Into Infinity & Beyond: Getting Your Terrain On!
January 10, 2014 by crew
A few articles back I mentioned that when you’re playing Infinity you’re going to need at least a dozen terrain pieces of varying size. Depending on your experience (or lack of) with other table top games you probably won’t have that much. While the task of filling up your table can seem daunting I’m here to promise you that you can do it fairly easily. You can even fill your table up on a budget without advertising to the world what size shoe your significant other wears!
We’re going to take a look at several options, starting with cheapest, for putting together your terrain. Free is always the cheapest of course, and there’s a couple ways you can spruce things up. You can make your own on a small budget. And finally there are a number of options to purchase terrain depending on your budget.
Cheap as Free
Ah the utility of a cardboard box. It’s light, it’s durable, they come in all shapes and sizes, and after this holiday season you’re likely to plenty lying around. Unless you’re willing to go crazy on them with a knife and a bevy of other crafting materials you’re likely to leave them as counts-as buildings.
Nothing wrong with this, but why not actually make them look like buildings?
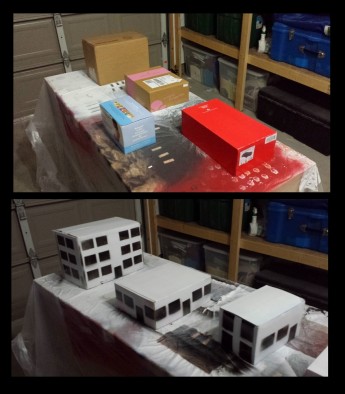
Do yourself and your friends a favor, and raid the garage for a few rattle cans of paint and turn the box your Christmas presents came in into a proper building! Take a few minutes with a hobby knife and a heavy piece of paper and you can create a simple template for doors and windows. You can also mask the box off if you want to spend an extra bit of time and effort.
With two passes of white primer and ten minutes making a template I knocked out these buildings in less than 30 minutes and no out of pocket cost.
If you want it done right…
If you have a few extra quid burning a hole in your pocket, some scrap materials lying around the house, and a bit of time, you can build yourself some quite nice scatter terrain.
Using some scrap pieces of wood I had left over from some other projects and a cheap package of cheese cloth (about $3) I was able to put together some nice looking cargo containers that make perfect line of sight blockers. For a step-by-step process of how to build your own, look here.
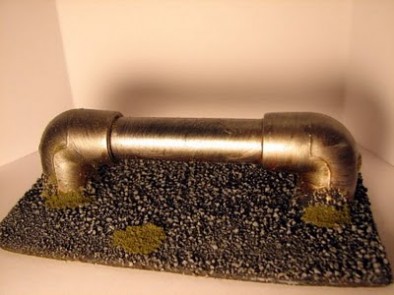
For a little more of an industrial look to your scatter terrain you can go to your local hardware store and pick up a small length of small diameter PVC pipe (0.25” works well), and a handful of pipe fittings to build some large industrial looking pieces.
Most stores will cut the pipe to length for you if you’re nice and you can fit them together using PVA glue since we aren’t actually running water through them. All in all to build a dozen or so pieces would cost a little under $10 and about 15 minutes of work.
Laser Cut
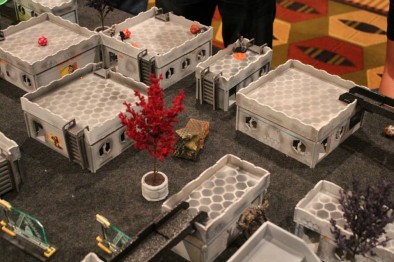
Now for the one we’ve all been waiting for. Laser cut mdf terrain has been the hot new thing lately and it’s not hard to understand why: the pieces look great, easy to assemble, quick to paint, and a table full of it would leave your mates drooling. But what about the cost?
It ain’t cheap.
Now to be fair there are a lot of different companies out there and they tend to target different price levels. I’ve been fortunate enough to try out two different brands; Shark Mounted Laser, and Warsenal so let’s see how they stack up.
With a name like that they definitely win style points! Just by looking at what they offer you wouldn’t expect they are targeting a lower price point than other mdf terrain manufactures. But compare them to someone like MAS and you will notice your dollar goes considerable further with SML.
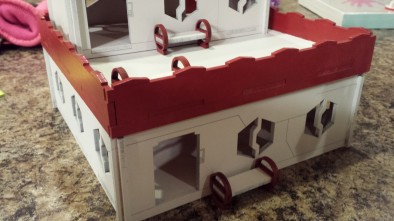
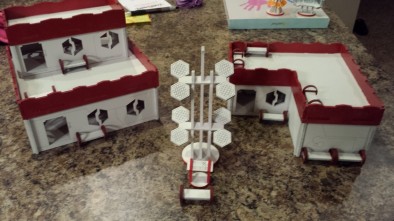
I built three of their buildings, a ton of benches, plus an antennae array and a computer console. None of them came with directions, but it took only a minute or two of dry fitting pieces to figure out how all the pieces came together. I never worried about breaking off a tab or ruining a piece. For a more detailed description of the build process go here.
While some of their designs lack the intricacy of other competitors, each piece is well thought out and fits perfectly together. Their buildings are nice with plenty of burnt-in details and sharp looking doors and windows. Some of their designs are actually quite ingenious like their flex crates or the bendable garage door. Putting several pieces of these terrain pieces together creates a brilliant looking area of the board.
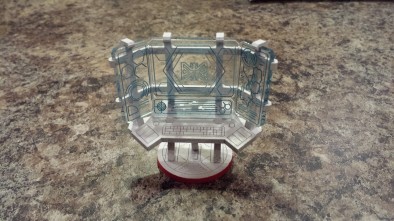
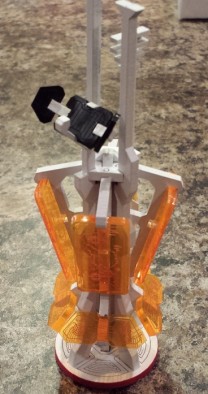
I’m going to come right out and say it: Warsenal makes absolutely beautiful terrain pieces. With the slick designs and the laser etched acrylic pieces it’s hard to find a non-lust worthy piece. That being said, you pay a higher price for their merchandise so I had to limit myself to the Tech Console and Comms Array.
Warsenal has a collection of youtube videos to help make assembling their terrain easier. Unfortunately the Tech Console video is out of date and the new version of the console is significantly different and the process they show will not work. Warsenal was quick to reply when I emailed them about this and they hope to have the videos updated soon. It took me close to an hour to figure this piece out by myself and in the process I nearly broke the piece several times. However, once it was assembled I’m happy to say its sturdy and I have no doubt it will hold up to regular use.
The Comms Array was a whole different story, it was missing a piece of acylic, but again Warsenal was happy to ship me a replacement. The kit came together very loosely and I had to hold it in place for a few minutes while glue dried to make sure it didn’t end up crooked.
One final thing to note: The acrylic pieces have a very tight tolerance and if you use too many coats of paint you won’t be able to fit them in. A bit of sandpaper or scratching with your knife to remove the paint isn’t difficult. While these pieces were certainly more difficult and expensive than the SML ones, they still turned out nicely and I love how they look.
Building a Resource
So there you have it. There are options to fill up your table with terrain no matter what your budget. For those just trying out Infinity it might be wise to start with cardboard boxes with a touch of spray paint to keep their costs down. But how about we turn this post and comments into a strong resource for new terrain builders/buyers?
Post some of your favorite terrain, be it bought or built, and tell us why you like them!
Some images from Terrain from Junk & Infinity Facebook Page.
If you would like to write an article for Beasts of War then please contact me at [email protected].



























Will we see a future batrep with these terrain pieces being used? I’d like to know how each style performed in gameplay.
The next bat rep will be at the flgs but yes,we will be seeing these pieces on the table soon!
These are great tips; I like to use the PlastCraft stuff for infinity: http://www.plastcraftgames.com/en/64-designed-for-infinity – it’s made of rigid PVC sheets which are sort of like a more durable cardboard – they go together super-fast without any breaks (the material is a lot more flexible than MDF) and the price let me fill a 4×4 table with 2-story buildings (and I mean adequately fill) for about 80 GBP. Everything in the set is also designed to fit together so it’s easy to add ramps, walkways, multiple levels and inter-link all the buildings. – Might be worth a look, I love… Read more »
PlastCraft looks great, but ihaven’t seen any of it in the wild yet, you have any pictures of it?
Also have tout tried painting it? I’m Curtis how the material takesa can of paint.
I built a bunch of PlastCraft shipping containers last summer. There’s an article about it on my site http://www.smallcuts.net look under reviews.
I’d like to get a few stuff from there myself tbh. It looks quite cheap (in UK currency). What’s the quality of the stuff like, before painting? 🙂
I started out using the Ikube stuff.
http://www.toposolitario.com/workshop/ikube.html
Just print cut and fold. I made loads of these. And best of all, its free!
Recently I bought the Spartan Scenics laser-cut stuff http://www.spartangames.co.uk/products/spartan-scenics Its relatively expensive but the kits are great. I have the starter set, an extra rooms set and the towers set. More than enough to fill a board or two.
With paper stuff does it move around if the base of mini bumps it? It’s so light i was wondering if it’s easy to accidently disturb.
Sorry, should have been clearer. I actually printed mine on some card rather than paper. As we tend to use several of these stacked up together or next to each other they don’t move that much if you slightly knock them with a model
The amount of terrain needed for Infinity can be one of the most daunting things about it, but with the much lower model count requirement it is probably still a whole lot cheaper than some other wargames. Personally I really like the Bandua MDF stuff http://www.banduawargames.com/en/designed-for-infinity/4434-q-building-pack.html was nice and simple to put together has removeable doors and when you are not playing the smaller buildings fit inside the larger ones like those Russian doll’s so you save yourself some space too. Will have to check out some of these others you mentioned thanks for the article! :3
Over the Xmas period I put together a few bits of terrain I had collected over the year and received as birthday and Xmas gifts. These covered Bandua, Microarts, Spartan Games and Warmill. Have to say I love the Microarts acrylic advertising hoardings and the Bandua stuff whilst more basic than the others was much easier to put together. I also really liked the outcome of the Warmill pod and gantry but it was a bit fiddly to put together. I also ended up being a bit heavy handed with the Microarts 3 story building which is the same one… Read more »
Wow that’s a lot of mdf! I’m going to start asking for buildings for birthdays and Christmas from here on out. MAS sets the bar I for nice buildings, but I’ve heard others having a bit of trouble too.
I think Justin put together BoWs stuff, maybe @dignity could tell us his experience with them?
Wow, gent thanks to all that have posted here! Living in Australia limits the flow of information in relation to terrain, The posts that you have all raised have been fantastically helpful, Though I don’t yet play infinity the skirmish styling’s and terrain displays are spell binding. Again Thankyou for your posts 😀
Happy to be helpful! Please let me know if there are other topics you would find useful.
There are many great options, as simple as just grabbing boxes and cans out of the pantry for a really quick start. In my 40K days I made plenty of Foamboard Ork Buildings, which were lightweight and durable. X-ACTO® has a purpose-made Foamboard cutter which employs one or two blades which can perform many useful tasks relating to building construction, such as internal walls and multi-tiered structures, through angled or channel cuts… “The X-ACTO Foam Board Cutter (X7747) is ergonomically designed to fit in the palm of your hand for fast, easy, yet precise cutting of a number of craft… Read more »
Thank you! I’m buying one of these! I love doing foam board terrain but it takes forever to cut nicely, this should make things much easier and faster.
The shop where I bought them “had them in stock”, but didn’t know where they were; it was one of larger craft stores…. they had several locations with razor knives… after putting the clerks through a fruitless search….. I found it in an end-cap to one of the aisles. Worth the effort….
I’ve seen them discounted,online at around $4.00 (US) I bought mine at “Michael’s”… they have coupons for 40% off for in store purchases…. I’m sure other shops should have great discounts….
BP Laser do some amazing Infinity terrain. The Diner, especially, remains one of my favourites – http://www.spruegrey.com/bp-laser-infinity-terrain-the-diner