


![How To Paint Moonstone’s Nanny | Goblin King Games [7 Days Early Access]](https://images.beastsofwar.com/2024/12/3CU-Gobin-King-Games-Moonstone-Shades-Nanny-coverimage-225-127.jpg)


Wargaming The Battle Of Hastings: A 1066 Anniversary
October 14, 2021 by brennon


Today marks the anniversary of a battle which some say finished off the history of England with the collapse of the Anglo-Saxon way of life as William, Duke Of Normandy, took to the field at Hastings and after a long-fought battle wiped Harold Godwinson and his kin from the field.
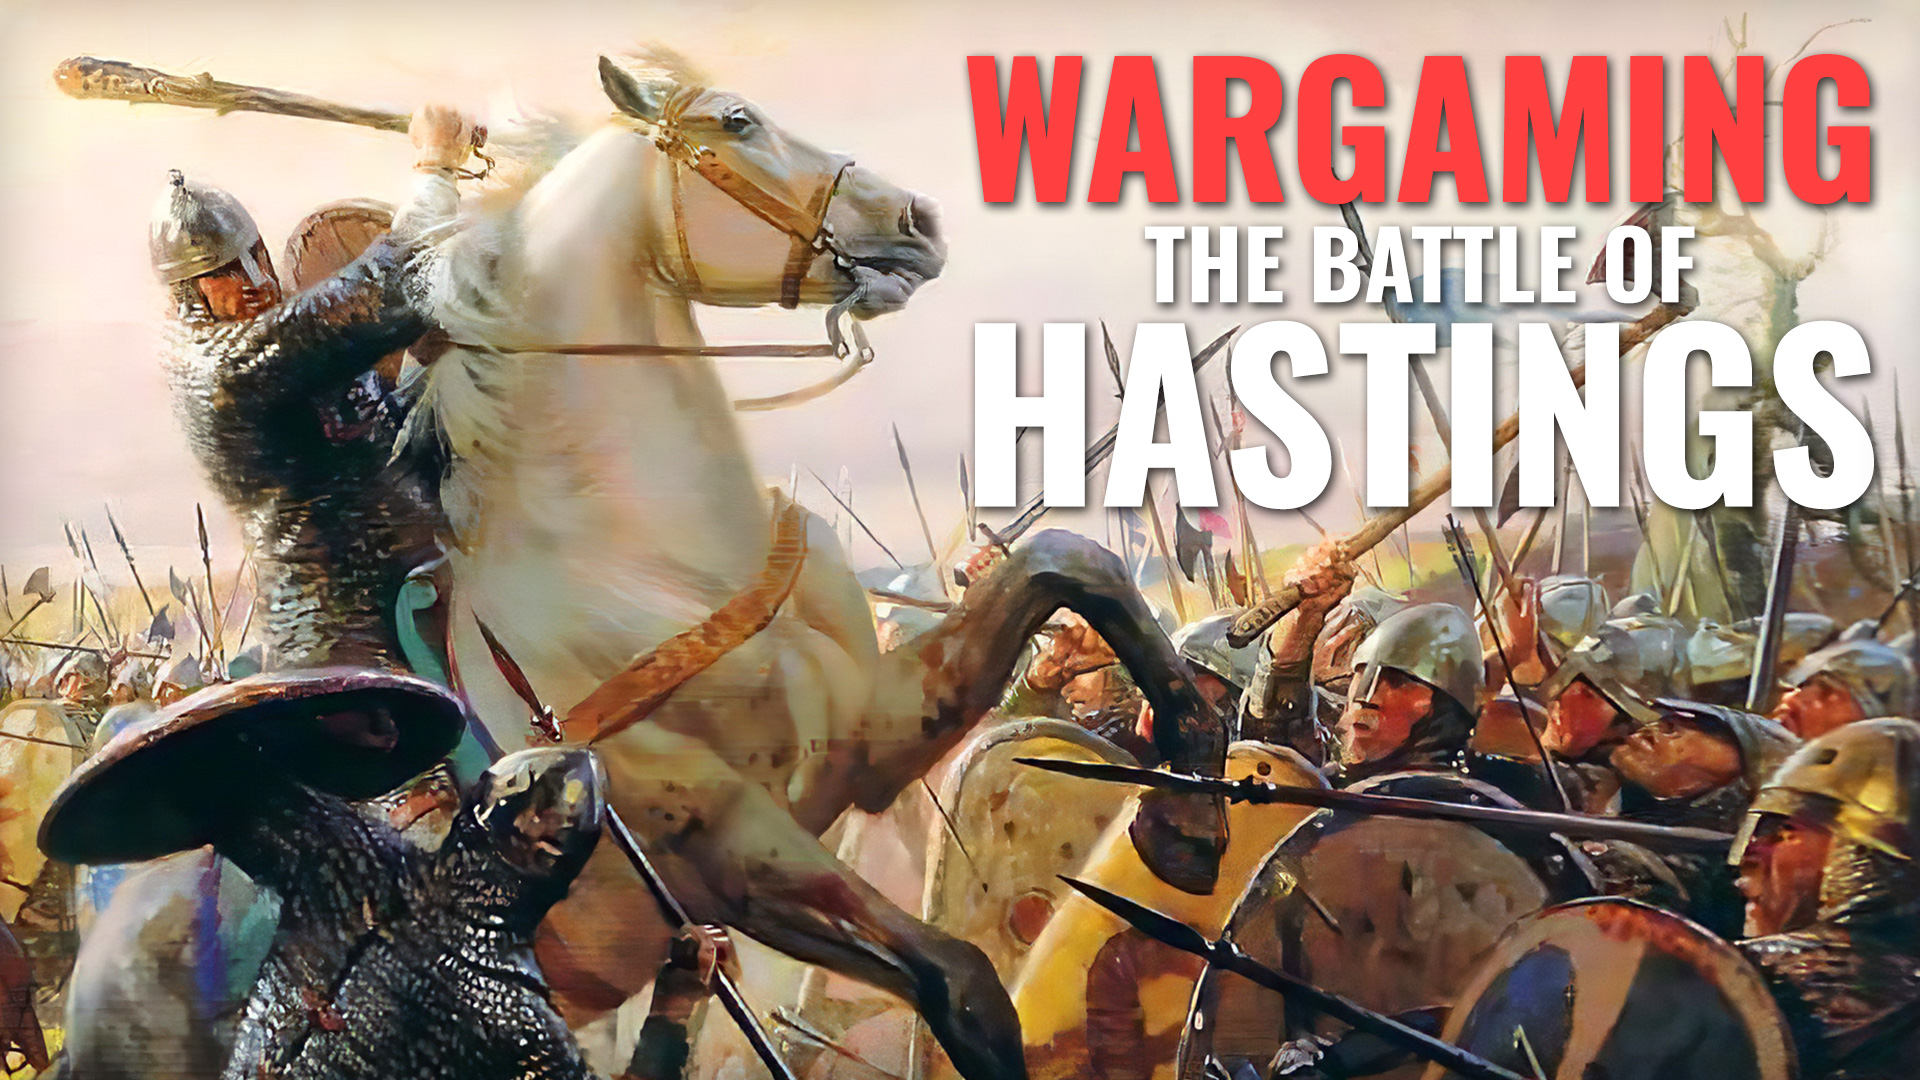
With that being said, maybe you’ll be able to bring some better battle-luck to Godwinson and refight the Battle Of Hastings yourself using games like SAGA to see if you can change the future of the Dark Age world. Before that, a bit of history.
An “Expert’s Guide” To 1066
The Battle Of Hastings was the final of a trilogy of battles which rocked the British Isles and saw the rise of who some would consider a usurper and the fall of mighty families and characters that have in some cases passed from history into legend.
Everything began with the crowning of Harold Godwinson as the Anglo-Saxon King of England. This then upset William, Duke Of Normandy who had been promised the throne when he was younger. This strife caused all sorts of political upheaval and sowed the seeds for vengeance as William sought to claim what was his.
Whilst William brooded in Normandy Harald Hardrada also disputed the claim who said that he had been promised the throne by Magnus The Good and the earlier King of England Harthacnut. Both individuals then set about raising armies and preparing for an invasion.
Pesky Exiles
This was all then made all the more annoying for Godwinson when his brother Tostig Godwinson, went out of his way to come back from exile and try and reclaim the throne for himself. His invasion was repelled by Edwin, Earl of Mercia and Morcar, Earl of Northumbria but this then sent him heading to find other allies, namely Harald Hardrada.
The brewing fighting then developed into a series of battles as Hardrada thundered down from the North, this Viking legend who had fought in Kievan Rus and even as part of the Varangian Guard in the Byzantine Empire. Hardrada and his Viking army fought their first battle at Fulford alongside the River Ouse in an area of marshy swampland. The battle was a fierce one but the fresh and eager forces of Hardrada were able to rout the Saxons and force them to surrender the city of York, which, rather than being sacked, was left alone as Tostig did not want his ‘capital’ to be ransacked and looted before he had a chance to take control himself!
The End Of The Viking Age
The Norwegians then headed back to Stamford Bridge and this is where the famous final moments of the Viking Age were played out.
The army of Harold Godwinson had headed North at pace, marching North to try and support Edwin and Morcar and hopefully put an end to the invasion so that he could get back to being King. His force came upon the Norwegians suddenly and surprised them, forcing them into a fighting retreat as they fought desperately to get back to the other half of their force which had been (some say) watching over their boats.
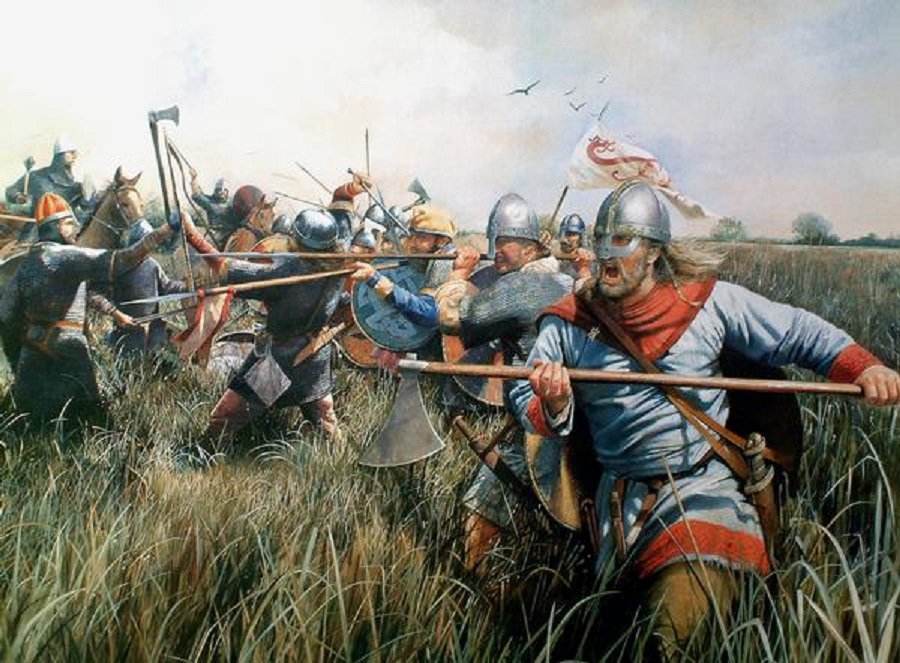
Here is where the famous scene then took place where one lone giant Norseman with a Dane Axe held off the bulk of the Saxon army as his allies retreated to the other side of the bridge. Stories say that he cut down forty Englishmen before a plucky soldier hopped into a boat and stuck a spear up into his nethers from beneath the bridge, mortally wounding him and letting the Saxons pour over the bridge.
The Norwegians had managed to create a shieldwall on the opposite bank and the fighting was once again fierce. However, surprised and ragged from their retreat the Vikings were soon broken and the fighting split into small pockets of resistance where the Saxons were able to overcome them. In the ensuing last stand Hardrada was killed by an arrow (somewhat poetically considering things to come) and Tostig was also cut down.
A final effort was made by Eystein Orre in what was known to the Norwegians as "Orre's Storm" there was a final last-ditch attempt to stop the Saxons from overrunning all of the Norwegian forces but whilst it briefly held them it soon blew out and the remnants of the army were either cut down of forced to surrender. In fact, some say that many of those Norsemen who surrendered actually then came to fight alongside Harold at Hastings.
With Hardrada defeated, Godwinson could breathe a sigh of relief. He knew William wasn’t crossing the Channel and now he could take some time to rally his forces, prepare them for the ensuing invasion and watch the South Coast at his leisure...or so he thought.
Three days later William’s invasion force landed in Pevensey Bay and began their fight inland. A forced march was called, summoning all those who could fight, and the army marched doggedly southward to Hastings.
The Death Of Saxon England
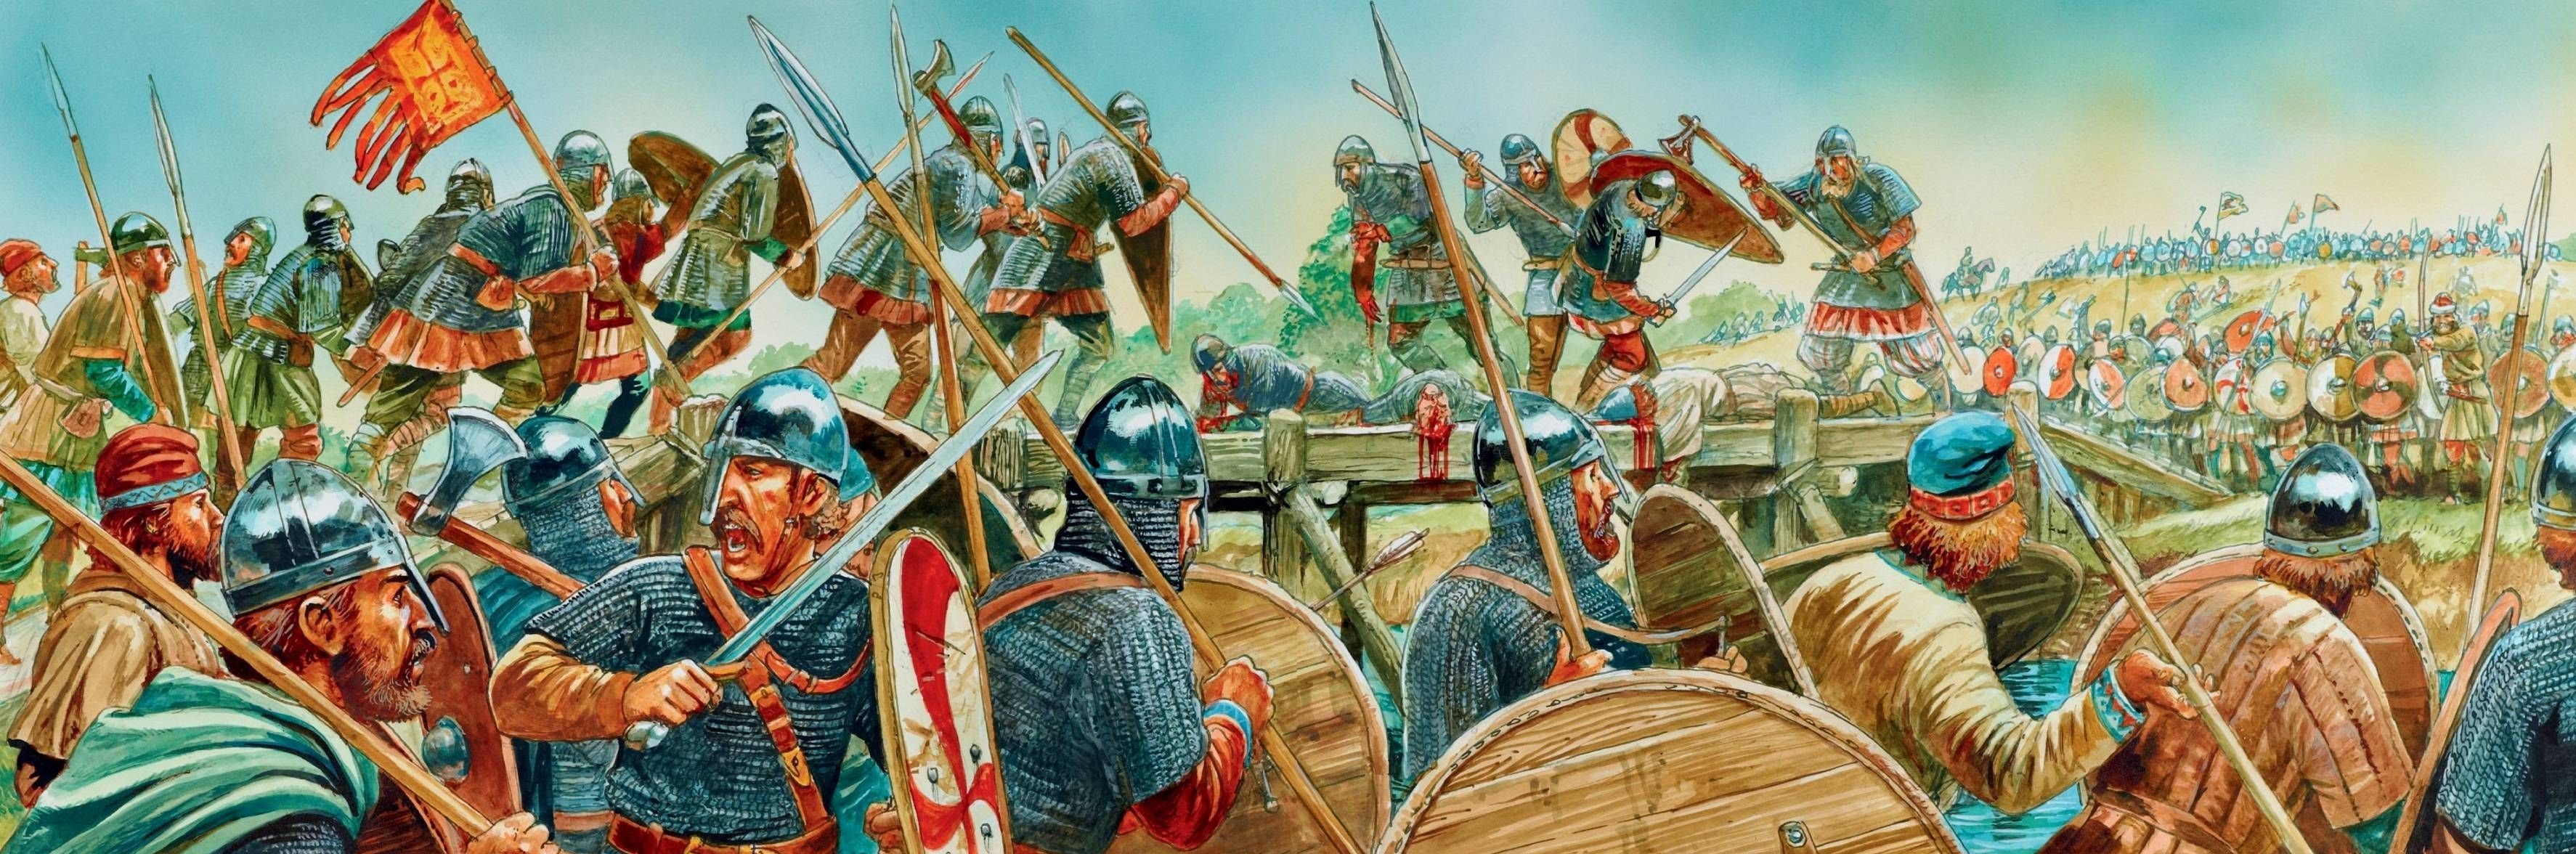
The Battle Of Hastings began in typical Saxon style. Atop the hill Godwinson’s army hunkered down behind their shields as arrows from the Norman army rained down on them, clattering off their shields almost harmlessly. The charge of cavalry was also proving to be ineffective as they could not get the momentum up to break through the shieldwall.
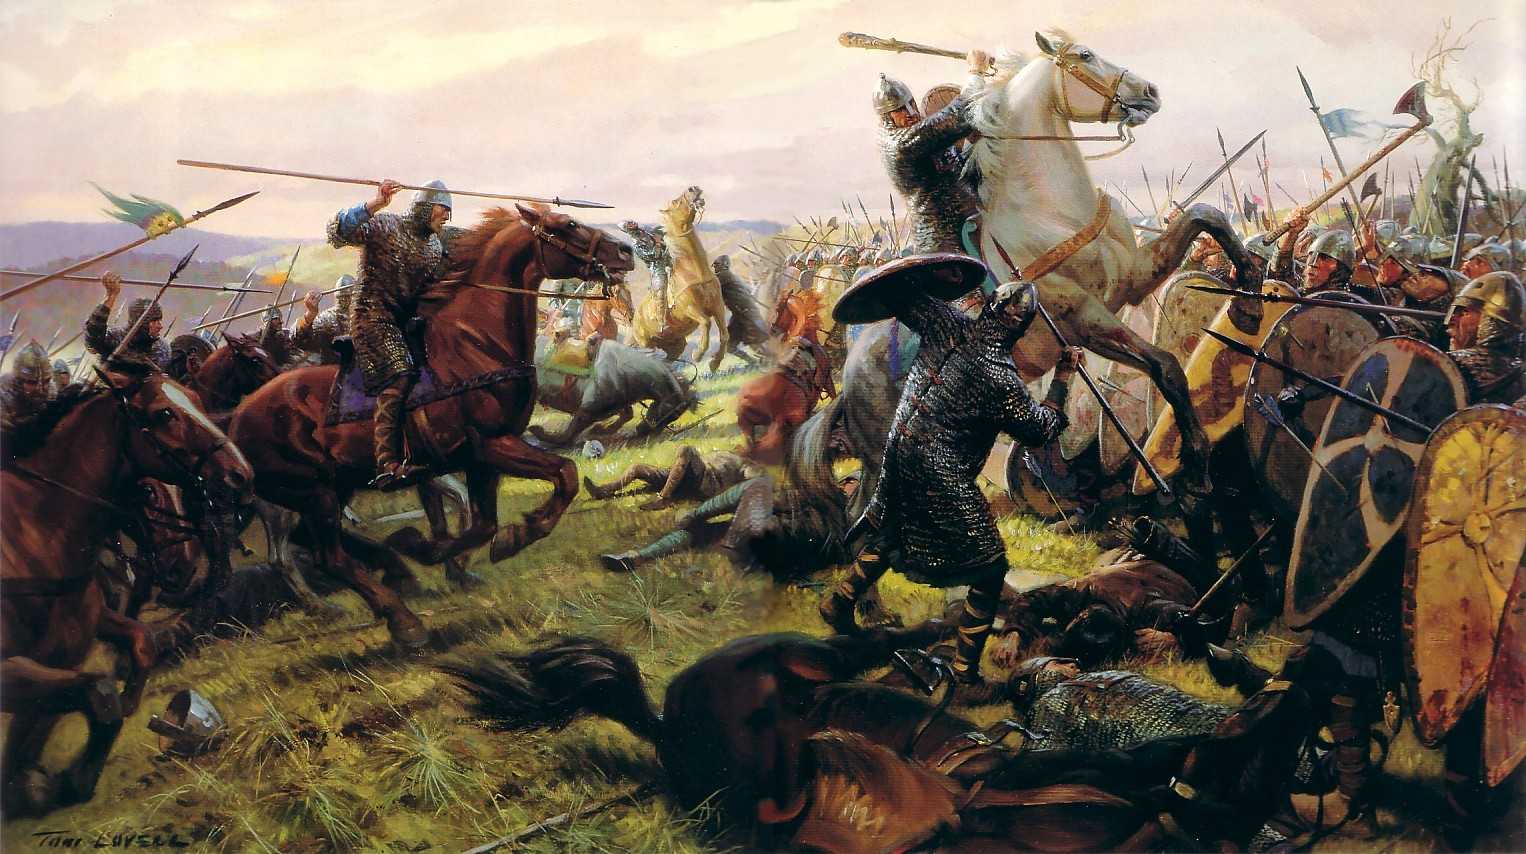
It seemed as if all was going in Godwinson’s favour and sections of the Norman army began to retreat. Murmurs of William’s death spread through the ranks and seeing the fleeing soldiers a large portion of the Saxon army chased down the fleeing Normans despite Godwinson’s bellows for them to keep in formation. William then showed his face to his men declaring that he was still alive and rallied to their leader, the Normans counterattacked, hacking down the English assault and forcing them to retreat.
Later in the day after a lull in the fighting as tired men tried to find their reserves a series of feigned retreats would then begin to force the Saxon army to unravel. These tactics are disputed but it seems to be that these retreats drew out the hardier veterans from the shieldwall into small advances away from the formation and slowly but surely elements of the Saxon army were replaced with less competent soldiers, not as seasoned in the ways of war.
In chasing these feigned retreats the Saxon army began to fragment and with their flanks exposed the Normans were able to start making their advances count. Ill discipline, shattered fatigue from the forced march and poor military commanders within their ranks meant that the Saxons were eventually broken and the brutal last fighting of Hastings began.
The familiar story to most is that Harold died from being shot in the eye by an arrow although many now believe that he was indeed wounded in that way but eventually was run down by a Norman Knight and hacked apart on the battlefield by zealous foes. Indeed some say that William even had the Norman Knight and the others that participated in his unceremonious death killed for their actions, although that may just be a little bit of fantasy.
Despite another rearguard defence by the Saxons at what is known as the "Malfosse" the battle was won for the Normans and so died the last of the great Anglo-Saxon Kings. In the ensuing years many rebellions tried to redress the balance against William and his Norman invaders including the famous uprising by Harold’s sons and later Hereward the Wake but the fate of the Anglo-Saxon line had been sealed at Hastings and the history of England would be forever changed.
Now, I turn things over to Gerry who is going to be delving into the battle itself and how you might want to play it out on the tabletop yourself!
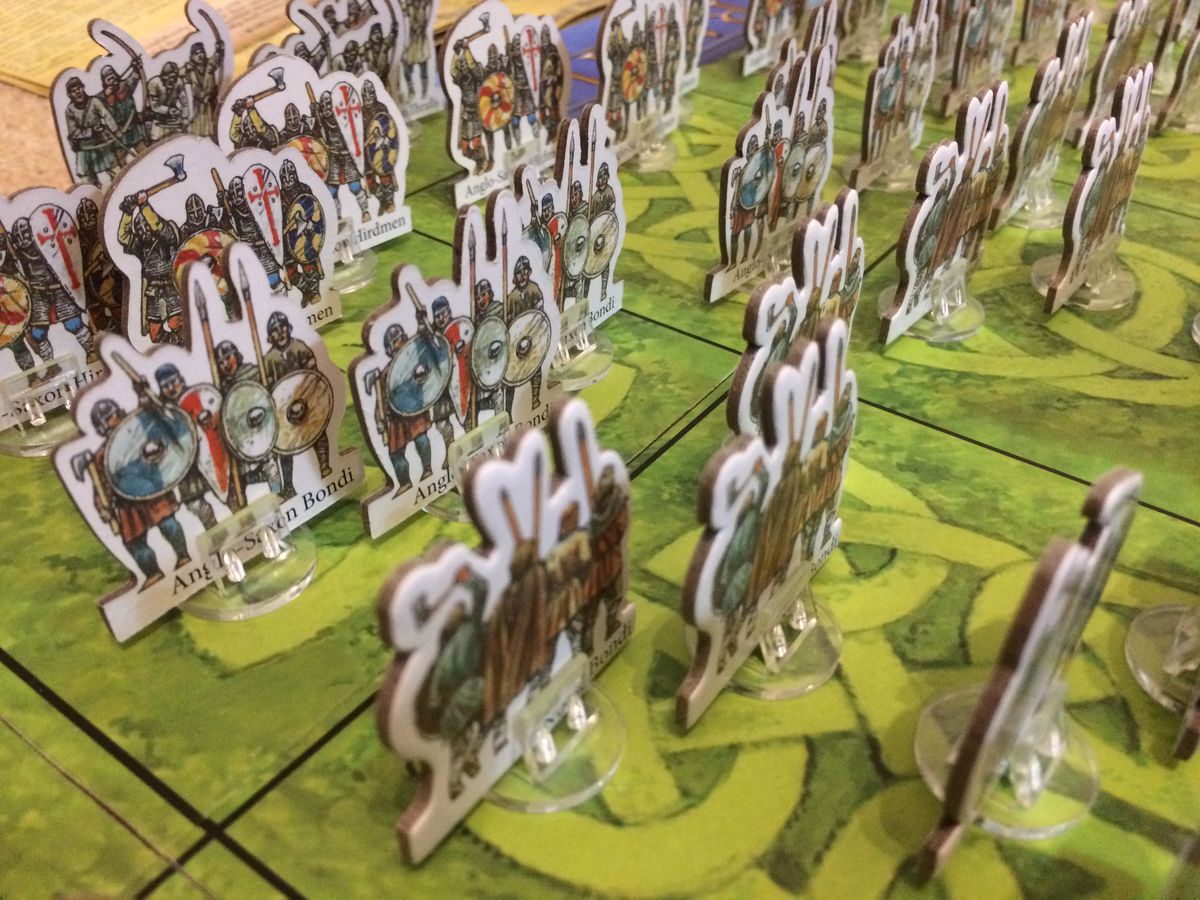
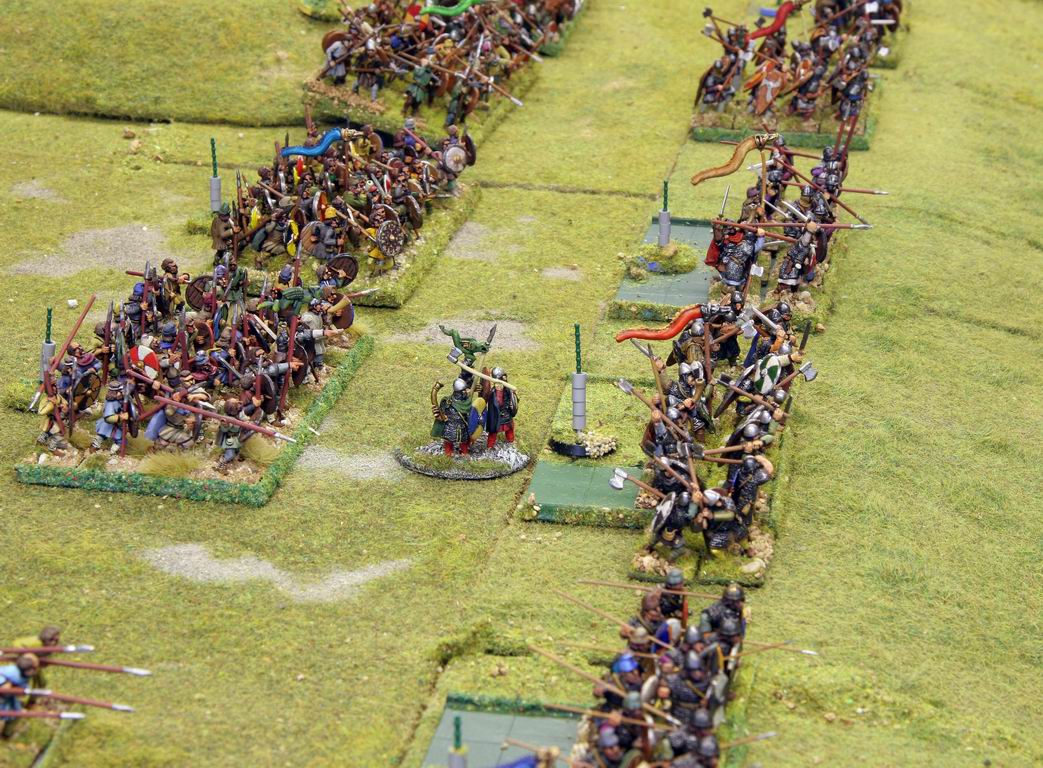
Wargaming Hastings & 1066
The first thing to think about when wargaming Hastings is do you want a simulation of the events of the battle or a game inspired by it? These will quickly define the parameters of what you can play and how the game will turn out.
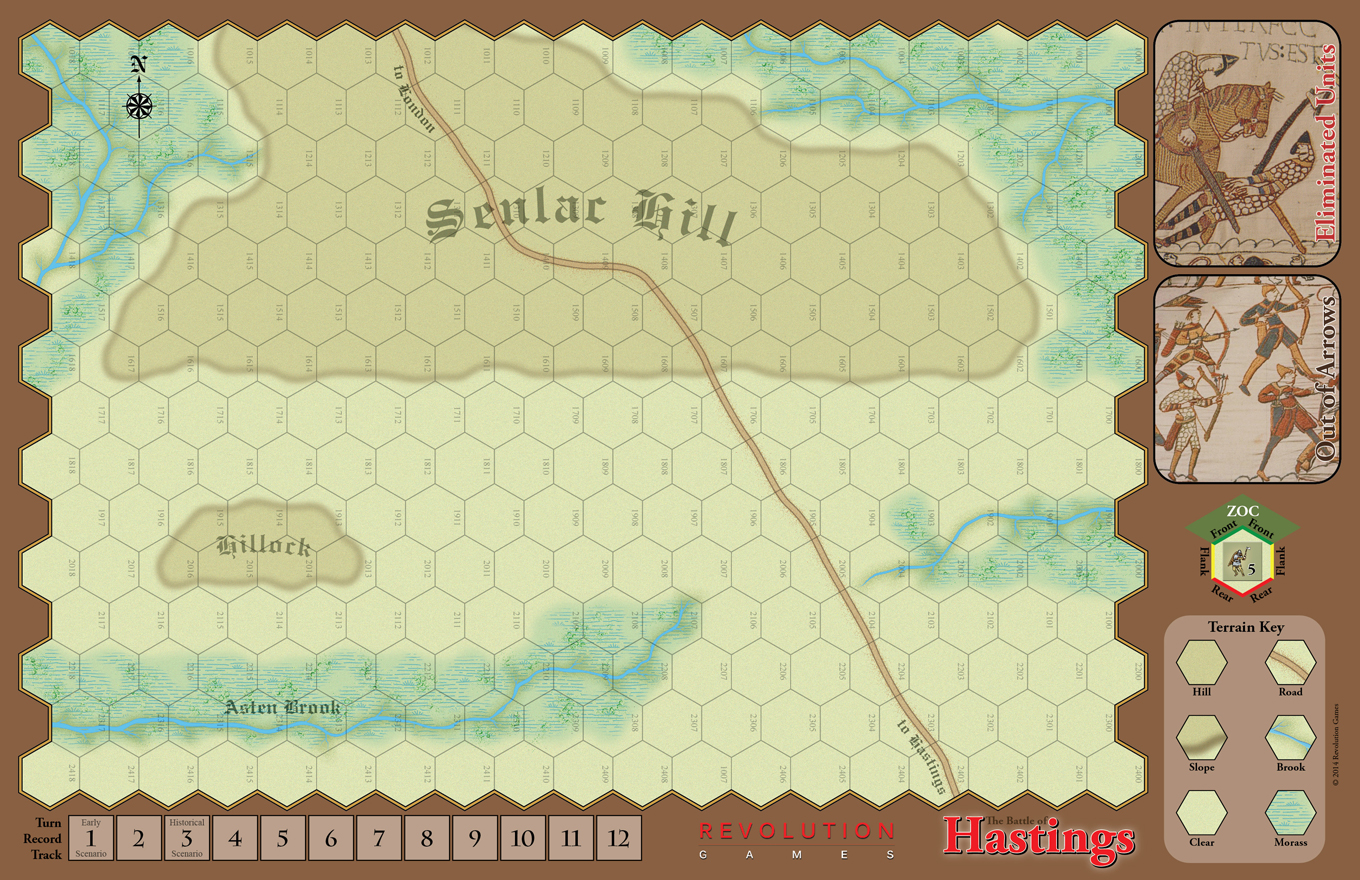
If you want a fairly accurate simulation of the events you really need to go to an operational level of wargaming, something like Revolution Games' Invasion: Hastings 1066. It’s a hex map game that comes with a set of rules to play out the battle with set scenario triggers to represent moments of the battle that chroniclers have marked out as key. The rumoured death of William or the ‘feigned flights’ of the Norman cavalry.
If you want a simpler set up and a faster play through then Daniel Mersey’s Battle Ravens from PSC games works equally well. Two shieldwall battle lines squared off against each other with the victor the first to break through their opponent's line in three different places.
This allows a modicum of tactics and strategy to come into play, reinforcing your lines and trying to exploit your opponents on a small scale it’s a very elegant and simple system and Norman forces are available separately. In actual fact, that means you could actually play Viking against Anglo-Saxons at Stamford Bridge first and then the Norman invasion afterwards.
The main problem with playing the Battle of Hastings as a traditional miniature wargame is that it was a very static battle. King Harold sat atop Senlac Hill with orders to his forces not to pursue the invaders. What this means game wise is one force will not move and the other is stuck charging up a hill repeatedly like waves crashing off rocks.
The way to make it more engaging is to use scenario triggers. These are either timed events to coincide with something that occurred or manipulations of the rules to better reflect the action that occurred. But you also have to be wary that changing these things may make the game one-sided.
After reading up on the Battle of Hastings we have several elements that most accounts agree on...
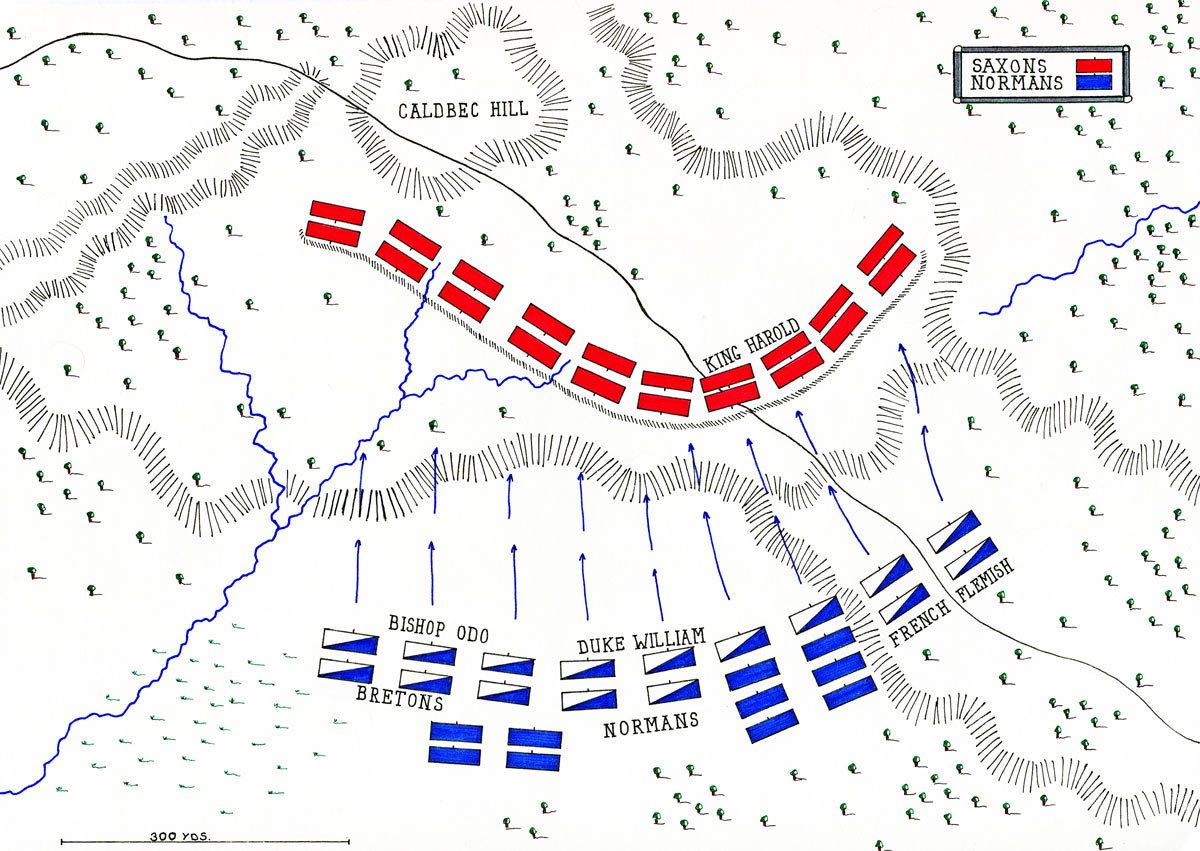
- The Anglo-Saxons deployed on the top of the hill behind a rough ditch and stake a defensive position
- The fyrd was drawn up on the left and right with the huscarls in the centre
- William’s forces had Bretons on the left, Normans in the centre and Flemish and French on the right
- The initial Norman assault was in three “waves” ineffective bow fire, an infantry charge, finally cavalry
We’ll use this to give us the deployment and basic battle lines for our Hastings game. Sources always give varying accounts of forces, either inflating the enemy numbers to make their victory look more impressive, or inflating their own numbers to show how vast their armies are. For the Anglo-Saxons, we have anything from 5000 - 13000 and the Normans 7000 - 10000.
I’m not as worried about numbers as much as how they were distributed. The invaders should have roughly half of the forces being William’s Normans, the remaining forces are roughly equal with the Bretons being slightly larger, but not so much as to cause issues. The composition of the force should be half melee infantry and then a quarter of them as horsemen followed by a quarter of archers.

The Anglo-Saxons is a little harder to discern. They lacked archers and had few missile troops, some slingers and javelins but not sufficient to be decisive. Harold and his bodyguard held the centre, and the rest of the line was made up of the shield wall fyrd with some huscarls intermingled along the line, to allow the shield walls to protect the lines and the Dane axe wielders to come forward and cause real damage. I would suggest a quarter of the forces being huscarl, half shieldwalls of ceorls and thegns, the later having limited javelins, and the remaining forces being geburs up to half of which could be armed with missile weapons.
Now we have our forces and their relative dispositions we can take a look at what happened and how to interpret it into gameplay. Here is a (very) rough timeline of the battle and events. At any time I refer to Normans take it to mean William’s mixed force of invaders...
- The Norman’s began with archery which was extremely ineffective, they were withdrawn
- Norman infantry attacked and were repulsed
- Norman cavalry attacked and around midday, the Anglo-Saxon centred is forced back but turns on the Normans and hold them off with the invaders suffering heavy losses
- The Bretons on the left are repulsed and rout; pursued into the marshy ground by the right Anglo-Saxon wing
- Rumours of William’s death cause an almost army-wide route
- The right flank retreats in a feigned flight drawing more Anglo-Saxons down the slope
- William bares his head, rallies his troops and destroy the troops attacking the Bretons on his left
- A renewed offensive takes place, the heavy centre of the Anglo-Saxon lines take a heavy toll on the Normans
- The left and right wings of the Anglo-Saxons are eliminated allowing the Norman cavalry to support the centre
The rules you use may have some bearing on how you choose to run this game but here are some suggestions based on what has happened above. Firstly set a turn limit based on the timetable of the battle, accounts suggest the archers began around 7am emptied their quivers and withdrew, the battle proper beginning around 9am and finishing at 6pm. Using an hour per turn as a rough guide means eight or nine turns would be reasonable I feel.
Secondly, to stop both sides sitting back and shooting (a most unsporting way to win a nation I feel) I would limit shooting. If the game starts after the Normans had “emptied their quivers and retired” you could focus on the main fight. Give any archers three rounds of shooting to reflect their depleted stocks. The Anglo-Saxon geburs and thegns could have two or three javelins.
The much-debated feigned flight of the cavalry can be handled in different ways. Anytime the cavalry retreat you could require the Anglo-Saxons to test to hold and the longer the battle goes on the more difficult the test could be. Or, you could allow two of the Norman flights to be feigned retreats and not require the cavalry to test to reform after. Some of this will come down to the rules that you use.
Because William rallied his army, it is safe to assume he was not leading from the front. Keep him to the rear with his bannerman and a force of bodyguards and don’t let this force become involved before the 4th turn to account for him joining in after rallying his army.
Another thing to note is that William had three horses killed under him during the battle, and so giving him a bonus save would be in keeping with the events that transpired during the battle.

Lastly allowing people to do things outside of history can be interesting, but the Anglo-Saxons charging down the hill turn one, or William charging the Anglo-Saxons pursuing left flank immediately are a little at odds with the written accounts we have. One way to allow people to have some leeway over history without rail-roading them is to let them do it, but penalise them in other ways. If you are using victory points then award bonus points to the other side if something is done in an unusual order, or limit the points gained from it are ideas to toy with.
Trying It Out Yourself
Obviously this isn’t a complete guide to replaying Hastings, but rather a framework to get you to think about how to play large encounters like this. If you are not a fan of massed battle wargames and prefer small scale skirmishes, games like Lion Rampant or SAGA, for example, there are other things you can do. Instead of attempting to replay the entire game pick key moments.

For example, the Anglo-Saxon right that pursued the Bretons down the hill into the marshland would make an interesting game; infantry defending themselves in the difficult terrain. Or you could play out the retreat to Malfosse where the pursuing Norman cavalry was cut down by Anglo-Saxons in a devastating last stand and in their haste plunged into an old hidden ditch.
1066 as a year of wars is a fascinating period and despite being called the end of Anglo-Saxon Britain it was not the last time the Normans would face an Anglo-Saxon army led by a Godwinson. In 1069 an army arrived in North Devon. It was made up of Irish and Anglo-Saxons and lead by Godwine and Edmund, the sons of the late Anglo-Saxon king. Harold Godwinson. In that regard, a longer campaign would work very well for this period. However you choose to game the Battle Of Hastings, I hope this has given you some inspiration and if you have any ideas on how you would replay this era-defining battle let us know below.
Battle Of Hastings Pictures By John Drewienkiewicz
Are you going to be giving this a go over the next few days?
"Stories say that he cut down forty Englishmen before a plucky soldier hopped into a boat and stuck a spear up into his nethers from beneath the bridge..."
Supported by (Turn Off)

Supported by (Turn Off)
"Despite being called the end of Anglo-Saxon Britain it was not the last time the Normans would face an Anglo-Saxon army led by a Godwinson..."
Supported by (Turn Off)


I can never think of this battle without thinking of the sketch on Micheal Bentines ‘Square World’
Started of with him showing a wargame of the battle, talking to both sides, but typically Bentine, hidden maching gun posts, tanks and finally two hill tops opening up with missiles about to be fired!
If you’re tempted by an interesting take on Hastings there’s also Time Commanders…
https://www.youtube.com/watch?v=LxZmmC32J74
Also, big props to @avernos for the heavy lifting here on the battle itself and gaming it. Some cool ideas!
Don’t remember that thank’s Ben!
@brennon , thanks for that link above, watched it and most of the series with the Hamster as presenter last night. Missed virtually all of them when they were showed on the beeb. Good night.
Did love the Vicar’s winning Tuetenberg Forest!
Yeah they are good shows – you can find most of them on Youtube which is cool 🙂
This is not helping avoid the Footsore 3 for 2 deal they currently have on Norman and Saxon packs!
If you want a papercraft version of the battles then maybe this?
https://www.amazon.co.uk/Battle-Britain-Wargame-Vikings-Normans/dp/191109629X
Saves you a bit of money and it’s Peter Dennis so it’s beautifully illustrated 😉
I have that book – though my history teaching sister is currently borrowing it to make teaching the Battle of Hastings more interesting to her little monsters!
And it is beautifully illustrated.
Very cool idea!
Funny your comment and the one from @robert cross over, My friend Keith who does a lot of Viking Reenactment but also does living history got some of the above for when he visits schools.
Interesting article! I’ve been looking into 6mm for some Dark Age warfare, maybe even going as nut as doing 1 figure 1 man (though I wouldn’t start with Hastings then 😉 ).
oh go on, if you aim for the smaller estimations it’s only 7000 v 10000 ish
@avernos Had a mate at the Chase Club who back in the day if he won the pools wanted to refight the Seige of Breda with Action men!
Think above way easier!
Just a thought that has been swirling in my head since this article was published yesterday, and something Big Ben from 4Ground has touched on before on an XLBS or chat with Gerry. Why did Godwinson feel the need to fight the Normans so soon after the Battle of Chelsea’s Soccer Stadium? He could have waited for reinforcements, given the soldiers he already had a chance to rest? Anyone know any good books, articles, documentaries on this?
I think (personally) that it might have been to do with the fact that he was a relatively new King. He wasn’t exactly popular with a lot of people and perhaps thought that he had to deal with these interlopers quickly so that he could gain favour. If he’d let William storm his way through the South he would have had a much more dug in force to deal with and William was nothing if not tactically savvy so he could well have caused all sorts of problems for Godwinson. Also, during the actual battle he ‘should’ have been pretty… Read more »
I’ve read that Harold was worried the Fyrd would have left to go back to their farms after service so he had to fight the Norman’s quickly. I think that Harold also having been in Normandy for a number of years knew it wouldnt take William long to set up a strong beach so had to fight him before that happened Personally I feel Harold was on a hiding to nothing in that he probably would have lost the second fight which ever person it was so if William had landed first we probably would had King Harald rather than… Read more »
Cheers, @torros and @brennon, more to muse upon.
I’m with @torros the Fyrd was limited in how long it could be called. I want to say 40 days a year. A protracted delay could have seen the loss of his army.
Also the psychological impact of having invaders carving off your country can’t have been good for King or populace.
I live about 30/35 miles from Stamford bridge and i will truthful I love the complete build up to the battles and the final battle at Hastings. I would love to play the battle so will have to read up how to war games goes.
This battle also lends itself very well to solo play. With one side being largely static, it’s possible to write ‘AI’ triggers for static defenders. A sort of ‘if this then that’ approach to how William (the player) conducts their side of the battle. If you wanted to reverse the player position, the ‘major events’ of the battle also lend them selves to an AI approach and you can test out playing as Harold. Re. the history, I always found it interesting as to how Harold was allowed to have the high ground in the first place. After all, William… Read more »
Wow, a historical article on OTT, I remember these! 😀 I think I even spy a little hex map action? 😀 😀
Seriously, though … great work and a very solid article.
I’ve always found the campaign angle of Hastings very interesting, with the fast-paced, almost desperate marches and counter-marches undertaken to bring the armies to the field (juggling different threats and priorities) in the greatest possible strength. Proof of the old addage that very often a battle is largely won or lost before it starts.
THe battle of Hastings reminds me of the time i fought the devil himself, in the GREATEST MOVIE EVER MADE
Theirs mud in your eye for the Anglo-Saxons?
Interesting article, may dig out my Dark Ages again. Have visited Battle and always find it fascinating, where did the actual engagement take place? For such a large engagement the almost complete lack of archelogy is a question still unanswered. If you ever visit go and stand on top of Caldbec hill and try to rationalise why Harold would move off such an excellent defensive position (steep sided) to the relatively gentle Senlac hill. Personal view but the only reason would be its a bit of a longer frontage and there is a thought that Harold expected more men to… Read more »