


DARKSTAR CAMPAIGN UPDATE: DUCHESS ANNABEL’S WAR IS OVER


New British Heavy Cruiser Playtested Live! (P2)
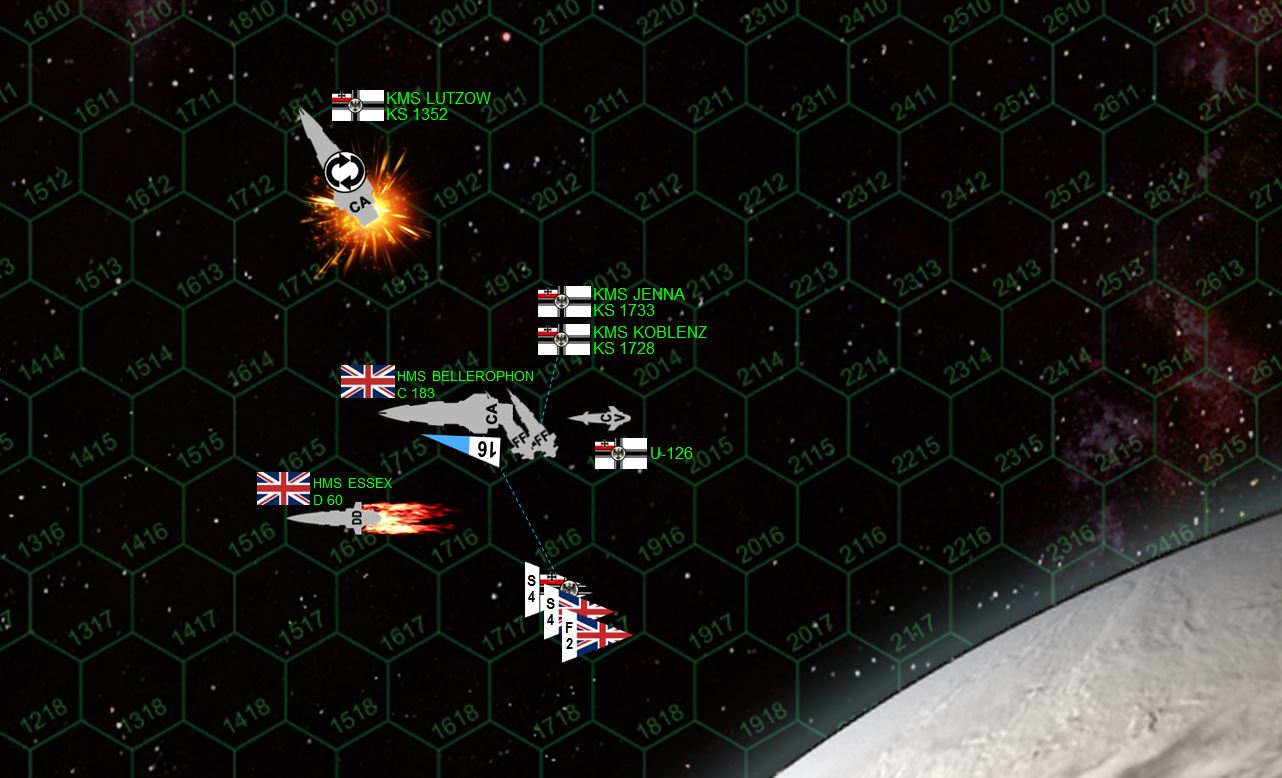
Duchess Annabel’s War continues in Darkstar, where a Royal Navy battlegroup, originally built around the Trafalgar class heavy cruiser HMS Bellerpheron (played by Damon), faces off against an intruding Imperial Prussian battlegroup led by the Leopold class heavy cruiser KMS Lutzow (played by myself).
So far we’ve seen the Prussians make a very fast approach, eager to close the distance against more accurate, longer-ranged British guns. The British made a dive toward the planet, peeling off in the nick of time in an effort to get behind the Prussian warships. In so doing, however, the British allowed the Prussians to “cross their T” for a moment, all they needed for a gigantic broadside of Prussian rail guns (x8 11-gigawatt rail guns, x20 6-gigwatt rail guns) to shred the escorting destroyer HMS Essex. The Essex has been crippled, her skipper perhaps dead or dying.
But the Bellerpheron has responded, knocking out one of the Lutzow’s maneuvering thrusters, making it all the more inevitable that the British heavy cruiser will be able to rake the big Prussian’s stern and cripple her as well. If Damon can trade a destroyer for a heavy cruiser, he’ll have this game all but won.
Now, the Lutzow loses initiative again (predictably – she has a slower thrust envelope because her power-weight ratio is lower than that of the Bellerpheron. Also, making turns at this speed will be twice as hard as she has lost one of her maneuvering thrusters.
Nevertheless, determined to survive, Lutzow powers up out of the planet’s gravity well, spending two thrust points to painfully roll over on her back, thus shielding her damaged starboard quarter away from the Bellerophon. But the Bellerpheron will not be denied her vengeance. Still moving at 24 kilometers per second (8 hexes a turn), she powers her 146,000-ton bulk in a tight s-turn (against planetary gravity), then using the planet’s gravity to tug her back into position directly behind the Lutzow, presenting a full broadside into the Prussian’s engines at less than 550 kilometers (pointblank range for heavy cruiser weaponry).
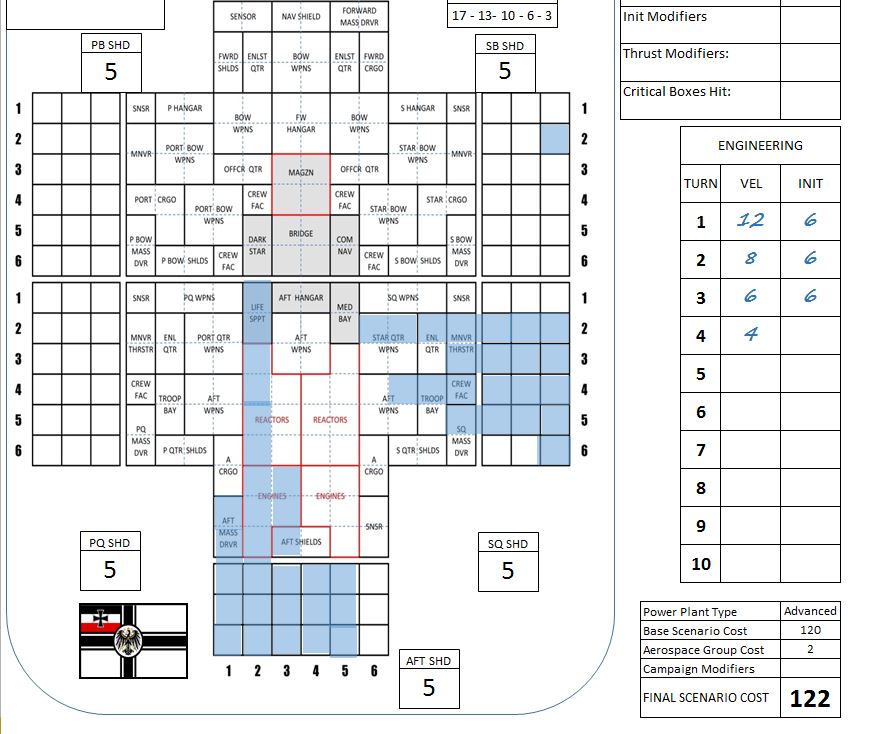
The Lutzow opens fire with her two aft turrets of 11-gigawatt rail guns and two aft turrets of 6-gigawatt rail guns. This is the first damage the Bellerpheron has taken this game, her starboard bow hammered by the big Blohm & Voss magnetic rail guns. There is internal structure damage, and the starboard hangar is knocked out, but casualties are light and Bellerpheron suffers no immediately critical damage.
With all turrets presenting a full starboard broadside, the Bellerpheron roars. It cost the Royal Navy a destroyer and dozens of lives to get her into this position, this single broadside could well determine the game. And the Lutzow has stronger gravitic shielding protecting her stern, just for this very reason. But this close, and with the Bellerpheron’s Hawkinge Electronics 01A (+1 targeting CIC) fire control system, almost everything hits. Most of the EPCs hammer into the port side of Lutzow’s stern, completely tearing apart the portside engine assembly and exploding the aft mass driver array completely out of the hull. Portside reactors take a hit, and even life support systems are hit, knocking out artificial gravity and atmospheric controls for Lutzow’s 768 officers and men. Fires burn out of control throughout engineering, further depleting breathable atmosphere. Fire control teams in oxygen masks fight to control decompressions and fires, while the bridge crew tries to reroute reduced power output solely out of the starboard reactor and engine.
It doesn’t work. Lights aboard the KMS Lutzow flicker and die, and the burning ship is now careening and adrift in space, trailing a long sheet of glowing molten metal and escaping, burning atmosphere.
In game terms, note that Damon has knocked out 9 “red” boxes of critical internal structure. The Lutzow is a heavy cruiser, and so her “target to cripple” on a d6 starts at a 14+. From that number, the 9 critical boxes are subtracted, leaving Damon with a 5+ chance during Turn 3’s resolution phase. He nails a 6, crippling the Lutzow.
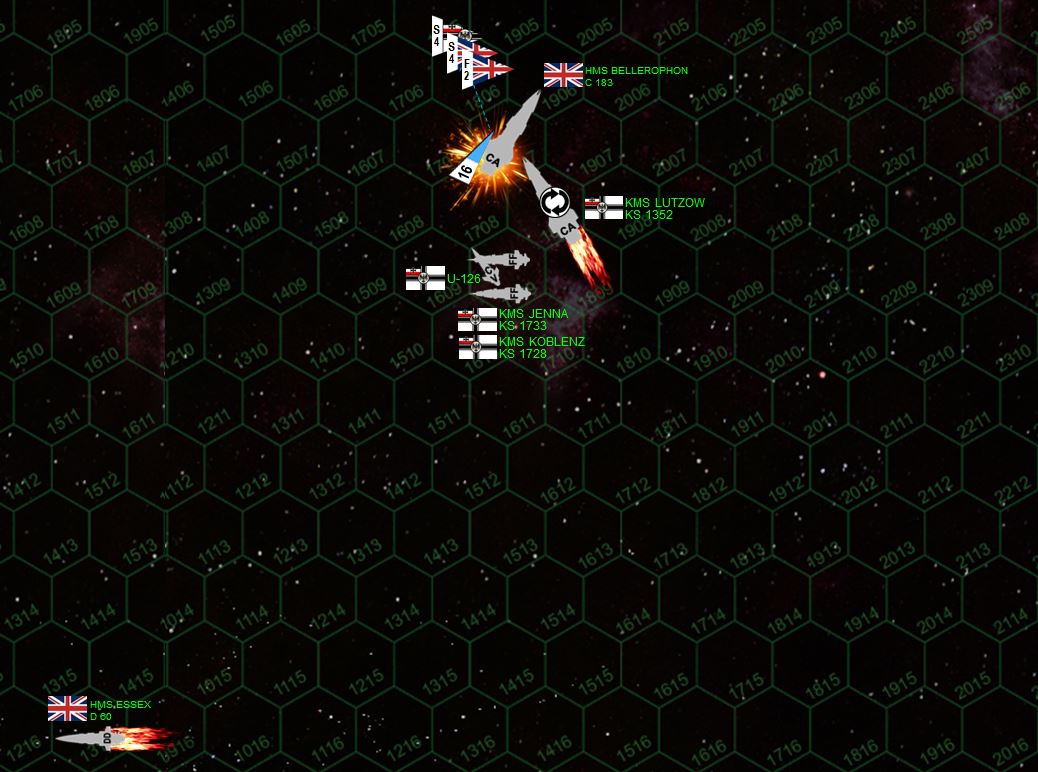
However, referring back to the map, we see that the two Prussian frigates Jenna and Koblenz have kicked their engines almost full reverse, letting the planet’s gravity guide them almost directly behind the Bellerpheron. Now their guns can never defeat the huge Bellerpheron (she outweighs each of these frigates almost 7-1), but they do have torpedoes, as does the little Prussian Type XII umfangangriffboot (perimeter attack boat) U-126. And without the Essex to escort her, the Bellerpheron is going to have a much tougher time shooting all of these down. The British scouts and fighters do their best, while the Prussian scouts fail to shoot down any British scouts. But five of them survive, and two of them get through Bellerpheron’s shields to strike directly against her stern armor.
Next come the rail guns and deck laser of the frigates and corvette. These actually score spectacularly well (they are in the same hex after all, perhaps as close as 50 kilometers). But the damage all tracks way to port, missing all the Bellerpheron’s engines and reactors (although the Prussians do hit the “CREW FAC” in column 1, putting a rail gun bolt through the Bellerophon’s pub. Bad form!
The Bellerpheron tries to pull away. Her captain for a moment considers chasing down and finishing off the Lutzow forever, but he’s still bound by orders to defend Vancouver Station. Bellerpheron turns to starboard, but the much smaller Jenna, Koblenz, and U-126 can easily match the move, remaining on Bellerpheron’s damaged stern. More torpedoes and rail guns are sent in, even as the tiny Jenna is cruelly charred by Bellerpheron’s aft EPCs and lasers. This time the Prussian hits track further to Bellerpheron’s starboard, eventually knocking out the medical bay.
Now here is where British luck at last gives out completely. In the damage chart below, note where two “core” boxes have been hit (gray). This causes the Bellerpheron to make a “breakoff” check. But heavy cruisers only have a 10% chance of breaking off per core box hit. So with two boxes, Bellerpheron only has a 20% chance of failing that roll.
But Damon rolls percentile 07. Perhaps it was the screams of dead and dying from the medical bay (really the only crew losses the Bellerpheron has taken so far) that compel the officers of Bellerpheron to break off the engagement. Perhaps Vancouver Station has now been evacuated, and further bloodshed now seems pointless.
In game terms, the Bellerpheron must now change course for the closest non-planet corner of the map, and she is now allowed to decelerate. It will take one more turn for her to each it and leave the map (then punching the Darkstar FTL drive, perhaps after rescuing survivors of the HMS Essex). This allows a second aft barrage to hit KMS Jenna, burning through the little frigate’s bridge (wounding but not killing the skipper – a “4” rolled on the Captain Survival Table). Lasers then hit the little corvette U-126. One laser hits the port bow, straight toward the corvette’s bridge. If Bellerpheron’s other aft laser hits there as well, the corvette will also be crippled. But it misses, leaving the tiny U-boat damaged but operational.
The last volley of fire from the three Prussian ships, like wolves attacking a wounded bear, actually cripple the Bellerpheron as she’s leaving the table at the end of Turn 5. In column 1, you can see where one of Koblenz’s torpedoes actually exploded all the way through the back of the ship, and out the bow. Yet amazingly, only two core boxes are hit, and thus crew casualties aboard the Bellerpheron will actually be very light (she carries 677 officers and men in all).
Note this damage chart reflect three successive broadsides of all three remaining Prussian ships, plus three torpedo spreads, all right in the stern (plus Lutzow’s original aft guns into her port bow). By now the two Prussian frigates are almost out of torpedoes, while the U-126 is completely out of torpedoes.

The final result. With only a frigate, corvette, and four scouts left, Prussian score is 20 + 12 + 4 = 36 points. The British have 4 scouts and 2 fighters = 8 points, giving the Prussians a 28 point victory (15.9%). This definitely gives them Vancouver Station, but by no means is considered a “major victory (a margin of 40%+ is required for that, per Rule 5.2.1.C.iii, p. 99). The Prussians are too busy getting tugs and rescue ships out to the Lutzow and solidifying their hold on this new station / moon / planet – they certainly won’t be immediately exploiting this success deeper into this British-held star system.

Speaking of post-battle resolution – we were just clowning around after the game and Damon actually failed the recovery check on HMS Bellerpheron. So I’m considering that first roll that would actually have to be made in this game, the Captain Survival Check for the skipper of HMS Essex (bridge completely knocked out). The commander of this ship, Commander Lawrence Book, sadly died when those rail guns went through the bridge. But the Bellerpheron would eventually be recovered, as would the Essex herself. Meanwhile, the Lutzow and Jenna would also be safely recovered and brought back to service, although the Lutzow will require 34 days in dry dock to be ready for action again, if they can repair her at Vancouver Station. If they have to tow her back to another station, God only knows how long it will take for her to limp back there (Rule 5.4.6.B.ii stipulates 3 days per light year, this could be as much as another month just in tow time).
In all, a great game, one for “canon” in the ongoing Duchess Annabel’s War. 😀 The Prussians squeaked by on this one, but trust me, with the hammering the Russians and British have been giving them in this war so far, they have quite a deep hole to dig their way out of.
As far as post-battle advice goes … the move to get behind the Lutzow was a good one, but my Americans and Japanese have fought many battles against Russian K-56 torpedo corvettes. They take maybe 1-2 “big gun hits” to cripple. Knock that U-boat out early when the ranges are still a little long, you’ll never outmaneuver her in a close-up dogfight. If if she was out, you Bellopheron never would have gone down to the torpedoes of the Jenna and Koblenz.


Nice game! Love reading these blow by blow reports.i just sit back, relax, and imagine the battle in full Technicolor glory, (with some shaky-cam thrown in here and there).
Lots of sparks, @templar007 ! 70mm film! THX surround sound! Hans Zimmer or John Williams soundtrack!
😀 😀 😀
Yeah, definitely should have hung back with the destroyer and tried to snipe the escorts, maybe should have gone across the top of the map in the first few turns and tried for a long range crossing the T.
Still, was a good game and really enjoyed crunching old school style.
Really into the idea of building a fleet for a campaign.
Yeah, @damon – this was why I wanted to make sure the Bellerophon was not lost “in canon.” We should test the waters with some other players and see what we can set up for a campaign. If possible, I’d like to fold it into the ongoing Duchess Annabel’s War. The UK is a leading faction in that conflict, so I don’t foresee that being a problem. 😀 Russians and Panasians are their allies. Prussians, Japanese, New Romans, and Black Dragons are their enemies. Maybe I’ll set up a huge battle with the Black Dragons, knock them out of the… Read more »
Oh, nice to see the conclusion of the game! I thought it was all over when the Bellerophon knocked out the Lutzow, but it seems the smaller ships carried the day!
Great game!
Hey, @umbramancer – I was really under the weather today. I’ve seen your e-mail and will check out what you have going on tomorrow (Wednesday) after work if that’s cool?