The God Breakers
Introducing the God Breakers
I’ve been working away on a longterm project ‘The Third Division’ which involves painting up a Napoleonic Army which, as you can imagine, gets a bit tedious at times! I thought it was time for a quick palate cleanser for which I am giving myself 2 weeks to complete; cue The God Breakers.
I bought a Reaver Titan after I saw one that a friend had painted and after assembling it wanted to do more. I love this kit! The build is a little more involved than the usual GW products but when you are only putting together a few of them I quite enjoyed it. So much so I went and bought a pack of Warhounds too.
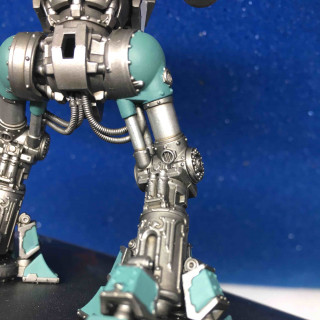
The Reavers that I have seen to date tend to be stood quite straight but I wanted mine to convey a sense of movement. With some careful posing (use blue tac!) I managed to get the titan to look like it was advancing but also, I feel, kept that feeling of weight that the model has. This is also something that I have tried to continue with the two Warhounds.
I’ll talk a little more about bases in a future post for now I want to focus on the initial steps I took in the painting process. Right off the bat I was inspired by one of the pieces of art in the Adeptus Titanicus Rule Book.
To me this colour scheme (and therefore Legio) jumped out as by far the coolest of the Legios in the book. I knew very little about them at the time but this is one of those cases of the artwork inspiring a project.
What stands out to me was the combination of the green and white with the red used as a limited spot colour. On top of this, I love the weathering incorporated onto the Reaver’s armour (turns out that the God Breakers deliberately leave their titans this way to let others know that they have already seen battle).
With my colour scheme settled it was onto execution. I started with the metal ‘skeleton’ of the titans with a black undercoat followed with Army Painter Gun Metal through an airbrush. This was then washed with a combination of GW Nuln Oil/Agrax Earthshade/Seraphim Sepia before a light dry brush of Gun Metal followed by Army Painter’s Plate Mail. I’ll weather the metalwork and add a few more details later on.
I played around with the green recipe a bit as it isn’t a colour that I have tried to paint recently. I really wasn’t happy with my first two attempts (image on the right above). In the end I think I got the green about right and I am happy with the white too. Test pieces below (admittedly still a bit rough)…
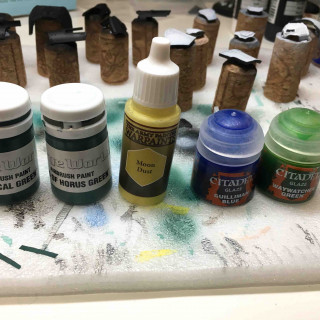
For the green I applied several thin coats of Forge World’s Lupercal Green followed again by several thin coats of Sons of Horus Green. I did these through an airbrush for all the plates that I could leave in sub-assemblies but for those on the model itself I used a brush and made sure that multiple thin layers were applied. To highlight, I mixed in a little Army Painter Moon Dust to the Sons of Horus Green and applied it sparingly through an airbrush. The green still wasn’t quite right and looking back to the artwork I realised it had a blue tinge to the armour so I mixed a turquoise glaze with GW’s Guilliman Blue and Waywatcher Green (image below of the mix in the airbrush).
That’s where I am at the moment. I’ll get another update on here soon…


![How To Paint Moonstone’s Nanny | Goblin King Games [7 Days Early Access]](https://images.beastsofwar.com/2024/12/3CU-Gobin-King-Games-Moonstone-Shades-Nanny-coverimage-225-127.jpg)


Leave a Reply