


![How To Paint Moonstone’s Nanny | Goblin King Games [7 Days Early Access]](https://images.beastsofwar.com/2024/12/3CU-Gobin-King-Games-Moonstone-Shades-Nanny-coverimage-225-127.jpg)


DARKSTAR CAMPAIGN UPDATE: DUCHESS ANNABEL’S WAR IS OVER


DARKSTAR CAMPAIGN UPDATE: DUCHESS ANNABEL’S WAR IS OVER
As some of you may be aware, there’s been talk of starting a new Darkstar campaign for a little while now. New Darkstar players in the community have been anxious to make their own additions to the “canon” and history on this setting. The first step in setting that up, of course, is to close out the existing war on the table, Duchess Annabel’s War in the Libra-Sagittarius SCS (strategic command sector).
The best way to do that quickly is to have a big enough battle so that no matter which way it turns out, enough campaign points are accrued by the winning side to give their faction a decisive edge at the inevitable UN negotiation conference.
The word was put out and we have @damon and @gladesrunner sign up to take part in this last big showdown.
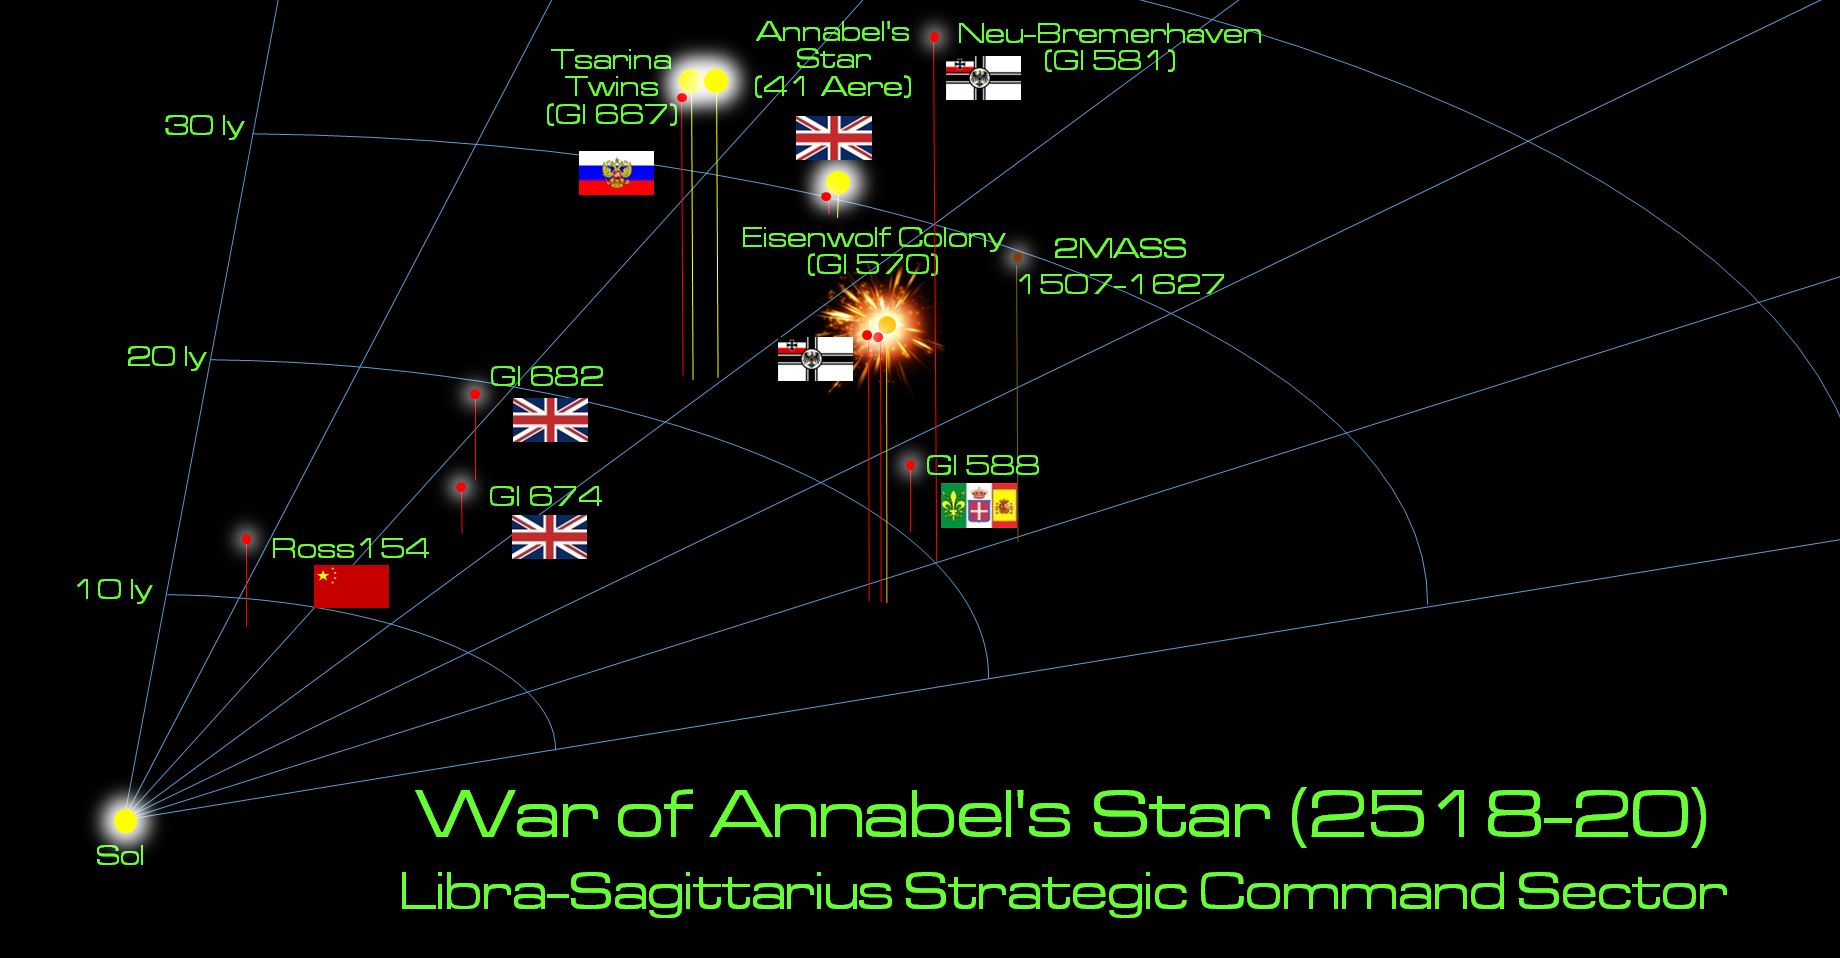
So this is it, the last big battle in Duchess Annabel’s War (also: War of Annabel’s Star, or the Libra-Saggitarius War of 2518-2520).
This will also be the last post on this thread. It’s hitting 3500 recommendations, 127 entries and over 600 comments. Half the time I try to open it, my web page times out. So this thread will be retired with the nice round number of 3500 recommendations (approximately) and a new one started to continue for the fresh campaign.
So let’s get to it. This is a very large Darkstar game, usually measuring in at 150-350 points. This one was 1000 points, so none of us had any illusion that we’d be up to for the evening. 😀
>>>>>>
The new campaign is being drawn up as we speak! In broad terms, we’ll be looking at the UNITED STATES and HOLY RUSSIAN EMPIRE teaming up against the UNITED KINGDOM and the JAPANESE, with possible support factions in the form the Corporate Consortium, Indian Republic, and/or Arab League. Players will be myself, gladesrunner, damon, and rasmus for starters, but more are always welcome!
If you want in on the ground floor on this new campaign, NOW IS THE TIME!
 The last several months of Duchess Annabel’s War haven’t been good to the Prussians. Although their Japanese allies have been racking up an impressive string of victories, the Prussians have already had two battleships crippled here (the Scharnhorst class pocket battleship KMS Von Der Tann and the Tirpitz class battleship KMS Admiral Scheer). The Japanese have opened separate negotiations with the British, Panasian League, and Russians, looking to “cash in their winnings” and call this war a win. This would of course leave the Prussians, New Romans, and “Black Dragons” of the Khitan-Tunguska Free State in very bad way. Obviously aware of the Japanese overtures, the British decide that a decisive moment is at hand. They will strike the Prussians now, hard, at their key colony in the Libra-Sagittarius sector, right when their fleet is weakened and their allies are deserting them. A hard enough blow at the heart of Eisenwolf Colony (Gliese 570) could compel the Prussians to offer favorable terms at the peace table.
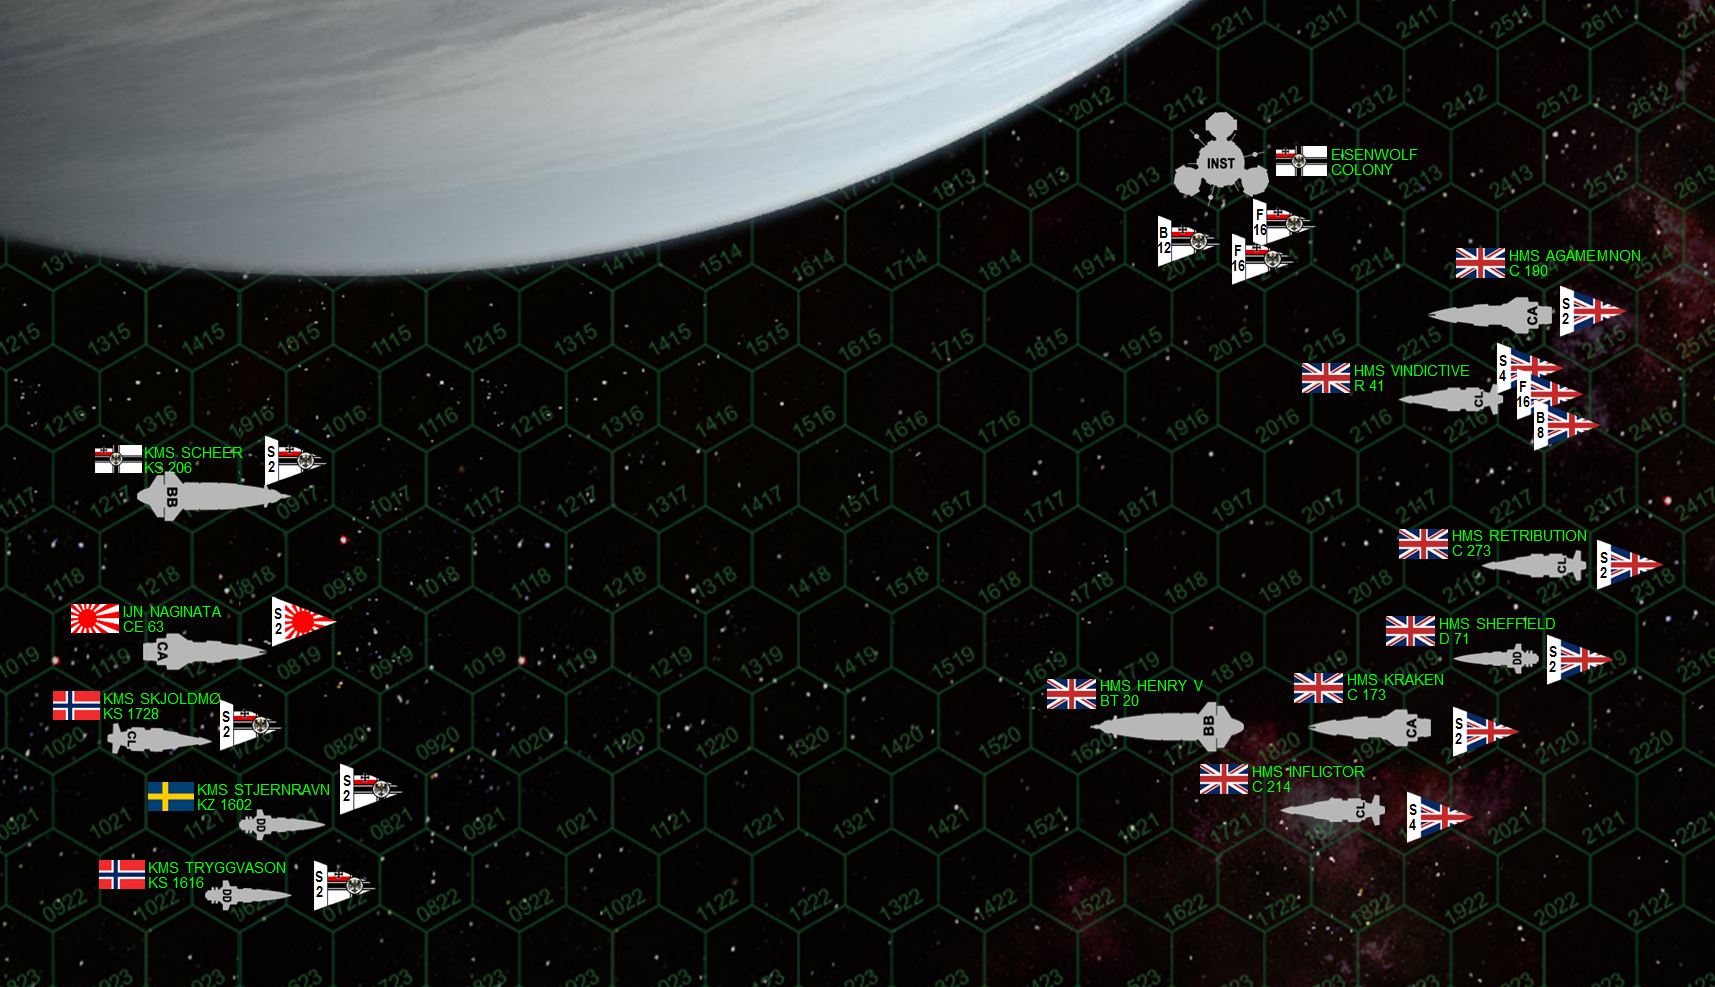 The matchup. For this assault, the British assign two cruiser task forces (Task Force “Kraken” and Task Force “Agamemnon”) to escort the Royal Sovereign class battleship HMS Henry V under the flag of Rear Admiral Sir Lord Perceval Ian Pinderglove. The target is the Eisenwolf Colony itself, a massive orbital facility bristling with 15-teravolt EPCs and 14-gigawatt rail guns, 35mm mass driver point-defense guns, sixteen Focke-Wulf 909 aerospace bombers thirty-two Messerschmidt SJ-363 fighters. Prussian warships are also in the area, including light cruisers, and destroyers of the “Shieldmaiden” kruezergeschwader (cruiser squadron), actually made up of crews drawn from Norway and Sweden. There’s also a Japanese heavy cruiser, the famously-decorated IJN Naginata, originally posted here to Eisenwolf just to assure the Prussians that they aren’t alone in this war quite yet. But one thing British intelligence didn’t pick up on was the latest status of the Tirpitz class battleship KMS Admiral Scheer. Indeed, she’s been brought back into service, and it looks like we’re going to have a battleship showdown on our hands.
 The engagement begins. The two heaviest “Iron Wolf” ships, Admiral Scheer and Naginata, are also very agile for their size, so they set a high engagement speed. Not as fast as the British, who thunder into the eclipse shadow of this gas giant moon at 30 kilometers per second. Yes, even the 400,000+ ton Henry V. The British make an orderly turn to port to present a broadside to the Eisenwolf Station, but as the Iron Wolves streak toward the station (clearly hoping to present a unified front of massed firepower and point-defense guns), the British switch targets and open fire on the incoming Norwegians and Swedes. The Maas-class destroyer Stjernravyn gets the worst of it, her starboard bow torn open by the heavy rail guns of the Henry V and Kraken. But it’s the little Falklands-class destroyer Sheffield, much further away, that actually lands the killing blow, putting an 8-MgKv laser through the Stjernravyn’s exposed bridge. The Agamemnon and Retribution hammer the sister-ship destroyer Tryggvason, inflicting enough damage to force her captain to break off the action. But the Iron Wolves are certainly not silent. Heavy gunfire from the station, the Scheer, and especially the murderously-accurate fire of the Naginata slash through the starboard bow of the Henry V, tearing open the battleship’s hull, crippling maneuvering thrusters, hitting both forward magazines, knocking out the flag bridge, and setting the main bridge on fire. Rear Admiral Sir Lord Perceval Ian Pinderglove is badly wounded, and Commodore Rhea Aubrey (HMS Kraken) has to take overall command.
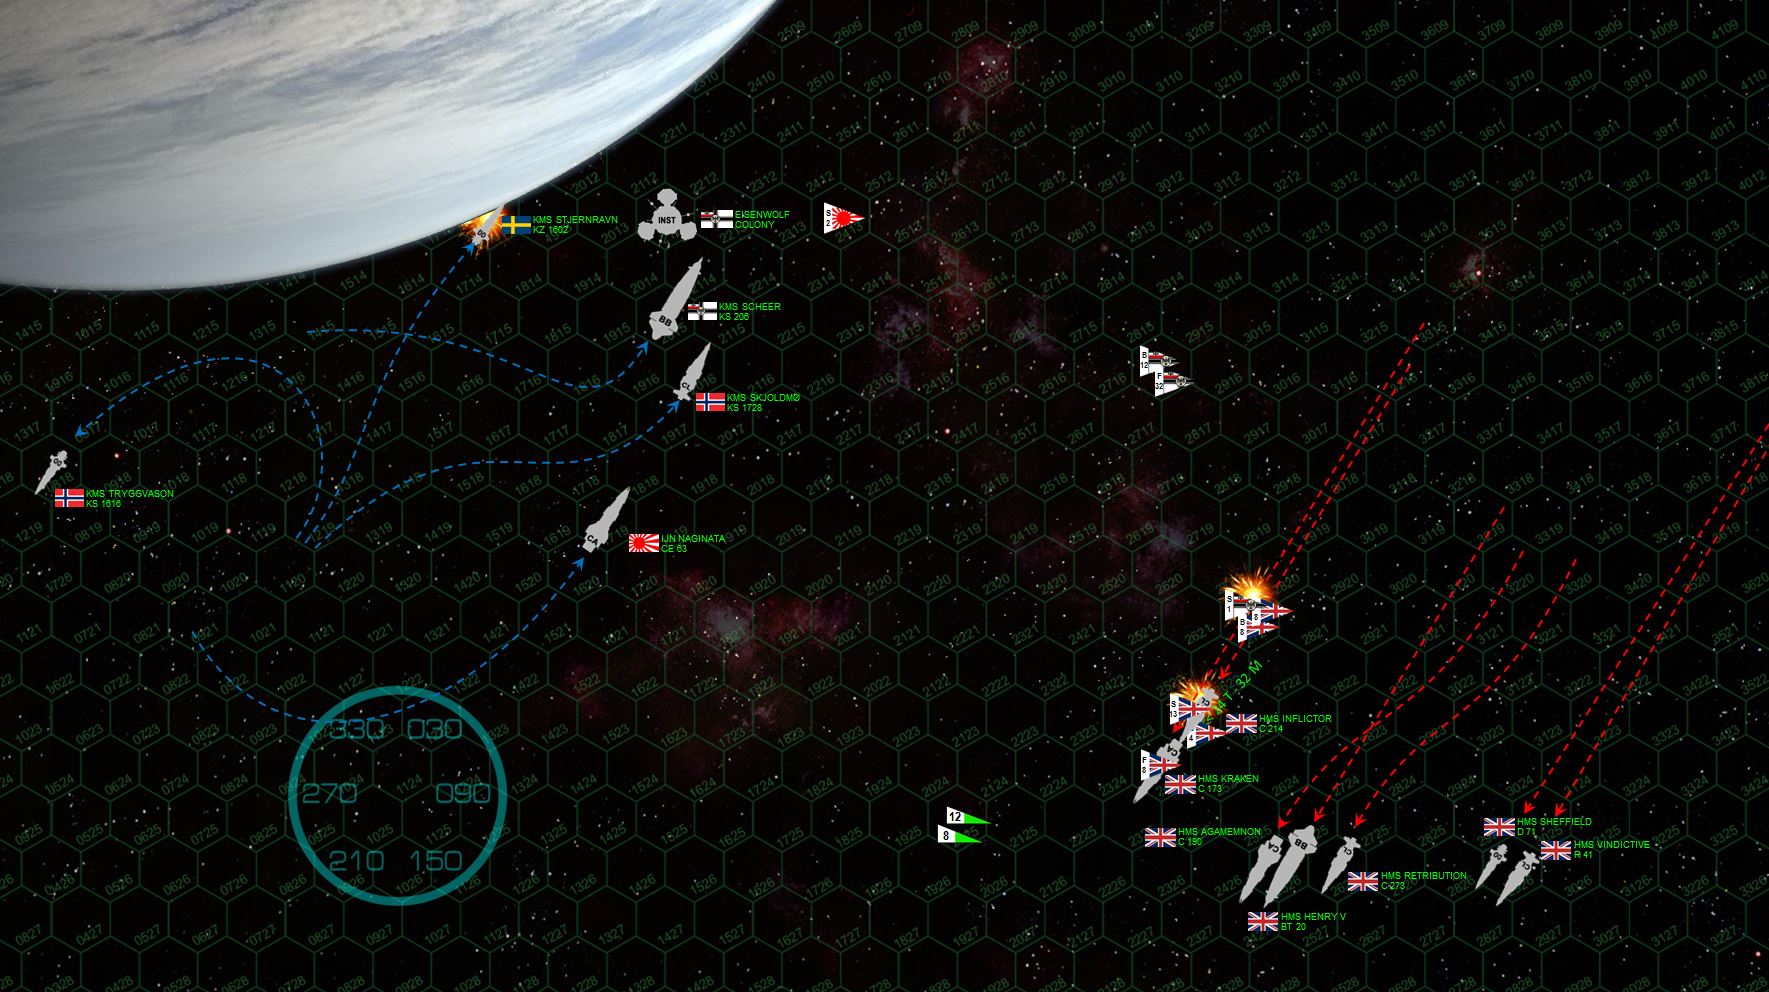 The Stjernravyn, crippled with no bridge, collides at 24 kps into the Eisenwolf moon in a titanic thermonuclear explosion. Fortunately, the interval between the bridge hit and the impact has given most of the crew time to escape the ship. KMS Trygvasson throws her grav rudders hard to port and banks away from the slaughter. The Scheer and Skjoldmo (Shield Maiden, Hipper-class light cruiser) fall in alongside the station, setting up what should be a truly withering broadside. Indeed, the Henry V is hot again … HARD, but not as hard as the Indomitable-class light cruiser HMS Inflictor. Maneuvering thrusters are hit along with sensors, the aft hangar … the Prussian bombers then strike, and a whole mass driver array is blown clean out of the Inflictor’s hull and an aft 7-GW rail gun turret is sent spinning off into space, trailing a glowing comet’s jet of molten slag. The ships should be in danger of losing power, but somehow the engineering crew vents just the right compartment into space to smother the fire and super-cool the red-lined reactor core on the starboard reactors (Jenn’s HMS Inflictor has the “Resolute Crew” upgrade – and it pays off). The Prussians, meanwhile, have finished launching their aerospace strike wing off the Eisenwolf station, even as the first Arado scouts engage and shoot down British torpedoes fired from HMS Kraken and the carrier HMS Vindictive. At the same time, however, the British put everything, EVERYTHING, into the Admiral Scheer, positively tearing open the Prussian battlewagon’s starboard quarter. Among the systems hit are the starboard quarter maneuvering thrusters, a critical blow in the moments to come …
 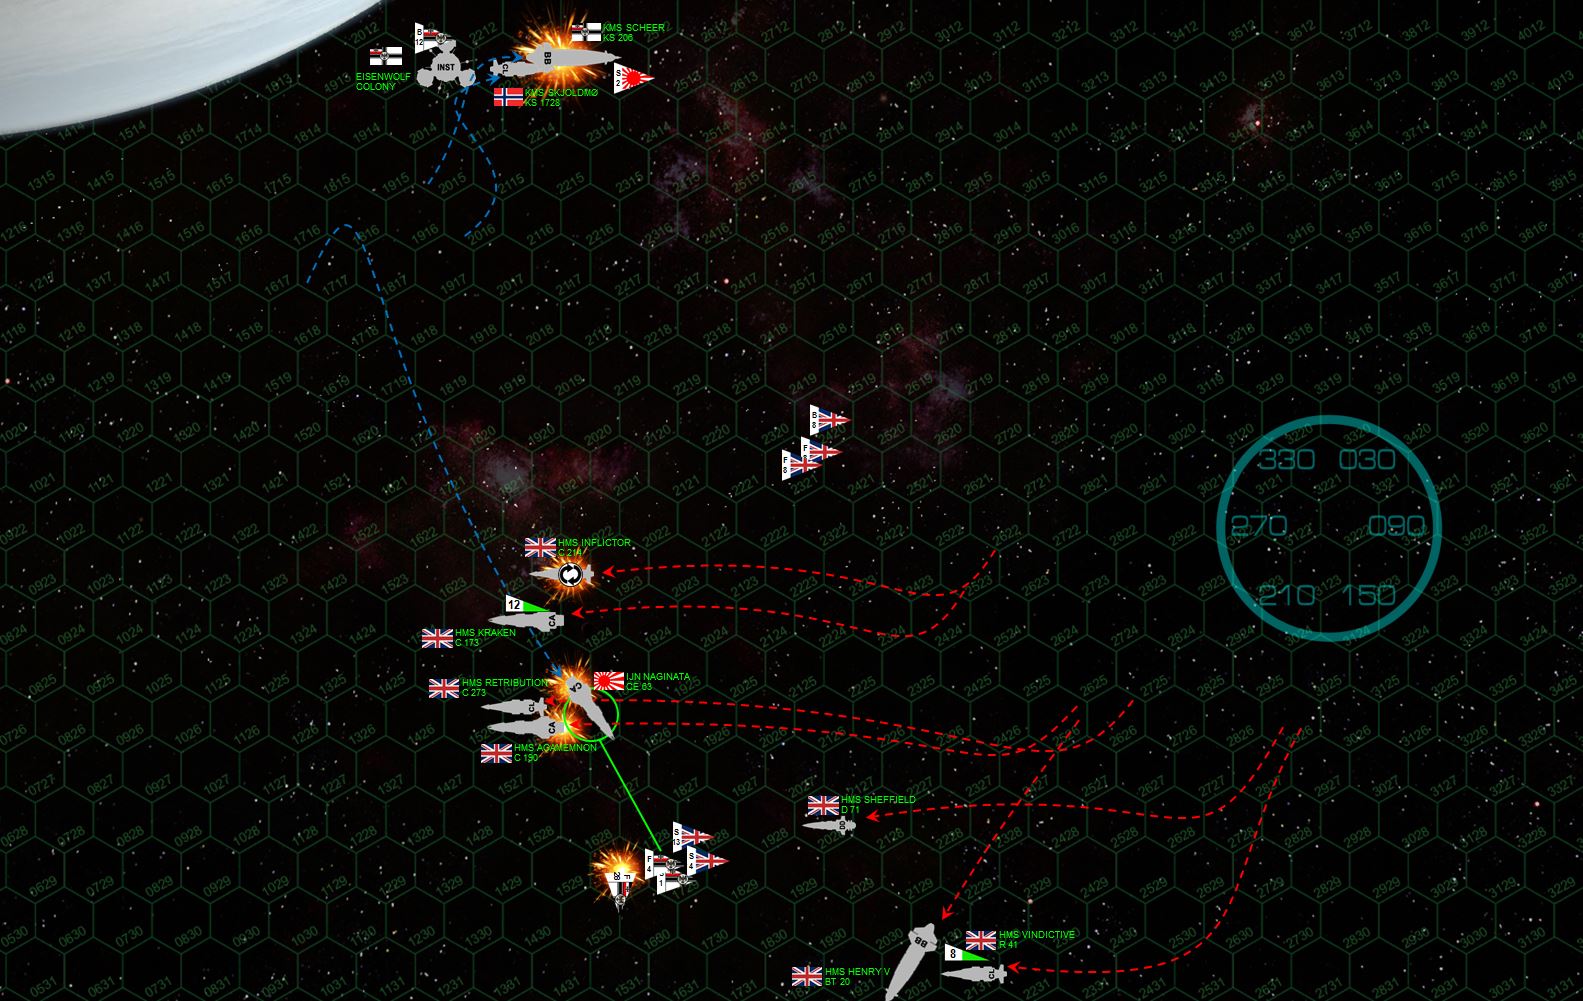 The Prussians … are in trouble. The Scheer’s starboard quarters has been torn open so badly that she HAS to get this part of her hull clear of more British fire. The problem is, she’s going too fast as sixty seconds ago, her starboard quarter maneuvering thruster has been damaged. So she can’t slow, turn, AND roll … at least not before the Agamemnon and Kraken cut in behind her and put a double broadside into her exposed reactors and engines. She fires full braking thrusters and manages a turn to starboard, at least forcing the British to hit full acceleration to get the firing arcs they need. Not all the British ships will make it, but with the heavy cruiser Kraken and Agamemnon, and the light cruisers Retribution and Inflictor, it will be enough. Thus, the Iron Wolves make a desperate move. The Naginata kicks her grav rudders hard to starboard, diving straight behind the Agamemnon and Retribution. The move is virtual suicide, especially with Vindictive’s aerospace strike group poised to launch a full torpedo and missile spread. But the captain of the Naginata, Hiromi Ozawa, knows she can take out the Agamemnon and possibly the Retribution, and by drawing fire, she just may save the Admiral Scheer. The plan … ALMOST works. The Agamemnon is indeed murdered by the point-blank broadside of heavy Japanese EPCs straight into her engines, the Retribution likewise taking a horrific mauling. By some miracle the Retribution will survive … for now. The Kraken turns her guns toward the Naginata, and combined with the British aerospace strike launched from the carrier HMS Vindictive, cripples the Naginata. But the last broadsides from the Agamemnon and Retribution, combined with the remaining guns of the blazing Inflictor, are just enough to take down the Prussian battleship. This courage costs the Inflictor, course, crippled in turn by the dying Admiral Scheer, even as the massed Prussian fighter group is slaughtered by British point-defense guns as they try to screen the doomed Naginata from British torpedoes launched from Vindictive, Kraken, and the British “Star Typhoon” bombers.
 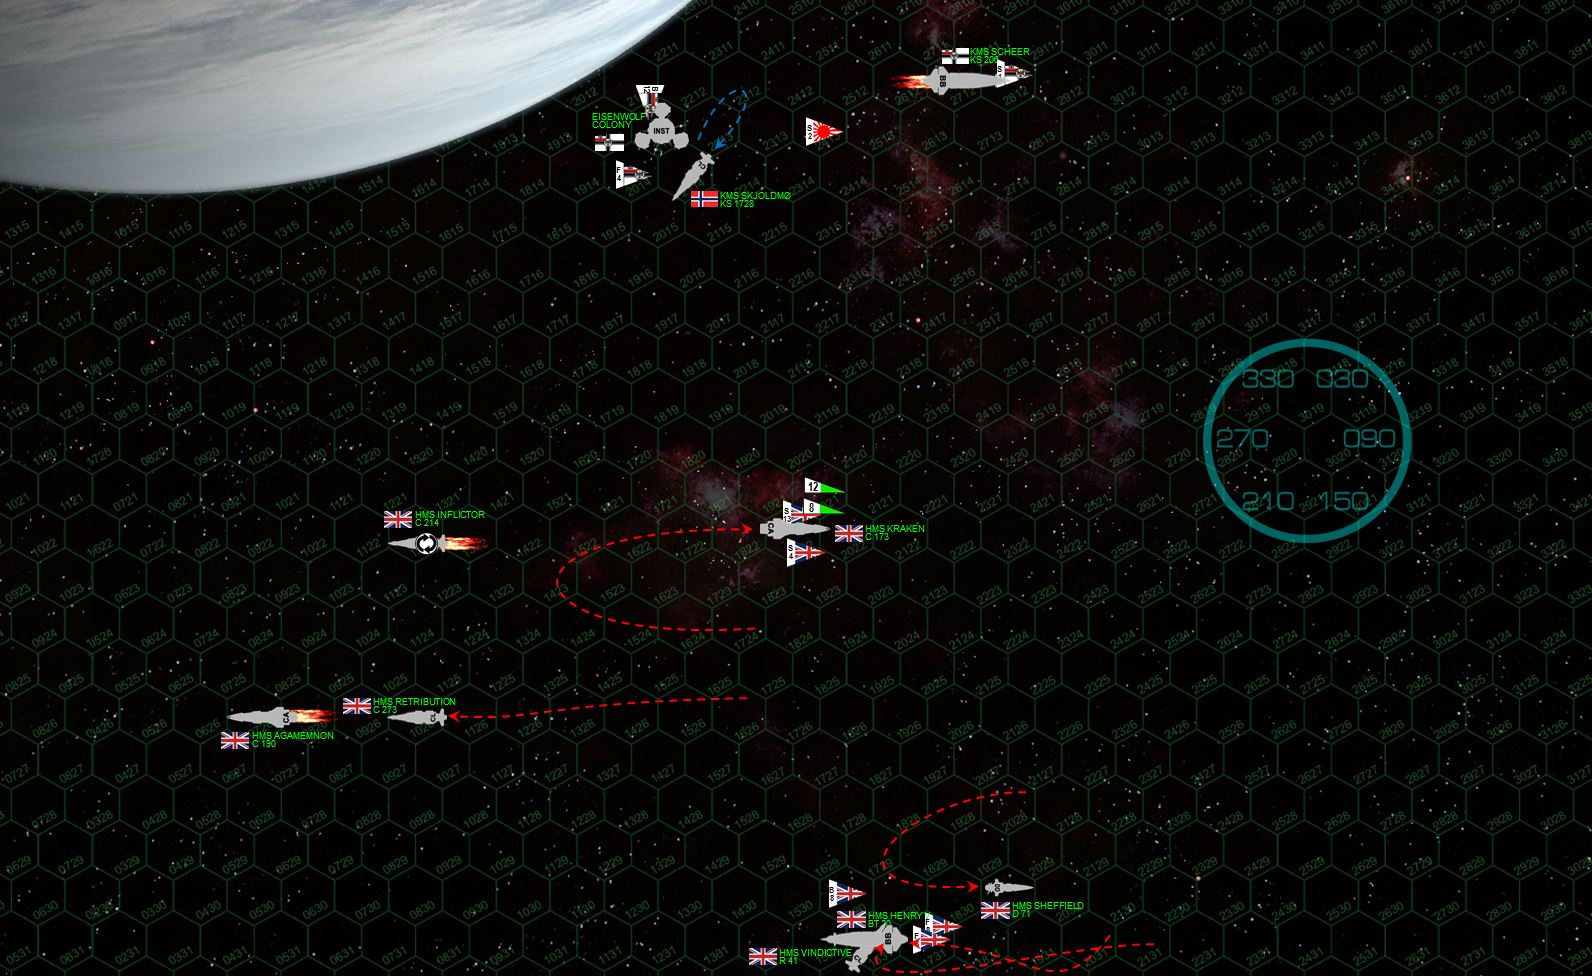 With their desperate gambit having failed, and proved hideously expensive in the process, the Iron Wolves have clearly lost this battle. Their last ship, the light cruiser Skjoldmo, valiantly protects the Eisenwolf station, and takes the full firepower of the British fleet for her trouble. But with the British fleet themselves so badly mauled, and now terribly disorganized, Skjoldmo actually survives. Furthermore, the “Shield Maiden” and the heavy guns of the station hammer the retribution, which again survives by a miracle … and also the Henry V … again.
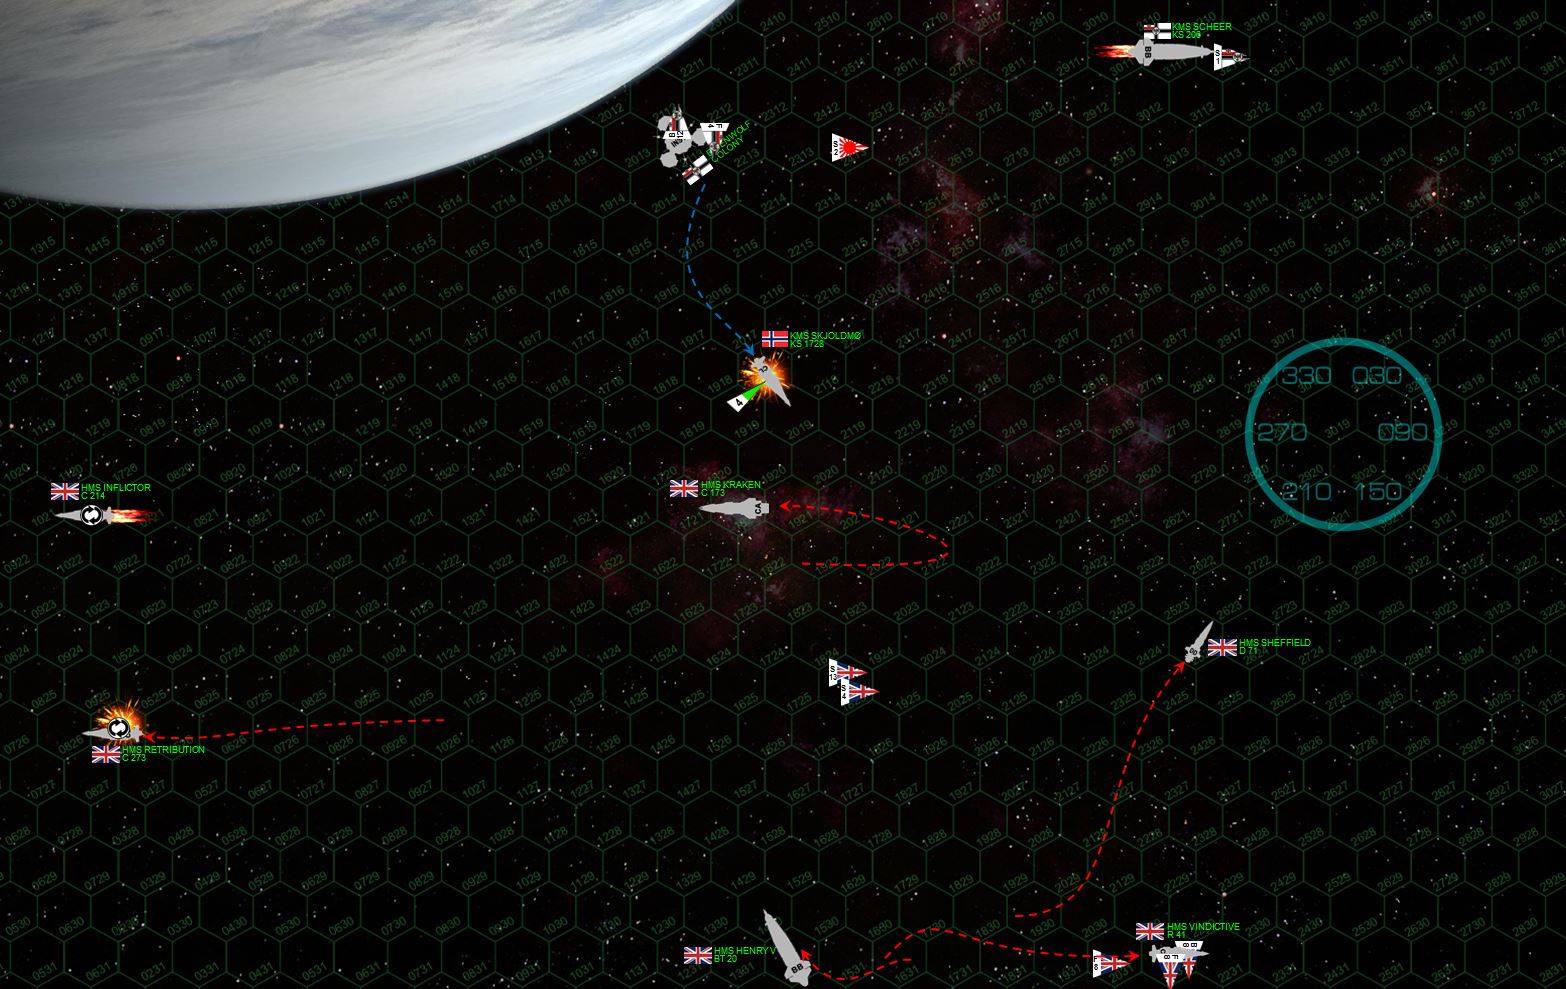 The Retribution tries to limp away, but by now has lost two complete engines and three maneuvering thrusters … she literally can do little more than drift. She’s also lost her aft shields entirely, so the Skjoldmo turns away from the station long enough to put a 8-gw rail gun broadside into her fantail and cripple the Retribution for good. Of course this dooms the Skjoldmo as well, after a blistering broadside from Kraken and the Henry V … while the Vindictive starts recovering her bombers and fighters to rearm them for a second aerospace strike. While none of this bodes well for the Prussians, it does mean that no one is firing at the station, which now opens fire at short range into the heavy cruiser Kraken. Previously undamaged, the mighty Iron Duke-class cruiser is ripped wide open by the station’s enormous batteries, losing some mass drivers and her starboard bow shields. The Prussians seem determined to go down fighting.
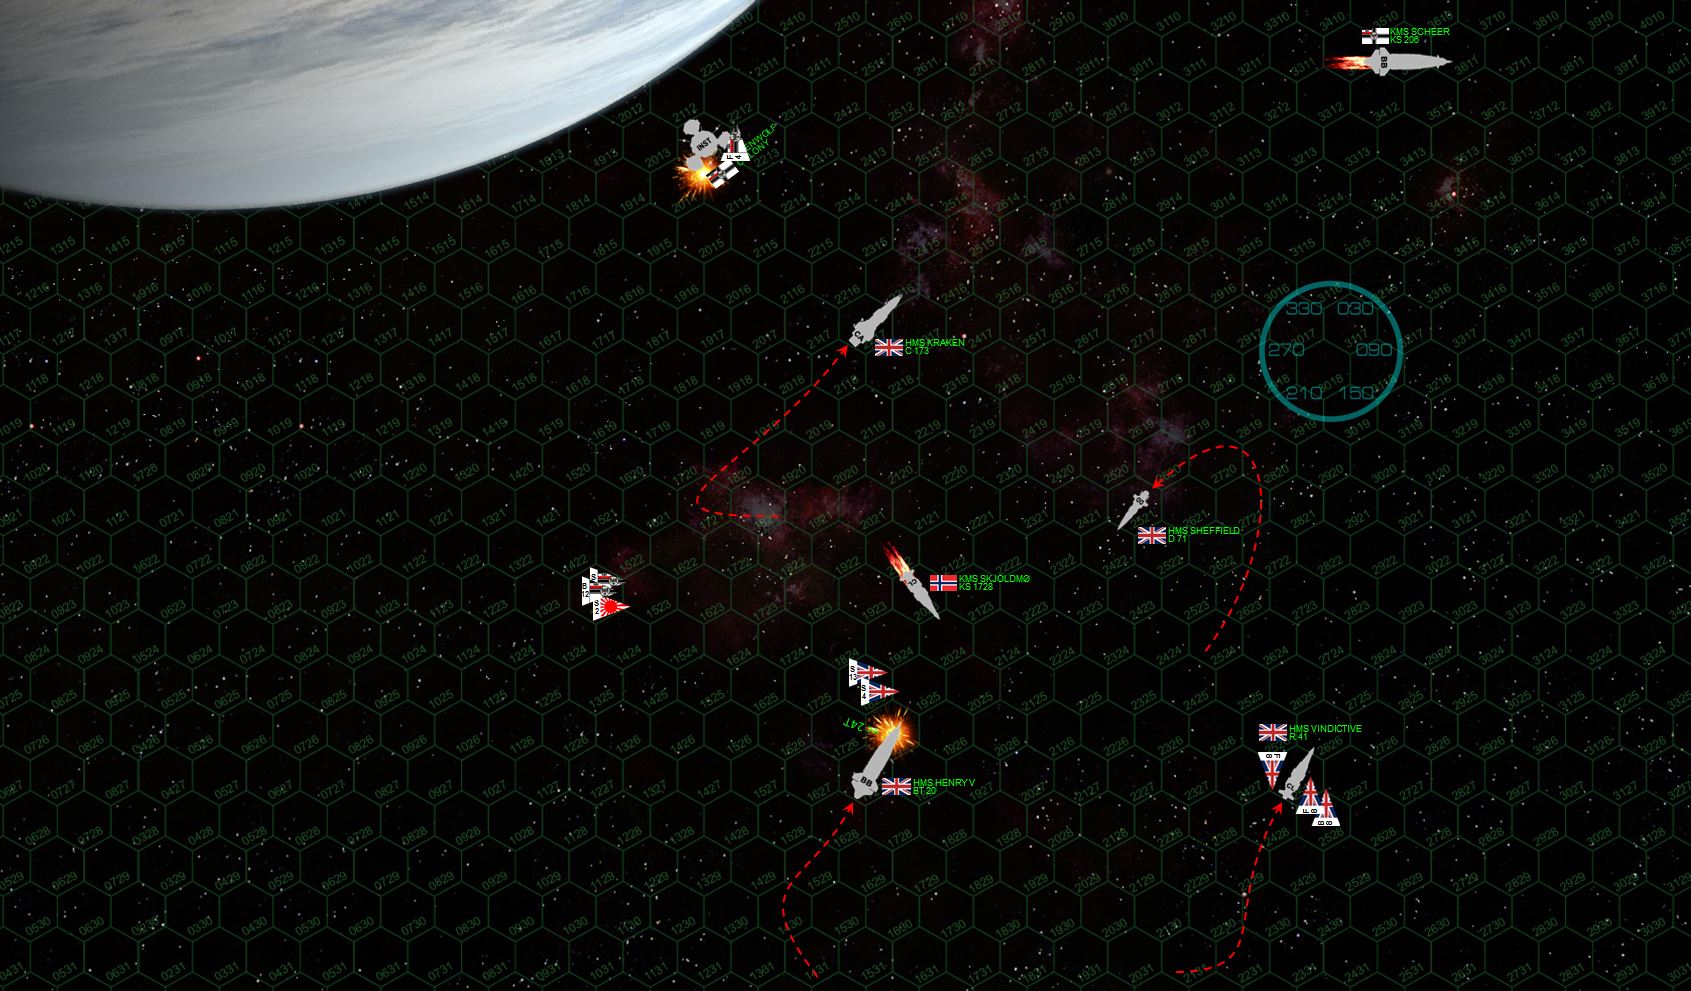 The end of Turn 6, when we decided to call this game (just short of seven hours at this point). The Prussians have managed to launch their re-armed bomber group, and hit the Henry V on the port bow along with another withering cannonade from the station’s heavy guns. They did significant damage, but not enough to cripple the British dreadnought. Meanwhile, the British fleet again hammers the station, but against that kind of armor and shielding, it’s going to be slow going. Another round or two might have ended it (Darkstar Assault games usually end on Turn 8) but no matter what the Prussians were losing this one. Their best case scenario was to cripple HMS Henry V as they lose the station, which would still leave them facing HMS Kraken, Vindictive, and Sheffield, over 300 points. Even if the station by some miracle survived until the end of Turn 8, HMS Kraken, Vindictive, and Sheffield would provide enough of a margin of victory on scenario points.
 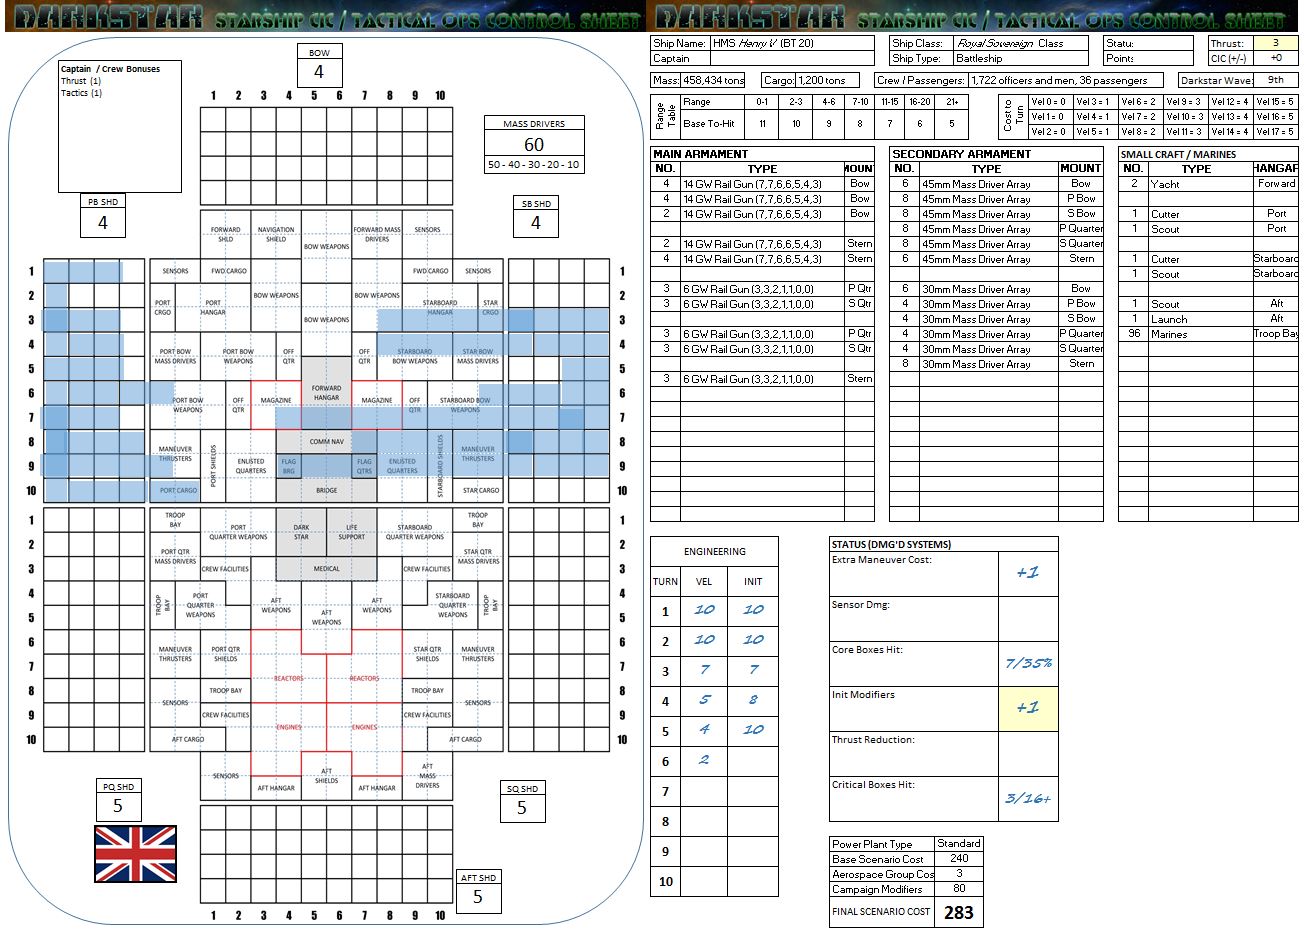 The Warship Record Sheet (WRS) of the HMS Henry V. You can see where one more good wallop on the port bow MIGHT have hit the bridge and left her crippled, but there’s no guarantee the British would be so accommodating as to present that facing to the immobile station. Port or starboard quarters could be presented with fresh shielding and armor, and still allow British 14-GW rail gun broadsides against the Eisenwolf Colony.
  Eisenwolf Station and the Norwegian light cruiser Skjoldmo (Shield Maiden). You can see where torpedoes from the HMS Vindictive drilled through the bridge and crippled the ship. It’s not often that a carrier gets a “surface kill” against another capital ship, usually scoring such victories with aerospace strikes. But it happened here. Meanwhile, you can see where the Eisenwolf colony could have easily lasted at least one more turn, if not two. Their shielding and armor are incredible. But being immobile, once they lose their protective fleet of warships and strike craft, eventual defeat, power-downs, and assault boardings are all but certain.
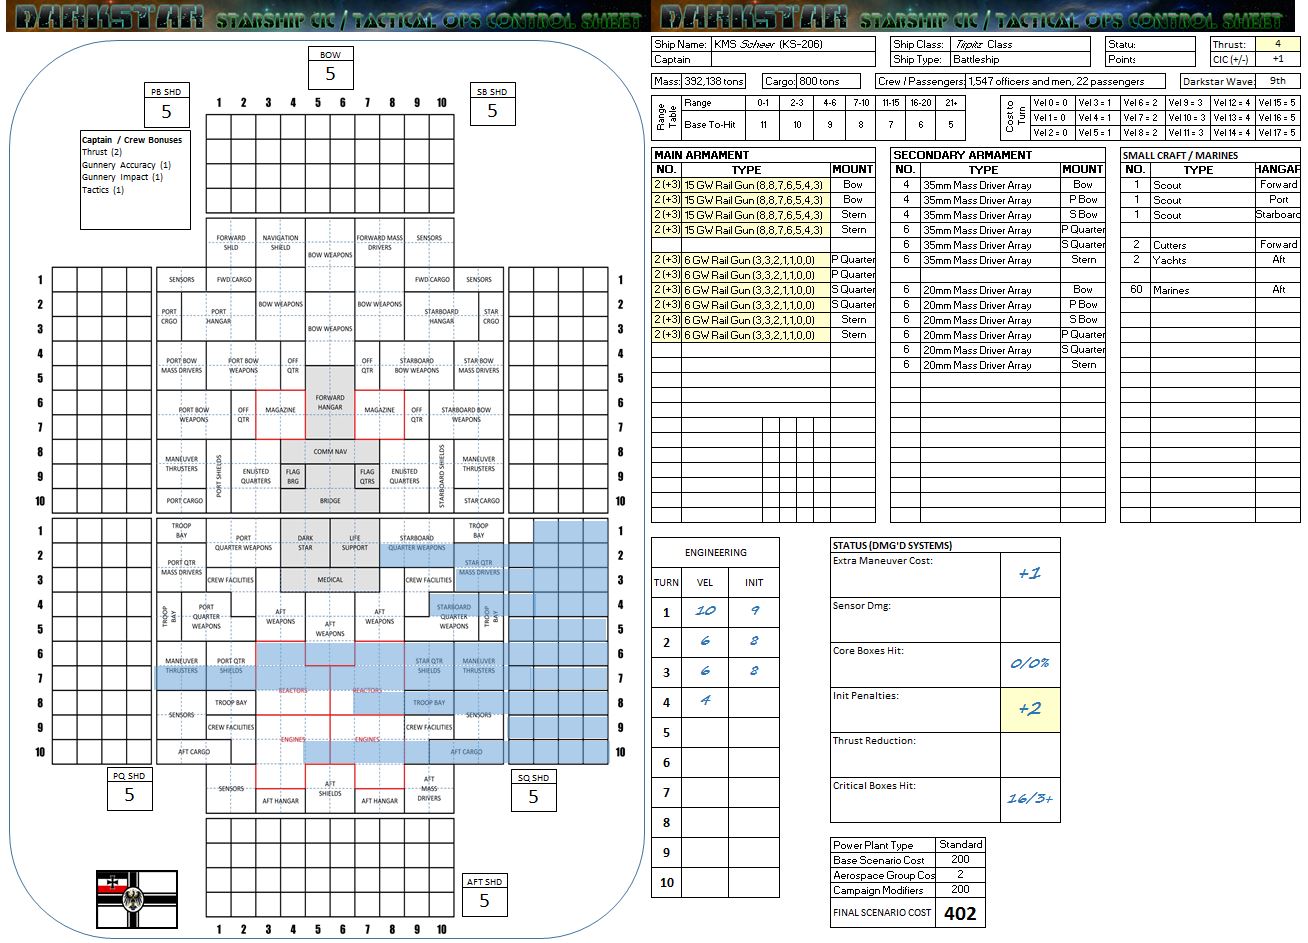 The WRS for the Prussian battleship Admiral Scheer. You can see where the massed British fleet had to hit the same area … twice, to finally cripple the dreadnought. Even then, power-down wasn’t certain (3+ needed on a d6). Had the Scheer been doing just one velocity point less, she might have been able to make the turn or roll to prevent this power-down for at least one more turn … one more turn for her eight 15-GW guns to cripple another British cruiser or at least put a few more holes in Henry V. >>> CONCLUSION: So that’s it, the War of Annabel’s Star is over. The British certainly won, as did the Panasians (the Chinese battleships Red Tiger won two major victories) and the Holy Russian Empire (after a rough start, my Russian “Lazarev” cruiser group really got on a roll). The Japanese were technically part of the losing coalition, but they didn’t lose that many battles. Both @aras and @rasmus won many battles with them. They’re going to be able to cut a deal and probably call this one a draw. The Black Dragons never won a battle, nor did the New Romans (including my poor French, who at best managed to steal one draw against Damon’s British). The Prussians are also losers in this one, with three crippled battleships in this war (the Von Der Tann, and the Scheer … twice).


Brutal but fun game.
Really enjoying Darkstar, looking forward to an interesting campaign with the White Ensign flying high.
??
@damon – Wasn’t as brutal as I thought it was going to be … I thought HMS Henry V was going to plow right up to the station and engage in a gunnery duel. Henry V WOULD have won that duel, as she can pivot to present fresh shielding and armor and the station cannot. That’s why I piled the Scheer in there. Oh well. 😀 Nothing like three battleship-scale gun batteries slugging it out at less than five hexes. ALL BATTERIES! FIRE AS SHE BEARS! 😀 😀 😀 I’ll get the new campaign going soon in a new Darkstar… Read more »
Hi, its been a whilebut I would be interesting in trying a few more games as the Arab League. That is if time zones and the like permit. I can’t guarantee super regular attendance but would love to get a few more games in and possibly build some heroic captains.
Congrats on all the Darkstar achievements so far.
Thanks, @muakhah ! The new campaign “soft-launches” later today. Arab League was a candidate … but @damon ultimately picked the Indian Republic instead. Of course, nothing says the Arab League can’t make a “cameo” – or a standalone battle (not every Darkstar game has to be part of this campaign) or even their own mini-campaign off on the side somewhere. I think you’re still on the e-mail thread, so just let us know sometime you’d like to give it a shot and we’ll set something up!
@oriskany I would have loved to be in on that game but damn real life you know
@rasmus – No worries at all! It was over seven hours and we really only got through six turns. It was a beast of a game. Between your Kama cruiser squadron and the @aras ‘ Kiyose carrier strike squadron, the Japanese won almost all their battles … just wound up on the losing coalition. Hence they cut their losses and signed a separate peace.
Aside from Stjernravyn was any ships totally lost ?
Not that I know of. We never actually rolled for it at the end of the battle. But honestly everyone had so many luck points (and there were surviving ships that didn’t have to use theirs) I would be stunned if anyone actually lost a ship except for the Stjernravn.
Brilliant game. Wish I could have stayed up and watched more of the live stream but I’m an old man and I need my bed!
No worries, @gremlin – we were glad to have you with us! Needless to say, 95% of Darkstar battles aren’t nearly that big. The usual point level is 150-350, not 1000. 😀 😀 😀
Such a cool conclusion, wish I had had more time to keep up to date with all this!
Oh man, hello @davehawes! Heavenly heard from you in a while. Hope all is well. Things here are fine.
Yes, this was ended a while ago. We have a new thread for the new campaign which is still ongoing. 🙂
Yeah just sometimes real-life gets in the way of lobbying, mostly work stuff. But trying to be better at carving out hobby time! Will take some time looking over the new threads!