


![How To Paint Moonstone’s Nanny | Goblin King Games [7 Days Early Access]](https://images.beastsofwar.com/2024/12/3CU-Gobin-King-Games-Moonstone-Shades-Nanny-coverimage-225-127.jpg)


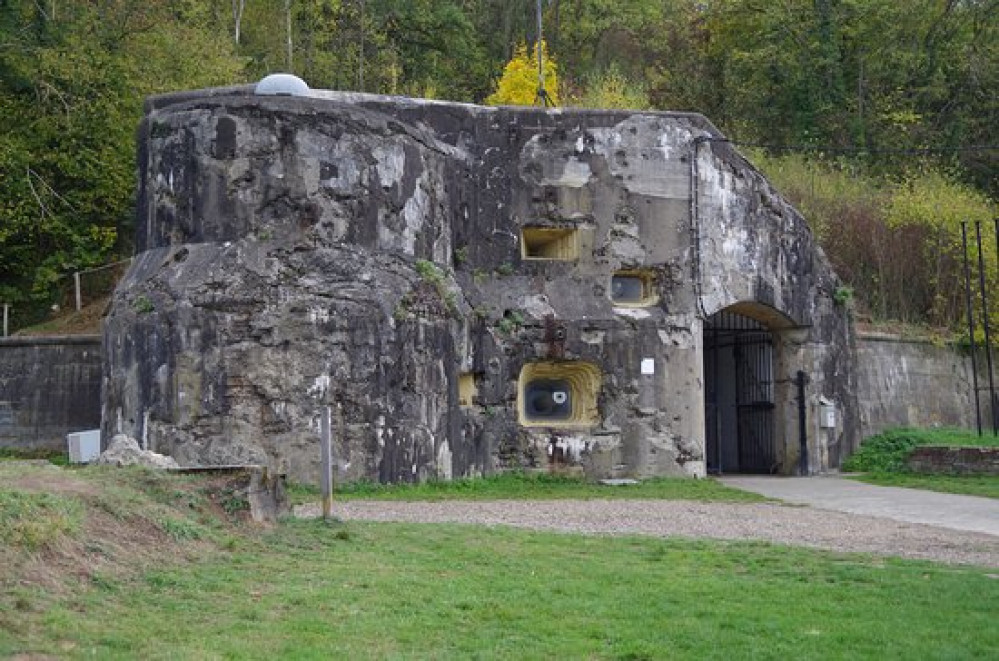
Assault on Fortress T’BomFee


*** Achieving Epic Killyness ***
*Respawning*
We propose using a Respawn mechanic to simulate vast numbers of troops. Each person will only have built a limited number of models and it would be more fun to be able to commit to the meat grinder, if you knew that your game would not be over if your squad was killed.
Named special characters would only have one life. Use them wisely.
Respawn points –
Bridges Table – Both sides respawn anywhere along the long edge of their side of table. Attacker may also attempt to land gliders on table.
Fortress Table – Attackers attempt to land gliders on the table. Defenders do not respawn on the Fortress table. They move on from the Chambers Table.
Chambers Table – Defenders respawn from determined points at the back of the table. Attackers do not respawn on the Chambers Table. They move on from the Fortress Table.
*Deployment*
Each side will need to decide how to deploy their **players** initially.
How much attention to devote to the Bridges, they are the ultimate objectives, versus how much attention is devoted to the Fortress. If the Fortress is not neutralized, then the bridges can’t possibly be captured, but if all the forces are on the Fortress then nothing is left to capture or hold them.
After the game has begun, players may choose freely which part of the battle they would like to contribute to by choosing which respawn point to redeploy at. The idea is to maximize fun by allowing the players to freely move around and sample every part of the battle if they like.
– Bridges table deployment
Each side deploys along their respective long edge of the table. Each deployment zone is a length 3 distance. Both vehicle and infantry may be deployed to this table.
– Fortress table deployment
This table has the more complicated rules for deployment.
The Imperial defenders determine which gun positions are manned and which units are deployed there. Those figures are physically placed in the corresponding rooms on the Chambers table.
Historically, not all of the positions were manned but the attackers did not know that. If it seems like metagaming by the Attackers seems likely perhaps the troop assignments could be written down or the Chambers table could be in another room to heighten the mystery and tension about what is happening inside the fortress.
The Glider assault works as follows:
Historically not every glider made it to the battlefield on time.
Pregame – each glider rolls one of the Black attack dice and on a “blank” result they are delayed and don’t deploy before the battle.
When deploying the glider pilot nominates a point on either the Fortress Table or the Bridges Table,
* Roll a Black attack die:
– Surge or Critical Result – Place Glider on nominated point
– Simple Result – 30 cm (12 in.) scatter in direction of point on the d8
– Blank result – 60 cm (24 in) scatter, placed by opponent
Later in the game, infantry can choose to respawn in a glider. Make a Reserves roll with a Black attack die.
* Surge or Critical result – Deploy immediately. Make a deployment roll as above.
* Simple Hit Result – Delayed. Deploy next turn or choose to walk on at Respawn point on Bridges table.
* Blank Result – Distant. Roll again next turn or choose to walk on at Respawn point on Bridges table.
***Any glider attempting to land on the Fortress table may be shot at once by the defending AA positions before landing.***
– Chambers table deployment
The Imperial forces deploy wherever they like on the Chambers table.
Might I suggest in one of the gun positions? That seems like a good idea. From there they’ll be able to rain death on rebel scum. If they get proper authorization first, of course.
*Firing the BIG DEATH GUNS*
Historically, the fortress had really bad preparation, low quality coordination, and horribly bureaucratic command structure.
The big gun emplacements were “dialed in” on points of strategic interest. The gunners could not physically see what they were shooting at. They dialed the weapons to the pre-determined setting listed for any given target and fired based on that. But they were forbidden from firing at anything at all unless given explicit orders from officers elsewhere.
On the upside, when the guns fired, they struck the target precisely and destroyed any vehicles or infantry utterly.
The defenders will have designated pre-determined targets on the Bridges table for the big guns.
The troops occupying a given gun position may attempt to fire that gun. Obviously, unmanned positions can’t fire, the Empire doesn’t automate such things. Why are you against gunner employment? They need wages too, you know.
Instead of rolling to hit, the gunners roll a White defense die.
On a Blank result, nothing happens. Permission hasn’t been given or the gun misfires or the ammo is faulty.
On any other result, a 5″ blast marker is placed on the pre-designated target and anything underneath it is annihilated.
Defenders designate 10 fixed locations on the Bridges table as targets. Once those locations are struck by the big guns leave a marker there representing smoking craters. Maybe the attackers will be smart enough to not walk there anymore.
The forces that just got smoked will be able to respawn at appropriate places to charge and die again. There will glory for all.
*Breaching turrets and silencing Big Death Guns*
Each attacking squad has two shaped charge explosive Maguffins powered by the angst created when Khyber and Dilithium crystals are combined with liquid unobtainium.
When in base contact with a turret , the squad may roll 2 Red Attack Dice to use one of their M4-GFN Shaped Charge Explosives to blow a whole in the turret.
2 Hit results are necessary to breach the turret, in addition for each Surge or Crit result rolled, one defender is automatically killed by the blast.
If the maguffin successfully breaches the turret, that gun goes out of action and the attackers may move into the corresponding gun chamber on the Chambers Table.
*Oh yeah, I promised a Giant Rampaging Tentacle Monster*
The Imperials have the aforementioned GRTM in a containment facility somewhere on the Chambers Table. They can choose at any time to release it from confinement.
After it is released, it will move at Speed 3 (or whatever that is called) toward the nearest living thing and attack it using, let’s say, 3 Red Attack Dice. IIRC those things were basically unkillable in the movie so let’s not worry about defense stats.
The critter will attack ANYONE and all casualties caused by count toward the victory conditions. It definitely could be used as a means of driving off the Rebel intruders in the fortress but it could end up being a very costly weapon of last resort. Could be a lot of fun though, watching that chaos.


Leave a Reply