


Emergency Miniature Work – 15mm USMC Super Cobra


Recommendations: 1804
About the Project
It's the return of Oriskany's Web Wargames, where we connect with YOU, members of the community, over the web to stage live wargames. This thread will go over the ideas, concept development, design, LIVE PLAYS, and after-action reports for these games, covering all periods and ranges of the historical genre.
For anyone who's ever interested in participating in one of these games, all you need is an internet connection (so software downloads required). Reach out me (Oriskany) on a PM and so we can agree on a time and a system.
Systems so far include multiple iterations of Panzer Leader (1939-2020), Valor & Victory (1918-1993), Naval Command, AirWar C21, Contact Front, and others!
So feel free to toss in ideas, reach out to play, just spectate, or just comment and +1 on the design and after action reports!
Related Genre: Historical
This Project is Active
Yankee Squadron - Air War C21 Live Stream - Sunday 5EST/10GMT
August, 1985. As described in the novels by General Sir John Hackett and later Harold Coyle, the Cold War is about to go hot in Europe. As the pre-dawn stillness of the Intra-German border starts to shake under the massed rumble of thousands of tanks, APCs, truck, helicopters, and artillery pieces, another war has in fact already started.
Make no mistake, the first engagements of a “Team Yankee” style war would not have been fired on the ground, but the air. Control of the ground is largely at the mercy of control of the skies, so both NATO and Warsaw Pact air forces would’ve engaged in an all-out air battle that would have decided who owned the skies over the imminent Team Yankee battlefields.
Have no illusions, there will be no Lynxes, no Po-105s, no Cobras, Apaches, Hinds, or Warthogs hitting ground targets until dominance of the skies has been decided.
LIVE TOMORROW we’ll be engaging in a broadcast web game that will take a look at one one very small part of that aerial Armageddon might have looked like. We’ll be pitting USAF Tac Air F-16 Fighting Falcons against Soviet GSFG Fighter Regiment MiG-29 “Fulcrums” in a dogfight somewhere over the Fulda Gap in south-central West Germany.
YouTube channel and Twitch.
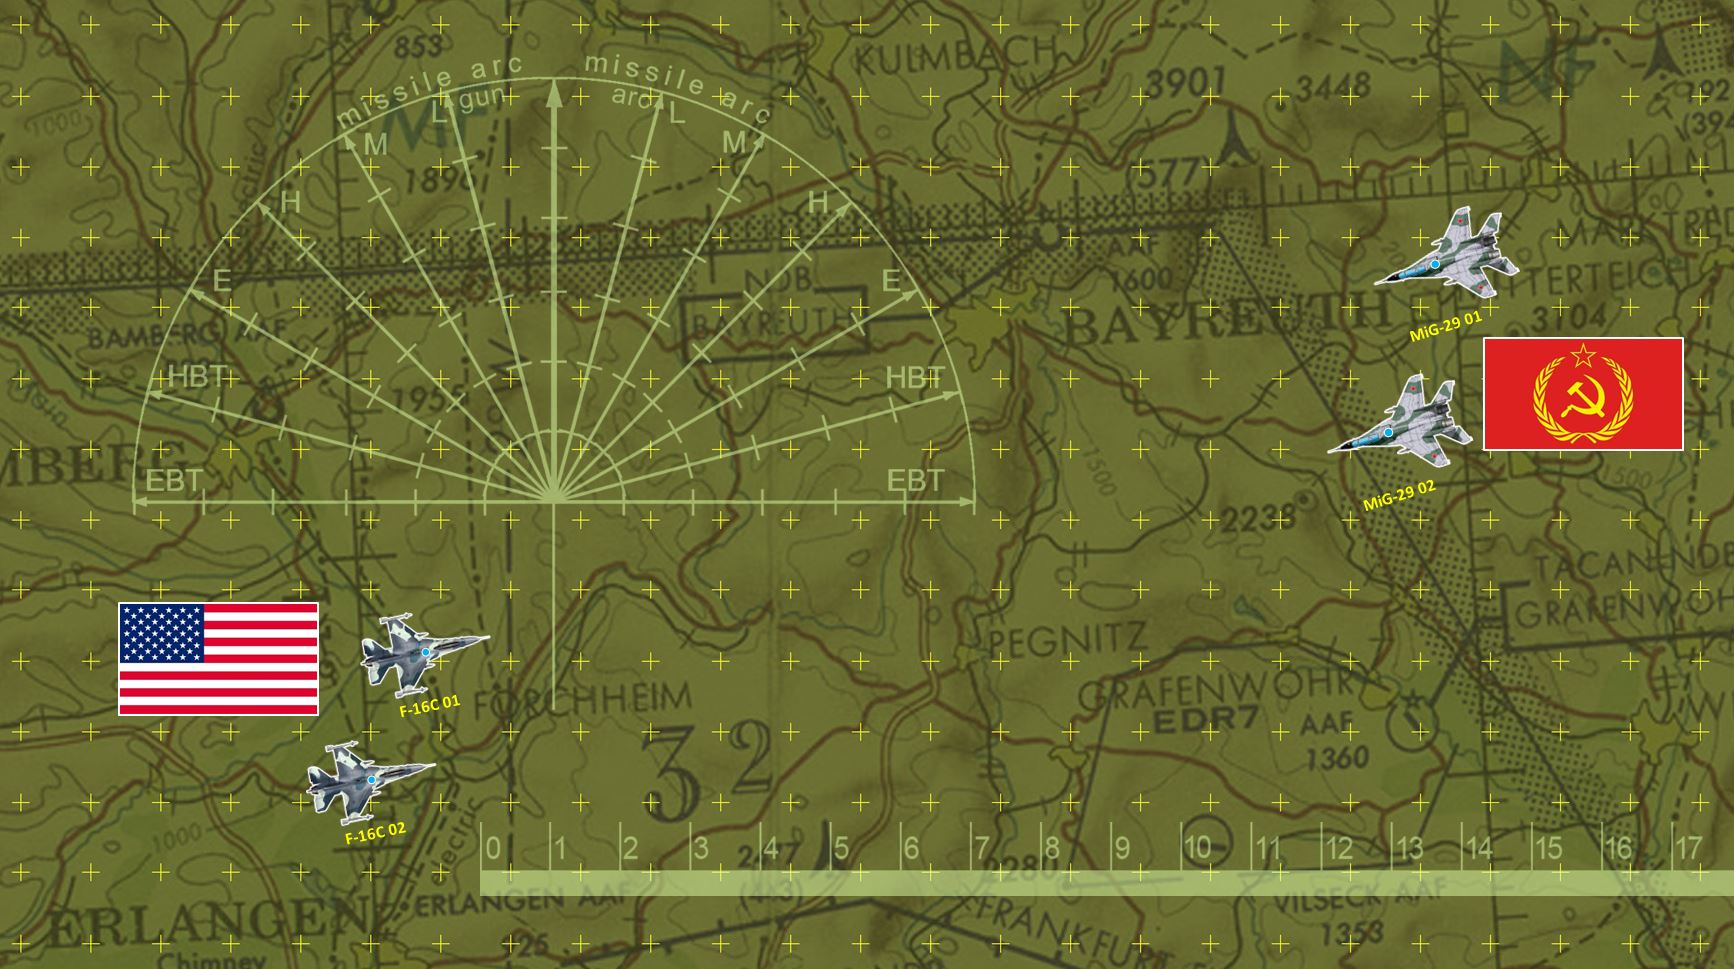 Here's a zoom in of part of our map. Turning wheels and move rules are scaled with the grid on our table. This allows for "miniature movement" to be properly measured and executed regardless of how the screen is zoomed in or out.
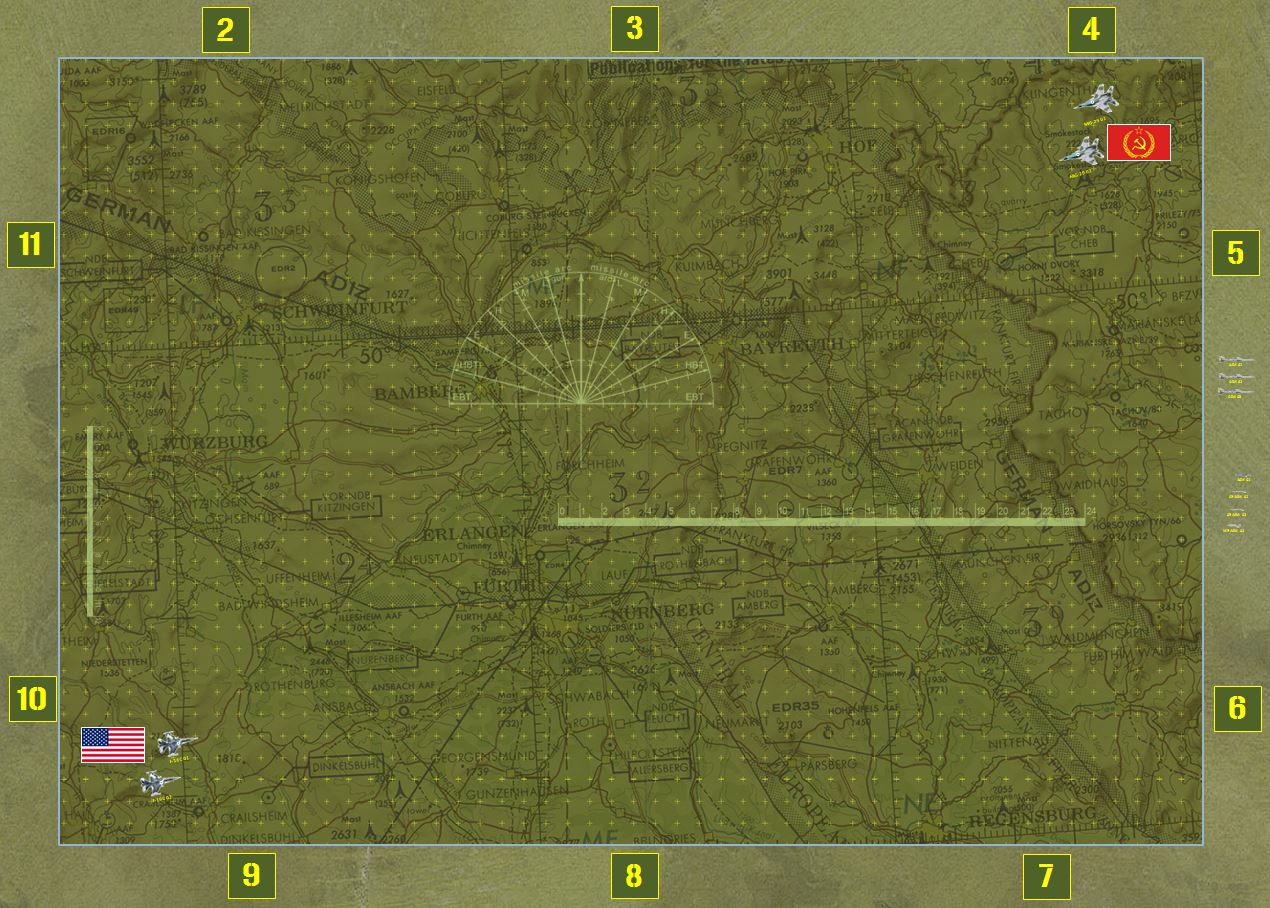 The whole map.
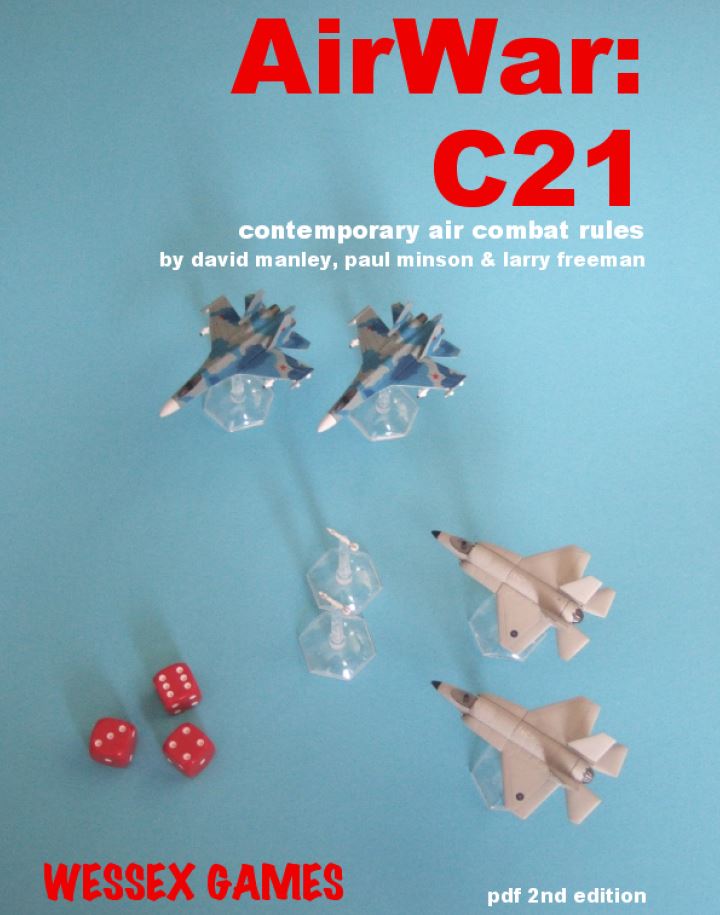 The system we'll be using. We've had great success with this system in out 1982 Falklands series and 1968 Vietnam Air War videos. Let's see how it does in the 1980s!
Yankee Squadron - Video Replay
Hello, everyone! Here is the video from last Sunday’s live game of AirWar C21, where we took a look at playing the opening dogfights in a theoretical “Team Yankee” style WWIII over Europe.
The video pits two of my F-16Cs:
512th Tactical Fighter Squadron, 86th TFW
Ramstein Air Force Base, Germany
vs. two of Jennifer’s MiG-29As:
773rd Fighter Aviation Regimentt, 6th Guards Fighter Aviation Div
GSFG, Merseburg
The video is fine, although I admit I made plenty of rules mistakes, narration mistakes, etc. We were also unaccustomed to aircraft this advanced in the game, so far we’d used the game for Argentinian Mirage IIIs, American F4 Phantoms, Vietnam-era MiG 17s and the like.
I’m thinking of taking another stab at this scenario later this week, as we clearly didn’t do the game justice here. Two opposing pair, of more modern types, was clearly what AirWar C21 was made for. So stay tuned for a better game, this video is more about us getting refreshed on a system we hadn’t run in a while.
YouTube channel and Twitch.
Yankee Squadron - US/USSR Rematch and AirWar C21 Walk-Thru
Okay, so after reviewing the rules again, and going over the technical information on these planes and missiles, and making some tweaks to my computer settings, I’m running this game again.
I’m also making this something of a beginner’s walk-thru of the AirWar C21 system by Wessex Games.
First part of the video is posted. Hope you enjoy it!
Ops Center Episode: 75th Anniversary of Iwo Jima
February 19, 2020 marks the 75th Anniversary of the Battle of Iwo Jima
February 19, 2020 marks the 75th Anniversary of the opening of the Battle for Iwo Jima. Fought primarily between the US Marine Corps and the Imperial Japanese Army, this was one of the most ferocious battles in the Pacific Theater of World War II, and a touchstone moment in the history of the US Marine Corps.
We look at what made this battle so intense, what factors led to its conduct and outcome, and some key features you’d want to bring to an Iwo Jima-themed gaming table, no matter what kind of system, command level, or gaming medium you enjoy.
Check out the Sitrep Podcast Channel on YouTube or Twitch:
YouTube channel and Twitch.
Some people have expressed an interest in a written form of the content in this video, so below is an edited transcript of the narration in our Iwo Jima 75th Anniversary video, linked above.
INTRO
February 29, 2020 marks the 75th Anniversary of the landings on Iwo Jima island, made by the United States Marine Corps against well-prepared defenses of the Imperial Japanese Army. One of the closing battles of World War II in the Pacific, the Battle of “Bloody Iwo” was one of the most ferocious engagements in the entire war. Officially lasting 36 days, the battle would eventually claim almost 30,000 dead, and marked the first time an invader had actually set boots on Japanese home soil in hundreds of years.
In the words of Fleet Admiral Chester Nimitz, commenting on the Marines’ conduct on Iwo Jima, “uncommon valor was a common virtue.” To this day, this battle retains a near mythic status in the annals of the Marine Corps, the American armed forces, and military historians around the world.
If you want a look at just how bad the Pacific War can get, look no further than Bloody Iwo.
BACKGROUND
Iwo Jima is a tiny volcanic island in the north-central Pacific, and had been part of Japan for hundreds of years. This made it special, because just about all the other landings undertaken by the US Marine Corps and Army thus far in World War II were either considered imperial Japanese possessions, colonies, outposts, or conquests taken by Japan earlier in the war. Iwo Jima was legally, administratively, and symbolically part of the home islands – the Japanese Self Defense Force operates a small naval air station there to this very day. The American invasion of Iwo Jima thus marked a fateful milestone. Beyond the bombing, beyond submarine warfare in Japanese home waters, beyond trading far-flung islands scattered across the Pacific … American boots would now be placed on Japanese soil.
By February 1945, the war in the Asia and the Pacific was reaching an apocalyptic pitch. While it would never reach the ferocity of the war in Russia, it would approach the scale of the Allied efforts in Northwest Europe and was almost always much more savage. Since 1942, together with the Australians in the South Pacific and the British in India and Burma, the Americans had pushed Japanese Pacific conquests back along two general axes of advance, an Army-dominated drive in the South Pacific, and a Navy-dominated drive in the Central Pacific. In October 1944, those two drives had met in the Philippines. While fighting the Philippines would rage until the end of the war, by the early spring of 1945 the Americans were teeing up invasions against the last North Pacific islands that would bring them to the doorstep of Japan herself.
One of these, fatefully, was Iwo Jima. Beyond its symbolic importance as a “gateway” to Japan, the island was also almost exactly halfway between the American bombing bases in the Marianna islands and Japan. Bombing operations against Japan had been underway since these islands were taken in June 1944, but they were at the extreme range of the B-29 Superfortress. If a B-29 sustained any damage or mechanical problem in the course of its mission, making it home was almost impossible. It was also impossible to stage fighter escort for these bombers. So setting up a base at the halfway point was a natural military priority, especially as preparations started to gear up for the full-scale ground invasion of Japan.
INVASION
The invasion of Iwo Jima would be undertaken primarily by the United States Marine Corps, specifically the 3rd, 4th, and 5th Marine Divisions formed into the Fifth Amphibious Corps. In all, some 70,000 US Marines would be pitted against over 20,000 defenders of the heavily-reinforced 109th Division of the Imperial Japanese Army. Although much was unknown about Japanese defenses, one factor beyond question was the fanatical intensity of Japanese defense. There’d been savage resistance long past any point of hope, suicidal banzai charges, even Japanese civilians had committed mass suicide with their families rather than face surrender – and that was for colonies and conquests. Resistance here, on Japanese home soil, would undoubtedly be fearsome.
Even though the US Pacific Fleet was by the point one of the powerful armed services the world had ever seen, they could only do so much at once. Fighting still raged in the Philippines. Preparations were underway for the invasion of Okinawa, even deeper in Japanese home waters. Thus, shore bombardment and aerial operations against Iwo Jima were rushed and far from adequate.
In truth, the Americans could’ve bombed and shelled Iwo Jima for a year, and it’s doubtful how much effect it would have. Japanese defenses had been under construction for more than a year. All civilians had been long evacuated. Iwo Jima is a tiny island of volcanic rock, which had by now been turned into a gigantic ant-hill of tunnels, underground barracks and bunkers, ammo dumps, gun positions, machine gun nests, observation points, booby traps, and supply caches. There would be no siege, no surrender. Every square yard of Iwo Jima would have to be assaulted, taken, and held against counterattack.
The initial landings finally went in on February 19, 1945. The first Marine amtracks hit the shore just before 09:00, and right off the bat things started to go wrong. Navy UDT teams (forefathers of todays Navy SEALS) had in fact already suffered bloody setbacks here, resulting in incomplete intelligence on the landing beaches. Iwo Jima was in fact covered in … not soil … not sand … but loose black volcanic ash, which played hell with vehicles. Marines couldn’t move quickly through this sand, and they couldn’t dig fighting holes, trenches, or protected positions. The beach was also backed by a 15-foot swell of this ash, which the tanks and amtracks couldn’t cross without enormous difficulty.
Then the Japanese opened fire. Per their plan, they hadn’t opened fire right away, instead remaining hidden until the American landing beaches were positively jammed with assault waves, boats, vehicles, and support units. Then they finally cut loose a little after 10:00, the slaughter was simply horrific. Marine losses easily outstripped losses on Gold, Juno, Sword, and Utah beaches in Normandy, by the end of the first day Marine casualties had ticked past even those on Bloody Omaha’s opening day.
PUSHING INLAND
Despite the carnage on the beaches, Marine platoons, companies, and battalions soon punched across the southern neck of Iwo Jima, reaching the small island’s opposite shore later that day and sealing off the highest ground on the island, the 500-foot volcano Mount Suribachi. This mountain was the next major objective, because from its heights Japanese observers were directing pinpoint artillery, mortar, and rocket fire from all over the island. The mission fell to 28th Marine Regiment, finally cleared most of the mountain four days later.
This resulted in the most famous moment of the battle, when the 48-Star American flag was raised over the summit of Mount Suribachi by troops of E Company, 2nd Battalion 28th Marines. The photograph taken of this event is widely considered one of the most famous and reproduced photographs of all time, and is perhaps the most famous single image of World War II. Entire movies have been made about the taking of this one photograph, it has been used as the basis for the US Marine Corps Monument in Washington D.C.
Of course it was the second such flag raising we see here, the first flag was too small to be seen across the island. Also, the commander of Second of the 28th didn’t want to give up the first flag to the Secretary of the Navy, hence the quote NEED to raise a second flag to send back to Washington. While there’s also been controversy and corrections about the names of the men actually in the photo, one sobering fact remains clear. Of the six men in the photo, three of them would be dead within days because the Battle of Iwo Jima was war, far from over.
SECURING BLOODY IWO
With the beachhead secure and Japanese artillery largely blinded, the grim task of taking the rest of the island began. There were two airfields on the island that had to be taken, along with a third under construction. The 4th and 5th Marine Divisions were joined by the 3rd Marine Division as the battlefront steadily expanded. The craggy ravines into which the Japanese had dug their defenses reduced the eject of supporting naval gunfire. Ground artillery and gunfire was almost useless against the volcanic rock, caves, and tunnels. More air units were brought in for bombing, along with flame-throwing tanks. The Japanese used huge 320-mm rocket mortars, not unlike the dreaded German nebelwerfer. Twenty-seven Marines and Navy Corpsmen would be awarded the Medal of Honor, more than half of them posthumously. For the Corps, this would total almost 30% of the Medals of Honor awarded in all of World War II. Fourteen of the twenty-four Marine infantry battalion commanders engaged on Iwo Jima were killed or wounded. At least one company sustained 100% casualties – every single man in the company had been hit at least once. In all the American landing force sustained 6,821 killed and 19,217 wounded.
When the battle officially ended on March 26, Japanese losses were nearly total. Over 19,000 were dead, only 216 survived to be taken prisoner. But the US Army’s 147th Regiment, garrisoning the island after the battle, was actually rooting out small pockets of hidden resistance for another thee months, pushing the Japanese death toll to almost 21,000. In fact, the last four Japanese soldiers didn’t surrender until January 1949, almost four years after World War Two had ended.
GAMING IWO JIMA
Gaming Iwo Jima presents a tough challenge. We’re looking at incredible fortifications and resilience on the Japanese side, and incredible determination and raw firepower on the American side. Another characteristic of the battle is an absolutely insane level of troop density. Iwo Jima measures just over five miles from tip to tip, and 850 yards across its narrowest point, in all 8 square miles packed with over 100,000 troops (making it the most densely-populated point on earth at the time).
What this means in gaming terms is that you want to stick to lower-echelon levels of wargaming. Small infantry systems like Bolt Action, Valor & Victory, the “Banzai” module for Avalon Hill’s “Up Front” series, Pacific-themed modules and expansions for Advanced Squad Leader, and so on. This is “scale one” wargaming, with individual fireteams, squads, platoons, and weapons crews, primarily infantry-focused. Armor is almost none-existent … there were flamethrowing Marine Shermans on Iwo, but less than a company in a battle that again involved almost 100,000 people. So these units would be very rare on an individual gaming table.
Larger-scale support weapons are tricky. While the Americans brought tremendous naval bombardment, ground artillery, and air power to bear, these were shown to be largely ineffective against honeycombed Japanese defenses. Similarly, Japanese artillery, while fierce and inflicting the majority of Marine casualties, was also blinded by the loss of Suribachi. However, most of the island was had been pre-sited by Japanese artillery crew, somewhat offsetting this disadvantage.
Asymmetrical victory conditions would be vital here. The Japanese player has to know he’s going to lose, and lose to the last man. American numbers and firepower, especially close support weapons like man-pack flamethrowers, bazookas, and satchel charges, will always turn the tide. The key for a Japanese win in the game is inflicting American casualties. To that end, be sure your scenario puts the Americans on a clock, with aggressive objectives required a very tight timeline. This way the Americans can’t just bombard the Japanese with their support weapons in the hopes of storming empty caves, tunnels, and pillboxes.
In a word, just keep in small-scale tactical. “Scale two” gaming (command tactical) doesn’t really work since there’s no real room for battalion, regiment, and brigade level maneuver. Also, because there was no real response from the Japanese navy or air force, operational “scale three” games might not be that engaging either. No matter what, if you’re gaming Iwo Jima, take the subject seriously. This isn’t one for beer & pretzel night.
So that’s it, everyone. We hope you enjoyed this all-too-brief look at the 75th Anniversary of Iwo Jima and some ideas on how to bring it to your wargaming table. The anniversaries for key points in this battle will continue for the next 36 days, so stay tuned for further updates. We’re signing off for now, thanks very much for reading.
Building Up Armies for 75th Anniversary Iwo Jima Wargames
Getting ready for some possible Valor & Victory games with refreshed / upgraded USMC and IJA counters – February 1945 Iwo Jima – 75th Anniversary.

Live Stream - Iwo Jima 75th Anniversary - Valor & Victory
Hello, everyone. This Sunday at 1PM EST / 6PM UK Time, we’ll be featuring a live stream wargame commemorating the 75th Anniversary of the Battle of Iwo Jima.
The initial landings took place on Feb 19, 1945 (see our 75th Anniversary Commemorative Ops Center episode here). But the battle continued through five more weeks, including battles at places like Mount Suribachi, the Quarry, the Meatgrinder, Hill 362, Motoyama, and Kitano Gorge.
So we’ll be running a series of games to mark some of these events, pitting US Marines of 3rd, 4th, and 5th Marine Division (V Amphibious Corps) against Kuribayashi’s hardened 109th Imperial Japanese Army Division.
You can tune in on Twitch, YouTube, or Facebook. I hope to see some of you there!
YouTube channel and Twitch.
Preparations complete for today's game
Good afternoon all,
The Iwo Jima Valor & Victory game is running today at 1PM EST / 6PM GMT.
We’ll be looking at “E” Company, 2/28th Marines, trying to scale the eastern slope of Mount Suribachi against elements of 312th Independent Infantry Battalion, 2nd Mixed Brigade, 109th Division of the Imperial Japanese Army.
Check out the Sitrep Podcast Channel on YouTube or Twitch:
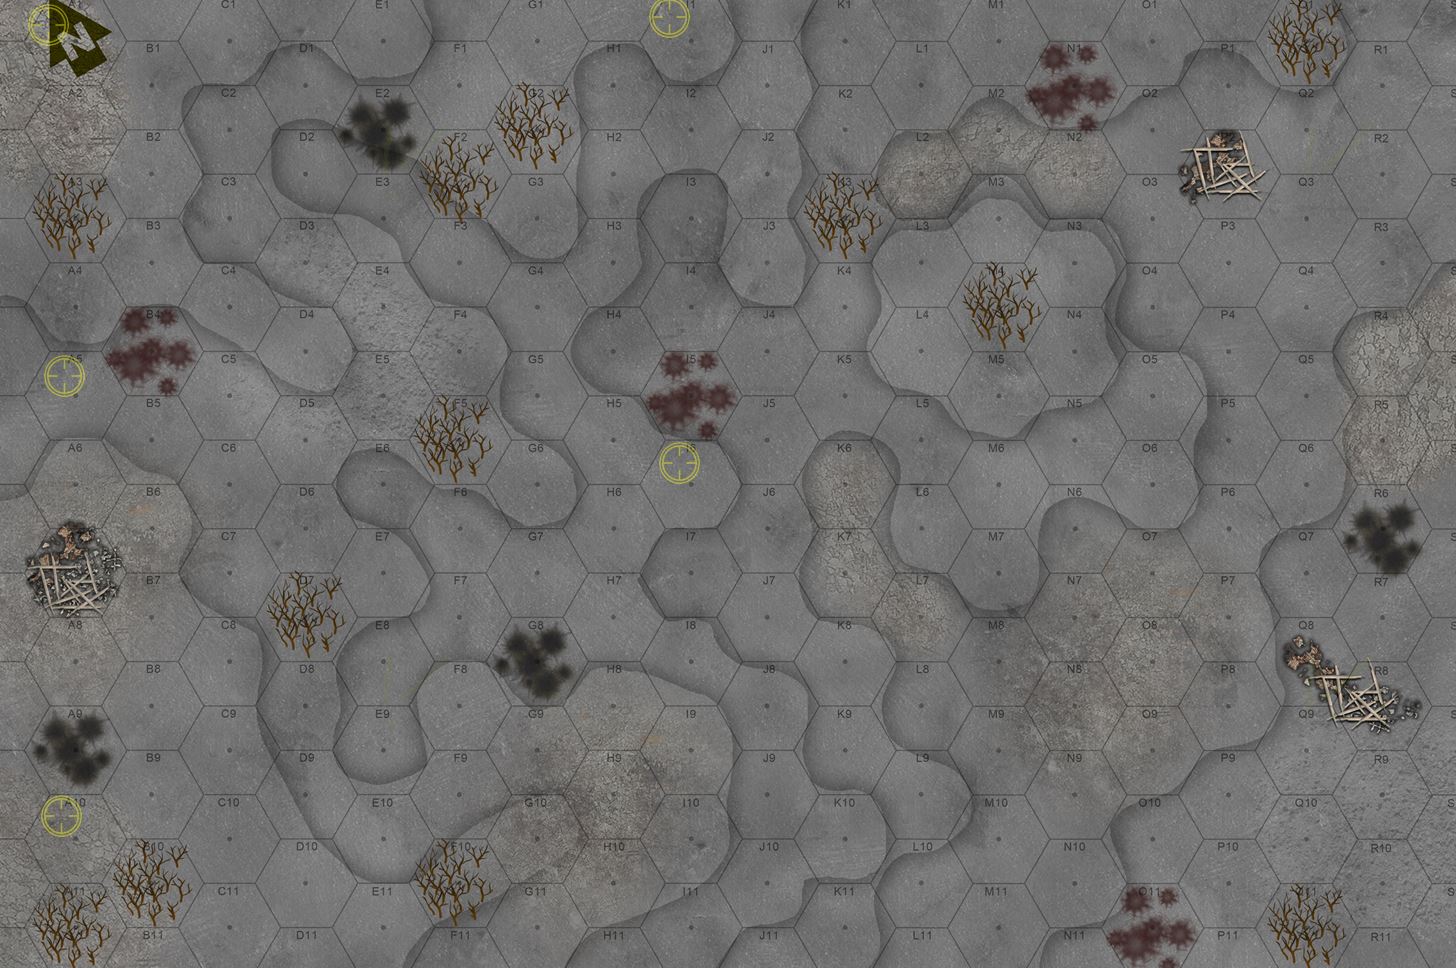 Here is the map. Obviously we have some very jagged elevation here, sloping up from low ground in the east to high ground in the west. Objectives are marked, the Marines must take at least three of them within six turns. Crater markers are the same ones I created for World War I Valor & Victory. There are also "dead trees" hexes new for this game, I'll be counting them as +1 HINDRANCE rather than a +2 OBSTRUCTION.
 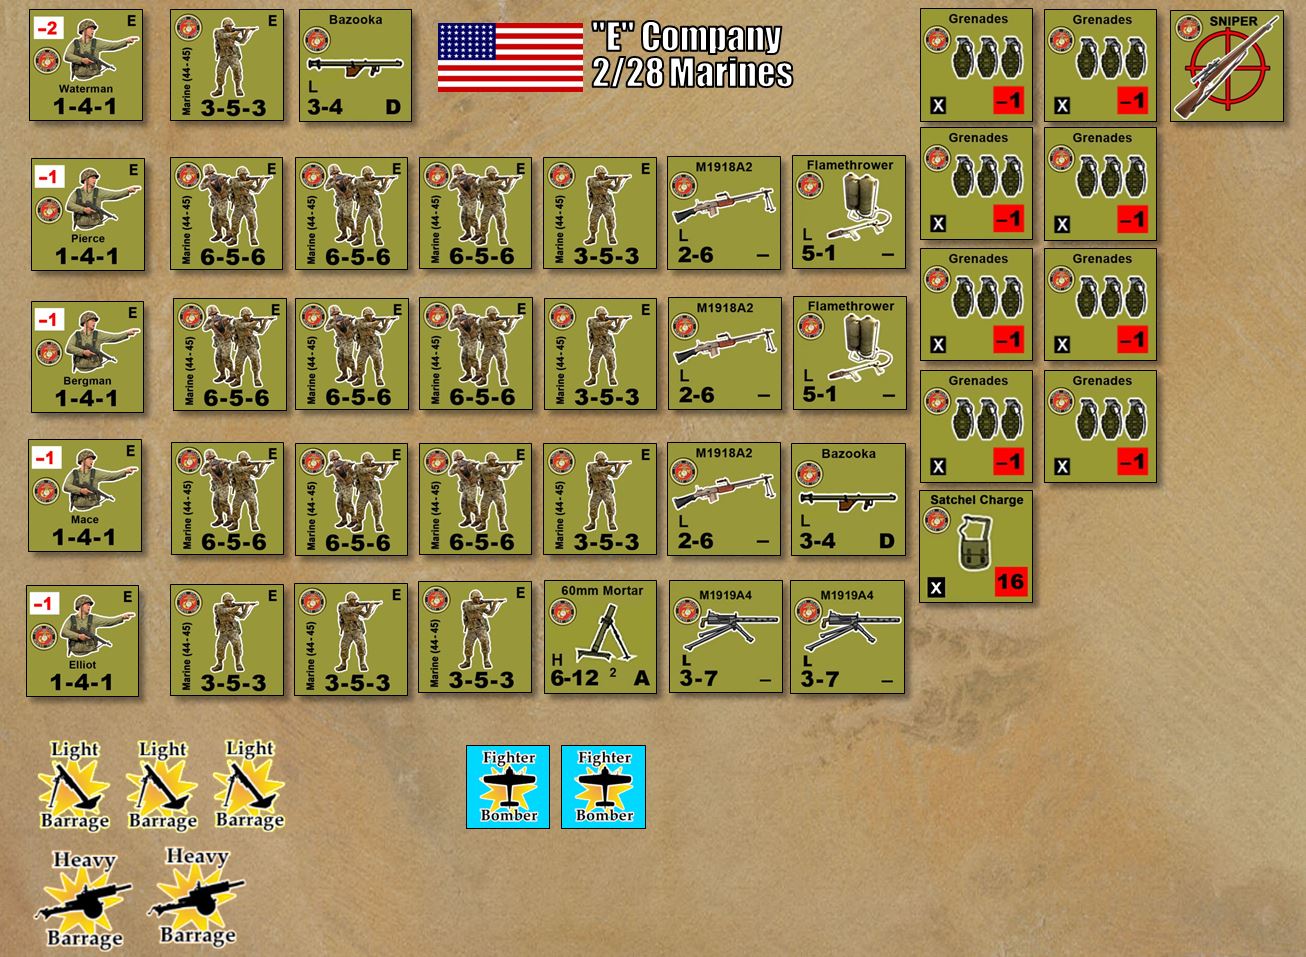 The Marine Force, showing 105 officers and men. Constructed per F-Series TOE / OB FM-1 dated May 1944, nothing above battalion level, accounting for several days of casualties (a full Marine rifle company would actually be a lot bigger than this). Included are flamethrowers issued from Battalion S-4, but everything else is right out of standard company OOB, including M1919A4 .30 cal machine guns, Bazookas, and 60mm mortars. Support missions include three light barrages (81mm mortars) from battalion, two heavy barrages from regiment (28th Marines), and two fighter-bomber strikes (F-4U Corsairs from USS Bunker Hill).
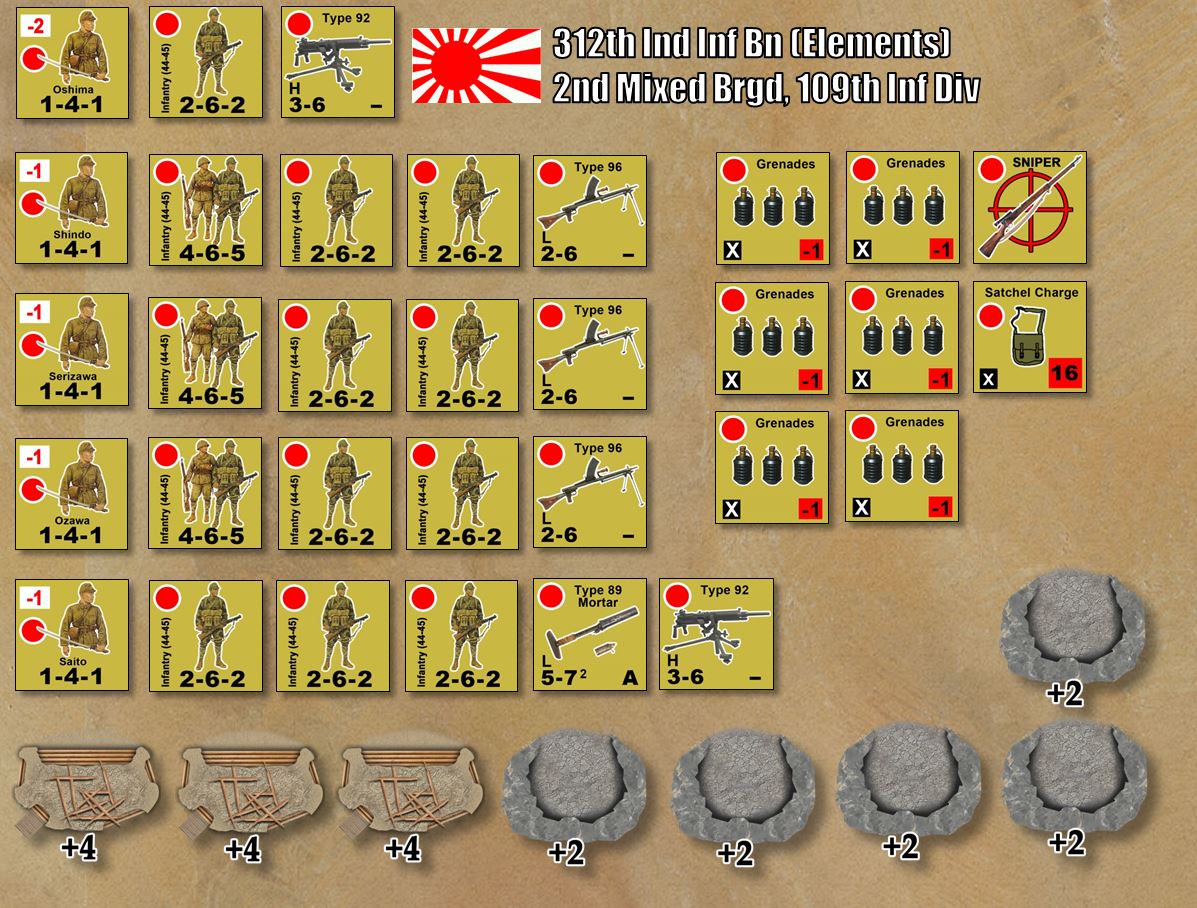 Japanese force, showing an understrength company from 312th Independent Infantry Battalion, 2nd Mixed Arms Brigade, 109th Infantry Division of the Imperial Japanese Army. The 312th were the troops assigned to defend Mount Suribachi. Note the new bunker and cave entrance counters created for this game. Japanese infantry will be able to travel UNDERGROUND between cave entrances so long as the entrances are within four hexes, very handy when the Marines are sweeping the ground above with .30 cal, flamethrowers, and mortar fire.
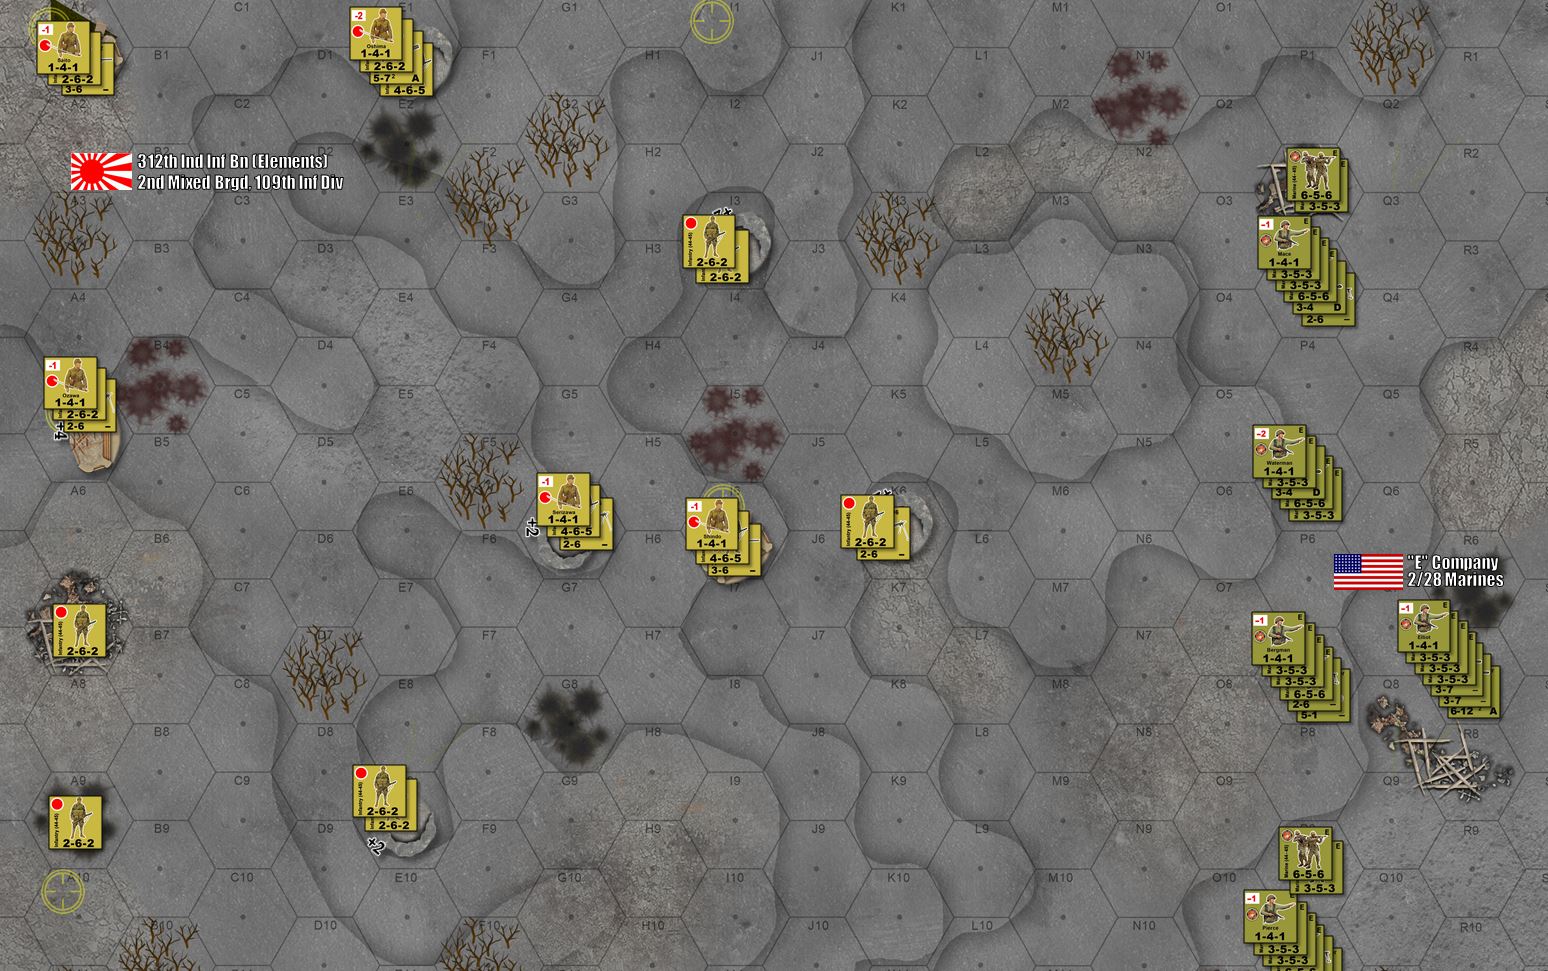 Initial set up. The Marines are all out of sight or at least out ofr range of Japanese weapons. We'll kick off with the American "command phase" at the beginning of Turn 01.
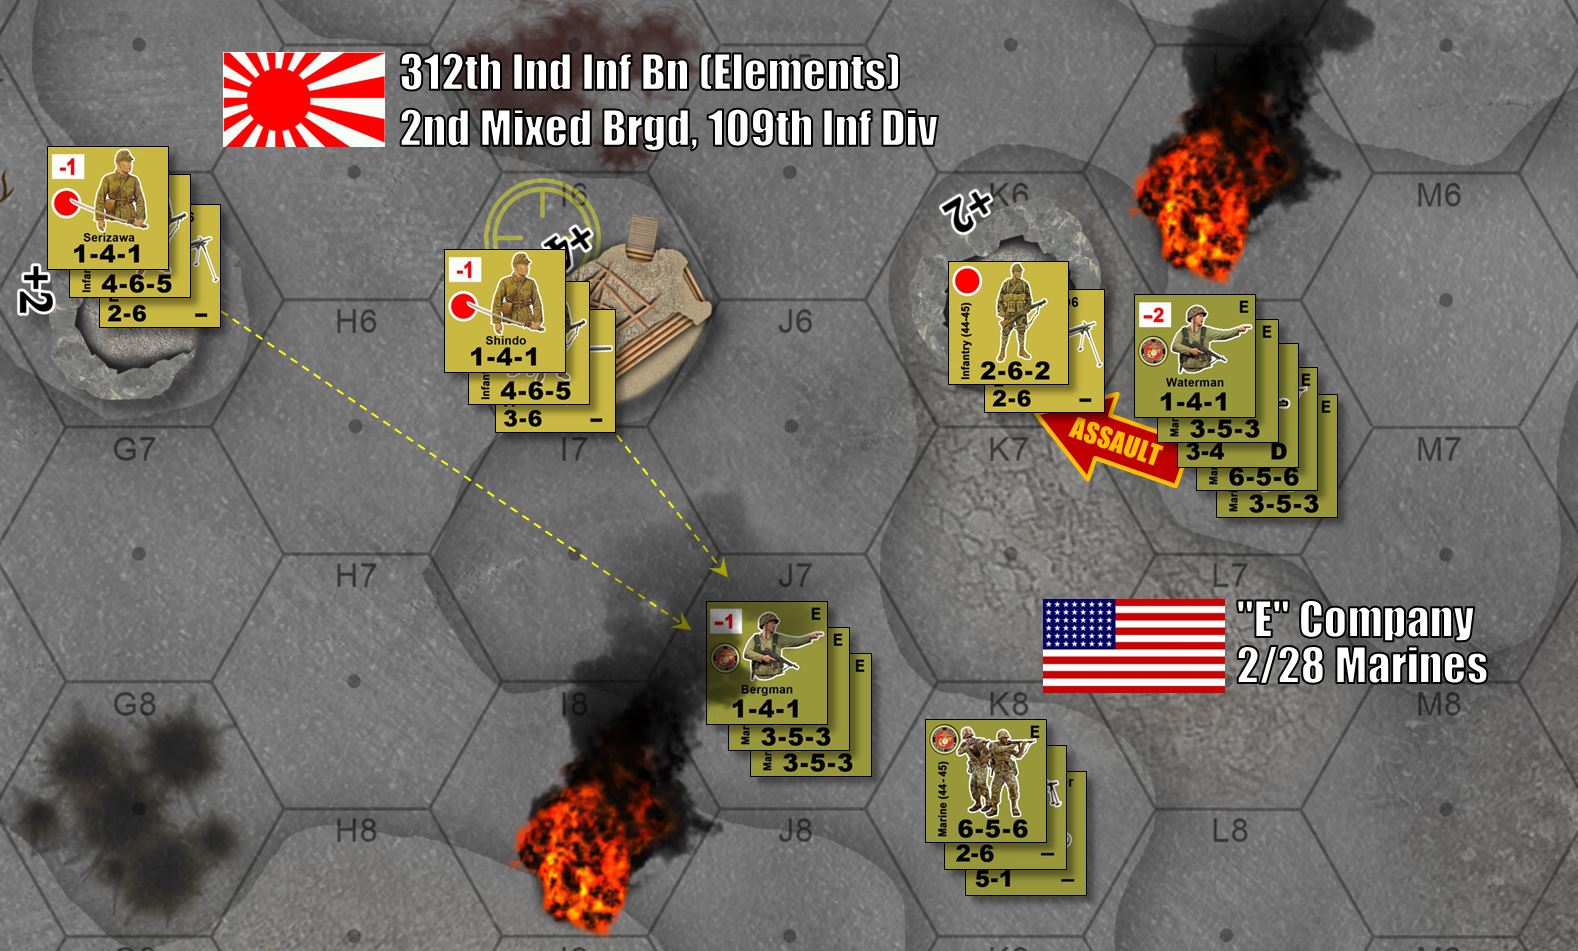 Here's what some of the action might look like. Tune in today to see how it goes down!
 "Yankee Squadron" - US v. USSR - AirWar C21 in the World of Team Yankee
August, 1985. As described in the novels by General Sir John Hackett and later Harold Coyle, the Cold War is about to go hot in Europe.
With games like Team Yankee and NORTHAG giving us a great look at what ground combat might have looked like in a potential European World War III, we’re using AirWar C21 by Wessex Games to take such conflict into the skies.
Had such a war ever occurred, the first (and probably most vital) phase would have been a clash of air power over the prospective battlefield. Only the side that won air superiority would be able to commit ground attack assets like A-10s, Su-25s, Hinds, Cobras, Apaches, etc.
This is Part Two – walking through a beginning game of AirWar C21 set in 1985. We’ll be pitting a pair of American F-16 Falcons against a pair of MiG-29 Fulcrums, meeting over West Germany, part of a vast air battle to determine control of the skies over the Fulda Gap.
x2 F-16C Fighting Falcons
512th Tactical Fighter Squadron, 86th TFW
Ramstein Air Force Base, Germany
x2 of MiG-29A “Fulcrums”
773rd Fighter Aviation Regiment, 6th Guards Fighter Aviation Div
GSFG, Merseburg
IMPROVED AUDIO, I’m happy to say.
YouTube channel and Twitch.
Battlefield: Revolution 1775-81
As part of Sitrep Podcast’s new broader historical focus, we’re hosting a live stream this evening for Battlefield: Revolution, a new game we’re playtesting for the community. The game puts the player in tactical command of small-to mid-sized battles of the American Revolution, putting the destiny of American liberty, or loyalty to the Crown, in their hands.
Live Stream: Sitrep Podcast Channel
The game has been extensively playtested in “pre-alpha” solitaire, tonight will be the first test with a “live” player (@elessar2590).
We hope you’ll join us as a brand-new community wargame comes out of the gate!
 Scales: 100 yard hexes, 10-minute turns, company+ counters (60-100 men)
 Fast, clear, simple rules for formation, linear tactics, charges, command, and morale
 Factions include Patriot (Continental and Militia), British Army, Loyalist Militia, Native Americans, and Crown Germans ("Hessians"). French to come.
 Historical map for the Battle of Trenton, 26 December 1776
 Replay of Trenton in progress. Balancing complete Hessian surprise vs. extreme American victory requirements (not a single unit lost historically) has been tough with this one.
 Successful Playtest
So we had a pretty solid first swing at Battlefield: Rebellion last night. A few rules errors here and there, but not bad for a first live game. @Elessar2590 stood tall for the Crown, while @Oriskany did justice by the Patriots.
The playthrough of the first six turns is on Sitrep Podcast YouTube.
Images from yesterday's game
Just a few screen captures from yesterday’s game with @elessar2590. Big thanks to him for helping us out with this playtest, it was great getting insight form an expert in the French and Indian Wars and Napoleonic Wars! 😀
 British force for the game. This was a hypothetical, non-historic game with evenly matched forces and commanders for playtesting purposes. The Crown force includes one line regiment (line infantry +flanking companies of grenadiers and light infantry), and one auxiliary company of Loyalist militia.
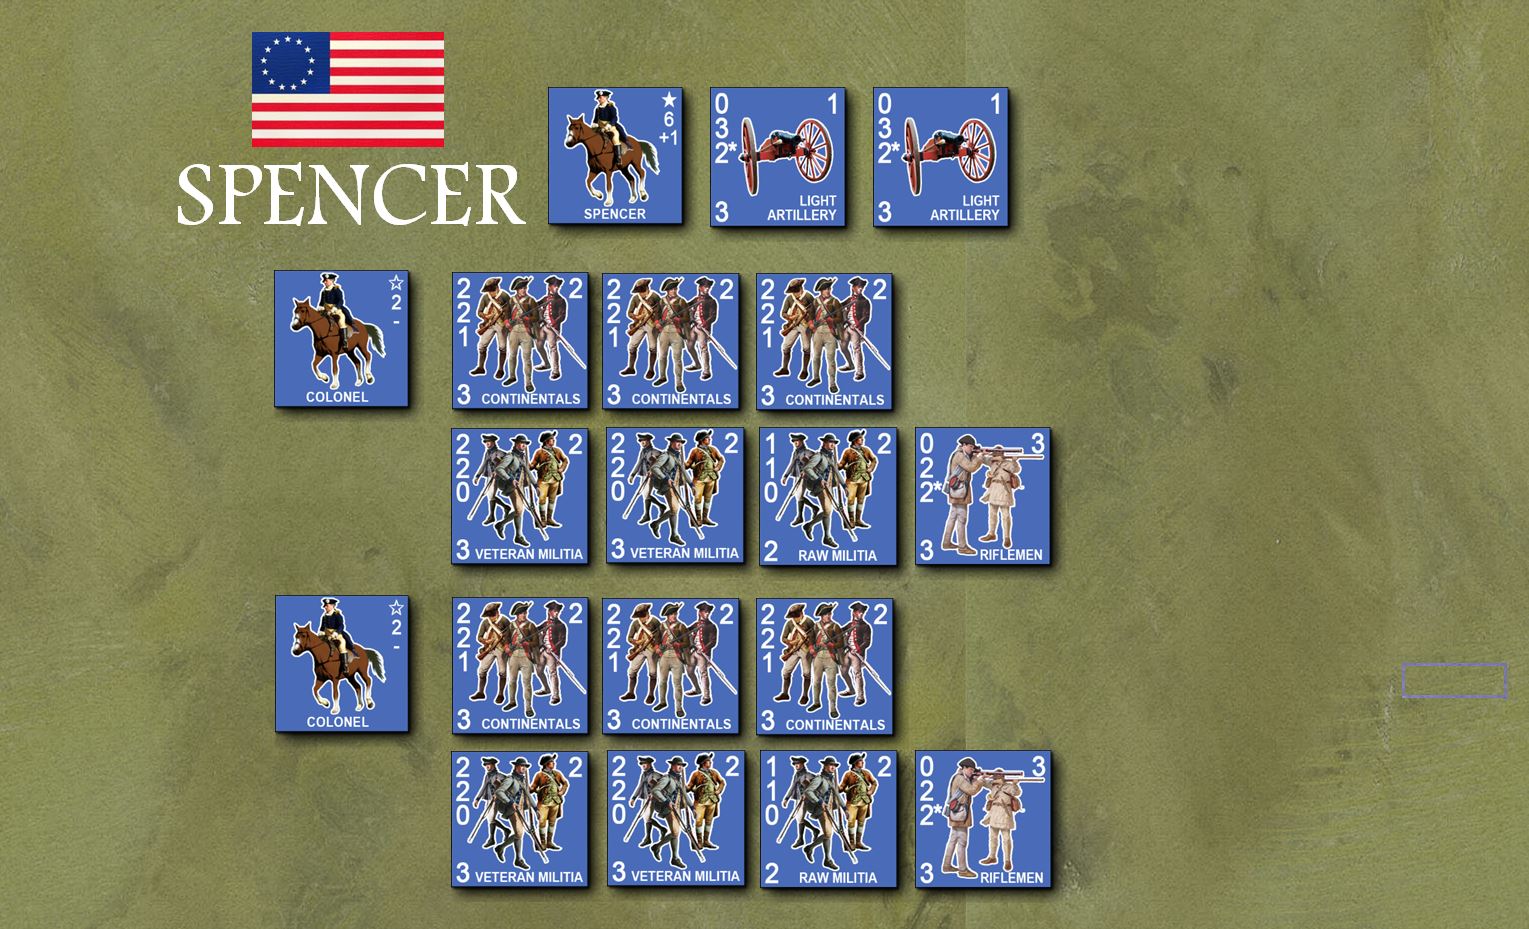 American force, with the understrength regments of Continental Regulars, filled out with a mix of veteran and raw militia. Both regiments also have a detachment of the dreaded American riflemen.
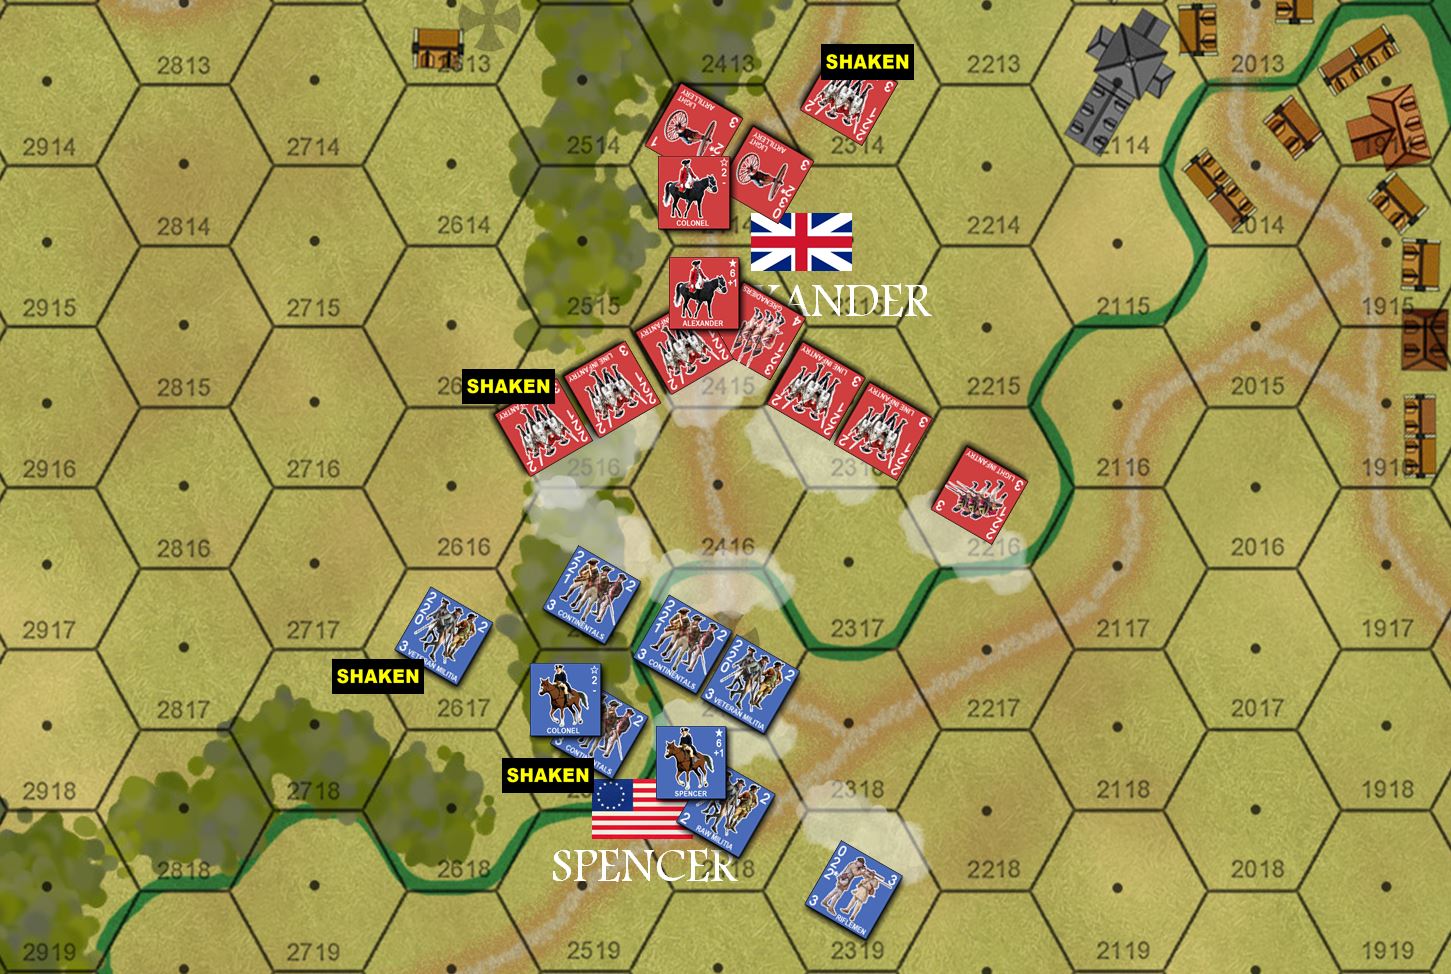 The situation on Turn 5 on the American right. Although I was holding well for the moment, I had lost both divisions of American artillery (6 pounders) in some forced withdrawals / stacking violations. So British artillery would be unchallenged from here on, and I'm sure they would eventually help break my hold on the objective hex (ford over that stream).
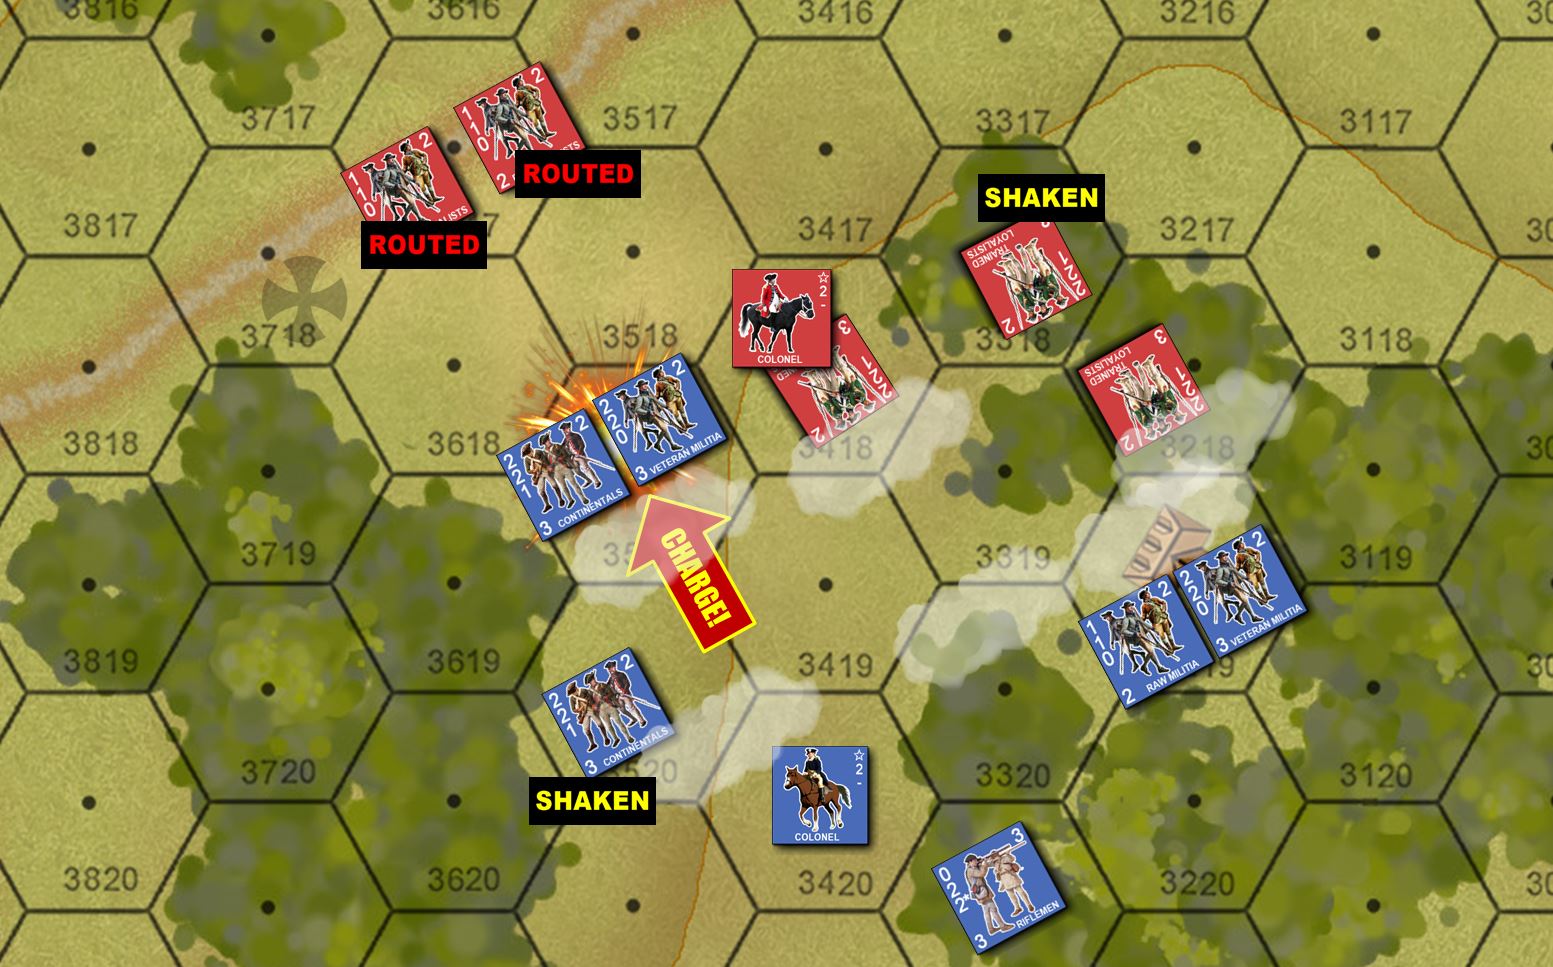 I was doing better on the American left. I had broken the "Tory" militia with a charge of two companies of New York regulars, and was still holding that objective hex (hunting lodge). Pretty sure I would hold that lodge, and take the objective hex to the northwest. So even if I lost that ford on the eastern port of the field, I would be left with three out of five objectives on the table and thus a narrow American win for this game overall.
Live stream with Elessar2590 and Oriskany, 10PM UK Time
Today we have the return of @Elessar2590 to our stream, where we’ll be taking another look at BATTLEFIELD: REBELLION, our new command-tactical wargame of the American Revolution. With slightly redesigned counters and tweaked turn sequence, we’ll also be rolling out some new factions for the first time, namely the Crown Germans (“Hessians”) and the Native Americans of the Iroquois Confederacy, which played such a crucial role in the northern campaigns of 1775-1779.
Video Stream - Elessar v Oriskany- Black Powder Historical Madness
Another successful playtest! American riflemen sniping Crown commanders! Iroqouis lurking in the woods! Crown German grenadiers in a charge! German jaegers (riflemen light infantry) pinning down Continental regulars! LOOT THE TAVERN! The end of this battle is a pure madness of command-tactical black powder combat.
Thanks to everyone who came out to our stream!
And thanks to @elessar2590 for a great game, and for working through small rules changes that we’re still writing as we continue our live playtesting of the new Battlefield: Revolution system! 😀
Elessar 2590 v. Oriskany, Battle Highlights
As community members are asking how this battle went between @elessar2590 and myself, let me offer a quick “cliff notes” outline of some of the highlights.
- We’re still playtesting the system. In this game we wanted to try out some new factions, namely Crown Germans (“Hessians”) and Native Americans of the Iroquois Confederacy.
- Since we’re still playtesting, the games are kept “impossibly equal,” and so are not historical battles.
- That said, these kinds of battles happen all the time in the 1777 New York Campaign, with elements of Germans and Native Americans detached from the main Crown Army (Burgoyne) to fight in the frontier wilderness of upstate New York. They were often checked by columns of American Continentals or (more commonly) militia.
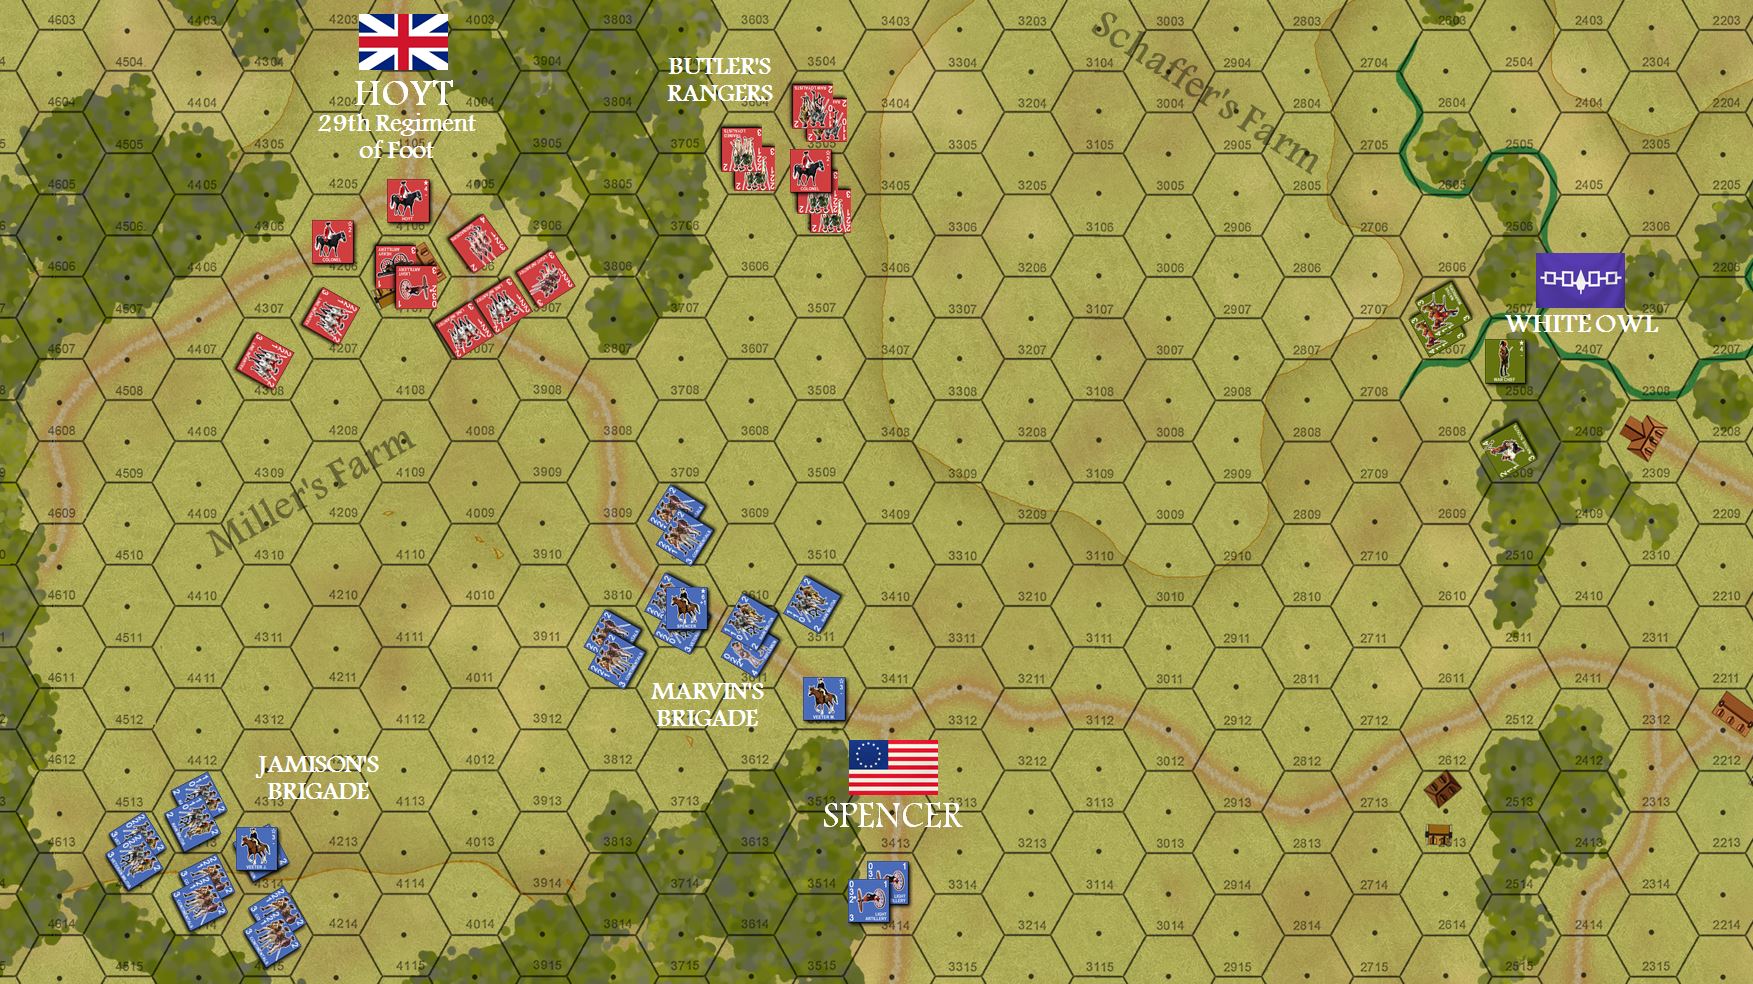
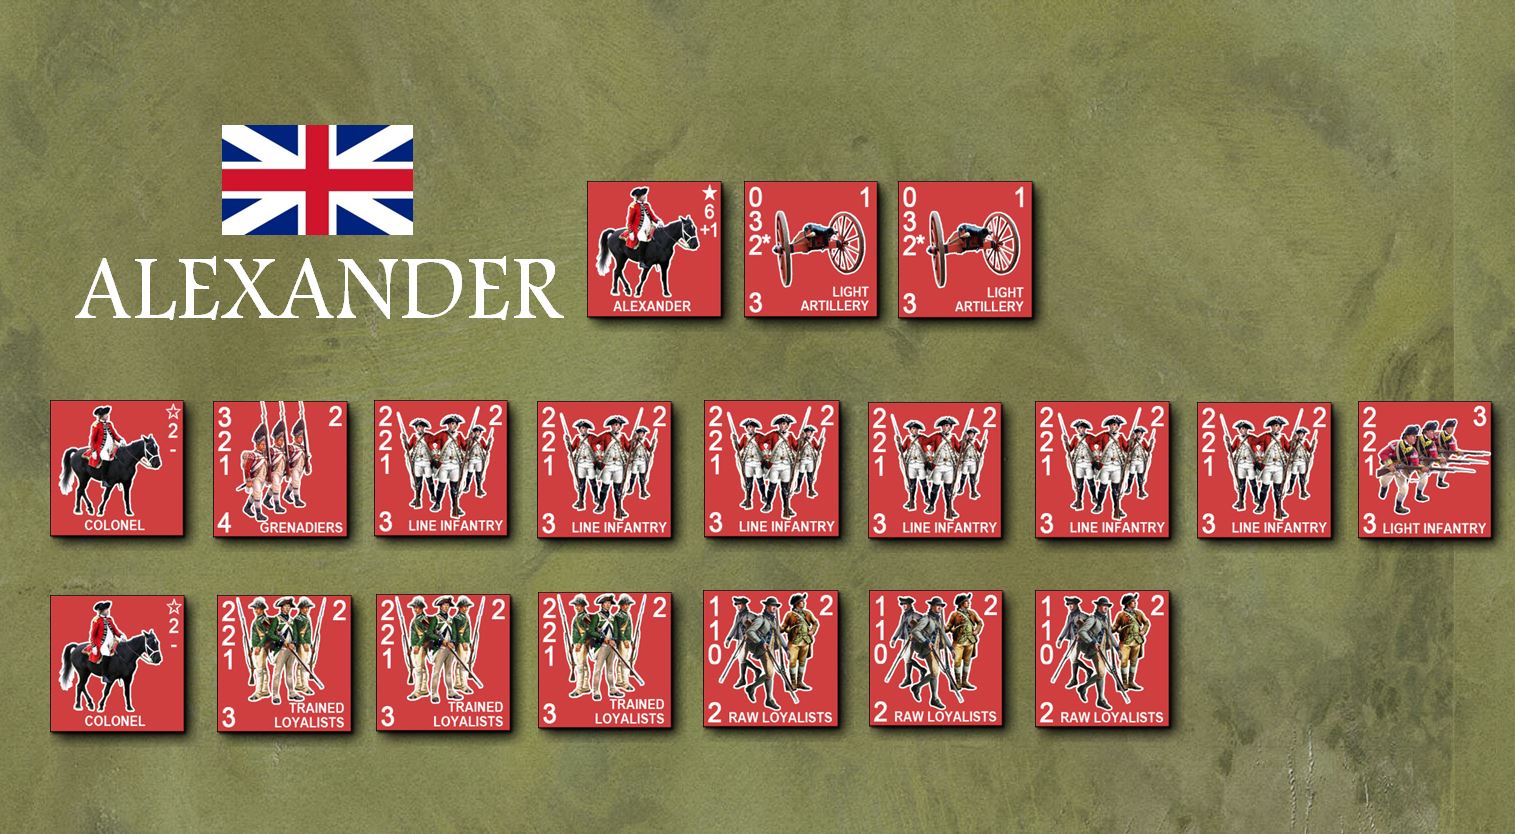
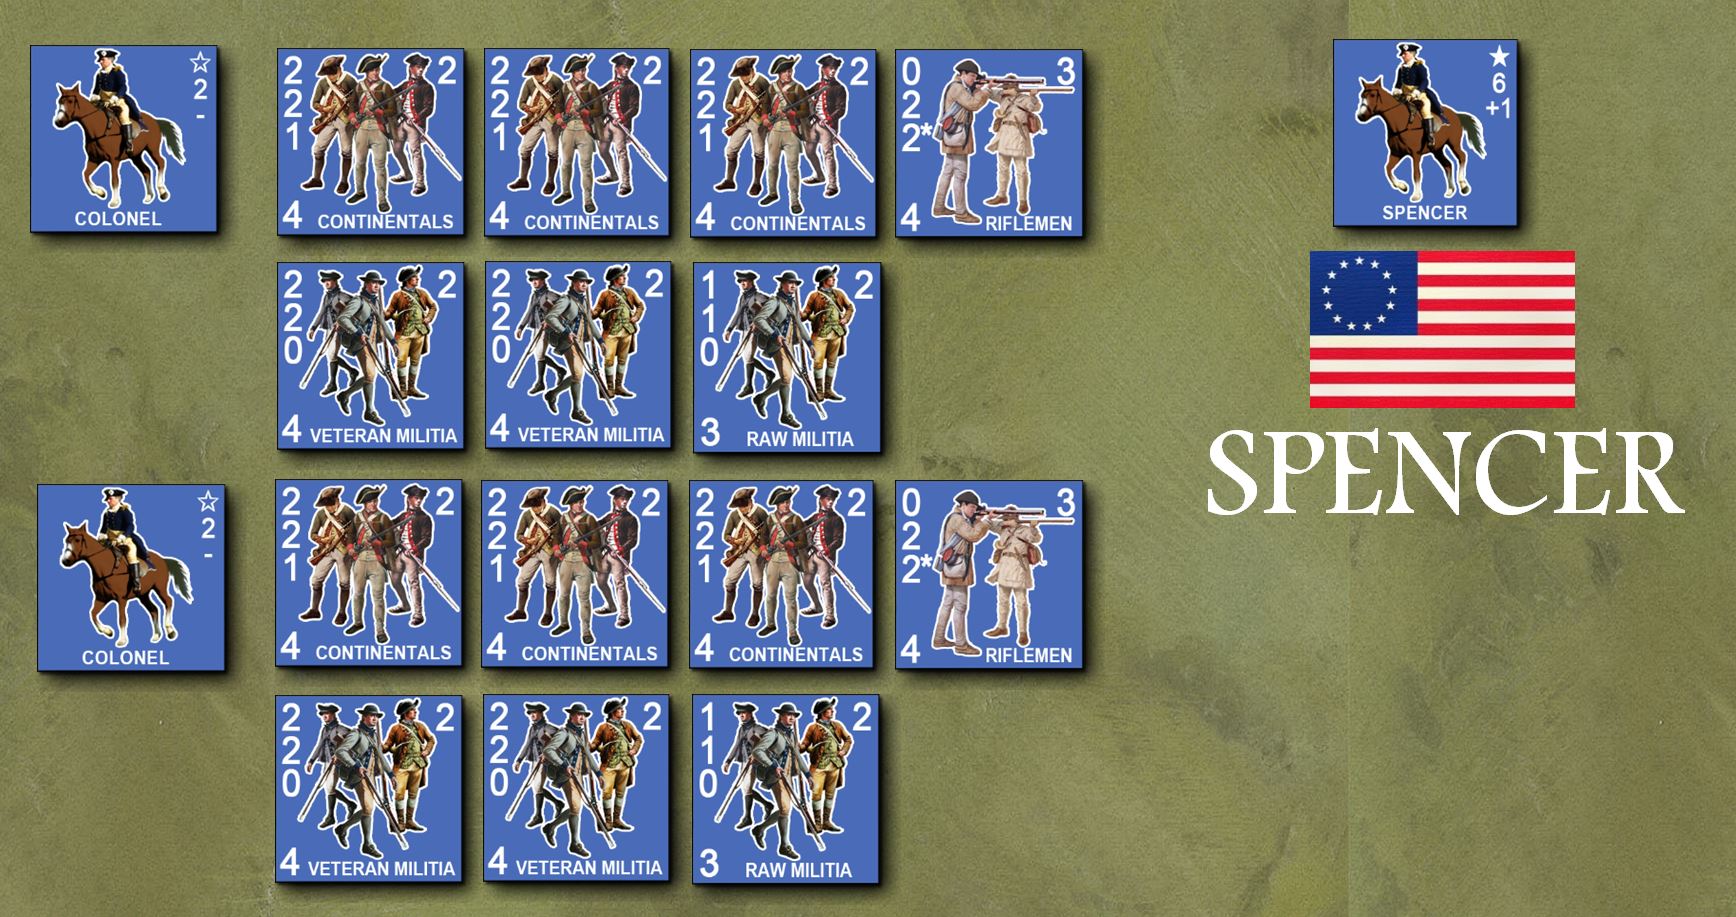 Here’s the American force. We have the fictional Brigadier General Spencer in command of two mixed regiments of Continental regulars, trained and raw militia, and riflemen. Two colonels command the regiments. We’re looking at 14 units (very roughly, 60-100 men, call it two companies each) so just over 1100 men.
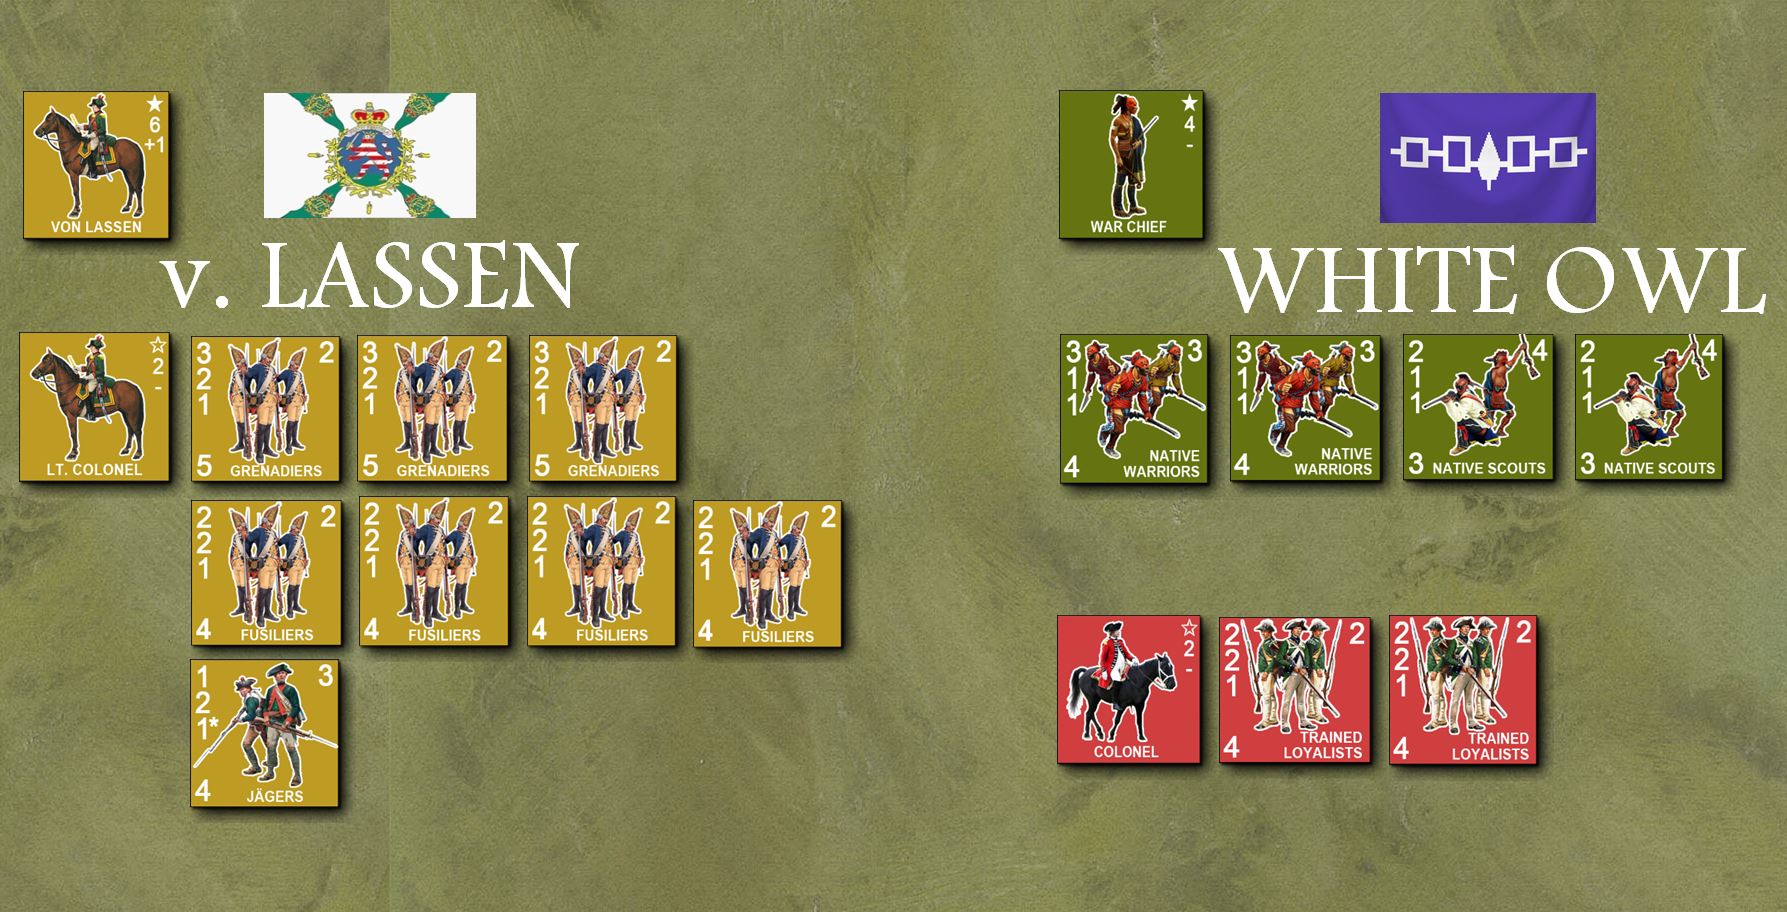 Here’s the Crown force. It’s a little different, but about the same in power. We have an understrength regiment of Hessian grenadiers (only 240 strong), along with fusilier “line infantry” and a detachment of jaegers. The fictional Colonel von Lassen is in command. Unlike British regiments of the day, most Crown German states of the day (Hesse, Brunswick, Saxony) organized their grenadiers into their own regiments, although these were few and understrength, as we see here. There is also a contingent of Mohawk Iroquois under the leadership of fictional war chief “White Owl,” and a detachment of local “Tory” loyalist militia.
 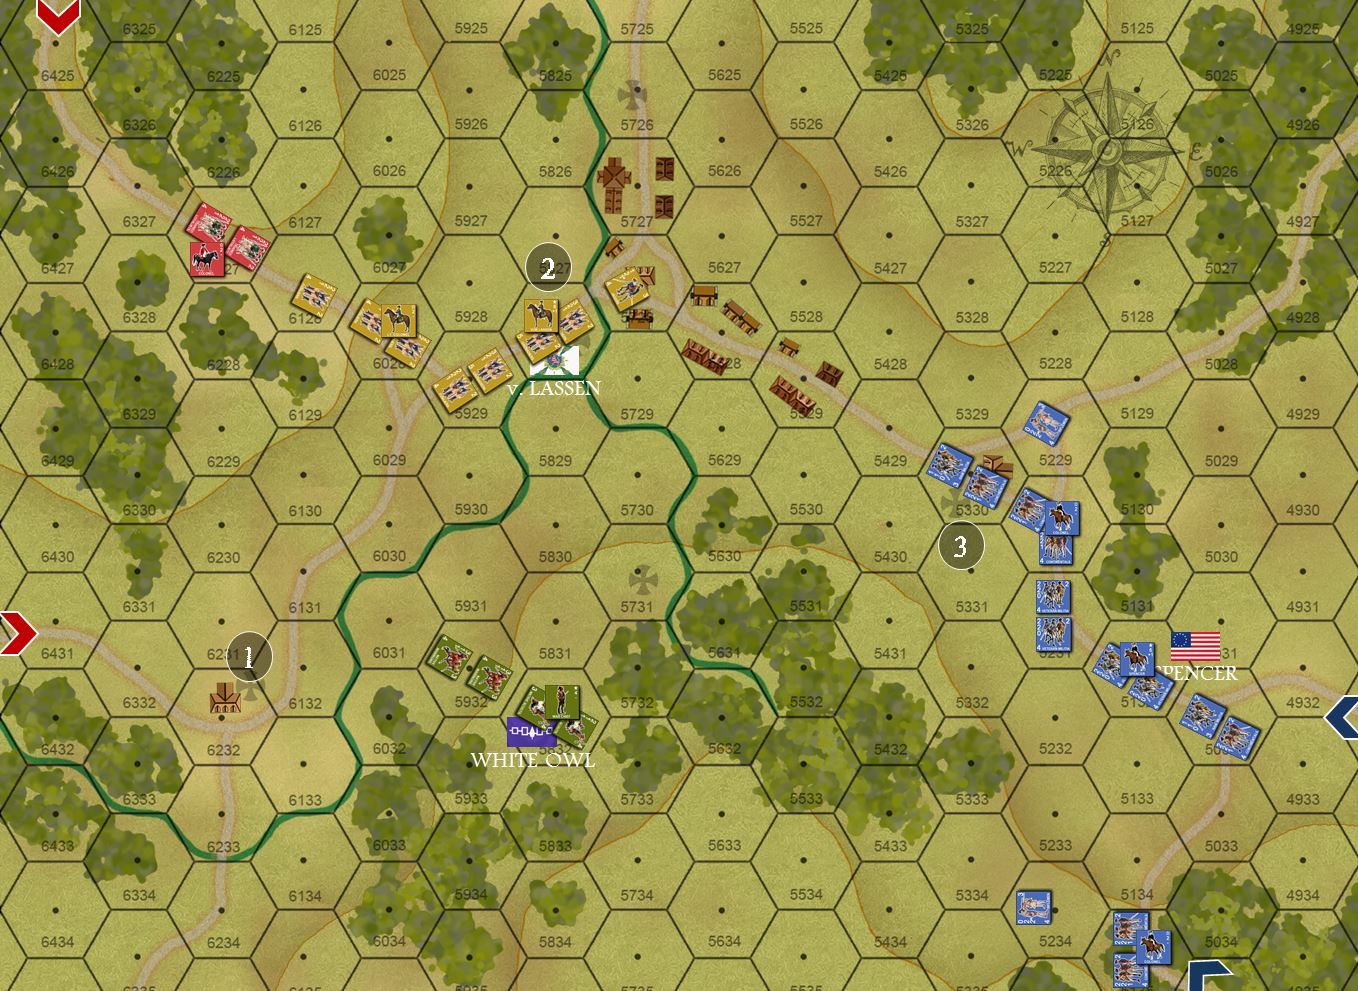 We rolled dice to determine that I would play the crown, and Dylan would play the Patriots. Dice also determine that I am the “attacker” and so move on to the table first. I approach along the west and northwest roads (entry hexes indicated). My Iroquois (VERY fast warriors) seize the West Tavern (1) and my light Hessian Jaegers move fast and seize the objective bridge leading into the town from the west (2). Meanwhile, the patriots also come in from the east and southeast, seizing an objective at the East Tavern (3). The Patriots detach a three-company battalion to the south under command of one of their colonels, wary of the Mohawk Iroquois I might try to work around their left wing.
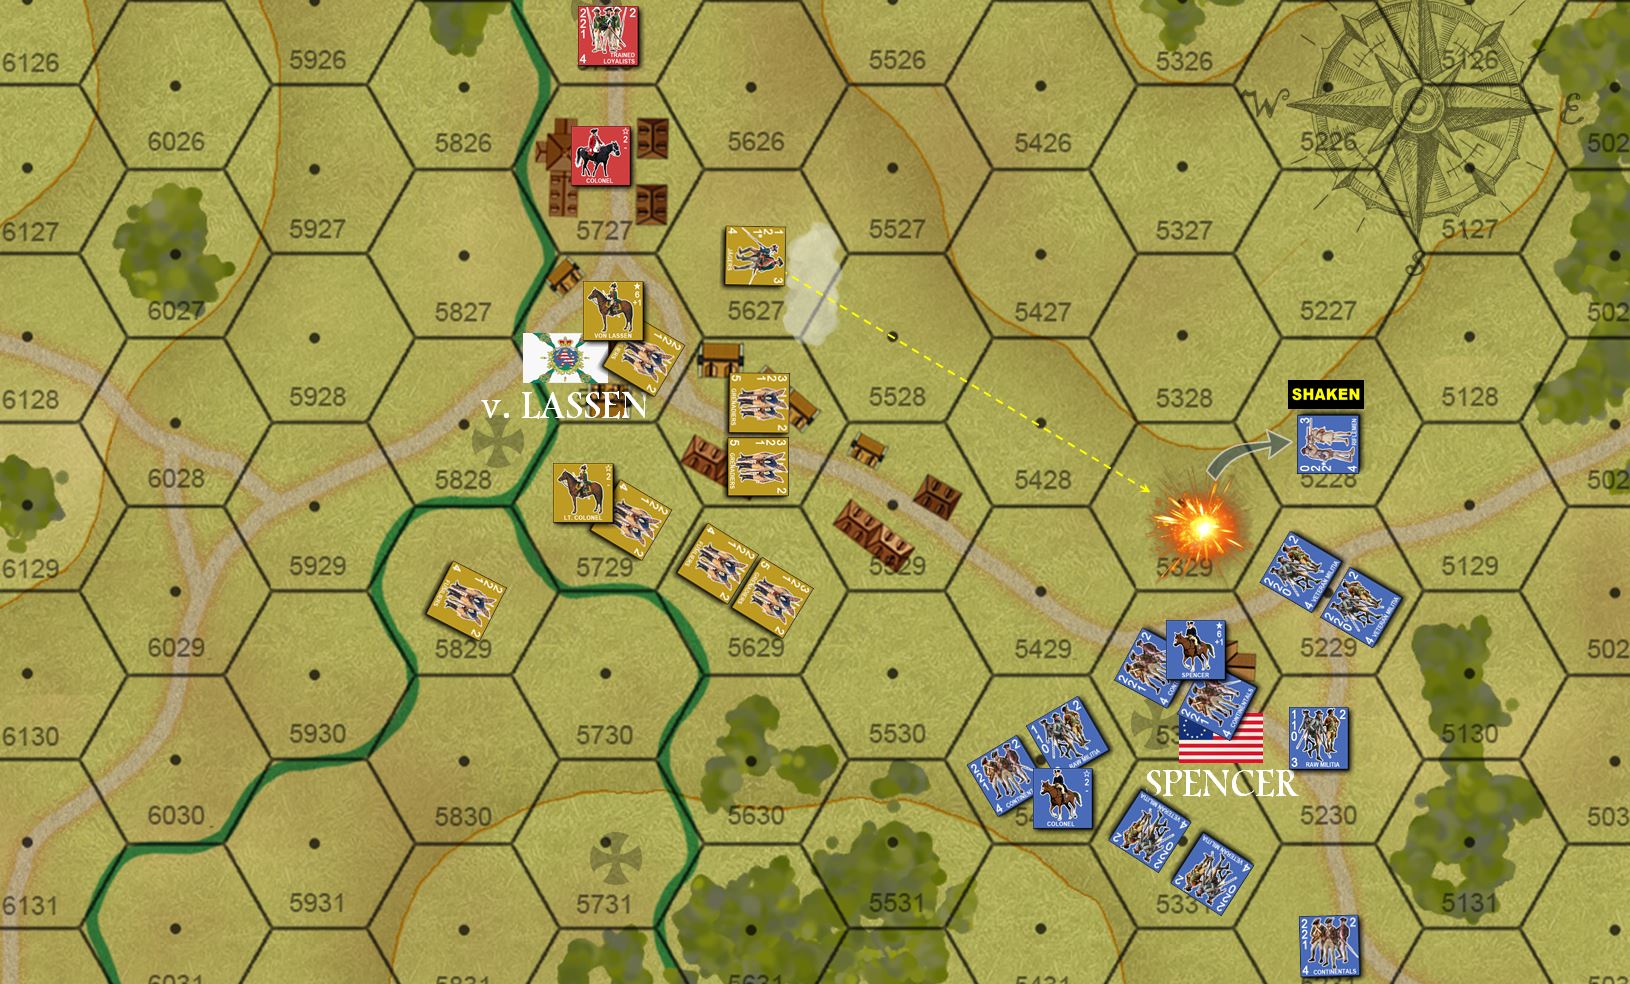 Shots fired! As the brigades close, my jaegers get the drop on an approaching column of Pennsylvania rifles. At long range (only riflemen and jaegers can engage at this distance), I manage to scare them off a little.
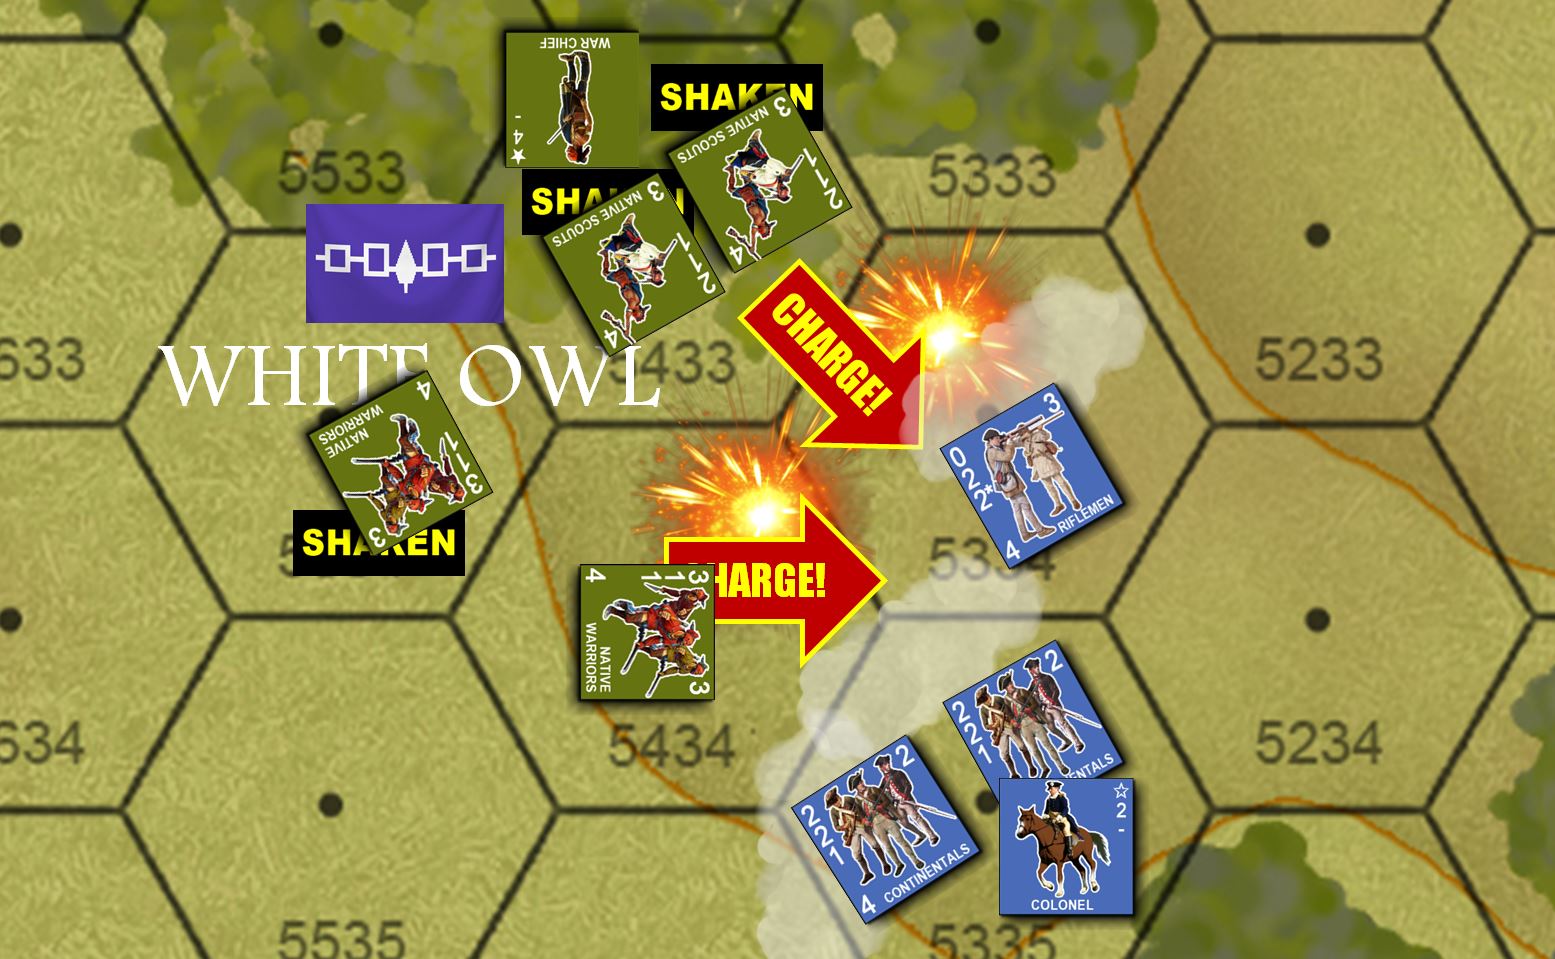 The battle starts in earnest not between the opposing main bodies, but in the south. Here I launch a screaming charge out of the woods with nearly all my Mohawk Iroquois (not all of them can quite reach the Patriots). However, Elessar2590 carefully portions out his interruption fire as I charge in, foregoing the possibly of KILLING any units for simply breaking up the charge and saving his extremely vulnerable riflemen. It’s a smart but risky decision that pays off. None of my war bands are KILLED or even seriously damaged, but the charge never really happens. Luck turns against me, though, as White Owl himself catches a stray bullet and is wounded.
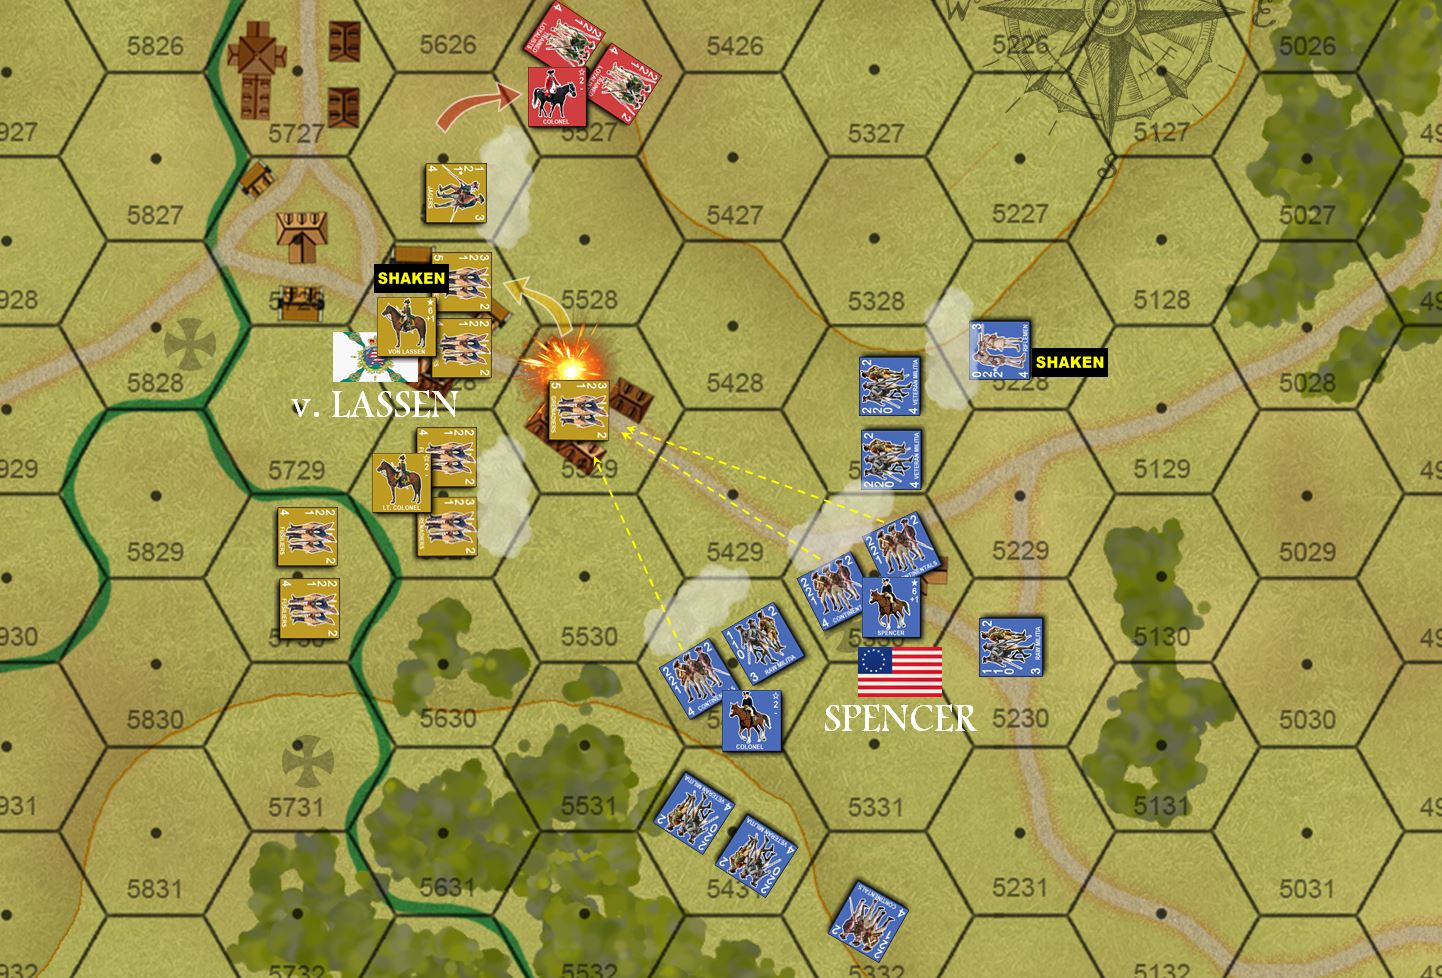 The main battle in the north finally gets underway. By opening volleys have missed, but return Patriot volleys are more effective. However, despite the firepower, these opening volleys are made at VERY long range for smoothbore muskets, the target are my very tough Hessian grenadiers, deployed between wooden buildings for cover, and with Colonel von Lassen’s +1 leadership bonus. Nevertheless, one company is actually shoved back a little. Meanwhile, my Tory Loyalists have taken ANOTHER objective along the north road (out of shot) and are now poised to take the high ground north of the developing battle.
 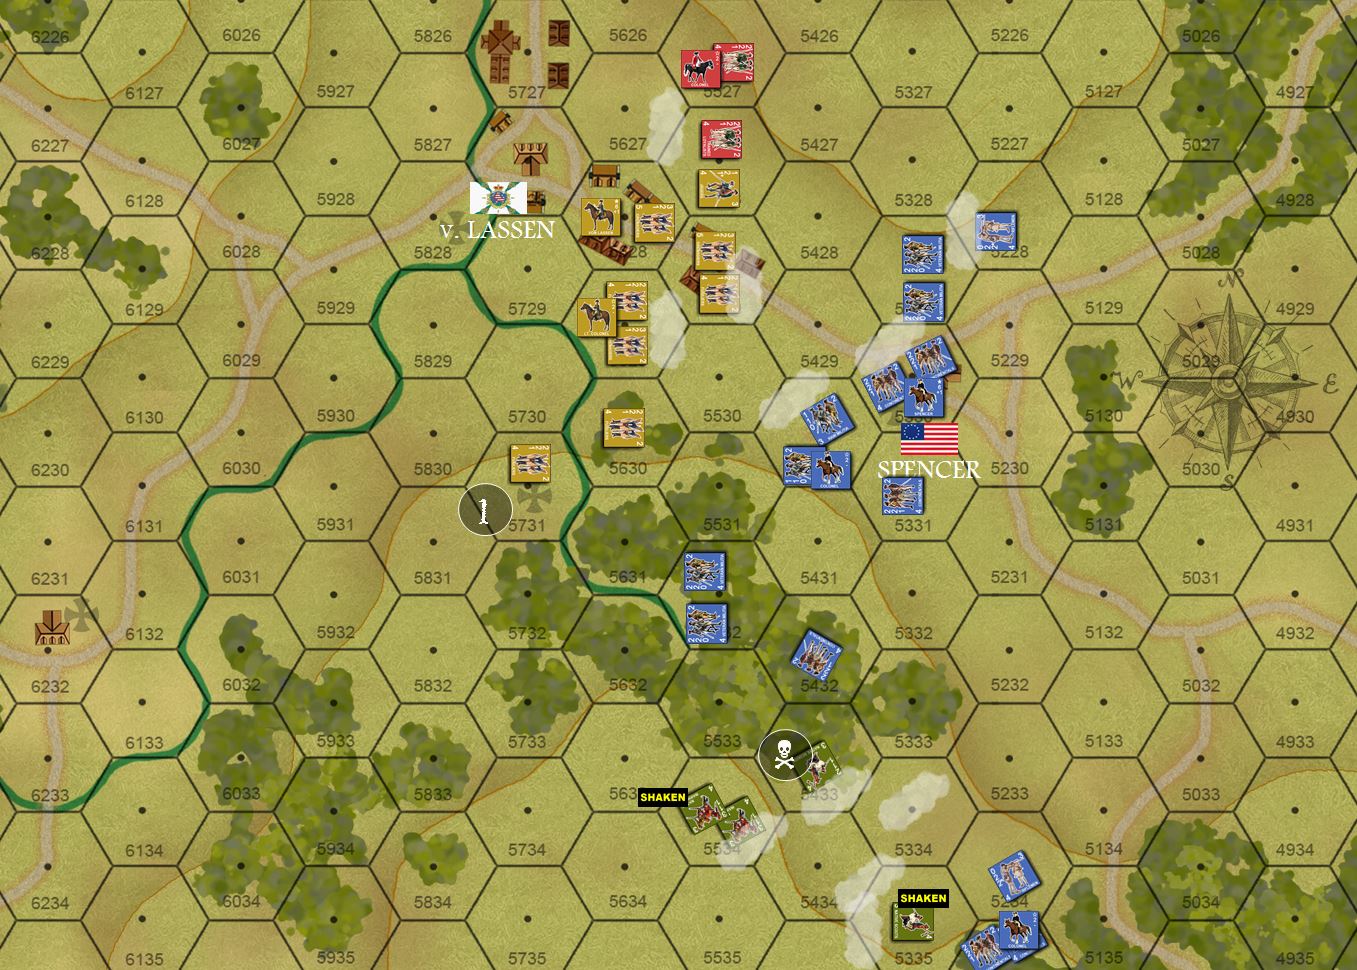 The situation at the end of Turn 4. I’m totally winning on objectives (note I’ve taken the “+” objective marker marked by the “1”). However, my south wing is in danger of completely falling apart. Here, Elessar2590 has chosen to use his Patriot riflemen not to attack my Mowhawk warbands, but try to SNIPE my wounded leader, White Owl (a special ability for Patriot riflemen, renowned and infamous for deliberately targeting Crown commanders). It’s a tough roll, and it means basically not getting a normal attack that turn, but Elessar2590 makes the shot and White Owl is killed (skull and crossbones marker). This means that these Iroquois are no longer under command (the game has strict rules for command radius, etc.), and what few survive in good order are basically helpless unless DIRECTLY attacked or if I can get another commander down there.
 More to come! Stay tuned!
Again, the whole game is available on video:
80th Anniversary Games and Shows
We’re working on a new mini-project, commemorating the 80th Anniversary of the the opening of “Fall Gelb” (Case Yellow) – the great German blitzkrieg that smashed into France, Belgium, the Netherlands, and Luxembourg on May 10, 1940.
So far we’re working up some Panzer Leader armies for use in a May 10 game, to be streamed live by the Sitrep Podcast Channel.
Initially we’re looking at Belgian and French forces that fought many of the key initial engagements through May 10 – 15 against German Army Group “A”. Later we’ll be looking B.E.F. units that fought at places like Aras and the approaches to Dunkirk.
We hope you’ll join us as we follow the 80th Anniversary course of this earth-shaking campaign (some of the effects linger with us to this very day) through May and into June … charting, gaming, and remembering the course of this world-altering WW2 campaign.
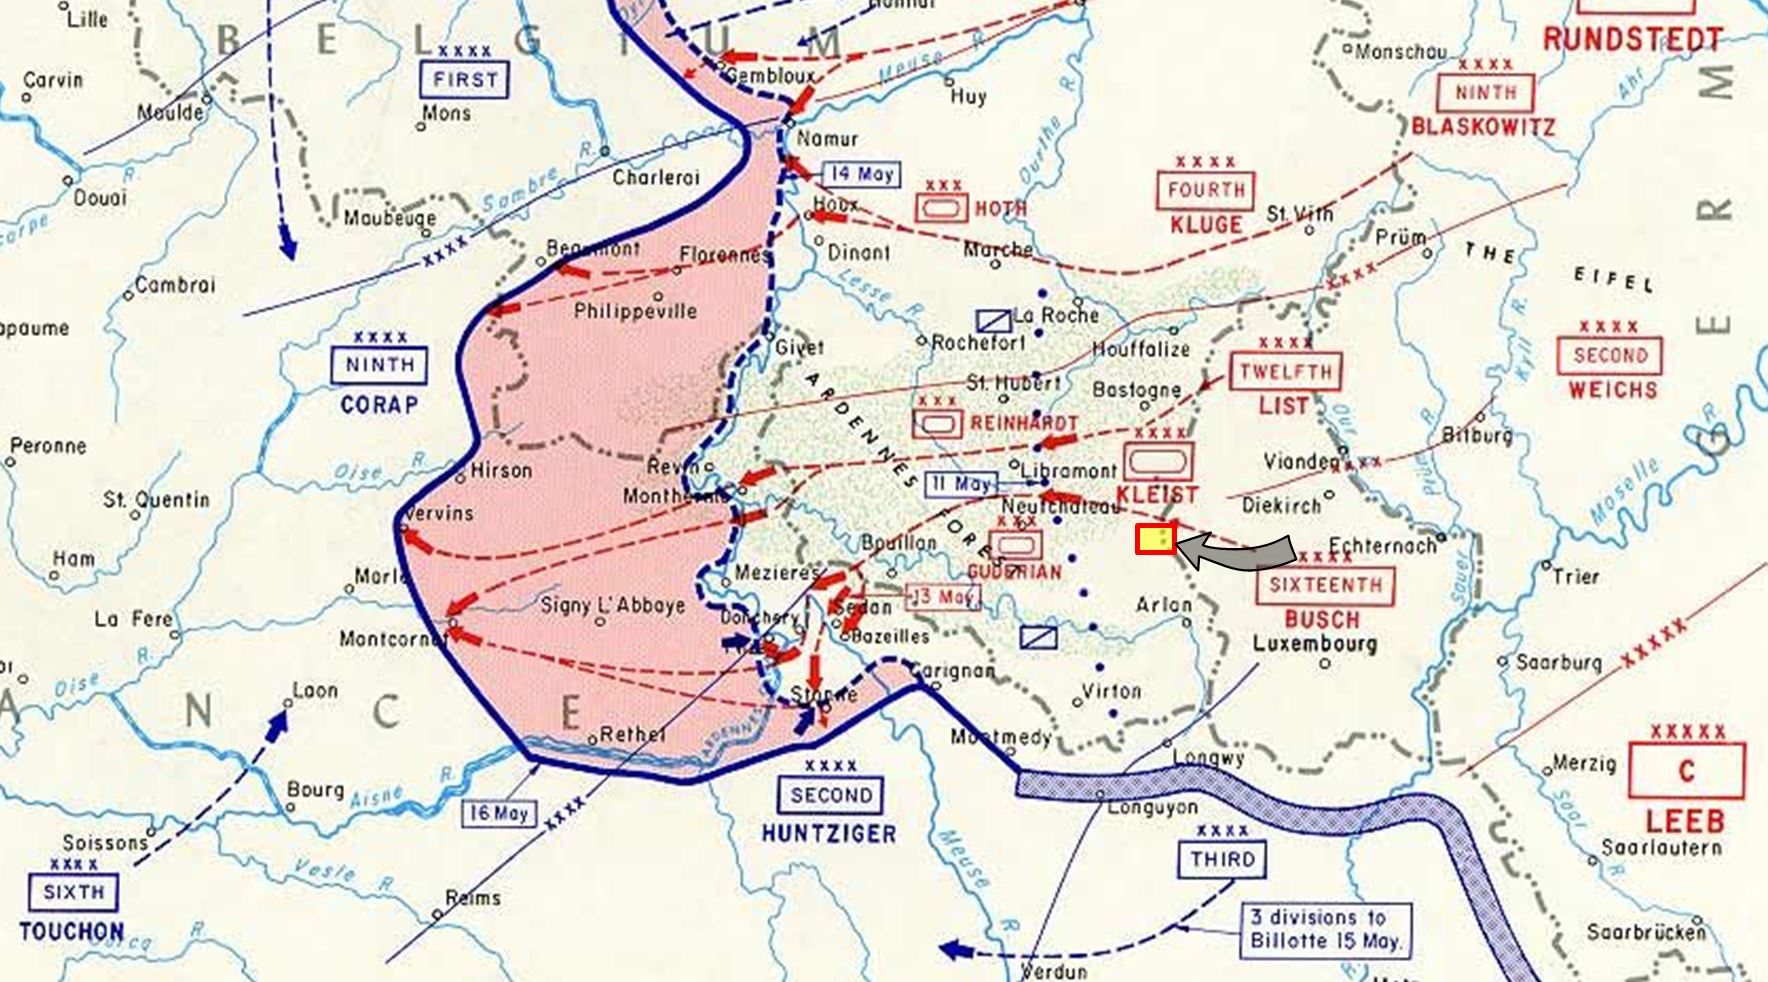 Our first game is scheduled for Sunday (live stream at 5 PM US EST). The map shows where it takes place at, the yellow rectangle is scaled for the actual size of our gaming table. So leading elements of Panzergruppe Kleist, spearheading Army Group A, have smashed completely through Luxembourg in about half an hour and are now entering southern Belgium. They will be met by Belgian forces along the border, who KNOW that can't stop the Germans, but hopefully will delay them until French allies arrive from behind them. For reference, note the far upper left, the city of Lillie (where some of the last delaying actions for the Dunkirk evacuation will be held in about three weeks), and the lower right we see Verdun. Closer to the imminent battlefield, we see Belgian towns like Neufacheteau and Bastogne ... this fight will take place on nearly the exact battlefields as the Battle of the Bulge 4 1/2 years later ...
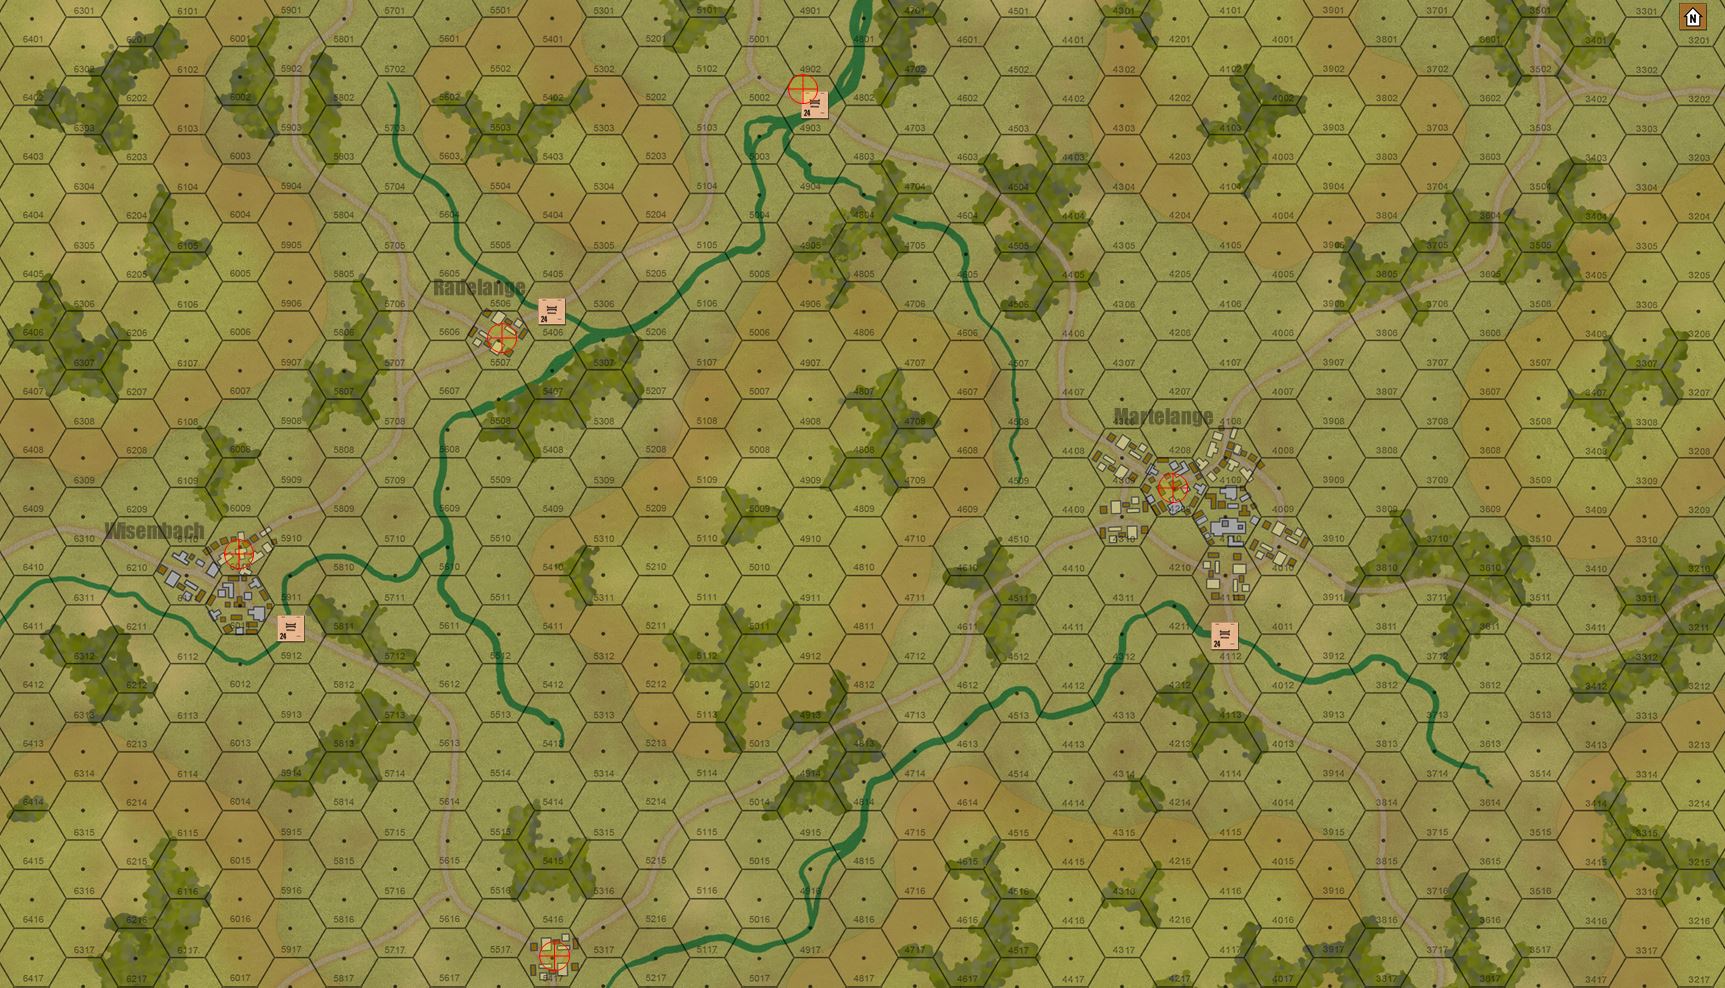 Here is the Panzer Leader map I have drawn up for our first game. We're looking at 150 meter hexes. The town of Martelange marks the border between Luxembourg (east) and Belgium (west). Belgian forces will be allowed up, then the Germans will enter from the east end of the table. Objective hexes (marked in yellow) must all be taken by the Germans.
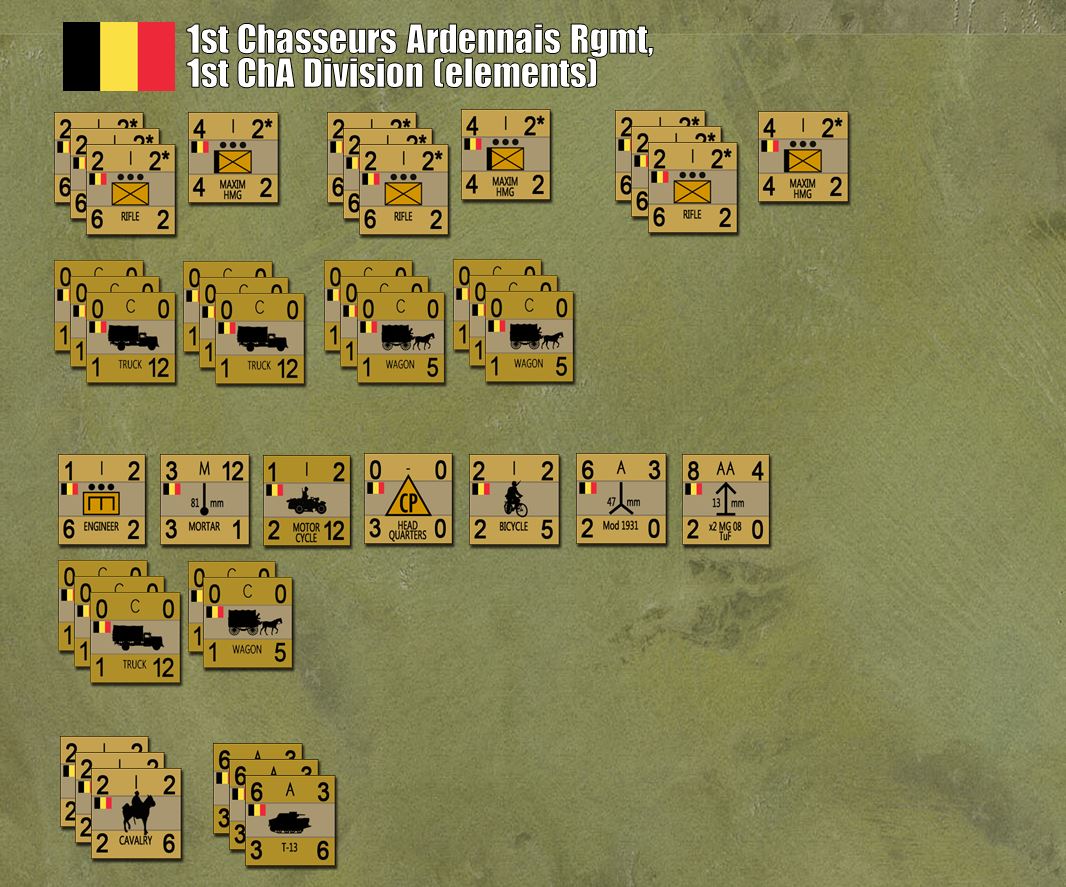
 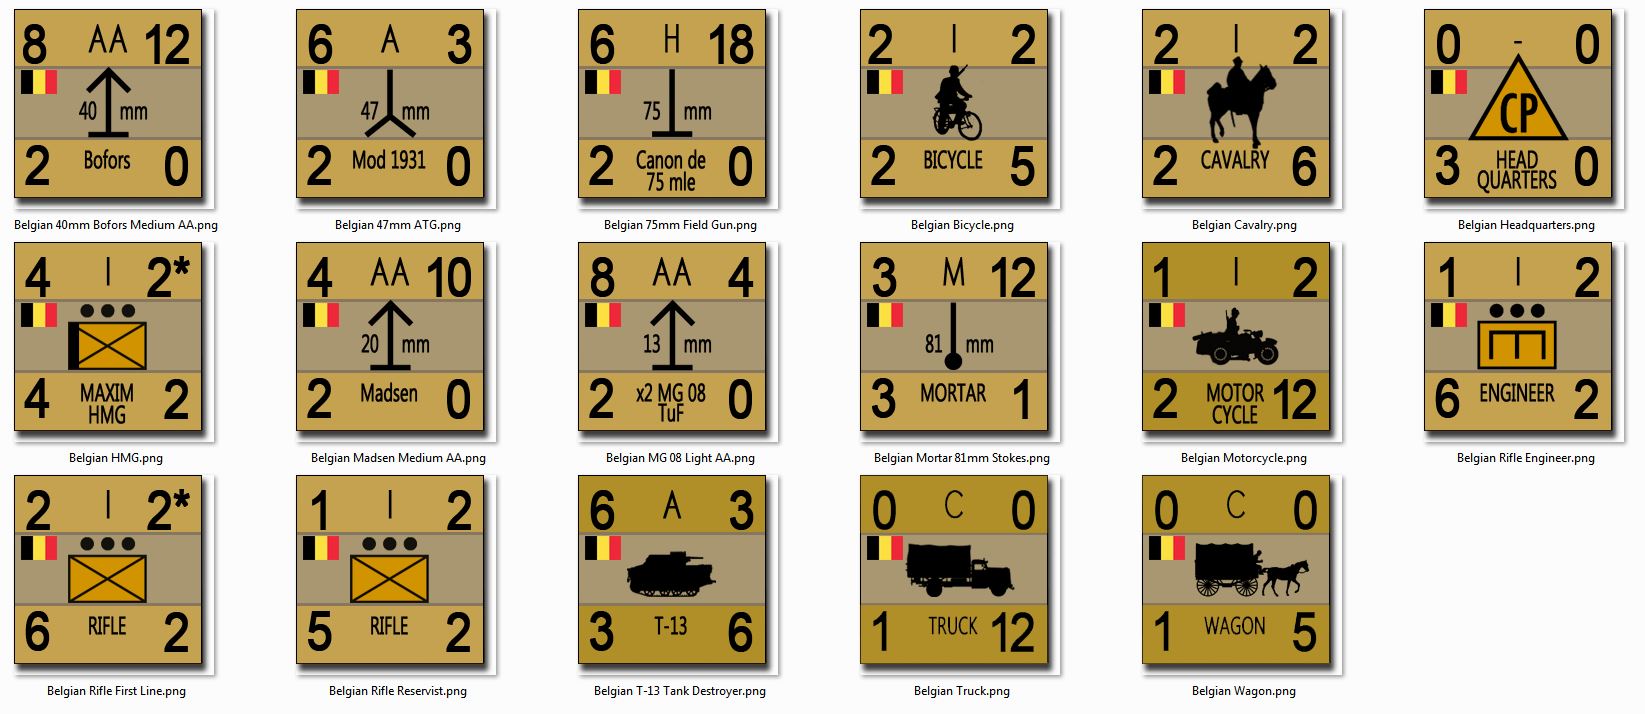 The Belgian counters made up for this game. Obviously some counters will be duplicated many times for multiple units on the actual table. The overall unit will be a battalion of the 1st Chasseurs Ardennais Regiment, 1st Chasseurs Ardennais Division, "Group Keyaerts."
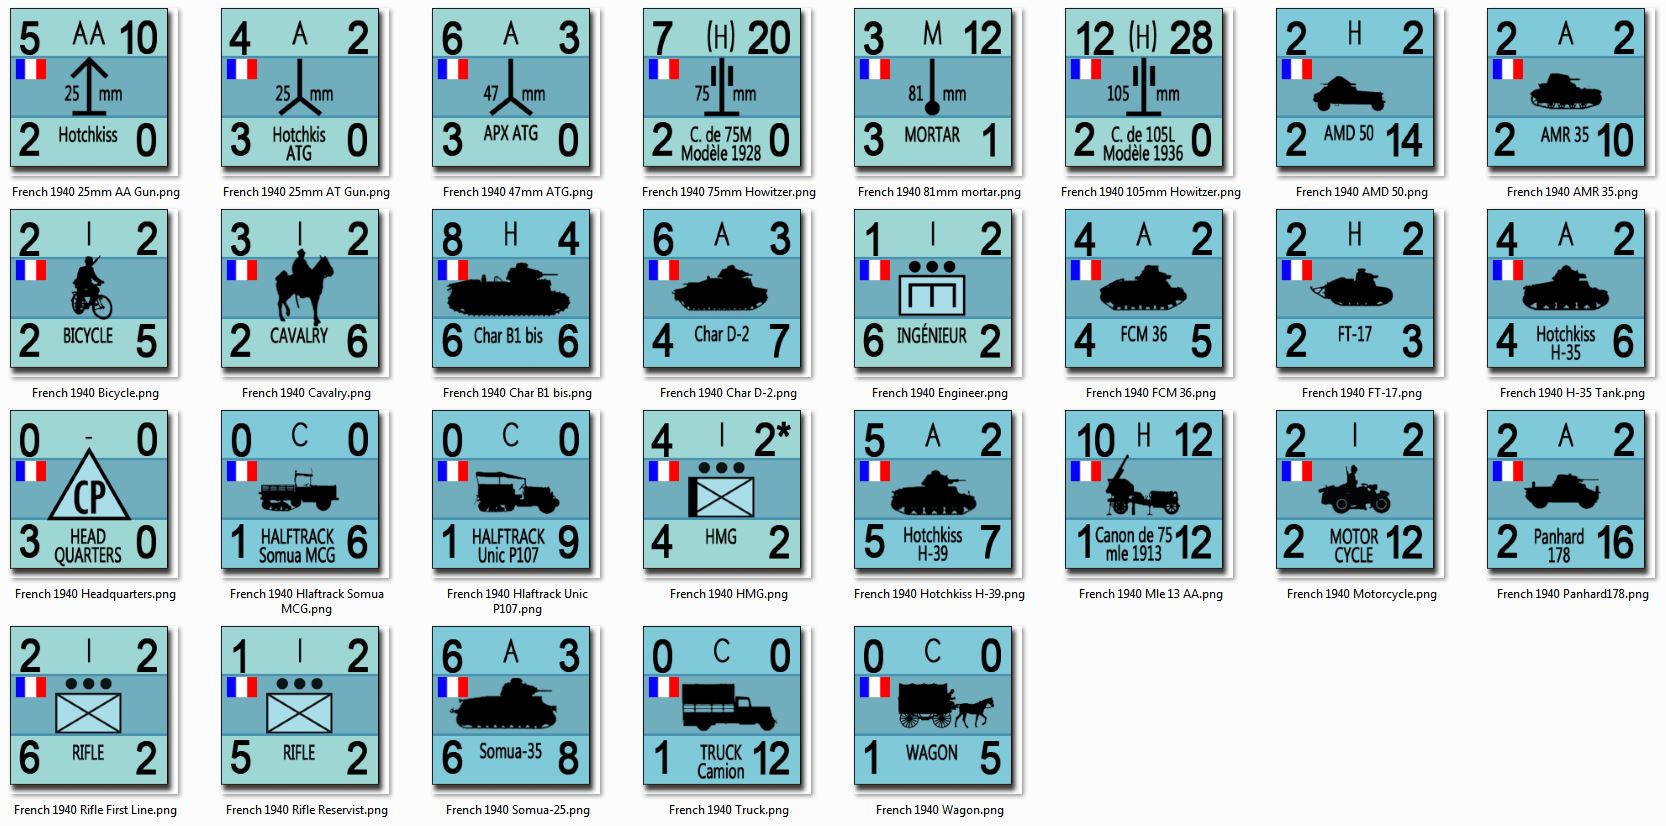 Now the overall Allied plan for defense was for the Belgians to delay as long as they could, then withdraw to a line generally described by the River Dyle, where French and BEF units would be coming up INTO Belgium from the west and join them in a united defense. Of course it didn't work out this way, especially in the Ardennes region of southern Belgium. Light, fast French units like the 5th DLC (Light Cavalry Division), part of the Second Army, were supposed to rush up and support the Belgians. But historically they didn't arrive until May 12-13. Here, we bringing in limited forward elements of 5th DLC (NOT all these tanks, this is a list of ALL the French counters we'll be using in the CAMPAIGN) in something of a "what if" scenario ... what if the French mobilization and reinforcement, and coordination with the Belgians, had been but a little better.
 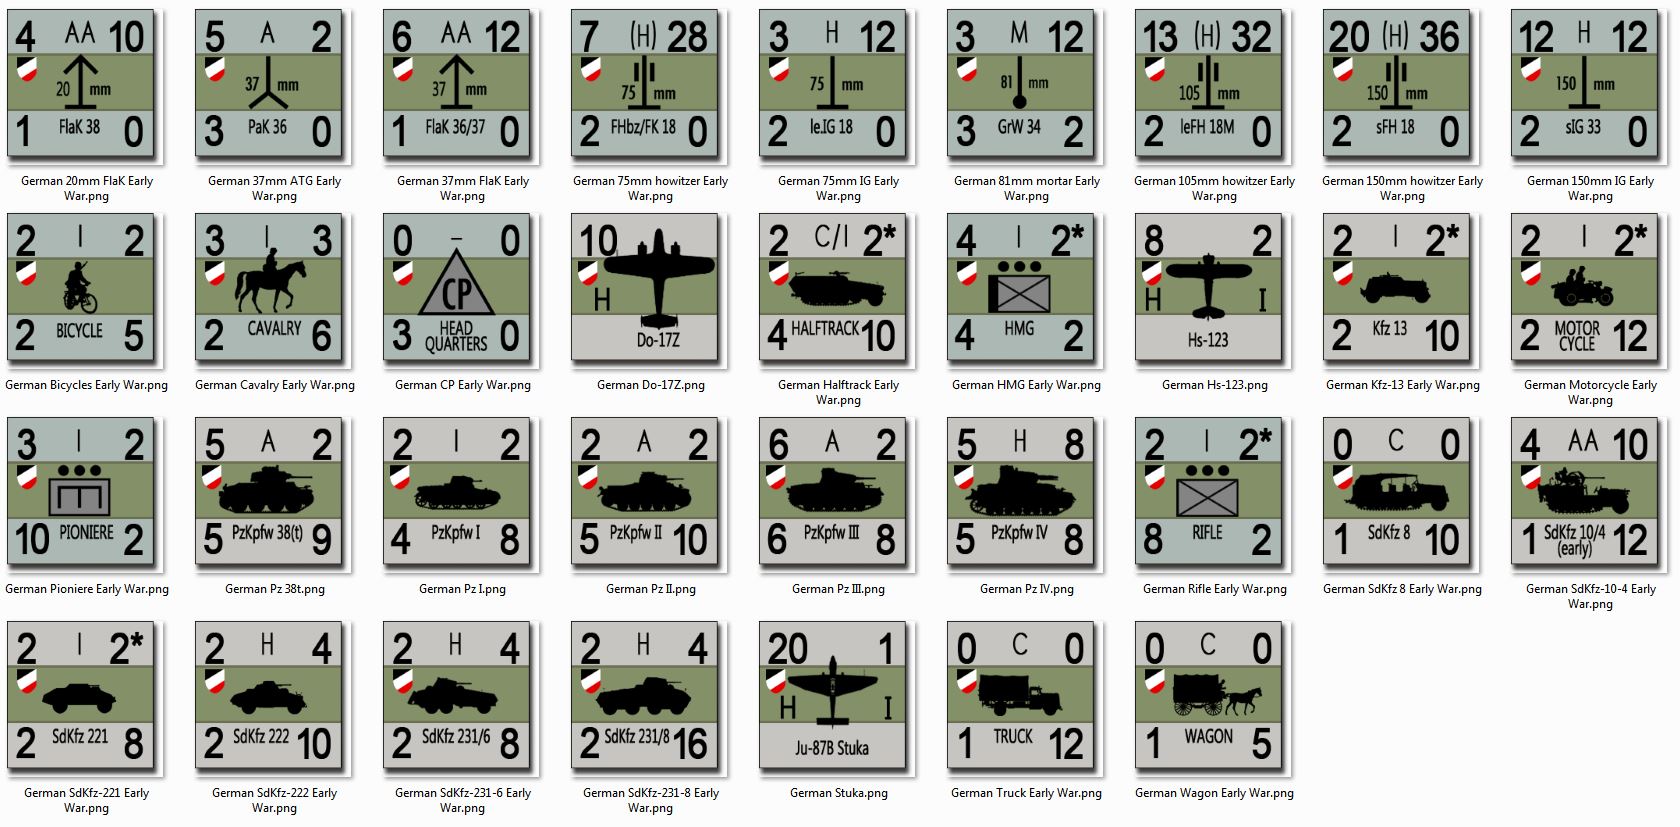 Again, this is a "warehouse" of ALL German units we'll be toying around with during this project, they certainly won't all be in this first game. But for now we'll be looking at the 1st Panzer Battalion, 1st Panzer Regiment, 1st Panzer Division, leading the way for Guderian's XIX Motorized Corps, Panzer Group Kleist, Army Group A. They be backed up by motorized infantry, panzerjaegers, reconnaissance armored cars, and course Stukas.
Live Stream tonight at 5PM US EST, 10PM UK
May 10, 1940 marked the beginning of what was undoubtedly the most successful German operation of World War II. Viewed in this light, it can in some ways be regarded as the war’s darkest day.
Eighty years ago today, an invasion began that would see no less than four nations crushed beneath the tyranny of the Third Reich. A fifth allied army would be routed and virtually destroyed, in some ways never to fully recover. This offensive would conquer most of Western Europe with stunning speed, establish the Wehrmacht’s aura of battlefield invincibility, and put Britain on the strategic back foot until almost the end of the war. Lessons learned in Poland and Norway would be applied in a new, improved version of “Blitzkrieg,” delivering for the Germans a victory in just six weeks what they couldn’t do in four bloody years of World War I.
If one considers the damage this offensive would also do to the global empires of Britain and France, we are still dealing with the fallout of this attack to this very day.
Victory in World War II never seemed more impossible as it did eighty years ago today … May 10, 1940.
“Fall Gelb” the Germans called it. “Case Yellow.” The Blitzkrieg in the West.
~ ~ ~ ~
Join us today as we live stream a Panzer Leader recreation of one of the campaign’s very first engagements.
 Belgian screening forces in this battle - forward elements of 1st Chasseurs Ardennais Division, deployed along the Bastogne-Neufacheteau-Martelange triangle.
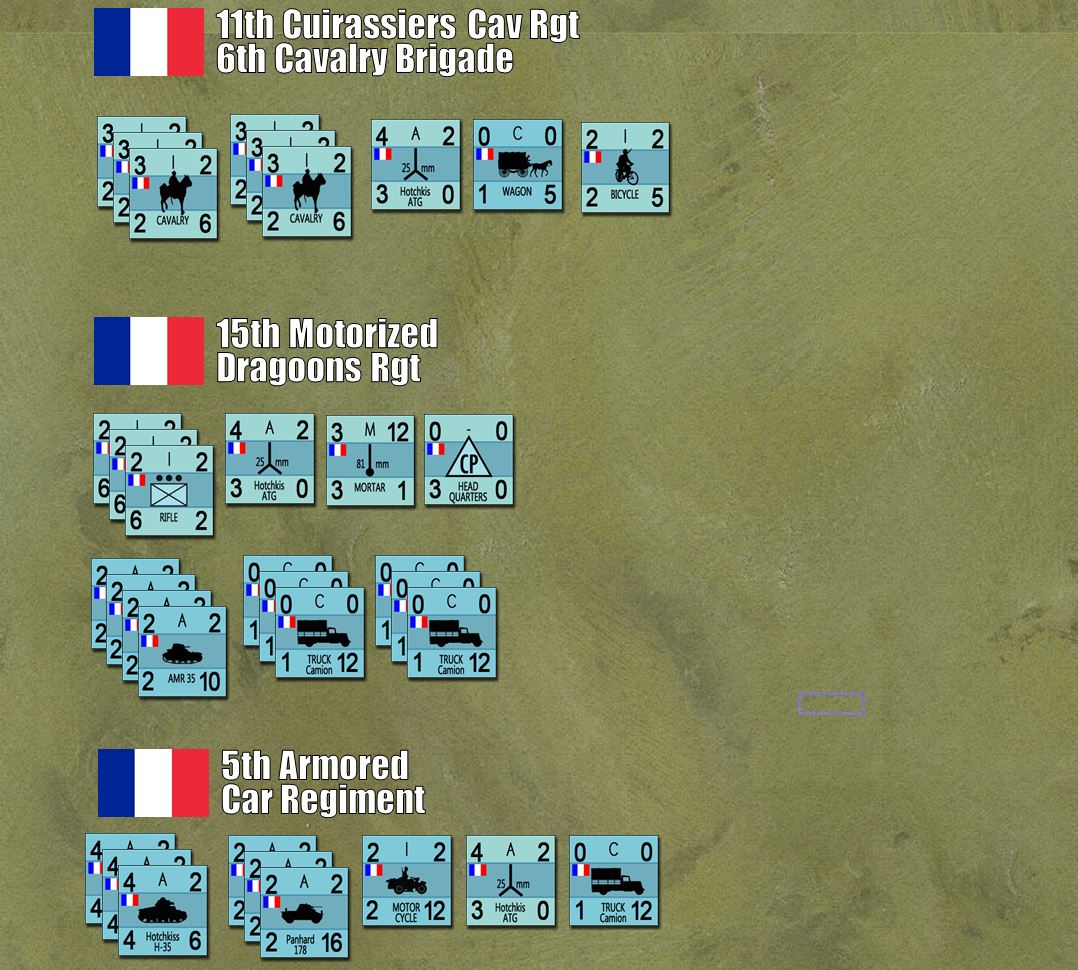 French reinforcements, drawn from 5e Division Légère de Cavalerie, or DLC (light cavalry division). Again, historically these forces didn't close with the Germans until day 2 or 3 of the offensive. We're taking a little historical liberty to get a third faction on the table and give the Allied player SOME maneuver force for a tank battle.
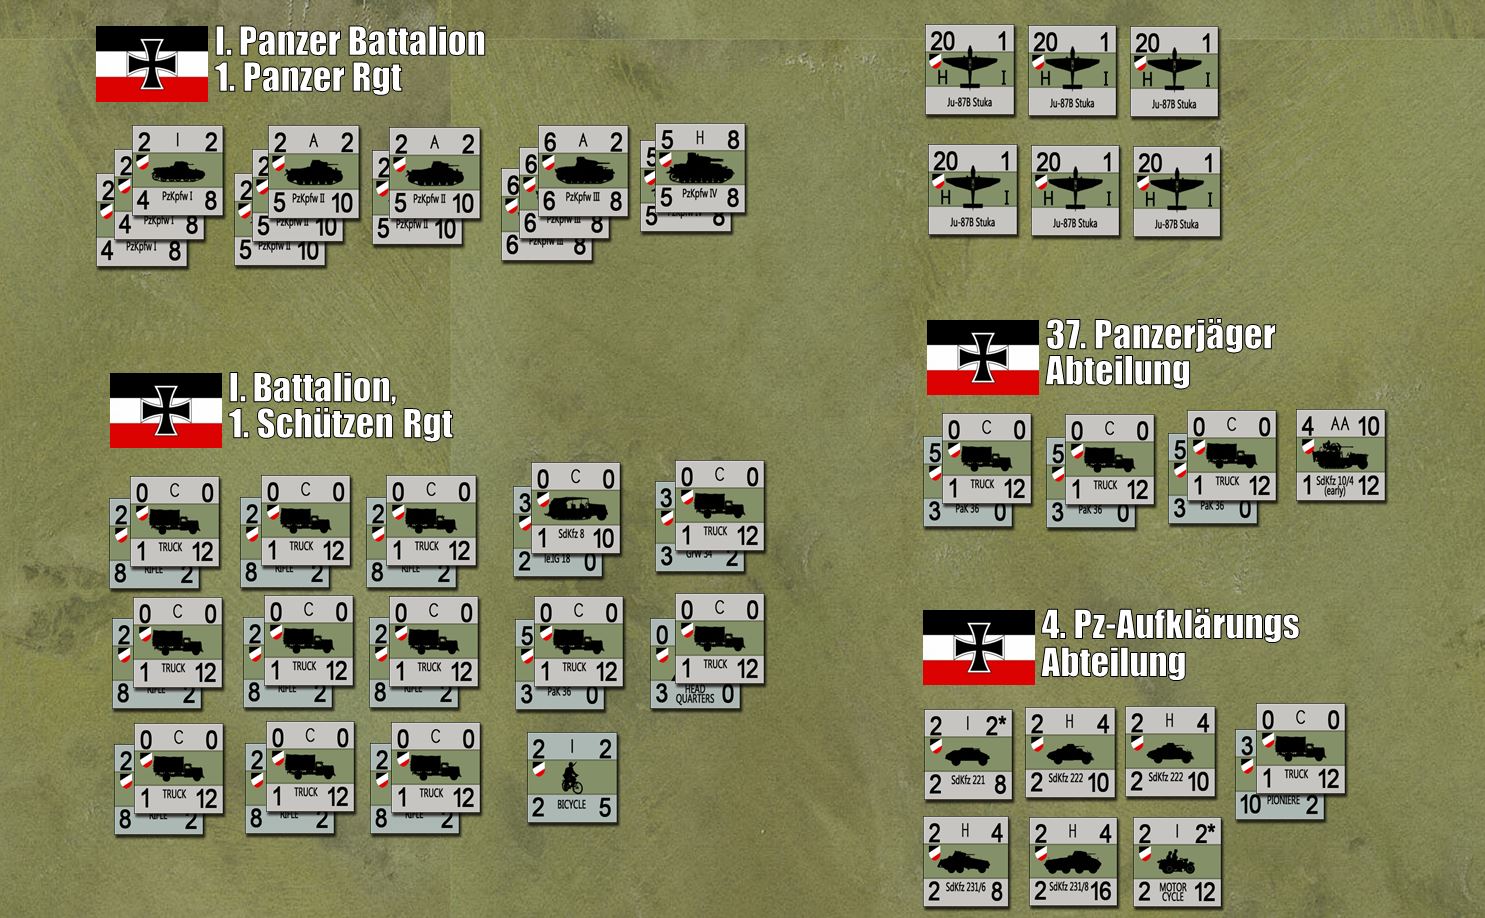 Leading elements of 1st Panzer Division, Guderian's XIX Motorized Corps (the didn't call them Panzer Corps until late summer 1941), Panzer Group Kleist, Army Group A.
 The game has technically started. Set up and initial German movement is complete, so when the stream starts, we're ready with immediate action.
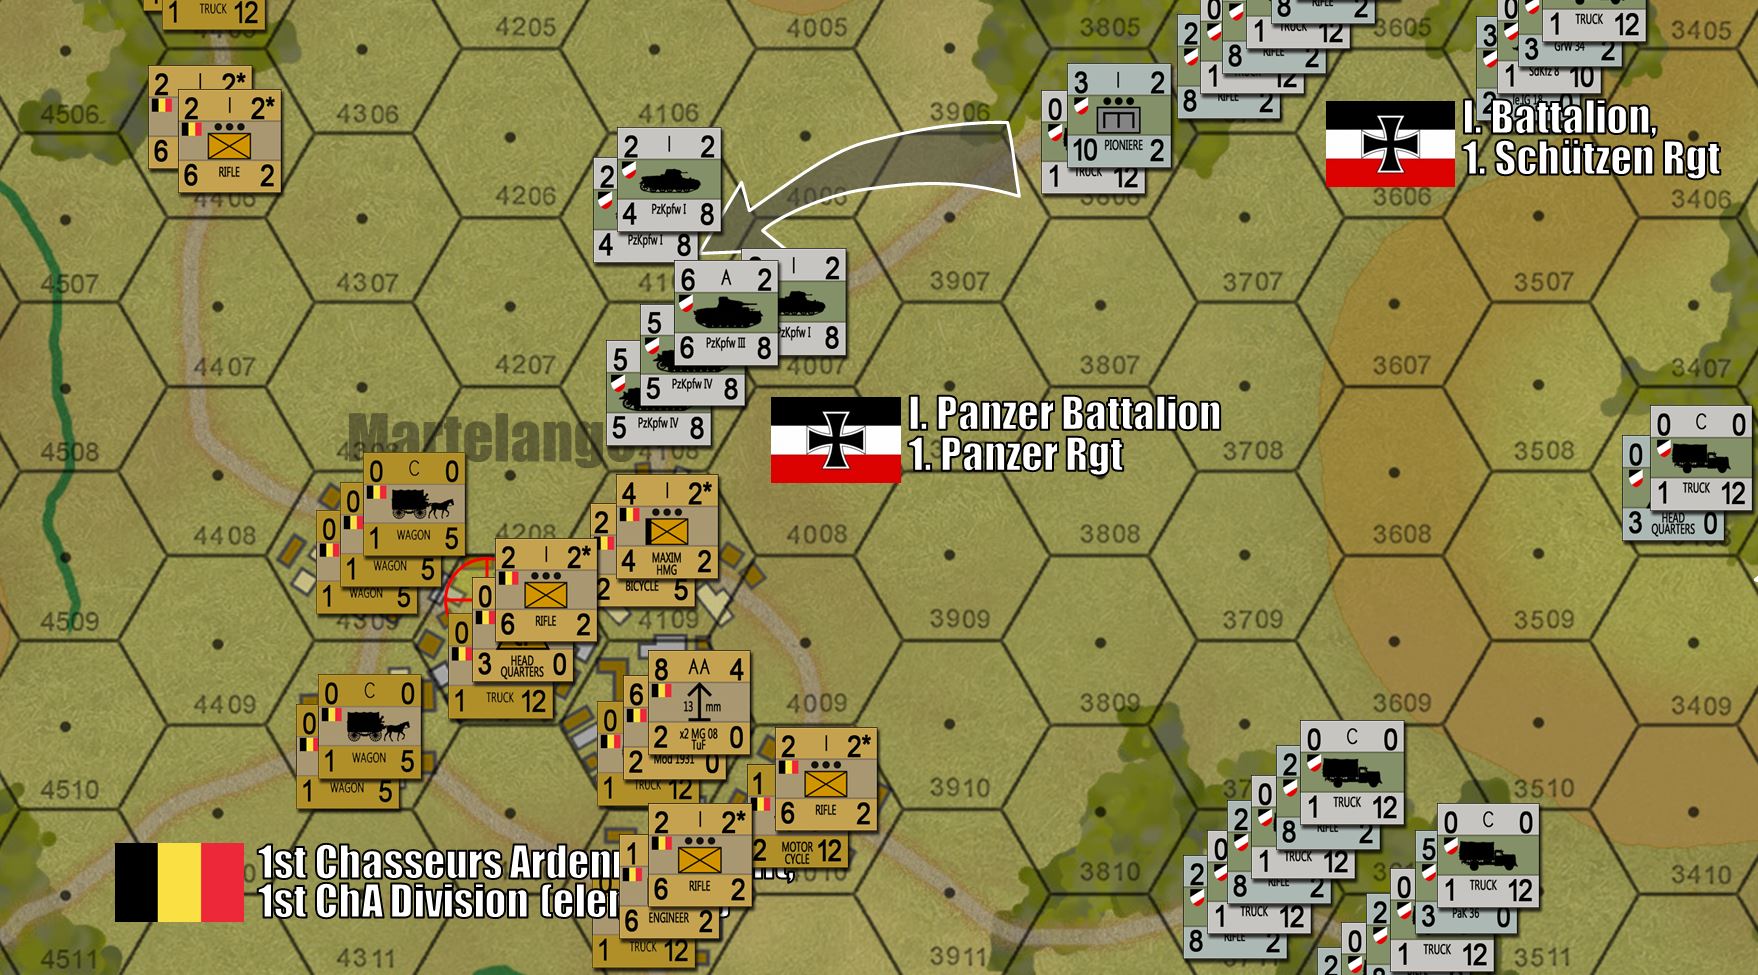 Leading off with German PzKpfw IVs with the old short-barrel 7.5 cm assault howitzer. Unlike the long, "sexy" tank-killing guns we see so often, these short stubby "ugly ducklings" are INVALUABLE against a far more common threat, enemy infantry and light artillery entrenched in woods, fieldworks, or (as we see here) in a town.
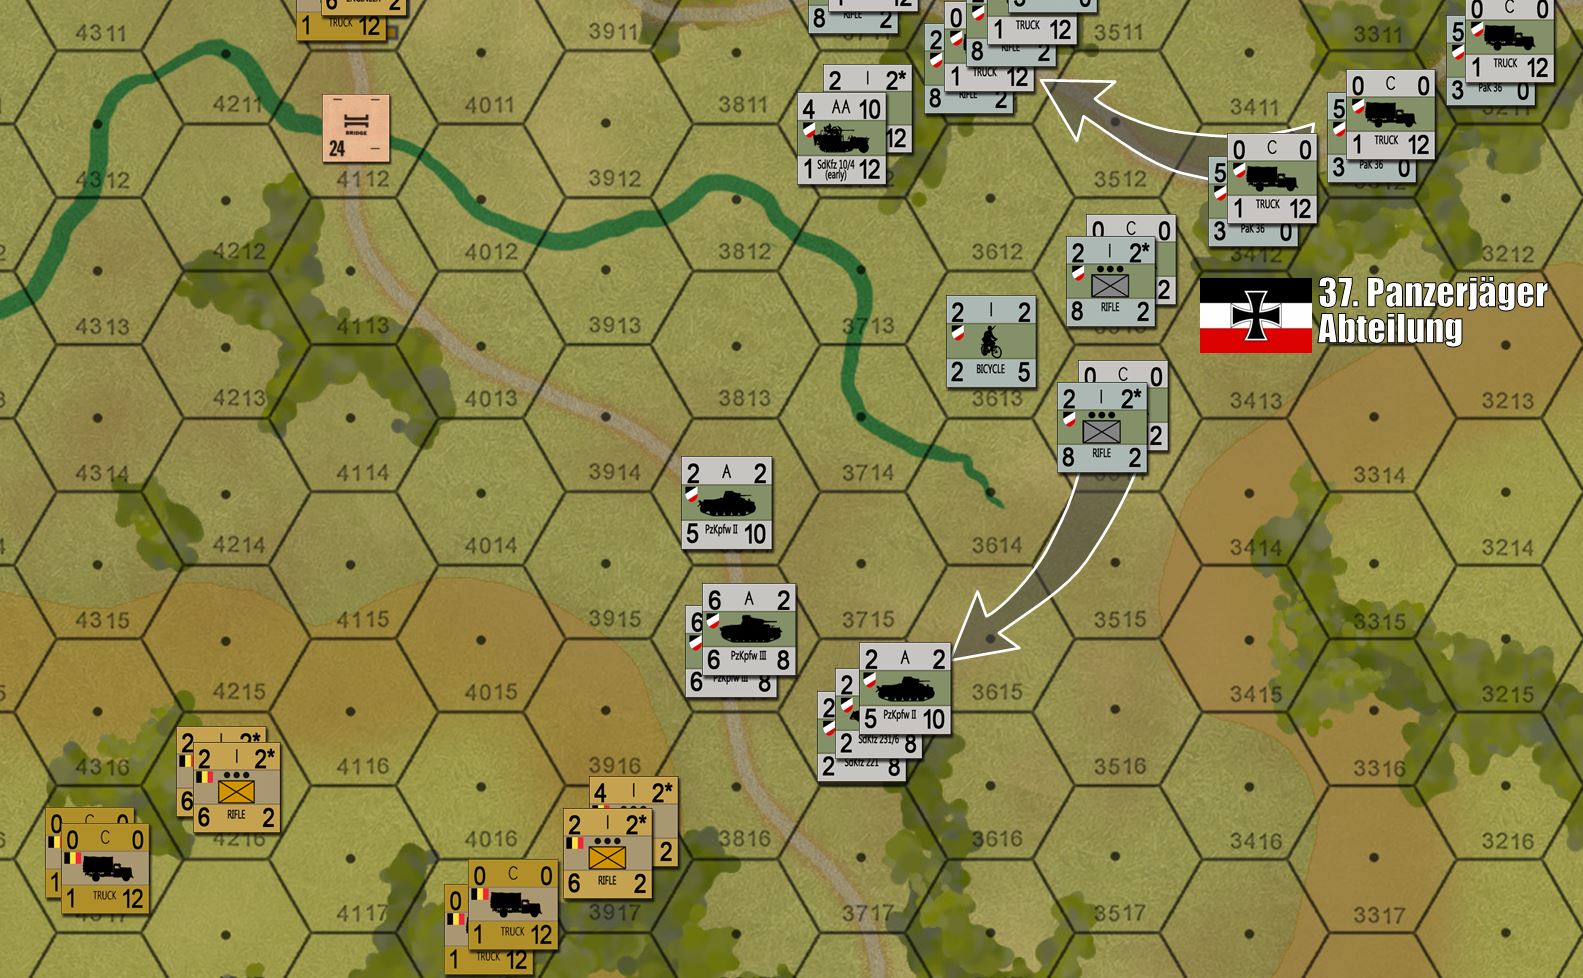 Here's another thrust the Germans have going to the south, hoping to flank the main Belgian position and get at some of the objective hexes along the Allied backfield before the French arrive in too much strength. Panzers are stacked with armored cars on purpose, for extra defensive strength and fire support JUST in case the Belgians decide to get bold and charge off that hill in a close assault against thin-skinned German recon units.
Panzer Leader 1940 Oriskany vs. Elessar2590 REPLAY!
1,000 thanks to Elessar2590 for joining me in this playthough / Demo of Panzer Leader 1940 (Avalon Hill). We got through about the first half of the game in this session (four turns), and definitely had some killer moments with Stukas, panzers, some kickass German “pioniere” assault engineers and hella-heroic Belgians of the Chasseurs Ardennais Division.
Also, thanks to the awesome audience who turned out in numbers I never expected, given the awkward hour of the game.
Check out the replay! Hope you like it.
Highlights from Sunday's Game
Here are just a few snapshots from Sunday’s game between @elessar2590 and I.
Again, the whole “report” was recorded on video HERE.
But just a few spots are highlighted below.
 Here are the Germans entering from the Luxembourg border on the east side of the map, representing the leading elements of 1st Panzer Division (XIX Motorized Corps, Army Group “A”). These represent ELEMENTS of 1st Panzer Regiment, 1st Schützen Regiment, 4th Aufklärungsabteilung (reconnaissance detachment / battalion), 37th Panzerjäger Abteilung (antitank detachment / battalion). This is the situation at the end of German Turn 1, when they have contacted the main line resistance for the Belgian 1st Chasseurs Ardennais Division.
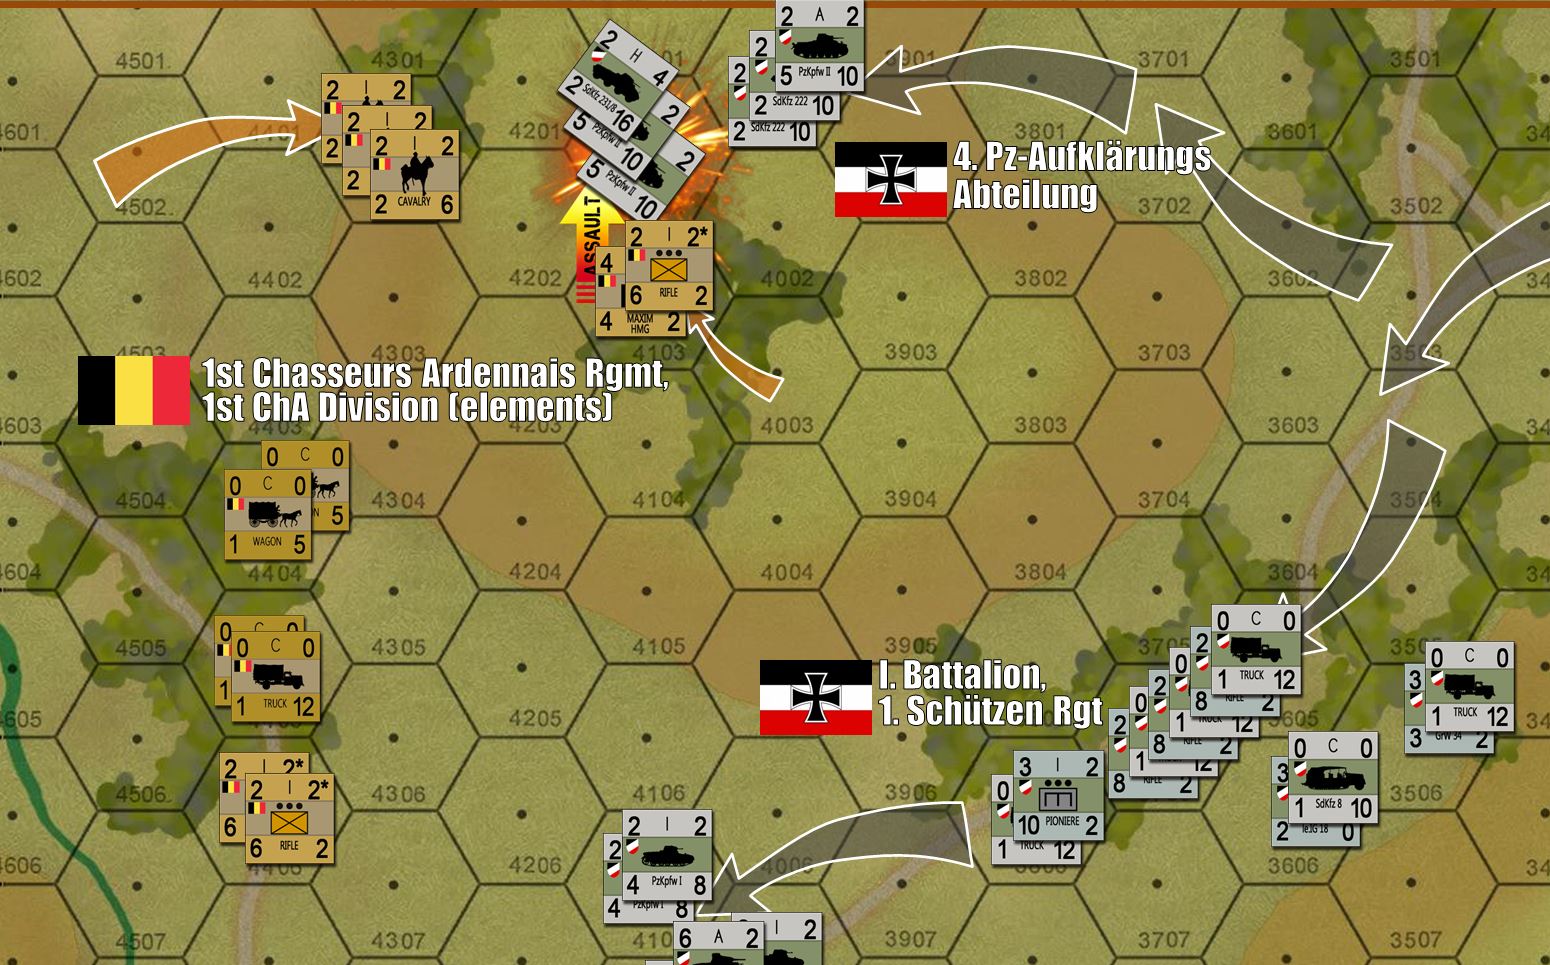 Action starts off right away as @elessar2590 hooks a platoon of Belgian rifles and a section of Maxim HMGs back through the woods in the north and “close assaults” some of my light armor trying to squeeze around the extreme Belgian left. Please remember this is the Ardennes and these cuts through dense treelines are very narrow. Normally in Panzer Leader all you have to do to avoid this is maintain a distance from treelines of at least 1 hex (150 meters). But that wasn’t possible here. Also, those German light tanks and armored cars were able to fire as the Belgians charged, I just whiffed the roll with a “6” on opportunity fire. So I guess these German panzer recon troops were still half asleep from their drive through Luxembourg. Also, note how Elessar2590 hooked back in such away so his advanced was screened from the follow-up stack of German light armor, so they couldn’t provide additional fire support against the charge.
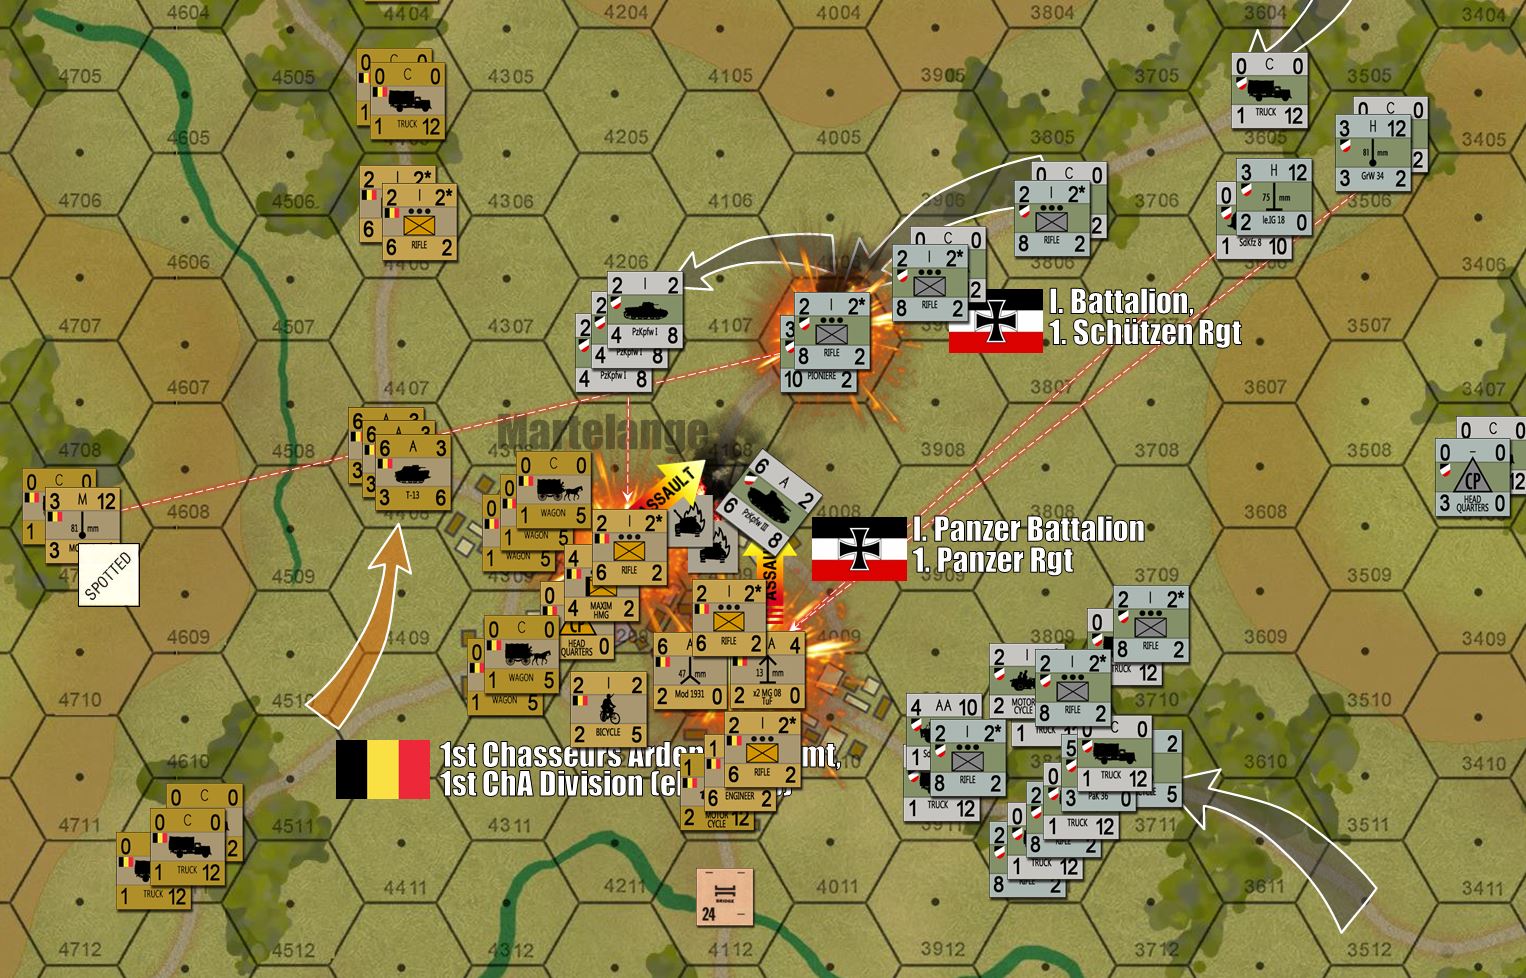 More bad news for the Germans comes when I hit the Belgian center proper on Turn 2. As I approach the town of Martelange (Belgian / Luxembourg border), Elessar pulls back from the first hex of the town on Turn 1. This gives me a foot hold in the town for free, but also compels me to advance into the town and engage the Belgians at close range in a street fight on Turn 2. Long-range fire support isn’t nearly as easy all of a sudden. In a rush and not really paying attention, I send in the PzKpfw- IVDs and PzKpfw-IIIs to bulk up the “assault hex’s” defense against anticipated Belgian infantry attack (those Mark IVs will do great with point-blank HE fire, but the Mark IIIs are practically useless in this fight). What I SHOULD have done is call in off-board artillery fire, but those batteries were left out of this game for purposes of the stream. This aside, what I also should have done was backed off with the tanks and sent in infantry, allowing the tanks to employ fire support from a different angle. But again, I was in a rush and not paying attention. Elessar’s 47mm ATGs and 13mm Maxim TuF HMGs pinned down by Mark IVs, and then he followed up with a great roll on a converging “CAT” (close assault tactics) battle. Basically, it was the “Belgian Prequel” for Saving Private Ryan, infantry mass-assaulting German tanks driving blithely through close city streets. There go two platoons of Mark IVs ... ten tanks in all. Ooof. Boss-man Guderian will NOT be happy. =(
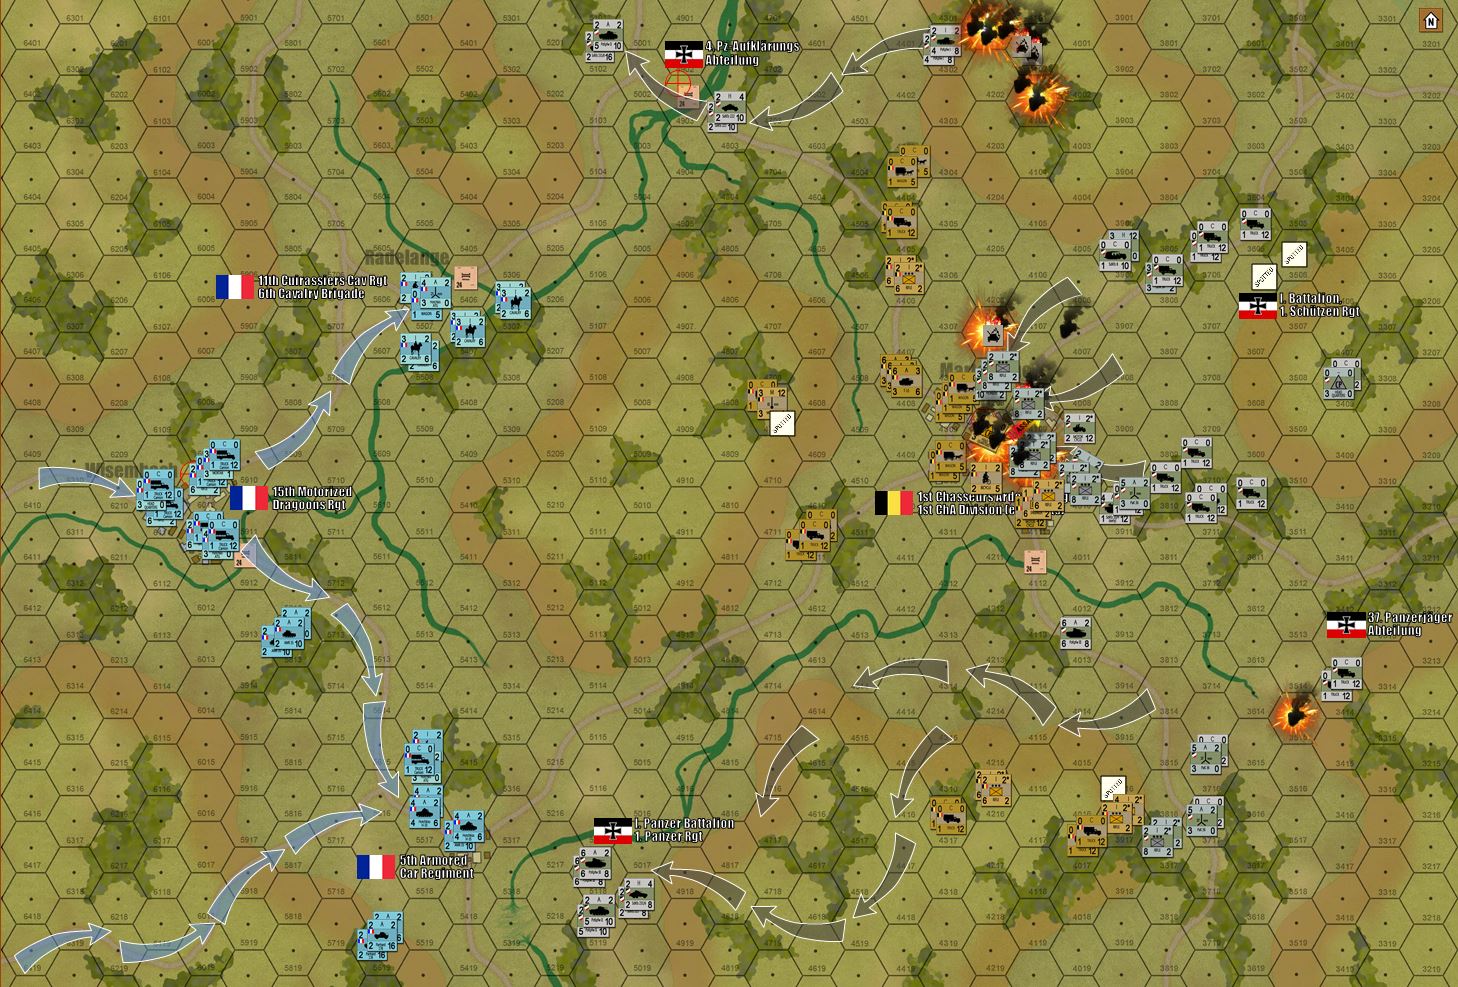 Turn 3, and here come the French (lead elements, 5e Division Légère de Cavalerie - 5th Light Cavalry Division). Now historically these guys didn’t arrive until Day 3, long after these forward Belgian units had been virtually annihilated. But for a fun stream we included them here anyway. Just in time to, because the Germans have shaken off their bloody noses of Turn 1 and 2. The Belgian left wing is gone, the Belgian center is cracked (but not quite collapsed YET), and the Belgian right is fatally outflanked. But they’ve delayed and blooded the Germans far more than should have been possible.
  First, the butchery in the center. Where German panzers have failed, Stukas and infantry (converging from two directions and bolstered by “pionier” engineers) have smashed the Belgian antitank battery, antiaircraft battery, HMGs, and two platoons of infantry. Fire from German 8.0 cm “grenatenwerfer” mortars and 7.5cm infantry guns have also helped. Some 200 troops are killed, wounded, or captured here, along with 12 guns. But still the Belgians cling to the center of town, pinning down one platoon of German infantry, their T-13 tank destroyers wrecking a handful of PzKpfw Is, and their Headquarters “CP” stubbornly refusing to die.
 In the north, the Belgian left wing is gone. Although two platoons of my light armor failed to rally from earlier Belgian close assaults and were then blown up by continued assaults on Turn two, follow-on German light armor pinned down a full squadron (company) of Belgian cavalry (150 mounts) that tried to counterattack. None of these rallied and were then butchered by sustained German 2.0cm autocannon fire. The same fate was share by Belgian infantry and Maxim HMG sections, already mauled by Stuka air strikes. The way is thus open for a route around the north, across that Ardennes stream and seizing the first German objective hex. But is it too late? Already the French cavalry of 5th DLC has arrived.
 In the far south, my panzer element that outflanked the Belgian right has also run into some terrain problems, delaying them just enough to where they French have narrowly won the race to this village crossroads objective hex. Looks like a little tank skirmish is in the making here?
 Sadly, this was as far as we got. Although the Belgians are mauled and on the brink of collapse, they lasted longer and cost the Germans more than they ever should have. Thus, the Germans are really NOT in a position to engage the French for the last two or three objectives hexes. Crazy as it sounds, this is an Allied victory as Guderian’s larger-scale timetable for 1st Panzer Division and XIX Motorized Corps in general is now totally thrown off. They’ll be fighting here for the rest of the day and into tomorrow, by which time Guderian had expected to be halfway to Verdun.
Great game from @elessar2590!
Panzer Leader Video Battle Report, P1
Playtesting some slight updates to the scenario played live with Dylan on last Sunday’s stream. Now the spearhead of 1st Panzer Division (XIX Panzer Corps, Panzer Group Kleist) has a little off-board artillery from the division’s integral 73rd PzArtillerie Rgt.
Just two batteries of 10.5 cm howitzers.
How much difference could that POSSIBLY make?
Live Stream - 5PM UK Time - Panzer Leader (Battle of Hannut)
Good morning, everyone.
Yesterday we featured a live stream recreating part of history’s first “true” tank battle. This was the Battle of Hannut, starting on May 12, 1940, part of the shattering German Blitzkrieg of the West.
As General Hoepner’s XVI Motorized Corps spearheaded German 6th Army’s drive into northern Belgium, Belgian resistance was hopelessly outmatched and crumbled before them. Following mobilization and response plans, French mechanized units entered western Belgium, intending to meet up with the retreating Belgians and combine to form a unified line of resistance against the Germans.
But the Belgians in this sector weren’t falling back. They’d been overrun. So the French, having not met the Belgians falling back, had no idea their Cavalry Corps (2nd and 3rd Division Légère Mécanique) was about to collide with Hopener’s XVI Motorized Corps, namely 3rd and 4th Panzer Divisions.
In a wild melee that largely surprised both sides, Prioux’s French Cavalry Corps and Hoepner’s XVI Motorized Corps rammed full speed into each other in what would become the Battle of Hannut, running from May 12-13, 1940. In all, almost 1,000 AFVs (tanks, armored cars, halftracks) would be engaged between the four opposing divisions, making this the first time actual tank formations would square off in open combat.
 The overall map, showing the corridor running east to west between the southern outskirts of Hannut and the Mehaigne river. Hexes are 200 meters.
  French and German forces. Yes, the Germans seem to have a lot of tanks. The Germans DO have a lot of tanks. This nearly full OOB for two German Panzer Regiments, back in the days when Panzer Divisions were still built around a full brigade.
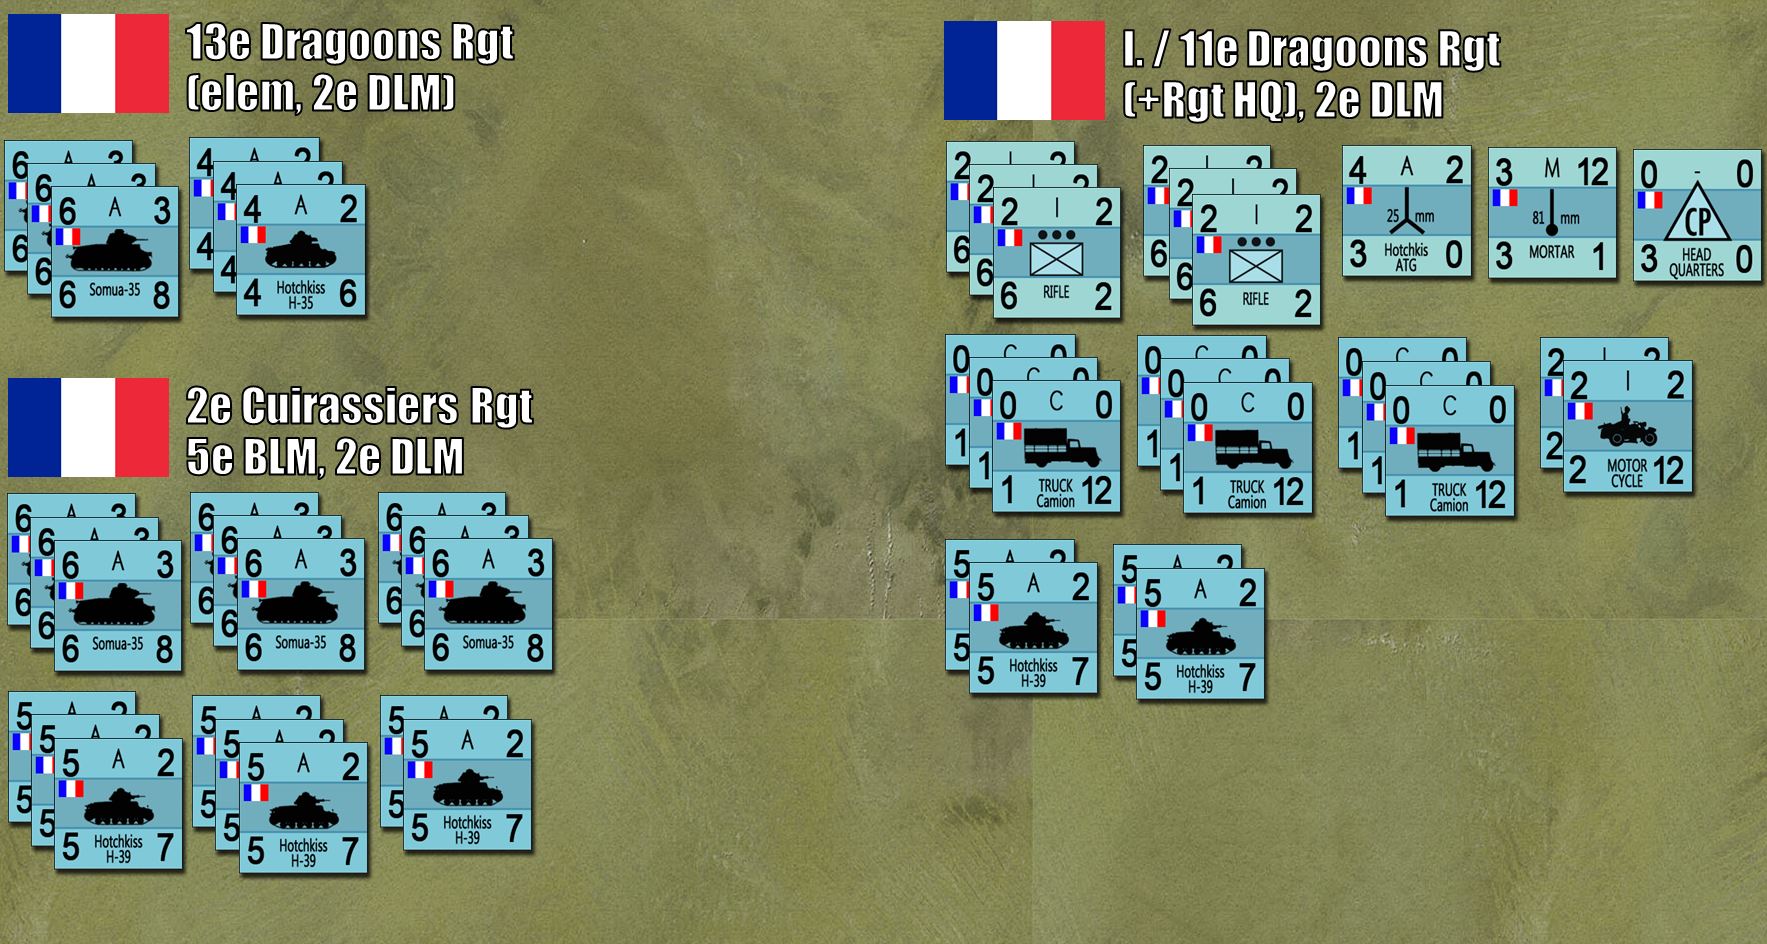 Close look at some of the French Armor. In short, we have two-three companies of the 13th Dragoons (here is where I was a little generous with the French). Then the 2nd Cuirassiers Regiment (four battalions, two of Somua-35s and two of Hotchkiss-39s). First Battalion of the 11th Motorized Dragoons will be deployed forward in holding positions in Thisnes and Crehen, while the armor and motorized artillery (76th Rgt) comes in from the west.
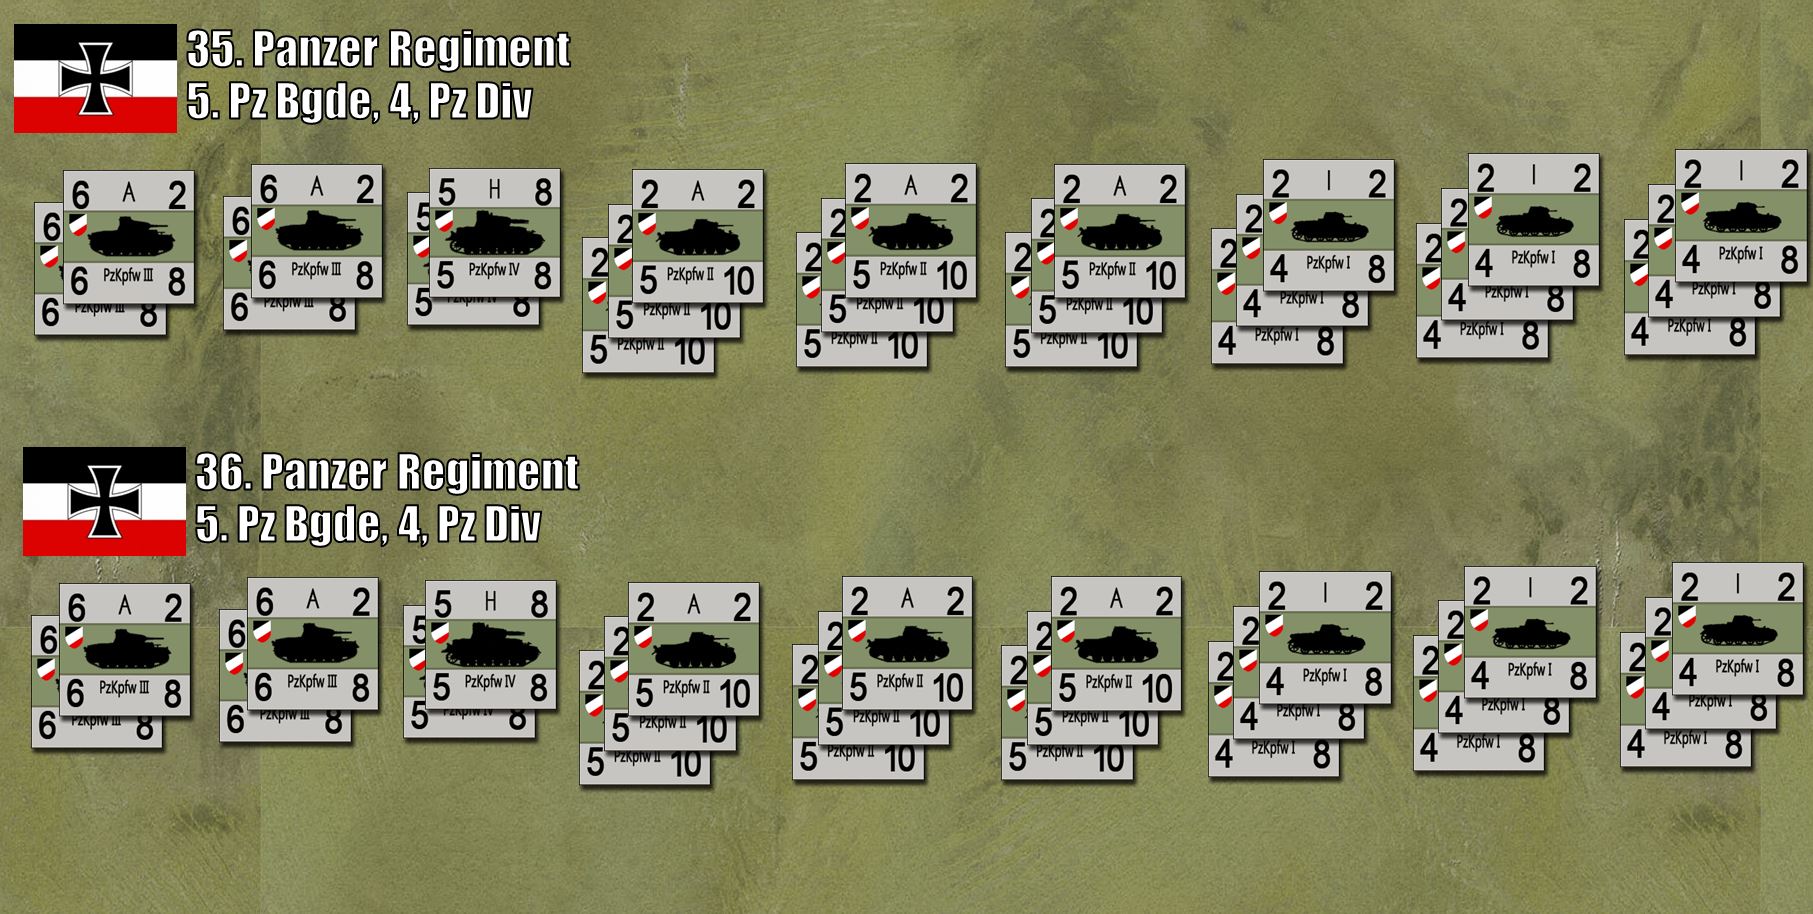 Here is a closeup of the German armor. While it may look formidable, notice that 18 out of the 48 (over a THIRD) of the German panzer platoons are the practically useless PzKpfw I. ANOTHER 18 platoons are the PzKpfw II, which was fast and decently armored for the time but again, largely useless against heavier French armor. Again, that's the history.
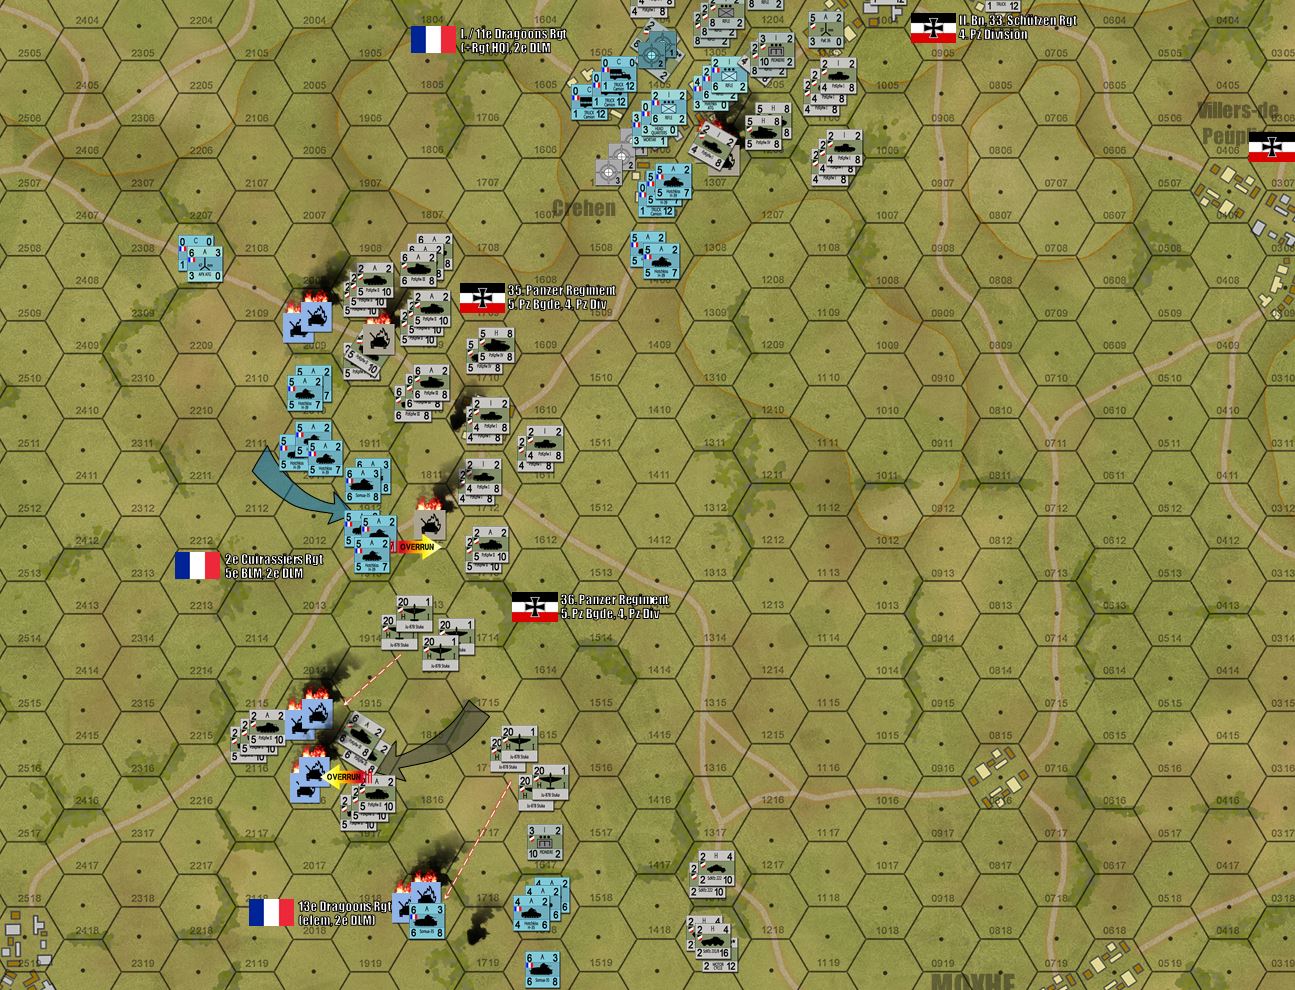 Part of the situation at the end of Turn 3. Air strikes! Overruns! COUNTER-overruns! God, how I love early-war Panzer Leader! You could never get away with these kinds of maneuvers in 1944 ...
 Now granted, this was supposed to be a live game and with some internet issues with my player, we weren’t able to have an opponent-vs-opponent live game, but as long as the Excel file is saved, the board is always set up and we can always take another swing at this later!