


![Alternative Trench Crusade Miniatures? Trench Missionaries Review | Wargames Atlantic [7 Days Early Access]](https://images.beastsofwar.com/2026/03/unboxing-wargames-atlantic-trench-missionaries-coverimage-225-127.jpg)


Foehammer’s Konflikted Painting Table


Recommendations: 293
About the Project
Documenting my Konflikt 47 projects, as well as my numerous other distractions and tangents.
Related Game: Bolt Action
Related Company: Warlord Games
Related Genre: Pulp
Related Contest: Bolt Action: Western Desert Boot Camp
This Project is Active
Keep on Truck'n
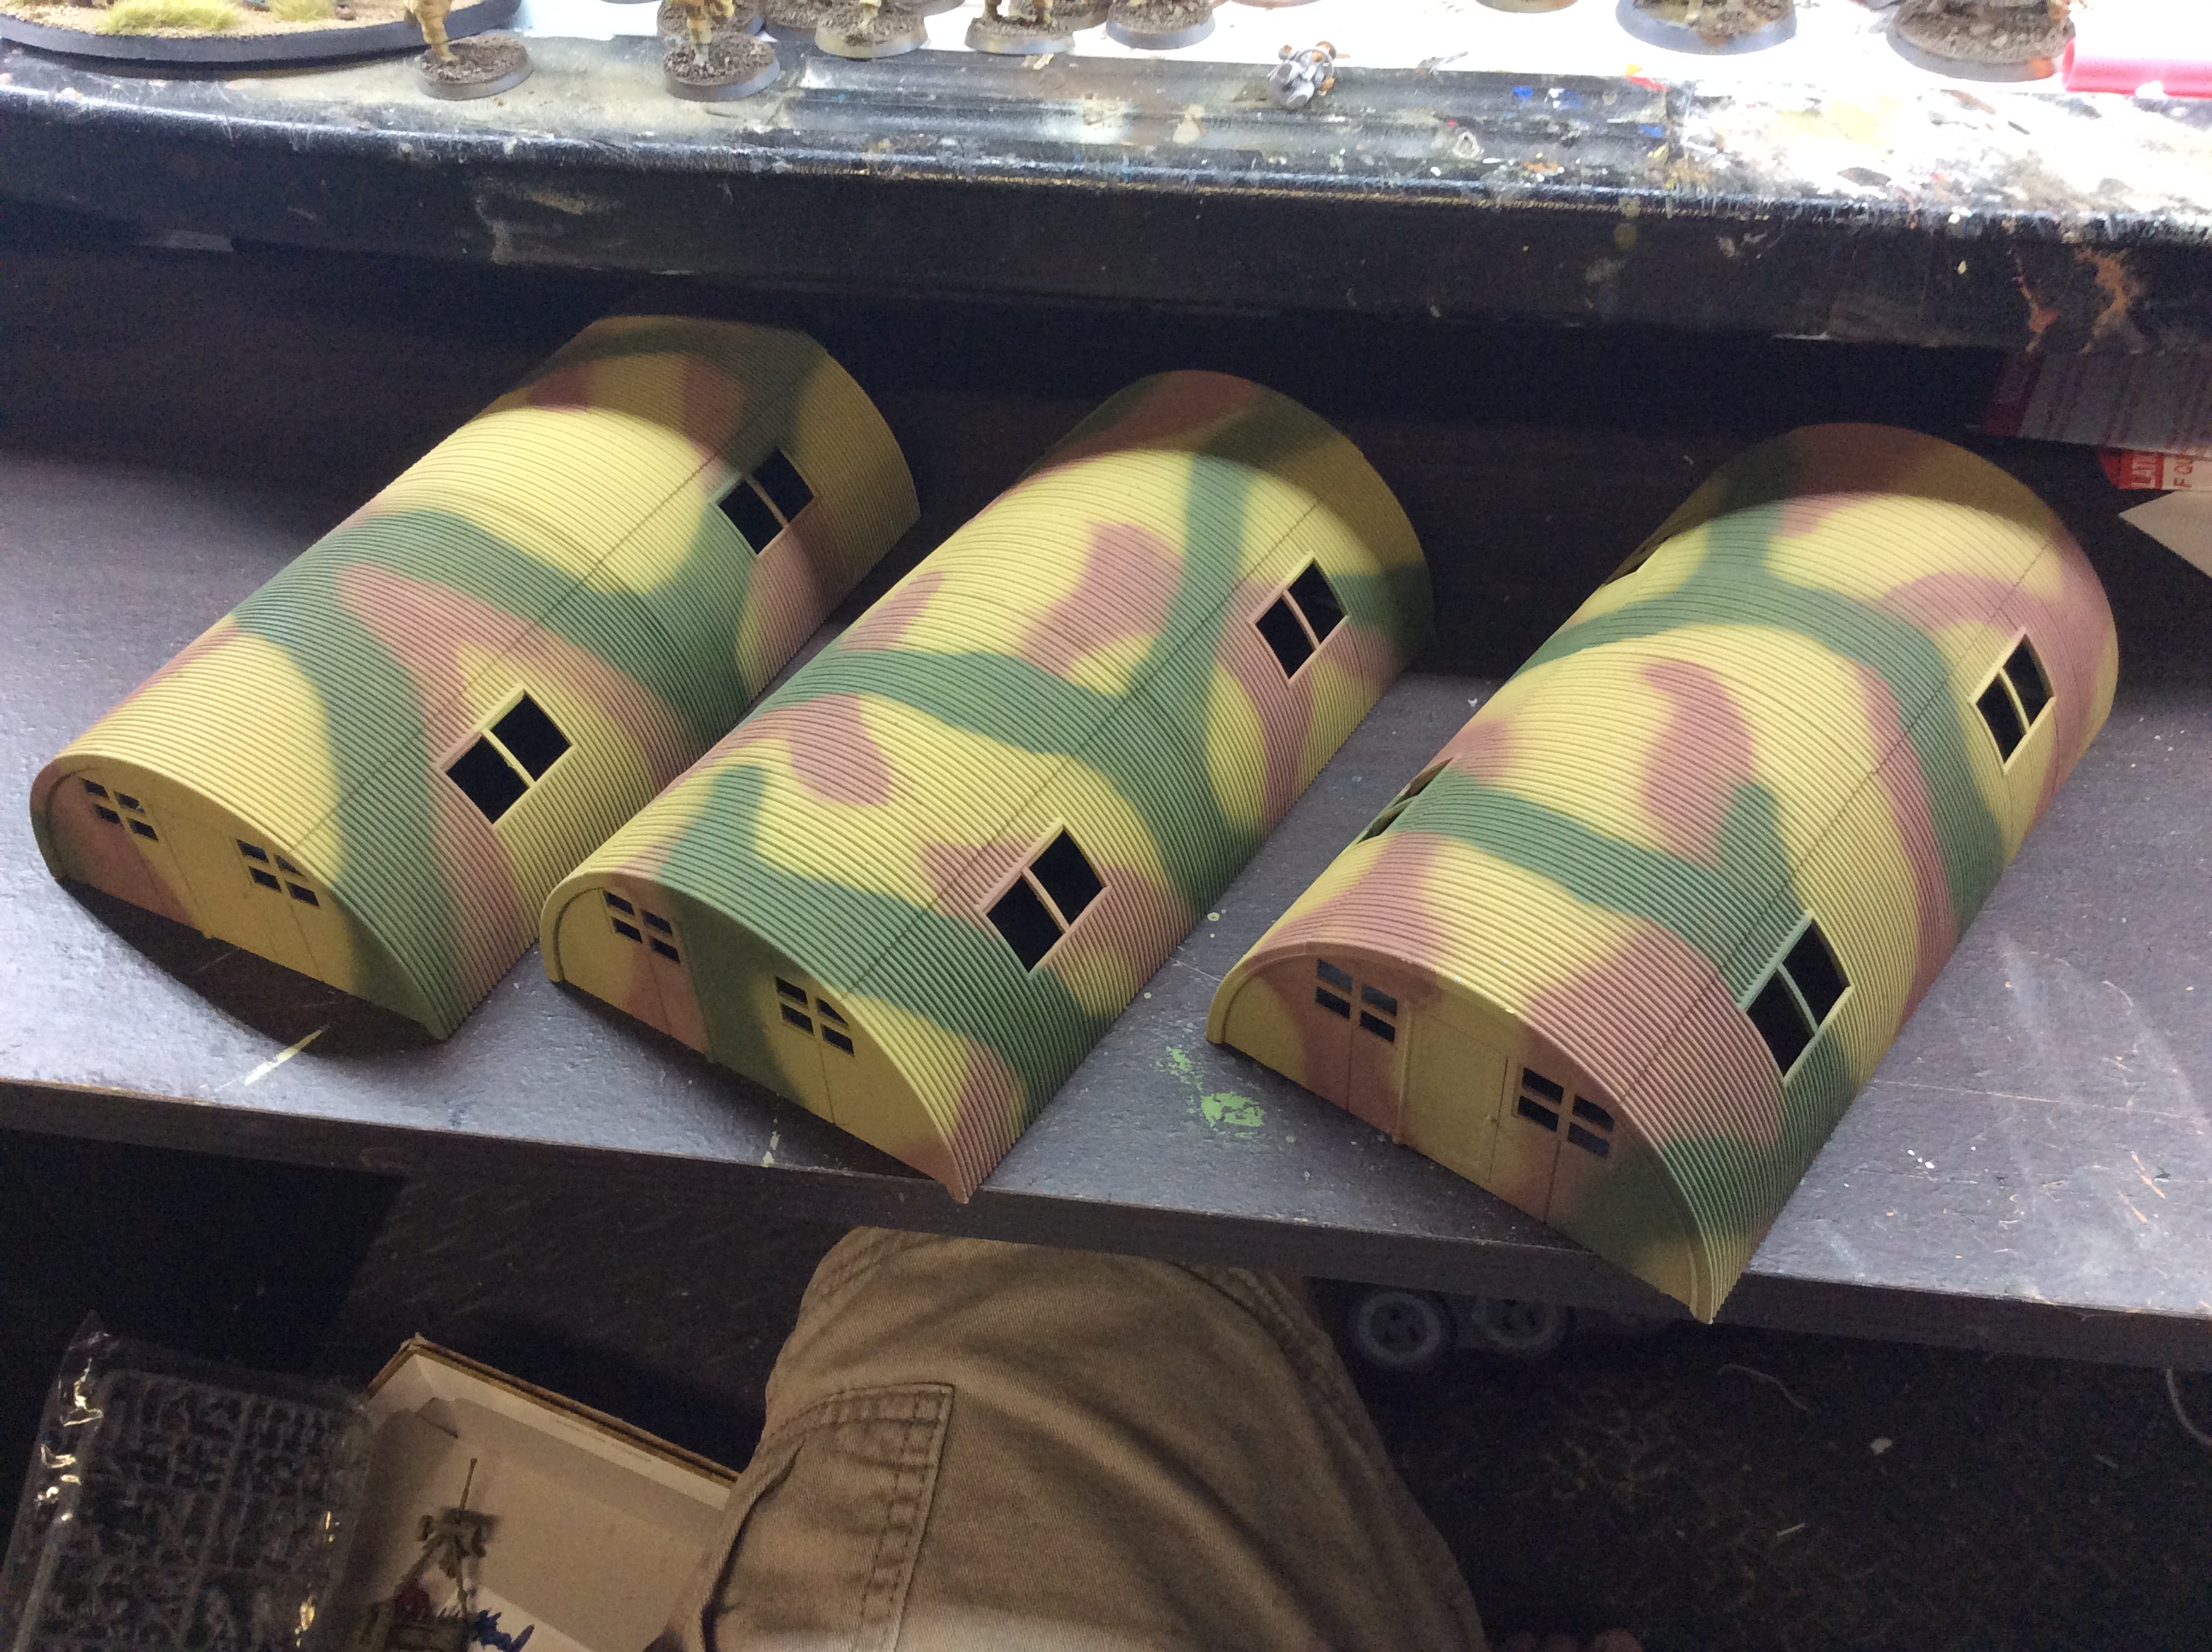
The table project continues to move along at a slow pace, given I can only contribute 1-2 hours per night. First, I’ve almost completed the painting on the Quonset Huts. They are now basecoated, have the airbrushed brown and Green Camo, and now have the yellow crossed curving lines that are common in Japanese tank camo.Let me tell you, if you thought painting yellow was a pain, try doing it on a corrugated surface. Took forever to get two smooth coats on those lines.
What remains that is partially complete is I’ve chosen to paint the window and door frames a metallic steel color. I’m basecoating them black first, then adding the silver. Now, realistically these would probably just be the same camo color as the rest of the hut, but when looking at the hut they needed some contrasting and defining features to make them pop on the tabletop, so I thought this was an easy way to do it.
I’m also thinking of adding some camo netting and palm-fronds to the tops as makeshift camo, but need to put some thought into how I’d make the actual camo netting.
Images below show the evolution of the hut painting to date, as well as the current appearance. After all the painting is done, I will be using Army-Painting Strongtone dip to shade and protect them, then hit them with some Matt Varnish.

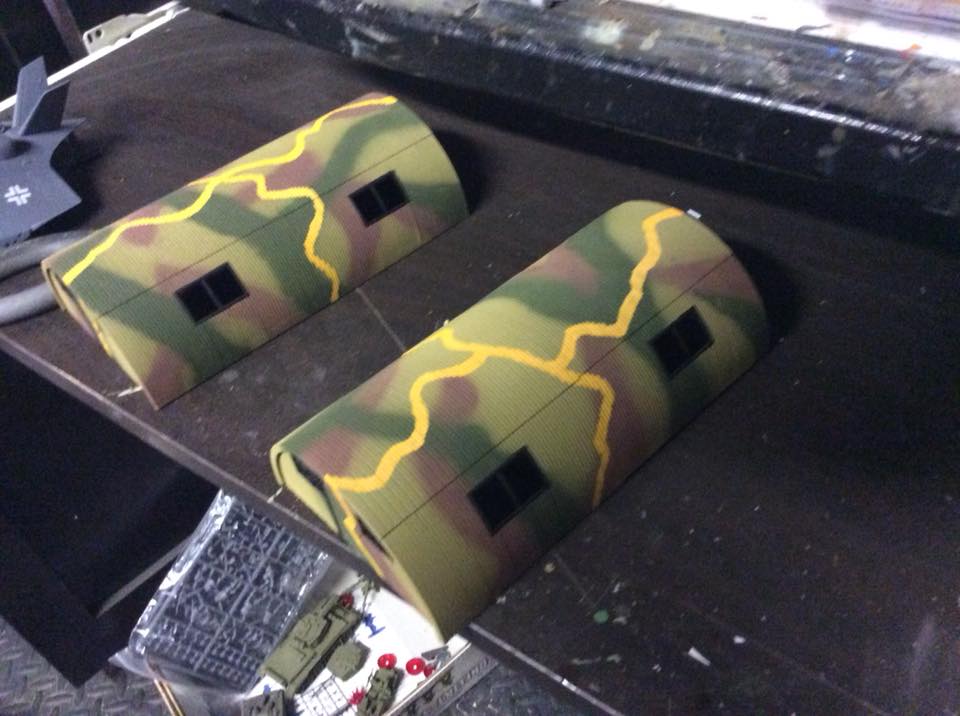
 Quonset Huts with most painting complete. Just need to finish the window frames, then shade and Varnish.
Other work proceeding is on the airfield. As mentioned previously, I had some 1/2in pink insulation foam lying around, but when I tried to use that on top of the 1/4in MDF to make the airfield, the airstrip was raised far to high above table level. it basically blocked LOS to infantry on either side of the airstrip. I didn’t want something that extreme, I just wanted enough of a lip so that infantry could choose to gain some soft cover using the airfield embankment if they were adjacent to it.
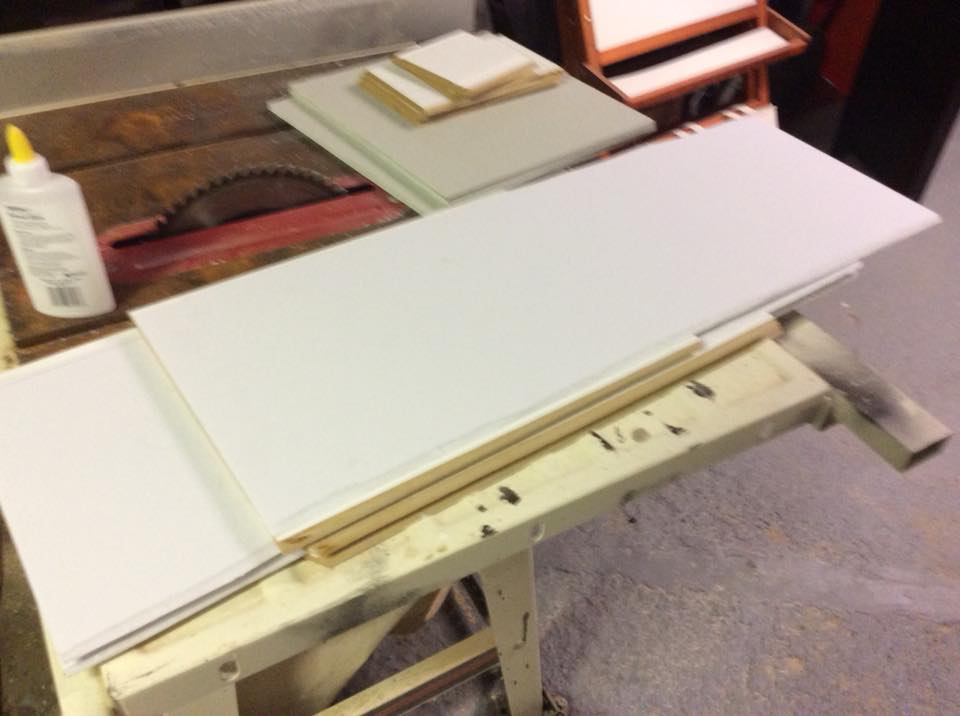
So, for a few $ I picked up some sheets of 1/4 foam board and used that to raise the airstrip surface. The airstrip pieces are 11in wide, with a 1/4 chamfer on the edge. This results in a flat surface on the top of 10.5 inches. AS I want to make a gradual rise up to the airfield surface, I cut strips of foam board 10in wide, and gave them a 45 degree chamfer before gluing them to the pieces of MDF. This made a 2-step transition, which I’ll further smooth later by adding some spackle/wood putty.
As both are essentially paper products, I glued the MDF and foam board together with PVA glue. I didn’t cut the foam board to the exact length of the MDF before gluing, allowing some to overhang until after the glue dried. I commonly do this so I can be sure the foam board/foam extends all the way to the edge of the MDF.
 Foam board being glued to the MDF. As the MDF is actually fairly heavy, I stacked them on top of each other to flatten them and ensure good adhesion.
 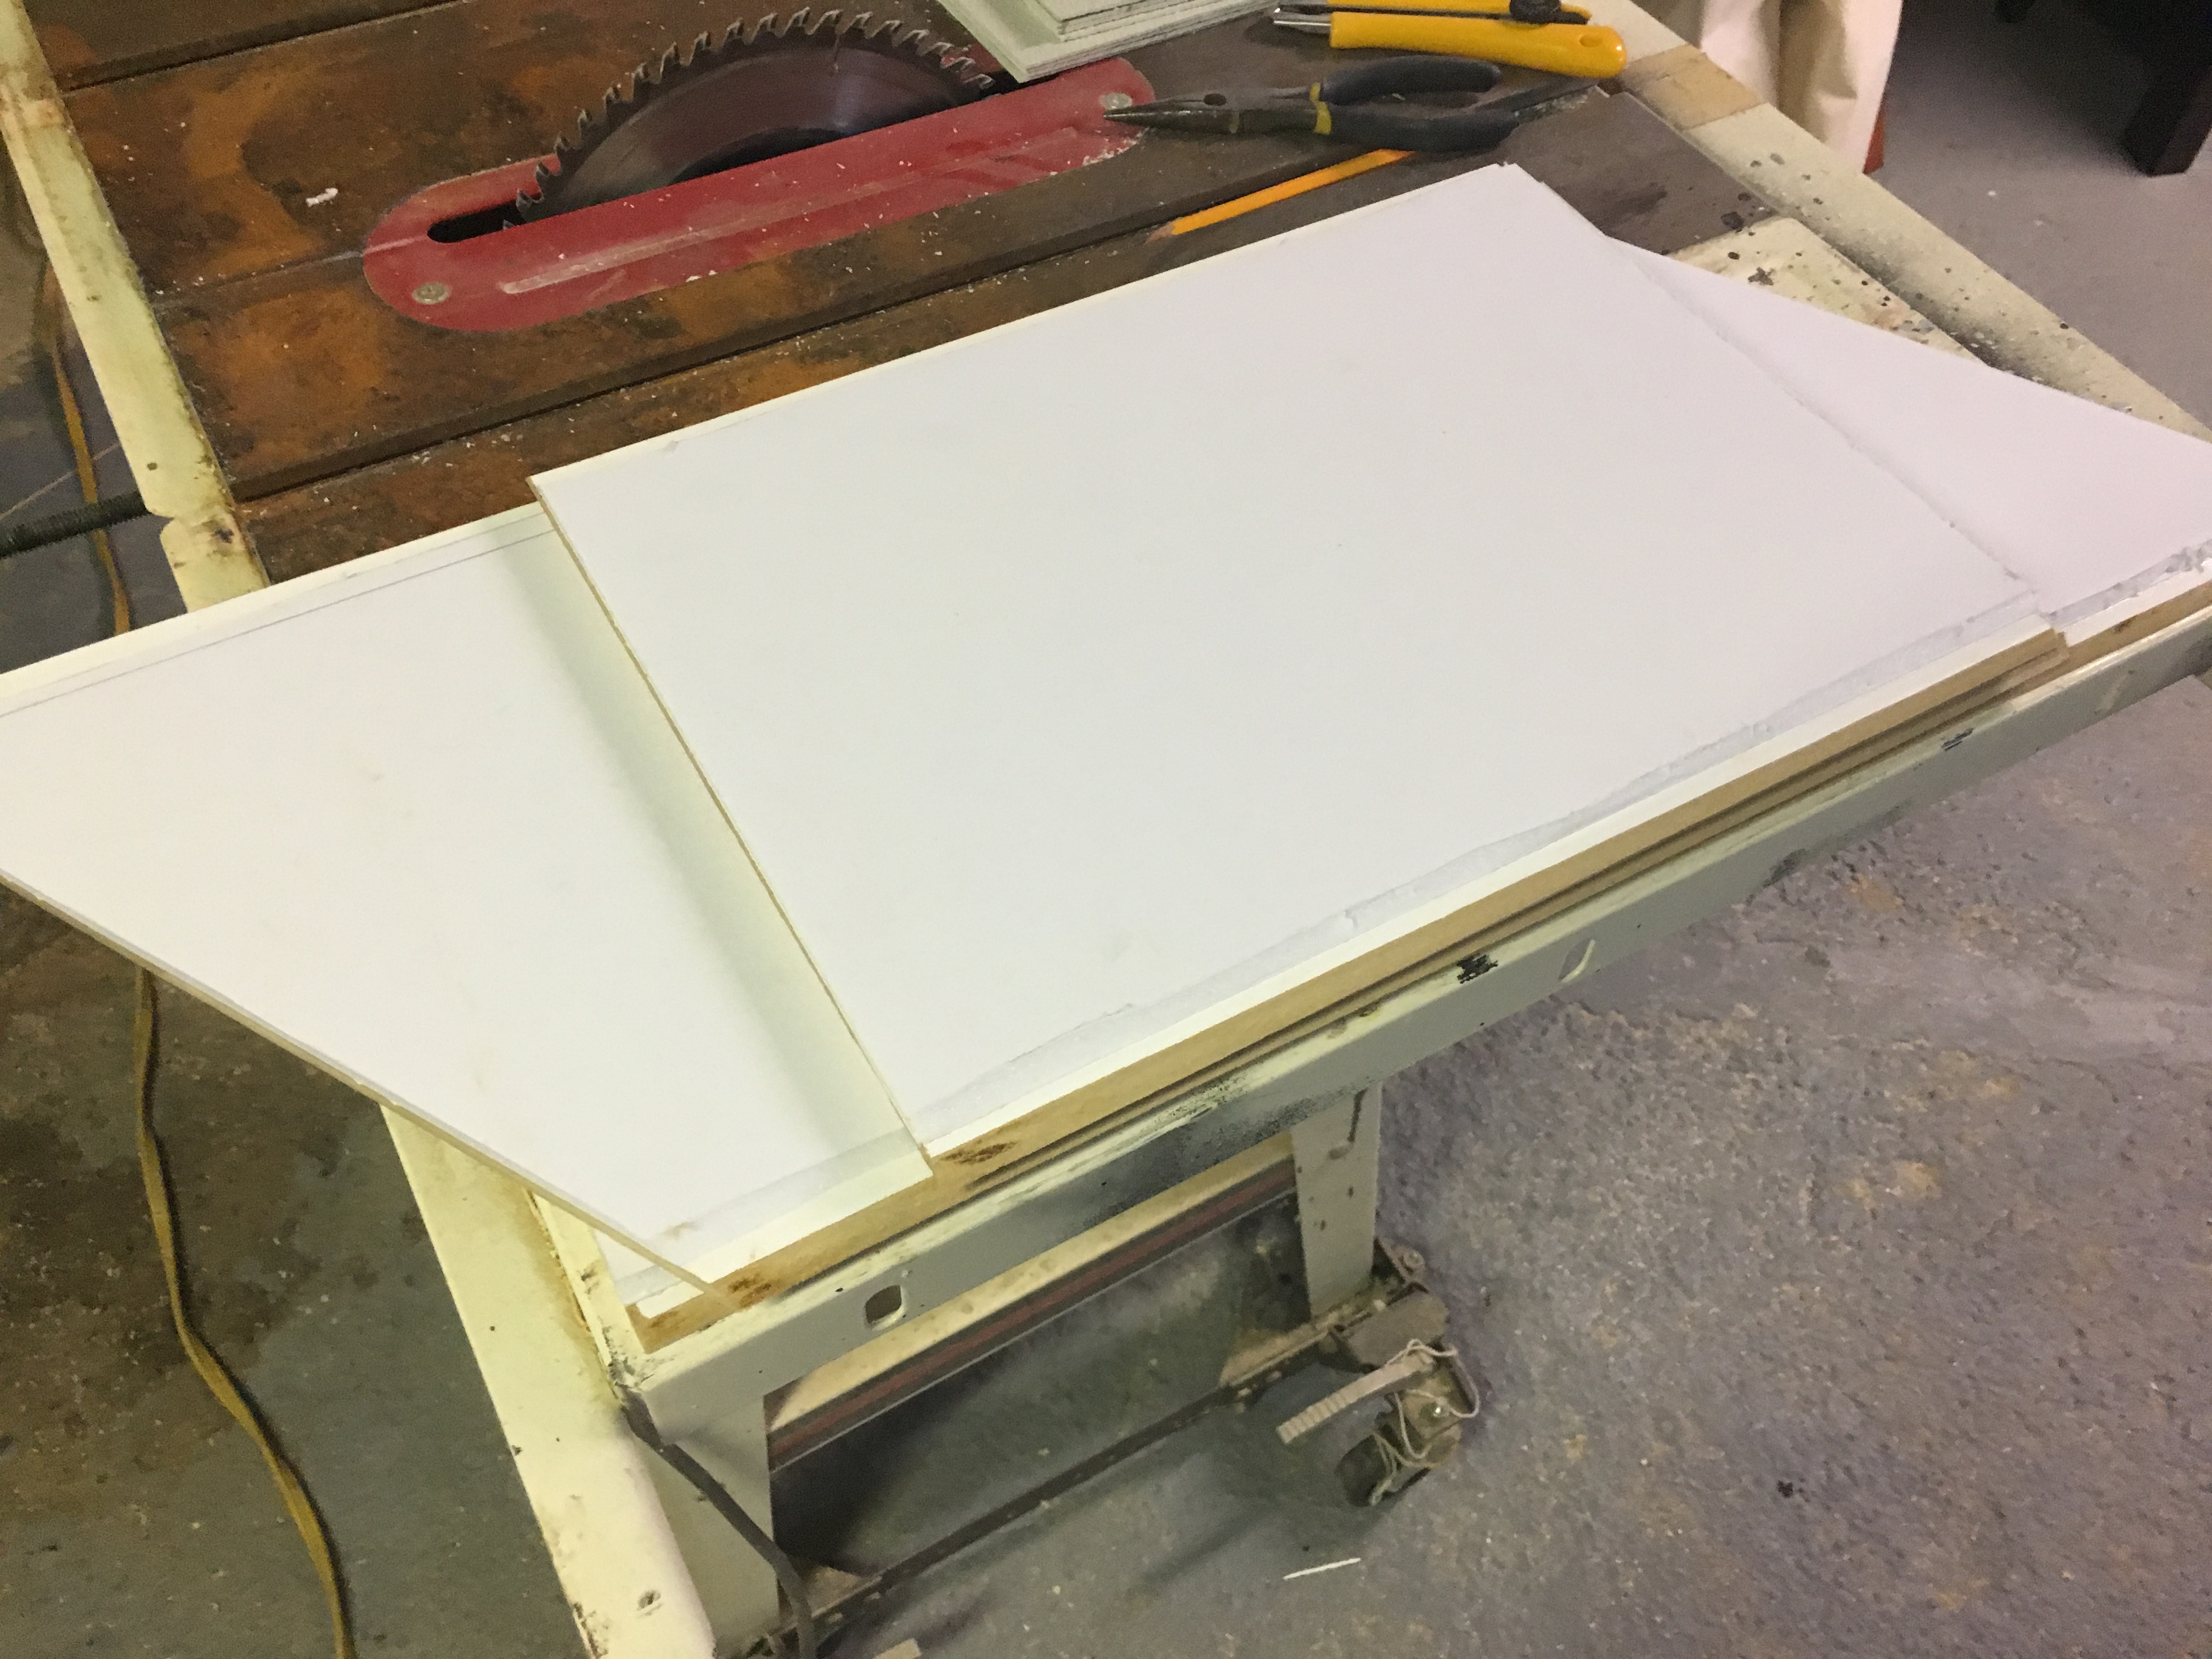 Dry airstrip sections with extra foam board removed
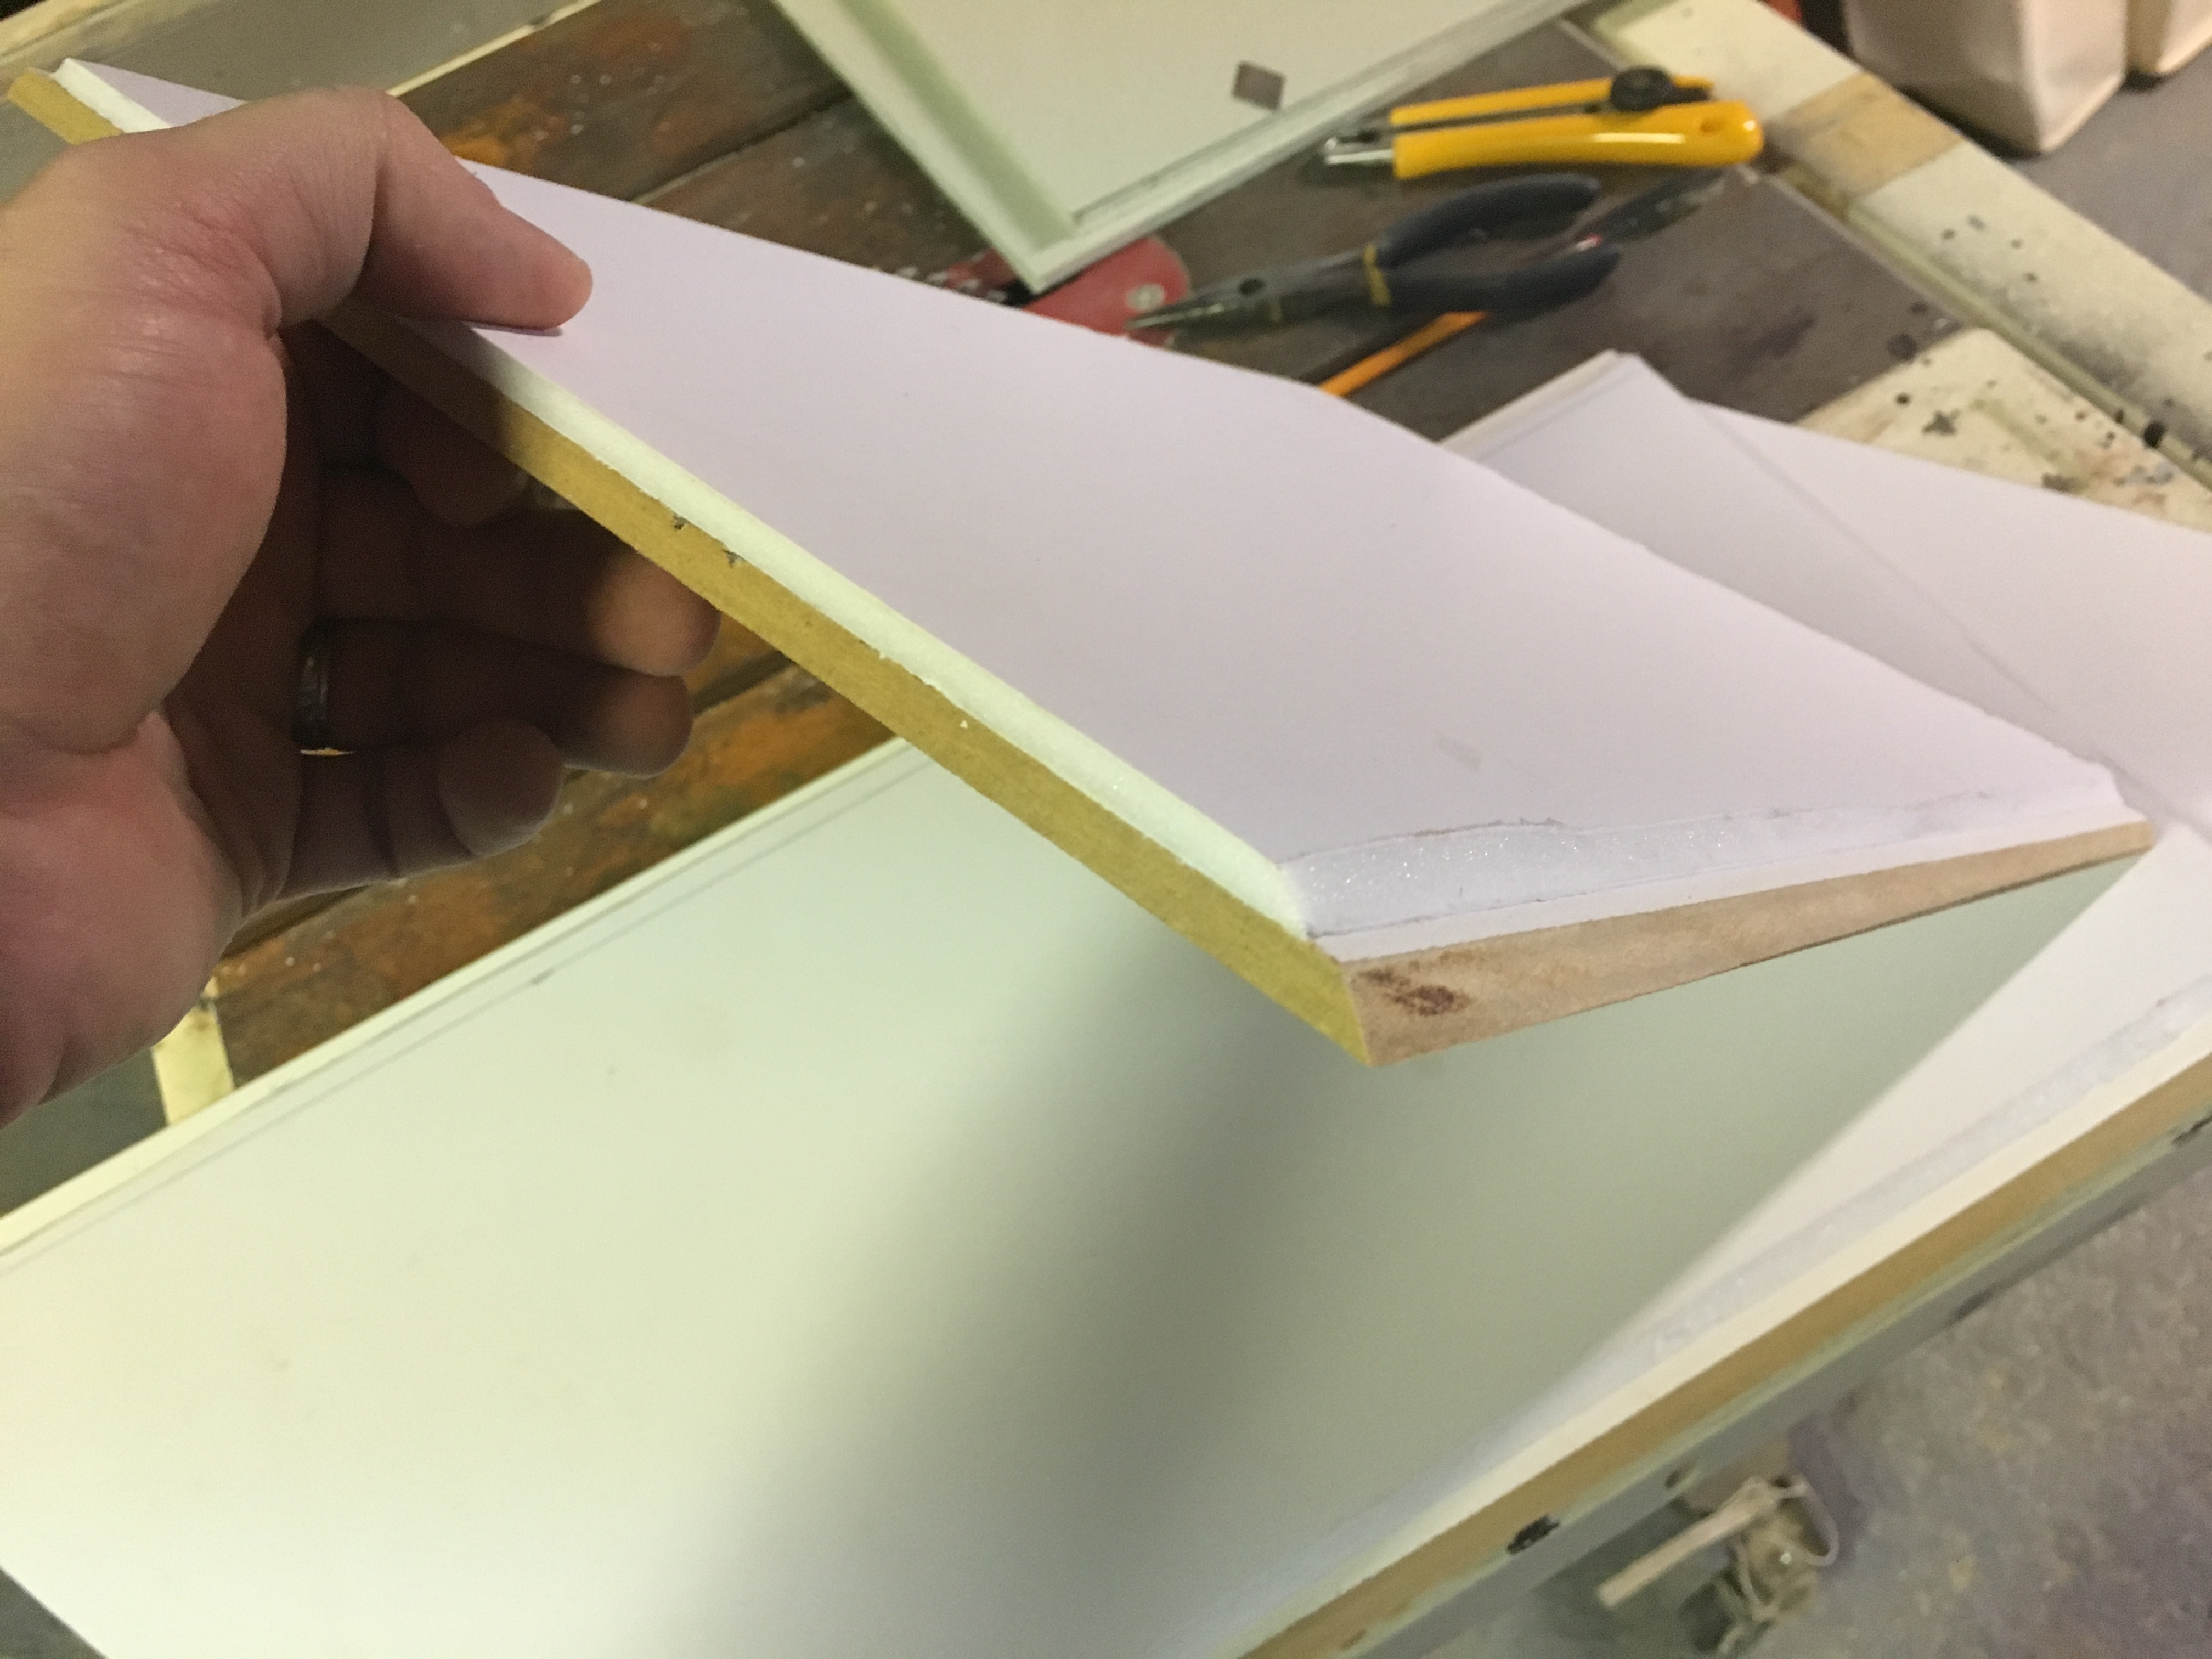 Image of the airfield cross section showing the chamfers and tiered effect
Last but not least, I used my jigsaw to do some shaping of the MDF off-cuts into bases for my jungle scatter terrain. If the rain holds off, i’ll be using my sander to put a bevel on these today.
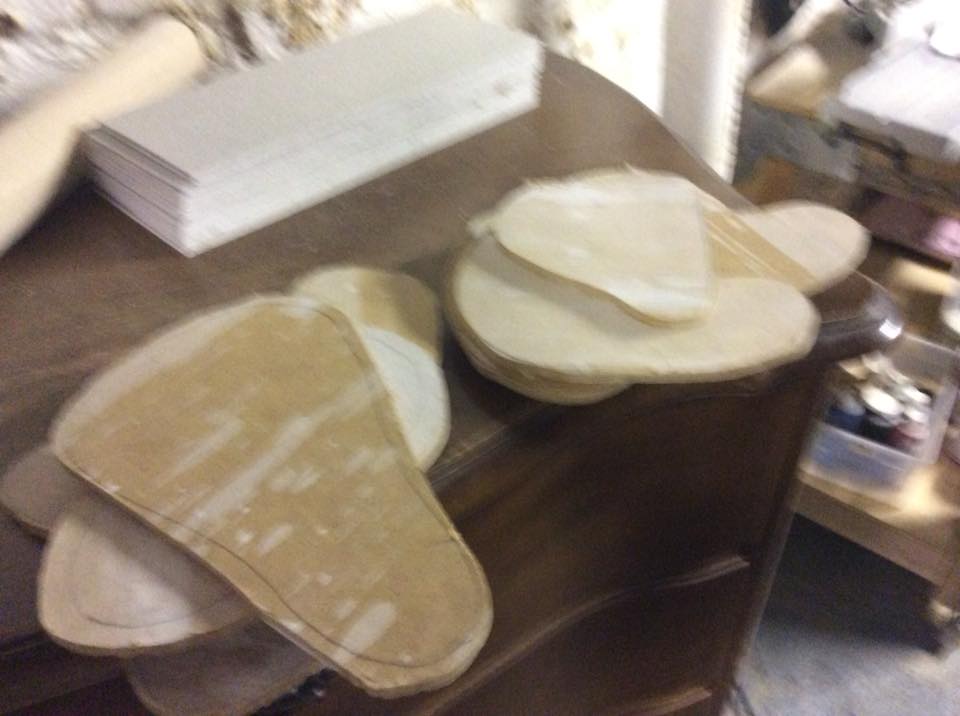 MDF cuts for scatter jungle scatter terrain bases. Not a great picture, but even on in a clear picture they just look like blobs.
 Give Me Fuel Give Me Fire
Quick update. I’ve been putting some additional paint on the Quonset huts, but those aren’t ready for publicly viewing yet.
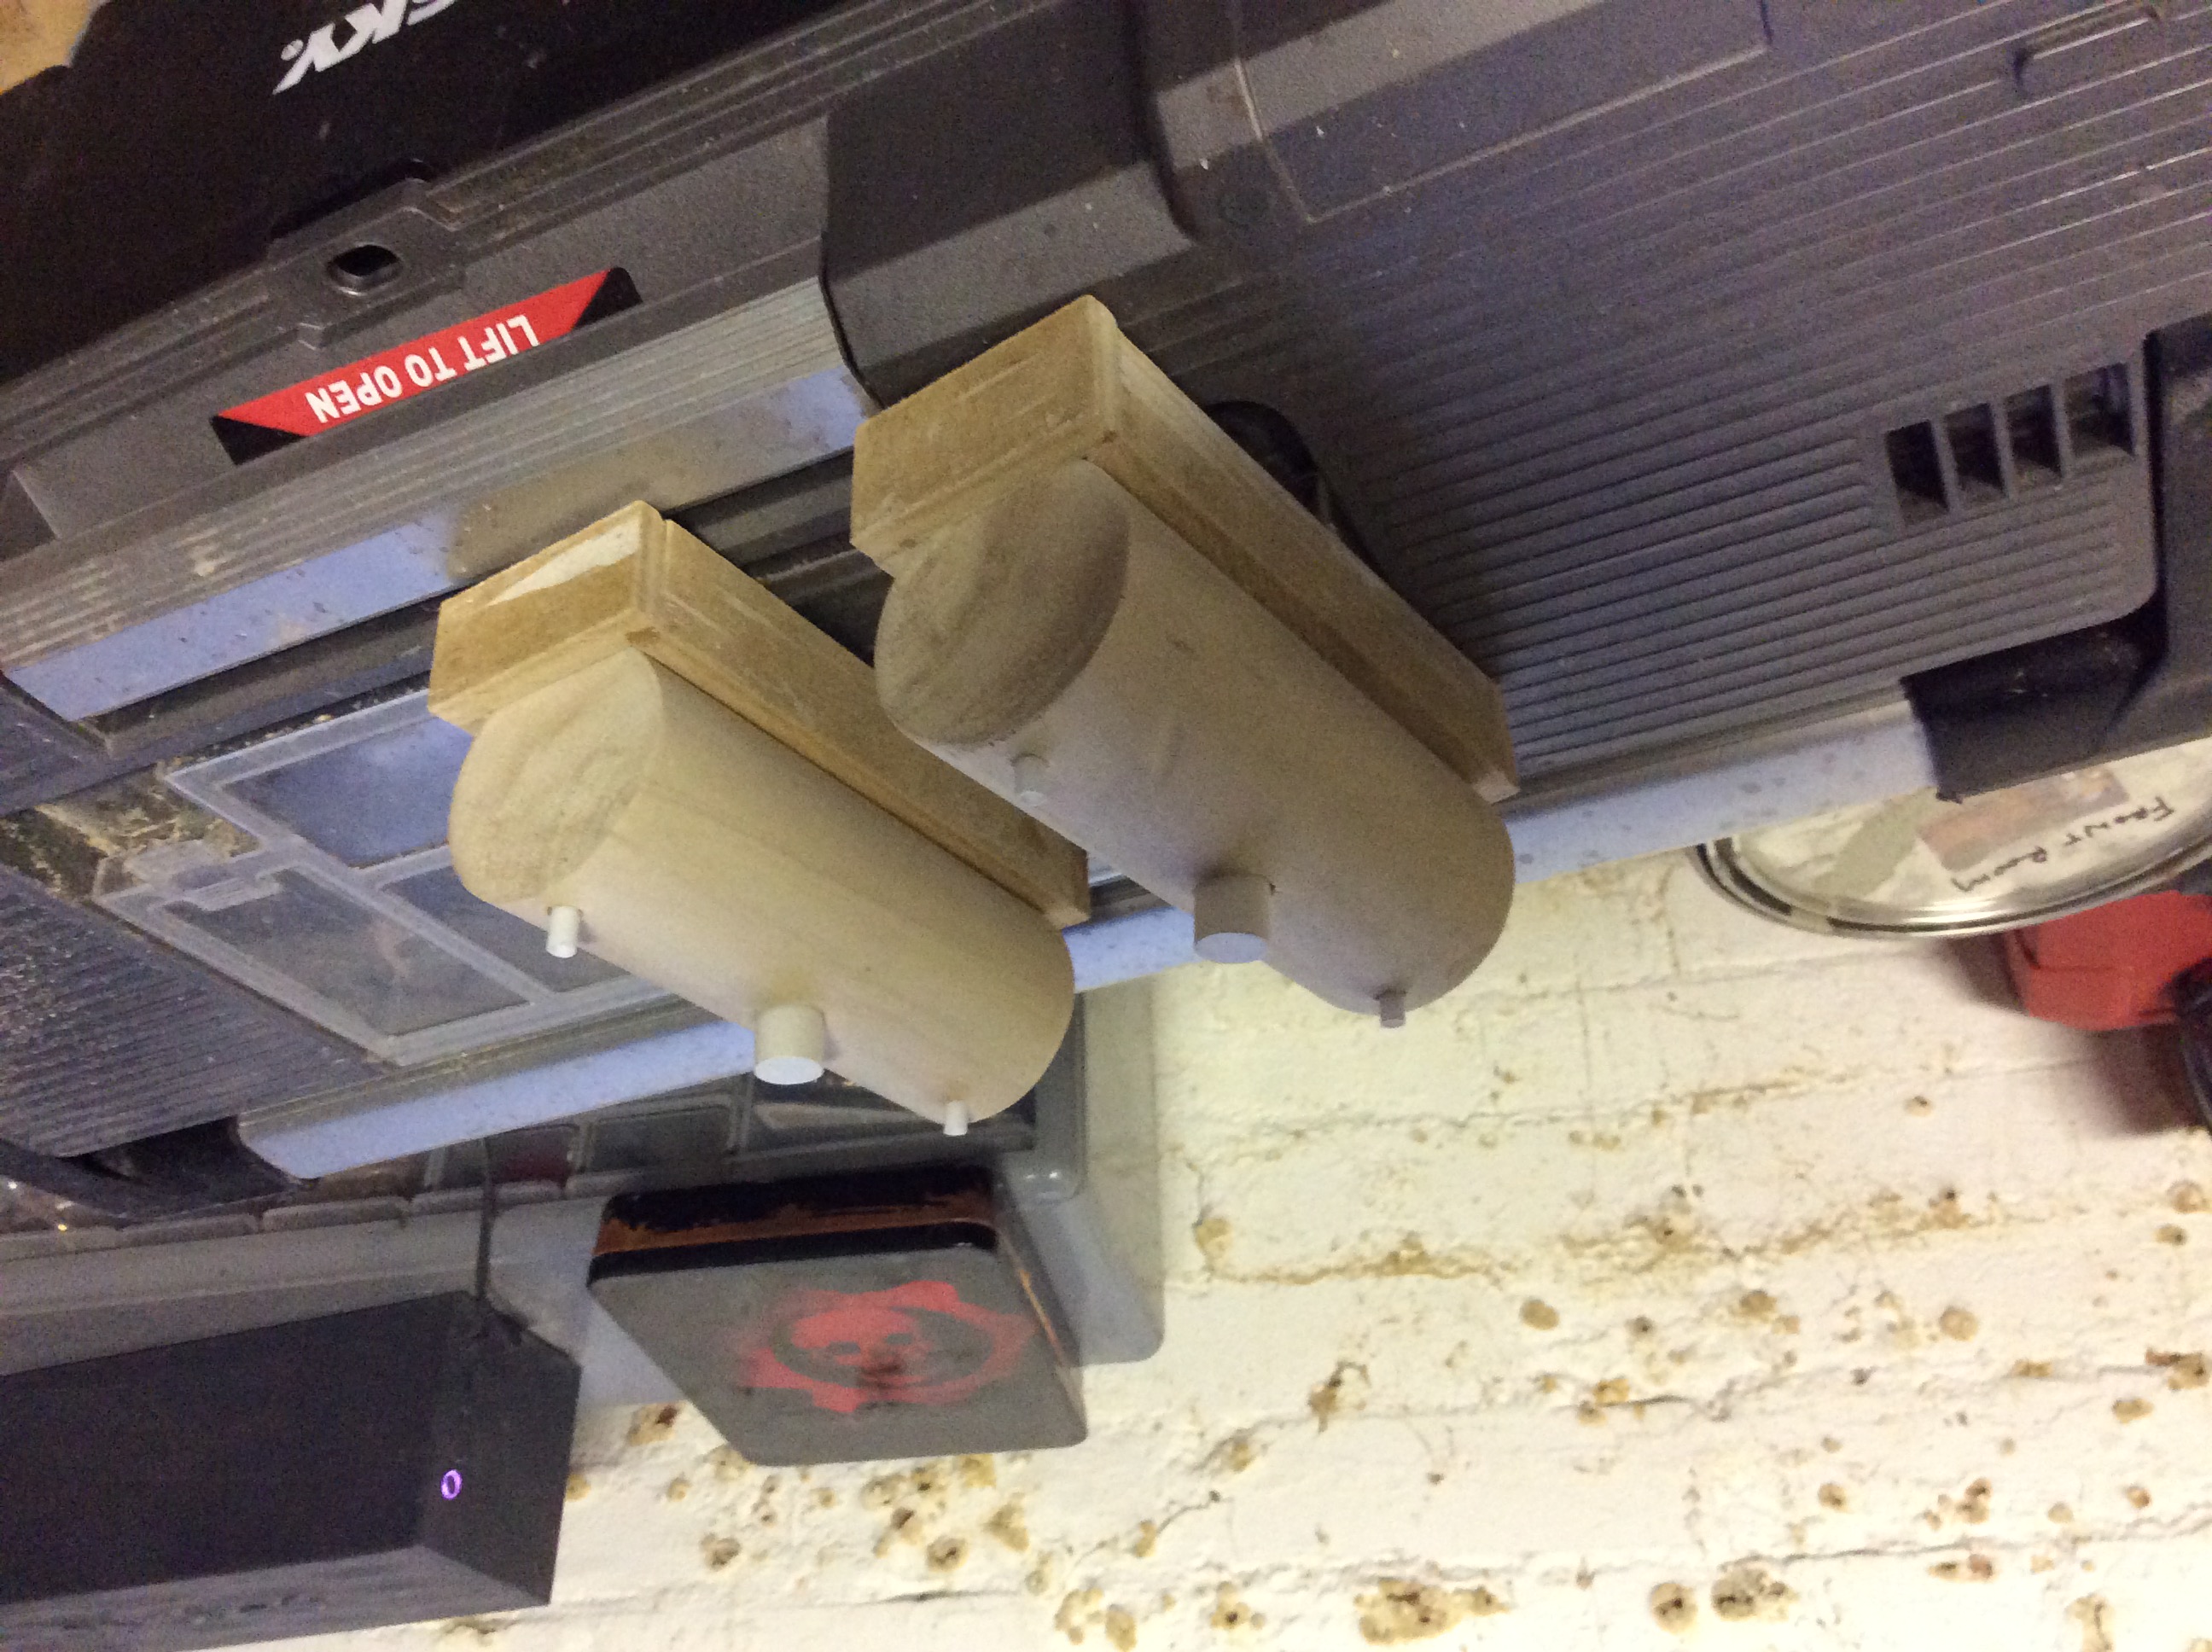
I did add the spouts to the fuel tanks. The larger spouts were also hollow tubes, but before inserting them I glued them down to a sheet of plasticard And trimmed away the excess to add caps.
The bottom frames were made of the same MDF as the terrain bases , just cut into thin strips (1in x 5in, and 1in x 2in) and glued together into a box for the tank to sit on.
Most of what remains on the is some detailing before painting.
Some Progress
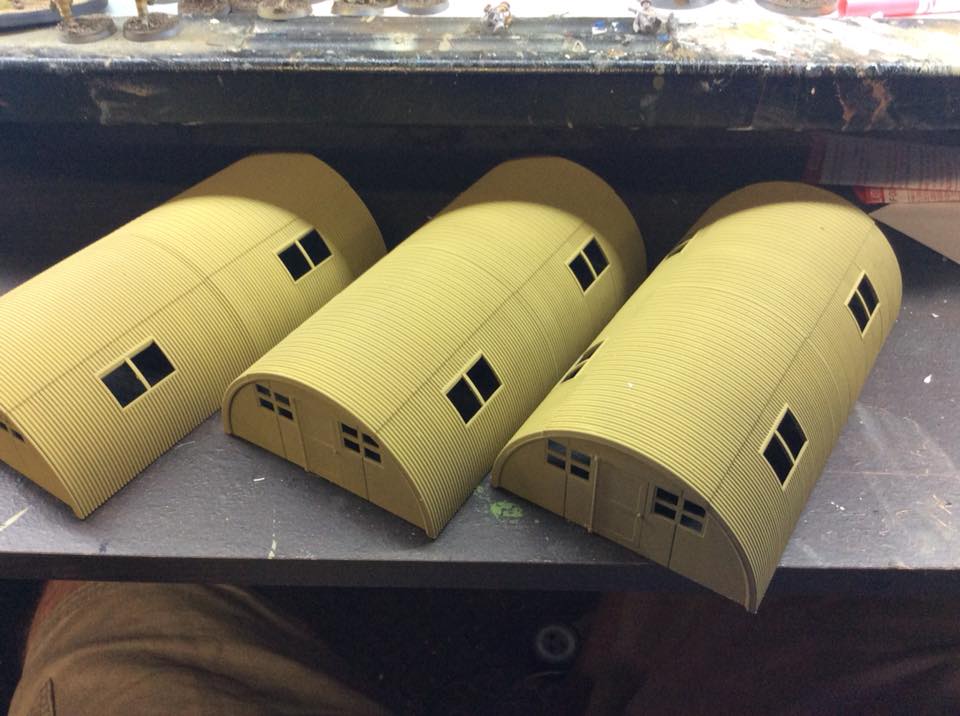
Taking some small steps forwards. Firstly I put some paint on the Quonset huts. I don’t know how the Japanese would have painted these. I don’t know if, given shortages of steel, if they ever made use of them. Regardless, I chose to go with the same tan/brown/green/yellow scheme used on their tanks. It was relatively quck work with an airbrush.
Im still deciding if I am going to paint the bright yellow cross with a brush, or masking with an airbrush. Masking would be a lot of work, but yellow can be tough to paint with a brush. Any suggestions?
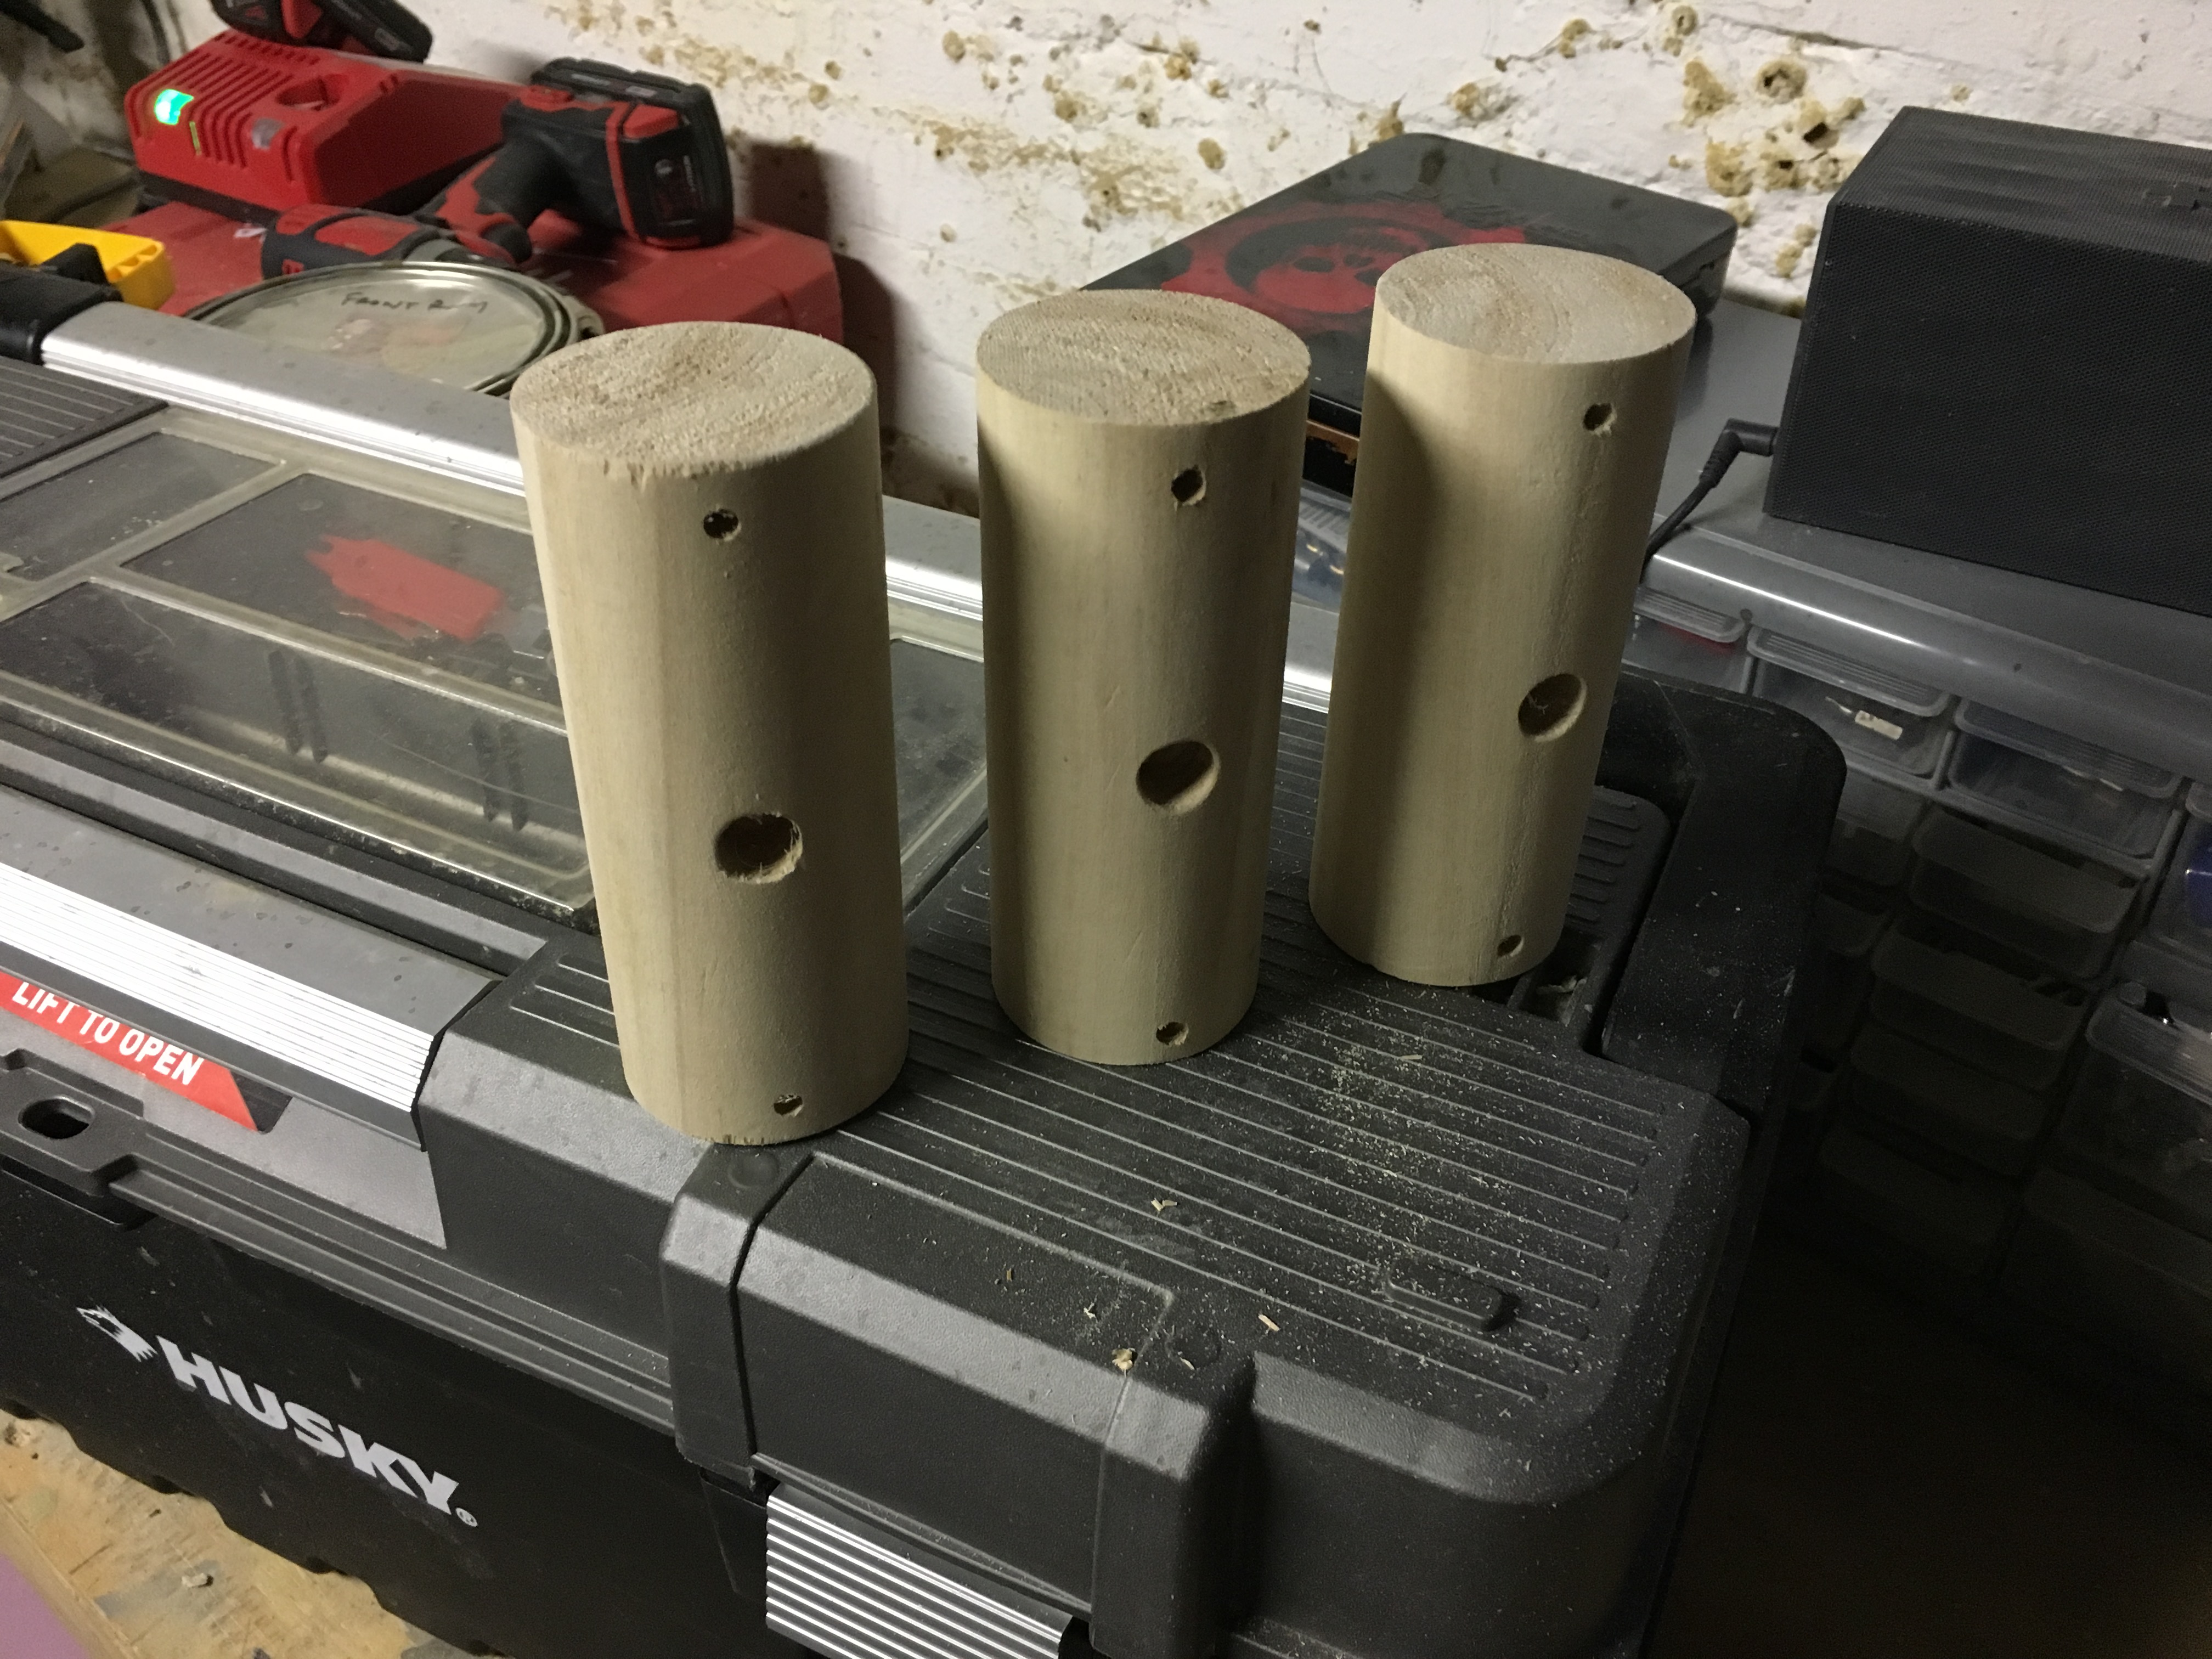
Next up I started some work on the fuel tanks that will act as some medium sized scatter terrain. From a previous woodworking project, I had a decent length of 2.5in diameter wood dowel. To make my 3 tanks, I simply sliced off three 5-in sections with my mitre saw. It could easily be done with a hand saw, would just take longer.
in images of these I’ve always seen them with short lengths of pipe coming from the top. I assume these are for filling the tank and letting air vent. I had some old plasticard tube to act as the pipe lengths, so I used my drill press to drill a few vertical holes into the dowel to mount them. Much easier that trying to surface mount them to a curved surface. Next I’ll need to do somd light sanding to avoid having an obvious wood texture when painted.
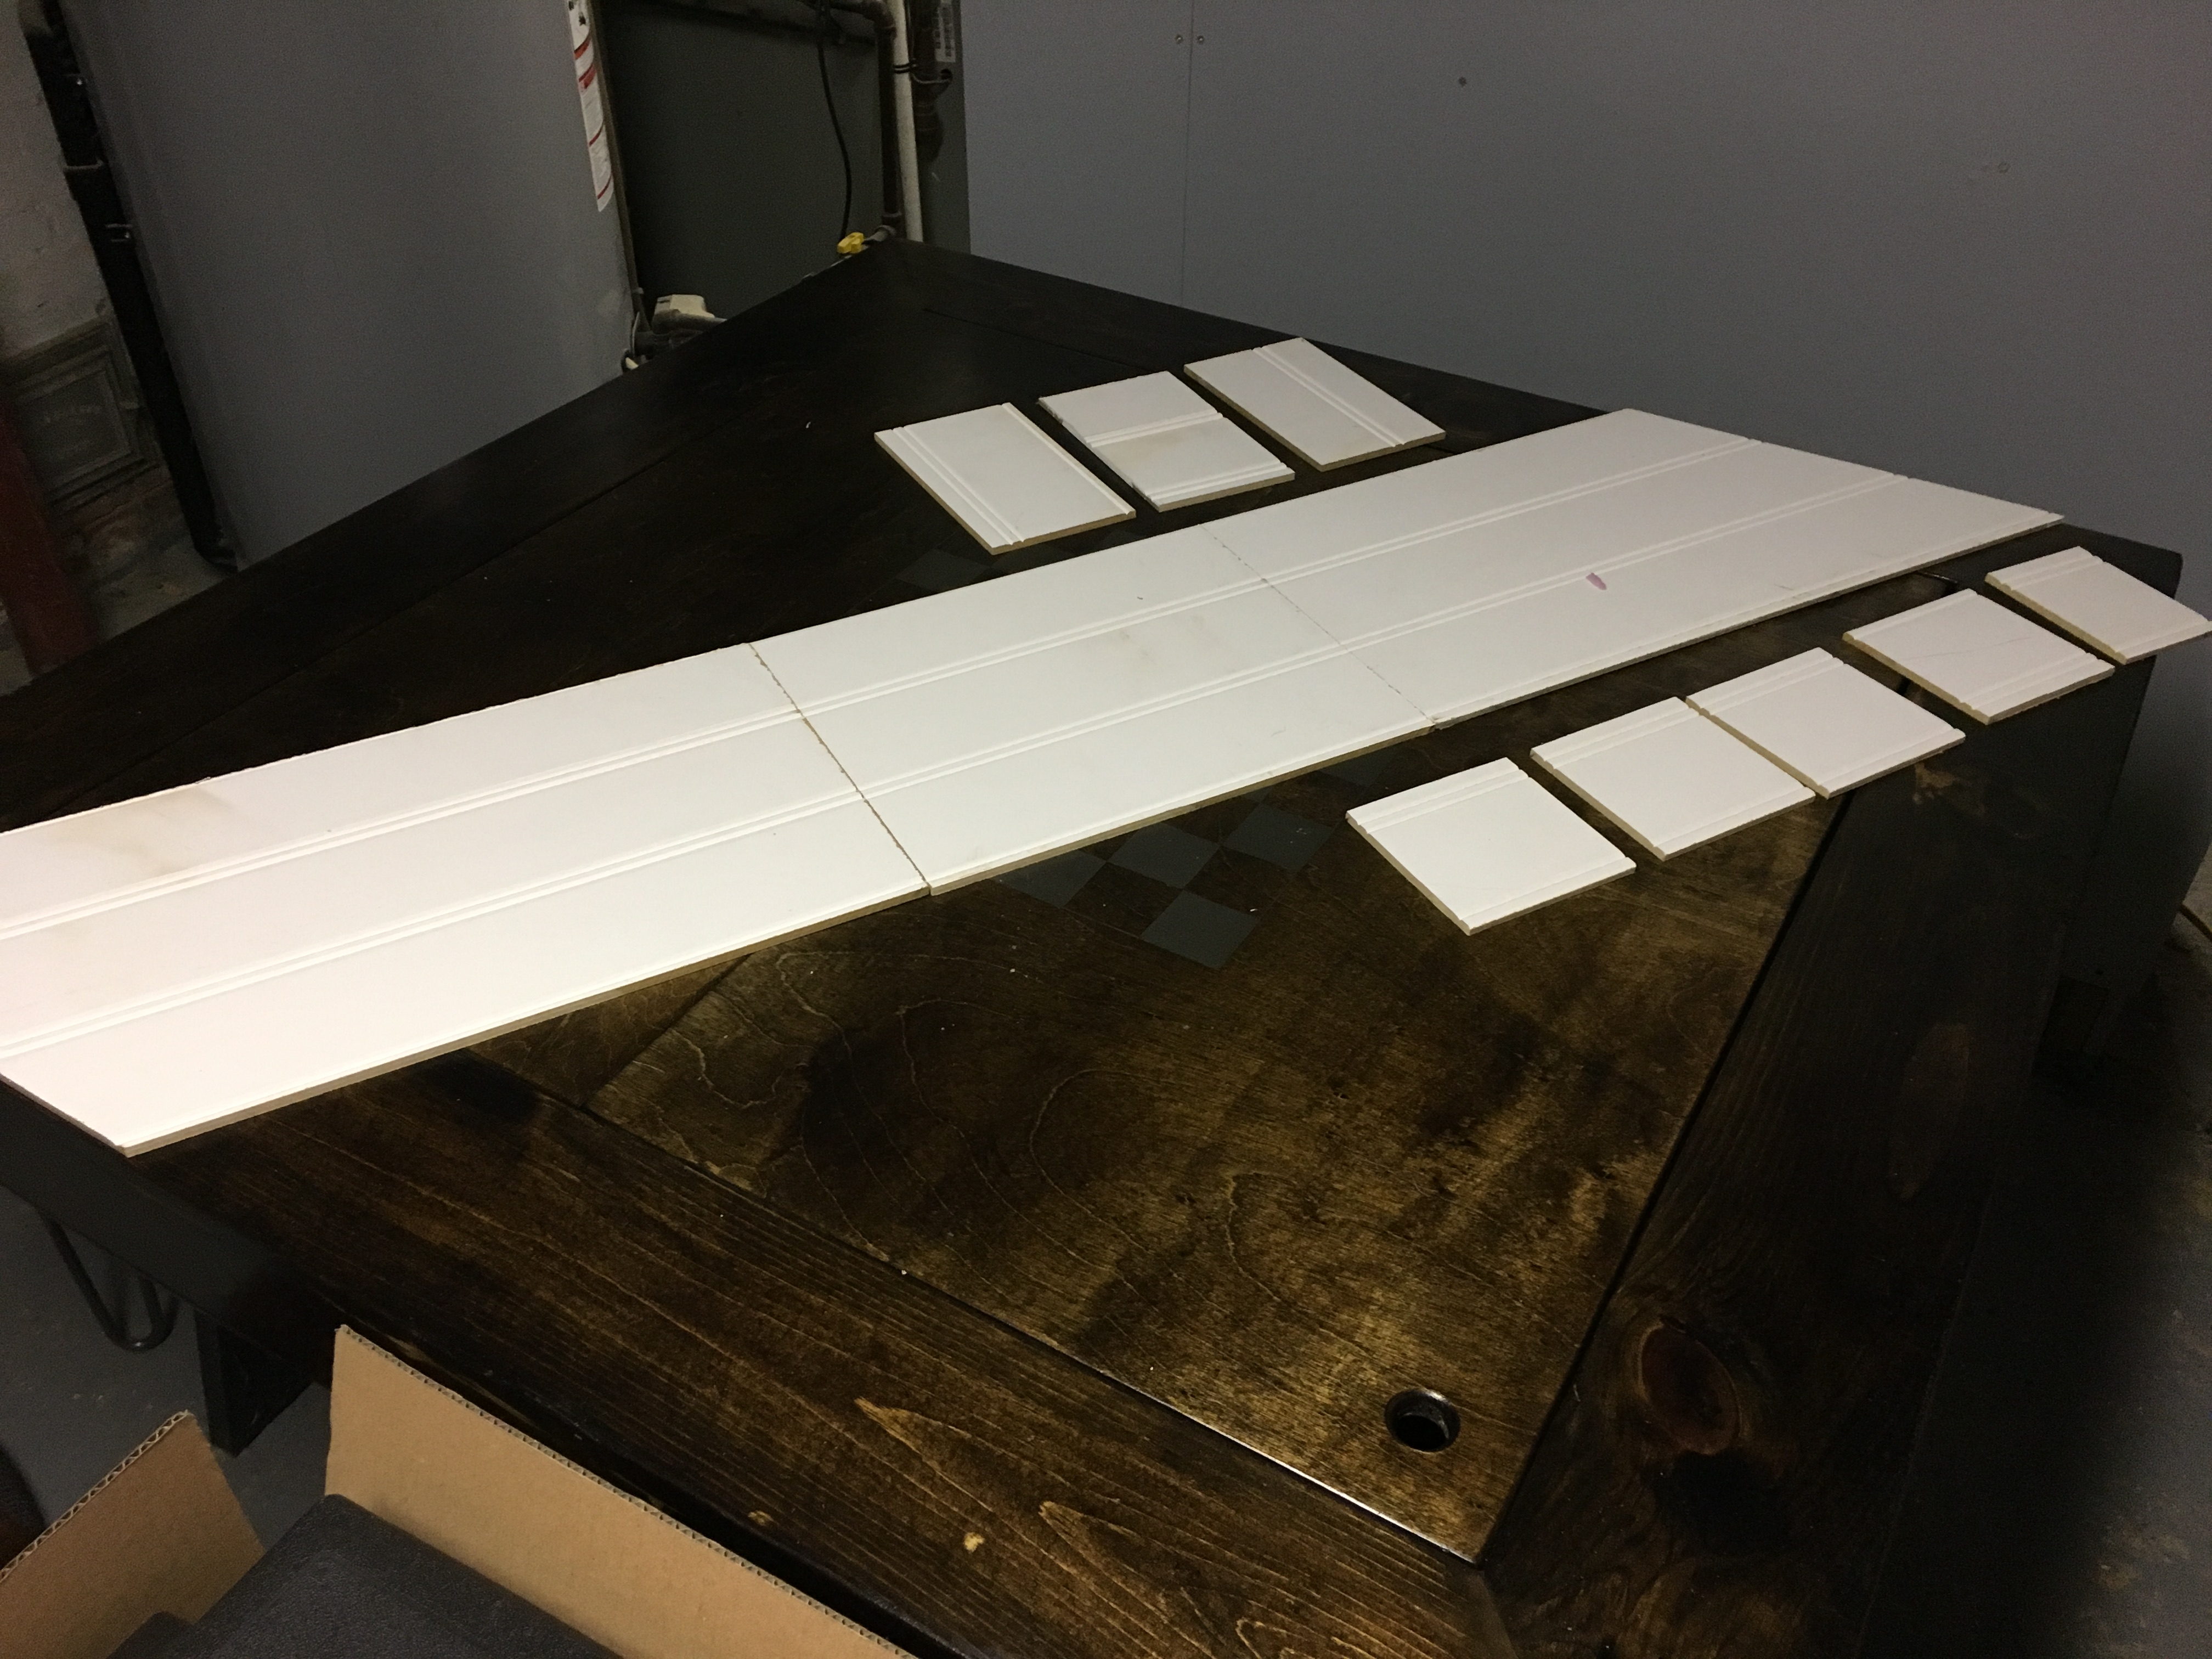
Lastly, I used my table saw to cut the bases for several of the terrain pieces. Here you see the bases for the airstrip, the Quonset huts, and several of the bunkers/towers. I used 0.25in thick wainscoting MDF simply because I had the material lying around from another project. I was going to use some 1/2in insulation foam for the airfield, but it will be too high on to of this MDF, so I think I will just use 1/4in foam core.
more on that to come.
Miniature Playground
Ok, I made a short post yesterday showing some Quonset Huts I am making for terrain for my games of K47. This is part of a greater plan to get myself a cool 4×4 table with the following goals:
- Be able to play at home on my newly made gaming/crafts table (which is 4×4)
- Get something cool that can be brought to my local store for BA/Konflikt demo days
- Get a gaming board more congruent with my USMC force (my current gaming terrain essentially looks like rural Poland)
- Get something that is a little more mission/objective oriented.
My idea is that Japanese Scientists and Engineers have worked cooperatively with German Scientists to develop a new form of fighter, and that fighter is going through test trials on this particular secret airfield. The allies mission/objective is to storm the airfield and capture/destroy the new fighter. Figured it would work for large assault missions, or potenially smaller stealth/special forces missions depending on the forces selected and specific game scenario played.
Diagram Below
 Plan View of Table done in MS Powerpoint. If you've never done this before, PowerPoint can be greate for this type of work. You can set the slide size to actual (in this case 56 x 56in. and then design the table in true-scale.
 Here is my plan.
- Quonset Huts – already have these. If interested, they are from the DUST range. Each of my huts consists of 2x DUST huts glued together. I was able to get all 6 huts for $22 by buying two fo the “Operation Icarus” expansions from Miniature Market for $11 each. Each expansion set contained 3 huts.
- Hanger, Tower, Guard Towers – These will be procured as kits from Sarissa Precision
- Fencing, Bunkers, Jungle Terrain, Fuel Tanks – I am going to customer build myself, plans in process. More on these later
- Experimental Jet – Working Ideas now. It’s the objective, but will also help break Line of Sight down the airstrip.
- Airfield – this I am going to make from MDF and foamboard. The reason being is I would like to raise it slightly above table level. This will make it look like it was a graded airstrip, and will also help prevent it from being such a large flat area for LOS. Infantry will be able to gain some cover by hugging the embankment at the edge of the airstrip.
Thoughts?
Quonset Huts from DUSTModified Jump Walker for My Son
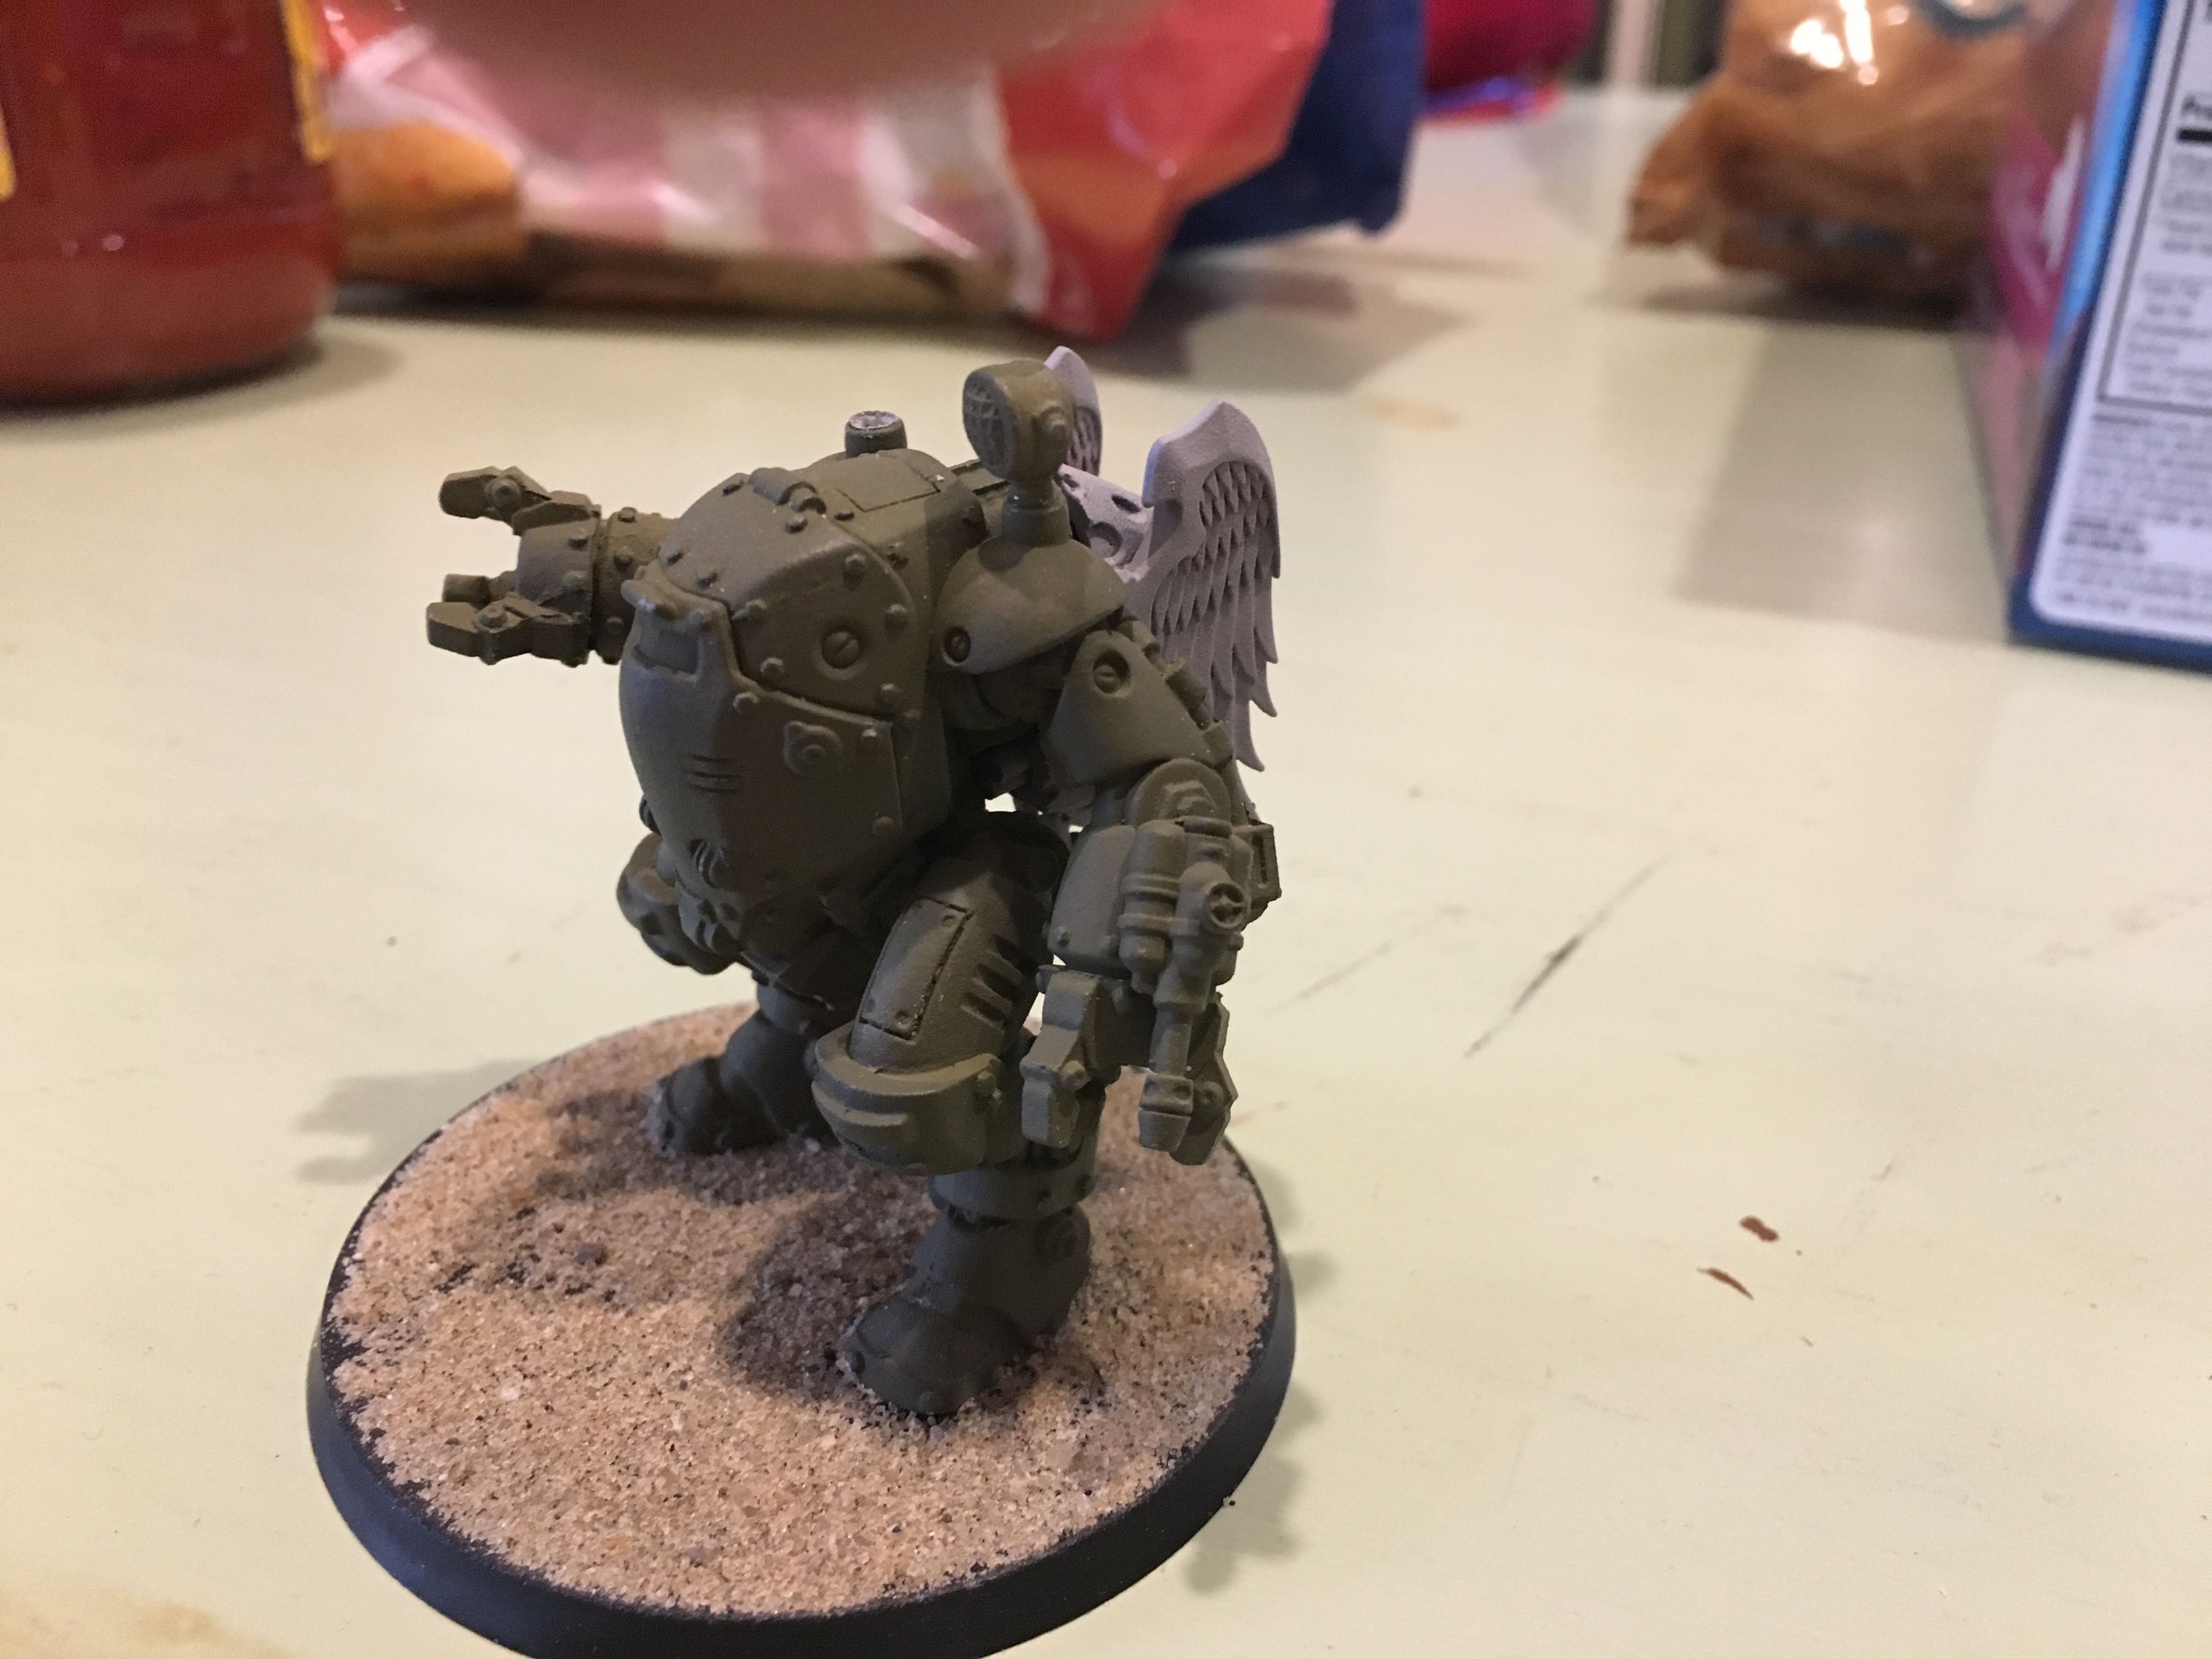
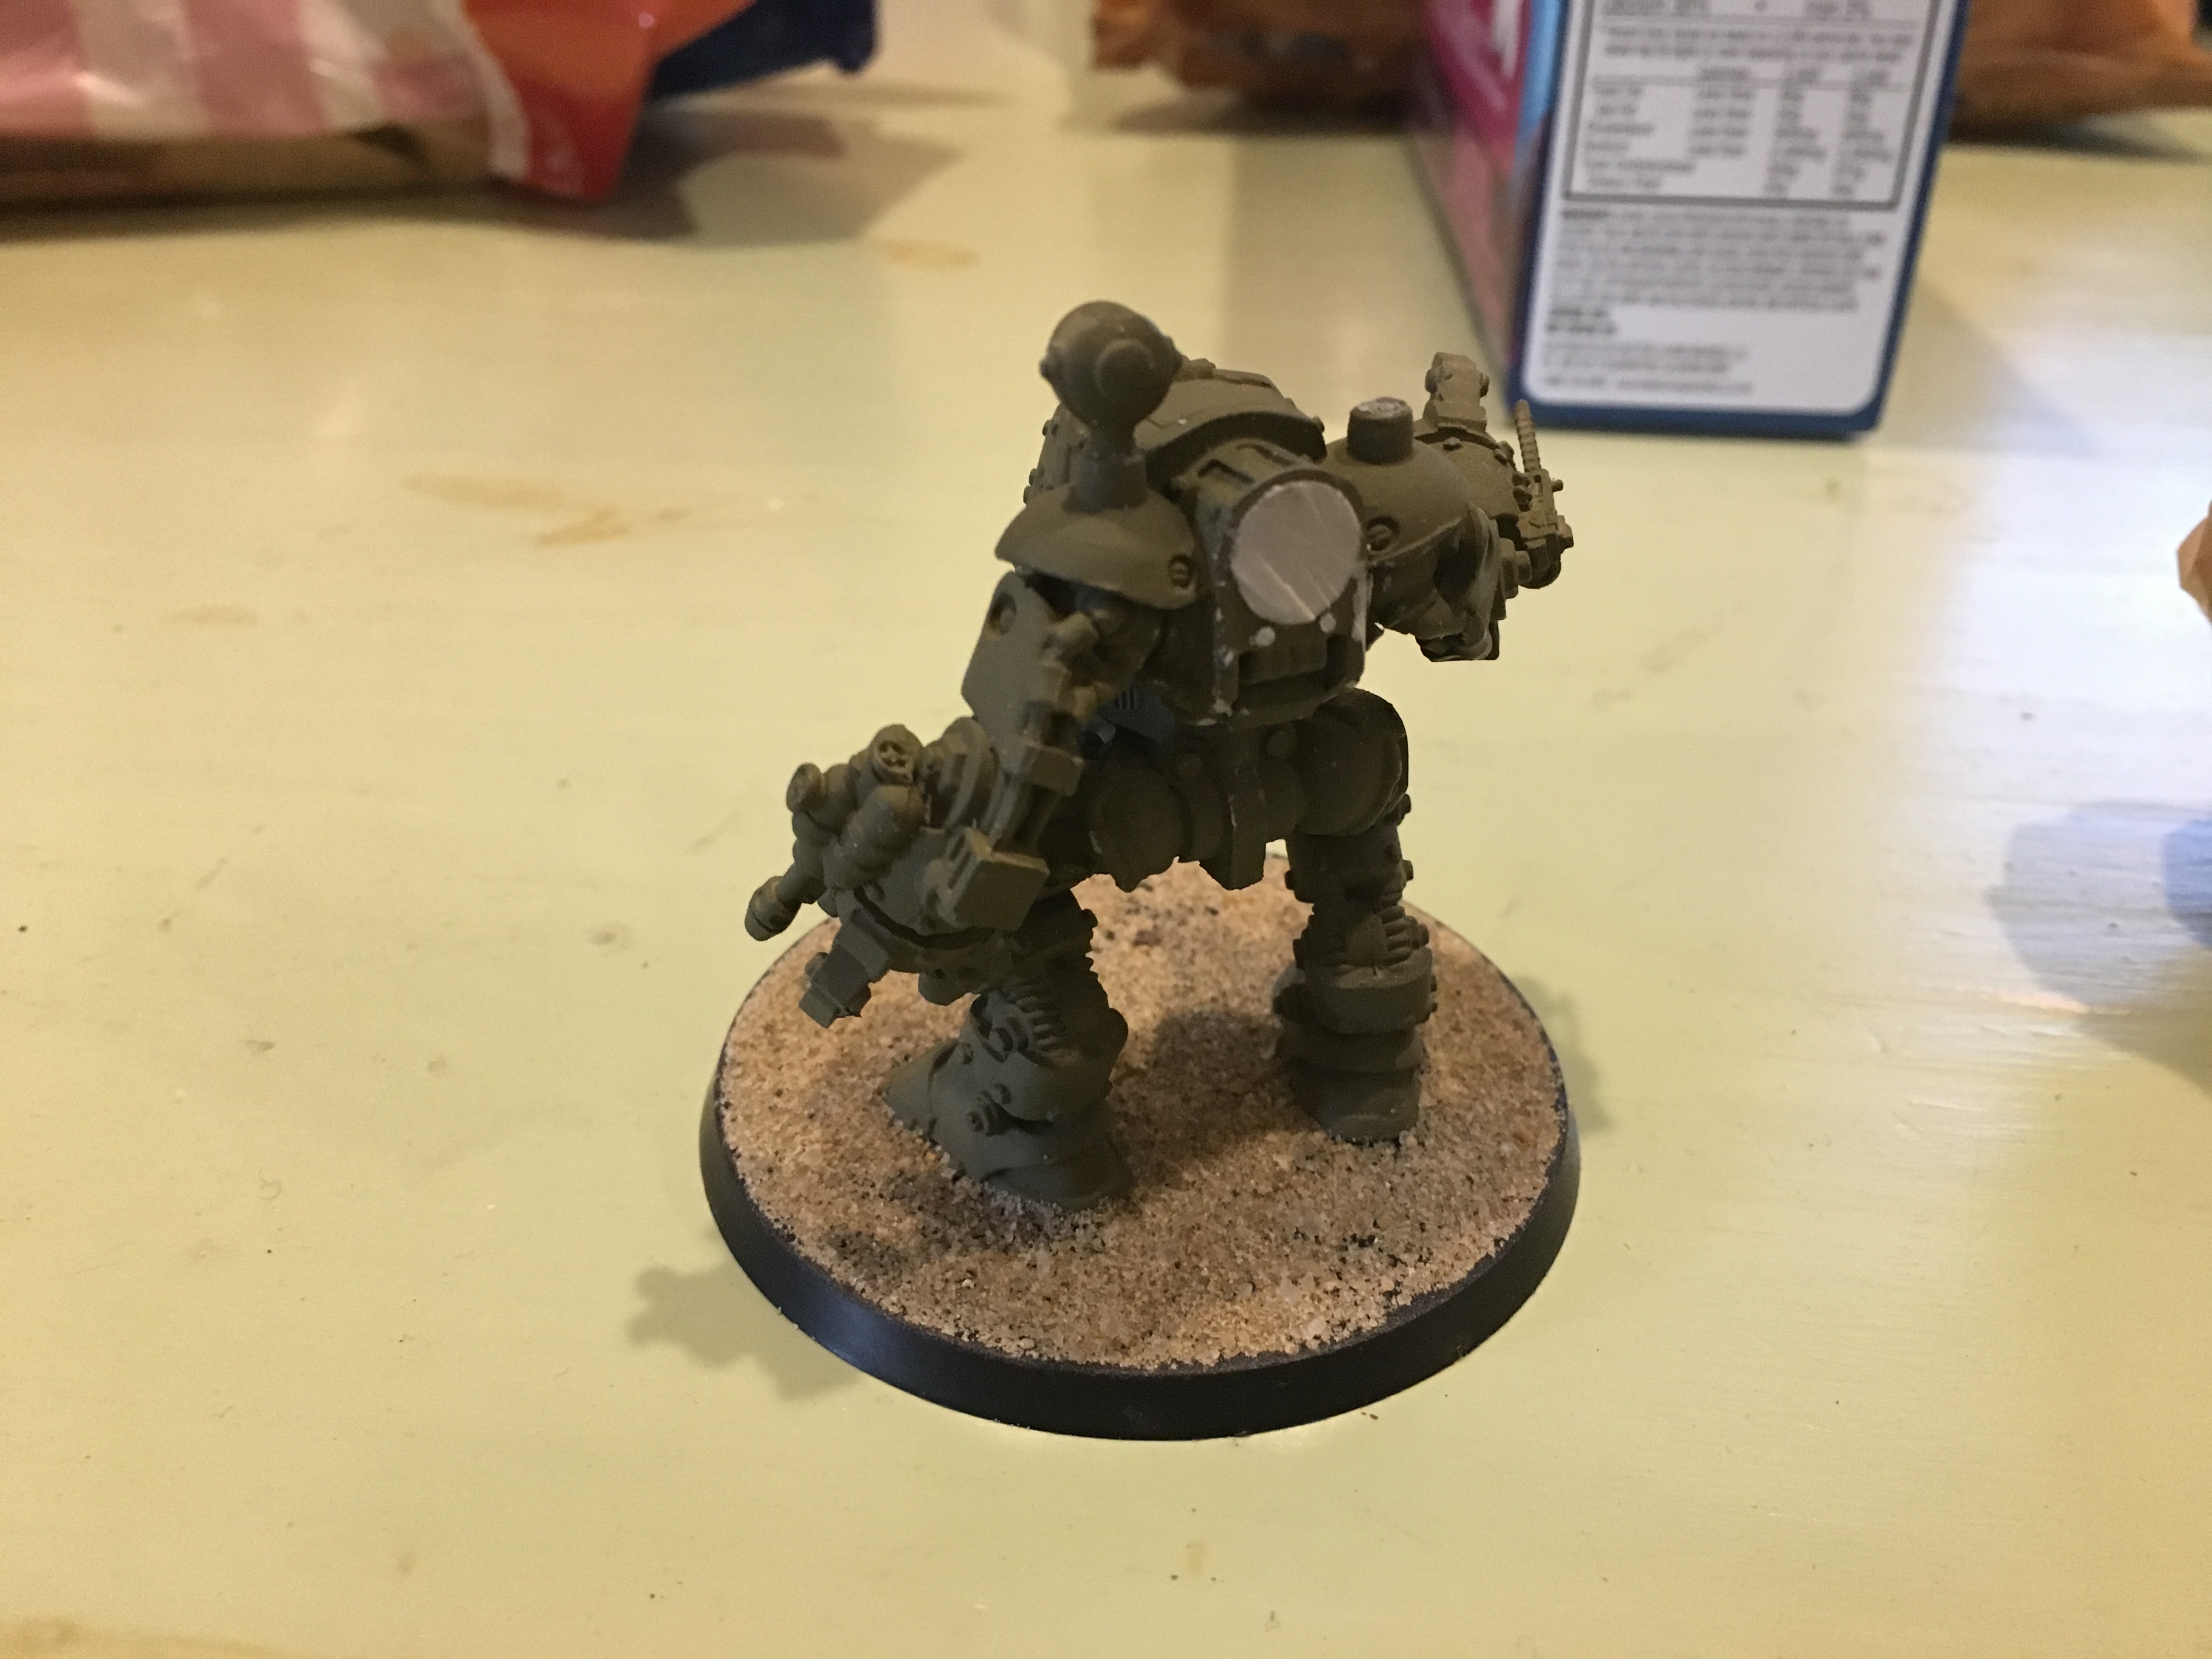
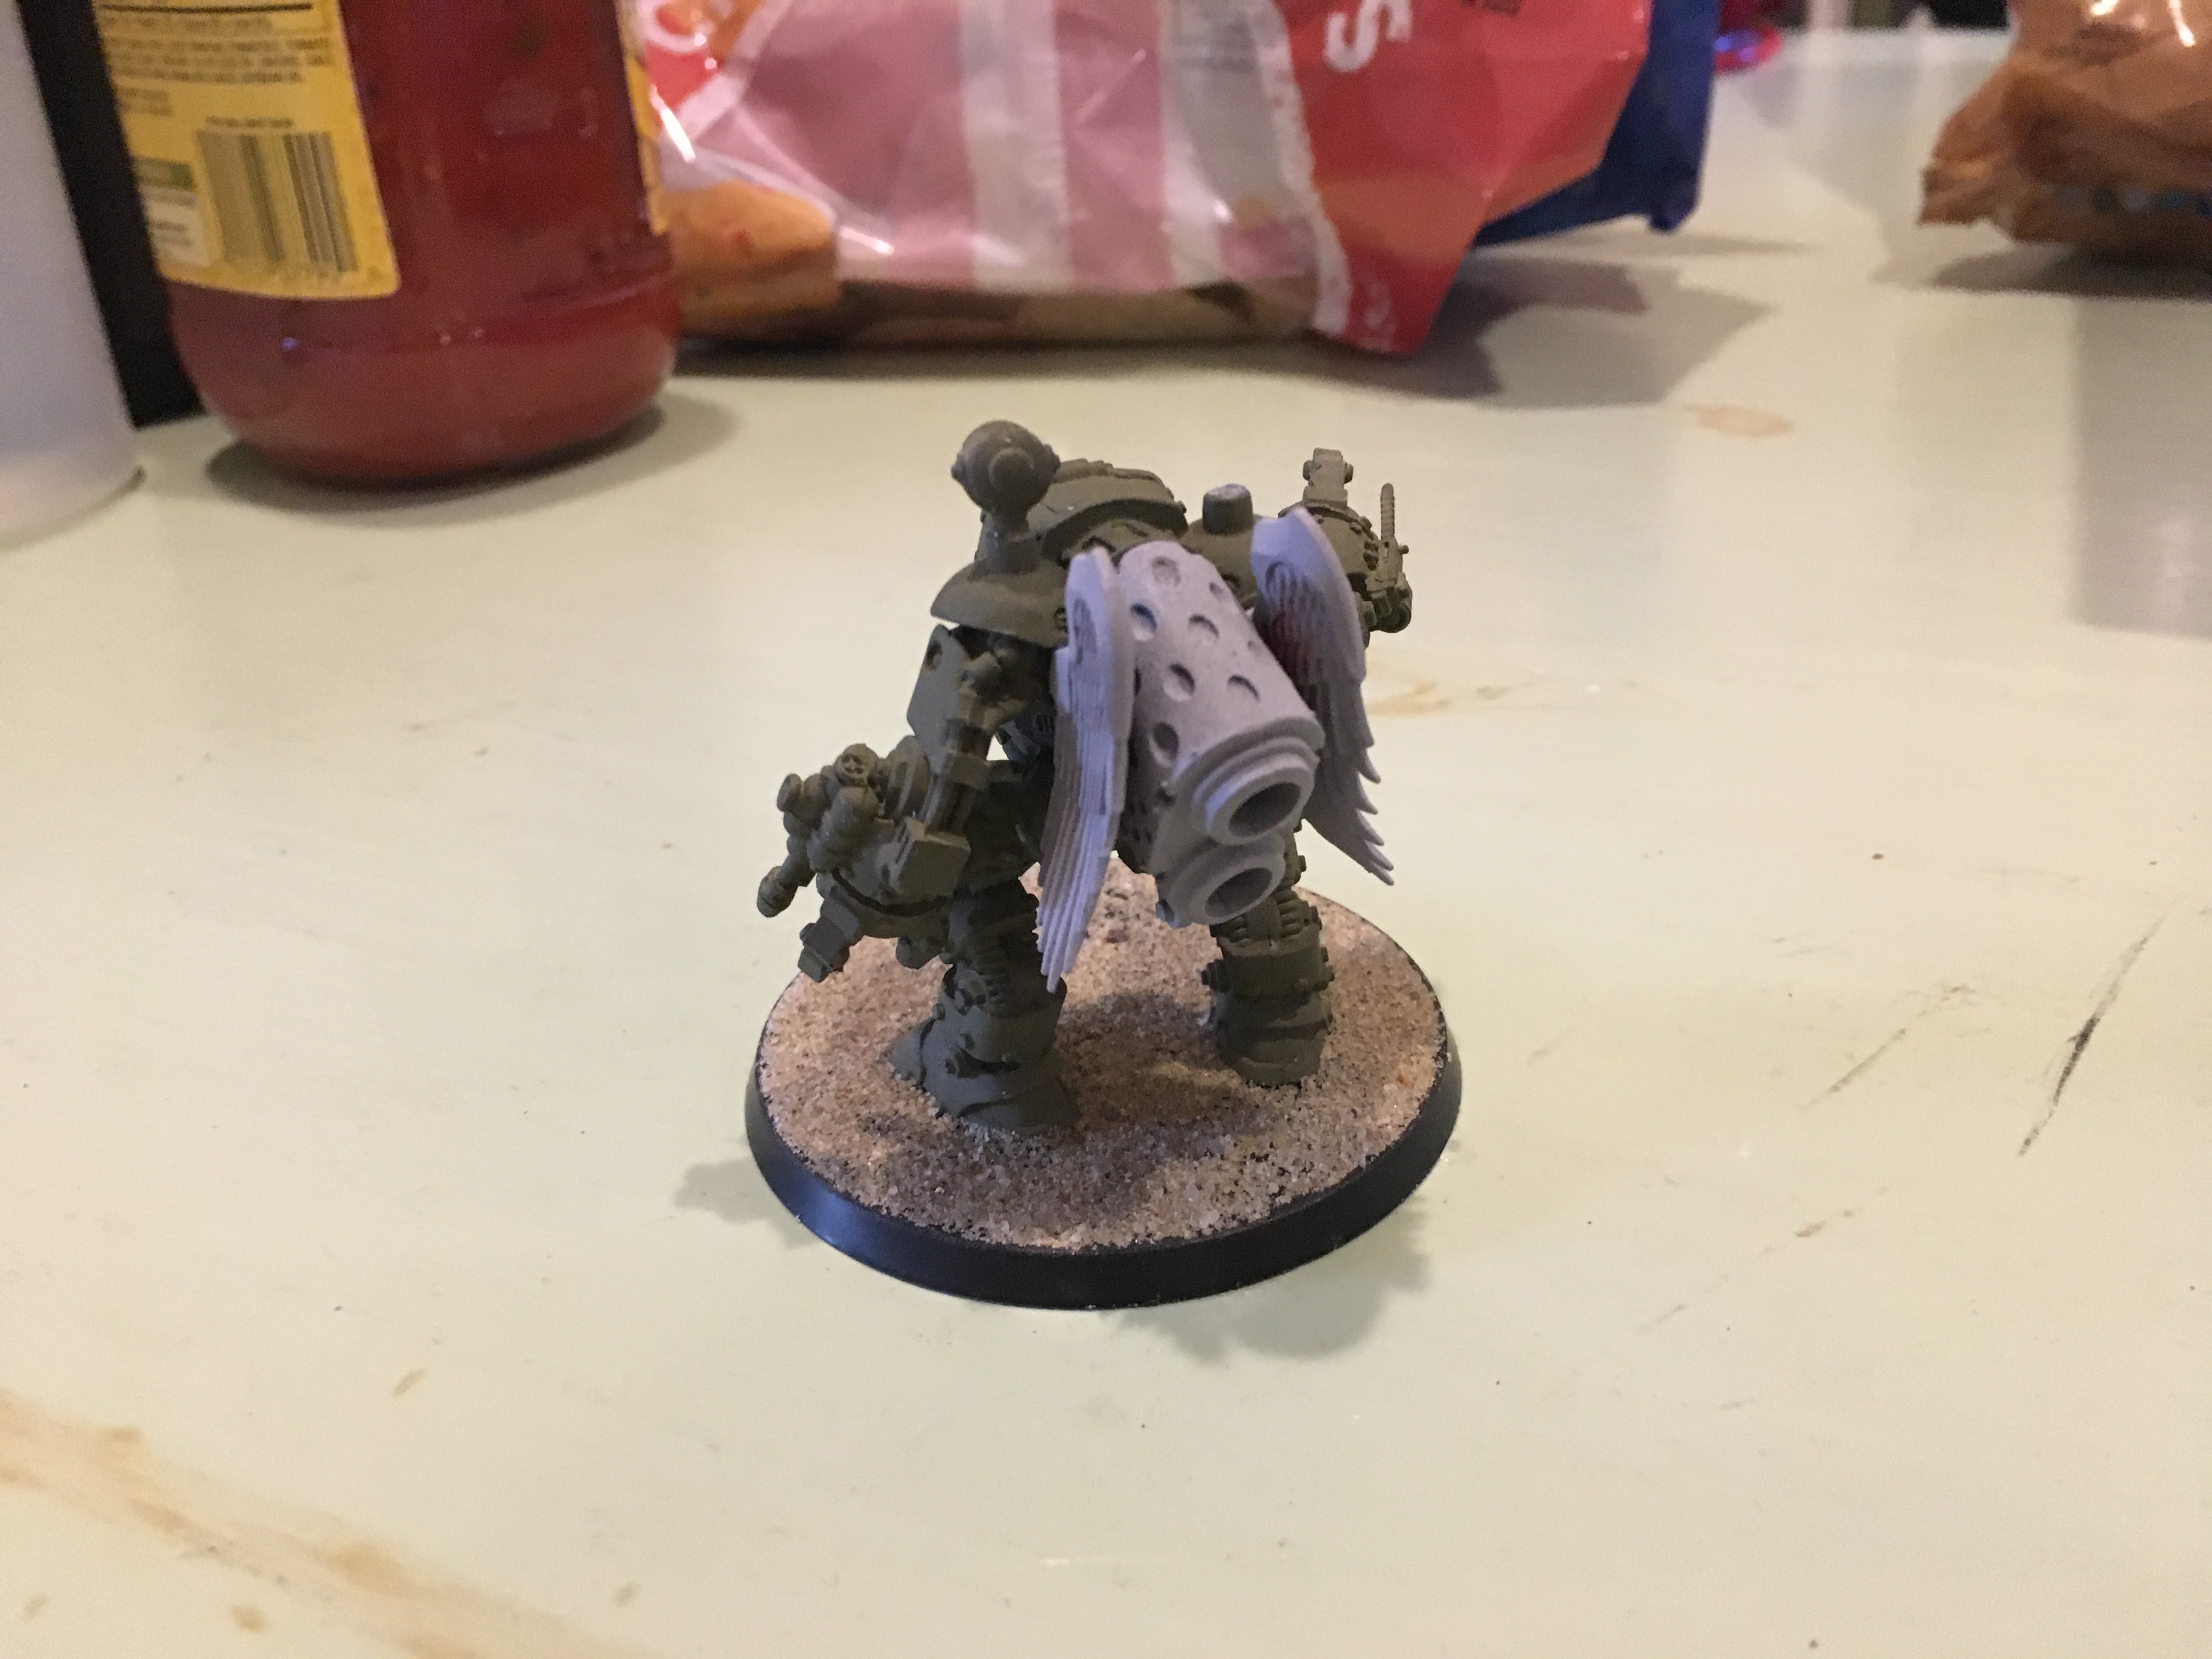
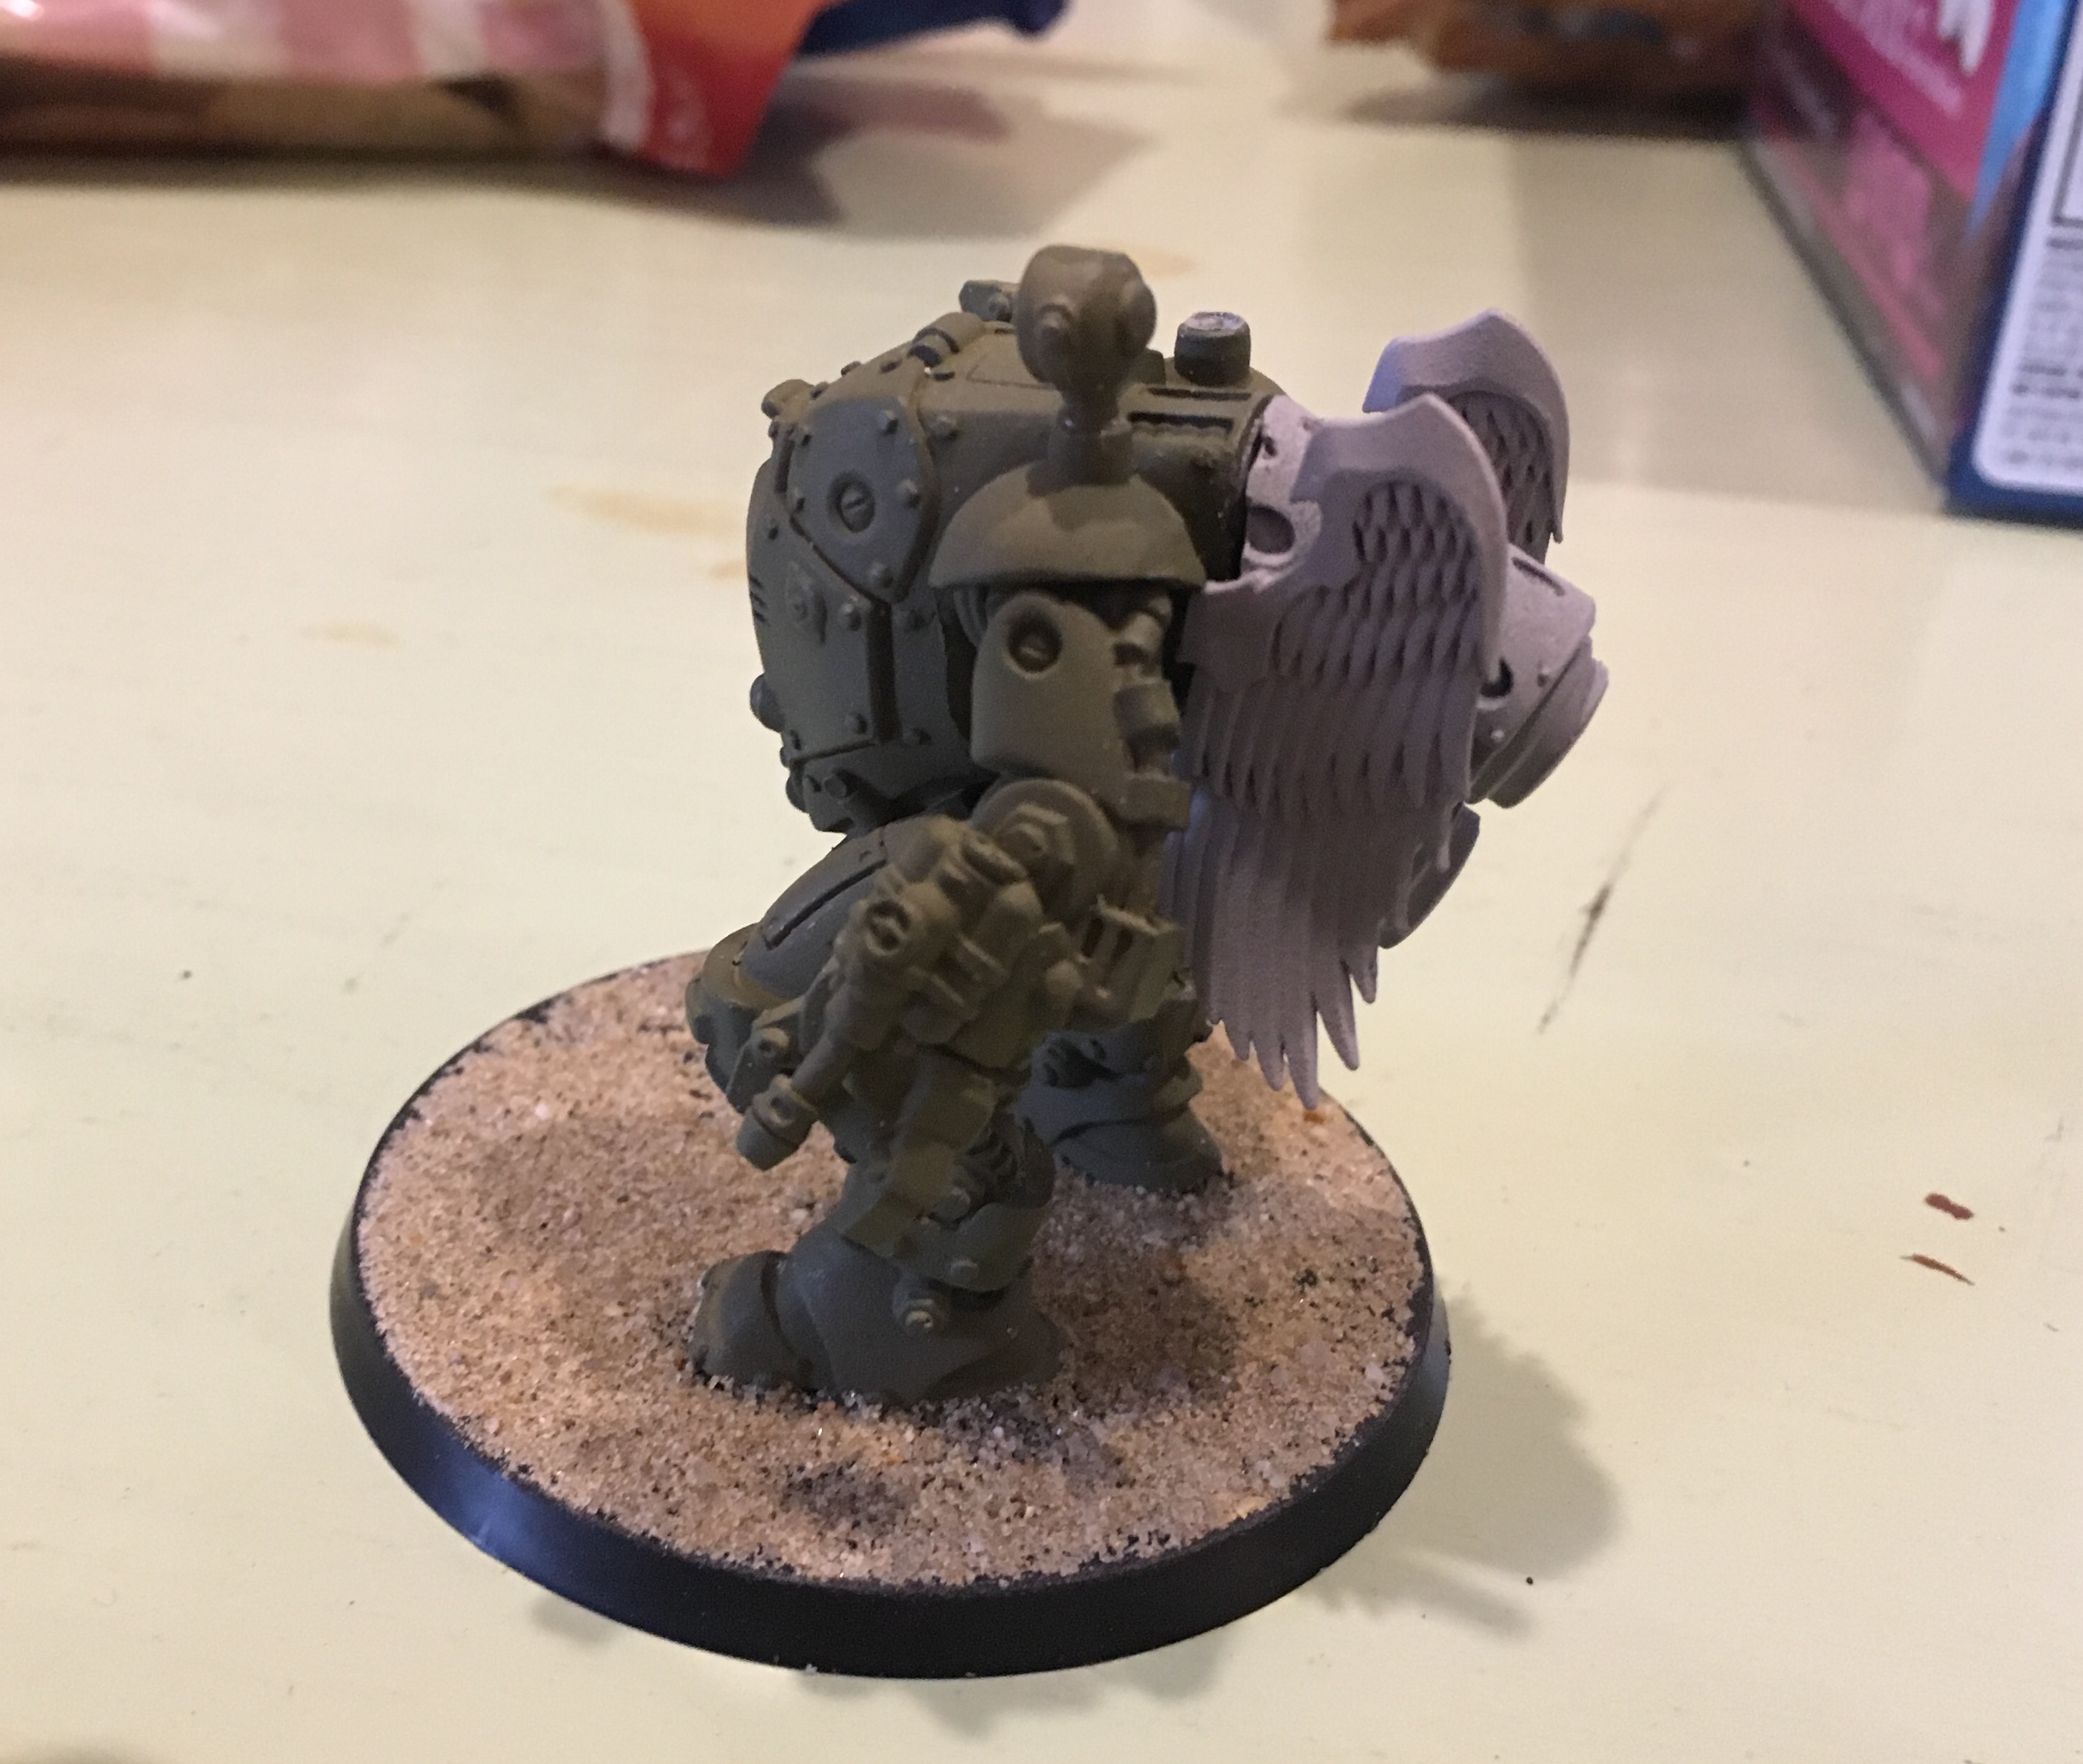
So, my son decided for his K47 army that he wanted to play British Airborne. He got a plastic Airborne kit, as well as the K47 Brit starter.
He loves the Automated Infantry and the Cromwell, but would prefer a jump walker over the current Guardian.
To the bitz-box I go.
See pics below. I combed together a rather simple jump pack.
1) I cut off the small turbine at the back of the guardian, and didn’t attach the HMG
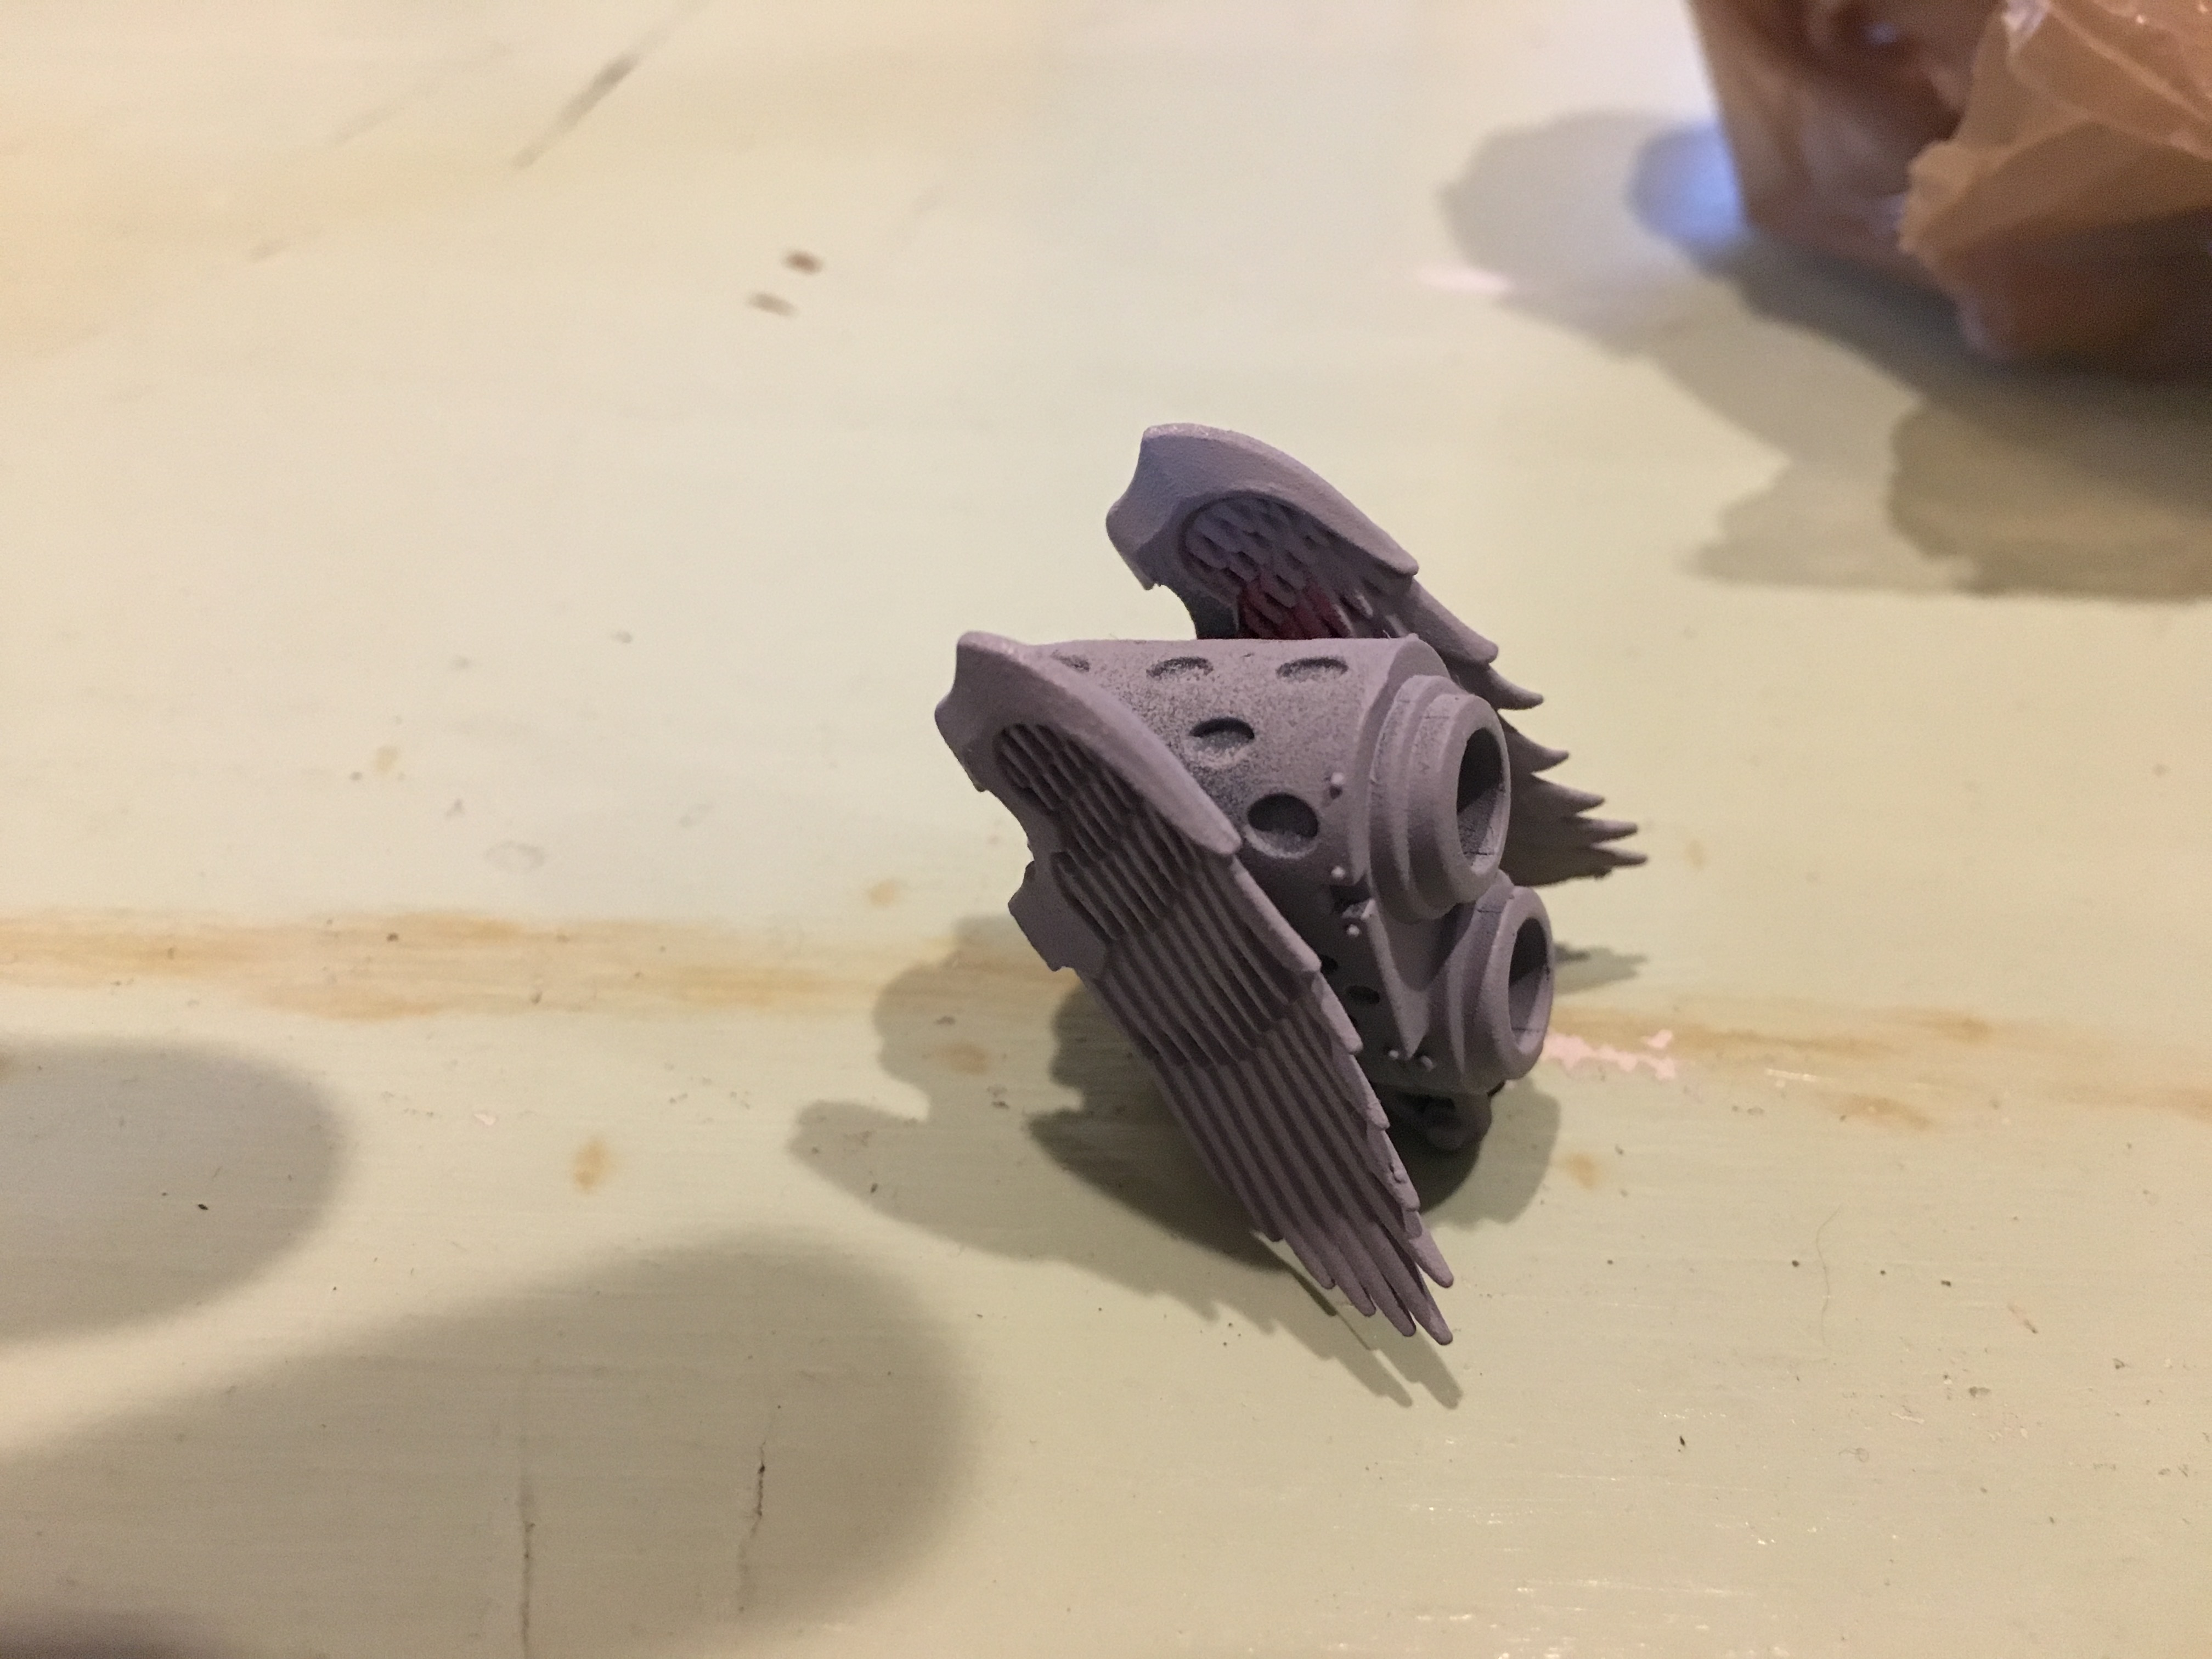
2) I trimmed the muzzle off an extra GW Imperial Knight Thermal lance a friend had sitting around. This took a bit of careful cutting and sanding to get it to fit right on the back of the walker.
3) in my bitz box diving I found these great wings from an old Space Marine kit. Not only were they thematic, matching the Pegasus wings of the British Airborne Logo, but the also hid most of the rough join between the two models.
Overall, I think it makes for a cool Jackal that almost looks like it was field modified with a jump kit.
Werfer-Envy
So, as mentioned in previous posts, my family is moving in the upcoming weeks, and as a part of that I am trying to downsize and consolidate my hobby-related stuff. While in some cases that means heading to Ebay for offloading unused figs, for hobby materials it means trying to attempt some projects to use materials.
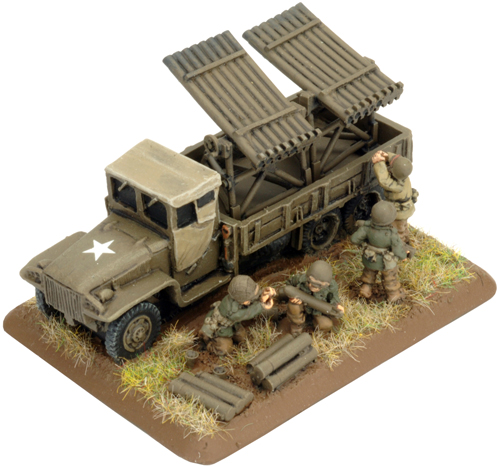
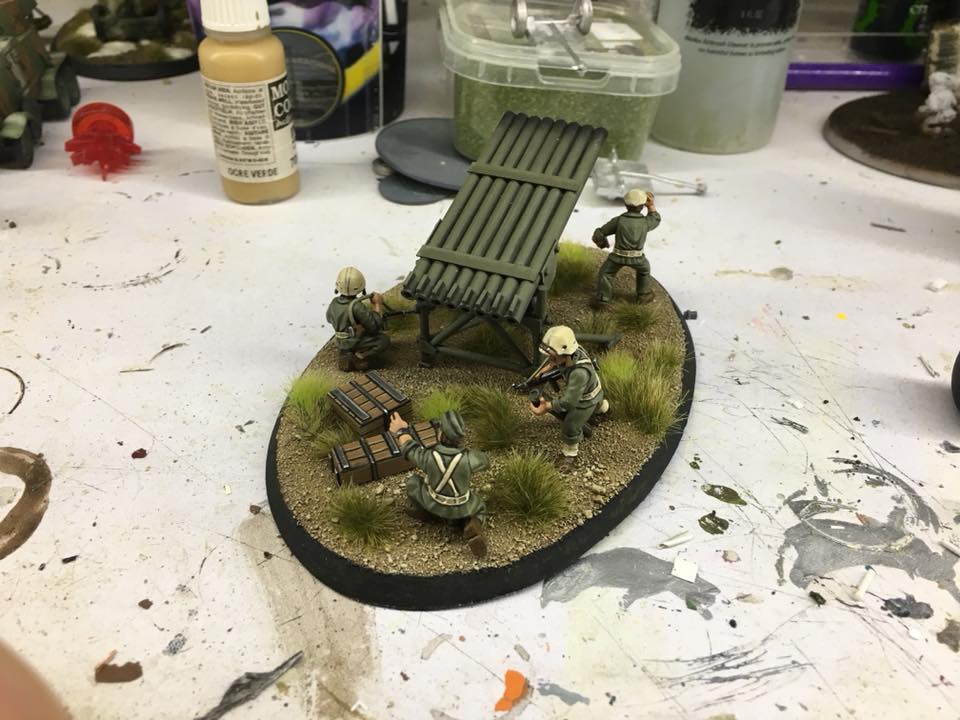
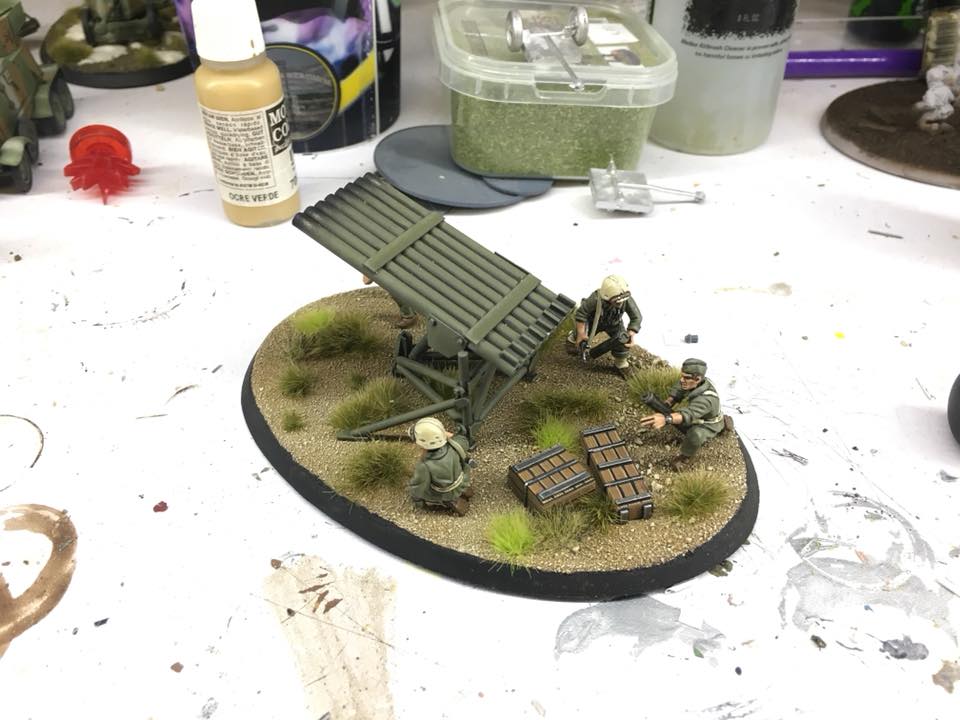
One such project that I started a few weeks ago, and showed off in the old “What Are You Painting Now” threads, was my USMC T27 Rocket Launcher. In most of the Bolt Action books, each army gets their own version of their front-line artillery rocket launcher. The Germans have their Nebelwerfer, the US the T27, the Soviets the Katyusha. I’d always wanted to try out a rocket launcher in game (they are somewhat hit-and-miss, but a fantastic cheap terror weapon), but unfortunately unlike the Germans/Soviets, the US lacked a model.
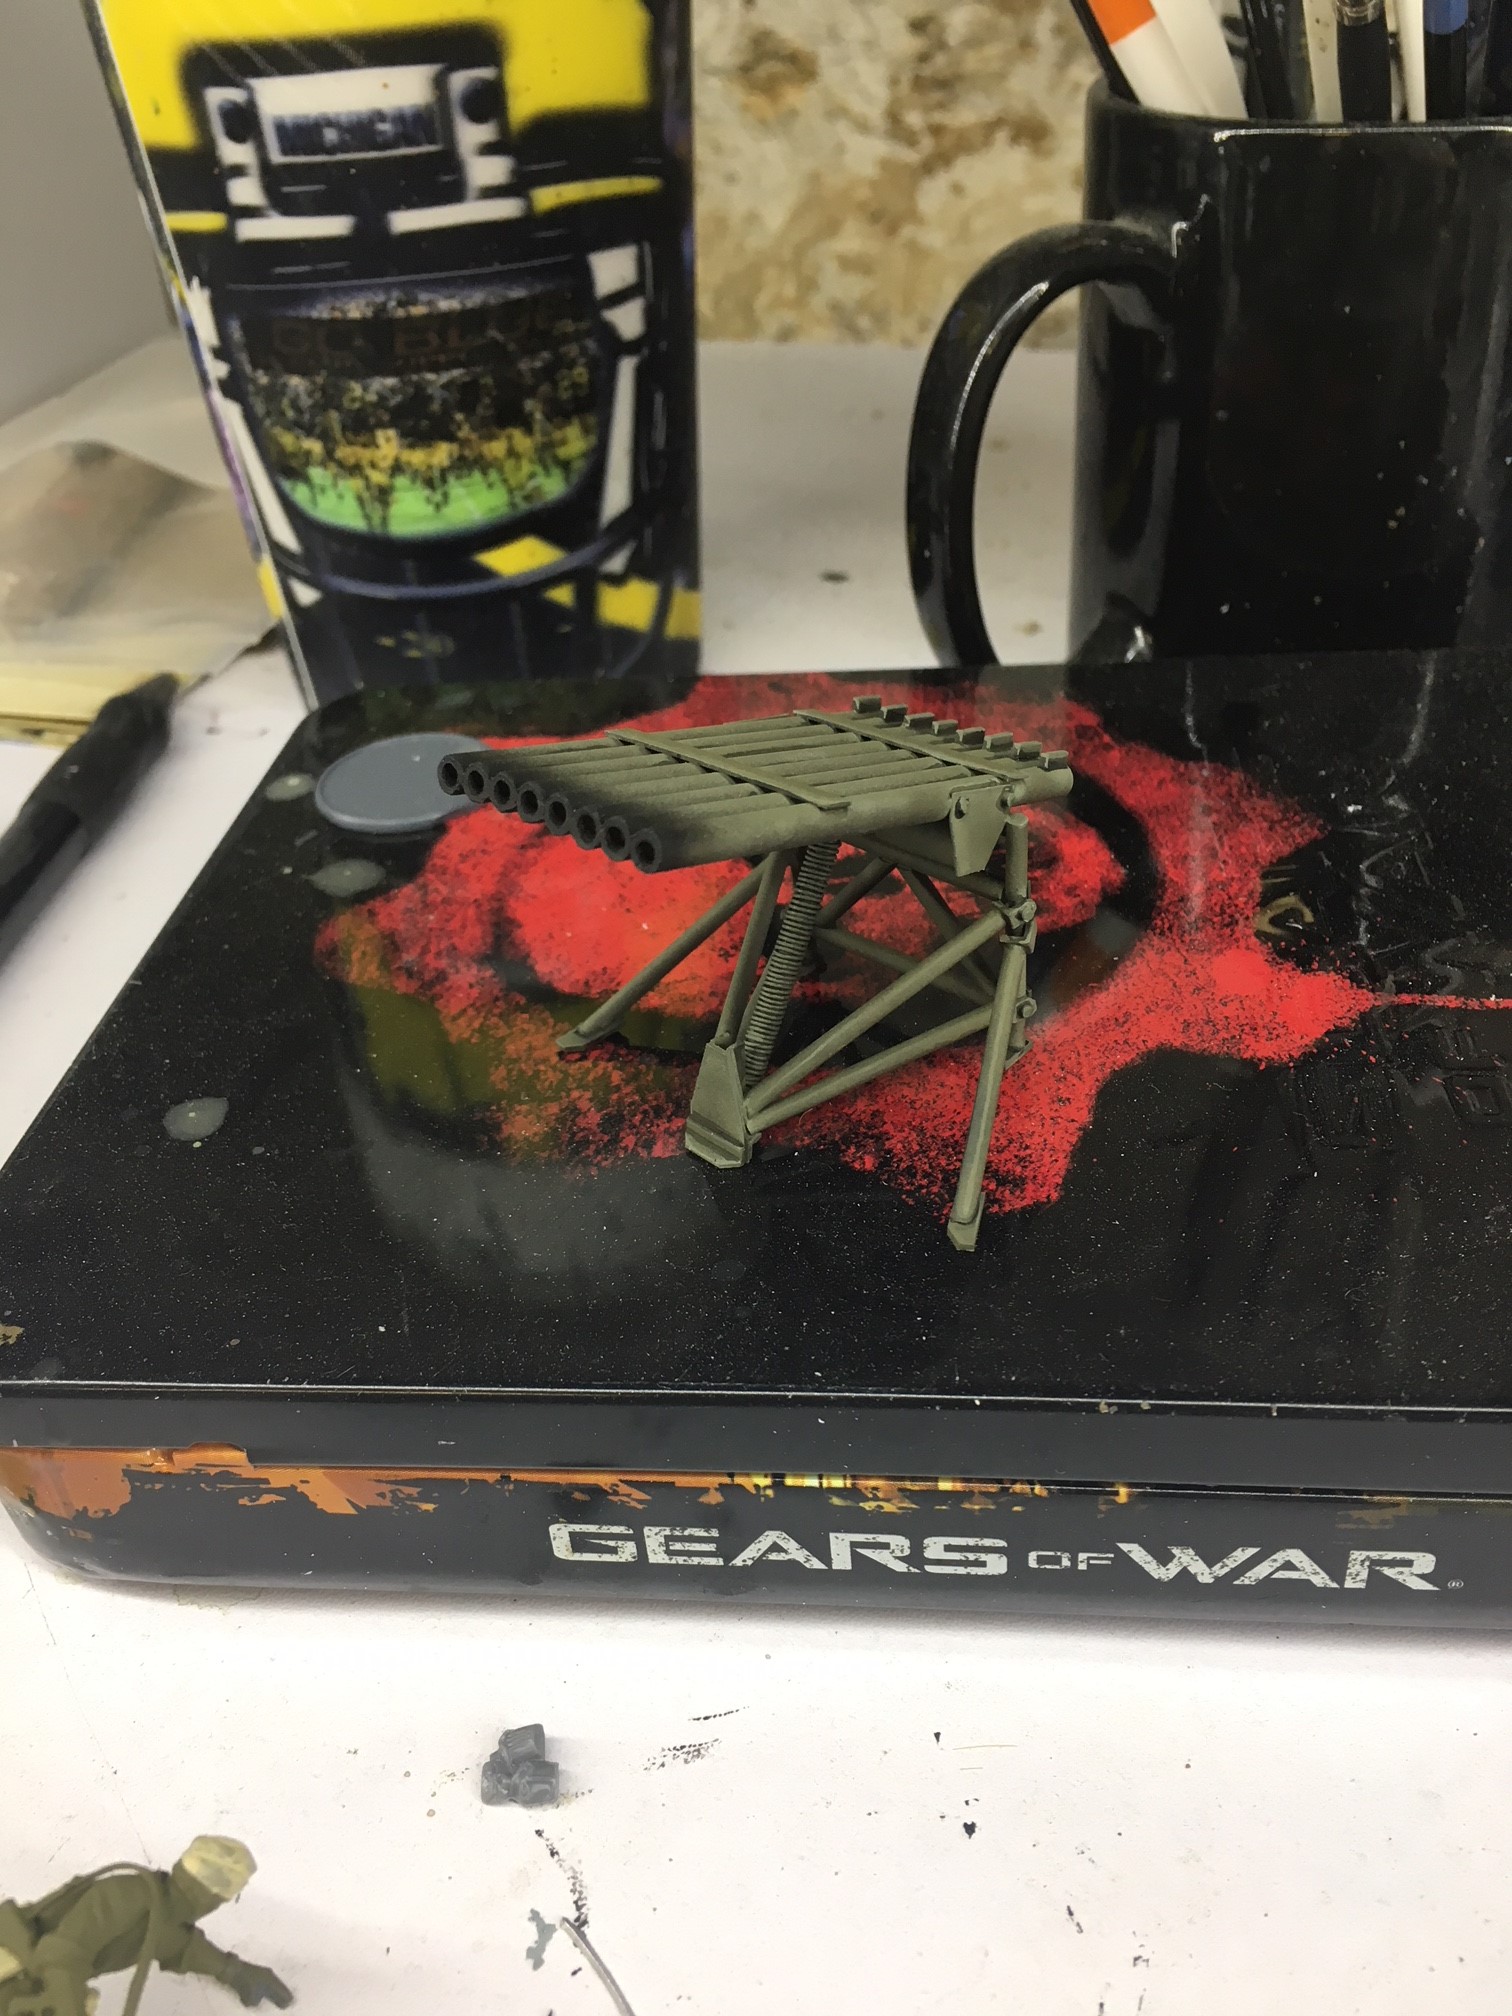
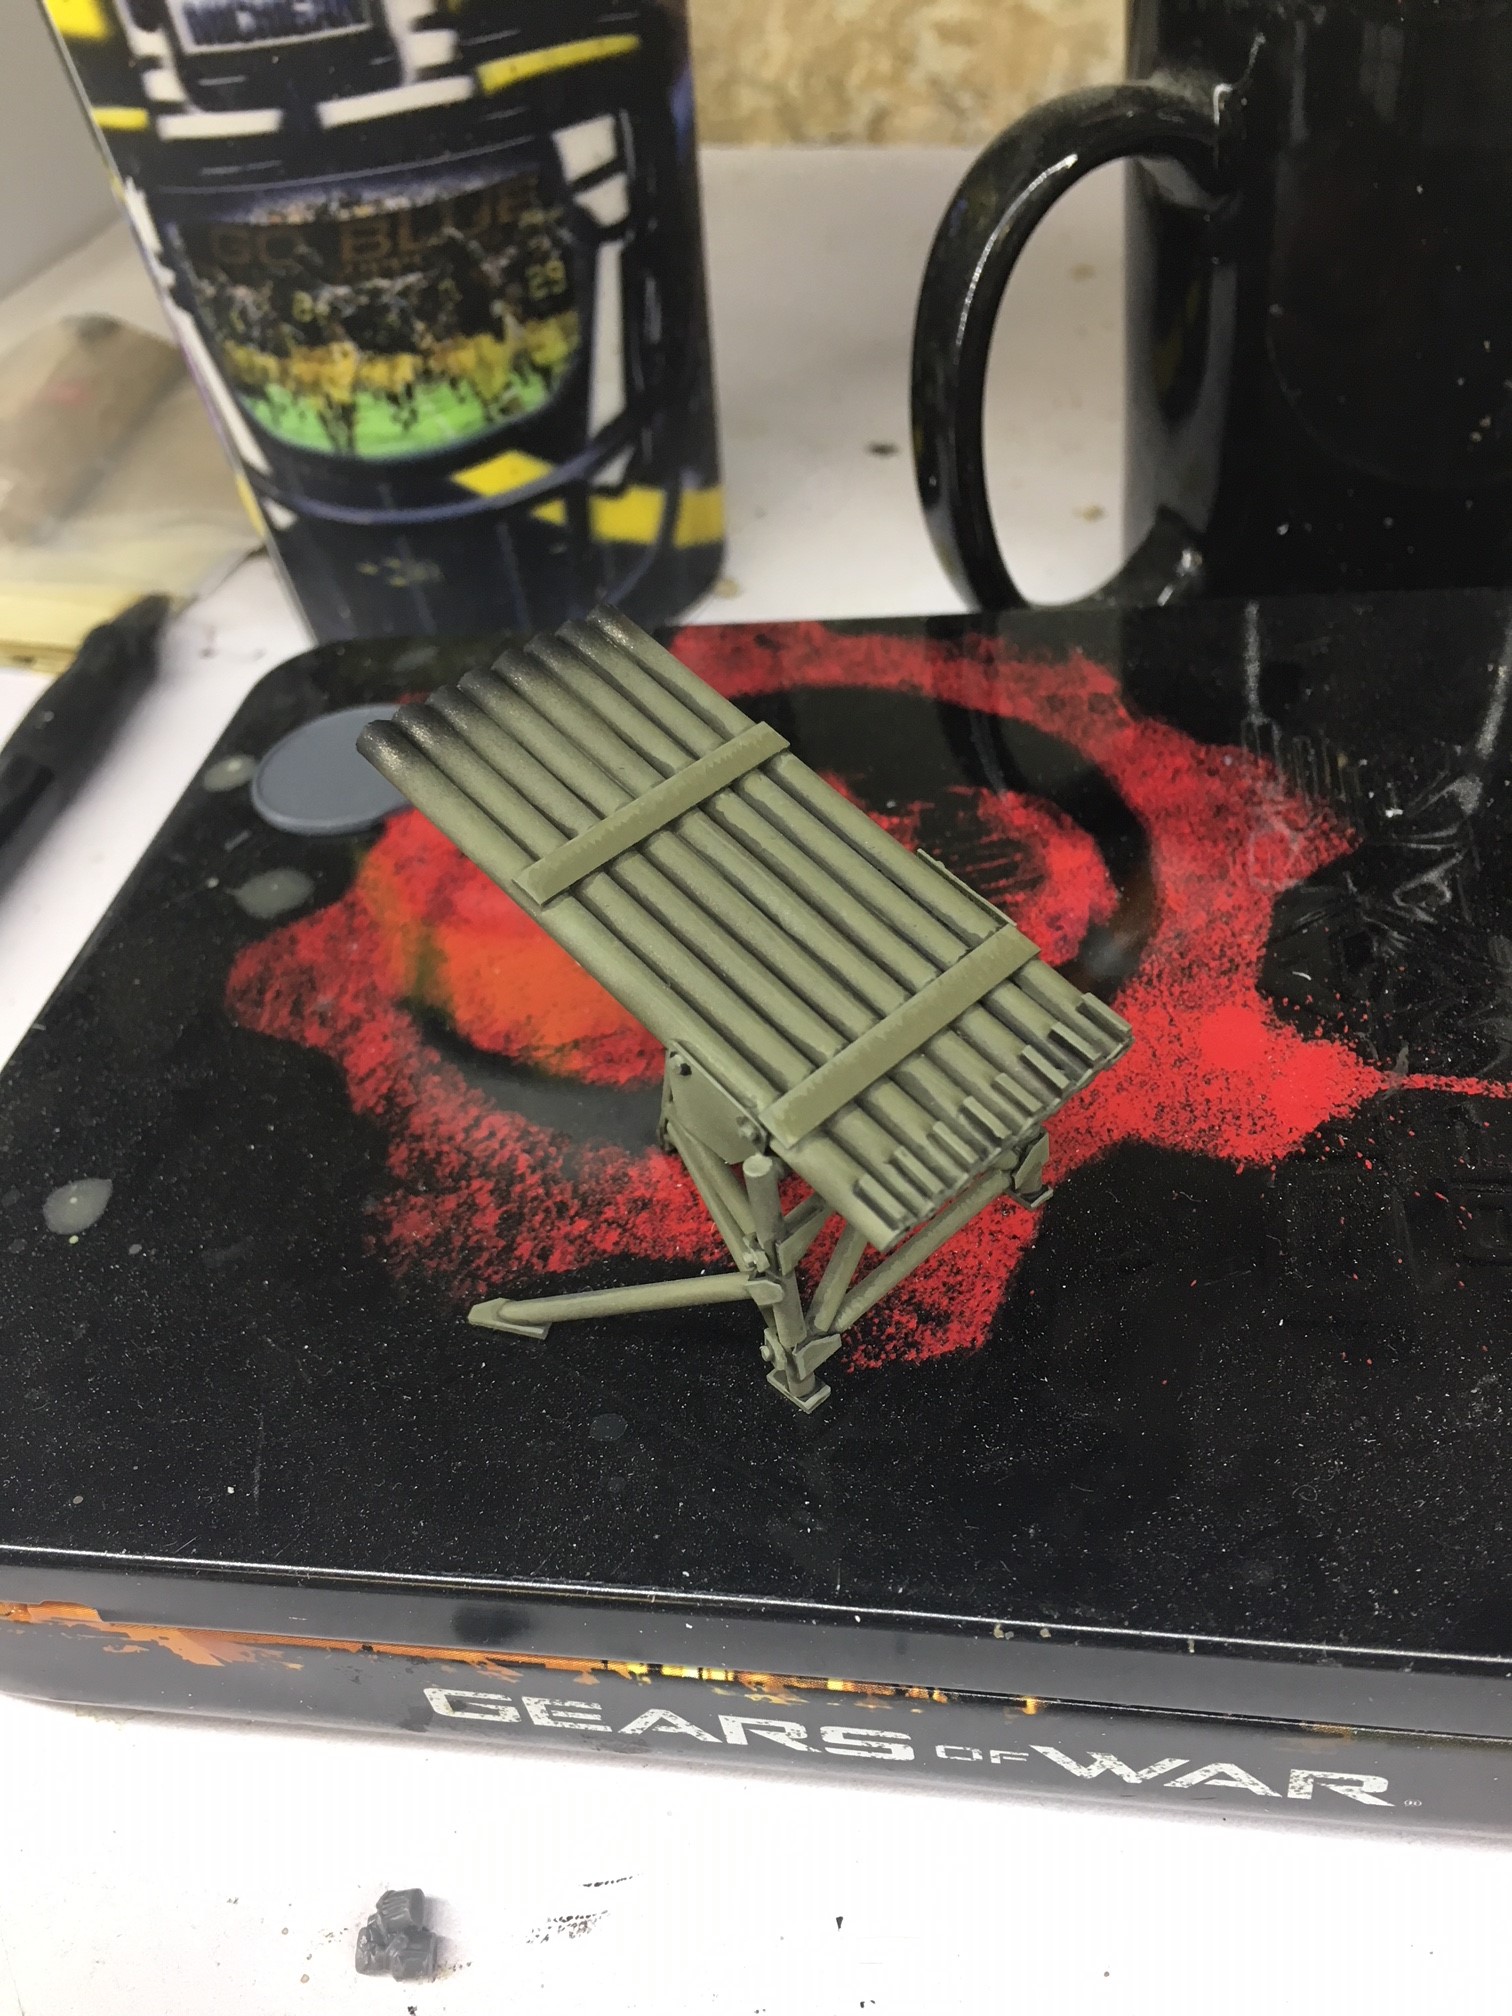
Digging through my hobby bins revealed I was sitting on a decent pile of Evergreen Plasticard bits, and some quick google searches showed that the US T27, like most WW2 rocket launchers, wasn’t an overly complex design. A frame and some tubes.
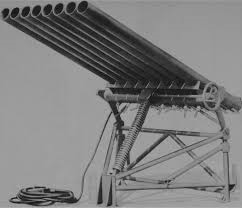
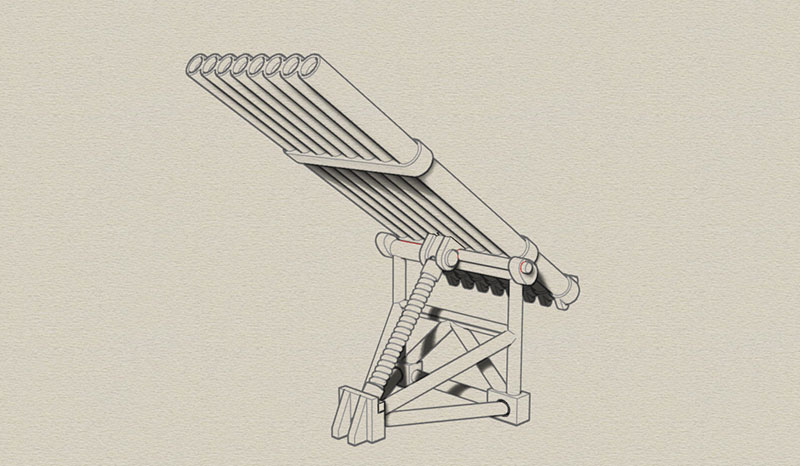
Now, often these launchers are depicted in historical photographs mounted in the bed of a truck. However, the Bolt Action rules just have it as a land-based piece of artillery, so that was what I was going to build. I figured being for USMC, the Pacific Islands would be less ideal for truck-mounted weapons anyway.
Below show my earlier images for the launcher built out of various plasticard tubes and strips I had lying around. I am constantly amazed at how easy this stuff is to work with, given that it goes together quickly with plastic glue, and thus won’t glue your fingers together. I built the actual launcher tubes first, as that would dictate the width of the actual frame to support it. Once the launcher tubes were completed, I then went about, slowly, building the frame. I’d cut a few pieces, glue a couple, and leave it to the next day to dry. Whole assembly came together over a 3-4 weeknights after the kids went to bed. I like projects like that, as I often only get hobby time between 8:30-10pm, so projects that work in small chunks help me make steady progress.
The only thing that isn’t plasticard in this launcher is the metal wire I had left over from putting up Holiday decorations. I wrapped that around a plasticard tube to make the central screw/spring assembly.

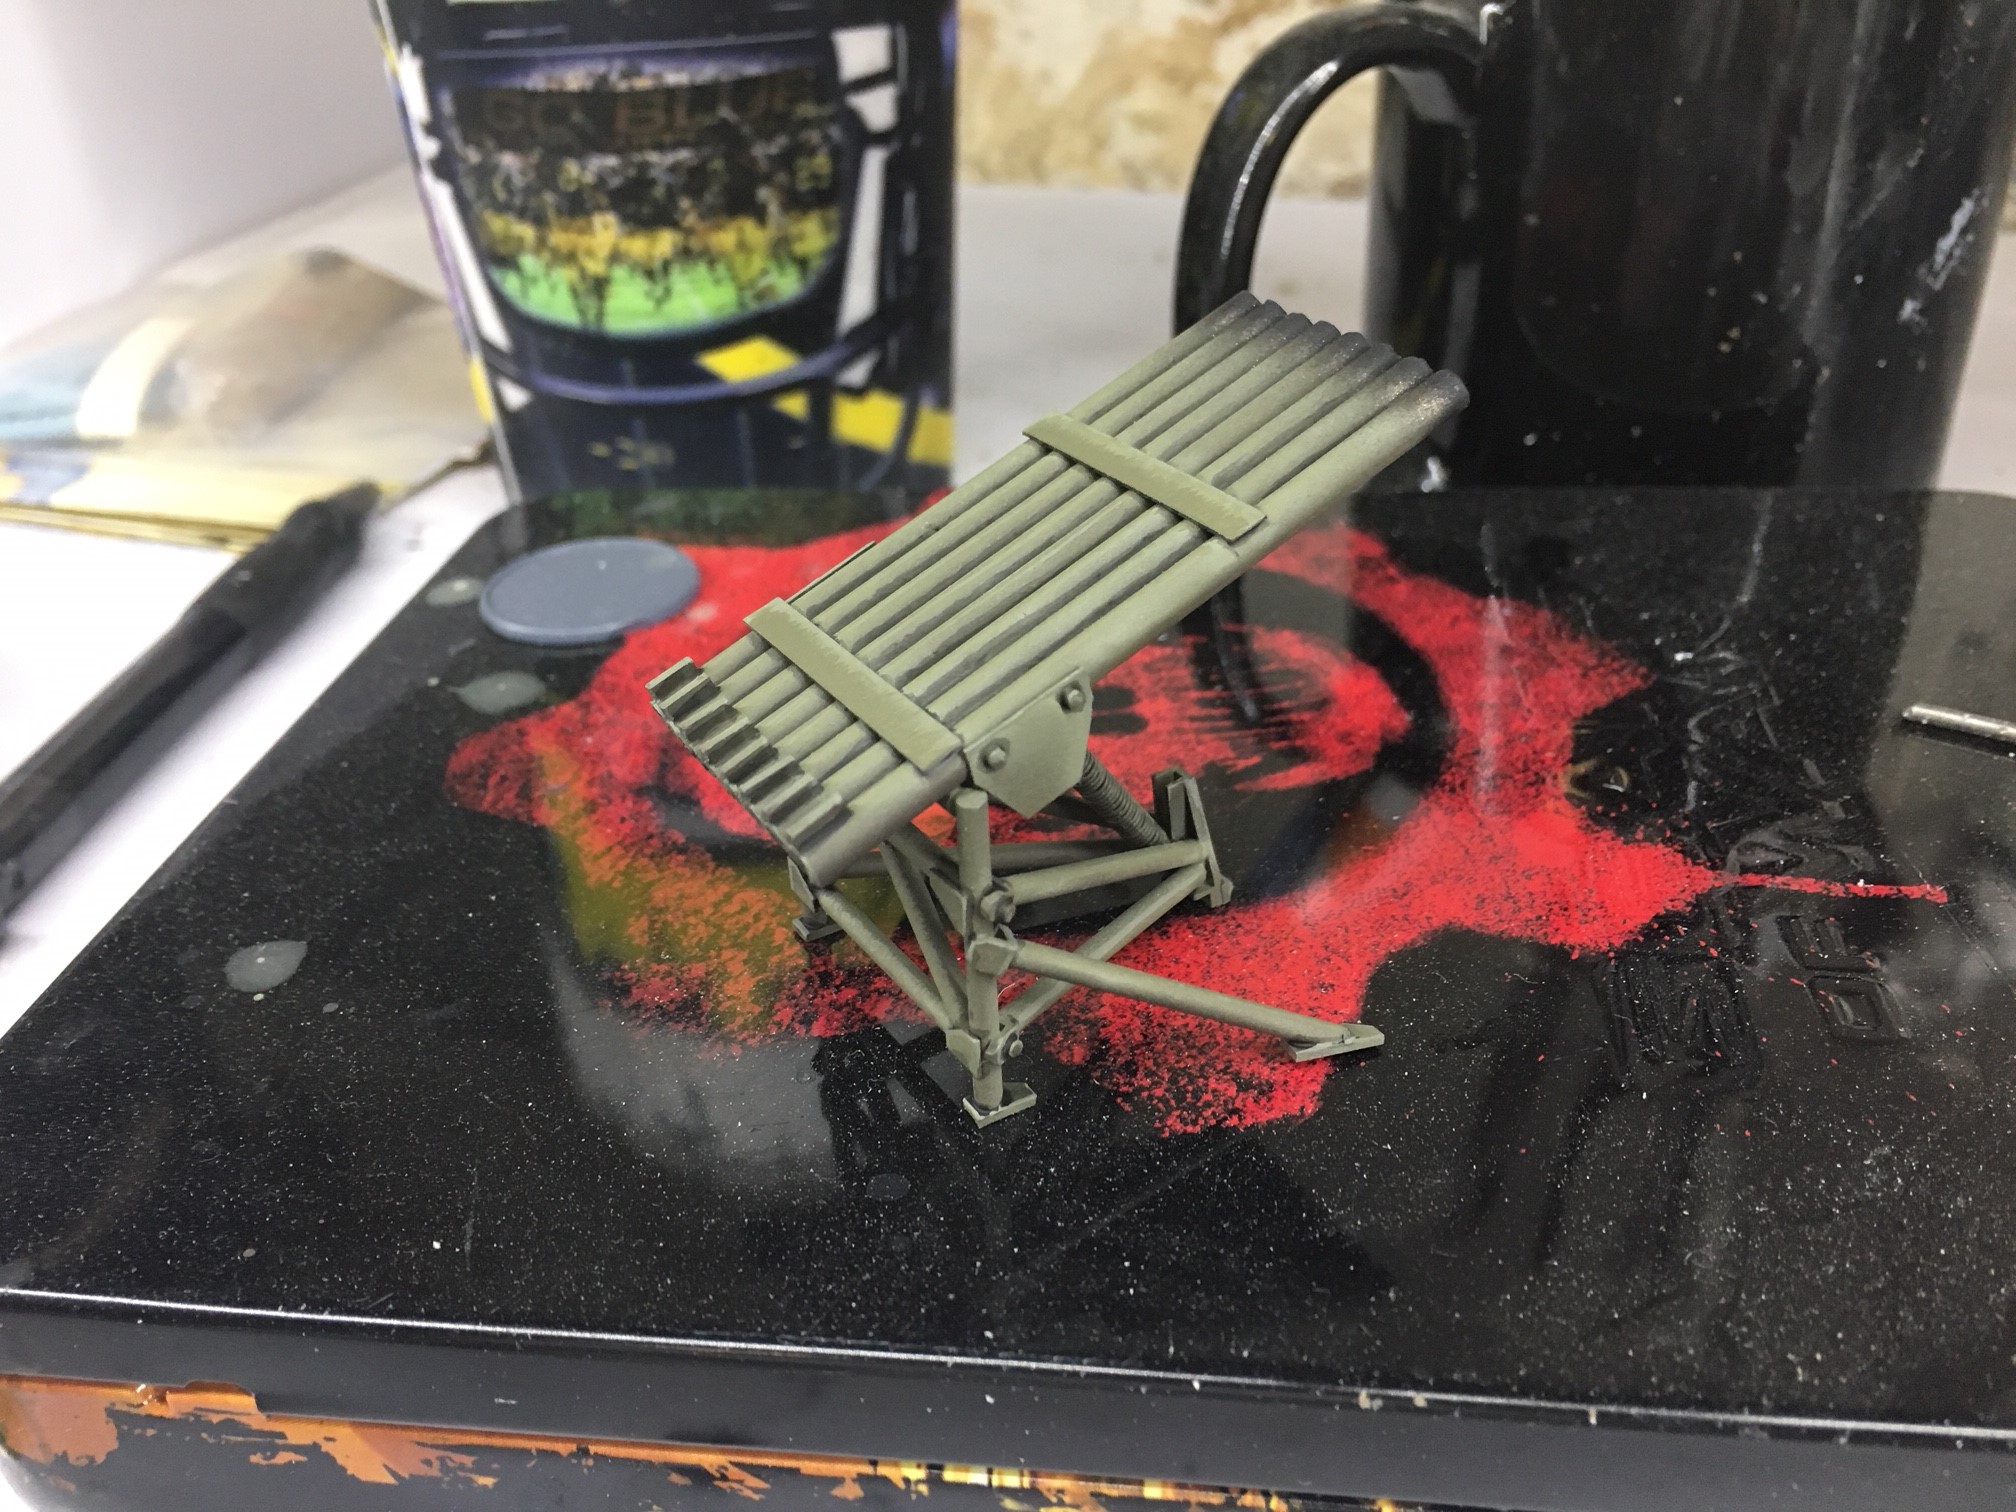
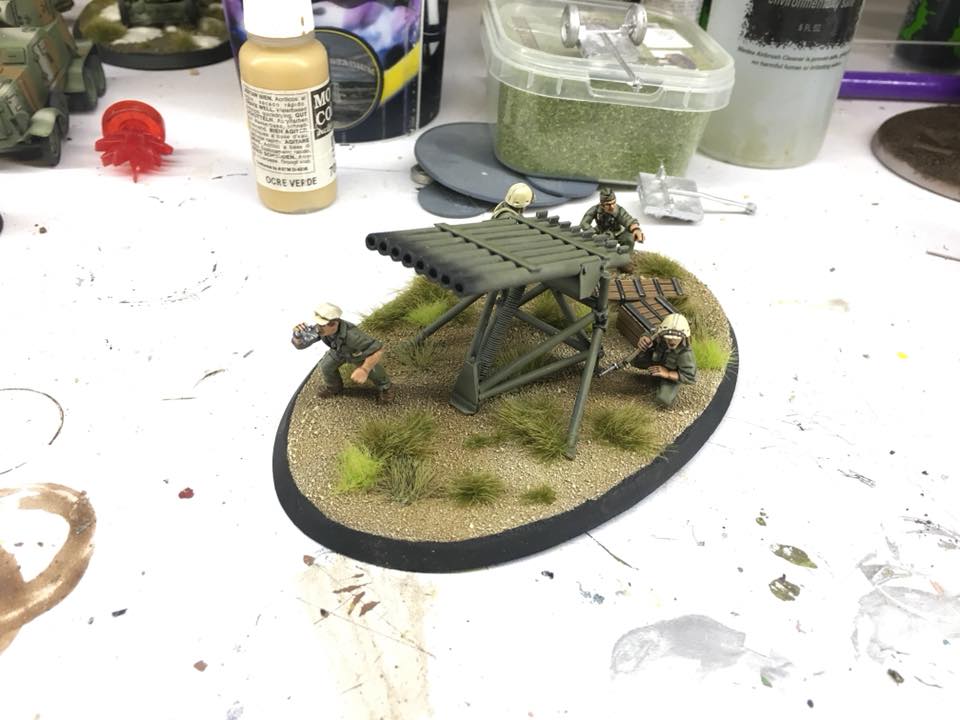
Below are a few pictures o the launcher painted up. It actually pained very quickly. I basecoated and highlighted with an airbrush using really basic zenith techniques. I then airbrushed some tin, and then black paint on the launcher tips to make it appear soot-stained from the rockets. After that was all completed, I simply painted nul-oil wash directly into recesses because I like high-contrast definition in my miniatures.
For those interested in my paints, I use Vallejo, start with US Olive Drab, and Highlight up to Brown Violet, and then a 50/50 mix of Brown Violet and Green Grey. Pure Green Grey is used for bush-applied edge highlights. I find these colors retain the US Green-brown, with the Green Grey giving the nice appearance of sun-bleaching.
Lastly is the based model with Crew. The crew themselves are just USMC Warlord plastics, which easily make artillery crew by selecting arms with less combat poses. Things like guys holding bionoculars, pointing, or holding slung SMGs/Carbines. I used some ammo tubes from a German artillery piece to represent the rocket ammo tubes, and added a few crates from a Rubicon US vehicle stowage kit (awesome kit BTW, 1 has lasted me for a dozen models worth of stowage).
I may put together a separate entry later on how I make my bases, as I’ve gotten a lot of questions. Please feel free to leave comments if you have any questions on techniques or models.
Paragons
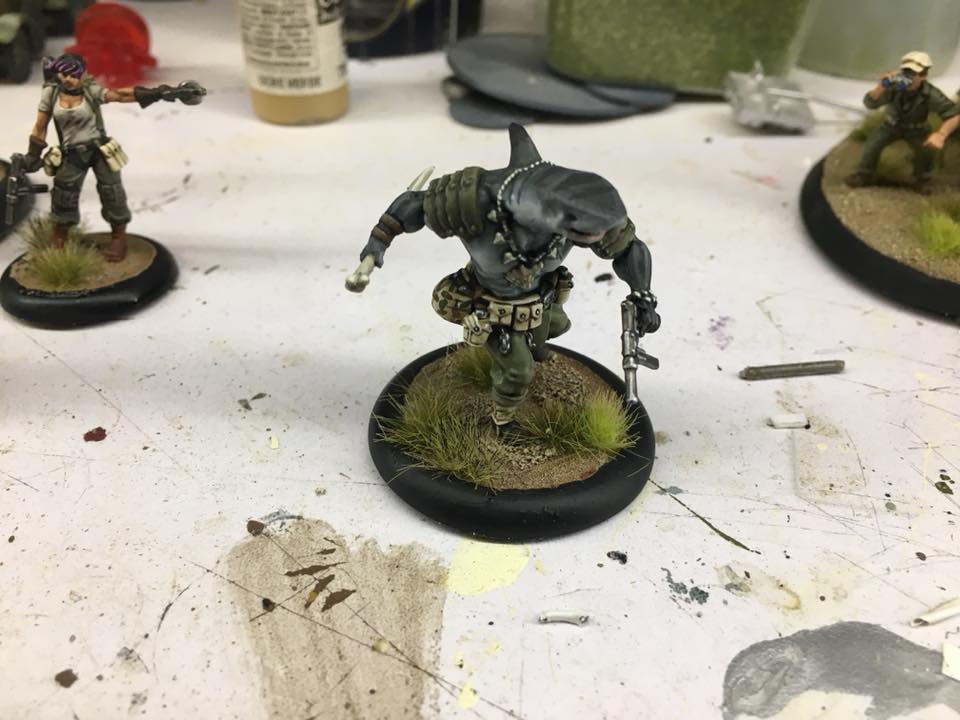
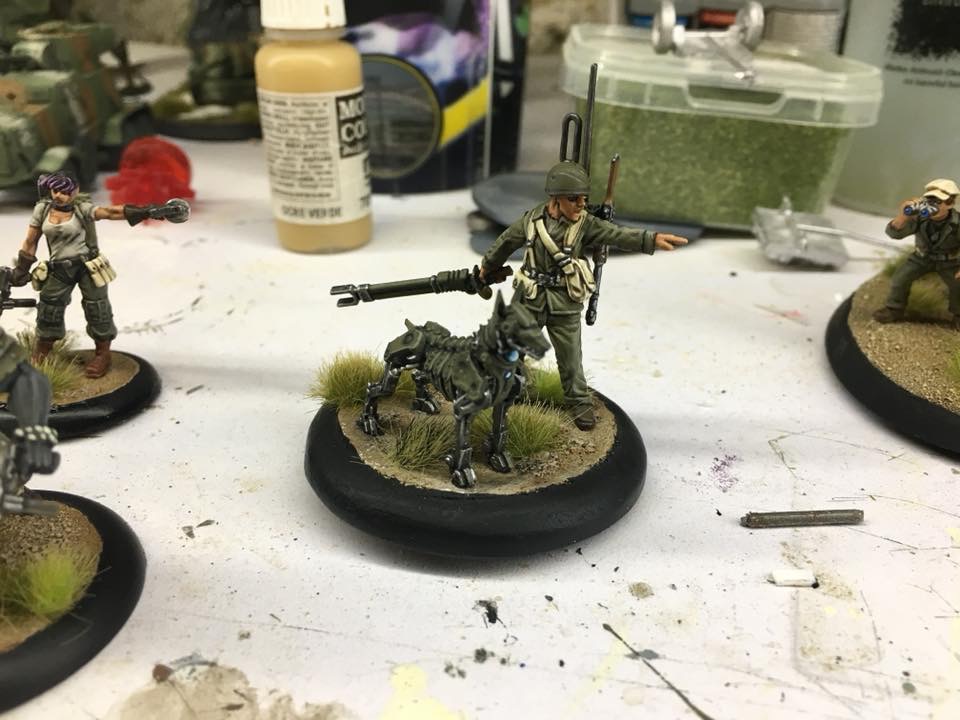
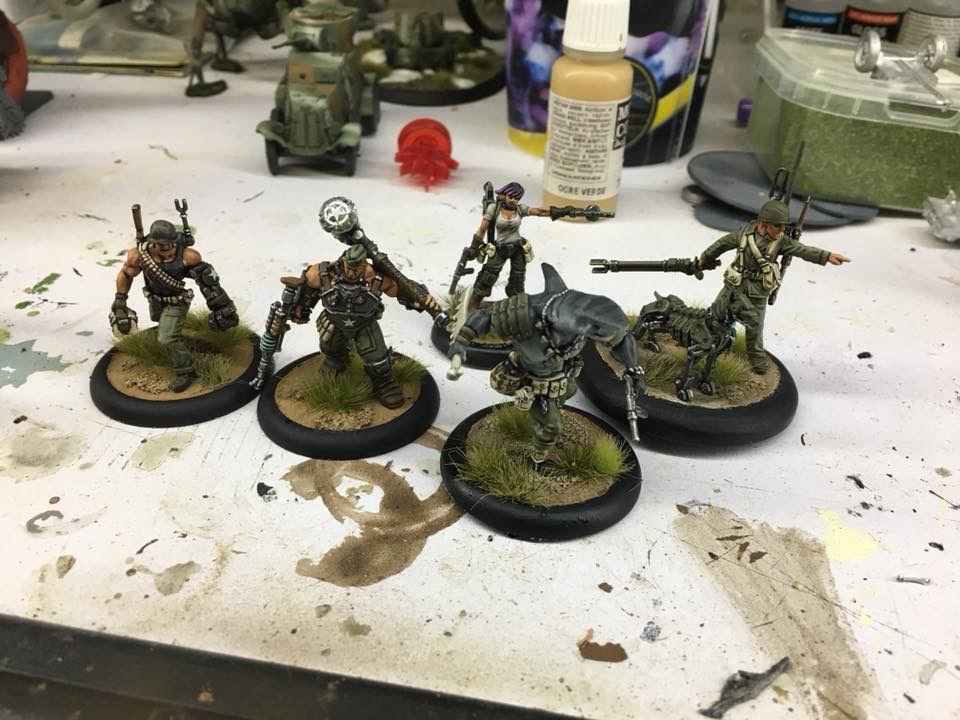
Weekend status update. 5 of 6 USMC Pacific-themed Paragons completed. For those who don’t know, in K47 the Paragons are the Avengers-Style super soldier unit for the US. Each of these figs is converted to represent a specific character. Several are based on DUST figs, but the Shark-man is based on a Wrath of Kings model, the robot dog is Wild West Exodus, and the Hammer-Wielding guy is a GW Goliath ganger from Necromunda.
1) 1 Bionic-Armed satchel-charge-toting crazy…check
2) 1 SMG wielding Shark-man…check
3) 1 Dual-SMG-wielding driver-chick…check
4) 1 Giant-Hammer-Swinging meathead…check
5) 1 Bar gunner with Automaton-dog…check
Just need to convert the sword-wielding fanatic to complete the unit.
Another Busy Day
As it appears like it’s going to be another busy day with little time for hobby work, so I figured I’d update the plot with some instructional info from on of my previous units.
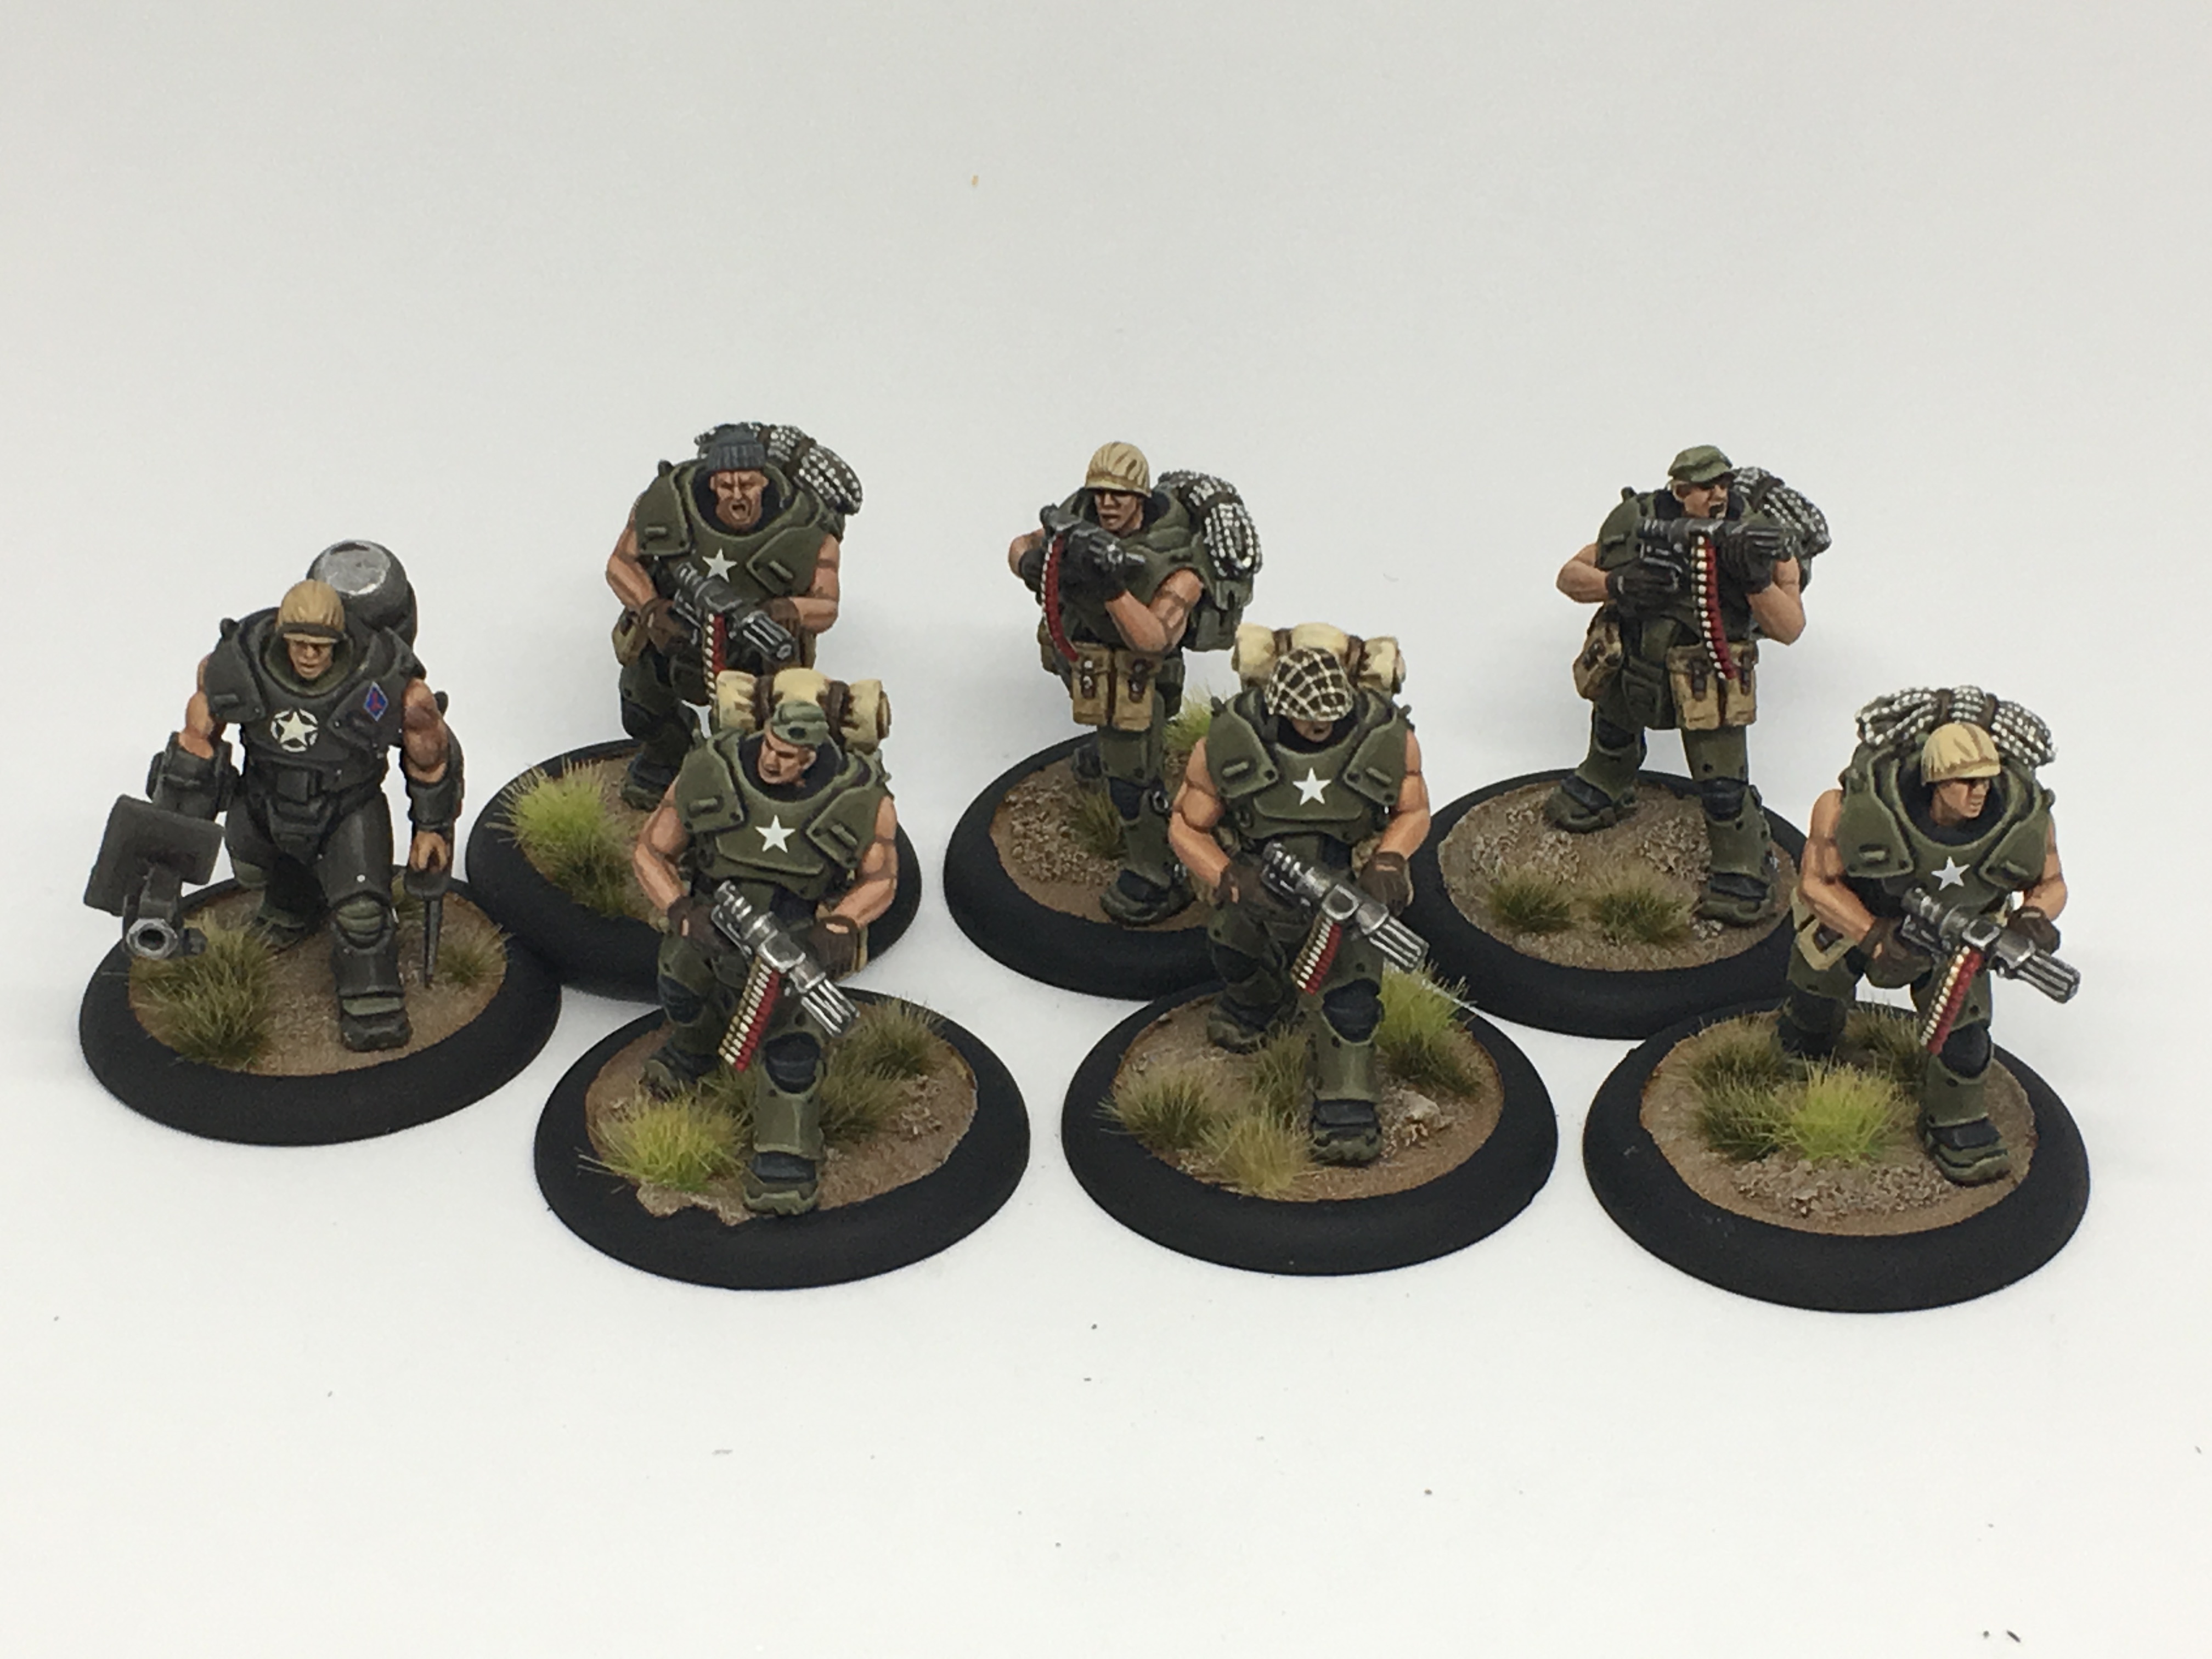
One of the cool things in K47 (and many Sci-Fi games for that matter) is power armor, and in K47 each force gets there own type. However, I was never a huge fan of the Clockwork Goblin US heavy infantry figs. To me, they appear to be wearing bell bottom pants, and the joints are too narrow. Also, given I play USMC, and they fight in the pacific, this armor looks like it would be too damned hot!
My solution. I was able to acquire some armored DUST commandos. While technically a larger gaming scale, as they are in power armor, the fact that they are larger is not readily apparent. They are beefier than the CG figs (big joints, no bell-bottoms), and their sleeveless arms seem like they would be more practical in the south Pacific.
The conversions required just 3 small changes:
1) head swaps – used Warlord USMC heads. I did need to use some greenstuff to extend the necks. Otherwise they looked odd.
2) Gun modification – these guys were carrying some kind of fancy multi-barreled ray gun. The k47 rules have them armed with assault rifles. I simply clipped off the energy ammo packs from the ray guns, and added a belt of shotgun shells. Quick and easy. Now they appear to be armed with a multi-barreled Gatling shotgun. Very thematic given they are Marines likely to be assaulting bunkers and tunnels.
3) adding an allied star – these are done after painting. I used Flames of War decals (15mm) to get a small scale capable of fitting on the 28mm infantry fig.

![StarCraft Tabletop Miniatures Game Pre-Orders Live Now [Updated]](https://images.beastsofwar.com/2026/03/starcraft-tmg-news-cover-600-338.jpg)


![Mounted US Cavalry On Kickstarter For Dead Man’s Hand! [Updated]](https://images.beastsofwar.com/2026/03/us-cavalry-main-600-338.jpg)


![Play WW2 Commando Operations With Butcher & Bolt [Updated]](https://images.beastsofwar.com/2026/03/relaunch-600-338.jpg)


