


![10mm Medieval Miniatures! Azincourt English Army Review | Wargames Atlantic [7 Days Early Access]](https://images.beastsofwar.com/2026/03/unboxing-wargames-atlantic-azincourt-english-army-coverimage-225-127.jpg)


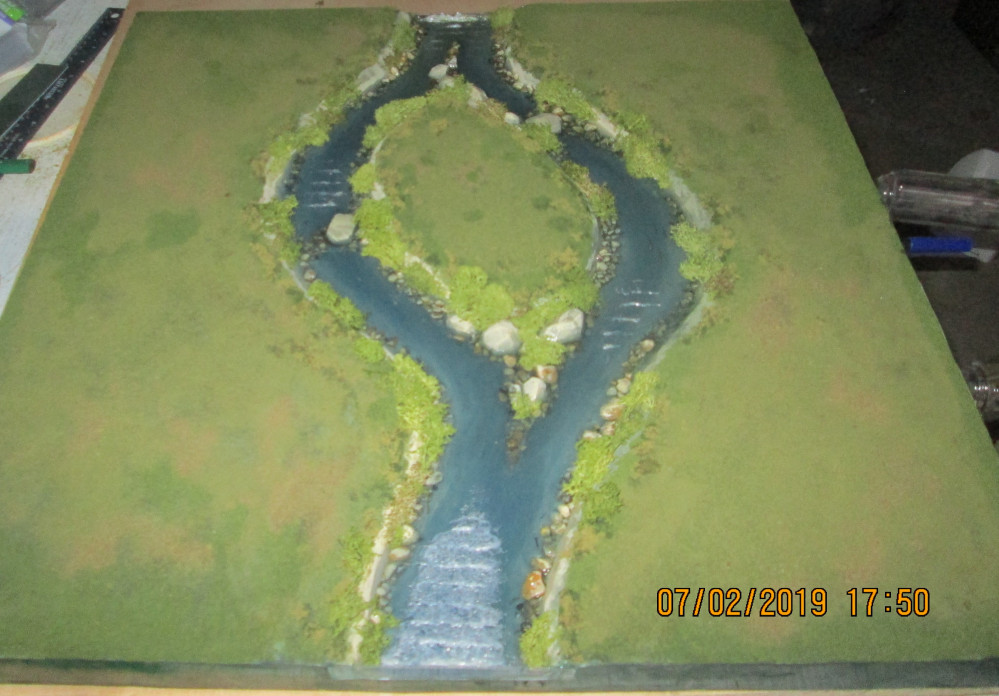
Battle Boards and Scatter Terrain


Recommendations: 241
About the Project
Last fall my LGS convinced me to build battle boards and terrain for their new store. It was a project that went from ‘a few boards’ as we ordered our first pints, to a monster undertaking where I somehow agreed to produce two 4’ by 6’ tabletops and accompanying scatter terrain.
Related Genre: Fantasy
This Project is Active
Battle Boards and Scatter Terrain
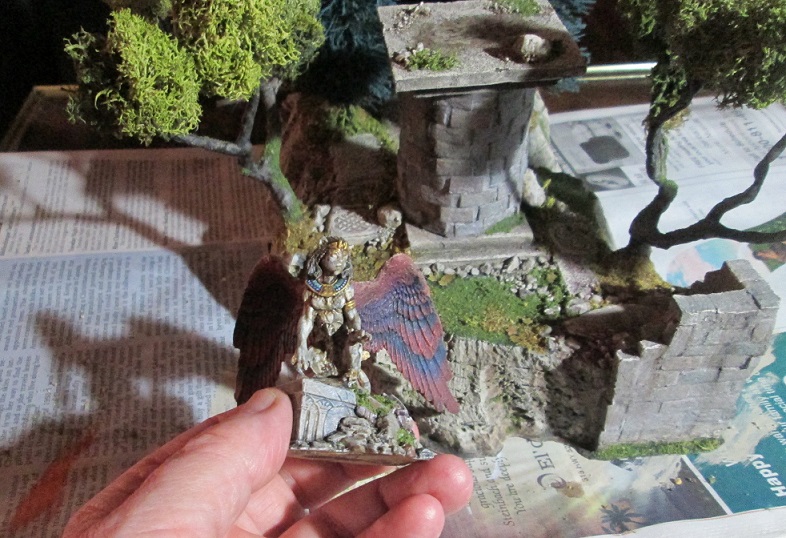 Reaper Bones Sphinx, painted in marble to match the fountain piece I posted last week.
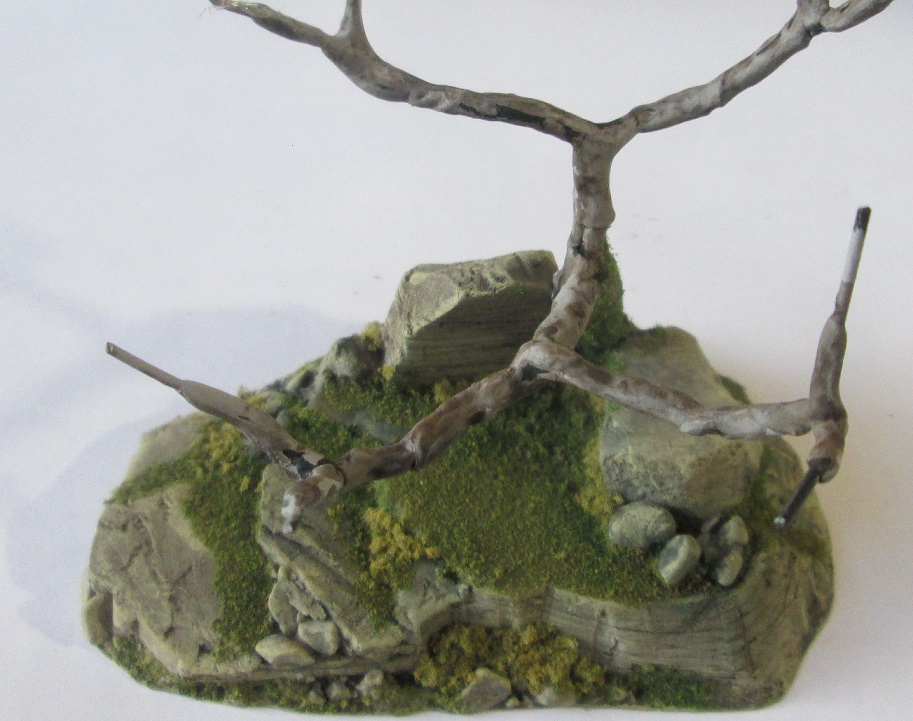
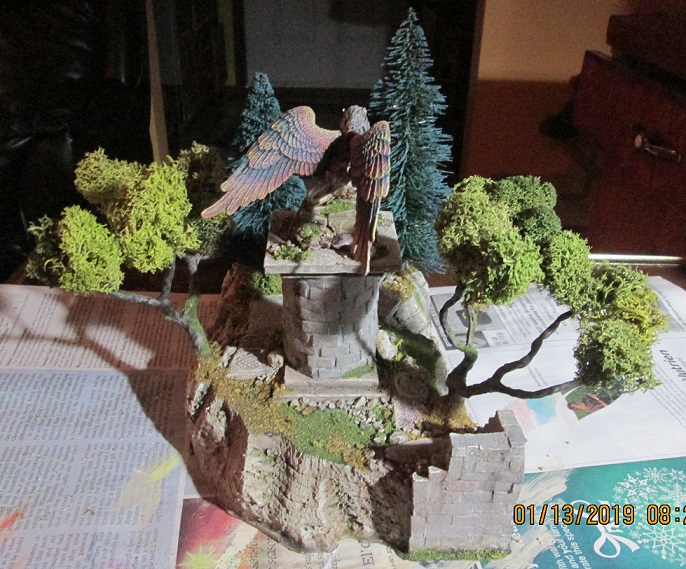 Rear view of the copse. There's plenty of real estate to put miniatures on.
Next week I’ll post pics of the remaining copses, and fill in any blanks in terms of process before moving on to the hills. If you have any questions, ask away.
Battle Boards and Scatter Terrain
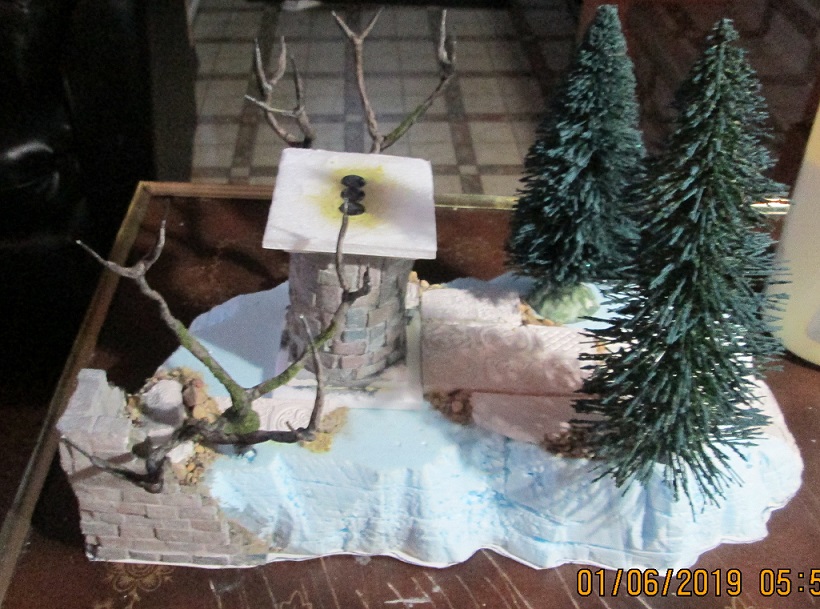
Copse Prototype
I’m back with another piece for the battle boards and scatter terrain project I got roped into.
The idea behind the copse was to put a bunch of trees on a 1½” thick base that was smaller than the hill features, and could actually be stacked on them (with the exception of the fountain hill already described) to make a more dramatic elevated bit of terrain. From experience I also know that multiple trees on a larger base are less tippy.
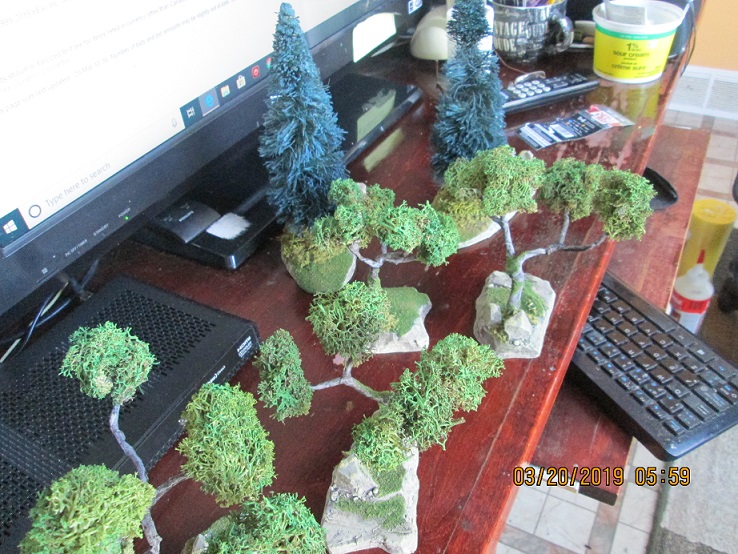
I decided to go with two deciduous and two coniferous trees on each base. Coniferous trees take up a lot of real estate so I didn’t want to squeeze in more than that, or there wouldn’t have been any room for models to interact, or room for other features that could be used as cover.
Every Christmas I stock up on pine trees at the dollar store. They are trimmed bottle brushes, more or less, and are often covered in some kind of white flock… but the price is right. I scrub off the ‘snow’ as best I can with soap and hot water, and then prime them black with a rattle can (vigilance alert. It takes a lot of spray to get rid of that ridiculous light green colour). I then get down about halfway into the bristles with a fat brush loaded with dark green paint. That way the ‘trunk’ stays black/shadowed.
 Bottle brush trees. Cheap as chips at Christmas . I stock up every year.
At this point you can brush PVA glue on the outer boughs, like a drybrush, and then throw green flock at it to get a better pine tree texture, but it’s optional. I didn’t on any trees in this project and they still look fine, but may try it next time. The final step is to drybrush a lighter blue/green on the boughs to give them that ‘blue spruce’ look.
Deciduous trees are more work, and to make them out of wire requires dedication and two pairs of plyers. I cut four pairs of wire about 7-8” long, with one pair being longer than the others. This became the ‘root’ that was jammed into the base and stuck in with a glue gun — part of my robust build strategy. It would take considerable incompetence or wilful malice to pull one out.
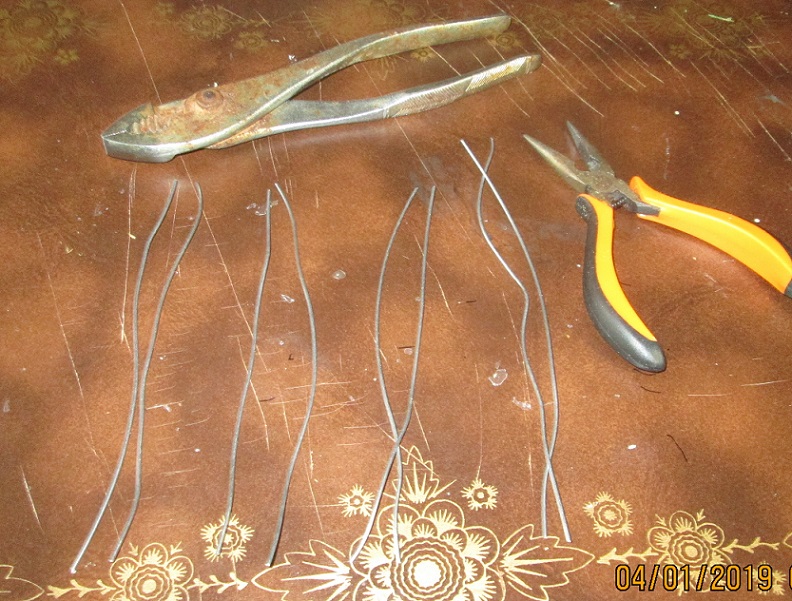 Deciduous tree build. The longer pair will form the root that gets stuck into the polystyrene and held in place with a glue gun.
I twisted the pairs together, leaving an inch or so of wire separated at the top. This was the final fork where I glued on foliage. The two pairs were wound together but l left room at the top for the pairs to branch out… literally. I twisted the long pair of wires with the remaining shorter one so that the two longer strands stuck out of the bottom. All four pairs went together, leaving the two long strands at the bottom, and a split trunk further up.

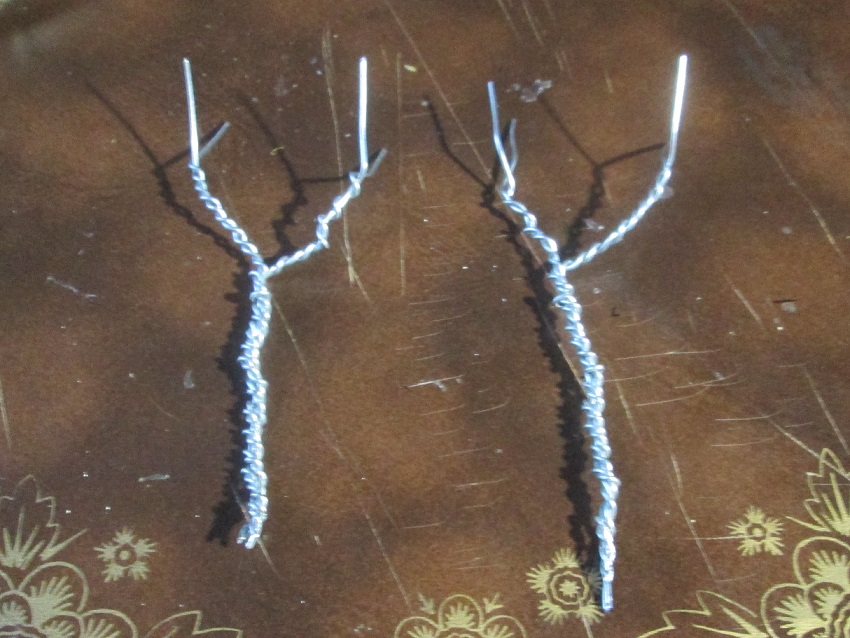
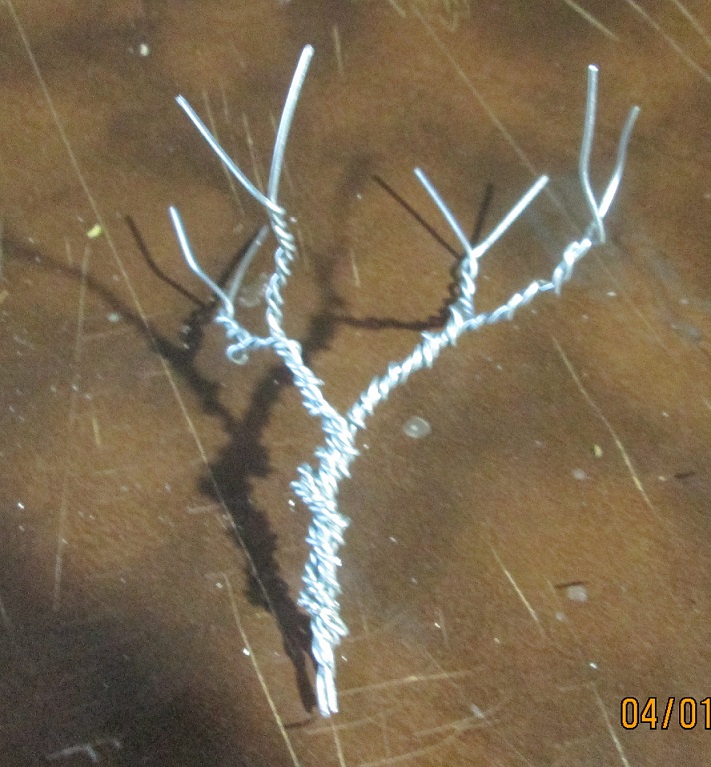

Putty: as stated previously, I used Milliput to fill out the trees but you can use any two-part epoxy, or even an air-dry compound like DAS. The idea, when applying the putty, is to preserve the twisted look of the wires, so it becomes part of the sculpt, and not just part of the frame.
I primed the trees black and applied a grey/brown base colour, washed with Agrax Earthshade – or ‘Artist in a Jar’ – as it is more commonly known, and then drybrushed with a lighter grey. Finally, I added green flock to the trunk, to mimic the moss that coats trees in a temperate forest.
Foliage: I used lichen but you can also use the shredded green foam. It’s a matter of personal preference in the end. The client preferred lichen, and so do I, but it does require some care and feeding. Glycerin, available at most drug stores, will keep the lichen moist and pliable; I mixed it 1:1 with water so it could be applied with a spray bottle; it is quite viscous otherwise. I stuck the lichen on with a glue gun, and in some instances, drybrushed a light green on it, as the colour can fade if it’s been in the bag for a while.
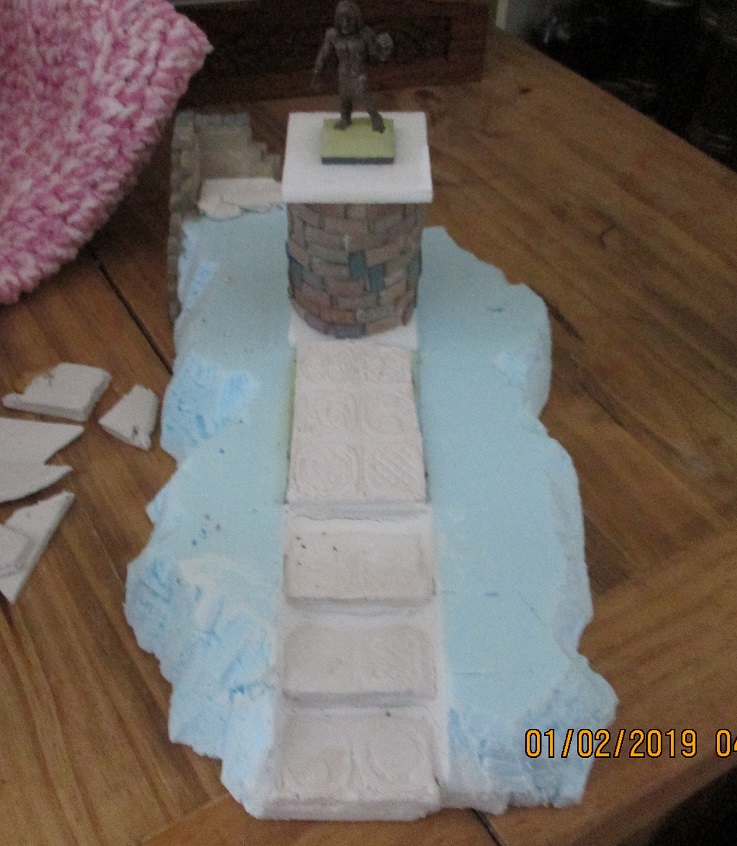 DAS is a cheap alternative to Green Stuff or Milliput. I've used it here with a Green Stuff rolling pin to make steps and a walkway, but it can also be used to make custom bases.
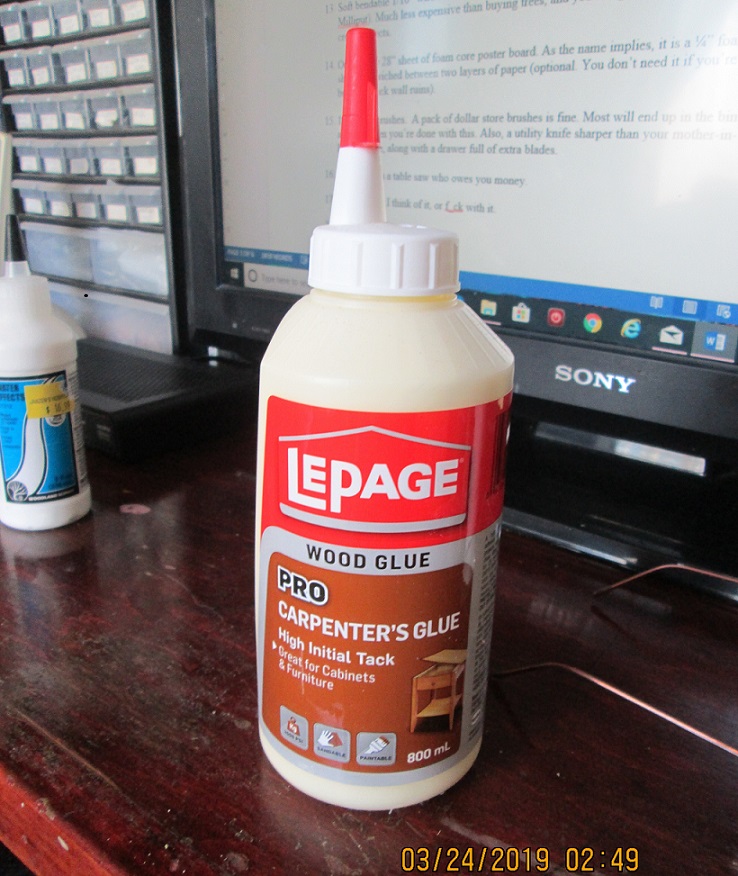
For this piece I used DAS and a Green Stuff Celtic rolling pin to make the stairs and paved area before the statue. I just rolled it out till it was about 3/16” thick, waited for it to dry (1-2 days), and then cut it as needed (it will distort if you try to cut it when it’s wet). The pieces were stuck in place with wood glue and the gaps sealed up with wall filler. You’ll see them better after a wash and drybrush.
The pillar was made with a toilet paper roll, minus the bum wad of course. I used the same brick technique I fiddled with on the fountain, and put in a bit of a wall ruin on one edge as well. The statue was an old AD&D golem I had lying around, but it didn’t come across dramatic enough, or large enough for the plinth, so I replaced it with a Bones model.
The trees were placed so that models could still interact between them and under them. I angled the deciduous trees outward so they wouldn’t take up space on the terrain piece, but at the same time there was still enough room for models underneath them on the table… the whole game table vs. diorama thing once again.
Note the 1/16” plasticard edge on the base (I couldn’t fit the image in here. See the gallery in the first post). I put a layer of wall filler there as a buffer against accidental bumps and bruises. Wood glue stiffened up the edge further, and will keep the wall filler from crumbling if it takes a hit.
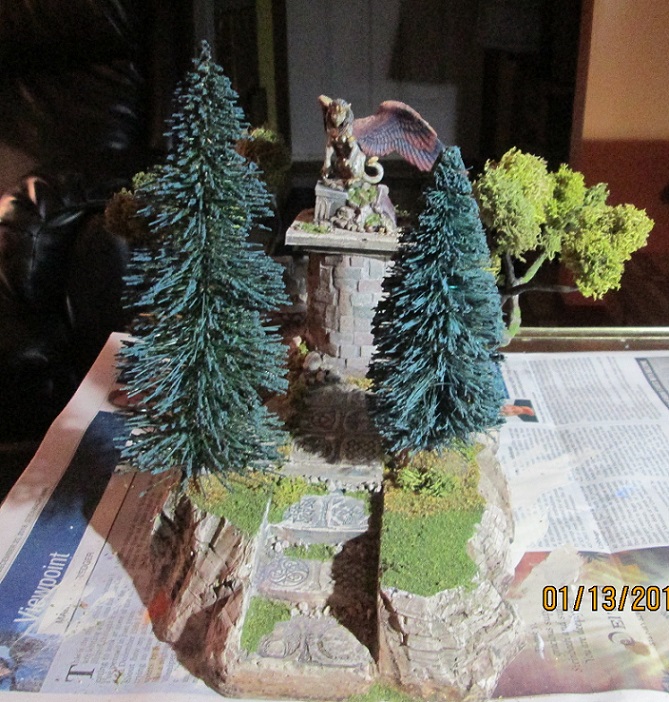 Front view showing angled trees and available space for models both on the piece and beneath the boughs on the tabletop.
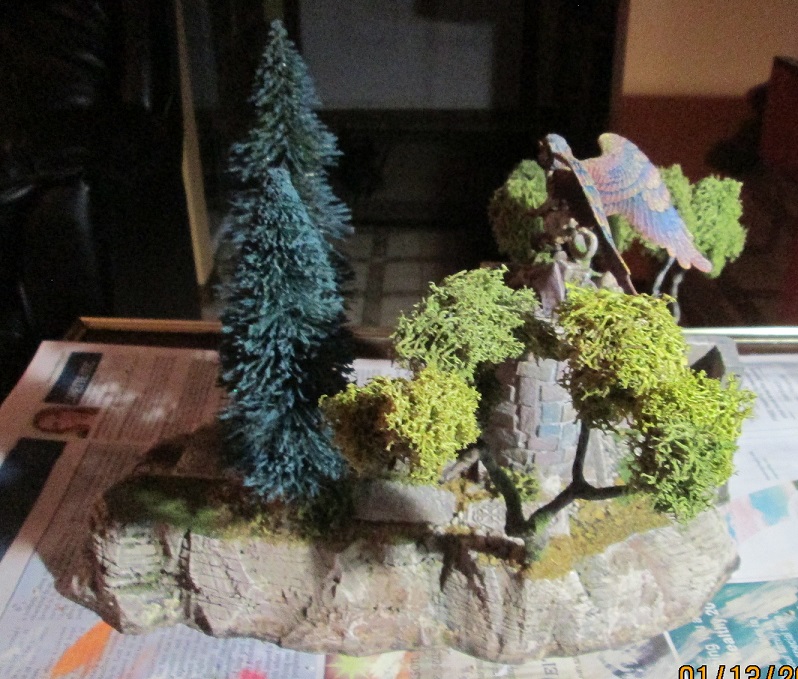 Forest floor made from assorted Woodland Scenics turf, Spanish moss, gravel, and leaves made with a Green Stuff leaf cutter. I used painted paper but actual leaves work better. Unfortunately all ours were buried under three feet of snow when I made this piece.
Gravel, grass and foliage were added. I painted up a Reaper Bones sphinx as a statue, with the same marble effect I used on the previous fountain board. I magnetized the platform and model for two reasons: first, in case someone wanted to animate the statue in a fantasy game, and second, so that it could be replaced with a statue of a space marine, Napoleon, or even an ACW general (only a Northern one, apparently). Pics in next entry.
Battle Boards and Scatter Terrain
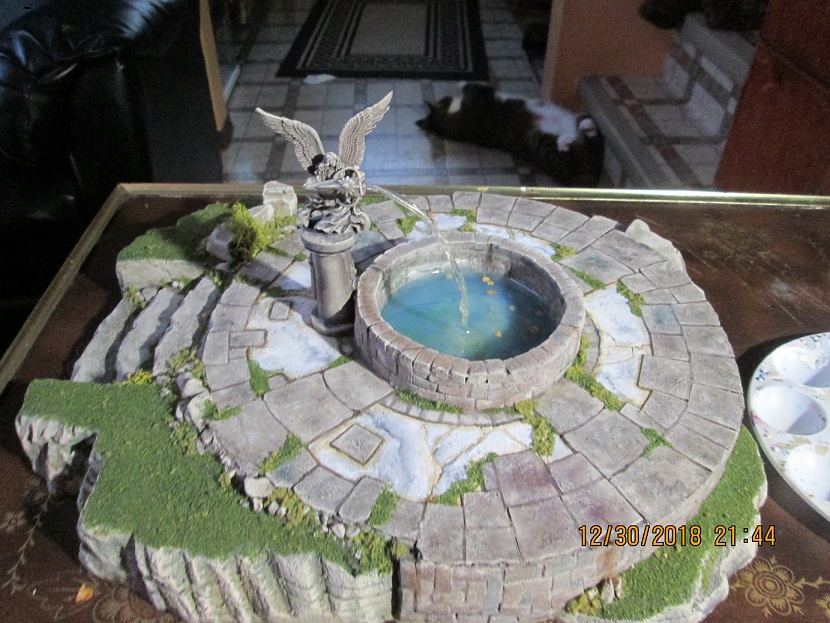
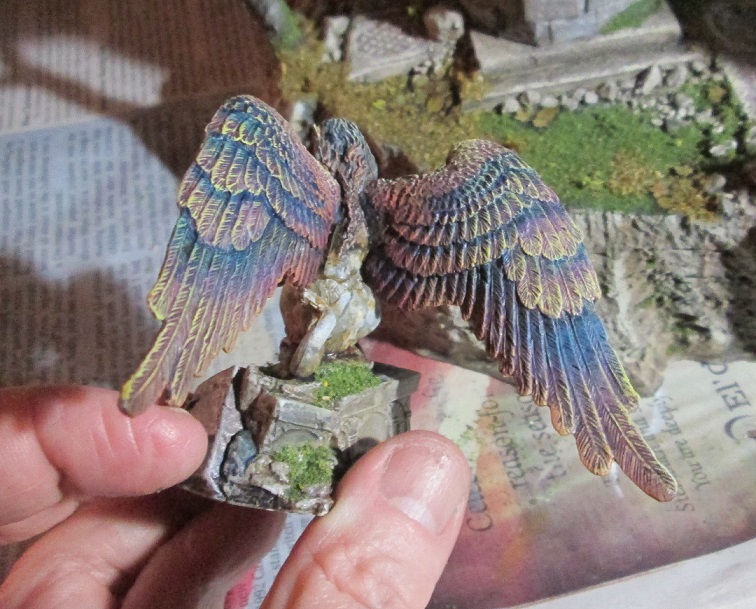
On to the angel. I originally bought the Reaper angel to teach the missus how to paint hair, feathers, and robes, all in one go. Needless to say, that plan went south. But the model was ideal for my fountain, and as luck would have it, the hands were perfectly placed to hold an amphora, which was made from Milliput, a paper clip, and a GW high elf bit. The pedestal is a thread spool nicked from my partner’s sewing room.
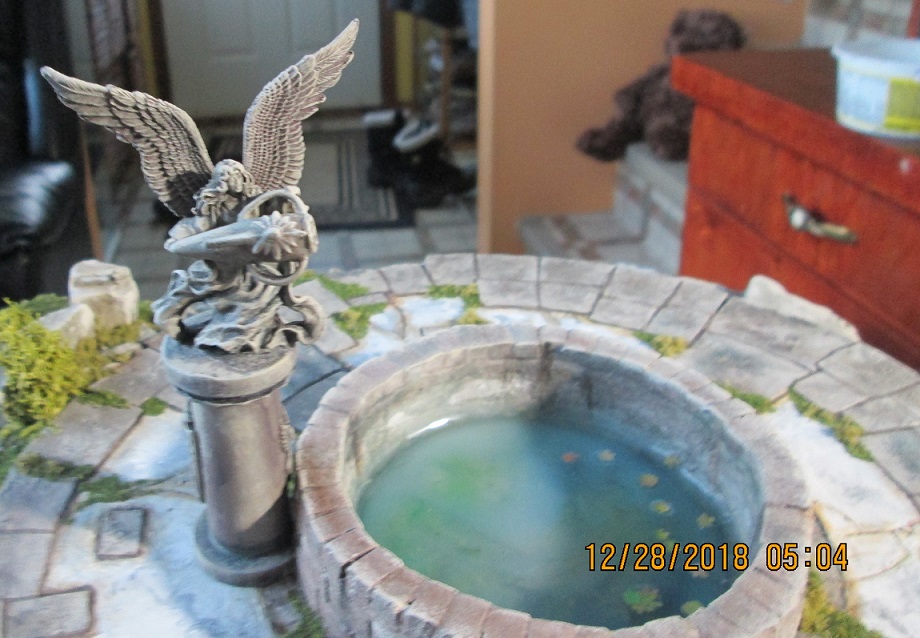 GW angel with amphora made from Milliput, a paper clip, and a GW elf bit. Note the leaves in the water. They were made with a Green Stuff leaf cutter and painted paper.
Water Effects
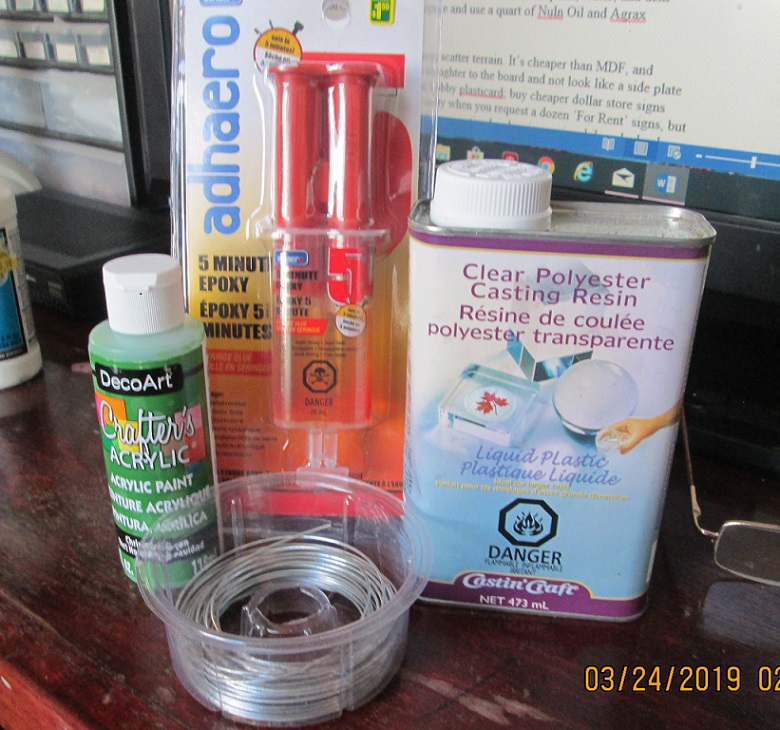
My original intent was to look for a cheaper alternative to Woodland Scenics Realistic Water (hereafter WSRW) for the pool itself, but in the end, that’s what I went with. I picked up some two-part five minute epoxy syringes, but there was far less in them than I thought there would be. I injected one into the fountain and it barely covered the bottom… grrr.
My next ill-conceived venture involved casting resin, which was marginally cheaper than WSRW. I poured about ¼” of the stuff into the fountain and left it for a day… then two… then three. The smell left us higher than kites – and it never did set. No one told us we needed to mix in a catalyst… duh. It also eats foam. I finally just bit the bullet and poured ¼” of WSRW over it.
I tinted the WSRW with a drop of blue ink (ink will tint the water, but leave it transparent, while a drop of paint will make it murky). After 24 hours it was mostly set, so I dumped in some leaves made with the Green Stuff leaf cutter. I did a final ¼” clear pour of WSRW and added more leaves so that it would look like they were dispersed throughout the water column.
The stream from the amphora was made with half a dozen bits of fishing line stuck together at one end with Superglue and stuffed into the amphora (fiddly bits profanity alert). The other ends were splayed and arced into the water, then glued to the surface. I mixed up one of the syringes of five minute epoxy, and applied it to the strands with a Kamikaze brush.
I made emanating waves with Woodland Scenics Water Effects, which starts life as a white paste, but dries transparent. It also has a 24-hour set time, so can be sculpted into ripples and waves without the manic frenzy of a five-minute epoxy. If you’re good with a glue gun, you can also sculpt the transparent goop into waves, but you’ll have even less time to mold it into something approaching a wave.
 Waves made with Woodland Scenics Water Effects were stippled with white then painted over with WSRW to give the white a gloss finish.
 You can use a dry brush or stipple brush to apply white foam to the crests of the waves, but you’ll need to paint on WSRW or another glossy finish afterward.
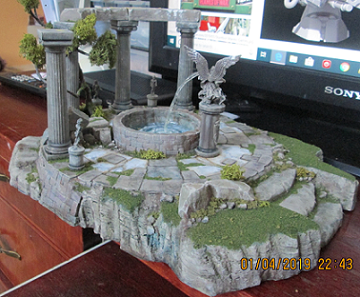
Finally, I added four wedding cake pillars to the back of the fountain, and placed statues produced and donated by a friend at Legions IV Hire in Winnipeg. The lintels were made from scrap ½” polystyrene from a previous project.
 Lintels, statues, and a climbing vine were added to finish the piece. More on building trees later.
I’ve glossed over a lot of the processes used in this first scatter terrain piece, but I’ll cover them in next week’s instalment where I build the first copse, with an enchanted statue nestled in its depths.
Battle Boards and Scatter Terrain
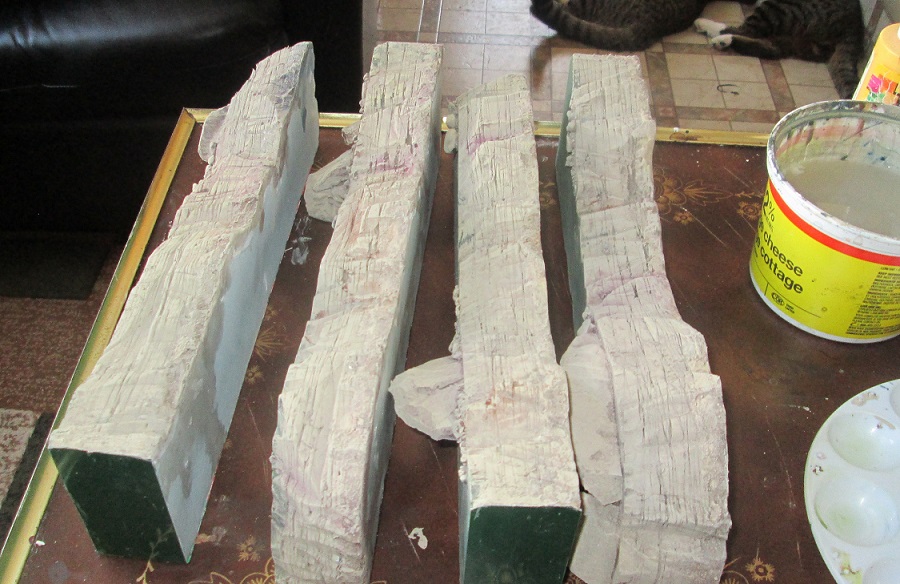
Initial Cuts
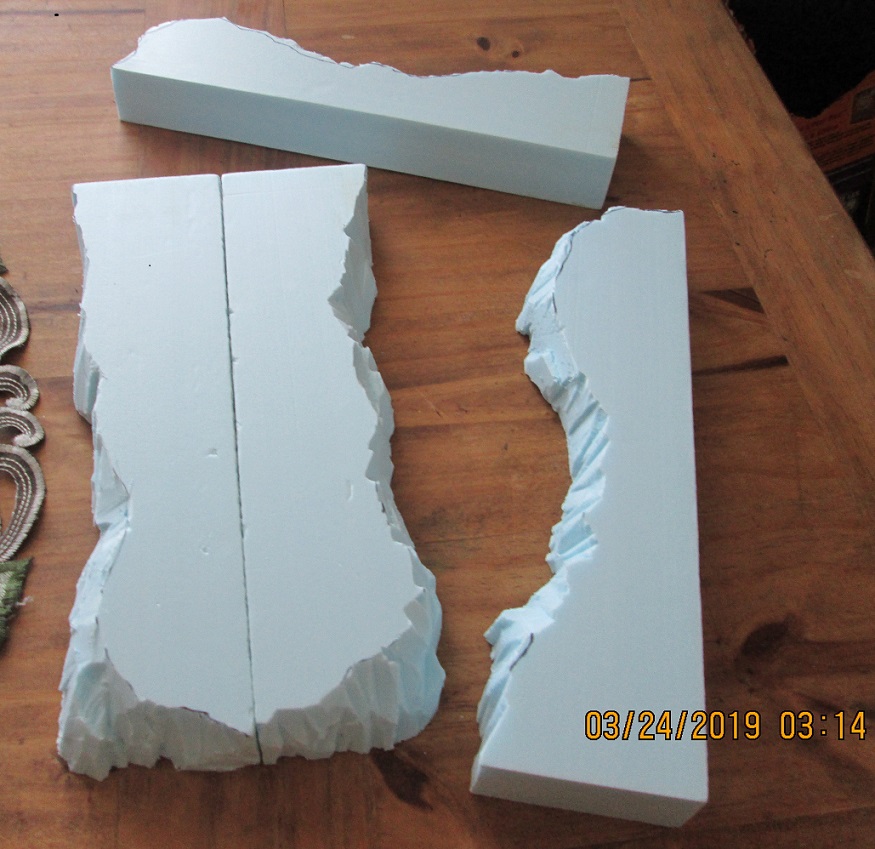
A table saw is a must at this stage, as it is almost impossible to make vertical cuts with a knife or hot wire, and you will need those cuts to be vertical to make your boards butt together properly. The only alternative I can offer is that most stores (around here at least) that sell polystyrene insulation will also offer to cut it up for you for a marginal fee.
Looking back on the diagram, you’ll note that I have only cut three 2’ by 2’ boards out of each sheet, as the blade width on the table saw made the last portion under 2’. Instead, I cut the rest of the pieces out of the end of each board, as their dimensions didn’t need to be precise.
The ‘slope’ pieces will be carved and ‘stacked’ on top of four of the boards, along an edge. The pieces marked ‘edge’, roughly 3” by 11 ¾, can be used with a slope board if the boards to either side are flat. A pic will explain it better… I’ll post one when I get there.
 Vertical cuts are essential when building boards. Here are the four 'edge' pieces described earlier.
Scatter Terrain
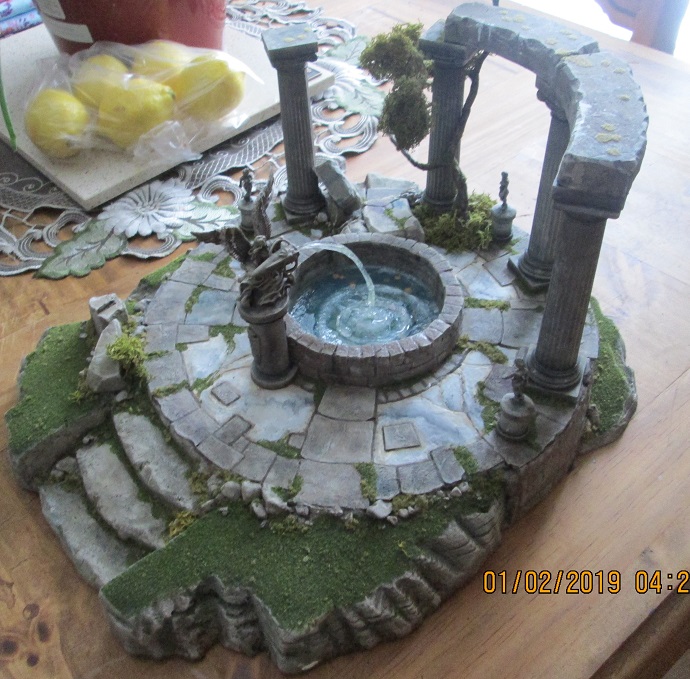
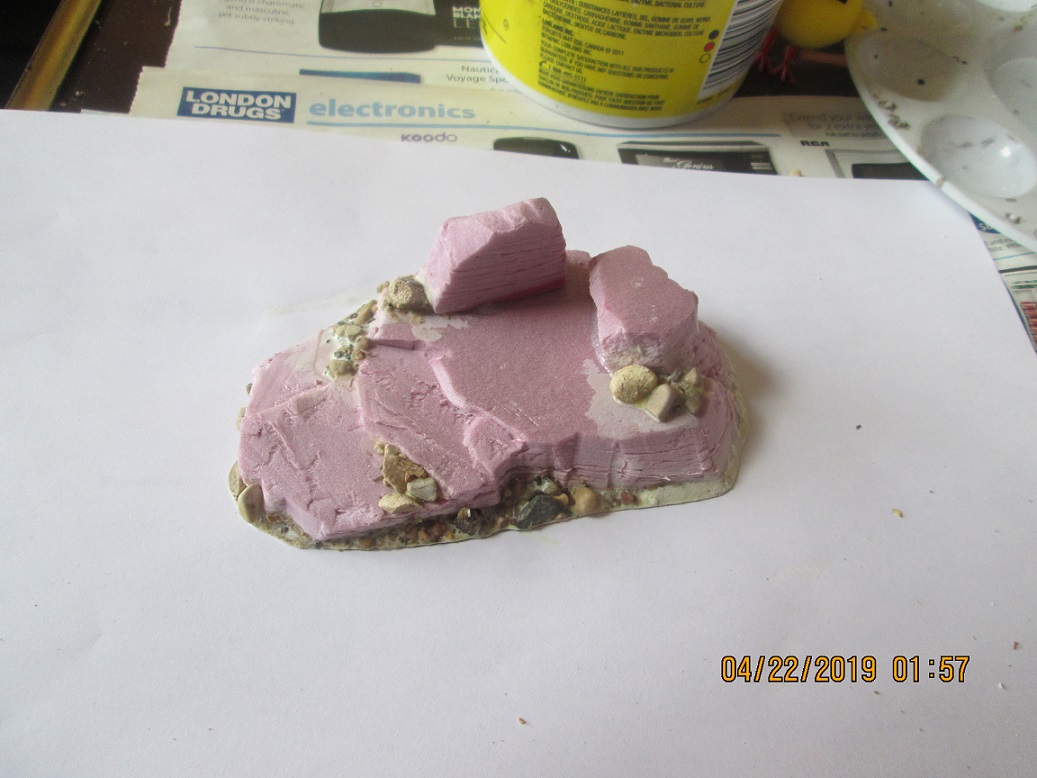
The first piece I wanted to work on was the fountain/hill, as it was a proof-of-concept for both colour palette and overall aesthetic (read ‘client approval’), and also a test for different materials. I would highly recommend fiddling with something small like this first, rather than destroying a larger board if things go pear shaped.
I started by drilling out a 3” hole for the fountain then cut the removed disk in half and reinserted one half as the floor of the fountain. I sealed it with wood glue, and then used a piece of foam core (with the paper removed from both sides) to make the round wall of the fountain.
I lined it all with wall filler, both for a textured cement finish, and also to prevent the foam from being turned to sludge by any of the water effects products I was testing. I finished off the inside with a dirty green wash for algae and put some rust and water staining above the eventual waterline.
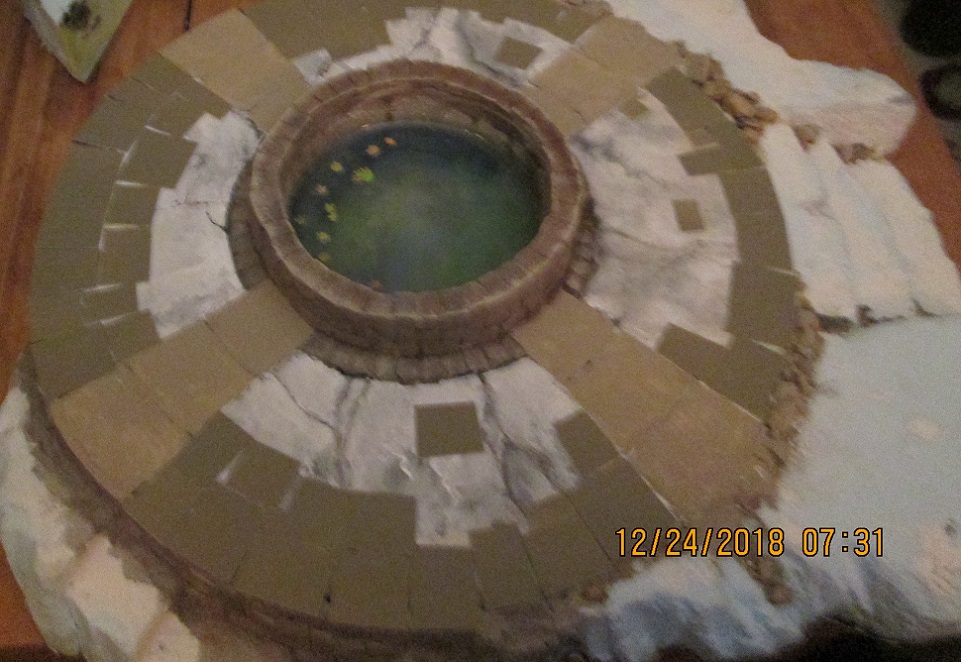
 Hill/fountain board showing initial sculpt, first fountain pour, and the start of the brickwork.
It was only after I had carved the slopes and stairs, and started the brickwork that it occurred to me that someone might be interested in the process, so you’ll forgive me if the first pic shows a more advanced state than what I’ve described. A bit of backtracking may be in order:
I used a dinner plate to trace the platform around the fountain then carved the rest with a utility knife. I’ve found that a shallow cut, followed by a little leverage to snap off the piece, will yield a more natural looking rock face than simply cutting all the way through the foam. Save your foam scraps for rockwork.
For this build I went with a fractured sedimentary strata look, and therefore spent considerable time putting horizontal slashes into the slopes *Cue ‘Psycho’ shower scene music*. I started with a tan base colour, covered it in a dark brown wash that was tinted in places with red brown, navy blue, and purple. The final drybrush was the original tan lightened with yellow.
Platform: Initially I carved in some brickwork but wasn’t happy with it, so covered it up with plasticard bits to make it look like there was an ancient marble floor lurking beneath the crumbling tiles. I used a sepia wash to put a patina on the marble
 I wasn't happy with the brickwork on the edge of the platform, so covered it with plasticard 'tiles.' Another alternative would have been to fill in the sculpted bricks with wall filler.
Brickwork: a bit of experimentation here. All the castle pieces I’ve built to date have had the masonry carved right into the foam, but it always looked too smooth, and a bit unnatural. For this build I decided to make individual bricks — to see if the process was feasible for an entire castle.
I peeled the paper off one side of a piece of foam core then made bricks by cutting down to, but not through, the second layer of paper. The bricks got the same tan paint, tinted with various colours. They were peeled off the second layer of paper, and then applied randomly to the side and top of the fountain, and to the back of the hill, as if to shore up a weak slope.
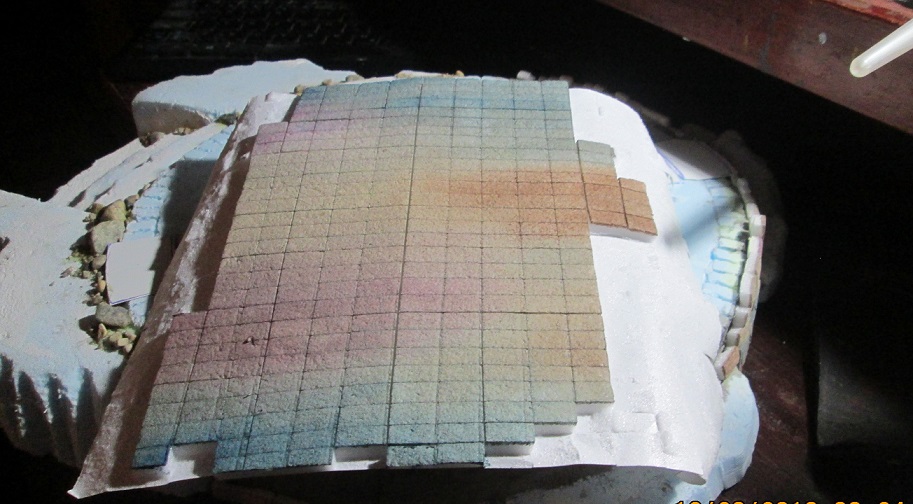 Bricks made from foam core board. The paper has been peeled away on one side, and cuts made down to, but not through, the bottom layer of paper.
The whole got a healthy dose of wall filler aka mortar, to fill in the spaces between the bricks. It dried very light, especially on the bricks themselves, so if you’re going to go this route, I suggest going over the surface of the bricks with a very damp cloth to get rid of as much of the filler as possible. The result at this point looked like new construction, but wasn’t the aged effect I was after. A wash dulled everything down, but left the individual brick colours visible – perfect.
 Wall filler filled in the gaps between the bricks, but the end result looked like newer construction. I was looking for something more 'ancient.'
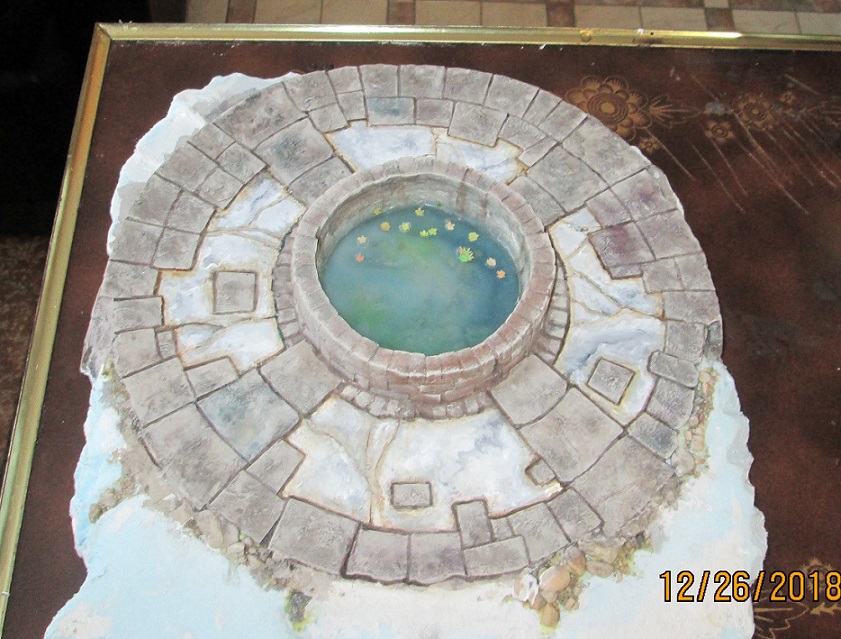 A wash gave the fountain the look I wanted, and I painted the plasticard tiles to match. The marble is black and white craft paint, with a patina of GW sepia.
Battle Boards and Scatter Terrain
This area will be reserved for pics that didn’t make it into the main article


Battle Boards and Scatter Terrain
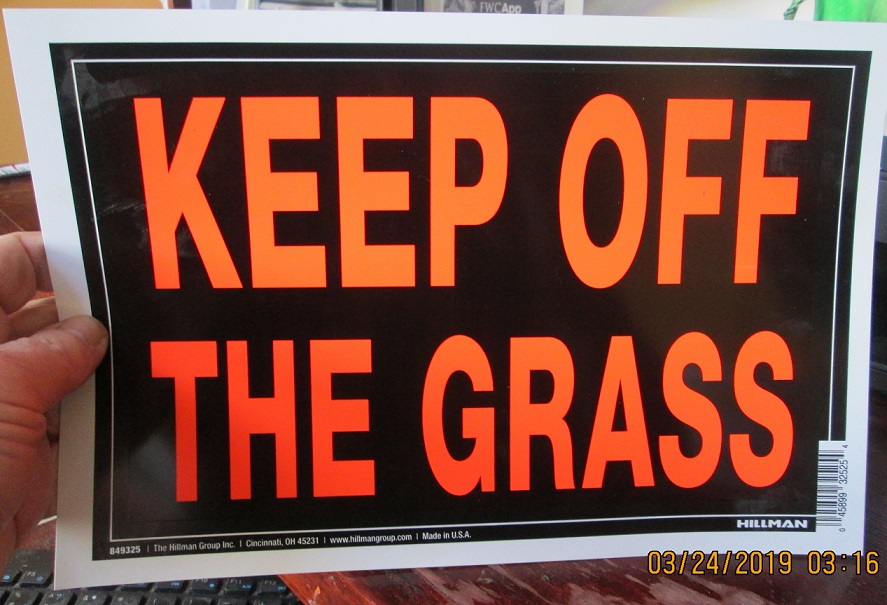 Plasticard. We won't be needing these signs anymore. The Canadian government just made cannabis legal.
10. Wall filler for joining foam pieces and fixing imperfections. Sand paper to smooth it all out.
11. Two 12 oz. bottles of Woodland Scenics Realistic Water (about $30 each).
12. One bottle of Woodland Scenics Water Effects for making waves and ripples ($17).
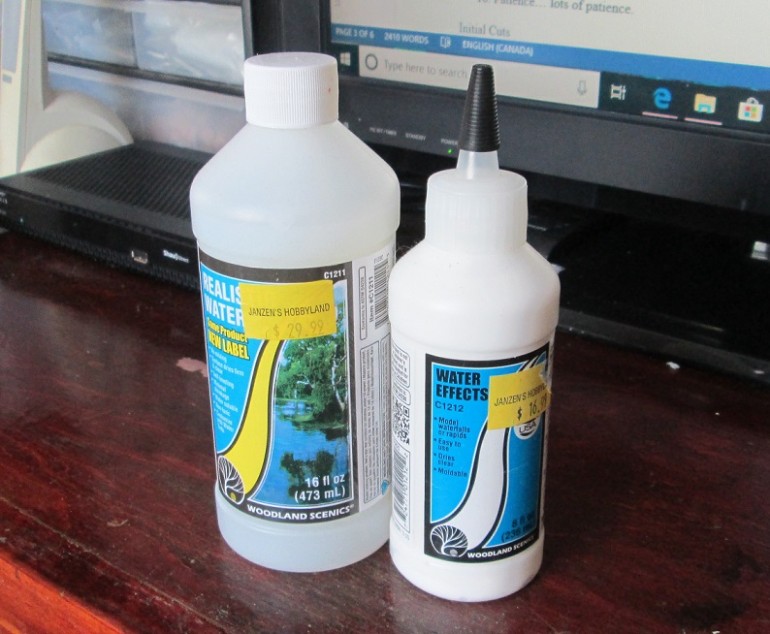 Woodland Scenics Realistic Water and Water Effects. Comparatively expensive, but worth it.
13. One 24” by 28” sheet of foam core poster board. As the name implies, it is a ¼” foam sheet sandwiched between two layers of paper (optional. You don’t need it if you’re not building brick wall ruins).
14. Soft bendable 1/16” wire for making tree armatures. Two-part epoxy to cover (I use Milliput).
15. 1″ and ½” brushes. A pack of dollar store brushes is fine. Most will end up in the bin anyway when you’re done with this. Also, a utility knife sharper than your mother-in-law’s tongue, along with a drawer full of extra blades.
16. A friend with a table saw who owes you money.
17. Other stuff as I think of it, or f_ck with it.
18. Patience… lots of patience
Battle Boards and Scatter Terrain
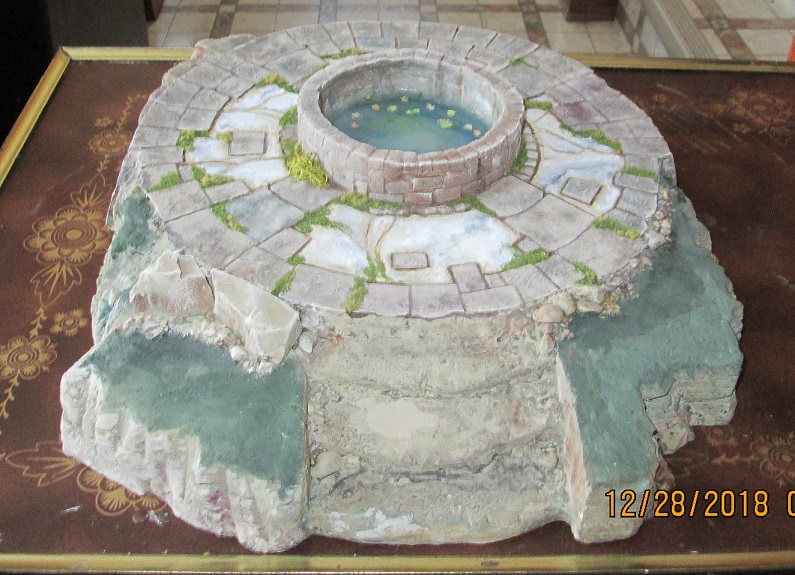
 The first scatter terrain piece. It was a testbed for concepts and materials.
Last fall my LGS convinced me to build battle boards and terrain for their new store. It was a project that went from ‘a few boards’ as we ordered our first pints, to a monster undertaking where I somehow agreed to produce two 4’ by 6’ tabletops and accompanying scatter terrain. At some point, in a moment of clarity, I managed to come up with a PIDOOMA (pulled it directly out of my ass) on a cocktail napkin that was based on four sheets of 2’by 8’ polystyrene and a hockey sock full of hobby supplies. It looked something like this:
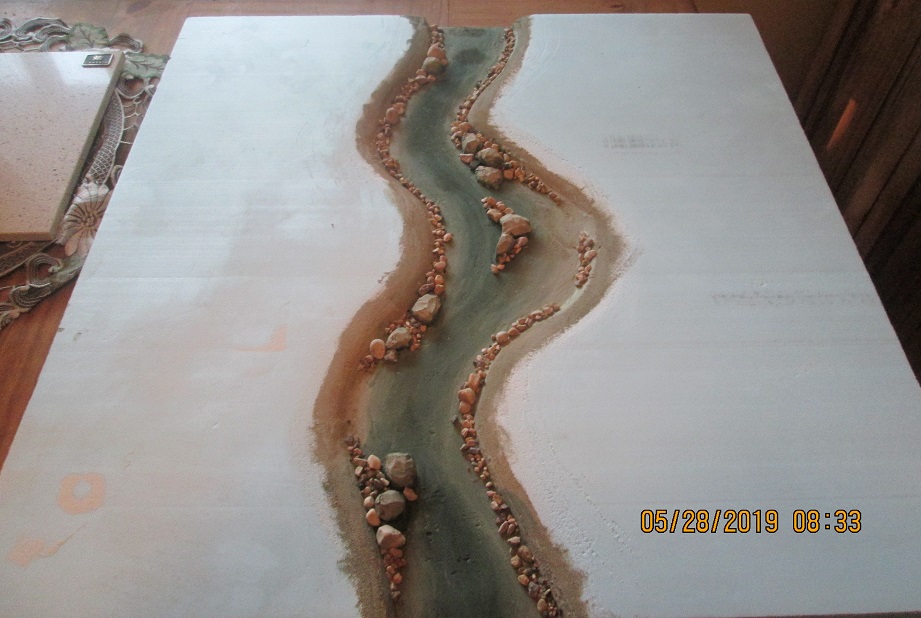
1. Twelve 2’ by 2’ game boards: six flat boards, four slope boards, and two river boards. The plan was for them to be geomorphic, in that they could fit together in a variety of ways.
2. Four hills, with one being a centerpiece with a fountain. More on the reasoning for that below.
3. Four copses, with one having a statue/plinth centerpiece.
4. Four small edge pieces to turn two back-to-back edge boards into a larger hill for ‘King of the Castle’ style games.
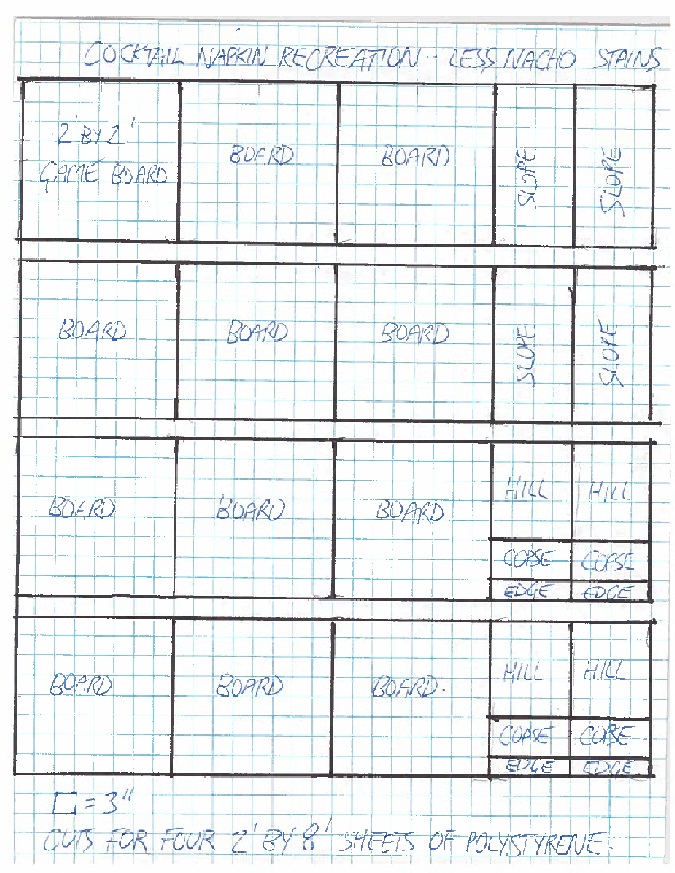 Tentative plan to turn four sheets of polystyrene insulation into twelve battle boards and scatter terrain.
I’ve since added some individual trees to the project as I thought the copses and hills weren’t enough to fill two tables. Keep in mind that this is an initial bare-bones build, and that I will be plugging in other pieces next winter, starting with some sci-fi scatter terrain, followed by a modular castle, and then a medieval village. I’ll post all relevant how-to’s on here, along with any how-not-to’s (we learn more from failure than success), epiphanies, and creative flares of profanity.
Parameters: As mentioned, the boards needed to be somewhat geomorphic, to create interesting and varied landscapes. Other factors were:
1. Maximum playable space. Herein lies the fundamental difference between a diorama and a game table. While it’s great to throw together great sprawling forests and huge rockwork landscapes, in the end it’s just unusable space. Also, steps and climbable rockwork would need to accommodate a 32mm base, minimum.
2. Contours would be a function of the scatter terrain, not the boards, meaning that the flat boards would stay flat, and not be carved into shallow depressions and crests. A pet peeve of the client, and frankly one of mine as well, is that it looks bad trying to rank up models on an uneven surface, or one studded with gravel or other annoying gubbins… another difference between a game table and a diorama.
3. The terrain needed to be generic, as opposed to genre specific, so it could be used for fantasy or sci-fi gaming, or even historical battles. I built some ancient ruins into the hills here and there, but resisted the temptation of putting in old helmets, shields, discarded bolters, etc.
4. The boards had to be robust. In my own experience gamers take terrain for granted. If it’s not theirs it’s meant to be tipped, dropped, bumped, leaned on, spilled on, puked on, and chipped. I needed to figure out a way to mitigate any *ding, blue foam* events.
5. Budget… doesn’t it always come down to that?
Materials
 A few of the materials I tested while looking for cheaper alternatives. Some good, some not so much.
1. Four sheets of the aforementioned polystyrene, 2’by 8’, 1½” thick (approx. $30 Canadian a sheet). Rumour has it you can also use it to insulate your home.
2. About 2 liters of PVA or wood glue
3. Glue gun and gobs of glue sticks!
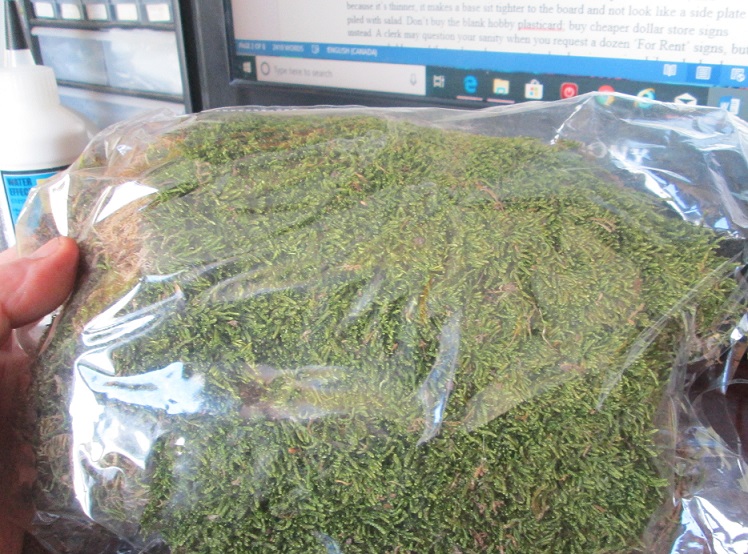
4. A bag of moss. I used Woodland Scenics, which was about $25 Canadian. I had about half of it left after all was said and done. I’m sure there are cheaper alternatives out there. You’ll need glycerin to keep it from crumbling like autumn leaves after it’s stuck to your trees.
5. Flock, assorted shades and textures. The Woodland Scenics coarse blend is great for adding texture and won’t ‘tilt’ model bases. In forested areas I used ground up Spanish moss as ground cover. Cheap enough at any dollar store or florist.
 Flat terrain doesn't have to be boring... said the guy from the prairies. Woodland Scenics products make for a diverse and realistic landscape.
6. Sand for areas devoid of vegetation.
7. Gravel. The key is to use different-sized pebbles to make your rockwork look natural. I have an abandoned quarry a mile from the house, so a no-brainer for sourcing. Pebble size should be ½” or less. You should use polystyrene scraps for any bigger ‘rocks’, else you’ll end up with a hernia when you schlepp your boards to a gaming event.
 Spanish Moss. Ground up, it's great for forest floor terrain, and can also be used as tree foliage in savannah or jungle landscapes.
8. Craft paint: six 4 oz. bottles of DecoArt Tan, and probably eight of the Christmas Green. They’re about $1.25 here. Alternately, you could buy two quarts of Latex, but it will cost more. You’ll be making dark washes out of brown/black craft paint, water, and dish soap… or you can get a second mortgage and use a quart of Nuln Oil and Agrax Earthshade.
9. Plasticard for edging boards and basing scatter terrain. It’s cheaper than MDF, and because it’s thinner, it makes a base sit tighter to the board and not look like a side plate piled with salad. Don’t buy the blank hobby plasticard; buy cheaper dollar store signs instead. A clerk may question your sanity when you buy a dozen ‘For Rent’ signs, but you can pre-empt that awkward conversation by showing up in a bib and a hockey helmet.


![Mounted US Cavalry On Kickstarter For Dead Man’s Hand! [Updated]](https://images.beastsofwar.com/2026/03/us-cavalry-main-600-338.jpg)


![Play WW2 Commando Operations With Butcher & Bolt [Updated]](https://images.beastsofwar.com/2026/03/relaunch-600-338.jpg)


