


![Alternative Trench Crusade Miniatures? Trench Missionaries Review | Wargames Atlantic [7 Days Early Access]](https://images.beastsofwar.com/2026/03/unboxing-wargames-atlantic-trench-missionaries-coverimage-225-127.jpg)


CRC’s Crazy Compendium 2; Eclectic Boogaloo


Recommendations: 687
About the Project
Welcome to the next season of the "most vaguely inconsistent extravaganza that no one really thinks about but if they did they'd be mildly misanthropic about it"! Following along from my last project, here you will find an array of things I'm working on from various games and companies. Hopefully we can manage a bit more variety than last time, but I have been slowly working through a significant backlog, so we get what we get. We think we finally got away from Spiny Norman, but we can never be too sure, so strap up and buckle in for the most ambivalent ride of someone else's life! For those who missed it, the last project can be found here: https://www.beastsofwar.com/project/1533345/
Related Genre: General
Related Contest: Spring Clean Hobby Challenge (Old)
This Project is Active
At least the Cpl. remembered the compass...
Slightly poor lighting here, but I haven’t attached this chap to the base yet and I wanted to take the opportunity to go over the webbing a little.
For anyone not in on the jargon, ‘webbing’ is the term given to the ammo pouches/packs/assorted accoutrements that the Tommies carried. The name comes from the material it’s made of, but the subject here is the colour. The webbing was a beige colour, but the British used a substance called Blanco to protect the belts and is turned them to a green colour. Now I think there’s variation in this colour, but my original colours on the loader and gunner were far too bright, so I dulled them down with some Agrax Earthshade. For the Cpl. of the section I decided to paint it a bit less bright. Annoyingly this is what I did on the Sgt. I painted a while ago…but forgot about…
 The actual gear on this chap is a little different, but the general kit uses the same colours.
 This may show up better with better light pictures (hopefully available tomorrow), but the main basecoats for the webbing haven't changed and I still use Loren Forest. You could use Castellan Green if you wanted a darker basecoat, though. Over the basecoat I applied the same Biel Tan Shade.
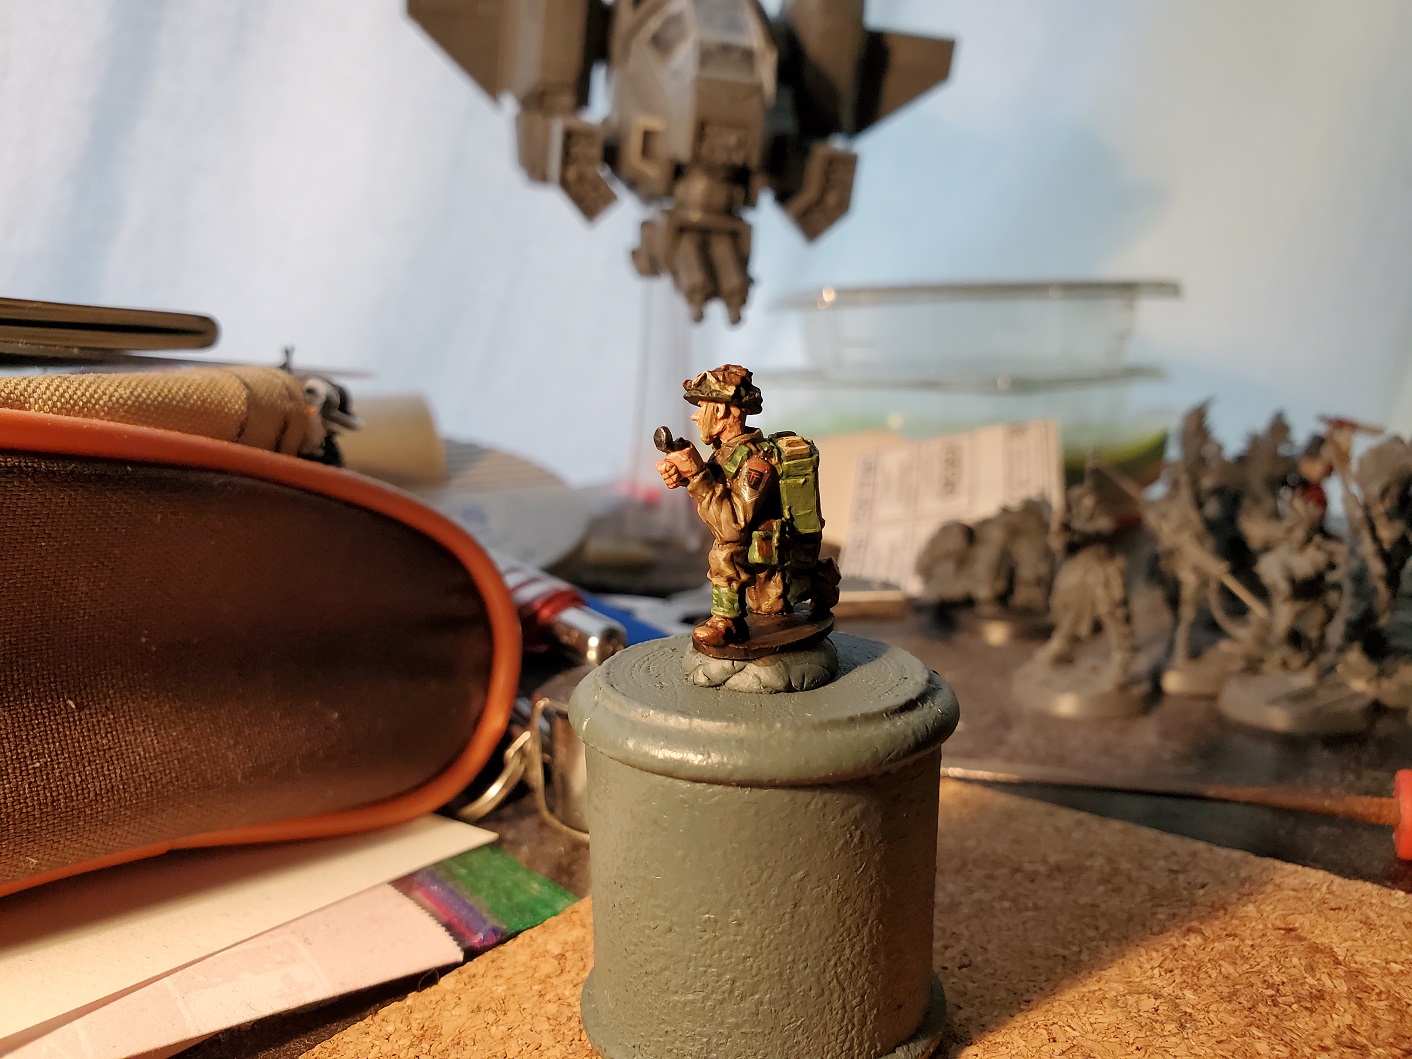 The main difference here is that I then layer back up with Loren Forest, rather than jumping to Elysian Green. I edge highlight with Elysian Green and if you feel like adding fine highlights of Ogryn Camo, you can, though I didn't here.
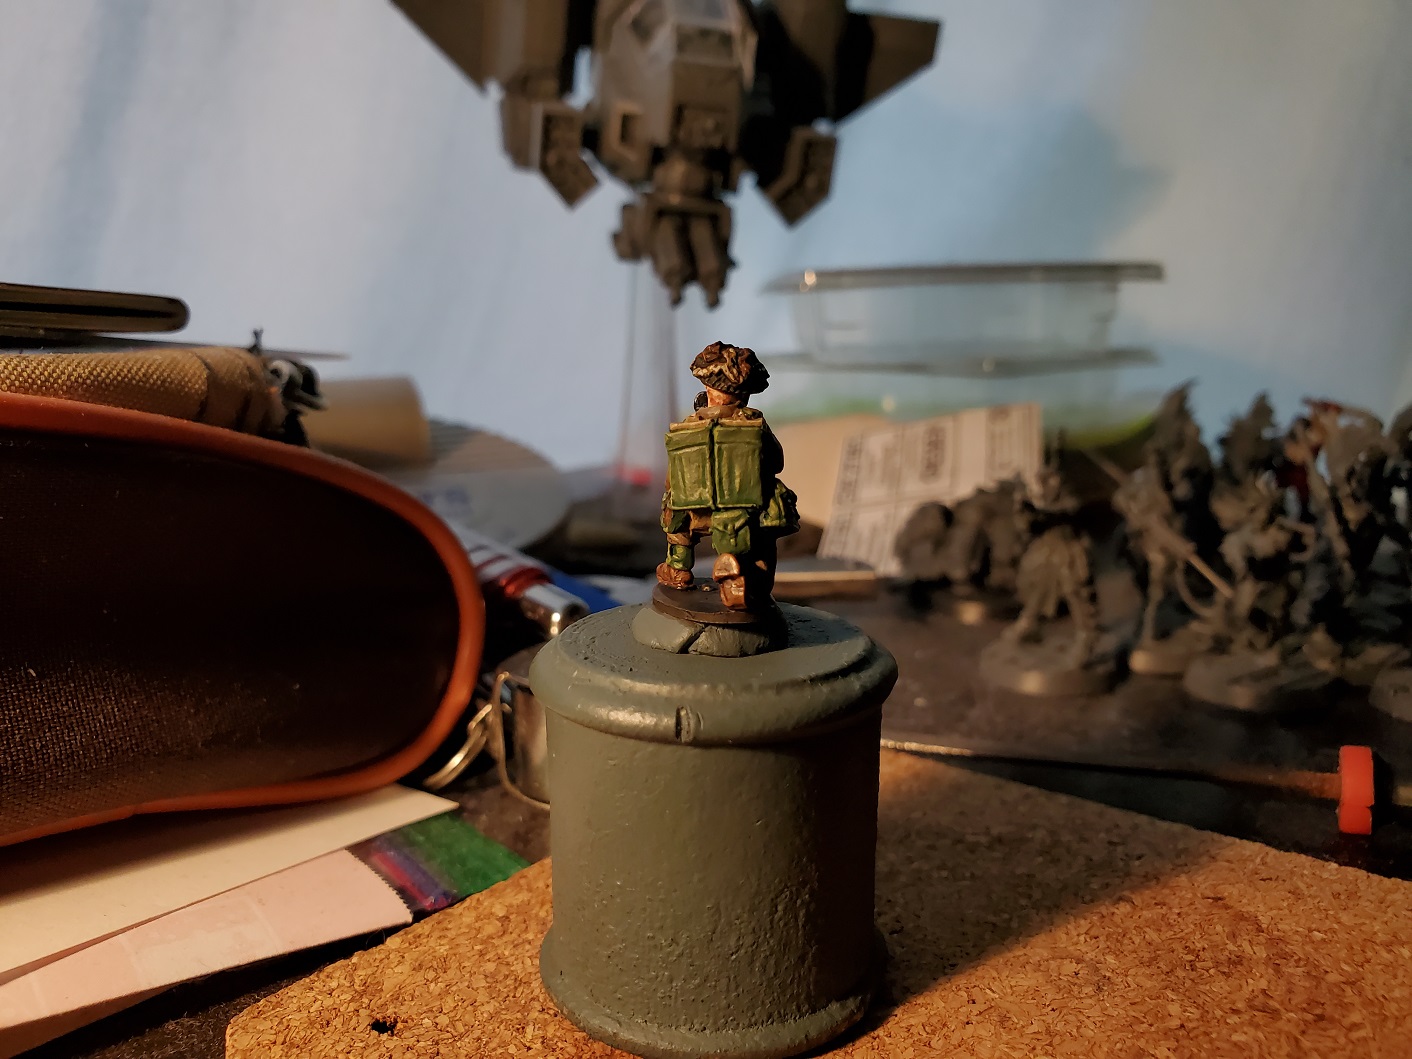 And the Lloyd shot! This scheme is a lot closer to the reality of the colours, which is good. You could also probably get away with shading with Agrax Earthshade if you want to save on paints, you'd just have a slightly browner colour to the weebing that still works.
Hopefully the weather will be less overcast tomorrow and I can get some better pictures. I should also have all three chaps on the same base…even if I haven’t got the basing on by then. 😛 May the 4th be with you, you mad buggers!
Machine Guns and the British Army in WW2
Well seeing as I got this double post and based on the last little comment on the loader below, I thought I’d use the space now. Once I finished the last post (and the comment about proper vehicle markings for 1st Hampshires) I decided while it was in my head to do a little research. Luckily for me, it seems I was right about the vehicle marking that I put on my Jeep several years ago, which is comforting, but also in the research I was reminded of Machine Gun Battalions. Seems like an odd thing to be reminded of, but I’m an odd person…
Let’s start with some basics of vehicle markings in WW2. There are several main ones and a lot that apply only to tanks and armoured divisions (which I won’t touch on too much here), but the basics of unit identification fall within two badges; the division badge, and the ‘unit’ badge (can represent a regiment or a battalion, usually). Here’s an example from my collection:
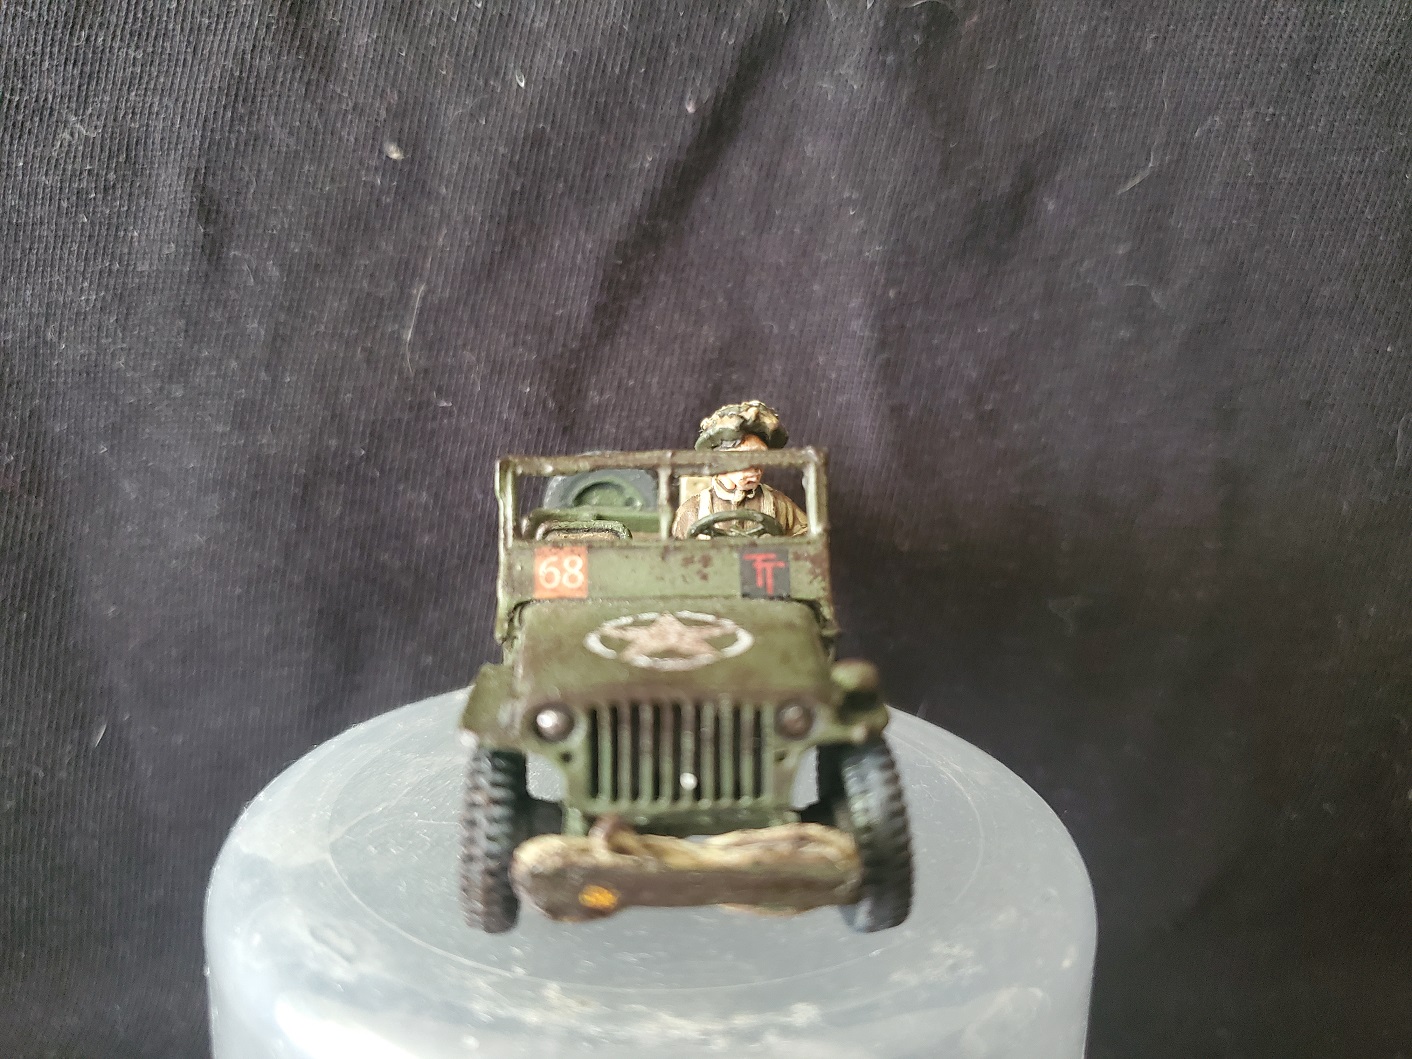 The yellow circle is meant to be a bridging disc, so just ignore that for now. The two square badges are the important ones.
The brightness is a bit high there, but the badges to look at here are the 68 is a brown square and the red double T’s in the black square. The division badge is the double T, in this case denoting the 50th (Northumbrian) Infantry Division. There’s lots of other badges like the ‘Triforce’ badge of the 3rd Division or the red rat of the 7th Armoured (Desert Rats). These badges are unique to a division, whereas the ‘unit’ badge is shared across all divisions of a particular type (Infantry vs. Armoured being the two most obvious ones).
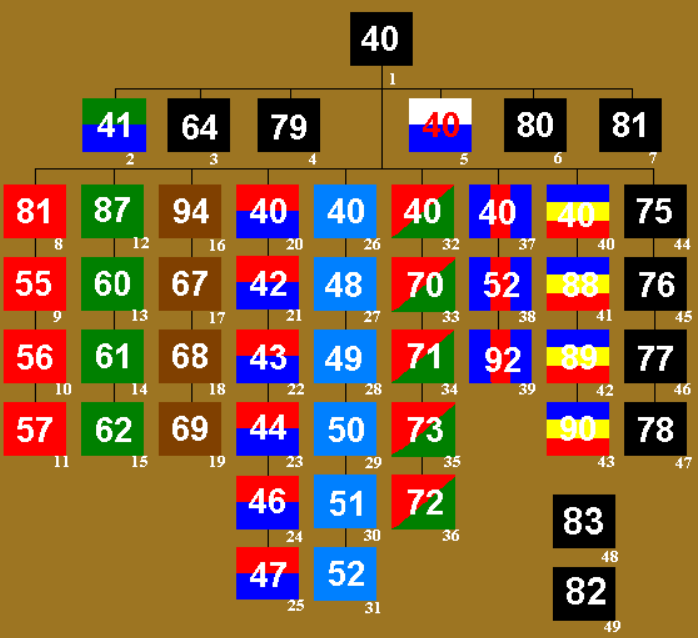 Standard Infantry Division badges. The key to this image is provided here: http://britmods.freehosting.net/infdiv.htm.
Using the example of my Jeep, and cross referencing to the details given on that site we find that a brown square with a 68 is the middle infantry battalion of the Junior Brigade. In this case it matches the 1st Hampshires, but as has been stated on a recent forum post, it’s best to have several sources that agree, so here (http://www.classicjeeps.co.uk/military-vehicle-signs-50th-northumbrian-division/) is another source with the same information. So that’s the basics covered.
“But what the hell has this got to do with machine guns?” I hear you cry. We’re getting there, I promise. Have a Lloyd shot of a tank to help you calm down a bit.
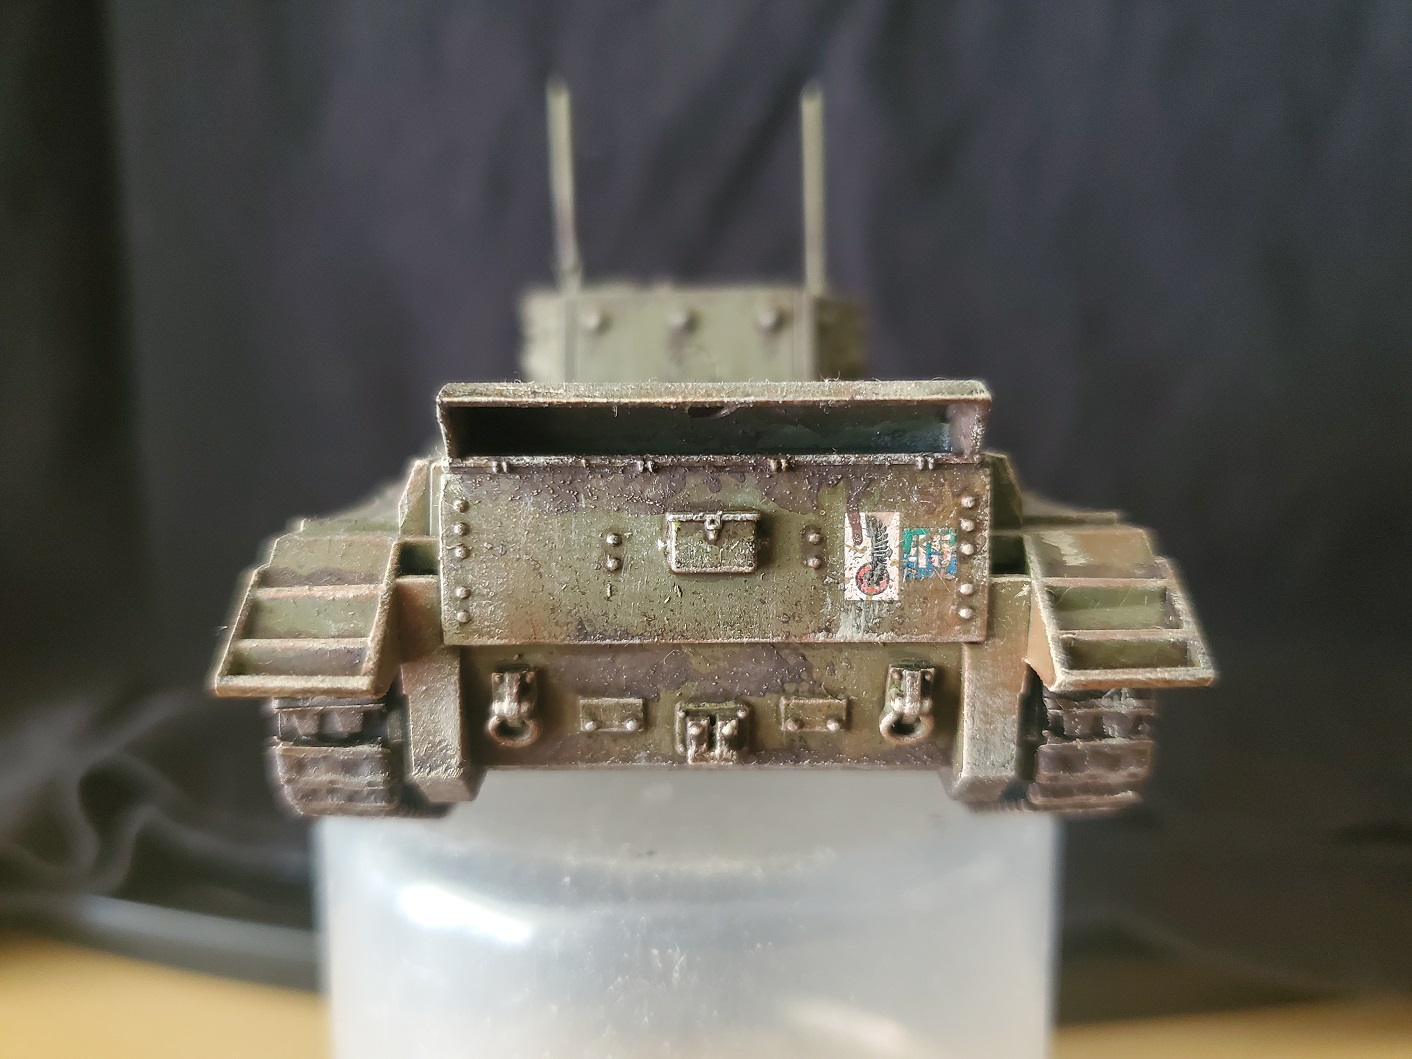 This is a tank, so the badges are a little different, but in this case the two badges tell us that this tank is part of the Armoured Recce for the 1st Polish Armoured Division.
Since WW1 the British had arranged their Machine Gun units as part of the Divisional or Brigade units. That’s an odd way of saying that regular infantry battalions didn’t get machine guns and they were kept at the brigade or division level and dished out to the units in the field where they were needed. There are badges that would denote this on the uniforms, but I just stick to division badges on my chaps but for vehicles they would need to be identified. Just as today, a brigadier would not want his truck for carrying his big guns to ‘disappear’ while the PBI have ‘found’ themselves a nice new set of wheels. So let’s go back to our badges and the legend on the website.
At the divisional level we see an entry for ‘Divisional Support Battalion’ which handily describes itself with Machine Guns and Mortars (heavy mortars in this case) and links to a black square with a 64 in it, and so we have our correct badge! Luckily the Warlord kit does have that decal in the transfer set, so maybe in the future it may make an appearance?
Should be noted that this is a level of detail that some people might find a bit off-putting or intense, and that’s cool. Not everyone is in to such maddening levels as I can be sometimes, but finding these details can be a little problematic sometimes so this is here to help anyone else interested. Here’s a few links to some site I found in my research for anyone who wants a bit of a jump start into their own research:
Infantry Div. Markings: http://britmods.freehosting.net/infdiv.htm
WW2 Infantry Battalion Organisation: http://www.kerynne.com/games/BritishInfantryBttnTOE.html
Machine Gun Battalions: https://vickersmg.blog/in-use/british-service/the-british-army/divisional-machine-gun-battalions/
Ok we got the bullets, now where are we shooting this thing?
And the loader is done! I decided to try a darker backdrop for the pictures this time round, but I don’t think I like it as much as the lighter grey one I was using yesterday. Once I actually move the whole set up will likely change anyway.
Back to the loader, however, he’s basically painted the same was the gunner with the big difference being the helmet and the ammo. The helmet is based with Castellan Green, then randomly pick out the burlap strips in Mournfang Brown and Zandri Dust before shading with Agrax Earthshade. After that, picking out the brown strips with Skragg Brown and the beige with Ushabti Bone. The ammo belt was a little trickier because of the sculpt. I suspect that the way a Vickers gun works wasn’t considered, but the cloth belt wasn’t actually sculpted on and there is a flat ‘thing’ sculpted on the bottom. It’s not a big issues, I just painted a band of Zandri Dust along the centre of the rounds to imitate the belt and he’s close enough to the ground that you don’t see the underside (possibly why they added the thicker bit to help strengthen the mini).
 The ammo box was also picked out with Castellan Green and highlighted with Loren Forest, like the helmet of the gunner.
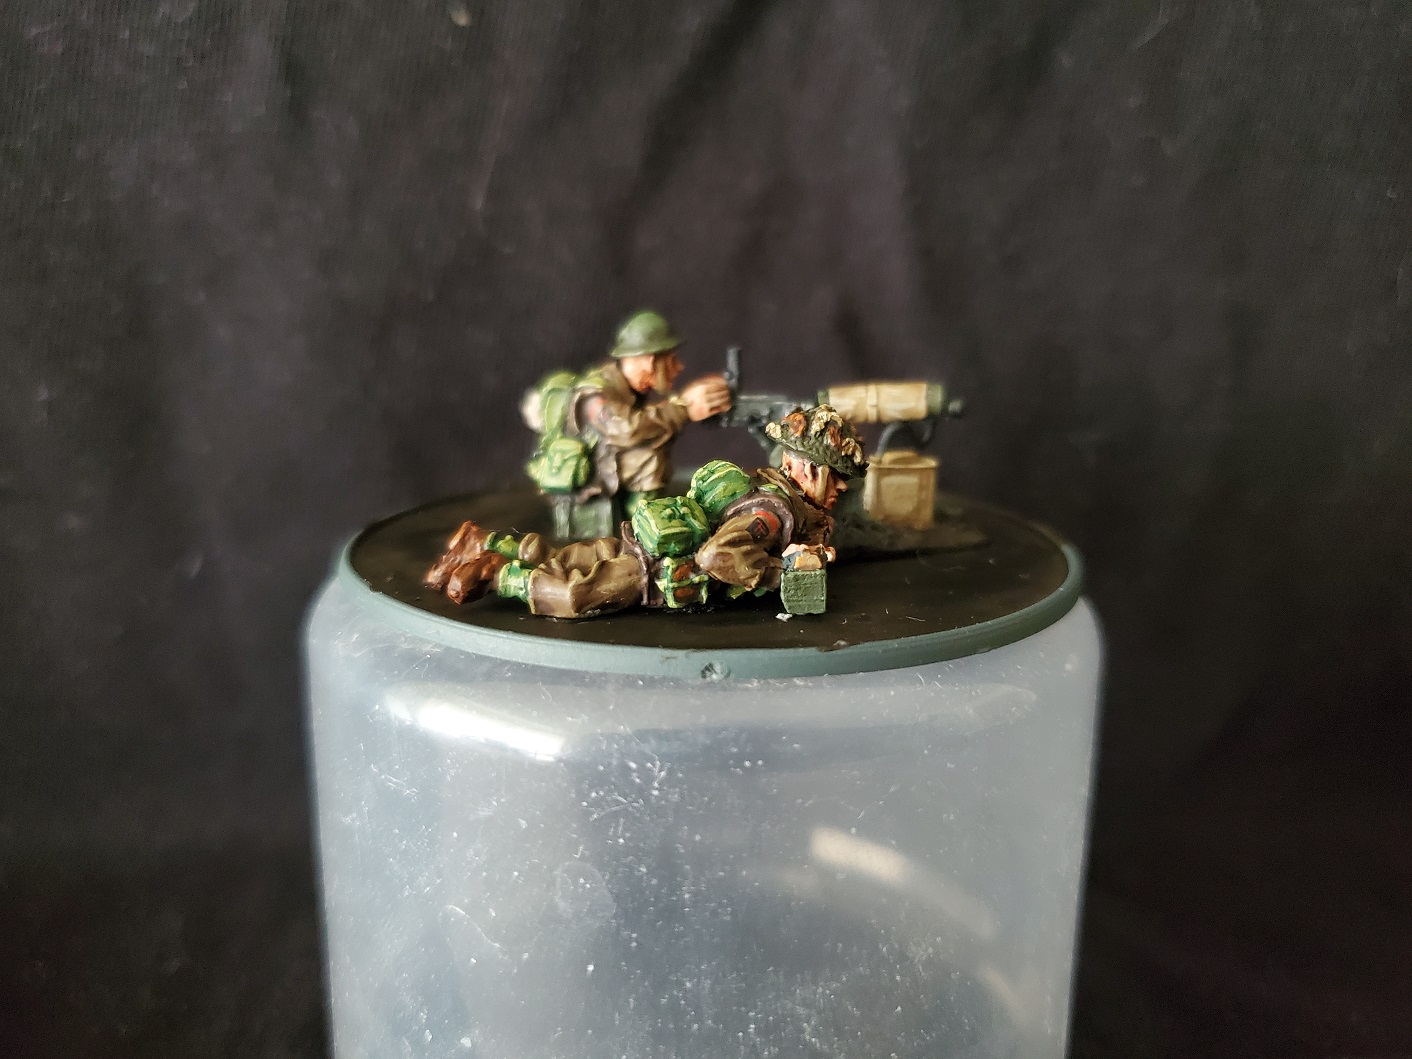 Only the one side picture this time round as the other side is just the Vickers...
 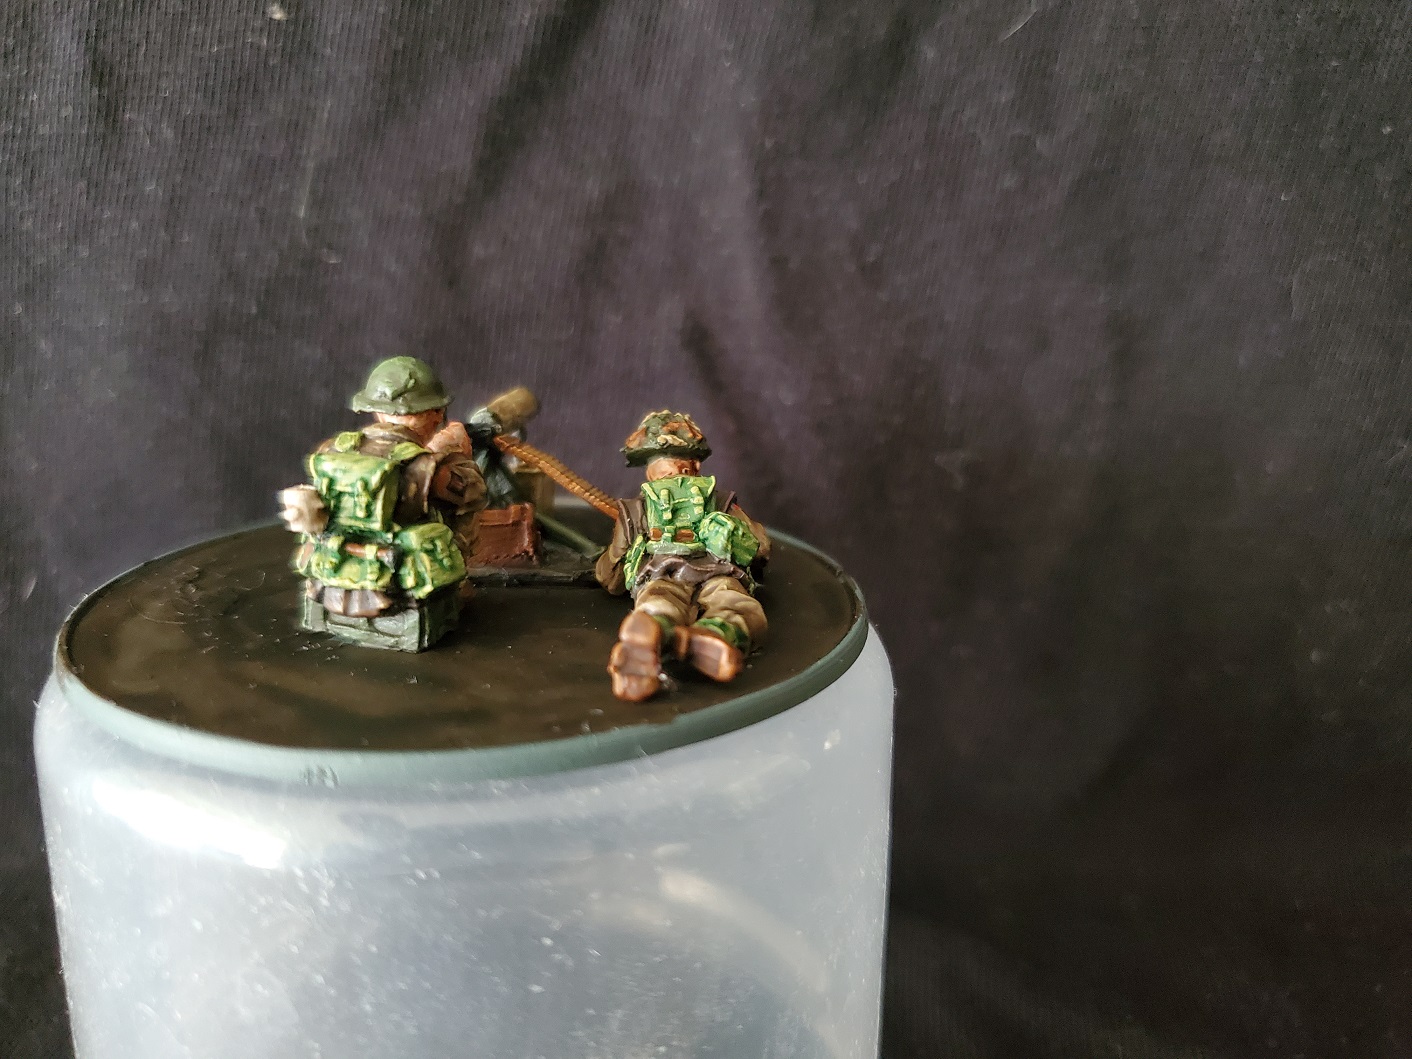 And the Lloyd shot! Also a possible Gerry shot of the gunner? He did show up a little blurry in these pics.
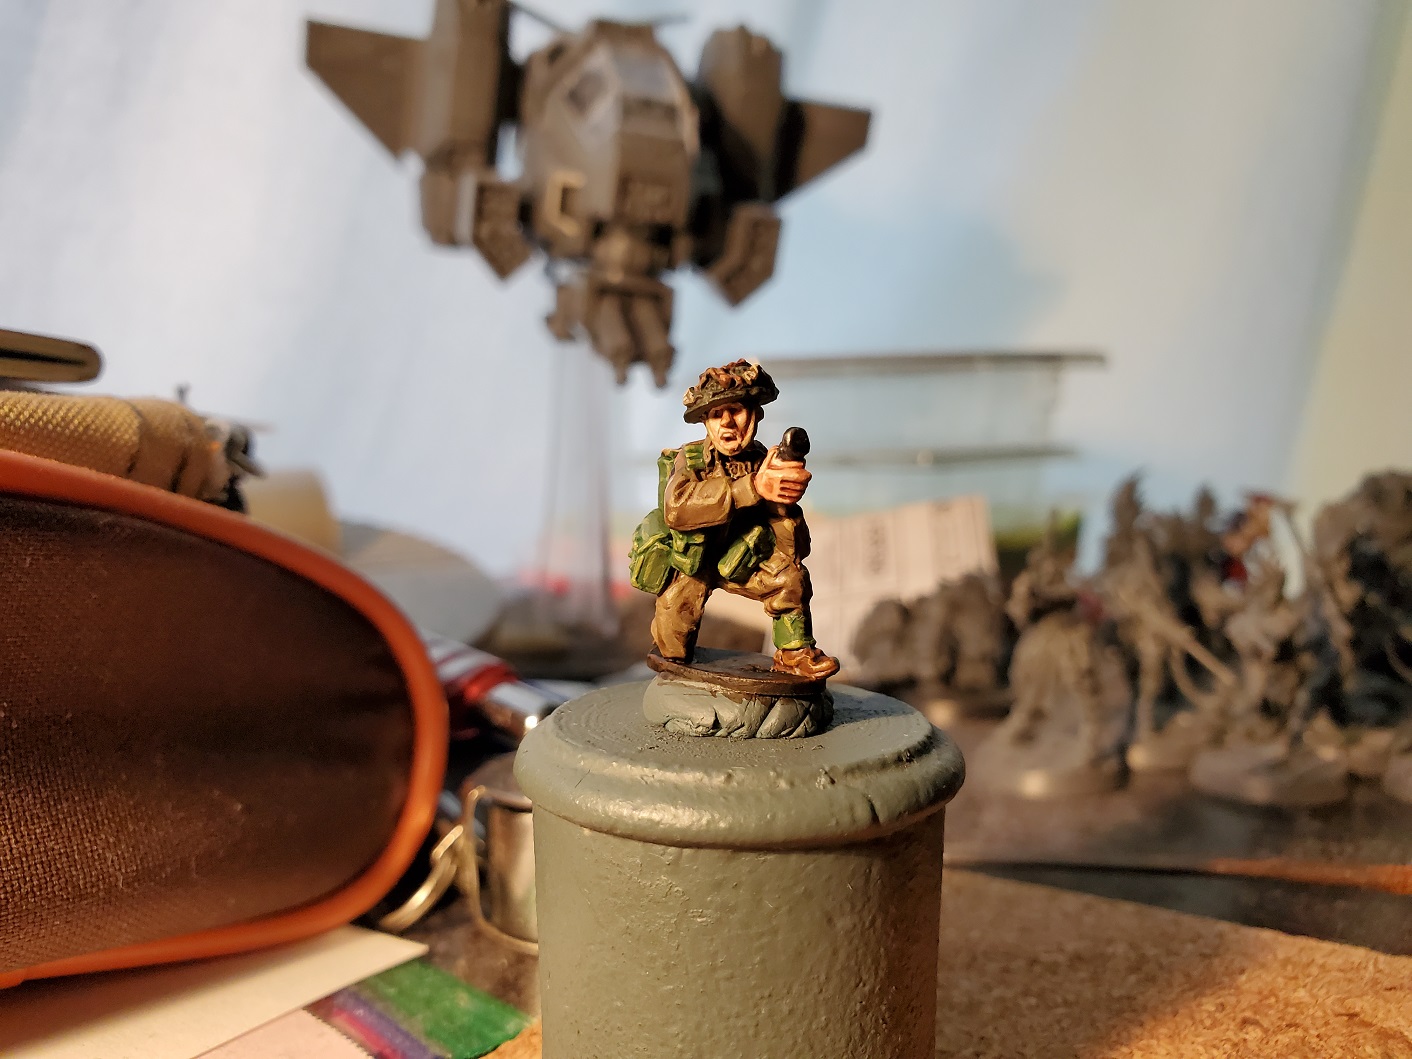
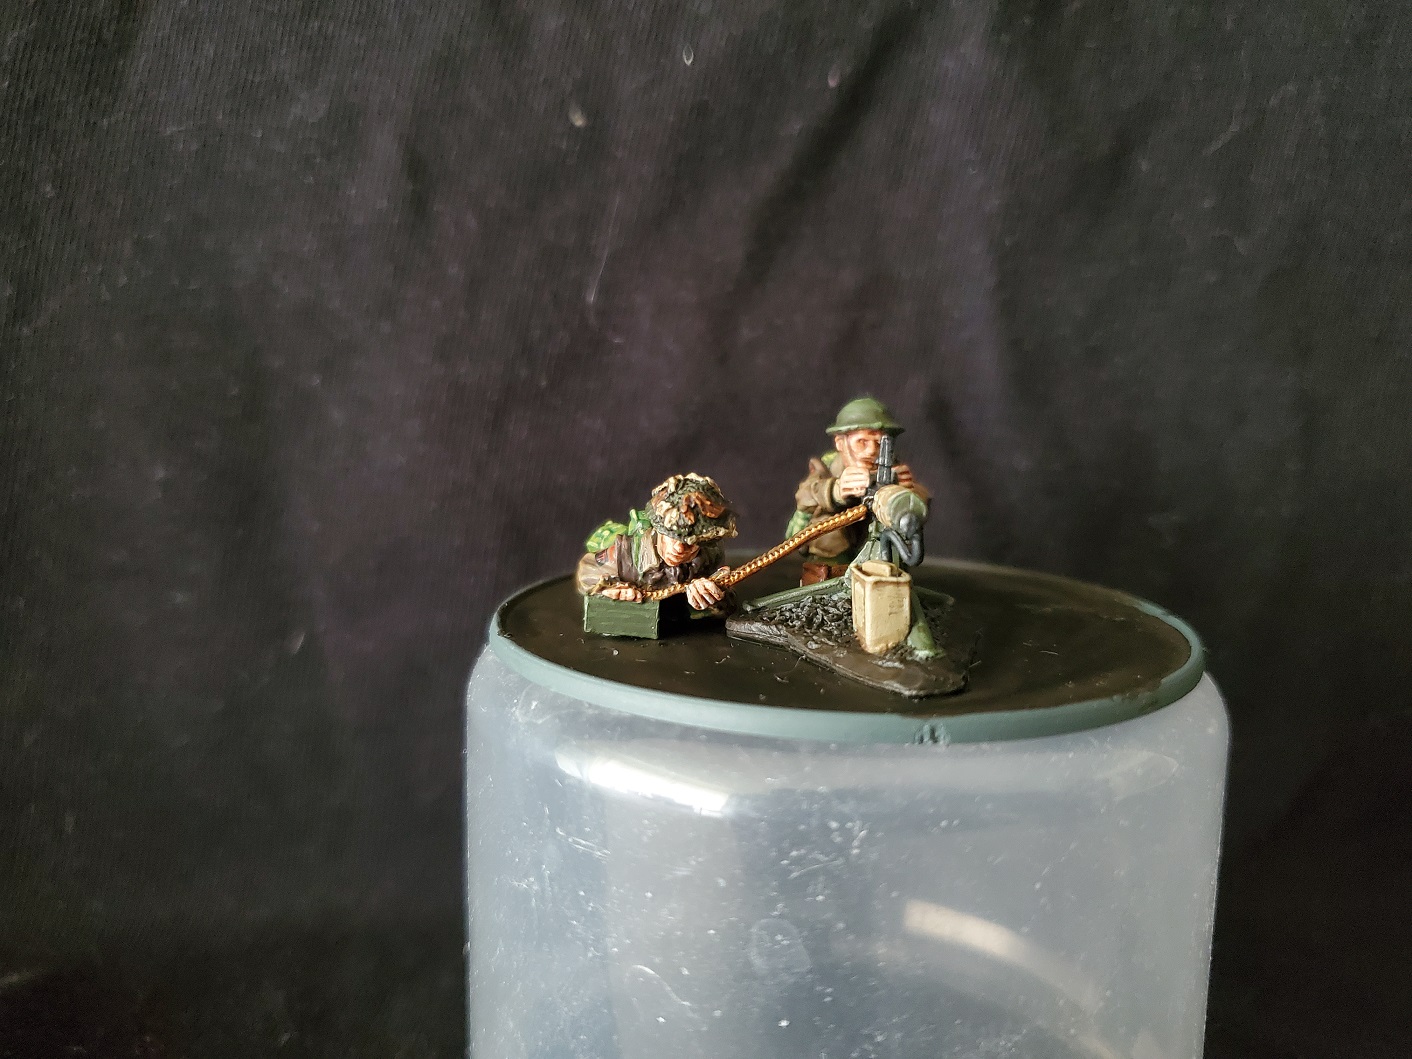
Just the spotter left…but I need to do some work on him first. I’m not a fan of metal minis. I know that’s a bold statement to make, but I find them difficult to work with and annoying to paint (though that last part is more a problem with single piece minis in general, but metal usually has some blocky recesses…). Hopefully I can get him done soon enough, then base the team properly. I was planning on building and painting a Universal Carrier for the team, but suddenly realised that the way the division system in the British army works is actually a little complicated when it comes to vehicle markings…I wanted to have these chaps as the 1st Btln. Hampshire regiment…but I need to know which battalion in that Infantry brigade they were (first, second, or third)… The last time I did this I obviously came up with them as the 2nd…but I’m not not sure. More research is needed!
If I sit here long enough someone will bring over some bullets, right?
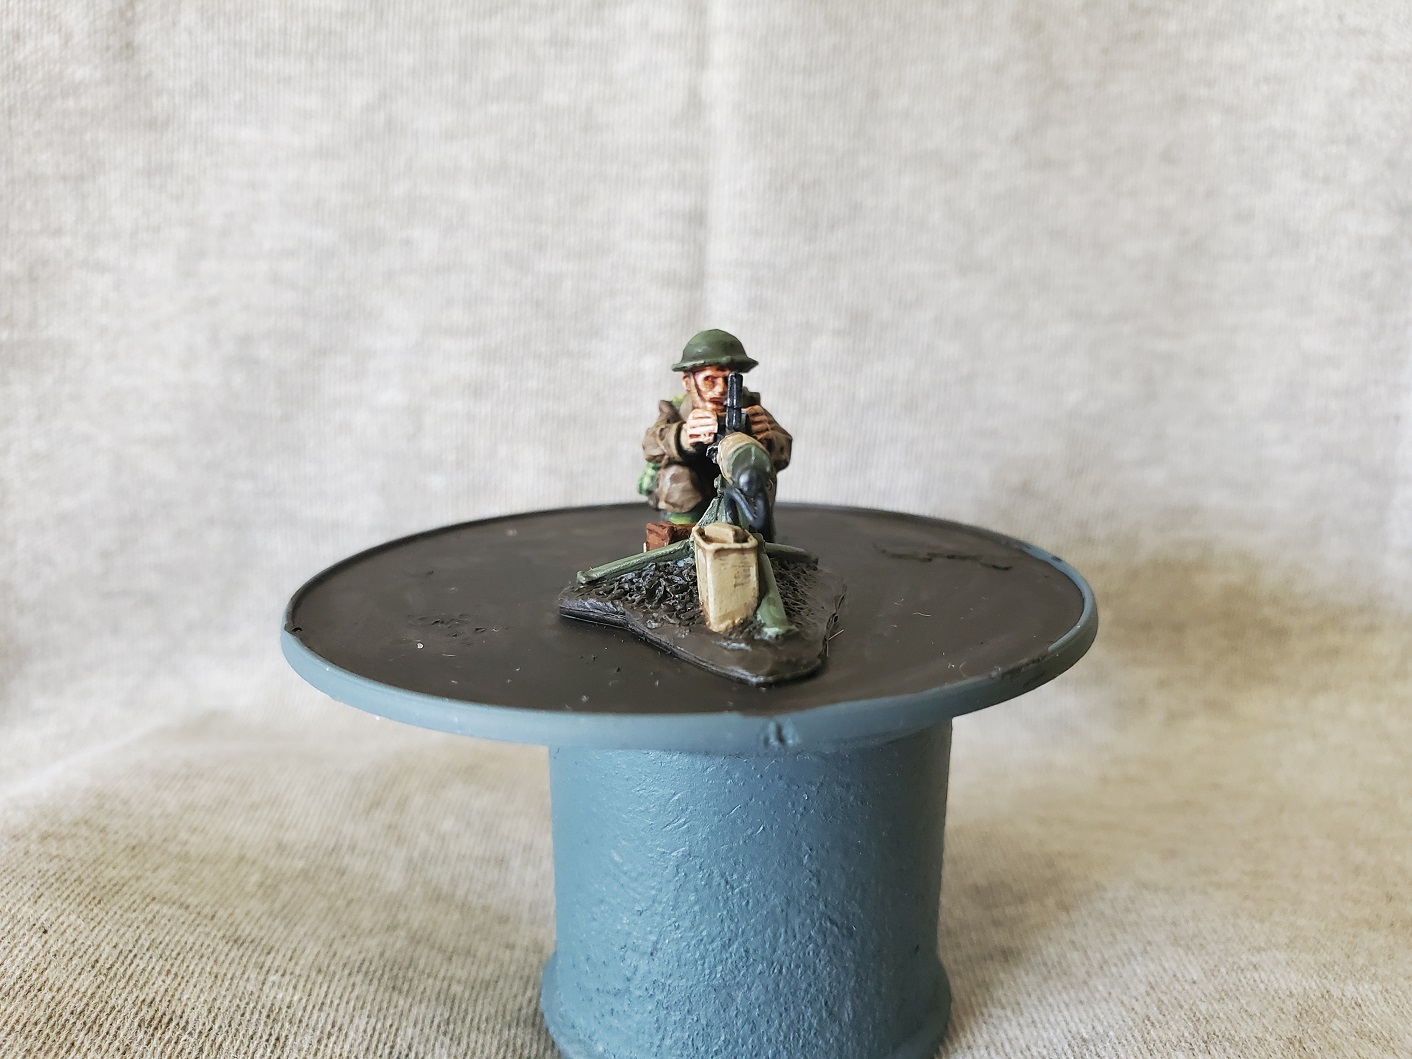
Decided to put up a post of this chap by himself rather than waiting for the whole team to be finished. He has the Vickers Gun, after all. That’s the important bit, right? and who knows, that box he’s sitting on might actually have all the ammo in it. The paint job is the same as other WW2 Brits I’ve done in the past, though that was in another project log now. 😛 As I use the GW paint range (sometimes I question why myself, but I know the range and that helps so I stuck with it) the colours are usually not as straight forward. No GW paint is called ‘British Uniform’, for example. So here’s a simple run-down of the main colours I used here.
Uniform:
Basecoat of Steel Legion Drab, shade of Agrax Earthshade, re-layering of Steel Legion Drab on some of the flatter surfaces/knees/elbows, edge highlight of Tallarn Sand.
Webbing:
Basecoat of Loren Forest, shade of Biel’Tan Green, layer of Elysian Green, edge highlight of Ogryn Camo.
Green Metal (helmets/gun mounts):
Basecoat of Castellan Green, shade of Agrax Earthshade, re-layer Castellan Green on some areas (dome of the helmet here, though with netting on the helmet you needn’t worry about this step), edge highlight Loren Forest.
 The base of the whole mini was given a coat of Wyldwood contrast paint just because it's got good coverage and as I need it for a base to cover up the grey of the primer. It will have some proper basing paint on it once the other chaps are painted and on the base.
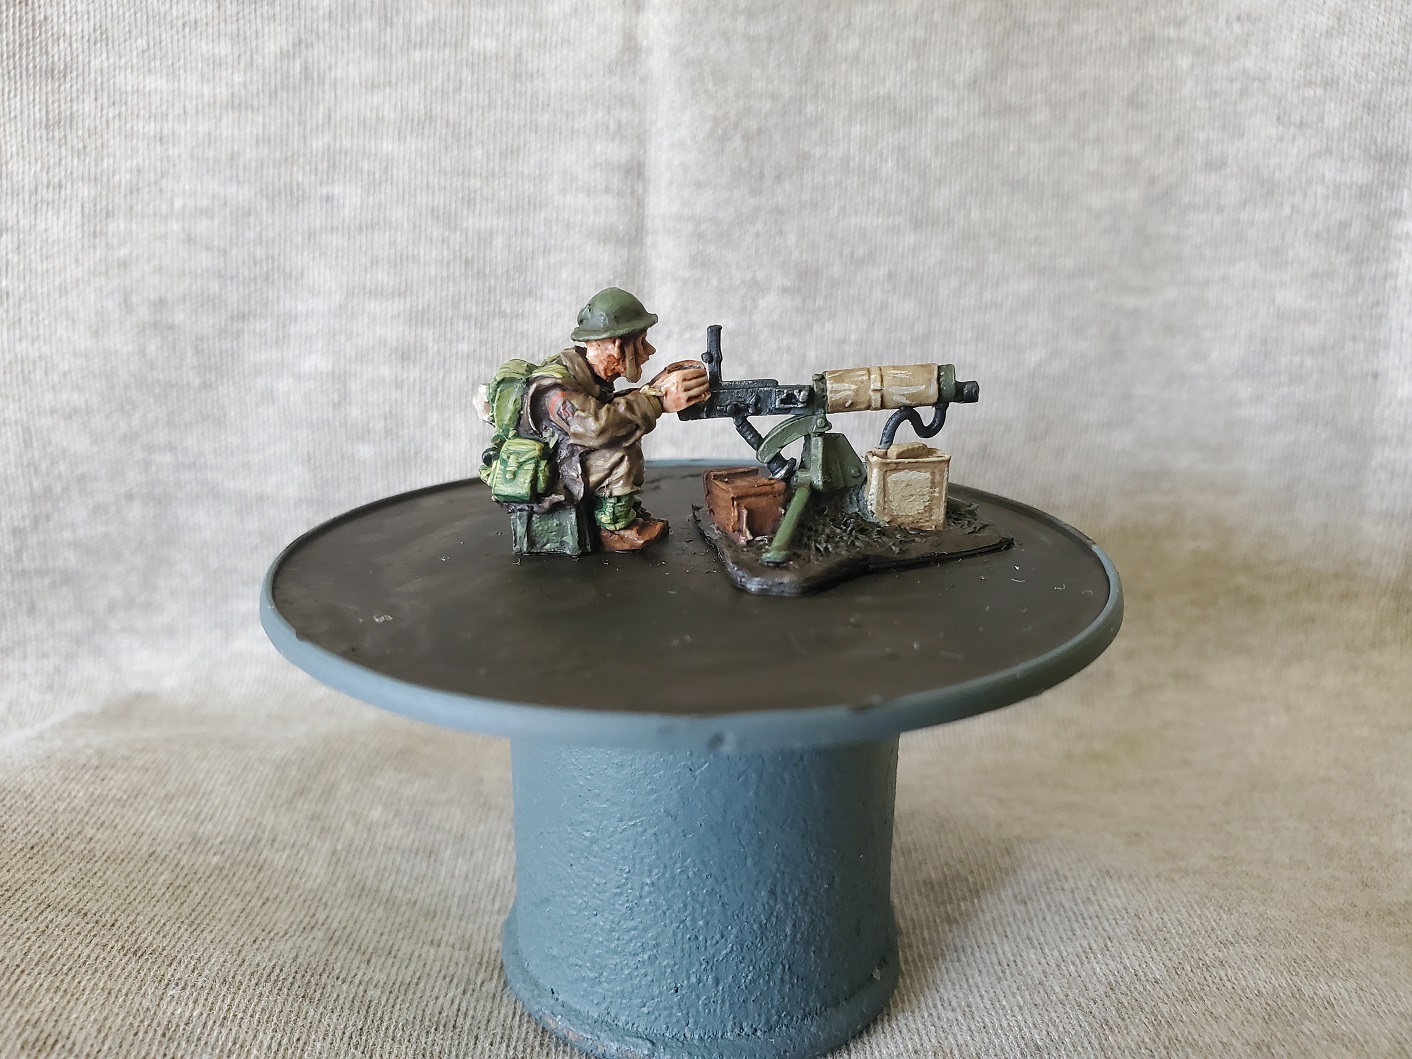 Went for as many 'reasonable' colours for the various boxes around the gun to help with contrast a bit. The colours might not be 'right'. The condensing 'flimsy' at the front, for example, was probably only that colour for the desert campaigns, but it could have just not got repainted. Always a challenge to balance what looks correct with what looks good in a mini this small.
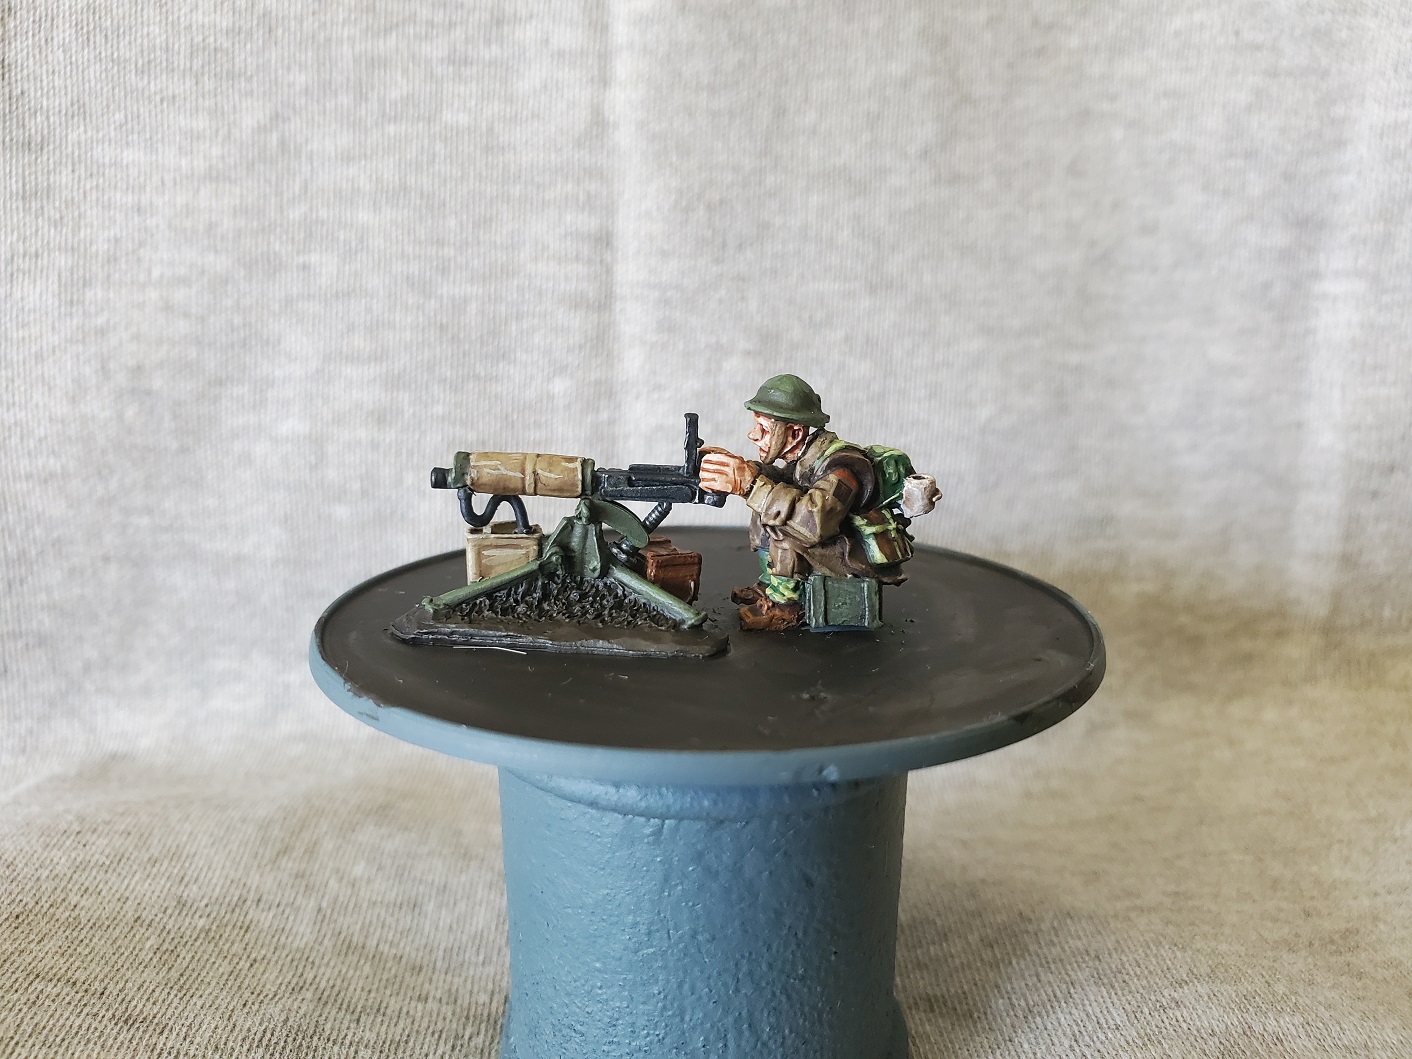 You can't quite make them out, but he does have division badges. No rank badges on this chap, just because getting them on around the folds is tricky. Might get a Cpl. or L/Cpl. somewhere in the team, but we'll have to see. I forgot how small the decals really were for these, so I actually but the division badges on my medic as well, so everyone is all in the same division.
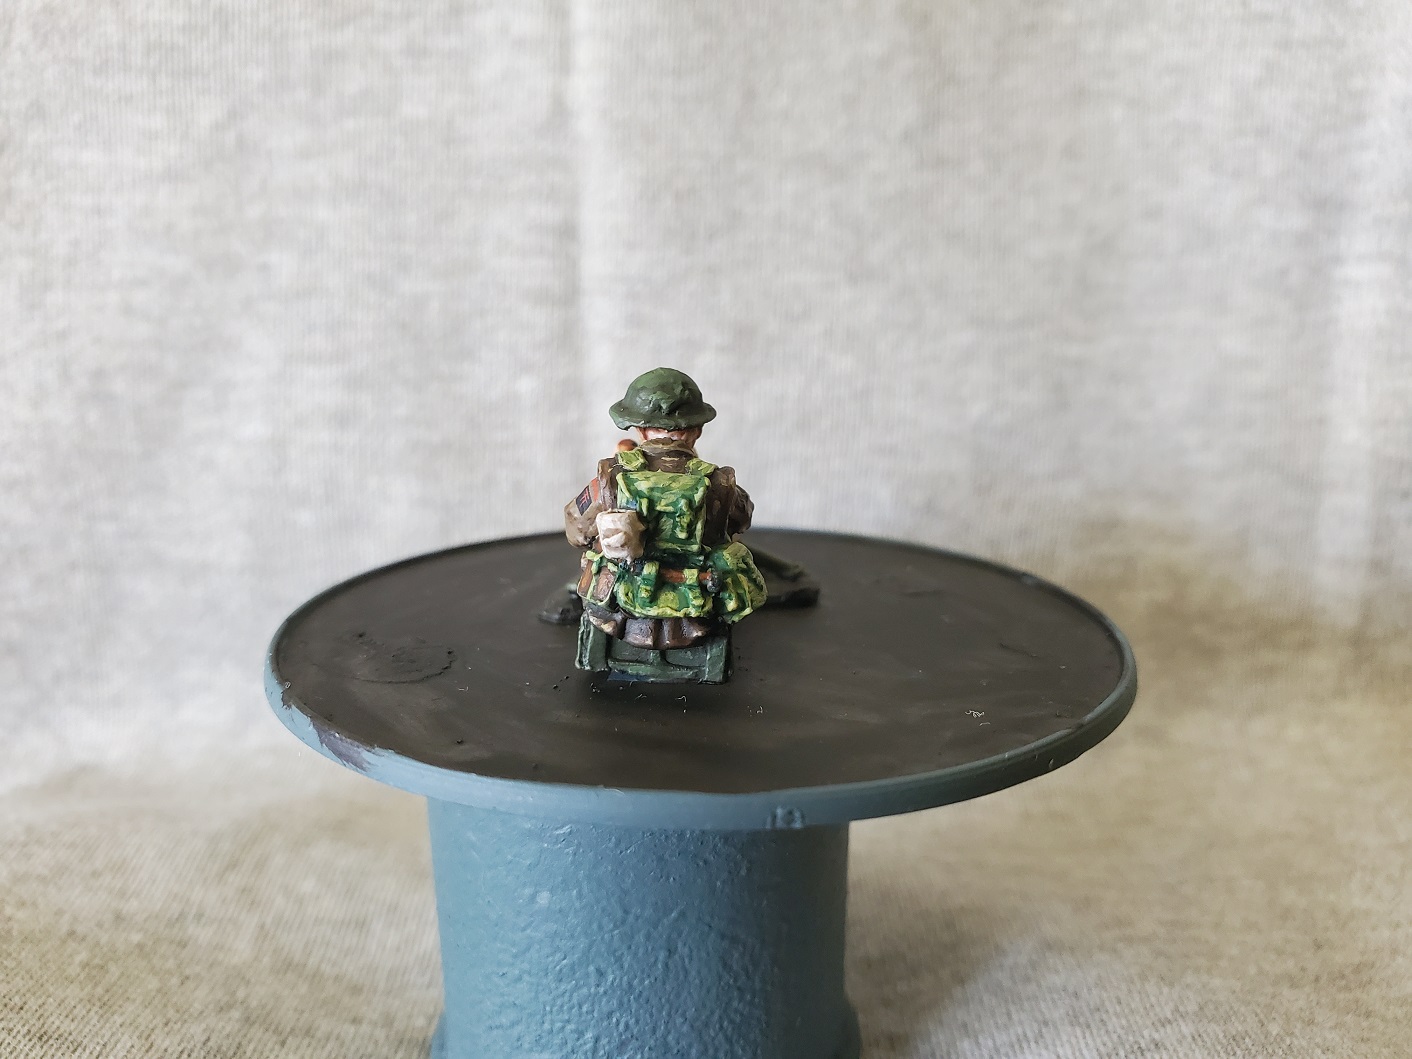 And the traditional Lloyd Shot. The most important piece of kit is here; the mug!
The loader is on his way; he missed the bus. The third man will be after that, then we can look at basing before saying my heavy firepower is finished. Stay tuned!
"Her father had once said of Walder Frey that he was the only lord in the Seven Kingdoms who could field an army out of his breeches."
It’s been a while…almost a month, in fact, but school is done for now and I found some time to paint. Back to A Song of Ice and Fire Miniatures for this one with Walder Frey, that lovable rouge from The Twins! A big part of this mini is his chair, and I wanted to try and make it look as good as possible for that reason. I did consider painting the carved details in the Frey colours, but that would have meant painting the wood grey and I didn’t fancy that. I decided that a good, solid wooden chair would suffice and decided to start with a coat of Wyldwood Contrast over the Mechanicus Standard Grey primer. Normally that’s too dark for the contrast to work it’s magic (particularly one as strong as Wyldwood), but it gave me a nice base to work from and that was the goal rather than a one coat paint job. Over this I drybrushed some Gorthor Brown to pick out the planks, though the detail is not always too deep on this mini. After that I did some recess shading with watered down Wyldwood just to add some darker spots of old wood. After that I drybrushed with Ushabti Bone which might seem a bit stark, but was mainly to set up the final colour of a coat of Seraphim Sepia across the wood. It’s a subtle tone, but mixed with the Ushabti Bone it can add that slightly yellow tint to worn, old wood. I think it came out alright in the end.
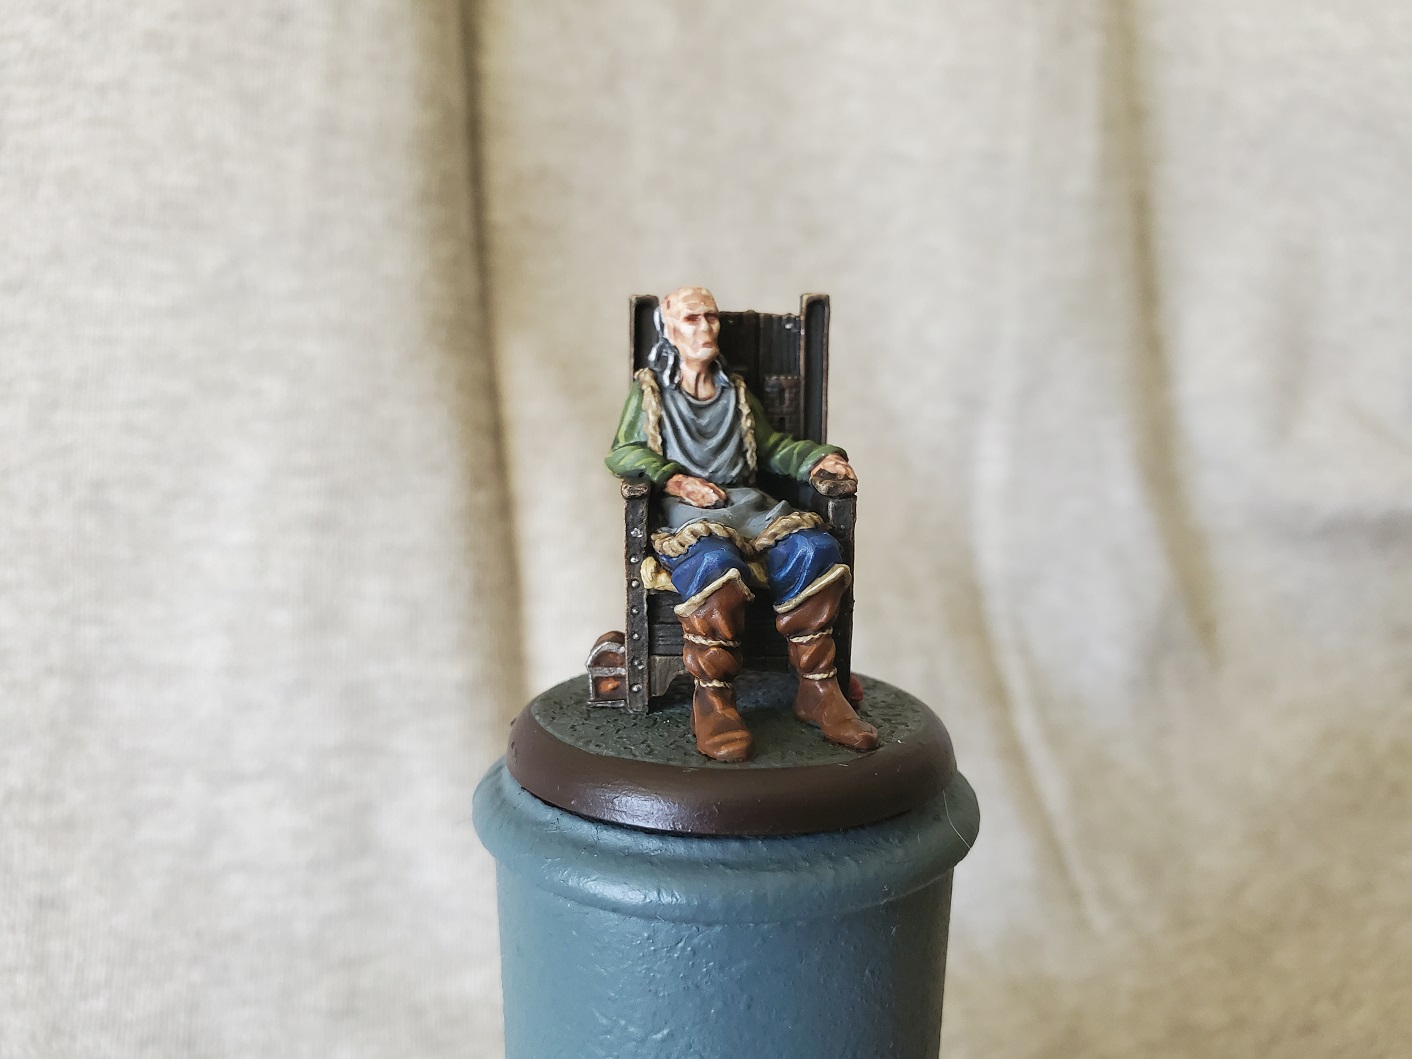 The little red bag stuffed under the chair was not a gift from the Lannisters...not at all...
The colour choice for Walder himself was based on the Frey colours of blue and grey, with the green shirt thrown in as just something muted for Walder to have lying around. The only really ‘rich’ colours he has is the blue trousers and red bag of NOT Lannister gold. The skin is something I’m not 100% happy with. He does look a bit like a zombie in a chair…which I consider a good thing…but the shallow detail does blur things a little bit. I also decided to try and add liver spots to the skin, but I may have gone a bit too big with them…and also a bit too stark. I did glaze over them to blend them a little better, but they are on the large side. Still, all in all I’m quite pleased with him. He’s looks like the pale, old, grumpy bastard that he is!
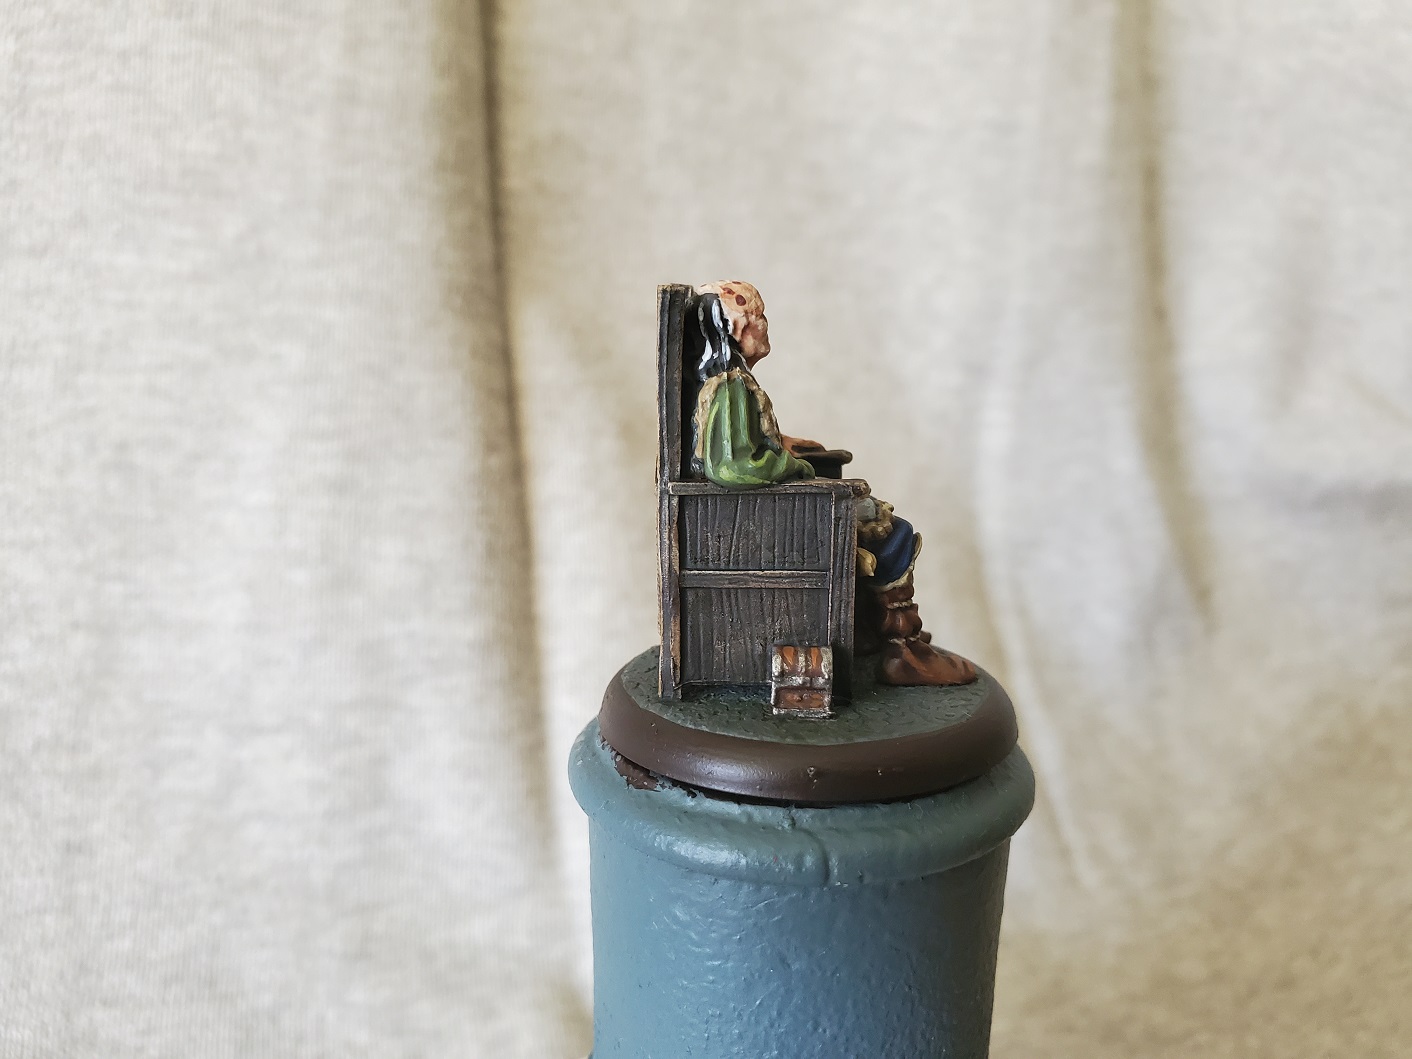
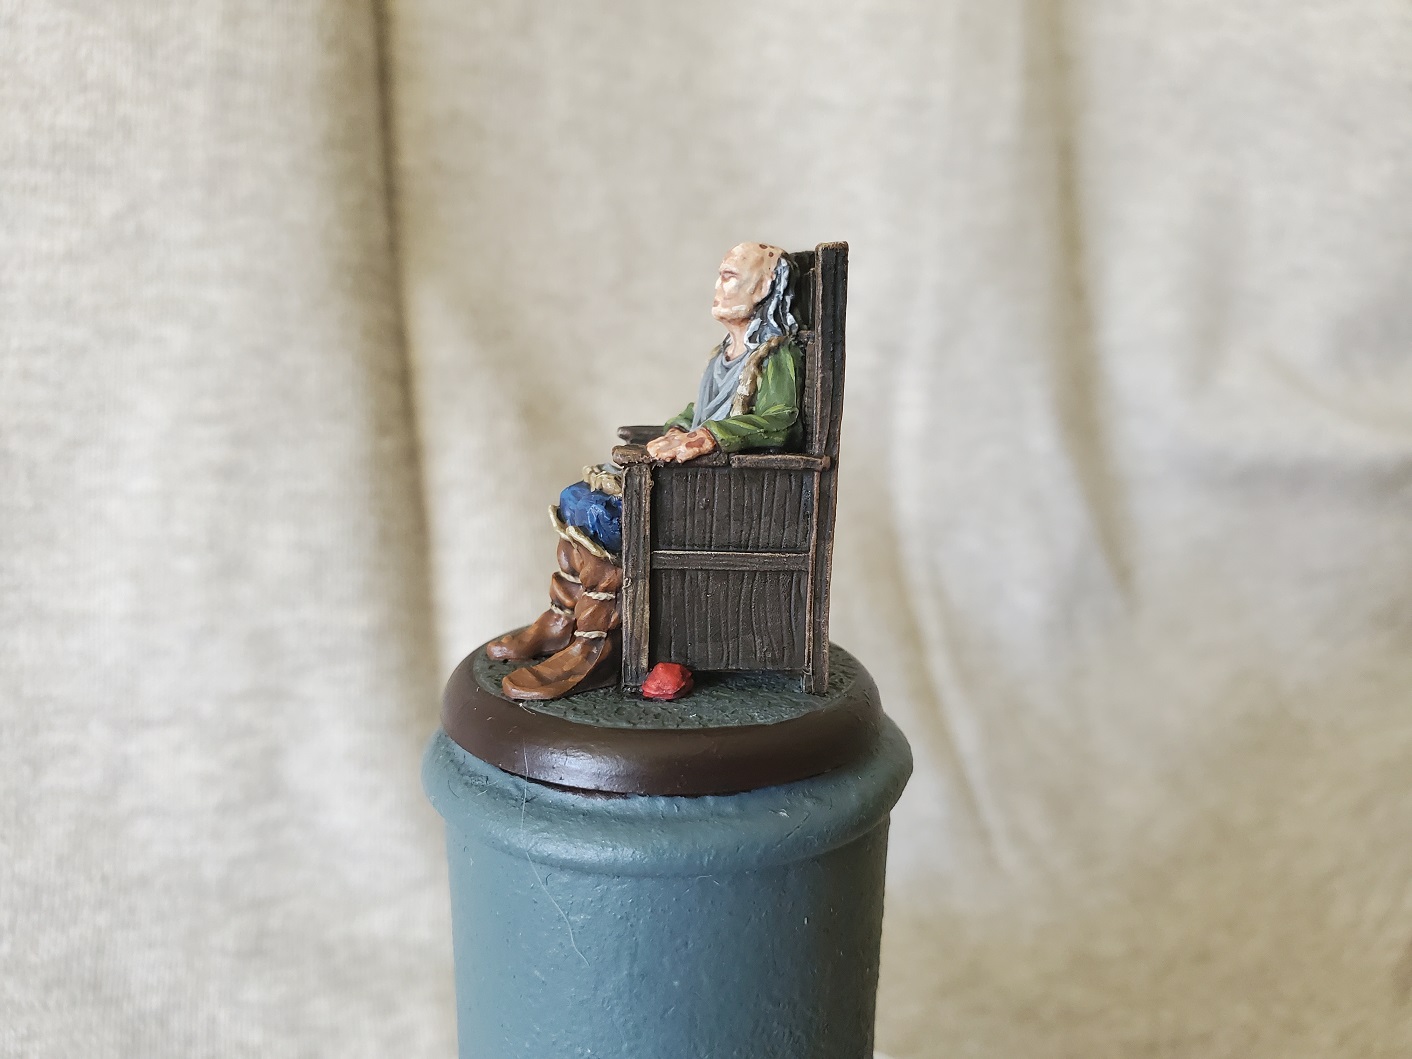
 And the traditional Lloyd shot, now with extra wood!
I’m curious if CMON will actually add some House Frey Bannermen to the neutral faction, like the Boltons. It’d be neat to see some more of the lesser houses represented here and there. But first I want to get my hands on the new Greyjoys… Too many minis and not enough pennies…
Hopefully I can upload with a bit more consistency at the moment, though I will be moving at some point soon, which could make that a bit tricky, but we’ll see. Not sure what the next project will be, yet. I still have to finish one mini for the Murder Girls Underworlds team, so maybe her? My Khorne Red is looking a little sad at the moment, though…
Murder Girls...in Space!
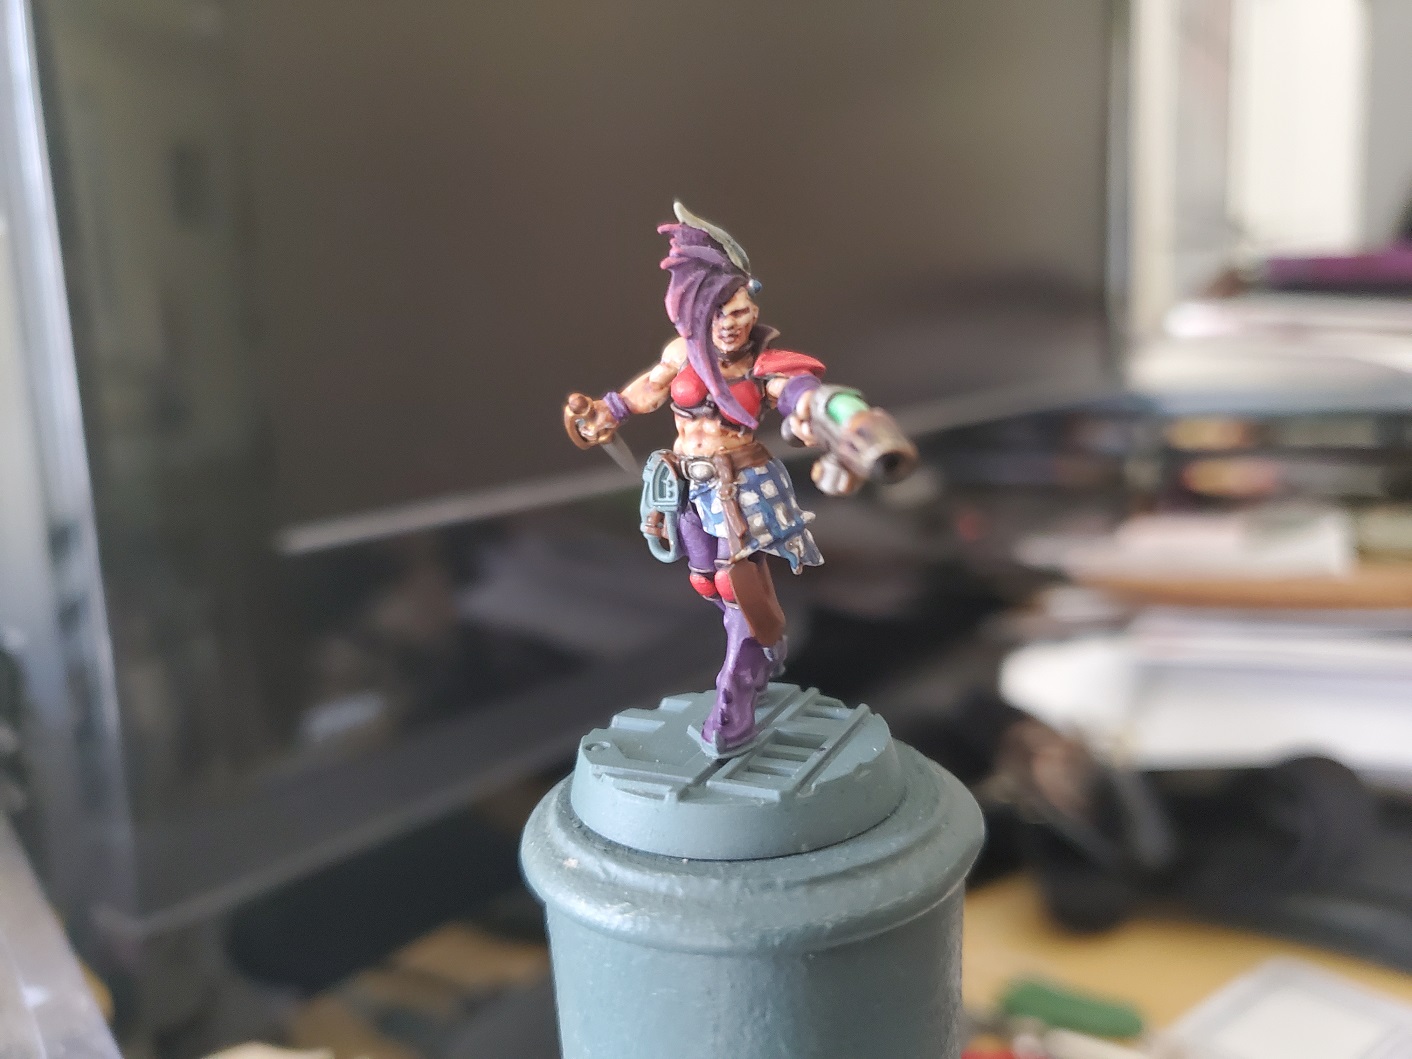
Well technically not space. Necromunda is a planet, after all. Anyway, final update on my Escher Lady. After several years of being primed and used for colour experimentation she is finally completed!
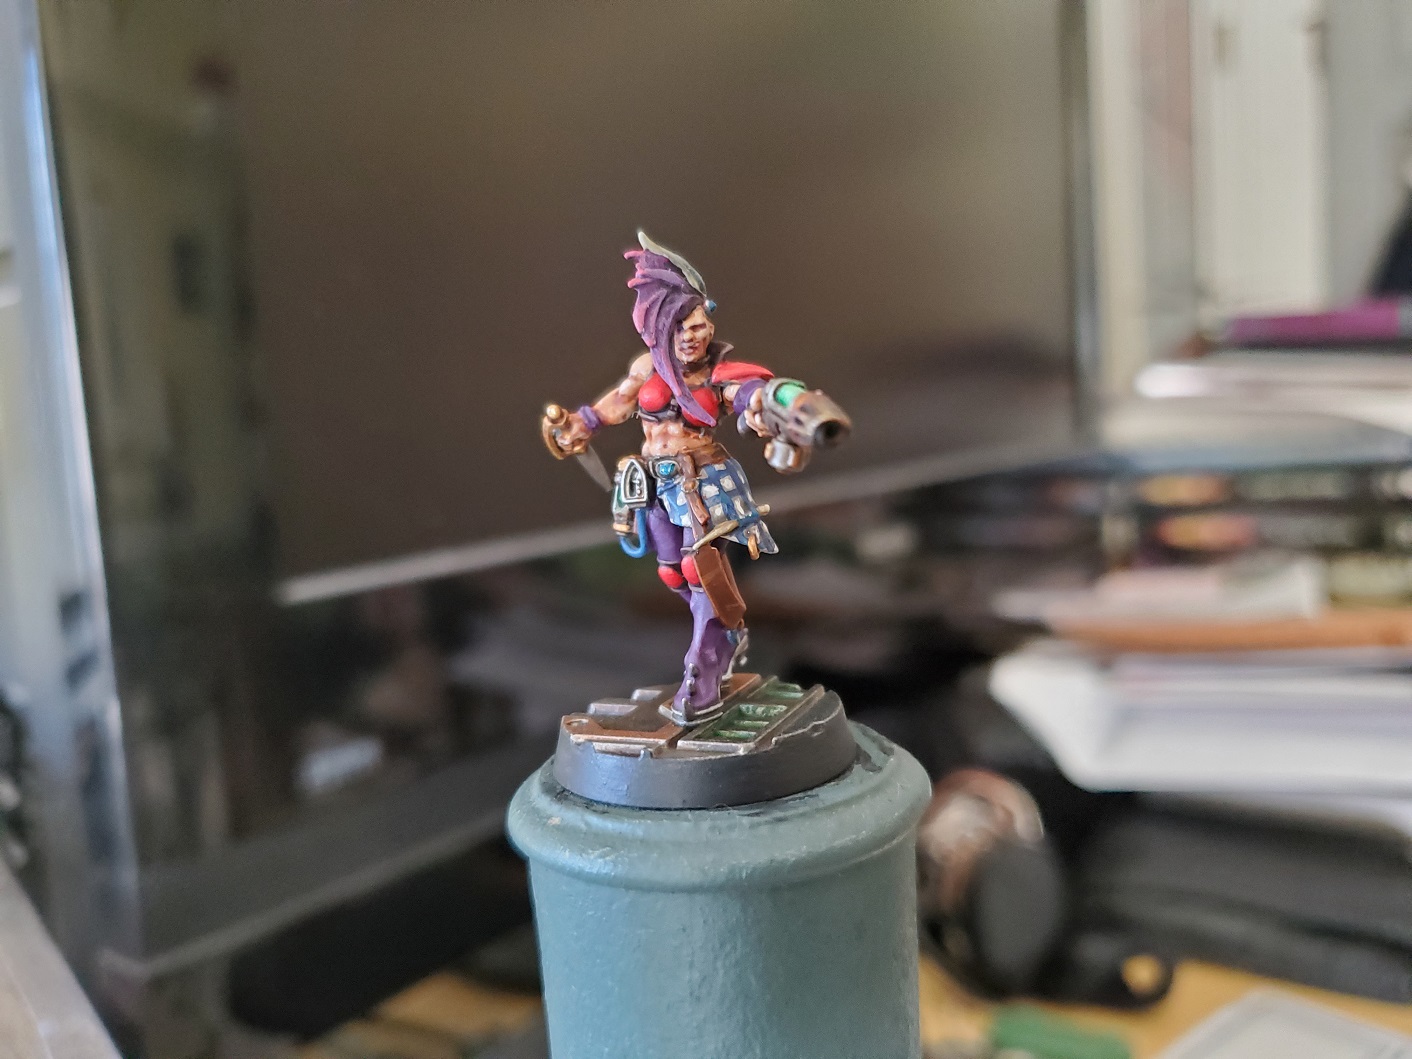 Mainly details that were finished from the last update. For now I decided to keep the heat damage to the muzzle of the plasma pistol, but that might change later.
 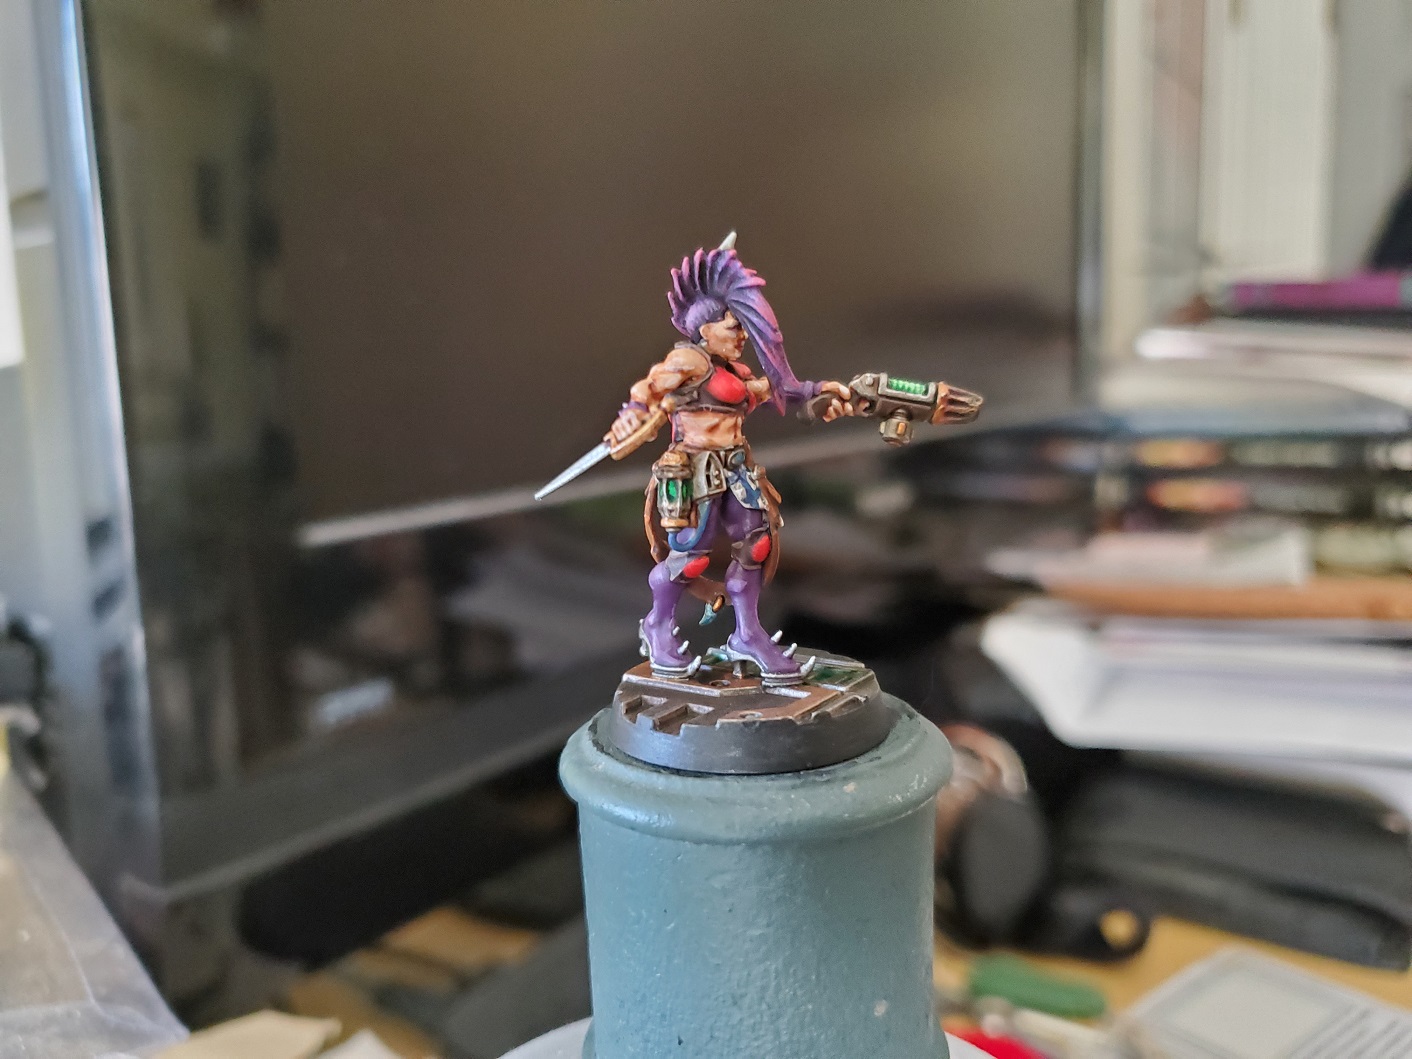 Went with blue as something of a spot colour, mainly because it's the only gemstone paint I have and I like the look that they give. I picked green as my 'energy' colour, too, which works much better with Biel'Tan Green than with Athonian Camoshade...more vibrant.
 Haven't gone too much into colours this time round, but I definitely think these Eschers look best with a nice bright punchy colour on the armour plates. As you'll see later on, the last scheme I came up with had metallic plates and I don't think it looks quite as good myself.
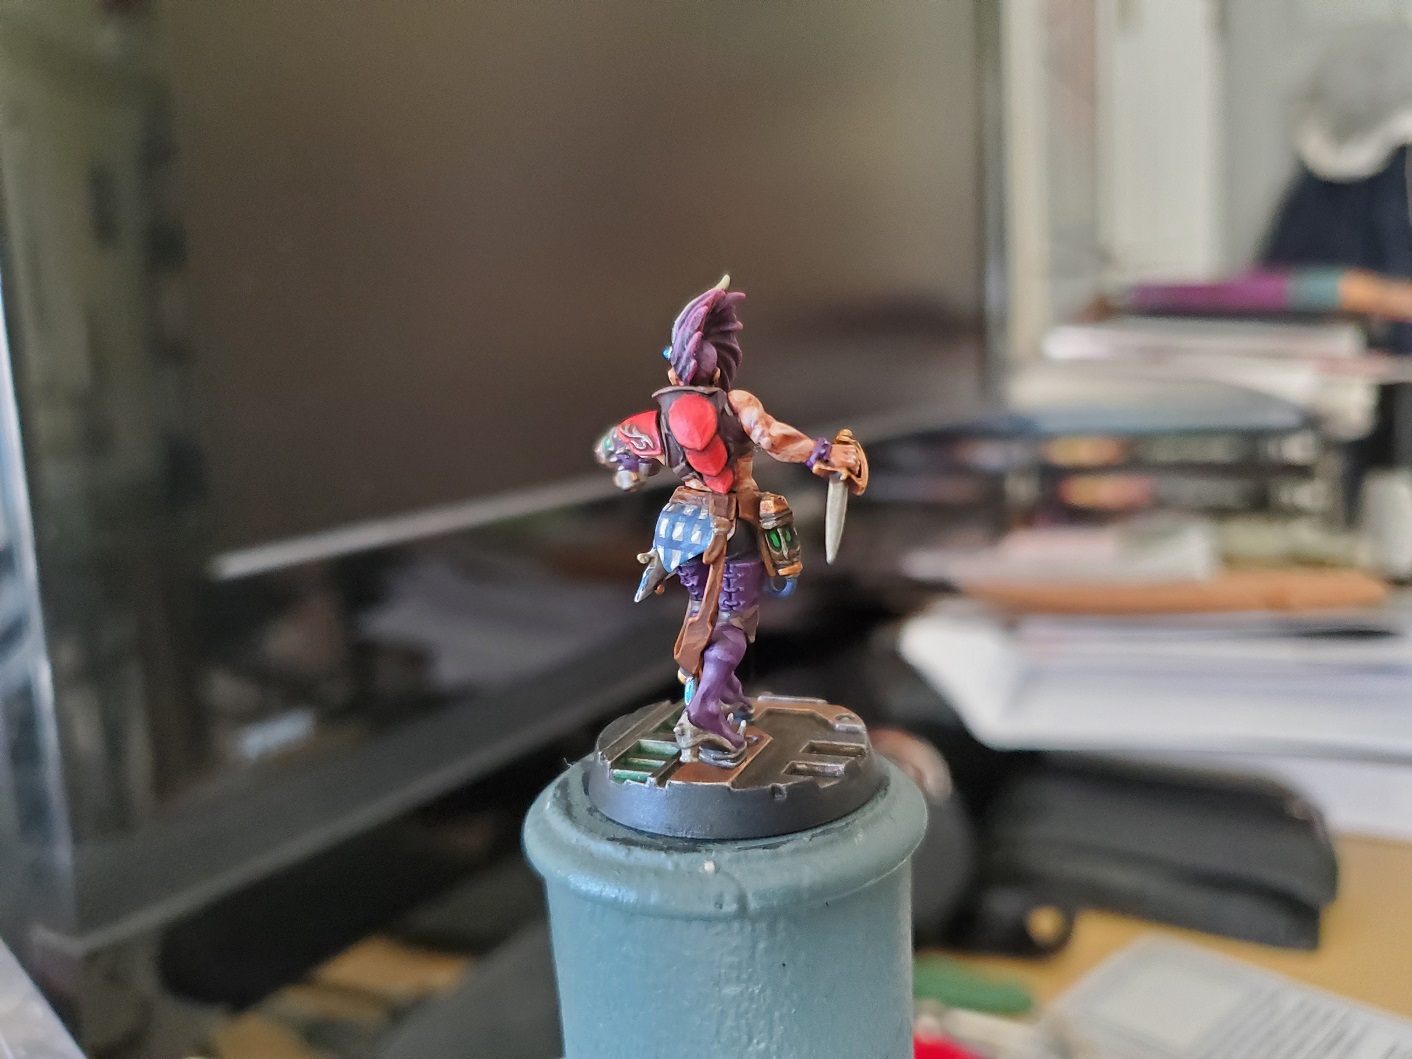 The tradiotional Lloyd shot.
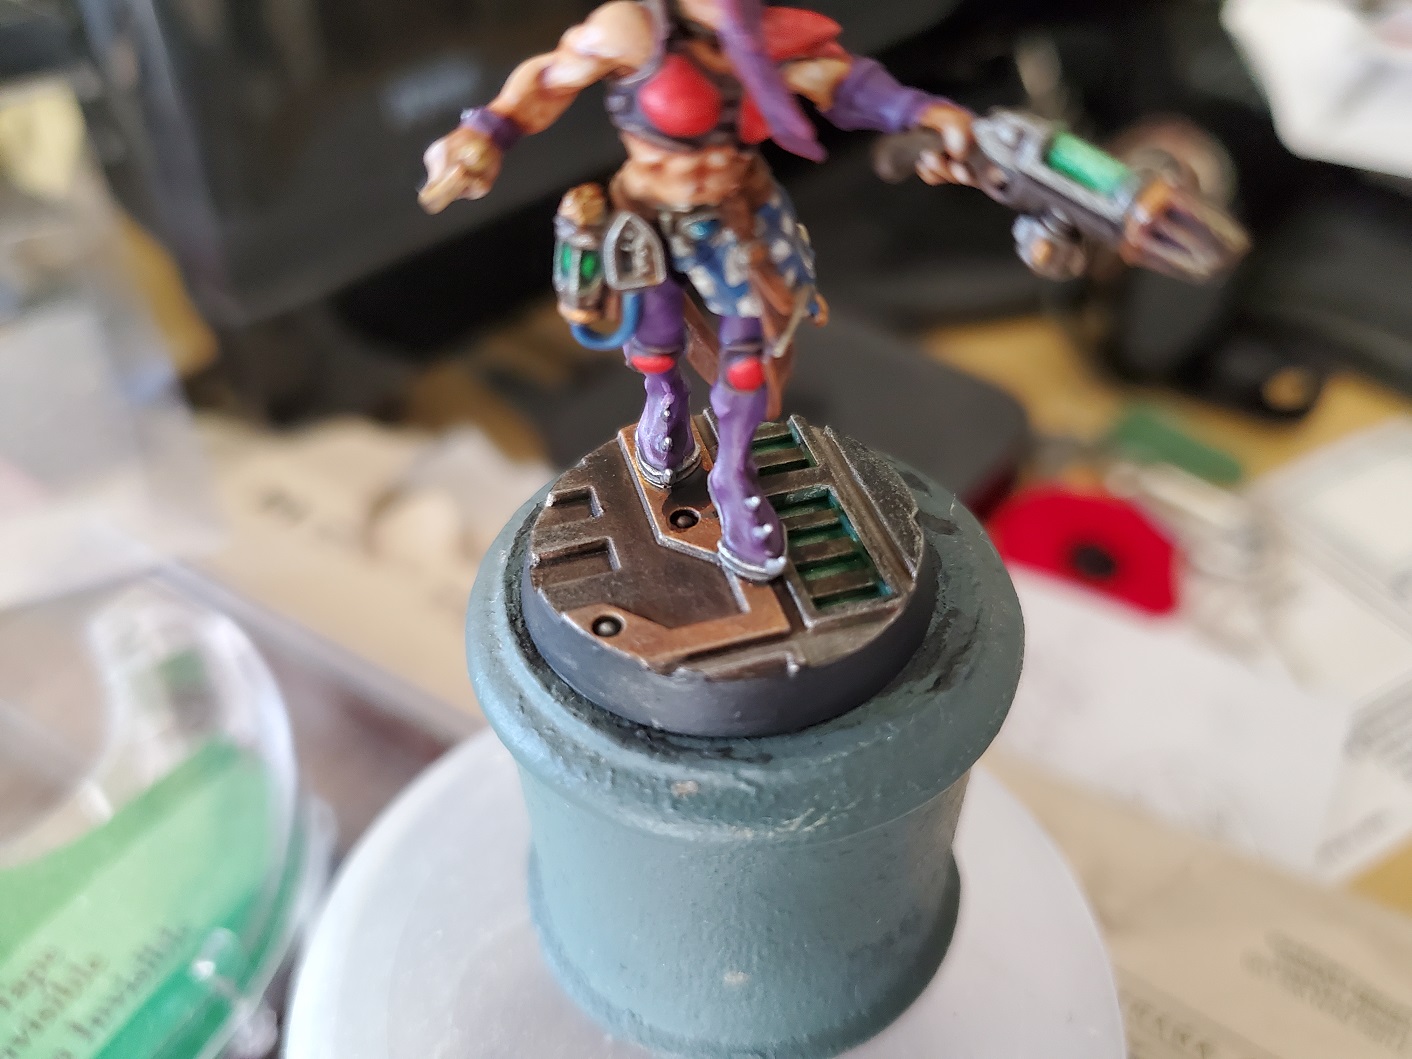 I'm quite pleased with the base here, because it was so simple to do. Everything had the same initial basecoat of Leadbelcher, then some panels were picked out with Retributor Gold. Then I went for Biel'Tan Green shade in the grates (either for chemical waste or energy flow) and shaded the rest with Agrax Earthshade. Then I picked out a few panels in Wyldwood and Black Templar Contrast paints before a drybrush of Stormhost Silver on top of that. Nice and simple, and looks really good.
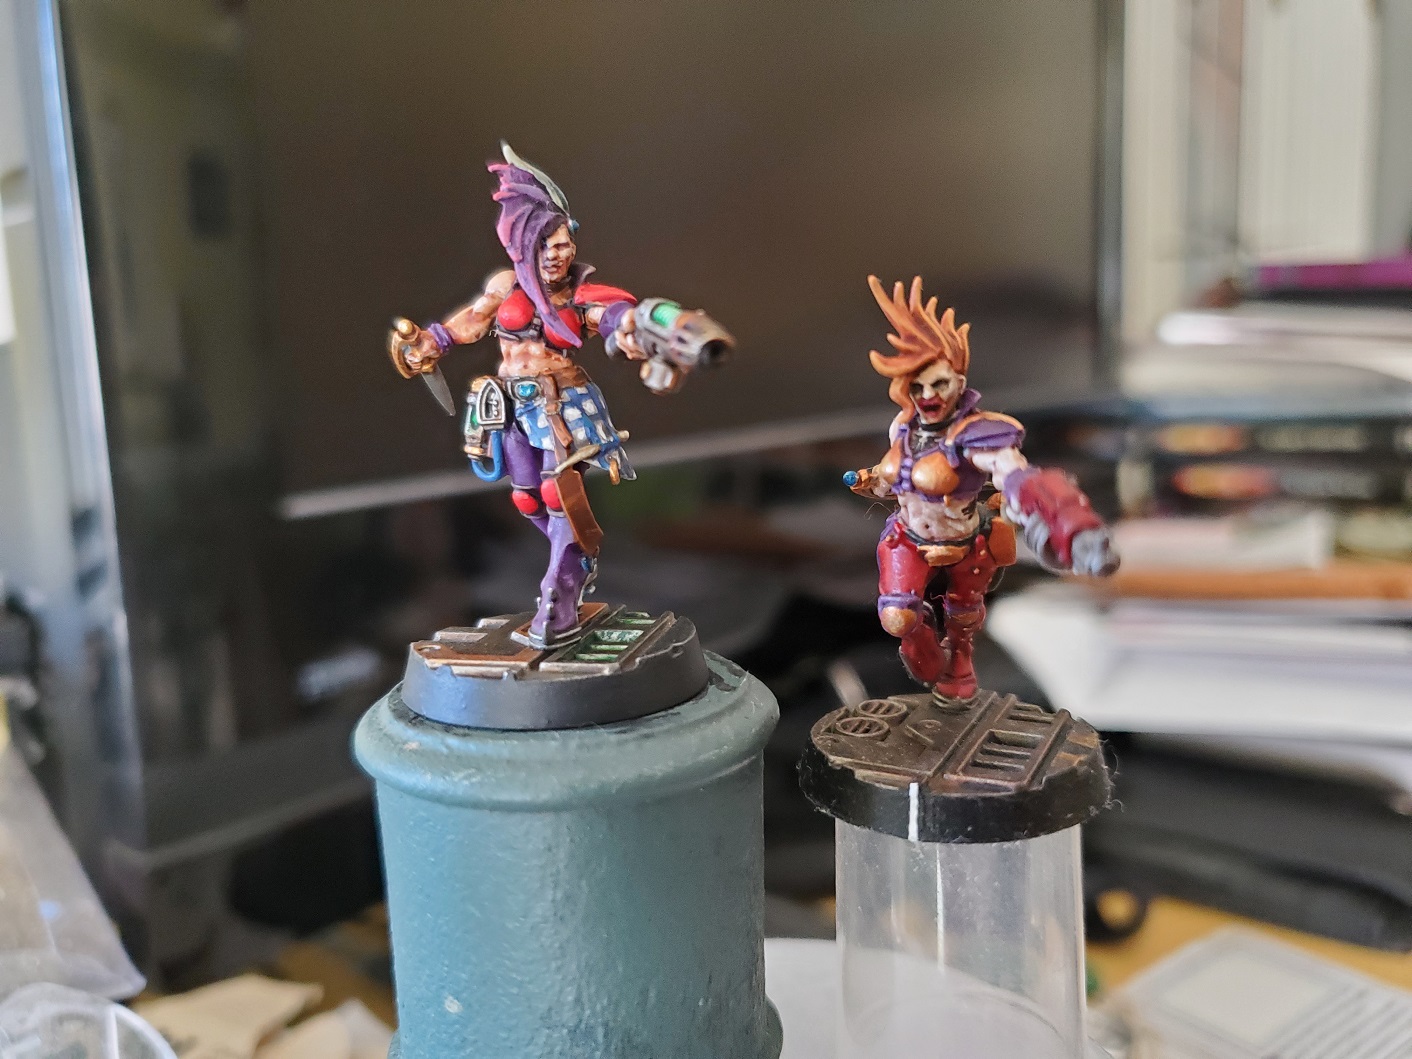 And finally the promise comparisson. If anyone gets any 'wanna know where I got these scars?' vibes from the redhead...I do too. I've gotten a bit better at the makeup bit since painting this older mini. I definitely prefer the newer scheme so eventually the redhead will be getting stripped...which is an odd thing to type, to be honest.
That’s all for now. I might be able to get more painted in the next few weeks, but I make no promises. At least I won’t promise to keep any promises I made…that is somehow worse…
Ancient Threads.
Just a quick update post while I’m taking a quick break from writing a paper, but here’s some of the extra colours! She’s not done yet, but she’s getting there. I’m very happy with the colour scheme here, and with the ancient tablecloth!
 A much brighter red than I have been using recently. I think it's a bit more punchy on this lady, and I like it!
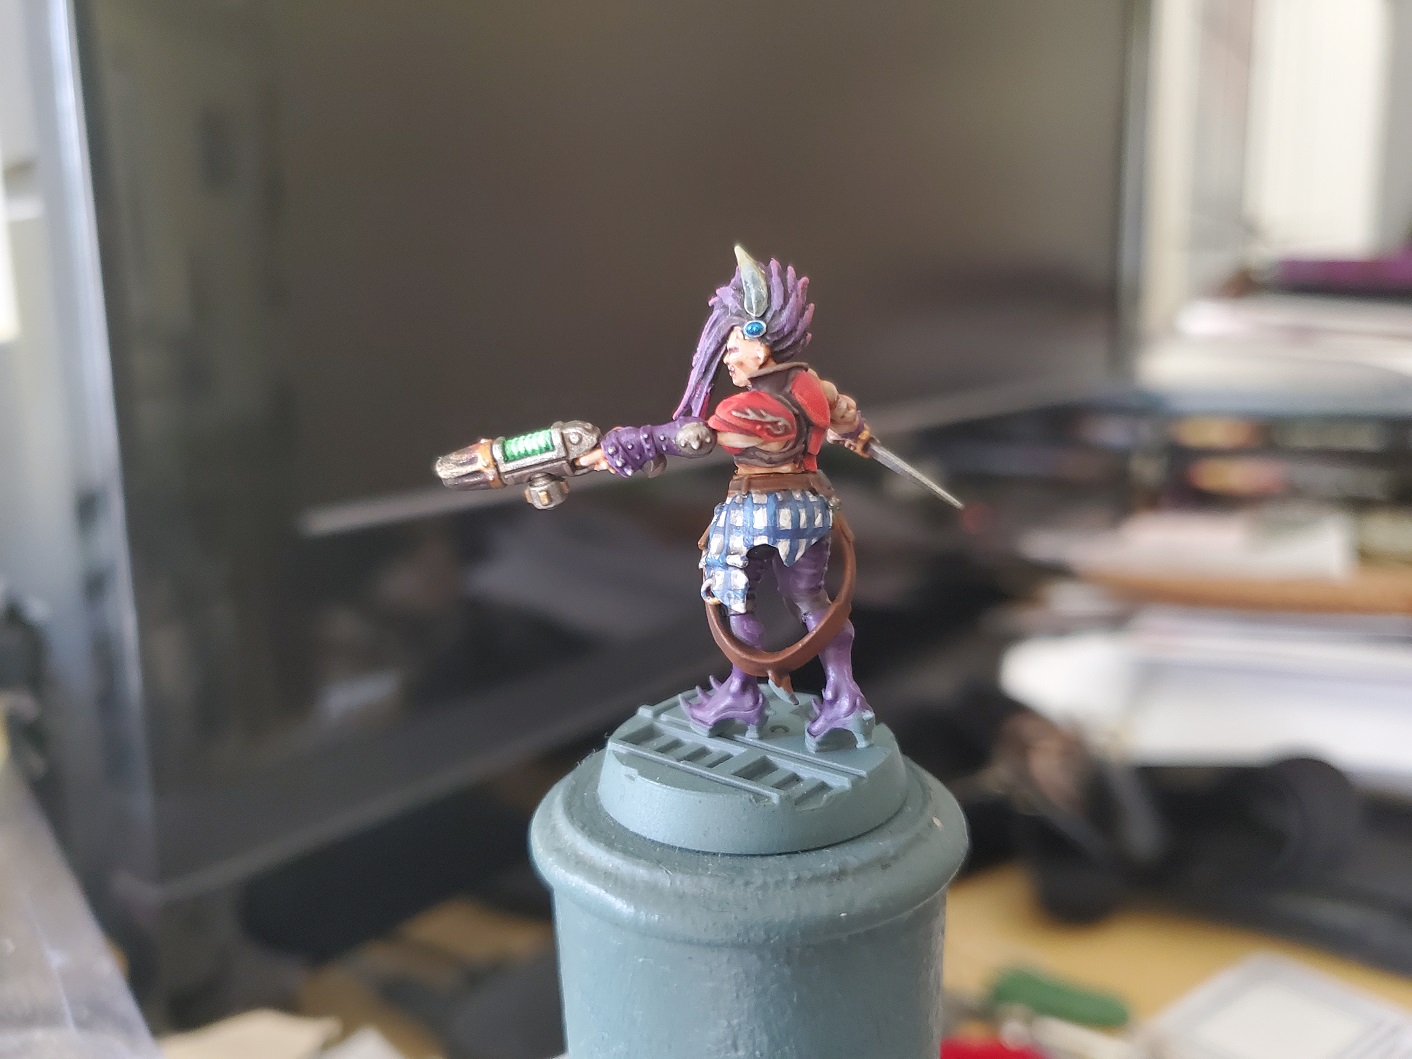 I think the tablecloth came out alright. Not the smoothest paintjob, but I'm just going to argue that this is an ancient heirloom of the family and it's looking a little rough for wear.
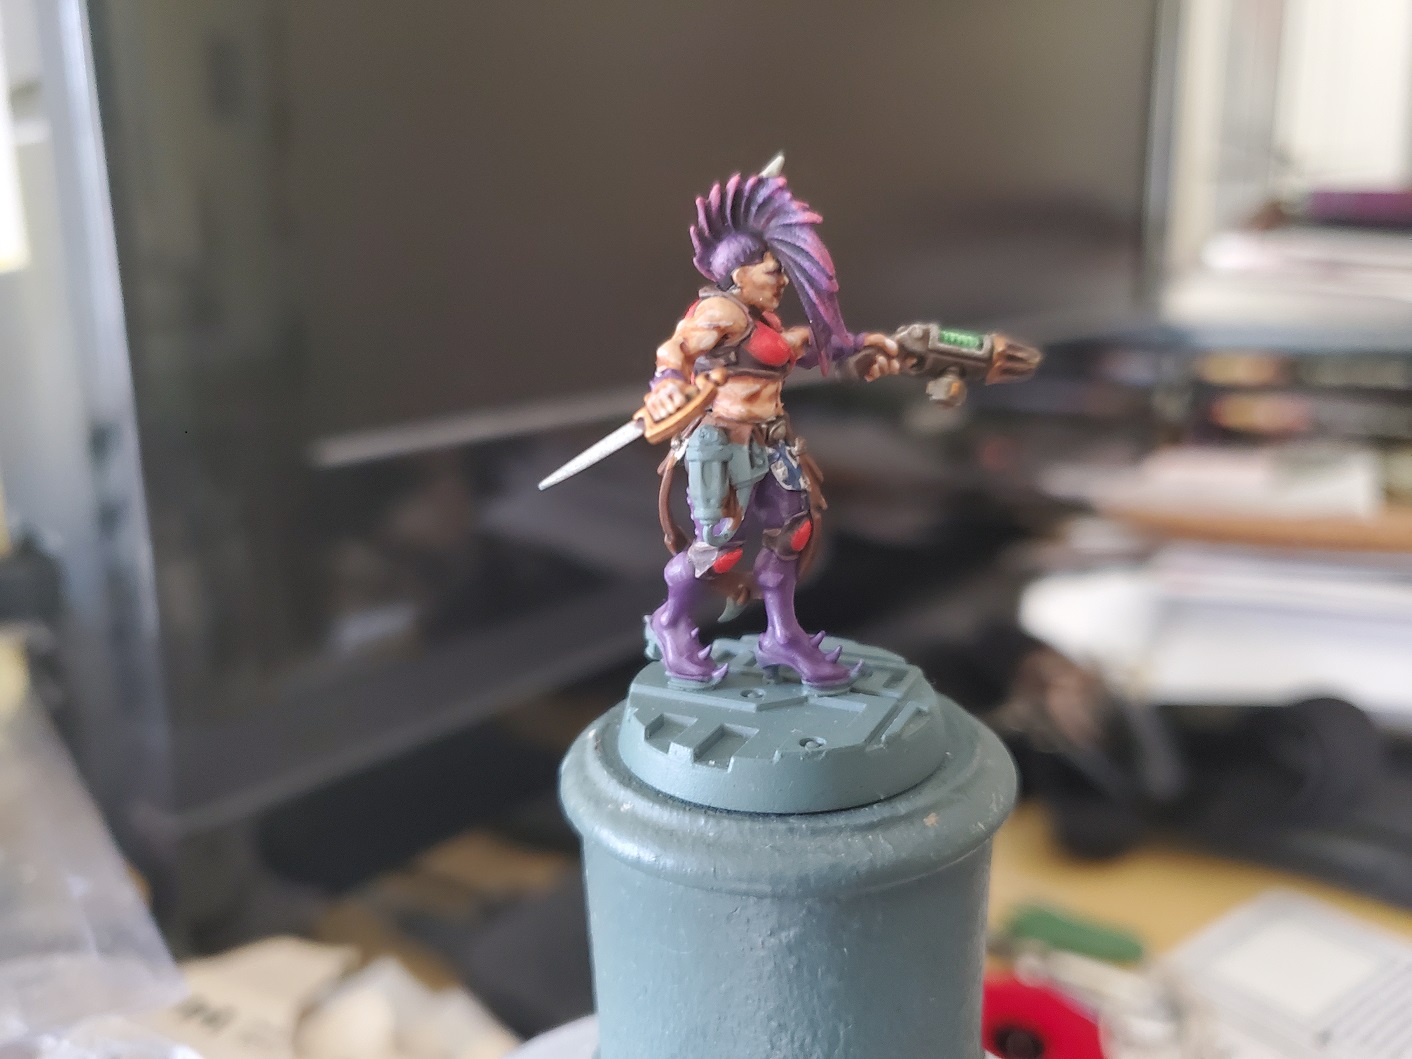 Tried to put some heat damage on the muzzle of the plasma pistol. Not sure if I like the result or if I'll repaint it later on. For now it'll stay, though.
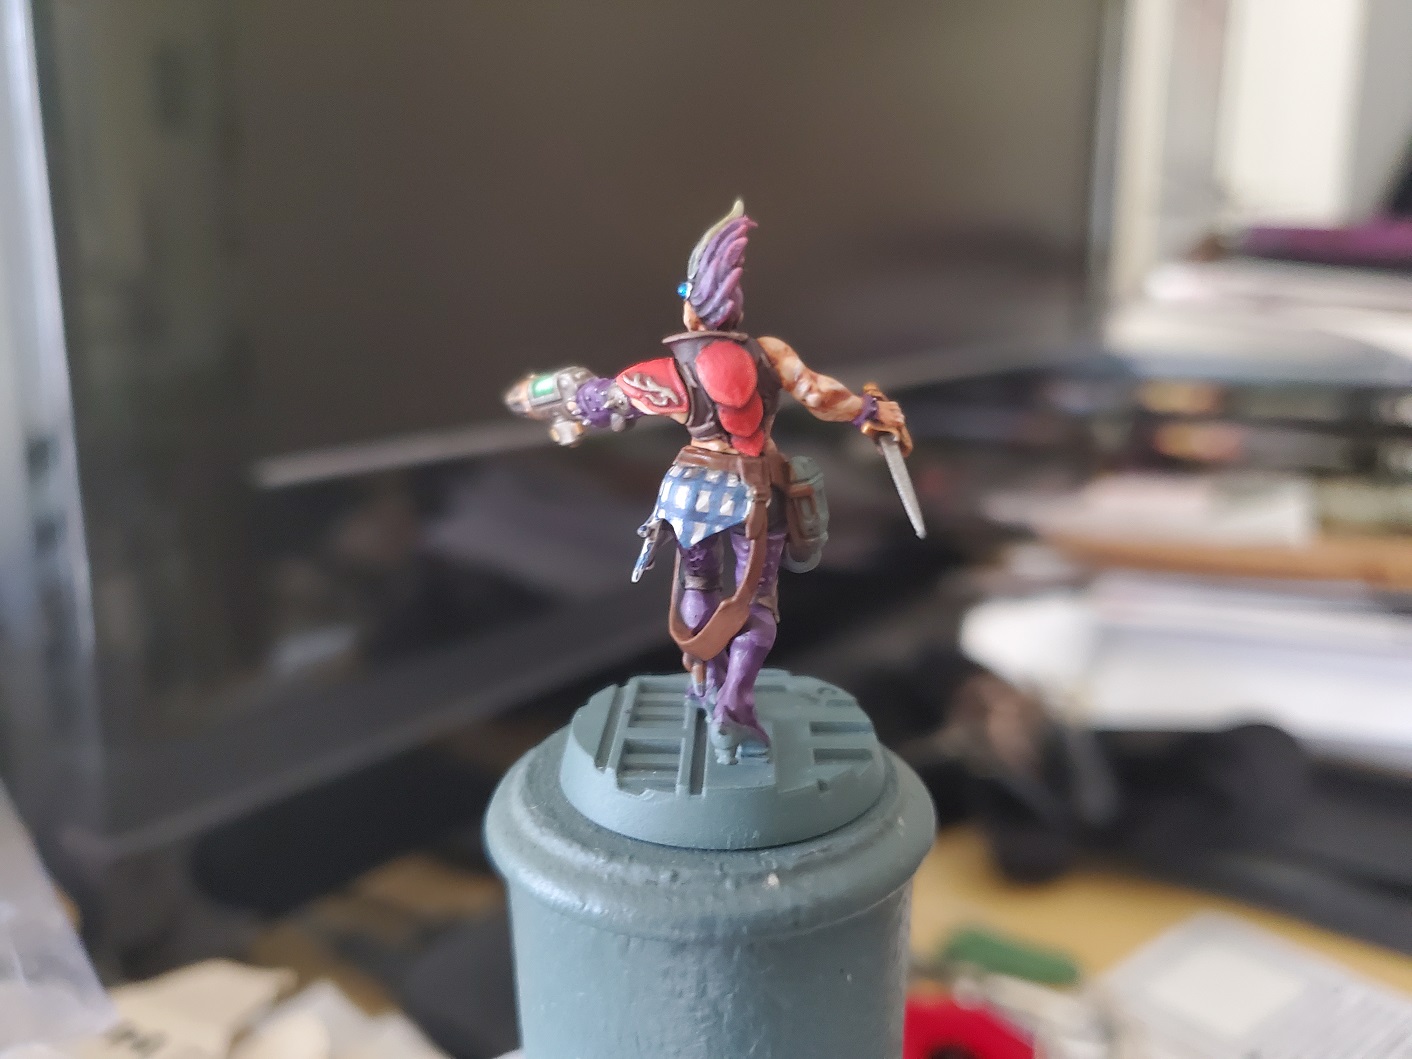 And the traditional Lloyd shot! Might be a day or three before I can add any more to her, but she's coming along nicely.
Old Friends.
Welcome to the new (and hopefully a little faster) project! Out with the old, in with the new, right? Well, kind of. Just for a laugh, I thought I’d start this project with the same mini that I started the last one with. I am so efficient at painting minis… For those who remember, a whole year ago I tested out painting purple hair on one of my primed Eschers from GW. You may also remember her from my colour experiments with British WW2 Jungle uniforms because she was there, well we’re back again though this time I do plan on finishing her completely…when time allows… Hopefully I can get back to more in depth project logs where I can go through steps and research again, but for now I’m still a little strapped for time with school…and then maybe field trips…but empty promises are so in right now, so I should be good. Right?
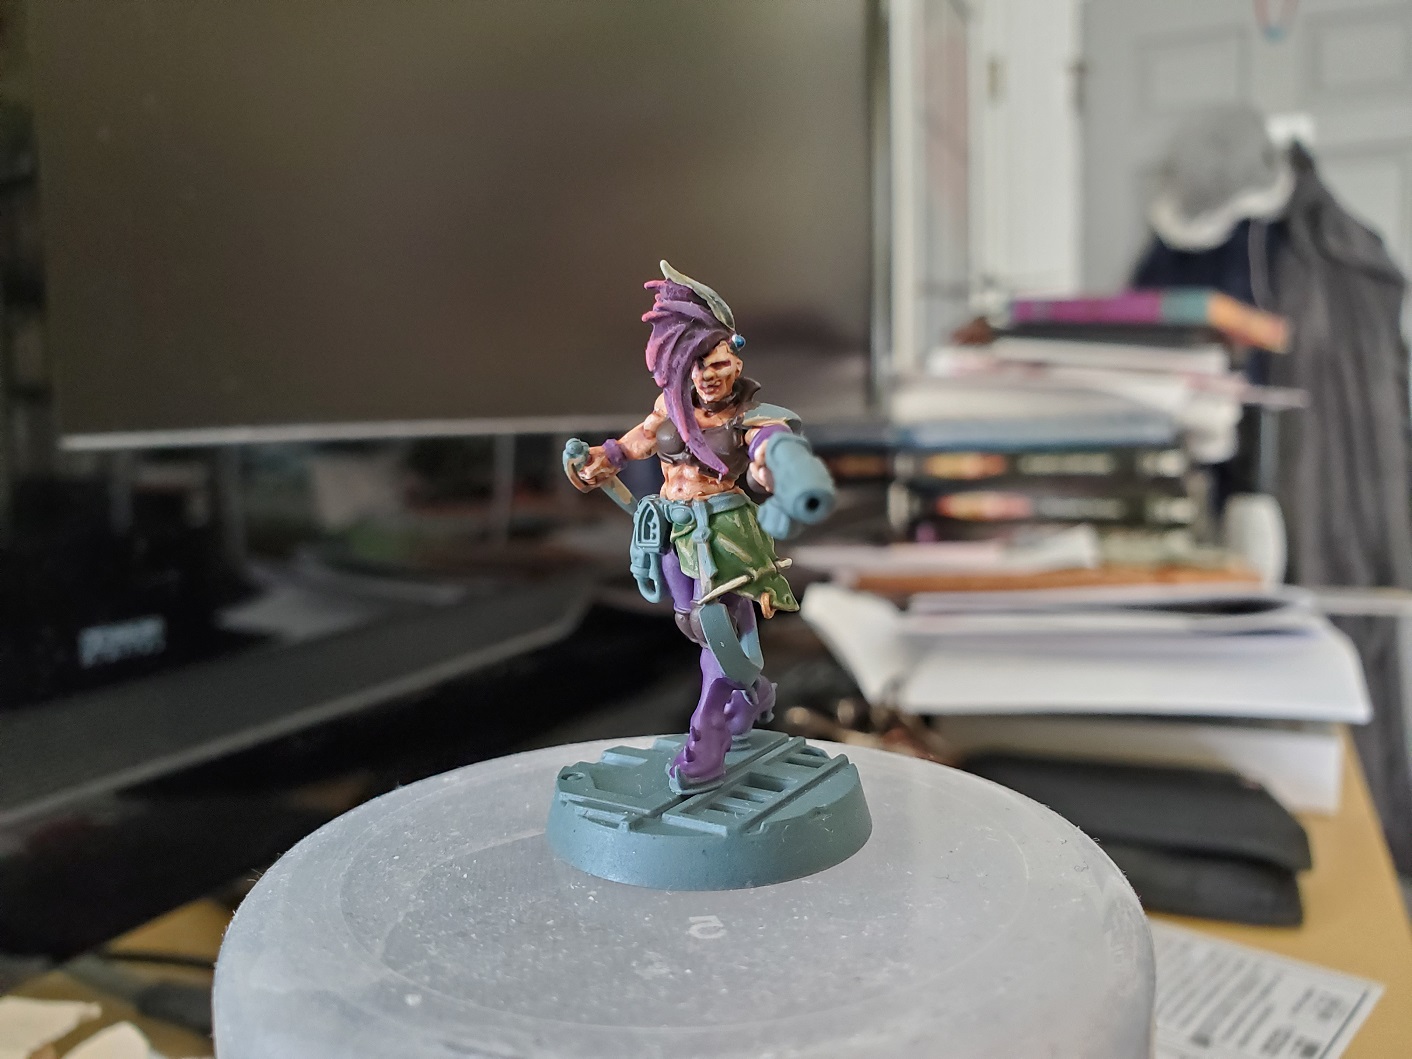 Once again, I started out with a Contrast 'base' and worked up from it. For now the cloth/leather areas are just blocked in but there will be some reds showing up later in the painting. I have a thing for purple and red, it seems...
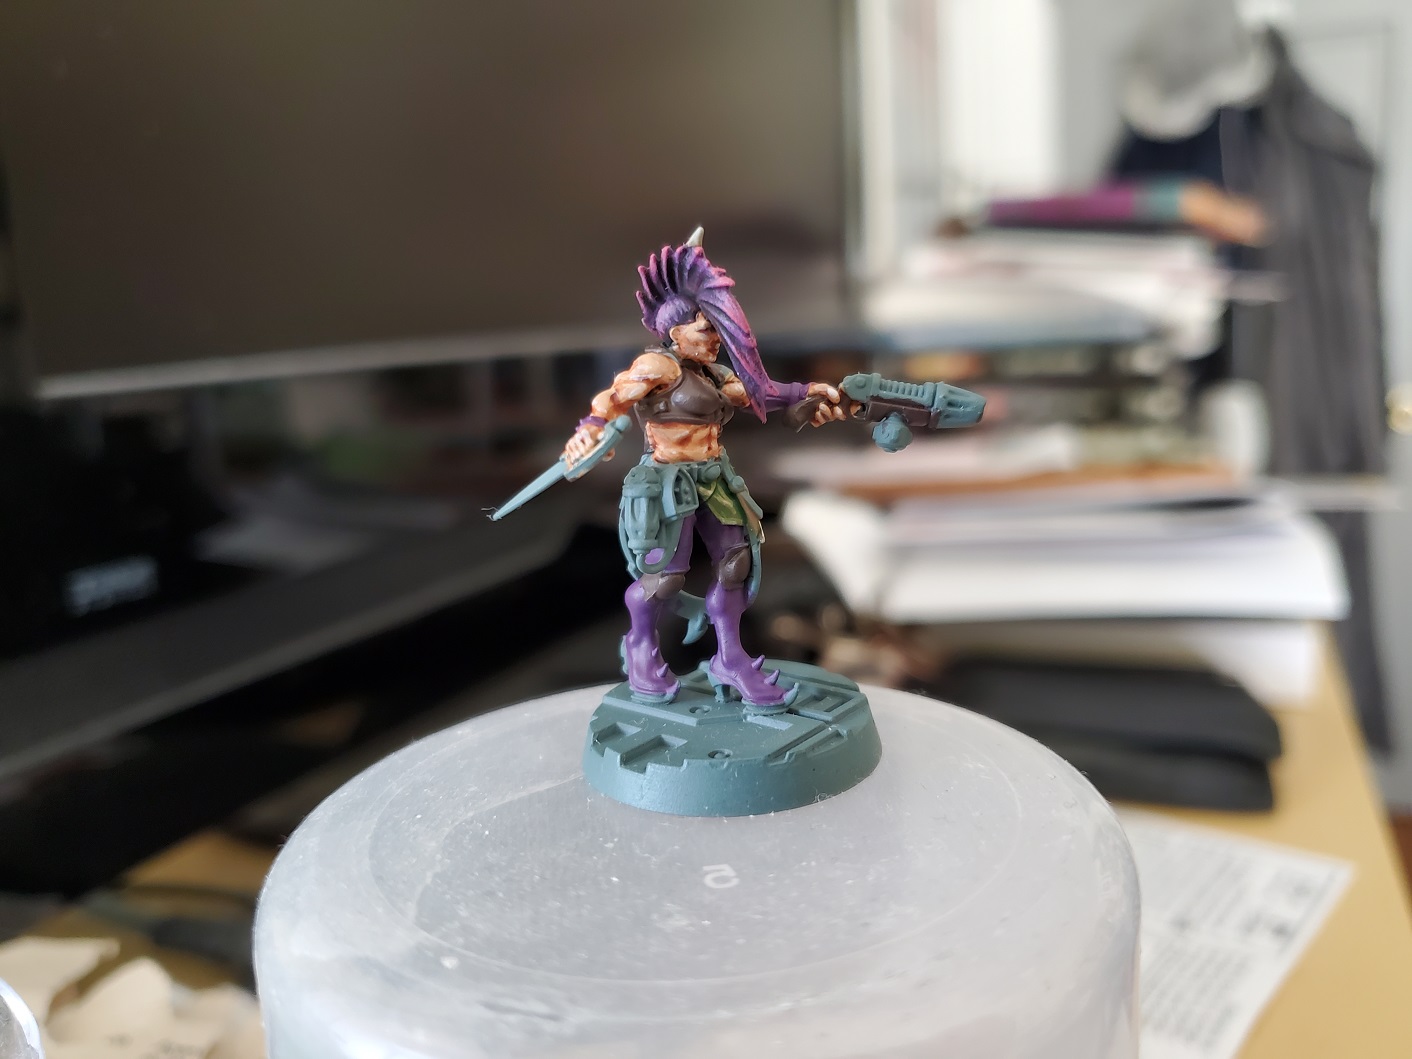 The tone is a little more tanned than I was going for originally, but I like it. I still need to do some more skin tone experiments at some point. Might have a Tau one coming up soon-ish...if the paint ever strips off... As is standard these days, I used shade paints for make up like eye shadow and even lipstick. The fact that it is more subtle makes it look more realistsic at this scale.
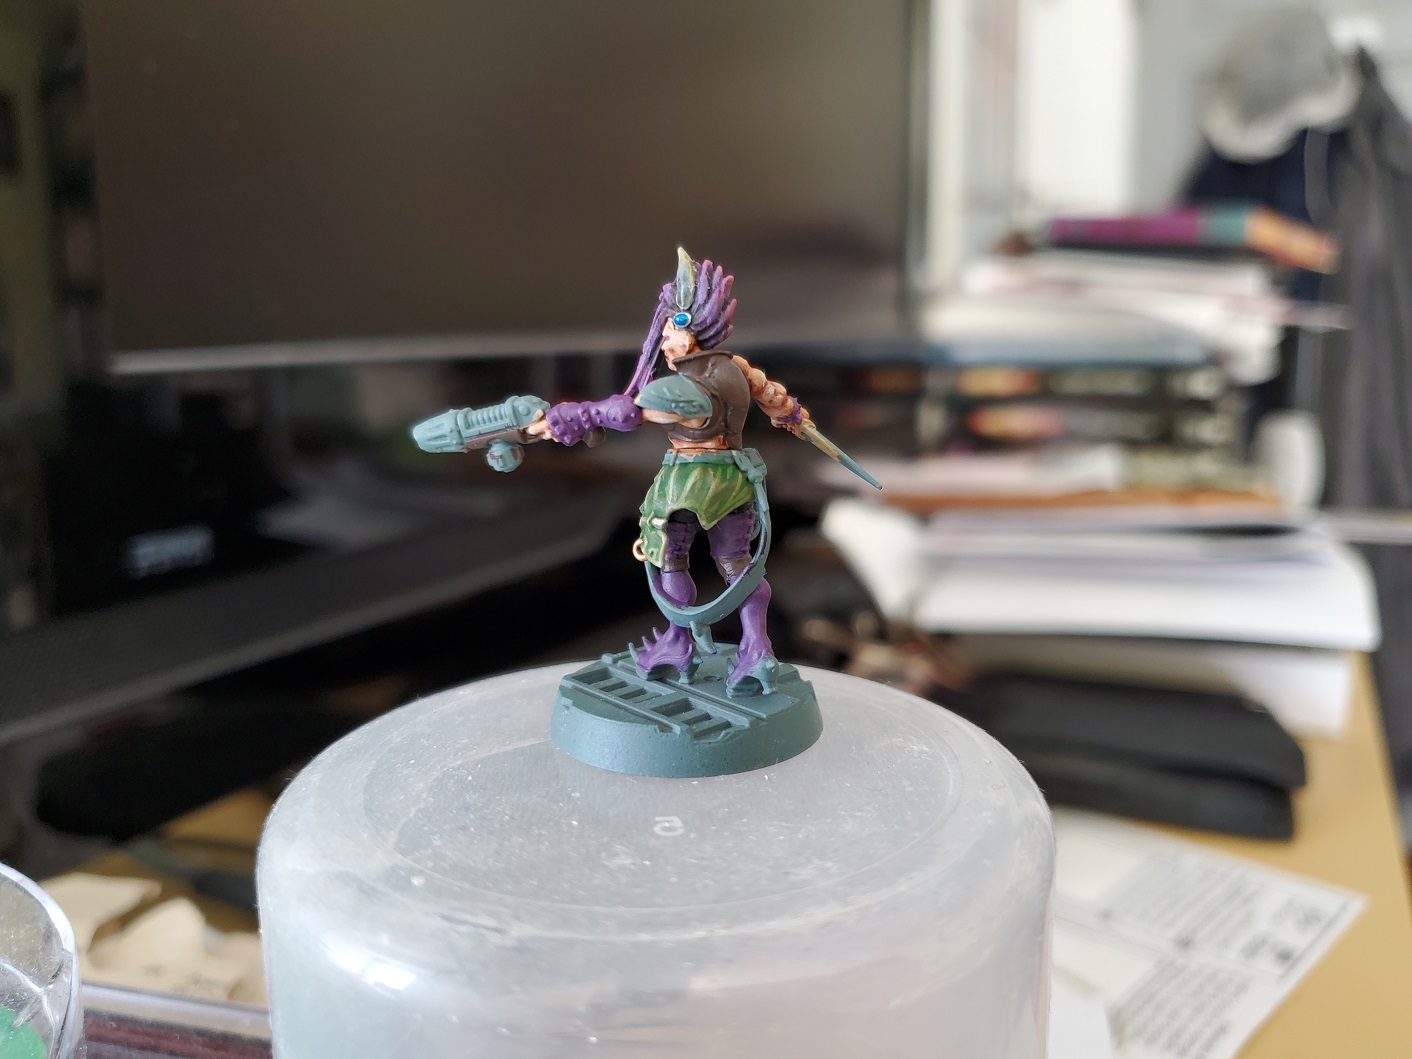 I will eventually change the colour of the strip of cloth. I like to imagine it as a keepsake, or just a cleaning rag. Keepsake sounds more fun and I was thinking of painting it like scrap of old tablecloth that has survived thousands of years to become a family heirloom. I like wacky things like that. Also probably going for a fancy colour for the plasma coils too. Blue is for my Ultras, not my Eschers!
 And finally the traditional Lloyd shot! Once I have her done, I'll compare her to my original test mini and you will see why the original will want to be redone...something very 'Joker-ish' about that one...
More to come at some point from now in the temporal continuum! I still have some bits and pieces from the old project to finish off like the schurtzen from my Panzer IV and the last team member of my Murder Girls. That is my official name for my Shadespire team. Happy Hobby everyone!

![StarCraft Tabletop Miniatures Game Pre-Orders Live Now [Updated]](https://images.beastsofwar.com/2026/03/starcraft-tmg-news-cover-600-338.jpg)


![Mounted US Cavalry On Kickstarter For Dead Man’s Hand! [Updated]](https://images.beastsofwar.com/2026/03/us-cavalry-main-600-338.jpg)


![Play WW2 Commando Operations With Butcher & Bolt [Updated]](https://images.beastsofwar.com/2026/03/relaunch-600-338.jpg)


