![Perfect Call Of Duty-Style Miniatures? Wargames Atlantic’s Operators Review [7 Days Early Access]](https://images.beastsofwar.com/2026/02/unboxing-wargames-atlantic-operators-coverimage-225-127.jpg)


2026 Mission to smash the pile of potential


Recommendations: 40
About the Project
Over the past couple of months I have decided to sell an awful lot of my pile of shame and focus more on getting projects done... I wont go into details unless asked but I am driven to getting stuff on the table and played with. So here we go.
Related Game: Warhammer 40,000
Related Company: Games Workshop
Related Genre: Fantasy
This Project is Active
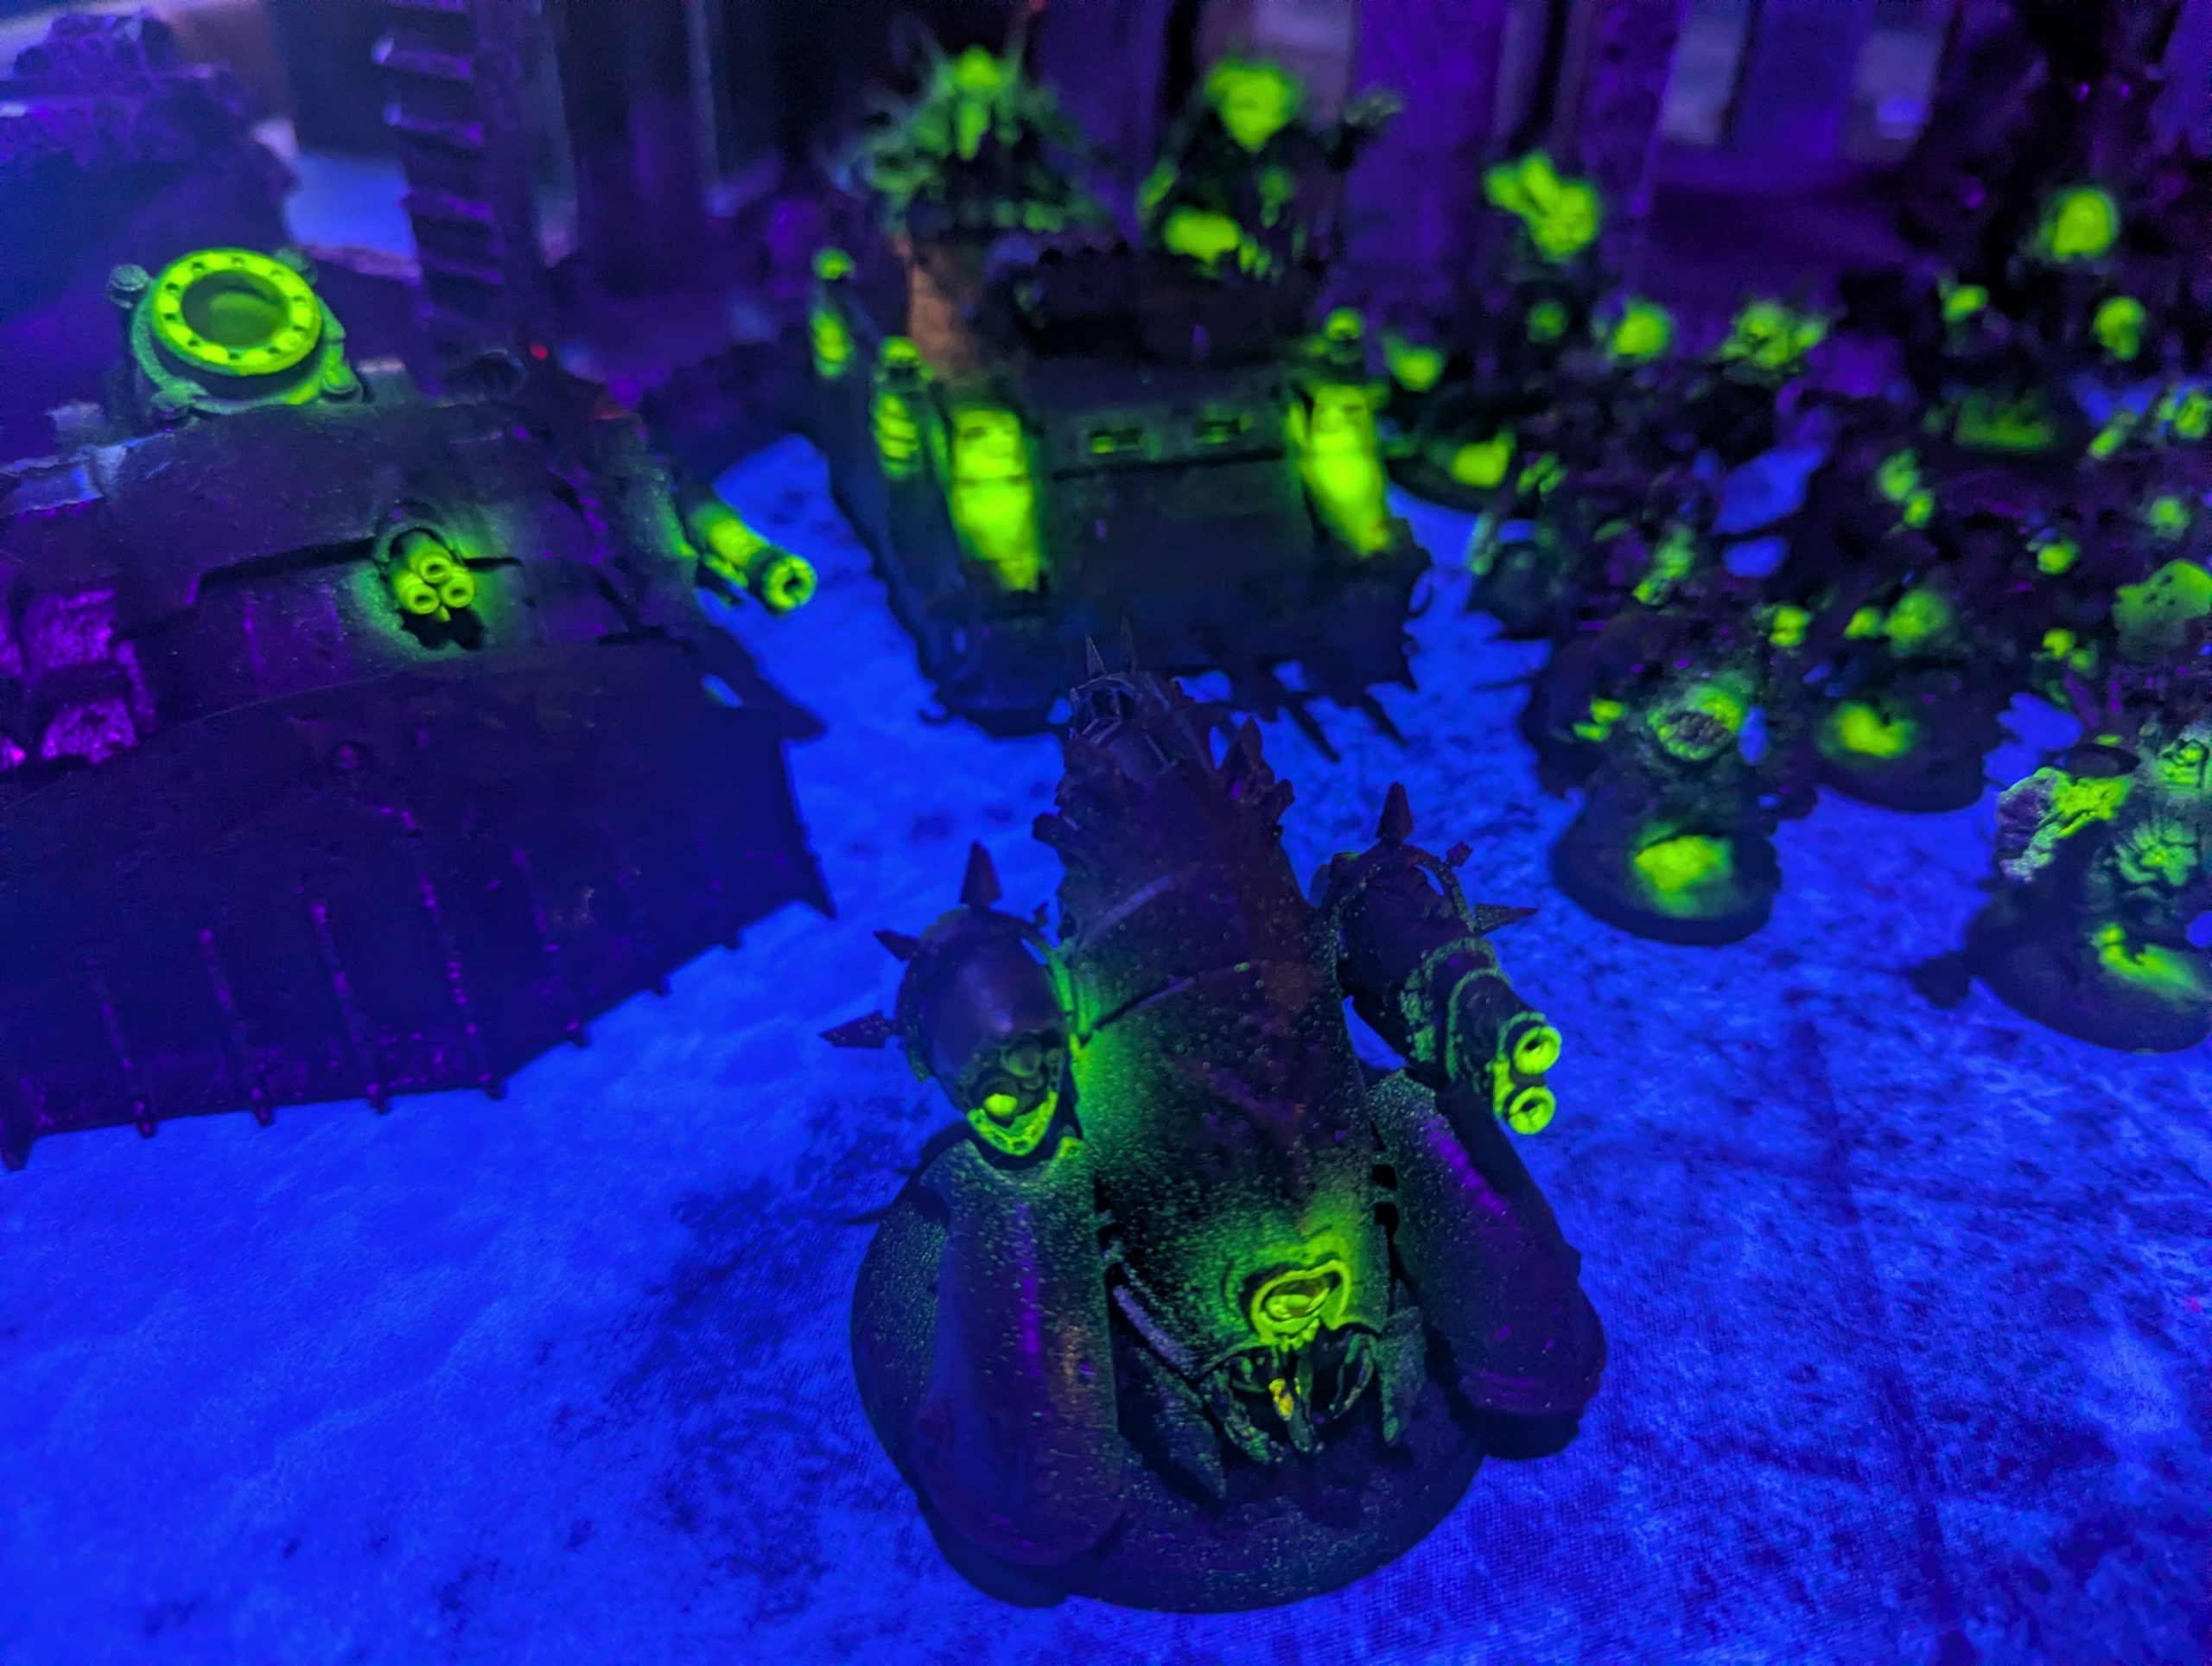
Neon Necrons - They pulled me back in
Just when I thought I was done with the Neon Necron project, I find myself one more miniature away. This was a lovely gift, my son was waiting for me when I got back from a business trip… I guess it is time to break out the snips, silver and neons and get to work.
2026 Status Report: 5 Armies & 200+ Minis in 5 Weeks!
Hey everyone, I sat down to do the actual math on my progress for 2026 so far, and I was honestly surprised by the numbers. It’s only early February, but the mission to smash the pile of potential is going better than expected.
I have managed to get 5 distinct forces to a playable standard or better. Here is the official damage report on the backlog:
-
Neon Necrons: 100+ Miniatures (The swarm is real!)
-
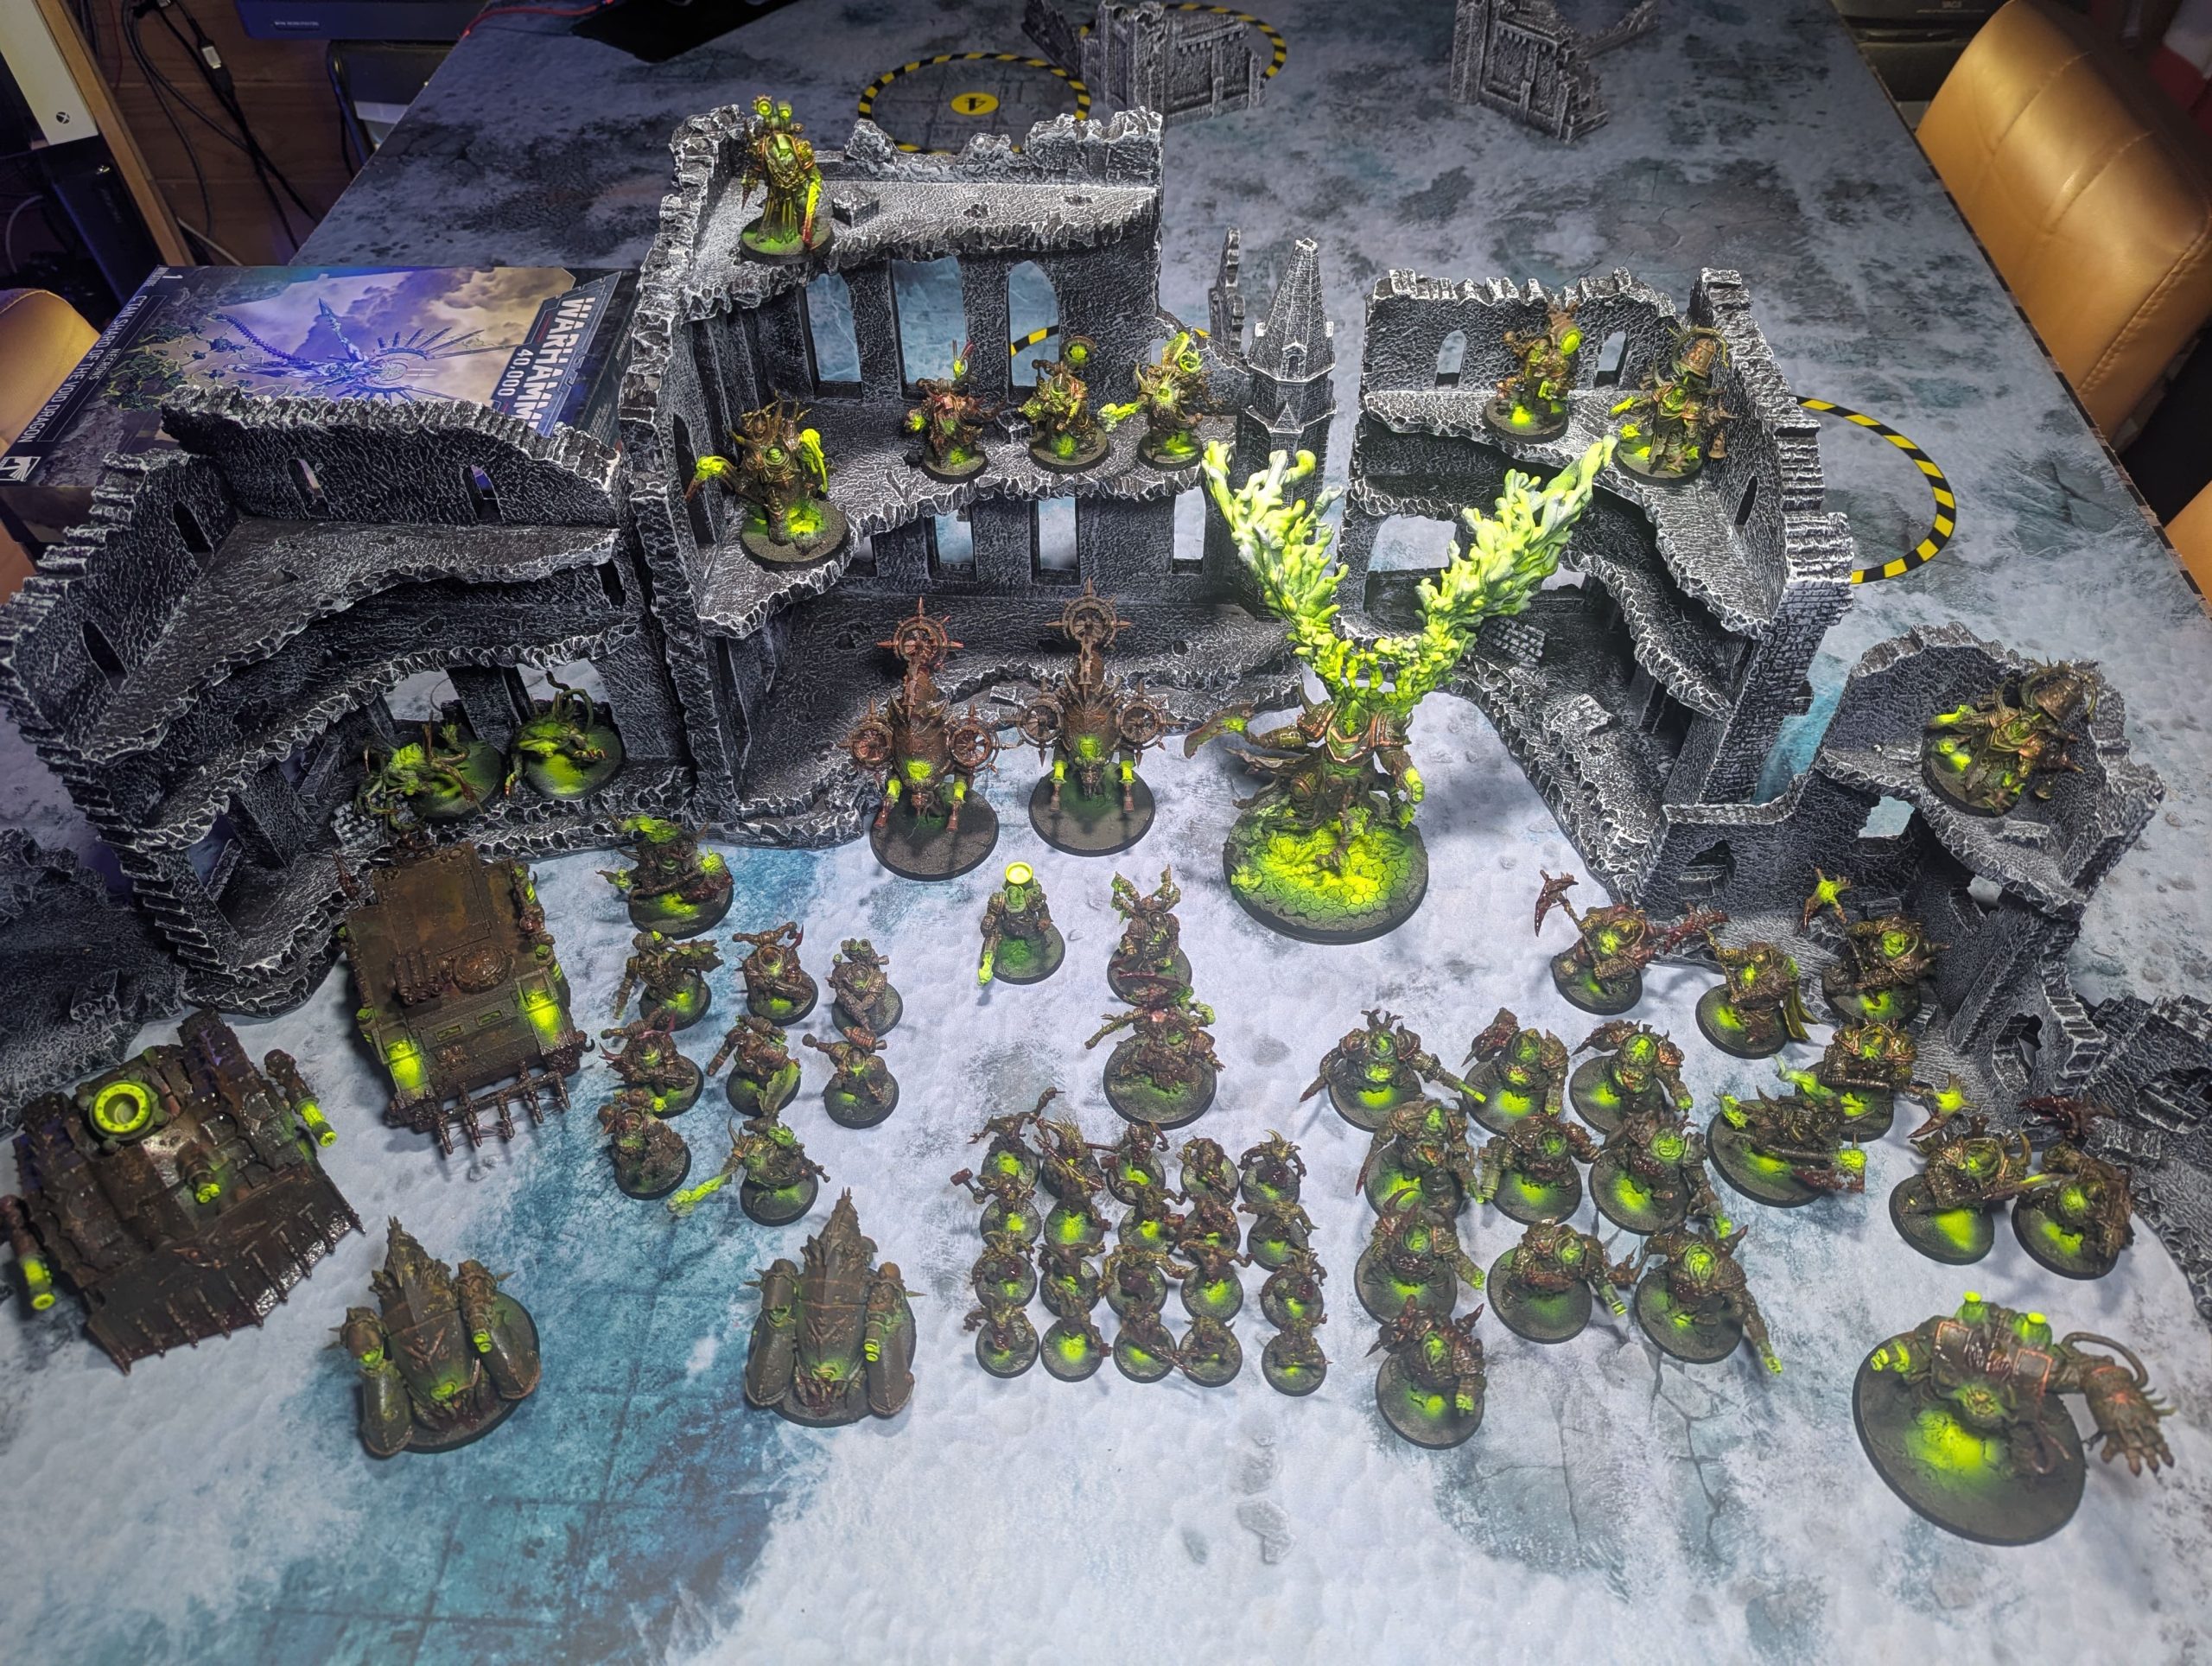
Death Guard: 67 Miniatures
-
Grey Knights: 20 Miniatures (Including the 6 Dreadknights)
-
Chaos Daemons: 14 Miniatures (Forces of the Warp)
-
Imperial Knights: 9 Miniatures (5 Questoris/Dominus & 4 Warglaives)
The Grand Total: That is 210+ miniatures painted in just over a month.
The ‘Knight a Night’ project was great for points efficiency, but churning through 100+ Necrons and nearly 70 Death Guard really bumped up the model count. As always, the airbrush, dry brushing, and sponge weathering have been my best friends to keep this pace without burning out.
I’m happy to share recipes for any of the specific schemes (the Neon Necrons or the dirty Death Guard, especially)—just let me know in the comments!
Now… what’s next?
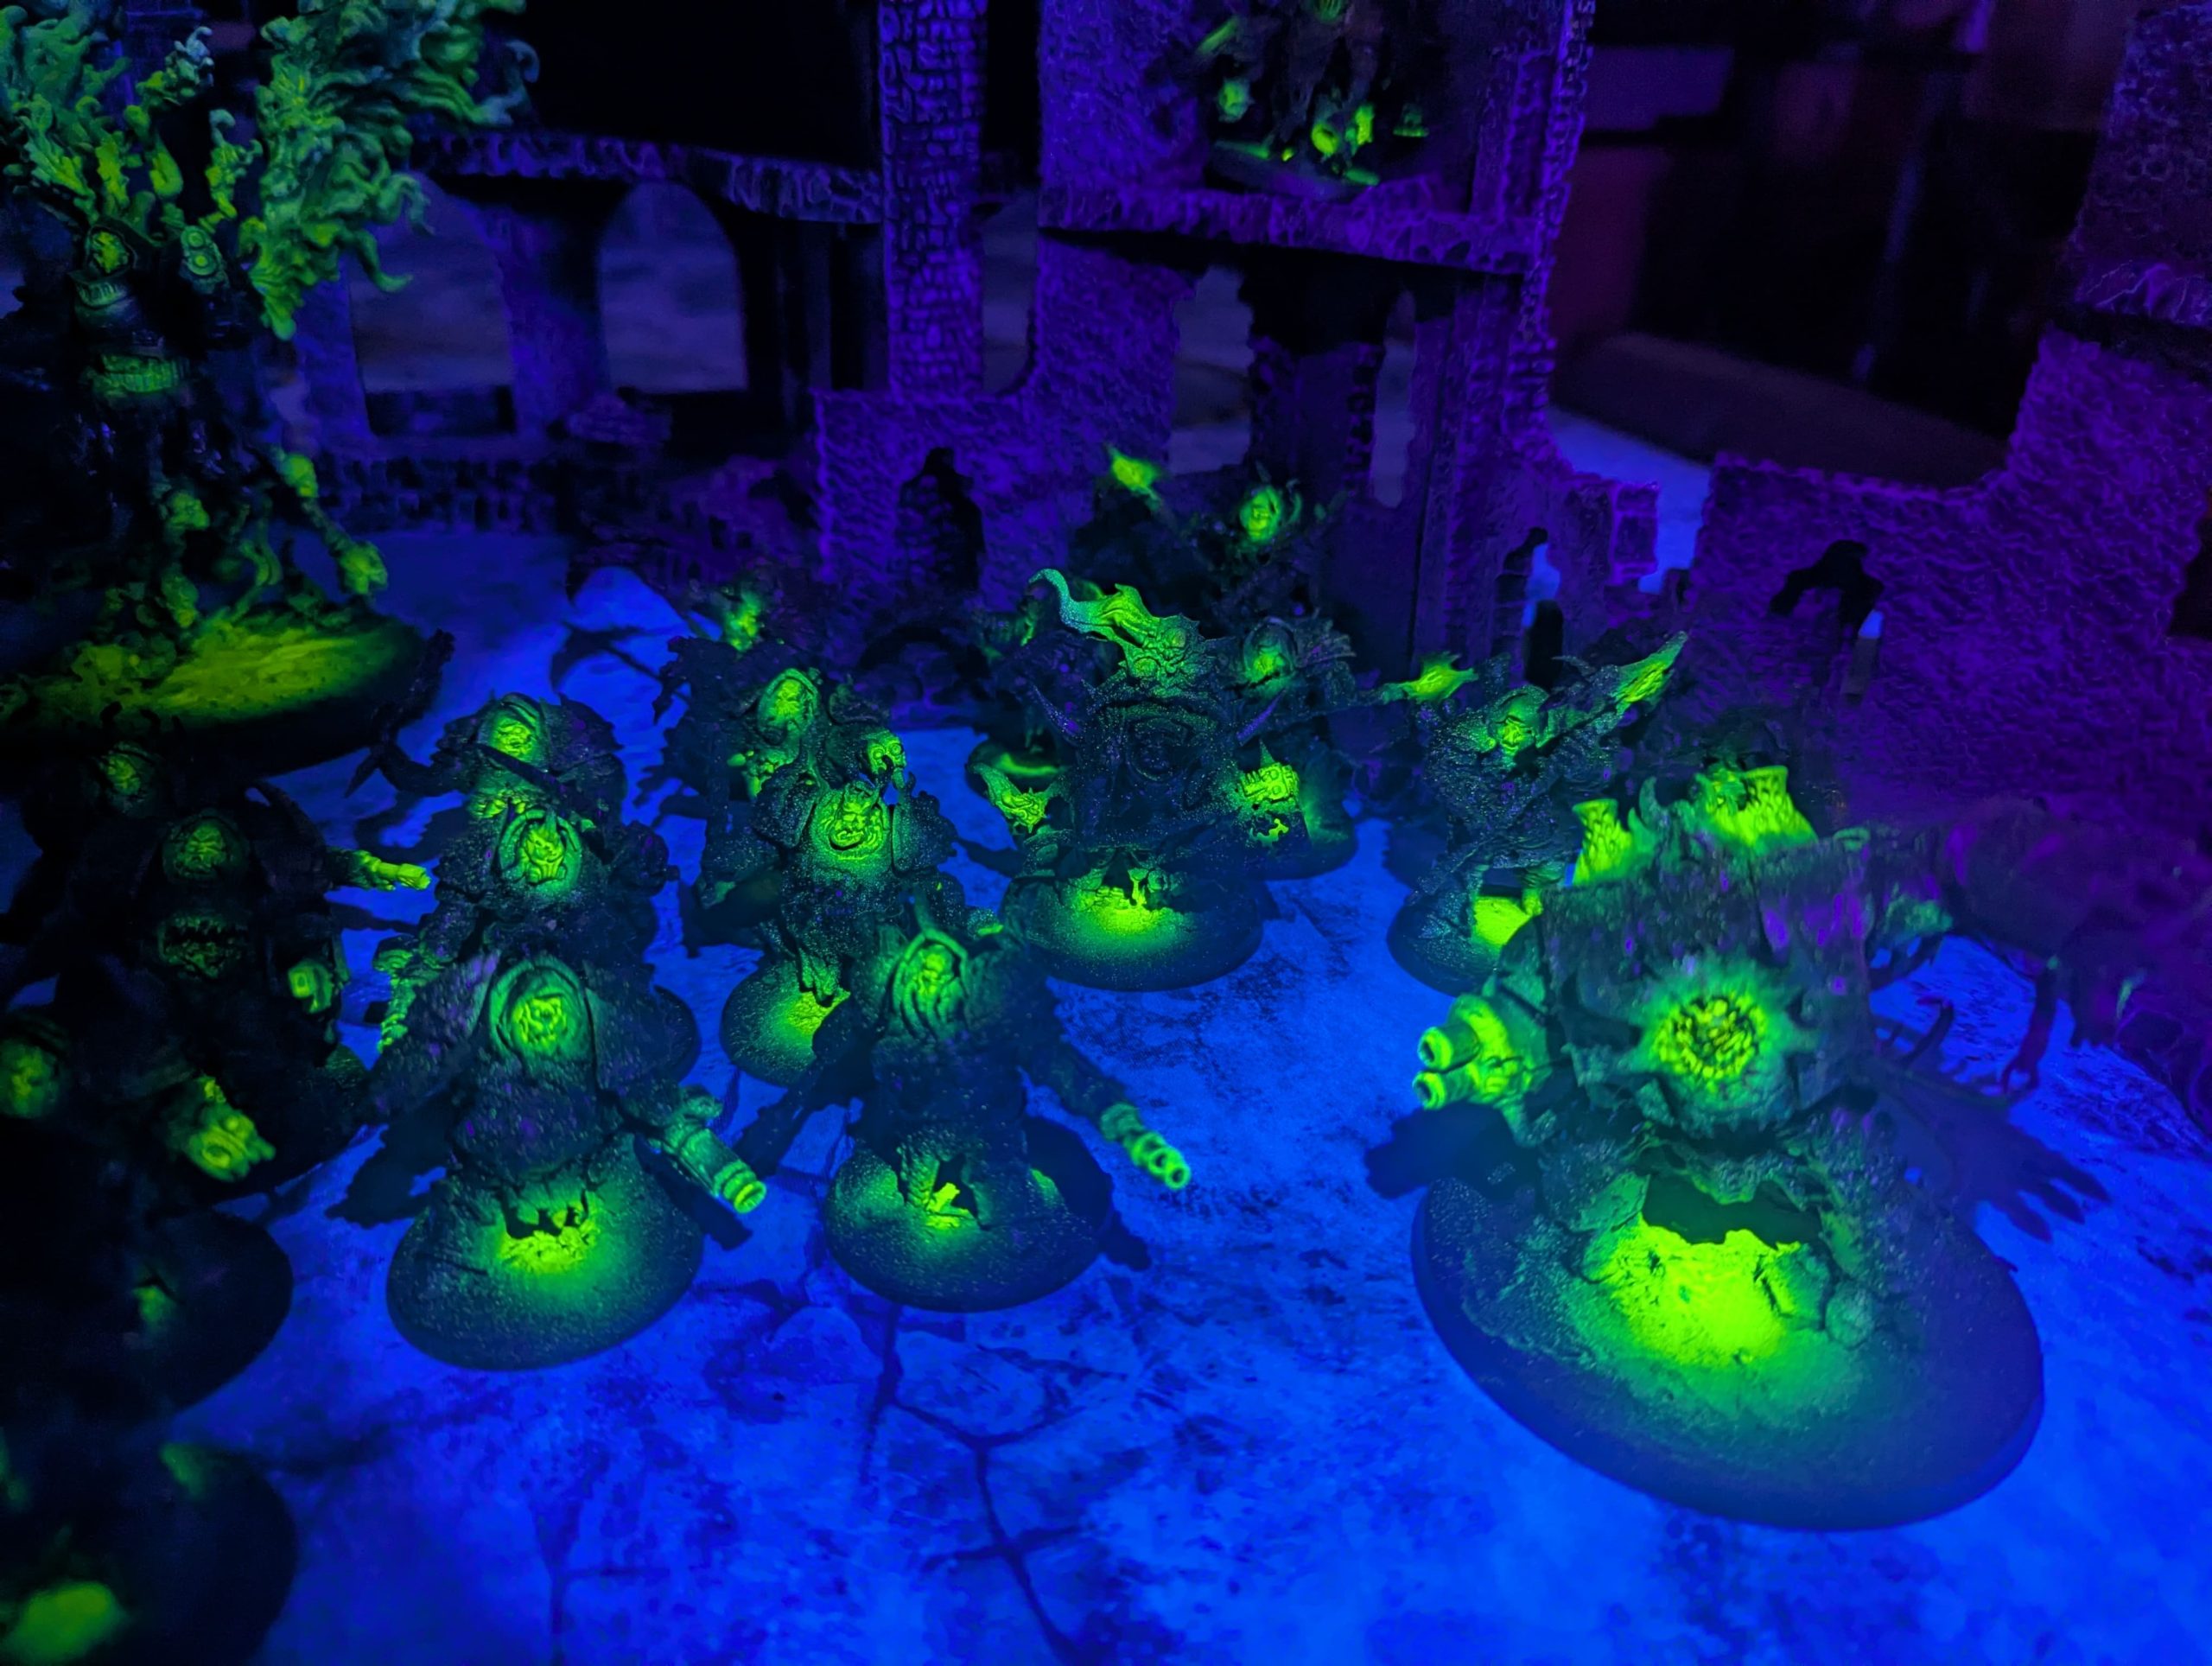
The Grim Dark Death Guard Project: At Night!
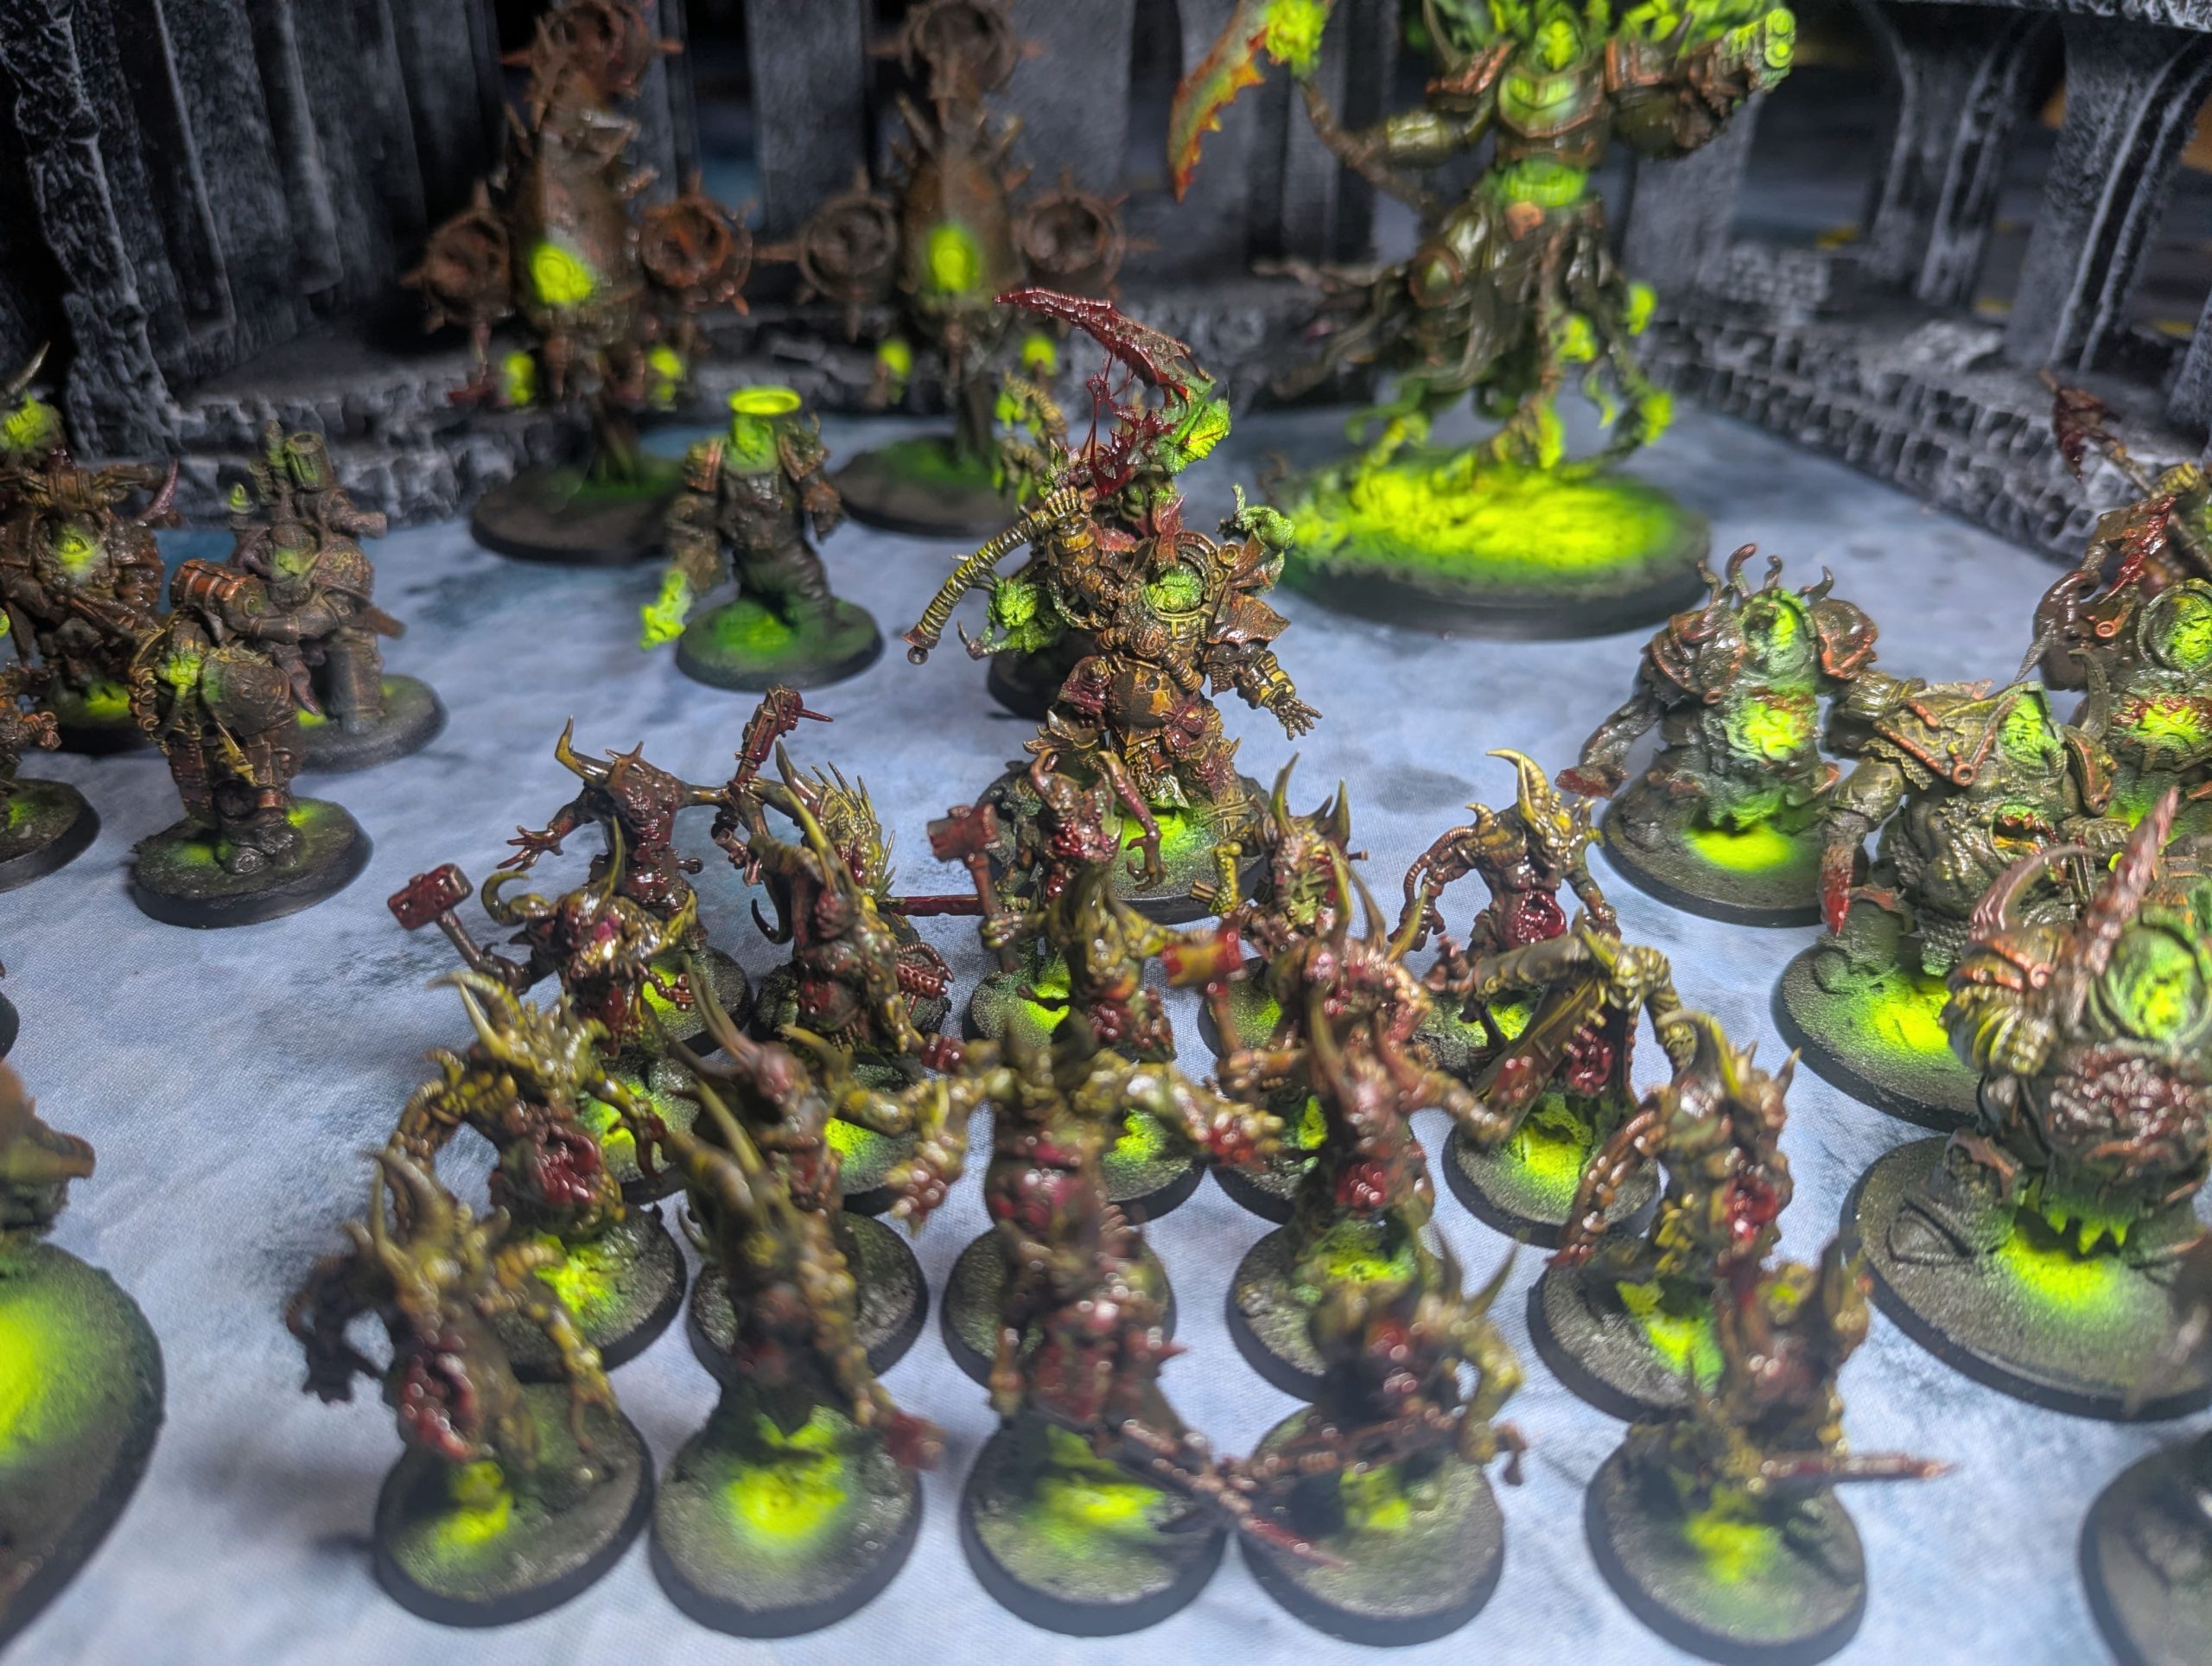
With the clever addition of a focused black light, the true, vibrant impact of the reactive paint becomes undeniably apparent. It’s an absolutely stunning transformation; where once there were just bright colours, now there is a searing, almost ethereal glow that makes the miniatures truly pop. The effect is particularly exciting and elevates the entire aesthetic of the force. I am personally thrilled and can barely contain my anticipation for the planned special event: a unique night-time game where our meticulously painted Neon Necrons will finally clash with the grim ranks of the Death Guard. This battle, fought under the simulated darkness and illuminated solely by the glow of the black light reacting with the paint, promises to be a visually spectacular and memorable experience that will go far beyond a standard tabletop match.


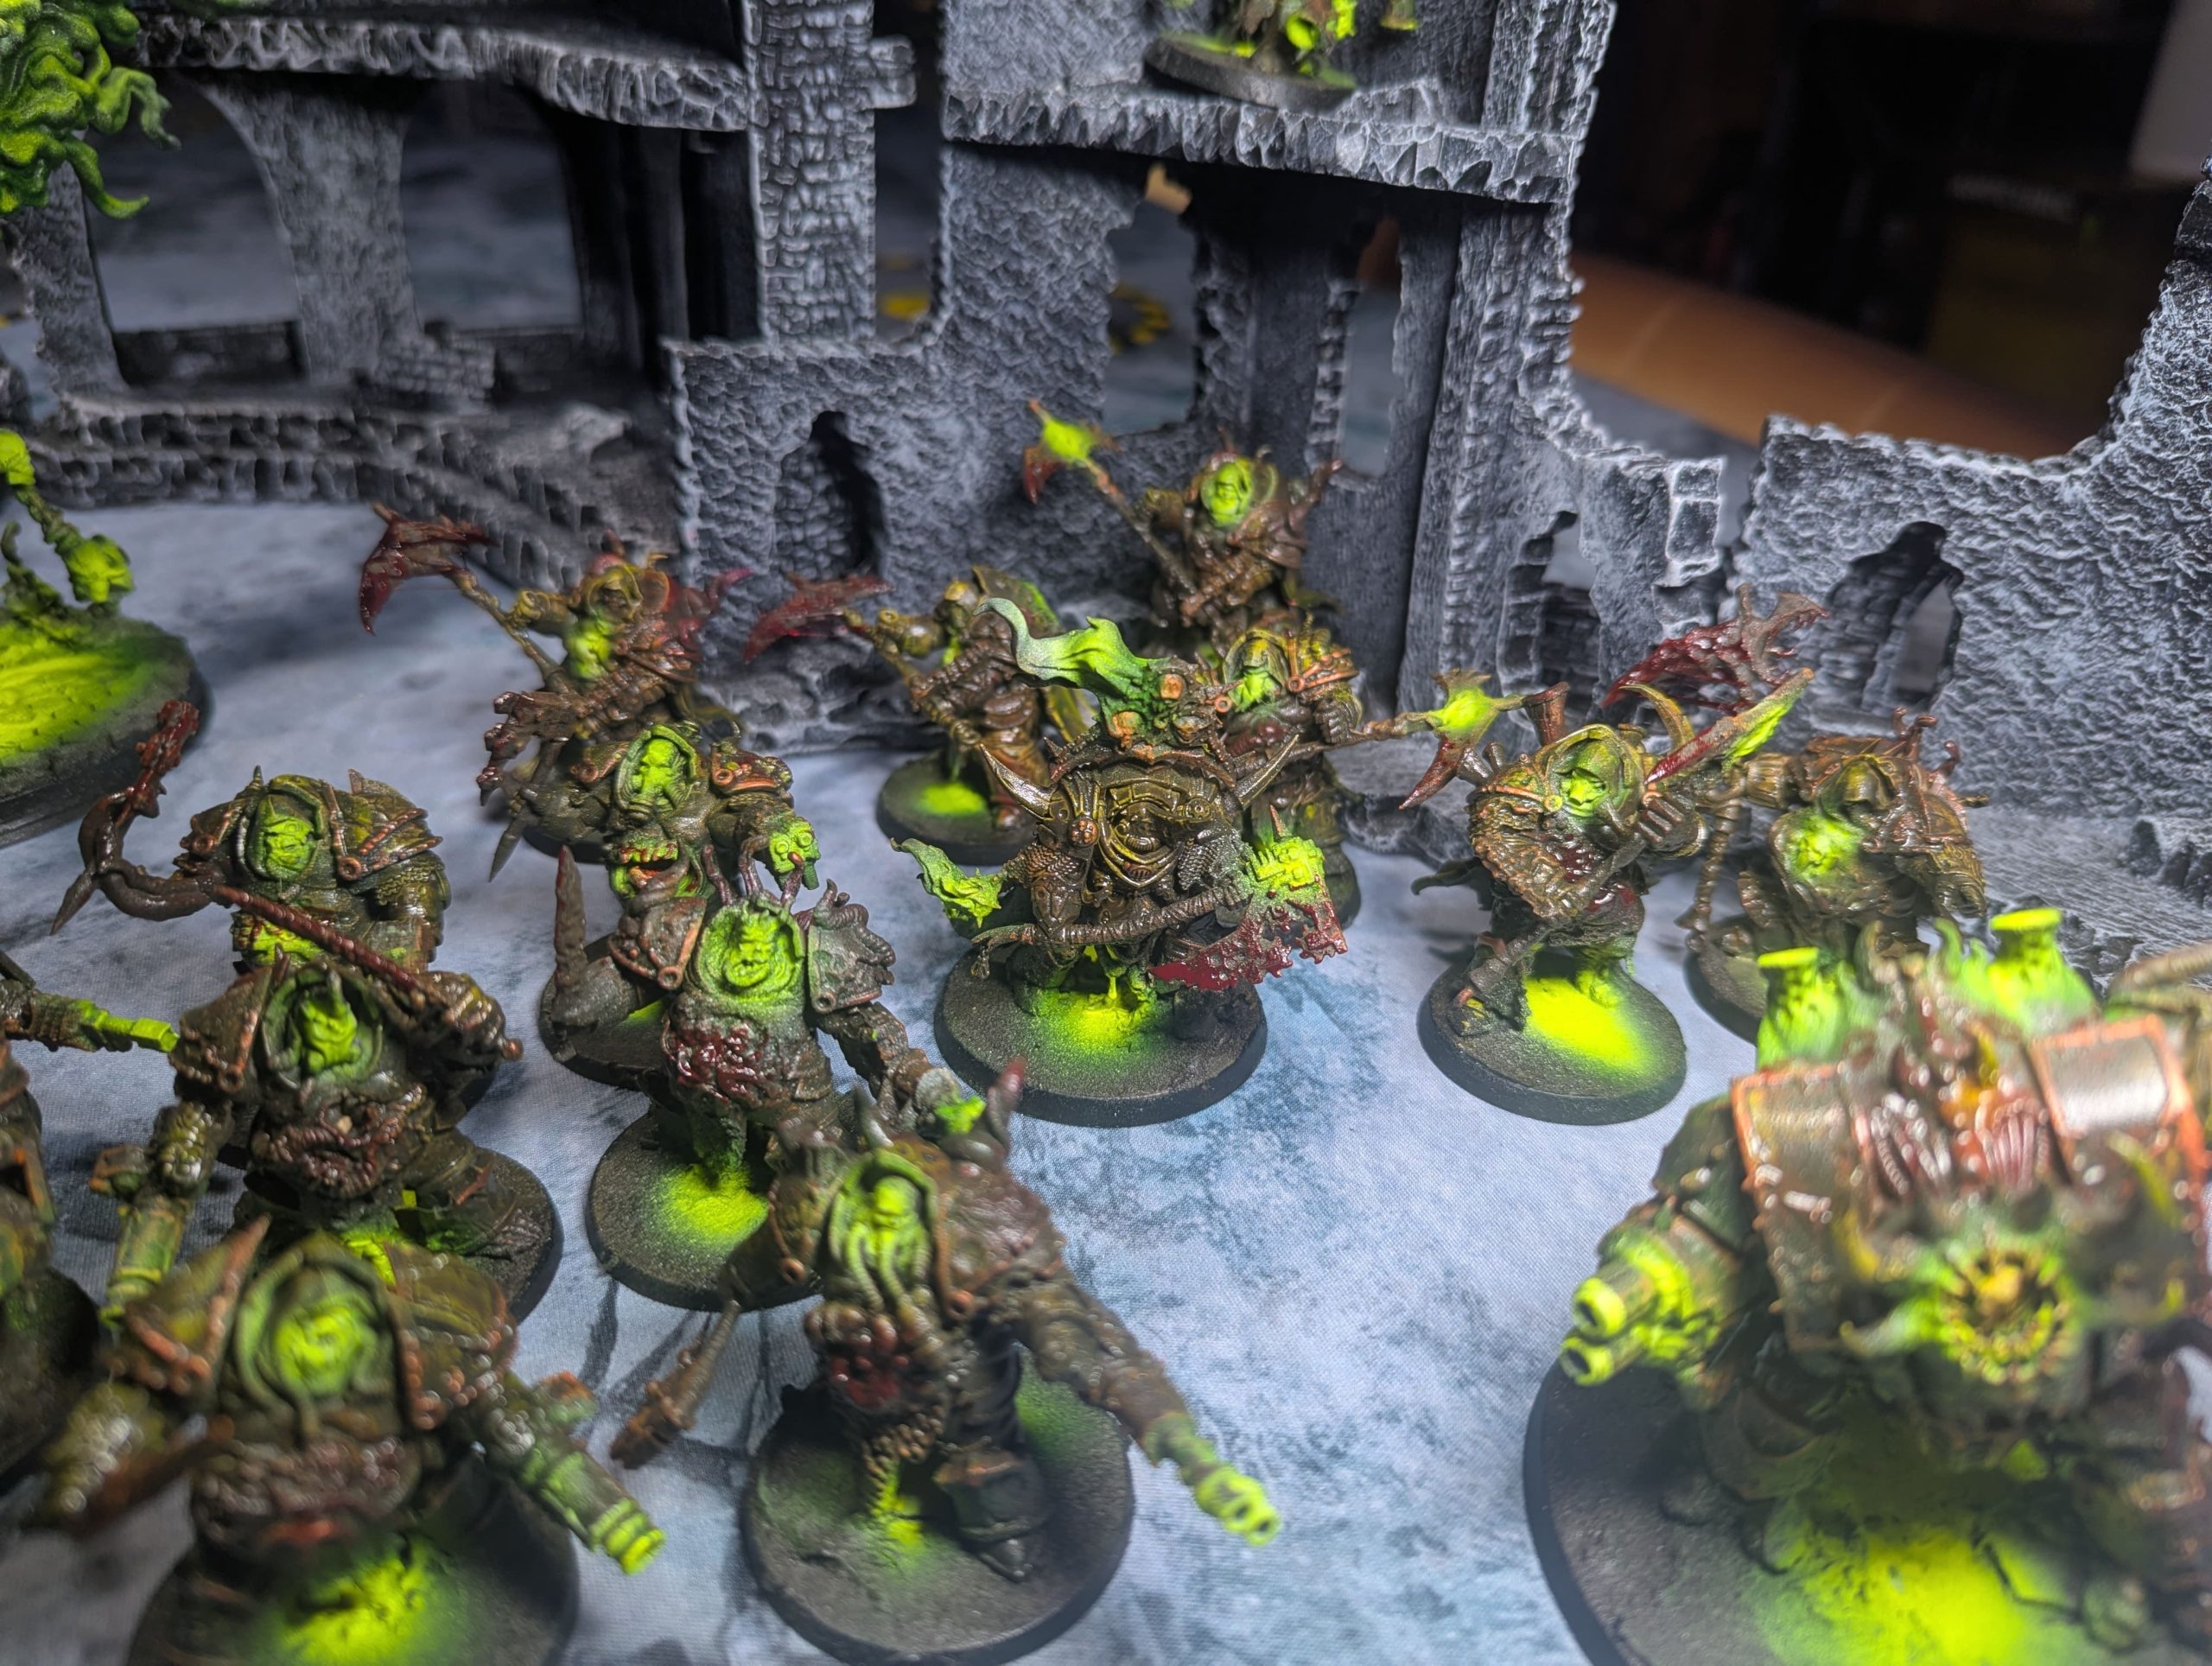
The Grim Dark Death Guard Project: A Deep Dive
My passion for the truly grim and dark aesthetics in miniature painting has always simmered beneath the surface of my hobby. While I’ve occasionally dabbled in small, focused projects capturing that desolate, gruesome feel, I’ve never before committed to a full army. The desire, however, has always been there, fueled by striking examples I’ve seen in the community.
The Army’s Foundation: A Hoard Unearthed
Over the years, almost by accident, I’ve amassed a significant collection of Death Guard miniatures. They arrived piecemeal—a few models salvaged from various starter boxes, a few more acquired through subscription magazines—a scattered host waiting for their moment. Seeing this substantial hoard of Nurgle’s chosen laid out, I realised the time was finally right to stop thinking about a grim dark army and actually build one.
The commitment was cemented by a recent hardware upgrade: I had just installed the Mars 5 Ultra resin printer. This meant any crucial unit or unique piece I was missing to complete the army list could be swiftly and affordably proxied. With the miniatures and the means now in place, the project officially began.
The Process: Speed and Purposeful Mess
Remarkably, this entire army was completed in approximately two weeks. This rapid turnaround was only possible because I relied heavily on quick, effective painting techniques perfectly suited to the grim dark aesthetic. My toolkit revolved around the airbrush, drybrushing, innovative effect paints, and only the most essential detail work. Crucially, this project allowed me to experiment with new products focused on achieving gross, wet, and corrupted textures—specialist grim, blood, and slime effects. The Core Technique: Zenithal and Speed Painting
The fundamental process for every model was structured for speed and atmospheric impact:
- Black Prime: Every model was primed black, providing a deep, natural shadow layer for the grime to cling to.
- Zenithal Highlight: A zenithal spray of white was applied from directly above. This subtle volumetric highlight instantly established the light source and helped the subsequent colours pop—or, more accurately, rot.
- Base Layers – Airbrush & Drybrush: I then moved on to the core colours for the armour plates, weaponry, and tattered cloth. The choice between airbrushing and drybrushing was tactical: large, flat areas of armour were quickly blocked in with the airbrush, while textured or damaged areas were hit with the drybrush for quick, weathered coverage.
- The Grim Dark Advantage: Because the ultimate goal was a heavily weathered, grimy look, I could afford to be fast and messy. Lines didn’t need to be perfectly sharp; colours didn’t need to be perfectly neat. A degree of controlled chaos was not only acceptable but encouraged, contributing to the final, disgusting appearance.
Layering the Corruption: Oils and Weathering
Once the core colours were established, the models were given a protective layer of varnish. This barrier was crucial for the next, most transformative stage: weathering with oil paints.
- The Streaking Grime Bath: I liberally applied oil-based products, most notably a dedicated “streaking grime” wash, over the entire model. This heavy application pooled in recesses and stained the armour plates, instantly aging and dirtying the surface.
- The Fading Process: While the oils were still active, I used cotton buds dipped in white spirit (or alcohol) to strategically ‘draw back’ the paint. By wiping downwards, the grime was lifted from the raised areas, leaving behind realistic streaks and concentrated dirt in the recesses and along panel lines—the perfect simulation of years of neglect and chemical runoff.
- Final Protection: Once satisfied with the level of weathering, the models were allowed to thoroughly dry before receiving a final, robust coat of varnish to seal the effects and prepare for the final touches.
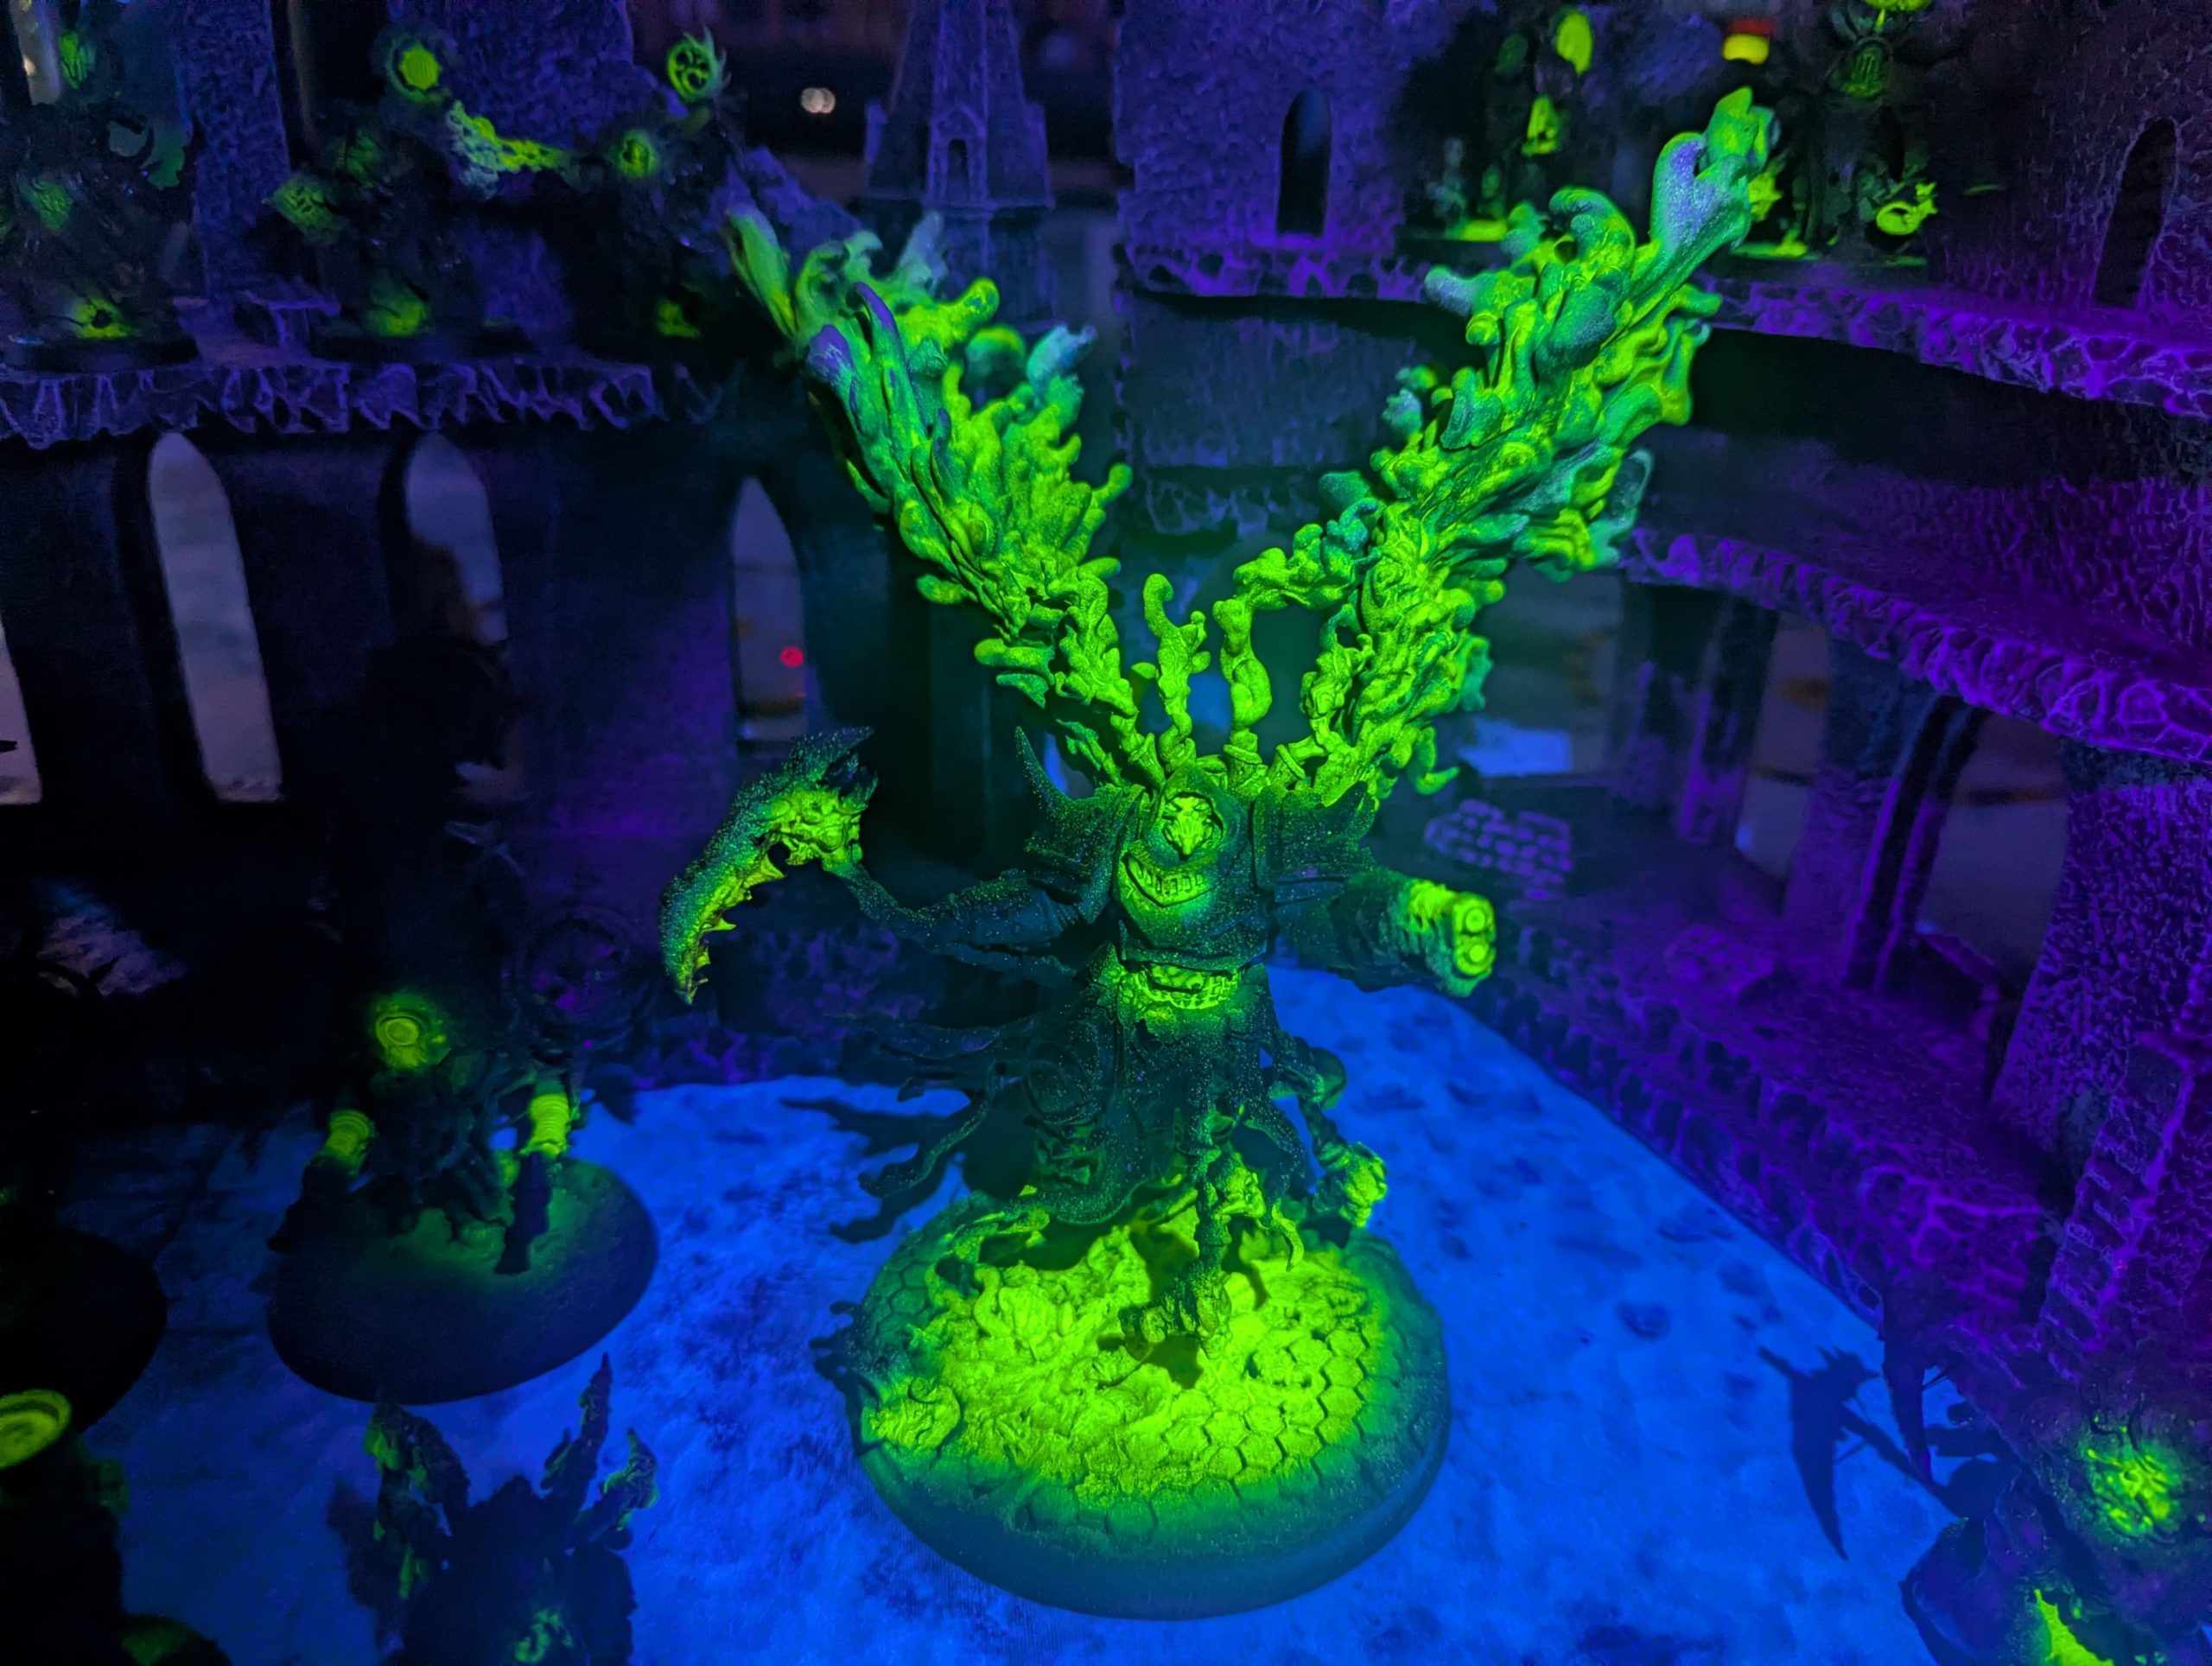
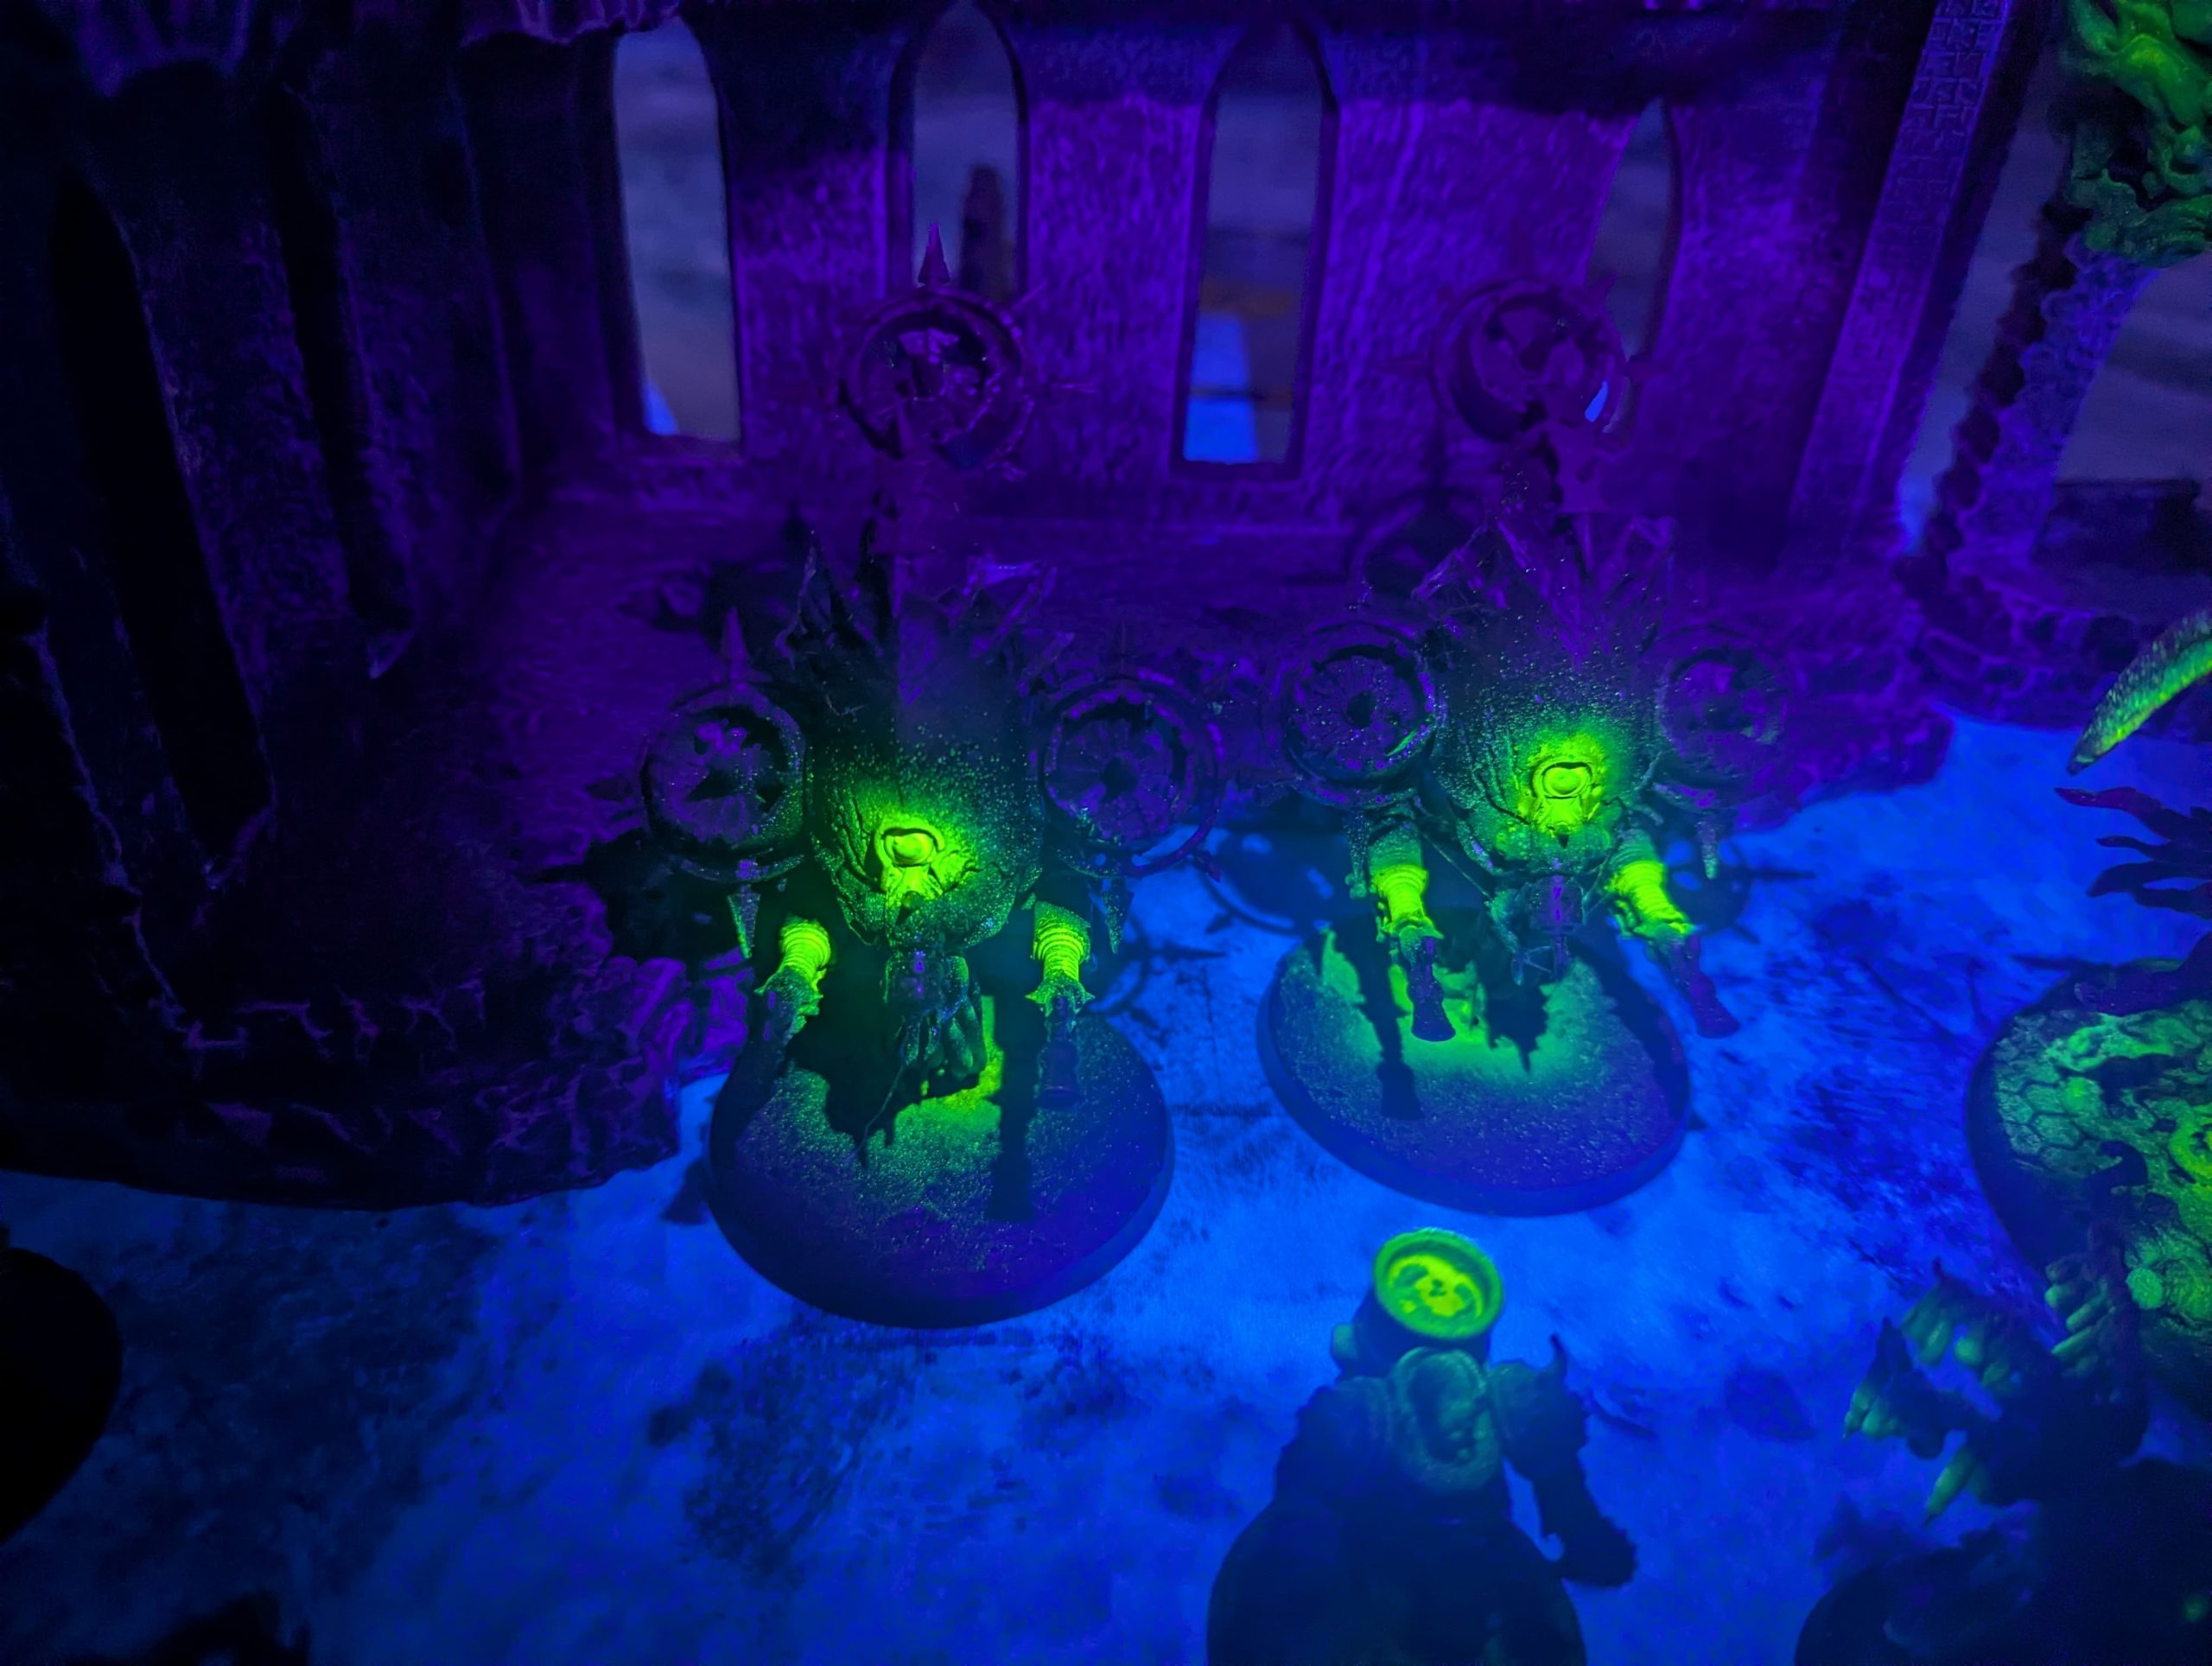
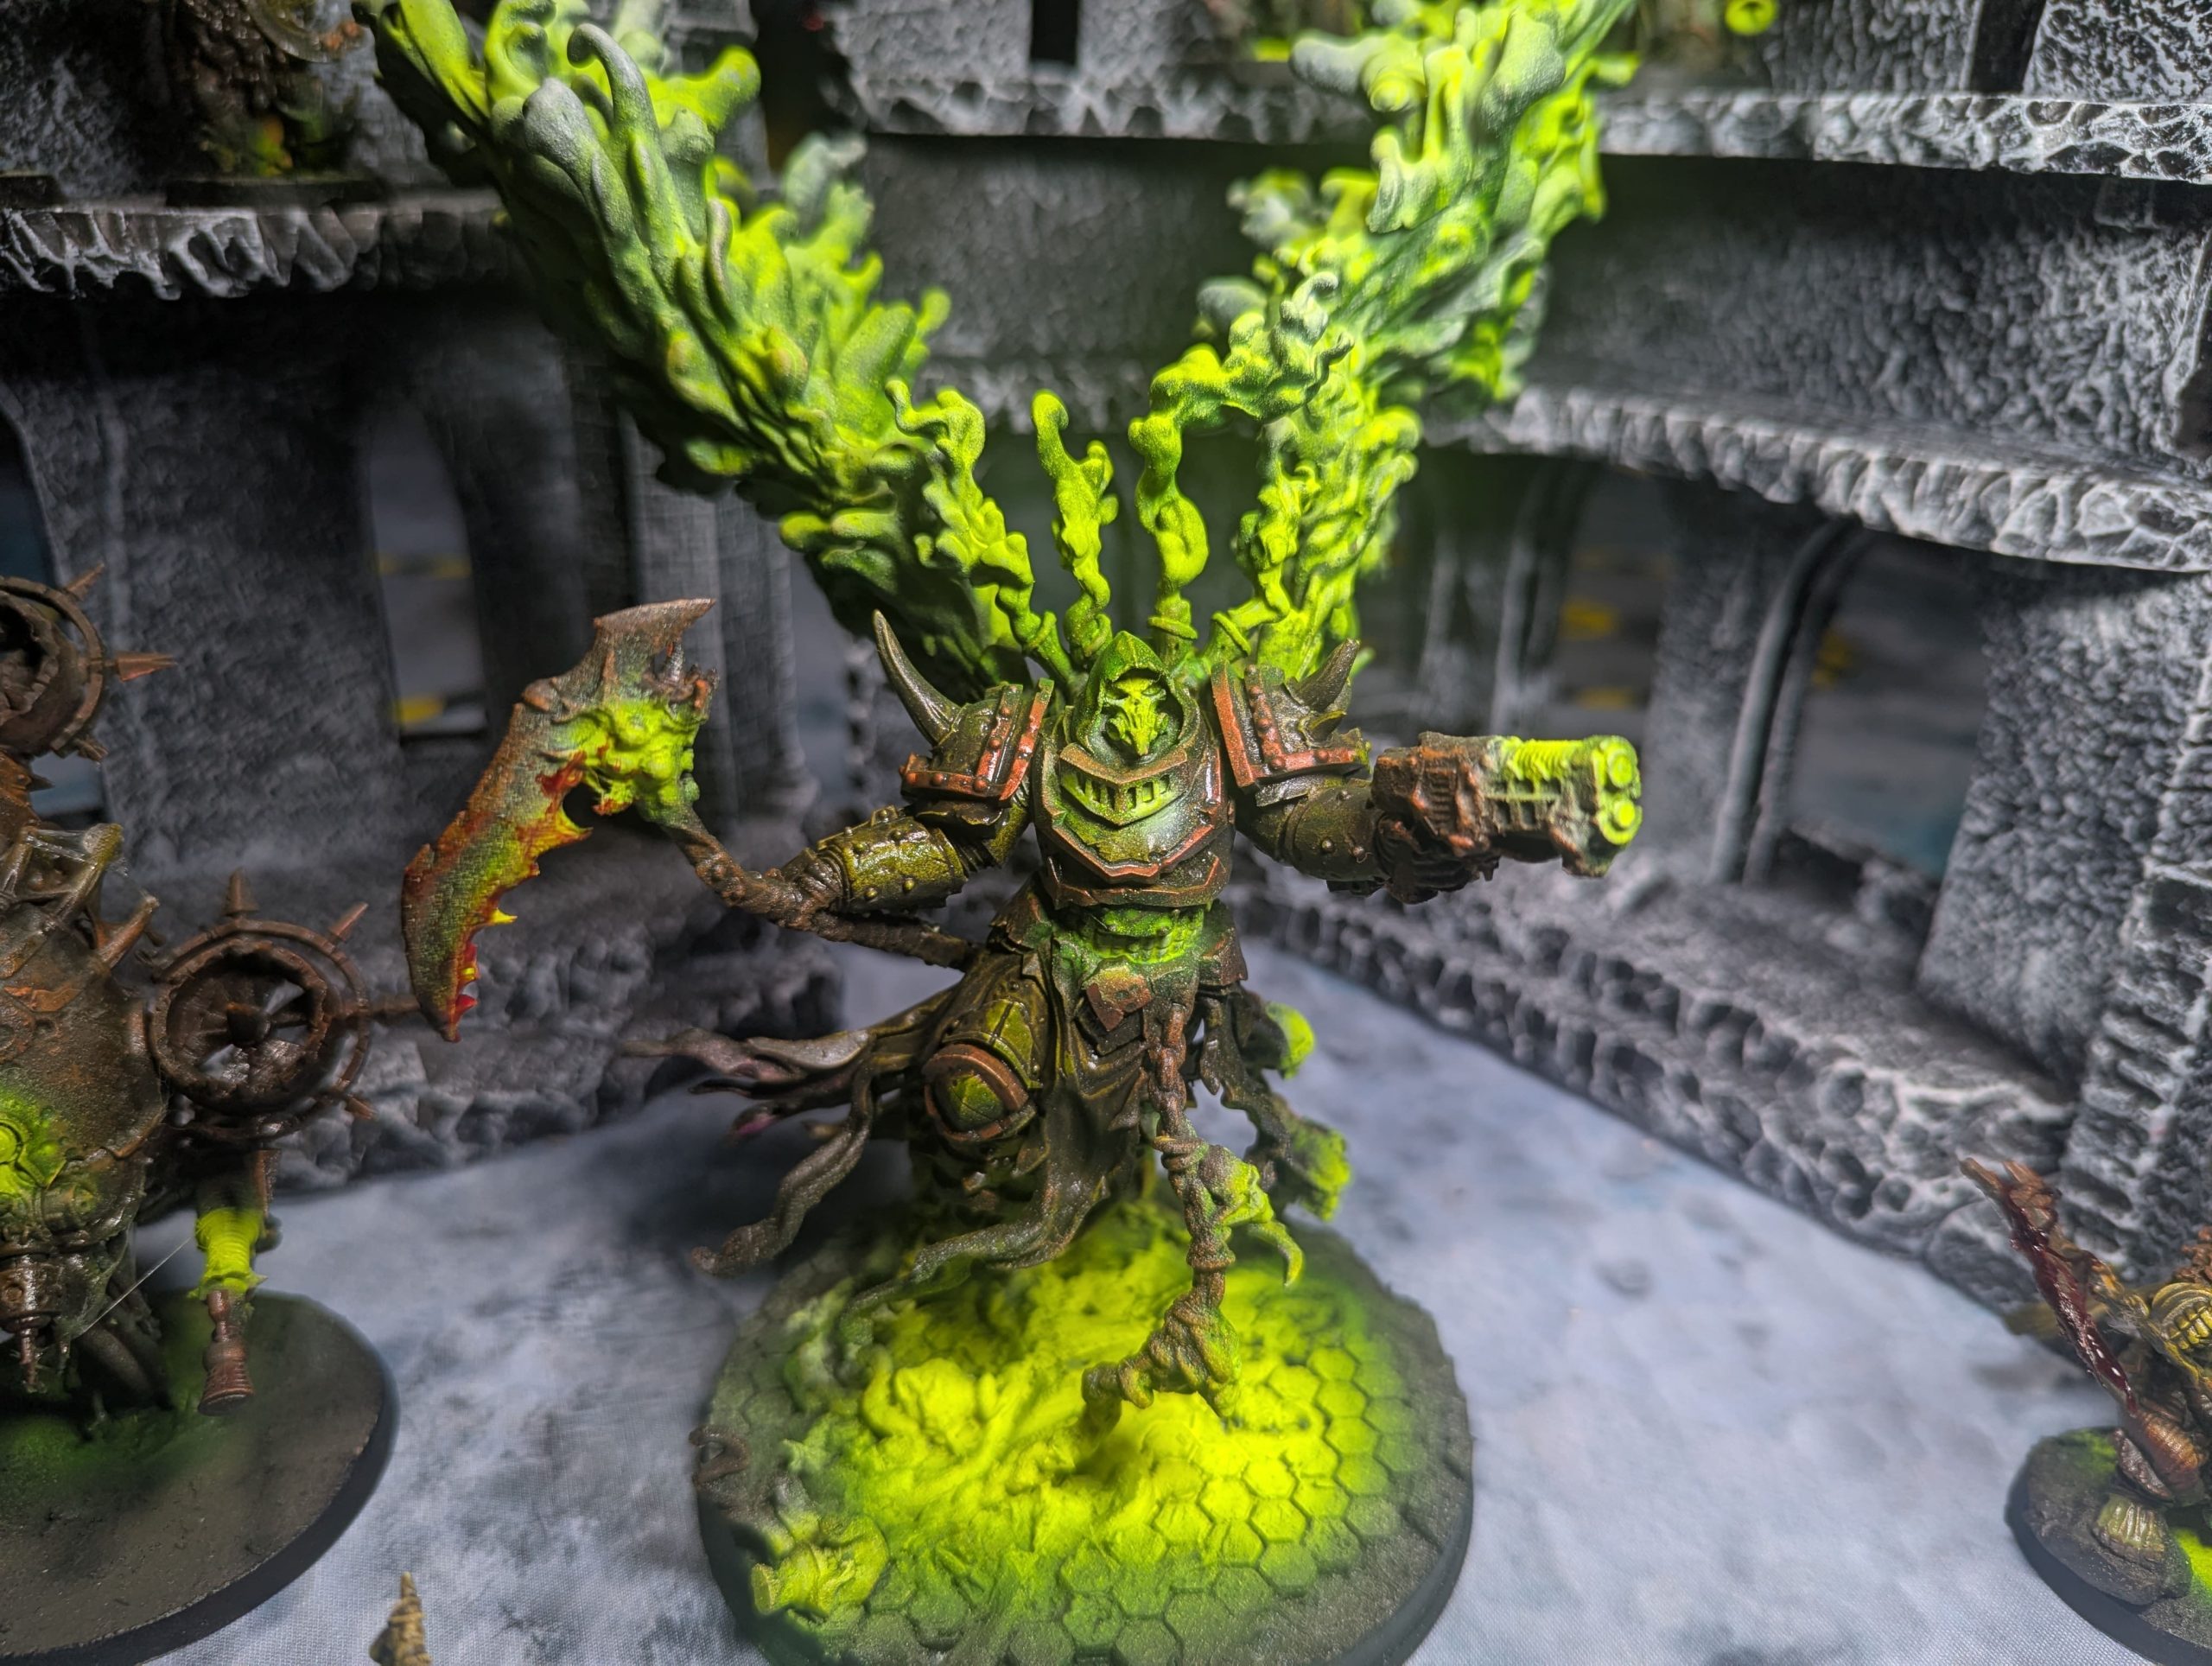
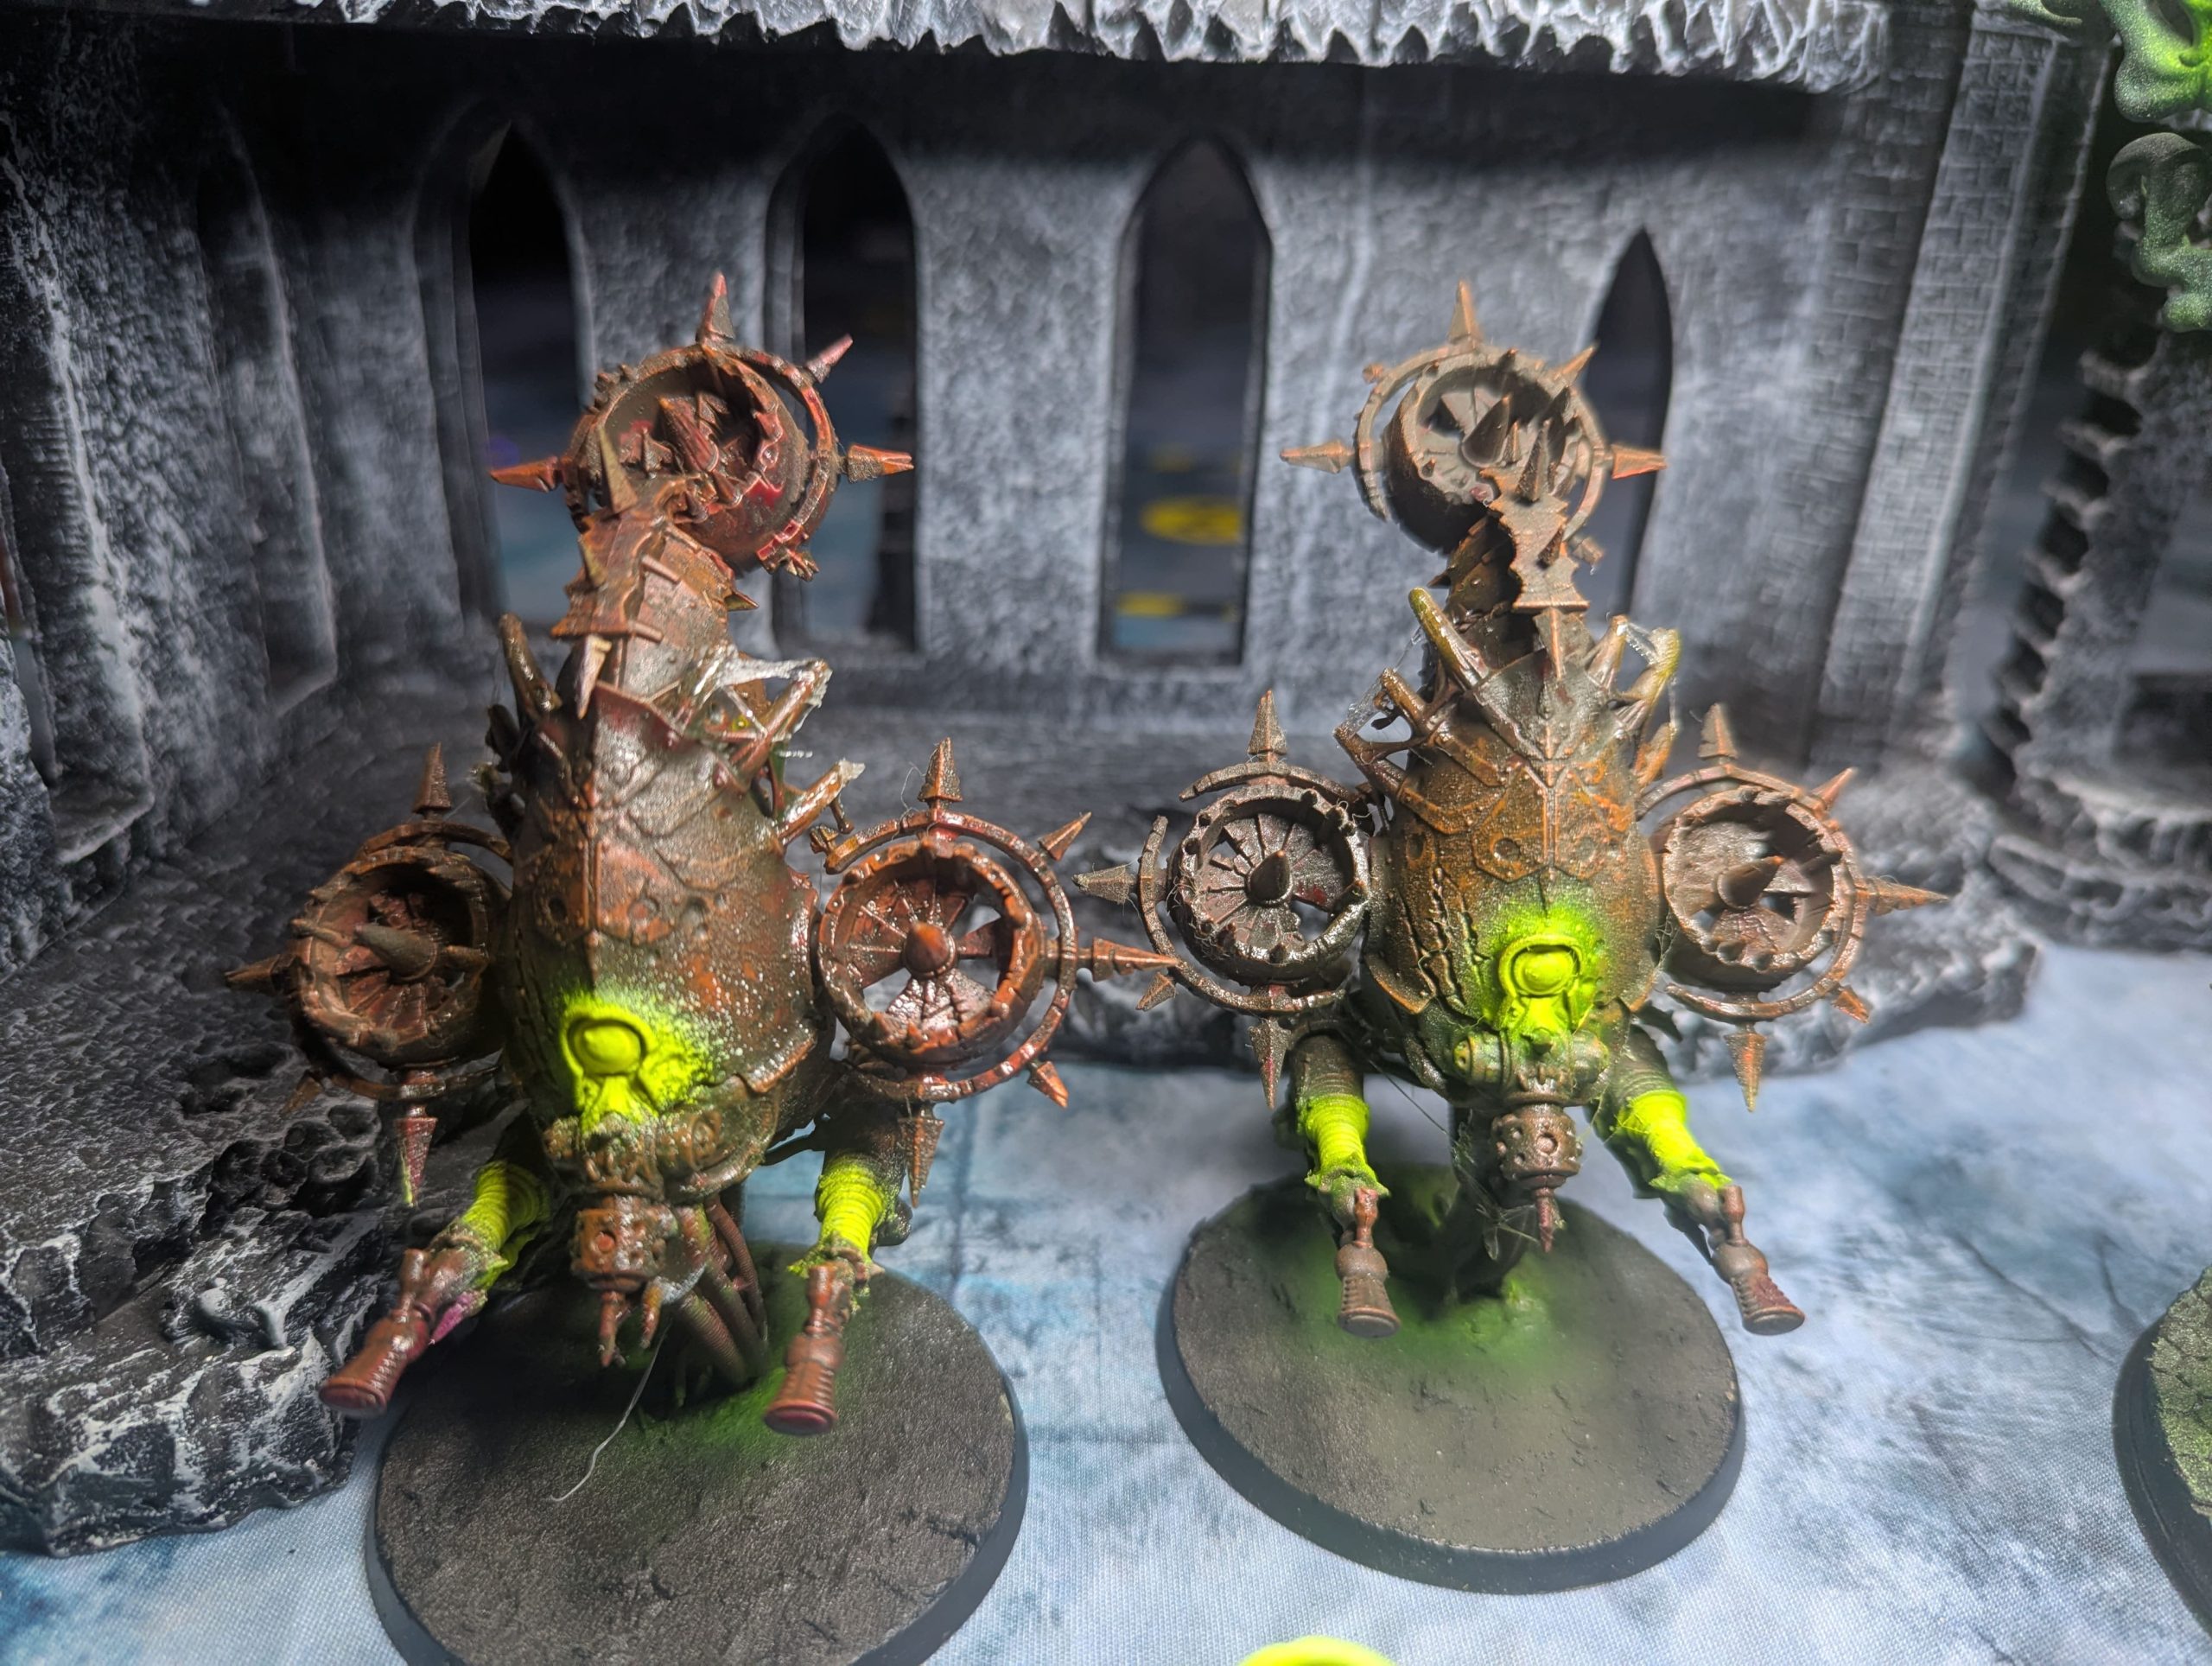
The Deathly Glow: Fluorescent Effects
This stage was dedicated to adding the supernatural, sickly horror characteristic of the Death Guard. It was time for the “fun bit”—creating the unsettling, deathly glow.
- White Ink Base: Targeted areas—tentacles, mutated flesh, or areas where warp energy was seeping out—were hit with a layer of white ink. This provided an opaque, reflective base for the fluorescent layer.
- Fluorescent Green: Over the white ink, I applied a fluorescent green paint. This technique ensures that the areas possess a sickly, unnatural glow in regular light, and under a black light (UV light), the effect becomes intensely luminous, giving the entire army a terrifying, rotten phosphorescence.
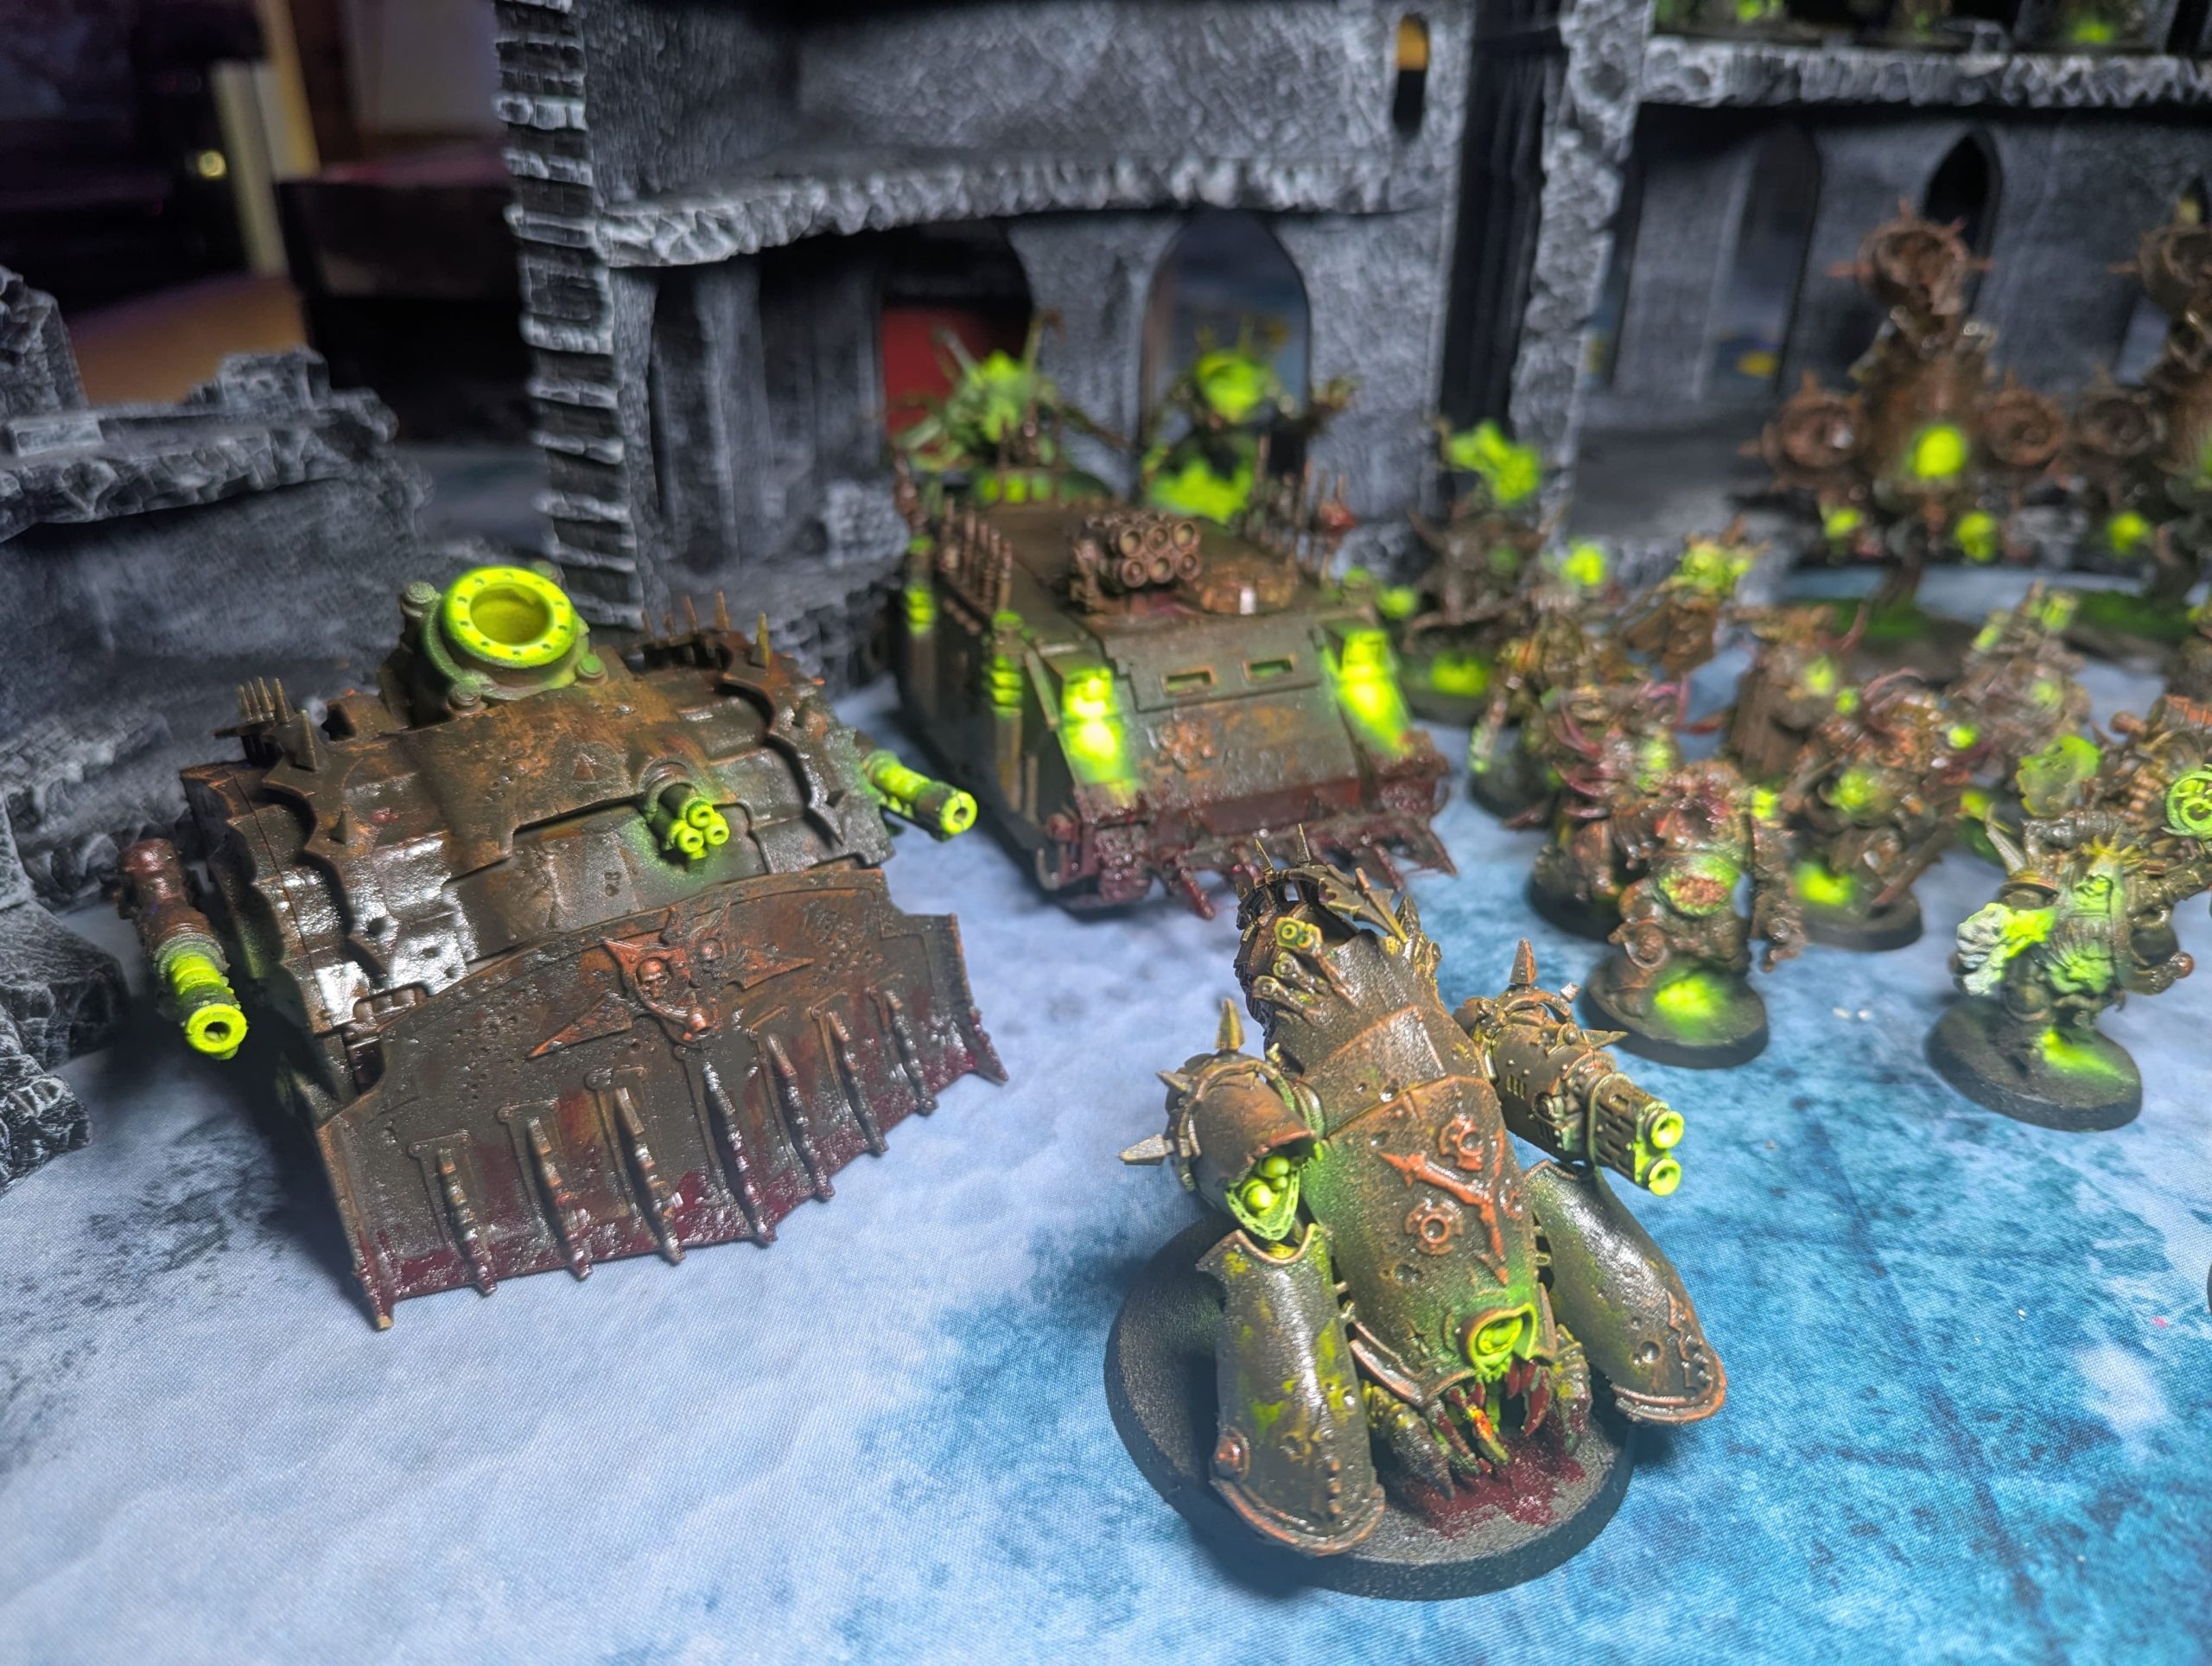
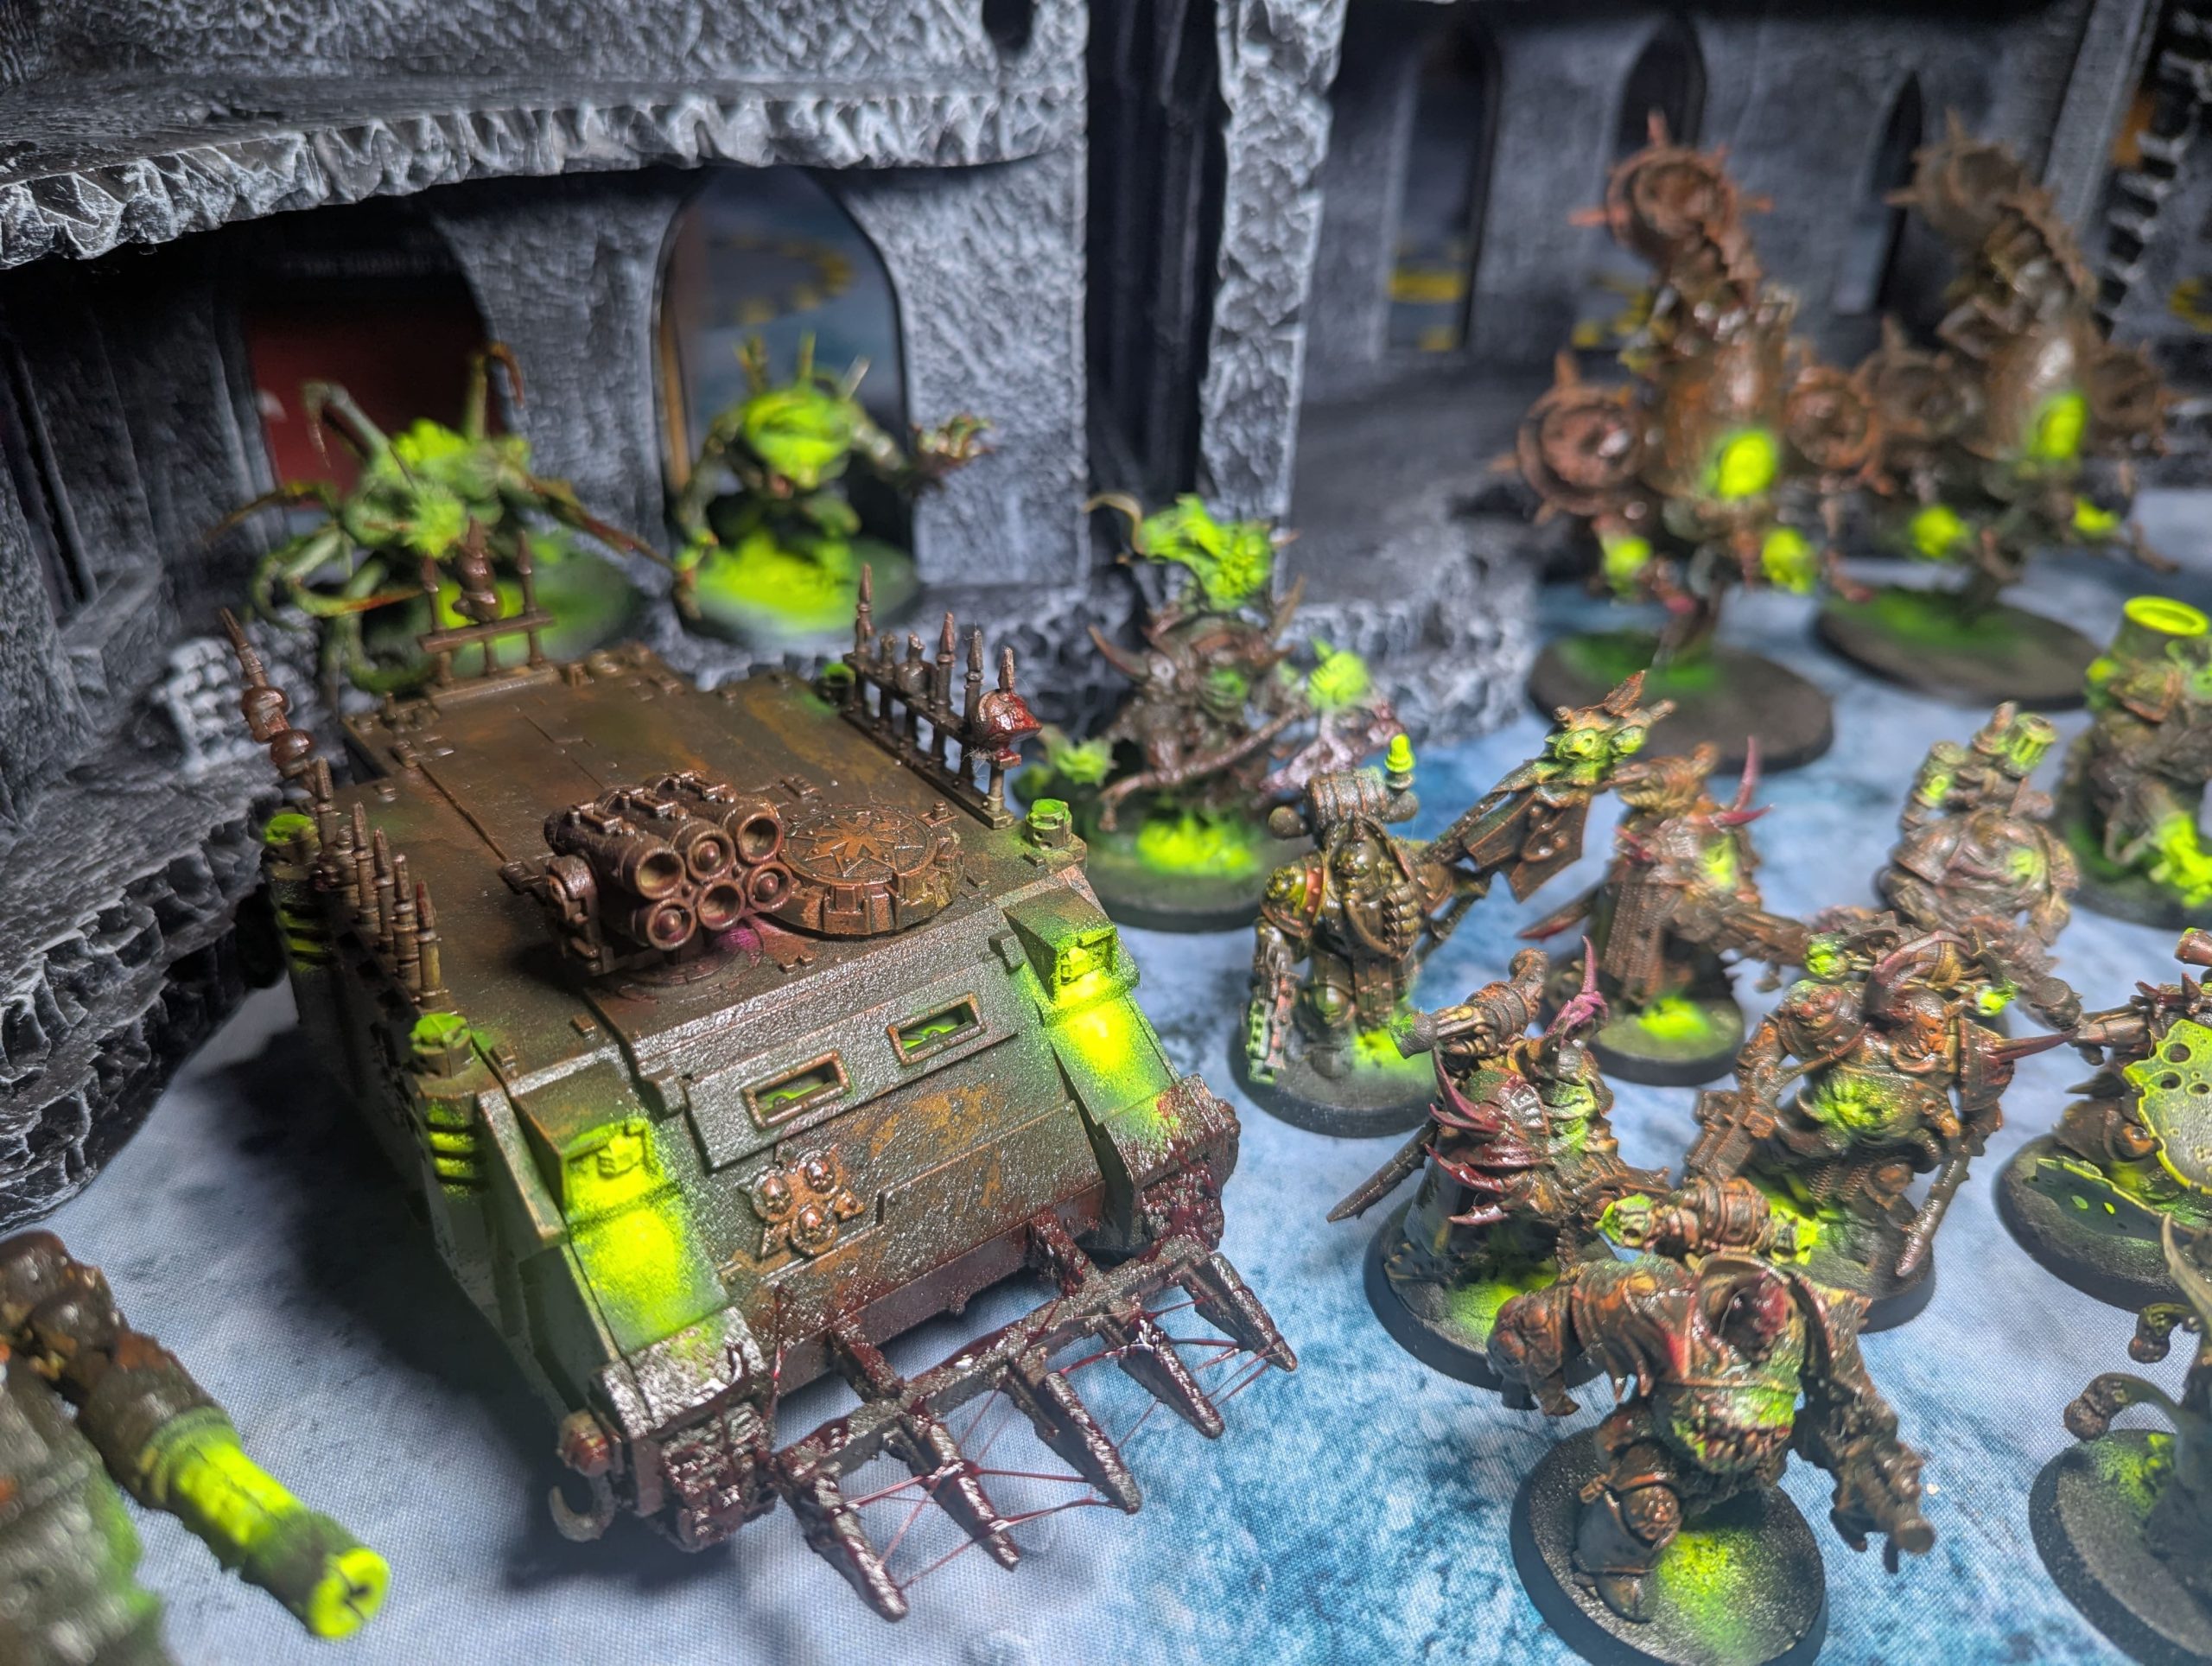
The Finishing Filth: Texture and Wetness
The very final stage was pure enjoyment—the application of the texture effects that truly sell the army’s disgusting nature. I enthusiastically deployed a range of gross effect paints: specialised products for blood spatter, oozing snot, crusting rust, and sticky slime. These were dabbed and applied to weapons, joints, and wounds to complete the illusion of a wet, infectious, and decaying force.
The Final Result
I am genuinely thrilled with the final look of this army. The speed painting techniques delivered a unified, high-impact force, and the relentless application of grime and effects achieved the exact grim dark look I had been chasing. I made the deliberate decision to retain a gloss varnish finish on various parts, as this subtle shine is crucial to maintaining the visual illusion of the “wet, gross look”—the oil and mucus that perpetually coat the Death Guard in a sheen of pestilence. This project was a perfect marriage of efficient painting and unbridled aesthetic commitment to the truly corrupted.
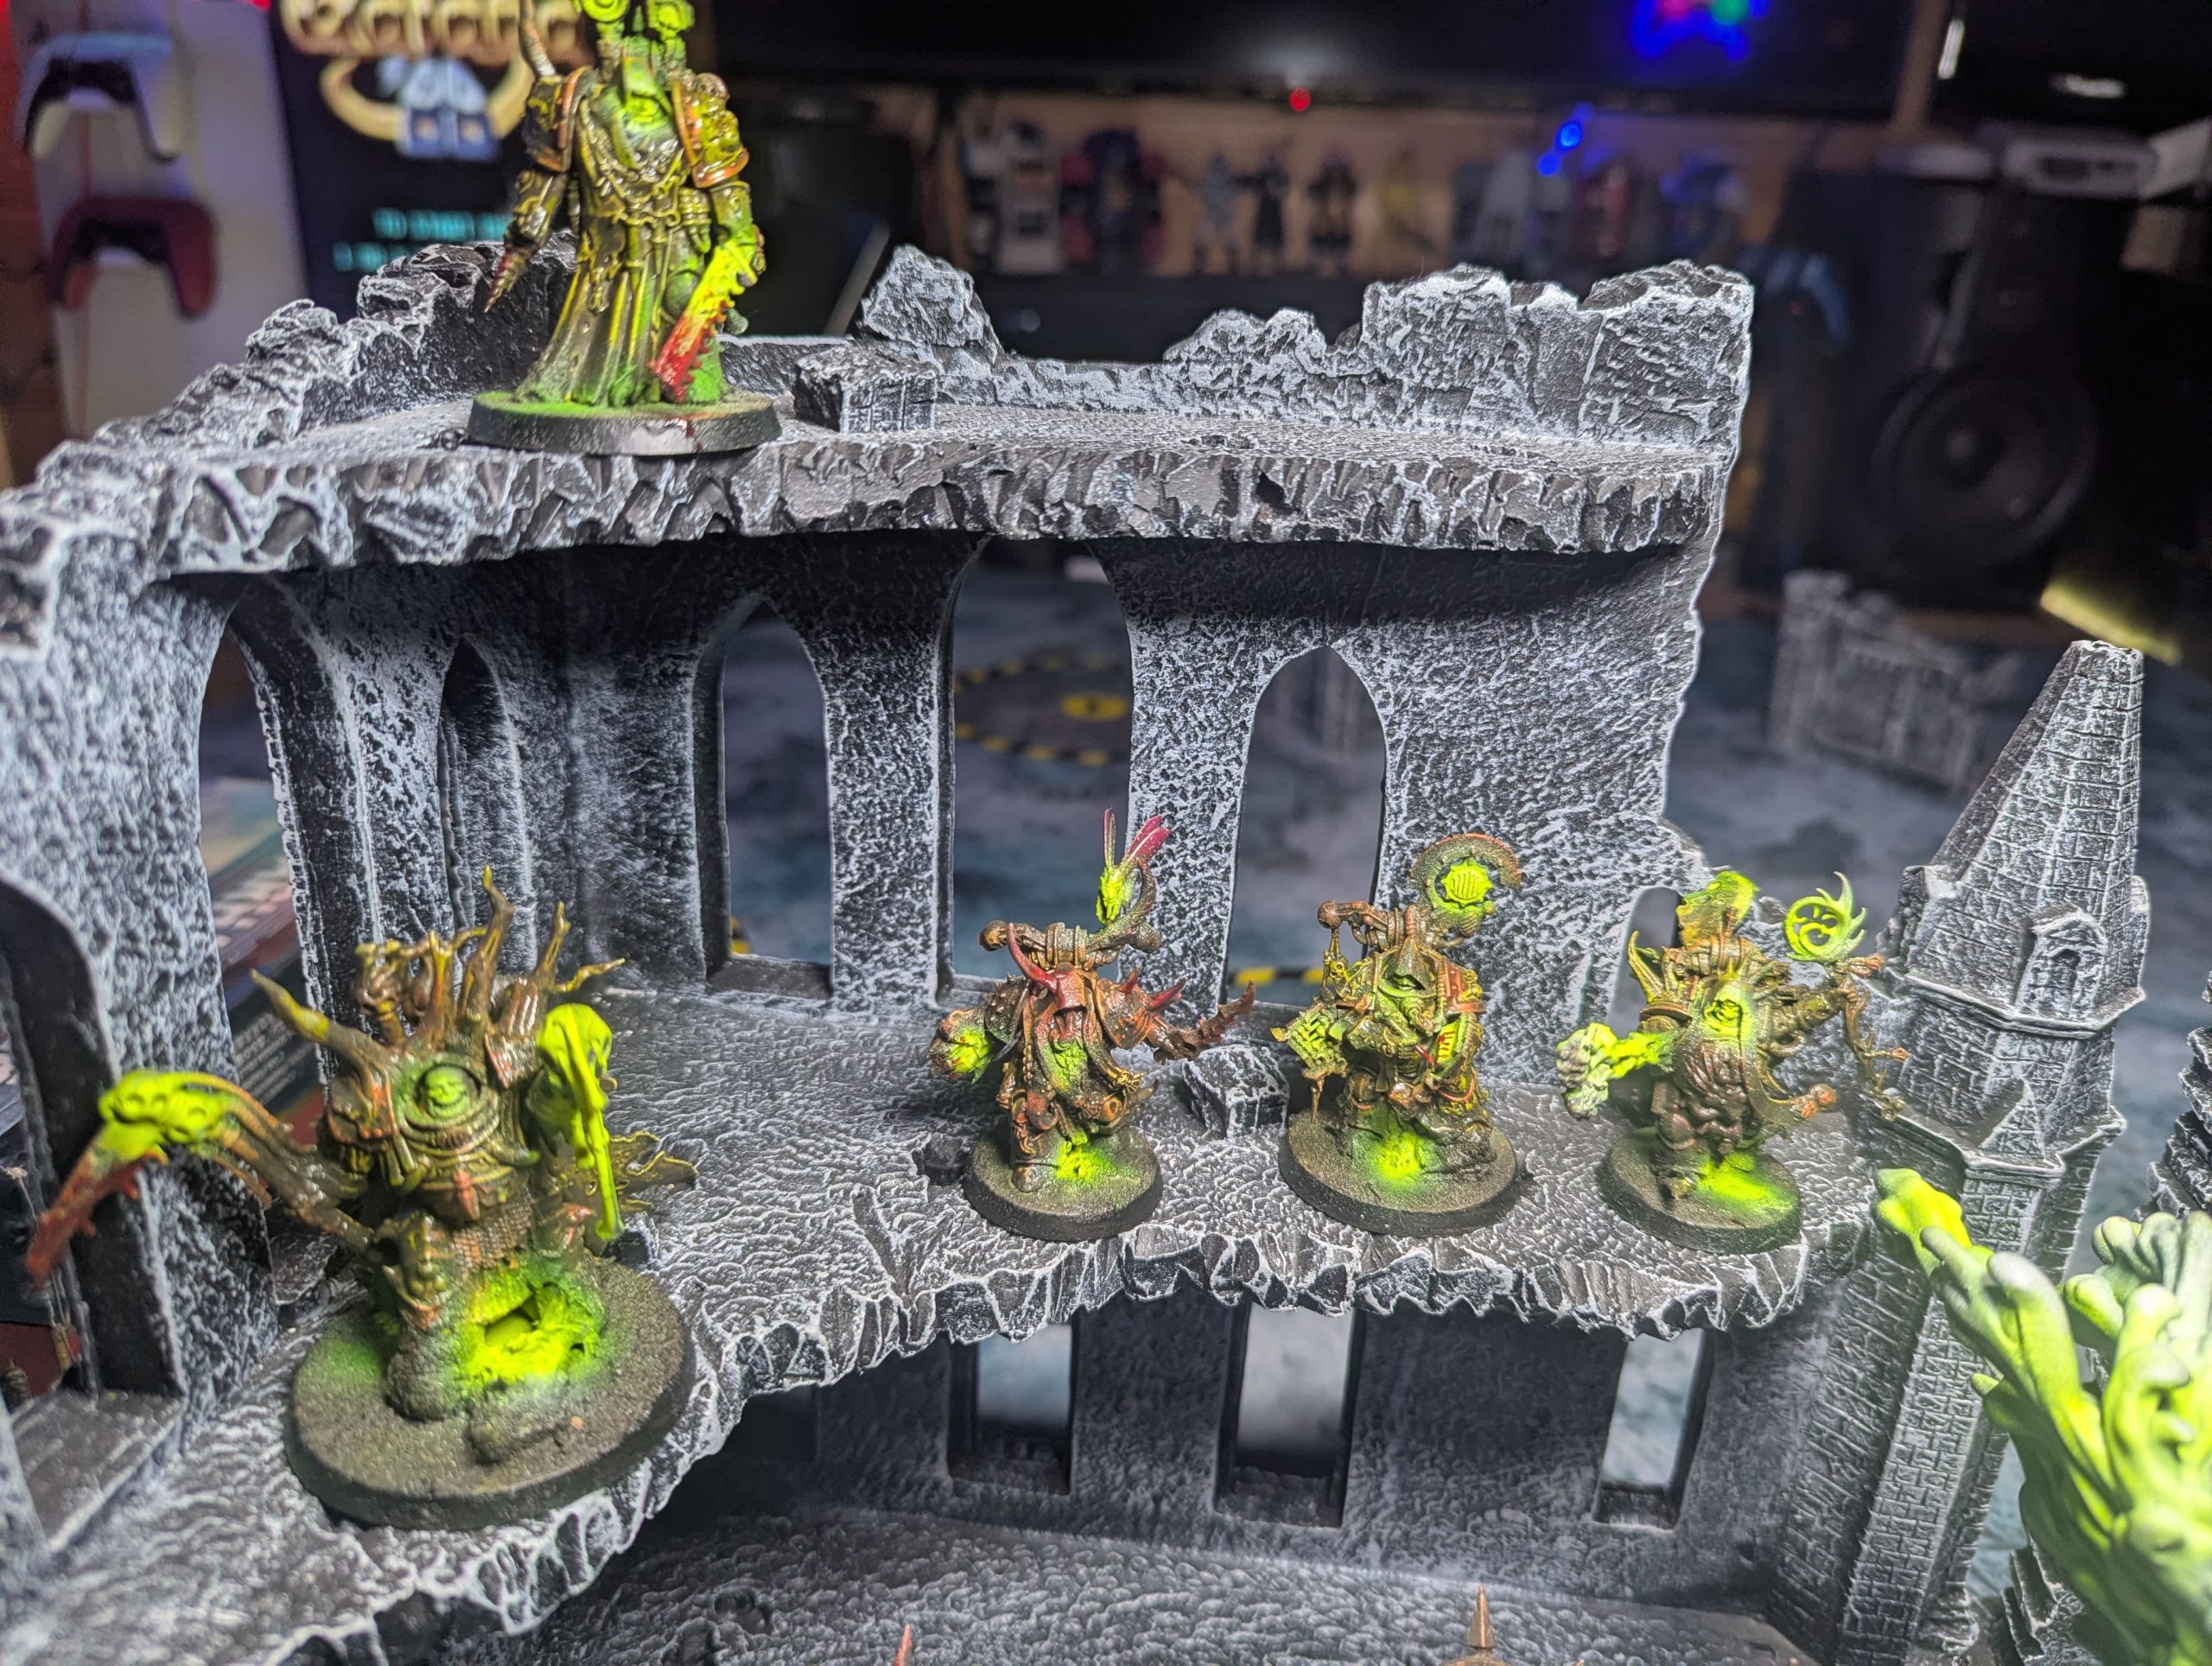
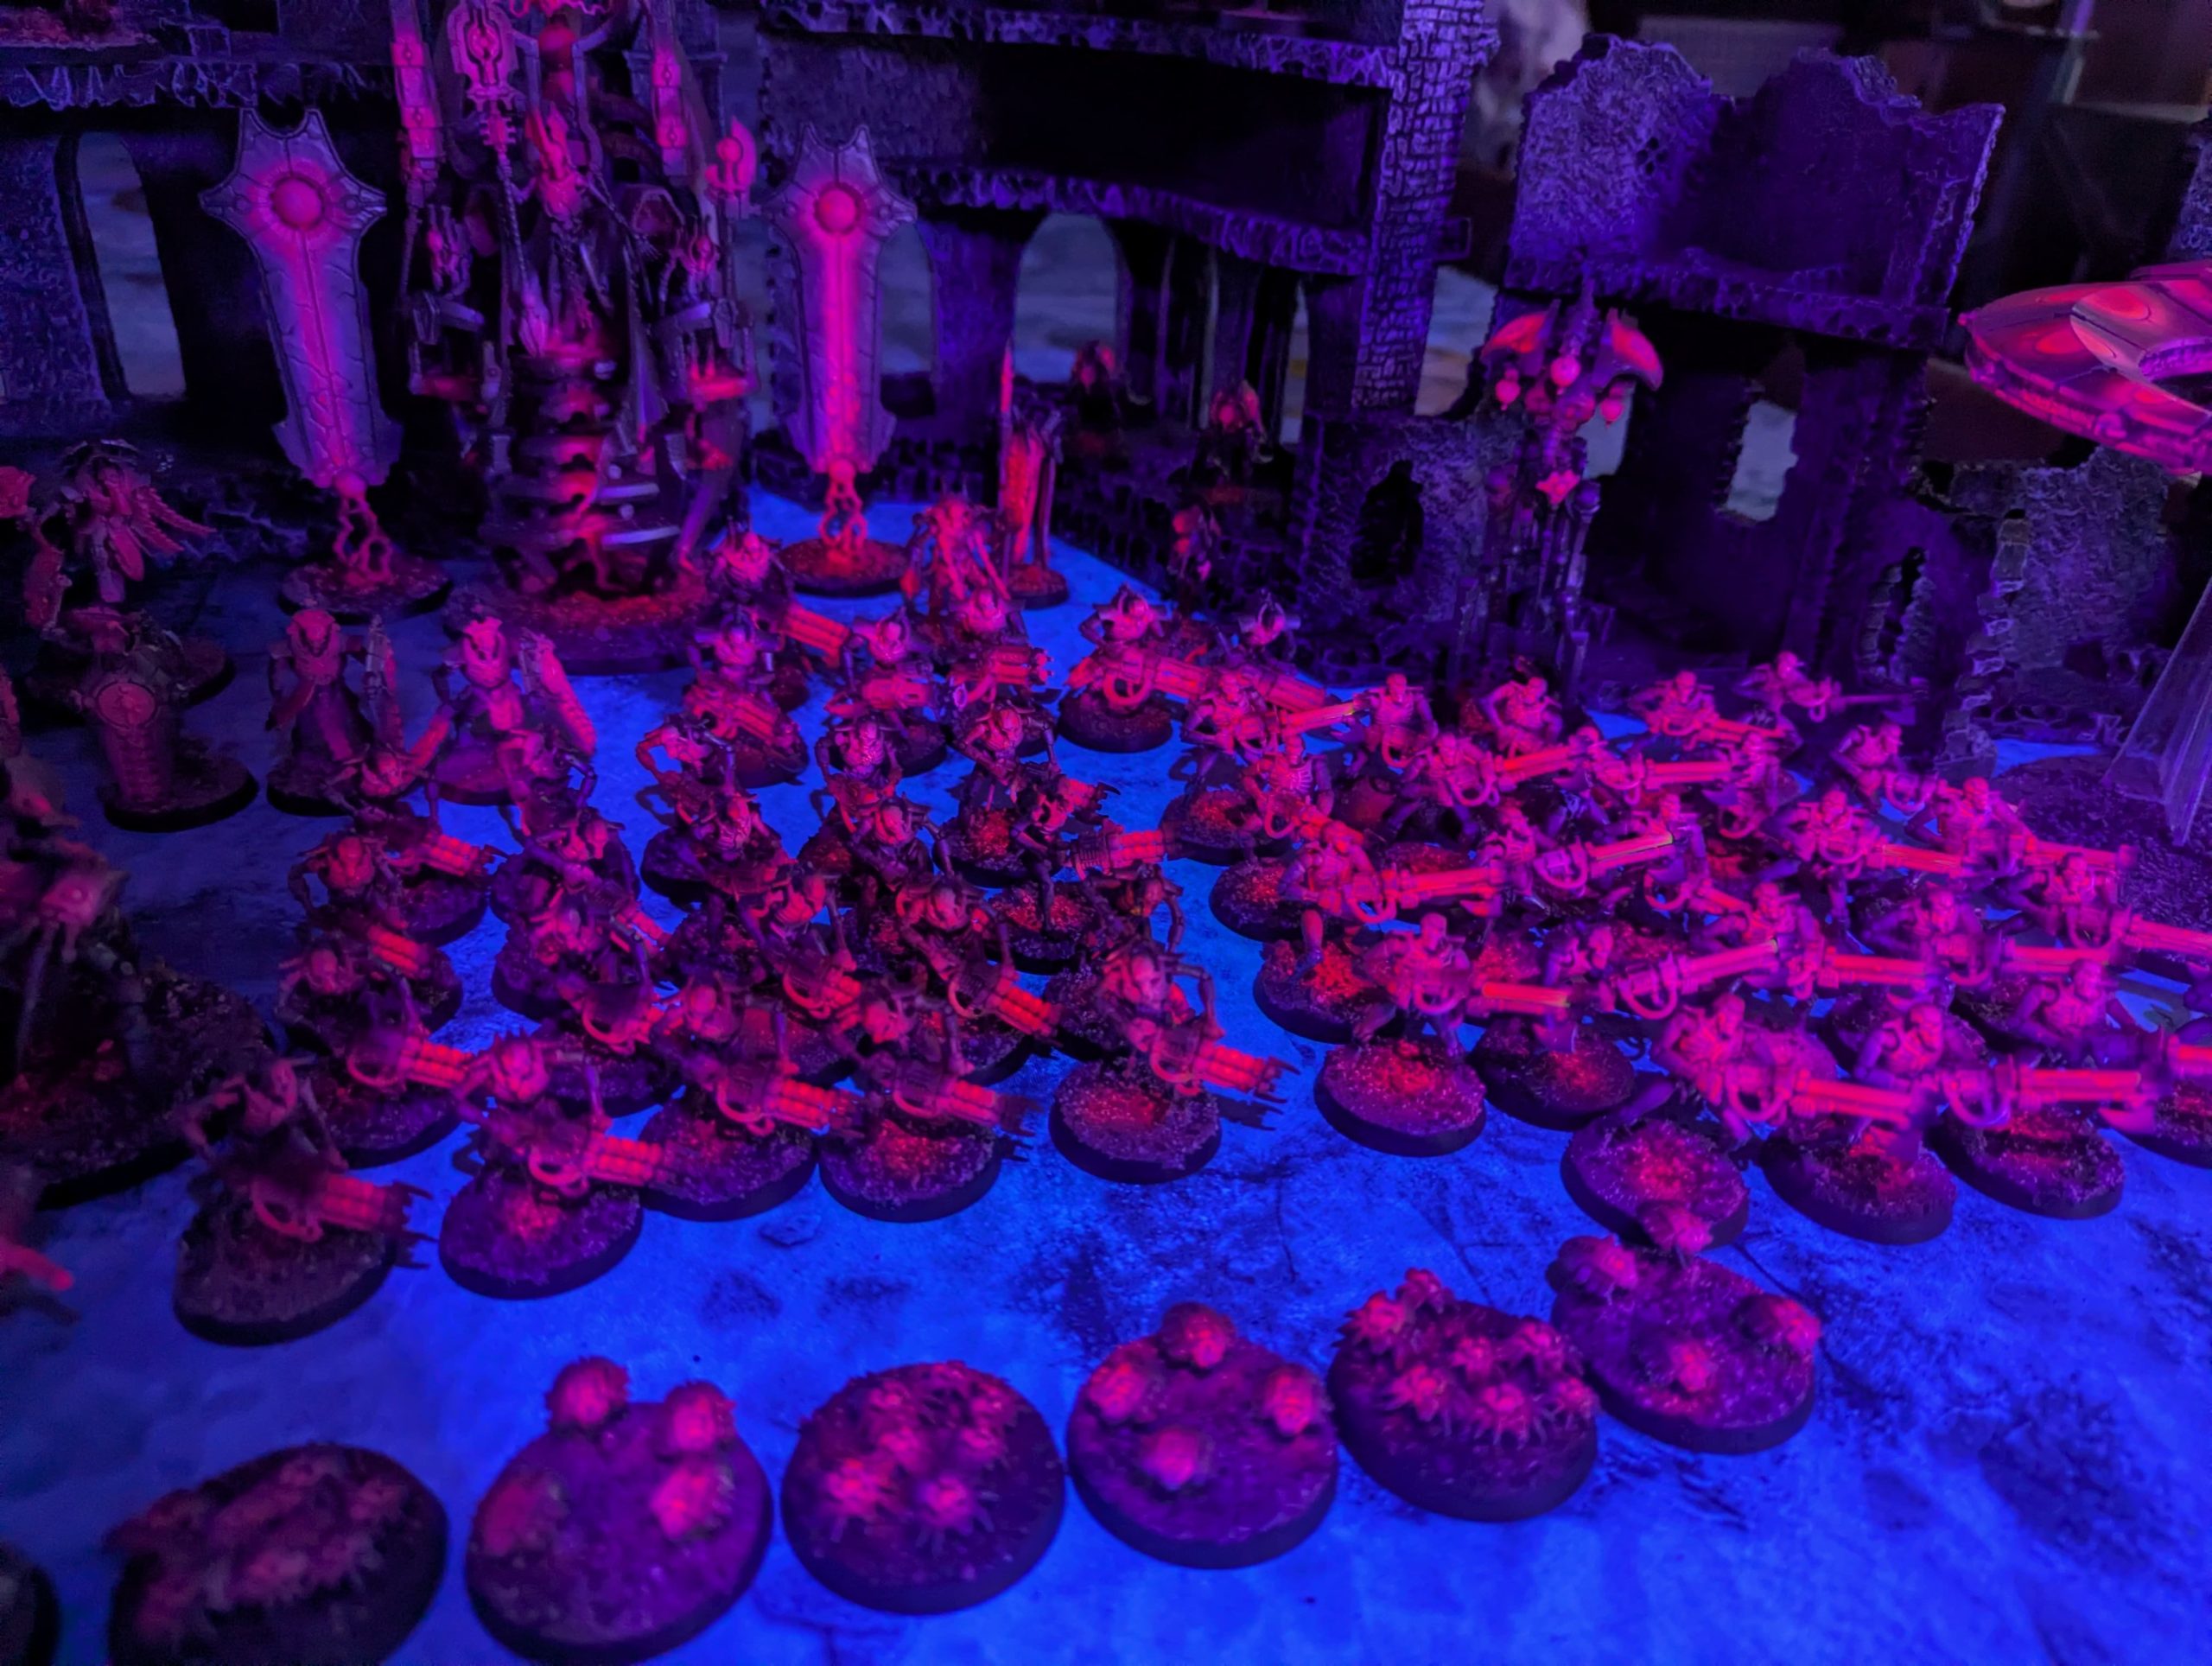
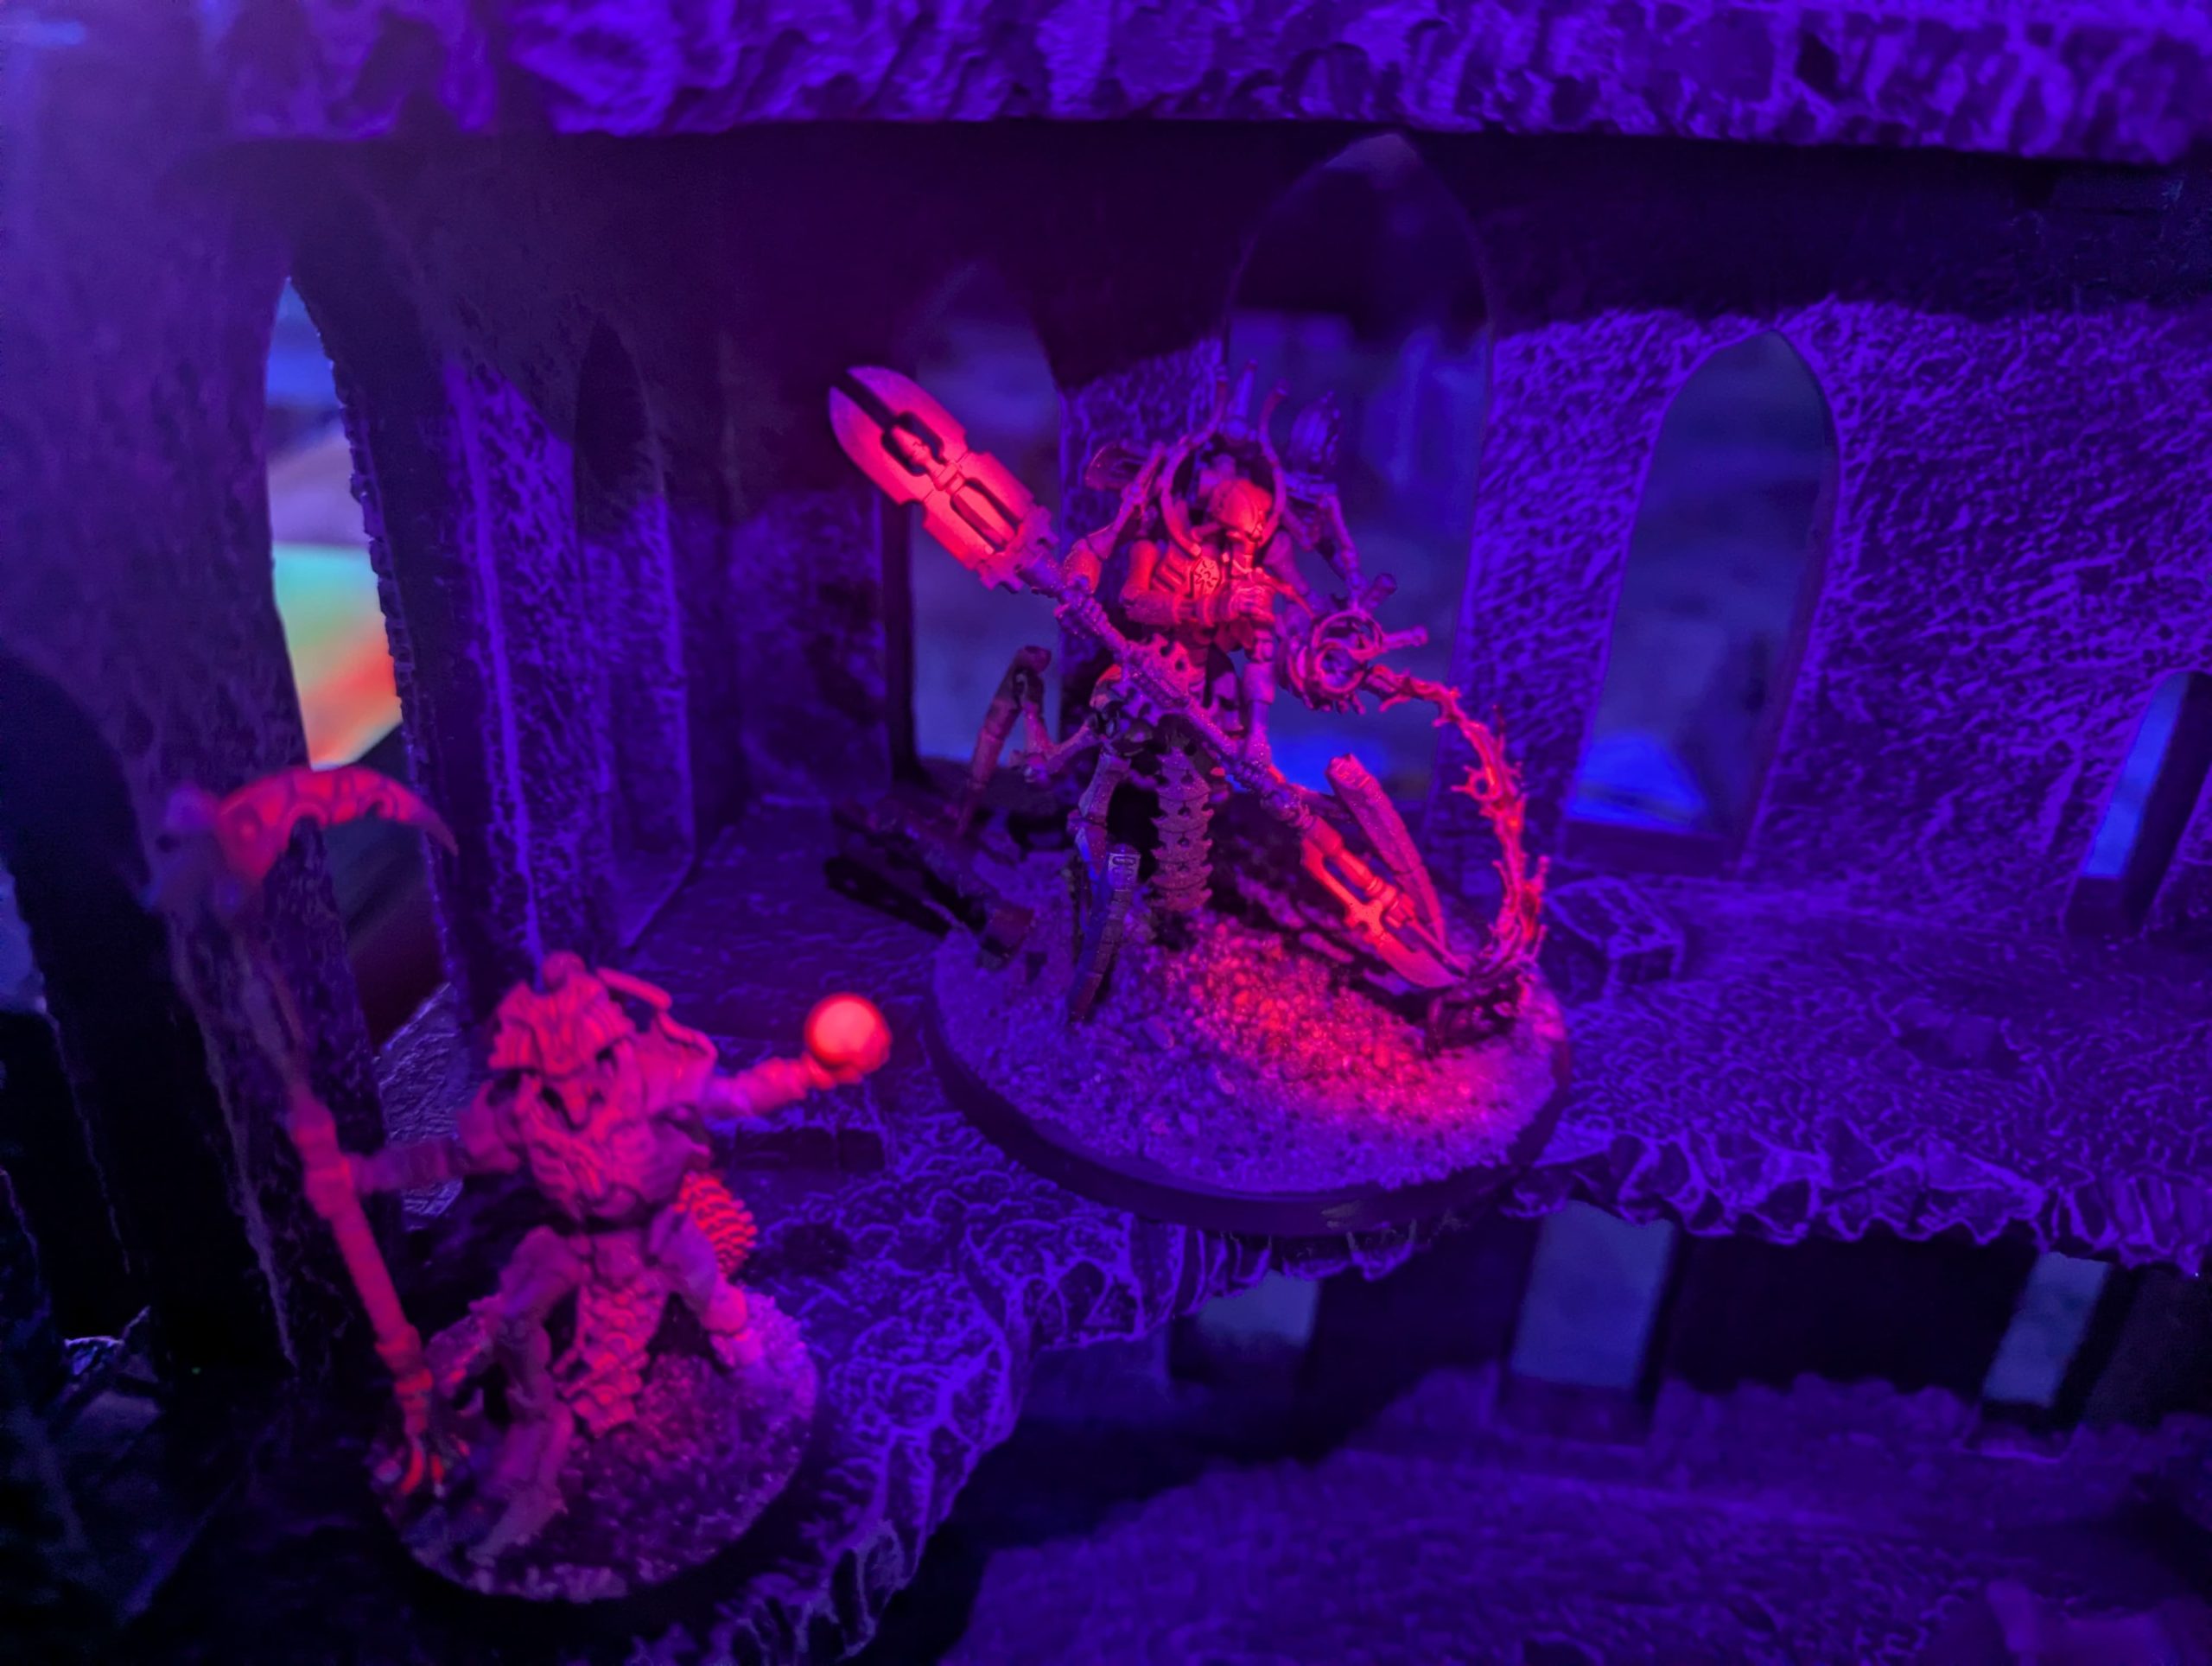
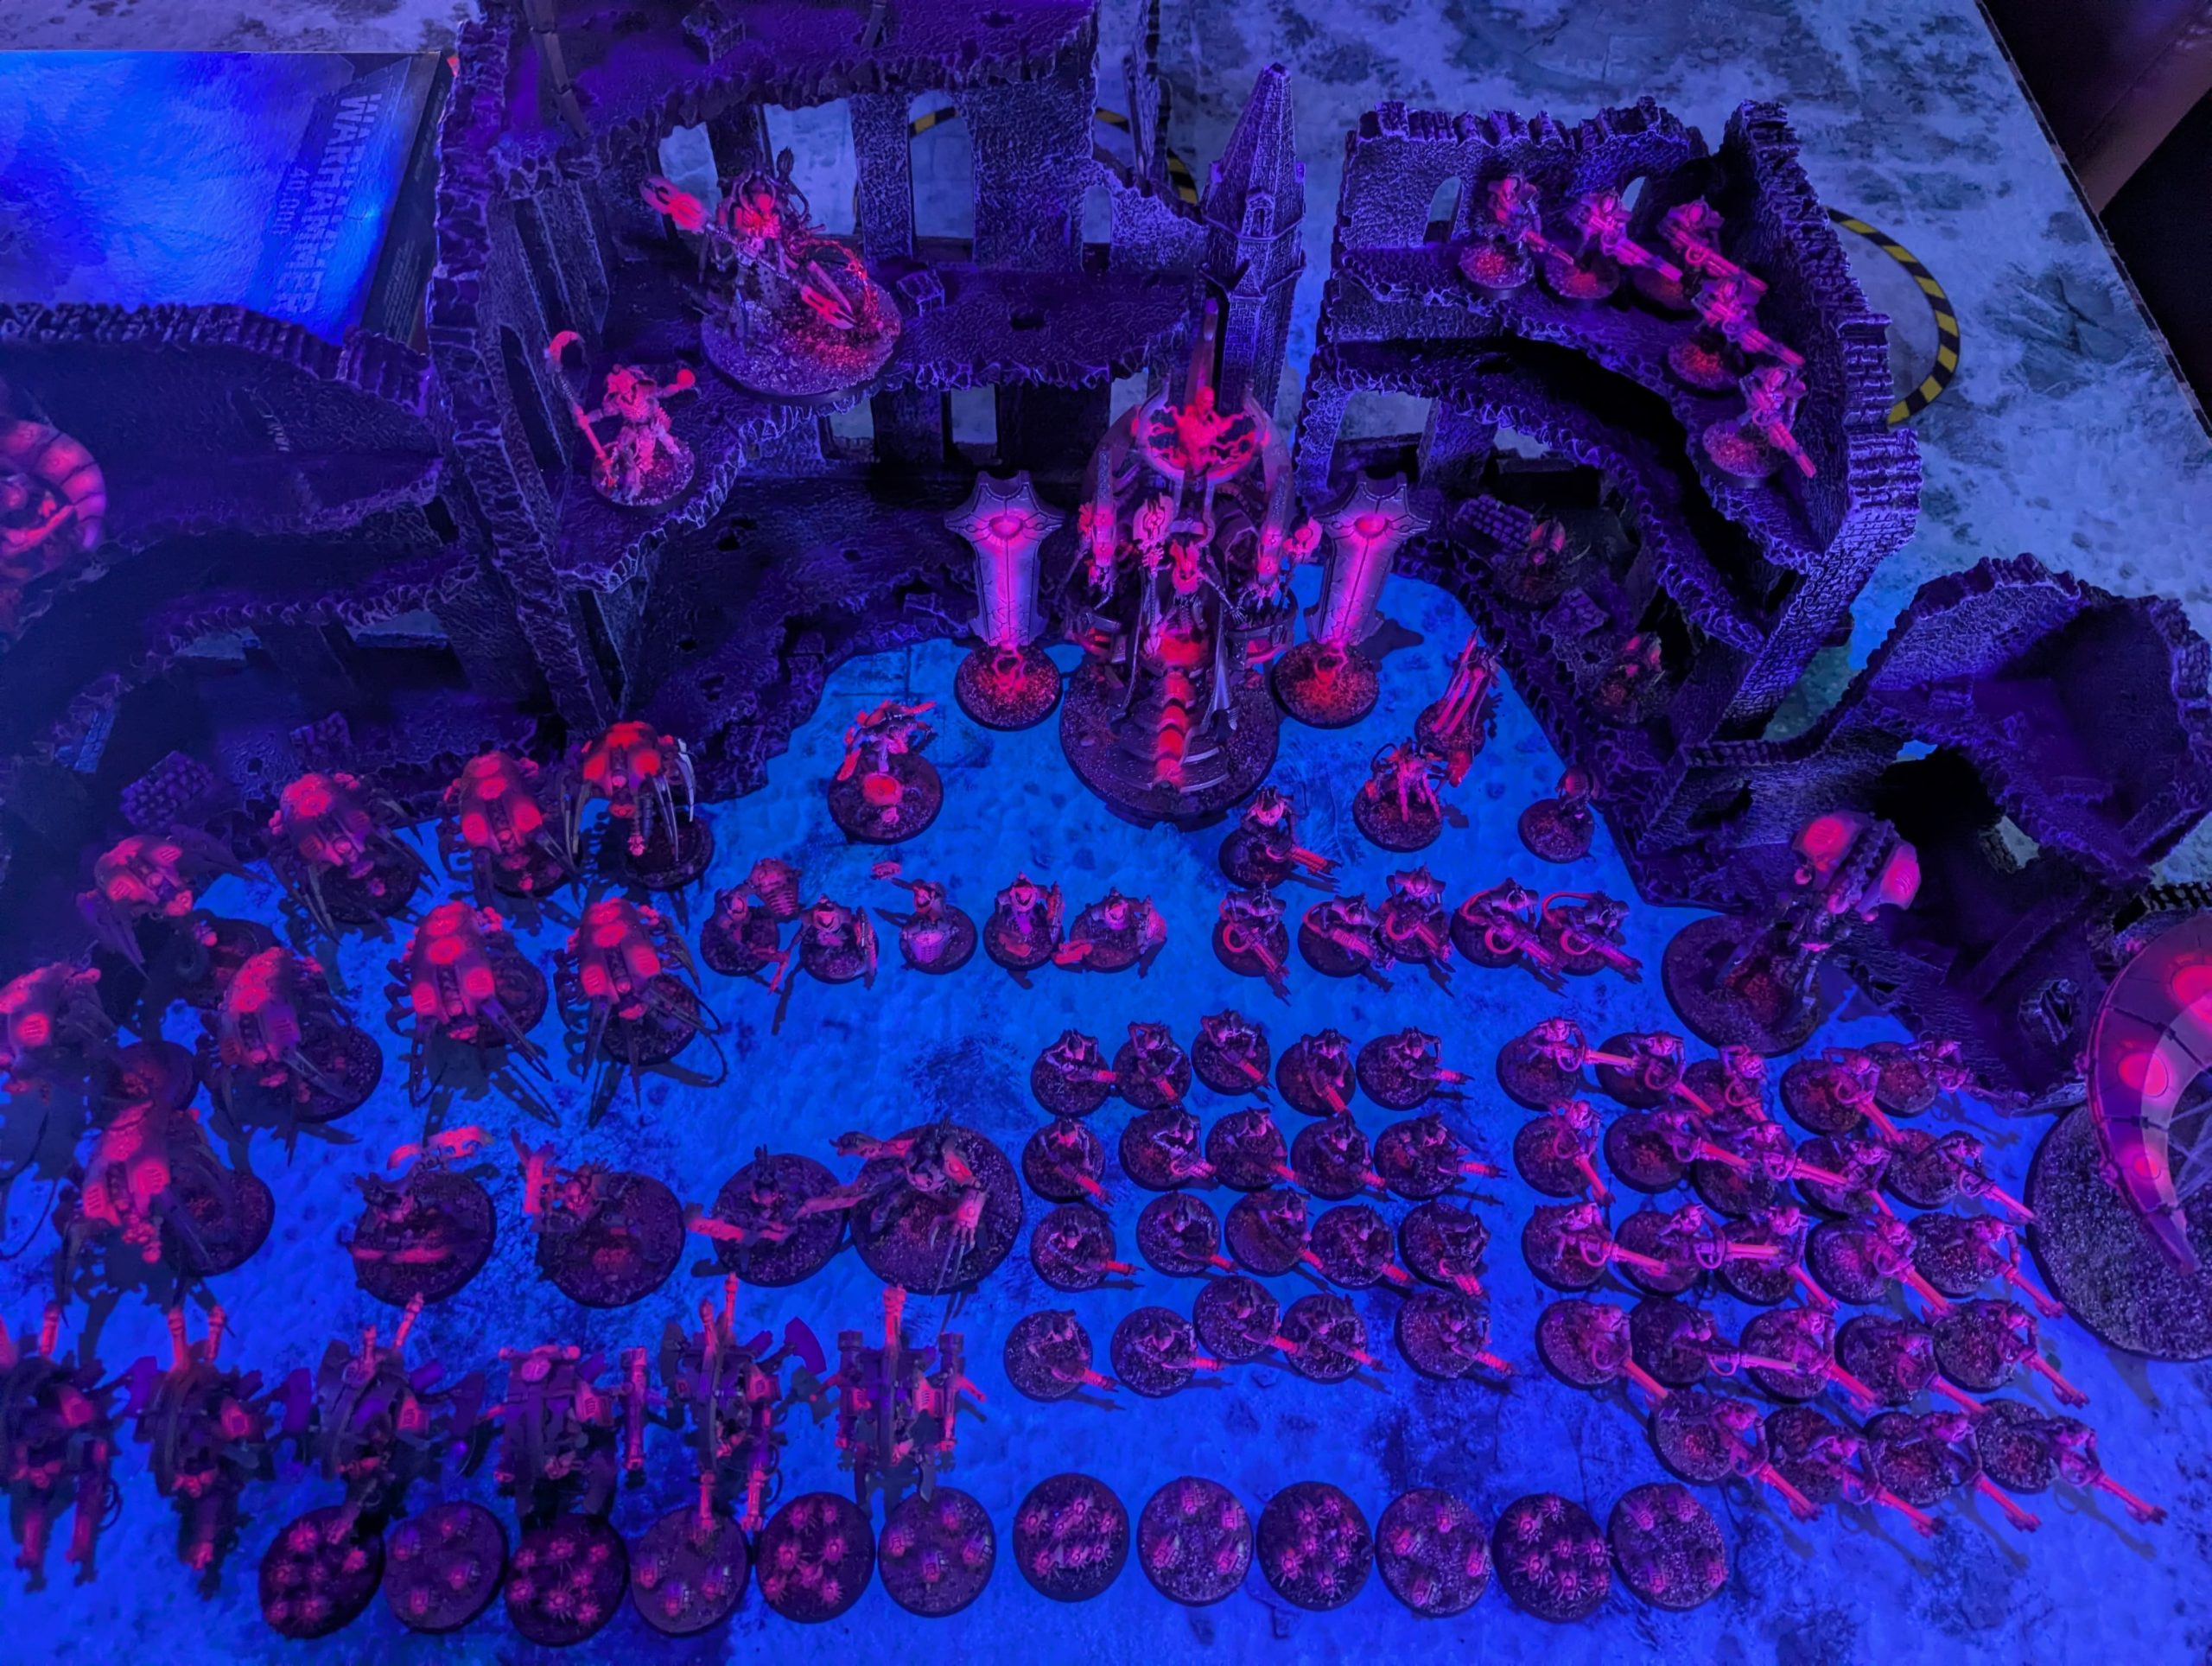
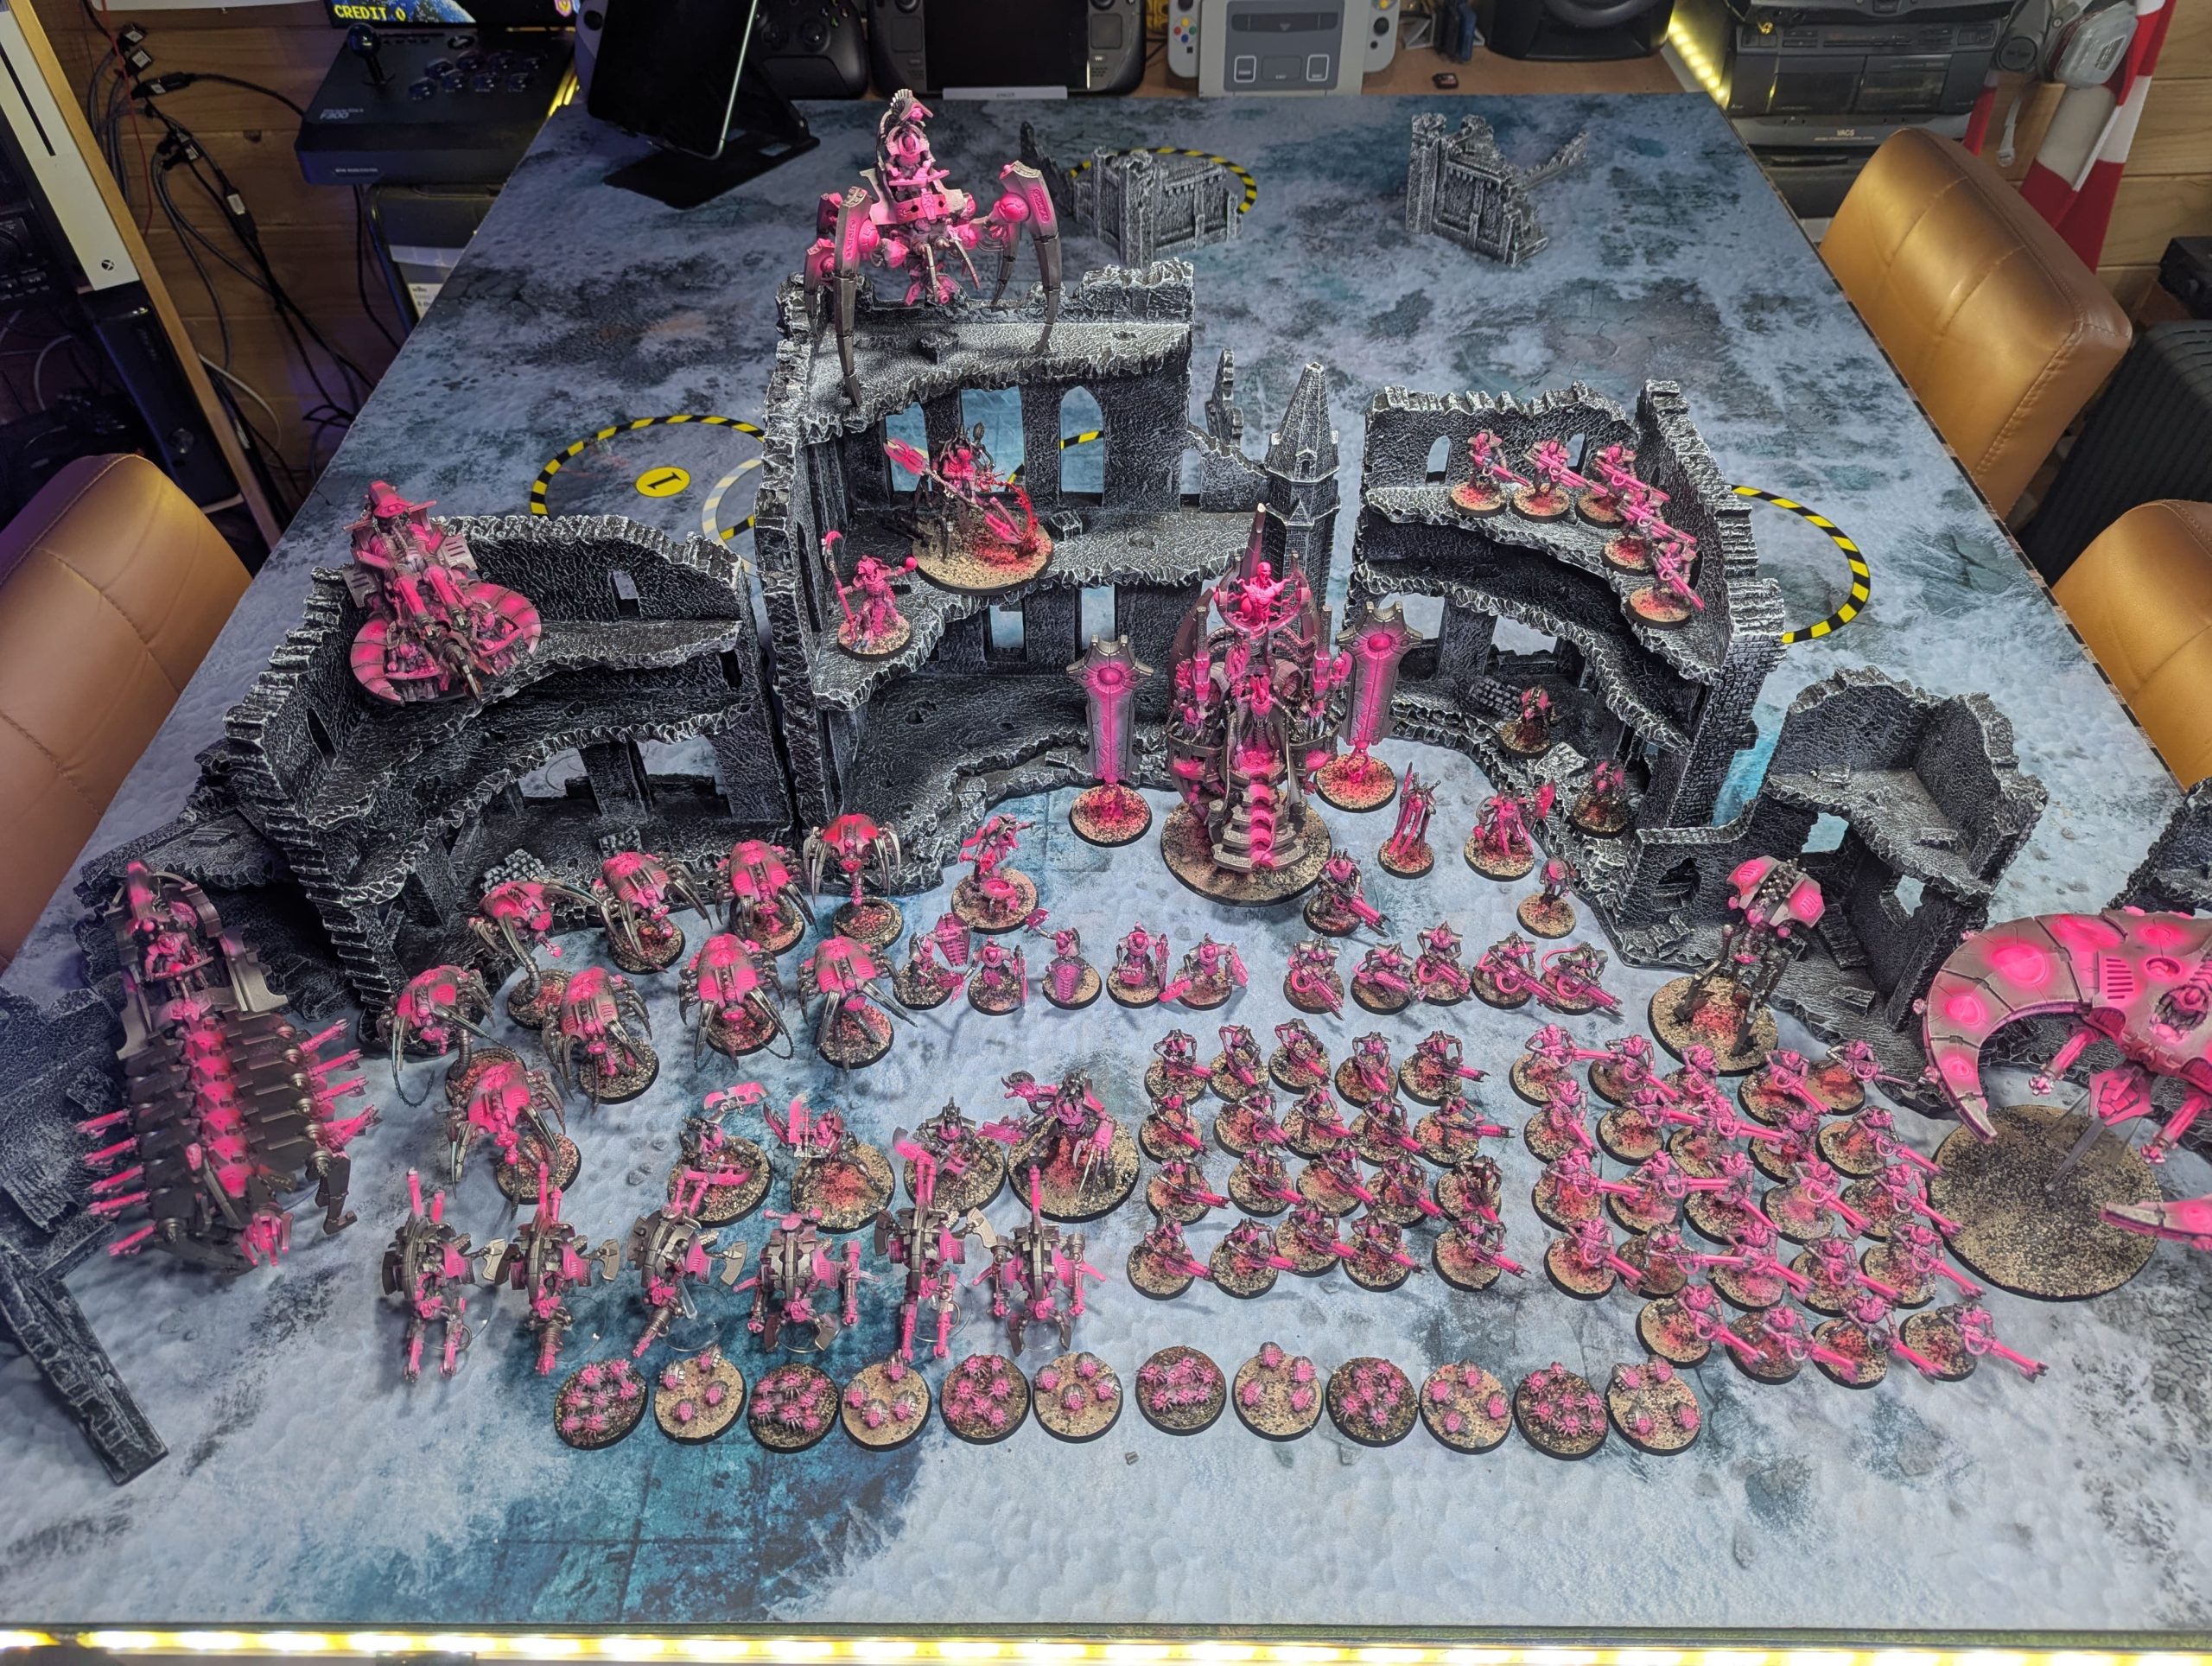
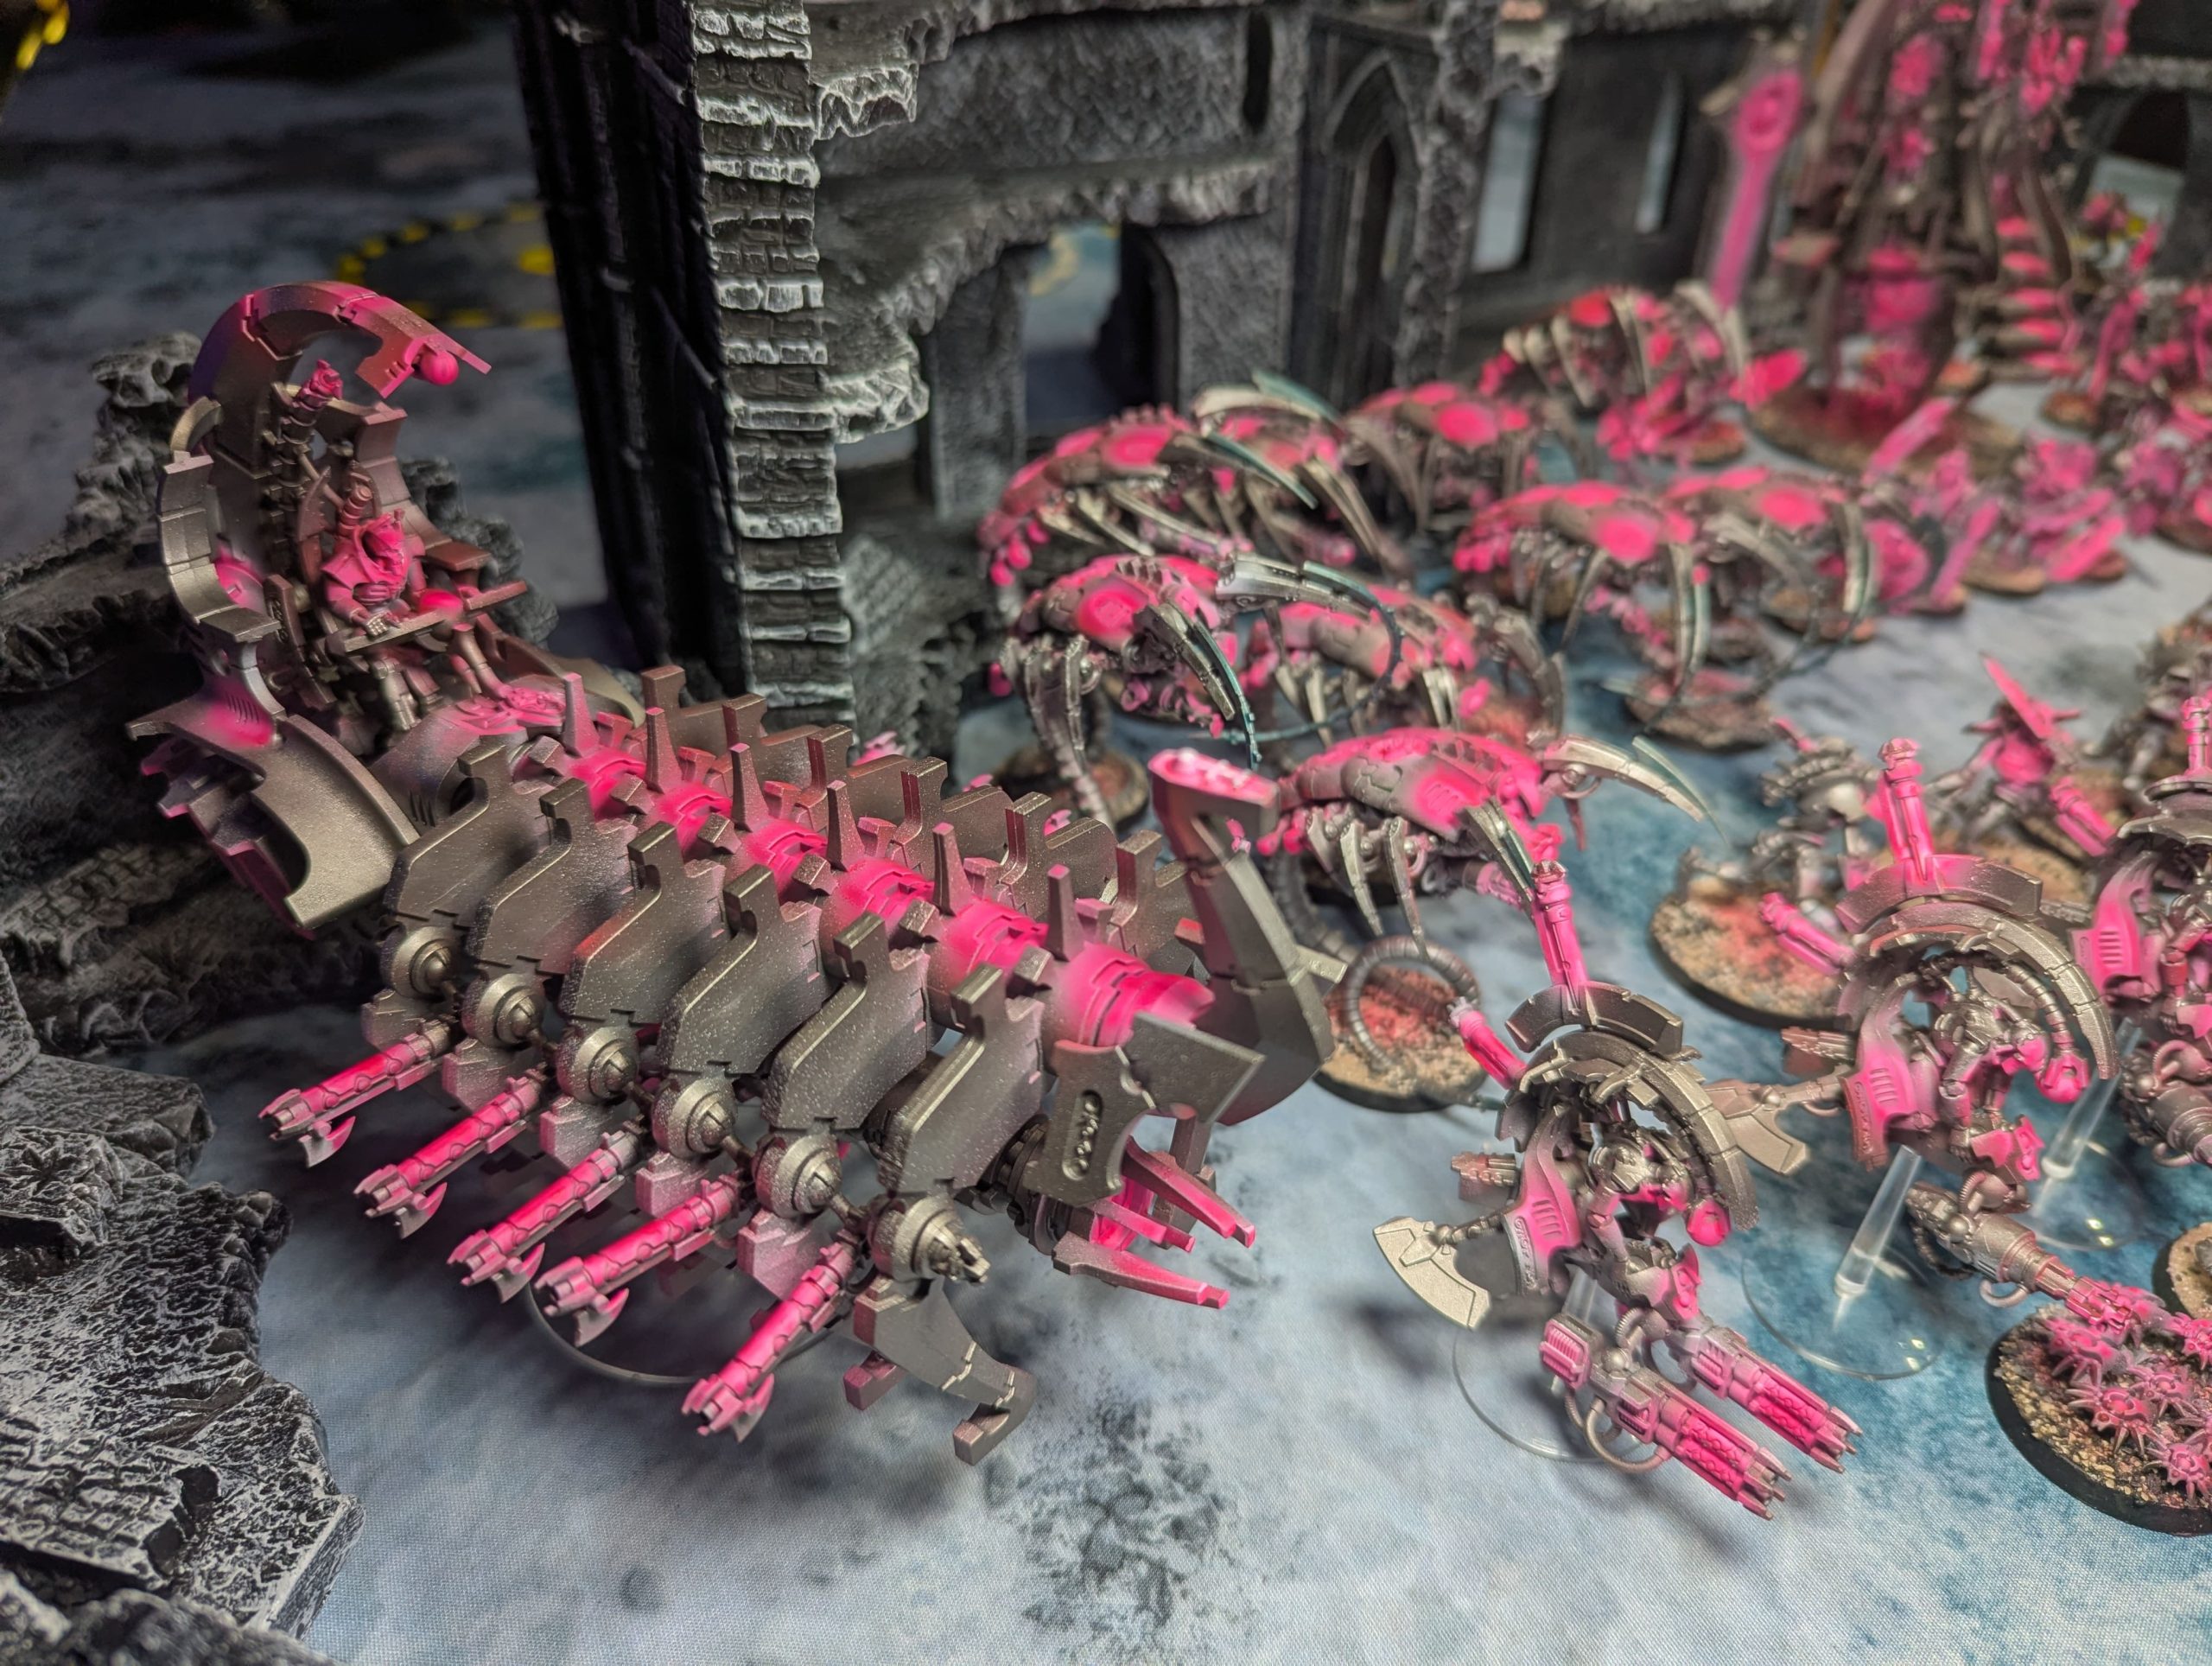
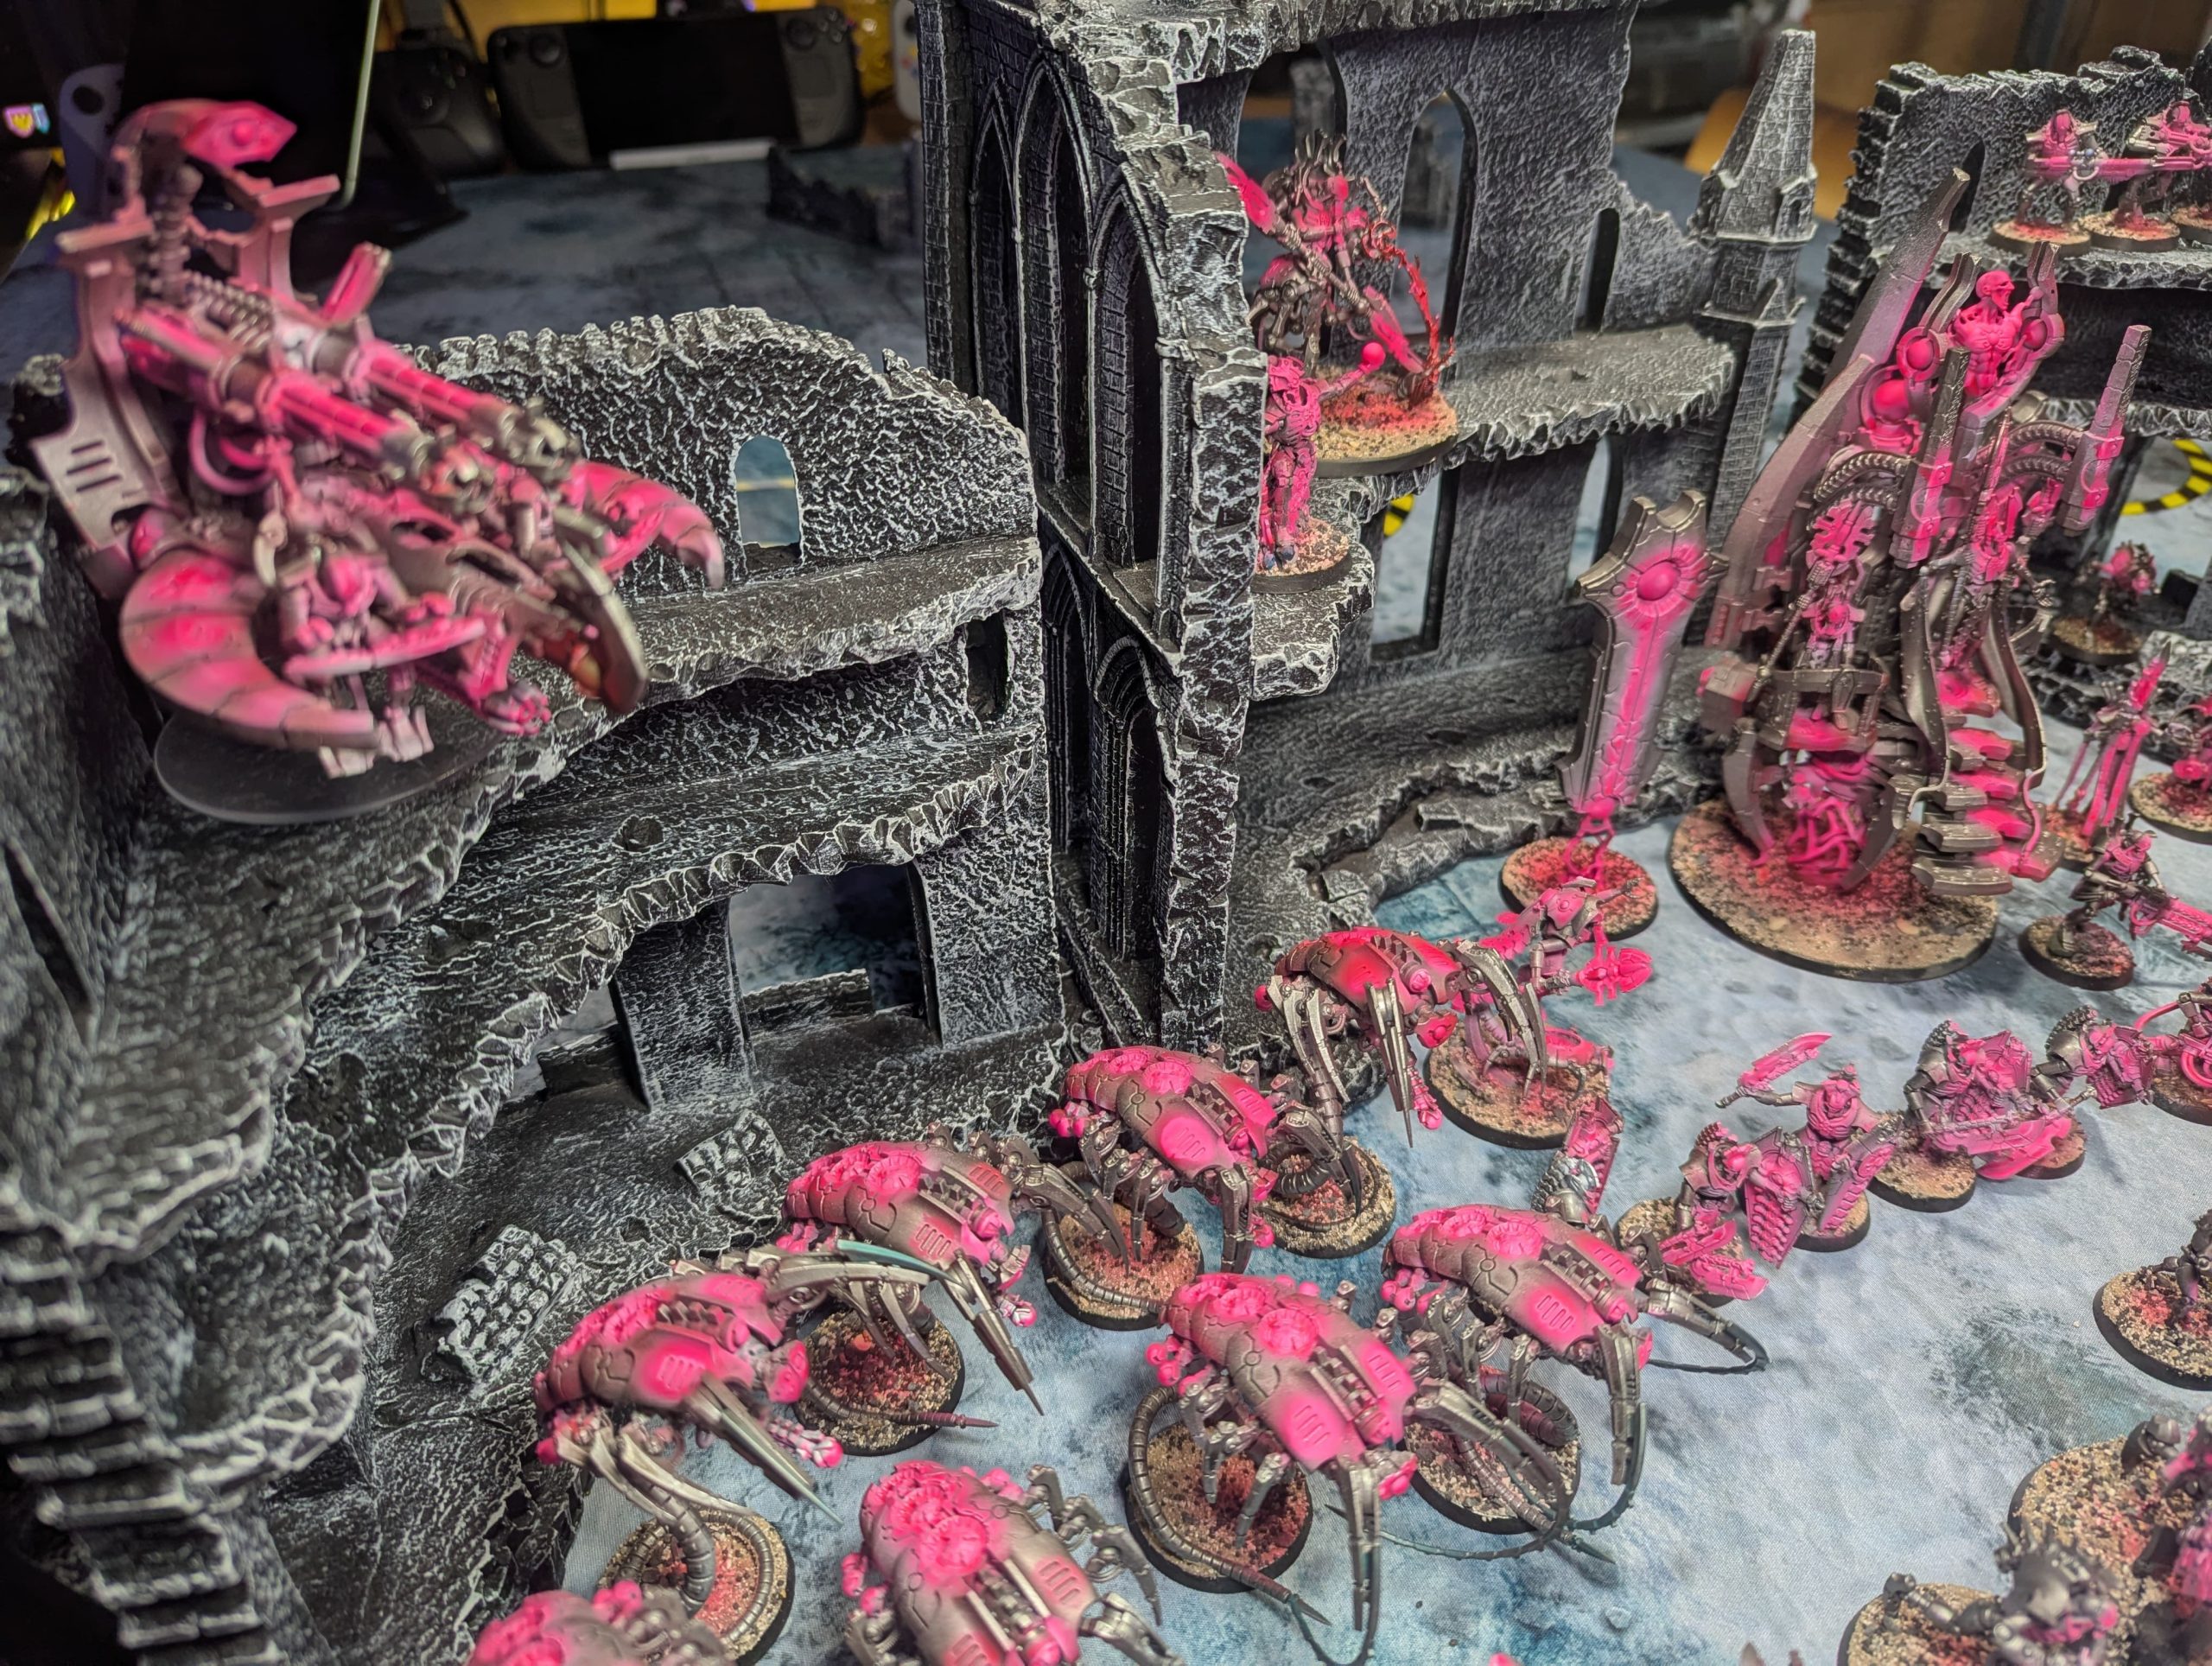
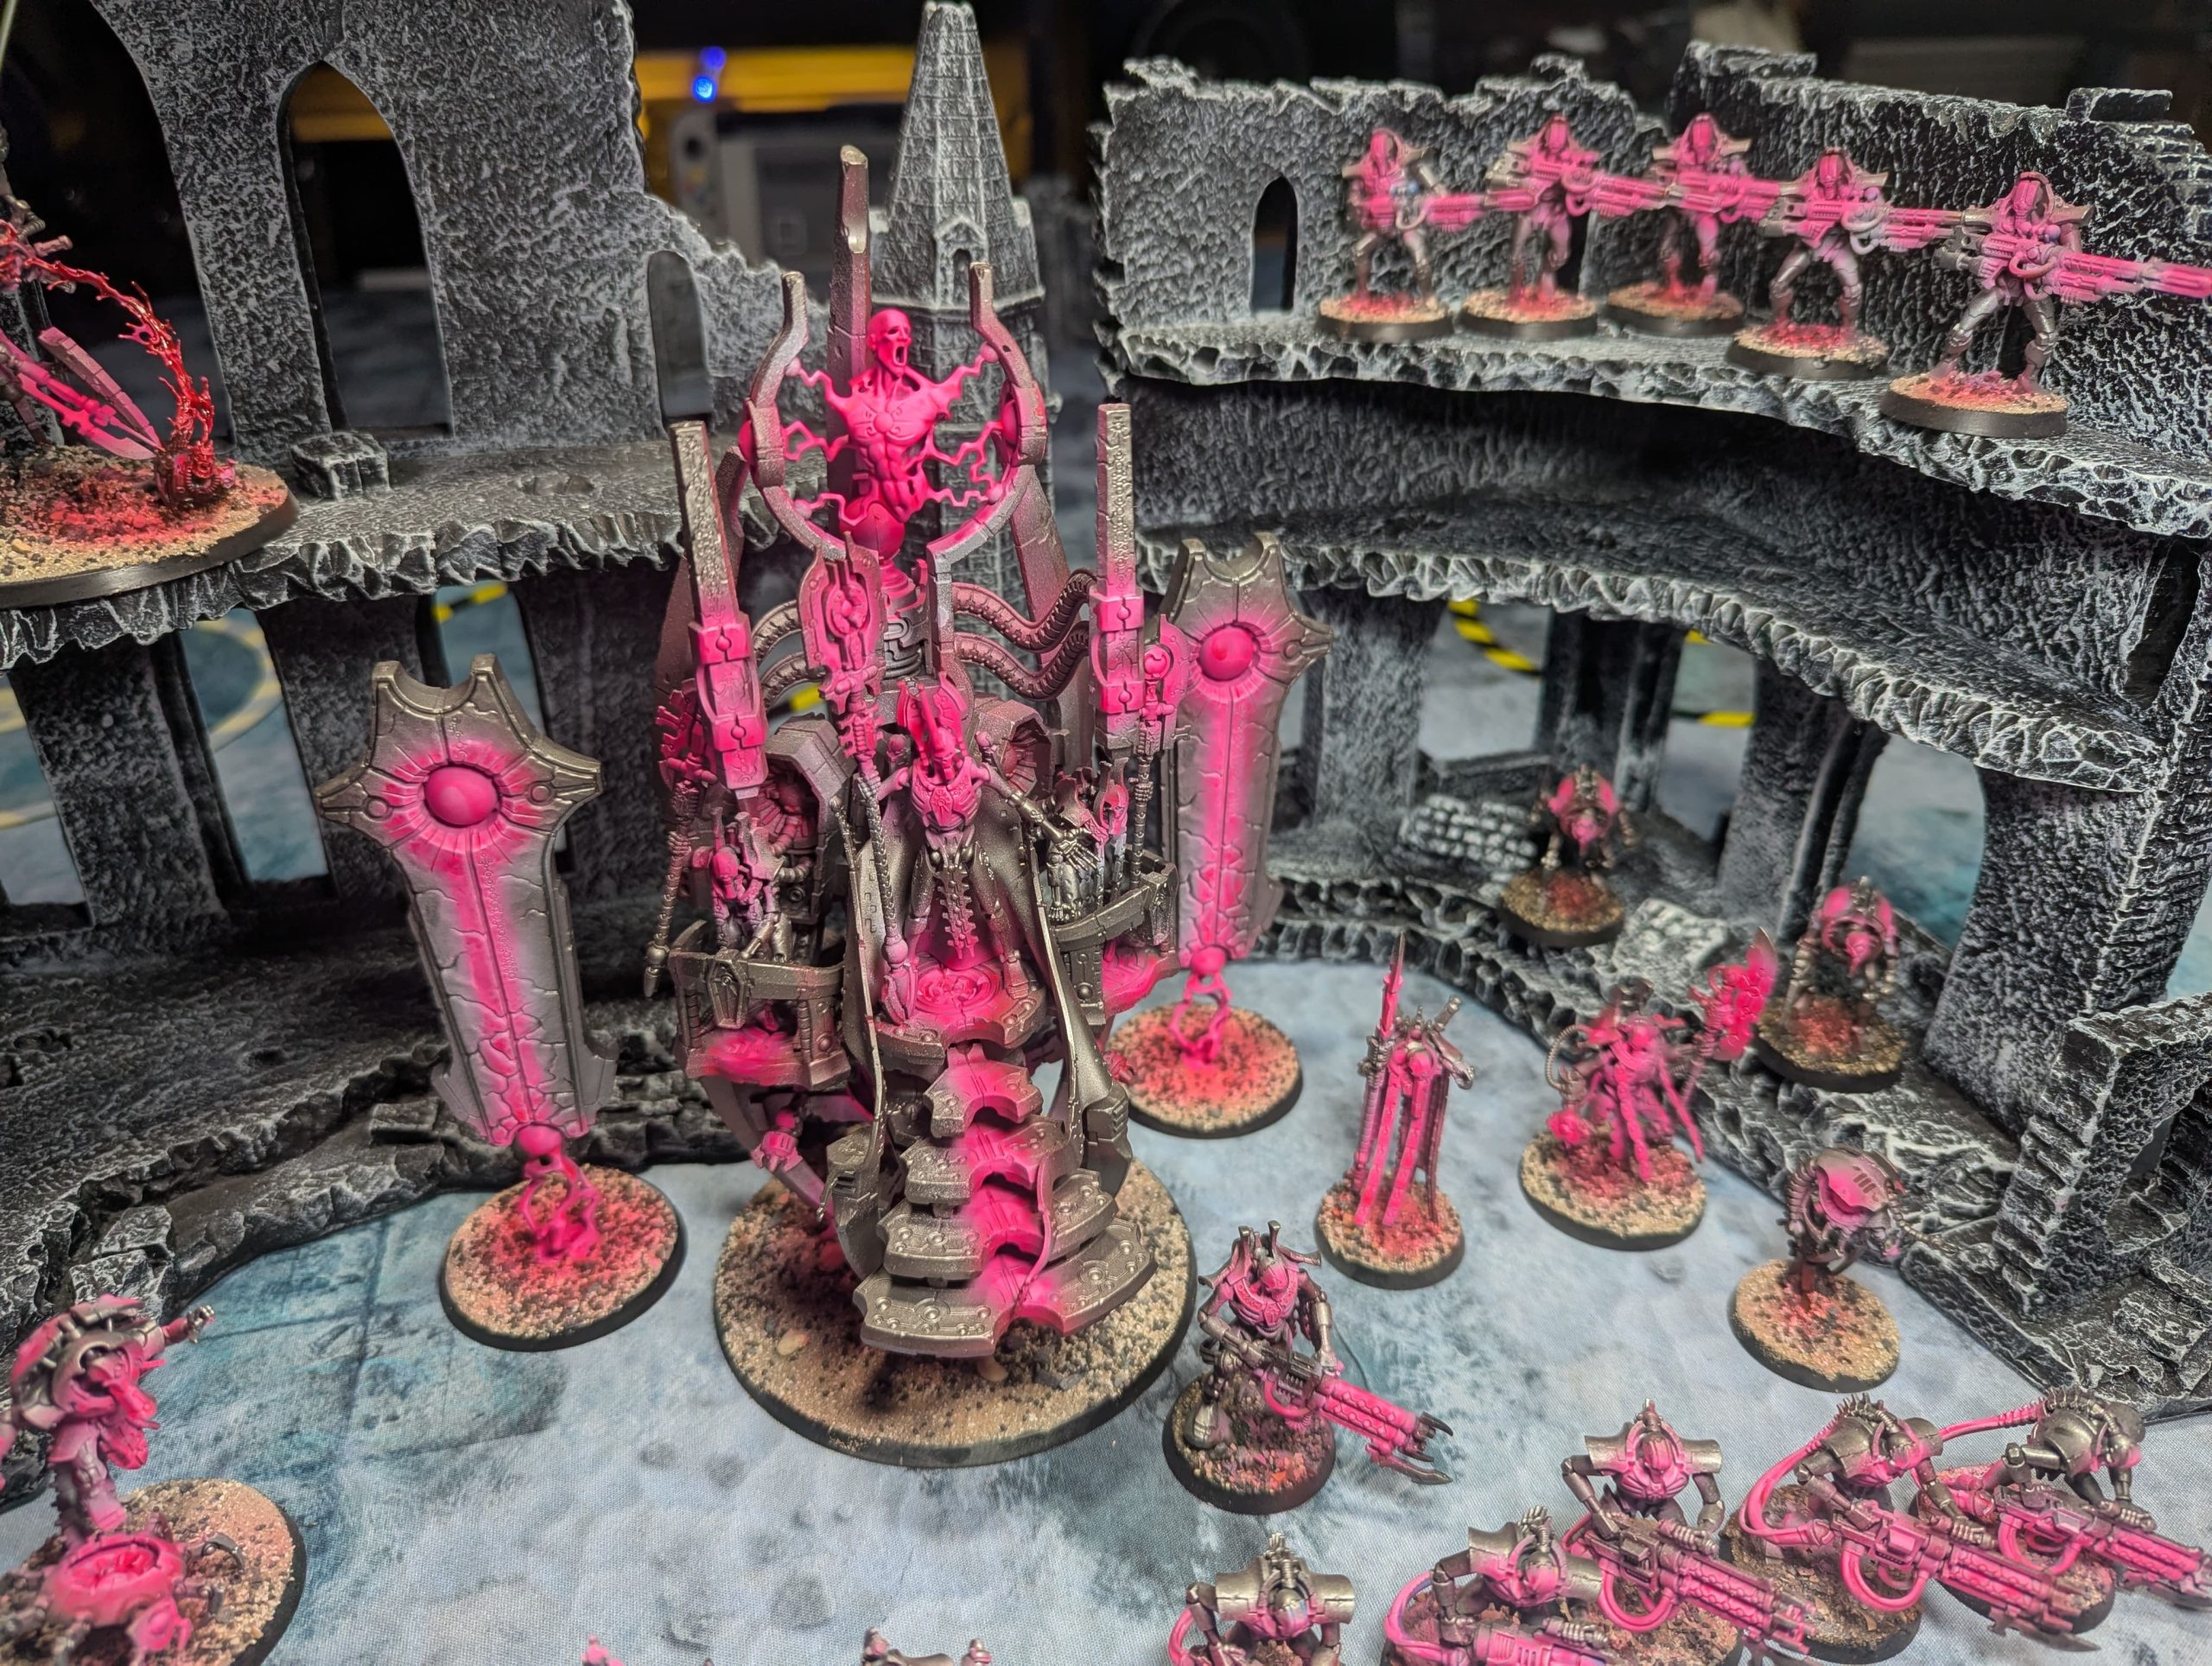
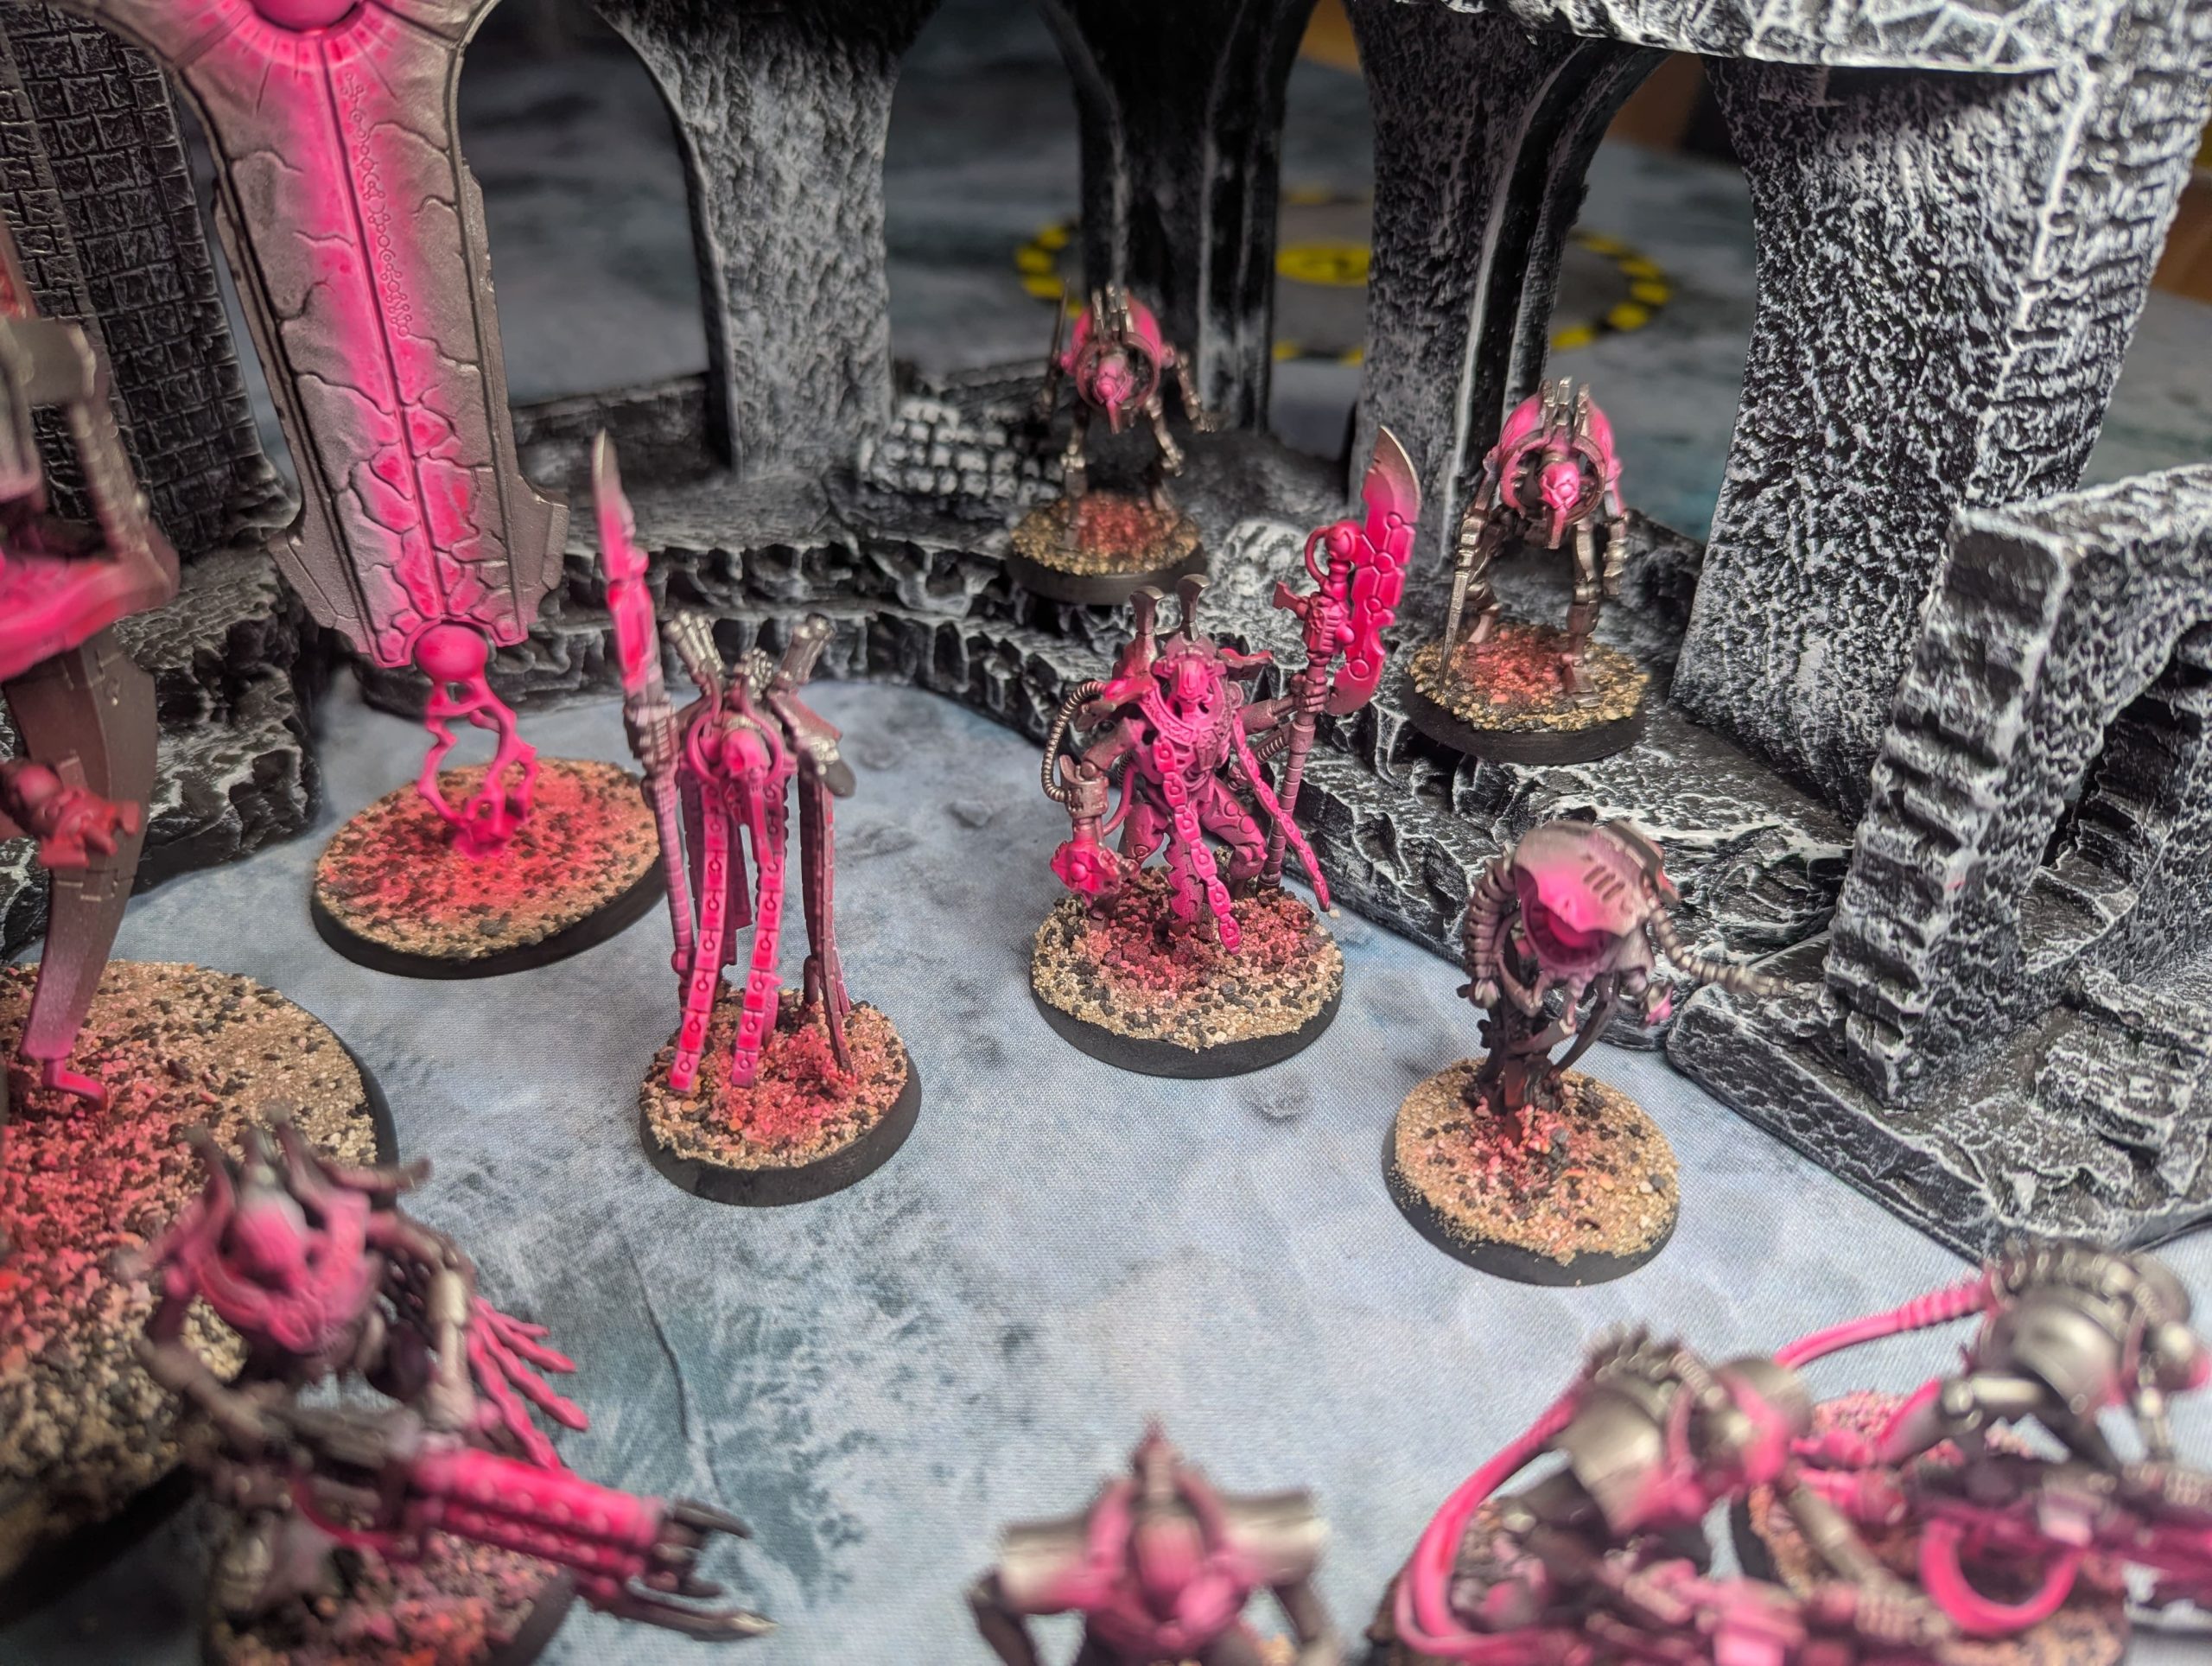
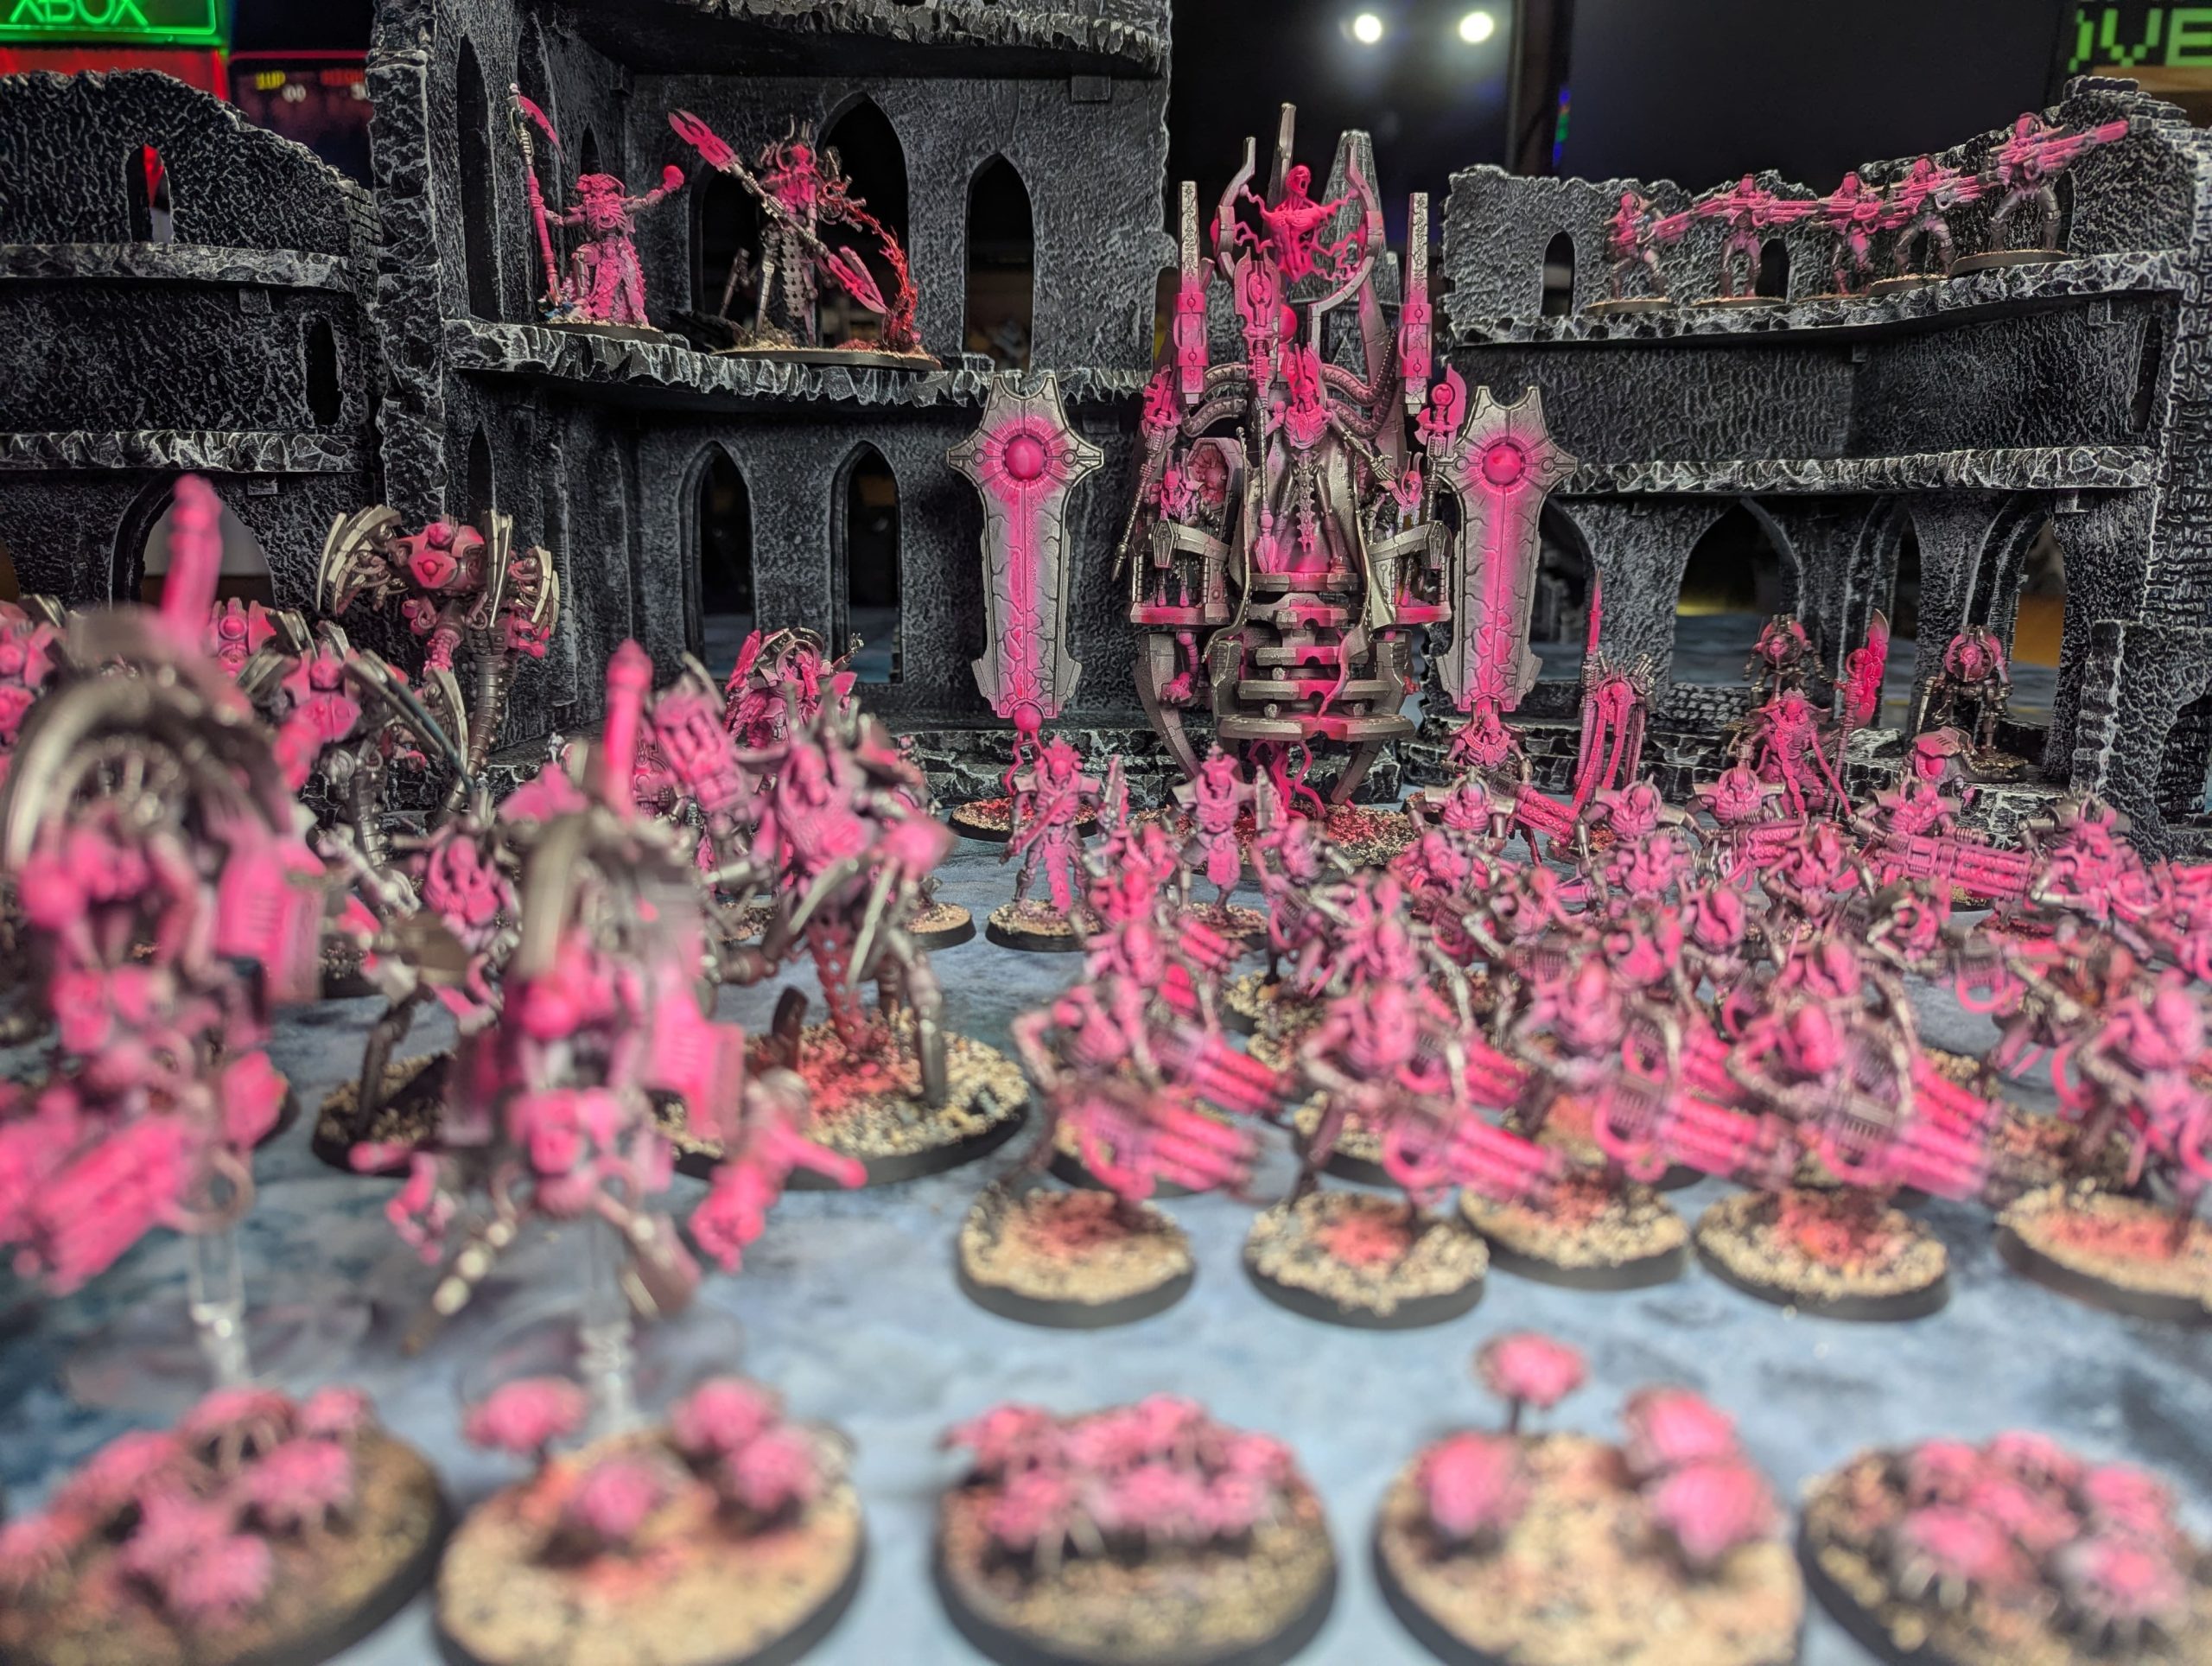
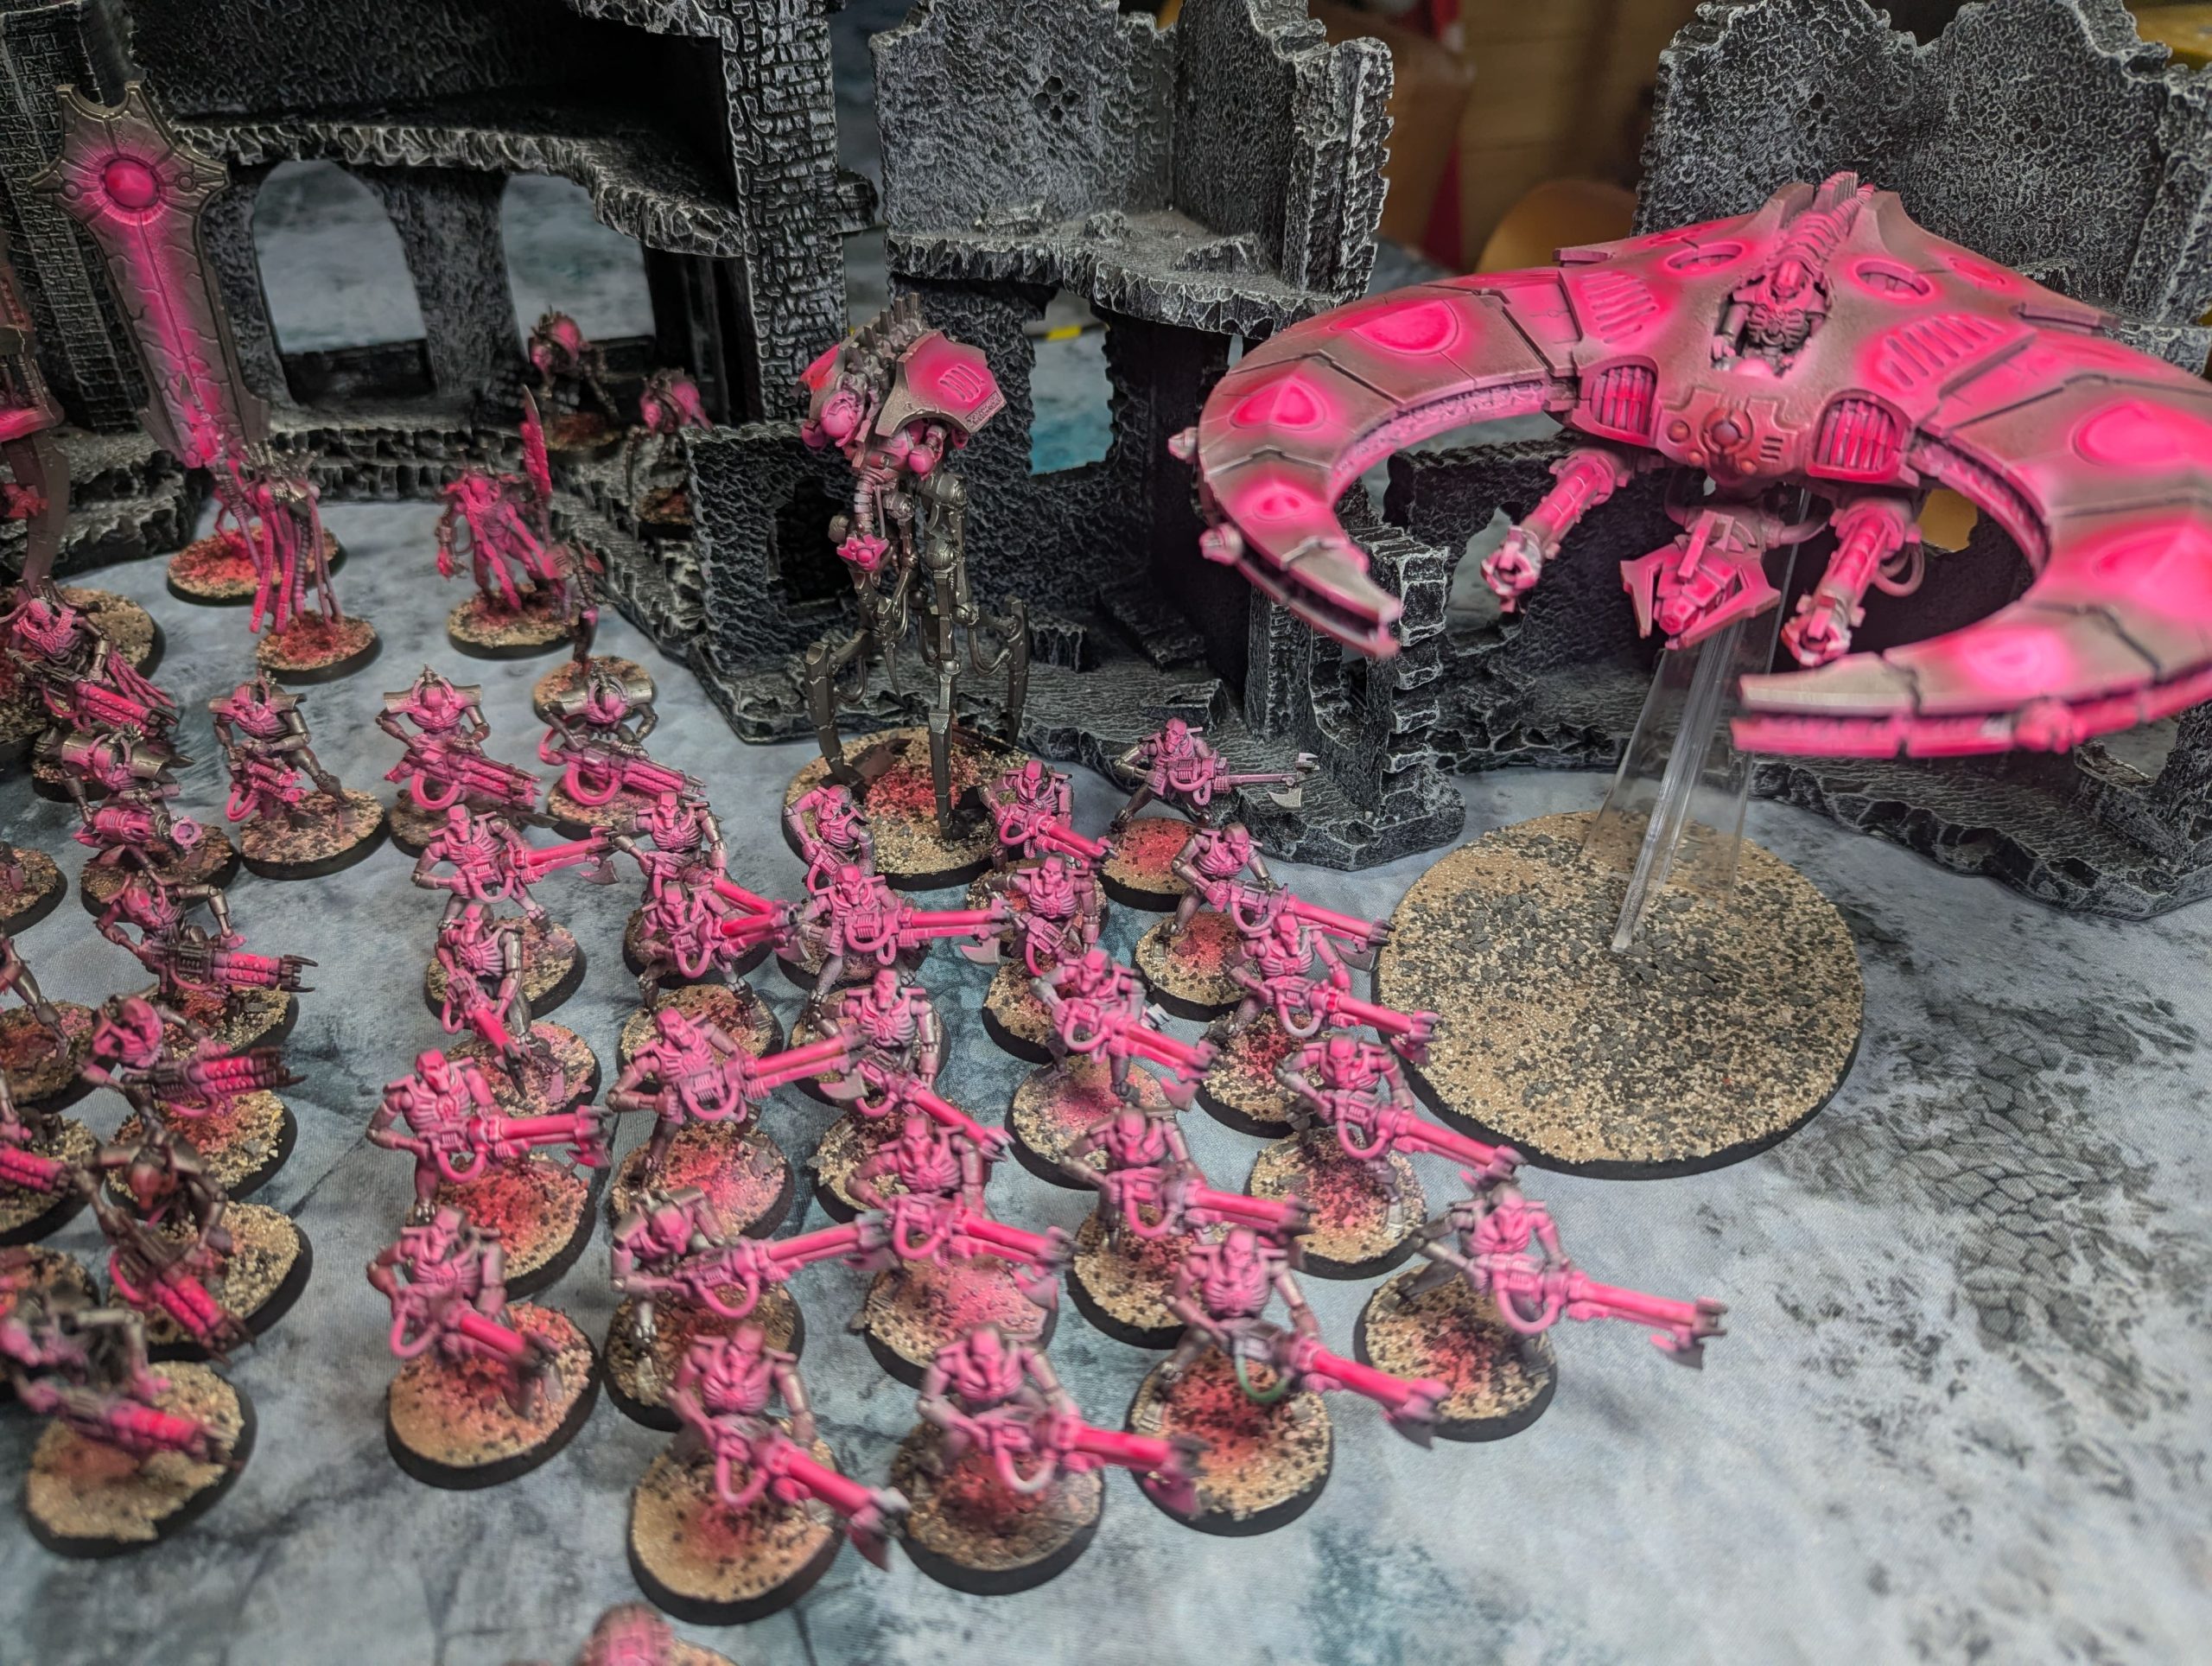
The Neon Dynasty: A Necron Painting Project
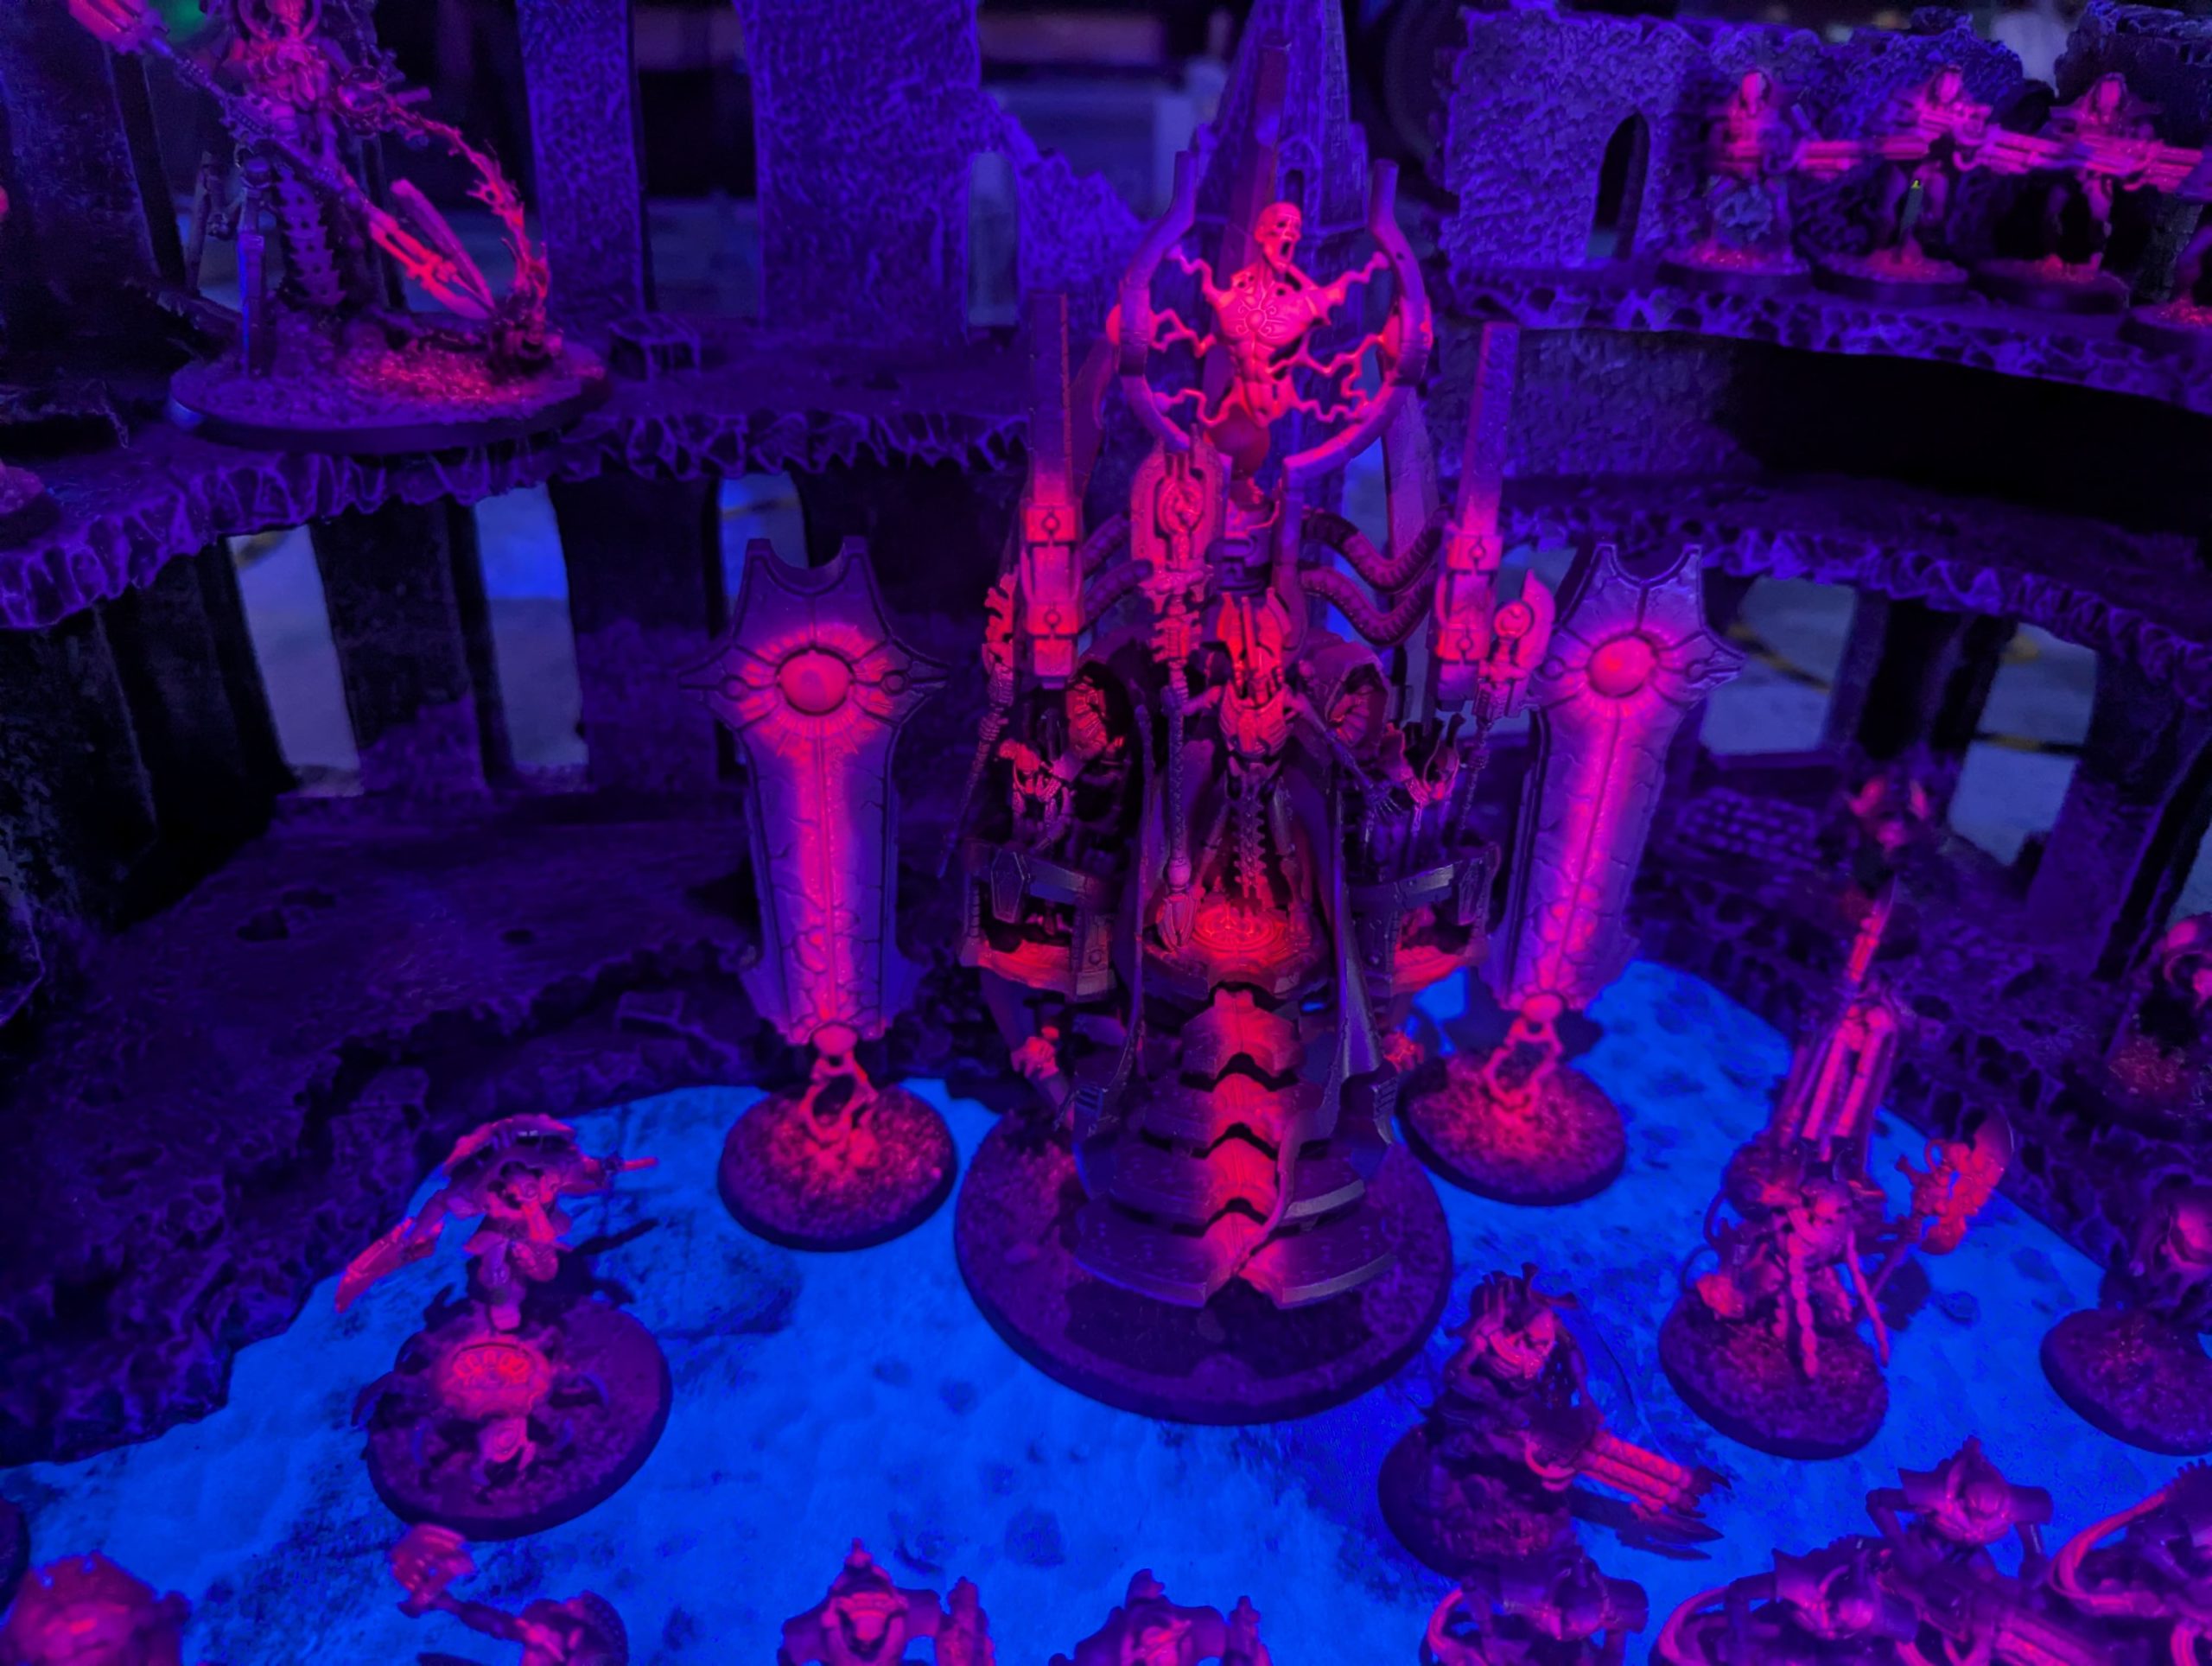
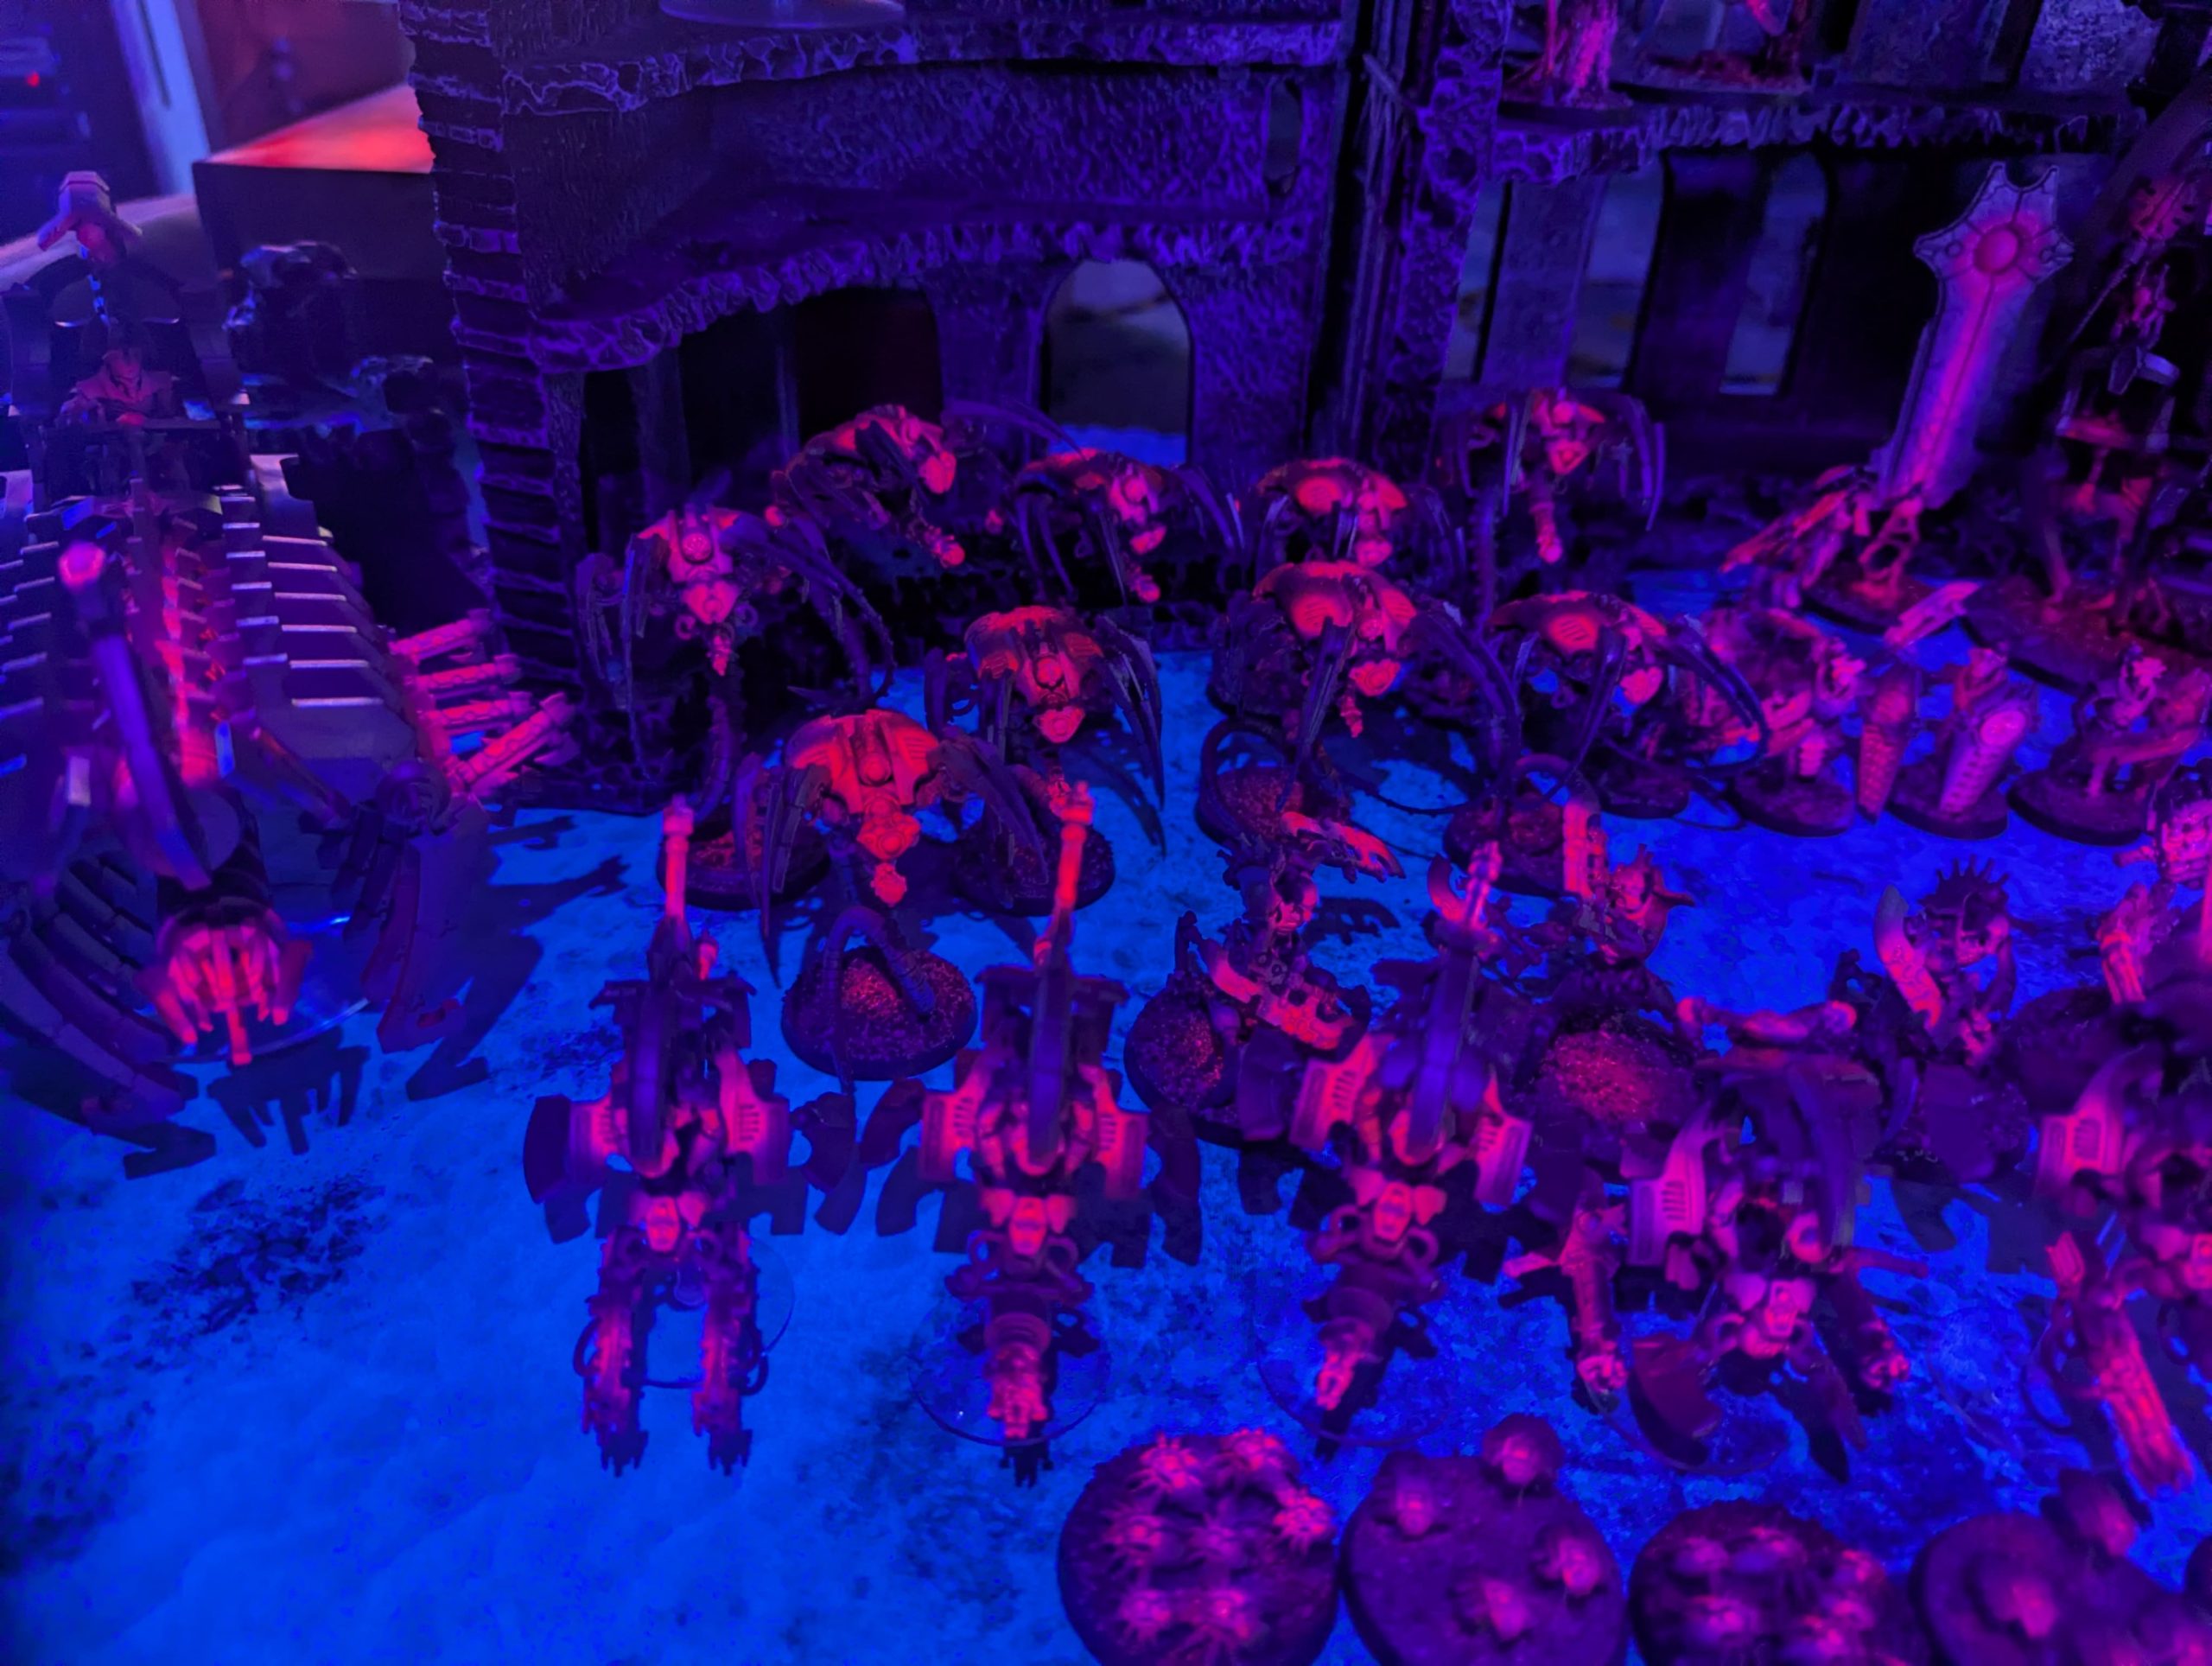
So, the compulsion struck again. Another project beckoned, but this time the goal was to finally tackle the absolute mountain of Necrons that has been quietly gathering dust in my hobby backlog for what feels like an eternity. I needed something fresh, something daring, to revitalise these ancient machines. The catalyst? Seeing the incredible potential of black light reactive paints.
Naturally, the default choice for Necrons—the ghostly, iconic green glow—was considered, but dismissed almost immediately. Green is the default, the established tradition. It’s been done, and frankly, I felt that to truly motivate myself to paint this many models, something entirely different, something eye-catching, was needed. The concept of a bright, alien pink under the eerie glow of a black light took root, and the Neon Dynasty project was born.
What’s truly satisfying is how quickly and efficiently this transformation took place. Working against the usual lengthy, intricate process of painting an army, I was able to complete this entire force in approximately two days. The speed was a result of a highly streamlined and focused approach, proving that you don’t need dozens of layers and fussy techniques to achieve a striking, tabletop-ready finish.
This is the exact, simplified process I followed:The Two-Day Speed Painting Recipe
- Preparation – The Foundation of Darkness: The entire model was coated in Black Prime. This serves as a quick, effective base layer and is crucial for creating the deep, natural shadows that contrast beautifully with the neon colours.
- The Light Source – Zenithal Highlight: A gentle White Zenith highlight was applied. This means spraying white directly from above, concentrating the light where a natural light source would hit. This pre-shades the model and makes the subsequent metallic and neon layers pop.
- Core Metal – Quick Coverage: An initial, rapid pass of Silver was applied using an overbrush technique. The key here is speed, not perfection. Do not worry about achieving full coverage or hitting every recess; the black primer underneath will serve as a perfect, deep shadow layer, providing instant depth and a weathered look.
- Aged Texture – The Drybrush: A targeted drybrushing with Necron Compound (or a similar bright metallic paint) followed. This instantly picks out the raised edges and the intricate details of the Necron armour, giving the metal a subtle, ancient texture that catches the light.
- Setting the Stage – The Neon Base: This is where the process diverged from standard painting. White Ink was introduced through an airbrush, specifically targeting the areas where I wanted the final neon glow—the weapons, eyes, and energy conduits. The highly pigmented white ink provides a perfect, brilliant base for the transparent fluorescent paint.
- The Glow – Bringing the Neon to Life: The vibrant Fluorescent Pink paint was then applied through the airbrush, sprayed directly over the white ink areas. Because fluorescent paints are transparent, the intensity of the colour is directly proportional to the brightness of the base coat, which is why the white ink was essential.
- Final Steps: The process was finished with simple, dark Bases to contrast the bright armour, and the army was complete.
It genuinely was that simple. While a close inspection of individual models might reveal the speed of the painting process—a missed edge here, a slightly uneven coat there—the overall impact of the army on the gaming table is fantastic. The models read instantly, the metallic bodies are grim and aged, and the startling pink energy stands out brilliantly.
However, the true magic is revealed with a minor addition to the gaming setup: a simple black light. Under UV light, the fluorescent pink explodes with an incredible, ethereal glow, transforming the army into a truly unique, eye-catching force that demands attention. This project proves that sometimes, less is more, and a clever choice of paint and technique can breathe new, vivid life into an ancient army.

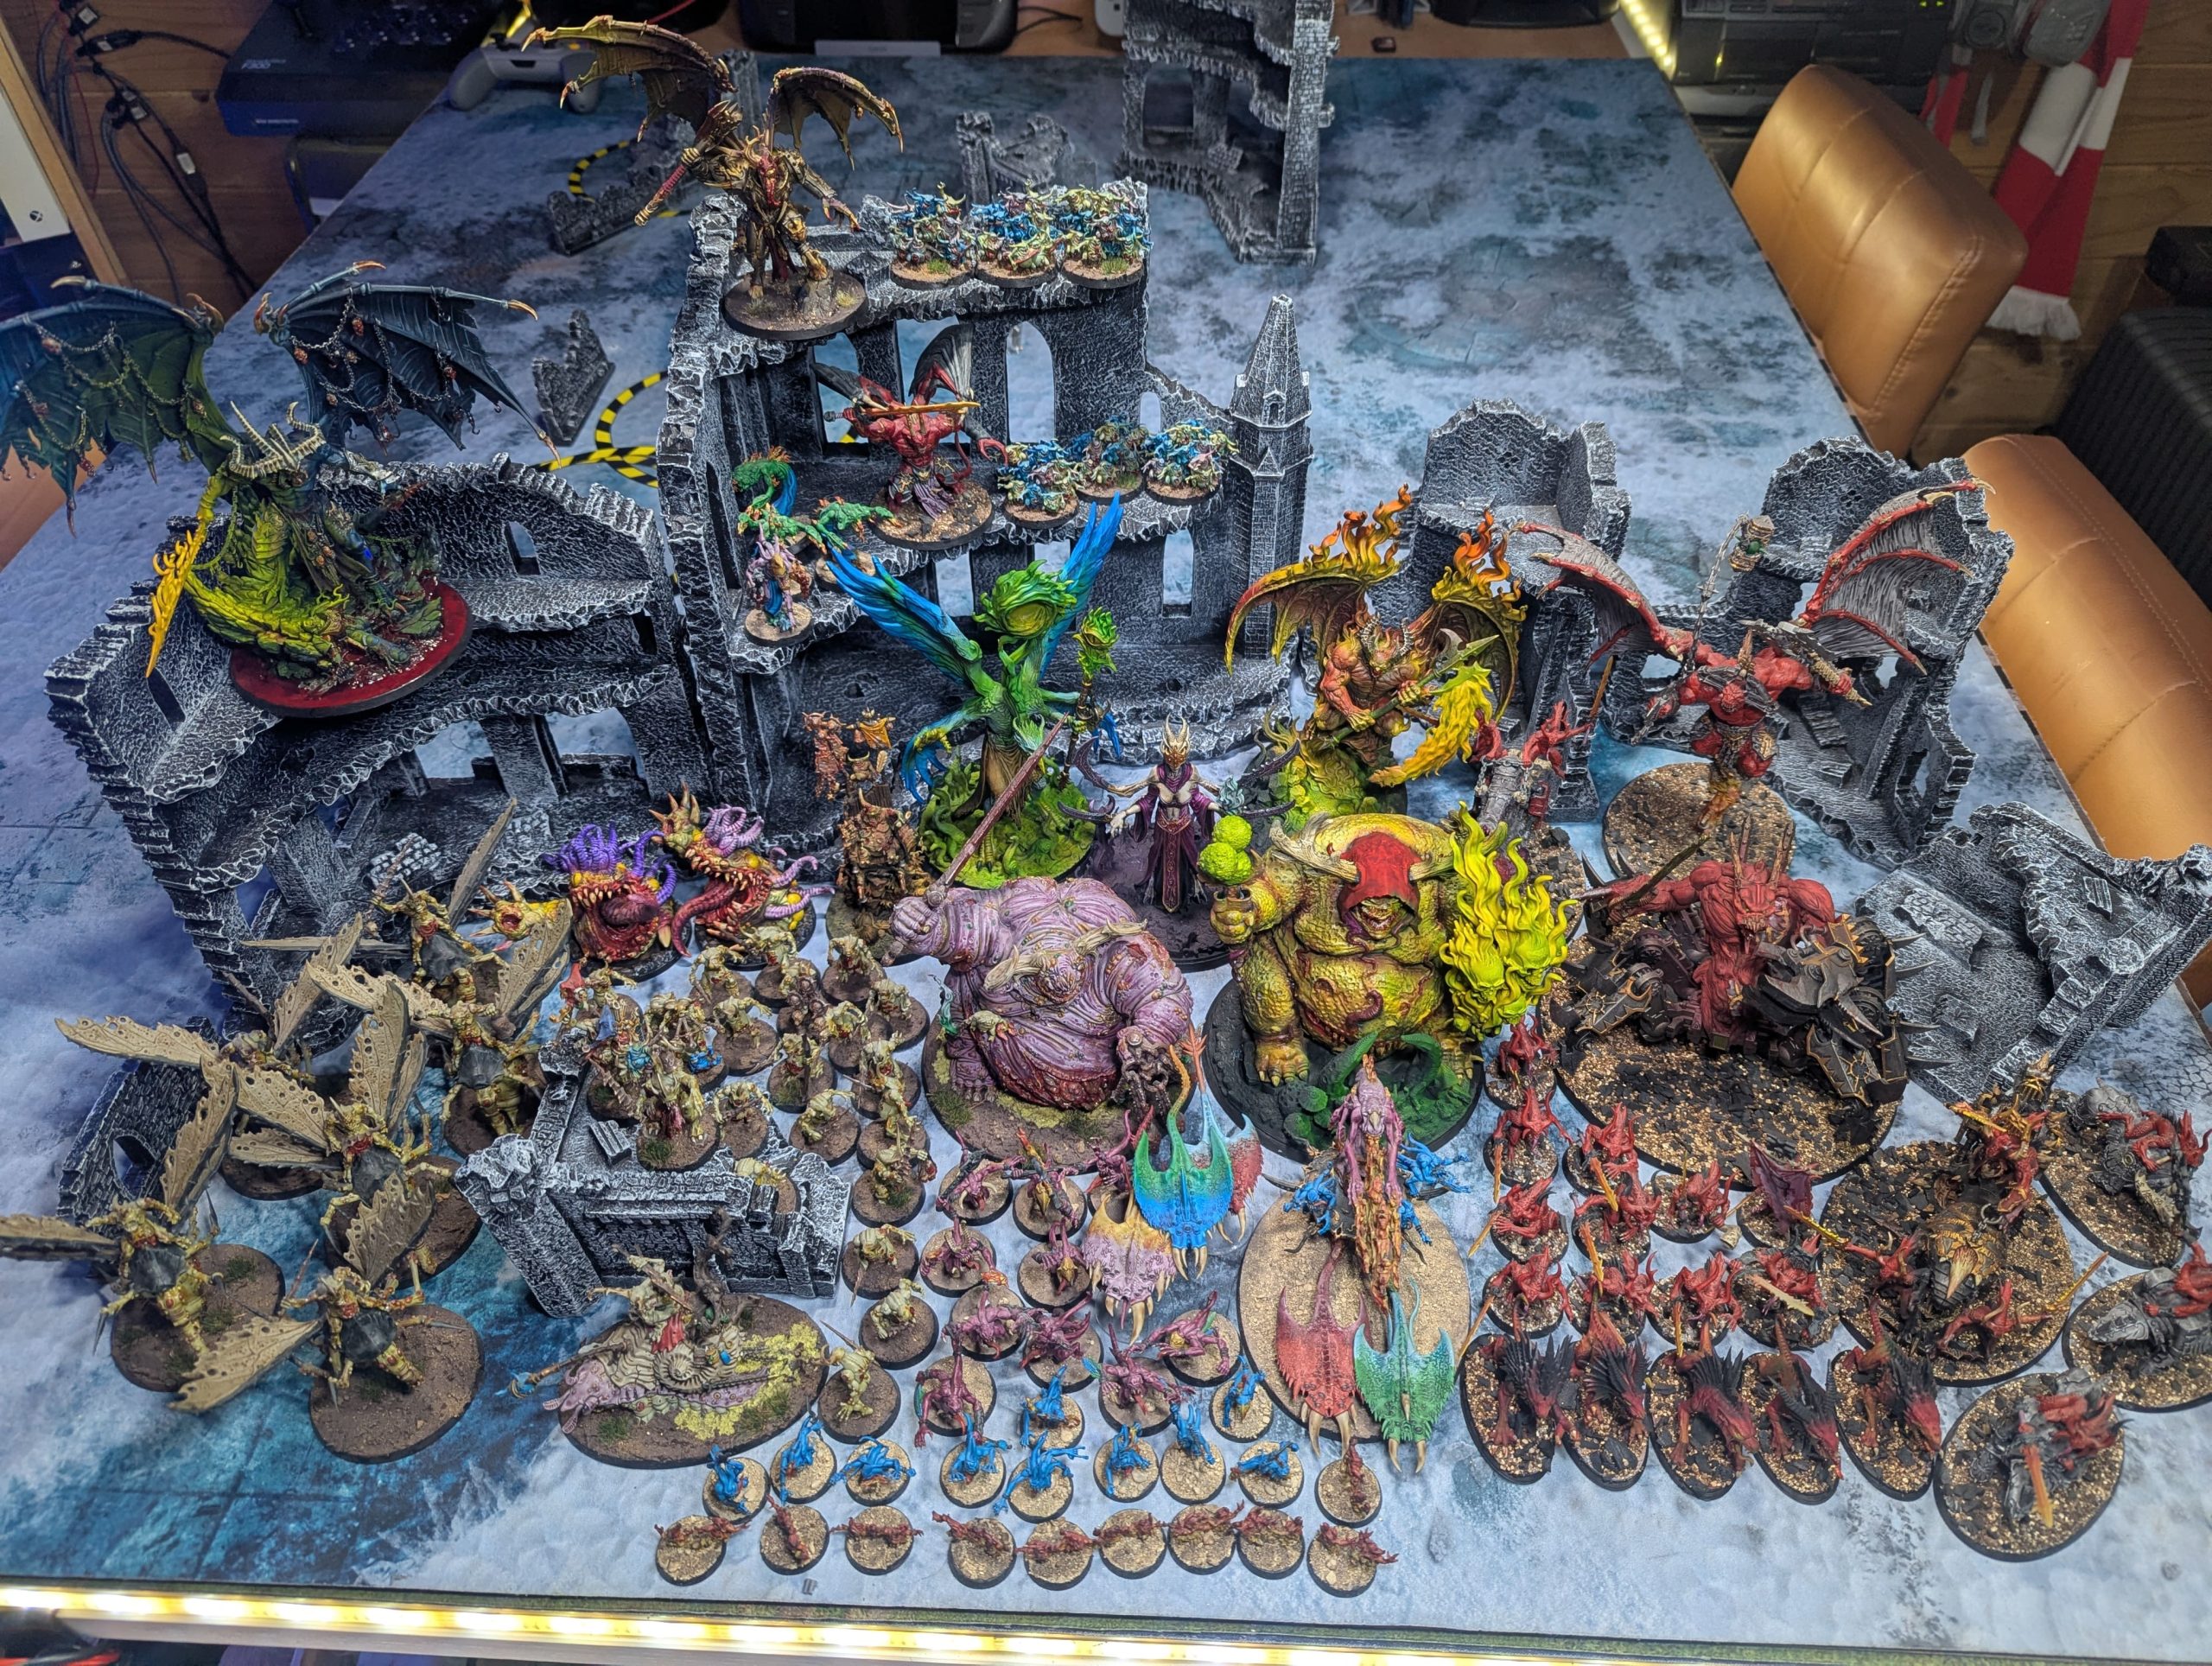
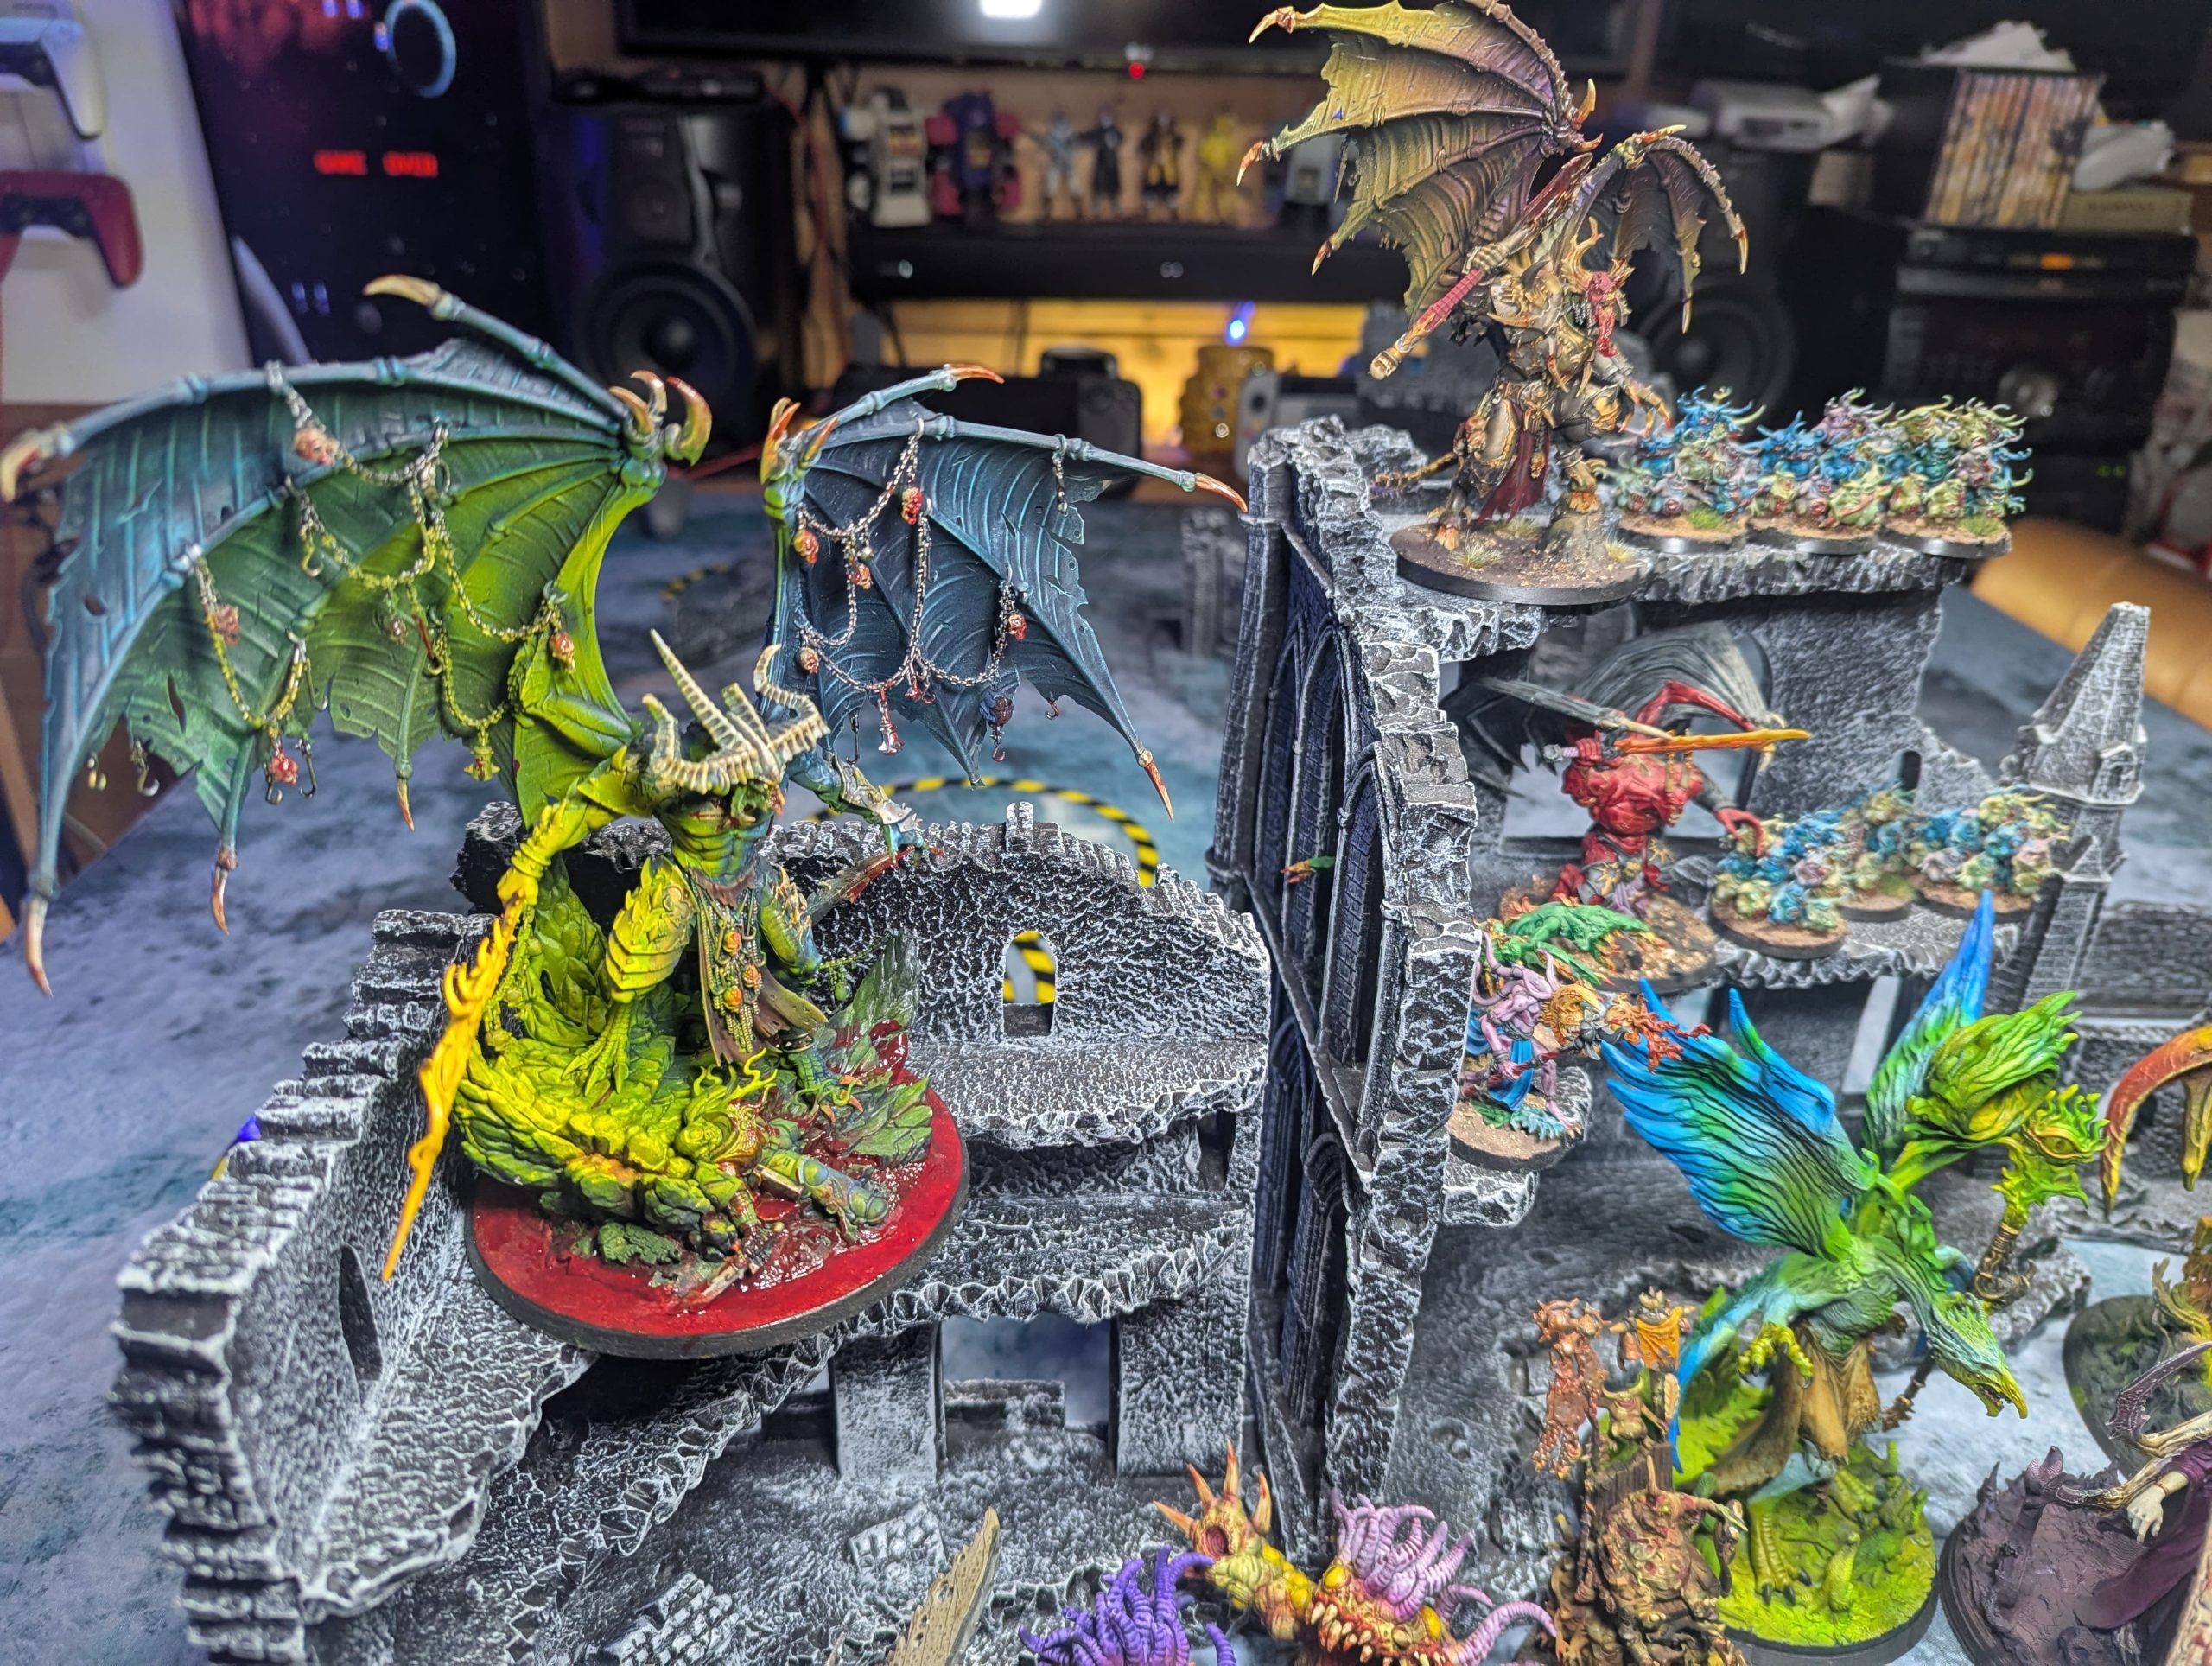
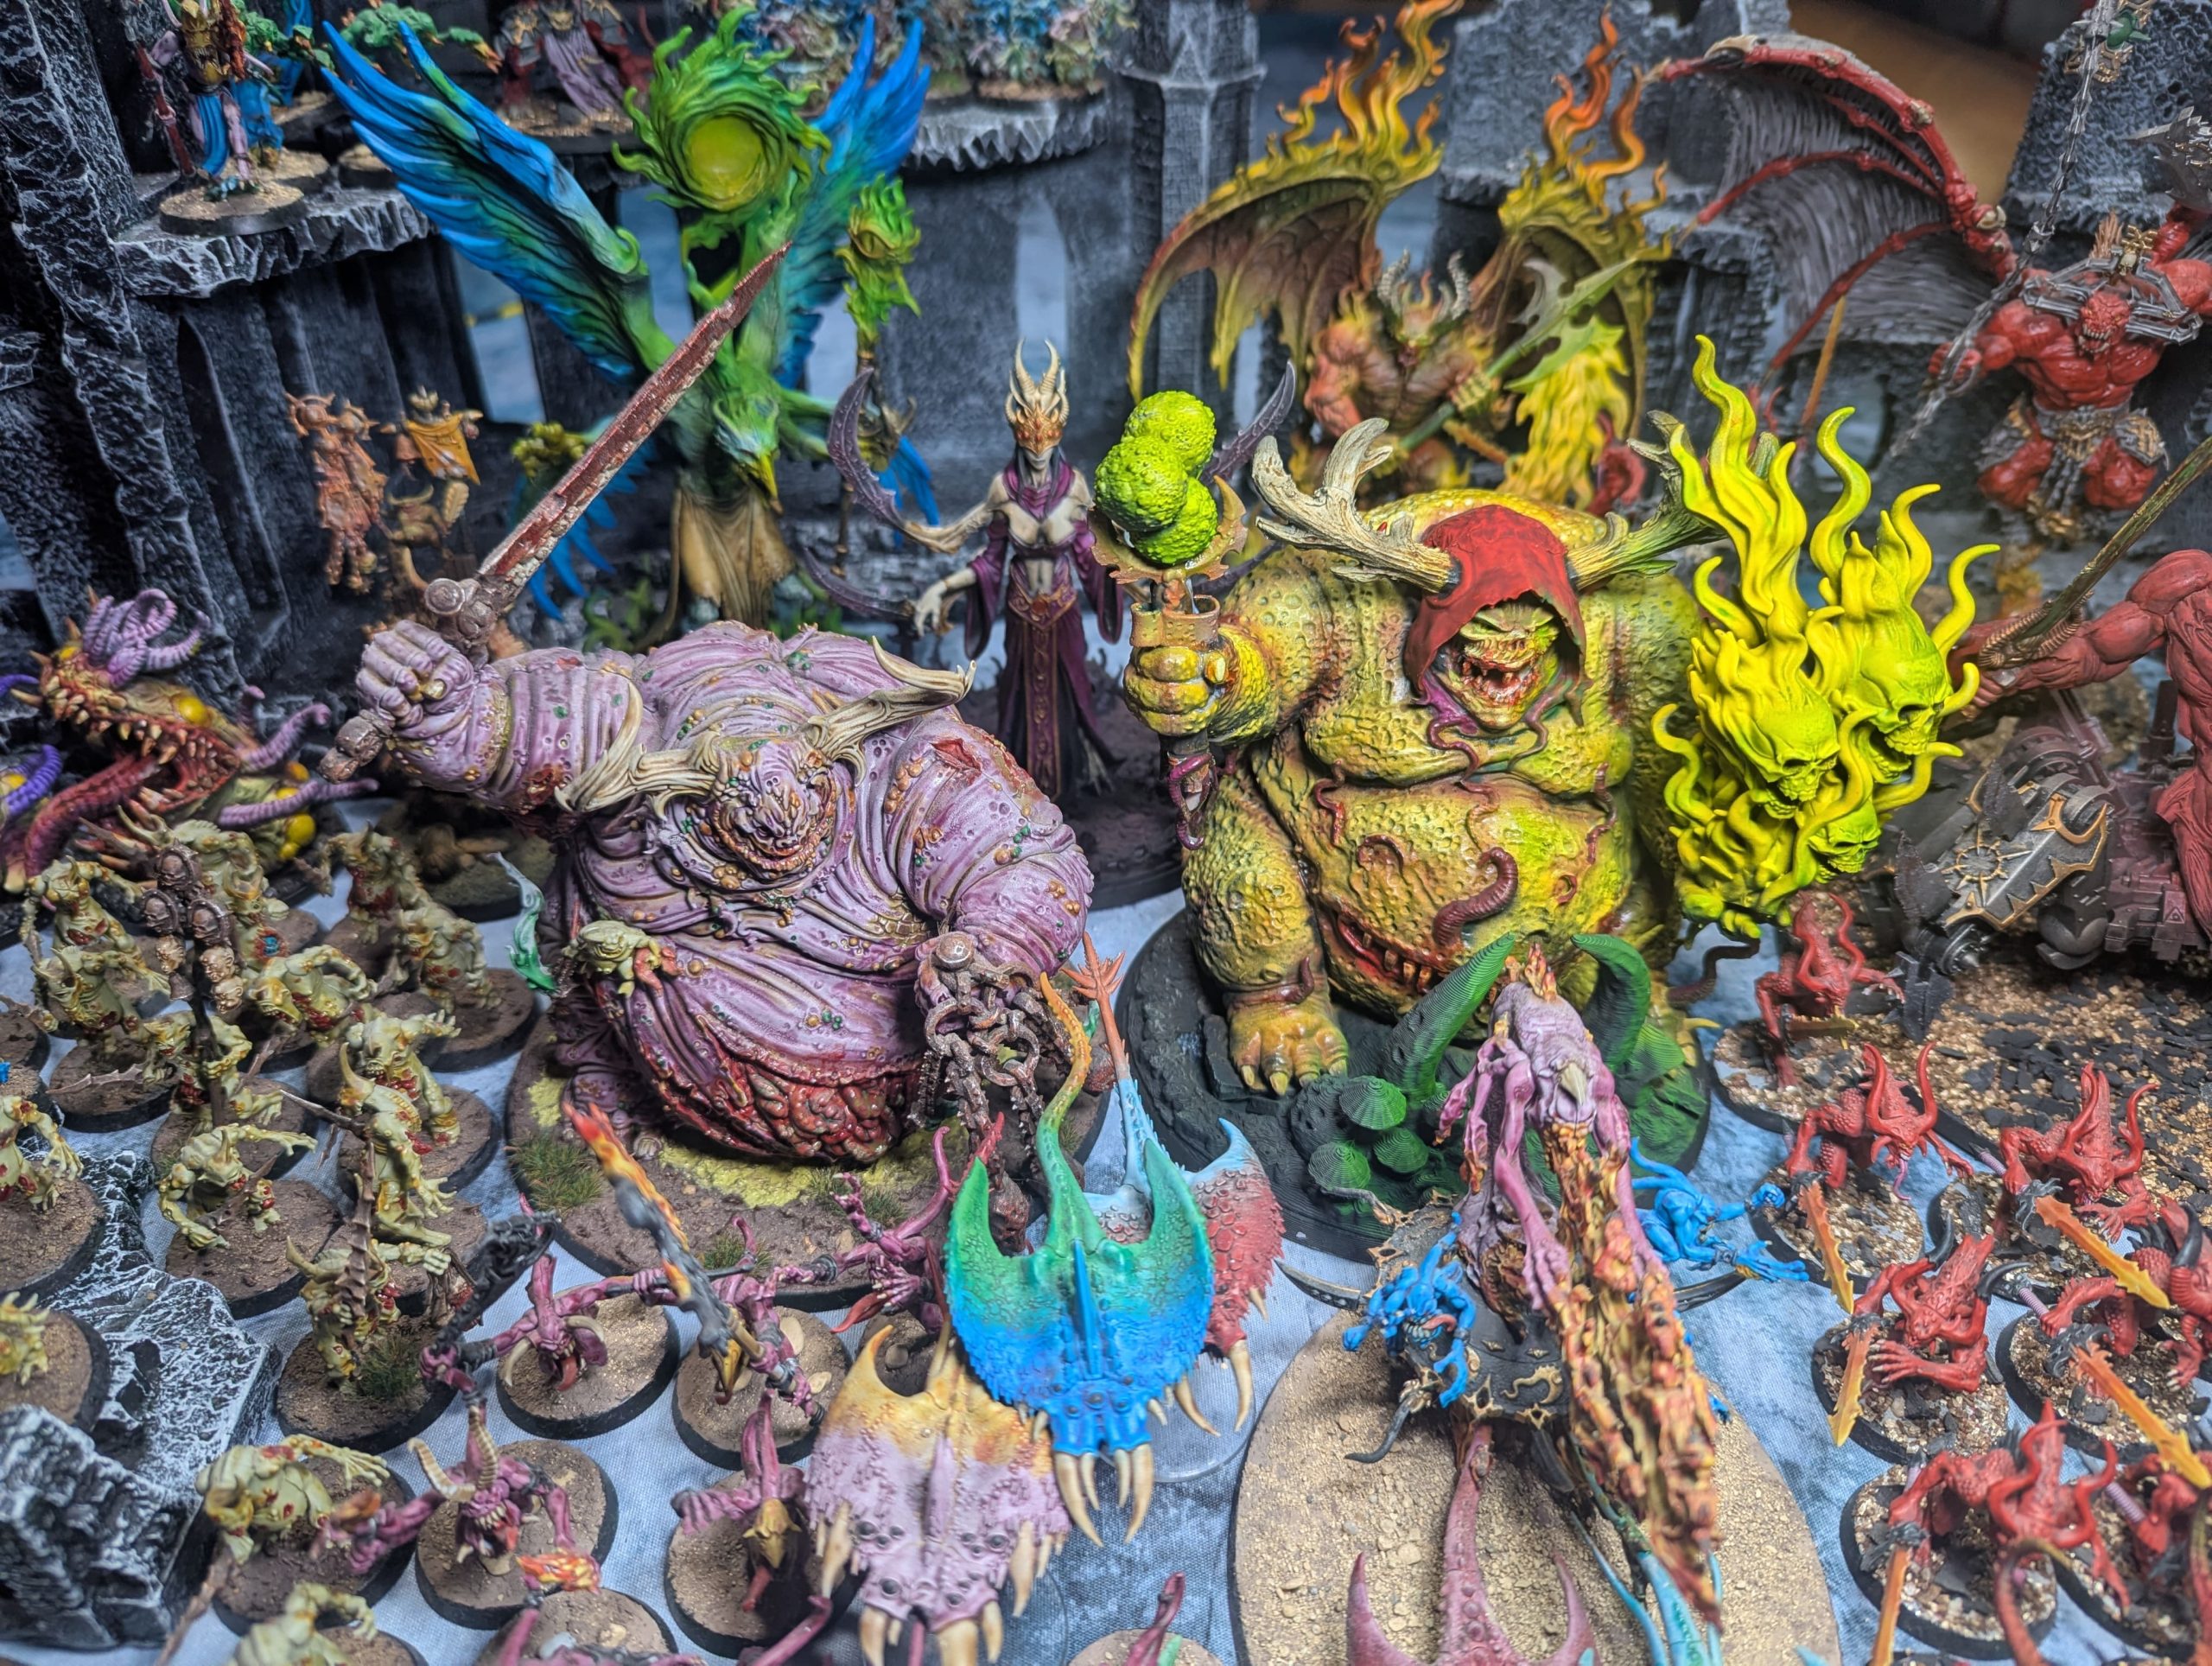
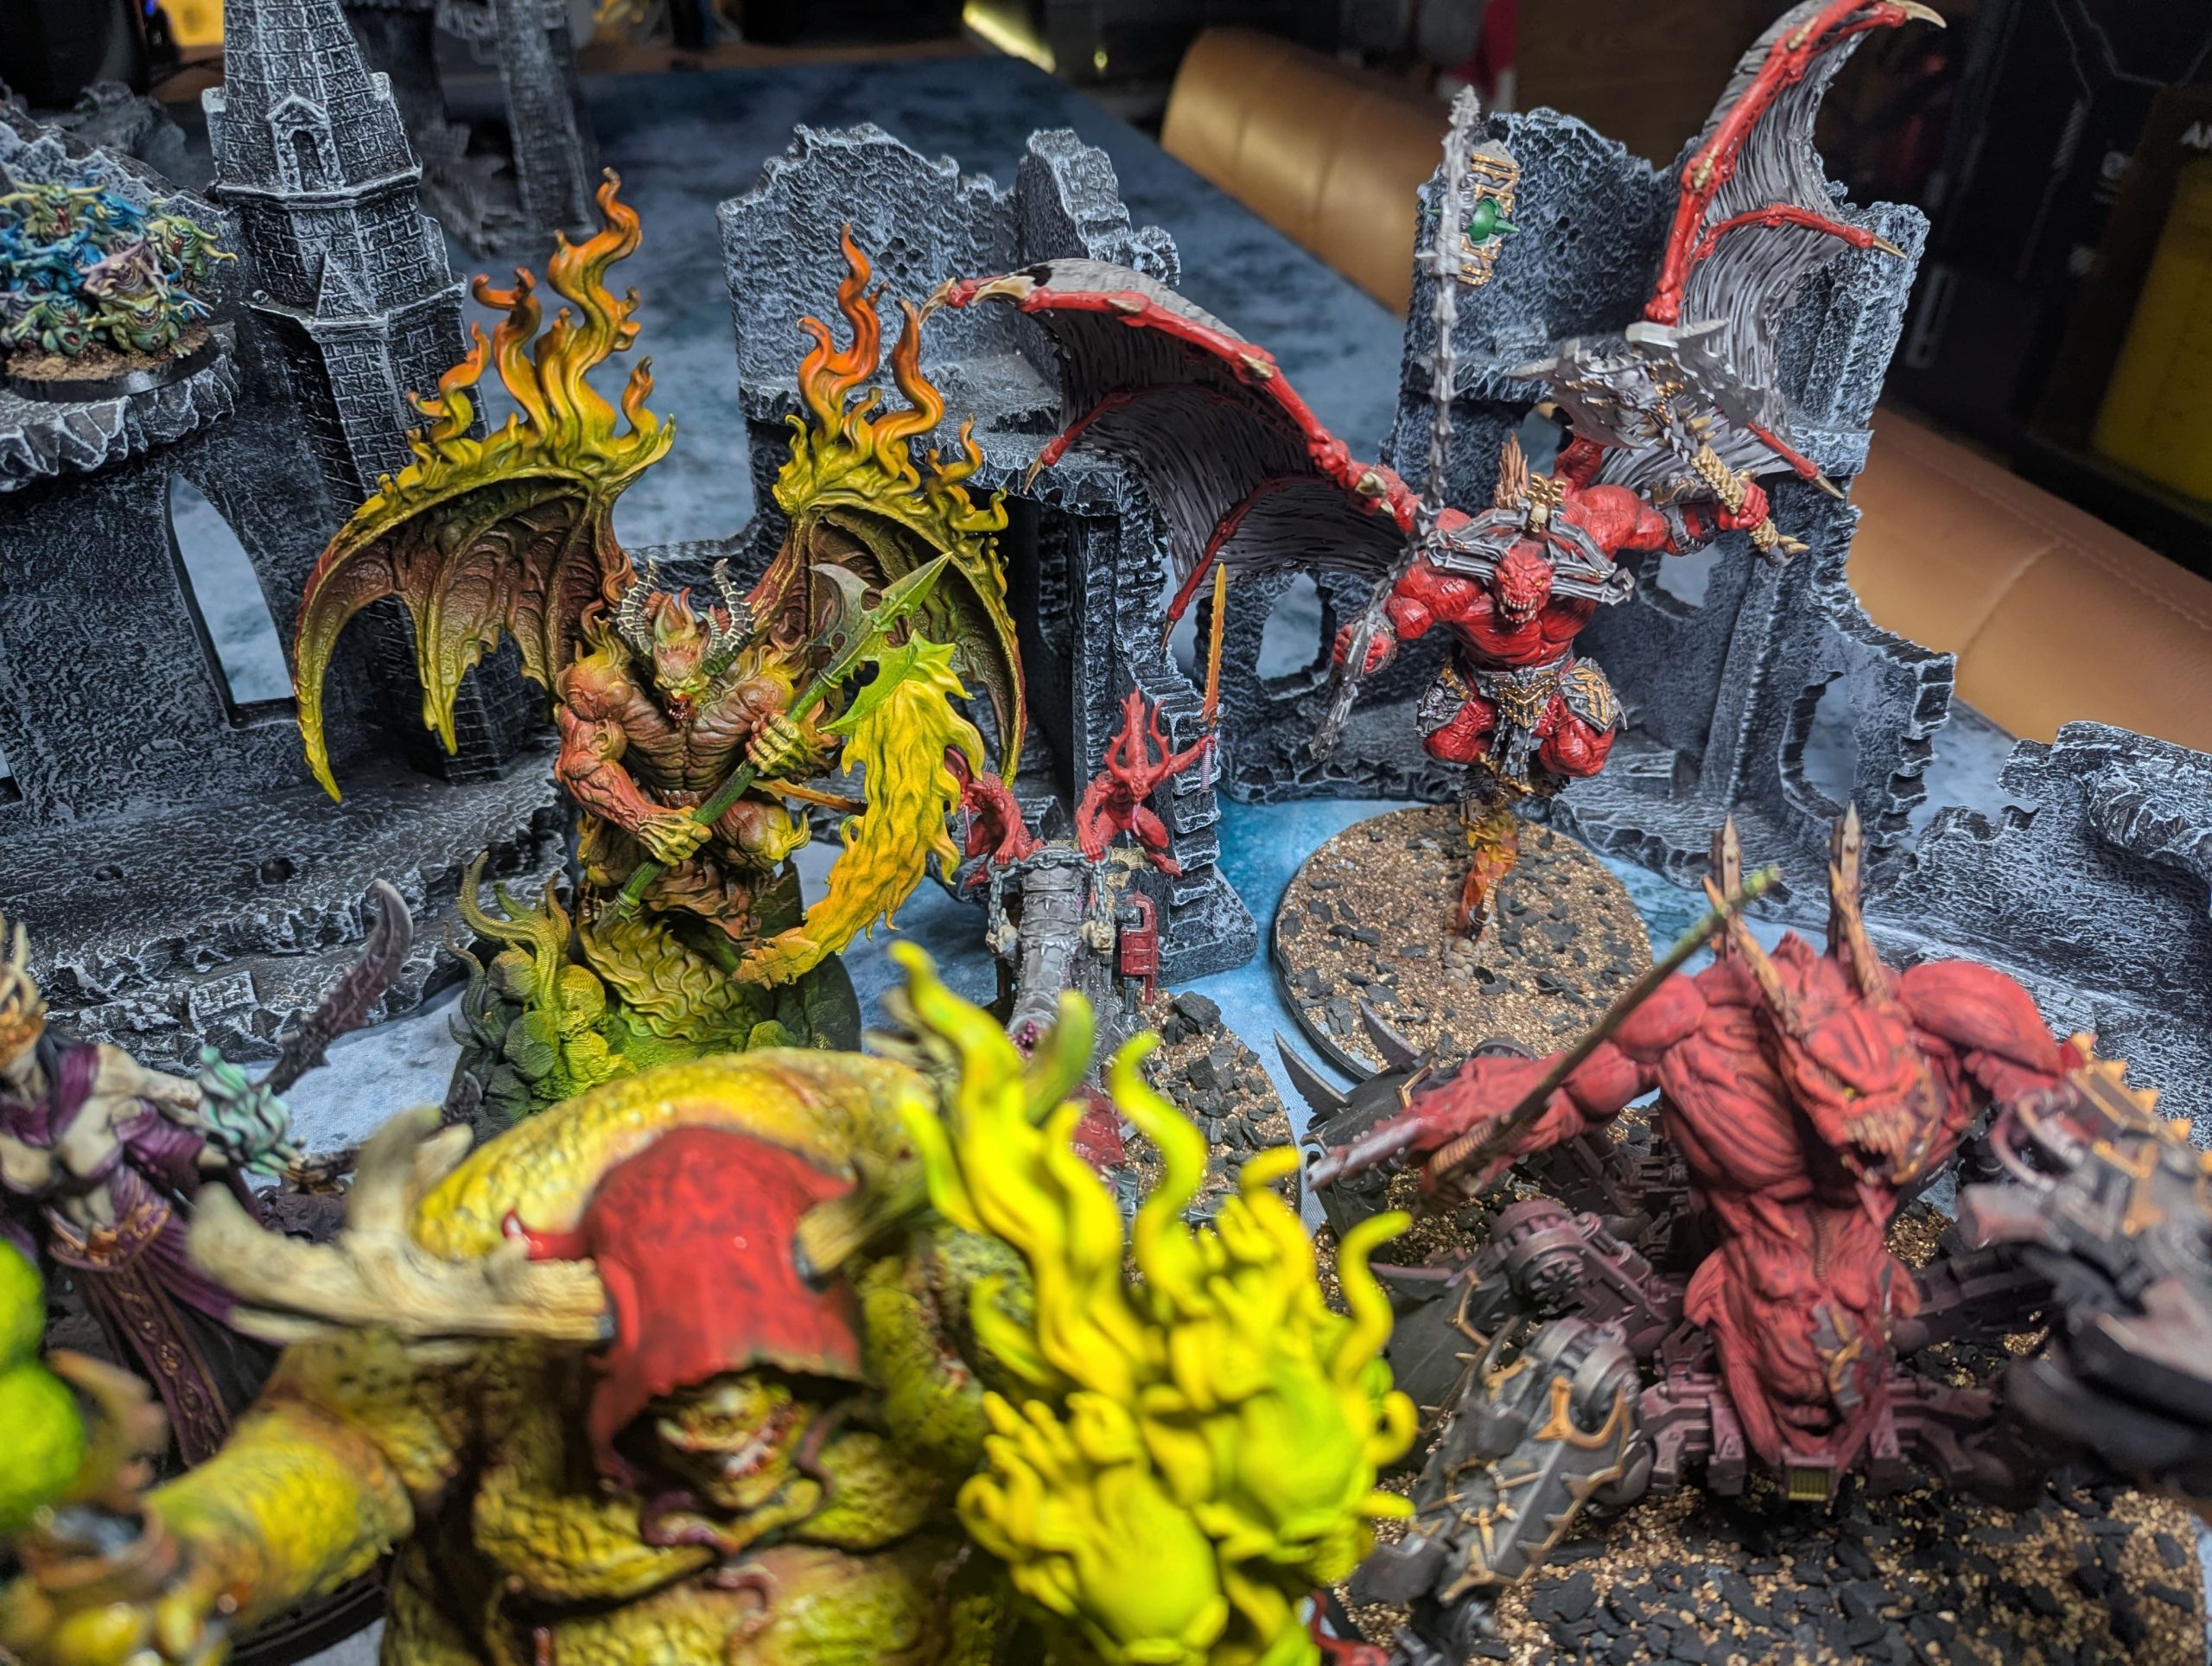
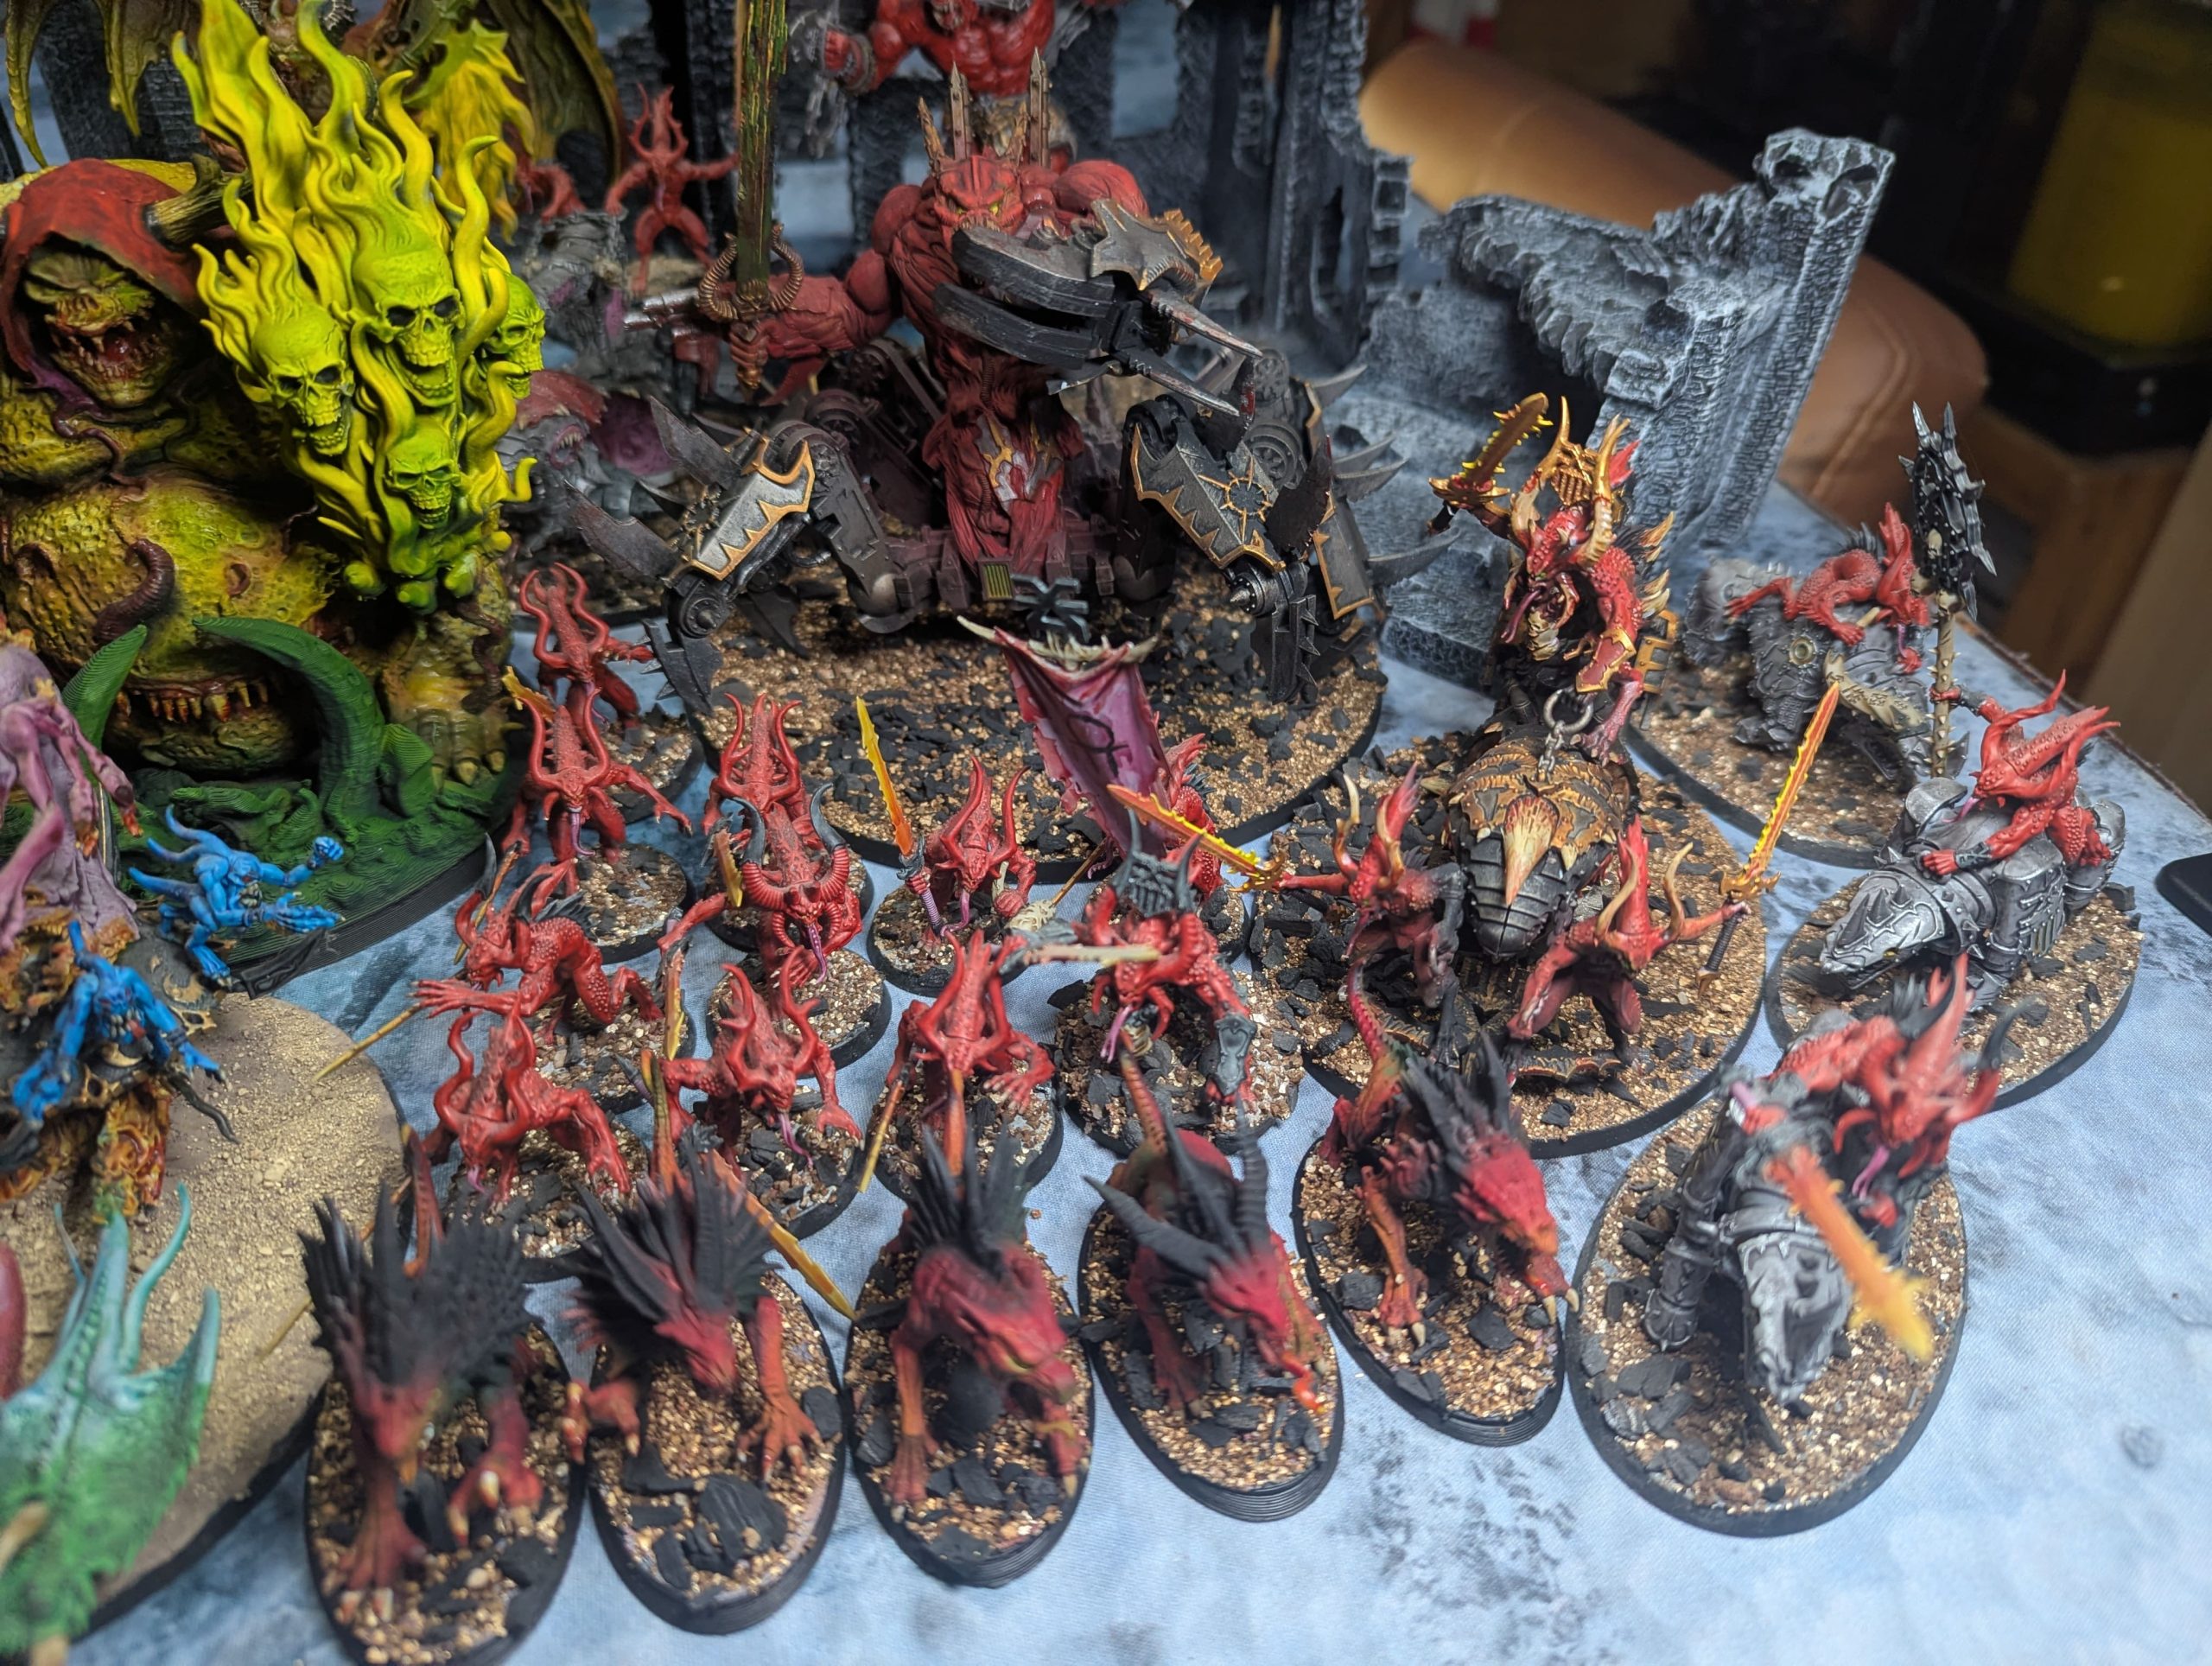
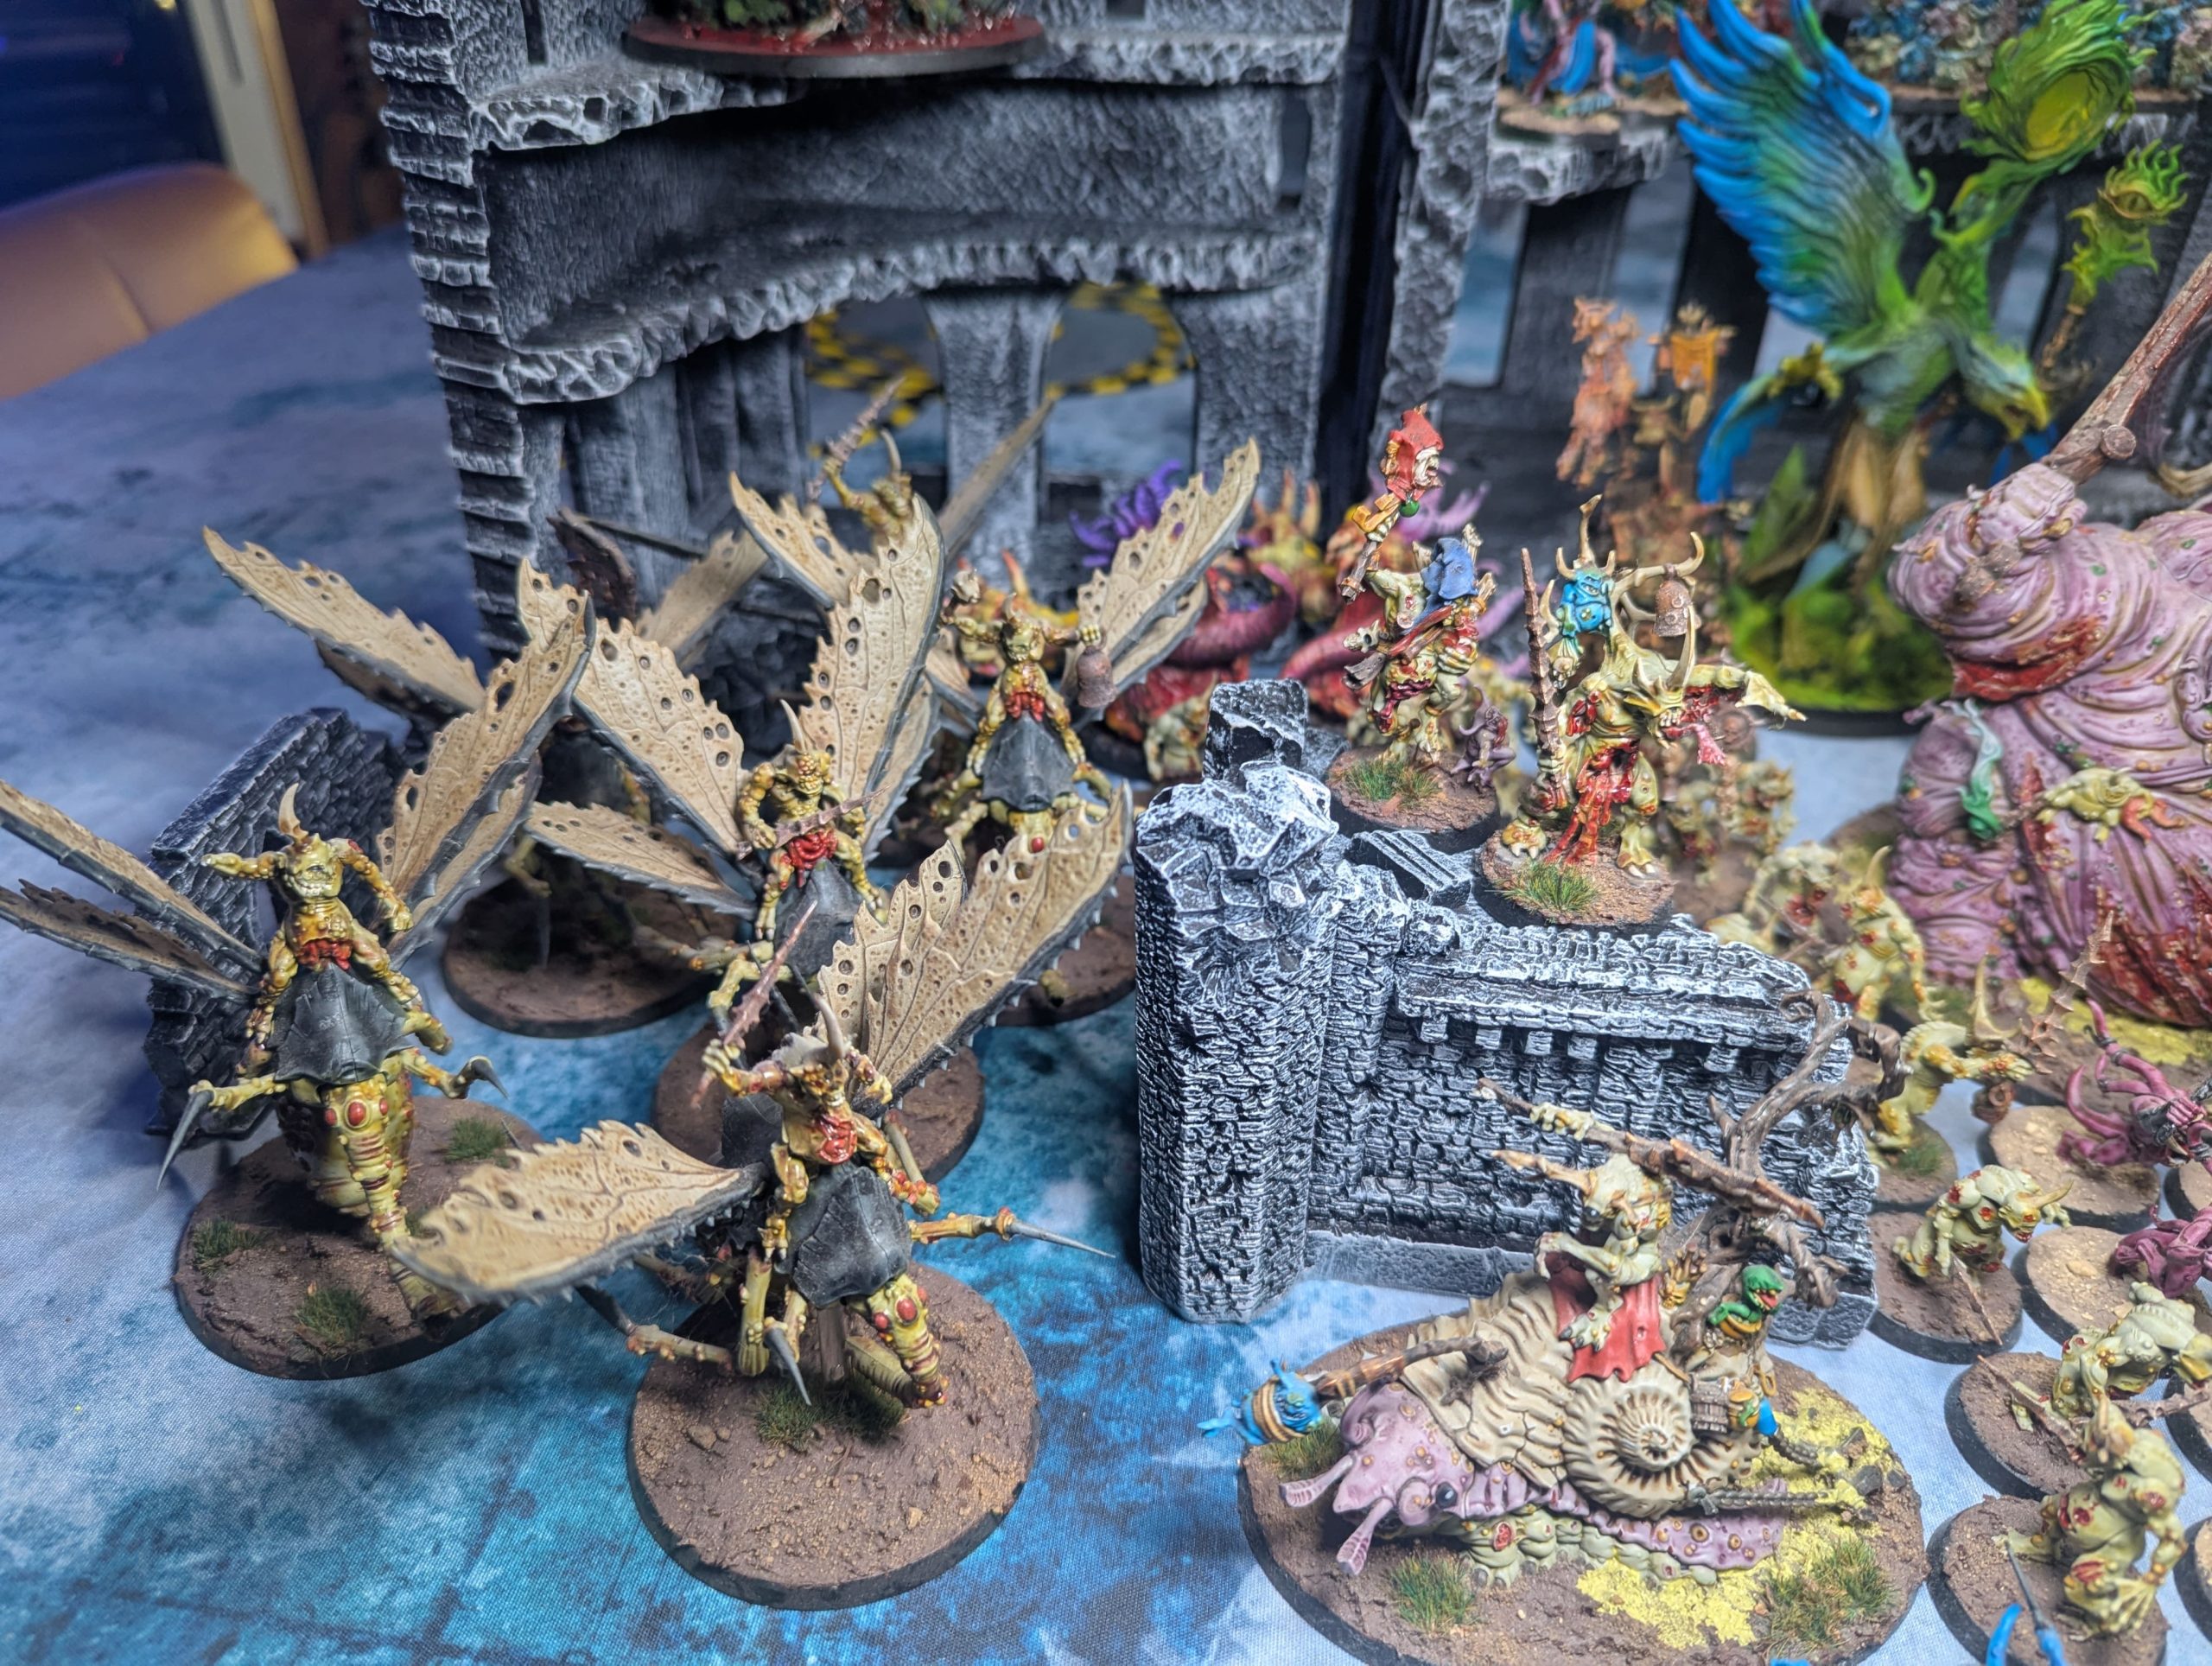
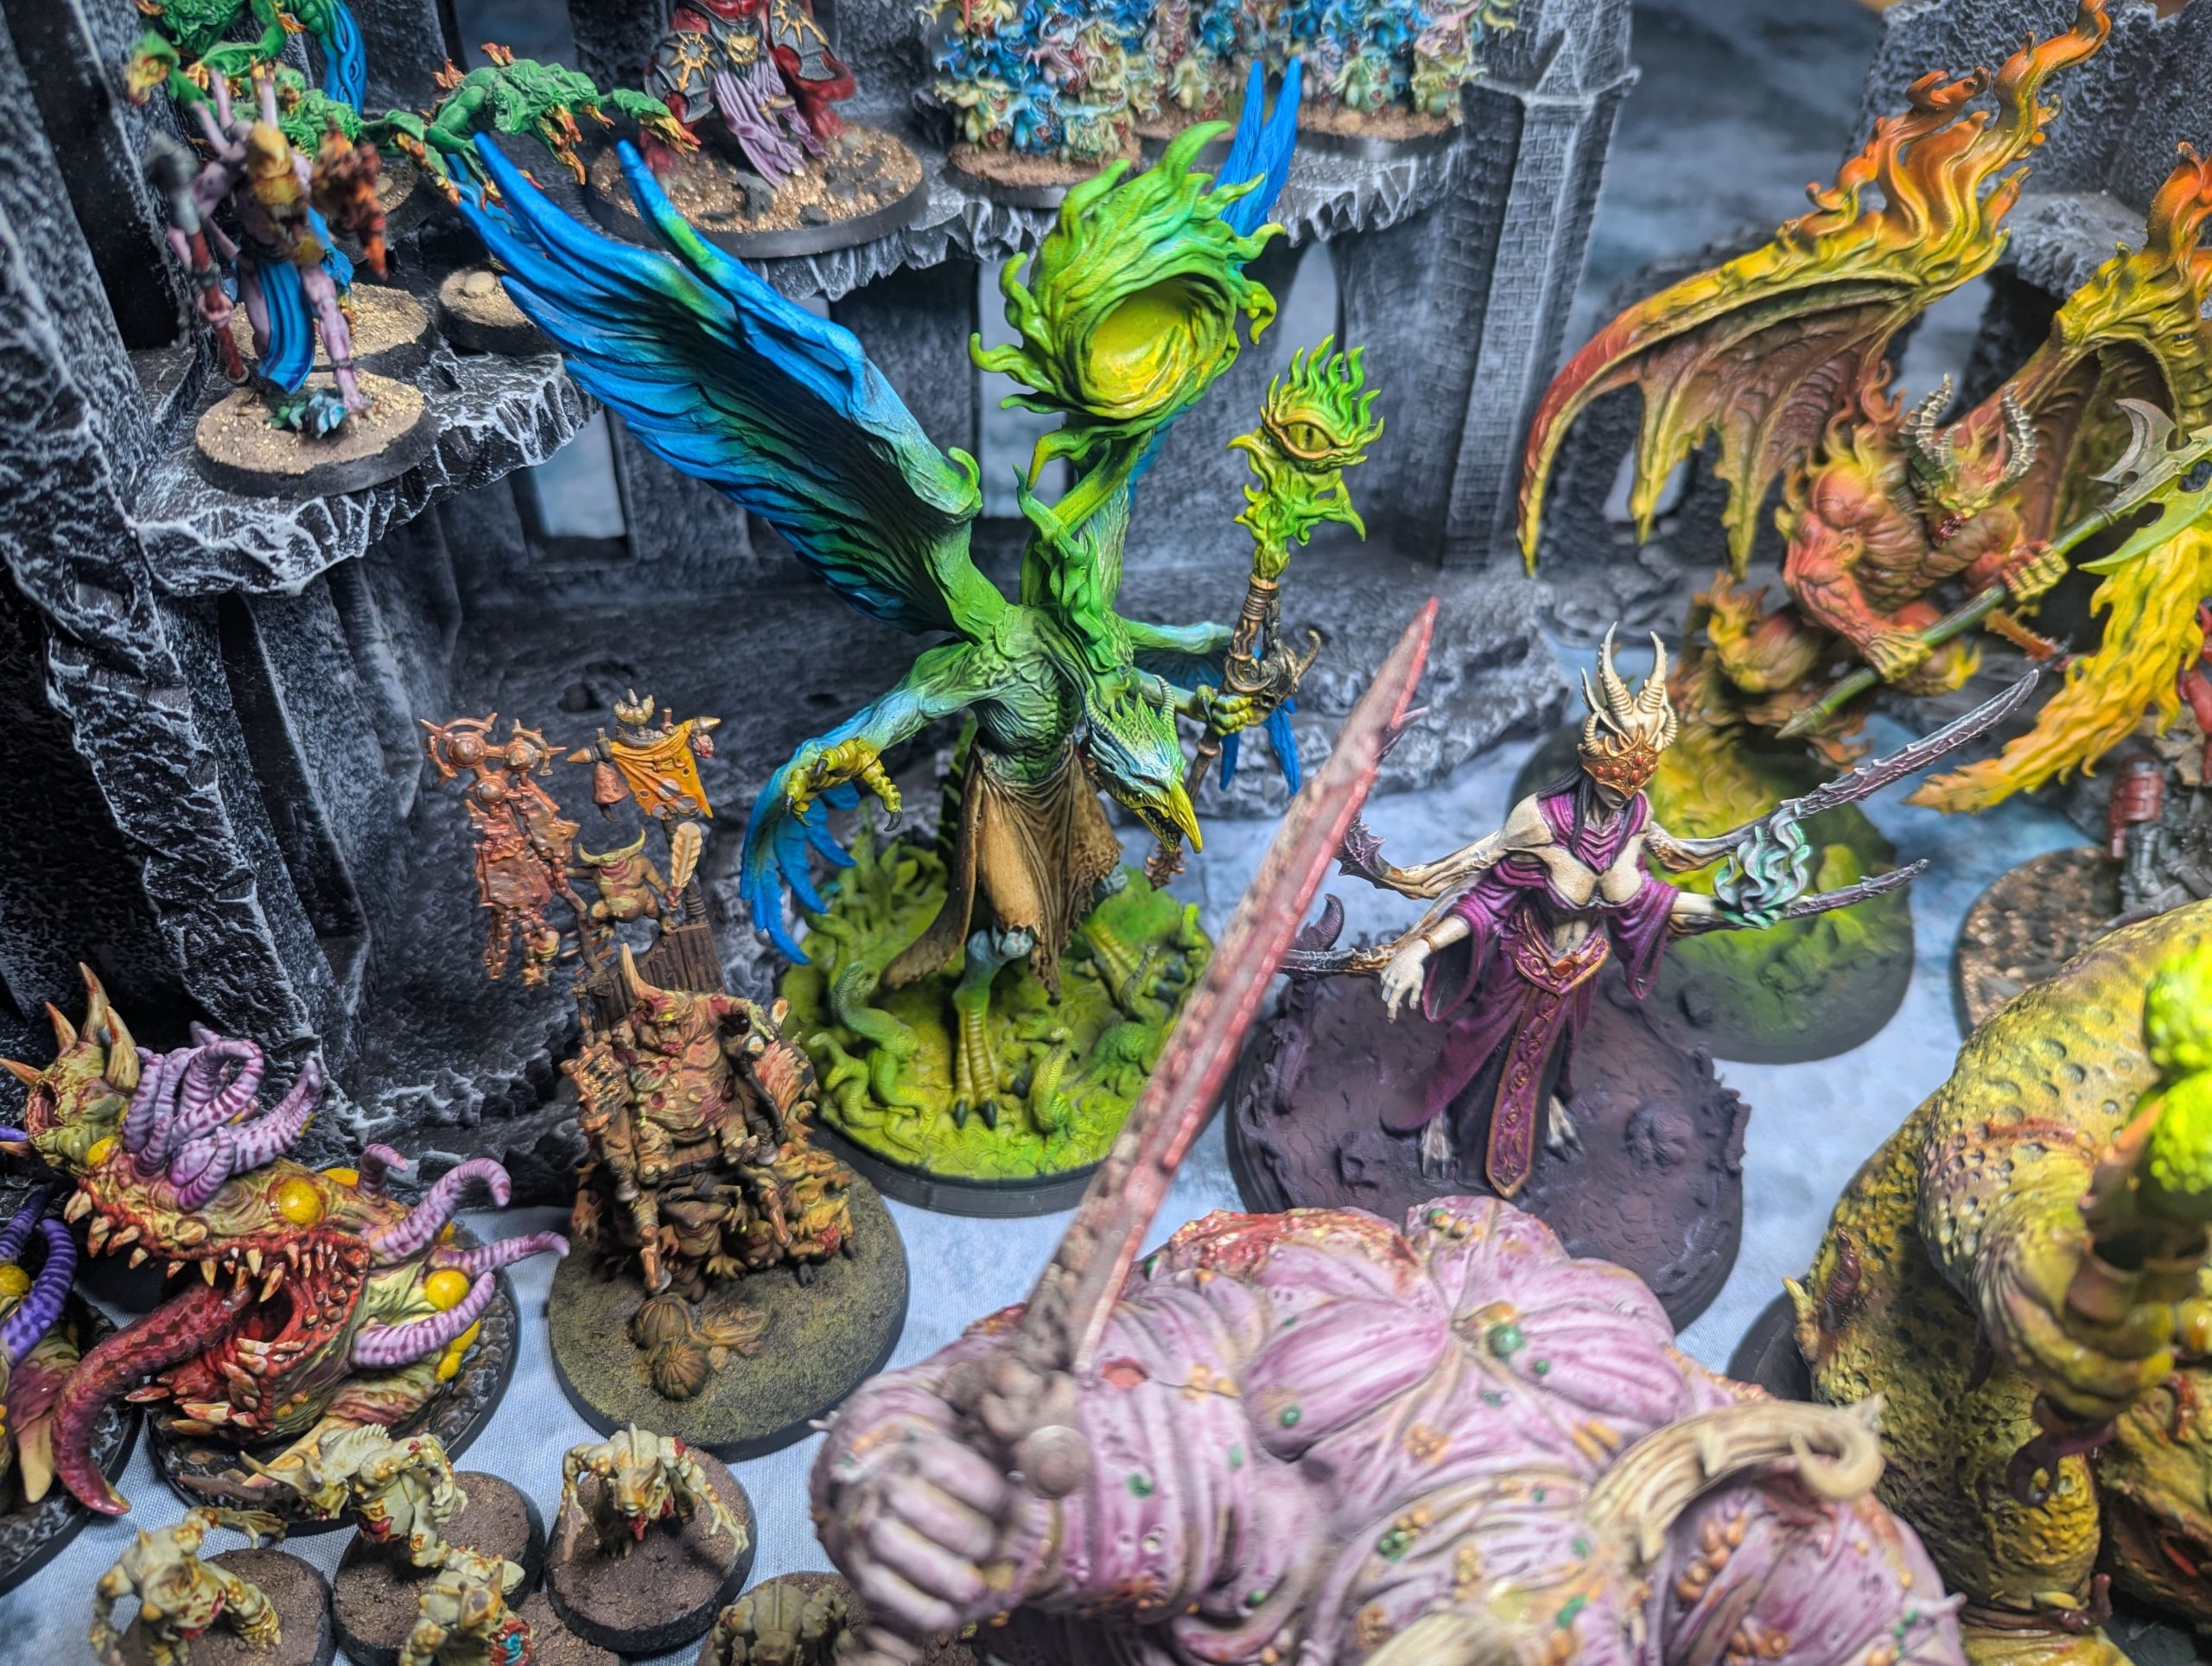
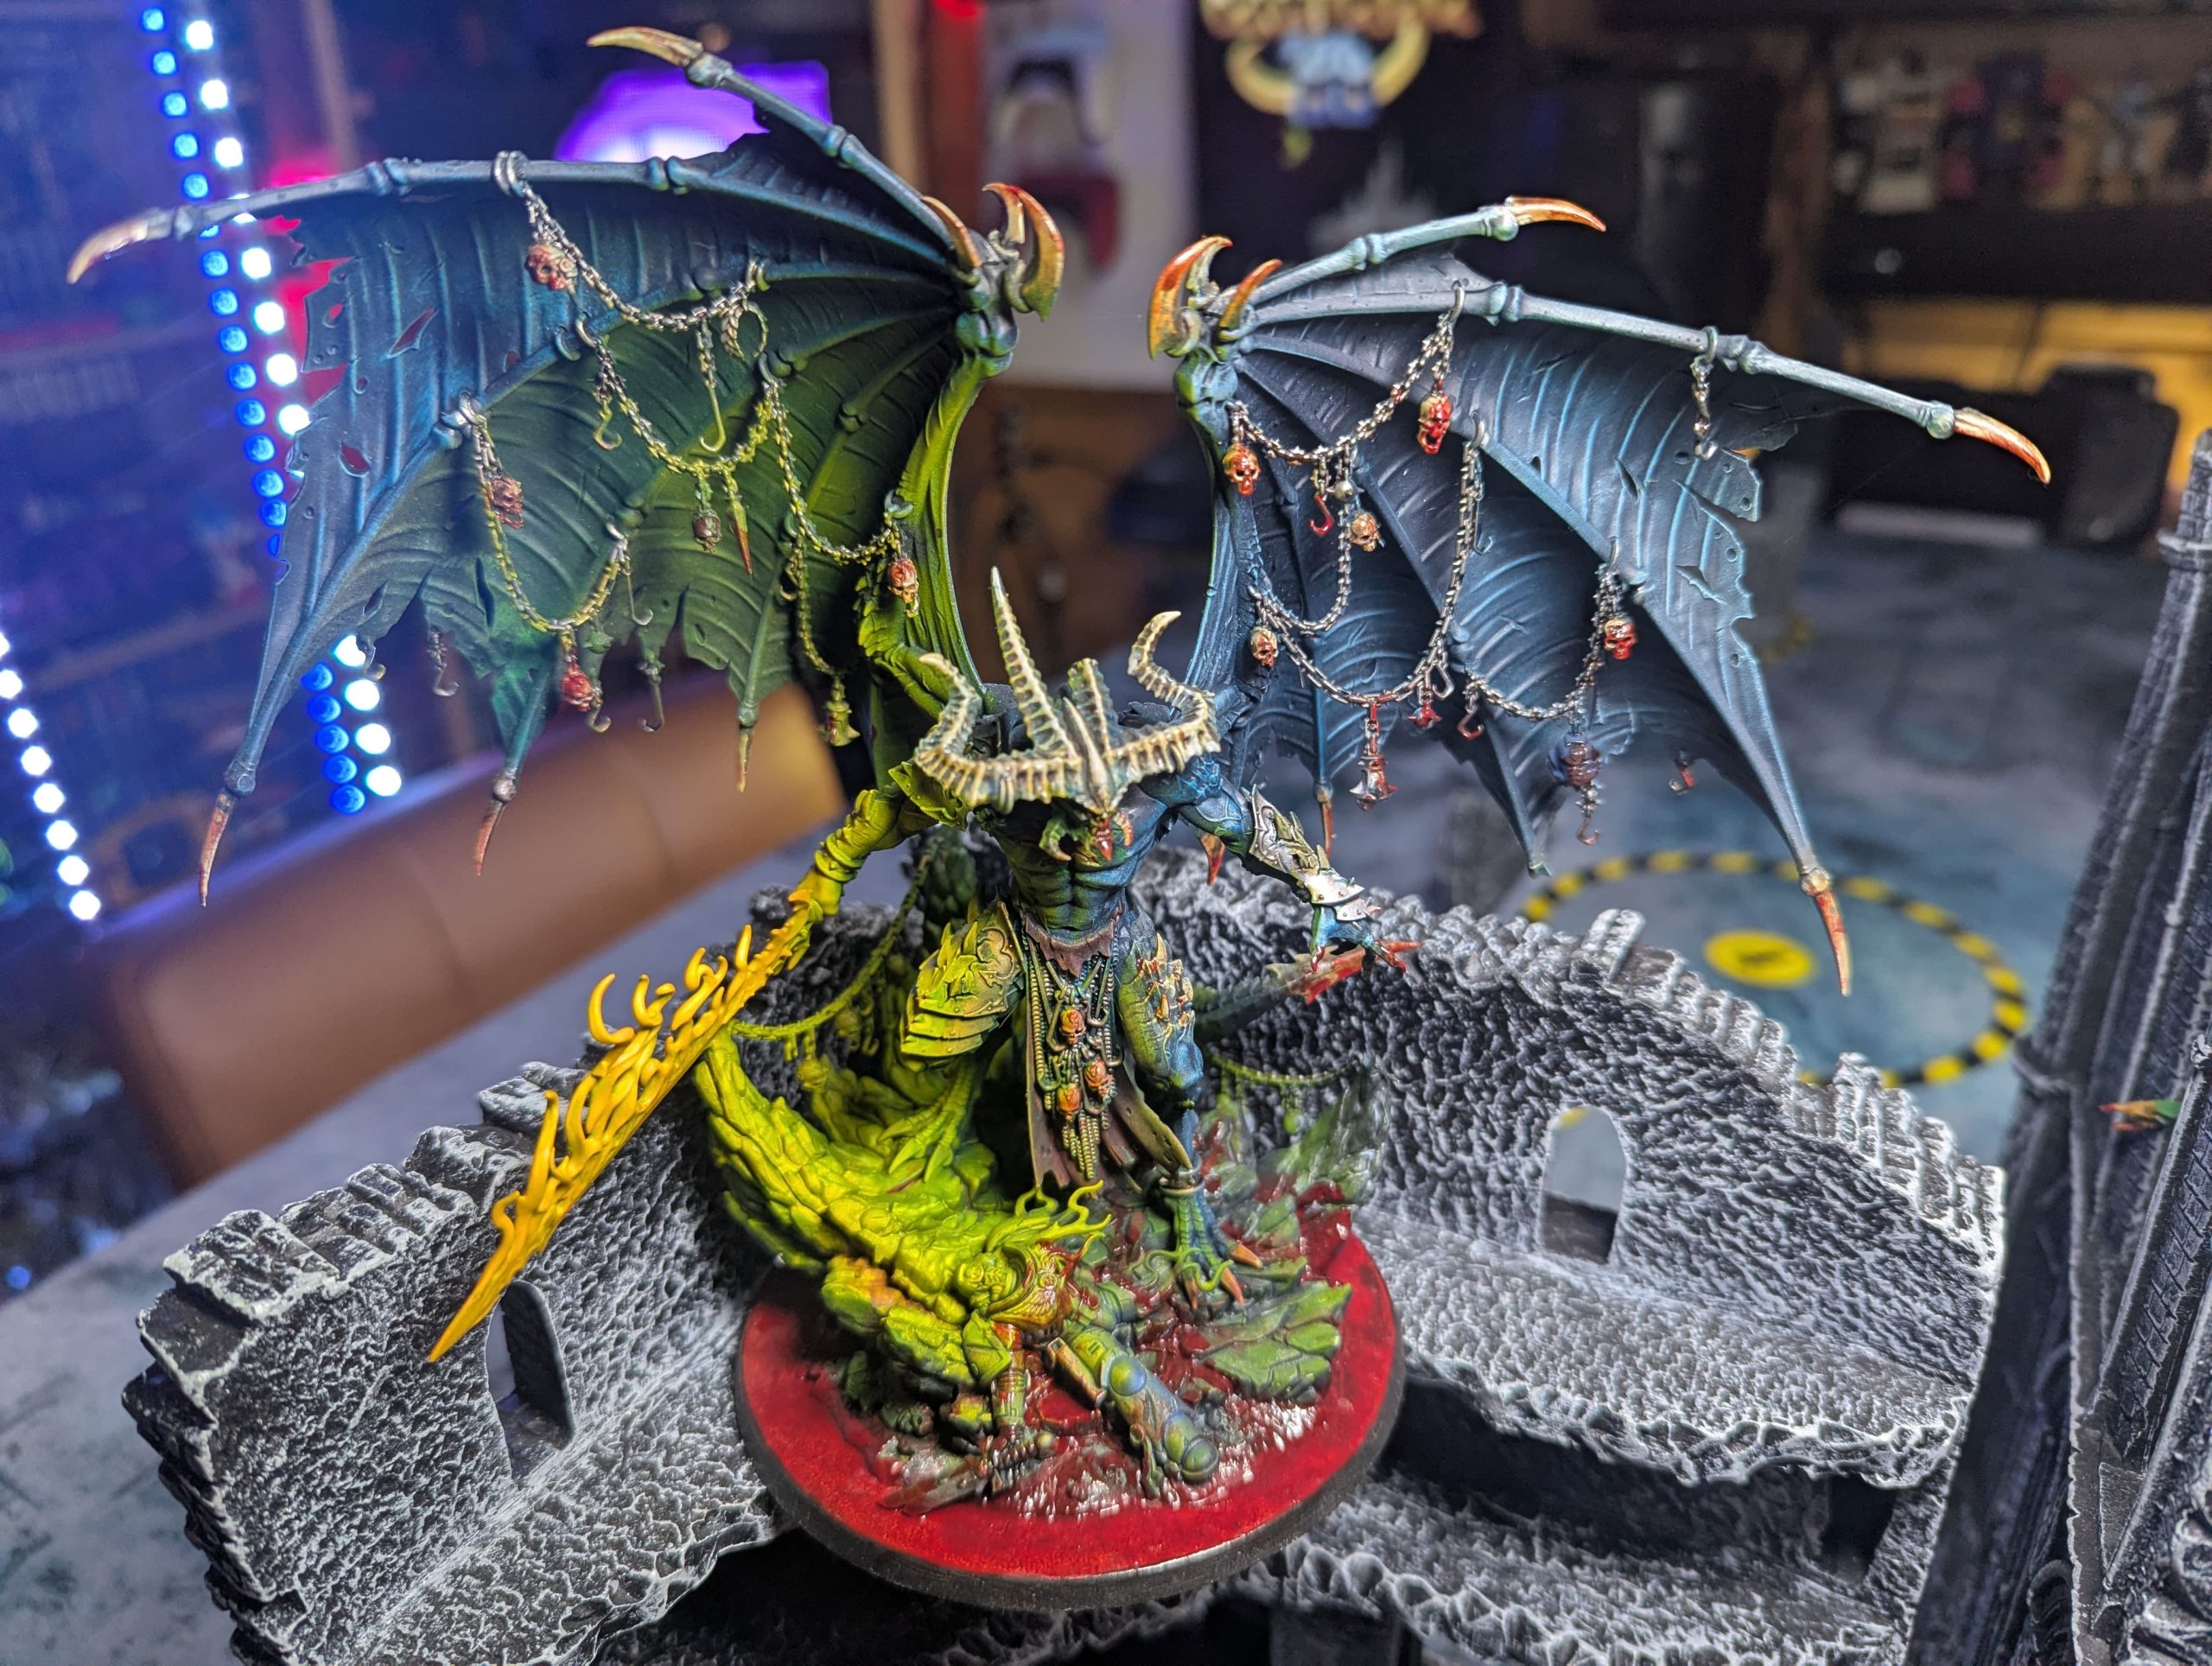
A Daemon Horde Rises: From Weekend Warrior to Full Army
The origins of this particular Daemon army trace back to a truly memorable event in 2019. Beast of War (now OnTableTop) hosted a fantastic Warhammer 40,000 weekender event, and while many attended in person, they also offered a remote participation option. This setup provided a perfect excuse for James and me to embark on a wildly ambitious project. Fueled by enthusiasm and perhaps a little too much caffeine, we ended up live-streaming our efforts for a staggering 30+ hours straight.
During that epic marathon, my goal was to completely paint four of the old Daemon “Start Collecting” boxes (a product no longer available, sadly). The energy of the community and the live interaction made the monumental task feel manageable, and the satisfaction of finishing that huge initial batch was immense. Ever since that weekend, the seeds for a full, dedicated Daemon army were firmly planted in my mind, and I began steadily accumulating more models as time went on, with the long-term goal of bringing a complete Daemonic Legion to the tabletop.
Fast forward to the recent holiday season—spanning Christmas and New Year—and the final catalyst for completing the army presented itself. James has recently become deeply engrossed in playing his Tau Empire forces, and, as fate would have it, Daemons of Chaos possess a surprisingly hard counter matchup against the alien technology of the Greater Good. The tactical advantage offered by the Daemons provided the perfect motivation I needed.
With renewed focus and spurred by the tactical imperative, I devoted the entirety of the holiday break and the weeks immediately following to finishing everything I had left. This final push included not only the models I had collected over the years but also necessitated the use of some stunning 3D-printed proxies to fill the last few gaps and bring the army to its full fighting strength. The result of this focused effort is a vibrant, complete Daemonic horde, ready to spill out of the Warp and onto the battlefield.
The painting process for the final stages was centred around efficiency and impact, maintaining a cohesive look across the entire force. I leaned heavily on time-saving but effective techniques: high usage of Contrast paints, primarily applied through an airbrush for smooth gradients and base coats, extensive drybrushing to pick out texture and details, and various technical paints to achieve realistic effects like pooling blood or noxious slime. The speed of the process was astonishing; I was able to complete even large centrepiece models—such as the formidable Belakor—in just a couple of hours maximum.
The final aesthetic is one that I am genuinely happy with; the colours pop, the models look great collectively, and the overall effect is suitably terrifying and cohesive. I am incredibly proud of the speed and quality achieved.
If you are curious about specific models, techniques, or the paint recipes I used—especially for achieving such quick results on the large number of models—please feel free to ask away in the comments below. If there is enough interest, I would be delighted to post a detailed breakdown of my process for painting these Daemons.


 How it started!
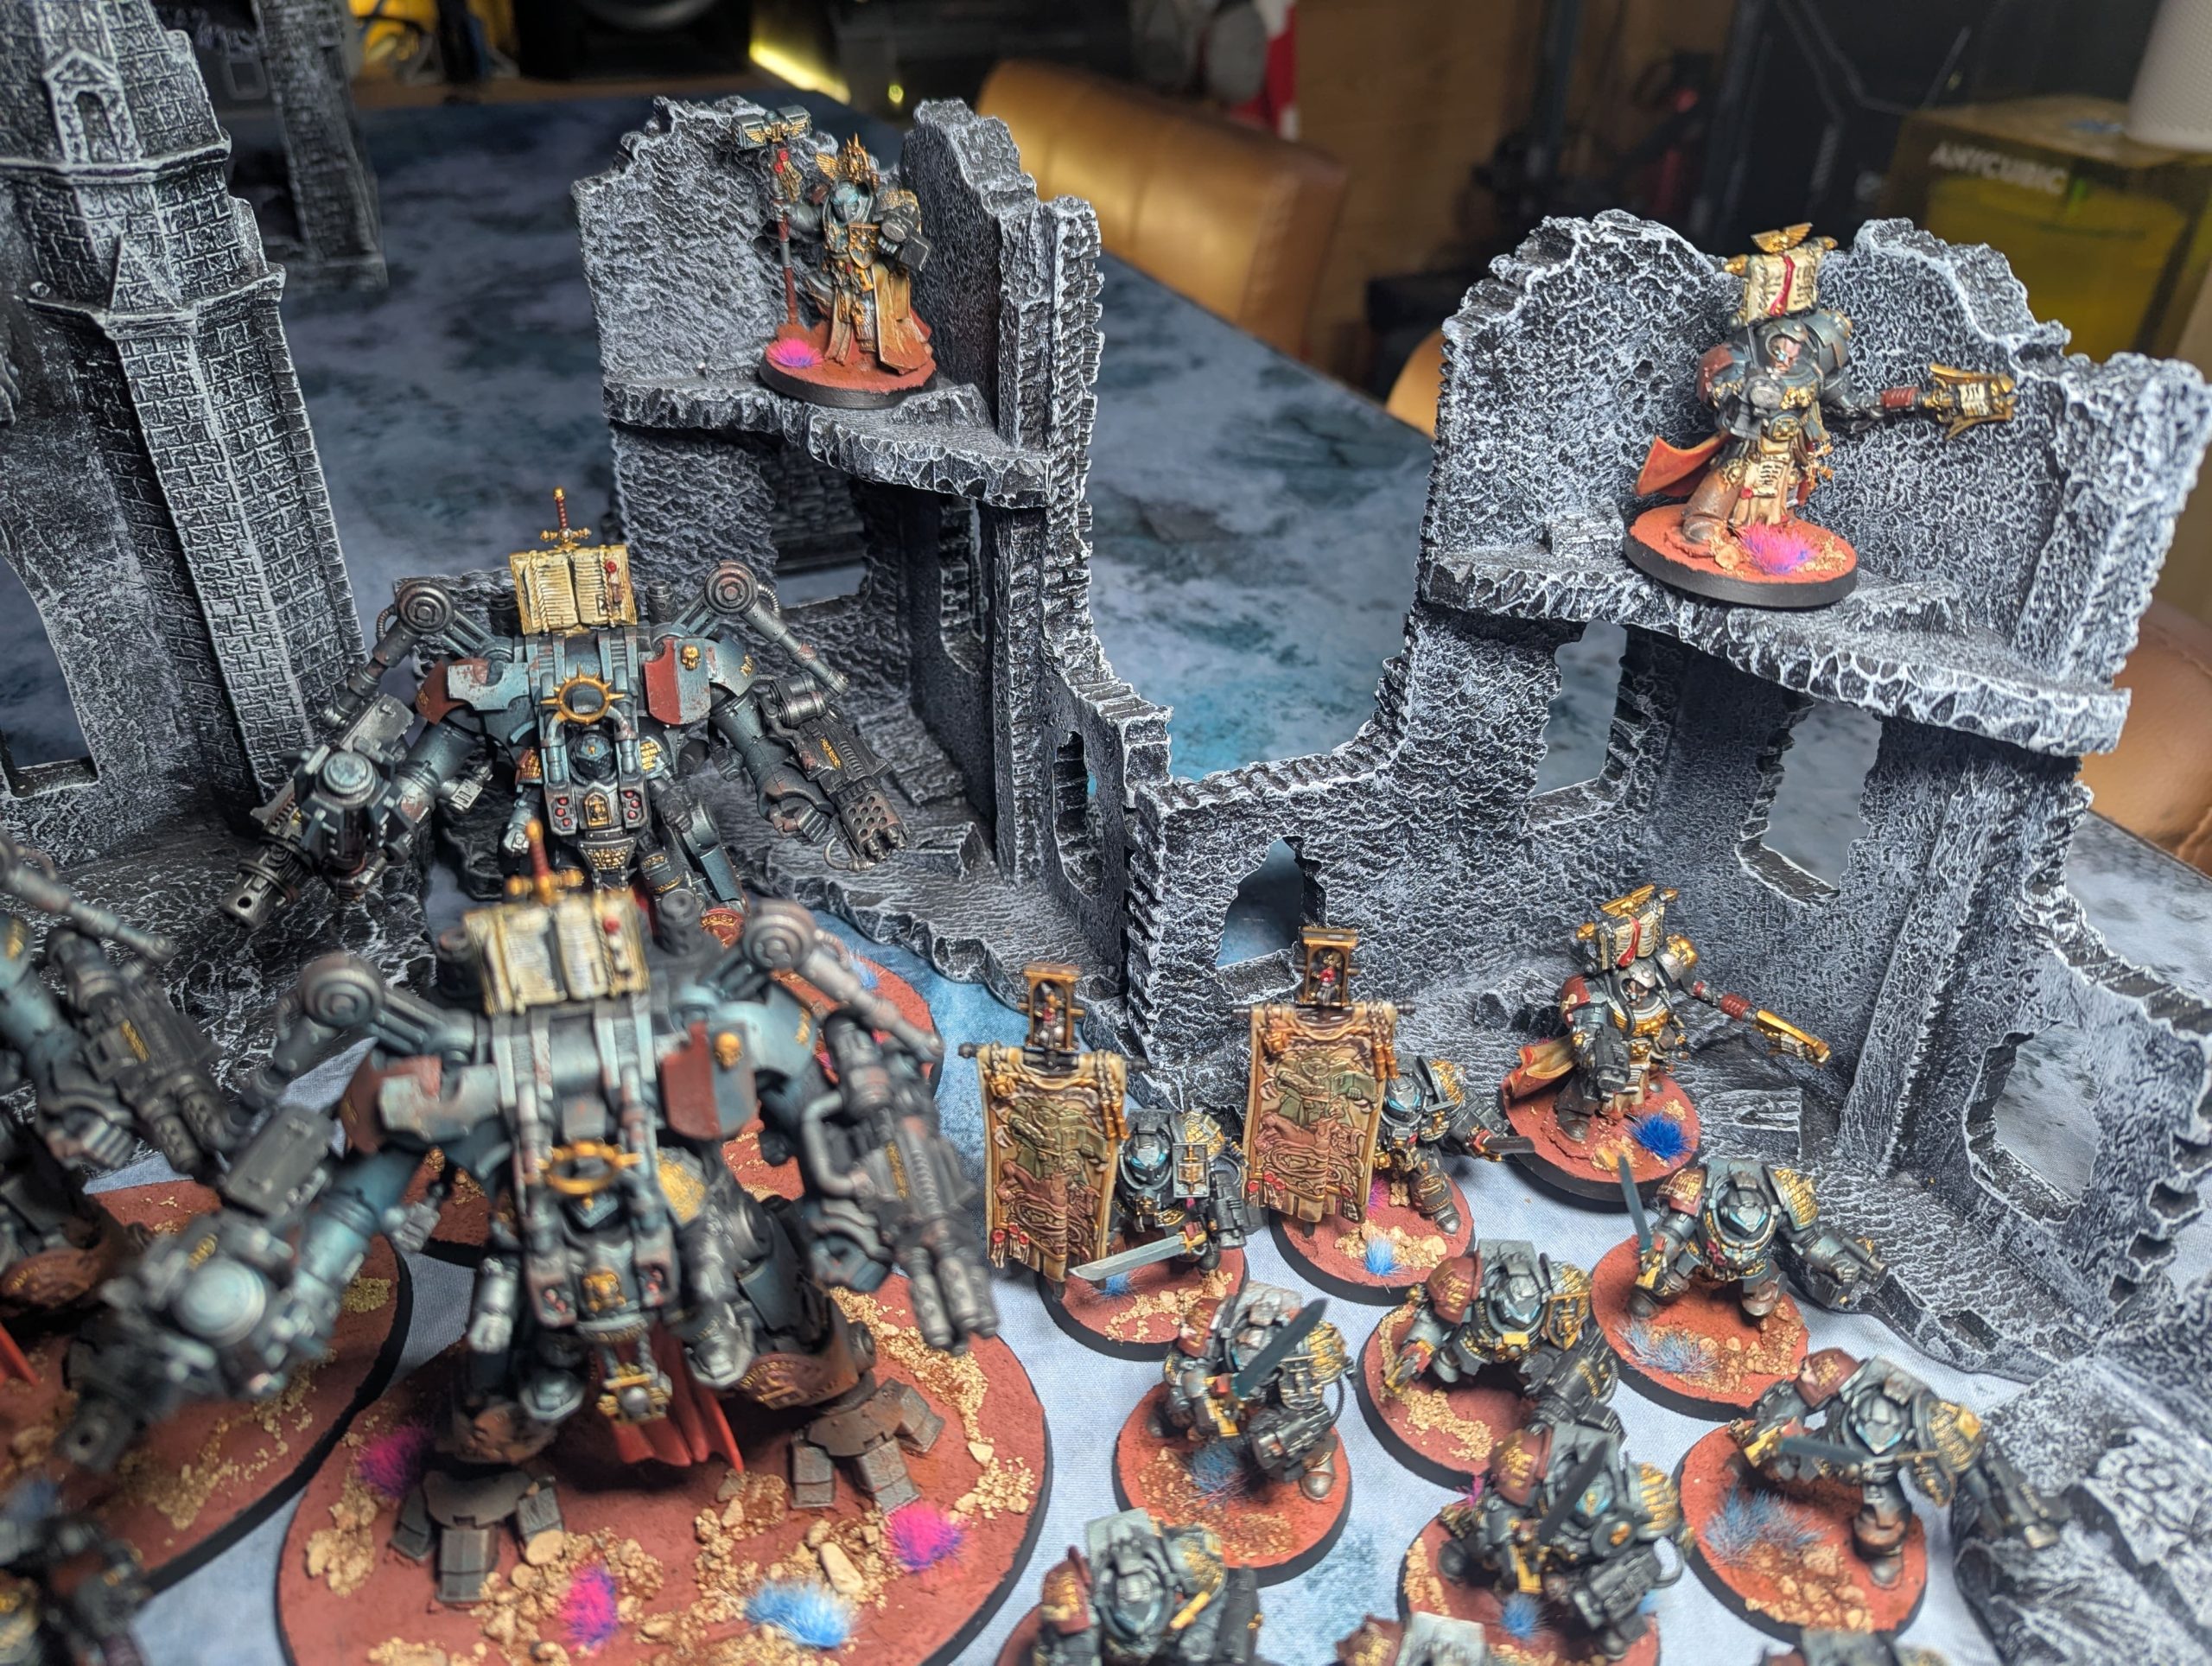
From Knights to Grey Knights: The Adepticon Army and the Dreadknight Contingent
From Knights to Grey Knights: The Adepticon Army and the Dreadknight Contingent
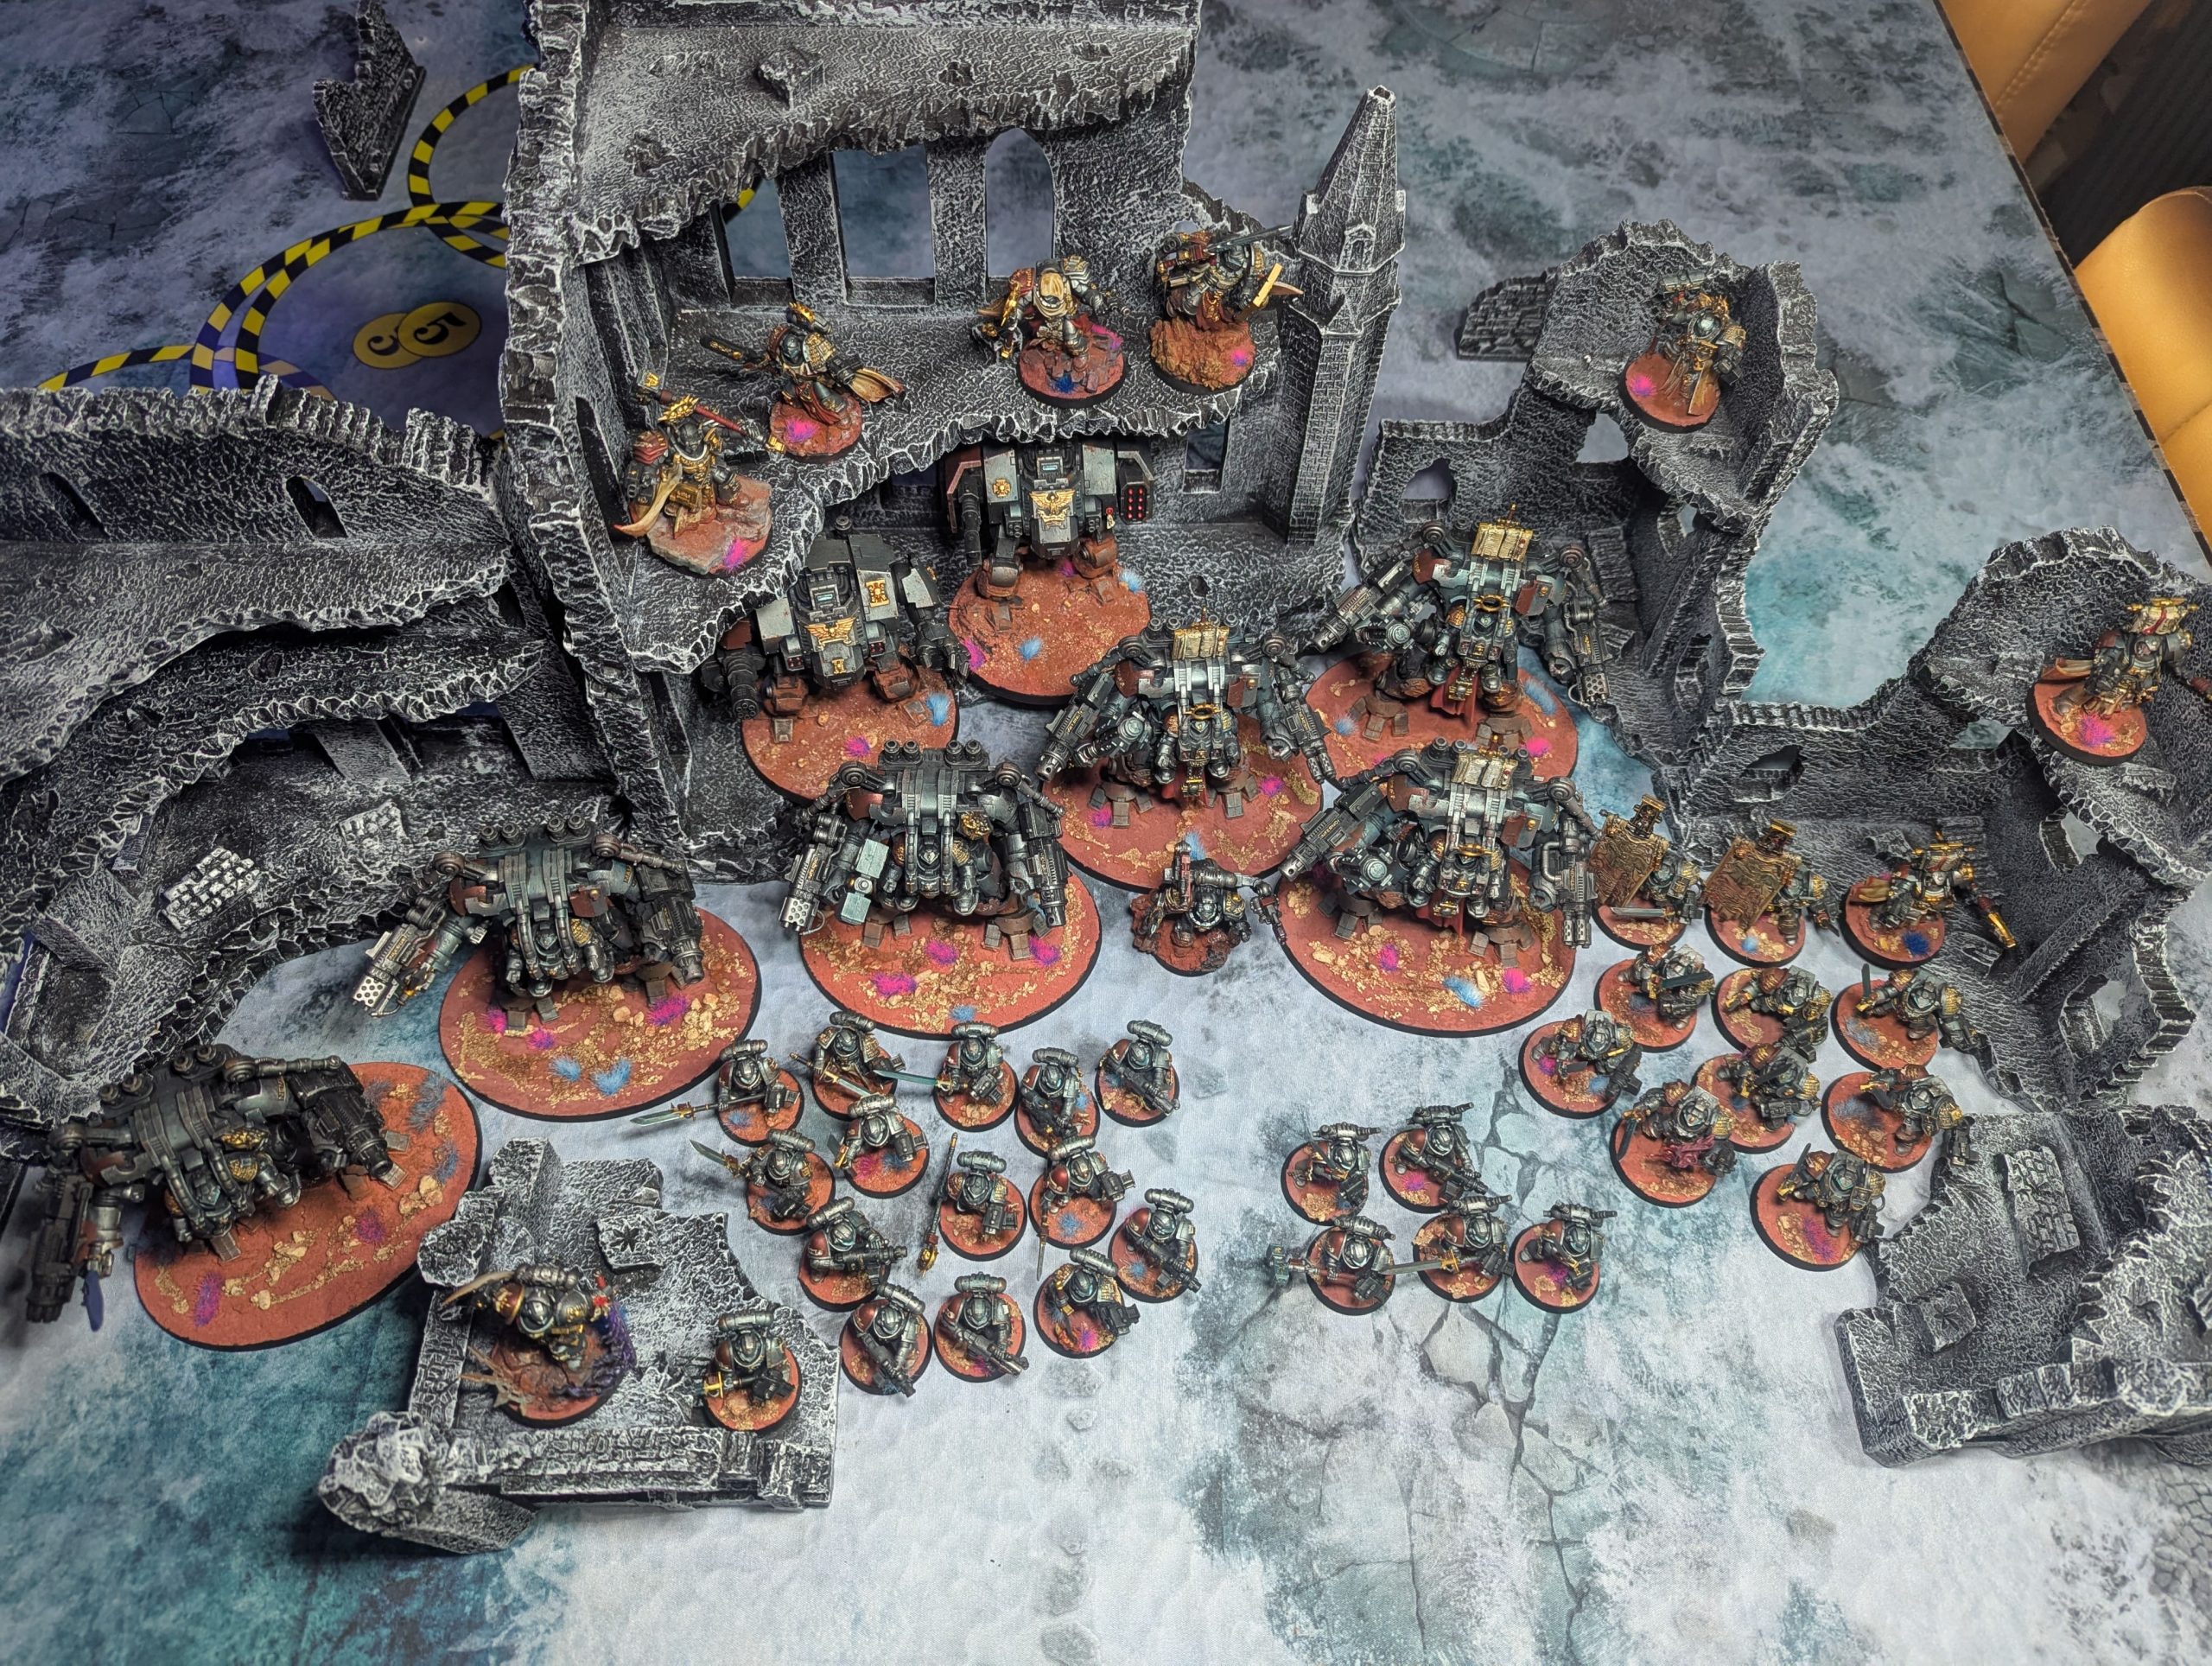
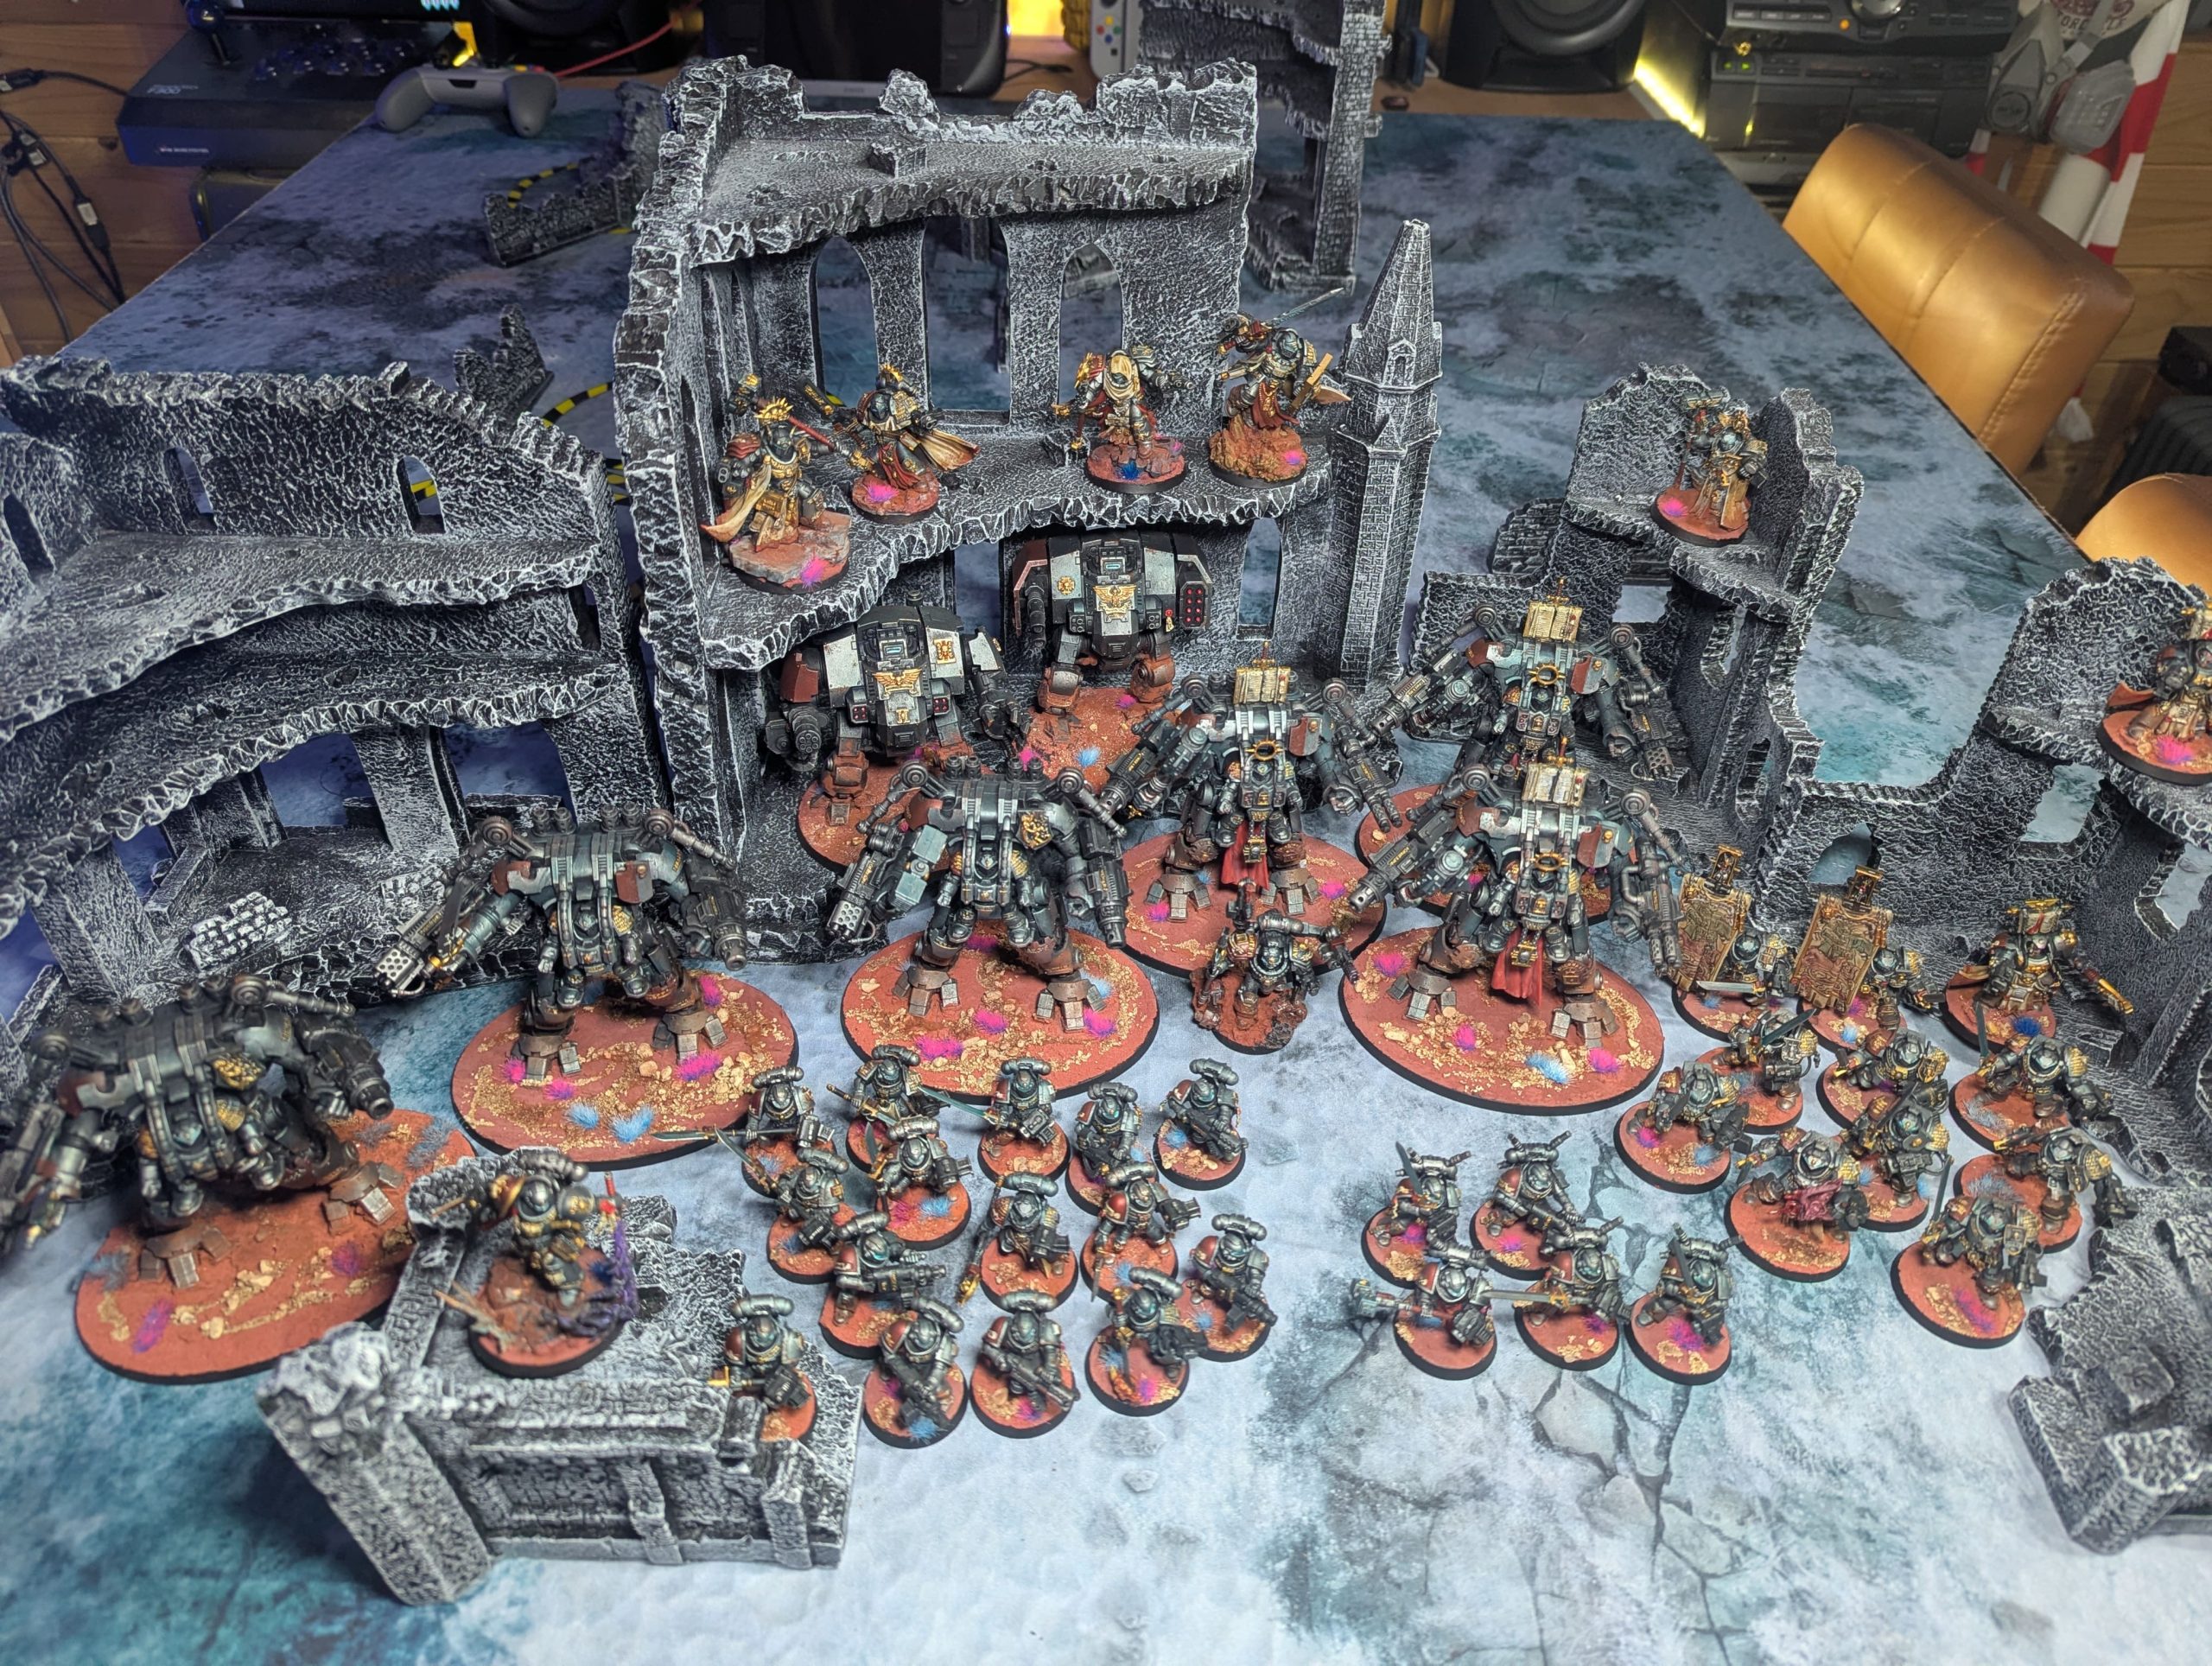
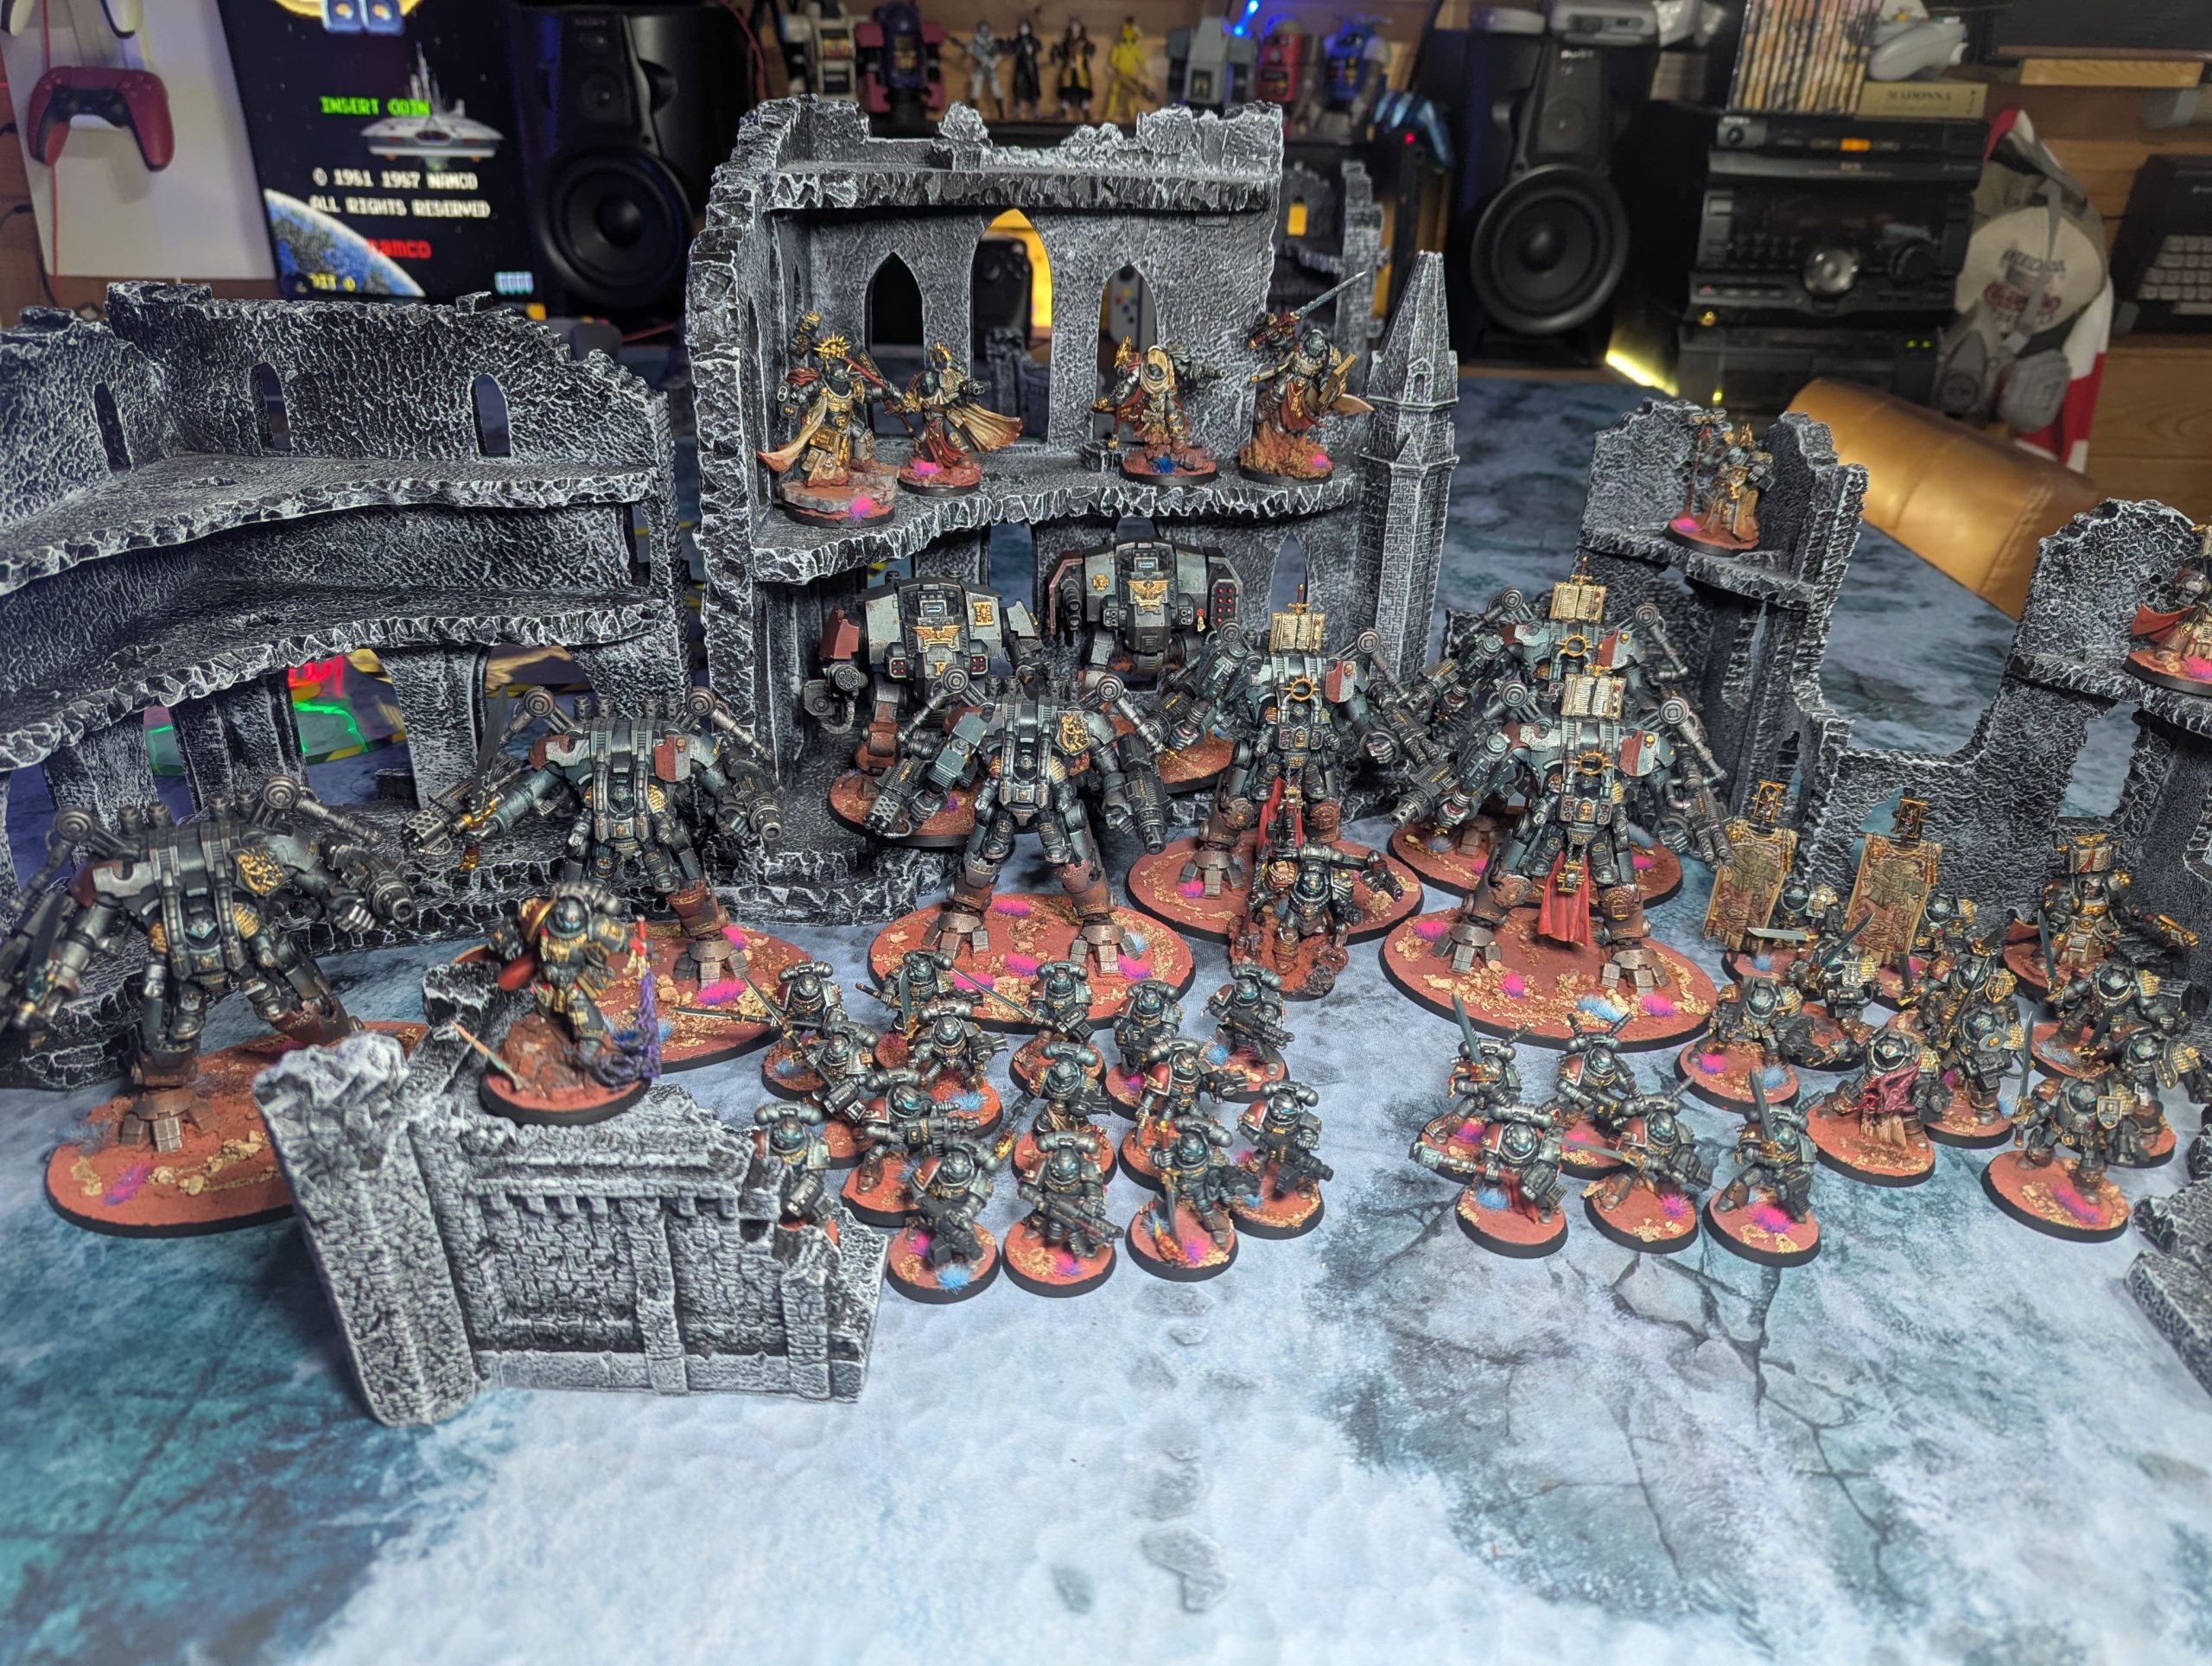
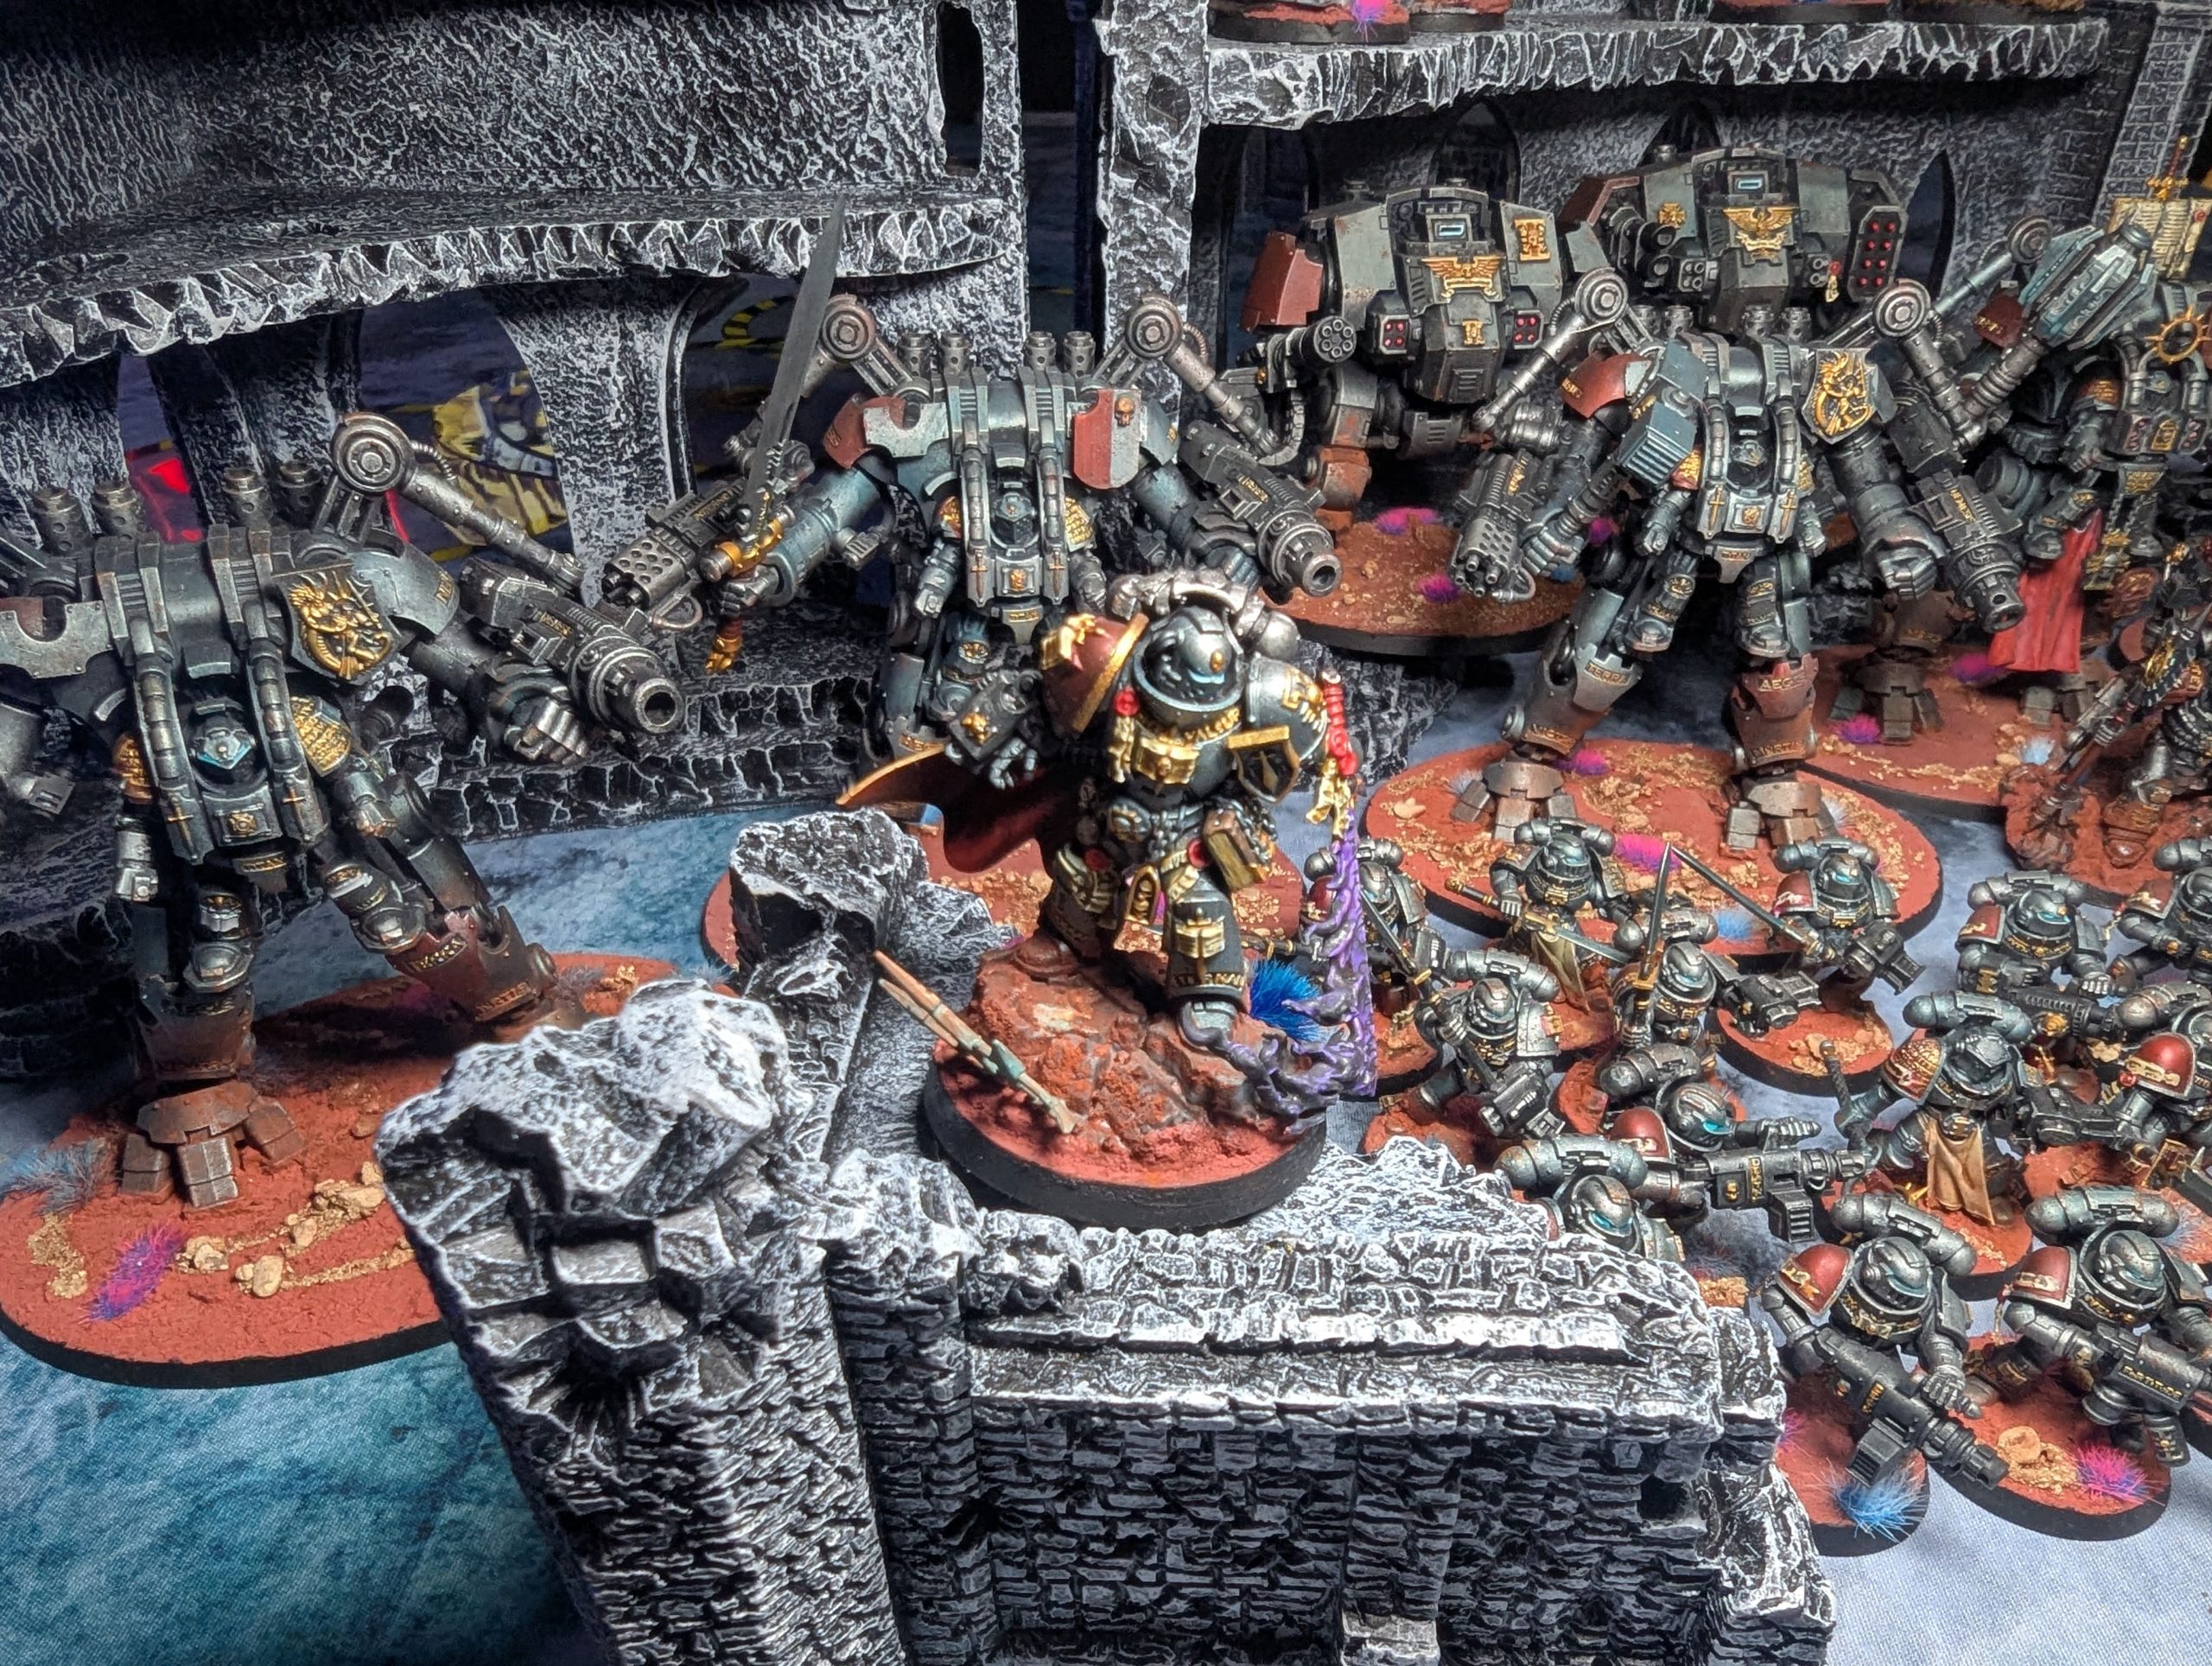
The year 2025 marked a significant turning point in my miniature wargaming journey, a transition that saw us move from Knights to Grey Knights. This shift was cemented by an unforgettable father-son trip to Adepticon, the pinnacle of North American wargaming conventions. For this monumental event, my son and I embarked on a project to build and paint a Grey Knights Combat Patrol. This trip, filled with great games, meeting fellow hobbyists, and shared enthusiasm, was truly amazing for myriad reasons—the memories forged there make this particular army inherently special and irreplaceable.
However, the Combat Patrol, a small 500-point force, felt incomplete. It was always the intention to expand this revered chapter of Space Marines into a full-fledged, formidable army. While exploring the numerous competitive and narrative list-building options available to the Grey Knights, a truly inspiring (and arguably audacious) idea presented itself: a list centred around the iconic Nemesis Dreadknight. It turns out, you can field a staggering six Dreadknights in a single army list. The mental image of six hulking, teleporting, mech-suited Terminators dominating the battlefield was too cool to ignore.
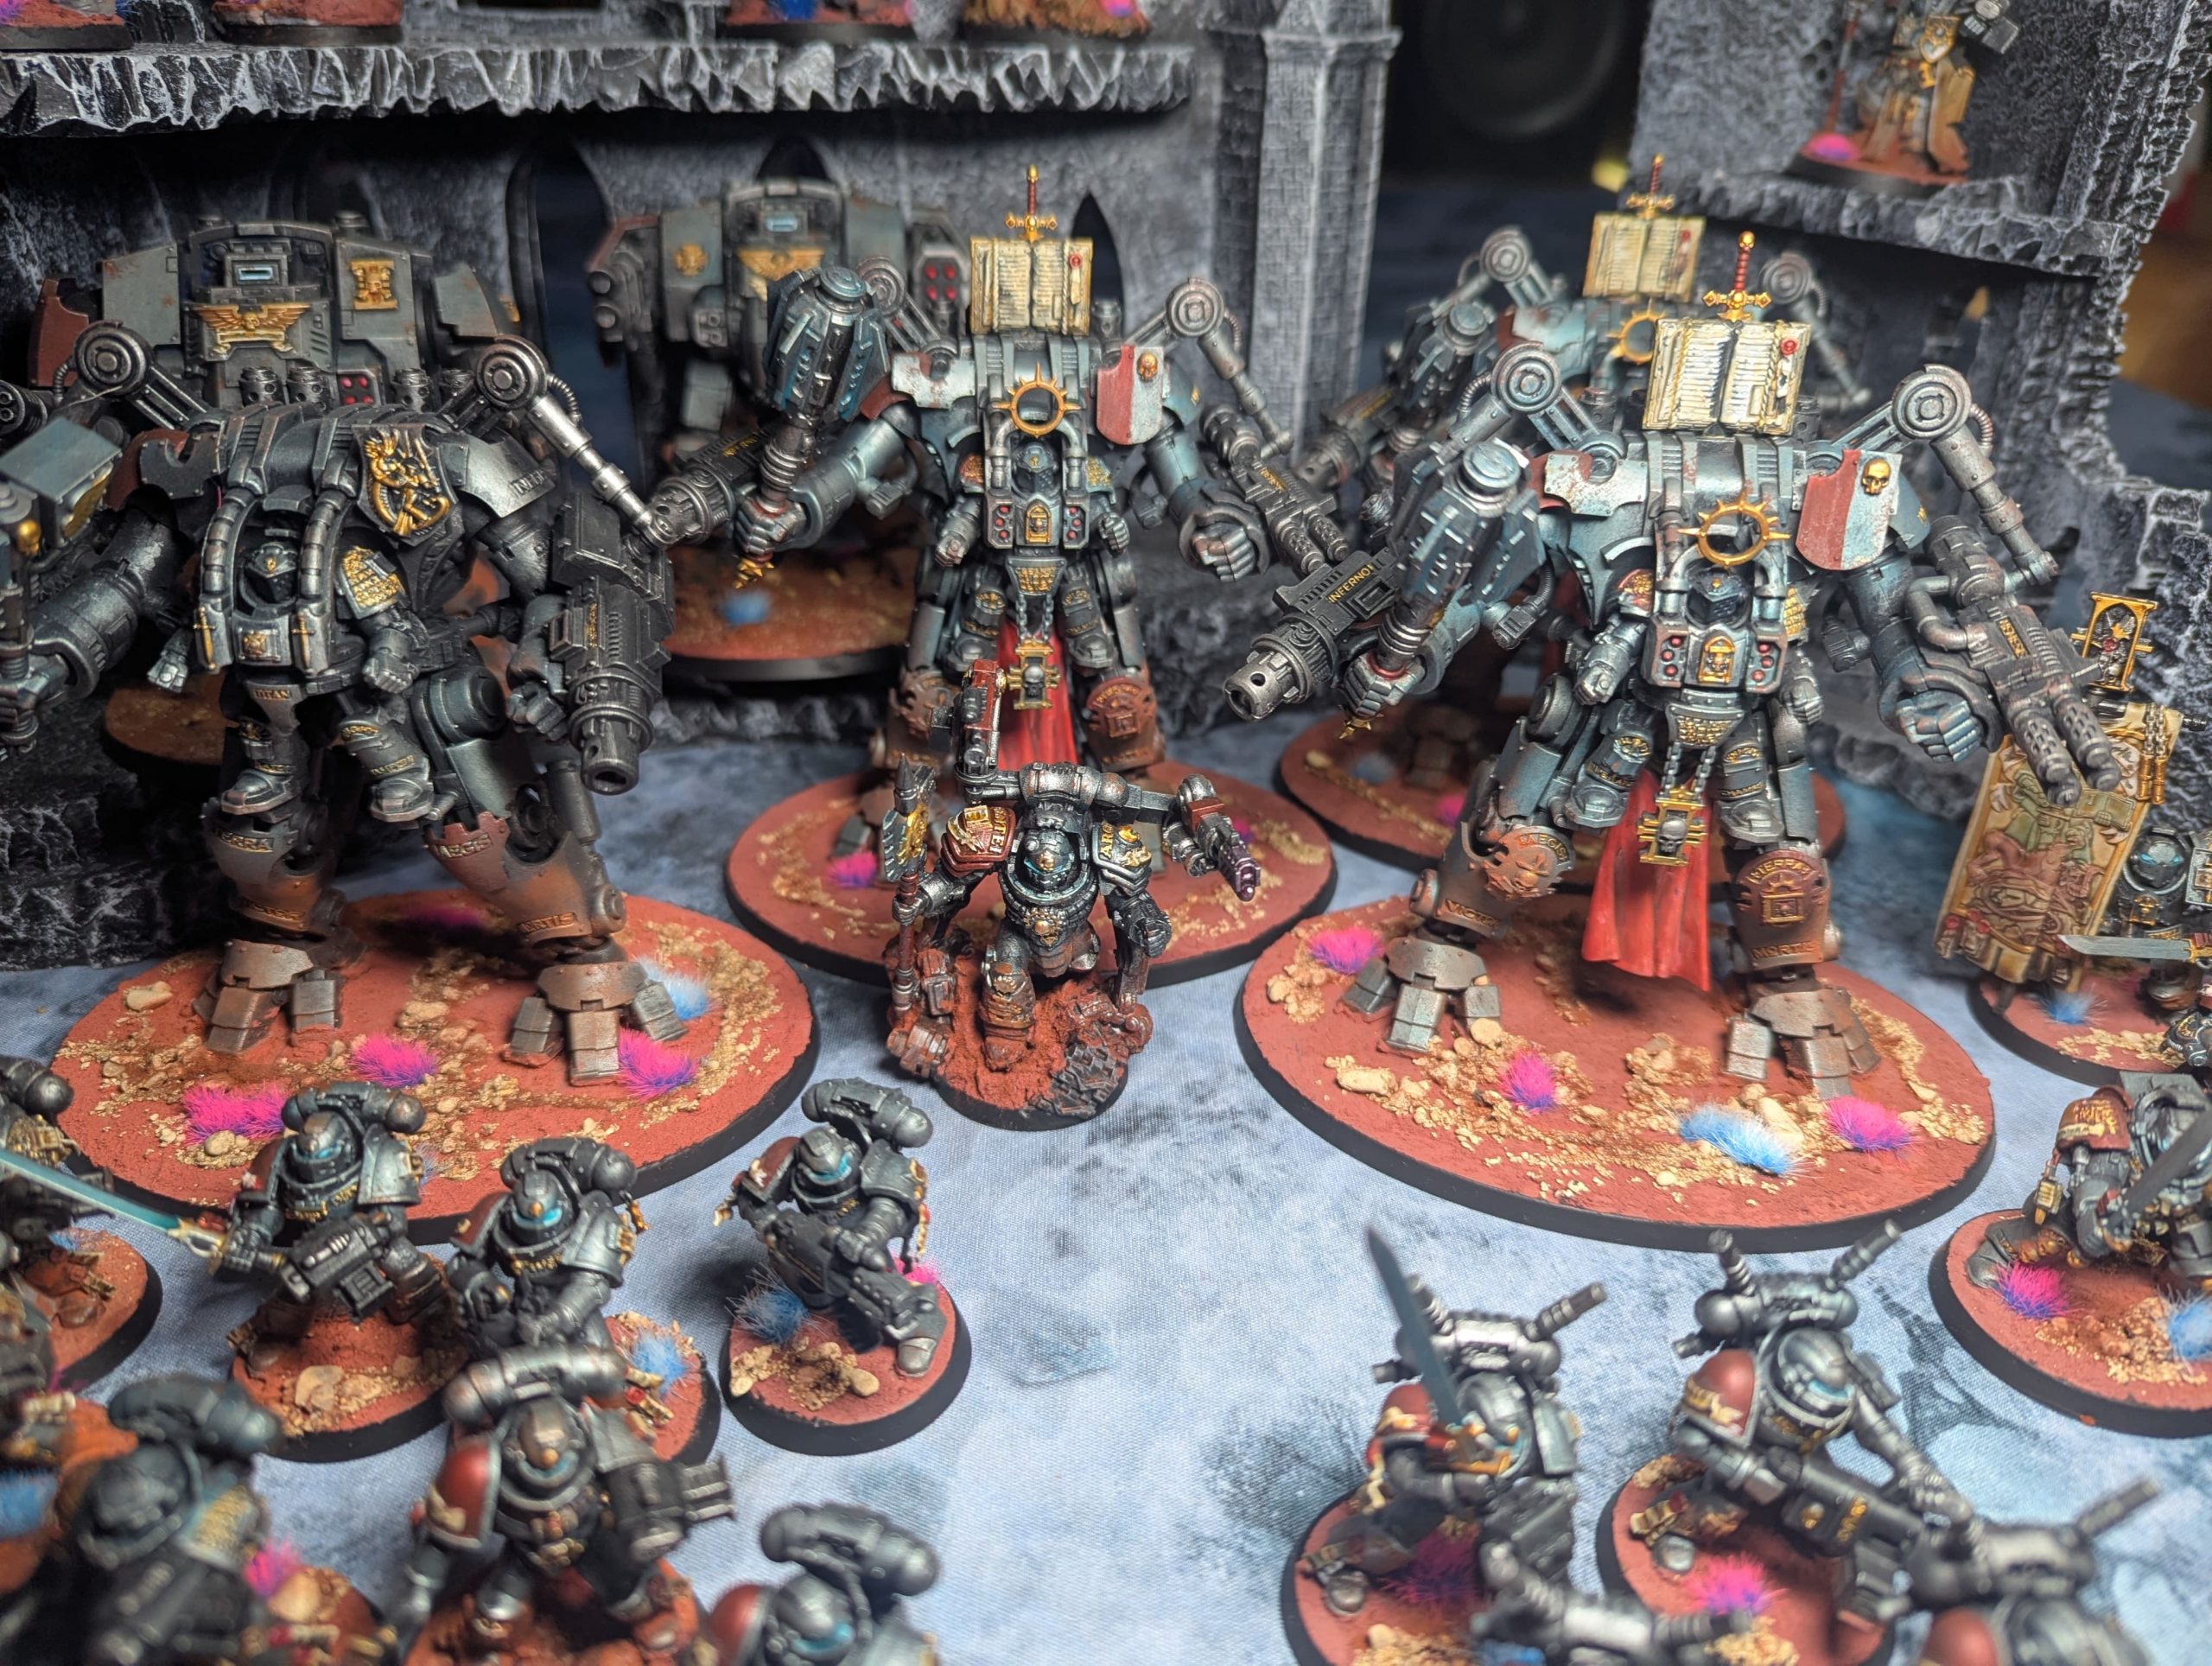
And so, the project began. We set out to bring this Dreadknight Contingent to life. The painting process, designed for efficiency and a striking tabletop presence, was kept relatively simple yet effective. The technique followed these key steps:
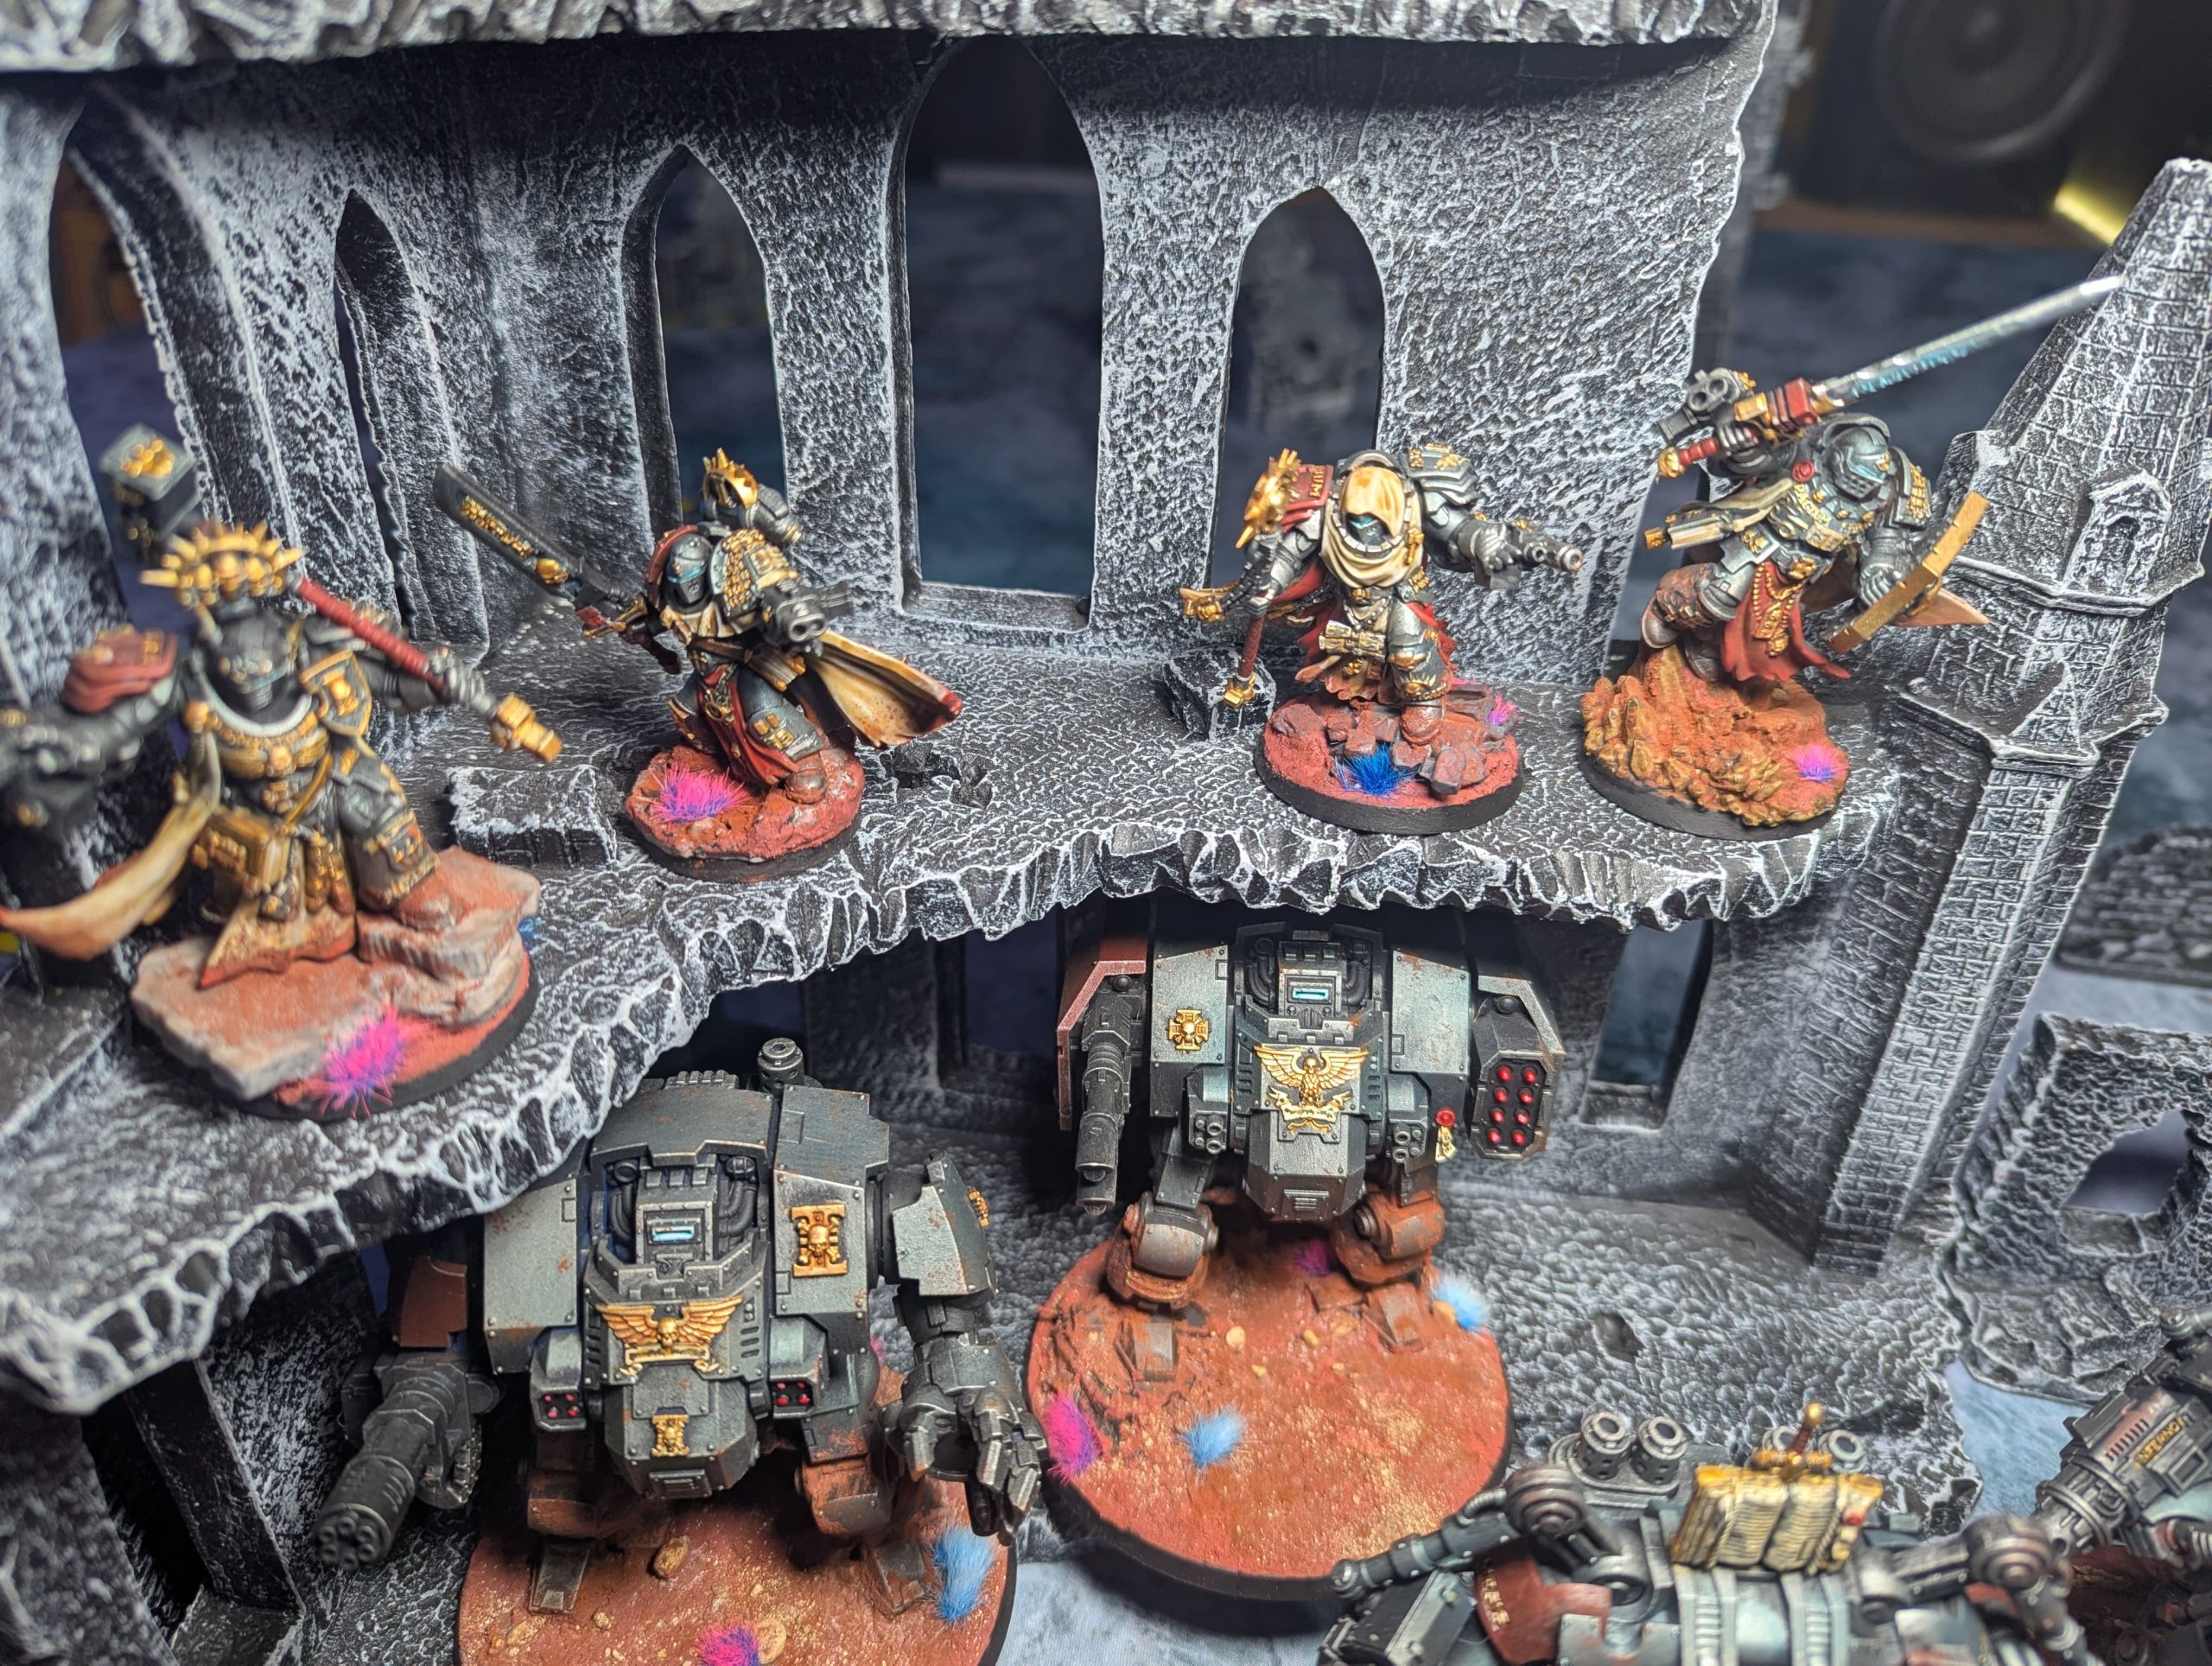
- Zenithal Prime: A foundational step using black primer followed by a lighter grey or white from directly above (the “zenith”) to establish realistic shadow and highlight placement.
- Silver Drybrush: A quick, heavy drybrush of a metallic silver across the entire model. This instantly established the Grey Knights’ signature shining armour and served as a brilliant base for the next layers.
- Pale Blue Airbrush: A very thin, almost ethereal layer of pale blue was applied through the airbrush. This glaze, catching the silver and the zenithal highlights, gave the armour its characteristic ghostly, psychic sheen that distinguishes the Grey Knights from standard metallic armies.
- Detail Work and Weathering: The final stage involved picking out all the intricate details: the gold on the purity seals, the glowing blue force weapons, the red on the lenses, and the scrollwork. Crucially, a small amount of sponge damage was applied to simulate battle wear and tear. This technique uses a small piece of sponge dipped in a dark colour to dab chips and scratches onto the armour, grounding the immaculate Dreadknights in the grim reality of the 41st millennium.
The result is a striking, uniform force that looks both elite and battle-hardened. We are extremely happy with how the army looks collectively—the sheer presence of six massive Dreadknights is visually stunning. More importantly, as an army on the tabletop, it performs great. Their ability to project power across the board and engage key targets with devastating force makes the Dreadknight Contingent a true joy to play.
Should any fellow hobbyists be interested in a more in-depth breakdown of the specific paints used, the list construction, or further progress pictures, we are always happy to share the details of this special Adepticon-inspired army.


![Zenit Miniatures’ Samurai Warlords Now Live On Kickstarter [Updated]](https://images.beastsofwar.com/2026/02/samurai-warlords-launch-main-600-338.jpg)


