

![Alternative Trench Crusade Miniatures? Trench Missionaries Review | Wargames Atlantic [7 Days Early Access]](https://images.beastsofwar.com/2026/03/unboxing-wargames-atlantic-trench-missionaries-coverimage-225-127.jpg)


The Sands Of El Alamein: Gearing Up For The FoW Boot Camp [Part One]
February 13, 2017 by crew
Ever since Beasts of War announced the boot camp they’ll be hosting for Flames of War 4th Edition, a discussion has been picking up across the site about the North African theatre of World War II. Small wonder, since the models we’ll be using at the event will be featured in the “Rommel’s Afrika Korps” and “Monty’s Desert Rats” Starter Kits.

That said, the Desert War was one of the longest and far-ranging campaigns of World War II. So what slice of the Desert War will we be dealing with at the boot camp? As part of the ramp-up for the event, I’ve been asked to present some context on the specific setting and timeframes for the battles we’ll have on our tables.
The Battles for El Alamein
July-November, 1942
Put most generally, the games we’ll be playing at the Flames of War 4th Edition boot camp will be set during the Battles of El Alamein, which ran from July to November 1942. This is the time period when most of the equipment that players will have in their starter sets was widely available to the historical armies in question.

This also makes sense since Battlefront is rolling out an “El Alamein Battle Box” as part of their 4th Edition release. Furthermore, El Alamein is by far the most famous part of the Desert War, when everyone’s favourite vehicles and equipment were in use. In short, it’s a great starting point for a new release.
Now this series won’t feature any table top games since our games won’t take place until the boot camp. Instead, we hope to provide a primer on El Alamein, sketching out the battle’s general outline, profiling its commanders, comparing weapons and equipment, and highlighting some key features encountered by the men on the ground.

In so doing, we’re aiming to provide some background to the boot camp experience. How do the tactics, pieces, and strategies on our tables measure up against those on the actual battlefield? What did these battles mean in the larger picture? Most importantly of all, we hope to crank up the excitement as the boot camp event draws near!
The Desert War
General Background
In 2015 we ran a five-part article series on the Desert War in its entirety, so I won’t belabour the reader with another long chronicle of every battle and campaign. For those that are interested, the original series is linked below. But for our El Alamein discussion, we’ll summarise the Desert War so far in the broadest of strokes.
- Part One - Overview & Origins
- Part Two - Early Successes
- Part Three - Pushing The Envelope
- Part Four - Turning The Tide
- Part Five - Endgame
The Desert War started over two years before El Alamein, in the summer of 1940. France was in mid-collapse, and Great Britain looked as if it might fall as well. Italian dictator Benito Mussolini believed the war was about to end in an Axis sweep and wanted to make sure his country got a share of the spoils.

One easy target for Mussolini seemed to be the British, with holdings and garrisons in East Africa and Egypt. After taking the British portion of what is today Somalia and attacking the Sudan, the Italians next targeted Egypt. In September 1940, their 10th Army (200,000+ men) invaded Egypt from the Italian colony of Libya.
However, the British garrison in Egypt (the WDF, or Western Desert Force) was not about to let Egypt fall. Despite numbering just 30,000, they launched a counterattack in December 1940 that not only threw the Italians out of Egypt, but took half of Libya as well. By the spring of 1941, it looked as if the Italians might lose it all in North Africa.
Feeling compelled to help his faltering Italian ally, Hitler sent a general and a handful of incomplete divisions to bolster the Italian defence. The general, of course, was Erwin Rommel, and the few thousand men (just a few reinforced regimental battlegroups at first) was the beginning of the Afrika Korps.

Before the Afrika Korps was even full landed at the port of Tripoli, Rommel struck (despite orders to remain on the defensive). He quickly expelled the British out of Libya and drove them back into Egypt. The Allied-held port of Tobruk was cut off and subjected to a siege that would last nearly a year. The legend of the “Desert Fox” was born.
A succession of British commanders tried to deal with the Rommel, hoping to throw him back into Libya and relieve the besieged defenders of Tobruk. General Wavell tried and failed with Operation Battleaxe in the summer of 1941, while his successor Claude Auchinleck had better luck (temporarily) with Operation “Crusader” in the fall.
Rommel, however, recovered quickly from this setback. In early 1942 he launched his most audacious and successful desert offensive yet, the Gazala Offensive. Yet again he and his Italian allies plunged into Egypt, and while Tobruk had held out for nine months last time, this time it fell in a matter of hours.

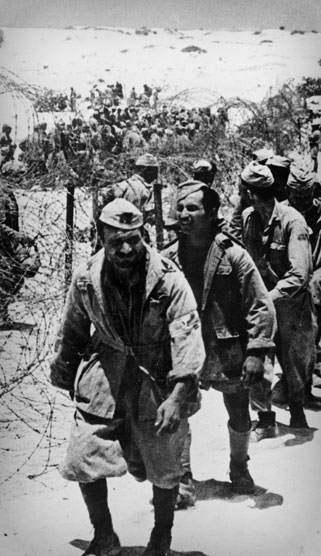
This time the British were thrown back deep into Egypt. They tried to mount a stand at Mersa Metruh, and quickly crumbled. Falling back further, they set up a new position near a remote railroad town called El Alamein. This was just sixty-five miles west of Alexandria…with Cairo, the Nile, and the Suez Canal just behind.
But while El Alamein may have been the last defensive position before the “prizes of Egypt,” at least it was a solid place to make a stand. The coastline bends down from the north, and from the south yawns the Qattara Depression, 650 feet deep in places, a vast impassable salt marsh where no mechanised army can travel.

In short, El Alamein was a bottleneck. In place of the typical open desert, the British had a rocky corridor only about forty miles wide, hemmed from the north by the Mediterranean Coast and from the south by the Qattara Depression. At last, the British had a position Rommel could not outflank.
El Alamein – Facing Off
Setting The Stage
Units began to gather at El Alamein, facing off as reinforcements steadily stacked up. Both sides realised they faced incredible opportunities and immense obstacles. Many times in history, the importance of a given time or place isn’t apparent until years later. But here, both sides knew that one way or another, the war was about to change.
On the Axis side, Rommel never stood so close to absolute victory in North Africa as where he stood right now. One more smashing victory and Alexandria would be his, with Cairo, the Nile, and possibly the Suez Canal right after that. His men were tough, confident, and eager, while the British seemed to regard him almost as invincible.
However, Rommel’s forces were also deep in enemy territory. Bringing up supplies or reinforcements from ports like Benghazi and Tripoli, thousands of miles away, was a nightmare. The panzers were breaking down, the men were exhausted and sick with tropical diseases. Rommel’s “Panzerarmee Afrika” was a shadow of its former self.

As for the British, their army seemed in danger of falling apart. Six commanders had come and gone after a string of disastrous defeats, and the men had lost all confidence that any commander could actually beat “the Desert Fox.” And their backs were to the wall, one more retreat and Rommel would be in Alexandria.
However, the Allies also had massive advantages. Auchinleck had picked a masterful place to fight. Time and again Rommel had beaten the Allies by turning the “desert flank,” but here there was no desert flank because of the Qattara Depression. Rommel would have to make a frontal attack.
The Allies had also hurled themselves into immense preparations. They laid millions of mines, built fortified “brigade boxes” everywhere. They absorbed thousands of reinforcements. New American tanks would be arriving like the Grant and the Sherman. Supplies were plentiful, and they were steadily winning control of the sky.

Rommel’s only real chance was to hit and crack the “Alamein Line” before it had a chance to fully settle in place. On July 1st, 1942, he tried exactly that with a shove against the southern end of the Allied line. But his assault (started three hours late) almost instantly degenerated into an absolute disaster.
South Africans slammed the German 90th Light Division to a halt, who could only disengage under cover of a sandstorm. When the storm lifted they were hit on three sides by the British 1st Armoured Division. Only when Rommel himself showed up was 90th Light prevented from falling into a complete rout.
But soon Rommel himself was pinned down, it took a Stuka air strike to break him loose. Meanwhile, the 15th and 21st Panzer Divisions ran into the 18th Indian Brigade. Badly outnumbered, the brave Indians were overrun, but in the process positively mauled Rommel’s only two real tank units, and wrecked most of their irreplaceable panzers.

Rommel tried again on July 2nd, then shifted his assault to the northern coastal road on July 3rd. All were failures. Clearly, Claude Auchinleck was ready for the Desert Fox this time. After that, Rommel had no choice but to settle into the defensive and await reinforcements. But with his supply bases a thousand miles behind him ...
Of course, we’re just getting started. In next week’s continuation, we’ll start looking at some of the further battles around El Alamein, where the famous Bernard Montgomery finally arrives on the scene. We’ll also start comparing arms and armour and look at how some of the rules of the game reflect the conditions of this desert battlefield.
We hope you like our look at El Alamein so far. More importantly, we hope you’re getting fired up for the upcoming boot camp, whether you’re attending in person or plan to participate via Beasts of War’s live blog coverage! Either way, drop your comments below and keep the conversation going!
If you would like to write an article for Beasts of War then please contact me at [email protected] for more information!
"...we’re aiming to provide some background to the boot camp experience. How do the tactics, pieces, and strategies on our tables measure up against those on the actual battlefield?"
"...we’ll start looking at some of the further battles around El Alamein, where the famous Bernard Montgomery finally arrives on the scene"
![StarCraft Tabletop Miniatures Game Pre-Orders Live Now [Updated]](https://images.beastsofwar.com/2026/03/starcraft-tmg-news-cover-600-338.jpg)


![Mounted US Cavalry On Kickstarter For Dead Man’s Hand! [Updated]](https://images.beastsofwar.com/2026/03/us-cavalry-main-600-338.jpg)


![Play WW2 Commando Operations With Butcher & Bolt [Updated]](https://images.beastsofwar.com/2026/03/relaunch-600-338.jpg)


Back in the burning sands of Africa, @oriskany
I know, right? It’s like an old mobster movie. “Just when I thought I was out, they pull me back in!” 🙂 But where the previous “Desert War” series covered the whole theater, this one will focus more on the specific El Alamein battles we’ll have on the table at the upcoming Boot Camp.
Thanks for kicking off the comment thread! 🙂
Watched a documentary about this last night during a bout of insomnia lol
It seems to have been quite a turning point in the war at least from a moral perspective if anything.
Also interesting that Churchill looks like he was about to ‘fire’ Montgomery for dithering, I saw the same thing between Napoleon and His Admiral of the Fleet just before Trafalgar – ended well for Montgomery, not so much for the other guy, but interesting none the less how those at the very top ‘just want thing to happen their way, regardless of the conditions faced by those executing it!’
Great start to a very interesting topic @oriskany 🙂
Next bout of insomnia – try the Dutch “Admiral” on Netflix it will give you some sea battles with wooden ships.
El Alamein proved that Rommel could be stopped, and that Churchill was a bit too trigger happy when firing commander (does the owner of a London based football club spring to mind?)
Thanks @warzan and @rasmus –
The question of Churchill’s potential impact on El Alamein (and firing of “dithering” Generals) has two sides, sort of an anti-Churchill perspective and a pro-Churchill perspective.
The anti-perspective is pretty well known. Churchill constantly demanded aggressive action, even when the Allies in North Africa were not ready for it. Even when they were doing well, Churchill would demand that forces be sent in other locations, thus stalling the success of the North African forces. This happened when the first British commander (O’Connor, commanding what was then the WDF – Western Desert Force) was running over the Italians in late 40-early 41. Before he can launch the next stage of his attack, Churchill sends half his divisions to a doomed effort to save Greece in May 41.
Later the WDF would become the XIII Corps, and finally the Eighth Army. Time and again, and with general after general, Churchill would demand aggressive action that would lead to unprepared attacks. Rommel would pivot, counterattack, and wind up in a much better position than before. The only thing Rommel didn’t do was send a thank-you card to Churchill. 😀 Operation Battleaxe in June 41 is probably the best example on this, and was the “end” of General Wavell (despite successes elsewhere in Africa like modern-day Ethiopia, Somalia, and Eritrea). Even the semi-successful Operation Crusader Nov-Dec 41 would eventually be countered by Rommel’s Gazala offensive in May-June 42. Churchill shares a big part of the blame for these disasters.
Still, there’s a positive side to Churchill’s pressure, in all fairness. The one really good general he’d had in there so far, Richard O’Connor, was captured by the Germans early in 1941. Successive generals were competent, but sometimes a little indecisive. In Wavell’s defense, he may have been indecisive because he was also fighting in East Africa, getting ready for fighting that would take place in Syria, Madagascar, etc. He was commander of the Middle East, not Eighth Army specifically, and had a lot to do with too few units. Auchinleck was next. He was also competent and had a little more of a “killer instinct.” His downfall was his delegation skills. As commander of the Mid-East, he let Neil Richtie run Eighth Army and gave him way too much latitude. Richtie wound up screwing things up so bad Auchinleck had to do both jobs, and accordingly couldn’t do both to full effect.
Furthermore, Churchill was a terrible military strategist but a very solid statesman. Battlefield realities aside, he KNEW he had to make certain impressions on his own people, people in Commonwealth and Dominion territories (who were doing a huge part of the fighting in North Africa), and especially the Americans and Soviets. In 1941, Churchill kept pushing because he felt he had to show something to the Russians who were on the brink with Barbarossa and the Americans whom Churchill was still trying to get in the war. Then in 1942, when the Americans are now IN the war and fighting losing battles with suicidal courage in places like the Philippines and Marianas, the Soviets are gearing up for Stalingrad . . . meanwhile the British surrender the most troops in their history (92000 in Singapore) and seem to be running away from every fight in North Africa?
Yeah, it’s time for a change.
But many people say Monty was “indecisive.” I feel that’s NOT true. He had a plan, and he’d stick to that plan, only attack when he was damned good and ready, and no force between heaven and hell (including Churchill) would hurry him into making his predecessor’s mistakes.
Of course later, the constant press and harassment that Monty was “too slow” would lead to him overcompensating a little in Market-Garden, and we all know how that turned out. 🙁
I remember my Uncle, a gunner through North Africe and then Italy, telling me his stories and showing his B&W photos – specially about the main barrage!
Let’s just say that when I get my British starter set one of the men will get an extra careful paint job! Play late war Germans normally, but Mid-War – gotta be the 8th!
Thanks, @coxjul . 😀 By main barrage, I presume we’re talking about the initial barrage at 21:40 hours, 23 October 1942? In other words, THE big barrage that started Monty’s assault at El Alamein? 😀
We discuss it (albeit briefly) in Part 3.
I’ve read somewhere were someone was calling it “the biggest artillery barrage since 1918,” which seems a little tough to swallow given what was happening in Russia at the time. Maybe the biggest artillery bombardment by the UK / Commonwealth since 1918? My sources say almost 1000 guns of varying caliber (not including mortars) which . . . yeah, is a pretty freakin’ huge over an assault frontage of less than 20 miles.
A good read, my grand father fought at El Alamein so naturally I went with the Brits for the boot camp.
Or there were only British Tickets left…lol
I will fully admit I picked the Germans only because I have big pile of desert British, and very few desert Germans. 🙂
@davebpg – do you have any idea which division your grandfather was with? Even a shoulder patch would help us identify it, and we could see exactly where your grandfather was and what his unit was doing during this battle. 😀
Sadly not, its a bit of a tragic story but I’ll you in person in a couple of weeks 🙂
No worries, @davebgp – by no means do I mean to pry. It’s just something I’ve done for some people on the site, “found” veteran relatives (or at least their units, sometimes down to battalion level) and talked about some of what the unit did. Some folks find this interesting since veterans themselves tend to talk very little about what they and their unit were doing. 😐
Very practical. Of course I’m sure it had nothing to do with the fact that you love German equipment?
Actually for this battle I like the British tanks, because at this one point in the campaign 75% of British RTRs are actually American machines (Stuarts, Grants, Shermans). 😀 I think the starter kits for the British will be 6 American Grants and only 3 British Crusaders?
To be honest, though, I’m starting to fall in love with the PzKpfw IIIGs. They’re so small and cute in 15mm. 😀 😀 😀
Well that helped too lol
😀
A nice start to my week after a weekend of tank battles with your good self buddy. I am looking forward to the Boot Camp and will diligently read your pieces to have a better understanding of the wider picture. I was at Duxford Museum recently and got to look at the caravan vehicle that was once Rommel’s and Montgomery’s. It changed hands a couple of times as it was captured.
You might be talking about “Mammoth” – Rommel’s nickname for the plus-sized British truck he often used as his mobile headquarters. The truck was big enough where the back could be outfitted as quite the command post. 😀 I think this truck was later re-captured after El Alamein, and Monty MAY have used it for a while just as a publicity stunt. “Here I am sitting in his headquarters! Ha ha!” I’ll have to check the facts on that one.
Sounds right, it was a couple of trucks. One kitted out as a sleeping area with sink and some small comforts, the other was a command vehicle with map room.amd radio posts.
Apparently Rommel gave it to an Italian commander if memory serves and was later captured by Rommel.
Captured by Monty not Rommel…
Poor Italians. Always getting the hand-me-downs. 🙁
Great article, looking forward to reading more….
Also interested as to how the preparations for the Boot Camp are going :oP
I’m gathering information and materials for some interviews, but that’s a really small part of the overall boot camp. As far as tables / studio prep, we’ll have to keep a lookout for the weekly VLOGs, I suppose. 😀
Monty allowed the odds to stack ever greater in his favour, with a particularly massive disparity in the resources available to either side. Rommel was constantly short of fuel and ammunition, had a chronic lack of tanks (there’s irony) and was under pressure from Berlin that pulled in more than one direction (Hitler and Co micromanaging again.)
Just as an example, Monty had more tanks parked in the reserves than were available on the battlefield from both sides combined.
Germany had not wanted a North African adventure, not without seizing control of the Mediterranean Sea first but without taking Malta and Gibraltar, than was never going to happen. It was a doomed adventure, but Rommel and his brilliant sub-commanders damn nearly pulled it off.
Great post, @dorthonion ! 😀
Monty definitely had no shame when it came to amassing a crushing materiel superiority – and with good reason. Auchinleck had already stopped Rommel at the First Battle of Alamein, and the Royal Navy and Air Force was starving him out of supplies from Malta and by bombing the roads from Tripoli and Benghazi. Also, Auchinleck had picked the perfect place to make a stand and made sure the Allies couldn’t be flanked from the south (Rommel’s one big move, sadly predictable by this point in the war).
The problem was (as we’ll see in Part 2 and 3) when the Allies went over the offensive (after First Alamein and Alam Halfa), those same defensive advantages now passed over to the Axis. Narrow battlefield, impossible to outflank, the Germans and Italians are sowing hundreds of thousands of mines. Monty knew that he’d have to carefully select a point for a frontal attack through heavy defense and hit it with overwhelming force. In a battle like that, raw firepower is your only salvation, and he wanted to make sure he had plenty of it.
The fact that Rommel was even in Egypt (for the nth time in his career against orders) shows his limitations as a commander. A flawless divisional commander and even corps commander. But when leading a panzergruppe, panzerarmee, and later an army group, his lack of operational foresight and strategic depth really come into ghastly focus. Kesselring told him not to advance into Egypt after Gazala, but he did, so his atrocious logistical problems were pretty much his own fault. Kesselring, a far better commander at these higher levels, knew what was going on (and what wasn’t going on) at Malta (i.e., no Operation Hercules), knew Spain wasn’t coming into the war to help close Gibraltar, knew what was happening to the Italian Navy and maritime arm trying to keep Panzerarmee Afrika supplied. In short, Kesselring knew he wouldn’t be able to keep Rommel supplied.
Rommel went in anyway. His men would pay the price.
Fabulous stuff again by Professor @oriskany !!!
This week I will have to spent with my BA Soviets but from next week onwards it’ll be all Western Desert and Panzerarmee Afrika! Can’t wait to really get stuck into all this 😎
I know the feeling. Now that I have my airbrushes finally sorted and some other hobby projects out of the way, my DAK force is finally starting to show some progress. 😀
Professor Oriskany…PERFECT!
Ooof, I dunno about all that. Although when I was 16-17 I did teach the WW2 segment in our Advanced Placement European History class, which (being an AP course) is actually worth college credits.
So . . . technically . . . yeah, I have taught college-level WW2 history??
Nah, I’m not buying that either. 😀 😀
But that was 25 years ago. I’ve learned / published a little more since then.
A good lead-in style article for the battle @oriskany.
Both Hitler and Churchill did not get what they were expecting in their man.
For Hitler he was after a German Lawrence of Arabia and Churchill was after a brawler.
Personally with Monty he appears as a modern day Cromwell in that the court never retires and each new generation must put him on trial. Some generations finding him guilty and others finding him not guilty. Both had to rebuild the army with the kingdom at stake, with one fighting for a king and the other against.
Looking forward to the rest of the series as you guys prepare for boot camp.
Agree, @jamesevans140 – the Desert War and Alamein in particular have so much mythology around them it’s almost hard to know where to start when it comes to “pressure washing” away all this crud and getting down to the bare metal of fact.
Was Monty a “good” or “bad” general? So many people ask that, gliding right past the staggering over-simplicity of the question. In some ways there are no “strengths” or “weaknesses” in generals (or even people at large) only “traits” which are either applied or misapplied to the situation at hand.
Suffice it to say I don’t think he was nearly as “good” (whatever that means) as most British histories remember him, and nowhere near as “bad” as most American histories remember him. 😀
Rommel’s different. Almost everyone remembers him “well.” And that just doesn’t hold up from late ’41 onward. Not really his fault, just promoted too far, too fast. At whatever job we work, if we were today promoted three times to become our boss’ boss’ boss . . . would we be able to do that job with EVERY CARD in the deck stacked against us, as it was with Rommel at Alamein?
Wait … no one spotted the tiny misspelling of Rommels’ name underneath the picture of his car ? …
oh well … I’ll pretend it doesn’t exist. 😉
That car in the picture would make for an interesting objective for the game.
If such a car exists in 1:100 scale that is.
“Wait … no one spotted the tiny misspelling of Rommels’ name underneath the picture of his car ?”
Oh . . . gawd
There, now you have two misspellings. 😀
What a great overview of where everyone will be and why they will be there. It really sets the scope of the games and gives them weight. Looking forward to the rest of the articles.
Thanks, @gladesrunner.
Part 1, as we’ve seen, is a primer, setting the stage.
Part 2 will be be a list of comparisons. Comparing the men, comparing the generals, comparing the tanks (with special focus on the ones we’ll b e getting in the starter kits).
Part 3 will breeze through the rest of the engagements at El Alamein (Ruweisat Ridge, Alam Halfa, and of course two two main stages of Second Alamein – Operations Lightfoot and Supercharge). We’ll also take a look at 4th Edition Flames of War and see how it stacks up against the actual tactics, conditions, and units featured in the battles.
This article was great. Really envious of those on the bootcamp. Especially interested in how 4th edition looks because the original Flames of War didn’t really appeal to me for some reason.
I just made an M3 honey with the Warlord Games plastic set. I have some Perry’s Commonwealth and DAK plastic models and hope to get enough together for a battle at some point.
Maybe I’ll bend Andy’s ear for some painting advice seeing as he is about to abandon the cold bulge for a while and heading into the dessert.
I know that Bolt Action would not really portray best the dessert scapes and sweeping movements of mobile infantry and tanks on display during El Alamein, but I found it cheaper to expand on my collection of Bolt Action than to start afresh in a new ruleset and scale like Flames of War.
I hope Lloyd creates a hobby lab video about his dessert buildings he seemed to have an epiphany about on a weekender several months ago.
For their new found love of Saga the houses could be used for the crusades variant of the game at some point and hopefully the idea scales down to help with terrain for the Flames of War bootcamp?
Thanks again for the article.
Thanks very much, @dugthefug1644 – I’ll be honest, I’m not terribly fluent on Bolt Action, but from what I can see it’s a great infantry game. As such, I would love to see someone put up some material on Beasts of War recreating some of the SAS / LRDG missions in the North African desert like the raid on the Barce airfield, which we did in Part Four of our previous article series in Battlegroup.
http://www.beastsofwar.com/battlegroup/desert-war-ww2-north-africa-turning-tide/
a nice start to a meat grinder of a battle. @oriskany
Thanks very much, @zorg .
As usual, not a word on Bir Hakeim, no victory could have been achieved at El Alamein without the two weeks Koenig gave to the brits.
“As usual?” Have you read many of my articles or other publications on the subject? If so you would have seen where I cover Bir el Hakeim quite comprehensively. I’ll post it below for your review and convenience.
You might find it enlightening, especially since it covers the parallel defense just a few miles away of Bir al Hakeim’s sister position, Bir al Harmat, defended by 500 Jewish Zionist volunteers fighting against the Third Reich under the command of Major Liebmann. I’m curious as to why you didn’t mention those, when their defense was equally as courageous and practically on the same battlefield as the Koenig’s Free French at Bir al Hakeim.
Also please bear in mind that in this article I have only 1600-1900 words to cover the first 80% of the 35-month expanse of the Desert War. So yeah, I have to leave out a lot. In this article I also didn’t have to cover about 40 other crucial North African battles on which I have written, including other facest of the Gazala / Knightsbridge battles which objectively may have been a little more influential in the “big picture” than Bir al Hakeim / Bir al Harmat
Here is work I have done on a scenario written for Desert Leader, originally a Brian Train adaptation of Panzer Leader for North African battles in WW2. Please click the ;link below to review the graphic (I cannot include them directly here) and then review the text below. I believe you will find I do Bir al Hakeim proper (and deserving) justice.
BIR EL HAKEIM – SCENARIO WRITTEN FOR DESERT LEADER – A PANZER LEADER VARIANT:
DESERT LEADER SITUATION 30
GAZALA IV – FRENCH BREAKOUT
BIR HACHEIM, 11 June 1942
As mentioned above, the fiasco of the Aberdeen offensive not only failed to crush Rommel’s Afrika Korps or eject him from the Cauldron, but it also left a big part of the Eighth Army very vulnerable to the inevitable counterattack, especially along the wings. When the 21st Panzer Division had slaughtered the 32nd Tank Brigade on Sidra Ridge, Ritchie’s northern flank had been ripped wide open.
The threat to the south was more subtle, with Germans and Italian spearheads worming through gaps in the British minefields near Bir el Harmat that no one in the Allied camp knew about. Thinking their left wing secure, the British were about to be sorely educated when the 15th Panzer came slashing through those gaps.
By the afternoon of June 5, 1942, the Germans were again on the move. The 21st Panzer Division leapt through the gap left by the reeling remains of the 32nd Tank Brigade, then curled east and south towards Bir el Harmat. Almost at the same moment, the 15th Panzer Division was likewise pushing the gaps cut through the minefields south of the desert town. The result was a massive double pincer, one of the few times Rommel tried such a maneuver (usually he relied on single pincers through the southern desert, relying on the Mediterranean Sea to cover his northern flank).
The British had no idea the Germans had cleared these gaps through the minefields, and surprise was complete. Quickly the 15th Panzer overran the headquarters of the 5th Indian Division and the 7th Armoured Division (again), even as the 21st Panzer cut down from the northwest. Very quickly, practically everything that had participated in the Aberdeen offensive had largely been encircled, including the majority of the 22nd Armoured Brigade, the 9th and 10th Indian Brigades (the bulk of the 5th Indian Division), and four regiments of field artillery.
Spastic efforts to regain some kind of footing were hampered by the Luftwaffe, which continued to bomb remaining centers if Allied command and control, such as El Adem and the Knightsbridge Box. The next morning, in the absence of any new British counteroffensives (such as might’ve been mounted by the 2nd and 4th Armoured Brigades, now reorganized under the 7th Armoured Division), saw the Afrika Korps renew their offensive around this new “mini-Cauldron” and smash the forces trapped therein. The Germans and Italians took over three thousand prisoners, 130 guns, and had destroyed at least 150 tanks.
Yet even with this victory, Rommel knew that he still couldn’t launch his final drive on Tobruk, not with Bir Hacheim still holding out stubbornly on his rear right flank. The position was still holding out against elements of the Trieste and 90 Light Divisions, sending Rommel into another of his temper tantrums. Orders went out to have this extreme southern anchor of the Gazala Line taken at once, no matter what it took.
One thing we had to clear up in the course of our historical research was the presence of a “Jewish Battalion” here at Bir Hacheim. Some sources, otherwise very detailed and reliable, repeatedly said it was there. Others, like Gregory Moore at gregpanzerblitz.com, made no mention of them. As it turns out, both were essentially
correct.
The 1st Free French Brigade, commanded by General Marie Pierre Koenig and reinforced by some elements of the 2nd Free French Brigade, in fact contained no such battalion. However, a group of about 400 Zionist volunteers commanded by Major Liebmann held another nearby position, about eight miles north-northwest of Bir
Hacheim, closer to Bir el Harmat. Many sources actually break these out as two separate battles, but both ran
essentially parallel courses. They held out against overwhelming Axis pressure, without any ground help from the Eighth Army. Despite murderous losses suffered from the fighters of the Desert Air Force, Stukas bombed these positions repeatedly starting on June 2, just as the battles in the Cauldron were starting to get cooking. Italian tanks also hit these positions, which both the Zionists and the Frenchmen often had to fight off with little more than Molotov cocktails.
The Frenchmen in particular were especially hard hit, but they did have a much larger force. Two battalions were made up of French Foreign Legion troops, many of them from Germany and Italy yet of course loyal to the Legion
(perhaps this explains why the French commander has a distinctly German name, recruits to the Legion often take
new French first names as part of their new identity).
German artillery also joined in as the 90th Light Division took up its siege positions, including old JgPz-47 tank destroyers and newer sIG-33 assault howitzers. Still, both positions held out despite a rapidly-dwindling supply of
both ammunition and water. Both General Koenig and Major Liebmann received repeated demands for surrender,
with both commanders giving the predictable reply. By now the forward German positions were just 200 meters
from the Bir Hacheim perimeter.
On June 9, the 7th Motor and 29th Indian Brigades tried attacking the 90th Light Division, in an attempt to take some
of the pressure off Bir Hacheim and Bir el Harmat. This attempt, although well-intended, only bought a single day’s respite for the besieged defenders. By now the Zionist Battalion in particular had suffered very high casualties, especially to Stuka attacks since they had no air defense weapons bigger than a Bren gun. Finally, on June 10, General Ritchie at 8th Army Headquarters was forced to admit that he could not rescue or relieve the positions at Bir Hacheim and Bir el Harmat.
He gave the order to withdraw. Major Liebmann by now had just 100 men left (25% of his original force), while Bir
Hacheim was being hit by Stuka raids sometimes up to 100 dive-bombers strong. Koenig made up his mind to break
out and escape with what he could, hoping to link up with nearby positions of the British 7th Motorized Brigade, some
seven kilometers to the southwest.
The attempt was made under cover of darkness, in the wee hours of the morning on June 11, 1942. Creeping through gaps in the minefields, the Frenchmen crept from the ruins of the Bir Hacheim fortifications and started what
the hoped would be a stealthy escape. Once a few surviving trucks and Bren carriers hit mines, however, the gig was up and it became a desperate sprint. Some of the fighting was hand-to-hand, and the French escaped with practically none of their equipment, but the majority of the survivors actually escaped. When the 90th Light finally took the Bir Hacheim fort, they took only 500 prisoners from an original force of around 4,000, most of them wounded too badly to make the run with their comrades.
When General Koenig and his men got to the 7th Motorized Brigade, they were amazed to find Major Liebmann and his men arriving as well. They had no idea another Allied force was fighting a similar (if smaller) battle for survival. In perfect French, Major Liebmann told Koenig his battalion were fighters from Palestine, but that they could not serve under their flag because of British regulations. Koenig then told him to raise their Star of David flag, and all Free French officers around him saluted it. Many of these Zionist officers would reappear on the pages of history a few years later, as some of the “founding fathers” of the Israeli Defense Force during their first War of Independence in 1948.
As for Major Koenig, he would later serve as the military governor of the French occupation zone of postwar West Germany.
Even Rommel gets a little good press out of this battle’s epilogue. There is documented evidence that proves that
Hitler knew about what was happening in the desert, and ordered Rommel to execute all French and Jewish prisoners taken. The French were fighting for a defeated nation, in defiance of France’s pro-Axis Vichy government, and thus could regarded as partisans rather than soldiers. As for the Jews, well … they were Jews. But these prisoners were never executed, and treated fairly by the Afrika Korps (actually, POWs taken by the Afrika Korps were treated better than most taken by the Germans overall). As for Hitler’s order to Rommel, it conveniently disappears from the Afrika Korps’ archives, presumably into the Desert Fox’s “Desert Circular File.”
Free French forces for this scenario are pretty well documented, thanks especially to Gregory Moore. First up are the 2nd and 3rd French Foreign Legion Battalions, still hard as desert nails but badly understrength. Next come the remnants of the Pacific Battalion (French colonists from Tahiti of all places), the 2nd Colonial Infantry Battalion (mostly from Cameroon), and elements of the 1st Naval Infantry Battalion. Although the French are assumed to have blown up much of their equipment, we can also envision them trying to escape with some of their guns, such as the remnants of the 1st Free French Artillery Regiment and the AA guns of the 1st Naval Fusiliers.
More notes follow on the special rules for the scenario, but you get the idea.
Apologies – image can be linked here:

or
http://www.beastsofwar.com/groups/painting/forum/topic/oriskany-steps-to-the-plate-uncle-jimmy-weekender/?topic_page=18&num=15#post-193494
The Warlord Games website have a LRDG 3 vehicle set with the twin Vickers K machine guns mounted, with some cool poses and they definitely sparks the imagination. In the Perry’s box set there are even some alternative heads (bearded and head scarf wearing) especially to represent some LRDG troops. What base paint colour did you choose for your British tanks for the dessert theatre?
Thanks, @dugthefug1644 –
I’m actually all over the place on my British armor. A lot of my Crusaders, Valentines, and Matildas are more 1940-41 with the markings and the simpler desert sand color:
Where as my more recent Grants have more of a El Alamein 1942 scheme. I might add some lighter sand as a “border” between the green and the tan.
And sorry for the really long post above, everyone – It sounded like the reader felt the contributions of French troops in the Allied Eighth Army were being forgotten, I wanted to make sure that wasn’t the case.
Thanks @oriskany.
According to the instructions I’ve built the Mark I variant. They describe the paint scheme on the box as “dessert Caunter camouflage”. I guess I’ll just start with an Army Painter dessert yellow and check youtube for painting advice on caunter camo.
I have a Panzer III to put together and will probably give this to my DAK force.
I know you haven’t looked at Bolt Action heavily, but historically would an M3 Stuart be able to take out a Panzer III (with some luck and a fair wind)?
Great question, @dugthefug1644 –
Okay, the “Mark 1” of the M3 Stuart? (I know the British call it the Honey, but it’s an American tank so we’ll use the American name). So I assume we’re talking about the M3 Stuart or M3A1 (American tanks aren’t usually numbered with “Marks” – more of a British and German thing). I know the British called their first Lend Lease Stuarts the “Stuart I,” so we’ll go with that.
Also, as you say, I know very little about Bolt Action, especially when tanks are involved. Historically, though . . .
My money is on the Mark III, or technically the PzKpfw III (Panzerkampfwagen = roughly “armored fighting vehicle”). There are several reasons for this.
1) While the PzKpfw III originally came out in 1938 with a 3.7 cm gun similar to the Stuart’s 37mm, by the time the M3 Stuart enters British Service in North Africa, it is Operation Crusader (November 1941) – by which time the later versions of the PzKpfw III with the larger 5.0 cm L/42 gun is coming out. Stuarts did NOT do terribly well against PzKpfwIII-Gs in Crusader, and eventually the British withdrew them from tank-to-tank combat and used them mostly as recon vehicles.
2) The PzKpfw-III G has a bigger gun, an L42 caliber 5.0 cm. By contrast, the early Stuarts have an M5 37mm. Later versions would see a slightly longer version (M6) of the 37mm (increasing muzzle velocity, range, and anti-armor killing power) – but it’s still just a 37mm.
3) The PzKpfw-III G has better armor. Also, some of the early Stuarts I’ve seen in British service seem to still have partially riveted construction (as opposed to casted or welded). Rivets are not good, once the tank is hit, even if the shell doesn’t penetrate, the rivet heads break off and zip around inside the tank like bullets. I’m pretty sure the PzKpfw III was all welded by this point.
3) The Stuart is faster, that’s really it’s only advantage. I’m not sure, but don’t all tanks in Bolt Action have the same speed? If so, that robs the Stuart of its only real advantage.
4) I’m not sure what kind of PzKpfw-III you have, but if it’s the “Mark III Special” (i.e., the PzKpfw-III J or L) – now you’re talking about an L60 5.0 cm gun with increased firepower and double the range of the old L42. Yeah, the Stuart is really out of gas by this point.
5) But against the PzKpfw-III G, the Stuart still stands a chance. Not a good one (I’d say 70%-30% advantage to the PzKpfw-IIIG) but a chance all the same.
Thanks again.
The Honey in the Bolt Action rules is considered a light tank with the recon special rule, which basically gives it a chance to bug out if they’re shot upon. It’s a fun rule to allow maneuverable vehicles their historical advantage without messing with the general rule for vehicle movement.
I will still give the Panzer III to the DAK force I intend to make. Points wise this dents the Germans list more than the Honey impacts on the British list. I also want the British to struggle with a superior tank because this was the case for much of the war. Complete balance isn’t natural or really essential to me. I play for fun, not to win tournaments. ☺️
Cool deal. You’re definitely on the right track, then, given that the Stuart M3 is an early 40s light tank and the PzKpfw IIIG+ (note G+) is an early 40s medium tank. “Recon” special rule definitely sounds appropriate. 😀
@dugthefug1944
An invaluable guide to British and Commonwealth camouflage patterns can be found in a series of booklets published by Mike Starmer. A review of them can be found on the matador models site.
http://matadormodels.co.uk/tank_museum/xcamo_starmer.htm
I have his complete collection, and they are well worth getting. Focused more towards the scale modeller than the wargamer, but there seems to be more and more overlap between the two disciplines now, I know I class myself as both.
Great link, @elaric – Those unit decals look pretty awesome. 😀
@oriskany They do look rather tasty. Unfortunately for me, I do most of my armour modelling in 1/48 static or 1/56 for bolt action, so decals are rather more difficult to get hold of, specifically vehicle/artillery decals for Infantry divisions ( carriers, M3/M5 half tracks, AT guns and the like). I am going to have to try printing my own.
Doms Decals do masses of them . Not sure if they do what you need but maybe worth a look if you haven’t
http://domsdecals.com/epages/81fc44d0-907b-42a4-9f72-8d3238c7e6b2.sf/en_GB/?ObjectPath=/Shops/81fc44d0-907b-42a4-9f72-8d3238c7e6b2/Categories/162b0ab69006ee0640bbbaafc81041f4/189fde5172106f3ade938835e51d3765
I know what you mean, @elaric – I’ve had to print my own “decals” in 15mm, which actually isn’t too bad given the small scale. Doing it in 1/48 or 1/56 might prove more of a challenge. 😀
@torros Cool link, thanks. Unfortunately all of the divisional markings are for Armoured formations. WD numbers, tactical, bridging etc markings I have from warlord, what I need is the “Griffon Rampant” badge of the 43rd (Wessex) Infantry division
Of course, the opposite seems to apply to players fielding Armoured platoons in BA. plenty of vehicle markings, but a lack of shoulder titles for the divisional infantry and gun crews.
@oriskany
Have you read Basil Liddell-Hart’s book ‘The Other Side of the Hill’? He interviewed a lot of surviving senior German officers after the war ended and it is enlightening to hear from them why certain decisions were made that turned out to be disastrous in the long term. He wished that Rommel had been among them because there were so many times that Rommel went against orders or pulled something out of the hat (with the invaluable aid of his many talented junior commanders).
As for Monty, his division was the one that retreated from the German attack in 1940 in the best order as he had trained his troops in how to operate a fighting retreat. His family origins are at Moville, a fishing port just up the coast from me and across Lough Foyle from Beasts of War HQ so you were not far from it on your foray over here.
I think some people get too caught up in the movie caricatures of famous commanders. Where possible, I like to see accounts written by them rather than critiques penned by someone years after the fact (eg, like Otto Carius – ‘Tigers in the Mud’.
Great post, @dorthonion – I’ve never read the specific book you mention, but I have read some others by German officers such as Guderian’s Panzer Leader, von Mellenthin’s Panzer Battes (on Rommel’s staff for a while), and Hans von Luck’s Panzer Commander – although he’s not exactly a senior commander, he knew Rommel personally and fought with him in the desert.
While I agree first-hand sources are important (one of the books I’d putting on the “Boot Camp Reading List” is Keith Douglas’ From Alamein to Zem Zem), I really try not to rely on them too much. The writer is too close to his material – how could you NOT be when recounting experiences like that? There’s a lot of apologism, a lot of emotionalism, and in the case of Guderian, waaaay too much “I told you so.” 🙂
I’m actually kind of surprised to hear German generals say they wished Rommel had been more involved in longer-reaching decisions. One, the “higher in echelon” Rommel’s decisions grew, the worse they got. He was a flawless divisional and corps commander (except for his insubordination, which is never good), but as he progressed up thropgh panzer group and panzer army and finally army group . . .
Two, Rommel was reviled by his fellow generals. Seriously, he was the “glory boy” at work who gets promoted way too fast, his shit doesn’t stink o matter how badly he screws up, and has a direct line to the boss at all times. 🙂 His MEN loved him. His officers feared him and felt his free-wheeling command style *(too close to the front) put too much pressure on the staff. But fellow generals hates his guts. Its surprising to hear them talk well of him. Post war revisionism, perhaps?
Military History Magazine conducted a survey in 2007 of German military historians, asking them to rank their top five German general of World War 2. Twenty or so historians submitted lists. Rommel appeared in none of them.
Yep, I’ve read about Monty’s division (3rd Infantry, I think, not going to Wikipedia to check) holding some of the roads to Dunkirk open after the surrender of the Belgian Army on May 28, opened some frontage that had to be covered. A lot of that credit also has to go to French First Army at t he Battle of Lille, however.
Monty was then given a corps in Kent (V Corps, I think), which we featured in our recent “Sea Lion” series.
One aspect of you post with which I agree 100,000% is the “eople get too caught up in the movie caricatures of famous commanders.” My, God, my God, my God, if I had just a nickel for the would-be historical buff or wargamer who thought Patton was anything like George C. Scott. 🙁
One thing that is all too often forgotten about Monty concerning his leadership, strategy and tactics in the Western Desert is the fact that the 8th Army was a truly international force. This comes with its own heavy disadvantages. First orders need to be issued in several languages and the level of training and national doctrine have their impacts on what he could do. These are the obvious issues and then you have the various religions. This caused Monty no end of military issues in that some could eat this food or that while others could or that on certain days they are forbidden to eat this or that. On certain days some religions saw killing on certain days or over a given period was unclean or forbidden to this religion or that. So it must have been a total nightmare trying to use the 8th Army as a unified force. As I opened with it often overlooked and given that Monty was not much of a diplomatic would have compounded the issue. Although this this was not unique as orders given in Operation Neptune had to be issued in 48 languages or dialects.
The poor old misunderstood M3 with its 37mm gun. It was not it’s fault that it was never used properly as originally conceived. U.S.tank doctrine was based and extended from blitzkrieg 1940 including the relationship between light and medium armour as a single force exploiting breakthroughs and attacking C&C nodes. Dealing with the other guys tanks was the job of the AT guns and TDs. So they had to break any infantry resistance they encounter very quickly. A look at the ammunition used by the 37mm and 75mm guns reveals this relationship a little better. Both have HE and AP, however the 75mm has smoke and the 37mm has canister (shotgun shells for tanks and artillery). The 75mm guns shell the infantry position while the 37mm guns moves up. Then once the 37mm M3s were in position to charge the infantry position the 75mm guns would lay smoke. Most U.S. armour training films dated around 1943 go to lengths to show this relationship. One issue it took a while to get the M4 to the battlefield however this could have worked with M3 Lee/Grants but the training was not there. By the time the M4 does arrive the M3 Stuart is being used in a light cavalry role. I do not know if the British made use of the canister round either, if they did not the overall effectiveness of the little M3 would have been reduced. As wargamers when we look at a tank and see it only in its tank vs tank abilities in a joust like fashion often overlooking the fact the fact it has side armour. While British cruiser theory was all about getting at the side armour while tactically the got drawn into too much head butting and paid for it.
One of the issues about describing the war in the Western Desert is its absolute size in comparison to war in Europe and military terms struggle with this and too many of them are used loosely or interchangeably. It is called the Western Desert Campaign yet a number of campaigns were fought there. In Europe what would be called a skirmish or meeting engagement would be called a battle when the size of the desert version is taken into account. So we are left with groping for terms like major battle. This term would encompass all the battles of the Somme into the major battle of the Somme. A number of major battles in the Western Desert need to be seen this way. Like a firestorm is not a singularity but the product of several major forest fires coming together to form a super fire. Distance can be another funny thing with a battle starting in one place but finishing some fifty kms or more away without any retreat being involve, it is just a product of how the armies engaged. You don’t have features like major rivers that help contain a battle like you have in Europe.
These are actually very good points, @jamesevans140 . While the very, very multinational aspect of the Eighth Army has in fact been brought up in this article and future article in the series (to the point where I don’t even call it the “British” Eighth Army because frankly it wasn’t, I try to call it the “Allied” Eighth Army), one thing I didn’t touch on was the difficulties this multinationalism poses. By the time Monty finally launches the Second Battle of El Alamein, the Eighth Army contains (and this is off the top of my head here, so please forgive me if I miss something)
British divisions
An Australian division
A New Zealander division (to include a famous Maori battalion)
A South African division
Indian divisions (to include regiments from modern Pakistan, Bangladesh, India, and troops from Nepal)
Free French troops (to include troops from Morocco, Syria, Cameroon, and other locations)
Greek Brigade
Even an AA detachment from Hong Kong
Previously included:
Poles
Carpathians
Zionist volunteers from Palestine
So yeah, it gets crazy. 😀
Indeed, it seems the UK tried using the M3 Stuart as a “battletank” to supplement or replace its Crusader II fleet. My example is Operation Crusader – when 8th Hussars Tank Regiment / 7th Armoured Division had something like 60 of these things (just as one example). Bad idea, it seems by Gazala the newer 6-pounder Crusader IIIs were coming out and the M3 Stuart was being reverted to a recon role (probably more in line with the US “cavalry” role).
The idea of the American “tank destroyer” at this time is very, very new. Most TD battalions (assigned to divisions separate from the tank regiments, and to corps HQ for assignment to infantry divisions as needed or to armored division “CCA, CCB, or CCR” commands) really start with but an M3 halftrack . . . with a 37mm gun bolted to the back and firing over the cab. Others included the T-19 with a 75mm howitzer, such was the idea of the American “SPG” at the time. We had plenty, but ironically had given away most of our existing M7 “Priests” to the 8th Army after the Tobruk disaster, leaving us with pitifully few of our own models (you’re welcome, Great Britain )
Of course, I don’t think these are doctrinal questions, simply a case of American industry, army depots, and finally the field formation gearing up as we enter the ground war as a full combatant. Even for the US and her “unlimited” resources, this process take a lot of time, moreso when you’re pushing the rest of Free Europe uphill in a wheelbarrow (Roosevelt’s words, not mine, but I agree).
One of the issues about describing the war in the Western Desert is its absolute size in comparison to war in Europe . . .
Agree 100%. I think Rommel’s retreat from Alamein to the Mareth Line in Tunisia was 1100 miles or so? Do that from Moscow and you wind up past Berlin.
It is called the Western Desert Campaign yet a number of campaigns were fought there.
Again, agree. I’m only calling it the “Western Desert” campaign to distinguish it from campaigns in Morocco, Algeria, Tunisia, Abyssinia, Eritrea, Somaliland, Syria, and Chad, and Madagascar (or even Iraq, if you want to count WW2 counter-insurgencies). Covered in more detail in the 2015 “Desert War” article series.
In Europe what would be called a skirmish or meeting engagement would be called a battle when the size of the desert version is taken into account.
Also, the size of the forces. In Africa, we have (at most) four German divisions. In France we’d see 80+, Russia we’d never get below 200-220. So when two tank companies meet, there’s a much bigger comparative impact in Africa than say, Kursk (an extreme example, perhaps, but makes the point).
You don’t have features like major rivers that help contain a battle like you have in Europe.
Ahh … now here I partially disagree. These desert battlefields, despite what it looks like in the newsreels, are a lot smaller and constrained by terrain than they appear. Even leaving aside the Qattara Depression at El Alamein (which is admittedly probably the biggest case) – we have more operational- and even tactical-scale constraints like:
Wadis – sometimes perfect places to set up hull-down gunnery positions, sometimes utterly impassable to tanks. Depends on the last time it rained and how much salt in sin there.
Escarpments – Now here’s the big one. The desert along the North African coast is NOT a flat plain. It is a series of levels that staircase up as the desert stretches south. Each of these levels are divided by escarpments sometimes 200, 300, or 600 feet high and hundreds of miles long. These divide the North African battlespace into a series of jagged, irregular, east-west “lanes” where transition from one lane to the other is only possible and narrow passes where natural “ramps” connect two levels. Halfaya Pass is probably the most prominent (and blood-soaked) of these.
Anyway, just wanted to say that these battlefields do have some pretty significant “constraining terrain”, both operational and tactical. I only wanted to bring it home because it was just such constraining terrain that made the Battles for El Alamein happen where they did, and were a major factor in their conduct and outcomes.
A truly great reply there @oriskany! 🙂
This is one of the issues we have bumped into time and again in our research on this campaign in that military vocabulary does not easily apply here. As I mentioned campaign is misleading as there were many. Describing it as a Front might cover the campaigns but is misleading as it suggests something nice and neat as a line. When it looks like a shotgun blast pattern upon the map. So in our group we tend to refer to it as the desert war but even this does not properly describe it either.
I am quite familiar with the North African coastline as it is similar to the Australian Eastern seaboard, once you strip away the gumtree rain forest. You now have a series of escarpments that can be over 1000′. These escarpments were a barrier that blocked exploitation to the interior for decades until a route through them was finally discovered. Then these explorers were confronted with tablelands.
My description of containment on reflection should have been better defined. I was mainly influenced by the U.S. Army’s post war analysis of North Western Europe as on average there is a major river crossing every 2.2 miles in this theater. Personally I think the number is a little too tight. You can however draw it as a map of tiny islands that are divided up by highly navigable rivers that are further divided into regions by hills, mountains and a small number of large swamps. Forests also in some areas could also act as dividers in some places. I should also explain this map I am drawing is one that is drawn up by the general staff. Starting with a blank page adding only military relevant features as described by de Jomini.
So perhaps i should have generalised on the battle space in Europe tented to be smaller but involving more units engaging, again in general.
Historians again in general to their credit try to show us the history of WW2 in a nice easy to digest linear fashion with topics placed in nice little boxes. However WW2 does not fit this model easily. The topic you are describing dwells in a period of high flux with a number of theories on operational warfare with the competing egos and politics that follows. In this period a political battle is being raged in the U.S. on who owns and should drive it. The two main contenders are the Army and the Cavalry, which at this point is a separate arm. The Cavalry will finally loose this battle and be absorbed into the Army at war’s end. To this battle is added the highly unpredictable wild card Roosevelt himself. Who was basically accused of helping the Brits by knackering the U.S. Army, not my words.
You then have the competing theories of expanding torrent and blitzkrieg for conducting operational warfare. The main difference is expanding torrent in its original form is fought with machines with little room for foot soldiers and is preferred by the Cavalry with the intention of eventually replacing the Army. Further compounding the issue is that senior generals in the field are given wide latitude in the use of units under their command which will be a mix of Cavalry and Army as are the generals.
All this will lead to the poor little M3 Stuart being deployed as battle tanks in the first encounters with the Germans with disastrous results and TDs being used as mobile artillery. Mind you when considering competing theories, politics and a far more interfering wild card the 8th Army is in no better shape. Given what is happening behind the scenes it is truly amazing these two bodies managed to share resources; took to the field and defeated the Germans and Italians who in turn was just as screwed up internally as the allies. I also believe it is a testament to talent of the lower chain of command who managed to wage war in an effective manner.
So this war across Africa and the Middle East is a bubbling cauldron with many lessons to be learned and extremely painful some off these lessons will be. It will take massive egos to pull this all together and to make it work.
It is this military/politics interface that caught my attention in this war and at times it is frightening and frustrating in its wasteful internal conflicts. So I understand why historians tend not to look at or sidestep this aspect.
So in our group we tend to refer to it as the desert war but even this does not properly describe it either.
Well, this part of the campaign was certainly a “desert war,” but I would certainly agree that the areas encompassed by Operation Torch (Morocco, Algeria, Tunisia) are at least a very different type of desert, and other combat areas like Syria, Madagascar, Abyssinia, Eritrea, etc . . . might not be considered “desert” at all. I agree it can be something of an overgeneralized title that struggles to encompass a much larger reality.
But for this series, which is honestly just trying to put some kind of frame around the various engagements of El Alamein . . . 😀
My description of containment on reflection should have been better defined.
I understand what you were saying, and of course you’re right. I’m just trying to make sure readers don’t get the idea that this desert was wide open and flat. (a) It always looks that way in the newsreels and movies. (b) the battlefields at El Alamein in particular were constrained by various terrain features (both on the “tactical” and “operational” scale). This may influence tables, victory conditions for scenario-based games, etc., that will take place at the boot camp these articles are meant to support.
I would certainly agree that at the time of Operation Torch (after the battles we’ll be doing at the boot camp), the US Army still had a lot of “workshopping” to do on its doctrines, and certainly in fielding the equipment required to effectively deploy those doctrines in actual combat. The British, for their part, had been hammering their way through a series of fall-down failures in trying to come up with a doctrine, mostly through battles like Operation Compass, Brevity, Battleaxe, and Crusader. But whereas the British had been let down continually by equipment and uncertain operational leadership, the Germans (who’d already introduced their doctrine in Poland, perfected in it the West, and were now realizing its limitations in Russia with Case Blue), the Germans were let down by an extremely tenuous supply situation that forced compromises on many of their doctrinal preconceptions anyway.
In simpler terms, were “doctrines” really that much of a factor in North Africa? The Germans couldn’t afford theirs. The British were just putting theirs together through painful experimentation, and the Americans frankly didn’t have a clue. Add the Vichy French who were about to become “Free French” again, and you’ve got all three Western Powers learning not only how to fight, but how to fight together (with all the teething troubles that process is likely to bring).
Dealing specifically with El Alamein, we have a “Desert Fox” who loves mobility, but is forced by logistics to fight an almost entirely static defensive battle. And we have Monty, who’s got a keep grasp on getting his army ready to fight and resisting pressure form upstairs to strike before he’s ready . . . yet who’s attack plan is relatively unimaginative. Unimaginative, but effective, as we’ll see in Parts 02 and 03. 😀
I look forward to the next installments and your take on this battle.
Stereotyping of a battlefield is as problematic as stereotyping the Army that fights upon it. Ask the average person about the Russian campaign and they will describe the endless featureless plains. Yet 40% of the Russian Front looked like Finland and could be colder. That is why I place nearly as much effort when considering a new army into the climate and terrain as I do to the actual army.
Rommel’s supply problems I use as an example of a self-perpetuating problem and highlights the fact that he was not ready to be a Field Marshall. The failure to secure his supply lines and in turn win the campaign is his alone. Insisting someone else deal with supply is handing over more than 50% of a Field Marshall’s duties.
It is true that most armies start a war by fighting to win the last one. Then comes the painful period of adjusting to the current war and finally developing the methods to win it. The other reality is in general armies don’t learn from other armies until they have been slapped in the face and especially from armies that have lost a series of battles. Yet an army learns most out of defeat.
Strangely there is nothing wrong with predictable. All of the current U.S. doctrine is available for reading, so I can tell you exactly how they will fight. Their radio communications will grow exponentially and then fall silent with their main attack coming within 24 hours of commencement of silence. With all this foreknowledge I can’t tell you how to beat them.
Wellington’s they came on the same old way statement plays down the realities dangerously when taken out of it’s political aspect. This same aspect is about to show itself again in this desert battlefield.
@Jamesevans140-
Stereotyping of a battlefield is as problematic as stereotyping the Army that fights upon it.
Can’t argue with that. We see it a lot with these miniature sets and terrain packs companies produce. The game designer / manufacturer has to thread a fine line between creating “stereotypical” terrain (and thus alienating the harder-core historical players that may be a big part of their user base) and creating terrain that is hyper-accurate but perhaps might not meet the popular image of a given battlefield (this turning off casual / new players).
Rommel’s supply problems I use as an example of a self-perpetuating problem and highlights the fact that he was not ready to be a Field Marshall.
Agree 100%. In 1939 he’s running a regiment. at the end 1942 he’s getting ready to run an army group. That’s a 15-20 year career path, not 3 1/2.
Insisting someone else deal with supply is handing over more than 50% of a Field Marshall’s duties.
Again, I couldn’t agree more. Like I said on the thread for part 02 – At the divisional level, it’s about tactical flexibility, command from the front, and speed. Rommel’s hallmarks. At higher levels, it’s about detailed preparation, staff work, coordination with other forces in a larger picture, and logistics. Rommel’s many Achilles’ heels.
Strangely there is nothing wrong with predictable.
I’d maintain that surprise is still pretty important. “Strike into voids,” as Master Sun says. “When the thunderclap comes, there is no time to cover the ears.”
All of the current U.S. doctrine is available for reading, so I can tell you exactly how they will fight.
I would draw a distinction between doctrine and operational planning. One cannot be kept secret, in fact it’s designed NOT to be (a template for training everyone who joins your army). The timing, direction, objectives, and exact composition of an attack (or defense) really should be as secret as possible. Especially in today’s environment with weapons so deadly . . . he sho shoots first . . . shoots last. Surprise is perhaps more critical than ever.
When a doctrine becomes too rigid that its starts dictating tactics (or worse, operations), an army is in very serious trouble. The Soviets seemed to struggle a lot with this kind of problem.
With all this foreknowledge I can’t tell you how to beat them.
That’s because we’re Americans. And thus awesome. 😀 😀 😀