DARKSTAR CAMPAIGN UPDATE: DUCHESS ANNABEL’S WAR IS OVER


Recommendations: 3619
About the Project
The year is 2512.
The powers that remain on an ecologically-devastated and plague-ravaged Earth have been forced to look to the stars for the resources, capital, and room not only to expand, but to survive. While the setbacks encountered by mankind over the past 500 years have forced him to unite in a shaky global coalition and make fantastic strides in technology, they have also caused seismic and reactionary shifts in religion, culture, and politics. A second age of imperialism has dawned, and because man would never survive another war on the fragile remains of planet Earth, he is forced to ply his oldest trade ... war ... exclusively among the stars.
Darkstar is a tactical war game postulating naval combat in a “science faction” universe set five centuries into a troubled and uncertain future. Players take command of warships serving in the new “black water” navies of reborn empires of old, struggling for control of shipping lanes, resources, and colonies. Ships maneuver and fire in fast-paced combat, with survival not only of the players’ fleets at stake, but perhaps their nation and all of humanity as well.
Related Genre: Science Fiction
This Project is Active
DARKSTAR CAMPAIGN UPDATE: DUCHESS ANNABEL’S WAR IS OVER
As some of you may be aware, there’s been talk of starting a new Darkstar campaign for a little while now. New Darkstar players in the community have been anxious to make their own additions to the “canon” and history on this setting. The first step in setting that up, of course, is to close out the existing war on the table, Duchess Annabel’s War in the Libra-Sagittarius SCS (strategic command sector).
The best way to do that quickly is to have a big enough battle so that no matter which way it turns out, enough campaign points are accrued by the winning side to give their faction a decisive edge at the inevitable UN negotiation conference.
The word was put out and we have @damon and @gladesrunner sign up to take part in this last big showdown.
So this is it, the last big battle in Duchess Annabel’s War (also: War of Annabel’s Star, or the Libra-Saggitarius War of 2518-2520).
This will also be the last post on this thread. It’s hitting 3500 recommendations, 127 entries and over 600 comments. Half the time I try to open it, my web page times out. So this thread will be retired with the nice round number of 3500 recommendations (approximately) and a new one started to continue for the fresh campaign.
So let’s get to it. This is a very large Darkstar game, usually measuring in at 150-350 points. This one was 1000 points, so none of us had any illusion that we’d be up to for the evening. 😀
>>>>>>
The new campaign is being drawn up as we speak! In broad terms, we’ll be looking at the UNITED STATES and HOLY RUSSIAN EMPIRE teaming up against the UNITED KINGDOM and the JAPANESE, with possible support factions in the form the Corporate Consortium, Indian Republic, and/or Arab League. Players will be myself, gladesrunner, damon, and rasmus for starters, but more are always welcome!
If you want in on the ground floor on this new campaign, NOW IS THE TIME!
 The last several months of Duchess Annabel’s War haven’t been good to the Prussians. Although their Japanese allies have been racking up an impressive string of victories, the Prussians have already had two battleships crippled here (the Scharnhorst class pocket battleship KMS Von Der Tann and the Tirpitz class battleship KMS Admiral Scheer). The Japanese have opened separate negotiations with the British, Panasian League, and Russians, looking to “cash in their winnings” and call this war a win. This would of course leave the Prussians, New Romans, and “Black Dragons” of the Khitan-Tunguska Free State in very bad way. Obviously aware of the Japanese overtures, the British decide that a decisive moment is at hand. They will strike the Prussians now, hard, at their key colony in the Libra-Sagittarius sector, right when their fleet is weakened and their allies are deserting them. A hard enough blow at the heart of Eisenwolf Colony (Gliese 570) could compel the Prussians to offer favorable terms at the peace table.
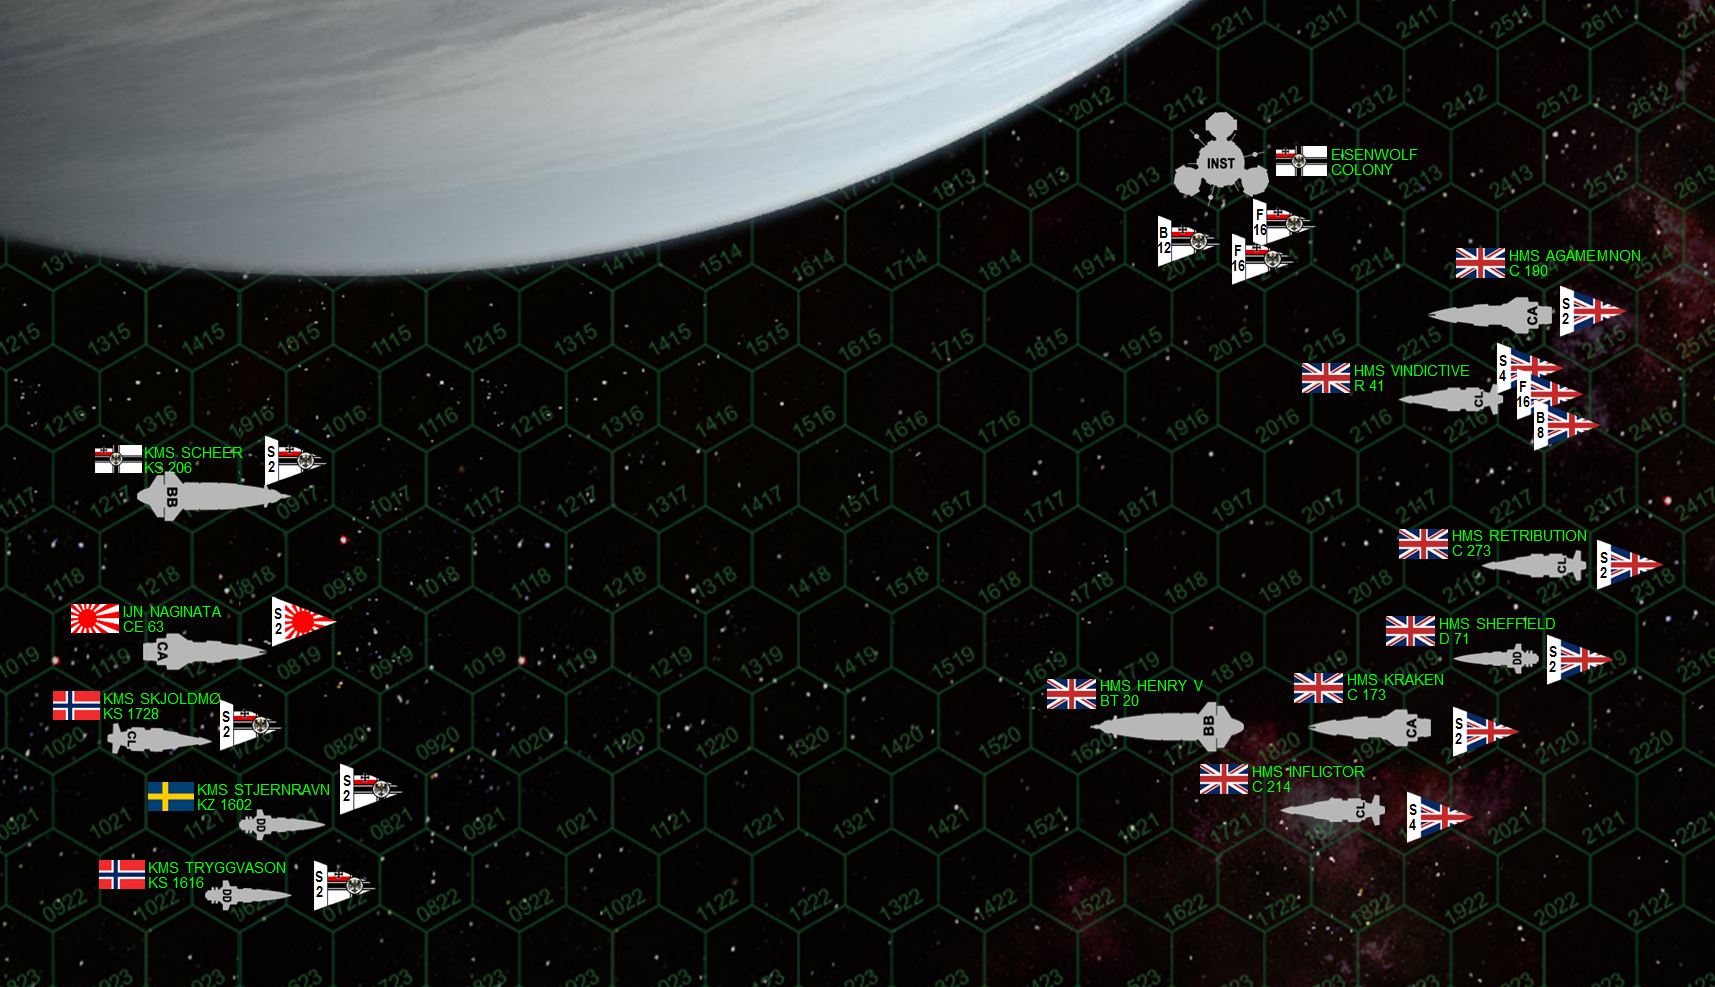 The matchup. For this assault, the British assign two cruiser task forces (Task Force “Kraken” and Task Force “Agamemnon”) to escort the Royal Sovereign class battleship HMS Henry V under the flag of Rear Admiral Sir Lord Perceval Ian Pinderglove. The target is the Eisenwolf Colony itself, a massive orbital facility bristling with 15-teravolt EPCs and 14-gigawatt rail guns, 35mm mass driver point-defense guns, sixteen Focke-Wulf 909 aerospace bombers thirty-two Messerschmidt SJ-363 fighters. Prussian warships are also in the area, including light cruisers, and destroyers of the “Shieldmaiden” kruezergeschwader (cruiser squadron), actually made up of crews drawn from Norway and Sweden. There’s also a Japanese heavy cruiser, the famously-decorated IJN Naginata, originally posted here to Eisenwolf just to assure the Prussians that they aren’t alone in this war quite yet. But one thing British intelligence didn’t pick up on was the latest status of the Tirpitz class battleship KMS Admiral Scheer. Indeed, she’s been brought back into service, and it looks like we’re going to have a battleship showdown on our hands.
 The engagement begins. The two heaviest “Iron Wolf” ships, Admiral Scheer and Naginata, are also very agile for their size, so they set a high engagement speed. Not as fast as the British, who thunder into the eclipse shadow of this gas giant moon at 30 kilometers per second. Yes, even the 400,000+ ton Henry V. The British make an orderly turn to port to present a broadside to the Eisenwolf Station, but as the Iron Wolves streak toward the station (clearly hoping to present a unified front of massed firepower and point-defense guns), the British switch targets and open fire on the incoming Norwegians and Swedes. The Maas-class destroyer Stjernravyn gets the worst of it, her starboard bow torn open by the heavy rail guns of the Henry V and Kraken. But it’s the little Falklands-class destroyer Sheffield, much further away, that actually lands the killing blow, putting an 8-MgKv laser through the Stjernravyn’s exposed bridge. The Agamemnon and Retribution hammer the sister-ship destroyer Tryggvason, inflicting enough damage to force her captain to break off the action. But the Iron Wolves are certainly not silent. Heavy gunfire from the station, the Scheer, and especially the murderously-accurate fire of the Naginata slash through the starboard bow of the Henry V, tearing open the battleship’s hull, crippling maneuvering thrusters, hitting both forward magazines, knocking out the flag bridge, and setting the main bridge on fire. Rear Admiral Sir Lord Perceval Ian Pinderglove is badly wounded, and Commodore Rhea Aubrey (HMS Kraken) has to take overall command.
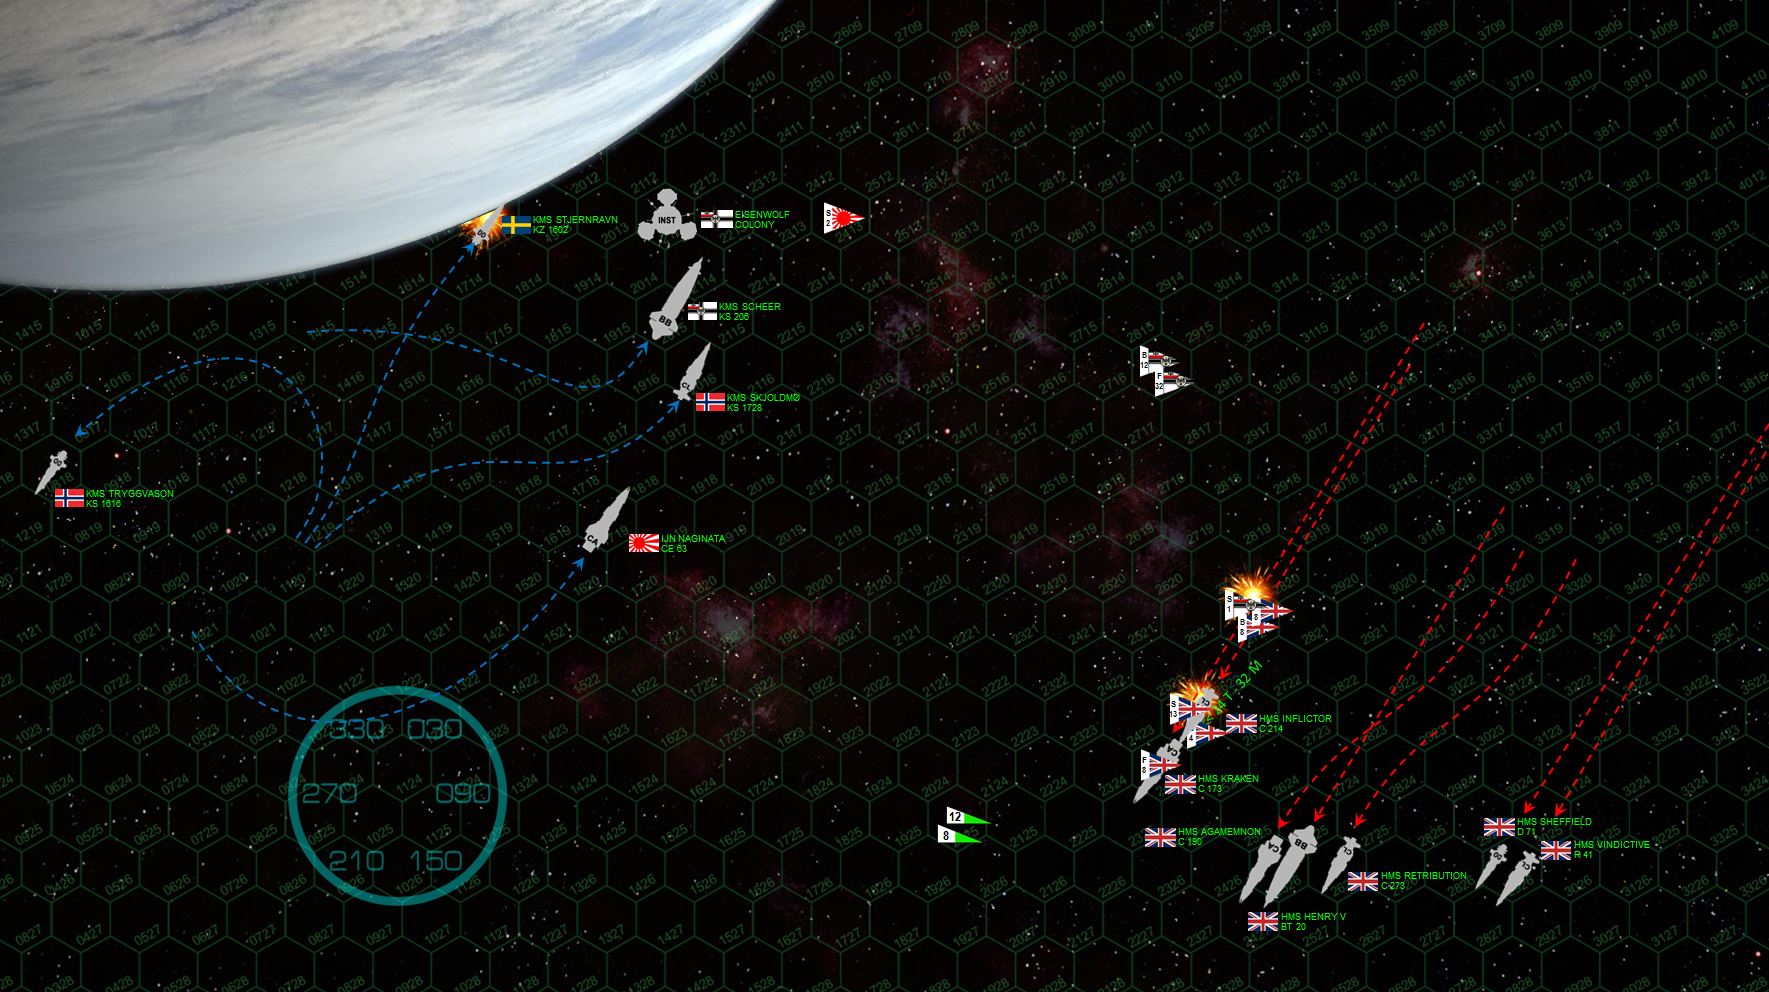 The Stjernravyn, crippled with no bridge, collides at 24 kps into the Eisenwolf moon in a titanic thermonuclear explosion. Fortunately, the interval between the bridge hit and the impact has given most of the crew time to escape the ship. KMS Trygvasson throws her grav rudders hard to port and banks away from the slaughter. The Scheer and Skjoldmo (Shield Maiden, Hipper-class light cruiser) fall in alongside the station, setting up what should be a truly withering broadside. Indeed, the Henry V is hot again … HARD, but not as hard as the Indomitable-class light cruiser HMS Inflictor. Maneuvering thrusters are hit along with sensors, the aft hangar … the Prussian bombers then strike, and a whole mass driver array is blown clean out of the Inflictor’s hull and an aft 7-GW rail gun turret is sent spinning off into space, trailing a glowing comet’s jet of molten slag. The ships should be in danger of losing power, but somehow the engineering crew vents just the right compartment into space to smother the fire and super-cool the red-lined reactor core on the starboard reactors (Jenn’s HMS Inflictor has the “Resolute Crew” upgrade – and it pays off). The Prussians, meanwhile, have finished launching their aerospace strike wing off the Eisenwolf station, even as the first Arado scouts engage and shoot down British torpedoes fired from HMS Kraken and the carrier HMS Vindictive. At the same time, however, the British put everything, EVERYTHING, into the Admiral Scheer, positively tearing open the Prussian battlewagon’s starboard quarter. Among the systems hit are the starboard quarter maneuvering thrusters, a critical blow in the moments to come …
 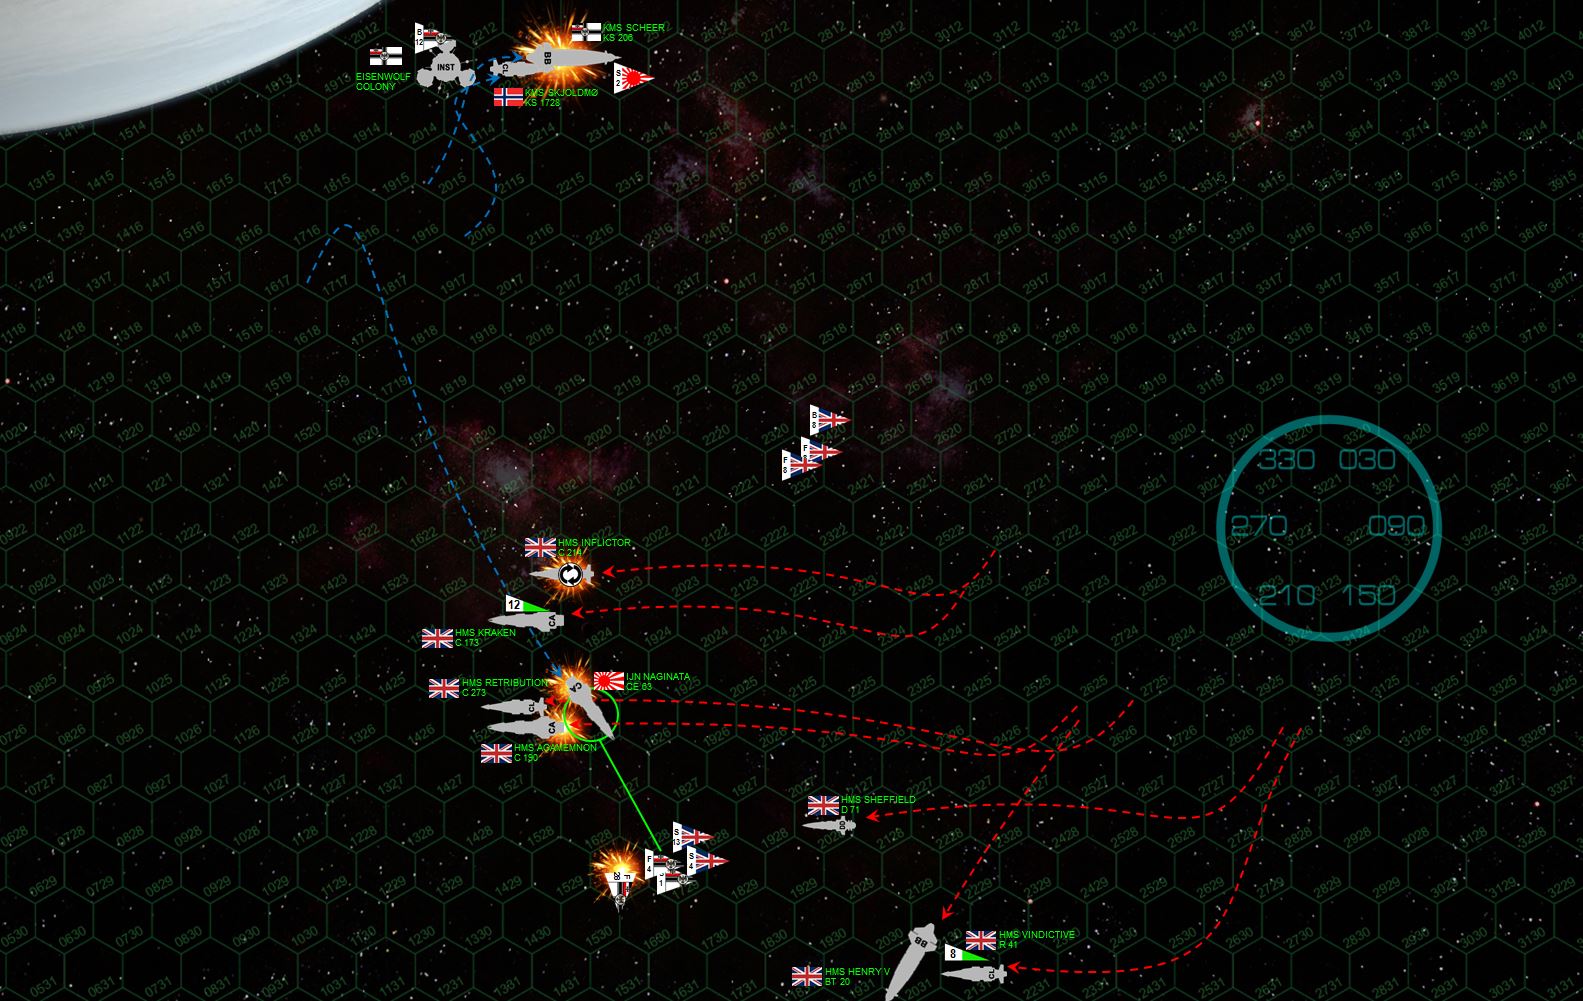 The Prussians … are in trouble. The Scheer’s starboard quarters has been torn open so badly that she HAS to get this part of her hull clear of more British fire. The problem is, she’s going too fast as sixty seconds ago, her starboard quarter maneuvering thruster has been damaged. So she can’t slow, turn, AND roll … at least not before the Agamemnon and Kraken cut in behind her and put a double broadside into her exposed reactors and engines. She fires full braking thrusters and manages a turn to starboard, at least forcing the British to hit full acceleration to get the firing arcs they need. Not all the British ships will make it, but with the heavy cruiser Kraken and Agamemnon, and the light cruisers Retribution and Inflictor, it will be enough. Thus, the Iron Wolves make a desperate move. The Naginata kicks her grav rudders hard to starboard, diving straight behind the Agamemnon and Retribution. The move is virtual suicide, especially with Vindictive’s aerospace strike group poised to launch a full torpedo and missile spread. But the captain of the Naginata, Hiromi Ozawa, knows she can take out the Agamemnon and possibly the Retribution, and by drawing fire, she just may save the Admiral Scheer. The plan … ALMOST works. The Agamemnon is indeed murdered by the point-blank broadside of heavy Japanese EPCs straight into her engines, the Retribution likewise taking a horrific mauling. By some miracle the Retribution will survive … for now. The Kraken turns her guns toward the Naginata, and combined with the British aerospace strike launched from the carrier HMS Vindictive, cripples the Naginata. But the last broadsides from the Agamemnon and Retribution, combined with the remaining guns of the blazing Inflictor, are just enough to take down the Prussian battleship. This courage costs the Inflictor, course, crippled in turn by the dying Admiral Scheer, even as the massed Prussian fighter group is slaughtered by British point-defense guns as they try to screen the doomed Naginata from British torpedoes launched from Vindictive, Kraken, and the British “Star Typhoon” bombers.
 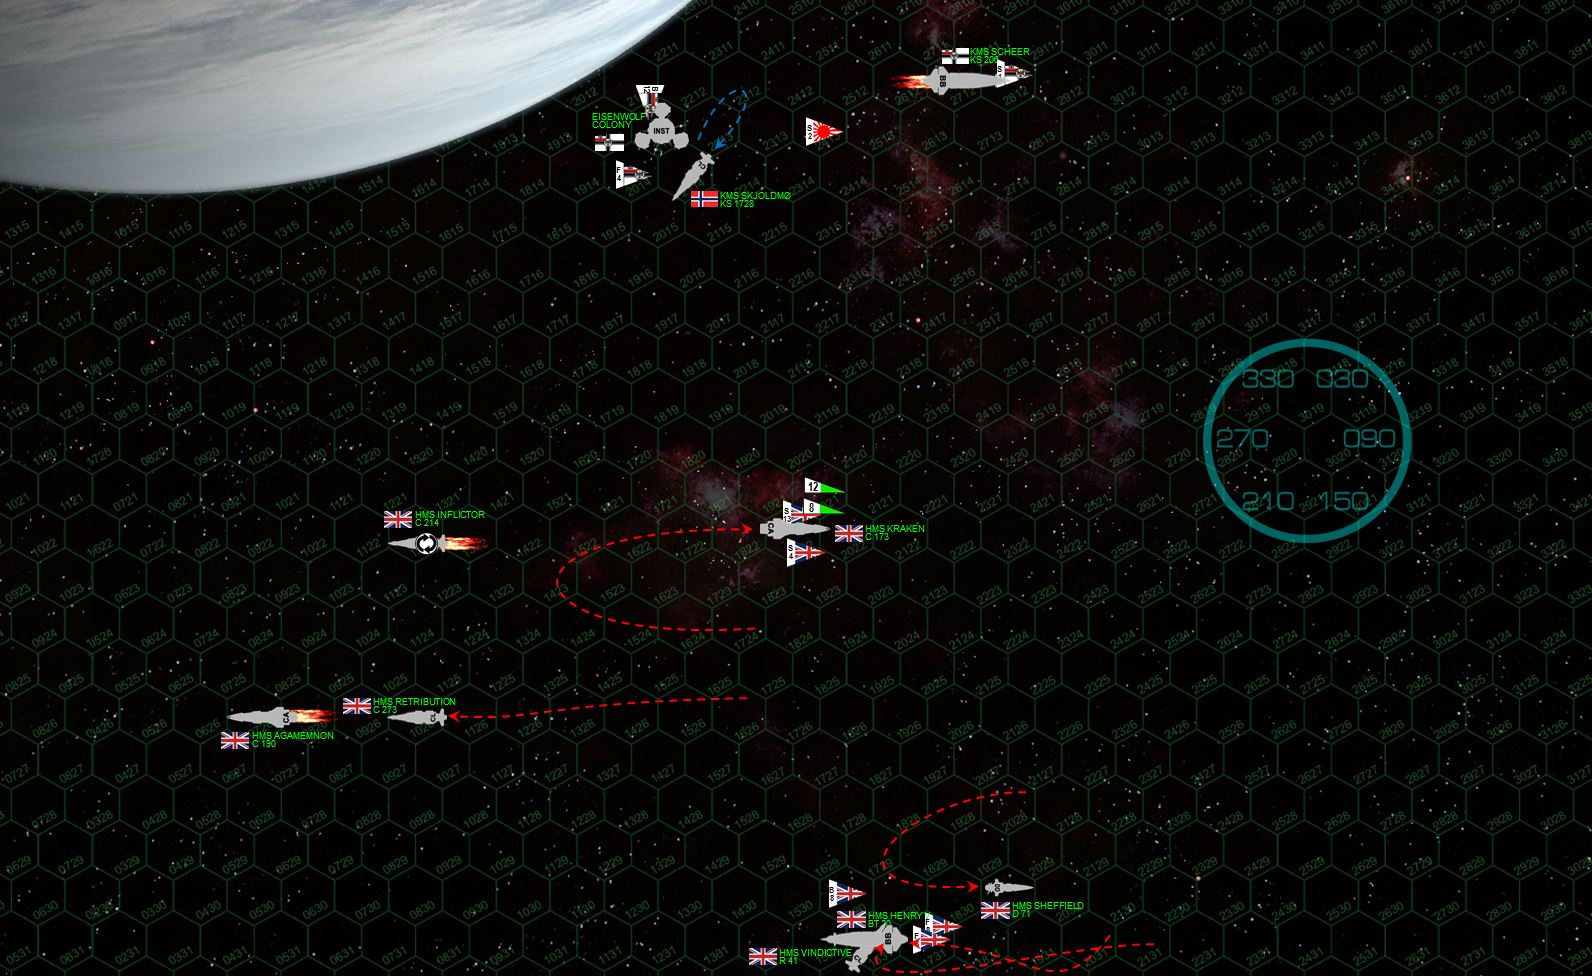 With their desperate gambit having failed, and proved hideously expensive in the process, the Iron Wolves have clearly lost this battle. Their last ship, the light cruiser Skjoldmo, valiantly protects the Eisenwolf station, and takes the full firepower of the British fleet for her trouble. But with the British fleet themselves so badly mauled, and now terribly disorganized, Skjoldmo actually survives. Furthermore, the “Shield Maiden” and the heavy guns of the station hammer the retribution, which again survives by a miracle … and also the Henry V … again.
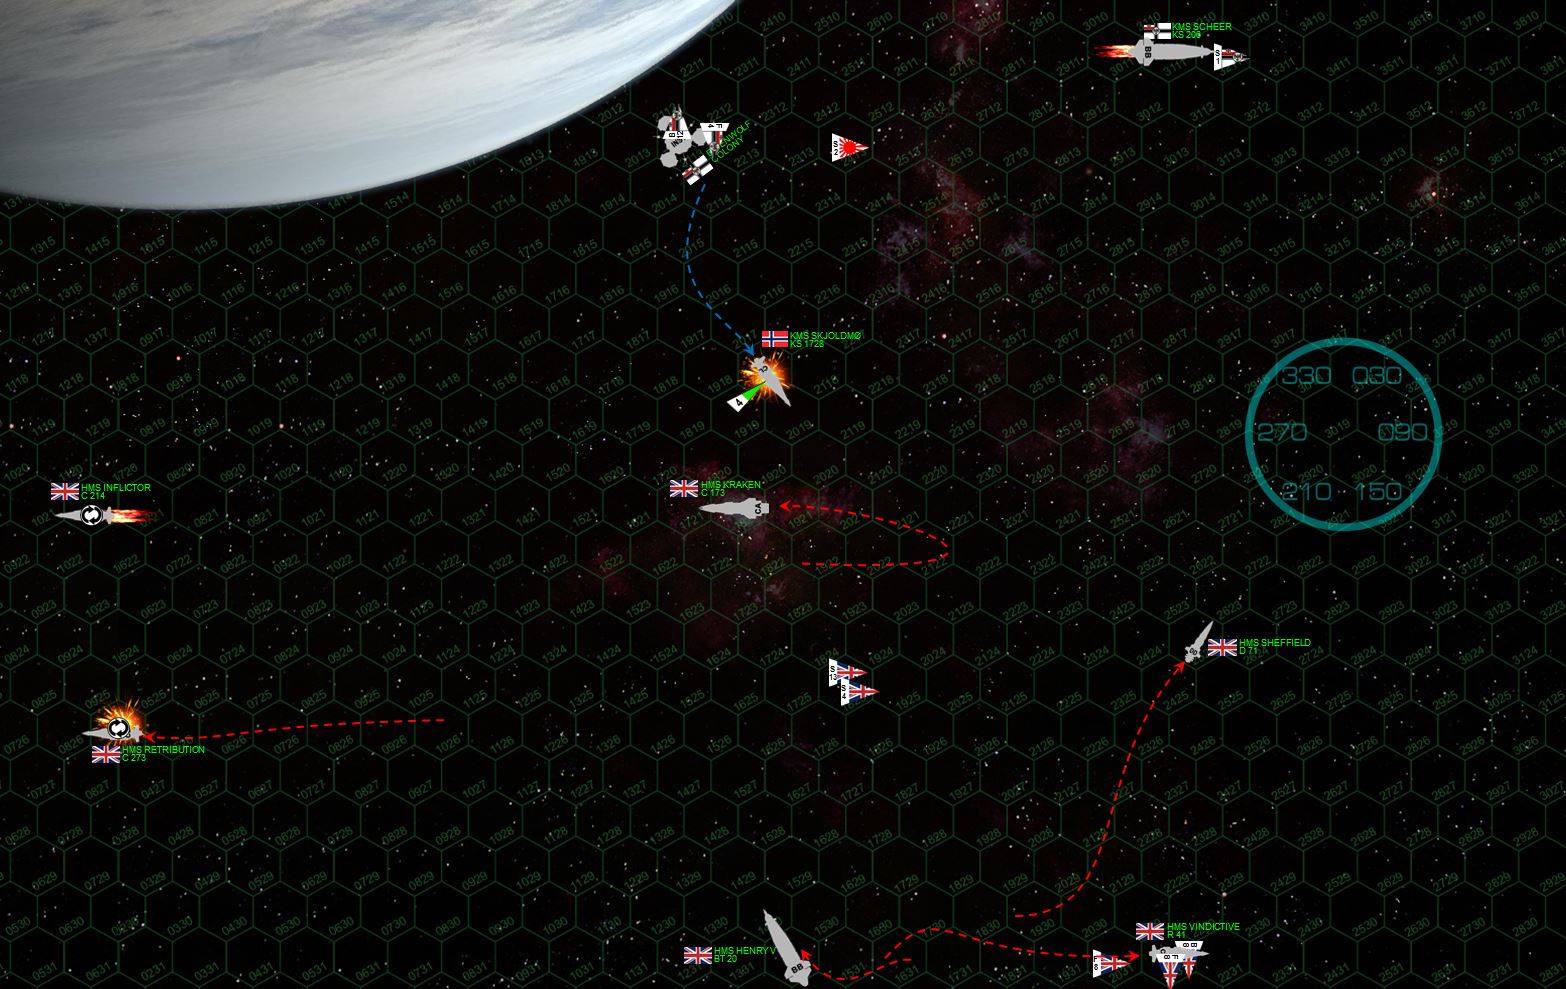 The Retribution tries to limp away, but by now has lost two complete engines and three maneuvering thrusters … she literally can do little more than drift. She’s also lost her aft shields entirely, so the Skjoldmo turns away from the station long enough to put a 8-gw rail gun broadside into her fantail and cripple the Retribution for good. Of course this dooms the Skjoldmo as well, after a blistering broadside from Kraken and the Henry V … while the Vindictive starts recovering her bombers and fighters to rearm them for a second aerospace strike. While none of this bodes well for the Prussians, it does mean that no one is firing at the station, which now opens fire at short range into the heavy cruiser Kraken. Previously undamaged, the mighty Iron Duke-class cruiser is ripped wide open by the station’s enormous batteries, losing some mass drivers and her starboard bow shields. The Prussians seem determined to go down fighting.
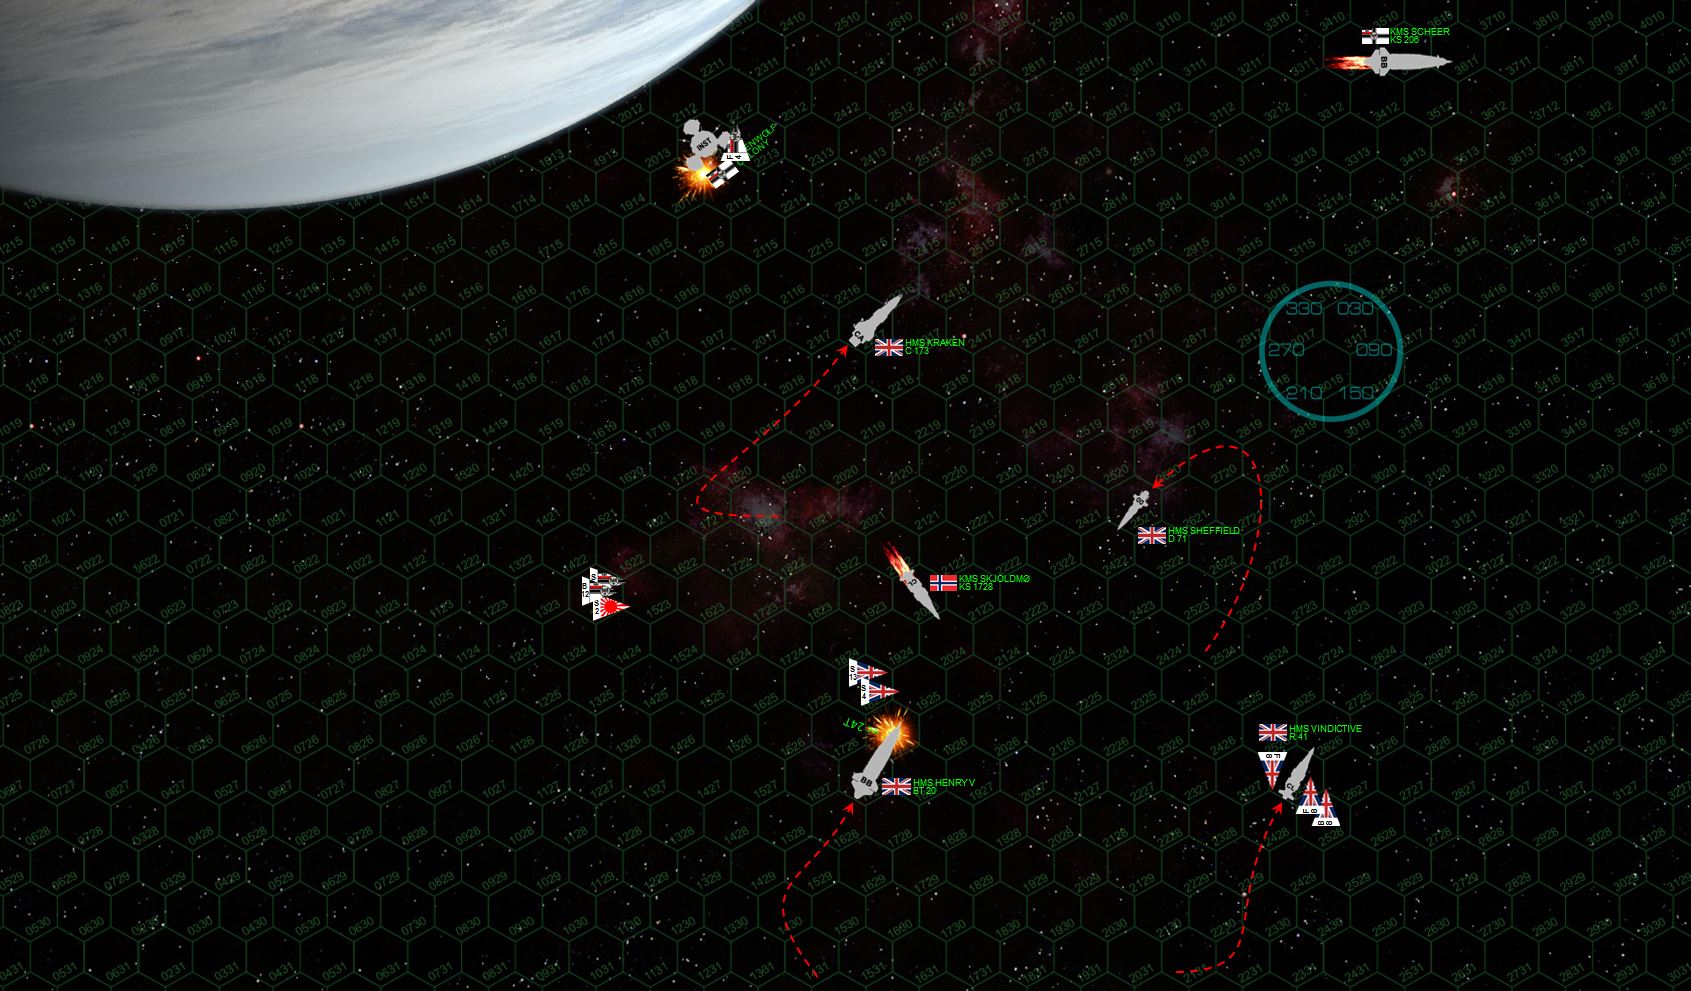 The end of Turn 6, when we decided to call this game (just short of seven hours at this point). The Prussians have managed to launch their re-armed bomber group, and hit the Henry V on the port bow along with another withering cannonade from the station’s heavy guns. They did significant damage, but not enough to cripple the British dreadnought. Meanwhile, the British fleet again hammers the station, but against that kind of armor and shielding, it’s going to be slow going. Another round or two might have ended it (Darkstar Assault games usually end on Turn 8) but no matter what the Prussians were losing this one. Their best case scenario was to cripple HMS Henry V as they lose the station, which would still leave them facing HMS Kraken, Vindictive, and Sheffield, over 300 points. Even if the station by some miracle survived until the end of Turn 8, HMS Kraken, Vindictive, and Sheffield would provide enough of a margin of victory on scenario points.
 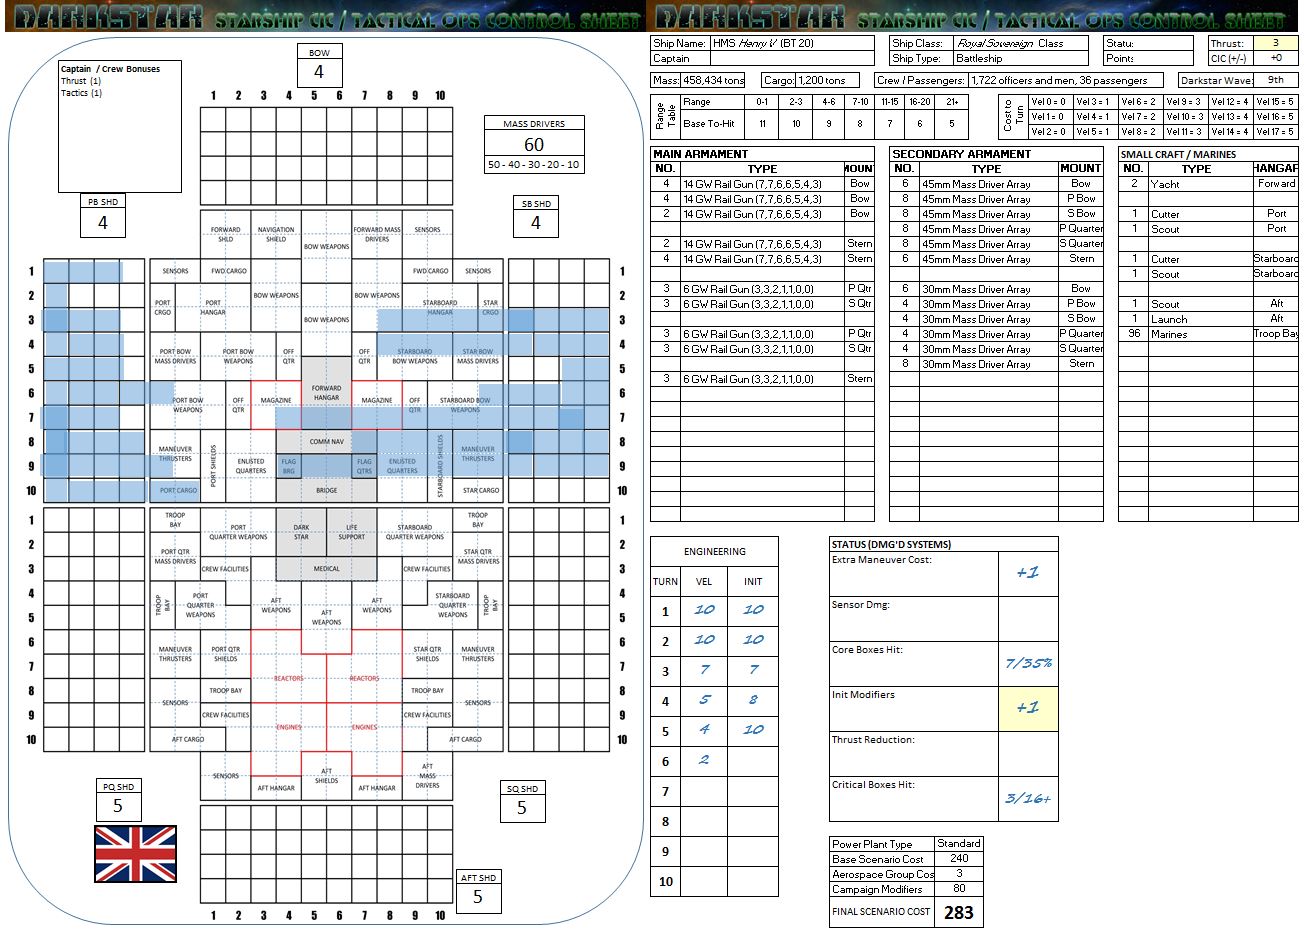 The Warship Record Sheet (WRS) of the HMS Henry V. You can see where one more good wallop on the port bow MIGHT have hit the bridge and left her crippled, but there’s no guarantee the British would be so accommodating as to present that facing to the immobile station. Port or starboard quarters could be presented with fresh shielding and armor, and still allow British 14-GW rail gun broadsides against the Eisenwolf Colony.
  Eisenwolf Station and the Norwegian light cruiser Skjoldmo (Shield Maiden). You can see where torpedoes from the HMS Vindictive drilled through the bridge and crippled the ship. It’s not often that a carrier gets a “surface kill” against another capital ship, usually scoring such victories with aerospace strikes. But it happened here. Meanwhile, you can see where the Eisenwolf colony could have easily lasted at least one more turn, if not two. Their shielding and armor are incredible. But being immobile, once they lose their protective fleet of warships and strike craft, eventual defeat, power-downs, and assault boardings are all but certain.
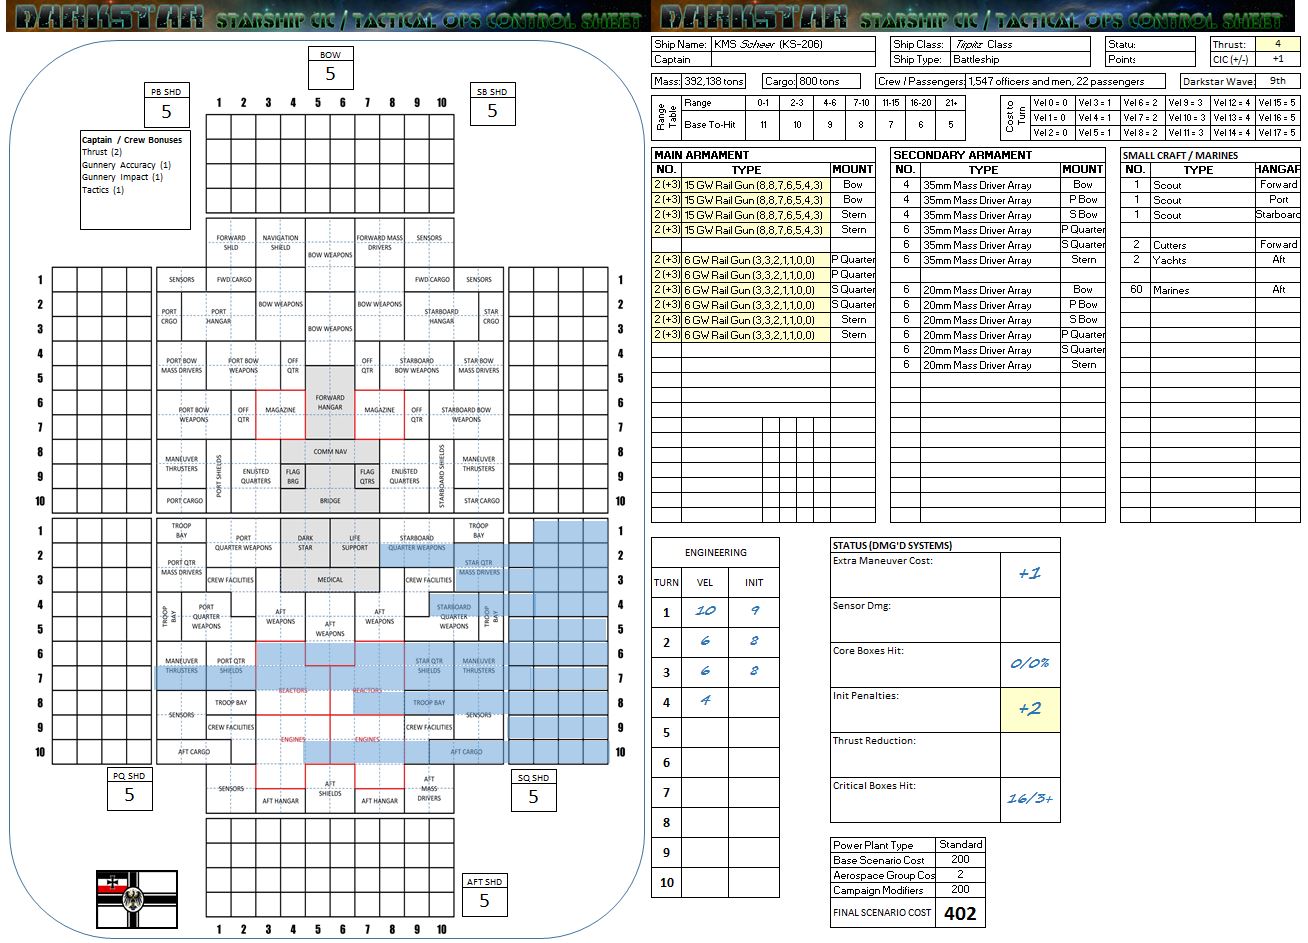 The WRS for the Prussian battleship Admiral Scheer. You can see where the massed British fleet had to hit the same area … twice, to finally cripple the dreadnought. Even then, power-down wasn’t certain (3+ needed on a d6). Had the Scheer been doing just one velocity point less, she might have been able to make the turn or roll to prevent this power-down for at least one more turn … one more turn for her eight 15-GW guns to cripple another British cruiser or at least put a few more holes in Henry V. >>> CONCLUSION: So that’s it, the War of Annabel’s Star is over. The British certainly won, as did the Panasians (the Chinese battleships Red Tiger won two major victories) and the Holy Russian Empire (after a rough start, my Russian “Lazarev” cruiser group really got on a roll). The Japanese were technically part of the losing coalition, but they didn’t lose that many battles. Both @aras and @rasmus won many battles with them. They’re going to be able to cut a deal and probably call this one a draw. The Black Dragons never won a battle, nor did the New Romans (including my poor French, who at best managed to steal one draw against Damon’s British). The Prussians are also losers in this one, with three crippled battleships in this war (the Von Der Tann, and the Scheer … twice).
 Darkstar Campaign?
I’d love to start a Darkstar Campaign. I don’t want to speak for anyone, but I feel we could get myself, @damon, and @rasmus lined up, as well as @gladesrunner – that’s four.
I would want to close out THIS project first. It’s really big and cumbersome, takes forever to load – understandably – and I’ve noticed some of the earlier entries have dropped off.
Turns out there is a “size limit” to these projects after all.
I’d like to hit 3500 recommendations on this one, so have a clean cut-over point. So once we hit 3500, there’ll be a new Darkstar project and this one can finally be retired. 😀 Hopefully the new one might kick off with a new campaign, if anyone is interested?
Rasmus v. Damon (Japanese v. Royal Navy)
It’s time for more Darkstar, with a somewhat belated battle report for @rasmus and @damon .
As fans of the project may be aware, we’ve been puttering around with the tail end of the “Duchess Annabel’s War” campaign for a while. This has been a long-running struggle with a complex backstory, which honestly should have ended by now, but I’ve been using it as a “sandbox campaign” to bring in new Darkstar players until we build up steam for a fresh campaign with hand-picked factions.
For now, “Duchess Annabel’s War” started about two “game years” ago in 2517. The fuse lit when the Panasian Union (Chinese) and the Holy Russian Empire desperately needed new allies for the ongoing war against the frontier colonial rebels of the Khitan-Tunguska Free State (commonly called the Black Dragons – a separate but related war that’s been going on for almost eight years). As Black Dragon raiders scored more and more successes in the Libra-Sagittarius colonies, the sector destabilized and Imperial Prussian and Japanese commanders smelled blood in the water. They saw a chance to take a slice out of the faltering Panasian and Russian colonies in the area. As if the Russians and Panasian didn’t have enough woes, the New Roman Alliance (France, Spain, Italy) was soon growing aggressive as well.
Traditionally, the British really couldn’t care less about the ongoing horrors of the “Black Dragon War” – even as more traditional powers began to involve themselves. The British have only one major colony in this area, the “Annabel’s Star” colony at 41 Arae. Once bestowed as a royal wedding gift, “Duchess Annabel’s Star” has grown into a major trade bottleneck from the outer Libra-Sagittarius colonies toward Sol, which powerful British companies have leveraged for tax and tariff revenue for almost 40 years.
But the prospect of Prussian, New Roman, and Japanese aggression in the area, whether it comes with Black Dragon rebels or not, is a threat the British shipping moguls cannot abide. This is a direct threat to British shipping monopolies, and thus the bank accounts of very powerful people who control certain figures in the Privy Council and Parliament. Ergo, by 2517 the Royal Navy has found itself allied with the Holy Russian Empire and the Panasian Union against the Prussians, New Romans, Japanese, and even Black Dragons.
The British were doing very well for a while, then very badly. Things seemed to be turning around by mid-September 2519, when the newly-commissioned “Agamemnon” Cruiser Squadron met a Black Dragon carrier raiding force and despite a savage aerospace strike, the British rallied and snatched victory from the jaws of defeat at the New Bremerhaven colony (Gleise 581 – see previous entry in this project). So startling was the upset that the British actually established a small presence in this former Prussian star system, which they hoped to trade back to Berlin at the peace table in exchange for favorable terms and a treaty guaranteeing British shipping rights through the sector.
But while the Black Dragon rebels are licking their wounds and the Prussians are willing to sign a deal, the Japanese are still anxious to get their licks in. The Japanese “Kama” cruiser strike squadron just dropped out of its Darkstar wave, having completed a 30-lightyear jump from Songubado Colony (HD140901). The Japanese have been in their Darkstar Wave for over a month, they may not have even heard the war is trying to wind down. Not that it matters now, both sides are decelerating to combat speed and powering up guns and shields.
Another battle is on!
September 21, 2519 – New Bremerhaven (Gleise 581 - M3V Red Dwarf - 20 LY from Sol)
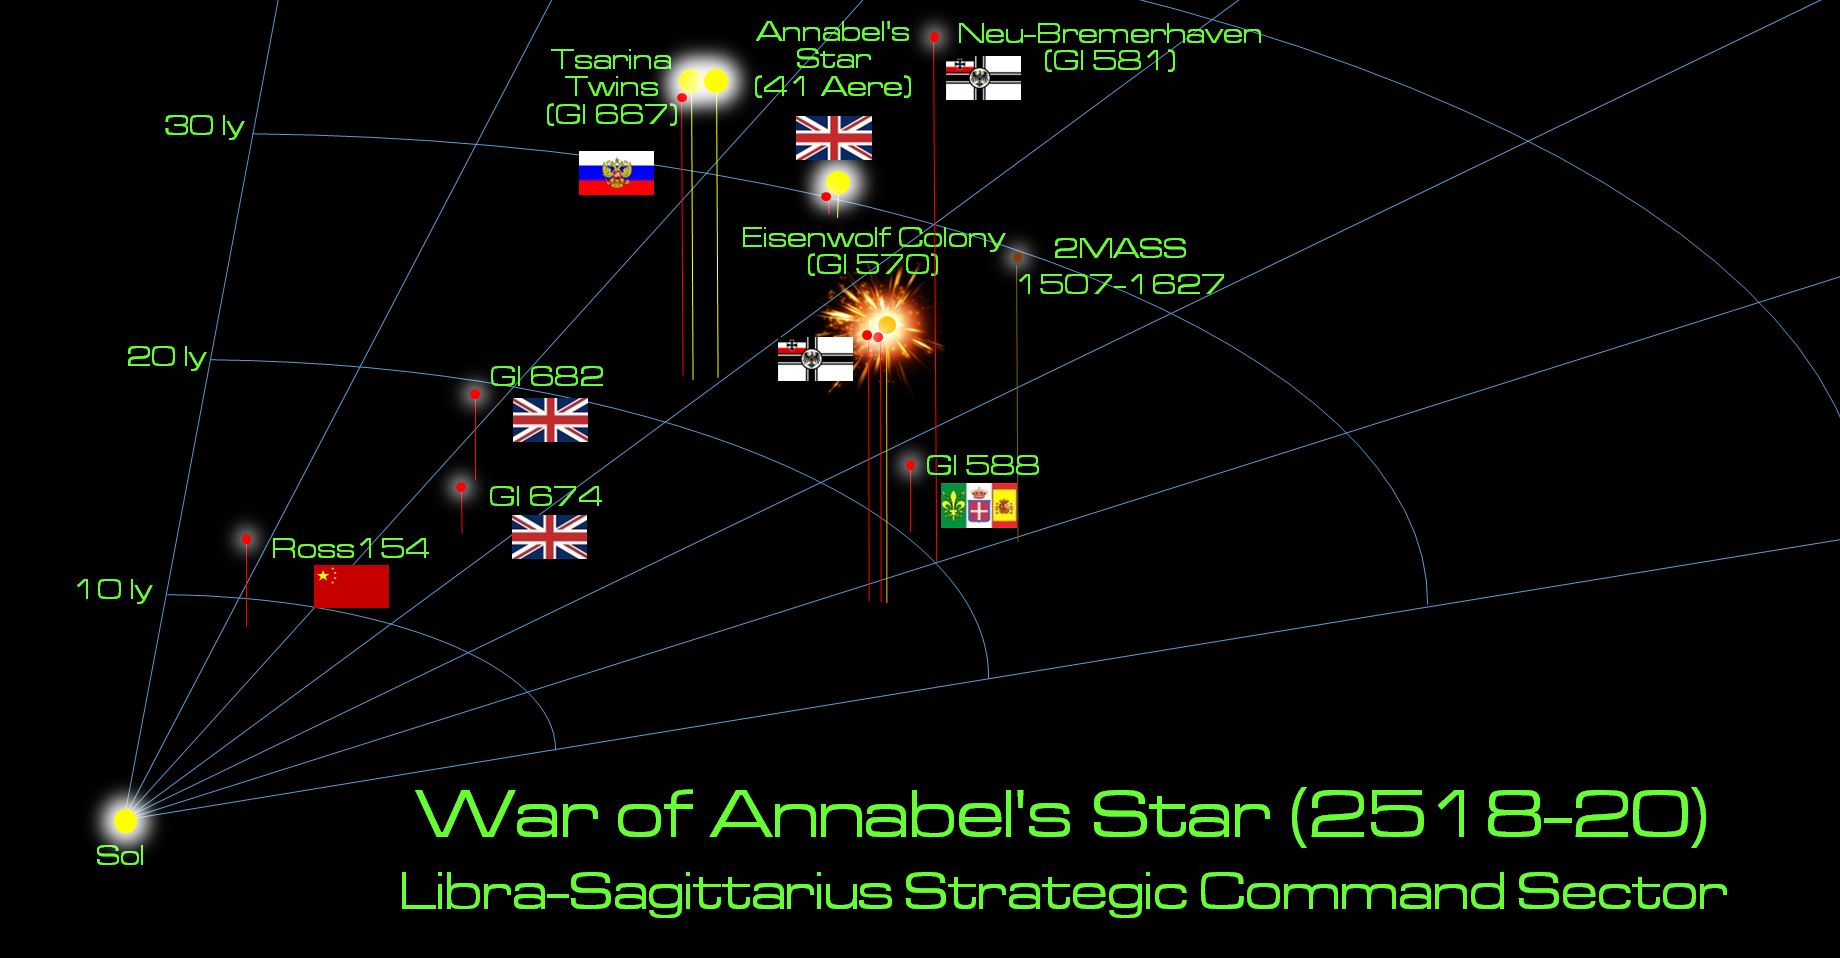
 Overall campaign area for the ongoing “Duchess Annabel’s War.”
 Here’s a quick matchup of the two forces. The Japanese force seems heavier, and well … it is. The Kama is a Katana-Class heavy cruiser, practically a pocket battleship that forgoes speed, aerospace craft, or even torpedo launchers for a powerful battery of hull-frying EPCs. Sleek, fast, modern, and beautiful, the Taiho (Greater Phoenix) class light cruiser Sendai Byo is something of a hypertech glass cannon, but her weapons are absurdly accurate and she can outrun most destroyers half her weight. The two Akashi-class strike frigates Urakaze and Sakito are Japanese naval aggression incarnate, to the point where almost every single weapon is mounted forward. The British, meanwhile, present a much smaller, more nimble and flexible force. The Trafalgar-class heavy cruiser HMS Agamemnon is still in dry dock, in her place in the Valiant-class light fleet carrier HMS Vestige, carrying elite squadrons of Supermarine Starfire aerospace fighters and Hawker Star Typhoon bombers. Basically, Damon wanted to try out carriers, and this carrier’s strike group has been upgraded to ELITE to balance the points against Rasmus’ heavy Japanese strike force.
  Now if you’re hoping for up-close gunnery duels, capital ship dogfights, boarding actions, and eye-to-eye broadsides, sorry, this week we do NOT have your game. The British have a carrier wing, it will take then two turns just to launch everything and then everything will be delivered in a smashing spread of aerospace torpedoes and missiles. The Japanese, meanwhile, also want to keep their distance, with insanely accurate guns that can hit at long range, usually out-reaching as well as out-punching the British guns (what few there are). Both sides also have to watch out for enemy ordinance, the Japanese Ki-45 Toryu (Dragon Slayer) and the British aerospace strike launched off HMS Vestige. So both fleets are going to want to stick together for maximum interlocking point-defense support.
 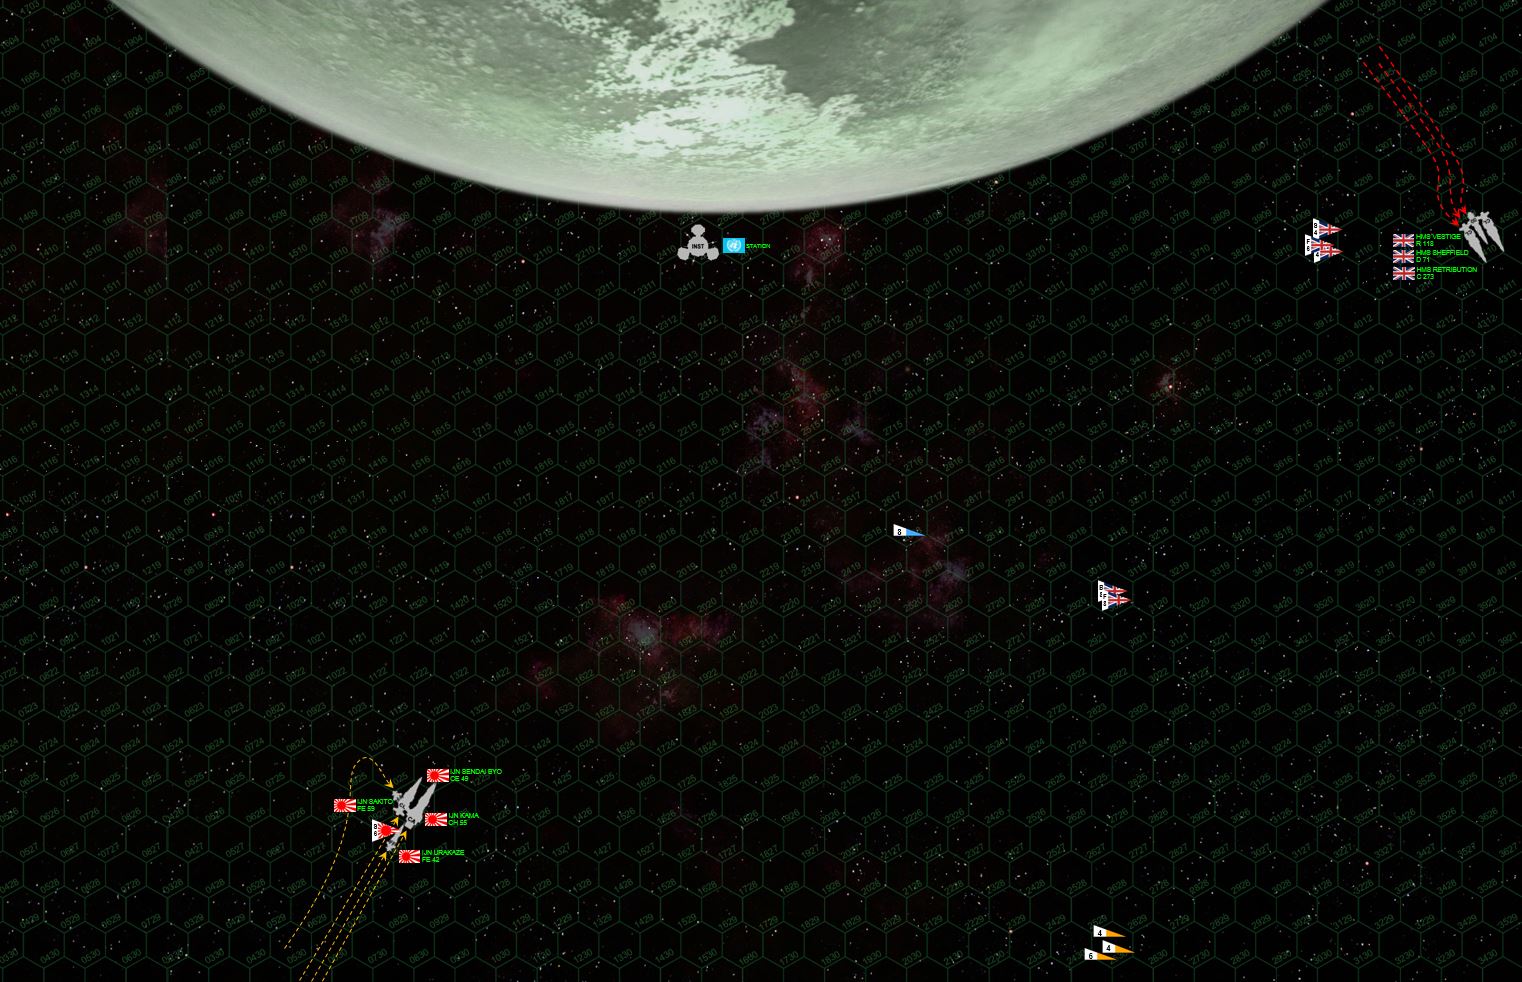 British aerospace launch is now more or less complete, while the Japanese have slung out a full spread of their Ki-45s. But at the distance these task forces are maintaining (34 hexes = 6120km, roughly the distance between London and Chicago), no one’s really in reach to hit anyone else, yet. The trick with aerospace or torpedo spreads is to hit the enemy all at once, since their point-defense guns can only shoot down your warheads so fast. So no one’s in a rush, while the bigger guns in both fleets ping away at each other at standoff (transatlantic) range.
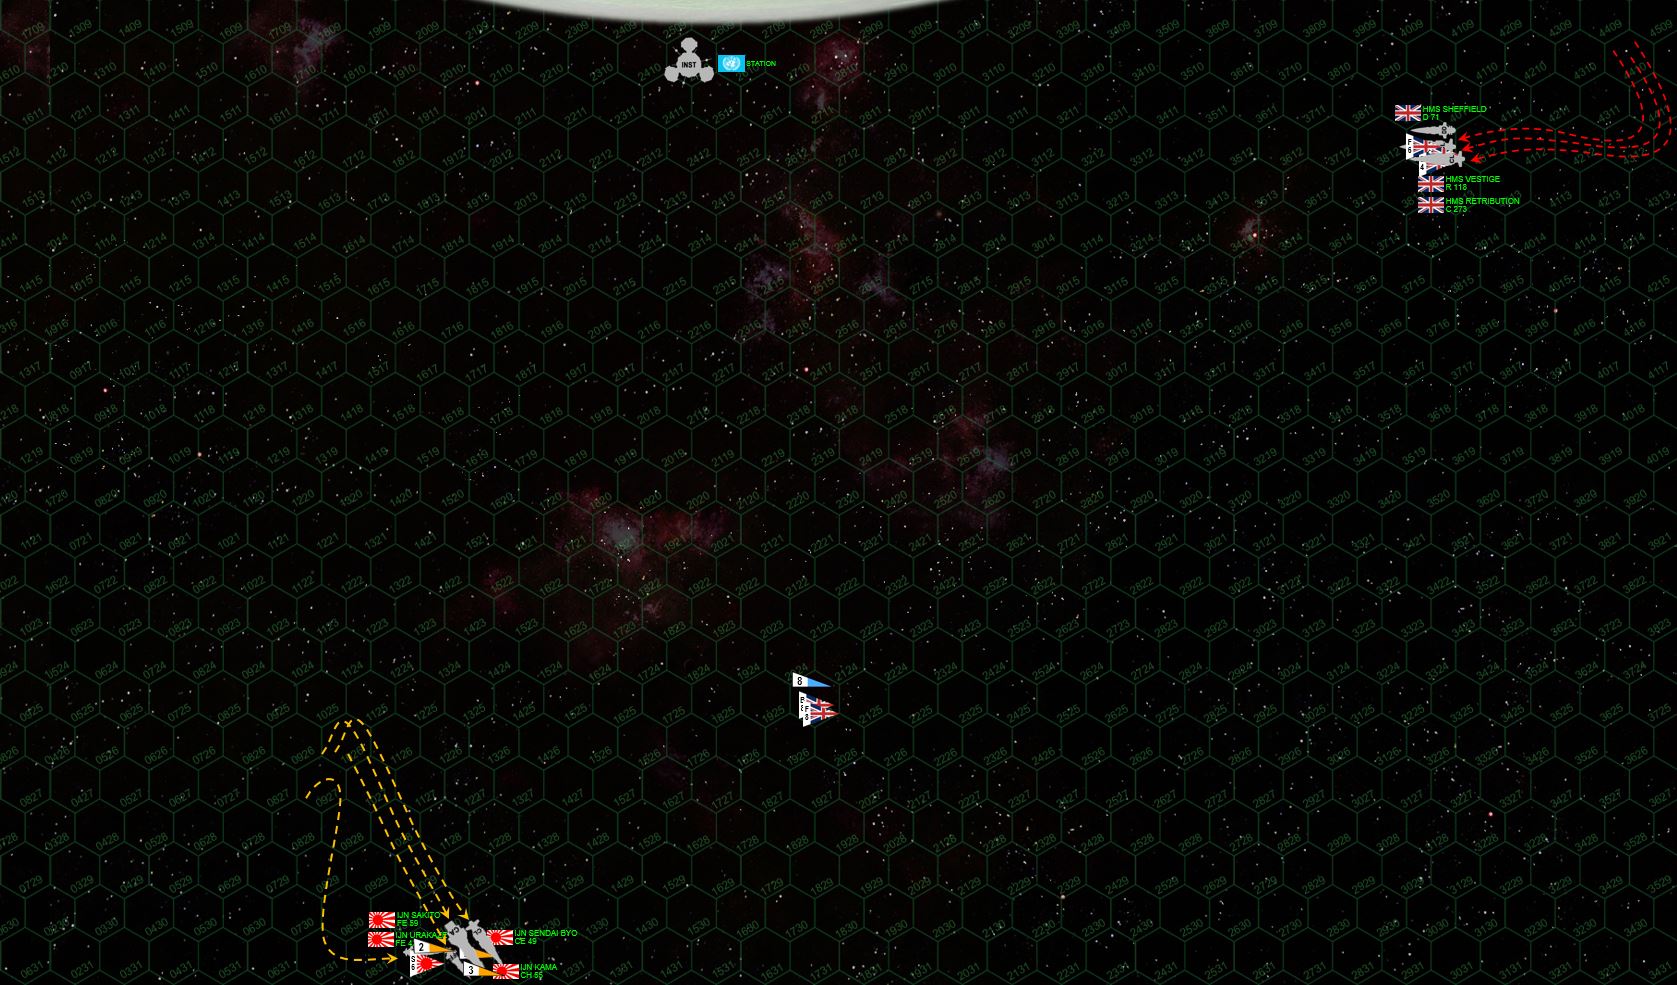 Still closing … Still maintaining formations. Stay on target … STAY ON TARGET … These cruisers, destroyers, and frigates have been slapping at each other for some time. Both the British and the Japanese have heavy torpedo and aerospace strikes they hope will knock down at least one enemy warship and thus give their side an edge in the rest of the battle. This is also a RAID, where victory points are tallied based on ships destroyed, crippled, or driven off, rather than an ASSAULT, where victory is based on ships left standing. Ergo, voluntary retreat is an option, and both Damon and Rasmus know that if one of these cruisers goes down, the other side can accelerate off the table and claim a win. Now Japanese torpedo spreads have gone in, but so far the British point defense systems have taken care of them. With their biggest ship (the heavy cruiser Kama) carrying NO torpedoes in favor of heavy guns, the Japanese task force is SLIGHTLY light in terms of NUMBERS of torpedoes. But Damon knows what a single Ki-45 “Dragon Slayer” can do. He can’t afford to let one of those bastards hit.
 Finally, more meaningful fire is exchanged. As British fighters and bombers draw near the Japanese task force, staying carefully out of range of point defense until the all aerospace and torpedoes can be amassed for a single “alpha strike,” Japanese scouts rush in to engage. Six scouts are shot down, three by elite British bomber crews, and the rest by the elite British fighters, but the Scouts also bring down two British bombers. This is actually pretty significant, since each bomber carries two aerospace torpedoes. Also, as elites, these bombers are worth three points apiece. So six Japanese scouts at 1 point compared to two British 3-point bombers, so far the score is tied but also … the British torpedo strike is already slightly diluted.
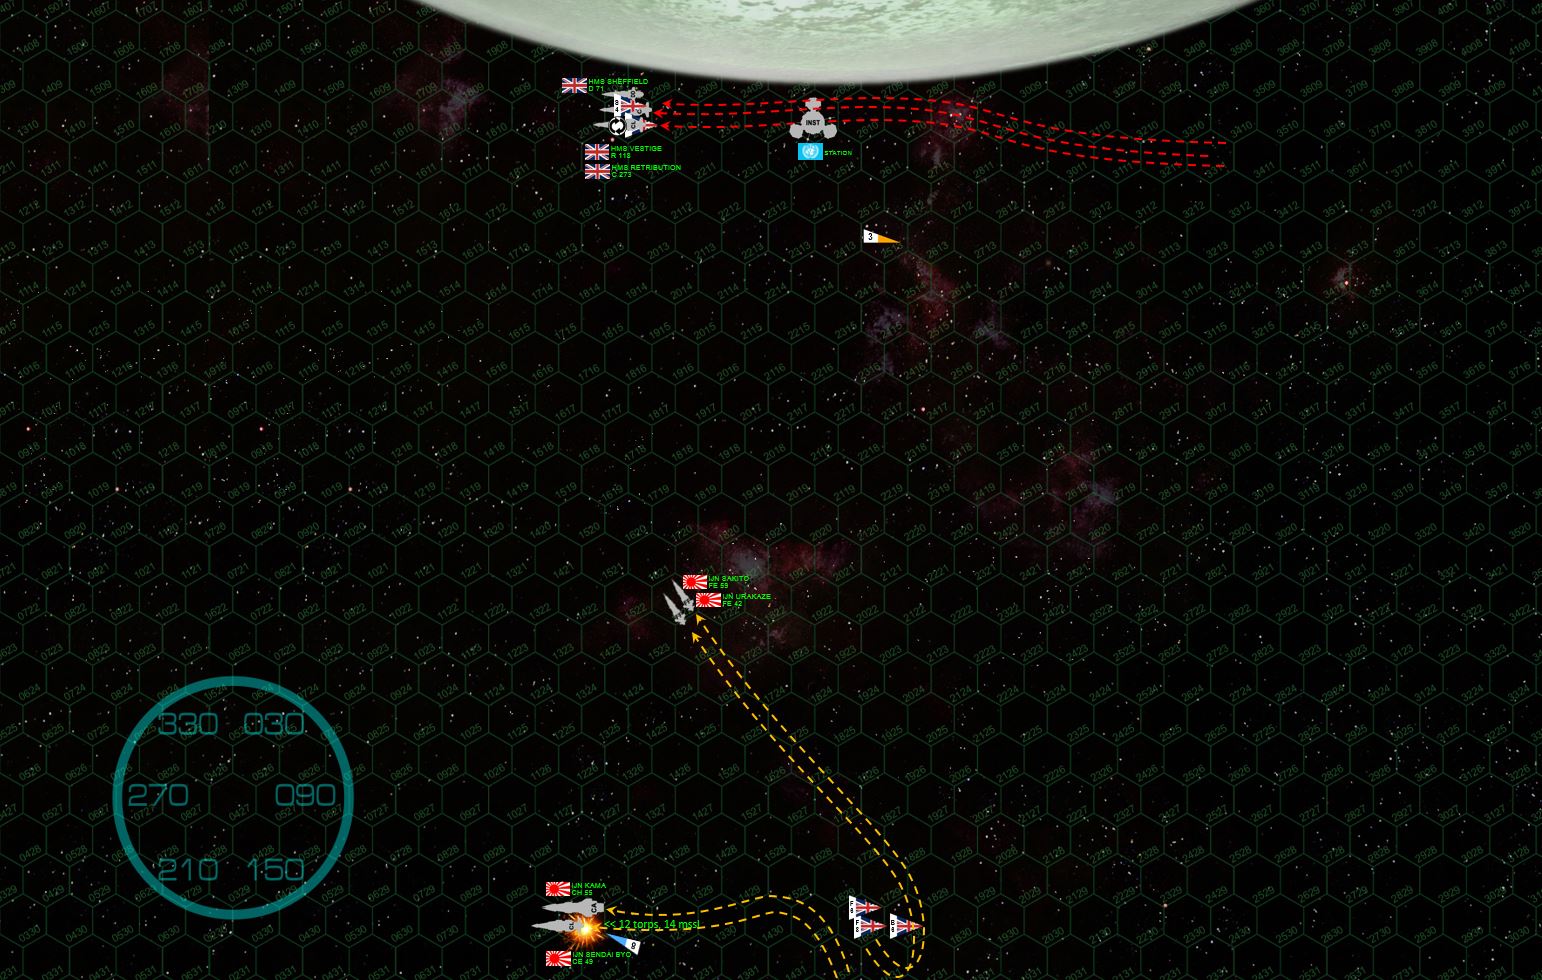 On Turn 5, both sides are finally in position for what they hope will be a game winning strike. For the Japanese, this is a gunnery broadside, still at long range … but with the Sendai Byo’s pin-point targeting and the now at Kama’s horrific firepower, it will be enough. The British Relentless-class light cruiser HMS Retribution has also been heavily mauled through the previous turns, and her port bow armor is badly charred. Damon executed a roll so the Retribution would present a starboard bow to the Japanese, but now the starboard bow shields just went down. Fighting the moon’s gravity and with maneuvering thruster damage, the Retribution didn’t have the power to roll back over again, and with an unshielded starboard bow offered up as a target, the Japanese just can’t resist. Kama and Sendai Byo jackknife turn and power up to hit this vulnerable area, but doing so turns their sterns temptingly to the incoming British aerospace strike. NOW BOTH PLAYERS have played an extremely cautious, measured, and reserved game. Now comes the time when both sides throw down. As it happens, the British aerospace strike is just very unlucky, and the Sendai Byo, although badly damaged, survives. The same cannot be said for the HMS Retribution, which is hammered by the Kama’s huge EPCs, one bolt going straight against the bridge.
 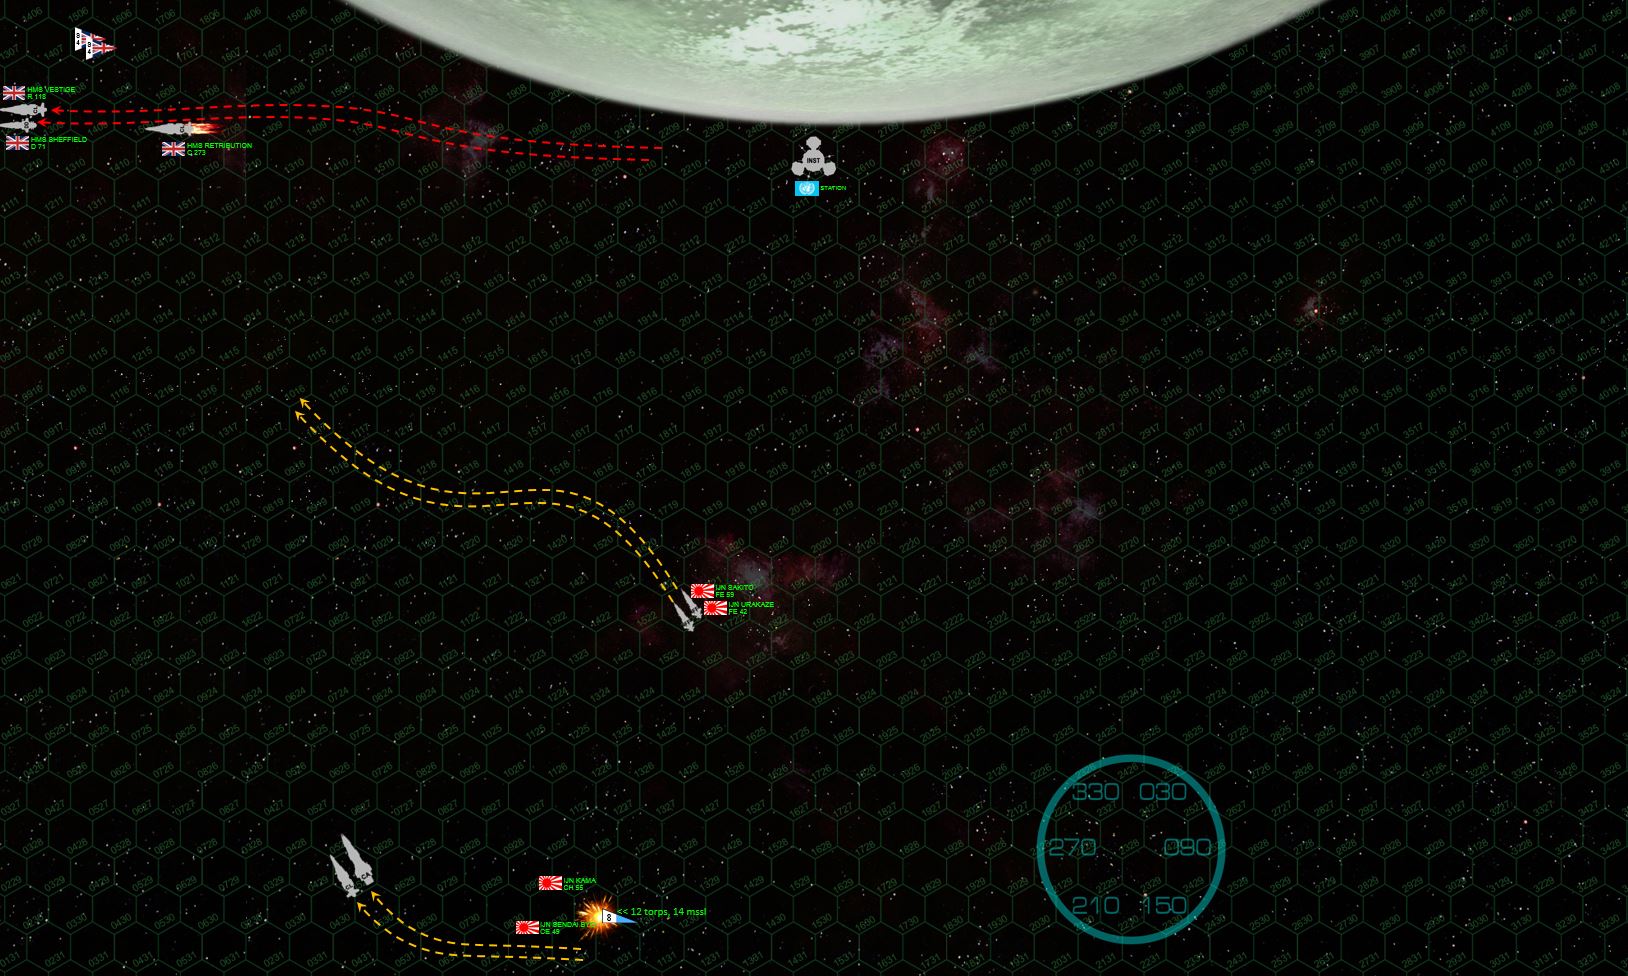 The frigate Sakita has also been heavily damaged, but the end result is that the British just never got lucky like they did last week, and no Japanese ship is crippled. The Retribution is crippled (98 point ship) which gives the Japanese a win. Damon wisely breaks off, choosing not to hand the Japanese any more victory points in a futile attempt to turn the tide or mitigate the defeat (in an ASSAULT game this logic would be reversed). So the remaining British shops power off the table. The Retribution will be taken under tow and eventually brought back into service. Damon made the right call in breaking off (he no longer had time to land his aerospace craft and rearm for a second strike), since a 98-point ship out of a 272-point game is a 36% margin, JUST SHY of the 40% required for a MAJOR rather than a MINOR Japanese victory.
 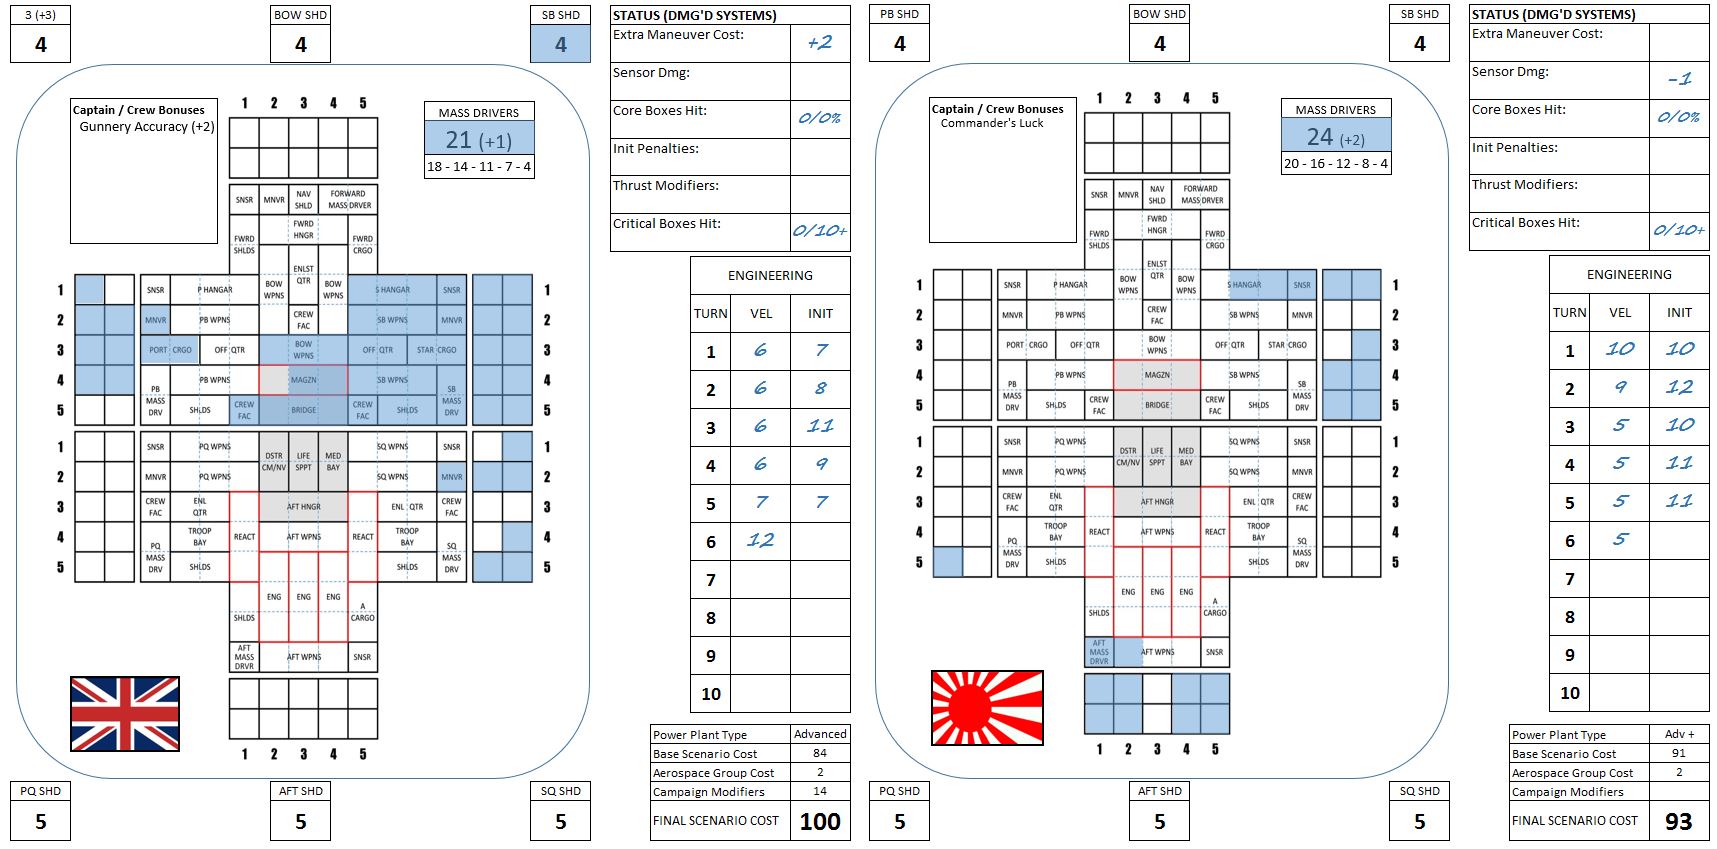 The Retribution and Sendai after the battle. The Sendai really shouldn’t have come off as well as she did. Just sometimes Lady Luck is on one side or the other. Last week she earnestly courted Damon. This week the bitch spurned him, HARD. The Retribution was more or less doomed on Turn 5, but if the Sendai had gone down as well the game still would have been more or less a draw, which means British fighters might have been able to pick off a Japanese frigate while the Kama tried to knock down the destroyer HMS Sheffield. As it turned out, we had two cautious, wary, and experience players biding their time, biding their time, biding their time for just the right moment … and when that moment came, it came sideways. :D
 Royal Navy vs. Black Dragons
We’re back to the stars, folks, with a return to Darkstar with my friend @damon .
The last year or so of Darkstar play has been a wild ride for the British. For at least nine months, from @dignity ’s game on camera, to games with @gladesrunner , @davehawes , @damon , and @rasmus , the British just couldn’t seem to lose. My Japanese lost to them twice. My Russians barely survived. Imperial Prussian battleships were broken. The renegade Black Dragons couldn’t catch a break. My French were beaten so badly I actually lost one of my commanders … Even when things started going badly for them, the British would rally back for at least a draw if not a narrow win, as we saw with @elessar2590 against a powerful force of Prussians.
Then about three months ago, the British started losing. A lot. @rasmus scored a win with his Japanese. My French finally rallied enough to steal a draw. The Panasian battleship Honghu (Red Tiger) crushed a British cruiser force. Worst of all were the Russians, who came back against the British … hard. And not just with Damon’s British, but Gladesrunner and as well. The British were smashed over and again, to the point where in a recent game, quite by accident, Damon lost his whole fleet. As in the ships weren’t just beaten, but destroyed (actually somewhat of a rarity in Darkstar). The whole task force, the cruiser Bellerophon (“Billy Ruffian), the light cruiser Indefatigable, and the destroyer Terpsichore, all were gone in a single disastrous afternoon. Although all of Damon’s commanders survived, the task force itself had to be rebuilt from scratch with all new ships.
Yesterday, that new task force saw combat for the first time. The new flagship was the recently-completed Trafalgar class “fast cruiser” Agamemnon, with an upgraded engine plant making this 145,000-ton heavy cruiser as fast in sublight as most destroyers. Sleek, modern, and also fast for her type, the Relentless class light cruiser Retribution replaced the venerable Indefatigable. She carried most of “Indy’s” expert gunnery crews now aboard, and so added the Indefatigable’s years of experience to far more advanced targeting systems. Finally, the new Falklands class fleet destroyer Sheffield filled the role of her late sistership, Terpsichore – fast, advanced, and bristling with aerospace defense mass drivers.
Meanwhile, “Duchess Annabel’s War” continued in the Second Band of Libra, Ara, Scorpio, and Sagittarius constellations. Having started out as a trade and tariff dispute between shipping lanes through the British-controlled “Annabel’s Star” (41 Arae) system, the issue had ignited into a local war against the nearby Prussian Eisenwolf Colony (Gleise 570). But now that war has dragged in other powers, with the New Roman Alliance and Japanese joining the Prussians. Outnumbered three-to-one, the British courted allies with other major powers in the sector, namely the Panasian Union (Chinese) and Holy Russian Empire. These nations had huge industrial colonies closer to Sol along these trading routes, and in exchange for support the British promised favorable shipping treaties through the “Annabel’s Star” system, which the Panasians and Russians desperately needed in their ongoing war against the renegade “Black Dragons” of the self-proclaimed Khitan-Tunguska Free State.
Which, in a very roundabout way, brings us to today’s battle. With the Black Dragons now an enemy of the British as well in the Libra-Sagittarius sector, the newly-refurbished Agamemnon cruiser squadron is given orders to preempt a possible threat building up in the Prussian star system of New Bremerhaven (Gleise 581). Black Dragon cruisers have been detected there by snooping British “Q-Class” gunboats and “Superb” class torpedo corvettes. The Agamemnon cruiser squadron is ordered to set a high-speed Darkstar Wave into the enemy star system, engage and damage the Black Dragon rebels as badly as possible, and then get home.
Make no mistake, this is a raid, not an assault. Although the British are in no position to invade New Bremerhaven at the moment, the British need this win not only to counter the growing Prussian-Black Dragon threat against Annabel’s Star, but also to steady their Panasian allies and smooth things over with the Holy Russian Empire.
So can Damon use his new fleet to get a comeback going for the British, and end this recent British losing streak?
September 14, 2519 – New Bremerhaven (Gleise 581 - M3V Red Dwarf - 20 LY from Sol)
The Agamemnon and her escorts drop out of their Darkstar wave and begin hard deceleration to attack speed. With their advanced powerplants, especially aboard the Agamemnon herself (seriously, the fastest heavy cruiser ANYWHERE in Darkstar at the moment), they were able to shave their Darkstar exits relatively close to the outer moons of a Gleise 581 gas giant. However, with such large ships setting such fast Darkstar waves, the gravimetric disruption was significant and enemy detection was inevitable. Sure enough, the Black Dragons have a sizable force already on a hard intercept course, including two former Slava class heavy cruiser and a former Gagarin class light fleet carrier.
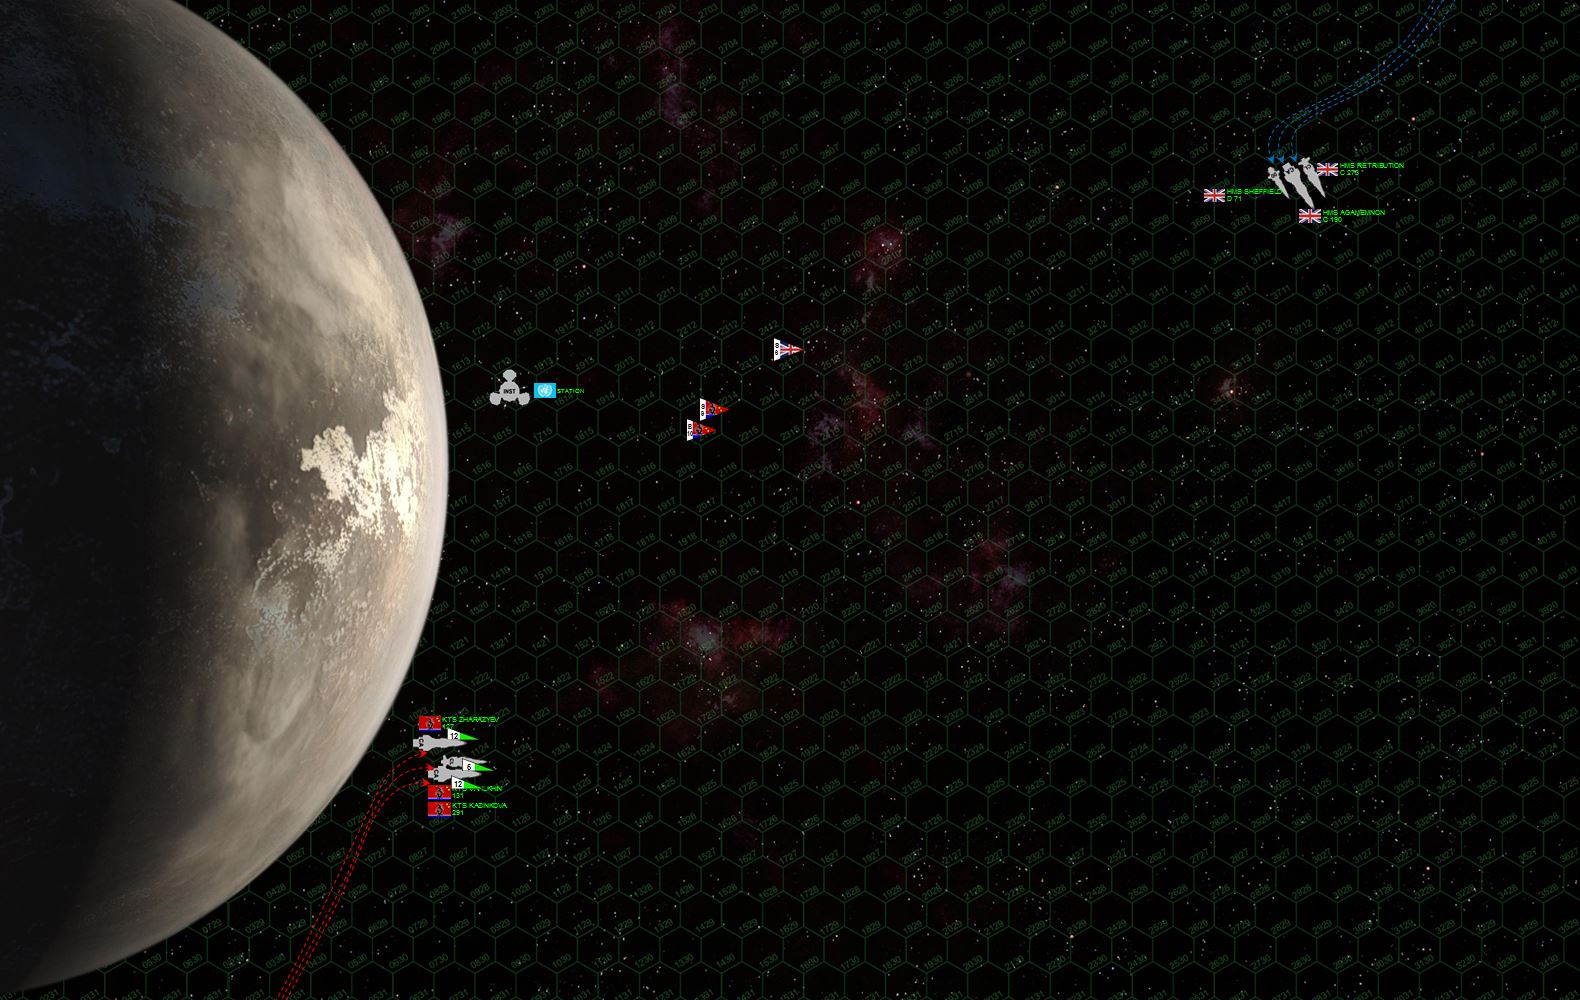 Here we see the British (top) and Black Dragon (bottom) cruiser forces on their approach. The moon is a big one, slightly smaller than the planet Mars. Here the opposing task forces are almost 5400 kilometers apart, yet are already exchanging long range gunnery. Ominously, the Black Dragons are also launching waves of bombers and scouts from the light fleet carrier Kazhinkova, vectoring toward the British ships along with a hair of P-500 “Plamya” torpedoes. British scouts, hopelessly outnumbered, fly out to meet the threat, hoping to shoot down at least some of the torpedoes before they reach the British cruisers. The Black Dragons, for their part, are using the moon to their advantage. First, by hugging the moon and turning away from it, they’re forcing the British to turn TOWARD the moon to engage them (never a good thing). Second, those big Slava class cruisers are moving very fast ... the better to close the range and take away the British advantages in long-range accuracy. But they’re also ponderous, and the moon’s gravity will help them slow down when it comes time to engage.
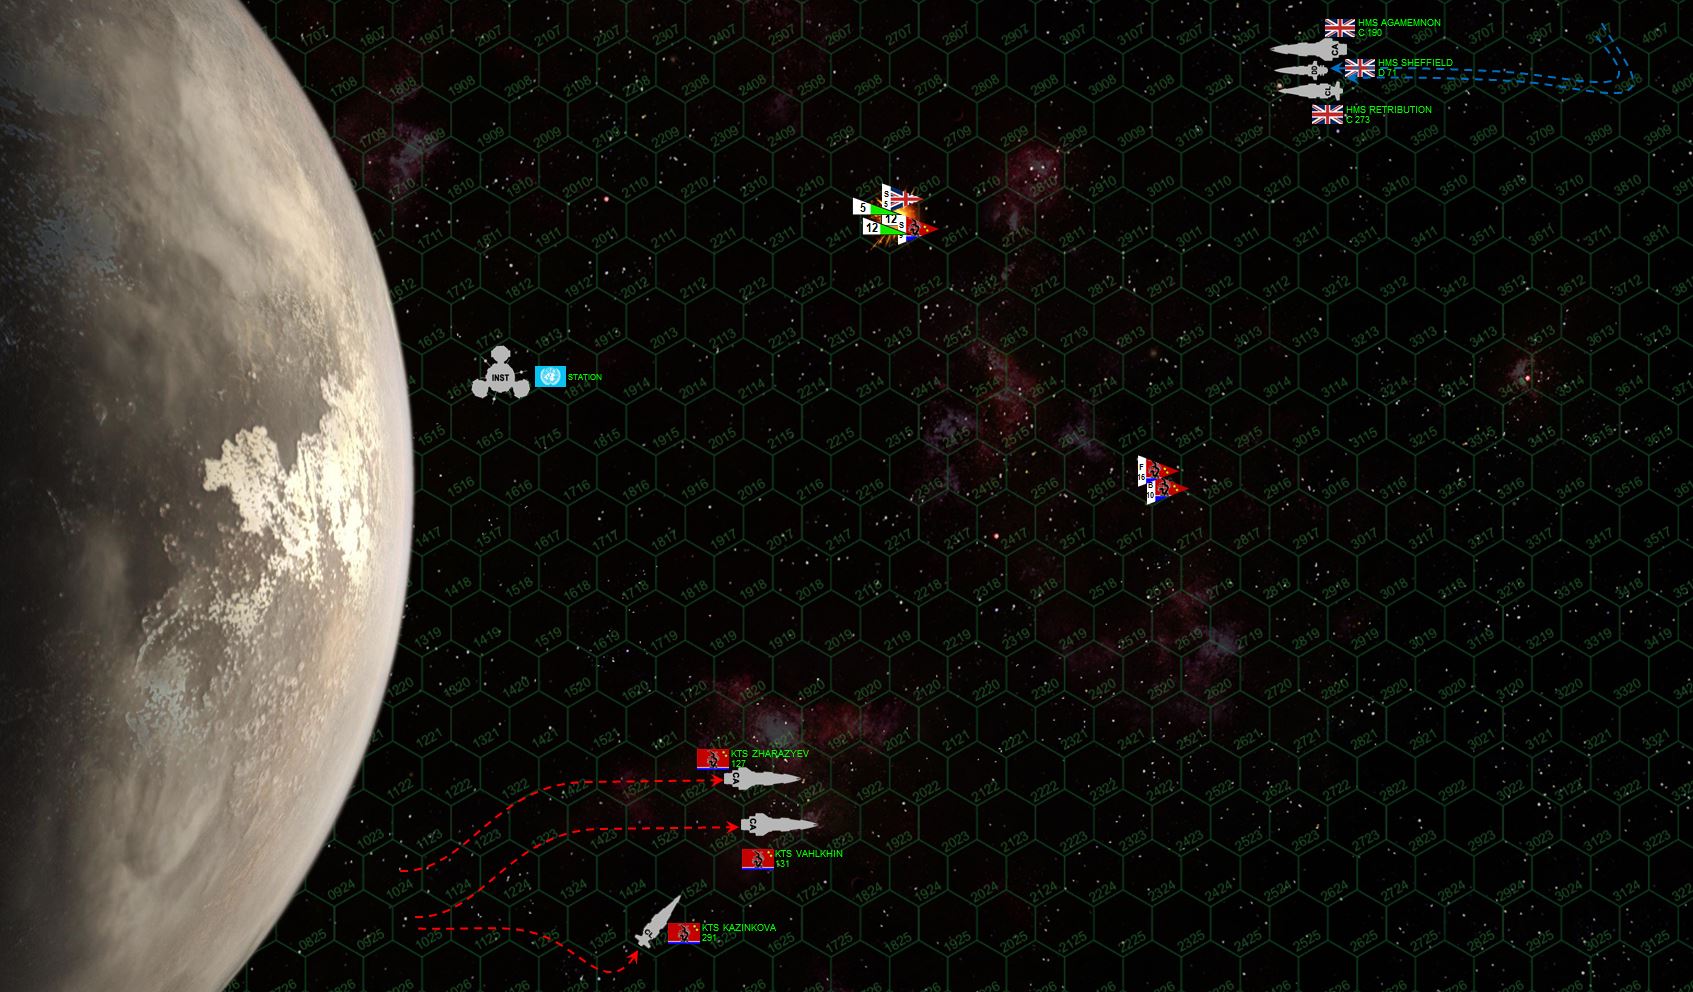 The Black Dragons draw first blood. As British scout planes manage to shoot down one of the torpedoes, Black Dragon scouts shoot down a British scout. Black Dragon fighters (a far bigger threat) have now also launched (carriers are limited in how many aerospace craft they can launch in a given turn) and are escorting the bombers in. The bombers could have launched their ordinance this turn, but do not, opting to wait until ALL torpedoes are in range (P-500s, aerospace missiles from the fighters, and aerospace torpedoes from the bombers). This is going to be a big one, and I as the Black Dragon player really only have one chance at it. Playing with carriers in Darkstar is tricky, an attack can take up to four turns to set up and execute, but you have to watch distance, timing, and angles VERY closely. If it comes together, though ... watch out.
 ![It comes together. The Black Dragon heavy cruiser Zharazyev turns to port to try to set up broadside against the incoming British cruisers. Damon hits the gas, HARD, accelerating to 33 kilometers per second and diving down with the Agamemnon and Sheffield to cross Zharazyev’s stern with broadsides instead. It’s a distant broadside, but given British targeting electronics, it should still be a good move. Unfortunately, it also allows the Black Dragon cruiser Vahlkhin to S-turn behind the Agamemnon in turn, putting a far more dangerous broadside right into Agamemnon’s engines. Perhaps making matters worse, the Retribution breaks off Agamemnon’s starboard beam, hoping for a cross of Valhkhin’s stern. A sound maneuver, except now British aerospace mass driver defense is split JUST at the time the combined torpedoes of all three Black Dragon capital ships and the complete aerospace strike of the Kalzhinkova makes its terminal approach. The British mass drivers open fire and knock down almost all the bombers’ torpedoes, but this just lets the fighter missiles and the P500s of the capital ships come in. Agamemnon is positively torn apart astern, especially once Vahlkhin opens fire point-blank with a full broadside 10-gigawatt rail guns and 30-kilogram plasma pulse projectors. Never mind “crippled,” the Agamemnon should have exploded here. In game terms she had an 80% chance of exploding across the stars in a miniature supernova [(18 critical boxes hit) - (heavy cruiser’s cripple target of 14+) x (20% for heavy cruiser)] = 80%). But an 83 is rolled on percentile dice. By some MIRACLE, the Agamemnon’s engineers eject the reactor core BEFORE it explodes. The ship is crippled straight off in her first battle, but at least she will PROBABLY survive and after six months in dry dock, perhaps see action again. But yeah ... THAT’S how you do a carrier strike. It seems the British losing streak isn’t over yet.](https://images.beastsofwar.com/2019/09/33532308-DS-Game-21_03.jpg) It comes together. The Black Dragon heavy cruiser Zharazyev turns to port to try to set up broadside against the incoming British cruisers. Damon hits the gas, HARD, accelerating to 33 kilometers per second and diving down with the Agamemnon and Sheffield to cross Zharazyev’s stern with broadsides instead. It’s a distant broadside, but given British targeting electronics, it should still be a good move. Unfortunately, it also allows the Black Dragon cruiser Vahlkhin to S-turn behind the Agamemnon in turn, putting a far more dangerous broadside right into Agamemnon’s engines. Perhaps making matters worse, the Retribution breaks off Agamemnon’s starboard beam, hoping for a cross of Valhkhin’s stern. A sound maneuver, except now British aerospace mass driver defense is split JUST at the time the combined torpedoes of all three Black Dragon capital ships and the complete aerospace strike of the Kalzhinkova makes its terminal approach. The British mass drivers open fire and knock down almost all the bombers’ torpedoes, but this just lets the fighter missiles and the P500s of the capital ships come in. Agamemnon is positively torn apart astern, especially once Vahlkhin opens fire point-blank with a full broadside 10-gigawatt rail guns and 30-kilogram plasma pulse projectors. Never mind “crippled,” the Agamemnon should have exploded here. In game terms she had an 80% chance of exploding across the stars in a miniature supernova [(18 critical boxes hit) - (heavy cruiser’s cripple target of 14+) x (20% for heavy cruiser)] = 80%). But an 83 is rolled on percentile dice. By some MIRACLE, the Agamemnon’s engineers eject the reactor core BEFORE it explodes. The ship is crippled straight off in her first battle, but at least she will PROBABLY survive and after six months in dry dock, perhaps see action again. But yeah ... THAT’S how you do a carrier strike. It seems the British losing streak isn’t over yet.
It comes together. The Black Dragon heavy cruiser Zharazyev turns to port to try to set up broadside against the incoming British cruisers. Damon hits the gas, HARD, accelerating to 33 kilometers per second and diving down with the Agamemnon and Sheffield to cross Zharazyev’s stern with broadsides instead. It’s a distant broadside, but given British targeting electronics, it should still be a good move. Unfortunately, it also allows the Black Dragon cruiser Vahlkhin to S-turn behind the Agamemnon in turn, putting a far more dangerous broadside right into Agamemnon’s engines. Perhaps making matters worse, the Retribution breaks off Agamemnon’s starboard beam, hoping for a cross of Valhkhin’s stern. A sound maneuver, except now British aerospace mass driver defense is split JUST at the time the combined torpedoes of all three Black Dragon capital ships and the complete aerospace strike of the Kalzhinkova makes its terminal approach. The British mass drivers open fire and knock down almost all the bombers’ torpedoes, but this just lets the fighter missiles and the P500s of the capital ships come in. Agamemnon is positively torn apart astern, especially once Vahlkhin opens fire point-blank with a full broadside 10-gigawatt rail guns and 30-kilogram plasma pulse projectors. Never mind “crippled,” the Agamemnon should have exploded here. In game terms she had an 80% chance of exploding across the stars in a miniature supernova [(18 critical boxes hit) - (heavy cruiser’s cripple target of 14+) x (20% for heavy cruiser)] = 80%). But an 83 is rolled on percentile dice. By some MIRACLE, the Agamemnon’s engineers eject the reactor core BEFORE it explodes. The ship is crippled straight off in her first battle, but at least she will PROBABLY survive and after six months in dry dock, perhaps see action again. But yeah ... THAT’S how you do a carrier strike. It seems the British losing streak isn’t over yet.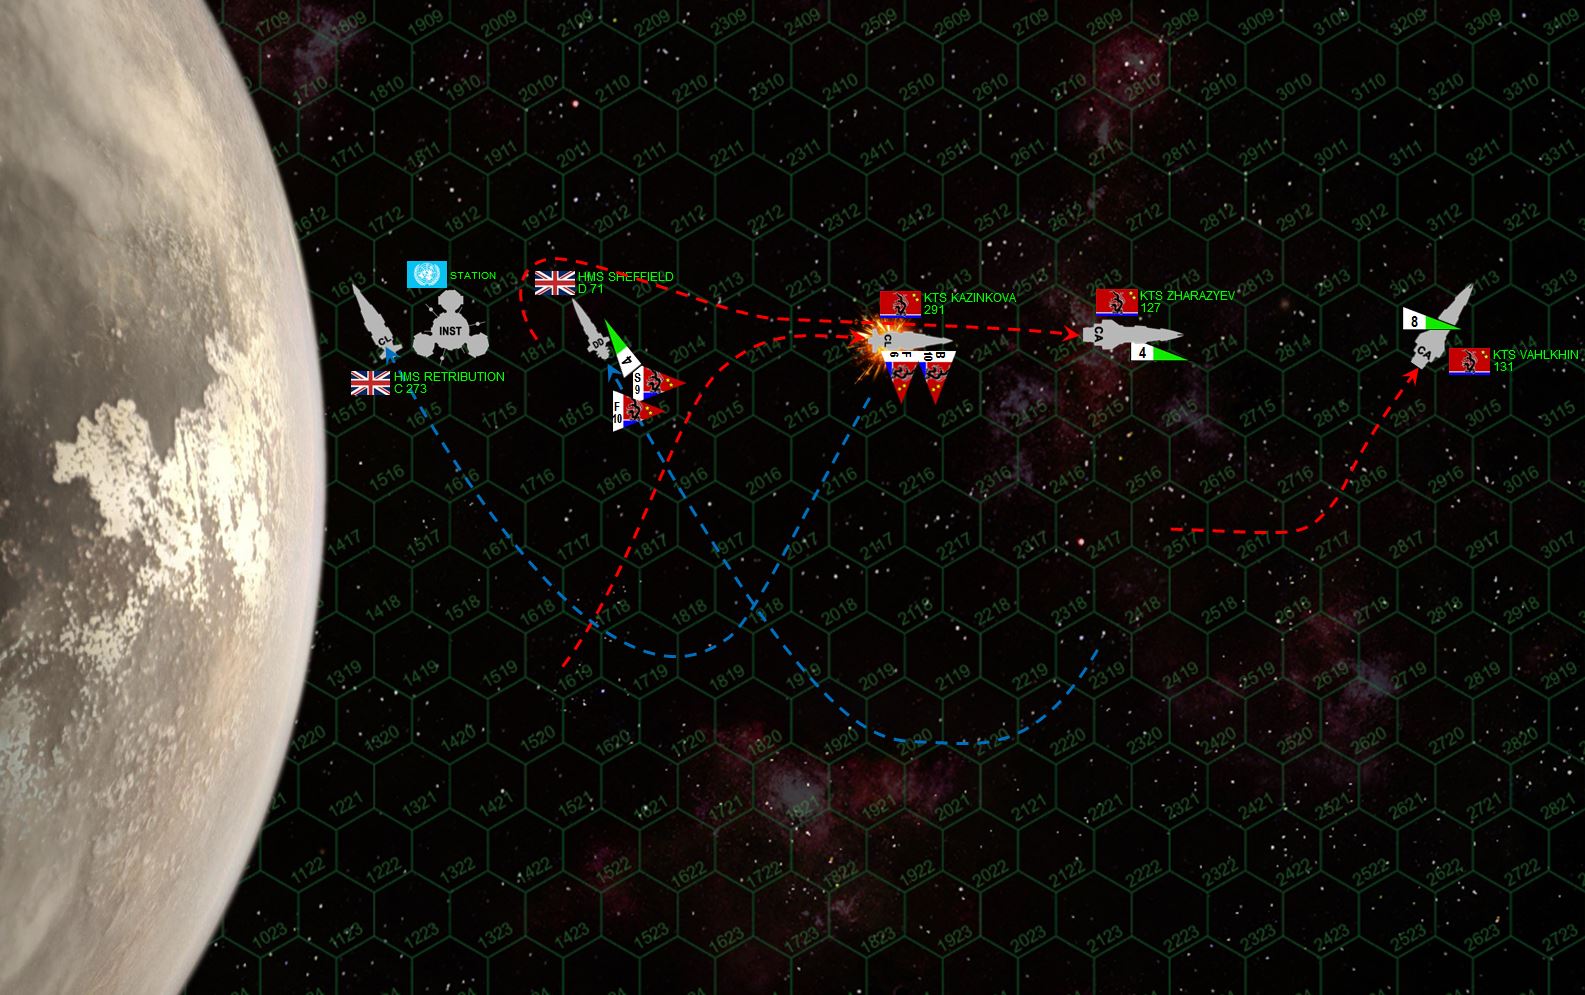 The British fleet is down to half strength, having lost its biggest warship to a deadly carrier strike and close range broadside. Now the British have to rally ... if they can. The Black Dragons, meanwhile, have to reorganize their fleet. Last turn’s maneuvers scattered them everywhere, and their aerospace strike wing has shot its bolt. Accordingly the carrier Kazhinkova maneuvers to get close enough for her bombers to land THIS TURN, beginning he process to rearm and re-launch for a second strike. Meanwhile, the ponderous Slava cruisers, both damaged in last turn’s gunnery but nowhere near in danger yet, try to slow down and turn toward each other. The Sheffield and the Retribution fire double broadsides into the stern of the Kazhinkova to cripple her, hopefully while her bays are still loaded with those bombers and some fighters. While they do appreciable damage, Damon JUST MISSES the roll the cripple her (the roll was a 5+, he rolled a 4). All British scouts are also lost.
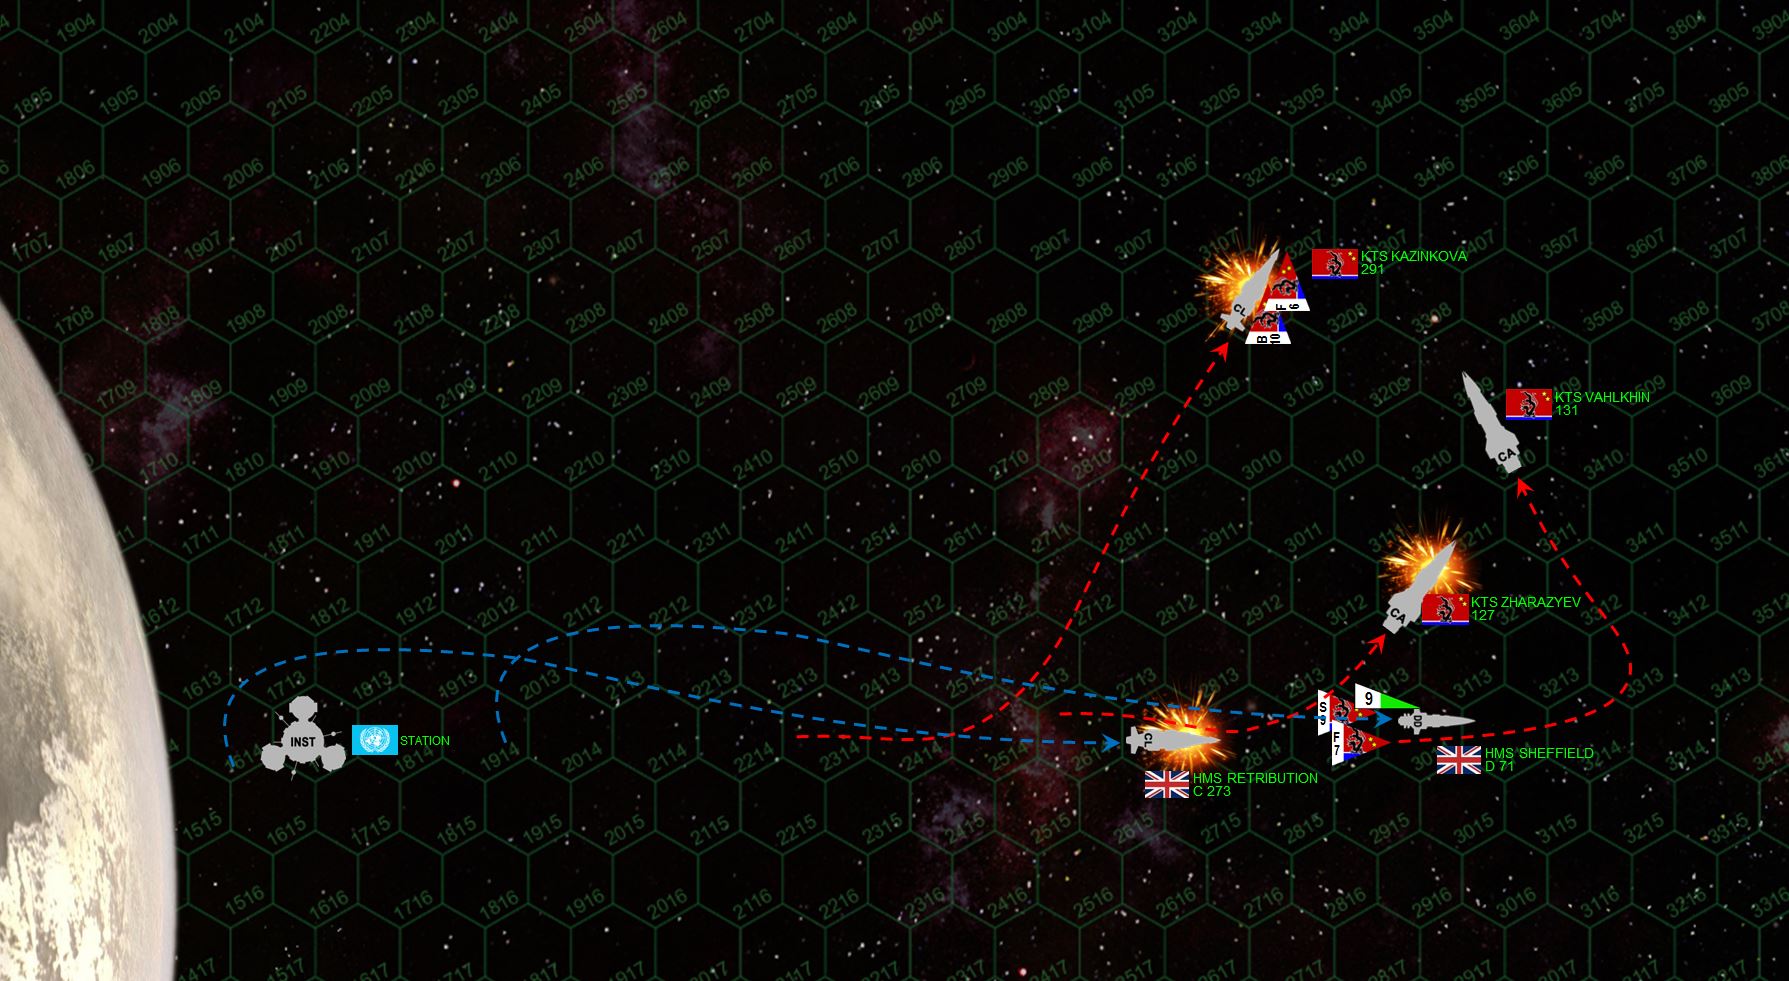 The Black Dragon advantage is firepower comes at a cost ... they’re much slower than the British ships, and this has a big impact on initiative. In summary, the Black Dragons LOSE initiative on Turn 5, hard. Then again, they totally have this game in the bag. Remember this is a RAID, so ships that are destroyed are counted for victory points (as opposed to ship remaining in the battle area at the end of the game). This means RETREAT IS AN OPTION. Having crippled (damned near destroyed) a 142-point British heavy cruiser, if the Black Dragons can just break off now, they win the game ... SIGNIFICANTLY. But again, these big Slava class heavy cruisers aren’t exactly Ferraris, and as they power up to get off the table, the Retribution and Sheffield cut in behind them for broadsides across their sterns. The Retribution fires first, putting her aft turret of 7-gigawatt rail guns and 8-megakelvin lasers into the stern of the Kazhinkova. This second broadside finishes the job started on Turn 4, and the Black Dragon carrier is crippled just as she’s getting ready to re-launch those fighters and bombers. Forward turrets are put into the stern of the Zharazyev , but the Vahlkhin’s broadside smashes open the Retribution’s fo’c’sle and port bow, putting a 10 GW rail gun bolt straight through the Retribution’s bridge. Torpedoes and fighters tear into the Sheffield’s stern, but with mass driver defense and enhanced ECM and gravitic shielding, the scrappy little destroyer survives. The Sheffield is right behind the Zharazyev, and releases point-blank laser and syglex (synchronized gravitically-lenses x-rays, 60 eHz band) into the Zharazyev’s stern. The Zharazyev ALMOST survives. After all damage is assessed, Damon had to roll a 2+ to cripple her ... and rolled exactly that, a 2.
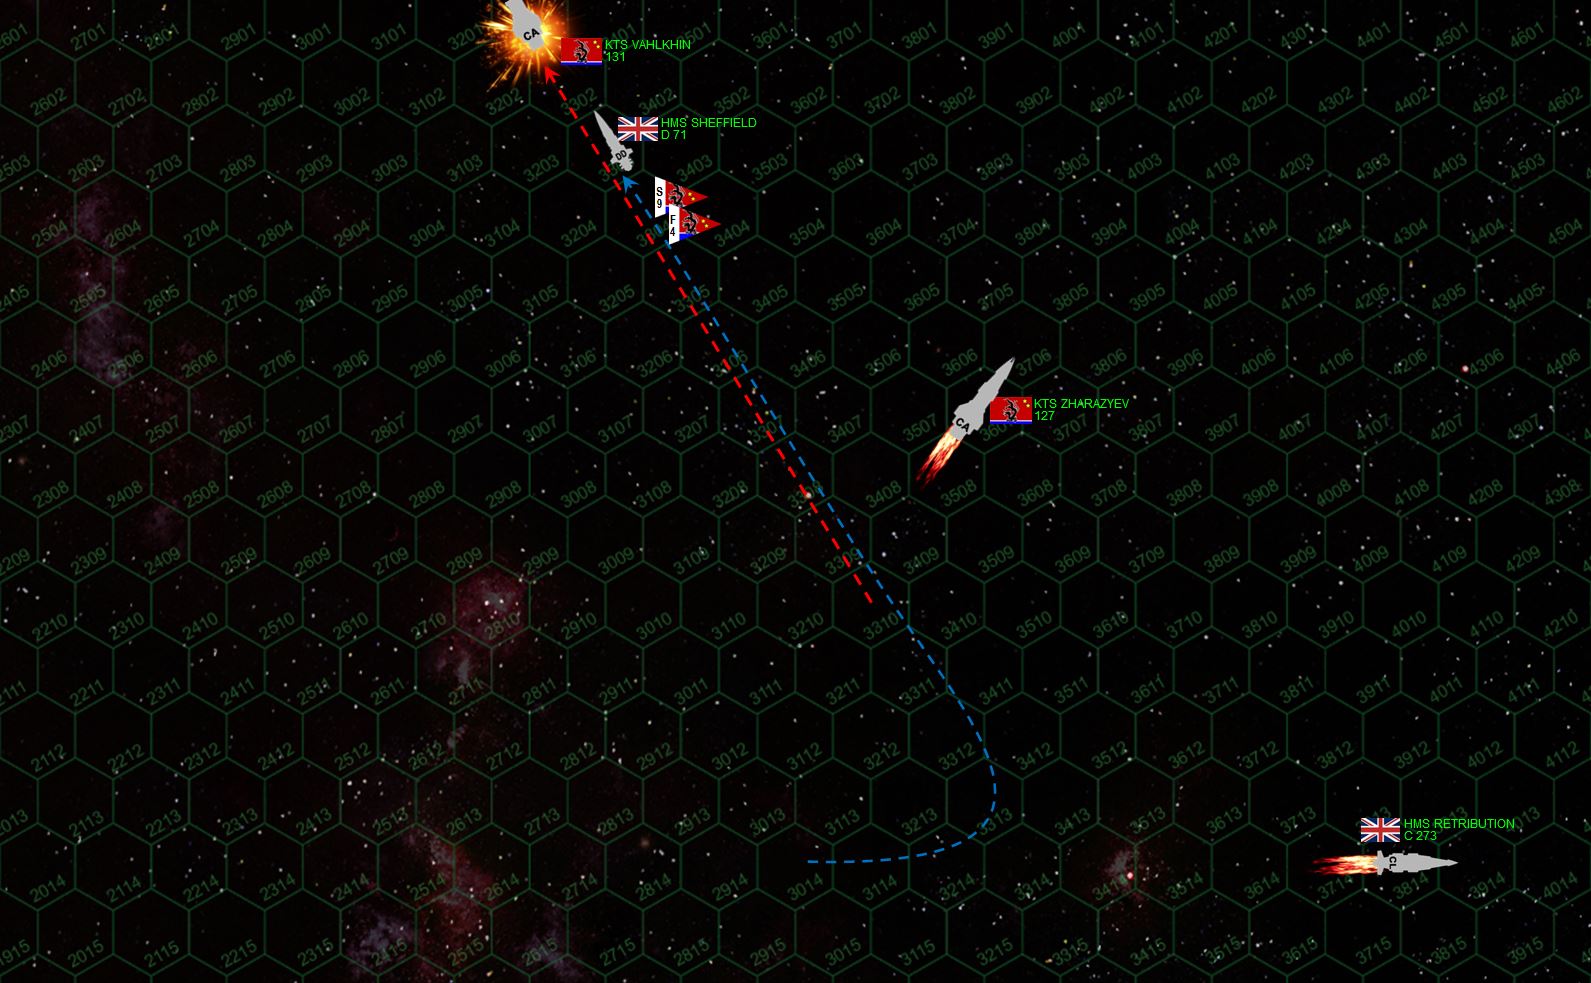 Just that fast, the battle is wrapping up, and the British have a slender chance of actually stealing back a victory. All ships are crippled except the damaged 160,000 ton Vahlkhin and the 39,900 ton Sheffield. The Vahlkhin is just trying to break off, IF SHE MAKES IT OFF the top of the table, the Black Dragons win (having crippled 244 points of British shipping vs. the British score of 177). If the Sheffield can cripple Vahlkhin before she escapes, the British win ... BUT ... the Vahlkhin outweighs the Sheffield by 4:1, and Vahlkhin is powering up to escape, the Sheffield is damaged herself, and has Black Dragon fighters and torpedoes still on her ass. If the Sheffield is crippled as well, the game is again a Black Dragon victory (by virtue of remaining fighters and scouts). So the Sheffield has to cripple a ship four times her size, THIS TURN, all while not being critically damaged herself. The Vahlkhin dumps everything she can into her engines, and accelerates to 27 kps. She literally makes it to the LAST HEX of the map, but doesn’t quite escape. One more hex, and this game ends right here as a Black Dragon win. The Sheffield makes the hardest turn to port she can, moving at 33 kps right behind Vahlkhin in a desperate stern chase. From this position, only forward guns could hit, but it was the best option. The Sheffield shot down enemy torpedoes and the Black Dragon fighters missed, but the Vahlkhin’s aft batteries positively mauled the Sheffield’s bow. But she survived. So now the Sheffield had cleared the first two obstacles to victory, the Valkhin didn’t escape this turn and the Sheffield survived Black Dragon defenses. Finally the Sheffield fired, but even now chances of victory were slim at best. Sheffield had to hit with almost everything, but she did. Then those weapons had to hit the huge cruiser in the right PLACES, and they did ... mostly. Even with all this, however, the Vahlkhin had lost only 8 critical boxes. Heavy cruisers start on a “cripple roll” of 14+, minus one for each crit box hit. 14-8=6, giving Damon a 6+ chance to cripple Vahlkhin and win the game. HE ROLLS IT. The Valkhin is crippled and the Sheffield is not, ending this epic “David vs. Goliath” story with an unlikely but well-deserved British win.
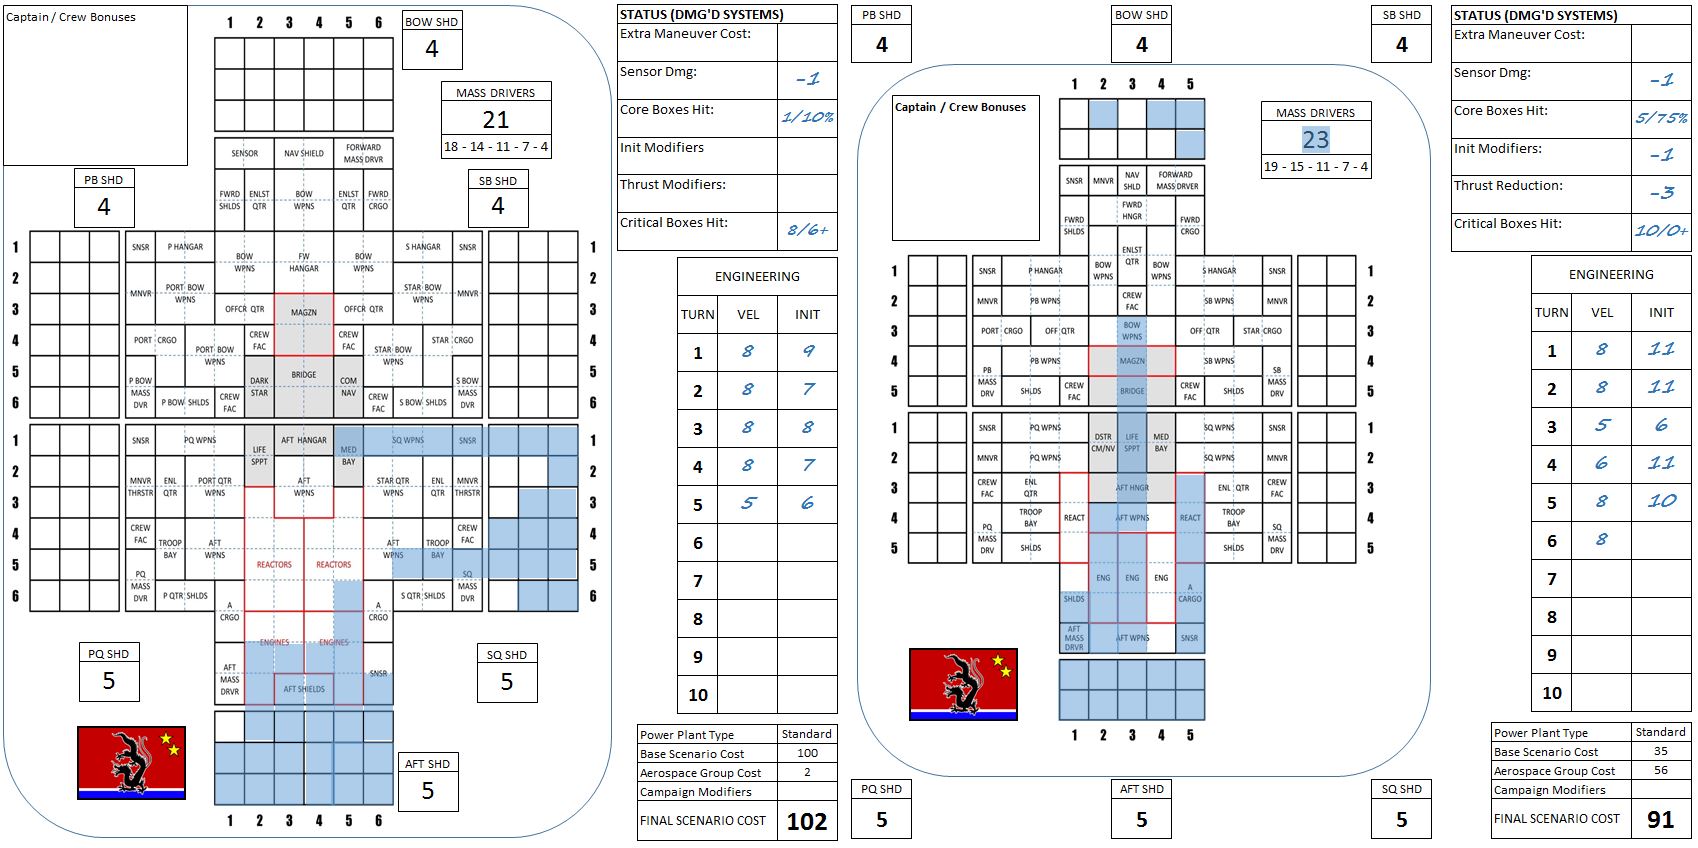 The Warship Record Sheets of the Vahlkhin (left) and the Kazhinkova (right). You can see where the Vahlkhin took eight boxes of critical engine and reactor damage, and where the Retribution’s rail guns and lasers cored all the way through Kazhinkova’s engineering plant to hit the ships core, bridge, and even set off the forward magazine.
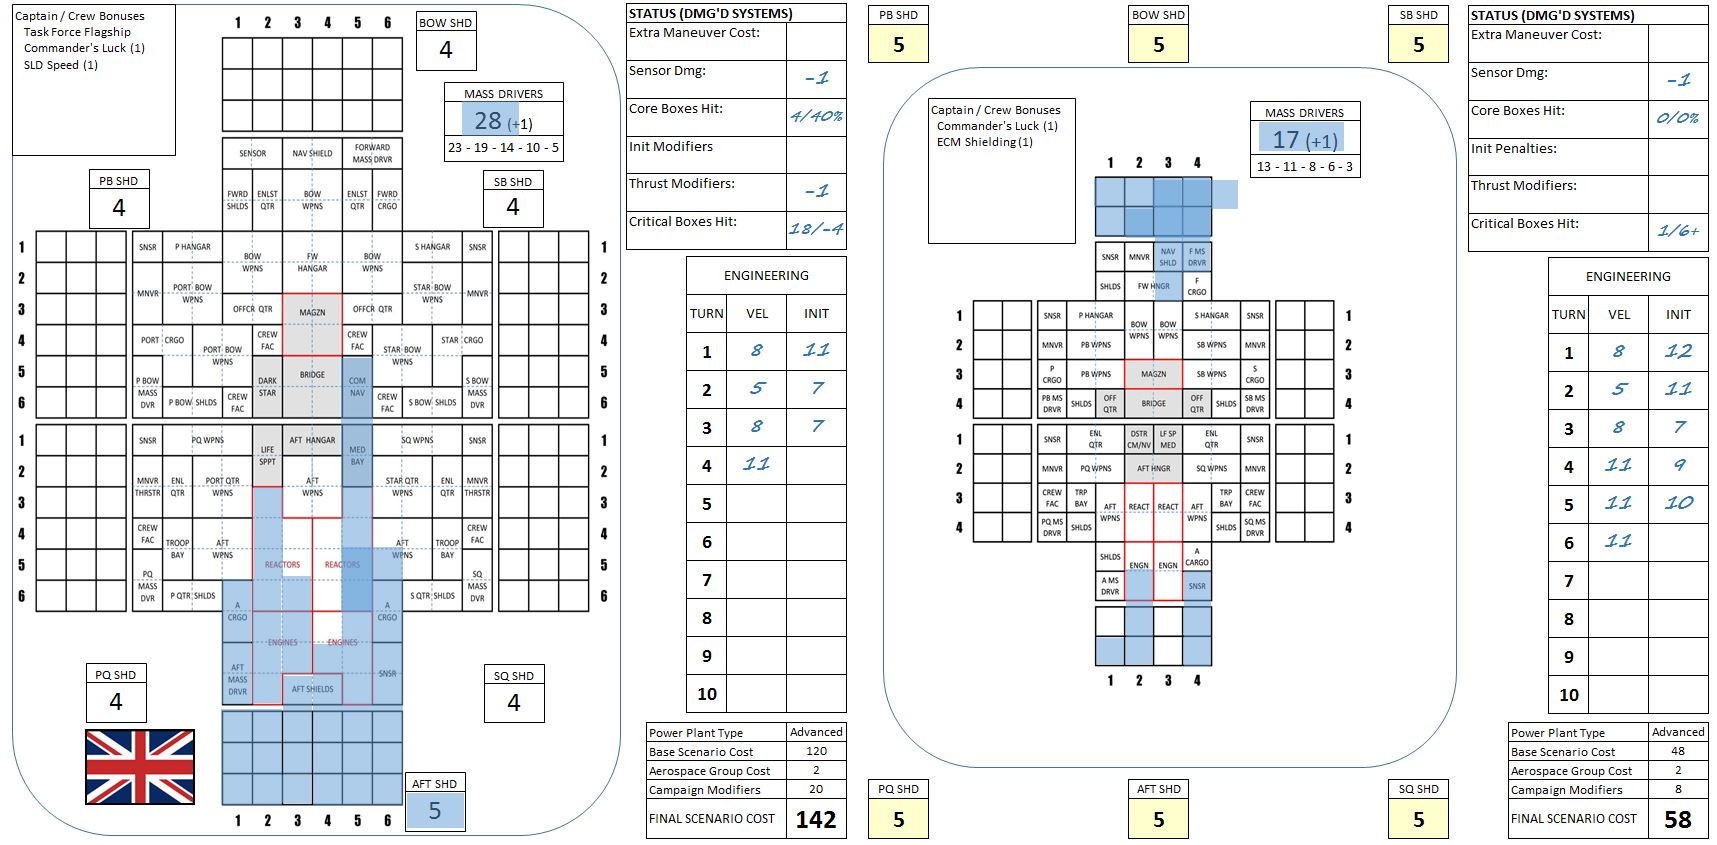 The WRS of the Agamemnon (left), who really SHOULD have died here. Maybe this is a charmed ship. Be wary of carrier strikes, and also of Russian or Chinese-built warships once they get too close. At ranges less than 500 kilometers (three hexes roughly) plasma projectors are terrifying. We also see the brave little Sheffield, including the terrible damage suffered in her valiant stern chase of the Vahlkhin.
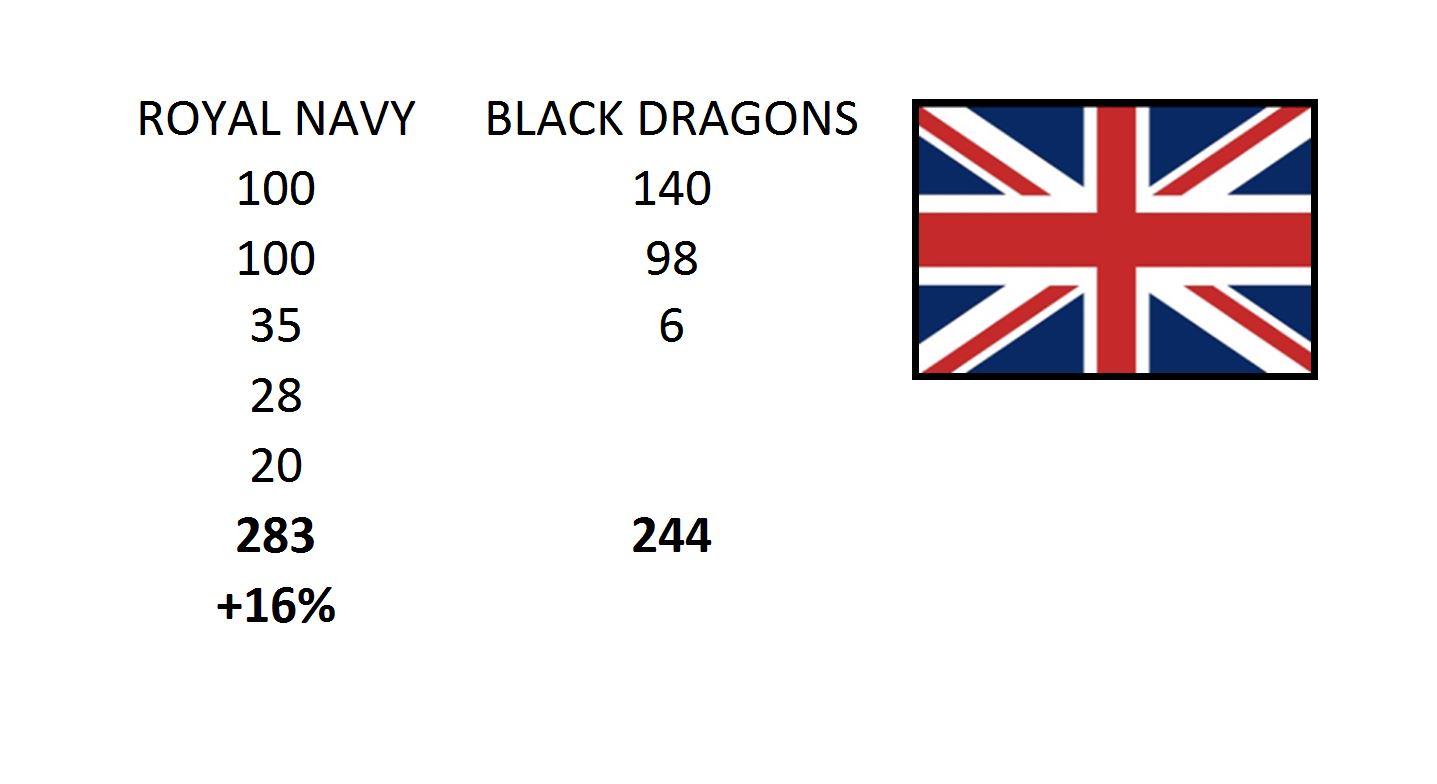 The final score. The British lost a heavy cruiser, a light cruiser, and six scouts. The Black Dragons lost two heavy cruisers, a light fleet carrier, ten bombers, and fourteen fighters. Furthermore, in the post-battle resolution, we found that carrier Kazhinkova was actually scuttled when British Marines moved to board her. The die rolls indicate the Black Dragon captain did not survive, either killed when Retribution hit the bridge or opting to stay aboard the ship when she was detonated. “Character death” in Darkstar is pretty rare, but it does happen.
 Darkstar Scenario Construction
Getting ready for a live web game of Darkstar tomorrow.
August 3, 2519:
Scenario: Xi Boötis is a Second-Band star system about 22 light years from Sol, currently hotly contested between the United Kingdom and the Holy Russian Empire. In this star system, the British have key military, industrial, and economic installations orbiting the moons of three of the outer gas giants. One of these orbital platforms, Ravenwood Station, is in trouble.
Sensors on Ravenwood Station have detected an incoming gravimetric ripple, the tell-tale sign of ships in a Darkstar Wave. The speed of the wave clearly indicates warships. The amplitude of the wave indicates at least a cruiser strike force. Yet although the wave is too fast for civilian traffic, it’s not fast enough for just a Russian cruiser raiding force. The incoming warships are only doing a 9th-magnitude wave, about 150 c.
This probably means troop ships. The Russians are coming to Ravenwood Station to stay.
Sure enough, as the Russians drop out of their Darkstar Wave and begin to decelerate to attack speed, British sensors identify the threat. This is the battle-hardened Lazarev cruiser squadron (reinforced) under Captain Piotr F. Myshaga, a bloody-pawed bear with a plasma-scorched record extending back to the Psi Serpentis Wars of 2512. The last ship in his battle line is perhaps the most chilling … the Zhukov-class assault destroyer Katukov. Small and practically unarmed, she instead carries almost 200 elite Russian zero-g assault troops. The Russians mean to take Ravenwood Station.
The only British force that is both powerful enough to match the Lazarev squadron and fast enough to make the intercept this far out in the Xi Boötis system is the Bellerophon battlegroup. Accelerating to short, slow (but thereby hyperaccurate) intrasystem Darkstar wave, the Bellerophon and her escorts drop out of FTL just a few thousand kilometers from this moon and Ravenwood Station. The Russians are already on their approach.
General Quarters!
 Full Mapsheet
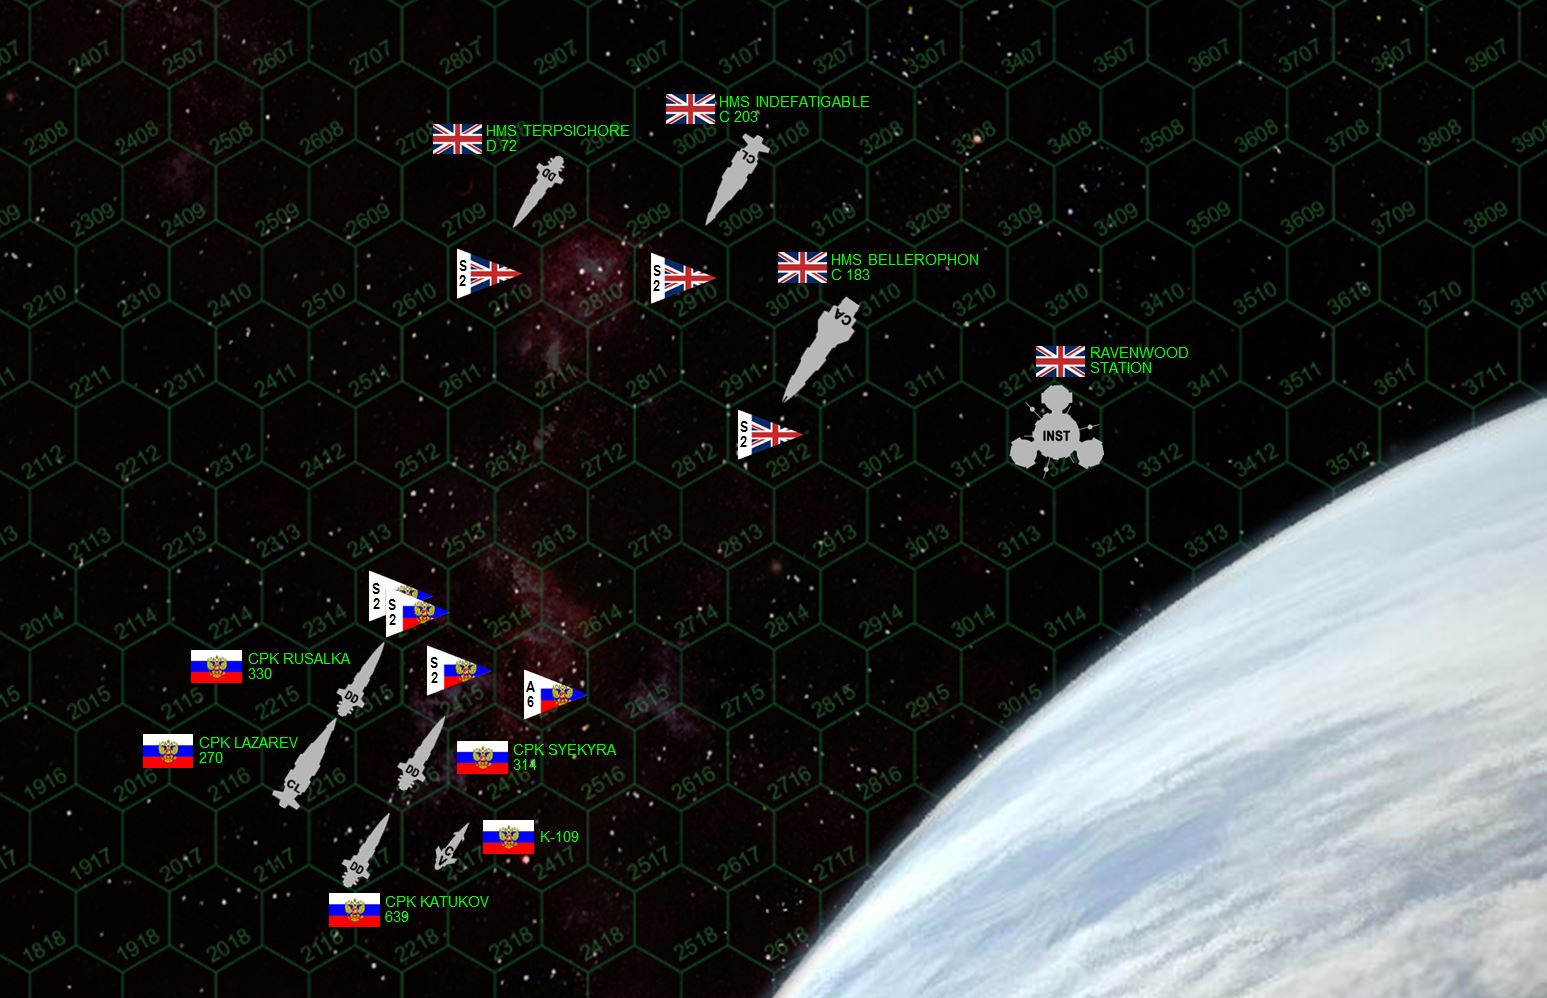 Matchup of the approaching forces. The British have the heavier guns, especially aboard HMS Bellerophon and the installation itself. But the Russians are much faster and more numerous. CPK Katukov is the troop ship, carrying six assault boats and 168 shock troops. If she manages to dock with Ravenwood Station ...
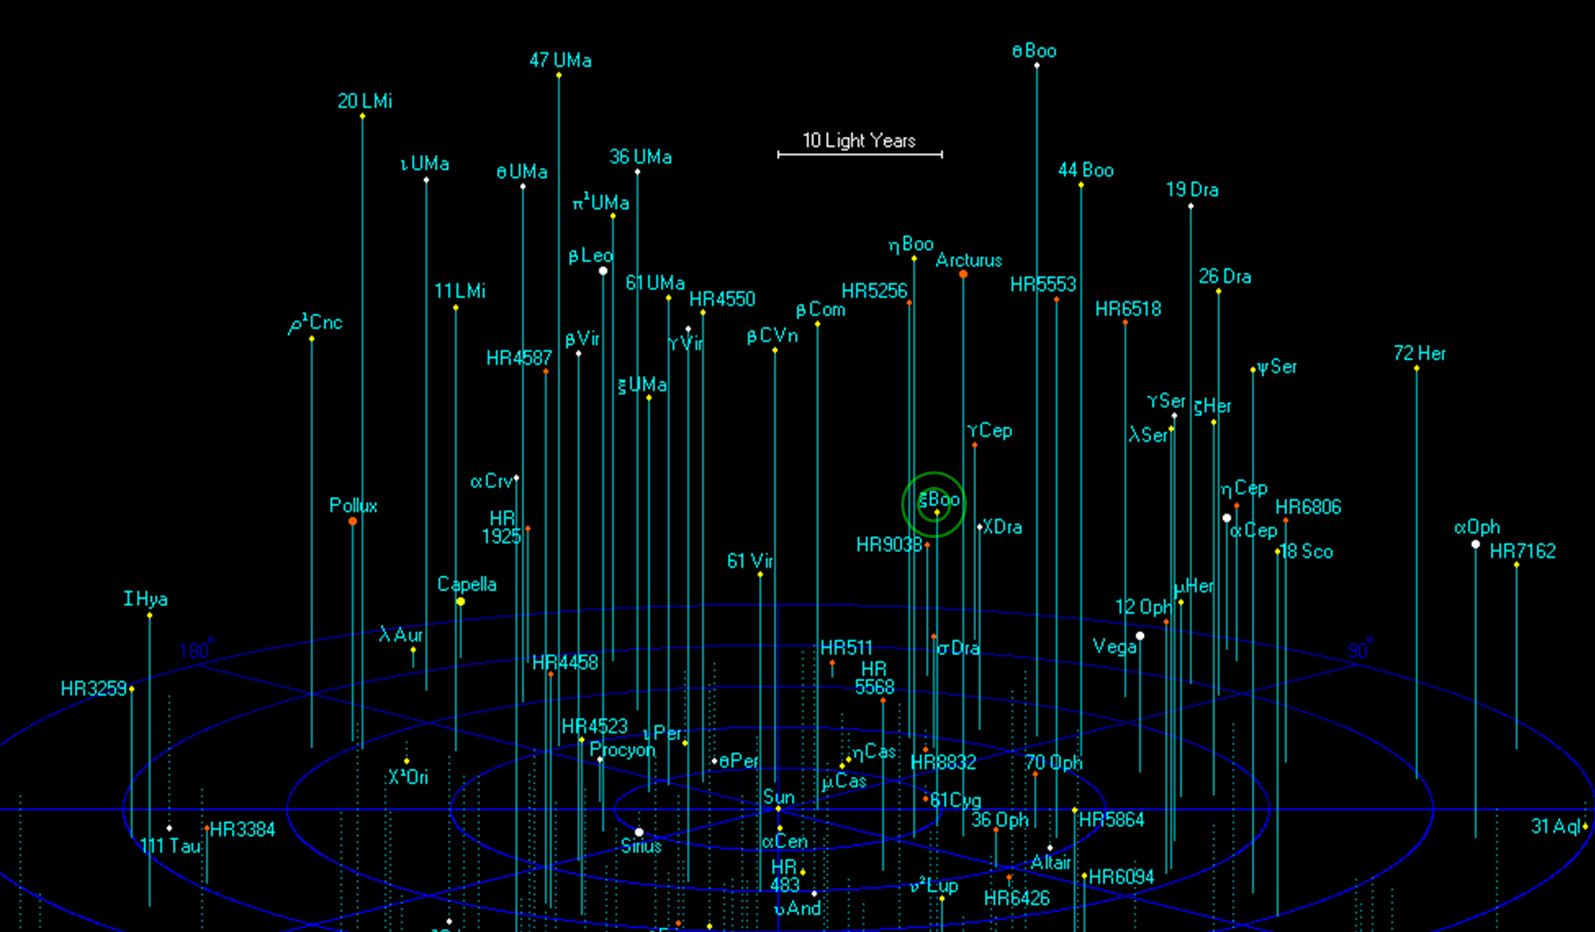 Xi Boötis is where the battle is taking place.
  Some of the rarely-used charts to resolve boarding actions, the firefights that may be taking place while the naval battle is still ongoing.
 The station sheet and the sheet for CPK Katukov, a modified Zhukov class assault destroyer (troop ship).
Darkstar Battle Report - Four-Way Cruiser Clash!
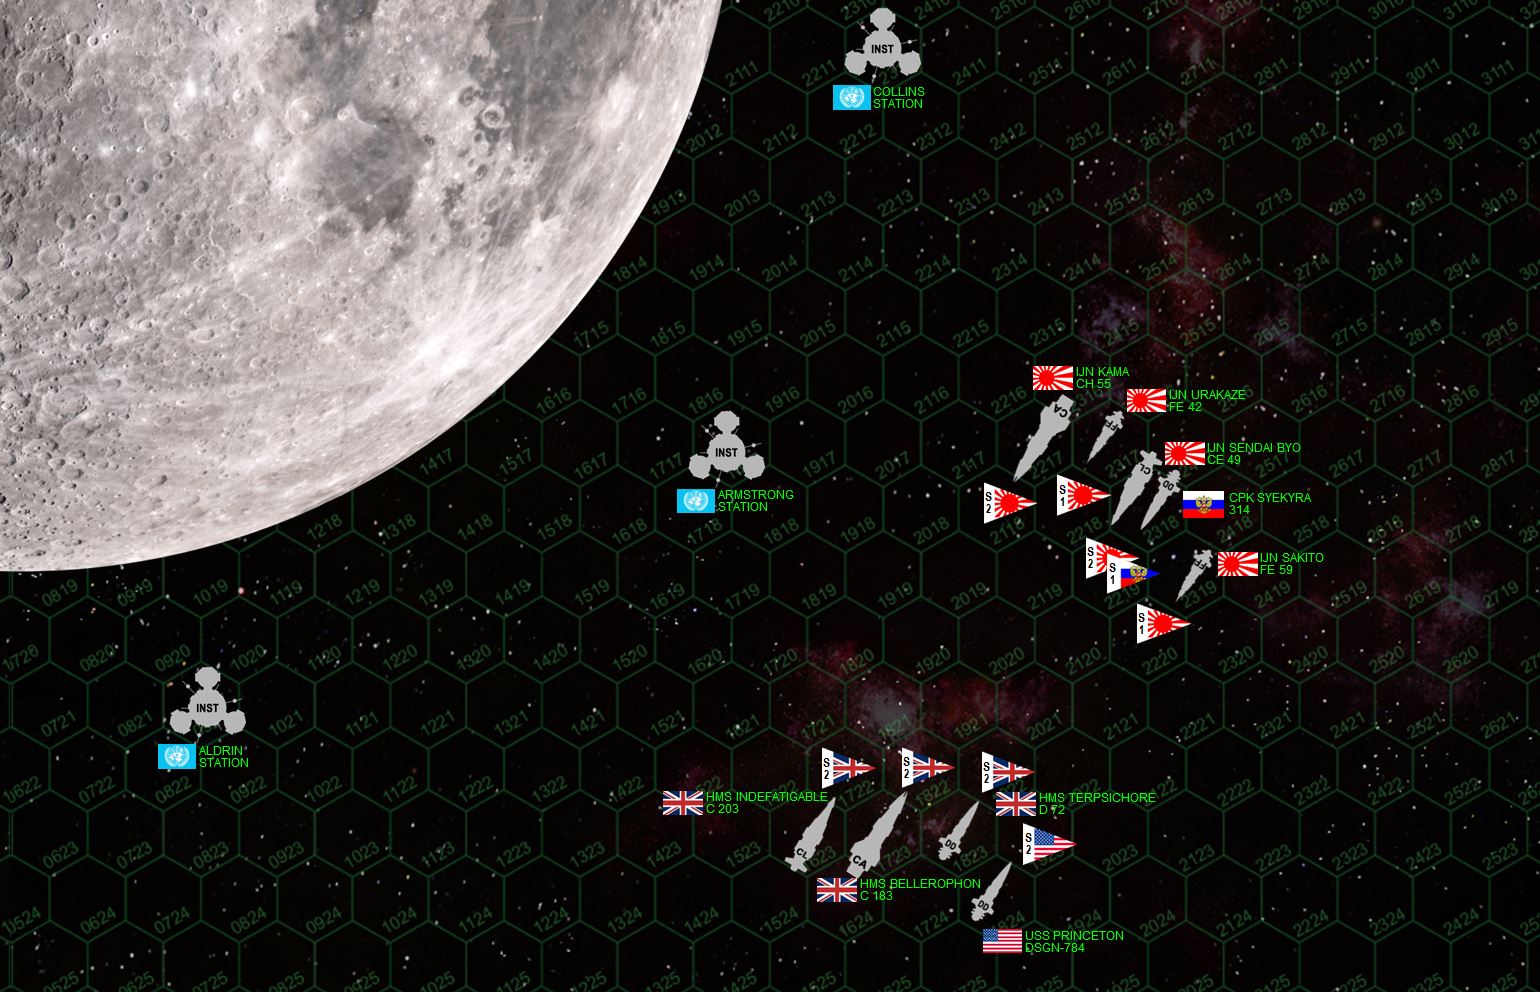
All right, it’s that time, everyone … Yesterday I had a great game of Darkstar with @damon and @rasmus. Damon had his Bellerophon task force with one of my American ships in support (Valcour-class destroyer USS Princeton) and Rasmus had his Japanese task force with one of my Russian ships in support (Sovnya class destroyer CPK Syekyra).
Just for fun, and just because we were playing this on the 50th Anniversary of the Apollo 11 moon landing, I put Earth’s moon on the table, along with three orbiting cities named for the Apollo 11 astronauts. Of course, in Darkstar canon this would be absolutely prohibited, anyone who so much as uses harsh language in what is called “the Lunar Sphere” – a sphere described by the orbit of the moon – is dealt with (i.e., exterminated) by UN and their fleet Jerusalem class super-battleships. Trust me, ONE of those can sink a fleet, four or five of them can crush a navy. This was written into the lore just so nations of Earth have to engage in interplanetary or interstellar combat, and not settle their grudges on the battlefields of Earth (it’s a SPACE game, after all).
Anyway, the Japanese have the Katana class heavy cruiser Kama, a real beast. Sleek, fast, high-tech and fragile, the Sendai-Byo (the original Sendai lost in the Xi Scorpio War of 2516-18). Two Akashi class strike frigates round out the Japanese force, along with the aforementioned Russian allies.
The British have the high-tech “raider” Trafalgar-class heavy cruiser HMS Bellerophon – fast, nimble (for a heavy cruiser) but less punchy than the Kama. The venerable Indomitable class light cruiser HMS Indefatigable runs alongside (old and creaky, but her crew are some of the best gunners in the fleet), along with the high-tech Falklands class destroyer HMS Terpsichore. Hoping to help out are the Americans in the aforementioned USS Princeton.
Simple smash-em-up game, with “assault” victory conditions (points left ON the table at the end Turn 8).
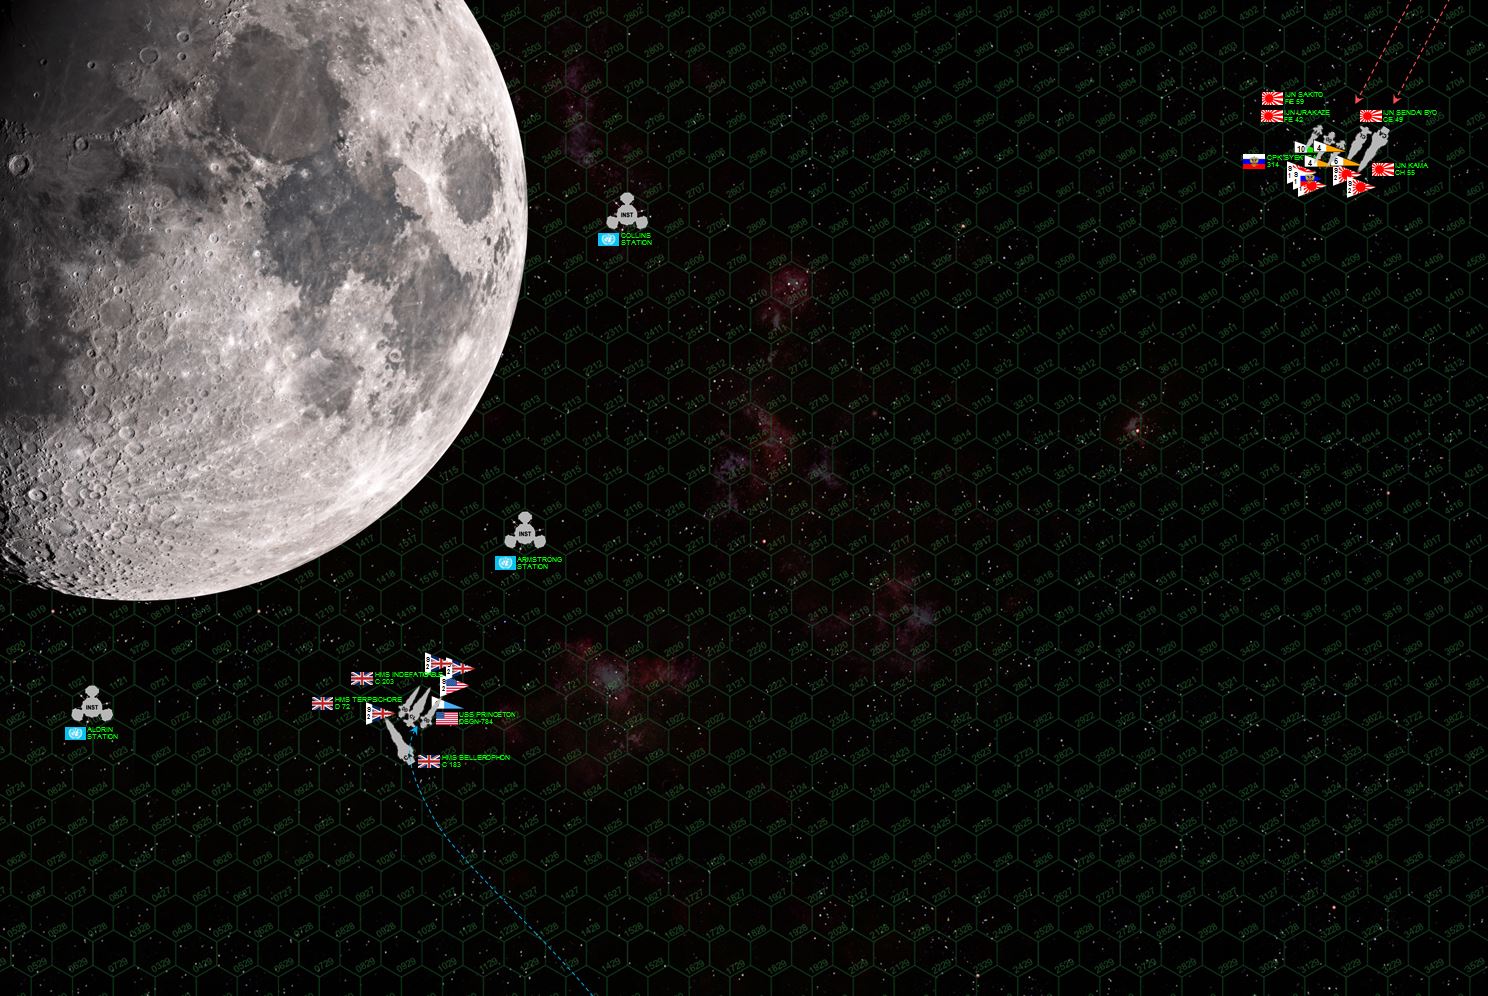 So here’s the initial approach. In the “age of sail” they had the weather gauge or the wind gauge … here in Darkstar you have the “gravity gauge” … which Damon seems to have seized right off the bat by cutting a course toward the moon (which is to scale with the hex grid, 180 km per hex – the ships are of course oversized, but they are moving at 3 kilometers per second per hex per turn). Note that as Rasmus turns to engage, he will have to point his ships TOWARD the moon, never a good thing in this game (bad time to be hit and lose power). Damon will also be able to pull up away from the moon, using the planet’s gravity to help decelerate to acceptable attack speeds once he’s made a higher-speed closing approach.
 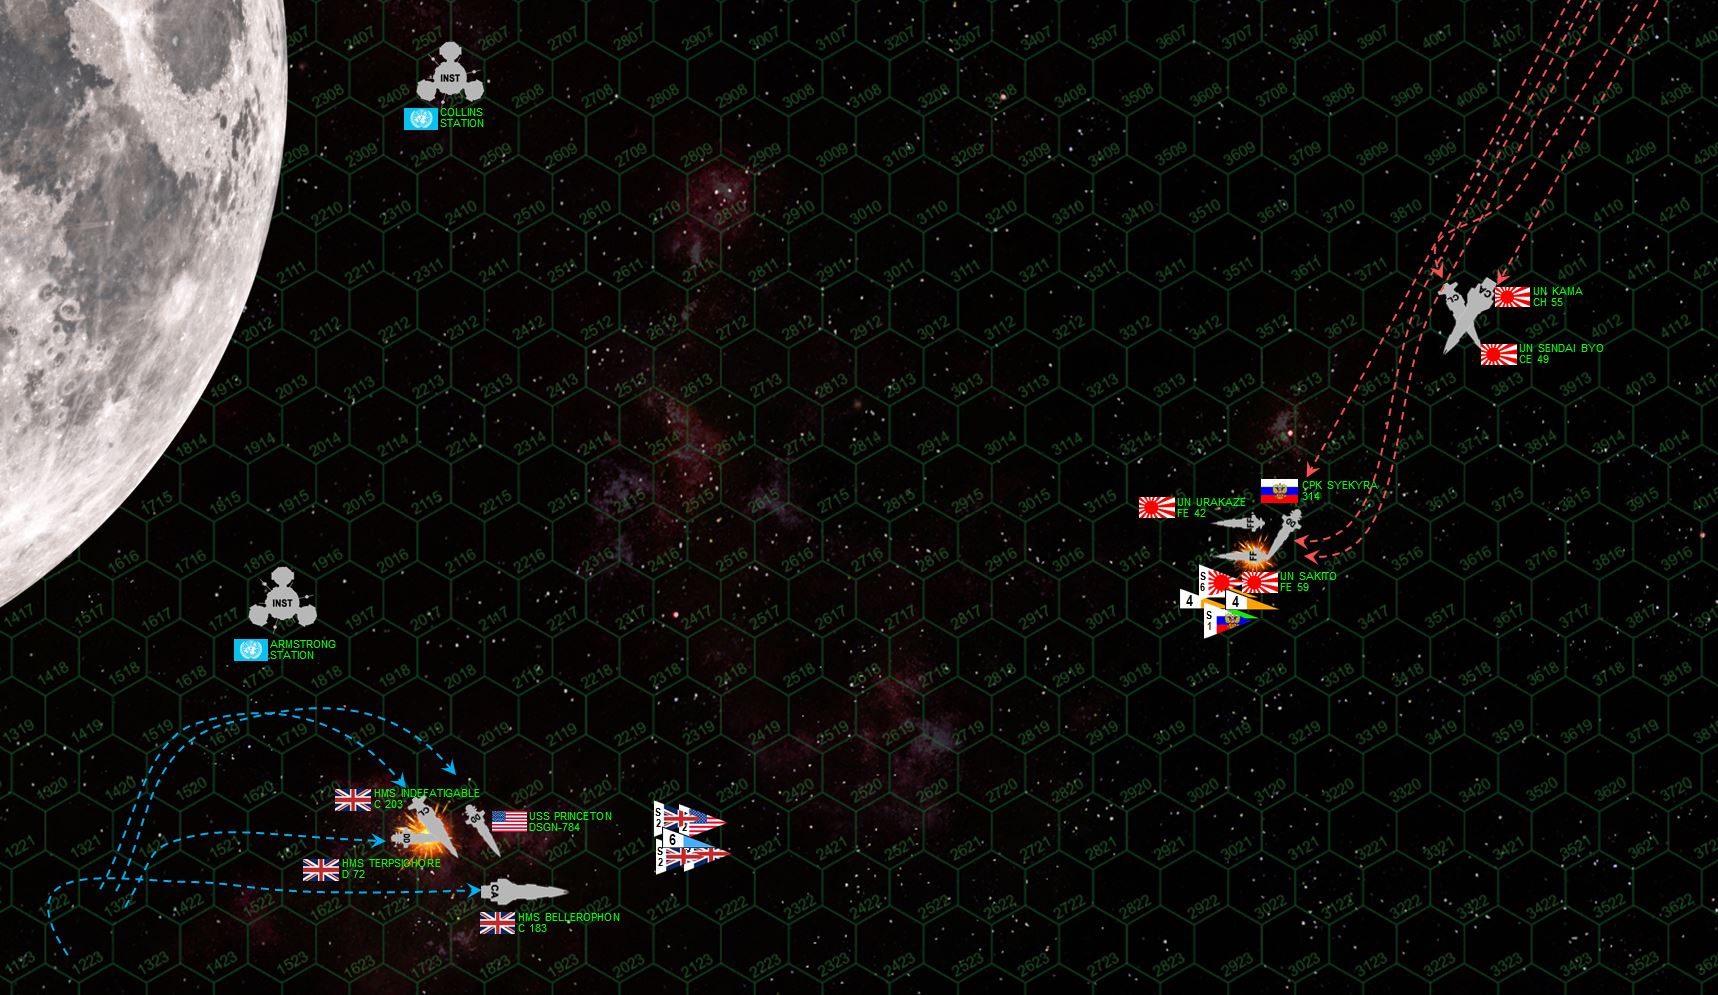 Damon doesn’t get lucky with initiative, however. Even as he turns away from the moon, the Japanese are able to avoid the worst of his broadsides. Rasmus divides his force into two battle groups, the cruisers handing back to provide long-range gunfire support (Japanese warships are ridiculously accurate with high-grade CIC / targeting systems), while the smaller, plasma-accelerator heavy Russian destroyer and Akashi strike frigates dive in close for shorter-range fire. HMS Terpsichore takes the worst of it at first, while the Akashi class strike frigate IJN Sakito is hammered in turn. Both sides have also launched formidable torpedo spreads, although the Japanese and Russian torpedoes are far scarier than the handful launched by the Princeton (none of the British ship carry torpedoes).
 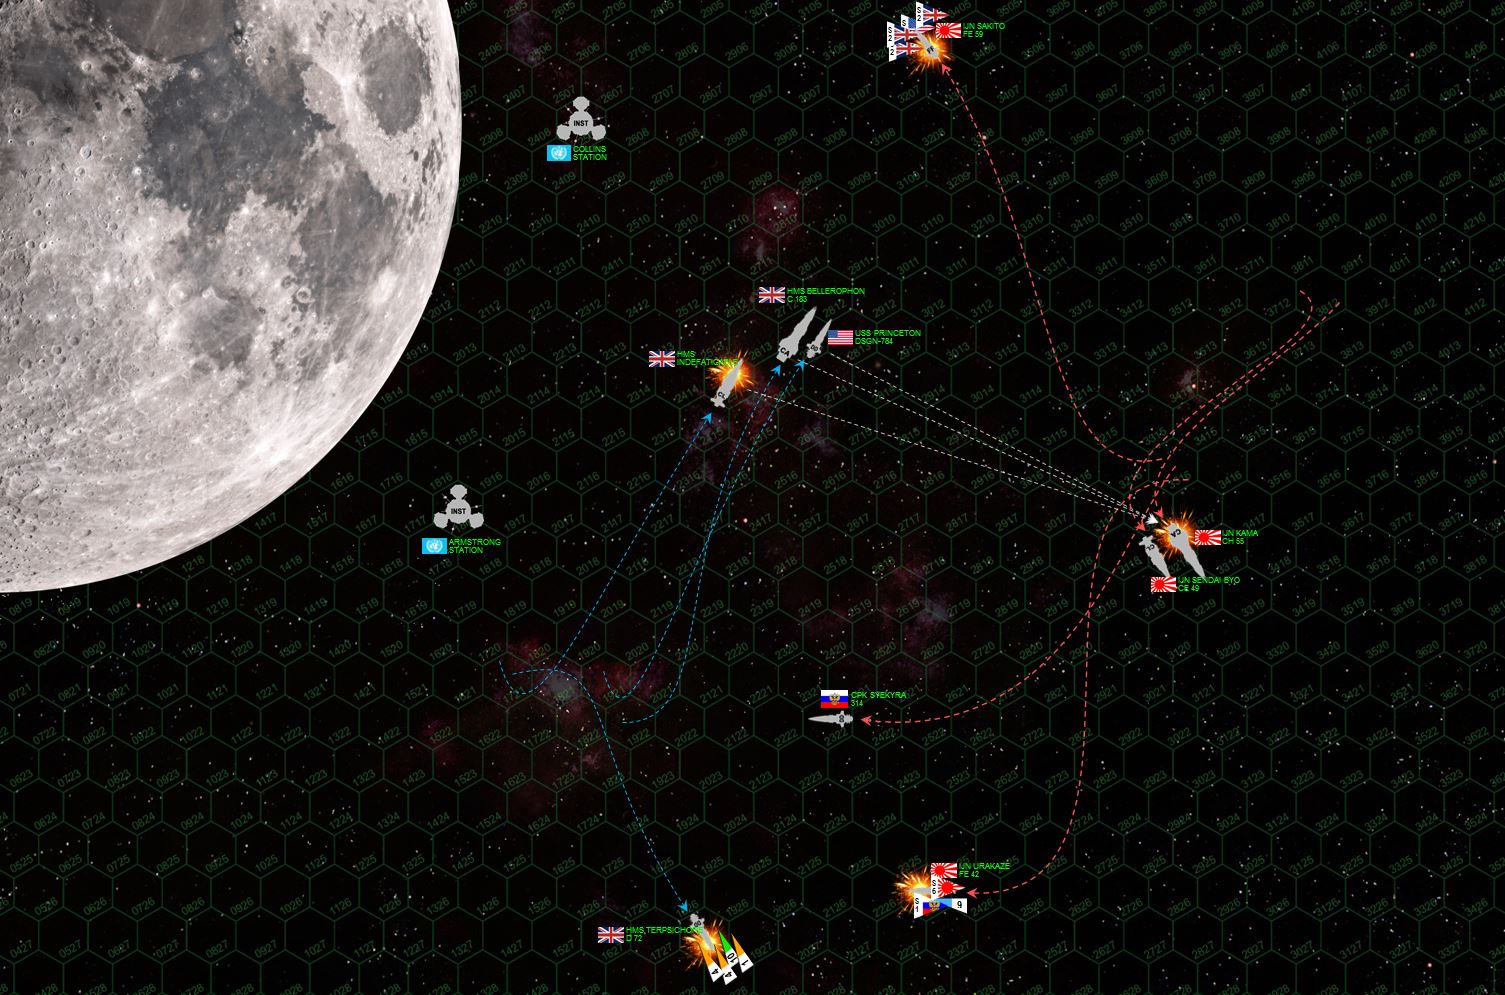 Things get crazy. Whereas many Darkstar games are borderline Napoleonic with linear fleet tactics and well-ordered task forces keeping tight formation … this one devolves into a dogfight, a brawl, a knife-fight across 5400 kilometers of open space. The only attempt at order is by Damon, with Bellerophon, Princeton, and Indefatigable managing to cross the stern of IJN Kama and Sendai (white arrows). This is the fire phase that should have won the British the game, but Damon’s dive roll for the broadside of the Bellerophon was literally all misses. We calculated the odds on camera, we figured a roll THAT bad was at least 60-1 against (10 dice, 60% chance to hit, ALL MISSES). Indefatigable did a little better but note these hits are hitting the Kama’s starboard QUARTER, not the STERN. Meanwhile, the Sakito has been hammered (forward shields down) and is trying to stay out of harms way, but is being chased down by American and British scout planes. Princeton’s torpedoes are headed for the Urakaze, the Terpsichore is now trying to limp off the board, and the Indefatigable is hammered by the aft batteries of the Kama and Sendai (forward guns broadsiding the Terpsichore).
  The Kama and Sendai finally turn straight toward the British (now that the Japanese have more or less passed BENEATH the moon), only to find that the British are my and large BEHIND them. The Bellerophon is admittedly faster and more nimble than her rival. However, now “Billy Ruffian” and the Kama are exchanging broadsides, a matchup the Kama will win every time (bigger bun battery, more EPCs, bigger gauge, and better shielding on the aft quarters than the Trafalgar class).
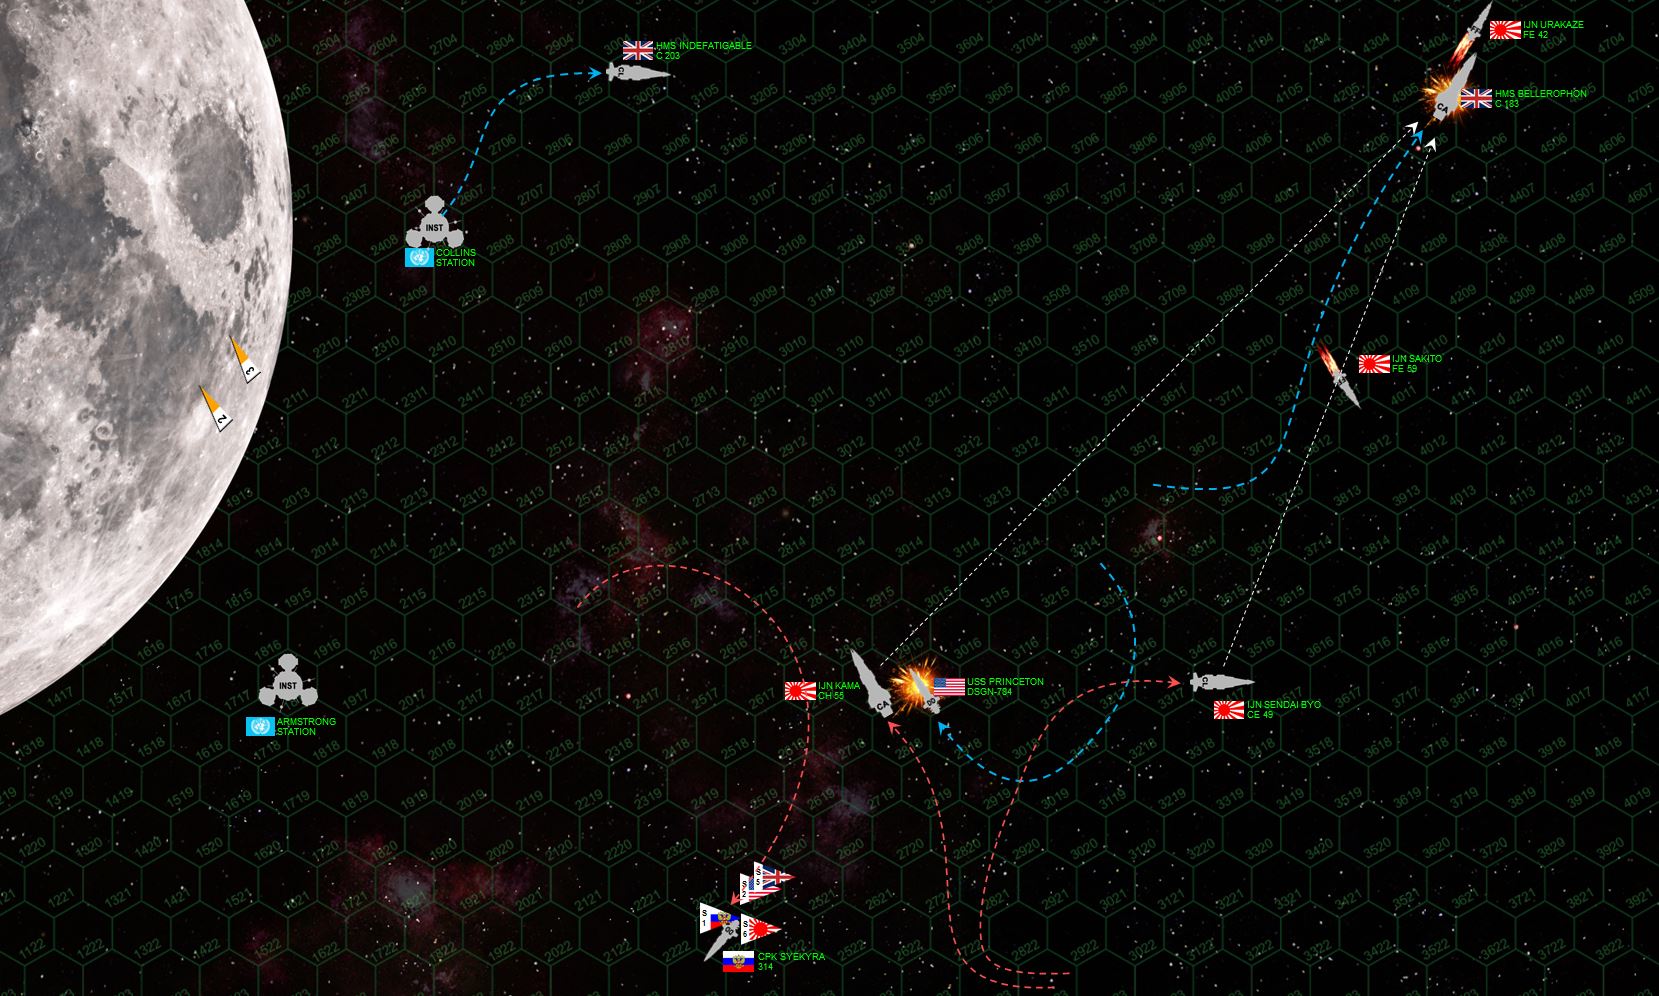 Exchanging broadsides with a Japanese Katana-class heavy cruiser is never a good idea, as the Bellopheron has learned to her cost. With her starboard quarter ripped open, she’s trying to maneuver clear, but with no starboard quarter shields and maneuvering thruster damage, she has a hard time making the required turns at her present velocity. Indefatigable has been drilled straight through the core, and with significant crew losses has been forces to break off the action. The Princeton tries to cover the British withdrawal, and parks right alongside the Kama. I’m gambling that Rasmus will want to put most of his big guns against the British as poor little Princeton is hardly a threat, but JUST MAYBE a point-blank broadside will cause some core damage or knock out and engine. Well, I wasn’t wrong ... Rasmus saves all his big guns for the British. Only two 12-megakelvin lasers (the temperatures at which the lasers burn) hit the Princeton, BUT RIGHT ON THE BRIDGE. I swear I think this is one of the most surgical ship-kills I’ve seen in Darkstar. Full long-range broadsides unload on the Belleropheron, which is crippled. The Russian destroyer Syrkeyra has been forced to break off the action while the frigates Urakaze and Sakito have also been crippled. But two Japanese cruisers remain, and only lightly damaged ... so clearly this game is going to the Japanese.
 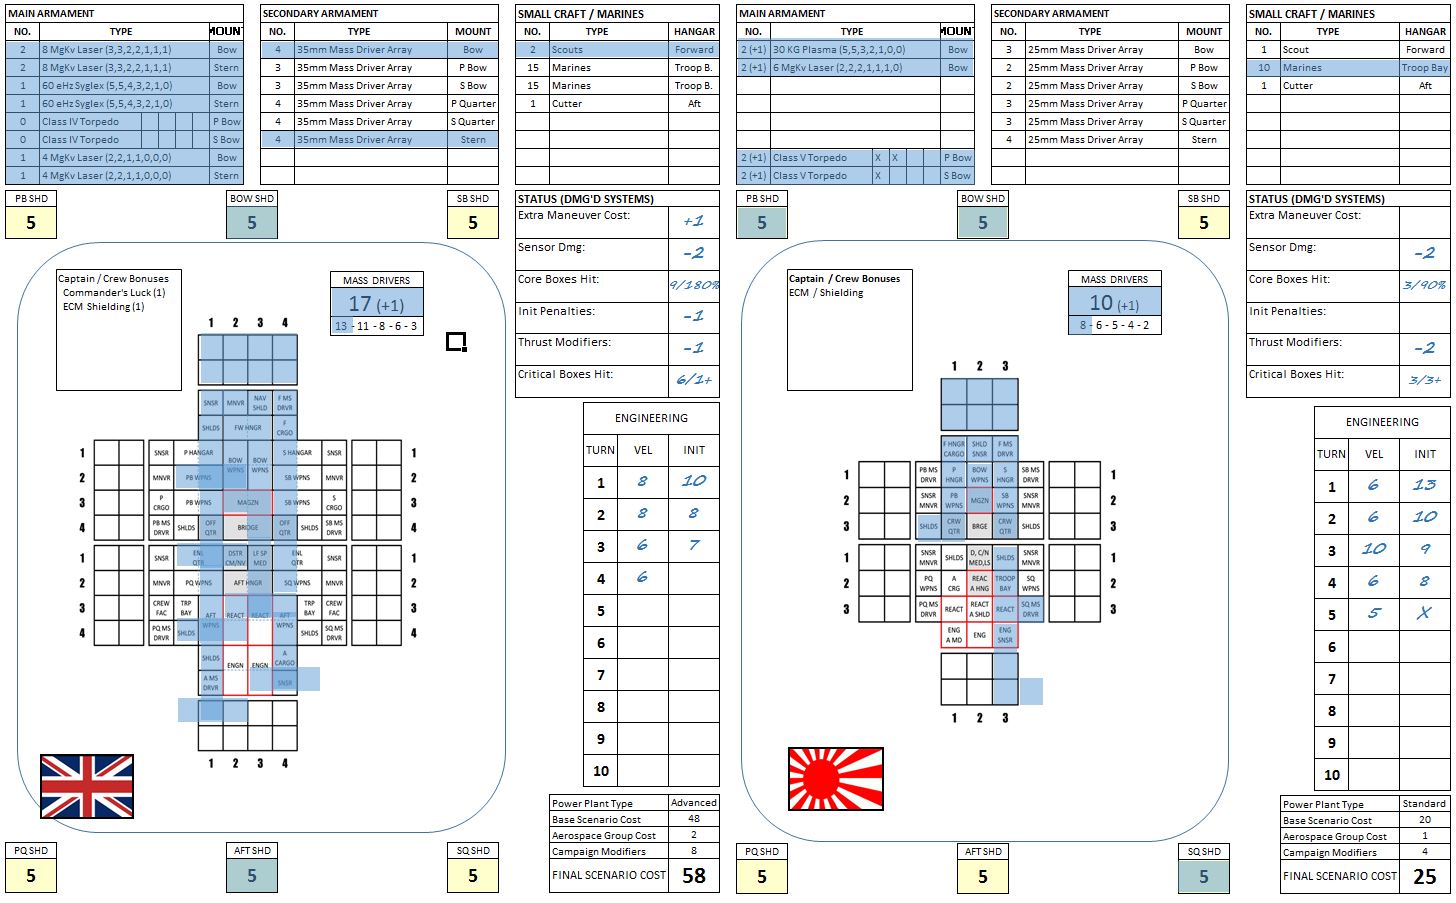 Here are some of the ship sheets after the battle. The Terpsichore is to the left. Good God, what a mess. Struck fight on the bow by no less than FIVE Ki-45 Toryu class (Dragon Slayer) torpedoes, plus all kinds of gunfire. The frigate Urakaze is at right.
 The heavy cruiser Bellopheron is at at left, the Russian destroyer Syekyra at right. One magazine hit wasn’t enough to cripple her, but the crew had decided they’d had enough as I failed the breakoff check. Just as well, I’d lost my port bow torpedoes, and torpedoes are arguably some of the most powerful weapons any destroyer has. Meanwhile, the “Billy Ruffian” is in worse shape. You can see that devastating barrage that hit the starboard quarter.
 Great game on both sides! The dice were definitely against the British and Americans on this one, but they put up a good show and left three of the enemy ships as wrecks or fleeing. Augh! Better luck next time!
Darkstar Battle Report - Four-Way Cruiser Clash!
Removing duplicate – apologies …
Darkstar Live Game - Apollo 11 Commemorative -1730 UK Time 20 July
It’s time for another big Darkstar game! We have four factions in this one, with players on both sides of the pond! Given the date, I decided to just for fun to have Earth’s moon on the table (that’s the moon to scale, 180 km to the hex), with three orbital cities overhead, named for the three astronauts of Apollo 11. Also, gotta have at least one American ship in the mix, hence USS Princeton.
Interested in checking it out and hanging out as we game live on the web? Ping me a PM and I will send you a link to our web conference.