


DARKSTAR CAMPAIGN UPDATE: DUCHESS ANNABEL’S WAR IS OVER


Recommendations: 3619
About the Project
The year is 2512.
The powers that remain on an ecologically-devastated and plague-ravaged Earth have been forced to look to the stars for the resources, capital, and room not only to expand, but to survive. While the setbacks encountered by mankind over the past 500 years have forced him to unite in a shaky global coalition and make fantastic strides in technology, they have also caused seismic and reactionary shifts in religion, culture, and politics. A second age of imperialism has dawned, and because man would never survive another war on the fragile remains of planet Earth, he is forced to ply his oldest trade ... war ... exclusively among the stars.
Darkstar is a tactical war game postulating naval combat in a “science faction” universe set five centuries into a troubled and uncertain future. Players take command of warships serving in the new “black water” navies of reborn empires of old, struggling for control of shipping lanes, resources, and colonies. Ships maneuver and fire in fast-paced combat, with survival not only of the players’ fleets at stake, but perhaps their nation and all of humanity as well.
Related Genre: Science Fiction
This Project is Active
Live 495-Point Game! Elessar2590 v. Oriskany!
This Saturday, @elessar2590 and I got together on the web for a massive 495-point throw-down in Darkstar. Apparently Elessar has been playing this game pretty heavily with his club in Australia, and his fleet has the upgrades to prove it. Furthermore, his game play is very solid and except for some very “corner case” rules questions (things that don’t come up more often than once in every ten games or so), he showed that he actually has a very good grasp on not only the basics of Darkstar, but also more complex operations like carrier operations, aerospace coordination with warship torpedo spreads, landing aerospace groups to re-arm for second (or third) strikes, electronic warfare, and so on.
So I guess this is the long way of saying he wanted to play his fleet … his whole fleet … his whole upgraded fleet. In all, he’s packing 495 points *(the only thing he’s missing is the required “Task Force Commander” rating for his flagship, a minor campaign rule required for a force this size).
And since he’s a bonafide Darkstar veteran, I put him up against portions of my heavily-upgraded (been playing on-and-off for seven years) Japanese fleet. No punches pulled. Very little “helpful advice” for new players. It’s time to see if Elessar can really hold his own against one of Oriskany’s best forces, the bulk of the elite Japanese “Storm Dragon” fleet under Commodore Hiromi Ozawa.
It bears noting that not all Japanese ships in this fleet existed in the former Darkstar “canon timeline” at the same time, this is strictly a hypothetical pick-up game to see if one our Darkstar students has truly ready to take on the designer …
 So here’s the matchup. The Japanese fleet is “small” (only three ships) but incredibly upgraded and, not to brag or anything, pretty friggin’ ferocious. Ozawa’s flagship is the Katana-class heavy cruiser IJN Naginata, upgraded with elite gunnery crews, an advanced CIC targeting suite, enhanced shielding, an expert commander (veteran of five wars, +2 on all initiative), upgraded sublight engines ... she’s a beast ... let’s just say that. She’s also 202 points, making her the equal of a Prussian pocket battleship or an older dreadnought. IJN Nagashima is a Kagoshima-class light fleet carriers, carrying dozens of double-elite naval aerospace strike group fighters, bombers, and scouts, plus the dreaded Ki-45 “Toryu” (Dragon Slayer) torpedo. The IJN Sendai is a hyper-advanced Taiho (Great Phoenix) class light cruiser, upgraded almost as much as the Naginata. All that said, the British fleet are no slouches. They aren’t quite as upgraded as the Japanese fleet, but pretty heavily upgraded nonetheless, and of course they have the advantages of numbers. Elessar has been fighting with these ships for quite some time in his own campaign with friends at his club, but now his skills are being put to a test.
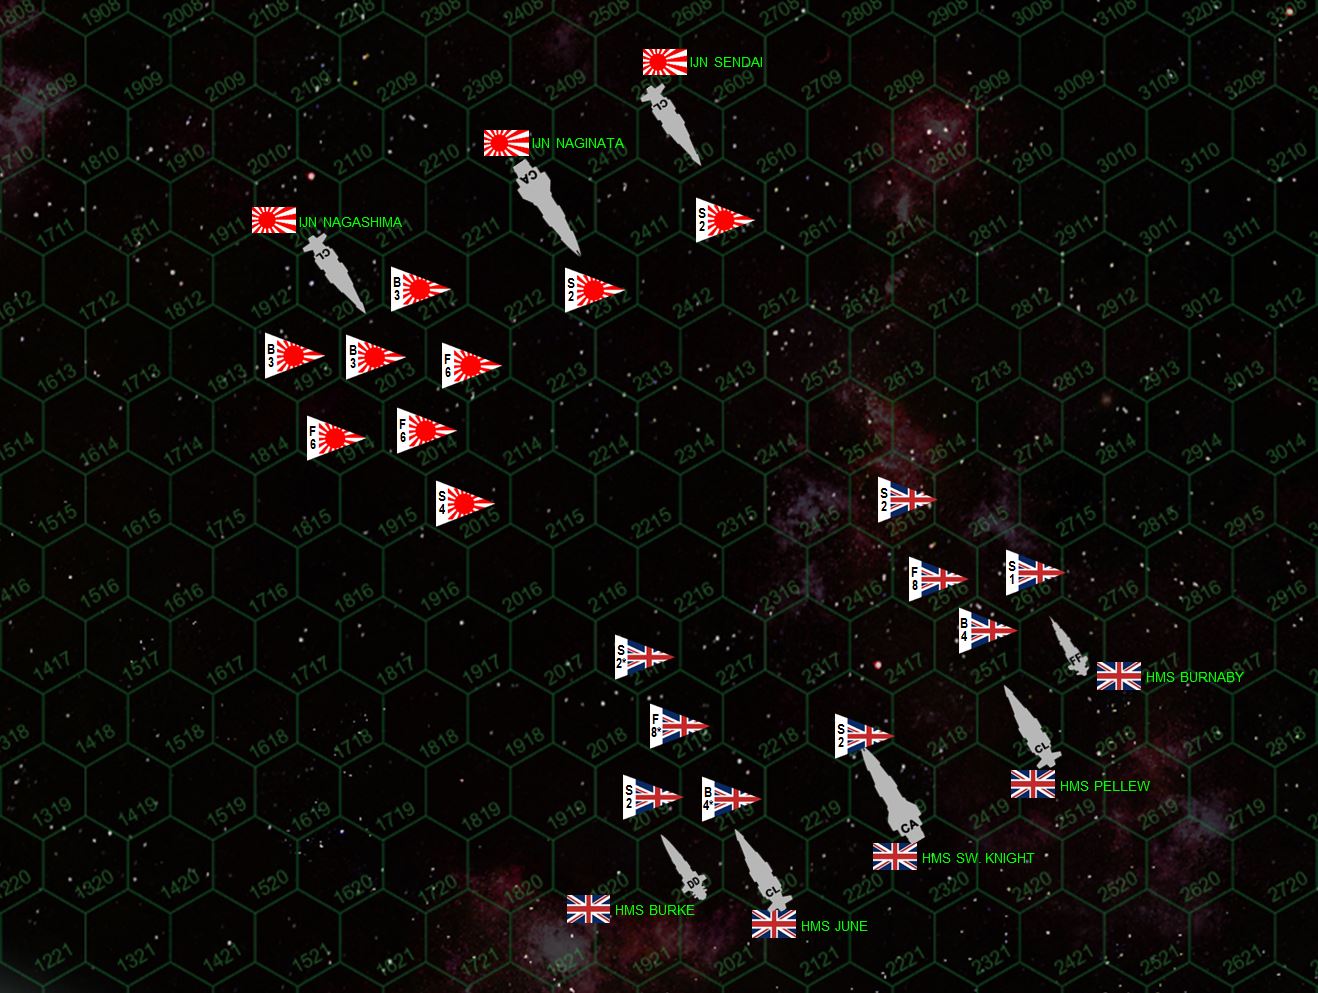
 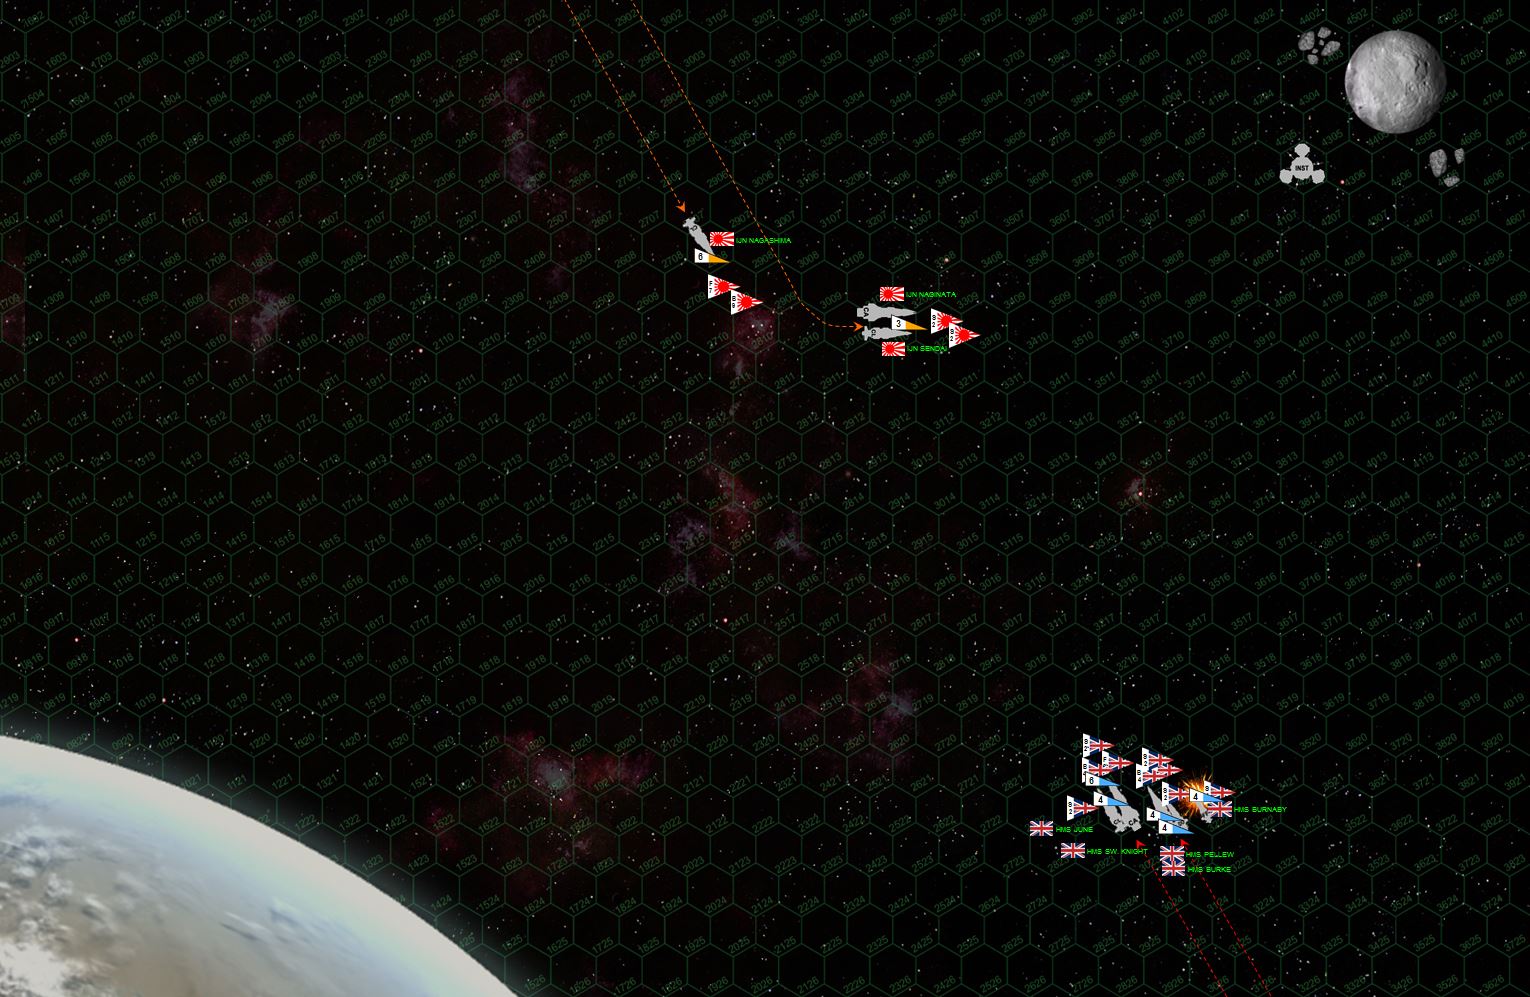 The initial approaches on Turn 1. With more experienced officers on most of the Japanese warships, we more or less win initiative and manage to start off crossing the British T at 2,350 kilometers. Even at this long range, the broadside of the Naginata and Sendai blow the fo’c’sle clean off the frigate HMS Burnaby, which technically survives the punishment, but immediately must fleet the battle area with horrific internal damage and admittedly, grievous crew casualties. Meanwhile, two of the new Maecenas-class expedition ships (the very first time I’ve seen these ships in action) HMS Pellew and HMS June (these cruisers were designed when Darkstar was published – originally named for people who supported the project on Paypal), launch fighters and torpedoes, along with more torpedoes from the British flagship (Iron Duke class heavy cruiser HMS Swedish Knight) and “hero-ship” Falklands-class destroyer HMS Burke.
  Turn 2, and things get horrific ... fast. First, HMS Burnaby, or what’s left of her, realizes this battle is way out of her weight class and speeds out of the battle area, a heroic engineering crew somehow maintaining power and control. The Swedish Knight and the June make a turn to port, trying to broadside the Japanese heavyweights. But Commodore Ozawa saw this move coming (won initiative) and instead the Naginata and Sendai (already heavy damaged by the forward batteries last turn) cuts into a broadside right across their stern at point-blank range. The Swedish Knight and the June’s broadsides smash open the starboard bow of the carrier Nagashima. A massive Japanese aerospace strike ... A9M "Kataka" (Fire Hawk) fighters, B7N "Tenrai" (Heavenly Thunder) bombers, and Ki-202 "Hien" (Flying Swallow) scouts send a hail or torpedoes and aerospace missiles into the stern of the Swedish Knight, tearing apart her engineering section and leaving her crippled and adrift. The Sendai’s broadside and the Naginata’s forward guns cripple the HMS June. But the Nebula “Star Typhoon” bombers and Supermarine “Starfire” fighters return the favor on the Sendai’s stern a moment later, even as British scouts and mass drivers shoot down four Japanese scouts. The Naginata’s aft guns blow a whole clean through the port bow of the expedition cruiser HMS Pellew. Including knocking down her port bow shields. Just that fast, three ships are crippled, a fourth running off the board. This fight has already dropped from eight warships to four.
 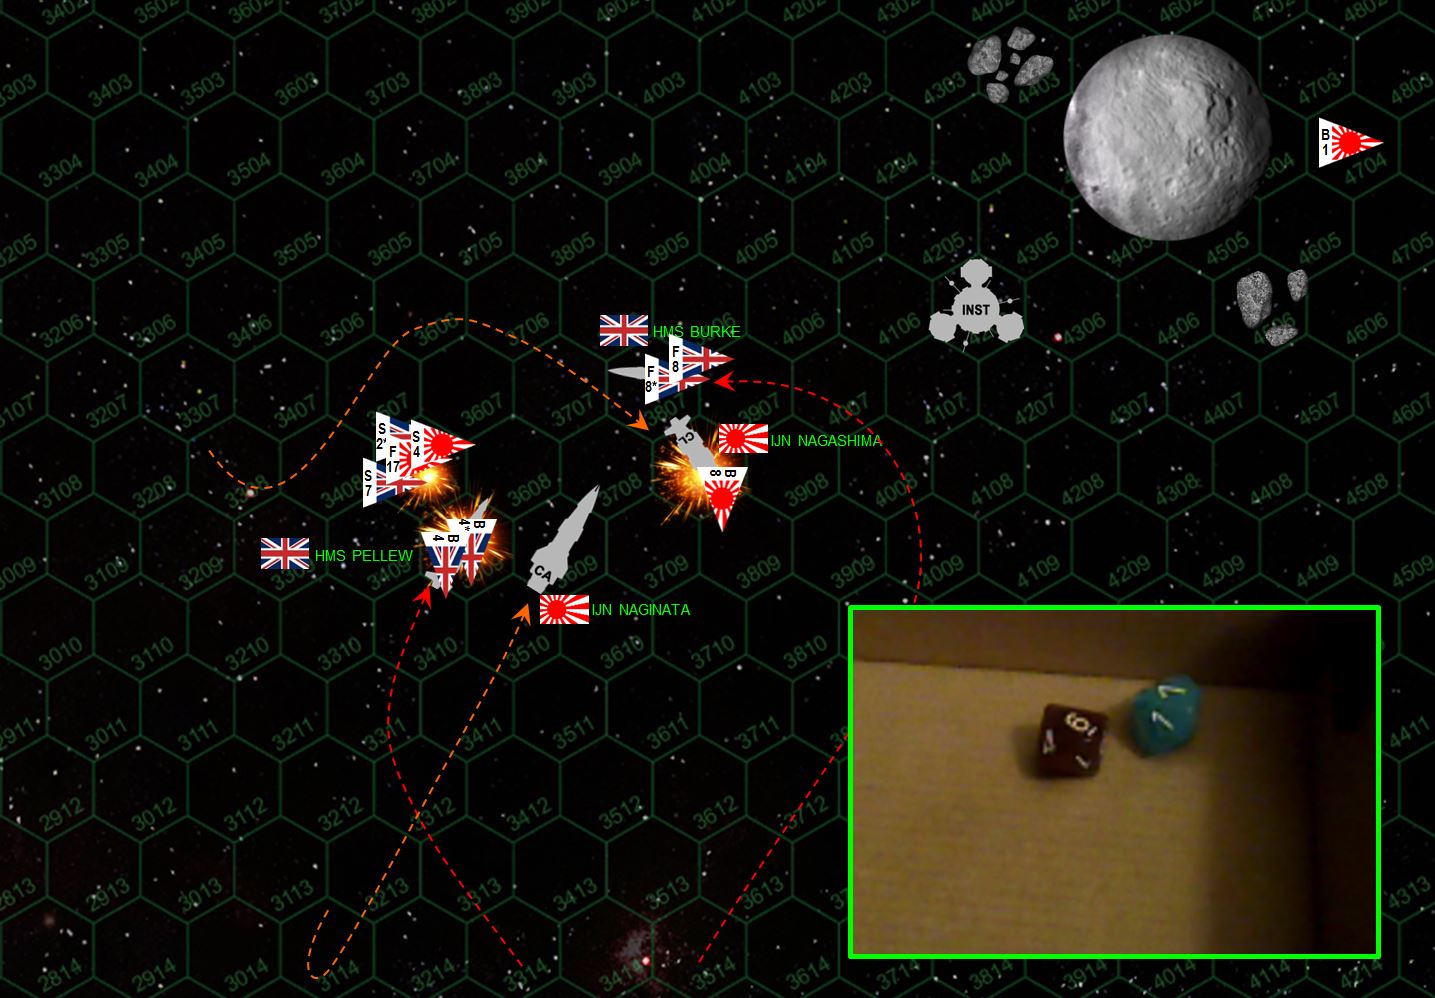 The hero ship HMS Burke (seriously, this scrappy little destroyer is quickly becoming the Royal Navy’s equivalent to the US Navy’s Valcour-class destroyer USS Oriskany) cuts behind the Japanese carrier Nagashima. Together with a mass strafing attack by June’s and Pellew’s fighters, they rip into the stern on the Nagashima and do so much damage that not only is she crippled, but she now has a 75% chance of exploding! (25% per critical hit BEYOND the threshold of automatic cripple). The problem if, IF Nagashima explodes, she’ll kick off a thermonuclear shockwave that will likewise wipe out most of those British fighters right behind her. But when I roll percentile dice (blue = 10s) I literally roll ON CAMERA a 76!! By one point, not only is the Nagashima spared to be recovered and fight another day, but sixteen British fighters (including eight that are double-elite) are also spaced destruction. The eight Japanese bombers that just landed aboard the Nagashima are not so lucky, they are considered lost as they are aboard a crippled carrier. Meanwhile, Japanese fighters likewise go after the Pellew, whipping around her port bow where she ... again ... HAS NO SHIELDS. They target the bridge, and yeah ... these guys don’t miss. I do lose one fighter, but HMS Pellew is likewise crippled, along with eight British bombers that were likewise trying to land and rearm. The Naginata, meanwhile, comes hard about, and REALLY angry, unleashes forward guns on the Burke, already the last British warship on the table. But would you believe almost everything misses?
 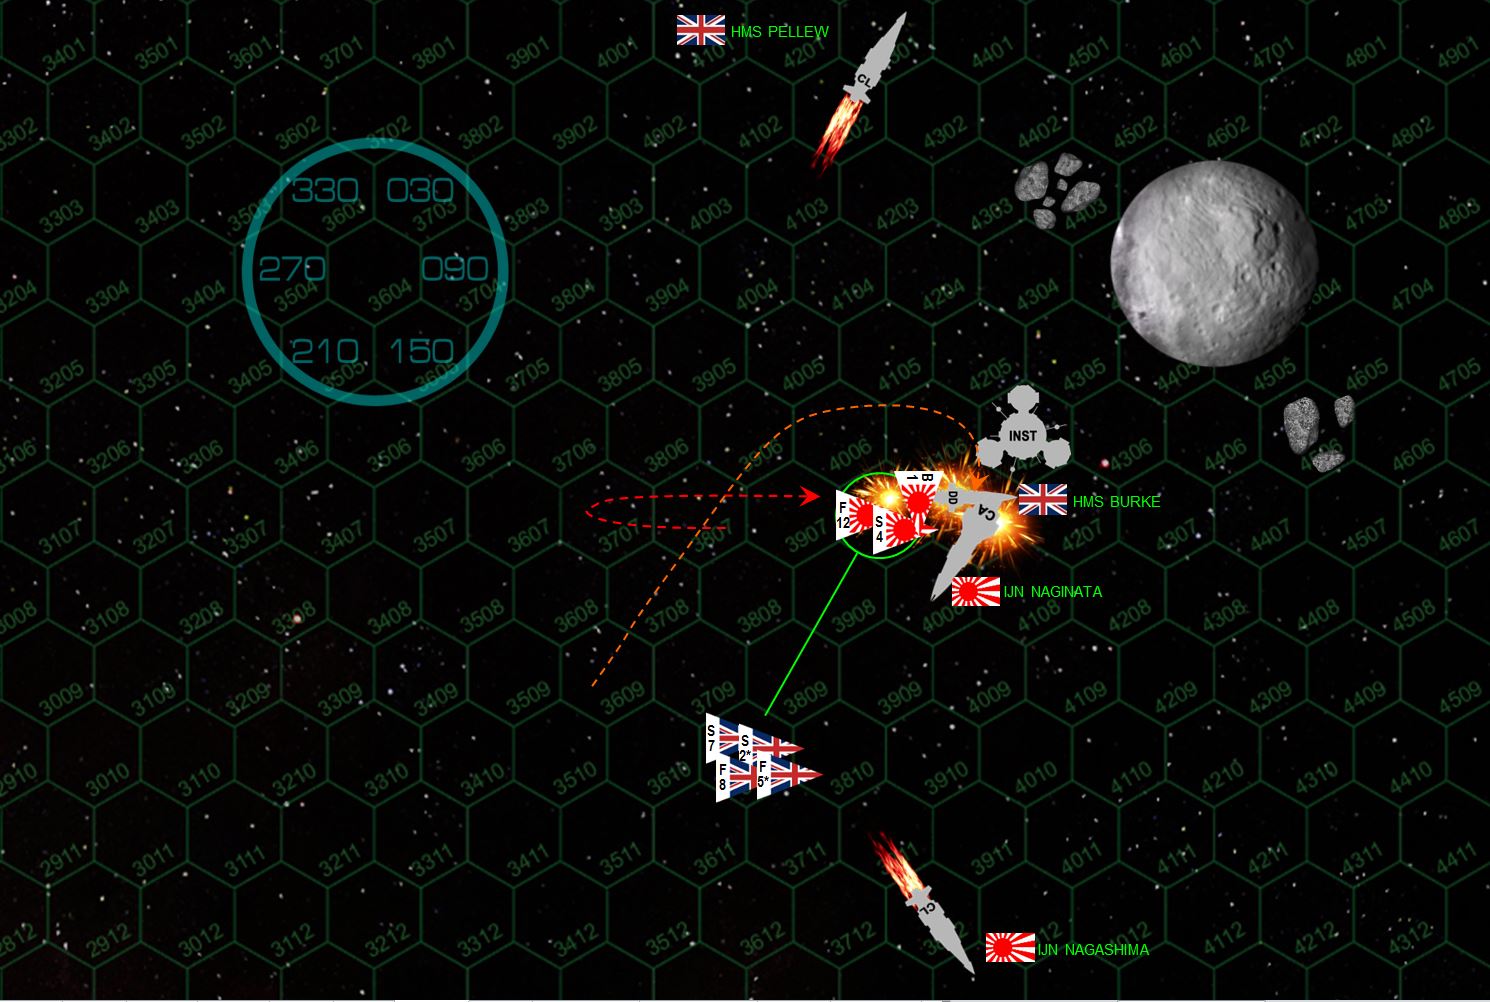 The game ends on Turn 4 with shocking speed. The Naginata loses initiative against the Burke (despite Ozawa’s experience, her ship is also almost four times the mass of the Burke, destroyers are just more maneuverable than heavy cruisers). She tries to keep her vulnerable stern away from the Burke, but the Burke comes hard about and makes a suicidal dive right at the Naginata, winding up in the same hex as the Japanese behemoth, cutting across her stern at less than 50 kilometers (ridiculously close in Darkstar). Burke puts a hail of fire point-blank into Naginata’s stern, and all guns hit DESPITE Naginata’s upgraded shielding. The two syglex emitters do the worse damage (x-ray “lasers”), enough to shut down Naginata’s engines and leave her adrift. Naginata’s last aft barrage doesn’t do enough damage to knock out the Burke, believe it or not (I’ve never hit Burke on her starboard bow yet) .... but the fighters of the Nagashima finish the job with a strafing attack intro the Burke’s engines that leave her adrift as well. Incredibly, this game is a draw. Technically I have the edge in remaining fighter craft, but not enough to win by the required 5% of the starting build-point cost to actually claim a “campaign victory.” (495 point battle, I have to win by at least 25, right now I’m “winning” by just 9).
  We call the game as a hard-fought draw. Indeed, Elessar has passed “Darkstar Command School” – having fought to a draw against an “Oriskany Tier One” force. Yes, he lost his whole fleet, but so did I, and even though I wound up with a pitiful handful of extra points, it is NOT enough to count as a win by the rules of the game (you have to win by at least 5% of the starting point cost of your fleet). So here are the two flagships.
 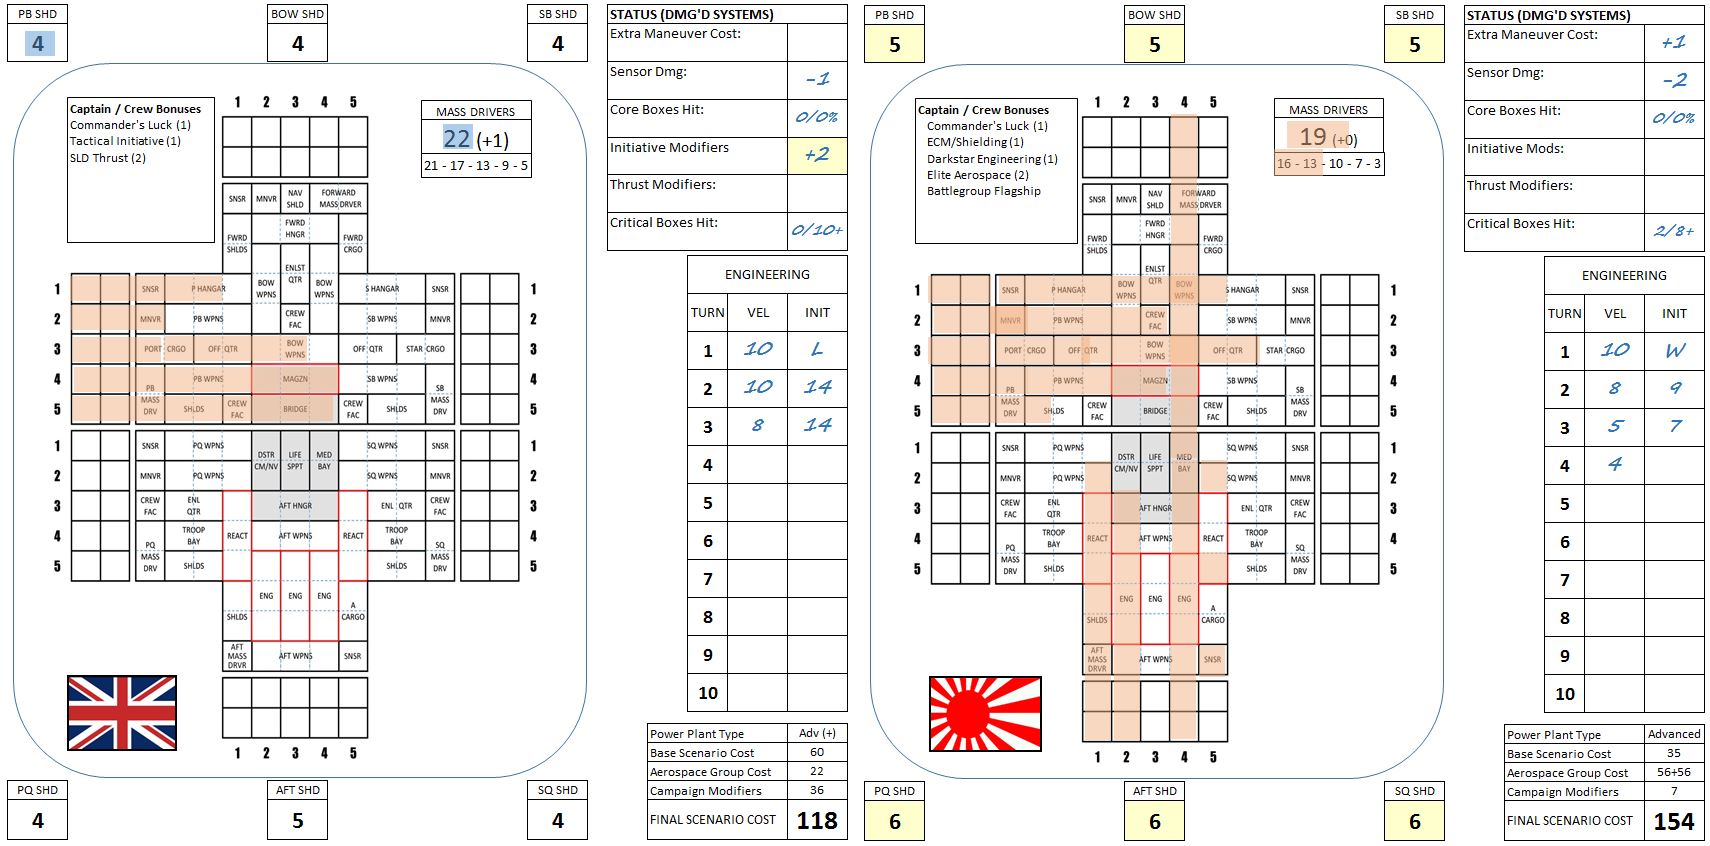 HMS Pellew, with her caved-in port bow. You can see where my fighters deliberately targeted the forward magazines and the bridge. This is one of the fastest ways to take out a warship ... but it’s a small target you have to hit precisely. The Nagashima, meanwhile, was turn asunder from both the port bow and the stern. Again, it is only that 76/75 percentile dice miracle that saved her from outright exploding all over the stars.
 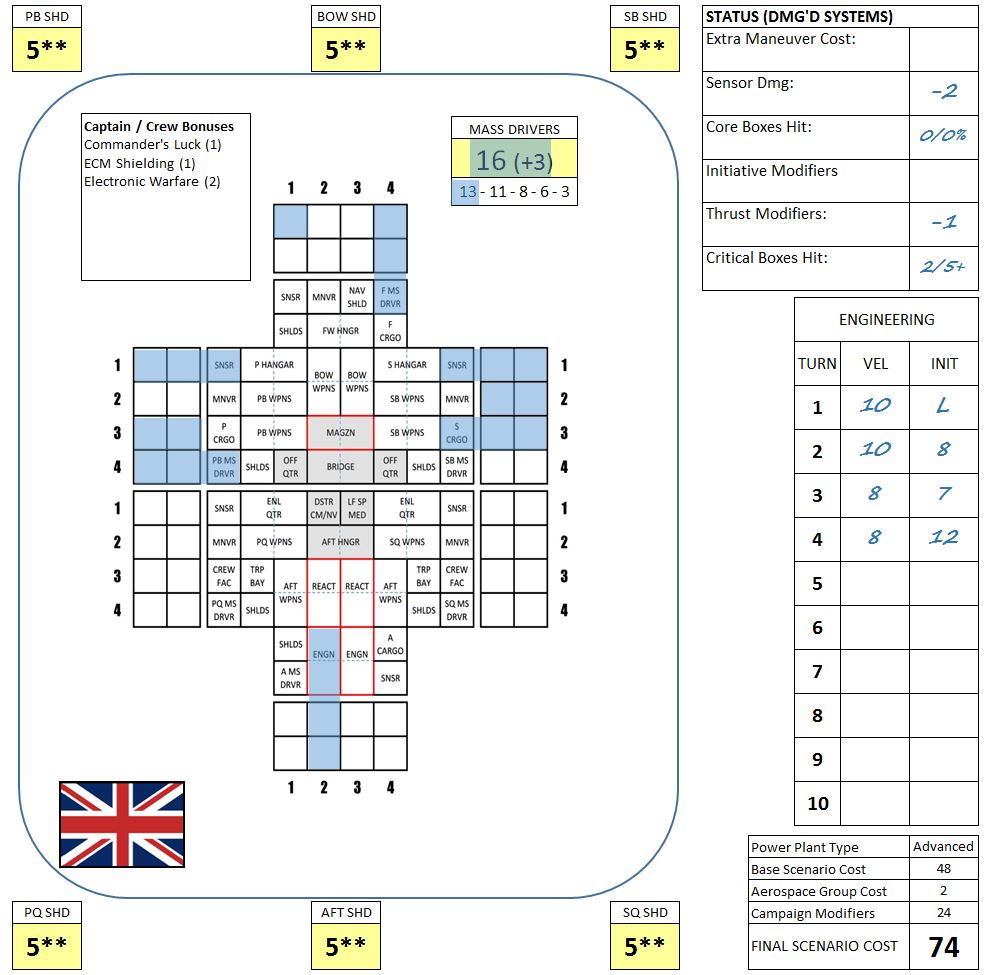 But the real hero of the day was the HMS Burke. She took four powerful hits, but as you can see, they hit her on four different sides thanks to swift maneuvering, so the damage never really had a chance to “pile up” on a particular facing. It was only the fighters that machine-gunned her portside engine that finally managed to knock her out.
 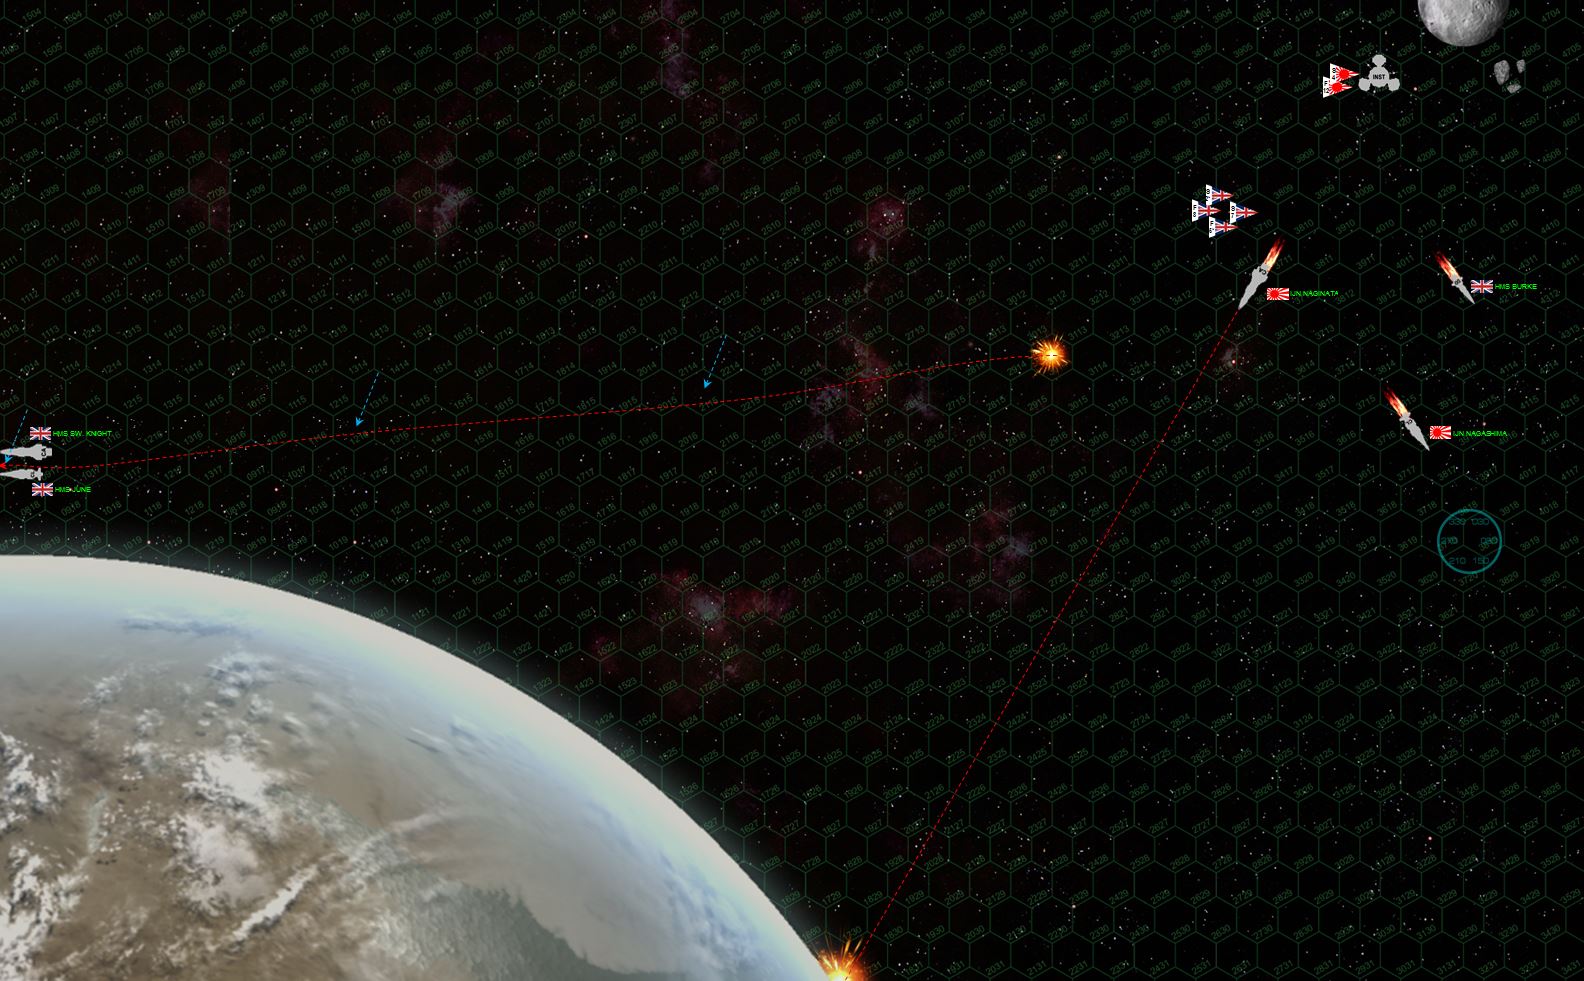 So here’s a zoom out as the battle ends. Crippled ships aren’t just taken off the table, they continue to drift at their last facing and speed, subject to collision with astrophysical objects and gravity. This is what happens with the HMS Swedish Knight and HMS June. Not only do they drift at 8 hexes a turn, but once they end each turn’s movement within 10 hexes of the planet, the drift one hex toward the planet as well. The blue arrows show their positions at the end of each turn, where they are pulled steadily toward the planet. Fortunately, they are also moving fast enough to where they get off the left side of the map before they hit the planet. It’s a near miss, but they’re safe. The same cannot be said of the Naginata, which I didn’t notice was pointing right toward the planet as she was crippled. A few turns later (she was moving at 5), she will collide. Luckily the crew has enough time to abandon ship, taking the flag, log book, and ship’s bell with them. GREAT GAME!
 Another great thing about this webgame was the fact that we had @bloodstrike from Canada and @damon from the UK on the call with us – so we were live on three continents (North America, Europe, Australia) and four countries. Darkstar has now CLEARLY developed a cadre of experienced players (Damon, Elessar, Rasmus, Gladesrunner, Aras, others) who have played dozens of games and now gave the system down (at least for the ships they currently enjoy).
Next step … FULL ON CAMPAIGN!
Desperate Battle against Panasian Dreadnought!
Battle report time! We’re taking a look at the Darkstar game this past Sunday between myself (Panasian League) and @damon (United Kingdom). This was a first look at some of the Second Wave ships that are now available (along with four new factions) – and also a look at one of the battleship designs that have been tweaked.
So in the past, including the very recent past with a battle involving my Germans (with a Tirpitz class battleship) and @damon and @gladesrunner ‘s cruiser task forces … battleships have fared very poorly. They will almost always lose initiative because of their size and low maneuverability (defined by their mass / surplus power ratio). I didn’t want to monkey with the math again, so instead just made a small adjustment … moving all the battleship’s secondary armament to the port and starboard quarters.
The hope was this would at least reduce the efficacy of the top tactic used by smaller ships to murder battleships … that is … to wolf-pack a point-blank series of broadsides and torpedo spreads right against the stern of the ship, which the battleship can rarely protect via maneuver because they are too slow.
Let’s see how this goes!
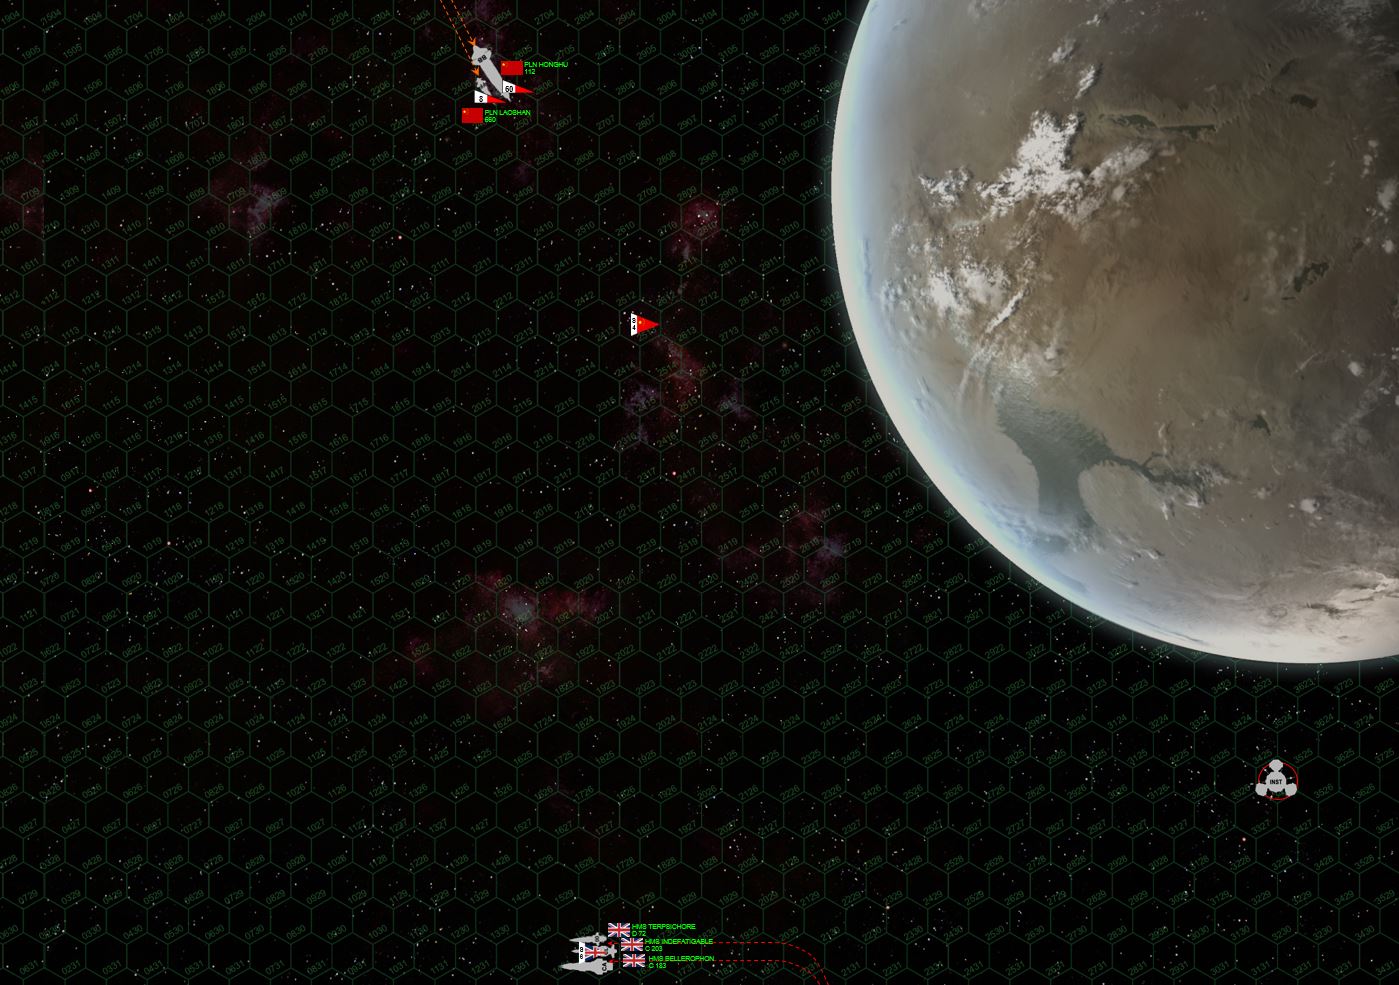 So here’s the opening map. The Panasian battleship Honghu (Red Tiger) is on her way back from an extended war cruise. She is undamaged, but not at 100% efficiency, either (in game terms, no battle or campaign upgrades). Escorted by a single frigate (PLN Laoshan, a Zhienha class missile frigate), she is trying to get back to her port at the lower right. However, the Bellerophon battlegroup (Trafalgar class heavy cruiser HMS Bellerophon, Indomitable class light cruiser HMS Indefatigable, and Falklands class destroyer HMS Terpsichore) is on an intercept course, with orders to “sink” the Panasian battleship before she can make port.
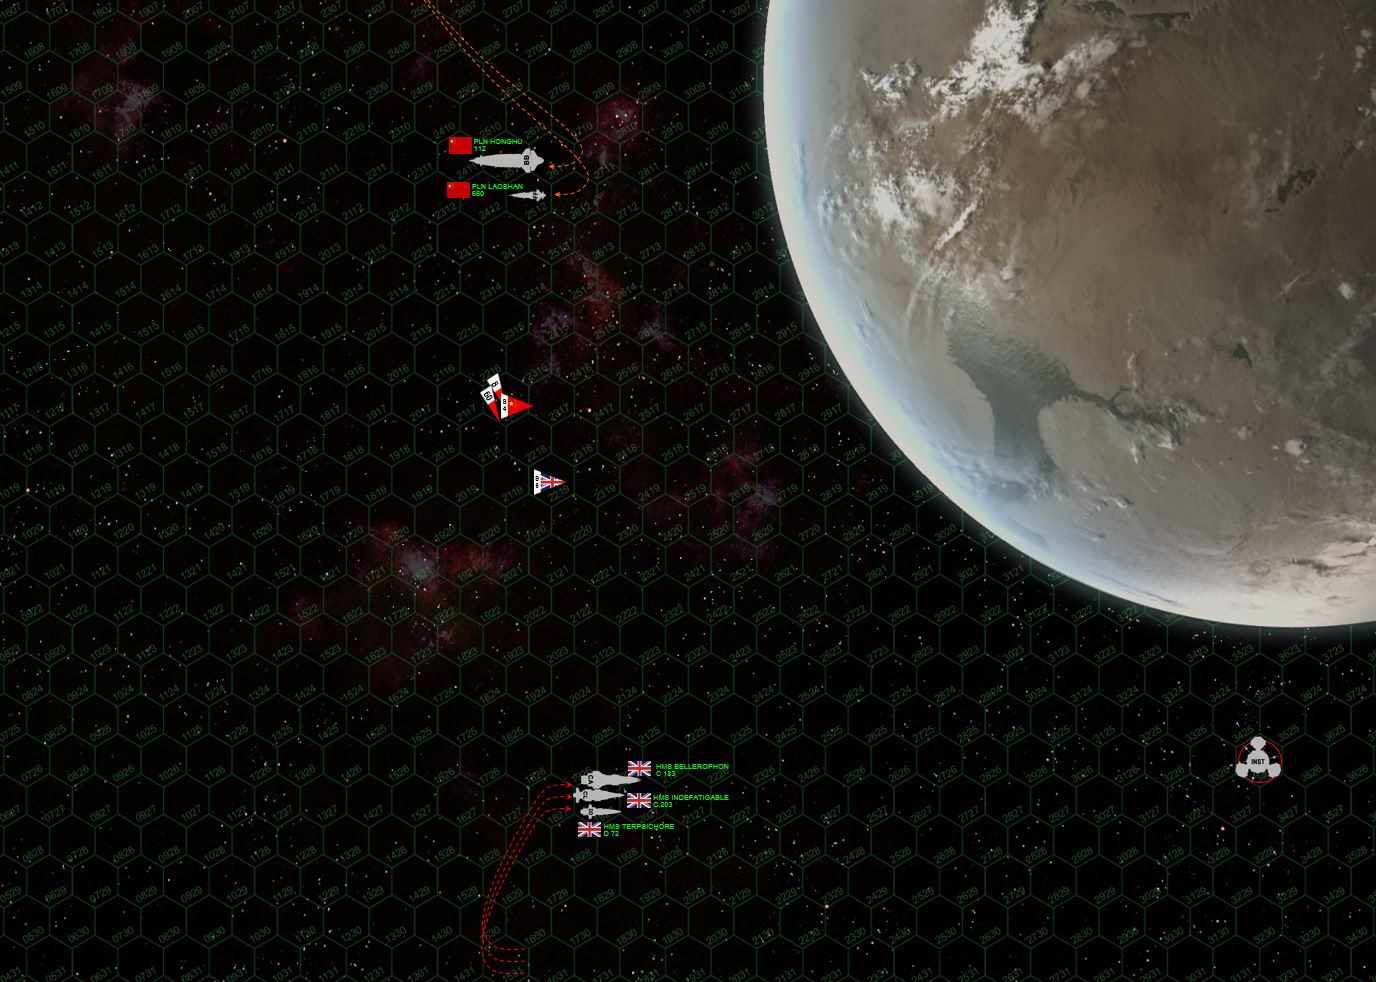 The Panasians are setting a shallow zig-zag course down along the planet, hoping to use the gravity and atmosphere of the planet to at least screen the battleship’s stern somewhat. Both sides now present broadsides at 2700 km, which should be terrifying for the British … but the ENTIRE Panasian volley misses. This is fortunate for the British, since Red Tiger’s initial forward barrage actually scored three lucky hits which left Indefatigable’s starboard bow heavily mauled. But now the Panasians have fired off a huge wave of torpedoes … relatively poor torpedoes that are easy to shoot down, don’t hit often, and don’t do much damage, but there are almost SEVENTY of them coming at the British …
 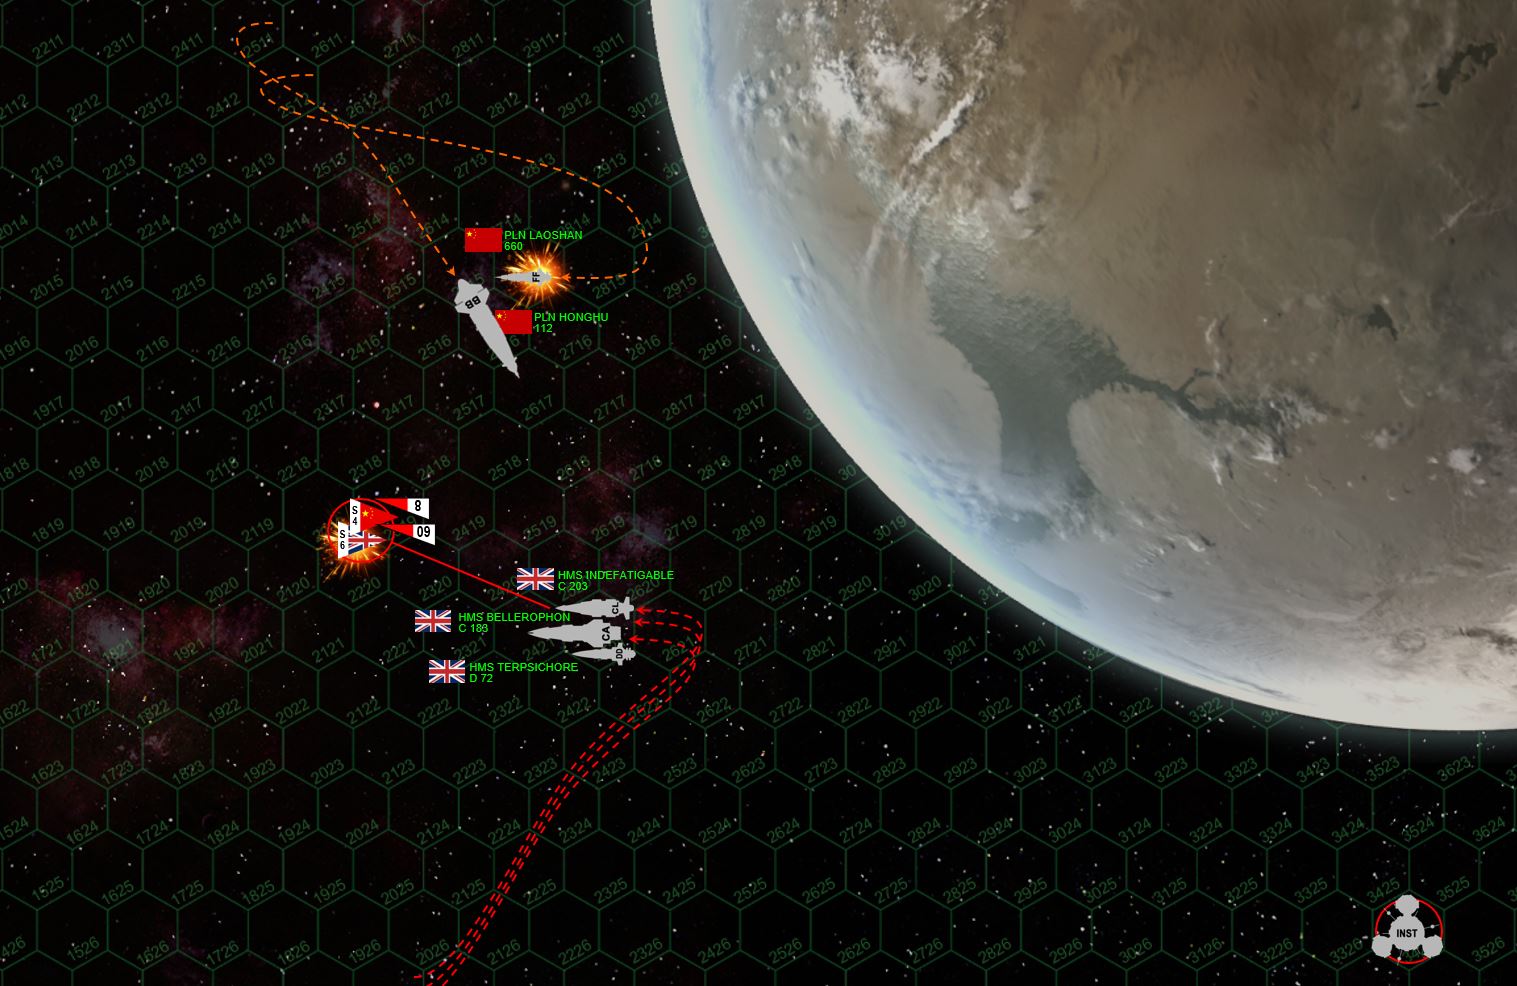 Getting close (in Darkstar terms, the average engagement range in this image is five hexes = 900 km) and here it gets nasty. British scouts are mowed down by Panasian mass drivers as the scouts try to protect the Terpsichore against the Chinese torpedo spread. Many Panasian torpedoes are shot down, and those that survive don’t do well against the British shields (recently upgraded aboard HMS Terpsichore). But a few get through, completely smashing out Terpsichore’s starboard engine and reactor array. She’ll be at -1/3 thrust for the rest of the game. Explosive broadsides are traded, damaging the Red Tiger slightly but blowing the Laoshan clean out of the battle (crippled, will later be recovered). Indomitable is also brutally mauled, especially along the starboard bow by the forward guns of the Red Tiger (gigantic 30 teravolt EPCs, the largest EPCs allowed in the game)
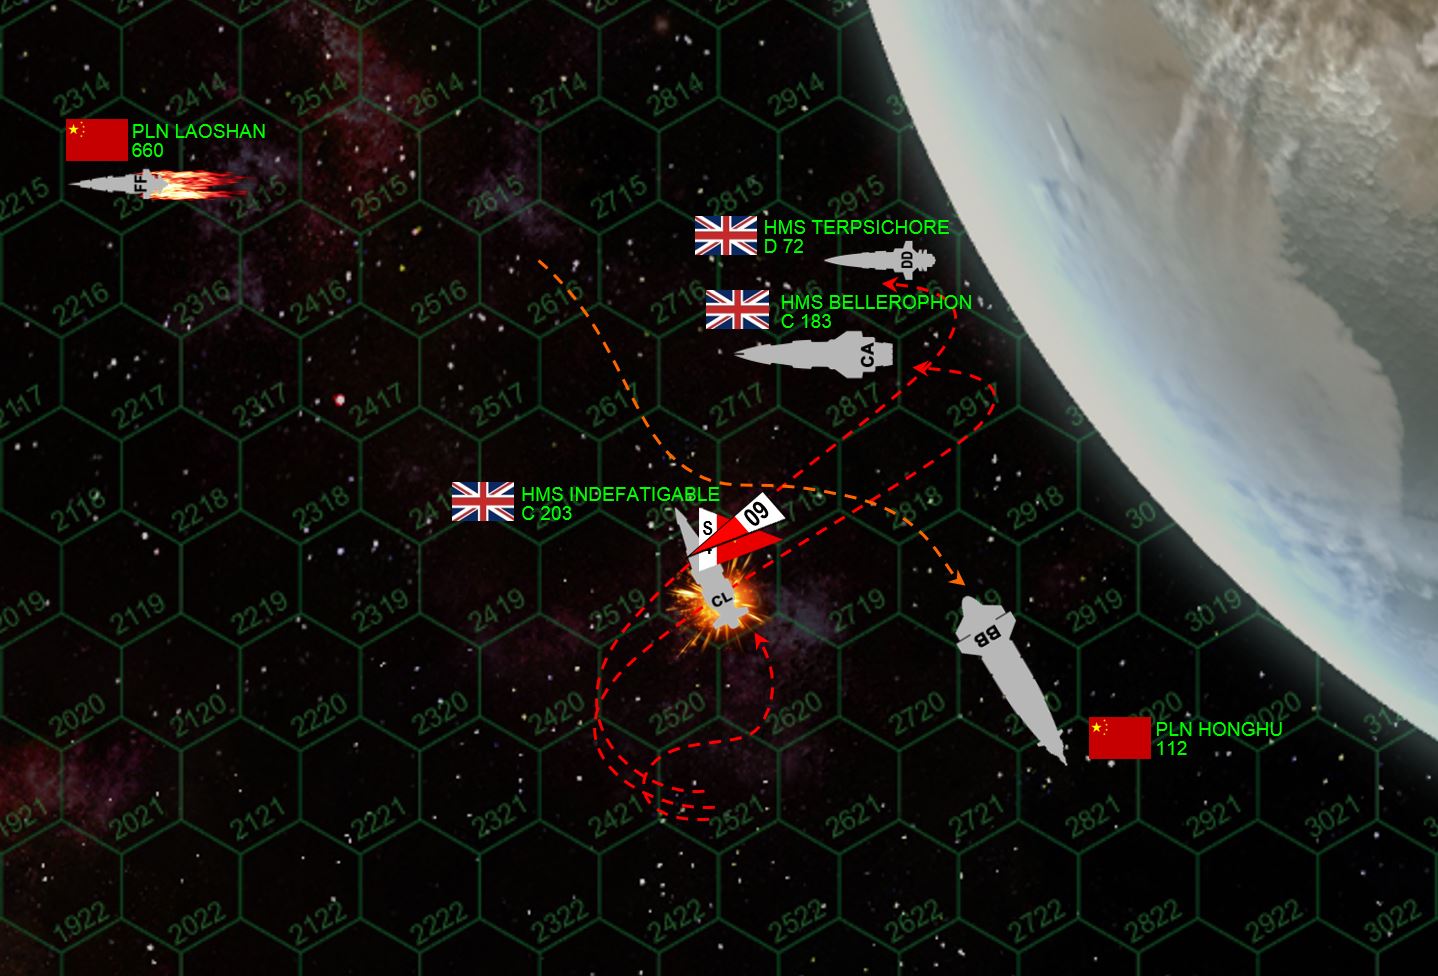 The Panasians seem to be running out of time. At last the Red Tiger can no longer keep her fantail safe from British broadsides, note that both HMS Bellerphon and Terpsichore are now right across her stern with every gun aboard at the murderously close range of 500 km. Furthermore, with the Laoshan now crippled, the Red Tiger has no escorts. However, the British broadside is not executed perfectly. Note the Indefatigable, out of position and hitting Red Tiger’s starboard quarter, not her stern. This is going to have terrible consequences later. The British broadside thus falls short of knocking out the Red Tiger, but still costs them the Indefatigable, ravaged by a 60-torpedo spread of Panasian warheads (note the other two British ships are a little too far away to provide effective mass driver defense), while the aft guns of the Red Tiger (including one of her two gigantic 60-kilogram plasma projectors) leave the Indomitable burning and adrift, crippled in space.
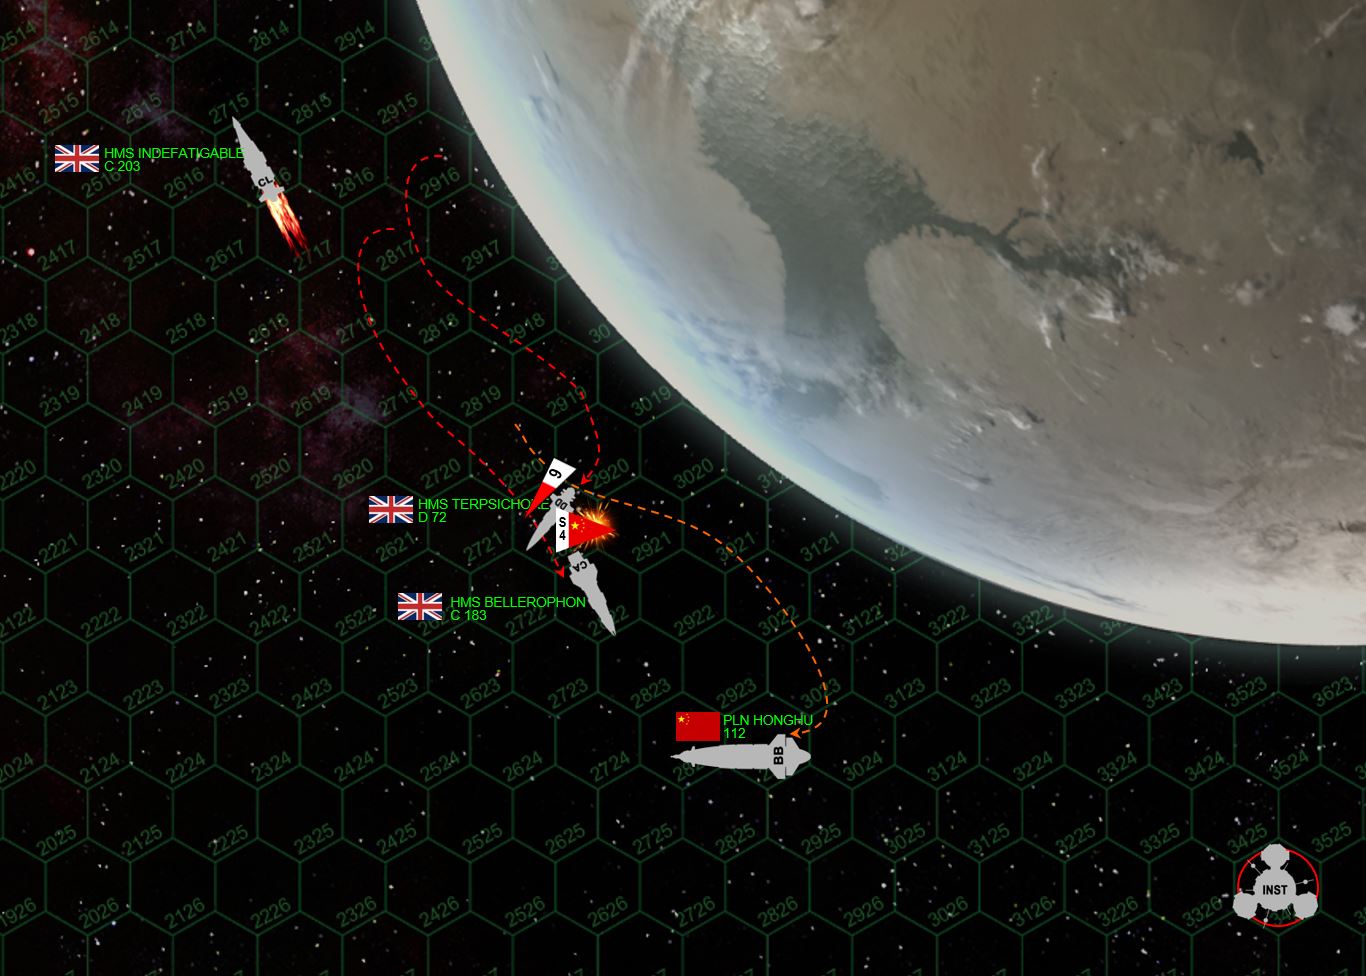 The Red Tiger doggedly continues to “staircase” down the planet’s surface, using the planet’s gravity to tug her bulk just a little closer to the atmosphere and thus hopefully SLIGHTLY more protected. As the Indomitable drifts upward (although only moving two hexes a turn, or six kilometers per second), she actually slips into a semi-stable orbit of the planet, but barely missing being pulled down into the atmosphere and destroyed forever. She will be thrown clear on Turn 8. Meanwhile, the vengeful Bellerophon and Terpsichore cut hard turns to port to pursue the lumbering Panasian giant. They will always outmaneuver her, but the Red Tiger can always outshoot them, even with only half her guns (presuming the British stay behind her and never allow her to use her forward batteries).
 No guts, no glory. The Bellerophon closes to point-blank range for a second broadside directly into the battleship’s stern. A gutsy move, and perhaps even the correct one, if she still had a light cruiser or her destroyer escort doing the same thing at the same time. The Bellerophon’s prow is all but blown clean off, her starboard bow cored like an apple, starboard bow shields collapsing, and fires now started on the bridge. Forward magazines have exploded, mass driver mounts are gone, hangars are gone, sensors and maneuvering thrusters are gone … core damage also means there is heavy losses among the crew, in fact she already has a 75% chance of being forced out of the action. But the “Billy Ruffian” stands tall, Damon rolls a 92 percentile dice. SHE IS STAYING IN ‘TIL THE FIGHT’S DONE!
 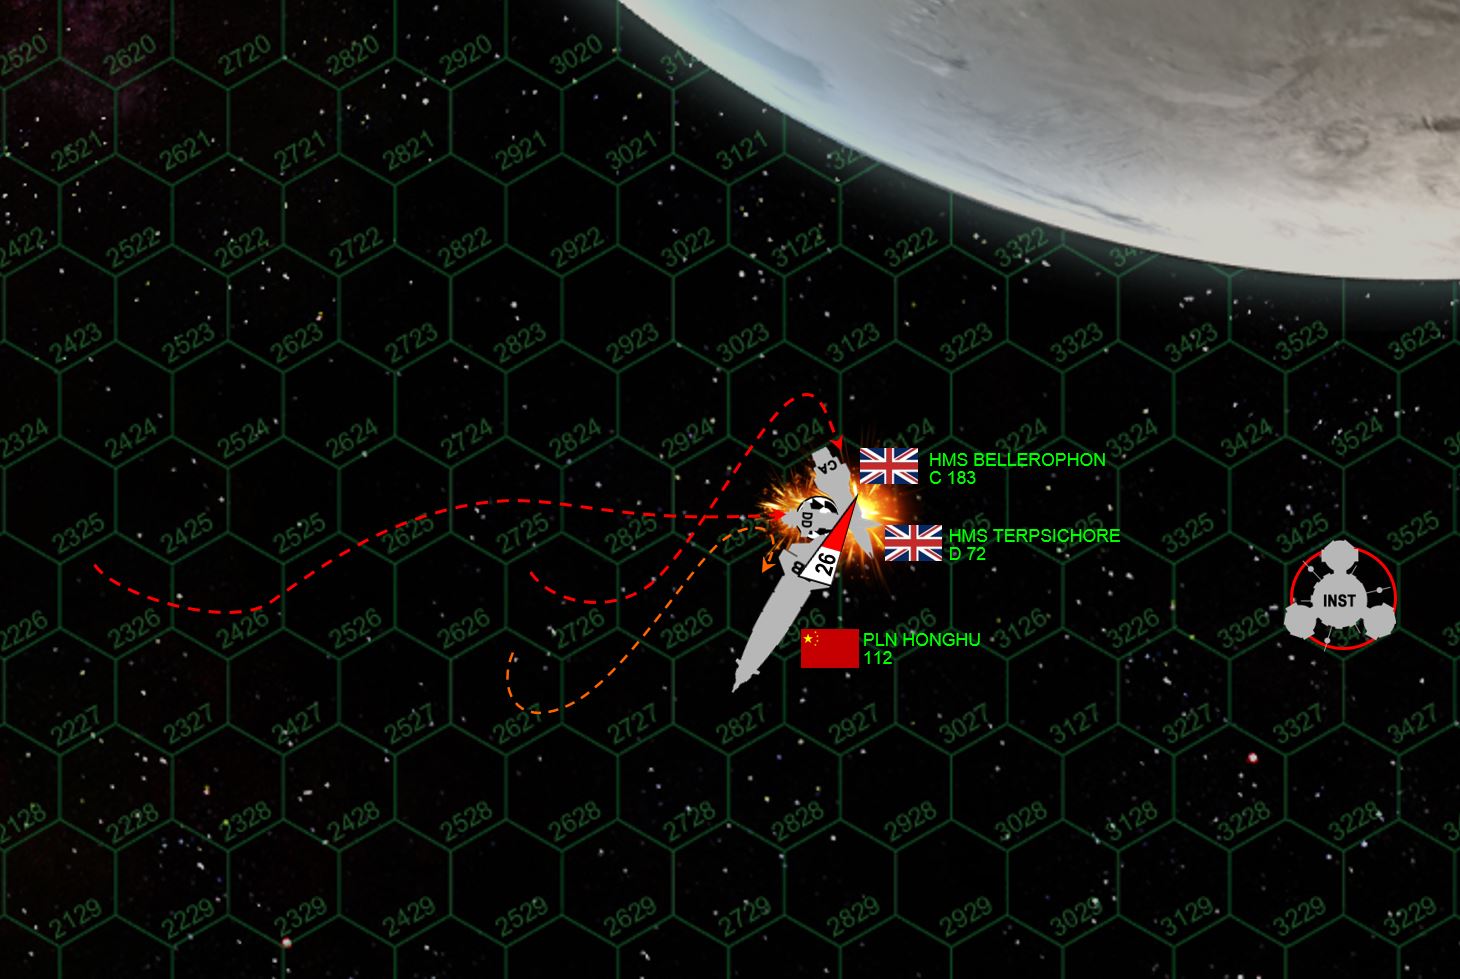 At last both British ships close for ANOTHER point-blank broadside against the Red Tiger’s fantail. To make this maneuver with damaged thrusters, Bellerophon must present her gutted and unshielded starboard bow. ALL HANDS – EXCEPT GUNNERY CREWS – TO LIFEBOATS! The Terpsichore does the same. Both ships are gone, they know it … by now they’ve just taken too much damage. But can they take the Red Tiger with them, and at least force a draw? The odds say yes, by now the Red Tiger’s stern is torn asunder and she has major fires in engineering (11 critical boxes, easily enough to cripple a heavy cruiser, enough to explode a light cruiser, and a destroyer doesn’t even have 11 critical boxes in its frame). But the luck of the dice just punishes the British again. Not only is the Red Tiger’s stern shield still up (about the only external system the Red Tiger still has on this facing), but the Bellerophon scores a terrible roll to hit on her final broadside. The Red Tiger survives, while her hail of Tsing Tao torpedoes blows BOTH Bellerophon’s main forward turrets out of the hull and also explodes the bridge (the captain will make his survival roll). The gunnery of the Red Tiger than likewise crushes the Terpsichore, exploding forward magazines and putting her out of the fight as well.
 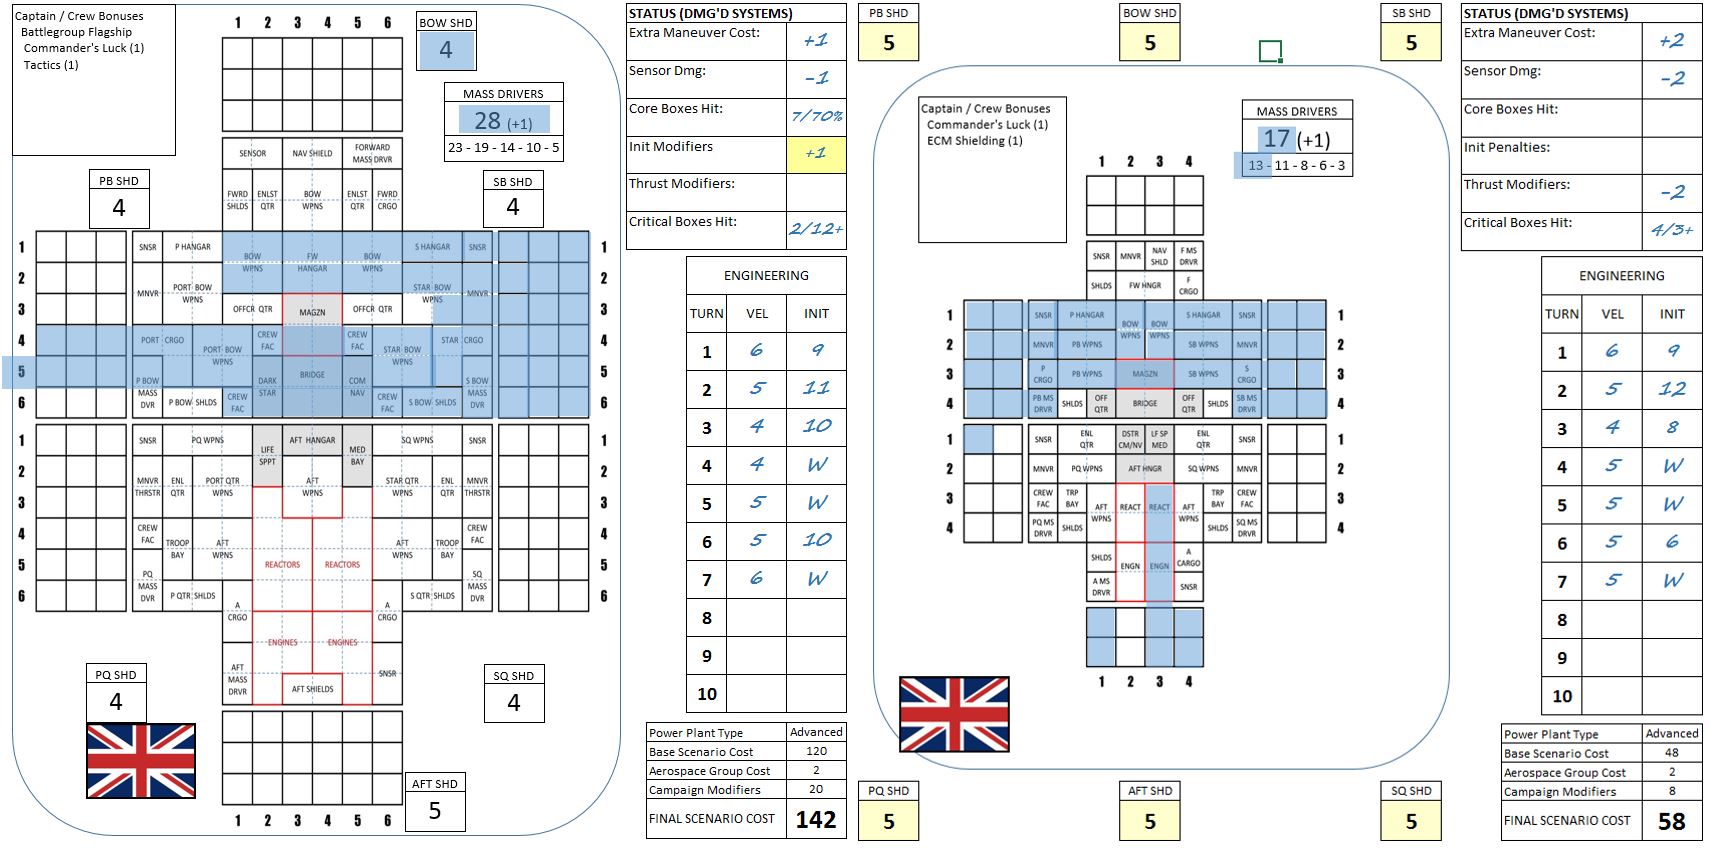 This cruel battle, by points, is a crushing 276-33 Panasian victory. I won’t lie, it feels good to win a game, and I’m also “glad” to see the British lose a game. For almost six months now, they’ve had an almost unbroken string of wins with Justin, Dave Hawes, Jennifer, and Damon. I was starting to worry if the faction was OP. Also, I am very glad that a battleship performed well. These “alpha predators” of Darkstar had lately been the “alpha clay pigeons” helpless lumbering elephants torn apart time and time again by packs of wolves and tigers. No more.
  All that said, this game was a LOT closer than the points would suggest. By averages, this should have been a draw, at least on the last turn of the game. A few missed opportunities by the British to put UNITED, COMBINED broadsides across the fantail of the Red Tiger might also have tipped the game. But even so, it came VERY close. Note the twelve boxes of critical damage done to the Red Tiger’s engines and reactors. Battleships start with a cripple number of 19+ . . . -12 critical hits = a 7+ to cripple her on a d6. So Damon was just one hit away from at least having a chance. Four more critical hits would have given him better than even money with a 3+ chance. And each of Bellerophon’s EIGHT main guns do four points of damage at this range. So literally one more well-placed hit could have made all the difference. I guess after that “1” rolled at the end of the Gold Beach Panzer Leader game, Lady Luck decided Damon owed her one. =)
PANASIAN BATTLESHIP SIGHTED! ACTION STATIONS!
A live game of Darkstar is starting RIGHT NOW – where community member Damon will take on my Panasian battleship and escorting frigate. If you’re interested in checking it out as it plays, ping me a PM and I will send you a link to the web conference.
 PANASIAN BATTLESHIP! Can Damon's British fleet stand tall?
Panasian Light Missile Cruiser Sighted!
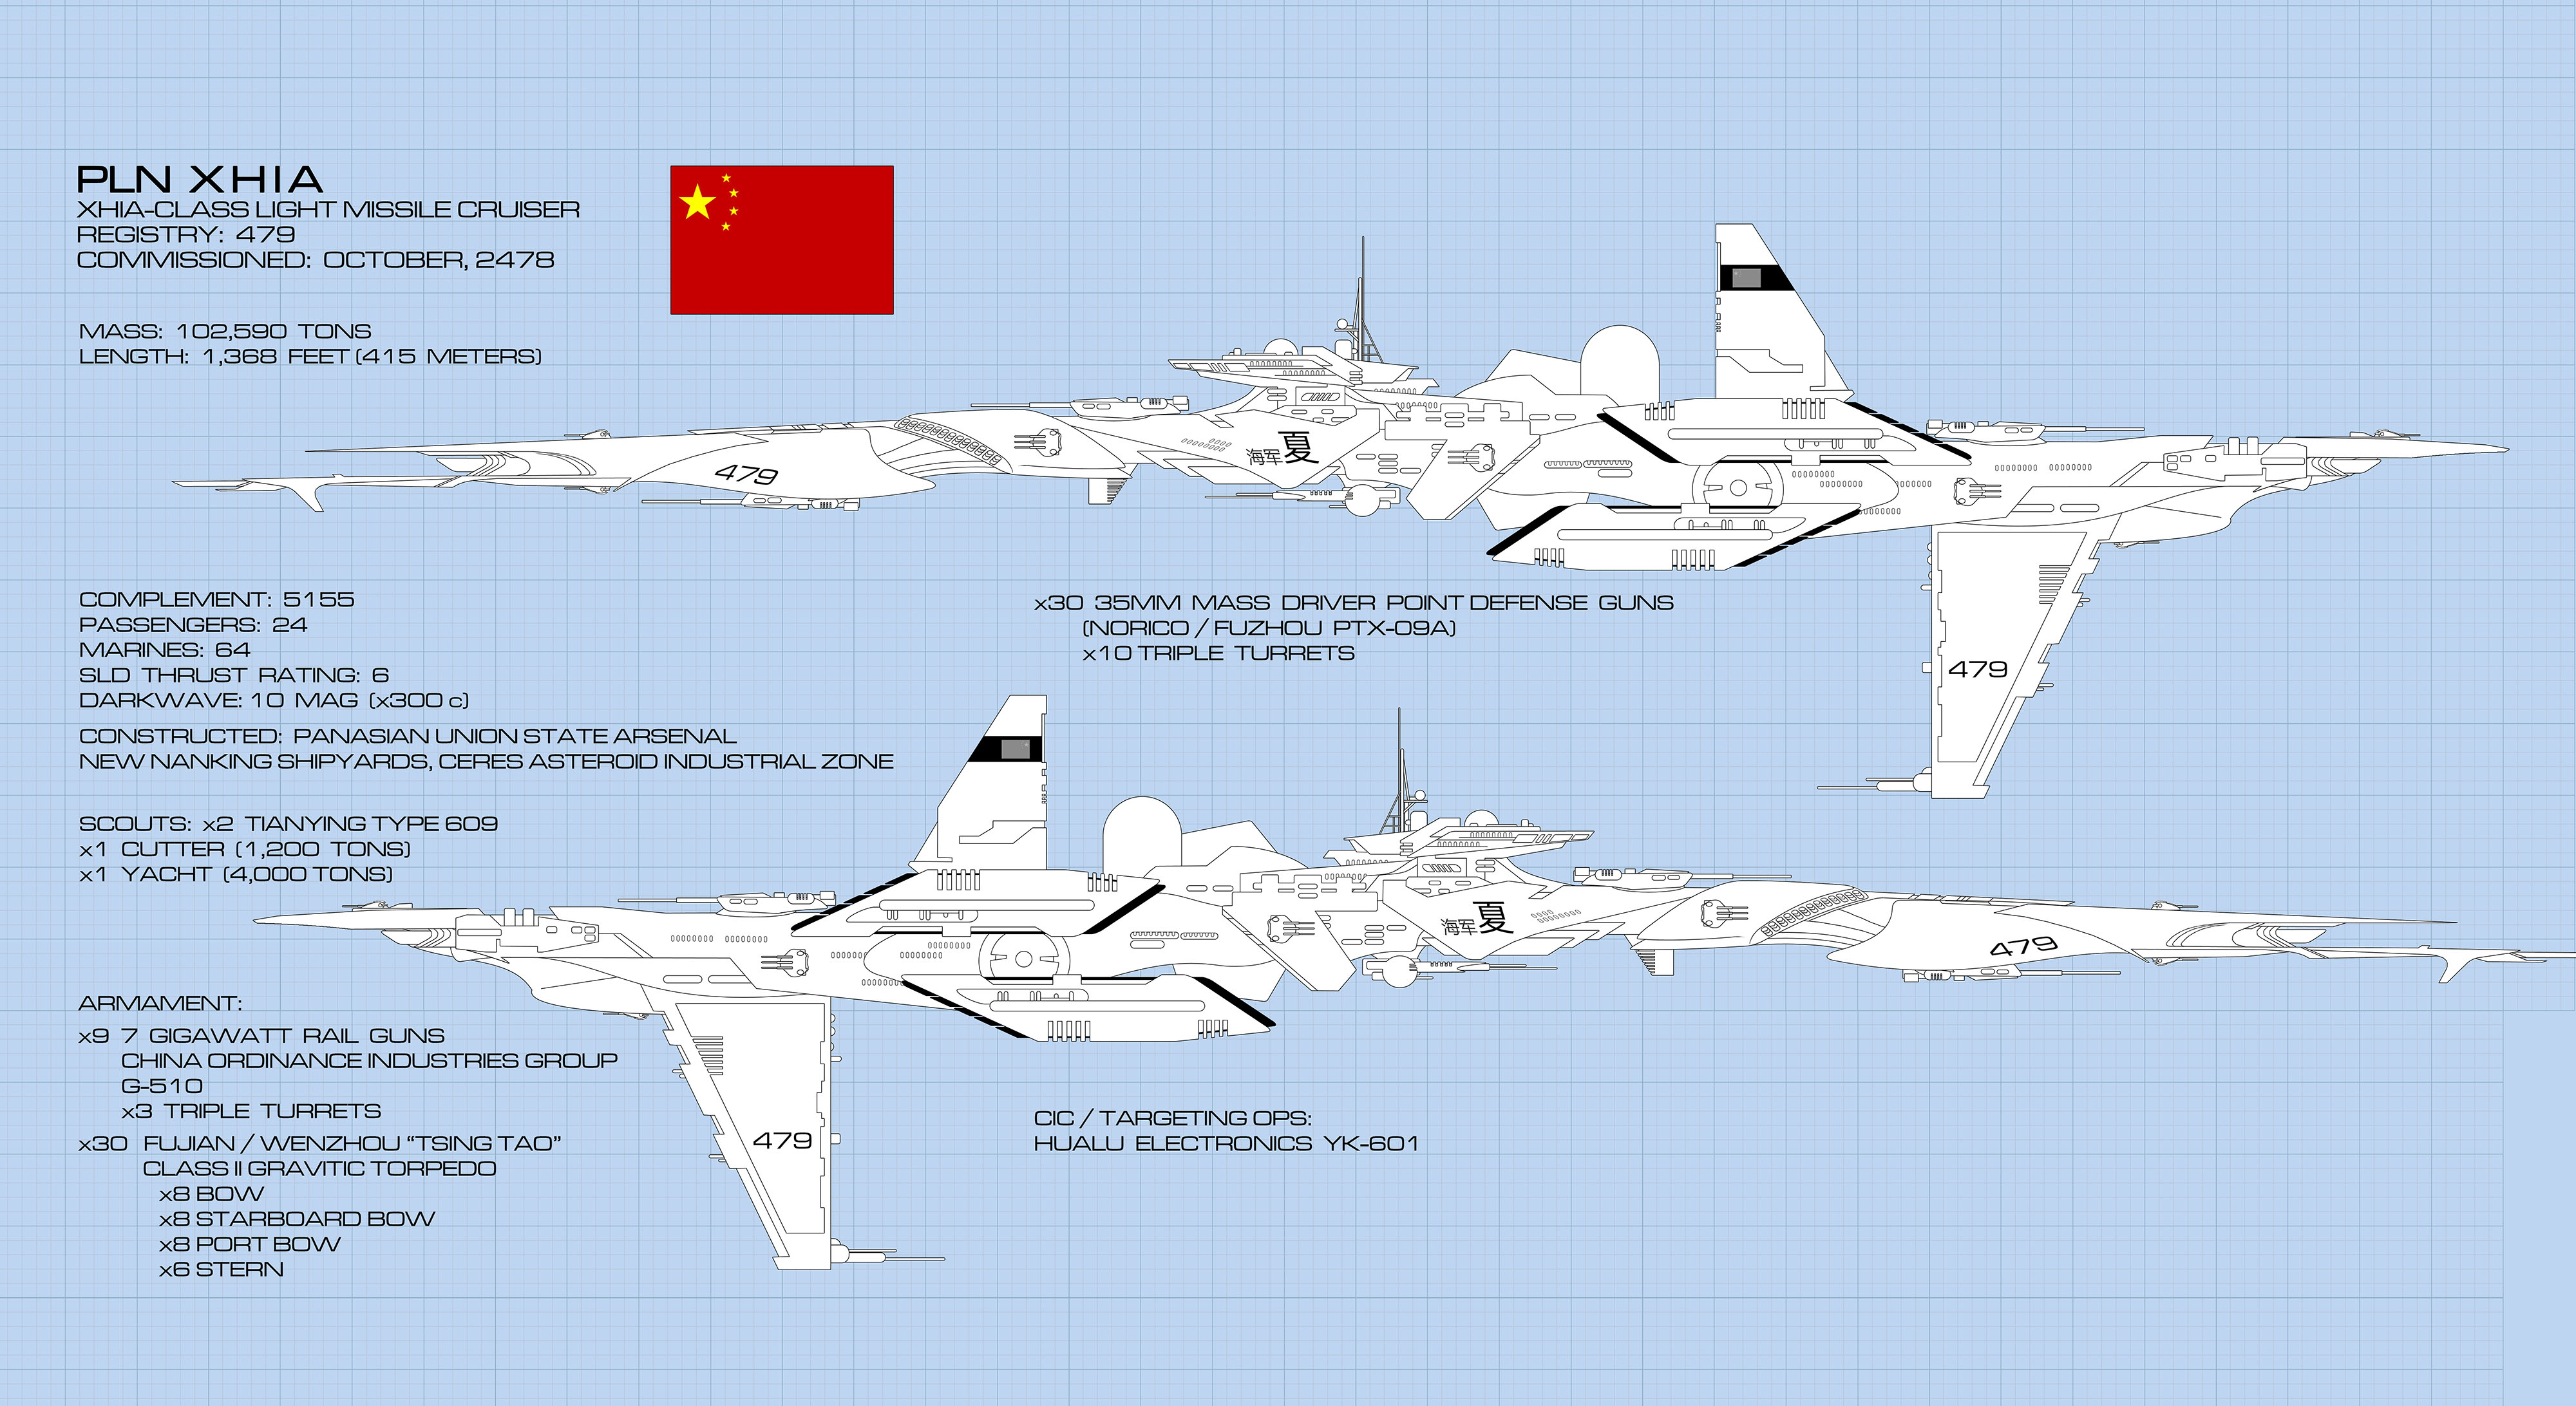 Here is a slightly low-res (easier for posting) image of the Xhia-class light missile cruiser for the Panasian League, one of the new warships in the "Second Wave" Darkstar Ships and Faction book (.pdf below). She's sleek and pretty, but actually rather old in the Darkstar 'verse, one of those ships that SHOULD have been retired decades ago, but somehow keeps winning victories when enemies underestimate her and or one of her dozens of sister ships.
Wave Two RELEASE: New Factions and Warships for Darkstar
“Second Wave” Darkstar warships and factions have arrived.
- Four new factions
- 20 Warship classes for those factions
- 10 new warships for existing factions
- 30 warships in all
Wave Two Factions and Warships for Darkstar - ALMOST DONE!
Just a quick update to let everyone know that Darkstar “Wave 2” is entering final stages of preparation. I should have a final .pdf available for everyone who’s interested by tomorrow at the latest.
THIS IS NOT an update or correction to any rules. Instead, this is strictly an additional roll-out of factions and warships to expand what’s available for community members who play Darkstar.
Four new factions, including 20 new warship classes.
Ten new warship classes for the original factions.
Thirty warships classes in all!
Including the absolute most powerful warship that is legally possible in the current rules of Darkstar, and she doesn’t belong to any of the “Ten Navies” of Known Space, which means you really get a peek at a FIFTH new faction!
Stay tuned, and thanks as always for all the great community support.
 Here is a LOW-RES preview of what might be the most powerful ship in the Darkstar Royal Navy: The Ark Royal class supercarrier. This is just one of the thirty new ships (including ships for four new factions) being rolled out for Darkstar in the next day or two at the most. She carries 88 combat aerospace craft, a mix of fighters, bombers, scouts, and even two gunboats!
Update: Wave 2 Ships for Darkstar
Update to “Wave Two” Warships and Factions for Darkstar:
Apologies, all … but a series of commitments last week prevented me from devoting the full amount of “firepower” this new release deserves. Please rest assured that this new “Wave Two” release of Warships and Factions is now started, and I hope to get it out sometime next week.
Materials in the new .pdf will include:
Warships for four new factions
- New Roman Alliance
- Panasian Union
- Arab League
- Indian Republic
Including:
- Ship rosters
- Historical writeups
- Warship Record sheets
Each faction will ghave five warship classes presented, for twenty ships total.
Also:
Ten new warship classes spread across the six factions already presented (United States, United Kingdom, Imperial Prussia, Japan, Holy Russian Empire, Corporate Consortium)
So that’s 30 warship classes total!
The .pdf will be made available free of charge here on Beasts of War, just like the original release was back in December.
Weekend wargames of Darkstar are available to anyone on line, al always. Just contact me via PM if you’re ever interested.
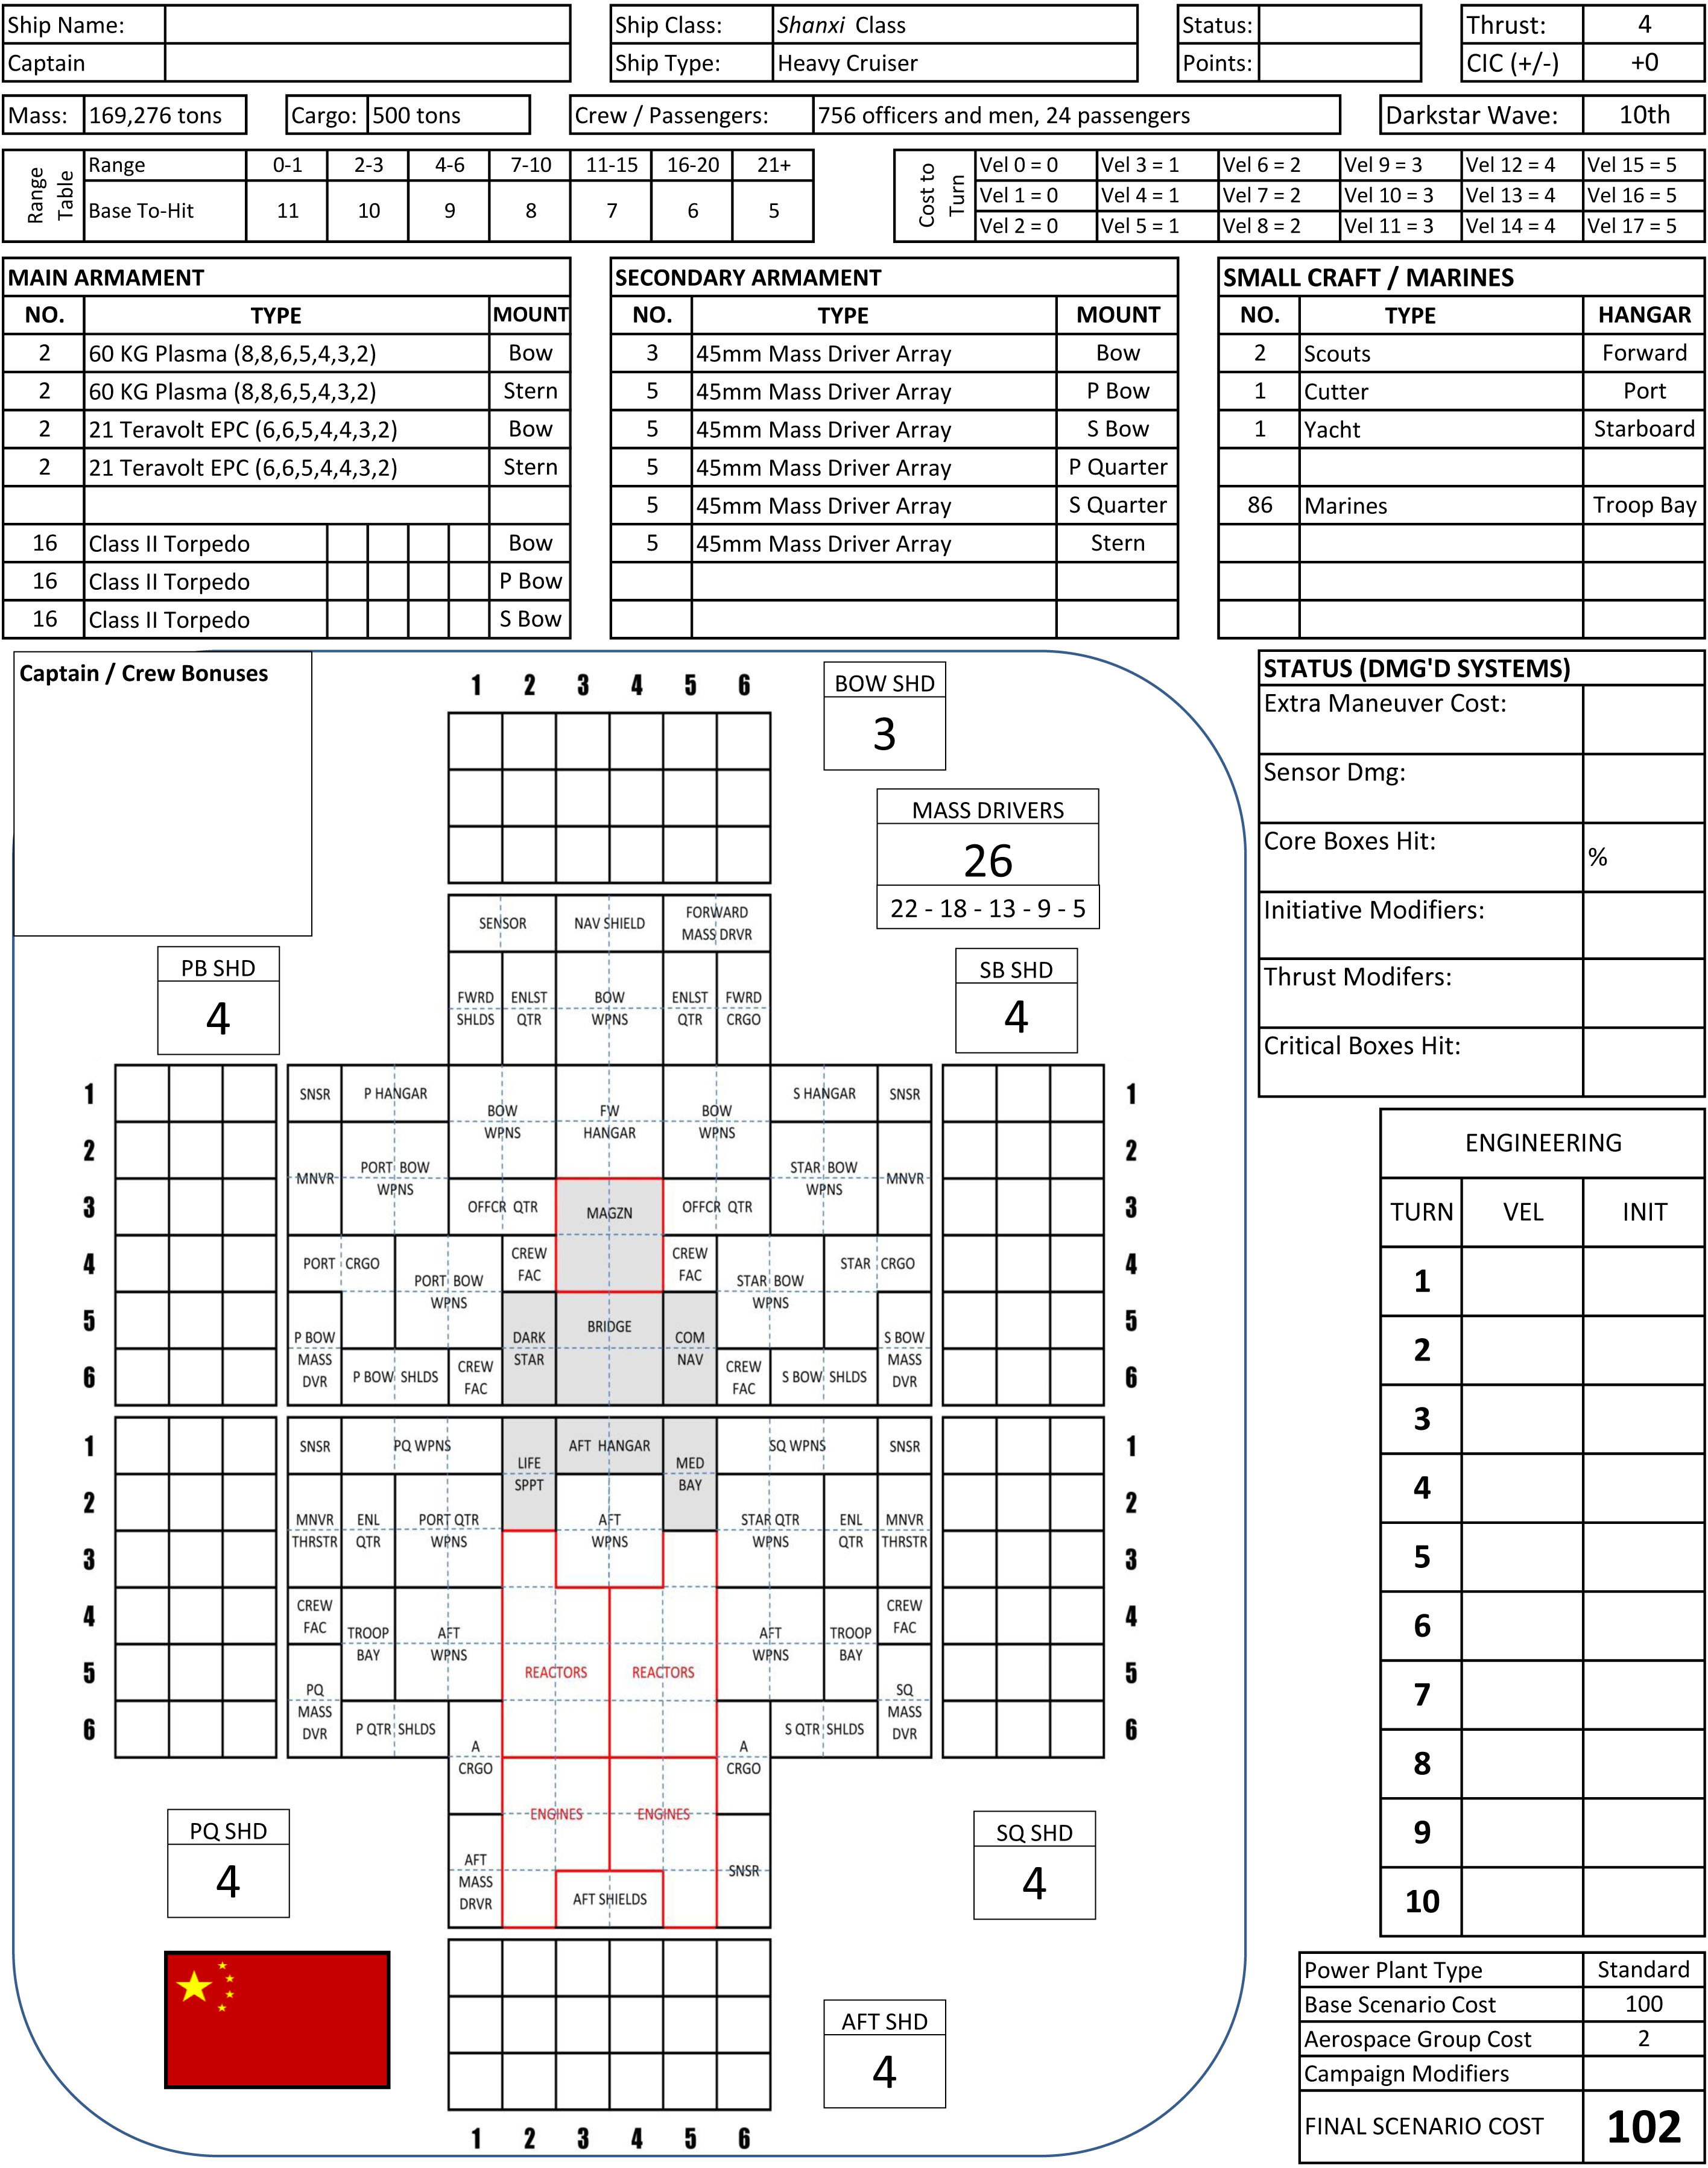 One of the warship record sheets available for the "Shanxi" class heavy cruiser, just one of the new warships available for the Panasian Union.
 Battle Report: Rasmus v. Oriskany (Japanese v. French)
This weekend @rasmus again stepped to the Darkstar table, where he may have caught a little of the retribution due to @damon instead. In summary, my French battlegroup of the New Roman Alliance (Capt. Rafael deChalemonde, commanding aboard the Foch-Hispaniola class light cruiser NRS Leclerc) has been getting the worst end of the stick lately from Damon’s Trafalgar battlegroup. I was beaten up so bad last week, in fact, that I lost a ship and a character for good. In an effort to realign my battlegroup for better success, I have a new Contessa class light carrier and a Drusus class torpedo corvette. I was planning on testing this new battlegroup on Damon, but Rasmus wanted to play this week so his Japanese Sendai Byo battlegroup faces off against my French instead.
DeChalemonde and his commanders have lost something like 4 games in a row, with only one draw breaking this streak, and even that draw was really a defeat. Now, stinging with wounded pride, they have one last chance to redeem themselves – at the ongoing Battle of Les Troie Filles.
The Battle of Les Troie Filles has been simmering for months now in the Psi Serpentis A system. A French-held gas giant has been beset by the British and Japanese, whose governments claim that the French lease on this planet has legally expired. Three valuable moons of this gas giant, dubbed “The Three Daughters” of the star system’s Marquis de Nouveau Châtillon, have been periodically invaded and counter-invaded by the three warring powers.
The situation on one such moon has settled into frustrating stalemate. In an effort to break the deadlock, a battalion of 600 French Foreign Legionnaires are being inserted on the far side of the moons, outflanking current Japanese Army and SNLF positions on the surface. However, the notorious and mysterious Japanese spy known only as “Red Kitsune” has alerted the Japanese high command of the French plan, and have a powerful cruiser battlegroup poised to intercept.
 So here’s the mission: The French are entering from the right, the Japanese from the left. The target hex for the planetary invasion is marked by the red circle (180 kilometers across, remember). The French have three planetary assault ships (15 damage points, shields 4, speed 6, turns 1 / round, 30 VP to the Japanese for each one destroyed, 30 VP to the French for each one that makes it to the invasion hex). The French have the light cruiser Leclerc, the destroyer Corsica, the light carrier Priscilla, and the torpedo corvette Sica. The Japanese have the heavy cruiser Kama, the light cruiser Sendai Byo, and the two strike frigates Urakaze and Sakito. The French have seven additional land-based bombers to balance out the points at 265 each.
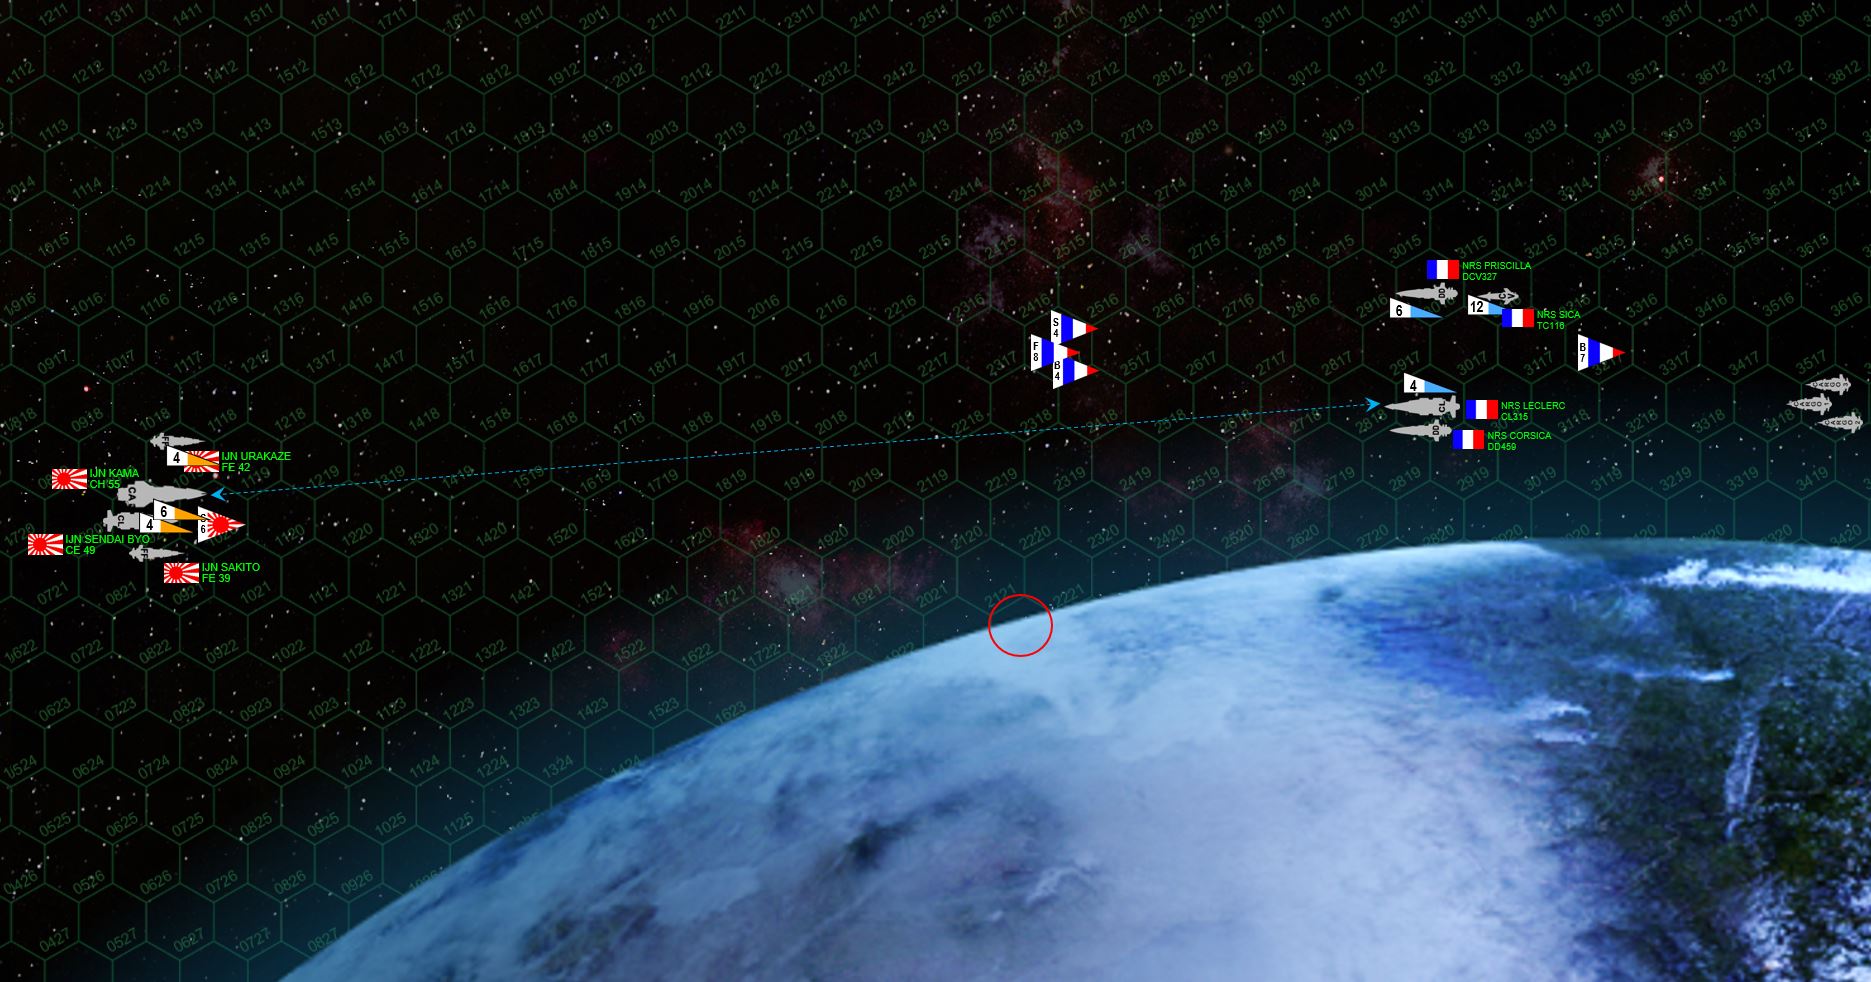 The fleets enter the battlespace in high orbit over the Troie Filles moon. Both sides launch torpedoes. The French have far more (thanks in part to the carrier Priscilla and torpedo corvette Sica), but the Japanese torpedoes are the deadly Ki-45 “Toryu” (Dragon Slayer). Perhaps even more ominously, the French are also launching fighters and bombers. The French approach vector has been quite fast, as deChalemonde is determined to get his warships between the Japanese and the troops transports that have started their assault run toward the moon’s surface.
 Taking the moon’s gravity into account, the French and Japanese battlegroups close to the orbital invasion zone. The French, in particular, have dipped VERY close to the moon intent on staying out of the Kama’s full broadside of massive 18-teravolt electron particle cannons. Those Akashi class strike frigates, meanwhile, mount ALL their guns forward, making them vulnerable but allowing them to ‘stab” right at the enemy with full firepower to bear (i.e., no need to maneuver to broadside).
 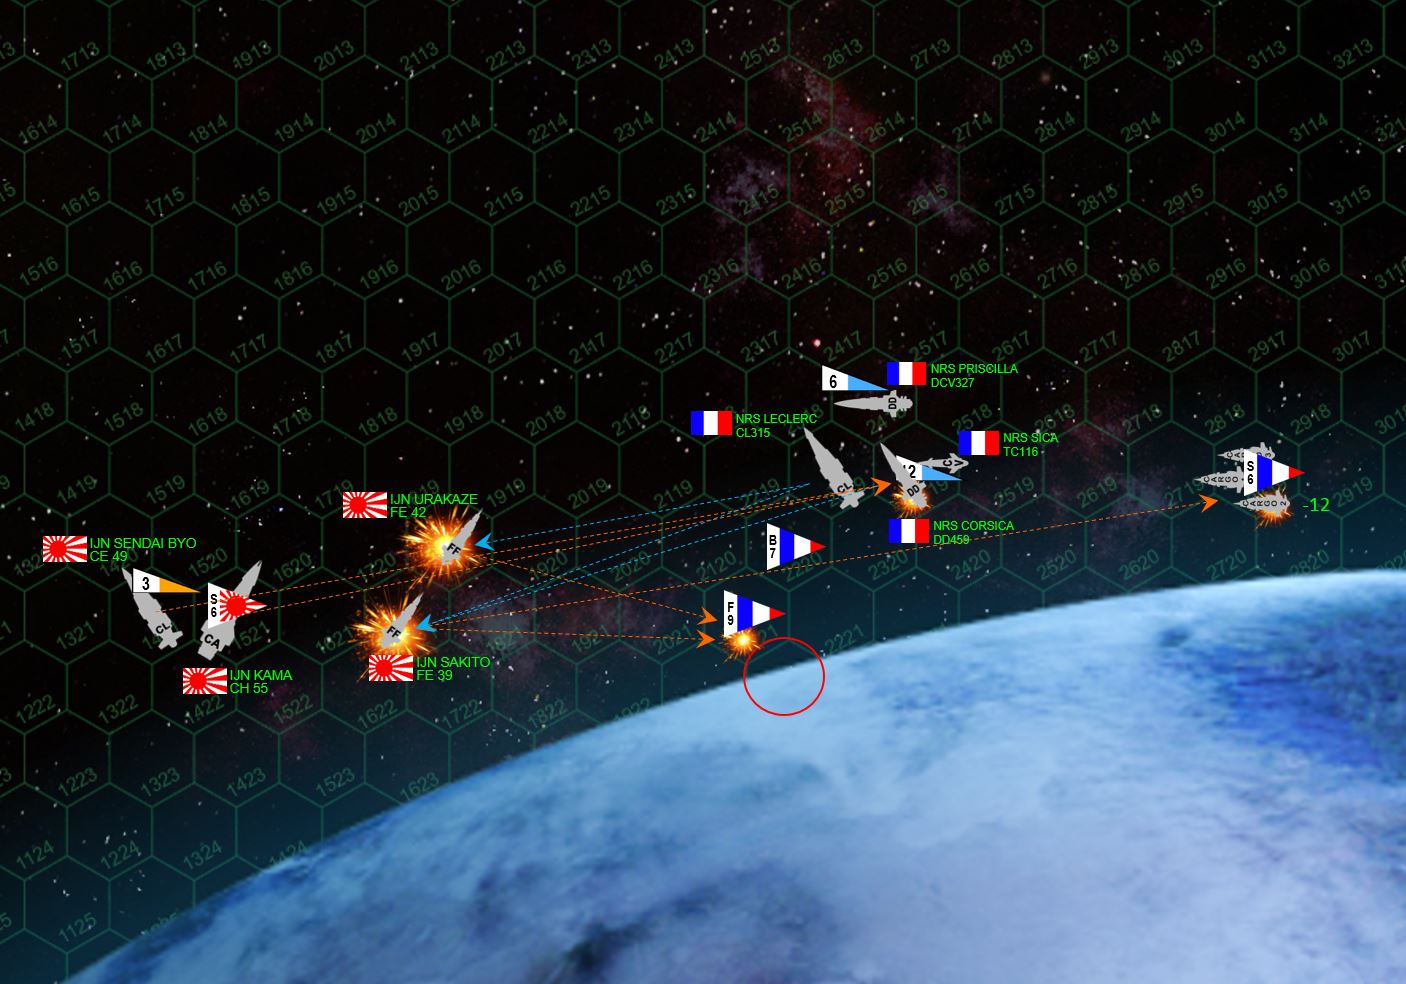 Turn 3 and things get very serious. First the French zoom in with fighters and bombers, ready to launch an aerospace torpedo and missile strike on the Kama’s stern. Rasmus sees the move and opens fire with long-range mass driver fire from the Urakaze and Sakito, knocking down four bombers from the carrier Priscilla. The fighters launch as well, as well as French ground based bombers, but their torpedoes can’t quite reach the stern so they have to hit the starboard quarter. French warship torpedoes (Class IV gravitic) hammer into the stern, but the Kama and Sendai Byo shoot most these torpedoes down. In all, the whole aerospace / torpedo strike is very disappointing for the French. The only bright spot is the broadside of the light cruiser Leclerc manages to cripple the Urakaze straight away, and Leclerc’s heavy 12-megakelvin laser battery slash open the Sakito so the escorting destroyer Corsica can finish her off. Meanwhile, the Corsica is heavily hammered by Japanese gunfire and forced to break off. Japanese torpedoes hammer into one of the troop ships and leave it heavily damaged as well.
 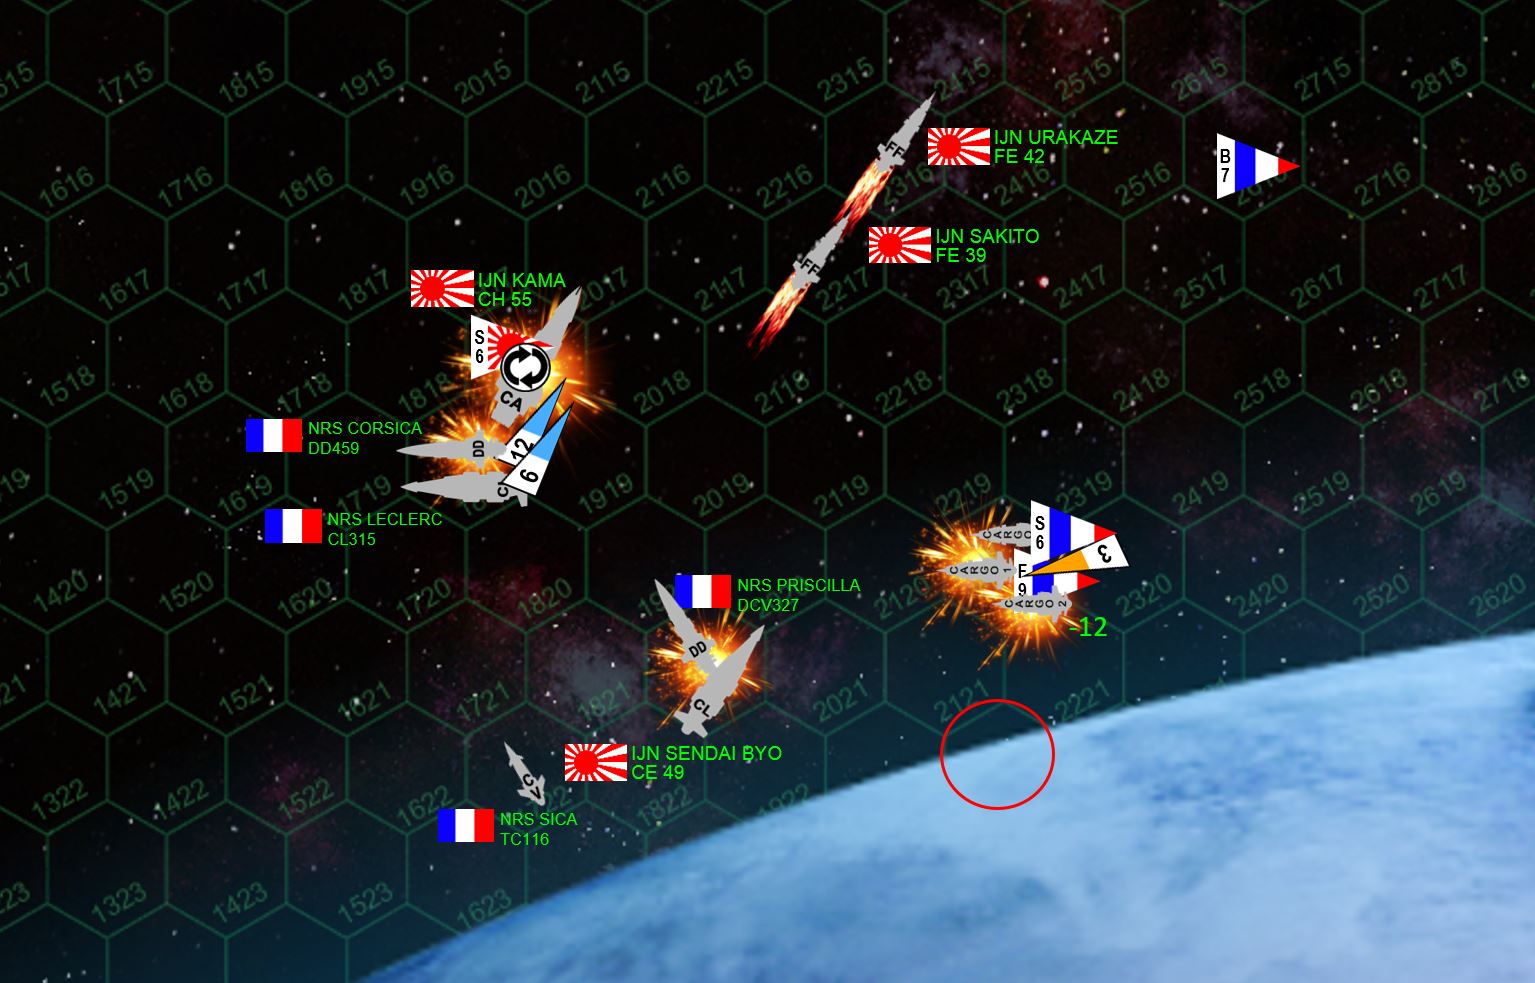 The climax of the game on Turn 4. While the Urakaze and Sakito careen helplessly away from the moon, the French assault ships rush in. The damaged one takes a hit from a Dragon Slayer torpedo, exploding it. Two more Dragon Slayers hit the second troop ship, leaving it burning in space until Kama’s heavy forward batteries likewise tear it apart. Two drop ships are destroyed, and the third is heavily damaged, but WILL make it to the surface during the movement phase of Turn 5. The Kama has her own problems, however. As she struggles up out of the moon’s gravity well, the Leclerc and Corsica (technically heading off the table, remember), slash across her stern in a double broadside. The move is risky, and in fact leaves the Corsica even more badly damaged. But the Leclerc tears the Kama’s aft sections apart and cripples the heavier Japanese ship. Meanwhile, Leclerc’s mass driver guns also shoot down the six Japanese scouts! The carrier Priscilla is lost, however, as the Sendai Byo cuts across her stern (both ships’ hulls probably glowing red from friction with the moon’s upper atmosphere).
 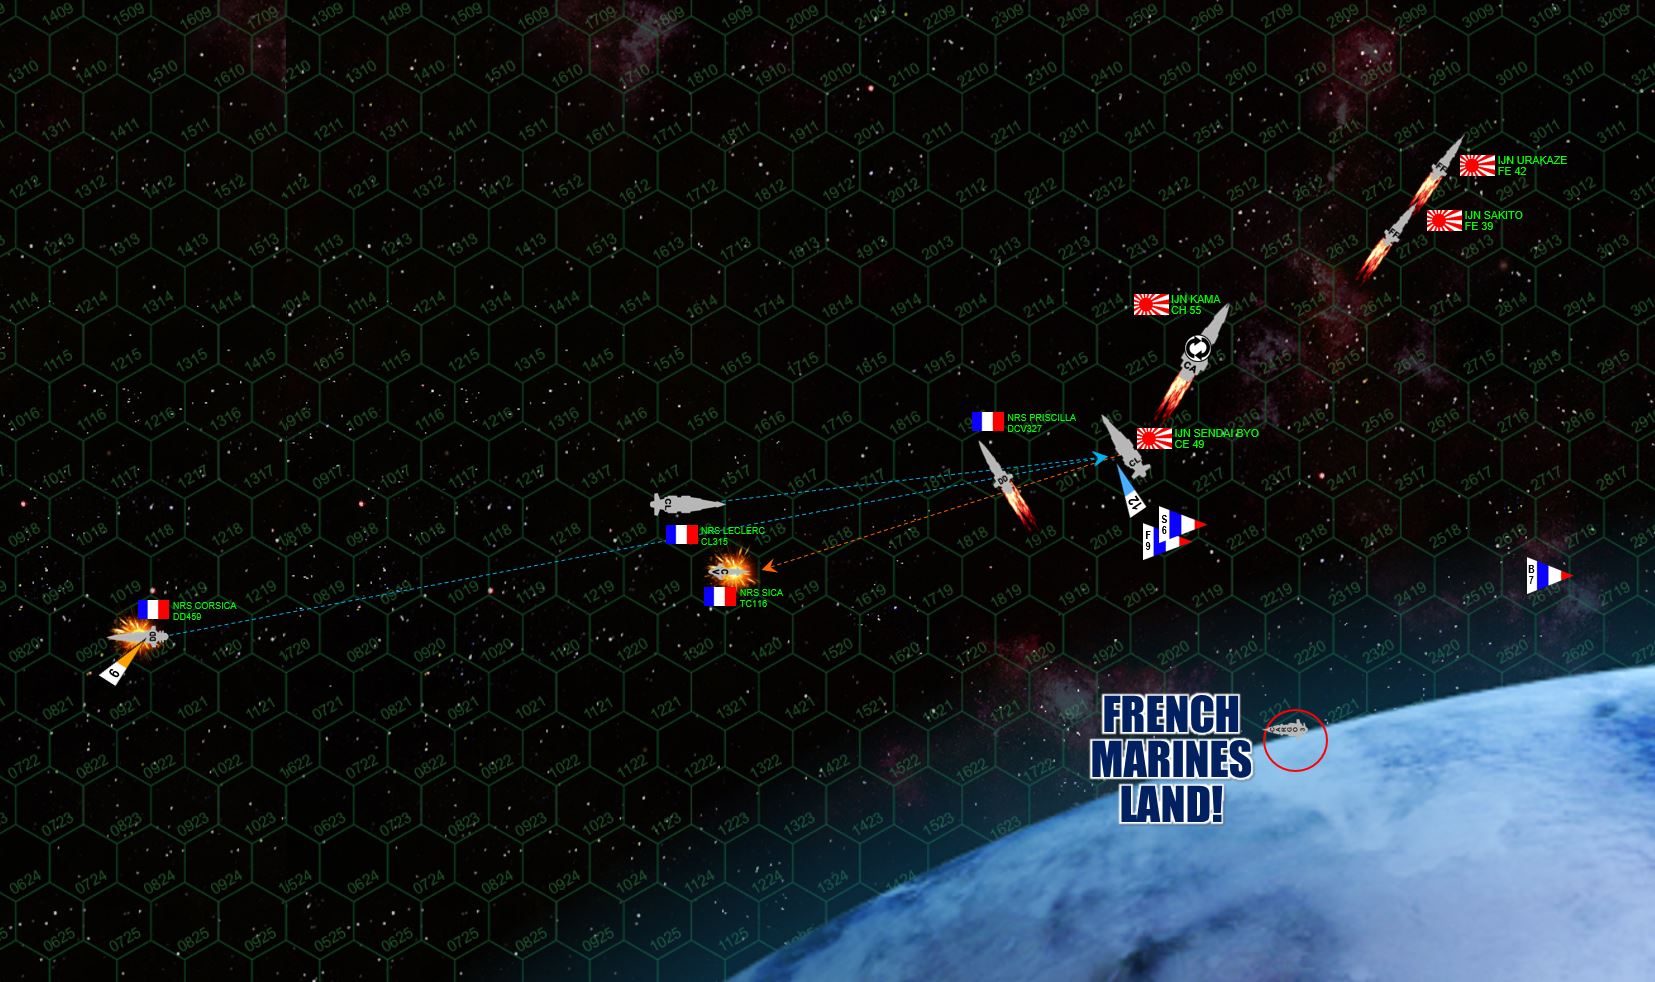 Turn 5, and the warships have largely passed each other. The last French drop ship hits the surface, putting 200 Foreign Legionnaires on the moon’s surface. The badly-damaged Corsica accelerates as best she can to escape, but Japanese “Dragon Slayer” torpedoes from the Sendai Byo catch up with her and slam into her unshielded port bow. She is now crippled (in game terms, she’s worth full points to Rasmus now instead of half points for driving her off). Sendai’s accurate syglex and EPC fire, meanwhile, cripple the little Sica torpedo corvette. Only two ships remain! The damaged Sendai Byo and the undamaged Leclerc!
  Pointing up the battle’s score, deChalemonde realizes that he’s got the battle won. He’s actually done more damage to the Japanese than vice versa. Remember the Kama was a heavy cruiser, and of course virtually the whole French aerospace group remains on the table (7 bombers, 9 fighters, 6 scouts, 38 points worth, almost a destroyer’s worth of points). The bombers head down to support the legionnaires on the surface, while the Leclerc denies battle by accelerating and extending the range. Yes, she could probably beat the Sendai (Sendai is damaged and she is only a 93 point ship compared to 122 for the Leclerc), but why risk it? The French HAVE to break their losing streak. One bit of bad news, though, the crippled corvette Sica will NOT clear the moon’s surface when gravity is taken into account, the crew abandons ship before she skips into the moon’s atmosphere and burns up.
  The final situation on the end of Turn 7. The French have won 206 to 169. While only one troop ship made it and two did not, the French Navy (including aerospace craft, remember) is actually more powerful than the Japanese in this sector. The Sendai will be forced to withdrawal (and start rescue / recovery work for the Kama, Urakaze, and Sakito) while the French Navy will remain in control of this moon’s orbital zone. The ground battle is thus a foreground conclusion.
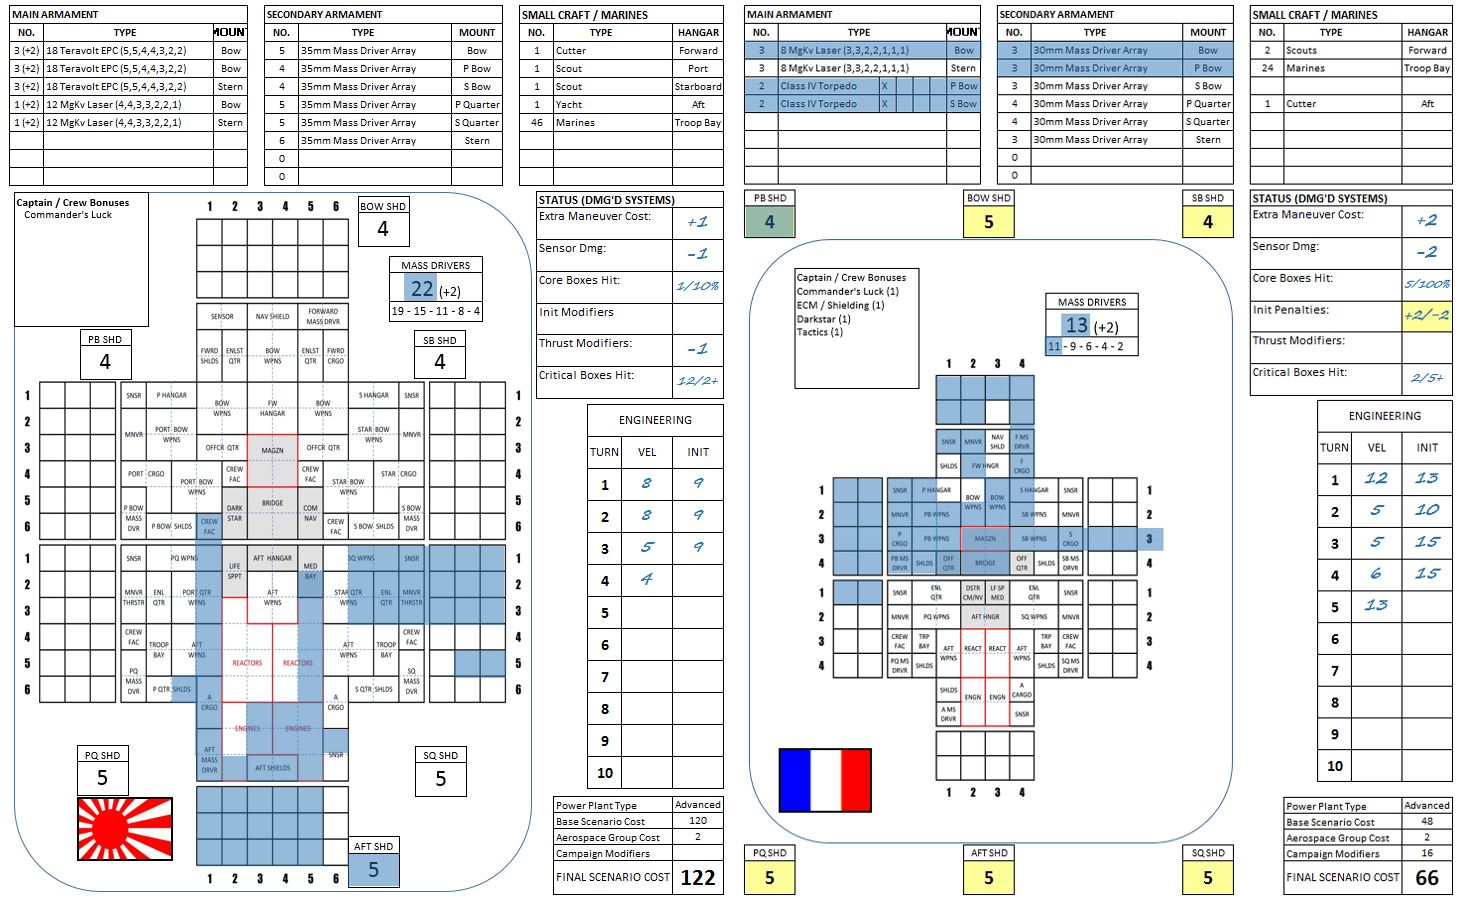 This game was supposed to be a “raid” in victory point calculation, but quickly turned into a toe-to-toe slugging match. We see where the damage on the Japanese heavy cruiser Kama (left) and French destroyer Corsica (right) reflect the ferocity of the battle. Notably, Corsica was hit straight through the bridge. That means her commander, Commander Daphne St. Croix, will have to make a survival check. She does so, but only with a “Commander’s Luck” point, probably indicating she was wounded by that torpedo hit that exploded into her bridge.
 In all, a great game! Congrats to Rasmus for really making me work for this one. 😀 And my poor French finally WON ONE! Maybe I’ll try my Russians next.
Meanwhile, if anyone is interested in trying this game, just ping me with a PM. We run Darkstar almost every weekend. All you need is an internet connection, some dice, and a bellyful of courage!


