![10mm Medieval Miniatures! Azincourt English Army Review | Wargames Atlantic [7 Days Early Access]](https://images.beastsofwar.com/2026/03/unboxing-wargames-atlantic-azincourt-english-army-coverimage-225-127.jpg)


Aurorainbags Dunkeldorf


Recommendations: 470
About the Project
My take on the gorgeous Dunkeldorf miniatures from King Games.
Related Genre: Fantasy
This Project is Completed
The Kingpin of Dunkeldorf
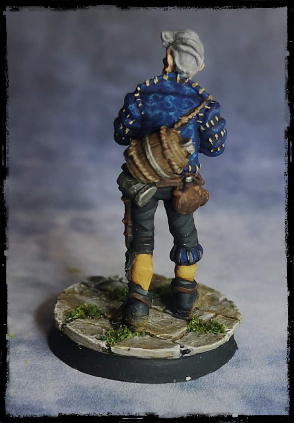
The third kickstarter for Dunkeldorf is ongoing as I write this, and I’ve been gifted some of the amazing minies for this one. Now I’m a huge Dunkeldorf (and Kinggames) fan, but I truly think Nana and Nicki have outdone themselves this time. Every detail is cared for. Every figure having a ‘place’ in the universe. So great to see the people behind this moving from strength to strength.
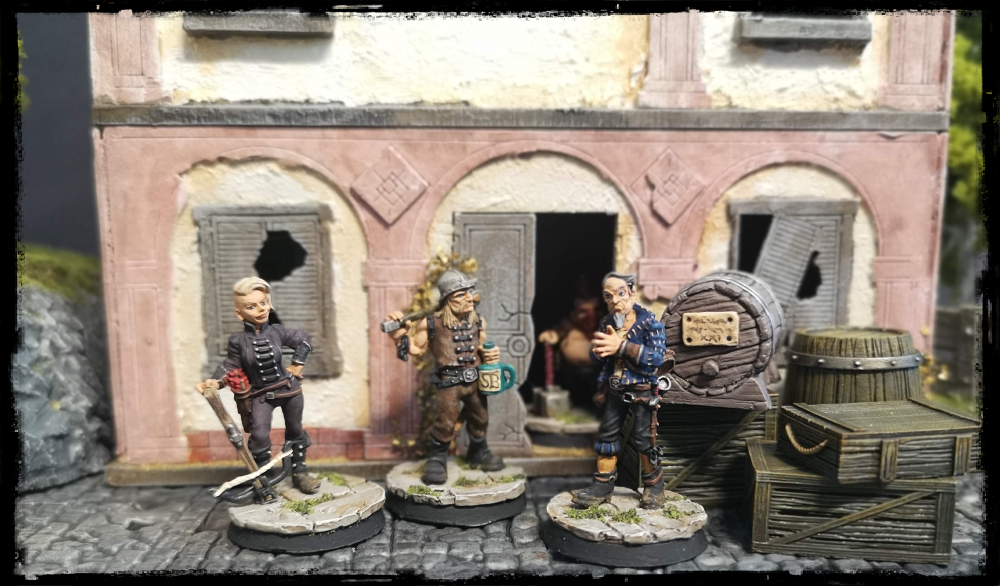
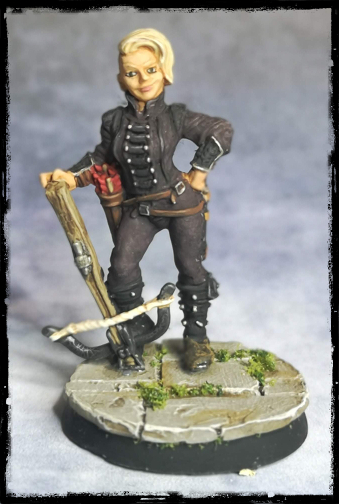
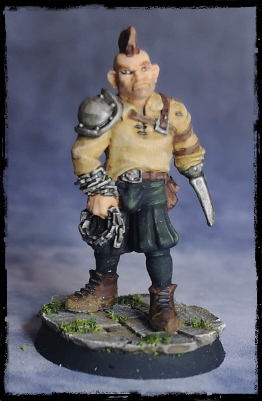
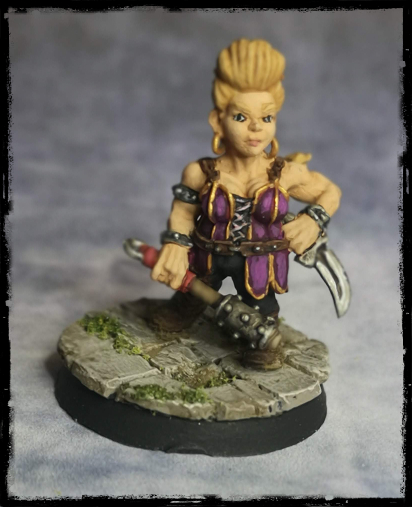
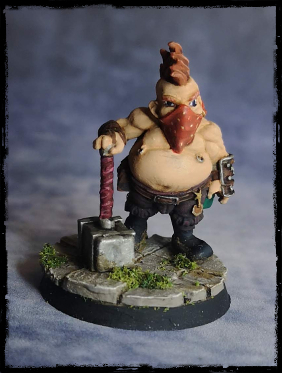
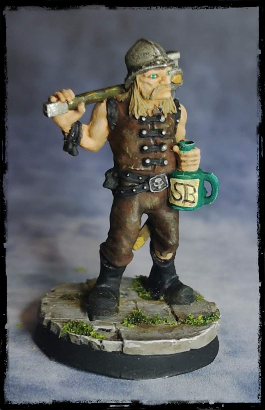
I’ve been gifted with some of this kickstarters characters. And once again, they’ve been a pure joy to paint. From Sven’s facial expression, Lenny’s ‘casual’ pose, Barik’s amazing tummy to Mariks fierce smirk and Claudia’s beutiful crossbow. I’m in love <3 And not sure I can ever do these beautiful characters justice. But that does not diminish my joy of painting them 🙂

Dunkeldorf Shelf: Above all else
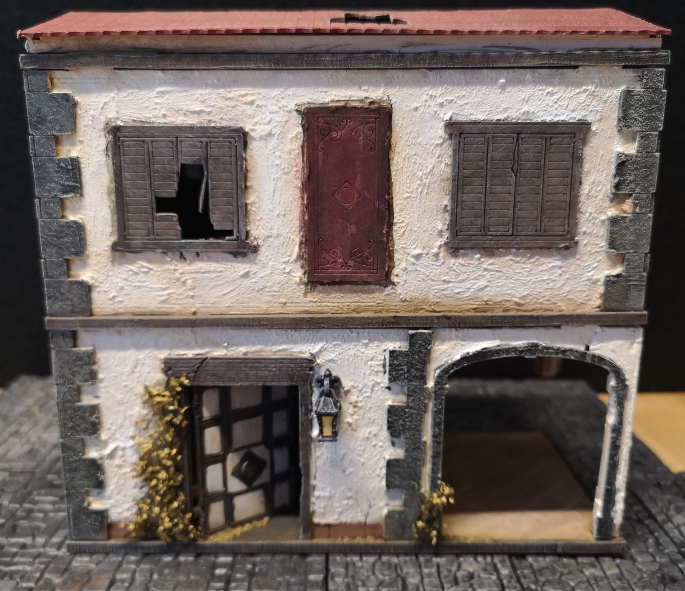 Another of the 'broken down' buildings completed. No specific order I wanna do these in. This one was chose cause I wanted to use it for some of the Kingpin kickstarter pictures. Added one of the lanterns from teh Dunkeldorf 2 kickstarter.
 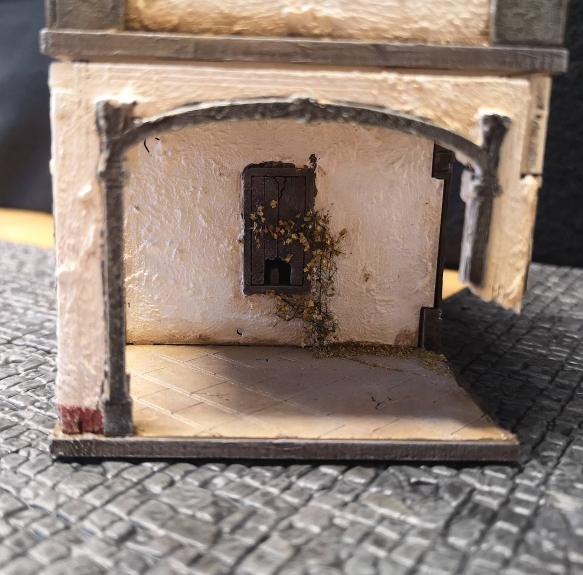 Love this little terrace. Decided the window here was never in use, so vines has been 'allowed' to grow over the door.
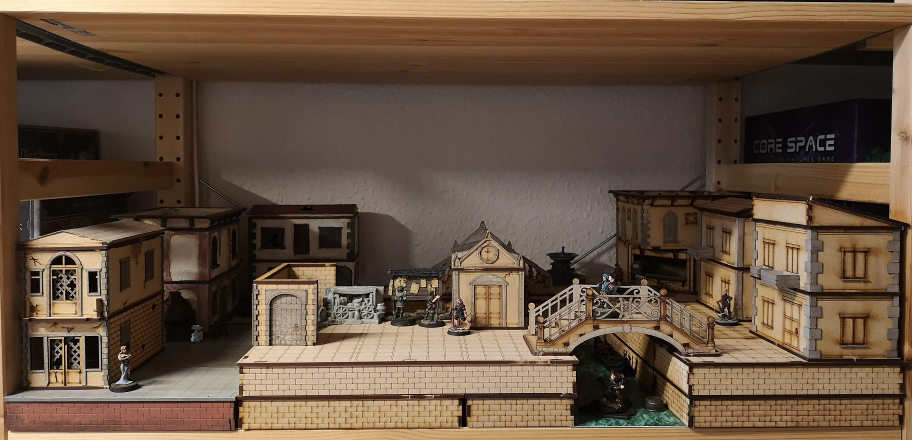 I've raised the 'better parts' of the city. Wanting to give off the impression that the rich and mighty really do look down on the poor. Gonna replace the 'bottom layer' with foam later on. Wanna make it look like rough stones with a sewer pipe sticking out somewhere. But that is a project far into the future.
 The newly finished building in it's environment.
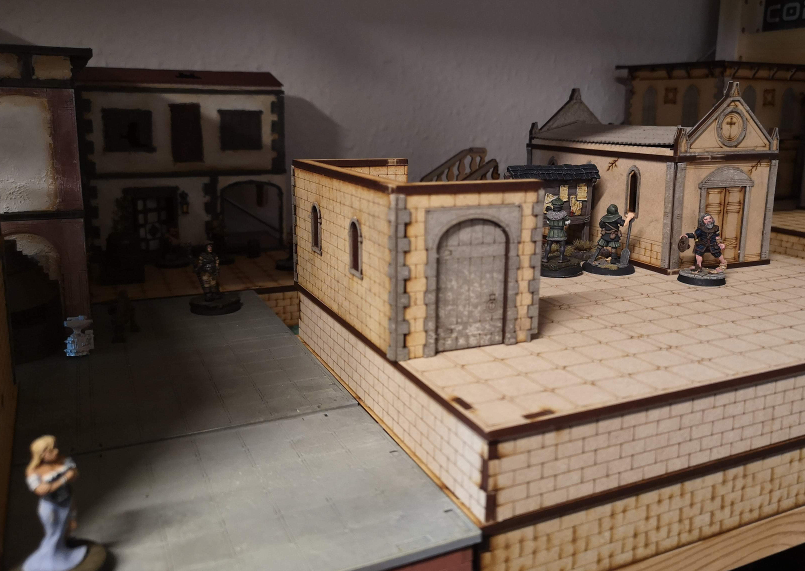 Turning this area into a market place. The walls 'shielding' the customers from the 'dirt' below. Stairs leading down will be added at a later point. And probably have a Dunkeldorf guard on watch duty just about there at all times.
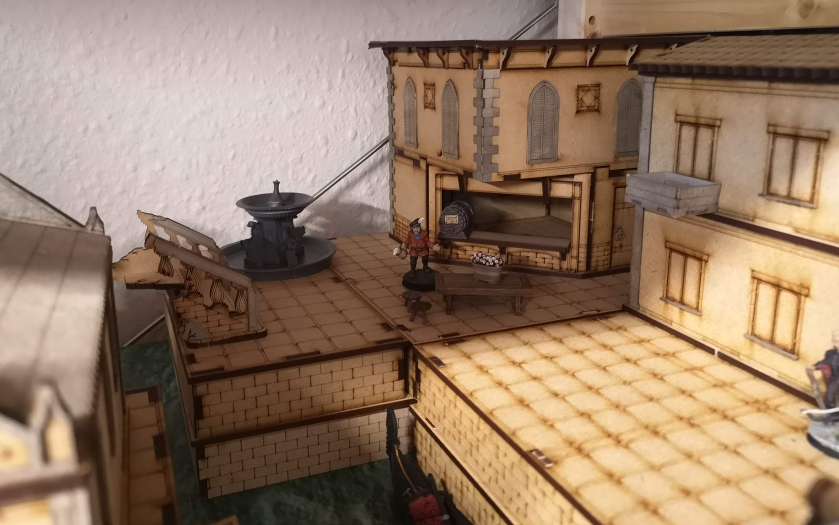 I'm already regretting this, but I've also started to add 'scatter' pieces all over. To make it all come alive. It does make it a bit of a pain every time I want to do changes. But I don't think this project will ever really be finished, and in the mean time it might as well look as fun and interesting as possible.
Kingpin stretch goal: Jenny
The Kingpin kickstarter is going incredibly well, with so many stretch goals being unlocked super fast. Here I’ve painted one of the: Jenny, Lenny’s kid. She’s so cute, with that smirk on her face. And teh fact that her pants are torn here and there, is such a great detail. Makes her feel so much more alive.
I’ve also painted some of the Dunkeldorf Botany pieces, but only used them as scatter pieces in these pictures. That said, It’s amazing how much some flower pots and bottles add to a scene.

Hermans new home
 Wasn't happy with the two 'pretty houses' on my Dunkelshelf. And I needed the stairs down into the poor parts of my Dunkeldorf. So a quick shopping spree later
 The two boring houses, that has now been torn down and the residents 'relocated' to make room for Hermans new home.
 Due to the way the house is placed on the shelf, it's kinda the more 'boring' side of the house that's seen. Even once the 'decorative cardstock' is added, it still looks a little empty.
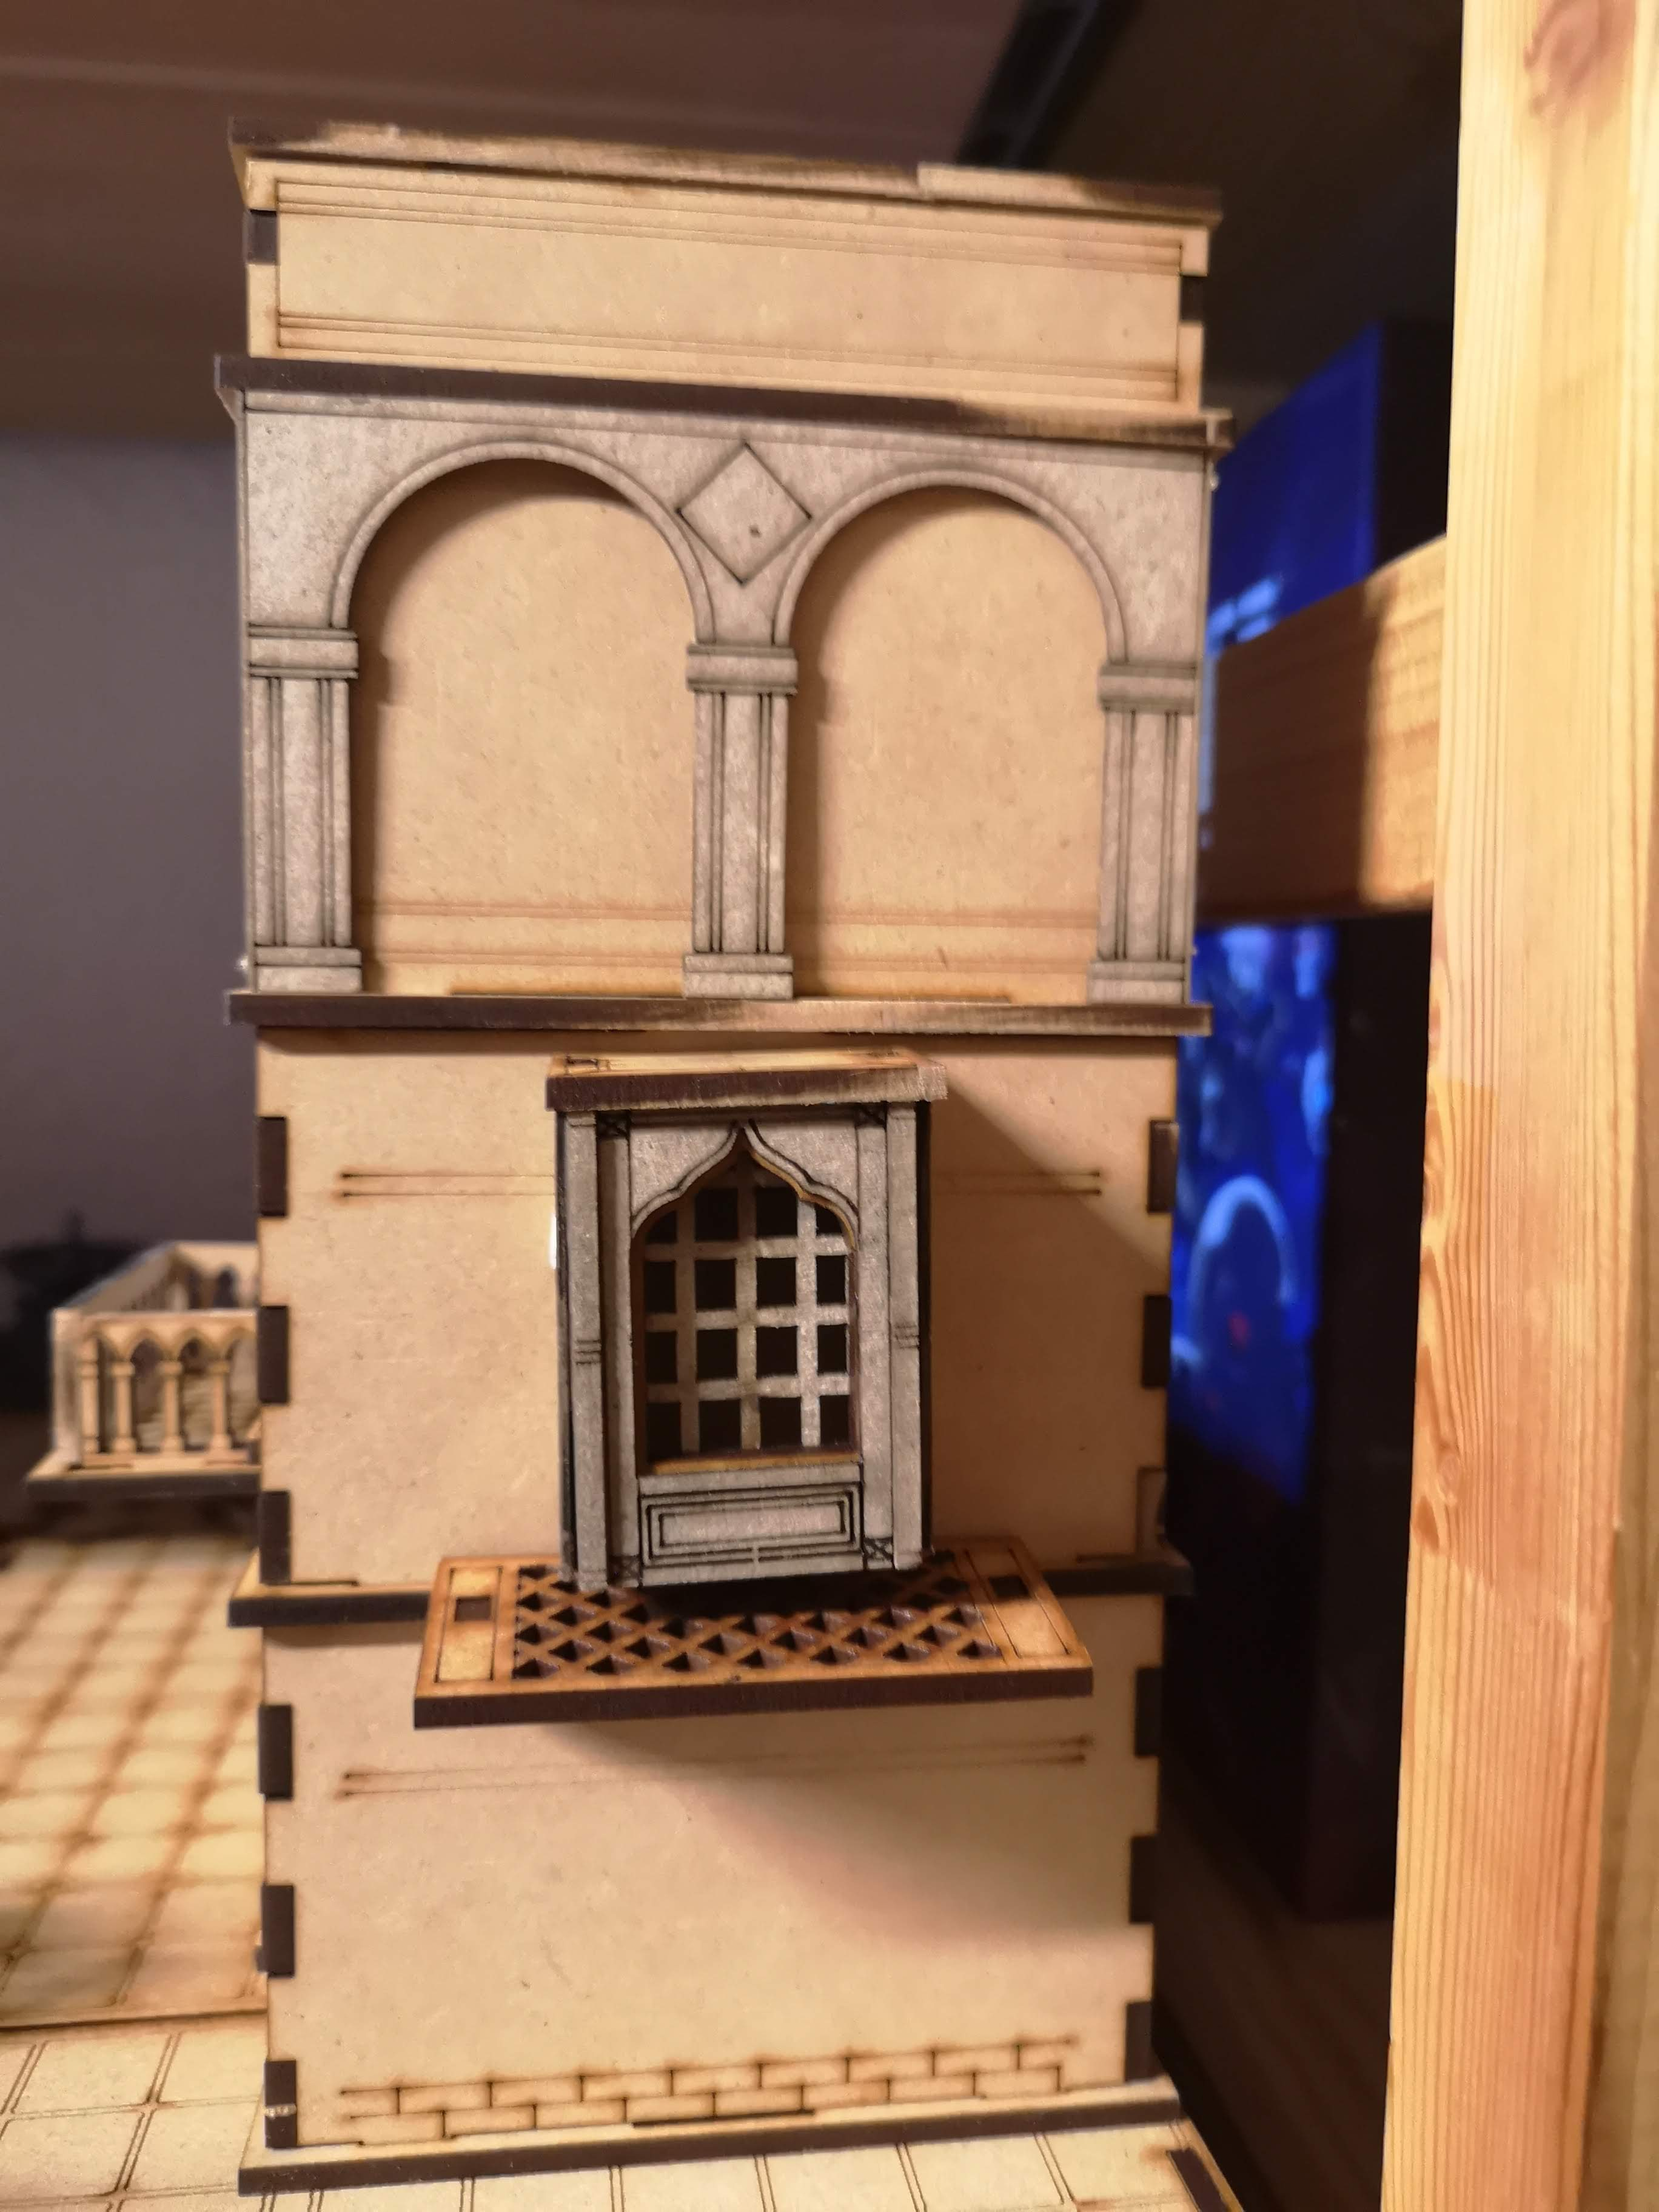 But one of the things I got in the Carnevale kickstarter was these extra windows. So I am adding one of these to the side (here it's just attached with bluetack), to add more interest.
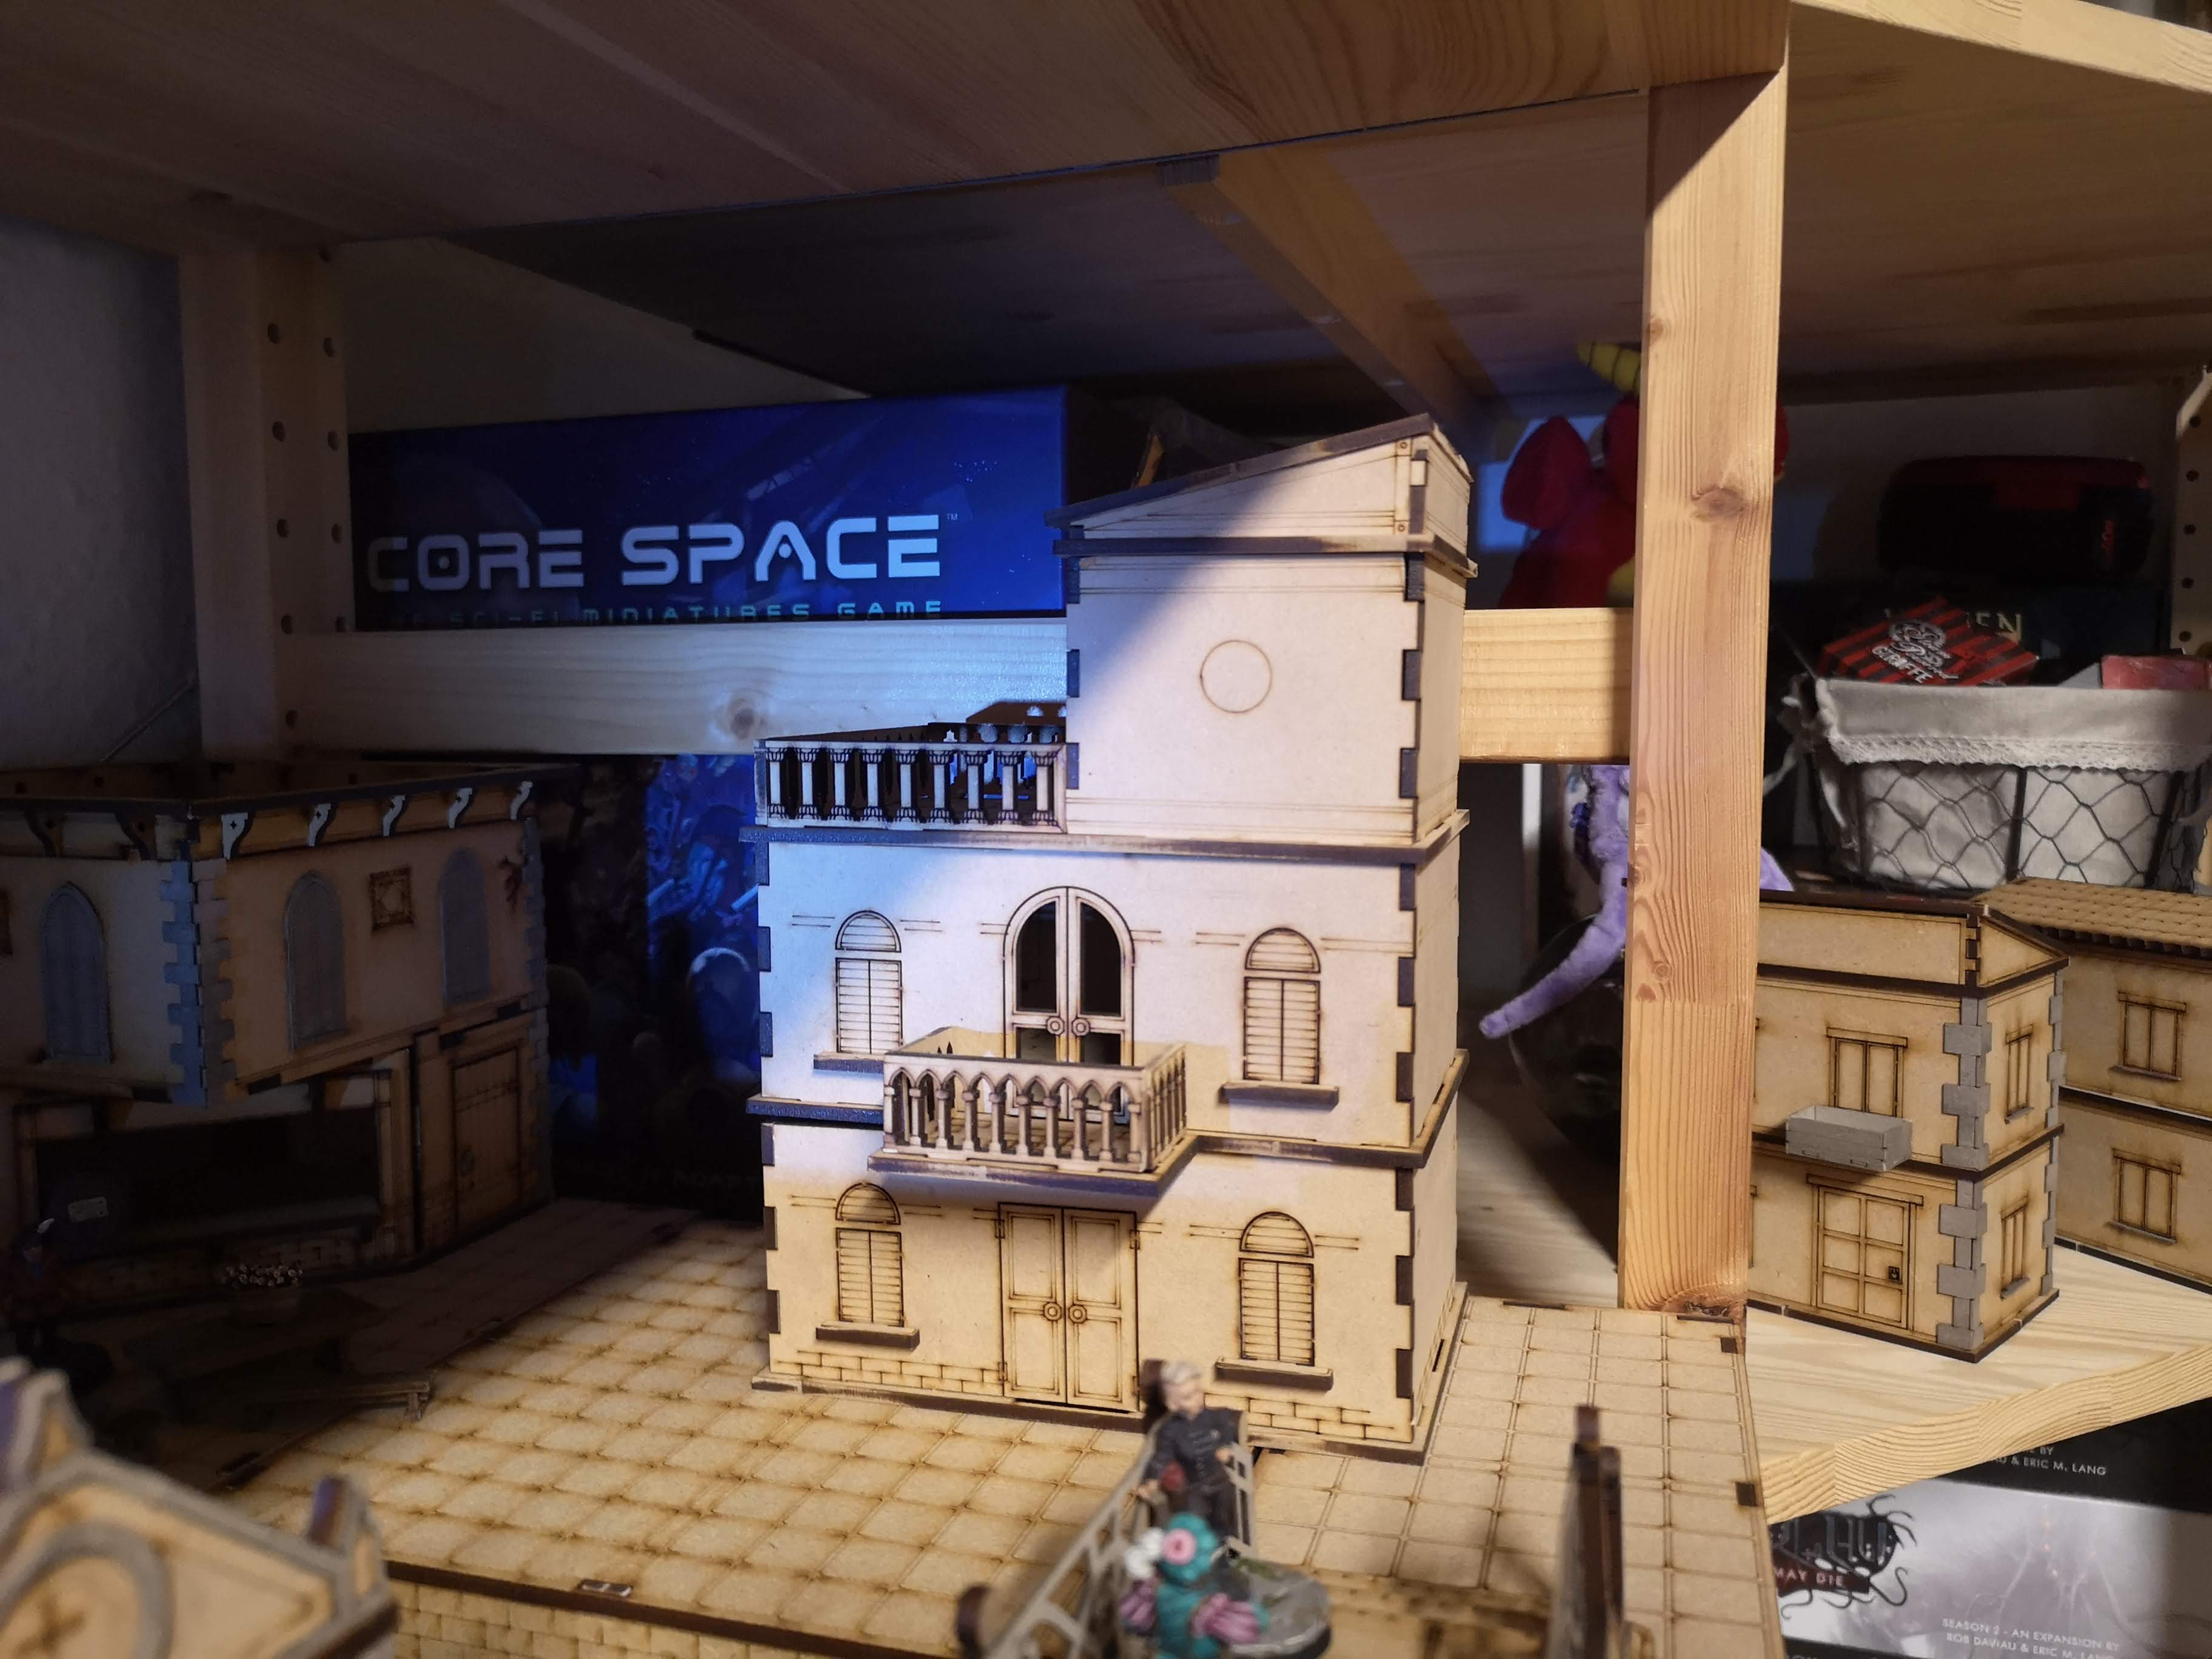 House in its place, but still without the cardstock details. Removing the two smaller houses also adds room for some more scatter pieces. I am considering a statue maybe.
 Building the Palanquin - Part 1
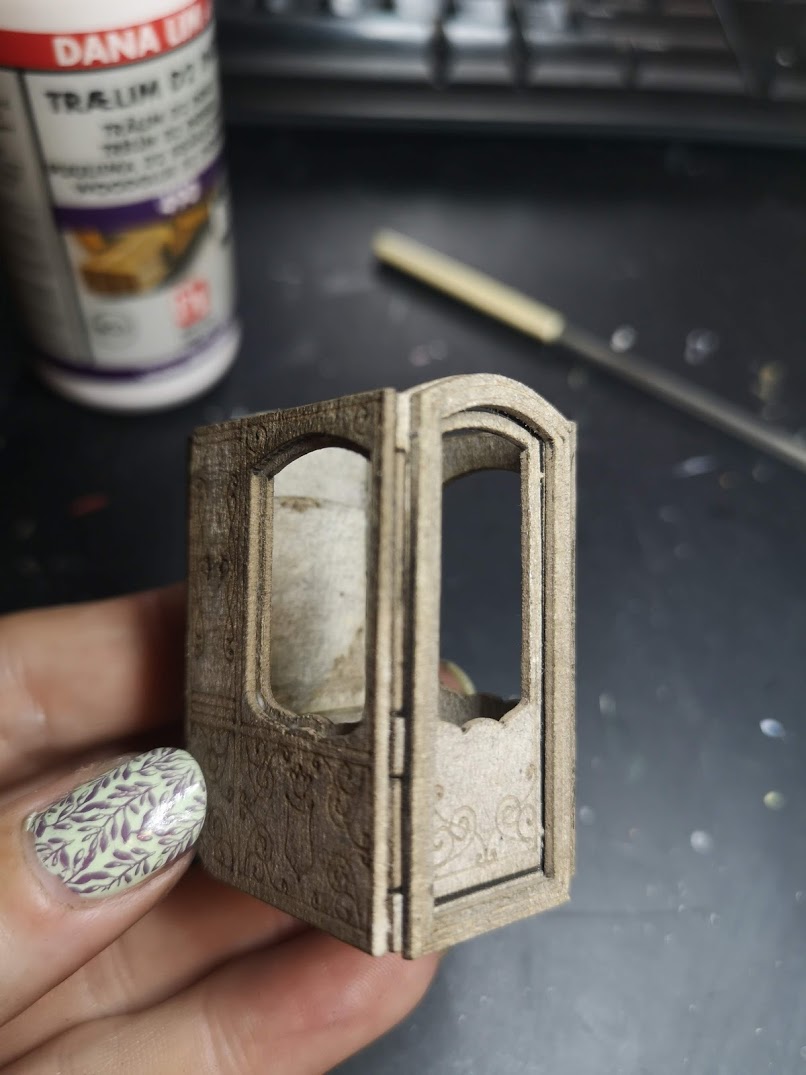
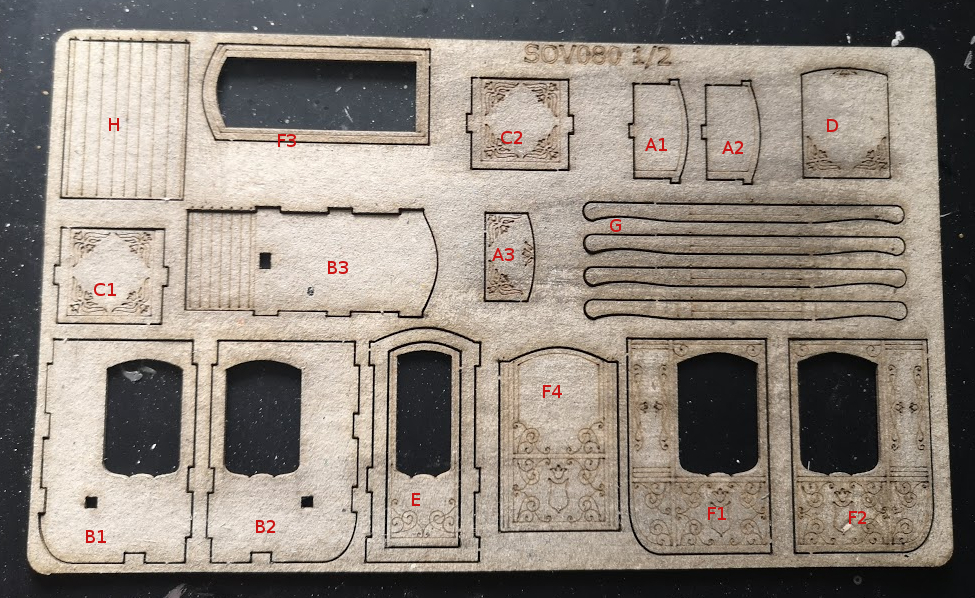 I couldn't find any instruction files for building the Palanquin. It's not that difficult really, but in case anyone can use it, here's how I went about it.
 A – The seat. Super simple, just glue A1 + A2 + A3 on top of each other. A1 and A2 align easily on top of each other. For A3, align it to the back, but so the little 'tab' is still free.
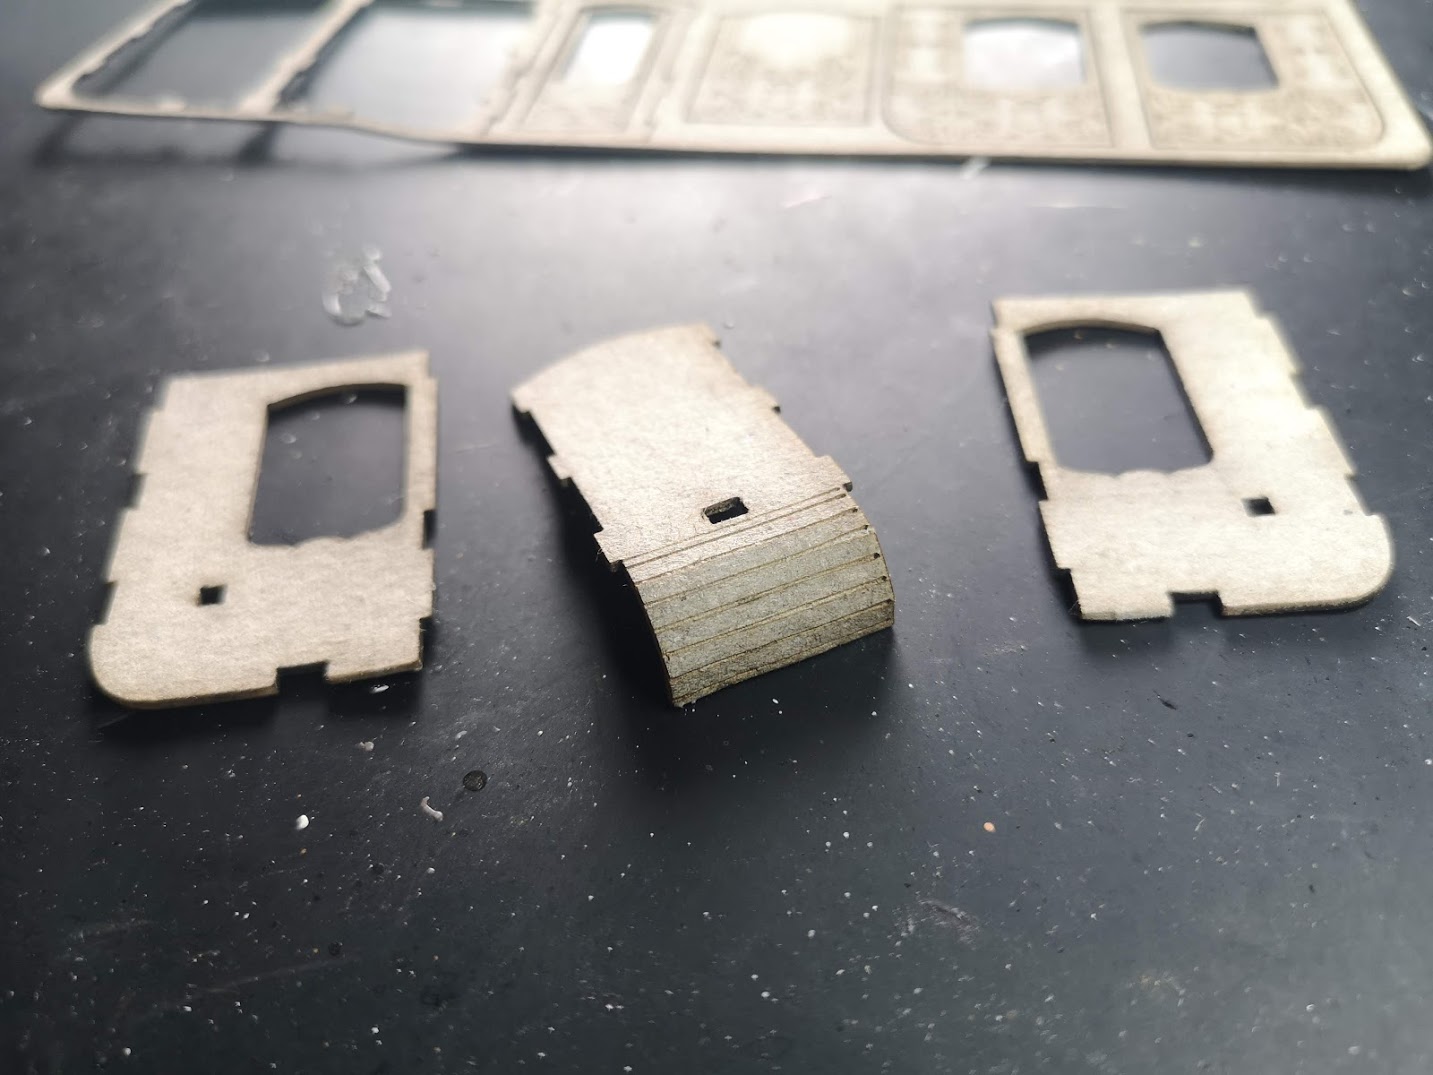 B – The frame I start by bending the lower part of B3. Doing this now will make your life so much easier later on.
 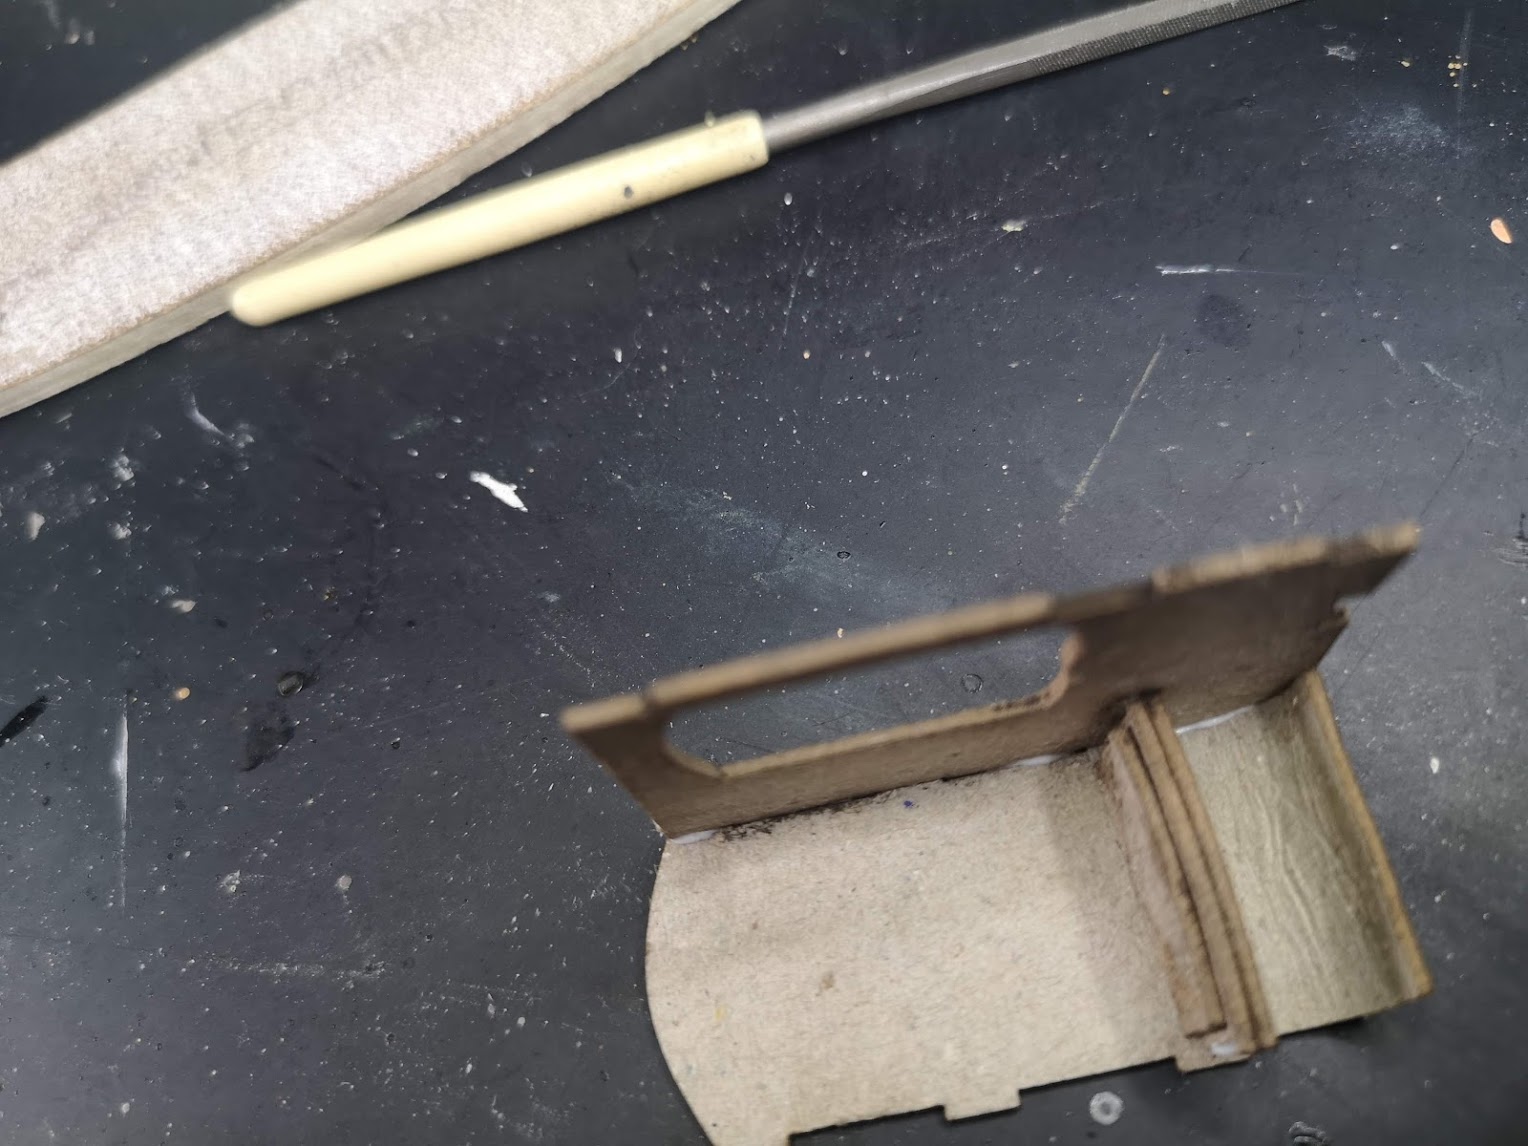 Then I glue one of the sides to B3. Doesn't really matter which one. Then follow up with the seat. Not much to note here, other than make sure the nicely detailed 'cushion' of the seat is up :). Last I add the other side of the frame.
 D - Back details. Not entirely sure if this should be aligned with the seat or a little above. But I like it best down at the seat, so that's what I did.
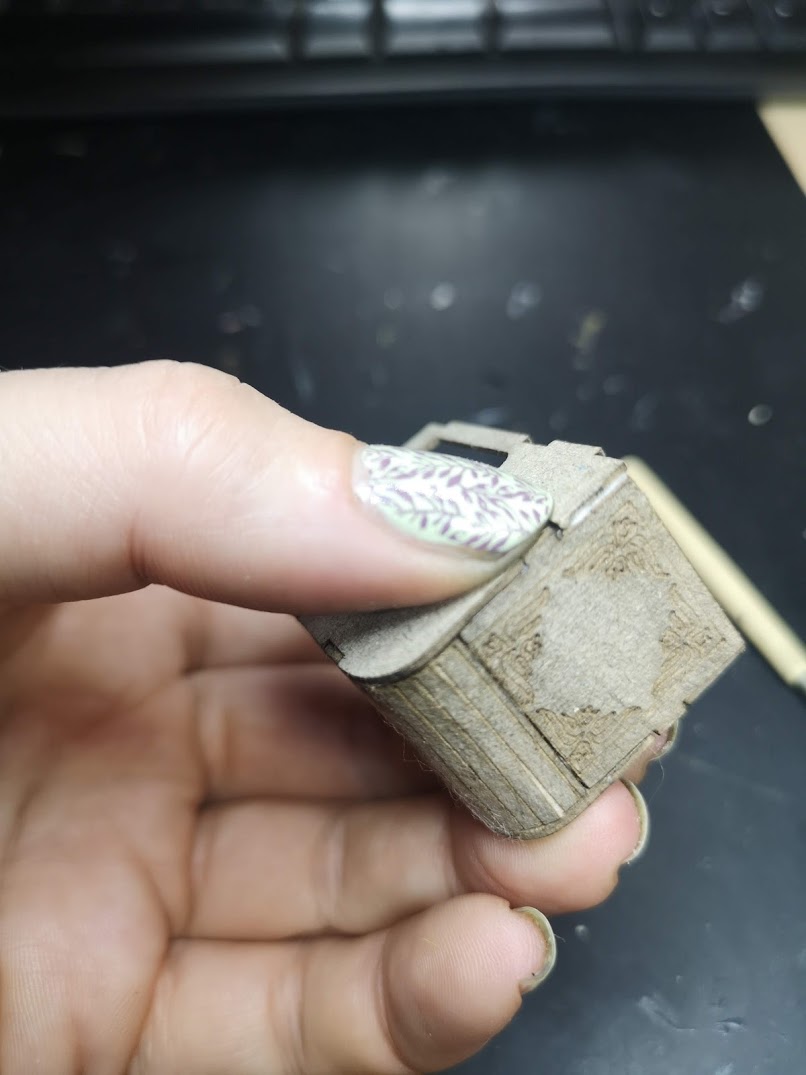 C – the bottom. Glue the two bottom pieces back to back, so the details are showing on both sides. This way, if you want to 'topple over' the palanquin, it will show some nice details on the bottom, while still retaining the same pretiness on the inside.
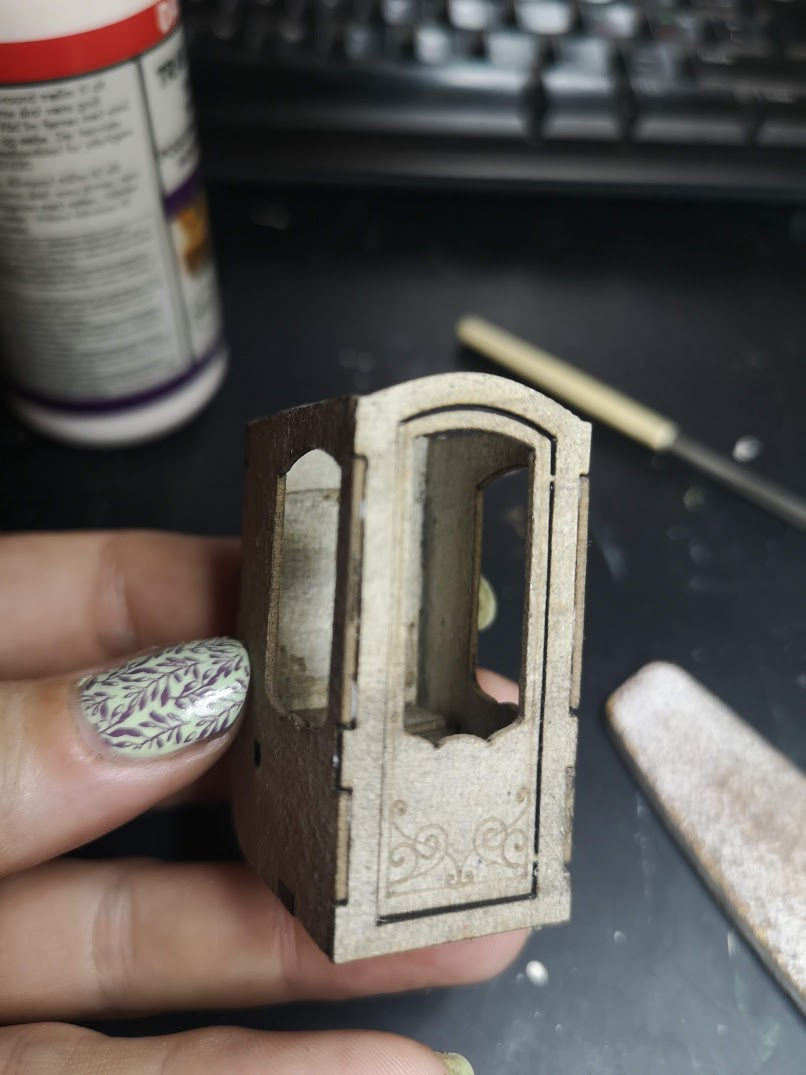 E – Front frame. Last piece of the frame. Just get the details on the front and you're good.
Building the Palanquin - part 2
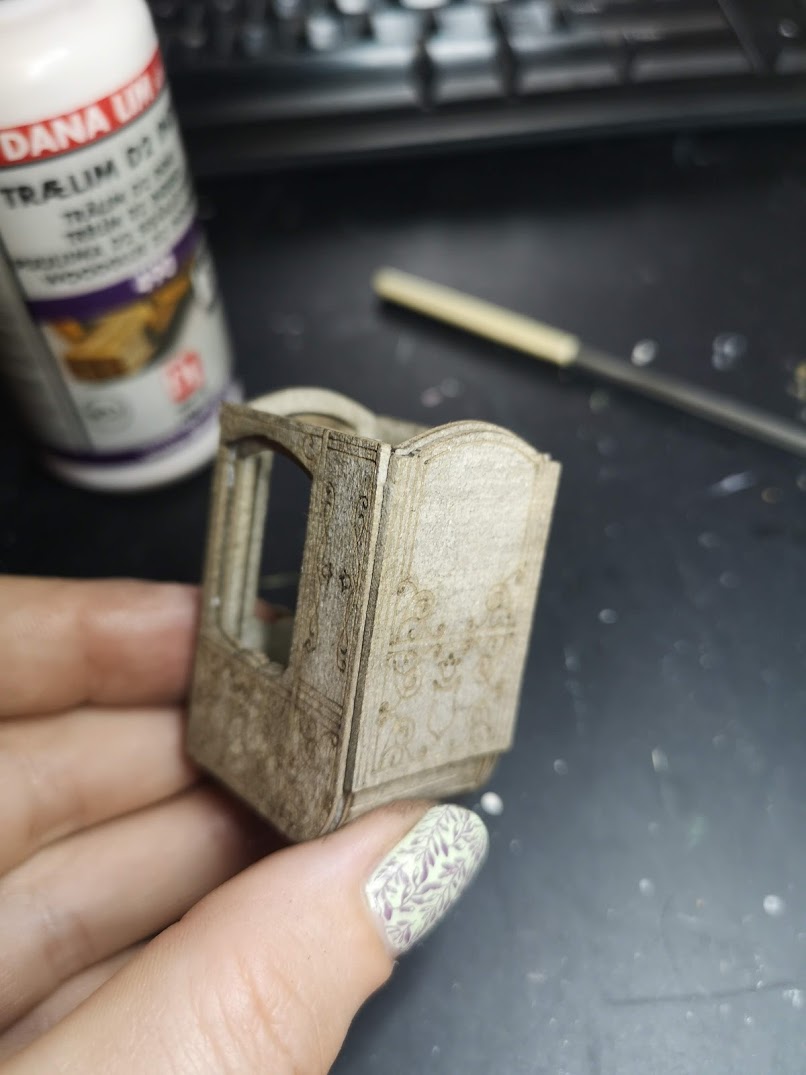 F – Details. Again, super easy, barely an inconveinience. I added the two sides first, then the front and lastly the back. But honestly the order of which you do this doesn't matter. I'm a little dissapointed the front doesn't cover up where the frame has been glued together. So I think I'm gonna add a layer of plastic putty or something, to make it more smooth.
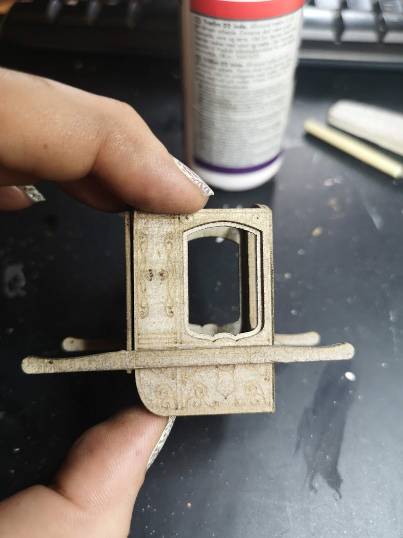 G – Handlebars. Glue two and two together, making sure any details are always on the outside, so they can be seen from any angle. I glued them on just below the window details. Didn't want to cover that up. Again, not entirely sure that's the right place. But it works for me.
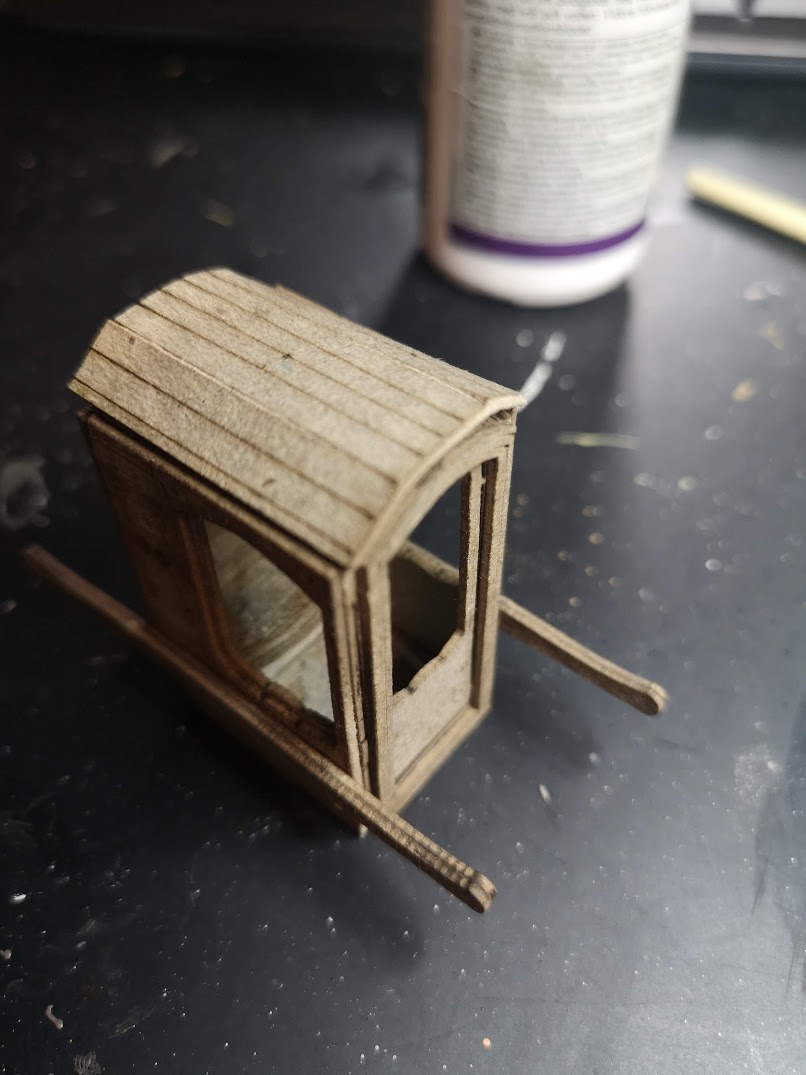 H – the roof Last is the roof. I will carefully bend it into shape, but I won't glue it on until the insides of the palanquin has been painted.
Johannes, Uwe and some Dunkelshelf changes
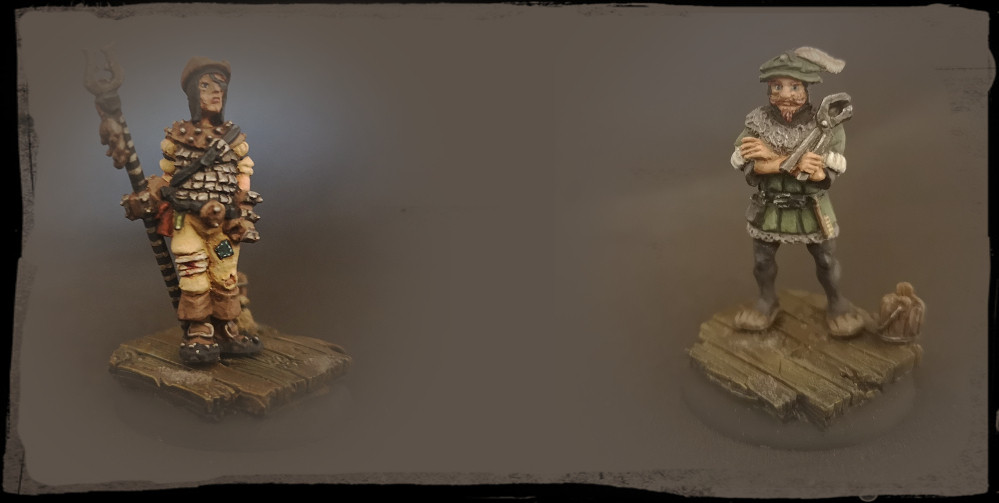
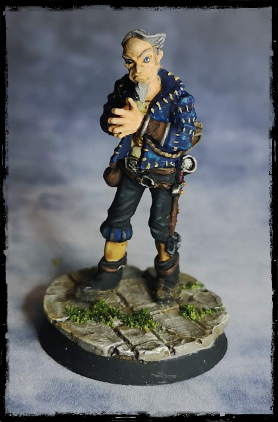
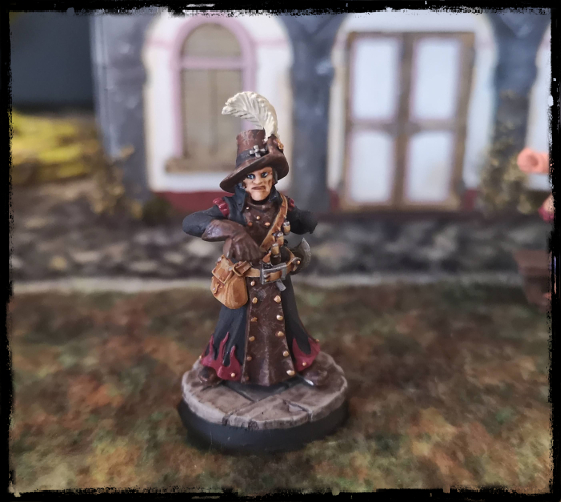
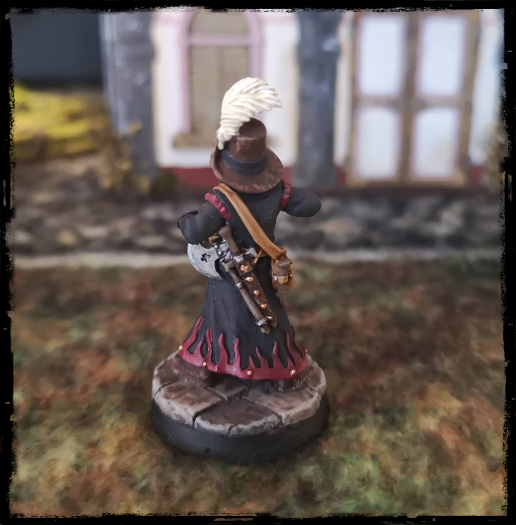
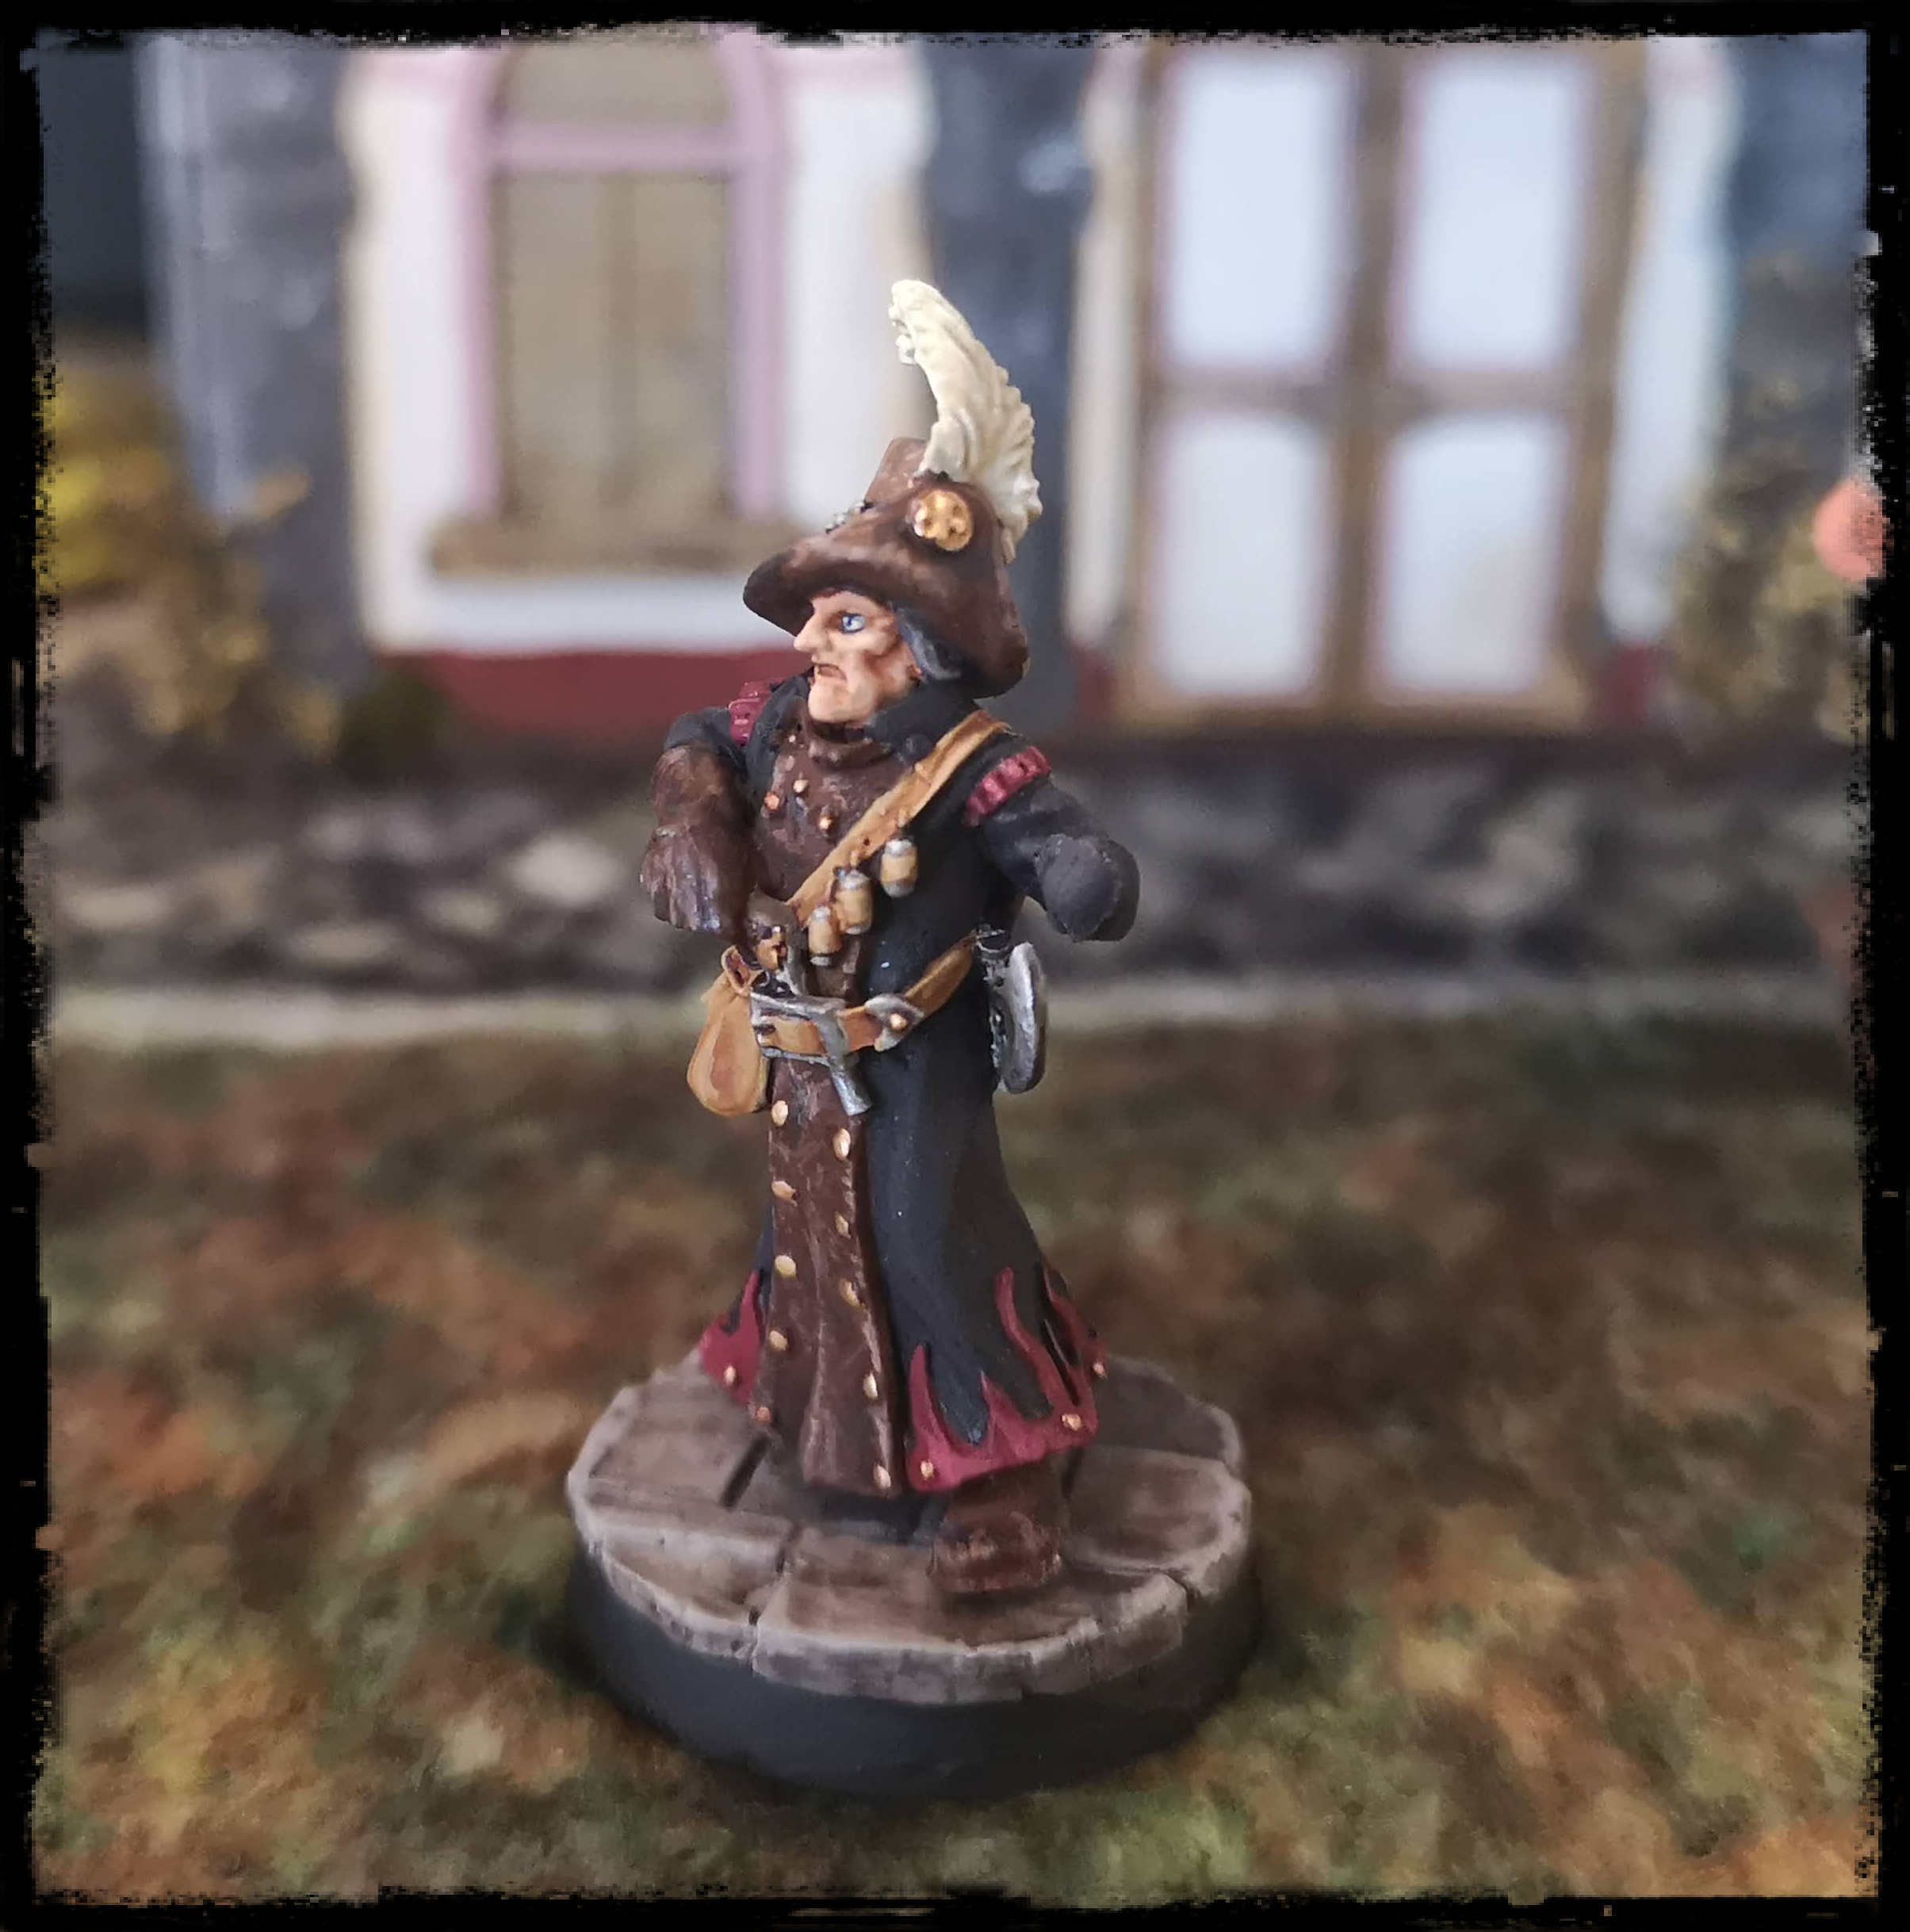
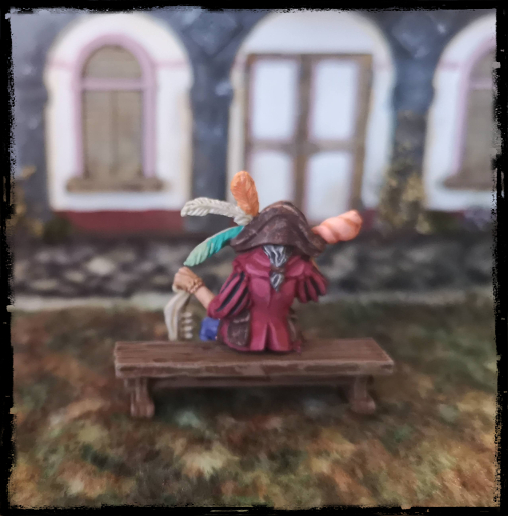
Yeah, I know. Johannes is missing an arm (and a really nice torch, attached to that arm). I wanted to paint her sub-assembly style. So told myself, I’ll just put that arm right over there. Now, it’s not like the arm is missing. I mean…it’s right there. It’s just that I no longer remember where there is (to quote Terry Pratchet). Still, she’s such an amazing figure (look at those details, wow!), even without her arm. So decided to finish her. Right now I’m toying with the idea of either ordering an extra Johannes and get her, her arm. Or maybe green sculpt some bandages on her, to make it look like she’s simply missing that arm.
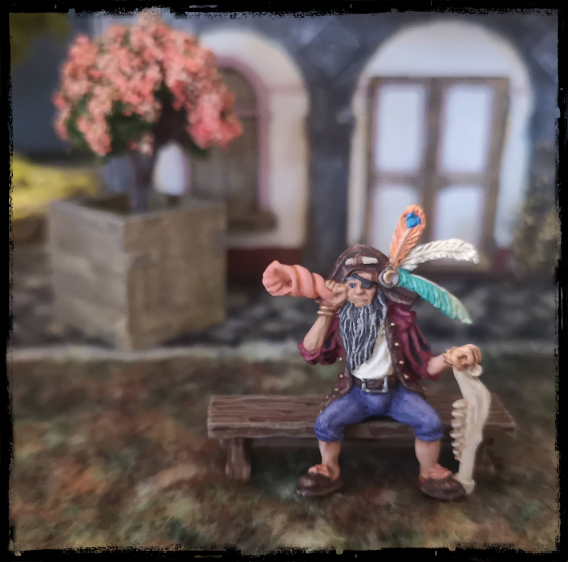
Uwe is pretty straight forward. But so much fun to paint. Wanted him colourful, but at the same time, his clothes shouldn’t look straight out the seamstress’ shop. The coulours are a little ‘washed out’ on the photo, making the cute seashells on his shoes blend in with his skintone. It’s a shame, cause in RL that detail is just perfect.
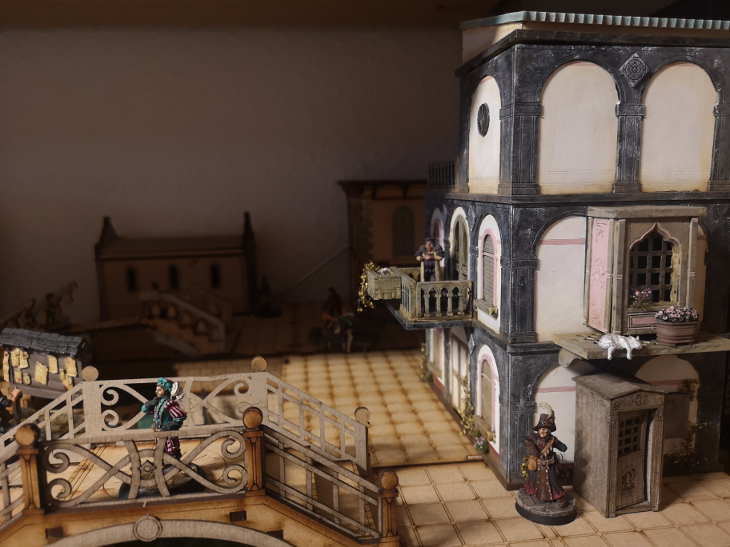
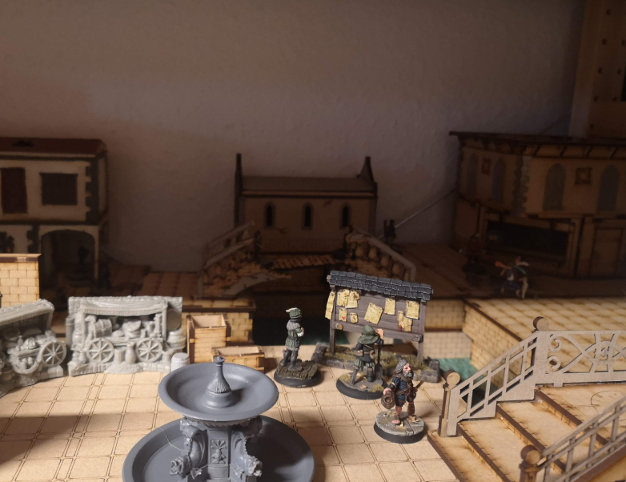
Got Hermans house painted up for the Dunkelshelf. And made some changes to the layout. That’s probably something I’ll do for as long as the shelf exists. Anyway, I moved the church into the background. Means you can no longer see the front door, where I liked some of the details. But you can see more of what’s going on back there, since it was blocking out a lot. Aaaaaand, I’m thinking with the church near the Prancing Peacock and the Dunkelshelf Slum area, the priests are where they’re needed (at least in their eyes). Sinners all around. Also added a walkway to the broken bridge. Like the feel of it being patched up like that. Moved the fountain to the front. Wanna play with some water effects on that one, so it would be a shame it was hidden in the background. And also now I have more space to play with the market area.
Paints used are Scale75 unless otherwise noted.
Joahhnes
Skin: Basic Flesh, Flesh Wash (Army Painter), Pale Skin
Coat: Petroleum Grey, Dark Tone (Army Painter), Mojave White
Leather: Leather Brown, Basic Flesh, Mojave White, Petroleum Grey, Mid Brown (Army Painter)
Reds: Deep Red, Basic Flesh
Yellow Leather: Gelbraun Brown, Light one (Army Painter) x3, Birch
Feather: Thar Brown, Birch, Mojave White
Gold: Gold (Vallejo), Copper (Vallejo), Antique Gold (Green Stuff World)
Metai: Thrash Metal, Dark Tone (Army Painter), Heavy Metal
Wood: Walnut: Mid Brown (Army Painter), Graphite
Uwe
Skin: Basic Flesh, Flesh Wash, Pale Skin
Shirt: Birch, White Sands
Trousers: Braineater Azure, Fairy Blood, Mojave White
Jacket: Deep Red, Basic Flesh, Birch, Health Red, Åetroleum Grey
Leather: Leather Brown, Basic Flesh, Mojave White, Petroleum Grey, Mid Brown (Army Painter)
Beard: Graphite, Dark Tone (Army Painter), Birch
Shell: Ishtar Pink, Light Tone (Army Painter), Birch
Bone: Thar Brown, Light Tone (Army Painter), Birch
Feathers: Surfer Orc Flesh, Undead Flesh, Tiamat Orange, Mediterranean Blue, Thar Brown, Birch, Mojave White
Gold: Gold (Vallejo), Copper (Vallejo), Antique Gold (Green Stuff World)
Metal: Thrash Metal, Dark Tone (Army Painter), Heavy Metal


![Play WW2 Commando Operations With Butcher & Bolt [Updated]](https://images.beastsofwar.com/2026/03/relaunch-600-338.jpg)


