![Perfect Call Of Duty-Style Miniatures? Wargames Atlantic’s Operators Review [7 Days Early Access]](https://images.beastsofwar.com/2026/02/unboxing-wargames-atlantic-operators-coverimage-225-127.jpg)


I love the smell of Prometheum in the morning


Recommendations: 64
About the Project
I backed a Kickstarter by Wargames Model Mods in 2017 for the awesome looking Prometheum Rig. It's such a huge project, beyond just assembling the model so I decided to collate my pictures from the last 12 months into a project. I have found with MDF scenery that it generally works if you view it as a skeleton more than the final piece; you can use them as the basis for something awesome but if all you do is throw some paint on them they just look like painted boxes. So this Project is less about building the model and more about turning it into a piece of scenery.
Related Game: Necromunda
Related Genre: Science Fiction
This Project is Active
Part 5 – Painting the Base
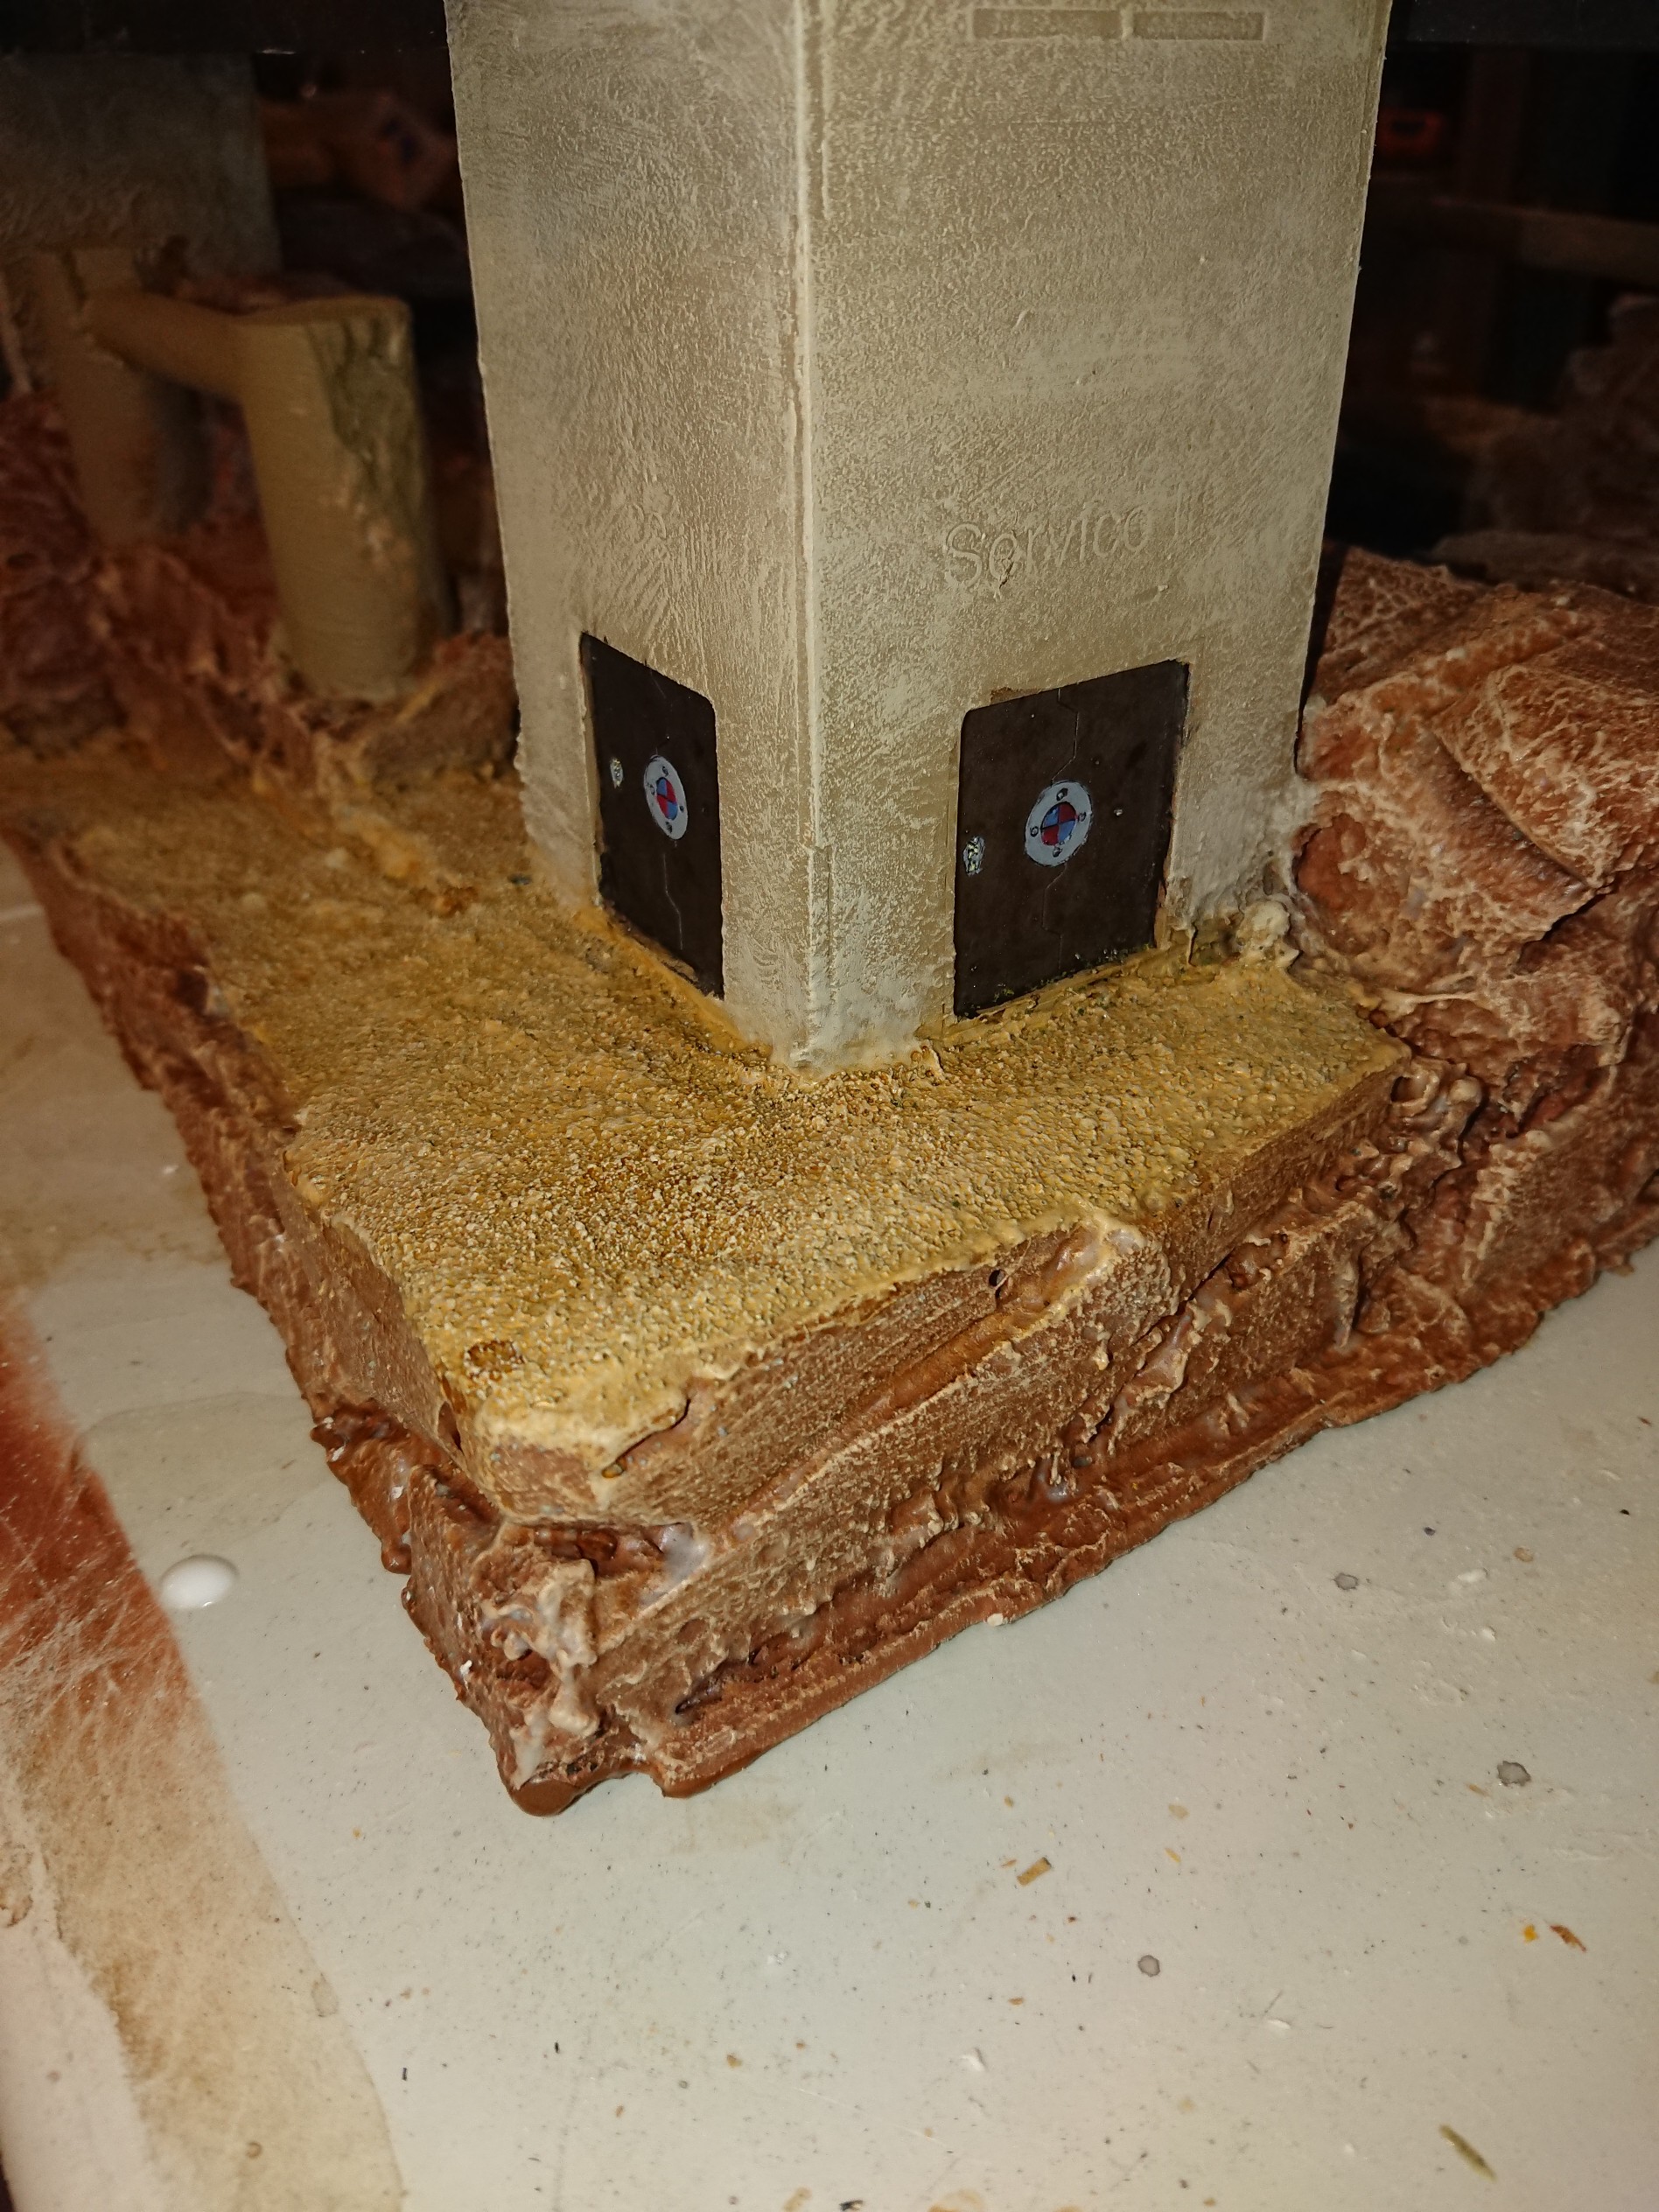
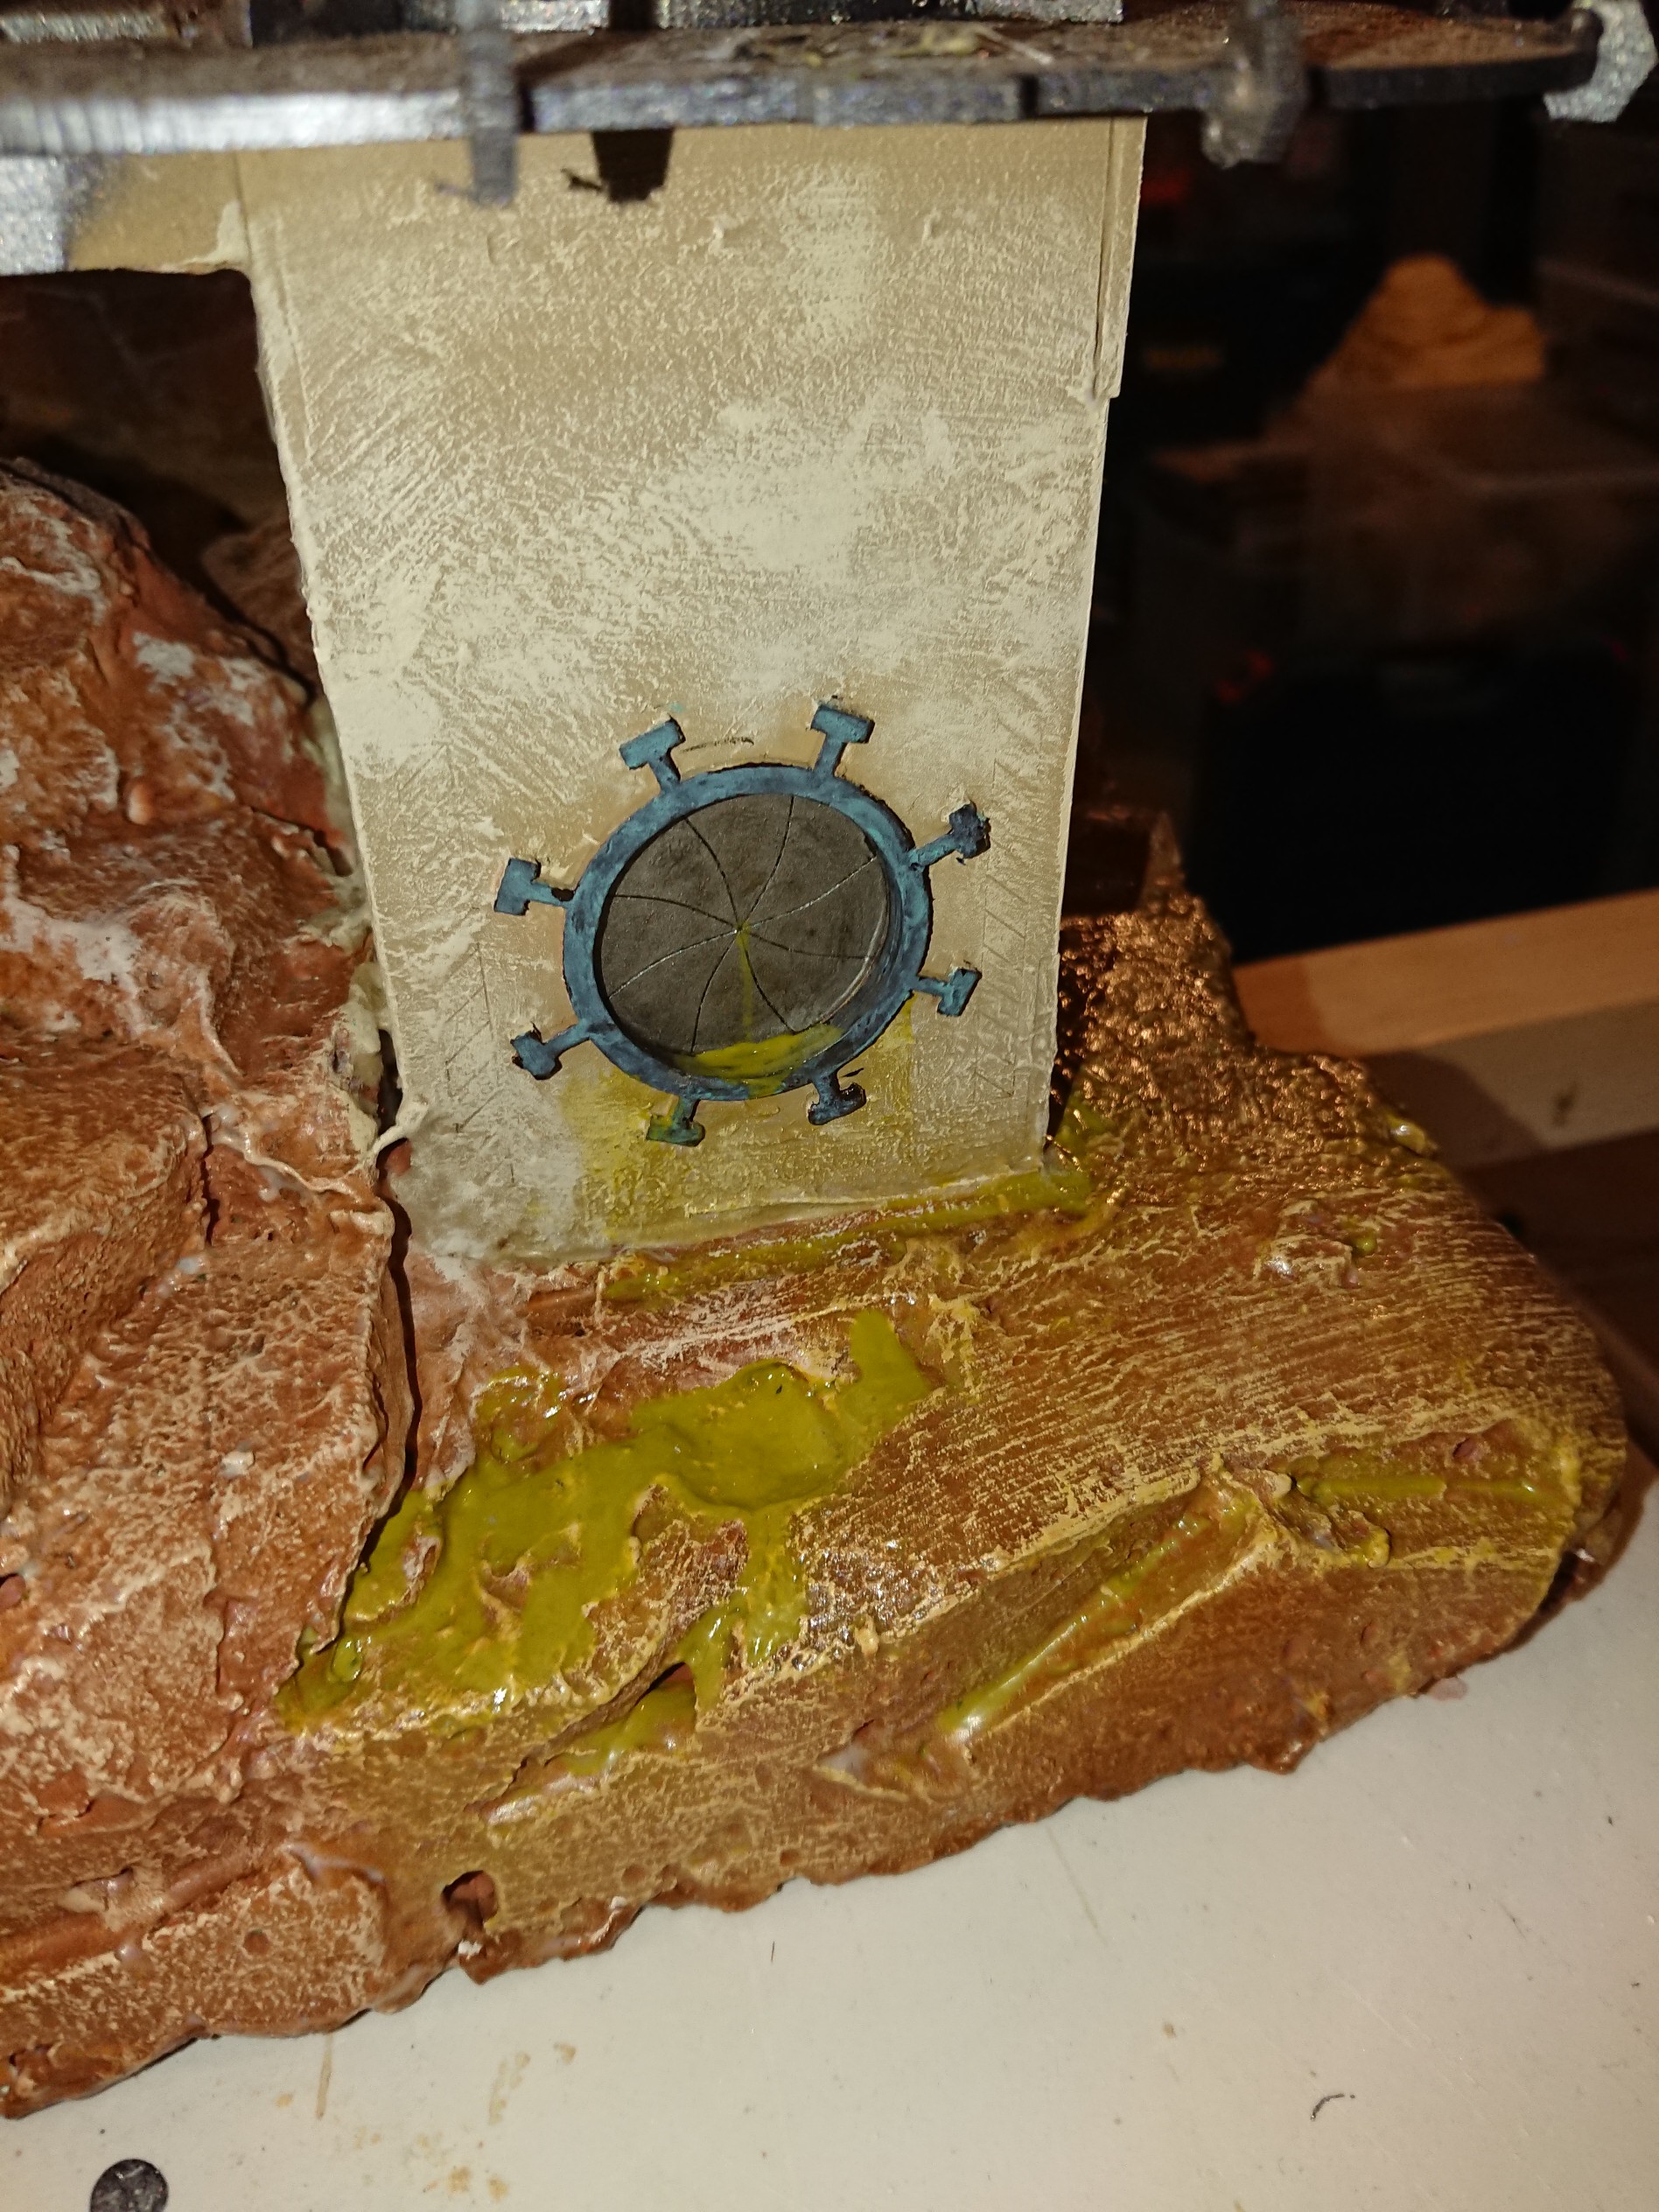
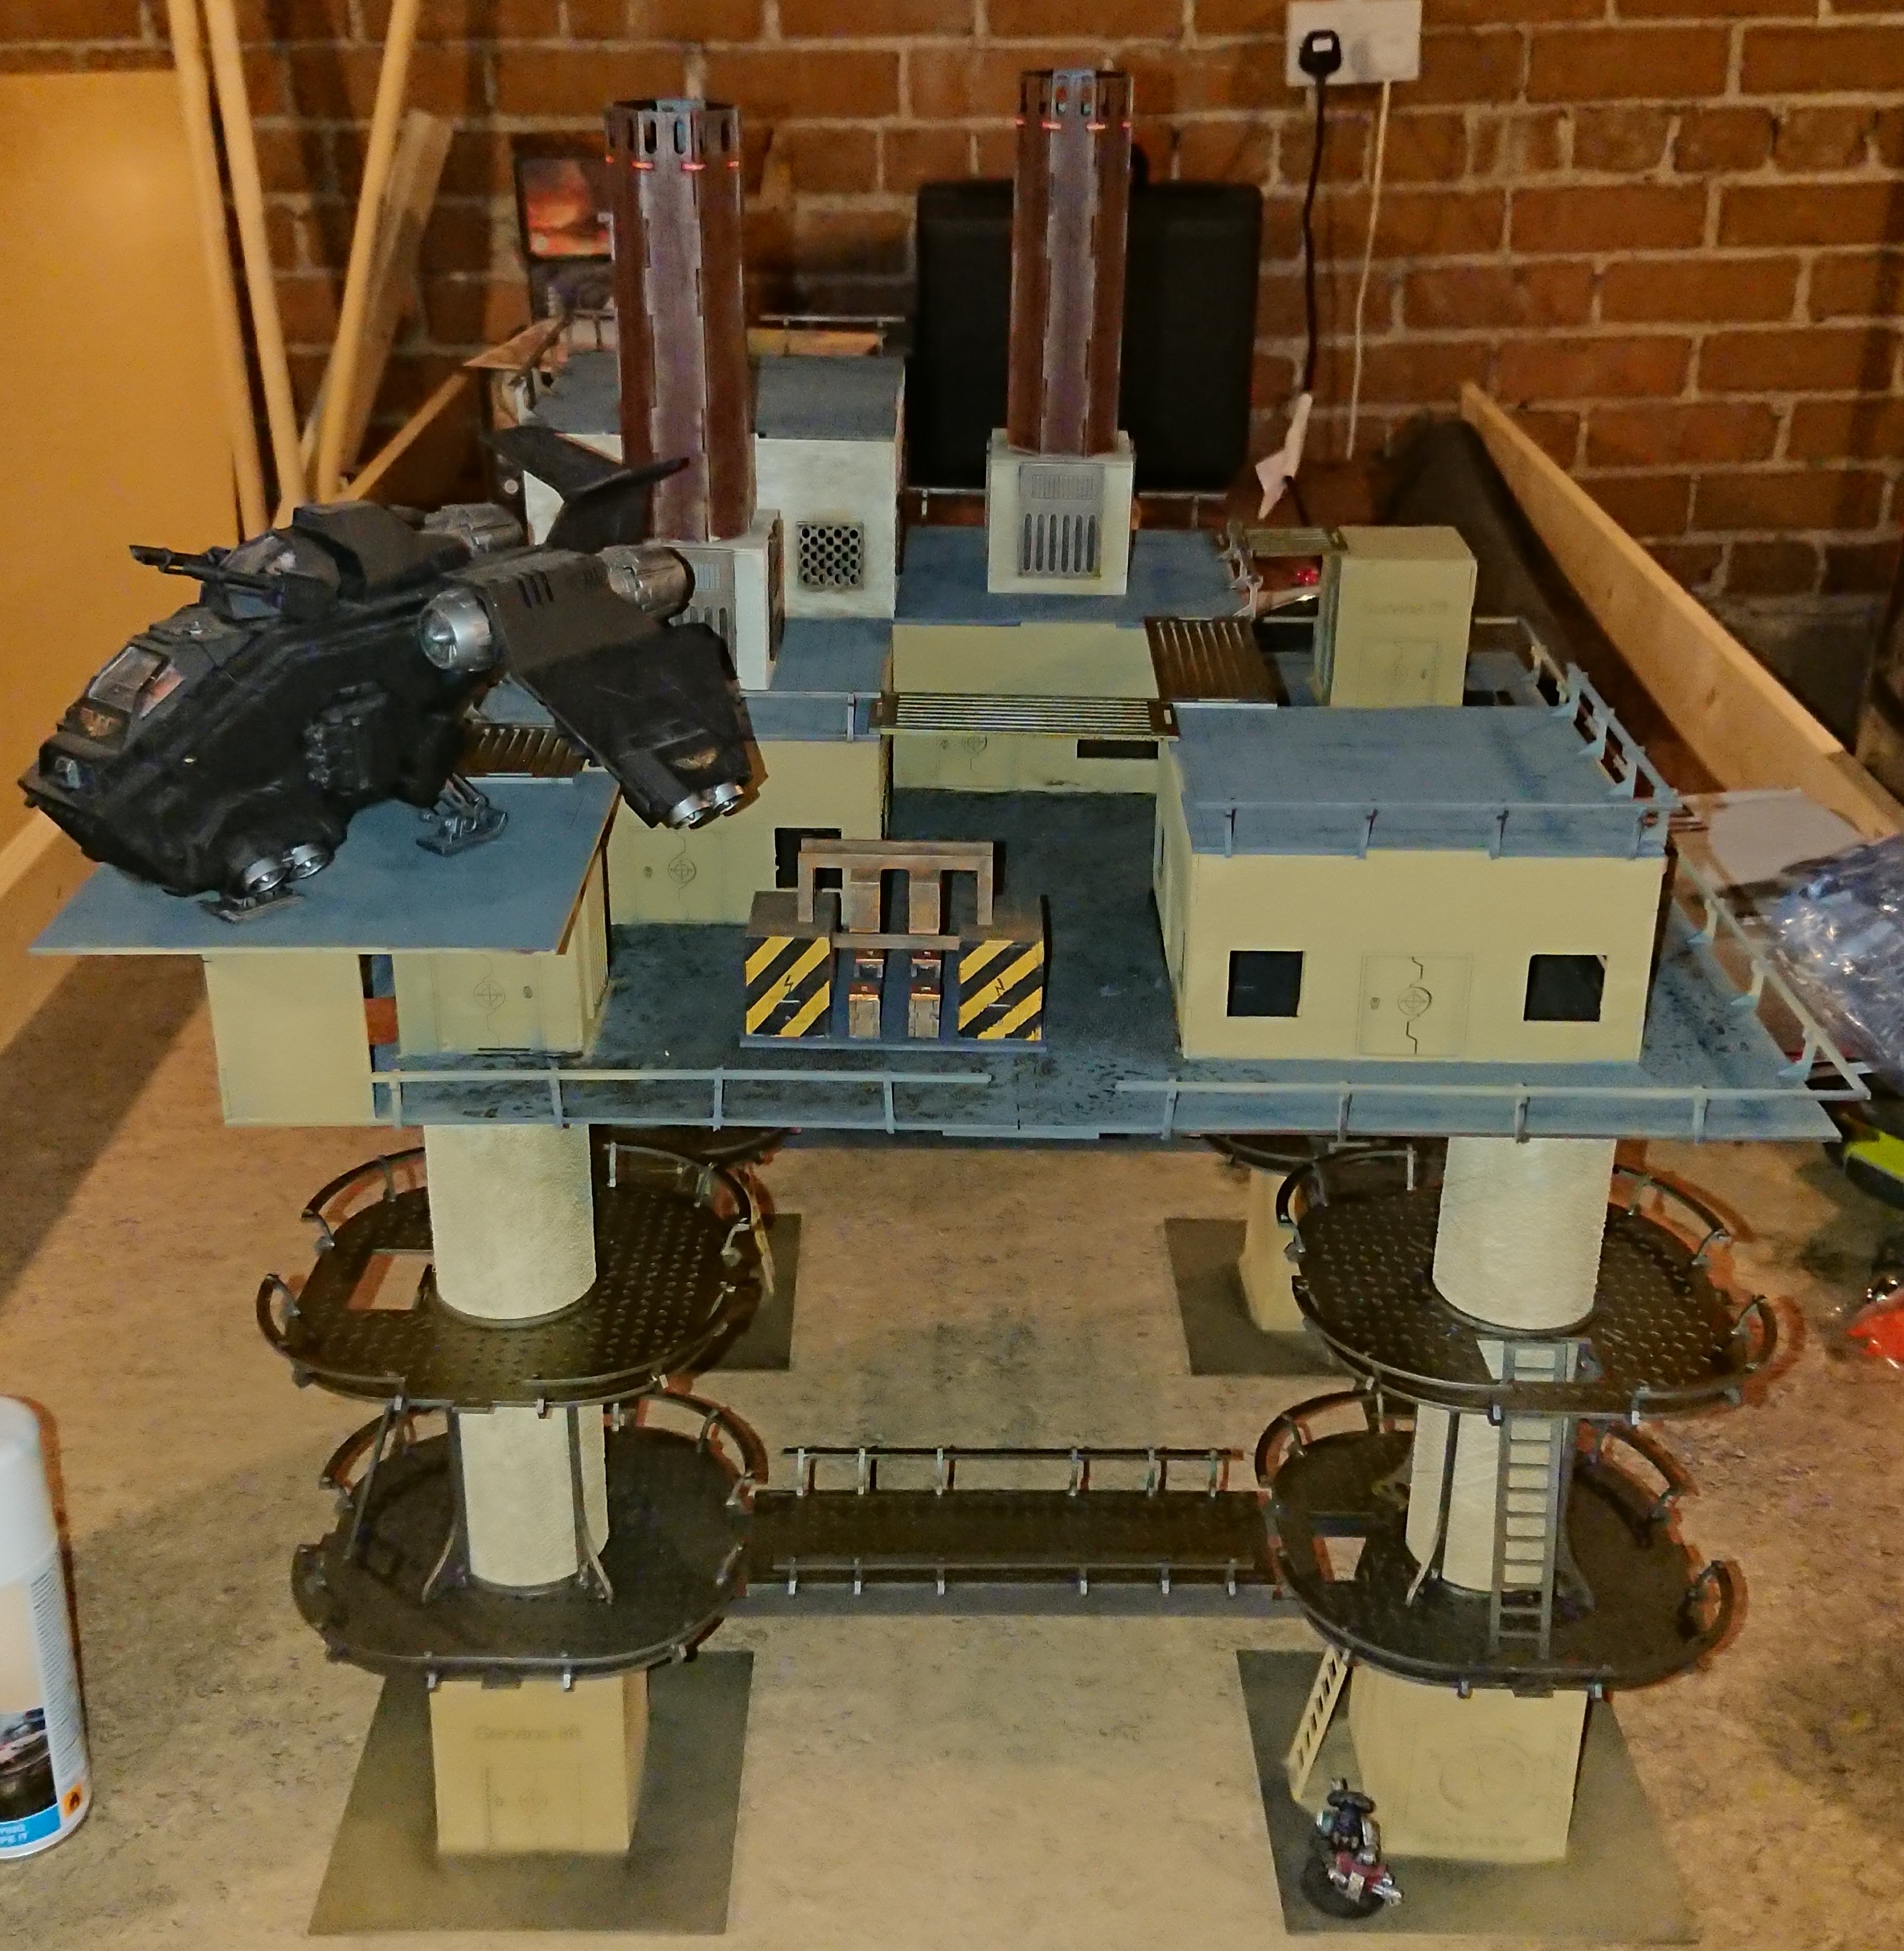
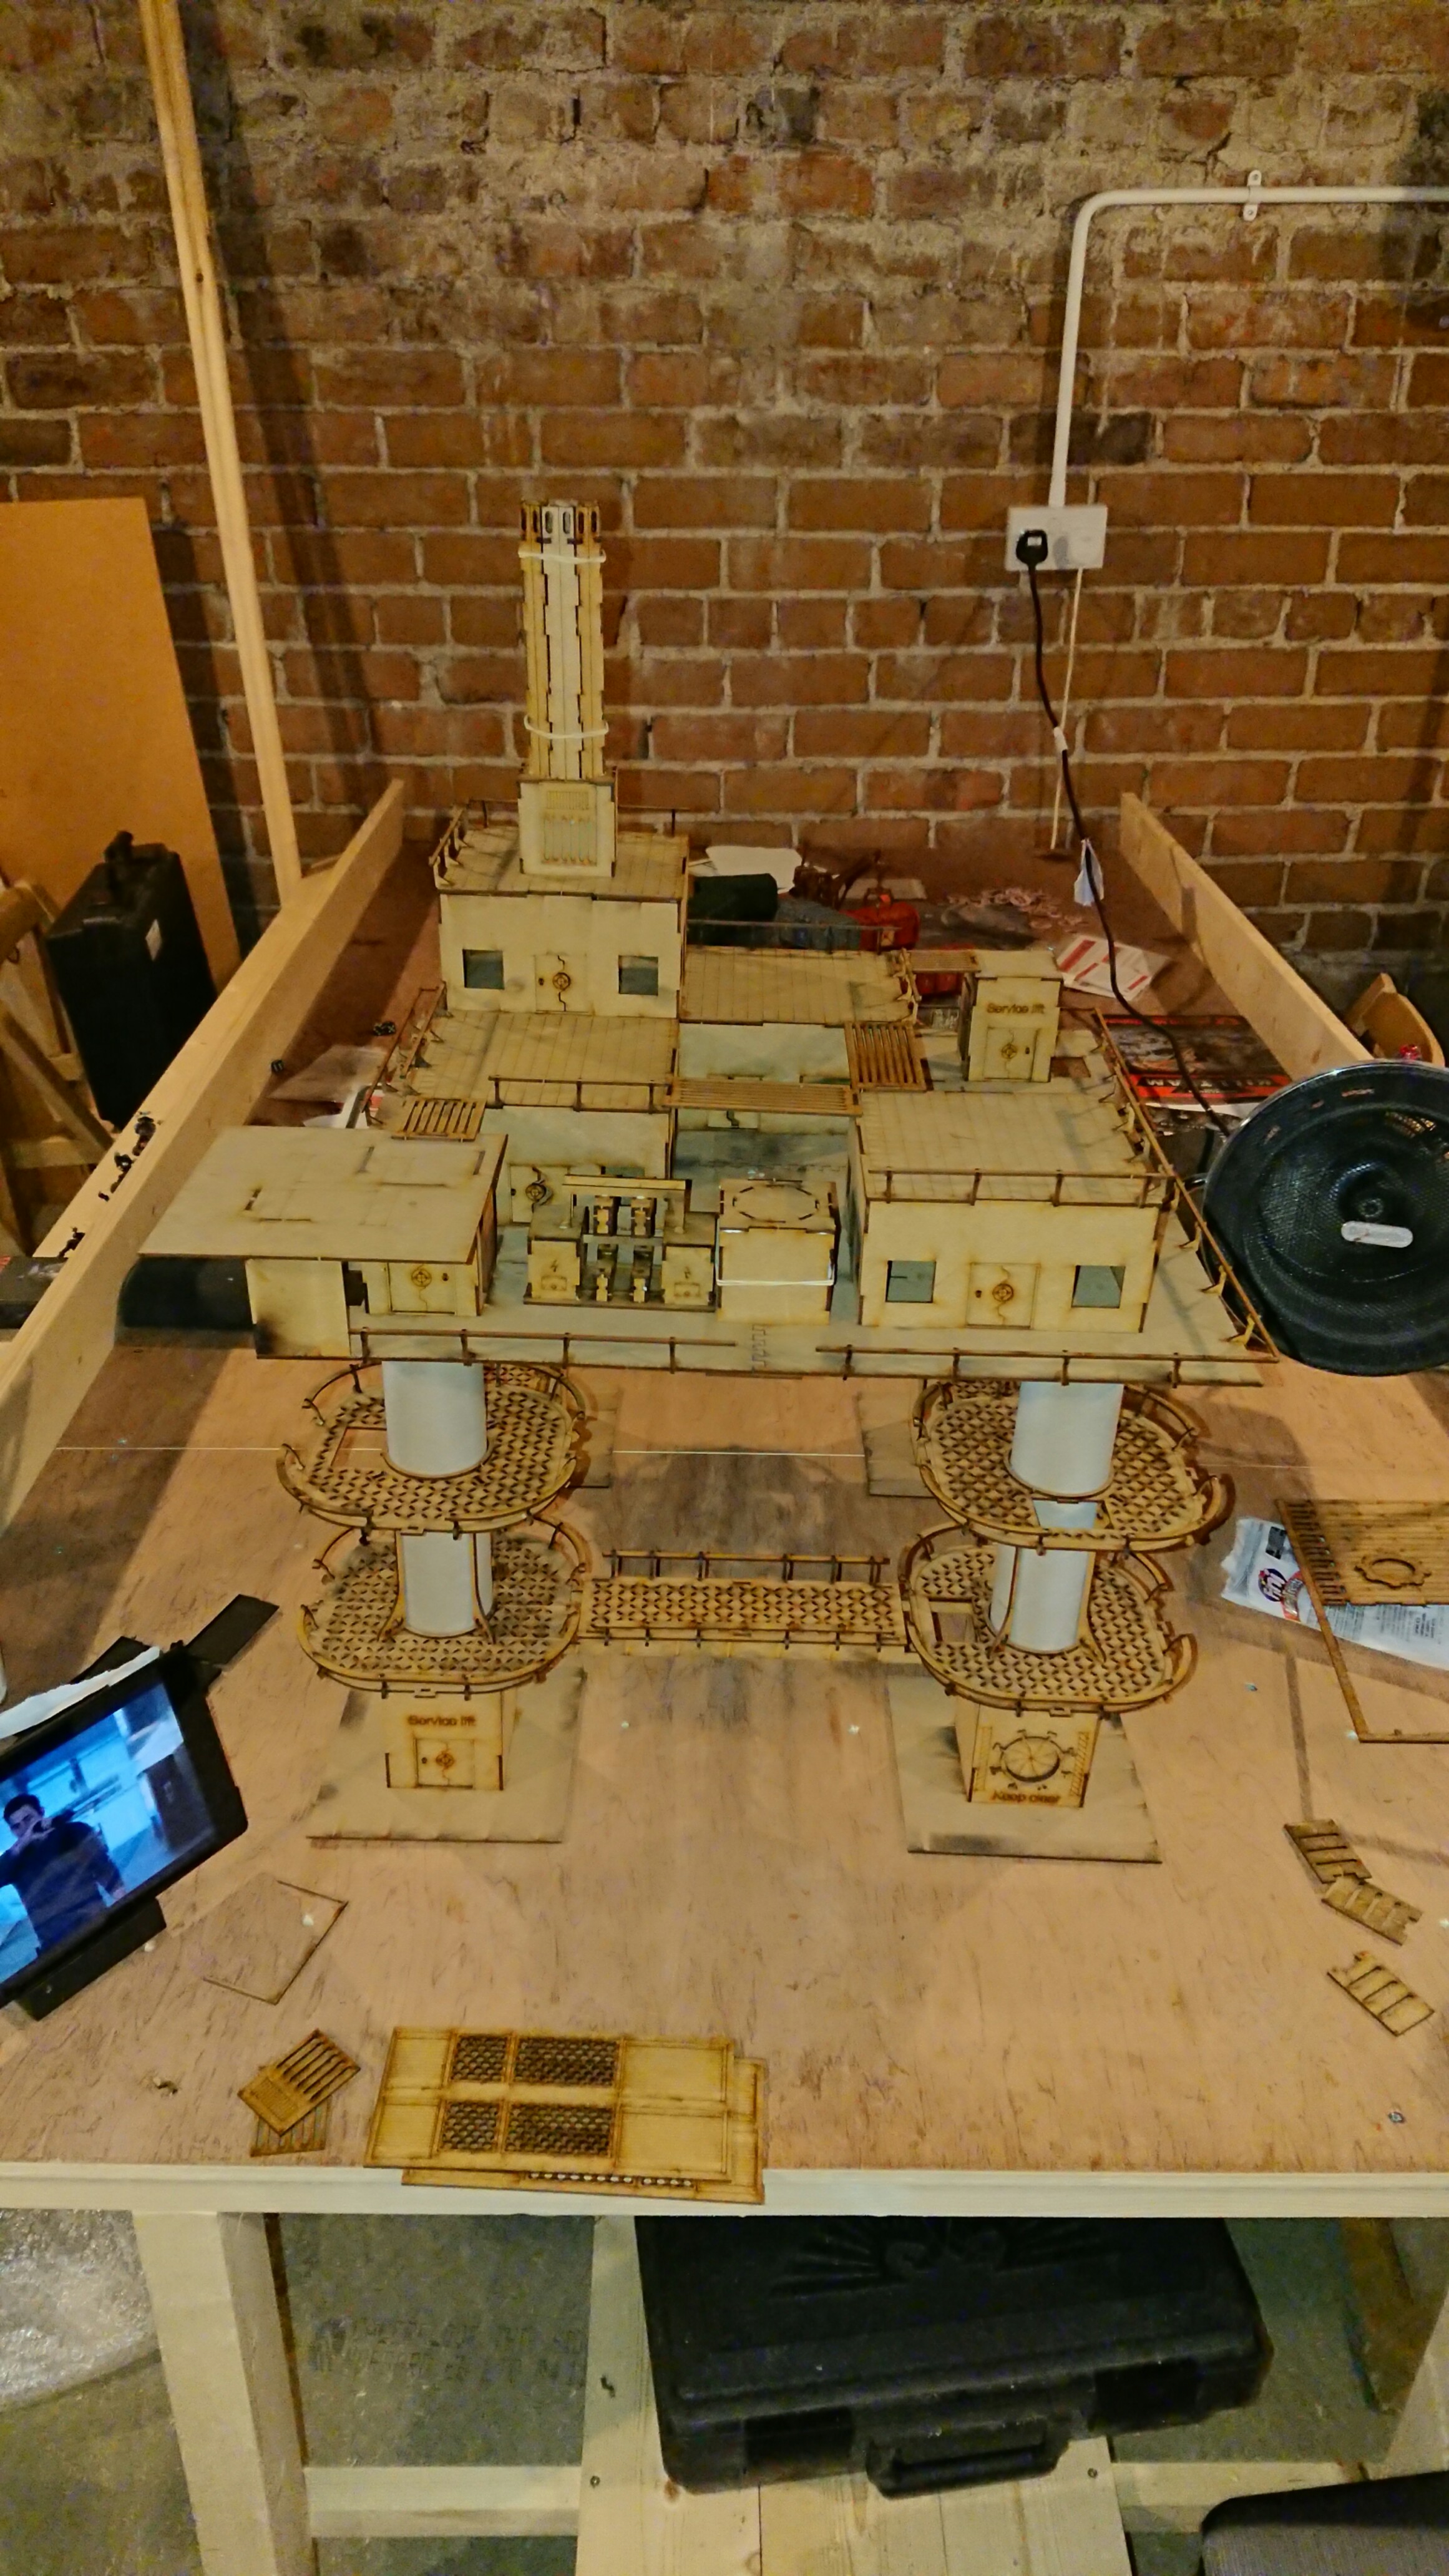
The finished piece is set to be part of a desert themed board so the rocks were painted in a sandstone scheme to match some existing rock formations. First step, because it’s all extruded foam, was to give the entirety of the base a coating of wall filler. Once dry, this was sanded to get rid of any unsightly lumps before priming it with Army Painter Fur brown. As you can see this ended up all over the “feet” at the bottom of each leg – a risk I had to take really and I accepted an amount of repainting would be required. After that I gave the rocks a wash using a dark brown wash (I mixed it myself because aggrax earth is expensive when used in the quantities I go through on scenery builds). After the wash dried (several hours because it was applied liberally) the rest is all drybrushing. I drybrushed them in 3 stages using GW dry pajnts, first a very heavy drybrush of Golfag Brown followed by Tyrant skull and finally Terminatus stone.
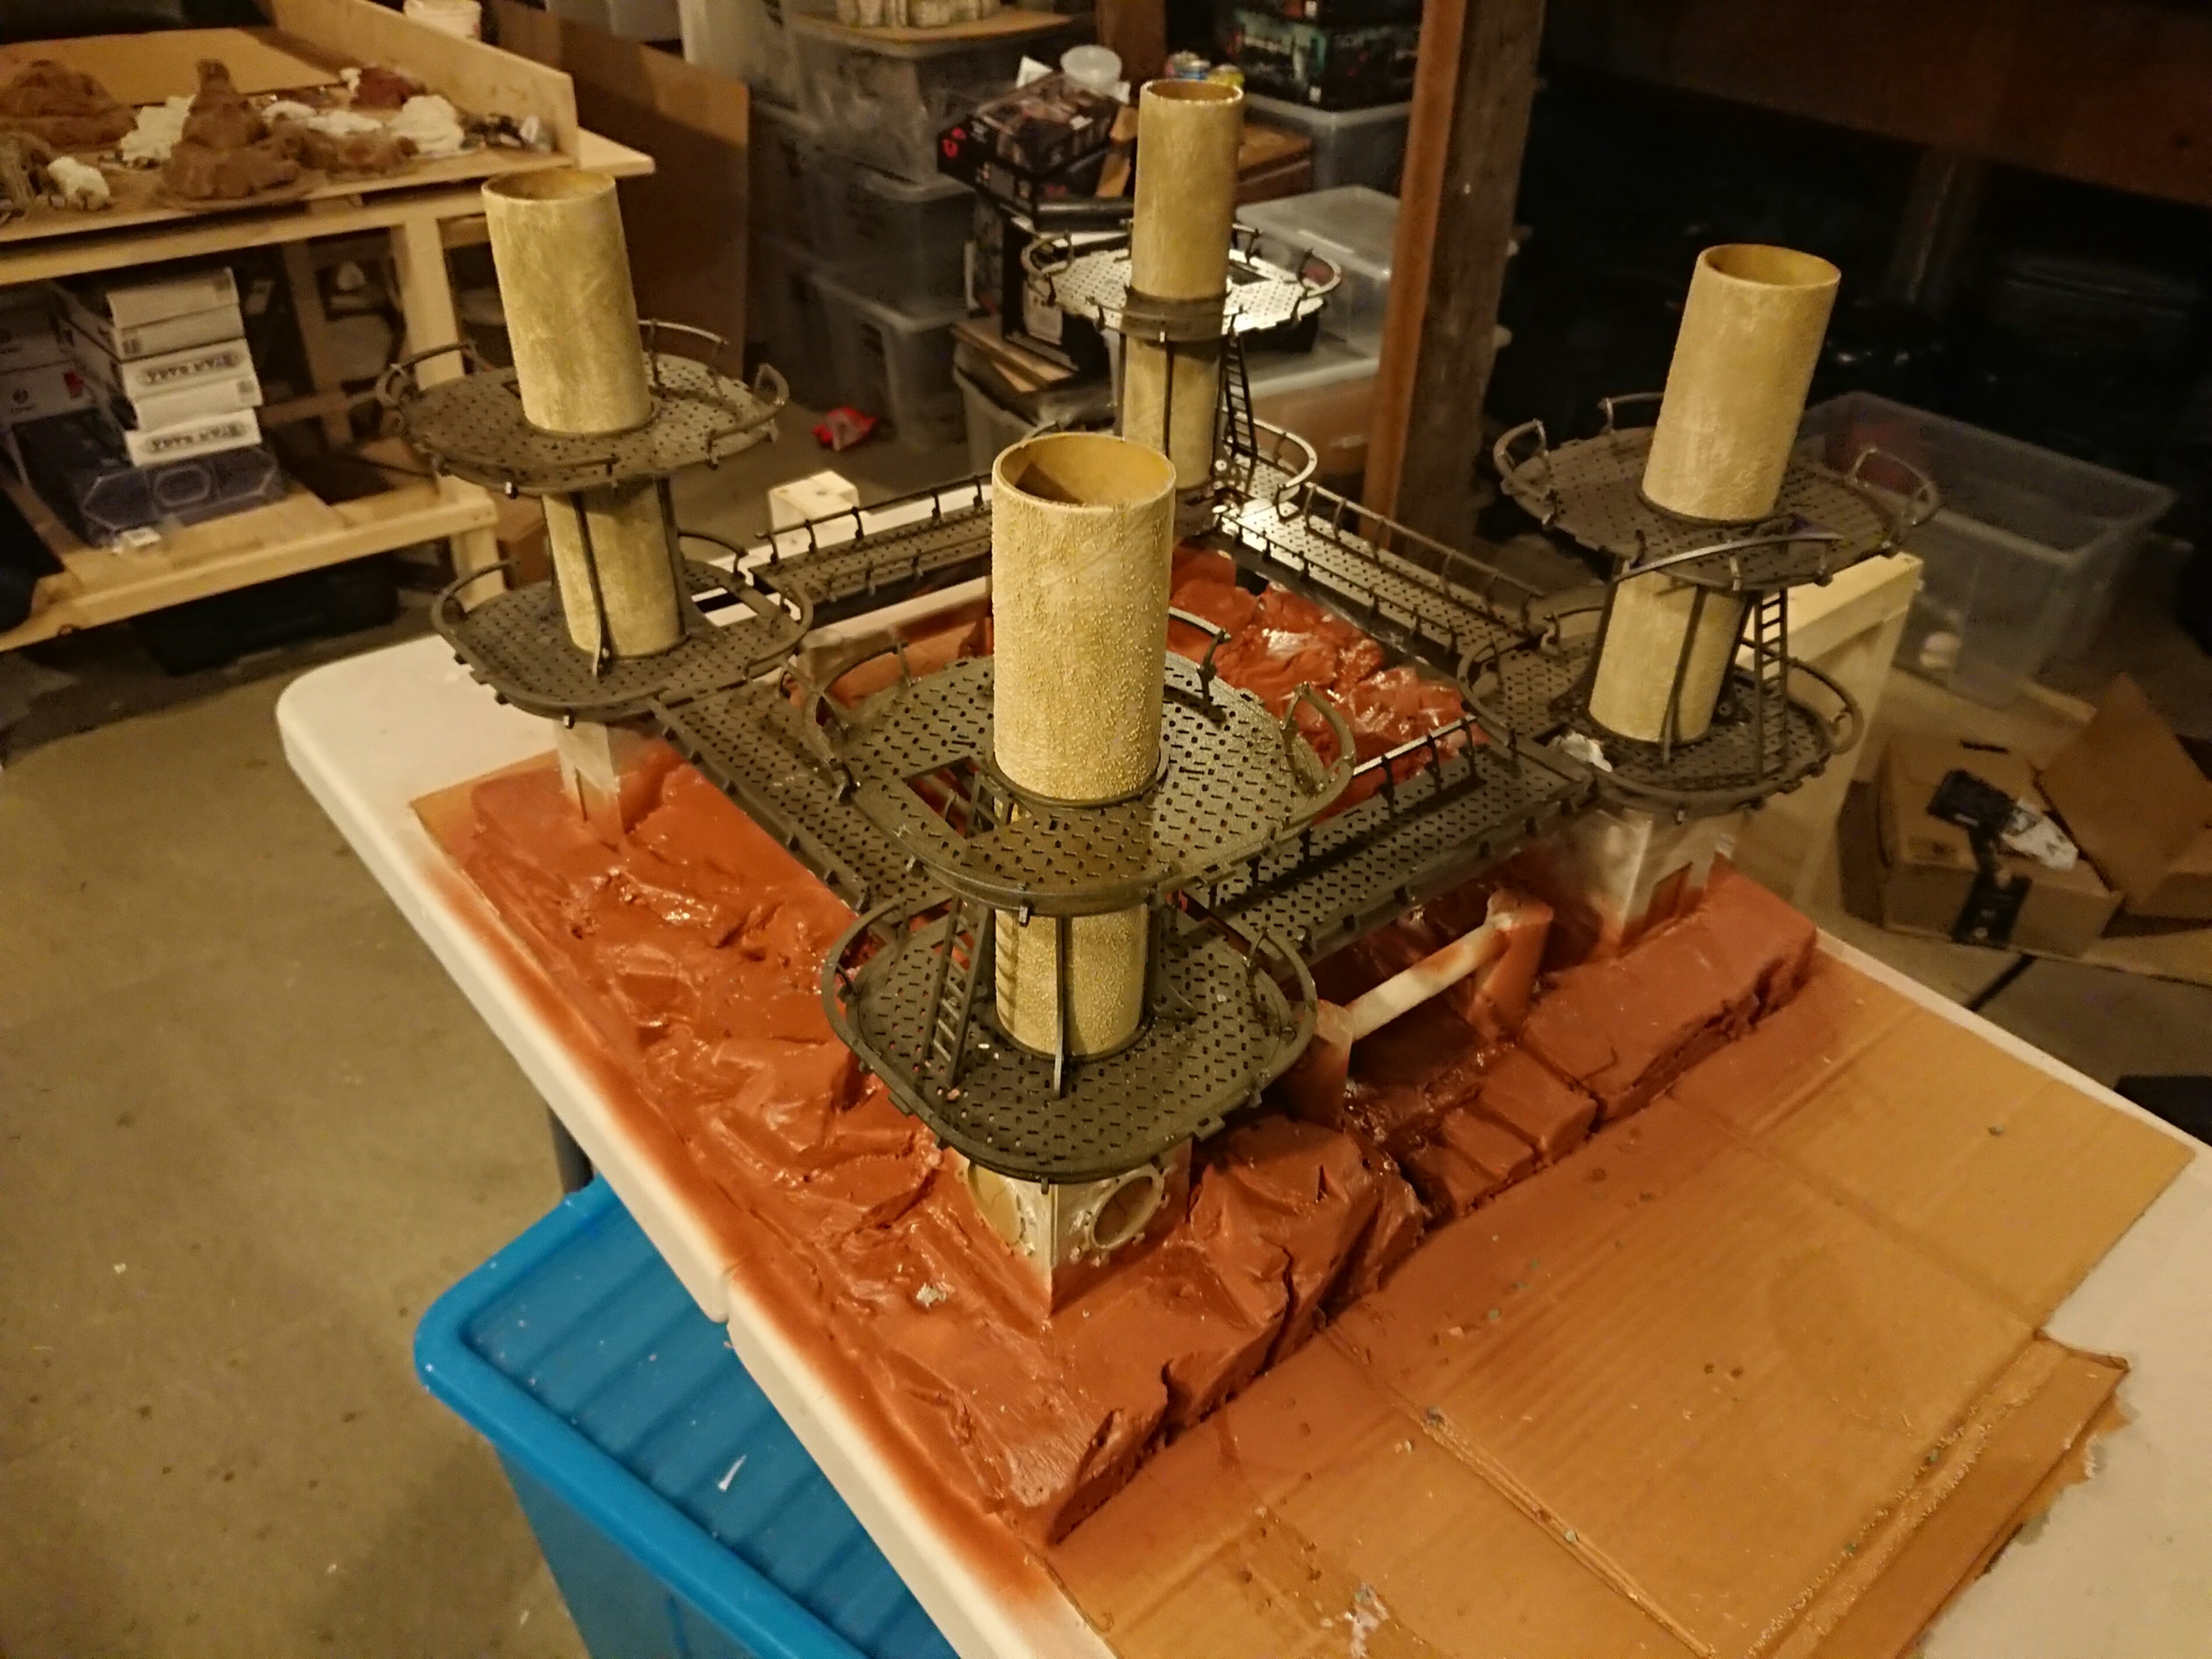
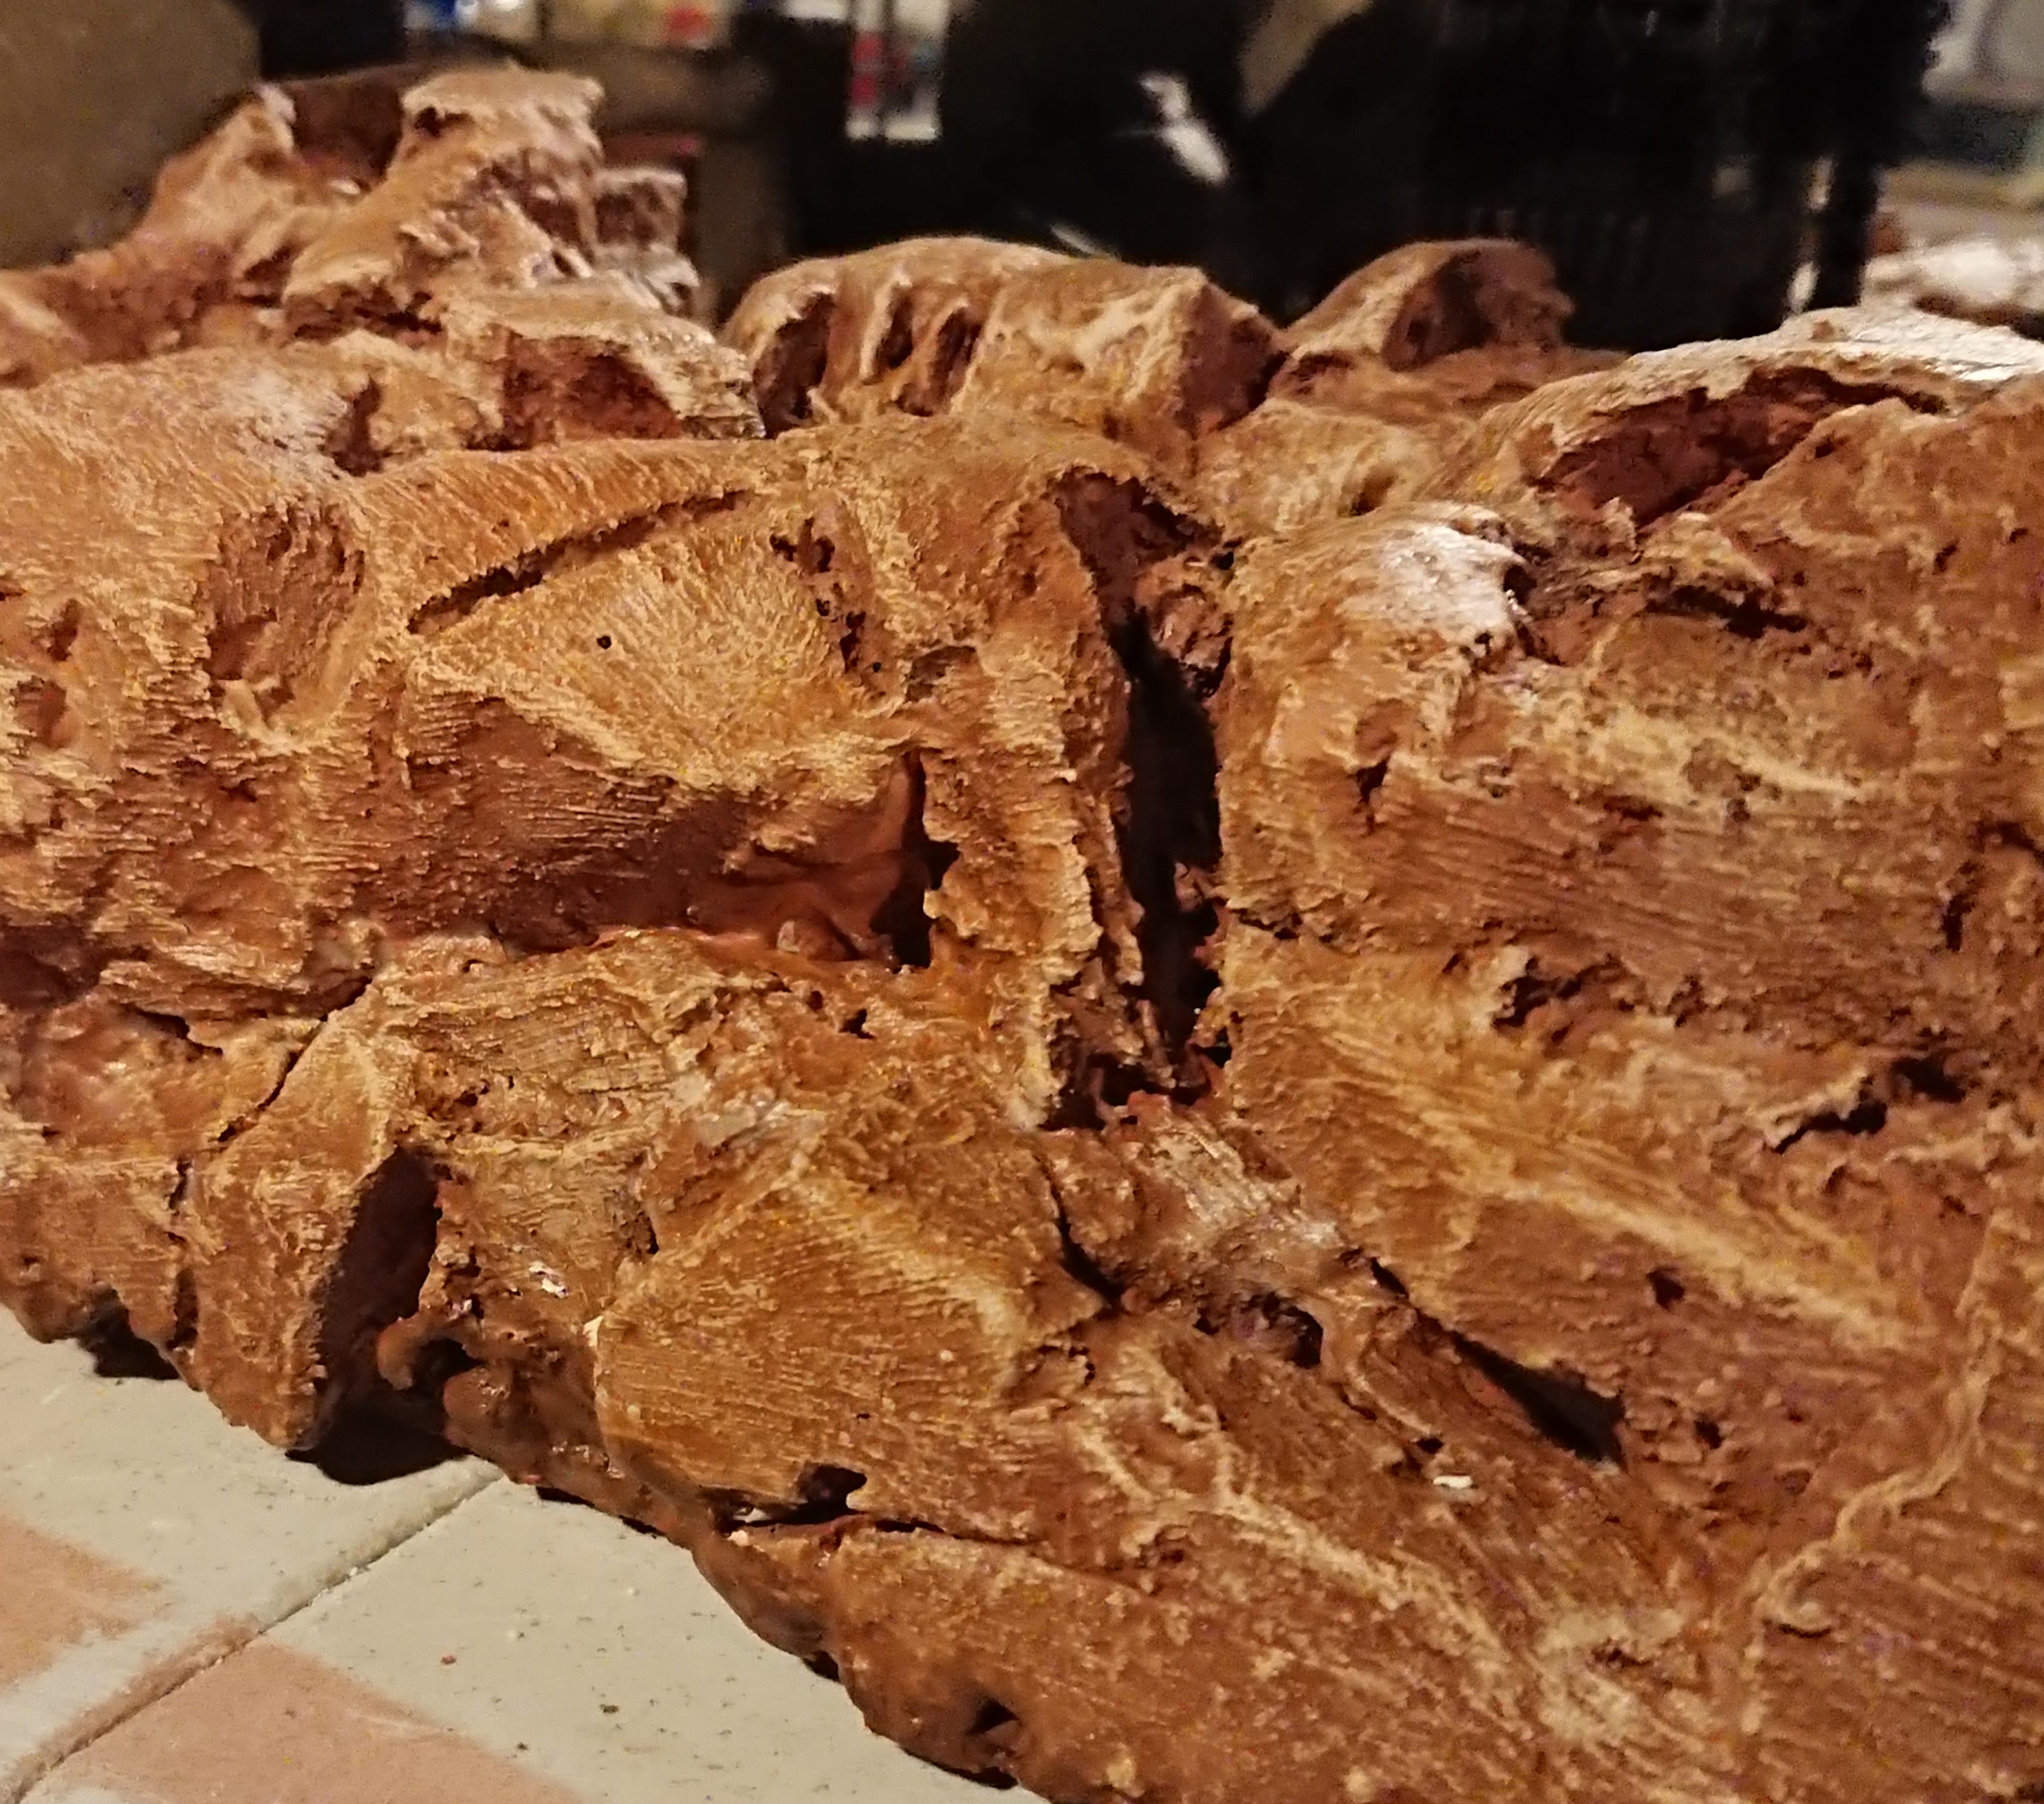
For some finishing touches I added sand to the flat areas where it would be able to settle, this also helps delineate some areas as normal terrain (sand) or difficult terrain (bare rock). And at the bottom of the legs with the Iris hatches, I painted loads of Nurgle Rot to imitate some kind of toxic waste out flow
Lastly, to protect it I coated the whole lot in Mod Podge Matt. When using Filler on scenery this is really important because the filler can be quite brittle and the mod podge dries solid and really helps to protect it
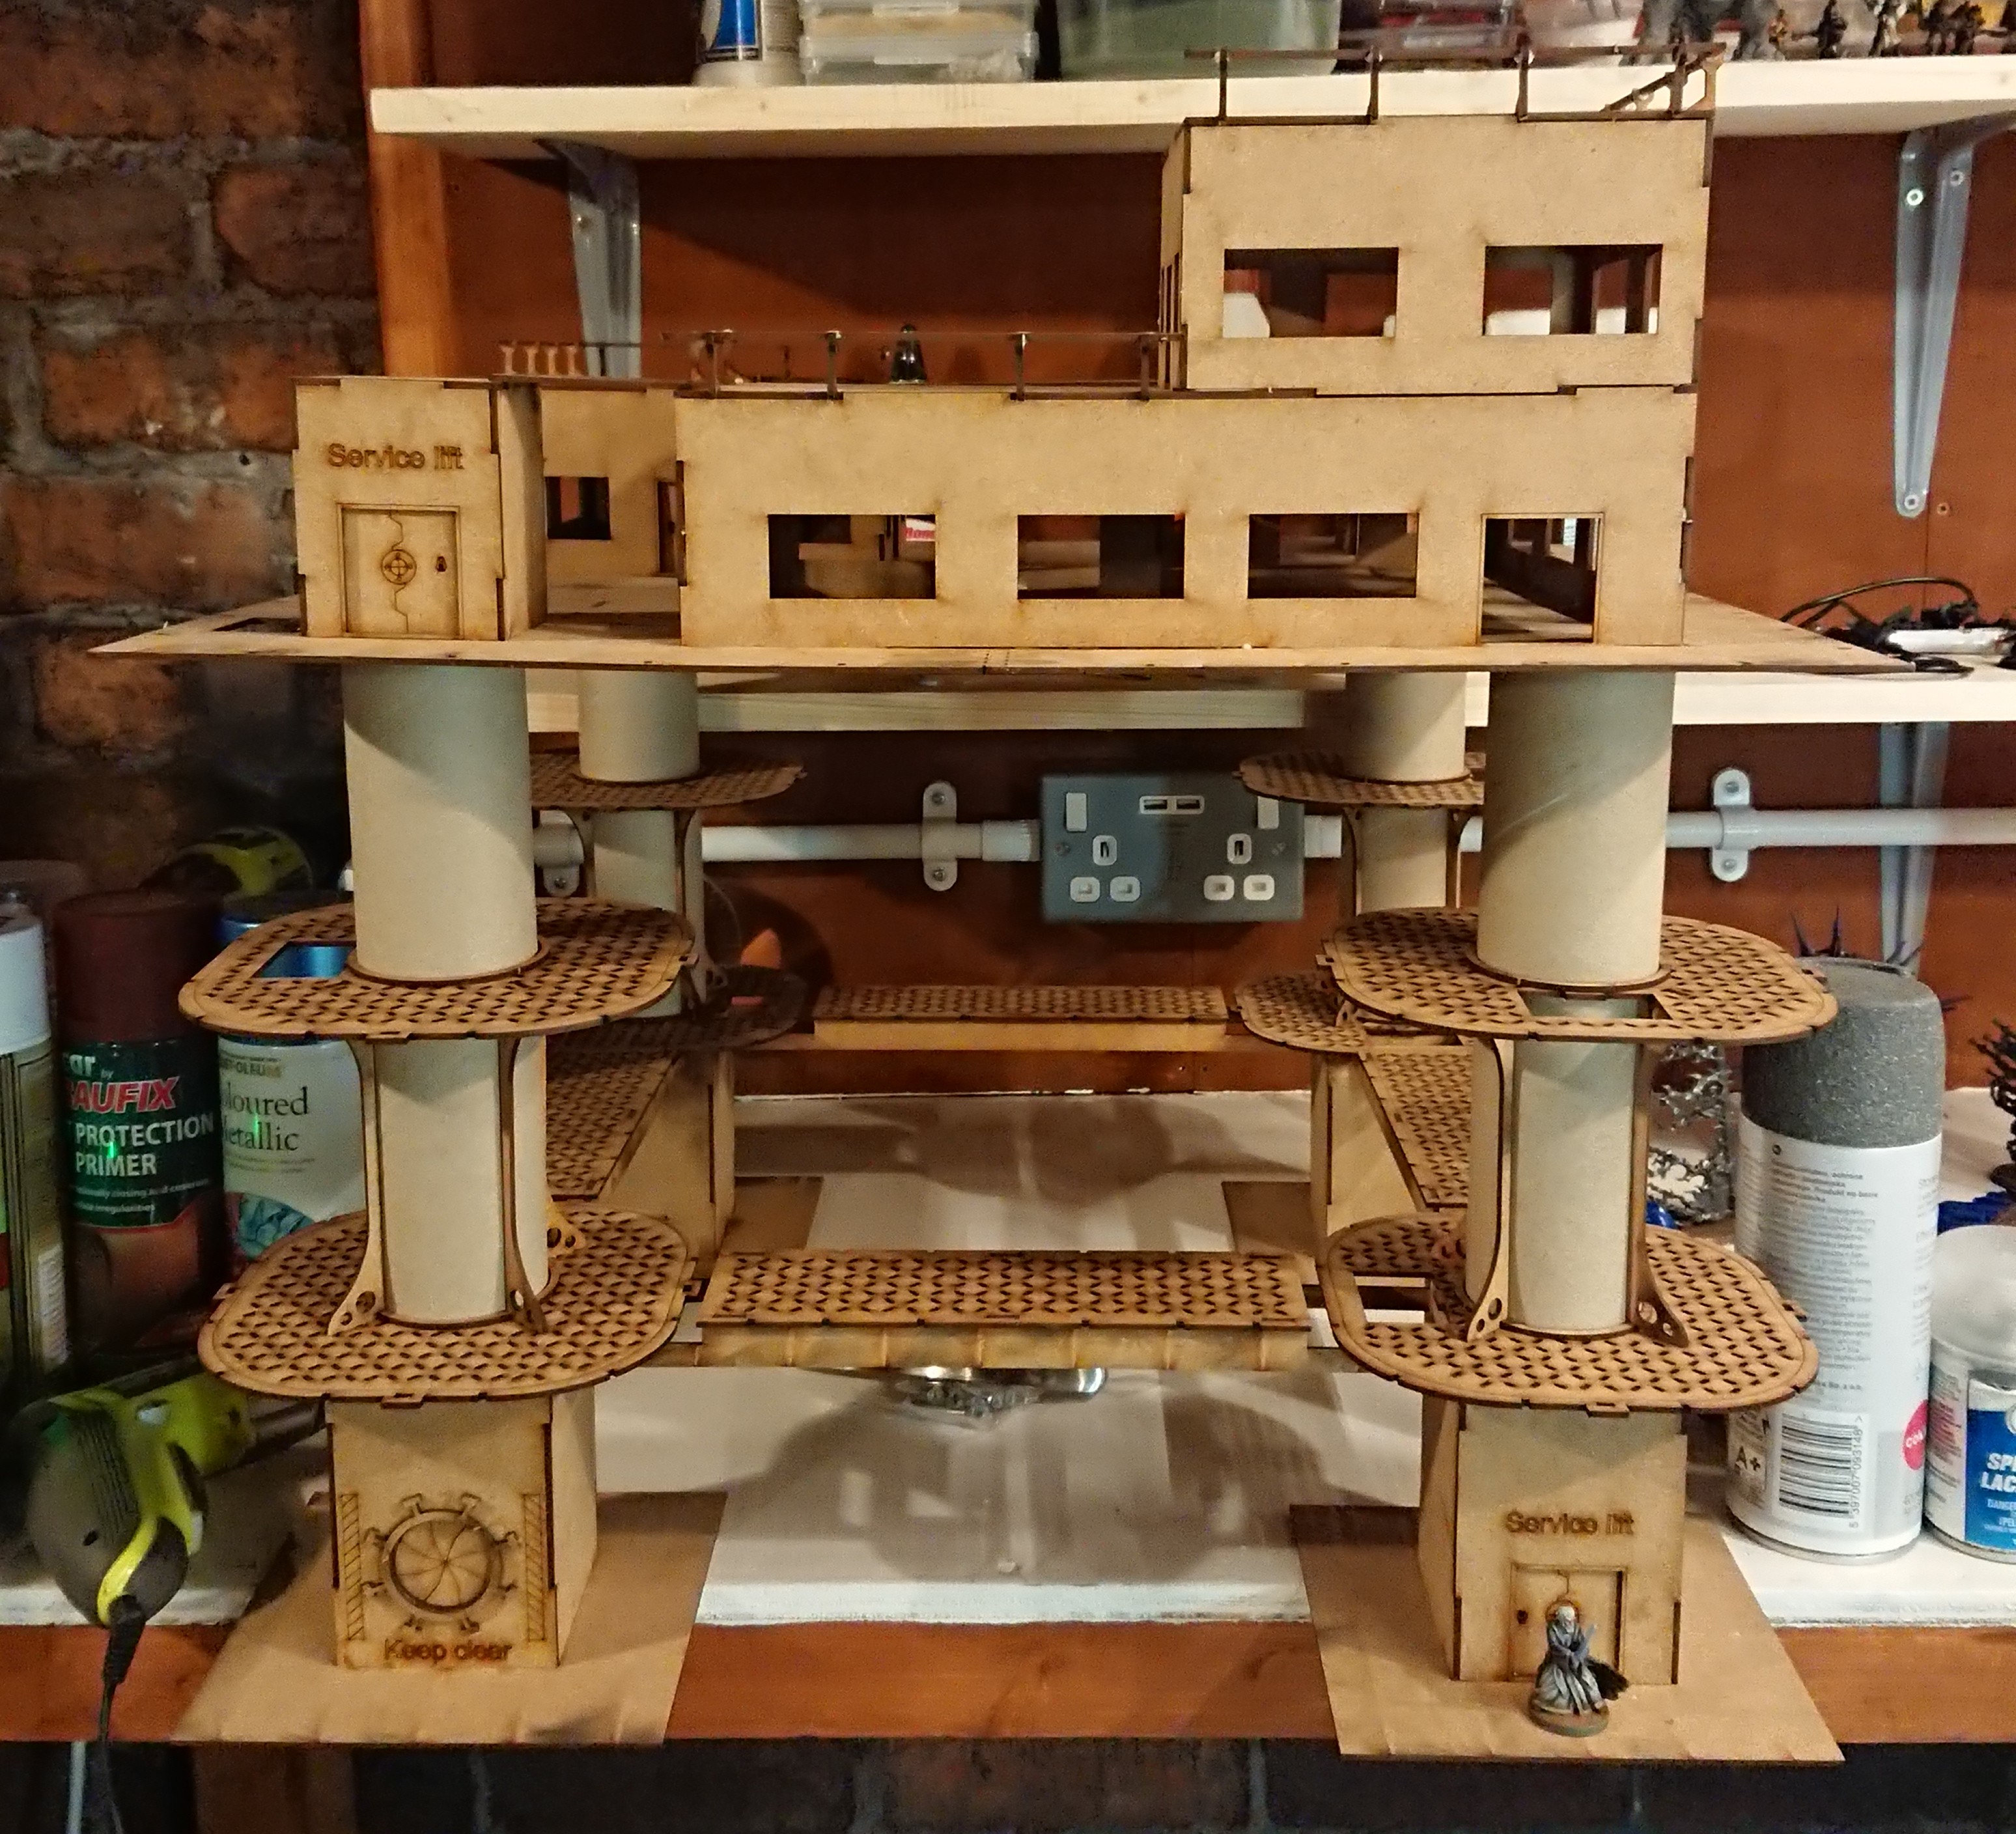
Part 4 - Building a Base
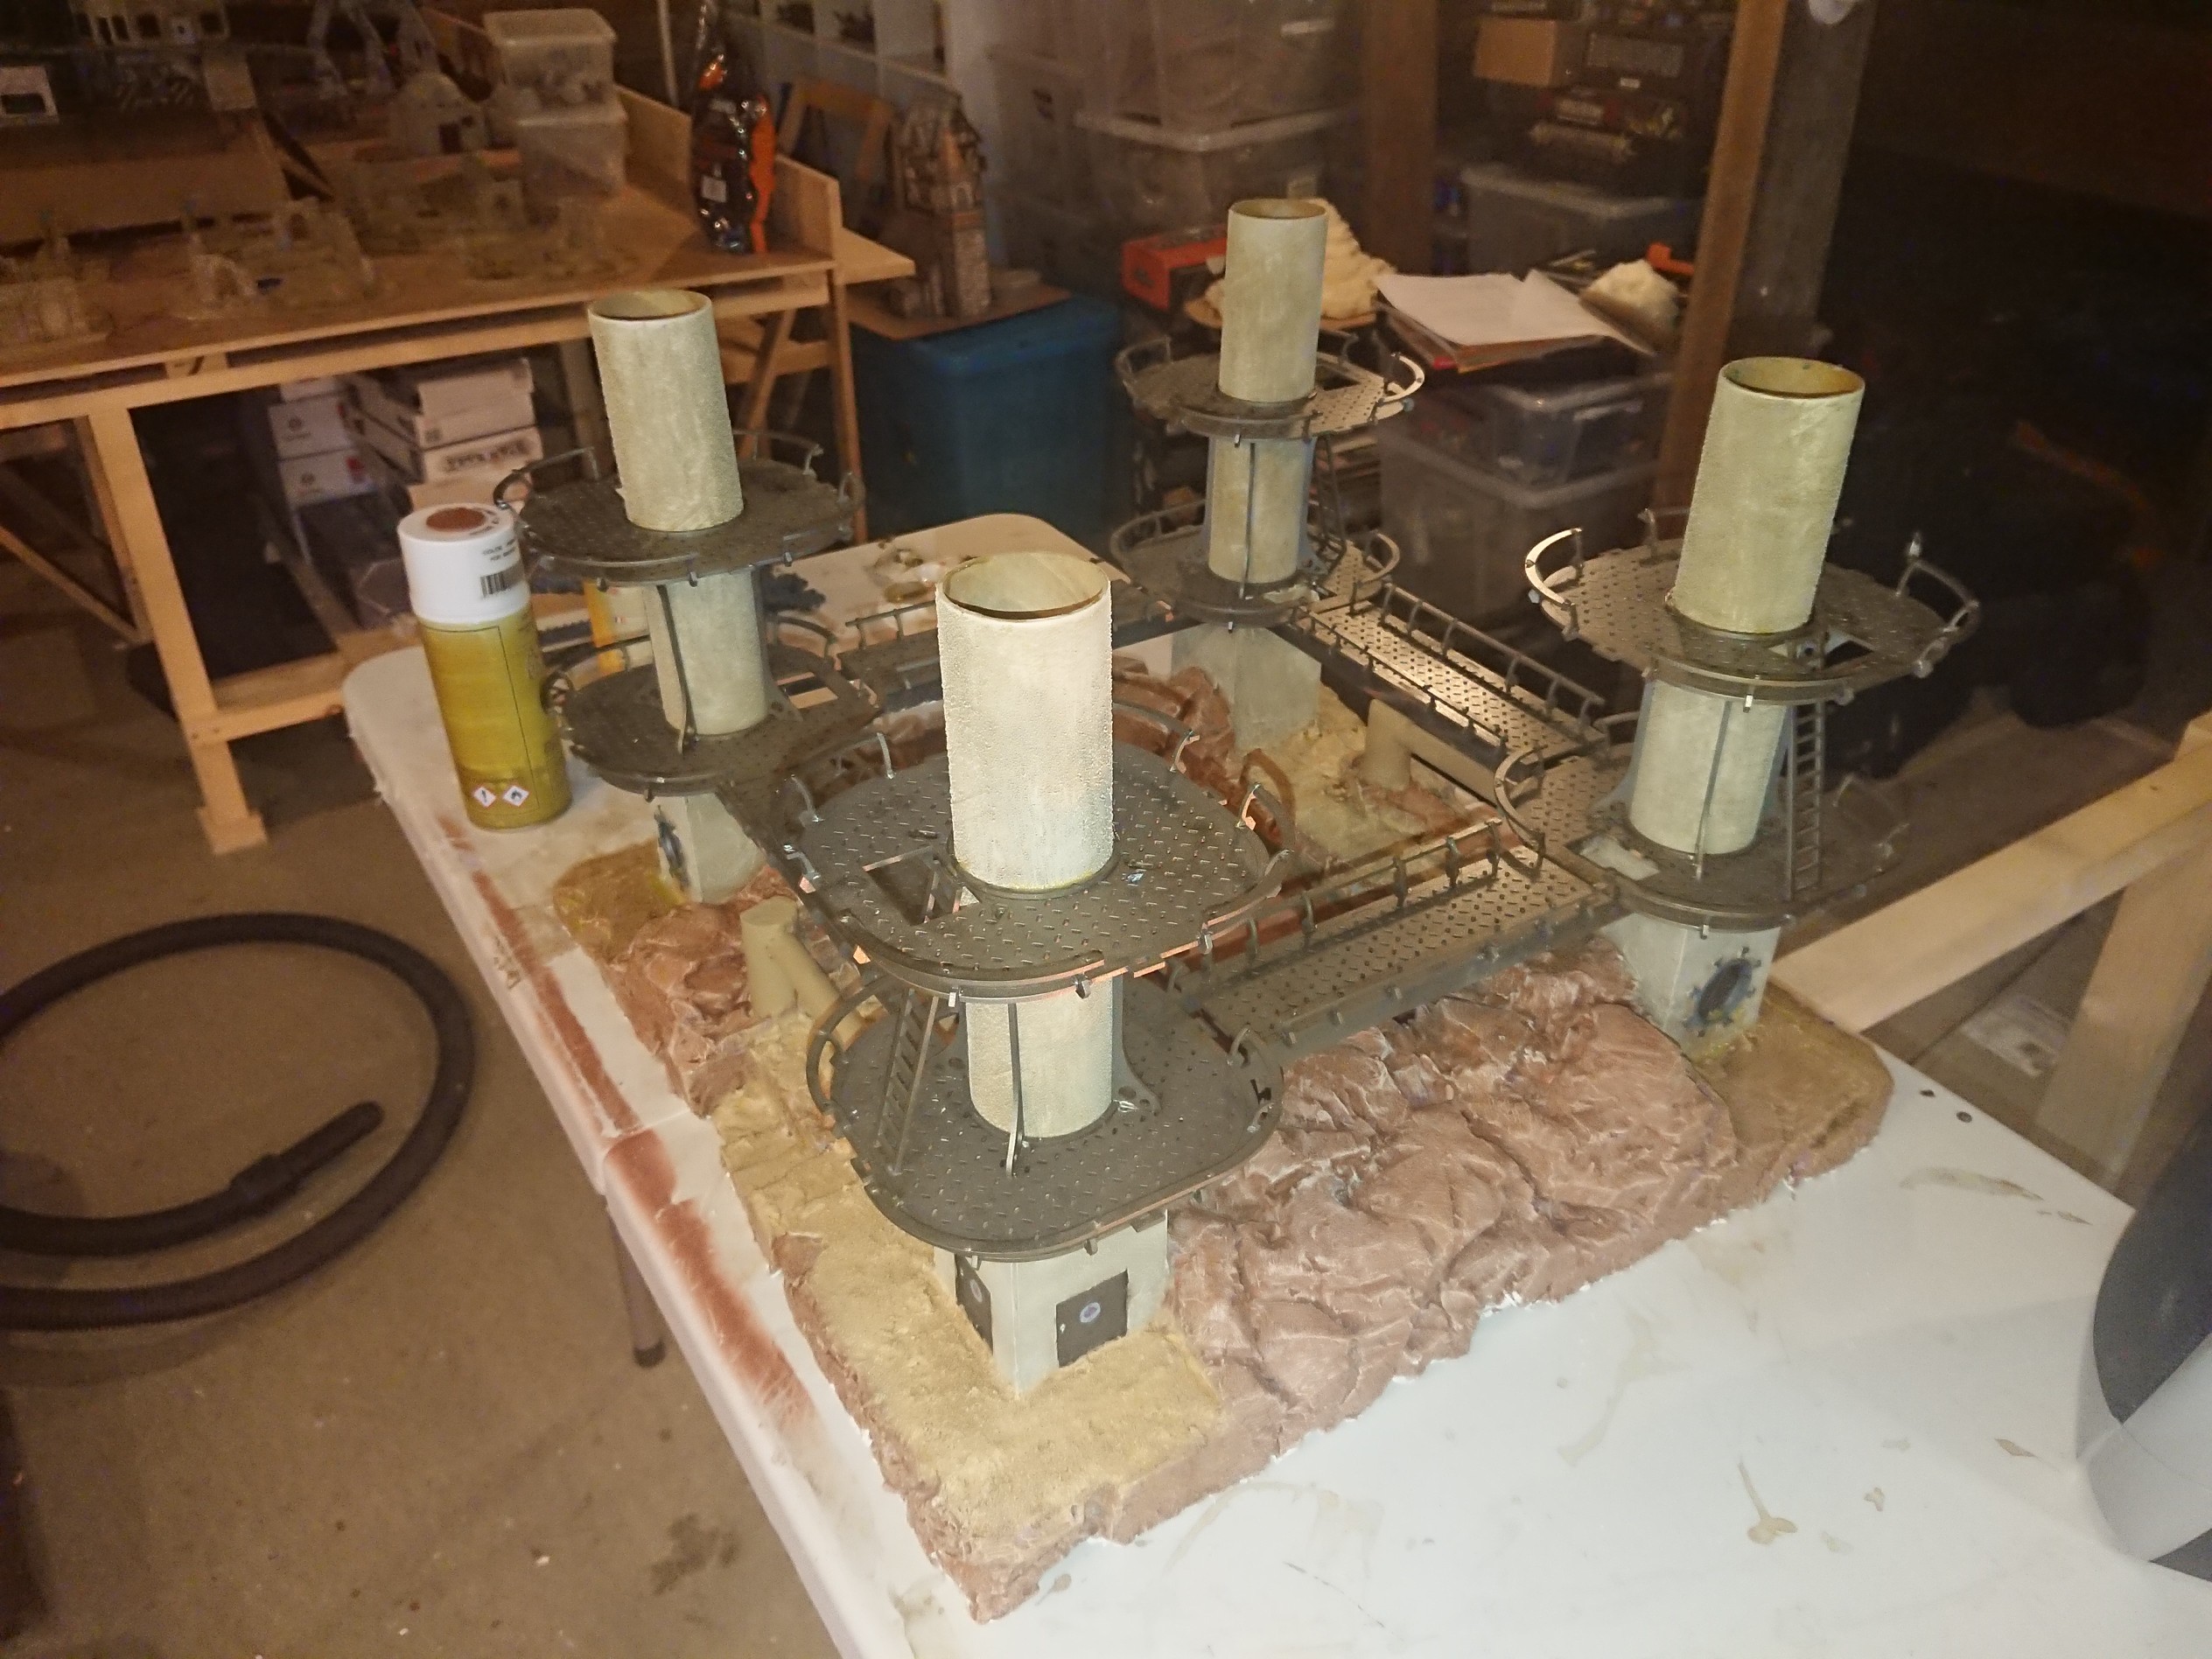
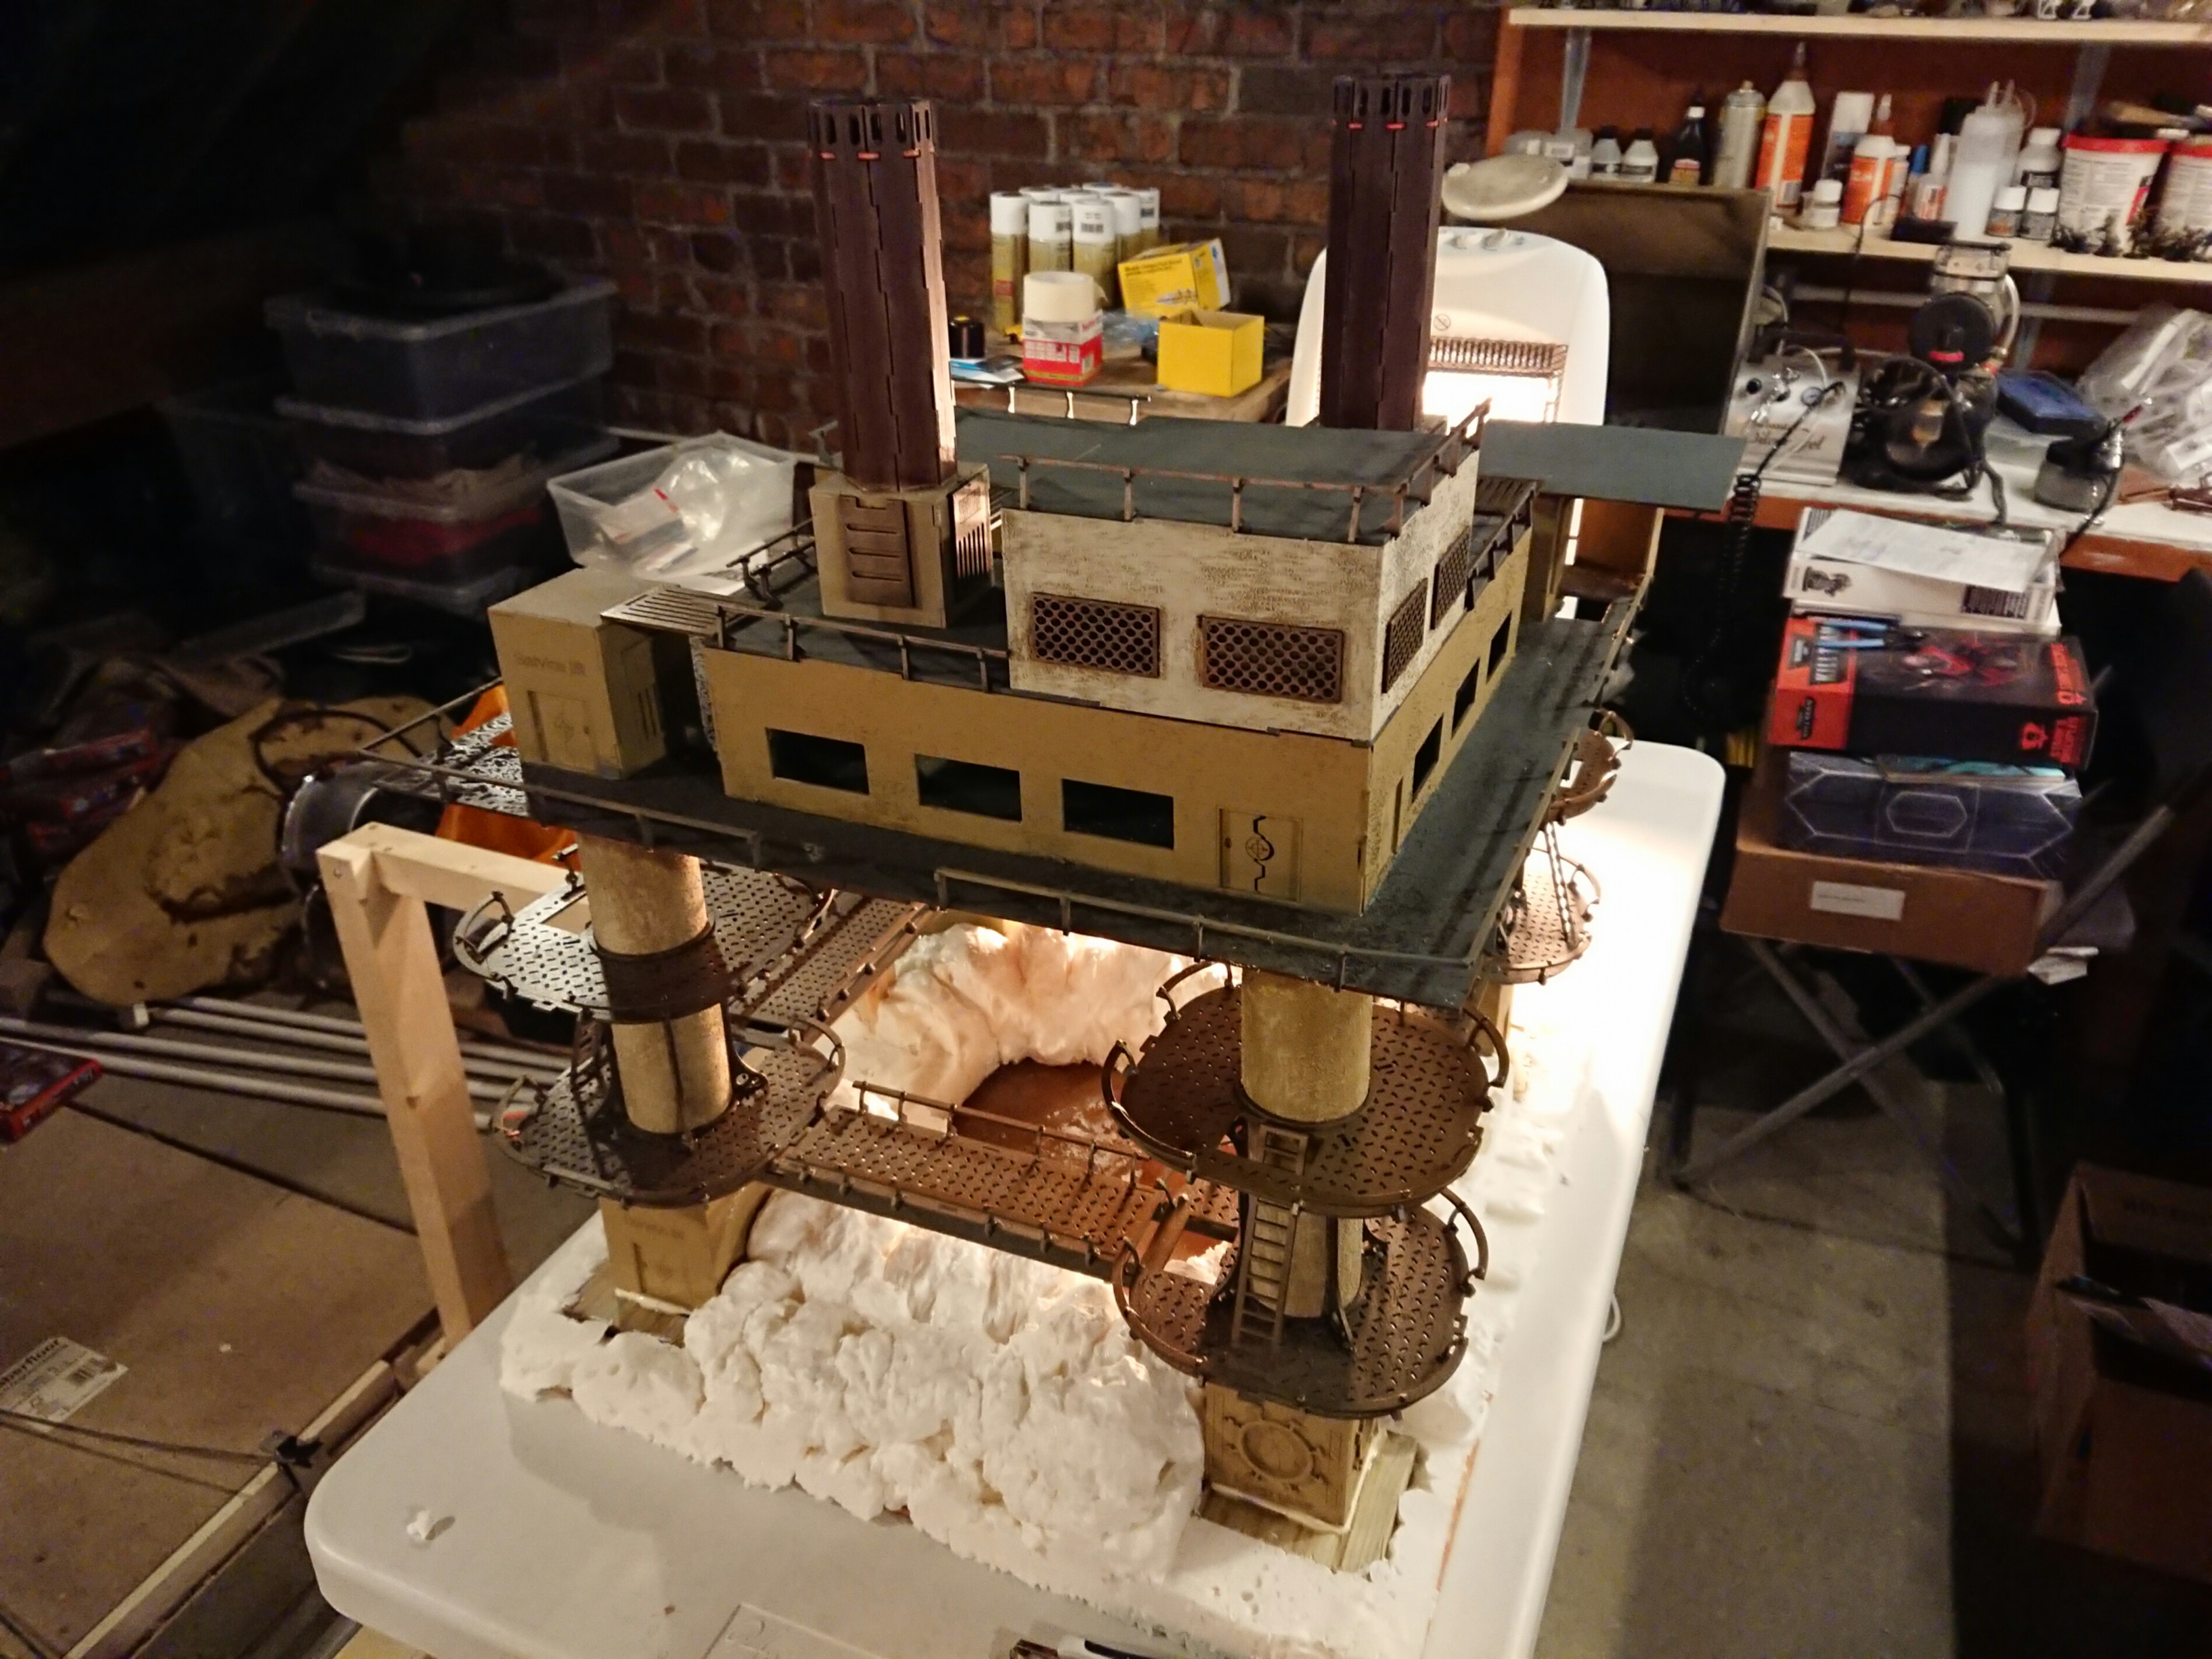
At this stage, something had been concerning me for a while. Whenever I needed to work on it, I was required to pick it up and move it around; it is too big to stay out when not being worked on. I noticed that the walkways were the only real means of picking the piece up without permanently fastening the platform to the legs (something I don’t want to do to make it easier to store and transport in the future). Even with the platform removed from the top, the walkways do not feel like they are comfortable supporting the weight of the entire piece and this is the point that what was originally going to be a simple kit build turned into a major project. I didn’t want to take the risk of it breaking in the future so I decided to build a base for it to reinforce it and make it easier to carry. He base consisted of a piece of hardboard cut into a 50cm x 50cm square onto which I built a frame using off cuts from an earlier joiner project. I then glued the feet to the corners of the frame, raising it up off the hardboard by an inch or so. Then I used expanding polystyrene foam and sprayed all around the frame to hide it, leaving a large hollow section in the middle. When this had dried it was then carved into shapes resembling rocks. The intention here is to create the impression that the rig sits over a drill site and at some point, the hollow section will be filled with a water effect and possibly a large drill platform will be built into the middle. I also added two wooden handles to the frame, prior to spraying the foam so that it is incredibly easy to lift and carry.
Part 3 – Painting
Before you can paint MDF you have to seal it. Now, I have some dedicated MDF sealer purchased from TTCombat which is absolutely amazing – If you’re painting a small building. As it comes in small bottles and is also a brush on medium I looked at the Promethium rig and decided there were better uses of my time. So I experimented and I used a few cans of cheapo spray varnish purchased from my local DIY shop (can’t even remember the name or brand now). I sprayed the entire model, probably twice in some places just to be sure (because you can’t actually tell once the varnish has dried). I then primed all the walls using Zandri Dust, all the metal using Army Painter Gun Metal any flat surfaces on the platform with Mechanicus Standard Grey and the chimney stacks were primed using Army Painter Chaotic red. Using the varnish as a primer worked a treat. To add a bit of texture I coated the legs of the structure in PVA and sprinkled some fine sand on before priming. However before I finished all the drybrushing I realised something about the entire piece that would require additional work so I stopped painting. The first issue was structural integrity – it was really flimsy. Second was the gaps in the joints of the wall sections – par for the course with MDF builds.
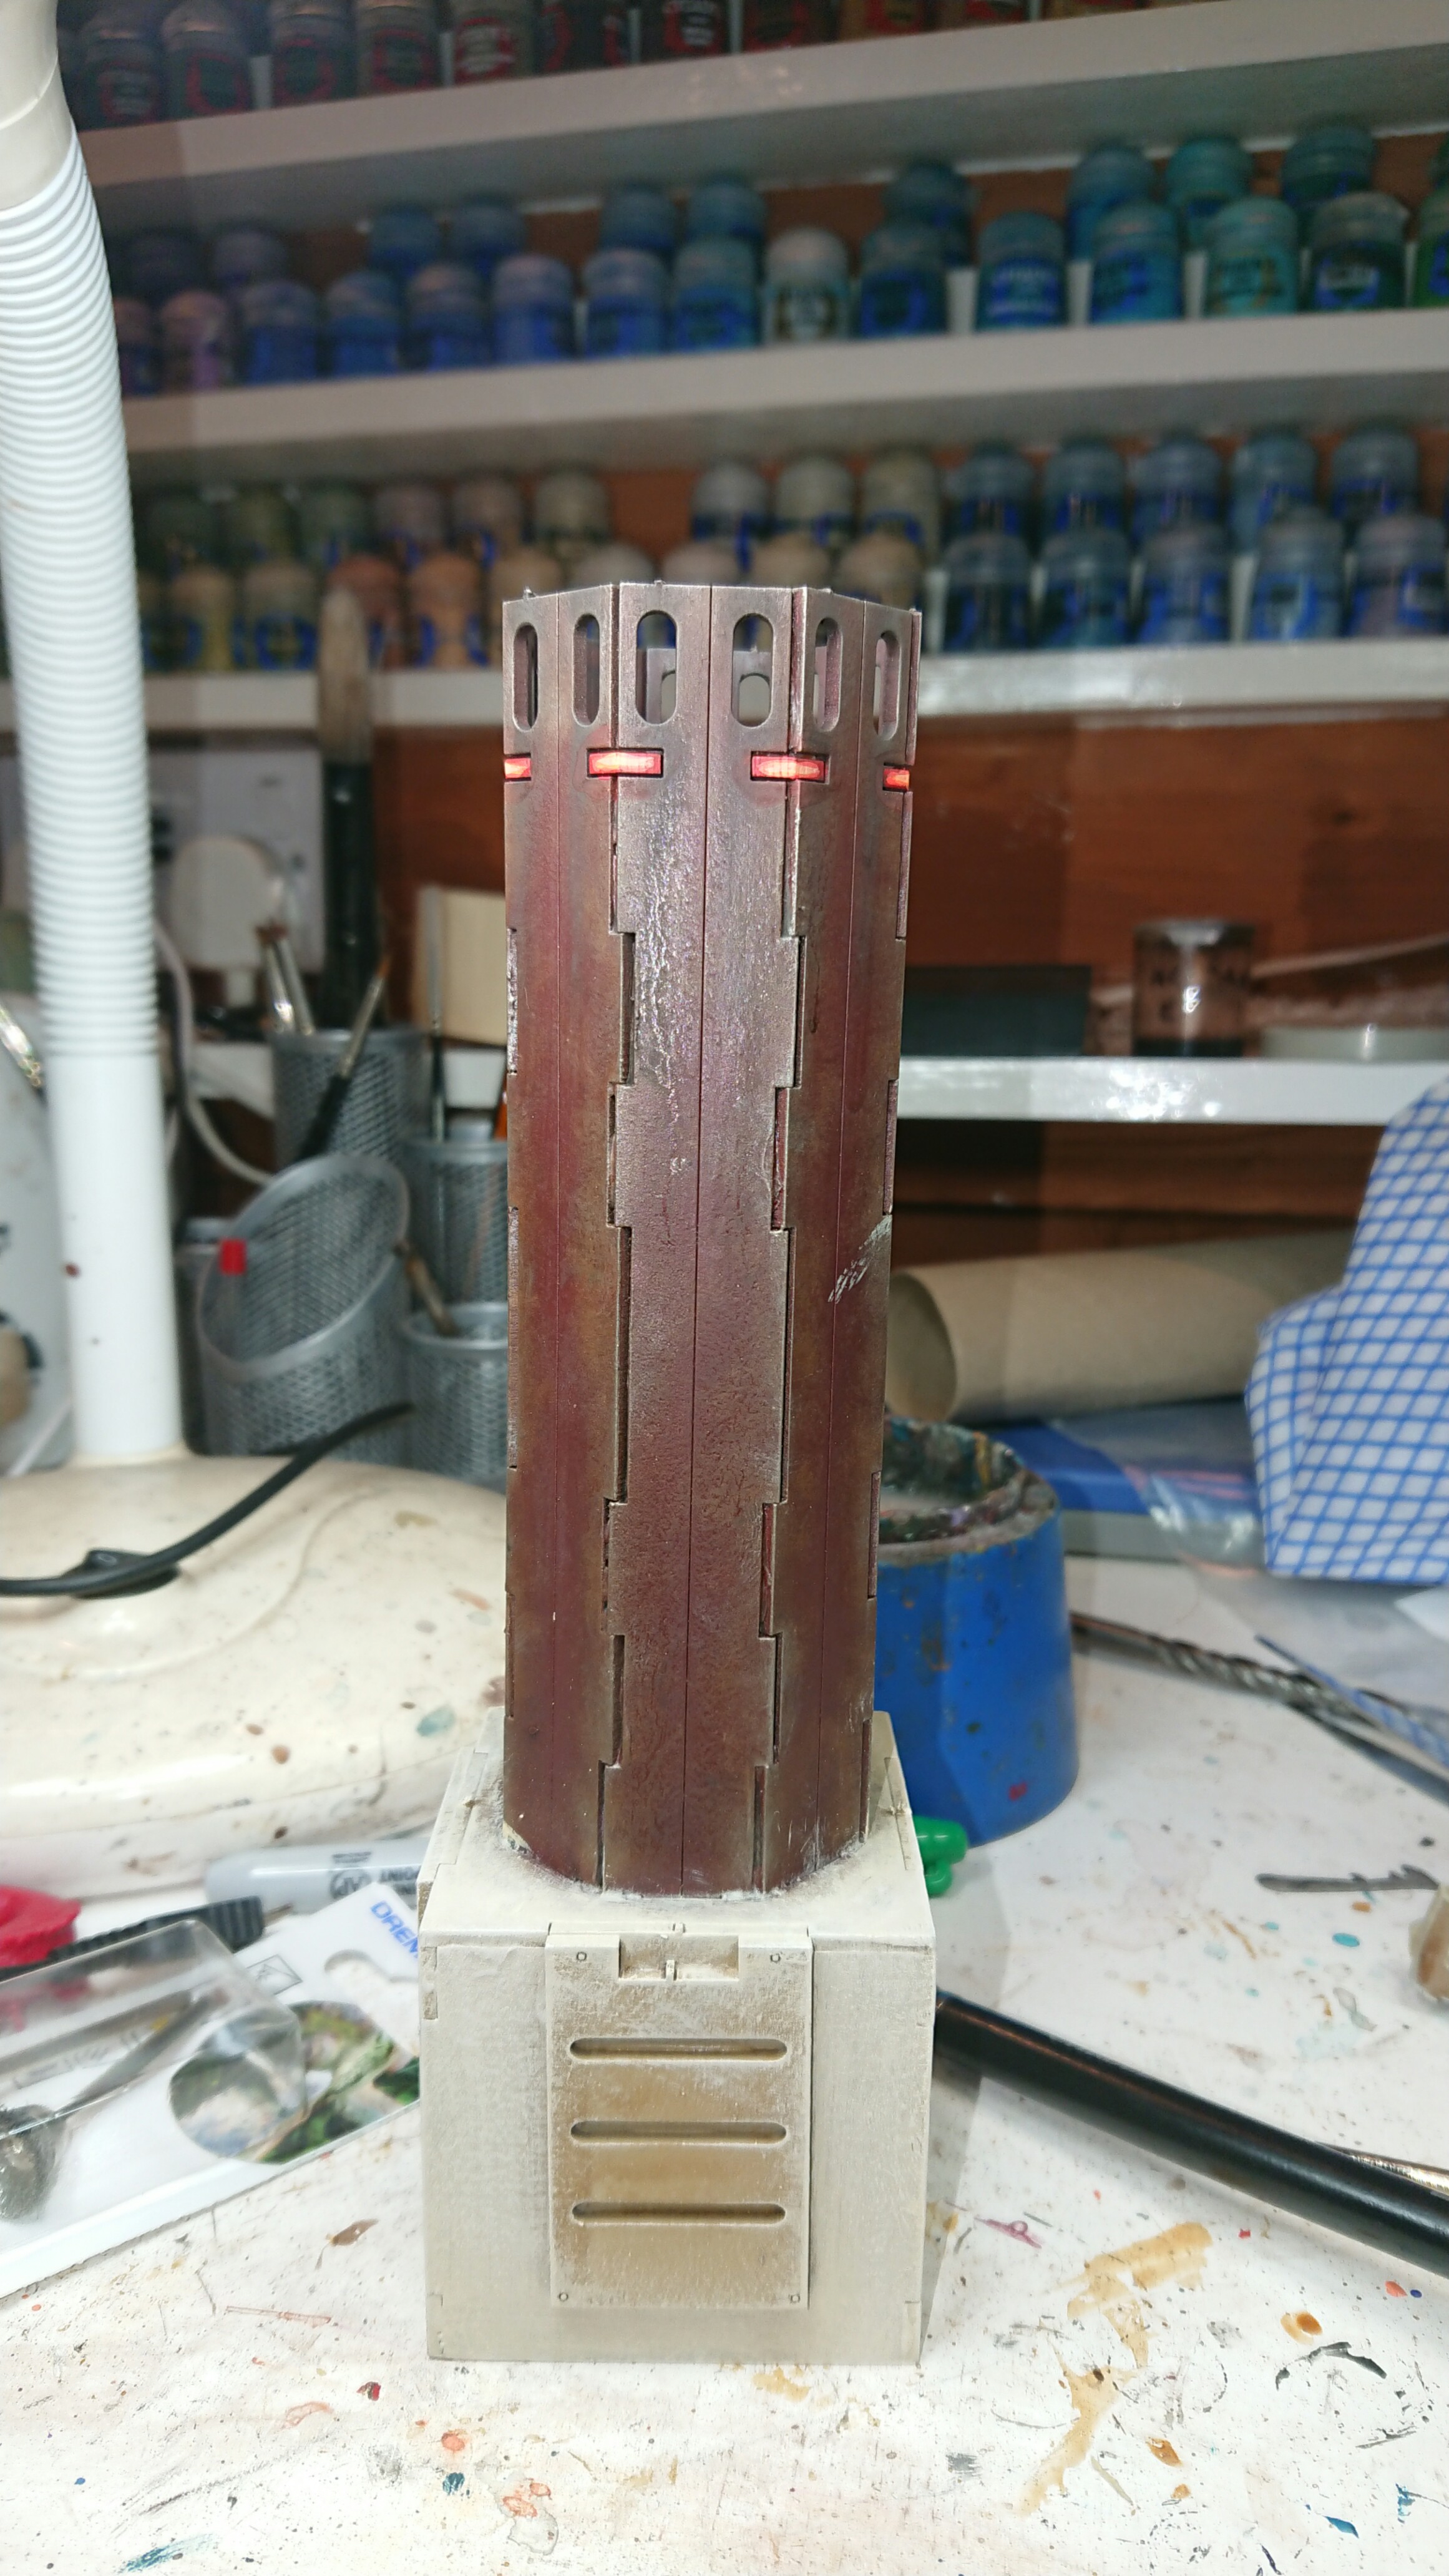
Because the chimney stacks aren’t fixed, I decided to finish them before doing any rework. To complete the chimney stacks I gave the edges (they’re octagonal) a drybrush with Mournfang Brown and then a lighter drybrush of leadbelcher to give them a worn, used look. Then around the vents at the top I used some black weathering pigment to create a sooty look, I also used this extensively on the inside of the chimneys. Then, to disguise the joints around the top, I painted them a bright red to look like altitude warning lights commonly seen on tall buildings.
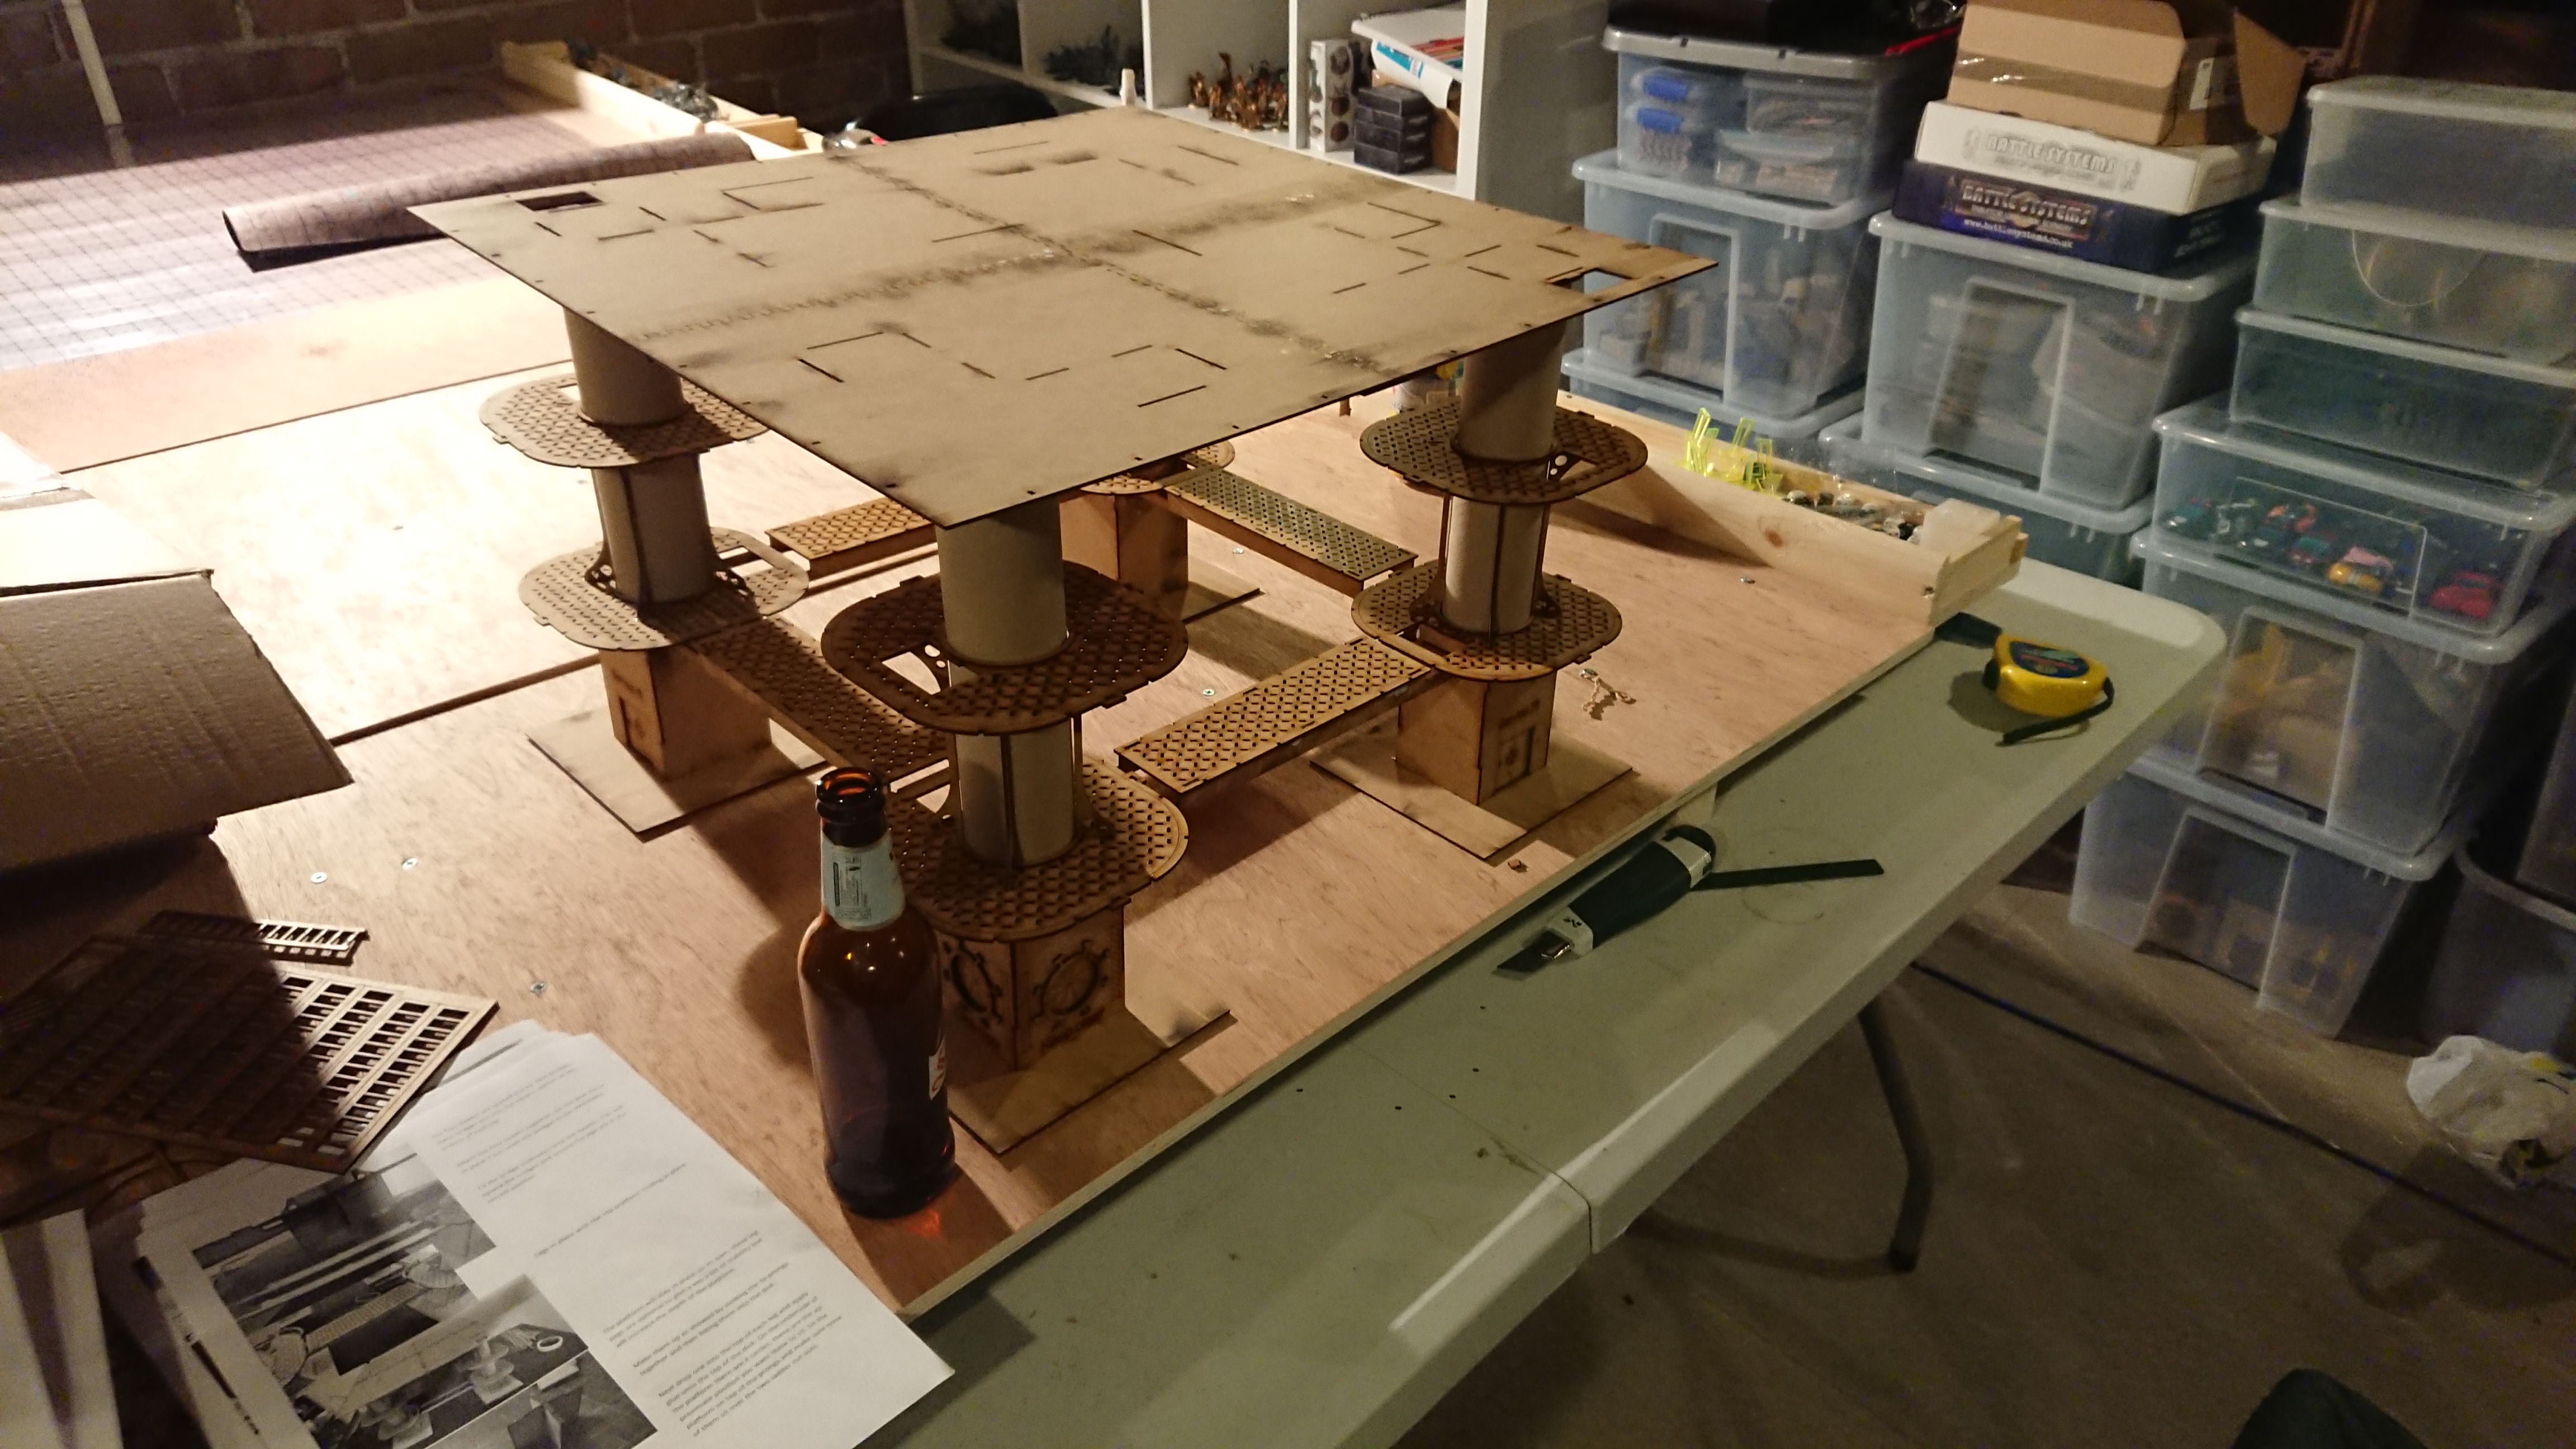
Part 2 - Building the Platform
Once the frame structure is in place, the buildings and other structures that sit atop the rig can be built. This bit is relatively straight forward, although the sliding doors were a bit of a pain in the arse – they’re a nice touch but they’re a bit of a faff. I also seemed to have one set of sliding doors less that the number of doorways so I ended up using one of the fixed door inserts for one door. It’s also pretty cool that you can remove the roofs for each building and access the interior. The top was a lot more straightforward than the structure, although again with some of the pieces they were hard to identify because they were loose in the box and the differences between some of the wall sections is incredibly subtle (and yes, it is possible to assemble it incorrectly). After the buildings were done, I Went back and fastened all of the railings on – my god that was painful. They’re not very complicated but there were 200 supports to be glued in place, which takes rather a long time using PVA glue. I did consider other adhesives however Superglue tends to be a little too brittle, gorilla glue takes almost as long to dry (and expands), epoxy is a faff as it needs to be mixed in small amounts and contact adhesive doesn’t readily allow pieces to be repositioned. So this took 2 nights to complete.
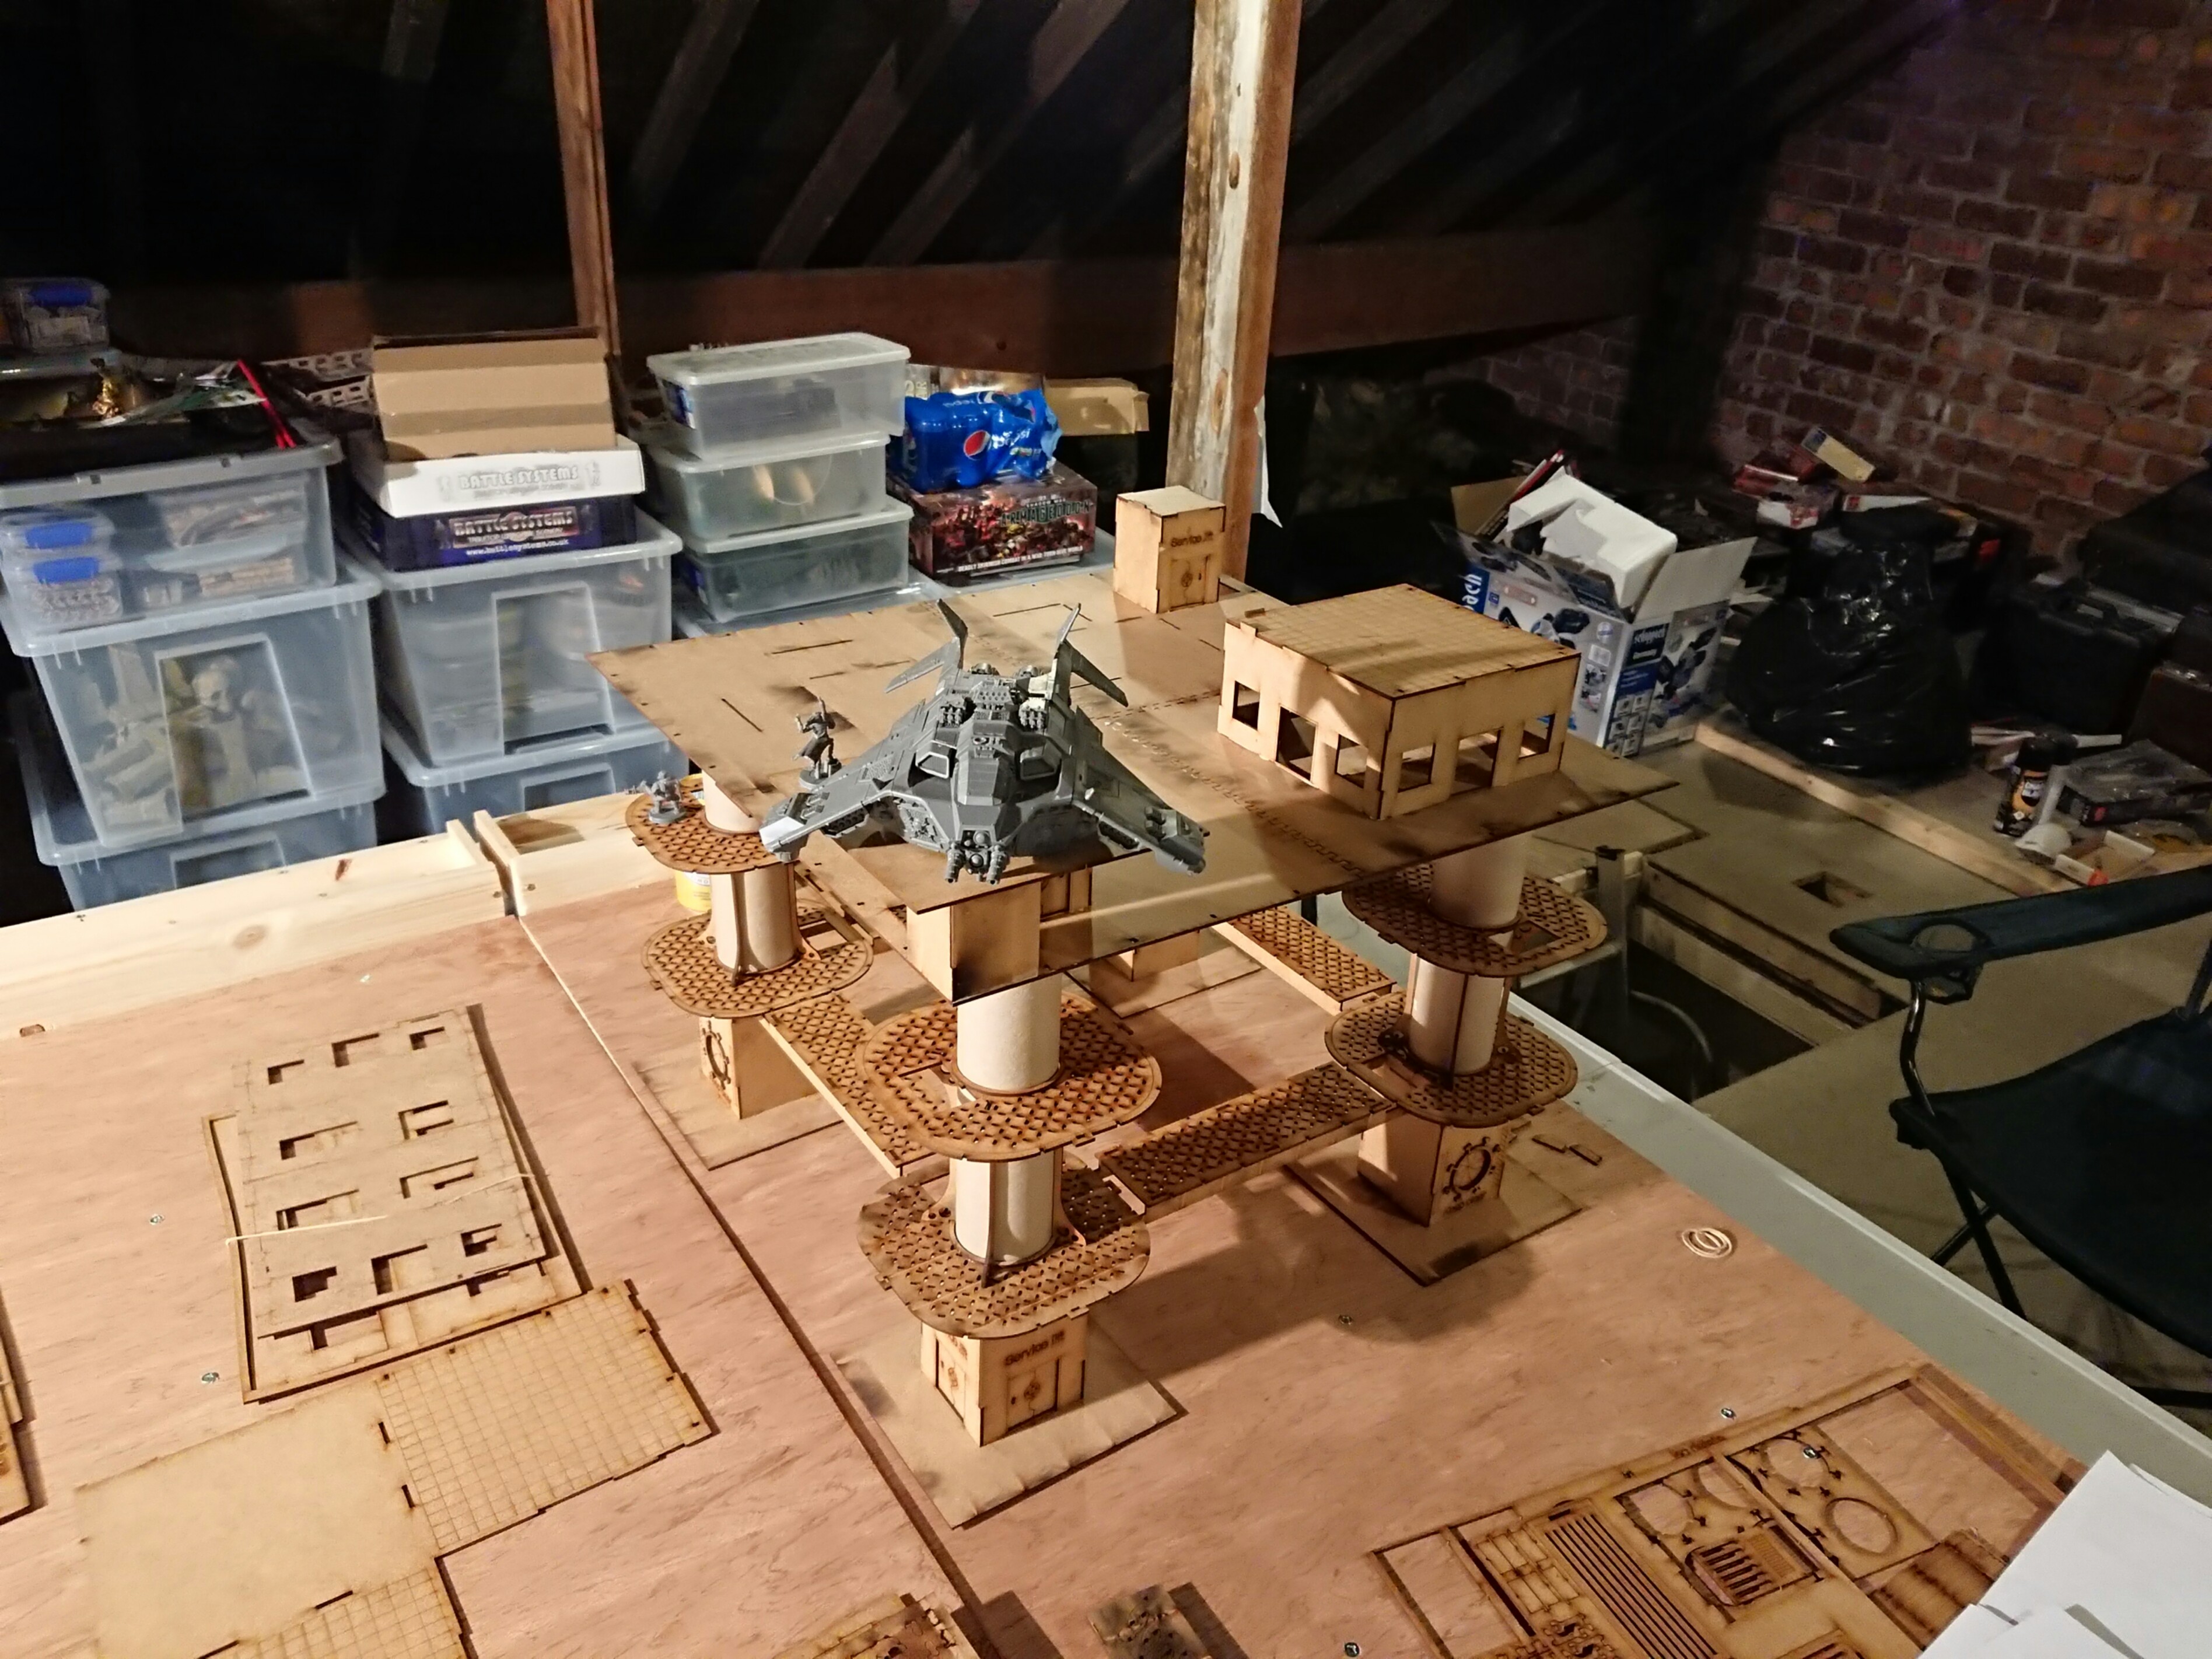
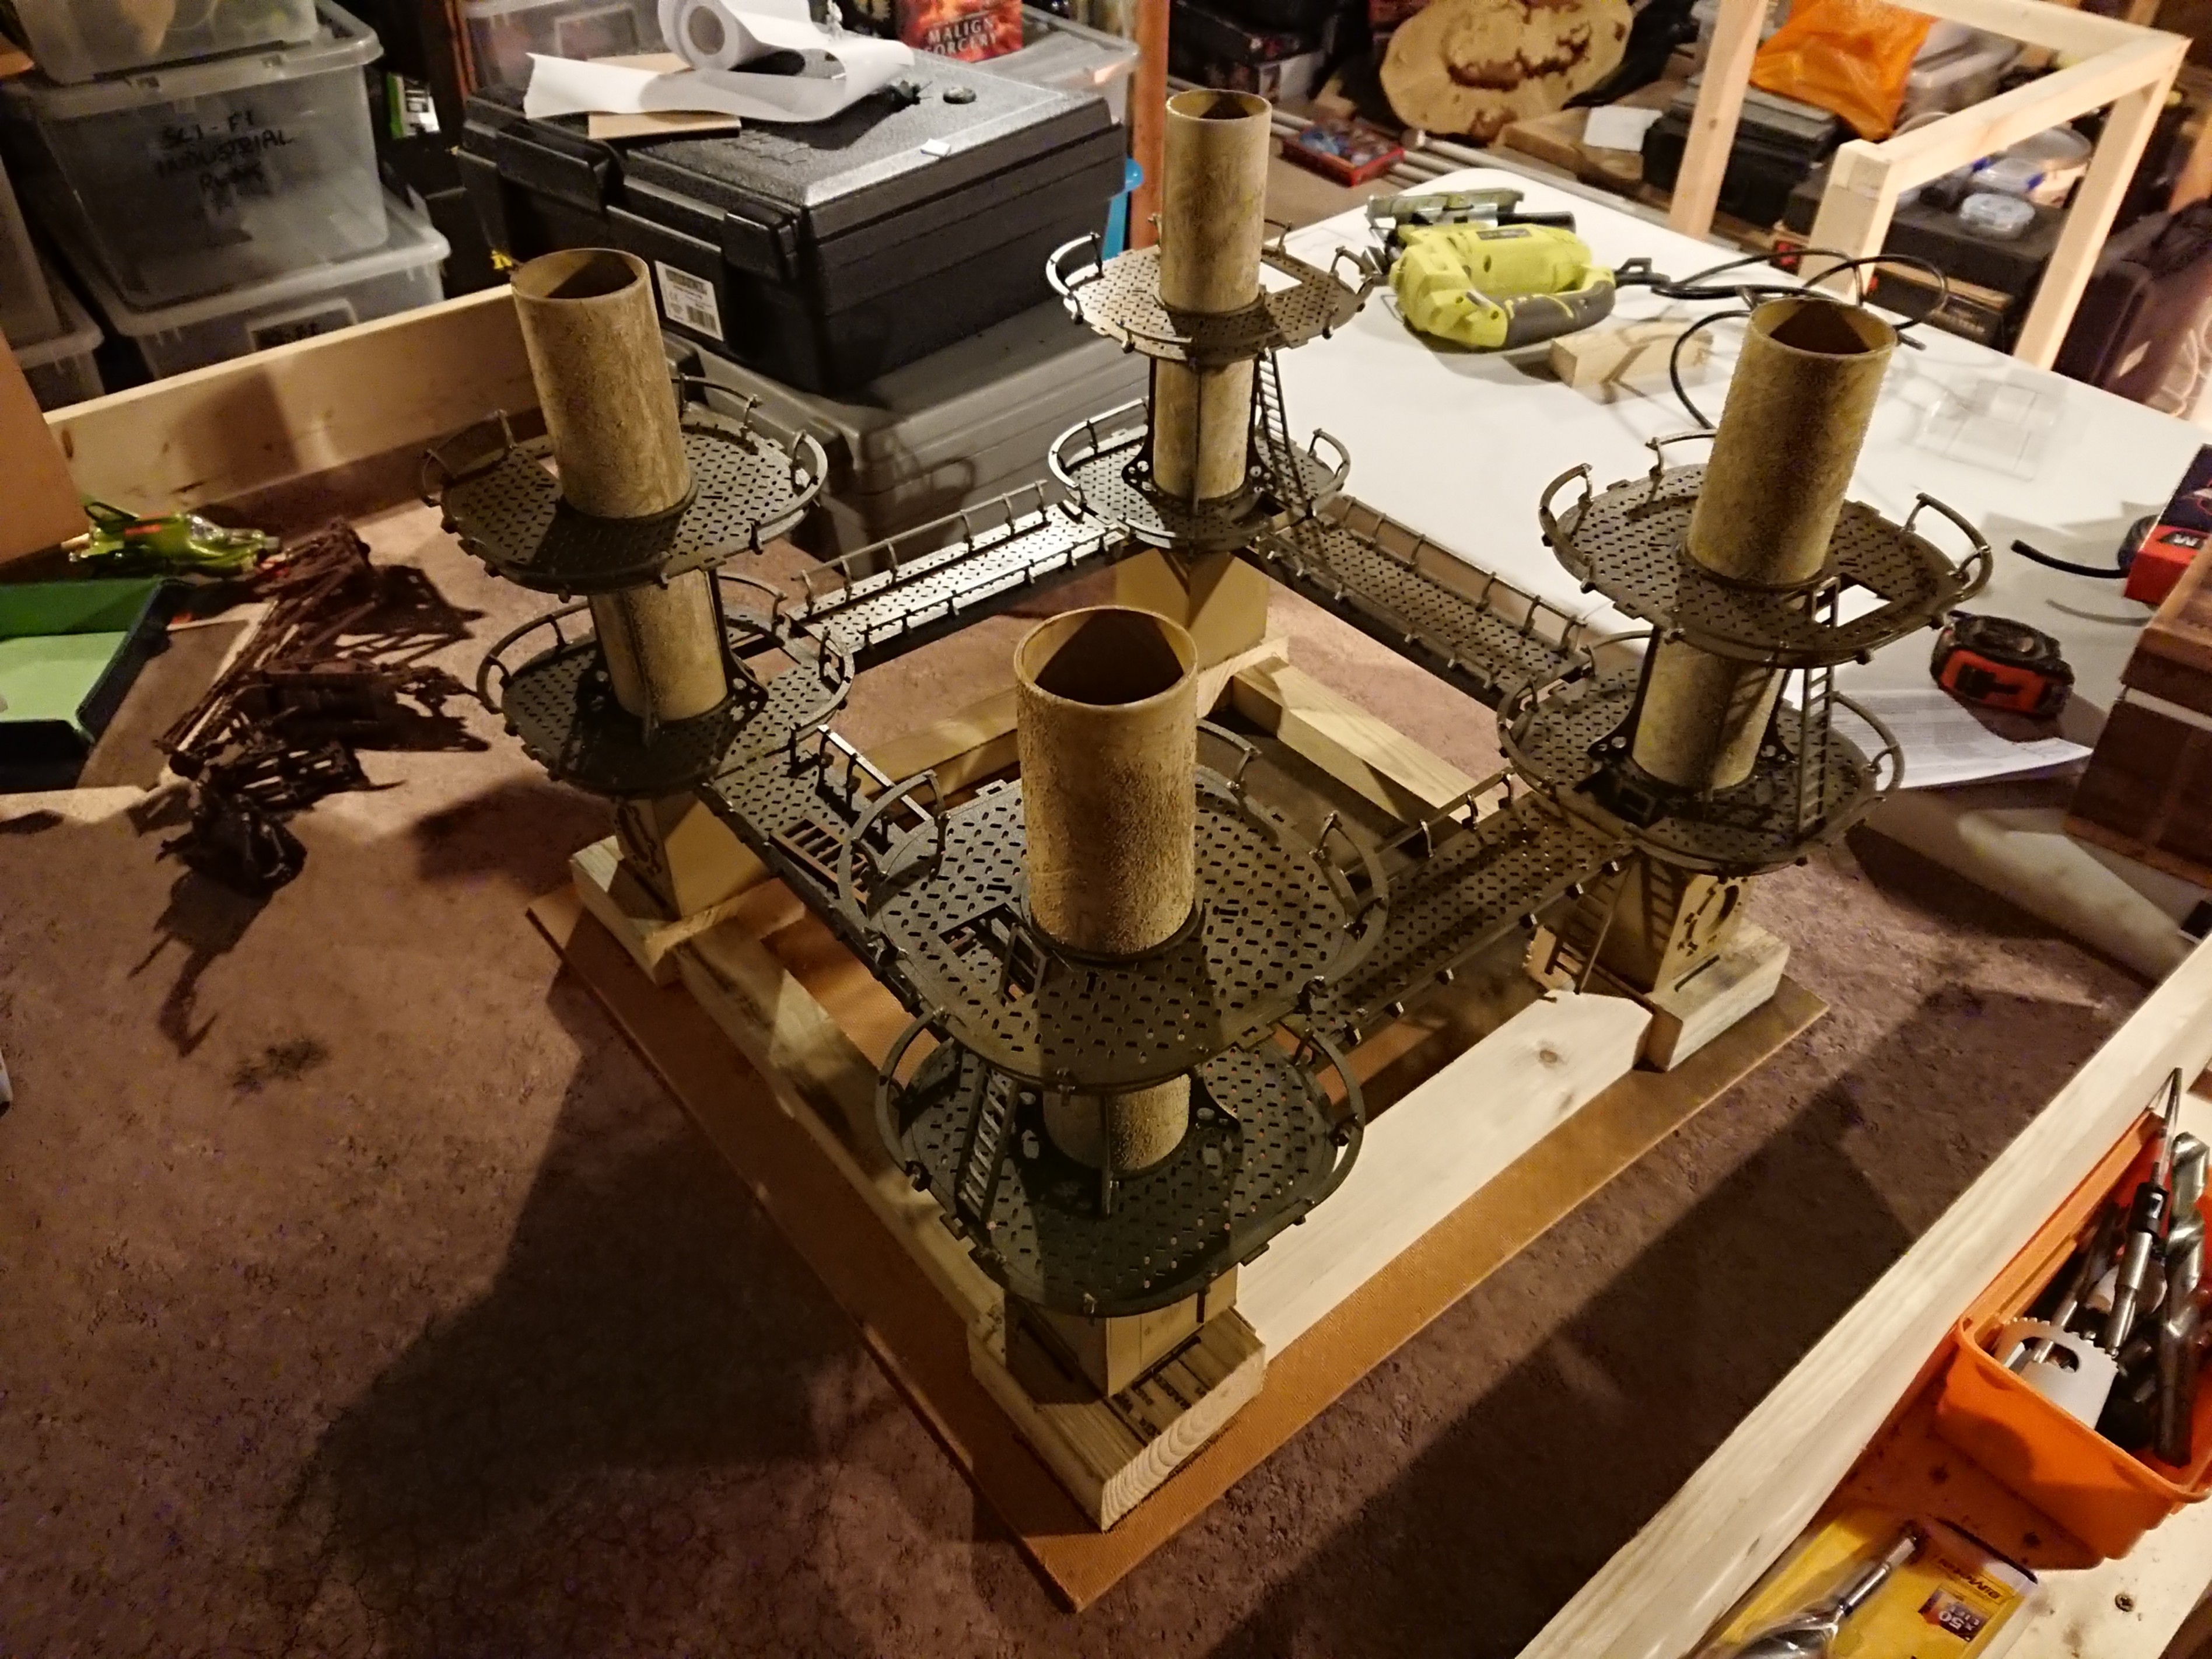
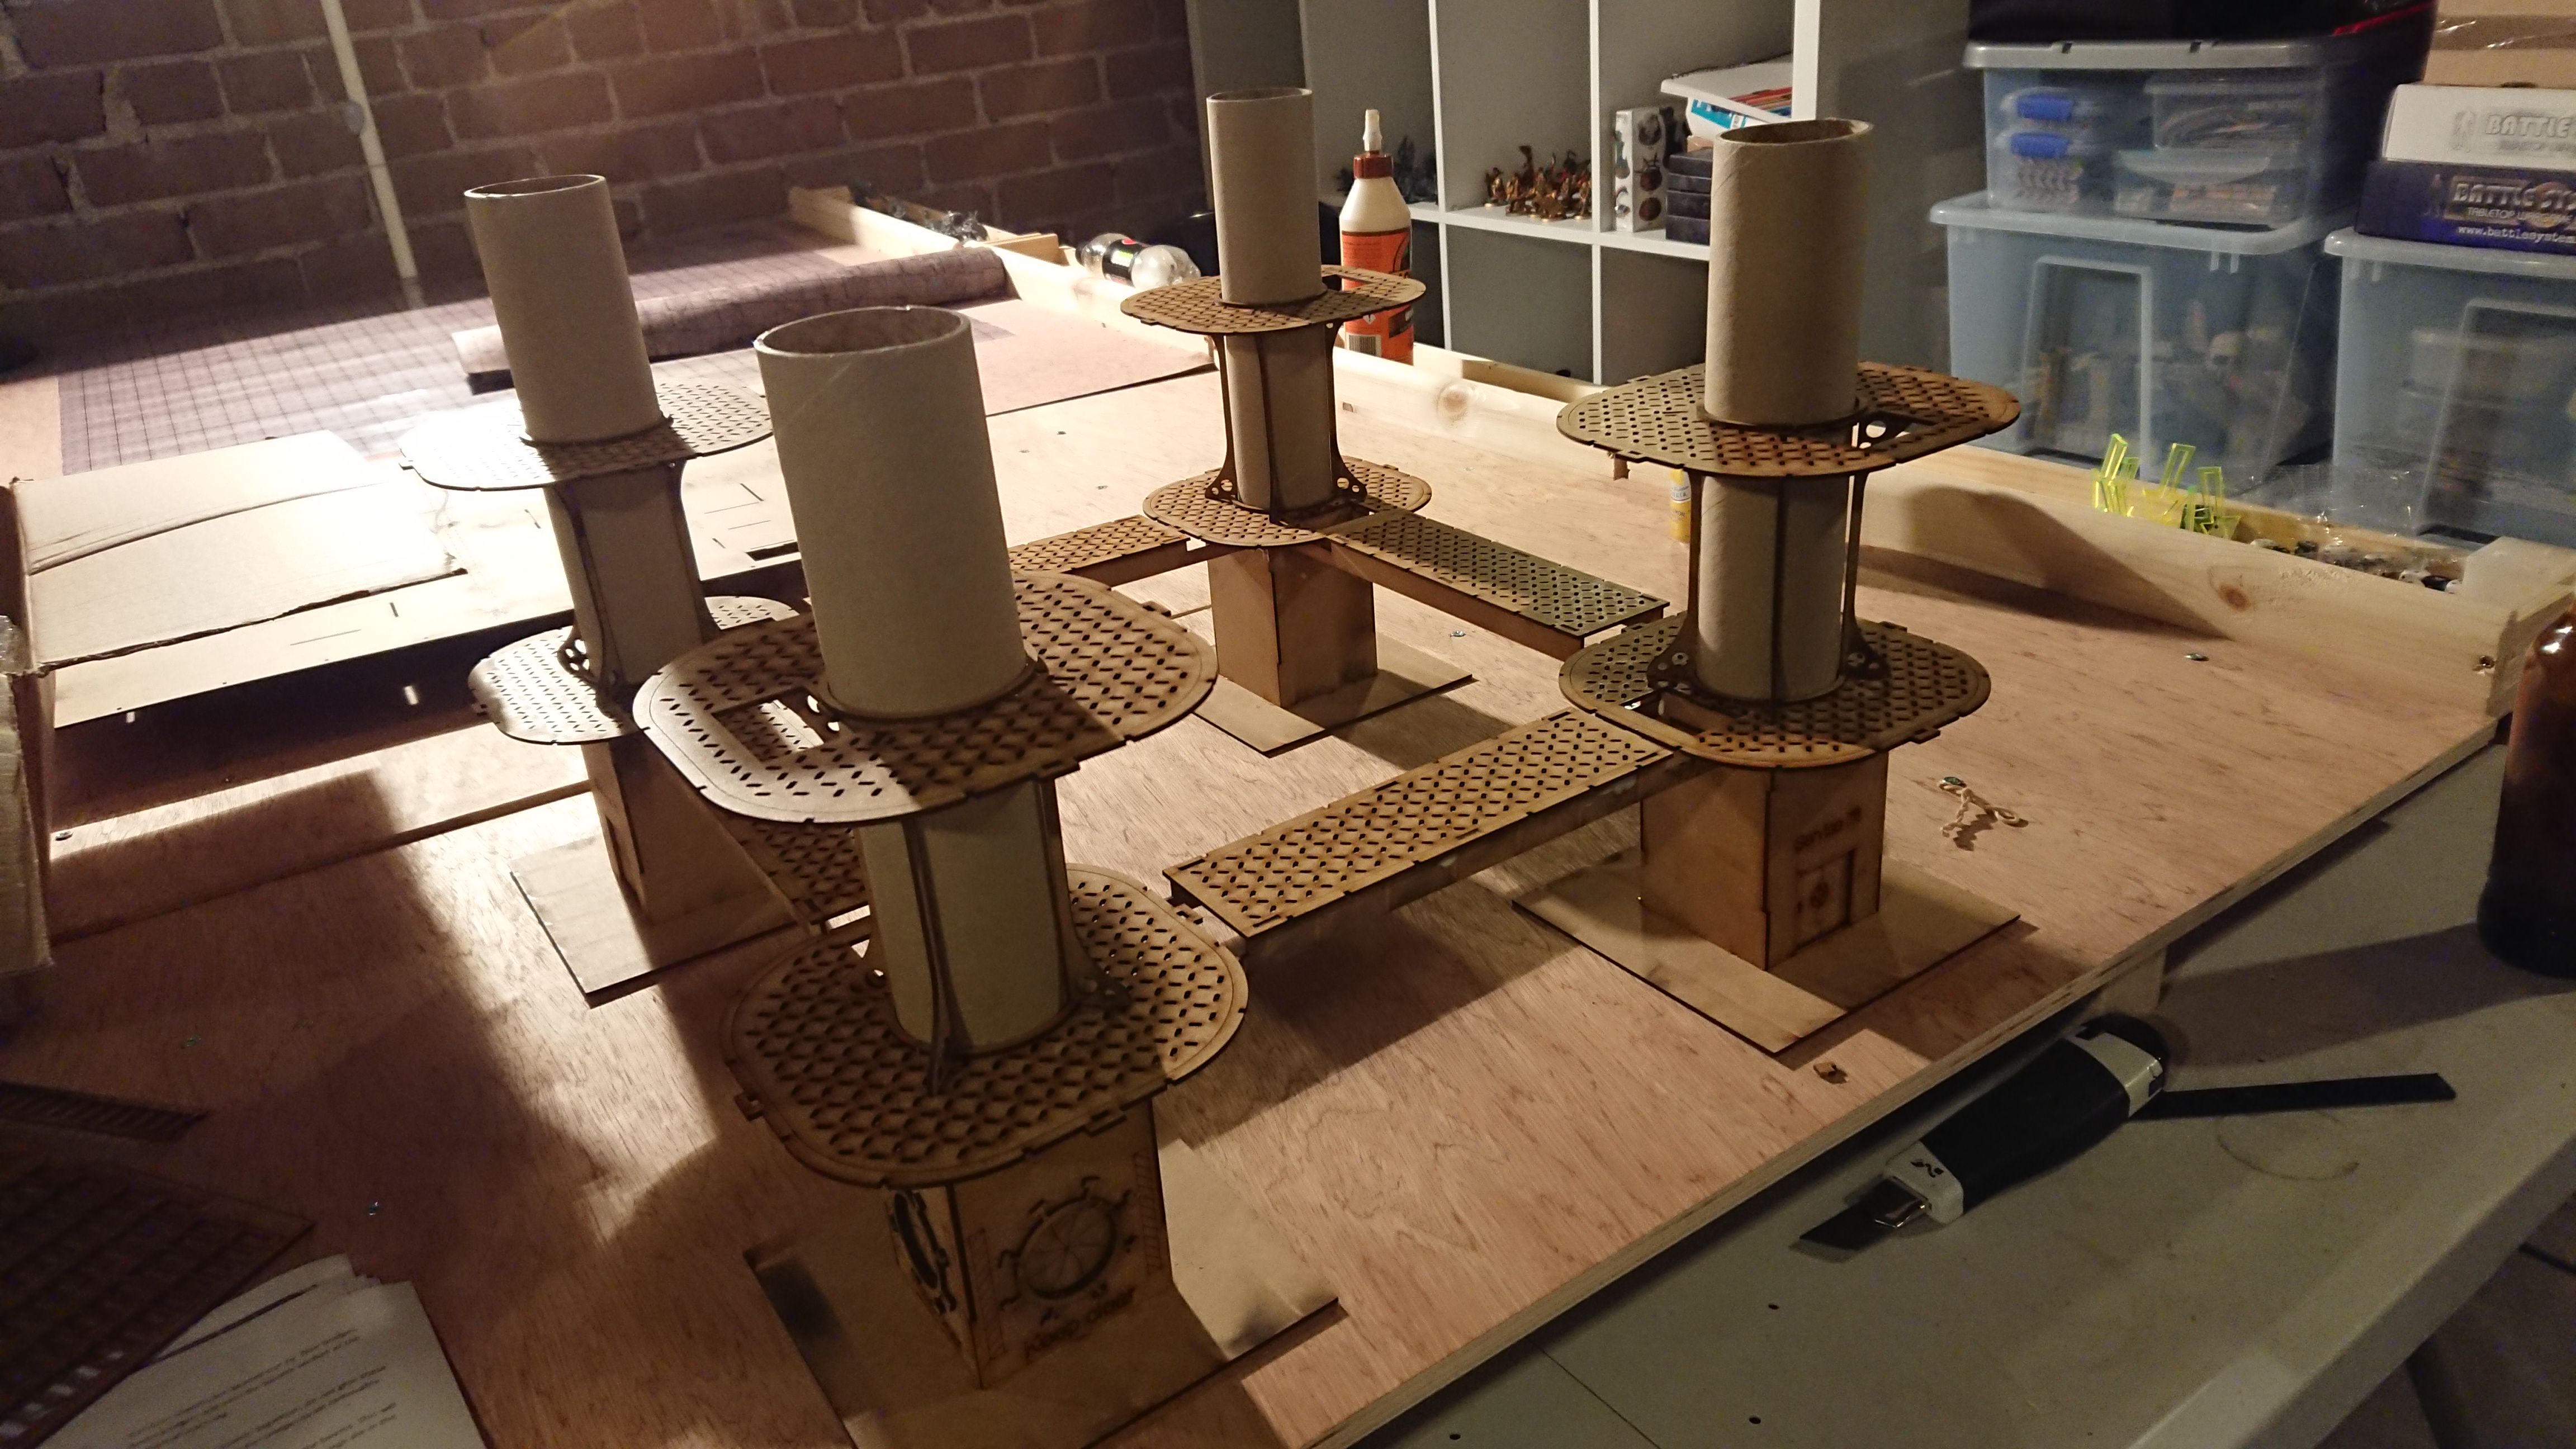
Part 1 – Building the Structure
Following the instructions provided, the first pieces to build are the legs and walkways that make the frame on which the rig will sit. The instructions weren’t perfect and at times I did regret choosing this kit as my introduction to MDF kits, especially as the kit seemed to be supplied as a box of bits with very little of it still on the sheets. Some of the pieces were a little hard to find. If you haven’t had any experience with MDF kits opening that box is a little overwhelming.
Anyway, I decided to crack on regardless and just sort if learn as I went. One of the options when building the kit is to glue the walkways in place to give the structure some rigidity. If anyone is building a similar kit, I don’t recommend doing so I will go into more detail about the pros and cons of doing so later. However for now just be aware it doesn’t actually give it a great deal of rigidity and it remains quite fragile after you glue the pieces in place. Also, when you build the platform to sit atop the frame, just be aware that it doesn’t have a great deal of load bearing capacity, if you leave something heavy resting on it after gluing it will bend/bow in the middle.


![Zenit Miniatures’ Samurai Warlords Now Live On Kickstarter [Updated]](https://images.beastsofwar.com/2026/02/samurai-warlords-launch-main-600-338.jpg)


