


![1918 Spring Offensive Wargame | Full Rules Overview with John & Gerry (WW1 Tabletop Game) [7 Days Early Access]](https://images.beastsofwar.com/2026/03/unboxing-warfulcrum-games-1918-spring-offensive-review-coverimage1-225-127.jpeg)


Persei-Aries War – Oriskany v. Rasmus


Recommendations: 1418
About the Project
After racking up 127 entries, 3500+ recommendations, and 600+ comments, the original Darkstar project thread was getting a little unwieldy. So I'm starting a new one, featuring a new campaign for interested players in the OTT community and beyond. So far we have five players, but there's always room for more!
Ever wonder if you had what it took to command fleet of starships in tactical combat? Darkstar offers that challenge to the hard-core wargamer, with a "Newtonian Physics" movement system, rules for astrophysical objects and phenomena, gravity, and of course dizzying amounts of 26th-century firepower. There are no aliens, no "hyperspace," no planets that look suspiciously like movie studio back lots. Just the old empires of Earth doing what they do best, colonization and kicking the hell out of anyone who gets in their way (i.e., each other).
In addition to starship tactical combat, Darkstar includes rules for carriers and aerospace craft, atmospheric operations, orbital and surface installations, boarding actions, assault landings, and a complete campaign system.
The system is free to download for members of the OTT community, and of course we play almost every weekend with a on-line version with starship commanders around the world! So if you ever want in, you know where to find us!
Related Genre: Science Fiction
This Project is Active
Battle of Nygoshima Lambda - 5 December 2522 (Alpha Aries System)
Had a great game of Darkstar against @rasmus the other day. I won’t post the whole battle report here, that’s on our Discord if anyone’s interested. Suffice it to say that we broke out the battleships for the first time in several years.
The game took seven hours, and I swear it felt like two.
Rasmus is a methodical, detail-driven, analytical player, who puts thought behind every turn, maneuver, volley, and torpedo launch. When you can genuinely put the game designer through his paces, and hand him defeats as often as not … in game as detail-focused as Darkstar …
Anyway, here are a few virtual table shots and some of the highlights.
 The initial approaches. I've got the British, coming in from the top. Rasmus has the Japanese, coming from the bottom. The basic scenario is both the Japanese and British hold possessions in the Alpha Aries (Hamal) system, and ... long story short ... they're in a bit of a fued. Initially on the back foot, the British have won a few battles and now hope to capitalize on recent success here at Nygoshima Lambda - 11th moon of the Nygoshima gas giant. This is a big Japanese colony and naval base, and the British must break Japanese naval presence here to clear the way for two Fearless-class planetary assualt ships carrying 1st Battalion, Royal Scots Dragoons and Queens Irish Hussars. Of course, the 400,000 ton Japanese Sengoku-class battlecruiser and her escorts might have something to say about that ... Hexes are 180 kilometers across (the moon at left is measured at slightly smaller than Earth). Turns are 1 minute, so one hex of movement = 3 kilometers per second. So yeah, the British are hauling the proverbial ass here, intent on closing the range with the Japanese as quickly as possible. This is because their guns have better accuracy at longer ranges, and they carry the dreaded Ki-45 "Toryu" (Dragon Slayer) gravitic torpedo. Best to get in close as quickly as possible, where your guns hit just as hard, just as accurate, and Japanese advantages are nullified.
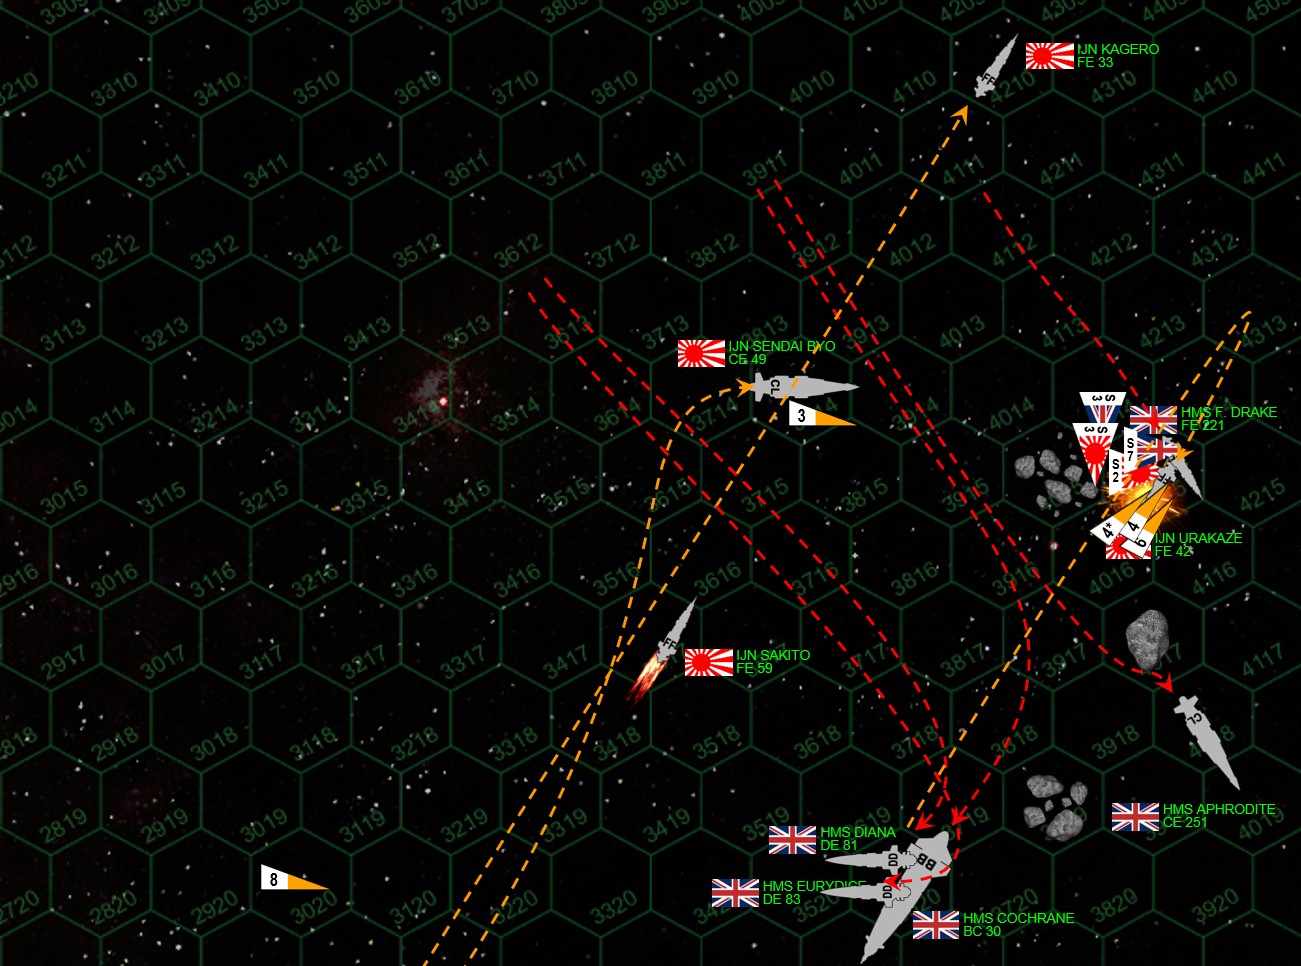 Things get VERY hairy in here, where the tight gaps between these drifting fields of orbital debris (basically, man-made asteroid fields) pose severe navigation hazards, through which both the British and Japanese are maneuvering at absurdly high speeds. This isn't a game where you can just count the hexes and move your piece that many spaces. Heading, velicity, available thrust, all combine in a semi-Newtonian movement system where you have to manage your speed, thrust, and even planetary gravity fields very carefully. And if you take a hit in your maneuvering thrusters here ... God save you. Of particular note is Hex 4115 (you probably can;t see the number), where frigates IJN Urkaze and HMS Francis Drake are engaged in a point-blank dogfight, while Japanese torpedoes scream in (orange wedges), while Japanese Ki-202 "Hien" (Flying Swallow) scout planes also howl in, intercepted by British DeHavilland "Buccaneer" scout planes, all amdist tumbling mountains of rock and iron - some of them big enough to be small moons themselves. Touch one of those rock hexes, by the way ... and die.
  The British come out of the asteroid fields in pretty good order. Two Japanese ships are already crippled, a third is looking for the door. The destroyer HMS Diana is in very bad shape, and the Francis Drake has had much of her bow all but blown off. Meanwhile, the two battlecruisers (basically, lighter, faster battleships - a kilometer long and weighing up to 400,000 tons - and yes, these are the small ones that trade some firepower and protection for speed) finally come to blows at broadsides at 1,800 kilometers. That's very close for guns of this caliber. At least part of the British plan has worked, the Japanese have been denied the longer-range gunnery duel they would probably prefer.
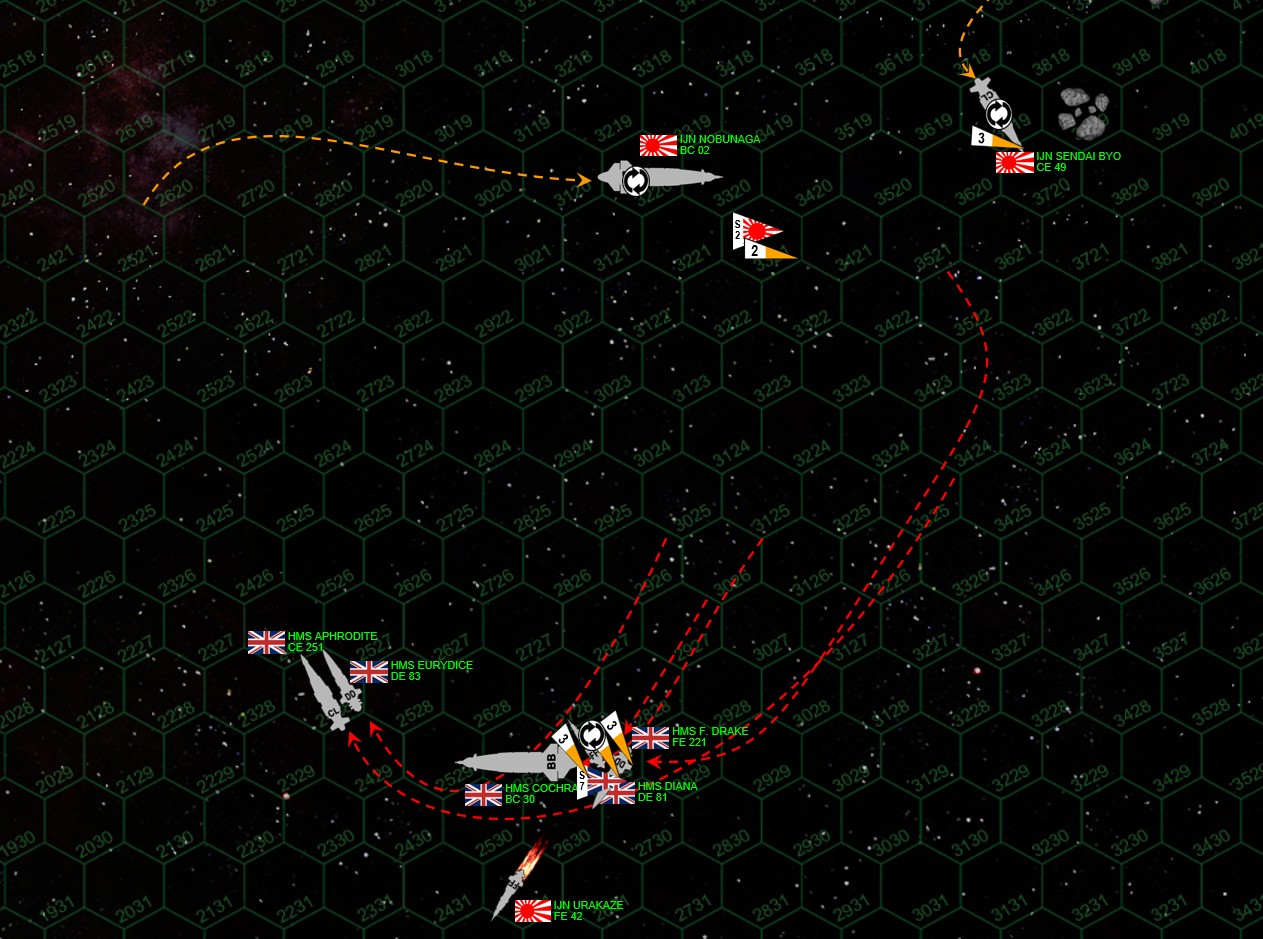 The advantage returns to the Japanese here. As the battlecruisers HMS Cochrane and IJN Nobunaga start to wheel around each other, still pounding away with starboard broadsides, the British have a problem. I'm still carrying too much speed. In summary, I can can slow down, turn, or roll my ship over. It's space, after all, I can roll my ship to present fresh armor and shielding if my starboard side gets beaten up too badly. The problem is ... I'm going at such a speed I can afford to two TWO of these things. So I turn and slow down. But I can't roll over. Rasmus rolls IJN Nobunaga, thus presenting fresh shielding and armor on his port quarter instead of his badly-damaged starboard quarter. I can;t do that quite yet, I'm still moving too fast ... so I have to eat another withering Japanese broadside in my burning, wounded side. Balanced against this, I still have my escort fleet in pretty good order, so they're adding lots of smaller guns to the argument.
 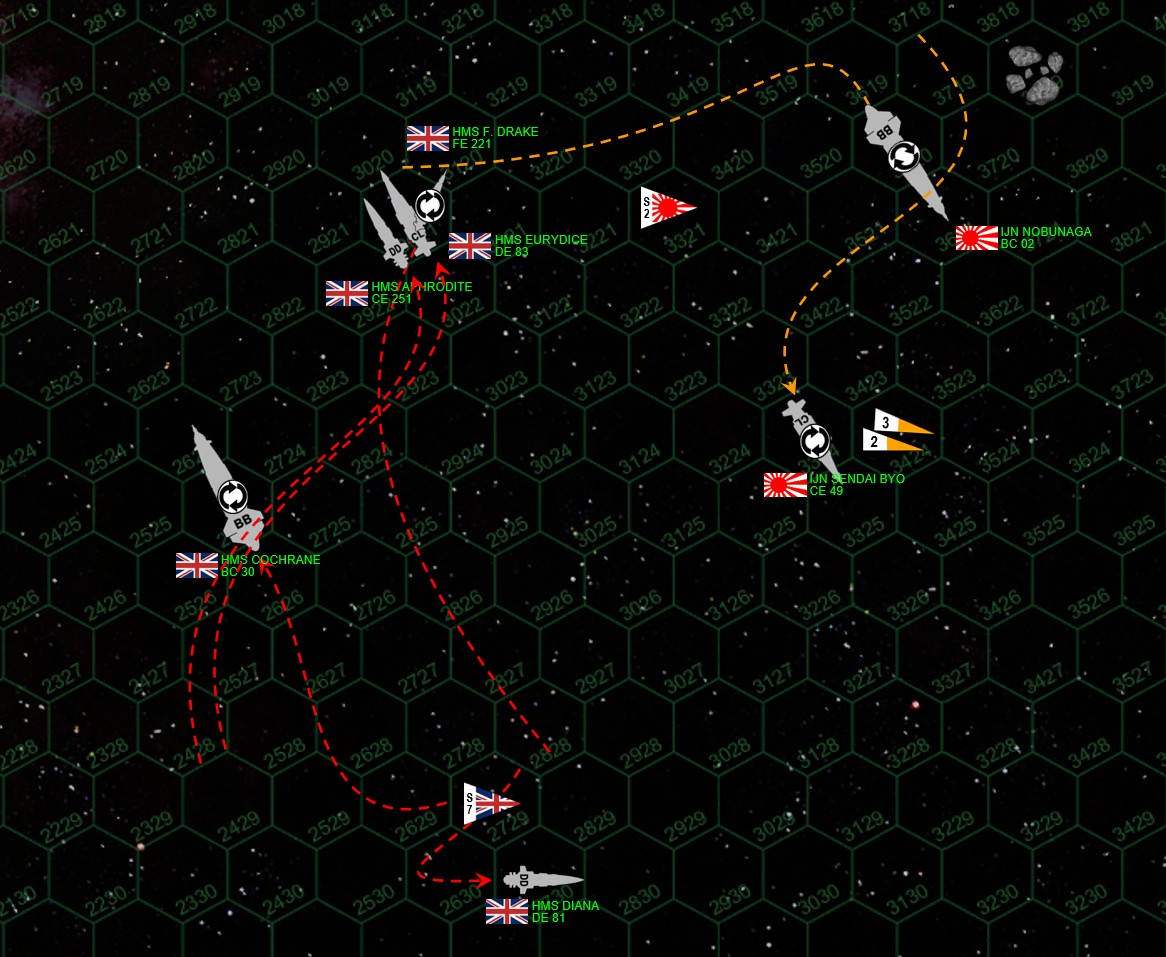 Good news, I've finally managed to roll my ship. Bad news, I've now taken sensor damage as well, giving me a penalty to hit - making it all but impossible to get through Japanese shielding. My escort ships sidestep closer, closing the range to make their to-hit rolls a little easier. But of course my big battlecruiser can't execute the required S-turn just yet - she's actually very fast for a battleship but no battleship turns on a dime. I have to hope I get lucky, and I actually do. One of the few hits I score takes out some of Nobunaga's maneuvering thrusters. Rasmus is going to have a much tougher time making turns and rolls now, making it easier to predict where he will be next turn. Meanwhile we continue to fend off waves of Japanese scout planes and torpedoes.
 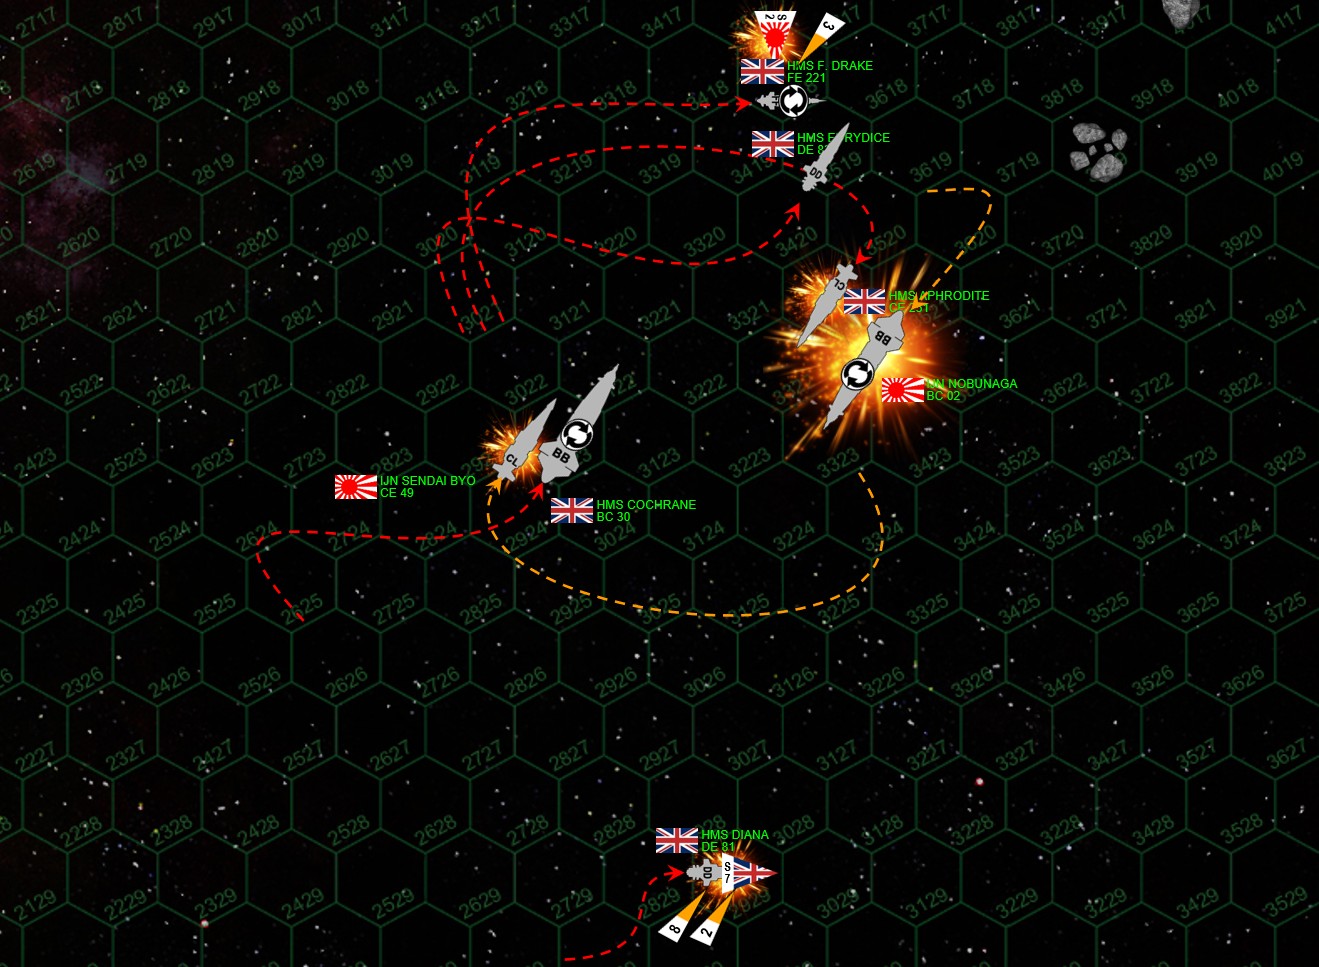 The end comes swiftly. Ramus pivots Nobunaga inside our wheeling waltz, thus presenting my guns with his undamaged port BOW rather than his port quarter (remember he's inverted, so what looks like his right side is actually his left side, etc). Ironically, our battlecruisers can barely hurt each other immediately, both of us facing (yet again) fresh armor and shielding. But our light cruisers, the IJN Sendai Byo and HMS Aphrodite, can cut in against each other's damaged quarters, even if that means instant, point-blank destruction at the hands of battleship-grade guns at 0 hexes and 1 hex range. Needless to say, we both sacrifice our light cruisers here. But for a chance to take out a battle cruiser and thus win the game? The difference here is that the Nobunaga has lost her port quarter shields, HMS Cochrane's quarter shields are still up. Cochrane takes horrific damage, but manages to stay operational. Nobunaga loses power as Aphrodite's y-gigawatt rail guns tear through exposed reactors and armor. She's left burning and adrift in space, and the British limp away with a smoking, blood-splattered, exhausted victory in the Battle of Nygoshima Lambda. As badly damaged as she may be, an operational BATTLECRUISER in low orbit over the Japanese csurface colony makes the imminent British troop landings a foregone success, marking a big step forward in the ongoing Persei-Aries War.
Perseus-Aries War Cooking Along
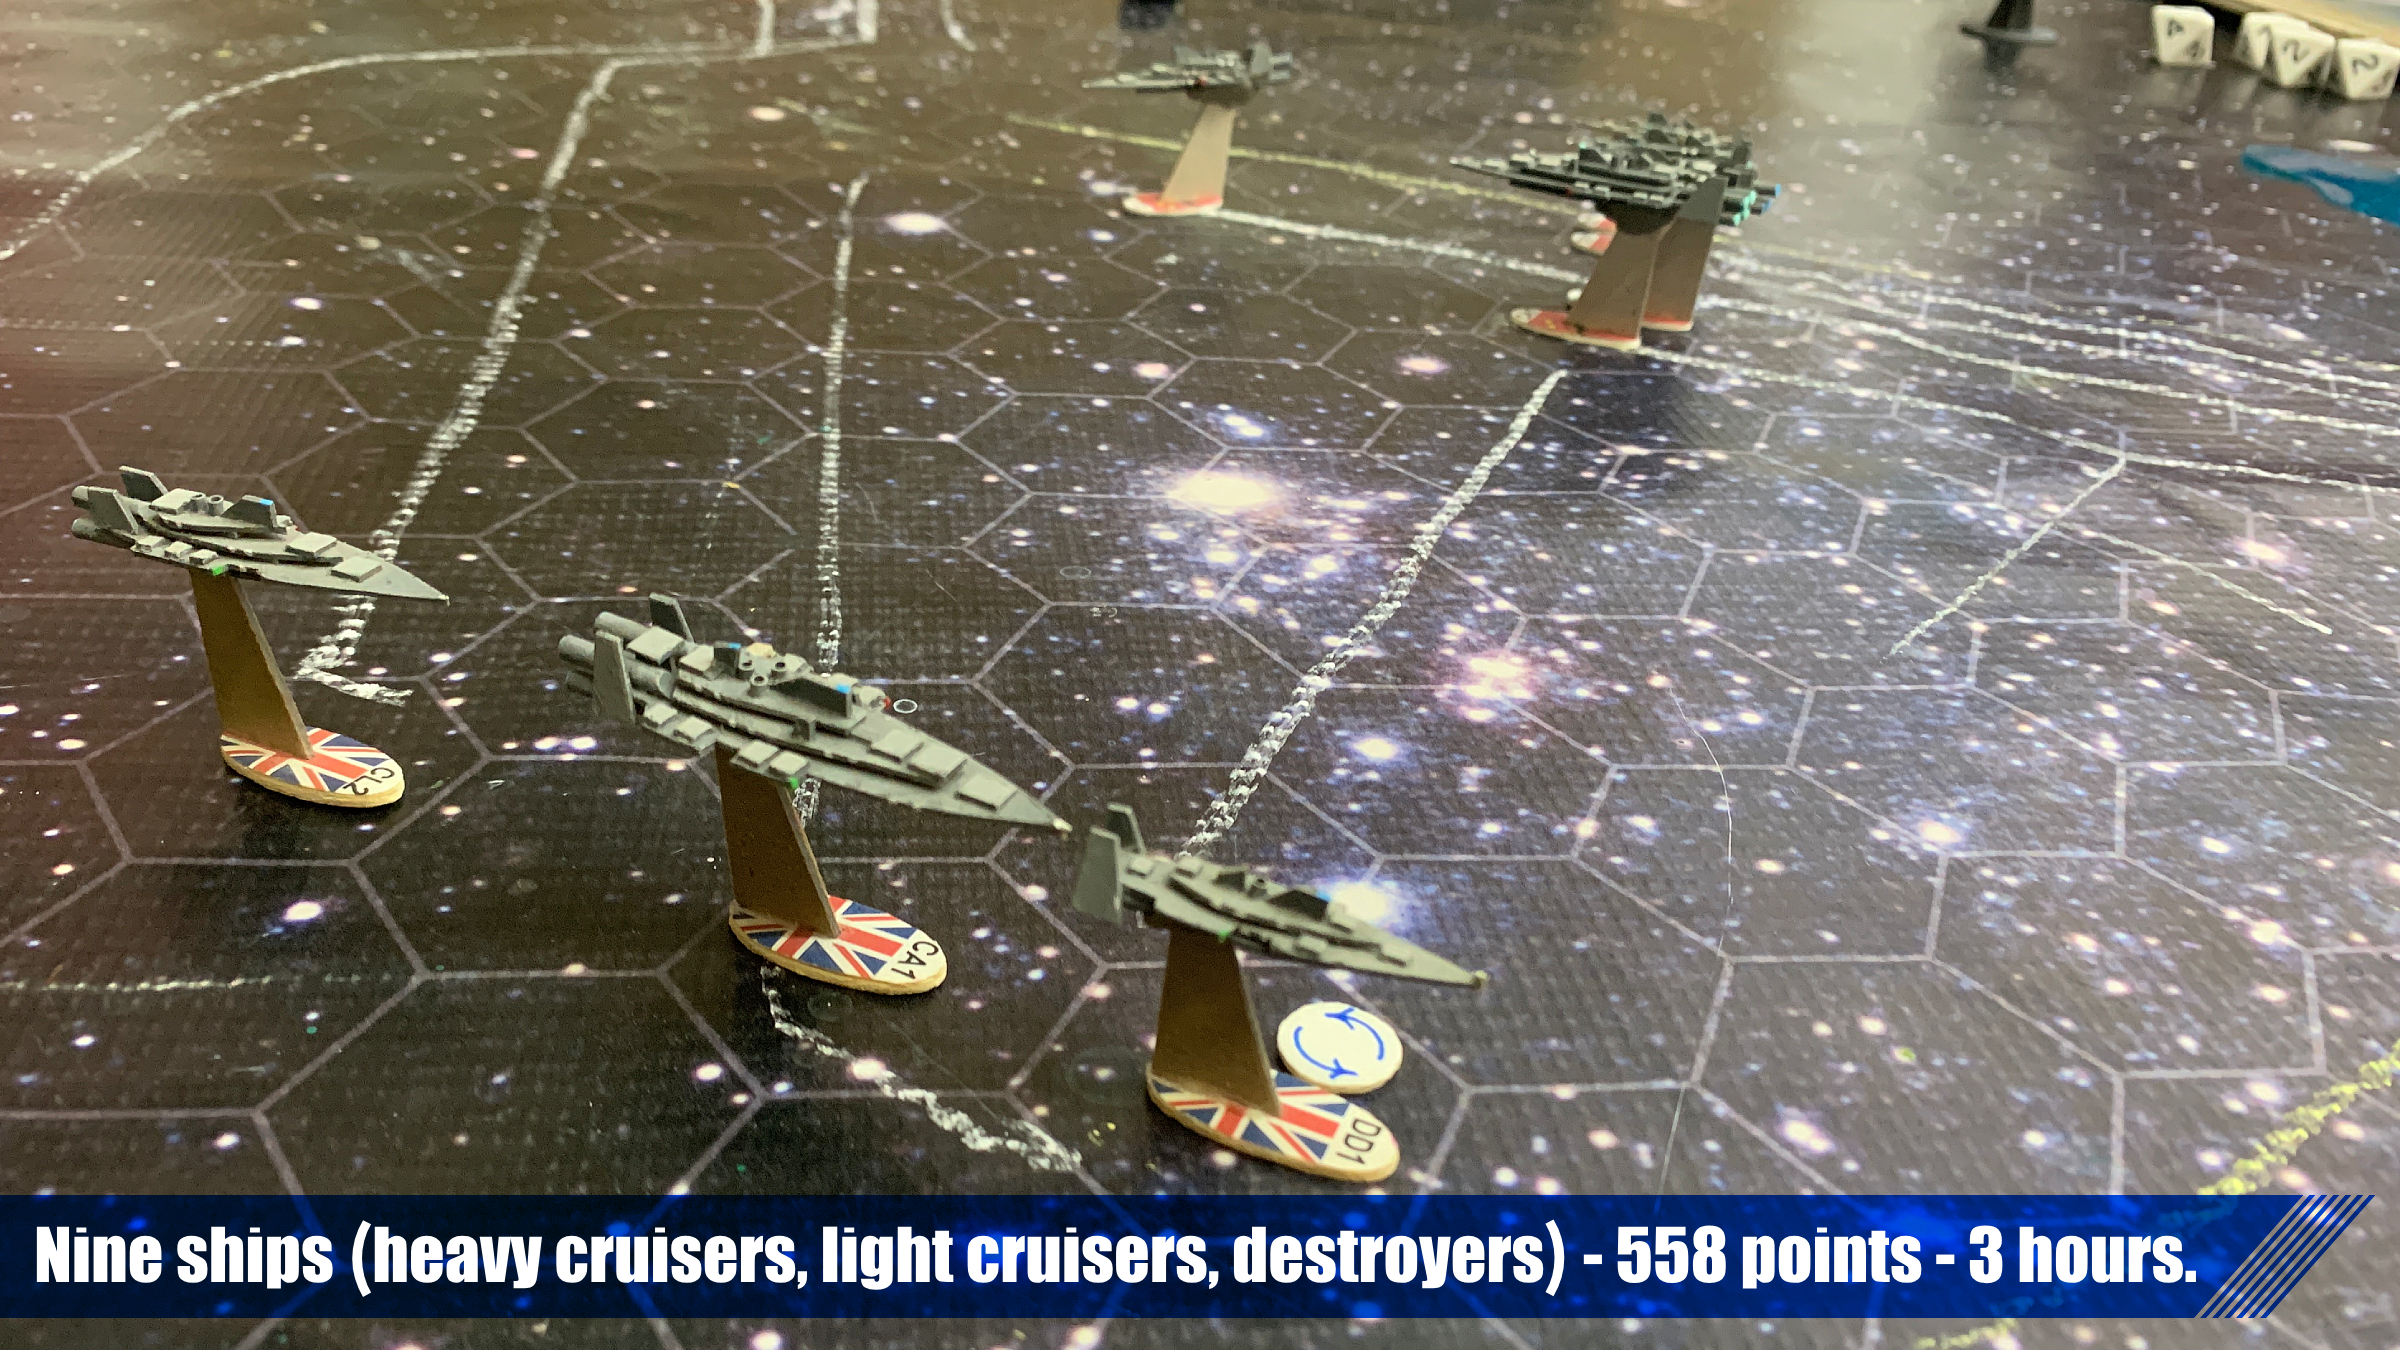
The crew has cracked open Darkstar once again, with @rasmus and other players participasting the occaisonal game. Here’s one I ran at the club today, with me and Jenn and John, with Mark and Tom playing a turn or two between turns on a nearby table.
558 points, nine ships, took three hours (teaching rules to three new players)
British:
HMS Kraken (Iron Duke class heavy cruiser)
HMS Inflictor (Indomitable class light cruiser)
HMS Requiem (Relentless class light cruiser)
HMS Londonderry (Falklands class destroyer)
“Black Dragons” (Khitan-Tunguska Free State)
KTS Khar Baavi (Slava class heavy cruiser)
KTS Zhang Jia (Gengdu Xhia class light missile cruiser)
KTS Jamsaran (Almanzor class light cruiser-modified)
KTS Vastrakin (Sovnya class destroyer)
KTS Khalys Tan (Basra class destroyer)


Intercept Enemy Reinforcement Covoy
In the wake of their recent (and bloody) victory Battle of Kinkaid III, repair work continues on the heavier American warships of Task Forces Liberty and Oriskany (creatively nicknamed TF “Lib-Skany” by the poets among the crews). On the surface of Kinkaid’s Outpost, meanwhile, ground-pounders of 2nd Battalion / 5th Marines are able to finally break the deadlock around the Kinkaid III colony, assisted in no small regard by the American naval victory in orbit overhead and the subsequent orbital support missions mounted by the destroyer USS Oriskany and other ships of the task force.
All the same, it soon becomes apparent that the Black Dragons are also mounting determined efforts to tip the balance of this ongoing battle in their favor.
On 28 May, while on long-range perimeter sweep, the torpedo corvette USS Daggerfish comes upon an incoming Black Dragon troop and supply convoy on a high-speed “ghost trajectory” toward Kinkaid’s Outpost. This is a common tactic for in-system naval operations, where a battlegroup or task force sets a low-speed, low-profile Darkstar dilation into the inner orbital zones of a system, then “ghosts” through normal space in a powered-down glide, hoping to avoid detection. What tips the Americans, however, is the sheer size of this new force – two light cruisers, four destroyers, and three frigates, all screening a host of troop ships, freighters, tankers, and other vessels for the support and reinforcement of the wilting Black Dragon beachhead at the Kinkaid III surface colony. The upgraded sensors and veteran crew of the Daggerfish certainly helped matters, along with no small amount of good old-fashioned luck when it comes to American patrols and detection efforts.
Other aspects of the American situation remain less cheerful. For the most part, Task Force Liberty remains laid up in orbital repair yards. Only the frigate Ronald Evans stands ready to join Rear-Admiral Spencer’s Task Force Oriskany. Even Spencer’s own force remains less than complete, as USS Princeton, replacement for the ill-fated Hancock, is only just arriving in system and is still fitting-out and doesn’t yet have anything like a full crew aboard.
Thus, Spencer has only the destroyers USS Oriskany, Valley Forge, the light carrier Tarawa, the frigate Ronald Evans, and the torpedo corvette Daggerfish to head off two Greater Xhia class light cruisers, four Sovnya class destroyers, and three Zhenhai class frigates. In all, Spencer is outweighed about 2.5:1 (approximately 475,000 tons vs. 175,000 tons). But this reinforcement convoy must be stopped, or the Americans could lose all the progress they have made in the bloody – and still undecided – ground battle of Kinkaid III.
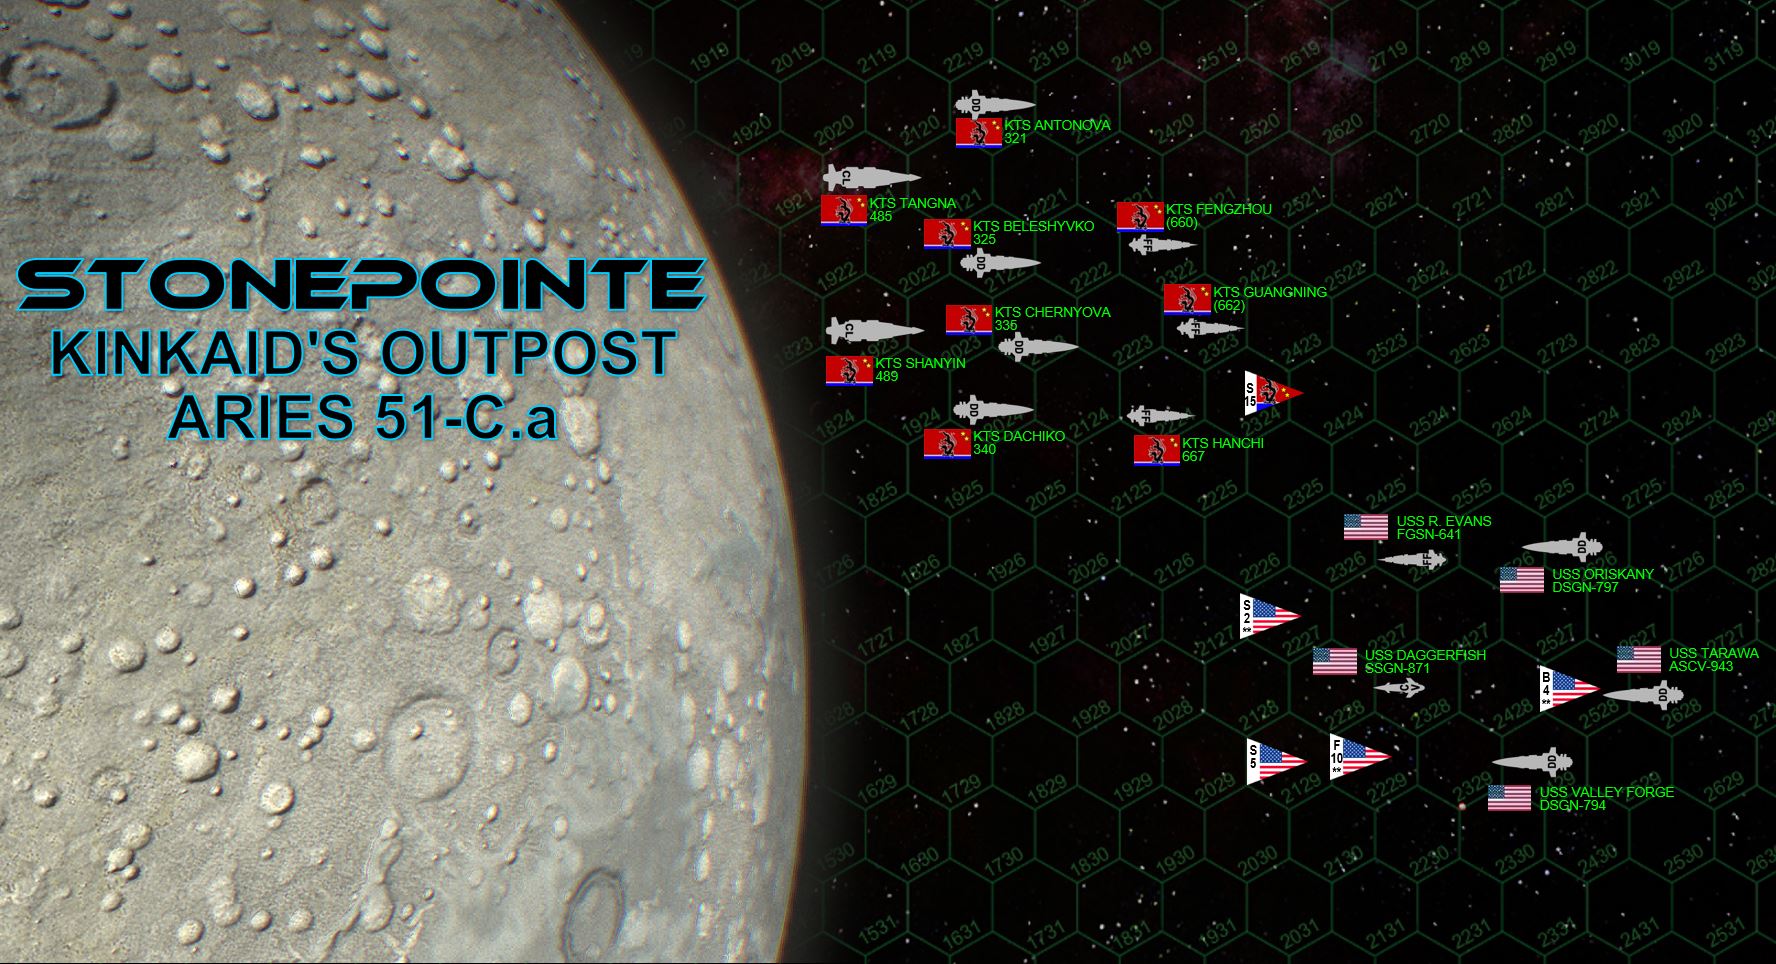
The two sides detect each other at relatively long range, allowing both task forces plenty of time to vector toward “Stonepointe,” the sole terrestrial moon of Kinkaid’s Outpost, each commander hoping to use the moon to their own tactical advantage. The Black Dragons, clearly, hope to leverage their advantages in numbers and heavy gunnery … the Americans hopefully countering with experience, heavily-upgraded ships, and the aerospace carrier striking power. The battle will most like be won by the side that somehow gets their enemy to fight their preferred form of engagement.
 The match up for the battle. The Black Dragons have much heavier ships, and many more of them. The Americans, meanwhile, are faster, more tactically nimble, and have a whole portfolio of insane technology, experience, and leadership bonuses. Basically this is a task force of elite badasses against a fleet of oafish giants. But if the oafish giants get too close ...
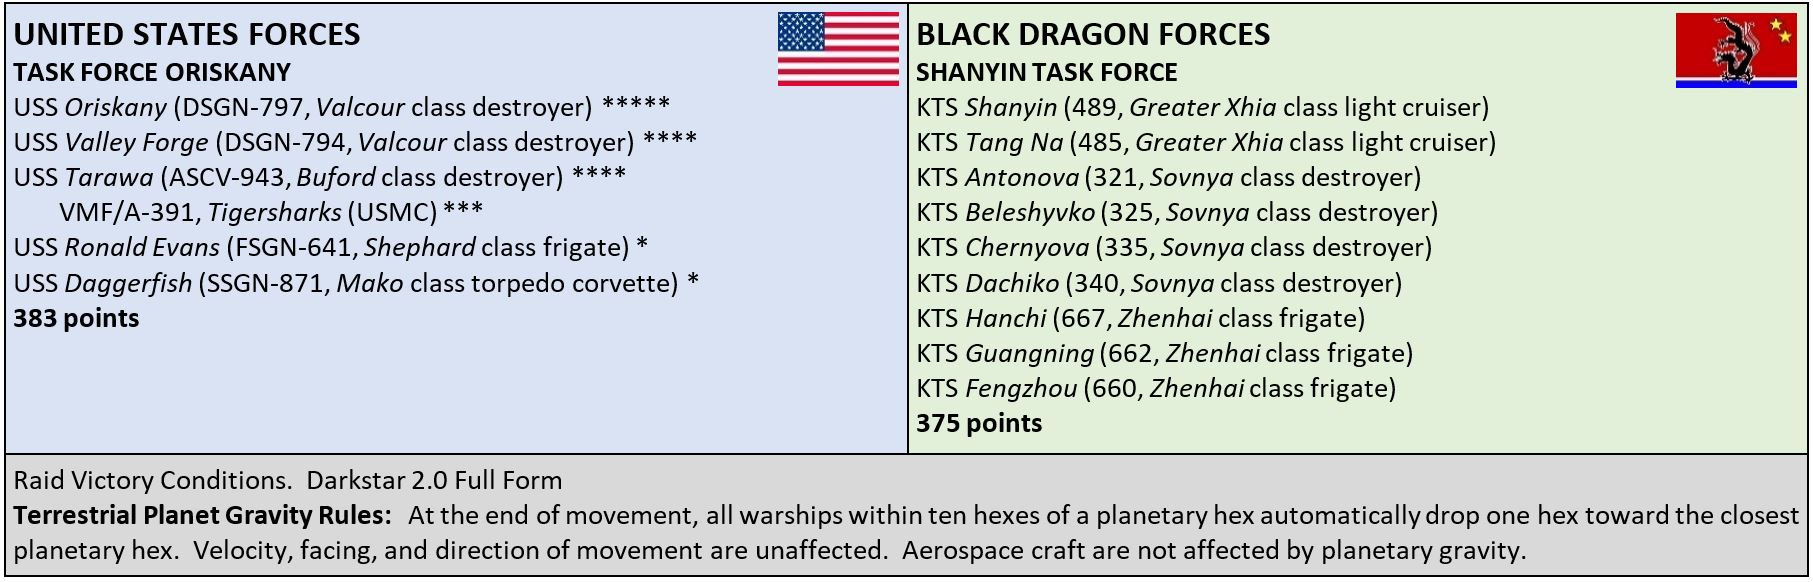 The point balance for the scenario. Another American advantage is a light carrier, in the form of the coverted planetary assault ship USS Tarawa.
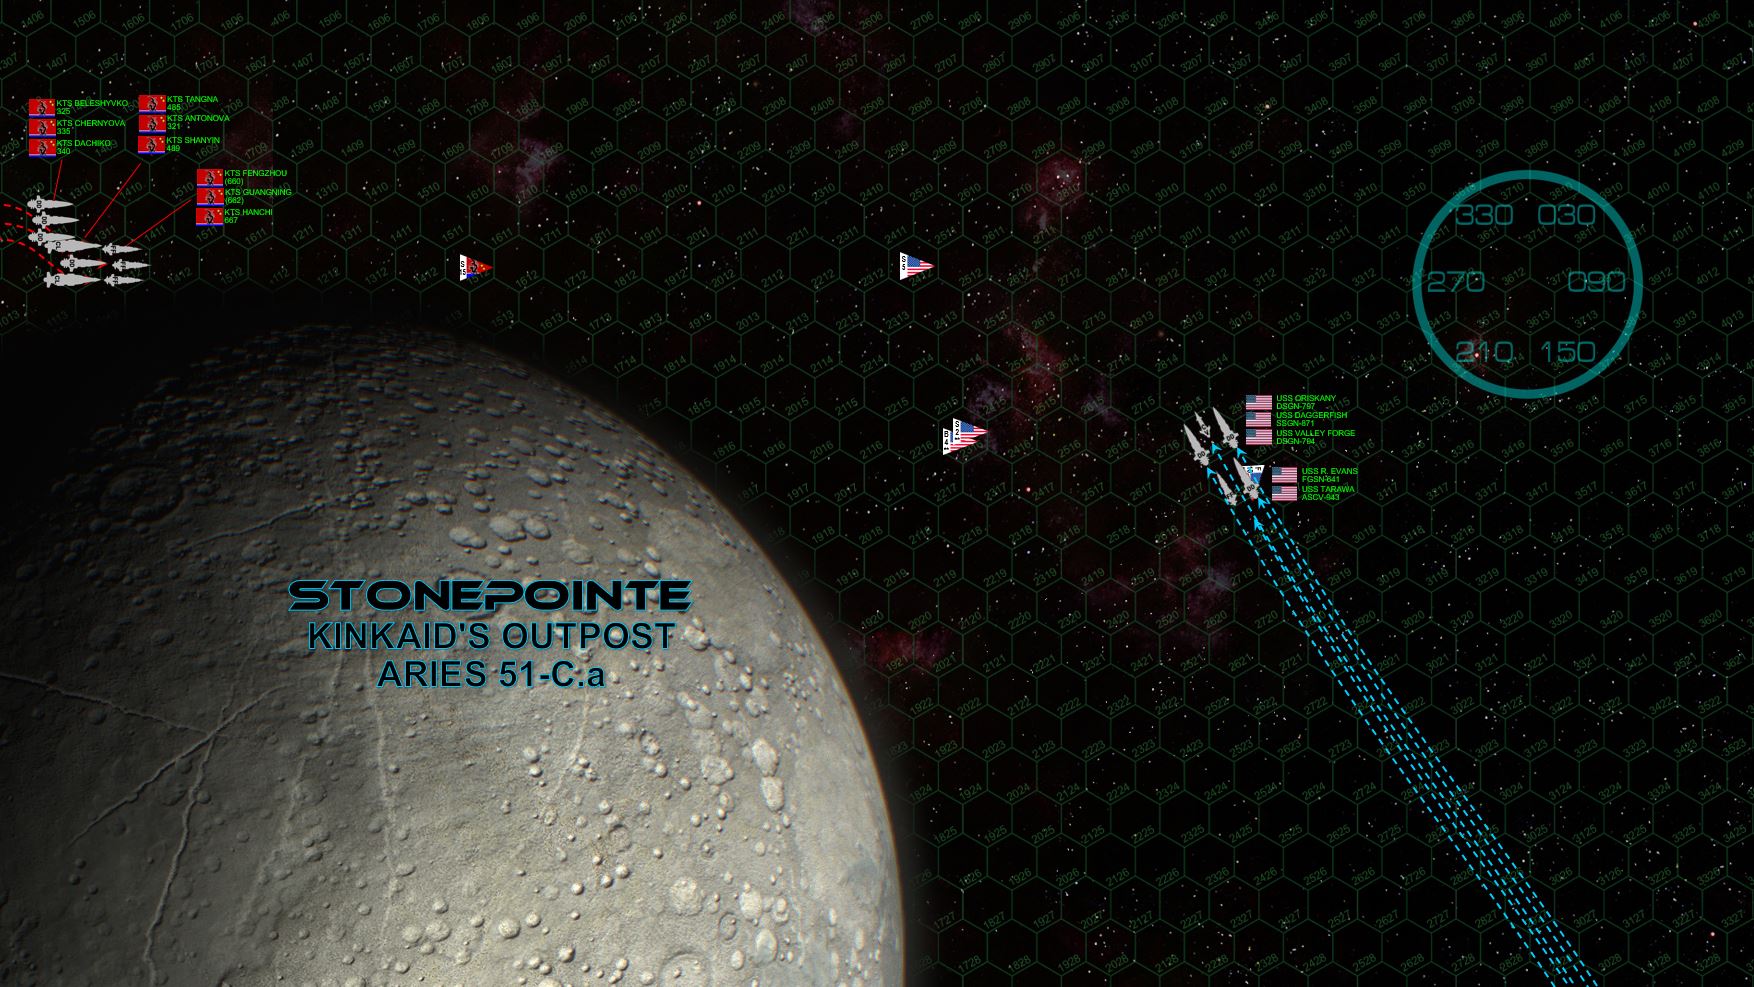 The Black Dragons make a very slow, very cautious approach, hiding behind the curvature of the Stonepointe moon and hoping to draw the Americans into a closer-range gun duel, not to mention into the range of the P-500 and Tsing Tao torpedo arrays. The Americans oblige, staying just behind the curvature as well, using the extra time to launch and position the Tarawa’s FS/A-81 “Avenger” torpedo bombers.
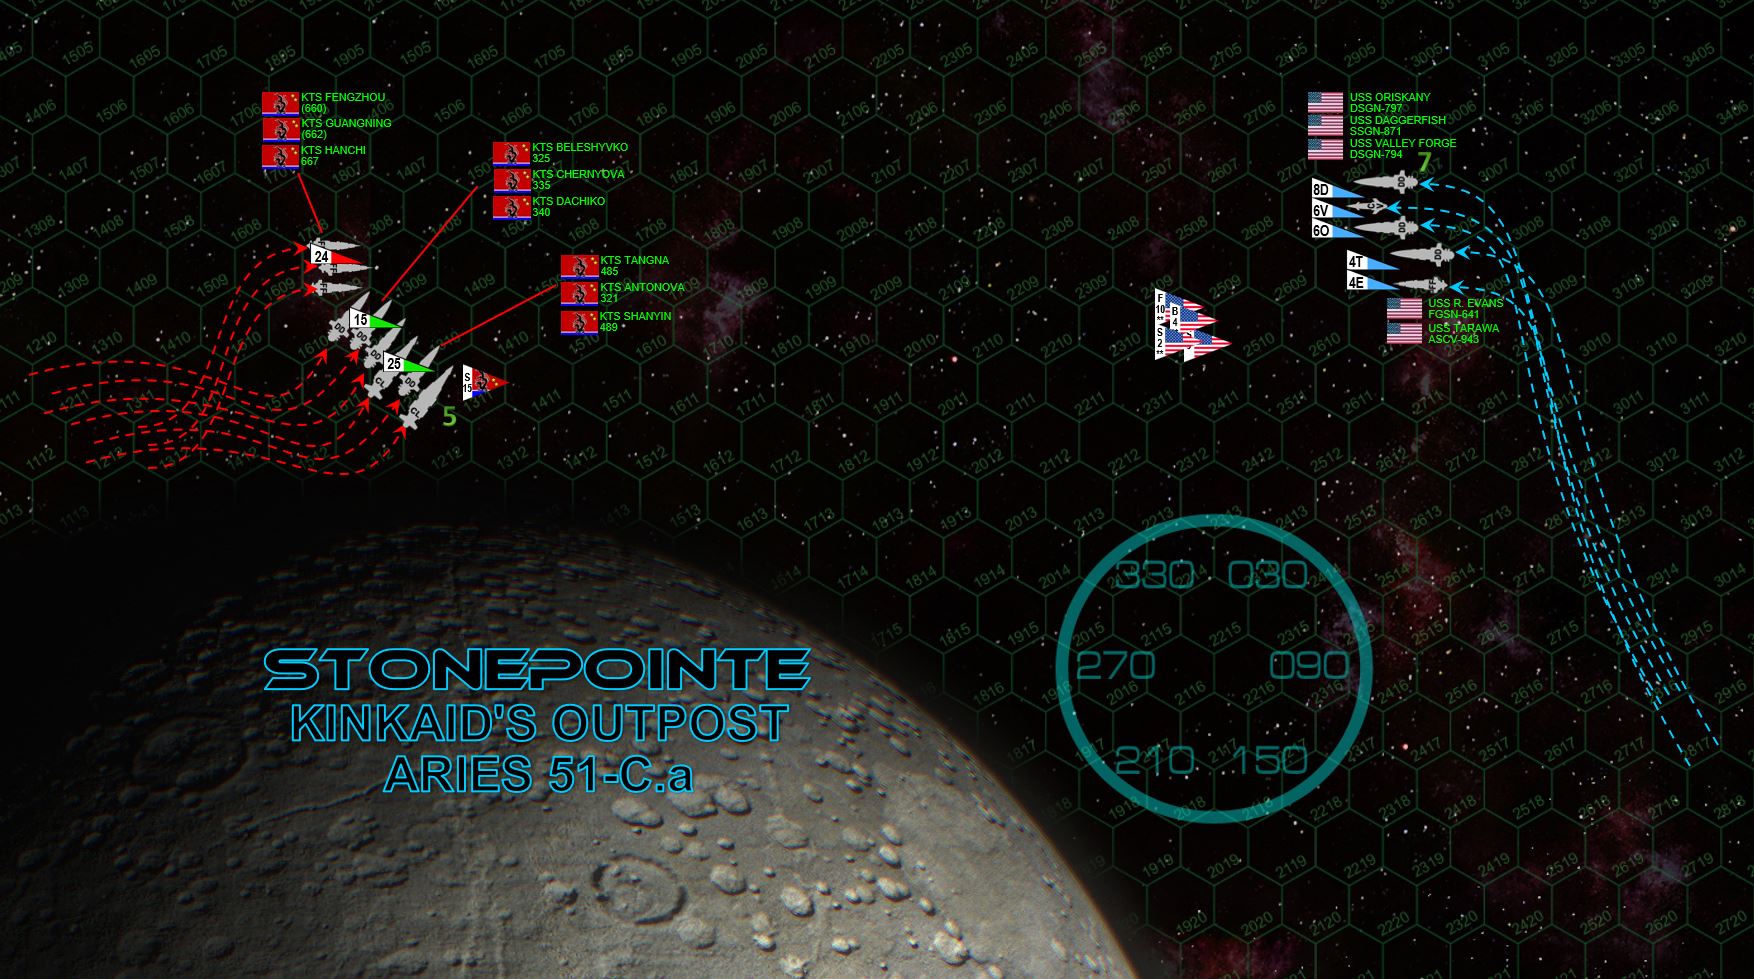 The Americans emerge from cover, making a decelerating turn around the moon's curvature. Spencer takes mortal care with his velocity, ensuring he retains speed to overshoot the broadsides of the Black Dragon fleet, yet not moving too fast to wind up in the enemy’s full forward torpedo arc. The Black Dragons greet the move, but only their forward guns can fire at a range of 2900 kilometers ... everything targeting on the smallest, most weakly-shielded ship ... the frigate Ronald Evans. Fortune smiles on the Americans, however, and everything misses! For their part, the Americans open fire as well, but at this range only Oriskany and Valley Forge can reach, and only with their forward guns as well. Hits are landed on the frigate Hanchi, burning out her forward hangar. Both sides launch torpedoes and Tarawa completes the launch of her aerospace group, most notably F/S-44 Star Corsair fighters of Marine Corps strike squadron VMF/A-391 (Tigersharks).
 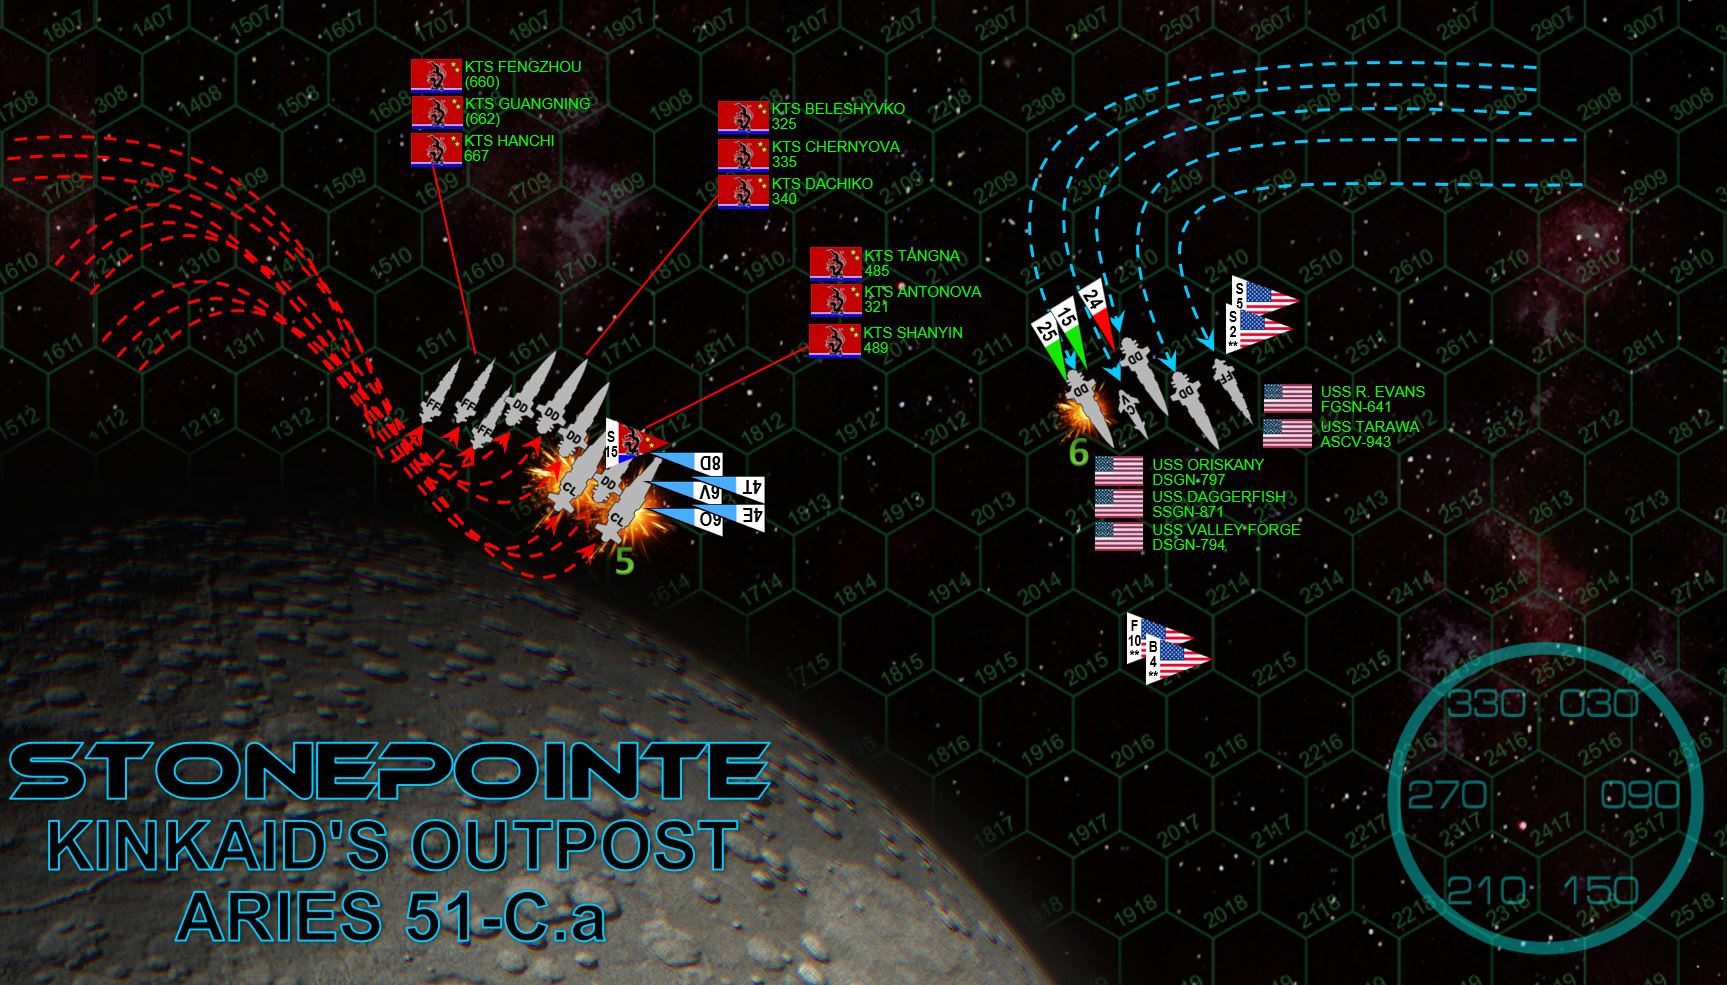 The Black Dragons continue to hedge themselves against the moon, hoping to cover their sterns against the expected American mass torpedo / aerospace strike. The Americans respond with a wide fishhook to port, "keeping the rock off their bow" as the expression goes, presenting broadsides against the Black Dragons' starboard bows without inviting a broadside in return (at least from the enemy's light cruisers). American torpedoes go in. The Mark 48s from the Ronald Evans, Valley Forge, Daggerfish are all short down. But all those from Tarawa and Oriskany hit the shields. All six of Oriskany's torpedoes slam into the port bow of the Shanyin, three of them landing perfectly against the armor protecting her bridge. Decapitated, the Greater Xhia class light cruiser slews out of line, dead in space, her conning tower wreathed in the flames of escaping atmosphere. Tarawa's torpedoes hit the Tang Na, smashing out her starboard side torpedo array. An instant later comes the Tigersharks’ aerospace strike, the fighters blowing up Tang Na's magazine. The bombers don’t do nearly as well, almost half the warheads shot down by Black Dragon scouts. Only one further hit is registered in the Tang Na. The Black Dragon torpedo strike comes in. Even after careful American maneuvering has prevented many of their banks from firing, the volume of the swarm is impressive. The Americans shoot down an amazing 34 warheads in all, but that still leaves 30 to impact against American shields. Most are going for the Daggerfish, whose enhanced shielding and EW suites shrugs off all the warheads. One comes desperately close, however .... and it would only take one P-500 to blow her clean out of the battle. American luck runs out at last when the Black Dragon guns open fire. The Oriskany takes three hard hits on her starboard quarter from the 7gw rail guns of the Black Dragon cruisers (the Shanyin landing a hit an instant before Oriskany all but vaporized her bridge), losing sensors, maneuvering thrusters, and a mass driver position. The Russian-built destroyers open up, scoring more hits that take out her troop bay and aft hangar, as well as lighting fires in Oriskany’s starboard reactor room. Plasma projectors are next, knocking down the starboard quarter shields and setting the portside reactor room afire as well. The Oriskany returns fire, all her rail guns and both syglex emitters hitting home on the damaged Tang Na. Her hit placement isn't quite as good as it was with her torpedoes, however, and although Oriskany hits the bridge and sets it on fire, she doesn't quite knock it out. The task then falls to the Valley Forge, who fires her forward 5gw rail guns into the Tang Na's conning tower and finally cripples the second enemy light cruiser. The rest of the American guns (not a terribly impressive battery to be honest) target the destroyer Antonova, but only sensors and maneuvering thrusters are damaged. Aboard the Oriskany, a frantic battle rages against the fires in both reactor rooms. The fire is put out in the port reactor room, and the fire in the starboard reactor is at least brought under control for now. The Oriskany remains operational, if terribly damaged.
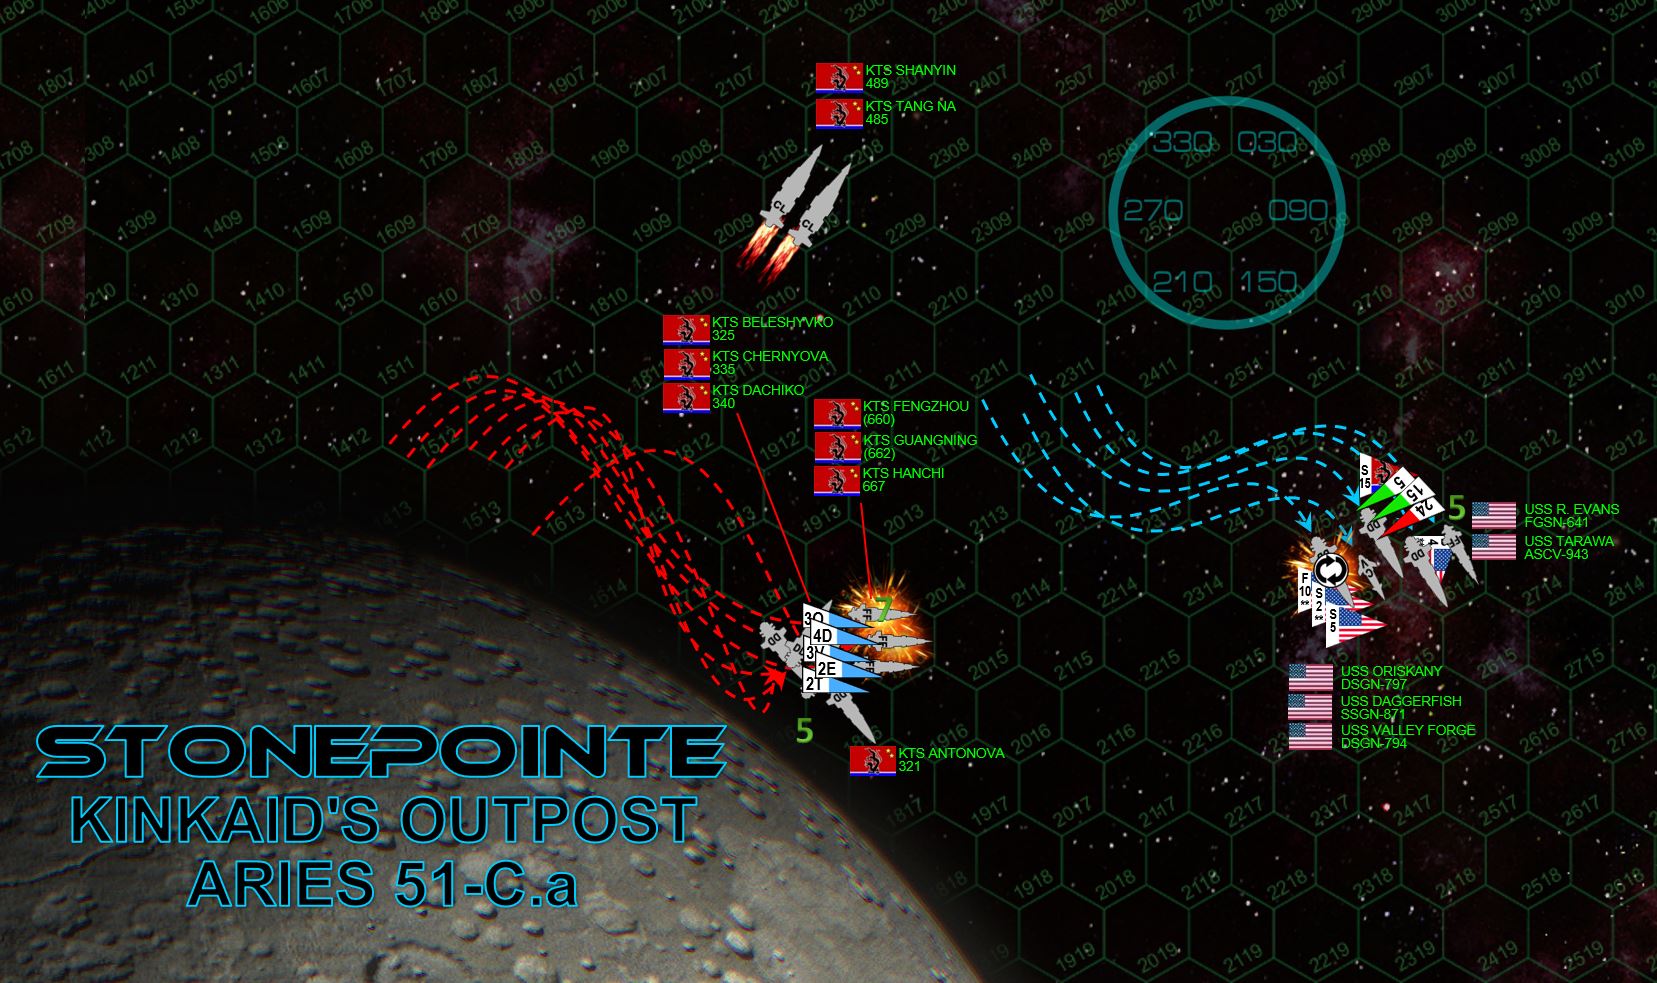 The Black Dragon destroyers and frigates continue to "slip stream" along the moon's curvature, now trying to present multiple broadsides and torpedo arcs so the Americans (their ships more maneuverable, their crews much more experienced) won't be able to avoid all Black Dragon broadsides. Spencer orders a gentle S-turn to port, edging away from the enemy and keeping the range open at just over 1000 kilometers. The Oriskany also rolls, her 49,000 ton hull actually slinging molten metal from her starboard quarter as she does. The Tarawa recovers her bombers to rearm for another strike, while her fighters and scouts take up station to cover Oriskany, doubtless about to be the target of a vengeful Black Dragon torpedo strike. The second American torpedo spread is much reduced (fired when they were presenting broadside), and the Black Dragons shoot down nearly all of the warheads in their compacted, mutually-supporting formation. Two torpedoes from the Oriskany still hit the frigate Fengzhou, smashing out two engines and aft mass drivers, leaving her crippled and adrift. Unfortunately, the Black Dragons' torpedoes are also coming in, targeting the wounded Oriskany - specifically her opened and unshielded starboard quarter. No less than 44 warheads are coming in. The mass driver defense is ferocious (even with Oriskany's damaged sensors), accounting for 32. Tigershark fighters account for seven more, scouts for five. That is just enough to stop them all ... but not the fifteen Black Dragon scouts also coming in. The strafing attack of these light craft, mostly Russian-made Su- 107 “Molniya” (Lightning) scouts, normally poses little threat. But with her shields down, and reactors and engine rooms exposed ... it seems time has run out for the “Lady O” – especially when the rest of the Black Dragon fleet opens with every gun on her port quarter. Finally, Spencer has no choice but to evacuate engineering and vent it to space, ejecting his reactors to save the ship. The Oriskany goes dark and is set adrift. American gunnery responds with a combined broadside on the frigate Guangning. Their aim isn't as sharp this time, and the bow-on angle isn't the best, nevertheless after enduring the last salvo from the Oriskany and a full broadside from the Valley Forge, the Ronald Evans puts a 9tv EPC bolt through the bridge, crippling the ship.
 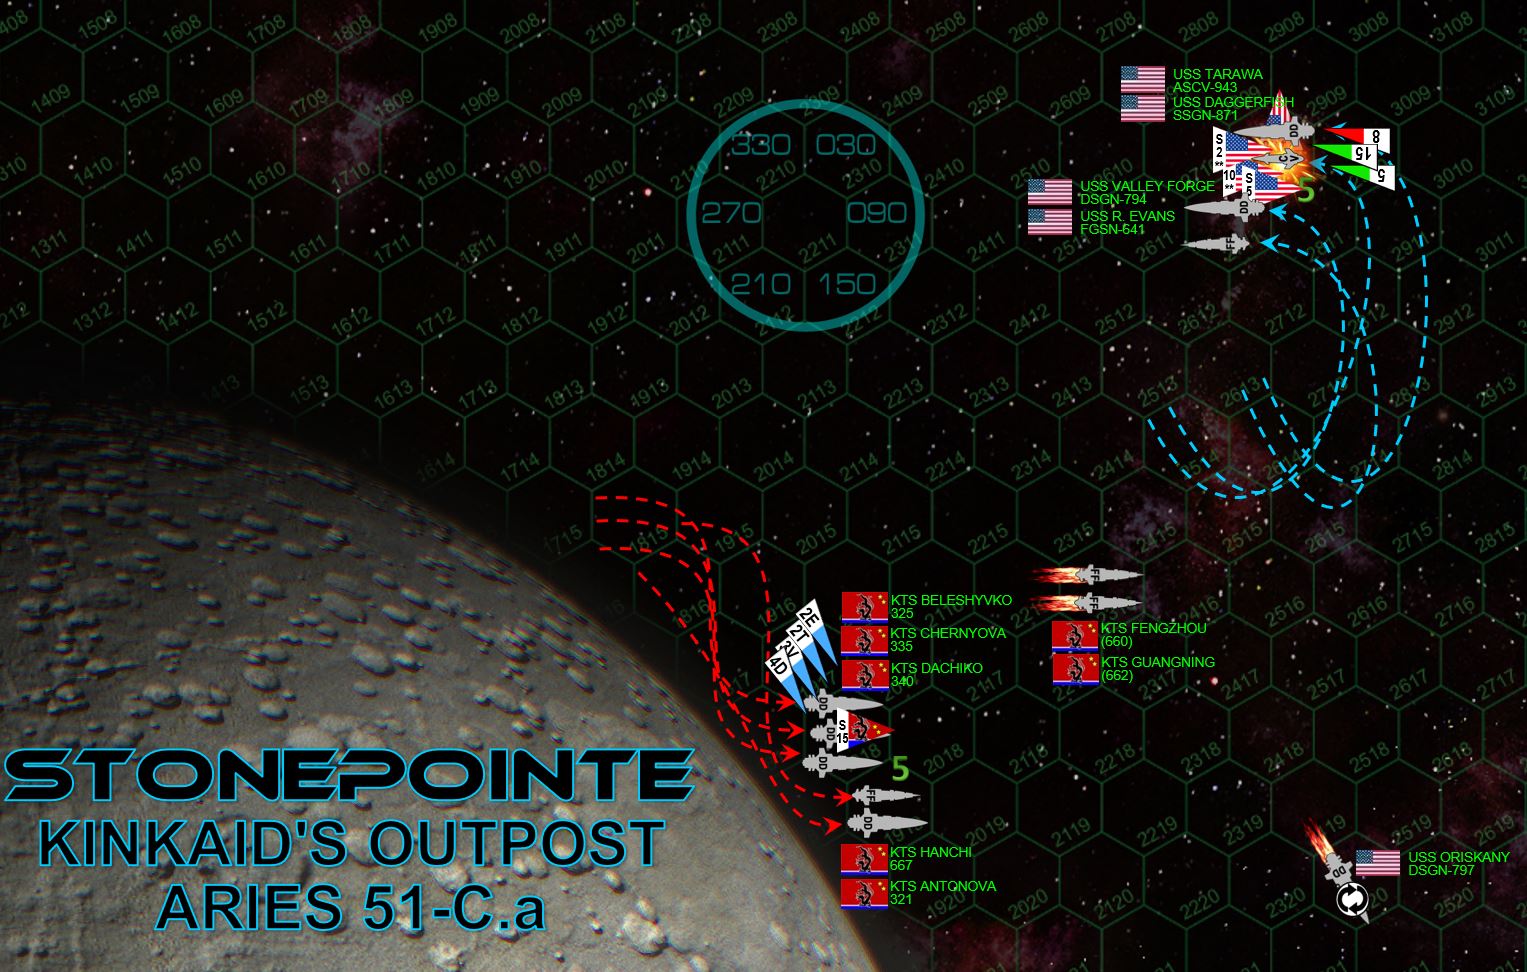 Assuming command aboard the Tarawa, Captain Raymond Cruz loops the American fleet around to port, now presenting portside torpedo banks (starboard arrays are almost empty) and rearming his Avenger torpedo bombers in Tarawa's hangar bays. The Black Dragons consolidate their five remaining warships, again trying to present broadsides and torpedo arcs ... again failing thanks to Cruz's skillful maneuvering (also taking care to keep American ships safe from possible collision with the Stonepointe moon). A fourth wave of Black Dragon torpedoes are all shot down by American mass drivers, fighters and scouts. Three American torpedoes hit the destroyer Beleshyvko, but their impacts scatter across her port quarter and she weathers the damage, save maneuvering thrusters and a mass driver turret. Black Dragon gunnery is more successful, the Chernyova landing one rail gun hit and the frigate Hanchi landing both an EPC and laser on the corvette Daggerfish - hitting the bridge and knocking the little corvette out of the battle. Here is where Cruz’s careful positioning comes into play … although her drift trajectory is curved by the Stonepointe’s gravity, Daggerfish avoids crashing into the moon and will eventually be recovered.
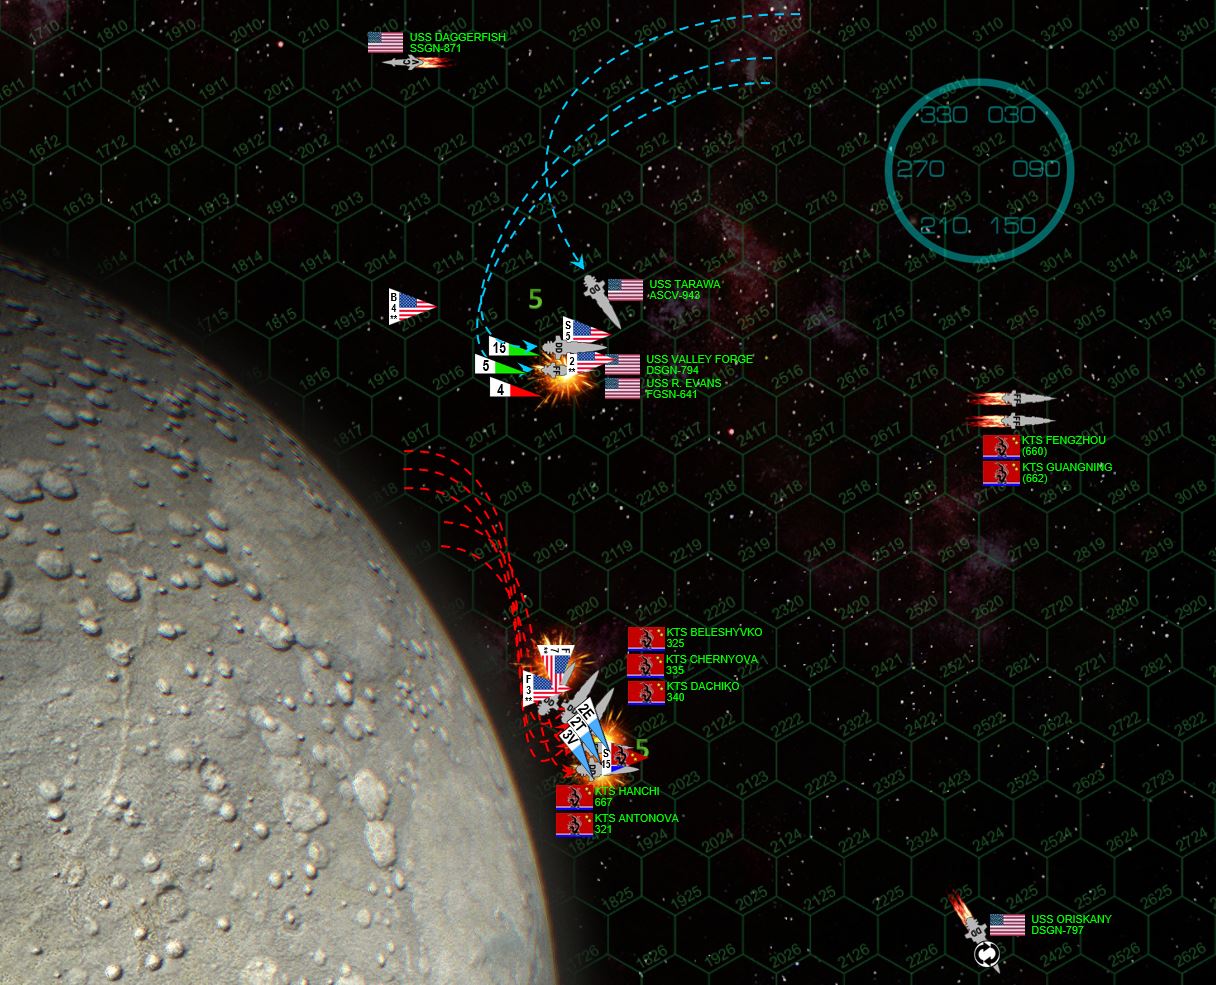 Cruz turns toward the Black Dragons in a broad port turn, presenting broadsides from the Valley Forge and Evans while launching bombers for the Tarawa. He also gambles with the fighters of Marine strike wing, sending in the F/S-44 Star Corsairs in a strafing run on the damaged Beleshyvko. If the Marines take too much defensive fire, at least they'll be clearing the way for the combined torpedo strike from the American warships and bombers. Sure enough, seven of the ten Corsairs are shot down, and the three that remain fail to cripple the Beleshyvko in their strafing run (although they do manage to knock down the manage to knock down the destroyer’s port quarter shields). Perhaps more importantly, they have drawn all the enemy's mass driver fire, clearing the way for the bombers and torpedoes. The bombers knock out the frigate Hanchi, the torpedoes from the Tarawa, Valley Forge, and Evans finally manage to cripple the Antonova. American gunnery hammers the Beleshyvko, knocking down sensors and another shield, although return fire from these Sovnya-class destroyers winds up hitting the bridge of the Ronald Evans, leaving the ship crippled and adrift.
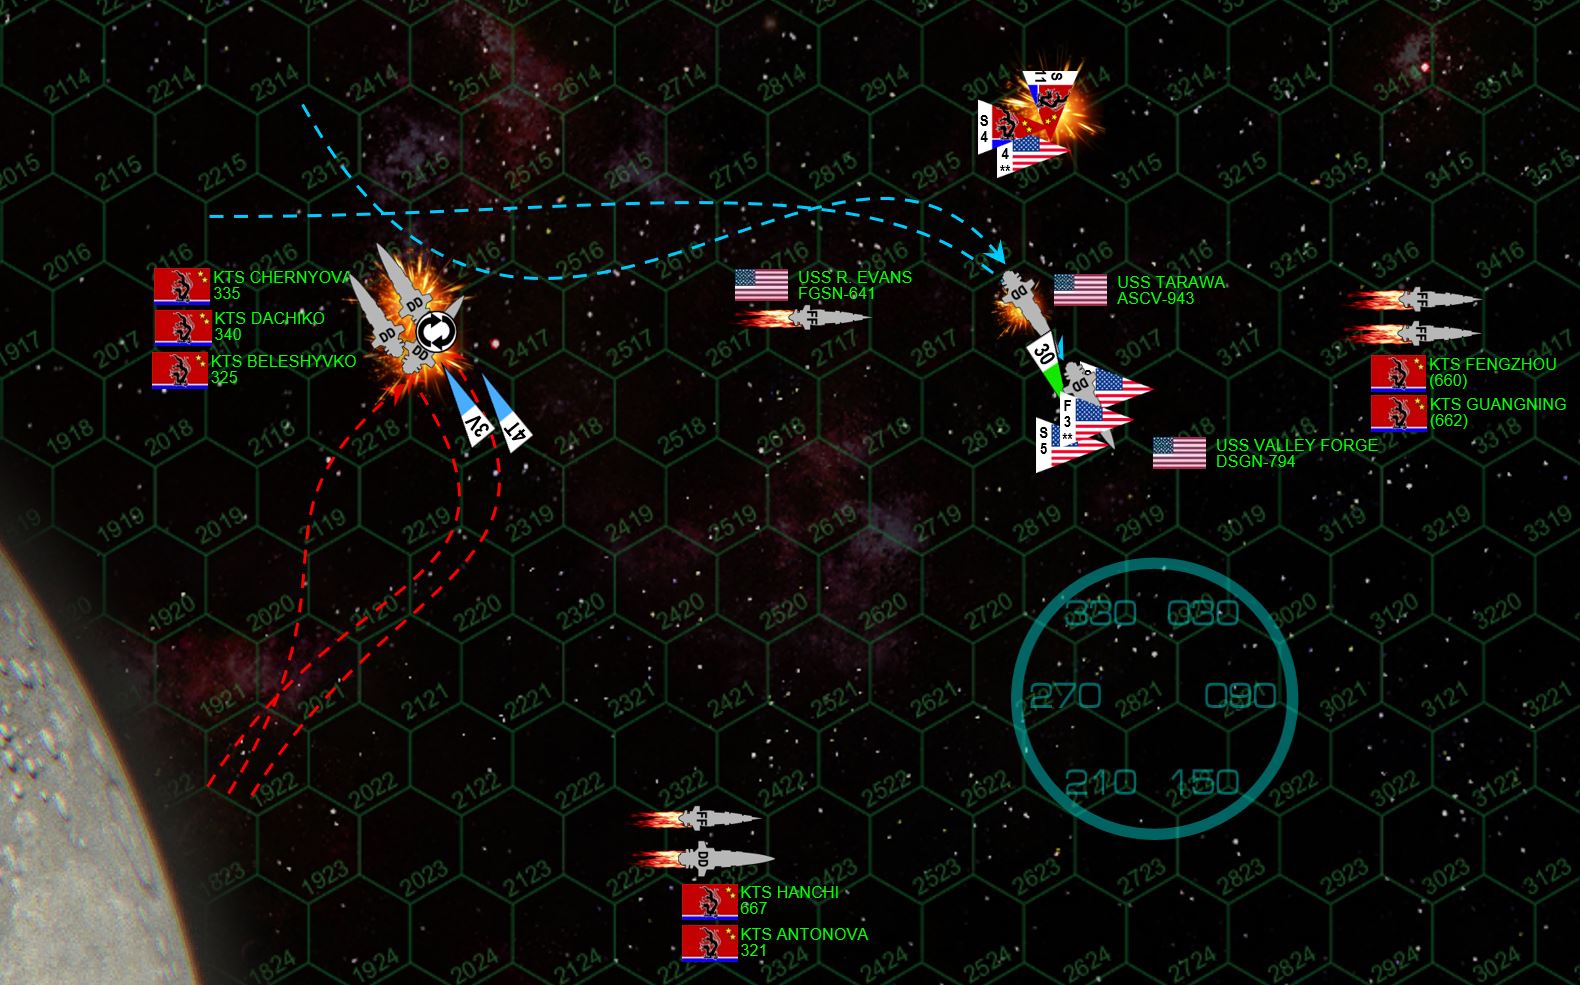 With only the Valley Forge and the empty light carrier Tarawa facing them, the Black Dragons smell blood in the water and charge with their three remaining destroyers up toward the Americans. Cruz sees the move, however, and immediately accelerates, ordering a sharp S-turn to port and sidestepping the Black Dragons’ charge. As they were powering away from the moon, however, the Black Dragons released a truly withering hail of torpedoes, all aimed squarely at the Valley Forge's stern. Captain Garrison Heathe makes the brave decision to ignore them, trusting in his upgraded shielding, ECM, and fighter protection, instead shooting all his mass drivers at the Black Dragon scouts that just tried to engage the Marine bombers trying to get back to the Tarawa. The gamble pays off ... no P-500s get through the Valley Forge's defenses. Eleven Black Dragon scouts are shot down, and no Marine bombers are lost. American fortune had been fading with the loss of Oriskany, Daggerfish, and Evans, but now seems to return with a vengeance. Some of their last torpedoes are sent in a spread toward the destroyer Chernyova, and even as all of Valley Forge's torpedoes are shot down, all of Tarawa's get through. Two of her warheads ping off Chernyova’s shields, but two get through and hit both port and starboard engines, leaving the ship crippled and adrift. Simultaneously, Valley Forge opens up her broadside on the unshielded port bow of the inverted destroyer Beleshyvko, hitting the bridge multiple times, all but tearing the conning tower clean off the superstructure. Black Dragon gunfire, however, remains vicious, skilled, and determined. Although Valley Forge was able to avoid almost all enemy broadsides, Tarawa was not ... and even as destroyers Chernyova and Beleshyvko were being shot and torpedoes to bits, their 7gw rail guns and 40kg plasma projectors were hammer away at the Tarawa. Aft hangar bays are gone, along with two maneuvering thrusters, sensors, two mass driver mounts, and port quarter shields. Limping and ablaze, the Tarawa remains operational ... although records also show a rather “brisk” discussion on the bridge about whether Tarawa should raise steam to disengage at flank speed.
 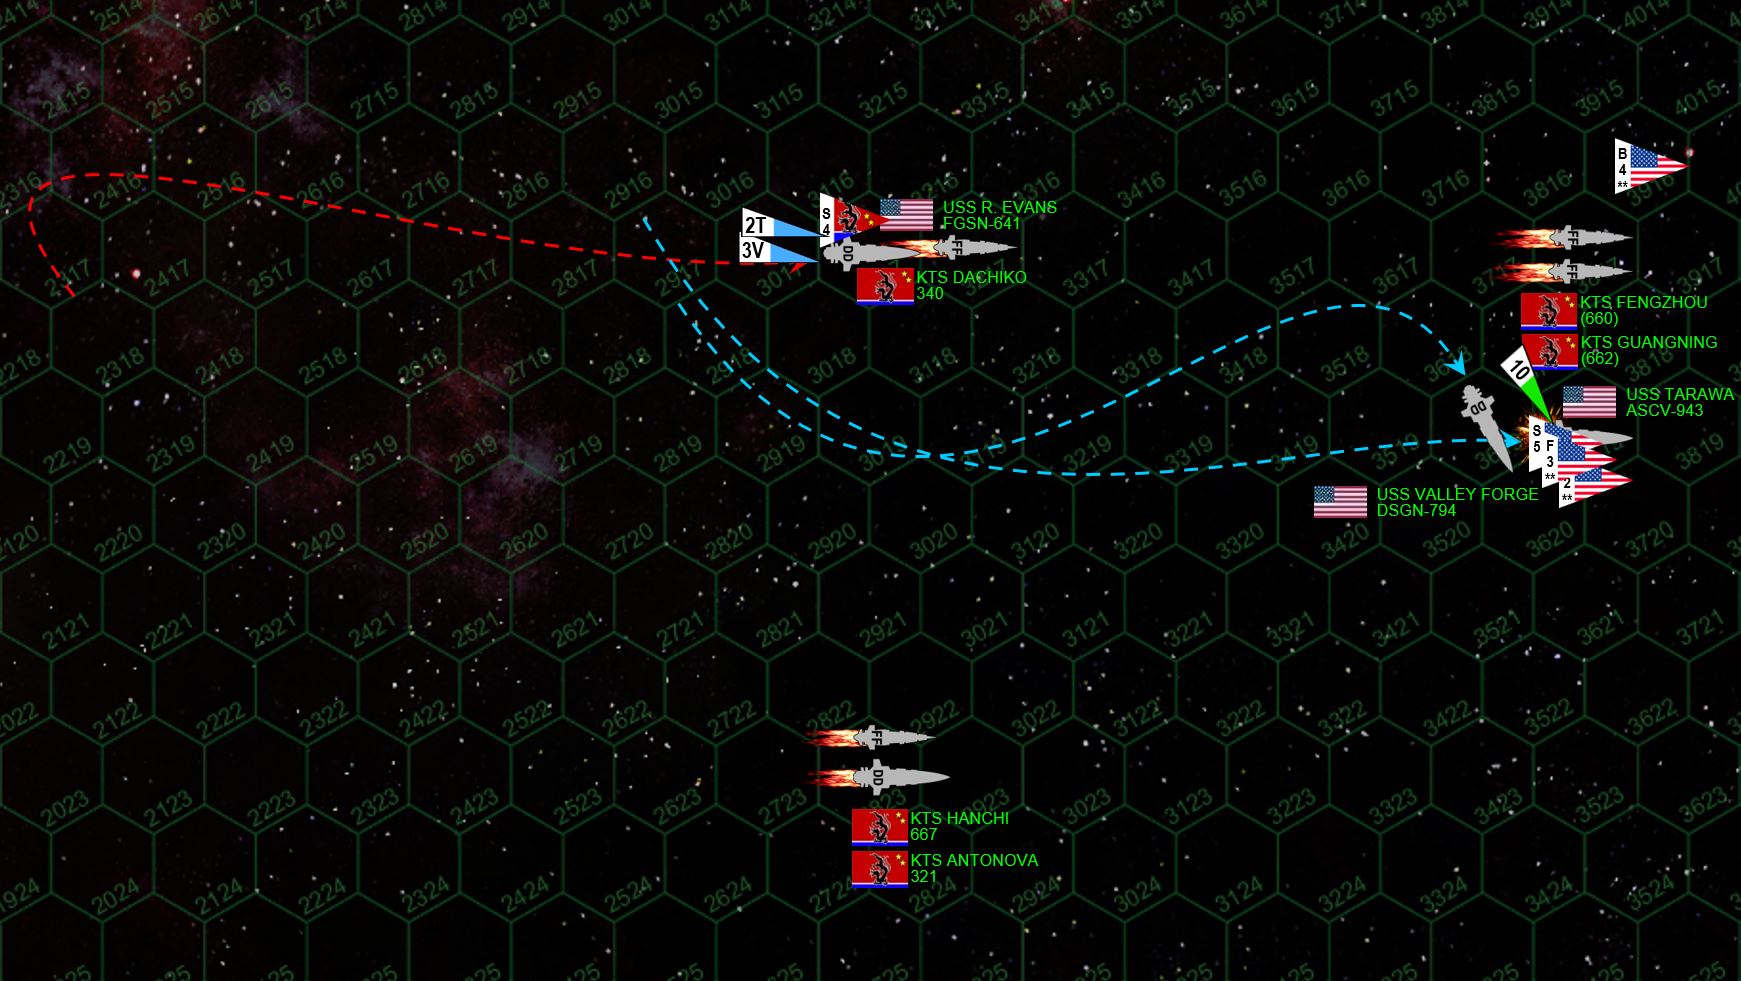 The last Black Dragon destroyer, Dachiko, throws her rudder hard over, making a hair-pin acceleration turn to starboard. Her skipper knows the Americans want to open the range of the engagement and is determined not to allow it, especially given the massive damage suffered to the Tarawa. The Tarawa and Valley Forge likewise accelerate, turning to port, not breaking off the battle but definitely trying to keep the range open and not offer the Dachiko any broadsides. The very last American torpedoes go for the Dachiko. All but one are shot down by the Dachiko or the remaining Black Dragon scouts, the last one is absorbed by the destroyer's shields. More problematic are the ten P-500 warheads streaking toward the Tarawa, particularly her burning and unshielded port quarter. The Valley Forge is right behind her, turning to starboard again to cover Tarawa as best she can, along with remaining Marine fighters and scouts. Fortunately, the Valley Forge mass driver gunners have had their coffee this morning, and the last Black Dragon torpedo attack is soon broken up with the help of Tarawa and her surviving Corsair fighters and E/S-101 “Hawkeye” scouts. Dachiko opens fire with her forward guns at 1400 kilometers, hoping for just a few lucky hits on Tarawa's stern. One hit is scored, but at this range the Tarawa's armor shrugs it off.
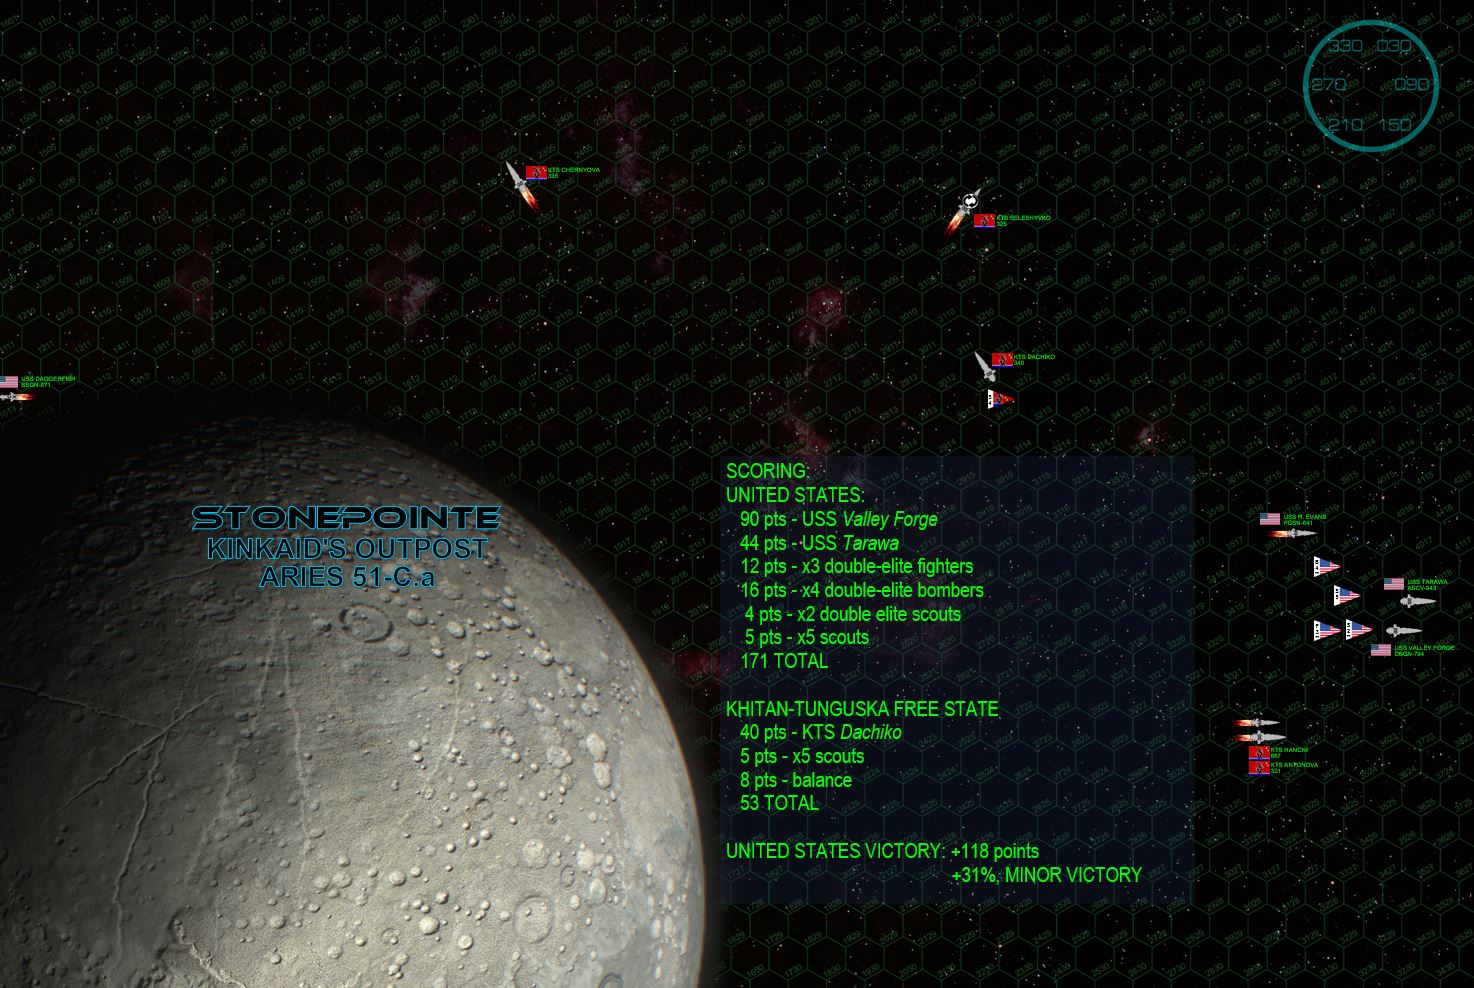 At last, the battle is over. All remaining ships are now completely out of torpedoes. The last Black Dragon destroyer Dachiko faces an undamaged Valley Forge, Marine fighters and bombers (against which is has virtually no aerospace cover), and thousands of comrades adrift in crippled and burning warships. Those bombers could also go for the unprotected troop ships and freighters, along with the USS Valley Forge herself, who is actually faster than the Dachiko and could easily maneuver around her if she doesn’t break off now. The reinforcement convoy is thus recalled, save two freighters who jettison their cargo to make room for rescue and recovery efforts. The Americans also have their hands full. The Oriskany’s damage control parties soon have the fires out and the ship technically under her own power, although she can do little more than limp slowly back to the orbital shipyards of Kinkaid’s Outpost, covered by the similarly-limping Tarawa and her handful of surviving fighters. The Valley Forge soon has the Ronald Evans in tow, while one of her cutters lands on Stonepointe to rescue fighter pilots who managed to eject and soft-land on the moon’s airless surface. The problem is the Daggerfish. Although her initial drift trajectory barely cleared her of Stonepointe, the gravity slingshot hurled the derelict corvette deep into interplanetary space, and it takes no less than three days for cutters from the Oriskany, Valley Forge, Tarawa, and Evans to find her. Even after the cutters dock with her and couple their reactors to Daggerfish’s engines, it is found those couplings are damaged, so the cutters have to initially tow the 12,200-ton corvette back toward Stonepointe. In the end, it takes almost a week for the Daggerfish to make it back to Kinkaid’s Outpost. The outcome of the clash at Stonepointe is far-reaching. The Americans have won a clear but bloody victory, turning back the Black Dragon effort to reinforce and resupply their besieged beachhead at the Kinkaid Three colony. Thus, 2nd Battalion / 5th Marines can continue their steady reduction of the position, their situation further improved when the light cruiser USS Northampton and light fleet carrier USS Liberty are finally back on station, providing an exponential upgrade in the volume and quality of orbital and aerospace fire support. Suffice it to say the Black Dragons at Kinkaid III quickly find themselves in a very bad situation.
 A New Campaign Begins - Four Players So Far - Any More?
The ever-turbulent world of Darkstar: Tactical Starship Combat has shifted and yet again, the empires of the Second Colonial Age are in a mood best described as disagreeable.
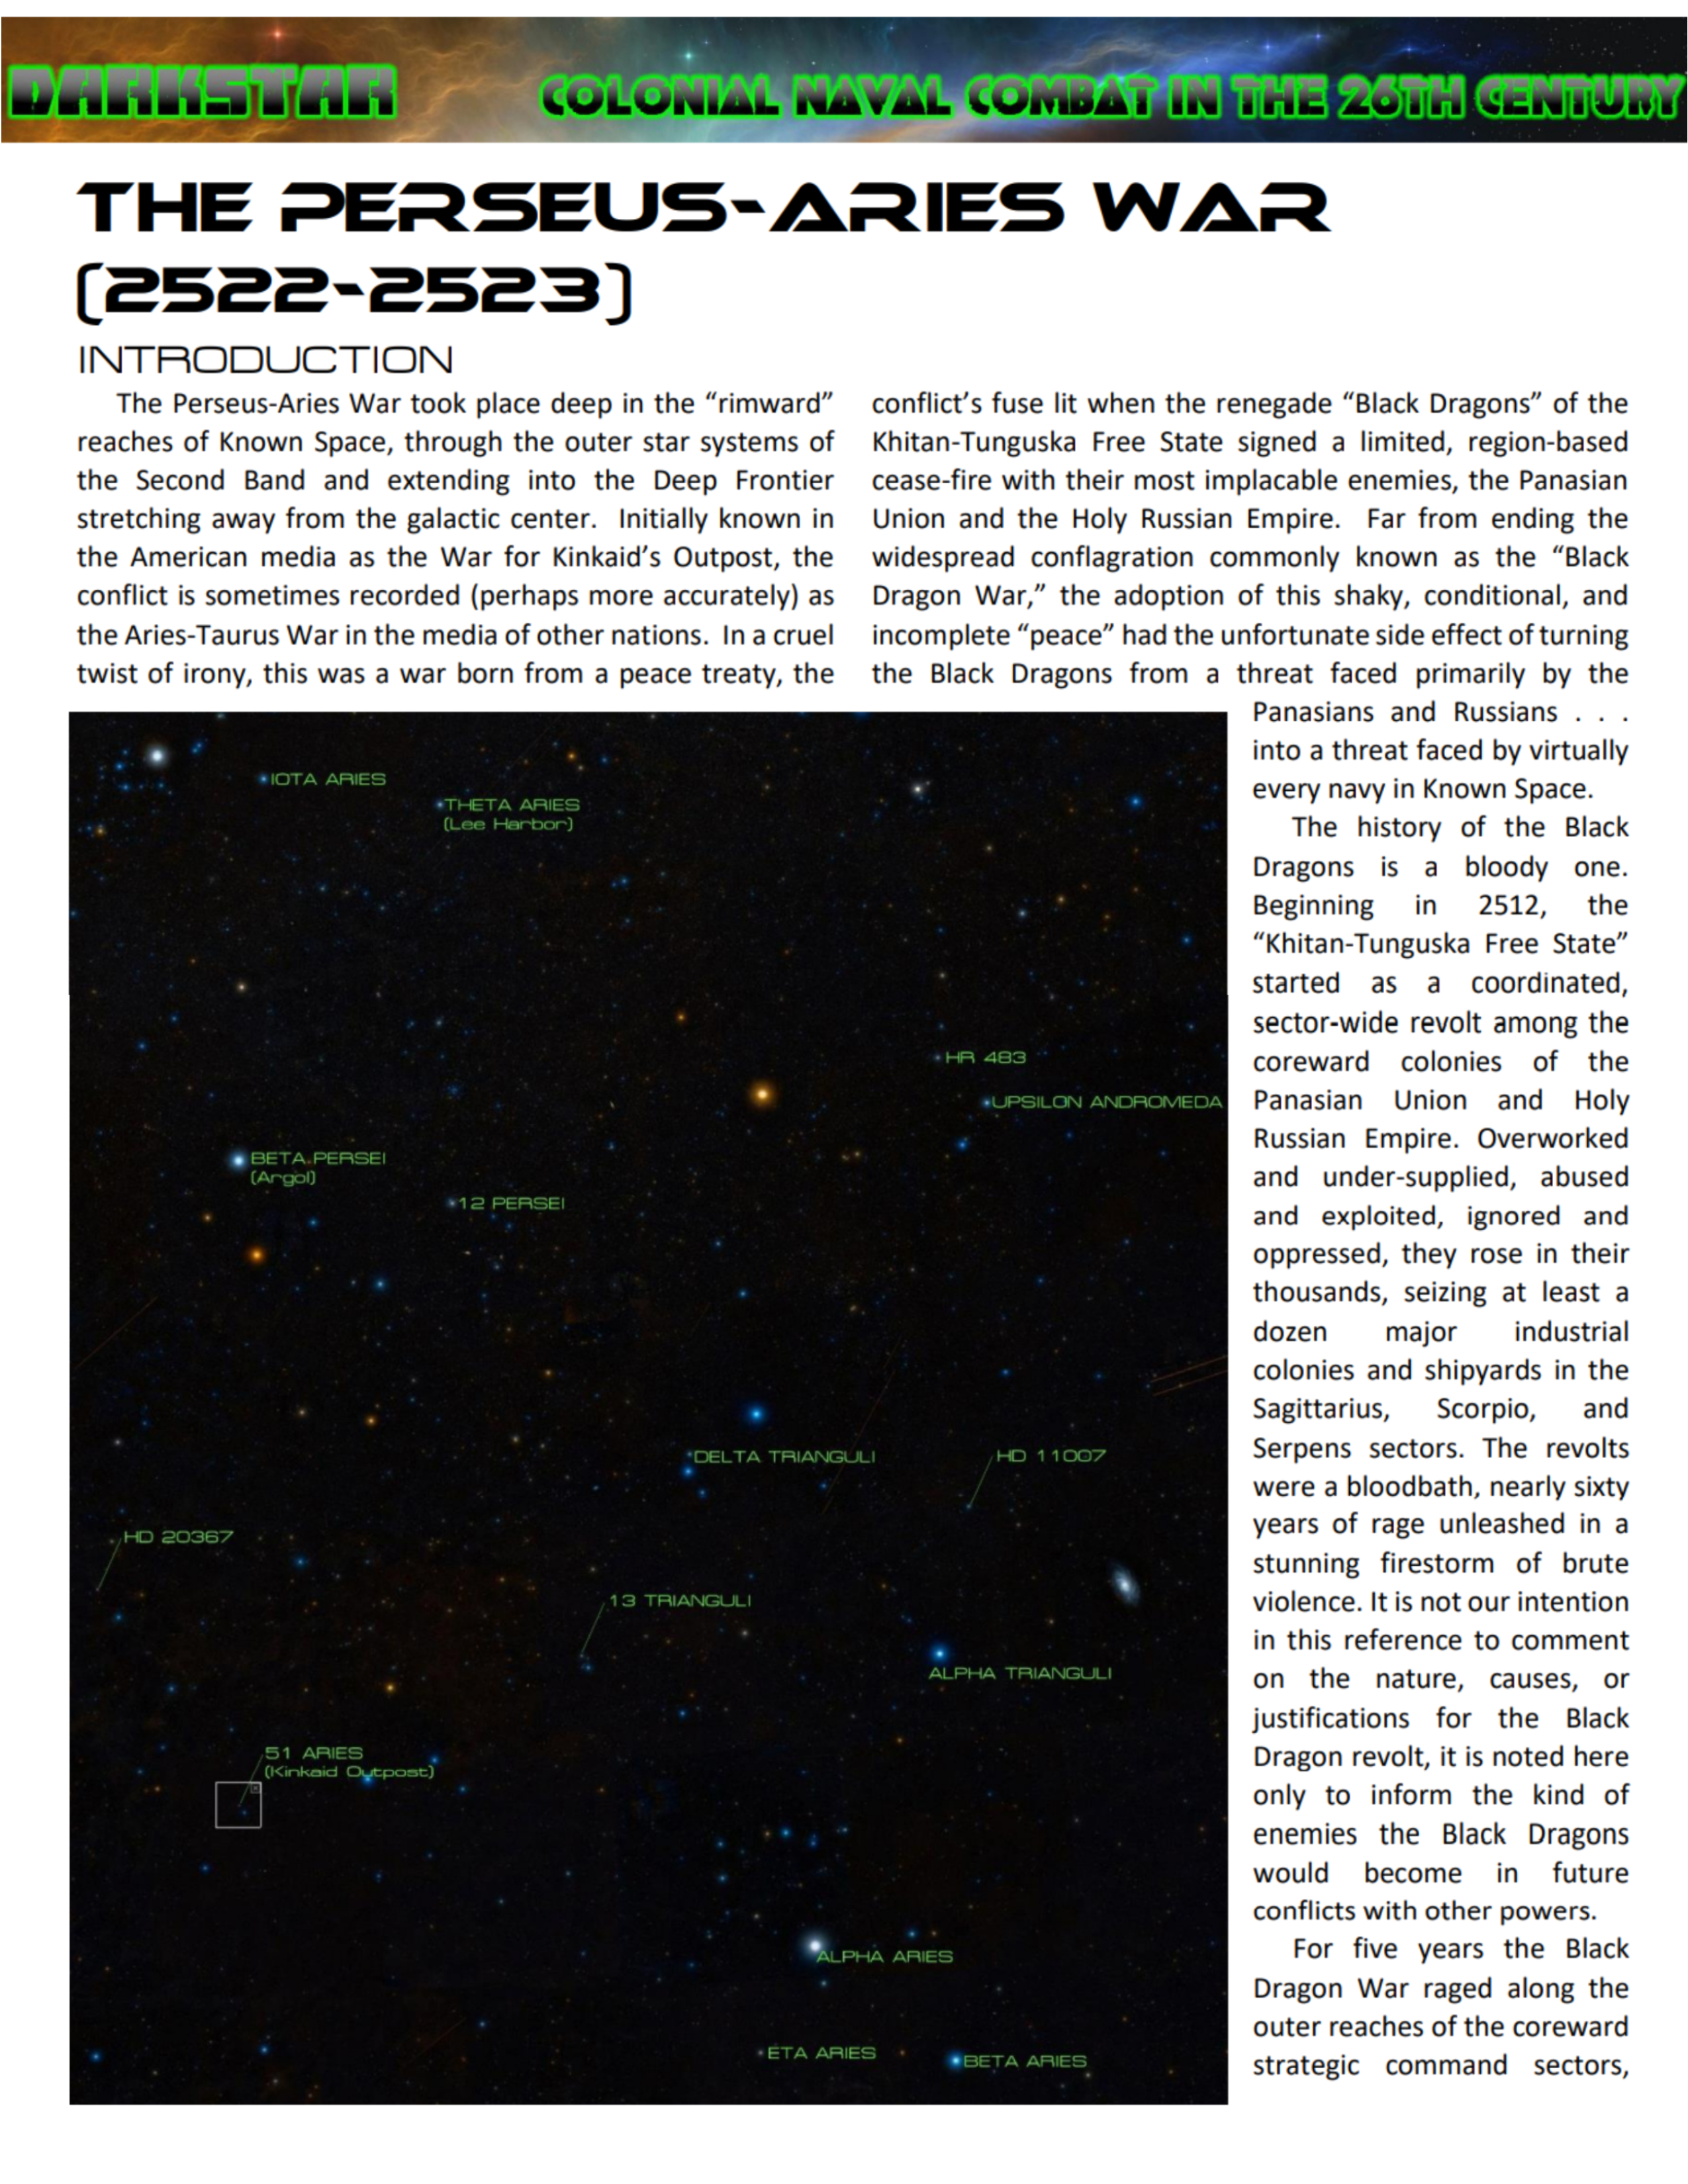
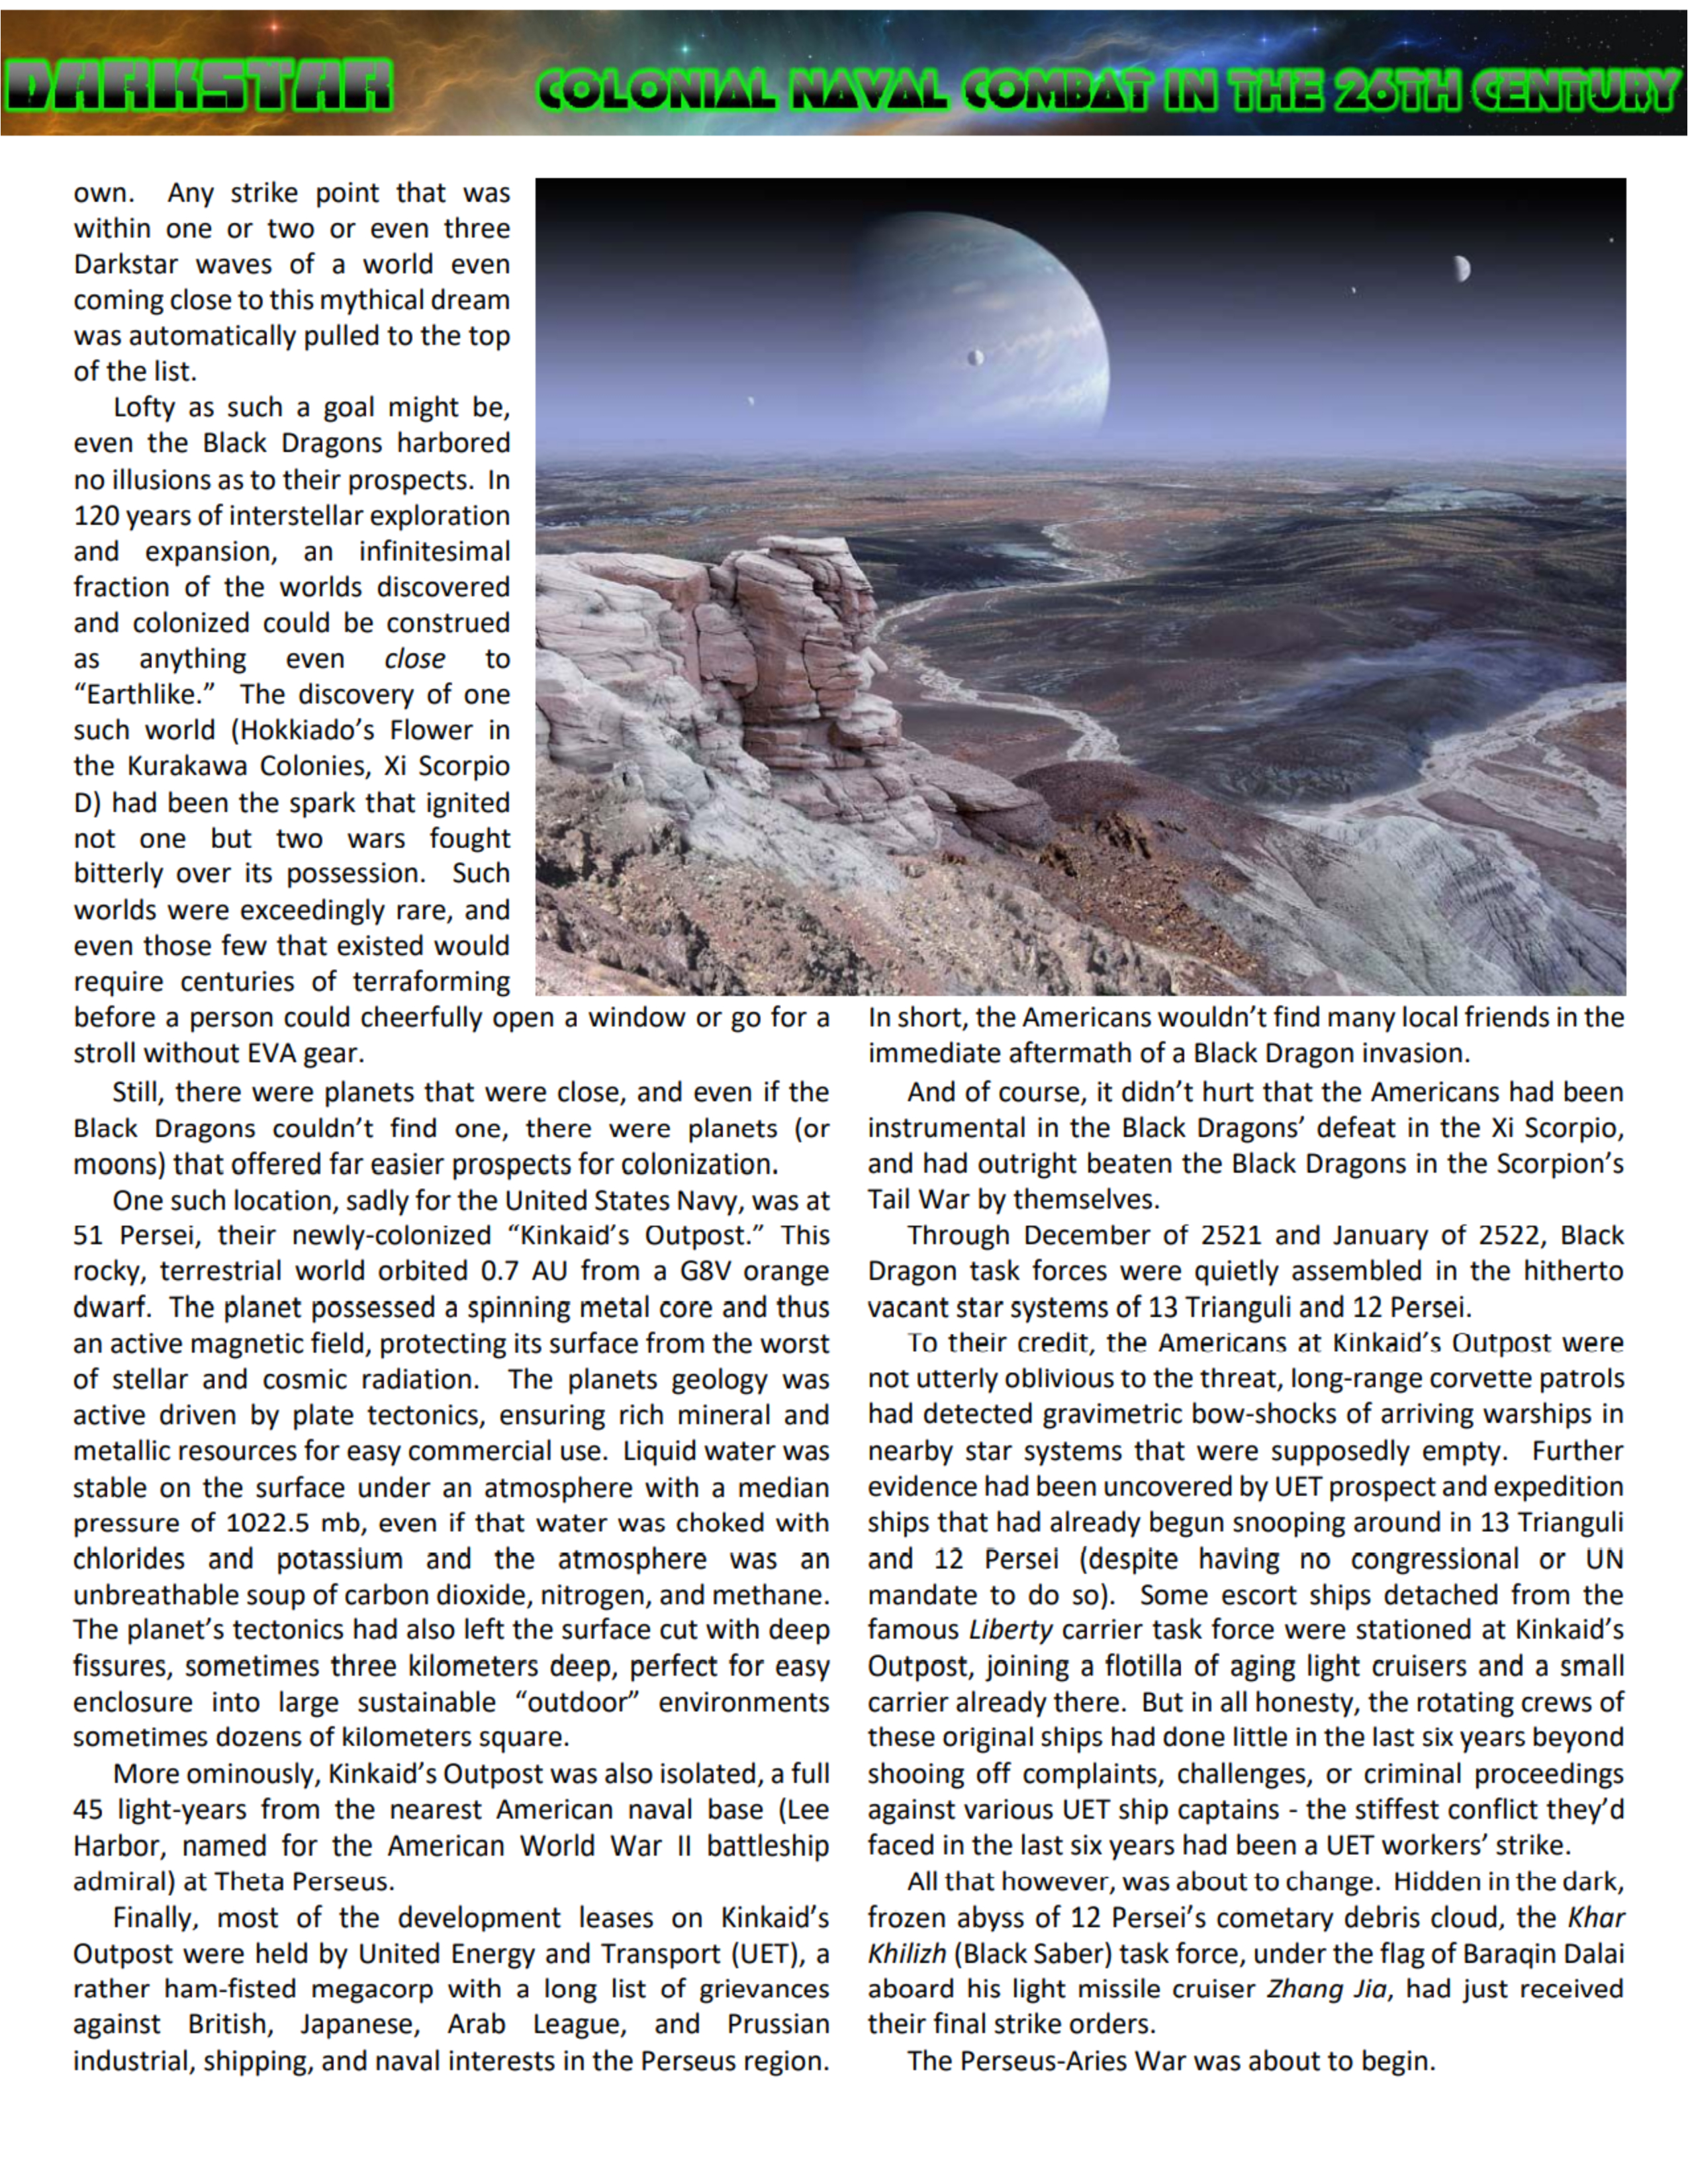
The scene of combat this time is the Perseus-Aries Strategic Command Sector (SCS). Here, colonies belonging to the United States (winning few local friends through the corporate behavior of United Energy and Transport) have come under attack by the “Black Dragons” of the Khitan-Tunguska Free State.
The colony under attack is Kinkaid’s Outpost (51 Aries system), where an American battlegroup was heavily defeated an the light cruiser USS Austin exploded with a tremendous loss of life.
For three weeks, only the rapid-deployment response force “Task Force Oriskany” was able to hold the line in Kinkaid’s Outpost. Immediately, however, overtures were made to nearby British star systems for help.
Through a cigar-smoke shrouded back-room campaign of neo-Victorian shenanigans, the British have agreed to help, which brought Black Dragons into mining their shipping lanes out of Alpha Aries … a system with planets also owned by the Japanese … and when a mine took out a Japanese passenger liner with the loss of 1200 civilians …
Now the Japanese are at war with the British for bringing Black Dragon into the shipping lanes and indirectly causing the loss of many Japanese citizens.
So far we’re six battles in. Mostly Americans vs. Black Dragons, but now a major battle has been fought between Japan and Great Britain as well at Blackwell’s Treasure (Alpha Aries-C … look for a full battle report tomorrow.
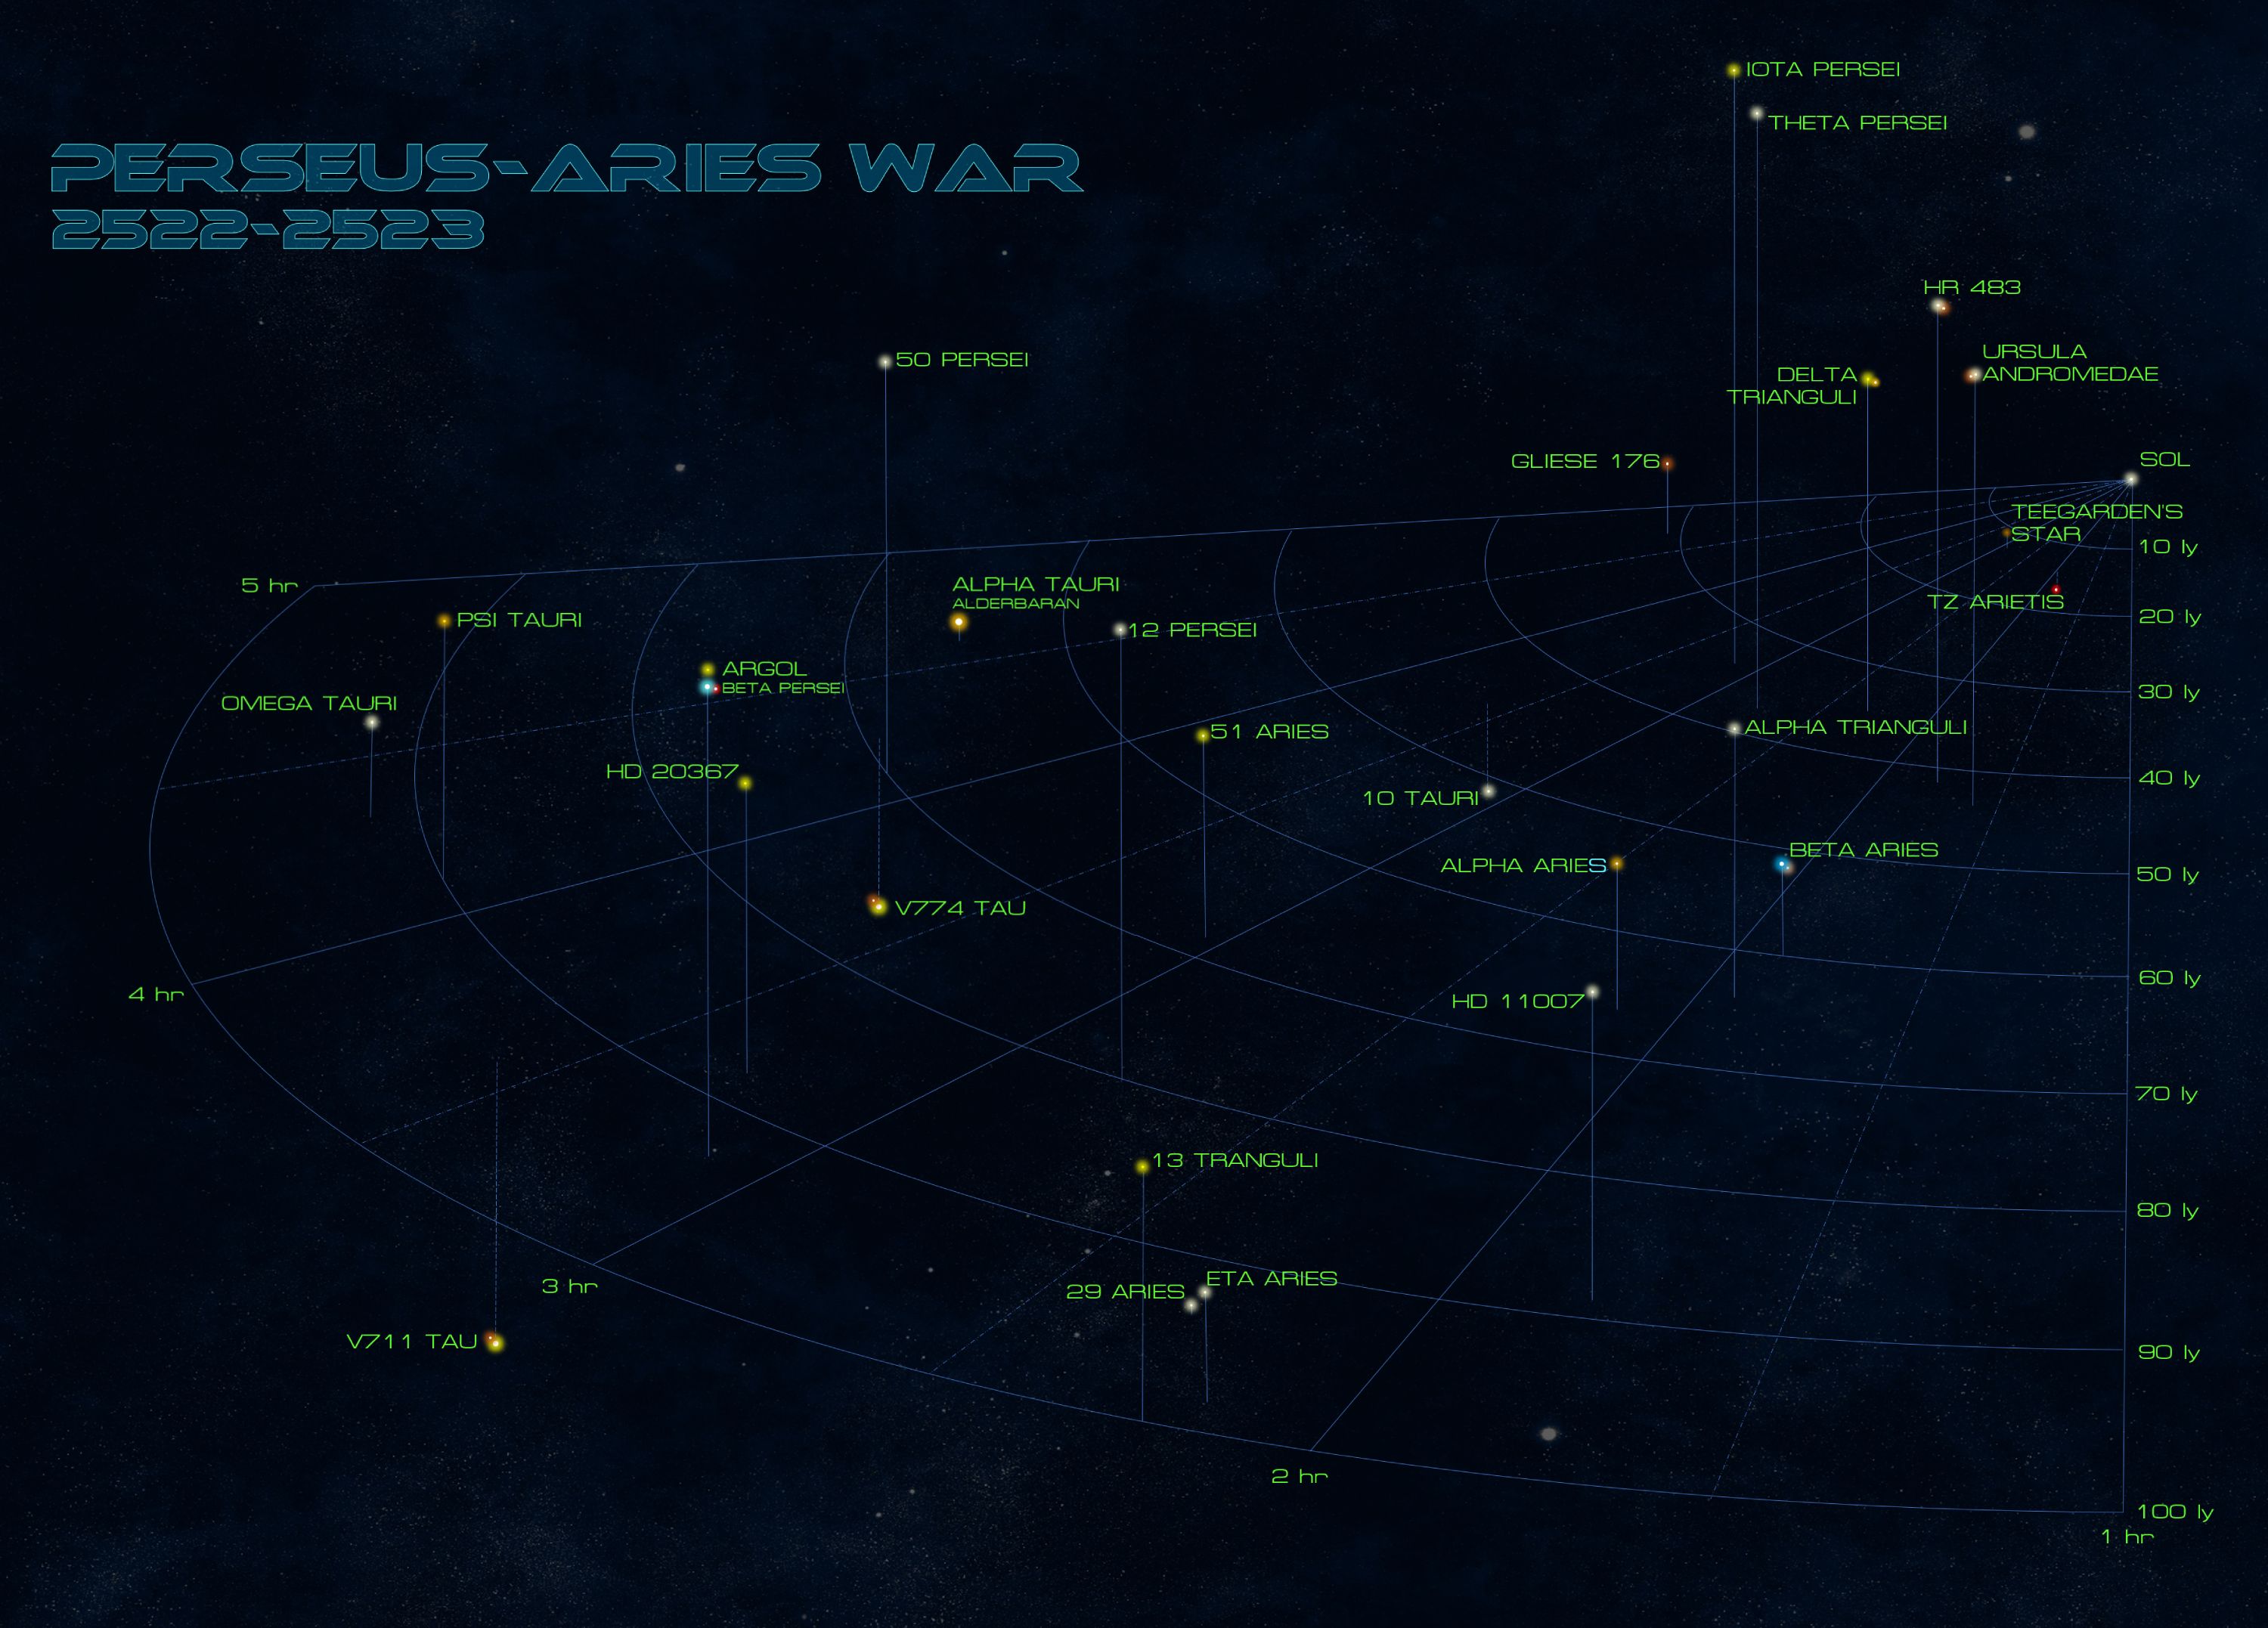
Meanwhile, here is the PDF that lays out in detail the camapign in progress. Included is a map of the real-life stars and their approximate locations, who controls what, and where some of the major battles have taken place so far.
Myself, Ramsu, Damon, and Hegemongary are signed up to particate so far, but more of course are welcome. Factions so far are the United States, Black Dragons, Great Britain, Japan, and the Arab League is about to jump in as well.
The full PDF is below, or the first few pages (lower-res) available for a quick preview.
Hope you like it!
New Campaign Theater Researched, Plotted, and Prepared
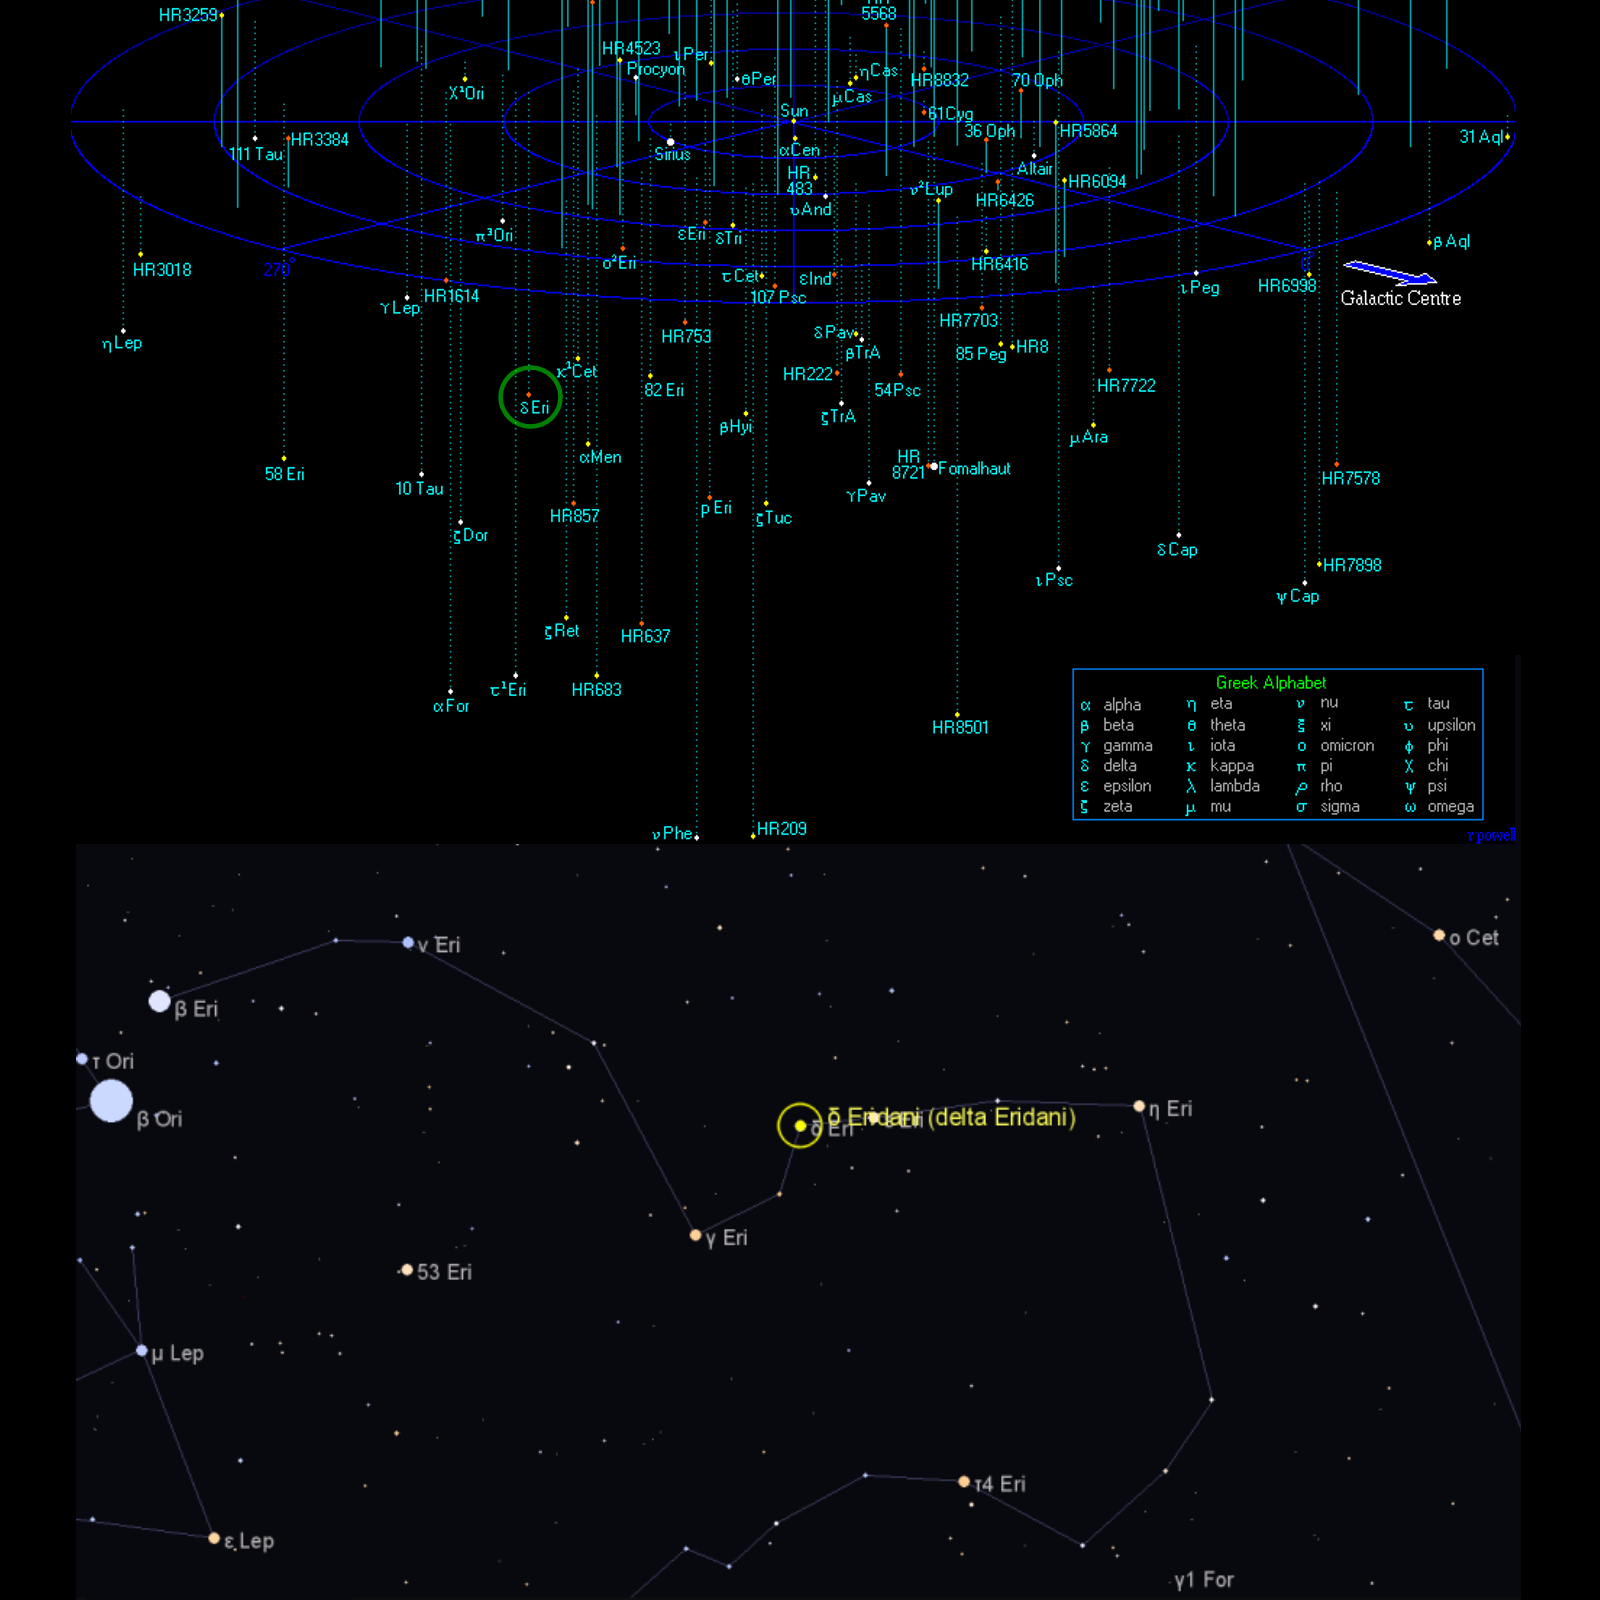
I’ve spent the day plotting declination and right ascension coordinates, color-coding stellar classifications, generally giving myself a headache …
End result is worth it, as I’ve now built up a new campaign area, potentially for the next big area of operations for a future Darkstar campaign / war / narrative.
None of these star systems (actual, albiet approximate locations) have been assigned factions yet … holding off until some people sign up (or don’t, it’s all fine) for a possible camapign.
If nothing else, gives us some new locations for pick-up games.
 Higher-res version available on our Discord. :D
 Battleship Smackdown at Delta Eridani
Once again, the heavens blaze with the fury of hypertech interstellar combat – another Darkstar game is in the books! This time I playtested the new Shahada al-Qadir (Witness of the Almighty) class battleship of the Arab League, recently requested by the Darkstar community and to be fair, it’s been on my “get around to it” list for at least six years. At last this “dreadnought of the star caliphate” is here, and she’s made a helluva splash.
 Today’s game takes place in Delta Eridrani stay system, where a colonial caliphate of the Arab League is under threat from a Japanese invasion force. Spearheading the invasion, a Japanese fast-attack battlecruiser task force has been sent in to find, engage, and crush any Arab League naval forces in high orbit over the sub-earth analog world of Jadzistan (Delta Eridani 12.g), home of the Al Farashan colonies. Once the battle area is secured, the transport group of modified Shimada-class assault destroyers hidden in the star system’s cometary debris halo will Darkstar wave in to Jadzistan and put SNLF Marines onto the surface. The Japanese attack is perhaps a bit rushed, mounted in reprisal for recent cooperative Arab-Black Dragon raids mounted on Japanese colonies along the Hercules Rim. Warnings that there may be an Arab League battleship at Jadzistan are ignored by Japanese naval intelligence.
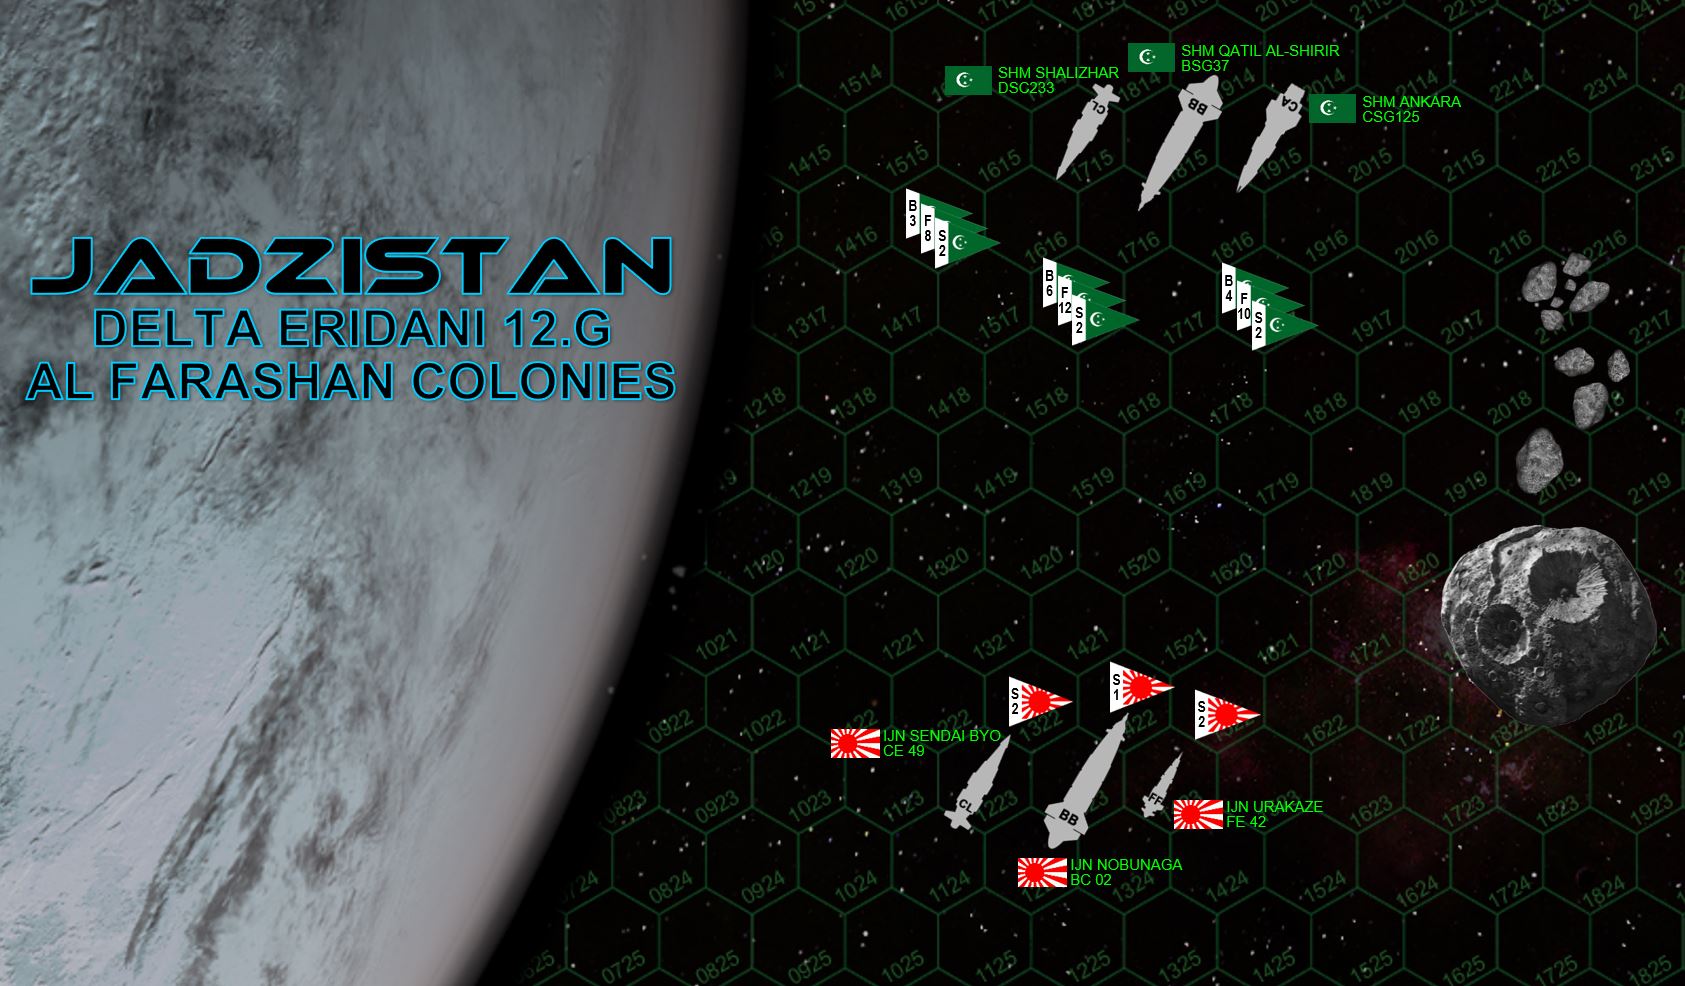 Here is the matchup for today’s game. Once more we have Rasmus’ task force built around his Sengoku-class battlecruiser IJN Nobunaga, escorted by the light cruiser Sendai Byo and the strike frigate Urakaze. The al Farashan caliphate indeed has a battleship defending her, the Qatil al-Shirir (Slayer of the Wicked), escorted by the hybrid heavy cruiser Ankara and the hybrid light cruiser Shalizar. Note these League cruisers carry lighter guns than is typical for their class, but instead carry a small aerospace strike group. Now, with three such strike groups together, we might see a sizable force of League fighters, bombers, and scouts.
 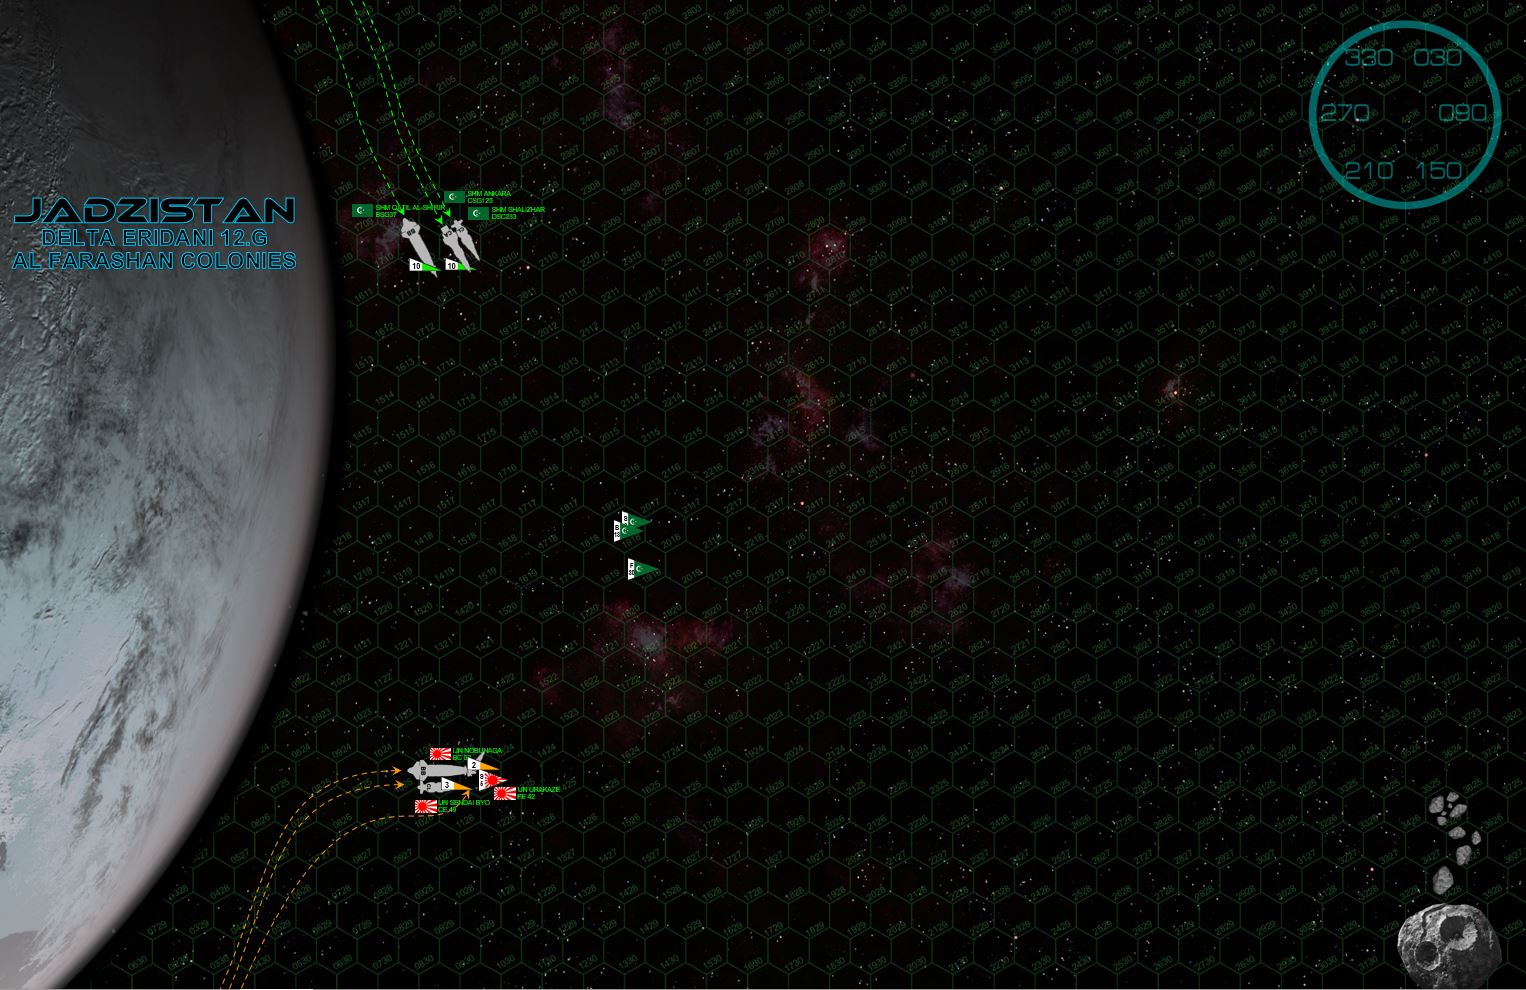 The engagement begins with both forces quickly detecting and vectoring toward each other, meeting over the planet’s dusk terminator. The Arabs would love to pivot to present a broadside, but they approach is still too fast and the Qatil’s maneuverability is no match for the Nobunaga. The Japanese easily make the pivot, presenting a port broadside and opening fire at 2700 kilometers. The heavy cruiser Ankara takes the worst of it, while limited League return fire (only forward guns can come to bear) hit the little Urakaze.
 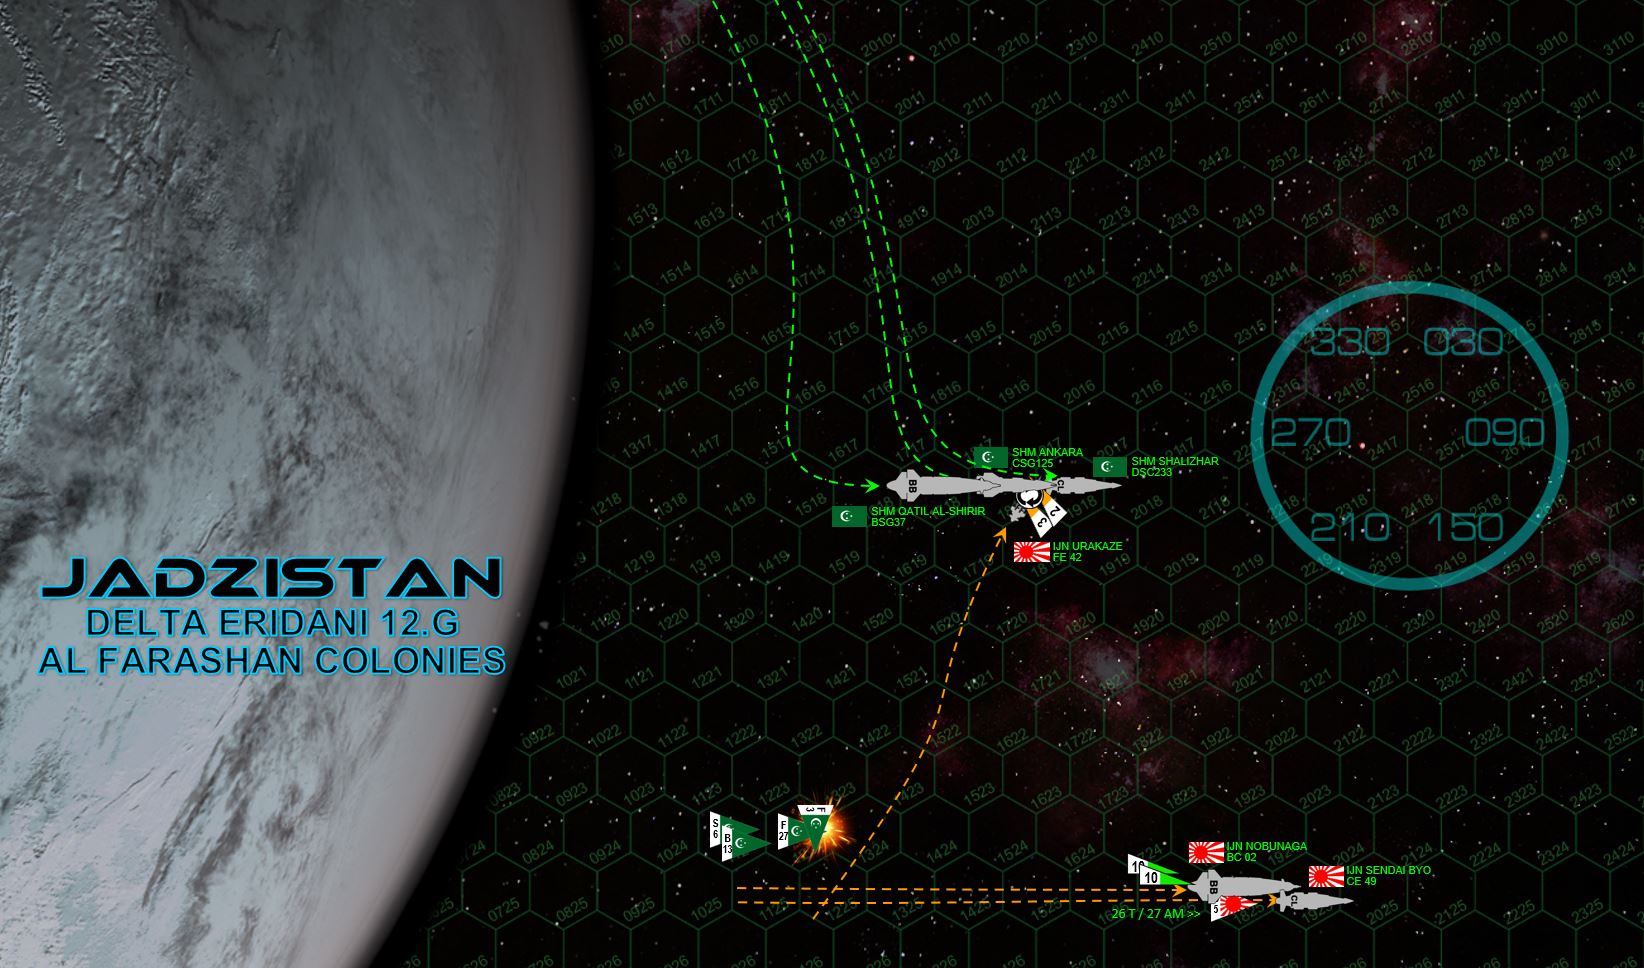 The League task force makes a turn to port (finally) but even now the ponderous Qatil cannot turn and decelerate at the same time. The Japanese could make a decelerated s-turn here and cut behind her fantail, but instead they opt for a medium range broadside. The problem here is that because of their residual approach speed, they’re presenting port quarters (and thus engines and reactors) while the League presents their starboard quarter. Meanwhile, the Urakaze makes a mad run straight at the Ankara. It’s a bold move, and the Ankara is indeed cruelly hammered by all Japanese ships, but for now the reeling heavy cruiser remains (minus torpedo bays and one of her forward EPC turrets, of course). The good news is that the League aerospace strike is largely neutralized, taking enough damage that their "Ahrasyfa" (Storm) Class IV torpedoes don’t do enough damage to disrupt any of Nobunaga’s critical systems. In fact, three of the League’s ““Mylekinir” (Fire Angel) fighters are shot down before they can even launch missiles. One problem is again Qatir’s maneuverability, even now she can’t swing her stern around to get a broadside on the Japanese or launch her aft torpedo array.
 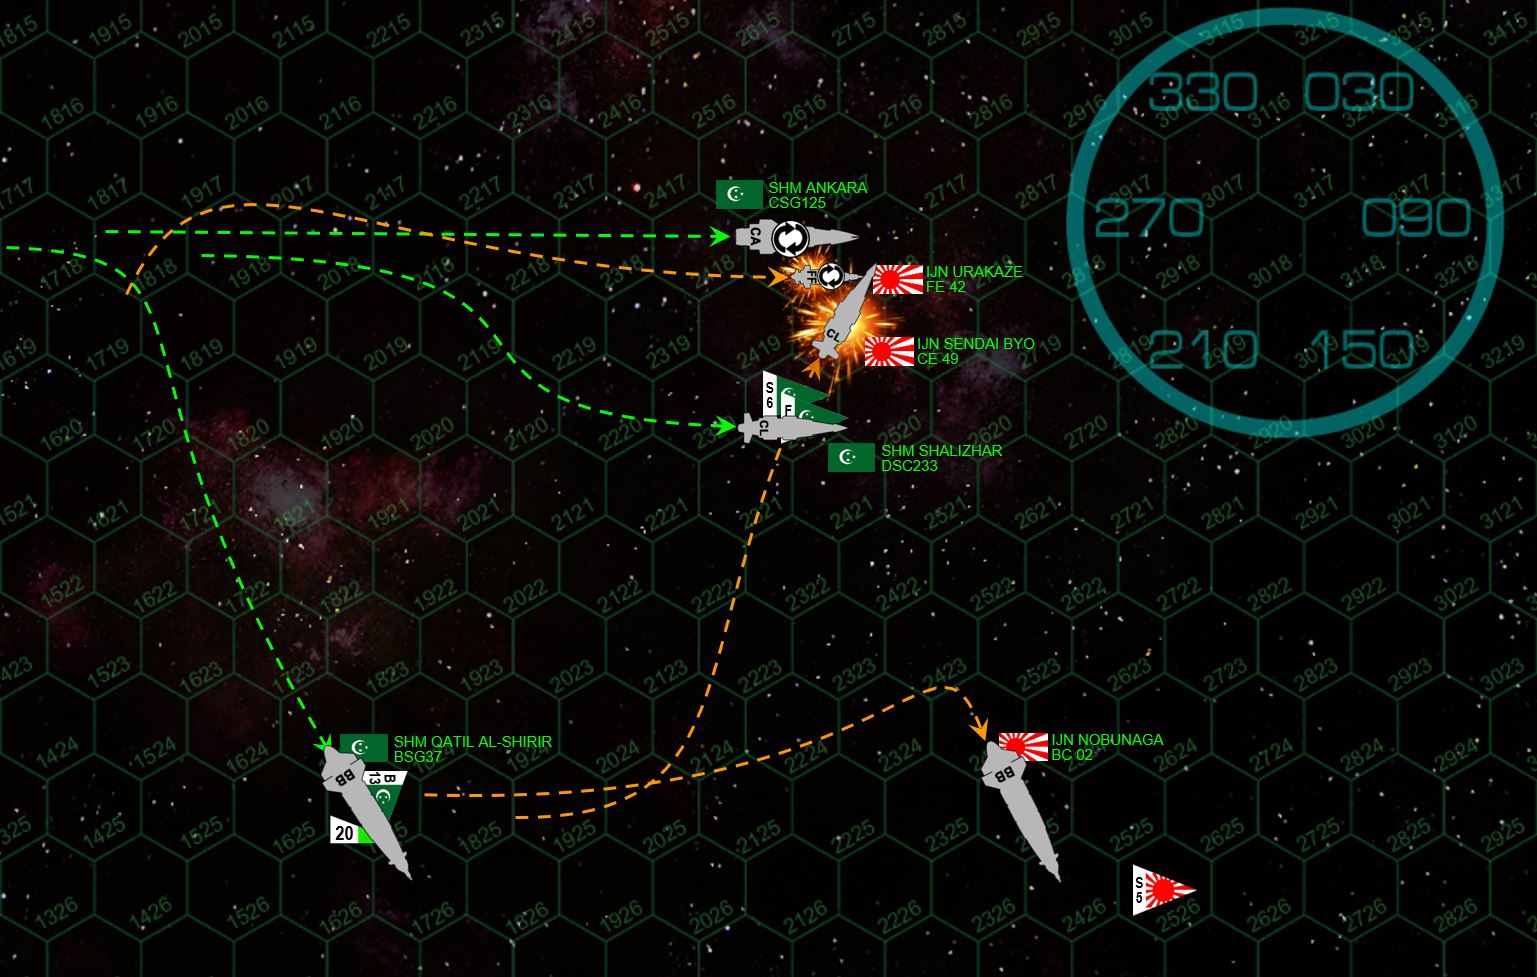 The tide turns. As the Qatil finally manages to slow down and recover the task force’s bombers (they are JUST close enough to do so in a single turn), the Japanese fleet divides. Sendai and Urakaze streak up to again hit the Ankara’s bow (but the heavy cruiser has rolled on her back to protect her starboard bow), but the Ankara and Shalizar have crossed the stern of the Nobunaga. In fact, the Urakaze and Sendai Byo are cut off, caught between the two League cruisers. It’s a brutal exchange of point-blank gunnery, the two battleships all but forgotten as the cruisers eat each other alive. Even the League fighters make a desperate strafing run, only for ten more of them to be shot out of the sky by Nobunaga’s longed-ranged mass driver support. The Sendai Byo is crippled, the League actually lifting fire so she does not explode. This isn’t just “chivalry of the stars,” note how many League fighters, scouts, and warships would be in the blast wave of such a titanic detonation. The Urakaze also goes down, despite having her bridge AND forward magazines knocked out and then brought back online by her valiant crew. The one ray of hope for the Japanese (besides that slaughtered squadron of fighters) is the heavy cruiser Ankara, AGAIN hammered by a blistering salvo … but somehow, she remains operational.
  As the Sendai Byo and Urakaze spin off into space, the vengeful Nobunaga makes a turn to port, presents a broadside, and blows the front HALF of the Ankara practically off the keel. The bridge is horribly damaged, the magazine goes up, all forward weapons are lost, shields are down, three sensor suites are lost, maneuvering thrusters are hit, hangars are gone and casualties are … in a word … horrific. The captain never even asks permission, Ankara hits full flank speed and makes best speed out of the battle area. Meanwhile, the Qatil has FINALLY managed to get her speed under control where she can actually start to make normal maneuver turns (she’s about to careen off the map), her broadside is right across the Nobunaga’s stern but distance, inferior sensors, and upgraded Japanese shielding dampen the effect of her guns. Her bomber bays, however, are busily turning around another strike of “Demkikham” (Vengeance) bombers. The Shalizar’s broadside is perhaps more effect, having cut closer to the Japanese battlecruiser but taking a hammering from her aft batteries for her trouble. Another torpedo strike has now hit the Nobunaga, meanwhile, only steadily chipping away at the battlecruiser’s massive stern, engineering spaces, and powerful shielding.
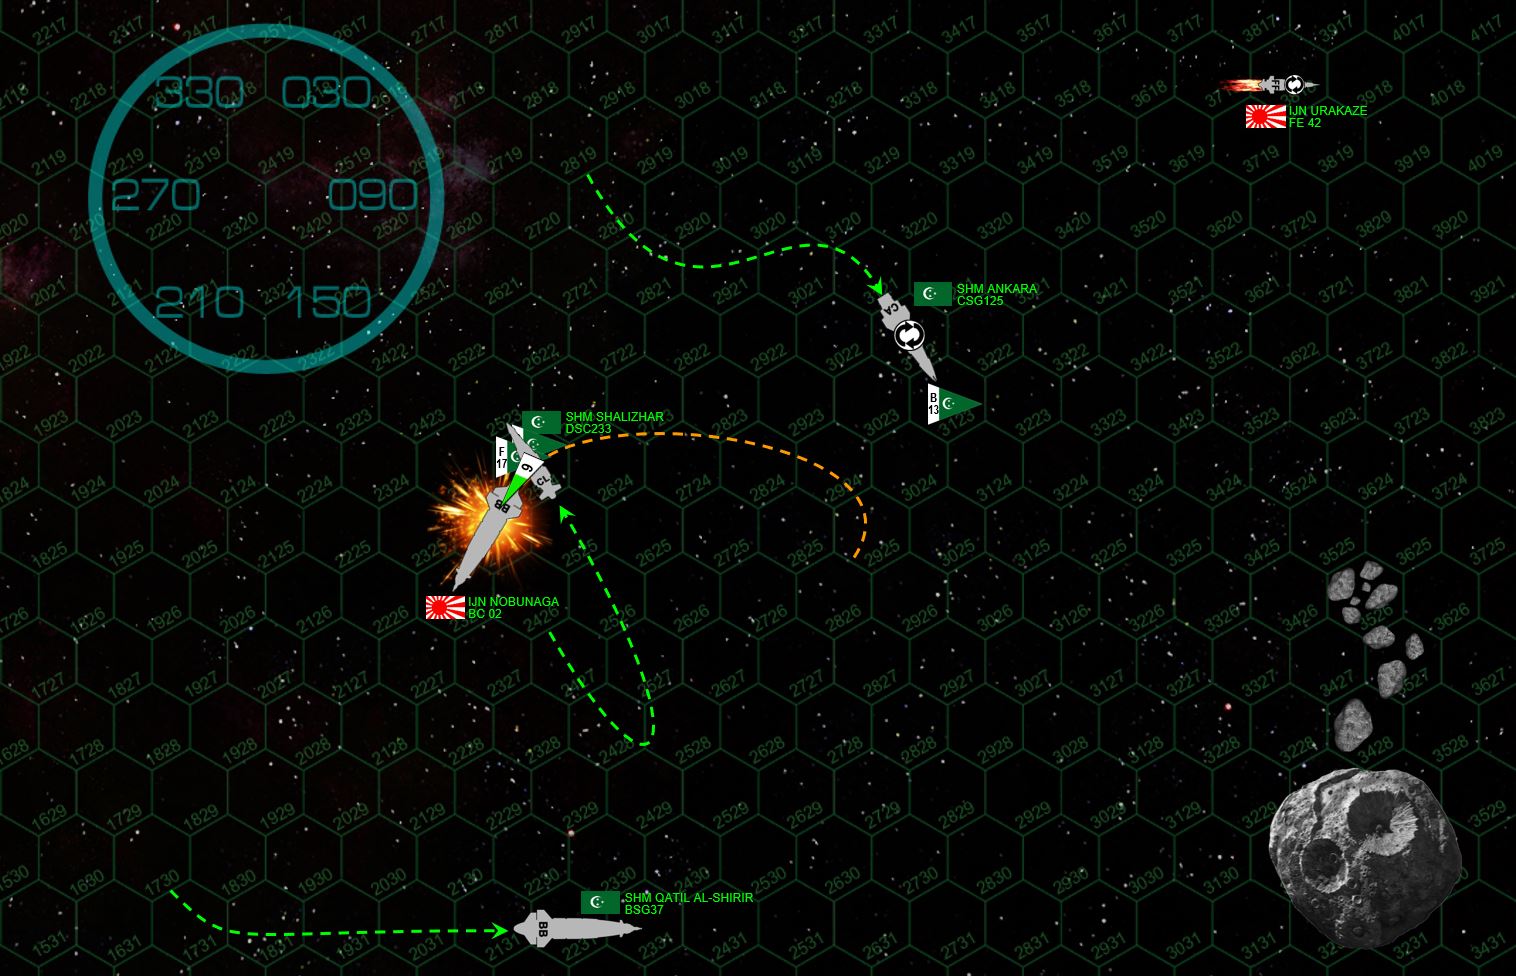 Finally, the end comes. Qatil re-launches her wing of “Demkikham” bombers, along the very last of her forward torpedoes. The Shalizar cuts RIGHT behind the Nobunaga to assist what the League hopes will be the coup de grace … but the point-blank fire of Nobunaga’s aft EPCs and especially plasma projectors all but burns the Shalizar in half. Yet Shalizar has also just fired, and at less than 200 kilometers, her guns can hardly miss. The EPCs and lasers of the Shalizar cut deep, along with the aerospace torpedoes, warships torpedoes, and even strafing of the bloodied “Fire Angel” fighters. The Shalizar takes horrific internal damage, fully 40% of her crew is killed or wounded, and immediately raises maximum speed out of the battle area. For just an instant, the two battleships are alone. But decompressions and explosions within the Nobunaga leave her crippled and adrift as well, and this rather savage fight is finally over.
 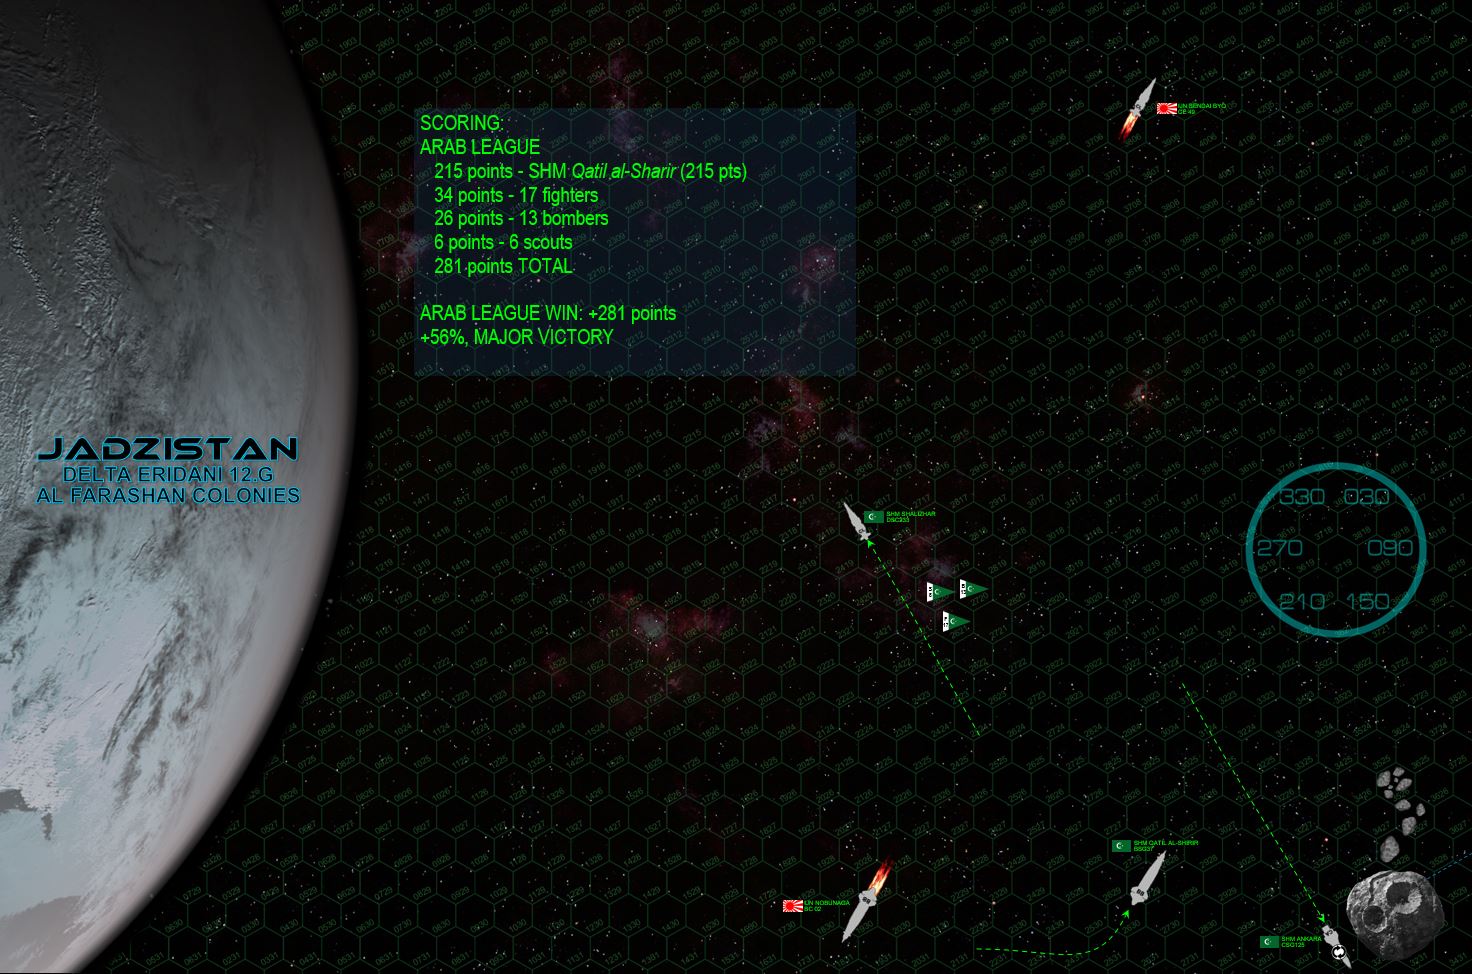 This game was scored as an “Assault” (judged by points LEFT STANDING on the table rather than what was damaged or destroyed). I’m not gonna lie, the Arab League has won this one pretty handily. Although the Qatil al-Shirir (Slayer of the Wicked) has been damaged along her port side, no critical systems are hit and she remains on station to support at least most of the surviving aerospace craft. In hindsight, I probably shouldn’t have put a battlecruiser up against so many aerospace craft with no aerospace cover of its own (we all know how that goes, sci-fi or historical). The good news that Rasmus has finally accrued enough campaign points to unlock the “Fleet Command” campaign upgrade, allowing him to greatly expand his battlecruiser’s escort force to include torpedo-heavy corvettes and especially light carriers. Next time fighters and bombers start flying at the Nobunaga, they’ll get even more of a hot reception.
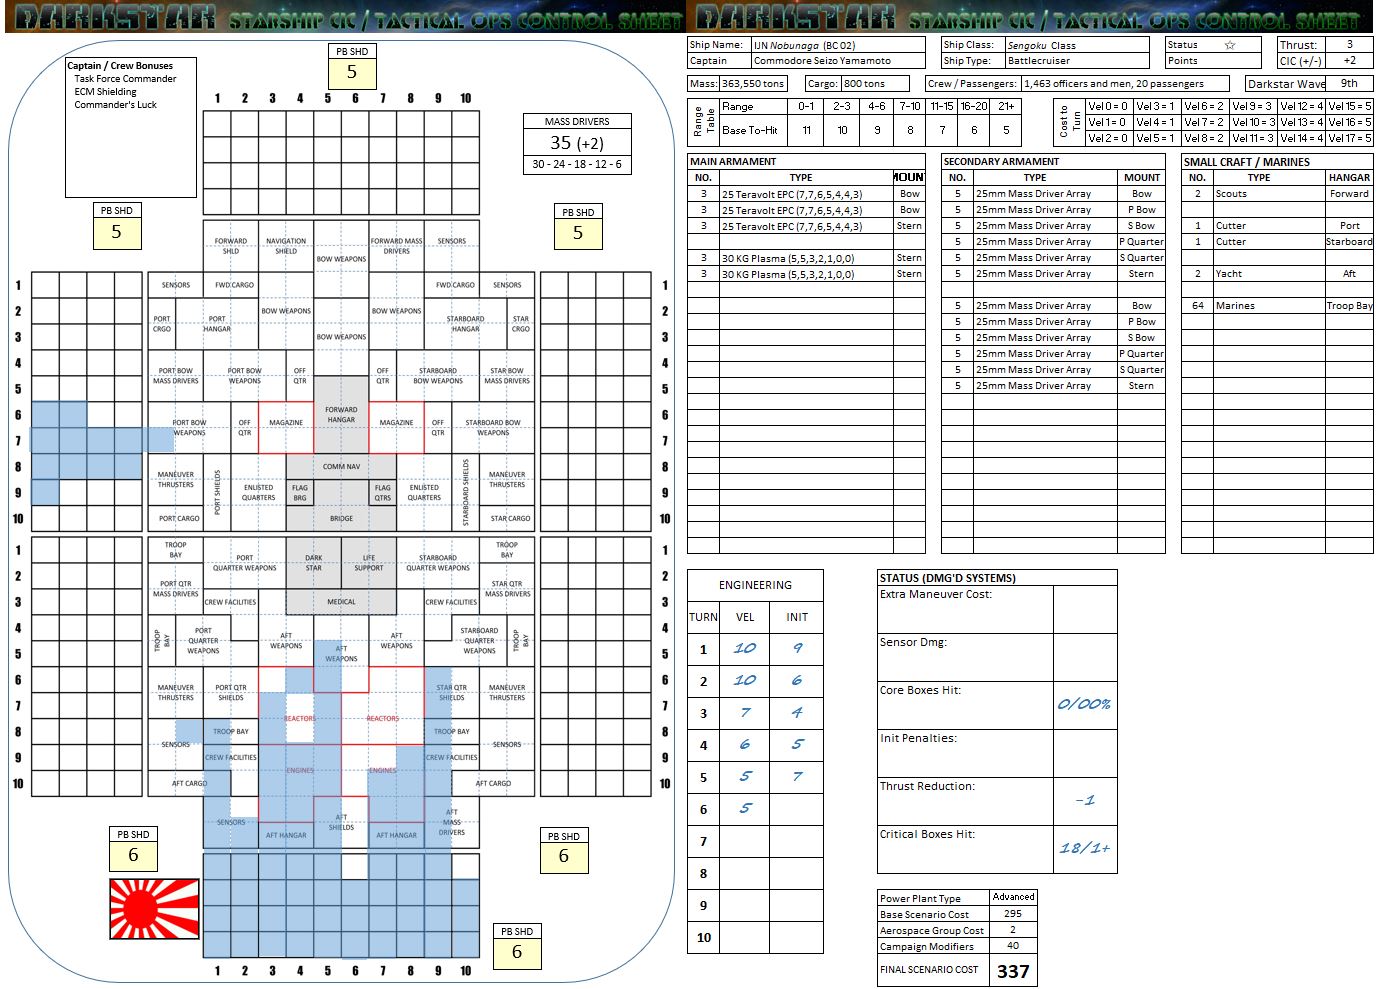 The WRS (warship record sheet) of the Japanese battlecruiser Nabunaga. It’s just too much torpedo damage, which couldn’t knock her out, but opened up the armor so the valiant stern-rake of the Shalizar could close down Nobunaga’s lights. It’s a brutal tactic, and costs plenty … but if it trades the League a light cruiser for a battle cruiser … I’ll take it.
 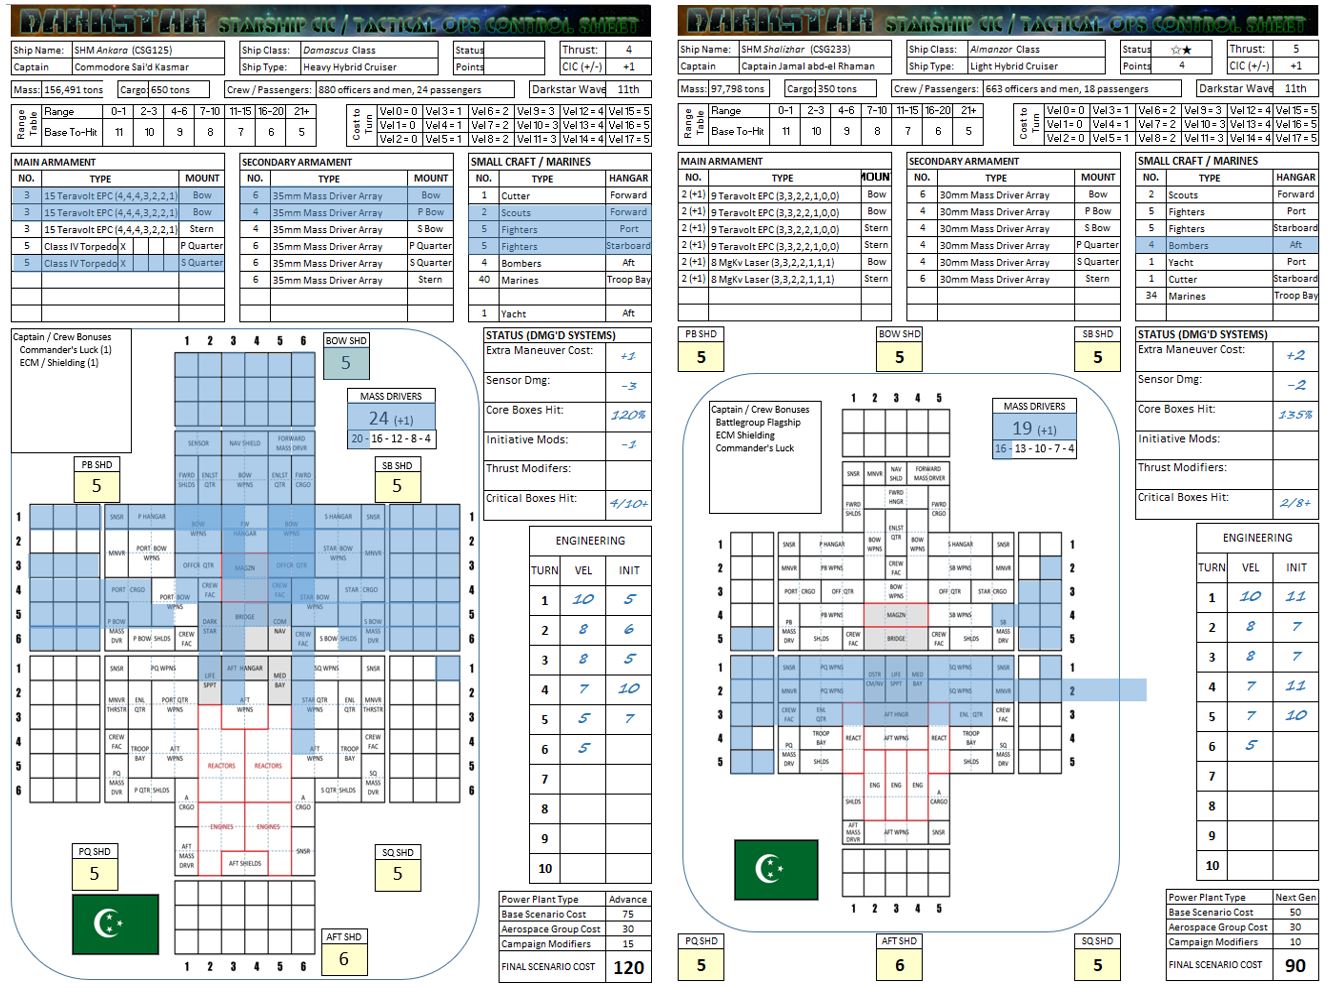 Speaking of brutal, the horrific hammering of the Ankara is plainly evident. Note how she took heavy damage on three sides, bow, port bow, and starboard bow. This is the ship’s captain maneuvering to present new armor and shields to the enemy with each successive salve (when possible). This means the Japanese had to give Ankara “the business” no less than three times, time when those guns were desperately needed elsewhere. Conversely, note the Shalizar, all but burned IN HALF with a single EPC / plasma salvo from the Nobunaga … and this was only aft guns. ALL aft core boxes have been marked off, Darkstar Drive, Life Support, Med Bay, Aft Hangar, meaning that … yeah, Shalizar’s crew took hellish losses on this one.
 New Warship Class Reported: Arab League "Shahada al-Qadir" (Witness of the Almighty) Hybrid Battleship
The Shahada al-Qadir (Witness of the Almighty) is the latest battleship class being produced by the larger shipyards in the Arab League and associated colonial caliphates. They are the largest warships ever built by the League, even if they are somewhat light compared to other battleship designs in peer navies. They are in many ways classic examples of League Navy design and construction, keeping many of the quintessential features of the League’s warships, even if such features make the Shahada class quite unusual among dreadnoughts of the Ten Powers.
As flagships of the League Navy, the Shahada battleships are dedicated command and control platforms, with extended passenger accomodations, CIC suites, and hangar bays for additional “admiral’s elbow room.” Such design features are fairly typical for a battleship, what is not so typical is the Darkstar drive capable of hurling her 396,000-ton bulk into a 10th magnitude distortion wave. Most battleships manage only a 9th (or even just an 8th) magnitude wave, making the Shahada one of the faster FTL battleships in Known Space. Such faster Darkstar drives are common in the League Navy, of course. As one of the last powers to make the leap into interstellar space, the Arab caliphates found most of the easier, closer colonization sites already claimed and so had to venture further to stake their national claim. Today, this legacy manifests itself by making the League Navy the overall fastest, longest-ranged, and most agile superluminal battlefleet in Known Space, and the Shahada battleships are no exception.
The Shahada is also something of a hybrid class, a battleship carrying not only heavy guns but also a respectable aerospace strike group and impressive torpedo load. In her normal strike group configuation, a Shahada carries two “Alnazir” (Beholder) scouts, twelve “Mylekinir” (Fire Angel) fighters, and six “Demkikam” (Vengeance) bombers. This load is only slightly less than a typical light fleet carrier, but due to the expanded launch bays and hangar facilities, a Shahada can launch all of these at once. The Shahada also carries a withering twenty-tube torpedo array, mounting the “Ahrasyfa” (Storm) Class IV warhead. Simulations and early engagements have shown that when used in conjunction with the aerospace strike group, this complete strike package can threaten almost any warship in Known Space.
For her main armament, the Shahada carries five triple turrets of 25-teravolt EPCs, opting for more turrets and more barrels of a slightly smaller gun, rather than huge cannonades as we see in the Colorado, Tirpitz, Yamato, and Qin Shuhangi classes. Three turrets are carried forward (two dorsal, one ventral), and two aft (one dorsal, one ventral), ensuring coverage on all quarters. Also note the torpedos are arranged fore and aft in a “broadside” configuation, common among many battleship and heavy cruiser designs that incorporate gravitic torpedoes in the weapons array. At least in this sense, the Shahada is a classic battleship design, her weapons loadout arrayed for maximum broadside output.
One curious omission is the complete lack of any secondary batteries. Indeed, except for the torpedoes, the Shahada carries only mass drivers as secondary weapons, and even this battery is somewhat light compared to other classes. This lack of a secondary gun battery – combined with somewhat mediocre mass driver defense and front-loaded main battery layout – makes the Shahada abnormally vulnerable astern. True, all battleships are somewhat vunerable from astern, and all battleships rely heavily on an escort fleet of cruisers and destroyers, but with the Shahada this drawback is somewhat more pronounced.
Also, however fast she may be in FTL, at sublight cruising and engagement speeds, a Shahada’s thrust-to-weight ratio is nothing special. A Shahada’s maneuver envelopes and accelleration curves are comparable only to heavier ships with much more firepower, and when compared to battleships of her own weight, she’s downlight sluggish. This isn’t a problem with her advanced power plant, it’s a concession made to the power demands of her Darkstar drive and aerospace hangars, launch bays, workshops, and associated support systems.
The Shahada al-Qadir is definitely an unusual battleship, and requires an unusual commander that can make the most of her uncommon strengths and also minimize her drawbacks. As a “jack of all trades,” she’s the “master of none” – clearly designed to be part of a battlefleet of other vessels. So far this doctrine seems to be working, with the class racking up impressive records against Japanese and Black Dragon opponents.
So far nine ships of the class are confirmed:
- Shahada al-Qadir (Witness of the Almighy)
- Rasul al-Allah (Messenger of God)
- Sayf al-Iktikham (Sword of Reprisal)
- Ayn al-Saalihin (Eye of the Righteous)
- Kalimat al-Nabii (Word of the Prophet)
- Abd al-Adl (Servant of the Just)
- Qatil al-Shiriyr (Slayer of the Wicked)
- Sayf al-Iman (Faithful Sword)
- Idrab Rahim (Merciful Strike)

New Warship Class Reported: Japanese Ransu Class (I-360 series) Torpedo Corvette
The Ransu (“Lance”) I-360 class torpedo corvette is a cutting-edge design emerging in recent years from smaller Japanese naval shipyards. A long-overdue replacement for the aging I-300 Umiyari (“Sea Spear”) series, the Ransu seems to be almost an overcompensation, an “apology” to the officers and crews of the Japanese corvette flotillas for their decades-obsolete I-300s. Other analysts speculate that the Japanese Navy plans to build these new corvettes by the dozen, far into the 2530s and 40s (much like they did with the I-300s) and are thus banking against the passage of time with a “leapfrog” step-up in technology. Only time will tell if the Imperial Navy will drive the Ransu class “into the grave” like they did with the Umiyaris.
The Ransu is, quite simply, the most advanced corvette design in Known Space. A single I-360 costs a third more than a K-56 of the Holy Russian Empire. Other “top tier” torpedo corvette designs like the American Mako class, Prussian Type XII class, and Roman Drusus class trail at least 5-10 years behind in terms of power generation … and thus combat, defensive, and targeting systems. The weapons suite is built around the dreaded Ki-45 “Toryu” (Dragon Slayer) torpedo, mounted in two quadruple racks on either side of the dagger-sharp hull. These are very large torpedo banks, making the Ransu also the largest torpedo corvette in Known Space at the time of this writing, tipping the scales at just under 14,000 tons, edging out even the hulking Russian K-56. The Ransu also costs more than most frigates twice their mass.
These torpedoes are guided by the trademark Japanese “Seiku” (Clear Sky) targeting and fire control system, one of the best in any Navy, especially daunting when one considers eight “Dragon Slayers” streaking toward a target. Even Consortium corvettes, while faster and carrying the comparable “Sparta XII” torpedo, don’t carry said warheads in similar numbers. In the words of the IJN press release, the Ransu is the ship to “make our enemies fear the Dragon Slayer again.”
Indeed, in many battles through the 2510s-20s, what was once one of the Imperial Navy’s most fearsome weapons largely became a non-issue once opposing navies developed simple, effective countertactics. By keeping even a few ships together for mutual mass driver support, Ki-45s just weren’t getting through to hit their targets. Sure, the Ki-45 can penetrate enemy shielding, especially with the “Seiku” firecontrol system, and did tremendous damage once an impact was scored. But in no less than seventeen engagements, not a single Ki-45 hit was recorded, especially as the Navy started moving toward torpedo-less designs like the Katana heavy cruisers and Sengoku battlecruisers.
The Rensu is part of an effort to redress that. A wolfpack of two or three of these corvettes is a nightmare for any captain not commanding a battleship. Of course, the pricetag of the Rensu (and the relatively small number of units so far produced) means such wolfpacks will be rare, but a chilling threat nonetheless.
If the Rensu can be said to have a weakness (besides its cost), its flank shielding is weak compared to many of its competitors. Admittedly bow shielding is very strong (rivalling even the Prussian Type XII), but mass driver defense is also poor, with only double-mounded 20mm and a single triple mount covering the stern. While not as vulnerable as a Corporate Twilight or Eclipse class, the Rensu might be something of a glass cannon, especially considering its cost.
Still, the Ransu presents a deadly new threat to those who stand against the Imperial Chrysanthemum. Rumors of an even larger, more advanced, and more expensive “I-400” class torpedo attack craft … perhaps edging into the “frigate scale” of warship hull … remain unconfirmed.
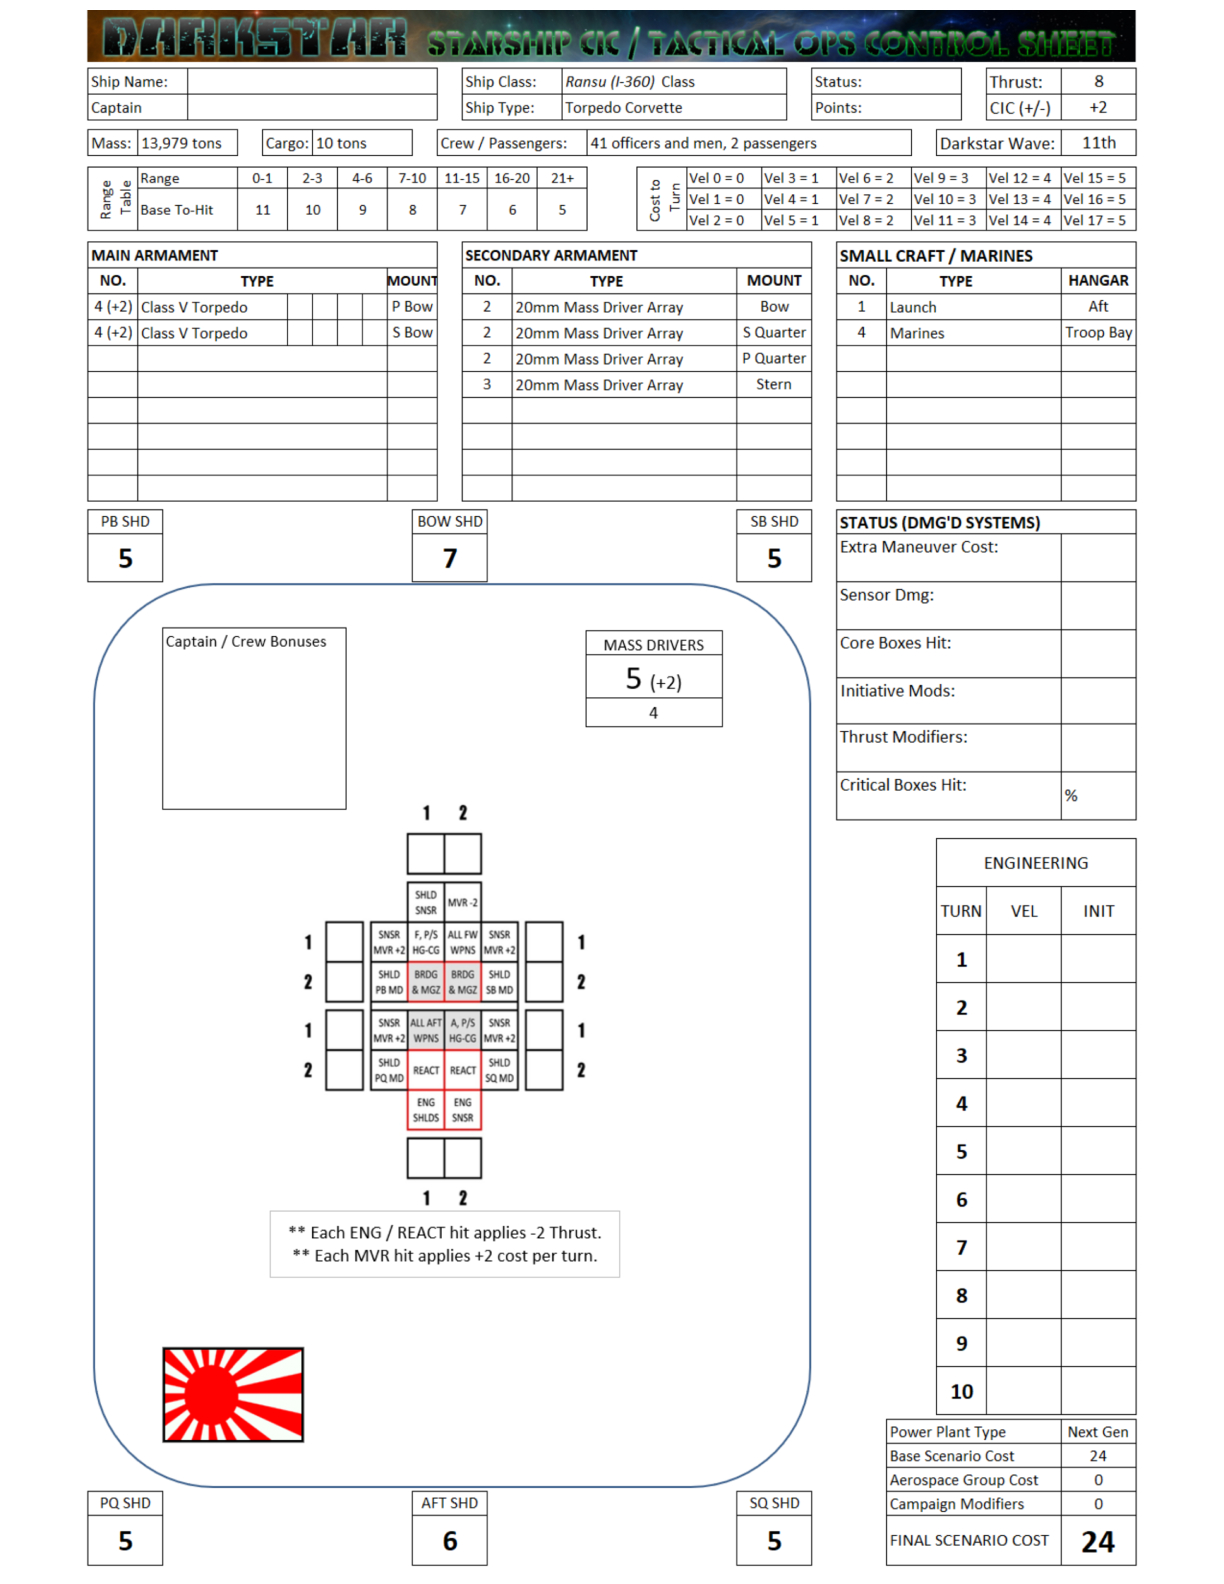


![StarCraft Tabletop Miniatures Game Pre-Orders Live Now [Updated]](https://images.beastsofwar.com/2026/03/starcraft-tmg-news-cover-600-338.jpg)


