


![NO Weekender Or Cult Of Games XLBS This Weekend [Updated]](https://images.beastsofwar.com/2026/03/No_Weekender_and_XLBS_this_Weekend-225-127.jpg)


Persei-Aries War – Oriskany v. Rasmus


Recommendations: 1418
About the Project
After racking up 127 entries, 3500+ recommendations, and 600+ comments, the original Darkstar project thread was getting a little unwieldy. So I'm starting a new one, featuring a new campaign for interested players in the OTT community and beyond. So far we have five players, but there's always room for more!
Ever wonder if you had what it took to command fleet of starships in tactical combat? Darkstar offers that challenge to the hard-core wargamer, with a "Newtonian Physics" movement system, rules for astrophysical objects and phenomena, gravity, and of course dizzying amounts of 26th-century firepower. There are no aliens, no "hyperspace," no planets that look suspiciously like movie studio back lots. Just the old empires of Earth doing what they do best, colonization and kicking the hell out of anyone who gets in their way (i.e., each other).
In addition to starship tactical combat, Darkstar includes rules for carriers and aerospace craft, atmospheric operations, orbital and surface installations, boarding actions, assault landings, and a complete campaign system.
The system is free to download for members of the OTT community, and of course we play almost every weekend with a on-line version with starship commanders around the world! So if you ever want in, you know where to find us!
Related Genre: Science Fiction
This Project is Active
Darkstar Three-Way Battle!
More fiery combat burns across the stars with a three-player game of Darkstar, a “ménage à trois” of rail guns, plasma projectors, torpedoes, and electron particle cannons. This time it was Rasmus and his Japanese “Nobunaga” battlecruiser squadron up against Hegemongary’s Arab Leage carrier strike group and two cruisers from my own “Khar Khilizh” (Black Sabre) strike squadron. This was also a rather big one, a 497-point game involving 9 ships, including aerospace carriers loaded with missile and torpedoes.
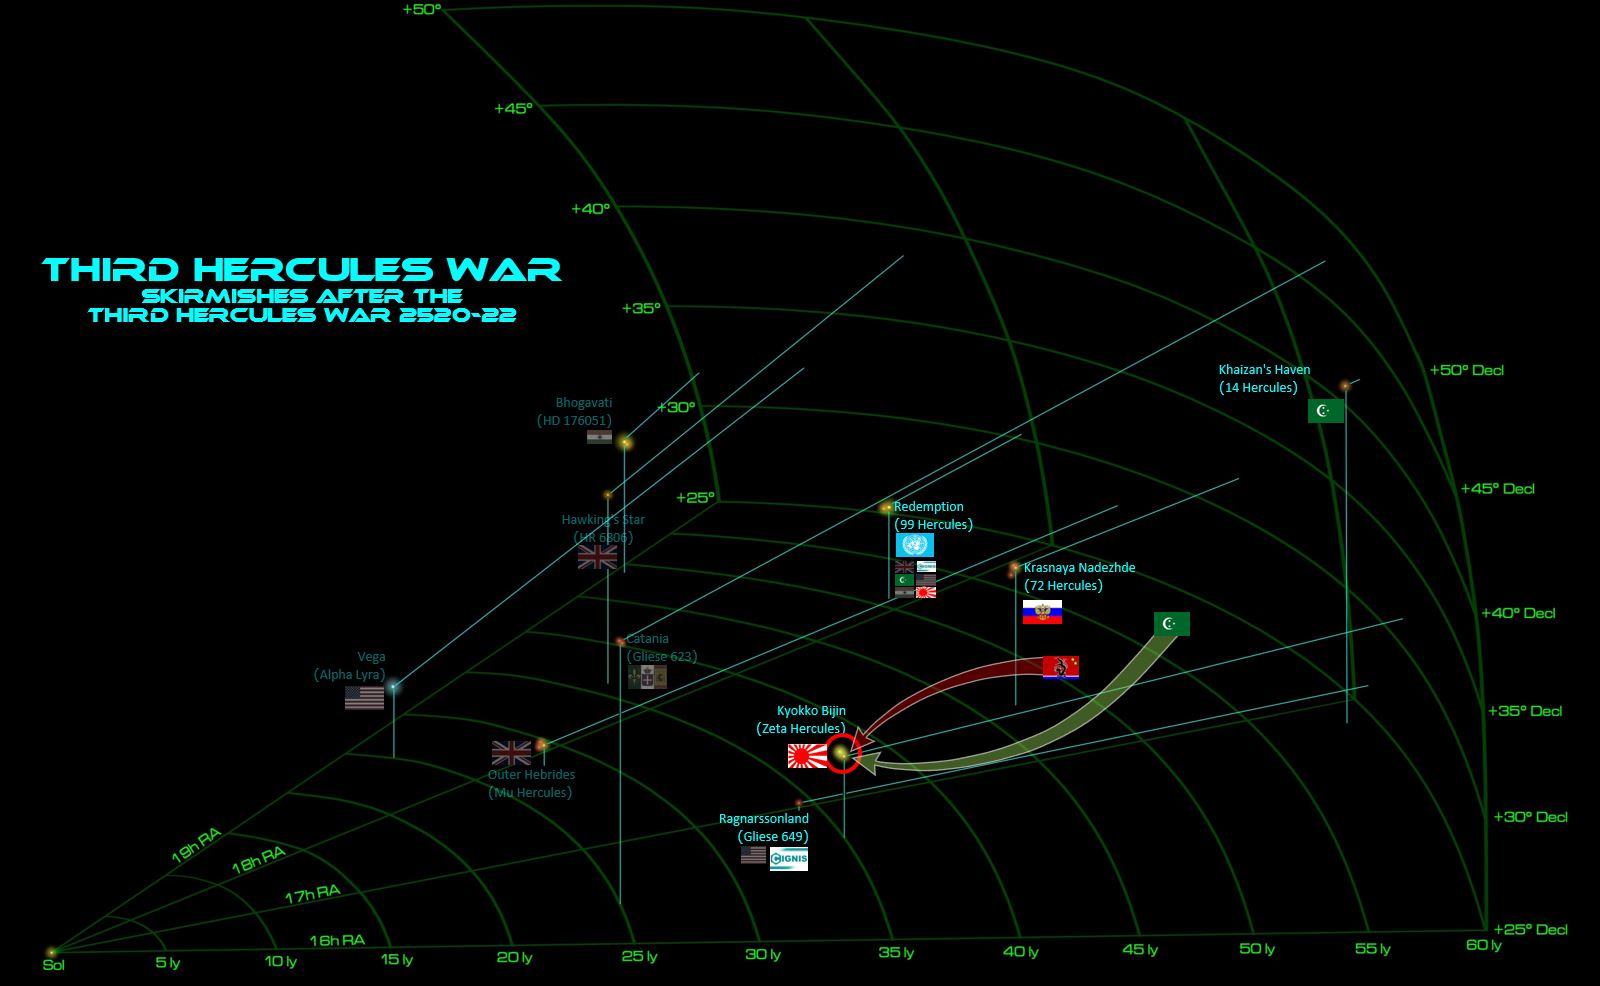 The game is set in our old stomping grounds, the “Hercules Rim.” Here, we see Khaizan’s Haven (14 Hercules), a former star system of the Khitan-Tunguska Free State (Black Dragons) – won by the Arab League in the recent Third Hercules War. The Black Dragons have never really given up on this system, with picket ships and torpedo corvettes always lurking around the system’s outer debris belts and cometary halo. Yet when the Arab League launches a raid against the Japanese in the nearby Kyokko Bijin colonies (Zeta Hercules system) and find themselves hopelessly outmatched by the unexpected presence of a Japanese battlecruiser, Black Dragon warships emerge to … HELP the Arab League? Perhaps the Black Dragons hope to cut some kind of concession or deal with the Arab League, or perhaps they plan on stabbing the League in the back? At the moment it doesn’t matter, the Arab League needs the help.
 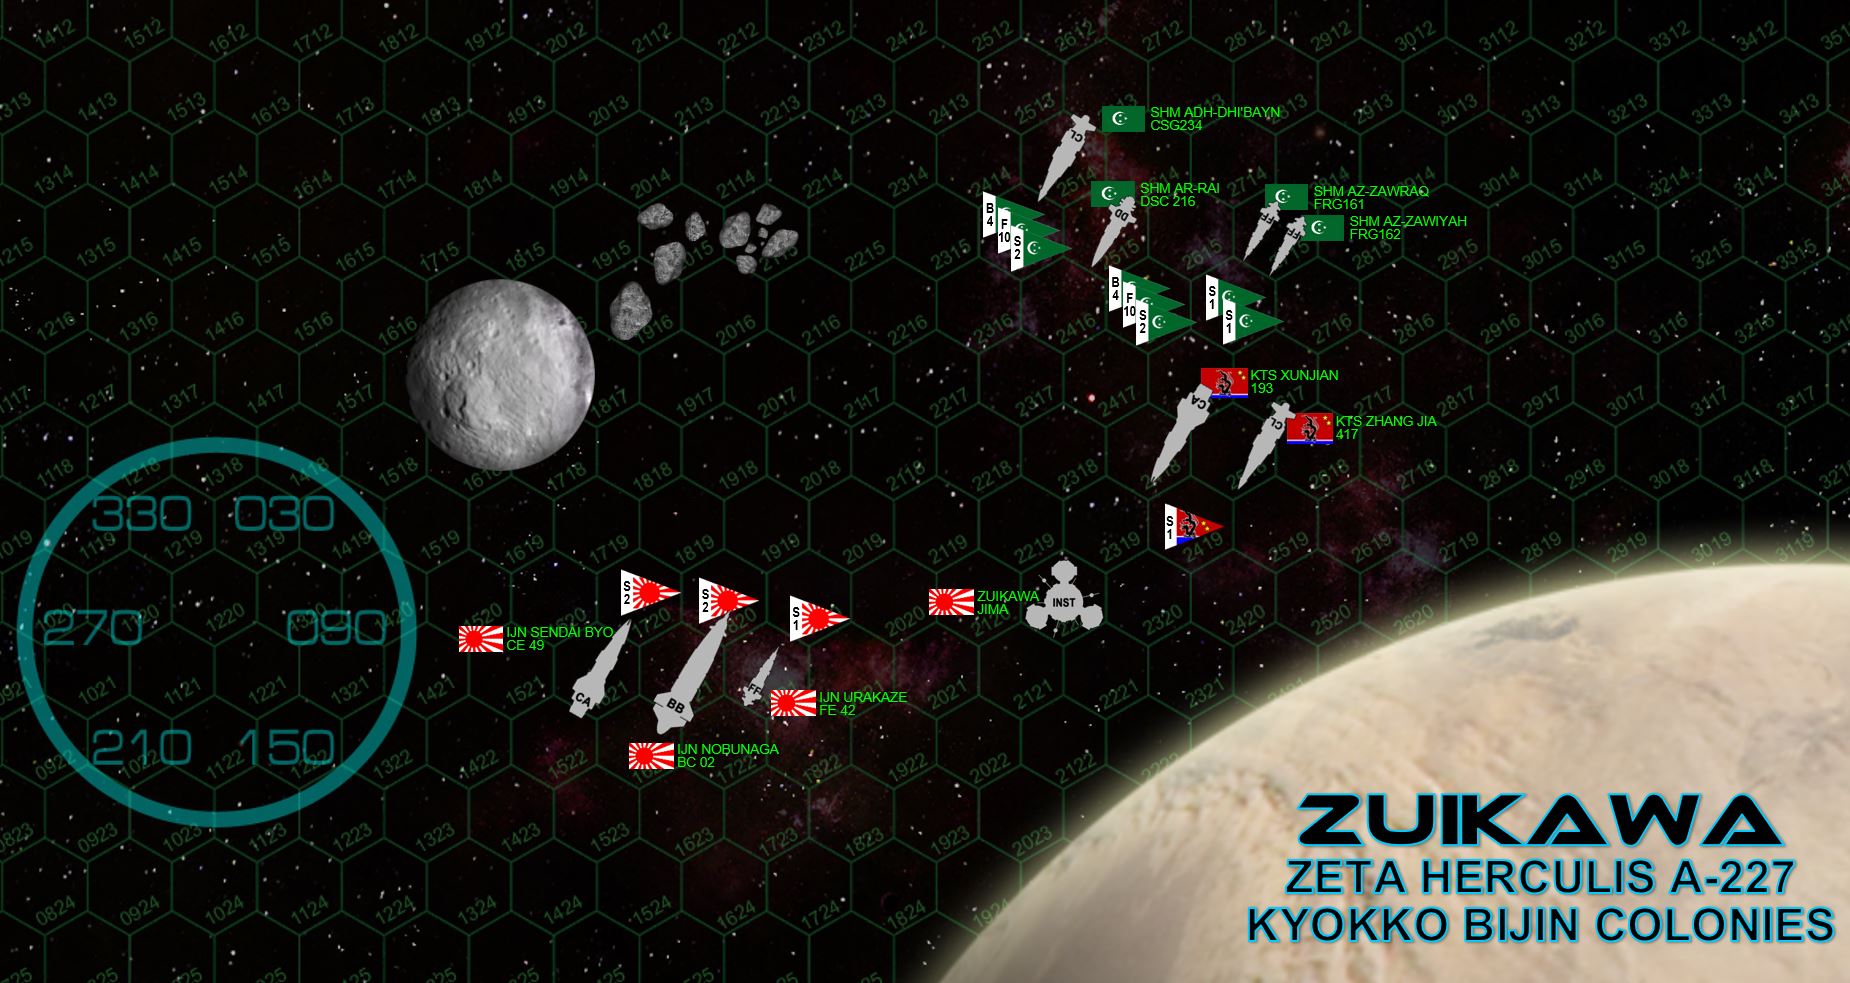 Here are the forces in today’s game. The Japanese are under the command of Seizo Yamamoto aboard his Songuko-class battlecruiser IJN Nobunaga – enormous, fast, high-tech … packing the firepower of a small battleship and speed rivaling some cruisers. The flagship is escorted by the sleek, fast, beautiful Taihō-class light cruiser Sendai Byo and the scrappy little strike frigate IJN Urakaze. The Arab League’s flag flies from the Almanzor-class hybrid cruiser SHM adh-Dhiʼbayn, along with the light carrier ar-Raī and the Hattin-class frigates az-Zawraq and az-Zāwiyah. The Black Dragons, meanwhile, come in with the heavily-upgraded Shanxi-class heavy cruiser KTS Xunjiàn (Swift Sword) and Greater Xhia-class light missile cruiser Zhang Jia. The Zhang Jia in particular is an old veteran of mine, having racked up an impressive tally of Russian, American, Japanese, British kills in the Black Dragon War, XI Scorpio War, Scorpion’s Tail War, and Duchess Annabel’s War.
 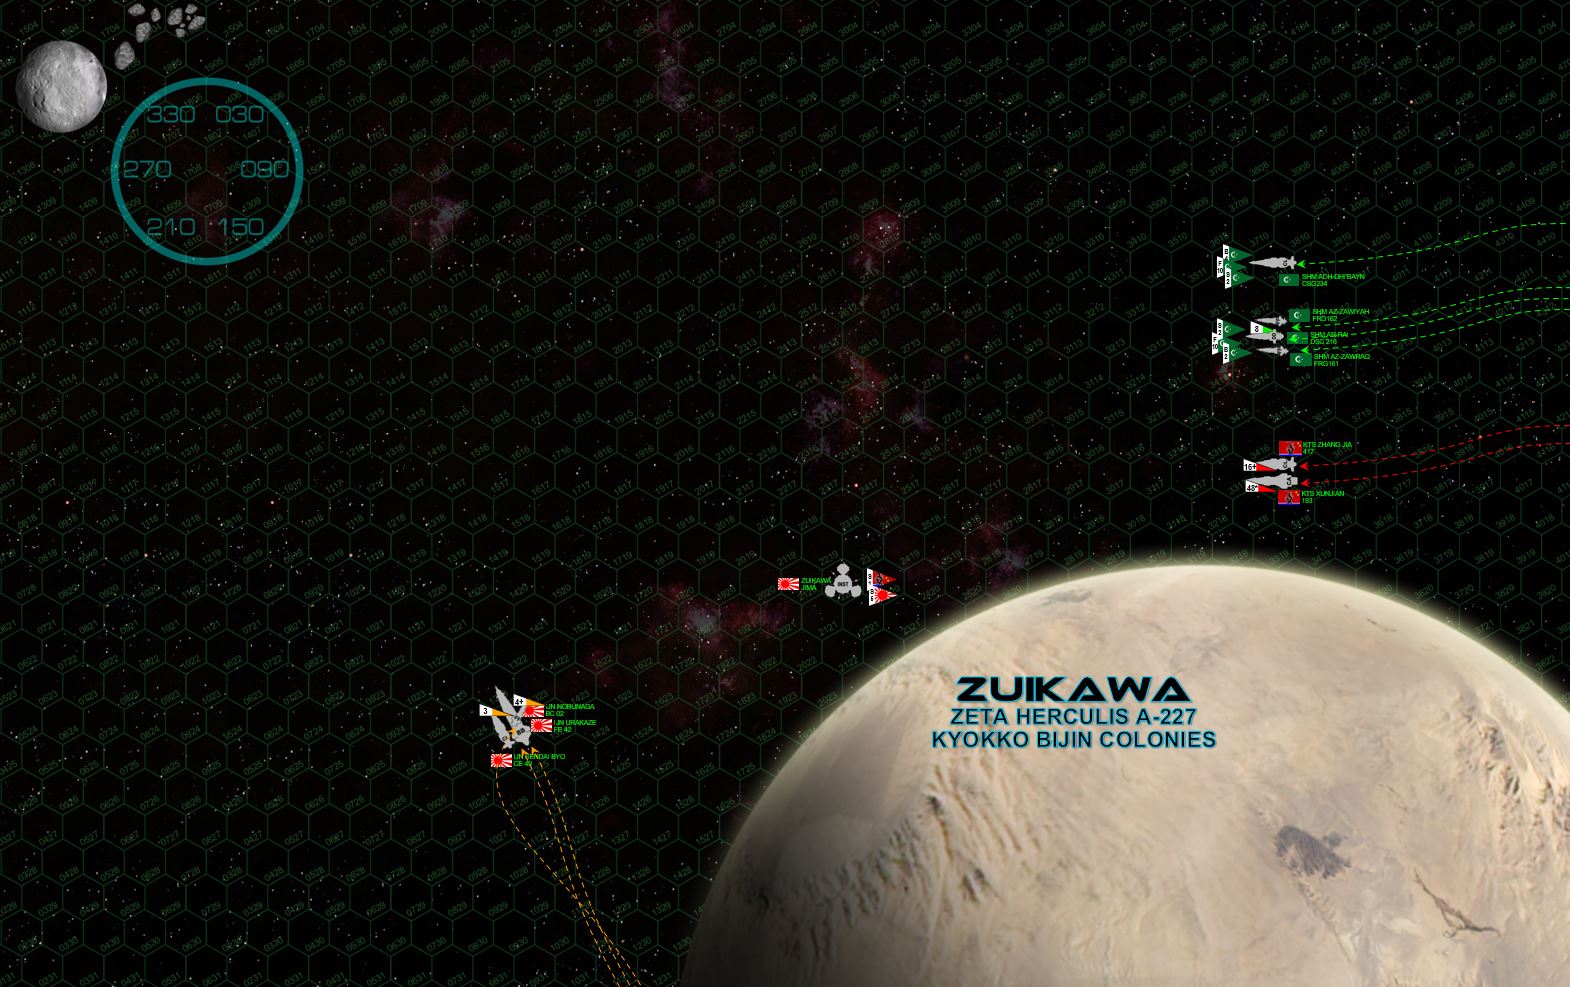 Battle is joined in orbit of Zuikawa, a Mercury-sized terrestrial world in the Zeta Hercules star system. The Japanese emerge from their low orbital zone station keeping trajectory, the Black Dragons using the planet’s gravity in a low-descent glide, keeping their velocity modest. They know their Arab League allies will need time to get all their aerospace strike craft launched, content to keep the Japanese bow-on for now in order to launch massive waves of Tsing Tao and Khurdan Jad (Swift Javelin) torpedoes. The Japanese, for their part, already have the enemy well within range of their deadly-accurate "Seiku" (Clear Sky) targeting and fire control systems, and the Nobunaga slings out her first EPC bolts, scorching across the bow of the Arab League carrier ar-Raī.
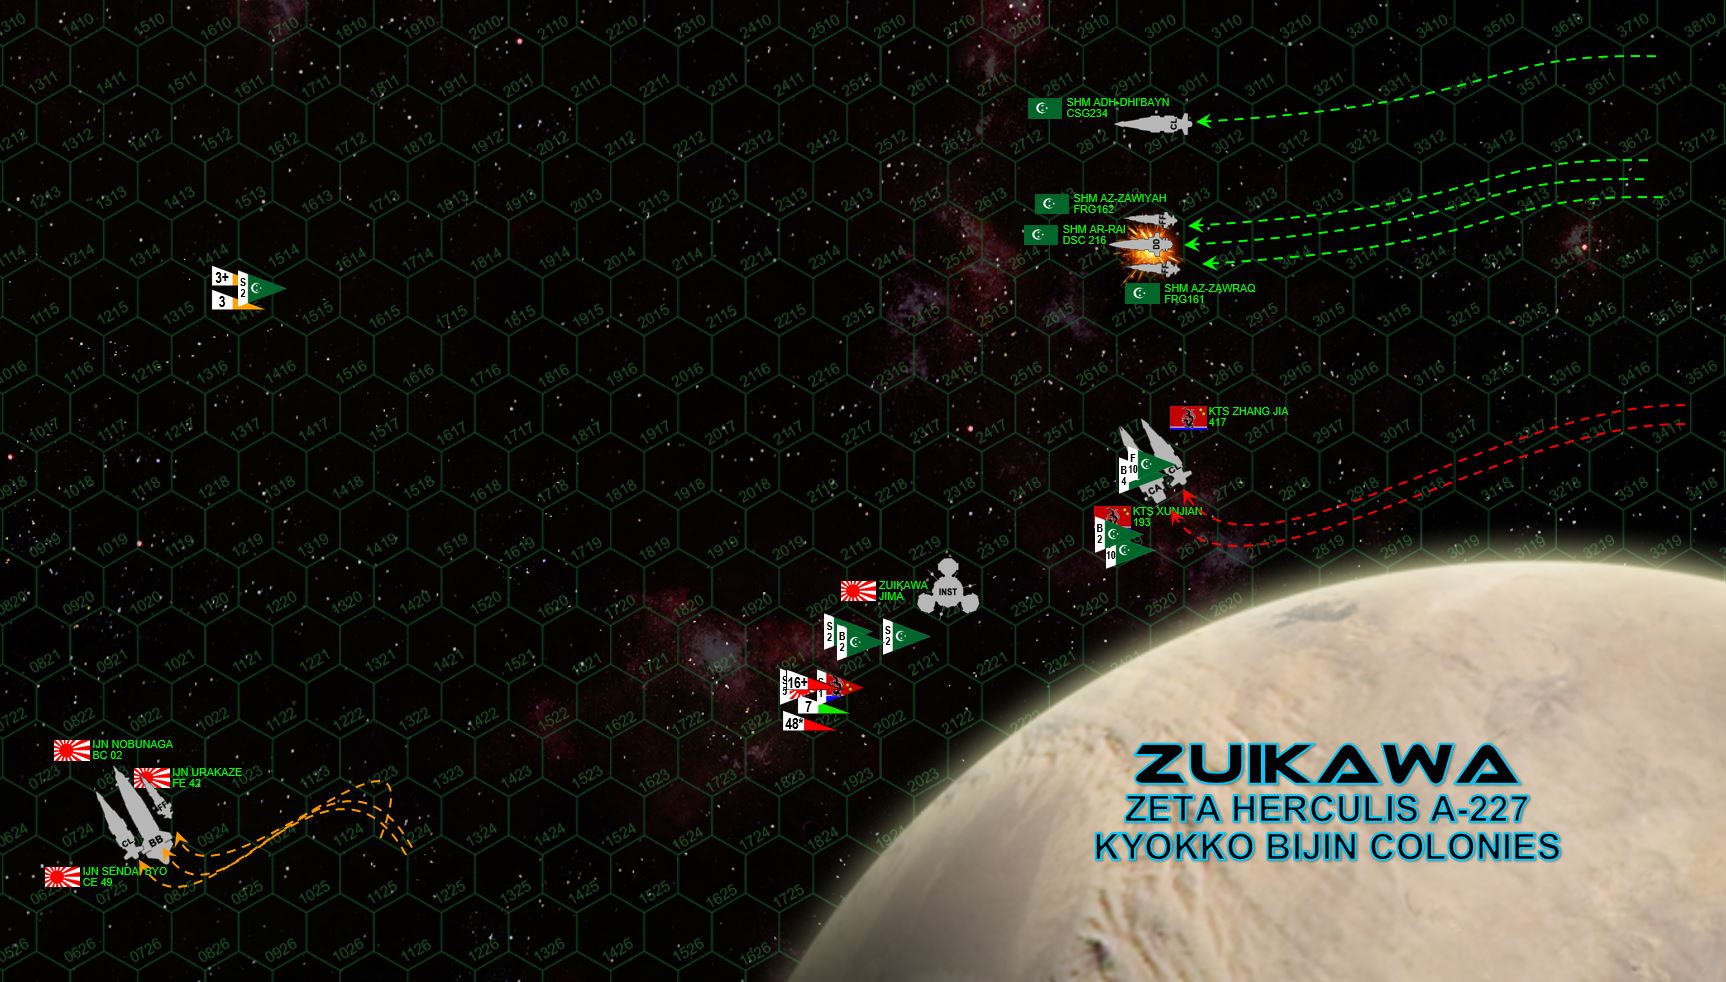 With their torpedoes away, the Black Dragons wait until their hulls are just starting to glow from friction with the Zuikawa atmosphere, turning away to swing their port broadsides toward the Japanese. They open fire on the Urakaze, but the Xunjiàn and the Zhang Jia don’t do enough damage to knock her out of action, especially with the resolute crew of the Urakaze quickly repairing the damaged sensors (the only system damaged so far). Long-range Japanese gunfire, meanwhile, really drills into the ar-Raī, her last two "Alnaazir" (Beholder) scouts launching JUST as Nobunaga’s EPC bolt sears through the hangar, exploding it behind the scouts. The ar-Raī’s magazine goes up, the bridge is hit … her commander surviving the strike but the ship slewing out of line and spinning adrift in space.
 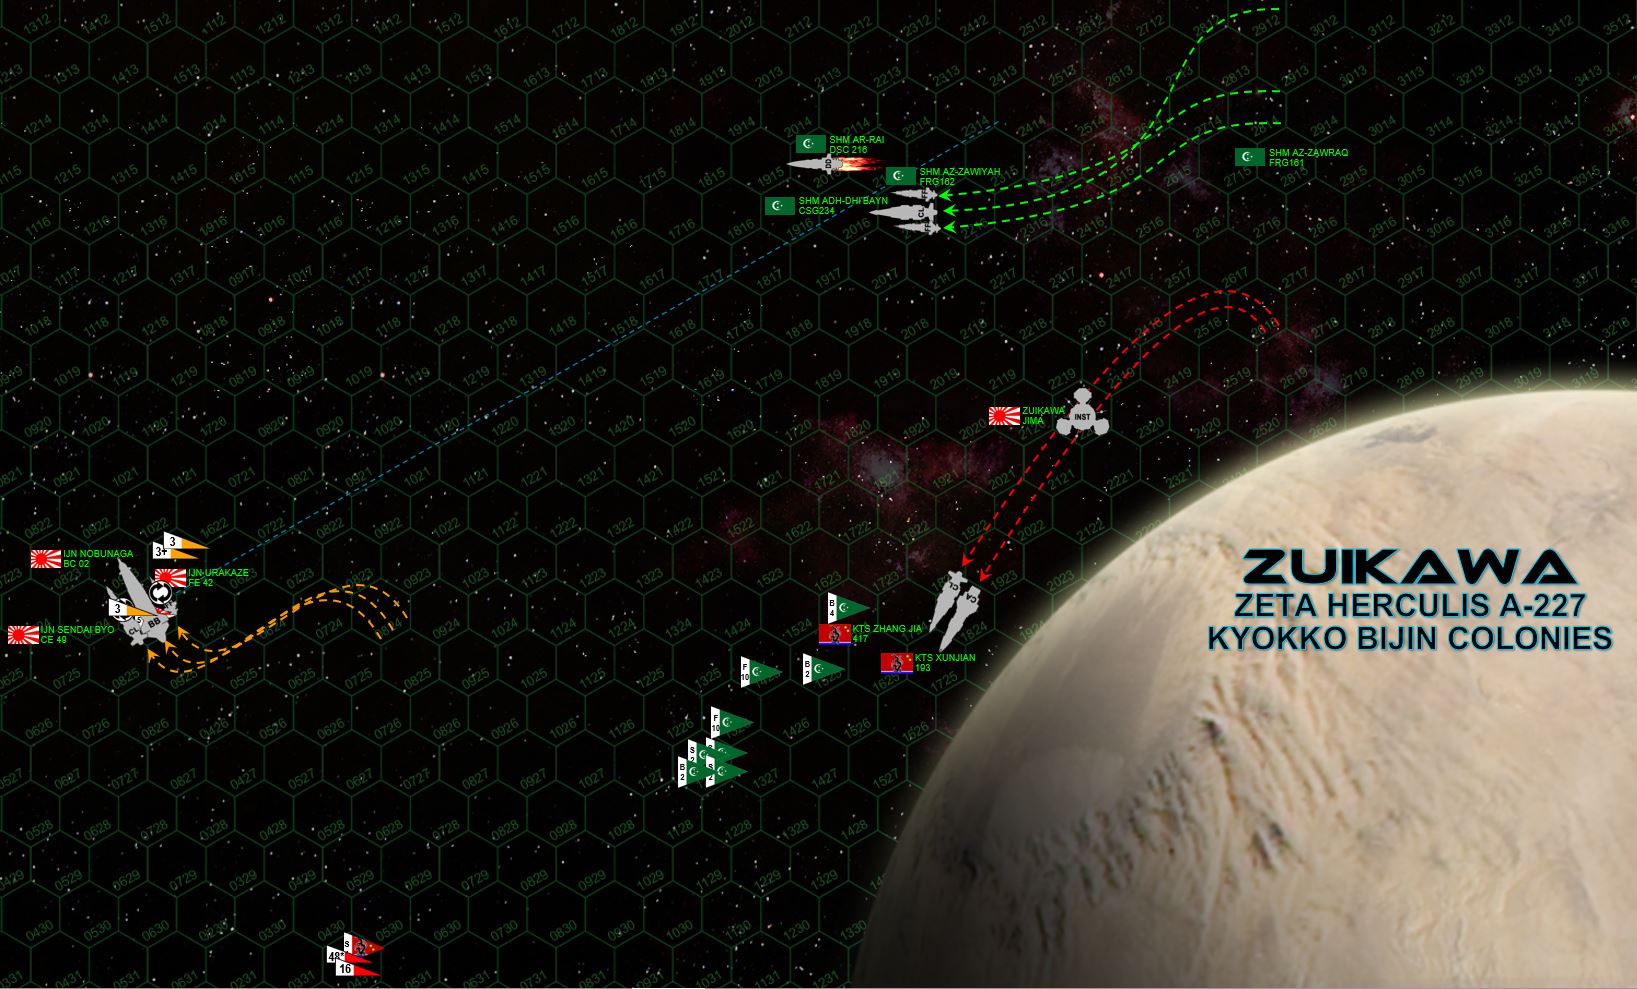 The Japanese keep tacking back to port, keeping the engagement range open, content to pick apart the Arab League battlegroup at range while keeping their distance from the heavy (but much less accurate) guns of the Black Dragon cruisers. Yamamoto switches his guns to the League’s flagship adh-Dhiʼbayn, smashing open her bow, knocking out maneuvering thrusters, hitting the magazine, and tearing one turret of 9-teravolt EPCs clean out of its housing. The League commander keeps her in the fight for now, returning fire as best he can with his forward guns. But the Japanese keep opening the range, their upgraded shielding is too powerful, the League guns just aren’t making a serious dent in the IJN Sendai. Clearly, the League battlegroup is a CARRIER force, the impending aerospace strike will make or break their participation in this battle. The Black Dragon guns, however, ARE making an impact at last, a second withering broadside smashing into the Urakaze from 2500 kilometers. The valiant crew manages to keep the central reactors and aft shields up … but it’s not enough to keep the ship operational. Power fails and Urakaze is set adrift out into interplanetary space.
  At last, the moment comes. Black Dragon torpedoes have flown nearly 8000 kilometers … the distance from London to Las Vegas, but they finally catch up to the Japanese task force despite their “hit and fade” tactics. The Arab League “Mylekinir” (Fire Angel) and “Demkikham” (Vengeance) bombers are also finally in range, unleashing a swarm of torpedoes and missiles at the Japanese as well. The combined strike is well-coordinated, the Japanese are hit with a combined 99 warheads of various types (Tsing Tao Class IIs, Khurdan Jad Class IIIs, aerospace torpedoes, aerospace missiles). Japanese mass drivers reap a grim harvest, easily half these warheads are shot down in their final approach. Even their scouts shoot down a handful. The rest must then punch through the enhanced aft shields of the Sendai Byo, but the enhanced electronic warfare suites of the Xunjiàn and the Zhang Jia help suppress the Japanese ECM defenses. The Sendai Byo is hammered hard, one of the Arab League scouts even hits her starboard reactor with its small weapons. Internal explosions ripple through the Japanese light cruiser, the blasts kicking her on her side and sending her cartwheeling through space, her hull slinging off curtains of glowing molten metal. Two Tsing Taos even hit the battlecruiser Nobunaga, to little effect.
 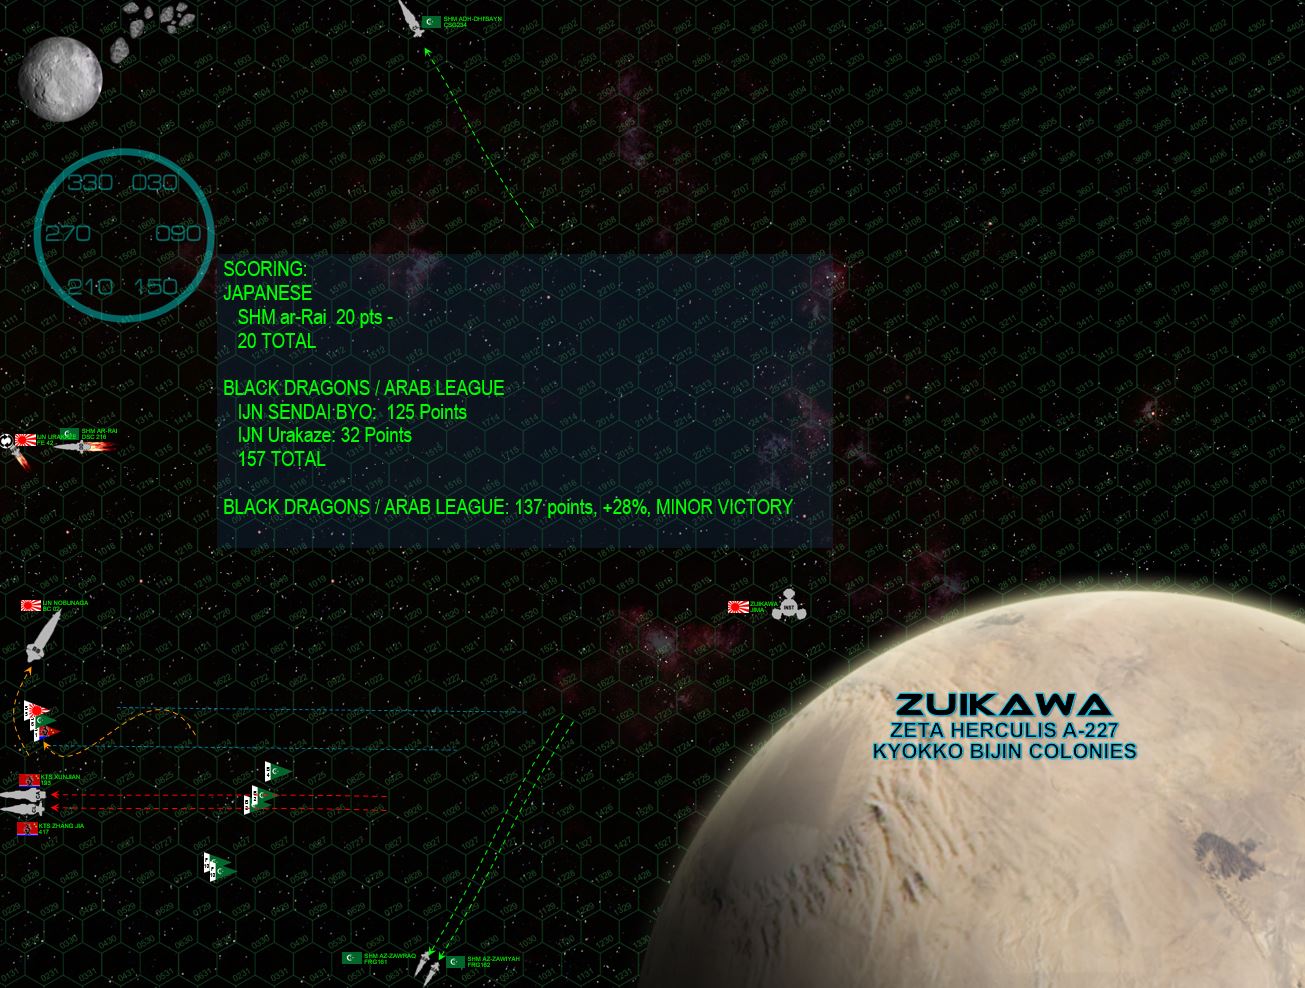 Now alone, the mighty Nobunaga turns to starboard, her broadside hammering the frigate az-Zawraq and practically shearing off the frigate’s bow … but she remains operational as the Arab League ships raise steam for flank speed and scatter out of the battlespace. This was a raid, after all, with the Sendai Byo crippled the League and the Black Dragons are content to break off the action. They have the velocity, thrust, and position to do it, and simply accelerate away. Balancing the forces destroyed or crippled by all sides, the game comes down to a respectable win for the Arab League and Black Dragons. At the same time, the Nobunaga has fended off the raid and protected the Zuikawa Jima colonies and orbital installation.
 A few ships were heavily damaged in this battle, and more than one bridge took a direct hit. With judicious use of “Commander’s Luck” upgrade points, all ships will be recovered, all commanders on bridges that took hits will survive the day. Rasmus needs just ONE MORE campaign point to unlock “Fleet Command” for Commodore Siezo Yamamoto, thus unlocking a force cap of 501-1000 points, allowing him to bring back his frigate Sakito and heavy cruiser Kama. I feel that with this restored escort force, the Nobonaga battlecruiser will start to do better against faster, lighter cruiser squadrons and aerospace strike forces like we saw here. Let’s face it, against massed airpower, do unescorted battleships EVER do well? Congrats to everyone on a hard-fought game and especially to Hegemongary for helping win the day!
New Player's First Game in Darkstar!
It’s happened again, folks. The cruel, fickle mistress that is Darkstar (Starship Tactical Combat in the 26th Century) has claimed another wargamer into her capricious claws. Yesterday my friend @Yavasa played his first game, taking out his new Prussian battlegroup in a maiden voyage to square off against a Russian cruiser group.
It was furious, fun, and fast … a straight-up gun fight with beginning rules, leaving out carriers, aerospace groups, planetary assaults, orbital installations, and so on. Old school Darkstar at it best.
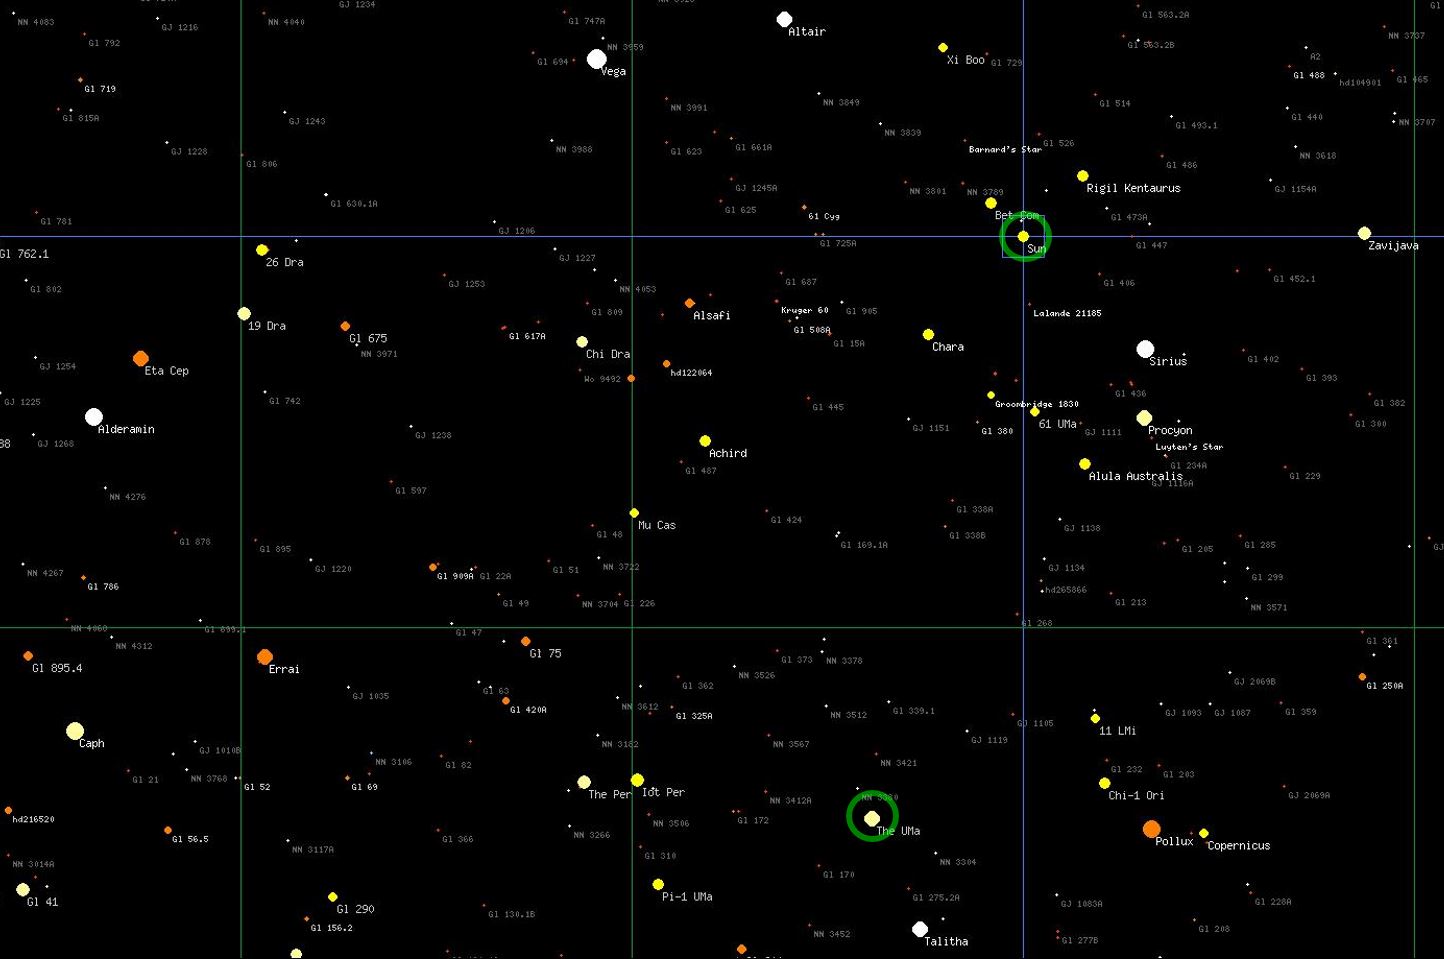 The location for the game was Theta Ursae Majoris, just short of 44 light-years from Sol, deep in the Second Band of Known Space (where most Darkstar games take place). Throughout the Ursae Majoris SCS (Strategic Command Sector), smoldering tensions have sparked into open conflict between the Federated States of Russia and the Holy Russian Empire, leading to an escalating series of skirmishes through half a dozen star systems over the past few months. Finally, the first big battle erupted at the Prussian “Zedlitz” colonies at Theta Ursae Majoris, a binary star system, where a Russian offensive has just been stalemated by determined Prussian resistance.
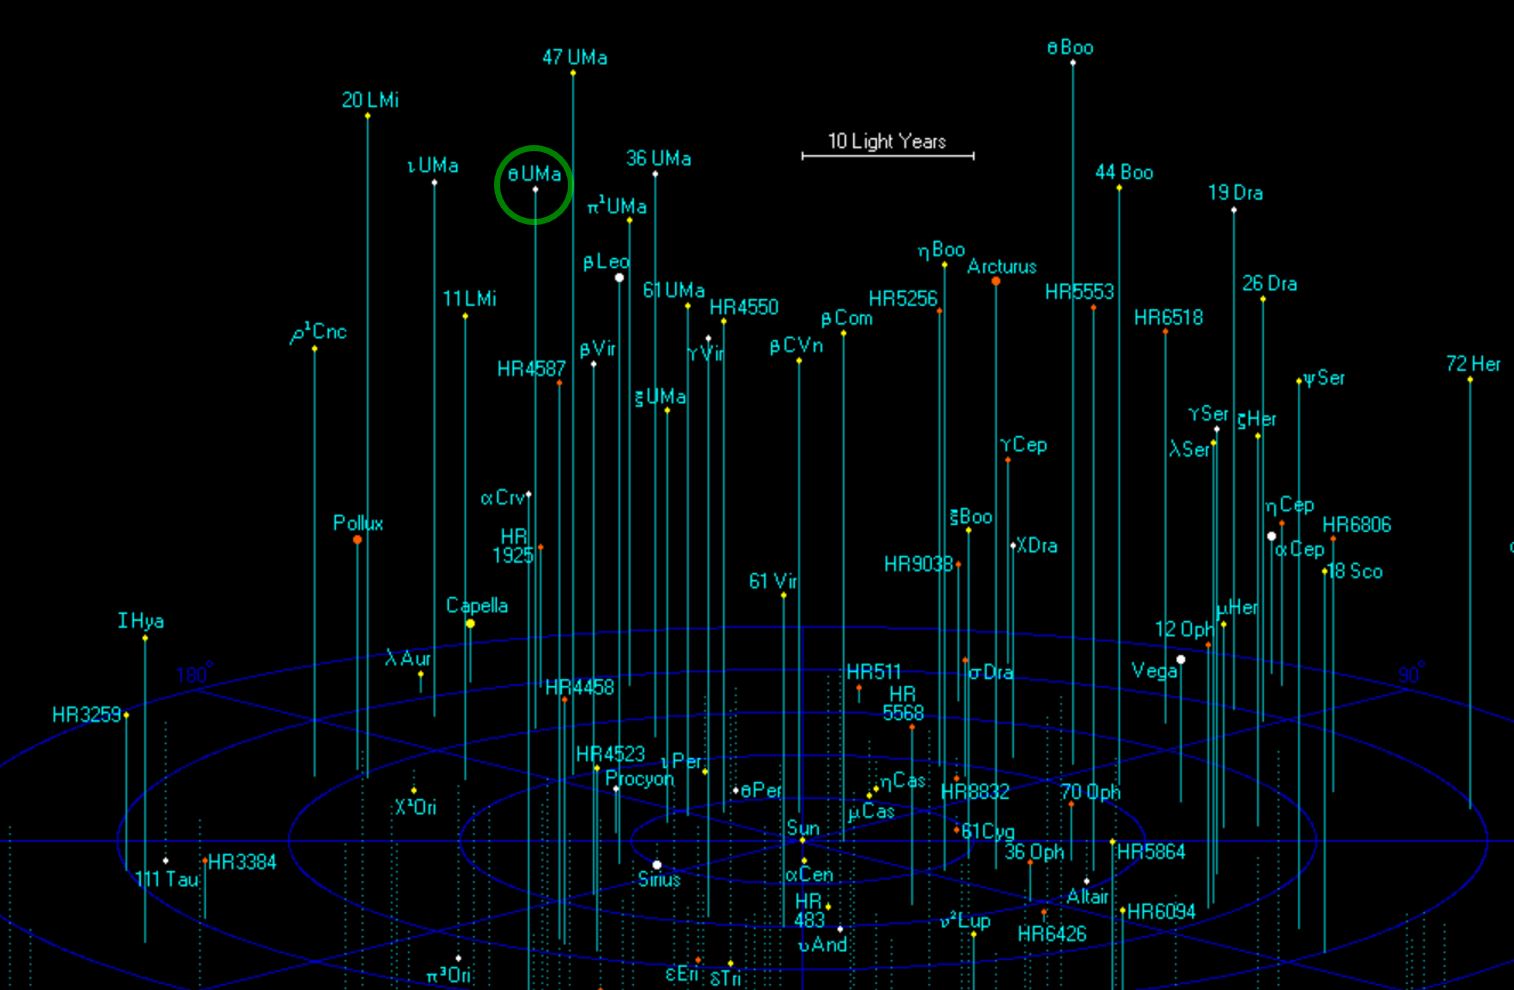 A set-piece engagement of startling size … has just ended. A Russian invasion fleet built around two Slava-class heavy cruisers and three Zhukov-class planetary assault destroyers (assault transports each carrying a battalion of elite Russian naval infantry) has hit the Prussian “Zedlitz” colonies. They were met by a Prussian task force centered on the battleship KMS Moltke, the resulting battle all but crippling both sides in equal measure. Now, just hours later, both sides are frantically deploying emergency reserves, not only to tip the precarious (and blood-soaked) balance in the Zedlitz colonies to their favor, but also secure the battlespace for what will be one hell of a rescue and recovery effort.
 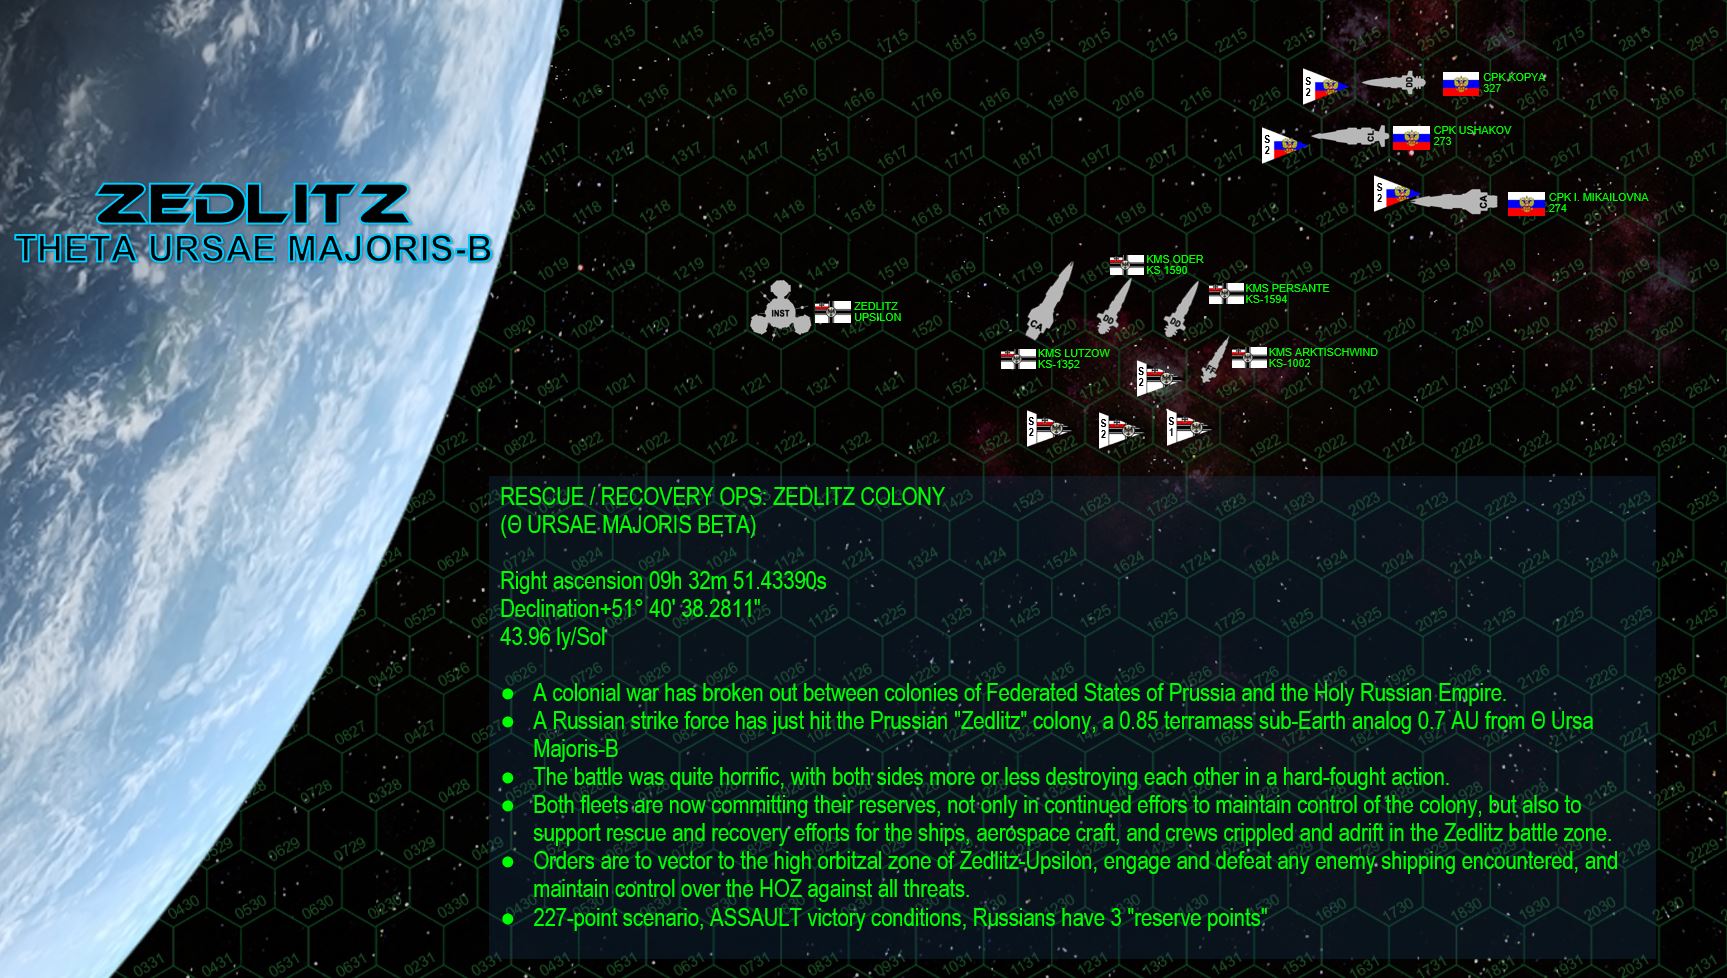 Here are the “reserve battlegroups” of both sides, as they will appear in today’s game. The Russian force is centered on the heavy cruiser CPK Irina Mikhailovna (named for one of the daughters of Mikhail Romanov), a Slava-class heavy cruiser. She is escorted by the smaller, faster Kutuzov-class light cruiser Admiral Ushakov and the Sovnya-class destroyer Kopya (Javelin). Yavasa’s battlegroup is built around his flagship KMS Lutzow, a powerful and advanced Leopold class heavy cruiser. We haven’t seen much of the Prussians in Darkstar lately, which is why I was especially excited to see them in action here. The Prussian Kriegsmarine in general focuses almost exclusively on rail guns, and few ships exhibit this doctrine better than the Leopold class. She’s escorted by two Maas-class destroyers (KMS Order and Persante) and finally the frigate KMS Arktischwind, an Ostwind-class escort frigate. Originally designed by friend Alex in the opening days of Darkstar, this frigate carries virtually no weapons … outside of mass drivers. She’s an “anti-aerospace frigate,” her specialized purpose to shoot down enemy torpedoes, missiles, fighters, and bombers threatening the Prussian battlegroup.
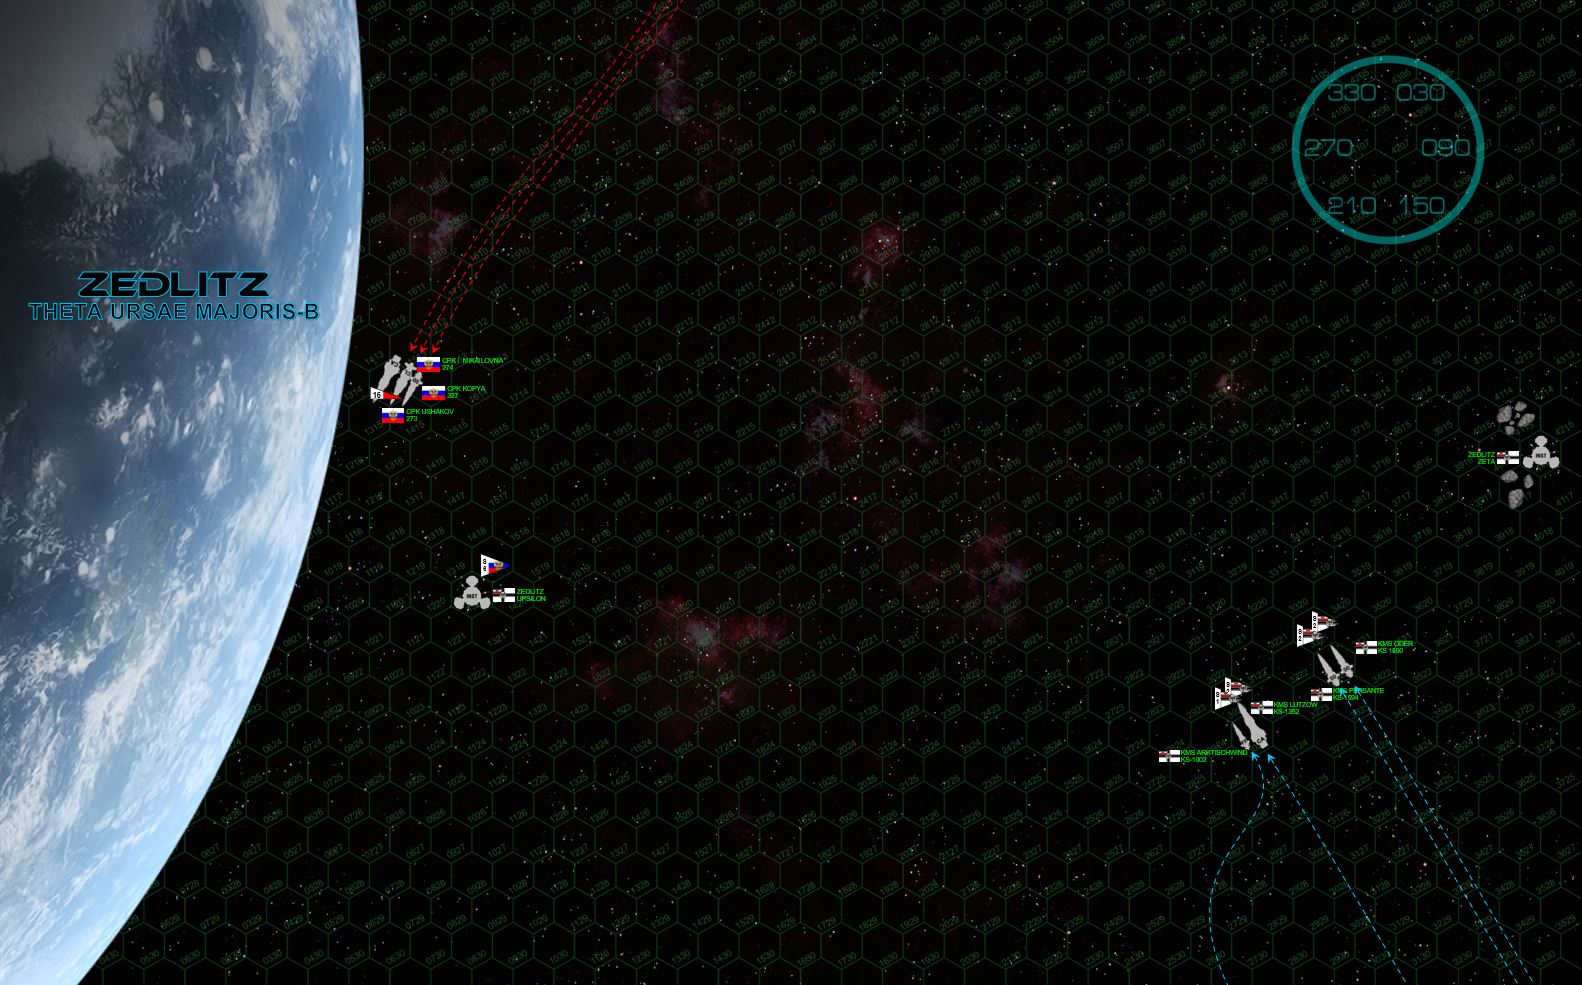 The two battlegroups make their approach. The Russians come on rather fast, clocking in at 42 kilometers per second, their course slewed slightly to starboard by Zedlitz’s gravity. Their retros are naturally on full, decelerating as they vector so close to Zedlitz that their hulls are just starting to glow red from the planet’s atmosphere. The Russian plan is plain, seize the “gravity gauge” and force the Prussians to turn dangerously toward the planet to engage them. Meanwhile, Yavasa brings on his Prussians, starting out a little dispersed (certain ships of his lost initiative) but quickly consolidating. Also note that while he’s angled generally toward the planet, he won’t HIT the planet if any of his ships are disabled this early. Not that such extensive damage is likely at this point. Most weapons remain out of range, only the main armament of the two heavy cruisers can reach any targets. The Lutzow and Irina Mikhailovna open fire at 4850 kilometers, the distance between Warsaw and Karachi, Pakistan … resulting in only the lightest of hits so far.
 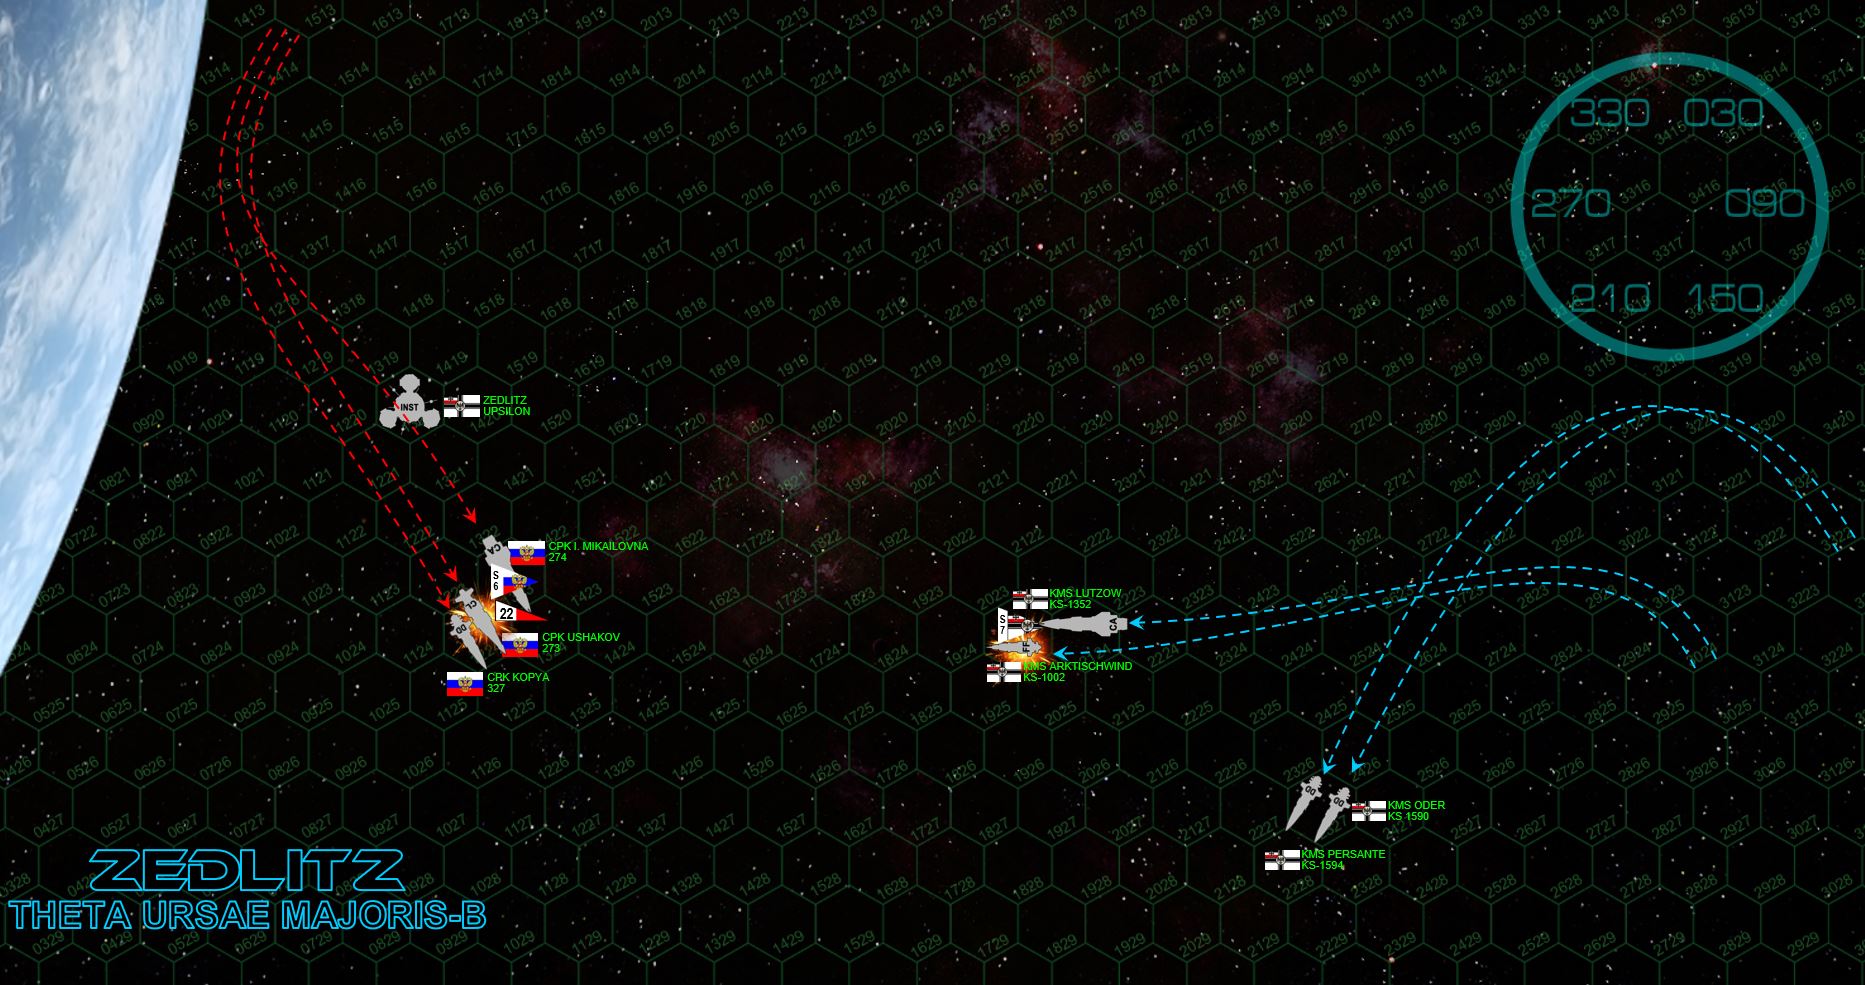 The Russians lean hard on their brakes and their grav rudders, peeling away from Zedlitz and using the planet’s gravity as auxiliary brakes. The Prussians, meanwhile, set a very bold, very risky course (some would say suicidal), straight toward the Russians and looming planet right behind them. The Lutzow’s bridge crew correctly plots where the Mikhailovna will be (at this speed and this close to a planet, her helmsman doesn’t have too many options), setting her own course JUST out of Mikhailovna’s broadside. The Arktischwind follows suit, providing close escort to the Lutzow while the destroyers Oder and Persante cut a safer stand-off course, setting up a longer-range broadside against the incoming Russians.
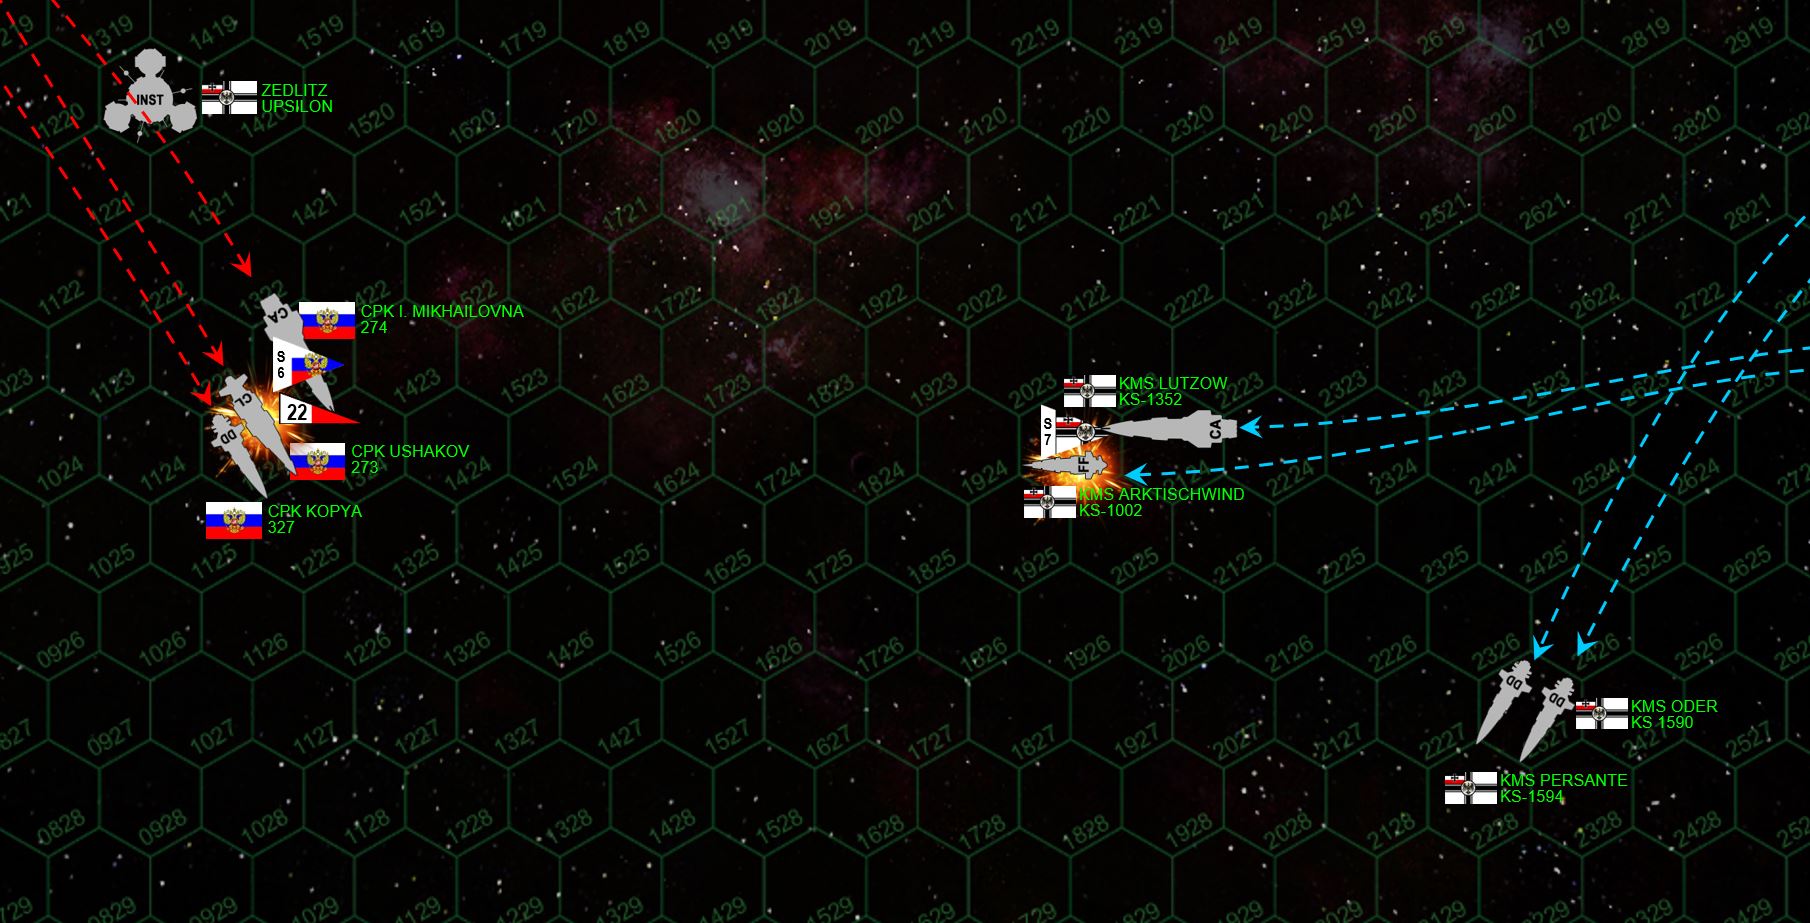 Both sides open fire. A veritable swarm of Russian torpedoes (P-500 “Plamya” Class IIIs) are first, one of them shot down by Lutzow’s scouts, the rest engaged by the aerospace defense frigate Arktishwind. The result is startling, virtually all the Russian torpedoes are swept from the sky by the specialized frigate, the Lutzow easily cleaning up the rest. Sadly, it's the last thing the Arktischwind does, struck an instant later by the forward guns of the Irina Mikhailovna. The heavy rail guns and plasma projectors of smash and burn their way clear through the forward hangar, cargo bays, shields, forward mass drivers, torpedo bays, detonating the magazine, and finally imploding the bridge. Lt. Commander Helga Kunkel will survive the attack, but her ship will not, still streaking at 30 kps directly for the Zedlitz atmosphere. The Lutzow opens fire a moment later, her forward 11-gigawatt rail guns and 6-gigawatt secondaries positively smashing into the port bow of the Admiral Ushakov. It’s pinpoint Prussian gunnery at its best, but only landing a stunning series of hits, but also in JUST the right place on the Ushakov. In moments, the bridge is struck twice, badly wounding Commander Natalya M. Khorzhako and leaving Ushakov crippled and adrift. It’s just not a great day for the ladies here at Theta Usrae Majoris.
 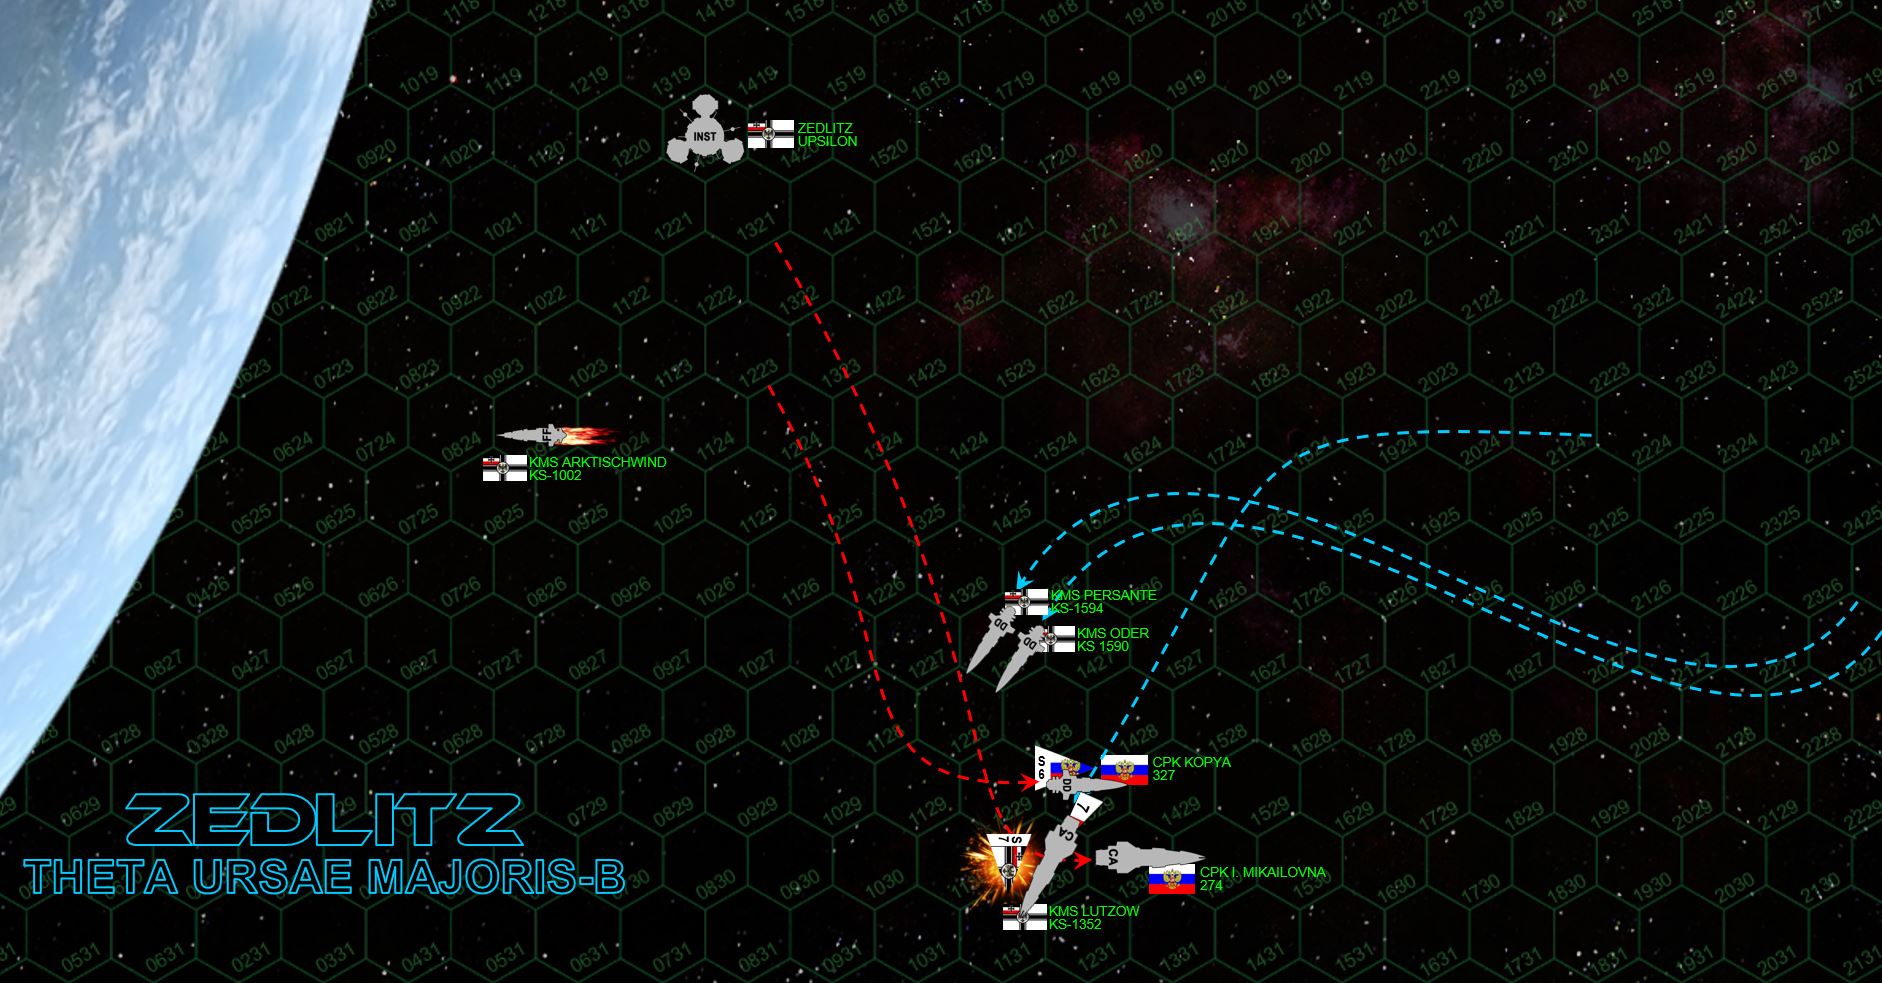 Finally slowing to a manageable maneuver speed, the Irina Mikhailovna cuts to port and sets up a broadside on the Prussians. But again Lutzow has outguessed the Russians, cutting to a fast portside turn herself and setting up a point-blank broadside right across Mikhailovna’s stern. The destroyer Kopya responds, slicing behind the Lutzow in turn, while the two Prussian destroyers S-turn to set up 350-kilometer broadsides on both remaining Russian ships. The Oder opens fire on the Kopya, smashing open her port quarter, just before catching a devastating broadside from the doomed Mikhailovna (there’s no way my aft batteries alone can cripple the Lutzow). The tough little Prussian destroyer reels but stays in the fight for now, at least until she takes a broadside from the Kopya as well … just before the Kopya is crippled in turn by the Persante (a single hit in Kopya’s portside reactor room is enough to knock her out with a lucky “6” on the power-down check at the end of the turn). But the real killing blow comes when Lutzow opens fire at 180 kilometers with every gun she has into the stern of the Mikhailovna. Russian ships are nothing if not tough, and it takes every gun Lutzow has, but finally the big Russian cruiser is crippled, decisively ending the battle.
 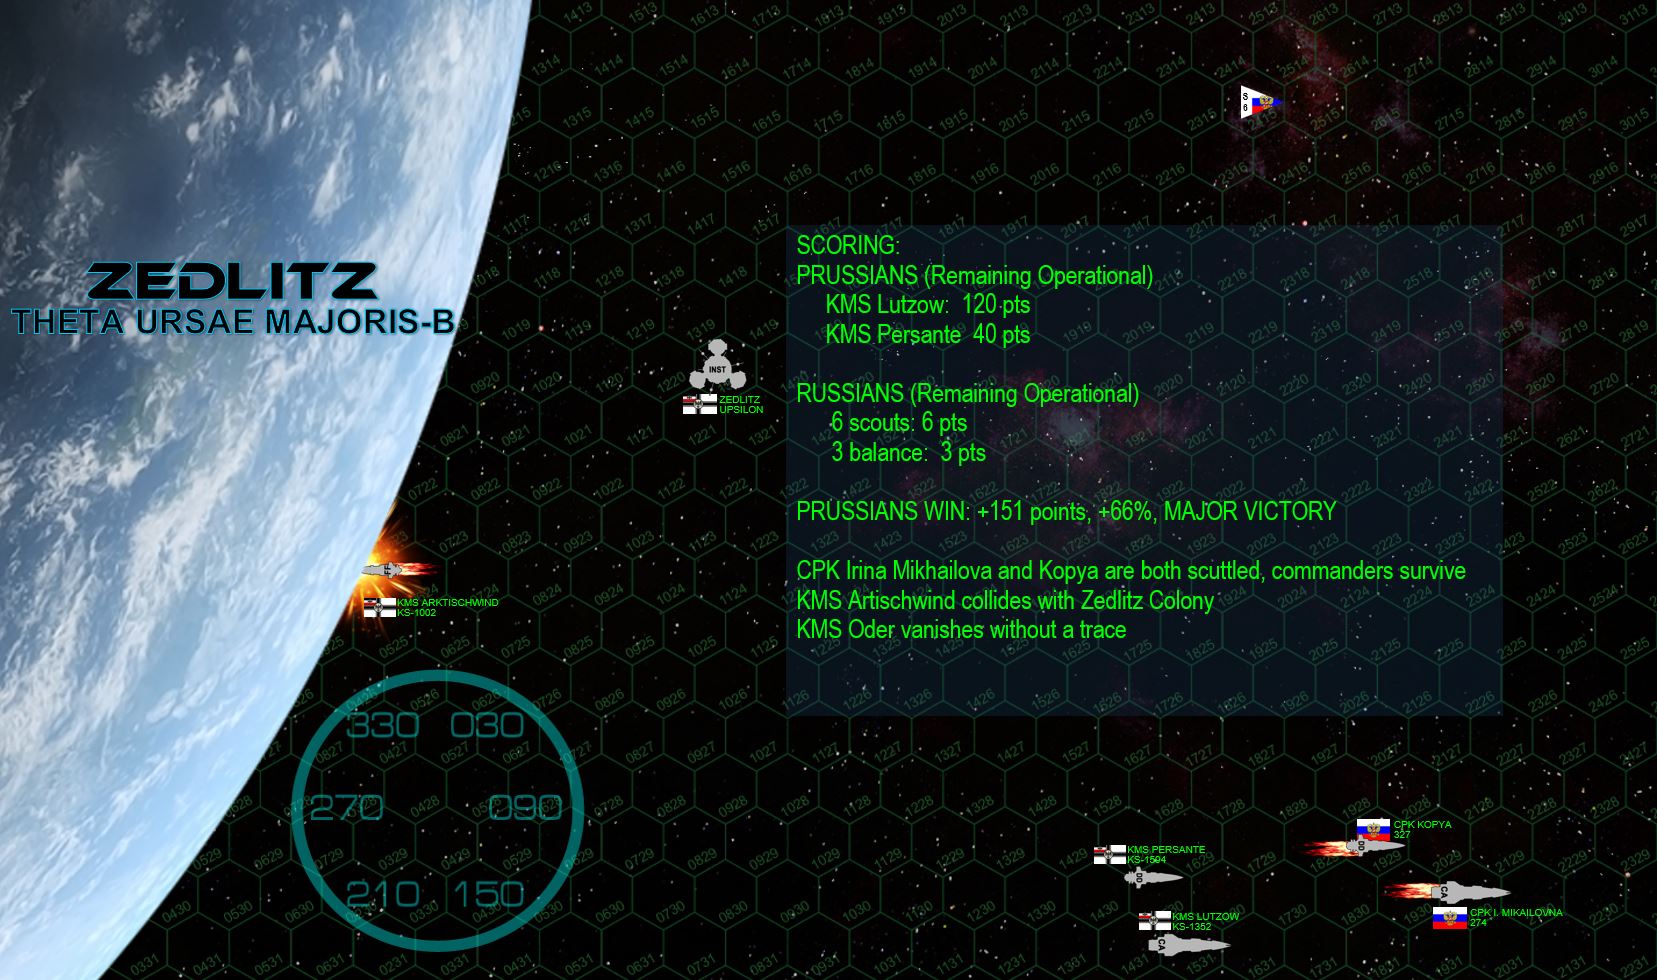 Clearly, this battle is a DECISIVE win for the Prussians, the first they’ve enjoyed in nearly four years. Since these are all “new” fleets without “Commander’s Luck” upgrades, the Warship Recovery Table is a little ruthless when it comes to the fate of ships crippled and set adrift. The frigate Arktischwind doesn’t even MAKE IT to the Warship Recovery Table, her 23,000 ton bulk crashes headlong into the planet at 30 kps (roughly Mach 150), melting into slag and exploding in the Zedlitz atmosphere. Fortunately, her surviving crew had long escaped by then. The fate of the destroyer KMS Oder is perhaps even worse, simply vanishing into the abyss of space. Commander Sigmund Haas, having survived the plasma strikes on his bridge and leaves the derelict ship with his surviving crew, but when they return with tugs … the destroyer just isn’t at the predicted vector and coordinates. Simply put, the “ghost ship” is never seen again. Meanwhile, both the Irina Mikhailovna and the Kopya will be abandoned and scuttled. The Mikhailovna is forced to blow herself up when approached by a Prussian Valkyrie-class assault cruiser loaded with Prussian “stosstruppen,” while the Kopya must put herself out of her misery when approached by a wolfpack of Prussian “umfangangriffboote” (perimeter attack boats), or “U-boat” torpedo corvettes.
 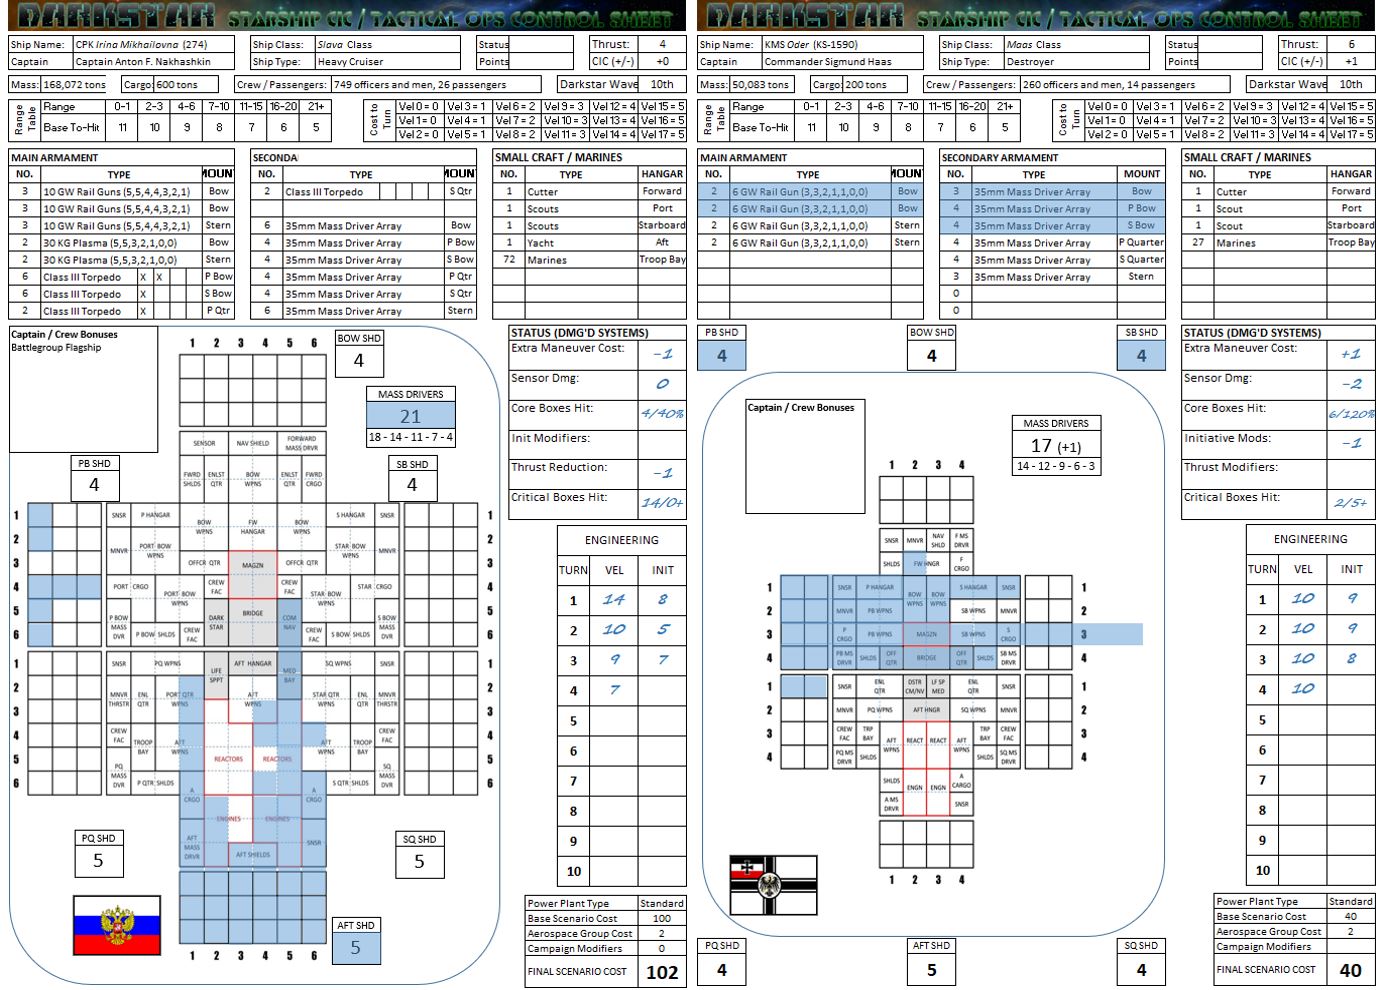 The stunning win by the Prussians in the Second Battle of Zedlitz resolutely secures their hold on the Zedlitz Colonies and Theta Usrae Majoris in general, and decisively shutting down Russian ambitions in the system for the foreseeable future. In game terms, I feel this result was the combination of three factors: partly me “showing a new player the ropes” … no small amount of killer Prussian dice (that round two crippling of the Ushakov was insane) … and especially good play on Yavasa’s part. He read the rules, understood them for the most part before the game began, and had a pretty solid plan even for his first game. The loss of the Arktishwind was regrettable, but ship crashes often happen early in a new player’s journey in Darkstar. In conclusion, GREAT GAME and CONGRATS on the solid win. Also, it’s just damned good to see the Prussians back in action and better yet, to WIN a game for a change. I was beginning to feel like this faction was “cursed …” a stigma that seems to be lifted for now!
 Oriskany's Russians v. Rasmus' Japanese: Battlecruiser Smackdown
Late last week, my friend Rasmus and I sat down for another game of Darkstar … which saw his Japanese battlecruiser IJN Nobunaga (Sengoku class) and her escort ships sortie forth in search of redemption. The last time this task force headed out to the stars … they were, frankly speaking, roundly defeated by a raiding American battleship and heavy cruiser at the Farukon Kosuto colonies (99 Herculis).
Can Rasmus’ Japanese redeem themselves and restore the honor of the Imperial chrysanthemum?
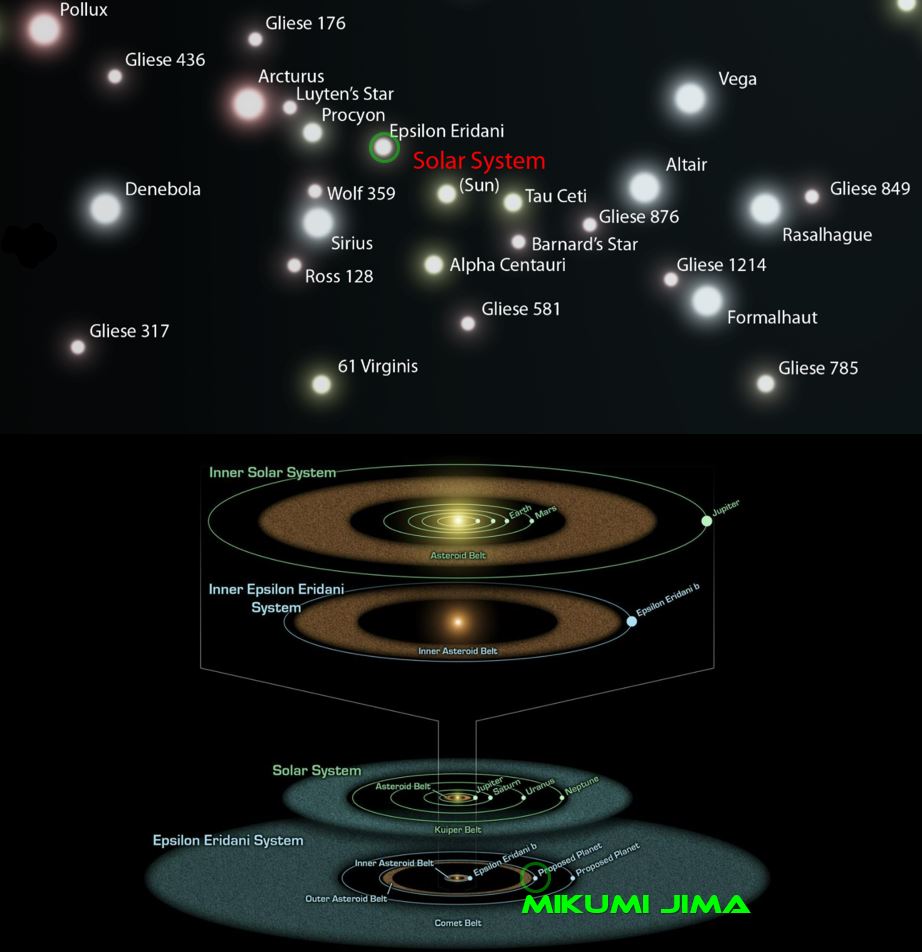 This time, Rasmus’ Japanese (sailing under the flag of Commodore Seizo Yamamoto) are called in to repel another raid, this time at a star system much closer to earth, the Mikumi Jima colonies at Epsilon Eridani. The aggressors today are not Americans, but a battlecruiser task force of the Holy Russian Empire
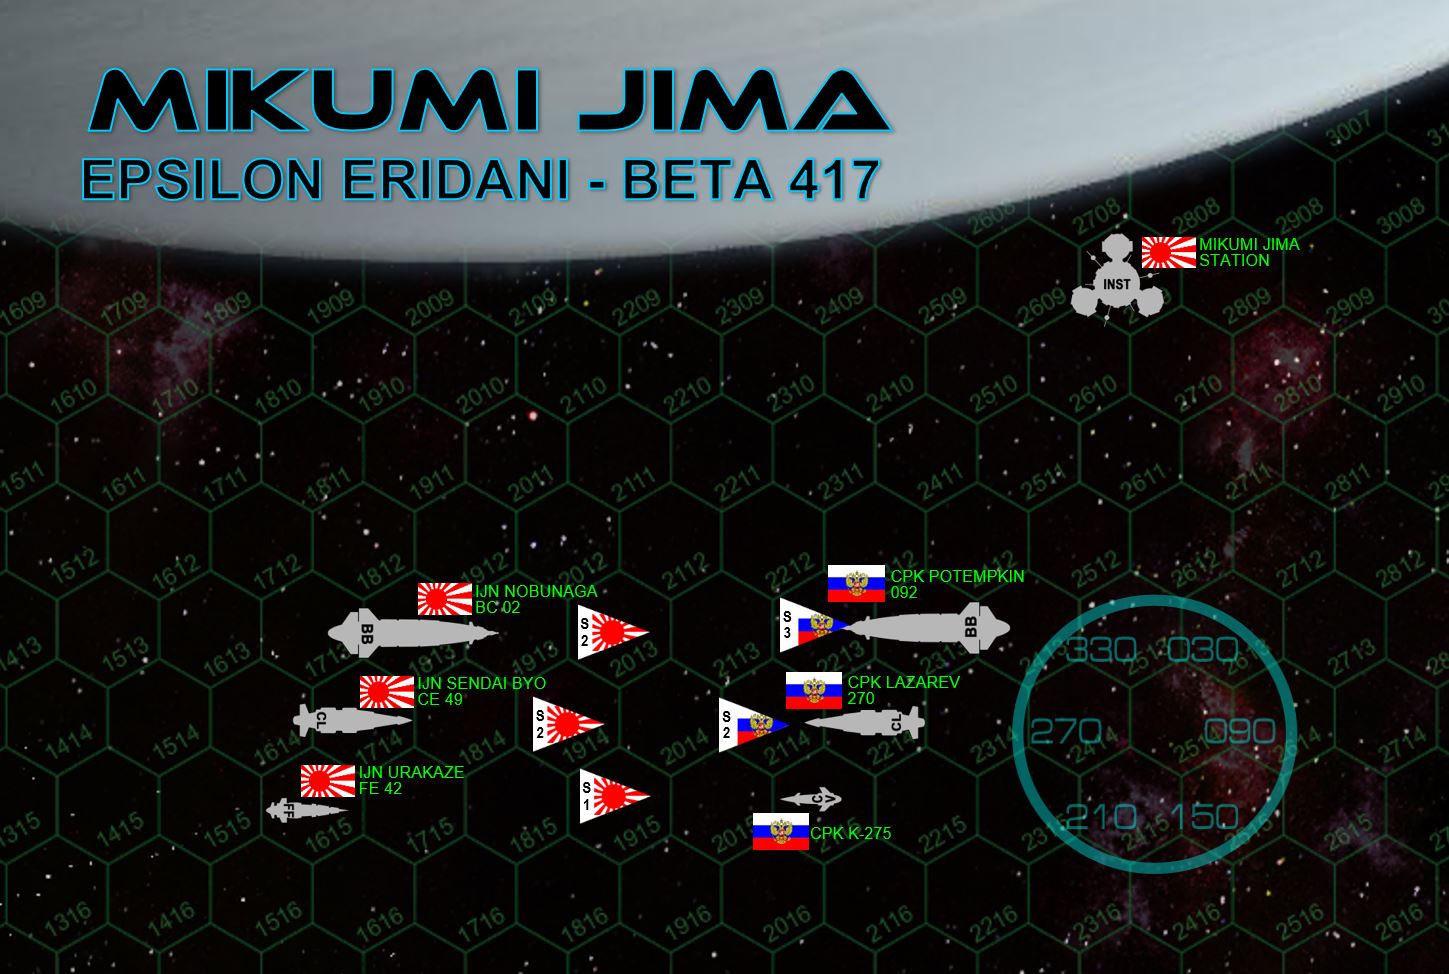 The Russian force is built around the Kirov-class battlecruiser CPK Potemkin, under the flag of Rear-Admiral Konstantin A. Zharyno, escorted by the infamous Kutuzov-class light cruiser CPK Admiral Lazarev (Captain Pyotr Fedorovich Myshaga). The small, stealthy, and deadly torpedo corvette K-275 screens the force as the Russians drop out of Darkstar wave and vector beneath the south pole of Mikumi Jima, a large moon orbiting the third gas giant of Epsilon Eridani. The Potemkin’s large Darkstar signature, however, has been detected and Yamamoto’s response force has enough time to set an intercept course. Escorting the Japanese flagship is the sleek, beautiful, and lethal Taihō-class light cruiser IJN Sendai Byo and the rugged, scrappy Akashi-class strike frigate IJN Urakaze.
 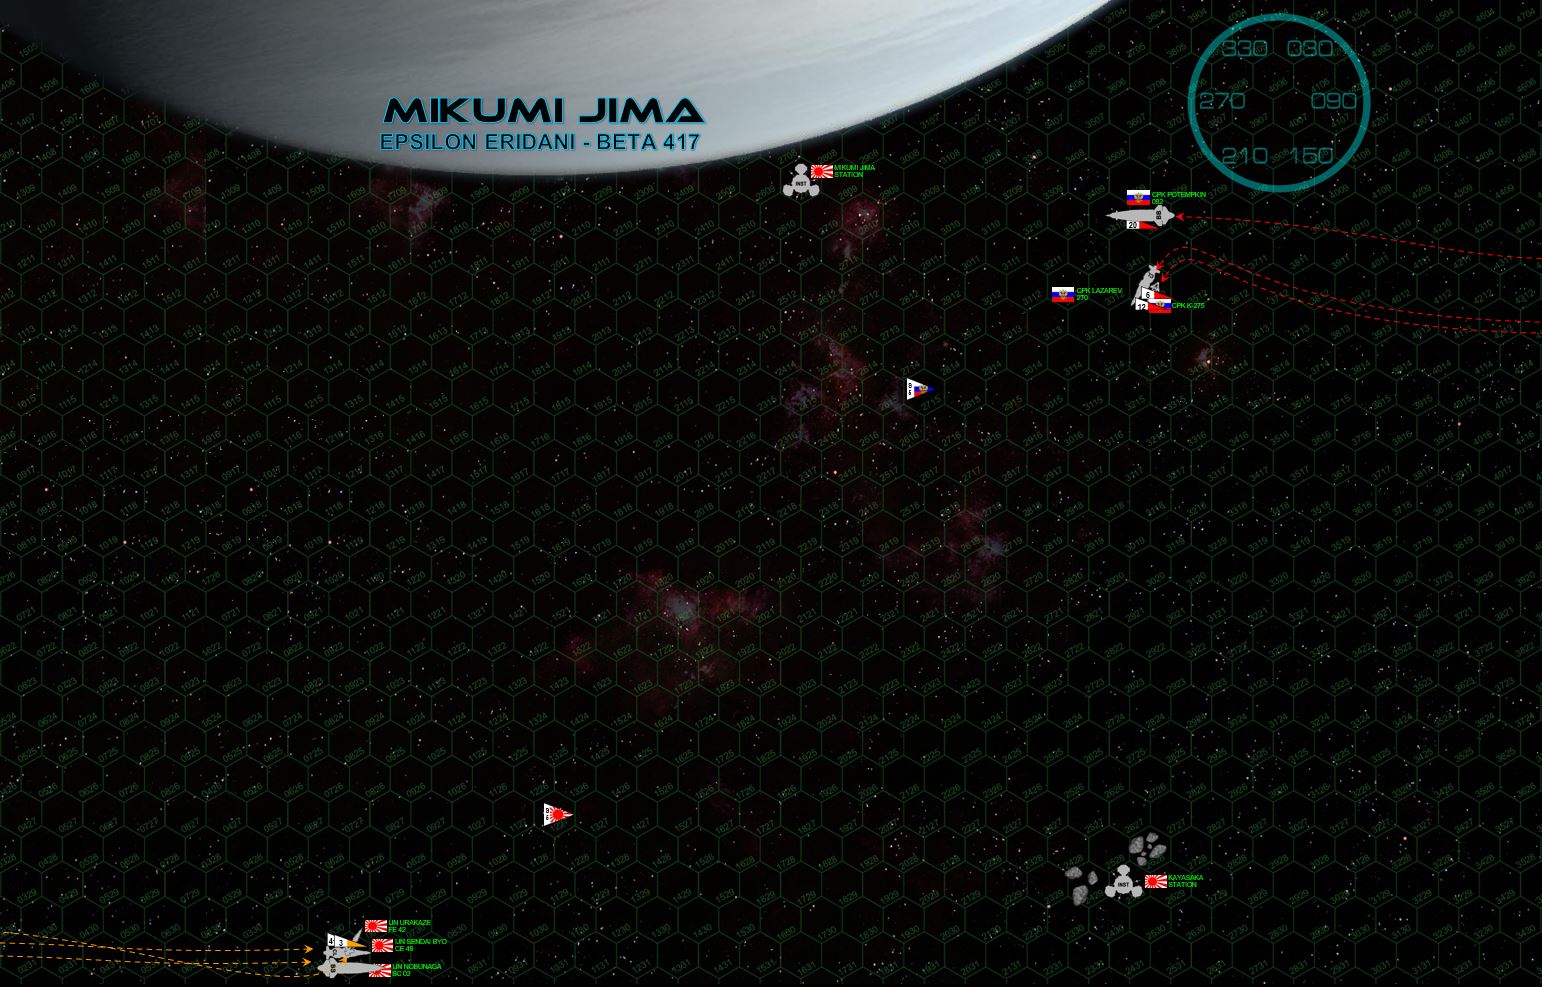 The two sides make their approach at 30 KPS, the Russians slowing and descending close to the polar atmosphere of Mikumi Jima. It’s a classic tactic, seizing the “gravity gauge” … using the planets gravity to make a fast initial approach, then as auxiliary brakes as they turn away from the moon to face the enemy. Perhaps most dangerous of all, it forces the enemy to turn TOWARDS the planet in order to engage them, a maneuver relished by few experienced starship commanders. The Japanese do not take the bait, however, maintain course and speed (and distance) from the Russians, hoping to make the most of the far-superior accuracy and longer-ranged hitting power.
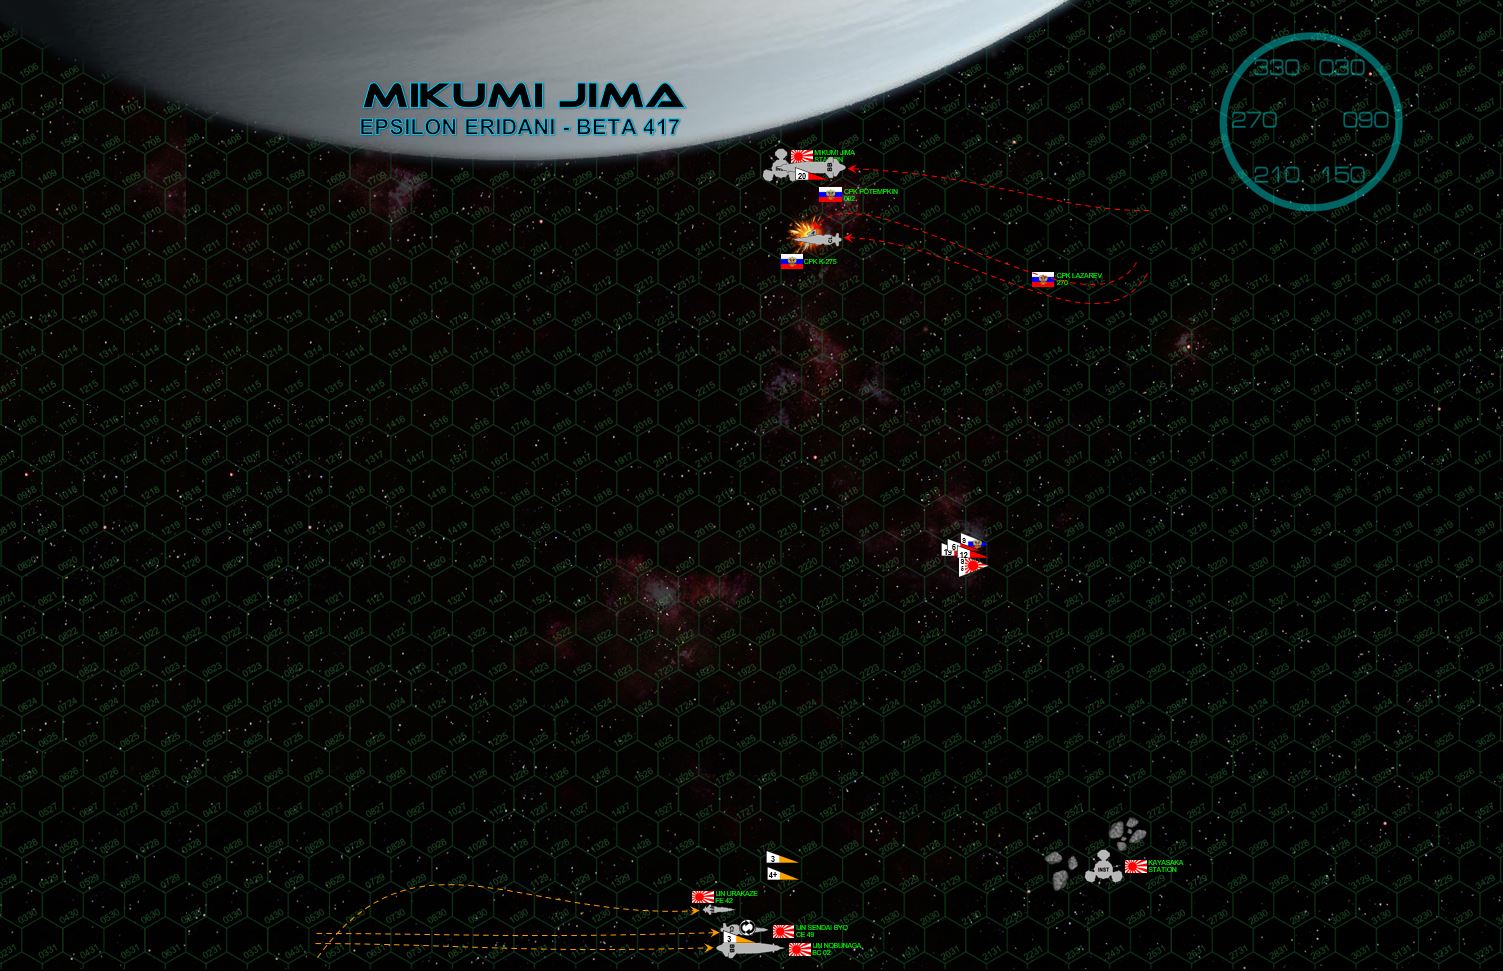 Both sides double down in their tactics, the Russians decelerating further, hoping to coax the Japanese to turn toward them. The Japanese refuse, happy to set up a broadside at 3600 kilometers, focusing their fire on the K-275. It’s a curious tactic, firing the full broadside of a 363,000 ton battlecruiser at 14,000 ton corvette. Russian torpedo corvettes are dangerous, however, almost impossible to lock on and hit and known to fling out waves of P-500 “Plamya” (Flame) Class III torpedoes at a ruthless pace. The corvette is finally crippled, but a staggering wave of 46 torpedoes is still incoming, launched from the Potemkin and Lazarev. Japanese Ki-202 "Hien" (Flying Swallow) scouts manage to shoot one of them down, while Russian Su-107 “Molniya” (Lightning) scouts counter-engage but fail to shoot any Japanese down.
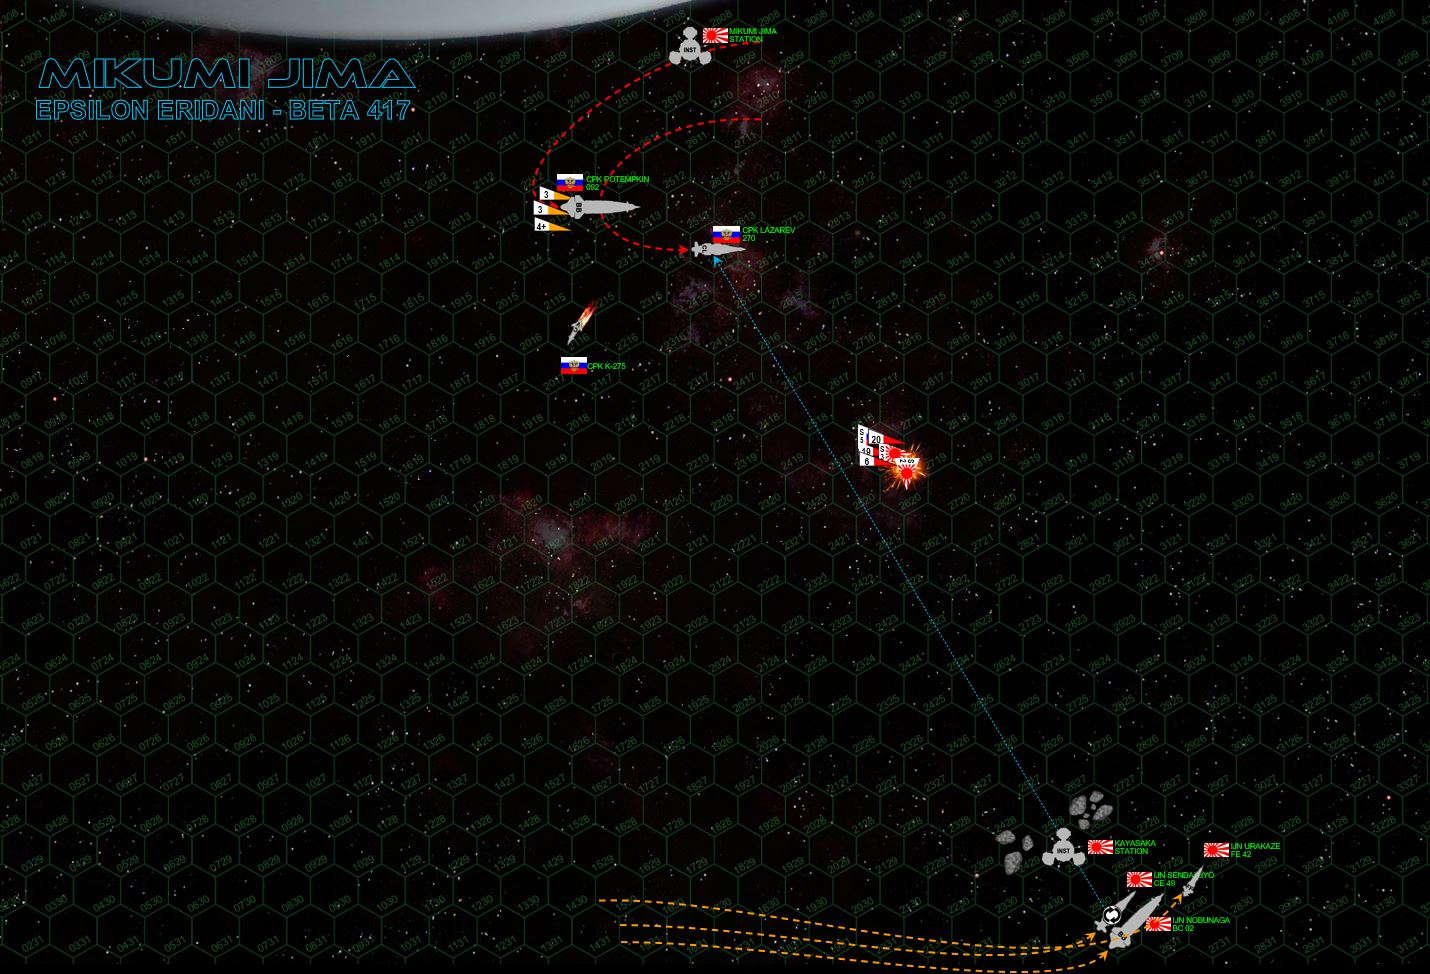 At last the Russians start to lose their patience. As the crippled K-275 careens out of orbit, the Potemkin and Lazarev come about in port standard turns, the Lazarev drilling forward guns into the reeling Urakaze (under sustained fire for three minutes), while Lazarev’s aft guns and the forward batteries of the Kirov switch to the Sendai Byo, smashing and burning holes in her port bow (the Sendai in inverted to bring new torpedoes to bear). Meanwhile, the Russians mass their huge wave of admittedly slow-moving P-500 torpedoes, the Japanese scouts again move to shoot them down but are in turn mauled by long-ranged mass driver fire from the Lazarev. Meanwhile, the wave of Japanese Ki-45 “Toryu” (Dragon Slayer) torpedoes targets the Potemkin, but none get through the battlecruisers withering hail of mass driver fire.
 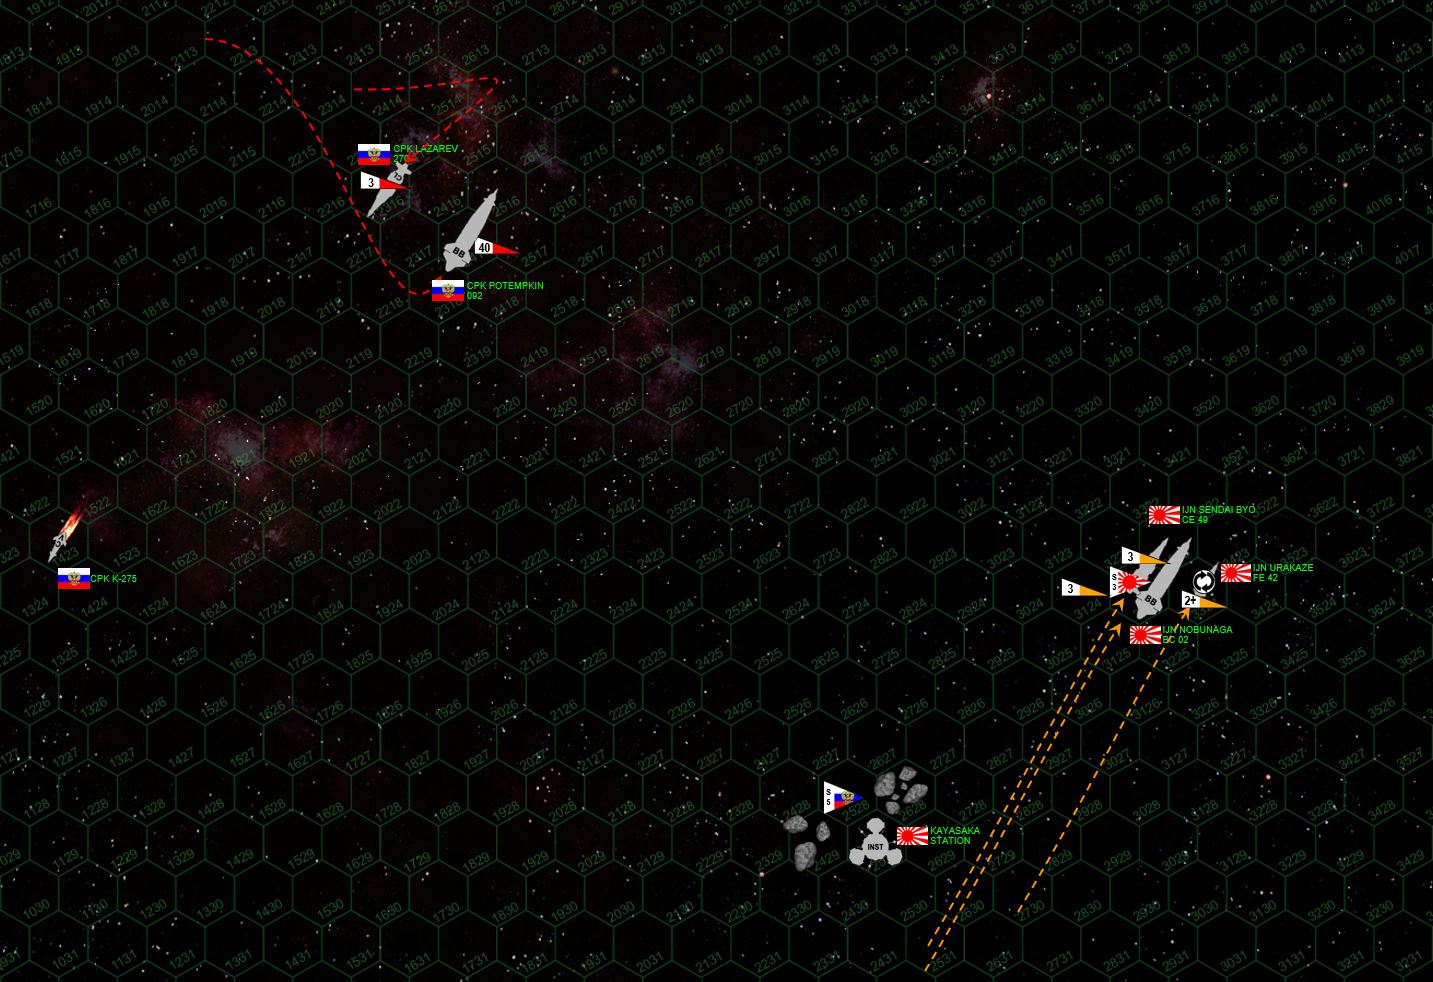 The Japanese task force powers out from behind the Kayasaka orbital mining installation, presenting a perfectly unified and aligned broadside against the Russian ships. The Lazarev and Potemkin crisscross against each other in a far less elegant maneuver, driven by the need to run close abeam for mutual mass driver support against the next wave of Toryu torpedoes, and also Myshaga’s maneuvering to keep his vulnerable port quarter out of Nobunaga’s broadside. The ploy doesn’t work but it’s a moot point, all Japanese ships have already opened fire on the Potemkin’s starboard bow. In a fateful twist, Potemkin’s sensor suite takes a hit JUST as her huge gun batteries are finally getting to some kind of decent engagement range. The massive Russian torpedo strike finally engages, but Japanese mass drivers and poor Russian targeting electronics means (and bad dice) mean NONE of the 45 warheads meet their mark.
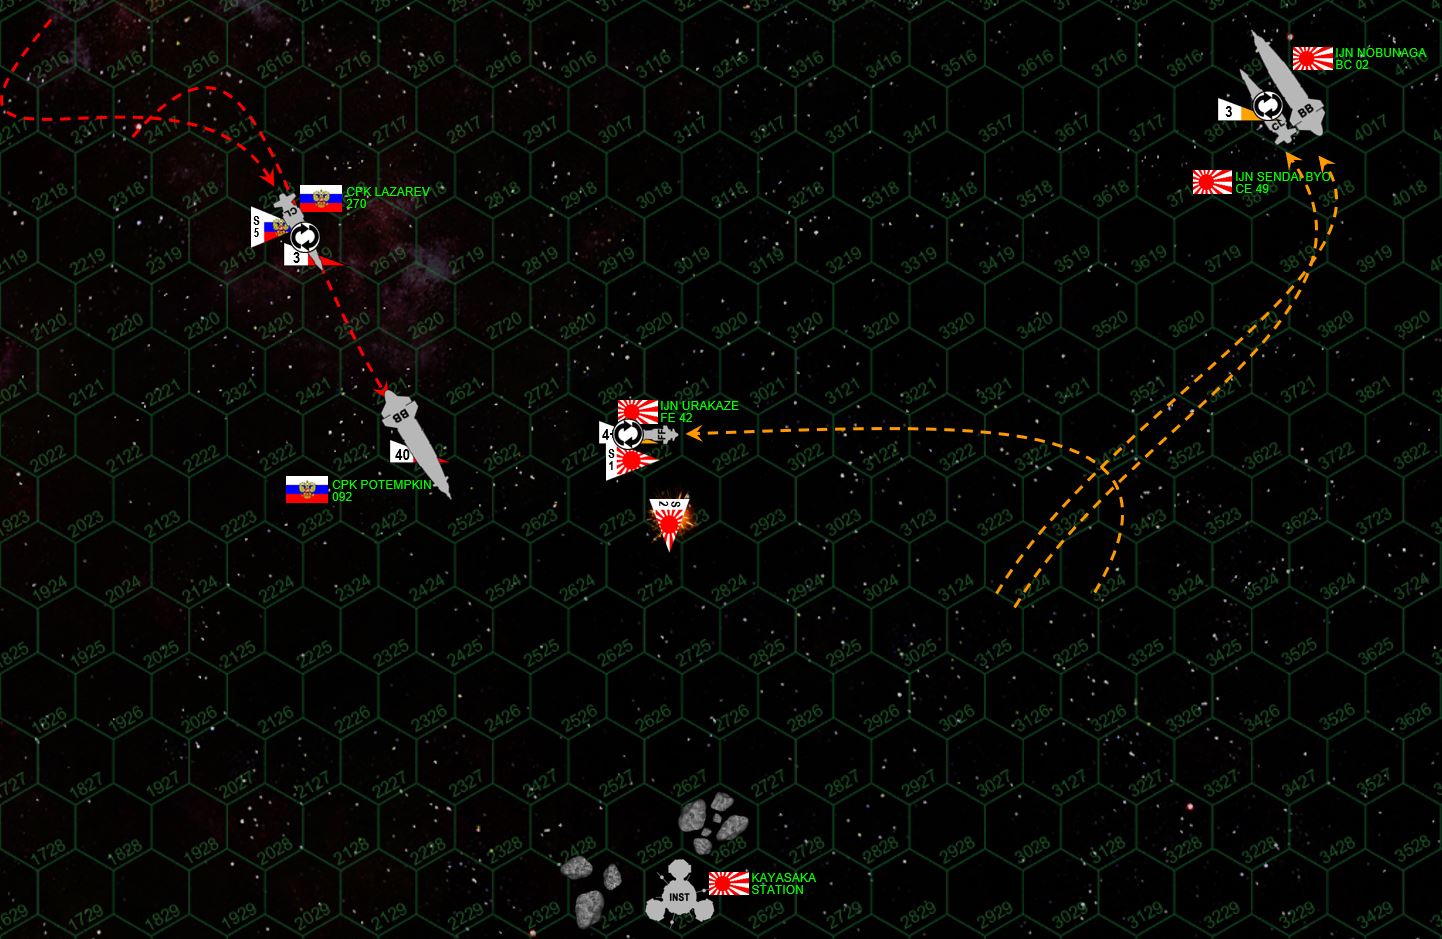 At last, the Russian “gravity gauge” tactics pay off when the Japanese FINALLY turn toward them. Yet Nobunaga and Sendai Byo also backstep as they do so, keeping the engagement ranges long and open even as they are forced to finally turn toward the Mikumi Jima moon. The frustrated Russians manage to get their formation back together in a classic line-ahead, their broadside hammering the starboard bow of the Sendai Byo again. The only outlier is the Urakaze, turning directly TOWARD the looming Potemkin, the 27,000 ton frigate charging headlong toward an opponent almost fourteen times her size. But this is an Akashi class strike frigate, ALL guns are mounted forward, and she’s aiming straight for the badly-damaged armor plating melting off Potemkin’s port bow. A second Russian torpedo wave does slightly better this time, still nowhere near enough to cripple the Sendai Byo. The Lazarev’s three warheads are also sent at the Urkaze, and as the Japanese scouts again try to engage, two more are shot down by Potemkin’s mass drivers.
 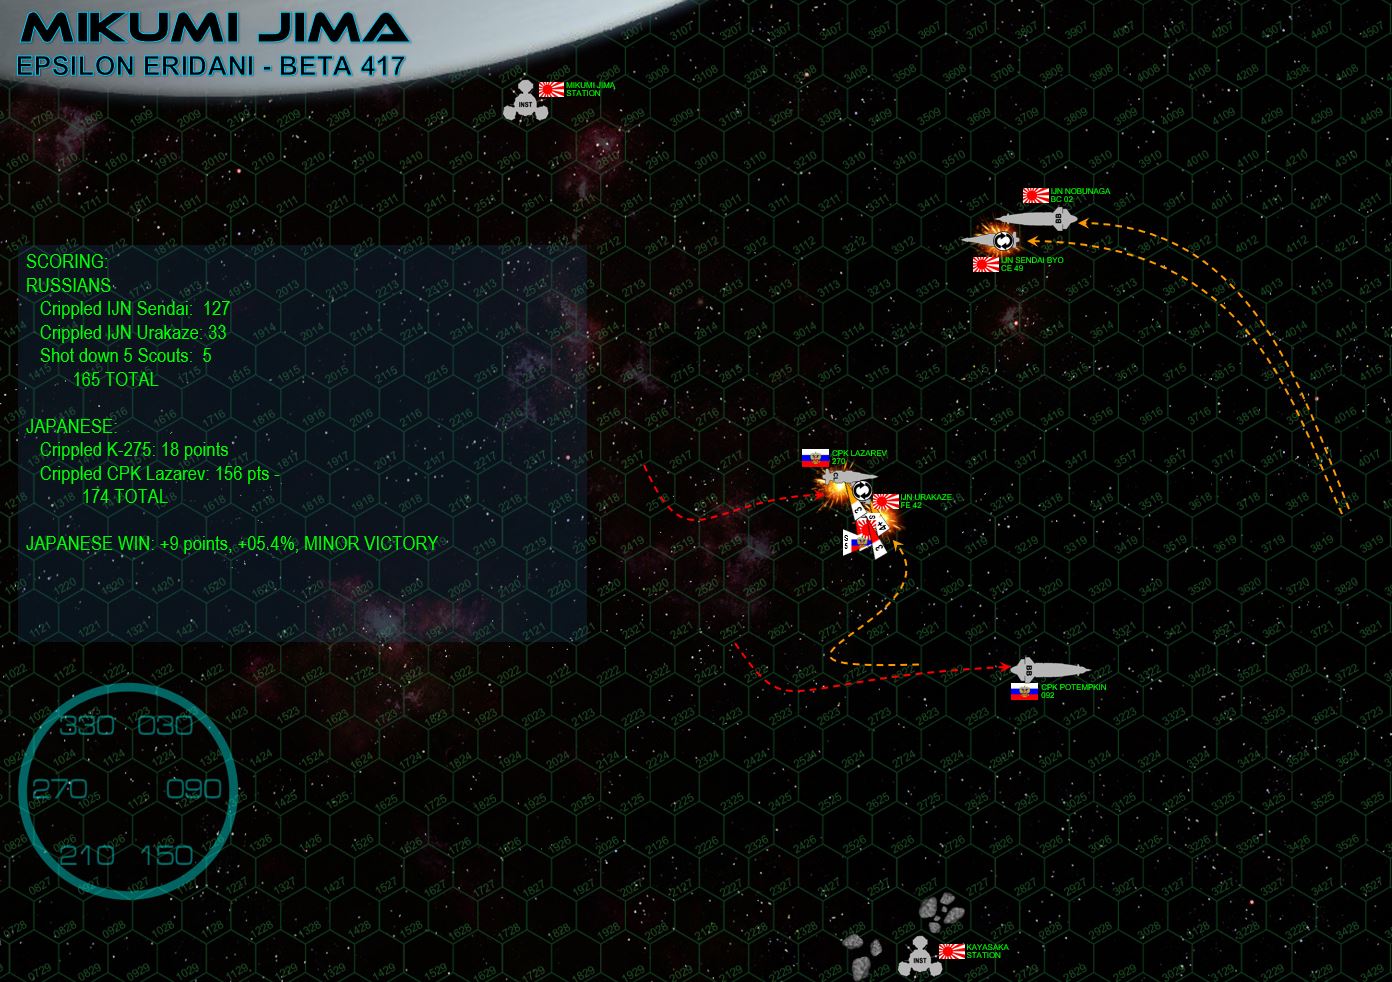 After a long, patient, deadly, and sometimes frustrating dance, the two sides finally come to grips in a furious exchange of torpedoes, particle cannons, and rail guns. The Potemkin lumbers forward in a port turn, the Nobunaga countering in a graceful matching turn, using Mikumi Jima’s gravity to tug her just a little further out of Potemkin’s reach. At 1800 kilometers, however, the Potemkin is finally in good range, only the fact that her sensors are partially brinded save Nobunaga from worse damage. The Sendai Byo is worse off, damaged maneuvering thrusters means she cannot decelerate against the moon’s gravity or re-roll off her back to protect her wounded starboard bow. The Lazarev is thus able to make her port turn much faster, cutting inside to broadside Sendai while avoiding the broadside of the Nobunaga. The Lazarev’s broadside hammers into the Sendai, the EPCs and plasma emitters burning into her fo’c’sle and setting off the forward magazine. Combined with earlier damage to Sendai’s port reactors, its enough to leave her crippled and adrift. However, the battered little Urakaze continues to burn, hammer, and slash into Lazarev’s starboard bow, and now at point blank range (under 180 kilometers), even a frigate’s plasma projectors are fearsome. A lucky plasma strike scorches into the Lazarev’s bridge, leaving Captain Myshaga wounded but alive, his ship adrift but salvageable. The Urakaze has little time to celebrate the victory, however, the valiant little ship then hit by the massive THIRD wave of Russian torpedoes. Even with the repairs Urakaze’s resilient crew has been making all game, up to and including bringing the bridge back on line, the ship’s stern is all but blown apart and she is left crippled as well.
 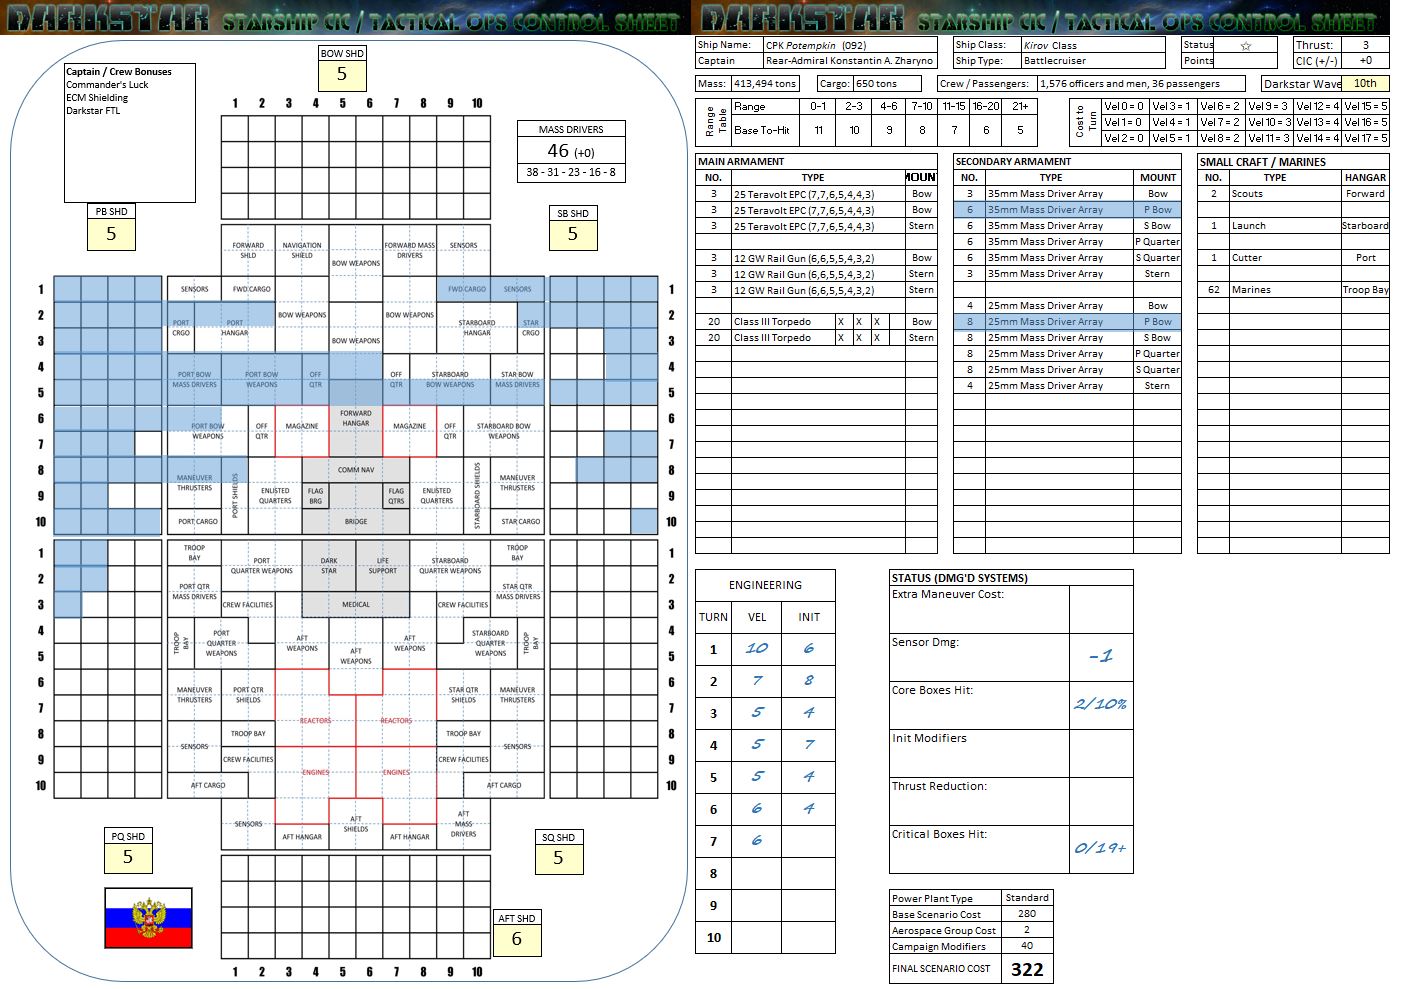 The battle is over (“Raid” model scenarios end after six turns). Although the battleships never closed the range to where they could really inflict lethal damage on each other, the cruisers and smaller escort ships ripped each other apart plenty. The Russians have BARELY managed to score the 165 points required (30% of original total scenario points, 497 in this case) to even qualify this as a raid, but the Japanese have outscored them with 174. That nine-point margin is JUST enough to clear the +5% victory margin, handing Rasmus’ Japanese a razor-thin (but still legitimate) 5.4% minor victory. CONGRATS TO RASMUS! Also note the Urakaze is considered NOT to be destroyed by hitting the moon, as the game technically ends before the impact (in narrative terms, the Mikumi Jima Station’s tractor beams manage to sling her wreck into a wobbly orbit). I’m not 100% that’s how it’s been interpreted in the past, but for now it’s more than fine, the Urakaze’s gallantry against first the Potemkin and later the Lazarev shouldn’t be punished. Also, this scenario was a little weird… battleships aren’t usually used in “raids” (6-turn games) but more often full-scale assaults (8-turn games), meaning Urakaze would have smacked the Mikumi Jima moon on Turn 8. But again, it’s fine.
 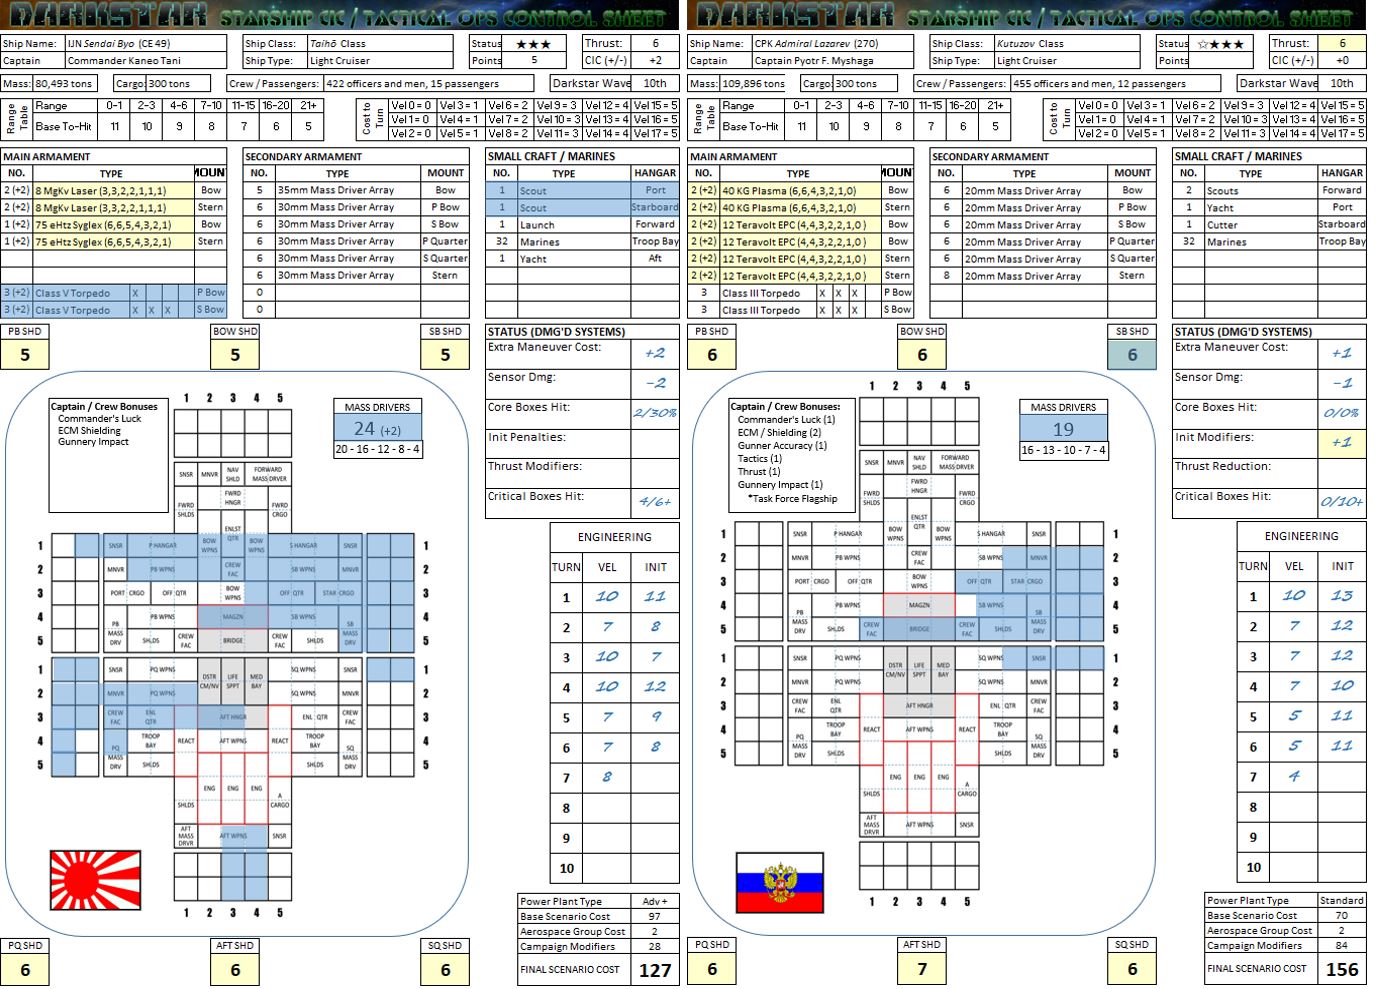 Here are the two real combatants in this scenario, the two light cruisers who so bitterly mauled each other. The comparison is an interesting one, with the Russian ship’s tougher shielding nevertheless lanced by a smaller (but more precise) damage profile, hitting the crucial bridge and CIC (ERRATA: Lazarev’s sheet should reflect 45% chance of break-off based on three core compartment boxes hit, while Sendai should be showing 75%). The Sendai, meanwhile, has taken much more damage, but less precise … in fact I only knocked her out with a lucky “6” cripple check thanks to the magazine and port reactor hits.
 British vs. French in All-Out Cruiser Melee!
Earlier this week, my friend Elessar2590 and I sat down for a long-overdue game of Darkstar … and a pretty big one as well. With eleven total warships (not including 30+ aerospace craft) and 438 points, this game wound up taking about 5 ½ hours to play out, but it had a great finish.
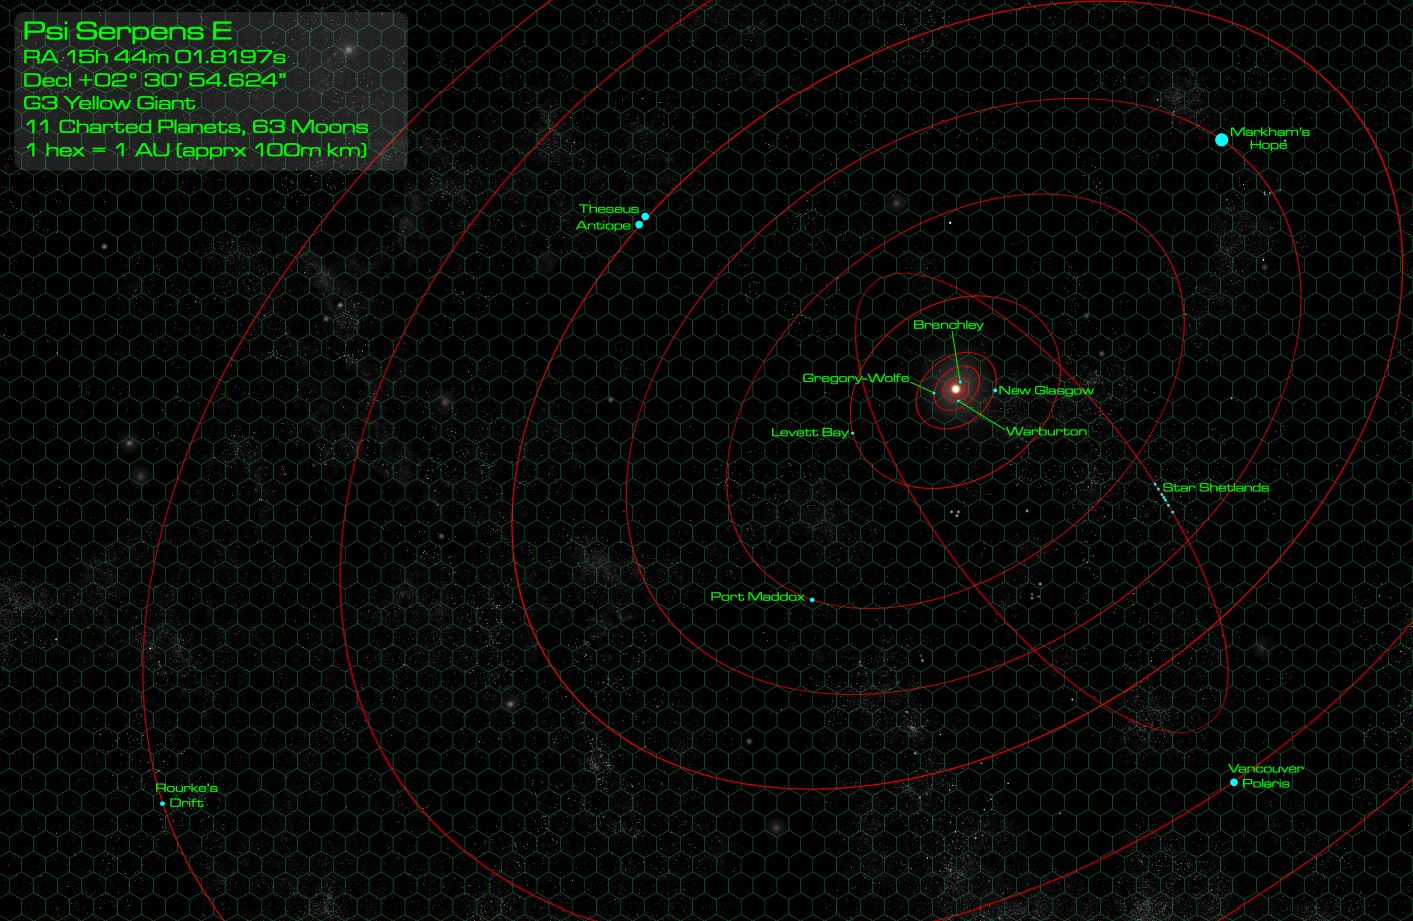 Elessar2590 wanted to play his British task force. For an opposing force, I decided there was no better foe for a classic Napoleonic-themed British fleet than the French. So I brought in a mixed “New Roman” force of my French, bulked out by an “NPC” Italian heavy cruiser of the Tiberius class. The last time the British and New Romans (a coalition of Italian, French, Spanish, Swiss, and other powers) really went to the mat in 400+ point games was in the Psi Serpentis War, so I decided to set this one-off game during that period. The setting was thus chosen as the “Markham’s Hope” colonies in Psi Serpens E (New Glasgow) star system, with a Franco-Italian raid on this huge British gas giant – more specifically, on the colonies built on one of the planet’s Galilean moons (Markham 12).
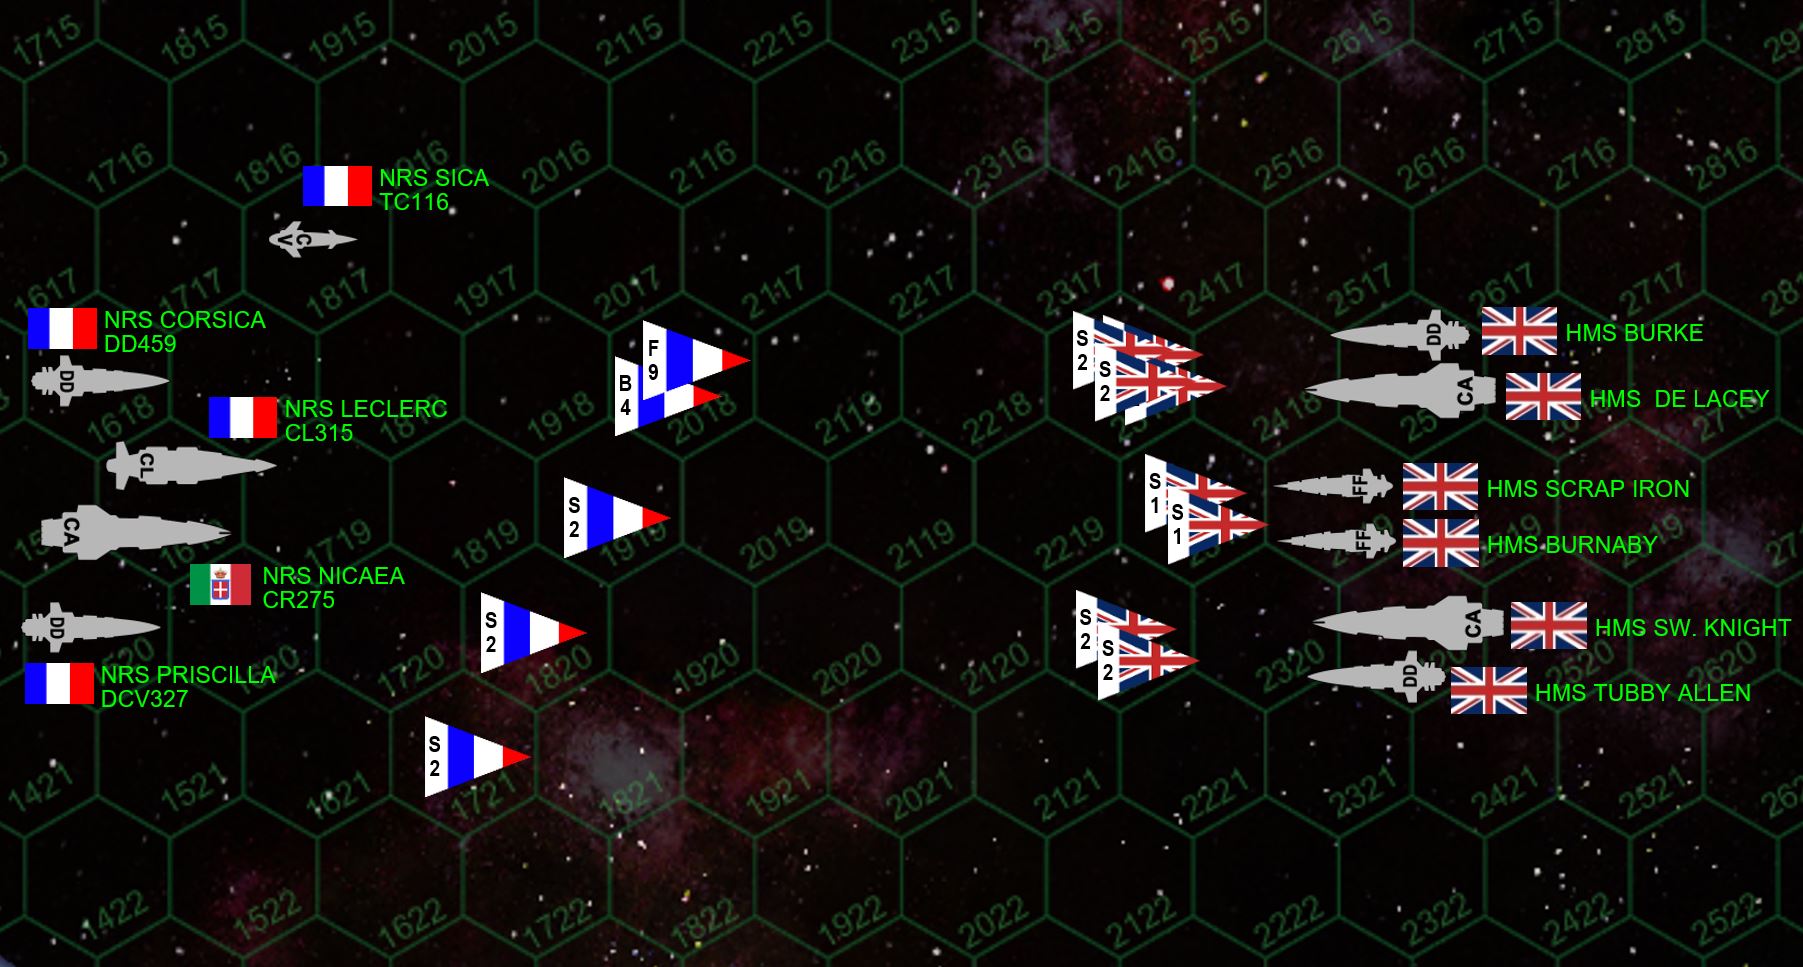 Elessar2590 has recently expanded his task force to include two Iron Duke class heavy cruisers, two Falklands class destroyers, and two Cornwallis class frigates. Some of these ships had campaign upgrades, so his fleet wound up tipping the scales at 438 points. To match him, I set up my “NPC” Tiberius class heavy cruiser, along with my “campaign commanders” I’ve been building up off and on for the past few years. Overall, the French fleet is MUCH lighter, but also faster, more maneuverable (I’ll almost always win initiative), and has aerospace support in the form of the light carrier NRS Priscilla. Also, my French light cruiser NRS Leclerc (Foch-Hispaniola class) is far deadlier than she looks and can punch far above her weight class due to her upgrades. Still, the British have TWO heavy cruisers to my one …
 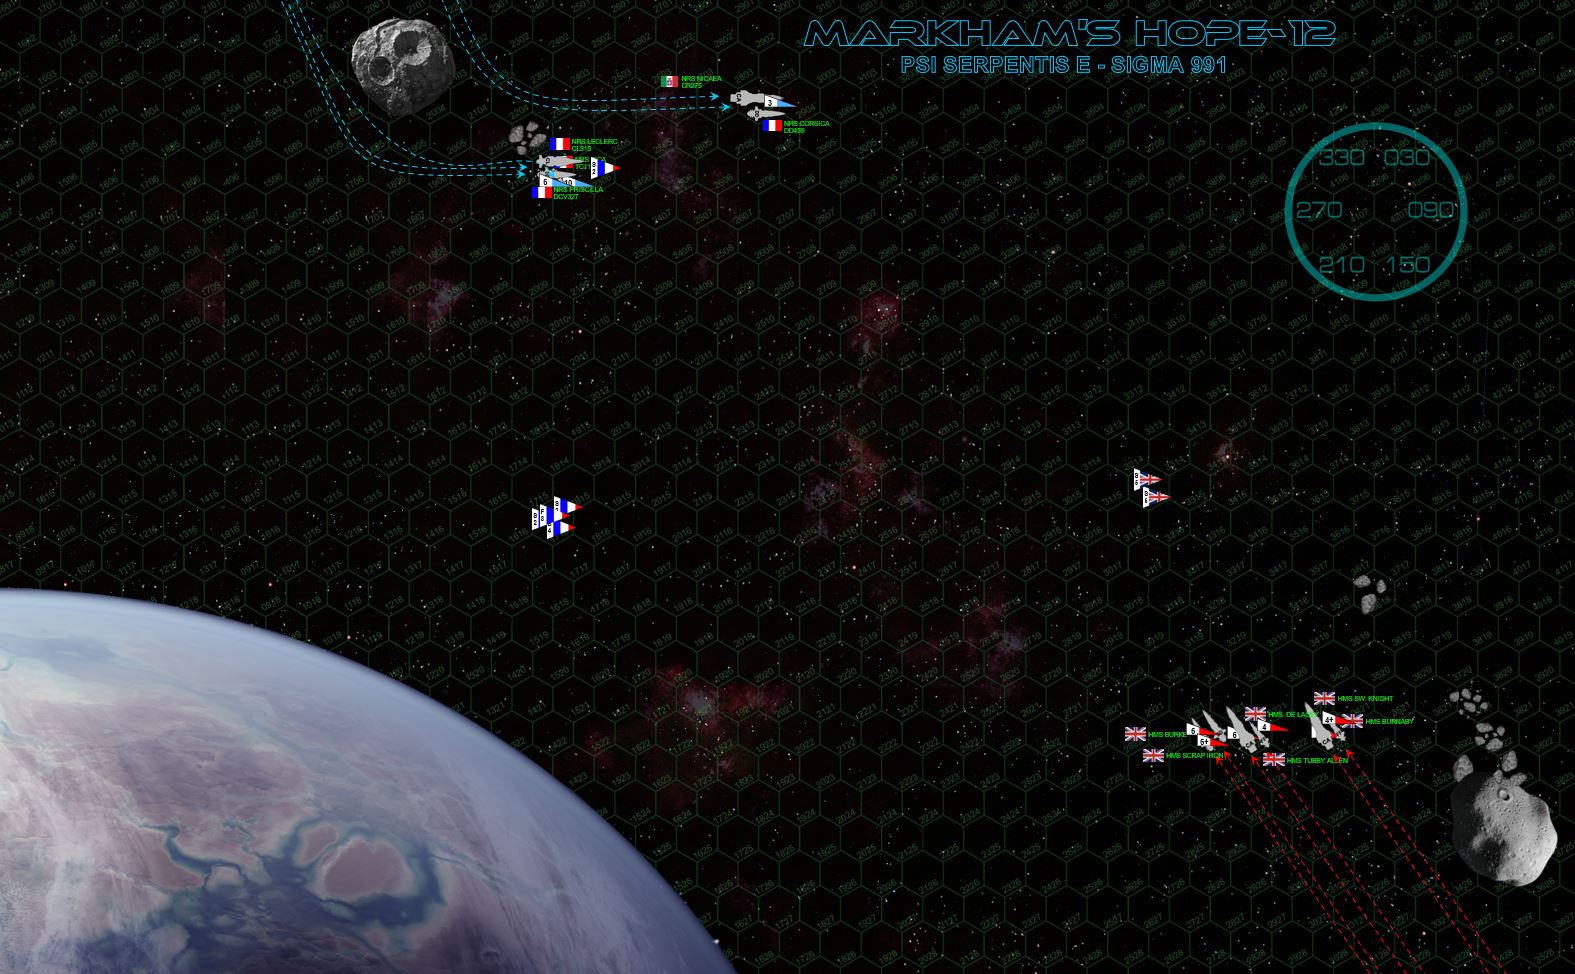 The engagement begins above the dawn terminator of the Galilean moon Markham’s Hope-12, with the HMS Swedish Knight leading the British task force past the rubble of mined asteroids (gravity-tugged into orbit of the Markham’s Hope 12 colony). The New Romans cut in as well, both task forces doing about 30 kps, the Romans cutting a port turn around another captured asteroid. The new Romans can’t QUITE get the British into their broadside, no both sides open fire with long-range forward batteries at ranges of about 4000 kilometers (hexes are 180 kilometers across, turn is 1 minute, each point of movement = 3 kilometers a second). The French light carrier NRS Priscilla starts launching her aerospace group, leading off with Caproni CA.580 “Aquila” (Eagle) bombers.
 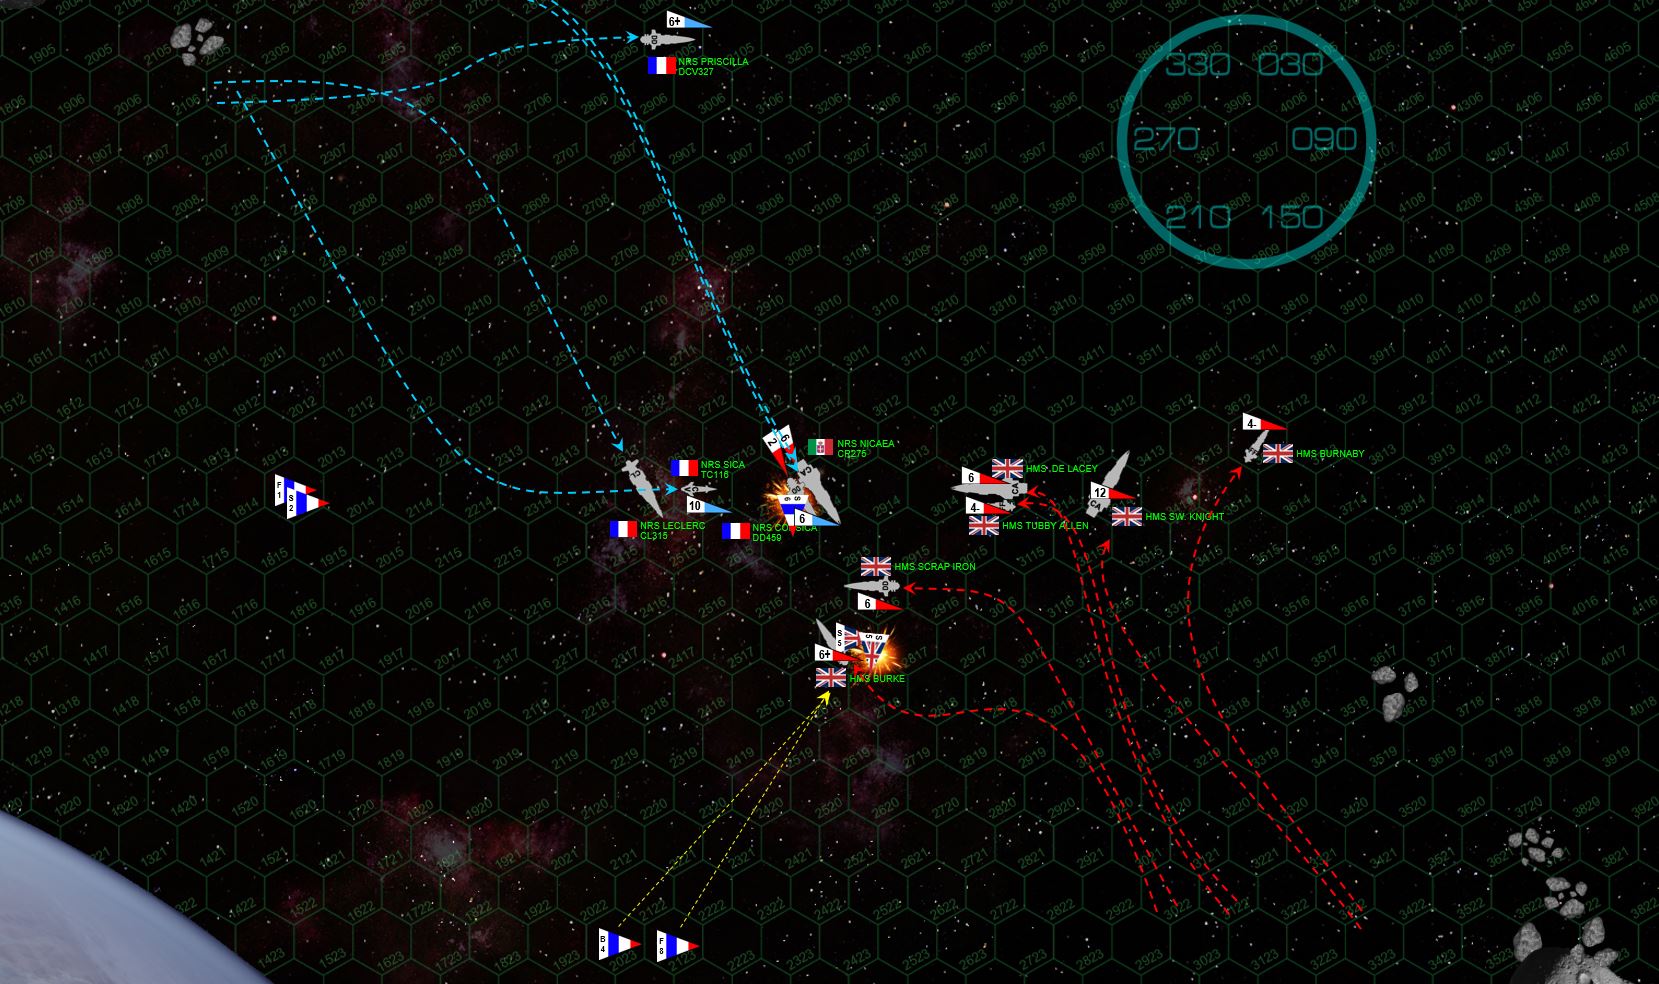 The Swedish Knight starts a turn to starboard, clearly trying to get the Romans in her powerful broadside of 10-gigawatt railguns. The Italian flagship, NRS Nicaea, sees the move and accelerates in a hard starboard turn, cutting half-behind the Swedish Knight. Both heavy cruisers have each other in broadside, but the Romans will be hitting the Swedish Knight’s port QUARTER (engines and reactors), while the British will be hitting Nicaea’s port BOW (less vulnerable systems). Also, the Franco-Italians are clearly trying to cut behind the British for broadsides and torpedo strikes on British sterns. The fight quickly devolves into a melee, with the cruiser De Lacey turning directly FOR the Nicaea, the Priscilla’s aerospace group of “Aquila” bombers and Dassault-Rafael “Mirage XII” Fighters joining the torpedo strike of the corvette Sica (Drusus class) against the stern of the Burke. Mass British torpedoes also strike the Nicaea, but both ships weather the storm (somewhat) thanks to small-caliber mass driver support from nearby friendly warships.
 By this point in the engagement, many ships on both sides have absorbed tremendous punishment but so far all remain operational. However, as ranges continue to close and captains vie for gunnery positions … and FURTHER torpedo strikes hiss toward their targets … this all changes with horrific speed. “Aquila” fighters launch a daring strafing attack on the ravaged stern of the HMS Burke, which she survives, putting a broadside into the stern of the French destroyer NRS Corsica, who’s 8 megakelvin lasers have just sliced through the reactors of the frigate HMS Burnaby. French torpedoes (Dassault-Rafale "Lancea" Class IVs) streak in after the fighters, and Burke’s engineering section is blown apart. More torpedoes come in after the HMS Scrap Iron, but she shoots down enough torpedoes to survive the attack, adding a further fusillade at 1000 kilometers into the stern of the Corsica, burning the engines out of the hull and leaving her adrift as well. The heavy cruiser Swedish Knight hammers on the corvette Sica, quickly shutting her down as well with a laser through the bridge. Only the quick thinking and bravery of the skipper, Lt. Commander Sebastian Anjou, saves the ship to be salvaged later … but Anjou himself will sadly die of his wounds. The Nicaea takes bloody revenge, absolutely shearing the stern all but clean off the Swedish Knight, instants before a massed British torpedo strike smashes through her engineering sections as well. In sixty seconds, six warships totaling 450,000 tons of shipping, have been knocked out of the battle.
  On the bridge of the cruiser De Lacey, Edward Evans assumes command of what’s left of the British task force, kicking his grav rudder hard to starboard and closing with the French while also trying to consolidate his fleet. The skipper of the frigate Tubby Allen is caught out of position however, as the ruthless Captain Ralphael deChalemonde assumes command aboard the Leclerc, and cuts his swift, sleek cruiser between the Allen and the De Lacey. His aft guns cripple the Tubby Allen with almost contemptuous ease, his forward guns raking the starboard bow of the HMS Scrap Iron, destroying both hangers, damaging the bridge, and JUST missing the magazine. The Scrap Iron, however, takes a grim revenge, point-blank opening fire into the stern of the French carrier NRS Priscilla. The Priscilla has closed to this distance for protection from British torpedoes, a tactic that works well enough … but its doesn’t save her from the lasers and syglex emitters of the Scrap Iron. Only by a VERY fast reaction of the ship’s engineer does NRS Priscilla eject her reactors in time, leaving the ship crippled but at least sparing her from a full-scale explosion. Ironically, post-battle analysis reveals that HAD NRS Priscilla exploded, she was close enough to HMS Scrap Iron to take her out as well with the blast wave … a “crash-down” emergency bulkhead is all that stands between the burning bridge’s starboard side and the raw vacuum of space.
 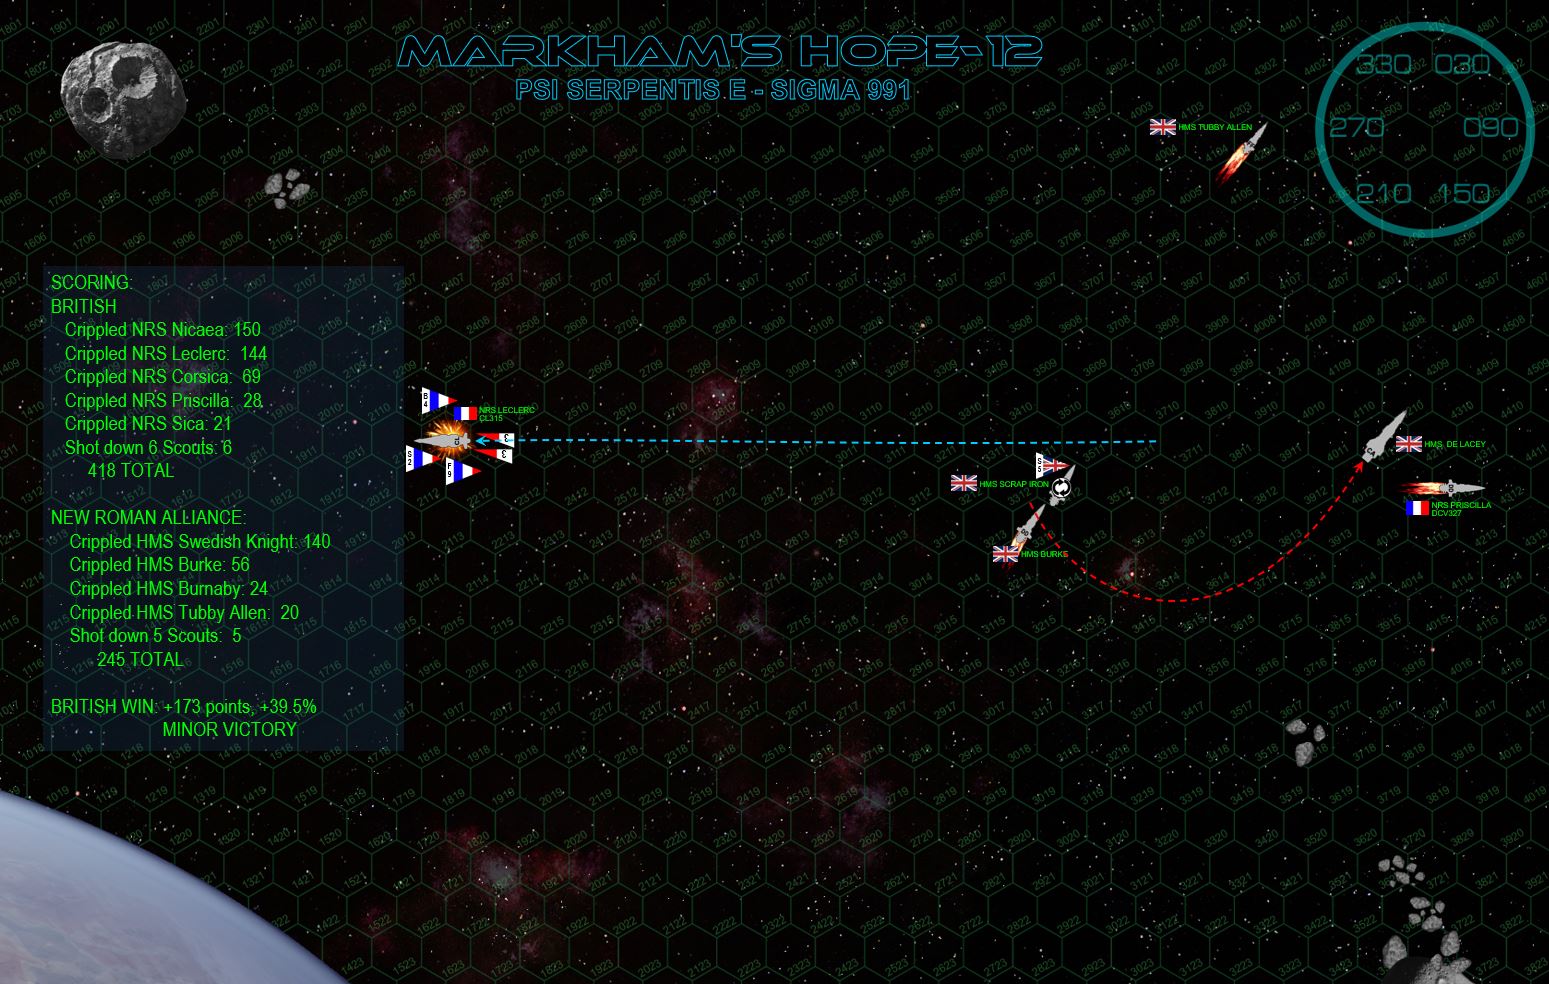 The NRS Leclerc is now badly hammered and venting into space as well, her port bow mauled by the 500-km broadside of HMS De Lacey. Now alone, deChalemonde knows he has to make a run for it. Ideally, he’d turn to starboard and escape over the moon’s north pole, but De Lacey’s 10-gigawatt rail guns have just torn one of her maneuvering thrusters out of Leclerc’s hull. This leaves deChalemonde with only one option … all ahead flank and simply race forward. The Leclerc is a very fast cruiser, and he ALMOST gets away with it, especially after Scrap Iron reverse-thrusts to a dead standstill in space and De Lacey is caught flatfooted after turning the other way. It’s not enough though. At a range of 3800 kilometers, DeLacey’s broadside is enough to cripple Leclerc’s engines and leave her crippled and adrift.
 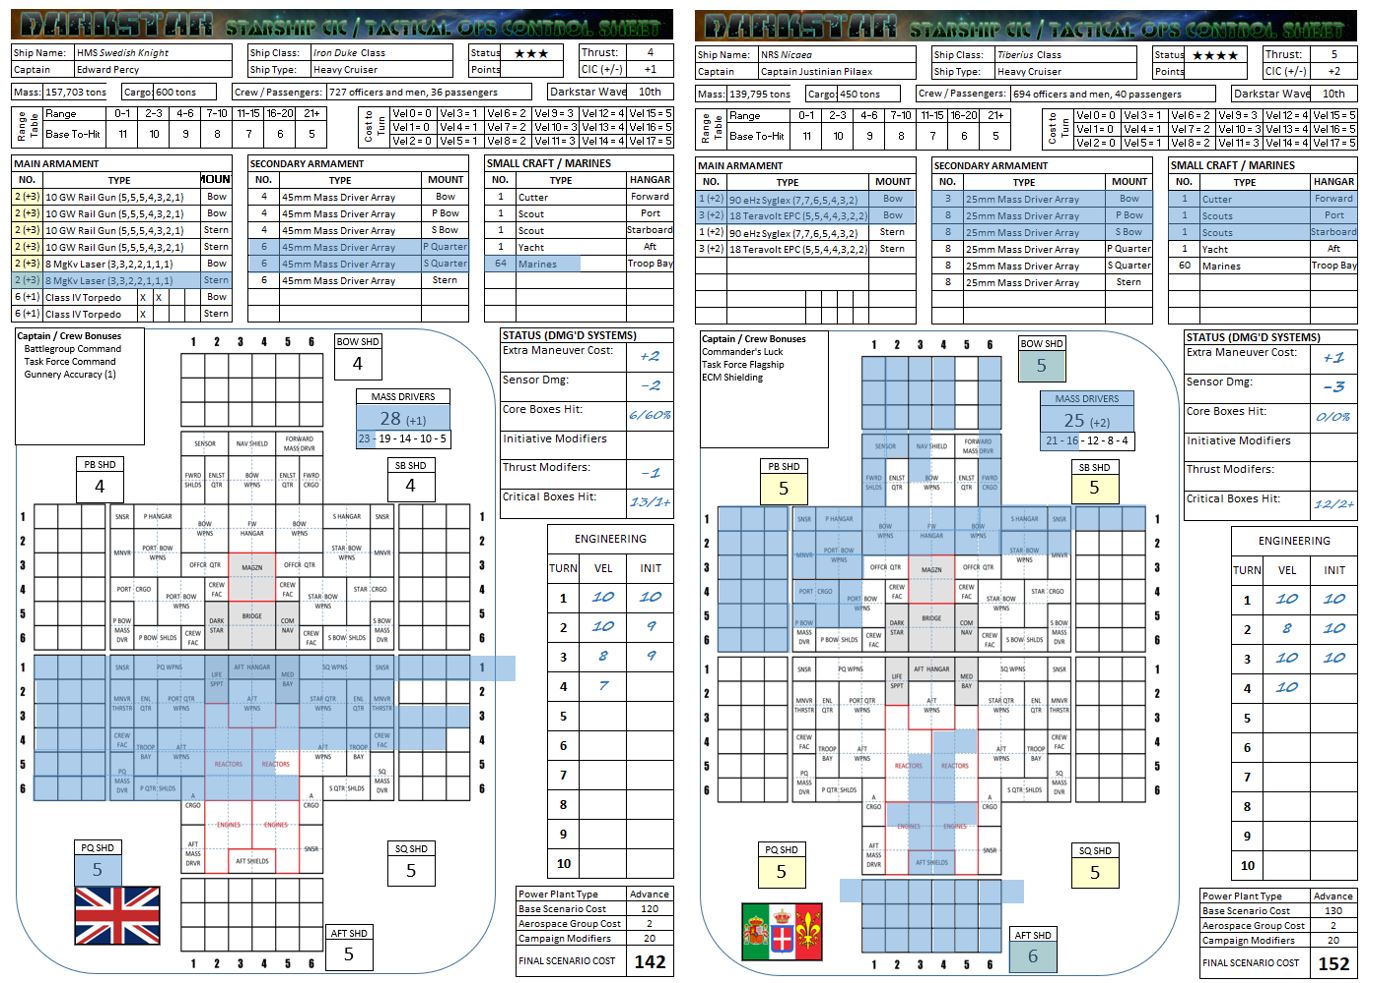 The battle was ALMOST a “major victory” for the British, with the French effectively being tabled here and only their aerospace group remaining. With the score being 418-245, the victory margin of 173 was calculated to be 39.4977% of the 438 beginning total … JUST short of the 39.5 … which would round up to 40 … the required percentage margin for a Major Victory. Still, it’s a SOLID win for sure, congrats to Elessar2590 for the great game!
 Darkstar Returns (It's baaaaack ...)
It’s true, it’s true … after eight months (I think) since our last game, and I think about a year since the official end of the Third Hercules War, we’ve dusted off the Darkstar rules and played another game! It takes place vaguely in the Third Hercules War timeline (we don’t really have a full campaign going yet), but of course that war is already over and decided so this won’t affect the conclusion of that war in the Darkstar timeline.
The basic background of this engagement has to have the two forces CLOSE, because both players wanted to try out a battleship, and such star-dreadnaughts don’t exactly lend themselves to fast, long-range strikes … especially when under-escorted (as they will be here). Also, both sides have to make MAJOR operational and strategic assets nearby and under threat, or else a battleship wouldn’t be committed to combat in its defense.
So I used the old “Redemption” star system (99 Herculis), a UN Mandate along the Hercules Rim where several regional naval powers have colonies and installations orbiting terrestrial worlds or gas giant moons. We can imagine the US Navy (despite their loss to the British Navy earlier in the war’s timeline, scraped out a new lease here in Redemption thanks to another campaign against the Spanish, French, and Italians of the New Roman Alliance) setting up their new base on one of the dozen or so moons of an outer ice giant’s moon, only to find the Japanese have a moon here as well (Farukon Kosuto, or “Falcon’s Coast”). As so often happens here in the colonial world of Darkstar, misunderstanding compounds distance-delayed communication compounds old grudges compounds corporate greed compounds, compounds, compounds …
Long story short, an American destroyer-frigate battlegroup strayed too close to Faukon Kosuto, Japanese corvettes slung out a salvo of torpedoes. The Americans turned hard about and withdrew, vowing a response to this “militant act of war, blatantly violating the guarantees of (insert half a dozen out-of-date treaties here). Perhaps flush with overconfidence after their recent thrashing of the New Romans, the US Navy sends out a full battleship with heavy cruiser escort. There’s no hiding such a deployment, so the Japanese have plenty of time to respond in kind … and the match is on!
 I had the Americans, and Rasmus had the Japanese. Rasmus’ force included his new Sengoku-glass battlecruiser Nobunaga, along with his veteran light cruiser Sendai Byo. I have the Colorado-class “fast battleship” USS Michigan, along with my semi-NPC Gettysburg class heavy cruiser USS Shiloh. Rasmus’ battlecruiser has better shields and more accurate guns than by battleship (his ship is also SLIGHTLY more expensive)
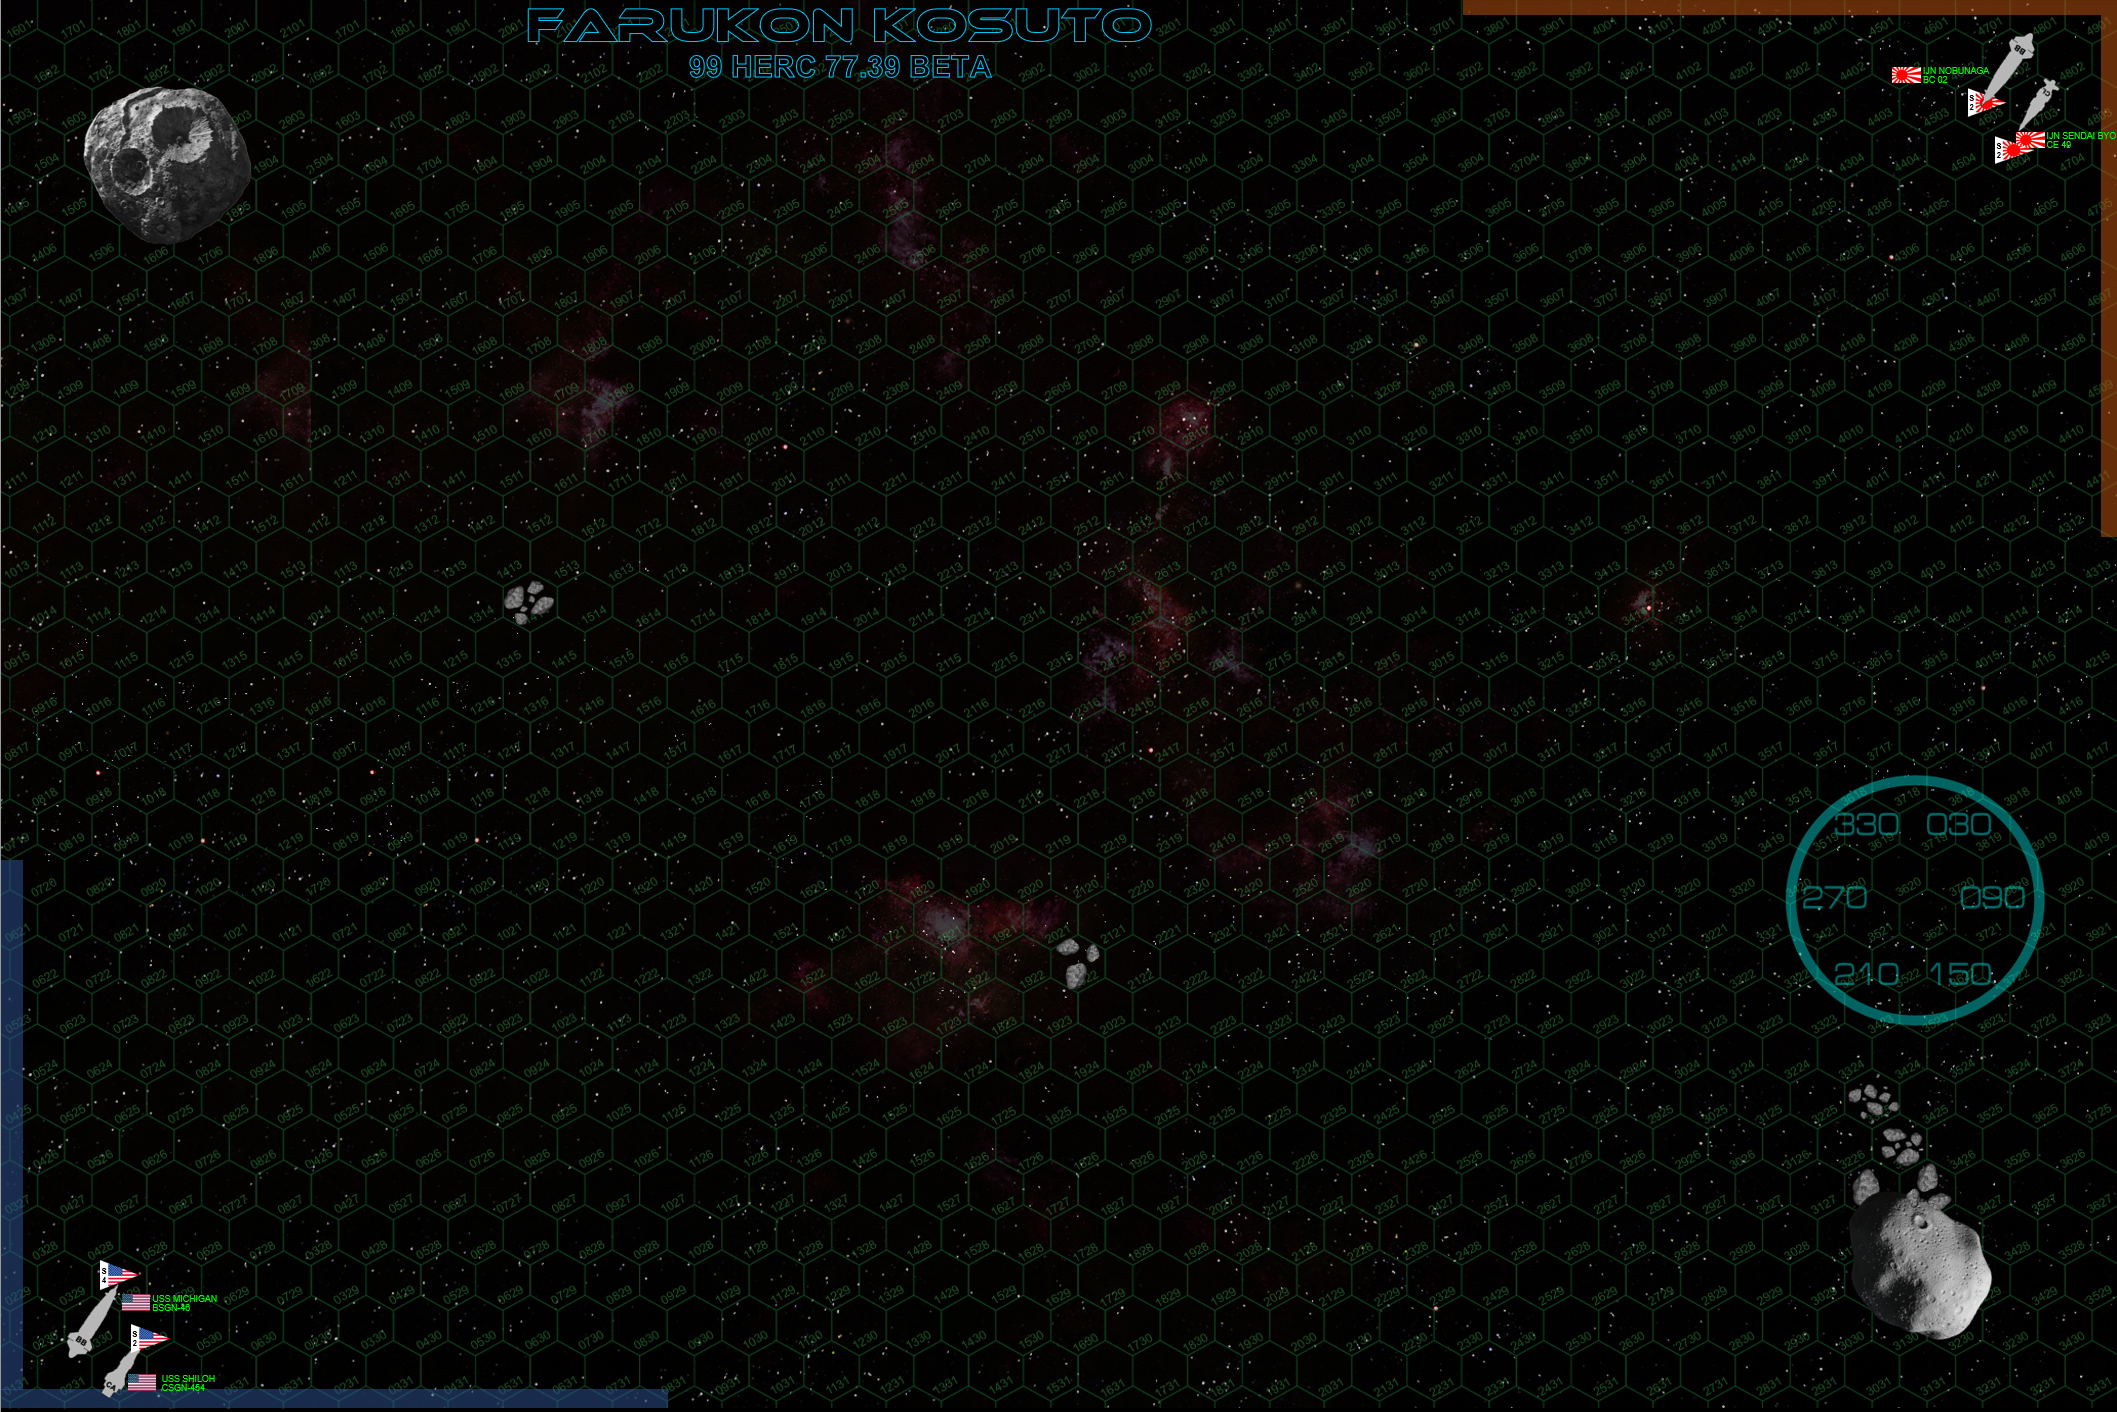
 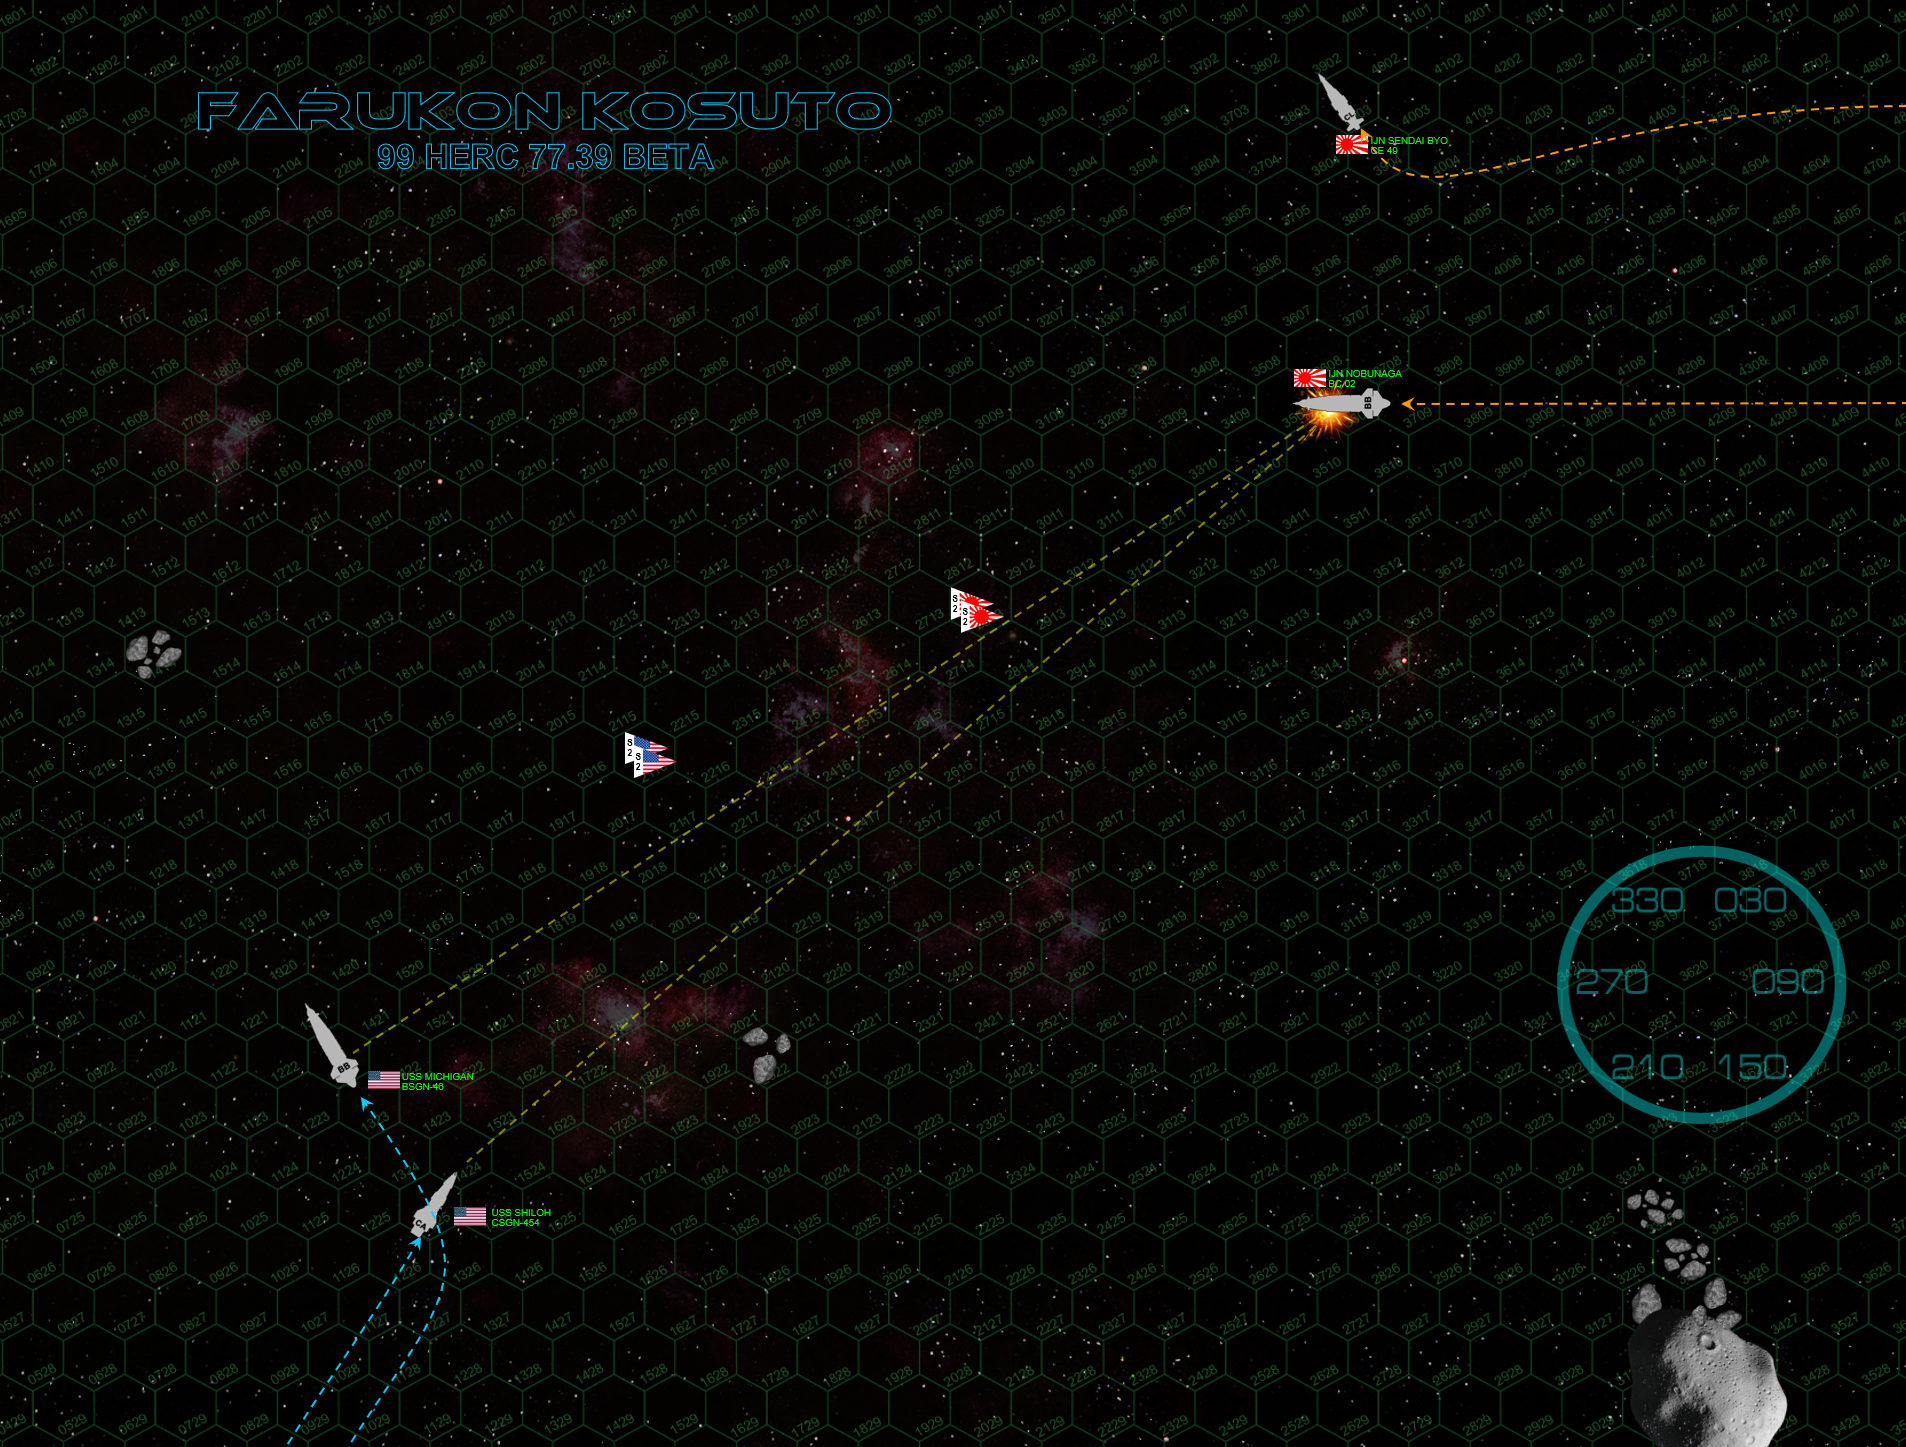 Both sides set relative high-speed approach vectors, since both these capital ships have available thrust 50% higher than most battleship-sized vessels. USS Michigan is perhaps the boldest of all, the only ship NOT firing full retros, instead pouring every once of power from her huge Pratt & Whitney / GE reactor plant into a high-speed turn to port, thus presenting an opening broadside at over 4100 kilometers. Nine 16-gigawatt rail guns open up, but not a single round hits. The Japanese have fewer guns at these ranges and angles, and they also largely miss. But the first hit is finally landed by the two forward turrets of the heavy cruiser USS Shiloh, doing a single point of damage on the massive Nobunaga (one point of armor, she carries 240 points in all). :D
 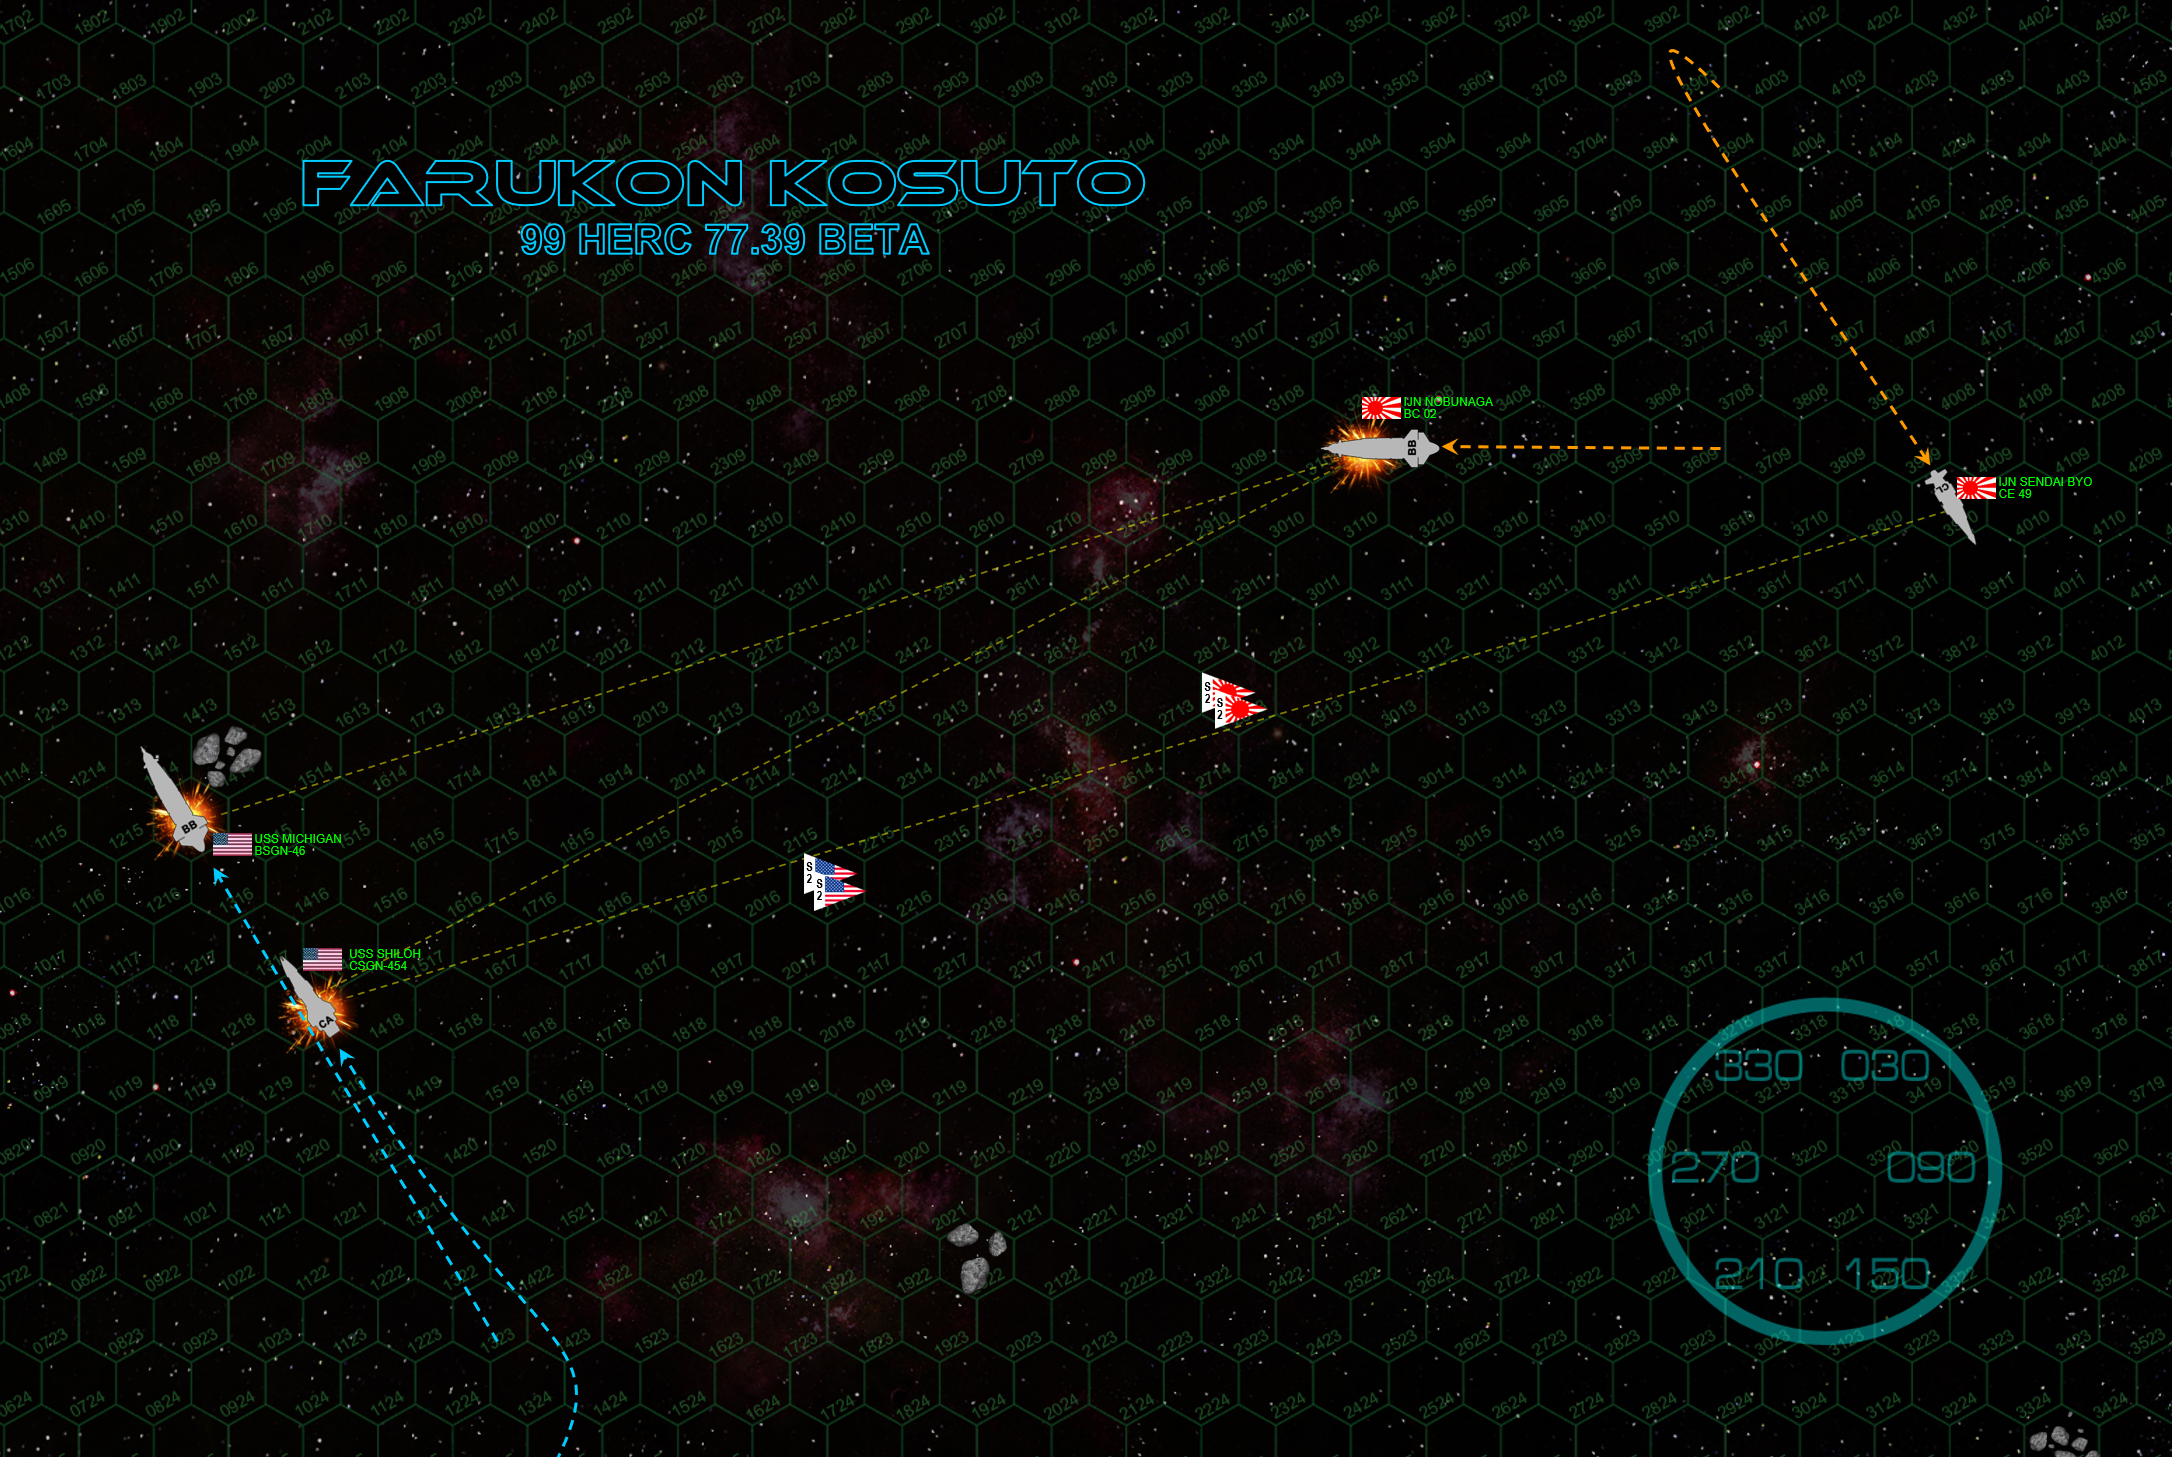 The Michigan finally starts to decelerate, her course carefully plotted LAST round (when exactly she made her portside turn) because her commander (Rear-Admiral Jamison Marcus) knew the Michigan would have to avoid that asteroid patch AND decelerate on Turn 2. The Shiloh falls in behind the Michigan, both American warships presenting a broadside to the oncoming Japanese battlecruiser. One curious move is the course-break of the Sendai Byo, opting for a longer-ranged barrage while Nobunaga continues to close the range. This second American double-broadside hits the Japanese battlecruiser much harder, now that the range has closed to where the less accurate American guns have a batter chance of hitting. But it’s right on Nobunaga’s prow, so actual system damage remains very light.
 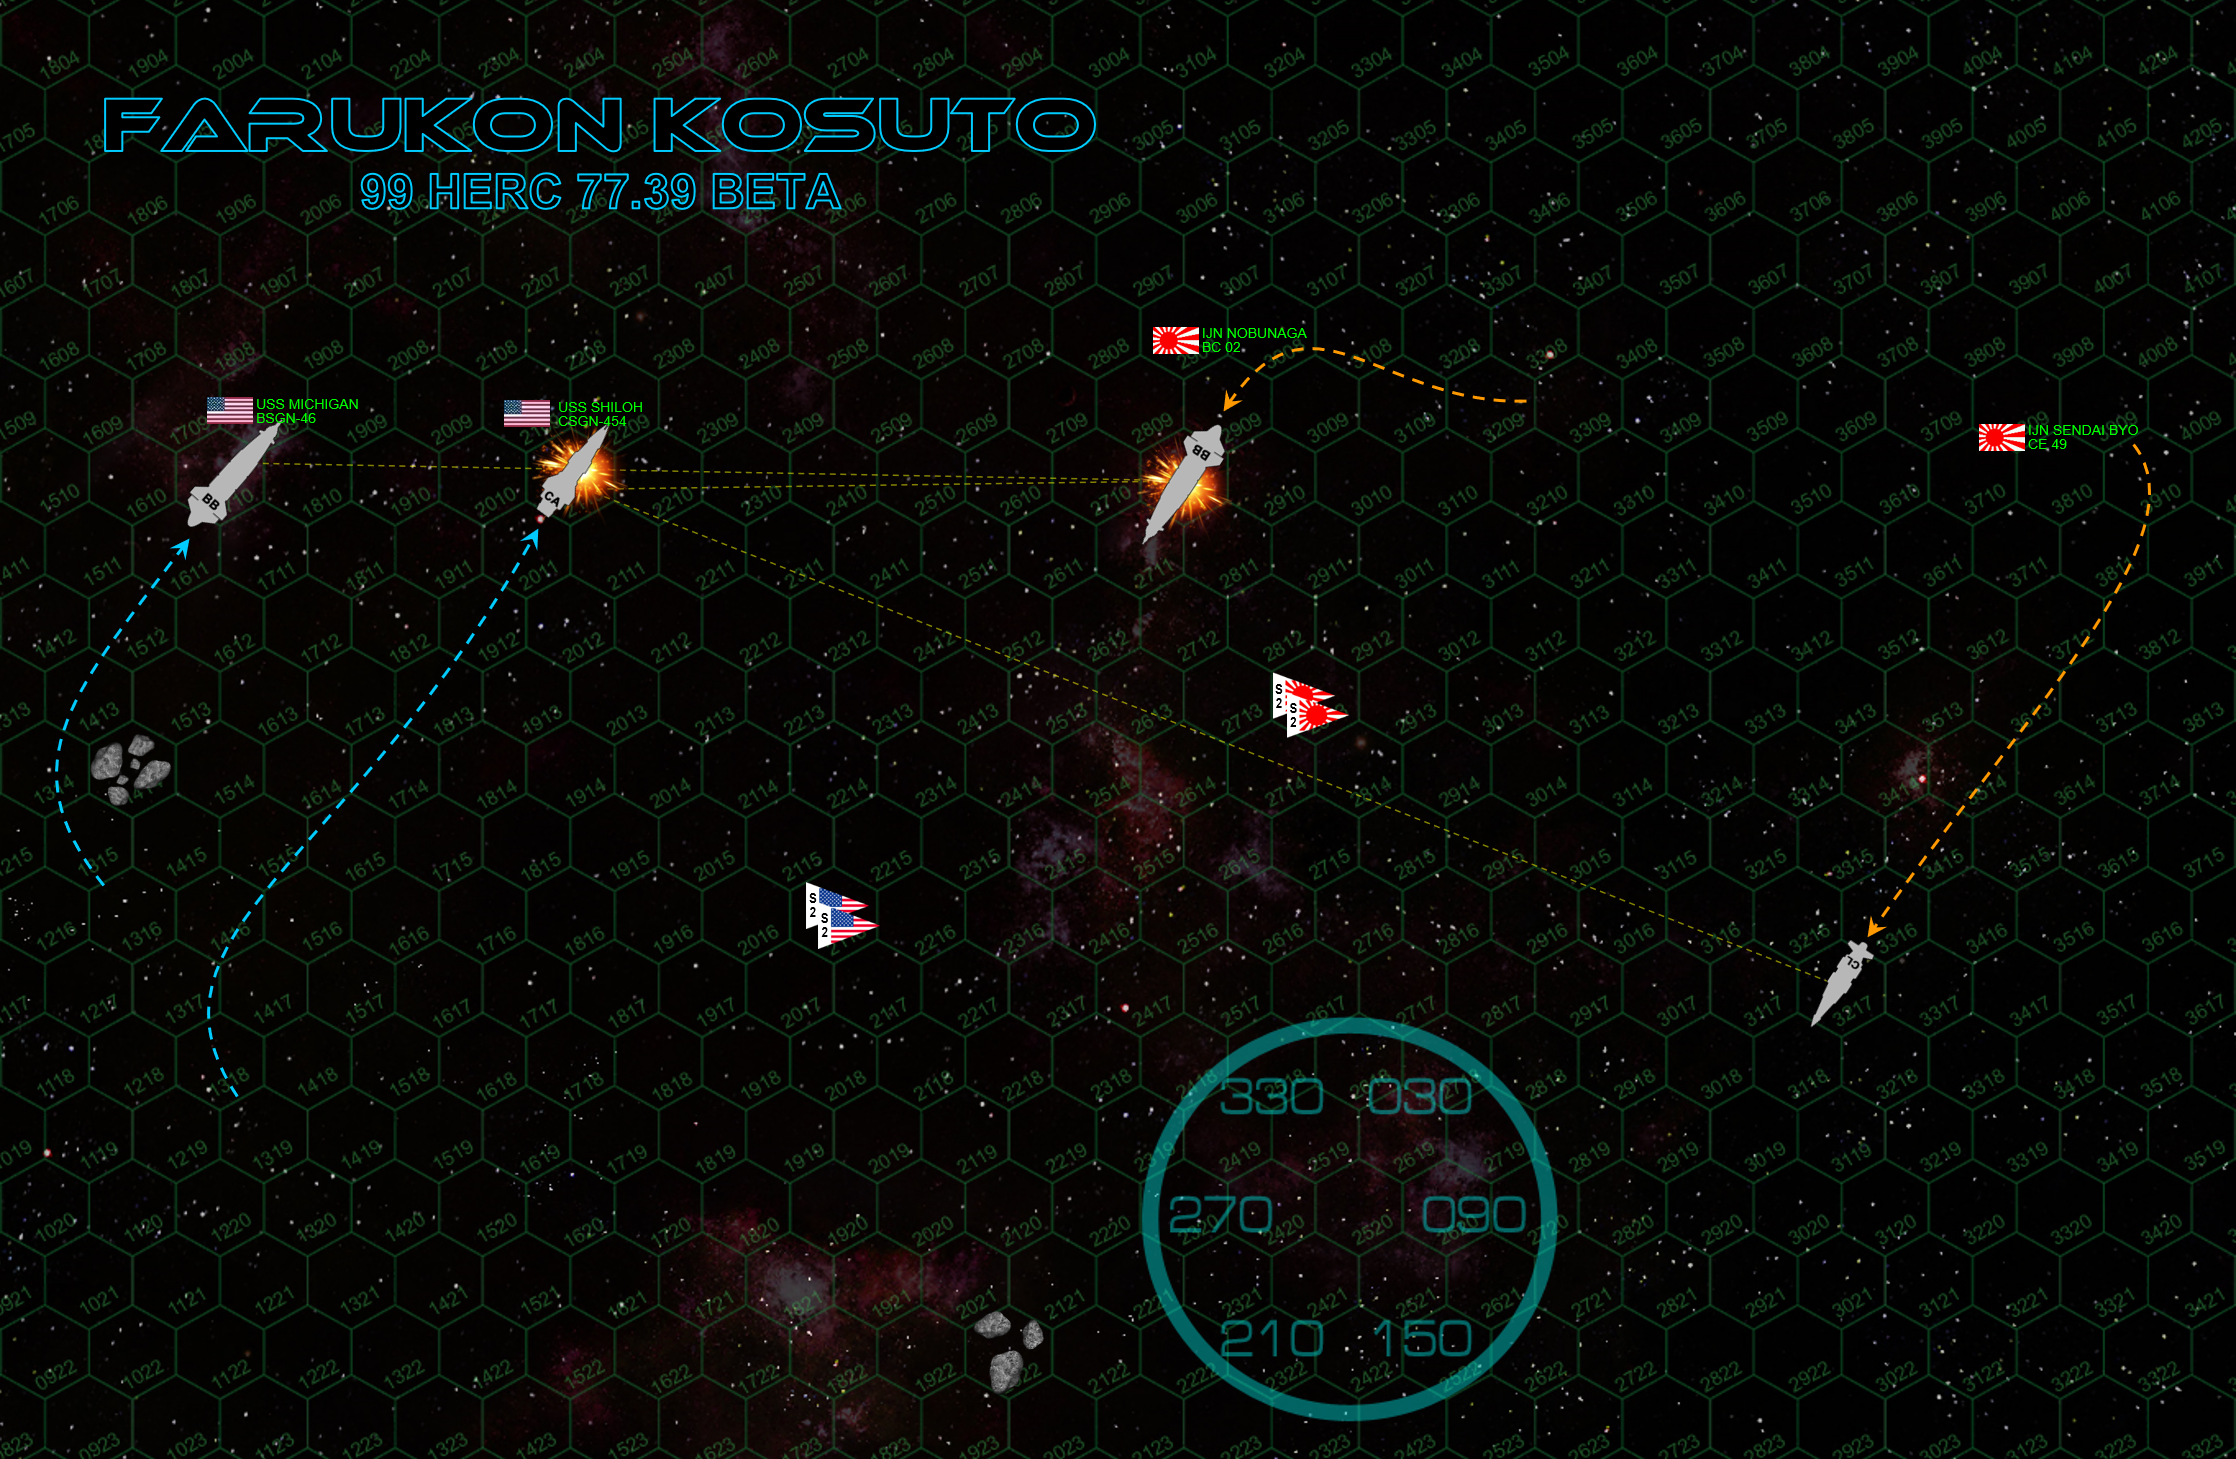 The Michigan swings her 420,000 tons around the asteroid cluster at 21 kilometers per second, the Shiloh dutifully cutting the same turn on an inside track to keep herself between the enemy and the flagship she is escorting. The Nobunaga welcomes the move, decelerating to just 12 KPS and making a turn to port, so both battleship and battlecruiser are lined up on each other’s broadsides, each targeting the other’s starboard bow. The key difference here is the that the heavy cruiser Shiloh (armed with three triple turrets of 10-gigawatt rail guns and ranging at just 1200 kilometers away) is hitting Nobunaga on the same starboard quarter … while the Sendai Byo is 3200 kilometers from the Shiloh and 4100 from the Michigan. Also, Lady Luck takes a hand here … not only does the Nobunaga take very hard hits on her starboard bow, but they also hit one of her sensor arrays, partially blinding her gun crews. Disaster greater still comes a heartbeat later, when the Shiloh lands two rounds on Nobunaga’s bridge (one 10-GW rail gun and one EPC). The bridge and CIC remain operational, but they are badly damaged and will have a noticeable effect on Nobunaga’s response time.
 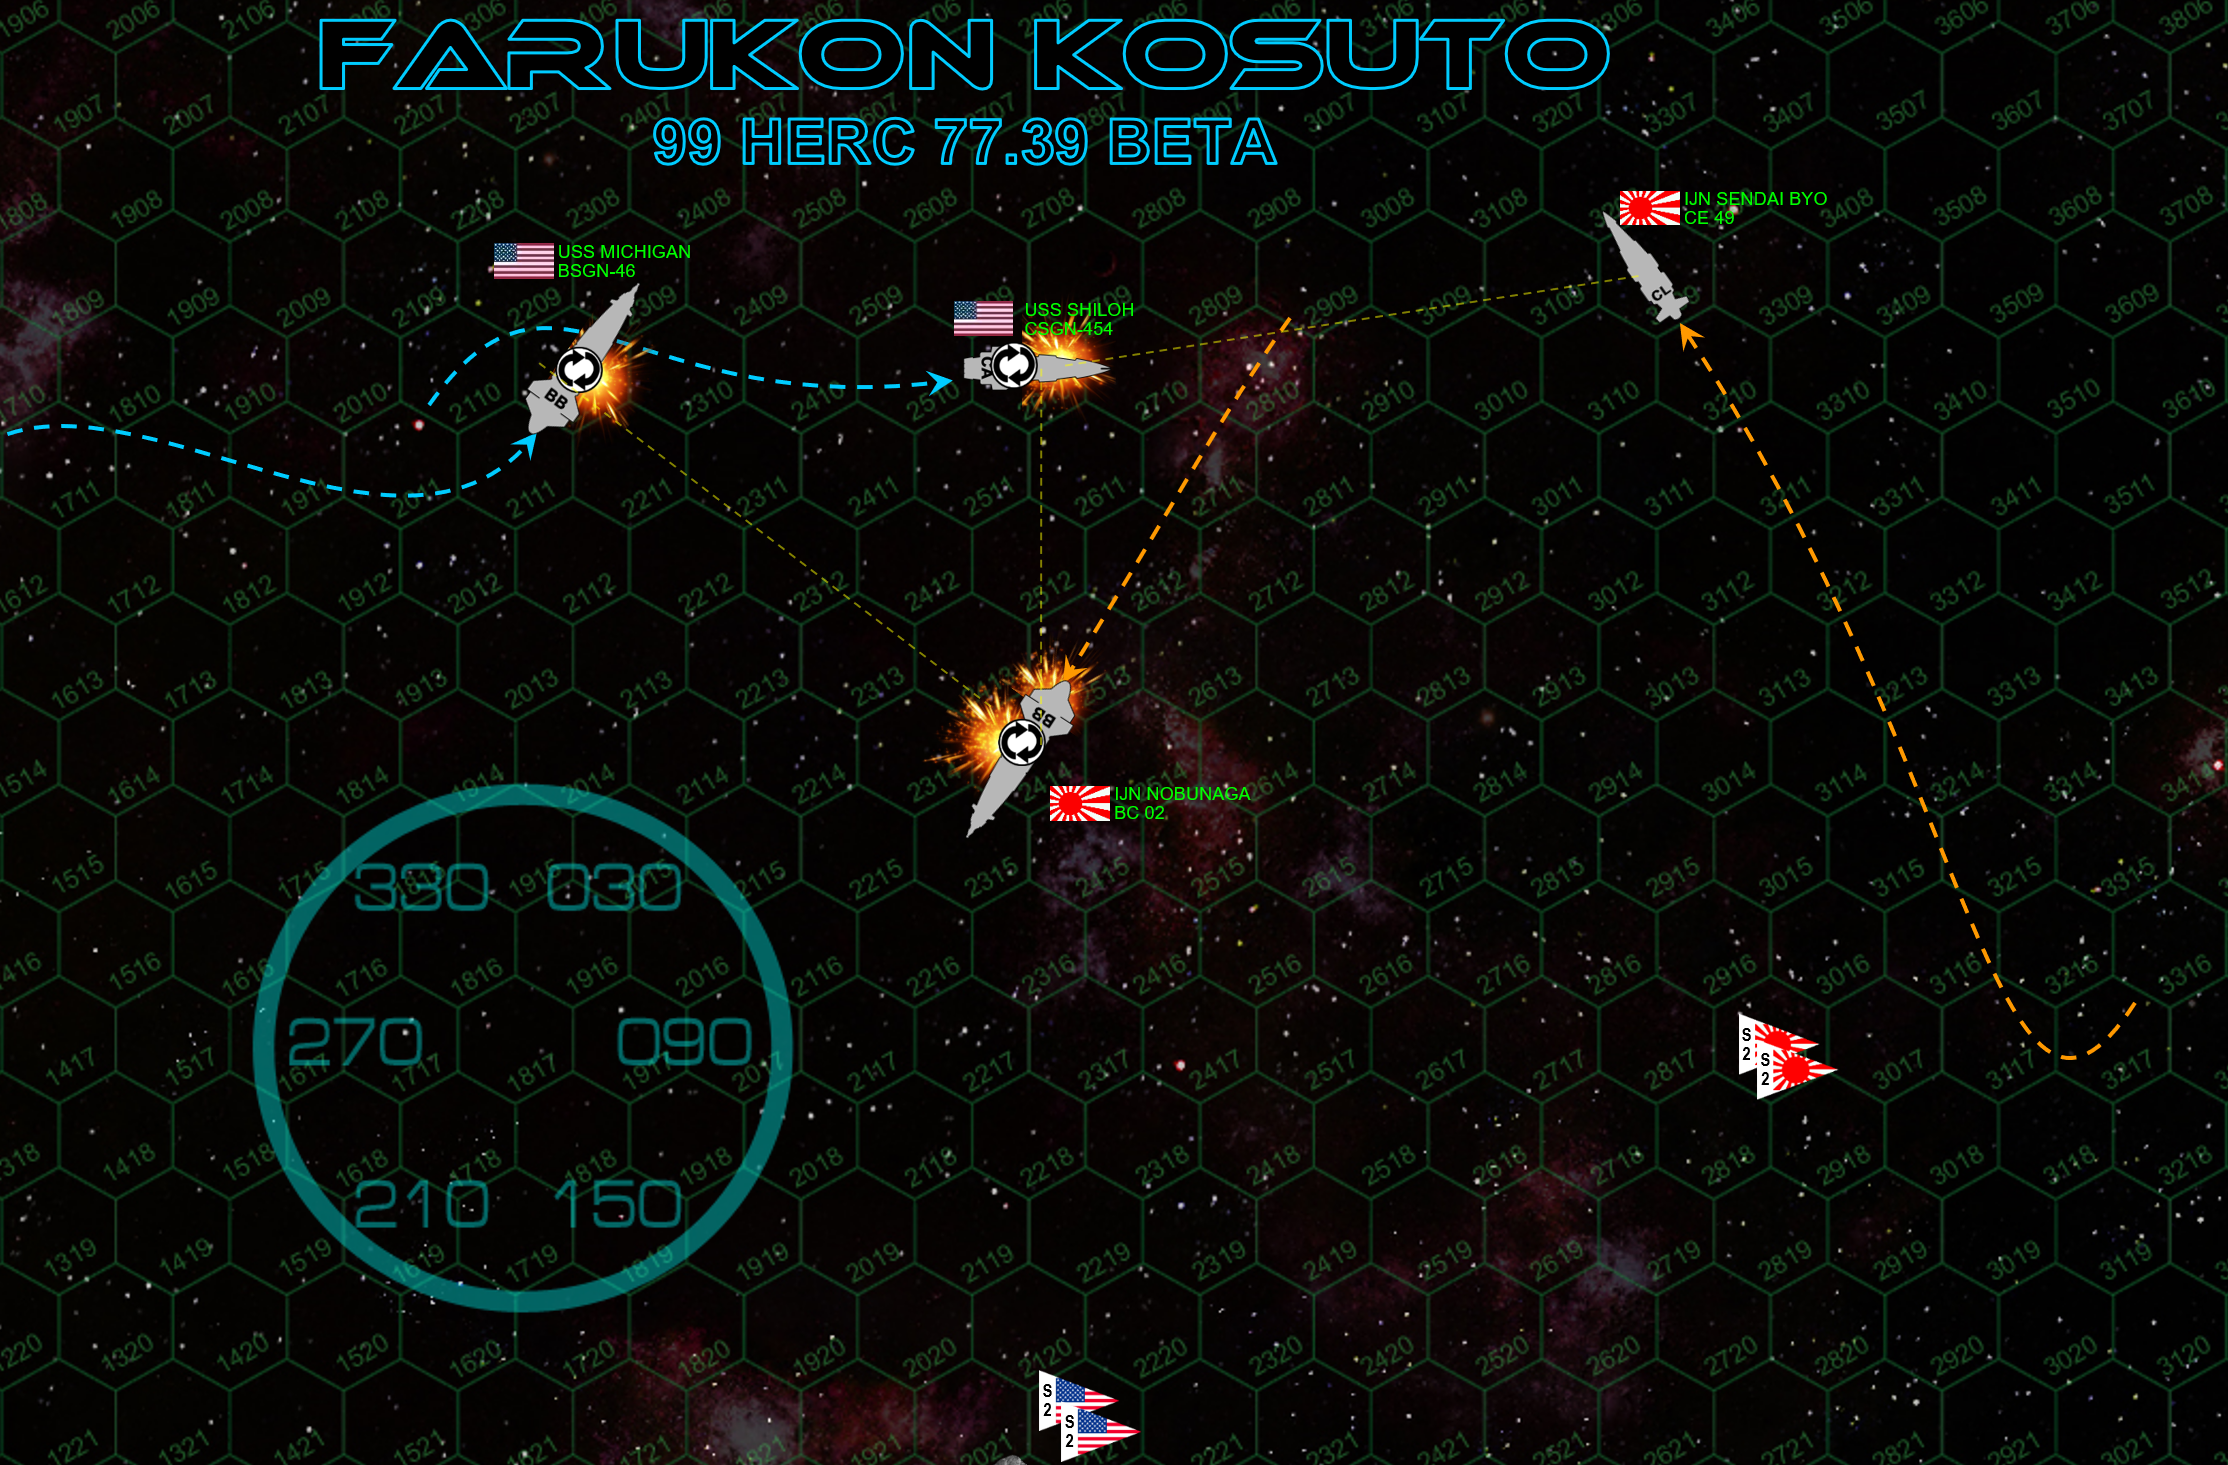 Fate has simply dealt IJN Nobunaga a cruel hand here. She’s designed as a fast battlecruiser with highly-accurate guns, but with a damaged bridge and sensors, she’s lost exactly those two qualities … her enhanced agility and her sharpened gun accuracy. Now she’s CLOSE to the big-gun American battlewagon, whose less-accurate (but much heavier) guns are no longer a drawback due to the near point-blank range. On top of all that … Nobunaga is ALONE. She rolls on her back to hide her less-damaged portside, but the Americans aren’t showing any mercy. The Michigan can’t quite maneuver behind Nobunaga, but the Shiloh, closer and faster, is able to land close-range rounds on the battlecruiser’s stern and set the first fires in her starboard engine room (Game terms: the two battleships actually TIE initiative this round, but thanks to the bridge damage, the Nobunaga loses and thus has to move first, allowing the Americans to maneuver behind her to set up salvos into her fantail next turn).
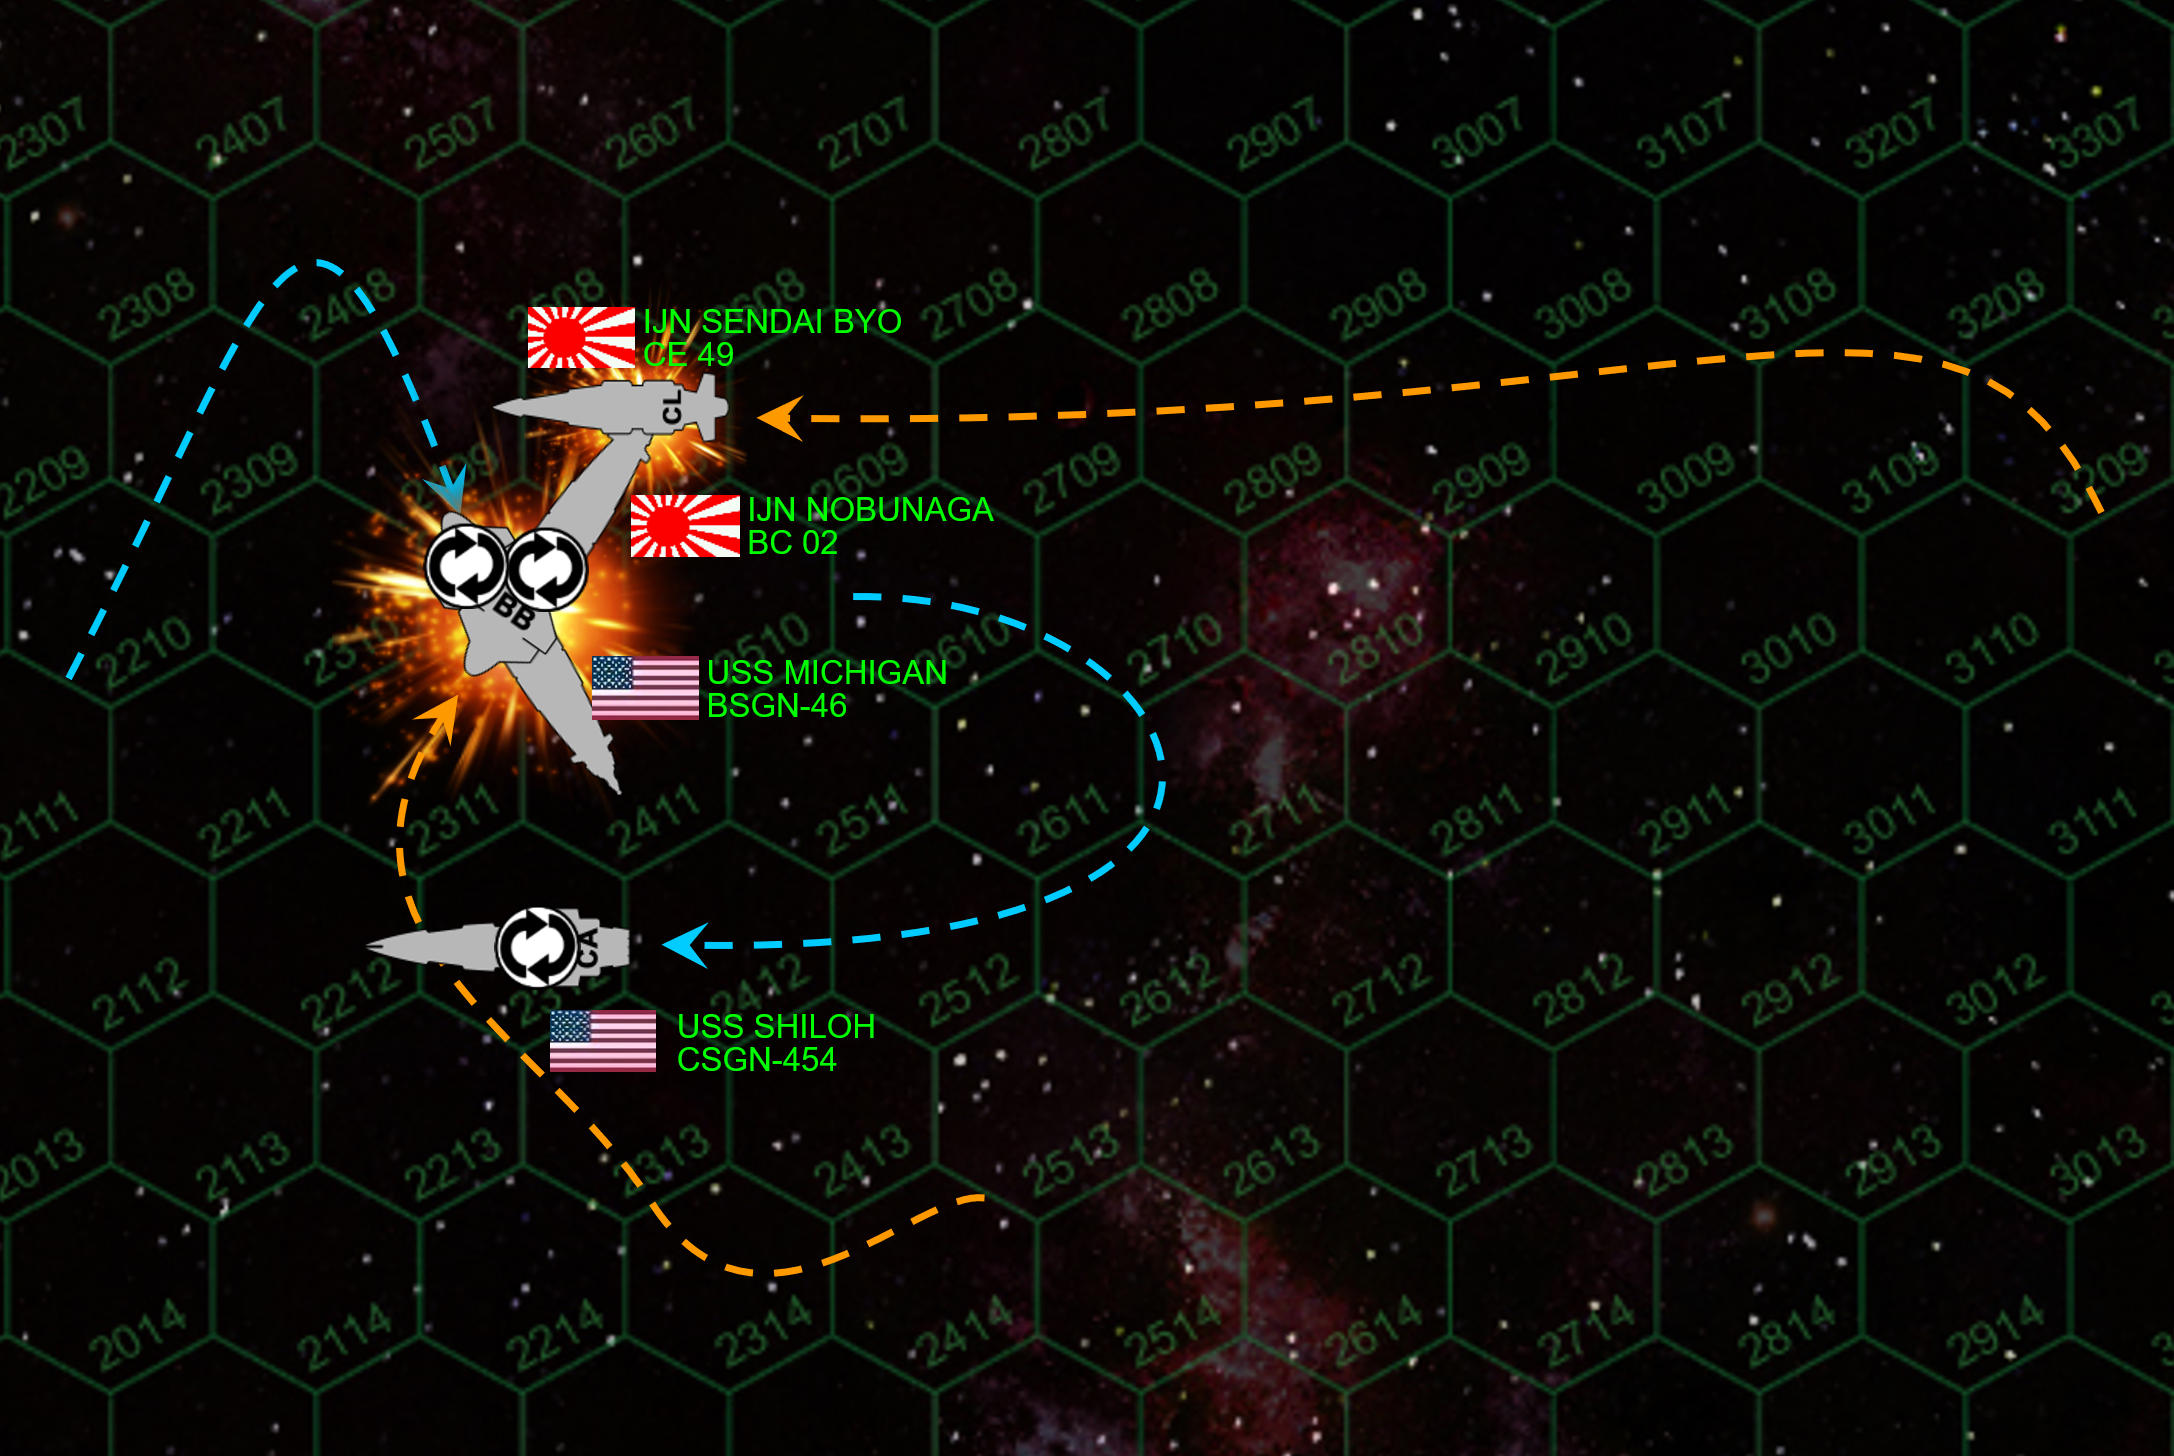 The end comes swiftly. The Nobunaga heaves hard to port (remember, she’s inverted so the turn is effectively to the right), diving straight at her merciless assailants. The maneuver ALMOST works, by diving toward enemies you can sometimes cause them to overshoot. In fact the Michigan’s final attack course is far from ideal, she crosses Nobunaga’s stern at less than 100 kilometers (game terms: in the SAME HEX), which of course exposes her to point-blank fire in turn from the Nobunaga’s after batteries. The Sendai Byo also finally closes the range, likewise drilling into the Michigan’s starboard quarter (by now Michigan is inverted as well). But the Michigan hasn’t taken VERY serious damage on this quarter yet, and despite hard hits at point blank range, she largely weathers the storm. Still, a cascade of decompressions starting in the medical bay forces her to break off from the action. Meanwhile, Michigan’s main 16-GW rail gun cut loose into the Nobunaga, absolutely blowing her stern apart, ripping one starboard engine clean out of the hull and hurling the semi-molten 20,000 ton wreckage into space. She damned near explodes, only the instant order by Commodore Seizo Yamamoto to eject the starboard reactor keeps the ship from detonating into a tiny man-made star. Secondary guns go into the Sendai Byo, along with the full broadside battery of the Shiloh. The bridge it hit and explodes into space, crippling the light cruiser and killing her captain, Commander Kaneo Tani.
 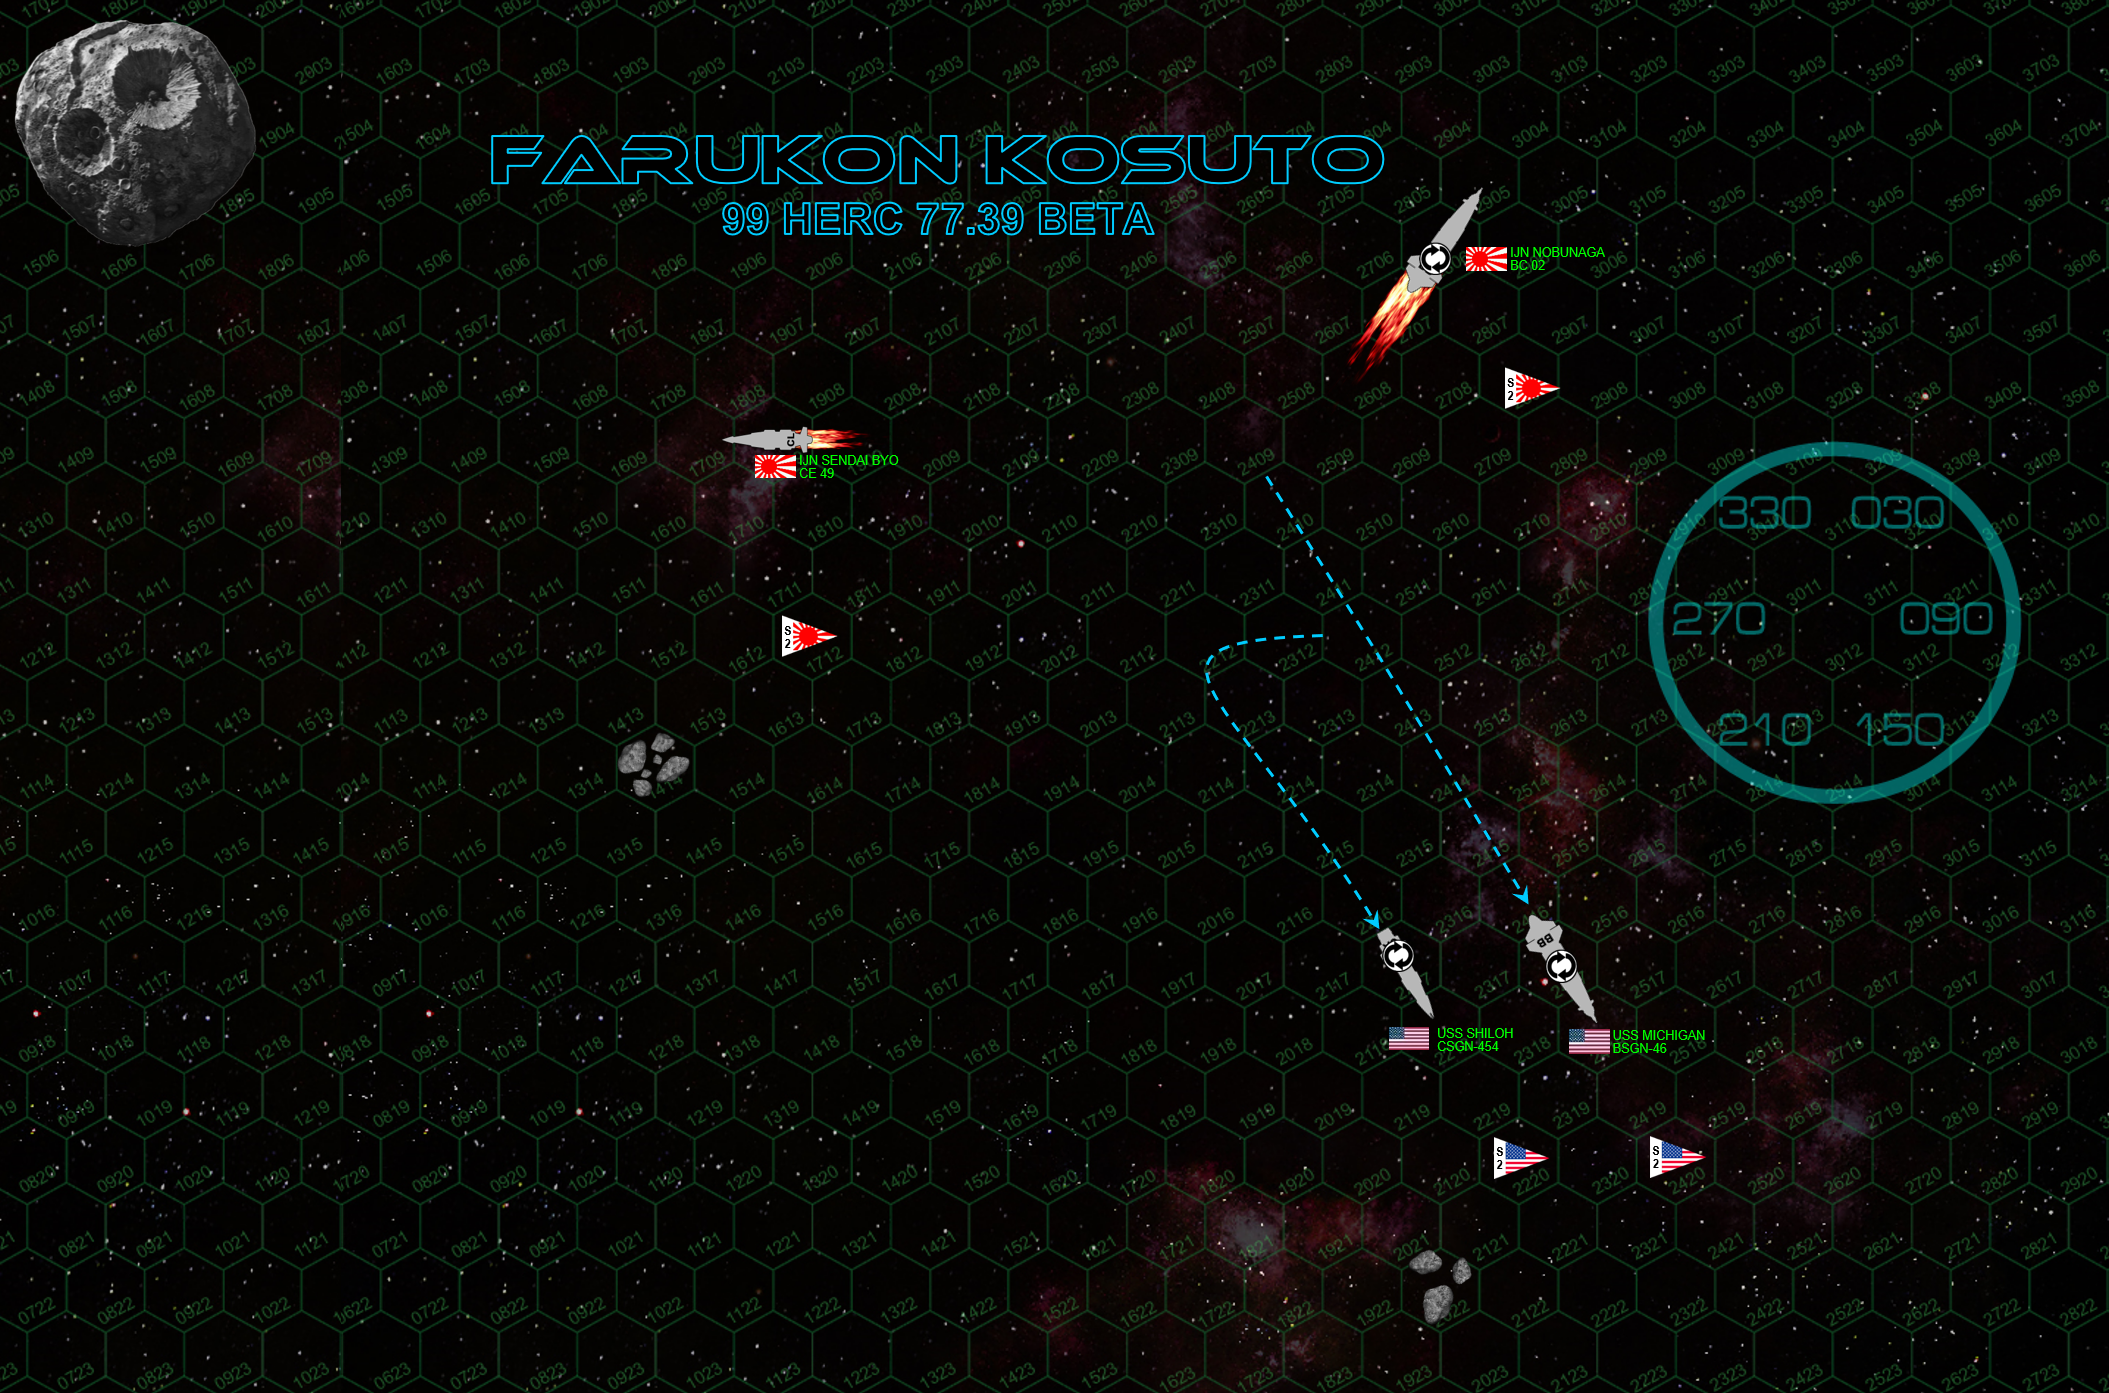 This battle is well and truly over. Honestly, the American Navy is my preferred faction and I just like their ships and know them pretty well. Conversely, this was Rasmus’ first game in almost a year. Simple, tight, conservative play is usually the key, and keeping both of my ships close together so they can focus on the same target, on the same facing, turn after turn, usually gets the job done. Even more importantly, my luck in this game was incredible. I won initiative 3 out of 5 turns, after Turn 1 I didn’t have a single volley of fire that wasn’t above projected hit averages. The hits I did score were in JUST the right place, quickly taking away the Nobunaga’s two key advantages – agility and long-ranged accuracy, huge traits for which she paid dearly in design and construction. With those advantages removed, she just became underpowered against a simpler, more “brutish” Colorado class that outgunned her broadside about 2-1 … ESPECIALLY as the range closed to absurdly close distances.
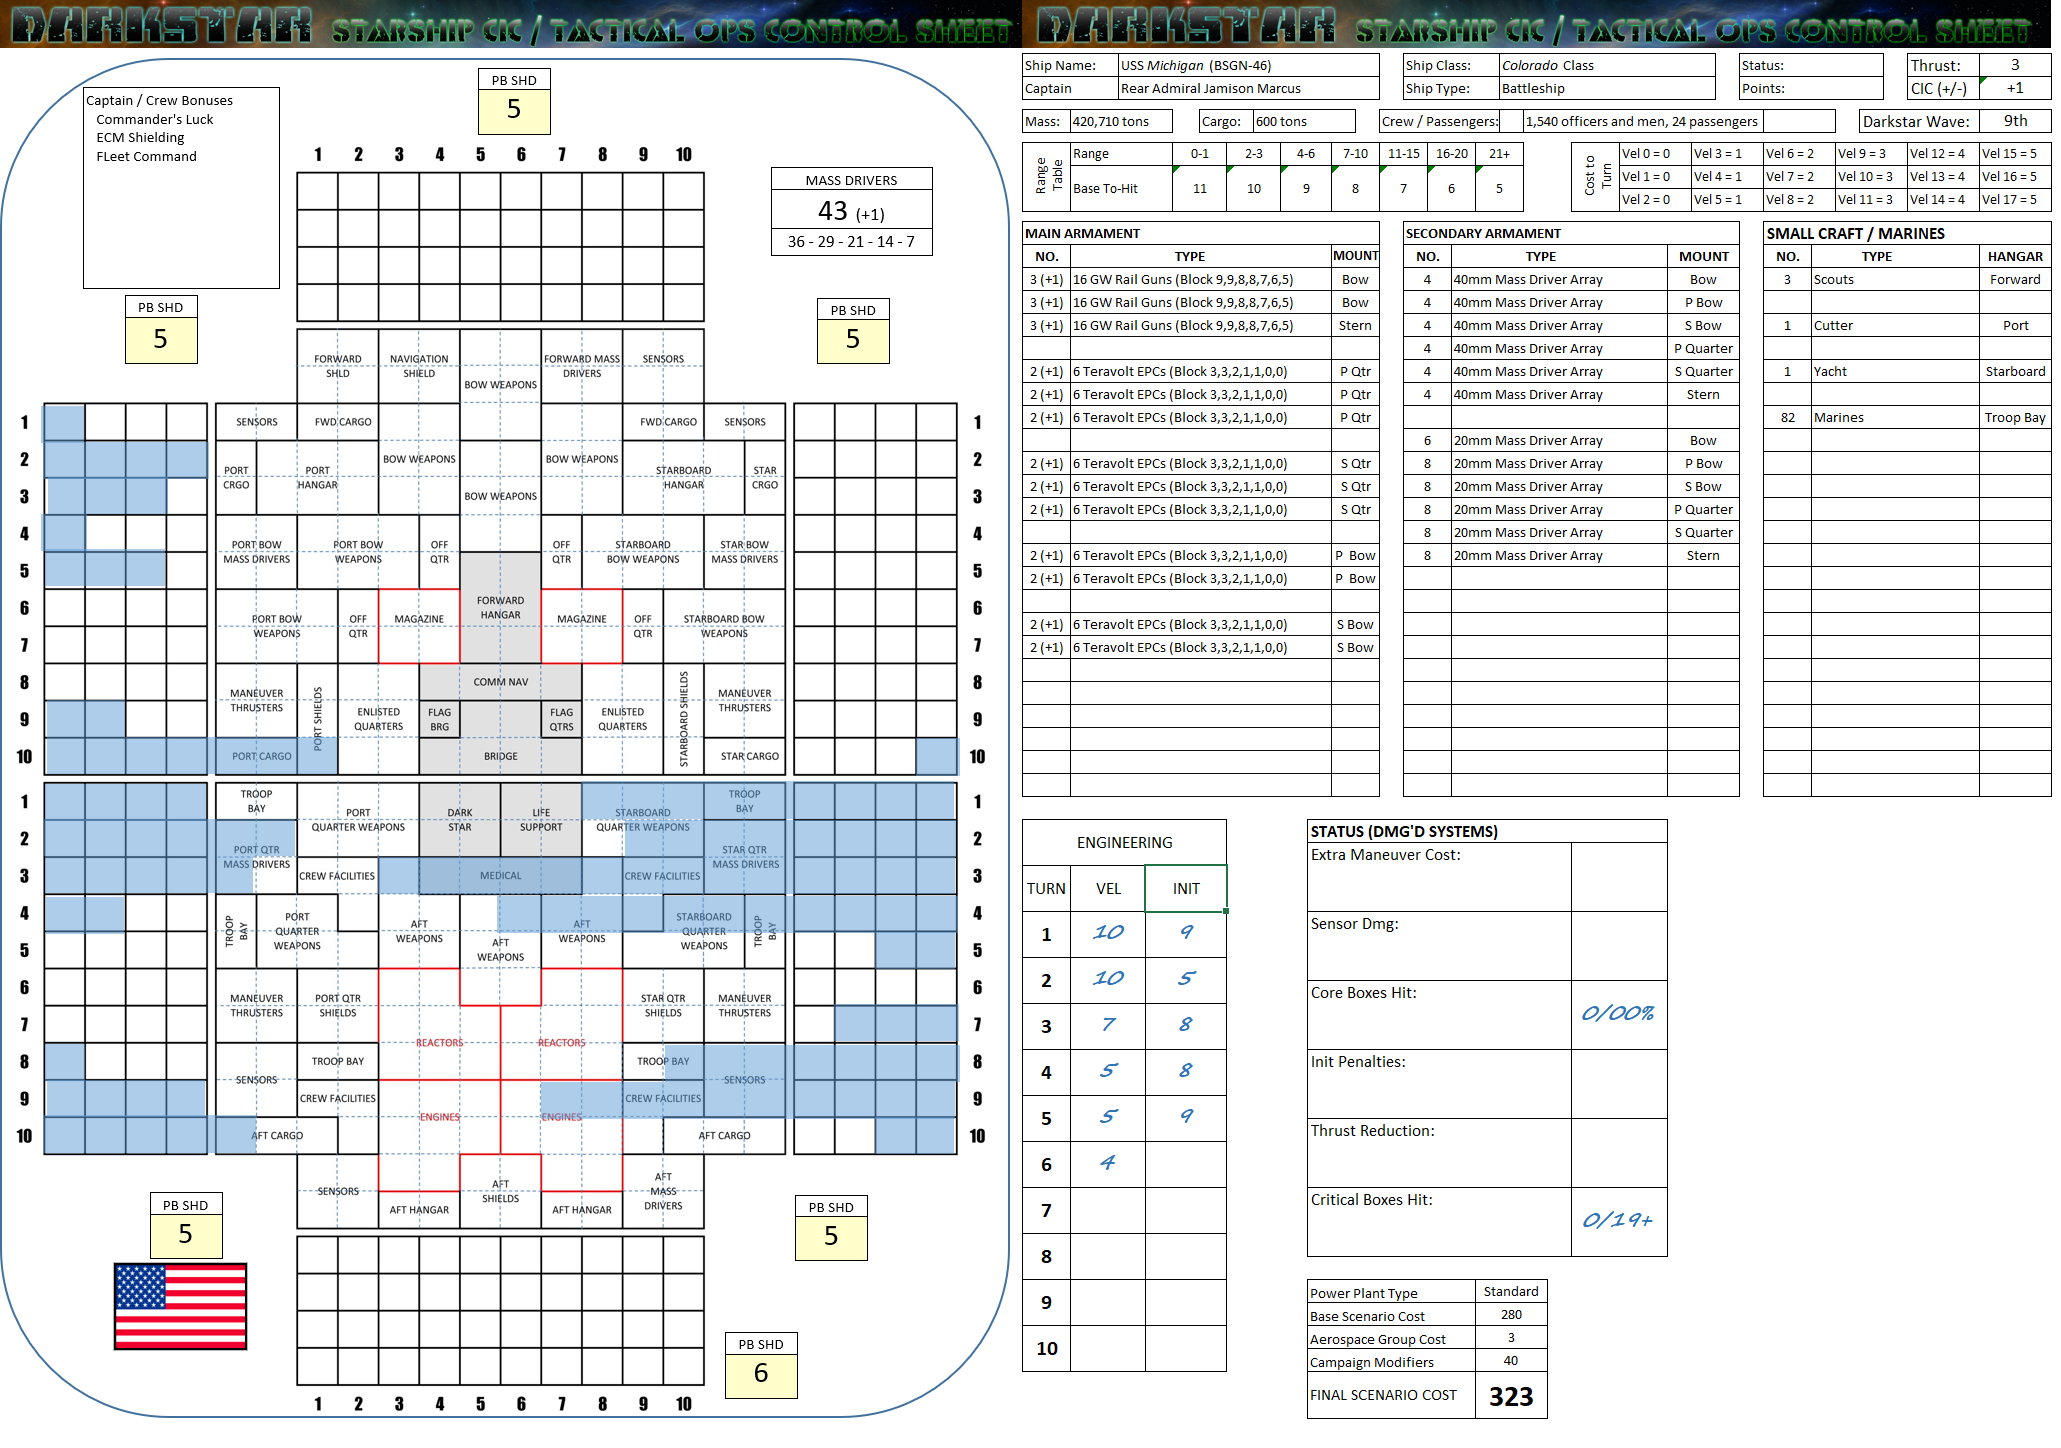 Here is USS Michigan after the battle. You can see where Nobunaga’s aft guns drilled into her starboard quarter. If the Nobunaga had instead landed those big hits further aft … or if she’d been able to get her broadside into this instead of just her aft batteries, or if Sendai Byo’s hits had landed in the same place, if… if… if…
 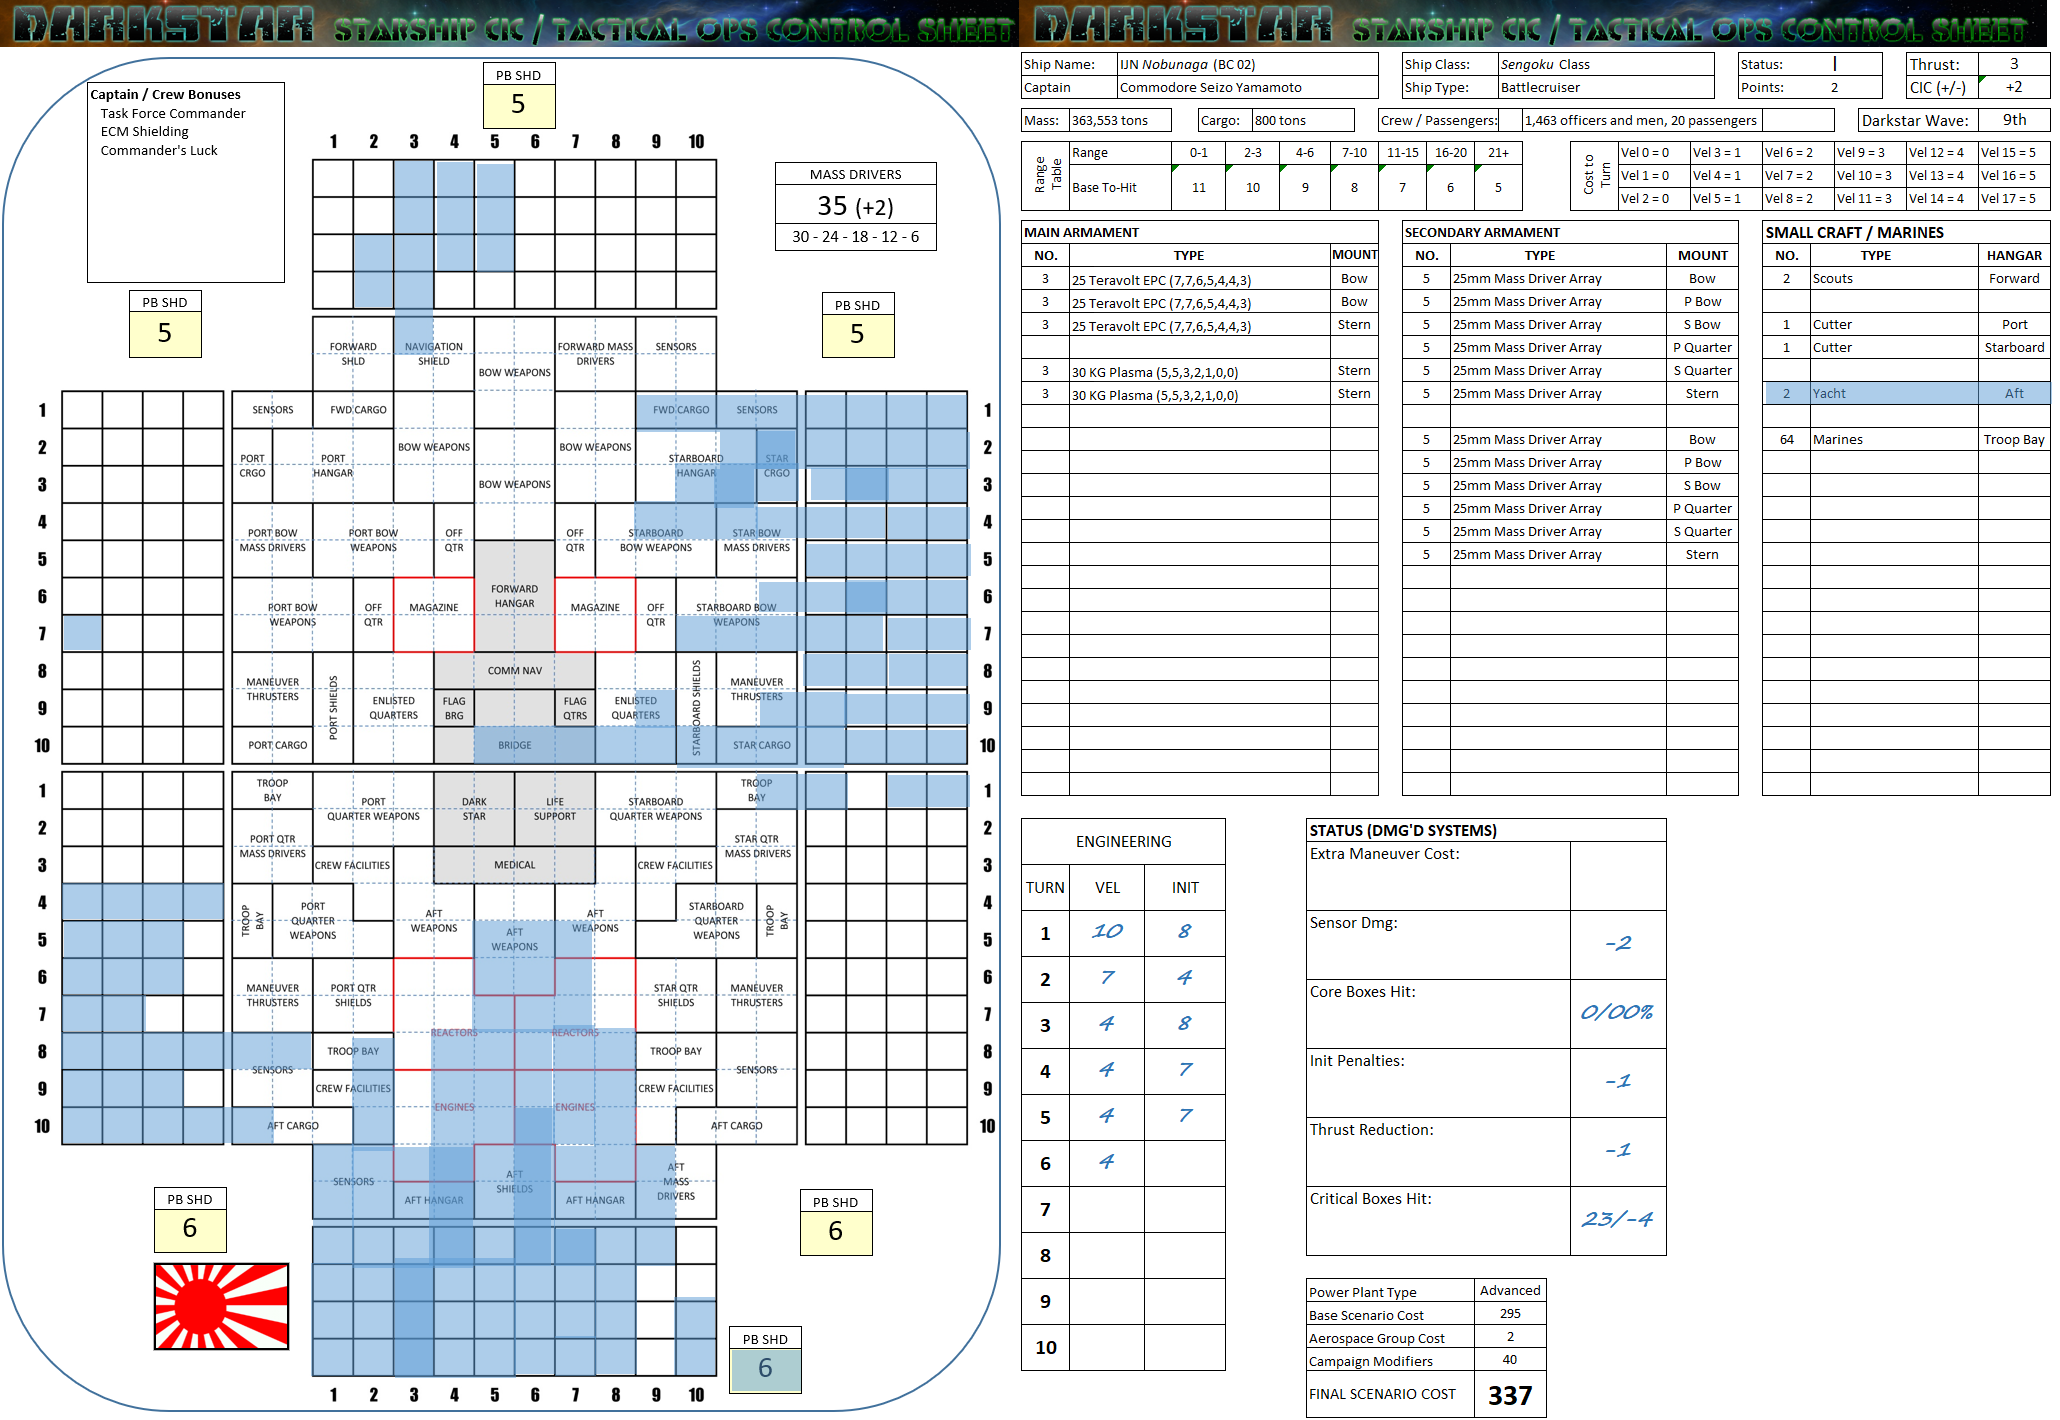 The Nobunaga after the battle. I won’t lie, Lady Luck didn’t just blow me a kiss in this game, she didn’t just flutter her eye-lashes at me, she straight-out mounted me in a full-frontal lap dance. :D :D :D I’m just glad all my dice rolls were on camera, by the end my dice were so hot I needed welders’ gloves to pick them out of the tray. I mean, I did play well and in Rasmus’ shoes I might have done a few things different, but I freely admit fortune was ALSO well and truly on my side this time.
 New Warship Class: Azadistan Class Light Fleet Carrier
I should note that this week’s warships were designed by the community during a “Warship Workshop” held on our Discord Channel last Saturday. Now the community members have made their decisions, set their priorities, and made their tradeoffs, we’re ready to try these new warships in live Darkstar games in the weeks ahead!
>>>>>>>>>>>>>>>>>>>>>>>>>>
The Azadistan class light fleet carriers are a new class of aerospace strike ships being built for the Arab League Navy. They are named for breakaway Arab caliphates that waged a stunning and bloody (if brief) war against the Holy Russian Empire, Indian Republic, and United States during the Water Wars of the 2190s. In some ways they are the “purest” carrier class yet built, little more than flying hangars (albeit with advanced engines and Darkstar FTL drives). All they can do is carry and launch aerospace strike aircraft, and this they do very well.
Note the greatly expanded hangar and launch bays, housing a startling total of forty-four craft, easily more than any other light fleet carrier class, challenging even the aerospace strike groups of much larger fleet carriers like the American Obama and British Windsor classes. Also note the disproportionate number of bombers, with two full squadrons of “Demkikham” (Vengeance) bombers carried along with just one reinforced squadron of “Mylekinir” (Fire Angel) fighters. This clearly indicates the Azadistan’s true purpose as a dedicated strike platform, hurling out a wave of bombers to devastate enemy capital ships, orbital platforms, or ground targets. There are practically no comparable ship classes that even have a hope of withstanding such a strike, statistically speaking an Azadistan commander could theoretically play “finger of God” and simply point at the enemy warship he wants erased from existence.
The problem, however, is that the Azadistan carries such a devastating weapon at the cost of some crippling weaknesses that enemy commanders may be able to exploit. One, the ship carries no ship-to-ship weaponry, period. Even other “pure” light fleet carriers like the Gagarin, Endeavor, Valiant, and Kagoshima classes at least carry a battery of gravitic torpedoes. Two, the Azadistan carries ECM and shielding suites that most analysts consider mediocre at best, as well as mass driver protection. Note these systems aren’t bad, but they aren’t great, either. Three, even the Azadistan’s aerospace group may need protection, with such a high number of vulnerable bombers compared to escorting fighters. Fourth, and perhaps most dangerous, the Azadistan is still a light cruiser, and can thus only launch so many aerospace craft at a time. Estimates indicate that an Azadistan will require a full three minutes to launch their entire aerospace group, an eternity in a high-speed naval engagement. Bombers typically need a further 60-90 seconds to reach engagement ranges to their targets, meaning that an Azadistan may require four-five minutes to actually hit with a full strike, but which time many battles are already over. By that time enemy fighters, bombers, and warships are likely upon the Azadistan, which would now be at risk of destruction perhaps with aerospace strike craft still in the hangars.
Used correctly, however, and well-supported by other ships in a fleet action, the Azadistan has potential as a truly fearsome weapon. They may be demanding ships to command, but properly managed and coordinated, the damage they can inflict as a raider or strike platform (perhaps as part of a planetary invasion) is truly impressive. As the first units of this class take their place in the battle lines of select Arab League task forces, the verdict will soon be in on whether this bold new concept pays off in combat.
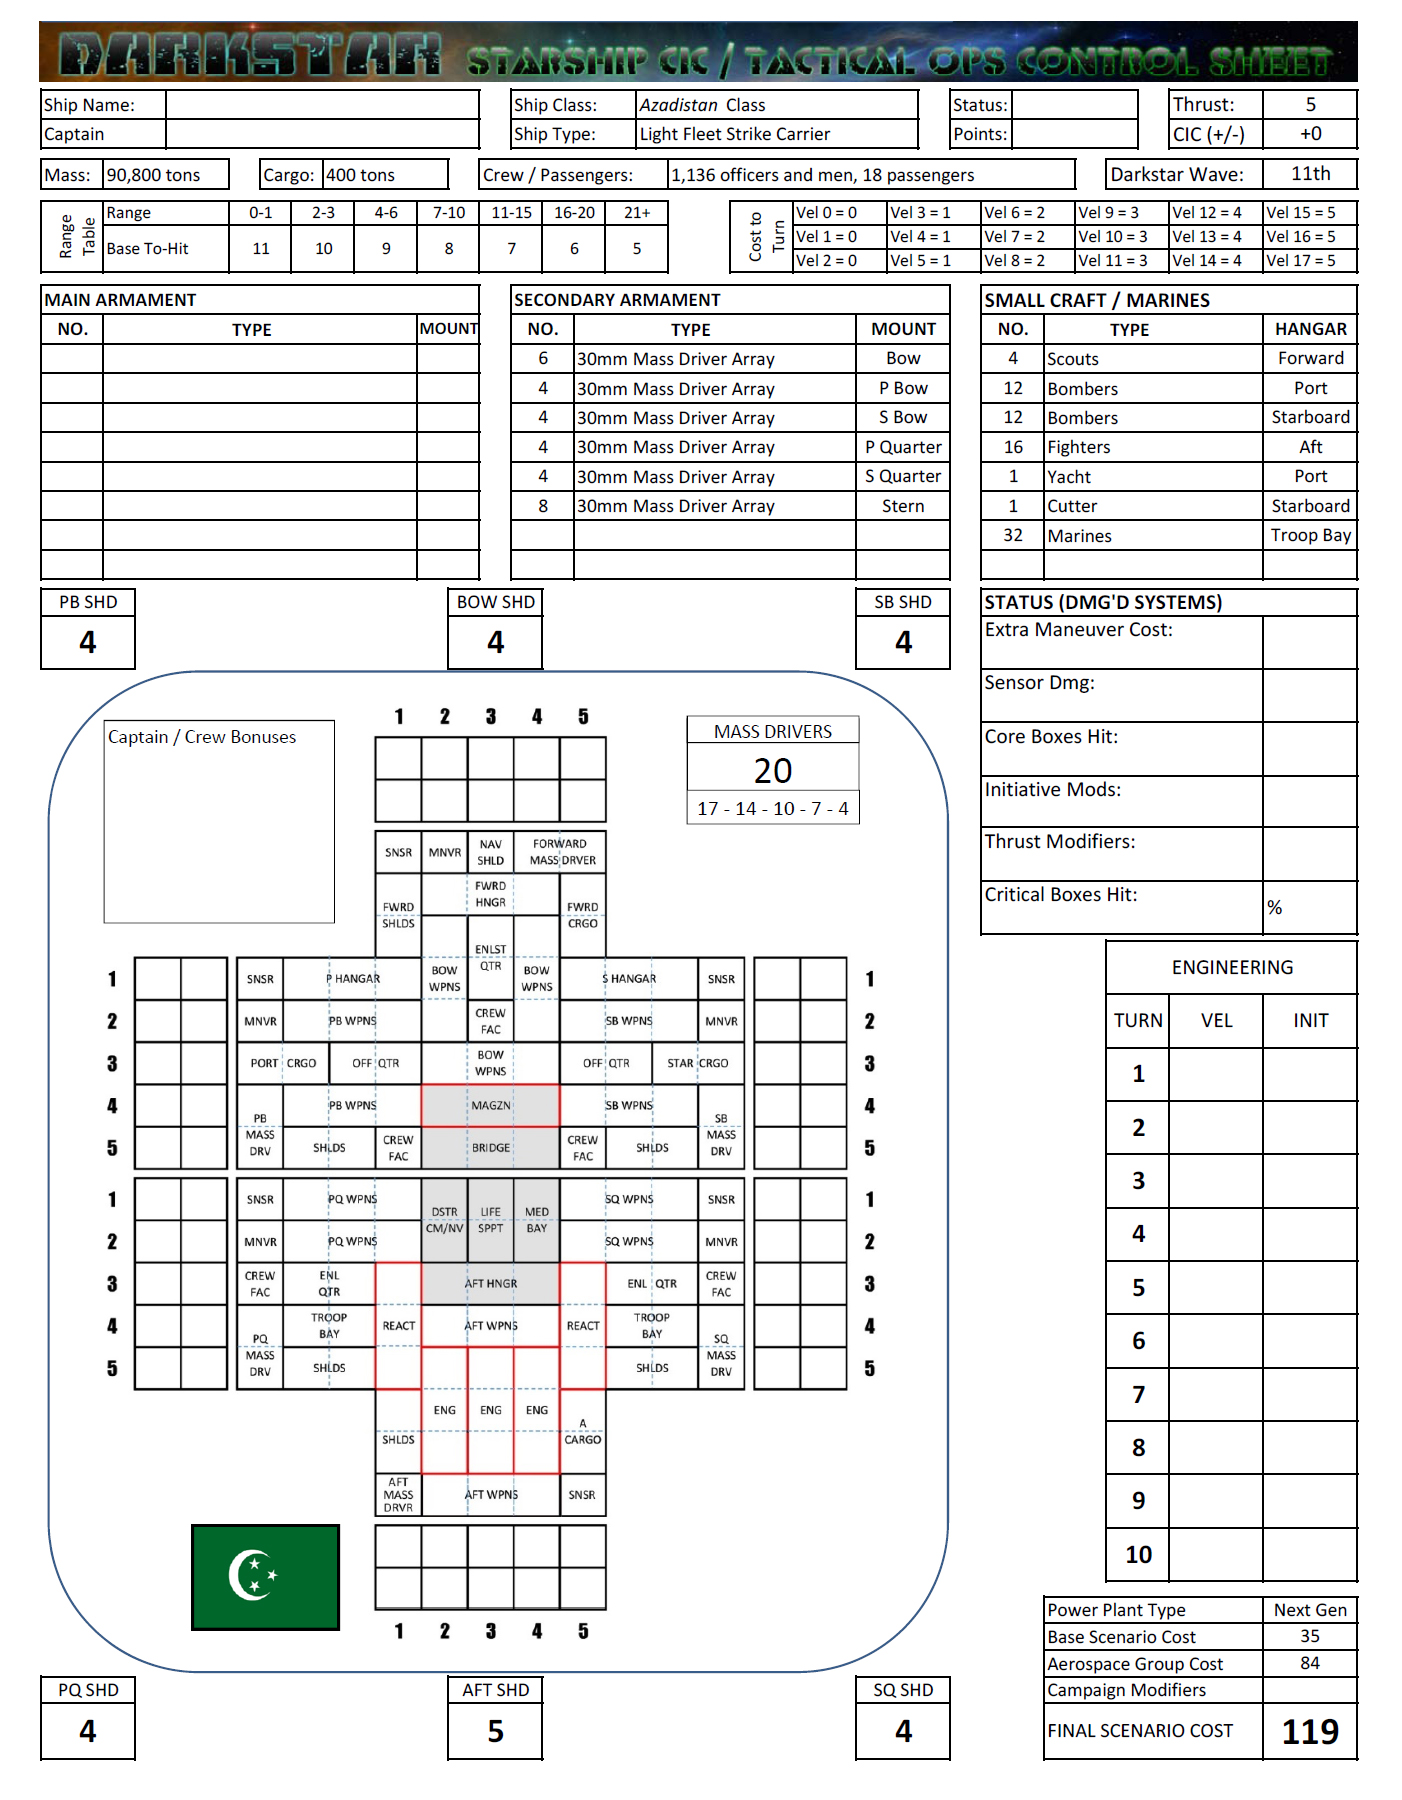
New Warship Class: Sengoku Class Battlecruiser
I should note that this week’s warships were designed by the community during a “Warship Workshop” held on our Discord Channel last Saturday. Now the community members have made their decisions, set their priorities, and made their tradeoffs, we’re ready to try these new warships in live Darkstar games in the weeks ahead!
>>>>>>>>>>>>>>>>>>>>>>>>>>>
The Sengoku-class battlecruisers, named for the leading daimyō who unified Japan during the Sengoku period of the 16th Century, are the end product of hard lessons learned by the Japanese Navy in the recent Xi Scorpio War. Together with two smaller American task forces, a larger Japanese task force under the flag of Commodore Hiromi Ozawa fought for fourteen incredibly violent months to reclaim the “Flower of Hokkaido” colony of the Kurakawa system (Xi Scorpio D), one of the closest Earth-analogs yet found in Known Space. In the final battle of that war, however, the Japanese flagship, the Taiho class light cruiser Sendai, exploded, Commodore Ozawa barely escaping with her life. In the end the Americans (Task Force Liberty, Task Force Oriskany) had to finish that battle and win the war, along with the smaller Scorpion’s Tail War that immediately followed.
In the wake of these events, the message was clear. Too many warships of the Imperial Japanese Navy fell into two divergent categories. First, there were the fast, sleep, ultra-tech, (and ultra-expensive) but tragically vulnerable “glass cannons.” Second, there were the proud old icons of the fleet, storied, reliable, tough … but just plain old. After so many modernizations and upgrades, they barely had an original part in their hulls and orbital shipyards could barely maintain or repair them. Besides, they couldn’t keep up with the faster elements of the fleet, especially when the Japanese Navy had to cover a long distance fast (like they had to with Xi Scorpio, 92 light-years from Sol).
In the wake of the Xi Scorpio War, the new Katana class heavy cruiser was designed, embracing the EPC as her main weapon type with three triple turrets, small se. The first one, Naginata was assigned to Commodore Ozawa, who smashed a British heavy cruiser task force with the new ship in less than four minutes. The Naginata also performed very well in the subsequent Duchess Annabel’s War and Third Hercules War, where a second shop of the class, IJN Kama, also performed very well, particularly against heavier Russian warships.
With the success of the Katana class, talk quickly started in Naval command circles of taking the next logical step, expanding the general concepts of the Katana class into the battleship range. Thus we see the Sengoku-class battlecruiser, armed with a similar layout of main armament, protection and defensive systems priorities, and curious omissions in the design (considering the norms of Japanese naval design).
First up, the Sengoku carries three triple turrets of heavy EPCs, but much larger 25-teravolt weapons, a single shot easily capable scorching through the armor of a light cruiser even at ranges beyond 5,000 kilometers. Closer in, a single bolt from these weapons can all but saw a frigate in half. These turrets are laid out in the classic Pacific configuration, with two triple mounts forward (one ventral, one dorsal) and one aft, along with two triple turrets of 30-kilogram plasma projectors. Note these two secondary batteries are mounted aft (clearly to meant to ward off close-range stern-rakes by smaller warships), but not on the port and starboard quarters, but along the ventral centerline of the ship so they can add to the battlecruiser’s broadside firepower as well. This weapons arrangement is admittedly risky, since the capacitors and relays for all aft weapons must pass through only a few compartments along the Sengoku’s stern, but designers note these conduits are behind the main reactors … if enemy fire ever got this deep in the ship’s hindquarters, she’s probably been crippled already.
One must note, however, that the Sengoku is not a battleship. She is a battlecruiser. At only 364,000 tons, she is light for her size, and so maintains a fast acceleration curve. She easily outpaces Japanese battleship classes like the Haruna and the Yamato, keeping up with other battlecruisers like the Cross class and battleships like the American Colorado and the New Roman Constantine. Protection is also solid with powerful ECM and gravitic shielding emitters, together with an expanded and up-scaled version of the advanced “Seiku” (Clear Sky) targeting and fire control system. But all this speed, accuracy, and protection comes at a cost, and that cost is paid in the simple weight of the firepower. Although impressive, those nine 25-teravolt EPCs are hardly war-winners compared to weapons mounted on other full battleships. Further, the Sengoku’s secondary weapons, while formidable up close, are far less effective at longer ranges. And of course, being a “small battleship,” she can only push a ninth-magnitude Darkstar wave, meaning she will go nowhere very fast in the interstellar sense, and she will almost never achieve any kind of operational or strategic surprise.
The Sengoku is a brand new class, the first units just having finished their fitting out and shakedown cruises. While fearsome, and based on a very successful design, it remains to be seen whether these “big sisters” to the Katana class cruisers will really stand up to the crucible of combat.
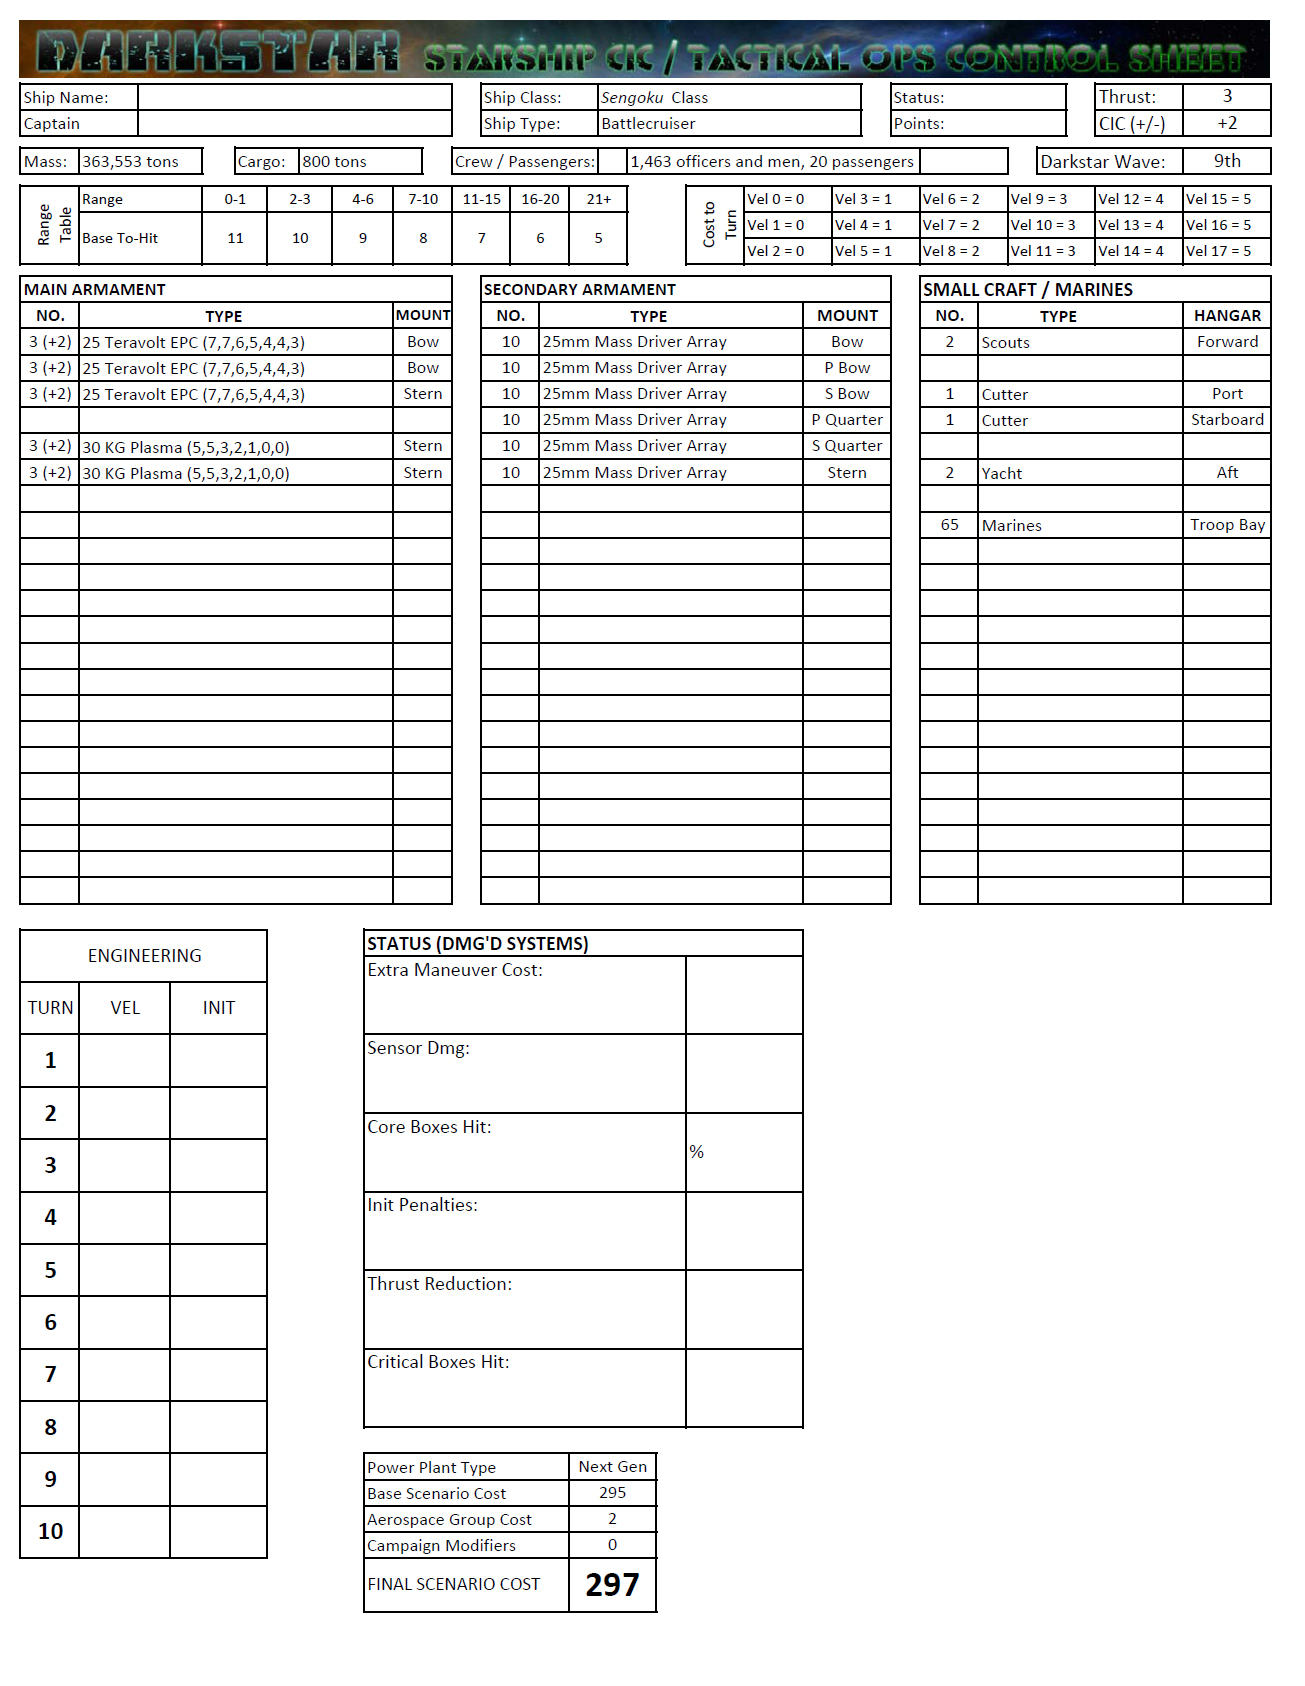
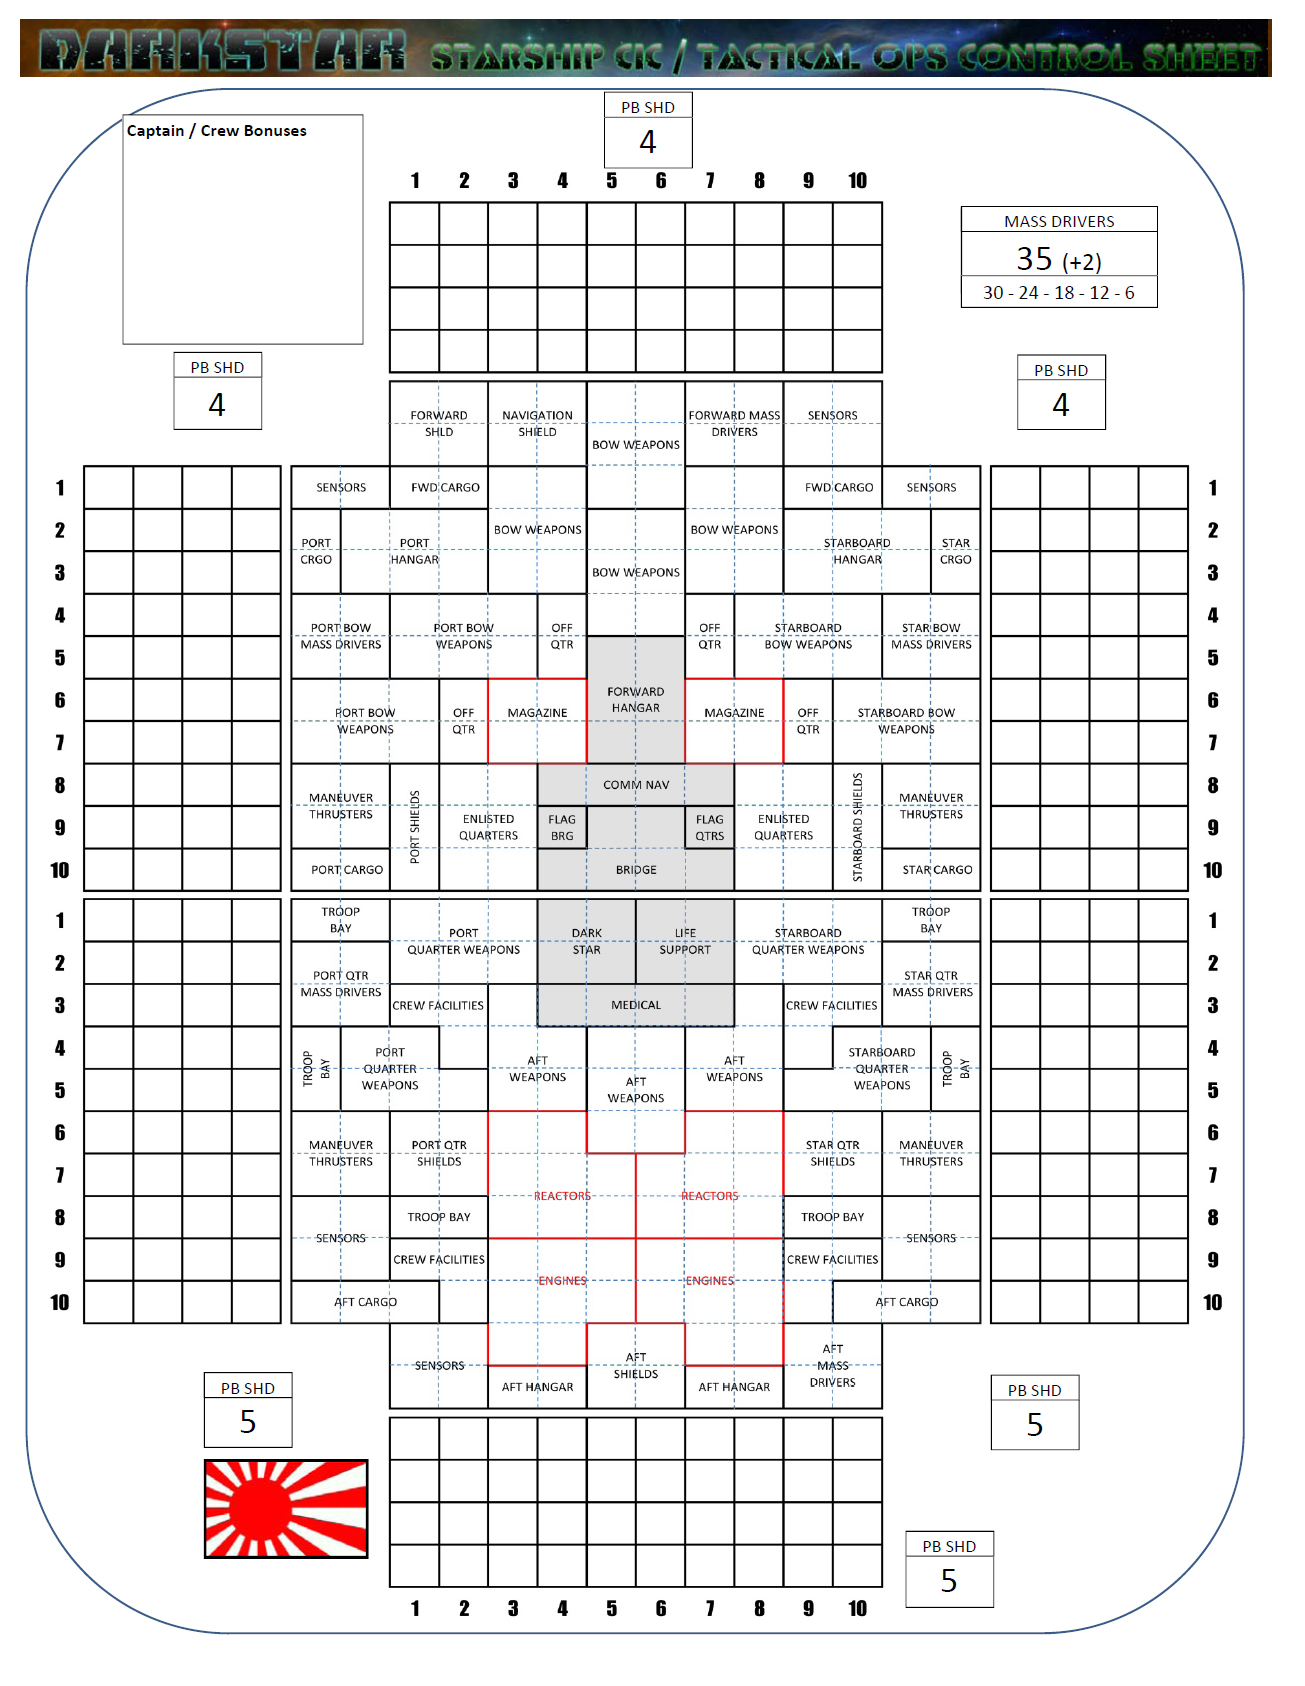
New Warship Class: Windsor Class Fleet Carrier
The Windsor class fleet carriers, named for royal families in the history and myth of terrestrial England, are built to form the nulceus of most of the Royal Navy’s more powerful aerospace strike squadrons or planetary assault task forces. Usually escorted by a heavy cruiser like a Titan or Iron Duke, or alternately by two Relentless class light cruisers, a Winsdor class can usually establish aerospace superiority over a recently-colonized world, if not a whole star system. Her hangars carry no less than three reinforced strike squadrons, two of Supermarine Starfire fighters and another “heavy” squadron of Nebulon Star Typhoon bombers (more like a squadron and a half, when fully loaded), a well as a section of De Havilland Buccaneer scouts. In all, this aerospace wing can potentially put over 140 warheads into a single strike, enough to destroy most warships under a battleship, most orbital installations, and certainly any ground target in support of a planetary invasion. Indeed, Windsor class fleet carriers are often called “baby Ark Royals,” sometimes expected to do a supercarrier’s job in a star system or contested sector where the fleet can’t afford to send one of its precious few Ark Royal flagships.
The comparison to Ark Royal class supercarriers goes further than simple size of the aerospace wing or hangar bays. Like the Ark Royal, the Windors carry curiously heavy ship-to-ship weapons for an aerospace carrier class. They mount two double turrets of Harland and Wolff “Nebula” 8-megakelvin laser emitters, the same as were mounted in the Maecenas class expedition cruisers and Falklands-Commonwealth destroyers. Rumors abound that these lasers were mounted on the Windor because the arms manufacturer building these other classes (Johnston-McAuley Aerospace at New Glasgow Colony – Psi Serpentis-E) “padded” the contract and over-delivered the weapons – leaving the Royal Navy with a surplus that had to be used somewhere. Such rumors are unconfirmed, those who believe the story point to the lack of Hawkinge Electronics 01A system that is mounted in the Trafalgar and Iron Duke class heavy cruisers, “proof” that the Windsors were not originally built for these weapons. Those who discount the rumor point to the Ark Royal class and it’s 8-gigawatt rail gun turrets, citing that mounting relatively large ship-to-ship weapons on carriers is a long-standing facet of Royal Navy carrier doctrine. While too small and too few to really make a difference in an actual gunnery duel, the idea is for these British carriers to be able to close with target vessels or installations long enough to rapidly recover, re-arm, and re-launch successive waves of bombers.
While this sounds good in theory, please note the somewhat lackluster mass driver defense system installed, electronic warfare suite, and gravitic shielding. While such defensive systems are not exactly poor, they aren’t very formidable either, especially for the hull profile and high-value target that a Windsor class carrier presents. Similar aerospace carrier types like like the American Obama class have tougher shielding, stronger mass drivers, and better electronic warfare and targeting systems, but lack the laser firepower of the Windsor. As the Windsor is still a very new class, it remains to be seen whether these design features will pay off in combat.
In parallel with the Windsor class, a sub-class of planetary assualt carriers has also been developed. These are the Waterloo class, named for victorious land battles won by the British Army through the centuries. In this configuation, the ship trades in all its fighters for twelve Griffon Hoverwork Conqueror class assault boats, six of which carry twelve Excelsior battle tanks (two in each assualt boat), four of which carry twelve Rapier class APCs (three in each assualt boat), and two of which carry a total of 48 Royal Marine Commandos. Bomber complement remains the same, their payloads usually configured with missiles for maximum effectiveness against enemy planetary surface targets.
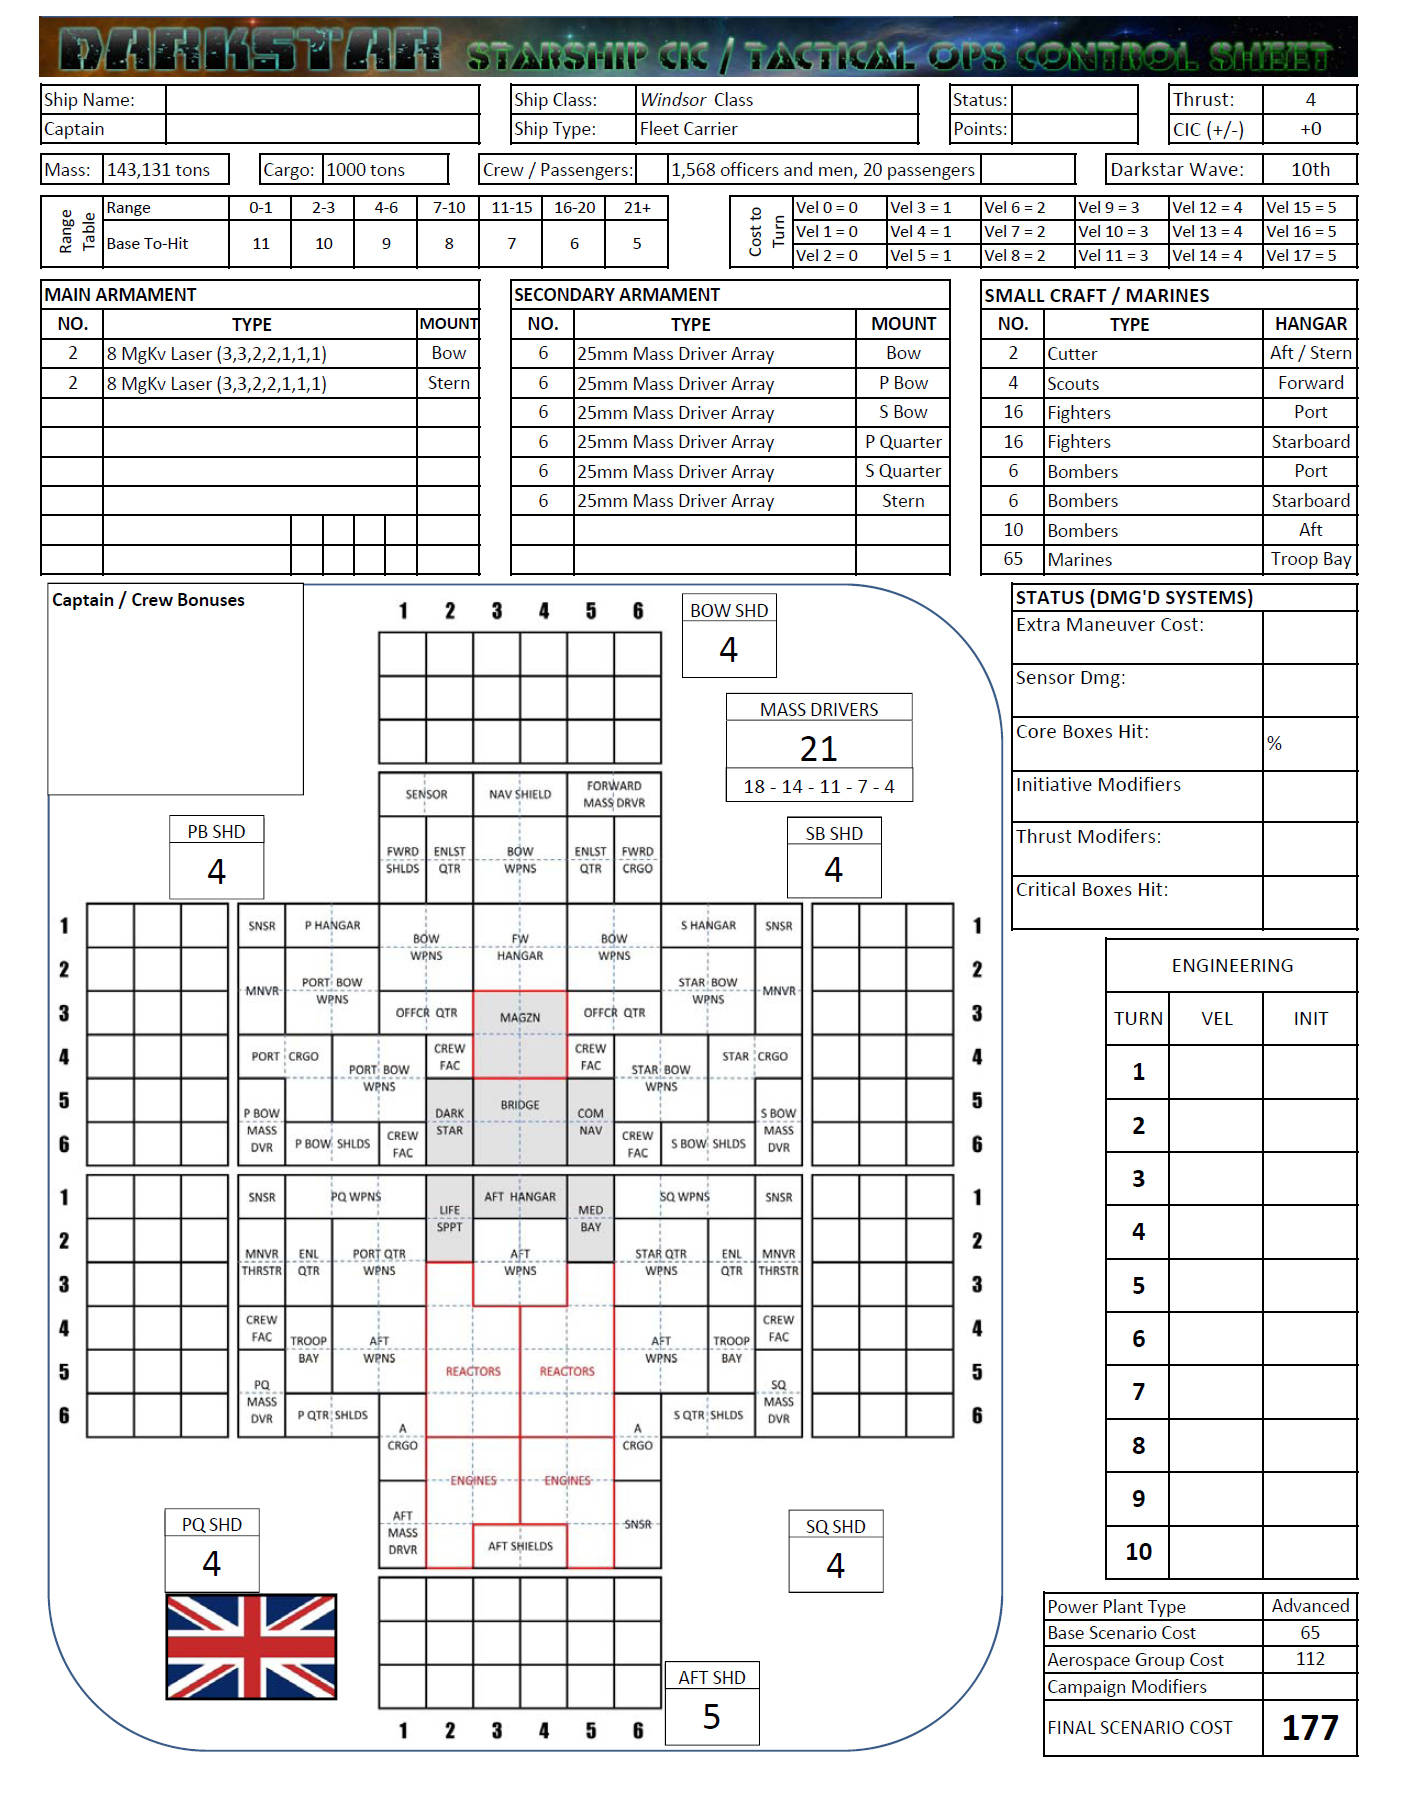


![StarCraft Tabletop Miniatures Game Pre-Orders Live Now [Updated]](https://images.beastsofwar.com/2026/03/starcraft-tmg-news-cover-600-338.jpg)


