


Persei-Aries War – Oriskany v. Rasmus


Recommendations: 1418
About the Project
After racking up 127 entries, 3500+ recommendations, and 600+ comments, the original Darkstar project thread was getting a little unwieldy. So I'm starting a new one, featuring a new campaign for interested players in the OTT community and beyond. So far we have five players, but there's always room for more!
Ever wonder if you had what it took to command fleet of starships in tactical combat? Darkstar offers that challenge to the hard-core wargamer, with a "Newtonian Physics" movement system, rules for astrophysical objects and phenomena, gravity, and of course dizzying amounts of 26th-century firepower. There are no aliens, no "hyperspace," no planets that look suspiciously like movie studio back lots. Just the old empires of Earth doing what they do best, colonization and kicking the hell out of anyone who gets in their way (i.e., each other).
In addition to starship tactical combat, Darkstar includes rules for carriers and aerospace craft, atmospheric operations, orbital and surface installations, boarding actions, assault landings, and a complete campaign system.
The system is free to download for members of the OTT community, and of course we play almost every weekend with a on-line version with starship commanders around the world! So if you ever want in, you know where to find us!
Related Genre: Science Fiction
This Project is Active
Rasmus and Tuffyears take on Oriskany
Hello one and all. This past weekend we had another great game of Darkstar with the community, this time with veteran Rasmus and newcomer Tuffyears. Together they teamed up to take on some of Oriskany’s Americans in a larger, 241-point game. Rasmus had two of his Japanese warships, including the mighty Kama. Sleek, powerful, bristling with weapons and sensors, she’s a 149,000-ton Katana class heavy cruiser, escorted by the scrappy little Akashi class strike frigate Sakito. Their allies in this game were two Baroness class security frigates, high-tech “escalation action” response ships sailing under the auspices of a ASDA, a powerful shipping and commodities corporation here along the Andromeda Arc.
That’s right, after almost two years of gaming we finally have to take a break from the Hercules Rim of the recent Third Hercules War, because in that war, the Japanese and Consortium were firmly-entrenched enemies. But of course Hercules is just one of 24 strategic command sectors (SCS) in the Second Band of Known Space, in any other one these two factions could be fast friends. The Andromeda Arc (Andromeda-Pisces SCS) was chosen for this game simply because the American and Japanese navies fought a bitter war here in 2514-15, and its easy to imagine tensions sparking again into open conflict.
Such is the nature of Darkstar, a setting designed to allow warships of any nation to fight any other nation without wondering about lore or mythos or “current situation.” Yes, such background is available, but it’s set up specifically to never be in the way. Next week might see me team up with Tuffyears against Rasmus, but with my Black Dragons, or Russians, or French … against Rasmus or Damon or Hegemongary or who knows who … playing who knows which faction. Not until a definitive campaign is set up do the factions solidify a little, and even then only in the specific campaign area (usually 6-15 star systems) and even then only temporarily (1-2 years of campaign time).
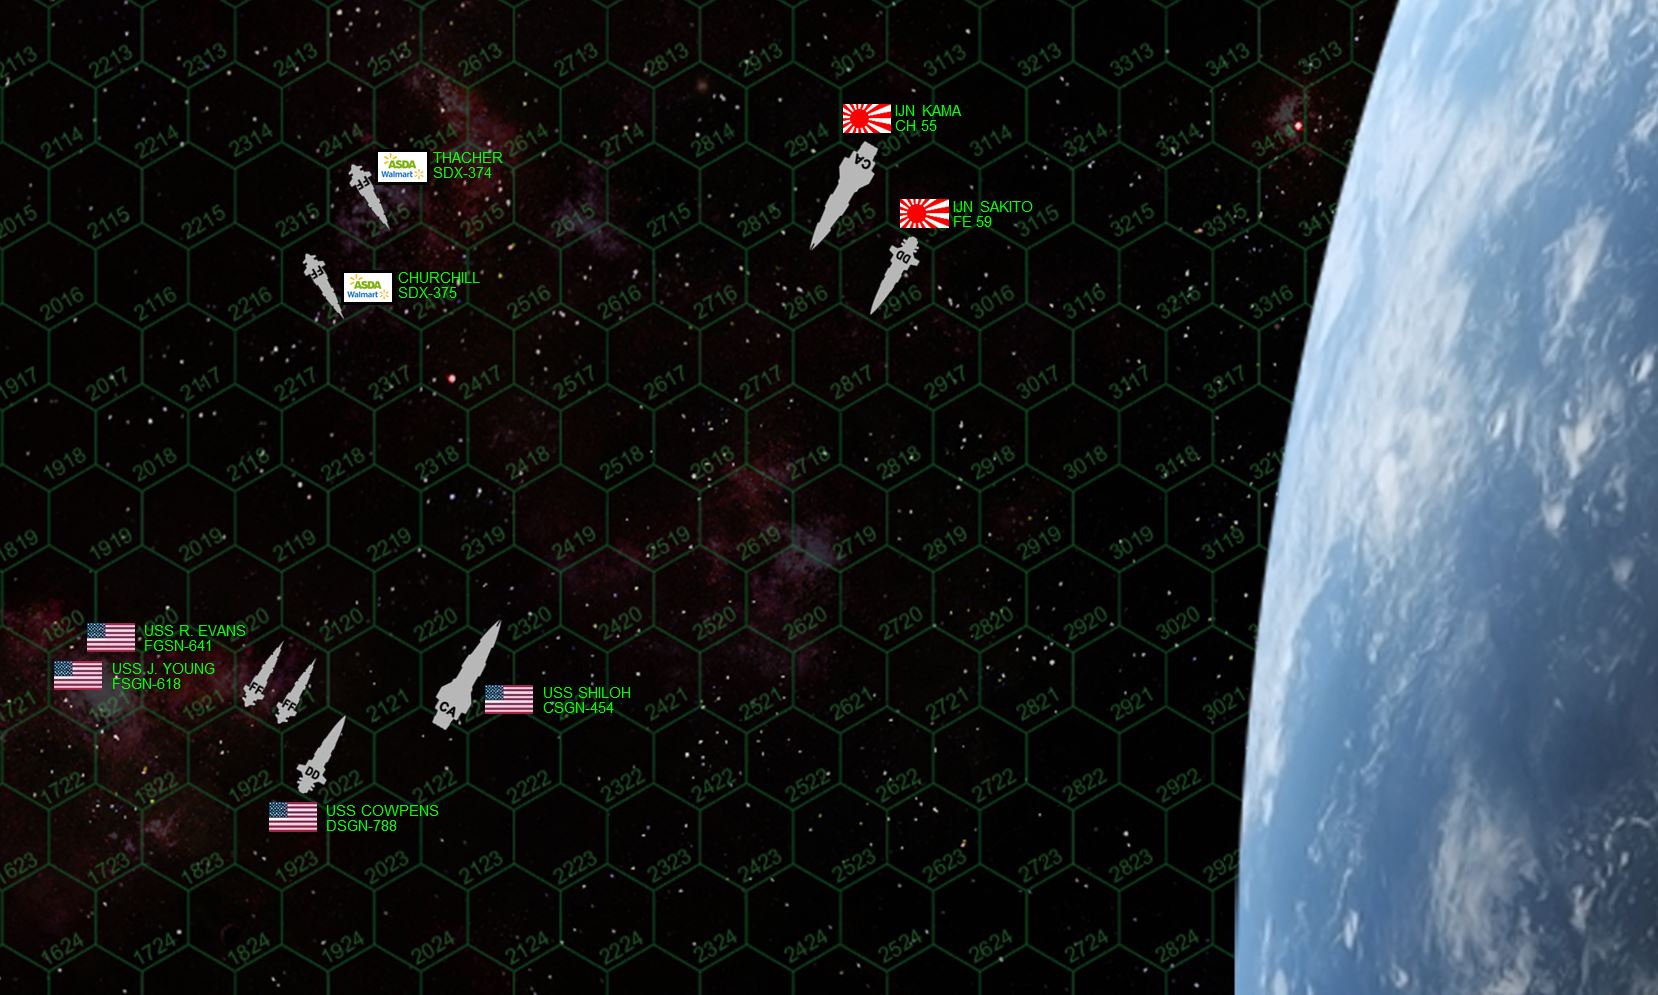 So here is the matchup. People who’ve followed this project before will know the big Japanese flagship, Rasmus’ IJN Kama. She’s a true “gun cruiser,” a hypertech 26th-century equivalent of the old Pacific War Takao, Chikuma, Mogami, or Mikuma. Although a little sluggish (as all heavy cruisers are), lacking in significant secondary weapons, and mounting NONE of the dreaded Ki-45 “Toryu” (Dragon Slayer), the Kama mounts three triple turrets of huge 18-teravolt EPCs, some of the biggest guns you will find this side of a full battleship. ASDA Wal*Mart has the same flagship WMS Thacher as last week, but now she’s joined by her sister ship WMS Churchill. Both are Baroness-class “security” frigates originally built by the Cignis megacorp, armed with the 6-teravolt “Tachyon” model EPC (electron particle cannon) and 8-megakelvin “StarSabre” laser emitter. Extremely fast, maneuverable, their small weapons are slaved to a deadly-accurate “ZenCloud” command and control system, allowing them to punch far above their weight. The opposing American flagship is the Gettysburg-class heavy cruiser USS Shiloh, sailing beneath the flag of Rear-Admiral Virginia Saunders, packing three triple turrets of 10-gigawatt rail guns, a secondary battery of 9-teravolt EPCs. She outweighs IJN Kama by 20,000 tons, but she’s not as high-tech. Escorting ships include the Valcour-class fleet destroyer USS Cowpens (same class as USS Oriskany, just not nearly as well-upgraded) and two Shepard class frigates USS Ronald Evans and John Young (Shepard frigates are named after early American astronauts of the Mercury and Apollo space programs).
 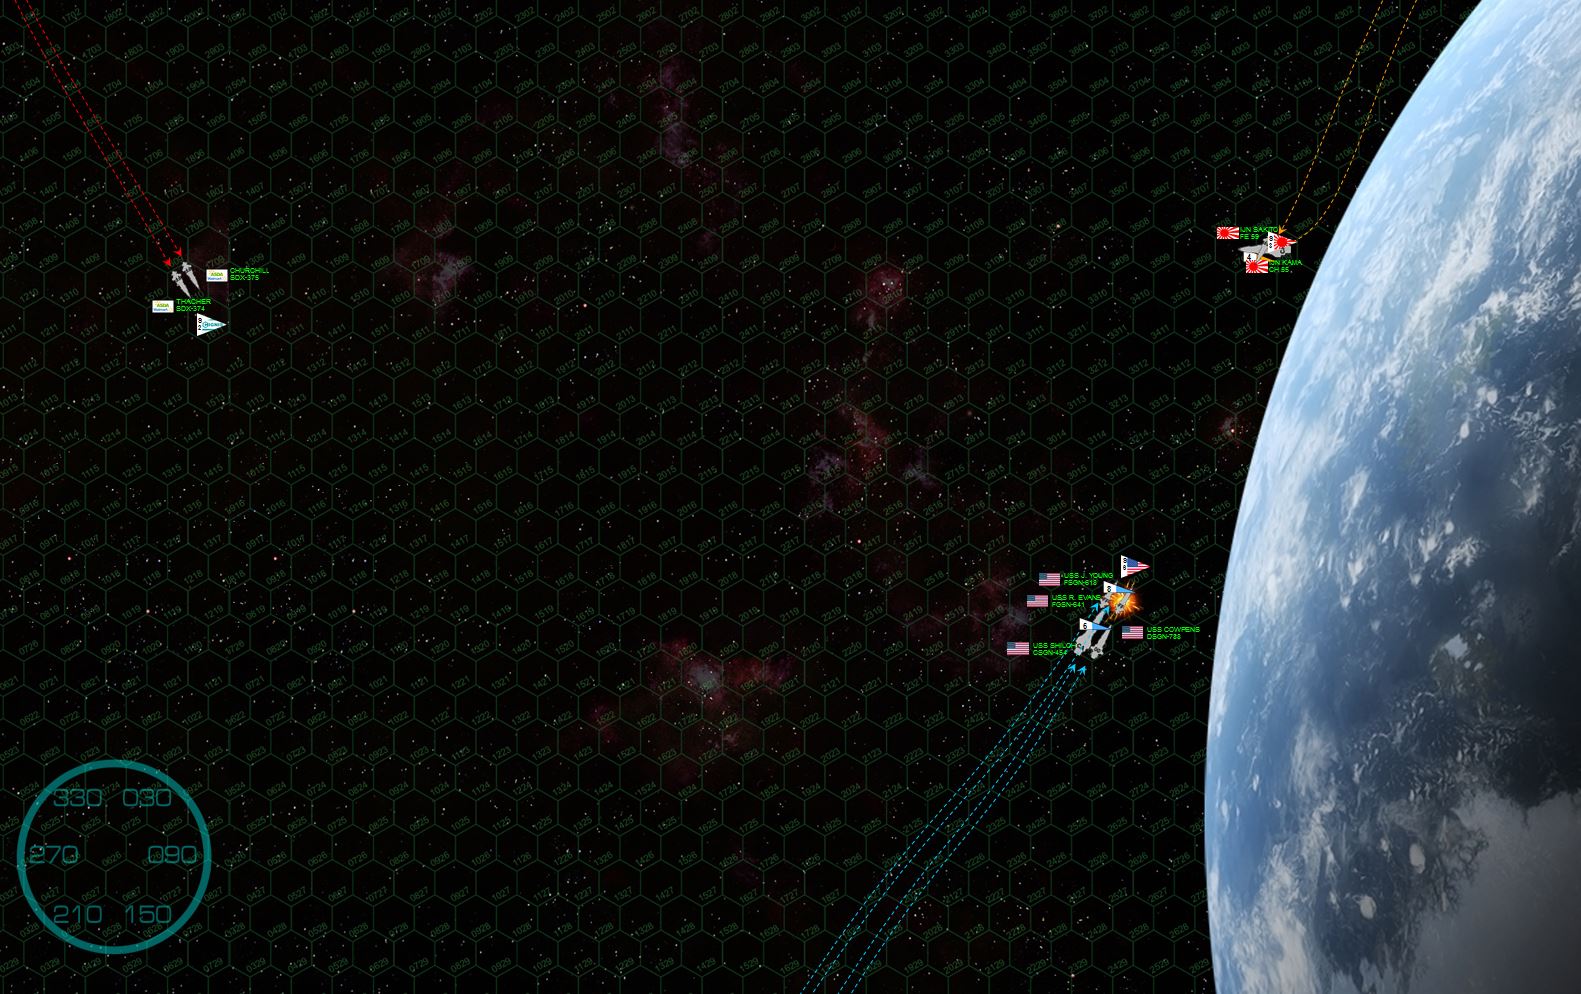 The two battlegroups make their approach. For the most part, the Americans lose initiative and have to move first. They stay together, setting a powered glide-path down into the planet’s gravity well in an attempt to gain the “gravity gauge.” This is a tactic where the the commander tries to put his or her ships between the enemy and the planet, forcing the enemy to turn TOWARDS the planet (very dangerous) to engage. Also, by turning away from the planet to engage the enemy, the gravity-gauge commander can use the gravity to help slow his fleet and sharpen his turn after a high-speed approach run like this. It doesn’t really work out for Admiral Saunders, however, as I straight-out miscalculated the course of my ships and their effect gravity would have on them. So when Rasmus thunders onto the table with Kama and Sakito, presents a broadside, and opens fire at 1800 kilometers, the hapless frigate John Young has her fo’c’sle blow practically clean off. EPCs and lasers slash into the bridge, Lt. Commander Emily Sanchez narrowly escapes but her ship is doomed, pulled down into a deteriorating orbit that will soon have it burning up in the planet’s atmosphere.
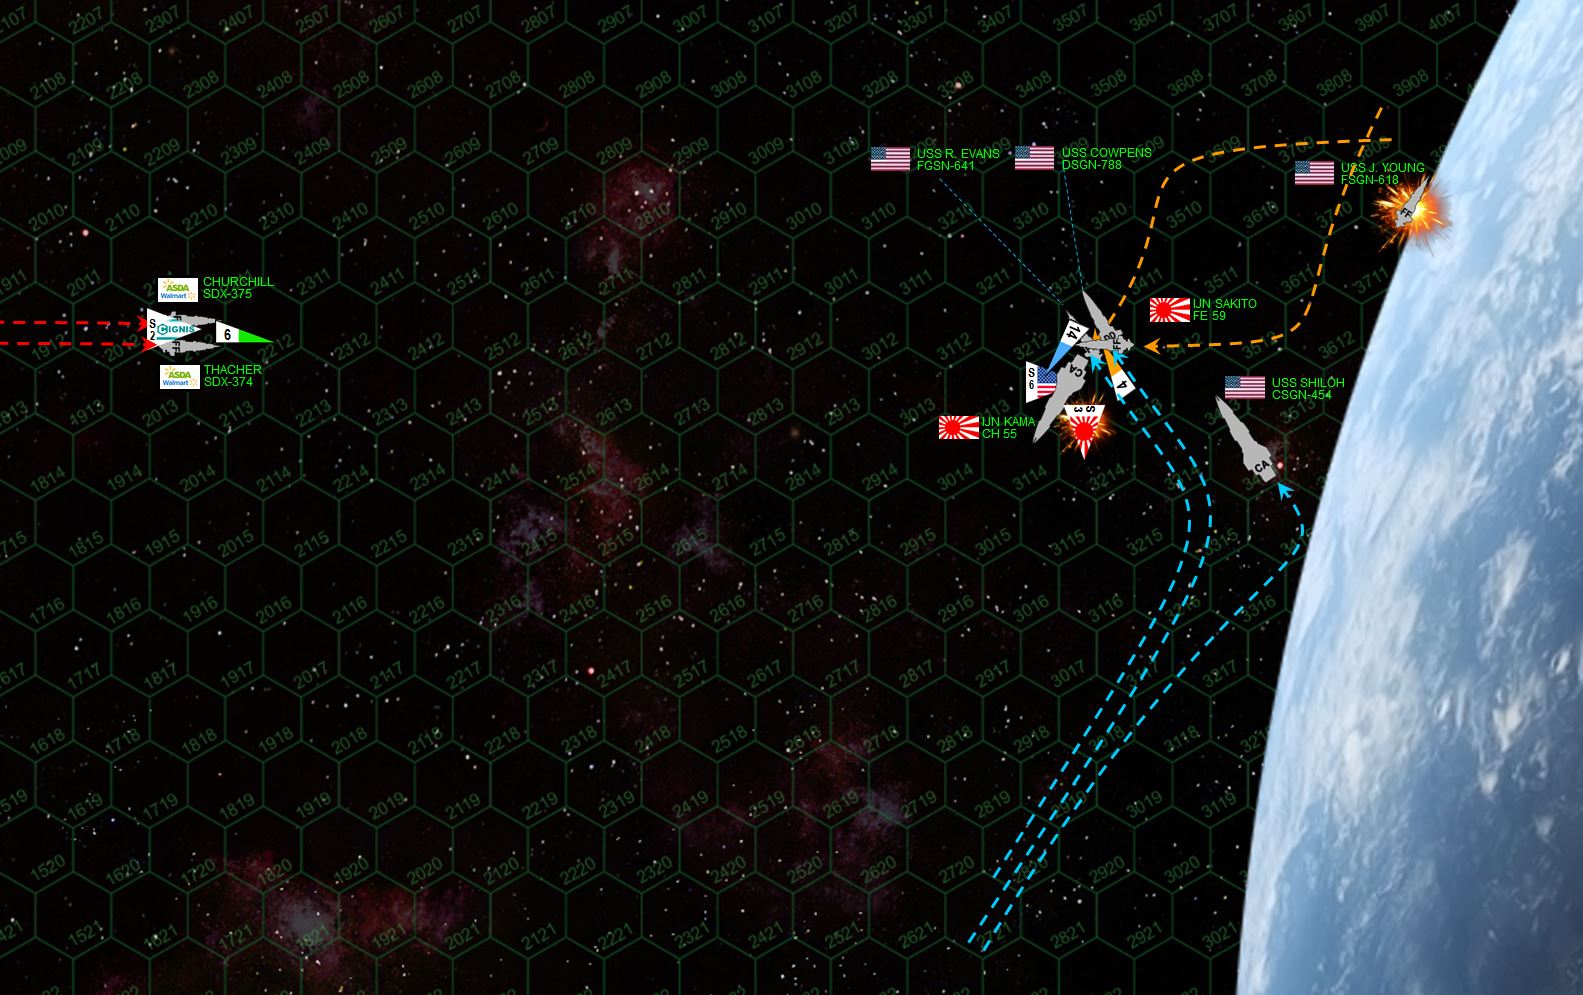 As USS John Young evacuates, the 25,000 ton hull burning up and exploding in the planet’s atmosphere, the two fleets close to a brutally-close engagement range. Here the advantage starts to swing a little to the Americans, at this range my guns are almost as accurate as Rasmus’, and those expensive targeting arrays give him less of an edge. He again wins initiative though. All I can do with USS Shiloh is continue to slow her approach, turn away from the planet at the last moment, and use the planet’s mass to screen my vulnerable stern. Rasmus positions Kama to deliver another broadside on my port bow, while not accepting one in return (only my forward guns can fire here, but most of Shiloh’s heavy guns are forward anyway). Rasmus comes off better in this brutal, point-blank exchange (3 hexes = just over 500 kilometers, spitting distance for these main-battery guns) … at least until my destroyer USS Cowpens (Commander Rachel Collingsworth) and frigate USS Ronald Evans (Lt Commander Charles Watson) cut across Kama’s stern for a point-blank broadside into her reactors and engines. The swift strike frigate Sakito rushes up behind Cowpens and releases a full barrage (ALL Sakito’s weapons are mounted forward) … but misses with EVERYTHING. All Japanese scouts are then shot down as well. Has the tide begun to turn?
 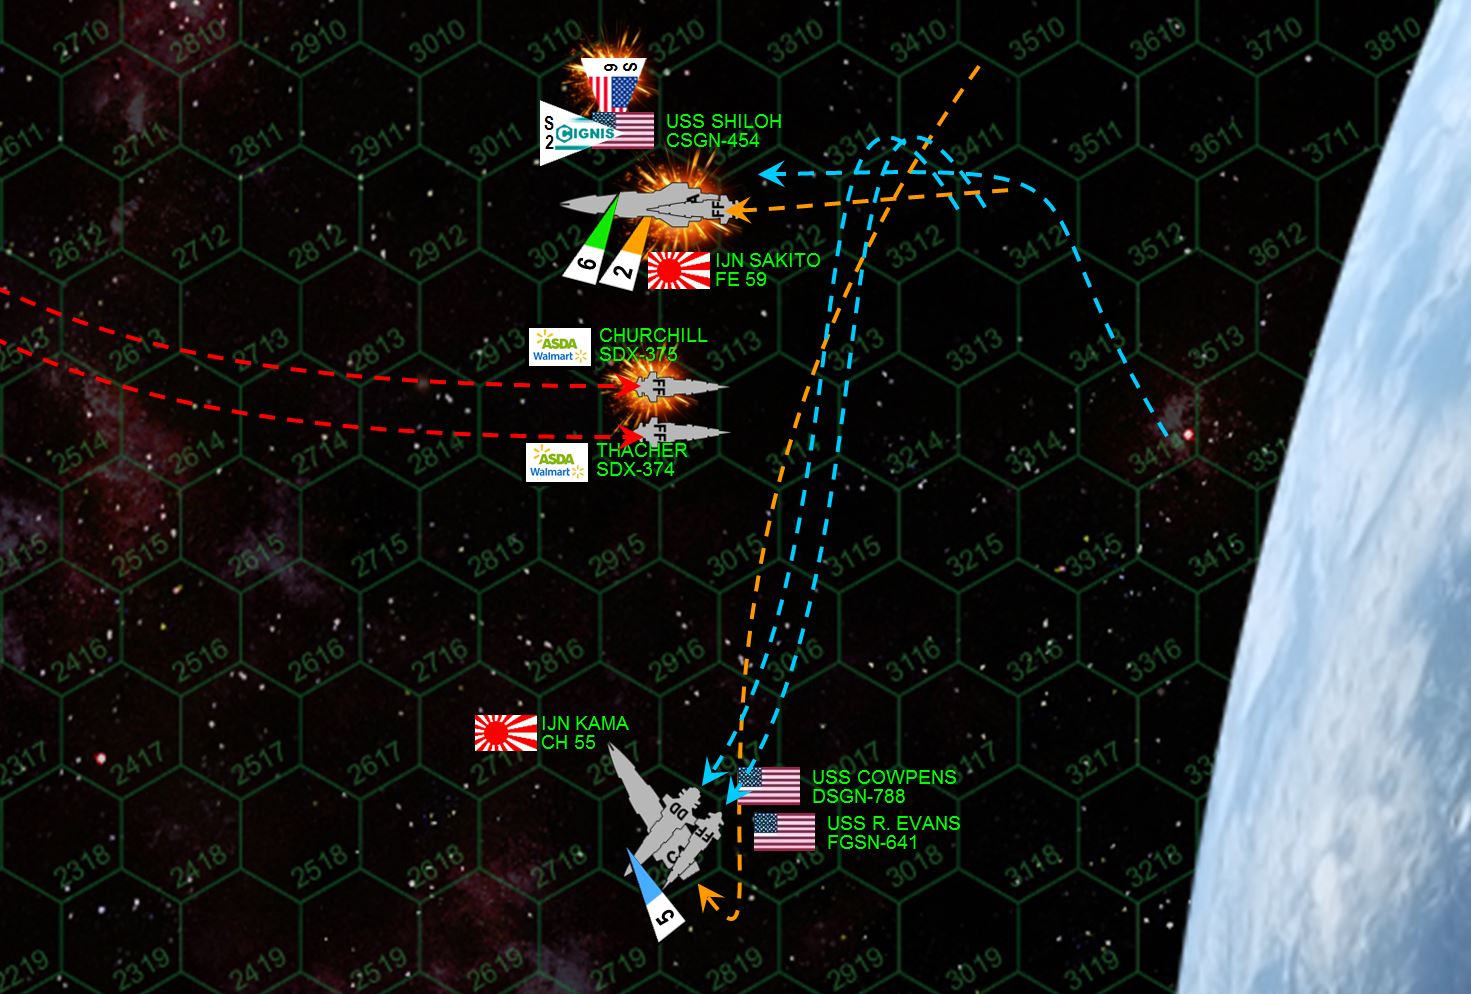 Thee minutes into the engagement. USS Shiloh completes her peel-up form the planet’s surface, ready to at last broadside the Japanese. Rushing into her gunsights, however, are the two tiny corporate attack frigates, diving at 33 kilometers per second (11 hexes) directly toward the planet … in the broadside of an enemy cruiser, at optimum range. They’re even positioned so Shiloh can put her big guns into the port quarters, immediately hitting vulnerable engines and reactors. THEN Sakito rushes up behind her, to put another point-blank forward volley into Shiloh’s engines. For just a minute, USS Shiloh has almost the entire enemy force in full broadside. Of course, the Thacher and Churchill hammer Shiloh in return. All American scouts are shot down. Sakito takes the full brunt of Shiloh’s aft batteries, I knock out her starboard engines and reactors while hitting her from the FRONT, meaning I have basically blow off the starboard side of the ship. Shiloh’s forward guns turn on the corporate frigate Churchill, where I literally hit the 20,000 ton ship with … and I’m not kidding here, 20,000 tons of guns. Needless to say, Churchill is all but blown in half, the flaming remains in a fatal dive toward the planet where she will impact not far from here the John Young blew up. Her skipper, Director Moore, is not among the survivors. The Thacher is also hit hard in sensors and maneuvering thrusters, affecting her two best attributes, accuracy and maneuverability. The Kama, however, hammers the heavily-damaged port bow of the Shiloh, and she does not survive a second such fusillade. EPCs and 12-MgKv lasers slash through the bridge, and while Rear Admiral Saunders survives the loss, her ship is crippled. The battle is far from lost, however. USS Cowpens and Ronald Evans are again on the Kama’s stern, and despite a withering fusillade from Kama’s aft guns, the American destroyer and frigate manage to backload Kama’s engine planet until she’s forced to eject her reactors. The Kama is adrift and crippled.
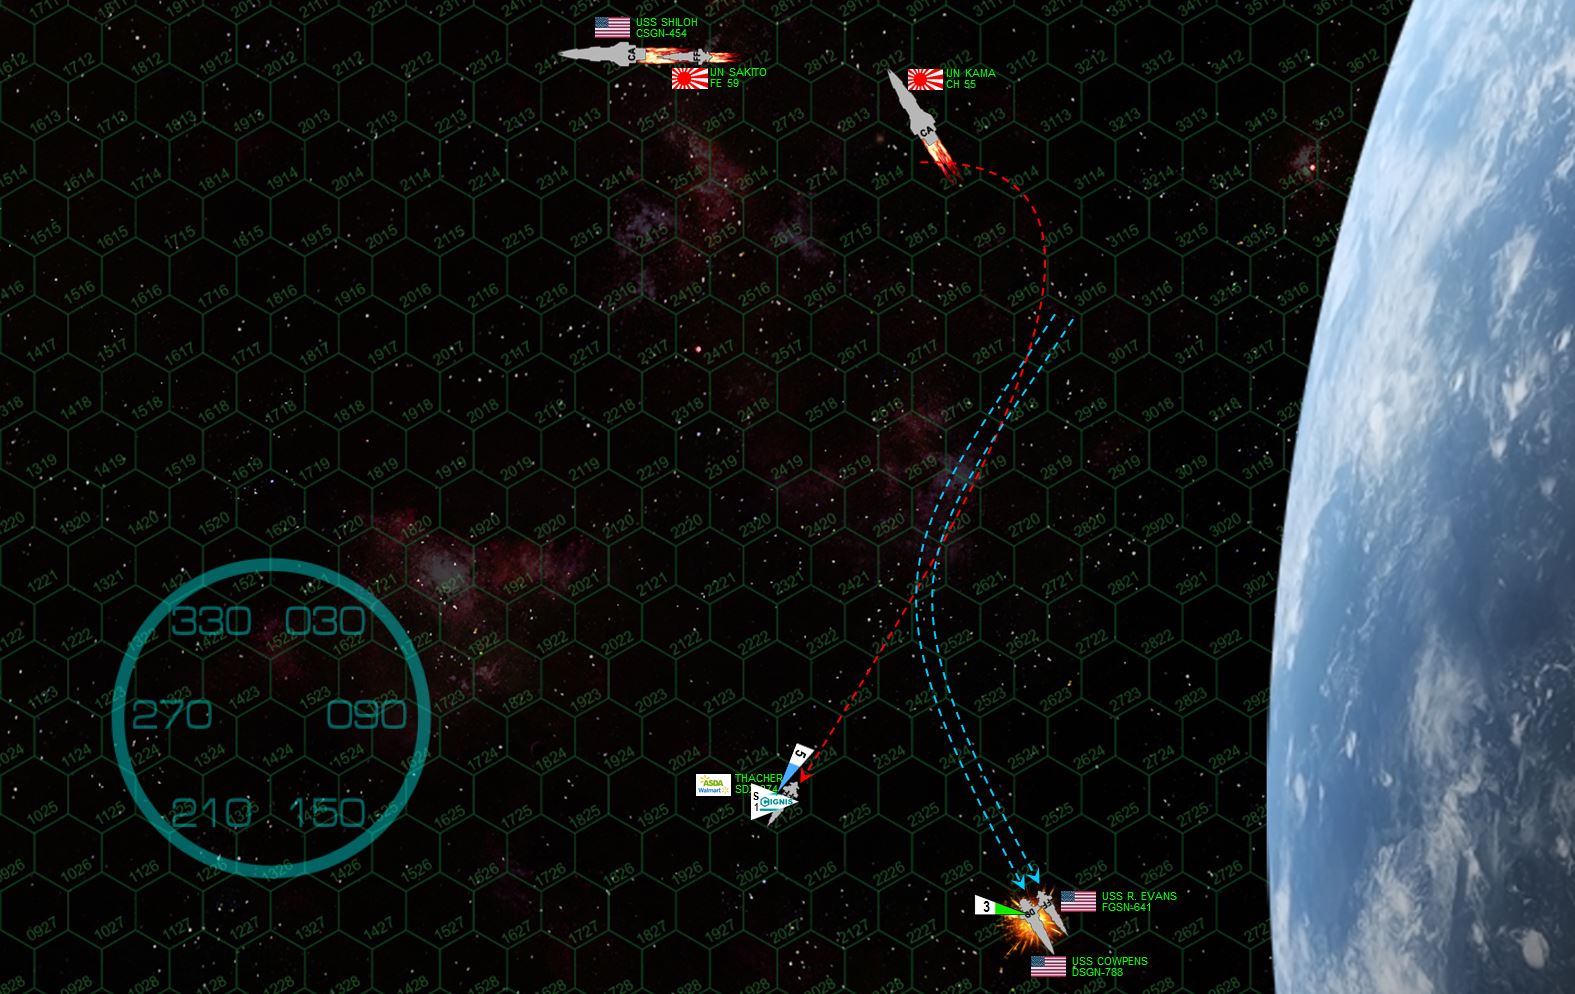 Straight out, I have now WON this game. I have a destroyer and a frigate against a half-blind, half-hobbled frigate. All I have to do is break off. Read on to see how I throw the game away with a series of stupid mistakes. Although USS Cowpens has indeed crippled the Kama, in doing so she received brutal 18-teravolt EPCs that shut down (amother other systems) her starboard quarter shielding. I deliberately turn away from the battle, accelerating back into the planet’s gravity well to screen my wounded side from any fire that might come from the last enemy ship, Tuffyear’s WMS Thacher. Except … in a straight-up rookie blunder, I literally mix up my left and my right. My starboard, burning and completely unshielded, is exposed to an east turn and broadside from the Thacher. Two hits are scored in Cowpens engines, giving Tuffyears a 5+ chance to cripple Cowpens on a d6 … and she rolls a 6. My bad navigation has combined with fortunate dice to put the Consortium back in this game.
 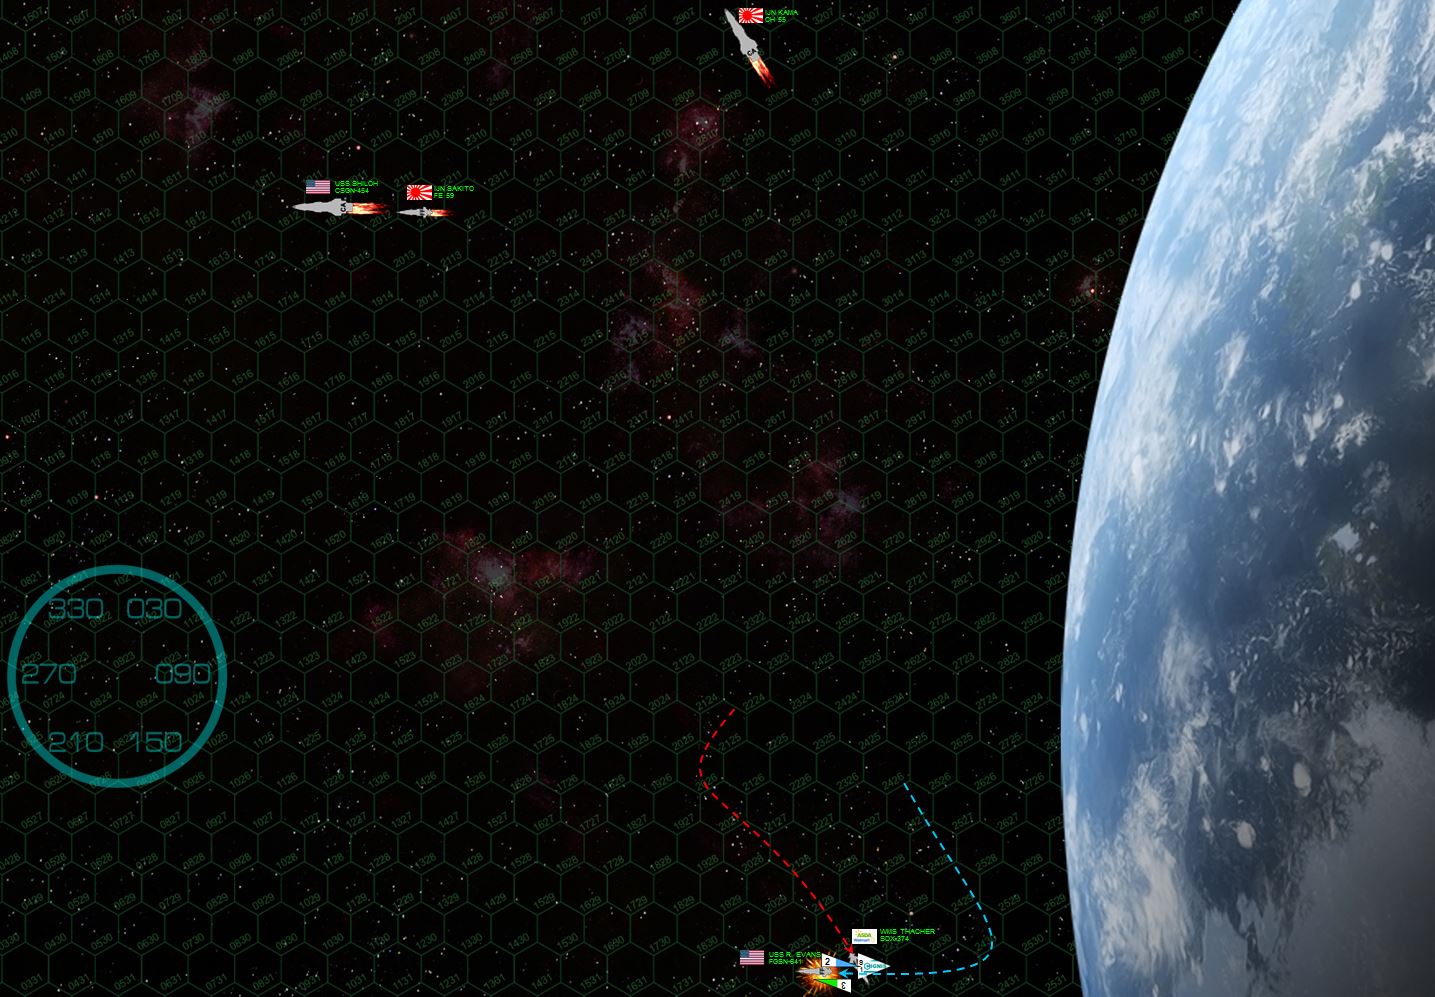 Dumb decision number two … USS Ronald Evans turns BACK into the fight instead of leaving the table. If I had simply kept drifting, I would have escaped with a 24-point frigate while Tuffyears would have a 29-point frigate, that 5-point difference nowhere near enough to score this 241-point game as a “victory” (per Darkstar Rule 522.A.ii., you have to win by at least 5% of starting points or else the game is considered a draw). So I could have easily had a pleasant draw. Nope. The WMS Thacher is badly damaged, recall, and I somehow hope that I would knock her out and steal a win. I even said to the players, “if I lose initiative, I’m out of here. If I somehow win initiative, I’ll try to get on your damaged side and knock out the Thacher.” I lose initiative (no surprise given Thacher’ edge in thrust) but then remain on the table anyway. WTF??? THEN I roll a “1” on the mass driver defense table when Tuffyears sends three “Sparta XII” class V torpedoes at my stern (worst possible roll, obviously). So only one torpedo is shot down, the two other two hit, THEN the Thacher’ broadside … yeah, that’s all she wrote for the Ronald Evans. The game goes down as a 29-point win Consortium-Japanese win (12%).
 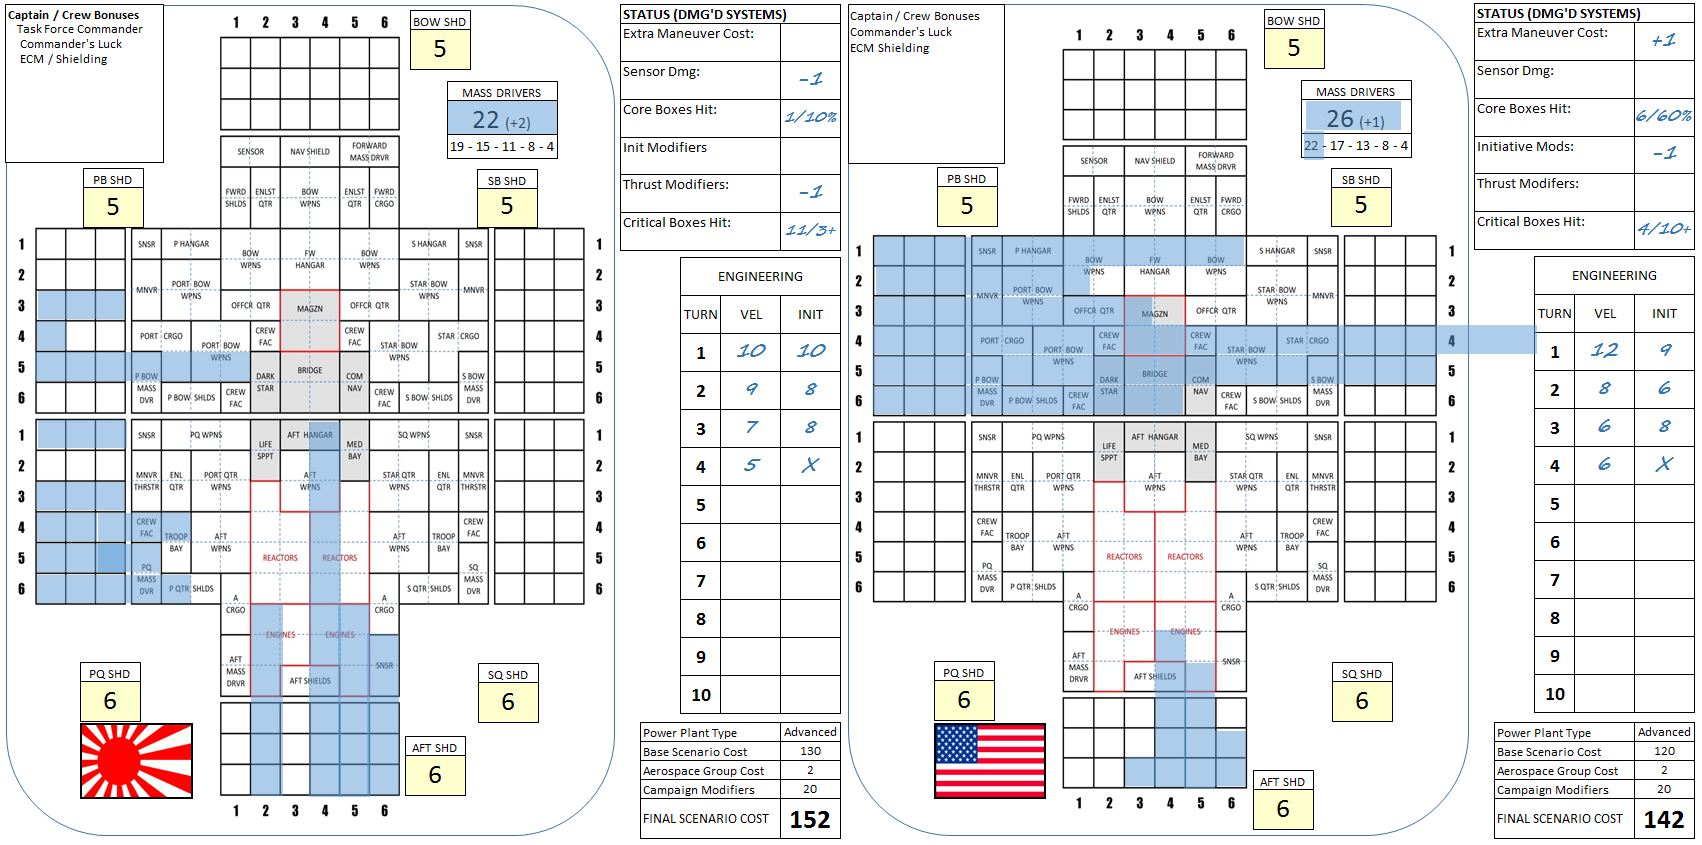 So here we see the clash of the titans, the warship record sheets of the USS Shiloh and IJN Kama. Clearly the Shiloh has taken much more damage, but the damage against Kama is much more precise … the footprint of smaller, more maneuverable ships as opposed to head-on slugging matches like we see with the Shiloh. In the case of the Shiloh, her commander (Rear Admiral Virginia Saunders) has to make a 60% survival check when her “Bridge / CIC” boxes were completely filled in (bridge blown up, did she personally survive that). Whether Saunders lives or dies, the ship itself makes a recovery check (different for each warship type and dependent on whether your side won or lost the battle). Then, if the ship was lost, and the captain survived the actual bridge hit, the captain rolls again to see if she’s among those rescued from the wreck. Good news, she gets to make these rolls more than once thanks to “Commander’s Luck” campaign upgrades (Rule 571.A).
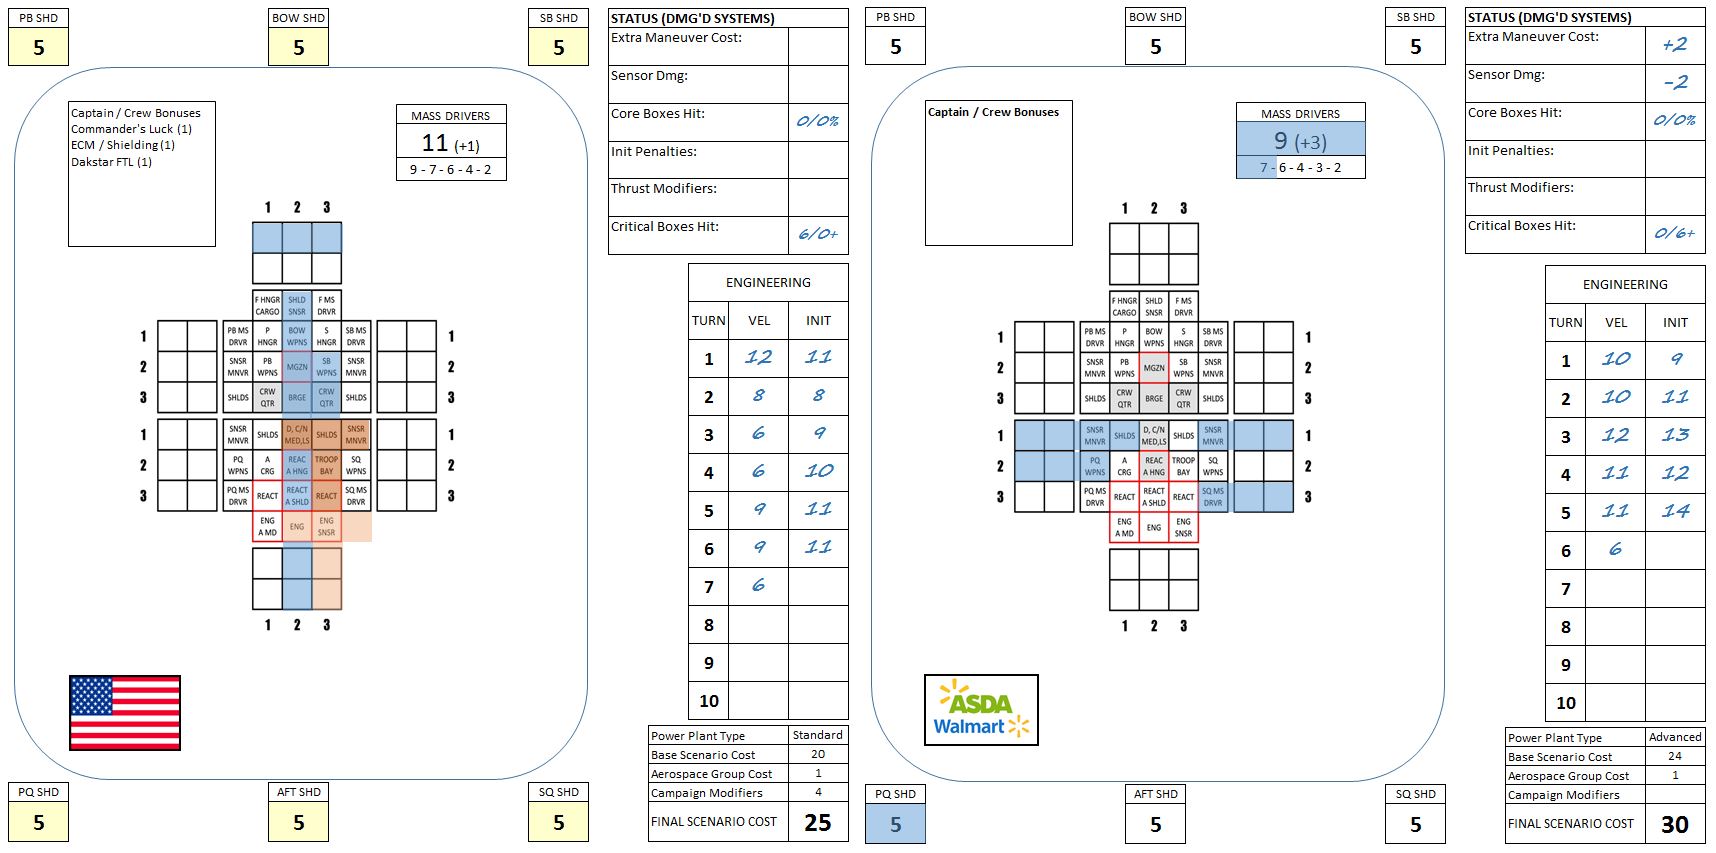 And the two ships that would actually determine the battle’s outcome, frigates USS Ronald Evans and WMS Thacher. In orange you can see the devastating damage caused by the two Sparta XII Class V torpedoes. Note the second torpedo sailed straight into the hole blasted by the first torpedo, and detonated inside Evan’s starboard reactor room. And while I certainly damaged the Thacher, I never really hit anything vital. So congrats to Rasmus and Tuffyears on the win!
 New Darkstar Players - Tuffyears vs. Hegemongary
Darkstar is back, everyone with new players “joining the fleet” eager to test their skill, push their luck, and find their fate across the stars. This game was played between community @tuffyears and @hegemongary, both of whom were brand new to the game. In a single session, we sat down and created two small beginning battlegroups, with the players electing their factions and warships. We pointed up a small 65-point game, set up “raid” victory conditions, and had a quick game.
For their first time with the system, both players did great with the rules mechanics for range bracketing, torpedo and aerospace strikes, and the Newtonian “drift movement … and the end result was damned near to a mathematical draw. It was a great first taste of Darkstar, and we hope the first of many games with these new players (building up their fleets until their ready to take on some of our more veteran commanders like @Damon and @Rasmus.
Tuffyears has started with a battlegroup from the high-speed, low-drag, and very high-tech Corporate Consortium. Just for fun she’s designated “Wal*Mart ASDA” as the sci-fi mega-corp that her Senior Director and crew of “security consultants” fly for. Yes, even in the year 2522, it seems this company is still a powerhouse. Hegemongary has chosen the Arab League, wanting to select a navy not many have chosen before and interested in their high-tech, high-FTL designs, their doctrine heavy with carriers and hybrid-carrier/cruiser designs.
So the date is July 2522. The Third Hercules War has ended just last month, yet even as the embers cool and the ink dries on a fresh stack of peace treaties, further conflict kindles anew. The Consortium technically wound up on the losing side of that war, while the Arab League stood as a victor. Now, as planets, moons, and whole star systems change hands across forty light-years of the Hercules Rim, some local Consortium vice-presidents are less than happy with how the war ended, and remain reluctant to hand over holdings and shipping lanes to the winning powers.
The first incident comes in the outer protoplanetary debris belt of the Gliese 649 system (Ragnarssonland Colonies). The United States co-owns that system with the Consortium, and the US has agreed in the peace treaty to provide access to certain Ragnarssonland orbital refueling points and comm-drone relay points to the Arab League. As the Arab League dispatches a small, high-speed battlegroup to claim its stake, they find their approach being intercepted by a small Consortium battlegroup. Apparently the US Navy forgot that Wal*Mart ASDA was one of the companies on the lease of these refueling stations, and Wal*Mart ASDA never agreed to that clause of the treaty. It seems Wal*Mart ADSA were supposed to receive a quiet kickback from the US State Department in exchange for signing off on this clause, but payment is still pending.
Thus, the Consortium is not backing down, and Tuffyears has orders to intercept the “invaders” and teach them some manners. Hegemongary’s battlegroup, conversely, has orders to claim what was rightfully won in the late war and legally signed over by international treaty. Looks like another scrap is about to go down in the chaotic world of Darkstar.
 Here is the Arab League battlegroup, the Khalifa-class aerospace carrier ar-Ra’I, carrying a complement of “Mylekinir” (Fire Angel) type fighters and “Demkikham” (Vengeance) class bombers. Escorting her is the Hattin-class frigate az-Zawraq, armed with small but stinging 6-megakelvin lasers and 9-teravolt EPCs.
 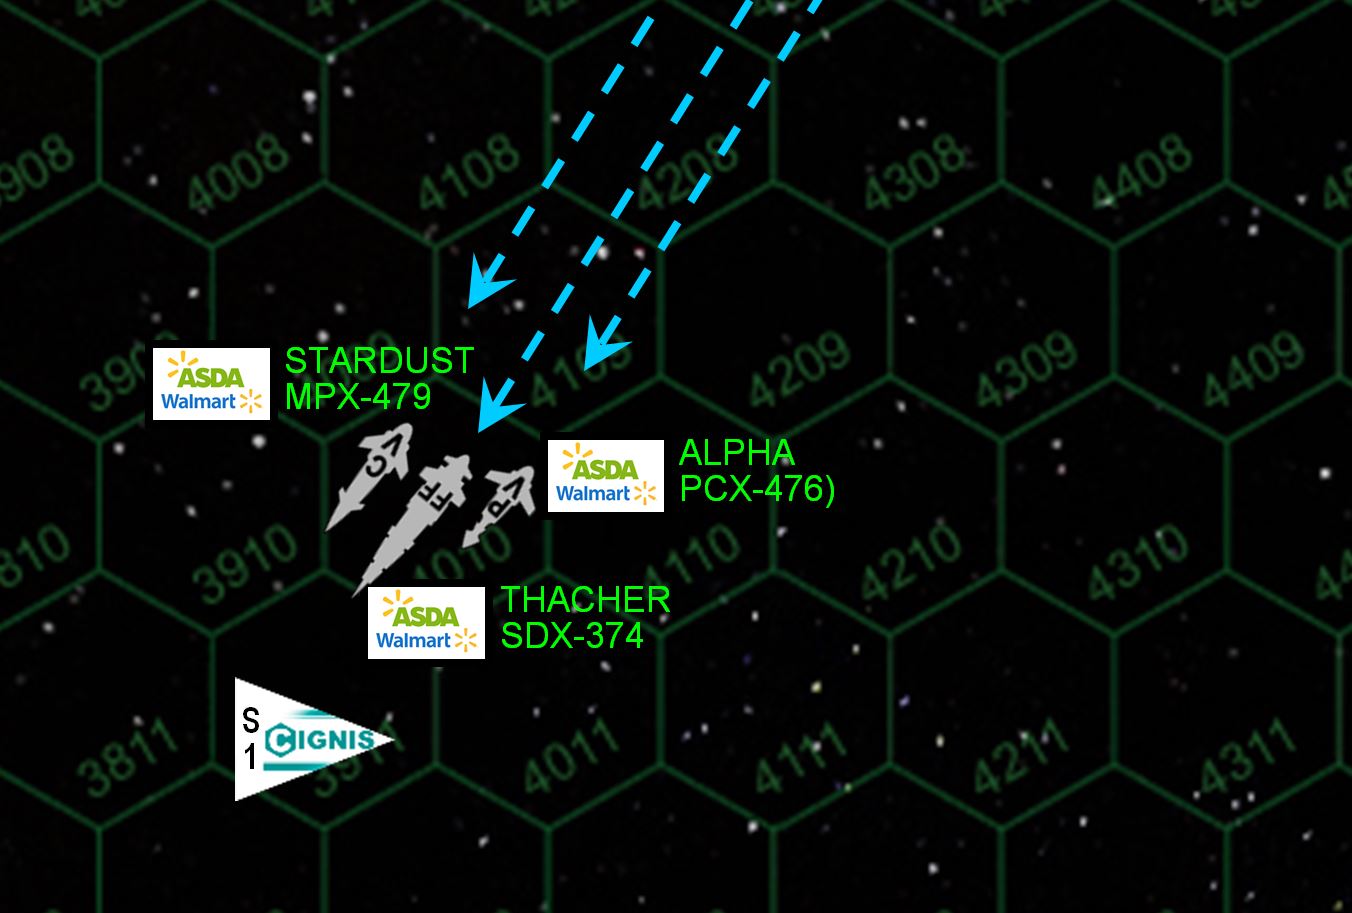 Meanwhile, the Corporate battlegroup cuts in to intercept. The flagship is the Baroness-class WMS Thacher - small, high-tech, and startlingly well-armed for her size, and fast even for a “security frigate” (often read “merchant raider”). Escorting her is the Twilight-class “venture cutter” (corvette) WMS Stardust, and finally the Rogue-class armed sloop (gunboat) WMS Alpha ... basically the size of the Millennium Falcon.
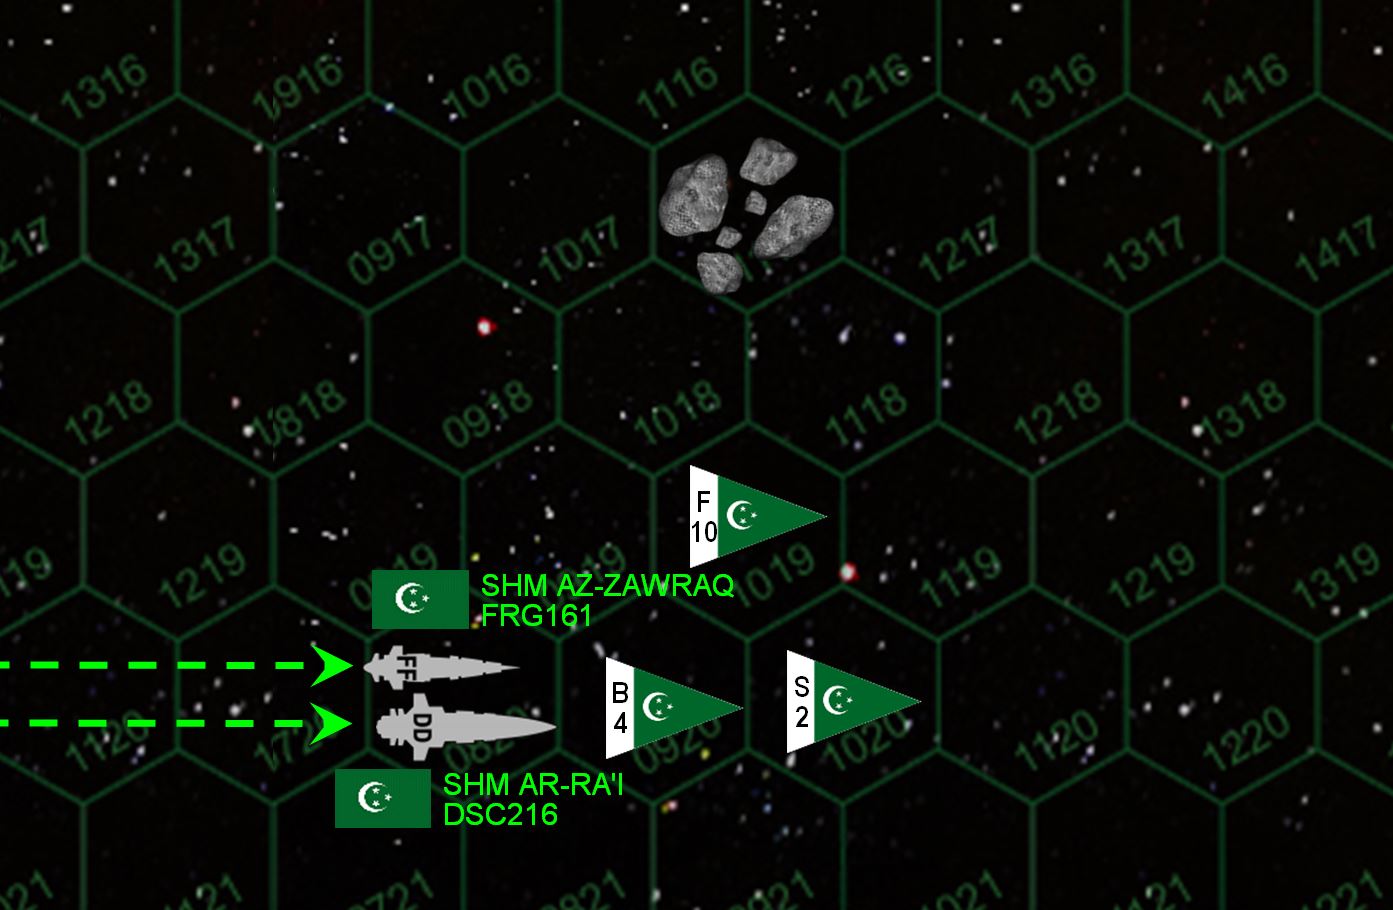
 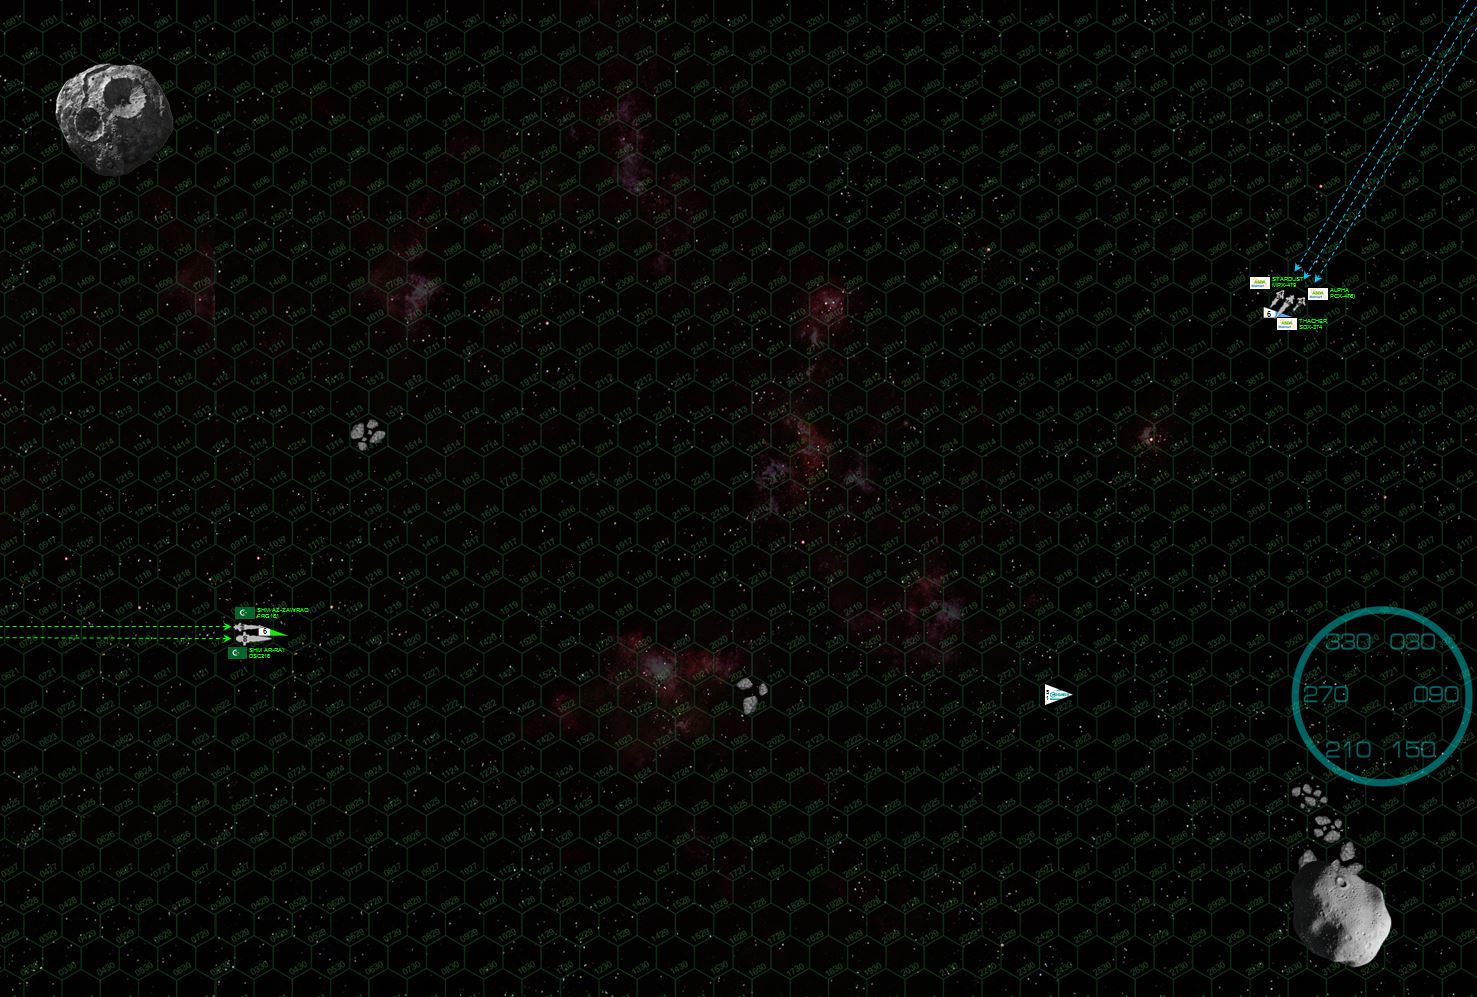 The two battlegroups make their initial approach through the drifting asteroids and icebergs here along the extreme outer edges of the Gliese 649 star system, analogous to our own solar system’s Kuiper Belt. Arab League keeps their approach slow and stead, not even immediately launching their initial aerospace fighters. The Consortium comes down from the upper right much more aggressively, launching and sending out their one and only scout plane. Both sides have only a single long-range laser that can reach at this point (the range between them is 32 hexes, 5760 kilometers, about the distance from London to Afghanistan). So no one hits on the first volley, but torpedoes are launched and begin their attack runs on enemy ships.
  Each turn is a minute, and at the end of Turn 2 the two battlegroups are close enough to actually start landing superficial damage on each other. The Consortium’s weapons are particularly accurate at this range, thanks to their dizzyingly-advanced sensors and targeting suites. But all that draws incredible power, reducing the number of caliber of their weapons. The Arab League’s guns may not be as accurate, but the az-Zawraq carried many more of them. Meanwhile, Hegemongary launches the bulk of his aerospace strike group, but the ar-Ra’I’s launch bays are only so big and he can’t quite get everything off at the moment. Both sides are also carefully guiding their torpedoes to target, keeping them out of range of enemy mass driver defense guns. In fact, Tuffyears keeps her torpedoes within range of her own mas driver guns, just in case Hegemongary decides to send his fighters after her torpedoes before they can reach his ships.
 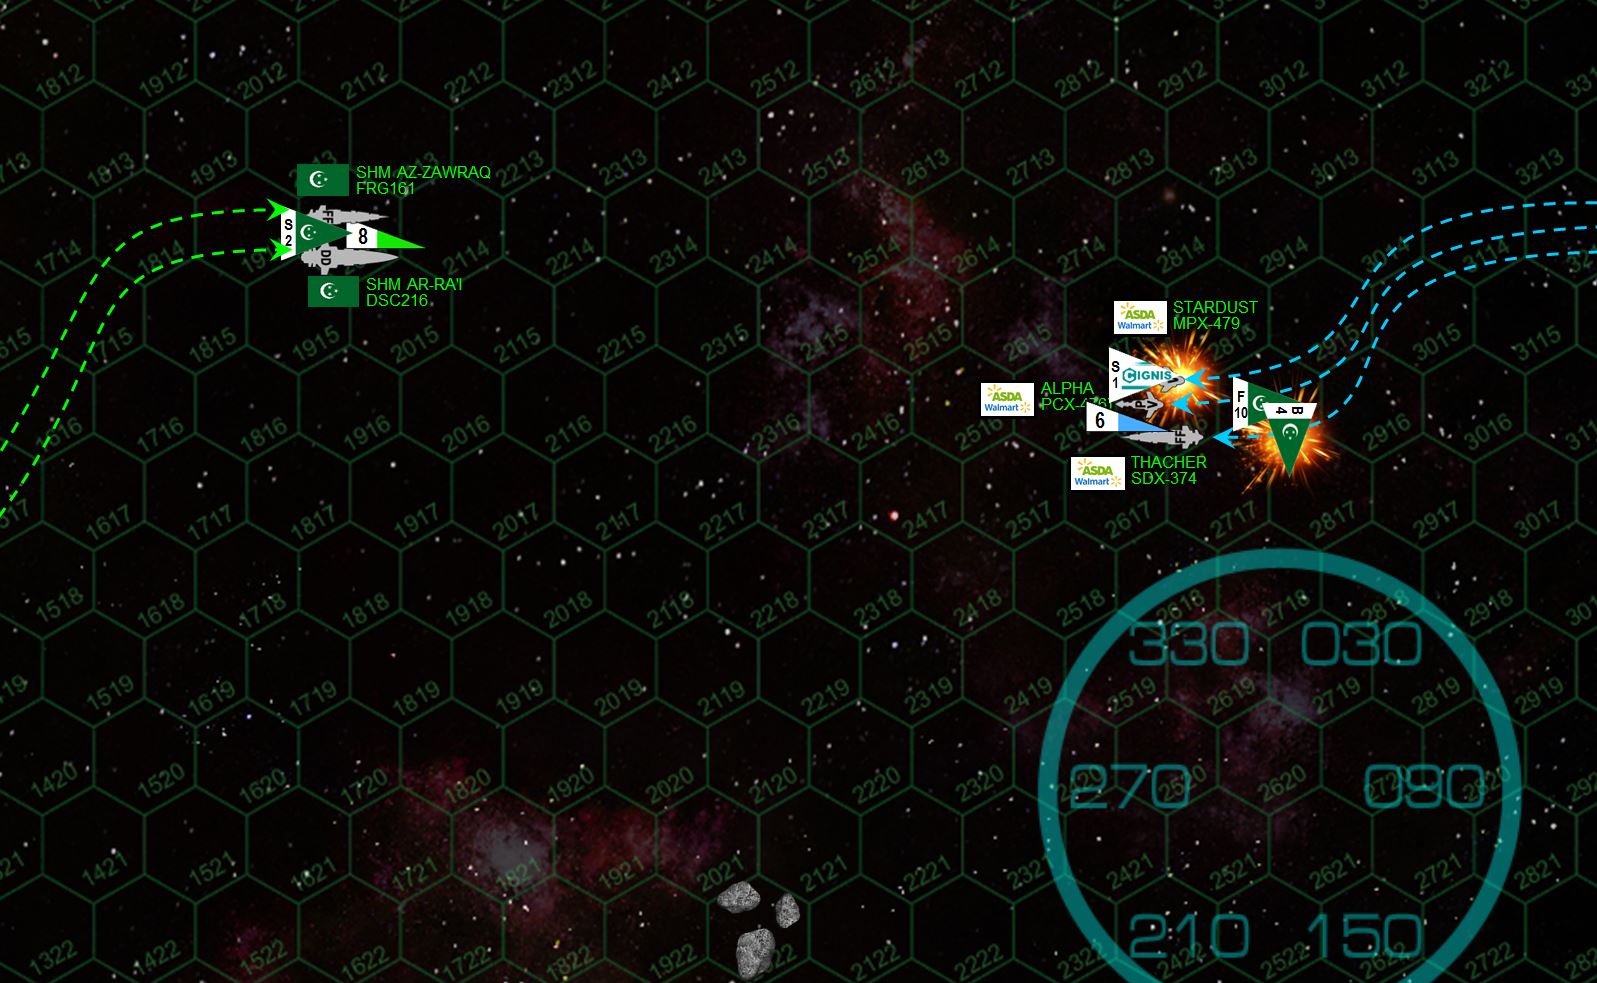 Both task forces turn directly toward each other, sidestepping and weaving slightly as they make their rush. Here at last, at a range of 1680 kilometers, the two fleets really come to blows. Arab fighters and bombers make a point-blank run at the stern of the Consortium ships, hoping to present a dilemma to Consortium mass drivers between shooting at them, or at their powerful "Ahrasyfa" (Storm) Class IV torpedoes. Tuffyears has to divide her mass driver fire, and while she shoots all the Arab bombers and most of their torpedoes, one torpedo hits the stern of the Stardust ... but the gravitic shielding pre-detonates the warhead. Ten “Fire Angel” fighters make an up-close “Star Wars”-style strafing run, and actually do just enough damage to the Stardust’s starboard engine and reactor to leave the ship crippled and adrift. First blood is drawn!
 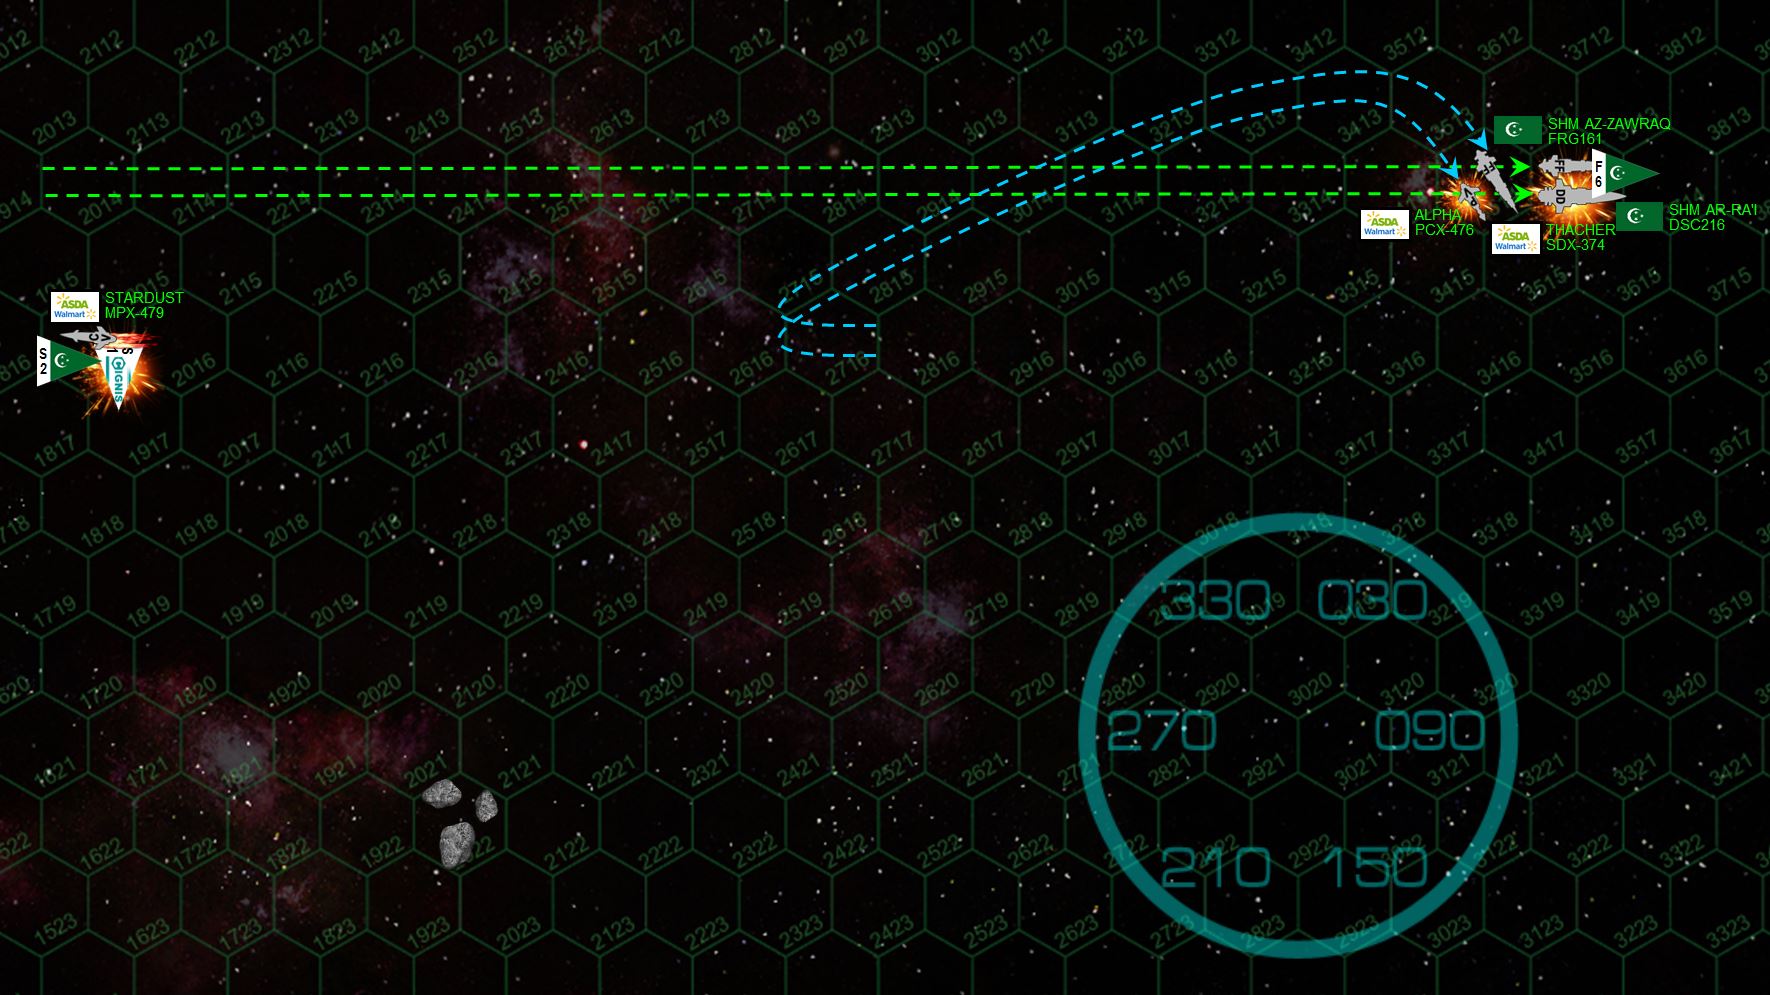 Now this is a very small battle (65 points, typical games run from 300-800), and raid victory conditions ... meaning that Hegemongary has actually already fulfilled victory requirements (destroy 30% of the enemy points, win by at least 5%). Now he just has to get out of the battle area. His two ships pour everything into acceleration, and are now pushing 16 hexes (48 kilometers per second) in a determined bid to break off the engagement. Consortium ships, however ... while small and fragile, and INCREDIBLY nimble. So even at her speed of 24 kps, Tuffyears is able to execute a four-point turn that puts her two remaining ships in a point-blank broadside straight across Hegemongary’s stern. Gunboat Alpha fires first, tearing open the az-Zawraq’s stern armor but not quite getting into her engines or reactors. Az-Zawraq fire back with stern EPCs, slashing the Alpha clean in half, the 9-teravolt “lightning gun” incinerating the bridge and instantly killing her skipper, Sr. Manager Taylor. The Thacher fires a moment later, drilling straight into the az-Zawraq’s armor that the Alpha had just opened, knocking out her port and centerline engines, two reactors, aft mass drivers, and aft shield. The ship MAY be crippled, but Thacher’s two powerful 8-megakelvin lasers have already switched to the ar-Ra’i. These hit perfectly in the ship’s central stern, damaging both port and starboard engines. Ironically, although more badly damaged, the az-Zawraq survives the assault, while ar-Ra’I loses power (along with four fighters shot down in an abortive missile attack run on the Thacher)
  And that’s it the battle is over on Turn 5. The az-Zawraq survives and escapes along with six fighters and two scouts (who shot down the one Consortium scout near the drifting wreck of the Stardust). The Stardust and ar-Ra’I will be recovered and towed back to base for repairs, while the gunboat Alpha is lost forever, her helpless wreck hunted down and destroyed by vengeful Arab League fighters after the battle. The results are pointed up and the game is very VERY close, with Tuffyears’ Consortium battlegroup scoring 36 points to 34 (the biggest Arab ship wound up crippled and those fighters and bombers add up too). Per Darkstar Rule 522.B.ii, you have to win by at least 5% or the game is considered a draw. Dividing 34 by 36 yields 0.944444, giving Tuffyears a 0.05555556% victory, BARELY enough to call this one a win, but it’s a legit win nevertheless!
 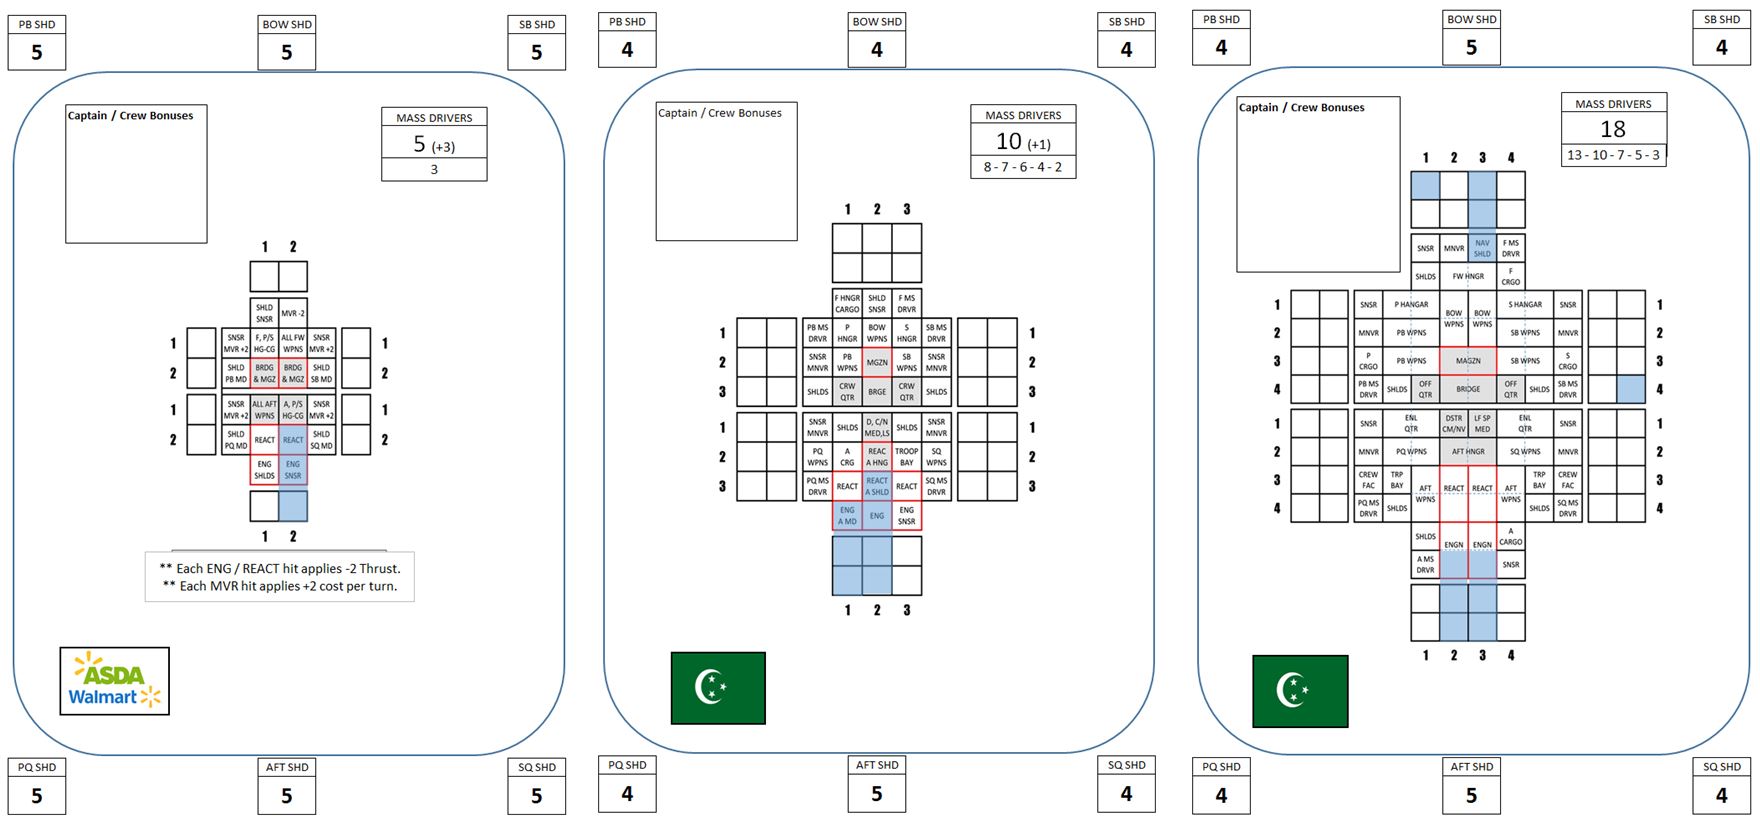 Here are some of the damage sheets for the ships after the game. As you see, the az-Zawraq actually took more internal damage than the ar-Ra’i, the az-Zawraq just had luckier dice on the ship crippled table. This one really did come down to the wire, both players did great especially for their first time in what is NOT a simple or forgiving rules system. There were many times where a single dice roll could have swayed the game either way.
 Darkstar: Live on Discord
Good afternoon – Today we’re bringing back Darkstar, the game of starship tactical combat in the “Second Colonial Age” of the early 2500s. We’re gathering up some old players, and potentially bringing in some new players, for world-wide web play on on our Discord channel.
If anyone wants in, we’ll be live, on-line starting at 2PM EST today (7PM UK time). May or may not be actually gaming, but setting up task forces and introducing the game to some new interested players.
Here is an invite link for anyone who wants to check us out:
Sitrep Discord
Conquest and victory await you among the stars!
We hope to see some of you there!
Damon + Gladesrunner v. Oriskany
Last Saturday, myself, Damon, and Jennifer had a game of Darkstar. No big story arc, no campaign background. Just a fun smash-em-up with some of our favorite ships. Now, since so many of our “favorite ships” have been upgraded to the point of madness, this means that even a game with a relatively small ship count will be very heavy in points, as upgrades to your ships and command crew naturally increase the point cost of your vessel.
So this was a big one, a 772-point Darkstar game that would up taking about 5.5 hours once we got going.
Damon and Jenn (@gladesrunner) teamed up as the British. I took a force of my favorite Russians and Americans, with one huge Russian battlecruiser to balance the points.
BRITISH FORCE:
TASK FORCE “A” (Lord Commodore Edward Cavendish)
Trafalgar-class heavy cruiser HMS Agamemnon
Relentless-class light cruiser HMS Retribution
Falklands-class destroyer HMS Sheffield (ISLE upgrade)
TASK FORCE “K” (Commodore Rhea Aubrey)
Iron Duke-class heavy cruiser HMS Kraken
Inflexible-class light cruiser HMS Inflictor
RUSSO-AMERICAN FORCE:
Kirov-class battlecruiser CPK Potemkin
Kutuzov-class light cruiser CPK Admiral Lazarev
San Antonio-class light cruiser USS Northampton
Valcour-class destroyer USS Oriskany (FRAM-I upgrade)
RAID Victory Conditions
 Here is the match up. The big boy on the table is of course the battlecruiser Potemkin (basically a “fast” battleship). But don’t be fooled, even as 322 points she has to watch out for the 202-point heavy cruisers Agamemnon and Kraken. The light cruisers are running 140-170 ... and even the destroyers Sheffield an Oriskany have been upgraded to borderline absurd levels (98 and 130 points, respectively). This is a clash of some of the best on offer from the respective navies.
  The British largely lose initiative on the initial approaches, setting up a vector away from the planet at speeds ranging from 24-30 kilometers per second (8-10 hexes). The Russians and Americans come on even faster, running at 33 kps, using the planet’s gravity for a slight velocity assist, all while leaning on the retros to decelerate to 24 kps. This will allow the least maneuverable ship in their fleet, the Potemkin, to make a facing change next turn. The Americans and Russians are also clearly seizing the “gravity gauge” – putting themselves between the enemy and the planet. This serves two purposes, it helps decelerate to battle speed when we turn away from the planet toward the enemy, and it forces the enemy to turn TOWARD the planet to engage us. This means they’re running the risk of planetary collisions if they lose power due to battle damage. On the other hand, it also gives the British the first big broadside of the game, which they open fire on the USS Oriskany at about 5400 kilometers, which the Oriskany weathers passably well due to her heavily-upgraded shielding, except for an early hit on her maneuvering thrusters (ouch). On the OTHER hand, all forward arcs on the Russian and Americans hips are presenting near-full torpedo spreads at the British. Watch out. The electronic warfare stations on the British bridges all just exploded with a swarm of red lights.
 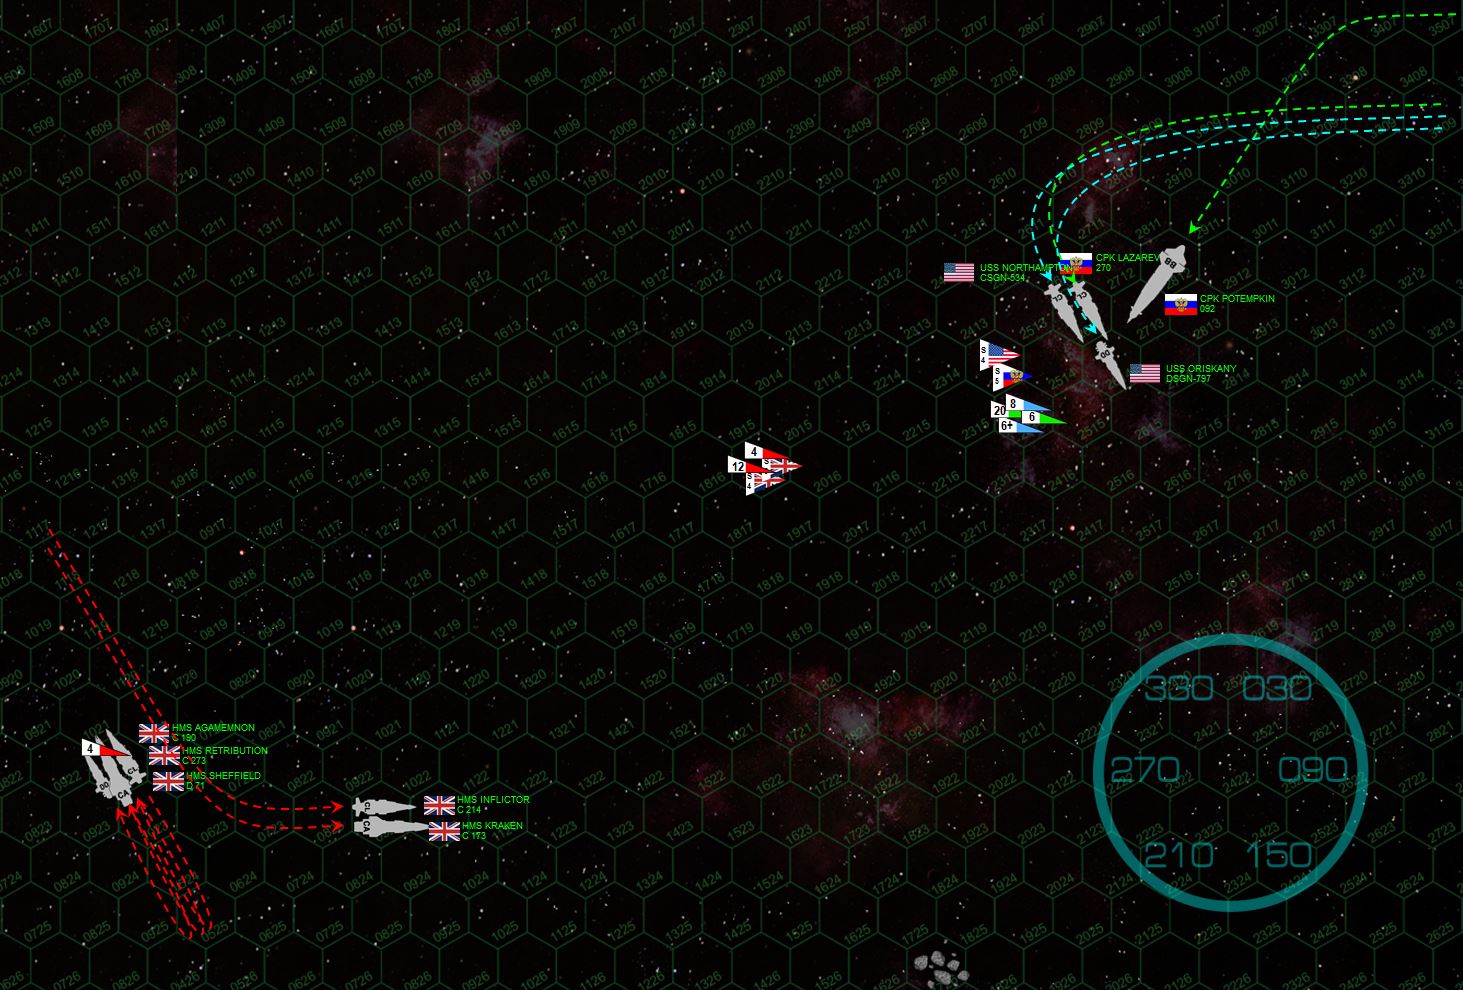 Lord Commodore Cavendish comes full about to present another broadside, again hammering the USS Oriskany (now presenting a different facing with even heavier shielding). The Americans also give the British a broadside, along with the heavy forward 25-teravolt EPCs and 12-gigawatt rail guns of the Potemkin. The British light cruiser Inflictor takes the worst of it, if only because her shielding is SLIGHTLY less than the rest of the British ships, and Commodore Rhea Aubrey has taken her two ships just a little bit closer to the Russian and American guns.
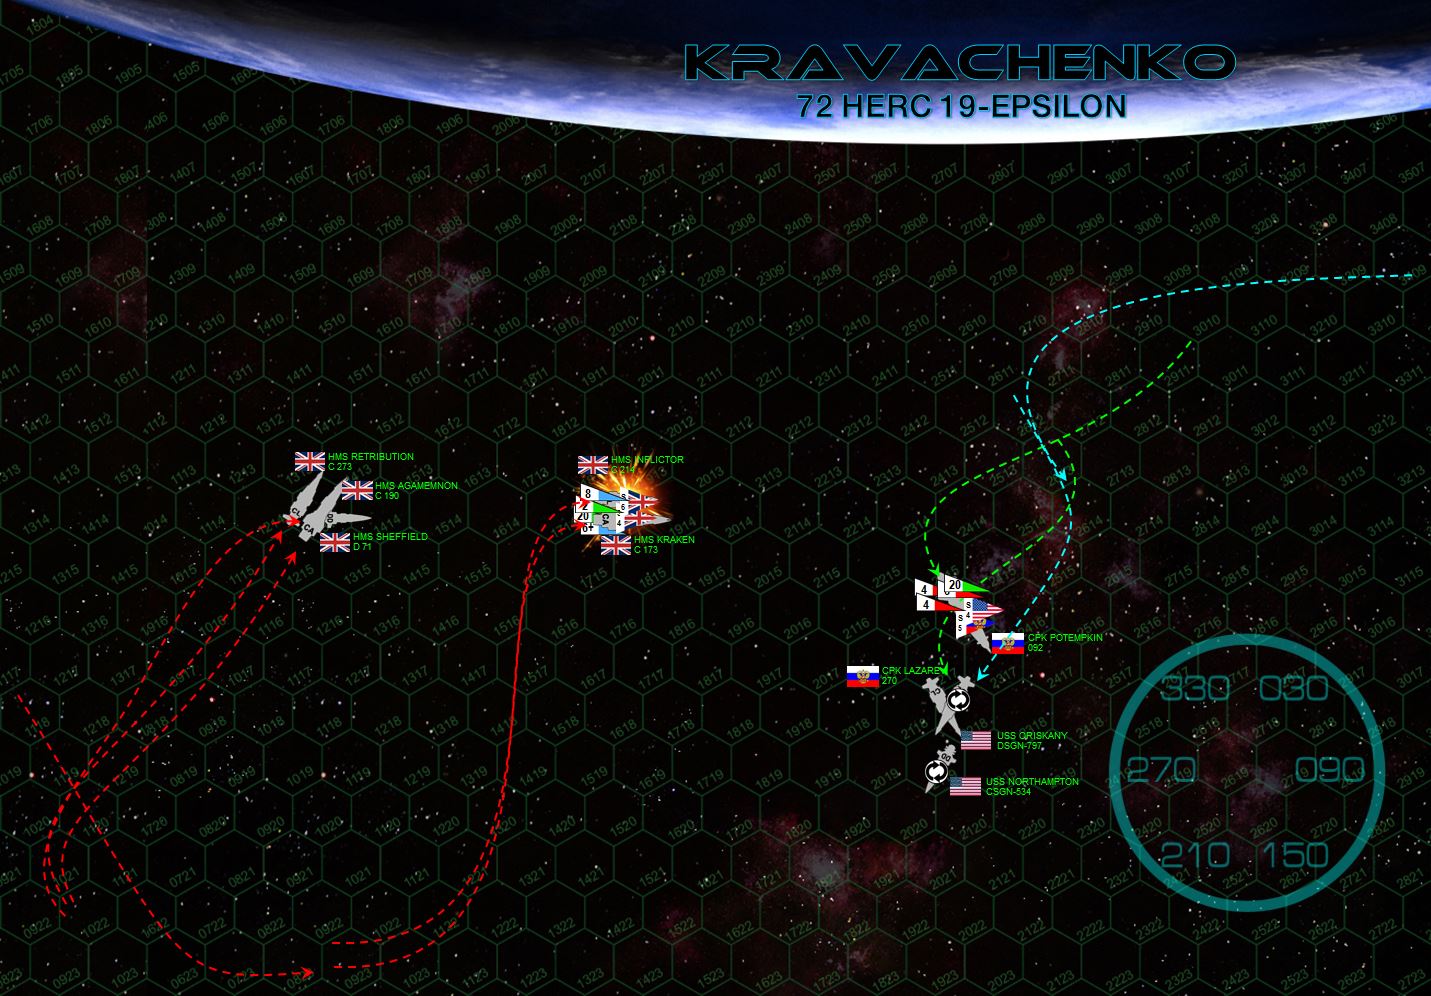 The Potemkin has finally slowed to the point where she can make more than one facing change per turn, but as a battleship, she usually loses initiative so the British cruisers have can stay out of her full broadside. To do so they must dive toward the planet, but they’re engines have been upgraded (and their captains are managing their velocity and momentum) to the point where this is little trouble. It does leave Cruiser Squadron “K” a little isolated from Cruiser Squadron “A”, a fact of which the Russians and Americans take full advantage with a devastating torpedo strike on HMS Inflictor. This, plus a barrage of gunfire that hits Inflictor’s bridge (light cruiser USS Northampton scores the “killing” blow), knocks the ship out of the battle. The British, meanwhile, concentrate their broadsides (Cruiser Squadron A) and forward guns (Cruiser Squadron K) on the Potemkin, and do horrific damage to her starboard quarter ... but this is a battleship. There’s a LOT of armor and internal components to dig through. Core damage is done to Potemkin’s medical bay, but the crew holds it together for now.
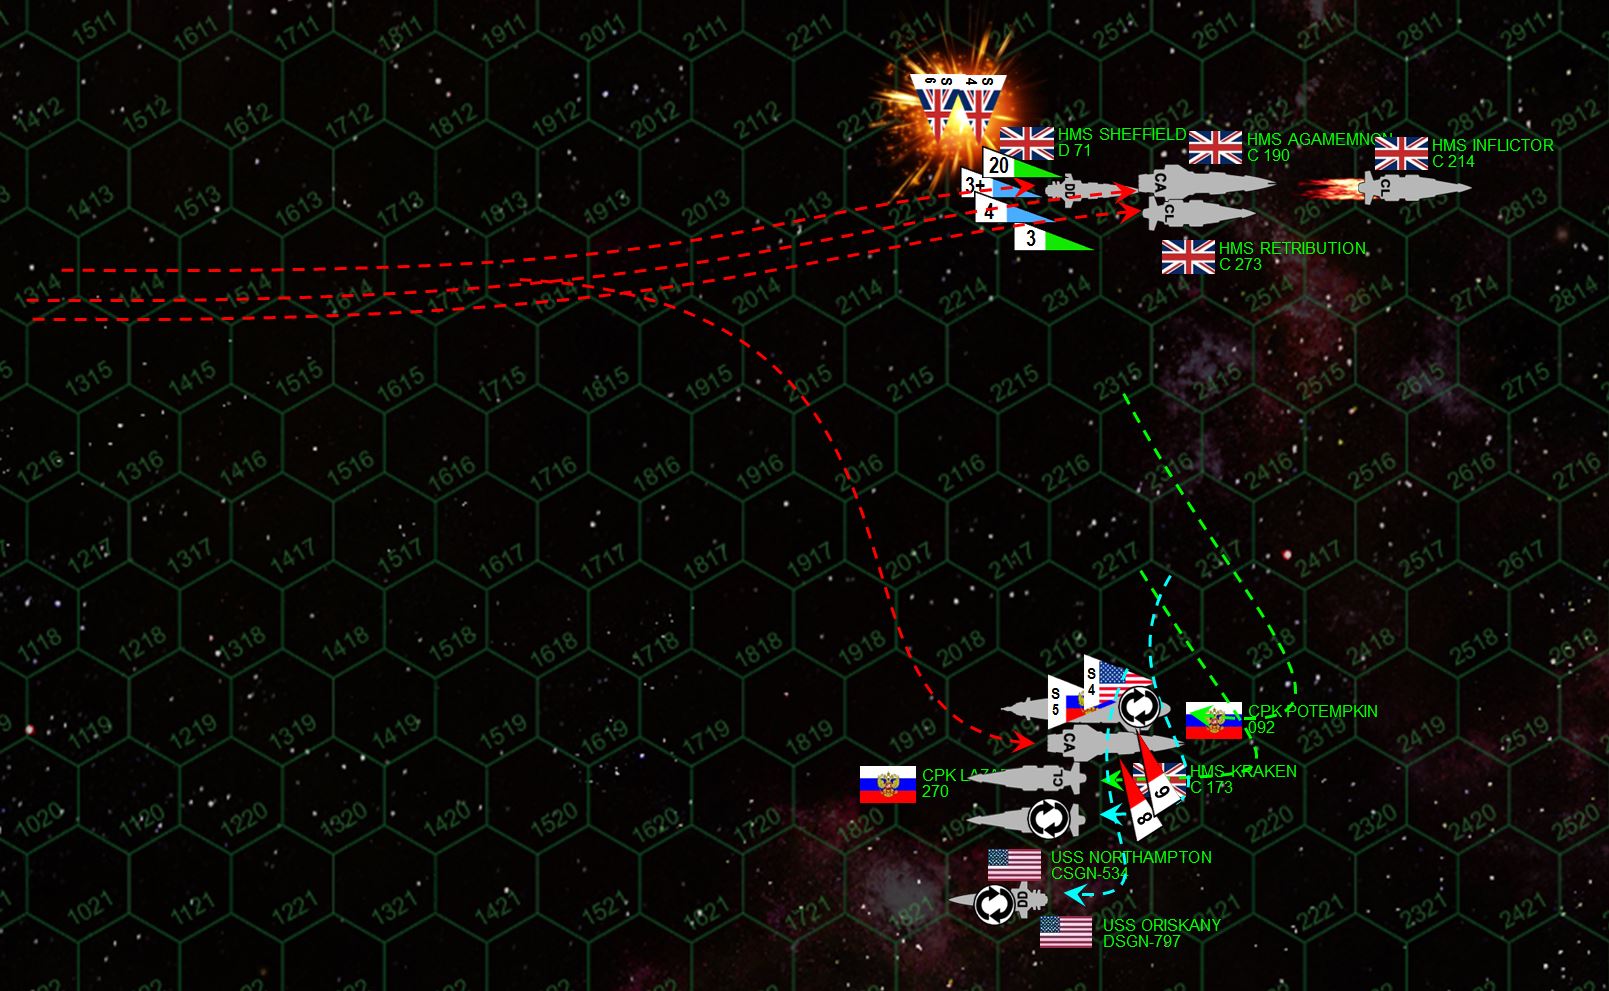 Turn 4, and things get desperate. While the Inflictor careens out of control and the Cruiser Squadron A pivots for another broadside on the Potemkin. Bad news for the British, the Potemkin has rolled on her back (this is SPACE, after all) and is now presenting her PORT quarter to the British guns ... at least until HMS Kraken dives at the Potemkin to exchange point-blank broadsides with the gigantic Russian battlecruiser’s STARBOARD quarter. It’s a suicidal move, Commodore Aubrey just hopes she can trade her ship for the Potemkin and get the British back in this fight. Point-blank cannonades are changed ... but incredibly, both the Potemkin and the Kraken SURVIVE these volleys! The Kraken survives in large part due to her “Resolute Crew” upgrade, where her engineering crew makes the roll required to mitigate the damage in reactors and engines and keep the Kraken from losing power. Russian and American torpedo strikes go for the HMS Sheffield. The British scout planes rush in to help defend the Sheffield, only to be swept from the stars by the merciless mass driver fire from the Potemkin (yes they are close enough ... barely). The Lazarev and Northampton fire on the Sheffield as well, but it’s USS Oriskany that gets the “killing blow” on the British destroyer.
 Now horrifically damaged on both port and starboard quarters, the battlecruiser Potemkin is raising best possible steam to escape the table under her own power. This game is set for RAID victory conditions, remember. If she makes it off under her own power, she yields no victory points to the British. The Lazarev, Northampton, and Oriskany try to cover her fantail as best they can. The British oblige, now shifting fire to the Northampton and blowing her starboard quarter almost clean off (note she is also inverted in space). The Kraken hobbles away from her toe-to-toe slugging match with a battleship almost here times her size, hammered by ANOTHER mass torpedo spread, which again she somehow survives.
 Raid games always end on Turn 6 ... (Rule 5.2.2) and the Russians and Americans take full advantage. The Potempkin can ALMOST make it off the table, but not quite. Still, with the range re-opened to 4000 kilometers and presenting a fully-armored and shielded fantail, she’s more or less free and clear. The American light cruiser Northampton is swifter, and wisely escapes the table before she can be finished off. This does have two unfortunate side effects, it nullifies Northampton’s last torpedo strike, and leaves USS Oriskany to suffer the vengeance of the British warships. While the Lazarev and Oriskany put yet another volley of torpedoes and gunnery into the Kraken (the Lazarev making a point-blank run at the Kraken), FINALLY putting down this ship (Resolute Crew is the only thing that saves her from outright DETONATION), the British put their last broadsides (and frutrations) into the USS Oriskany, which goes down with an laser hit to the bridge from HMS Retribution. Meanwhile, the Kraken is crippled, but not before doing enough damage to the Lazarev that she is FORCES to break off (half victory points). Thus the game shakes out as a Russo-American win, 432-205. (+227 margin, or 29% of the original 772 point total)
 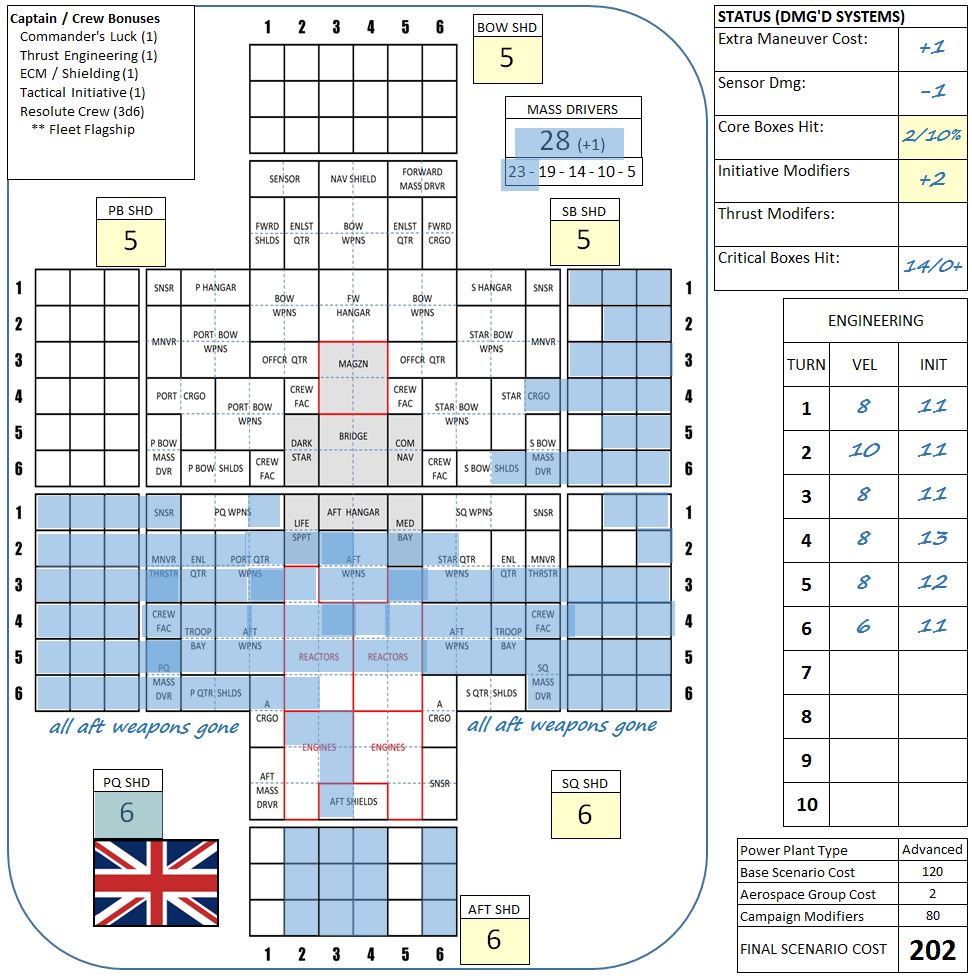 The incredible amount of damage suffered by HMS Kraken.
 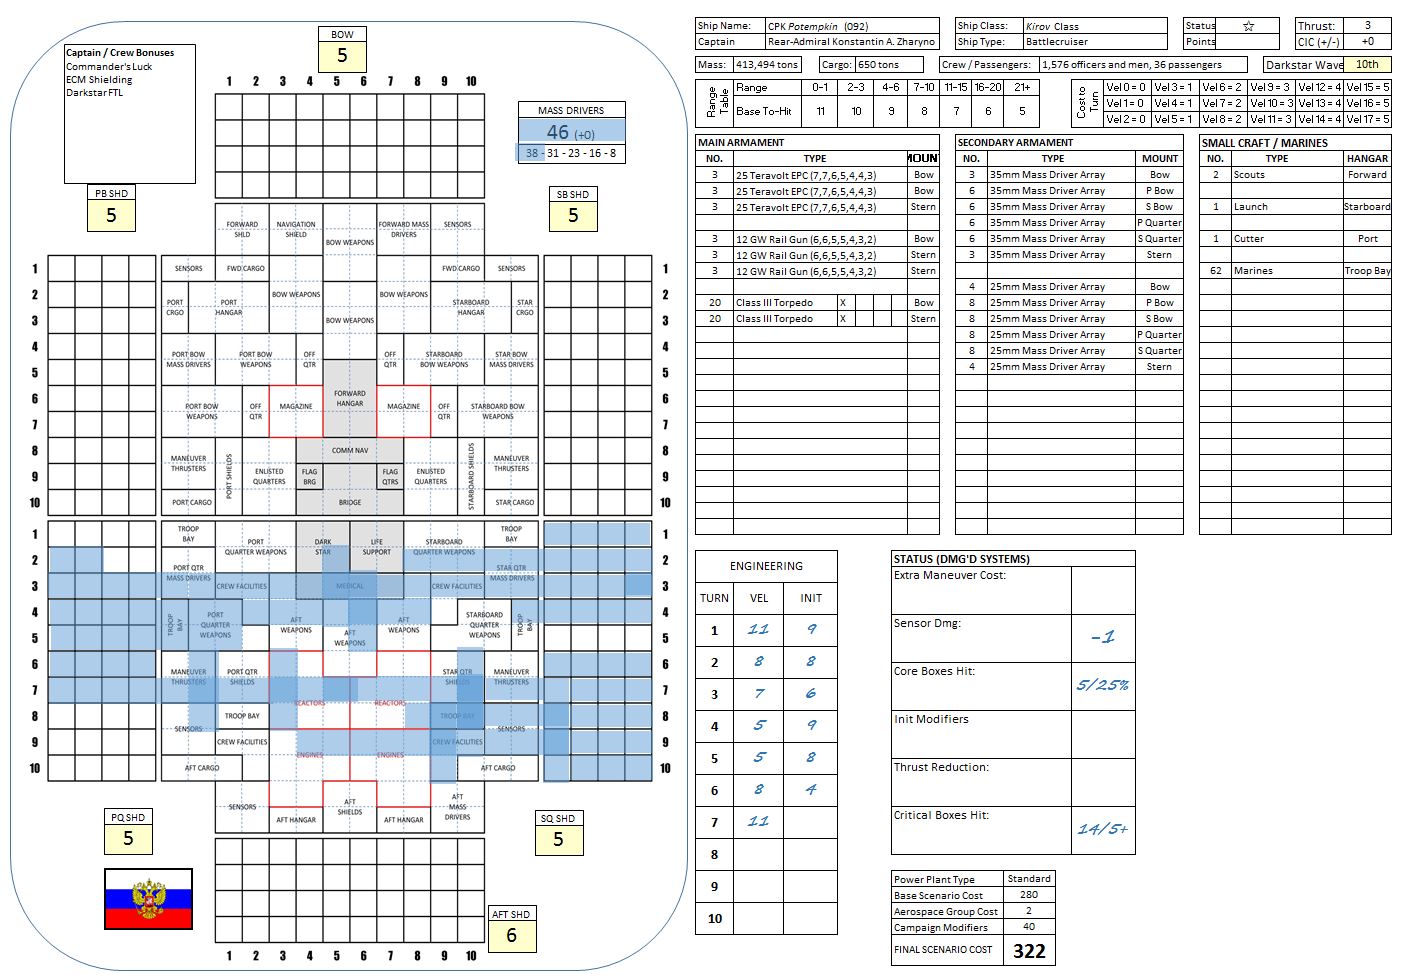 The terrible damage done to battlecruiser Potemkin. Note the 5+ notation at lower right ... the British COULD’VE won the battle if that d6 cripple number had been a 5+. But they rolled a 2. Had they scored that cripple, that’s +320 points to their score and an instant win. The British were also robbed on an 3+ cripple check on Admiral Lazarev. While they did make some mistakes in dividing their fleet against Russo-American torpedo strikes, the dice really were also against the British as well. In short, I think this game was a lot closer than the score would suggest.
Last Battle of the Third Hercules War
FROM: ADVISORY OFFICE, UN HERCULES SCS REGIONAL COLONIAL CENTER
17:10 SOL GMT, 13 JUNE 2522
BREAKAUTH: 181072.18J
CLEARANCE: NATIONAL COMMAND AUTHORITY
SUBJ: BATTLE OF MISHA’S WINDFALL (72 Hercules-A, 119 Delta)
The climactic campaign of the Third Hercules War continues, with a joint British, Arab League, and Japanese invasion of the Holy Russian Empire “Krasnaya Nadhezda” (Red Hope) colonies in the 72 Hercules system. The Russians are the last major power holding out against the “Renkei Alliance” between the British, Arab League, and Japanese, and 72 Hercules is their last major stronghold here along the Hercules Rim. Finally, after months of preparation, buildup, and coordination, often disrupted by Russian spoiling attacks, counter-invasions, and political maneuver, the Renkei invasion of 72 Hercules is underway.
The 72 Hercules system is a trinary system, with a yellow main sequence star (72 Hercules A), an orange dwarf and a red dwarf (72 Hercules B and C) orbiting around a common gravimetric barycenter. Although defense and industrial installations exist in 72 Hercules B and C, the main center of the Krasnaya Nadhezda colonies are rooted in 72 Hercules A.
Just over 24 hours ago, the British spearheaded the initial thrust of this invasion, with the Agamemnon cruiser-carrier fleet cracking Russian defenses along the outermost orbital belts of 72 Hercules A. The assault was a bloody one, with heavy damage inflicted on the Agamemnon squadron, while the defending Russian Admiral Lazarev cruiser task force was effectively destroyed. What remained of Russian defenses here was the massive “Goryzhont Stanstsiya” (Horizon Station), a naval support and defense facility the British hoped to use as a beachhead for expanded deployments deeper into the inner orbital zones of the 72 Hercules system.
But the British never subdued or took Horizon Station, only destroying its protective cruiser task force and than “laying siege” to the installation. The British outgun Horizon Station, and the installation’s eventual fall is assured … assuming no reinforcements reach the station.
The only problem is, reinforcements are now on the way – and the Russians are not kidding around, either. With an enemy foothold now in their primary Hercules colony, their allies long gone, the Duma screaming for an end to this war, and even the Holy Patriarch of Muscovy petitioning the Czar to end hostilities … their time has run out. The Holy Russian Navy has one last chance to redress the situation, and the time is now.
Fortunately for the Russians, they believe they finally have the tools to mount an effective frontal counterstrike. Escorted by the veteran heavy cruiser Tatiana Mikhailevna and strike carrier Novorossysk, the Russian task force is built around the Kirov-class battlecruiser CPK Potemkin. With upgraded Darkstar drives, this “light” battleship has covered the distance from the larger Russian colony group at Psi Serpentis C – a high-speed voyage from the Psi Serpentis Strategic Command Sector of about 45 light-years covered by the Potempkin covered in just under two months. Accordingly, Potemkin has made it here long before the larger, full-dreadnought Peter the Great class battleship from the core colonies of the Holy Russian Empire. Originally she was intended to spearhead a more concerted Russian counter-invasion of the Outer Hebrides or Khaizan’s Haven, but the Russians have clearly run out of time.
The Russian task force sorties from the Red Hope colony at the heart of 72 Hercules A, their mission to engage the British cruisers at Horizon Station and lift the siege. One of their navigational waypoints is the moon of an outer ice giant, 72 Hercules 119 Delta. More colorfully nicknamed “Misha’s Windfall,” this tiny moon is being bombarded with debris torn by gravitational tidal forces off an asteroid that Russian industrialists have tugged into a fatally-close orbit. As shards of asteroids the size of small countries smash into the surface of Misha’s Haven, the moon’s rotation pulls the impact zones an orbital industrial station, which has an easy time mining through the metals, silicates, and even glacial ice hurled up as impact ejecta.
This leads to a very curious battlespace, with two small moons in terribly close (and very unstable) proximity and cascading sheets of debris. The Russians though the hazardous nature of Misha’s Windfall would make it the last place intercepting ships would look for the Potemkin battlegroup.
They were wrong. For the Potemkin has indeed been located, and has now been intercepted by converging vectors of two smaller task forces. These are Task Force Mutamid (Captain Rashid abd-al Maghrebi) of the Arab League Navy, and Task Force Kama under Captain Seizo Yamamoto. The Mutamid task force in particular has been heavily upgraded after their recent victories at Khaizan’s Haven, and now includes no less than three Almanzor class light hybrid cruisers. The largest allied ship is of course the heavy cruiser Kama, her massive 18-teravolt EPCs suddenly overshadowed by the Potempkin’s 25-teravolt mass drivers . . . and 12-gigawatt rail guns. At 347,000 tons, Potempkin outweighs any other ship engaged by 2:1, but the Japanese and Arab League in turn outnumber the Russians by the same factor. The League also brings a powerful aerospace group from their three Almanzor class cruisers . . . fighters and bombers that will be hardpressed to make a dent in Potempkin’s gigantic point-defense systems or double rack of torpedo tubes . . . of twenty tubes each.
The Battle at Misha’s Windfall will be one for the ages. For the Russians, this is their last chance. If they lose here, they are out of the war and as the last power of the Coalition of Eagles . . . that’s the end of the Third Hercules War in general. The Japanese and Arab League also want a win here, hoping for vindication after some stinging defeats, even their victories have been overshadowed by the British.
Can the Japanese and Arab League score the win that finally ends the Third Hercules War?
JAPANESE: Rasmus
ARAB LEAGUE: Muakhah
HOLY RUSSIAN EMPIRE: Oriskany
RAID VICTORY CONDITIONS (568 points)
 The current disposition of the Third Hercules War. Not only is 72 Hercules (Krasnaya Nadhezda) being assault from three sides, but the British now have a lodgment in 72 Hercules A’s outer debris belt and have a major Russian installation there under siege. A massive relief force, built around a newly-arrived Kirov-class battlecruiser, is on its way to lift the siege and eject the British. But that relief force has now been intercepted by two converging task forces of Arab and Japanese warships. If the Russians win, they buy some time and this war continues. If they lose, it’s over.
 Here we see Misha’s Windfall, where Russian industrialists have tugged an asteroid so close to this small moon of an outer ice giant (72 Hercules A-119) that gravity is tearing the asteroid apart, the impact collisions allowing the Russian station to bring a whole new meaning to the term “colonial strip mining.” The Russians were hoping this hazardous, out-of-the-way station would make for a good waypoint for the Potemkin task force, but the Japanese and Arab League have caught wind of the ruse and made the intercept. Both sides use the disintegrating asteroid to mask their initial approach, even if it means setting course straight FOR the debris at a relatively high speed.
 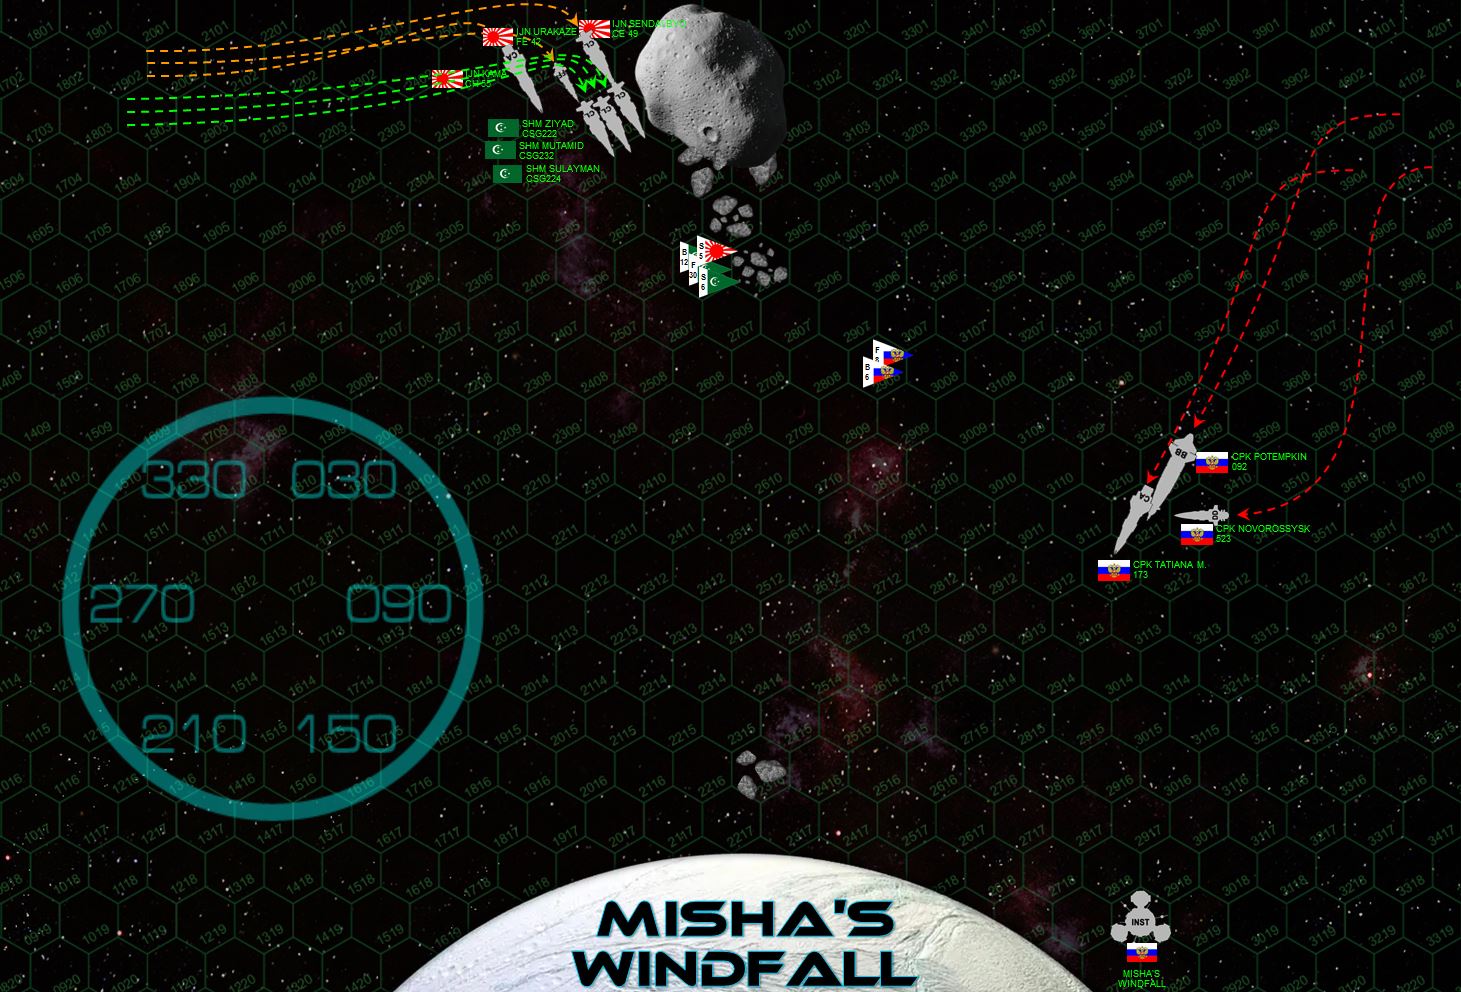 The Russians make a standard turn to port, hoping to set up a broadside against the Arabs and Japanese who will ... sooner rather than later ... have to emerge from behind that rubble. The Renkei Alliance ships prolong that inevitable moment as long as possible, making crash turns to starboard only at the last possible instant before destruction. The Arab cruisers even accelerate while making this move, but the safety it offers is momentary at best. Even as both sides avoid the asteroid and its surrounding debris, they’re only diving towards the methane glaciers of Misha’s Windfall itself. Both fleets are also keeping a close formation in order to offer best mass driver defense, either against swarms of Arab League aerospace strikes, or clouds of Russian P-500 torpedoes.
 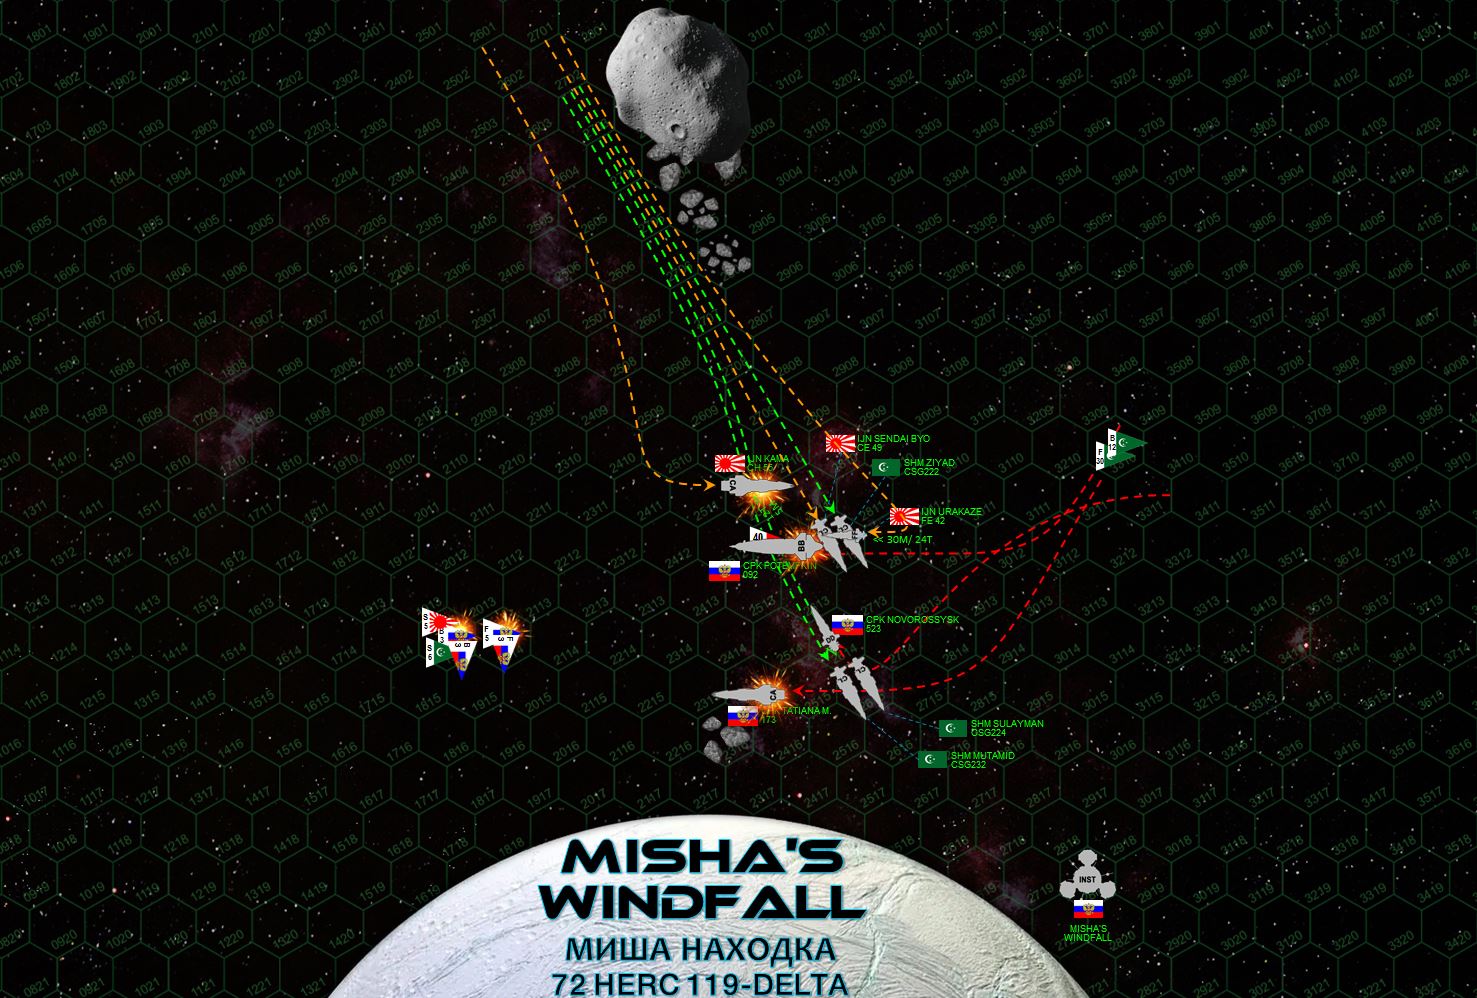 There are times in Darkstar where the battle is a chess game, a careful and well-coordinated match of ploy vs. counter-ploy, the killing advantage delivered through subtle, crucial factors rarely evident until it’s just too late. This is not one of those times. This damned near turns into a full-on demolition derby. The Russian cruiser Tatiana Mikhailevna loses initiative and has to move first, so she pulls a wide bend to starboard to open the range and cross the enemy’s T as they emerge from behind the asteroid debris. The Kama is next, which moves to perfect broadside range and position against the Tatiana. The battlecruiser Potemkin, seeing the largest enemy ship on the table, lunges forward to deliver what should be a killing counterstroke against the much-smaller Kama, a POINT-BLANK BATTLESHIP broadside. Yet even with the gunfire support from the Tatiana, AMAZINGLY the Kama survives. Sure, the whole bow of a 150,000 ton heavy cruiser is basically blown OFF, but the Russians don’t hit the bridge and she’s technically still operational. Meanwhile the light cruisers Sendai Byo and Taliq ibn Zayid stomp the gas and cut straight across the Potemkin’s stern, a VERY risky move since they are closing with a battleship at point blank range while pointing DIRECTLY at a moon (lose power = collision and total loss of ship). The little strike frigate Urakaze won’t be undone, cutting behind the Potemkin and turning straight toward her stern (Akashi-class strike frigates have ALL their weapons mounted forward), rather like a terrier biting the ass of a bear. But even with these three point-blank, full-size volleys delivered directly aft (not to mention the outmatched but still devastating point-blank broadside from the Kama against Potemkin’s starboard bow), Potempkin still remains operational, releasing a hideous swarm of torpedoes to hit next turn. Fighters and bombers from the Novorossysk don’t do very well, nor to the mass fighter and bomber strike from the hybrid cruisers Mutamid, Sulayman, and Zayid. The Mutamid and Sulayman do score a significant success, however, as they slash behind the stern of the Tatiana and in a single combined broadside, blow her engine and reactors clean out of her hull. Indeed, no only to they cripple the Slava-class cruiser, they damned near blow her up.
 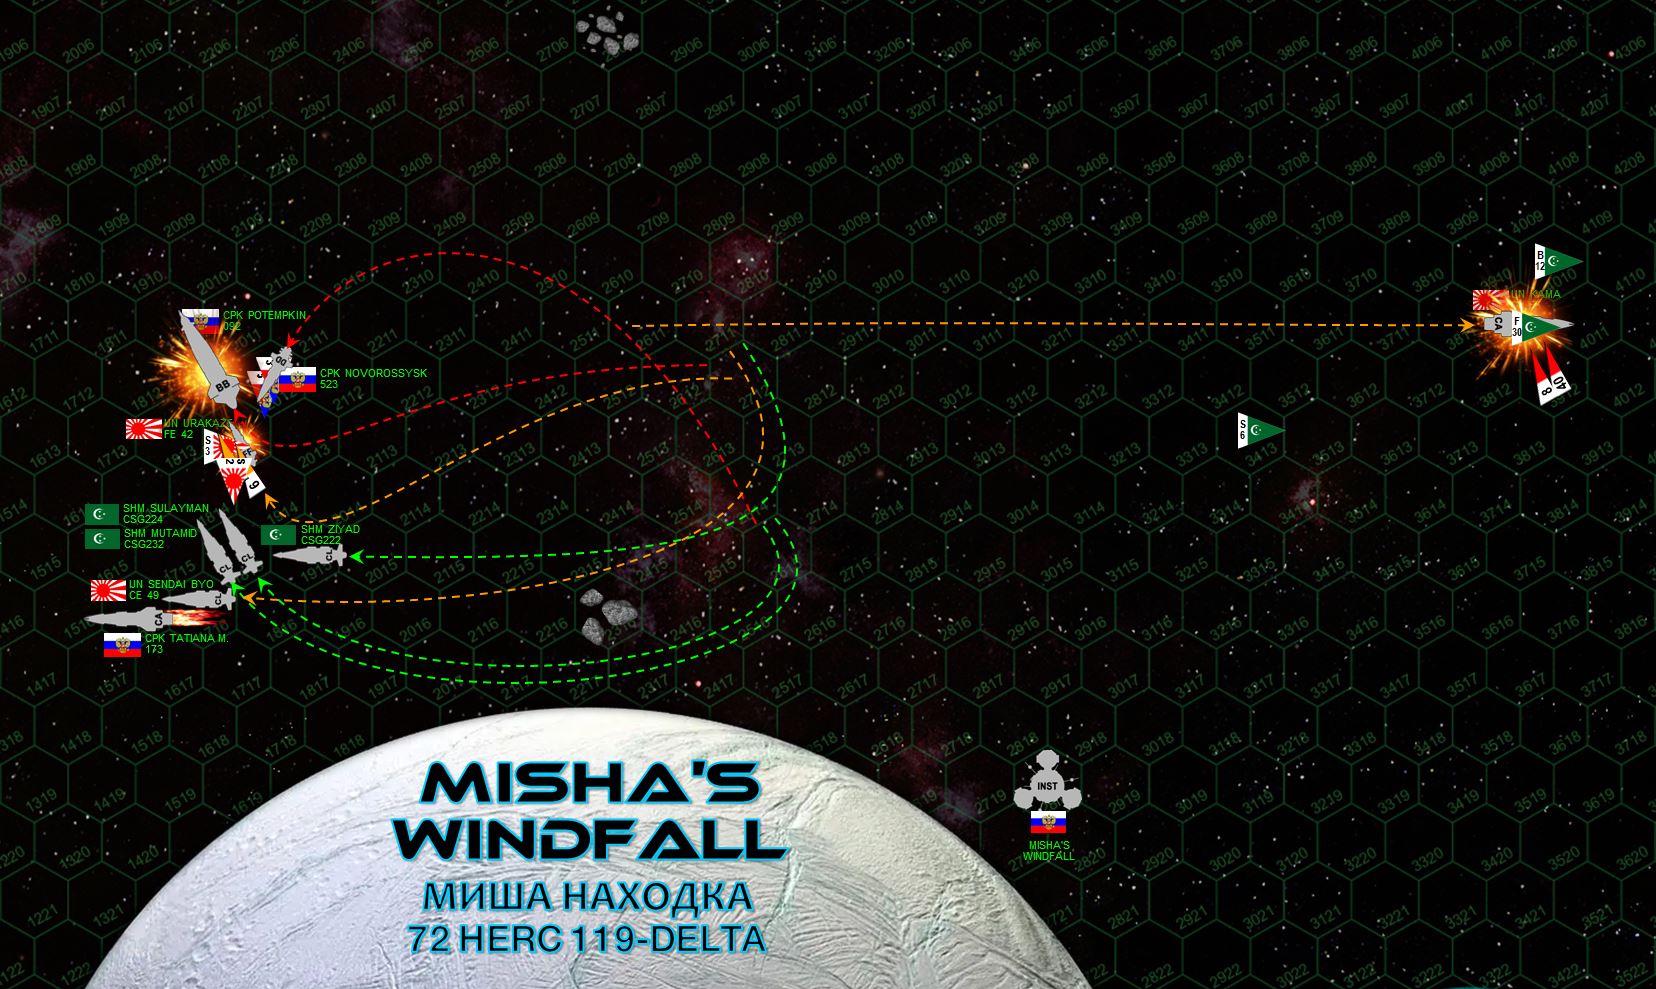 The Potemkin heaves away from the Misha’s Windfall, unable to do much more than that with her current speed and limited maneuverability (she’s a “fast” battleship, but still a “battleship”). The Kama also raises maximum steam to disengage, she’s still “operational” but positively mangled in her brief, unpleasant encounter with the Potemkin. But she doesn’t get very far, mounded by a massive wave of Russian torpedoes targeting her collapsed starboard bow shielding. Despite waves of these P-500 warheads being shot down by Arab League “Mylekinir” (Fire Angel) fighters and the Kama’s own mass drivers, two torpedoes hit the bridge and cripple the ship AT LAST. It should be noted that Kama took most of the Russian firepower for two complete turns, when really one turn should have been enough to leave her crippled. That one extra turn free of MOST Russian firepower (bought at such a dear price) is what allows the rest of the Arab-Japanese forcer to maneuver behind the Potempkin. The Urakaze is positively blown inside out (crew losses would approach 100%, except for her “Resilient Crew” upgrade) but the rest of the fleet hemmers into the engines and reactors of the Potempkin, finally knocking down the gigantic Russian battlecruiser.
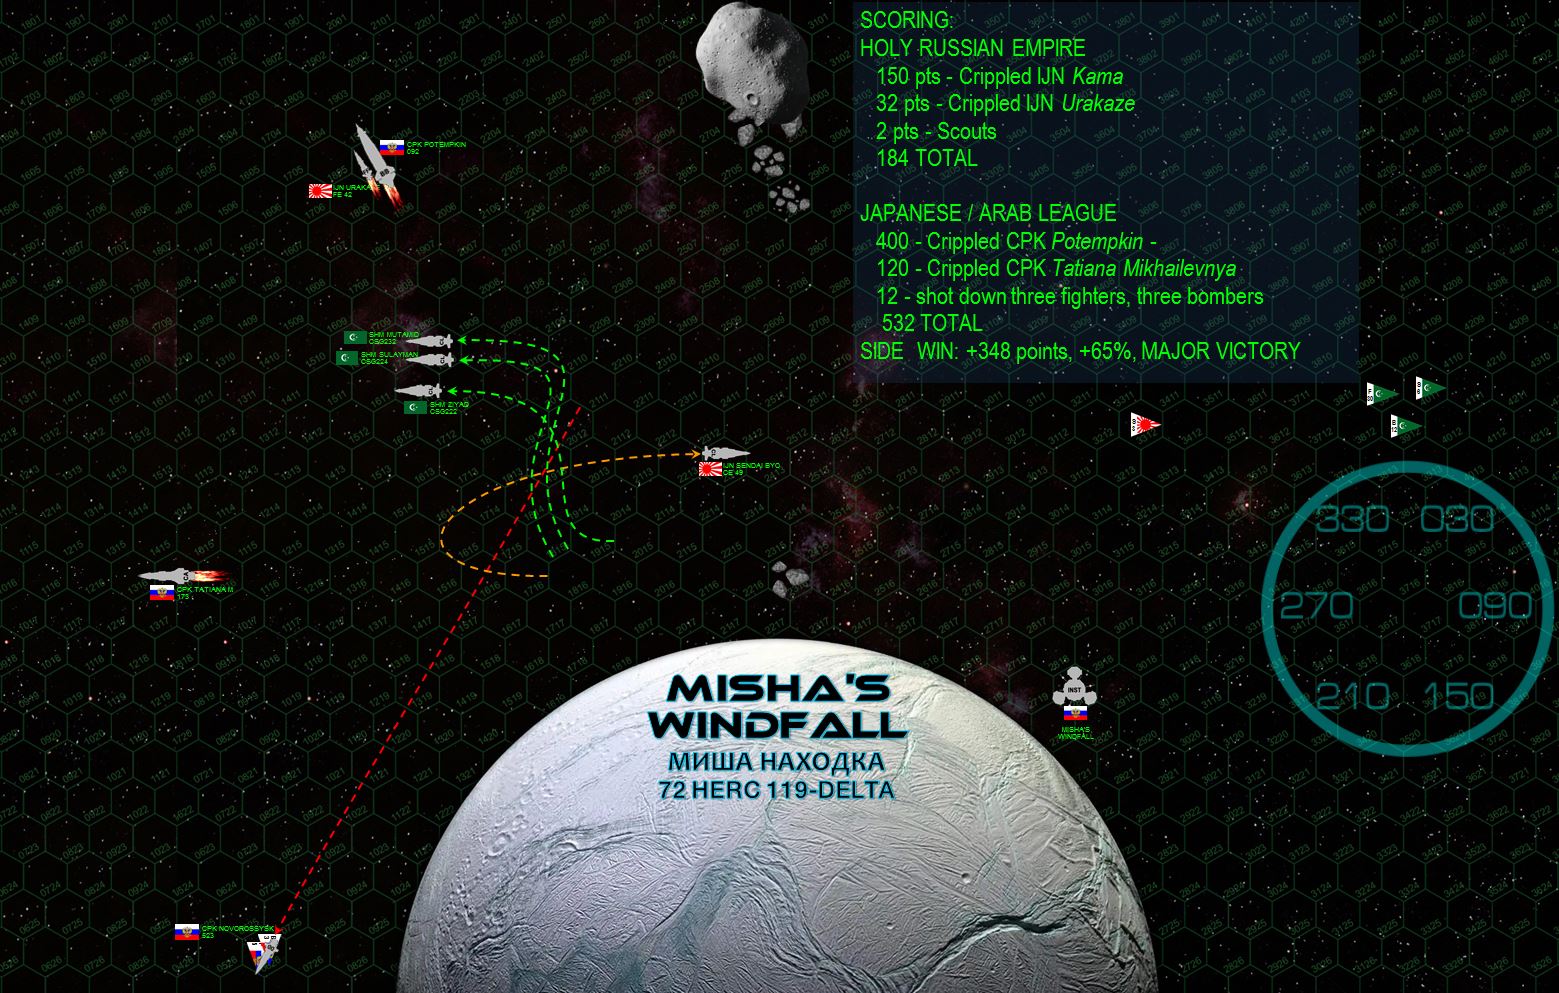 The Novorossysk, last Russian ship on the table, has recovered the surviving Russian fighters and bombers, and now raises maximum steam to escape the table. The Russians and Arab League let her go, their victory here is clearly decisive and instead turn to rescue and recovery efforts. Although a stunning victory, crew losses aboard the Kama and Urakaze have been extreme. Both ships will be repaired and EVENTUALLY see service again, but especially for the Kama, the road to recovery will be a long one. But she’ll have time to be repaired in peace ... because with this Russian defeat, Red Hope colonial administrators put out a call for a cease fire. The Third Hercules War is over.
 Here is the Warship Record Sheet (WRS) for the CPK Potemkin. You can see where the cruisers Sendai Byo, Mutamid, Sulayman, and Zayid (along with the last fusillade from the valiant little Urakaze) have completely burned out her engineering sections. Exactly nineteen “red boxes” have been checked off, leaving Rasmus and Muakhah with a “0+” chance to cripple on a d6. That’s a pretty easy roll to make. In fact, one more and Potemkin could have exploded, and an exploding battleship is something you want no part of. Meanwhile, only one gray “core box” has been hit (where most of the crew actually are while at “general quarters” action stations in a battle). So Potemkin’s crew losses are probably something like 3.33% (say 13 killed and 40 wounded). In some ways, this makes the crippling of Potemkin ... nearly “perfect.”
 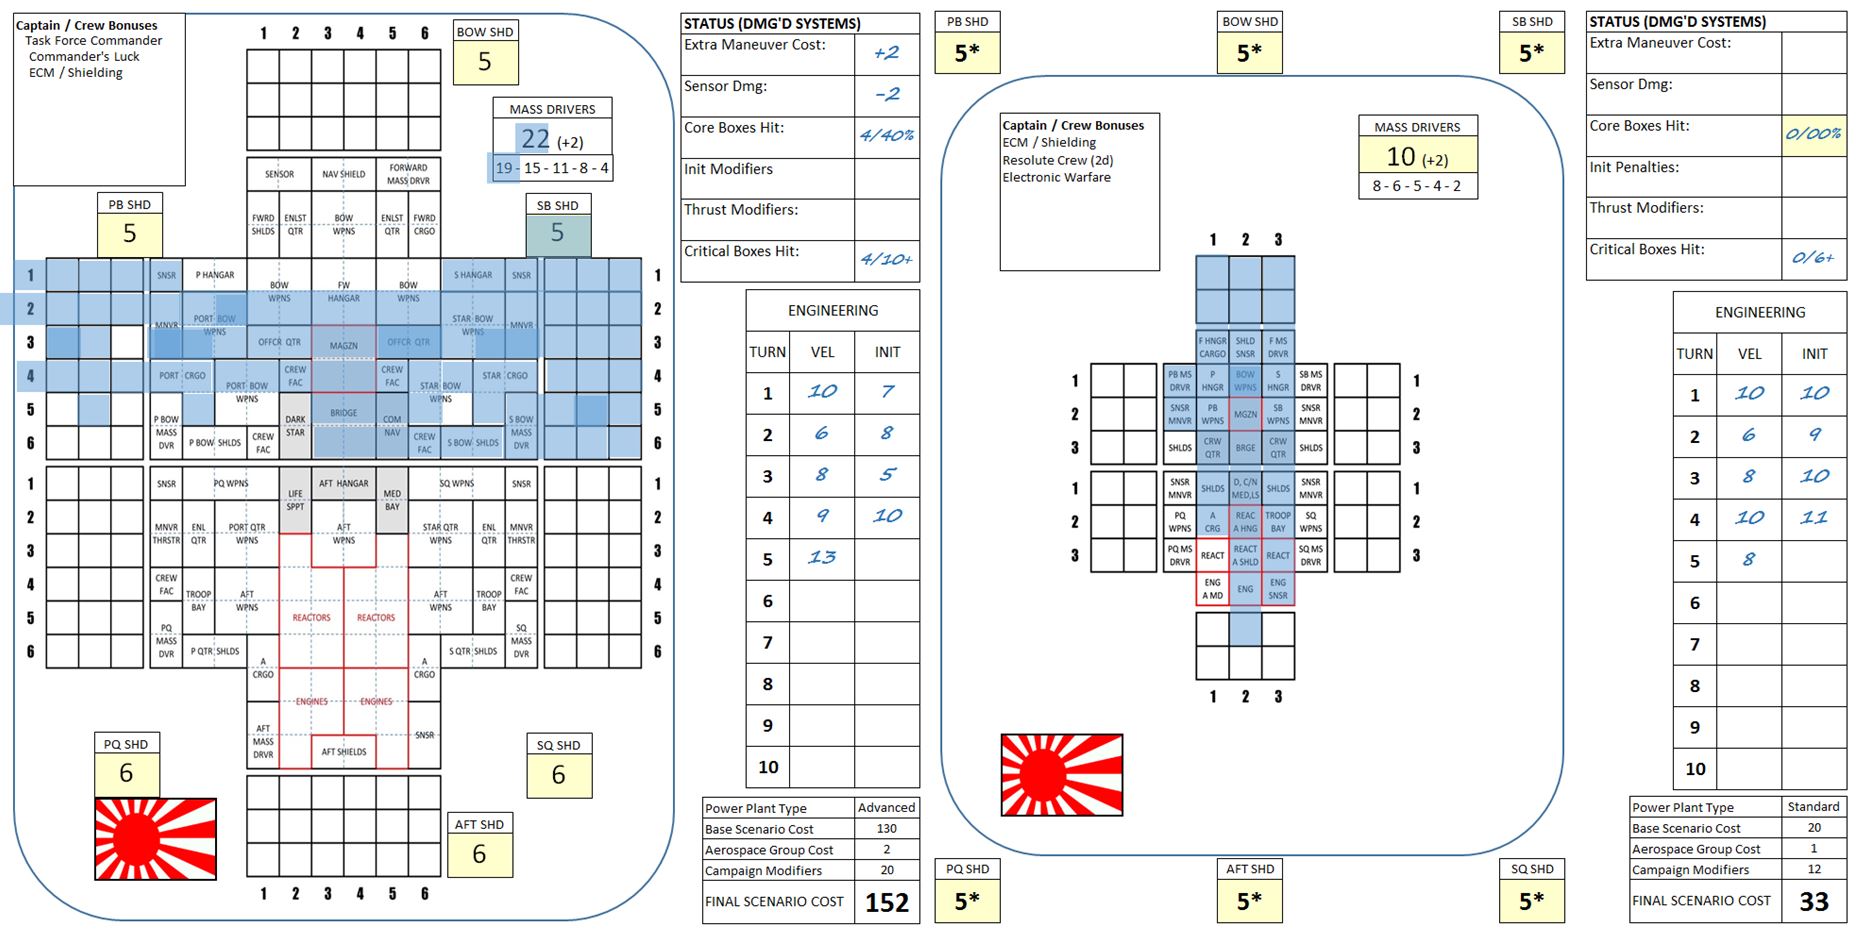 Not so much with the Kama and especially Urakaze. Kama’s taken 10 out of 18 crew boxes hit, putting her losses closer to 55%. Out of a crew of 684 officer and men, that’s 94 killed and 284 wounded. Urazake would be even worse (the little 27,400-ton frigate carrying only 121 officers and men). In fact casualties would be total, except she has the “Resolute Crew” battle upgrade, allowing crew casualties (and % break off chance) to be halved. So figure 15 killed and 45 wounded. Suffice it to say that Japan has earned herself a slice of the winnings in 72 Hercules and 99 Hercules (Redemption UN Mandate). By contrast, the Arab League ships were not even FIRED UPON. But they knocked out the Tatiana Mikhailevna singlehandedly and delivered MOST of the killing fusillade into the stern of the Potemkin.
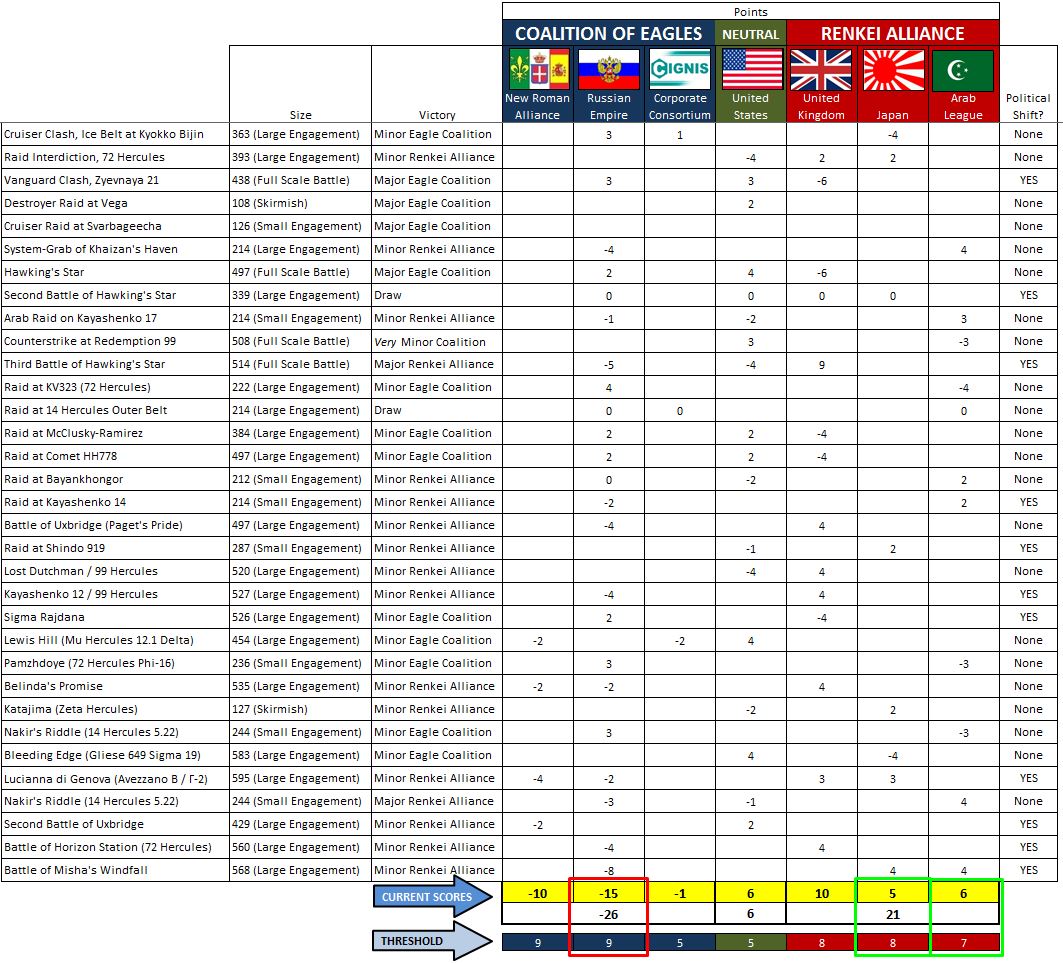 So that’s it, folks. THE THIRD HERCULES WAR IS OVER. The proof is in the chart above. I might put out a short retrospective later this week, where we talk about the aftermath who gets what (put your comments below!), what happens with the key commanders (medals, titles, promotions). Many already shiny have new ships under their command or in their fleets. MEANWHILE – the Third Hercules War has gone on since mid-October (just over nine months of gaming), creating another year and a half of Darkstar “history” (late 2520 to mid 2522). GIGANTIC CONGRATULATIONS to all players who stuck with it, all of them pushed all the way through. Great effort, everyone. Great campaign, and great games!
 New Warships - Falklands-ISLE upgrade and Kirov-class Battlecruiser
Here are some new warship classes I’ve been working on for Darkstar.
The first is a new upgrade made to the British Falklands class destroyer, much the same way we did for the Valcour class (USS Oriskany) before.
The Falklands has been a fan favorite of the community ever since I brought Darkstar to the OTT community, with at least four players having at least one in their fleets. At least two players have told me its one of their favorites, and two of them (HMS Sheffield and HMS Burke) are well on their ways to becoming the next “USS Oriskany” – legendary destroyers of the Darkstar ‘verse. 😀
The second ship presented … wait for it … the Russians finally have a battleship. Technically she’s a battlecruiser, the Kirov class (obvious homage to the Cold War era Kirov class nuclear-powered missile battlecruiser). This one’s already been upgraded and will now form the core of the Russian force in tomorrow’s game against @rasmus and @muakhah!
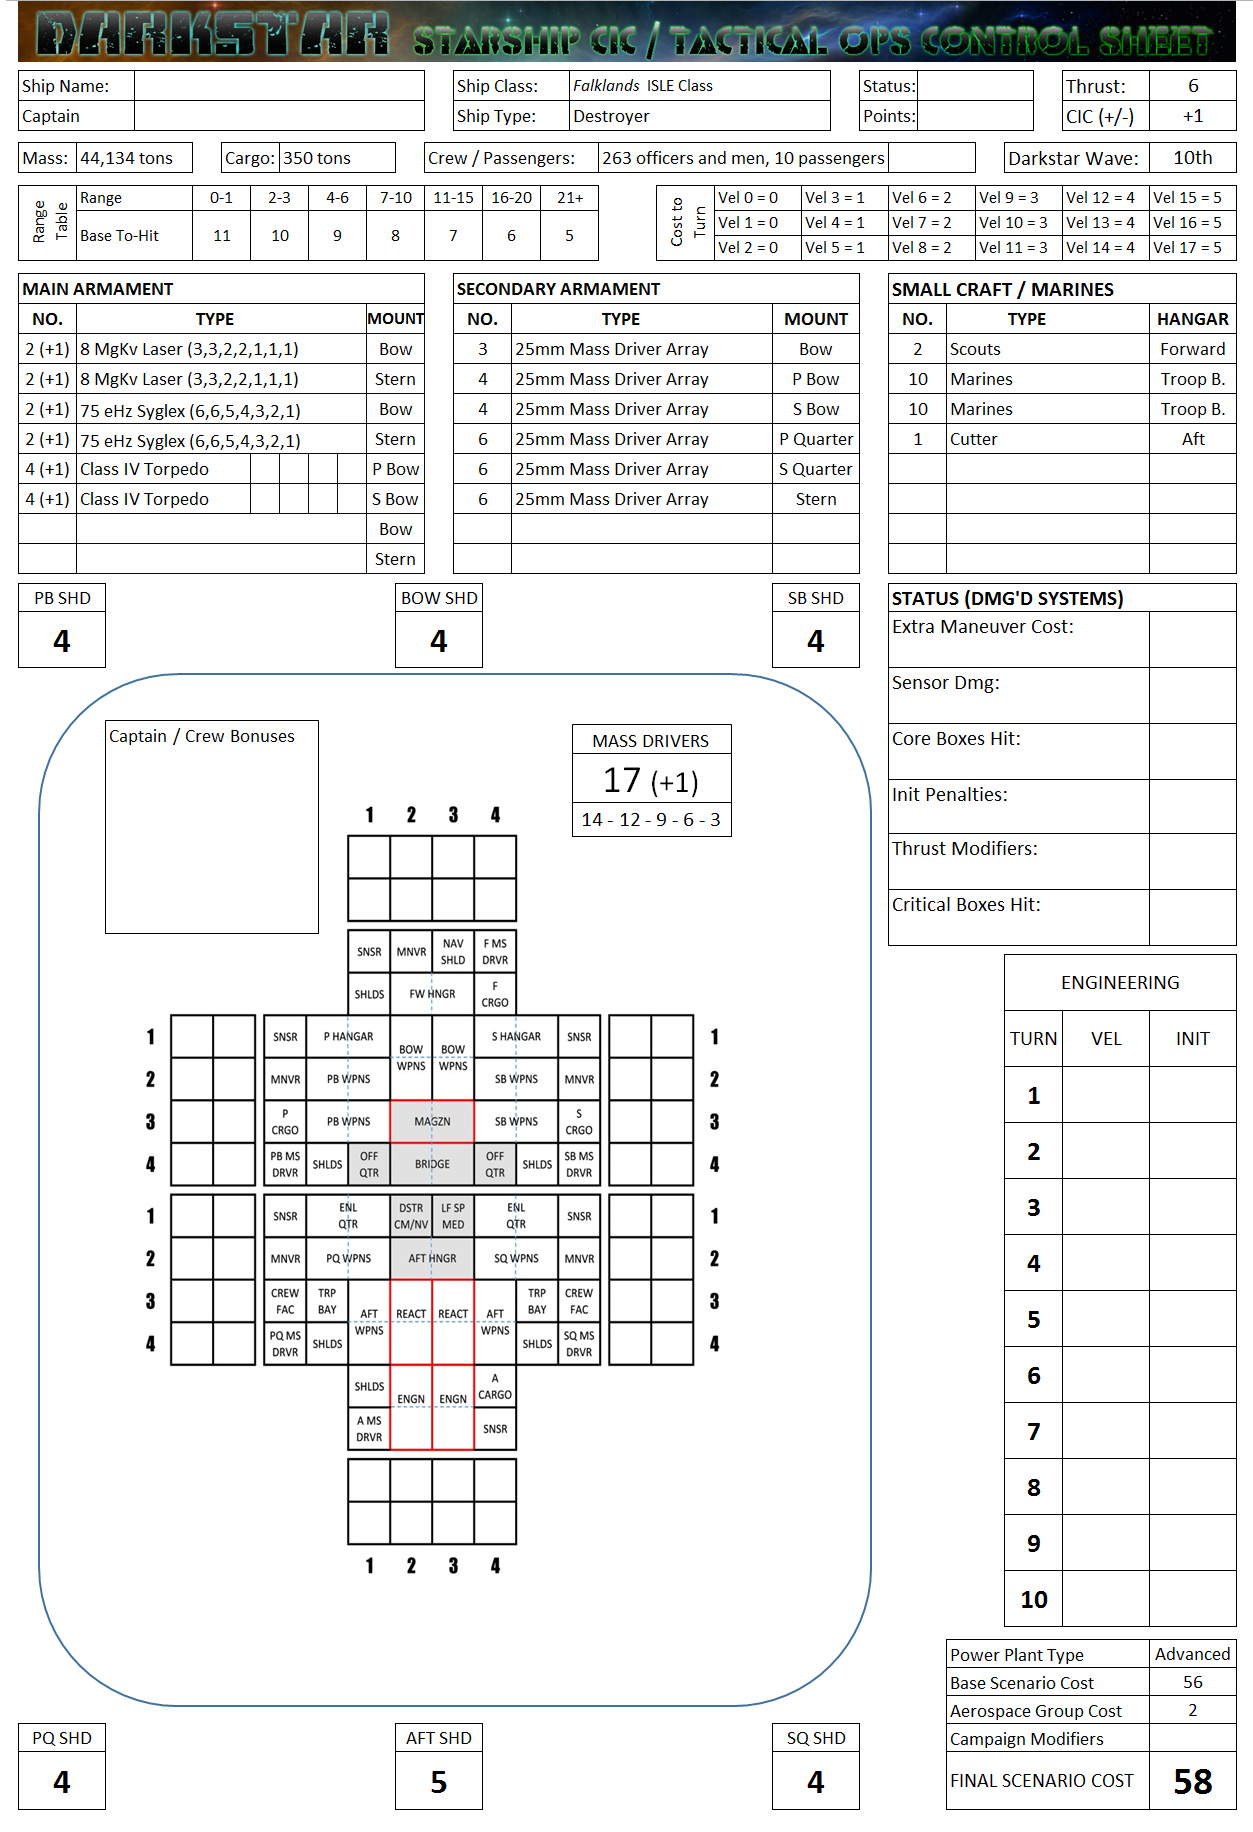
When the Falklands class destroyer was first brought into service, many within the Royal Navy doubted the newest “glass cannon” in the fleet. A personally-sponsored program of the immensely powerful and influential Lord Admiral Nathaniel Byron Annistaire, he pushed the design and construction of these ships after the death of his son Daniel aboard the aging Bristol class destroyer HMS Stamford. This intense personal attachment, the high cost of the Falklands design, and the lack of any real improvement in shielding, armor, or speed, made many question whether Annistaire’s “pet destroyers” were really worth it.
Sixteen years later, the debate is over. Since 2504 the Falklands has proven the most capable (and most sought-after) destroyer design in the FTL-era history of the Royal Navy. An entire spin-off class has been commissioned (the Commonwealth class) and units continue to be produced to this day. Famous ships of this class include the HMS Burke (Commander Robert Lewis), HMNZS Aotearoa (Commander James Matapaere), HMS Singapore, HMS Dignity and especially HMS Sheffield (Commander Howard Bowen).
Finally the decision was made to prepare this ship for the next two decades of service. This was the “In-Service Life Extension” program (ISLE), a particularly fitting suffix to the “Falklands” name of the class. The HMS Sheffield was the first ship selected to undergo the overhaul and refit after completing her tour during the Third Hercules War in mid-2522. Work started at the Lucy’s Hope shipyards (Hawking’s Star / HR 6806 star system) in August of that year, and completed in January 2523.
The Falklands ISLE program was a comprehensive upgrade of the ship’s protection package, weapons suite, point-defense systems. Aft shielding was amplified, the gravitic curvature of the generator increased by 20%. This was an important upgrade, since directly aft is the facing most commonly targeted by enemy torpedo, missile, and aerospace strikes. The point-defense system was also modernized, with the older, slower-firing 35mm systems upgraded with new Hispano-Vickers 25mm systems, mostly in triple mounts, and double mounts port and starboard.
Offensive systems were also upgraded, with the biggest single improvement coming to the deadly BAE “Sabre” class 75 exohertz syglex emitters (x-ray lasers). Where the Falklands class formerly mounted two of these weapons (one fore and one aft), the Falklands-ISLE now mounts a double-gun turret. Redesigned gravitic lenses, optimized power couplings, and redesigned mounting braces have allowed two guns to be twin mounted in an expanded turret ring assembly. Admittedly this was the most difficult part of the upgrade, requiring the complete restructure of at least six decks of both the fo’c’sle and quarterdeck areas of the ship. Power relays also had to be greatly expanded from the newly-upgraded Johnston-McAuley Aerospace DT-Fusion engines, not only to the new shielding and mass driver arrays, but especially these oversized new syglex emitters.
Lastly, the torpedo array was expanded from three tubes on the port and starboard bow racks, to four on each rack.
In all, this has resulted in seven new crew aboard, an additional 2300 tons in mass, and 5.5% additional power draw on average. But the Falklands ISLE class can still pull the same acceleration curve, and make the same 10-mag Darkstar Waves in FTL.
Four ships were eventually selected to undergo this refit. Only the future can tell whether these upgrades will prove the value of the investment, and if these esteemed destroyers will continue their winning record through the 2520s and beyond.
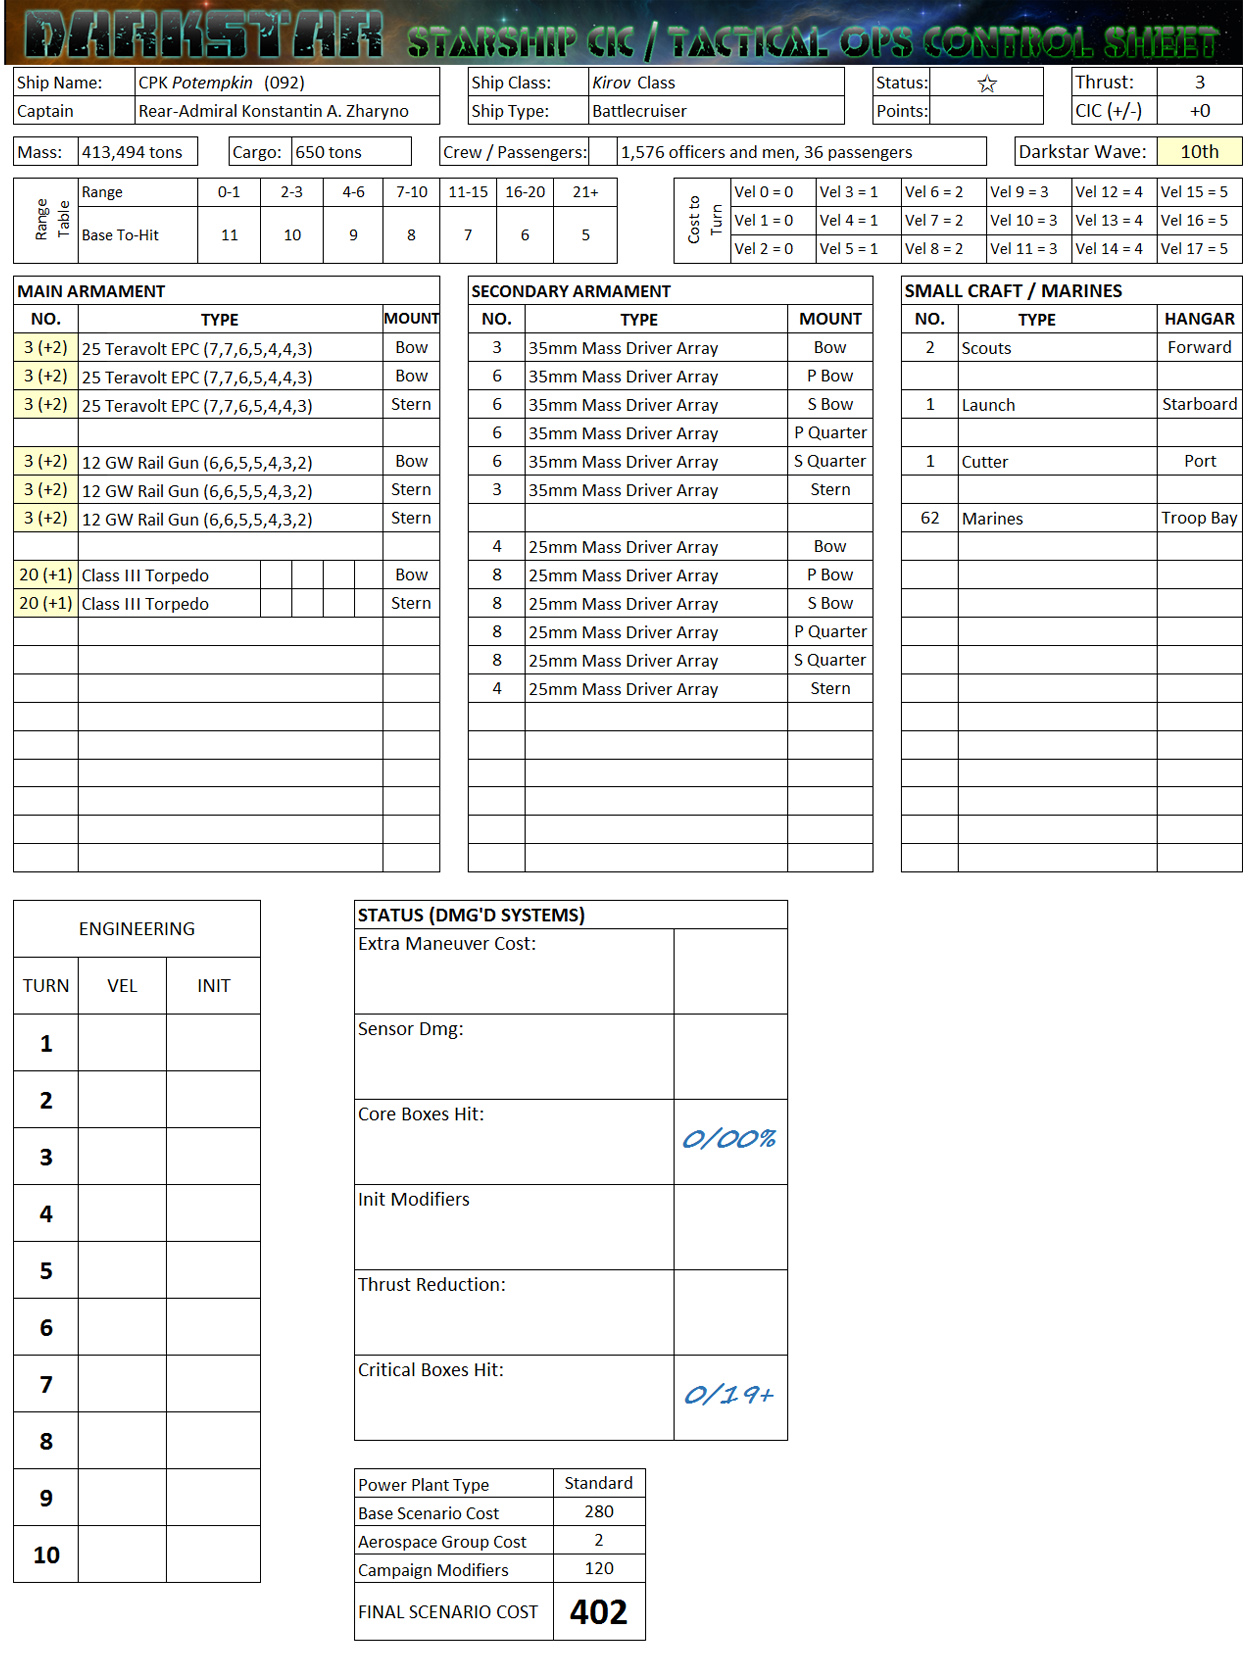
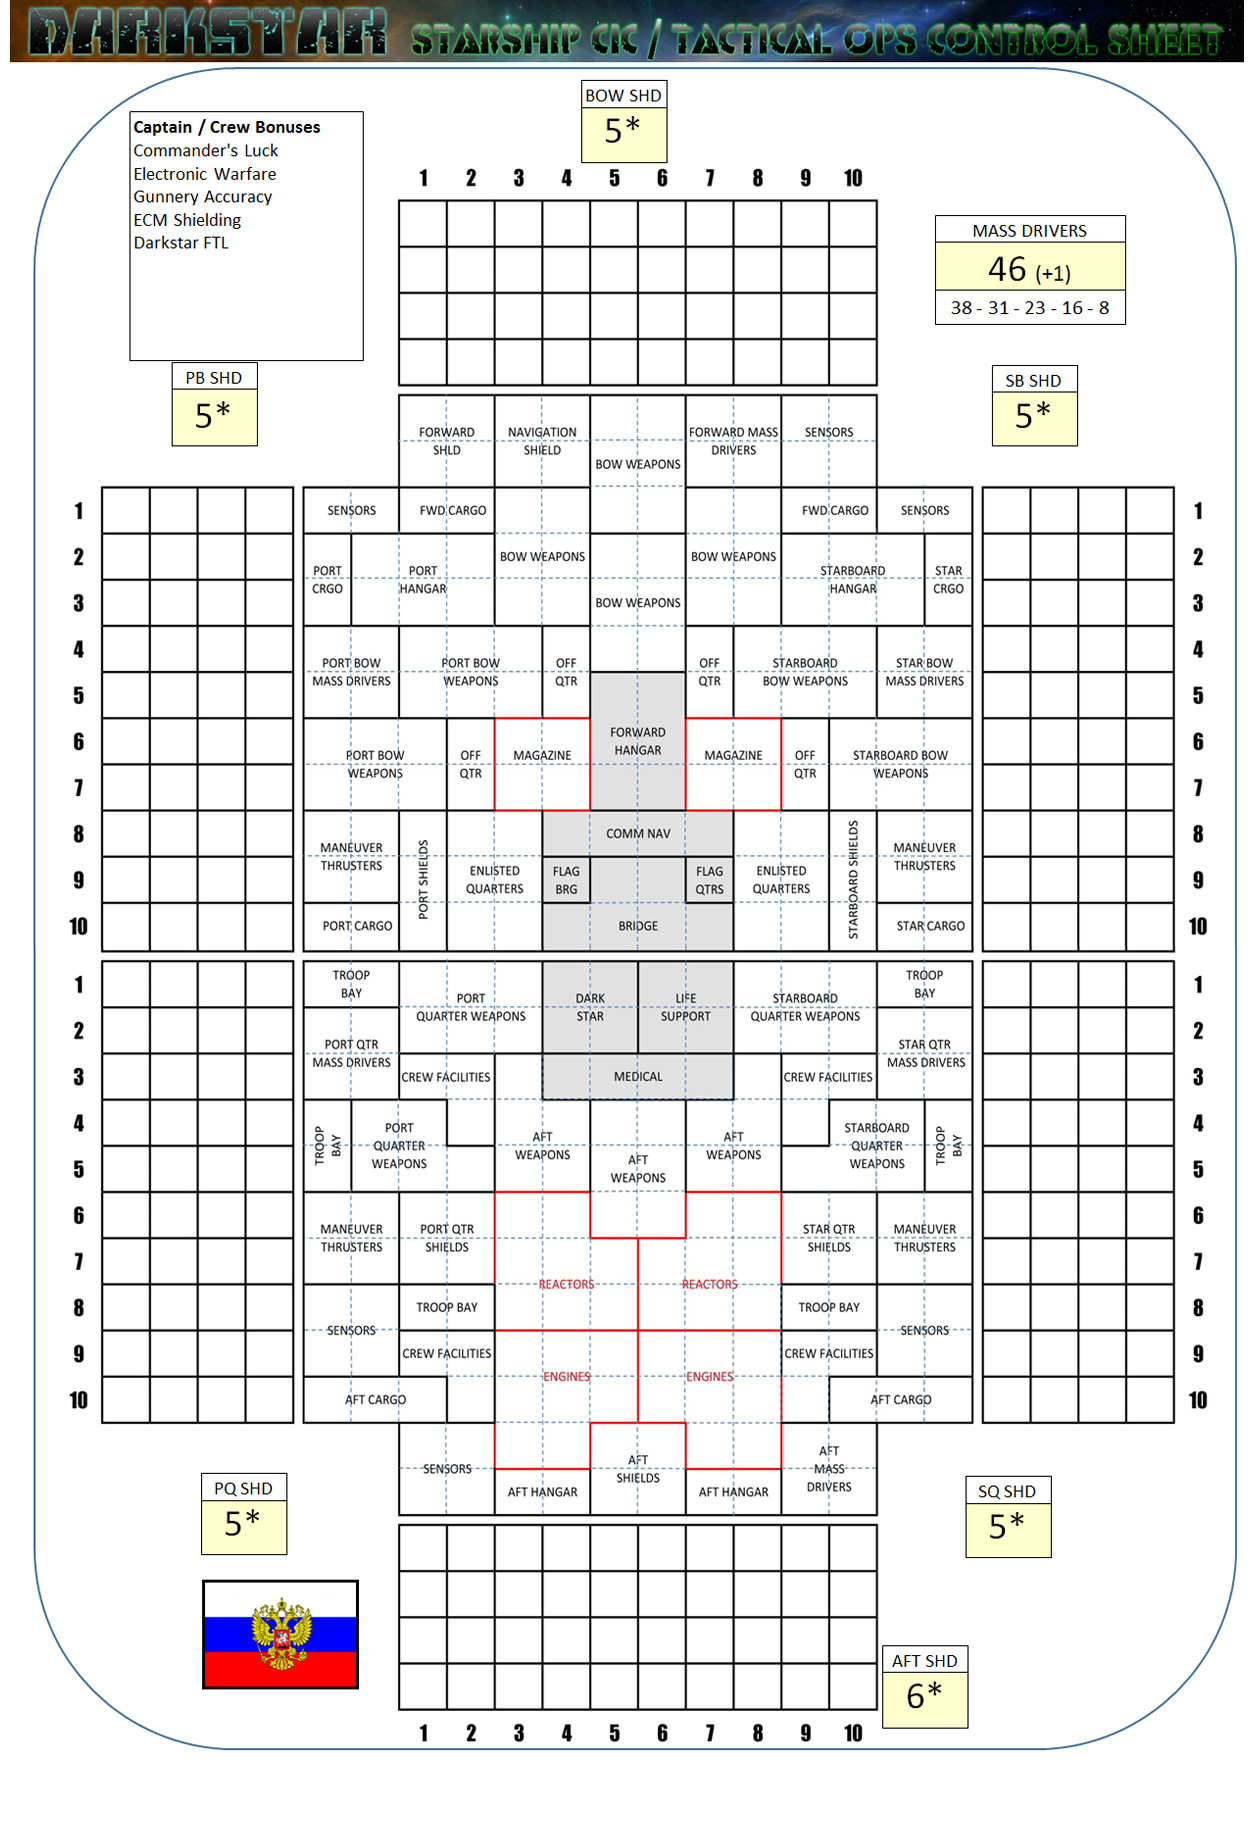
The Kirov class battlecruiser is a something of an odd design, considered by some to be the “least Russian warship in the Russian navy.” Indeed, her design choices seem to heavily draw from similar designs of other navies, like the Prussian Scharnhorst class or the British Cross class. Not quite powerful enough to lock horns with a true battleship but easily capable of breaking heavy cruisers in half, a Kirov battlecruiser trades the firepower of a true dreadnought for additional speed. The general idea is that this speed will extend cruising and maneuver envelopes beyond the capabilities of likely opponents, allowing a Kirov to choose the angle and time of engagement, the range of fire exchange, and the point of disengagement. In plainer language: “She can outrun anything she can’t outfight, and outfight anything she can’t outrun.”
This design principle is borne out in the weapons systems. Note she does not have a primary battery and a secondary battery, but two primary batteries. The 25-teravolt EPCs are admittedly heavier, but not only do they hit harder, but at much longer range than most Russian warships (normally famous for their blistering batteries of short-range, high-yield plasma accelerators). The Kirov can kill at a distance, something not usually seen in Russian warships. These are also the forward-weighted mountings (two turrets forward), allowing the approach Kirov to choose the aforementioned range. Meanwhile, the 12-gigawatt rail guns mount two turrets aft, closer-range weapons clearly meant to defend against smaller, faster cruisers and destroyers looking for a swing around the Kirov’s stern.
In some ways the Kirov is better than its rivals. While not as fast as the Scharnhorst, the Kirov mounts a far more impression gunnery suite. That said, it is not as accurate as the Prussian counterpart. Then again, Russian analysts have seen that dreadnoughts are taken out by massed torpedo attack as often as anything else, and mount a point-defense array of 25mm quad-mounts and 35mm triple mounts that make the Scharnhorst green with envy. This leads at least one American admiral to comment: “Battlecruiser my ass. She’s a fast battleship, same as our Colorados.” He may be correct, except the Kirov also mounts two massive racks of no less than twenty tubes for the P-500 “Plamya” (Plame) torpedo … a weapon for which a Colorado class has no answer.
All that said, the Kirov does have weaknesses. Like all battlecruisers, she has underpowered guns (compared to a true battleship) and underpowered shielding. Conversely, although faster than most battleships, she’s slower than any heavy cruiser class in known space. Accordingly, any Kirov commander has to know that he’s going into battle with a shortcoming that a savvy opponent can exploit. Also, although impressive in number, the P-500 is painfully slow and highly inaccurate. Furthermore, the Kirov ship is clearly set up as a “broadside” ship, with all weapons (even the torpedoes) arrayed along the ship’s centerline. While this allows for great broadside firepower, is also crams the weapons systems and their power, control, ammunition, and crew systems into tightly-compacted compartments within the ship that sometimes lead to cascading systems failures when damaged in combat. And finally, with a mass of 413,494 tons and crew of almost 1600 officers and men, a Kirov battlecruiser is exorbitantly expensive to build and operate.
In terms of aesthetic, the Kirov’s lines are a combination of sleek yet brutish, streamlined yet bristled, an odd blend of cutting speed somehow combined with hulking intimidation. In this regard the battlecruisers are something of prestige ships, showing the flag at far-flung colonies and carrying diplomats to high-stakes negotiations. Clearly the Holy Russian Navy is proud of these vessels, and plans to keep them for decades into the future.
British spearhead the invasion of 72 Hercules - Is the end in sight?
FROM: ADVISORY OFFICE, UN HERCULES SCS REGIONAL COLONIAL CENTER
17:10 SOL GMT, 12 JUNE 2522
BREAKAUTH: 181072.18J
CLEARANCE: NATIONAL COMMAND AUTHORITY
SUBJ: BATTLE OF STANTSIYA GORIZONT (Horizon Station, 72 Hercules)
The long-awaited Renkei Alliance invasion of the 72 Hercules trinary star system, spearheaded by the British Royal Navy and supported by the Arab League and Japanese Empire, is finally underway. This system is home of the “Kransnaya Nadhezda” (Red Hope) colonies, colonial capital of the Holy Russian Empire, last real enemy of the Renkei Alliance in the Third Hercules War. As such, a successful assault into 72 Hercules and capitulation of Krasnaya Nadhezda is anticipated to at last force the Russians to the negotiation table, put a final end to the so-called “Coalition of Eagles,” and close the Third Hercules War.
So evident is the importance of 72 Hercules, in fact, that the Russians have tried for months to throw every possible obstacle, impediment, and distraction against the mounting of such an invasion. Division among British allies, spoiling attacks into neighboring star systems, and counter-invasions against the Arab League at the Khaizan’s Haven caliphate, all frantic plays for time while the Russians scrambled to build new defenses or call in reinforcements.
Now the time has come to put said defenses to the test. The British have finally stabilized their rear at places like 99 Hercules and forced the New Romans out of the war, the Japanese have recovered from defeats at the hands of the Americans, and the Arab League has ejected the Russian beachhead from their Khaizan’s Haven colonies. All three allied powers are thus poised to invade 72 Hercules, and now that offensive has begun.
The primary terrestrial world of 72 Hercules, Red Hope itself (72 Hercules A/4.1), is protected by a gigantic series of orbital installations. Given the defensive capabilities of these installations (and the tens of thousands of civilians who live on them), the British Admiralty is hoping for force a decision without a direct assault on Red Hope, sure to be an apocalyptic bloodbath.
Rather, the orders for Task Force Agamemnon (Lord Commodore Edward Cavendish) are to establish a foothold in the outer reaches of 72 Hercules. The specific target is Gorizont Stantsiya (Horizon Station), a powerful defensive and fleet support base installation in the outer debris disc (i.e., Kuiper Belt) of the largest of the three 72 Hercules stars. From this base, the British hope to either compel the Russians to come to terms, or stage the next phase of a massive invasion toward the core of this massive triple star system.
Cavendish’s mission is not an easy one. Gorizont Stantsiya (Horizon Station) is a beast of an installation, with a mass rivaling most battleships, massive quadruple turrets of 15-teravolt EPCs, double turrets of 14-gigawatt rail guns (again the caliber normally found on a battleship), bristling mass driver defenses, and an aerospace strike group rivaling those carried aboard most classes of fleet carrier. On top of that, it’s protected by the Admiral Lazarev task force, commanded by the veteran Captain Piotr Myshaga (light cruiser Admiral Lazarev, destroyers Syekyra and Rusalka).
Adding still more danger is the battlespace itself, where huge floes of ice, proto-comets, and planetary debris drift in the eternal abyss, detritus left over from the formation of the 72 Hercules star system. The “Kuiper Belt” of 72 Hercules is thicker than most, probably because the competing gravity of the three 72 Hercules stars preventing the collapse and formation of more outer ice giants or gas giants. Astrophysics aside, this debris now poses a very real collision hazard for any warships engaged in battle around Horizon Station. But if the British and their Renkei Alliance partners hope to crack 72 Hercules and finally end this war, they have to start here.
UNITED KINGDOM: Damon
HOLY RUSSIAN EMPIRE: Oriskany
ASSAULT VICTORY CONDITIONS (561 points)
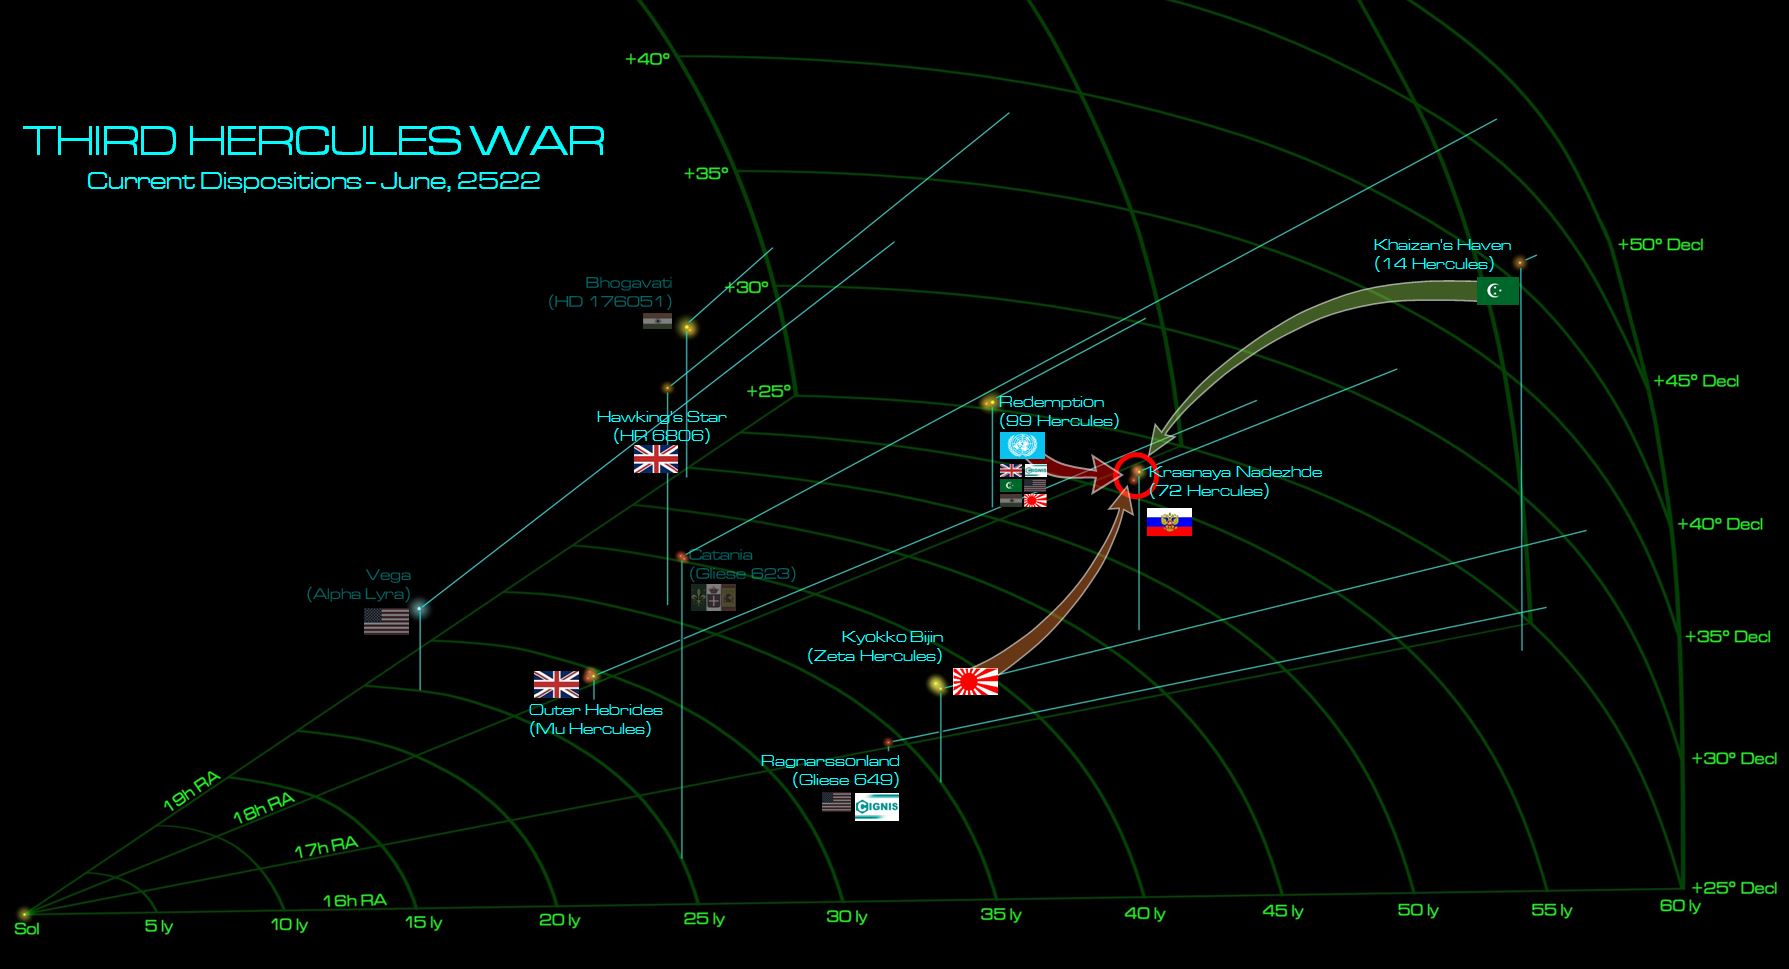 The general situation of the Third Hercules War in early June, 2522. The Russians more or less stand alone - their former allies in the “Coalition of Eagles” (the United States and New Roman Alliance) having been forced out of the war. The Russians have been playing for time with divisive politics and spoiling attacks, but now at last ... time has run out. The Japanese, Arab League, and British are all poised for simultaneous assaults into the 72 Hercules star system, home of the Krasnaya Nadhezda (Red Hope) colonies - “capital” of Russian holdings here on the Hercules Rim. Now the British are spearheading what is hoped to be the final invasion of this conflict. Is the Third Hercules War finally drawing to a close?
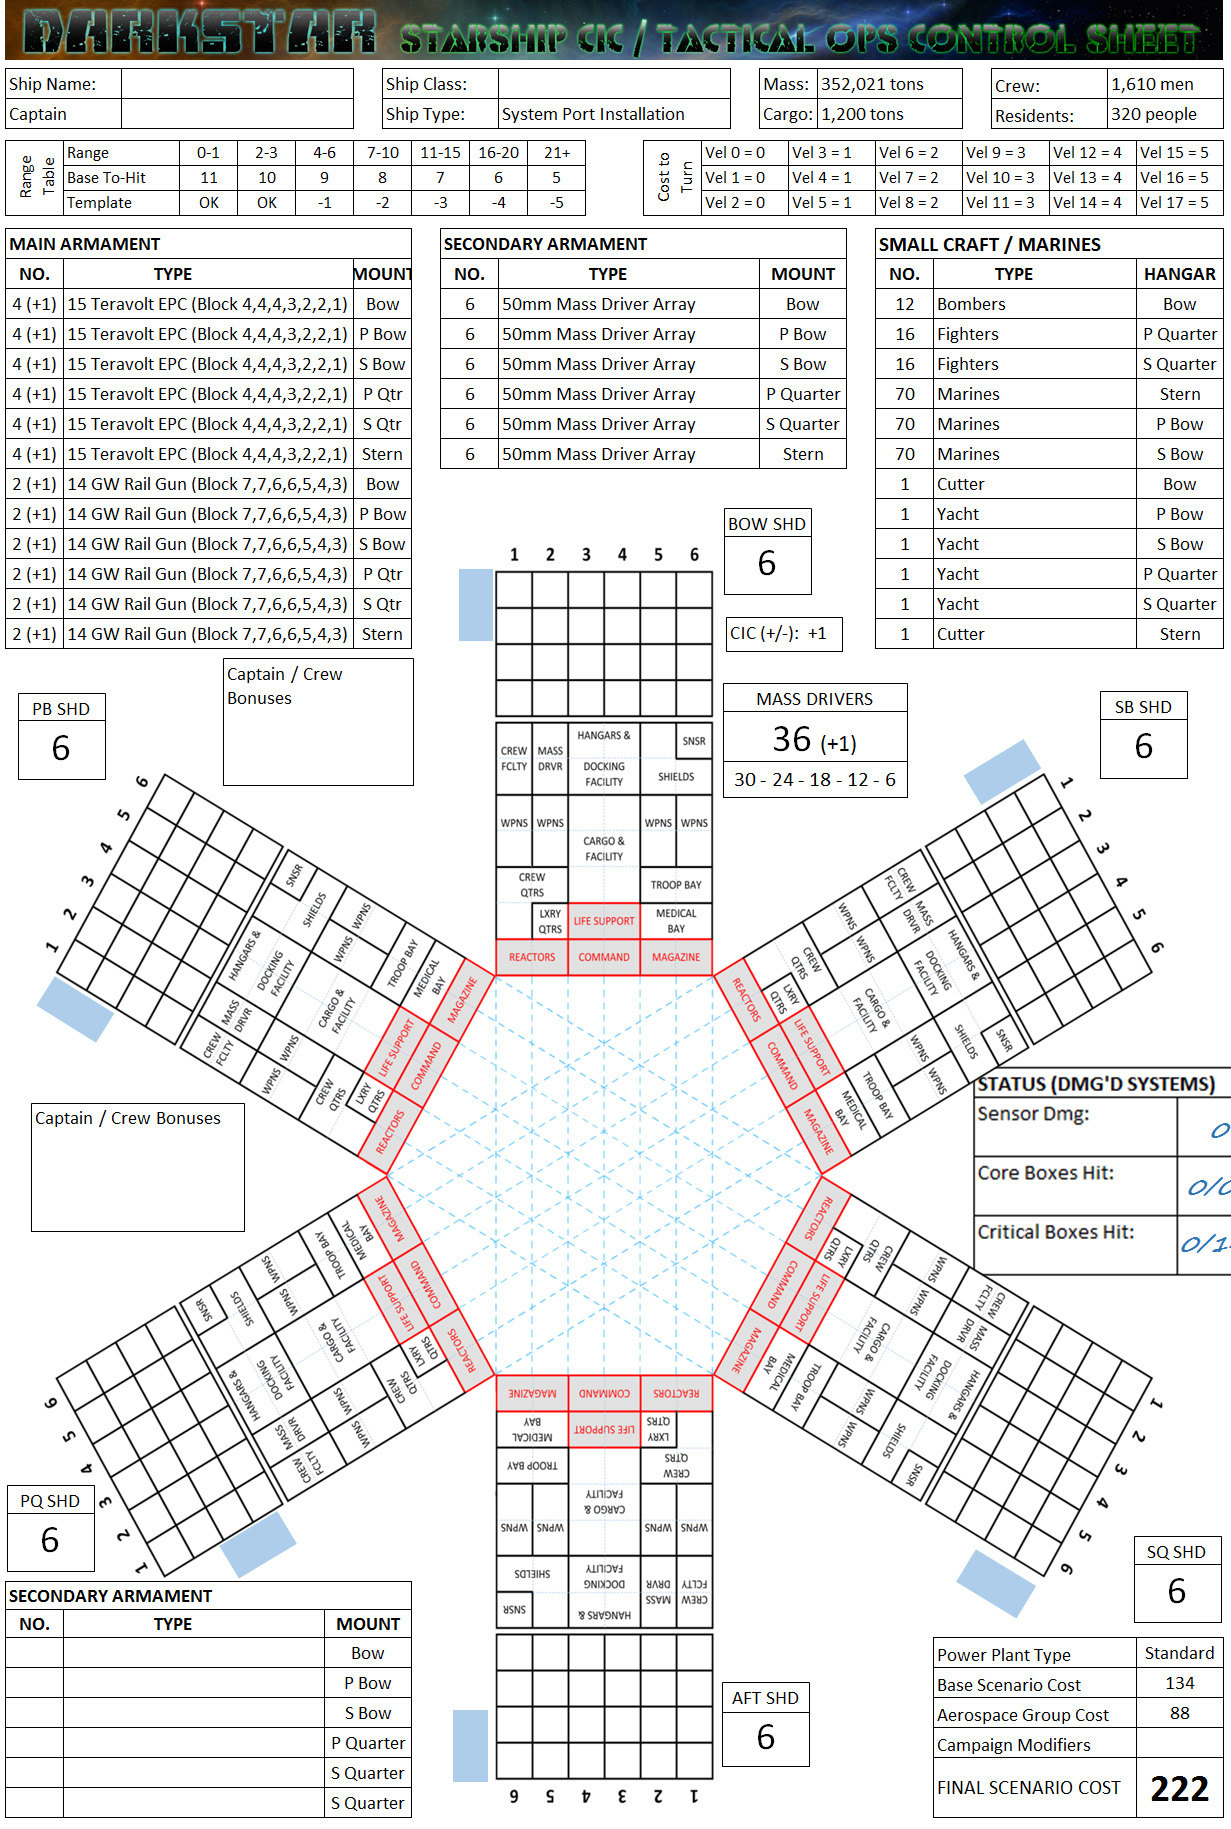 First, let’s take a terrifying look at the Warships Record Sheet of Horizon Station. This city in space can serve as the permanent base for a complete task force, or a temporary base for full battle fleet. It weighs more than some battleships, boasts the 14-gigawatt rail gun battery of a battleship, and carries more fighters and bombers than some fleet carriers. It mounts shielding that makes most heavy cruisers or even battleships green with envy, and enough mass drivers to make virtually any aerospace or torpedo attack a virtual suicide charge. The only problem, it doesn’t move. It’s a helpless stationary target. If it takes damage to one side, it can’t maneuver, roll to protect its wounds, or even retire. As Patton allegedly said, “fixed fortifications are monuments to the stupidity of man” ... but of course he never had to assault one of these bad boys.
 The engagement begins. The Russian approach is uncharacteristically slow, preferring to stay under the cover of the big guns of Horizon Station. Usually the Russians, particularly Captain Myshaga, rushes enemy battlegroups at high approach rates, hoping to get his large (but slow) torpedo attacks, EPCs, and especially plasma accelerators right into enemy engines and reactors. But here, he’s got the disadvantage that two-thirds of his firepower is immobile, so he’ll have to take his time and force the British to come to him. It doesn’t work, at least initially, as Cavendish instead starts launching his aerospace group in hopes of knocking at least one of Myshaga’s ships down before closing into a more general engagement. For now both sides fling long-range broadsides at each other’s destroyers, the HMS Sheffield and CPK Syekyra taking the worst of it.
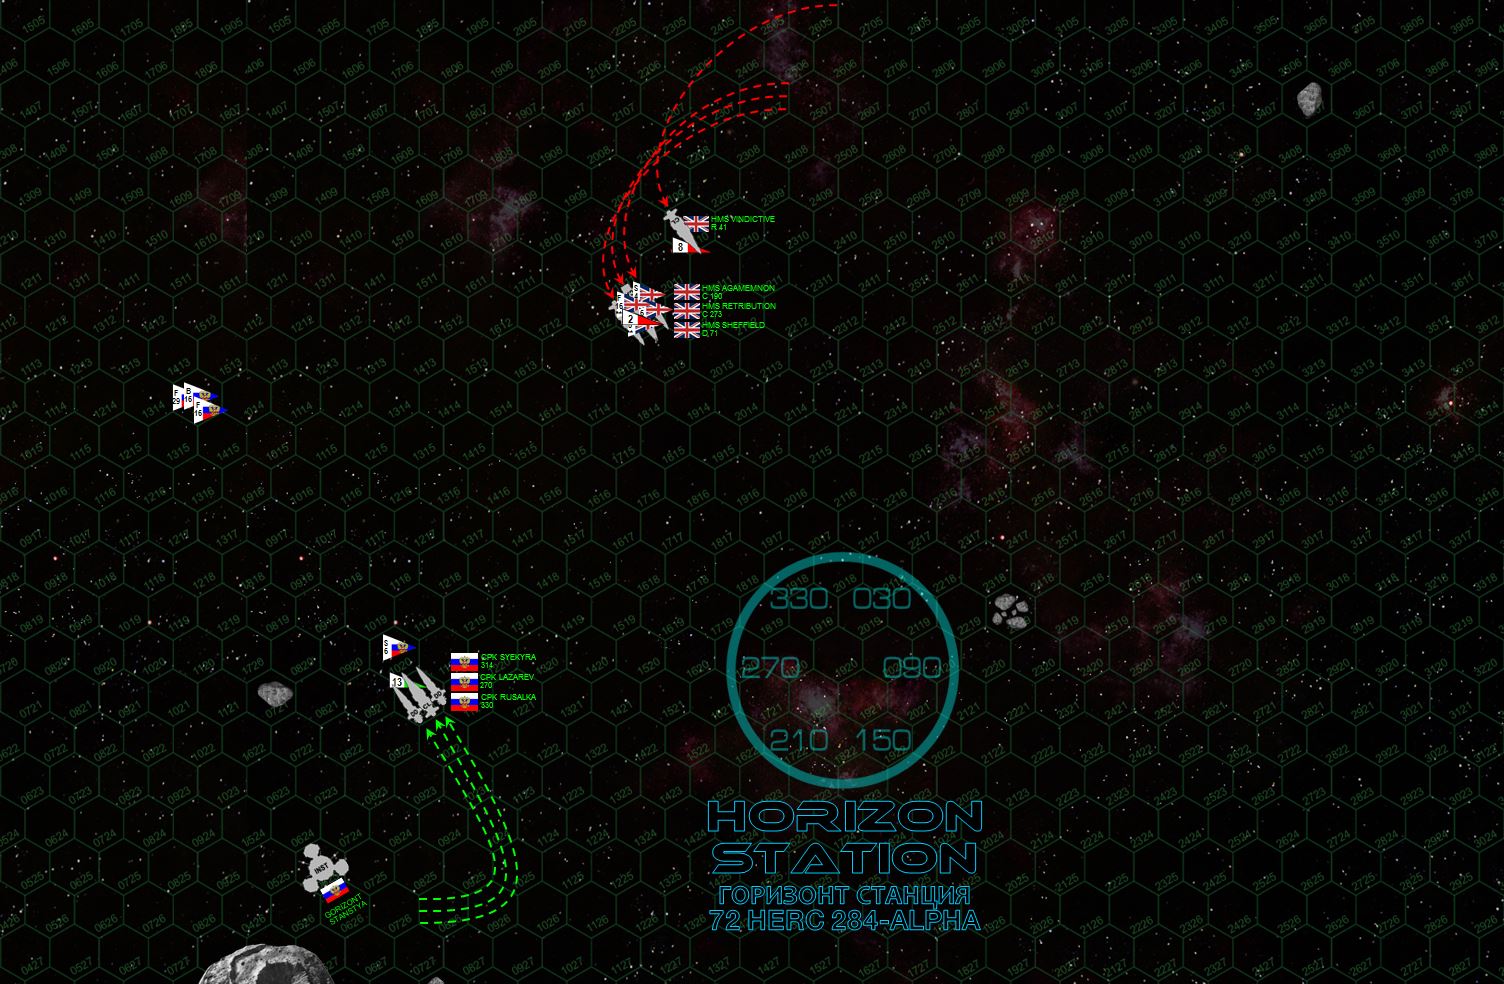 Both sides execute port standard turns, coming about to present starboard bows to each other for closer broadsides delivered at 1600 kilometers. Cavendish’s stand-off engagement plan isn’t really working ... while his enhanced shielding and electronic warfare suites is making his ships very hard to hit, the sheer weight of Russian firepower is starting to tell. The HMS Sheffield is hammered wide open but while her skipper (Commander Howard Bowen) maintains power, he’s compelled to break off the engagement. The Syekyra (Captain Ekaterina Alexyevna Duranov) is also forced to break off, but that massive Russian aerospace strike is now howling in, and the British just don’t have enough mass driver defense to fend of that sheer number of warheads.
 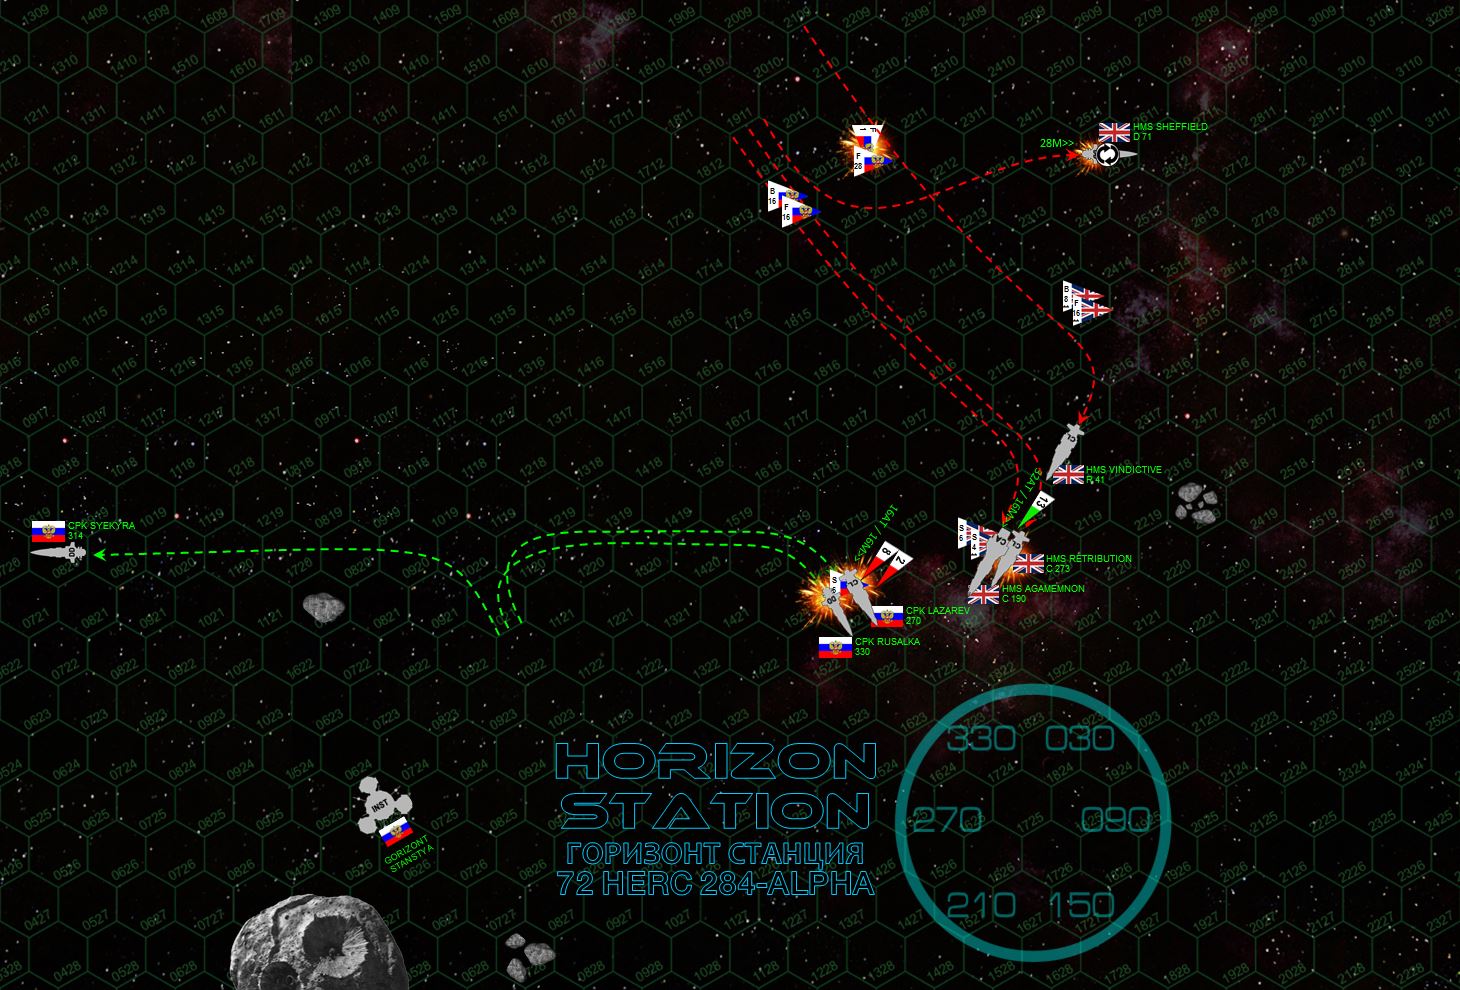 At last the moment arrives. Like many Darkstar games, the Battle of Horizon Station comes begins with feints, postures, and maneuvers, until finally coming down to a more or single smash somewhere on the table. The trick is to influence the conditions of that collision to maximize your strengths while minimizing your shortcomings for best chance of success. Here, the break almost completely falls in the British favor. The mass Russian fighter strike on HMS Sheffield (hoping to finish her off so she doesn’t linger in the 72 Hercules Kuiper Belt) is almost a complete failure, especially with her “Resolute Crew” battle upgrade repairing her burning bridge and keeping the ship on her feet long after she should have gone dark. The even bigger Russian torpedo and missile strike on the stern of the light cruiser HMS Retribution (Captain Helena Seacole) does a little better, but her double-enhanced shielding and excellent mass driver defense of HMS Vindictive and Agamemnon makes this impact far less lethal than it should have been. The real disappointment comes with the guns of the station, which practically all miss on HMS Retribution. The point-blank broadsides of the Rusalka and Admiral Lazarev do far better, but even this Retribution survives. Myshaga has also made a critical mistake here, throwing away the benefits his “Gunnery Accuracy” and especially “Gunnery Impact” upgrades to close the range to just three hexes, where the forward batteries of HMS Agamemnon and Retribution could tear him apart in return. He’s ventured out from under the protection of those heavy guns, and pays the price. The aerospace strike from the carrier HMS Vindictive (Commander Alfred Carpenter), combined with Cavendish’s own gunnery of the Agamemnon, cripples both the Admiral Lazarev and Rusalka.
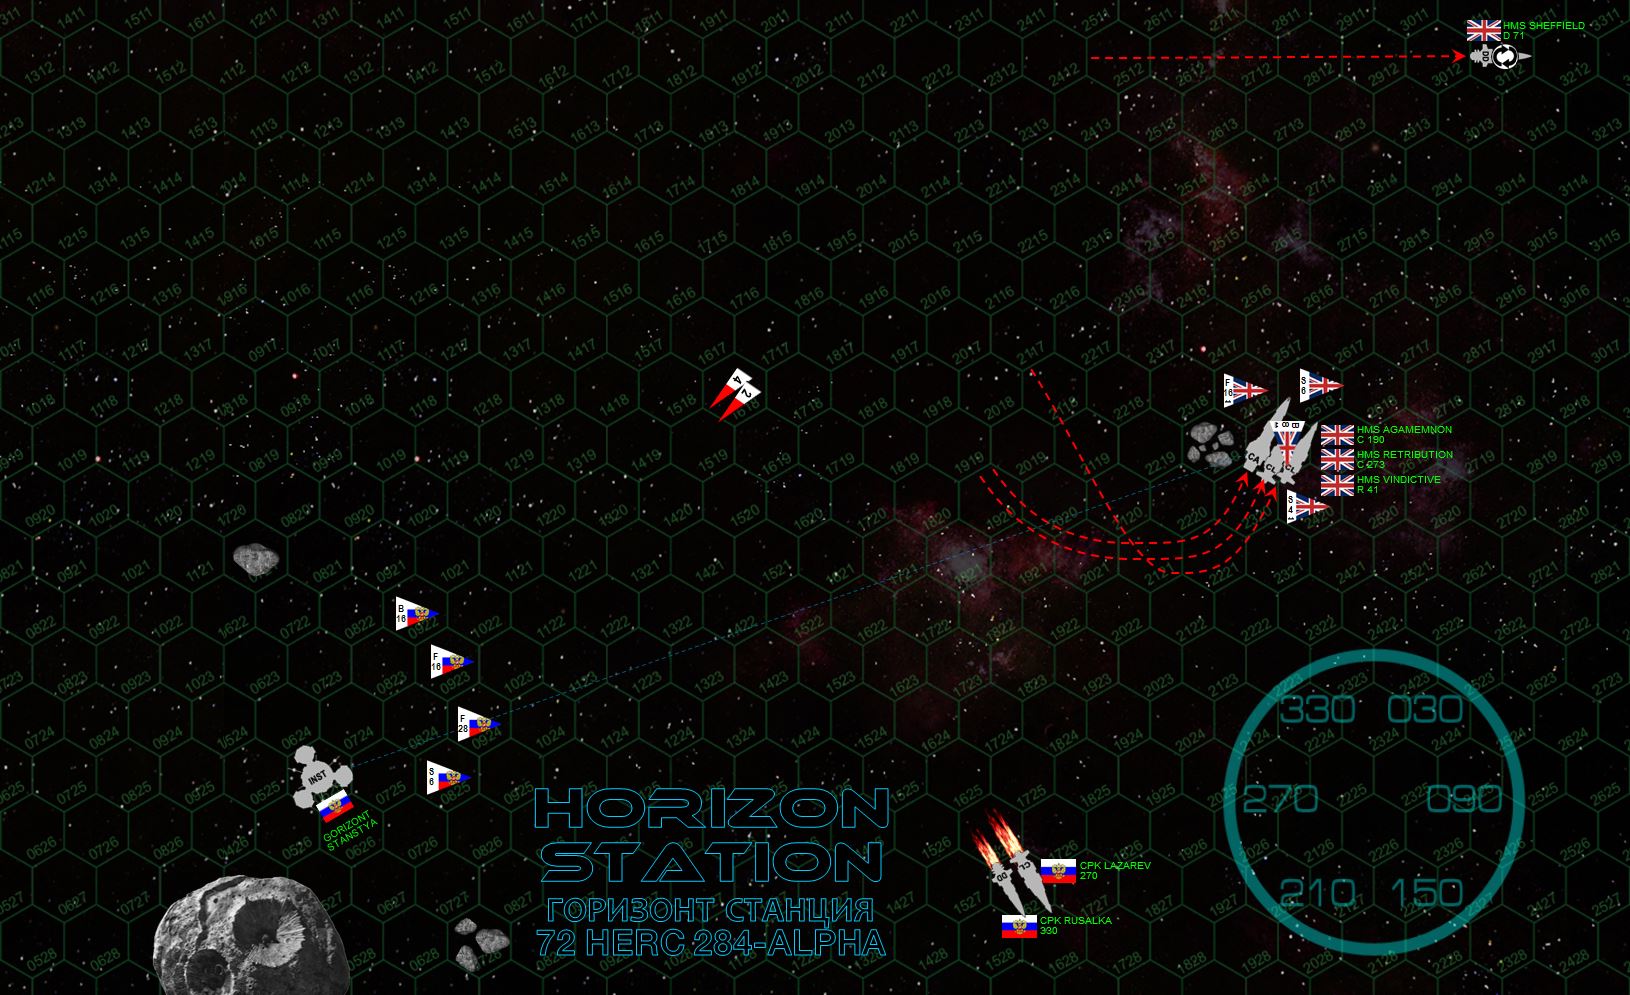 Now we’re at a curious moment. With the whole Russian fleet either crippled or driven off, all that remains is the bloody assault on the “castle” of Horizon Station. But does Cavendish really have to assault the station at all? Rather, he pivots behind the Kuiper Belt debris so the station cannot hit him. In game terms, he’s running out the clock. He has more points on the table than the Russians and so long as the Russians cannot hit him, he wins the game. The only chances here are if the Russians can launch another aerospace strike to cripple the Retribution ...
 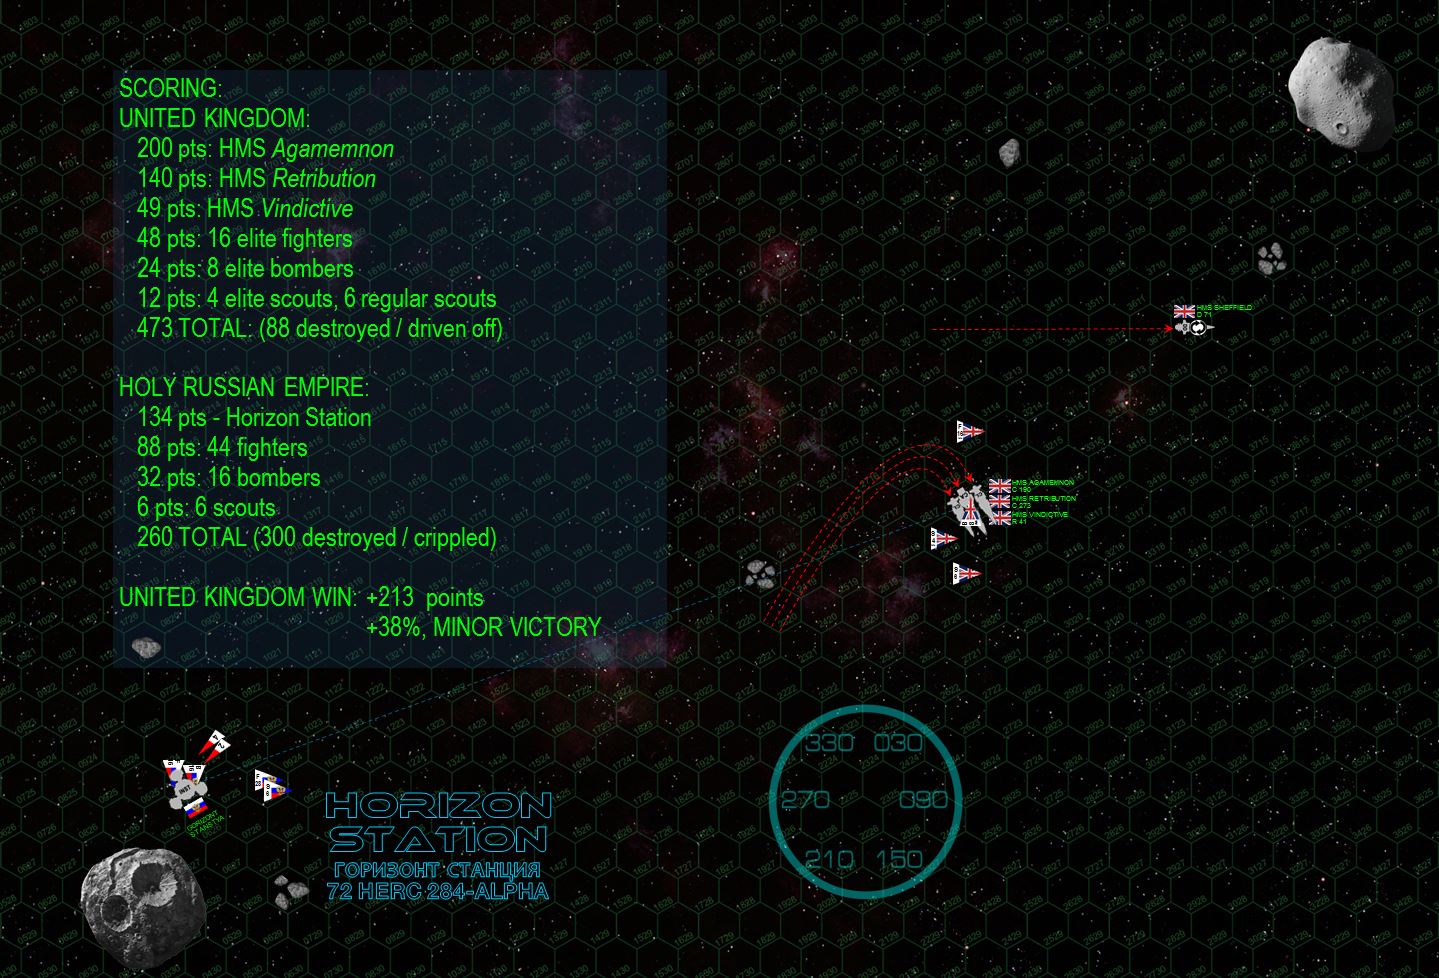 Running the game forward through one more turn, we realize that even this won’t work. The Russian bombers are only so fast, and by the time they land on Turn 5, rearm on Turn 6, re-launch on Turn 7, and fly back across thousands of kilometers of space to re-engage on Turn 7 or 8, the game will be over (assault games are limited to eight turns). Even if they did cripple the Retribution, the British still win (although by a more slender margin). Conversely, A second British aerospace strike will never get through the station’s heavy defenses. Engaging the station in a gunnery slugging match will probably shake out in a British win, but will never allow a MAJOR win as the British will lose AT LEAST one more ship, probably the horribly damaged HMS Retribution. Barring some truly remarkable dice one way or another, the Russians cannot win, they cannot force a draw, and the British cannot enhance the margin of victory they already have. The battle is basically already decided. Cavendish thus makes the call and runs out the clock. Not the most cinematic finish, but one that a real naval commander would probably make (saving hundreds of lives and billions of pounds’ worth of starships). In game terms, he basically lays siege to the station, ready to engage with a VERY powerful force any relief force the Russians may try to send to New Horizon. Meanwhile the rest of the British invasion fleet would arrives (mostly carriers and troop ships), and would EVENTUALLY grind the station down with mass torpedo strikes if nothing else. More likely the local Russian commander comes to terms, realizing help will never reach him with Cavendish’s cruiser lurking out among those asteroids and comets.
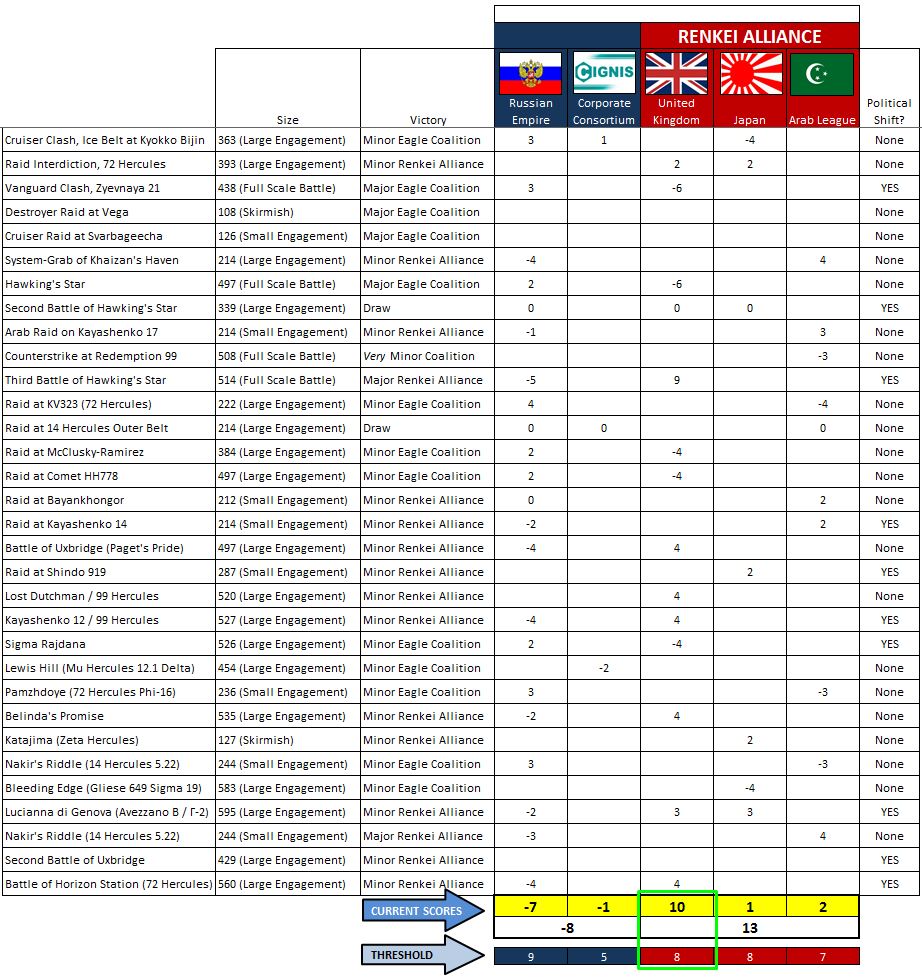 So that’s the end of the battle. By playing smart, reserved, and cautious, Damon has won the final victory needed to push the United Kingdom up over the “8” campaign threshold score. The British are now able to cut a deal with the Russians, an Anglo-Russian cease fire will be declared. The British parliament, Admiralty, and crown are all able to declare victory in the Third Hercules War. ASSUMING ... and here’s the onion ... that the Arab League or Japanese battles (taking place at the same time in this simultaneous three-way invasion) win at least one more victory against the Japanese. Note that while the British have EXCEEDED their threshold of +/-8 with a campaign score with a +10 ... the Russians have NOT capitulated (i.e., they have not yet been knocked to their own threshold of +/-9 with a campaign score of -7). Either the Japanese or the Arab League have to win to finally shove the Russians down to -9, only then will the Third Hercules War truly be over. Still, for now the British, especially Lord Commodore Edward Cavendish, can rest on their laurels. Even if the Russians mount a comeback, the diplomats are already drawing up papers, the British have well and truly won their part in this war. Damon has fought FOURTEEN Darkstar battles (8 wins, 1 draw, 5 losses) over the last nine months (his first game in this war was October 26, 2019), battled his way back from the brink of absolute defeat TWICE, to carry the war to ultimate victory. It’s the biggest Darkstar effort I’ve seen from a player in years, and really deserves the community’s congratulations. Well done!
 Two More Factions out as Third Hercules War Builds to Climax
FROM: ADVISORY OFFICE, UN HERCULES SCS REGIONAL COLONIAL CENTER
02:15 SOL GMT, 26 MAY 2522
BREAKAUTH: 181072.18J
CLEARANCE: NATIONAL COMMAND AUTHORITY
SUBJ: SECOND BATTLE OF UXBRIDGE (Mu Hercules C-3)
By now even the most vapid colonial socialite among the colonies of the Hercules Rim can tell the war is drawing to a climax. Ever since the Americans were largely forced out of the Coalition of Eagles by the Treaty of Zubrin, the Russians have stood more or less alone against the Renkei Alliance (Britain, Japan, Arab League). The Corporate Consortium refuses to engage meaningfully. The New Roman Alliance, although a powerful (and fabulously wealthy) faction based out of their Catania colonies at Gliese 623, flails in a successive string of naval defeats.
All the while, the British (predominantly influenced by Lord Commodore Sir Edward Cavendish), have been aligning their Renkei allies for a final, war-winning strike on the Russians at 72 Hercules. To forestall this, the Russians have been creating as many problems along Renkei flanks and rear as possible. But by the end of May 2522, these “spoiling attacks” have run their course. A recent major Arab League victory has smashed the Russians out of their foothold at Khaizan’s Haven. The Russians and Romans were both defeated in a major battle at Avezzano in 99 Hercules, where a New Roman battleship Leo Magnus was beaten to within an inch of her life and driven off the table.
Now, in a final attempt to draw off pressure from 72 Hercules, the New Roman Alliance has mounted a small invasion of the British “Outer Hebrides” colonies at Mu Hercules. The Roman commander here, Commodore Justinian Pilaex, knows he can’t take the whole system, his mission is take just one planet, perhaps a few moons of one of the system’s outer ice giants, just enough to force the British to turn resources away from the impending invasion of Krasnaya Nadhezda.
However, opposition at Mu Hercules might be more than Pilaex anticipated. As per the “mutual military assistance” clauses of the recent Treaty of Zubrin, the Americans have been obligated to keep a task force at both the Outer Hebrides and the Hawking’s Star, defending these colonies of their former enemies. Now that a Roman task force has entered the outer debris belt of the Outer Hebrides, the Americans stationed there have orders to raise steam and intercept.
The force that will join battle is Task Force Oriskany under Captain Matthew Spencer, finally brought up to full strength now that the flagship, the Valcour class destroyer USS Oriskany, has completed her six-month “FRAM I” refit and upgrade at Port Halsey (Alpha Lyra / Vega). Together with the destroyers Valley Forge and Hancock (Captains Garrison Heathe and commander Priscilla Wolfe, respectively), the US Marine Corps light assault carrier USS Tarawa, (Captain Raymond Cruz) and the torpedo corvette USS Daggerfish (formerly Wolfe’s command, now under Lt. Commander Lewis Knight), Oriskany leads a light, fast, elite, and high-tech force. Grossly outmatched by the weight, gunnery, and power of Pilaex’s force, the Americans will have to use speed, upgraded electronics, and a vastly superior aerospace strike group to level the playing field.
Indeed, the sheer firepower of the Roman force is sobering. Pilaex’s flagship is the Tiberius class heavy cruiser Nicaea, 140,000 tons of high-tech EPCs, syglex emitters, and oversized engines that allow her to move like a ship two-thirds her size. Escorting her is the light cruiser Leclerc under Captain Raphael deChalemonde, the destroyer Corsica under Captain Daphne St. Croix, the light strike carrier Alejandra, and the torpedo corvette Sica.
The two task forces meet at the planet Ubridge (Paget’s Pride / Mu Hercules C-3), one of the major terrestrial worlds and colonial center for the British here at Mu Hercules (third planet of the third star of this trinary stellar group). Both sides have help coming in, the Romans have their invasion fleet, built around a Bersaglieri-class planetary assault ship, while the Americans have British forces coming in from the other side of the Mu Hercules system. Before either force arrives, however, the issue here will most likely be fatefully decided, one way or the other.
ASSAULT VICTORY CONDITIONS (429 points)
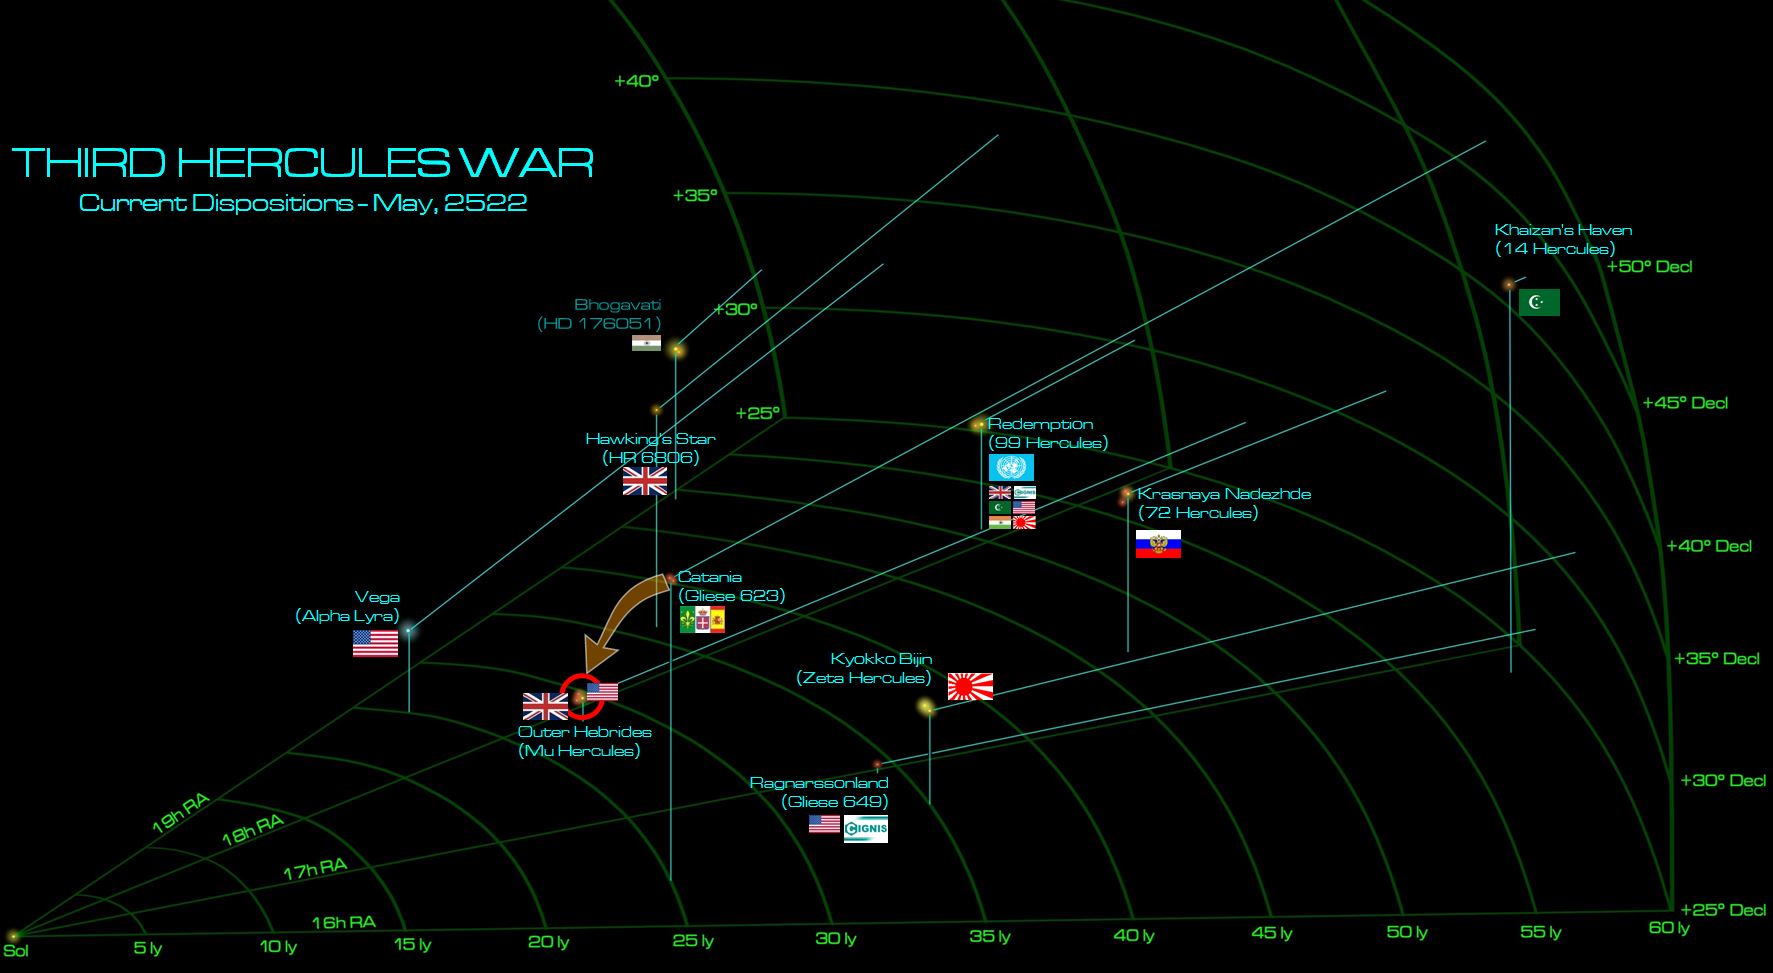 The general situation of the Third Hercules War in late May, 2522. For the Russians, holding out at their “Red Hope” colony (Krasnaya Nadhezda) at 72 Hercules, time is starting to run out. They’ve lost their foothold at Khaizan’s Haven, so the Arab League is again breathing down their neck from the outer rim. The British and Japanese have won a stark victory at Azzevano in 99 Hercules, largely shutting down the Roman and Russian bid to destabilize Anglo-Japanese rear areas as they build up against 72 Hercules. In a last bid to draw pressure from Krasnaya Nadhezda, the Romans have mounted a strike against the British at Mu Hercules.
  As the two task forces draw to engagement range over the day side of Uxbridge (Paget’s Pride), both sides hug the planet, anxious to secure the “gravity gauge” or even use the atmosphere to screen their more vulnerable engines and reactors. Romans come on fast, but the Americans come on even faster (only natural, as a destroyer flotilla they have MUCH more nimble ships). Initial gunfire is exchanged, already at just 1800 kilometers. The Roman flagship NRS Nicaea scores two hits on the torpedo corvette Daggerfish, while the light cruiser Leclerc scores one along with the destroyer Corsica. This opening volley hits the Daggerfish’s bridge, crippling the ship (Lt. Commander Lewis Knight survives). The American destroyers USS Oriskany, Valley Forge, and Hancock do the same to the torpedo corvette NRS Sica, the Oriskany finishing her off with a syglex emitter down the port side that hits the bridge, aft capacitors for mass drivers, portside reactor and engine housing. Lt. Commander Sebastian Anjou will also survive the day, but both corvettes are already blown out of the engagement.
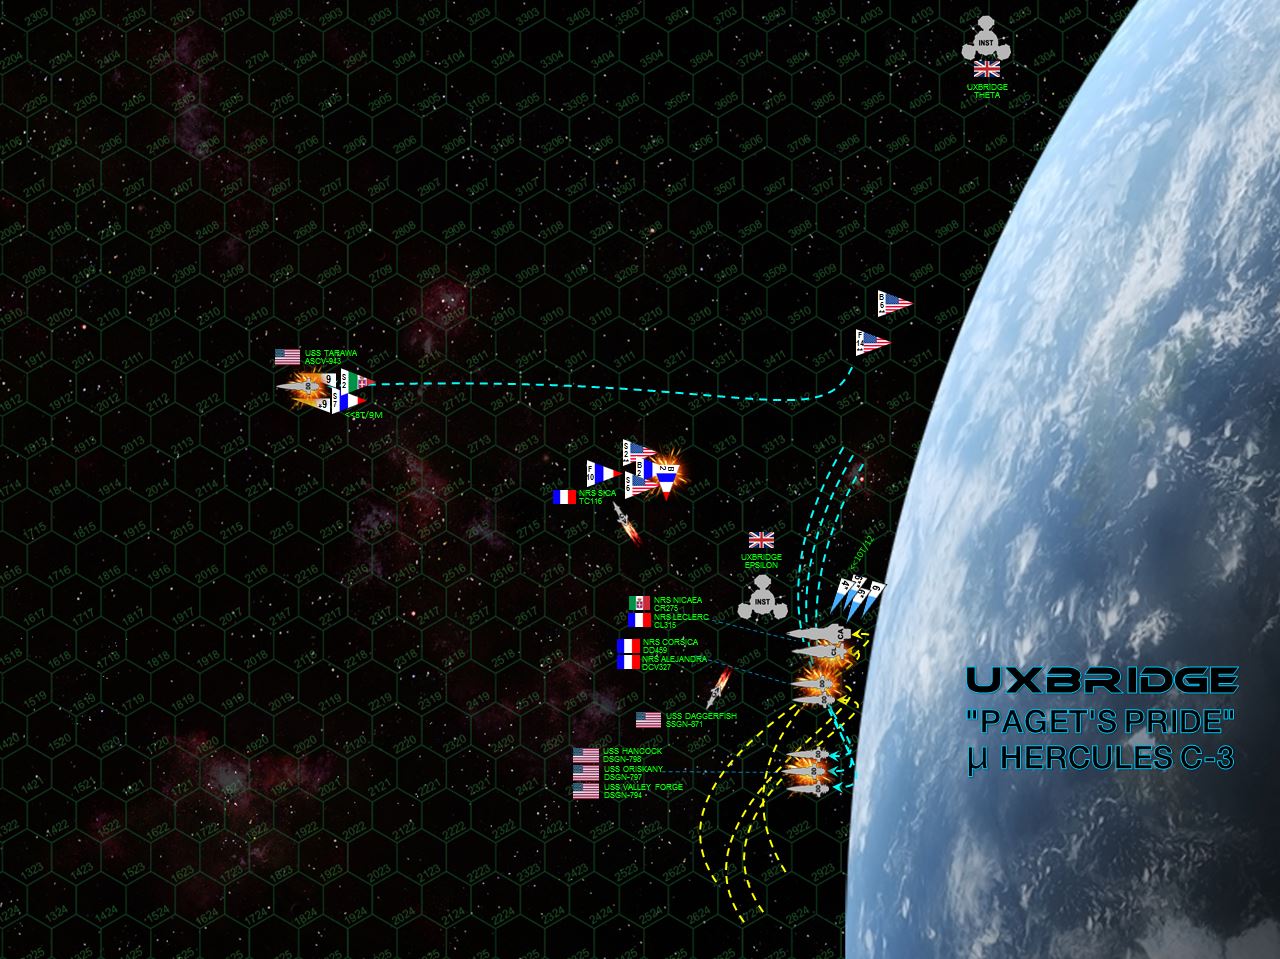 The Americans largely lose the initiative, and Commodore Pilaex uses planet Uxbridge to screen the sterns of his ships. In response, Captain Spencer tries to bypass the Romans, then turn into a shallow dive toward the planet, THEN hairpin turn away to set up some kind of a broadside. His ships all have enhanced engines so they can JUST pull off the maneuver, but the results are not great ... they can’t target the port quarters of the of the Nicaea or the Leclerc. The Tarawa more or less has to flee the immediate battle area, making a starboard turn away from the planet and raising maximum steam to put as much distance between her and enemy guns. In all, it’s a bad movement phase, the Americans have to hope their larger ordinance strike and heavily-upgraded shielding can “brute force” their way through the difficult turn. DeChalemonde’s light cruiser NRS Leclerc fires her forward rail guns at the fleeing Tarawa, putting the rest of her broadside into the Oriskany, just 540 kilometers away. Yet even as the Lady O’s newly-upgraded shields reel under the lasers and rail guns, Leclerc is hammered by the combined Mark 48 gravitic torpedo spreads of all the American warships, plus the US Marine Corps’ VMF/A-319 (The Tigersharks) launched off the USS Tarawa. Despite a withering hail of accurate Roman point-defense, enough American torpedoes are guided by enhanced electronic warfare suites ... and the double-elite “Tigershark” Marines land just enough ASM-56 Harpoon torpedoes and ASM-92 Hellfire missiles ... to detonate the Leclerc’s starboard engineering suites, sending her crippled hulk spinning through space. Two Dassault-Rafale "Lancea" ship-to-ship torpedoes hit the stern of the carrier Tarawa, the rest of the Roman aerospace and torpedo strike pinging off Tarawa’s double-enhanced, EW-upgraded stern shields. The move costs two Roman Caproni CA.580 “Aquila” (Eagle) bombers, shot down by the Marine scouts. Forward EPCs of the Nicaea follow up, scoring one more hit which is finally enough to put the Tarawa out of action.
  The rest of the Nicaea’s guns all fire at the Oriskany, and despite the close range and enhanced Roman targeting, ALL GUNS MISS (seriously, her d10 odds were base 10 + 2 for CIC, -7 for Oriskany’s absurd shielding = 5 modified to hit, remaining five shots were 6, 6, 7, 7, 7). The Leclerc has already done terrible damage, however (one 7 GW rail gun slammed right into the starboard engine, a second round hit in the same place and detonated actually INSIDE the port engine room). Even now, the Oriskany can survive. The Valley Forge and Hancock open fire into the port quarter of the destroyer Corsica (Captain Daphne St. Croix) at just 360 kilometers (2 hexes), hammering her open but not crippling her fast enough to prevent Corsica from swiveling her broadside on the Oriskany. Both the St. Croix’s Corsica and Spencer’s Oriskany (each a celebrated destroyer in their own right), limping and afire, put their last broadsides into each other. Corsica is positively ravaged, the remains of her stern basically blown off by Oriskany’s rail guns and brand new 75 eHz syglex emitters (even the carrier Alejandra takes a few hits). The Corsica’s 8 MgKv lasers likewise slash into the Oriskany, who just BARELY misses her Resolute Crew checks. and then the Romans just BARELY make the cripple check (needed a 2+ on d6, scored a d6. The Lady O is down.
 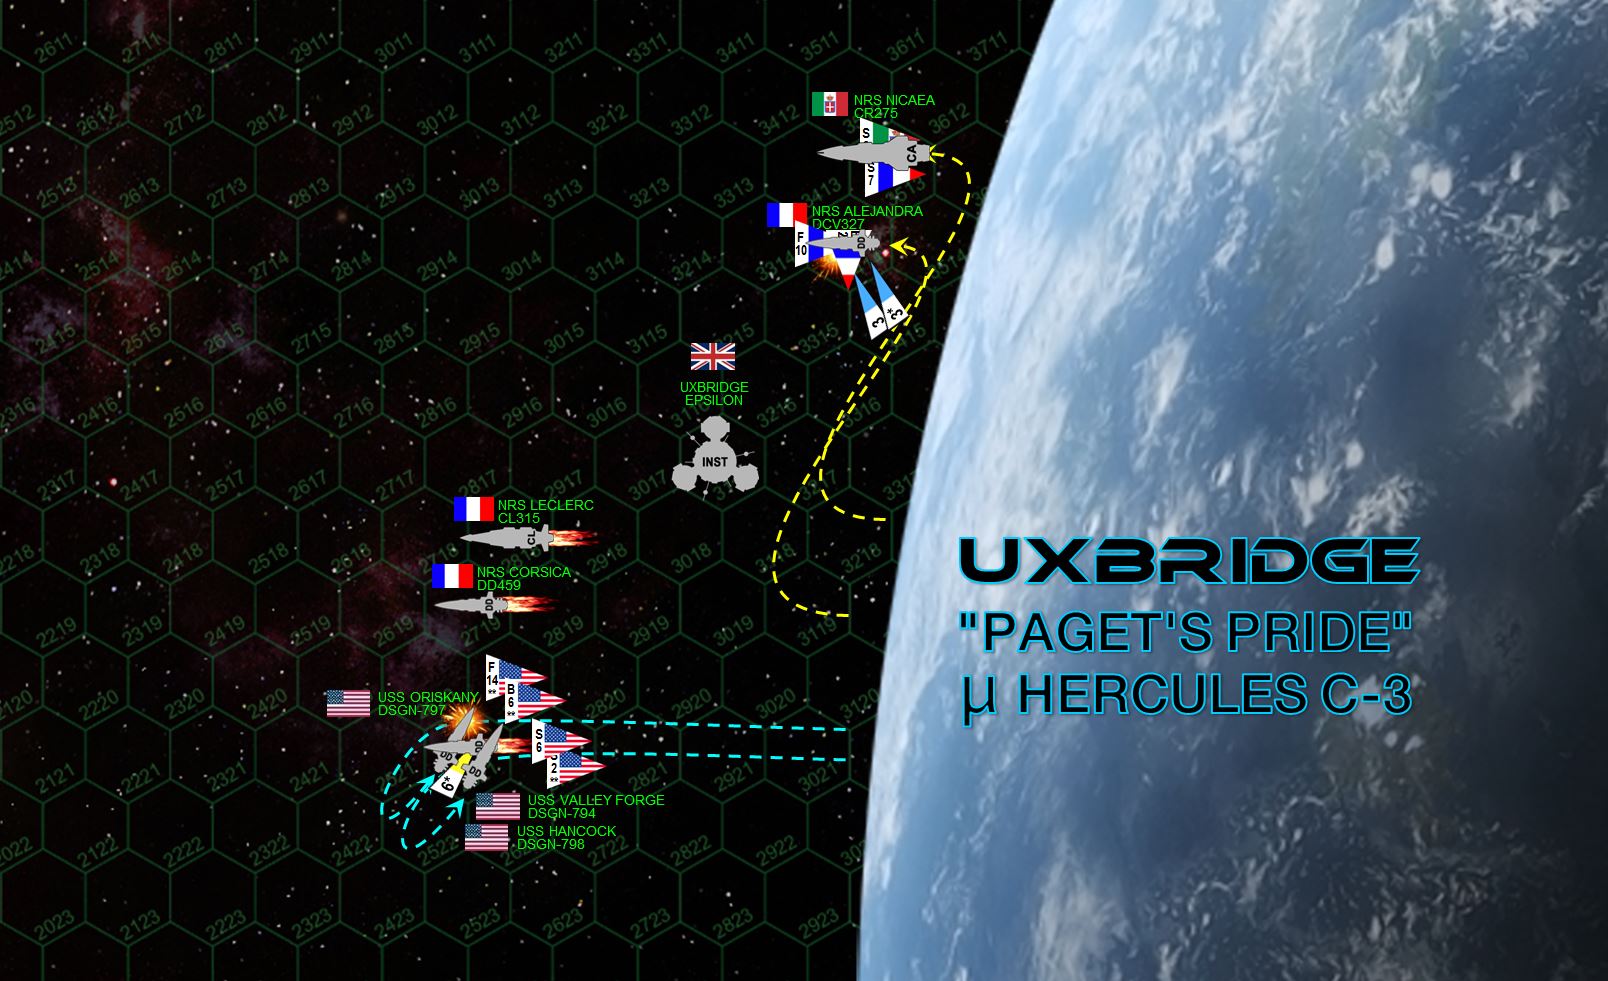 Left with only a ponderous heavy cruiser and a light carrier with no guns left in their task force, the Romans “take root” in low orbit of Uxbridge, jackknife-turning away from the Americans, keeping their sterns screened by the planet’s atmosphere. The Americans for their part (now just the destroyers Valley Forge and Hancock, Captain Garrison Heathe in command) pull away from the planet, hairpin turning back toward the Romans so they can launch full frontal torpedo spreads at the enemy (while keeping out of the Nicaea’s broadside). Frontal American guns ping away at the port bow or the carrier Alejandra, while the forward guns of the Nicaea hammer on the foc’s’le of the Valley Forge. The guns are hideously accurate, and the Valley Force loses her forward shields. This will hamper Heathe’s plan on keeping his bows pointing at the enemy for maximum torpedo attacks.
 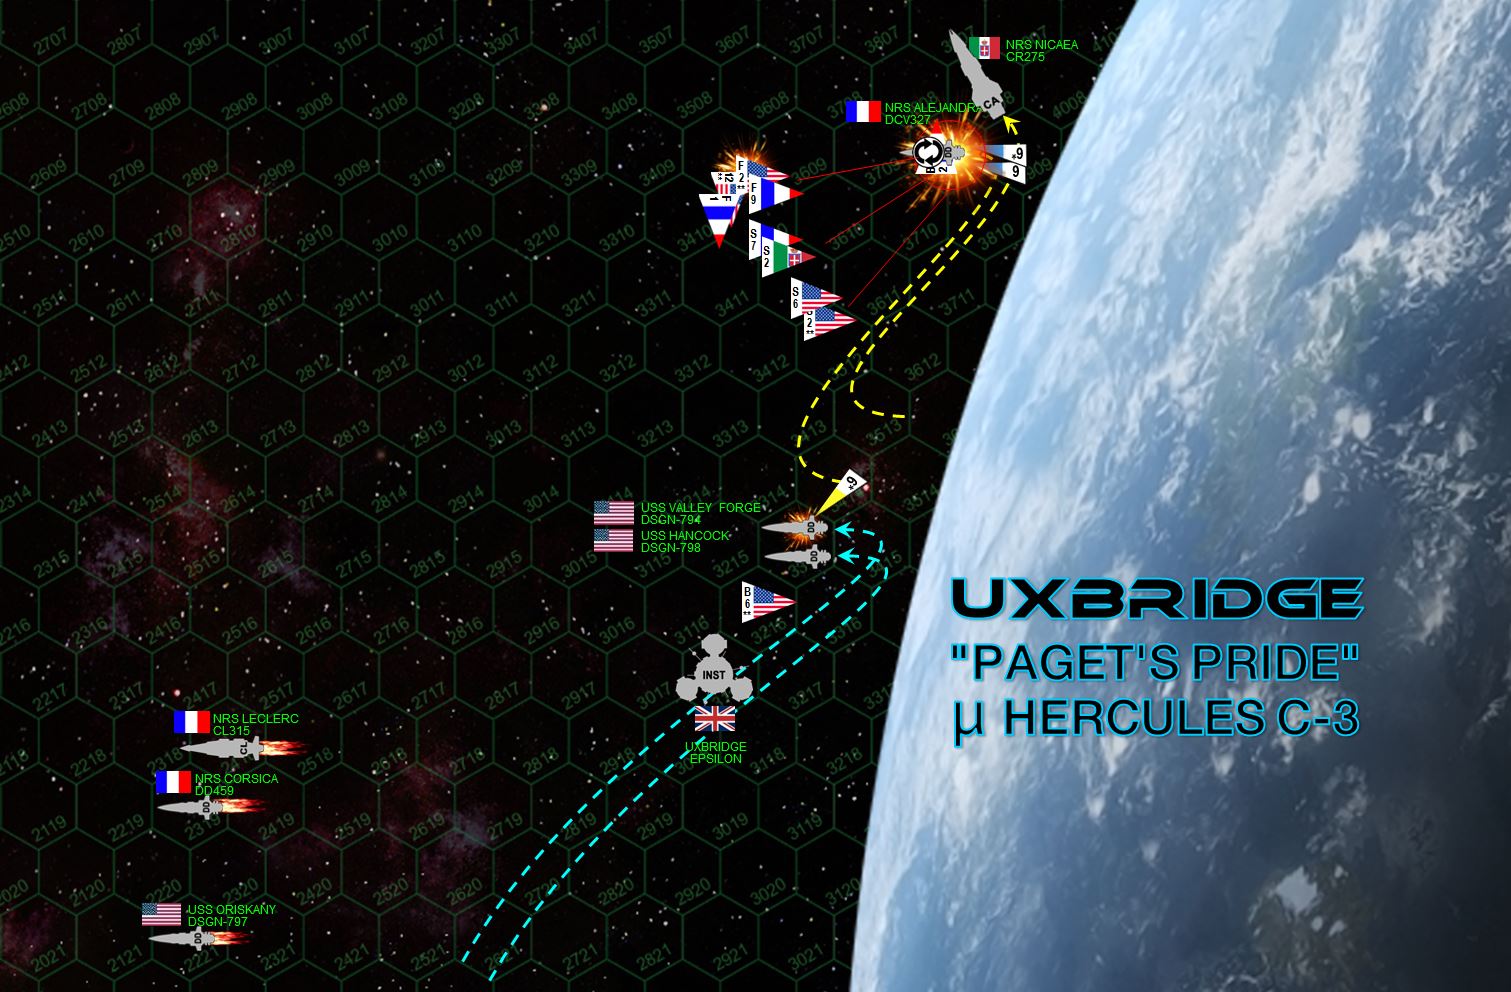 The Romans continue to “sideslip” along the upper atmosphere of Uxbridge, except this time Commodore Pilaex tries to keep more of Nicaea’s broadside threatening a wider arc of possible American approach space. The carrier Alejandra also rolls, keeping her port side screened from further American attacks. It doesn’t work, with the Americans sending their full torpedo wave and all the fighters and scouts of the Marine “Tigershark” squadron. Roman Dassault-Rafael “Mirage XII” fighters race back to defend their carrier, but their close enough to the American carriers to actually draw American mass driver fire. One Mirage is shot down. Pileax has a tough decision to make here, he can either engage the Marine fighters (F/S-44 Star Corsairs) with his mass drivers and lose the Alejandra to American torpedo attack, or shoot down the torpedoes and POSSIBLY lose the Alejandra to American fighters strafing the Alejandra’s bridge. He goes for the fighters, figuring me might as well make the Americans pay for his light carrier. The slaughter is horrific, 12 of the 14 Tigershark Corsairs are shot down as Pilaex more of less sacrifices the Alejandra. With no mass drivers defending the carrier, the Mirages originally send against Marine Corsairs instead switch to incoming torpedoes. Only three torpedoes are shot down, however, and five get through Alejandra’s aft shields. With torpedoes exploding in her engine rooms, the last two Marine Corsairs and eight Marine and Navy E/S-101 “Hawkeye” scouts make a desperate strafing run, one of the last Marine Corsairs shooting into Alejandra’s exposed starboard reactor room to finally cripple the ship. This bloodbath assault was costly, but the Marines can take solace in two more “Aquila” bombers were in Alejandra’s hangar bays (having landed to rearm). The Valley Forge and Hancock fire broadsides into the Nicaea, but the guns of two American destroyers against a 140,000 ton heavy cruiser isn’t going to do very much. They are positioned to fire full frontal spreads, however, using the drifting hulks of the Leclerc and the Corsica as initial target acquisition. The Nicaea’s aft guns hammer hard on the Valley Forge, this time hitting her on the starboard quarter, and ALMOST power her down (they needed a 6+, they rolled a 5). Damn, the Romans came within a single digit on the dice of winning the game right there.
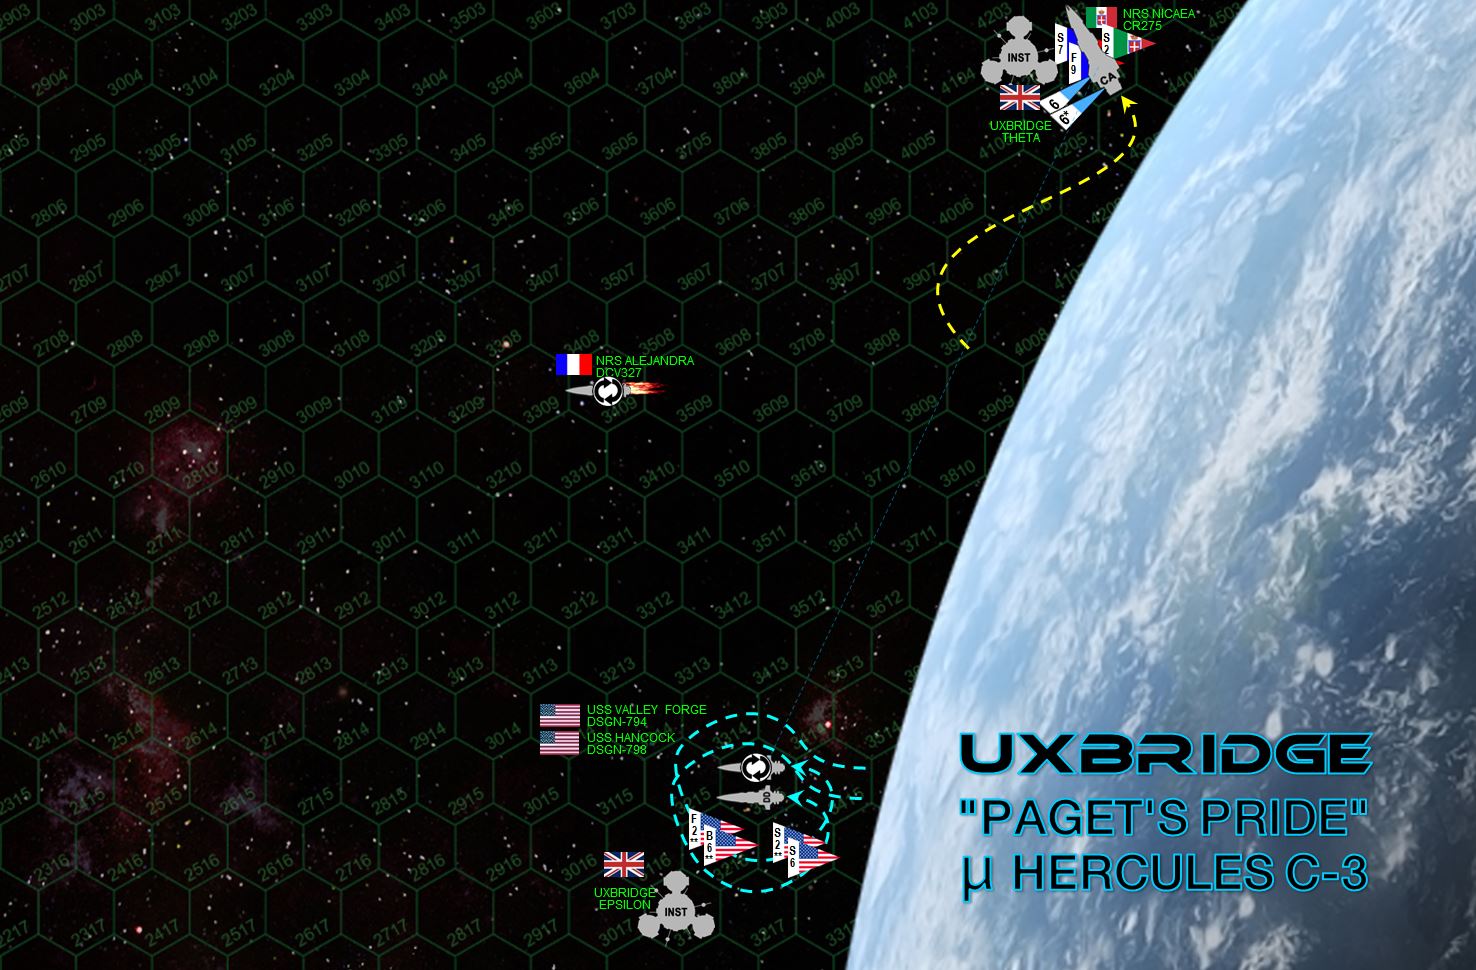 The battle is now reaching a frustrating draw. The Nicaea continues to sideslip, the Americans tucking back further and further behind the curvature of the planet. Nicaea’s guns are absurdly powerful and accurate, but as long as she continues to use the planet to screen her stern, and the Americans hide behind the curvature of the planet, they can’t hit. In order to engage the Americans (who are now content to run out the clock), Nicaea has to raise stem, turn away from the planet, and come down after them. The problem here is that this puts the Nicaea’s stern in play from American torpedoes. The American hopes are on a last big torpedo smash on the Nicaea’s stern, while the Nicaea’s hope is to cripple or drive off the Valley Forge. But honestly Valley Forge can hide behind the planet, keep the range open, and keep presenting fresh armor and shields (admittedly she is pretty badly damaged by this point). The Americans are also keeping their remaining aerospace craft by their destroyers, so any Roman fighter attacks against them will be mown down before they attack the remaining fighters and bombers. The Roman fighters, meanwhile, are also hanging by the cruiser, ensuring that no American torpedoes really have a shot of getting through.
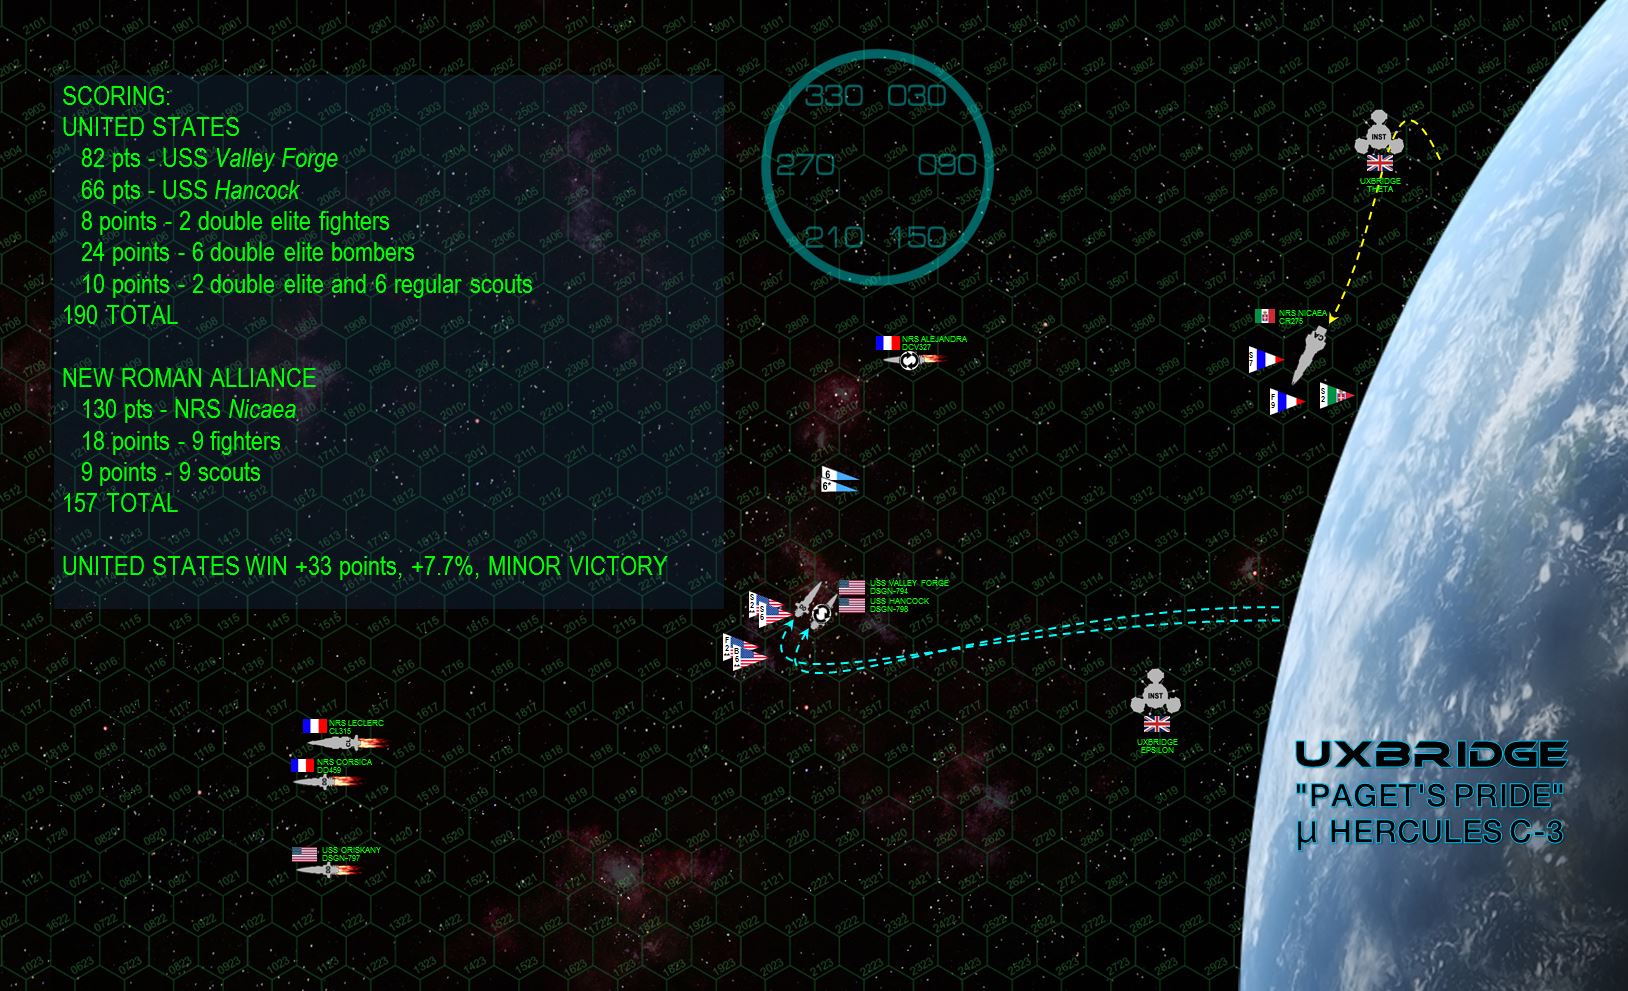 We call it on Turn 6. Neither side has any good options here. It’s not a very cinematic ending, I’m sorry to say, but the Americans have a slender lead here and have the option to run out the clock. They do so, and thus win by a razor-thin margin. Because this battle was so thin, and won largely through “run out the clock” cheese, I’ll count it only as half campaign points. Suffice it to say that Commodore Pilaex is still screaming for that invasion force to come in and land on Uxbridge, have JUST ENOUGH firepower to make his superior think twice about sending in troop ships (especially with British naval forces also expected to arrive within 12 hours). In short, it’s Assault victory conditions, whichever side has the most SURVIVING assets on the table (by points) at the end of Turn 8, wins.
  This ends the Third Hercules War for the Americans (cashing out as “winners”) but remember they also “lost” when they had to sign the Treaty of Zubrin with the British. So yes, the American bid to outright seize the Outer Hebrides or Hawking’s Star has failed. However, they’ve secured a valuable shipping lease with the British at the Lost Dutchman in the 99 Hercules System, a lease with the Consortium in Gliese 649 after their startling victory against the Japanese at Bleeding Edge, and rights to ship through a small gas giant moon in the Catania system after defeating the New Romans twice at Mu Hercules. As for the New Romans, the cardinals and princes who advocated entry into the Third Hercules War have been removed from power, once has even been exiled in disgrace. They came close a couple times, but honestly never won a single battle. With the Romans out of the war, the rear and flanks of any prospective Renkei Alliance assault (British, Japanese, and Arab League) on the Russian stronghold at 72 Hercules are now clear. After nearly two years (this campaign started 14 October 2520), the Third Hercules War might be finally drawing to a close.


