Corona Self-Isolation made me build a STAR DESTROYER


Recommendations: 749
About the Project
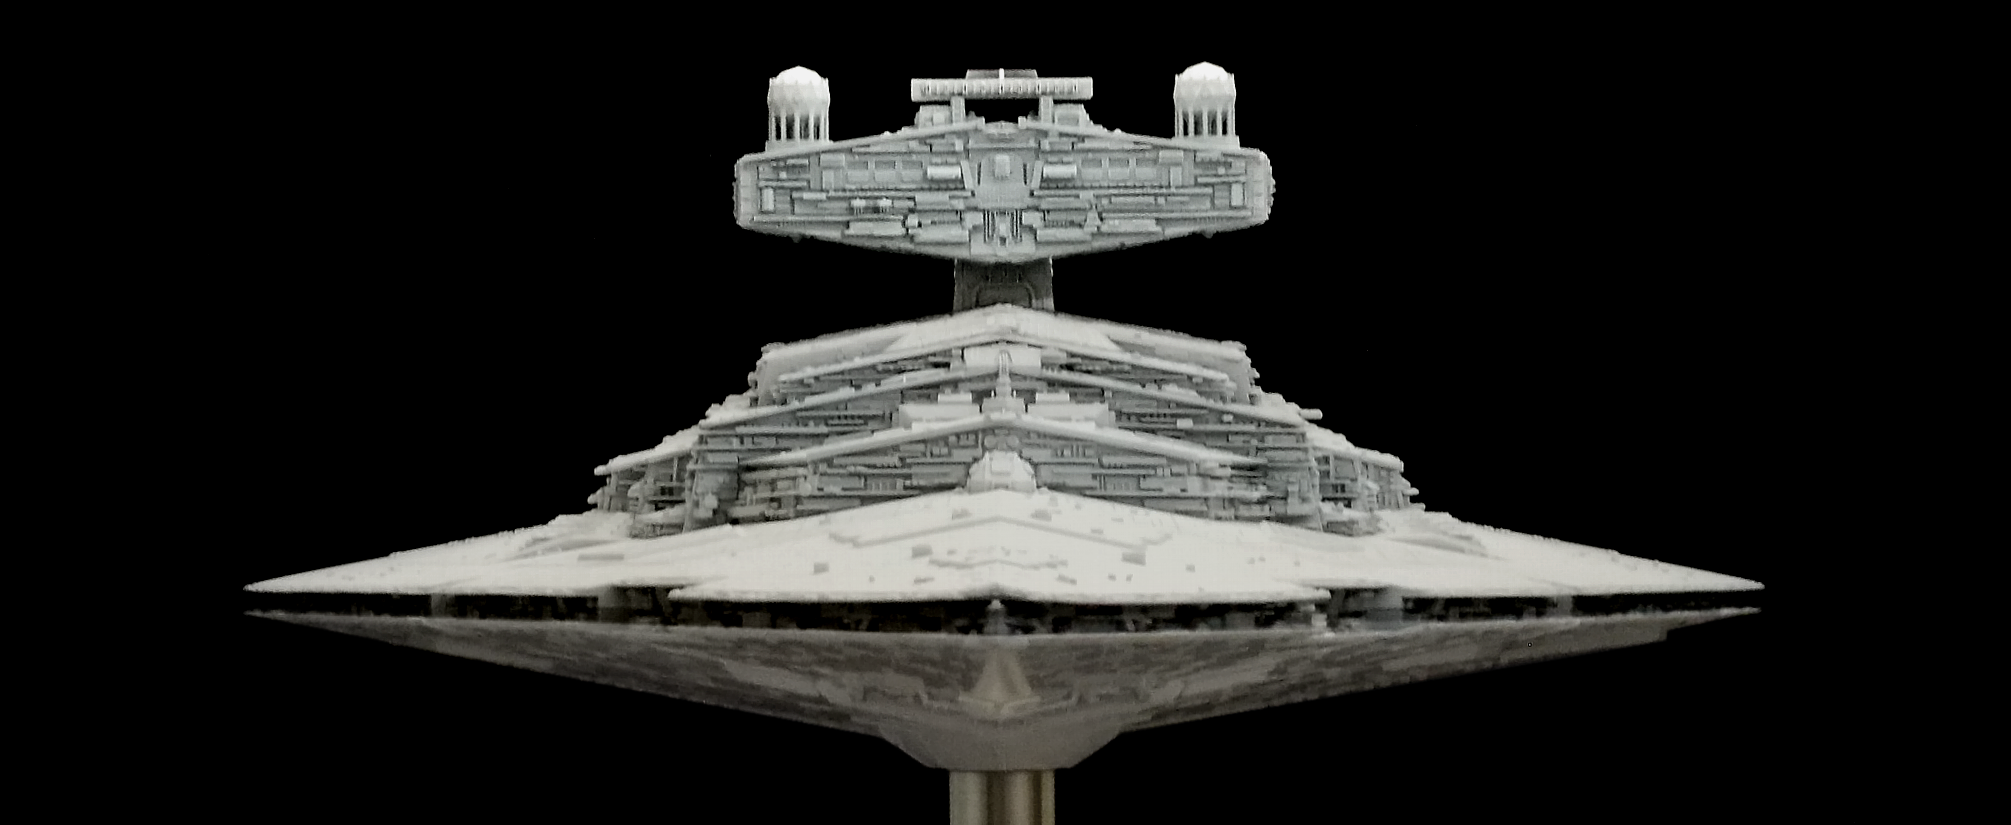
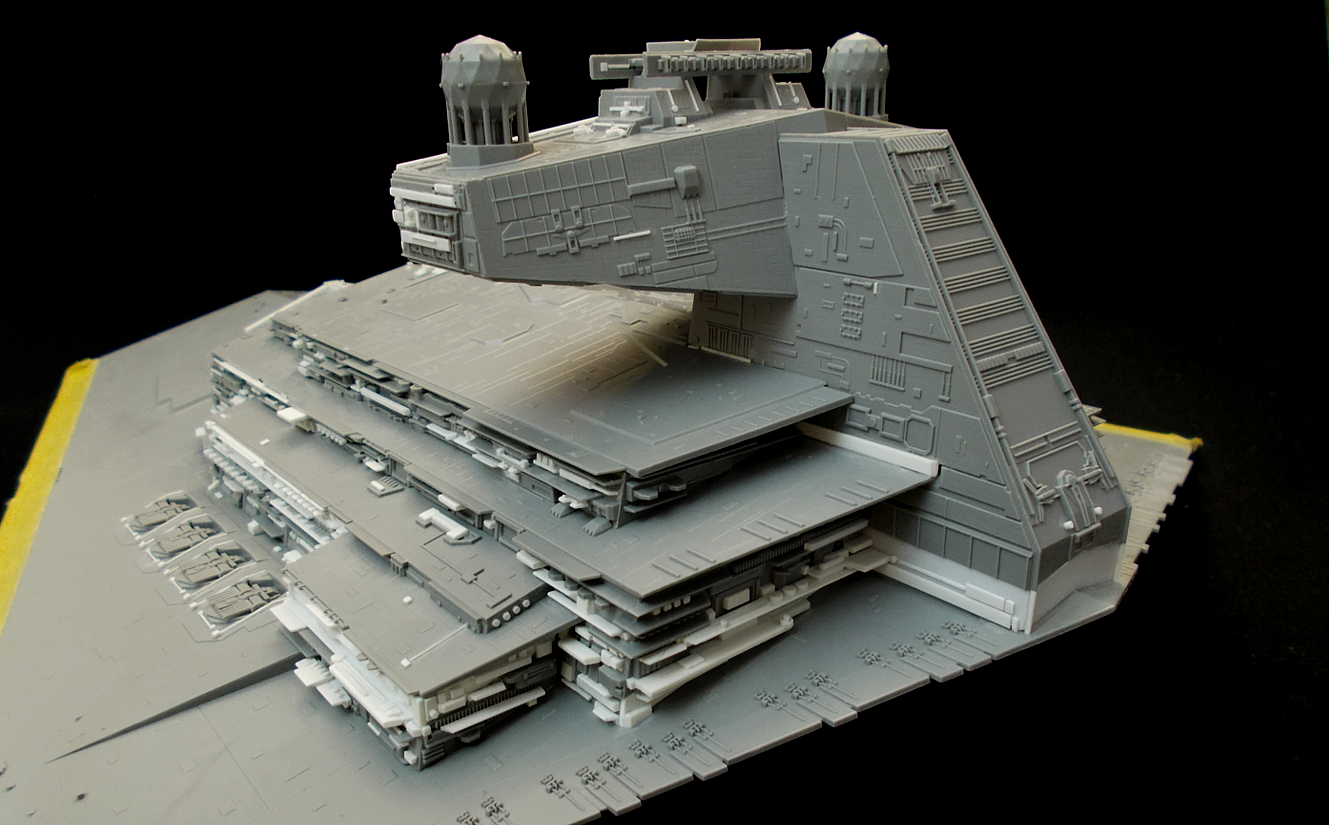
Since my childhood over 30 years ago - when I started building model kits before I got into miniature gaming - I always wanted to have a model of a Star Destroyer from Star Wars. Since then, a handful of attempts have been made and discarded because I wasn't convinced by the kits, my attempts to make them more accurate, and ultimately the results. Most of all: I lacked the patience and time to focus on the task, and a Star Destroyer is a quite complicated thing, despite its basic shape. So, when I had to go into homeoffice late march with not much to do for work, I needed to fill the time with something worthwhile. Why not attempt another one? - I thought immediately. Apart from Randy Cooper's really good (and expensive) garage kit made from resin, there are two affordable kits available currently which are top notch for different reasons. First, there's the 32cm Bandai kit which also comes with (crappy) lighting and is a formidable replica of the original 8-foot studio model, both in detail and proportions. However: It is only 32 cm long, and you don't need to improve anything about it. Then there's the 60cm kit from Zvesda which is now a repackaged model distributed by Revell. This kit has a good size, all the shapes and proportions are correct except for two major flaws: The superstructure is too flat, and the bridge-sections sits at an incorrect angle. Plus: While there are details, there are too few of them and many, many defining details are completely missing. The Zvesda-kit seemed to be a good challenge for a modeler to bring it into correct proportions and custom-build loads and loads of studio model-accurate details for it. Sounded like fun time - and it was and still is! So here it is - my Star Destroyer-project. The goal is to create a ship that comes very close to the original 8-foot studio model even on a close inspection, although I also rationalized all the tiny differences as it being an improved retrofit of the 'off the rack'- Imp Deuce like the 'Avenger'. Also - no lighting (edit: Yeah, I'm doing lighting now..!). Not because I'm lazy or don't know how to do it, but because the only way to light such a model is via fiber optics, which requires drilling lots of tiny holes in-between the hundreds of tiny or complicated custom-built detail without damaging it or knocking it off the model, and if that succeeded, having to go in with a tiny side cutter cleanly cutting off the strands of fiber optics - again in-between the hundreds of tiny or complicated custom-built detail without damaging it or knocking it off the model. No way - I wanted to come out of self-isolation sane!
Related Genre: Science Fiction
This Project is Active
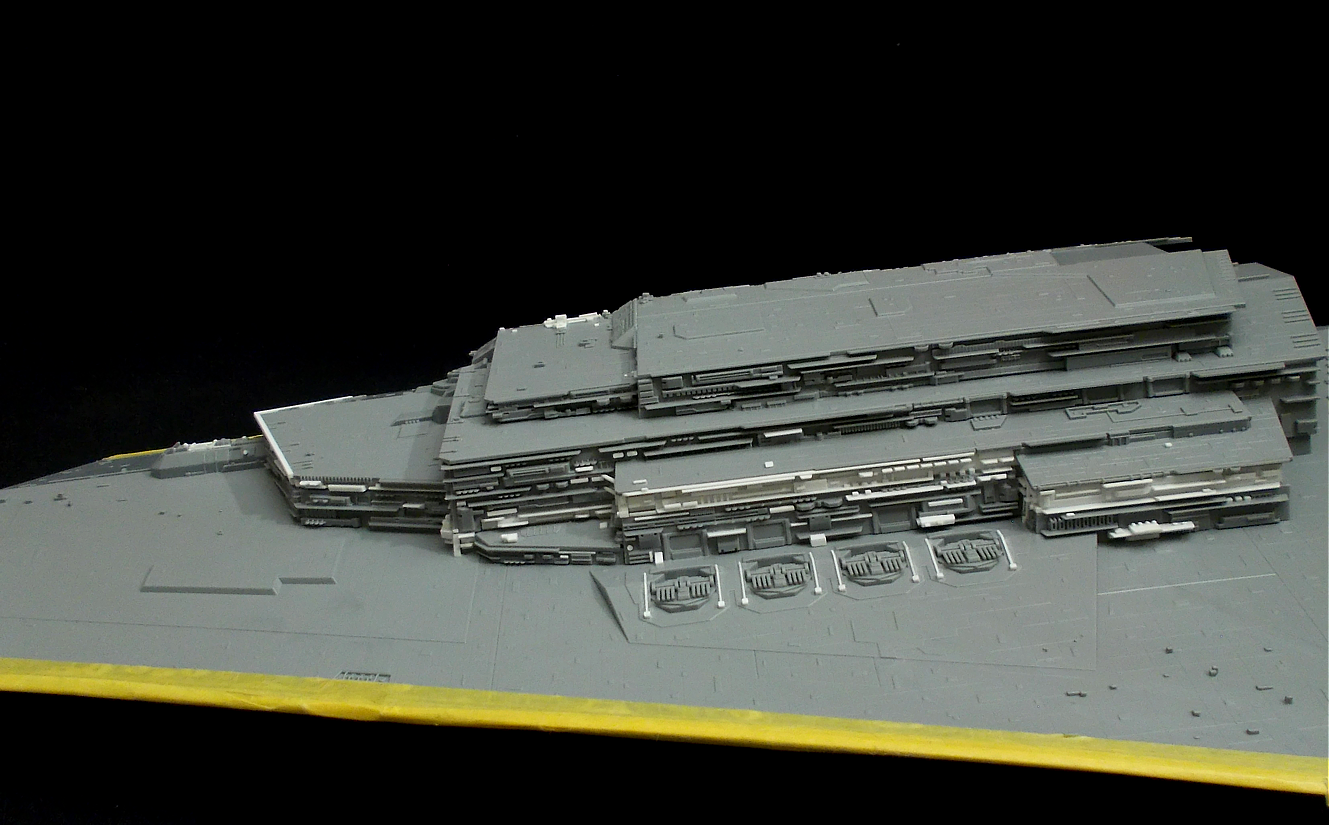
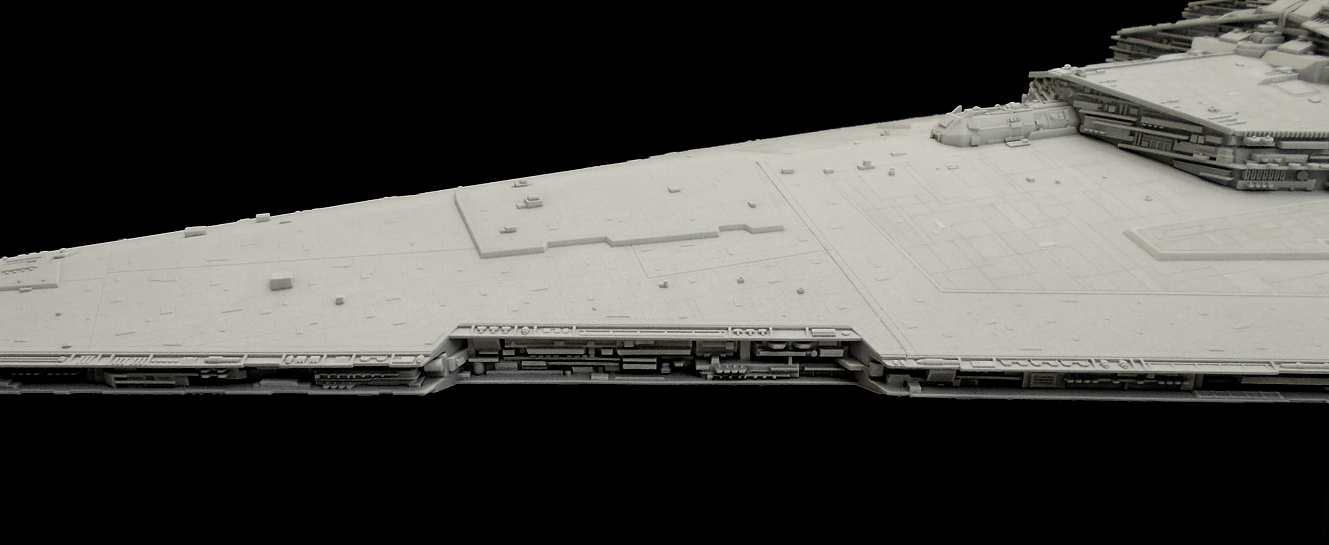
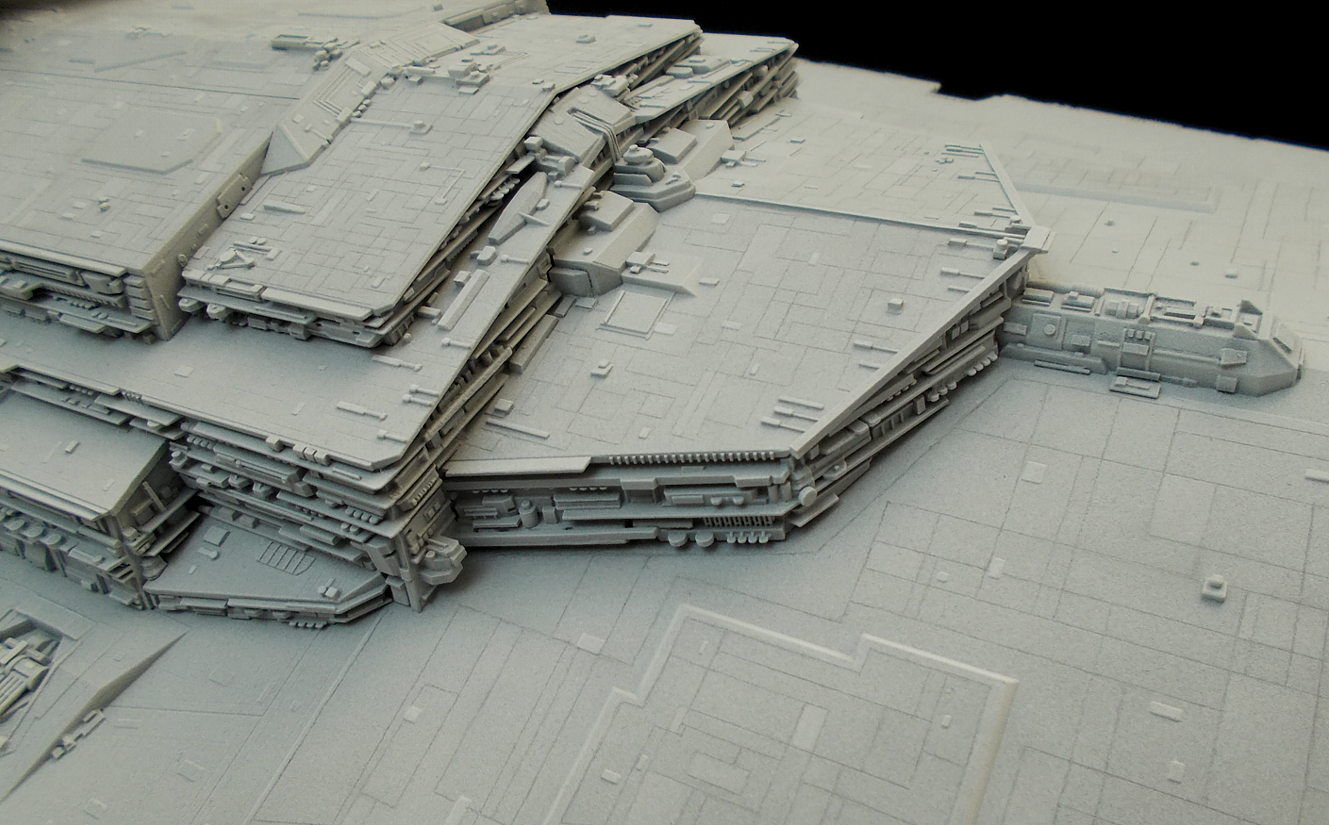
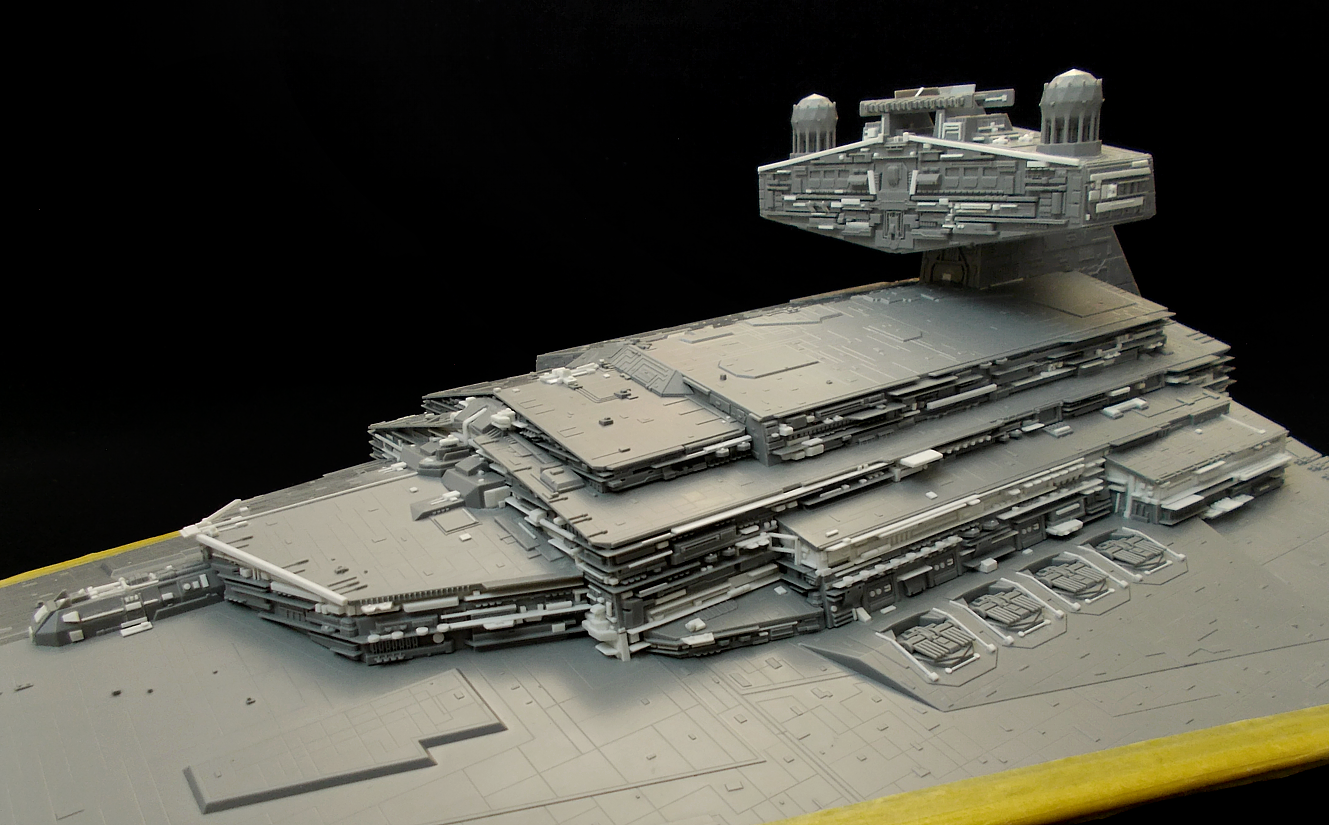
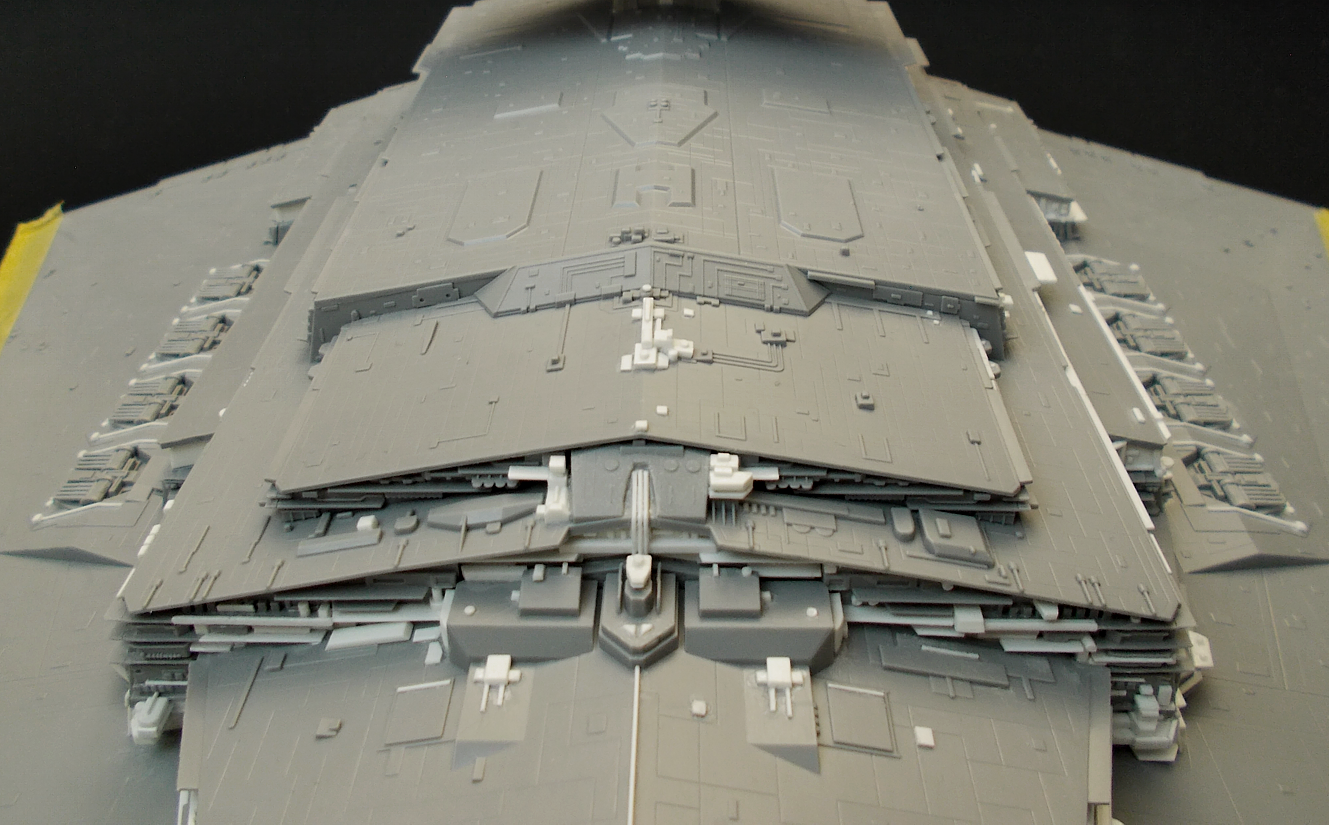
Improving Details on the lower Half of the Model
Since the upper half of the model was coming along nicely, I decided to study more reference images of the original studiomodel and add accurate detail to the lower half – mainly the side trenches – and then proceeded to prime and pre-shade it, and finish the paint job on the side trenches:


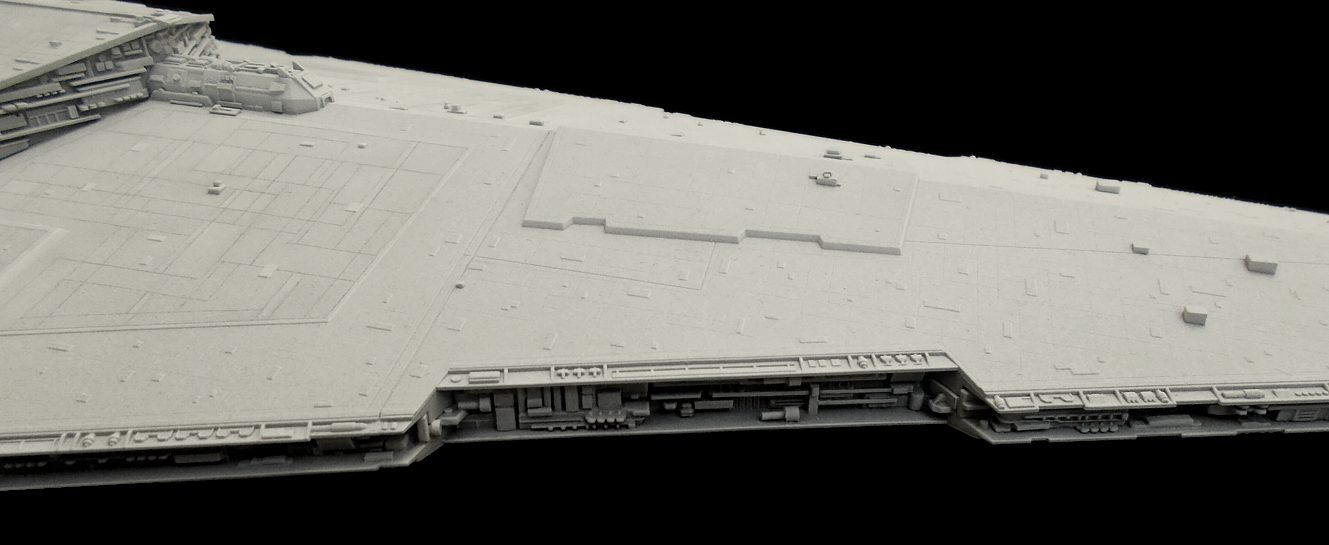
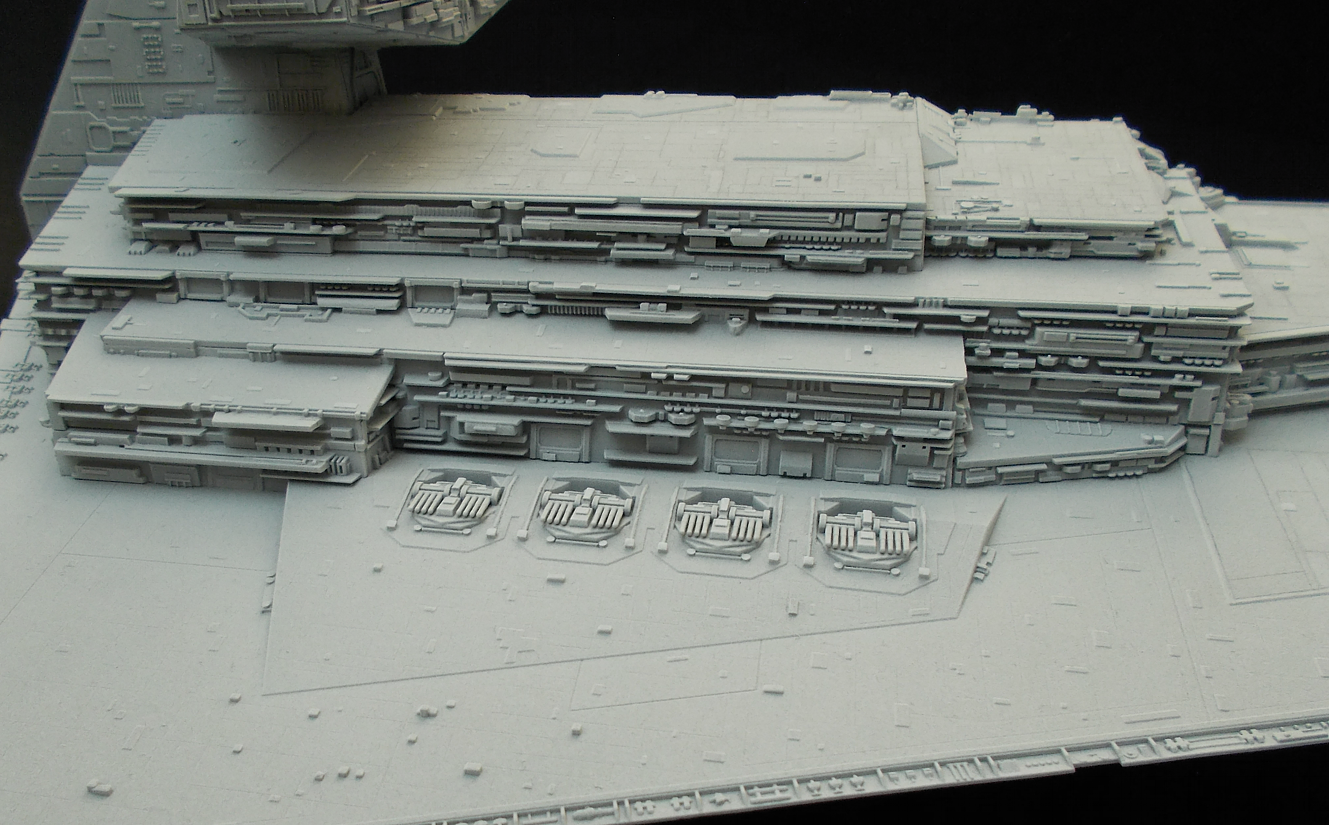
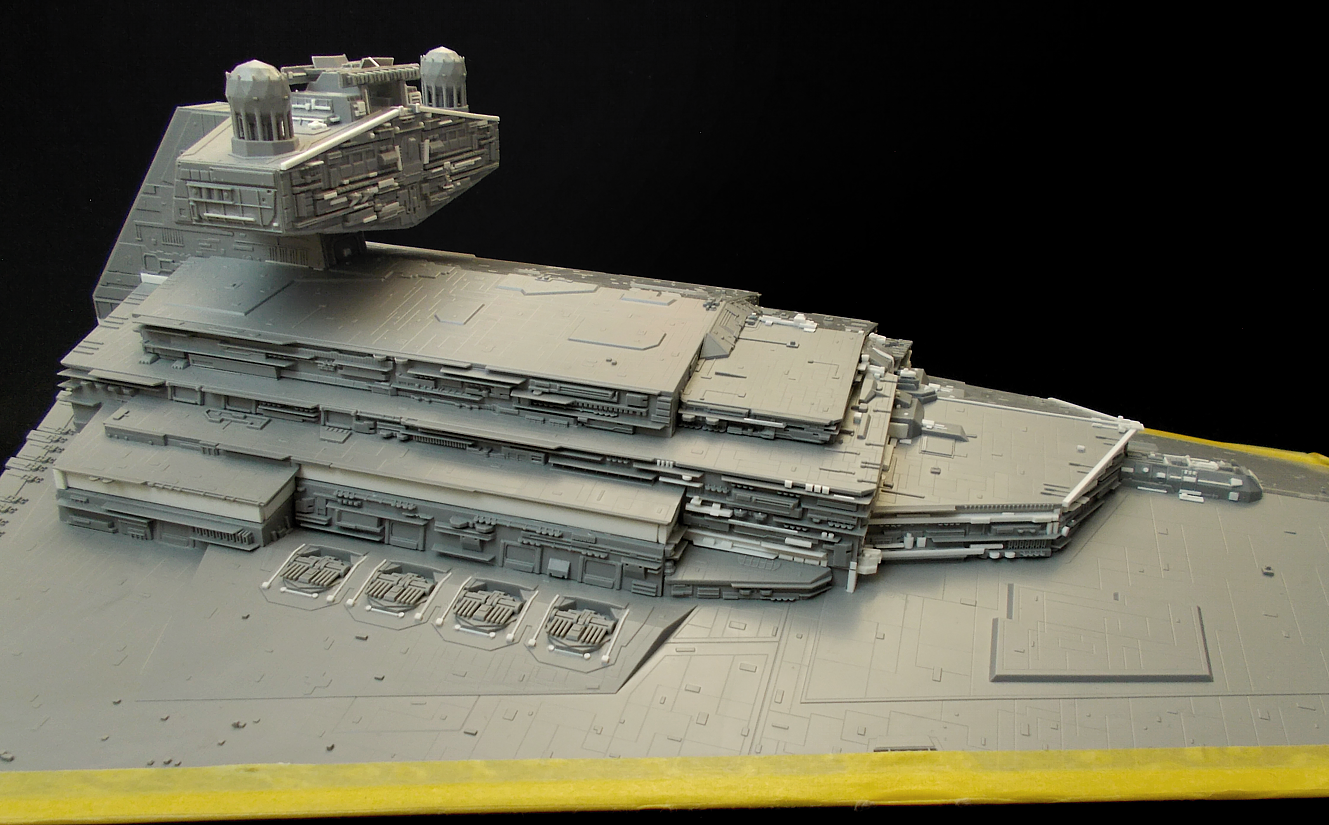
More Painting andTest-Fitting the Subassemblies
Before I continuedthe paint job with panel-lining and panel-shading, I decided to do a bit of test-fitting and to make sure the side trenches are straight. I also added studiomodel-accurate details to the engine section and finished painting that subassembly.


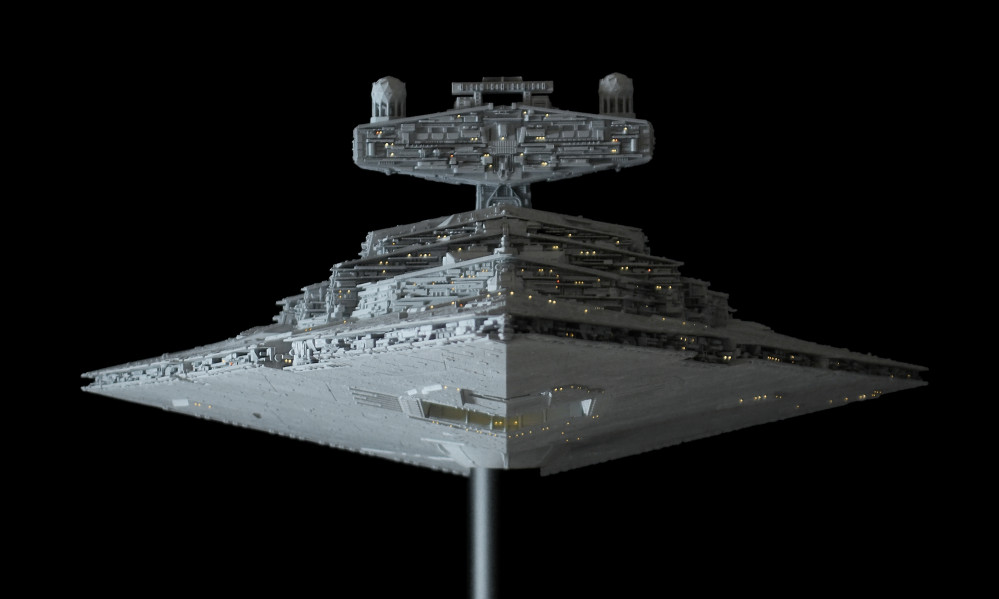
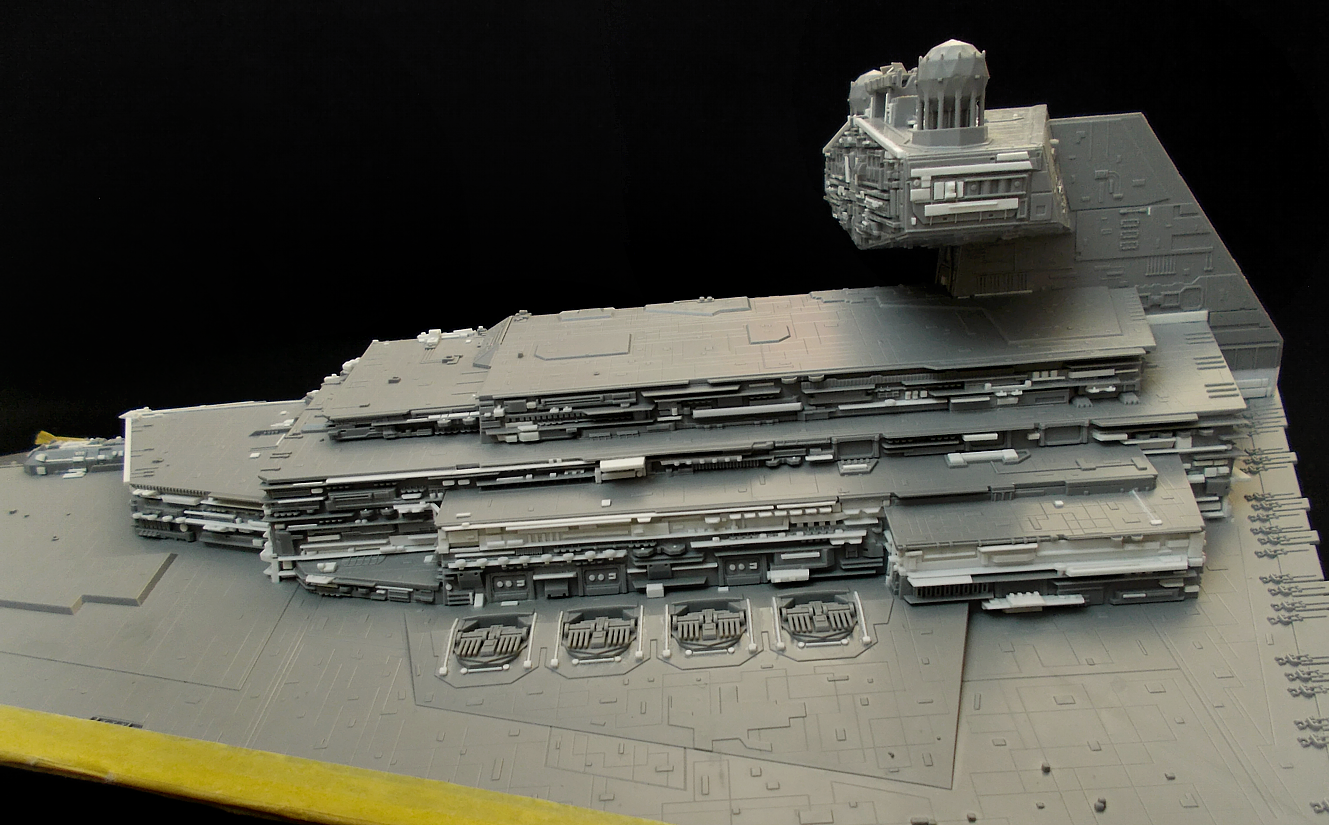
Which color is a Star Destroyer?
Oh, no – never post that question in a modeling forum! Everyone has one opinion, and everyone’s opinion ist the only correct one. Of course.
No, I’m interested in truth and facts and care shit for opinions, so I studied the subject matter myself and came to the following – nuanced and therefore truthful – conclusions:
The color of your Star Destroyer depends on what you want to go for. You can do a general representation of a Star Destroyer, in which case a neutral mid-grey is appropriate, or you could go for a screen-representation, in which case a slightly darker blueish mid-grey would be appropriate. I went for a studio model-representation, so a very light grey, almost off-white, was the way to go. I choose this route for two major reasons: The very light grey gave me the option to maximize contrast in the deepest recesses and thereby bring out the volumes and details more than if I went any of the other two ways, and it also allowed me to go for a very precise, albeit subtle panel lining and panel shading.
I started by undercoating the whole sub-assembly in USAF grey. Then I gave the whole model various light zenithals with an off-white, thereby creating natural shading in the volumes and details. I then lightly drybrushed all the detailed side-sections white to bring out the details even more, and gave the whole thing another single light zenithal to bring it all together. With that done, I went in with a brush and used dilluted white to highlight all flat raised details.
I also started to do panel lining. I used a very high-tech method for this: A very sharp, hard pencil. 😀

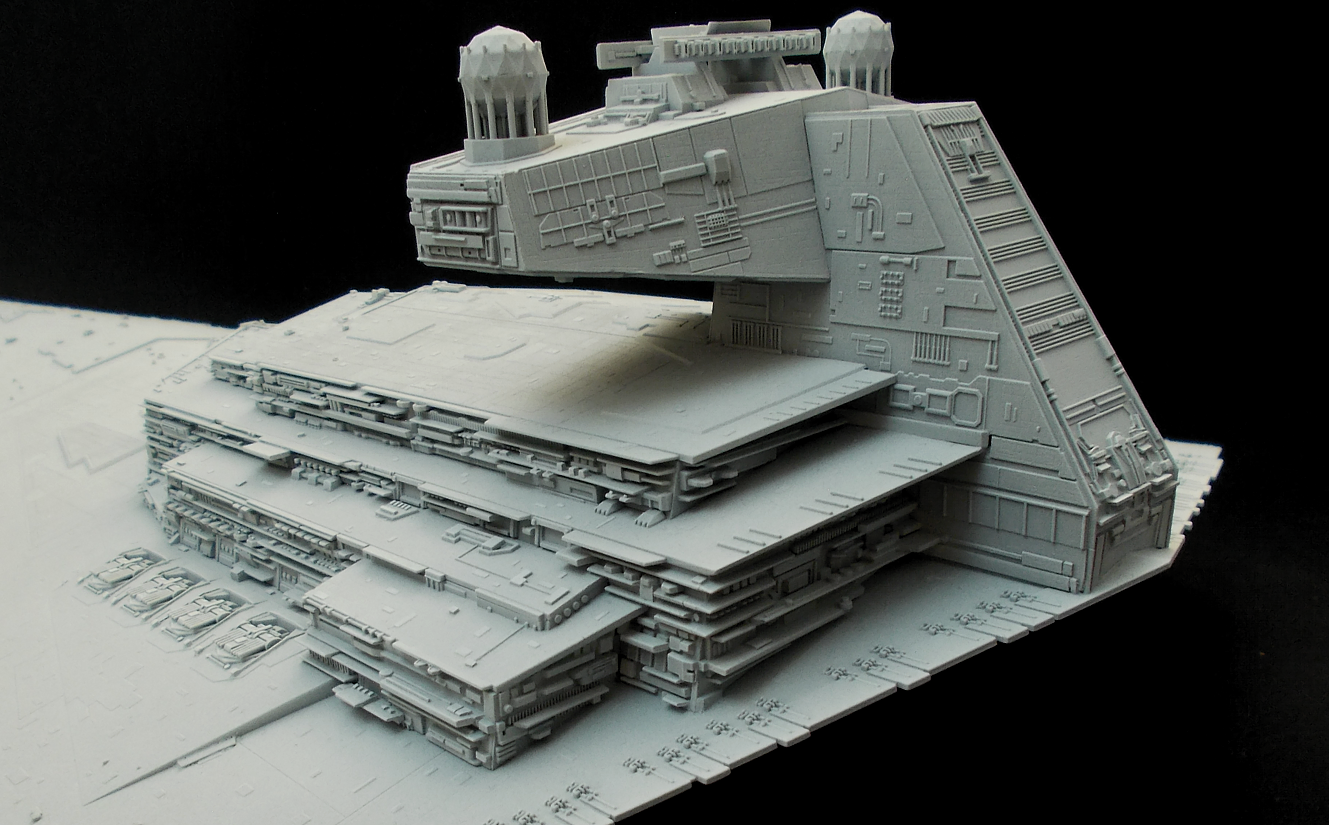
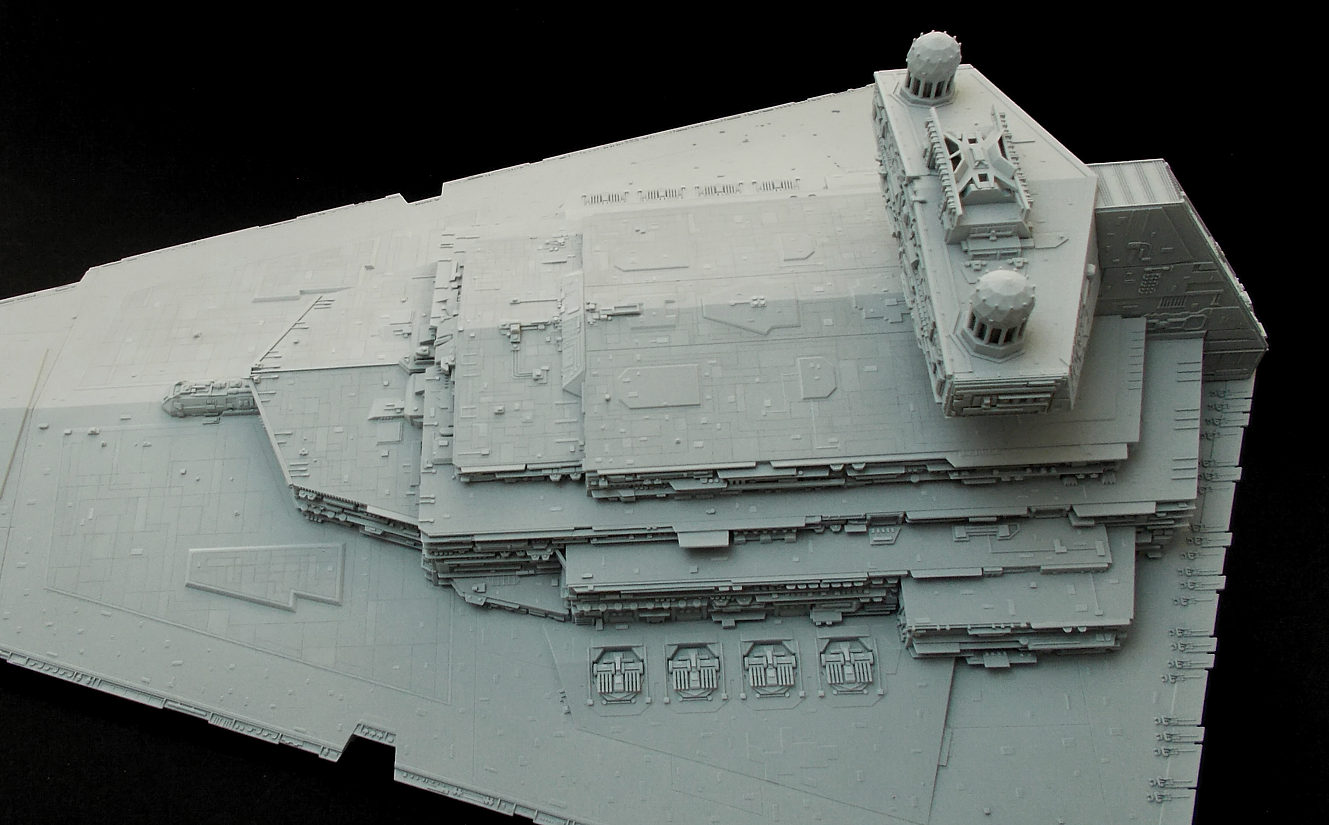

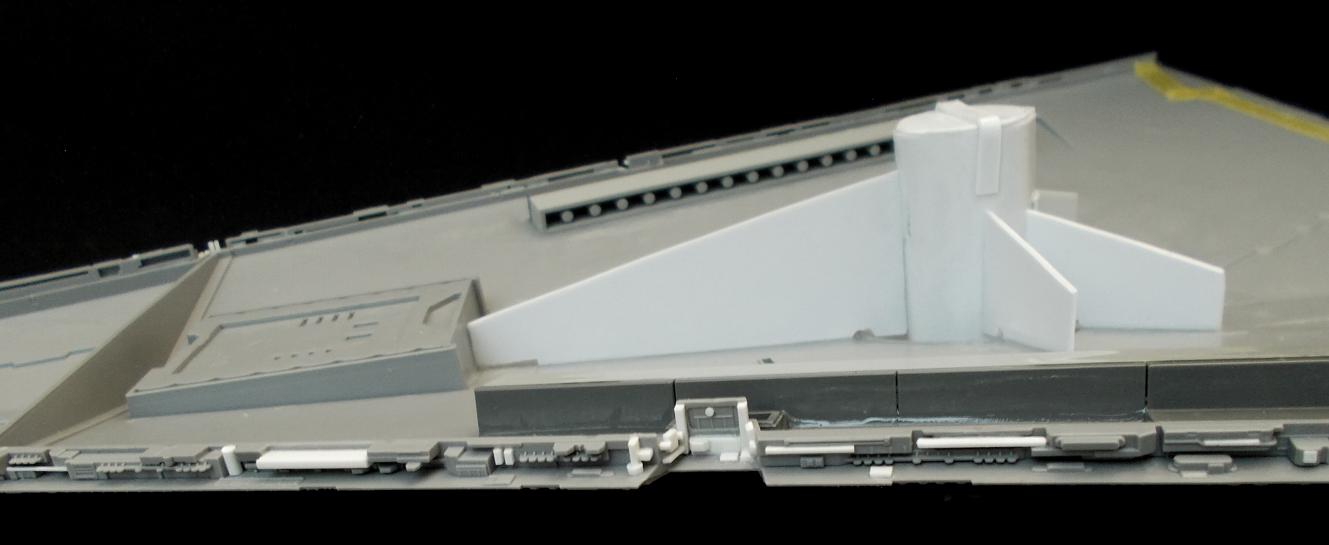
The bridge-section, custom detail, more custom detail, and much more custom detail
Let’s say it as follows: I had a very steep learning-curve when it comes to working with plastic card. So much plastic card. But while the process of building and attaching so many custom details seems tedious and boring, I found it to be fun and exciting. I got to know the original studio model very well in the process!
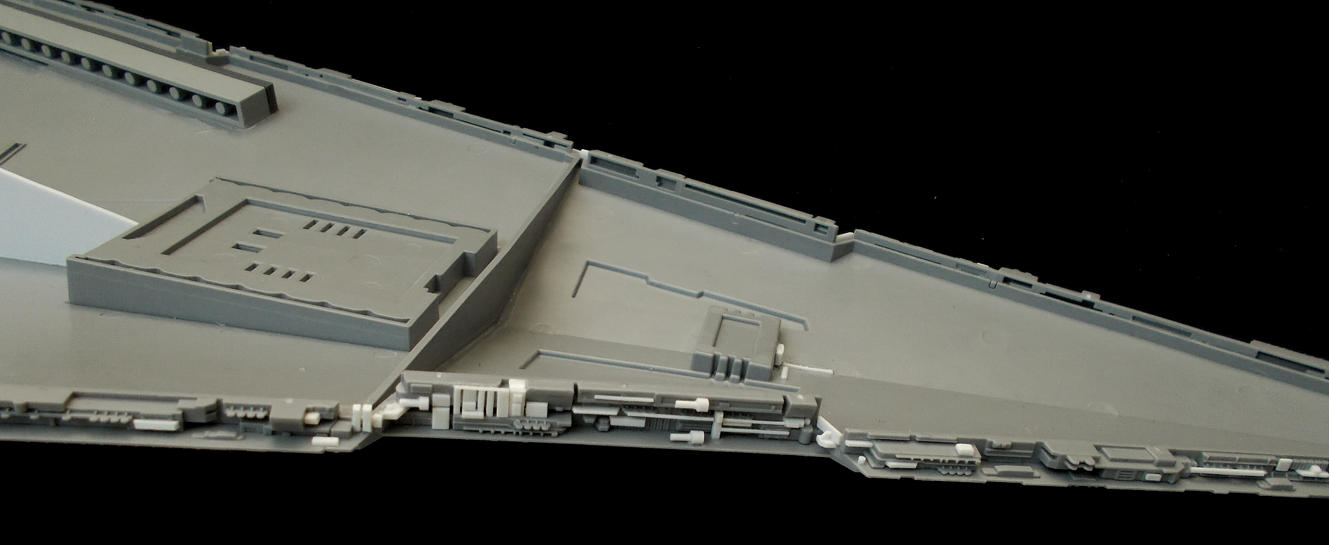
It’s a good idea to start with larger, defining structures like the ‘shelves’, and work from there, adding smaller details and tiny details last. The bridge-section of the kit is pretty accurate as it comes, only that everything is mirrored. So I had to remove certain elements from one side or the other and replace it with detail like on the studio model.
Before I did all that, however, I had to correct the angle of the bridge-section and the ‘neck’ on which it sits. Out of the box, both are along a line with the side trenches of the hull, but they should be along a line with the super structure as they are on the studio-model. I simply cut a thin triangle from the bottom edges of the ‘neck’ until it fit on the hull and superstructure at the correct angle. This was made easier by the detail and panel lines on the ‘neck’, since they could be used as markers as to which angle would be parallel to that of the superstructure.
Prepping - not for Corona, but for building a Star Destroyer
I ordered the Revell re-pack of the Zvesda 1/2700-scale Imperial Star Destroyer. I also ordered plastic glue, superglue, and loads of plastic card in various profiles and strengths, and blades for my hobby knive and scalpel. I also required masking tape, a needle, and pincers.
With all that set aside and/or ordered, I studied, saved and printed dozens of high-quality reference images from here:
https://modelermagic.com/star-wars-identities-display-in-france-star-destroyer-avenger-photographed-by-jean-marc-deschamps-olivier-cabourdin/
Once the kit arrived, the first order of the day was to build the super-structure and make it higher using plastic card. That was a very straight-forward task and easy to do. I also started adding detail – especially on the sections raised with plastic card which were plain and had to be filled. The challenge here is to not simply fill it with random detail, but to re-create the specific detail and texture of the 8-foot studio model as accurately as possible.