

![10mm Medieval Miniatures! Azincourt English Army Review | Wargames Atlantic [7 Days Early Access]](https://images.beastsofwar.com/2026/03/unboxing-wargames-atlantic-azincourt-english-army-coverimage-225-127.jpg)


CRC’s Crazy Compendium 2; Eclectic Boogaloo


Recommendations: 687
About the Project
Welcome to the next season of the "most vaguely inconsistent extravaganza that no one really thinks about but if they did they'd be mildly misanthropic about it"! Following along from my last project, here you will find an array of things I'm working on from various games and companies. Hopefully we can manage a bit more variety than last time, but I have been slowly working through a significant backlog, so we get what we get. We think we finally got away from Spiny Norman, but we can never be too sure, so strap up and buckle in for the most ambivalent ride of someone else's life! For those who missed it, the last project can be found here: https://www.beastsofwar.com/project/1533345/
Related Genre: General
Related Contest: Spring Clean Hobby Challenge (Old)
This Project is Active
Is 'Foot on Fungus' better, or worse, than 'Foot on Rock'?
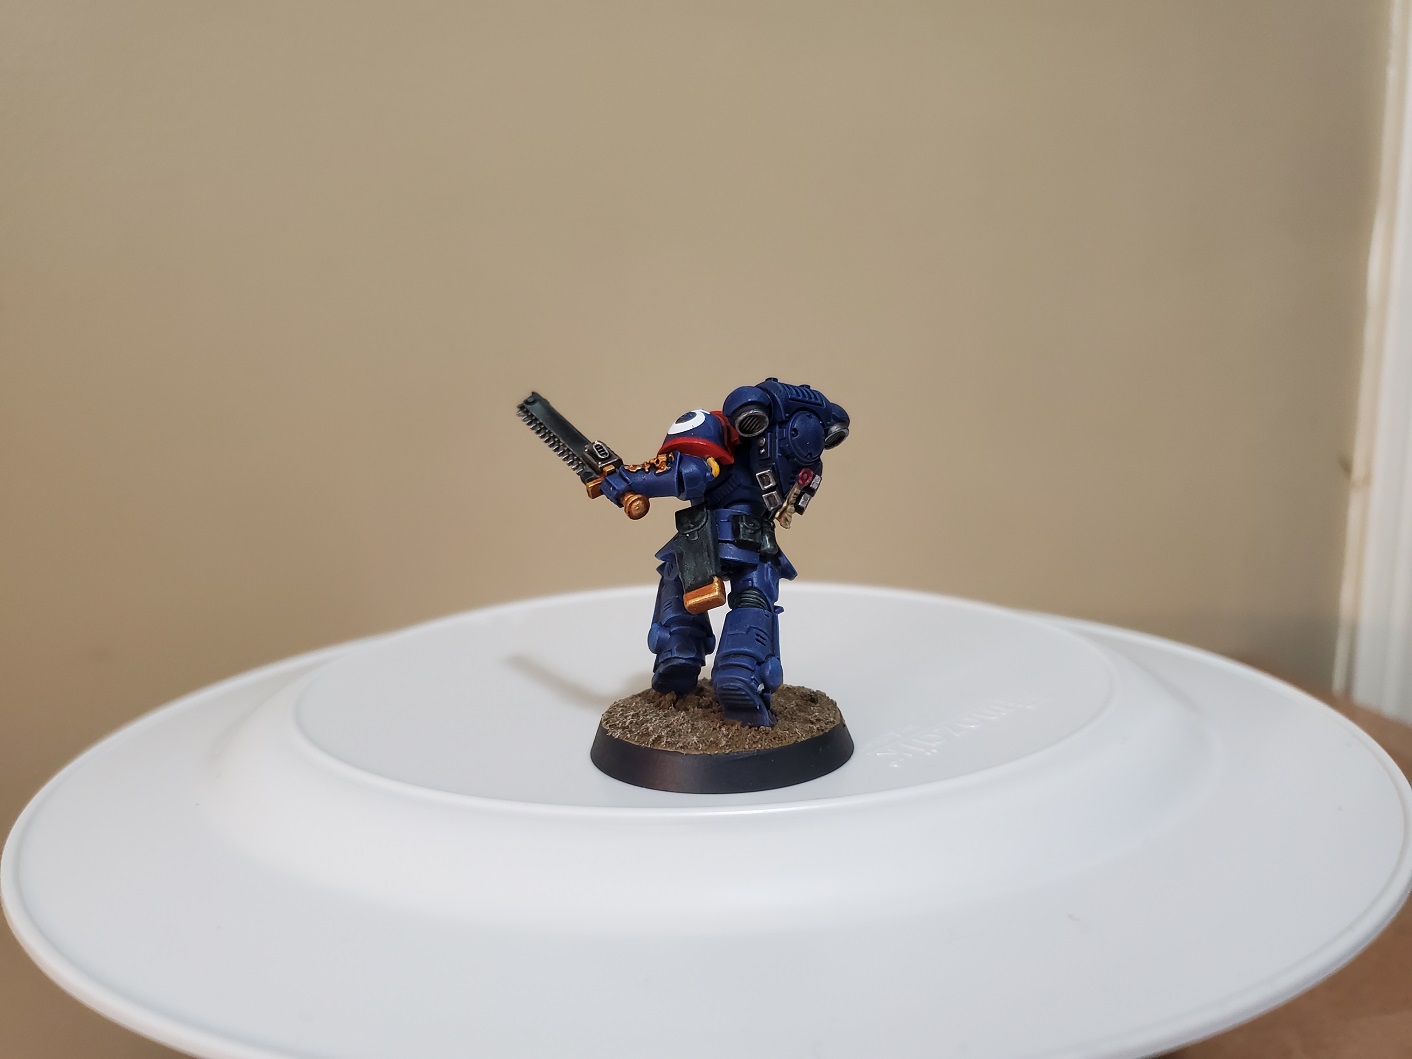
Managed to get some priming done so I could finish off my Trainee Chaplain. I think I’ll call him Jeffrey…because I call everything Jeffrey… However the base is dominated by a dead ork, who I’ll call Gus, for reasons.
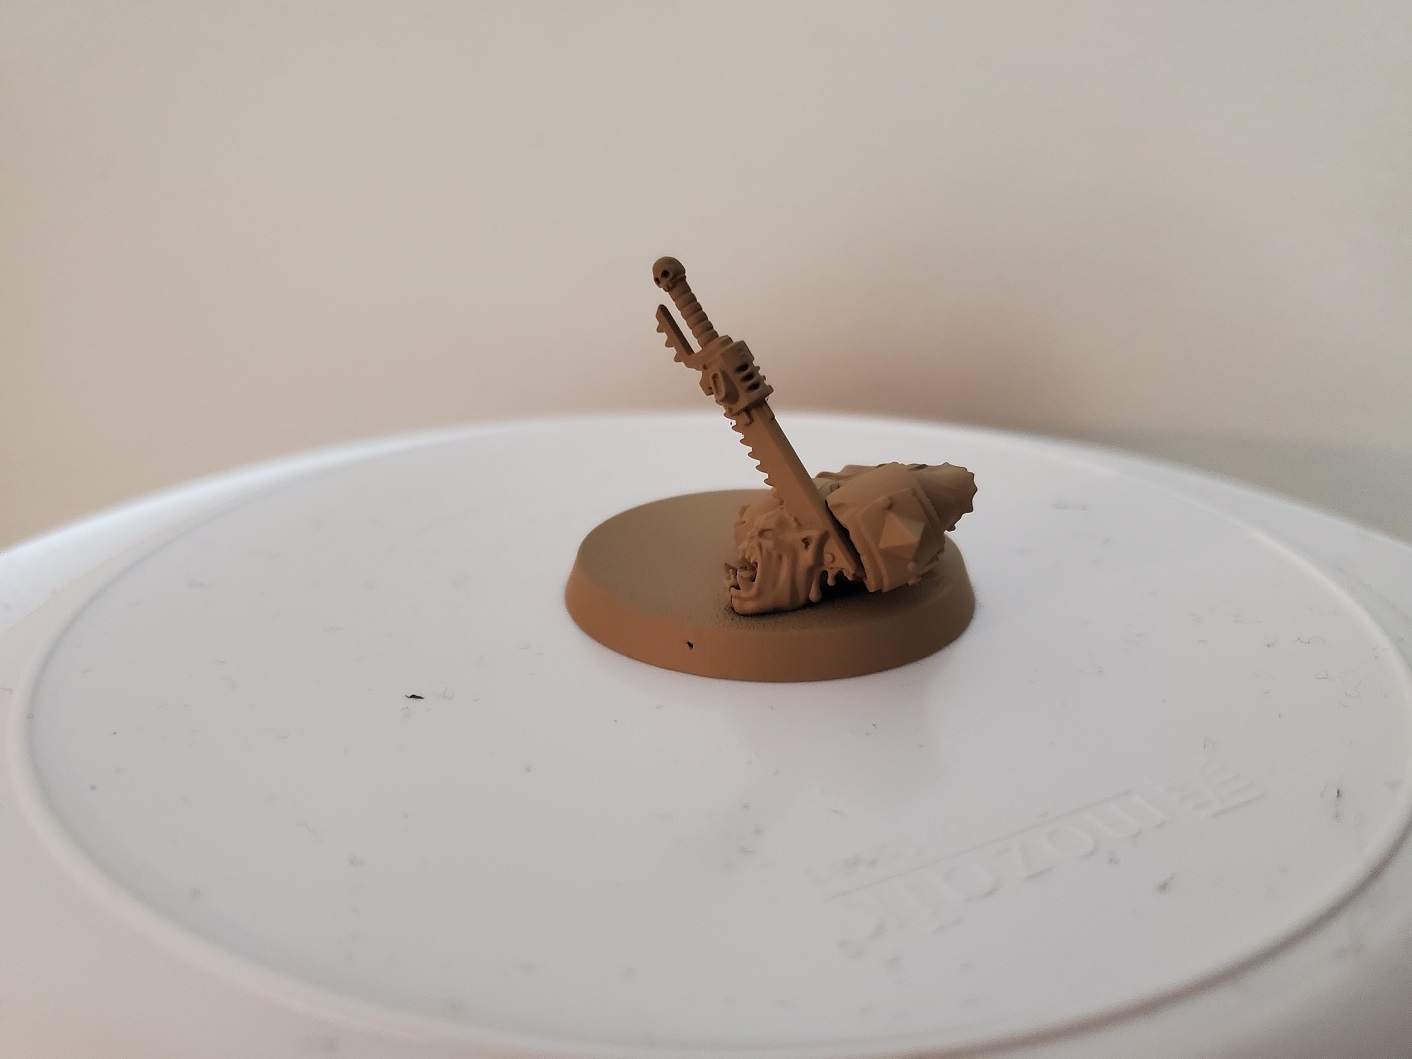 I had to prime in Zandri Dust as that was the only mid-tone colour that I had, so no grey basecoat this time. It actually gave me an idea for painting the leather that I'll go over in a bit, so it wasn't too much of a bad idea, I suppose.
 And then I painted the ork purple and I was done and ready for basing. I primed a blank base for this joke. I'm not proud of myself.
I suppose there IS purple on the mini…but not on the ork, so he’s not invisible…this time. There’s a few things I want to touch on with Gus before I get to the finished product, so lets start with how he turned out.
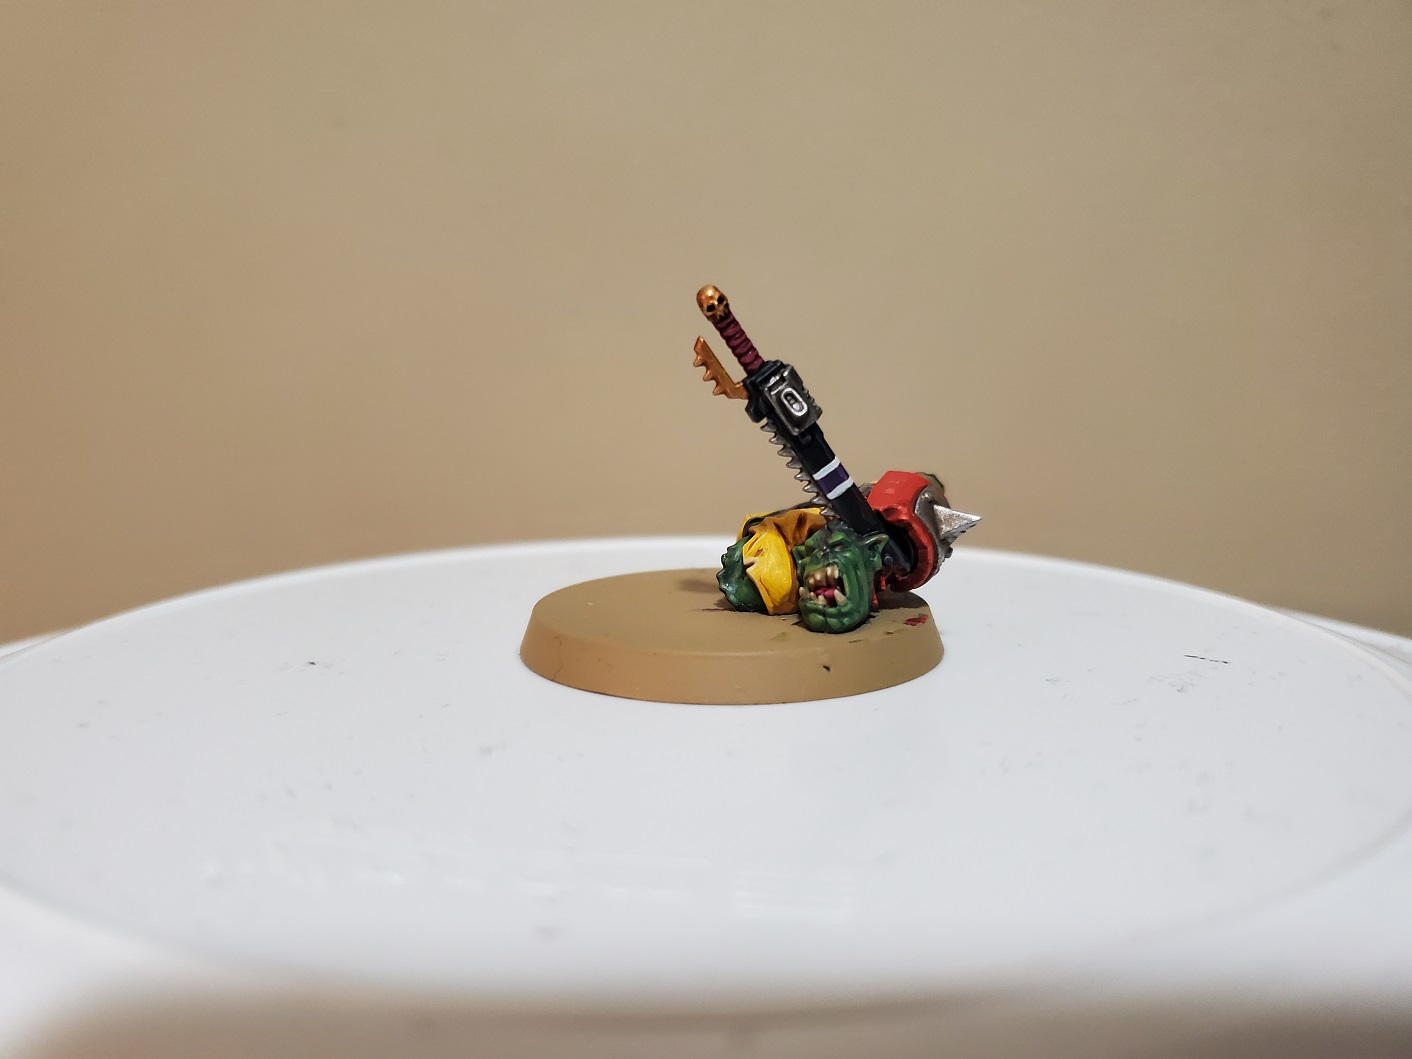


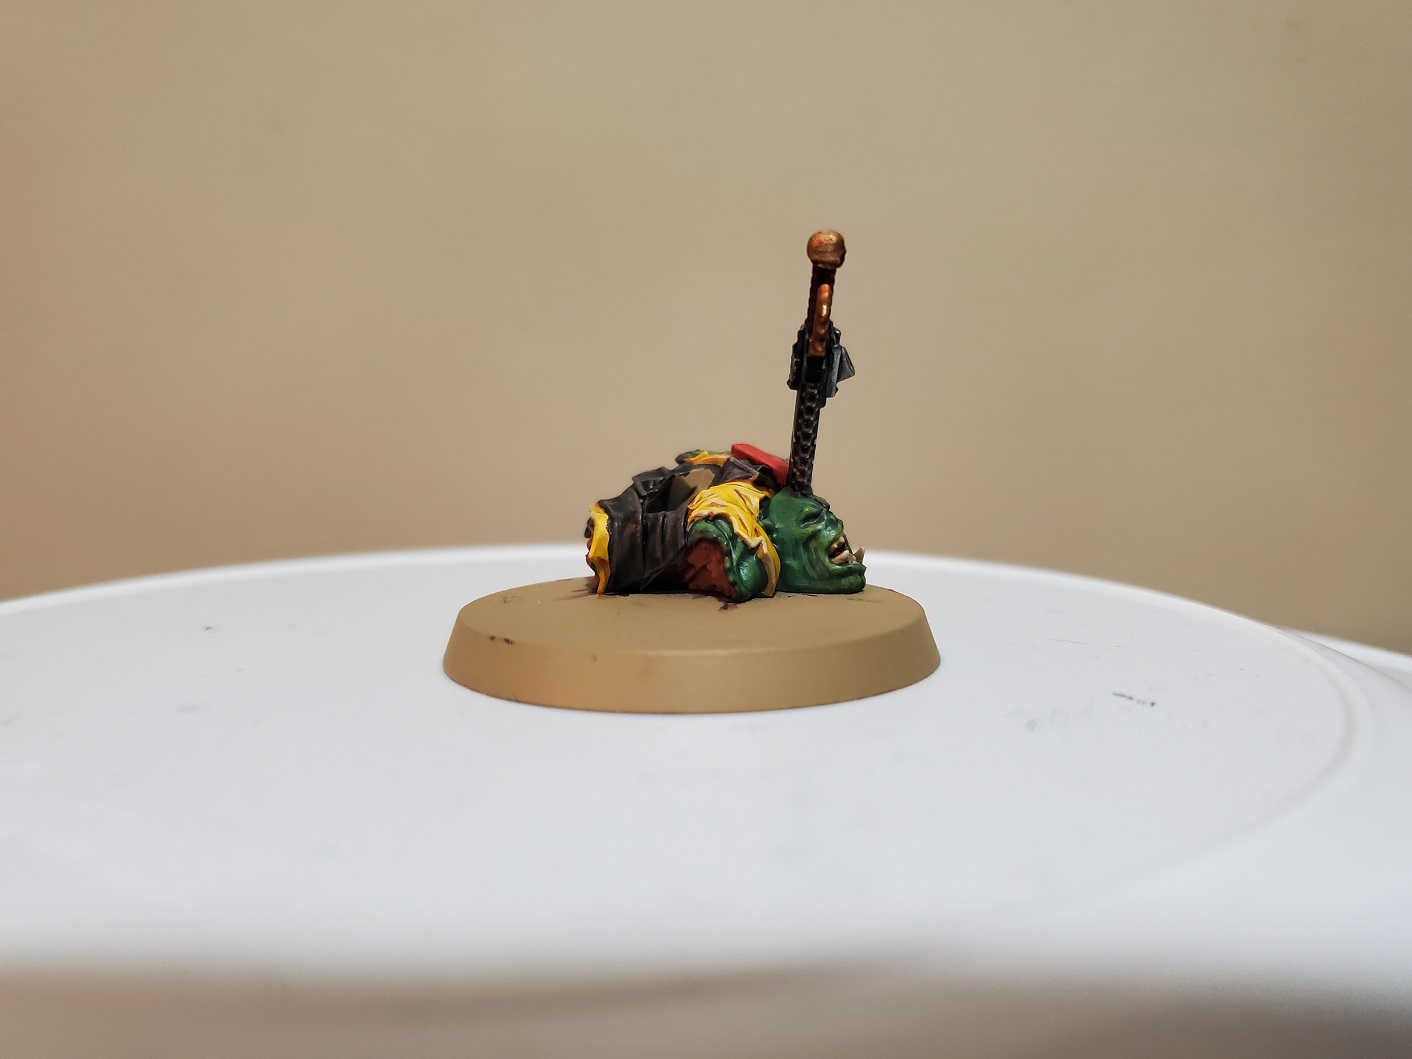
So we’ll kick off with the obvious point of ‘what colour is ork blood’? Because that’s been a back and forth all over the place for years. I went with red tones here for one very good reason (and a reason once given in a GW publication SOMEWHERE in the long ago); red shows up better. So the innards of poor Gus were done with that in mind. I could have highlighted them up more, or added a bit of gloss for ‘wetness’ but I decided to push ‘realism’ too far.
I also went for a triad system for painting the skin so there’s no shades on it at all. Basically, I realised just how dark of a colour WAAARGH Flesh already is as a base and didn’t want it any darker in case to the Carroburg Crimson didn’t show up at the wound edges like I wanted it to. I also used Ellysian Green as a final highlight which is maybe a bit of an odd jump, but the overall look here worked well enough. Nurgling Green (or whatever the equivalent is) would have maybe been a better option.
For clothing I wanted a good contrast against the more dour colours of the Marine, so I went almost 2nd Ed. with them. Going straight for the bright red of Evil Sunz Scarlet for the armour plate and a nice bright yellow for the shirt. It worked out well, I think, and really does give a nice contrast as you’ll see with the finished product.
The leather straps are an experiment I’m quite pleased with. Since I had a base of Zandri Dust, I wanted to see how it would look with a Black Templar Contrast paint over top of it. It came out ok, but was lacking something a bit more leathery, so I did some broad highlights with Dryad Bark, and then almost stipple highlighted on some Gorthor Brown along the edges to get that old, worn leather look. I rather like how it turned out, though if I do it next time I might use Wyldwood Contrast rather than Black Templar.
Anyway, onto the final deal!
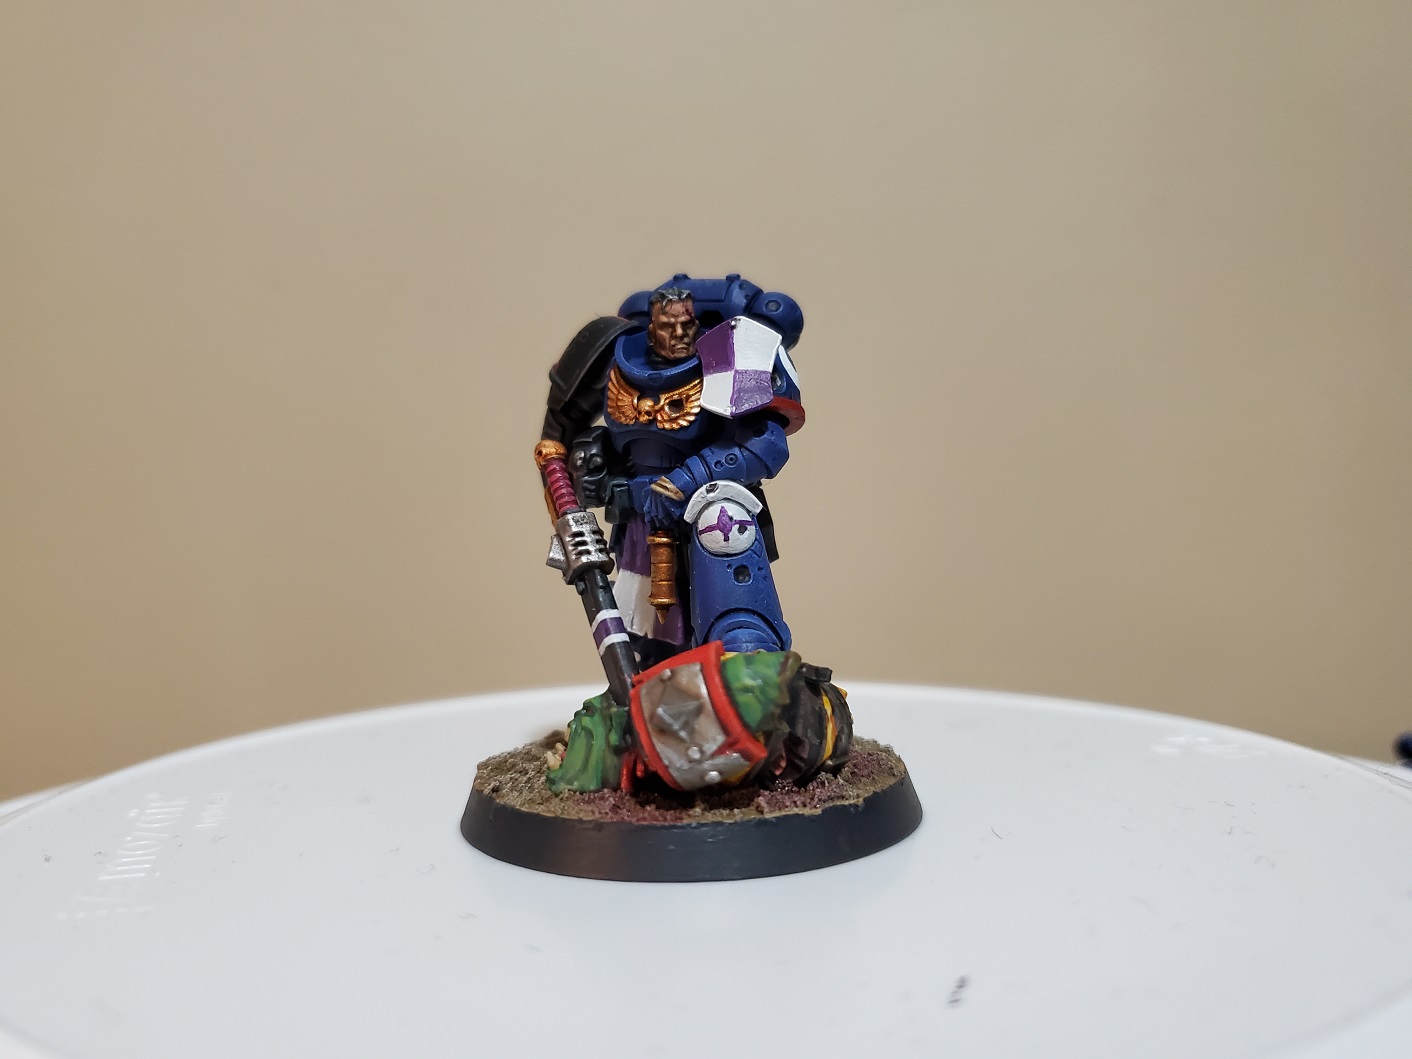 I didn't end up moving the Chapter Badge in the end, as I swear the GW official paintjob has their sitting in a fairly similar position...though they may have used a smaller badge. The base does still need some grass tufts, but I ran out a while ago, so this is what we get for now.
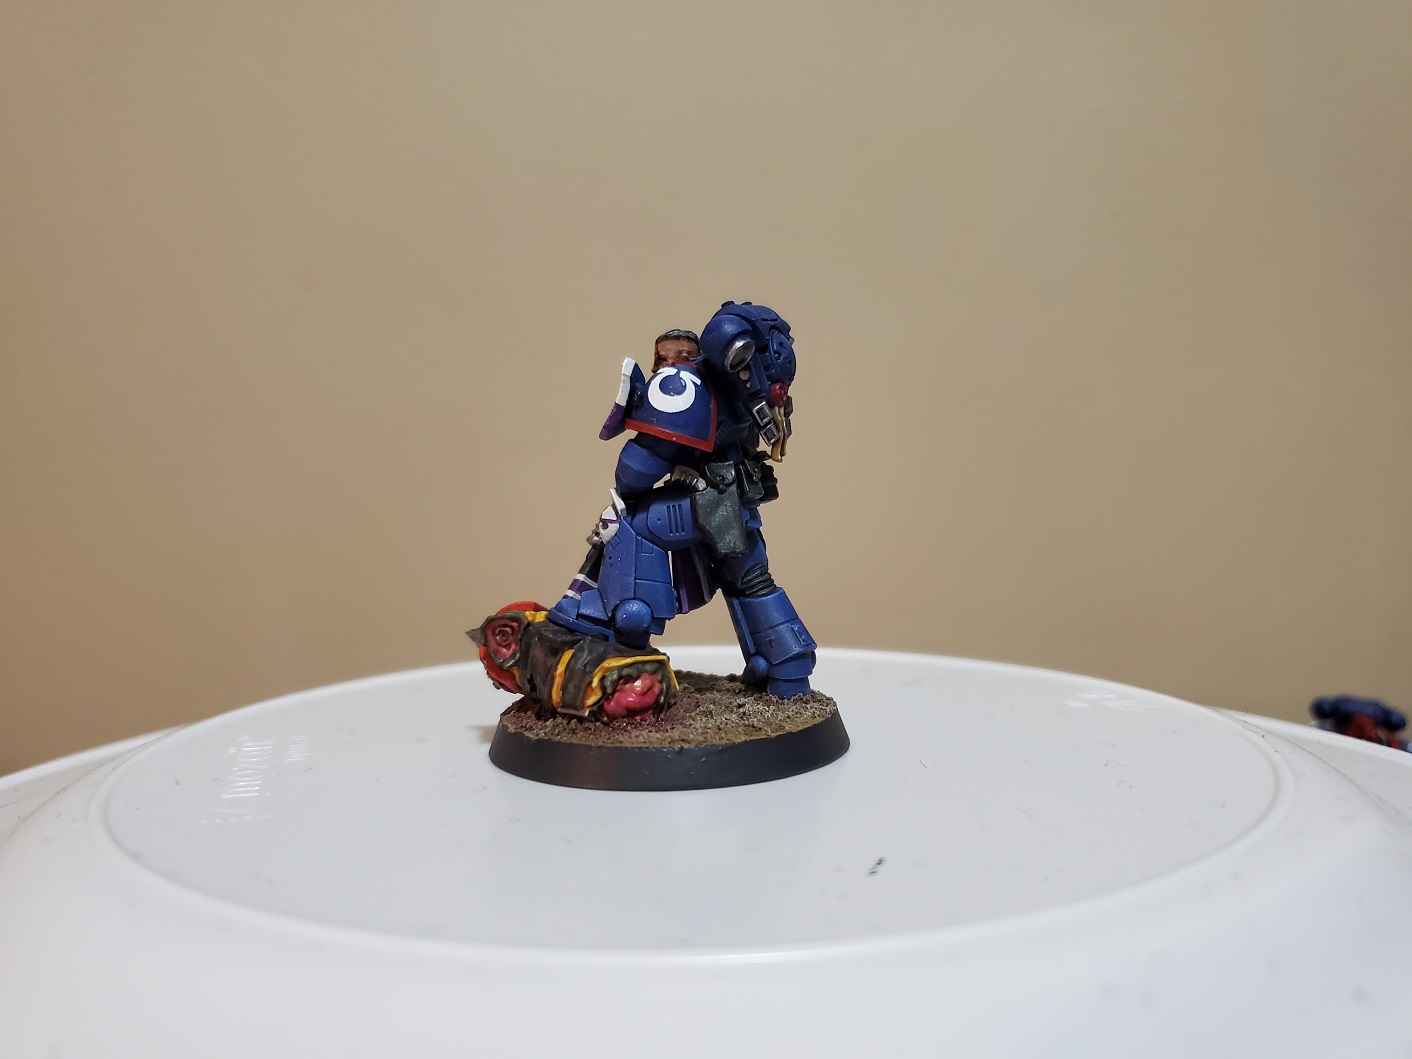 He definitely looks a lot better with a painted foot rest.
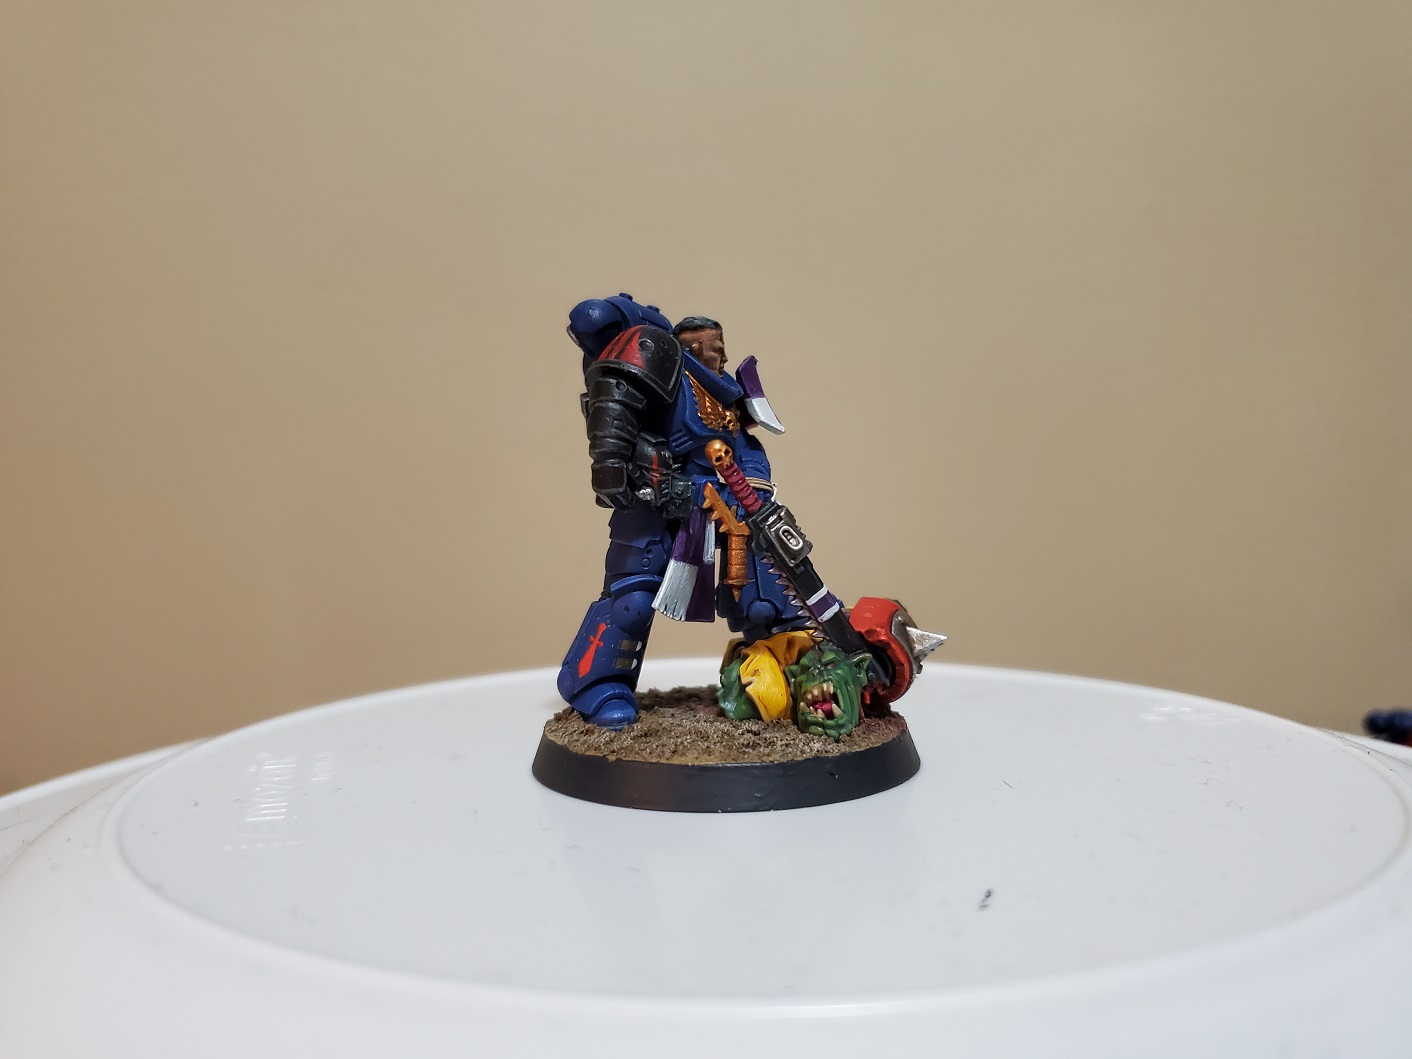 I also added the purple and white colours to his chainsword. The sword does look pretty clean seeing as it's imbedded in a dead ork, but I'm kind of going for the 'Pristine' aesthetic for my Marines. They're supposed to be angels of death, so I try to keep them as 'clean' as possible. If I ever get much in the way of Guardsmen again, then they will be the ones covered in dirt and blood.
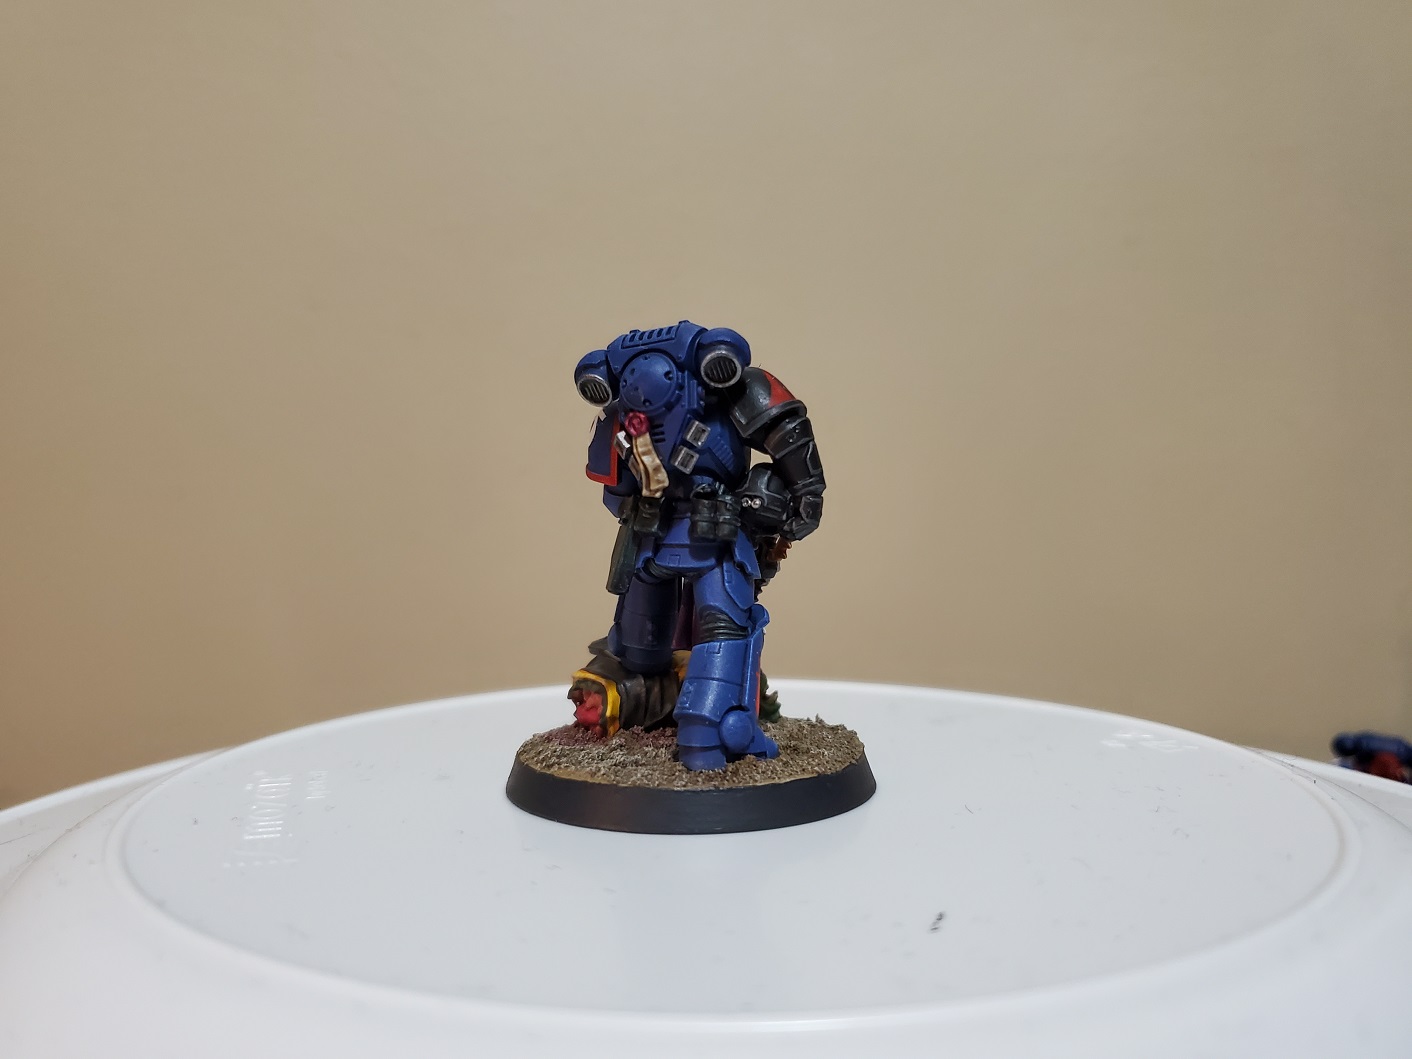 And the Lloyd shot...that is pretty much the same as last time.
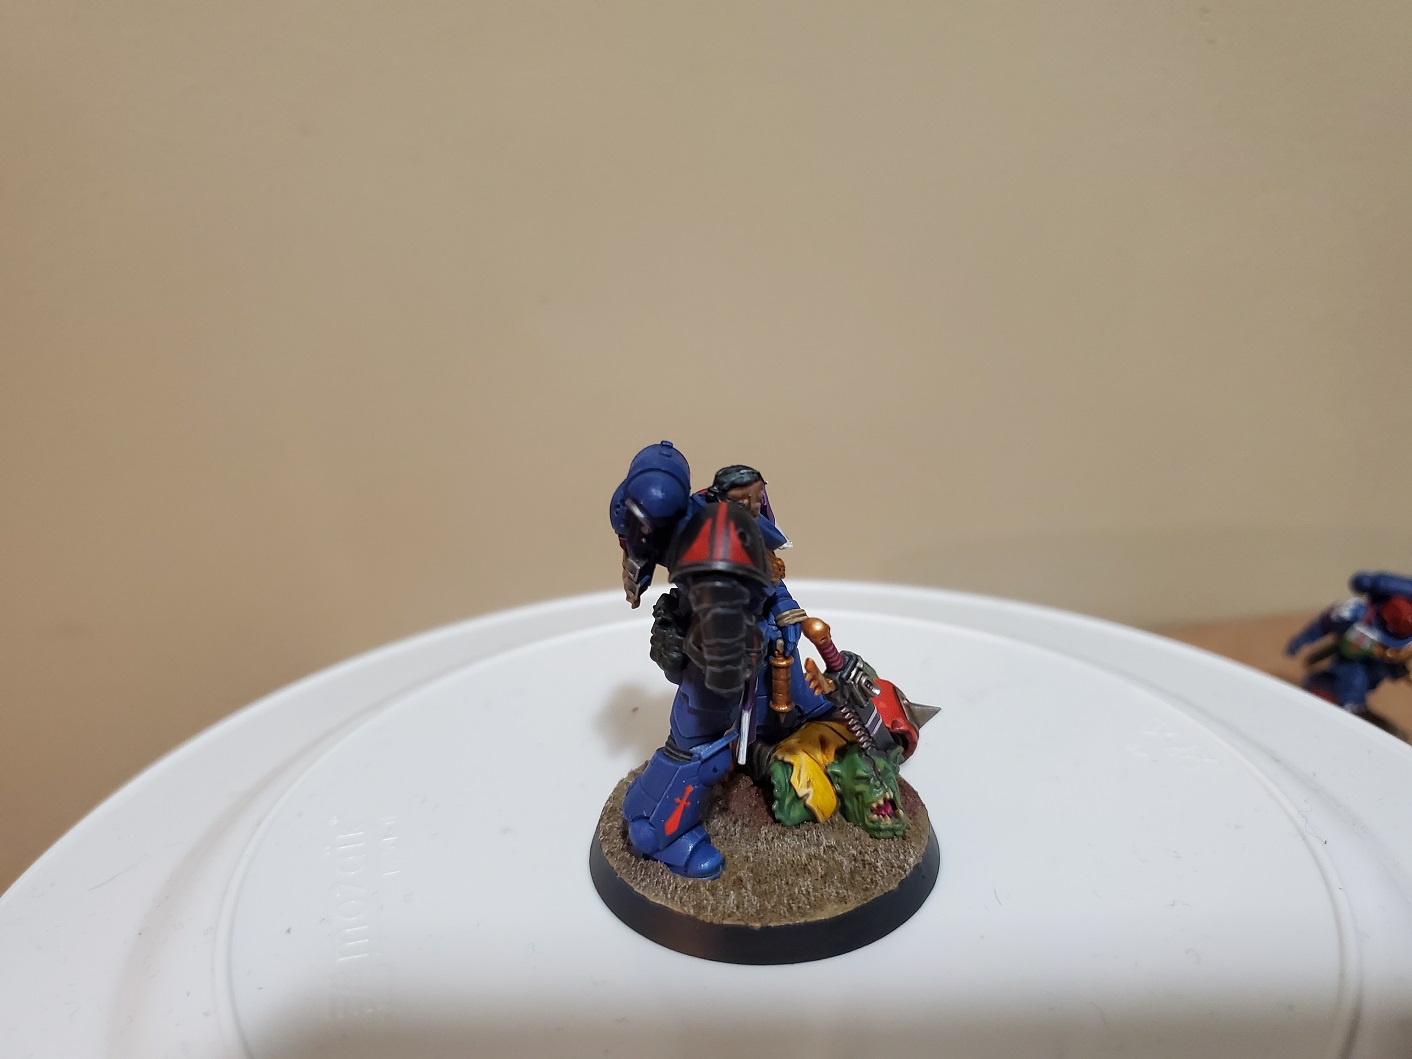 I'm pleased with much of the freehand work I've done on the Marine, but this shoulder pad is something I'm rather proud of. Careful blocking of shapes and using marker on the mini itself made it a lot easier than I thought it would be. I'm rather enjoying experimenting with freehand markings at the moment.
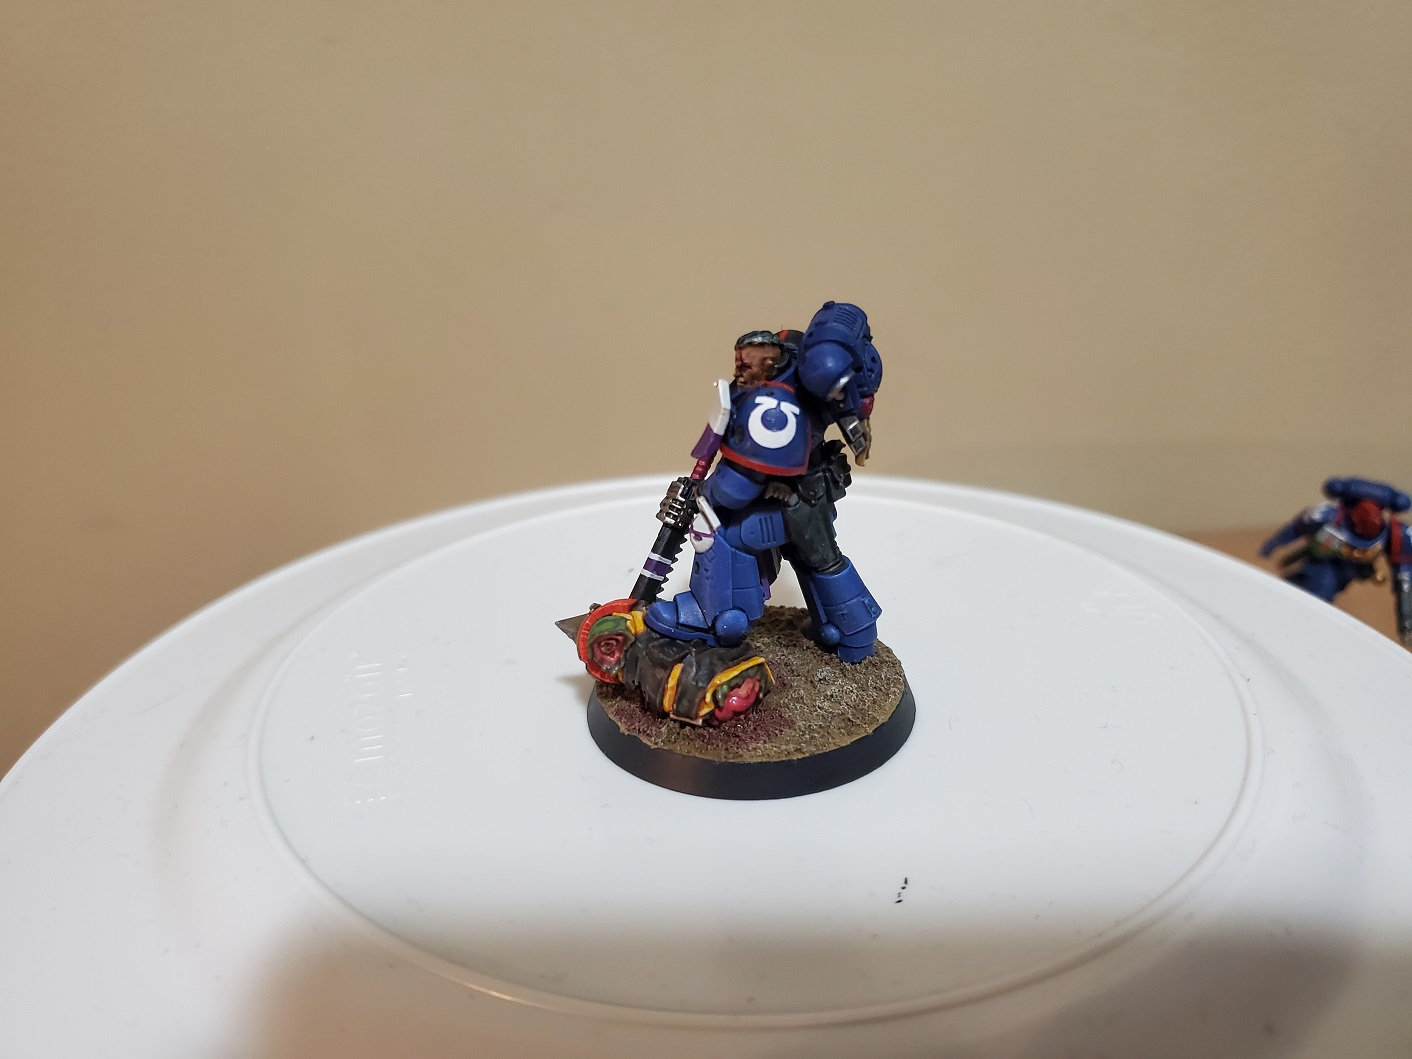 And a final note on the blood on the base. This one was really simple, because I have gone for a dry dusty base, so blood just soaks into the ground rather than pools, so just a touch of Carroburg Crimson over the drybrushed base and you get this effect. No need to gloss it, because of the dry soil just letting it seep in. That's a gruesome point... Until next time, folks!
You can't get to Chaplain levels of angry without training, you know.
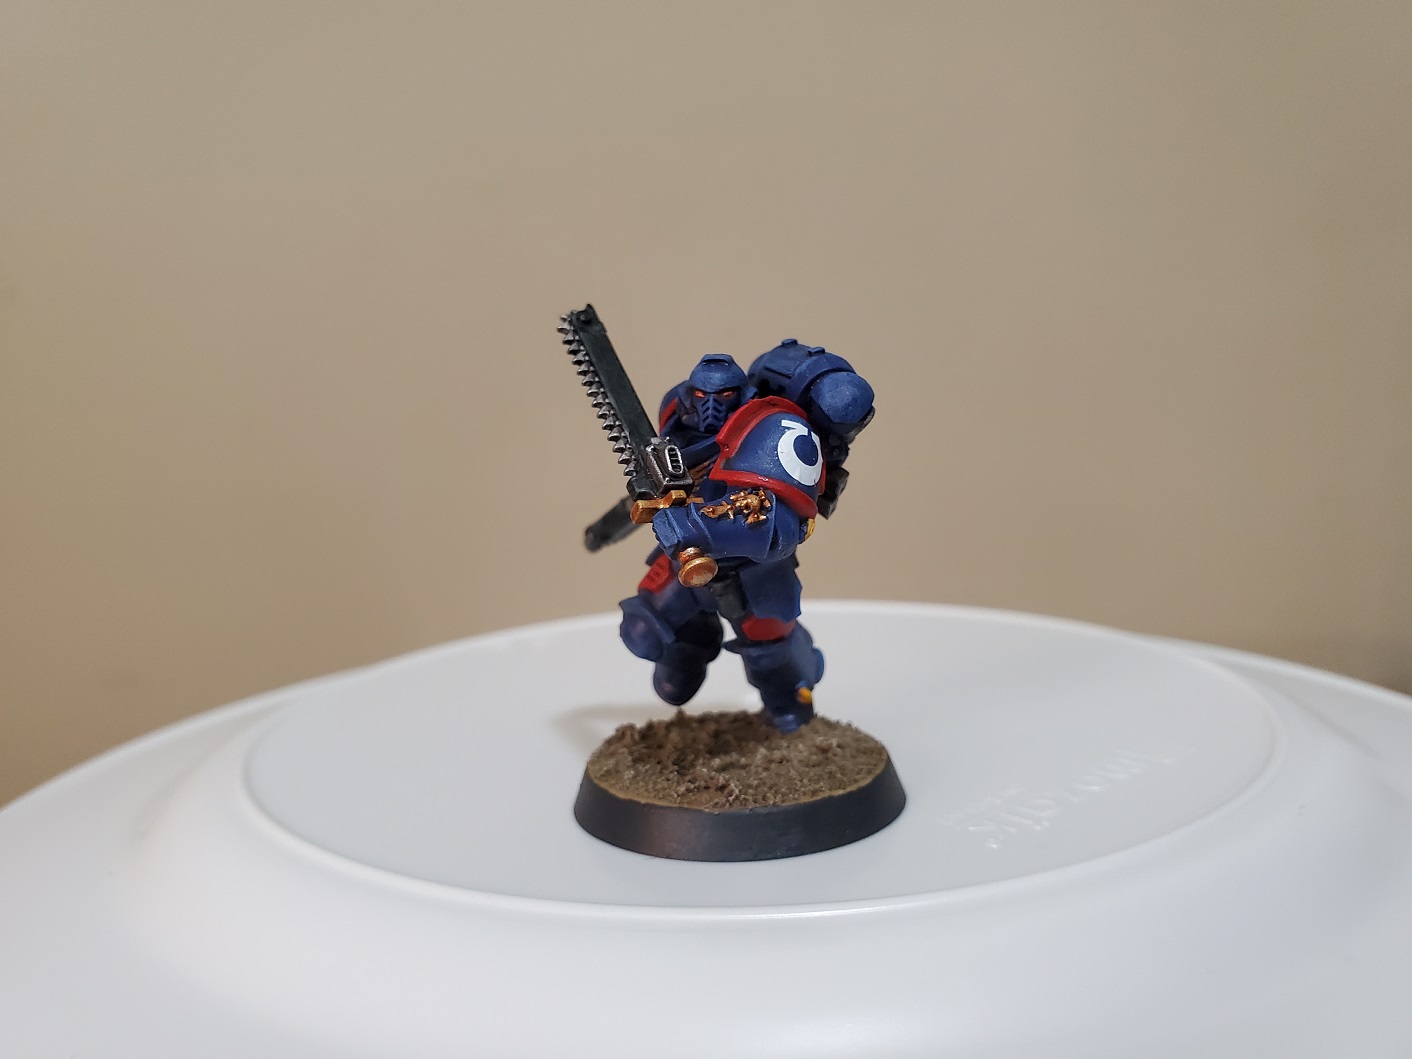
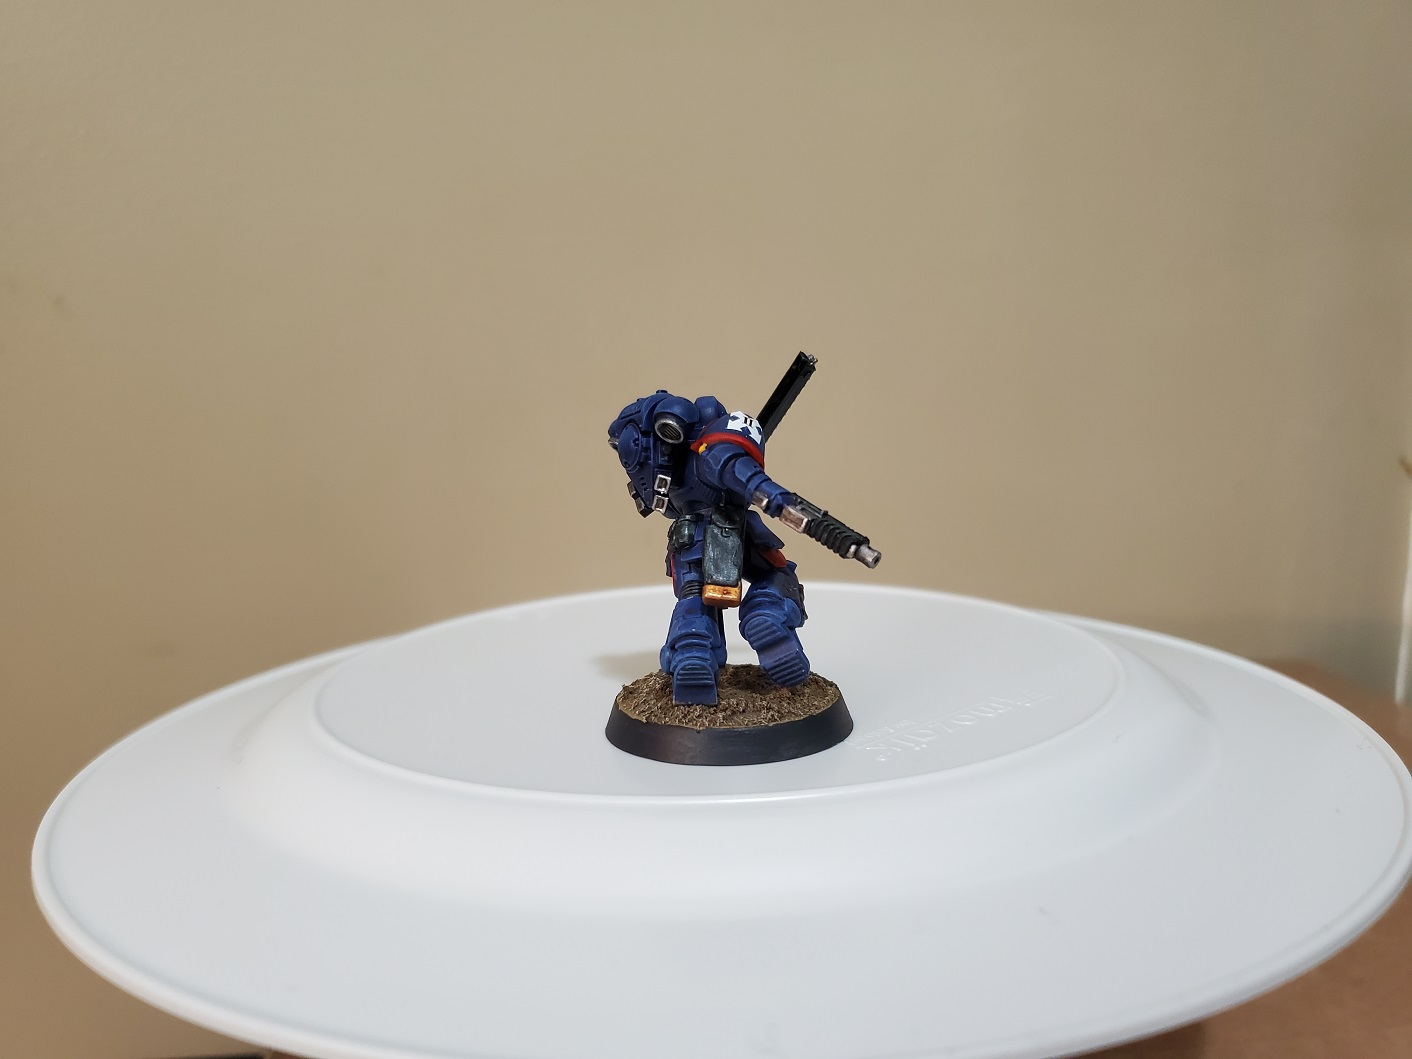
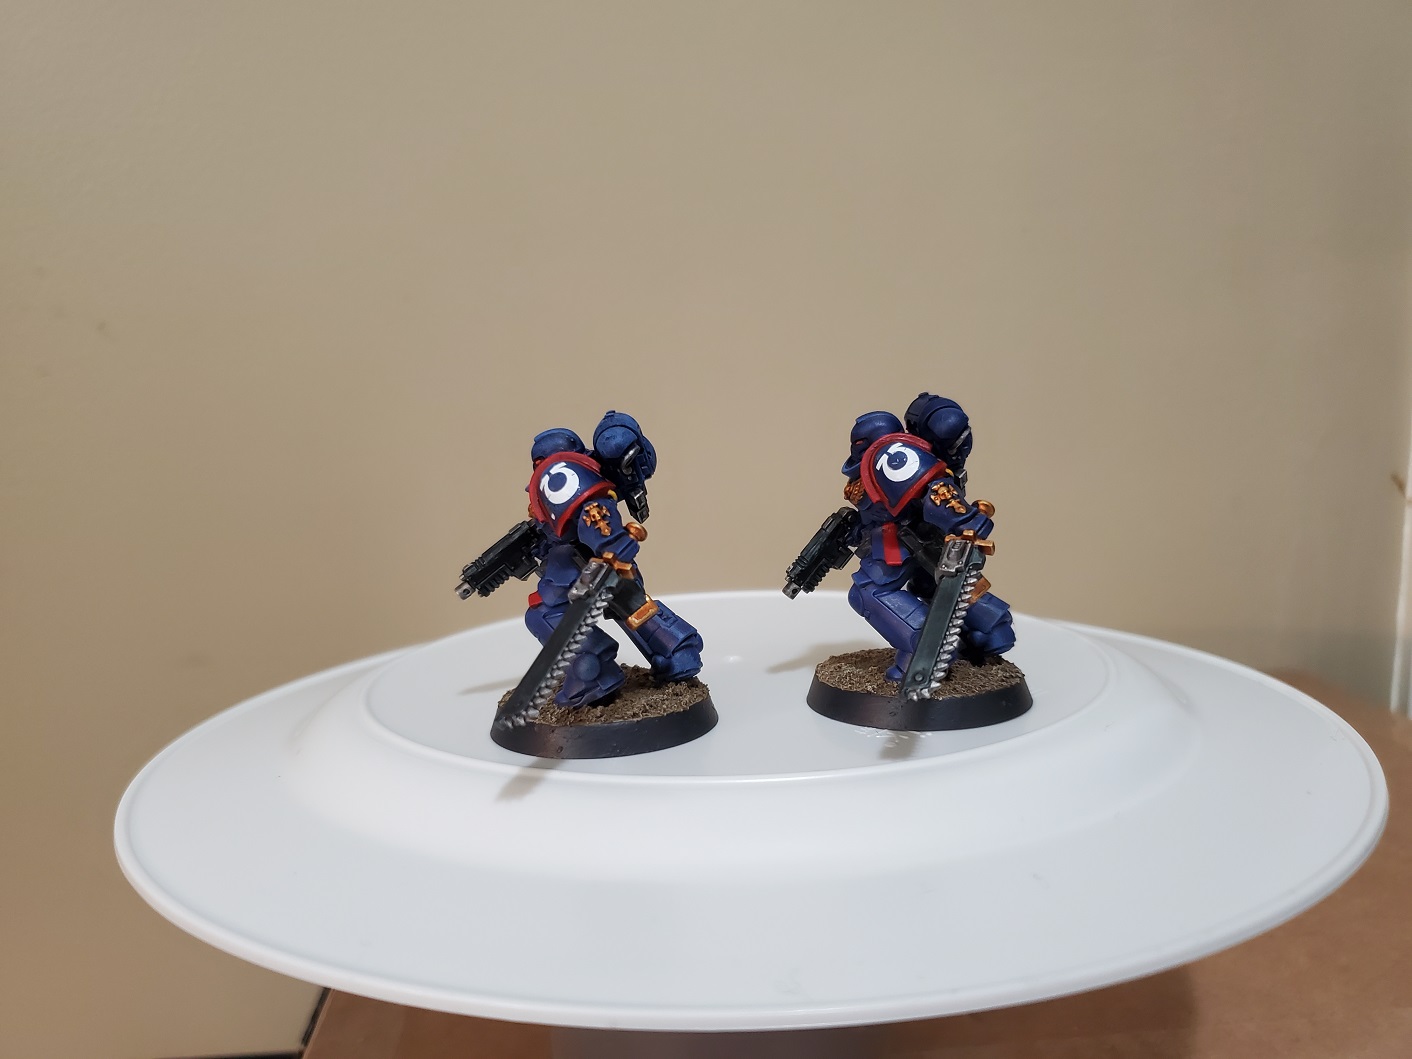
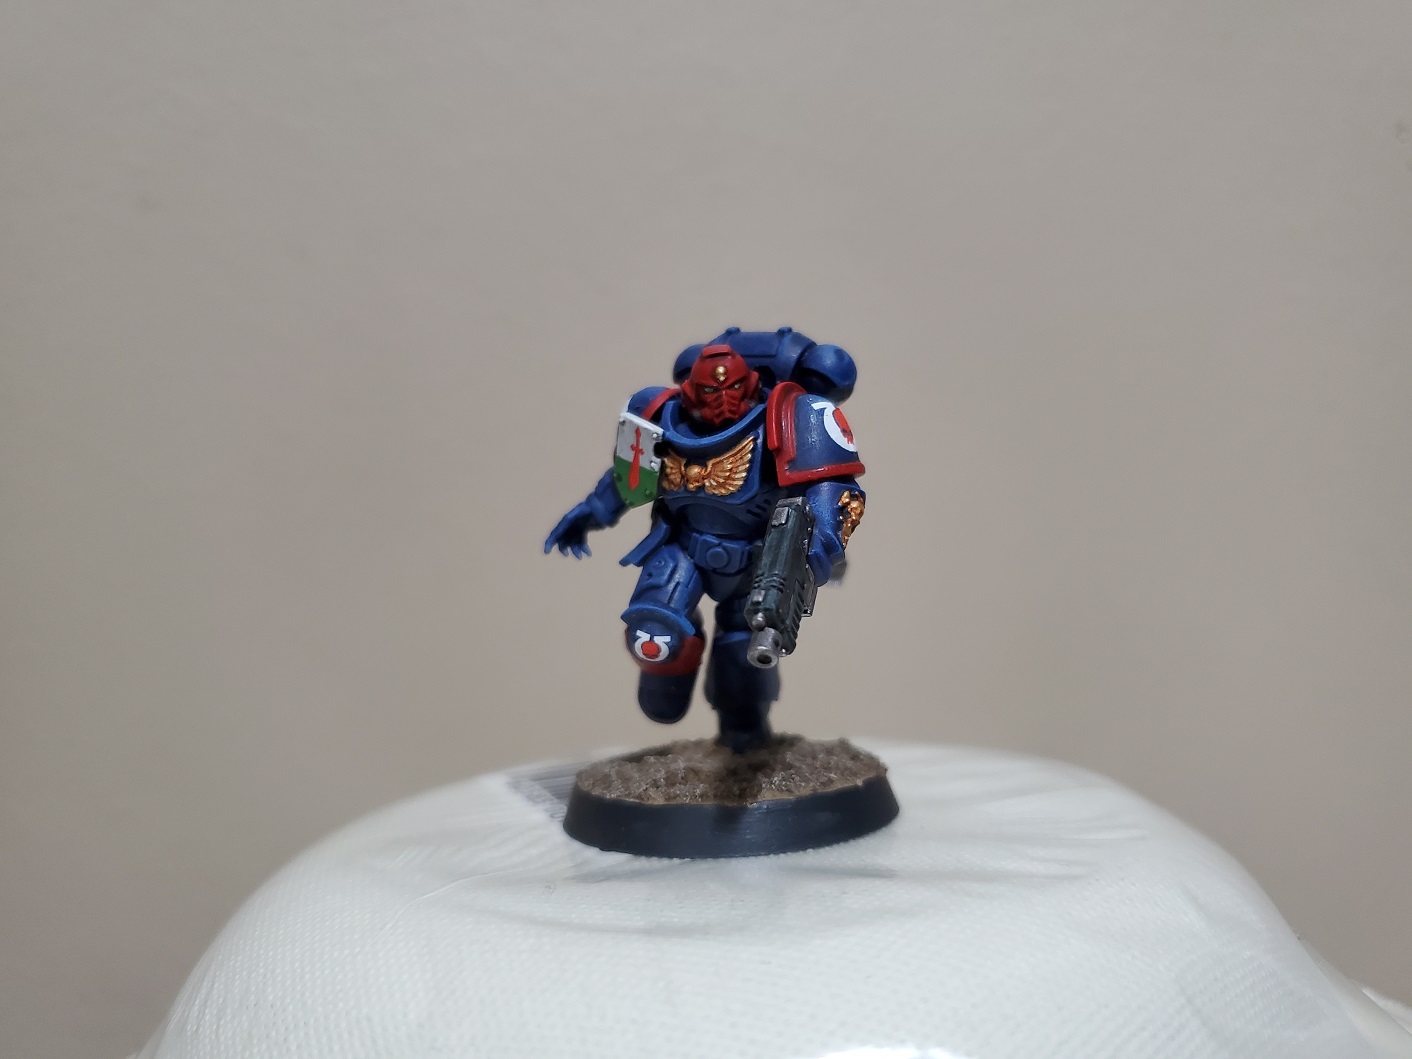
It’s another Marine, but he is what I had primed and I just wanted to paint something. I don’t remember which special edition mini this is (I have Sergeant Jovian in my head, but that might not be right), but I decided a while ago that I was going to paint him as a trainee Chaplain and use him as a Lieutenant in games, though I already have a LOT of them lying around… Anyway, it’s just the main mini for now because I never got around to priming the dead ork on the base, so that’ll have to wait for later.
 I tried to create a First Nations skin tone for the chap, though I'm not sure if I got it quite right. I haven't decided yet if it's a bit too brown in tone, but it's a good approximation considering this is supposed to be a long way in the future.
Specifically, I was going for a Haudensaunee look (Iroquois for those who aren’t aware of their own name for themselves) which is why I picked purple and white for the heraldry colours. I was going to try and do a whole shin guard in purple with the white symbol on the Haudensaunee Confederacy flag, but free-handing squares is a pain and the purple just didn’t stand out enough from the blue, so I improvised a bit. The knee pad is reverse colours of the flag with just the central ‘fire’ symbol shown.
 The black arm and helmet is the symbolic mark of someone chosen as a trainee Chaplain (they do have a specific name, but I don't remember it), but I decided a bit of a red design would stand out nicely on the pad and even went for a slash mark across the eye, though from the damage his helmet has taken in the fight he may have picked to wrong eye. I'm blaming the mini and not the fact that I didn't want to paint it over the sculpted battle damage. That sculpted damage was a pain...
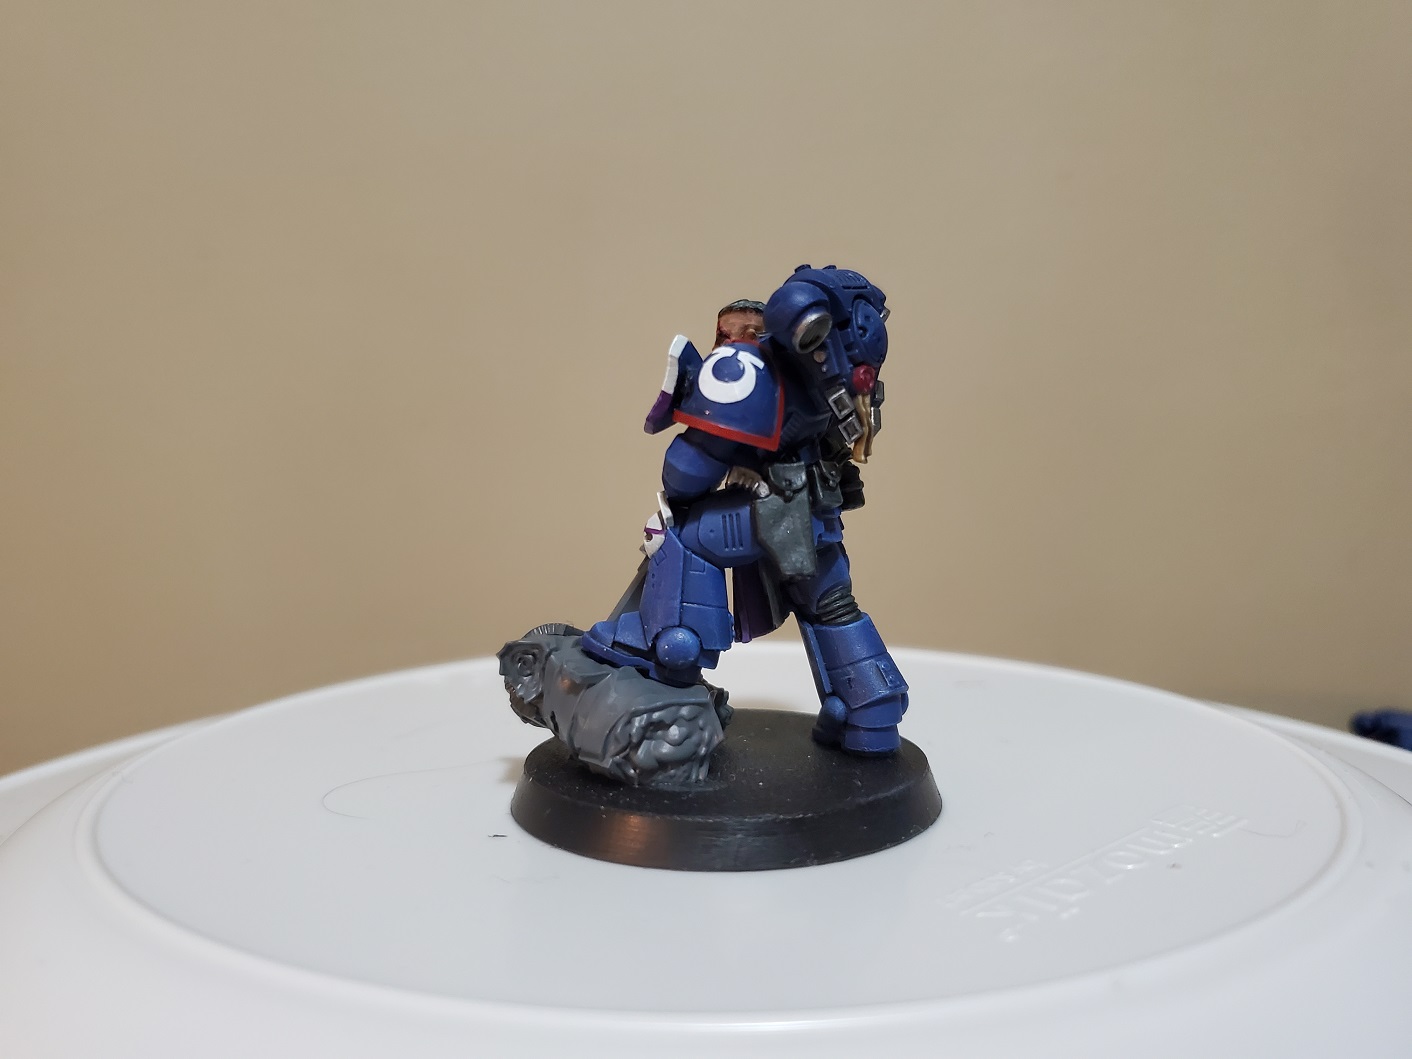 I might have to fix the Chapter Badge here, because it really isn't straight...but if I do that I'll have to modify the badge to fit over the battle damage...which is annoying. We'll have to see if I feel like it...but the thing being off centre is starting to bother me already...
 And the traditional Lloyd Shot. I think I might have to run some darker paint into the larger dents across the mini as well, so he's pretty much done, but there's some things I might add before I finish the base and declare him 'finished', but we'll see.
So other than those possible changes and tweaks, he’s done except for the base. Not sure what to do with the ork, to be honest, but I might try and make him a bit fun and bright just to counter some of the darker tones I have on the main mini, but we’ll have to see what I come up with.
Everything is better with chainswords...and friends, I suppose, but mainly chainswords.
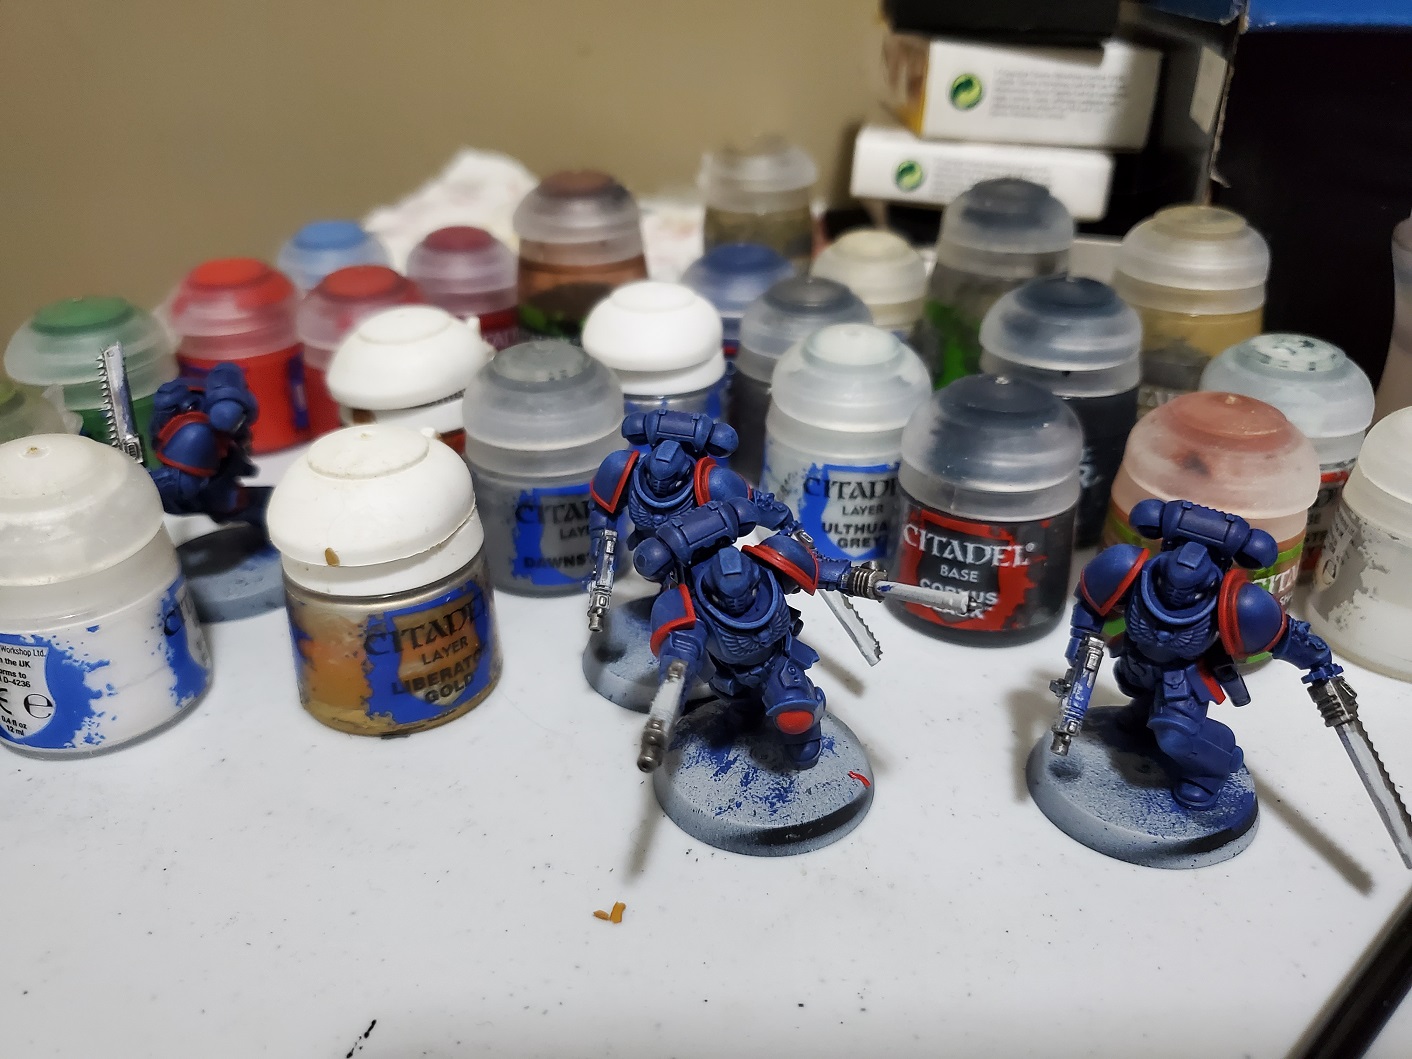
Finished up the other 4 Marines from my Assault Intercessor squad. Pretty pleased with how they turned out, even if it did take me a bit longer than I planned to finish them up. They will eventually get some grass tufts on their bases; I just don’t have any right now. Anyway, here’s the gang!
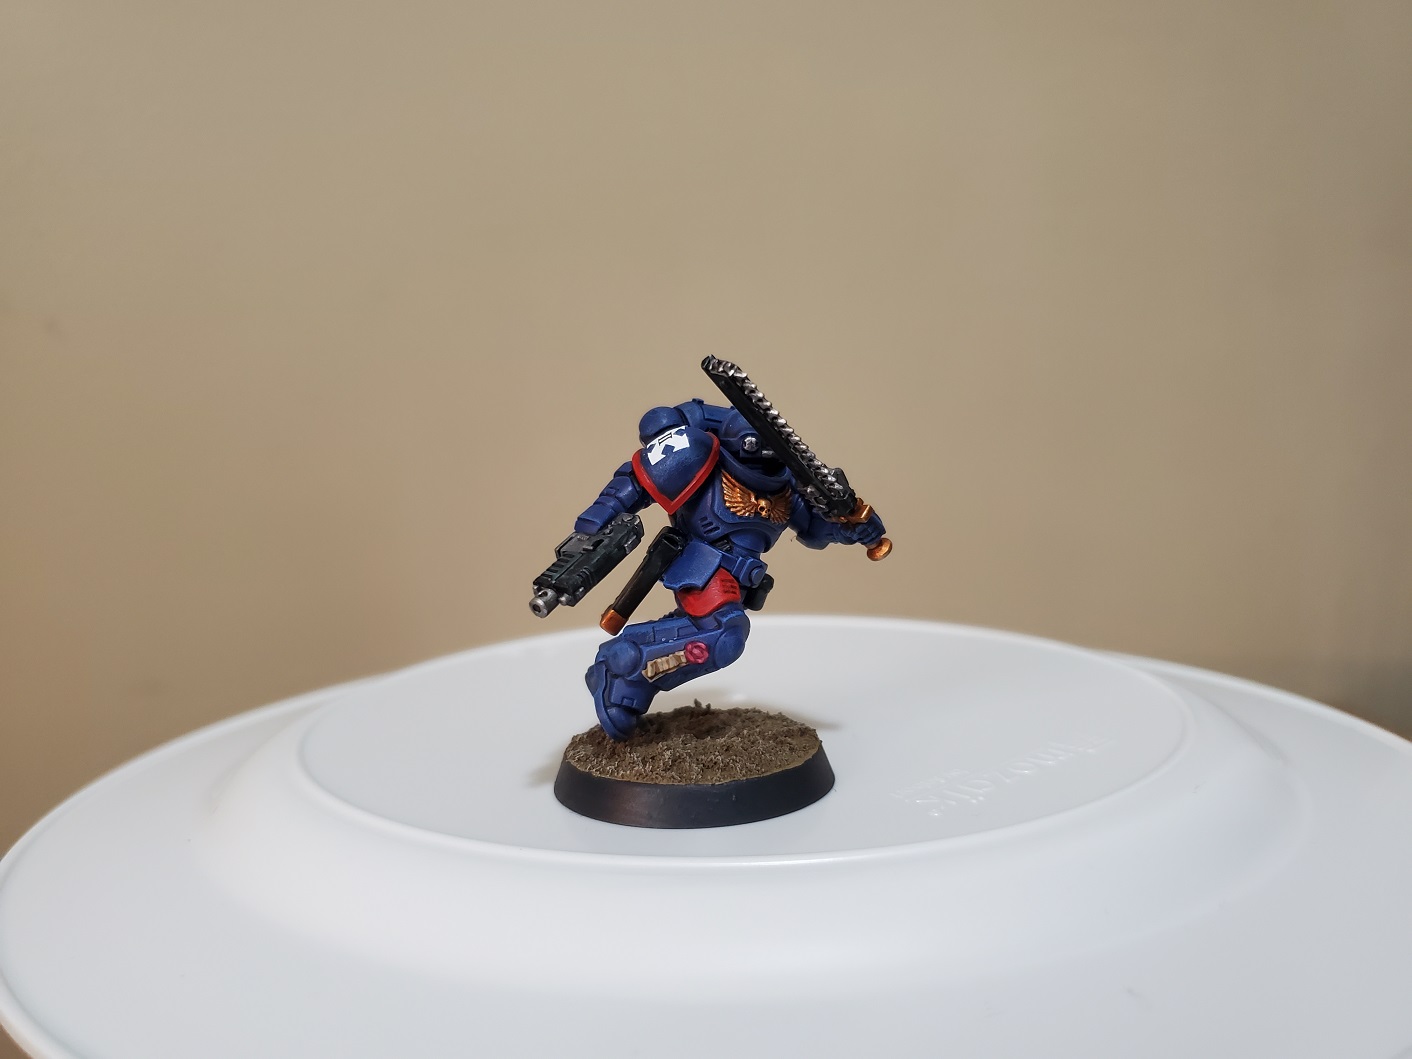
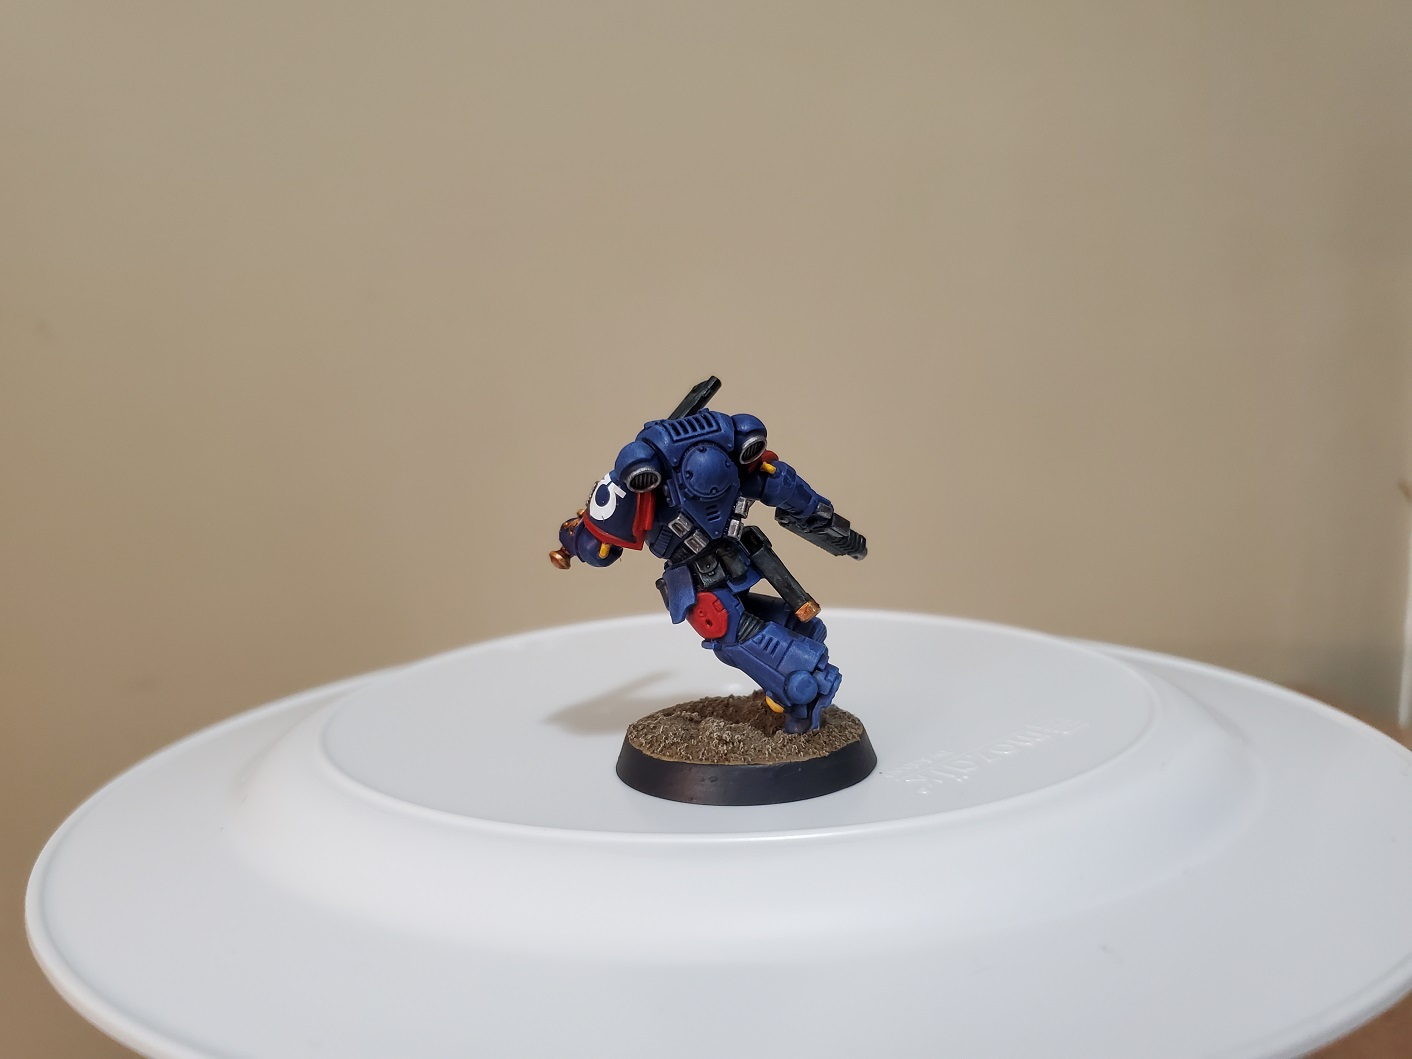


The next two I’ve taken to calling the Twins…seeing as they’re duplicate poses…obviously. I could have done some work to change them up a bit, but I just didn’t feel like it, so these chaps are the main reason for the random panels being picked out in red. I also noticed when taking the pictures that one is a bit of a darker blue than the other…must have had less paint on the bristles when drybrushing and not noticed it… I also gave one of them a bullet decal, which is apparently a badge for accuracy. Either way, these guys started the whole thing of putting some kind of pattern or something individual on the armour, and I like how that idea turned out.
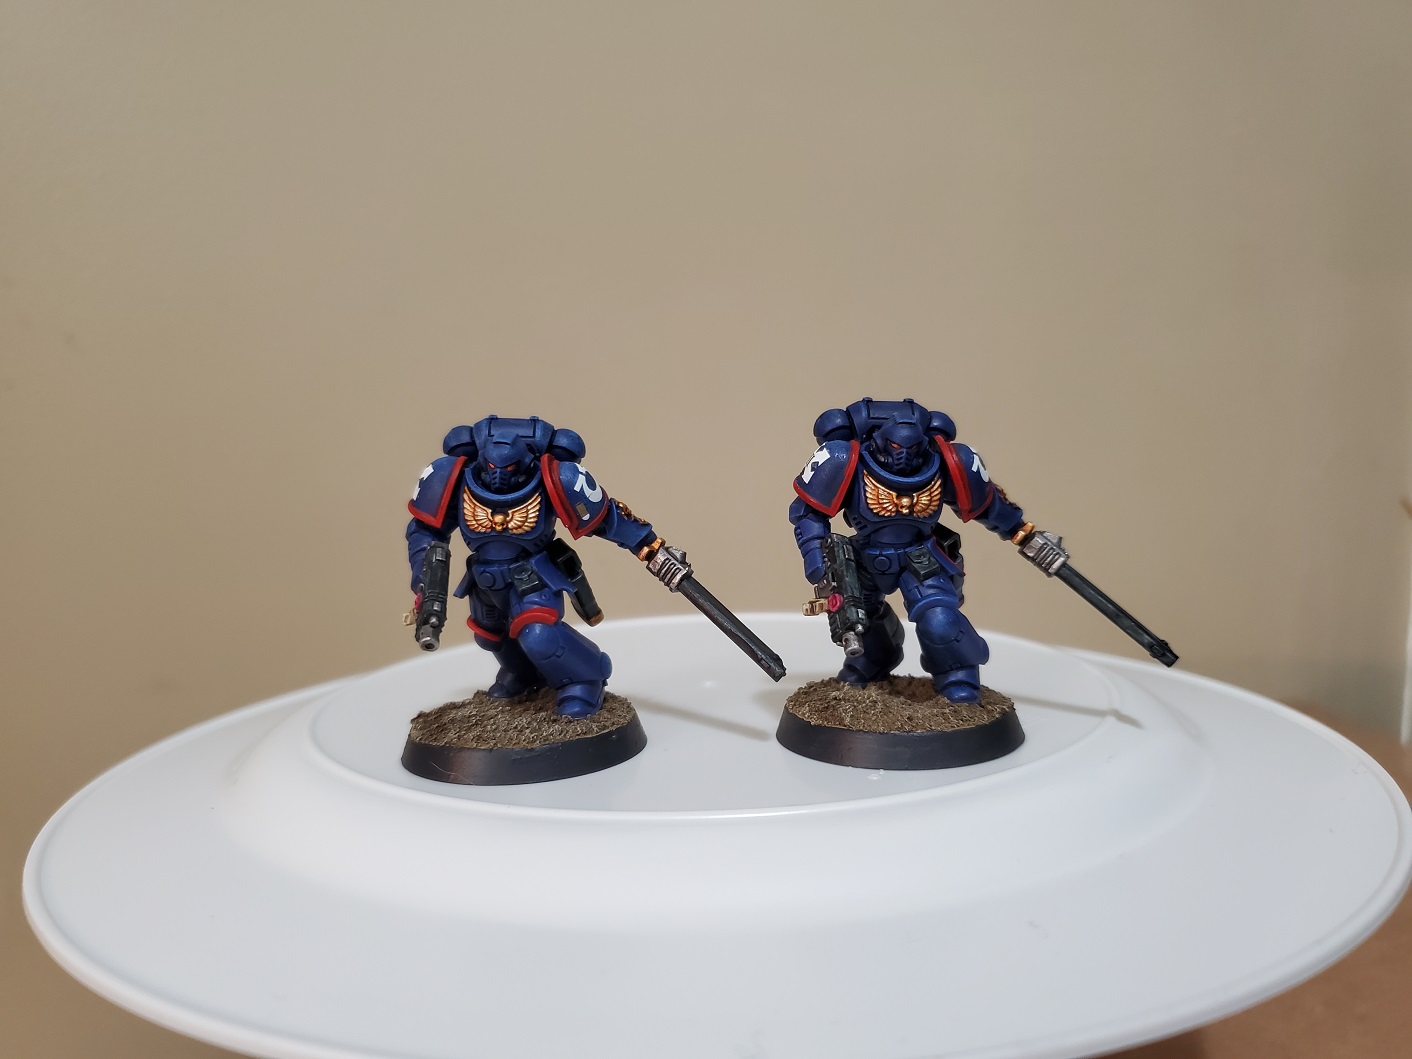
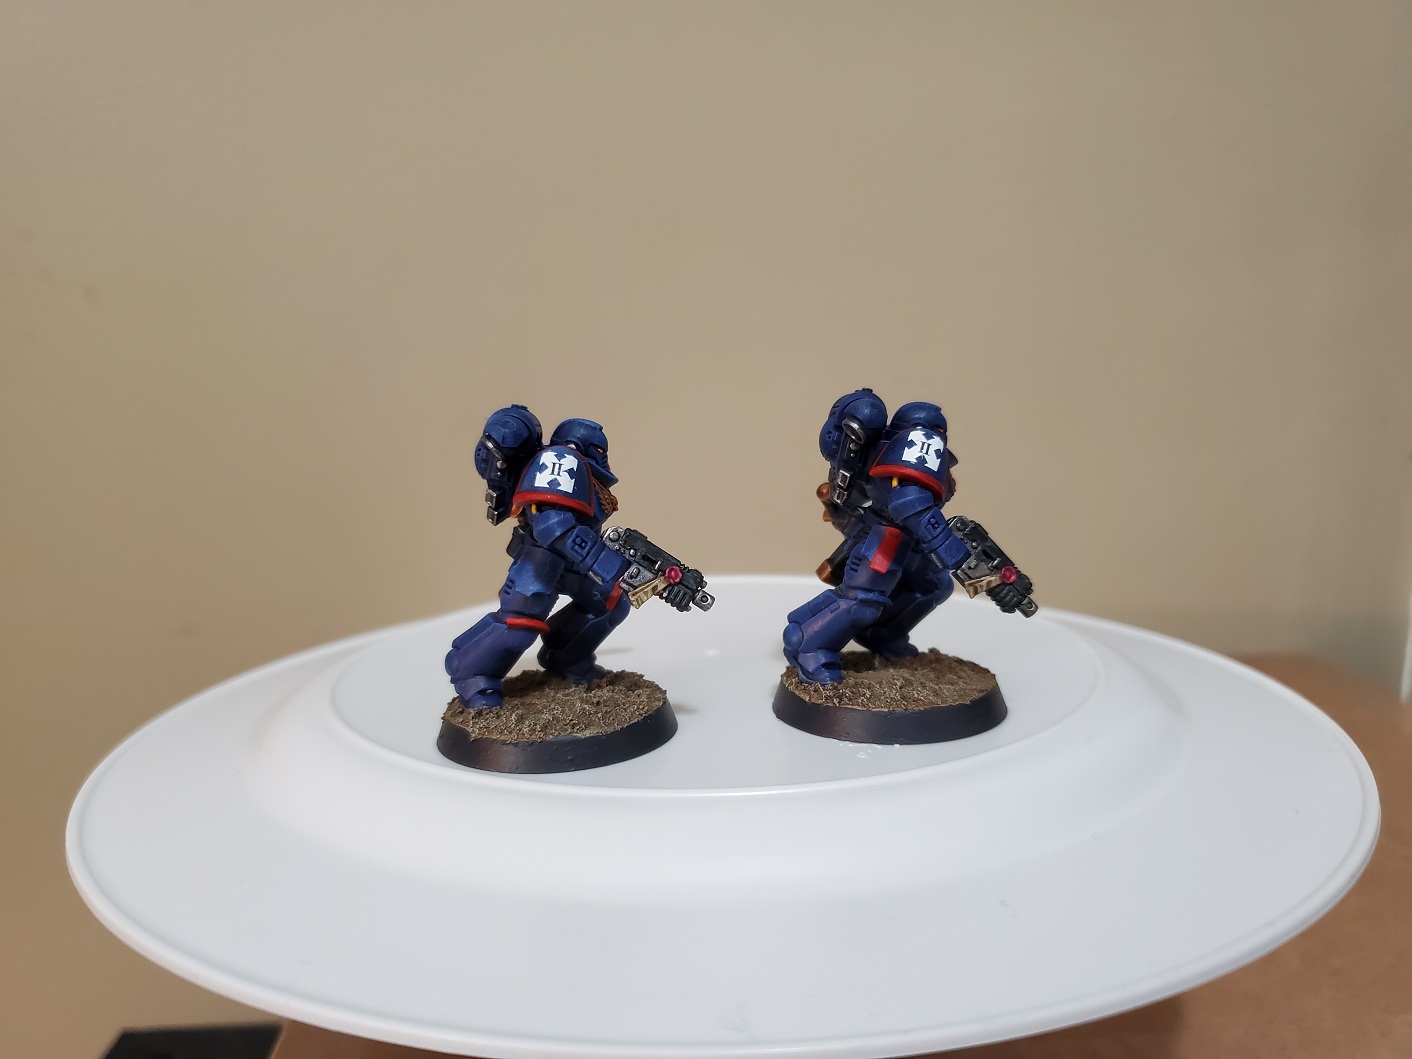
And now with extra Sergeant!
 I didn't have the stuff to do a full scenic shot of them, so this upturned plate will have to do. Sorry about that.
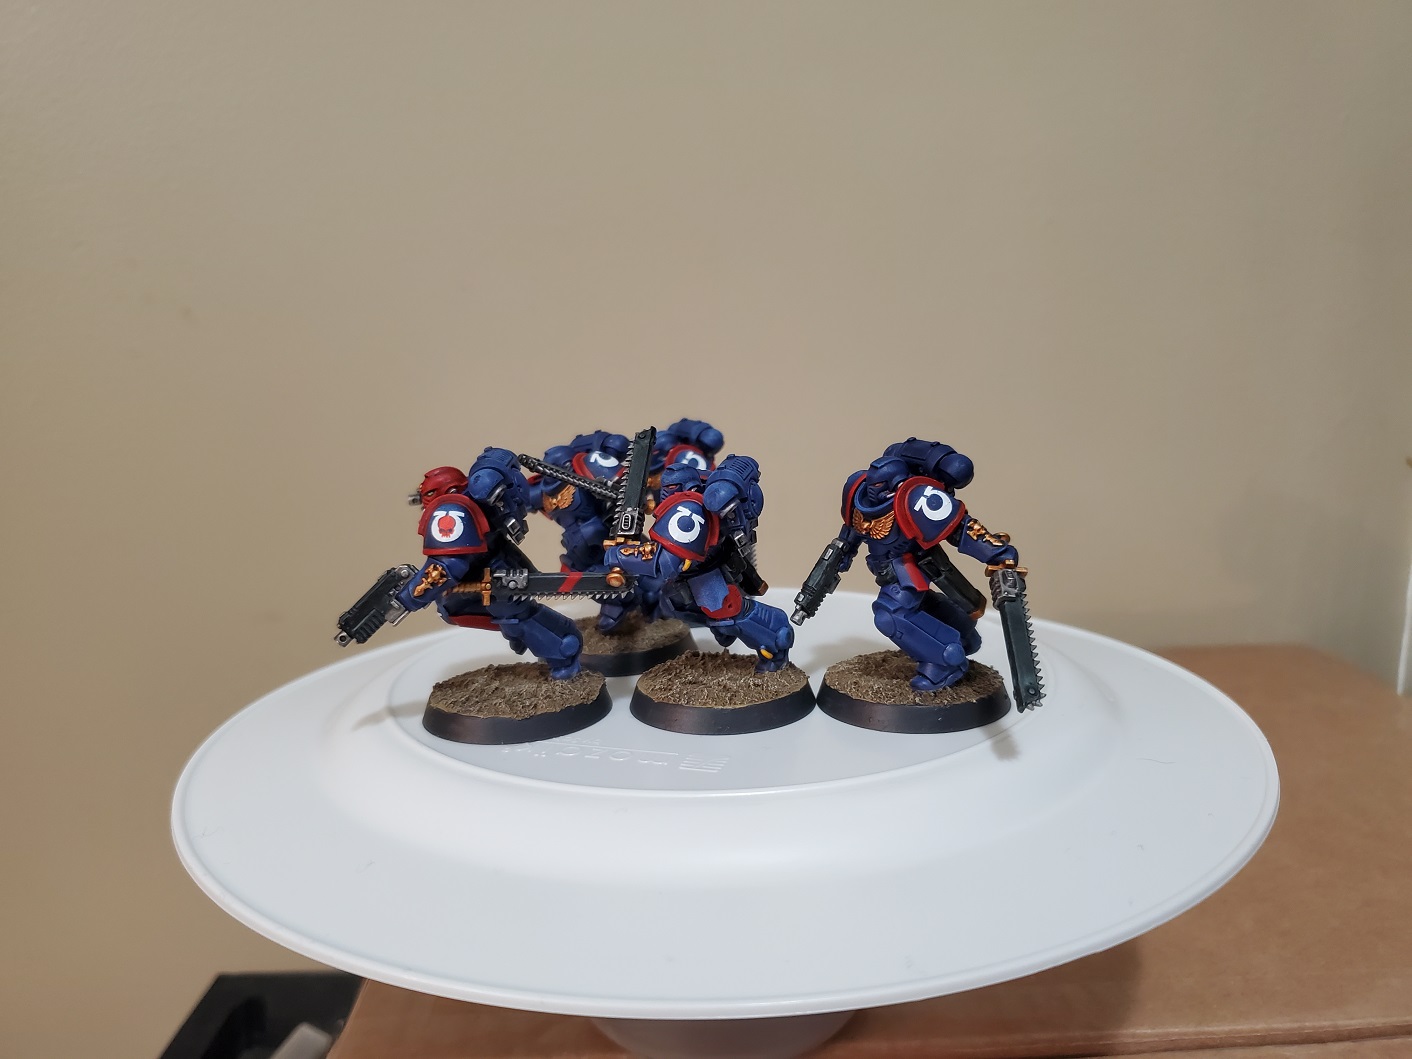 Would have looked a lot better if I had, but alas.
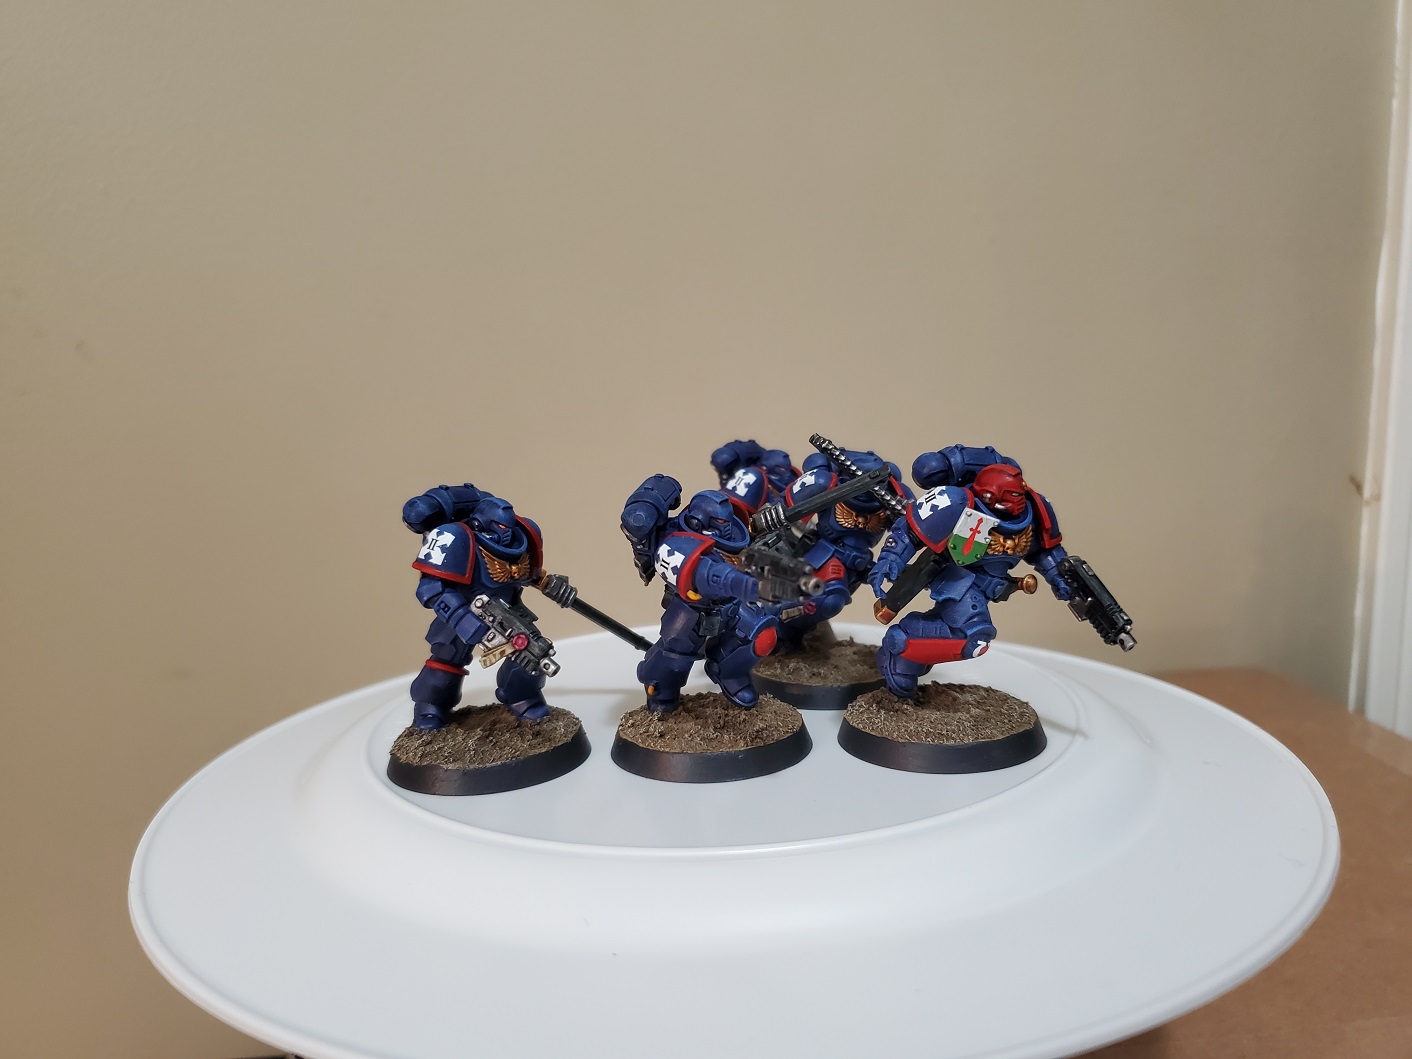 The plate is clean, at least, so there's that.
 And final a group Lloyd shot. Not as interesting on Marines, but such is life.
Not sure what’s up next as school is right around the corner, but I have another Marine primed that I was going to paint as a trainee Chaplain…but I also want to get my Murder Girls finished and there’s only one lady left to paint there, so we’ll see.
Long time to paint one mini...
Almost 2 months since my last post…that’s longer than I thought it was… Anyway, moving problems and just general burnout and other issues finally subsided enough for me to get something done. It technically hasn’t taken me 2 months to paint one mini…but I have been working on this group for almost a month-ish. Efficiency!
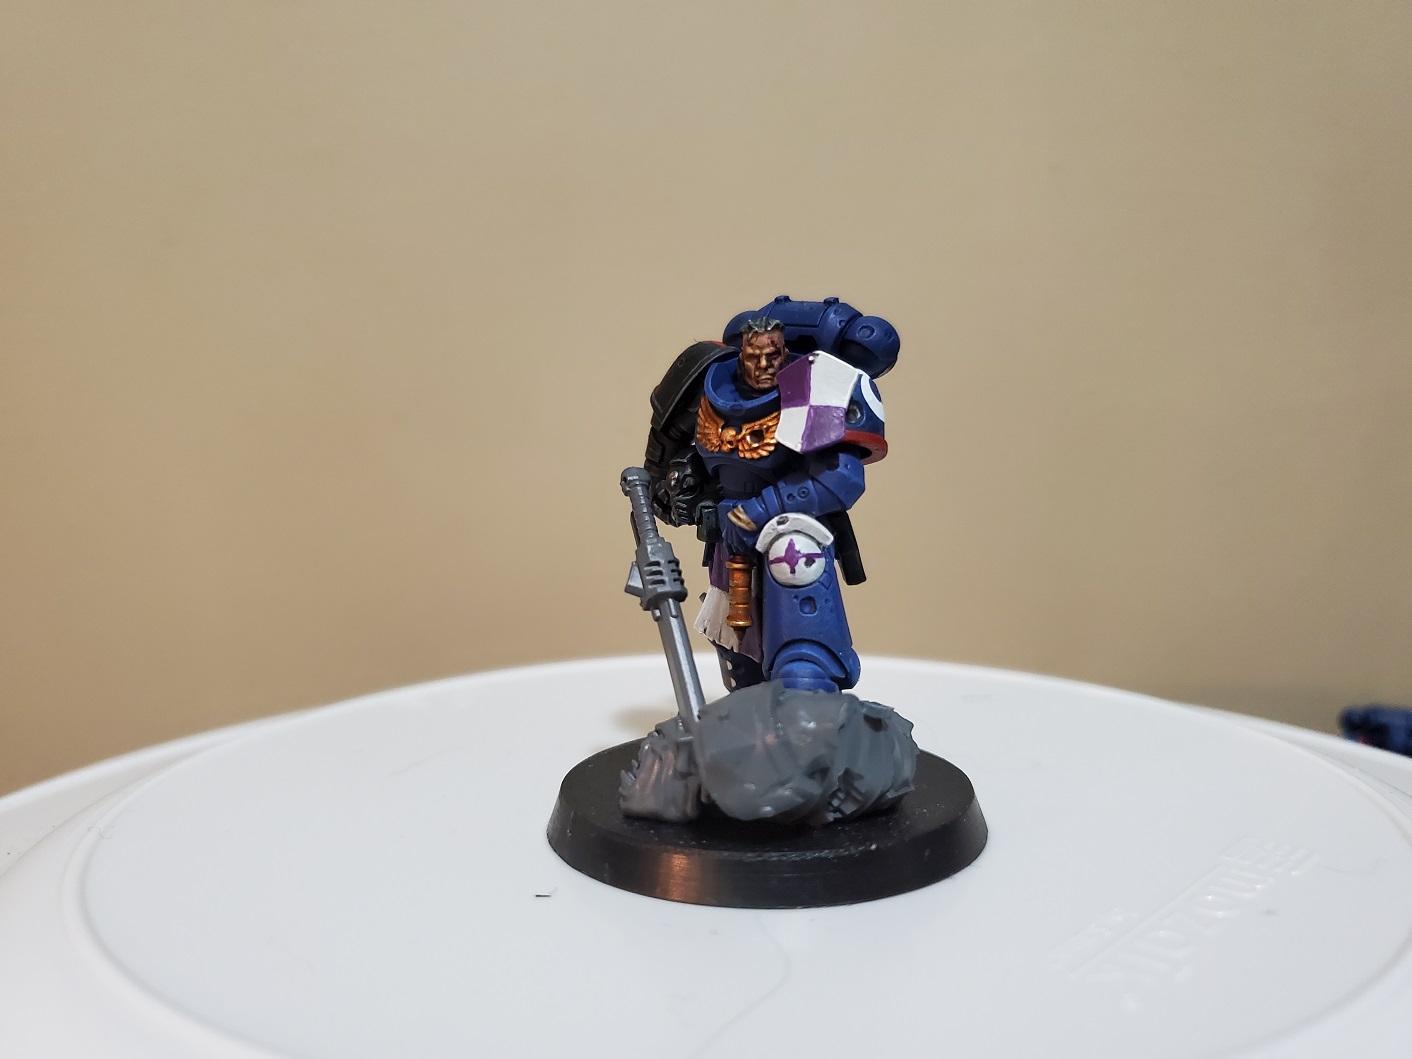
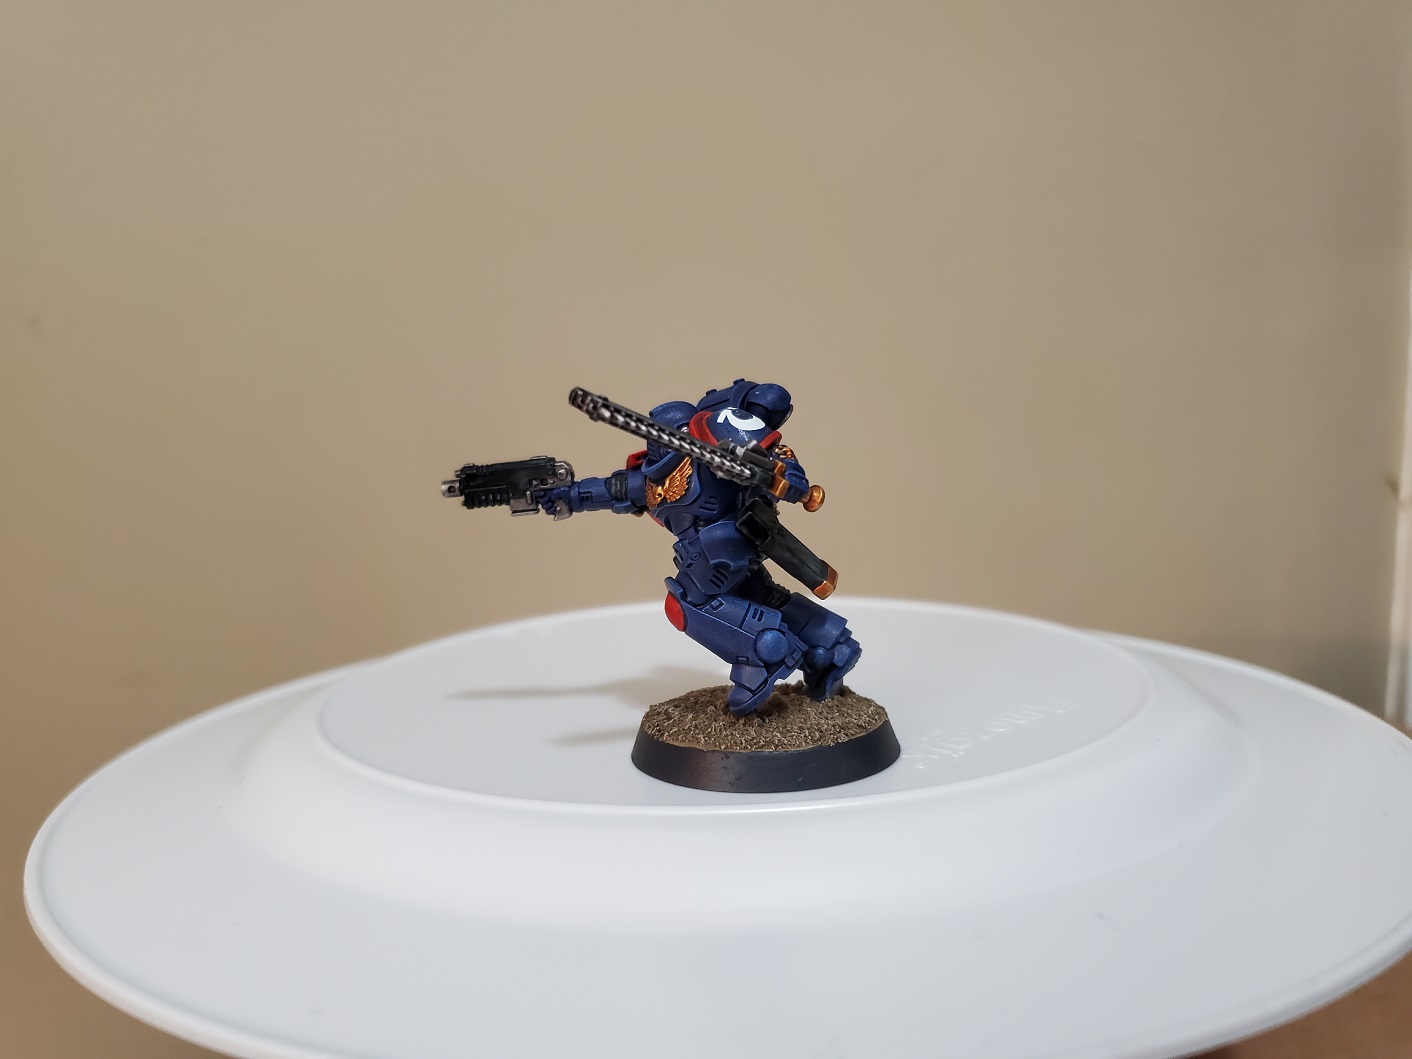
Anyway, there was a bit of a ‘sell off your spares’ thingy at my FLGS in early July and I managed to snag 5 Assault Intercessors for a damn good price and they were already primed, too. Had to do one head fix because the pose was just awful, and they were primed white instead of my typical blue, but it was a VERY good price. Basecoating Marine armour is not something I’ve done for a while with a brush, though, so that stage just took a long time. I decided, though, that following my additions of heraldry on many of my minis I also wanted to take the idea of individualism that little bit further and took a bit of inspiration from the Clone Wars series. If they can make literal clones of the same man look like individuals, then I could do it with Marines.
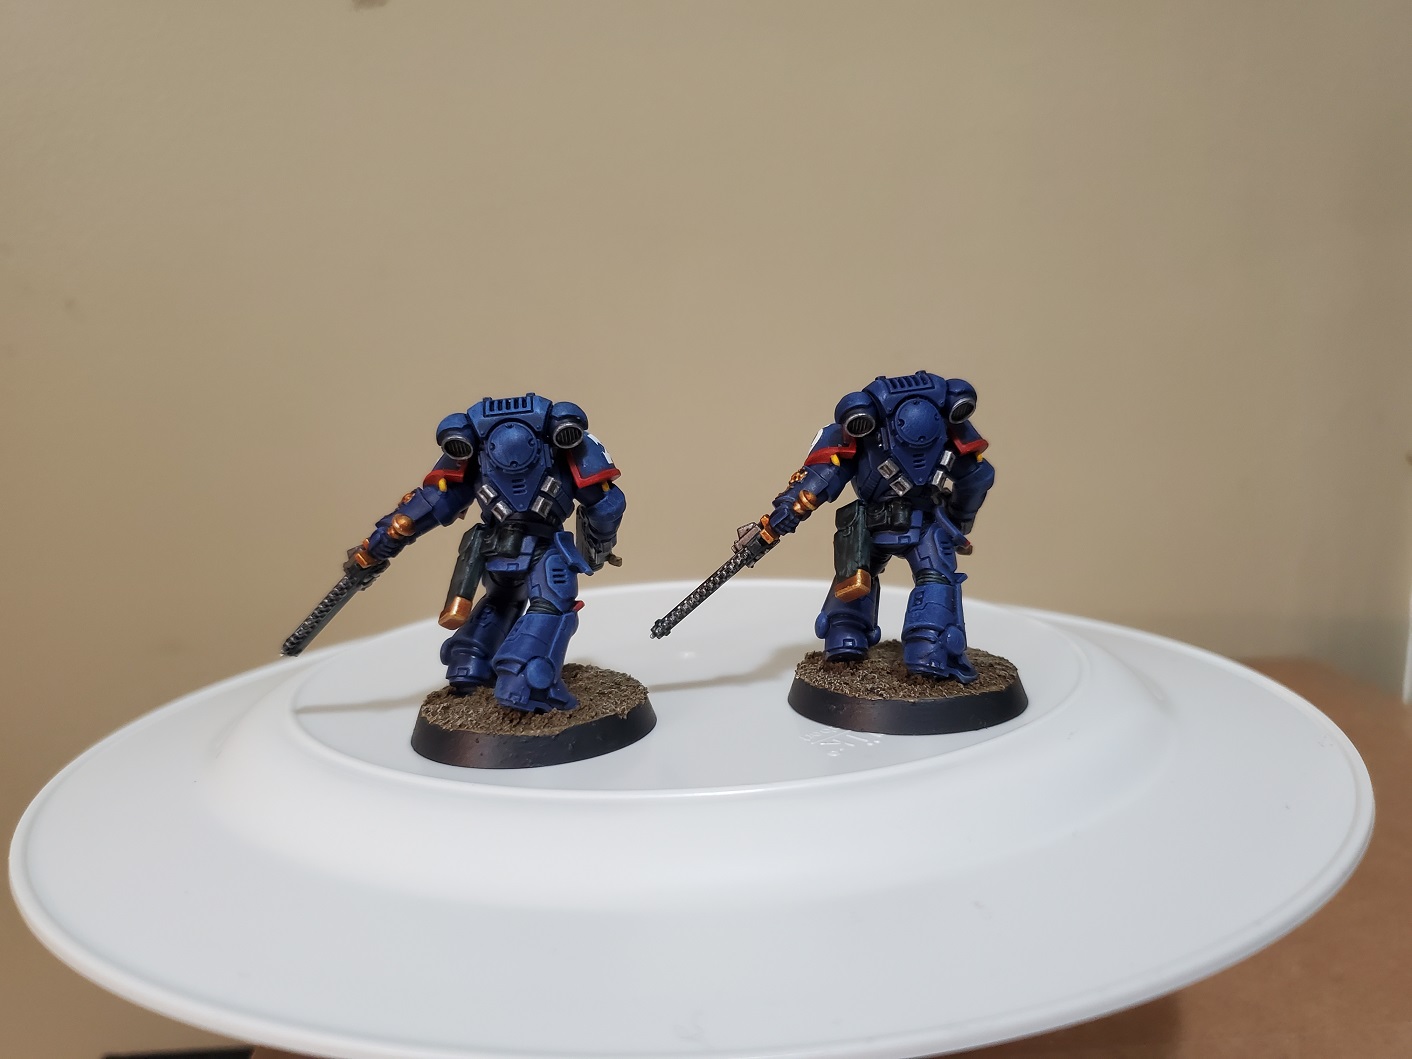
 I did this with red panels in various places across the armour and chose the (Marine's) right greave on the Sergeant. Going with red means that I can keep the company colours the same while still adding some individual flare to the armour.
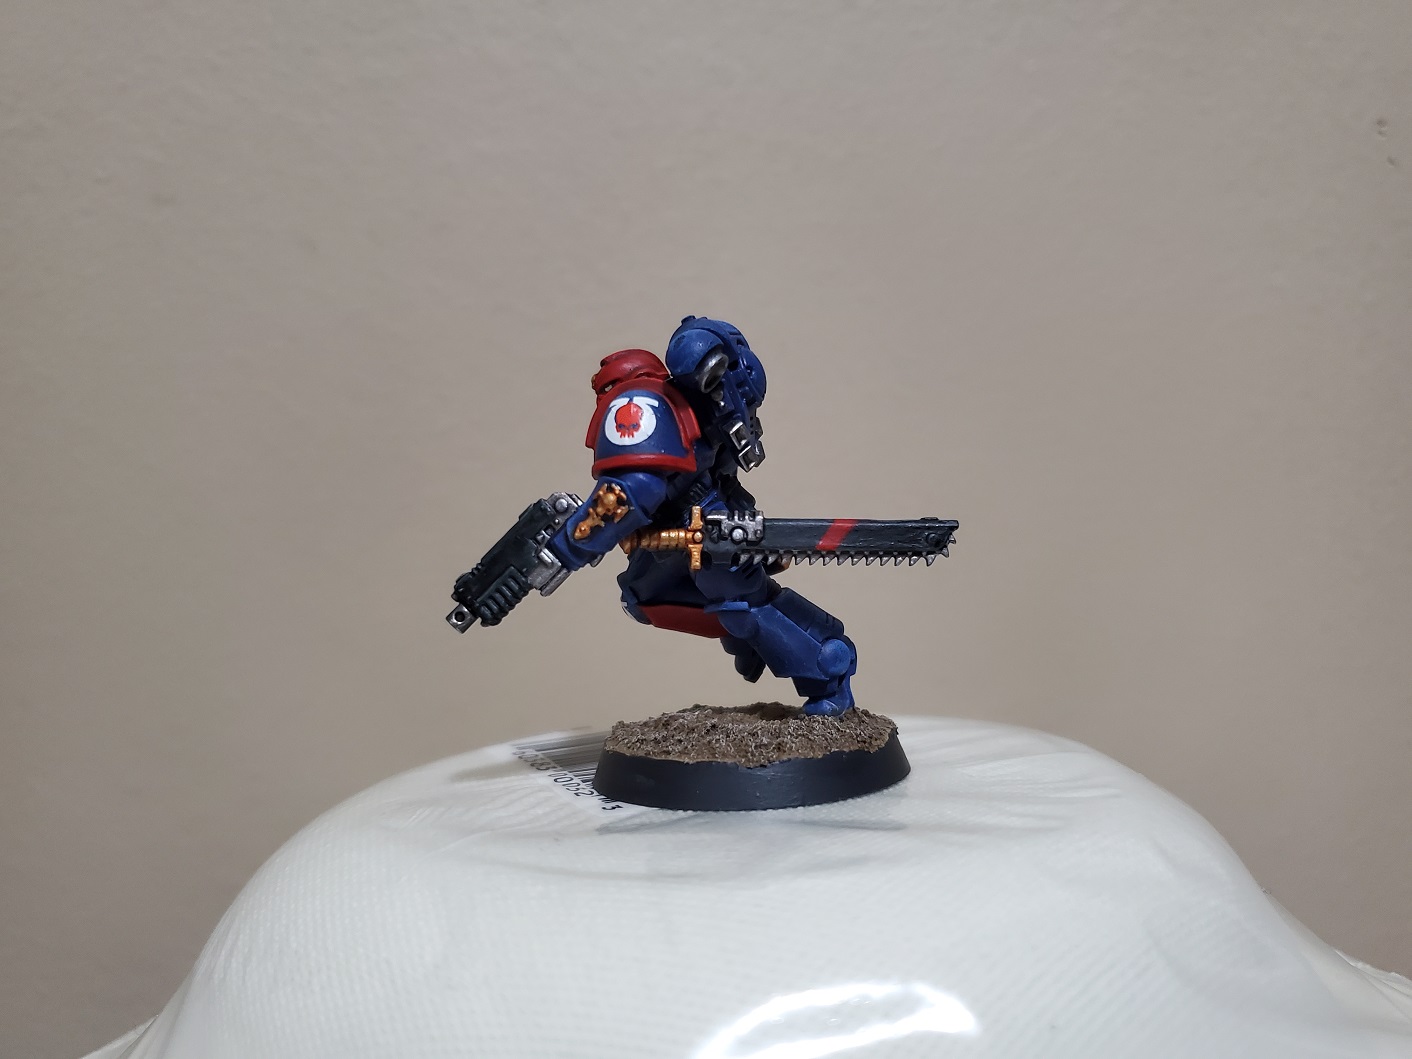 I also added a red strip to the casing on his chainsword just to add a little more personal flare, though this I'm keeping with the Sergeant. I did think of adding the white stripe of a Veteran Sergeant, but I'm saving that for rewards if the squad does well in a game...because I will be able to play games again eventually...right?
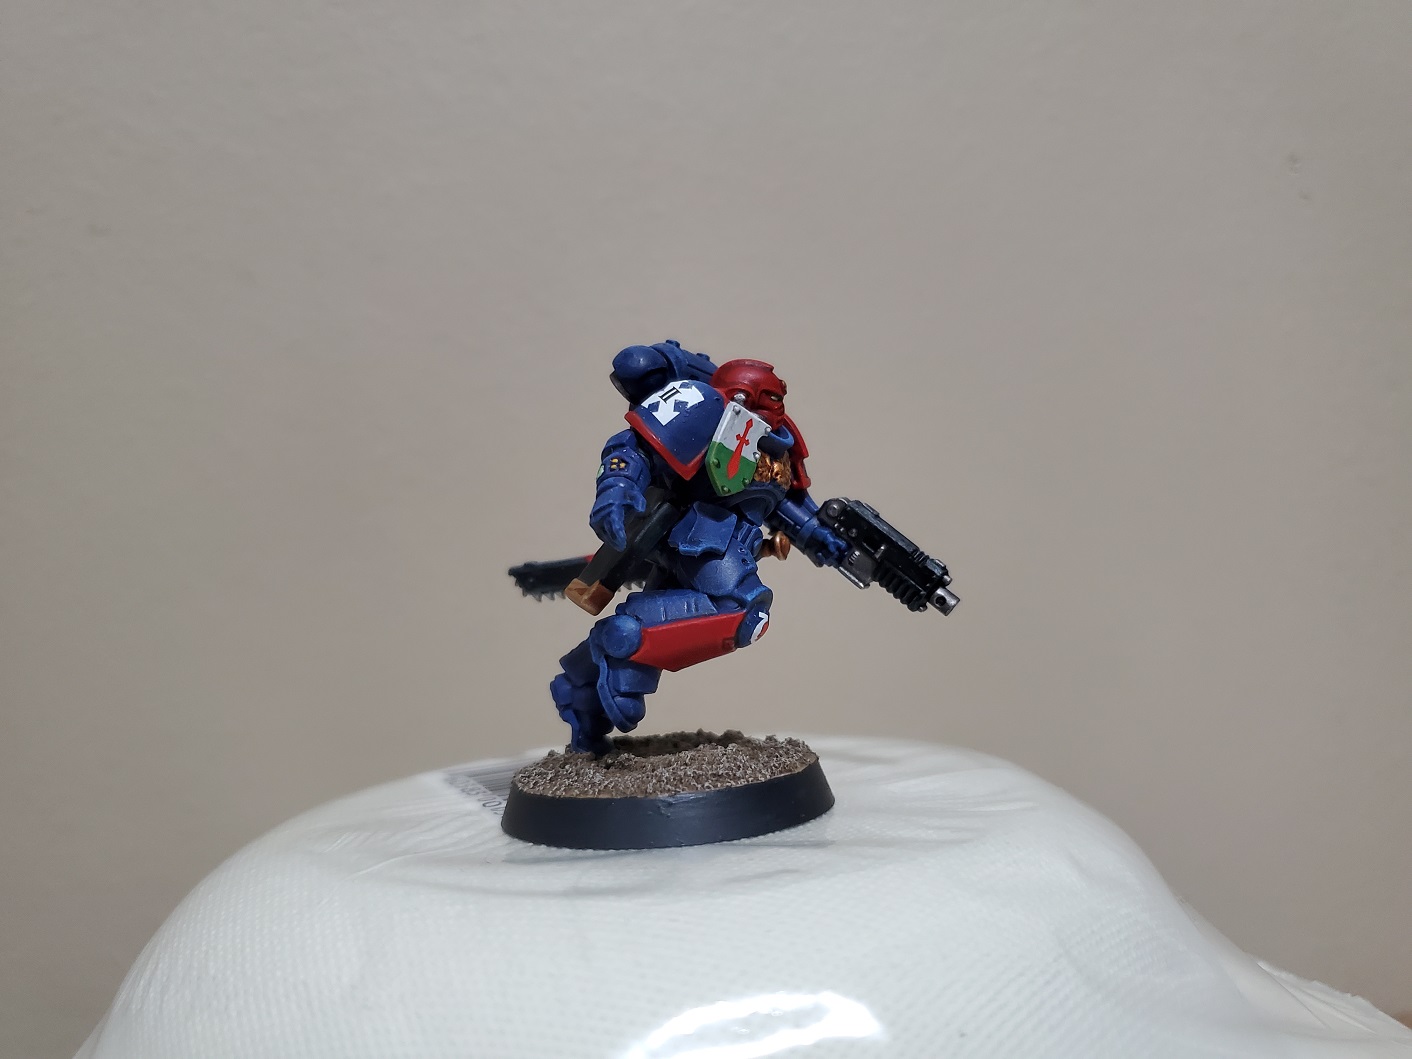 The tilting shield here has some obvious influences that I wanted to go for. Sadly I had no dragon transfers lying around, but I think the red sword works quite nicely and still gives the right feel for the design. It's also a very nice contrast to the rest of the mini.
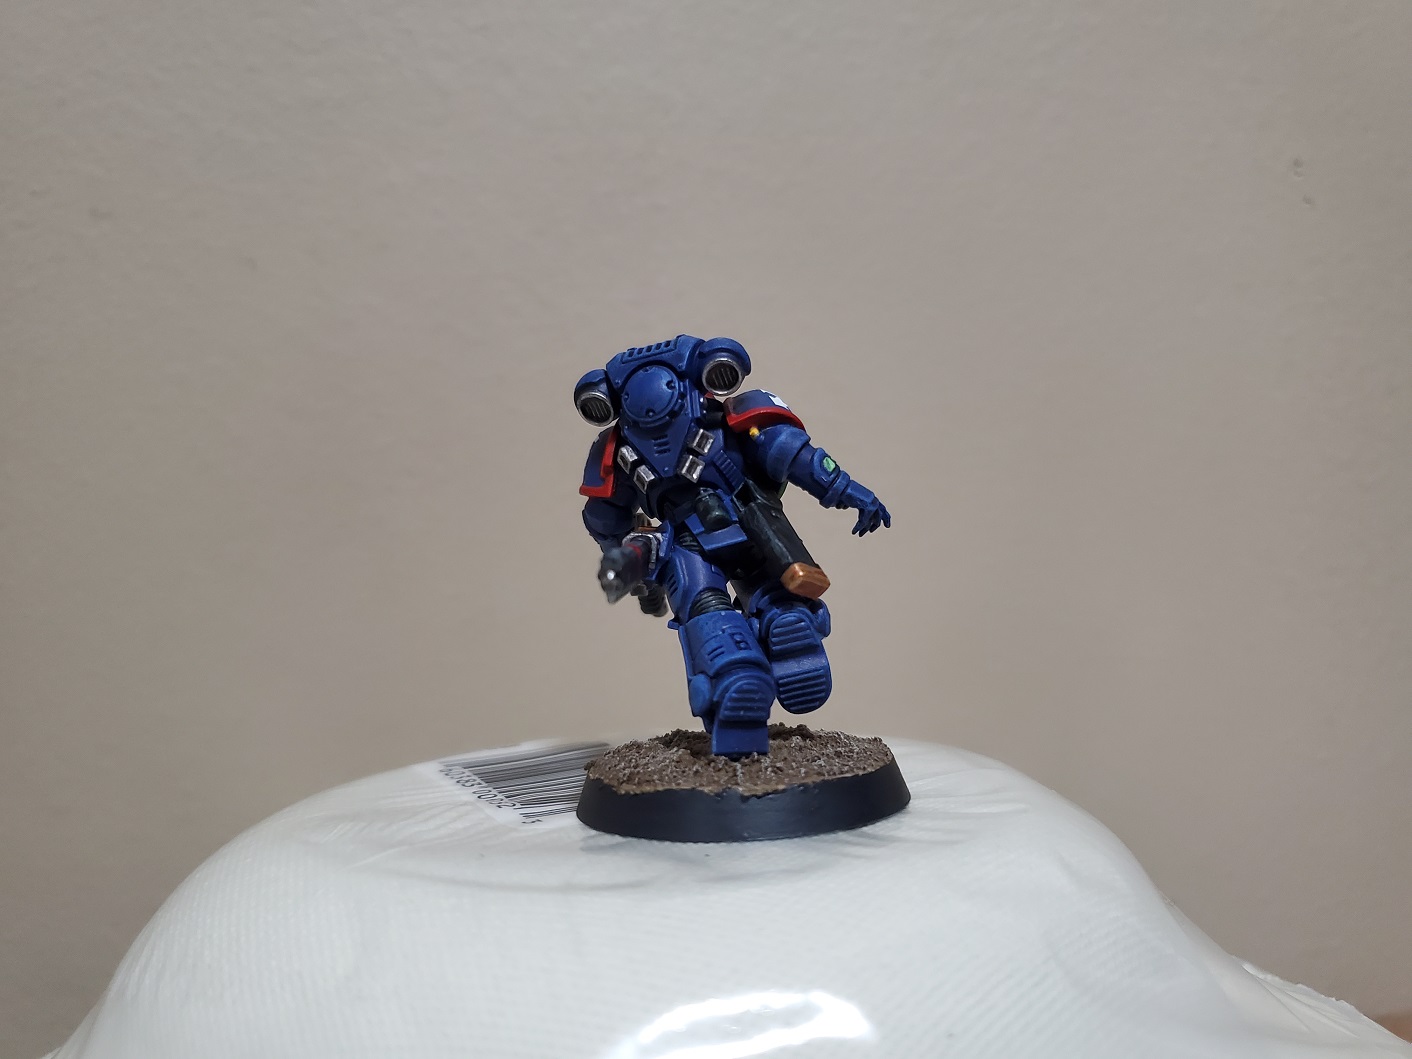 And the traditional Lloyd Shot.
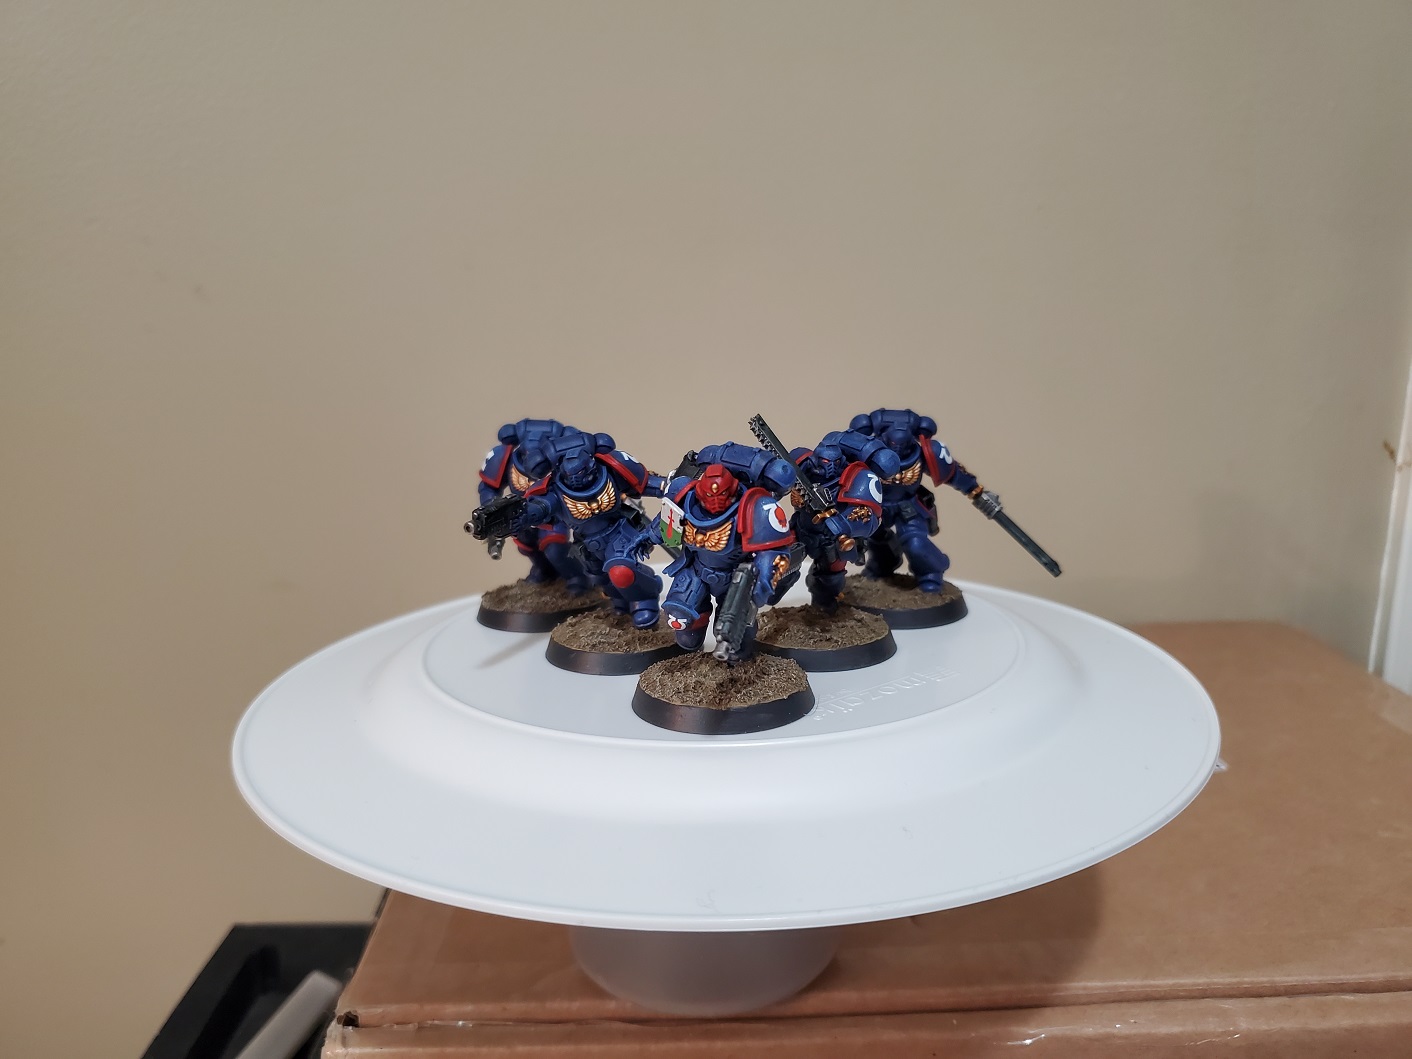
I did say I got a squad of them…and I did start them at the same time, but I’m not very good at batch painting and just decided to steam on with the Sergeant. But the others are coming too…slowly. I also apologise for the lighting in the pictures, but that’s a bit downside of living in a basement. I really wish I could have got a proper student house, but you get what you can find these days. Anyway, here’s the proof of the others, and hopefully I can get them done over the next week or so.
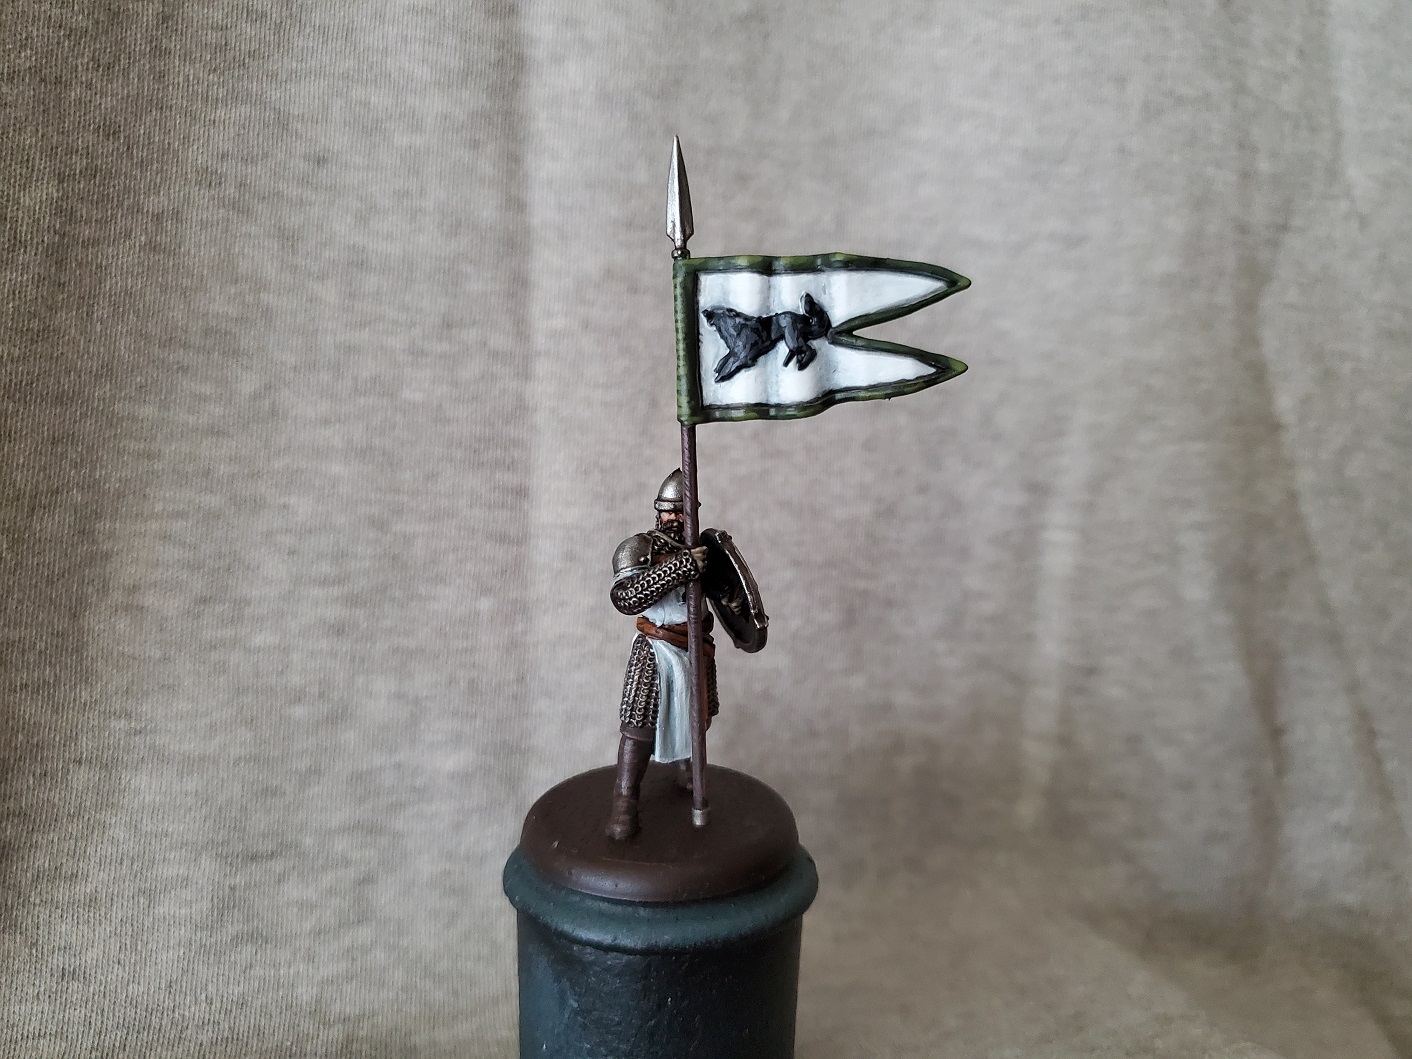
"They say those northmen are a savage folk, and their woods are full of wolves."
I suppose it’s cheating to take quotes for the titles of these Game of Thrones chaps…but it takes me just as long to find the ‘perfect’ quote as it does to come up with a witty (or just usually god awful) pun, so it is what it is.
I’m still sort of stuck with single minis at the moment for a number of reasons, so this banner chap is all I’ve been working on the the past day or so. I wasn’t really paying attention to how much time I spent on him this time round…so I don’t have that info. That being said there were a few things I was trying out that I wanted to go over in detail. Firstly I decided that I wanted the mini to look much more practical (let’s ignore the Stark colours on the tabard here) but also have some interest in colours, so I wanted to do something a bit different with the chainmail that makes up a fair bit of the mini.

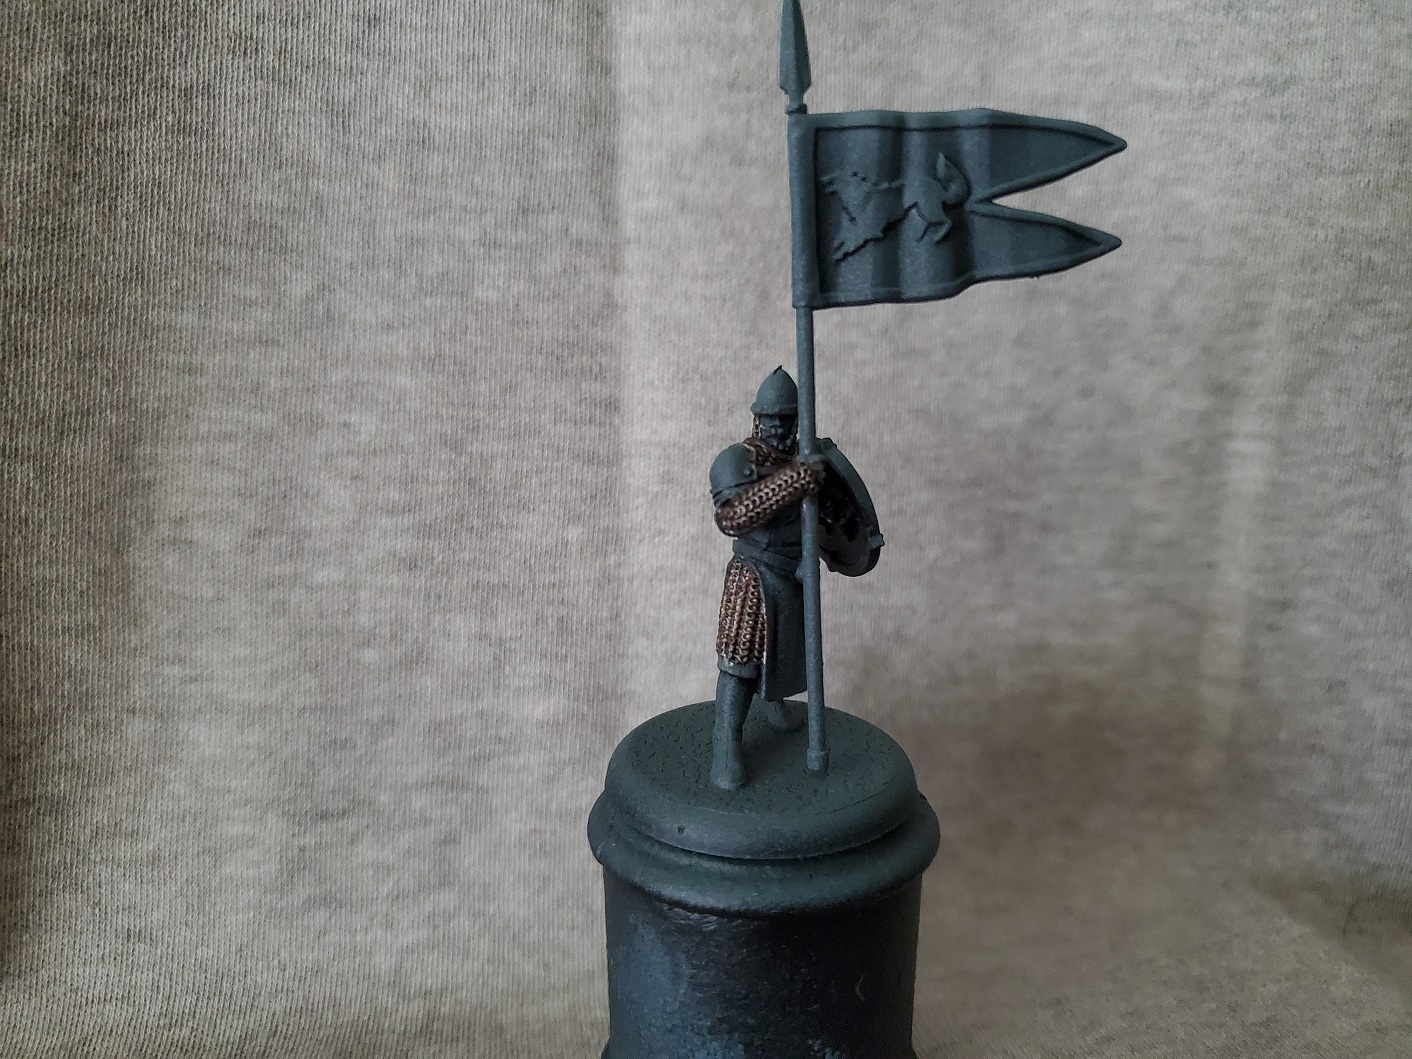

Fairly simple work here going from a basecoat of Leadbelcher (GW) followed by a coat of Wyldwood Contrast (GW) to give the oily brown look before drybrushing another layer of Leadbelcher over the top just to add a bit more of a metallic look. You could do this with Agrax Earthshade (GW), but the colour is not as deep as with the contrast as you will see with the rest of the metal being done with Agrax over the Leadbelcher.
The rest of the mini was painted using normal methods, but I did want to go over the banner a little as it is the same as the tabard…but with extra steps. The tabard was just done with a Celestra Grey (GW) up to White Scar (GW) transition, but there’s a few extra bits I did with the banner that I wanted to go over.
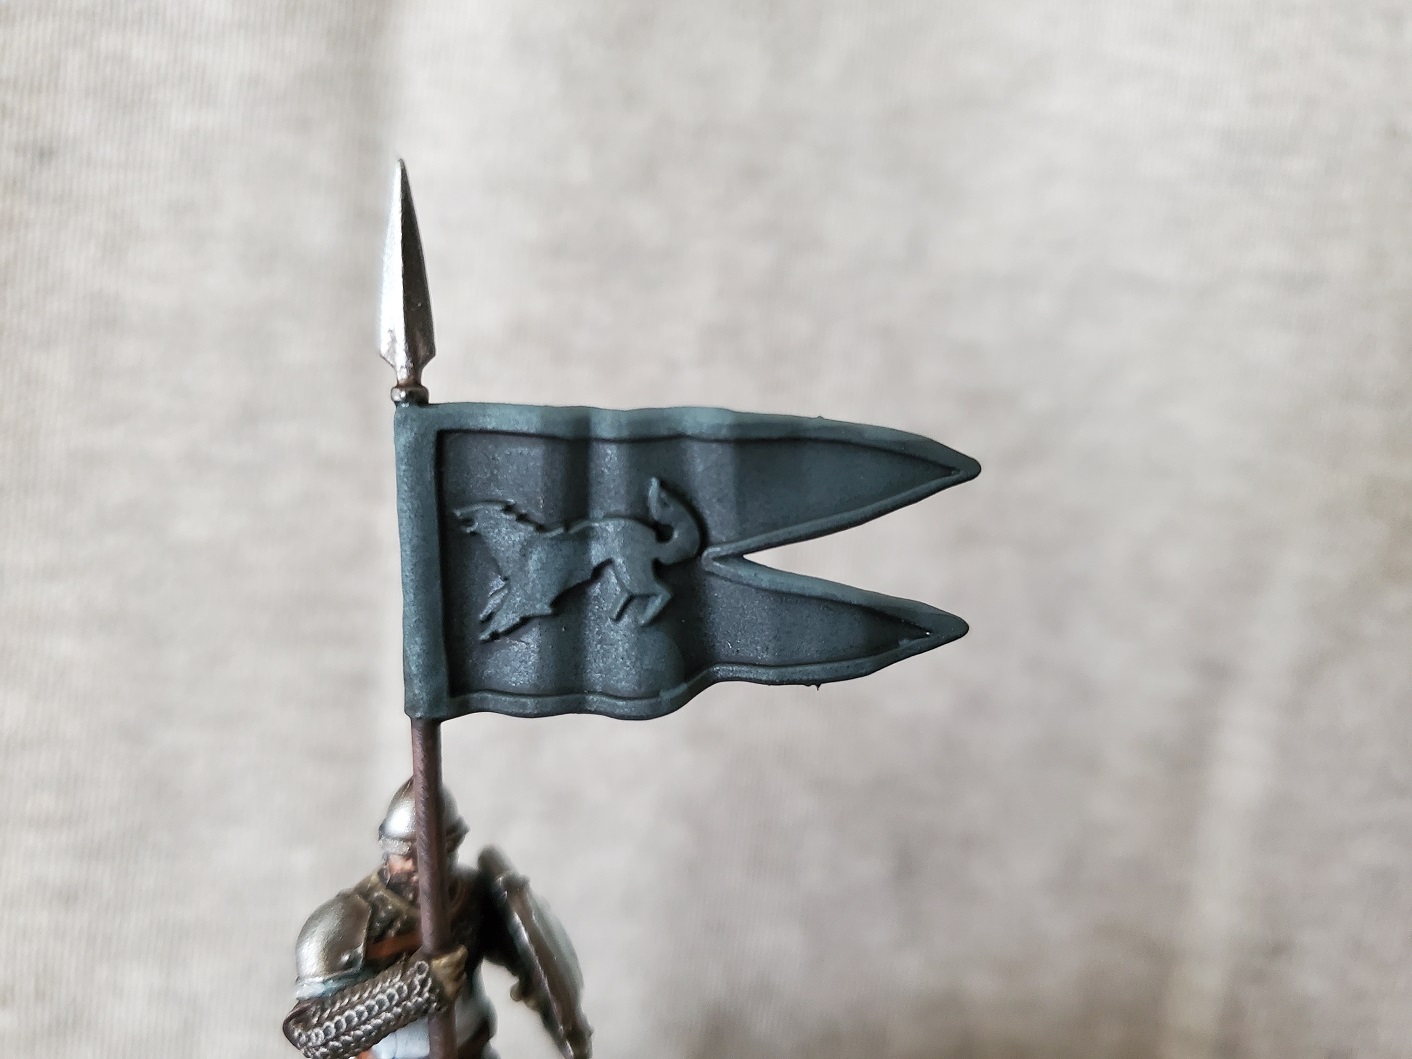

To start with I covered the banner with a coat of Nuln Oil (GW). This was to try and deepen the shadows a little, but really you could skip this as you can see it does very little (though if you’d use a brighter prime then maybe it would do more good). Over that I thinned Celestra Grey and coated that over the whole banner but focused successive layers onto the folds to try and build some shade tones…it sort of worked. This is the same method as for the basecoat on the tabard though not quite to such an extreme level. After that I moved on to Ulthuan Grey (GW) to build up the highlights on those folds. I tried to be a subtle as possible, though you can see some stark (accidental pun) contrast between the two colours that I fixed later on.
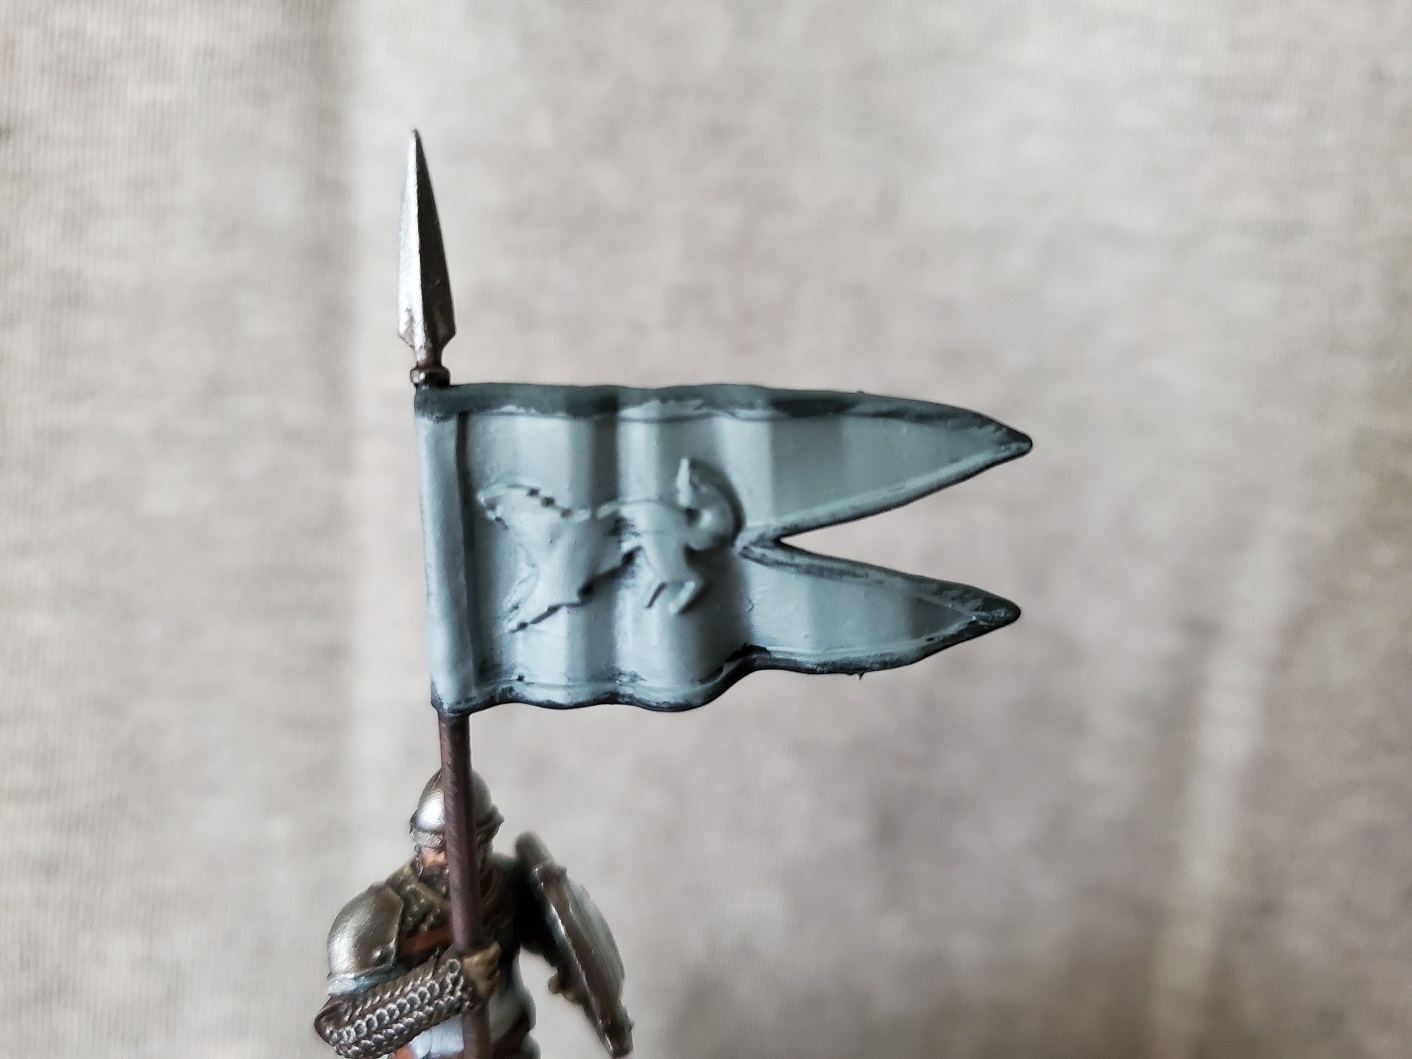
Then I moved up to White Scar and focused even smaller areas on the folds. This Celestra Grey > Ulthuan Grey > White Scar is the method I used for the tabard. On the banner, though, I found the colours to be too blocky and un-blended so I topped the flag with a glaze made up from White Scar mixed with Lahmian Medium (about 4:1 with medium to white) just to blend it out.
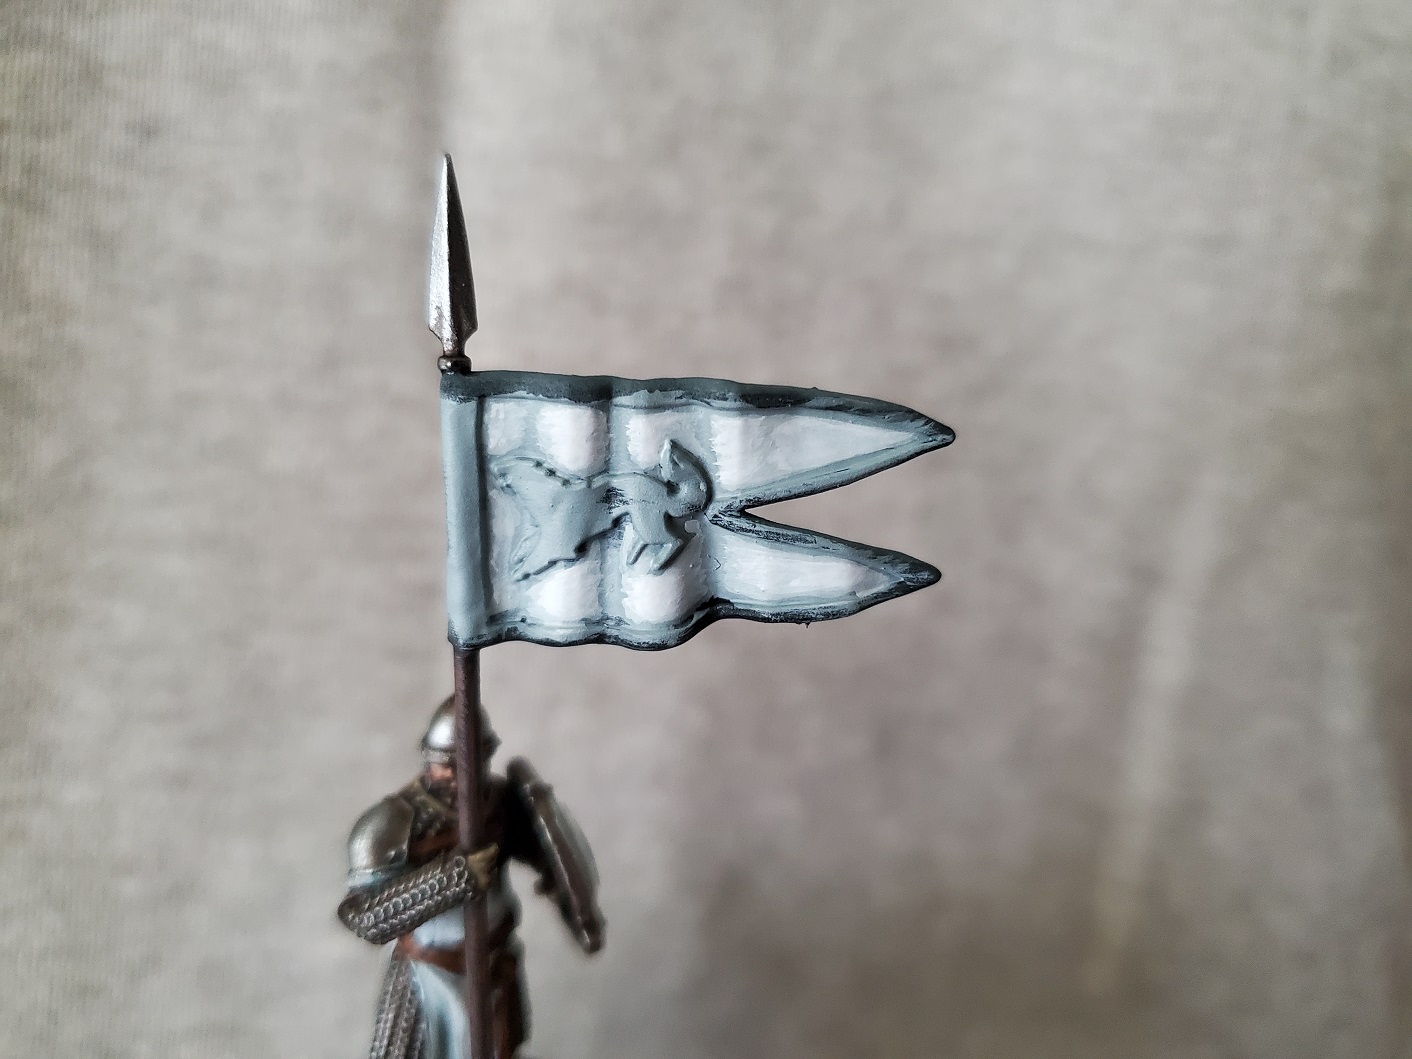
After that I painted the wolf with some black to grey general steps and picked out the trim on the flag with a green as a small homage to the TV series that for some reason added green to the Stark colours. Basically I didn’t know what colour to put there so I picked green. It works. I also took the time to try and add some black lines to the edges of the white to frame it a little better. In the end he ended up like this:
 Like how he turned out and compared to my Lannister bannerman he does look a lot less ostentatious...even with the highly impractical white tabard... :P
 I think when I paint more of these chaps I'll start changing up some of the different colours of the various leather parts and some of the shields. I might even change up the tabards a little, but that's a problem for later.
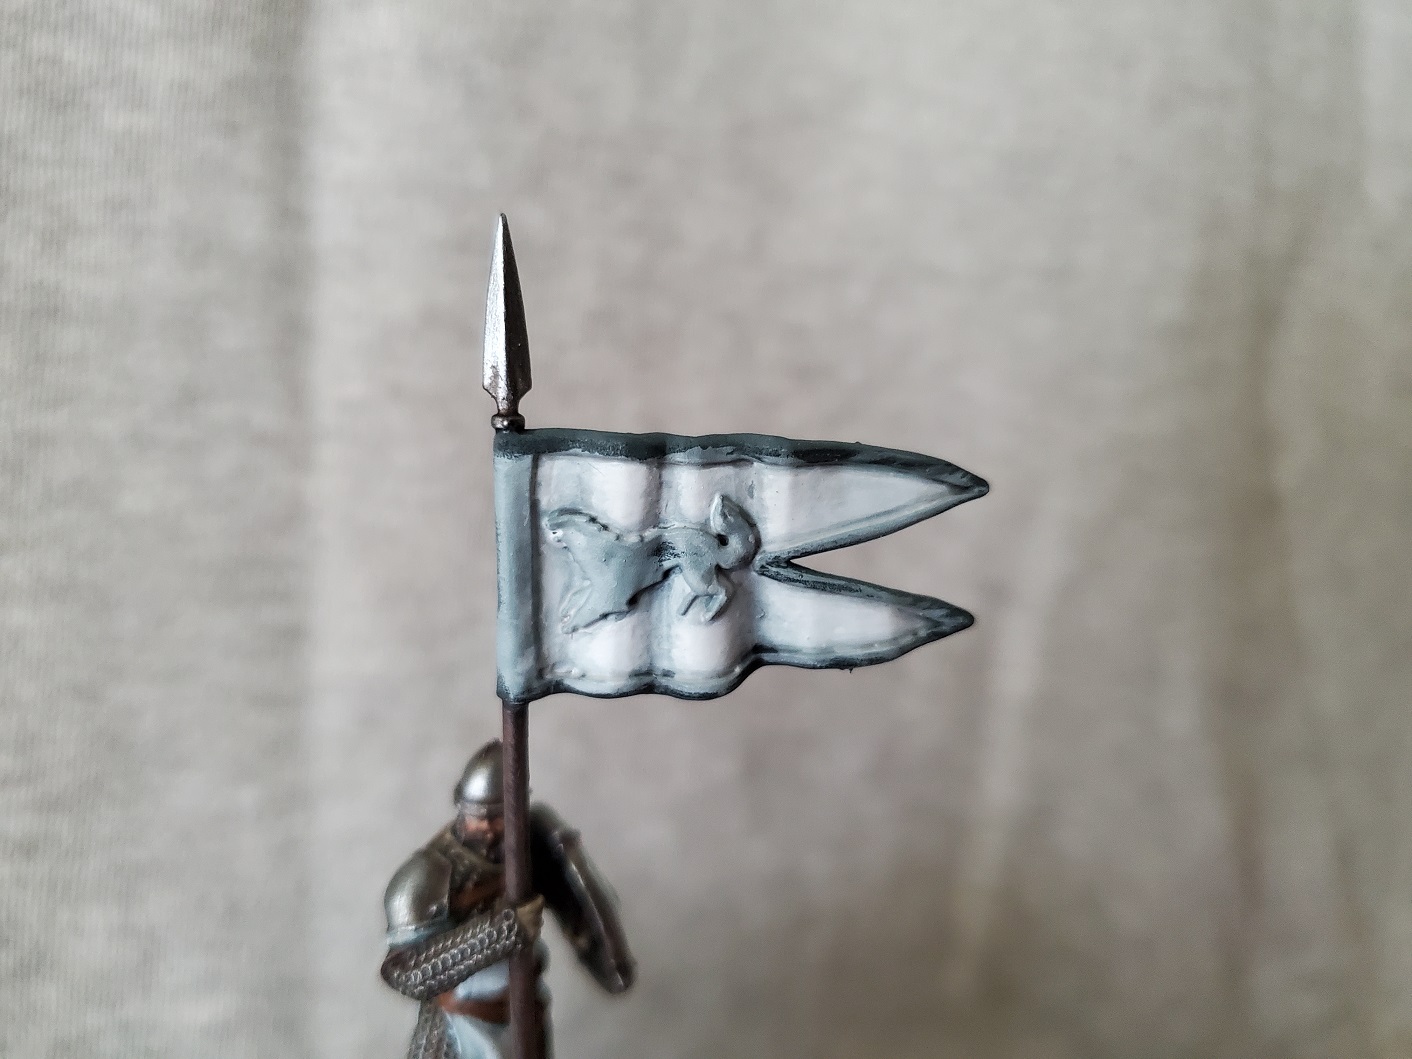
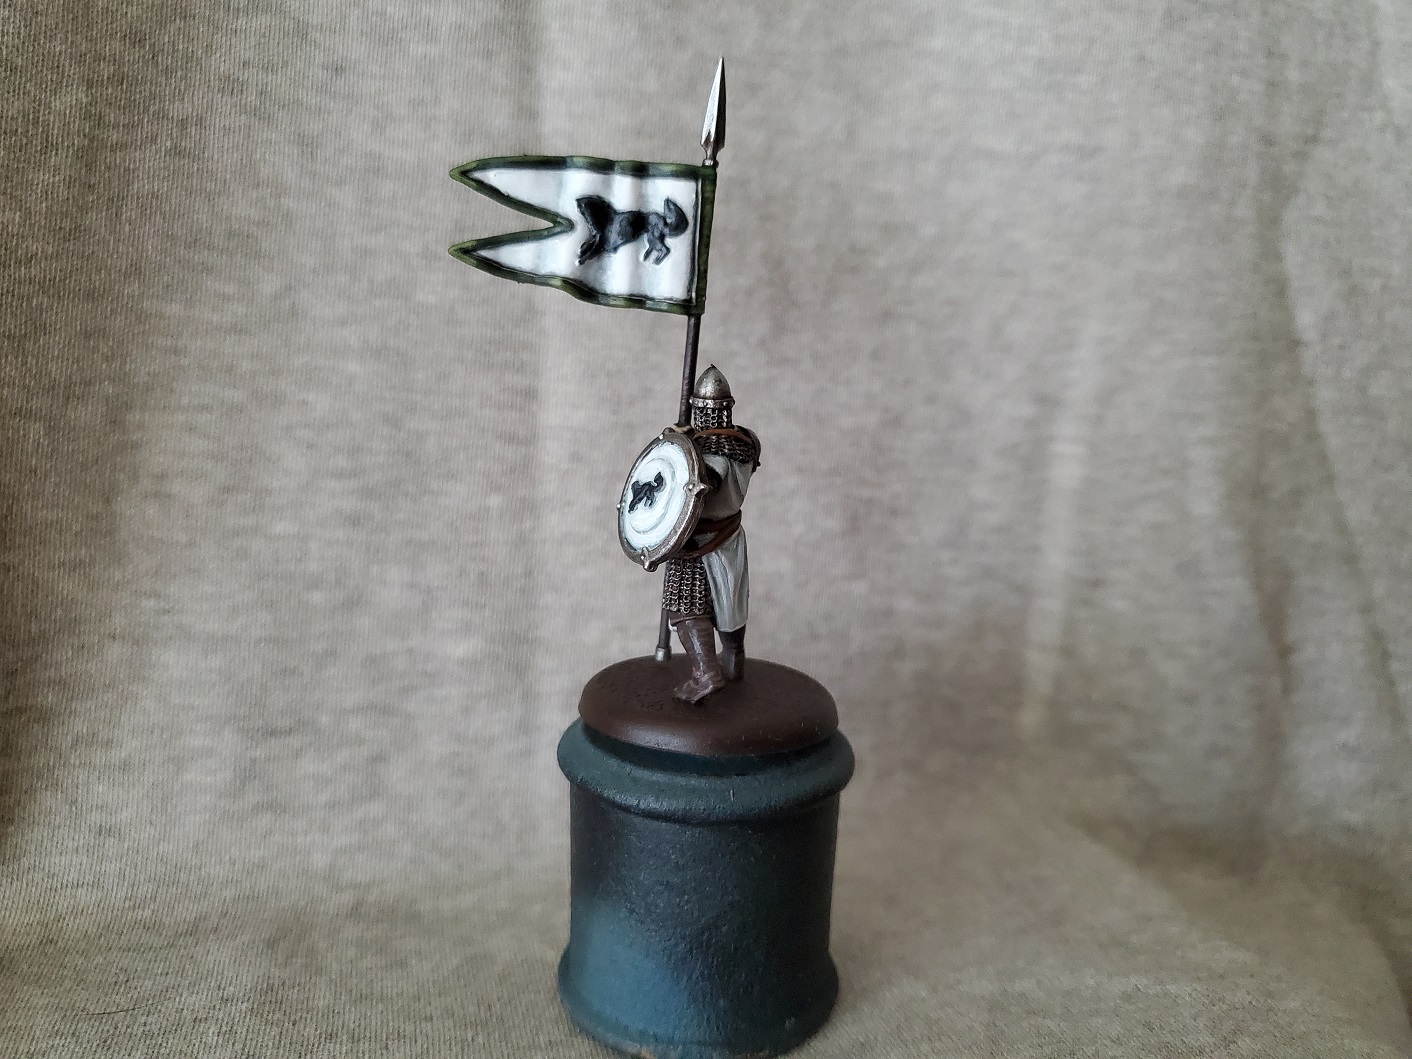 Seeing as he's carrying the banner I wanted to have a fully painted shield. Pretty pleased with how it turned out. I might change the wolves to look a little more grey than black eventually; the black is just a monochrome for the icon.
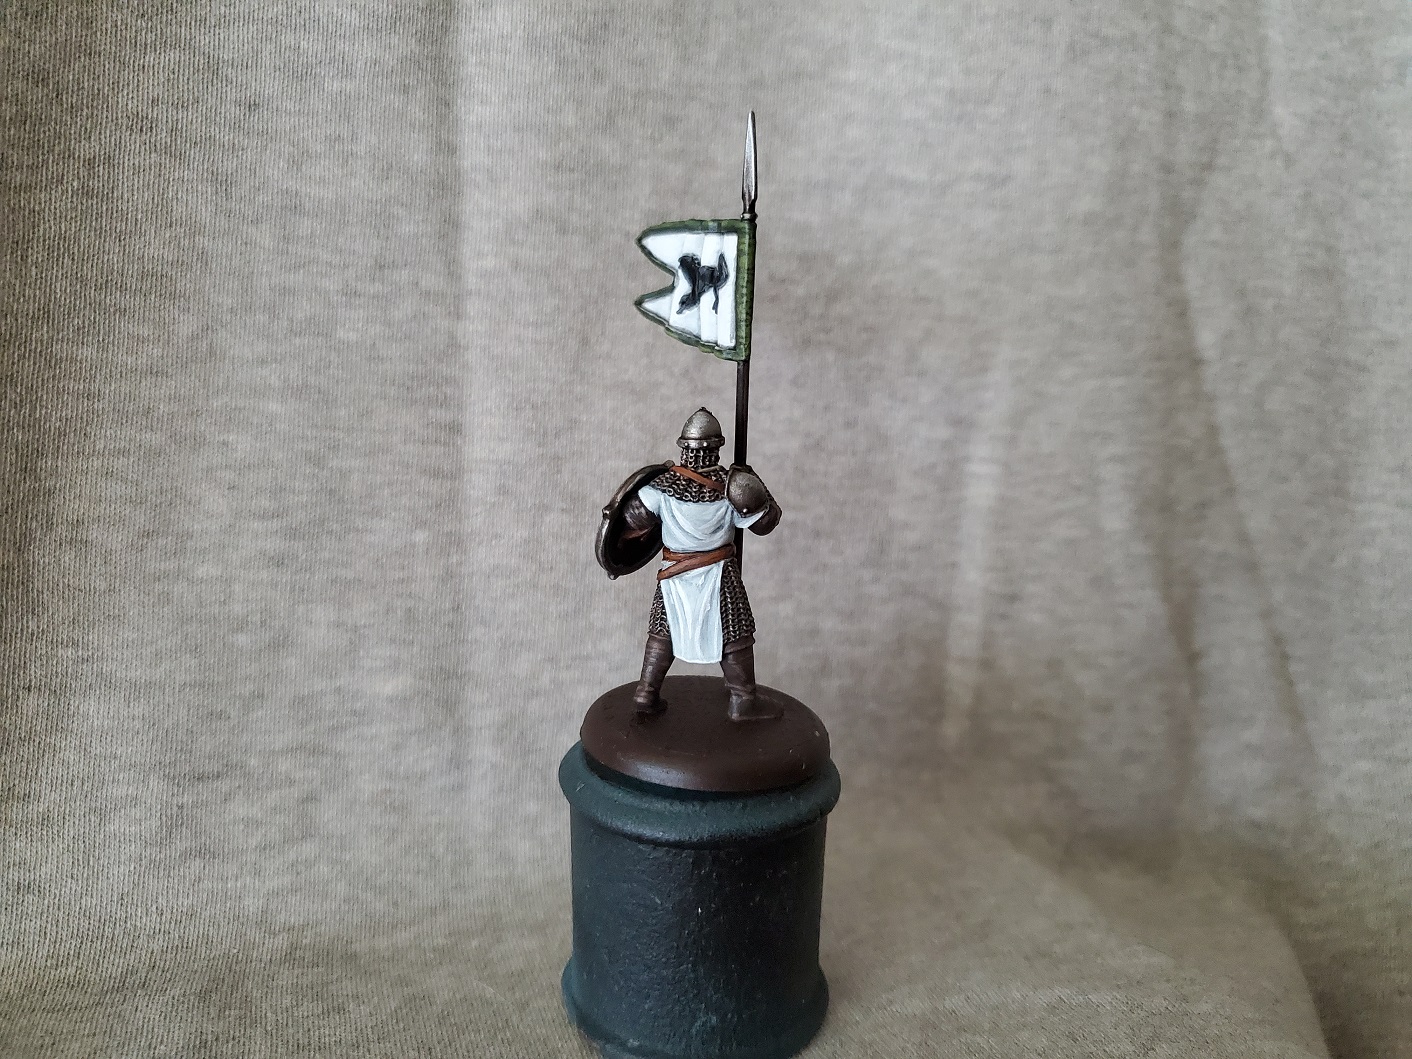 And the traditional Lloyd shot. No basing on yet just because I have no basing stuff left, but I'll get some on there eventually.
So minus the wolf motifs possibly changing to a brighter grey colour, he’s all done! Pleased with how he turned out…though when I get to painting the rest I may not go quite to in-depth on the paintwork… 😛
Ashes to chimneys, and dust to tracks...doesn't have the same ring to it, really...
Weathering! A fun little final step with vehicles/armour/scenery/ect. Final being an important part of this…seeing as this tank has been unweathered for quite some time…as is evident from the horrid ‘before’ picture because I’m an idiot and didn’t think to take a new one before I started…
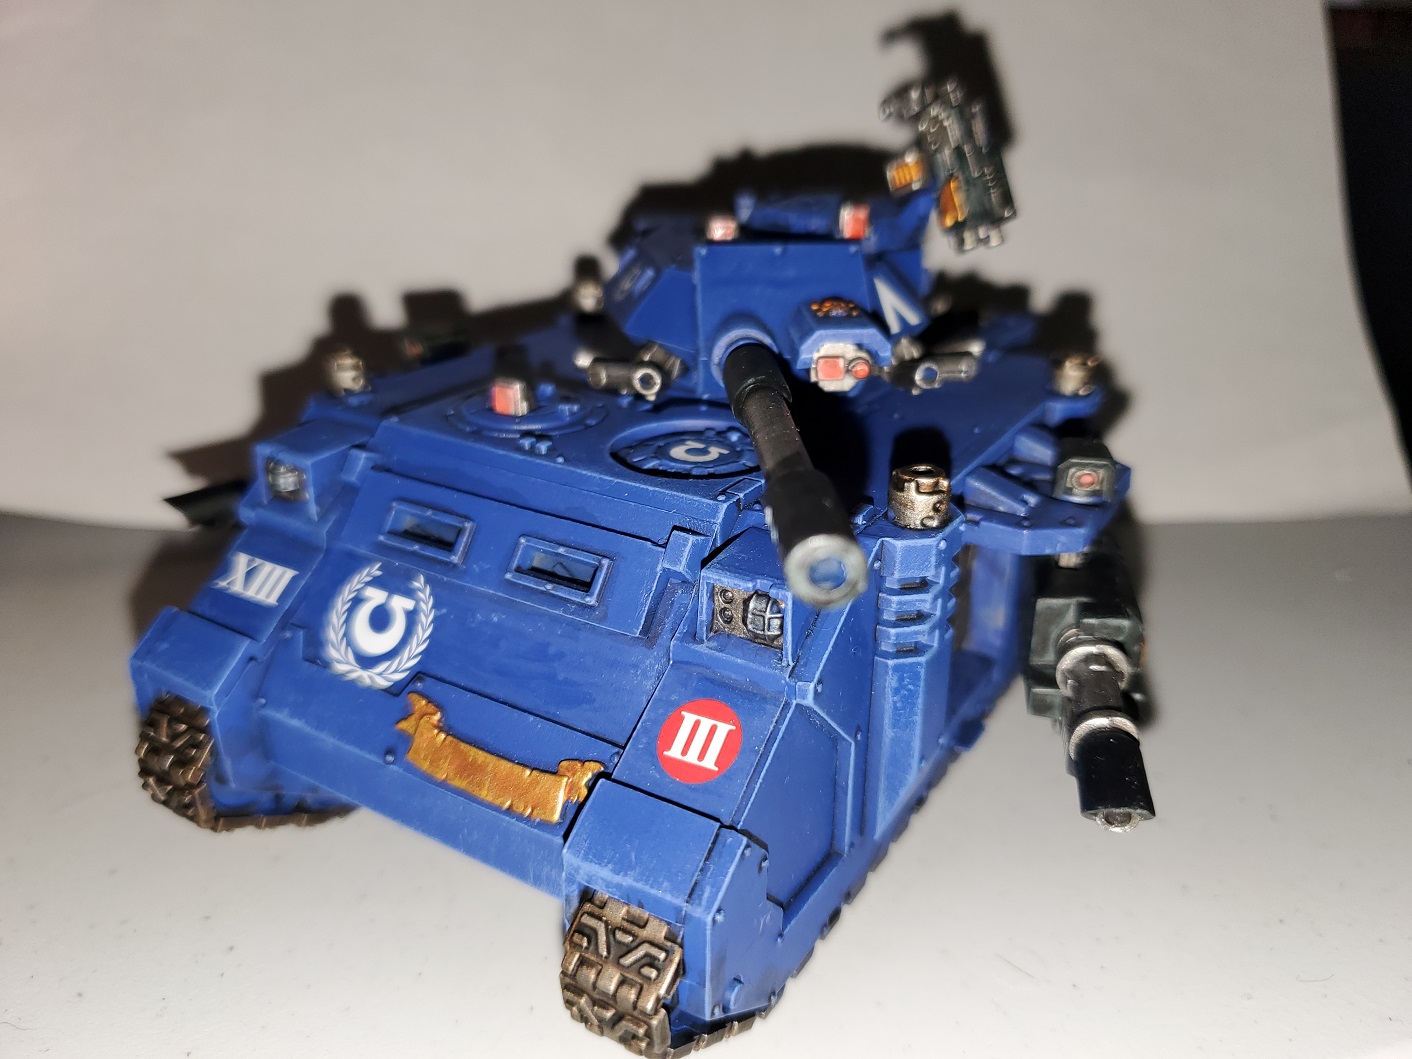 The lighting is bad, the focus is awful, and you can barely see what I'm trying to show but the paintwork looks 'clean'...I hope...
So that terrible picture aside, what I wanted to go for with this mini was a clean tank but one that is in action. Even a newly painted tank has to drive to the fight, so the main focuses here were dust and some water streaks from splashing through puddles. This is why I’ve mainly focused toward the bottom of the vehicle.
For the dust I used Tallarn Sand (GW) as a drybrush along the lower portion of the tank. I tried to brush in a circular motion to show a bit of turbulence in deposition, but in parts that wasn’t as easy to do. In parts I followed this with a lighter drybrush of Ushabti Bone (GW) in places. I did this before the streaks as I wanted them to be more like water run-off so have some darker streaks over the dried dust to look like wetter parts. I will plan on putting a base on the tank eventually and I don’t plan on adding any water to it, but I like to think that at least one river could have been crossed to get to the fight.
 The focus is still not perfect...I really need to check what my settings are on my phone...
The vents all over the hull were coated in thinned Black Templar Contrast (GW). Just thinned it with water to deliberately change the properties a little bit. If you used the Contrast Medium (GW) I suspect it would look a little smoother, but I was going for something a little rough. The other streaks were done with Wyldwood Contrast (GW) in a similar manner and applied to areas where water should pool and then dragged down to create the streaks. I might have gone a little too far with the glacis plate in the front but I did limite the number of streaks I put on the turret to show the lower chance of water splashing that high in general use. On the top plate I just dropped some of this colour into recesses where the water would pool.
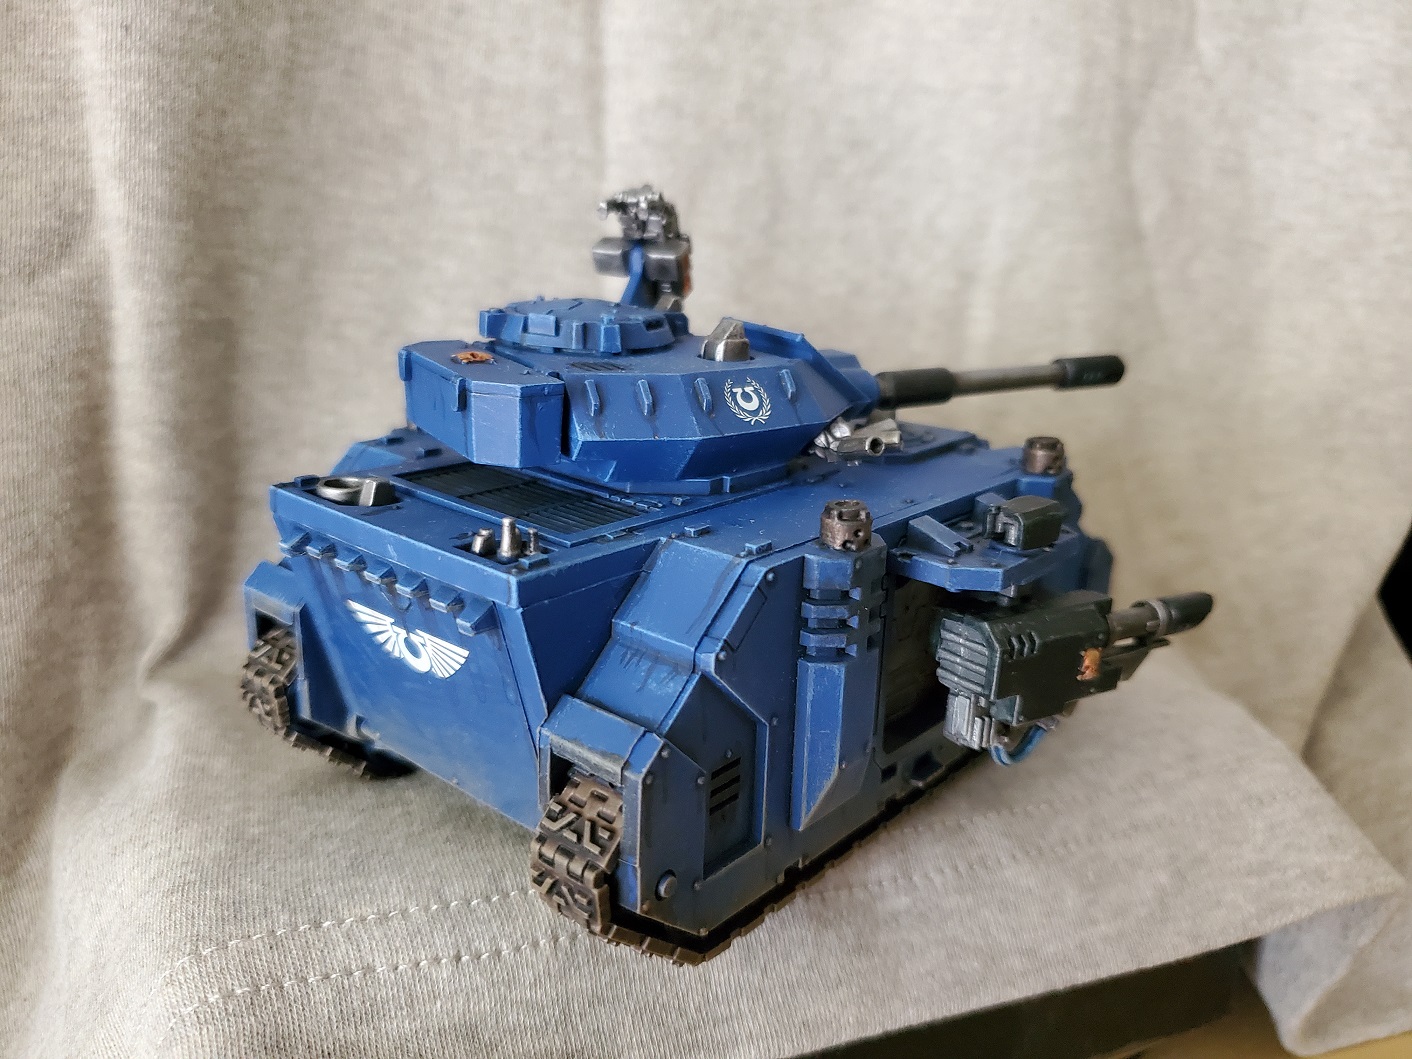 Also helps the decals look like part of the vehicle when I can drag some streaks over them.
To show some smoke and soot from the chimney stacks I drybrushed and stippled Corvus Black (GW) around the top of the chimneys and around the cutouts on the sides of them to add a bit of discolouration. Didn’t go overboard here as I just wanted to show use rather than heavy use without deep cleaning going on. I want my Marines to look clean so it plays into the angelic side of their nature. If this was a Guard tank I would weather the thing to hell. 😛
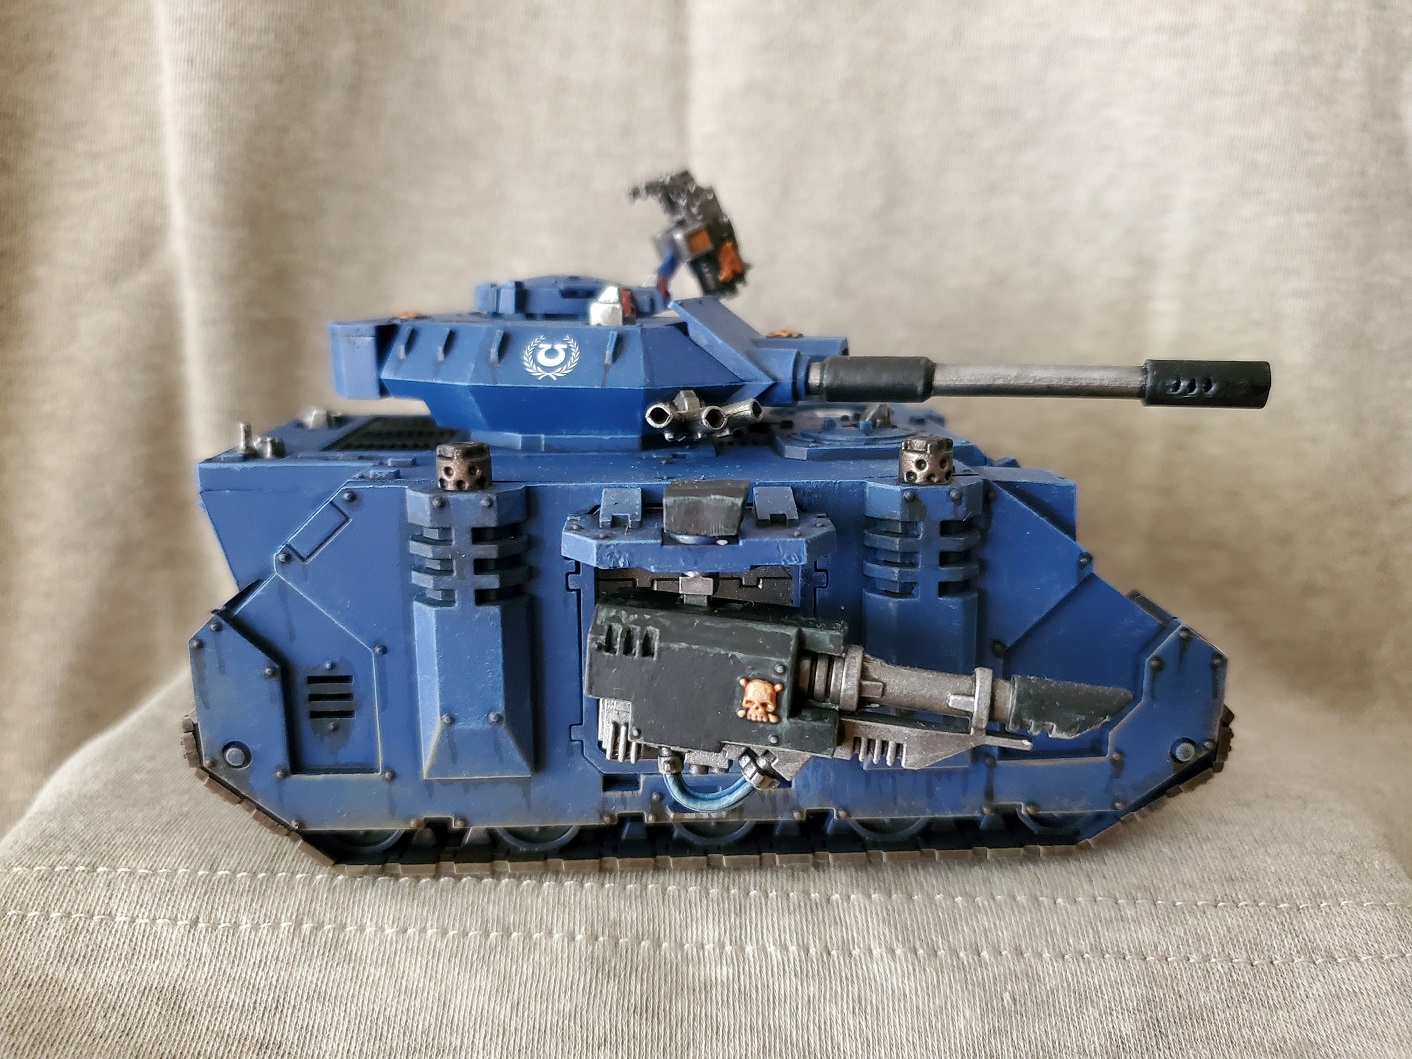 This a better focused look at the different types of weathering across the side plate. Not Lloyd shot today...unless you count the pic above as a half-Lloyd...
Still not sure about that front plate…but for now I don’t have any Macragge Blue to tidy it up a bit, so it’ll have to stay as it is for now. Of course chipping is another method of weathering that can be done, but that’ll have to be saved for the next Bolt Action tank I work on…which might be a while away (I need to do more infantry first…).
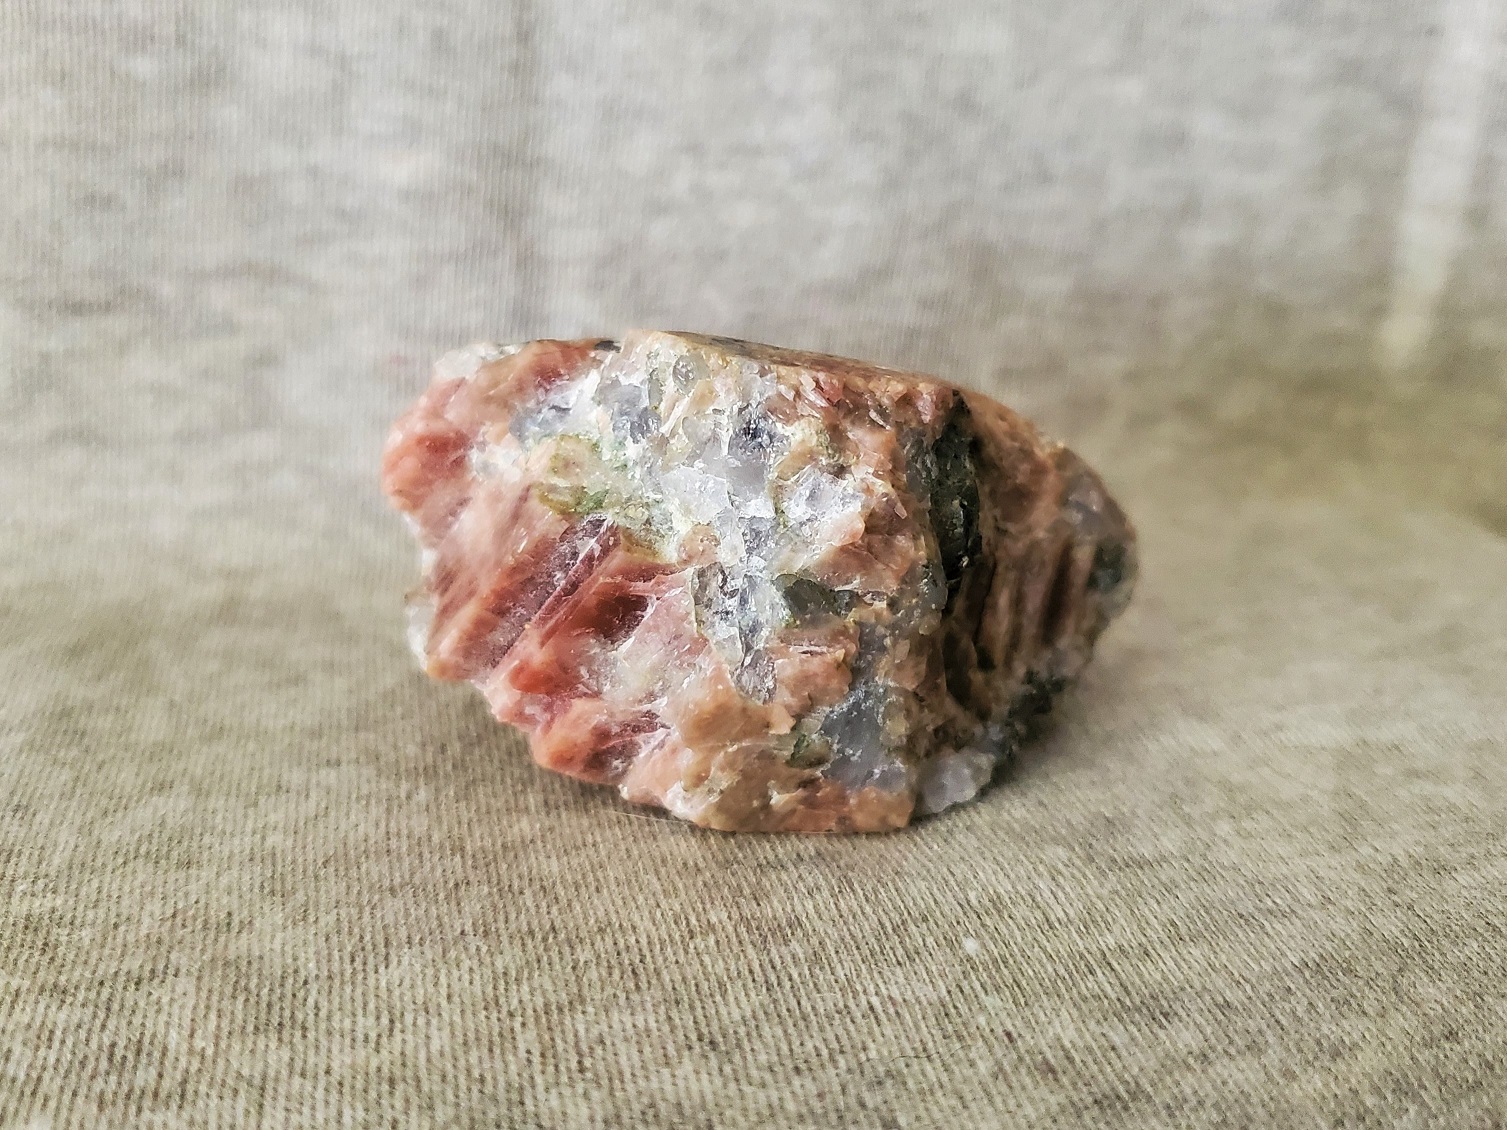
Running some test and doing some maintenance.
Just running a few tests on image size and doing some general background work on the project, so my apologies if this keeps popping up on the feed for a while. As a consolation prize, here’s a picture of a cool rock I have; it’s a granite pebble.
Ok, the faffing about should be done now. Project should run smoother, faster, and more reliably with the reduced pictures…we didn’t need that level of zoom…
"How many monsters does Lord Tywin have?"
Vargo Hoat is done…almost… I missed a clasp on the end of the belt but I’ll fix that later. I managed to avoid screwing up the cloak while getting to the other details and I managed to get my idea for fancy trousers done too! Most of the colours are fairly simple tones for leather and such. The skin tone is entirely contrast but to give a slightly different tone I used more sandy colours like Ushabti Bone (GW) as the base coat so that slightly more brown tone shows through. It’s not perfect, but it works well enough.
The trousers were something I haven’t done very often with stripes, so I decided to paint the trousers in blue first and highlighted them right up (I used the same pattern of colours as the Royal Artillery Officer’s jacket below). After that I took some thinned Celestra Grey (GW) to paint the white stripes. Using the thin paint allows some of the shading of the blue to show through, then it’s a matter of highlighting up to some pure white. Actually a bit simpler than I thought it would be, though painting in straight lines is a bit tricky sometimes…
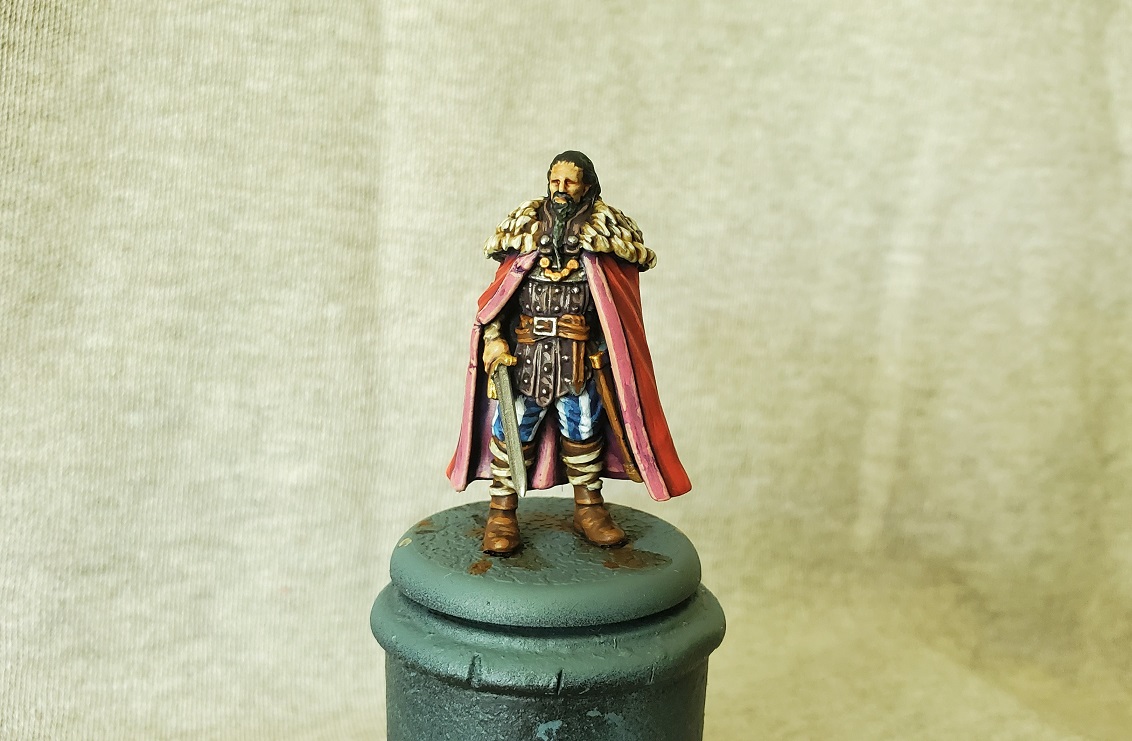 Just ignore the grey clasp on the end of the belt... Other than that boo-boo I think he turned out well.
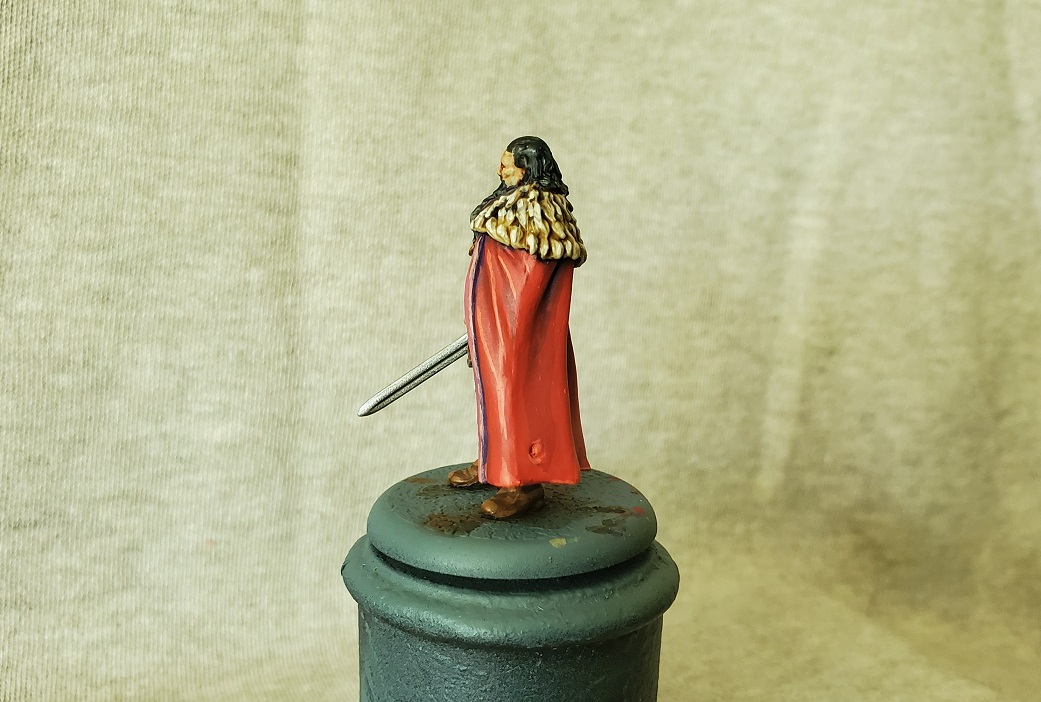 Not much change on the sides and back...seeing as the cloak is such a large part of the mini.
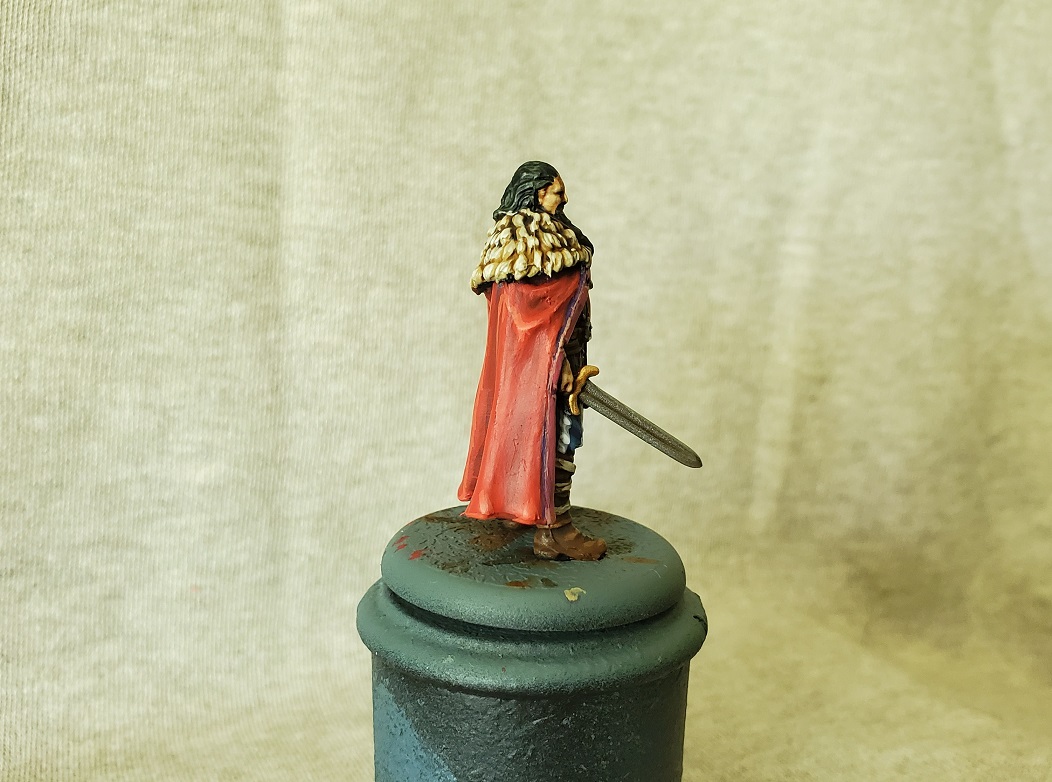 The fur turned out quite nicely. Zandri Dust (GW) shaded with Seraphim Sepia (GW) and then Agrax Earthshade (GW) closer towards the collar before highlighting with Ushabti Bone and Screaming Skull (GW).
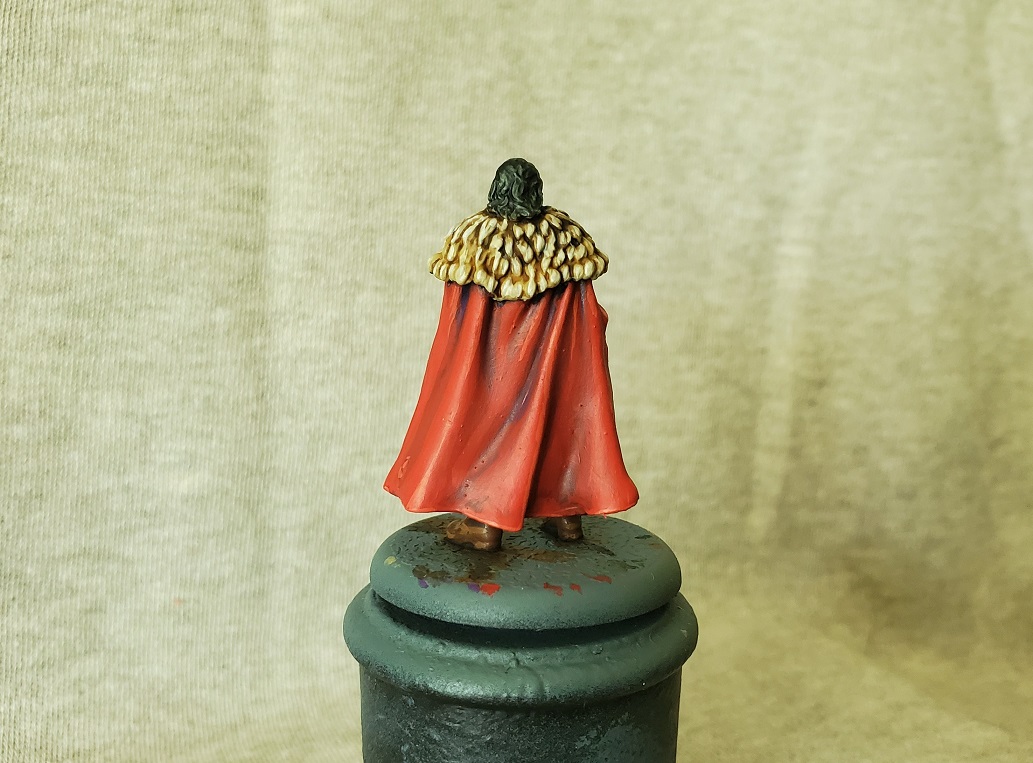 And the Lloyd shot!
No immediate plans for a next project at the moment. Dealing with a bit of hobby burnout (or just general burnout) at the moment. I might do something a little different next time just because I like to keep up with things like this. I might do something geologic that I could tie to hobby time…maybe following on from a conversation of painting stone golems as different rock types…but who knows.


![Play WW2 Commando Operations With Butcher & Bolt [Updated]](https://images.beastsofwar.com/2026/03/relaunch-600-338.jpg)


