


DARKSTAR CAMPAIGN UPDATE: DUCHESS ANNABEL’S WAR IS OVER


Recommendations: 3619
About the Project
The year is 2512.
The powers that remain on an ecologically-devastated and plague-ravaged Earth have been forced to look to the stars for the resources, capital, and room not only to expand, but to survive. While the setbacks encountered by mankind over the past 500 years have forced him to unite in a shaky global coalition and make fantastic strides in technology, they have also caused seismic and reactionary shifts in religion, culture, and politics. A second age of imperialism has dawned, and because man would never survive another war on the fragile remains of planet Earth, he is forced to ply his oldest trade ... war ... exclusively among the stars.
Darkstar is a tactical war game postulating naval combat in a “science faction” universe set five centuries into a troubled and uncertain future. Players take command of warships serving in the new “black water” navies of reborn empires of old, struggling for control of shipping lanes, resources, and colonies. Ships maneuver and fire in fast-paced combat, with survival not only of the players’ fleets at stake, but perhaps their nation and all of humanity as well.
Related Genre: Science Fiction
This Project is Active
Update on Wave 2 Starships - Live Game Today at 17:30 UK Time

UPDATE:
All factions (published and non-published) are now “caught up” with latest edition Warship Record Sheets, and their math is now compliant with most recent edition or the rules.
Wave 2 warship .pdf I hope to have out in the next week or two.
Wave 2 ships will follow much the same format as Wave 1 that went out with the initial Darkstar .pdf last December. Each faction will start off with 5 designs, with a write-up and a sample WRS.
That will get players to an even 50 available classes, 30 from the original set and 20 more here. Just under half.
Wave 3 will follow on later this year, with either Installations (ground and orbital, already designed and ready) … or maybe more warships for the 10 classes (three more designs per faction = 30 more per release).
Wave 4 will take whichever option Wave 3 did not, either way we’ll now be at 14 installation types (orbital and ground) and 80 warship classes.
Wave 5 will wrap up the remaining 30 or so warship classes, leaving players will well over 100.
That takes our release schedule somewhere into 2020, so we’ll have to see what comes after that. 😀
Also, LIVE DARKSTAR GAME will be online starting at 17:30 today UK time! Ping Oriskany a PM if you are interested in checking it out on web conference.
British v French Again, and this time characters GO DOWN!
Okay, so @damon and I had another great game of Darkstar on Saturday. Again, we’re looking at my French vs. Damon’s British. In addition to the successful running of Darkstar on line and another great game, we’re also expanding our playtesting more and more into successful execution of SCENARIO based play, instead of just pointed-up mash-ups. Last time we had a “dock and rescue” mission, this time we’re trying convoy escort.
Forces are the same last time (no ships were lost permanently last time, and again, we’re just trying a new scenario model).
French (New Roman Alliance):
- NRS Leclerc (Foch-Hispaniola class light cruiser – upgraded)
- NRS Corsica (Milan II class destroyer – upgraded)
- NRS Calais (Milan II class destroyer – upgraded)
British
- HMS Bellerophon (Trafalgar class heavy cruiser)
- HMS Indefatigable (Indomitable class light cruiser- upgraded)
- HMS Terpsichore (modified Falklands-Commonwealth class destroyer)
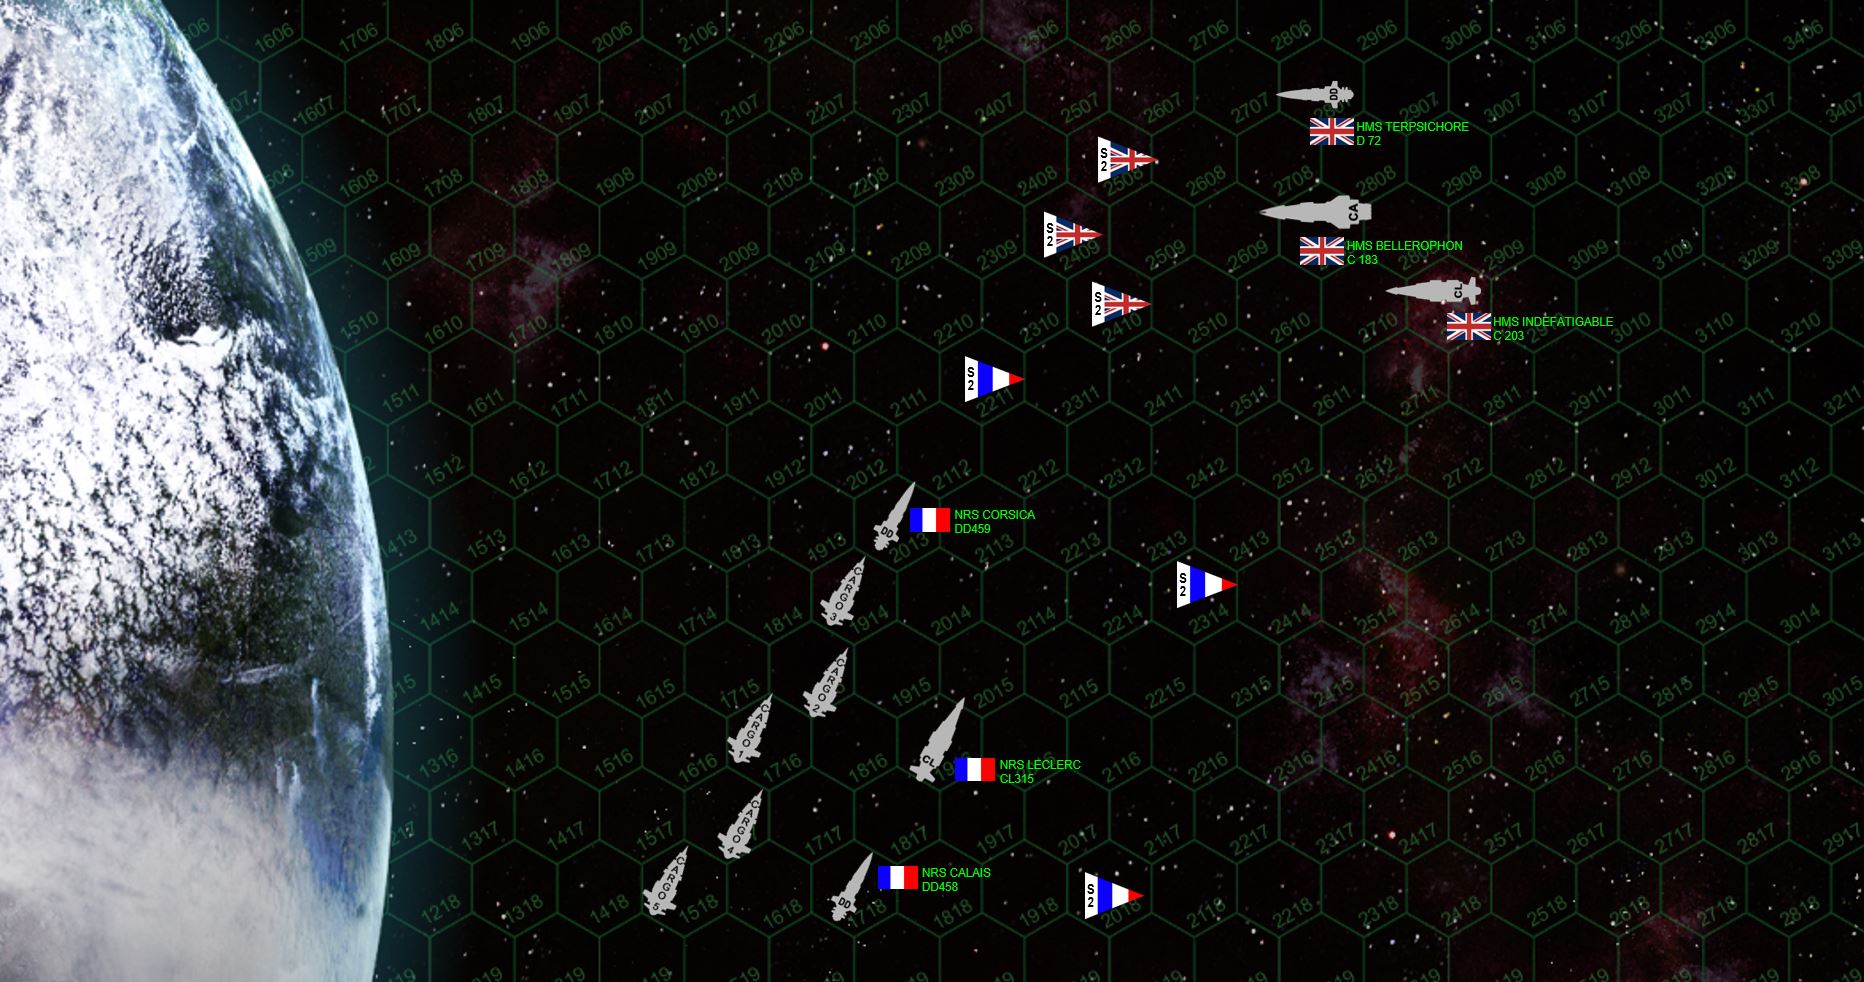 The French have an convoy of five automated drone cargo ships, entering on the bottom half of the table. Movement on these are 7 hexes a turn, they automatically “lose initiative” and must move first every turn, they make one hex-side facing change per turn, have 3 in shields on all facings, and 10 damage points. The French get 20 points for every one of these that successfully get off the top end of the map sheet. The British get 20 points for every ship they destroy. // Terrestrial gravity rules. One hex of gravitational drift toward the planet is assessed against any non-aerospace ship (including cargo ships) that end their movement within 10 hexes of the planet’s outer rim. Any encounter with a hex that is even partially covered by the planet graphic results in immediate and total destruction of the ship. // Scoring in this scenario is RAID-based, i.e., players get points for enemy warships destroyed / crippled / driven off … NOT remaining ships on the table at the end of the game. To claim a victory, players need to score at least 40% their opponent’s beginning total, and must score at least 5% more than their opponent. In this case, both sides have 244 points on the table, so that 40% threshold is 98 points. This is rarely an issue, it’s just to keep players from “peeking” onto a corner of the table, releasing a hail or torpedoes, and vanishing with minimal damage inflicted, yet claiming a victory without ever really engaging in battle.
 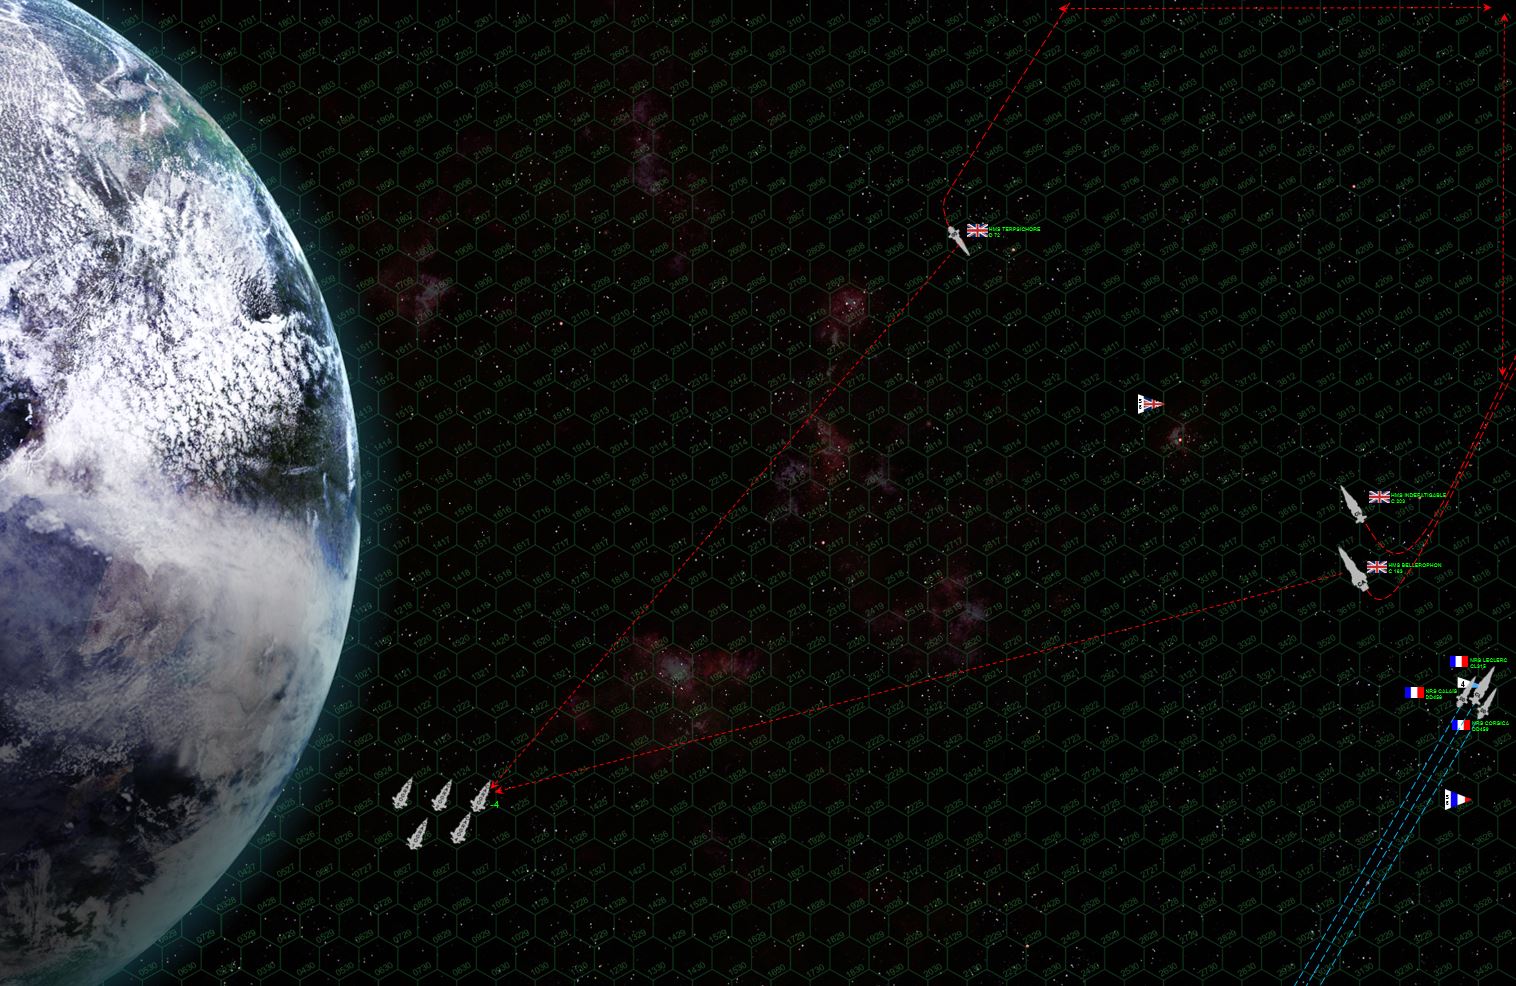 A wide angle of the whole map sheet at the end of movement, Turn 1. The French cargo convoy has entered near the planet. The British then came on through the hexes specified for their entry hexes (upper right, indicated by red arrows). With hard jackknife turns to starboard, Damon seems to be trying to set up long-range broadsides on the cargo ships, but the range really is very long (just short of 4700 kilometers, the distance between London and Nova Scotia). Meanwhile, the French, who largely WON initiative aggressively stab onto the board from the lower right, rapidly accelerating to a broadside position. Payback time!
 A close up on that lower right corner of the map, where the French unleash a truly withering broadside straight into the stern of HMS Indefatigable. Not only is she instantly crippled here, but takes so much damage to her reactors and engines that she’s actually in danger of EXPLODING. Damon makes the roll, however, and the Indefatigable is only crippled, and in fact will be recovered and towed back to port for eventual repair. But she’s out of this one, that’s for sure. Rear guns on the two British cruisers pummel the port bow of the Leclerc, knocking down port bow shields and crippling one sensor array, but otherwise doing little damage. Meanwhile, the aforementioned forward broadsides on the French cargo drones do very little, the range is just too long. The French are definitely winning this one so far.
 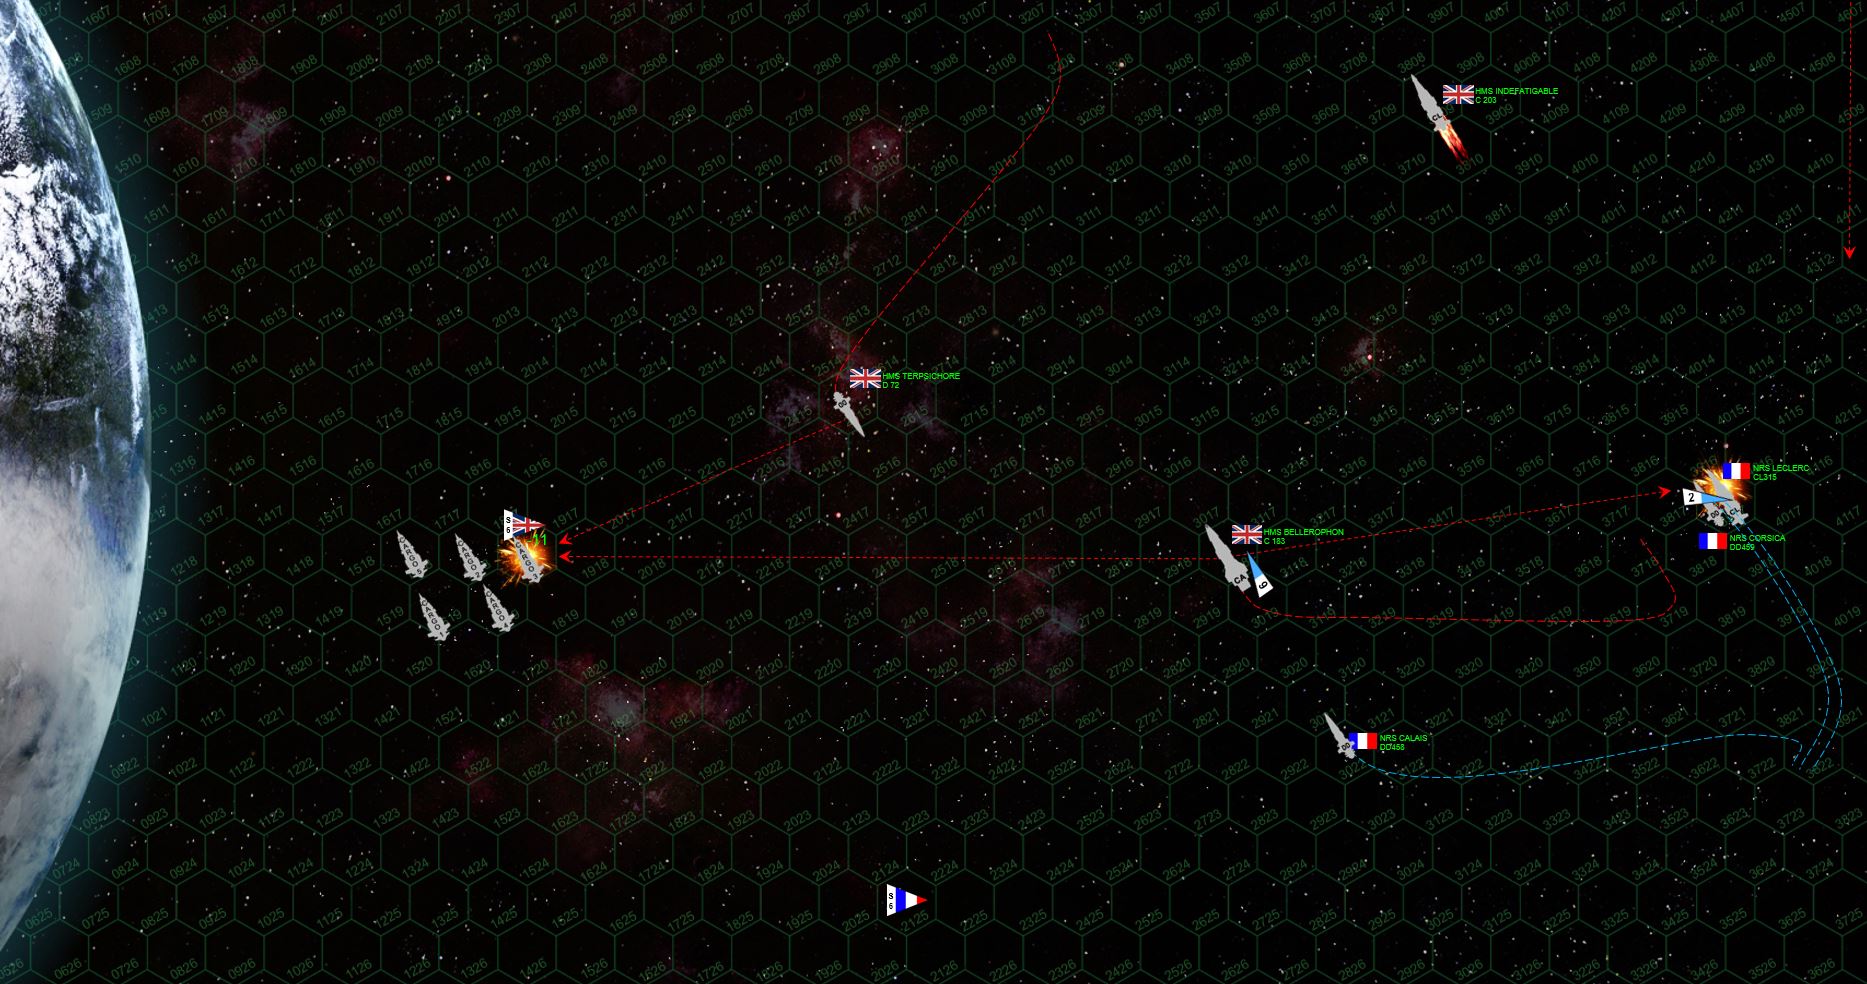 The French (and by that, I mean MY DUMB ASS), literally snatch defeat from the jaws of victory here. Rather than simply roll the Leclerc to protect her vulnerable port bow, I totally forget I lost that shield and decelerate instead. Damon doesn’t waste the opportunity, putting a few of Bellerophon ‘s heavy EPCs into the Leclerc’s totally unshielded port bow. One 15-teravolt bolt scorches right through the bridge, damaging it. Another follows up, crippling the Leclerc and actually forcing my commander here (Captain Rafael deChalemonde) to make a captain survival roll. God, I can’t believe I did that. Meanwhile, the Bellerophon and Terpsichore switchback their broadsides closer to the French cargo fleet, finally knocking down the first ship. The cargo fleet is actually using the planet’s gravity to hedge further away from the British, squeezing a little extra velocity and distance from the planet’s gravity well. The one piece of good news for the French is that the Bellerophon and Terpsichore are widely separated, allowing the destroyer Calais to S-turn behind her for a torpedo spread into Bellerophon’s stern.
  The French cargo drones have practically “bounced” off the planet’s atmosphere here, but they’ve still lost a second cargo drone. Three remain, but they’re already only two turns from the edge of the board! The Bellerophon, meanwhile, has rolled over on her back, having lost her starboard quarter shields. This maneuver hopes to shield the starboard quarter from the 8-megakelvin lasers of the two French destroyers, but these Milan-IIs are fast if nothing else. And with the additional Tactics battle upgrade, they ALWAYS win initiative. You can see where NRS Corsica and Calais are really putting the speed on here, trying to get at the Bellerophon’s starboard quarter (actually on the left side here, again, because the ship is inverted). One or two solid volleys in that vulnerable spot will cripple the ship and save the day! Calais makes it, but can only put in her forward guns. Inversely, Corsica does NOT make it, but can put her whole broadside into a barrage on Bellerophon’s stern.
  No guts, no glory. At this point it’s clear I’m not knocking down HMS Bellerphoron, missing shield generator or not. Damon’s using her enhanced thrust to power away from the threat, and carefully keeping his ship rolled to sure I won’t get another crack at it. You know, all the things I SHOULD HAVE DONE with the Leclerc! (Grr … I’m still made at myself for that). So instead I move to engage the destroyer Terpsichore. If I can knock out that ship, and not lose a destroyer myself, I actually still win this game. The Corsica, at flank speed (14 hexes a turn, 42 kilometers a second, insanely fast in this game), barely makes it in a crazy, hull-groaning turn to starboard, using the planet’s gravity to tug her 45,000 ton frame just into the Terpsichore’s stern arc … although again … forward guns only. The Calais gets the broadside, but has to take the calculated risk of nose-diving straight at the planet. If she loses power now … Sure enough, the French get very lucky here twice. One, Damon scores only 9 damage points on the third cargo drone, not the 10 he needs to cripple it, and they’re off the table next turn. SWEET! Two, the Calais and the Corsica indeed knock out the Terpsichore, with enough 8-megakelvin lasers to cripple her engines. But three … the Calais is crippled in turn with the Terpsichore’s powerful aft syglex emitter (gravitically-lensed x-ray “laser”) through the bridge. She’s crashing into that planet at 11 hexes a turn (33 kilometers a second). BOOM. So just that fast, I won this game again, and lost this game again. Have I mentioned how much I love Darkstar?
 Final situation and scoring. Now there is an ERROR in that math … I forgot that the Indefatigable is an 84 point ship, not a 70 point ship (+20% cost for her gunnery accuracy bonus). So my score was technically 194, not 180. Still, at 194 to 214, Damon wins by 20 points, or 8.2%, which clears the 5% he needs to claim a win.
  The Calais (left) and Leclerc (right) after the battle. Actually the Calais doesn’t look like this now, she’s little more than a kilometer-wide hole in the surface of that planet. Captain DID make his survival roll (both of them, one for the hit through the bridge and one for the crash of the ship in general), but it doesn’t matter. This was his third ship lost in combat. So Commander Leon Pelegras is now “promoted” back to the academy to teach classes or run a supply base or some such. There was a backstory in my commander logs talking about how he was in this task force because he was desperately in love with a French-Algerian aerospace pilot on one of the New Roman carriers, a woman he’ll probably never see again now. THANKS A LOT, DAMON! :D
  The murderously neat precision of New Roman laser fire is apparent here in the damage profile of the HMS Indomitable. She had a 30% chance of detonation, but Damon rolled a 38 on percentile dice. This ship ALMOST wound up as an aroura borealis light show in the atmosphere of this planet. Terpsichore (right) took much less damage, but it takes less to cripple a destroyer, especially when I got lucky and rolled a 5 on the 5+ required to cripple a destroyer with two boxes ticked off in critical components.
Desperate Rescue Mission in Gas Giant Atmosphere!
I had a great game of Darkstar on Sunday with my friend @damon, who’s been playing his British heavy cruiser-based battlegroup for a while now and building it up to where he’s actually making some progress and buying some upgrades for his commanders and warships.
Accordingly, I “judged him ready” for a battle in a gas giant, and just for good measure, decided to put him up against some of my “core” campaign commanders. In this game, his battlegroup (Trafalgar-class heavy cruiser Bellephoron and Falklands-class destroyer Terpsichore) was reinforced by the older Indomitable class light cruiser Indefatigable, would meet up with my New Roman Alliance commanders (in this case, French), of the Leclerc battlegroup (Foch-Hispaniola class light cruiser Leclerc escorted by the two Milan-II class destroyers Corsica and Calais).
The battle would take place in the violent maelstrom of a gas giant’s atmosphere. Gravity is beyond deadly in these games, to say nothing of the winds, the lightning, the atmospheric pressure, and so on.
BACKGROUND:
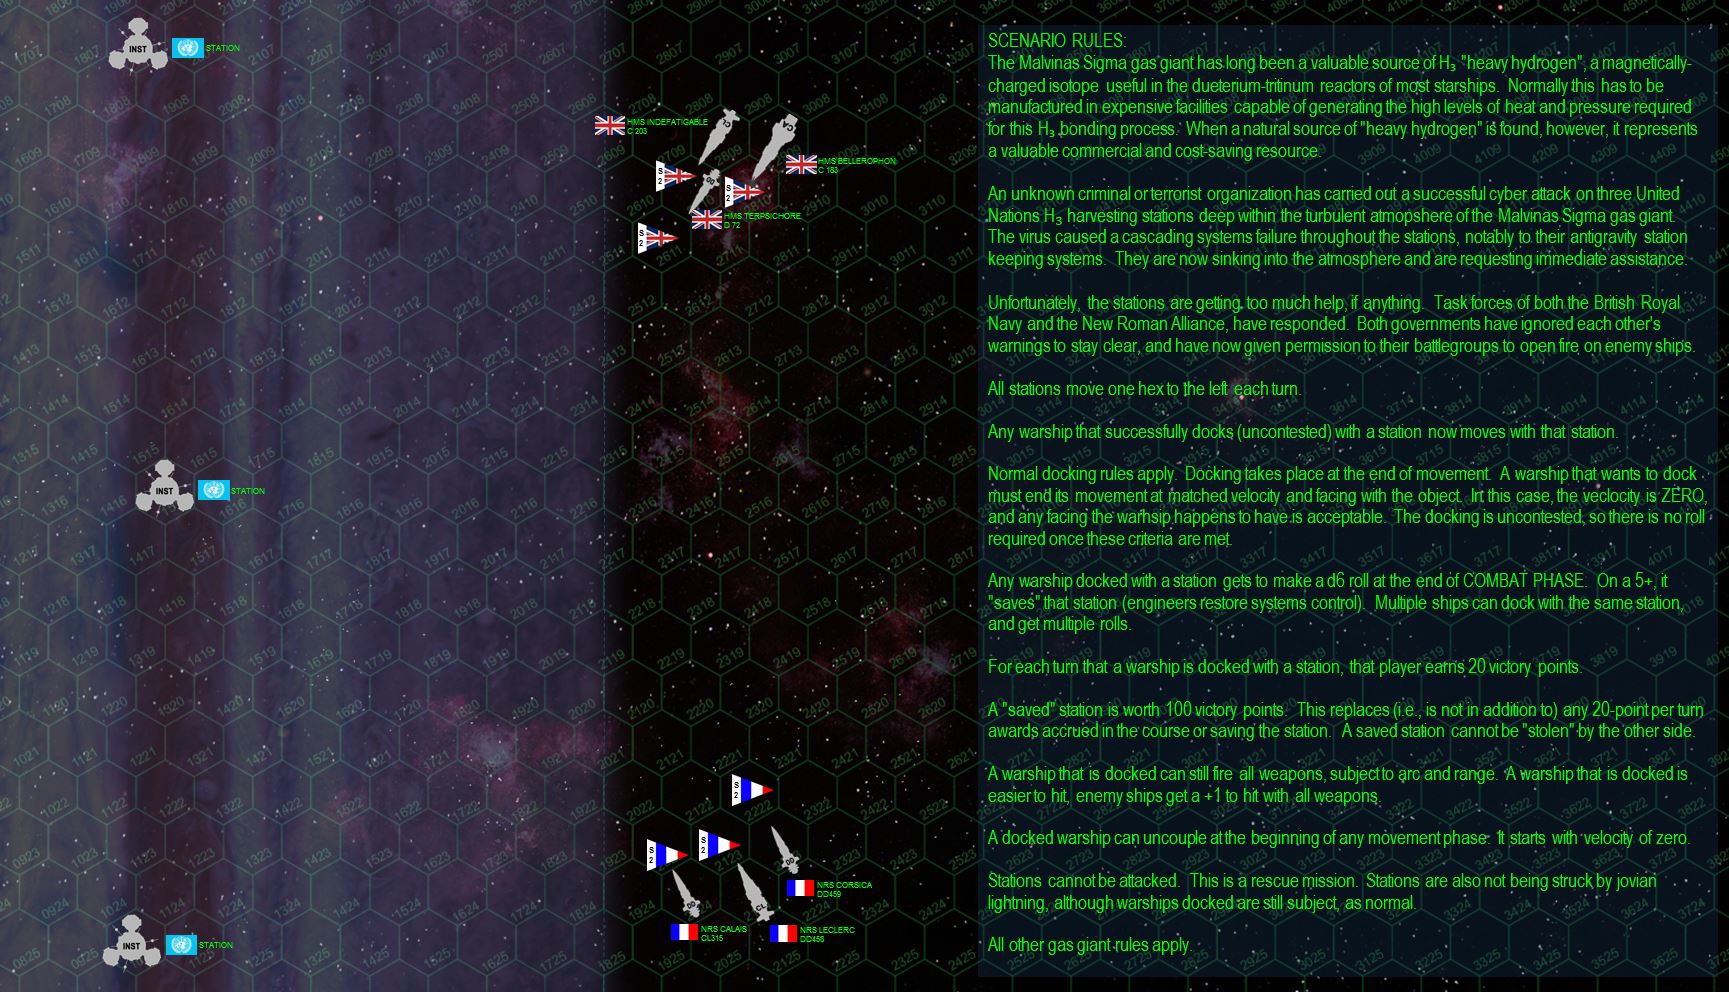
The Malvinas Sigma gas giant has long been a valuable source of H₃ “heavy hydrogen”, a magnetically-charged isotope useful in the deuterium-tritium reactors of most starships. Normally this has to be manufactured in expensive facilities capable of generating the high levels of heat and pressure required for this H₃ bonding process. When a natural source of “heavy hydrogen” is found, however, it represents a valuable commercial and cost-saving resource.
An unknown criminal or terrorist organization has carried out a successful cyber attack on three United Nations H₃ harvesting stations deep within the turbulent atmosphere of the Malvinas Sigma gas giant. The virus caused a cascading systems failure throughout the stations, notably to their antigravity station keeping systems. They are now sinking into the atmosphere and are requesting immediate assistance.
Unfortunately, the stations are getting too much help, if anything. Task forces of both the British Royal Navy and the New Roman Alliance, have responded. Both governments have ignored each other’s warnings to stay clear, and have now given permission to their battlegroups to open fire on enemy ships.
 Special rules and scenario set up are listed here. In summary: both Damon’s British warships and my French warships have to rush in, try to dock with these sinking atmospheric processing stations, save them if they can, or at least stay docked with them for as long as possible to rescue as many people, as much data, and as much resources / equipment as possible. All the while, of course, there’s a full-blown shooting war between the two battlegroups, and of course the planet itself is trying to kill them, as the stations themselves are over 1,400 kilometers deep in the gas giant’s atmosphere. This is a planet that is, no kidding I have done the geometry on this, so large that even at the scale of 180km / hex, the CURVATURE of the planet barely registers (using Jupiter as an example). Gravity, needless to say, is everyone’s enemy here.
 So here the British and French make their approaches, my French from the bottom of the map and Damon’s British from the top. Note we both decided to start INSIDE the planet’s atmosphere (left half of the map). There’s a speed limit here, if a ship is ever moving faster than 12 hexes a turn, armor plating starts melting off the bow.
  Note that gravity in these games is much, much stronger than in other Darkstar games. Depending on your speed and direction, it can not only pull your ship “down” at the end of your movement (and more than one hex too, in some cases), but also affect the ship’s velocity. If your ship’s velocity ever gets too low, it can actually change your direction. Here we see Damon’s ships come on the map. The green dotted line shows how the ships move in game terms, given conditions set by their depth in the atmosphere, direction, and speed. In short terms, at the end of their movement they are pulled one hex left, or “down” in this case, and the velocity reduced by one. Of course, gravity is effecting the ship’s course the whole time, so the blue tracks show what’s “really” happening. Note the destroyer Terpsichore, which Damon navigated perfectly, using the planet’s gravity to actually put him into position to dock with the first station on Turn 1. He He enters at velocity of 7, travels 7 hexes, he puts all 6 thrust into deceleration, thus reducing velocity to 1, gravity pulls him down one hex, AND reduces his speed from1 to zero, a perfect slingshot that puts his 45,000 ton destroyer into position to dock with the first installation (ends movement in the hex at velocity zero). Cruisers Bellerophon and Indefatigable power forward to cover the rescue attempt from French knavery. Well done! Even so, opening barrages from French lasers (very long ranged and pin-point accurate) slash into Indefatigable’s starboard bow.
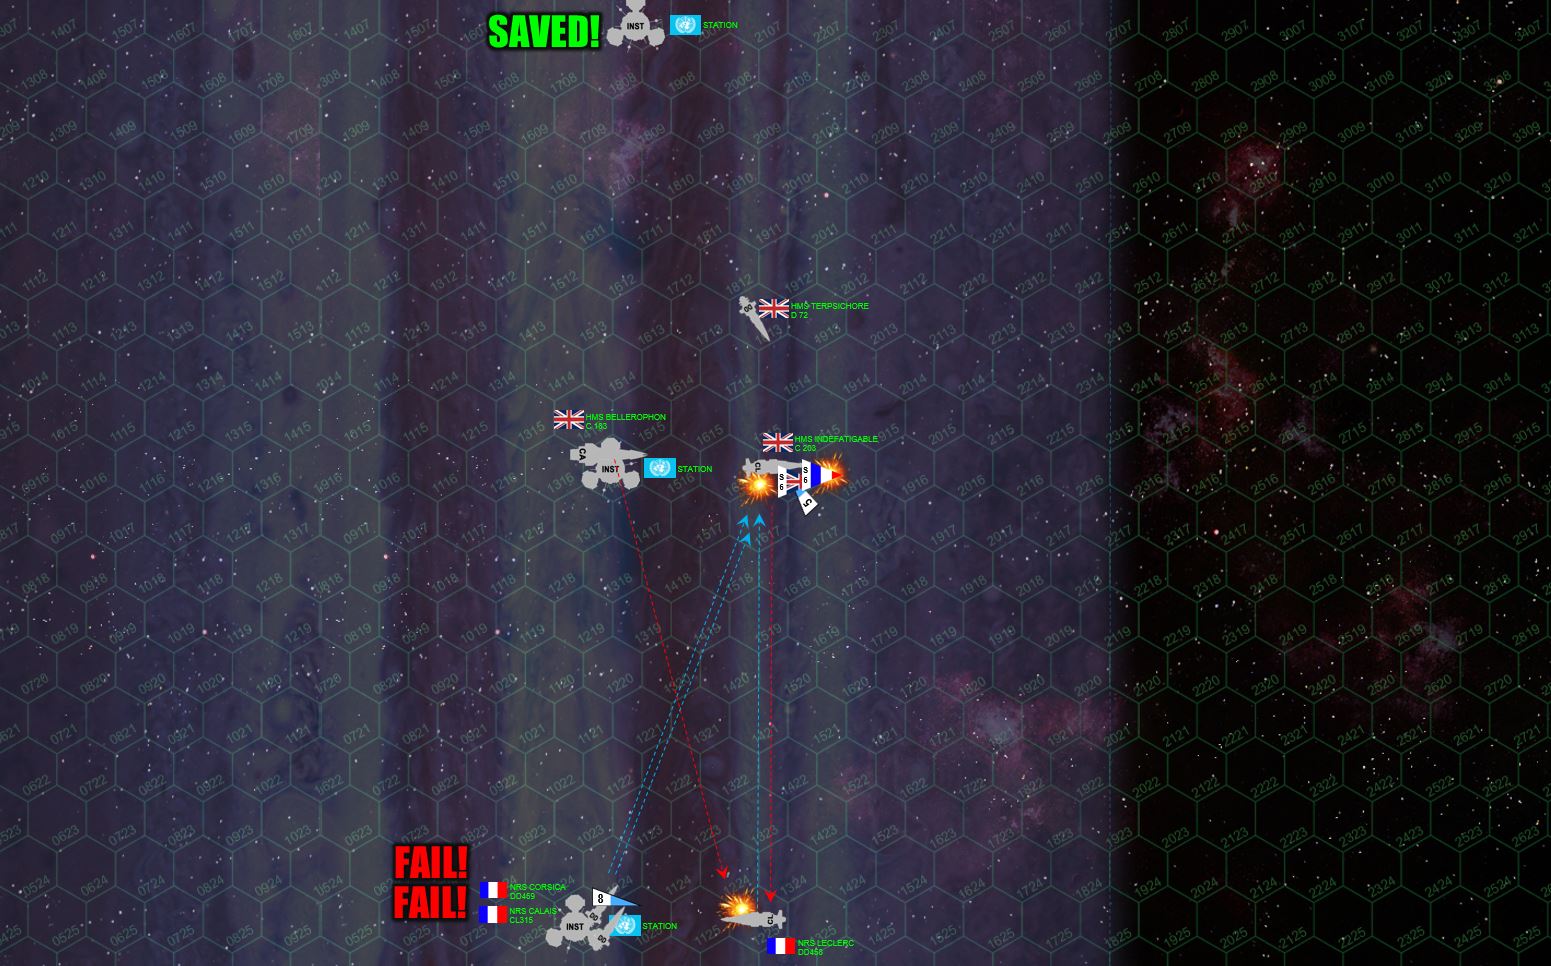 Meanwhile, my two French destroyers Corsica and Calais have also docked with the first station. The reason I’m docked with two ships is that at the end of each combat phase, each docked ships gets a 5+ roll attempt to save the station. Basically, we’re dropping in new software to purge to cyberterrorist virus, our engineers are trying to repair the station’s antigravity generators, our reactors are hooked up to jump-start the station’s powerplant, etc. You are vulnerable while docked, however. Yet Damon makes his first roll with the Terpichore, while my TWO destroyers both miss. So my destroyers choose to remain docked while Terpsichore uncouples and powers back up to maneuvering speed, back into the fight. Meanwhile, my light cruiser Leclerc fish-hooks a risky turn STRAIGHT DOWN into the planet’s atmosphere to get a broadside on HMS Indefatigable, which is getting aggressive along with Bellerophon at that center station. Frontal 8-megakelvin laser arrays of my two destroyers take issue with that, opening the argument at 1600 km range, while the broadside of the light cruiser Leclerc absolutely burns away Indefatigable’s starboard side. Class IV torpedoes rush in to finish the job, and even though Indefatigable largely misses these with her point-defense guns, the scrappy little Terpsischore shoots them down. This leaves the Bellerophon’s point-defense guns free to shoot up my scouts, which are all lost in a hail of British fire.
 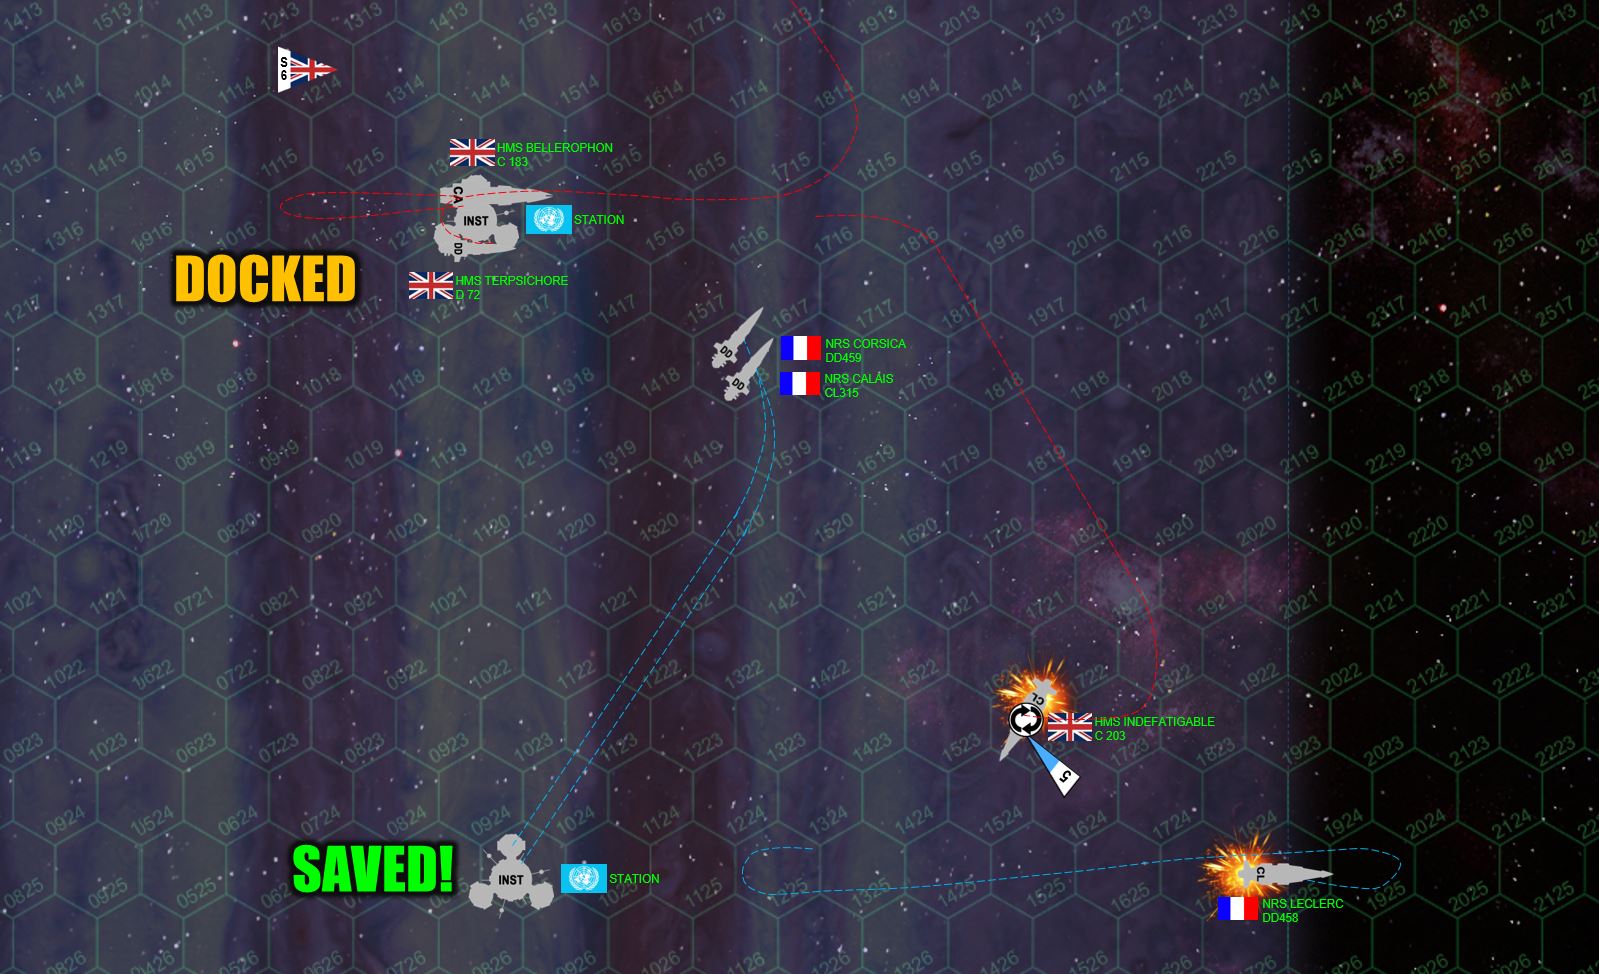 Things start to turn around for my French. Although the Bellerophon was in the same hex as the center station last turn, she was moving at 2, basically sailing PAST the station too fast to dock with it (6 kilometers per second, to be exact). Meanwhile, my two destroyers finally saved the first station, uncoupled, and are now pushing forward. The Indefatigable is now turning into us, rolling over on her back in an attempt to protect her wounded starboard side, especially the starboard bow which now has NO SHIELDS. No good, the nimble Leclerc AGAIN pivots around in a fishhook and powers up out of the planet’s atmosphere, ready to put aft guns against the Indefatigable’s starboard bow. This is an incredibly risky move, note is also exposes my fantail (and all my engines and reactors) to the Indefatigable’s broadside at just 720 kilometers (spitting distance in this game). Nor do my two destroyers actually have the best options, this is the only position that their previous location, facing, thrust limitations, and planet’s gravity allow them to be WITHOUT beiong the broadside of the Terpsichore and especially the massive Bellerophon (which for the record outweighs ANYTHING else on the battle by at least 50%). But as you can see by the movement tracks, gravity is a killer here, always pulling mercilessly down in varying degrees depending on where you’re positioned and which direction you’re facing. Meanwhile, Bellerophon has powered back into position, and docked with the center station, along with the escort destroyer Terpsichore … SO THE REAL QUESTION – who lives and who dies in this turn? Well, my torpedoes from the Corsica and Calais get through the Indefatigable’s starboard bow, one warhead detonates in the forward magazine, another detonates in the bridge. That’s the end of that ship. The Leclerc pays a hideous price, however. She’s left with one whole reactor and one whole engine array down, with another engine damaged. Damon has to roll a 3+ on d6 to cripple her … thank God he rolls a 1. We did the math and calculated that Leclerc JUST had escape velocity to make it off the map if crippled … but I’m glad I didn’t have to cut it that close.
 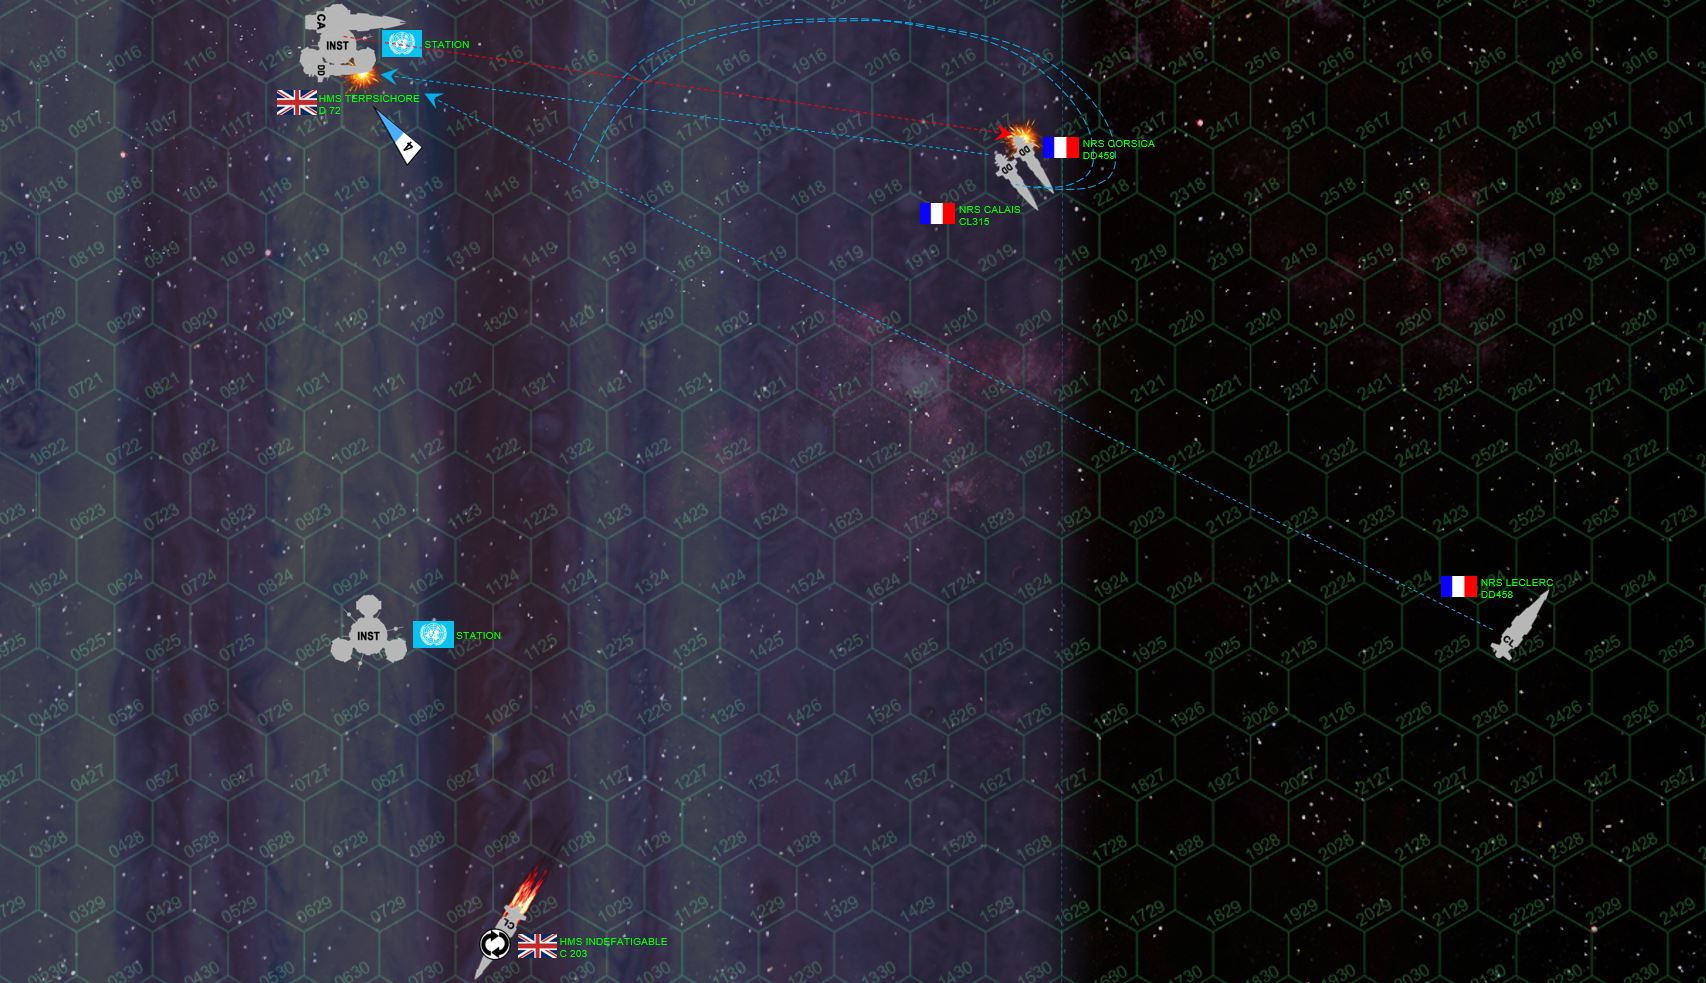 So the British are winning in stations, but so far the French were winning in ships. The Indefatigable, burning and adrift, careens off the bottom edge of the table – but because she did not technically leave off the left side of the map, she’s considered to have a “gravity slingshot” that hurls her wreck clear of the crushing, fiery grave awaiting at the core of the gas giant. Meanwhile, the British have saved the center station. Yet Damon chooses to remain docked for now. After all, if any ships are now crippled, they’re moored to the station, which is stabilized, so the ships won’t fall to their doom in a super-pressurized ocean of liquid, metallic hydrogen. My three French ships take advantage of this British kindness, with the damaged Leclerc and my two destroyers weaving back and forth from the relative safety above the cloud layers, pouring laser broadsides into the Terpsichore, who has now lost her forward shields. Hey, my French gunners get a bonus for firing at moored ships, and damn it, we still owe the British for that stunt they pulled at Mers el Kabir! Yeah, you Brits thought we FORGOT about that?
 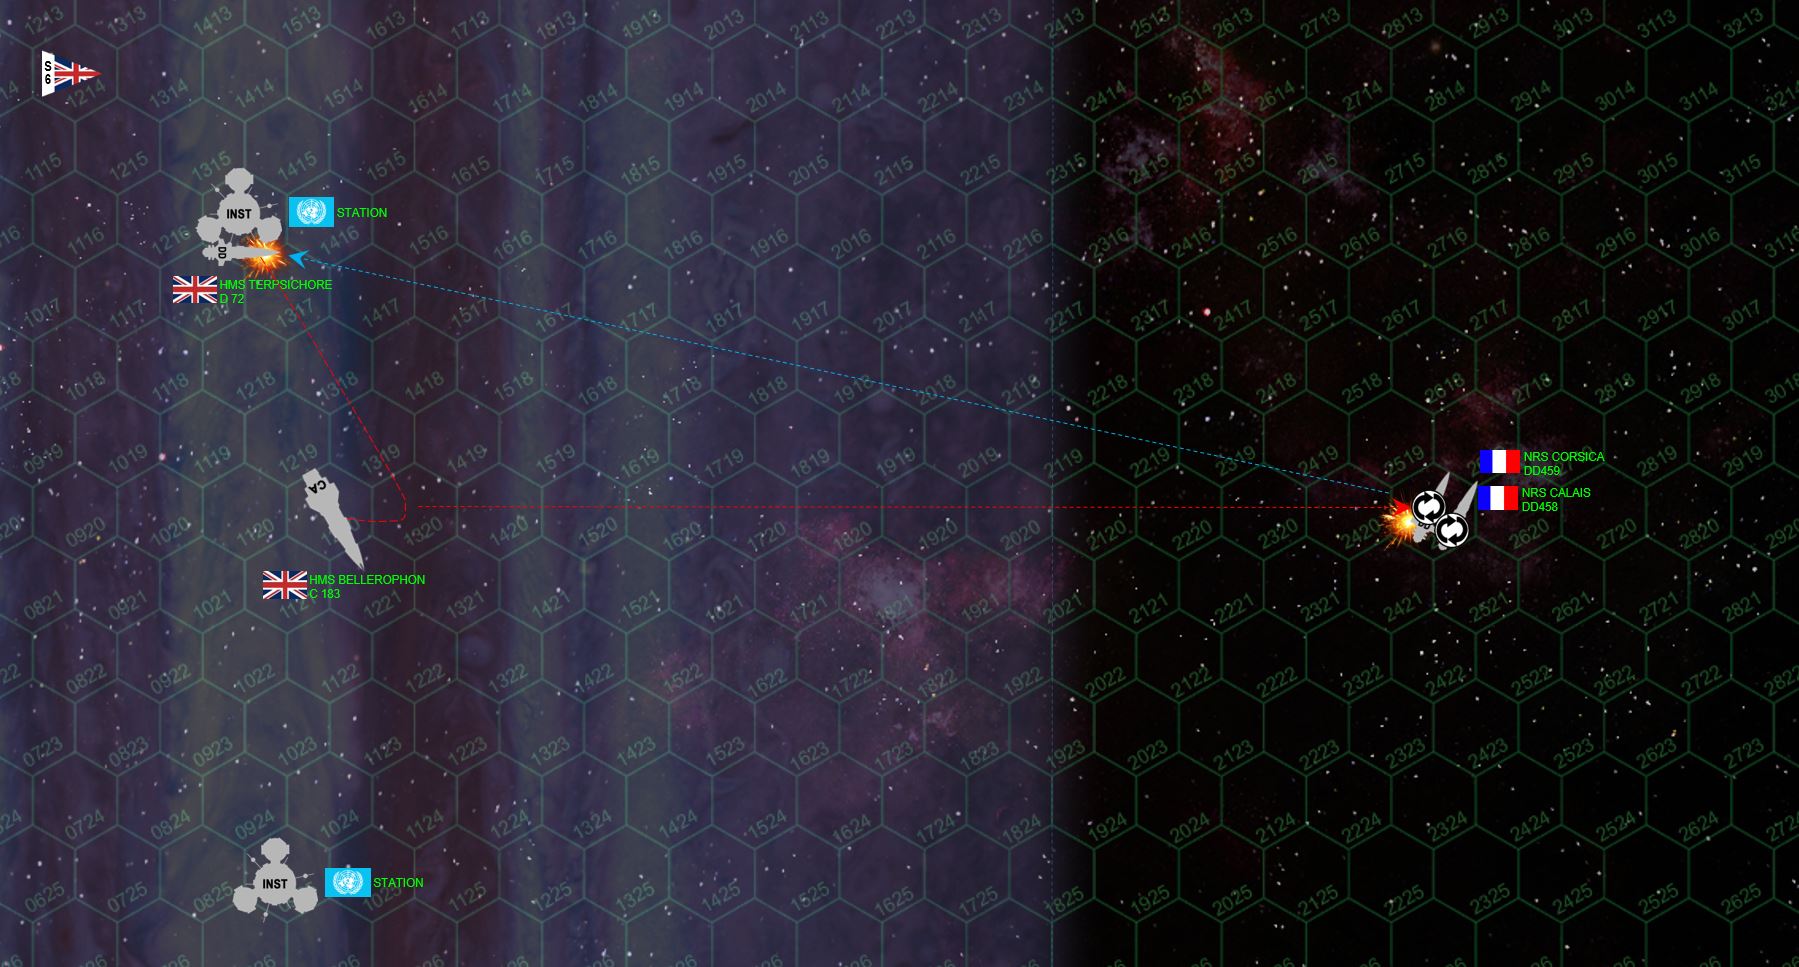 The light cruiser Leclerc finally decides that discretion is the better part of valor, and vectors off the bottom edge of the table. No, it’s not the most glorious decision. But it also denies Damon 112 victory points (yes, that light cruiser is very advanced and upgraded twice – she’s expensive!) Meanwhile, my destroyers Corsica (now quite heavily damaged as well) and Calais have finally drilled their way out of the atmosphere but continue to pour long-ranged laser fire down into the Terpsichore. Yes, the range is long, 2900 km at this point, but I have +2 targeting and enhanced CIC suites, the Terpsichore has NO forward shields, and I get another +1 for firing at a moored ship. I have to inflict a lot of collateral damage on the Royal Navy here to make up for the fact that Damon has claimed two stations while I only have one. I hit the Terpsichore’s forward magazines, which forces her to make a power check. I fail that roll, though, and she is NOT crippled. Her crew does “bail out” of the ship, however, probably heading to the station’s pub after I knock out a SECOND “crew facilities” compartment (both port AND starboard pubs have been knocked out!) and officer’s quarters (we lost all our gin!)
 Now at a range of 4500 kilometers, I try for one more parting shot with my two destroyers aft turrets. I can’t hang around much longer, the Bellerophon has uncoupled from the station and is now thundering up out of that jovian atmosphere, she outweighs each of my destroyers by well over 3:1. I have damaged the Terpsichore’s bridge, I was hoping a lucky shot could just maybe hit that bridge again and leave her technically crippled for full victory points based on her scenario point value. But since I was only able to force her to evacuate, I get half value for her, and full value for the crippled Indefatigable. Meanwhile, none of my ships were crippled or FORCED to break off by crew casualties or core compartment damage (the Leclerc withdrew on her own volition and under her own power). But if I lose one of these destroyers now, and it would only take one solid broadside landing from the Bellerophon on the stern of the damaged Corsica … That’s 66 points to Damon and an easy win for the British. Better to play a smart, cool, measured, tactical game, and settle for the draw. BRITISH SCORE: 6 French scouts shot down plus two stations rescued = 6 + 100 + 100 = 206. French Score: 70 for crippling the Indefatigable, 100 for our one station, and 25 (half points) for forcing the Terpsichore to evacuate = 195. So Damon wins by 11, but in a campaign game you have to win by 5% or it’s considered by command “too close to call.” We each started with 244 points, and 5% = 12.2 … so the French steal a very sneaky, pretty cheesy draw.
  The damage charts for the HMS Terpsichore (left) and the HMS Indefatigable (right). You can see how badly French lasers cut Terpsichore to shreds, one more well-placed hit on the bridge and she’s no longer operational, resigned to weeks in dry dock. The Indefatigable wasn’t so lucky, shown in red is the torpedo that landed basically against the bulkhead of her bridge. She’ll actually fail her ship recovery check, but HMS Bellerophon uses her “Commander’s Luck” upgrade to re-roll the result, and saves her. In narrative terms, Bellerophon was able to launch a cutter and yacht loaded with damage control engineers, helped saved the Indefatigable, and tow her up and out of the gas giant’s atmosphere after the battle.
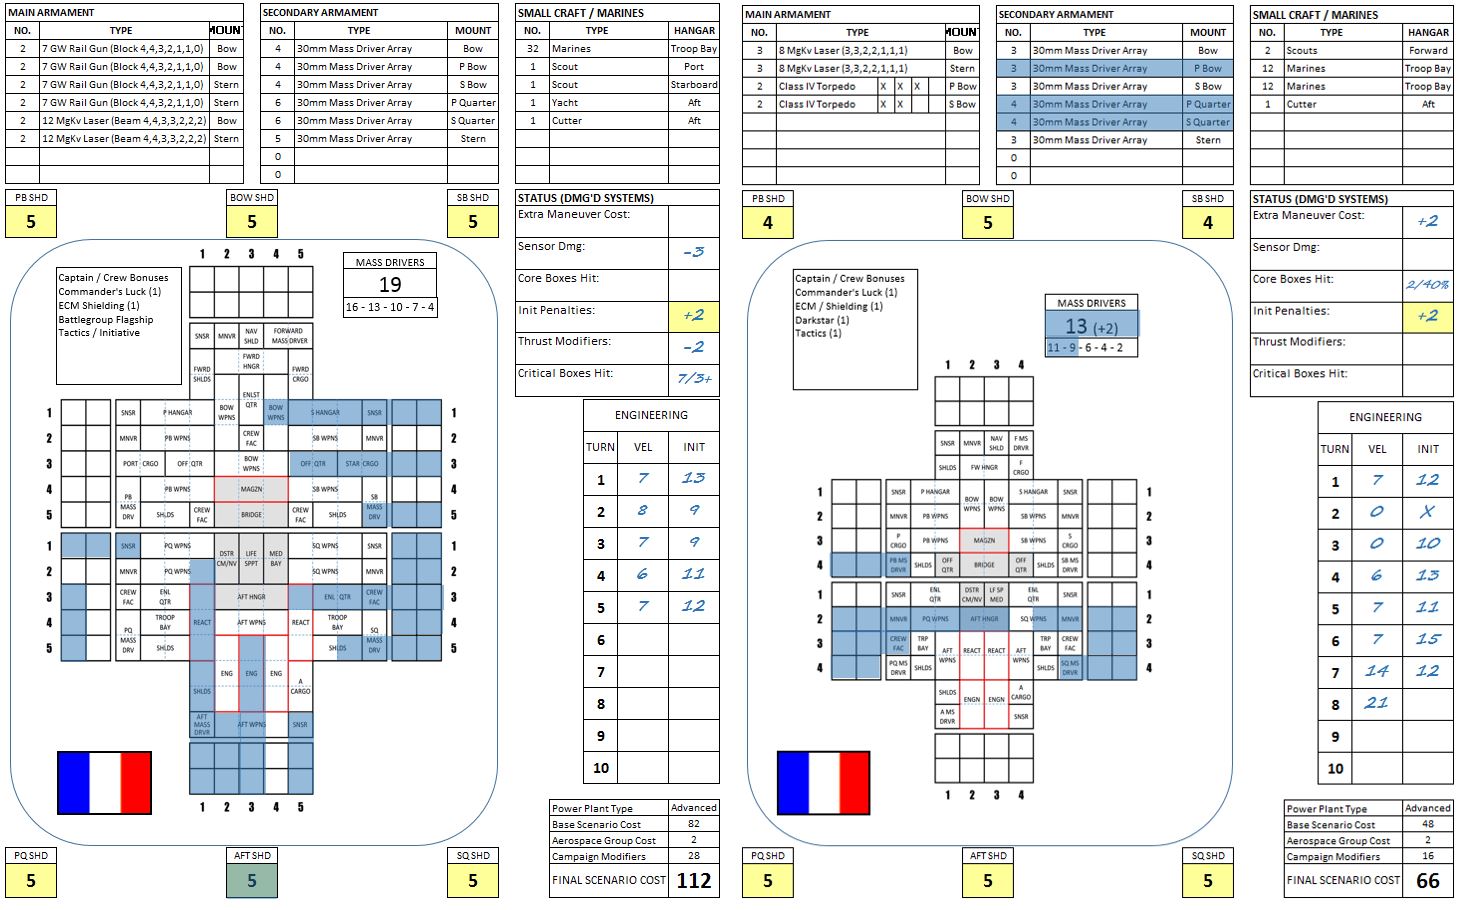 Some of the French ships after the battle. You can see where the Leclerc (left) had her portside reactor and centreline engine blown away, and suffered damage to her starboard reactors as well. She straight-out got lucky here, with 7 critical compartments hit and light cruisers starting on a 10+, Damon only needed a 3+ to cripple her JUST as she broke free of the planet’s atmosphere (10 starting number– 7 crit hits = 3+ target). But Damon rolled a 1, and Leclerc will return to port under her own power. Note the -3 for sensor damage, Leclerc lost THREE sensor suites in that fight, by the time she frinally powered off the table she was practically firing half-blind. One of her escorting destroyers, NRS Corsica, was hit twice by jovian lightning, and more than once by British guns. Three mass driver arrays are lost, as well as two maneuvering thrusters, never a good thing in a gas giant battle.
 Desperate Rescue Mission in Gas Giant Atmosphere!
Here is a quick peek at the Darkstar live game set to begin in about 1 hour. (1700 GMT, 21 April). If anyone is interested in spectating or participating, send me a PM and I’ll send the link to the web conference.
Hope to see some of you there, and Happy Sunday!
Battle Report: Prussians (Elessar2590) vs. US Navy (Oriskany)
Well, it had to happen sooner or later. Here’s another Darkstar battle report, this time between @elessar2590 and myself (game Saturday, April 13). This time the the game took place in the upper layers of a gas giant atmosphere, where factors like jovian lighting, hyper-velocity winds of 400+ kph, titanium-melting heat, hull-crushing pressure, and gravity like you will never see anywhere else on a Darkstar table are almost as dangerous as the enemy!
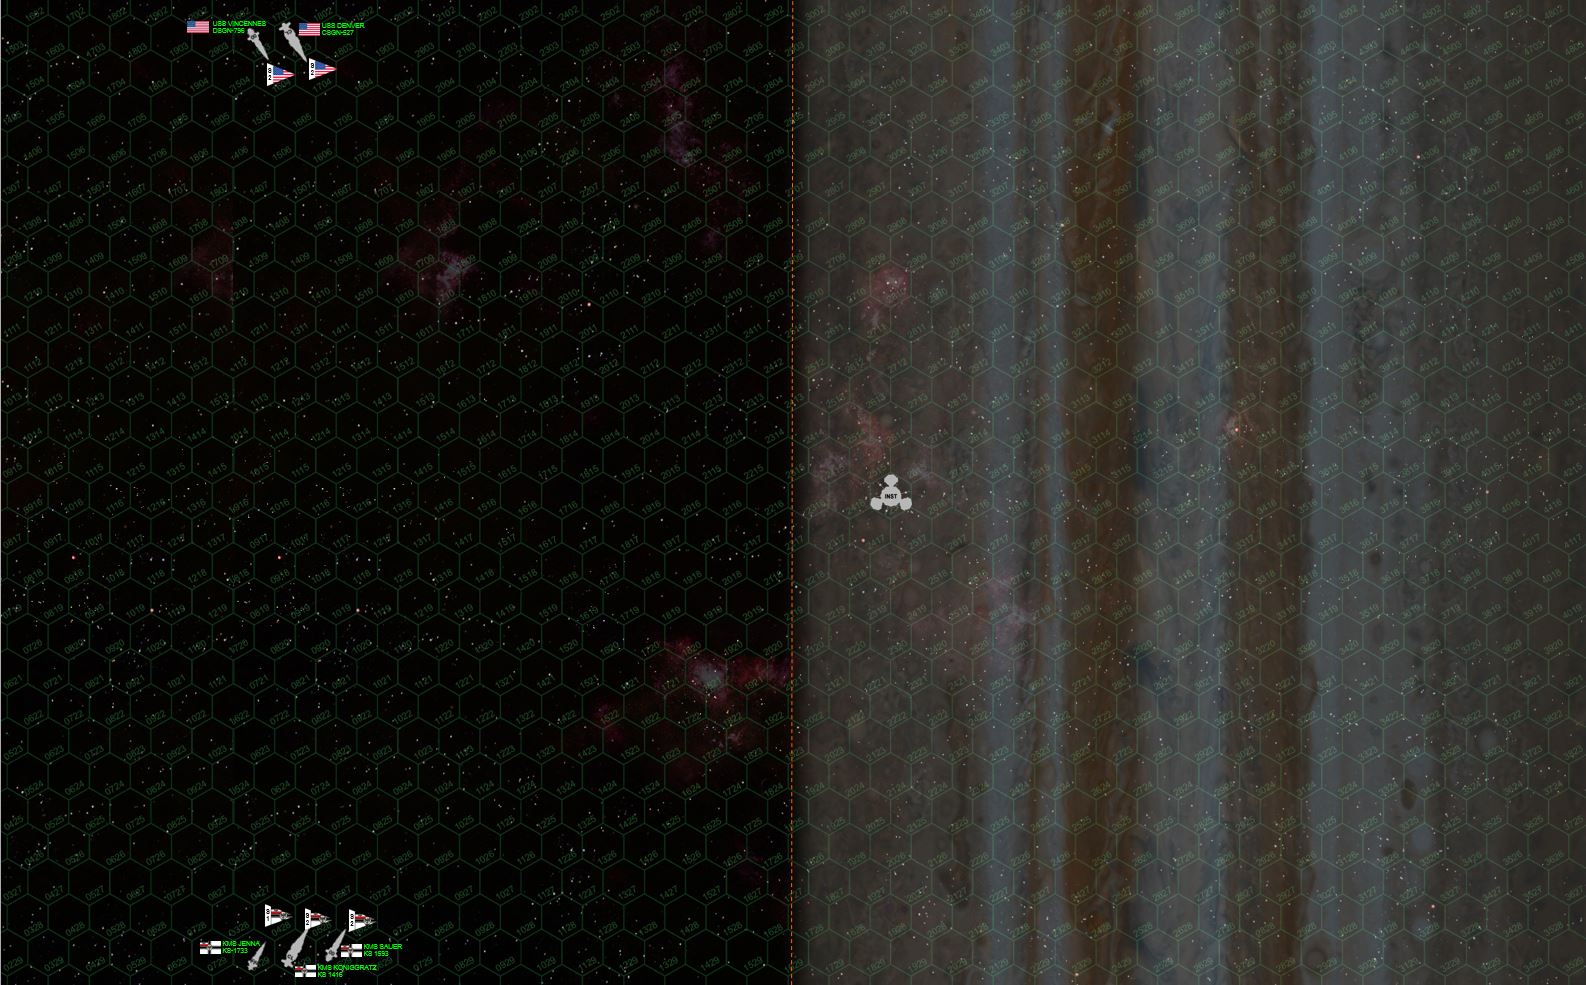 Here’s the opening map. Even at a scale of I hex = 180 kilometers, a jovian gas giant will NEVER fit on a table … you won’t even meaningfully see the curvature of the planet’s sphere. Seriously, on this scale Jupiter is almost 900 hexes across, that’s 23 complete Darkstar Maps. Yes, I have measured it, and yes … you can technically see the curvature, but no … the curvature is so small at that scale it literally has no game effect (i.e., always stays within the same row of hexes). Elessar2590 has the Hipper class light cruiser KMS Koniggratz, the Maas-class destroyer KMS Sauer, and the Emden-class frigate KMS Jena. I have the sleek, beautiful, powerful, but expensive and somewhat vulnerable San Antonio-class light cruiser USS Denver, and the Valcour-class destroyer USS Vincennes. The objective is to fight over the atmospheric gas giant station floating in the upper layers of the gas giant, much like Bespin’s Cloud City.
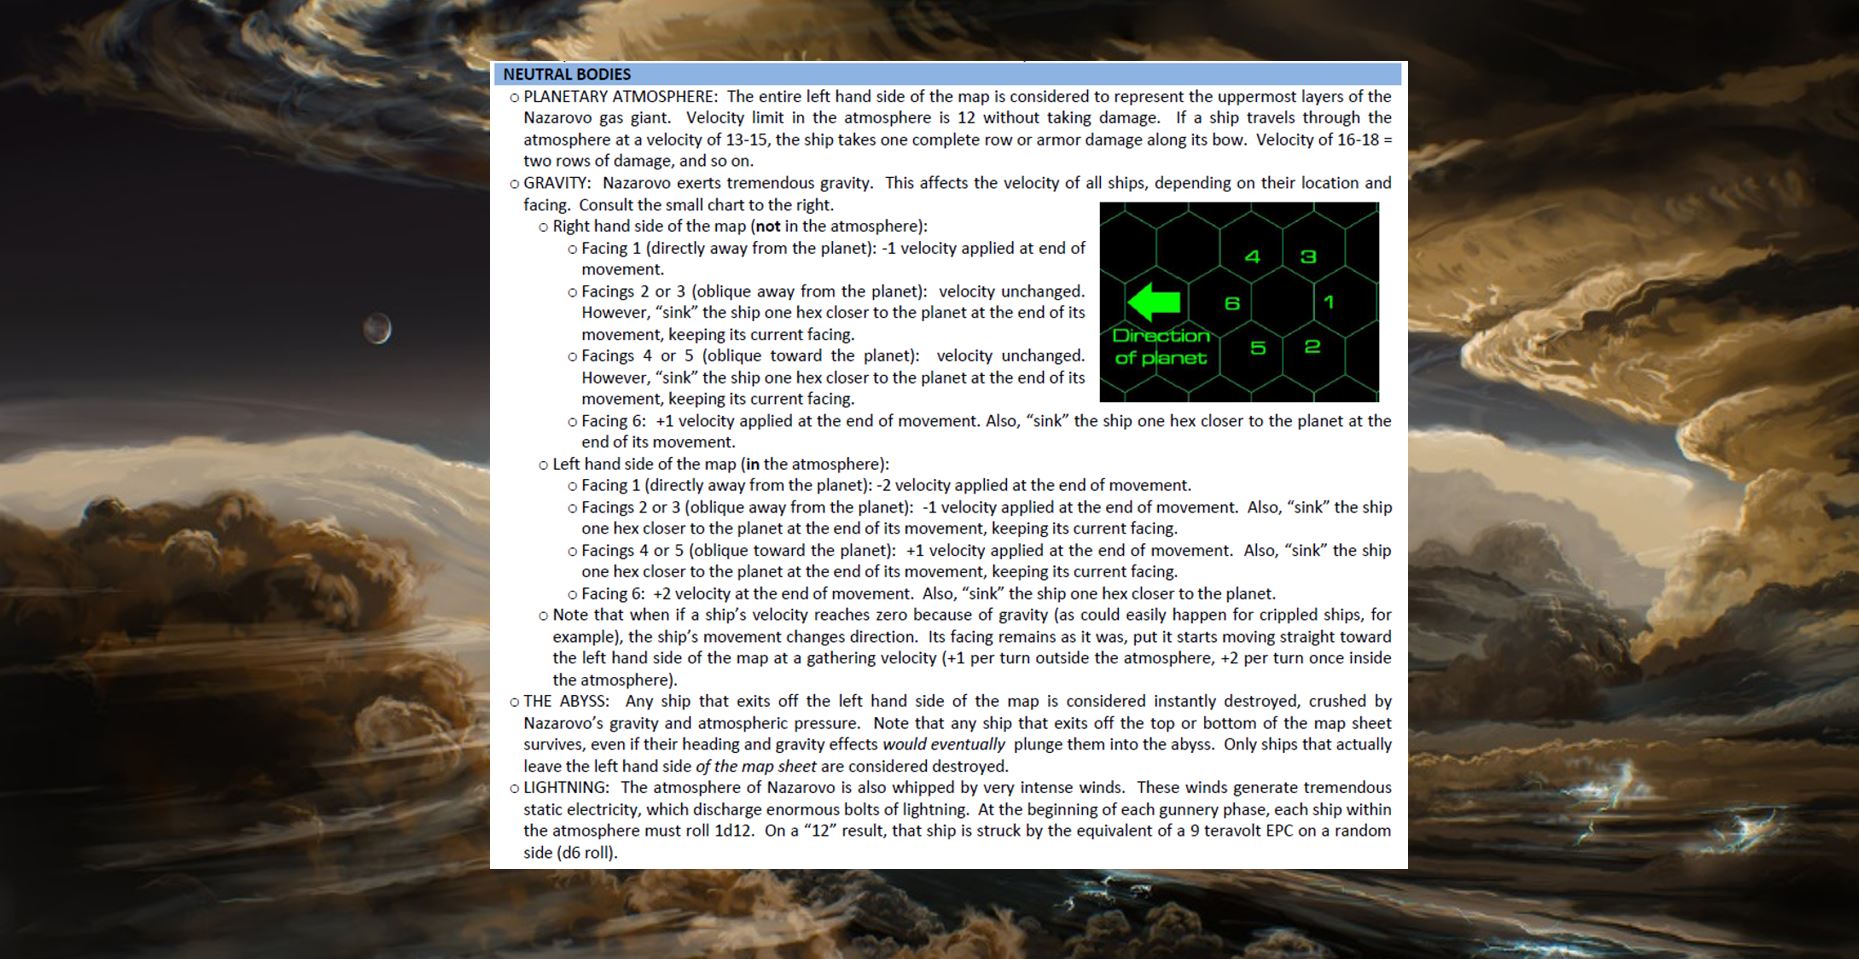 Here is a brief overview of the special rules for games on gas giant tables. This sheet is from a previous gas giant battle, where the gas giant was on the other side of the map (pretty much just reverse all the “left” and “right” notations). As you can tell, the gravity here is strong enough to affect your ship ANYWHERE on the table, it can actually change your direction of movement and your velocity, and anything that leaves the right edge of the map is just … gone … crushed by the 10,000 atmospheres of pressure, burnt to ash by the heat, and sucked down to crushing oblivious by the inescapable gravity of this planet that’s so big it’s practically a failed star.
 The Americans and Prussians make their initial approaches. The Americans go for a bow-on approach, intent on launching a full spread of Mk 48 gravitic torpedoes (“14” counter). The Prussians, despite losing initiative for the most part, fire off with front guns except for the scrappy little frigate Jena, who turned fast enough to preset her fearsome little broadside. Hey, don’t laugh, she scores a lot of hits!
 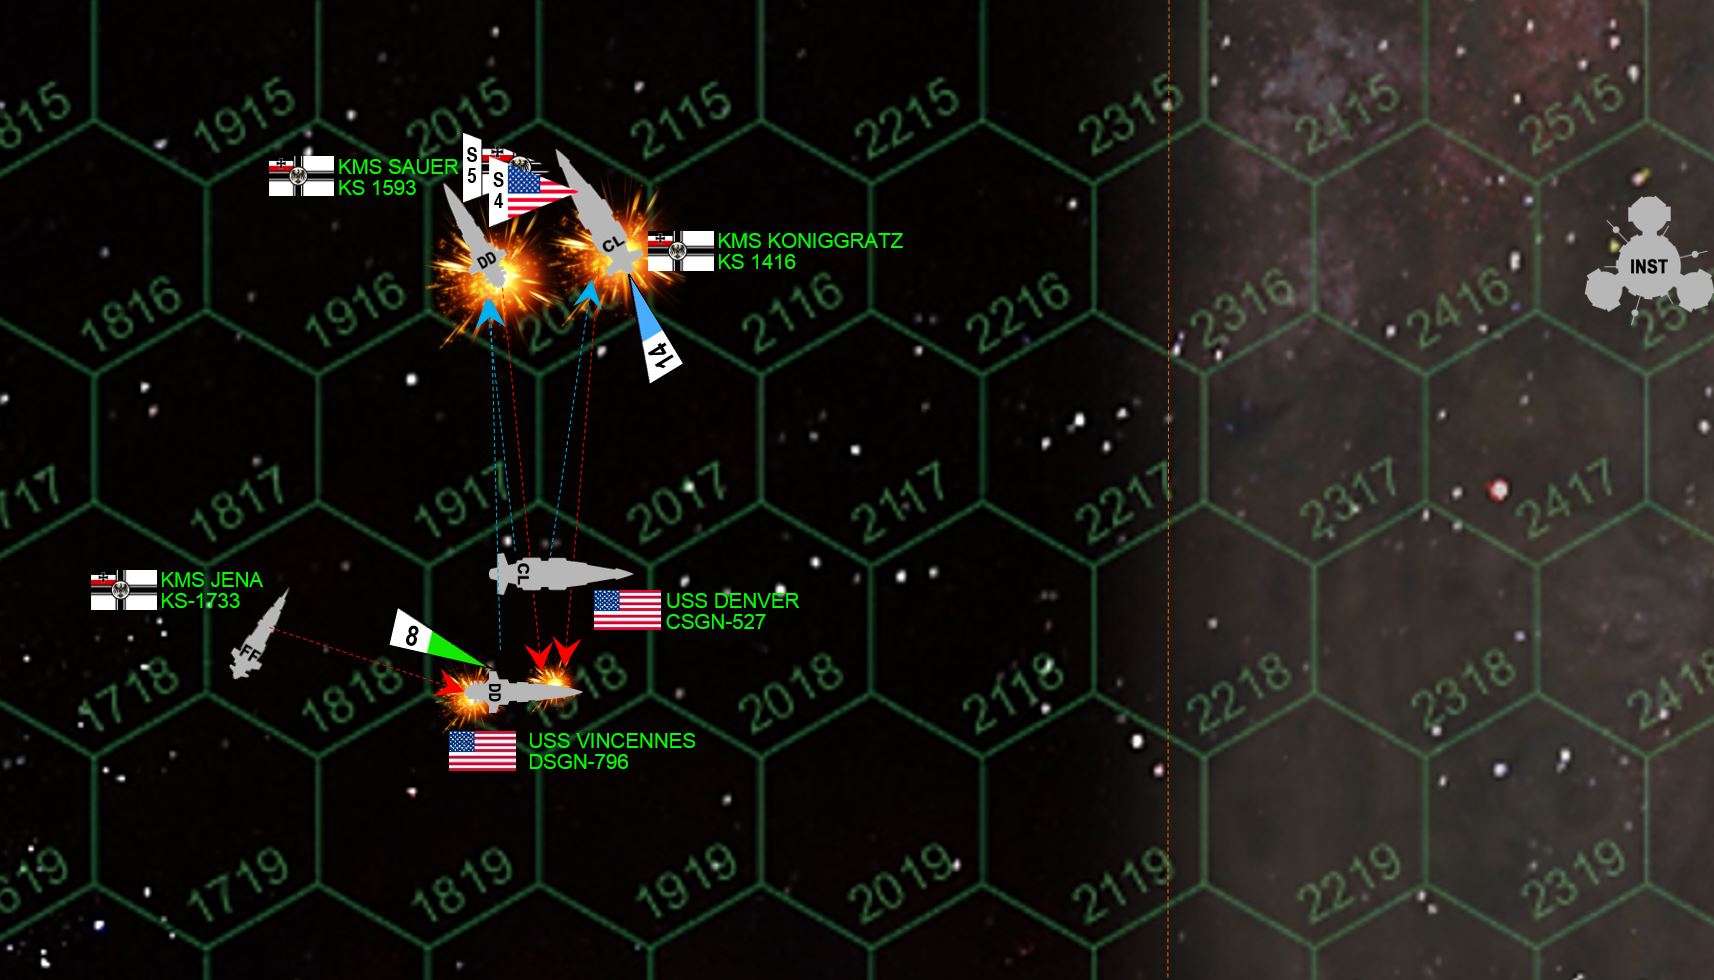 I get lucky once again and largely win initiative. So as the Prussians make a port turn toward me (fighting the planet’s gravity as they pull out of their shallow dive, I’m able to sidestep to starboard and then cut a hard turn to port, dropping in directly astern with a full broadside. Excellent gunnery position, really the best spot in the game for a broadside, the problem is I am now spearing down like a javelin directly toward the gas giant’s atmosphere. If one of my ships loses power now … And again the Jena cuts behind me, ready to drop a point-blank broadside of her own. The gunfire is insane. Four of my torpedoes get through the mass drivers and the shields, slamming into the stern of the Koniggratz. This, followed up by the blistering broadside of the Denver’s EPC batteries, quickly cripples the ship. FULL DISCLOSURE: We forgot to fire Elessar2590’s scouts at my torpedoes, he WOULD have shot at least one of them down, this MIGHT have made a difference, but would have just meant I would have to fire ALL Denver’s guns against the Koniggratz. As it stands, the Denver’s lasers swivel on the escort destroyer Sauer, slicing her open so the guns and smaller lasers of the destroyer Vincennes can finish her off as well. Just that fast, the Americans have torn the heart out of the Prussian battlegroup. However, the little Jena pounds away at the Vincennes’ stern, and actually leaves her with fires in engineering. As they were being crippled … the AFT guns of the Koniggratz and Sauer also hammered into the port bow of the Vincennes, detonating her forward magazine. Vincennes has a 4+ chance of being crippled at this point, her life hangs by a literal 50-50 thread …
 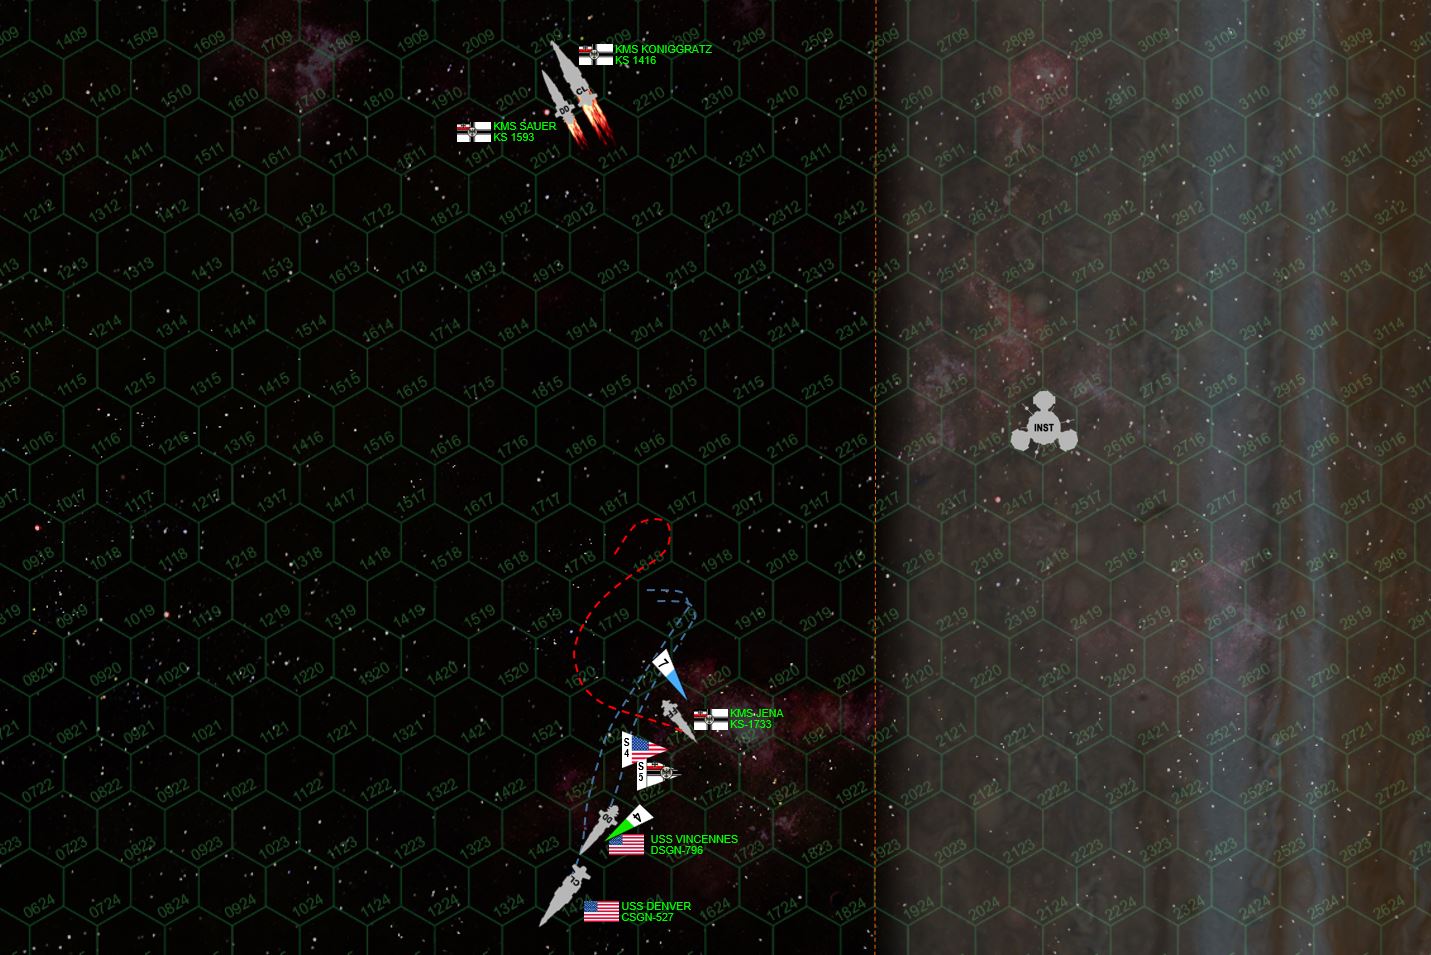 The Vincennes survives! Elessar2590 rolled a 3, and needed a 4+ to cripple her. So by the SLENDEREST of margins, the ship retains power long enough to pull a desperate turn to starboard, and full-power blast up out of the planet’s gravity well. Meanwhile, measuring the last recorded velocity of the Koniggratz and the Sauer (24 km per second),and adjust for gravity, we see where the will actually make it off the top of the map before they are pulled down into the planet’s gravity. Long story short, they are crippled but will not be destroyed permanently by the planet.
 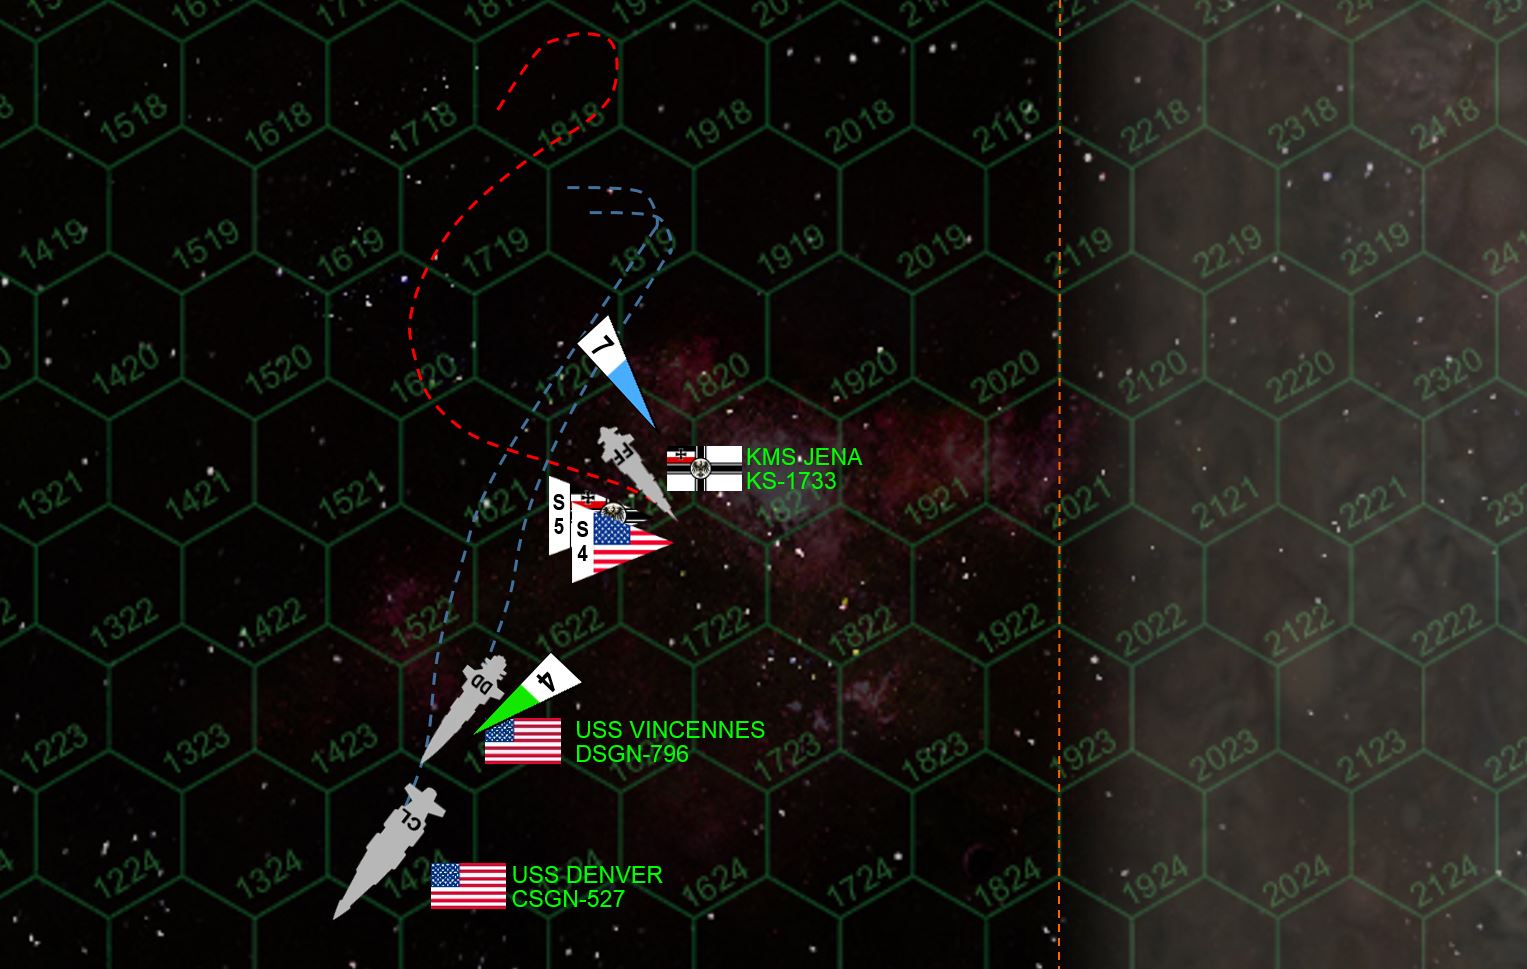 Meanwhile, the last little ship Jena, executes an insane little fish-hook turn and again broadsides the stern of the Vincennes. This time the Vincennes loses power for sure. But at least now she’s powered up out of a death spin toward the gas giant’s core. Vincennes will make her recovery check after the battle, and thus will eventually see service again. Meanwhile, aft guns of the Denver put two EPC bolts through the bridge of the Jena, mercifully ending this battle. Hey, with the ass-kickings that I’ve taken in Valor & Victory and AirWarC21, I deserved to win a game ONE of these days. :D
 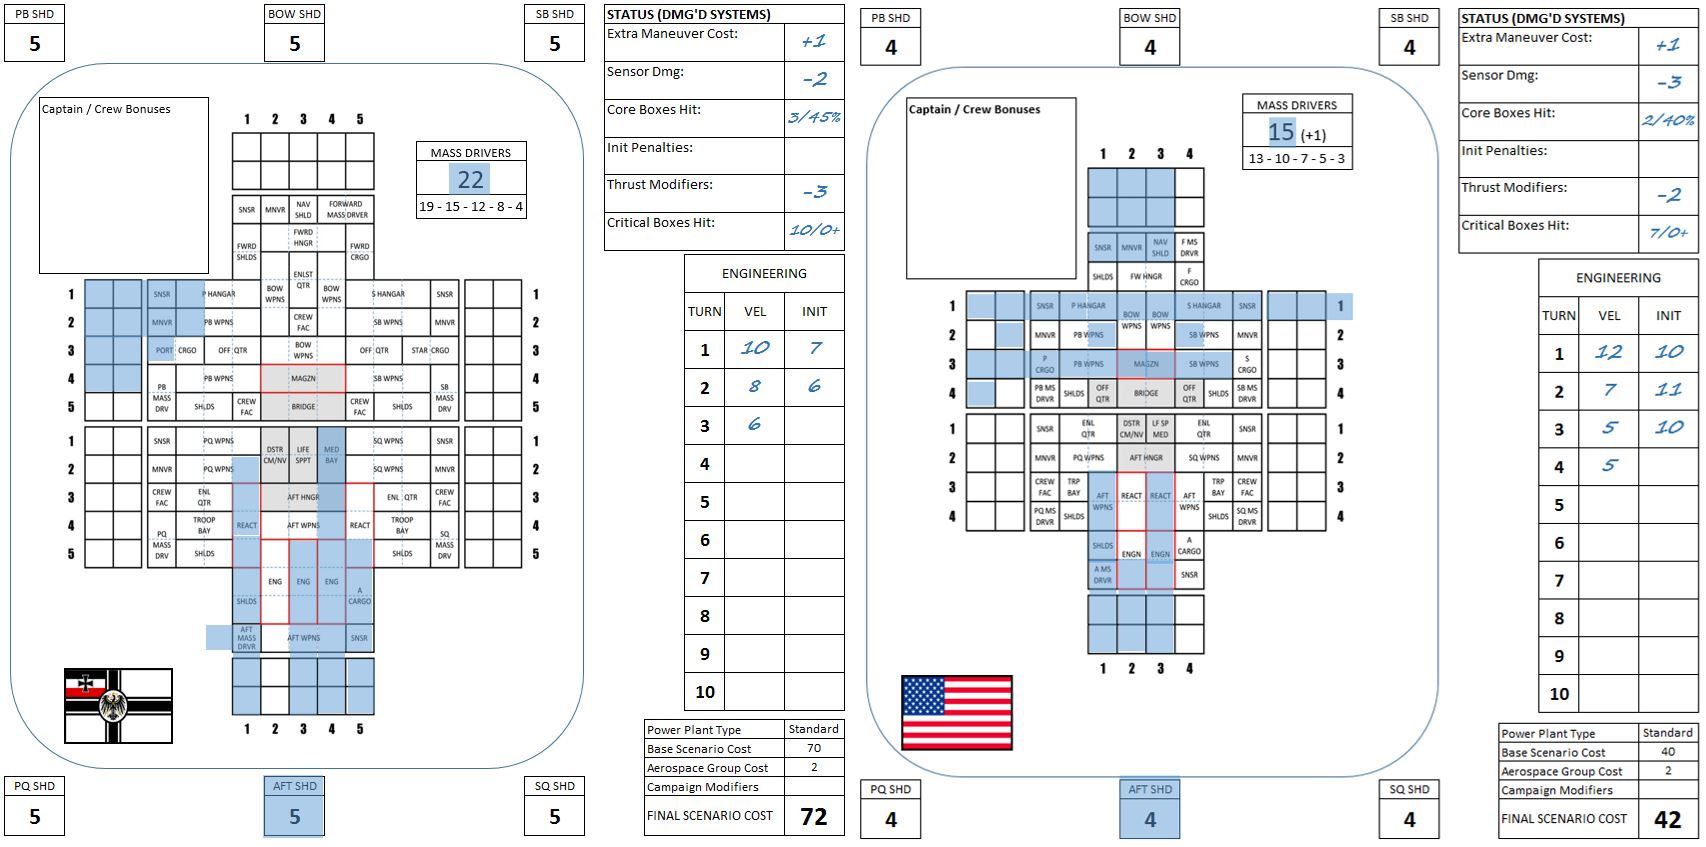 The Koniggratz and the Vincennes after the battle. The Vincennes will be towed back to port, and after a few weeks in dry dock, will eventually be repaired. In all, a great day for the American Navy.
Live Game! Elessar2590 vs. Oriskany
Good afternoon ~
@elessar2590 and I have a live game of Darkstar going on! If anyone’s interested in spectating, send a PM and we’ll get you in the web conference meeting!

Heavy Cruiser Clash - British v. Imperial Japan (Damon v. Rasmus)
The Japanese and British are at it again, it seems …
So we had @damon and his trusty Trafalgar class heavy cruiser HMS Bellerophon, along with his new destroyer HMS Terpsichore (RIP HMS Essex) looking to take on @rasmus and his Japanese. But this time, Rasmus decided to set aside his IJN Sendai Byo light cruiser to try one of the new Katana class heavy cruiser, IJN Kama. To balance the game, I added the oft-crippled but never destroyed Akashi class strike frigate IJN Urakaze and a sister ship. IJN Sakita.
So we’re looking at 172 point game! No carriers, no aerospace craft, no landing ships …
Just a very unstable red dwarf less than 30 light-seconds away …
That’s right, this battle takes place close to a mineral- and heavy-metal rich planetismal that is desperately close to the systems’ red dwarf planet star. These stars, while cool (in stellar terms) are typically electromagnetically unstable, and this one is no exception. At the beginning of combat phase, I’m rolling a d6 to see what the “space weather” is like that turn.
Special rules from the scenario:
BATTLE TAKES PLACE AT A TINY DWARF PLANET EXTREMELY CLOSE TO A RED DWARF STAR
NO GRAVITY – PLANETISMAL IS BARELY 2500 KM ACROSS
(SLIGHTLY LARGER THAN PLUTO)
SHOOTING INTO or THROUGH CLOUD (IONIZED PARTICLES BURNED OFF THE PLANETISMAL’S SURFACE)
-1 TO HIT
NOT CUMULATIVE PER HEX
CORONAL MASS EJECTIONS
D6 BEGINNING OF EACH FIRE PHASE:
1 = NO EFFECT
2 = NO EFFECT
3 = NO EFFECT
4 = -1 TO HIT
5 = -1 TO ALL SHIELDS
6 = -1 TO ALL HIT AND TO ALL SHIELDS
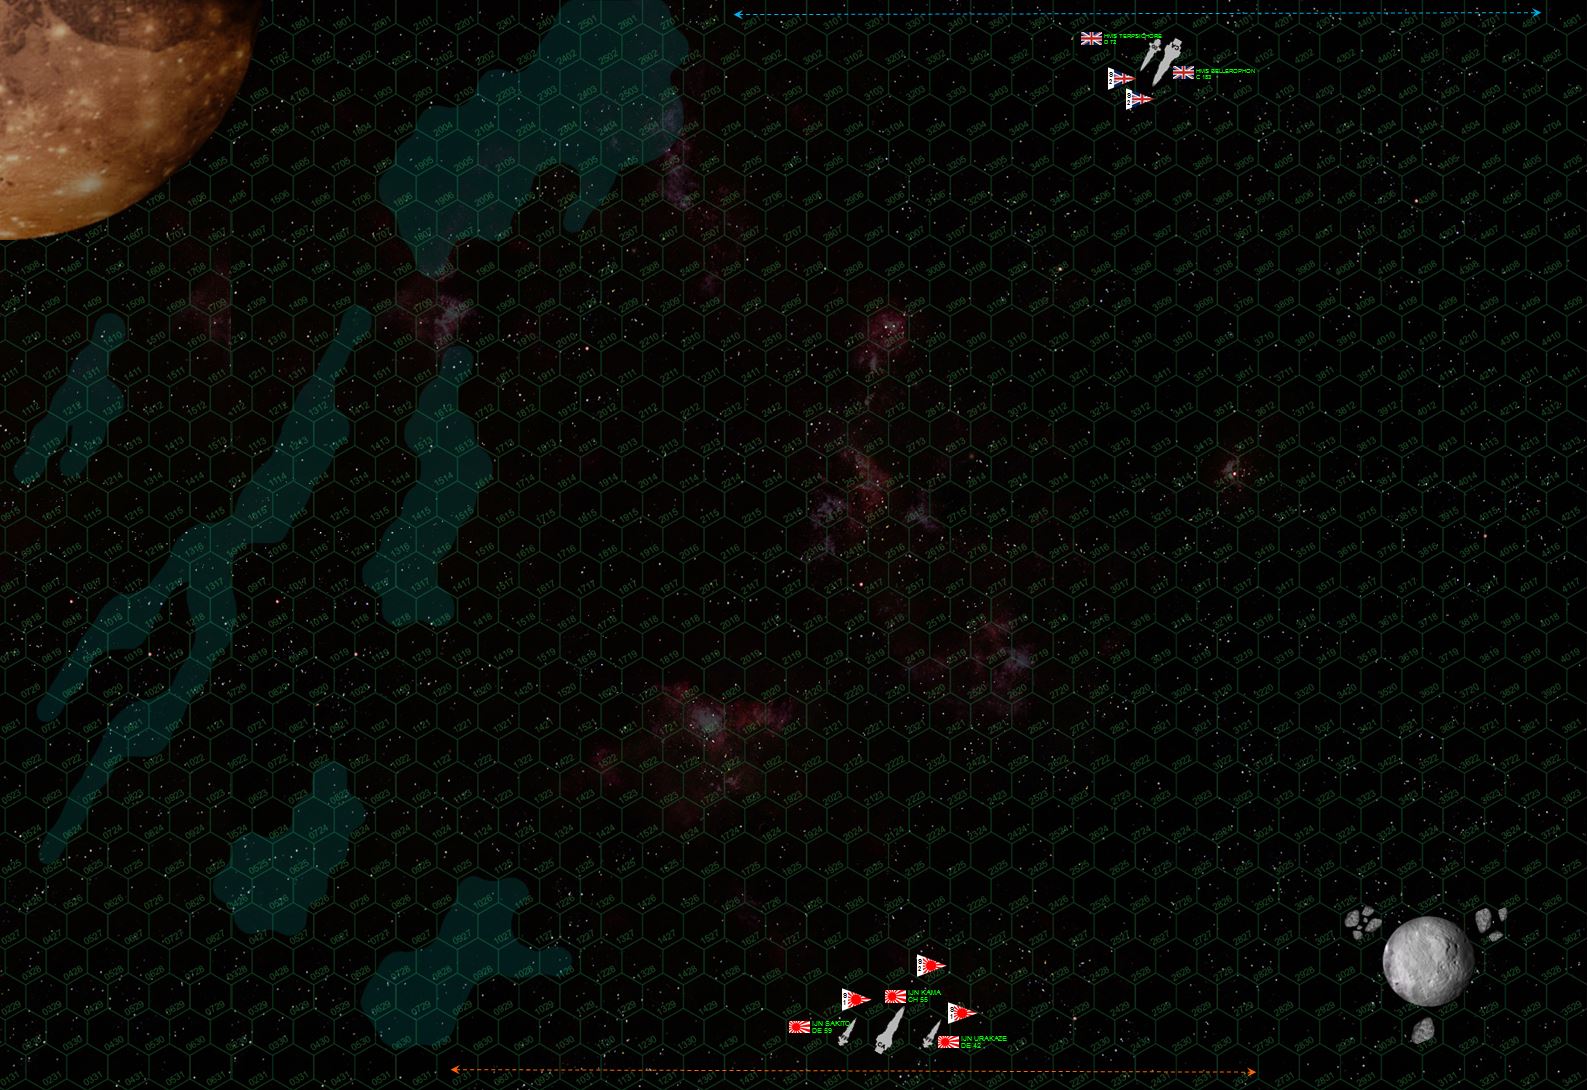 Both sides begin their approach, from the designated entry zones shown by the blue and orange arrows along the top and bottom of the screens
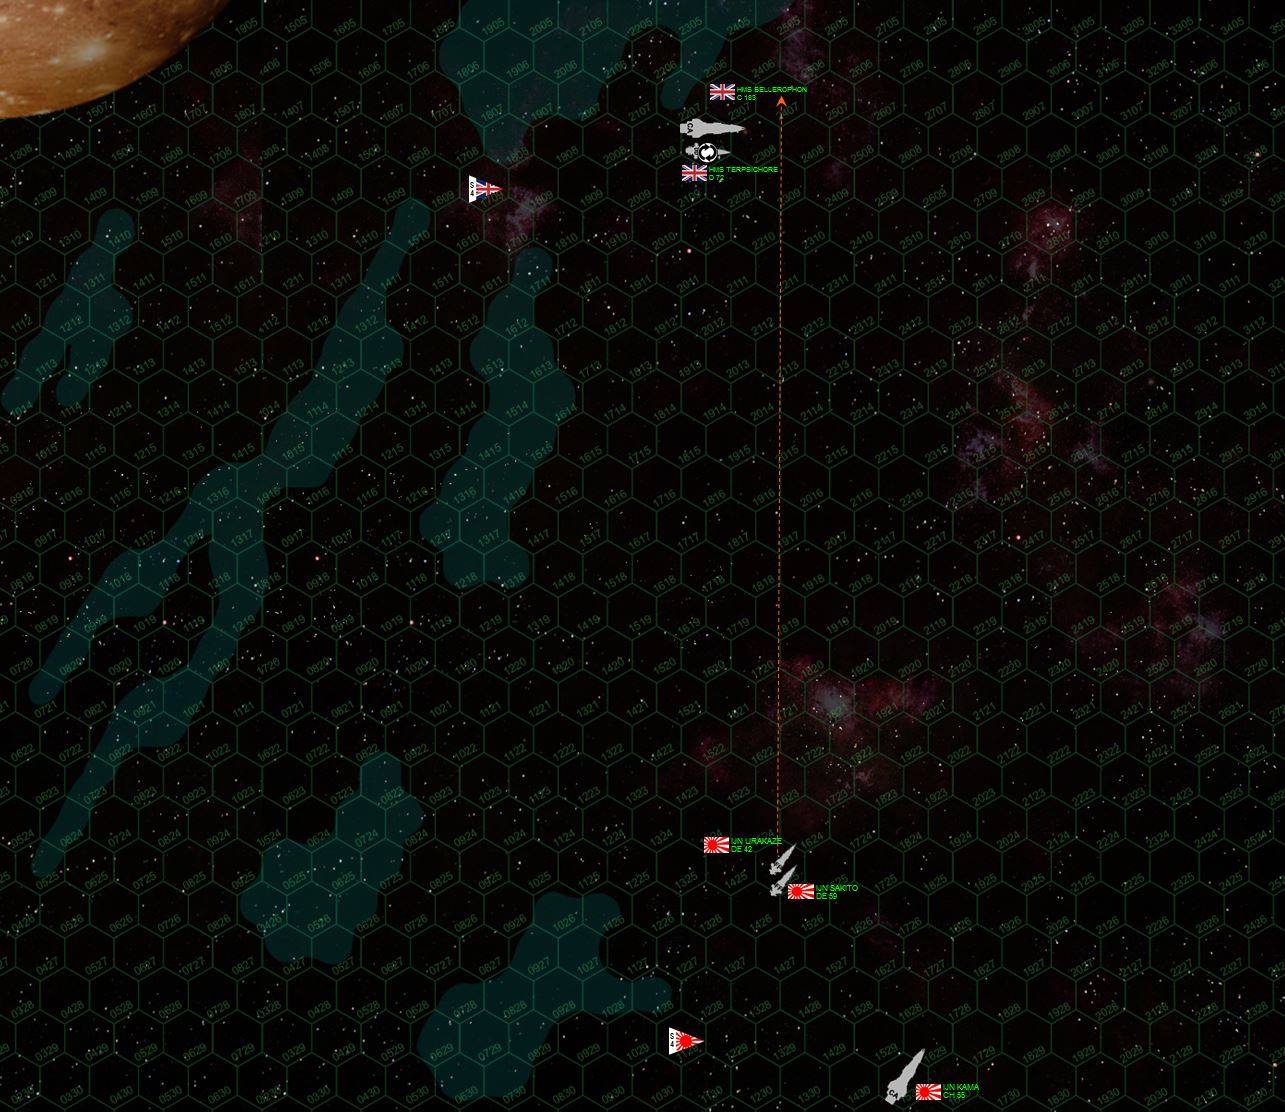 This is the end of Turn 3, both sides are being very reluctant to close quickly, hoping to ping away at least one of each others' destroyers or frigates before closing to gunnery range. Note the clouds of ionized particles (blasted off the planetismal by the freakishly powerful solar wind here) provide -1 to enemy to hit rolls if they have to shoot into or through at least one hex of clouds.
 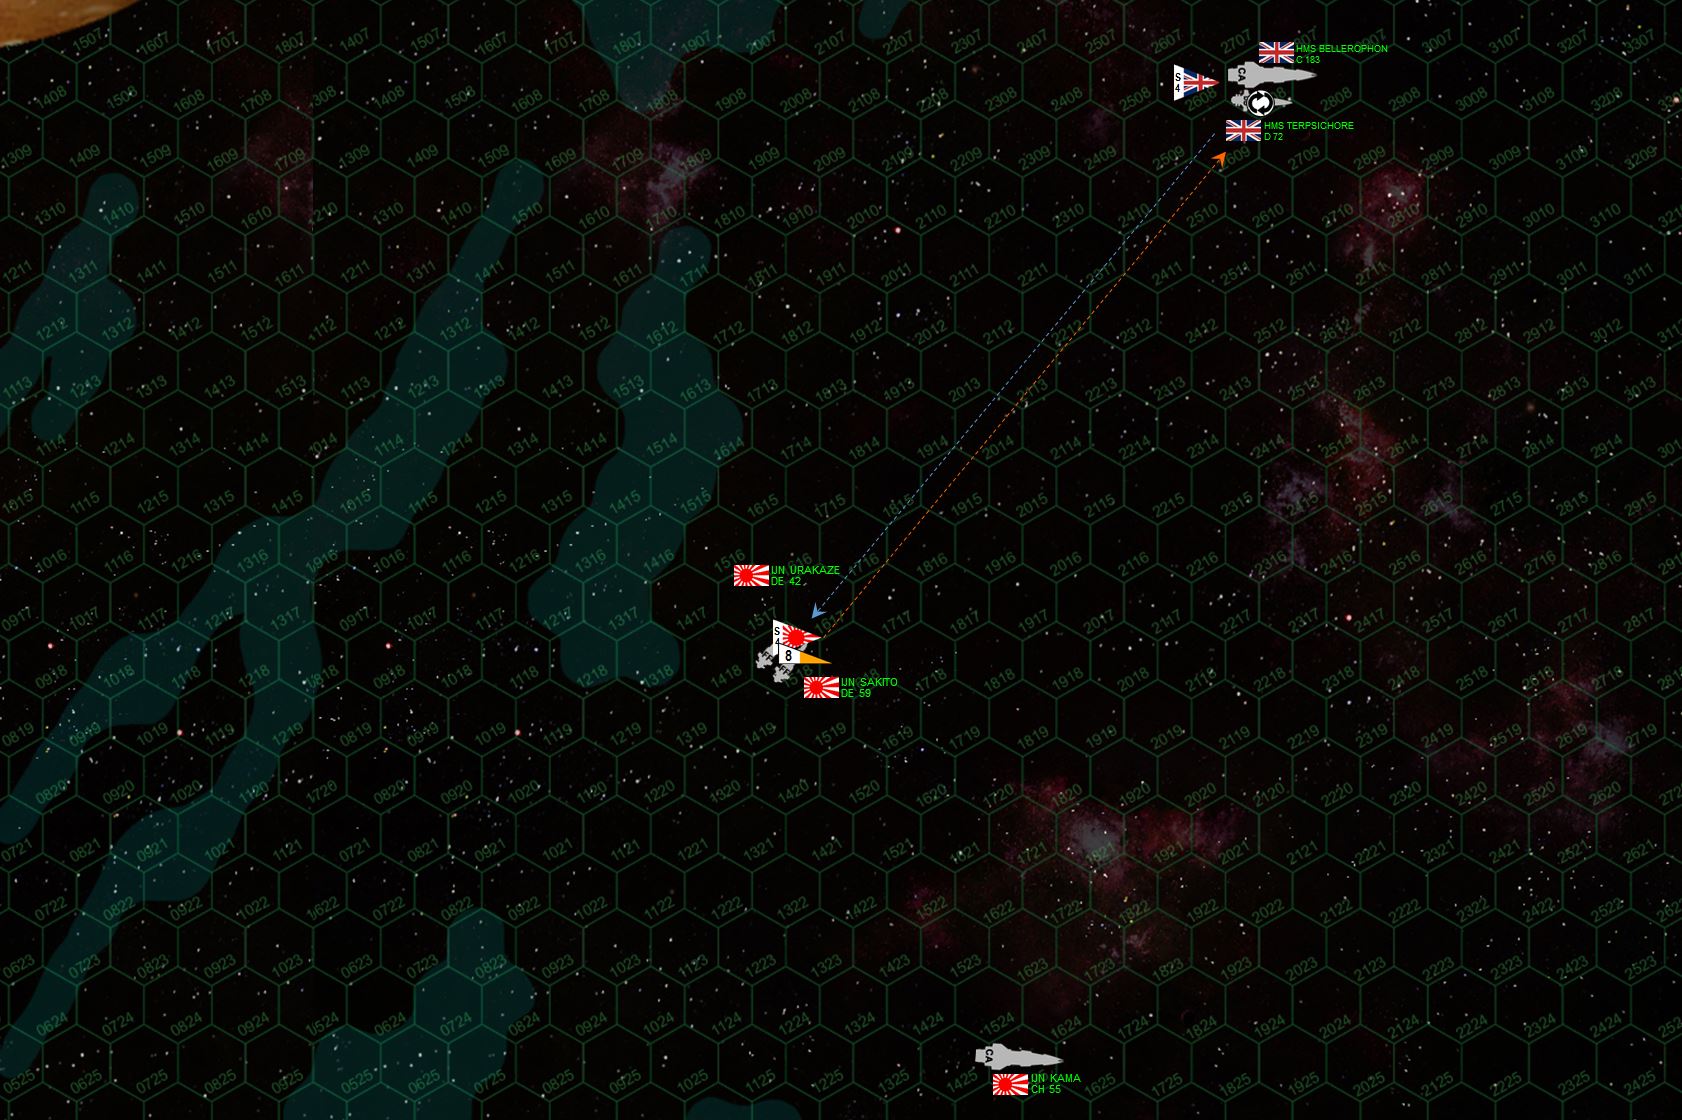 It's not until Turn 4 that we drop out of maximum range brackets. By now Rasmus is realizing that he frigates won't be able to shoot pretty much anything, the little ships' guns hit hard enough but just won't reach. So the two frigates accelerate toward the British, firing full frontal torpedo spreads as they go.
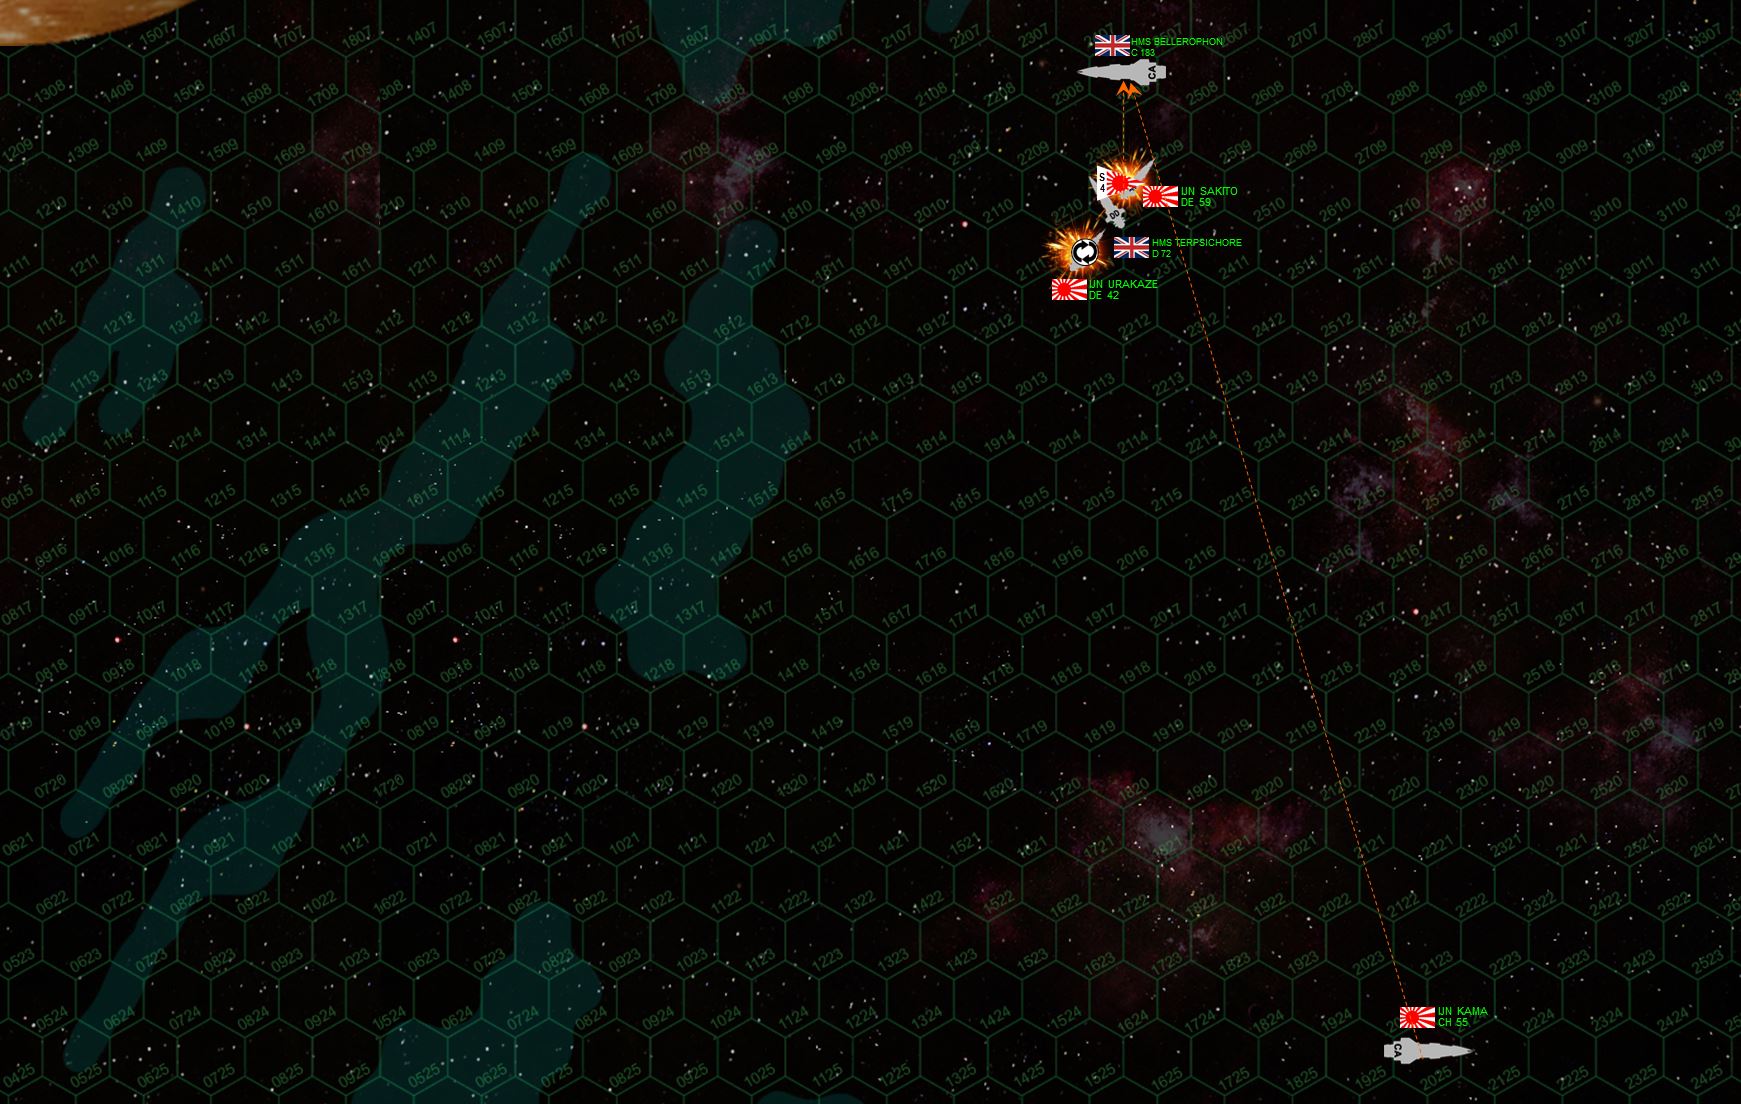 At last things get up close and personal. Again Rasmus seems to be rolling out his patented "send in the Akashi frigates for point-blank fire, while the heavy ship sits back and lobs in heavy salvoes. I'll lose the frigates but take out at least one heavier enemy ship in the process ..." Hey, it's been working for him so far ... Sure enough, it seems to at least sort of work here ... He indeed loses the two frigates, but also takes out the HMS Terpsichore. Thats an even 50-point exchange ... HOWEVER, IJN Sakito also opens a nasty gash in the port quarter of the HMS Bellerophon, which the Kama also adds to with long range gunnery from the bottom of the mapsheet.
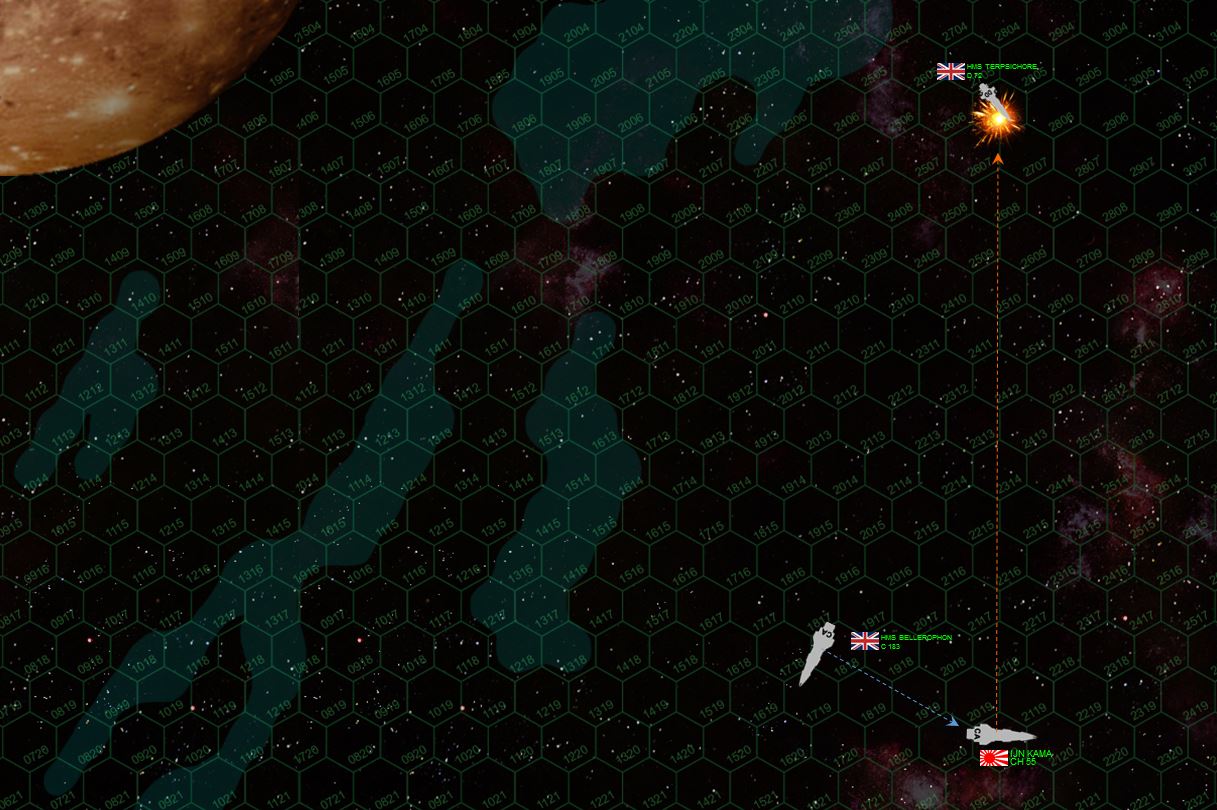 Rasmus winds up winning the battle for the Japanese. The damage to the Terpsichore is enough to leave her crippled on Turn 7. Meanwhile, Bellerophon's rake of the Kama's stern doesn't hit very much, because previous damage to the Bellerophon has damaged her sensors and he's having a hard time shooting through the EM interference from the star. The Sendai Byo, meanwhile, causes just enough damage to force another breakoff resolution check (core damage - crew casualties), which the "Billy Ruffian" sadly fails. She's forced to set a course off the table, which will mean her scenario points will only count half toward the British score (still operational, but retiring).
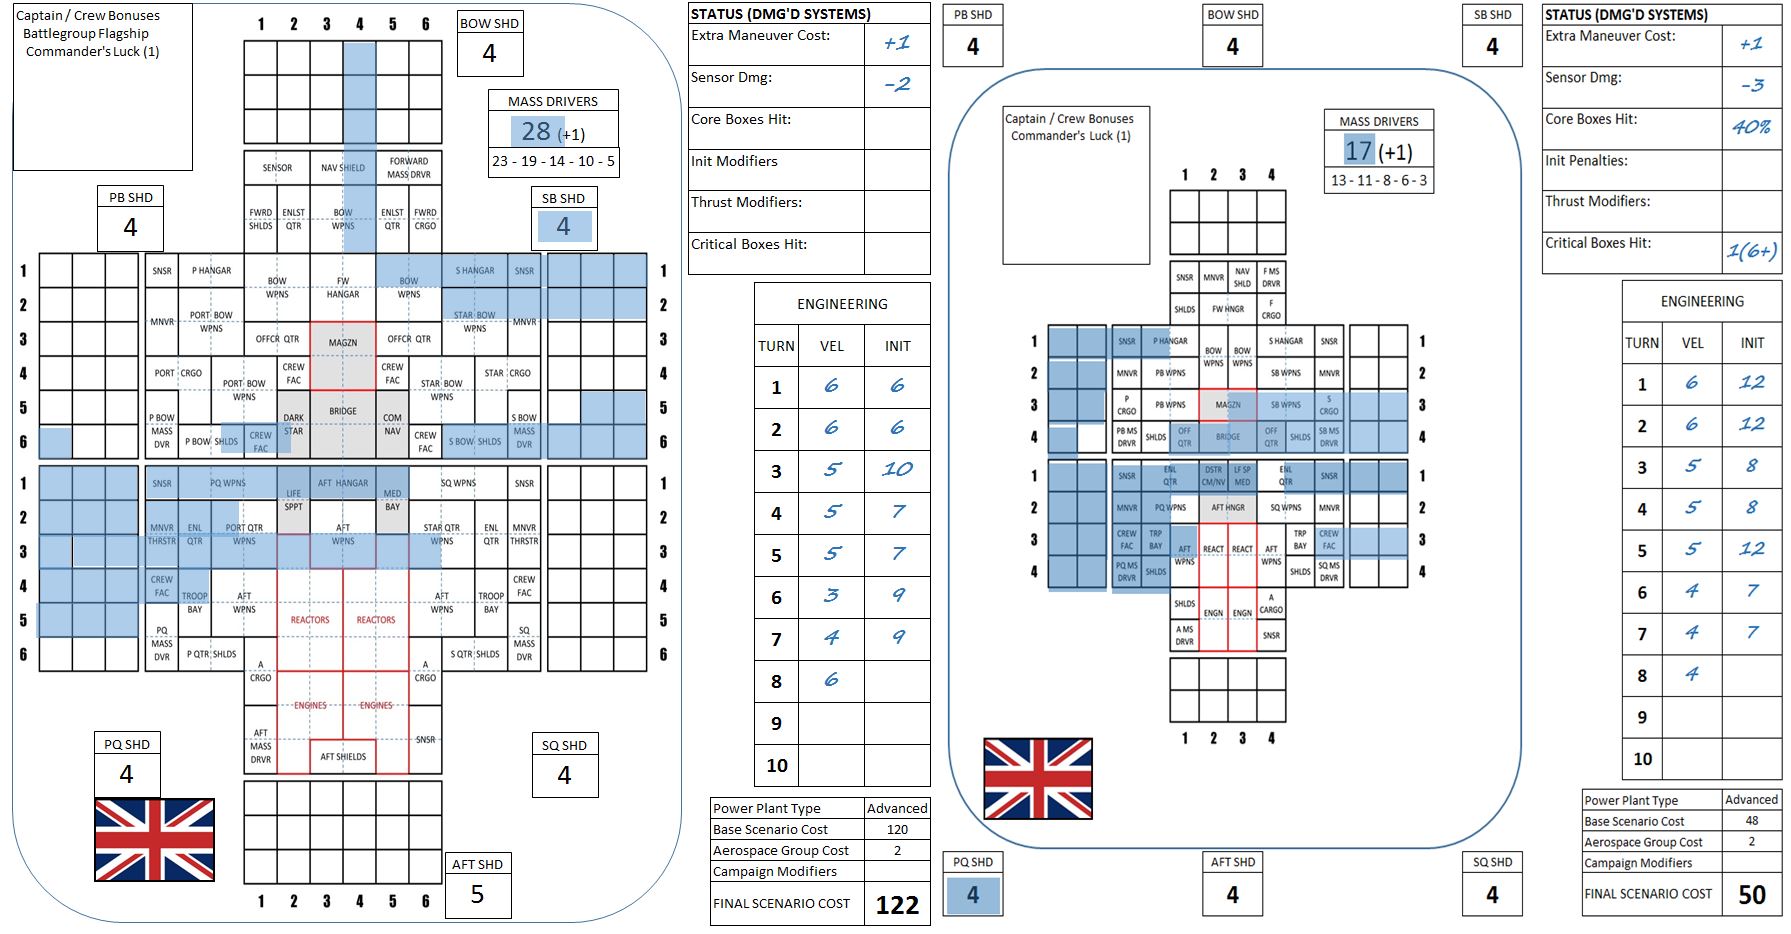 The British warships at the end of the game. You can see where the "Billy Ruffian's" damage on the starboard quarter was critical, piercing into gray "core areas" where most of the crew are when the ship is at general quarters. Hits here trigger die rolls, if your ship fails the roll, the captain is compelled to retire (in other words, the ship "fails a morale check"). The HMS Terpsichore, on the other hand, was hit by EPCs straight through the bridge. The ship and captain will have to make survival / recovery checks. Damon has since survived / won enough battles to buy Commander's Luck, and gets a certain amount of re-roll chances on these checks, which saves the Terpsichore from being scuttled, picked off by Japanese corvettes, or even captured.
 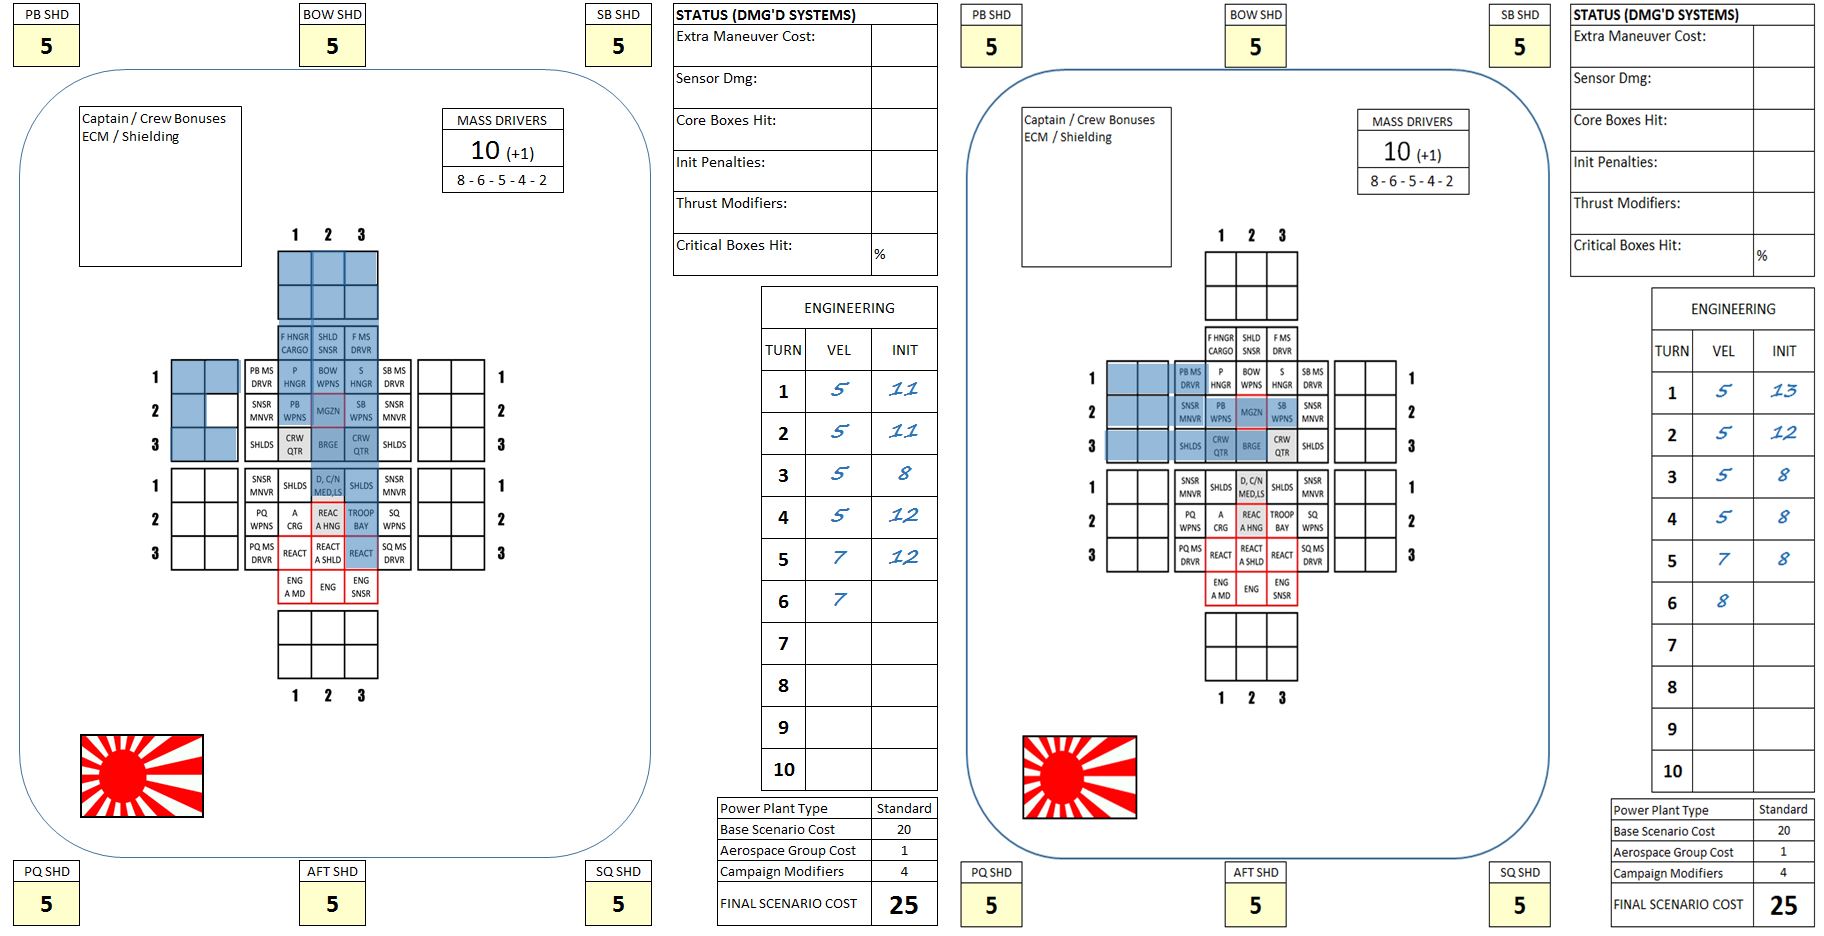 Bridge hits have also crippled both Japanese Akashi-class frigates. You can see how fast these little ships go down. They're cheap and cheerful, though, and can bring a stinging punch to the game if used with numbers and imagination. Just don't get too attached. :D
 Battle Report - Arab League v. Imperial Japan (Drew v. Rasmus)
Okay, I am waaaay behind on my battle reports here, so let me do what I can to catch up.
Last Saturday I had the privilege of hosting a live web game with two of Darkstar’s oldest supporters, @muakhah and @rasmus . This is also the first time Darkstar was played in Asia, which made for some challenging schedules and internet stability issues, but we toughed our way through it. I also had to keep the web conference a little short since I had a Sitrep Podcast scheduled, but nevertheless we had a great little game where we were able to roll out the Arab League, a faction that’s never been played in the new system and not played at all since 2014. It was also the first time one of the new “hybrid light cruisers” were played, warships that are part gunnery warship, part light fleet carrier.
I’m happy to report that the game went well, the new faction performed admirably, and the points balance for the new hybrid light cruisers seemed to work great.
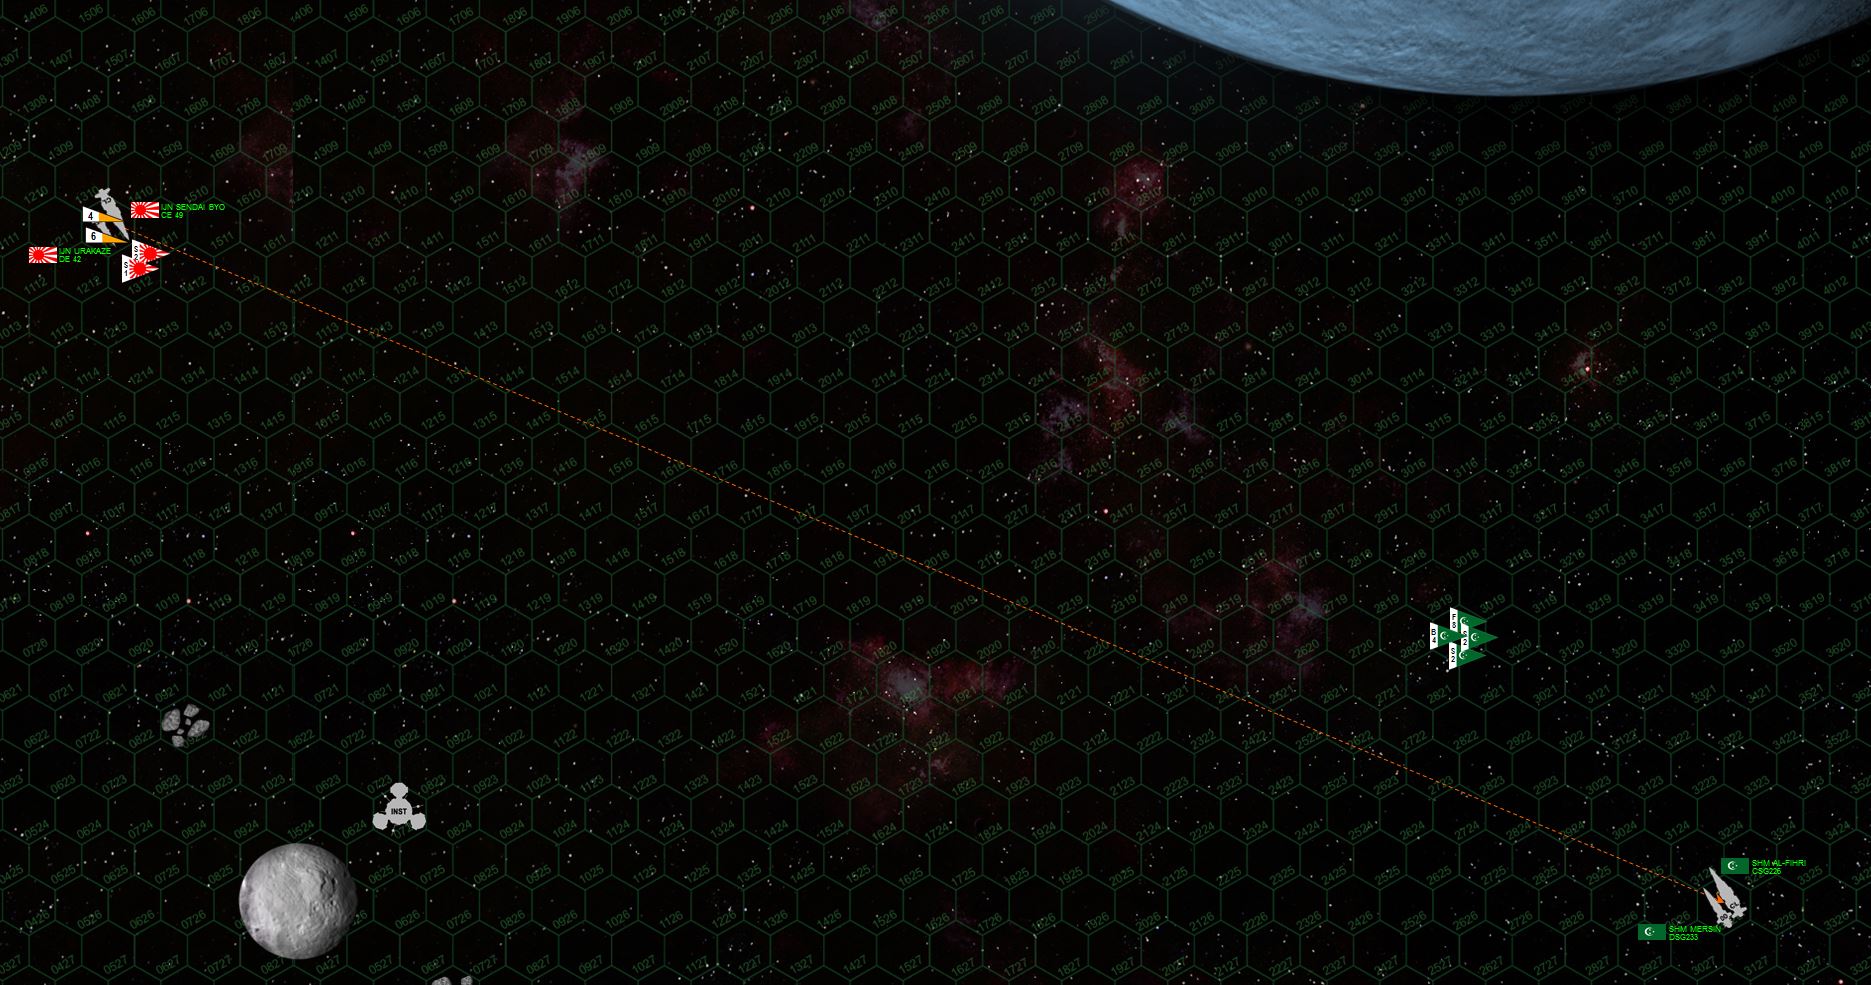 So this set up was relatively simple, since we had a new player and we were testing a new faction, a new ship type, and also breaking in a new player on aerspace carriers (albeit a hybrid ship, but still additional rules and considerations to manage). The Arab League flagship was the Almanzor class light hybrid cruiser Al-Fihri, escorted by the Basra class destroyer Mersin. The Japanese had the Taiho-class light cruiser Sendai Byo and the Akashi class strike frigate Urakaze. In short, the Taiho is sleek, fast, high-tech, and expensive (93 points), so by the time Rasmus could "afford" the Sendai Byo and a frigate escort, Drew could afford a full destroyer for his escort (along with the fighters and bombers of Al-Fihri's aerospace group, of course).
 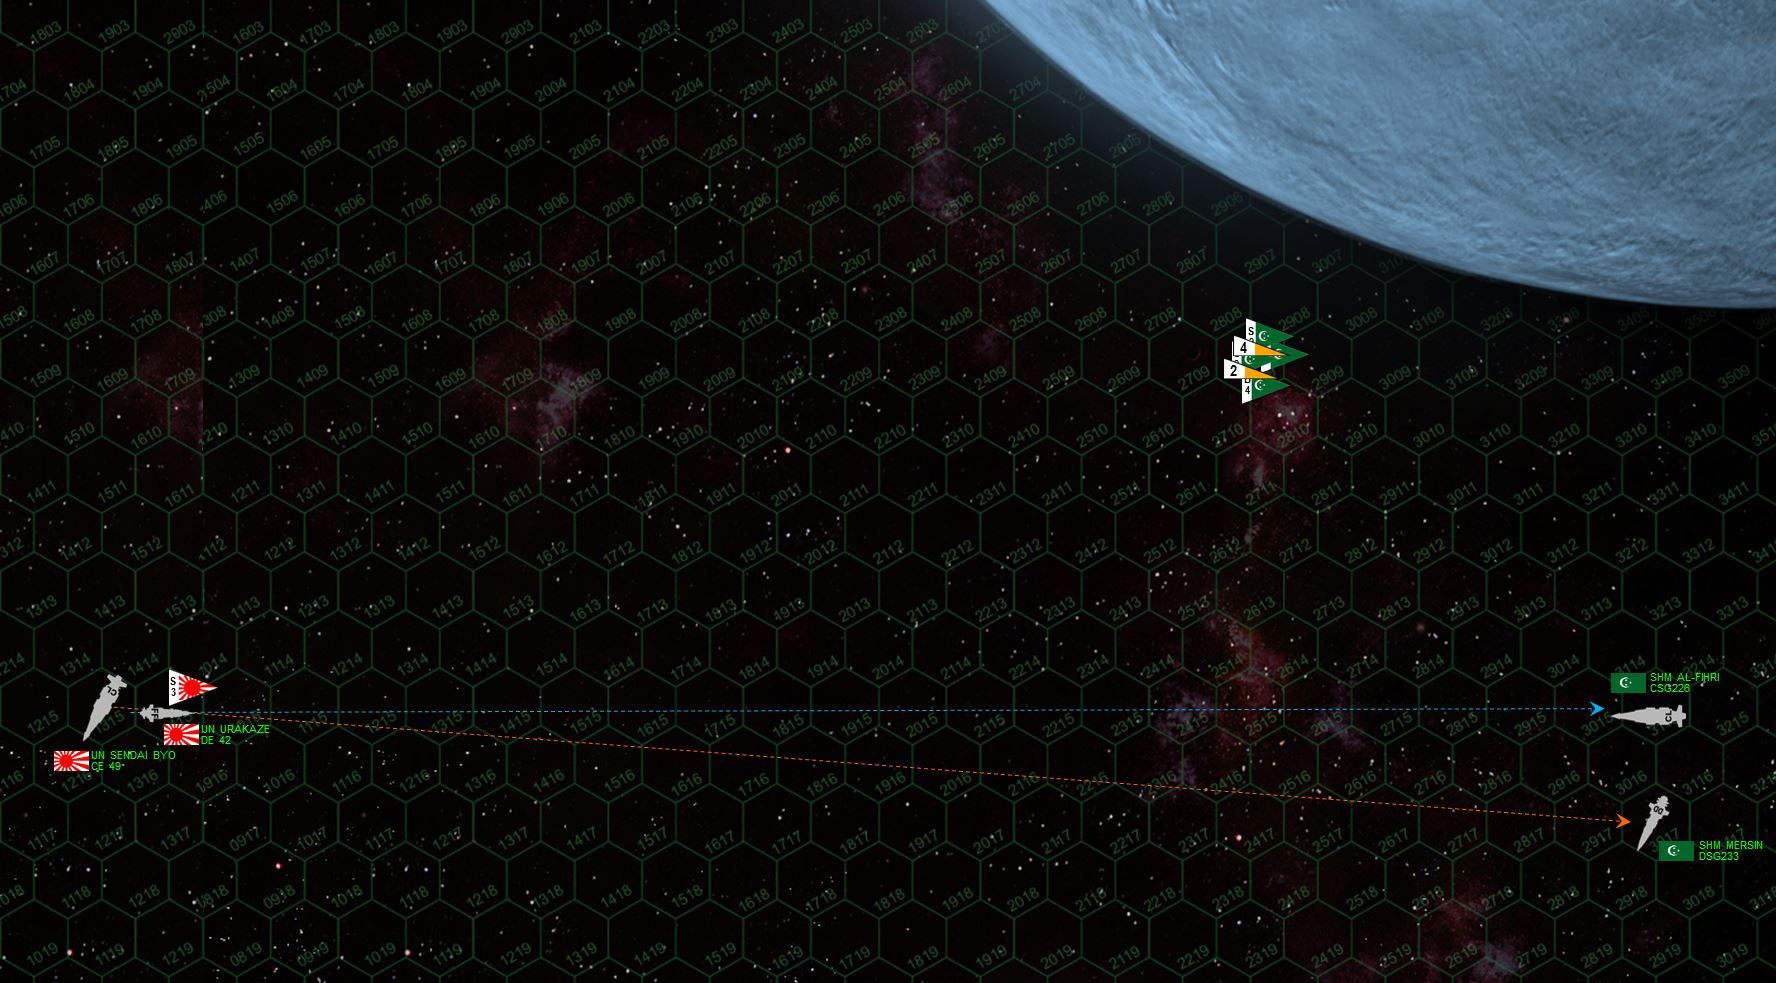 Both sides set relatively cautious approaches. All ships have at least a +1 CIC, making the weapons relatively accurate at long ranges. So no one was overly anxious to mix it up close range. Also, Drew was launching his fighters and bombers, while Rasmus was launching his torpedoes. It's usually a good idea to at least try and let aerospace take a swipe out of the enemy before you close to real gunnery ranges.
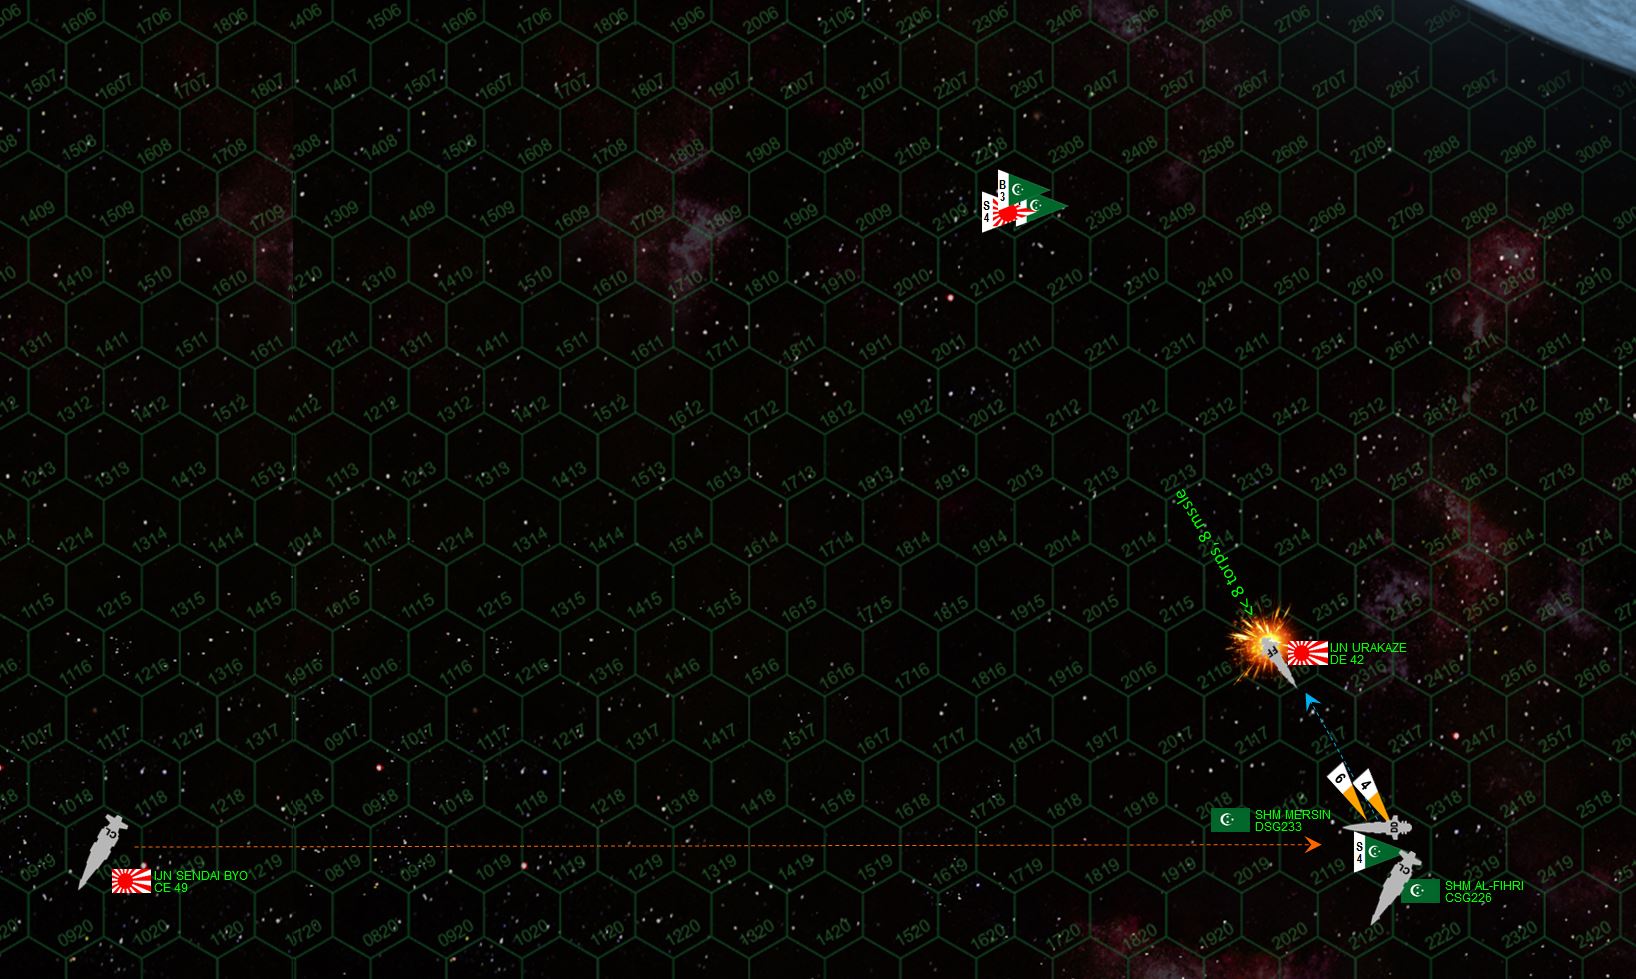 It's not until Turn 3 that things start to get nasty. Rasmus commits the Urakaze strike frigate on a high speed, close-range gunnery run with her deadly little plasma projectors, along with Ki-45 "Toryu" (Dragon Slayer) torpedoes from the Sendai Byo and the Urakaze. Meanwhile, Arab League fighters and bombers launch an aerospace ordinance strike at the Urakaze, aiming everything straight for her engines and reactors. Most torpedoes and missiles are shot down, but gunnery of both sides leave the Urakaze crippled and the destroyer Mersin heavily mauled. Also, Japanese scouts shoot down two Arab League bombers.
 Now standing alone, Sendai Byo reverses course and sets up another broadside on the destroyer Mersin. The more lightly-armed Al-Fihri tries to respond with a broadside, but the destroyer Mersin can't quite get out of the way and takes another hammering from Japanese EPCs and lasers. Meanwhile, Arab League bombers and fighters race back to the Al-Fihri, hoping to land to re-arm and perhaps launch another missile and torpedo strike.
 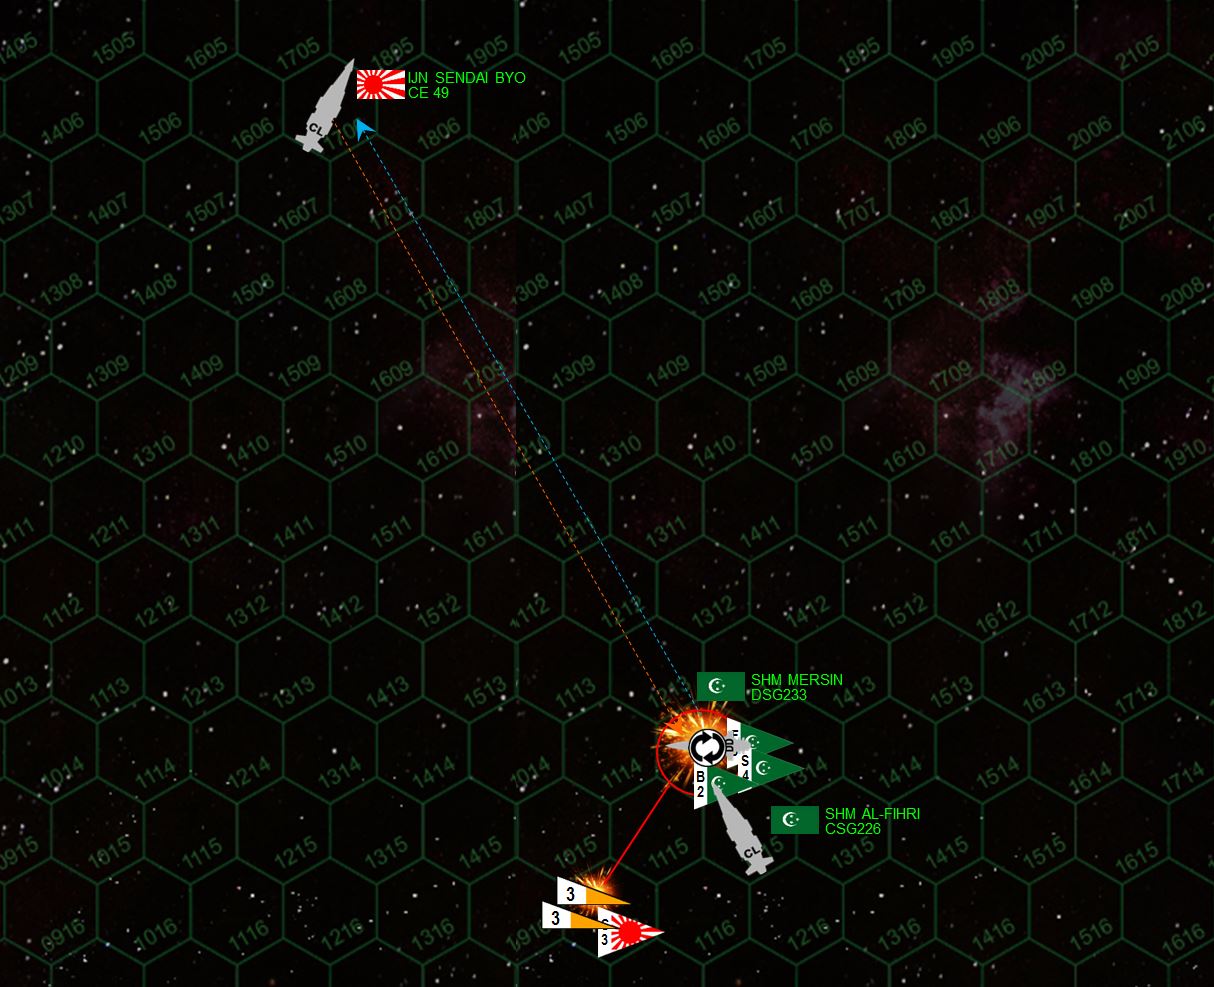 Another Japanese torpedo strike is fended off, barely, and Japanese scouts are shot down as well trying to make a gunnery run or shoot down Arab League bombers as they try to land on the Al Fihri. Nevertheless, another pin-point accurate broadside from the Sendai Byo leaves the destroyer Mersin crippled and adrift in space.
 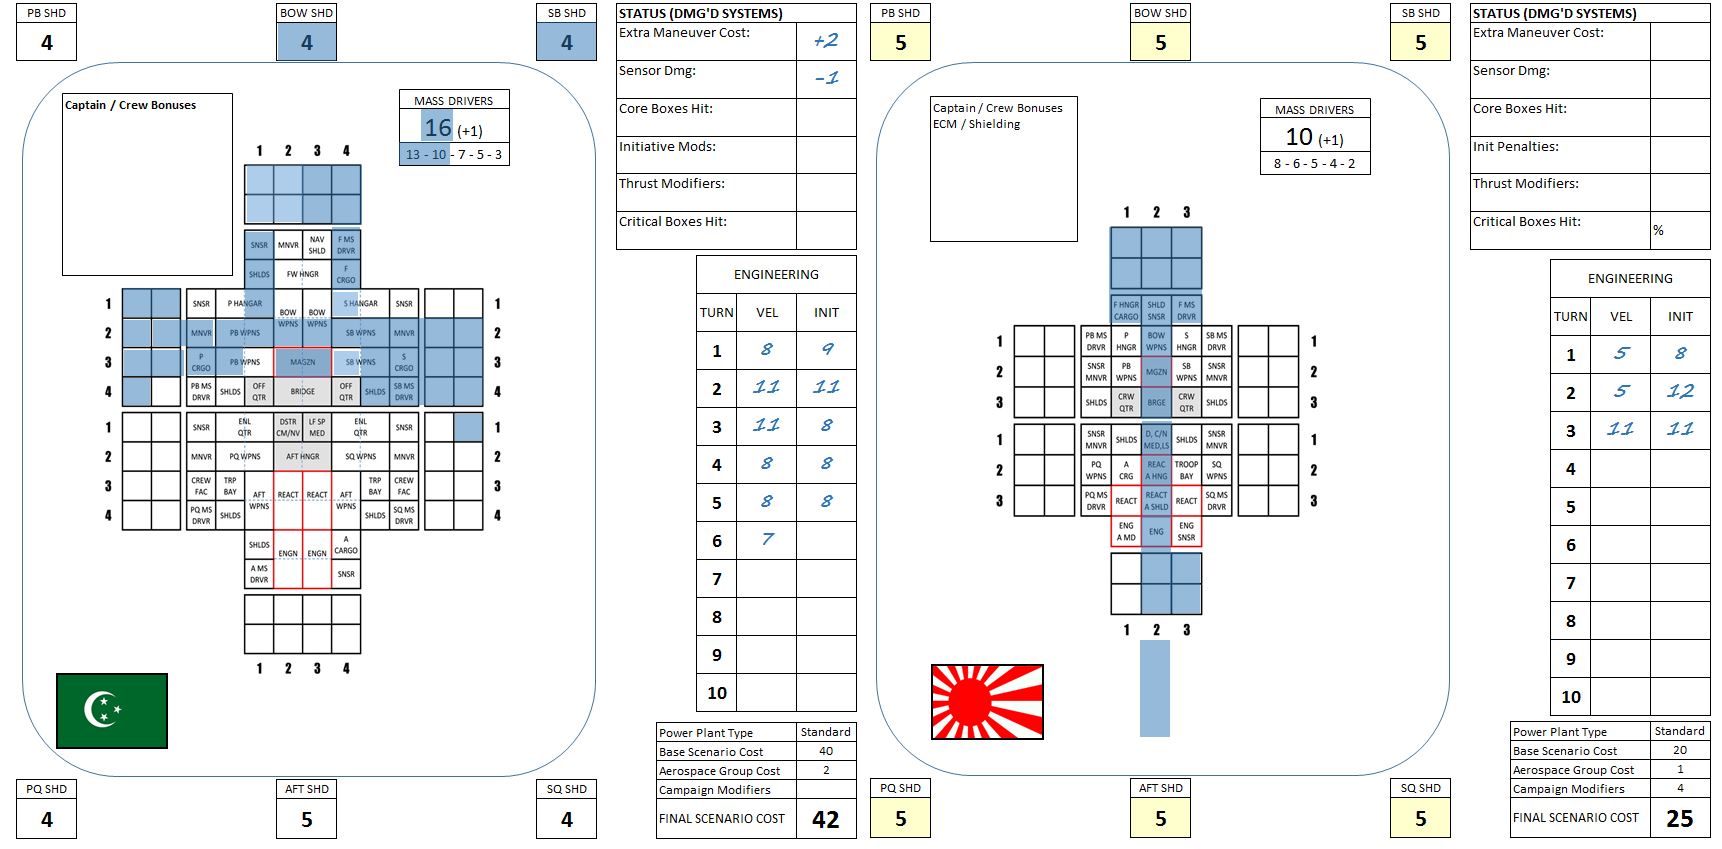 This is the end of Turn 5, and sadly, this is where we have to call the game so I can make my other appointment. Here are the two ships that didn't make it, the Basra class destroyer Mersin and the Akashi-class strike frigate Urakaze. You can see where both ships have been cored completely through, the Mersin from port to starboard, and the Urakaze from bow to stern.
 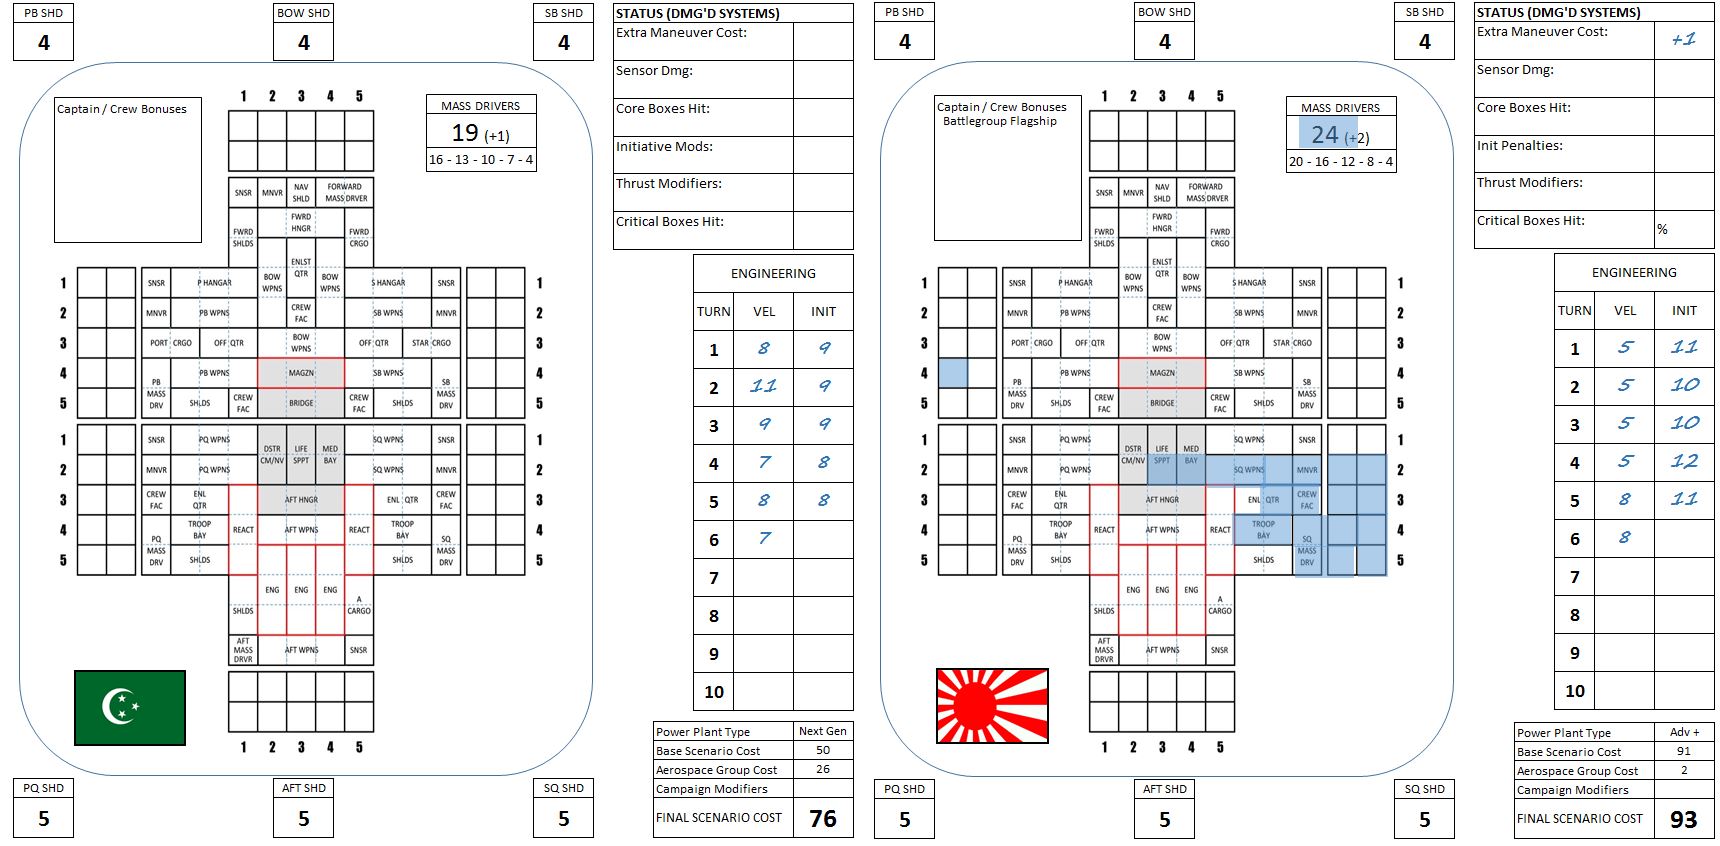 As the game stands, this skirmish is a very narrow Japanese victory, with the Al-Fihri still operational (unscathed, in fact) and almost a full aerospace group (74 points in total). Meanwhile, the Japanese have the light cruiser Sendai Pyo, a little beat up and worse for wear (core damage has forced break-off resolution checks) but she's okay for now (91 points, as she's lost her two scouts). All that saif, with three more turns (usually these go eight turns), Drew and Al Fihri really could have turned this around. The Sendai Byo has the Al Fihri outgunned, to be sure. But the Sendai Byo was also significantly damaged by this point, and the Al-Fihri had just enough time to land her aerospace group, launch, and perhaps hit the Sendai Byo with another carrier-borne aerospace strike. Just guessing, I would give the Japanese 60% chance to win this one had it played to full term, given its current state, but it definitely COULD have gone the other way.


![Play WW2 Commando Operations With Butcher & Bolt [Updated]](https://images.beastsofwar.com/2026/03/relaunch-600-338.jpg)


