


![How To Paint Moonstone’s Nanny | Goblin King Games [7 Days Early Access]](https://images.beastsofwar.com/2024/12/3CU-Gobin-King-Games-Moonstone-Shades-Nanny-coverimage-225-127.jpg)


DARKSTAR CAMPAIGN UPDATE: DUCHESS ANNABEL’S WAR IS OVER


British v French Again, and this time characters GO DOWN!
Okay, so @damon and I had another great game of Darkstar on Saturday. Again, we’re looking at my French vs. Damon’s British. In addition to the successful running of Darkstar on line and another great game, we’re also expanding our playtesting more and more into successful execution of SCENARIO based play, instead of just pointed-up mash-ups. Last time we had a “dock and rescue” mission, this time we’re trying convoy escort.
Forces are the same last time (no ships were lost permanently last time, and again, we’re just trying a new scenario model).
French (New Roman Alliance):
- NRS Leclerc (Foch-Hispaniola class light cruiser – upgraded)
- NRS Corsica (Milan II class destroyer – upgraded)
- NRS Calais (Milan II class destroyer – upgraded)
British
- HMS Bellerophon (Trafalgar class heavy cruiser)
- HMS Indefatigable (Indomitable class light cruiser- upgraded)
- HMS Terpsichore (modified Falklands-Commonwealth class destroyer)
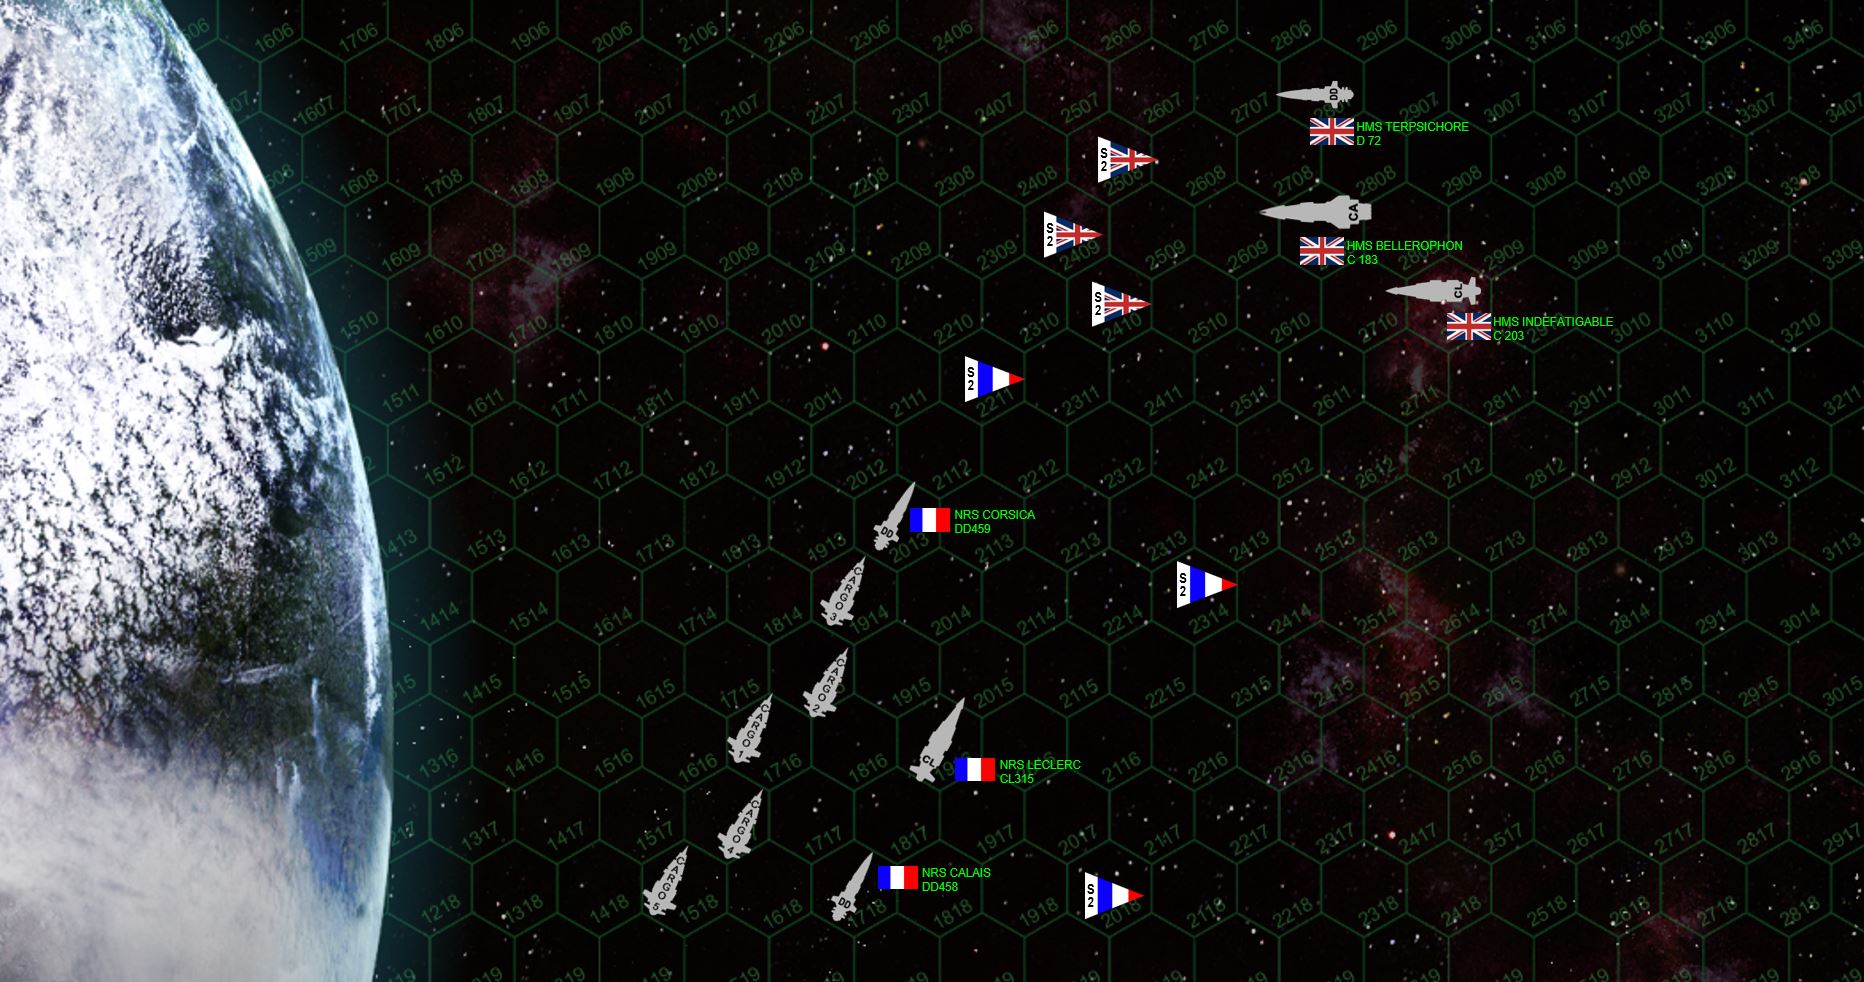 The French have an convoy of five automated drone cargo ships, entering on the bottom half of the table. Movement on these are 7 hexes a turn, they automatically “lose initiative” and must move first every turn, they make one hex-side facing change per turn, have 3 in shields on all facings, and 10 damage points. The French get 20 points for every one of these that successfully get off the top end of the map sheet. The British get 20 points for every ship they destroy. // Terrestrial gravity rules. One hex of gravitational drift toward the planet is assessed against any non-aerospace ship (including cargo ships) that end their movement within 10 hexes of the planet’s outer rim. Any encounter with a hex that is even partially covered by the planet graphic results in immediate and total destruction of the ship. // Scoring in this scenario is RAID-based, i.e., players get points for enemy warships destroyed / crippled / driven off … NOT remaining ships on the table at the end of the game. To claim a victory, players need to score at least 40% their opponent’s beginning total, and must score at least 5% more than their opponent. In this case, both sides have 244 points on the table, so that 40% threshold is 98 points. This is rarely an issue, it’s just to keep players from “peeking” onto a corner of the table, releasing a hail or torpedoes, and vanishing with minimal damage inflicted, yet claiming a victory without ever really engaging in battle.
 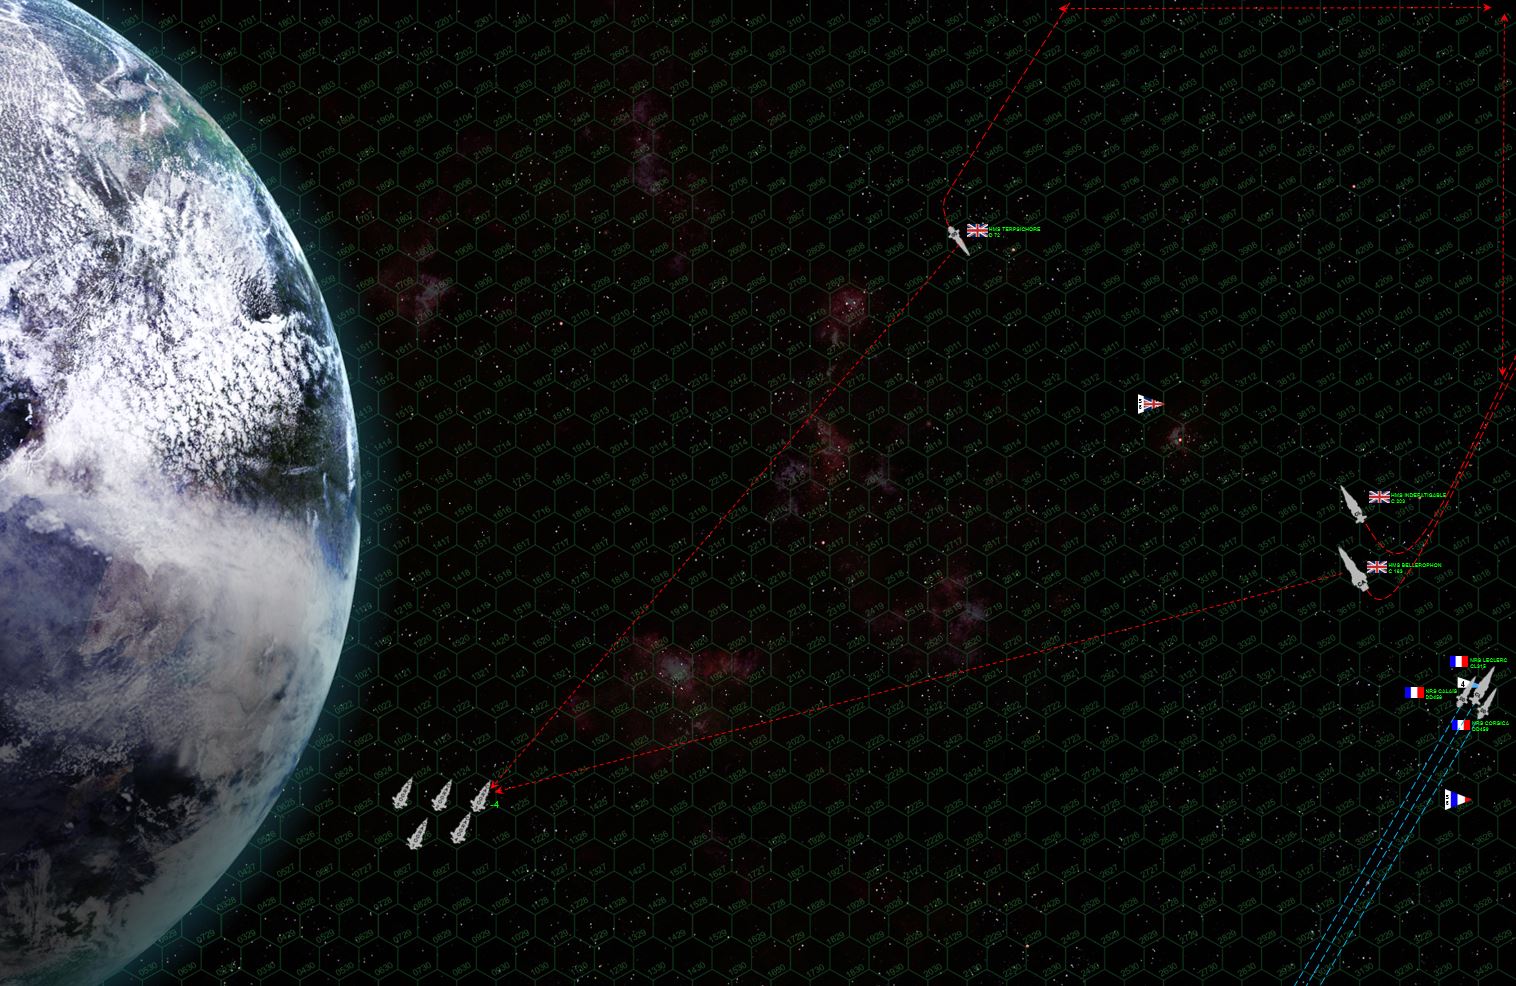 A wide angle of the whole map sheet at the end of movement, Turn 1. The French cargo convoy has entered near the planet. The British then came on through the hexes specified for their entry hexes (upper right, indicated by red arrows). With hard jackknife turns to starboard, Damon seems to be trying to set up long-range broadsides on the cargo ships, but the range really is very long (just short of 4700 kilometers, the distance between London and Nova Scotia). Meanwhile, the French, who largely WON initiative aggressively stab onto the board from the lower right, rapidly accelerating to a broadside position. Payback time!
 A close up on that lower right corner of the map, where the French unleash a truly withering broadside straight into the stern of HMS Indefatigable. Not only is she instantly crippled here, but takes so much damage to her reactors and engines that she’s actually in danger of EXPLODING. Damon makes the roll, however, and the Indefatigable is only crippled, and in fact will be recovered and towed back to port for eventual repair. But she’s out of this one, that’s for sure. Rear guns on the two British cruisers pummel the port bow of the Leclerc, knocking down port bow shields and crippling one sensor array, but otherwise doing little damage. Meanwhile, the aforementioned forward broadsides on the French cargo drones do very little, the range is just too long. The French are definitely winning this one so far.
 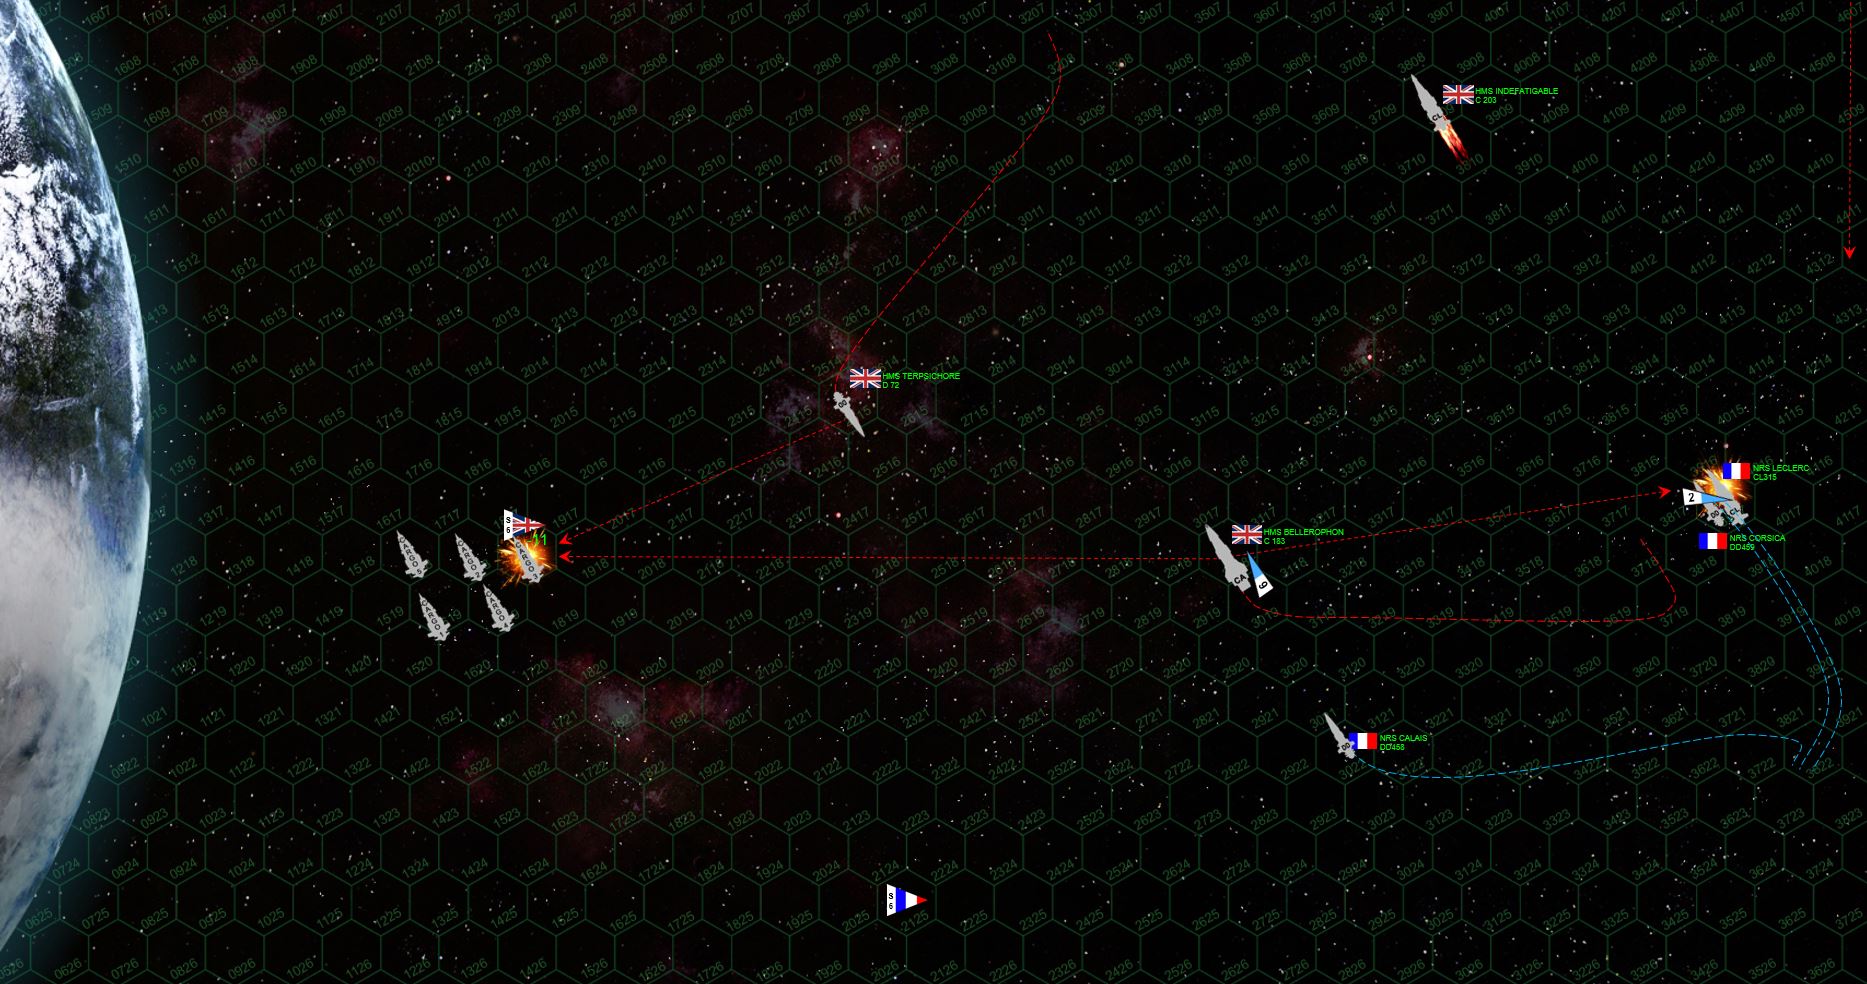 The French (and by that, I mean MY DUMB ASS), literally snatch defeat from the jaws of victory here. Rather than simply roll the Leclerc to protect her vulnerable port bow, I totally forget I lost that shield and decelerate instead. Damon doesn’t waste the opportunity, putting a few of Bellerophon ‘s heavy EPCs into the Leclerc’s totally unshielded port bow. One 15-teravolt bolt scorches right through the bridge, damaging it. Another follows up, crippling the Leclerc and actually forcing my commander here (Captain Rafael deChalemonde) to make a captain survival roll. God, I can’t believe I did that. Meanwhile, the Bellerophon and Terpsichore switchback their broadsides closer to the French cargo fleet, finally knocking down the first ship. The cargo fleet is actually using the planet’s gravity to hedge further away from the British, squeezing a little extra velocity and distance from the planet’s gravity well. The one piece of good news for the French is that the Bellerophon and Terpsichore are widely separated, allowing the destroyer Calais to S-turn behind her for a torpedo spread into Bellerophon’s stern.
 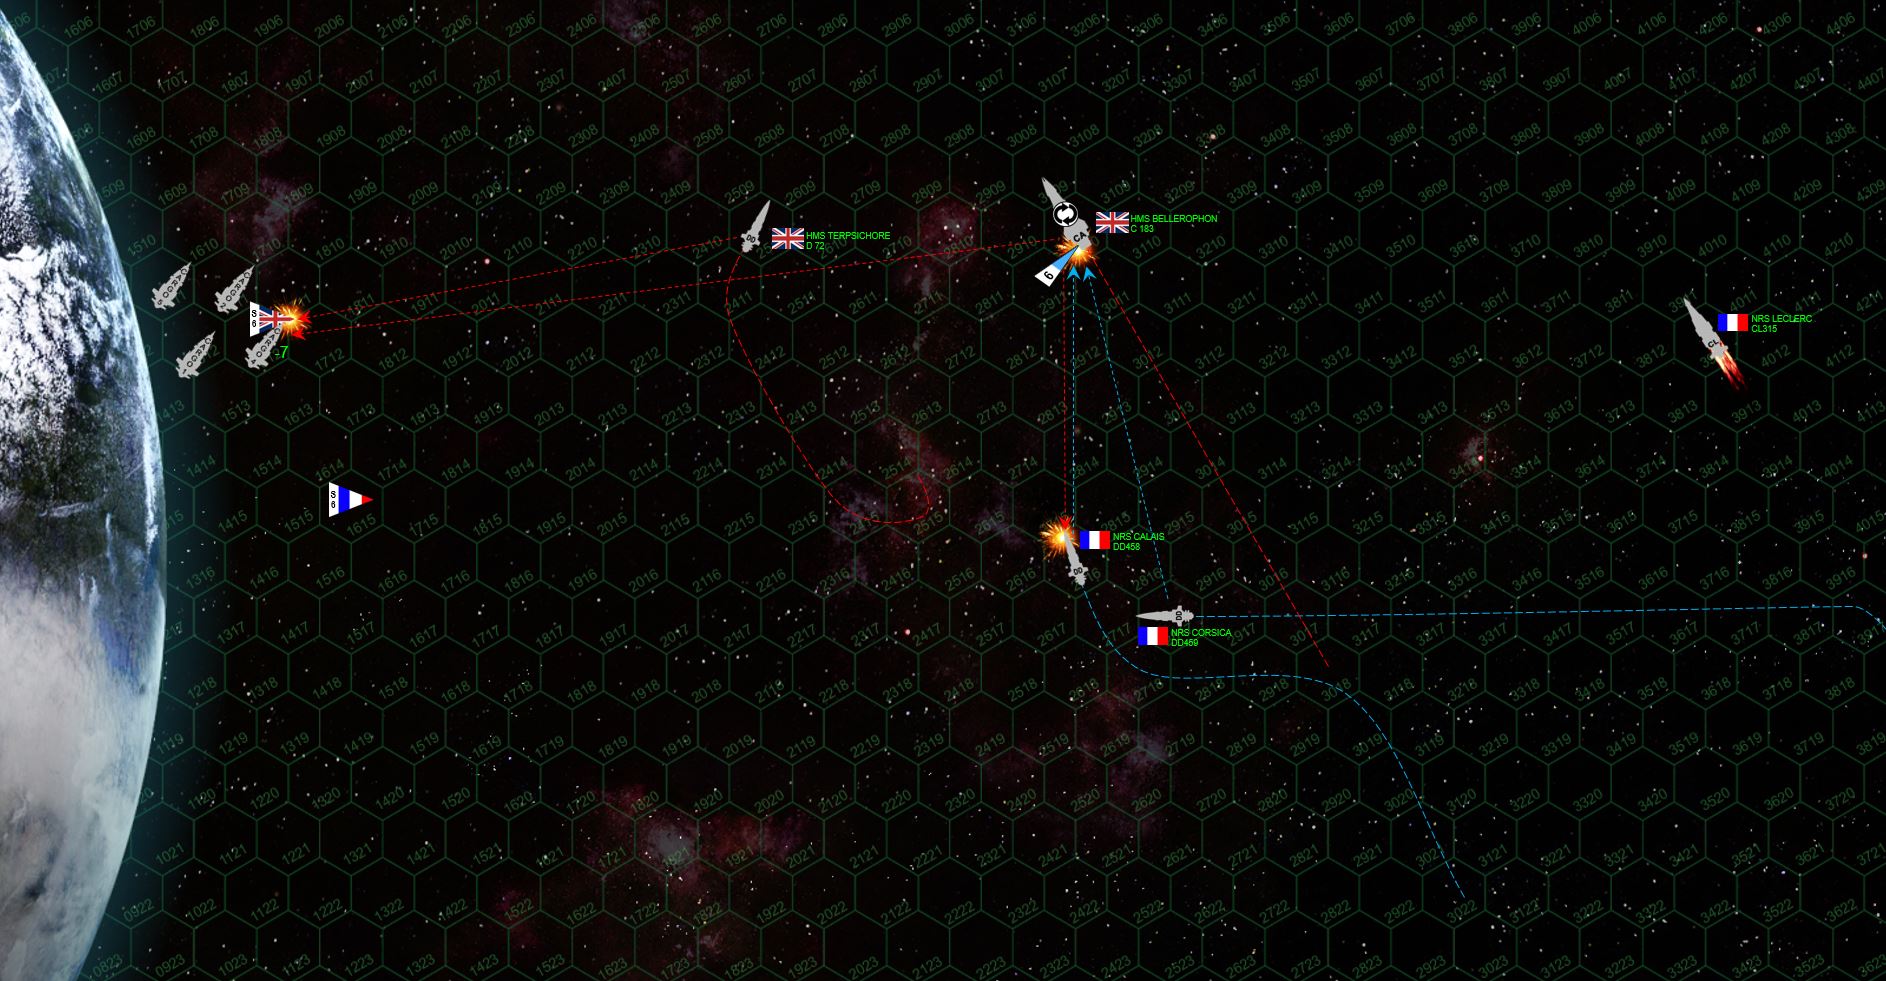 The French cargo drones have practically “bounced” off the planet’s atmosphere here, but they’ve still lost a second cargo drone. Three remain, but they’re already only two turns from the edge of the board! The Bellerophon, meanwhile, has rolled over on her back, having lost her starboard quarter shields. This maneuver hopes to shield the starboard quarter from the 8-megakelvin lasers of the two French destroyers, but these Milan-IIs are fast if nothing else. And with the additional Tactics battle upgrade, they ALWAYS win initiative. You can see where NRS Corsica and Calais are really putting the speed on here, trying to get at the Bellerophon’s starboard quarter (actually on the left side here, again, because the ship is inverted). One or two solid volleys in that vulnerable spot will cripple the ship and save the day! Calais makes it, but can only put in her forward guns. Inversely, Corsica does NOT make it, but can put her whole broadside into a barrage on Bellerophon’s stern.
  No guts, no glory. At this point it’s clear I’m not knocking down HMS Bellerphoron, missing shield generator or not. Damon’s using her enhanced thrust to power away from the threat, and carefully keeping his ship rolled to sure I won’t get another crack at it. You know, all the things I SHOULD HAVE DONE with the Leclerc! (Grr … I’m still made at myself for that). So instead I move to engage the destroyer Terpsichore. If I can knock out that ship, and not lose a destroyer myself, I actually still win this game. The Corsica, at flank speed (14 hexes a turn, 42 kilometers a second, insanely fast in this game), barely makes it in a crazy, hull-groaning turn to starboard, using the planet’s gravity to tug her 45,000 ton frame just into the Terpsichore’s stern arc … although again … forward guns only. The Calais gets the broadside, but has to take the calculated risk of nose-diving straight at the planet. If she loses power now … Sure enough, the French get very lucky here twice. One, Damon scores only 9 damage points on the third cargo drone, not the 10 he needs to cripple it, and they’re off the table next turn. SWEET! Two, the Calais and the Corsica indeed knock out the Terpsichore, with enough 8-megakelvin lasers to cripple her engines. But three … the Calais is crippled in turn with the Terpsichore’s powerful aft syglex emitter (gravitically-lensed x-ray “laser”) through the bridge. She’s crashing into that planet at 11 hexes a turn (33 kilometers a second). BOOM. So just that fast, I won this game again, and lost this game again. Have I mentioned how much I love Darkstar?
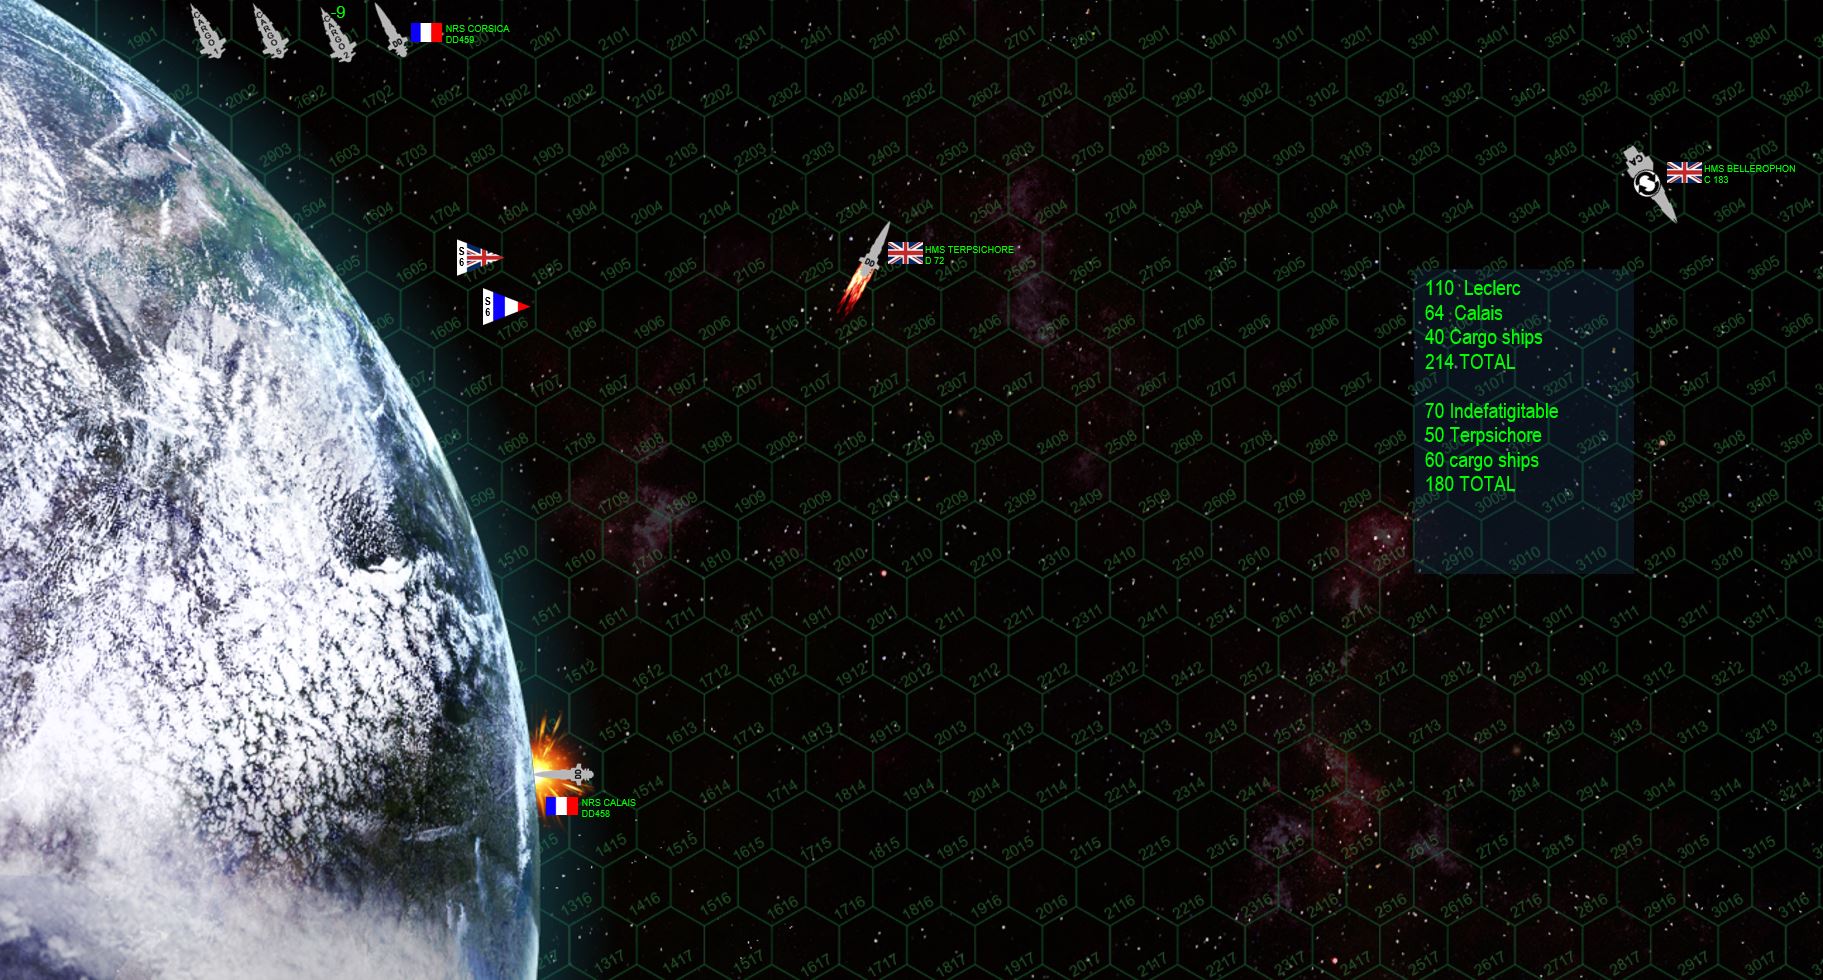 Final situation and scoring. Now there is an ERROR in that math … I forgot that the Indefatigable is an 84 point ship, not a 70 point ship (+20% cost for her gunnery accuracy bonus). So my score was technically 194, not 180. Still, at 194 to 214, Damon wins by 20 points, or 8.2%, which clears the 5% he needs to claim a win.
  The Calais (left) and Leclerc (right) after the battle. Actually the Calais doesn’t look like this now, she’s little more than a kilometer-wide hole in the surface of that planet. Captain DID make his survival roll (both of them, one for the hit through the bridge and one for the crash of the ship in general), but it doesn’t matter. This was his third ship lost in combat. So Commander Leon Pelegras is now “promoted” back to the academy to teach classes or run a supply base or some such. There was a backstory in my commander logs talking about how he was in this task force because he was desperately in love with a French-Algerian aerospace pilot on one of the New Roman carriers, a woman he’ll probably never see again now. THANKS A LOT, DAMON! :D
  The murderously neat precision of New Roman laser fire is apparent here in the damage profile of the HMS Indomitable. She had a 30% chance of detonation, but Damon rolled a 38 on percentile dice. This ship ALMOST wound up as an aroura borealis light show in the atmosphere of this planet. Terpsichore (right) took much less damage, but it takes less to cripple a destroyer, especially when I got lucky and rolled a 5 on the 5+ required to cripple a destroyer with two boxes ticked off in critical components.


Sound like a great game between @oriskany and @damon
Definitely a wild one @rasmus. I thought I had this one in the bag when @damon made that initial approach. Arrrggh! If only I had ROLLED the Leclerc!
Great game, was getting a bit worried about being beaten by the French so well played Damon.
Thanks, @gremlin! That’s twice now my French have come soooo close – actually last game I managed to steal a campaign draw. I have a Contessa-class light carrier I’m adding to the task force that might finally give me the win. 🙂
A great read! One of those battles when a single mistake cost you a win @oriskany
Thanks @yavasa. Hey, I can’t even blame the dice on this one. Made a blatant mistake and @Damon saw it. Well played! 🙂
Another good game that I nearly threw away with a dumb first move, must have had a brain fart to think that the French wouldn’t jump all over a chance to hit my six on turn one, I was lucky the ‘Indy’ didn’t explode. Losing shields on ‘Billy’ meant I had to go on the defensive when I should have been attacking, I think Jim’s mistake with his unshielded cruiser was the only thing that gave me back a chance. To stay on mission I think I should have rushed the transports with both cruisers, done as much damage as… Read more »
Yeah, @damon – my biggest fear there at the end of Turn 2 was that you might think I was “throwing” the game with that Leclerc roll. I assure you I was not. When I’m teaching someone a game I don’t mind tossing them some “soft pitch” games to get them started. But you are well past that point when it comes to Darkstar. 😀 I think I have my replacement ship for NRS Calais, a slightly upgraded Contessa-class light carrier. Actually, this was the fourth ship in the task force (as a frigate) but now I have kicked up… Read more »
Another great game, looking forward to seeing more engagements like this.
Thanks, @muakhah – I was a little off the grid this weekend but next weekend we should be back in the swing of things with more weekend wargaming. I’m sure someone will request Darkstar! 😀