Valor & Victory – 1918 (German v. French Megagame)


Recommendations: 227
About the Project
The Valor & Victory system was originally published by Barry S. Doyle, free to print & play. An unapologetic "love letter" to the 1980s Avalon Hill classic Advanced Squad Leader, Valor & Victory sought to present easy, fast, and yet realistic World War II squad-level combat - without the sometimes overwhelming complexities for which ASL was both loved ... and feared. Players of Valor & Victory have always been encouraged to create their own maps, scenarios and units, contributing to an ever-growing community of die-hard "substance over style" historical wargamers. In that vein, I've started creating a "1918 Edition" of the Valor & Victory system, featured recently on Beasts of War during the "Campaigns of 1918 - Centennial Gaming in the Great War" article series. Basically a "prequel" of the World War II scenarios, Valor & Victory 1918 seeks to put squad-based tactical wargaming in the Great War within easy reach of players like me, who may not have large armies of Great War miniatures available (or the time, resources, or inclination to build such an army and tabletop terrain).
Related Genre: Historical
This Project is Active
Valor & Victory Megagame (P4)
All Not-So-Quiet on the Western Front
German Trench Assault vs. French
Blücher-Yorck Offensive
Chemin des Dames Sector, May 1918
The epic battle of French and Germans in the trenches of Chemin des Dames …
… concludes.
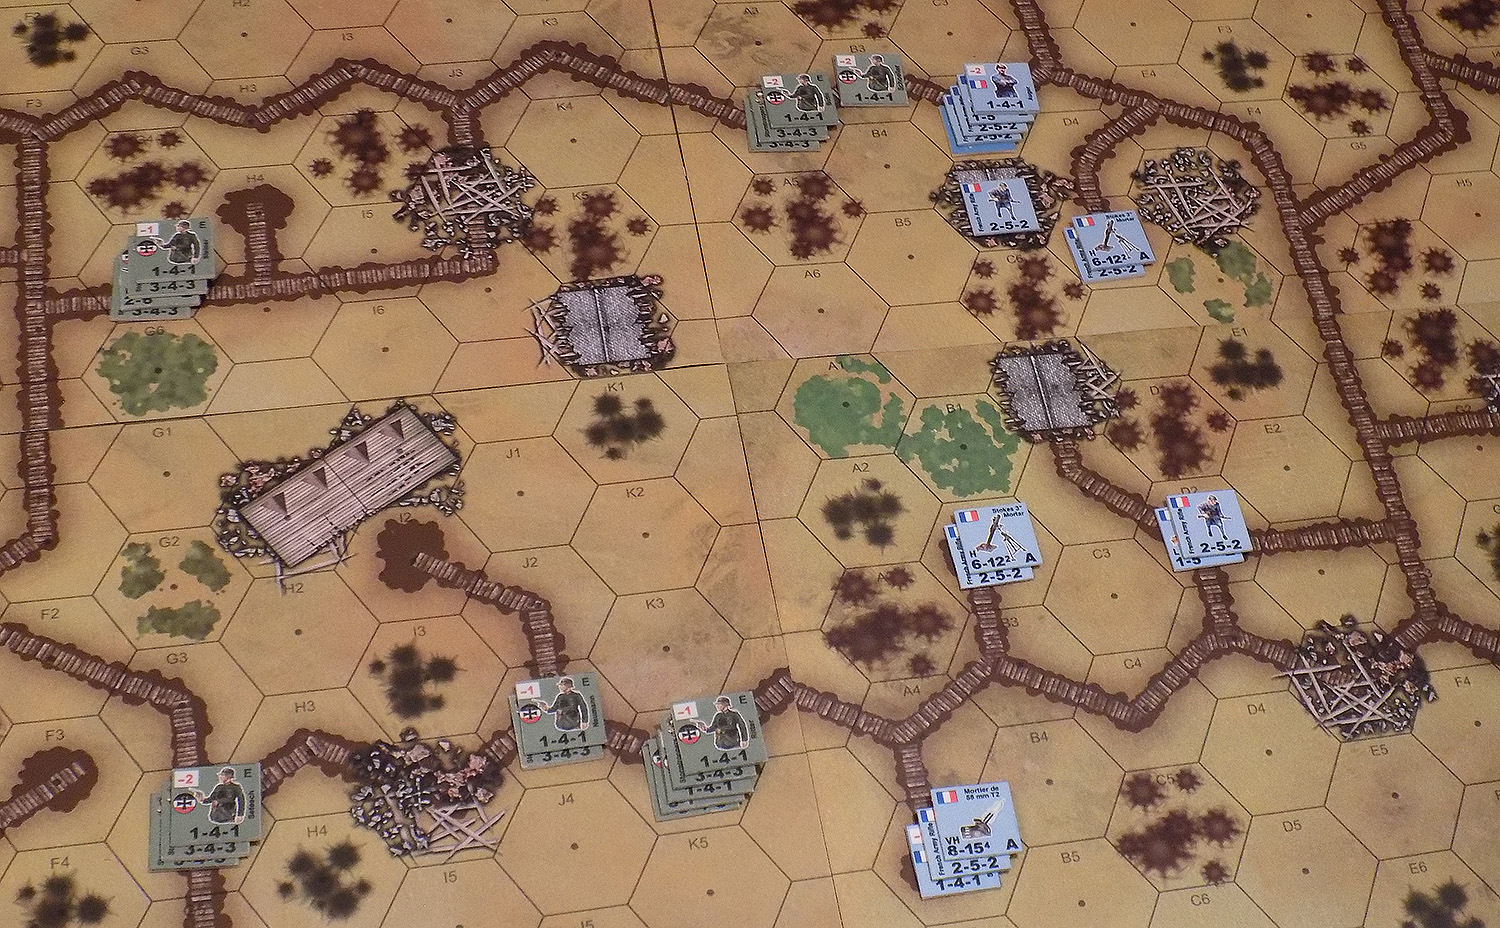
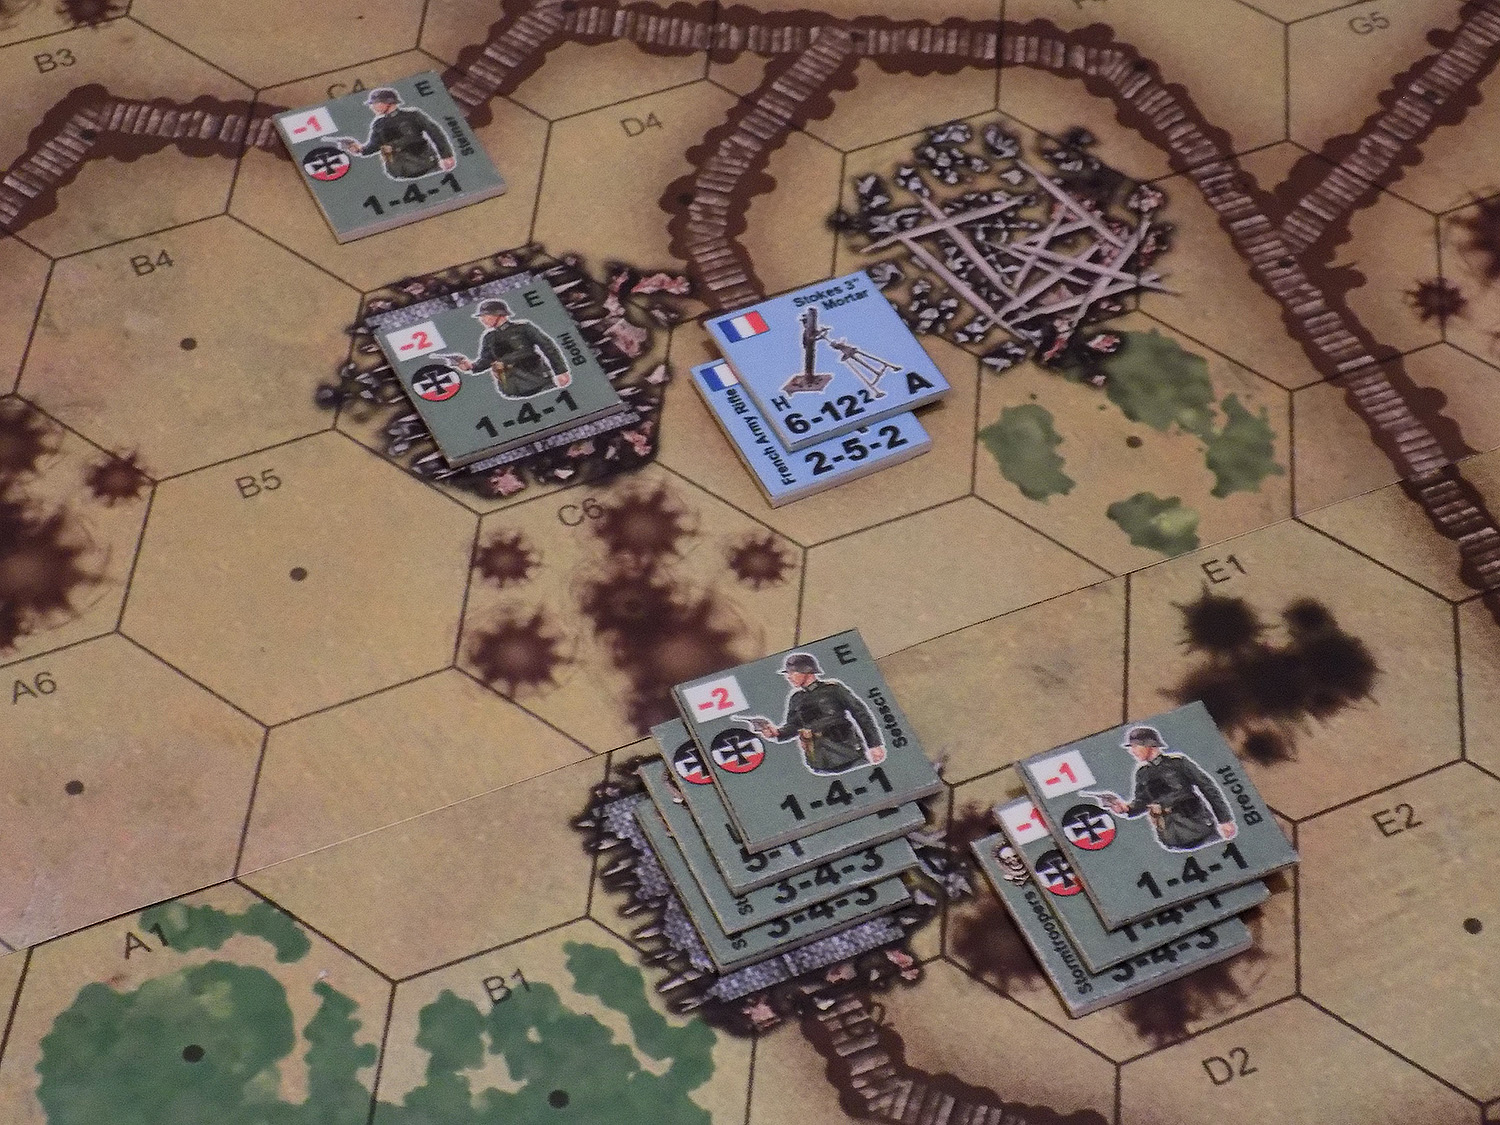
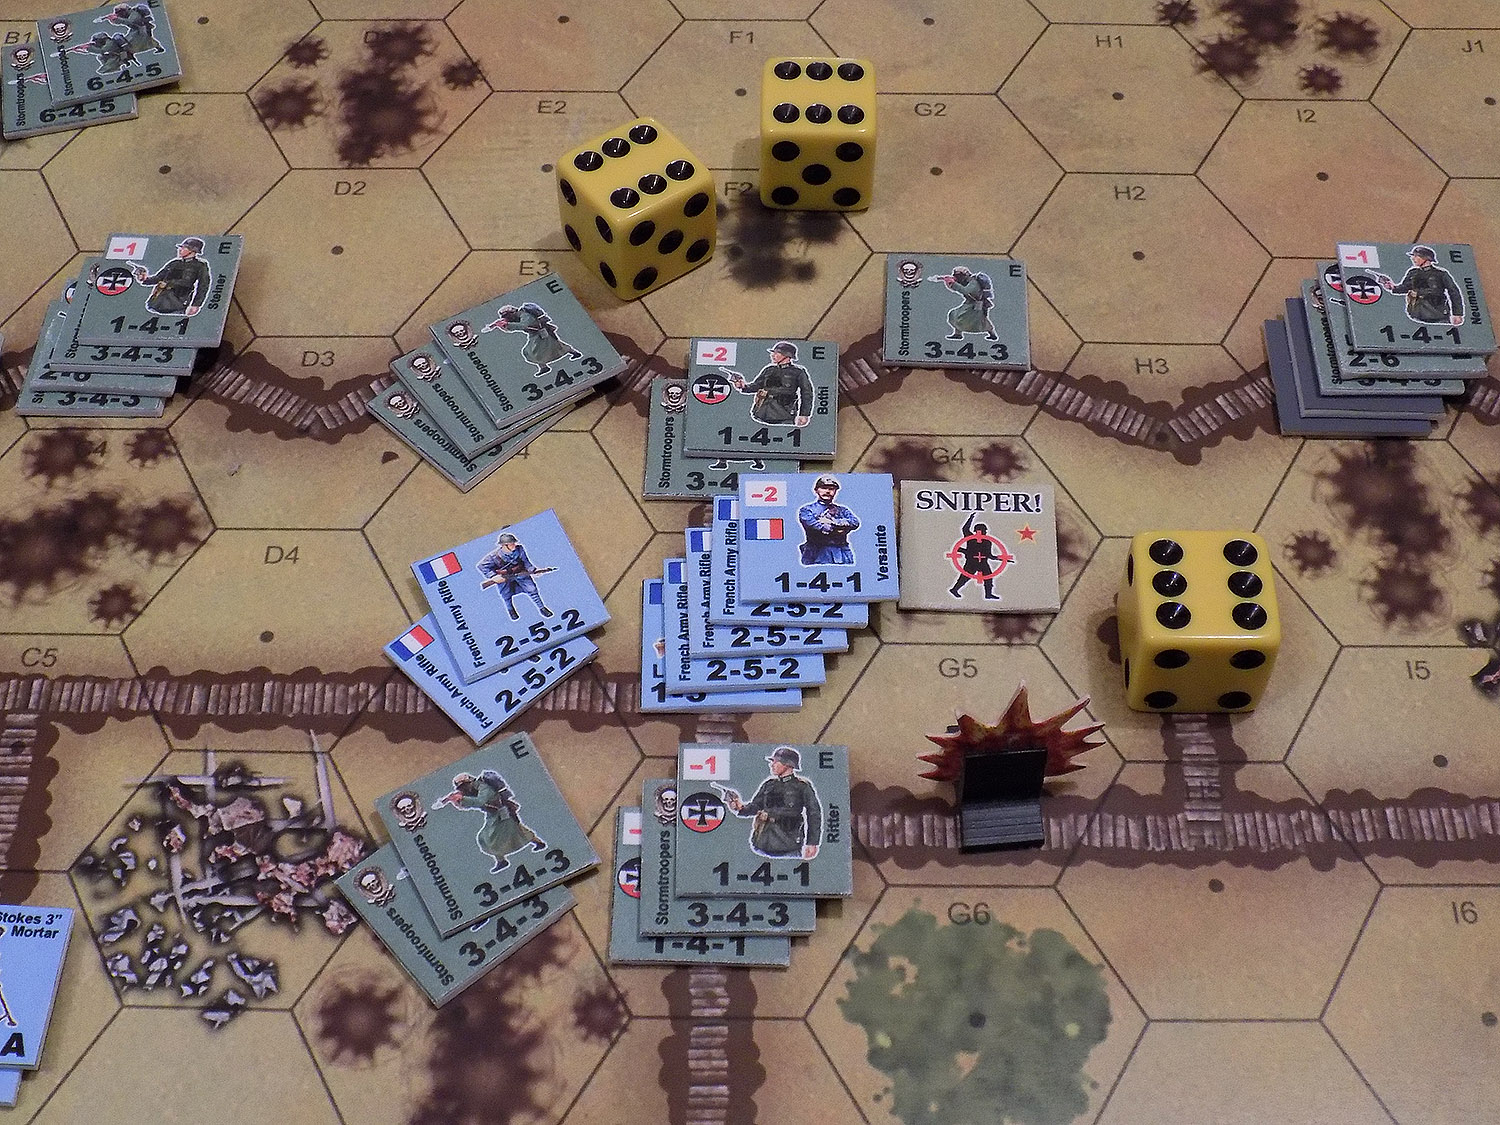
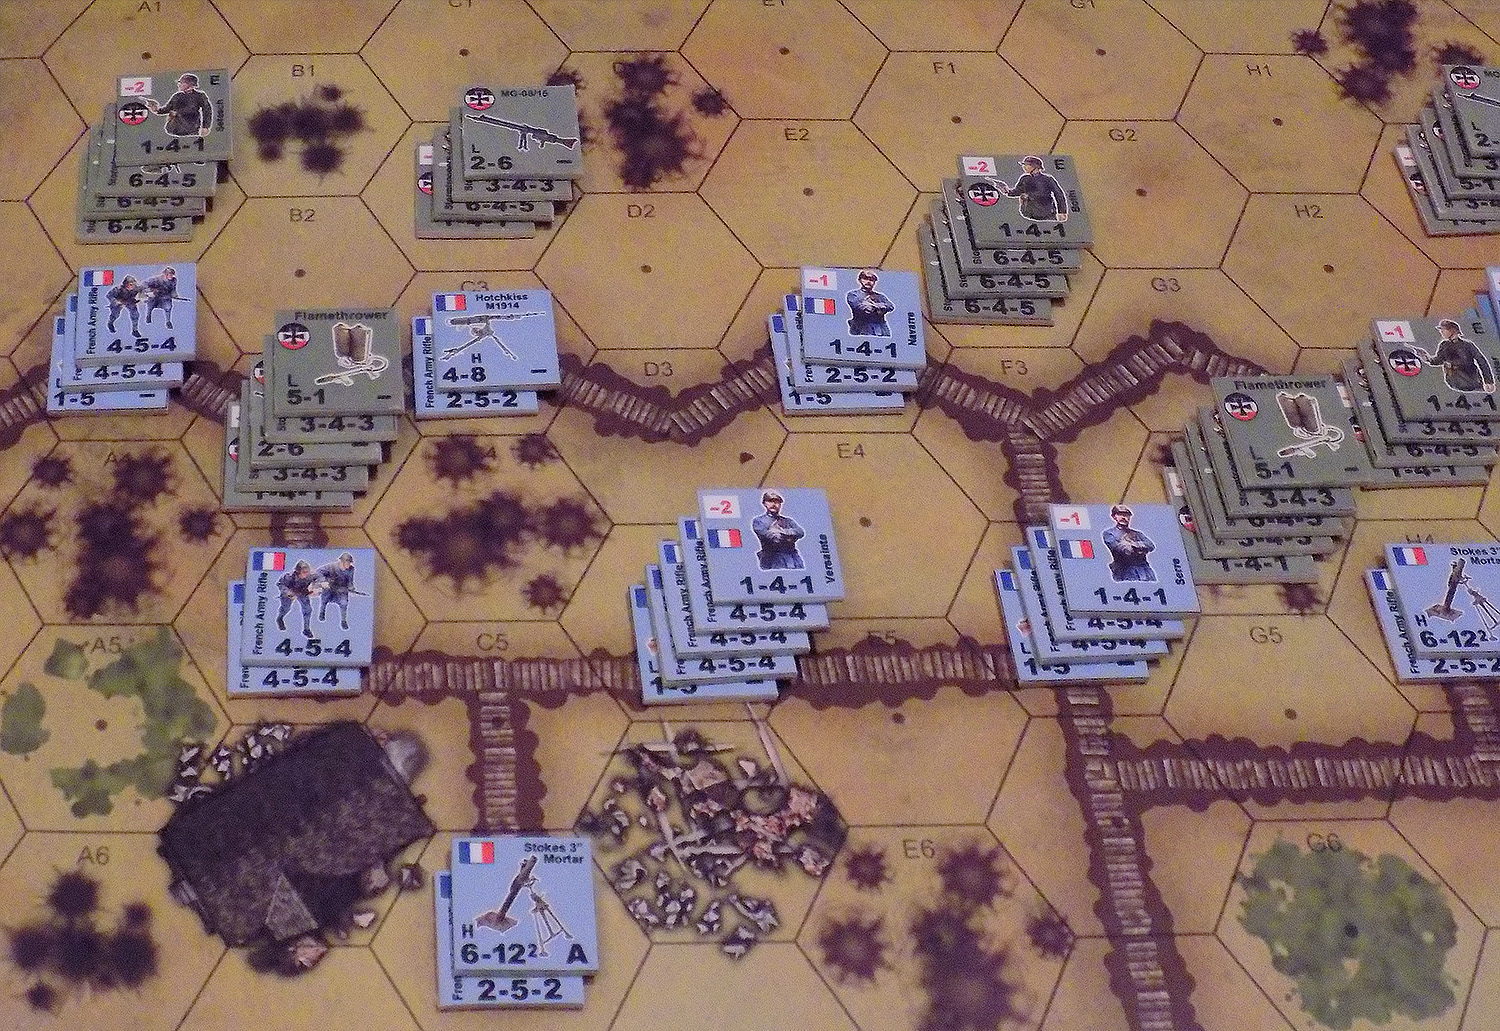
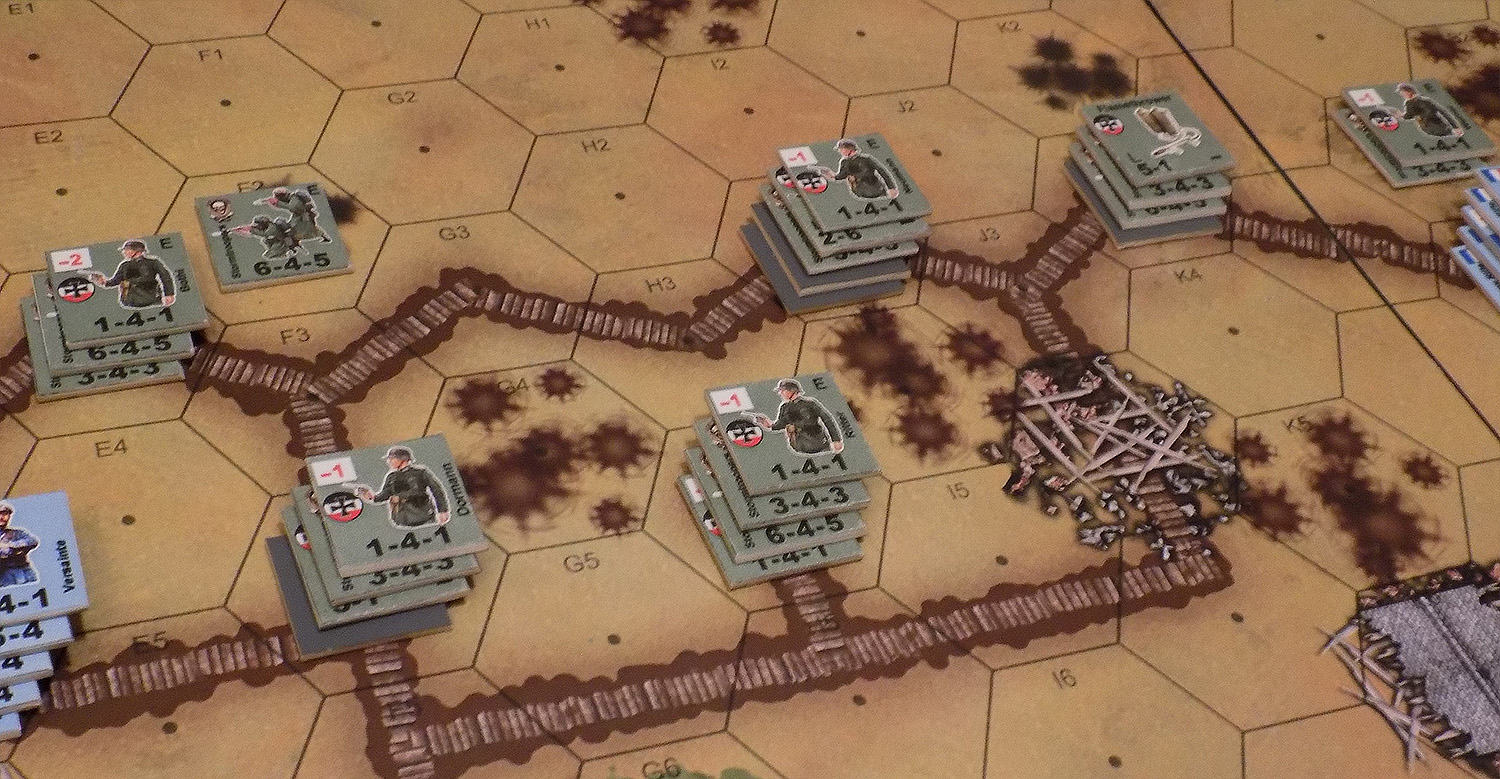
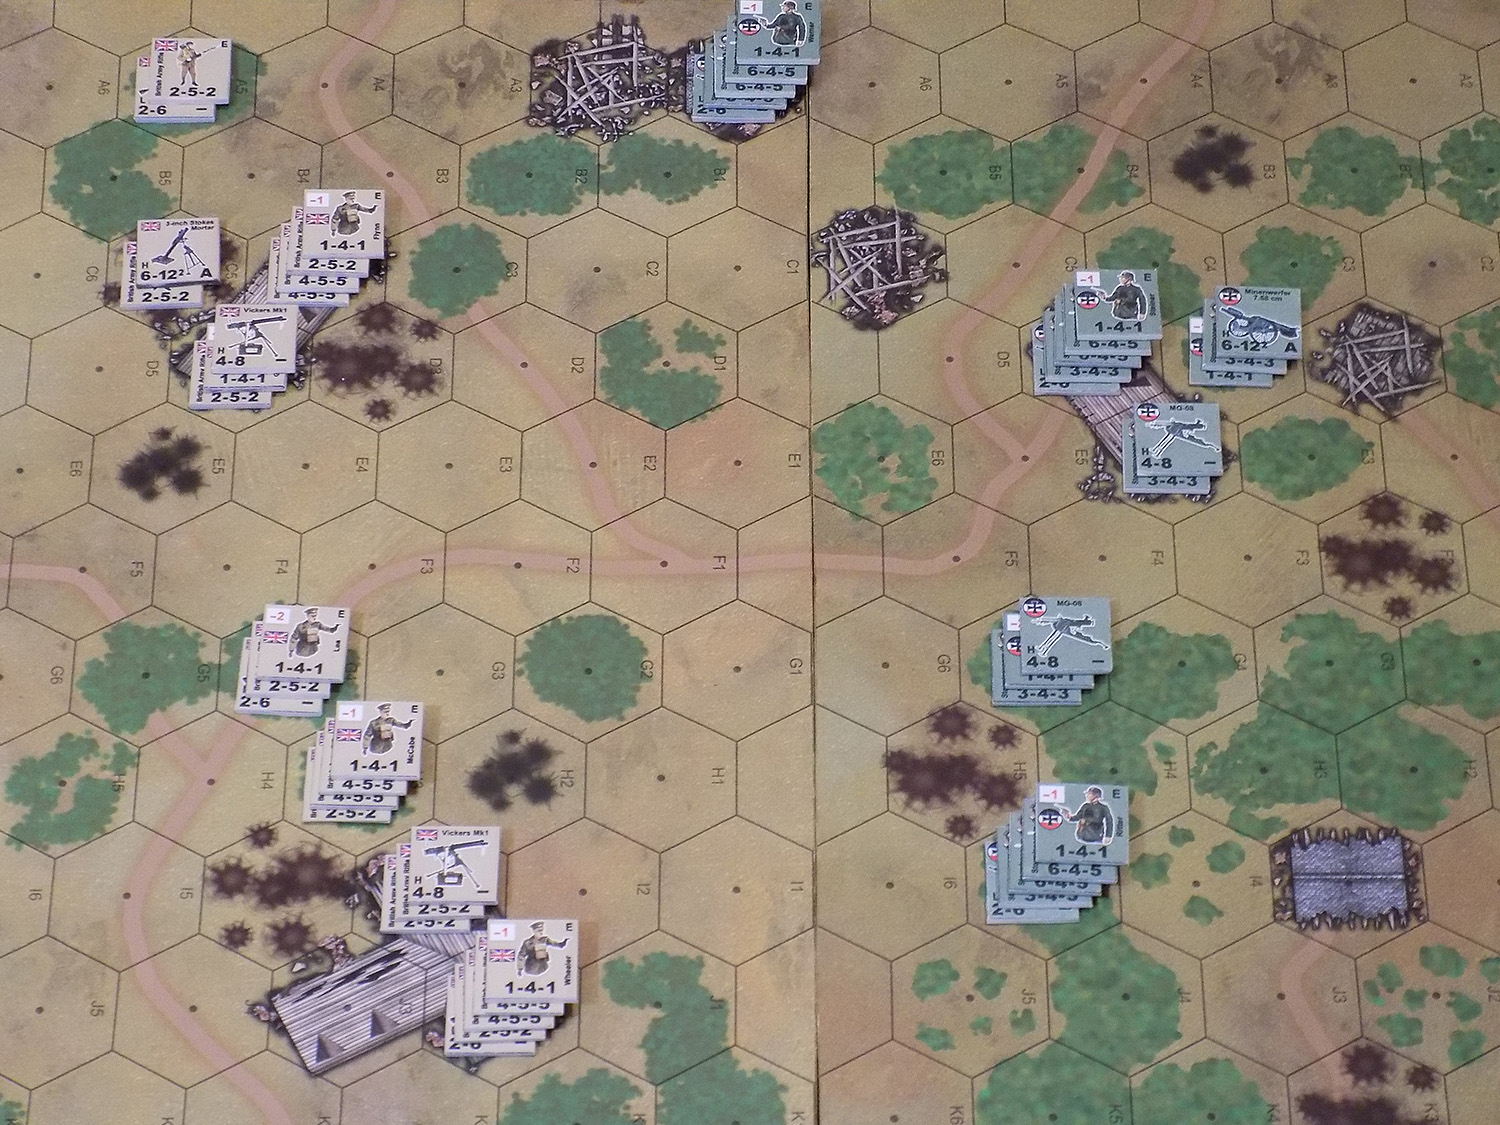
To the northeast, Hauptmann Schoeller gathers what remaining forces he still has from his shattered stosstruppen kompanie, clinging to his position as Bothi runs up behind him with his own handfuls of survivors. The Germans have more or less won the western two boards, the final result of this murderous trench battle will come down to whether the Germans can clear most of the French positions on the eastern boards as well. They face an uphill battle, the French are well-fortified, the actually outnumber the Germans here, and the French still have significant mortar support, although this last factor is fading fast as the Germans clear mortar positions from the western boards.
Weakened German stacks are vulnerable to French assault, especially after some of their units in these stacks are pinned by French mortar strikes or direct rifle fire from the bunkers and houses.
Finally, the third image below shows the overall situation at the end of Turn 4. The Germans have now completely cleared the western two boards (although even those mortar crews put up some decent fights on occasion and cost the Germans in casualties and time), while the Germans continue to feed squads into maintaining that bloody toehold on the northeast board.
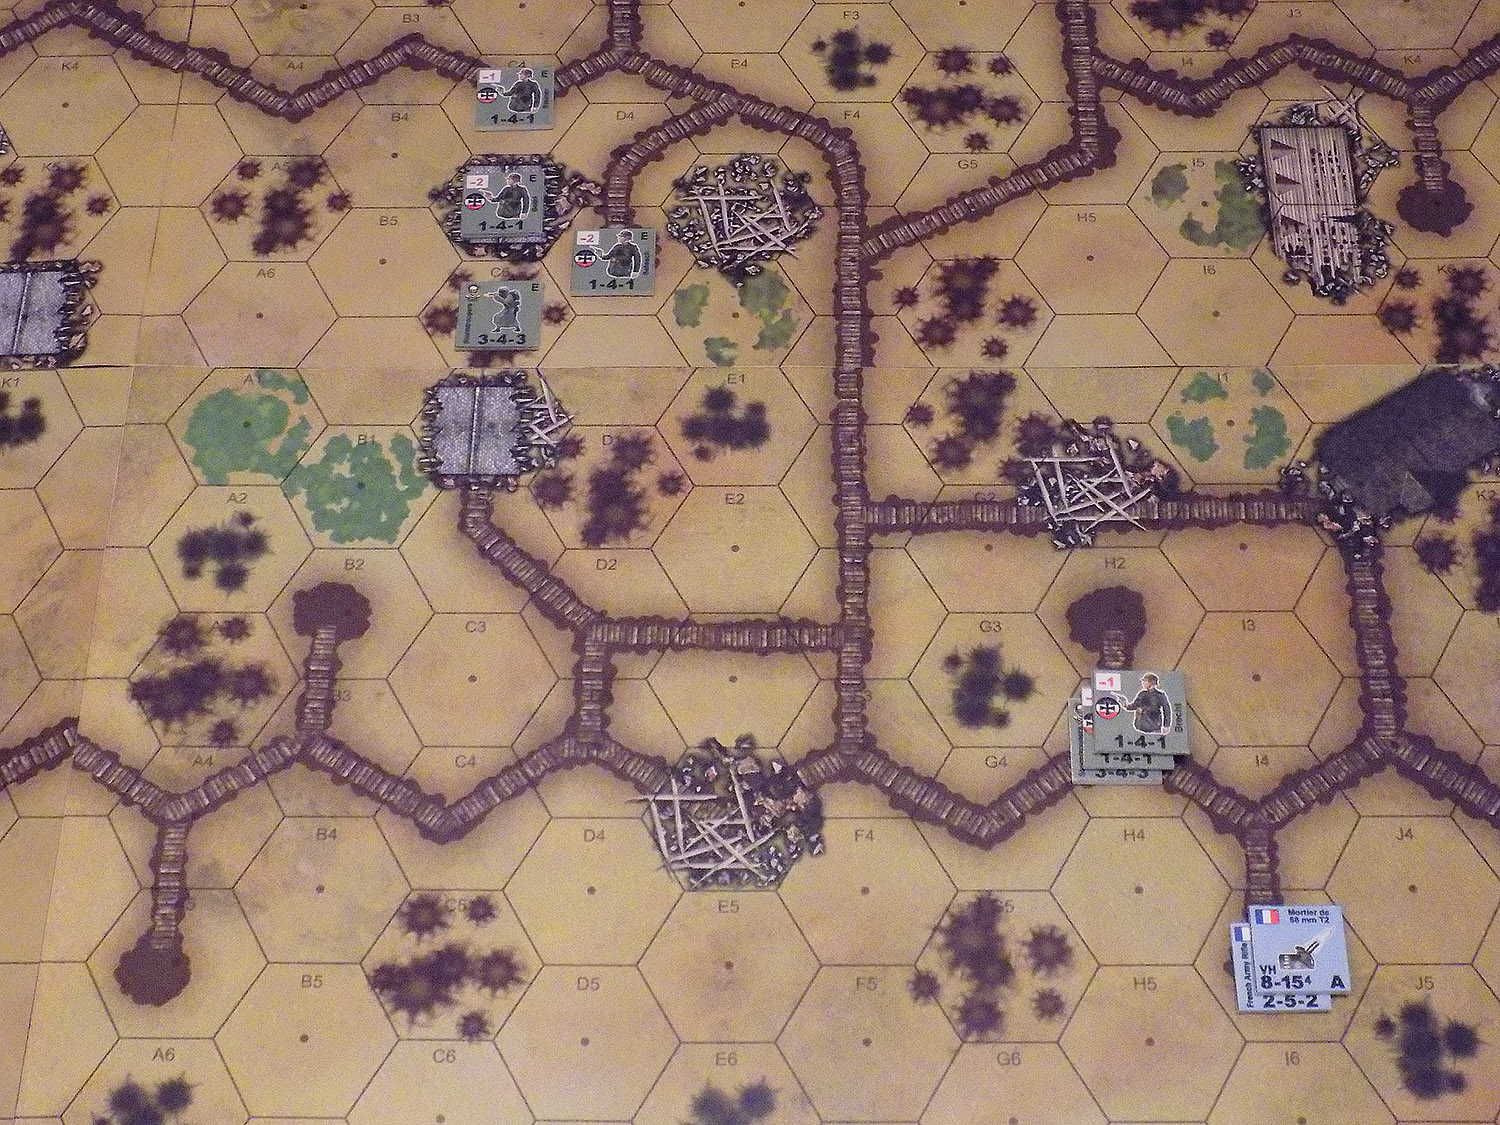
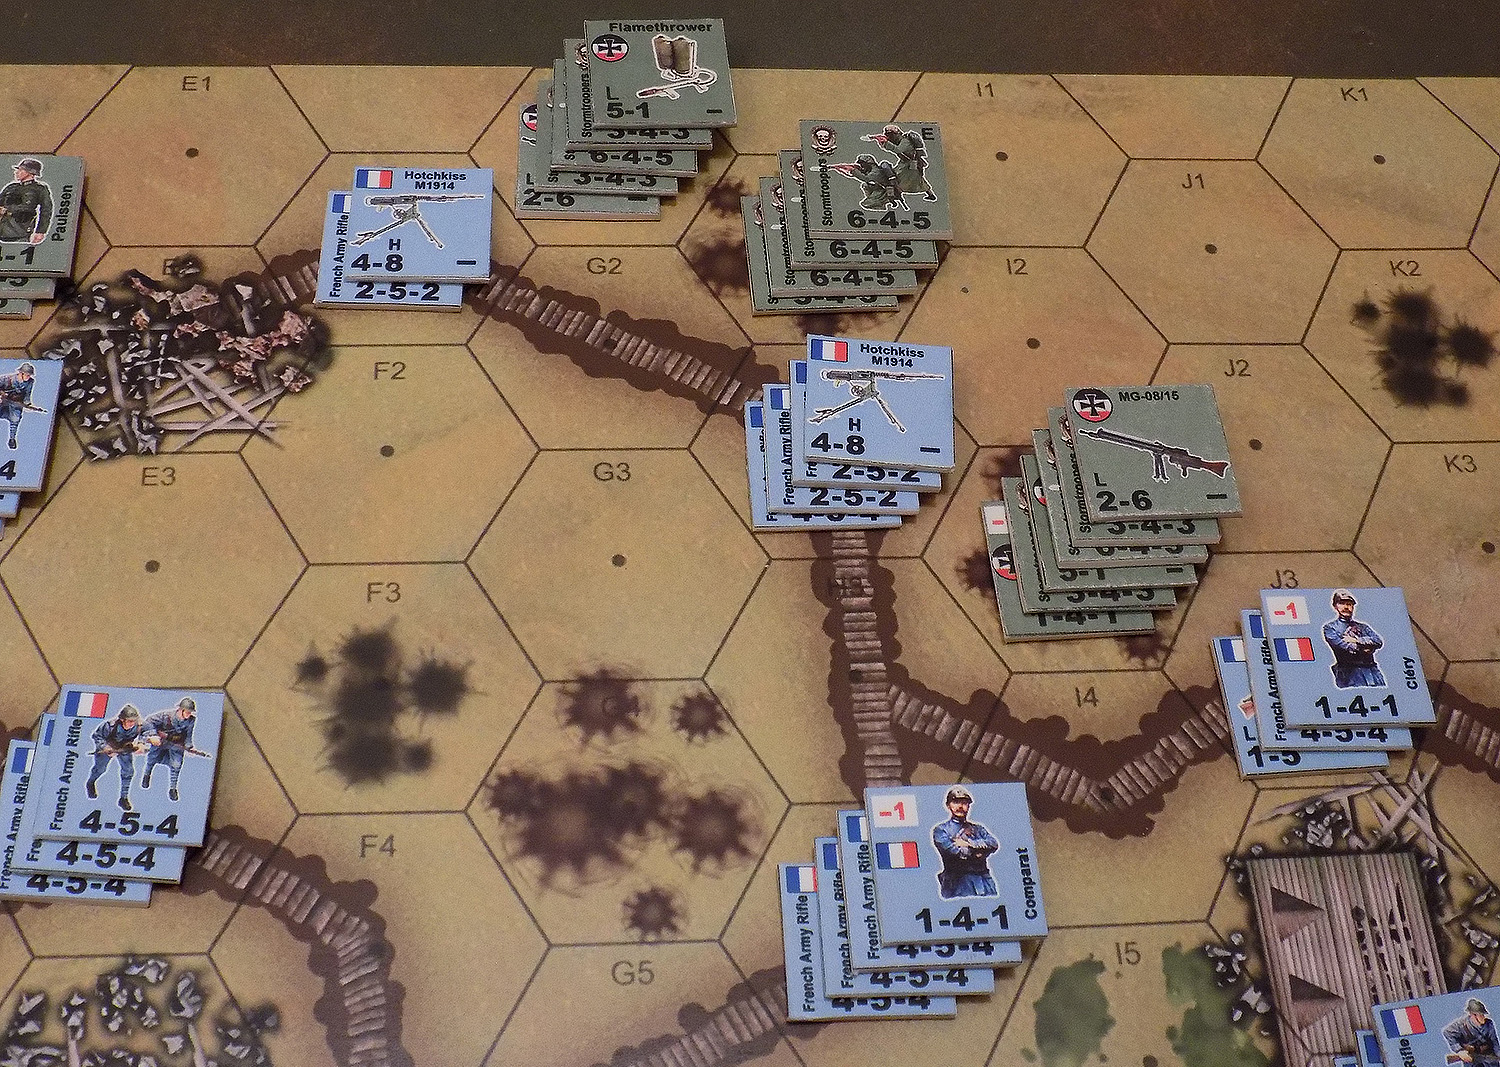
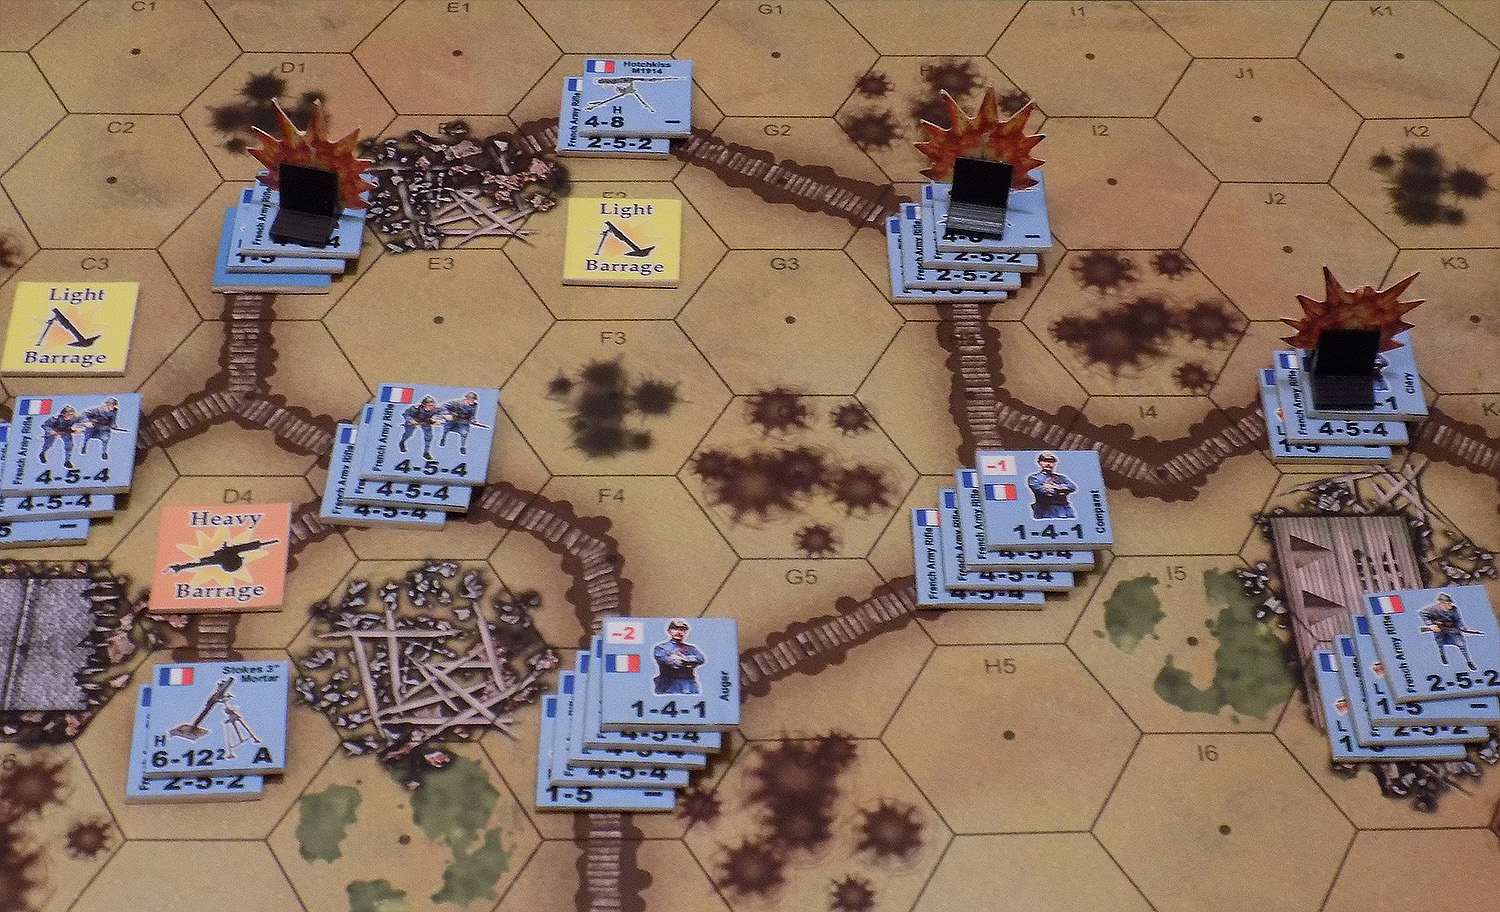
Starting on Turn 5, we see the prototypical nightmare of Allied forces during the spring and summer of 1918 – German stosstruppen detachments running unchecked through secondary, support, and communications trenches, fanning out in all directions, assaulting and overrunning isolated French positions wherever they find them. Three assaults at once are happening here, German firepower supplemented by flamethrowers and -1 and -2 officers. By making careful use of the pinning rules, the Germans are not able to clear almost all these positions, but thanks to their elite status and presence of officers, actually pay almost nothing in the process.
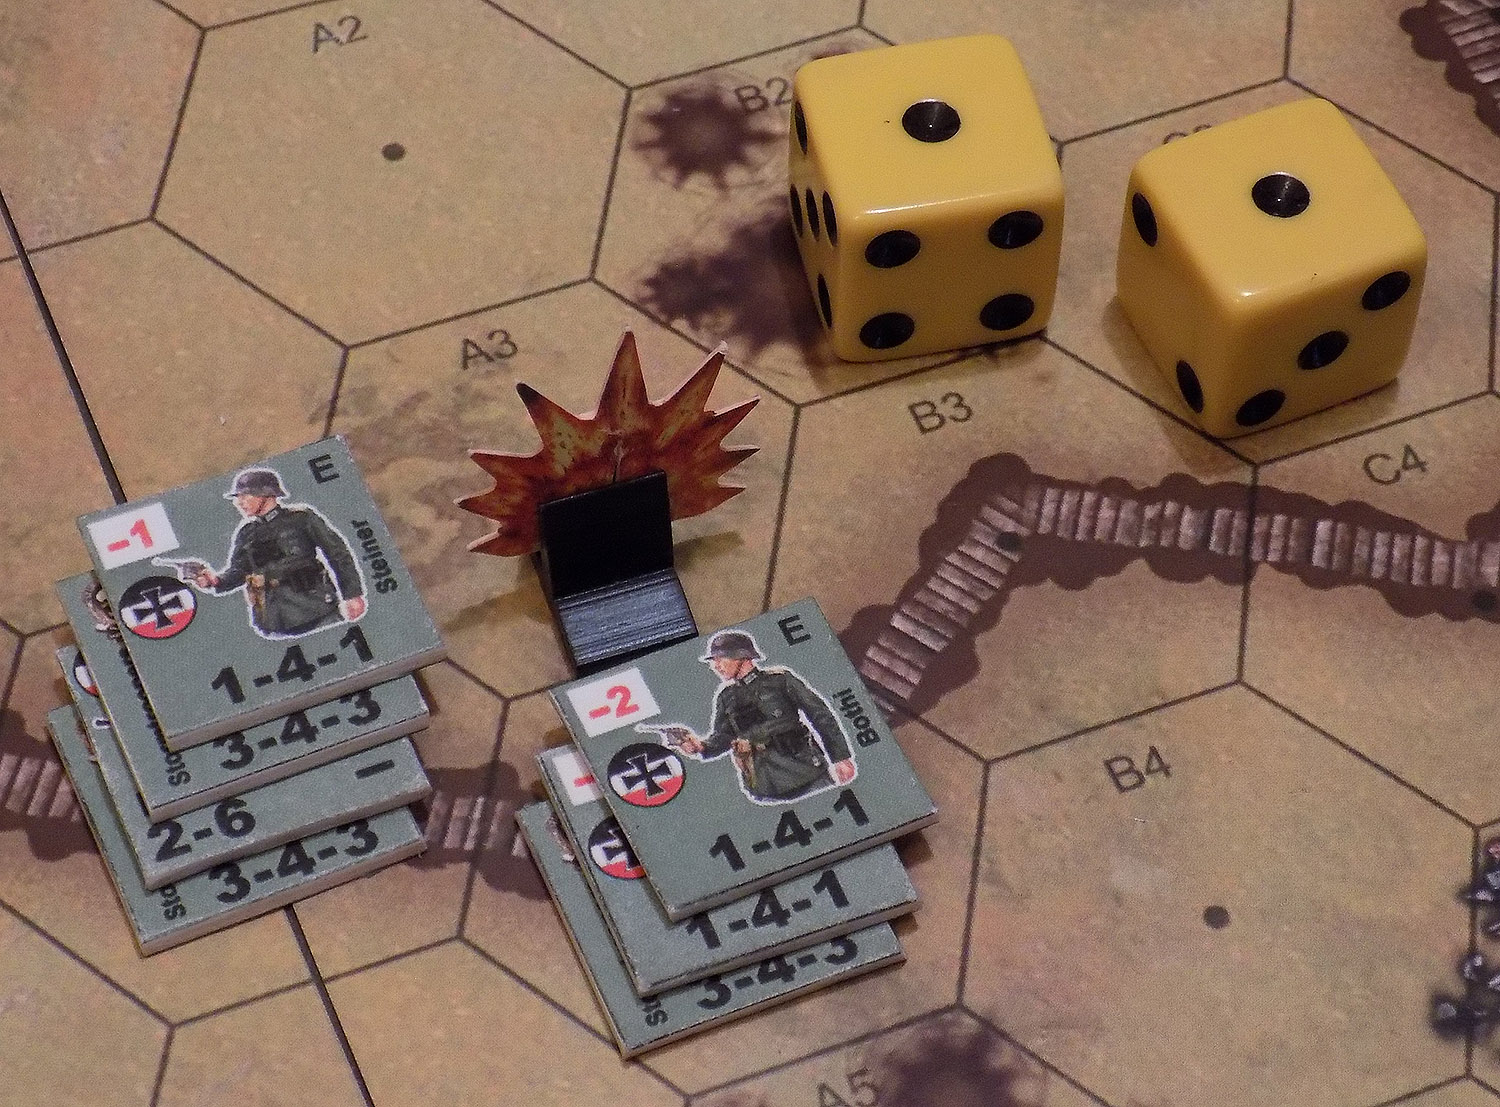
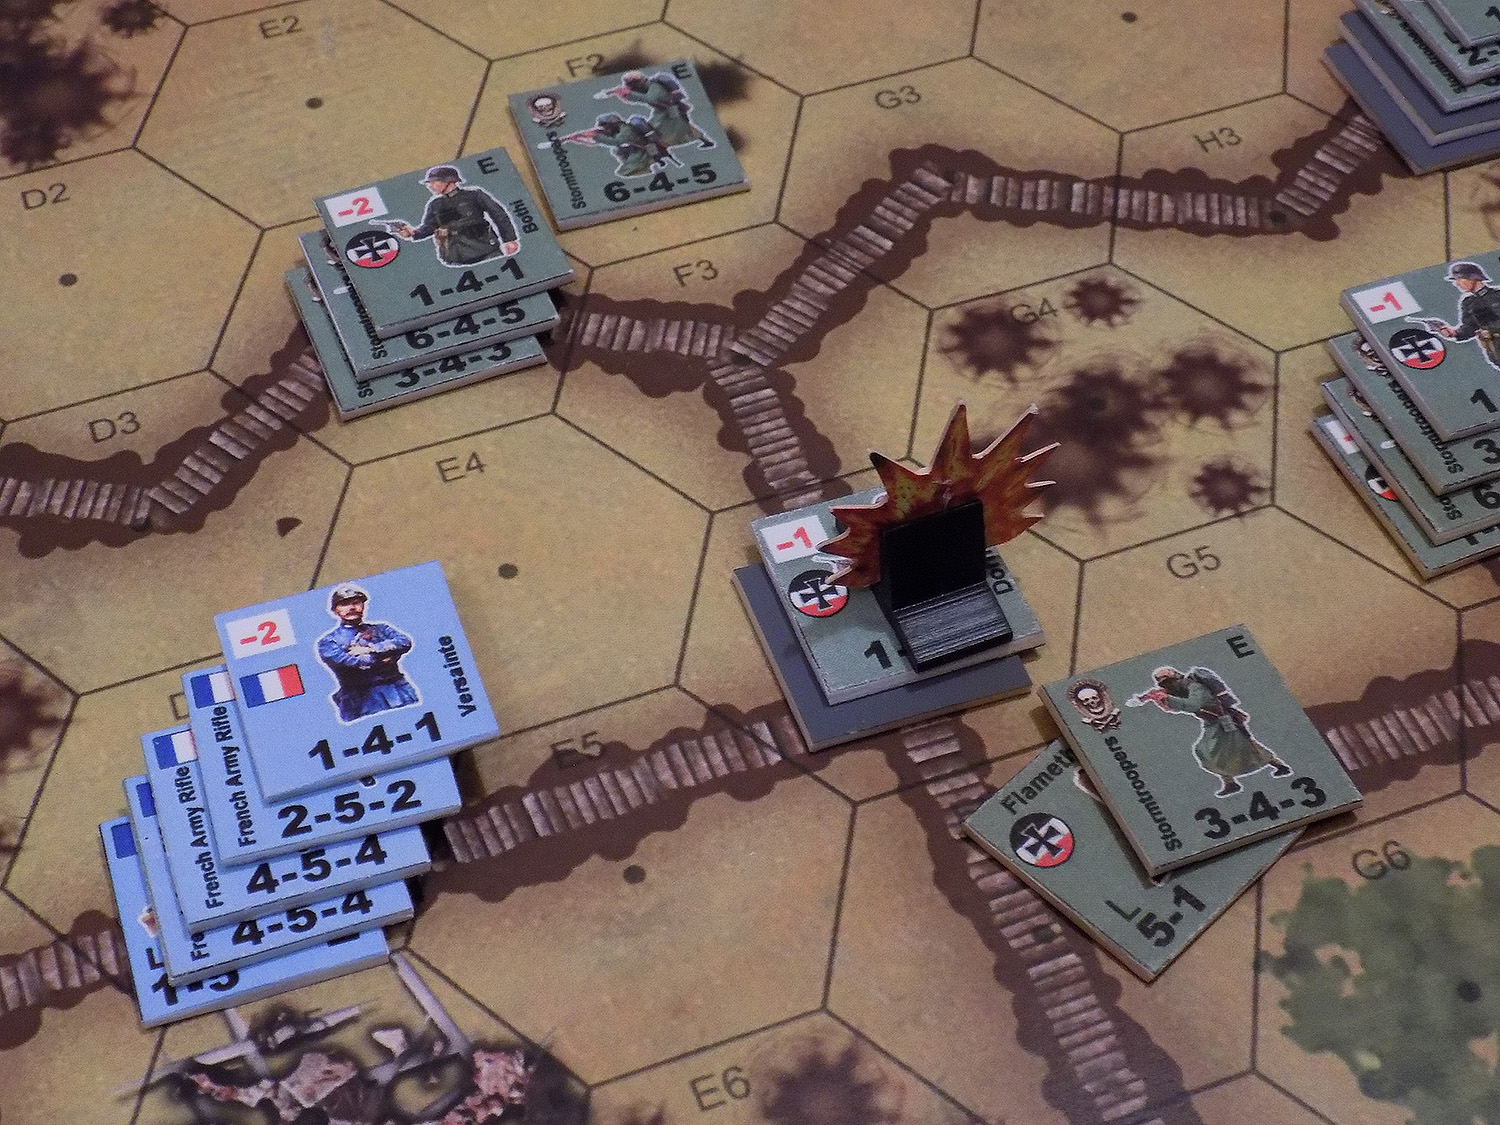
Bothi just has a huge target painted on his back today. One of the last French mortar teams scores a “snake eyes” hit (best roll in the game) on his remaining troops, inflicting still more casualties.
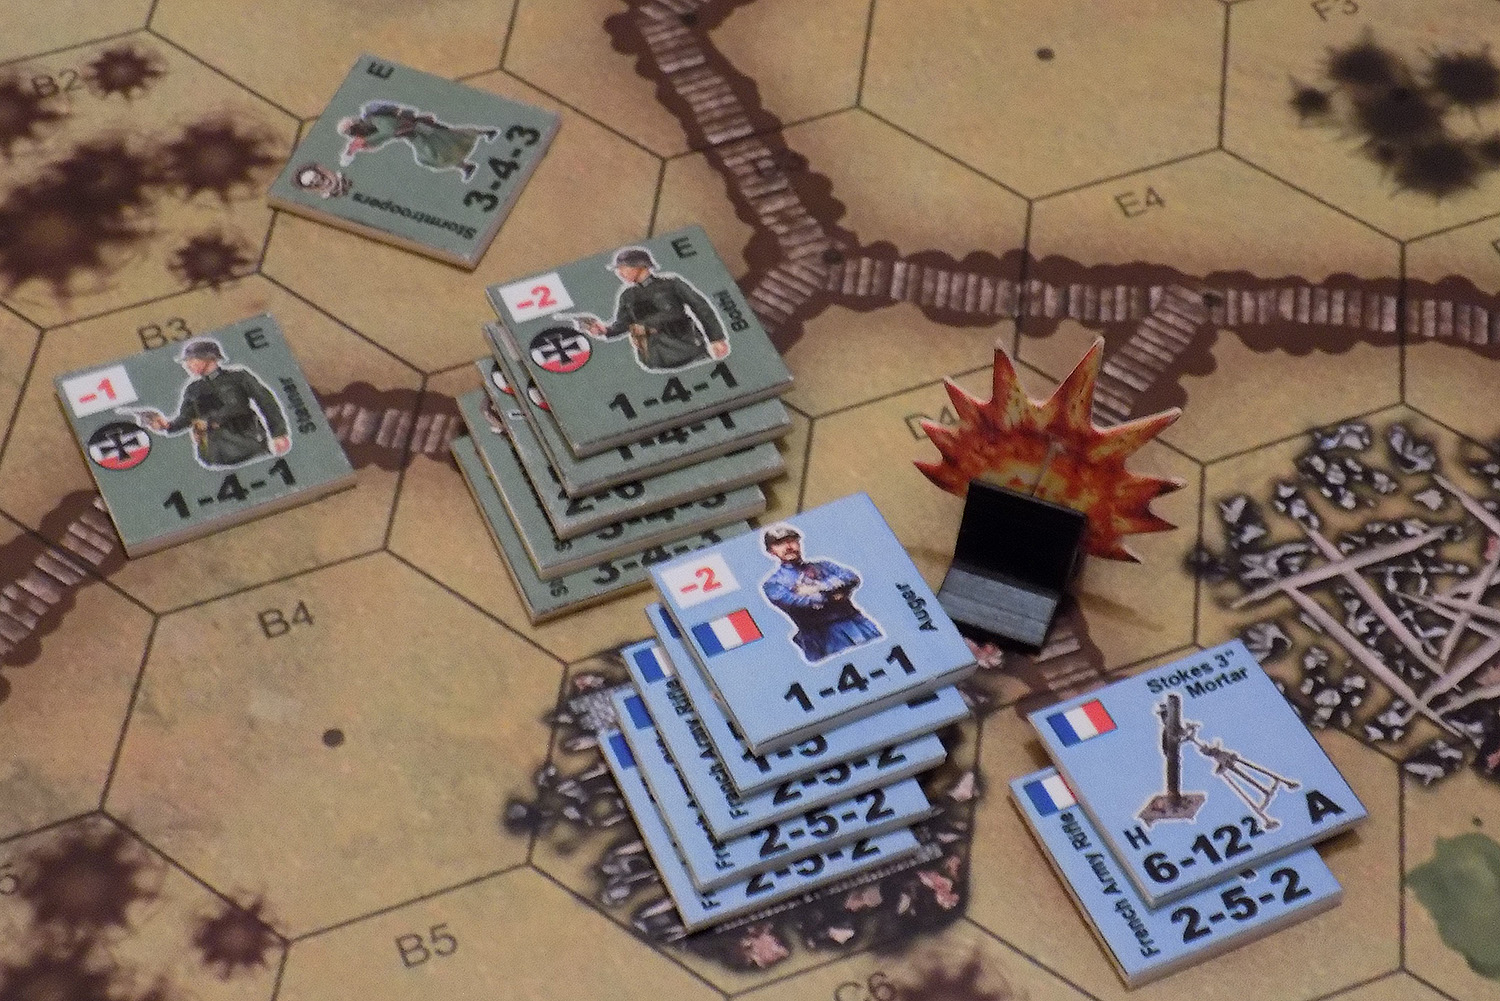
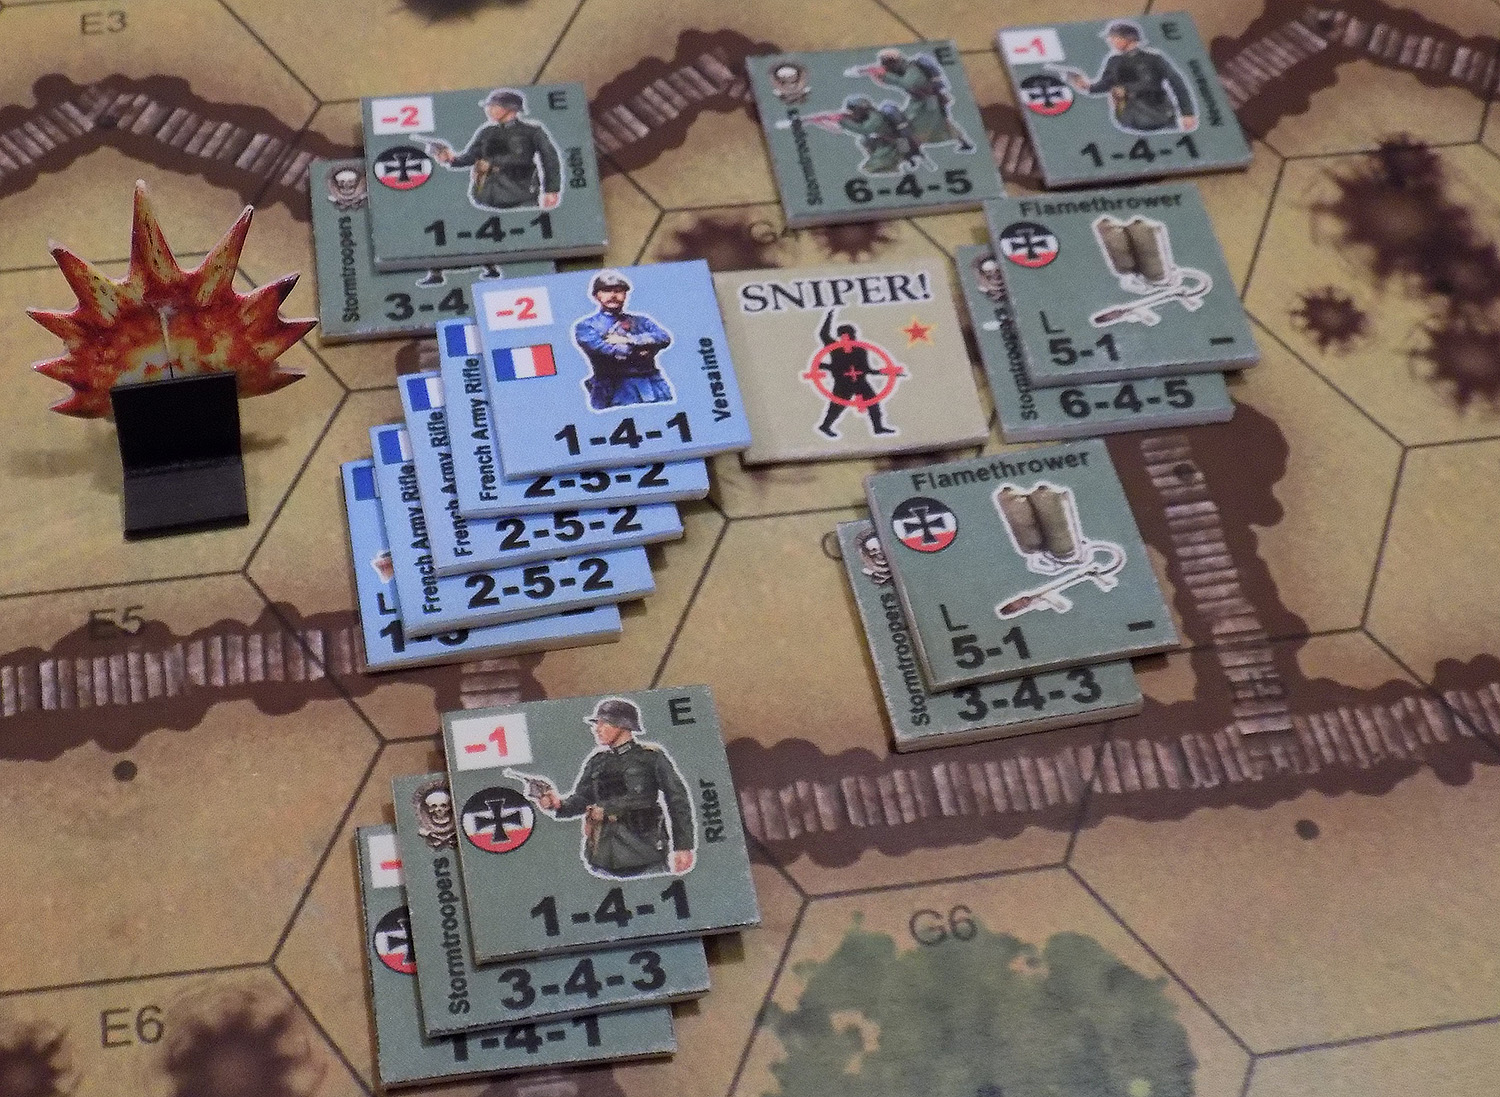
Yet Bothi will not be stopped. Gathering still more squads and half-squads from remaining platoons, he forms a last-ditch assault group here (with another officer helping him, one of his fire teams armed with am MG 08 15 LMG and despite losing another half squad to opportunity fire, manages a lucky assault on Captain Auger’s position, the last real French position left. The cost is grim, however. The Building was a +3 cover bonus, and Auger had three half-squads in that building. So that’s 3 casualty points for the building, 3 for the half squads, and 1 for Auger = 7 in all, in addition to the half-squad lost to opportunity fire.
Clearly, this is the kind of assault you usually make only after having a couple artillery missions called in on the house (but the Germans have none of these left) or some flamethrower teams burn some of the French out first (the Germans have none of these left either). So it’s grenade, bayonet, and shovel time … and the Germans pay a predictably high butcher’s bill for this “victory.”
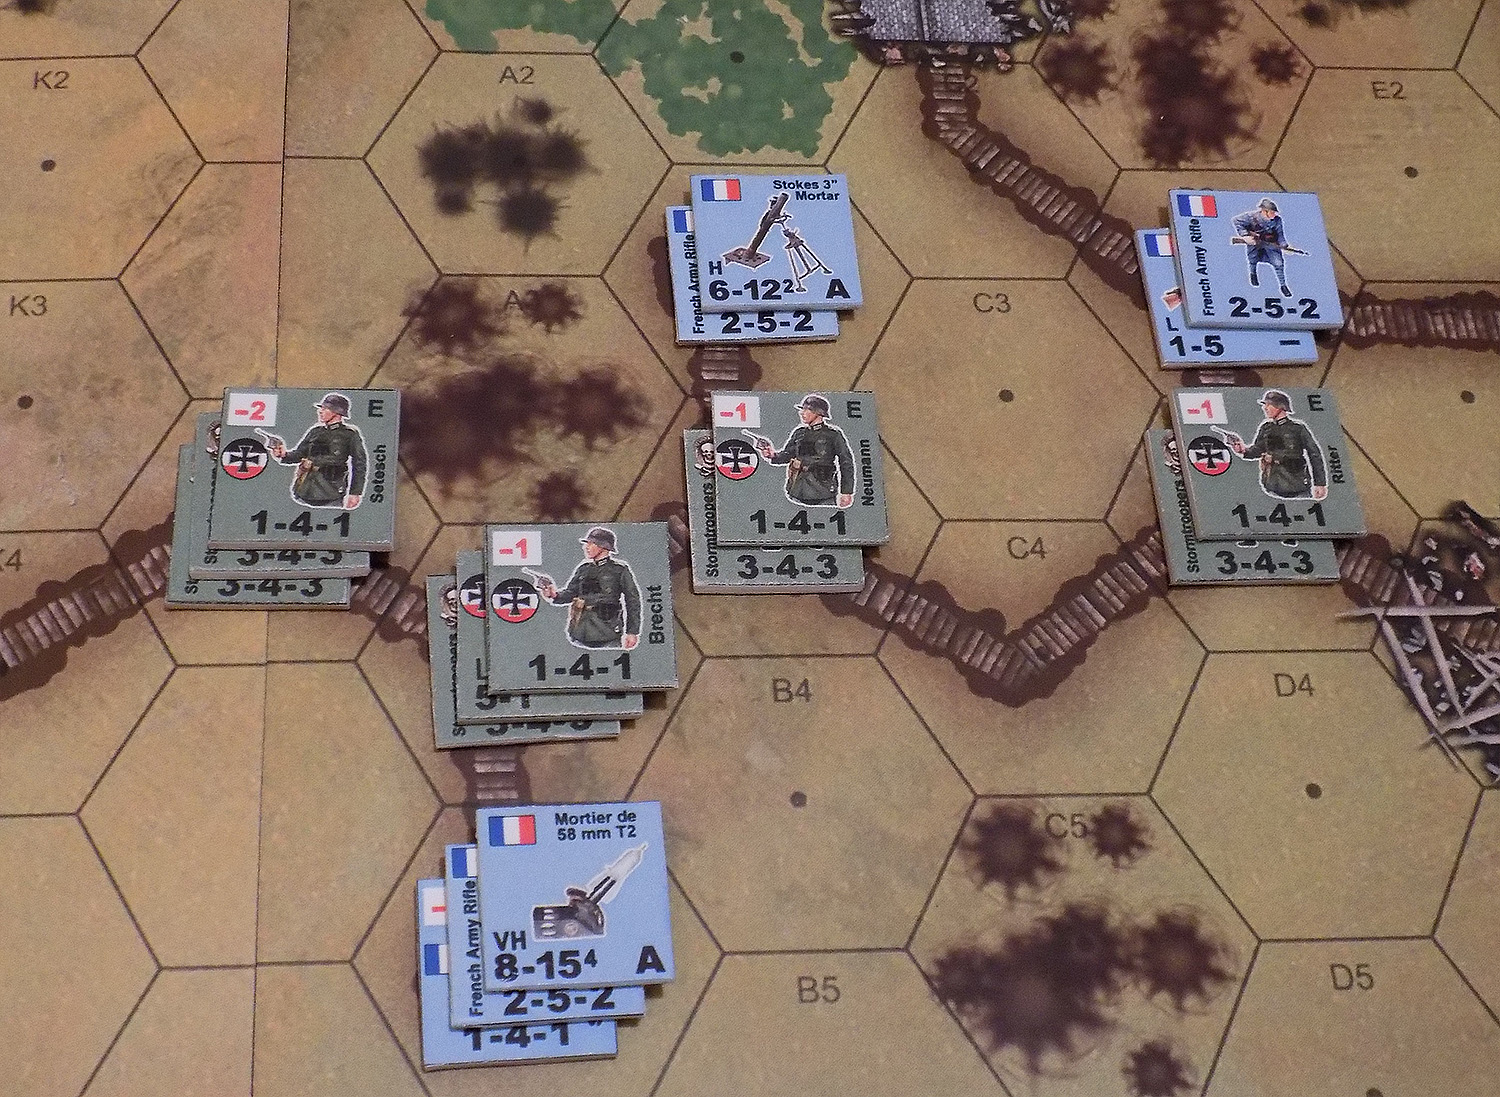
Meanwhile, Haputmann Setesch and Leutnant Brecht have assaulted from the south, clearing a much more lightly-held French building and putting some fire down on French mortar pit, one of the last French positions on the board.
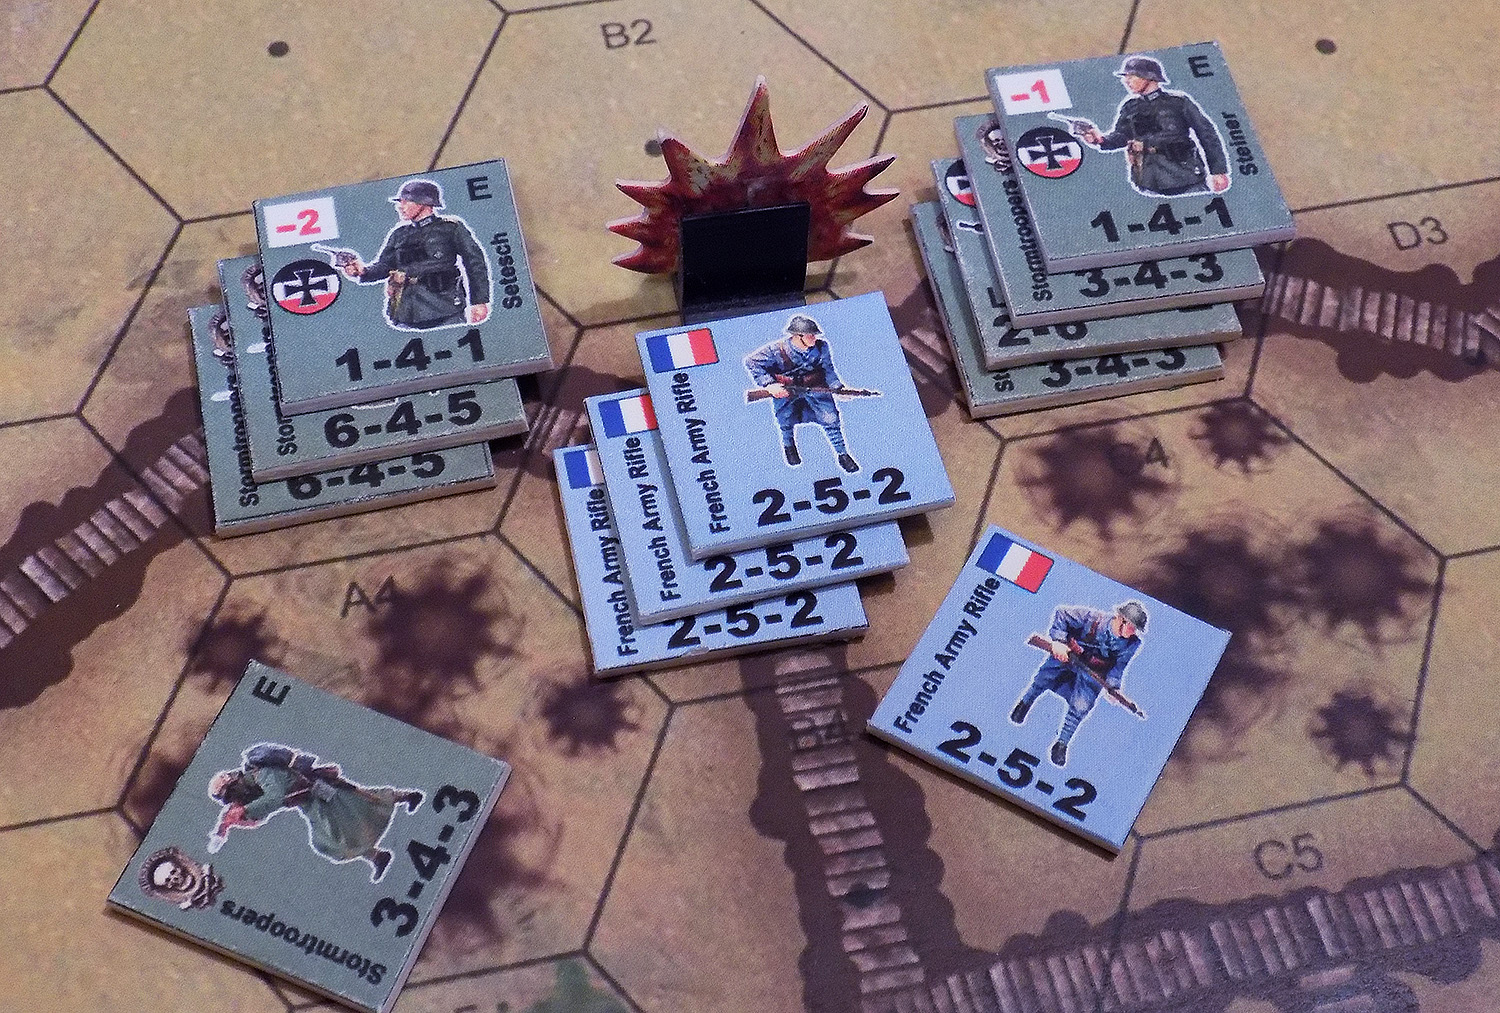
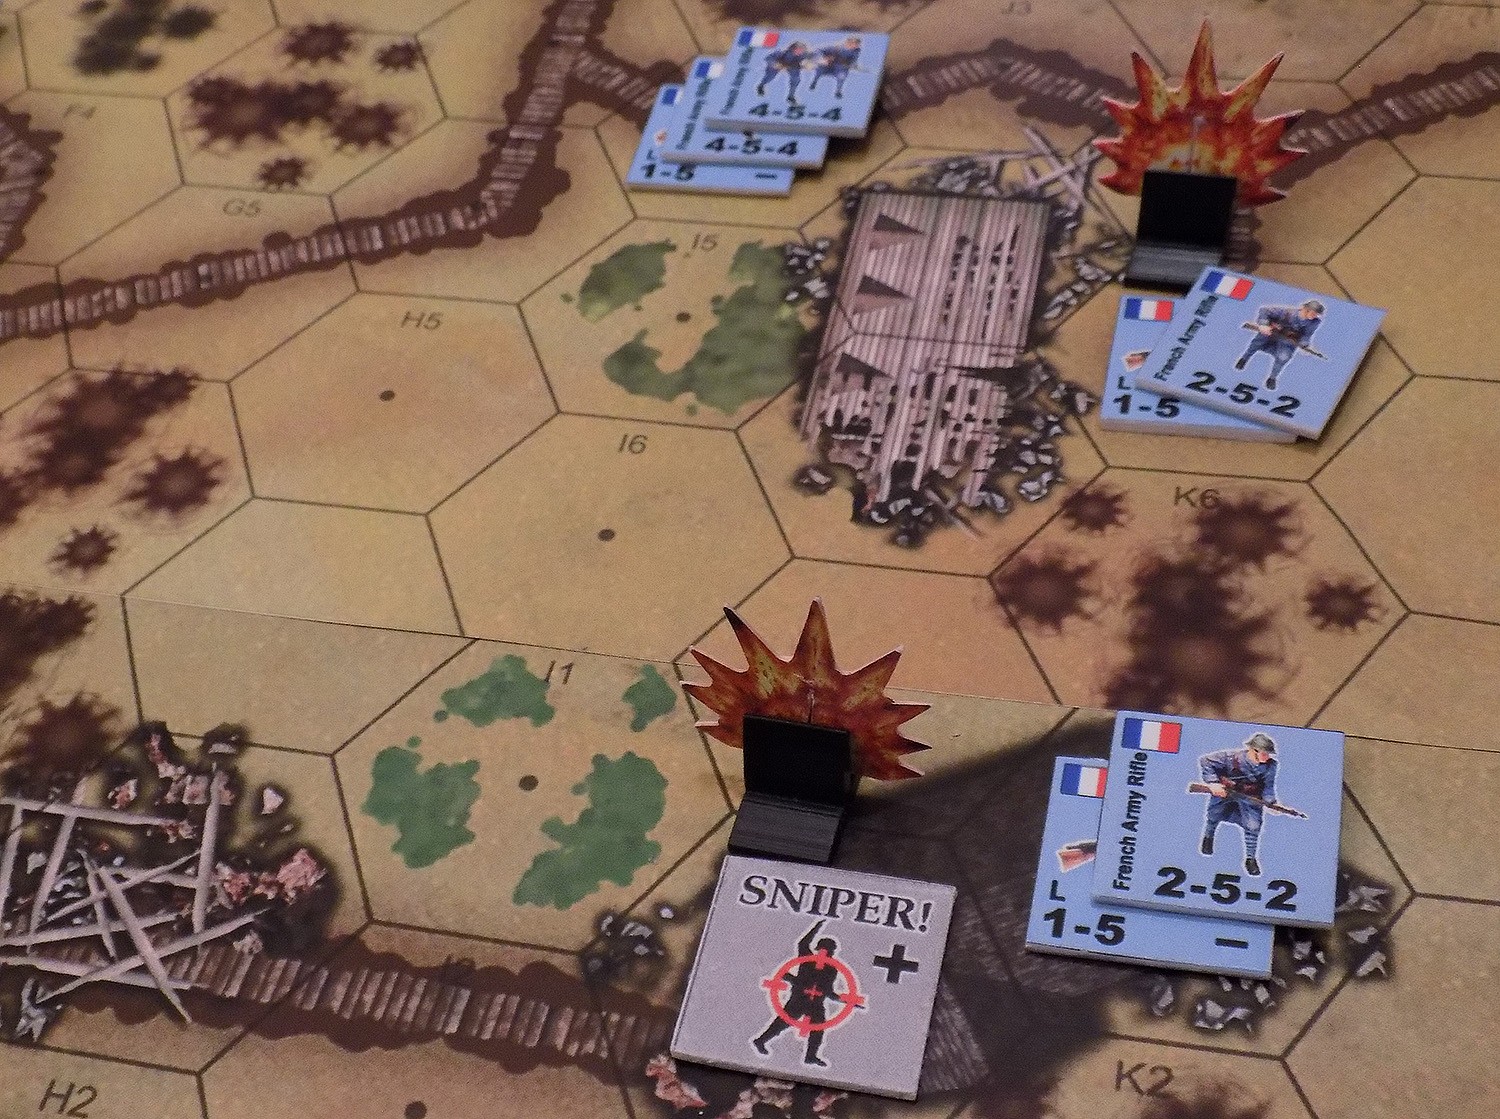
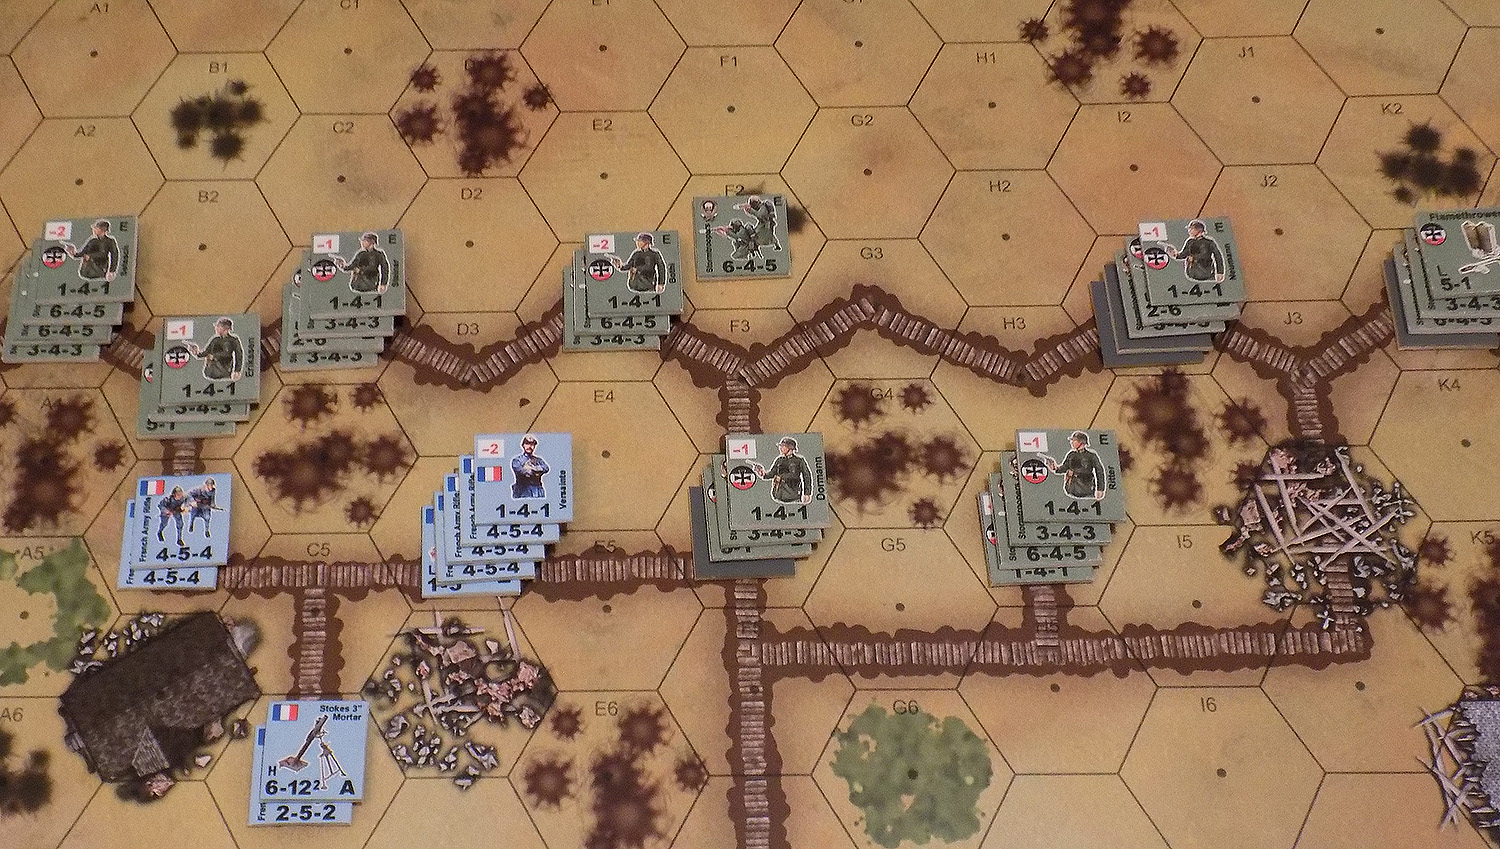
Finally, this last image shows t he position at the end of Turn 6, the end of the game. The Germans have … won? They have cleared all four boards except that last mortar pit, which be overrun by German assault on Turn 7. They have lost 63 killed and 120+ wounded, plus many more walking wounded, scattered, missing, or terrorized (251 in all combat ineffective). Of their twelve officers, seven are killed, wounded, or missing.
But they own the French trench system, and have inflicted 91 killed, 180+ wounded, and about 90 more walking wounded, or mostly taken prisoner (they own the board). All French officers are either killed, wounded, or on their way back to German PoW camps.
At least we have finished this game with a narrow German victory, and at least on this board, and at least for now, “All’s Quiet on the Western Front.”
Valor & Victory Megagame (P3)
All Not-So-Quiet on the Western Front
German Trench Assault vs. French
Blücher-Yorck Offensive
Chemin des Dames Sector, May 1918
Believe it or not, everything we’ve seen so far has just been the German phase of Turn 01. Fortunately, the “defense” turns in these games tend to go much faster, and the turns overall go much faster as the game progresses as the units available to both sides undergo a precipitous decline.
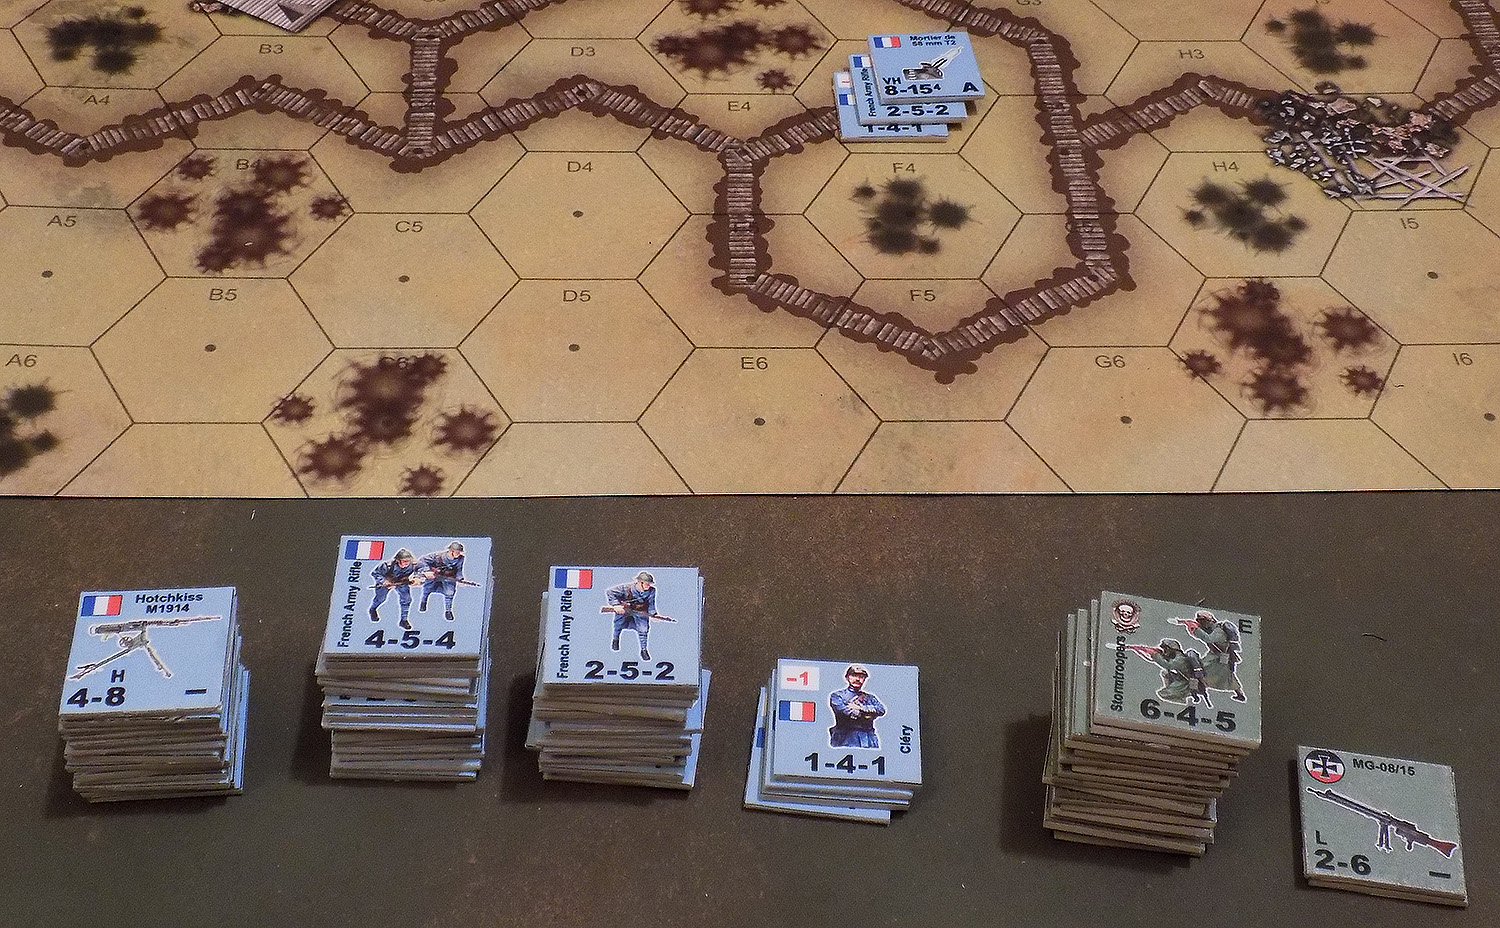
So the French start of with barrages from their on-board mortars. These mortars are much less powerful than the barrages the Germans unleashed in the opening of the game, the trade-off being that these mortars are actual units in the French OOB and available all through the game (six turns), not just at the very opening. Also, because they are called in by units with direct LOS, they do not “drift” like off-board missions do.
And the French score well on their first mission! All five remaining Stokes mortars and the three Md58t2s hit this hex and score enough damage to kill a German flamethrower team as they rush through breached French trenches. Why do I picture hot shrapnel igniting someone’s flamethrower pack and spewing fiery jellied gasoline, roasting stormtroopers alive as they try to scramble out of the French trench?
The French also launch counterattacks on the extreme right left and right, using buildings and communications trenches to cover approaches from German opportunity fire before launching close assaults.

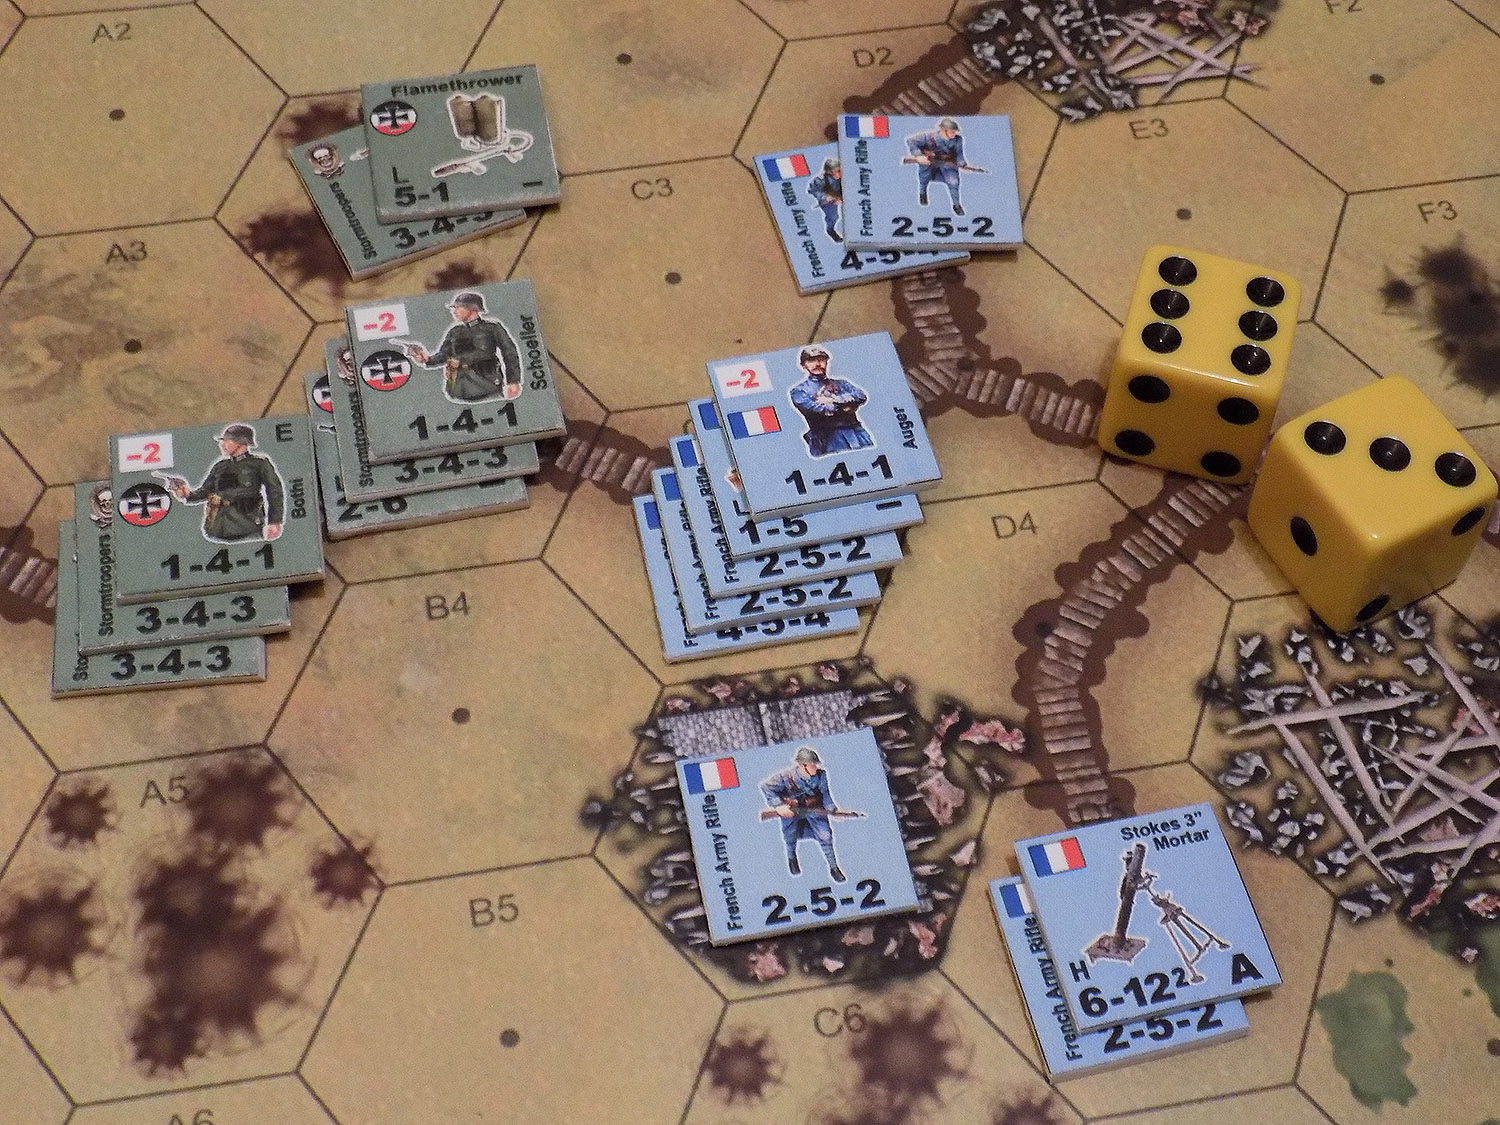
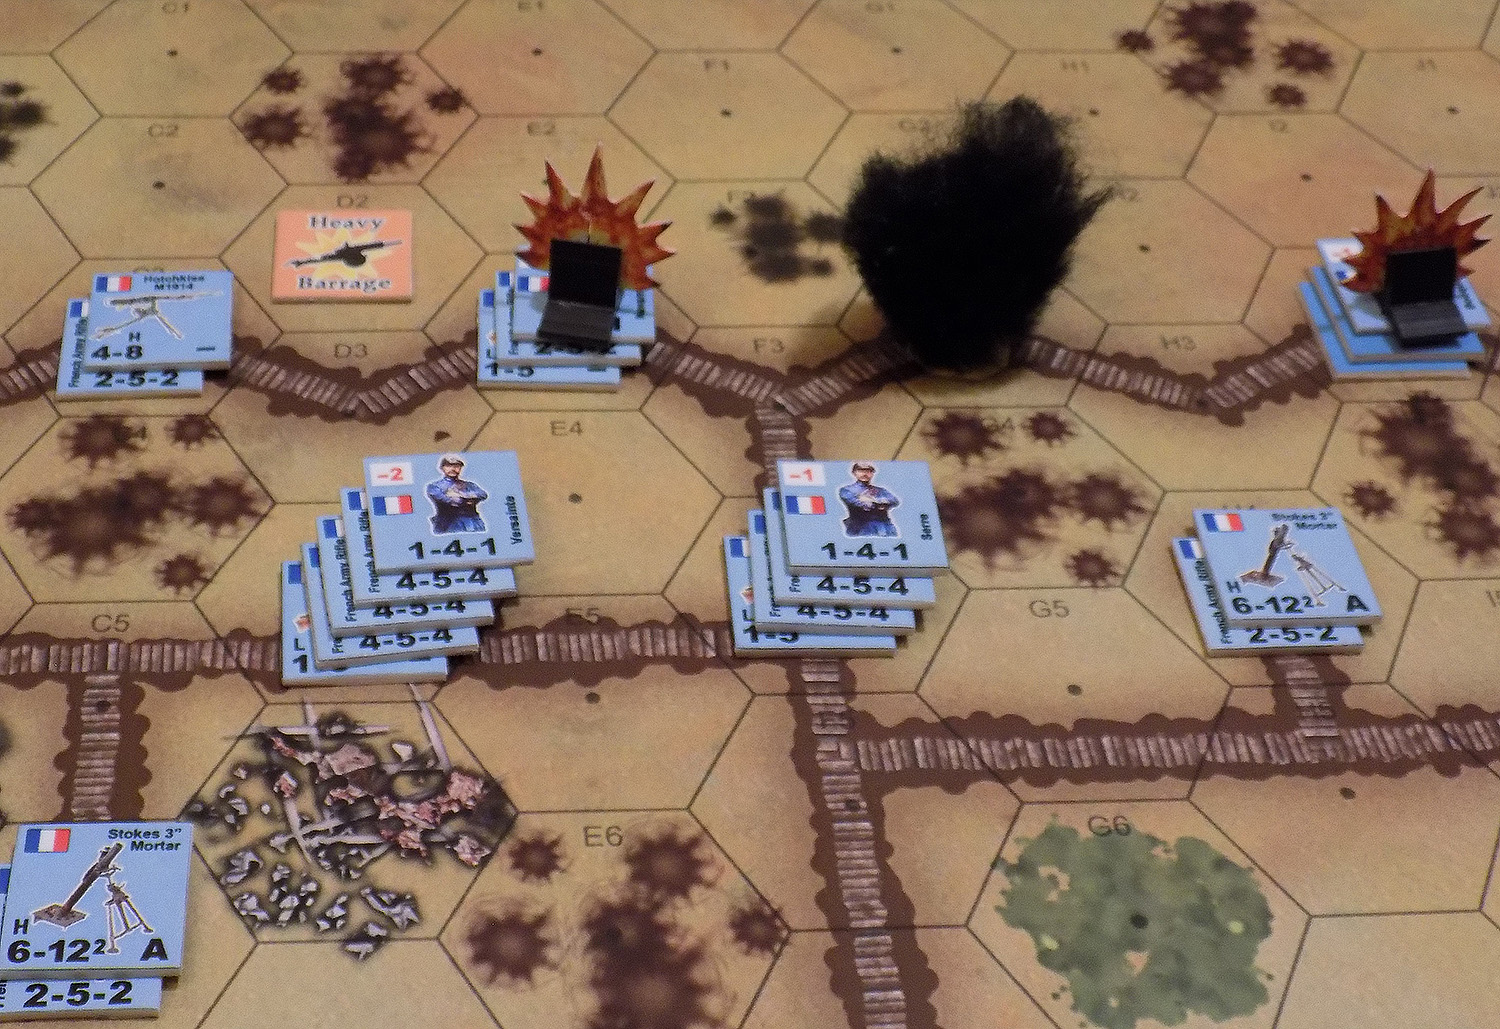
Now here is where things get ridiculously bloody. On the beginning of Turn 2, the Germans under Ritter launch a flanking assault from the east, cutting behind Capt. Versainte’s platoon to assault it from the rear. At the same time, Hauptmann Bothi assaults from the front from the cleared French forward trench. But Bothi’s assault rolls 12, the worst possible roll in the game! Not only does this result in hideous losses and a failed assault, but a French sharpshooter appears anywhere within LOS of Bothi’s platoon and immediately makes a sniper attack (d6 – cover bonus = immediate loss of casualty points). And the sniper rolls a 6! Subtracting -2 for the trench bonus, Bothi’s platoon takes another 4 casualty points! Holy hell, have the French actually turned the tide here?
Maybe not, because Neumann’s platoon immediately assaults as well from the northeast, overrunning the sniper’s position (taking more losses from the sniper’s opportunity fire) and them hitting Versainte’s position with not one but two flamethrower sections. Good God, almighty! Versainte’s position is wiped out, but the assault costs Neumann’s platoon another 6 casualty points (2 for the trench, 3 for the French half-squads, 1 for Versainte himself).
Seriously, eleven squads have just been lost in this 90-meter stretch of trench in less than two minutes, plus an officer, plus a sniper. That’s 90+ men total = combat ineffective (at least 20 dead, 40 seriously wounded, 30 more walking wounded, scattered , terrorized).
On the French Turn 2, a mortar team rolls another 12, meaning that a German sniper pops up in this ruined and abandoned French bunker and snipes out the mortar team (goodbye to one of the Md58t2 teams). Two French half-squads are detailed turn back and flush the sniper. One half squad is shot down as they make the rush, the other kicks down the door of the bunker and eliminates the sniper (with the M1915 “Chauchat” machine rifle doubtlessly clearing the room with a spray of automatic fire).
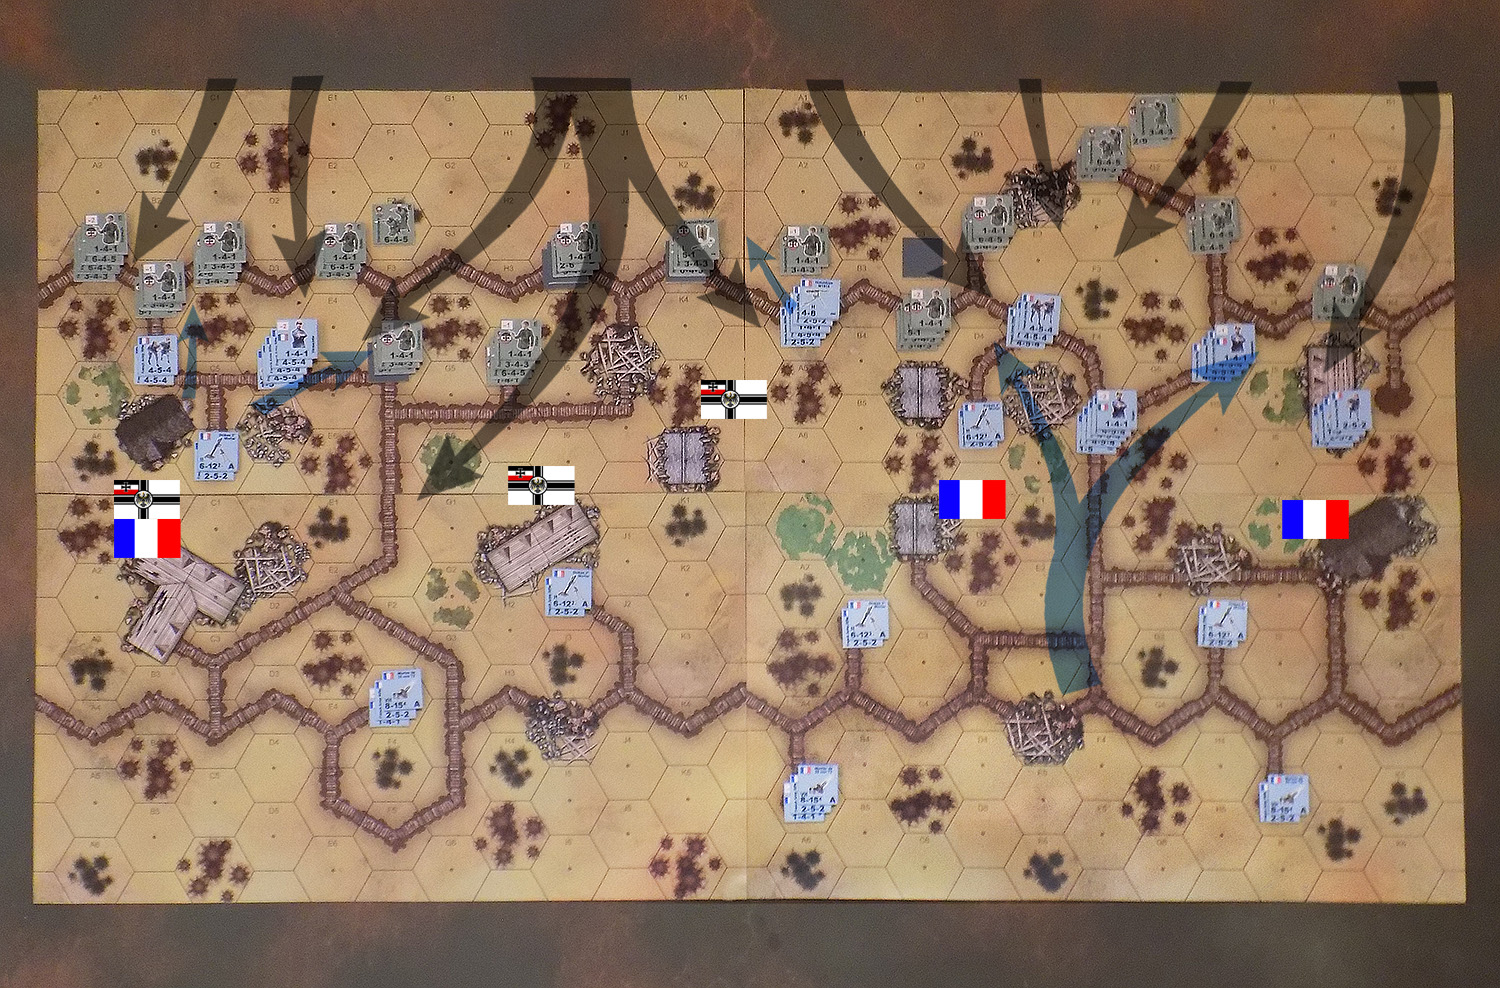
We then see the overall situation at the end of Turn 2, with the French all but smashed completely off the western two boards (with the exception of officers and mortar teams), while the Germans have been smashed in turn almost completely off the eastern two boards. Just that fast, this has turned from a north-attacking-south game to a west-attacking-east game.
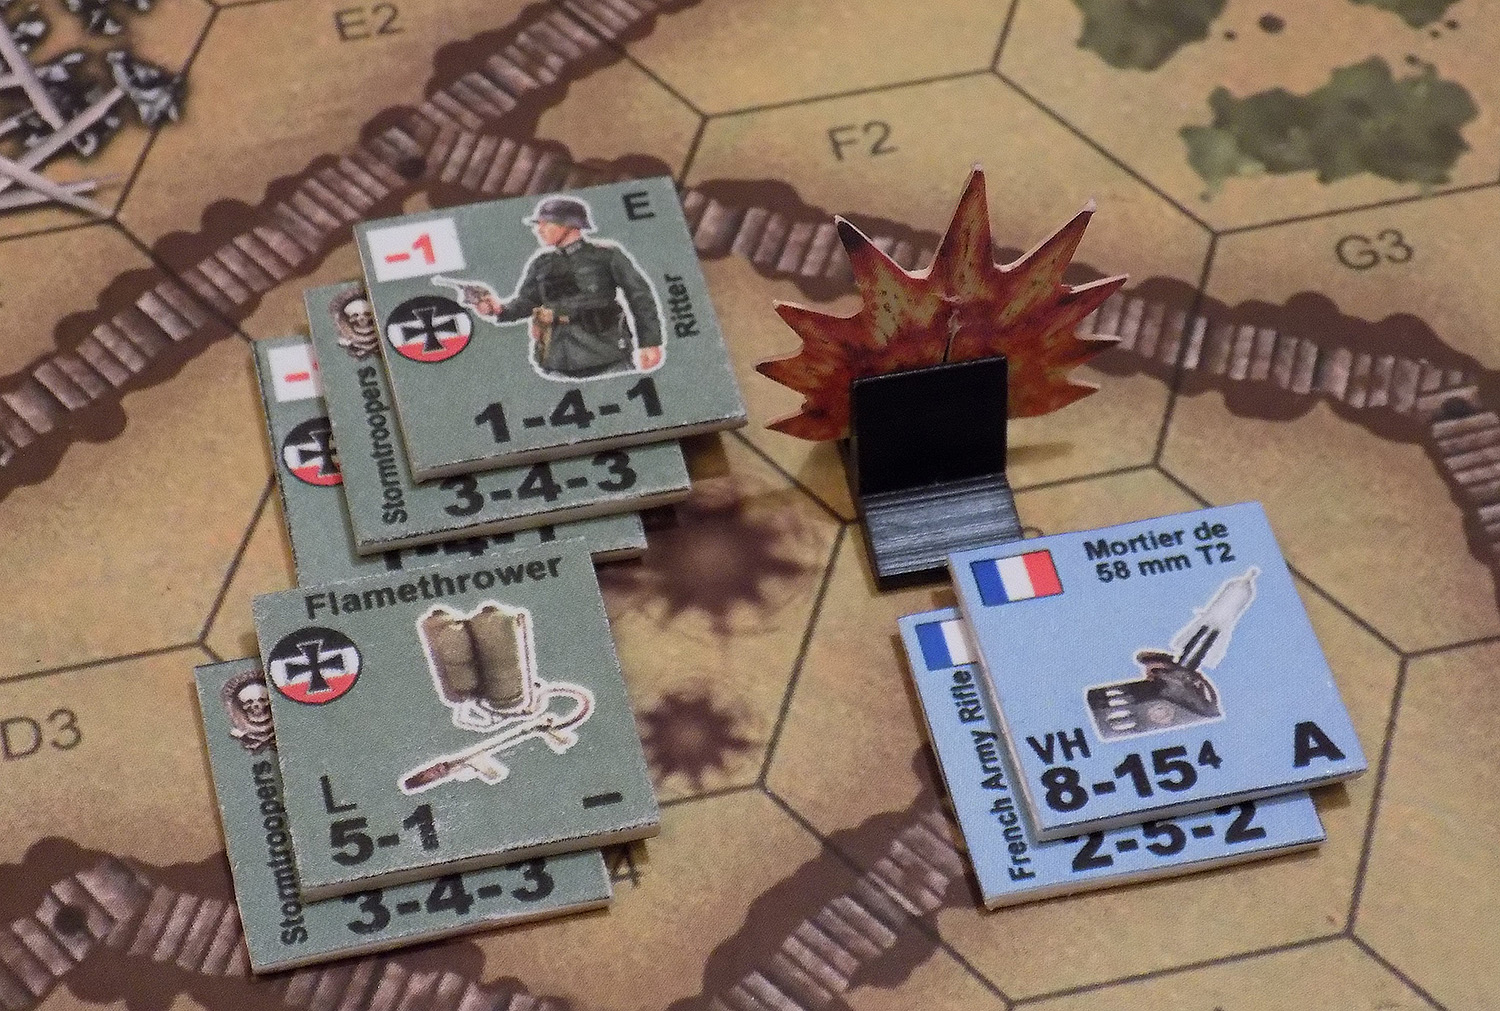
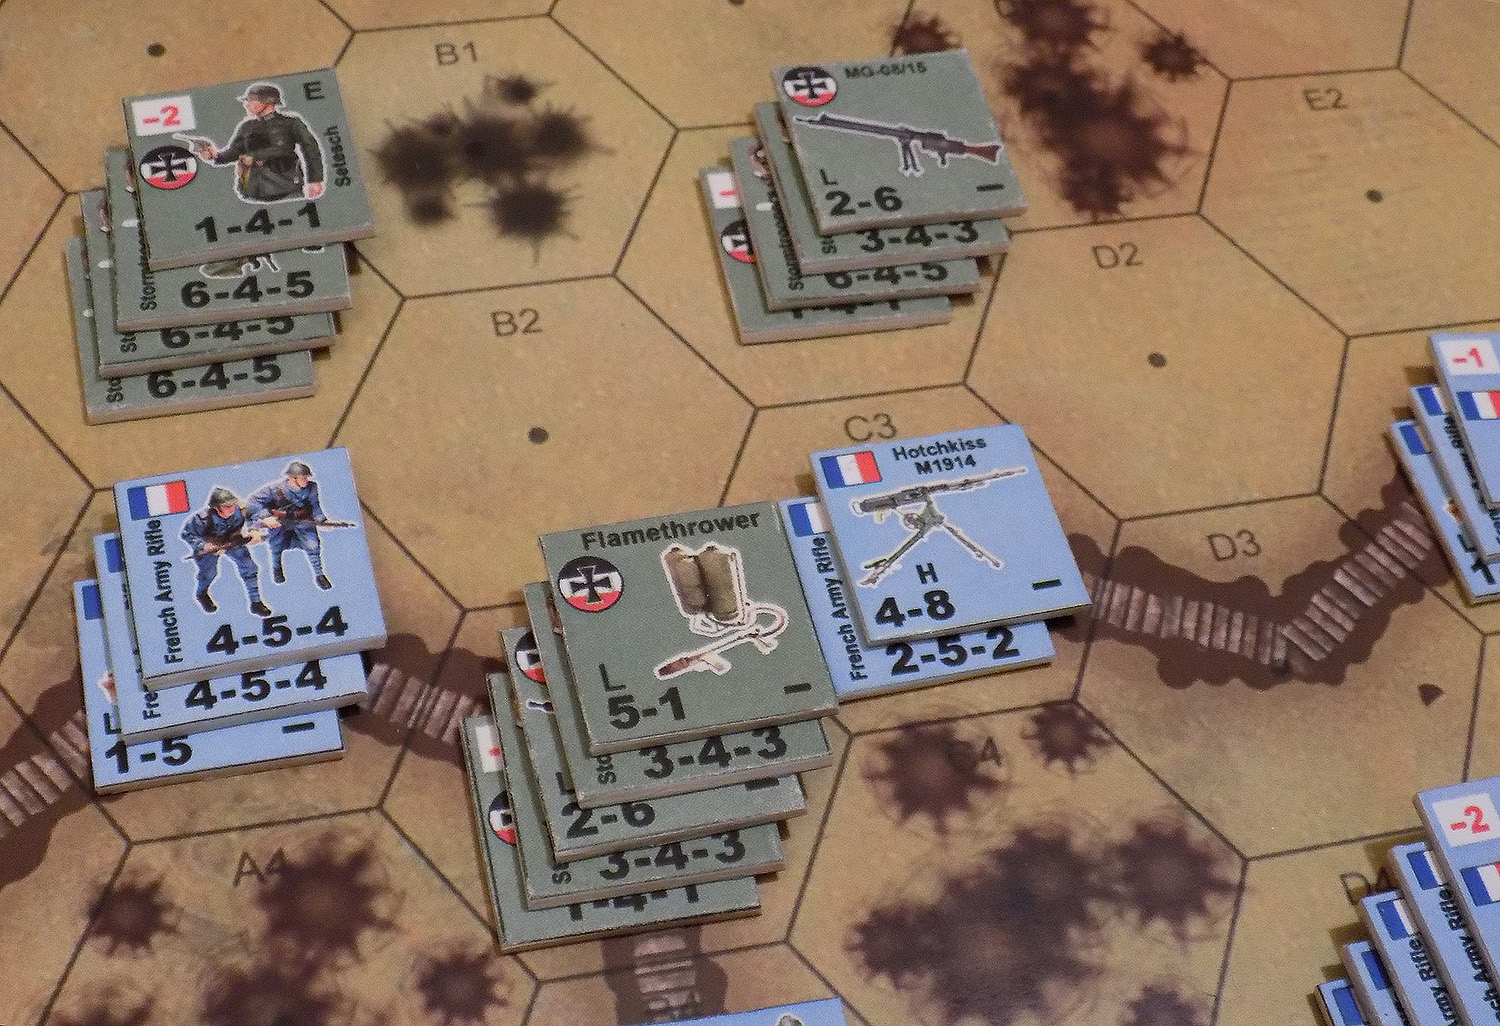
Finally, we see the Germans at the beginning of Turn 3, starting to clear these French mortar positions on the southwest board.

Valor & Victory Megagame (P2)
All Not-So-Quiet on the Western Front
German Trench Assault vs. French
Blücher-Yorck Offensive
Chemin des Dames Sector, May 1918
The German assault hits. I guess here is where I should lay out the German OOB for this game:
German Forces:
Three stosstruppen kompanie
Each with (8) full squads, (5) half squads, (1) +2 officer, (3) +1 officers
Support Weapons: (2) MG 08 15 LMGs, (2) flamethrowers.
* Thus each company has 84 men, 4 officers
* German total assault strength: 252 men, 12 officers.
* + (6) Heavy Barrages, (6) Light Barrages
Yes, the Germans are outnumbered by at least 35% (and they’re assaulting eemy trenches, when you’re supposed to outnumber the enemy by at least 3-1). But the German have better support weapons, more officers, better officers, and of course that murderous opening barrage.
Lastly (and perhaps most significantly) these German squads are qualitatively better than the French squads. Note the 6-4-5 combat ratings, compared to the French 4-5-4. That first “6” compared to the French “4” gives the Germans a +50% edge in raw firepower, at least close up (MP 18s, extra pistols, “stosstruppen” training, etc.) They also have an extra casualty point for each squad (the last “5” in stead of “4”) and the “E” in the upper right of their counters marks them as “elite,” which gives them enhanced chances for Valor rules, rallying pinned units, etc.
Now as the Germans make this approach (entering the north edge of the board), the French units that survived the barrage and are unpinned get a chance for “opportunity fire.” Pinned units do not get opportunity fire, they’re too busy trying to crawl under the duck boards at the bottom of those trenches. So you can see why the French decided to bit the bullet and take the losses under that barrage, they now get to positively maul the Germans as they approach over open ground, point-blank in front of French trenches and machine gun positions. The Germans try to make the most of crater hexes in their approach, but however you cut it, this will be nasty.
The German assaults have hit, I’m not even going to try and list out the math and die results for each one. Suffice it to say the Germans took heavy losses going in, but once the assaults started their local superiority in numbers, not to mention stosstruppen stats, gave them annihilating victory in all but two occasions
Losses just in the first German turn have been truly “Great War” in scope.
German losses total 15 squads or their equivalent:
* 120 men combat ineffective
* Assume about 24 dead and 48 wounded (48 more scattered, walking wounded, terrorized, etc.)
French losses total 25 squads or their equivalent:
* 200 men combat ineffective
* Assume about 40 dead and 80 wounded (80 more scattered, walking wounded, terrorized, etc.)
* + four officers killed, wounded, or captured.
The French have also lost far more support weapons.
And this is only the German turn. We haven’t even finished the first turn, the French still get to make fire phase and assault attacks in their turn!
The overall situation at this point of the game – the Germans and French are more or less in a standoff on the extreme west wing, while the Germans have smashed open a pretty grisly breakthrough in the west and centre. To the east, however, the French have actually repelled some of the stosstruppen assaults, have a local superiority, tons of on-board mortar support, and are about to launch some pretty serious counterassaults.
In summary, this battle could totally go either way at this point.
Stay tuned as this “All Quiet on the Western Front” mega game continues!
Valor & Victory Megagame (P1)
All Not-So-Quiet on the Western Front
German Trench Assault vs. French
Blücher-Yorck Offensive
Chemin des Dames Sector, May 1918
Okay, it’s time to put these new French counters, trench boards, and German stosstruppen to the ultimate test. Just how big of a trench assault game can we actually do in Valor & Victory? Let’s find out!
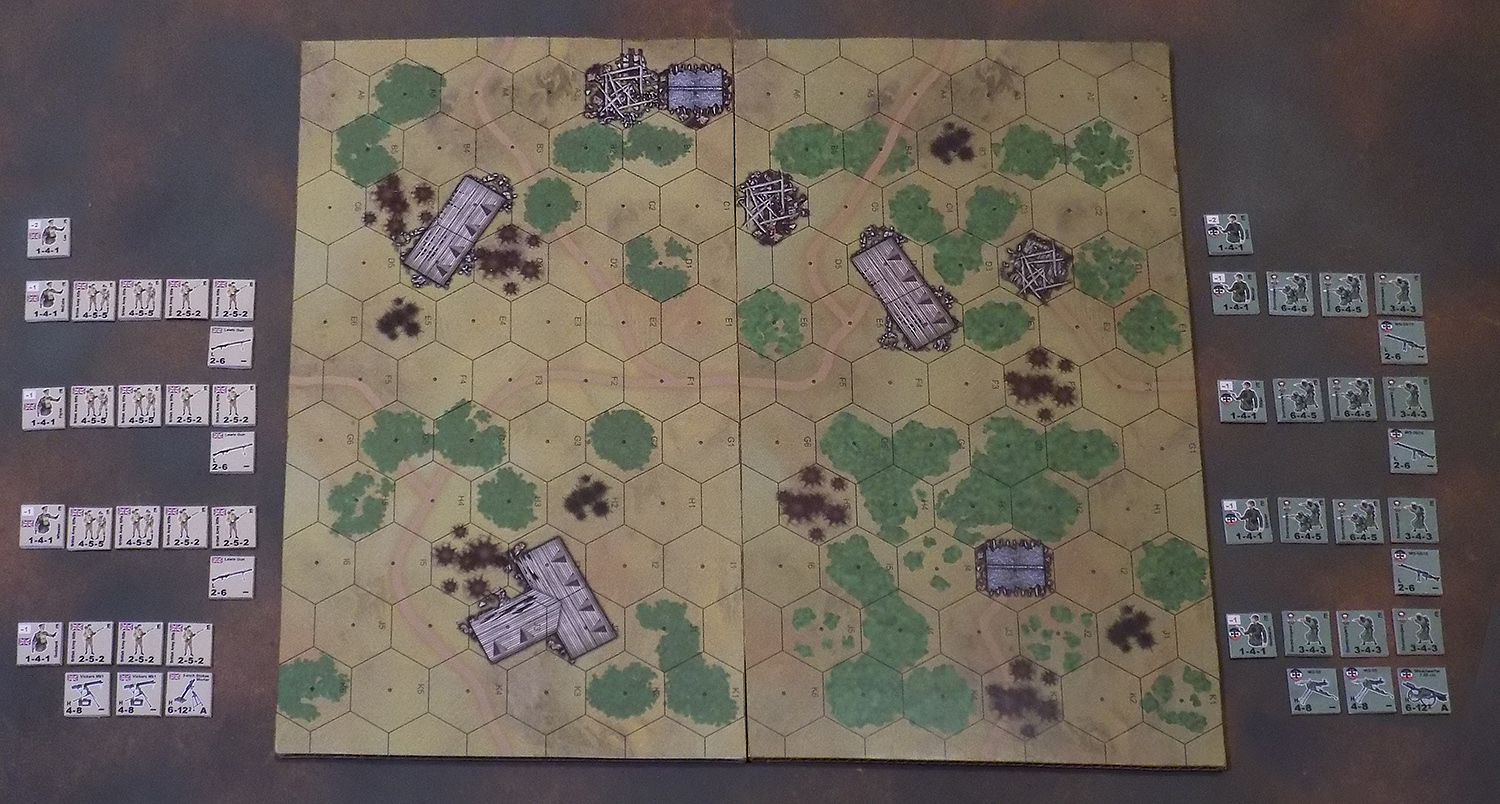
So I set up all four trench boards I designed previously for Valor & Victory: 1918 Edition. As you can see below, the boards are designed to fit together in multiple configurations, and most games would not actually include all four boards. Really great platoon sized games could take place on one board, really. Most games would be two boards, “vertically” for a breakthrough penetration game, or “horizontally” for a broad attack game.
But here we have all four. I’ve also deployed, simply put, just about all of my French counters. So what we’re looking at here is:
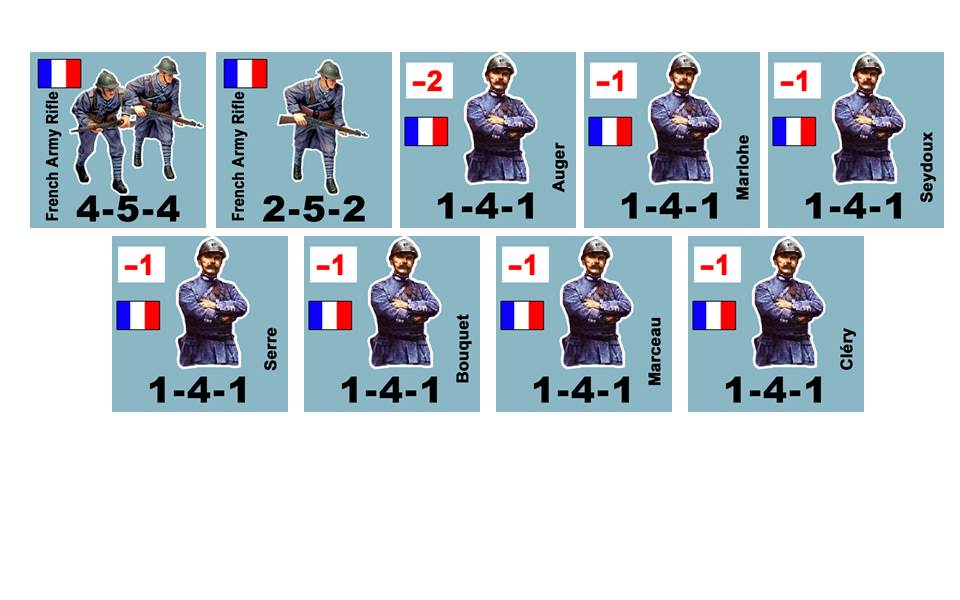
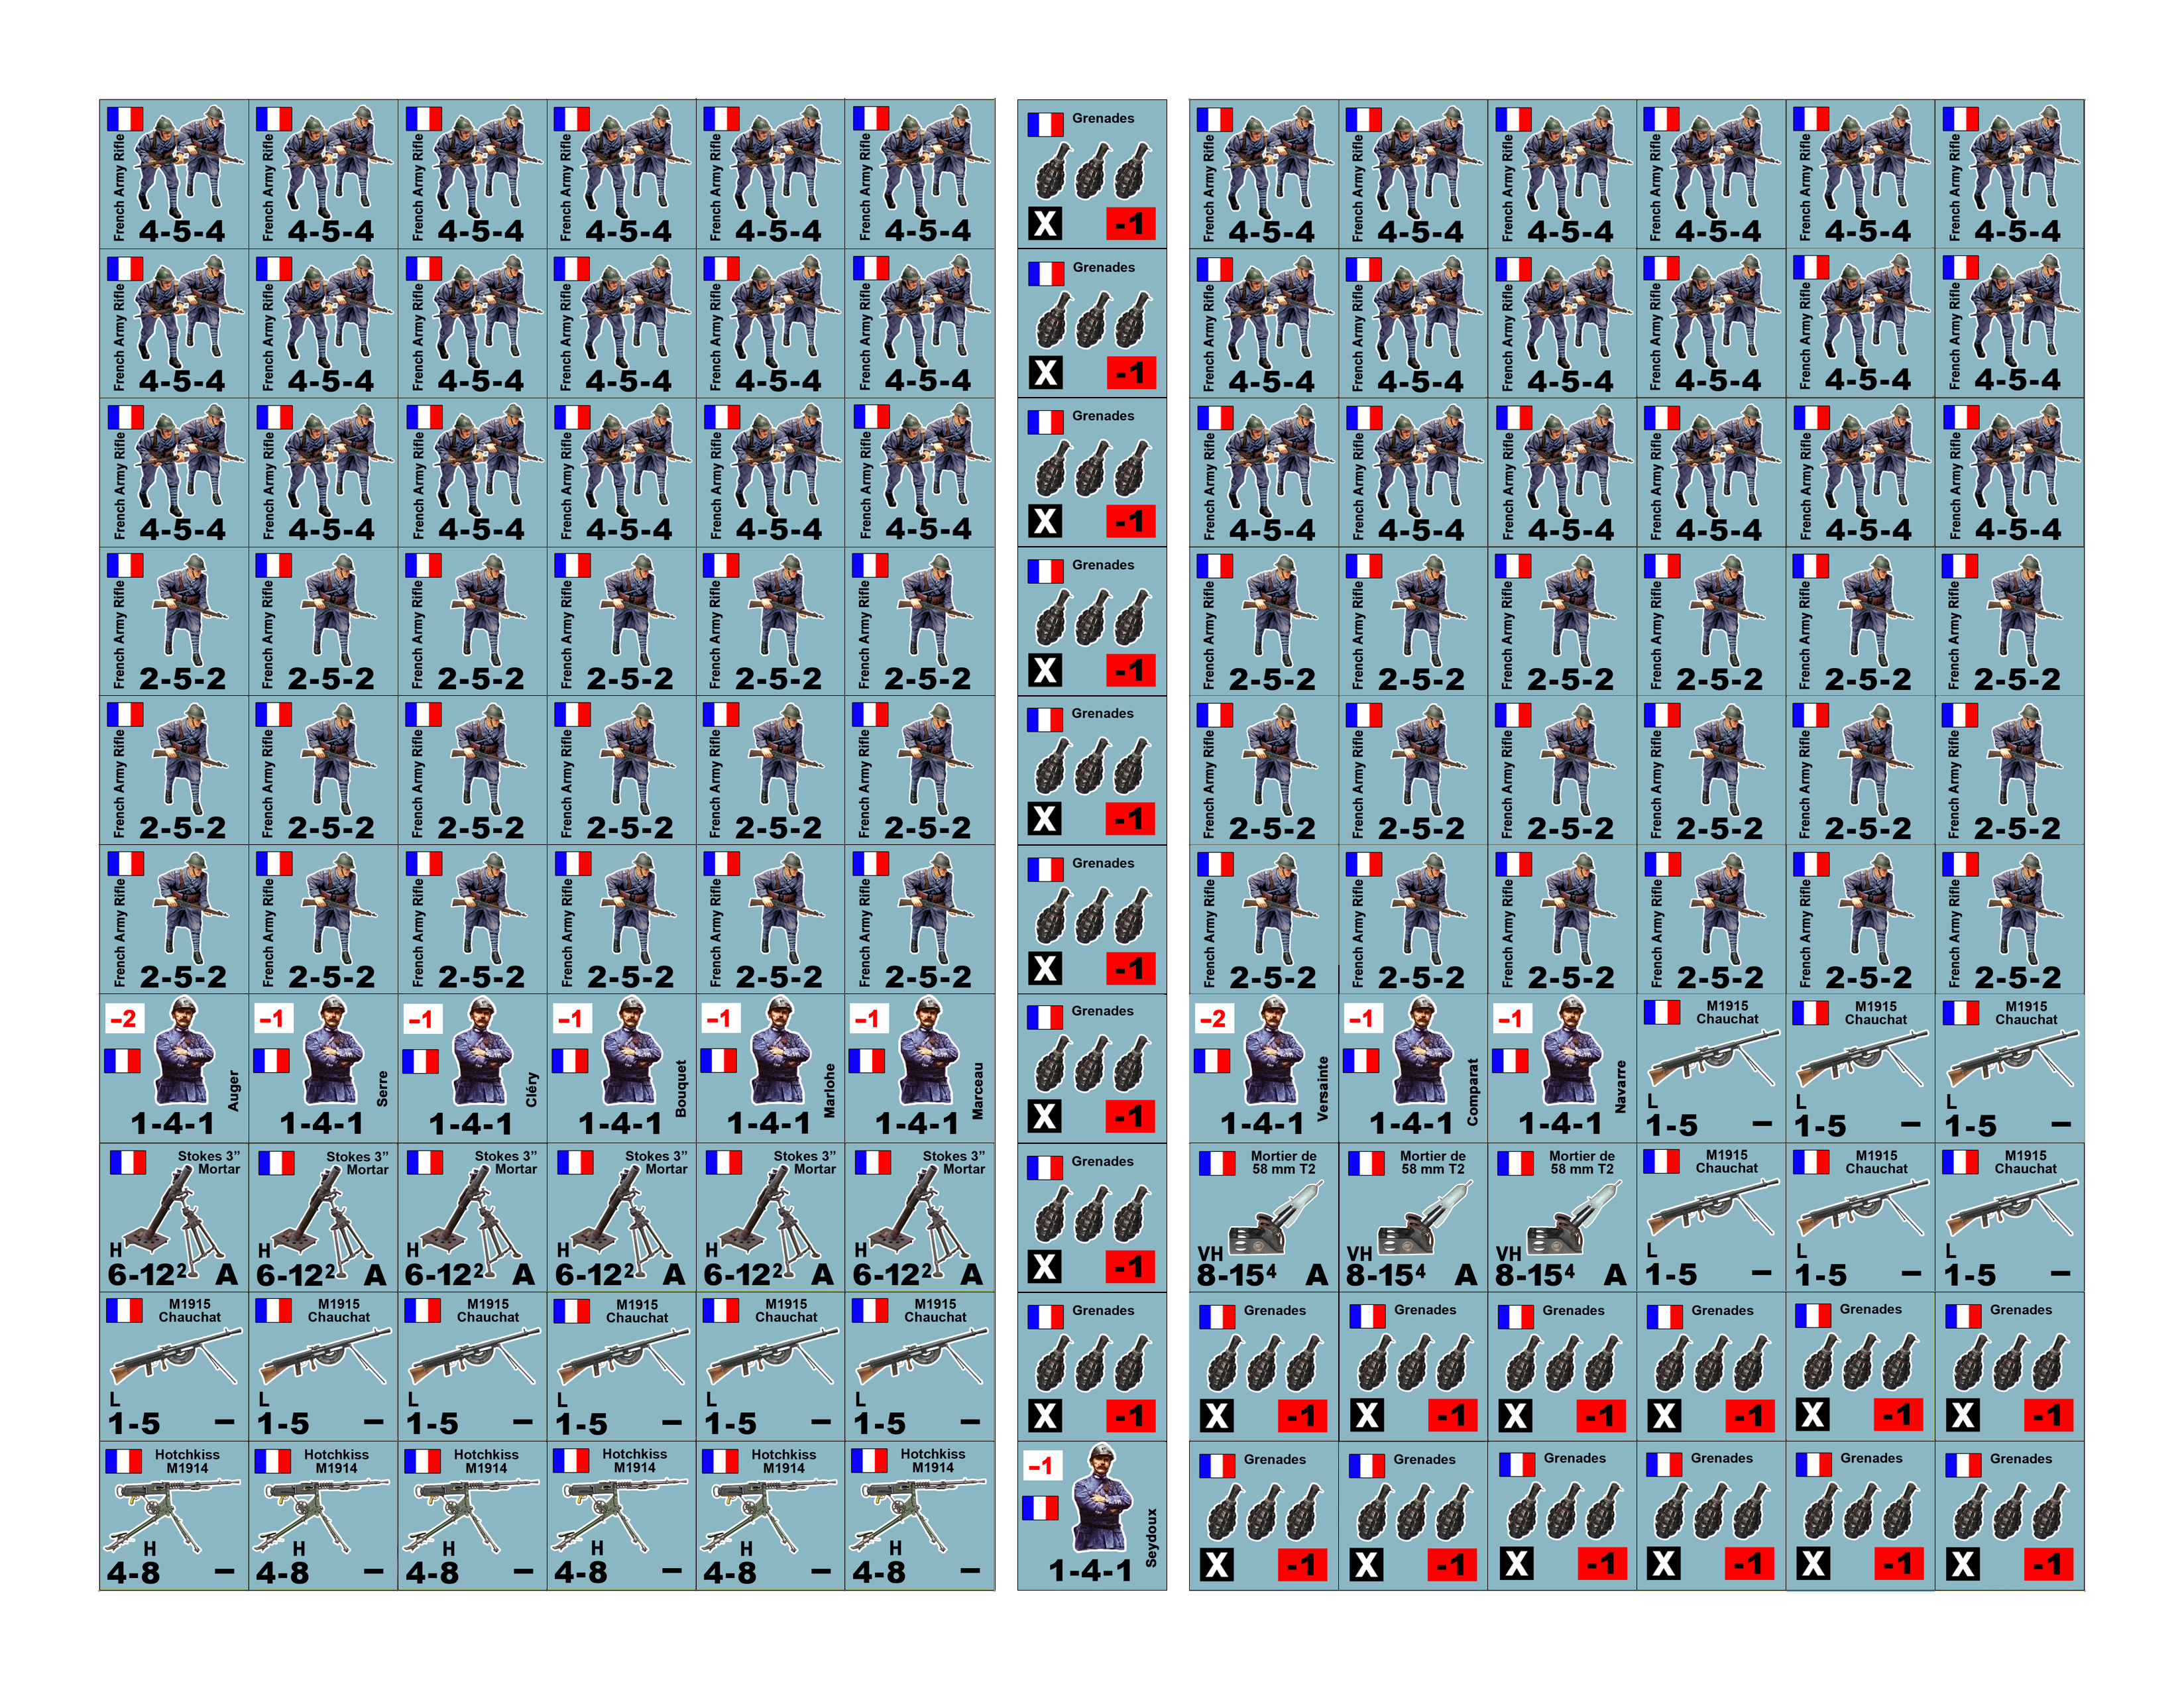
French Forces:
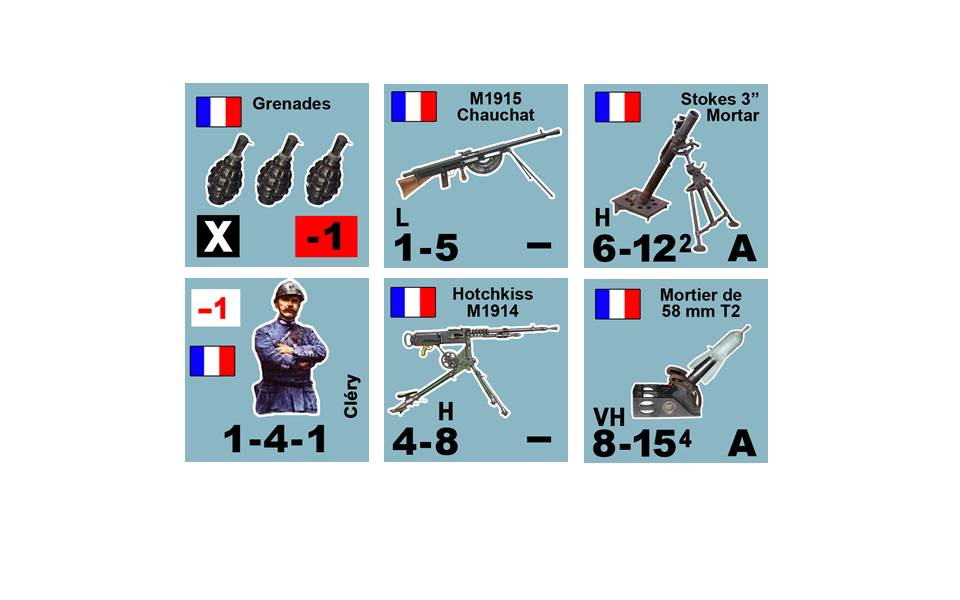
Four rifle companies, each with (9) full squads, (2) officers, and (3) M1915 “Chauchat” machine rifle LMGs.
* Officers are mixed bag, two companies have (1) +2 officer and (1) +1 officer, the others have (2) +1s.
* Total: 288 men, 8 officers.
One weapons company, with (15) half-squad weapons crews, (6) M1914 Hotchkiss HMGs, (6) 3” Stokes mortars, and (3) Md58 T2 trench mortars, (2) +1 officers.
*Total: 60 men, 2 officers.
Grand French Total: 344 men, 10 officers.

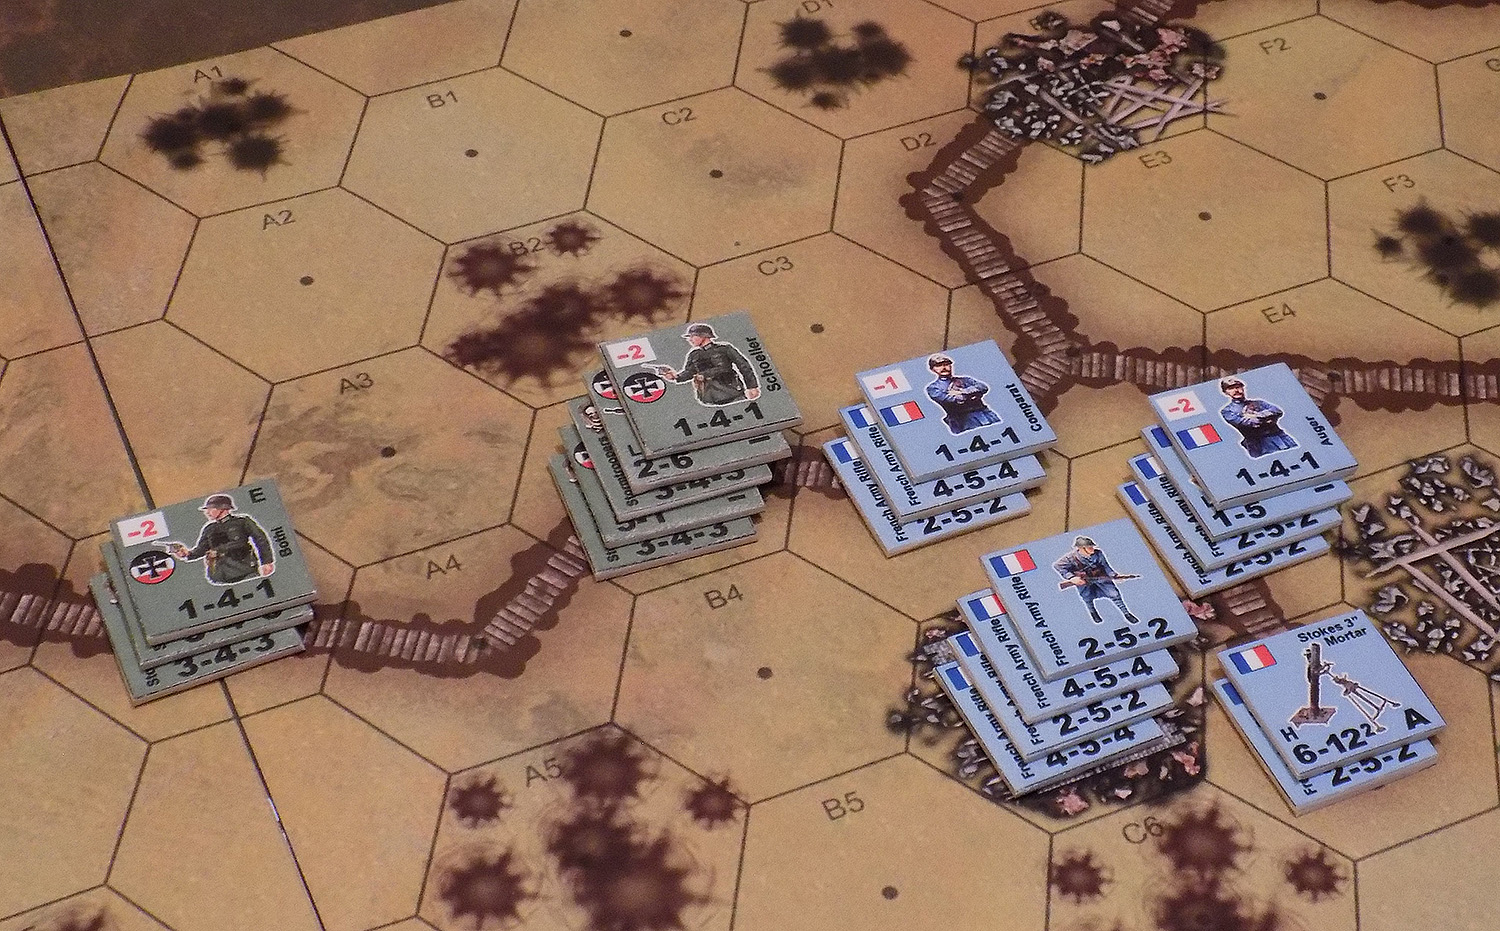
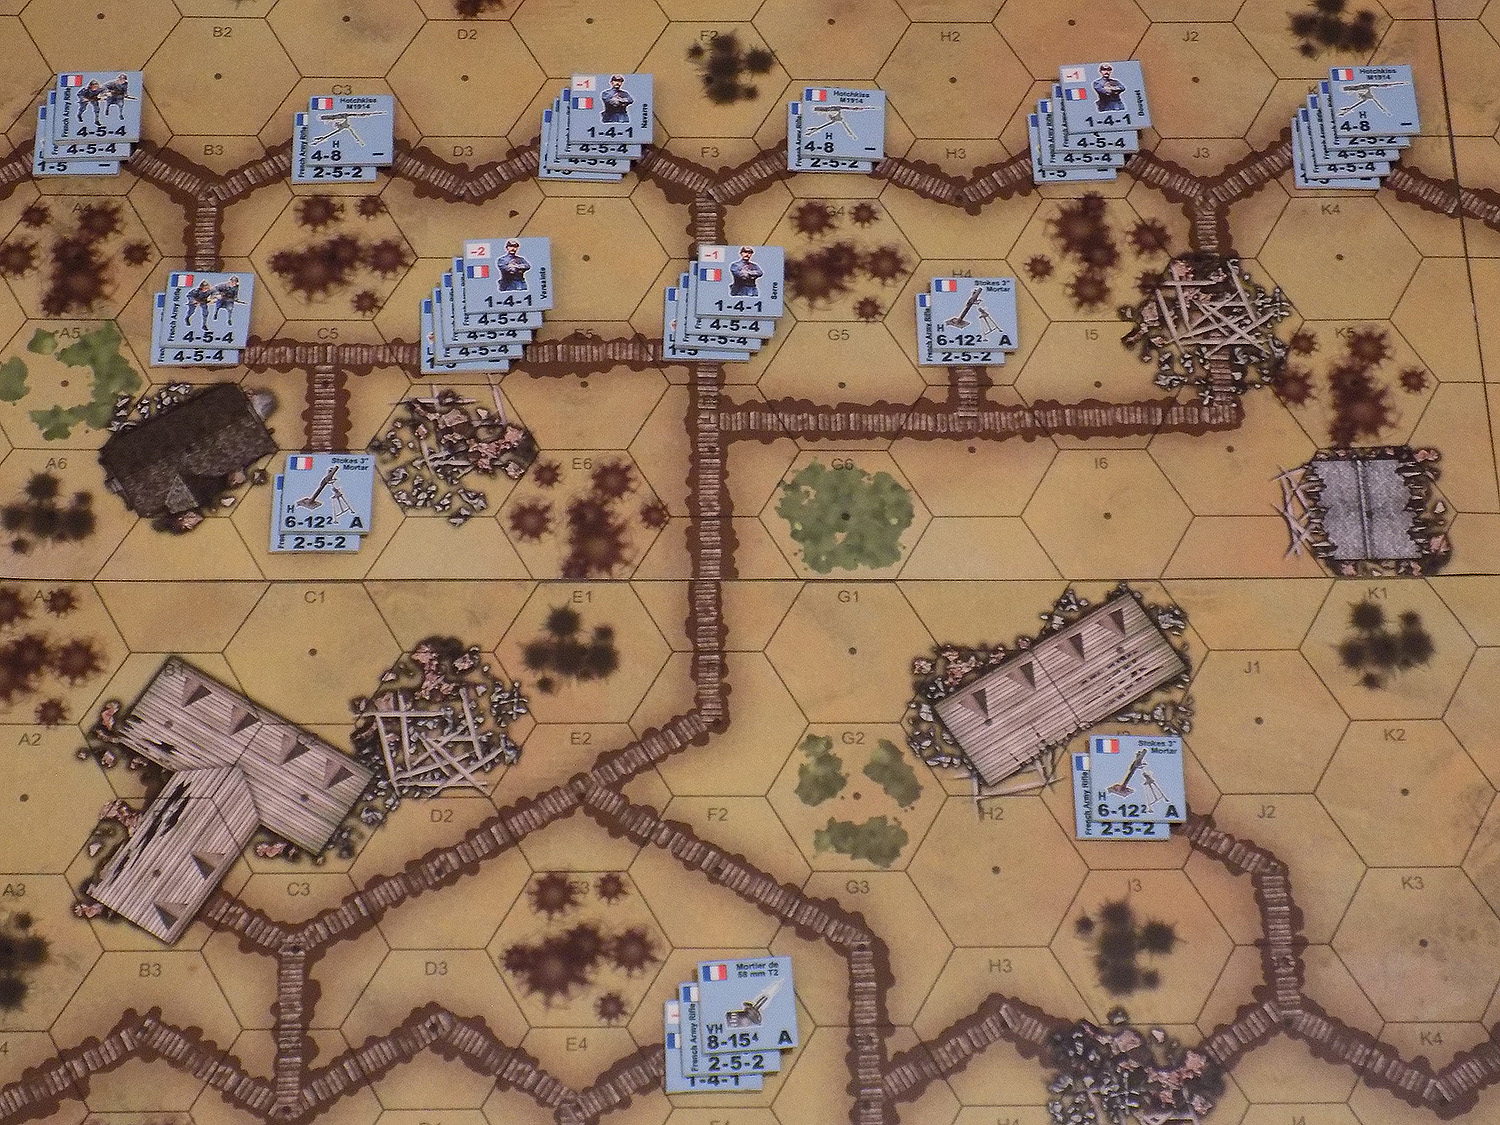
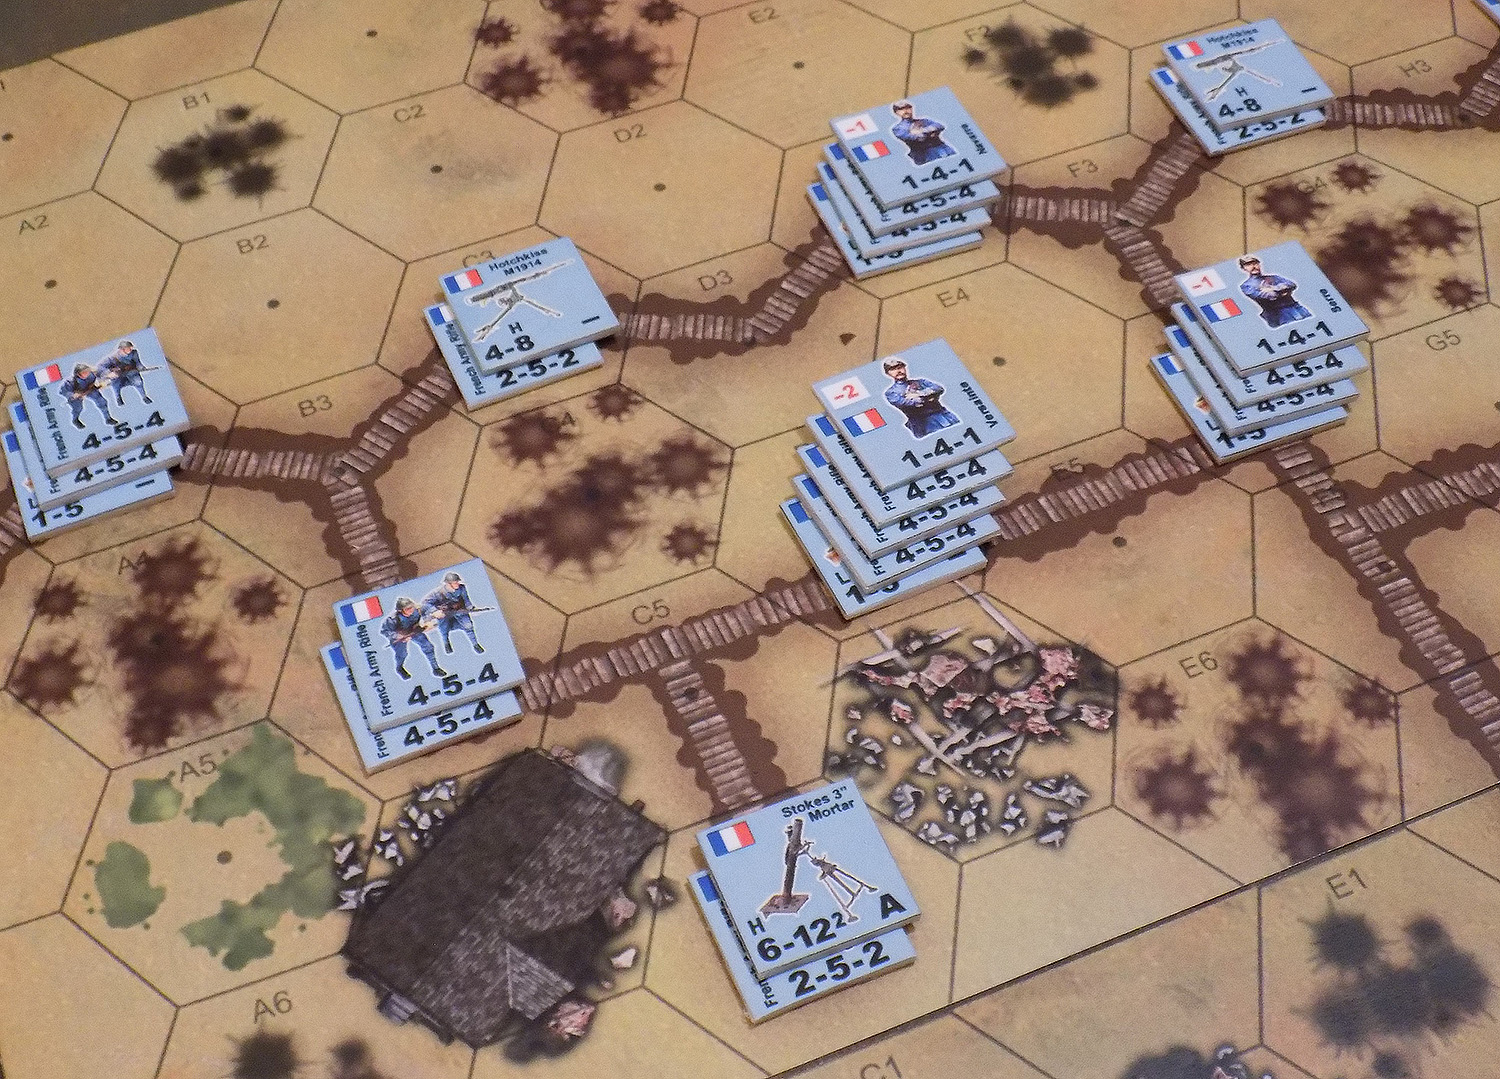
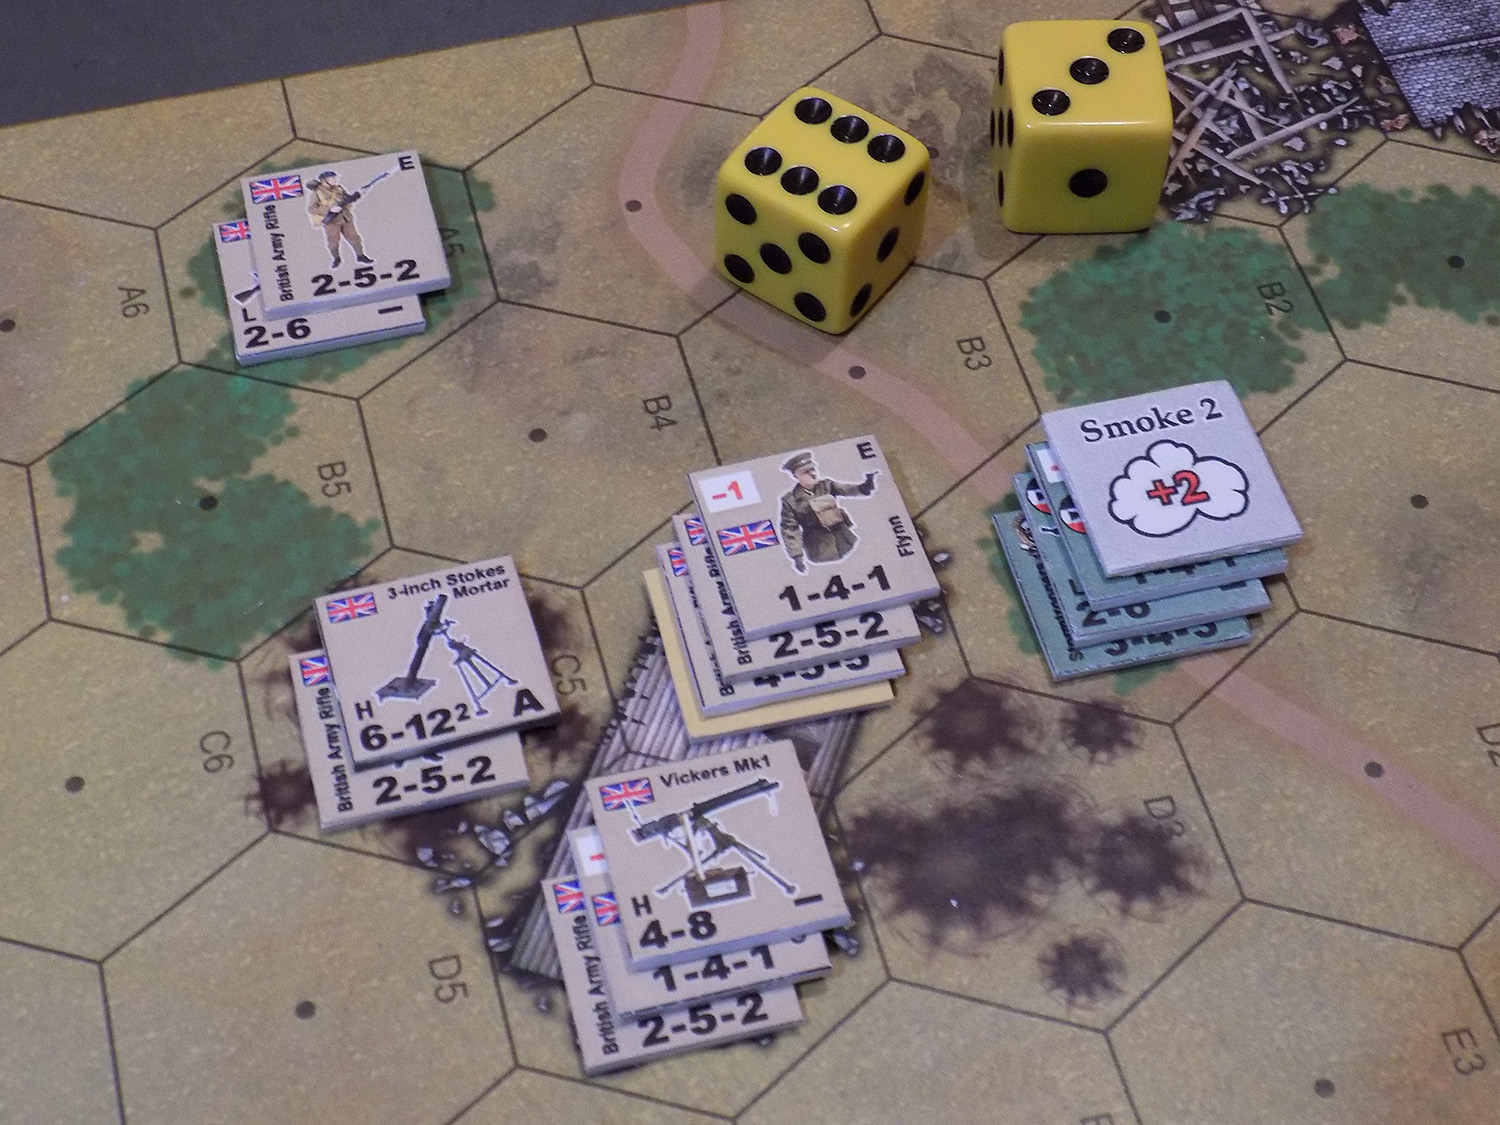
Some closer pics of the French deployment. Note the M1914 Hotchkiss HMGs in frontal firing pits, each manned by a 2-5-2 half squad gun crew. Rifle platoons are also staged across this frontal line. Behind that are more platoons in a “secondary” trench line. Behind and intermingled with them are the 3”Stokes mortars – a British design that by the end of WW1 was actually being widely used by many Allied armies, French definitely included. Finally to the rear we have the larger Mod 58 T2 trench mortars in “reserve” or “artillery” trench lines.
Note the French are deployed in depth, and not bunched together. This is because they are expecting a Germans assault, and this will lead off with a large pre-planned artillery barrage. These fire missions very often “drift” off their intended targets, but if your group your forces too closely together, even enemy “misses” can drift right onto other friendly units. When expecting enemy artillery, the classic rule is to spread out. A
Also, the French want to keep some kind of reserve force for the second half of Turn 01 or even Turn 02, after the German stormtroopers have hit their forward line, taken hideous casualties from French opportunity fire and in the course of their initial assault into the French trenches. These weakened stormtrooper units can then be counter-assaulted by these French reserves, and perhaps turn the tide.
The Germans plan their initial bombardment. Again, those familiar with the Valor & Victory system will see there is already a pretty big change here. Normally you can only include these off-board support missions when you have a valid, unpinned spotter unit on the board with LOS on the target. Of course the Germans have no units on the board yet. So what gives?
Again, these are the new rules I’m trying out for 1918 Edition. These are-pre-planned artillery barrages. They can only happen on Turn 1, they cannot be “saved” for later, and hit only on a 1-3 result d6 roll instead of the usual 1-4 (i.e., they are less accurate). They represent the plastering that German batteries are putting down before the stosstruppen go in.
I should note that the German barrages for this scenario included in their order of battle are:
6 heavy barrages. (7.5cm+ howitzers).
6 light barrages (8.1cm+ mortars).

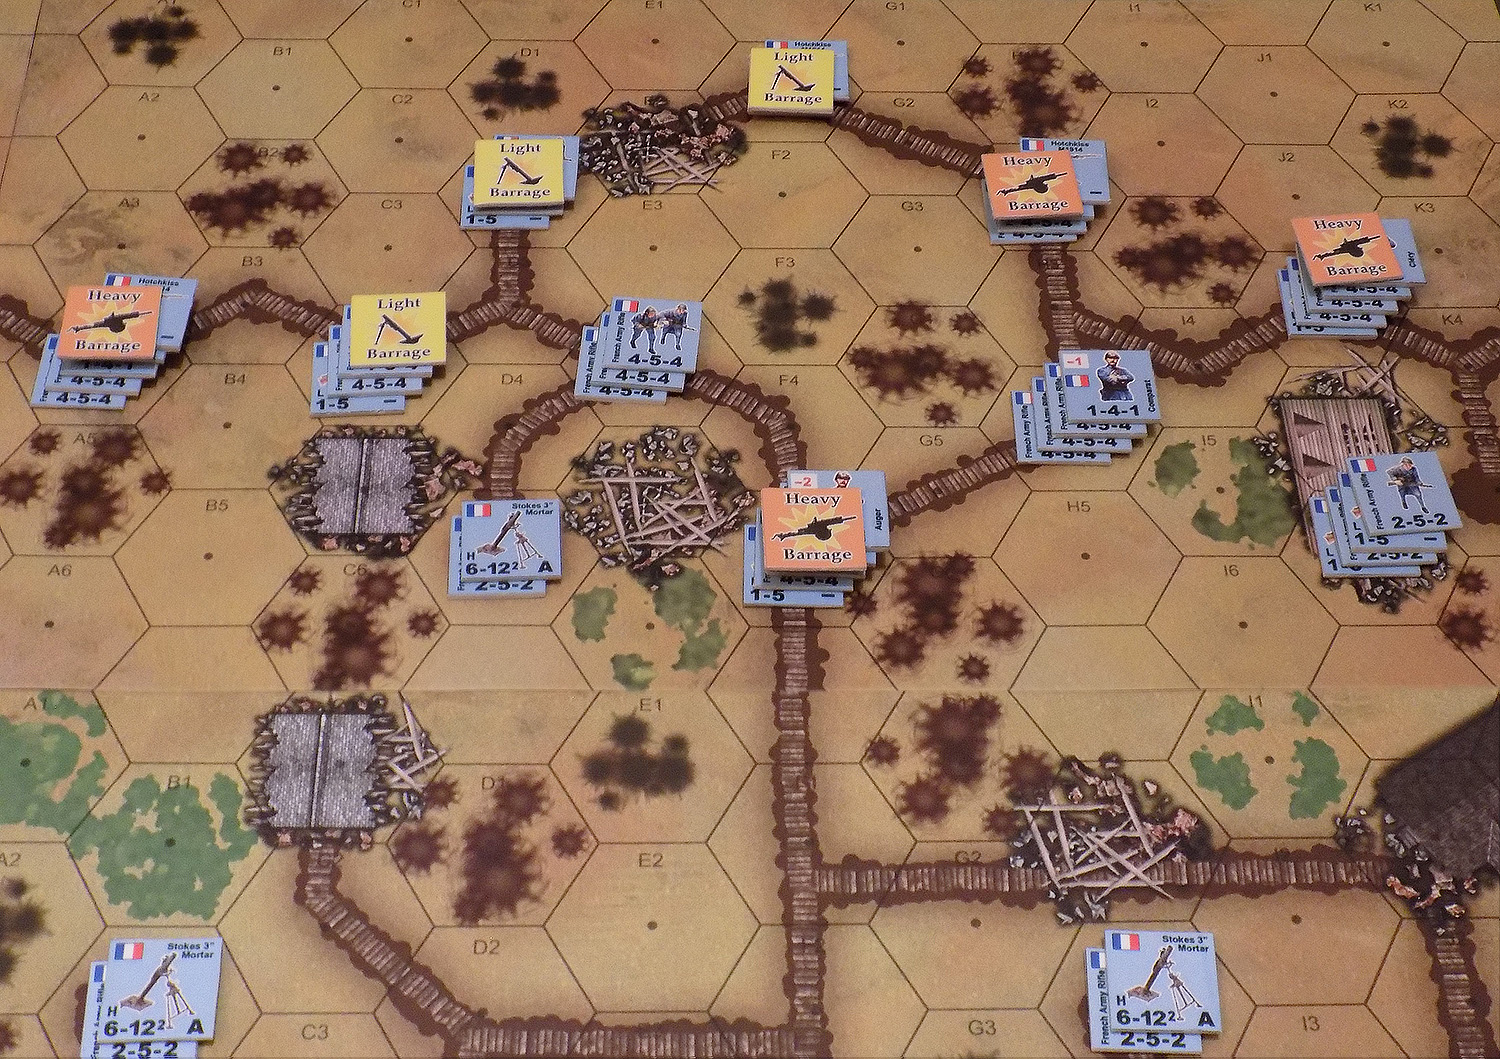
The German artillery whistles down in a horrific crescendo of screaming ordinance, slamming into the French line. You can see where some missions have drifted completely off their target. Others with the “explosion” margers have hit their targets and damage to French units in that hex. The large smoke marker designates where the fire missions has hit and completely obliterated all French units in that hex.
After the Germans roll to see whether each fire mission hits, the roll is then made of the Antipersonnel Firepower (APFP) table to see how much damage was done. The better the roll, the more casualty points are inflicted. Of course, heavy barrages tend to inflict more than light barrages (assuming they hit). For each unit stack hit, the French then have to “pay” the indicated casualty points, which they can do by eliminating squads, reducing squads half-squads, or pinning squads / half squads. Pinning squads keeps your men alive, but naturally you have to pin many more units to account for the same number of casualty points as a “killed” squad would pay for. Pinned units are also murderously vulnerable if they are assaulted in the enemy movement phase.
For this reason, the French pretty much bite the bullet here and choose to take the losses, losing fewer units rather than pinning many units. This is because a German assault is obviously coming, so the sergeants are screaming for their men to “hold their ground” and “keep eyes over the parapet” to meet the German assault already on the way.
Battle Report - British vs. Germans (P2)
Meeting Engagement in No Man's Land
Elite British Rifles vs. German Stormtroopers
Amiens Sector, June 1918
The battle between veterans British rifles (Princess Charlotte of Wales’ Royal Berkshire Regiment – 53rd Brigade, 18th Division – III Corps – Fourth Army) and a hardened kompanie of German stosstruppen continues, somewhere in no-man’s land, near Villers-Brettoneaux … Both sides have orders to probe this village, seize and hold it if possible setting up a defensible forward outpost for their respective regiments and divisions. However, these two company-sized patrols have run into each other, sparking a surprise, furious firefight.
Continuing on the British Turn 2:
The British push back in the north. This doesn’t start well, however, as mortar and MG fire from Goddard’s weapon section fail to inflict further damage or pinning on the remains of Werner’s platoon. Then, Flynn’s Owen Gun team makes a rush to try and take the building formerly occupied by Werner’s platoon, but a very lucky roll (finally the Germans catch a break) from Steiner’s powerful position positively chops this British fire team to bits as they enter the abandoned building. If the British want that extra building hex, they’ll have to pay for it.
Meanwhile, Flynn has to assault Werner’s position (note: all British pinned units automatically rally at the beginning of the British turn). Lea’s and McCabe’s positions have also failed to inflict further “softening up” damage, but fortunately Flynn has numbers on his side. He rolls well enough to kill / capture the rest of Werner’s platoon, while taking four casualty points himself (2 for the German units in the hex, 2 for the terrain bonus of the wooded hex). He drops another squad to half (accounting for 3 casualty points), then pins a half squad to account for the fourth, which again he fails to rally.
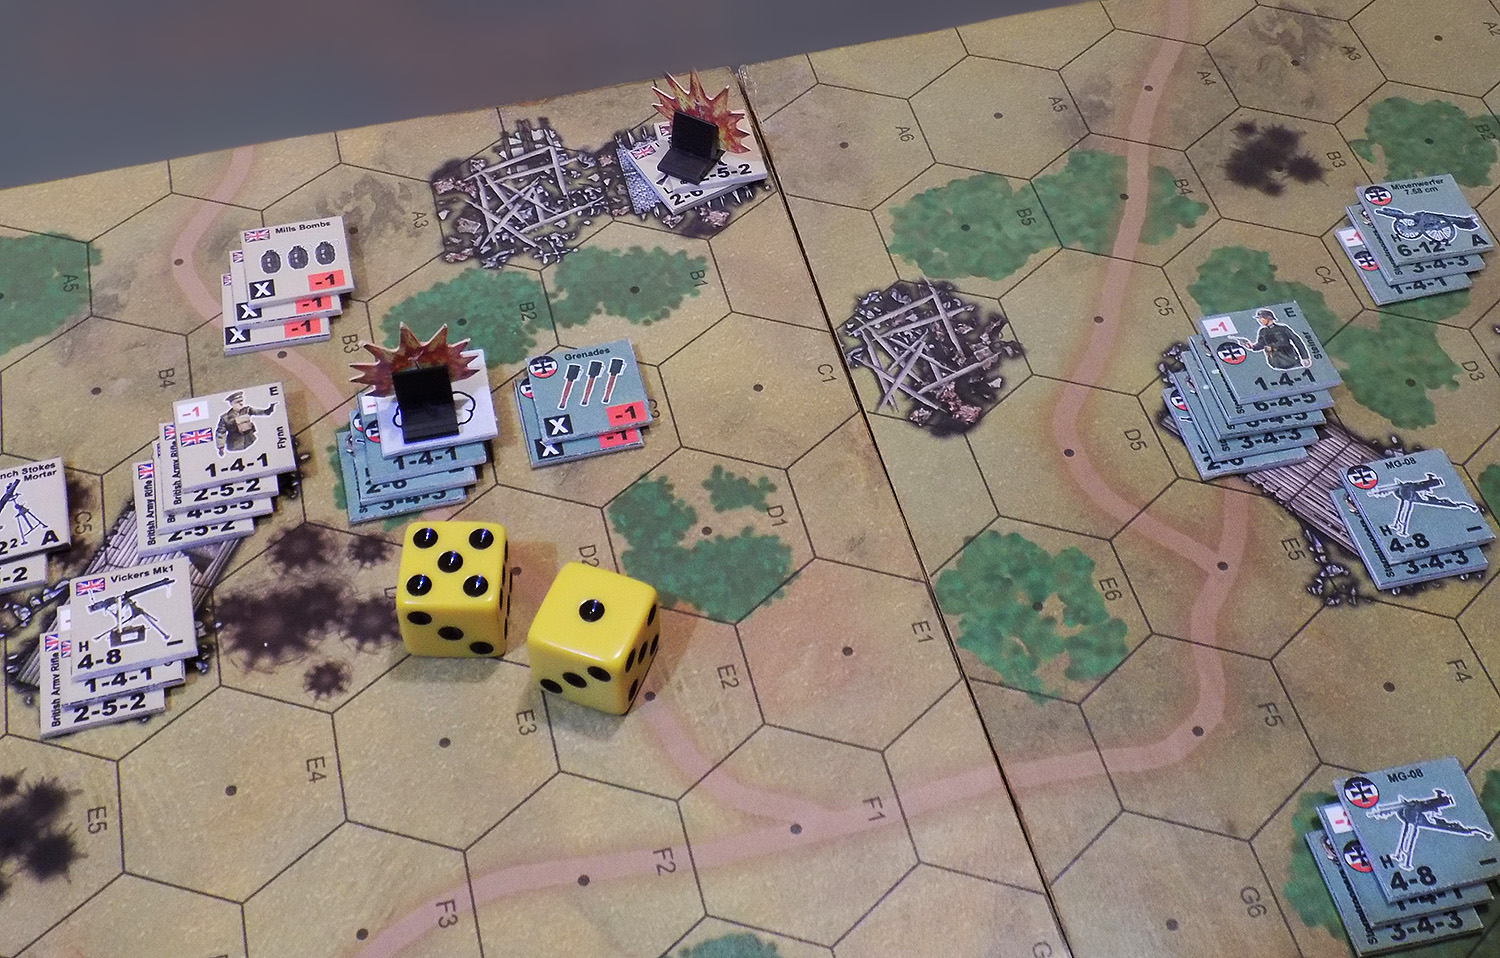
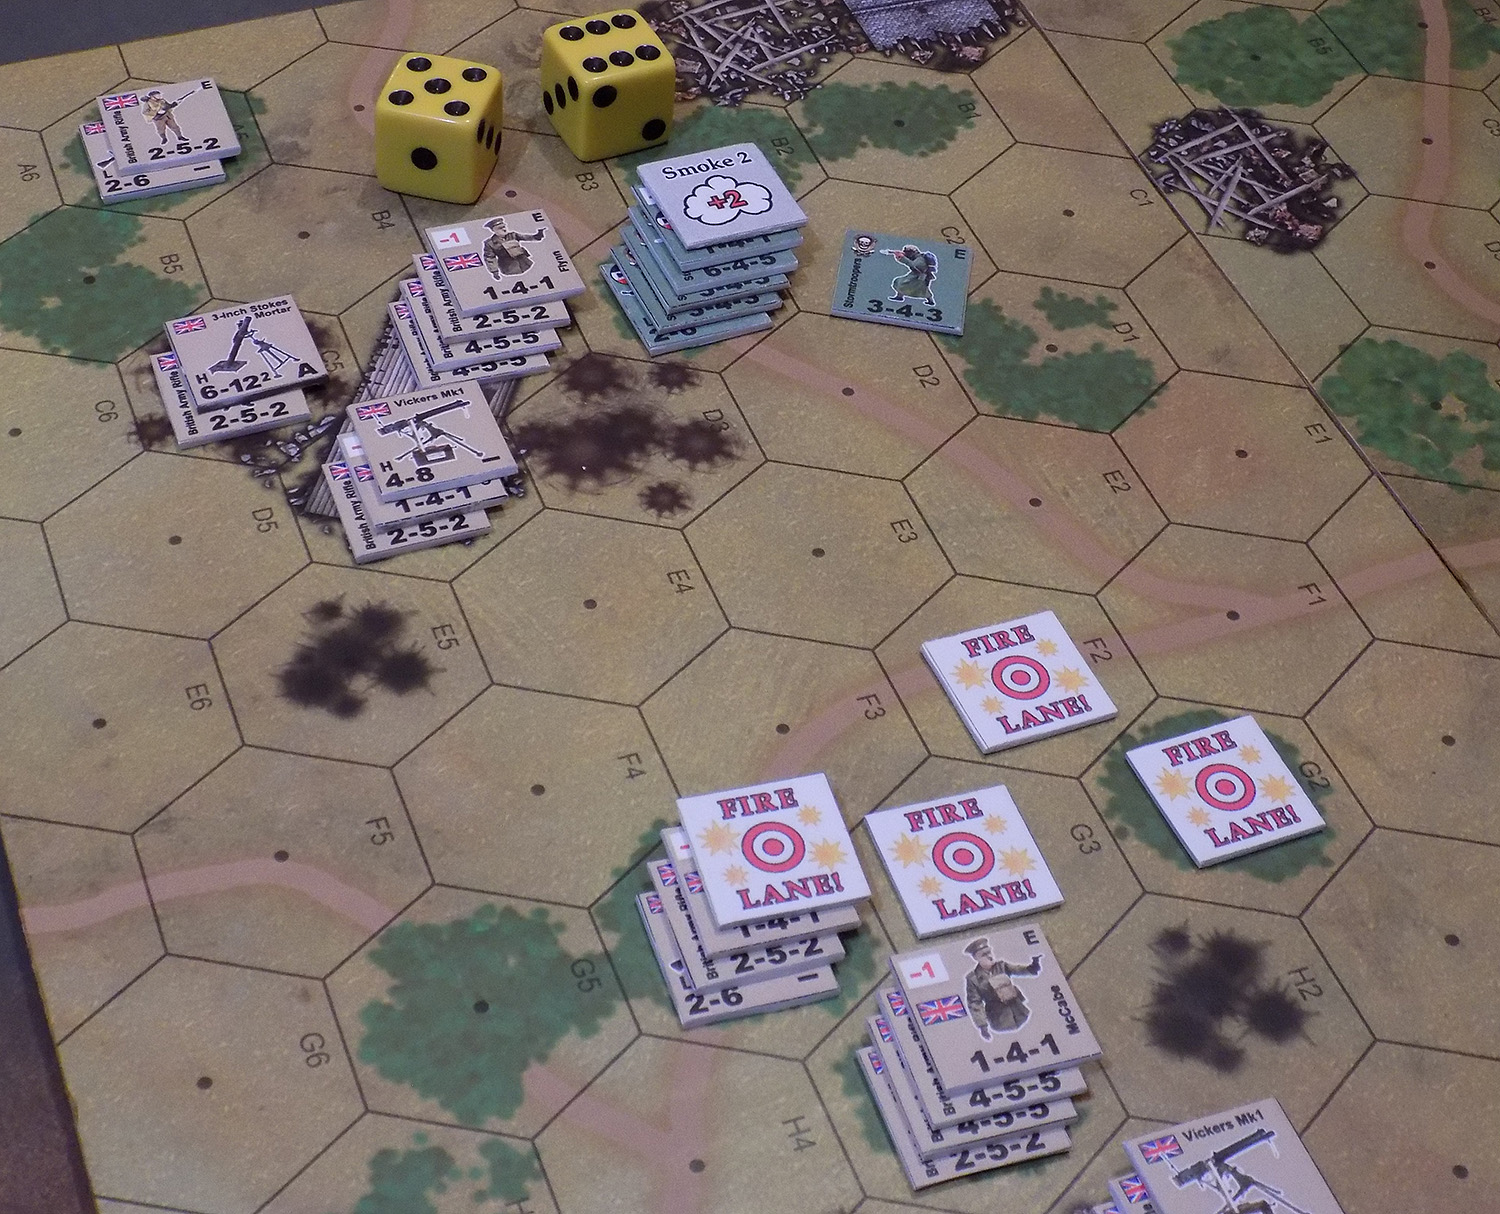
More success for the British comes in the south, where Lieutenant Wheeler forms a “fire group” between his platoon’s position and the adjacent hex with an additional half-squad of his, plus one of Goddard’s Vickers HMG positions. They target the MG 08 position in the German center, commanded by Hauptmann Bothi. It’s a high amount of fire (only through the “fire group” rules can units from different hexes combine like this into really devastating attacks), and the Wheeler rolls well, completely eliminating the MG 08 position and leaving Bothi alone in the hex.
(see the yellow fire lines and explosion markers, I took this photo after these counter has been removed and moved).
As much as I would love to leave that MG 08 in the hex and let Bothi command it against a charge of British infantry, in Valor & Victory that just isn’t allowed with “H” class weapons. Also, when a unit is eliminated, any support units it was carrying go with it.
For the record, more complex games like Advanced Squad Leader (the spiritual forebear of this game, by the way) absolute do allow this, leading to savage assaults and counter-assaults over possession of key support weapons like this.
TURN 03
The Germans, in typical fashion when hit with a battlefield setback, manage to consolidate, fall back, and hit back, all at once. To the north, Steiner’s platoon divides, with Steiner himself taking a half squad up to that northern building. Again, if the British want that building, they’ll have to pay for it. German MG fire and mortar fire, however, fail to inflict further damage on Flynn’s platoon. Bothi falls back to the central building, while in the south, Ritter’s platoon opens a devastating fire on the Vickers pit that just helped Lt. Wheeler take out the German MG 08. The Germans roll a 3 on 2d6 (very good roll), enough to completely wipe out the Vickers, its crew, and the half squad from Wheeler’s platoon that was dug in beside them. They then use the assault move phase to actually fall back, fading into the smoky, splintered trees, daring Wheeler’s platoon to come in after them.
Score is currently British 36 to German 28.
The British could theoretically sit back and run out the clock, either taking the win they already have or letting the Germans try to assault them again (and we saw how well that worked out).
But that would be a boring game, so Wheeler gets the order to mount a reinforced right hook around the south, pressing Ritter’s position. Captain Lea takes command of the southern building, sending McCabe and half of his platoon after Wheeler to reinforce. The rest of McCabe’s platoon is kept behind so Lea has some weight with which to hold that southern building, just in case.
TURN 04
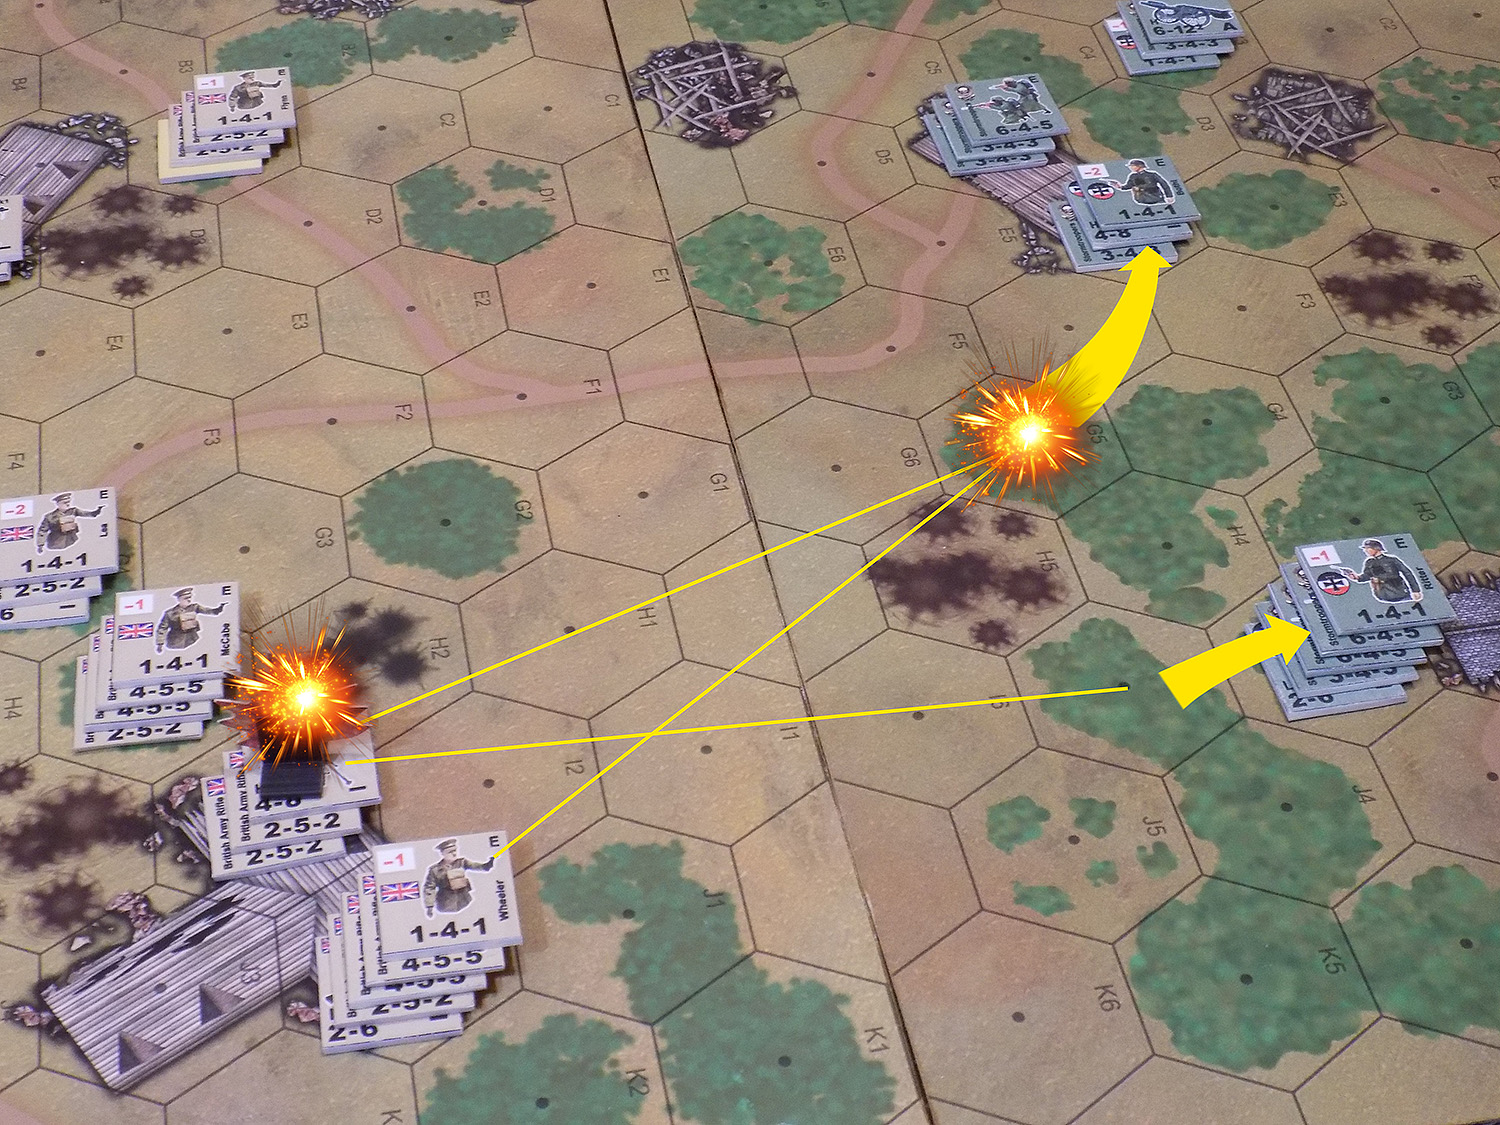
Ritter’s platoon falls back the rest of the way to the small stone house, deep in the woods. The German 7.58mm mortar team repositions to where Bothi can call in fire missions … remember the “no-radio” rules for indirect fire here – the mortar team can use indirect fire, but only if it has LOS with the spotter unit. Basically this reflects the spotter units yelling back to to the mortar crew for adjustments, or perhaps using hand signals.
Upon entering the woods in front of the Ritter’s house, Wheeler calls is a smoke barrage from Goddard’s mortar team, impacting between Wheeler and Ritter’s house. Once the smoke mission lands, Wheeler then edges his platoon around the woods and into some craters facing Ritter’s house. McCabe’s squad and a half are right behind. The Germans try opportunity fire (heavy penalties due to crater cover, smoke, and light woods) but roll boxcars on 2d6 – the worst roll imaginable!
This “summons” a British sniper, I have to use an American sniper counter as a proxy as I don’t even have British snipers made up!
The sniper takes its shot at Ritters platoon, but rolls only a 3 (-3 for the building’s cover bonus = 0, so no effect).
TURN 05
Germans manage to pin some of Wheeler’s men, and Neuman’s mortar team manages to pin two fire teams under Lea in the south building. Captain Lea is quick to rally them, however, thanks in part to his -2 difficulty Leadership rating.
The British, meanwhile, hope to pin some of Ritter’s platoon on Turn 05 with mass rifle fire from Wheeler and McCabe’s platoons, then assault on Turn 06. These fire phases fail however, and no damage is done.
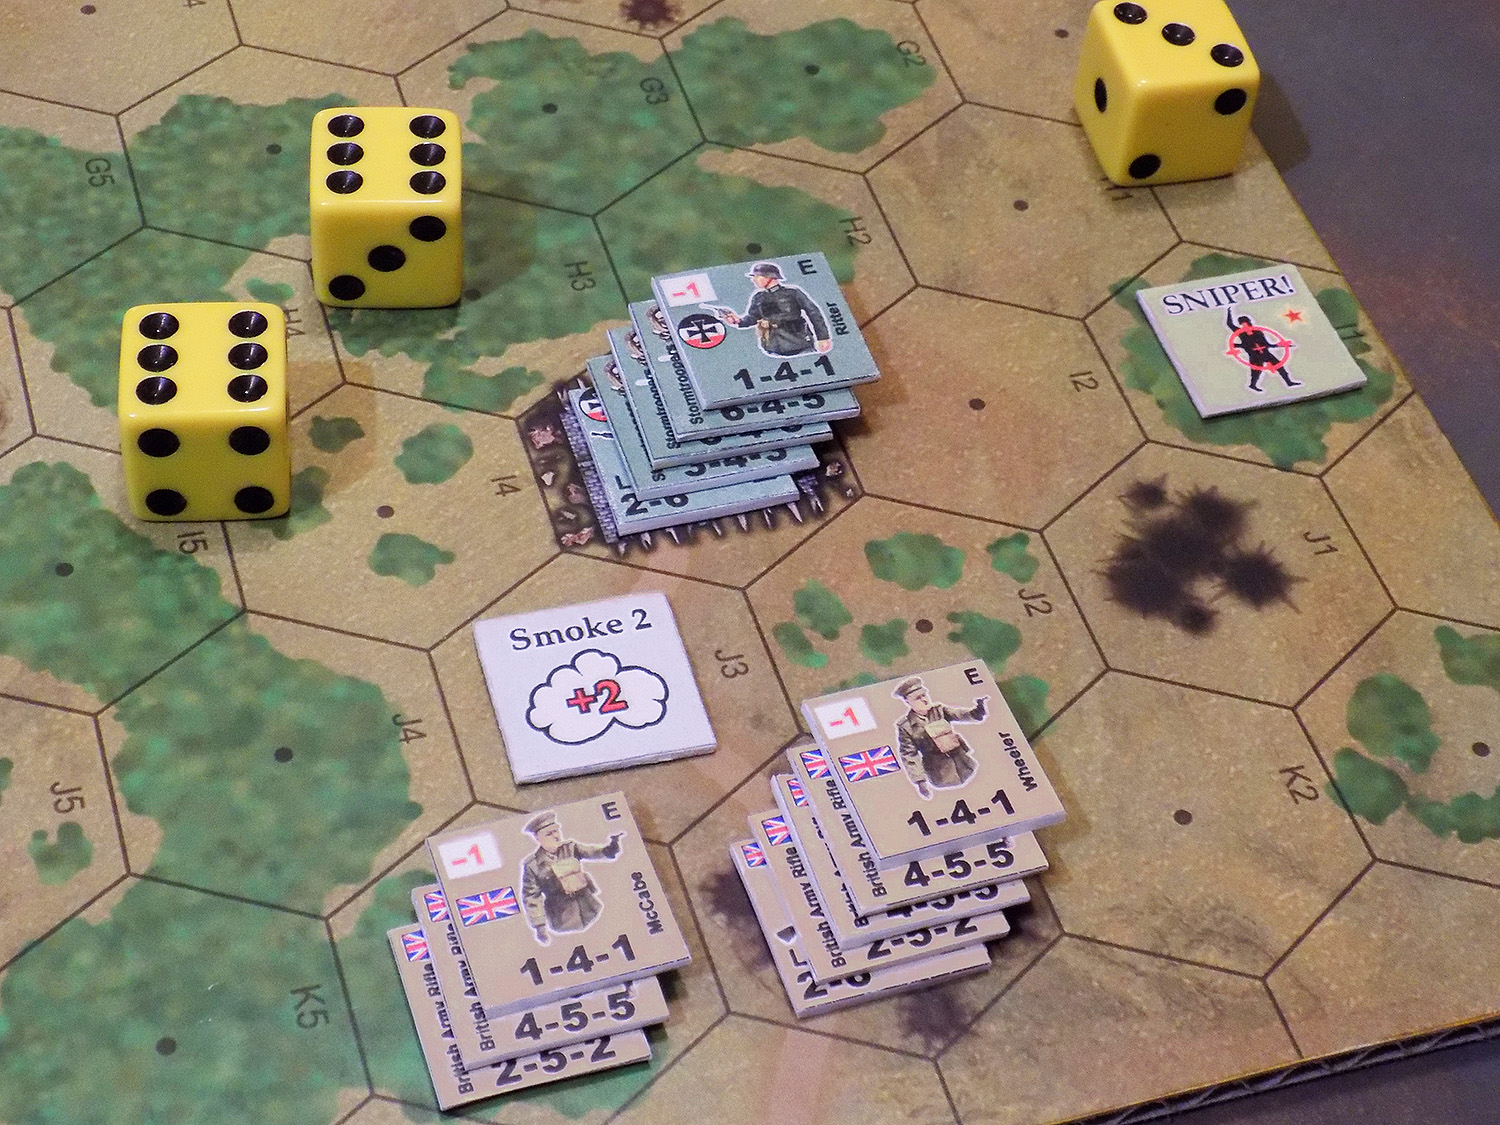
On the last turn, the German fire does basically nothing. The British assault is actually quite foolhardy, but the British have already won and I’m just trying to test these new units, counters, and WW1 rules. Let’s say that Lieutenant Wheeler and Captain Lea don’t want to order this assault, but have been overruled by a brutal and incompetent regimental commander (Colonel Johnson, Lord of Oriskany). 😀
Reinforced by McCabe’s squads, Wheeler “blows the whistle” and the assault goes in again Ritter’s platoon, but he basically has no chance. Ritter has more firepower, more grenades, and a fortified position. To minimize his casualties, Wheeler makes the most of “pinning” rules rather than eliminating his men. To their credit, Ritter’s platoon is also weakened.
Technically the remains of McCabe’s platoon could follow up with a second assault, but unless they rolled snake eyes it would be practical suicide.
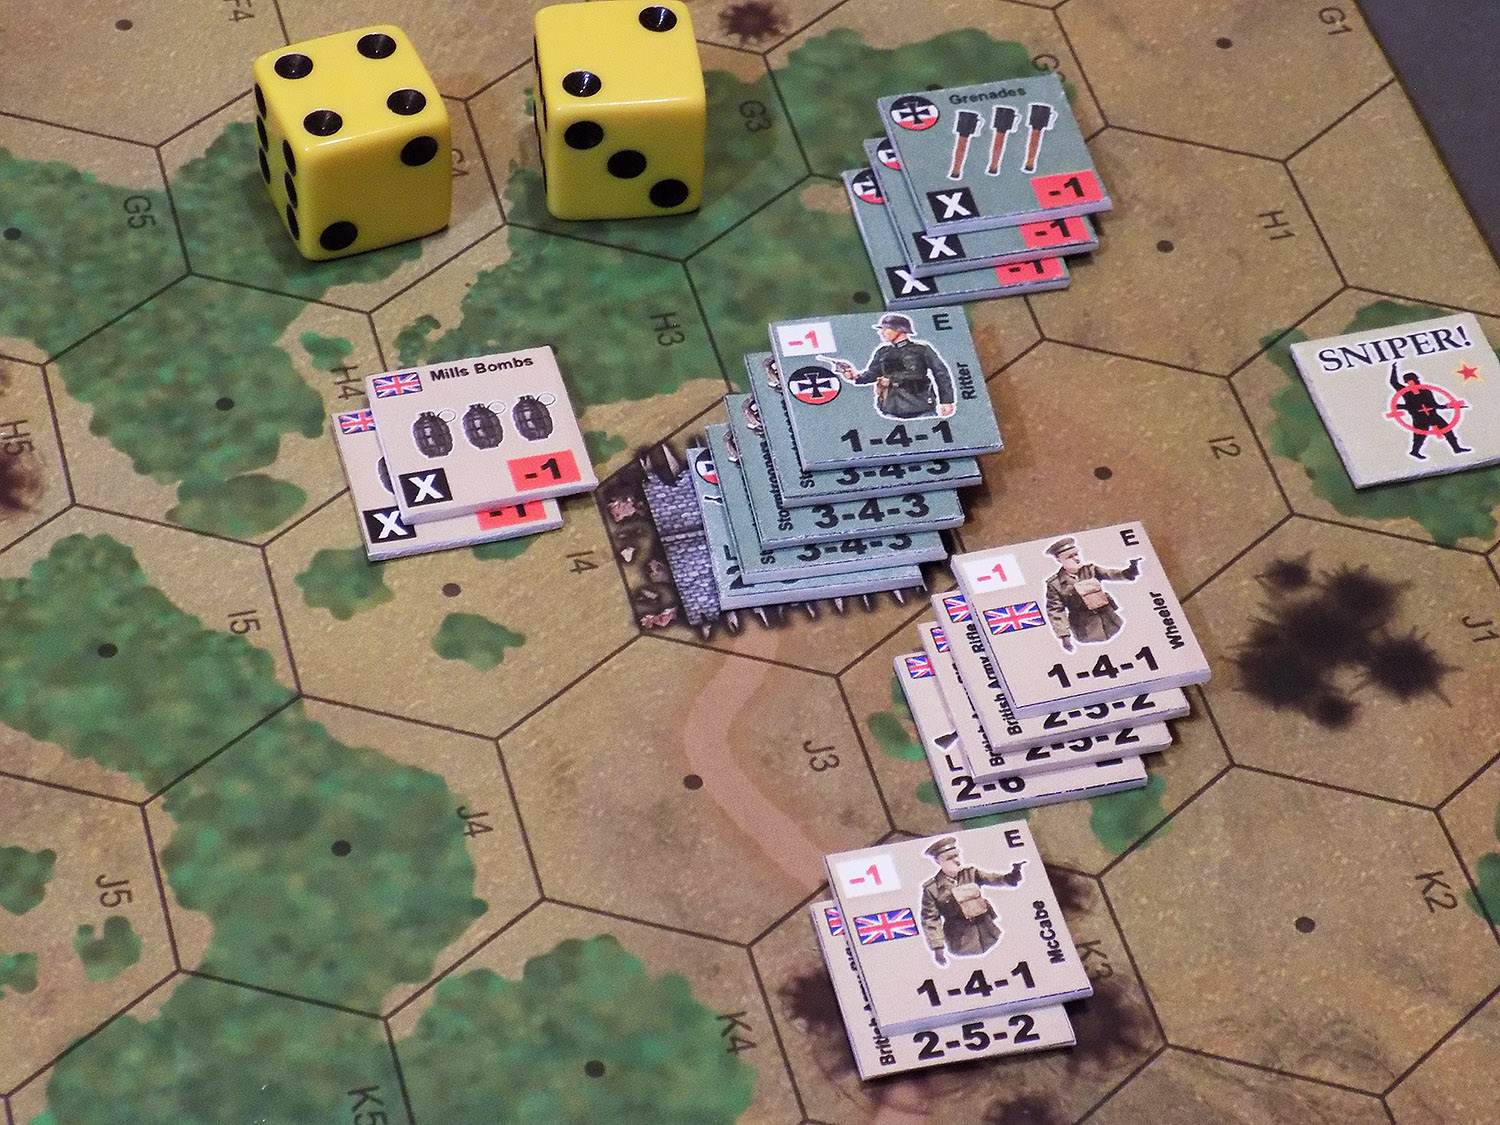
In any event, the British wave won the day.
The final score:
German 26 (four building hexes = 16, ten half squads remaining = 10)
British 31 (five building hexes = 20, eleven half squads remaining = 11)
This scenario is a little wonky (again, slapped together for playtesting) but not beyond repair. I might try reducing the award for building hexes to 3 points per hex, and change the points awarded for enemy units killed rather than friendly units surviving. This would give both sides more options for victory rather than assaulting these buildings.
Or, a special rule that says “all these buildings are heavily shelled ruins, only give a +2 cover bonus rather than usual +3.” That would reduce a little of the suicidal nature of these assaults.
As always, a work in progress. Thoughts?
Next I might try my French units. And then who knows? Some tanks and infantry?
Battle Report - British vs. Germans
Meeting Engagement in No Man's Land
Elite British Rifles vs. German Stormtroopers
Amiens Sector, June 1918
Okay, now that I have my British and French armies built for Valor & Victory 1918 Edition, it’s time to give them a try against Imperial German Army and German storm troopers.
Situation – Somewhere near Villers-Brettoneaux, Amiens Sector, northern France – June, 1918
During the course of the German “St. Michael Offensive” (launched on 21 March, 1918), the British Fifth Army and much of the Third Army has been largely destroyed. The remnants were pushed back toward Amiens until a heroic stand finally stabilized the line near Villers-Brettoneaux. Savage fighting bought the British time to reinforce this sector – and further battles fought through the end of April and into early May saw the line finally stabilize. Now, as the heaviest offensives shift to other sectors of the front (the Georgette Offensive to the north in Flanders and the Blücher Offensive to the south at Chemin des Dames in the south), the Amiens front settles into a deathly, exhausted calm.
Still, the British and Germans divisions facing each other here jockey for position, probing each others’ positions for weaknesses. Between the trenches in one section of no-man’s land, a small French village and a thicket of shell-shattered woods offers an apparently advantageous position for observation or even a springboard for further trench assaults.
A veteran company of British rifles (Princess Charlotte of Wales’ Royal Berkshire Regiment – 53rd Brigade, 18th Division – III Corps – Fourth Army) is sent as a “reconnaissance in force” to this position, with orders to scout its feasibility as an advanced regiment position. If feasible, they are to take this position and fortify it against enemy counterattack, so they bring a weapons section of Vickers machine gus and Stokes mortars.
The trouble is, a kompanie of German “stosstruppen” has the same orders … and although slightly outnumbered, the Germans have reached the village first.
BRITISH FORCES: Company Commander Captain Lea (-2 rating, Elite). Three platoons of veteran “elite” rifles (4-5-4 *E). Each platoon as a -1 leader (Lieutenants Wheeler, McCabe, and Flynn), two and a half squads, and a further half-squad carrying a Lewis Gun. The company also has a weapons section under Lt. Goddard, with two Vickers HMG teams and a 3” Stokes mortar team.
5 officers, 84 men.
GERMAN FORCES: Kompaniechef Hauptmann Bothi (-2 rating, Elite). Three platoons of elite “stosstruppen” (6-4-5 *E). Each platoon has a -1 leader (Leutnants Steiner, Ritter, Werner), two squads, and a half-squad carrying an MG 08 15 LMG. The company also has a weapons section under Leutnant Neuman, with two MG 08 HMGs and a 7.58cm “Minenwerfer” mortar team
5 officers, 72 men.
VICTORY CONDITIONS – 4 points for every building hex occupied. 2 points for every fill squad left. 1 point for every half squad left.
Turn 01 –
The Germans enter the board and occupy four building hexes. Some of these can only be reached thorough “assault movement” step at the end of the turn.
The British come on second and occupy five building hexes. Already they are winning the game, the Germans will be forced to come to them. Germans get first crack at the British, though, though opportunity fire. But the British have approached from behind buildings, moving up through the buildings, so by the time the Germans see them, the British are getting benefit of buildings’ cover.
Those few platoons that are not, like Lt. McCabe ‘s platoon in the south, are carefully placed so the majority of the German stormtrooper squads cannot reach him.
Note the German squads get the higher antipersonnel firepower (APFP) of “6”, but the shorter range of “4”. This is because as stormtroopers, they are heavily armed with MP 18 SMGs and extra pistols, shorter versions of the Gewehr 98 “Karbiner” and such, i.e., heaver firepower at a shorter range. Meanwhile, the British are carrying the reliable Lee Enfield (APFP of 4, but range of 5).
As long as we’re discussing unit factors here, the British and Germans both have “veteran” forces here, so get the tougher “5” for casualty rating (last of the three large numbers).
German opportunity fire is a complete whiff here, with 2d6 rolls of 9, 11, and 11 (low numbers are better in this game) – so the British occupy these commanding positions with no problems whatsoever and no losses at all.
TURN 02
The Germans are in a bad position here, I realize I may have designed a poor scenario. With a smaller number of units on the table and with the British pretty much automatically going to get five initial building hexes thanks to the board layout, the “burden of the offensive” is on the Germans, they HAVE to assault. The British can afford to just sit back and defend, if they maintain the status quo, they win (more squads and half squads, more building hexes).
Still, these are stosstruppen, infantry units designed to assault. So let’s give it a go.
In the north, the order is given to Leutnant Werner. Leutnant Neuman’s mortar drops a smoke screen. Hauptmann Bothi coordinates MG fire from two MG 08 positions on Captain Lea’s position, but this has no effect. Leutnant Werner launches his assault, using the cover of woods and smoke screen to cover his assault. Lieutenant Flynn’s platoon must have been surprised by the audacity of this charge, because with an “11” his opportunity fire does nothing despite a -2 point blank modifier. The small Lewis Gun team to the northwest also has no effect. Lieutenant Goddard’s Vickers team has a little more luck, inflicting one casualty point along with the positions of Captain Lea (under the “Fire Lane” marker) and Lieutenant McCabe. So three casualty points overall are inflicted, which the Germans decide to “pay for” by knocking out a half-squad in their platoon.
The assault goes in. The Germans, sadly for them, roll a 9, and the assault is a bloody disaster for them. Lieutenant Flynn’s platoon repels the assault, inflicting the grisly total of nine casualty points (4 British units in the hex + 3 for the building + missed the required roll by 2 = 9). Eight points are removed (a full 5-point squad and another 3 point half squad), with the past half squad being pinned and then rallied by Leutnant Werner.
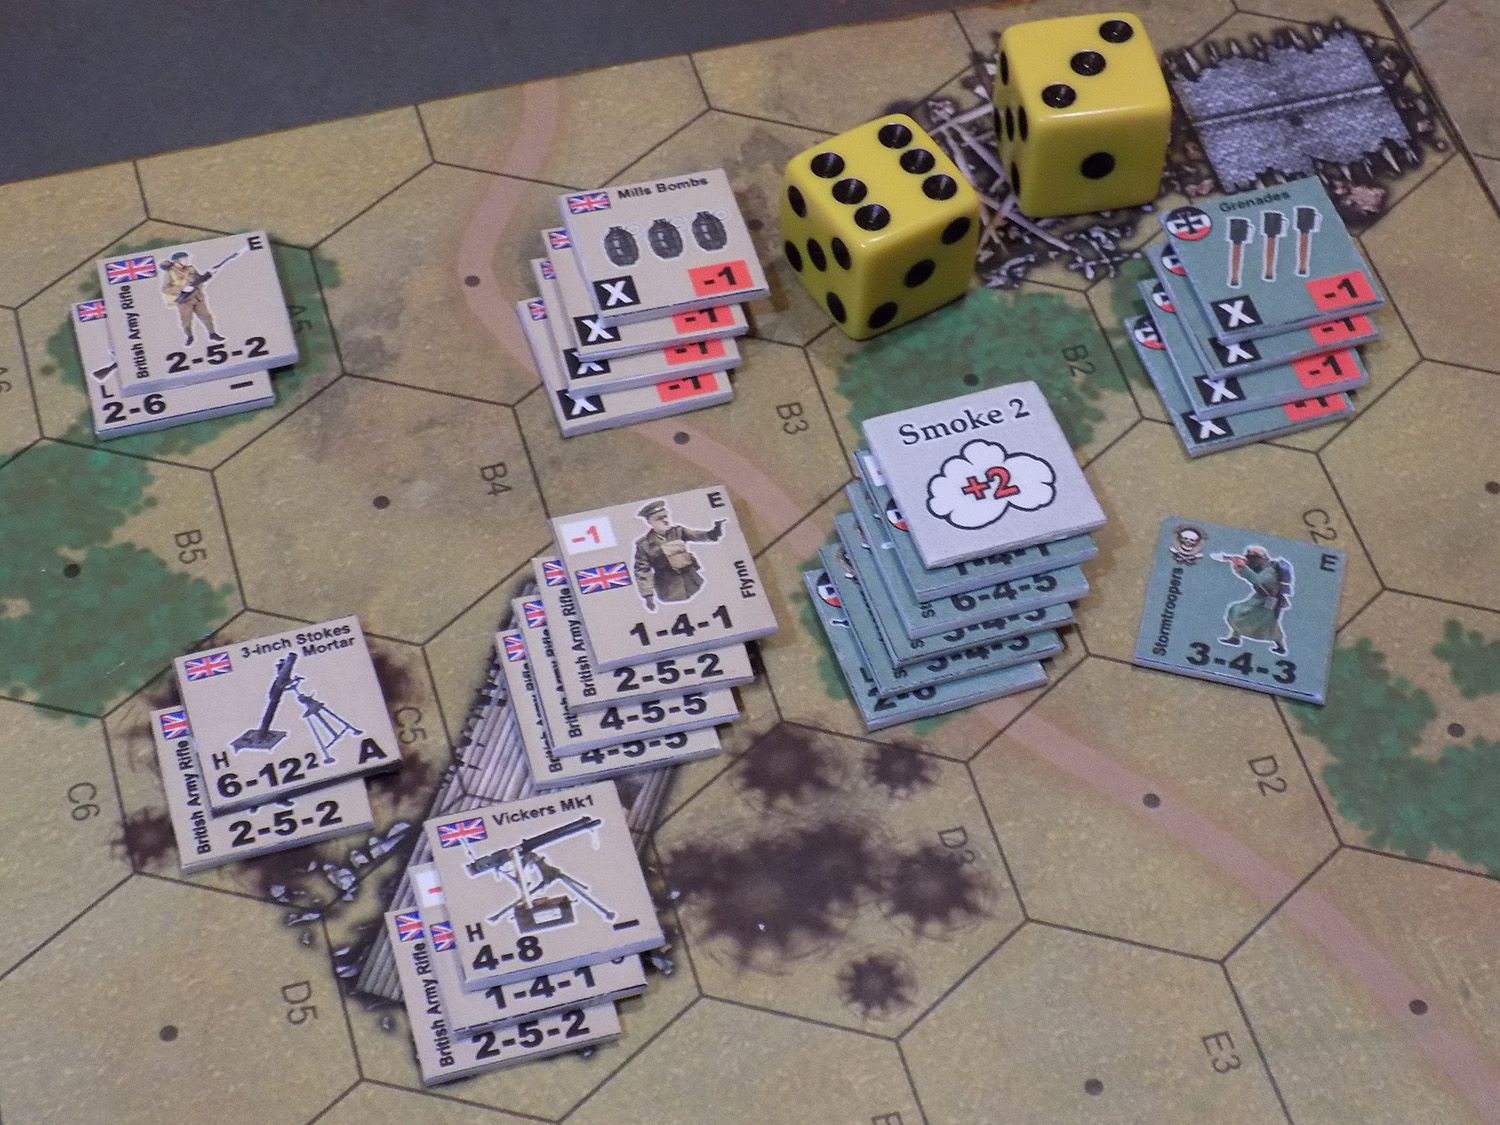
Lt. Flynn, for his part, is trying to keep losses down among his men. He’s required to pay four casualty points for repelling the failed assault (4 German units in that platoon). He knocks one his 5-point squads down to a 2-point half squad (thus paying 3), then has to pin one half-squad to pay the last point. He fails to rally this, however.
More to come tomorrow! 😀
Creating French Units - Valor & Victory 1918 Edition (P1)
One long night after work, and a new French Army is designed and ready to print for Valor & Victory: Great War 1918 Edition.
Tomorrow I’ll go ahead and print these out and start cutting them. Maybe some wargaming on the horizon for these new British and French 1918 infantry units for the July 4 holiday. 😀
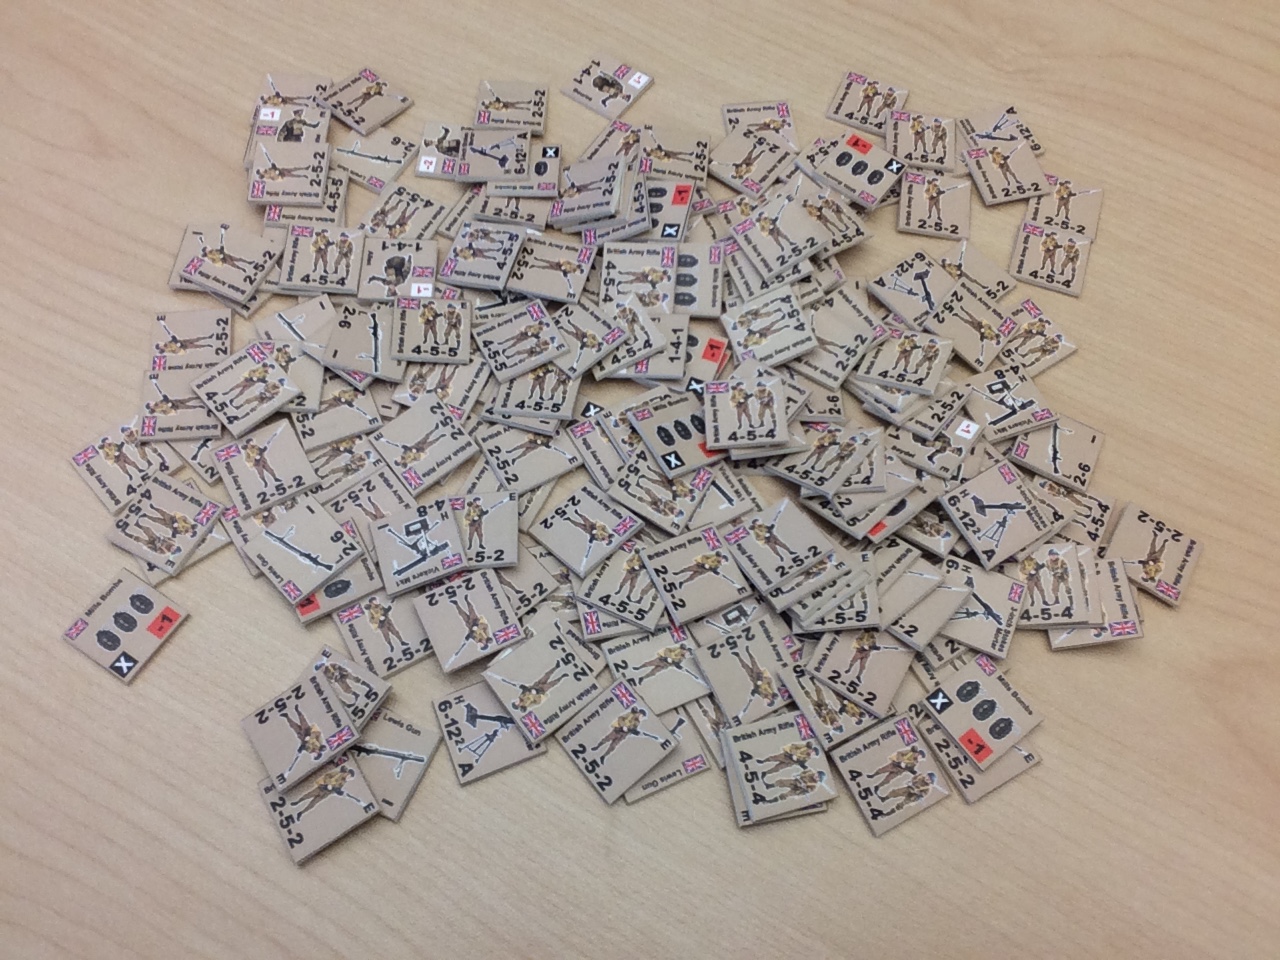
Creating British Units - Valor & Victory 1918 Edition (P4)
All counters are now printed, mounted on mat board, spray-painted light brown on the back for British army theme, then cut. 😀 Went ahead and cut a double-load of infantry squads (both regular and elite) so there’ll never be a shortage.
Maybe next will be French? Just to be a “completionist?” 😀