


![NO Weekender Or Cult Of Games XLBS This Weekend [Updated]](https://images.beastsofwar.com/2026/03/No_Weekender_and_XLBS_this_Weekend-225-127.jpg)


75th Anniversary of the Battle of Monte Cassino and Northern Italy (Gaming The Battles)


Recommendations: 781
About the Project
BEST READ IN REVERSE ORDER! The project charts and recreates the battles of Monte Cassino, fought between January 1944 to May 1944, and the onward Allied push through Northern Italy.
Related Game: Flames of War: The World War II Miniatures Game
Related Company: Battlefront Miniatures
Related Genre: Historical
This Project is Active
Operation Diadem (Battle 1 - Turns 5 and 6)
Turn 5 Allies:
With over half the battle over, the Allies are running out of time to reach the objective. They need to push on but still have some considerable amount of ground to cover.
The last remaining tank from Tank Platoon 1 fails its last man standing and is removed from play. Of the two bailed out tanks in Tank Platoon 3, one passes a bail in test and then passes its morale test to remain on the battlefield. The MG Team continues as well but Red Platoon fails to unpin.
The final tank from Tank Platoon 2 also passes its last man standing test to remain in play but the Allied army is looking shaken and the advance could falter at any time.
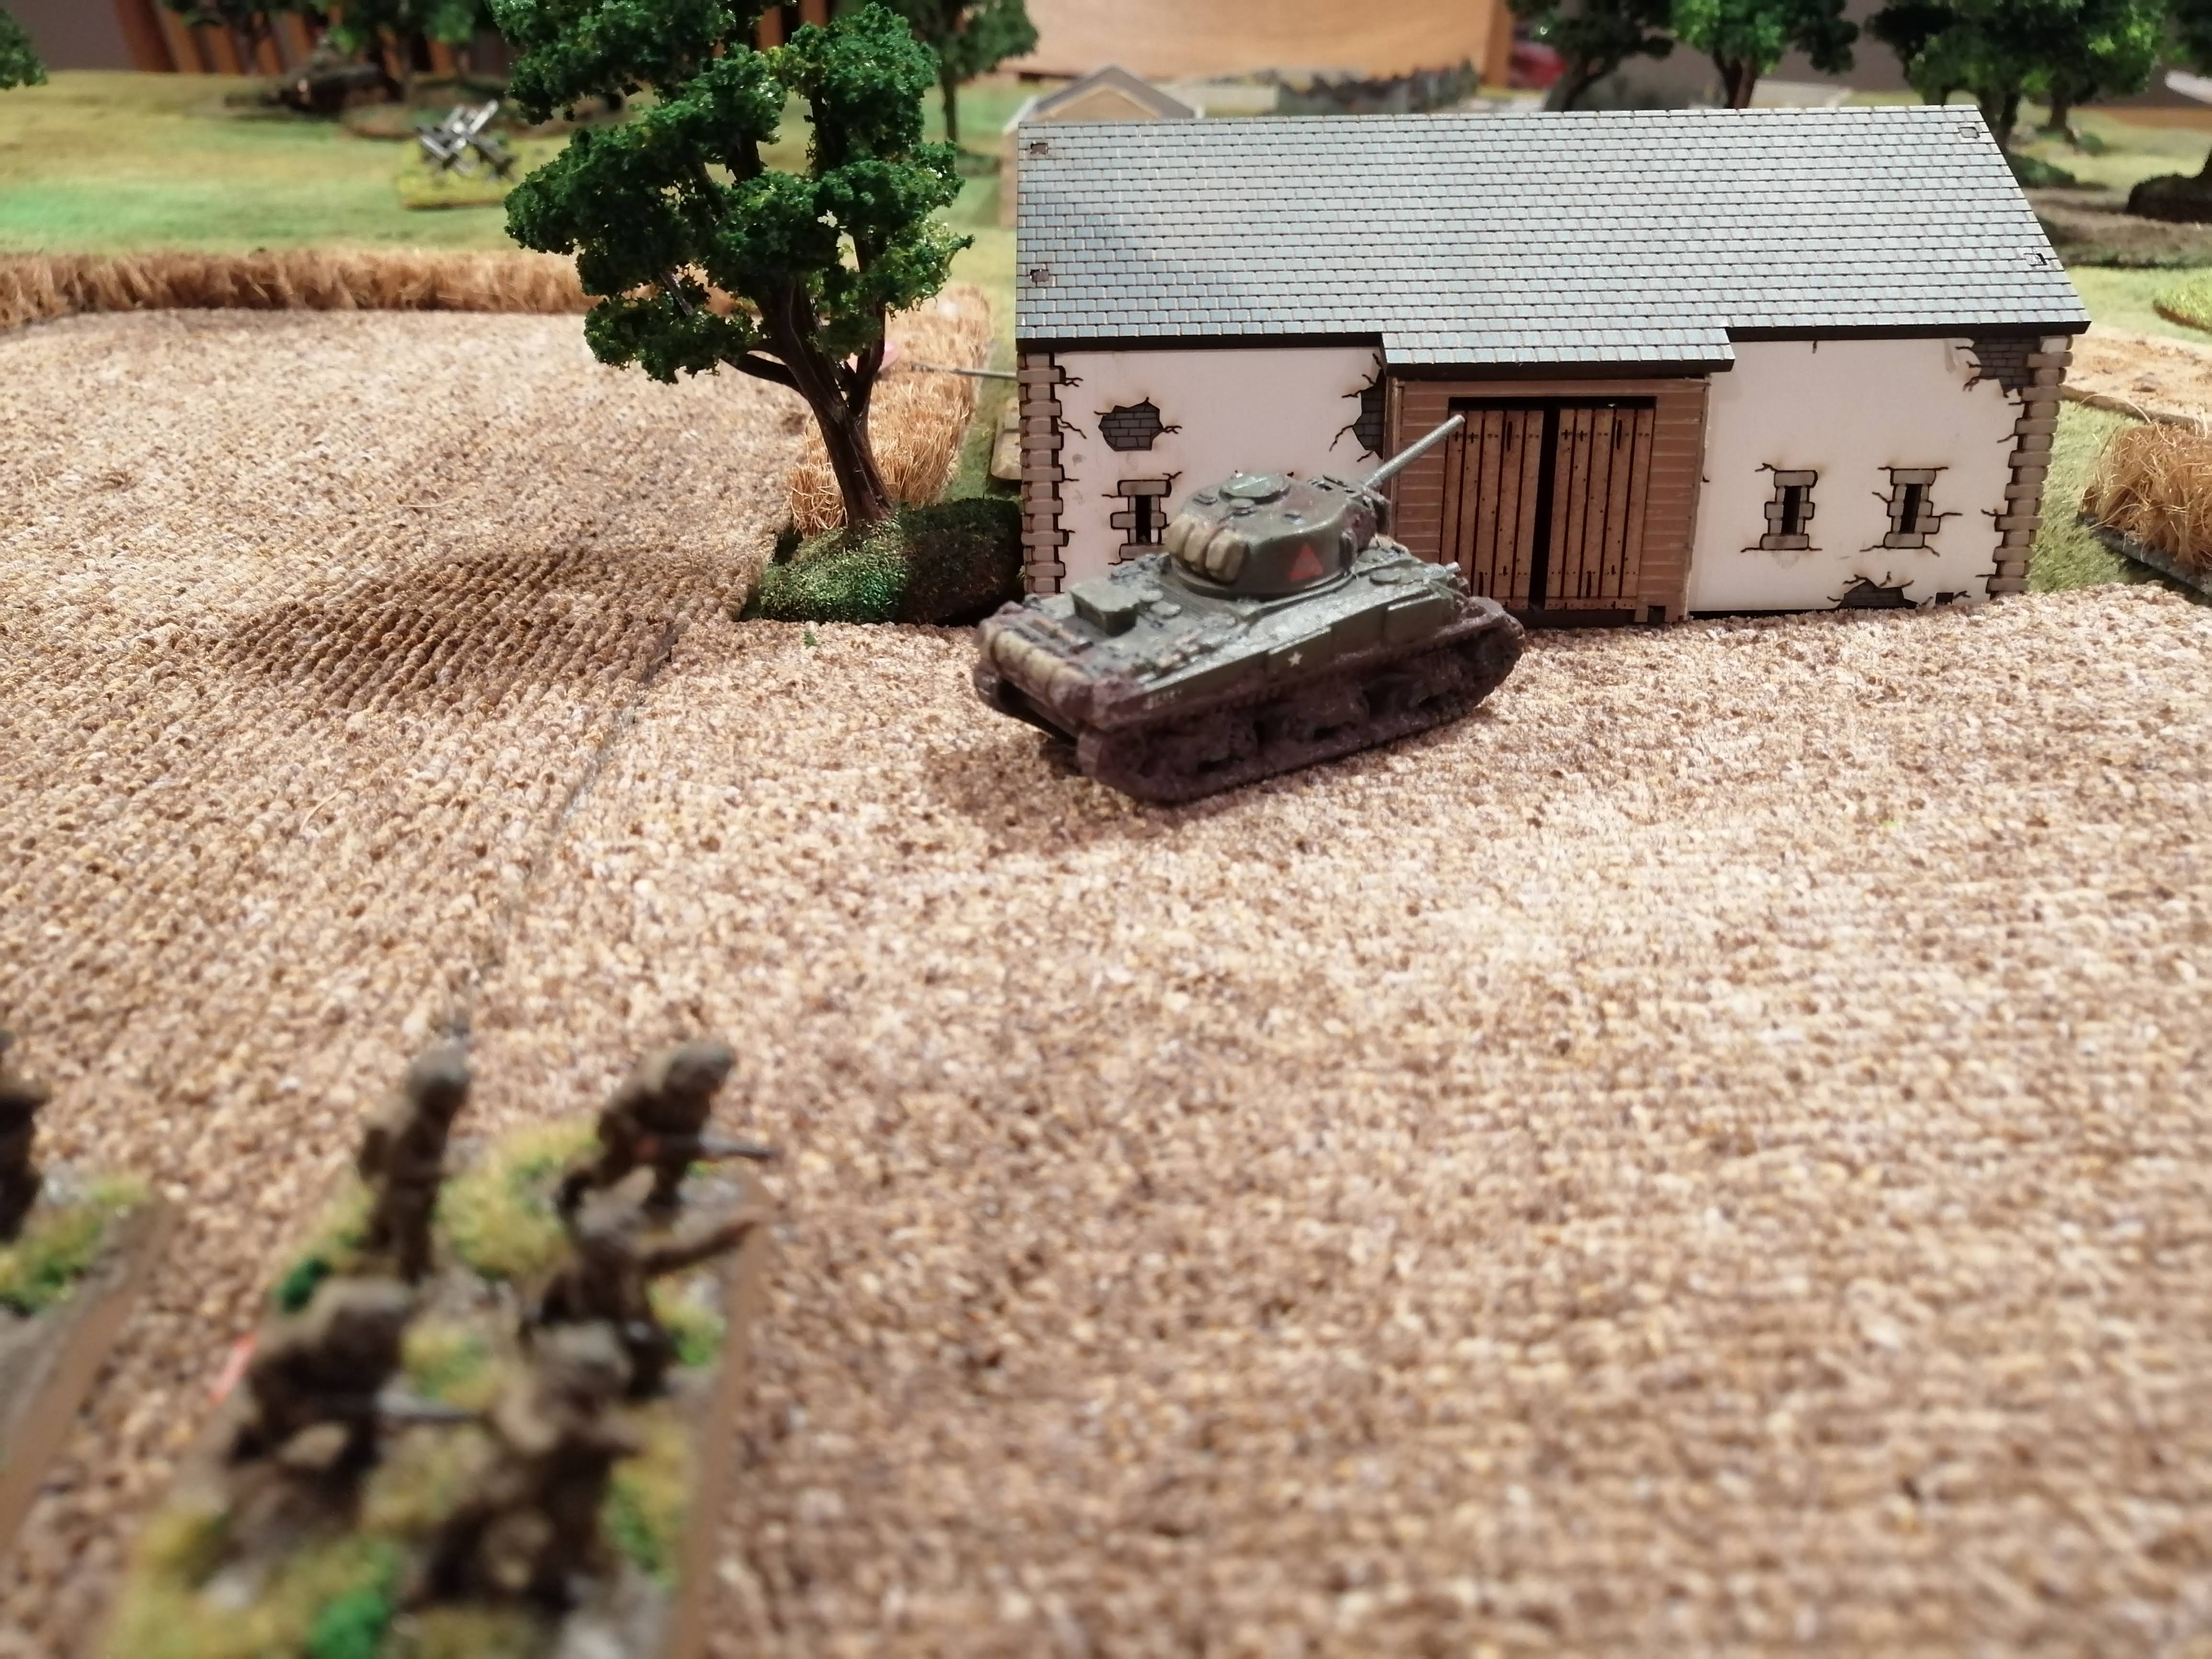
Orange Platoon and the Engineers advance into the field by the barn toward the 7.5cm gun team and the last of Tank Platoon 2 puts the barn between it and the PaK40.
The MG team along with Green Platoon begin to advance up the centre now that the threat from the MG Nest and the Fallschirmjager has been eliminated.
The single operational tank in Tank Platoon 3 drives into the woods and up behind Red Platoon whilst the Universal Carriers and the Sherman Crabs advance up to the barbed wire, uncovering another minefield token and finding this to be a dummy.
The Allied shooting is once again woeful, failing to cause any hits and indicative of the shaken state that most of the platoons find themselves in – can the Allies hold this advance together???
Turn 5 German:
The advance of Orange Platoon has allowed the German player to reveal two more units, drawing the second Grenadier Platoon (GP2) on the hill behind the road and the Marder II in the woods.
The mortars are this time able to range in on Red Platoon currently sheltering in the woods but are unable to cause any wounds. The PaK40 takes out another Sherman tank, this time the lead Sherman Crab while the 7.5cm Recoilless gun teams destroy the last remaining tank of Tank Platoon 2. The MG teams fail to score any hits and neither do the STuG or the Marder.
All in all, the 1st Canadian are looking pretty shot up with just the mine clearing tank platoon of a Sherman and a Sherman Crab and tank platoon 3 still operational!
 The newly discovered MG Teams take aim at Red Platoon in the woods.
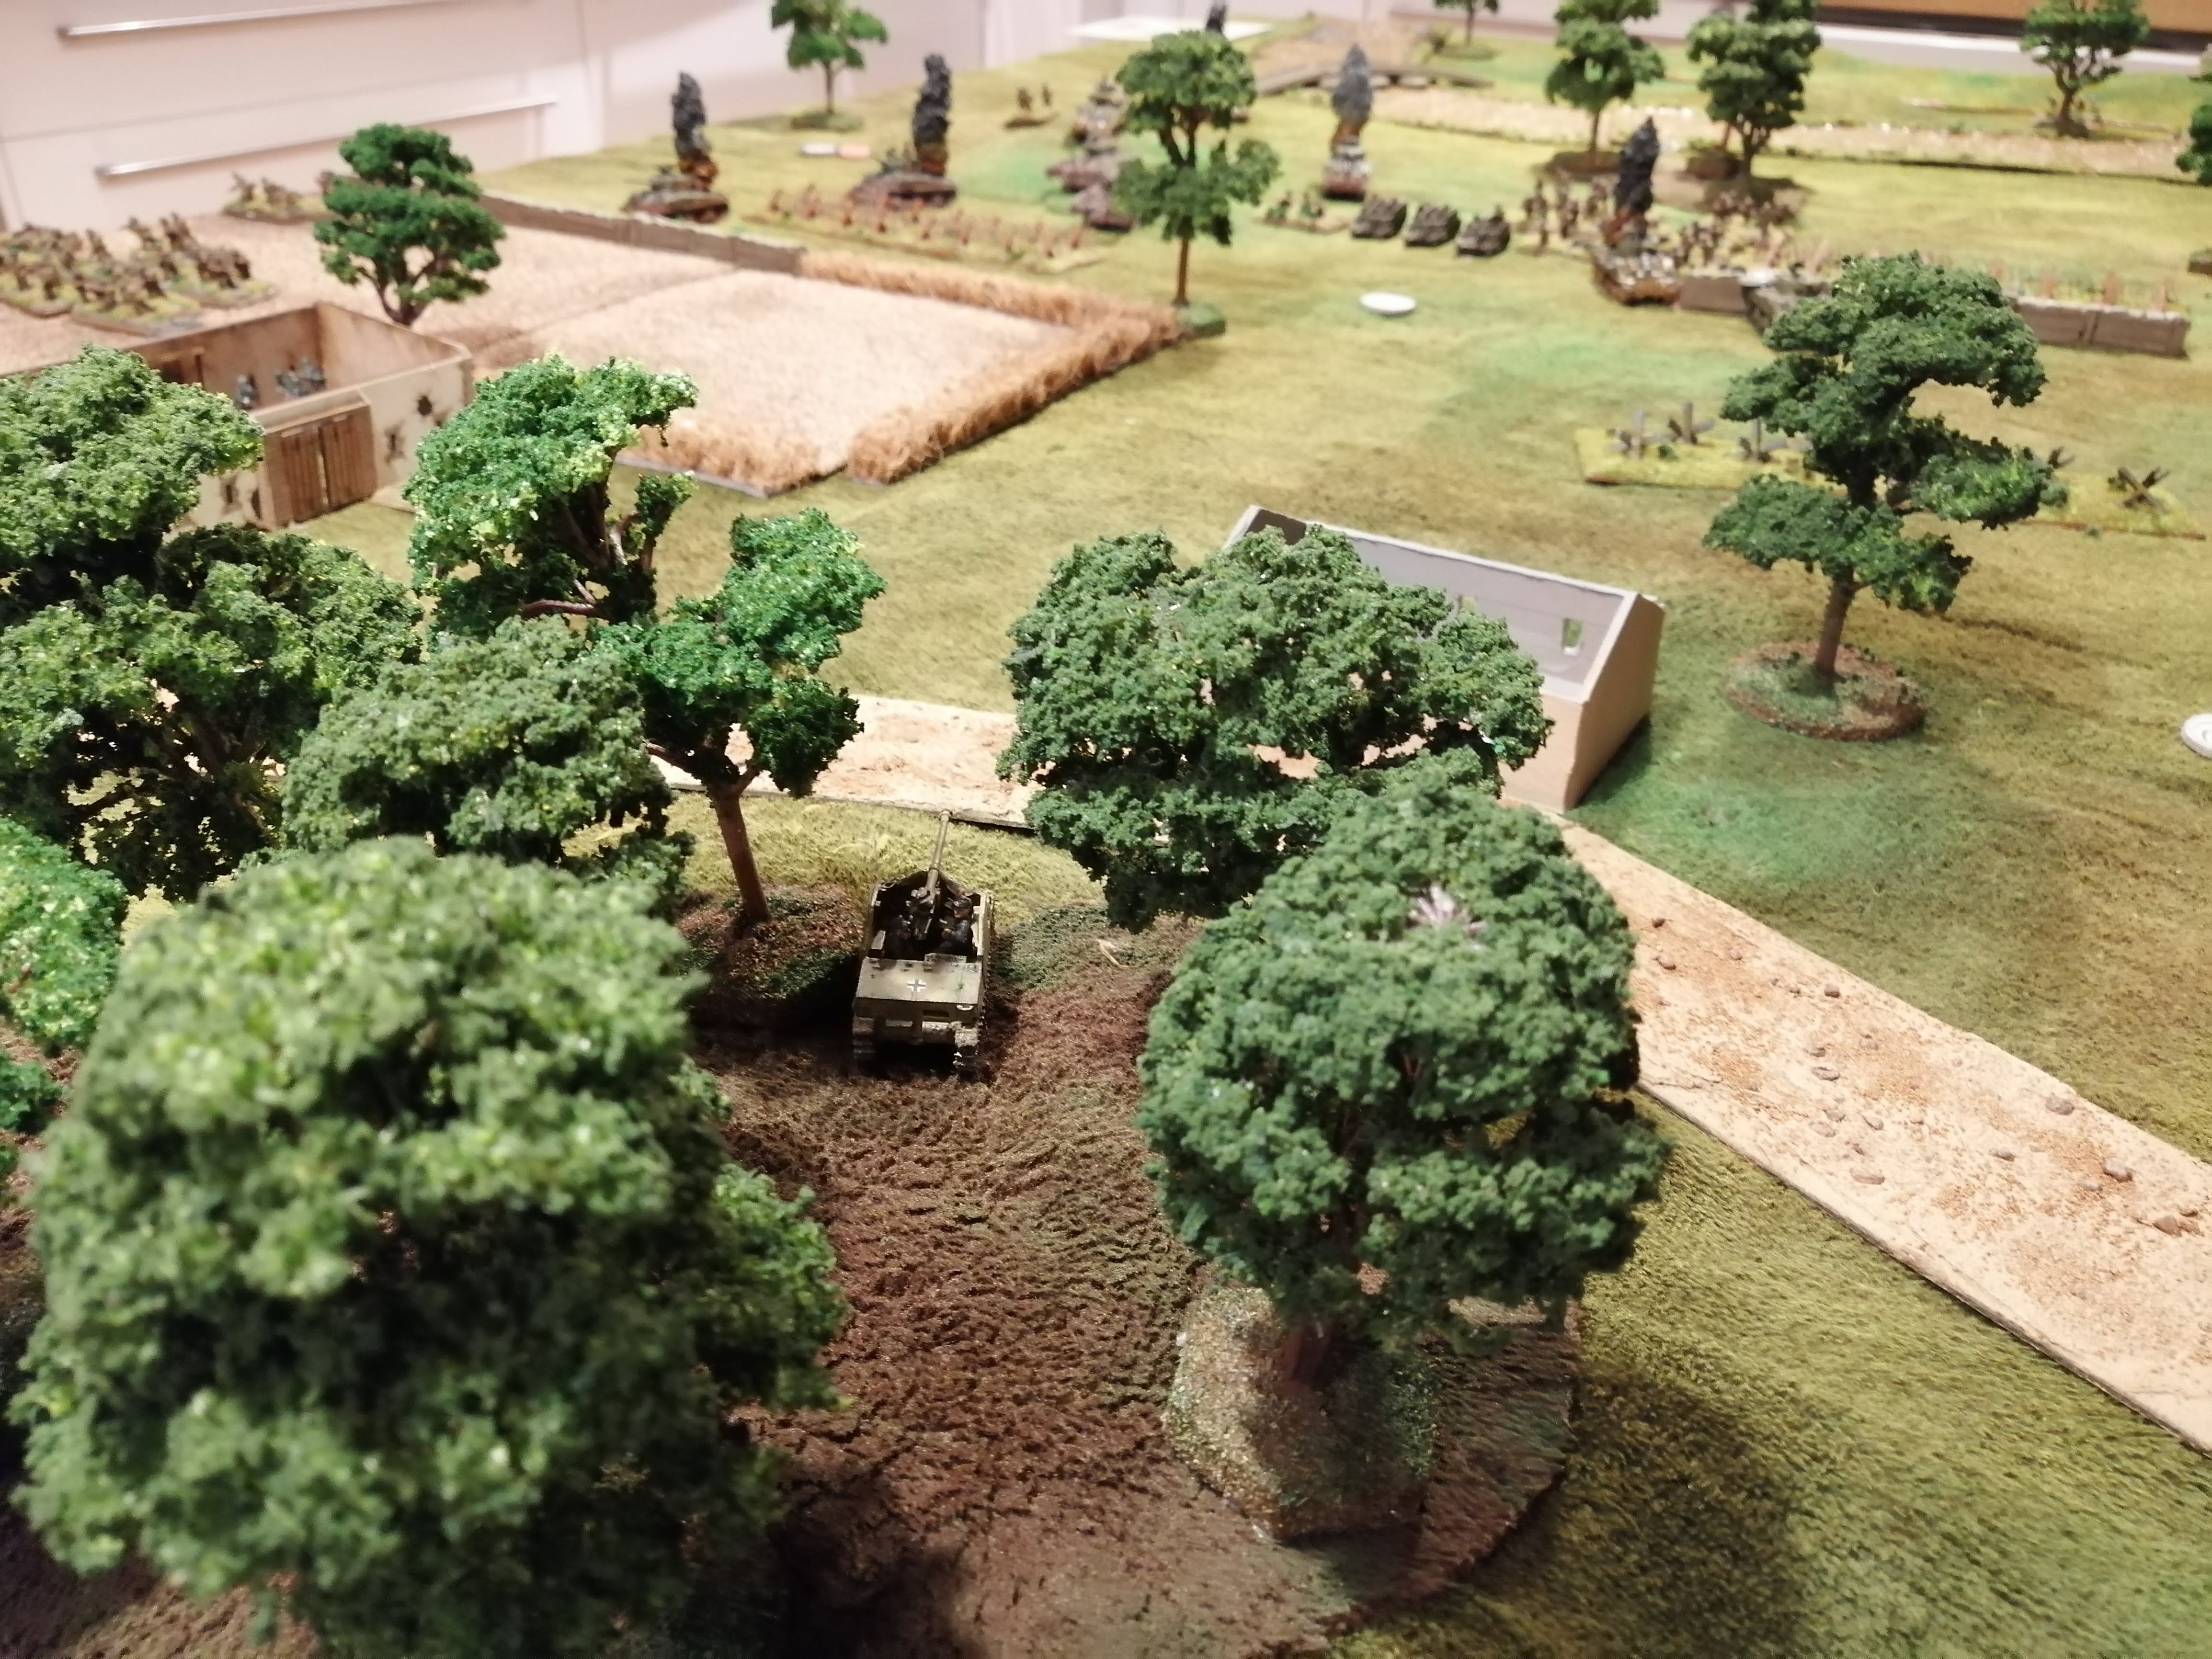 The Marder hiding in the tree line
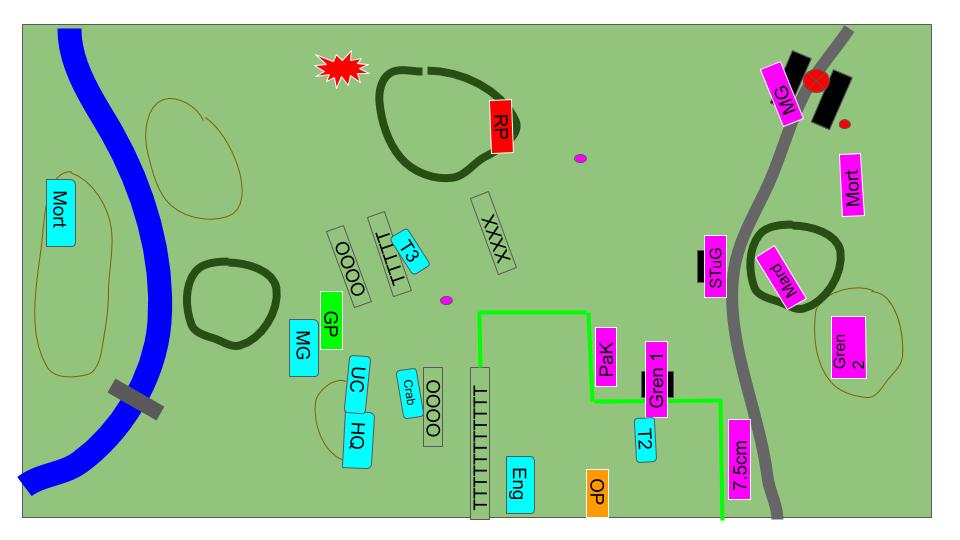
Turn 6 Allies:
The bailed out tank from tank platoon 3 bails in and drive up to join the other tank from its platoon in the woods. Red Platoon however fails to unpin.
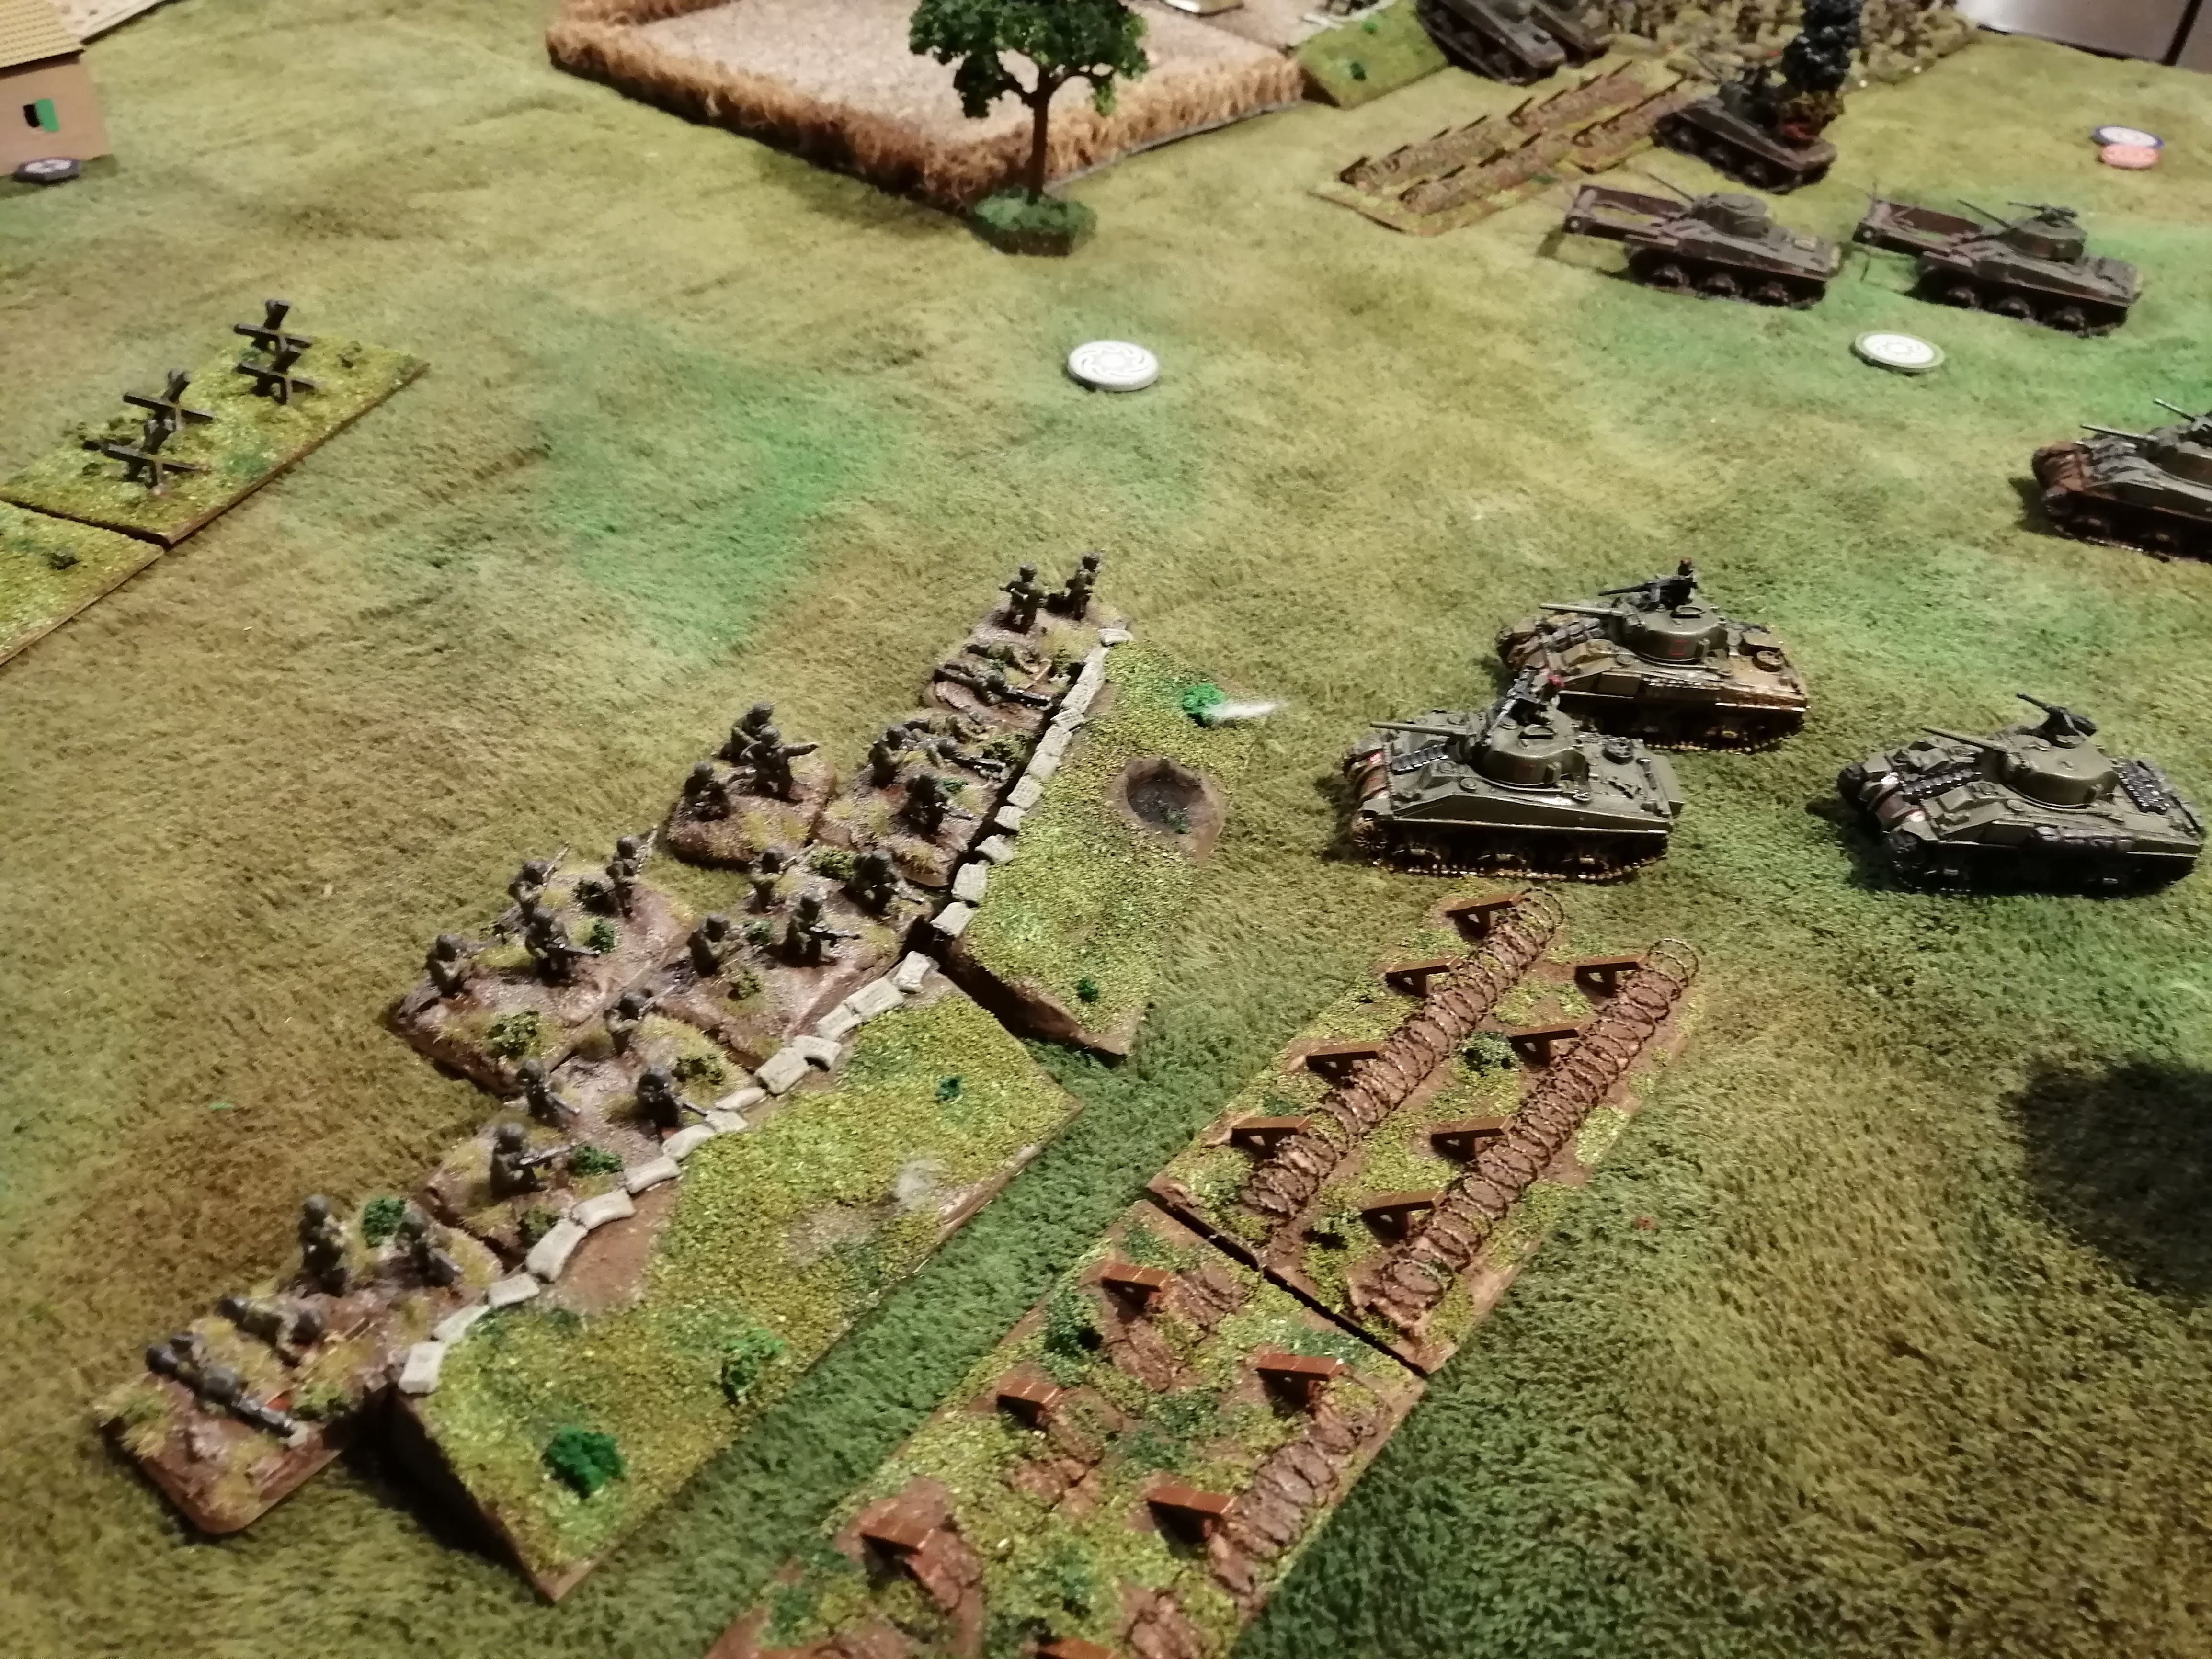
The Sherman Crabs advance to the trenches and the MG team and the Universal Carriers get to the hedges. Green Platoon advances up the middle and Orange Platoon with the Engineers move into assault range of the 7.5cm guns.
The mortar team is just able to to range in and hit the PaK40 gun team, this time destroying it. The shot also hits the Grenadiers in the barn, pinning them in place. Tank Platoon 3 fires upon the STuG and is able to destroy it, opening up the centre of the board a little.
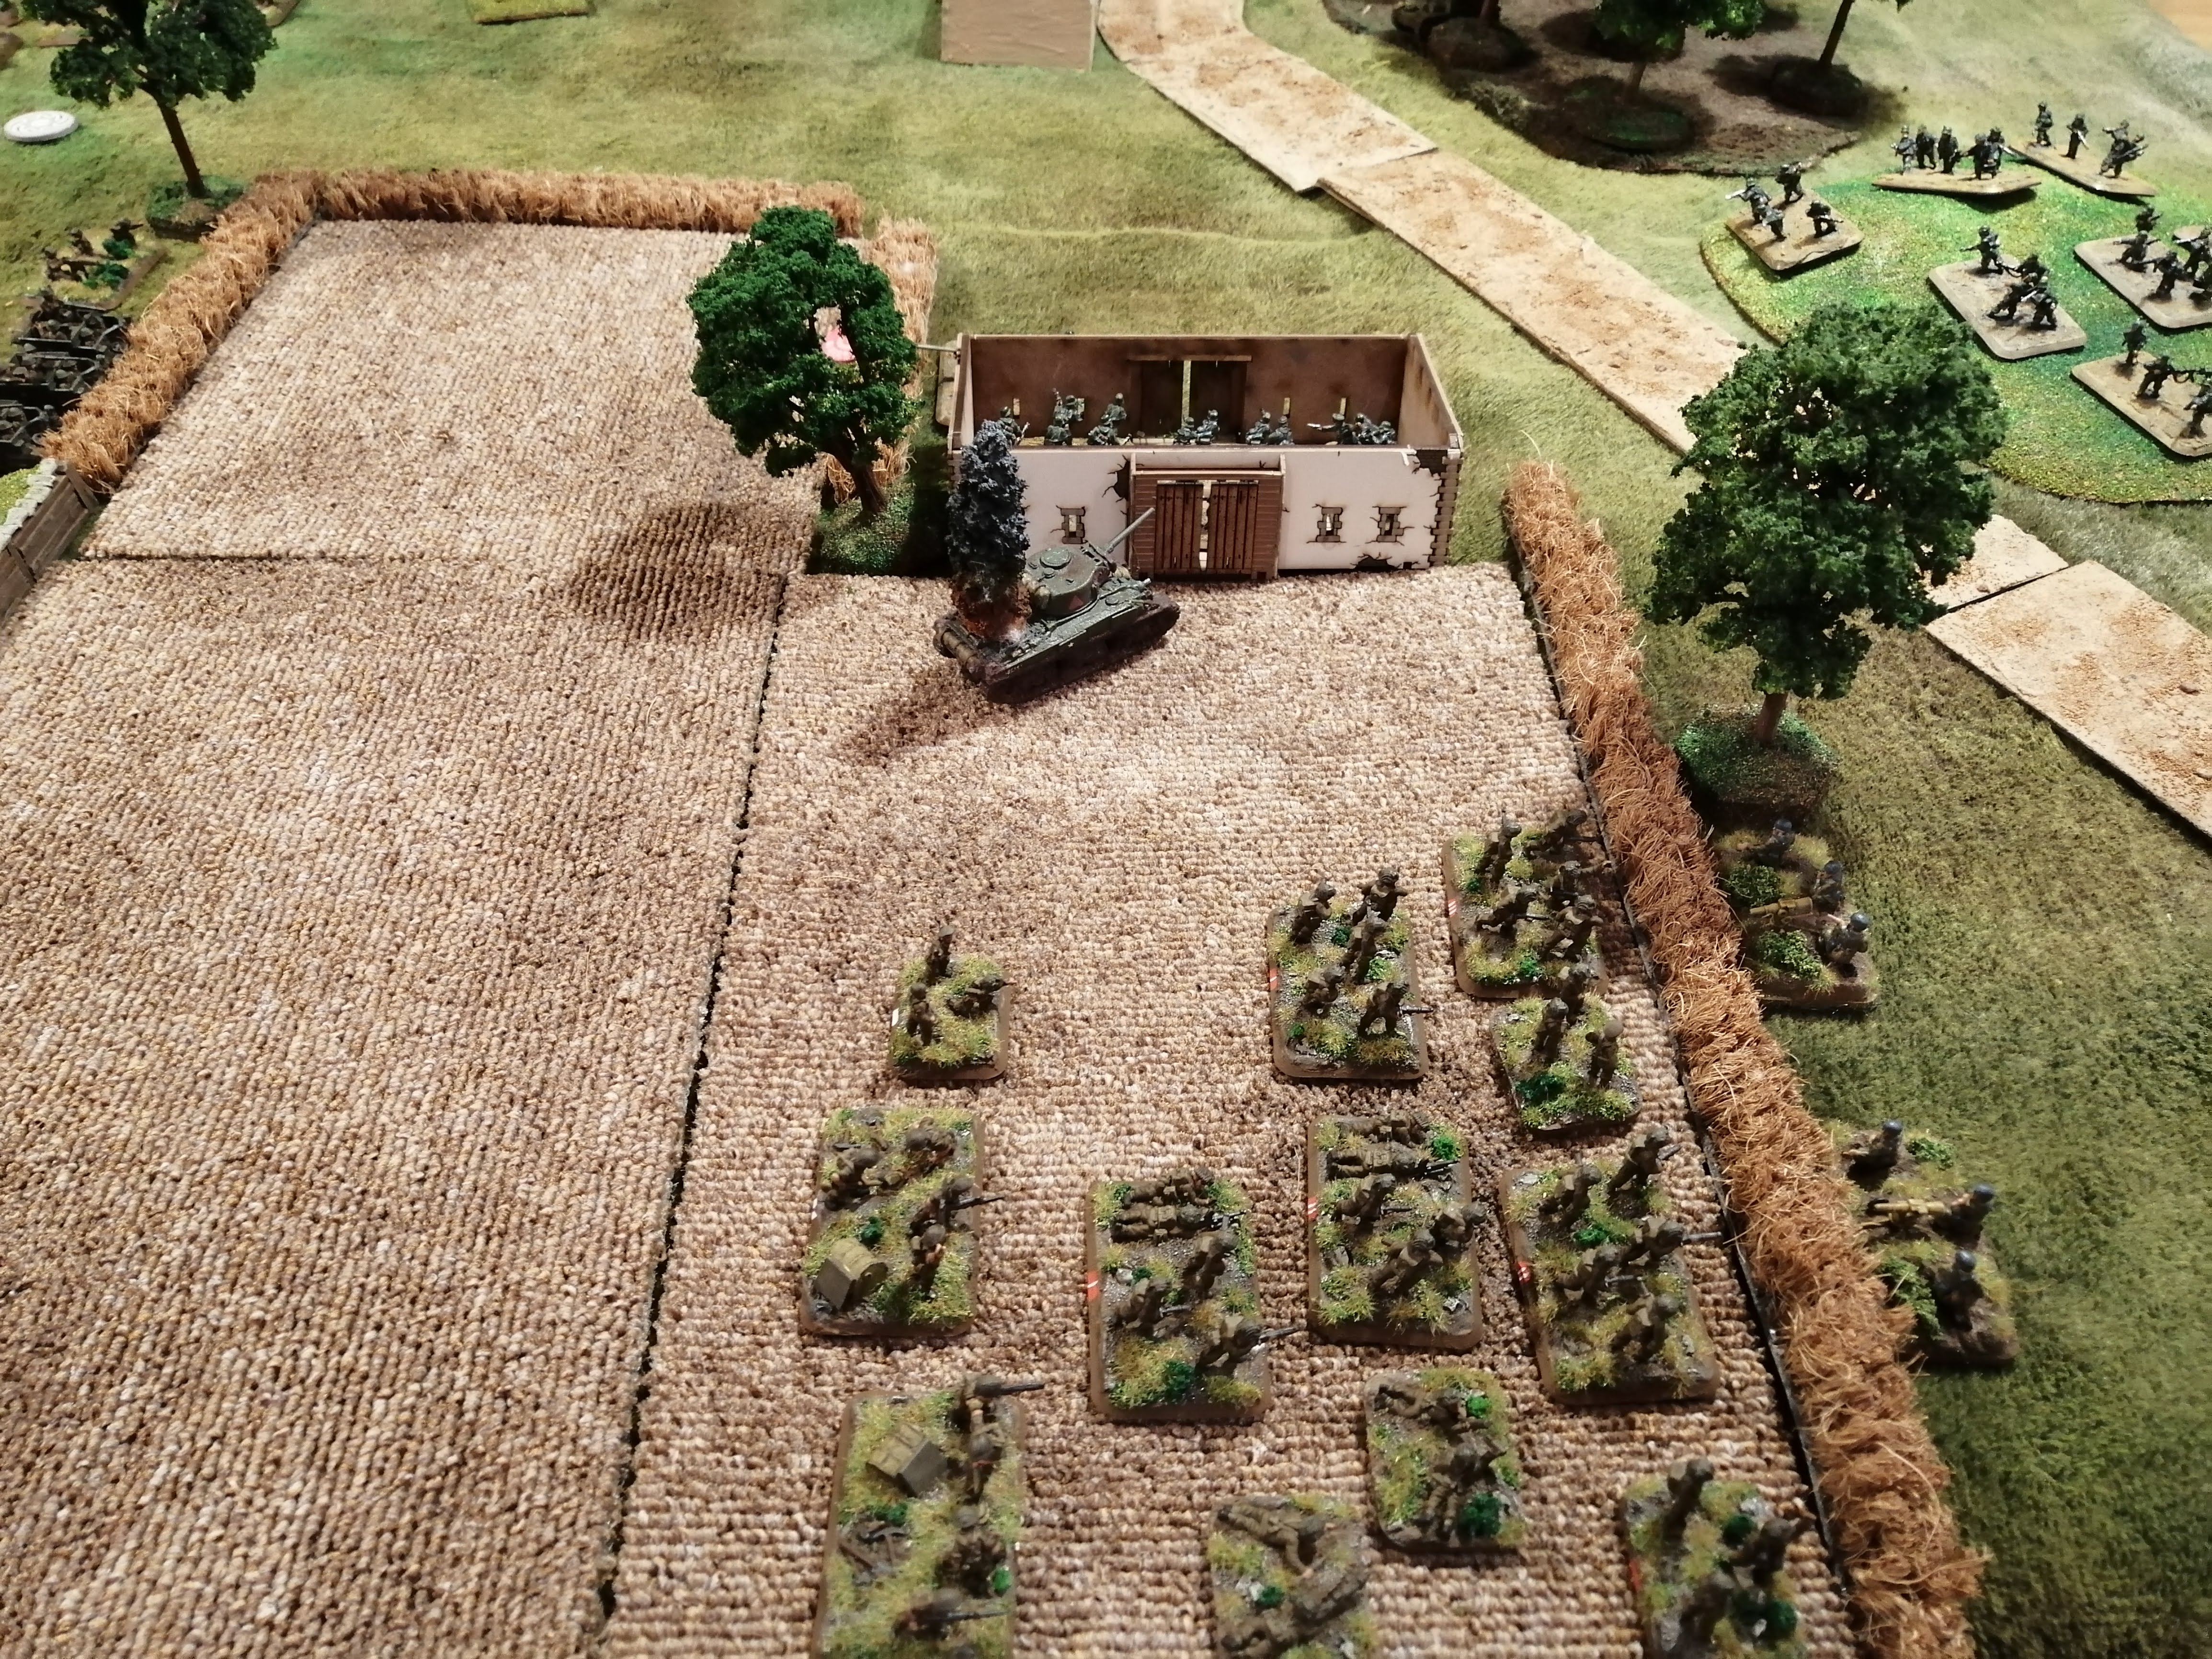
Orange platoon charges the 7.5cm guns and destroy both teams, taking up position behind the hedge.
Turn 6 German:
Grenadier 1 unpin. The German HQ falls back toward the hill while the remainder of the Grenadier platoon moves into assault range of Orange Platoon.
The MG teams kill another team from Red Platoon while the mortar platoon adjusts its aim to target Green Platoon, killing 2 teams and pinning the platoon in place.
Grenadier Platoon 2 stay put, working on the basis that the Infantry will have to try to advance past them to the objective and they can fire on them from their hill. The Marder misses its shots.
Grenadier 1 fires on Orange Platoon killing a team before assaulting. Grenadier 1 loses a team in the charge to defensive fire but the assault continues however they fail to cause any damage once they hit. Encouraged, Orange Platoon counter assault, killing two of the Grenadier teams and forcing them to fall back behind the barn.
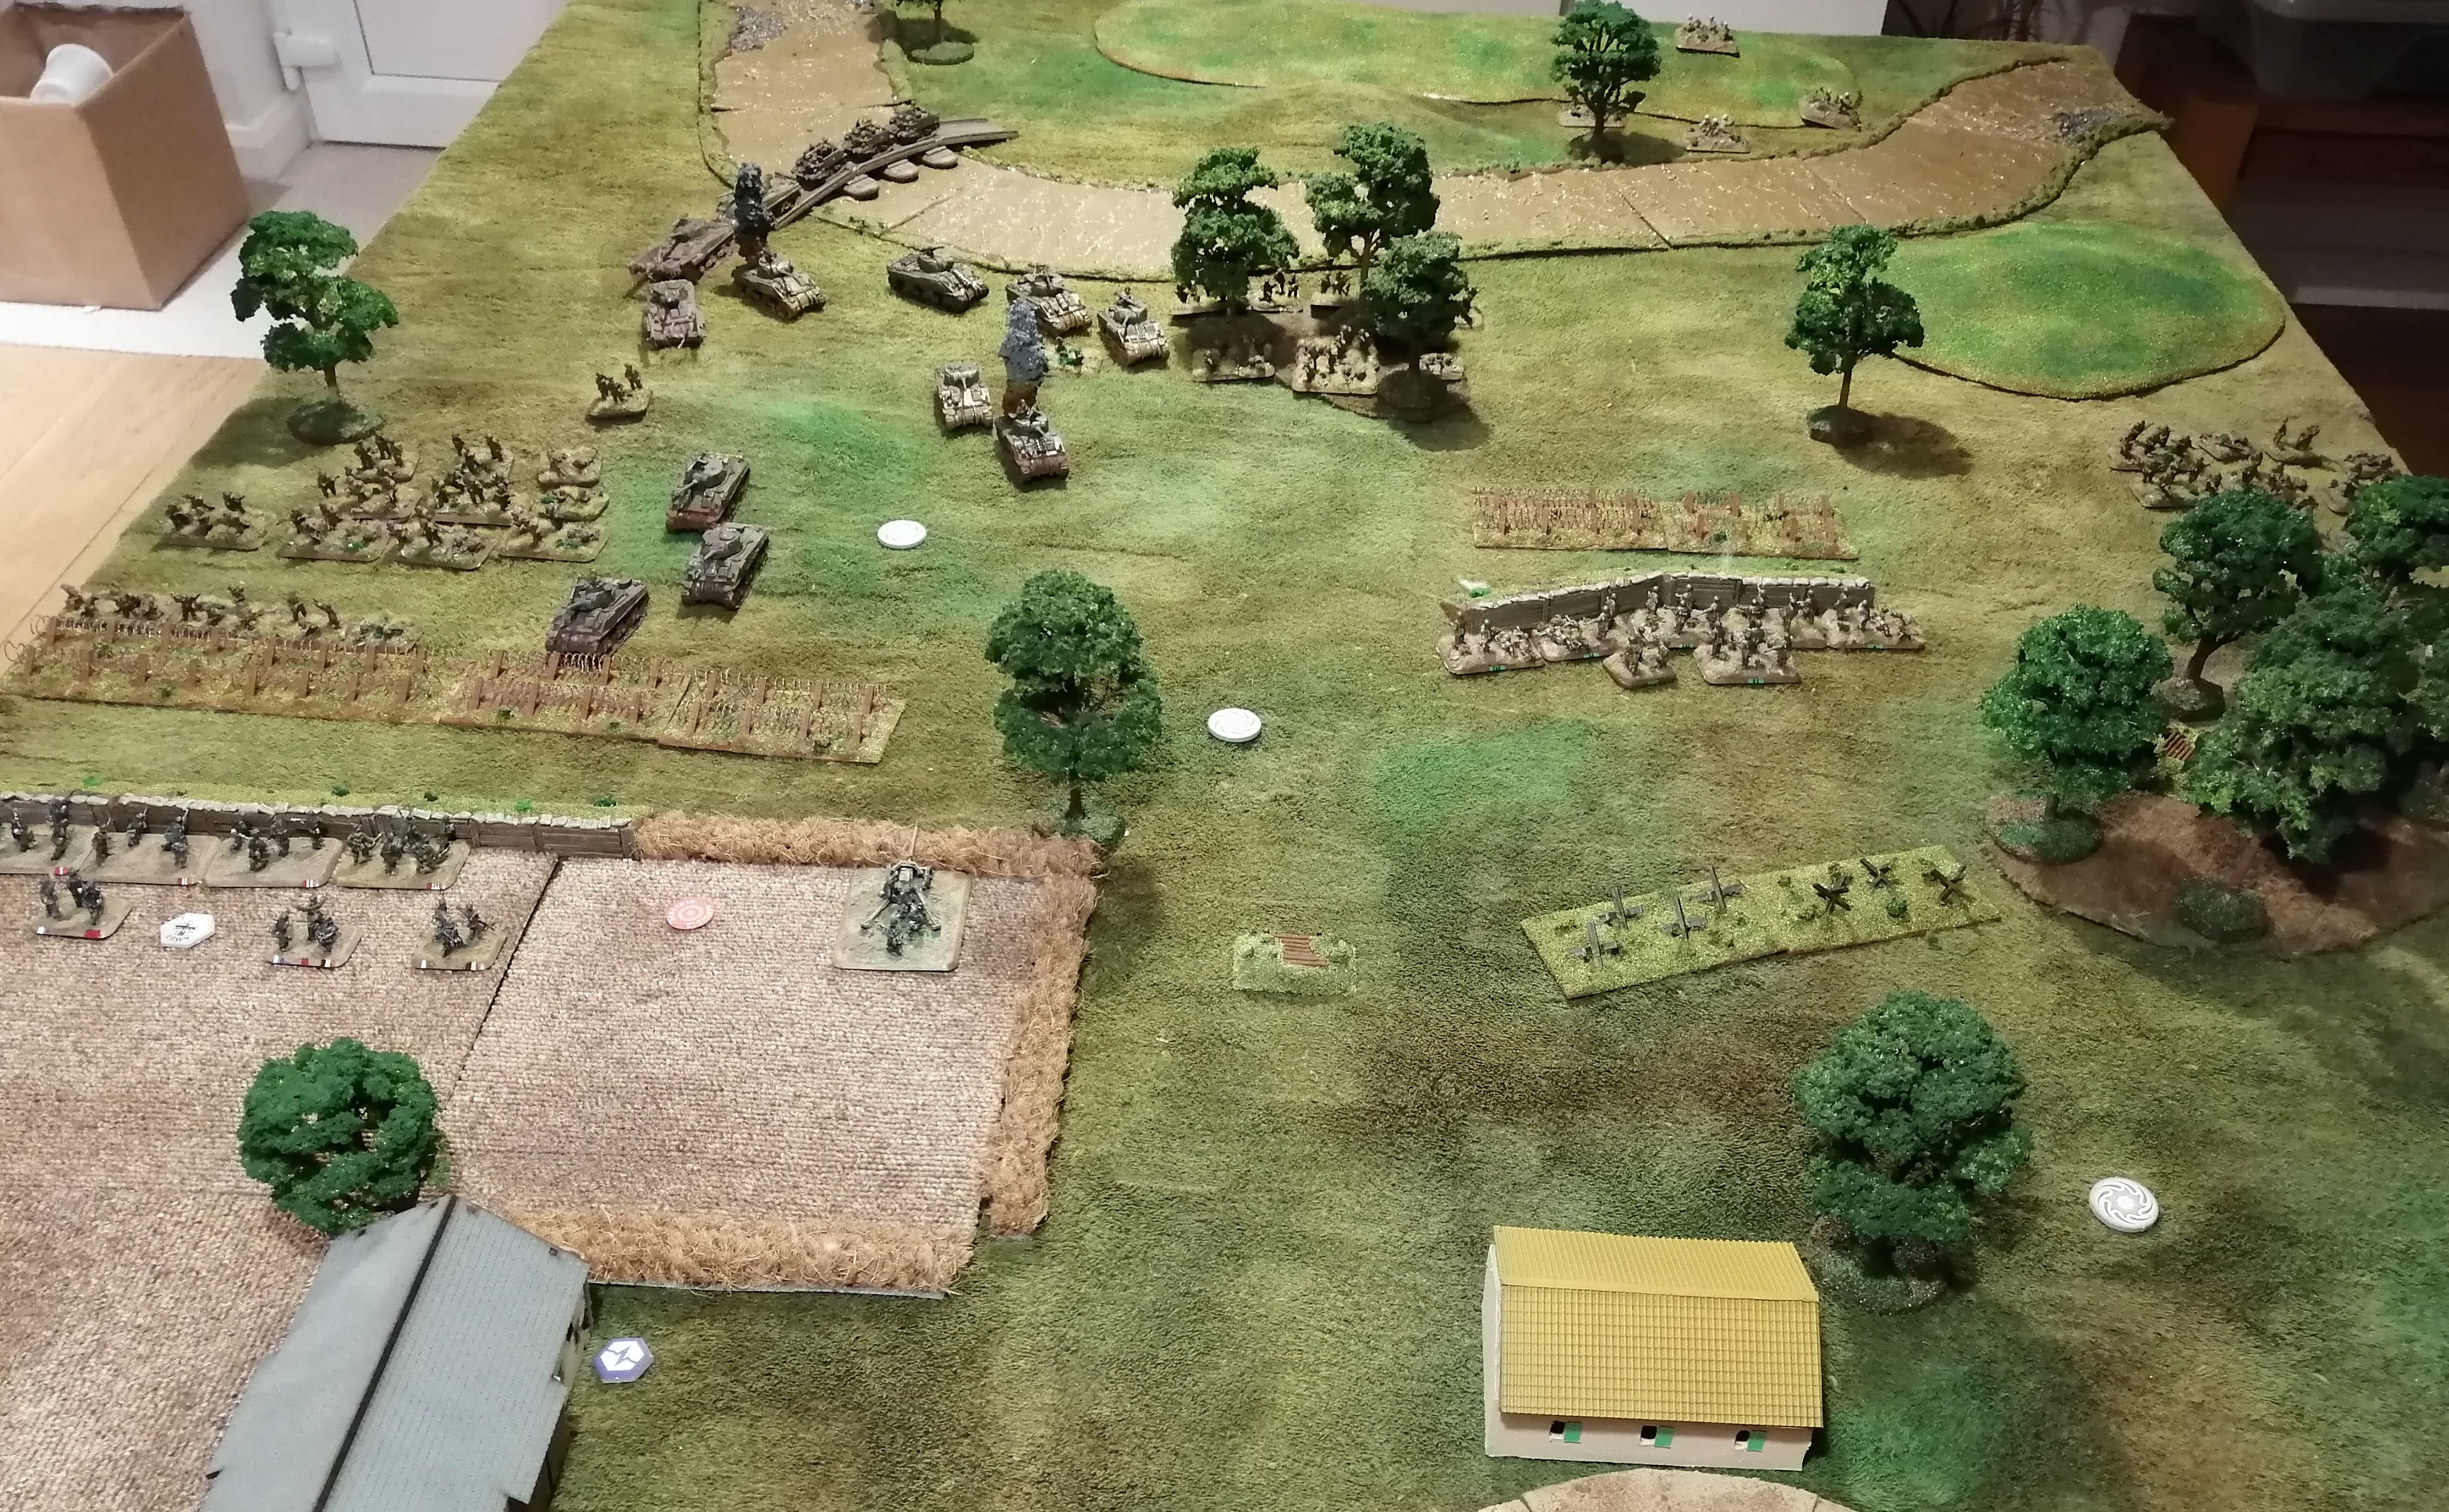
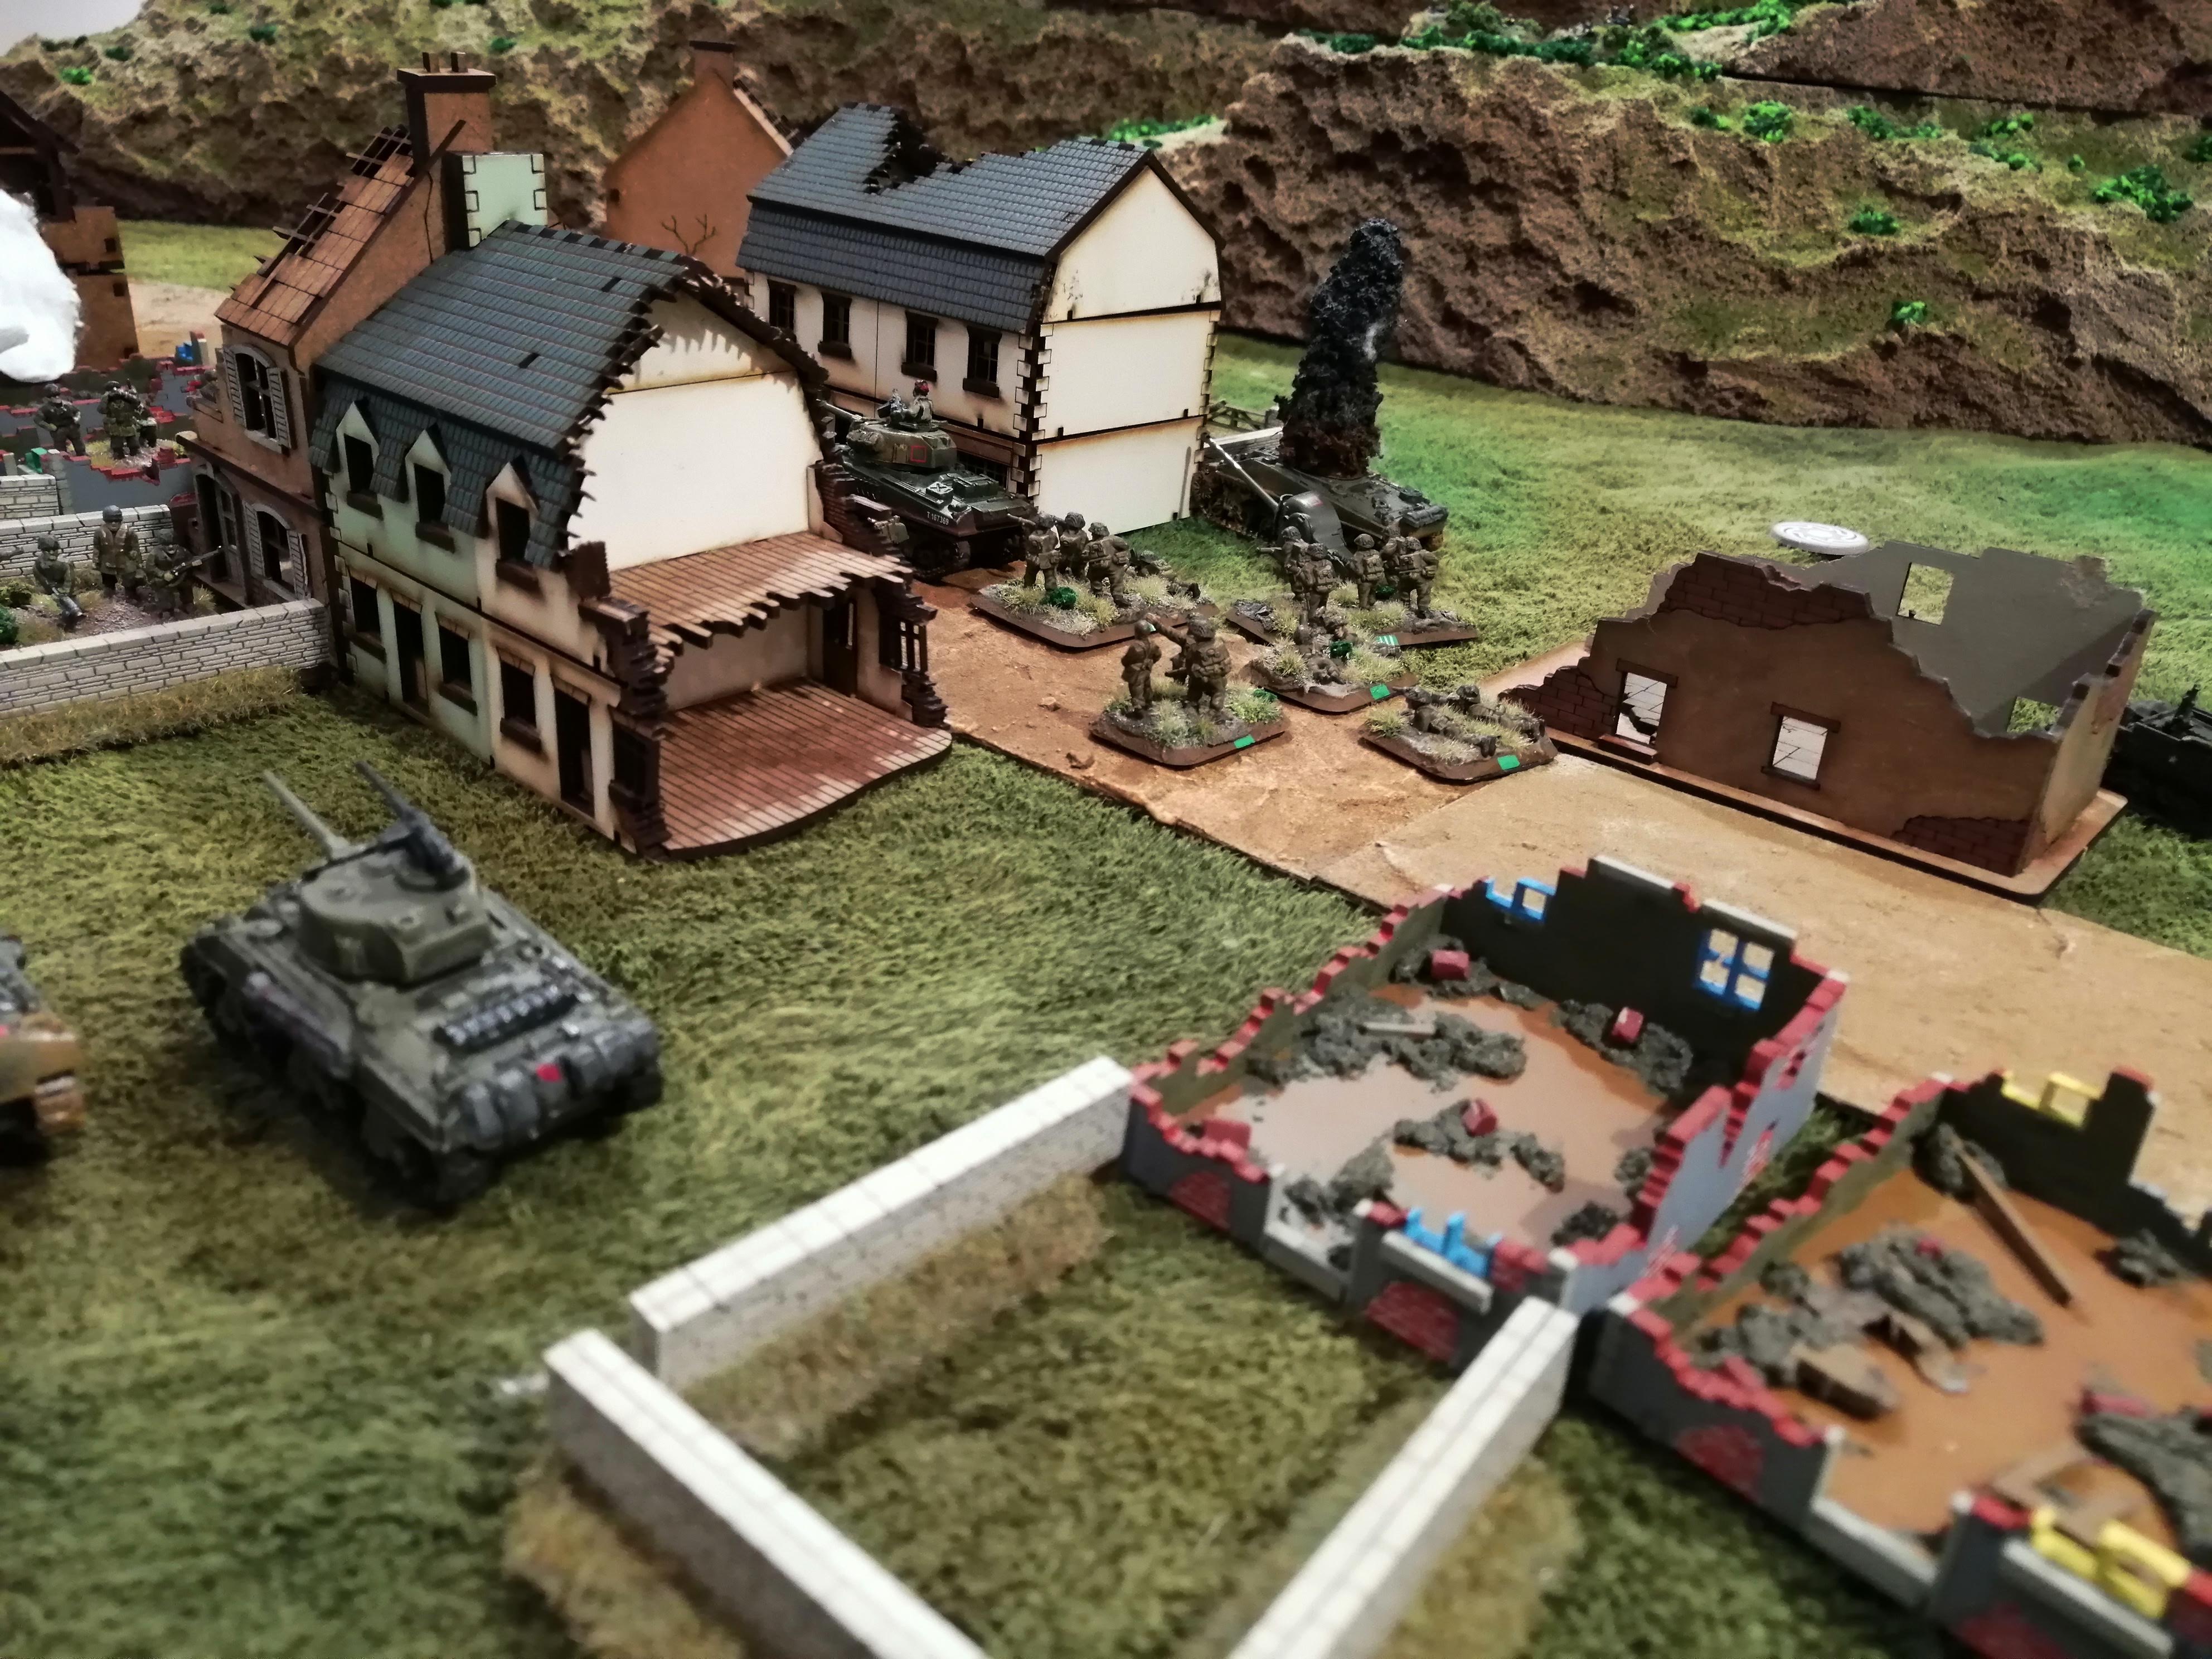
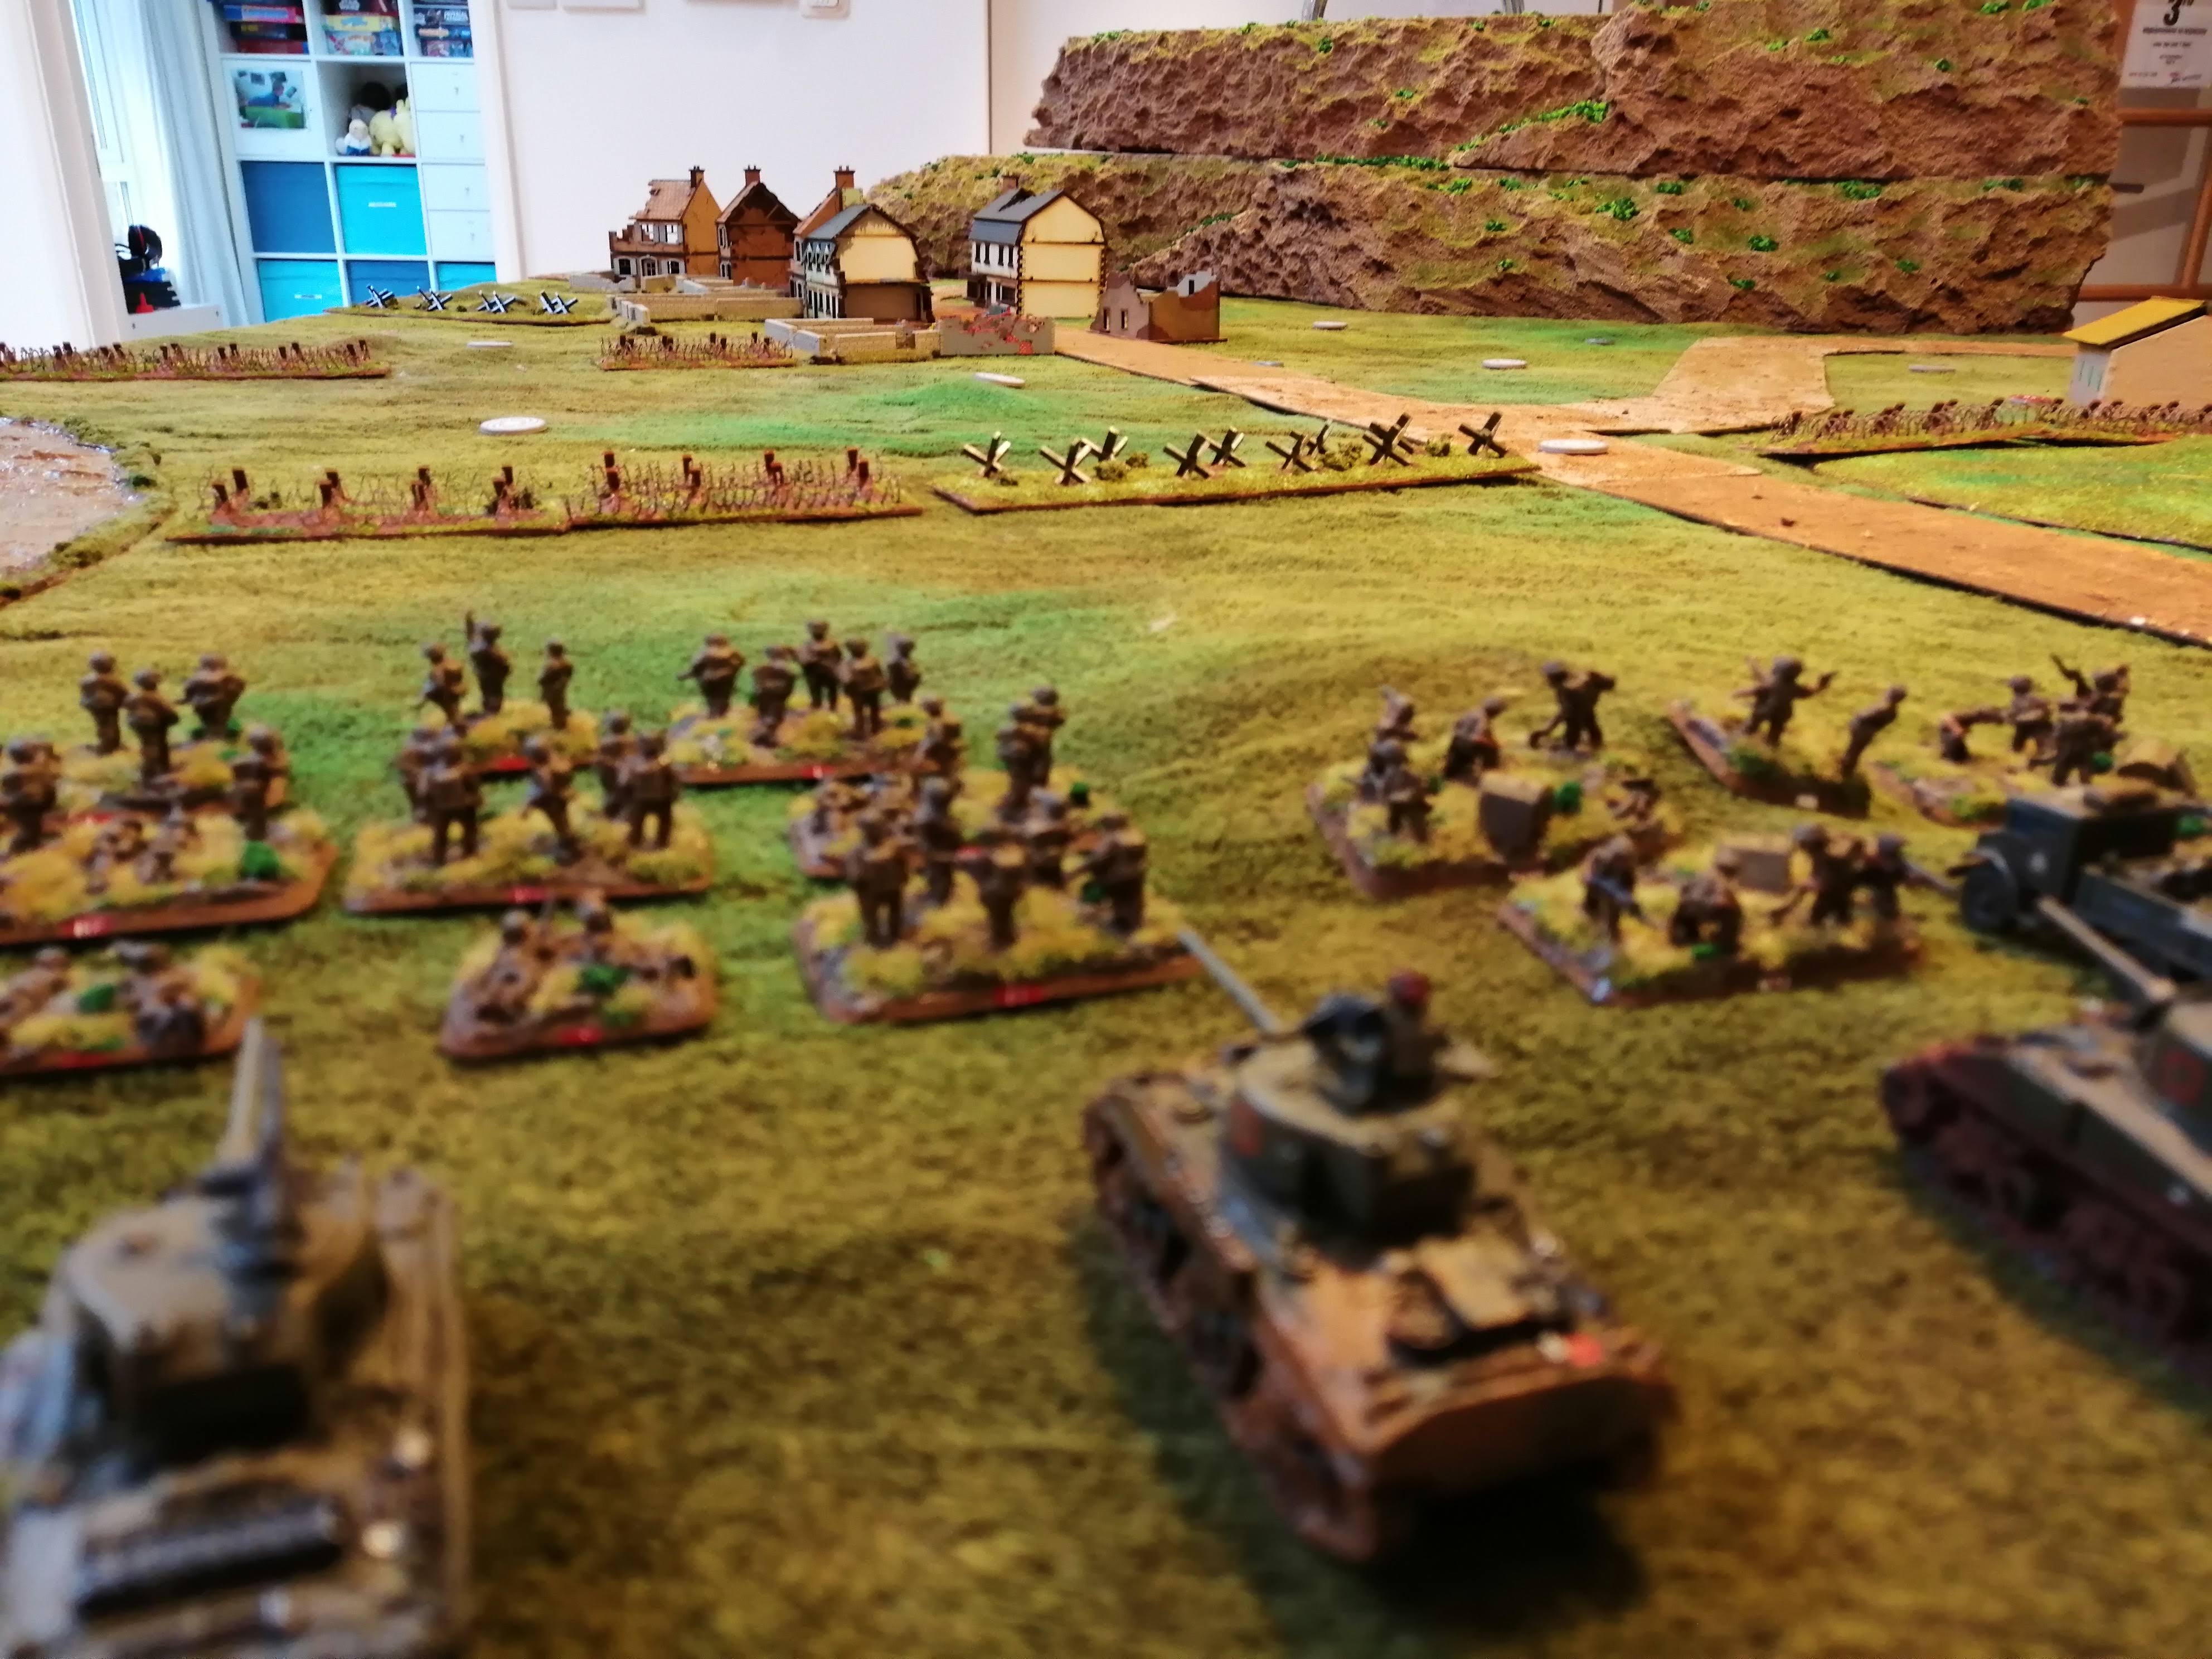
 Orange Platoon prepare to assault the 7.5cm guns
 Green Platoon advance past the wreck of a burning Sherman
 Red Platoon, supported by two Shermans, pinned down in the trees
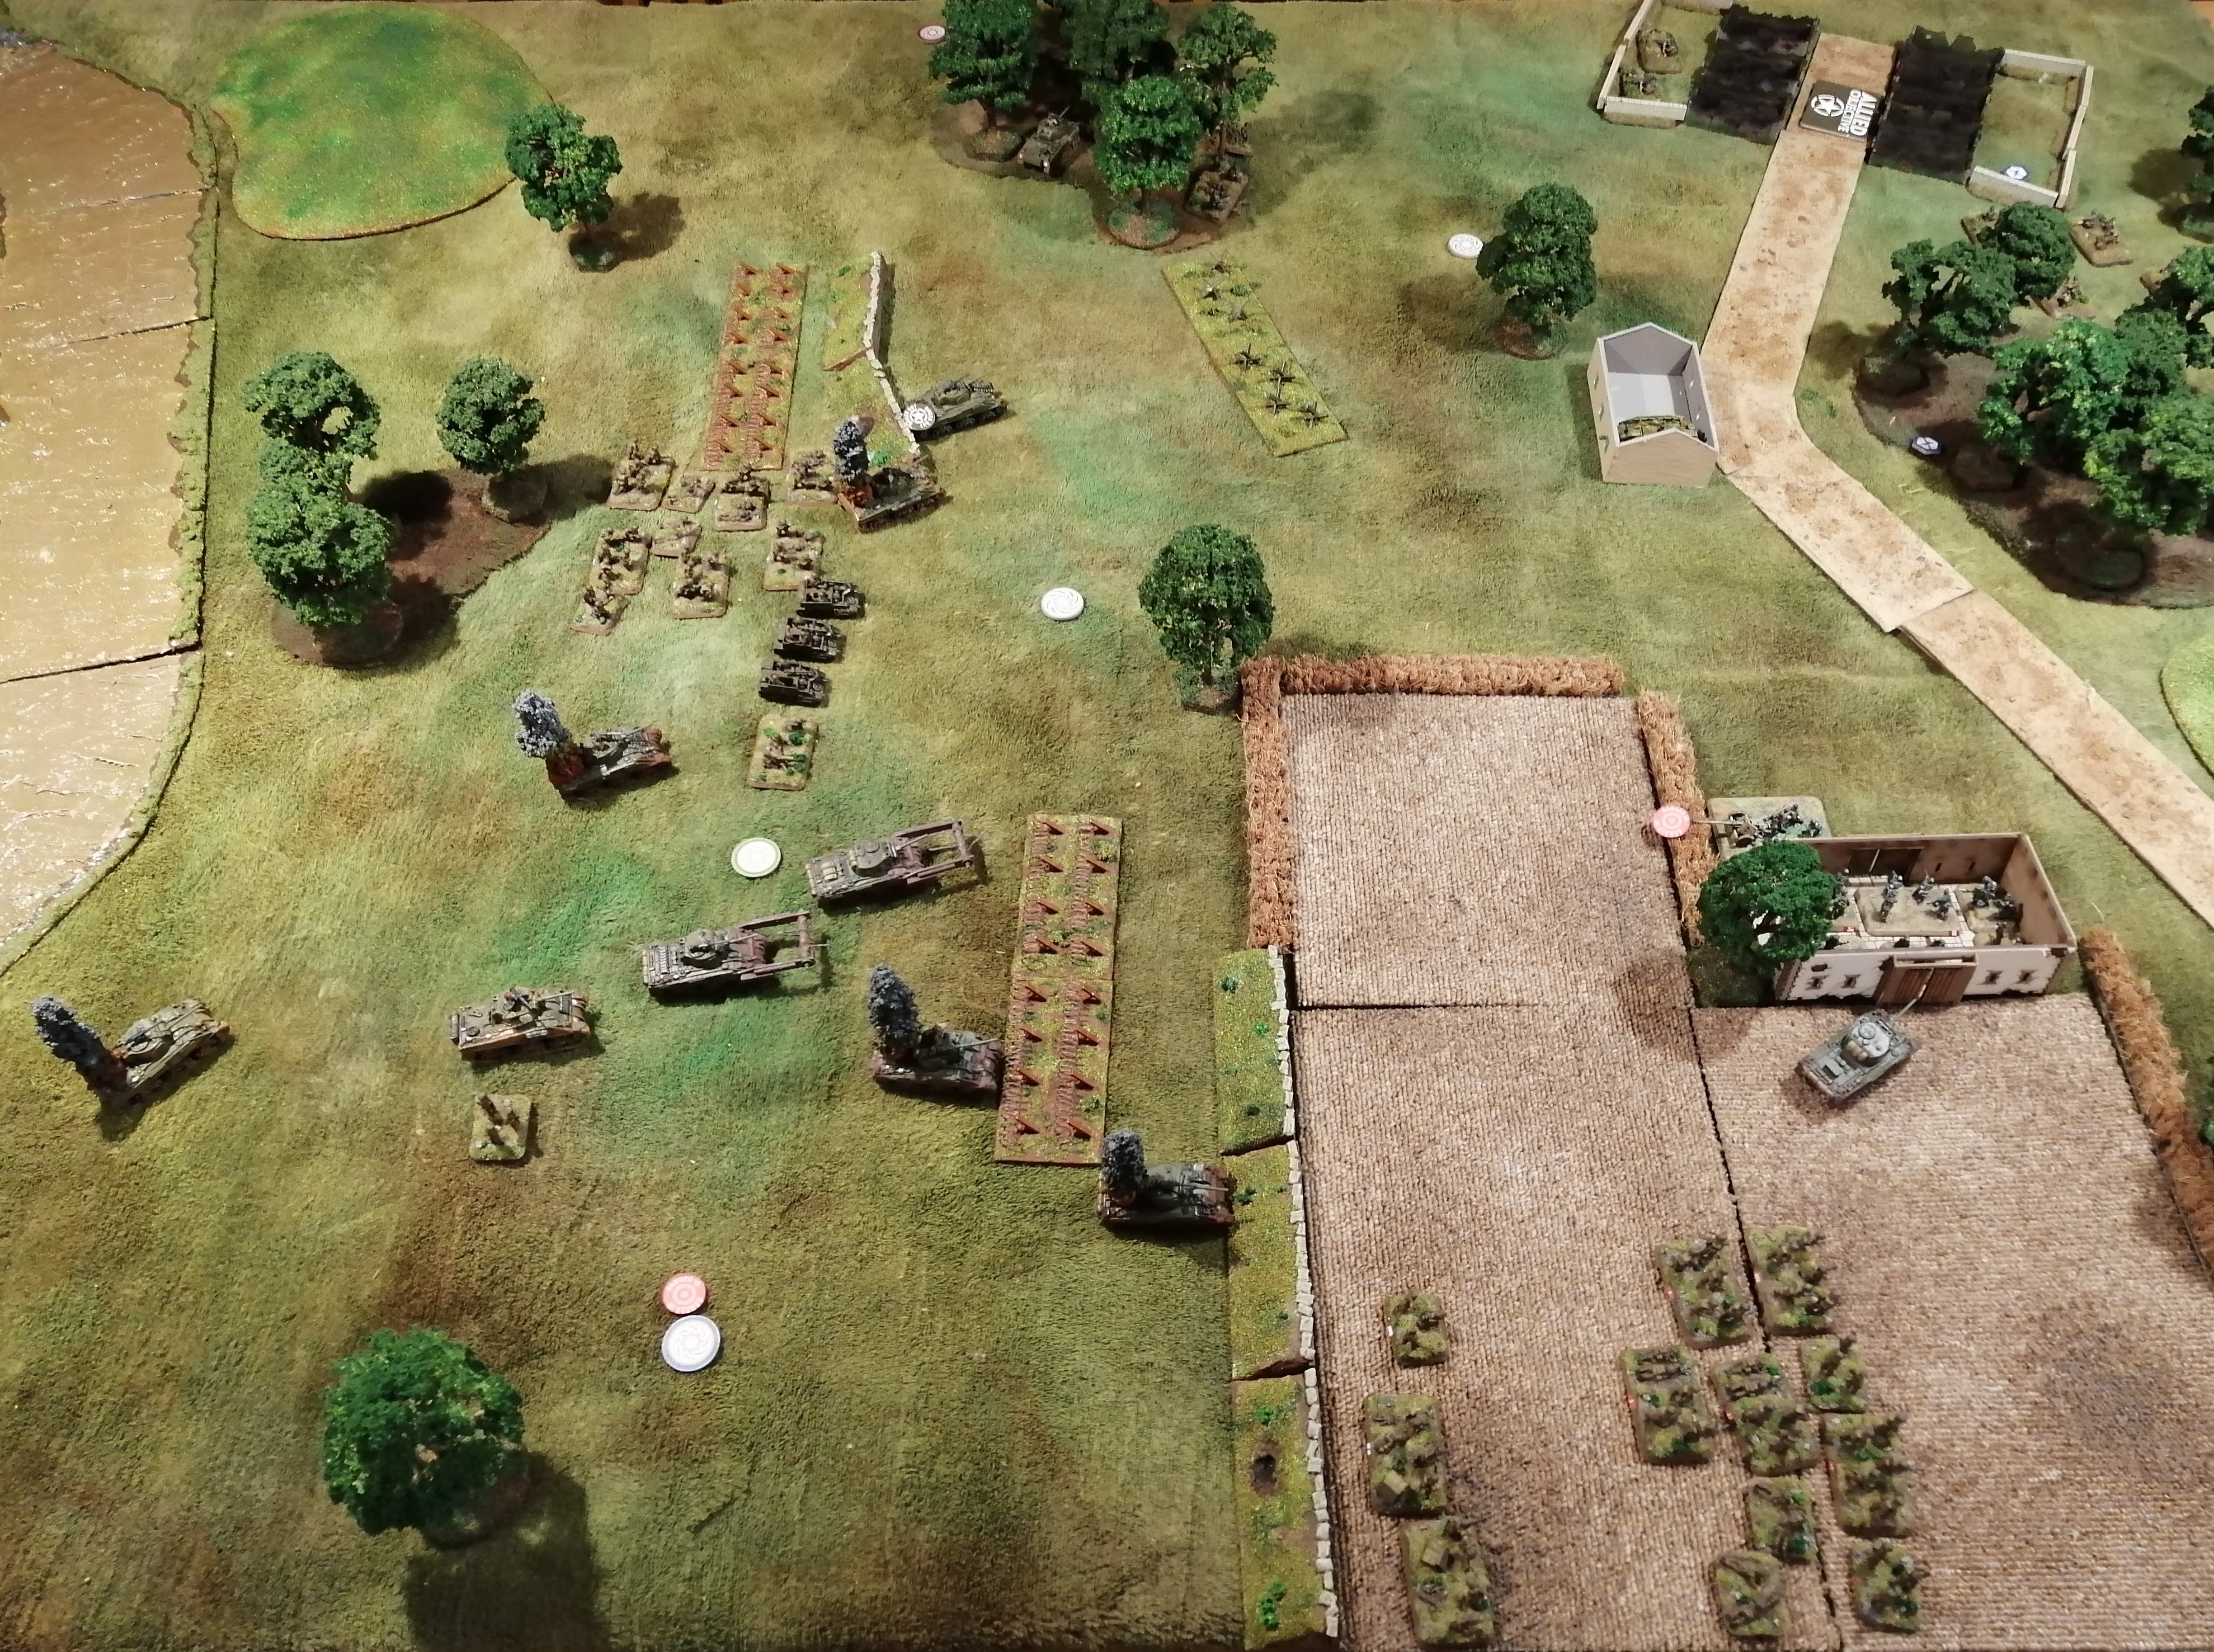
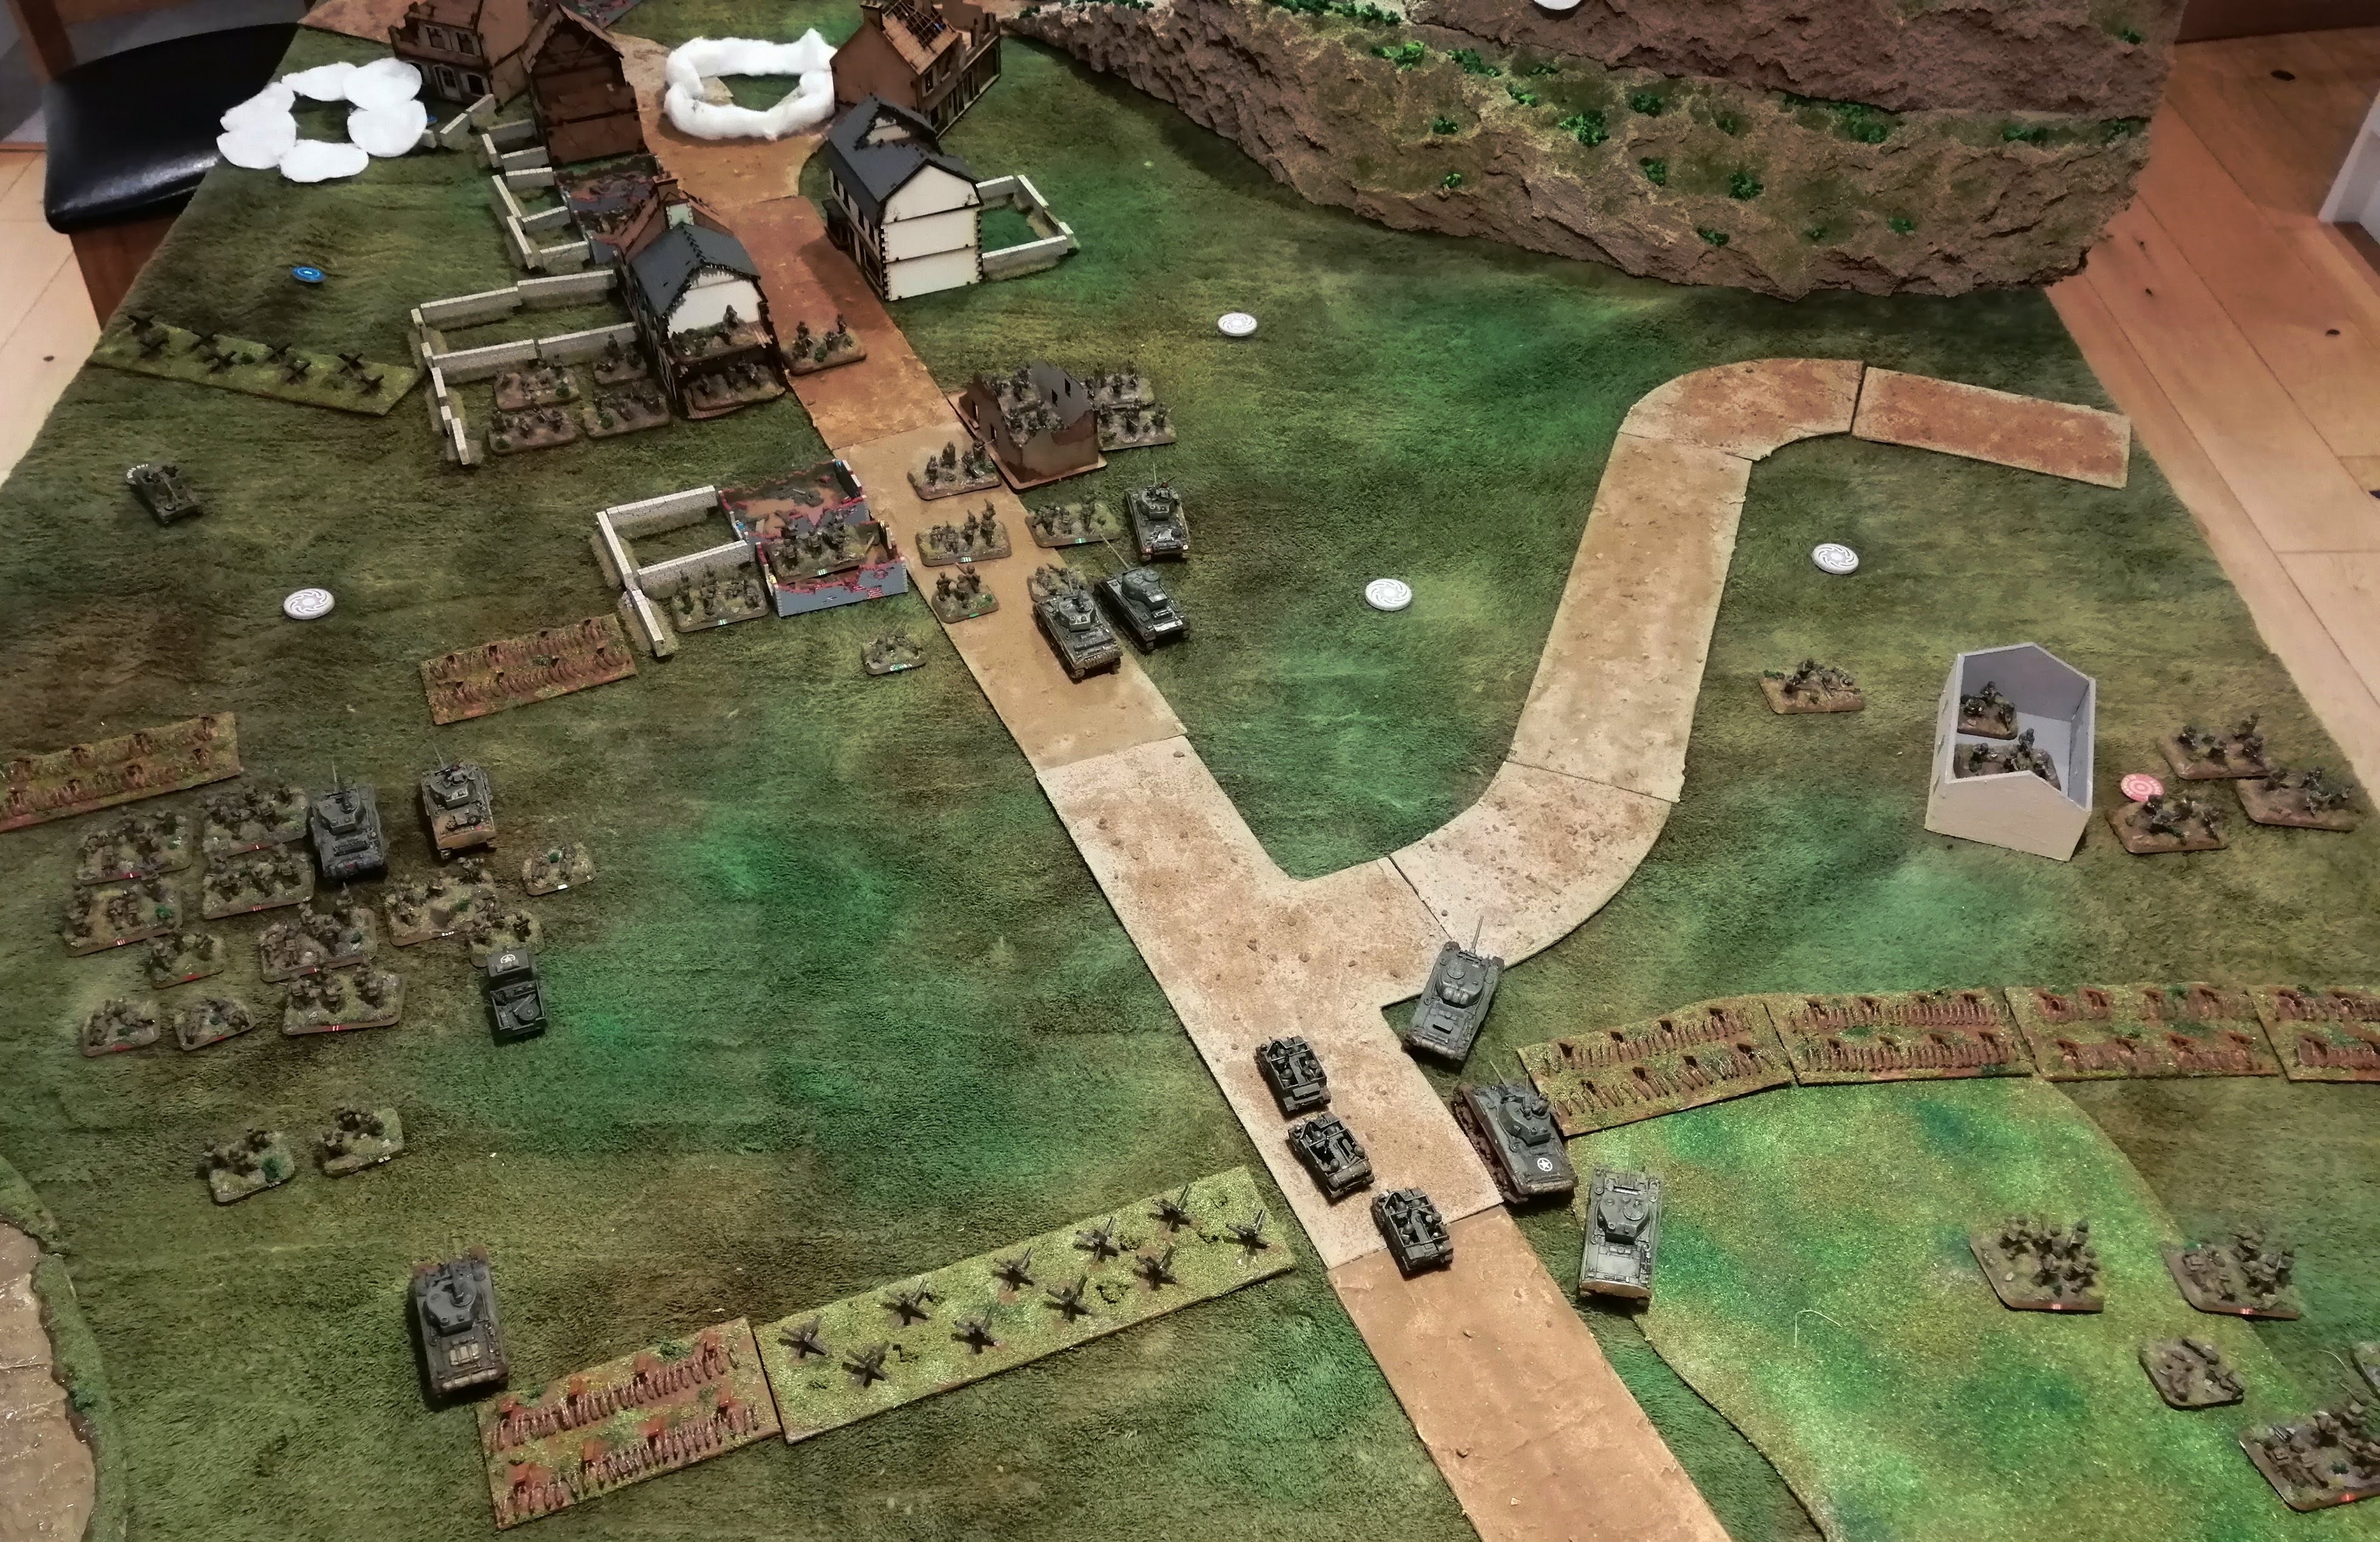
 State of play at the end of Turn 6
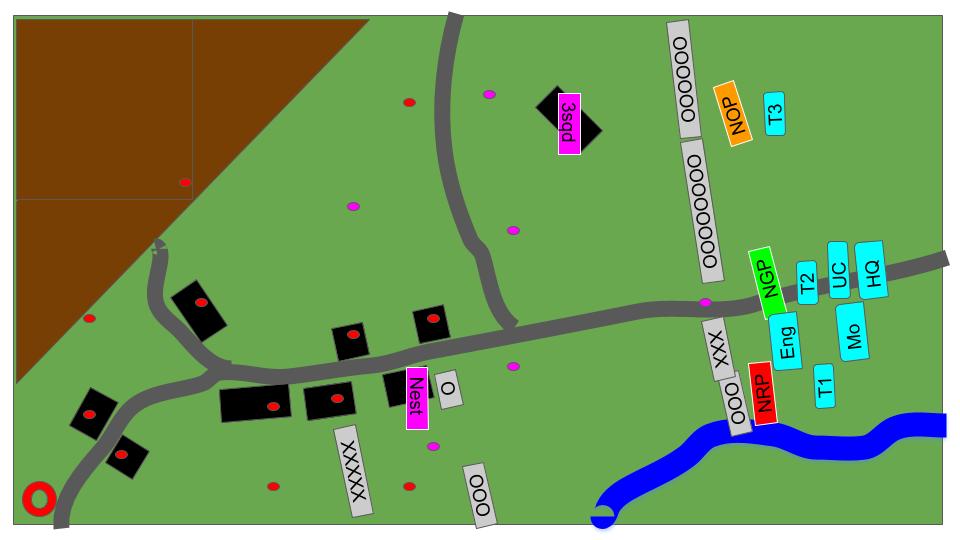
Operation Diadem (Battle 1 - Turns 3 and 4)
Turn 3 Allies:
The last remaining tank in Tank Platoon 1 bails back in and passes its last man standing test, so stays in the fight for the time being. The MG team also passes it’s last man standing test.
Red Platoon, with the tanks now engaging the German left flank decide to break cover and advance on the German right flank. They’re aiming to get into the tree line and behind the MG Nest located there. Orange Platoon also now advance over the hill and, with Tank Platoon 2 alongside, head toward the barbed wire in front of the Grenadier platoon.
Tank Platoon 1 stays stationary to concentrate its fire but Tank Platoon 3 advances off of the pontoon bridge and up alongside Green Platoon, looking to advance up the centre.
The Mortar platoon repeats its bombardment and this time manages to destroy the PaK 40 gun team, giving some relief to the advancing tanks!
The last remaining tank from Tank Platoon 1 fires upon the MG nest in the middle of the table and a shot gets through, blowing the nest apart. Suddenly, the German defences are beginning to look exposed.
Green Platoon and the MG team fire upon the Fallshirmjager and pin them in place.
Turn 3 German:
The Allies have moved within 20” of the deployment token at the barn and a random draw reveals this to be the other Pak40 – so just when the Allied tanks thought they had some space….
Once again, the Fallschirmjager unpin and the Grenadiers fail to do so.
The Grenadiers kill another team from the Engineer Platoon.
This turn the German mortar manages to range in and hits a number of the teams in Orange Platoon, killing one and pinning the rest in place.
The newly discovered paK40 opens fire on Tank Platoon 2, destroying the lead tank just as it reaches the barbed wire.
MG Nest 2 tries to stop the Red Platoon from reaching the woods but despite a lot of fire power, fails to cause any damage. However, the Fallschirmjager, recognising the threat of Red Platoon on their right flank, do manage to kill one team and pin the rest of the platoon in place.
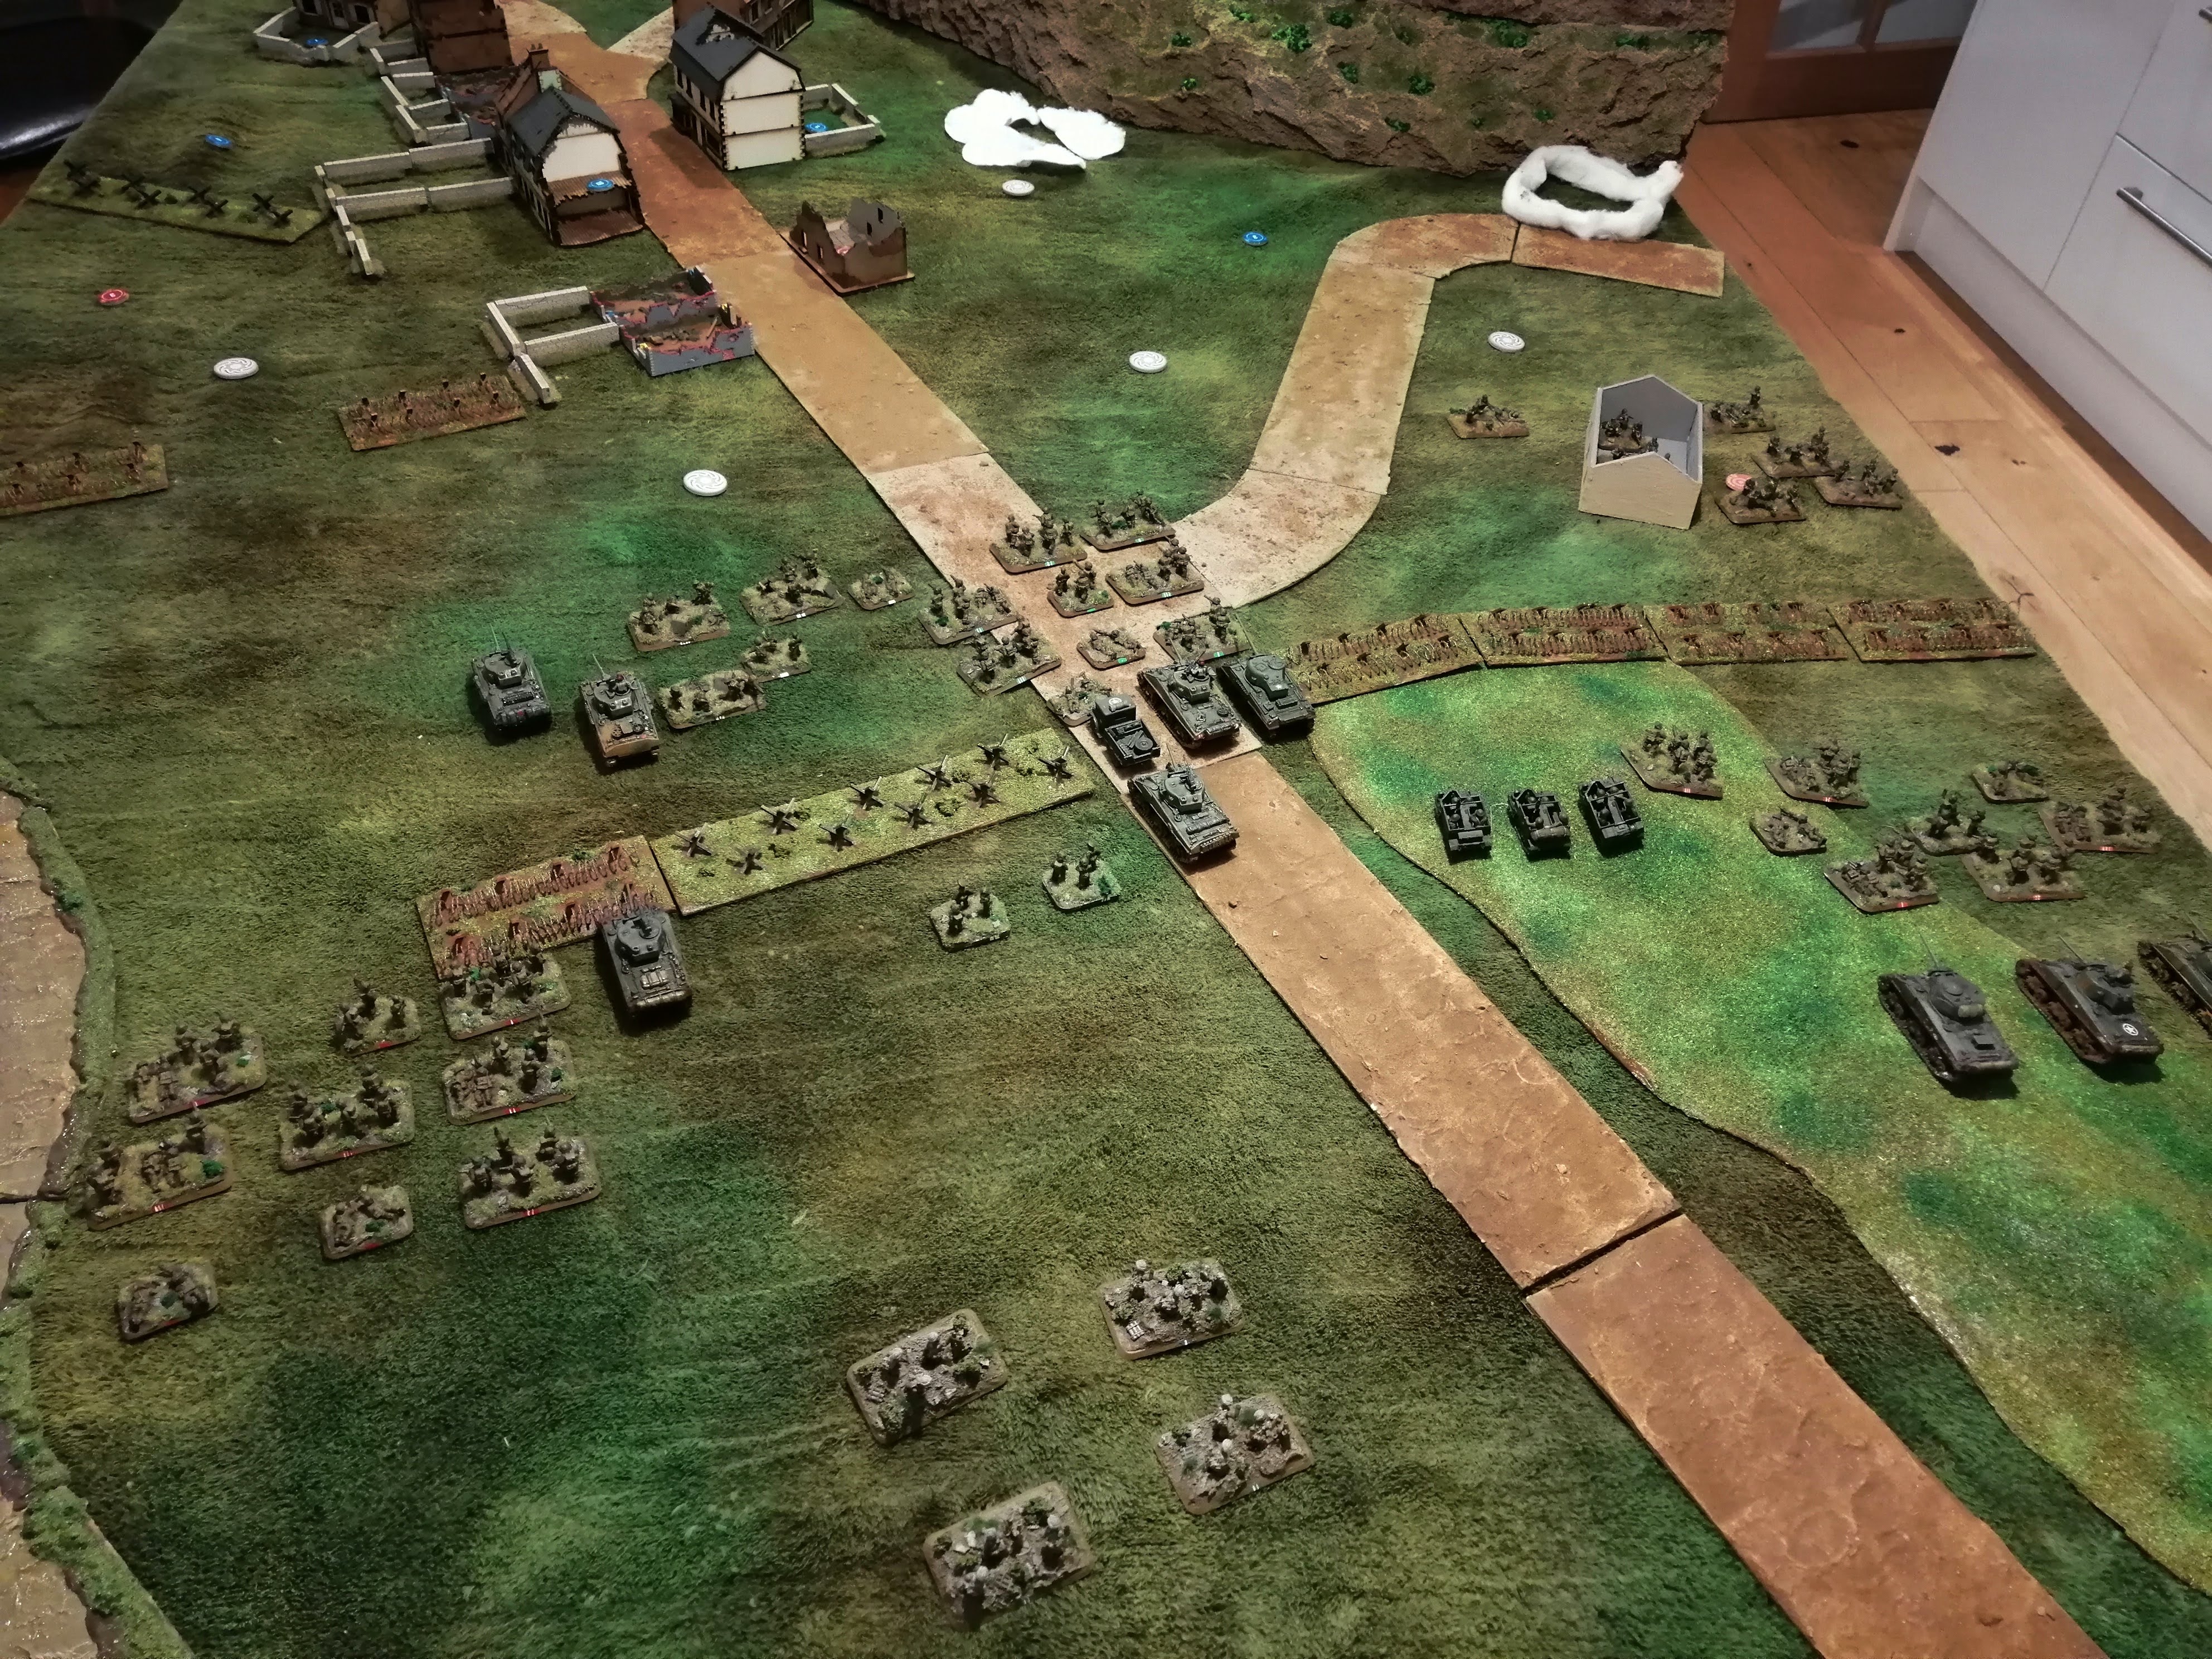
 The state of play as seen from the Allied perspective. Note the forces massing for the attack on the right flank and the infantry trying to 'sneak' up the left
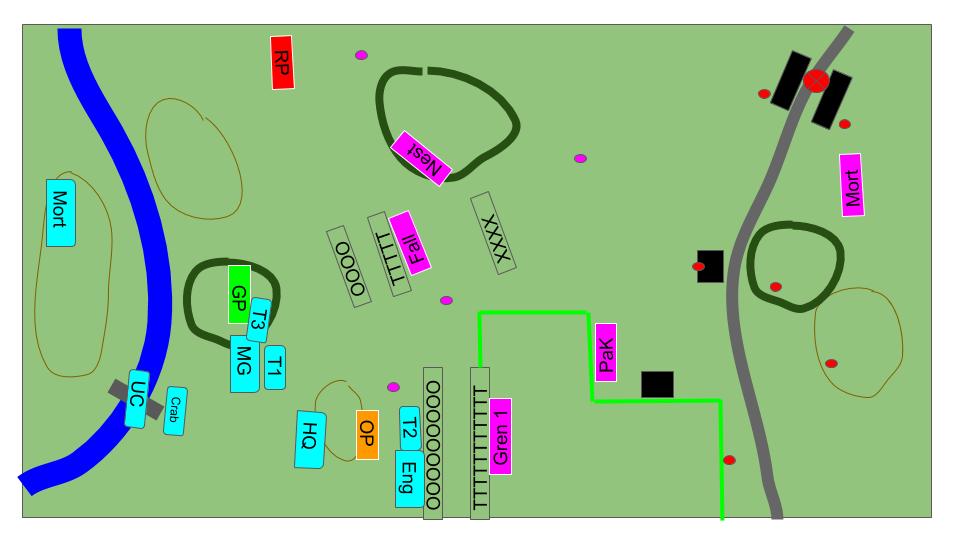
Turn 4 Allies:
Red platoon is able to unpin, particularly fortunate given that they are currently exposed in the open. The last remaining Tank from Tank Platoon 1 passes their last man standing, as does the MG team.
The Engineers clear half of the barbed wire opening the way for Orange Platoon to advance up to within charge range of the Grenadiers. Tank Platoon 2 also moves up in support and the Sherman Crab tanks look to advance slowly up the centre.
Red Platoon advances to the trees however they uncovered a minefield and lost 4 teams to the mines and booby traps laid there!
Tank Platoon 3 moves up to the threaten the Fallschirmjager in their trenches.
The Allies shooting is woeful and clearly the battle is getting desperate for them with the best outcome being the Fallschirmjager yet again getting pinned from the incoming fire from the tanks.
Orange platoon launches an assault of the Grenadiers in their trenches and kill two teams as they leap into the German positions. The Grenadiers, already pinned and facing infantry and tanks fail to counter and fall back into the field behind, allowing Orange Platoon to take over the trenches.
In the centre of the line, Tank Platoon 3 crashes into the Fallschirmjager, killing three teams. The Fallschirmjager aren’t going to give up their positions easily, as was the case in the real battle, and counter against the tanks, bailing two out. With one operational tank, the 1st Canadian try to push home the assault, killing another Fallschirmjager team but once again, they counter and succeed in destroying one of the bailed out tanks! Both sides continue the assault before the last remaining tank forces the last Fallschirmjager team to fallback. The position is in Allied hands, but at some cost.
On the Allied left flank, Red Platoon assault the rear of the MG Nest and, with no ability to defend itself, the nest is taken out, opening up the German right flank.
Turn 4: German
The Allied push has moved within 20” of three German deployment markers. On the German left, behind the hedge, a 7.5cm Recoilless Gun platoon is deployed. In the centre, inside the ruined farmhouse, is one of the STuGs and on the right, in front of the objective, is a heavy MG Platoon.
The last team from the Fallschirmjager platoon fails its last man standing test and is removed from play. Otherwise, the Grenadier platoon take up defensive positions inside the barn.
The PaK40 is able to destroy a tank from Tank Platoon 2 and the STuG is able to bail the last remaining tank from tank platoon 3. The MG teams are able to fire upon Red Platoon in the woods and the cover there helps avoid casualties but they do get pinned in place. The mortar team fail to range in this turn.
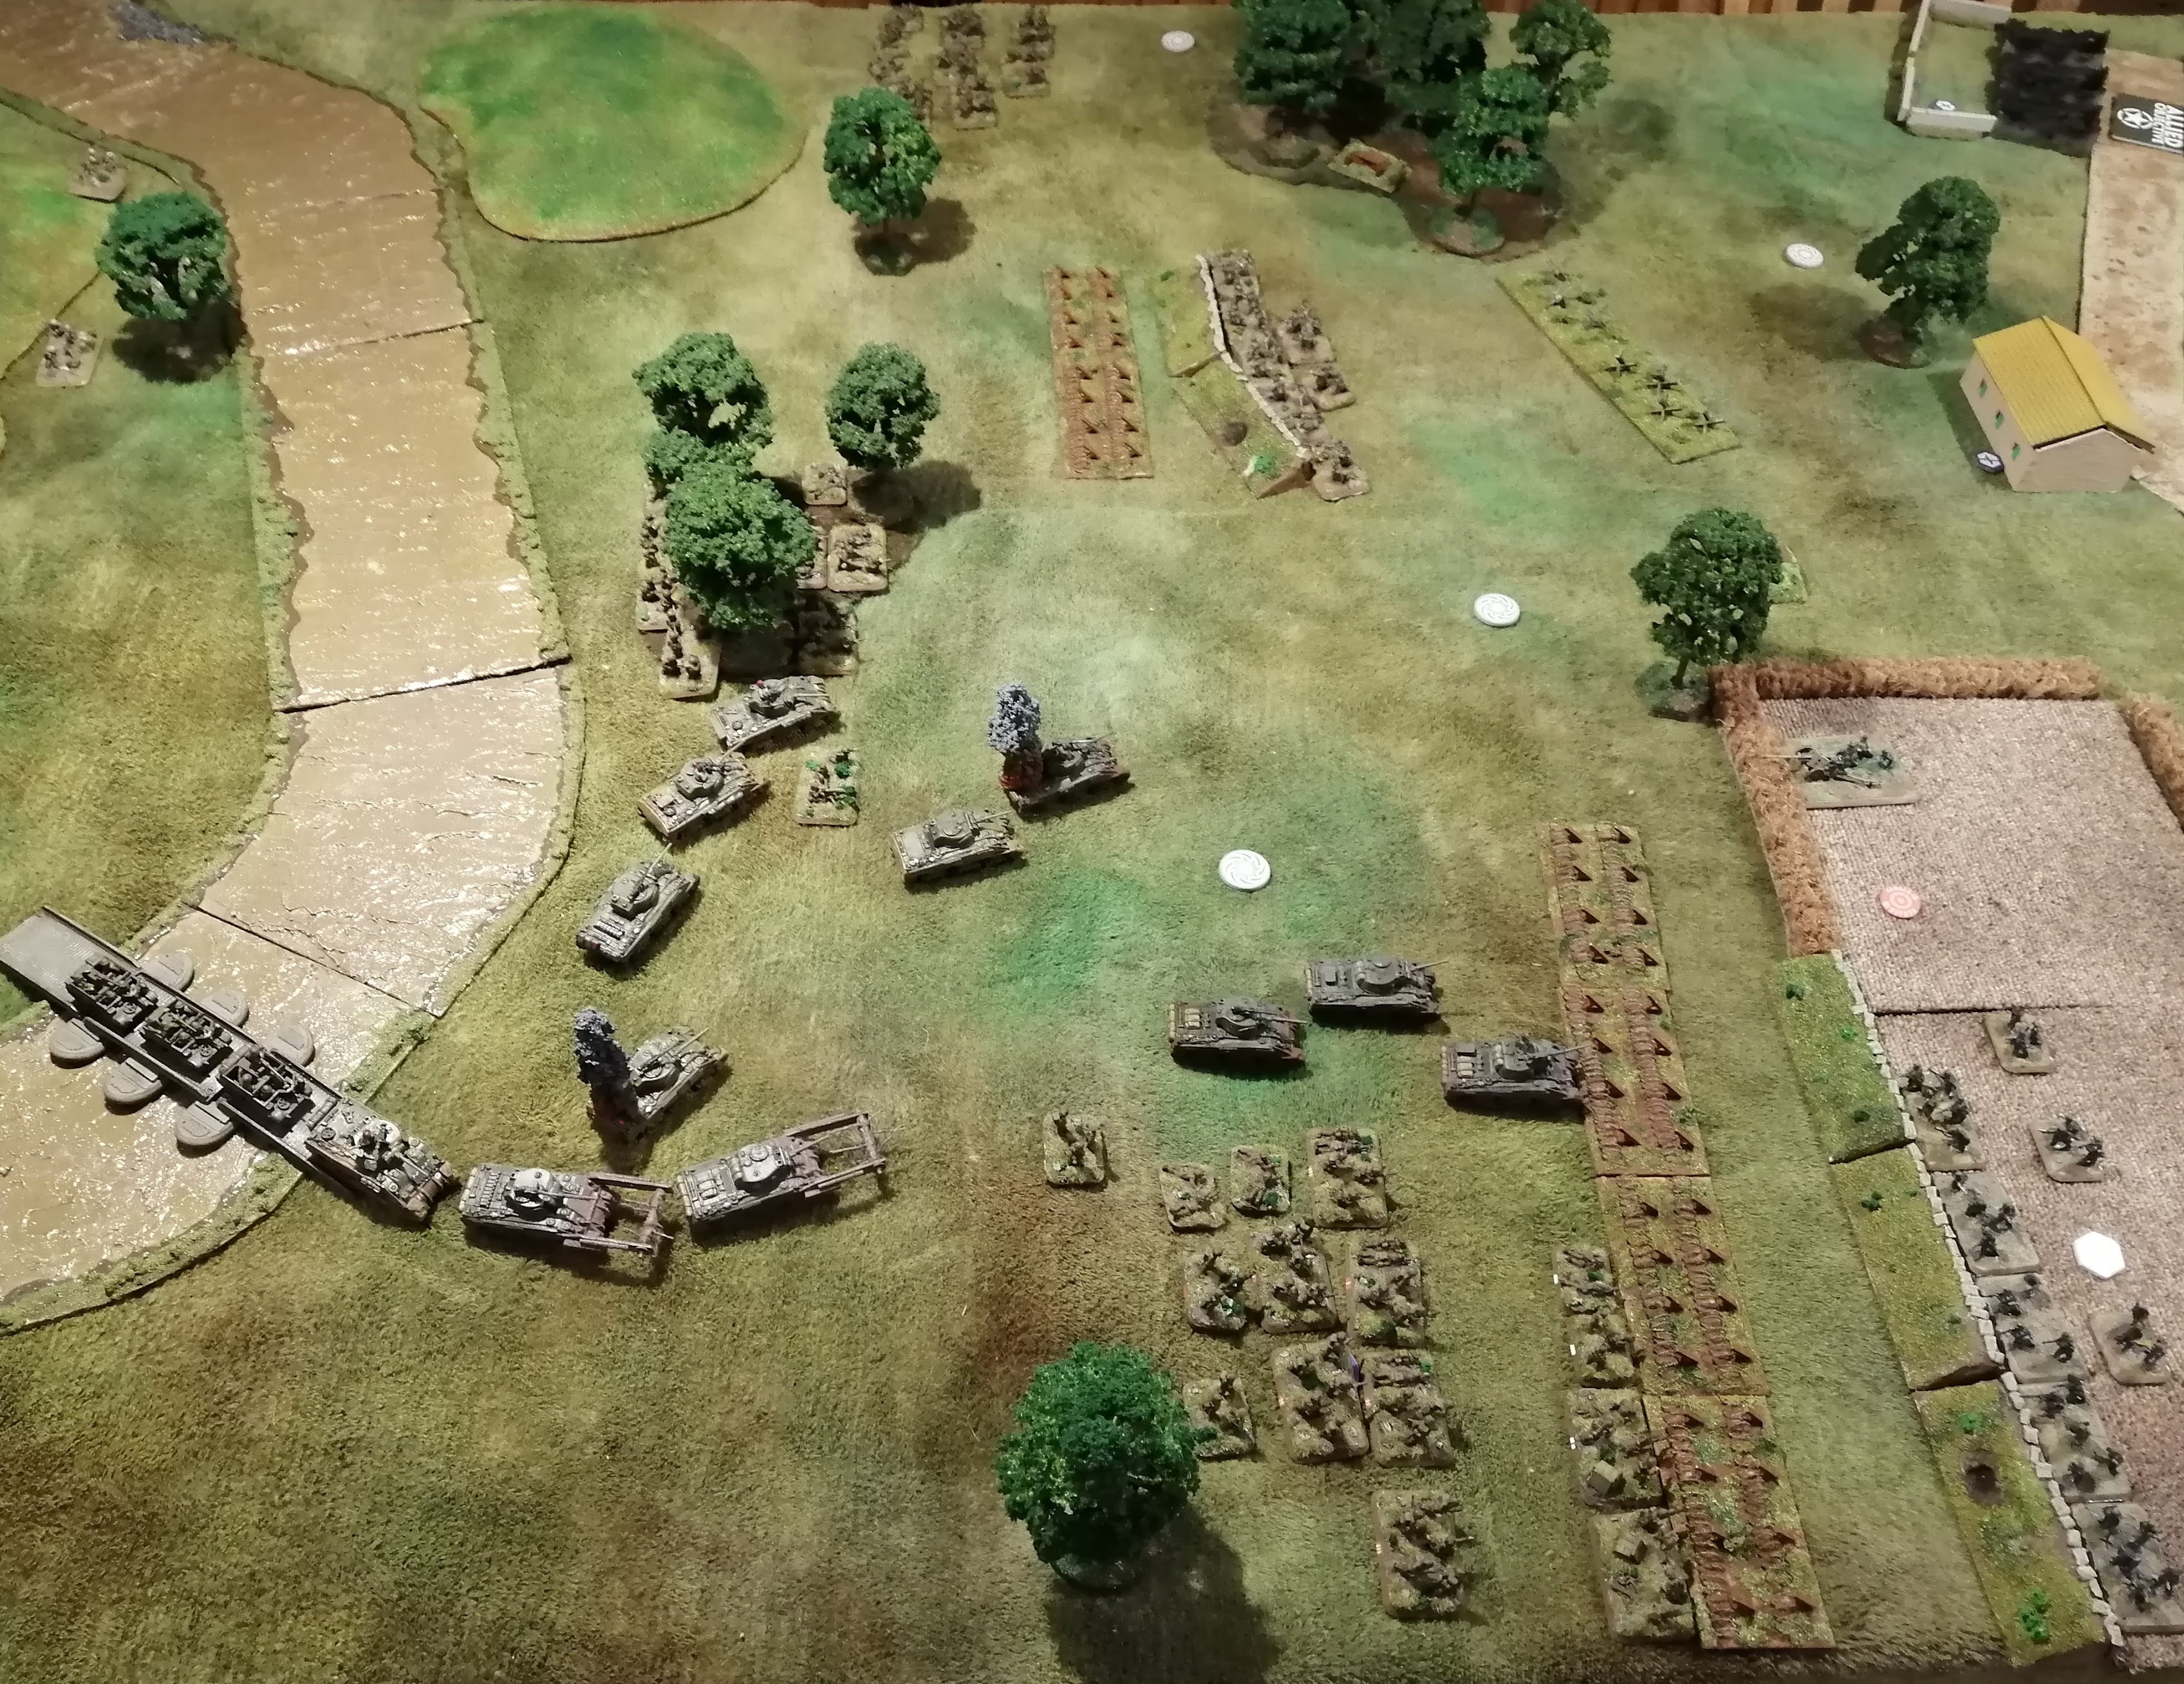
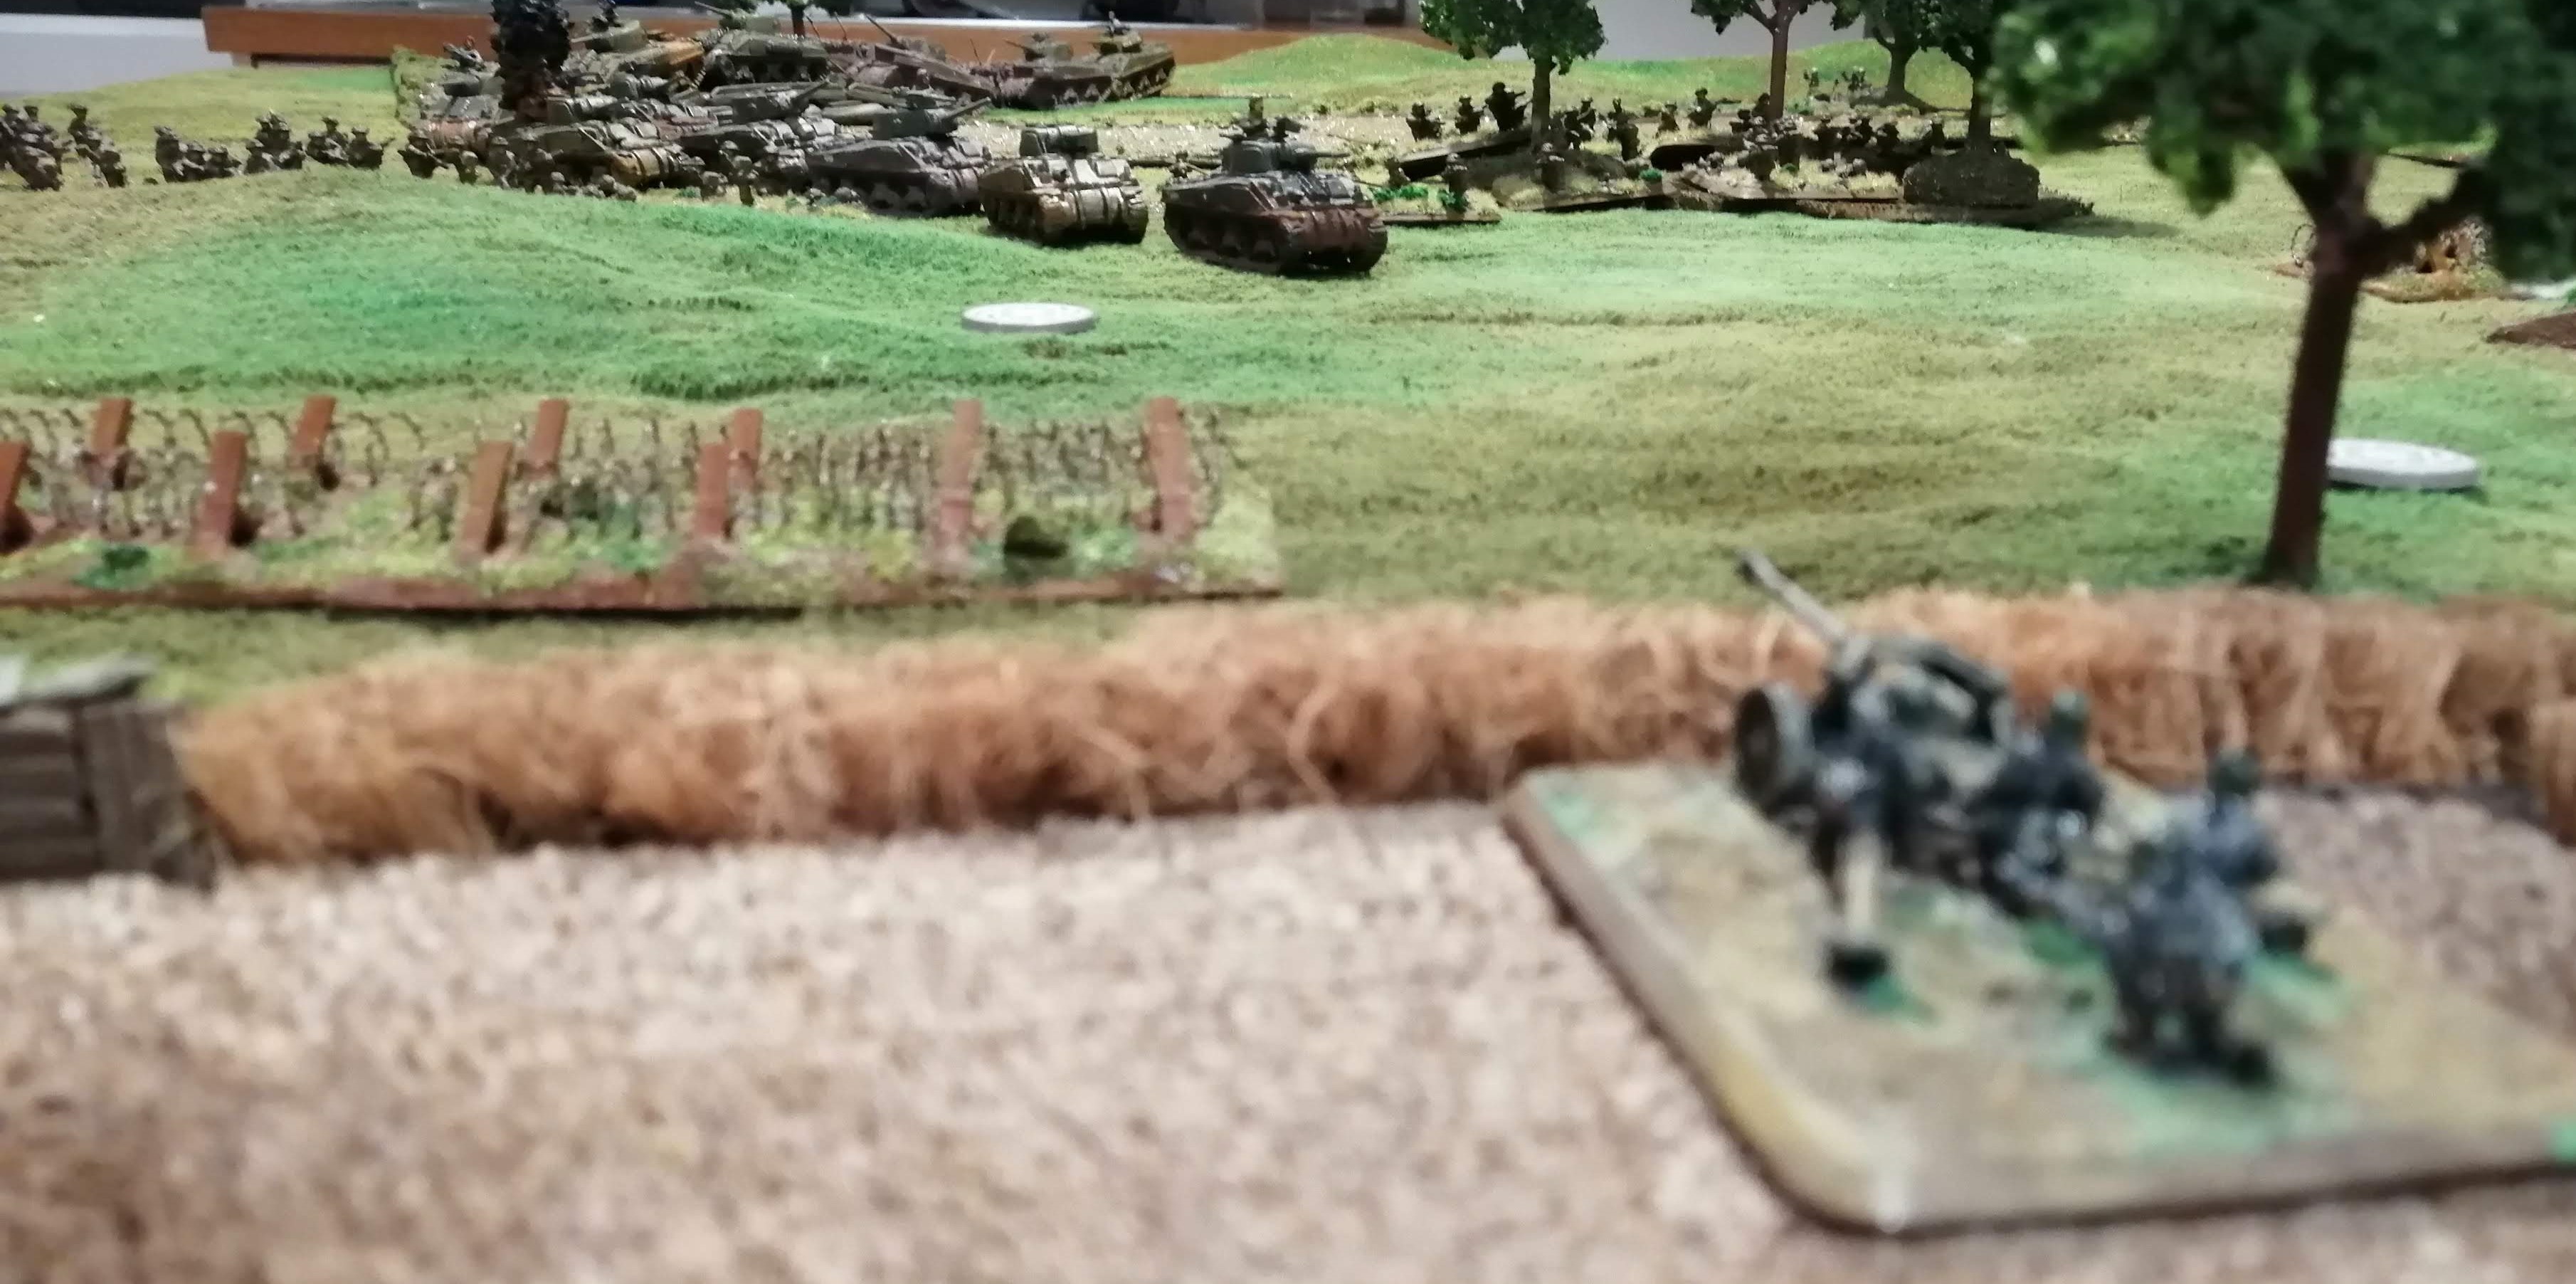
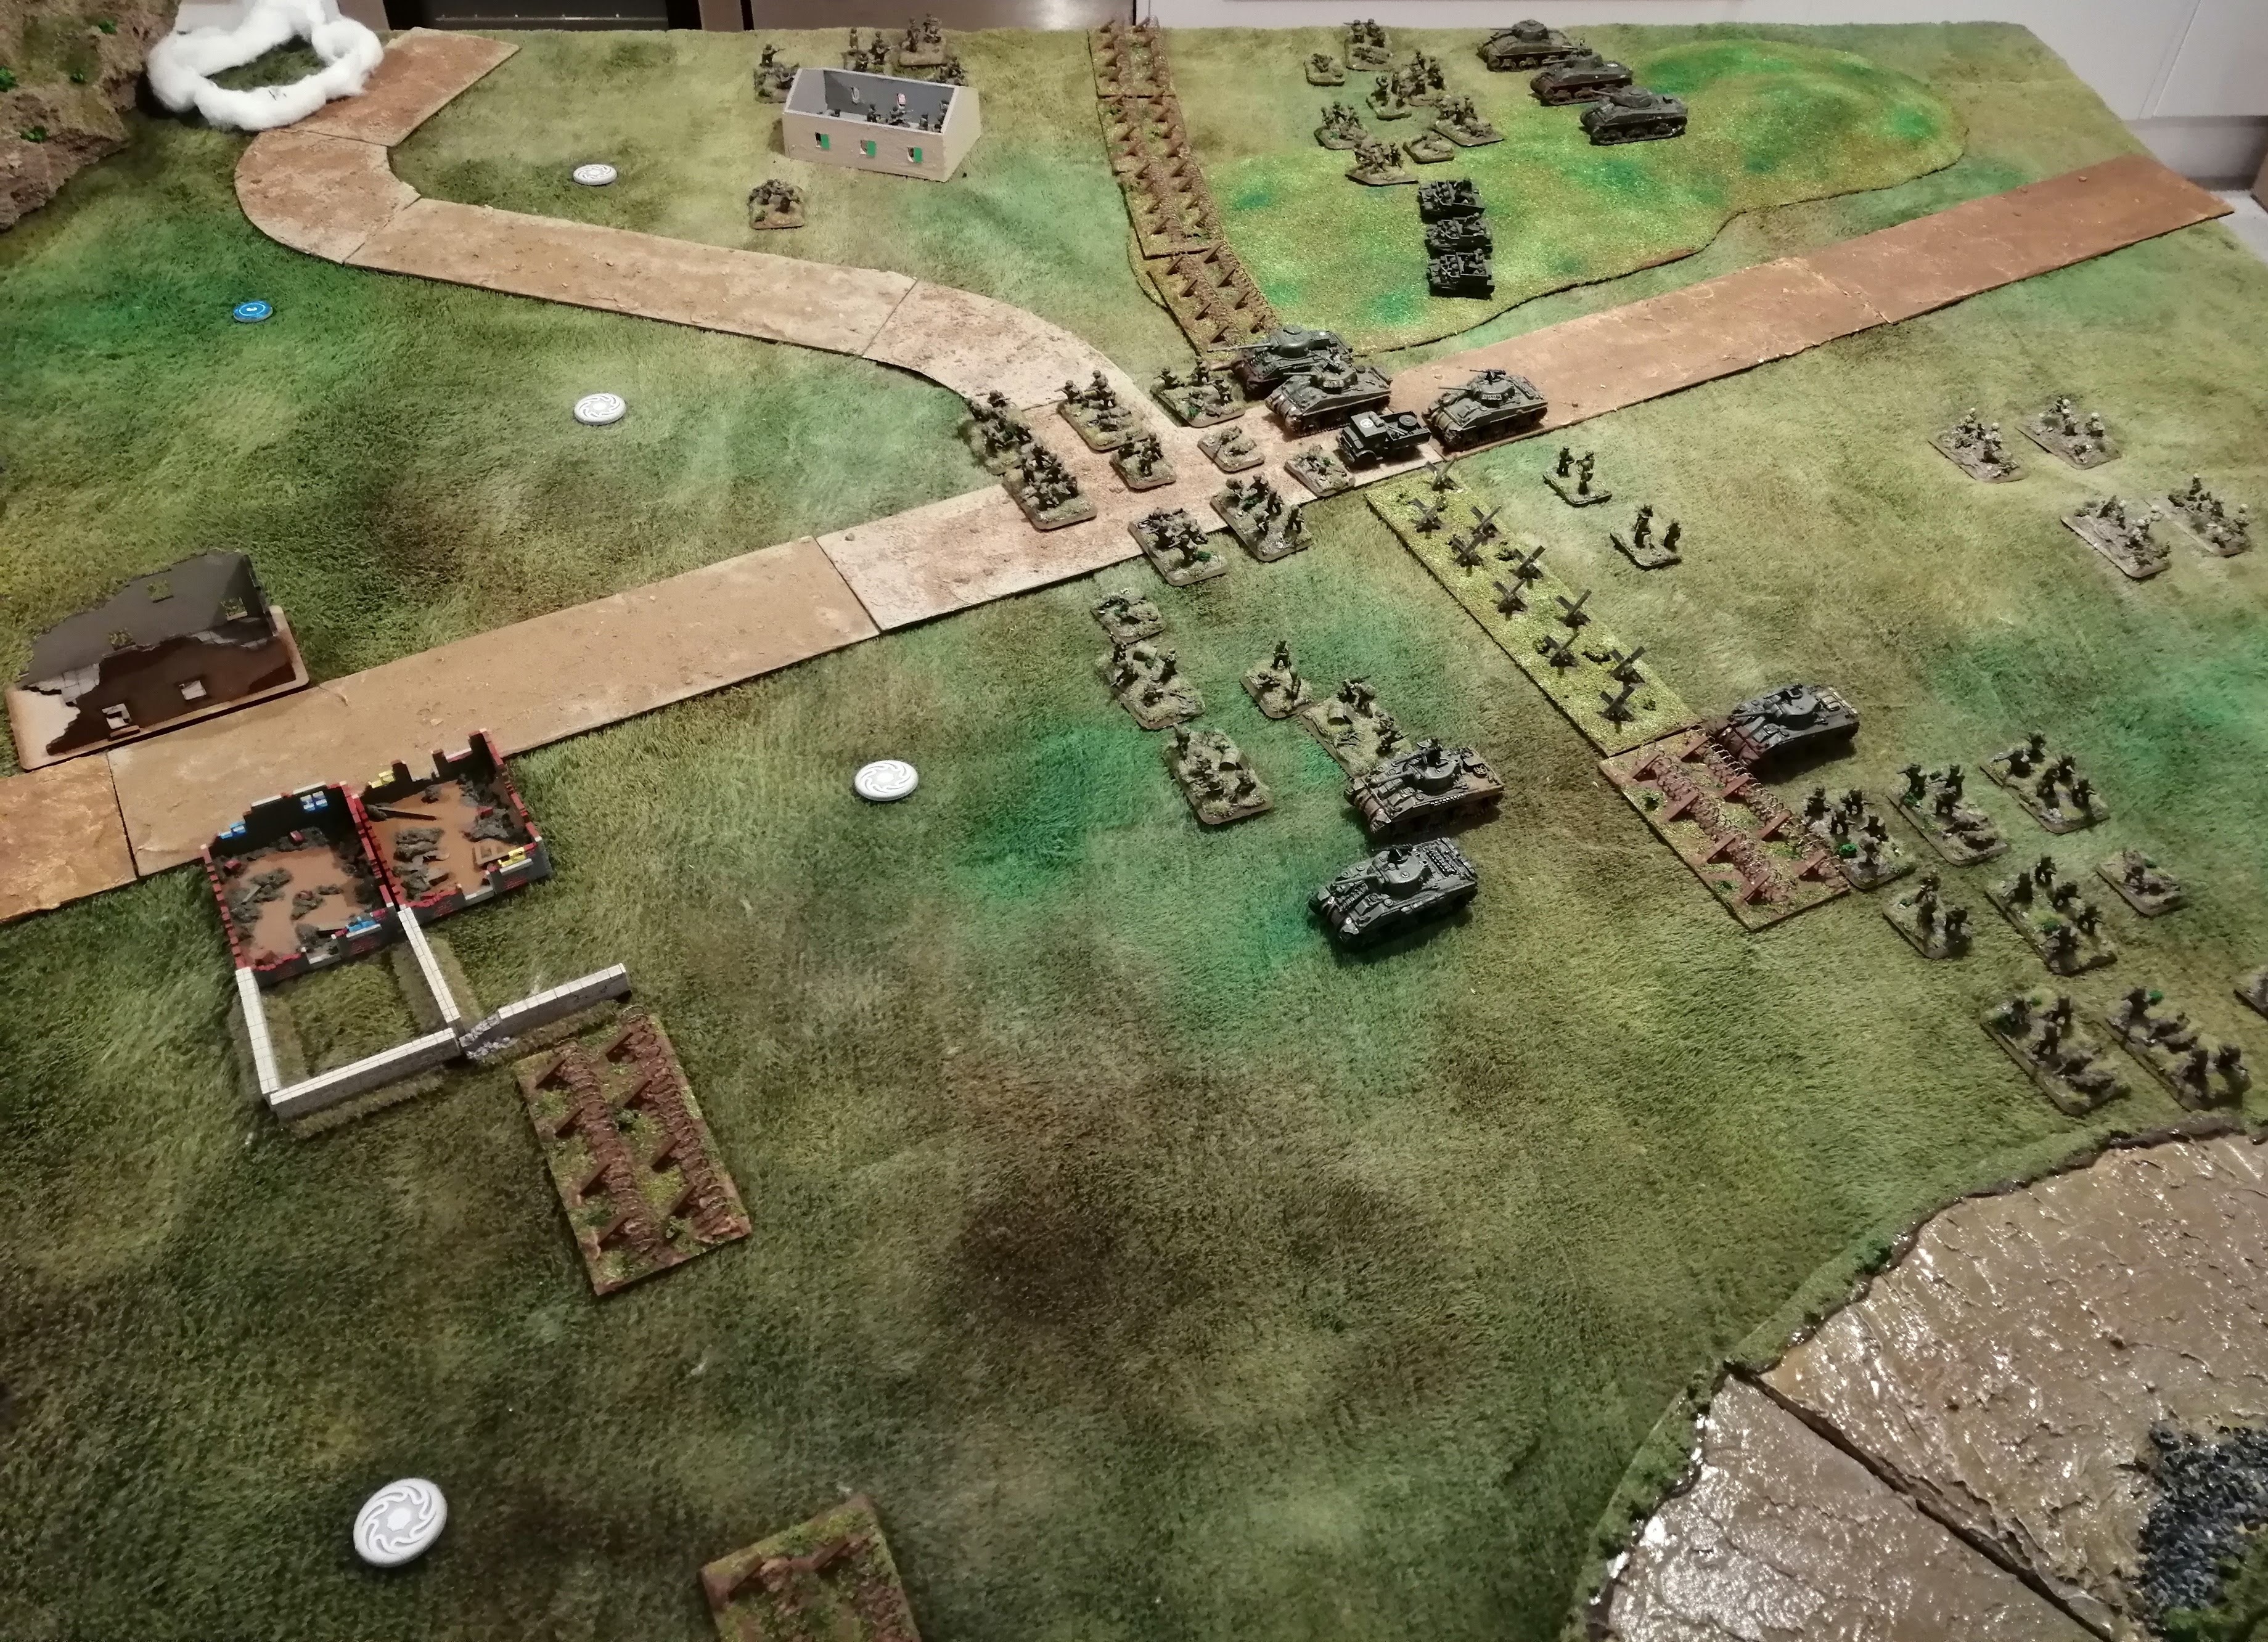
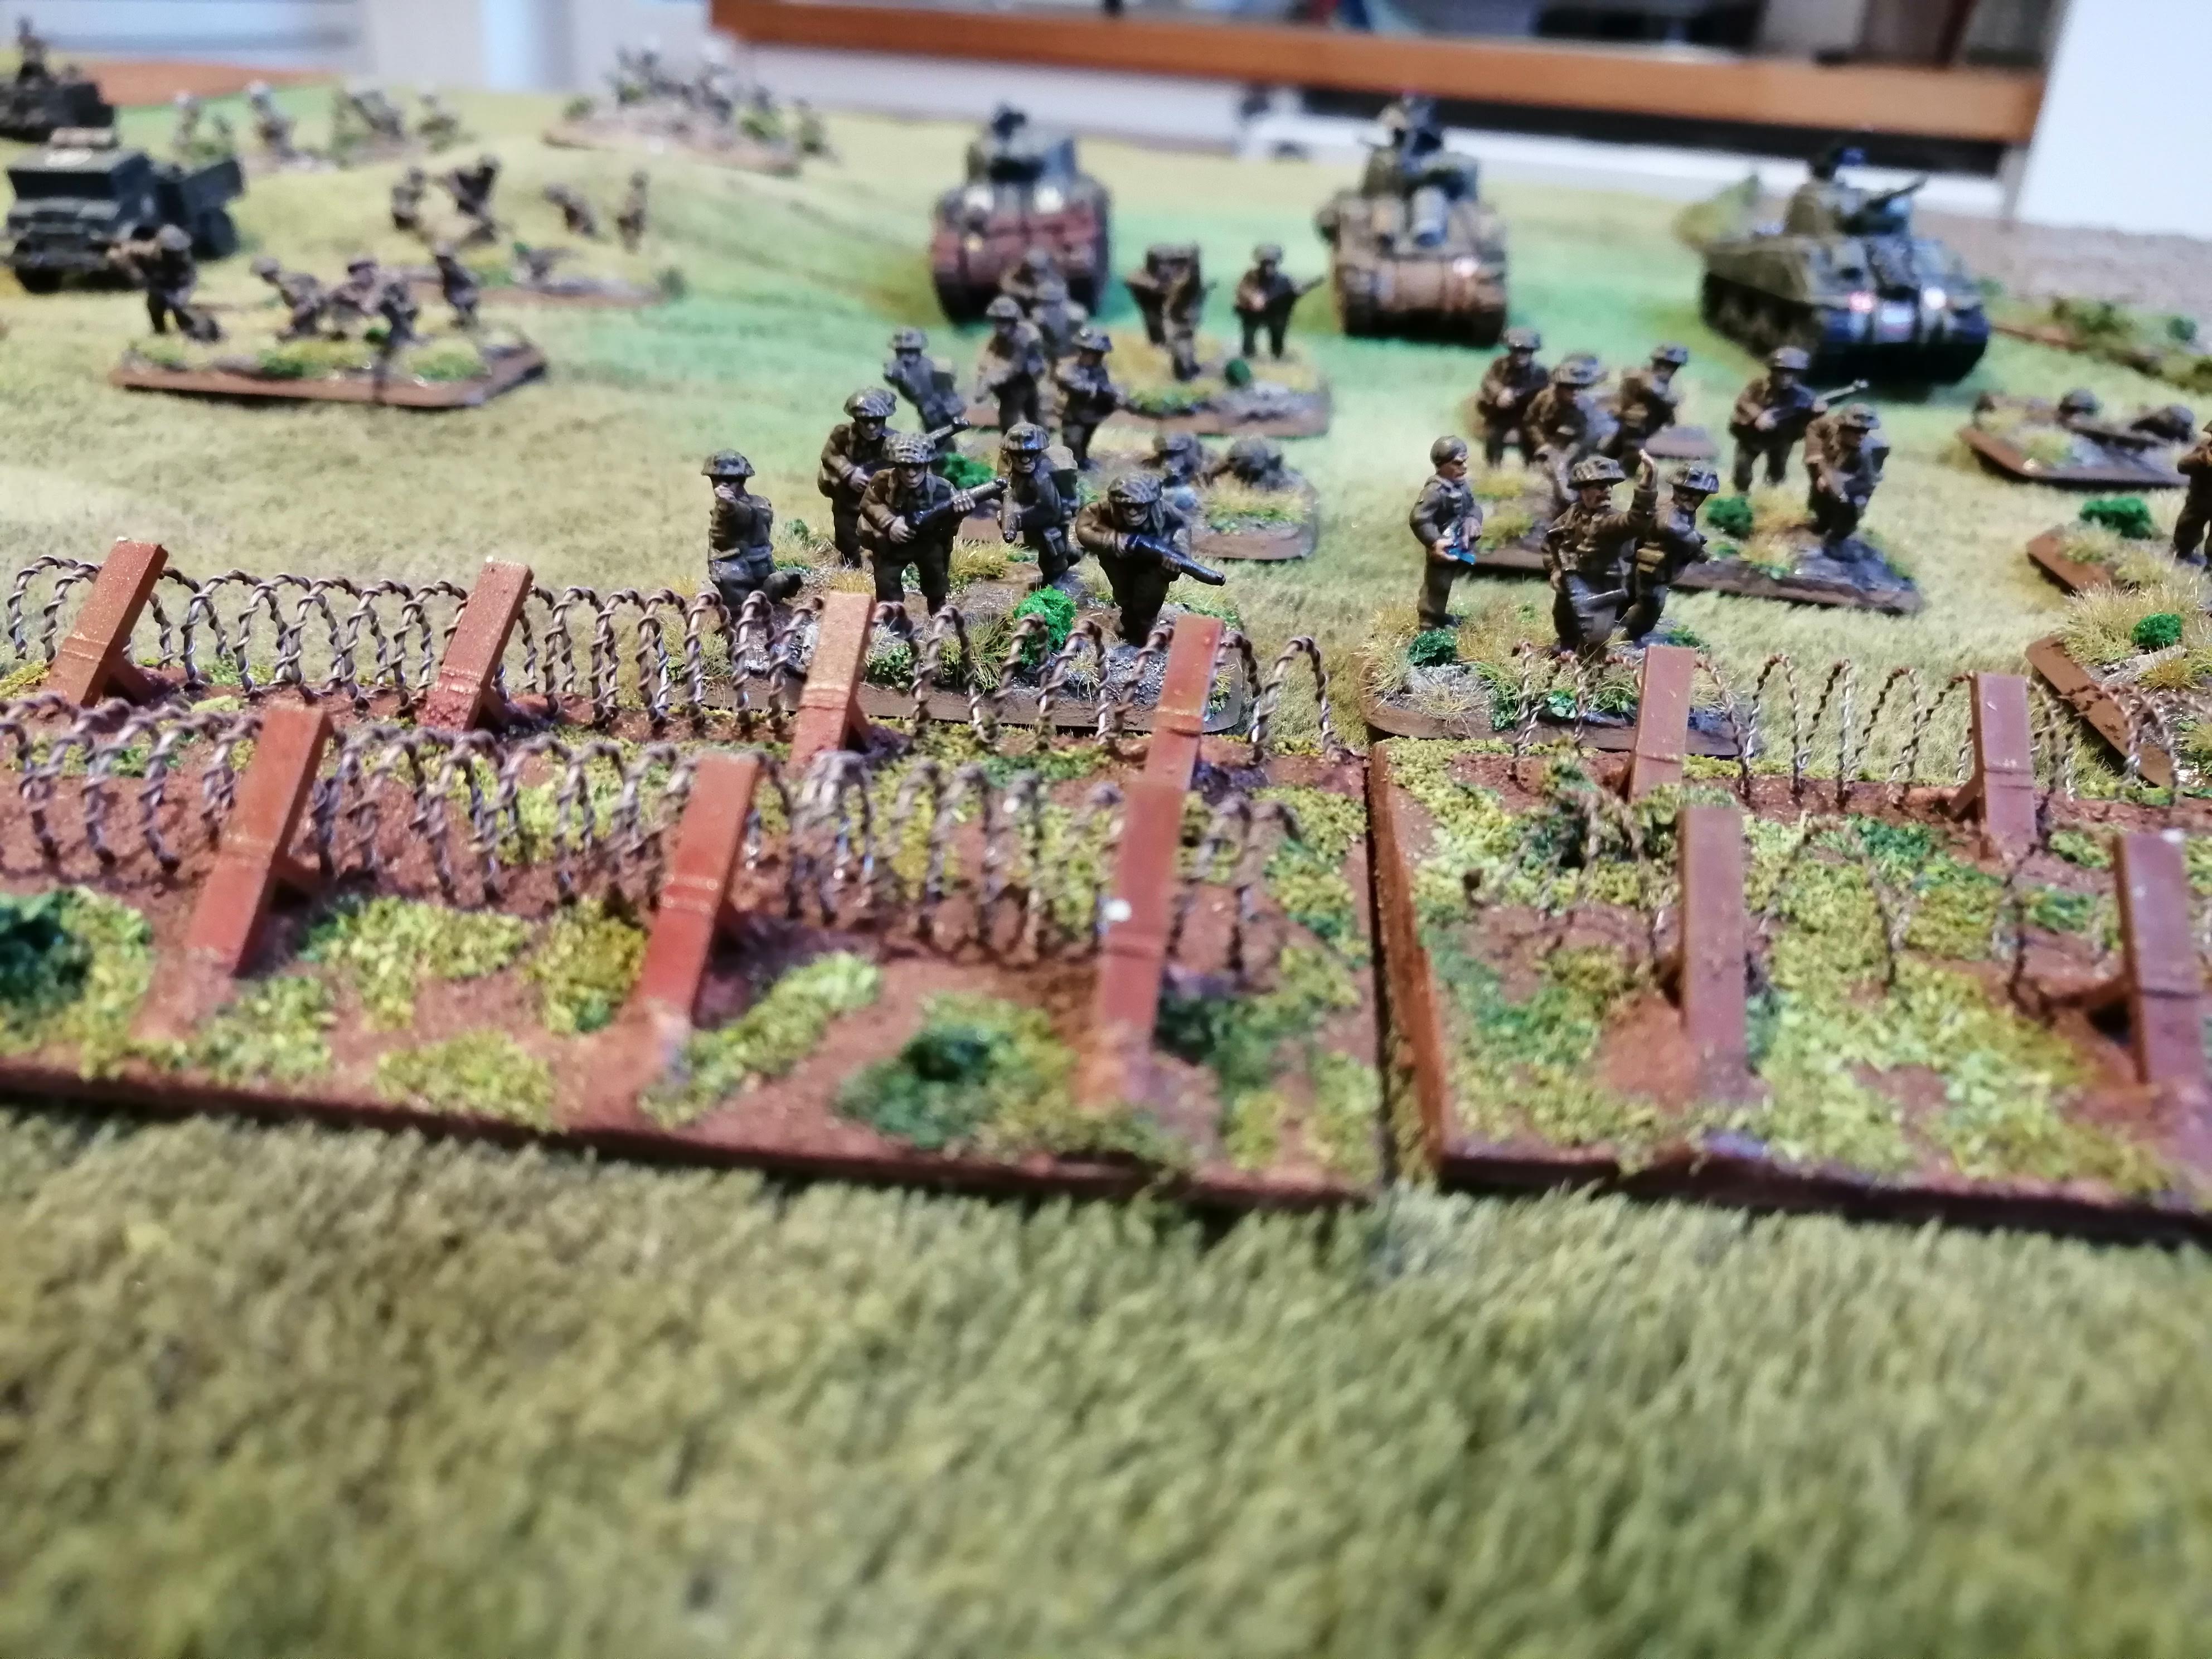
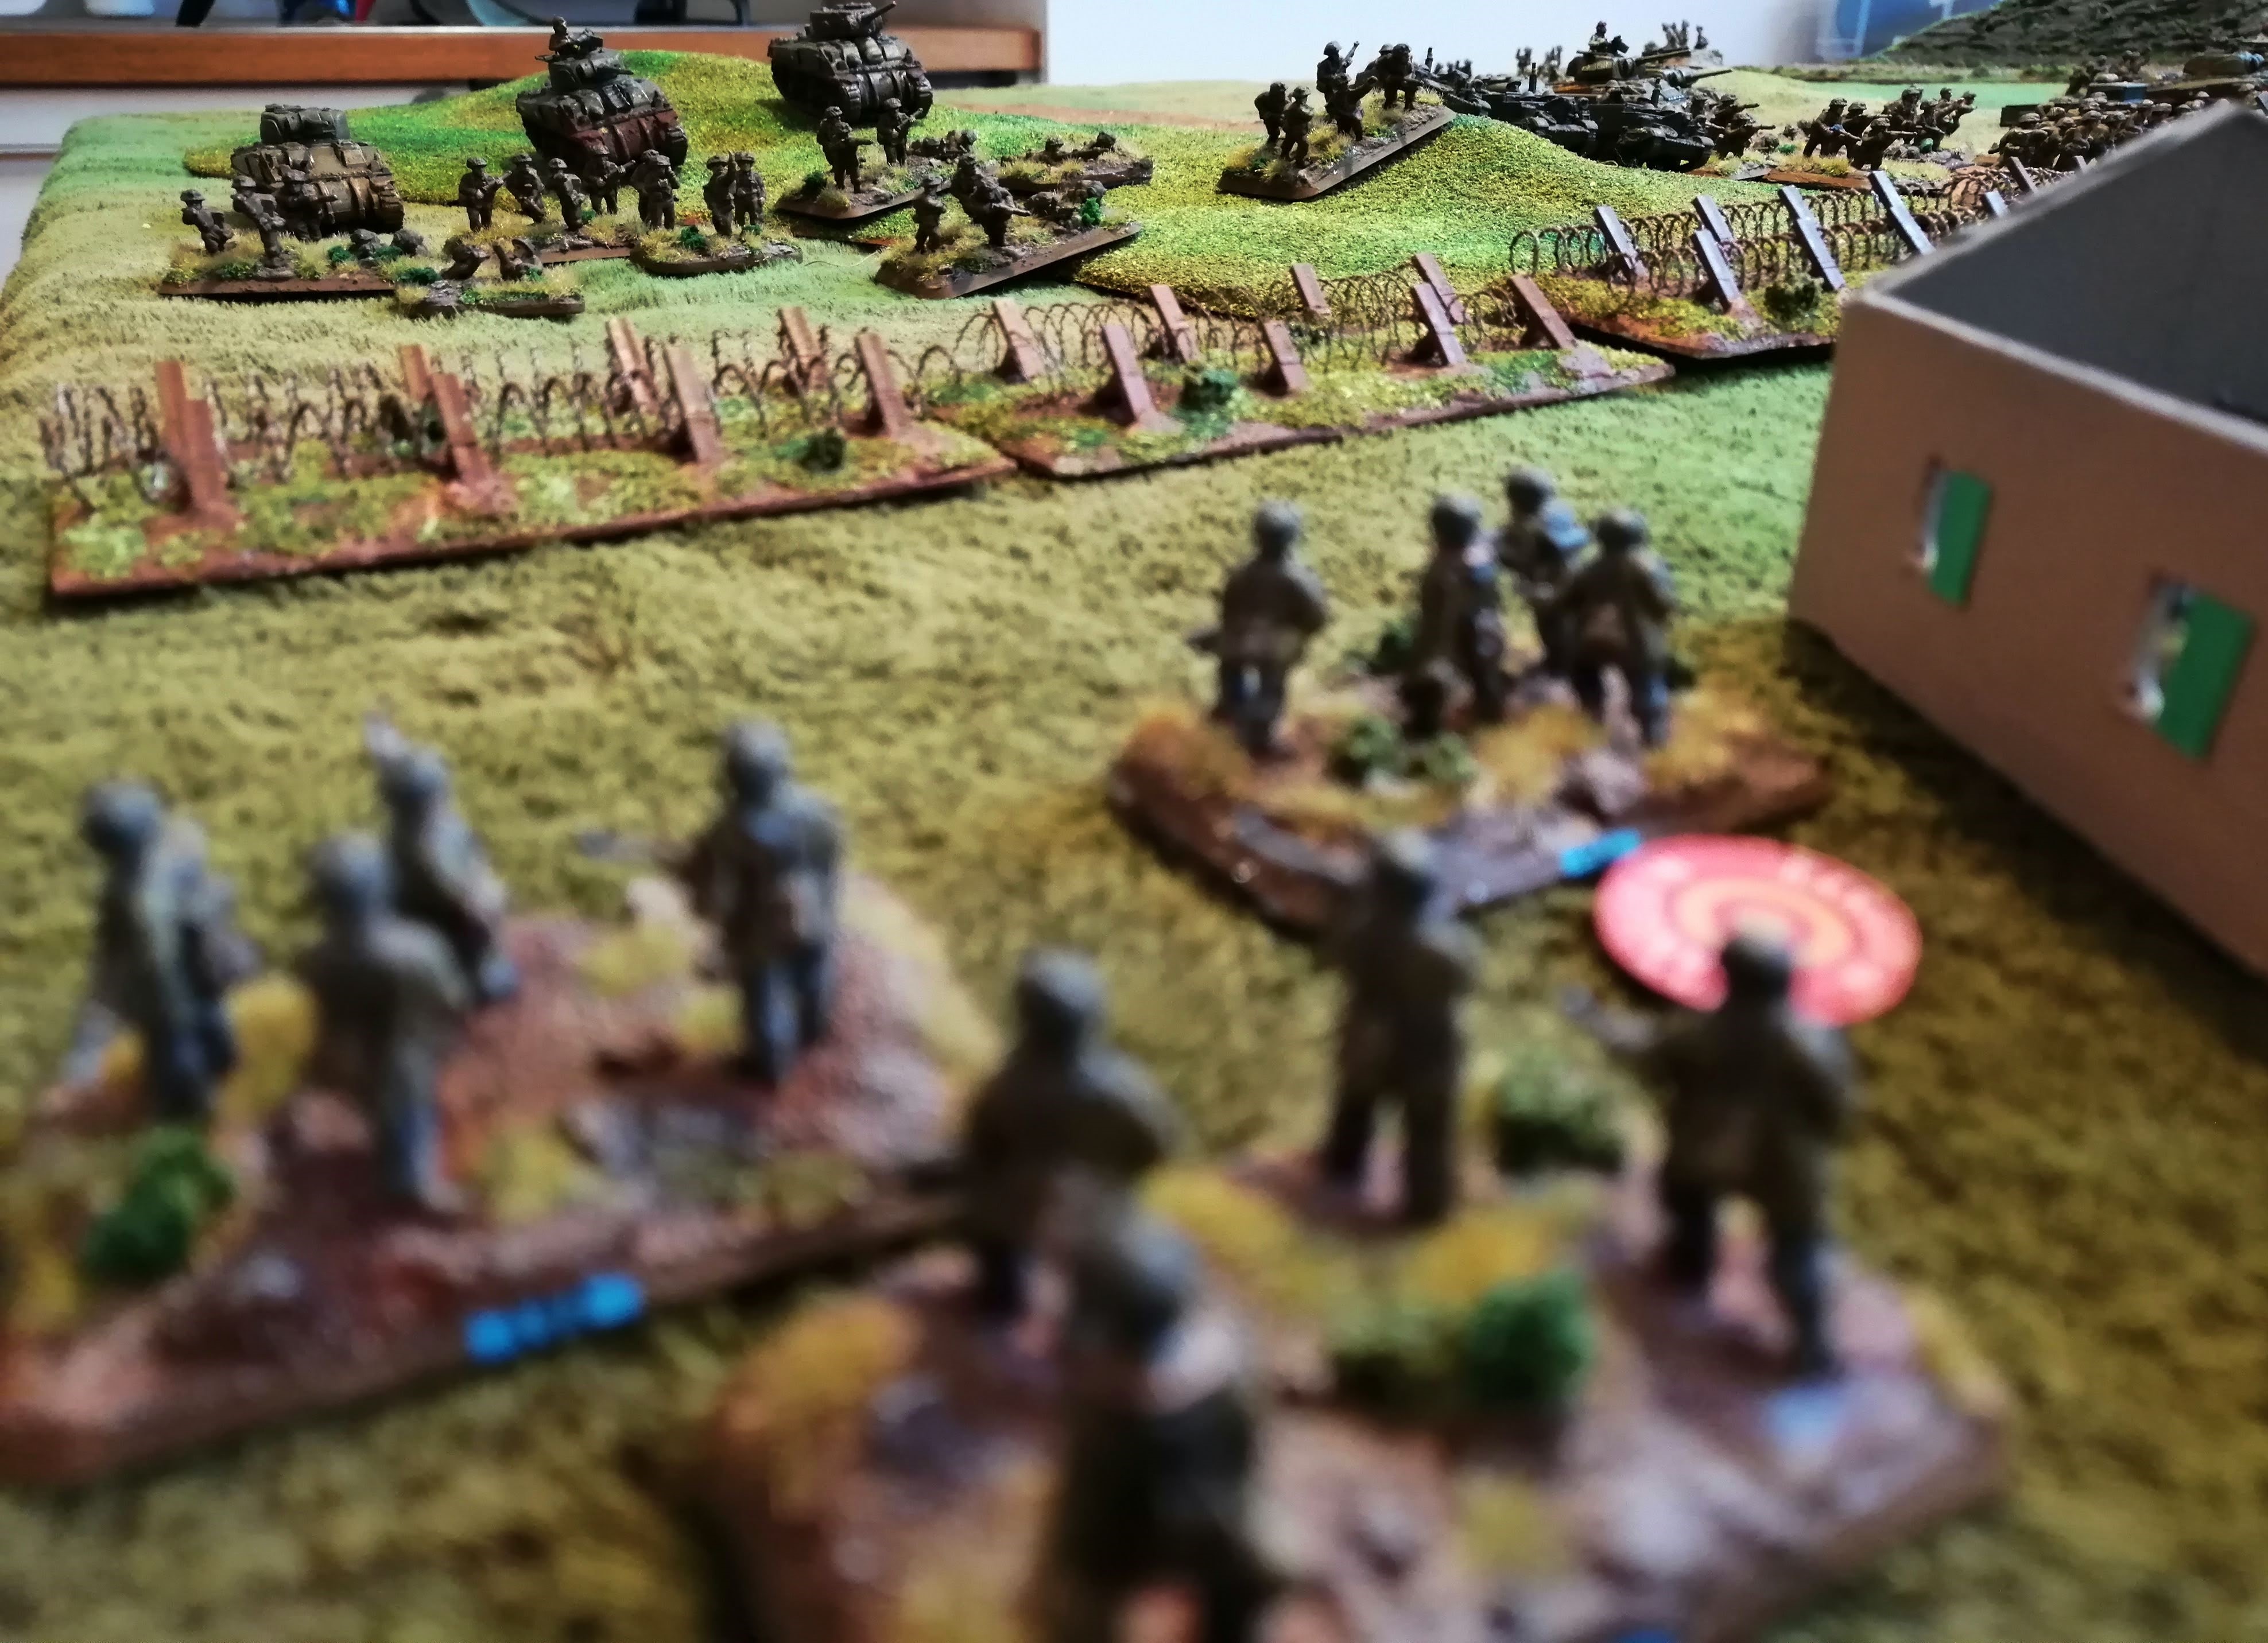
 The Allies launch their assault on the Grenadiers
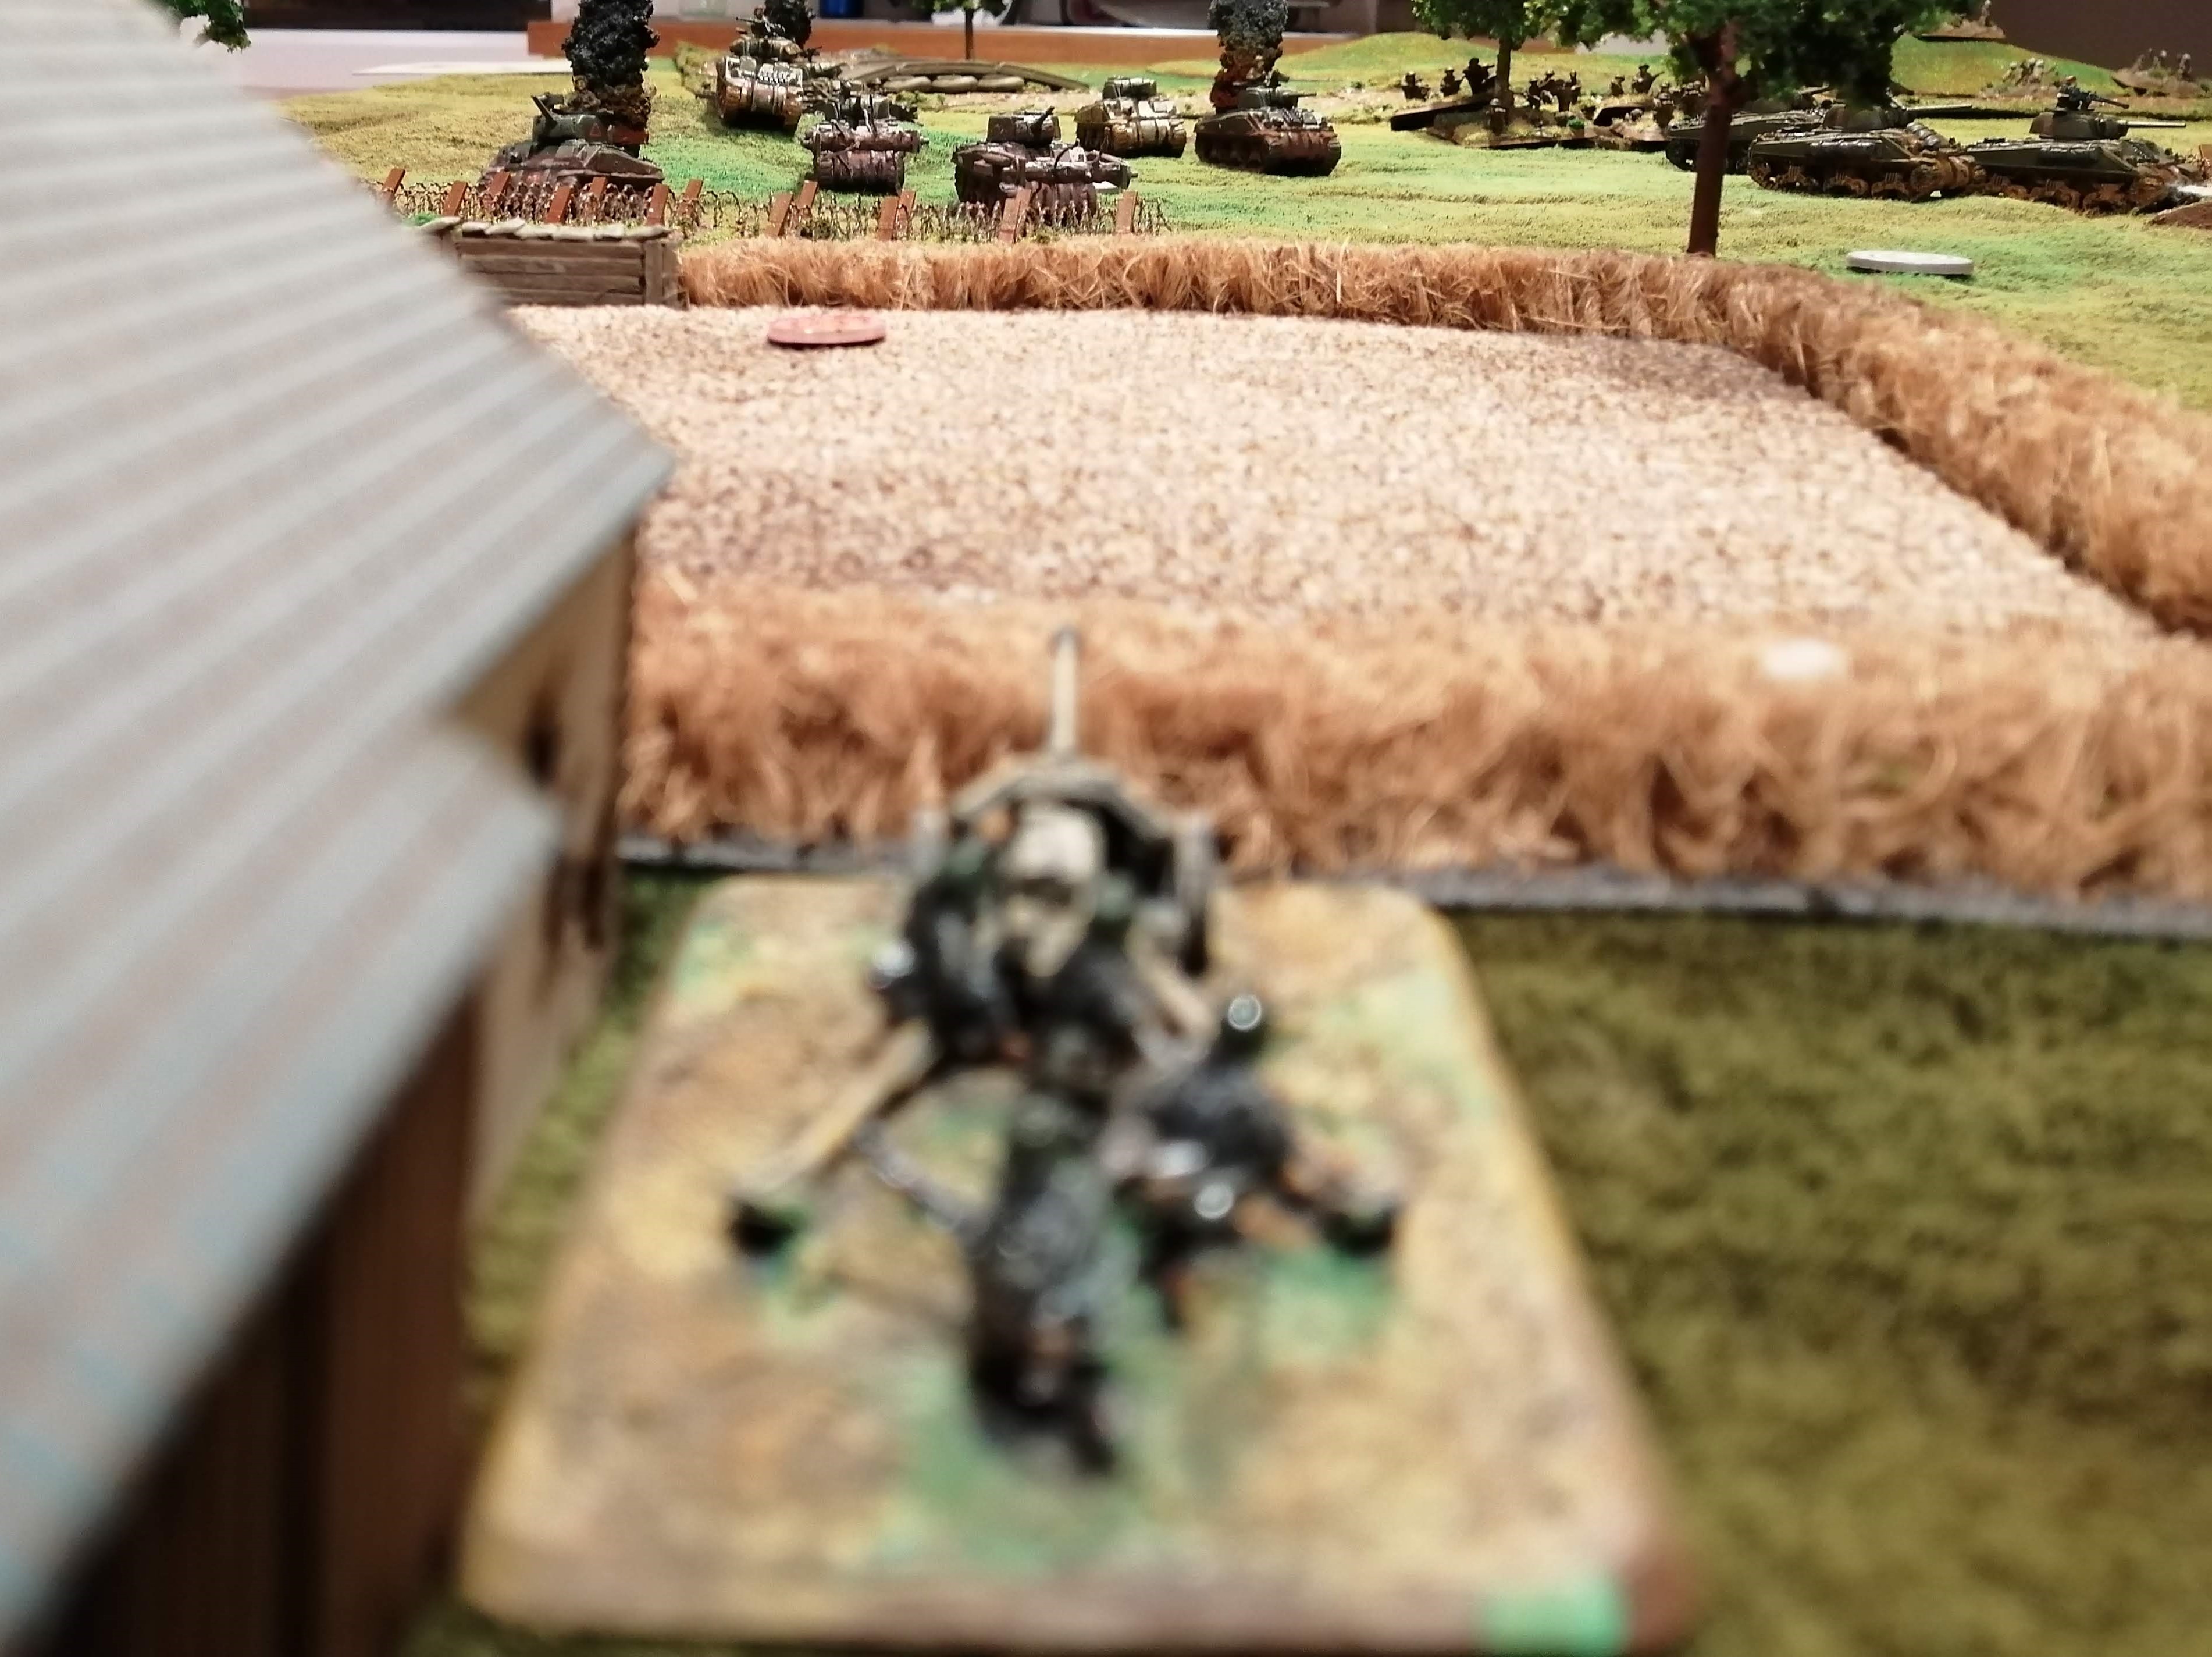 Another PaK40 breaks cover and opens up on the advancing 1st Canadian Armoured Brigade
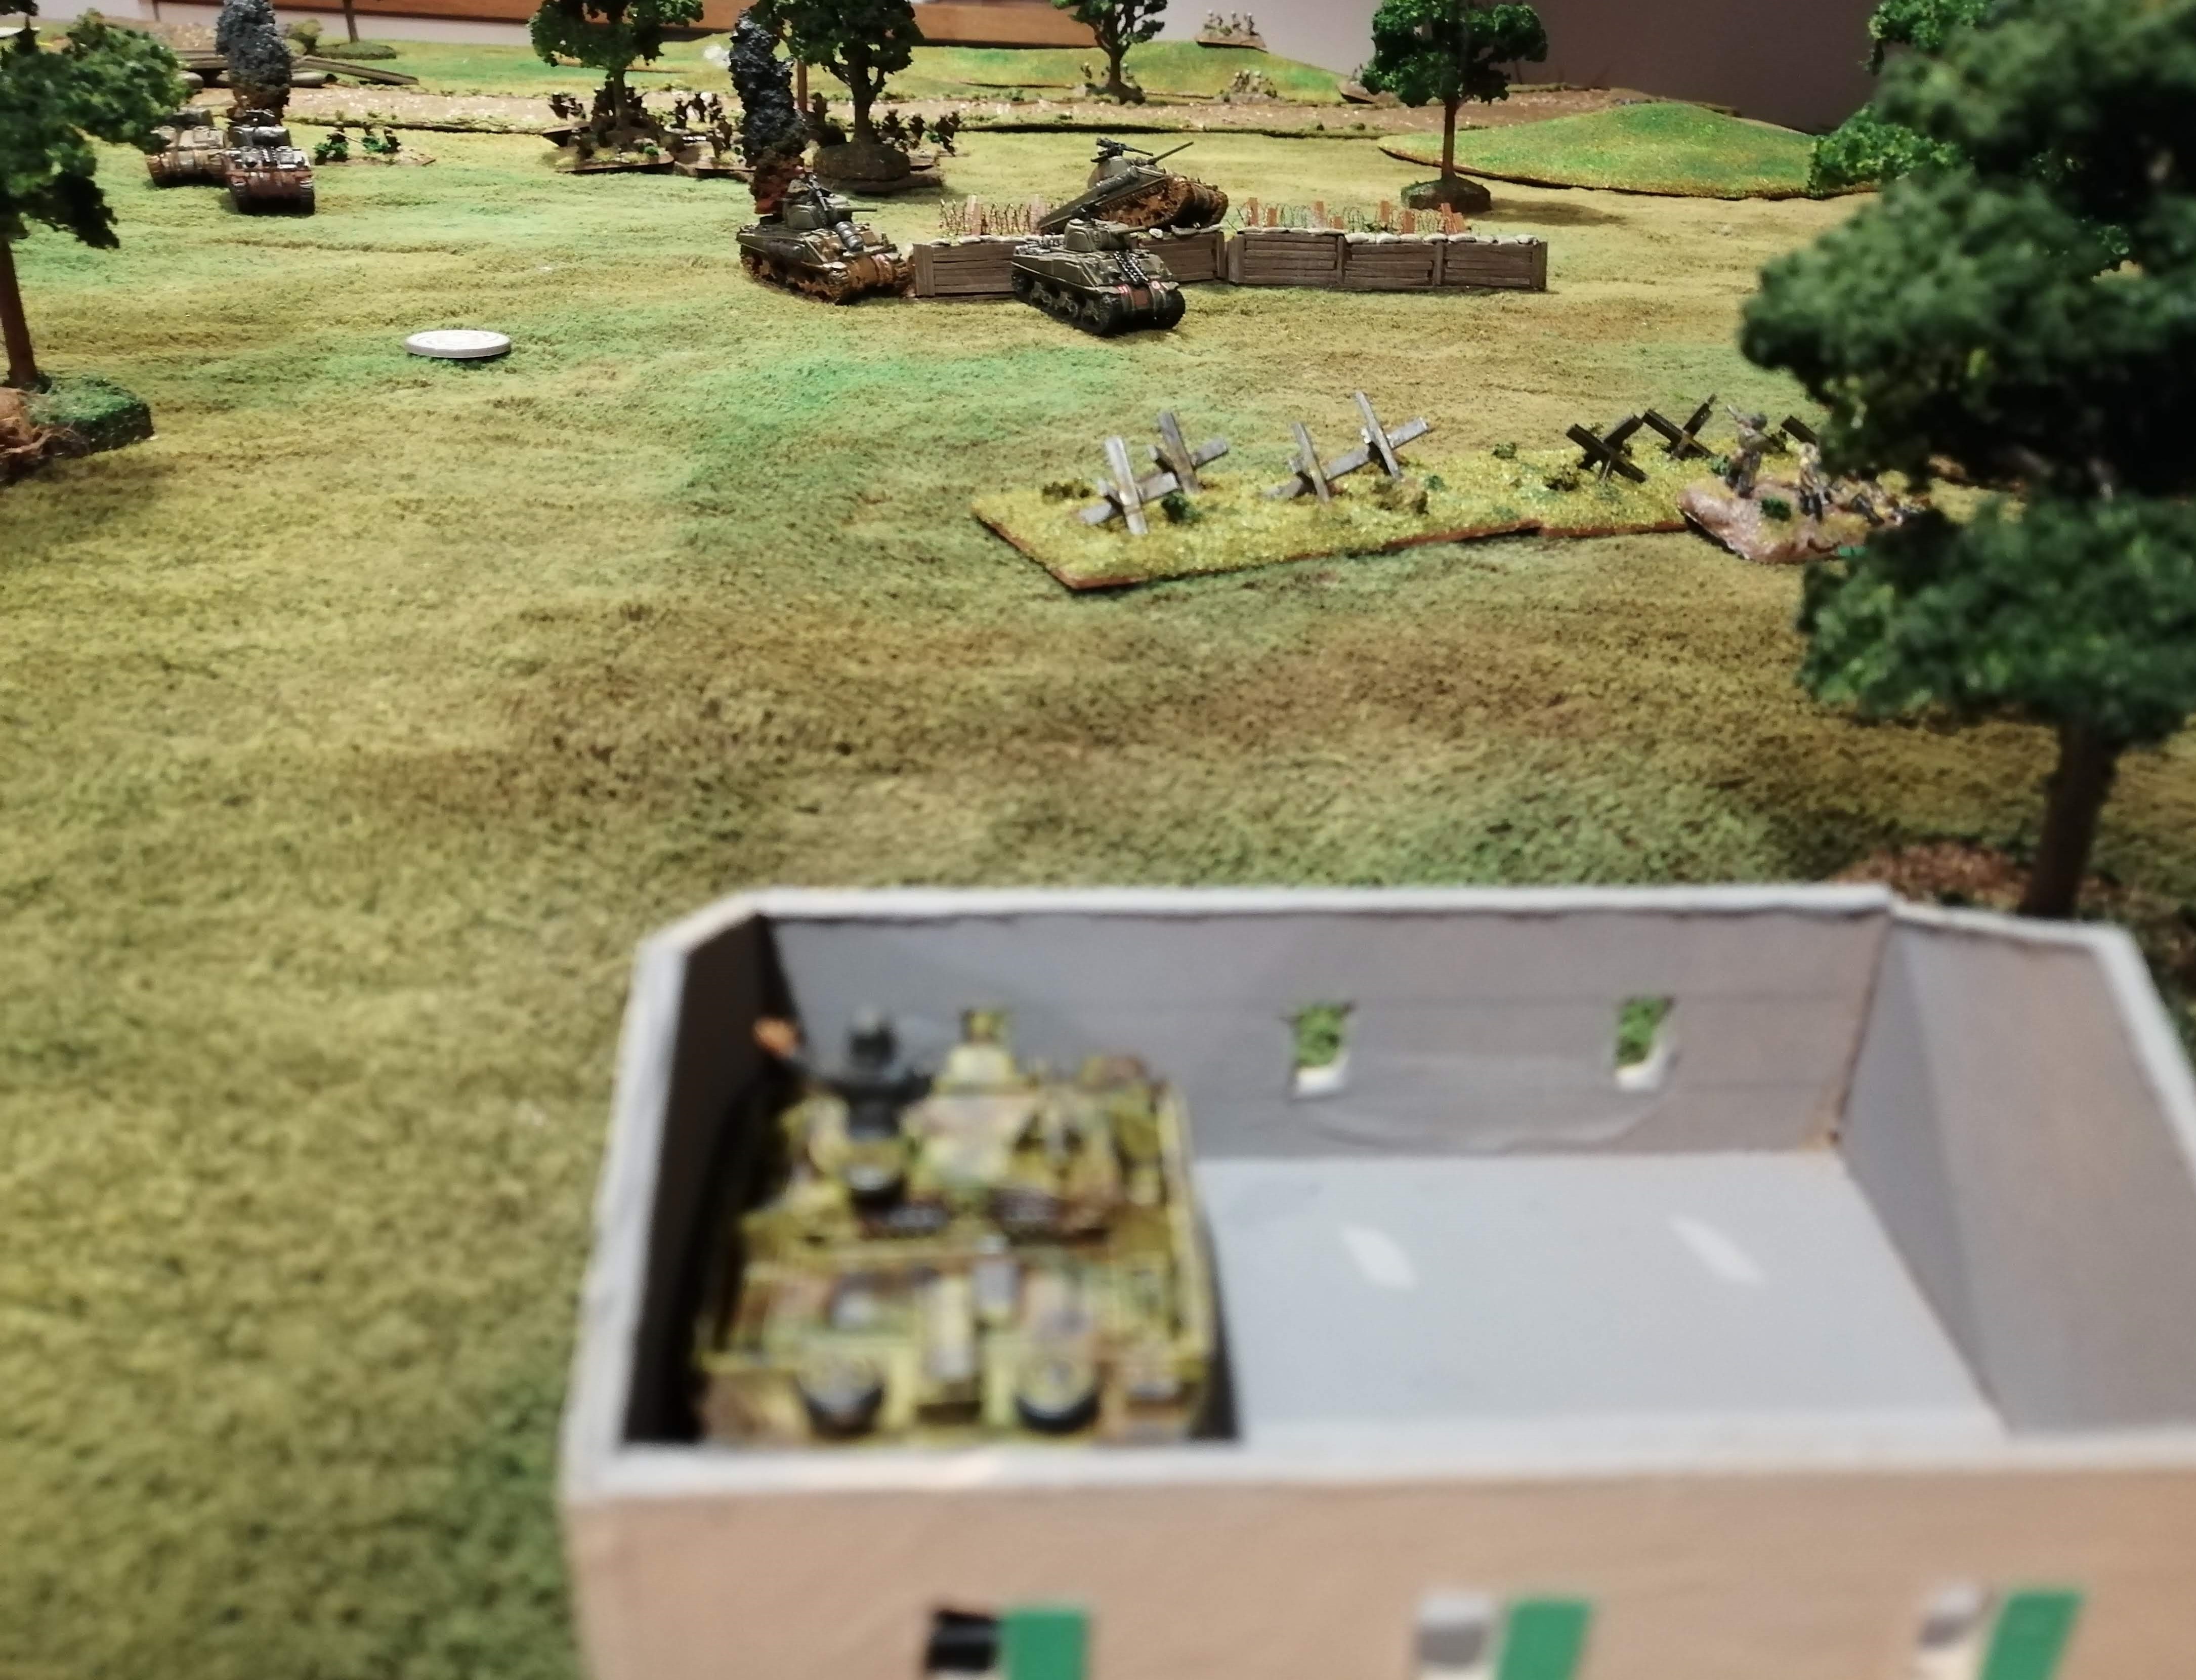
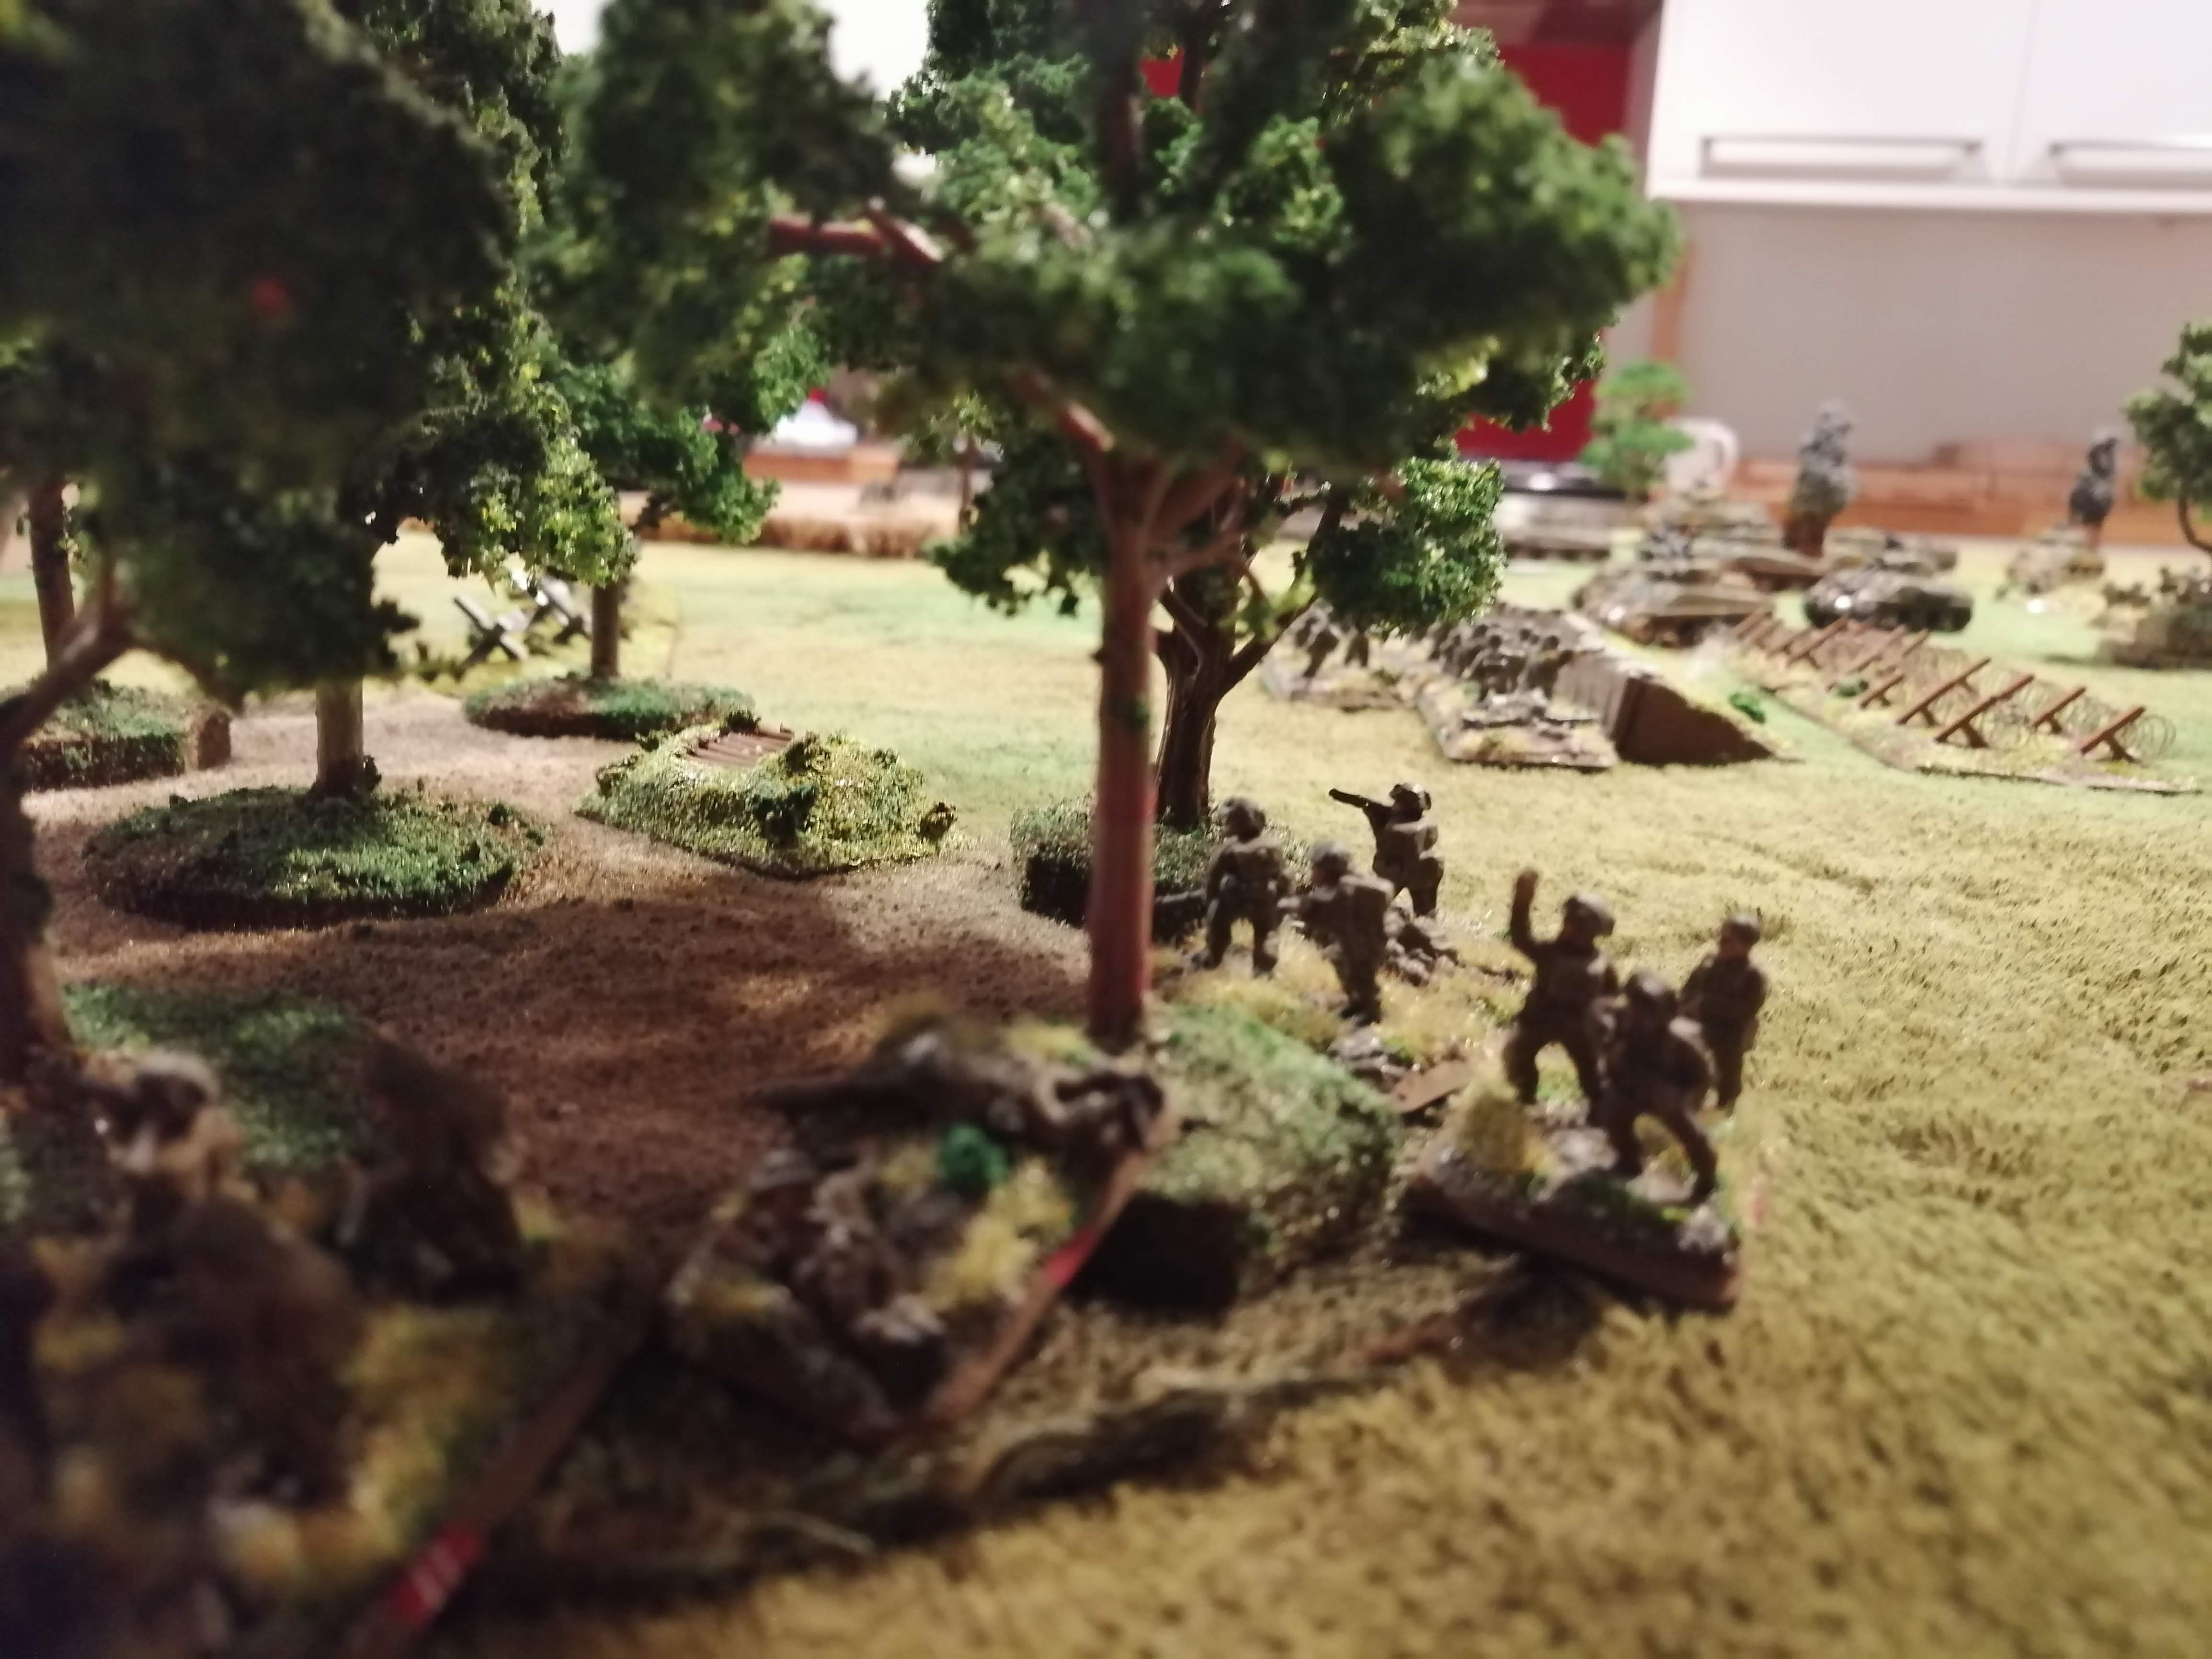 Red Platoon make it to the tree line and advance on the rear of the MG Nest you can see just left of centre
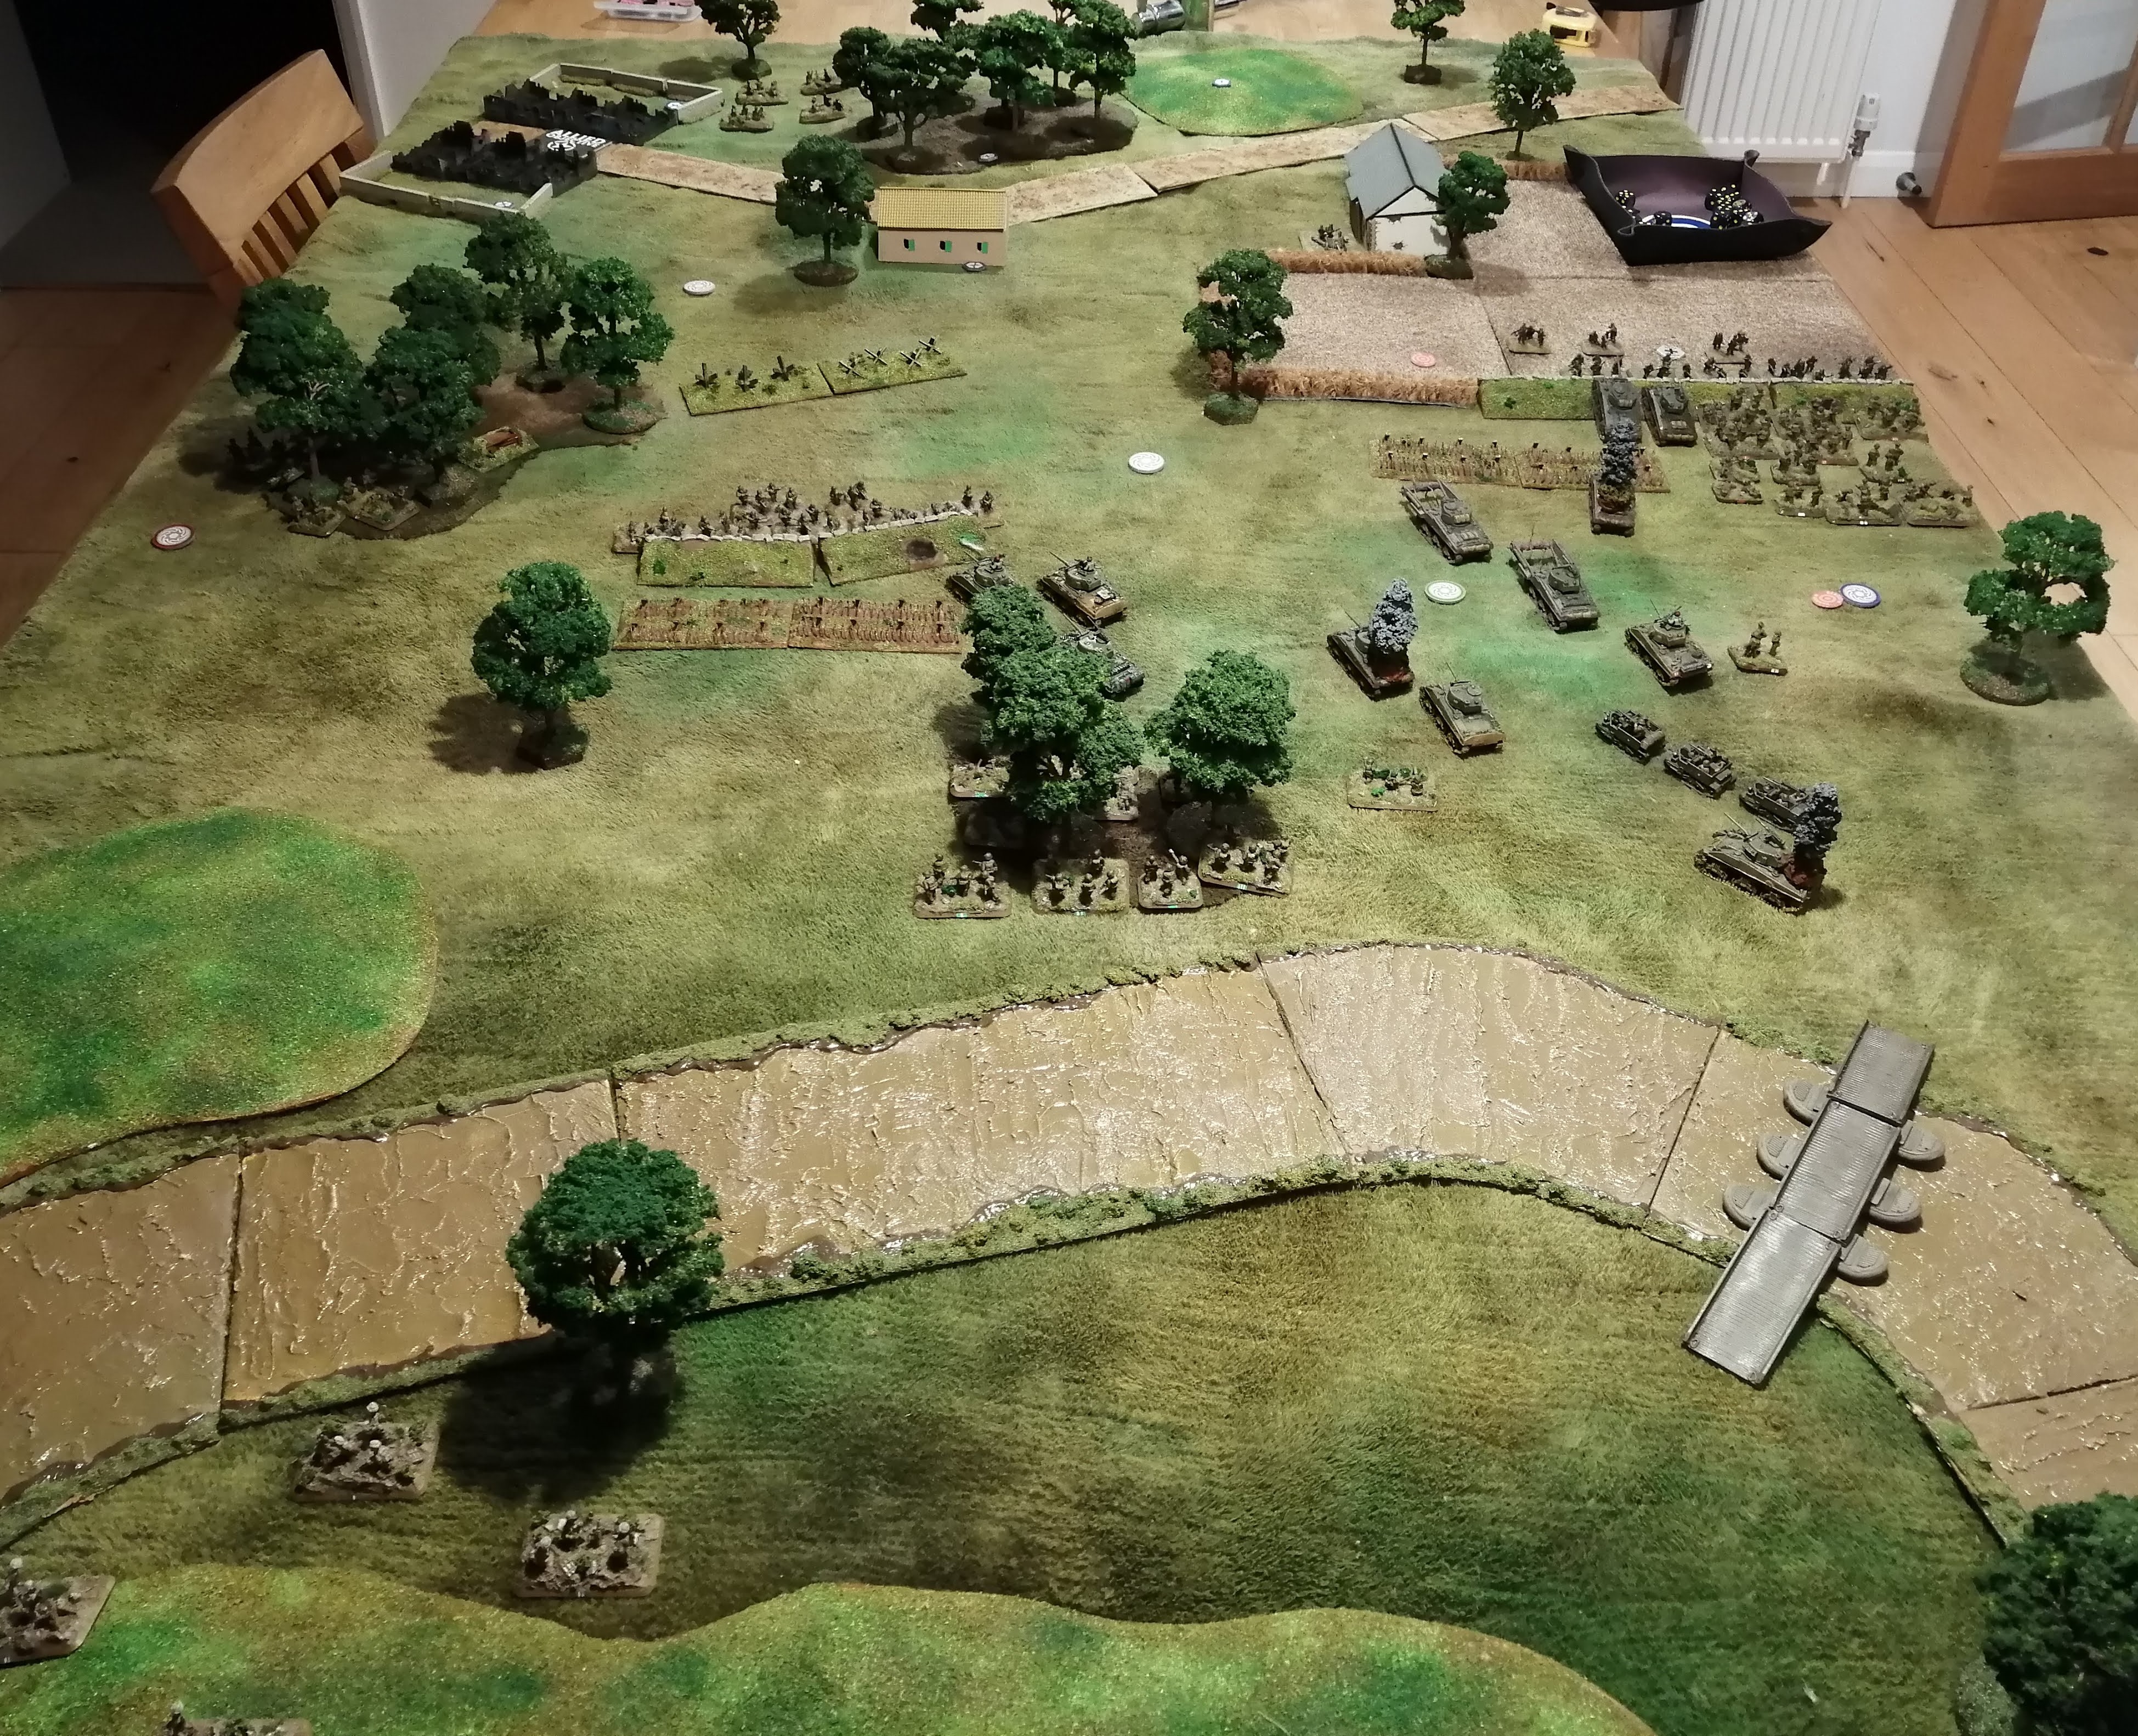 The Allied perspective
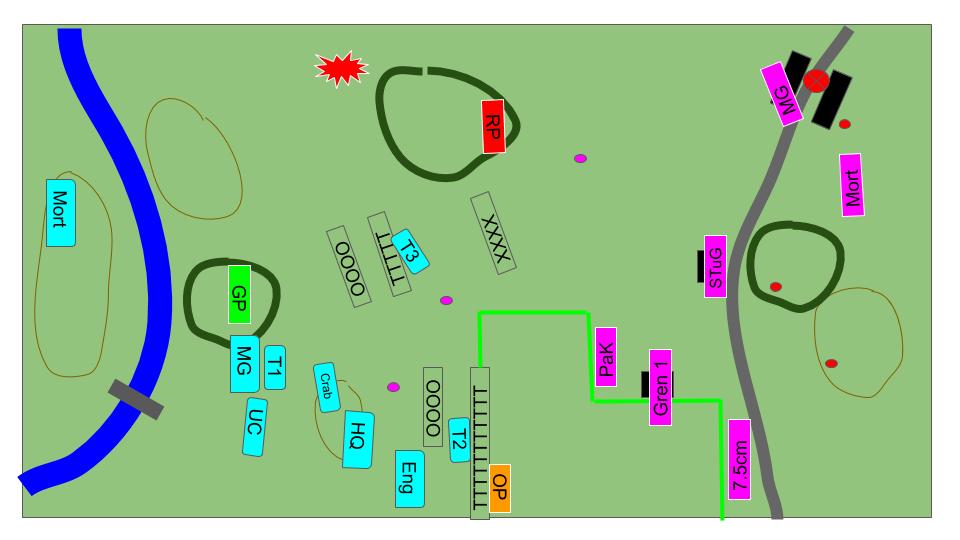
Operation Diadem (Battle 1 - Turns 1 and 2)
 Initial Deployment, from the Allied perspective
Turn 1 Allies:
With the smoke bombardment deployed, the Allies can try to get forward. The narrow crossing point will bottleneck the attackers so it is important to get as much armour across as quickly as possible. Faced with the MG Nests and dug in defenders, the infantry won’t be able to advance without the armoured support and with just 8 turns to cover the length of the board, time is critical.
With the above in mind, the Allies start their first turn by getting Tank Platoon 1 across the bridge, with Tank Platoon 2 on the bridge. The Engineer platoon and MG platoon begin to advance as well.
With the enemy behind a smoke curtain, dug in, gone to ground and at range, the Allies fail to score any hits in their first turn.
Turn 1 German:
With armour now on the German side of the Garigliano, it is imperative that the PaK40 earns its money. With no need to move this turn, the defenders begin to open fire. The Pak40 is instantly effective, punching straight through the lead tank of Tank Platoon 1 and destroying it.
Green platoon comes under fire from the Fallschirmjager and MG Nests and gets pinned but, being in the trees, the bullet proof cover protects them from damage. Red platoon also takes fire but escapes without damage. The German mortars fail to range in this round.
 End of Turn 1
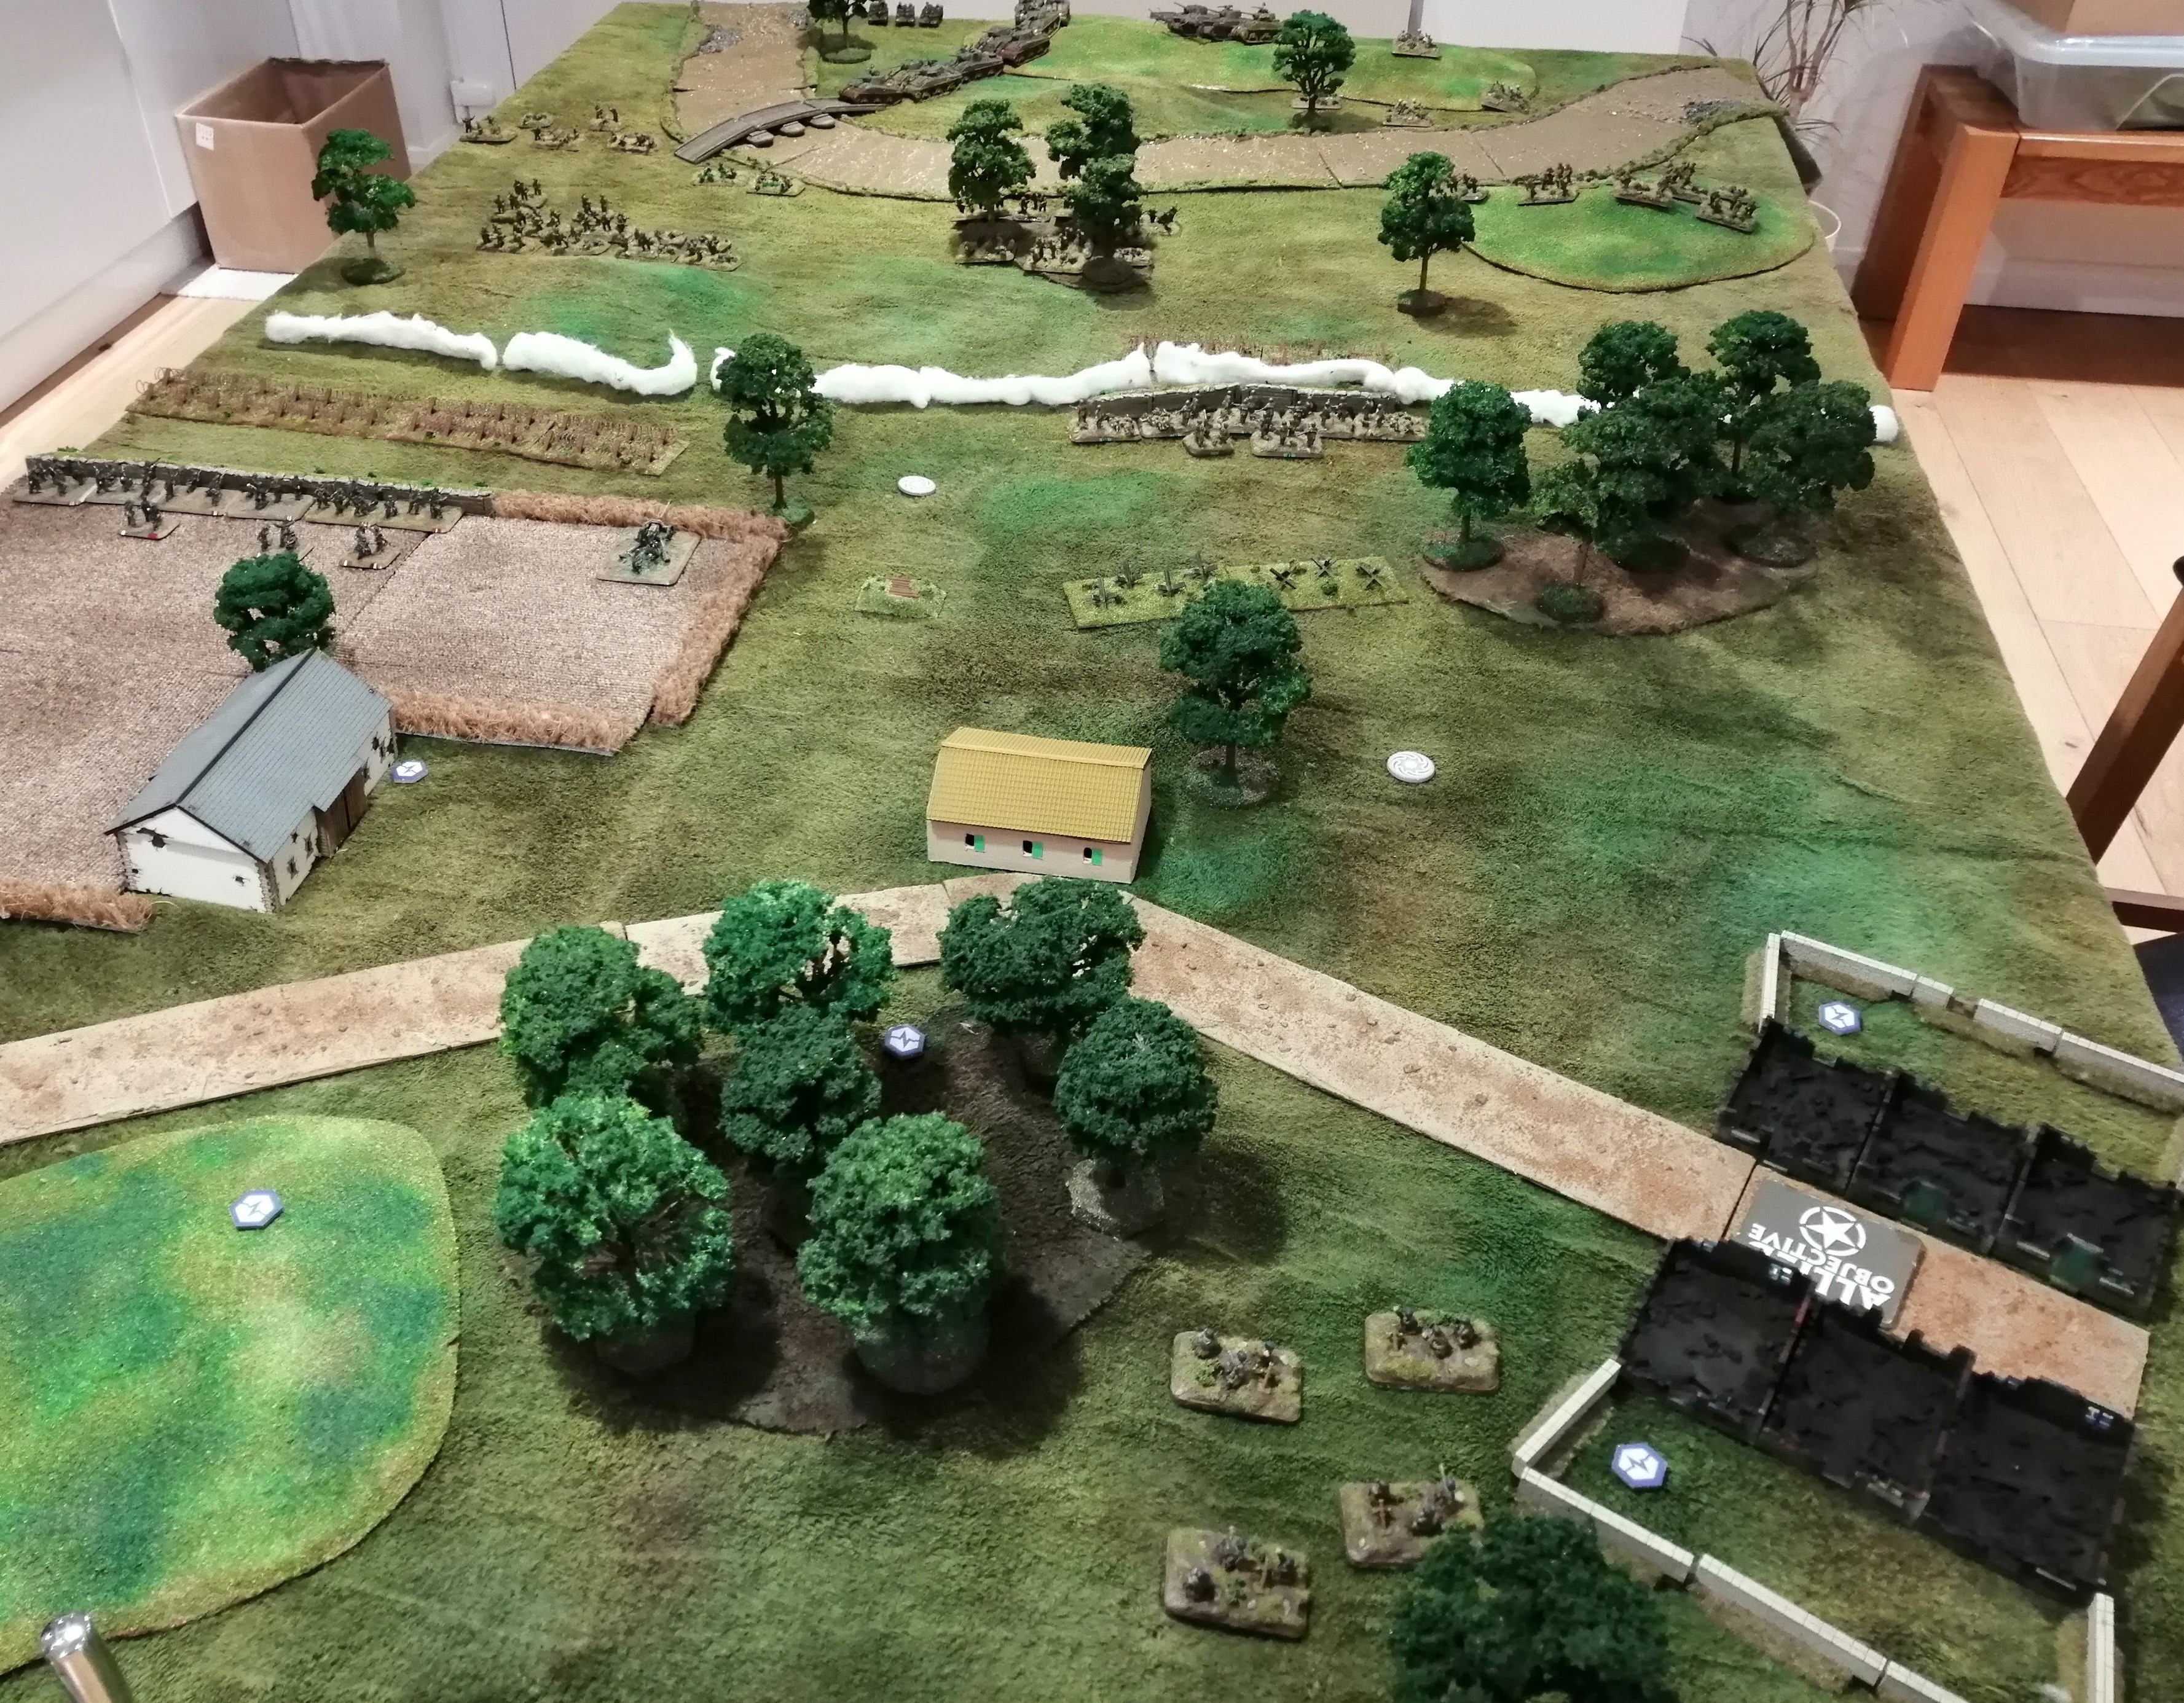

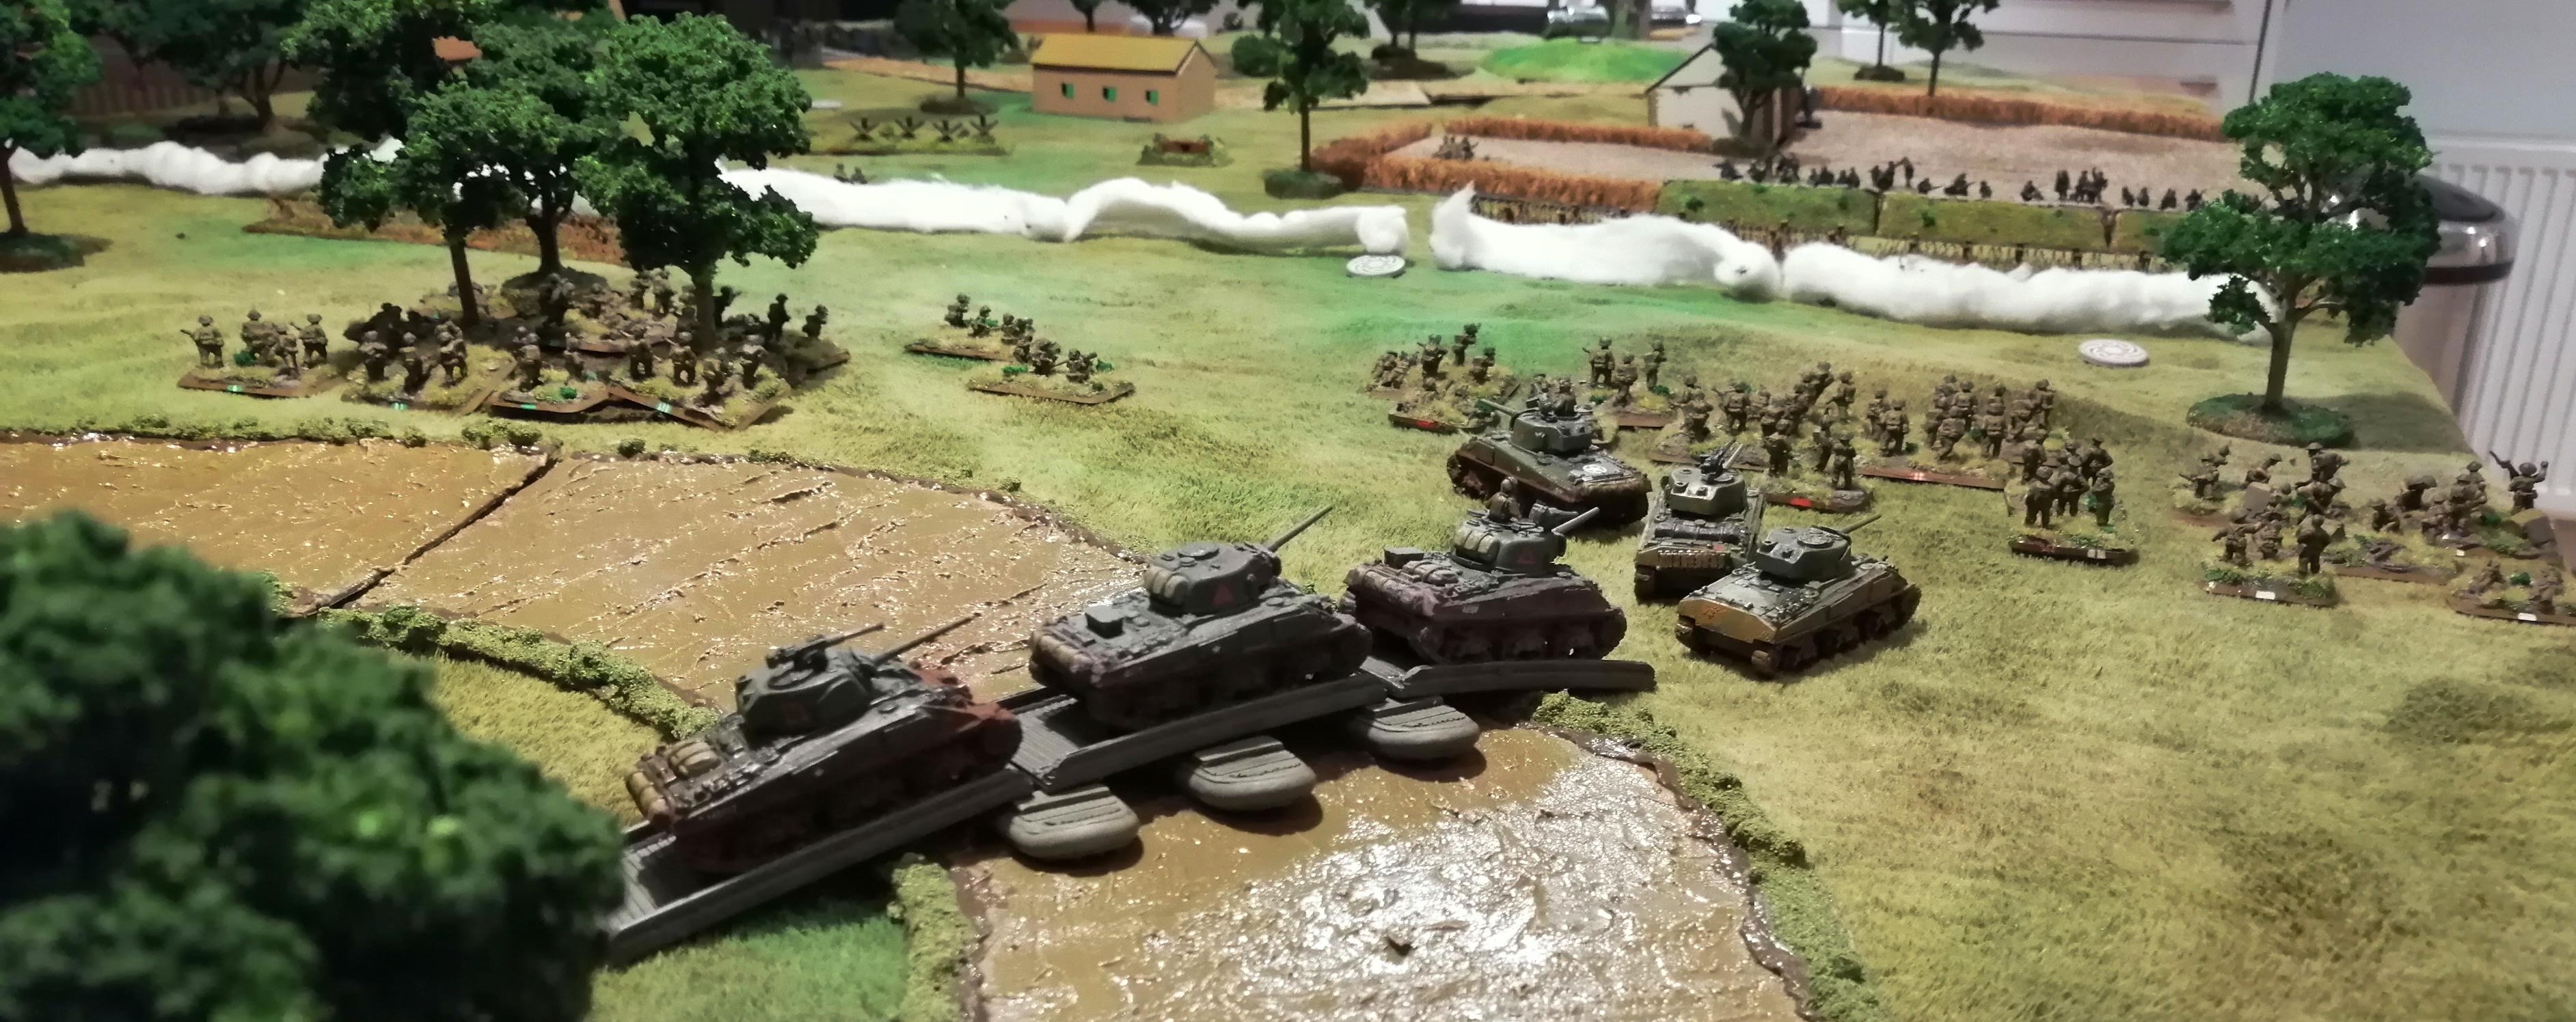 The 1st Canadian Armoured Brigade cross the Garigliano river using the pontoon bridges put in place overnight by engineers of the 8th British Indian Division
Turn 2 Allies:
Green platoon unpins.
Tank Platoon 1 continues to advance up the middle while Tank Platoon 2 reaches the other side of the river and turns to follow Tank Platoon 1. The remaining tanks continue to advance across the pontoon bridge.
The Engineer platoon advances up to the minefield token in front of the Grenadier platoon and finds that the token is a dummy – so no mines to clear this time!
The mortar ranges in on the PaK40, looking to knock it out to allow the tanks some breathing space. Despite ranging in first time, they fail to hit the PaK40 but do kill a team from Grenadier Platoon 1, with the heavy mortar shells making light work of the dug infantry.
The tanks miss with their shots but the MG platoon rake the Fallschirjager platoon and pin them.
Turn 2 German:
True to the grit and determination of the Fallschirmjager, they are able to unpin however the Grenadier’s do not, reducing their fire power.
The PaK40 once again does its job, as it scores two hits against Tank Platoon 1, causing one to brew up and the second to bail out. T1 is, at the moment, completely out of action!
The Grenadiers fire upon the Engineer’s at the barbed wire, killing a team and the MG nest in the centre of the table kills one of the Allied MG teams.
 The PaK40 team prepare to fire on the 1st Canadian Armoured Brigade
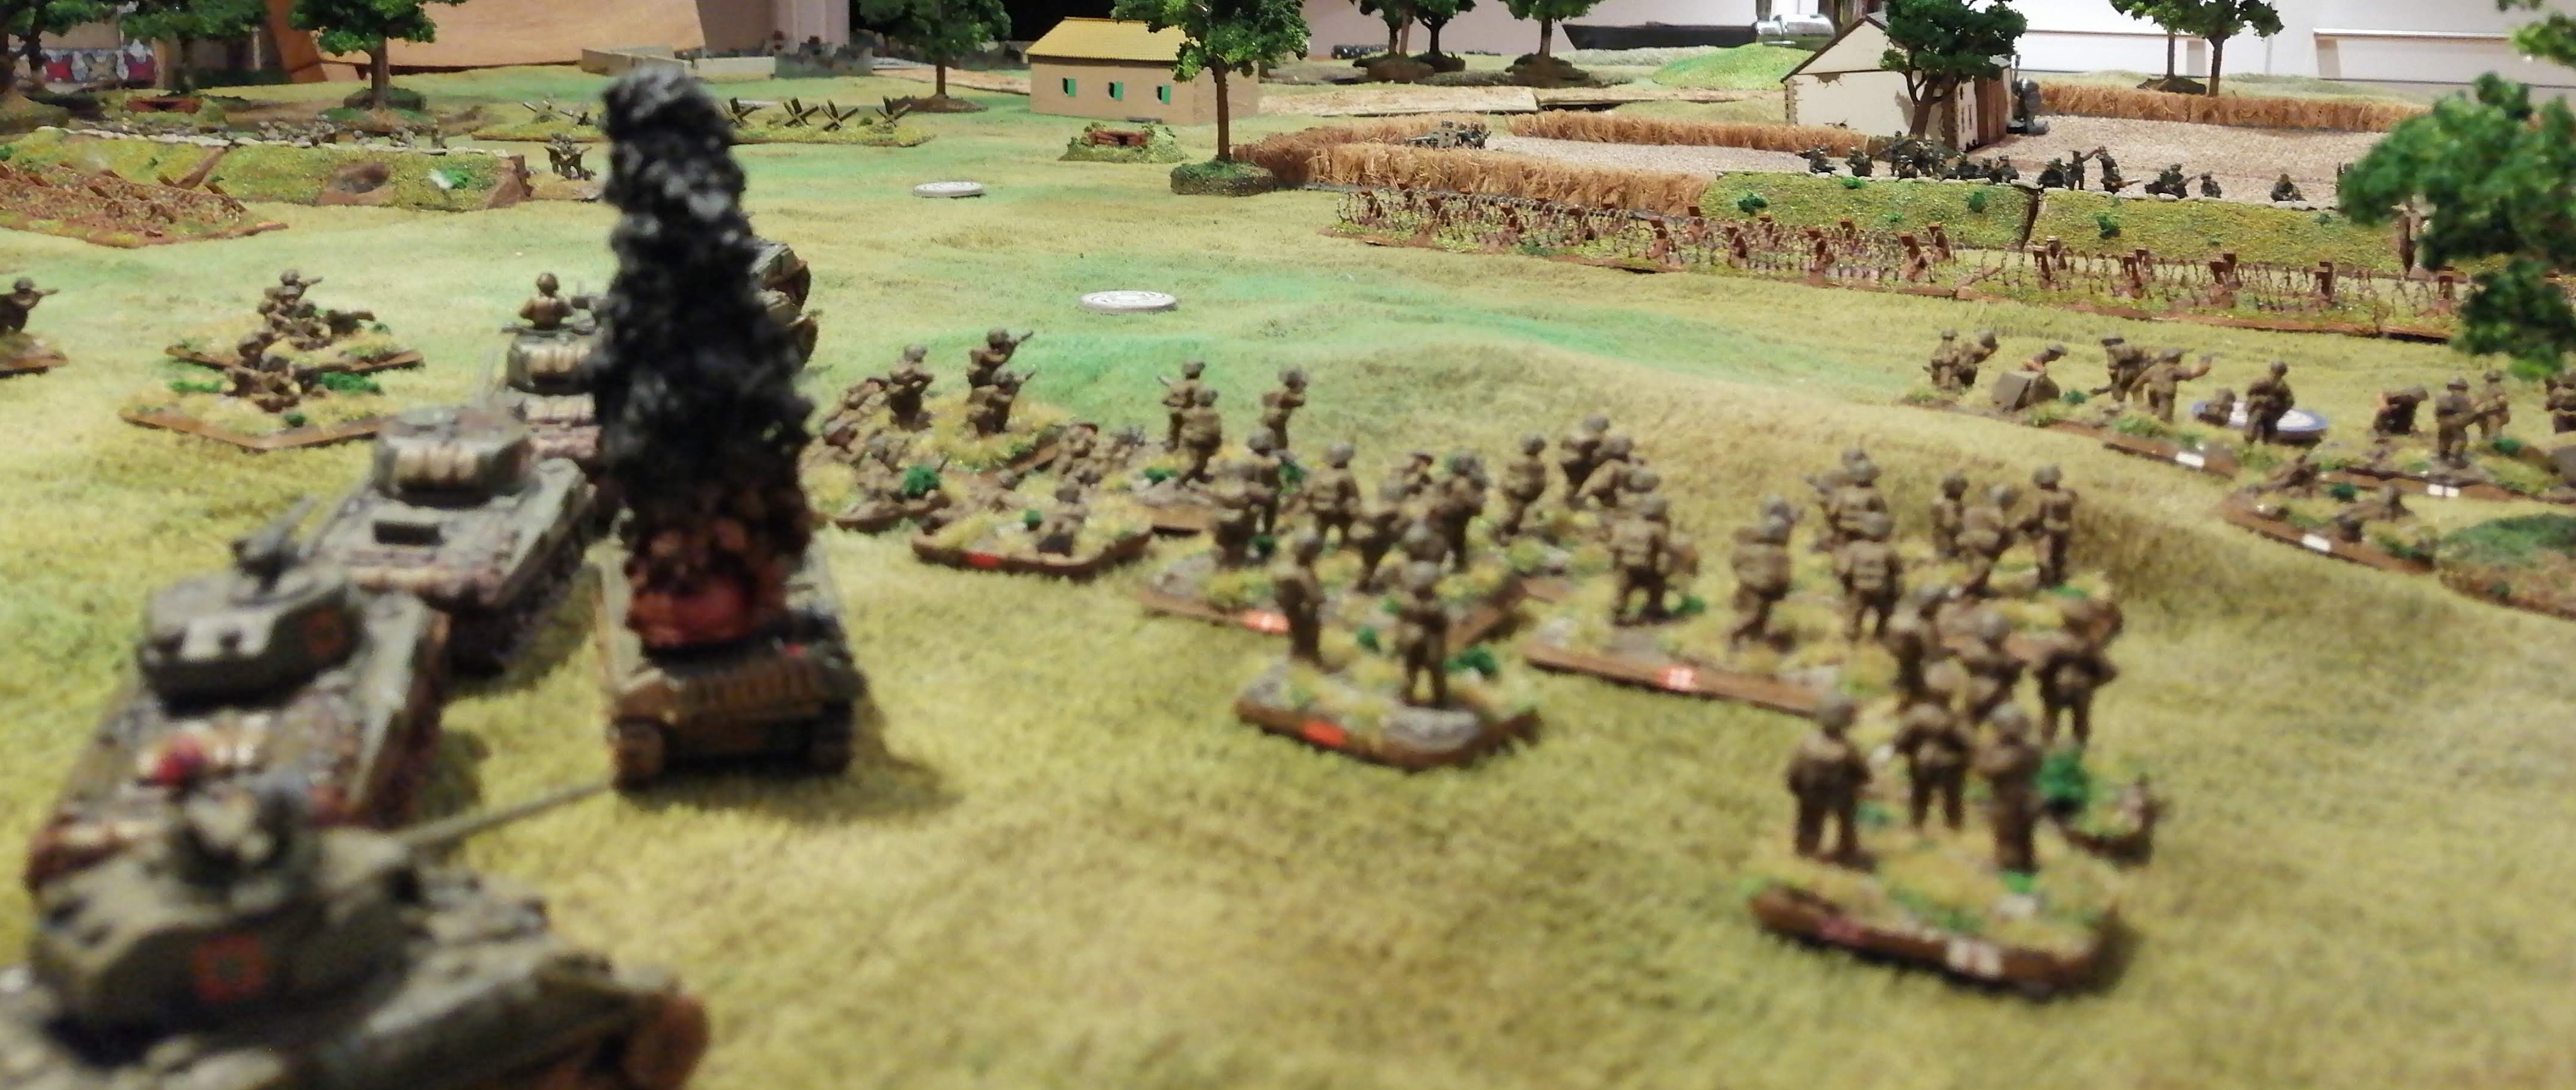 The 1st Canadian Armoured Brigade continue their advance past the burning wreck of the lead tank
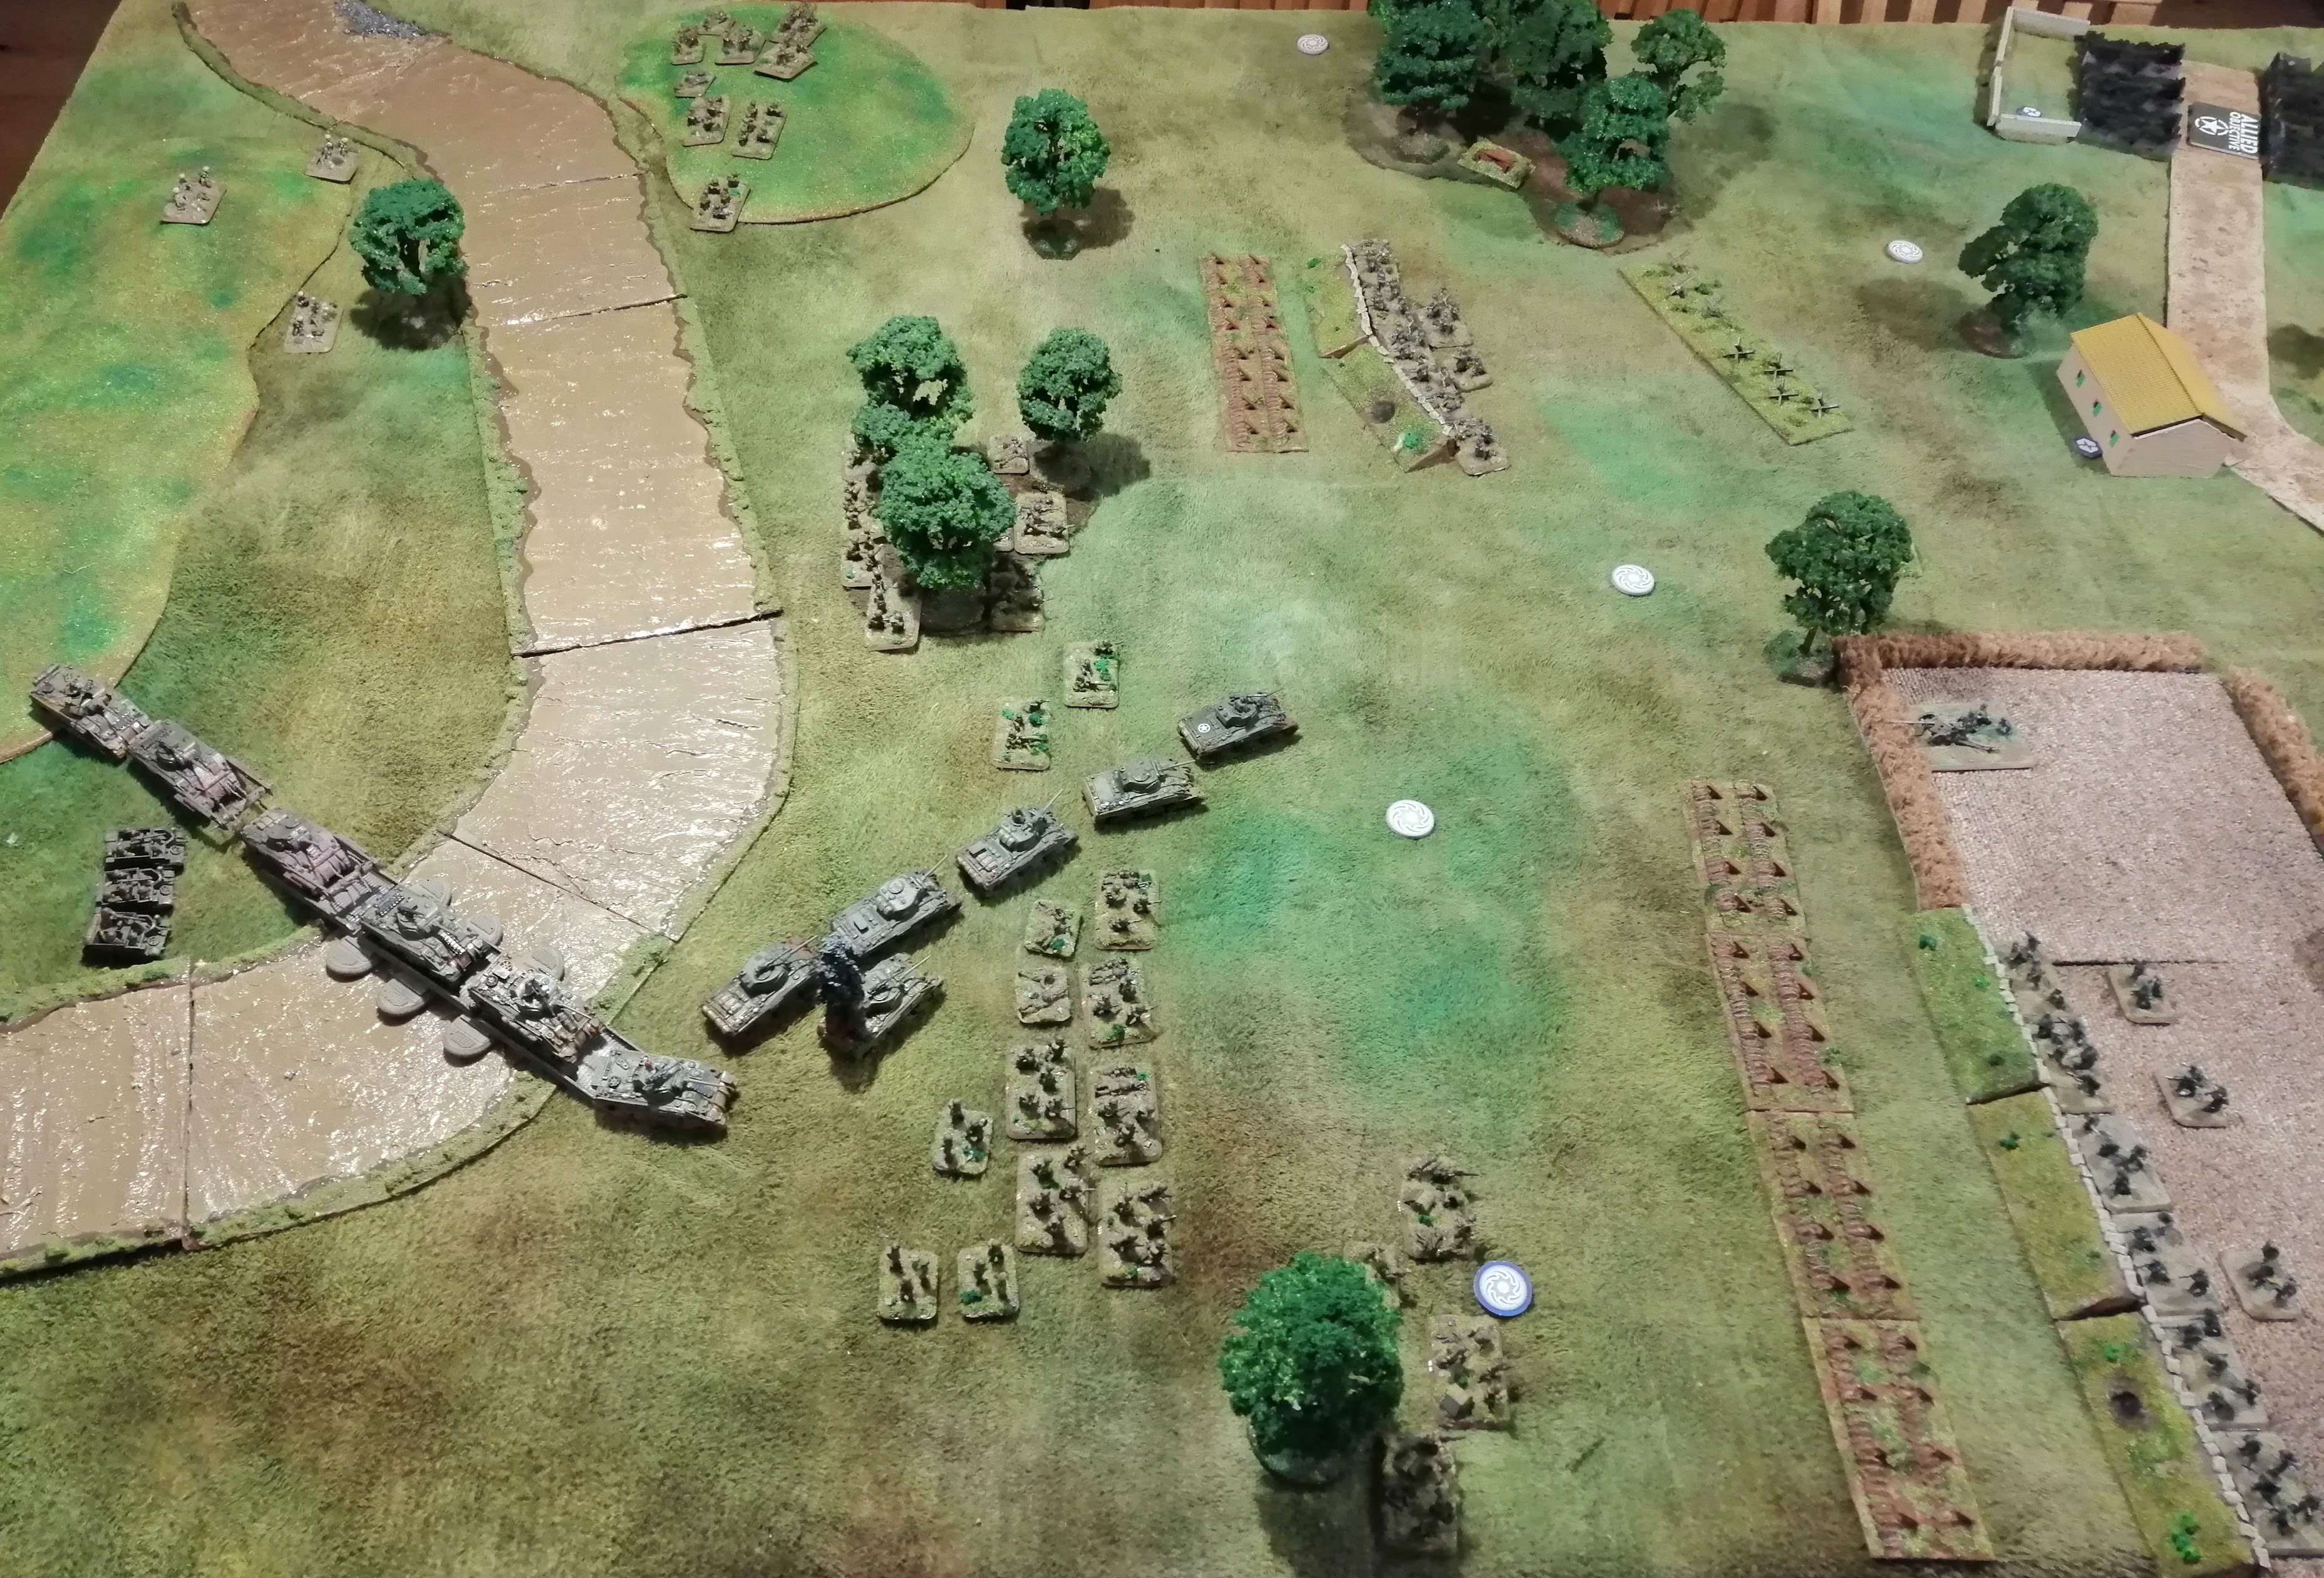 End of Turn 2
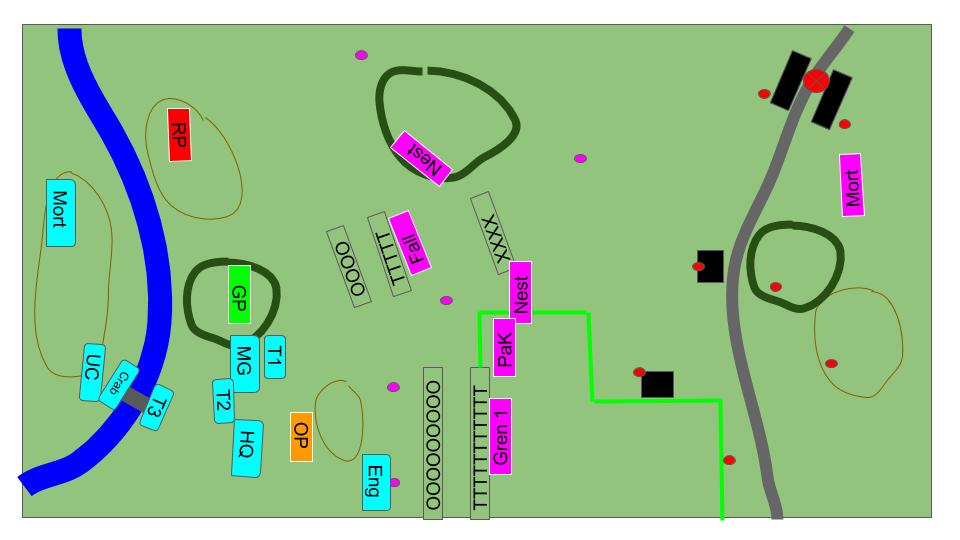

Operation Diadem (Battle 1)
Operation Diadem or the fourth battle for Cassino started at 23:00 on 11th May, 1944 with over 1600 artillery guns opening fire on the defender’s positions along a 30KM front, running from the Western coastline to East of Monte Cassino itself. The guns continued their bombardment for over 2 hours before the infantry, under the cover of darkness, started their assault.
On the left flank, the US 5th Army pushed North, with their II Corps advancing along the coast. The US 5th Army’s right flank was made up of the French Expeditionary Corps of mainly Morrocan soldiers who were tasked with advancing up the Aurunci Mountains and then to swing East to link up with the left flank of the British 8th Army who would be pushing up the Liri Valley.
The British 8th Army were tasked with taking the town of Cassino and the now ruined monastery atop Monte Cassino. The plan was to send most of the forces across the Garigliano river and up the Liri Valley whilst the Polish II Corps would advance on Monte Cassino from the East, following the same path that the previous three ill fated assaults had taken.
British XIII Corps were tasked with the Garigliano river crossing and the advance up the Liri Valley using Route 6 – the main road North toward Rome. In the early hours of the 12th May, Infantry from 4th Infantry Division and 8th British Indian Division crossed the river against significant opposition from the German defenders. During the night they managed to make small advances and established a bridgehead across the river.
More importantly, the engineers of the 8th British Indian Division had worked through night to establish bridges to allow the armour to cross and support the infantry. As sun rose on the 12th May, 1st Canadian Armoured Brigade was crossing the Garigliano in support of the infantry.
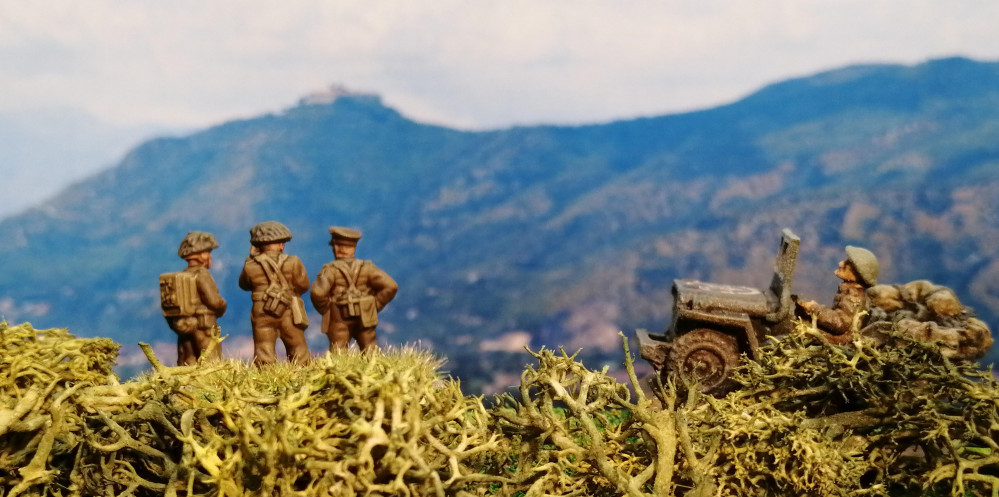
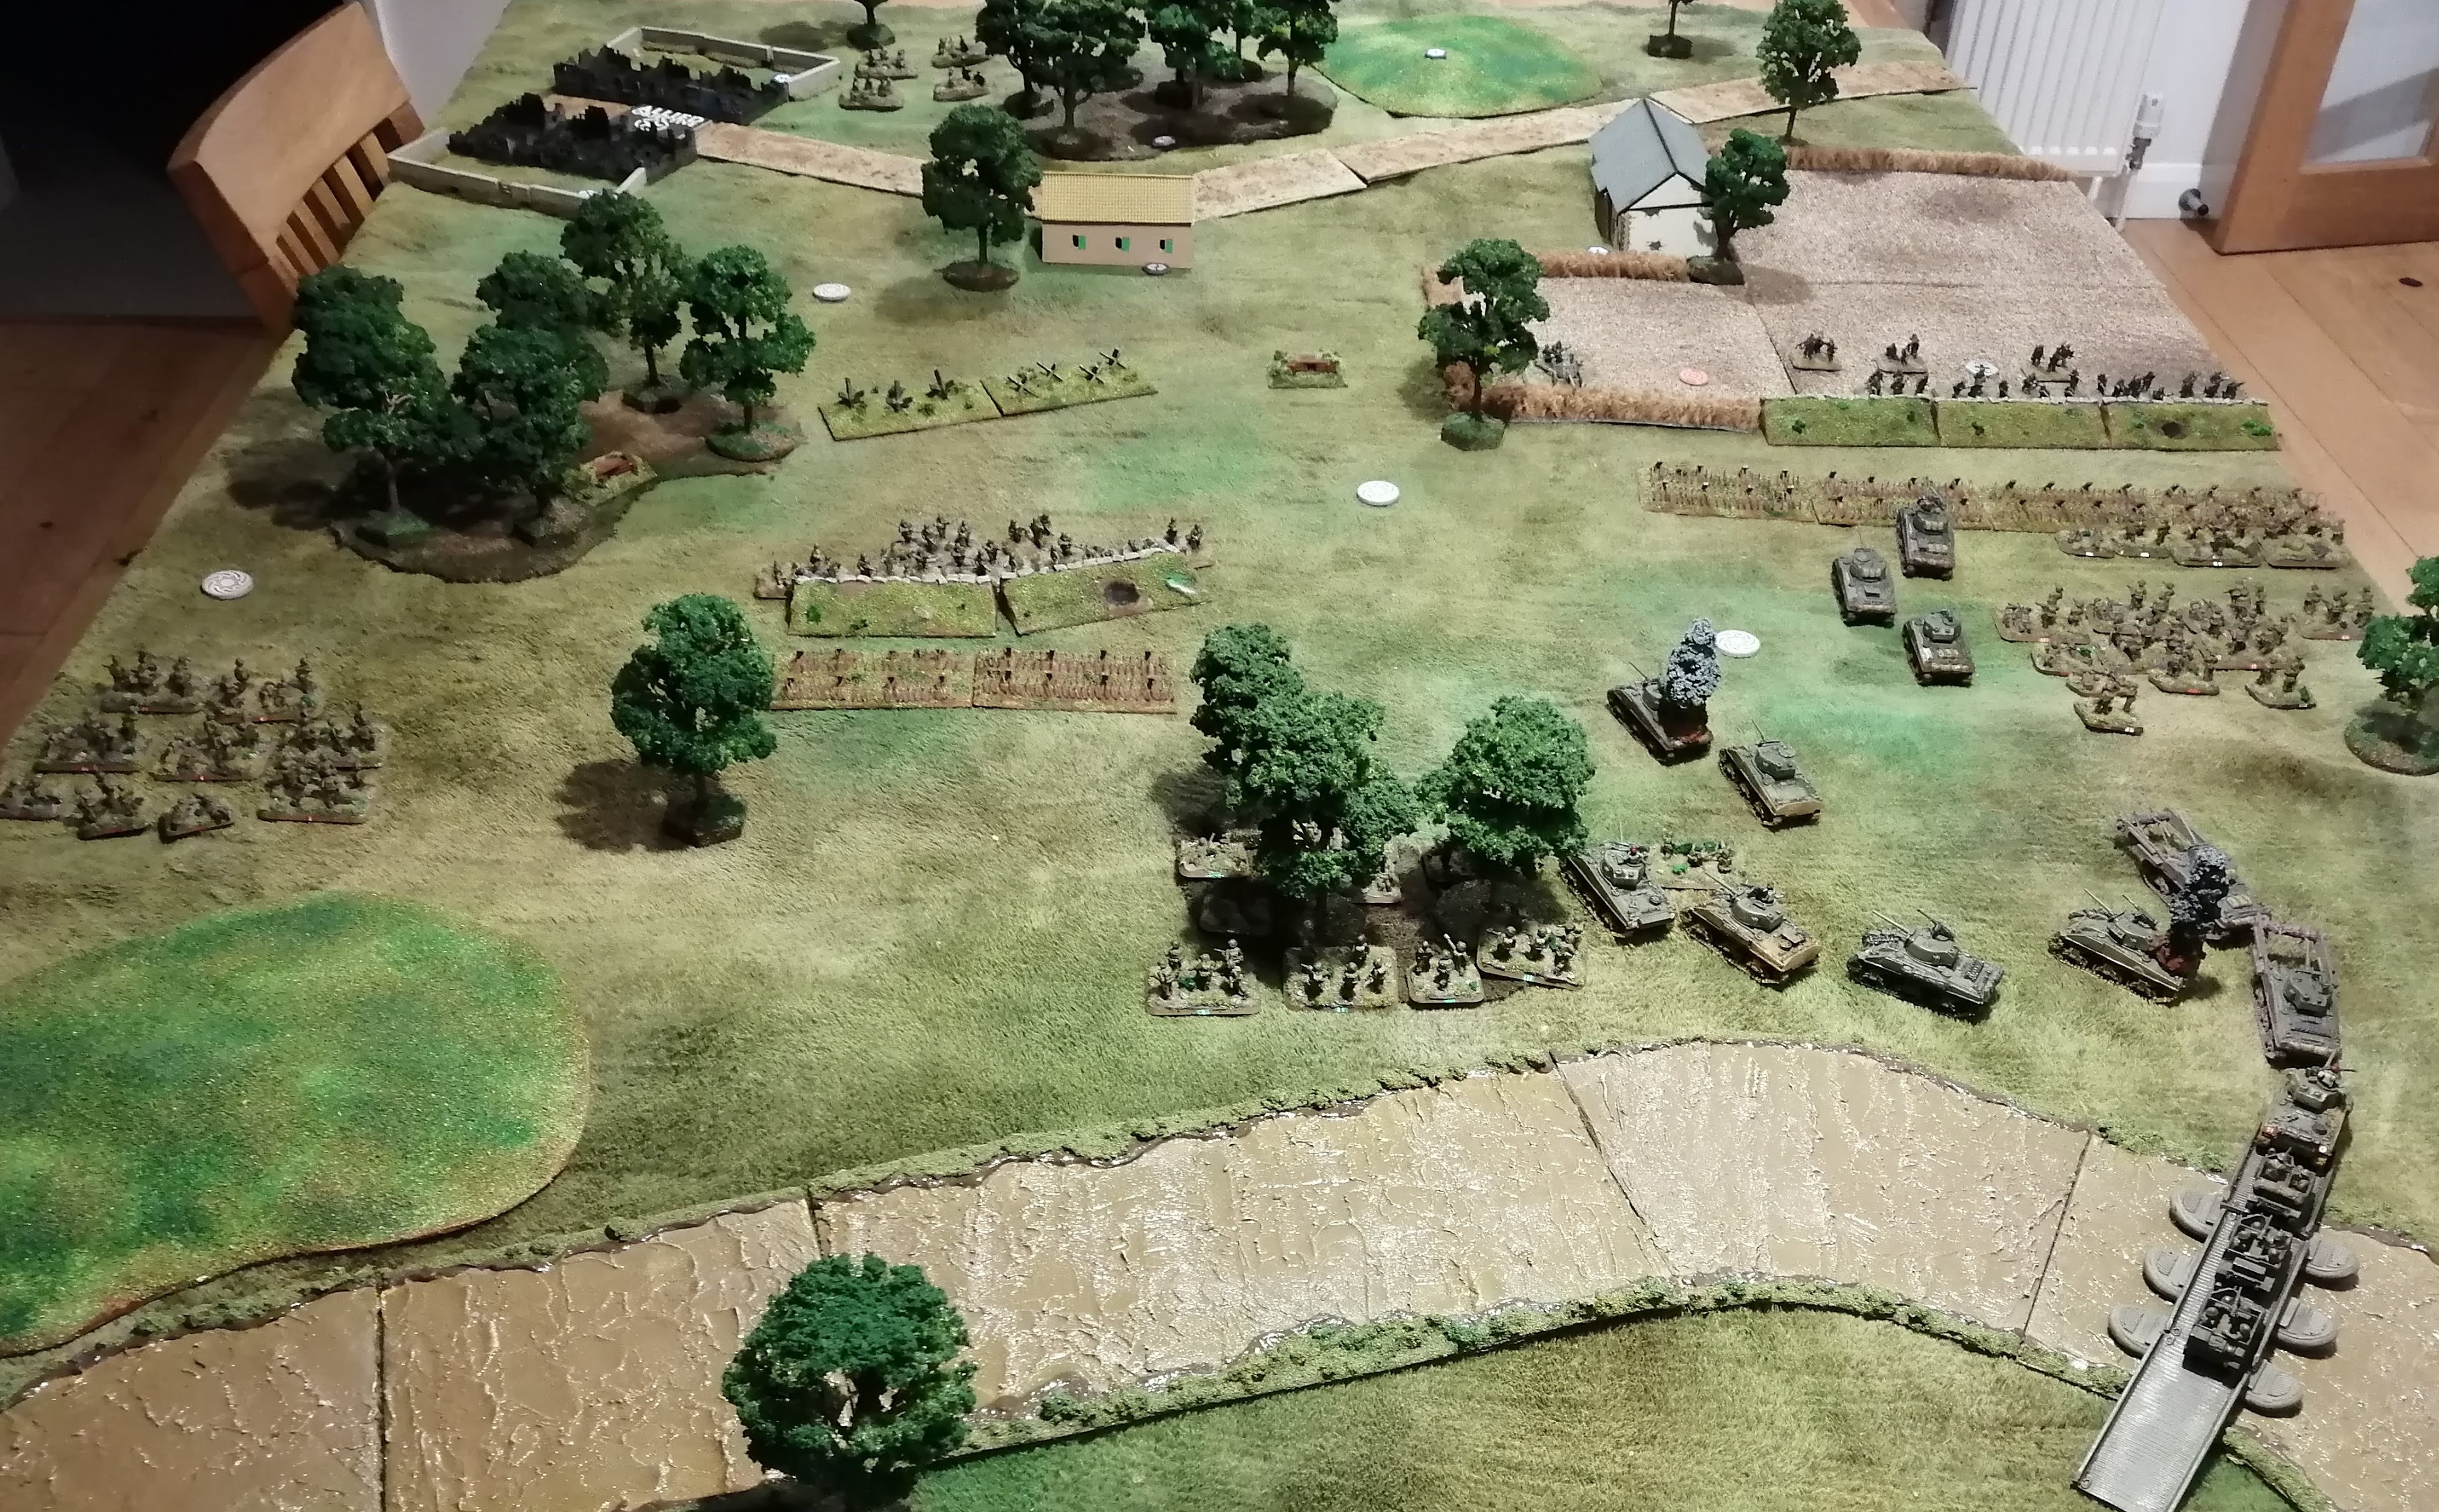
We join the battle at day break as the 1st Canadian Armoured Brigade prepare to cross the Garigliano. Several platoons of infantry are dug in on the other side of the river ready to carry on the advance with the support of the armour.
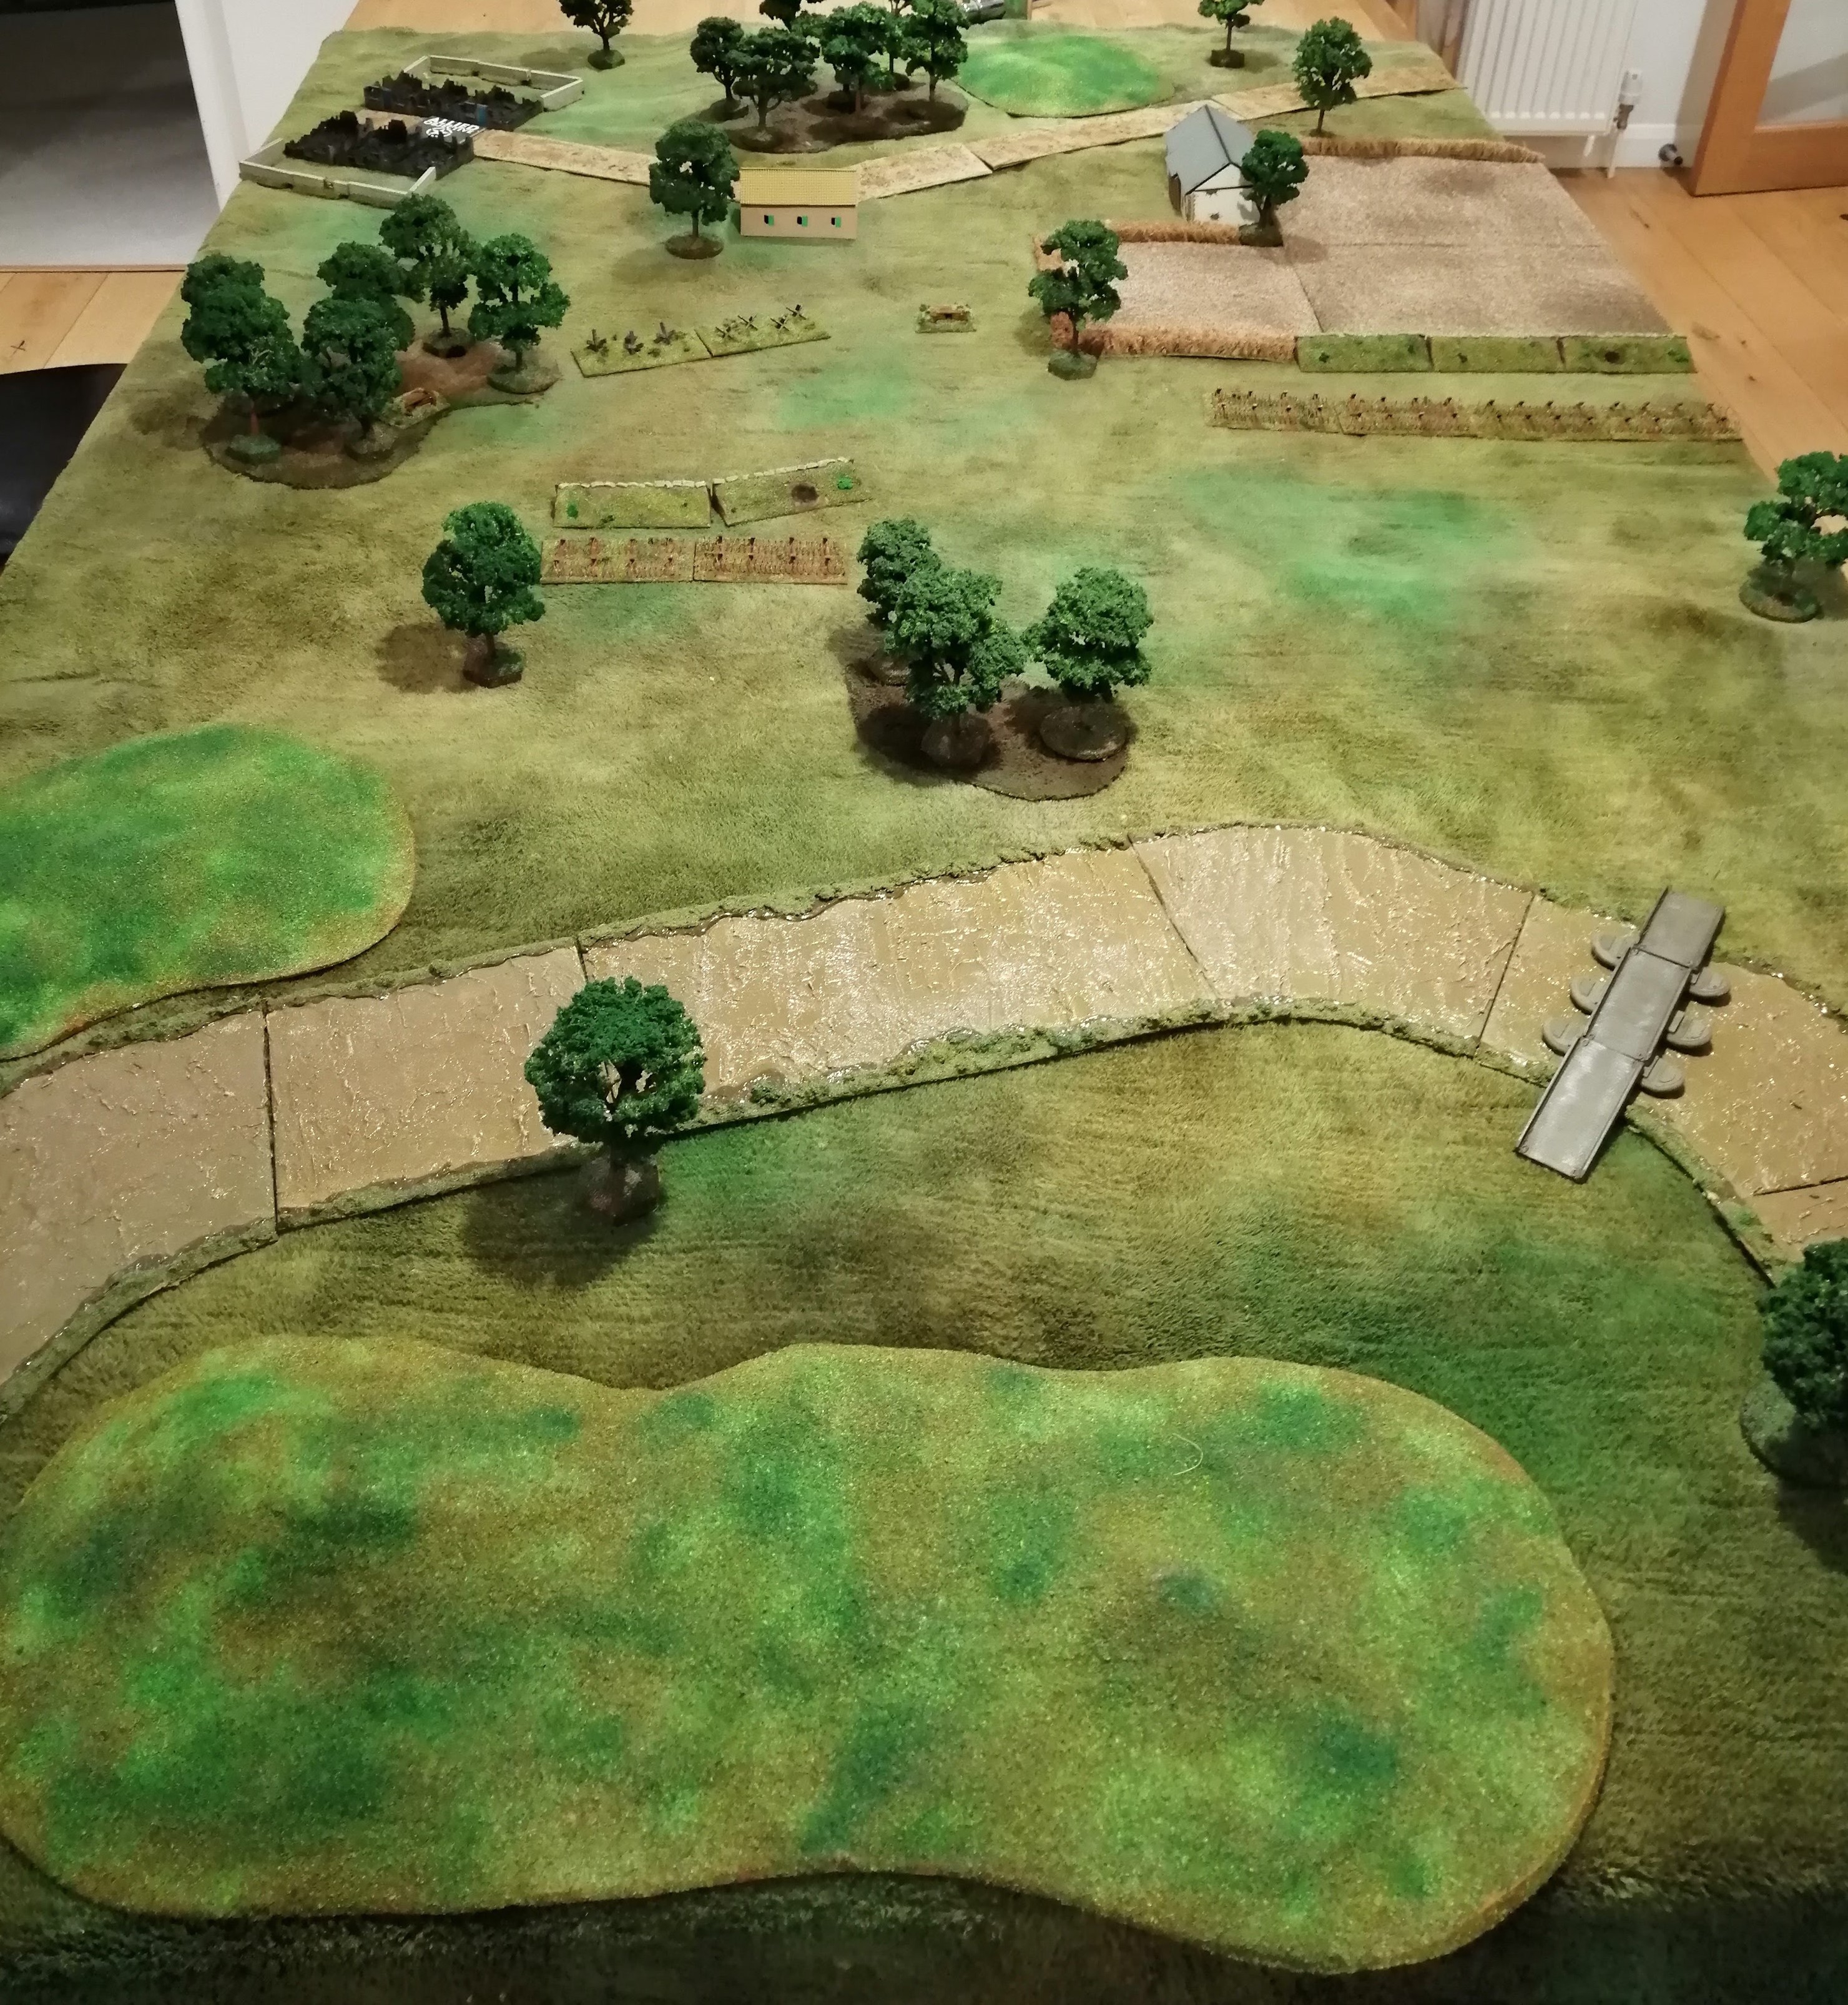 View of the Battlefield from the Allied perspective
The Rules for the game:
Allies:
The first round starts with a full smoke bombardment across the table to provide some cover for the advancing troops
Three infantry platoons start deployed in advanced positions across the river to represent the previous day’s bridgehead. An engineer platoon starts next to the pontoon bridge on the German side of the river
Germans:
The Germans can deploy 5 minefield markers, only 2 of which are actual minefields to represent the limited time the Allies have had to reconnoitre across the river
The Allies have made contact with the first line of German defenders and these are deployed on the board at the start of the game. This will be the platoon of grenadiers, platoon of Fallschirmjager, a PaK40 and the two MG Nests. A German Mortar team has been spotted operating further back
The remaining German units are deployed as counters into various defensive terrain areas. The counters are exposed at the start of the German turn when an Allied unit moves within 20”
German units starting as a single team are not subject to last stand rules
Victory Conditions:
The Allies have been tasked to expand the bridgehead and their objective is to capture the collection of ruined buildings on the road. They have 8 turns to accomplish this and must take the objective uncontested. The Germans will win if they stop the Allies achieving this objective
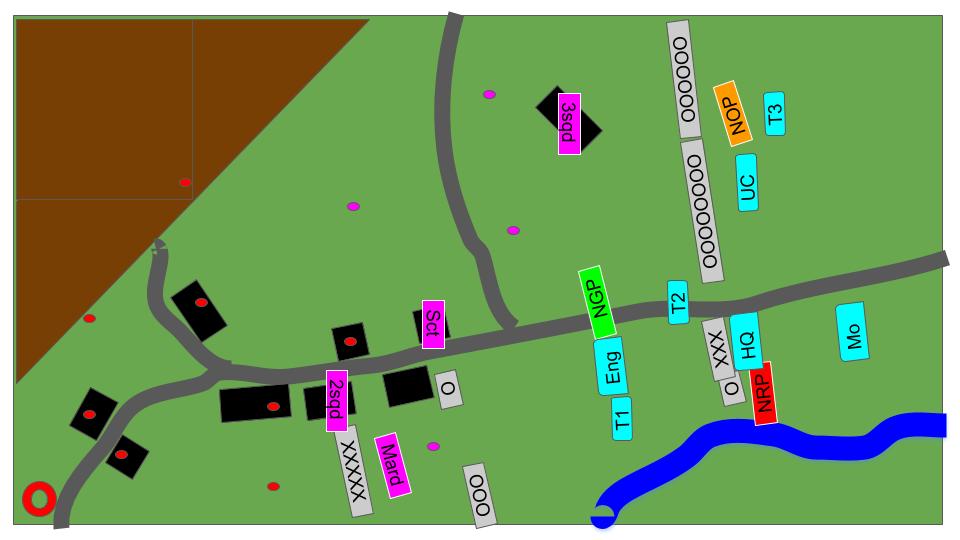
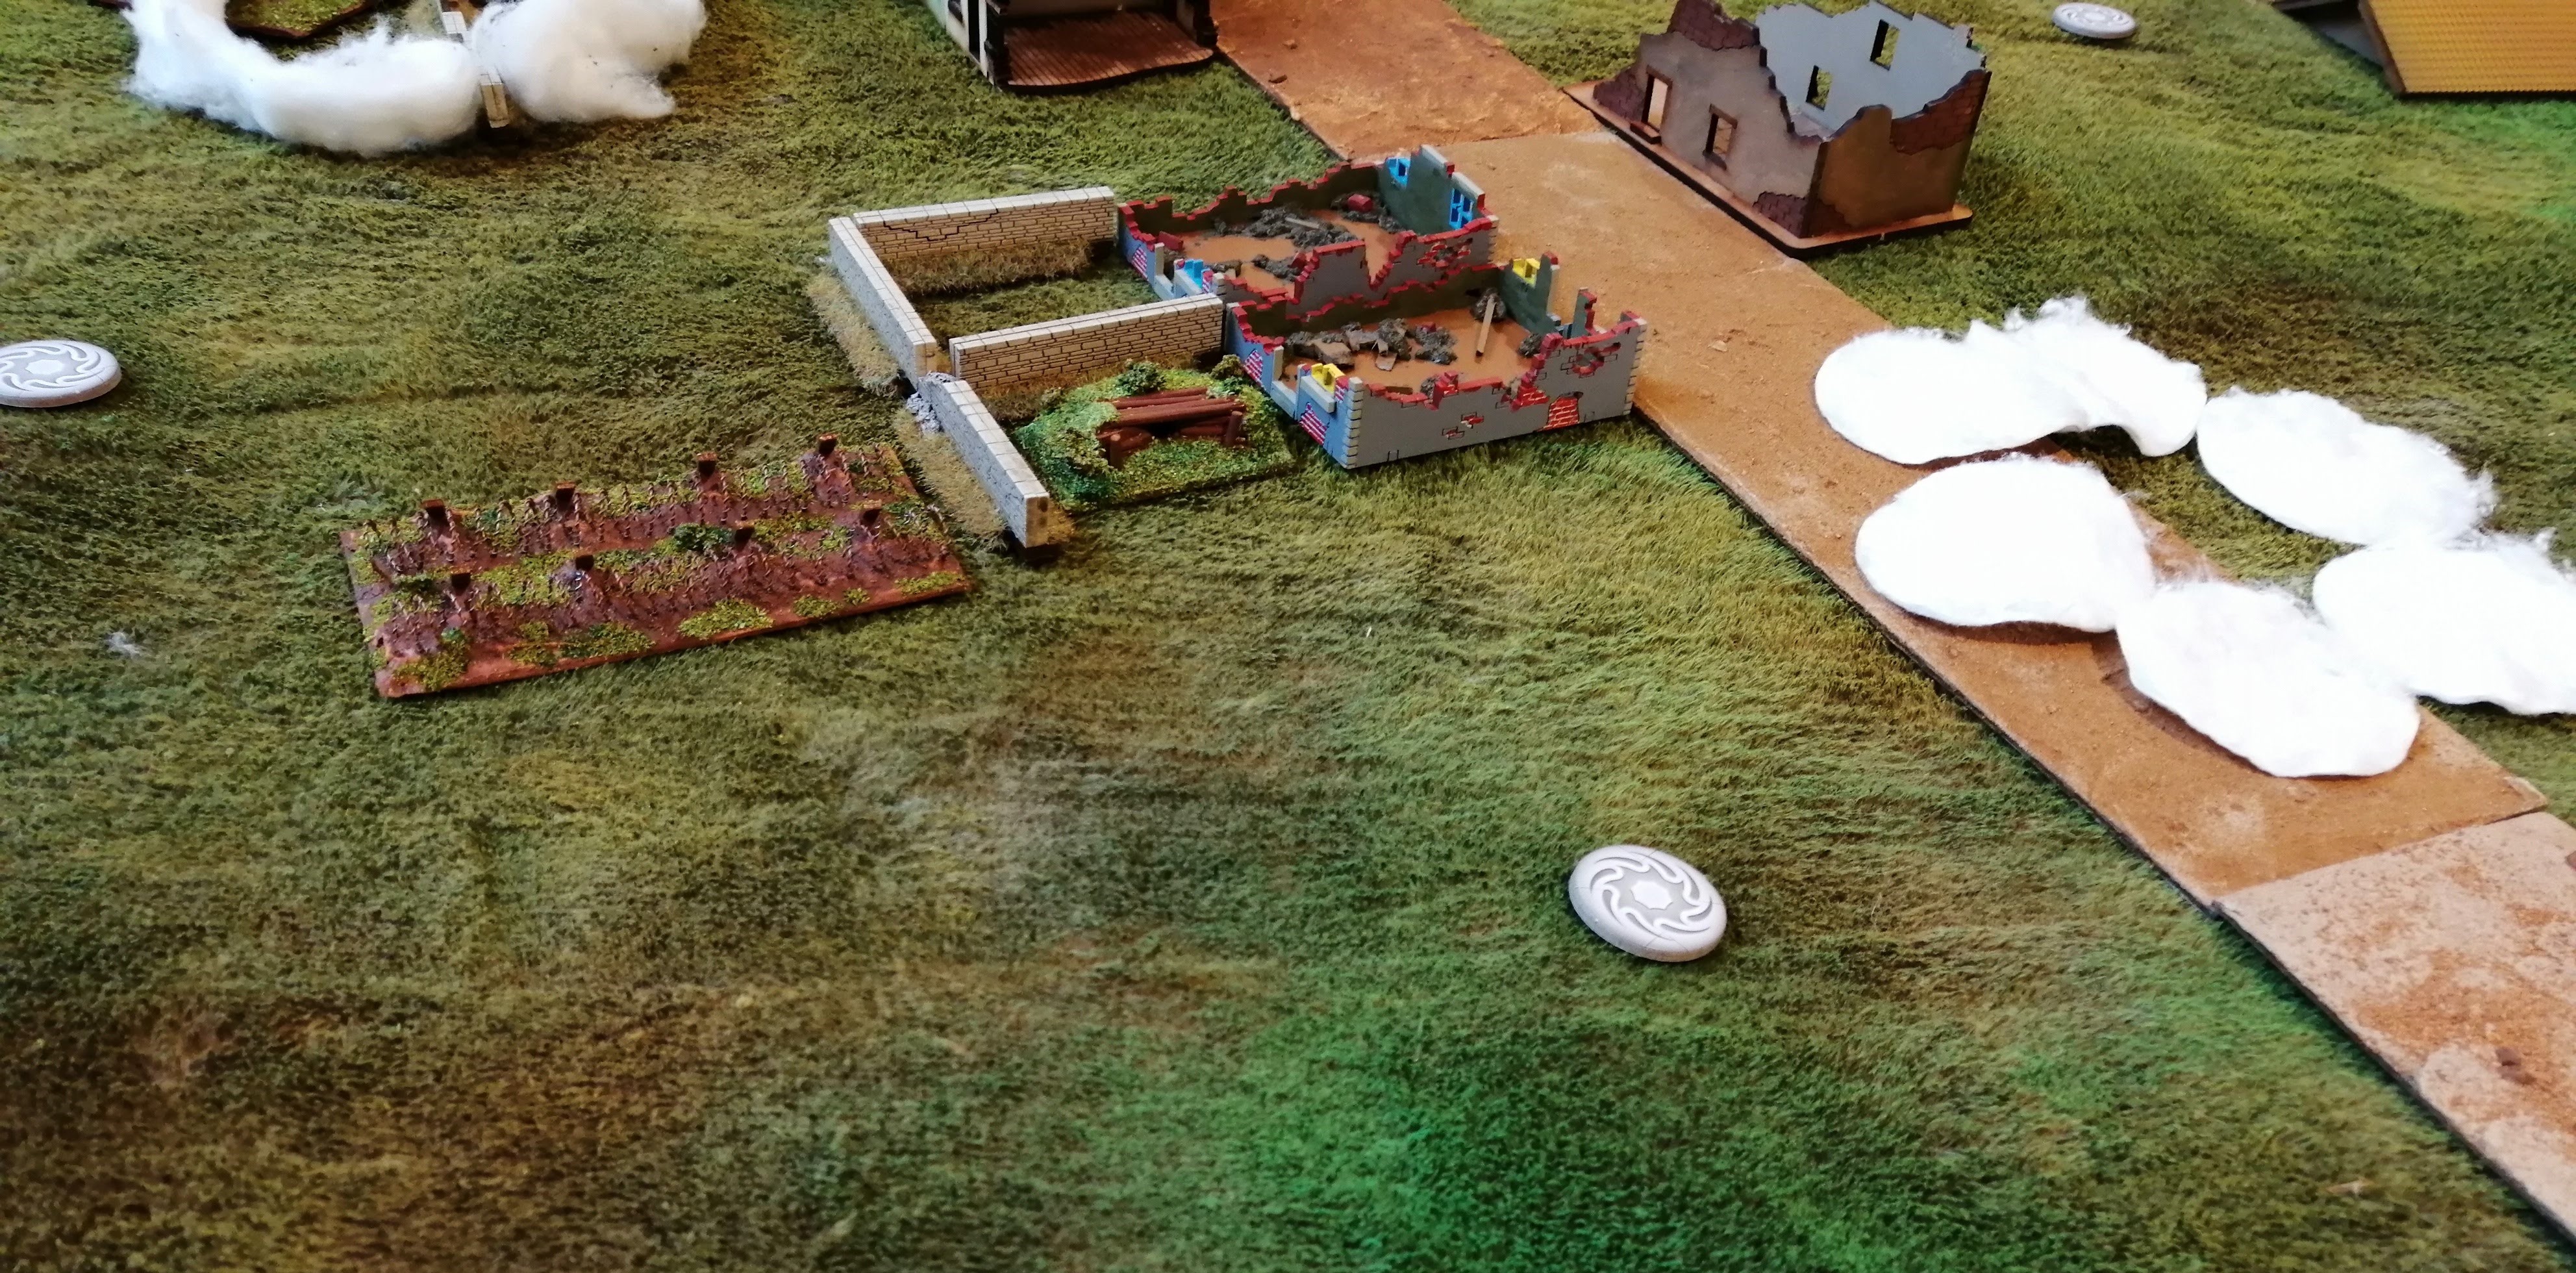
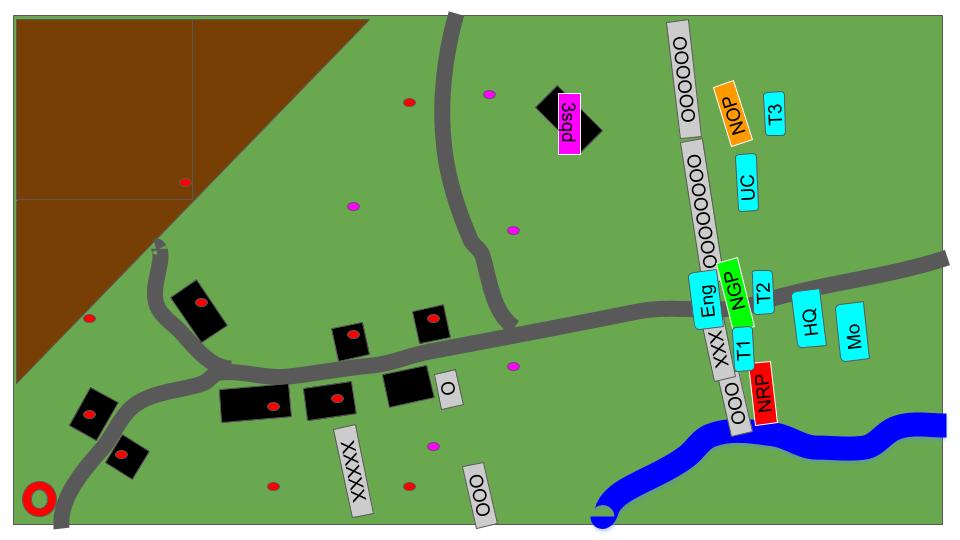
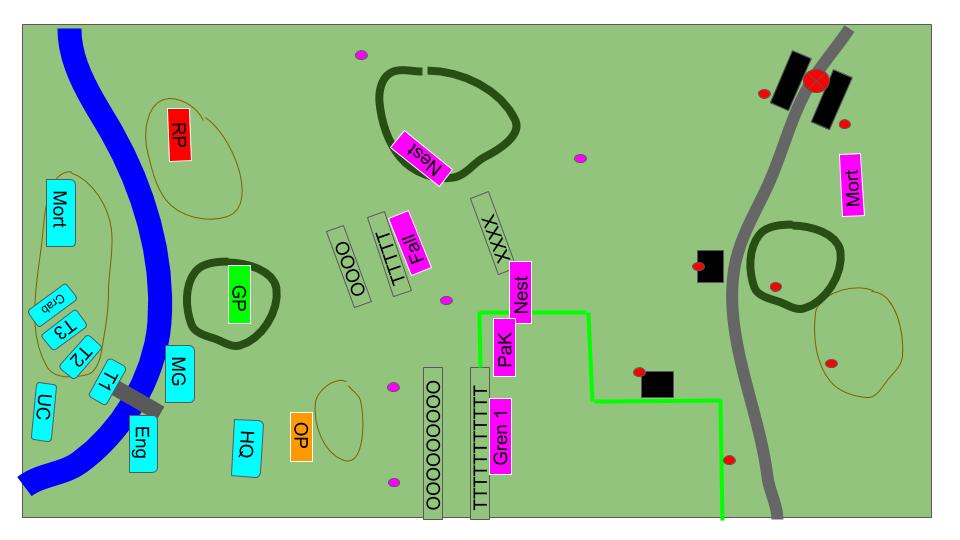 Initial Deployment
Map key.
German forces are marked in magenta with a brief text description. Gren1 being Grenadier Platoon1, Mort are the mortar team and Fall the Fallschirmjager Platoon. The defences are marked a TTTT for trenches, XXXX for tank traps and OOOO for barbed wire. Little magenta circles are possible minefields and little red circles are German Troop deployment spots for the hidden units.
The Allied troops are mostly in light blue except the infantry platoons who are coloured as per their platoon (Red Platoon, Green and Organge). T1 to T3 are the Sherman Tank Platoons.
The blue strip is the Garigliano river, grey strips are roads (or pontoon bridges), thin brown ‘circles’ are hills, dark green circles are copses of trees, light green lines are hedges and black blocks are buildings and/or walled areas. The Allied objective is marked with a red circle with a cross in it.
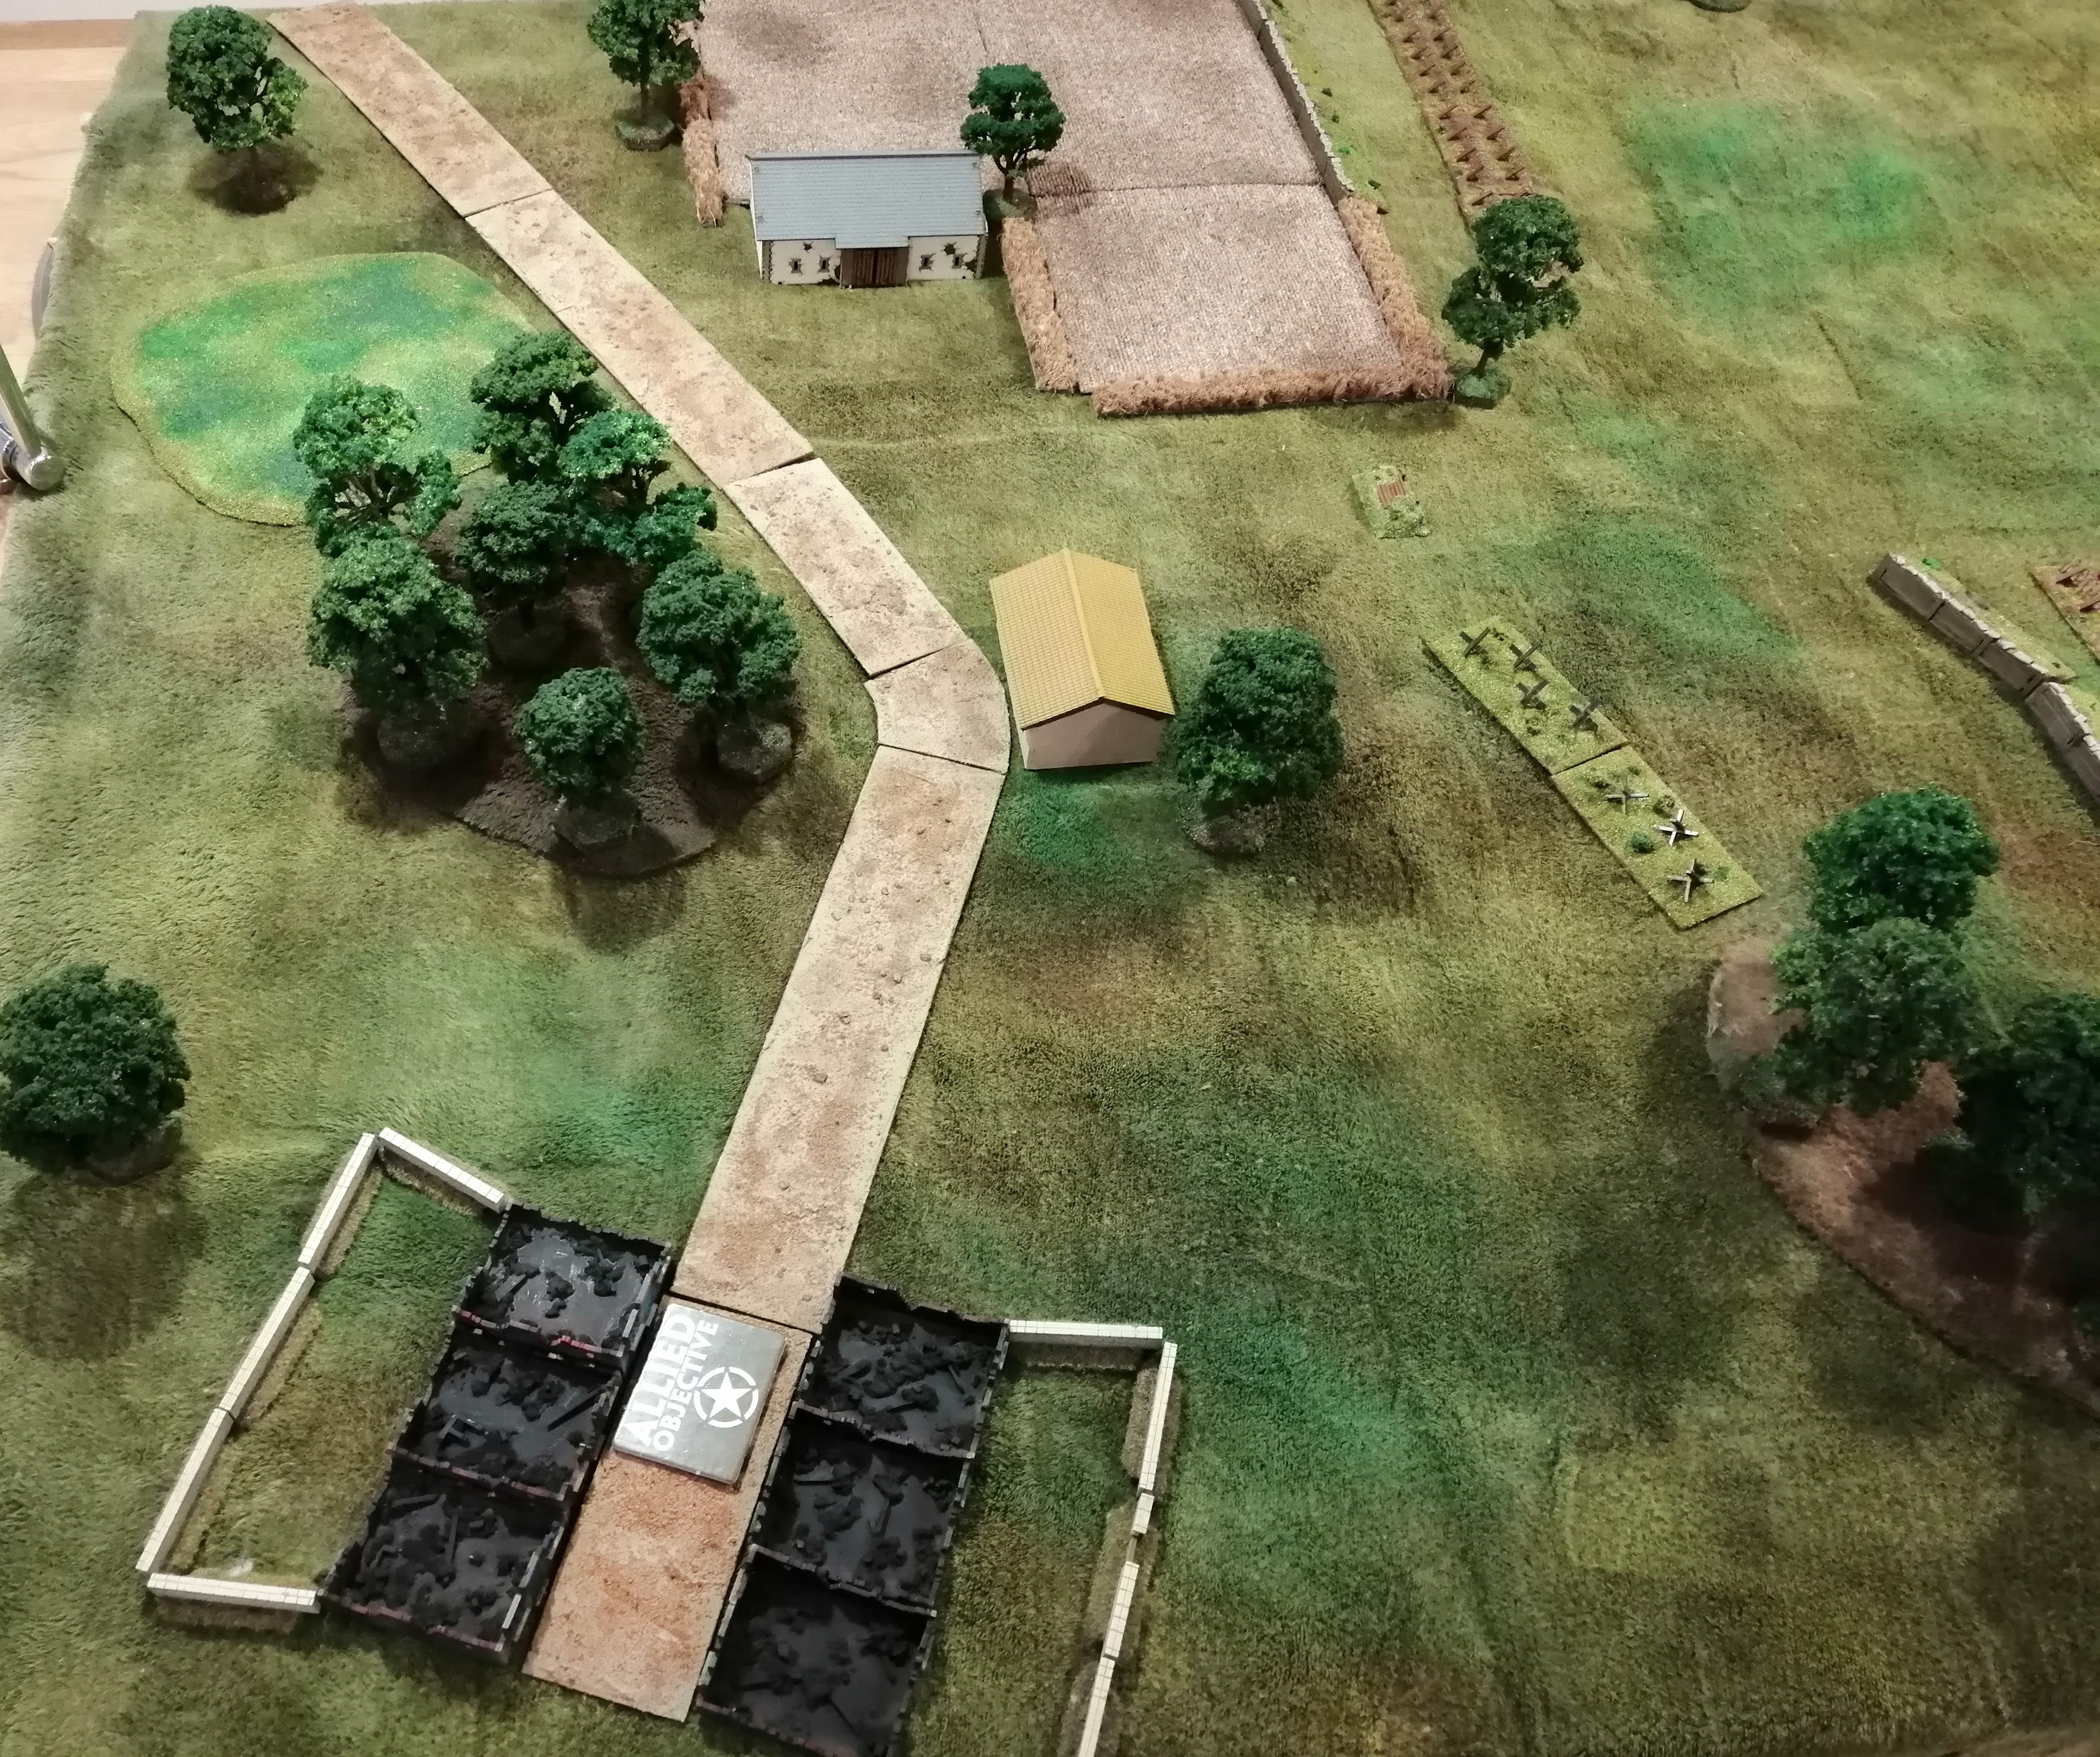 Location of the Allied objective, down at the end of the German end of the battlefield
Allied Forces:
Infantry HQ 1st and 2nd in command
3 Infantry Platoons of Cmd team, 6 rifle/MG teams, PIAT team and 2” Mortar team
1 Engineer Platoon of Cmd sqd, 3 Rifle teams and a PIAT team
1 MG Platoon with 2 Vickers MG teams
1 Heavy Mortar Team of four teams with 4.5” mortars
3 Sherman Tank platoons of 3 tanks per platoon
1 Mine clearing tank platoon of 1 Sherman and 2 Sherman Crab tanks
German Forces on the board:
Infantry HQ 1st and 2nd in command teams with SMG
1 Grenadier platoon of Cmd team with SMG and Panzerfaust and 6 Rifle MG teams
1 Fallschirmjager Platoon of Cmd team with SMG and Panzerfauct and 6 MG Teams
1 Pak40 Anti Tank gun
2 MG Nests
German Forces off the board:
1 PaK40 Anti Tank gun
1 Marder II
2 STuGs deployed as separate units
1 Grenadier platoon as above
1 Heavy MG platoon of 2 separate MG Teams
1 7.5cm recoilless guns
3rd Battle for Monte Cassino - Assault on the Town (Turn 8)
NZ Turn 8:
The smoke bombardments aren’t really an issue this round, being quite spread out around the battlefield. The Engineer platoon passes its last man standing test as does what is left of Green Platoon, who also heroically unpin, ready for more action!
Red Platoon continue their advance and get in among the tank traps just in front of the PaK 40 team. They’re also close enough to launch an assault!
The Engineer team clear the minefield and Tank Platoon 2 continues to advance down the road and confronts the 7.5cm gun platoon dug in around the ruined house at the end of the road. T1 advanced up behind the houses, using the garden walls as some form of cover and stops just in front of the remains of the Fallschirmjager 2sqd and Company Command. Green platoon dashes across the road into the ruined building next to T1 to provide some infantry support.
The Universal Carriers and T3 continue to advance up the road, trying to get into the fight.
Green platoon fires upon the PaK 40 team and is able to kill the crew, rendering the gun useless. Tank Platoon2 destroys one of the 7.5cm Gun Teams and Tank Platoon 1 then launches an assault on the Fallschirmjager Company Command team, killing the commander.
German Turn 8:
With the company command now dead, and several platoons needing to take last man standing checks, it’s not looking good. The remaining 7.5cm gun team fails its morale test and, with the last gun capable of dealing with the tanks gone, the German defense dissolves and the Kiwis take the victory!
 The end of turn 8
 Just before the shooting and assault step
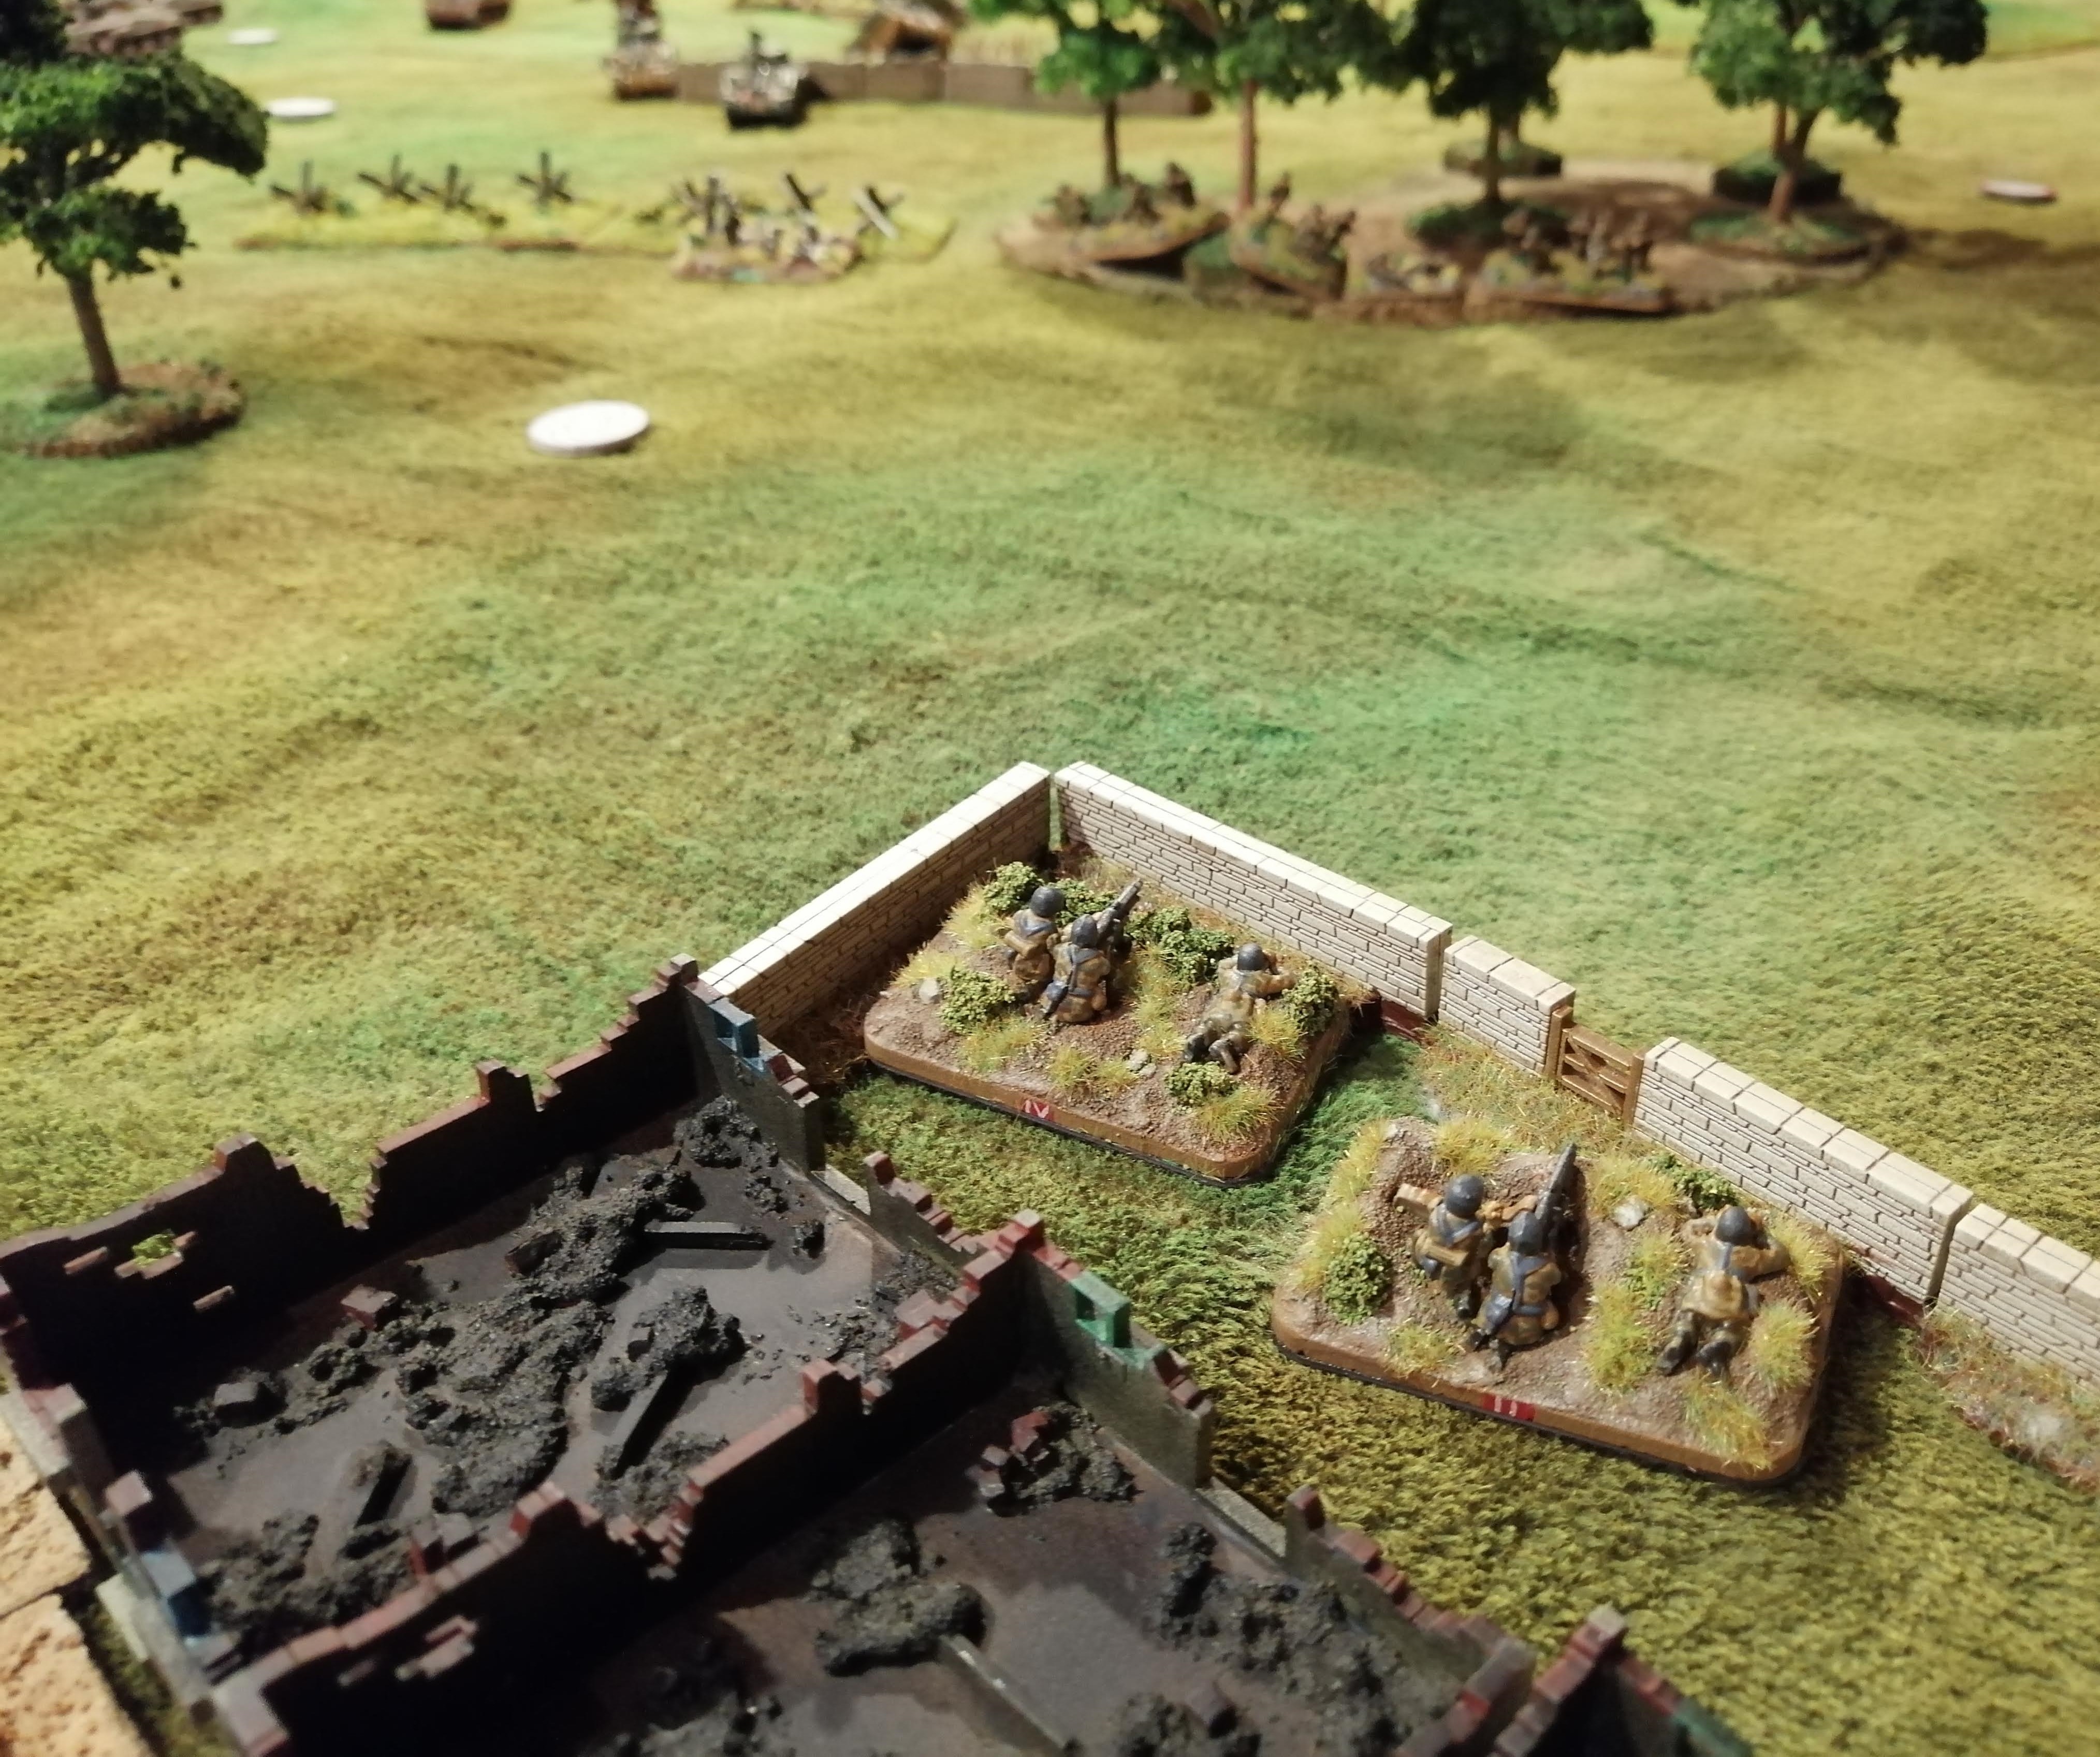
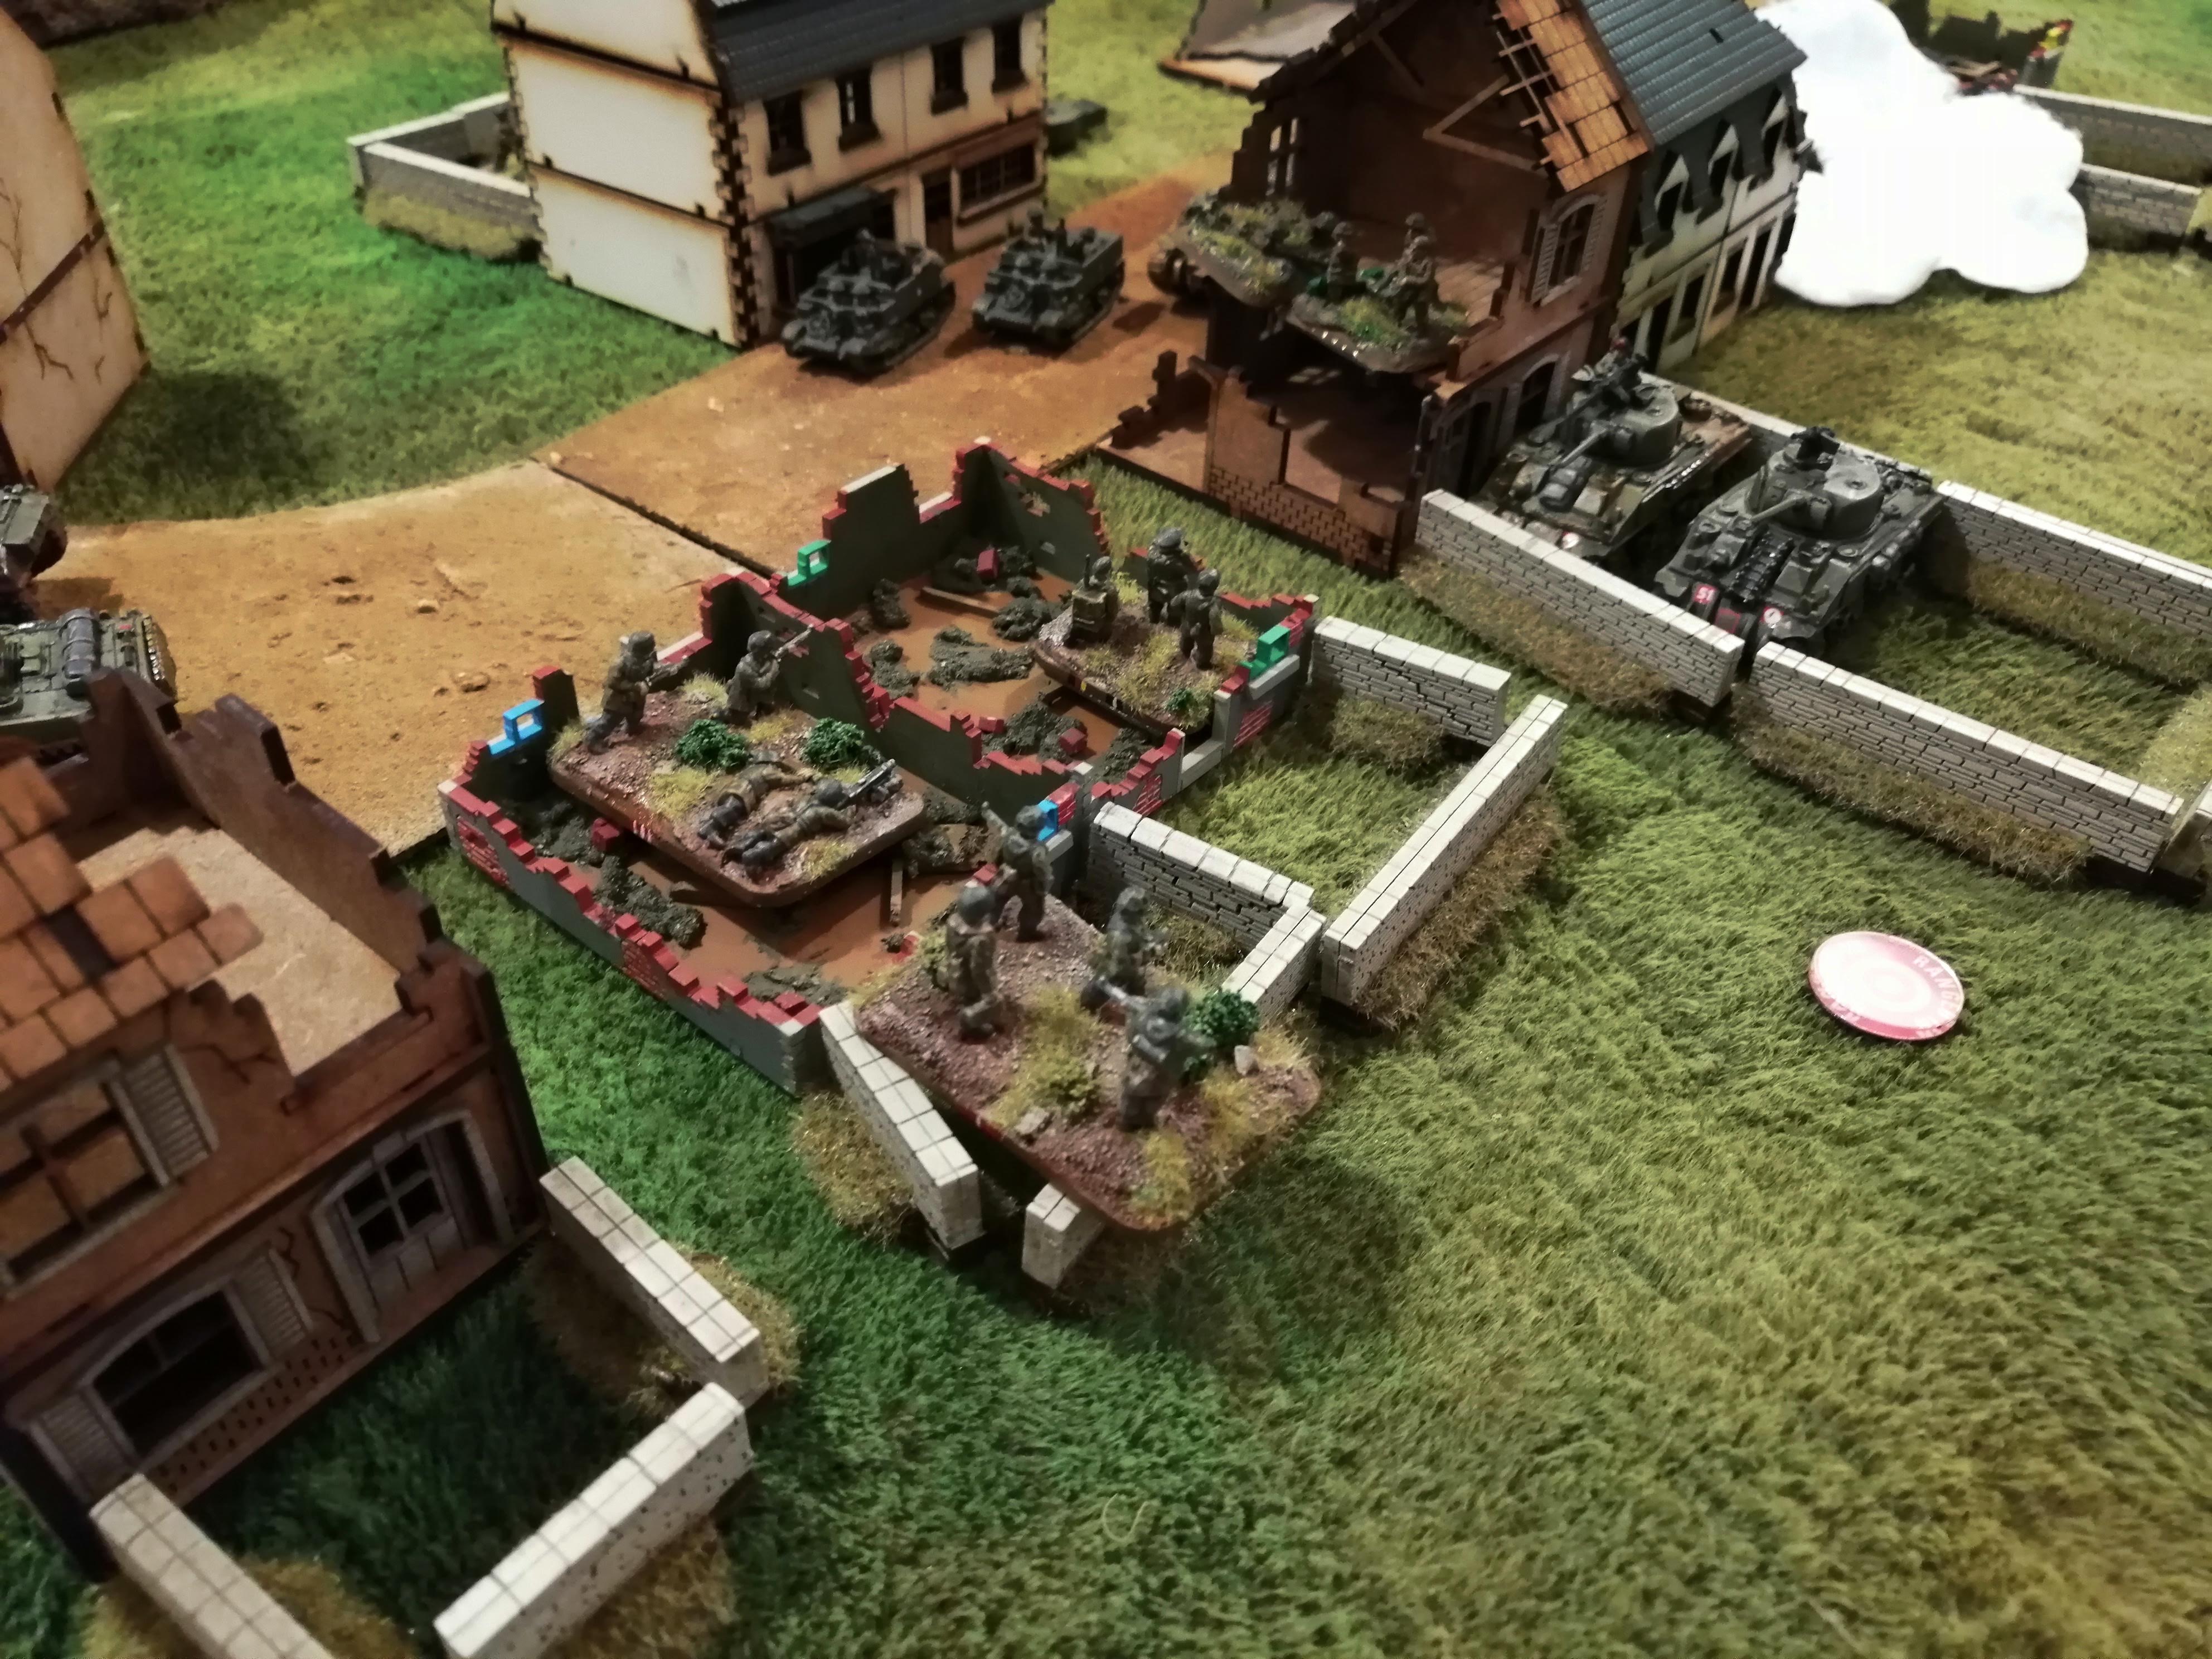 The Fallschirmjager Company Command and what's left of 2sqd face off against Tank Platoon 1 and Green Platoon in the ruined building
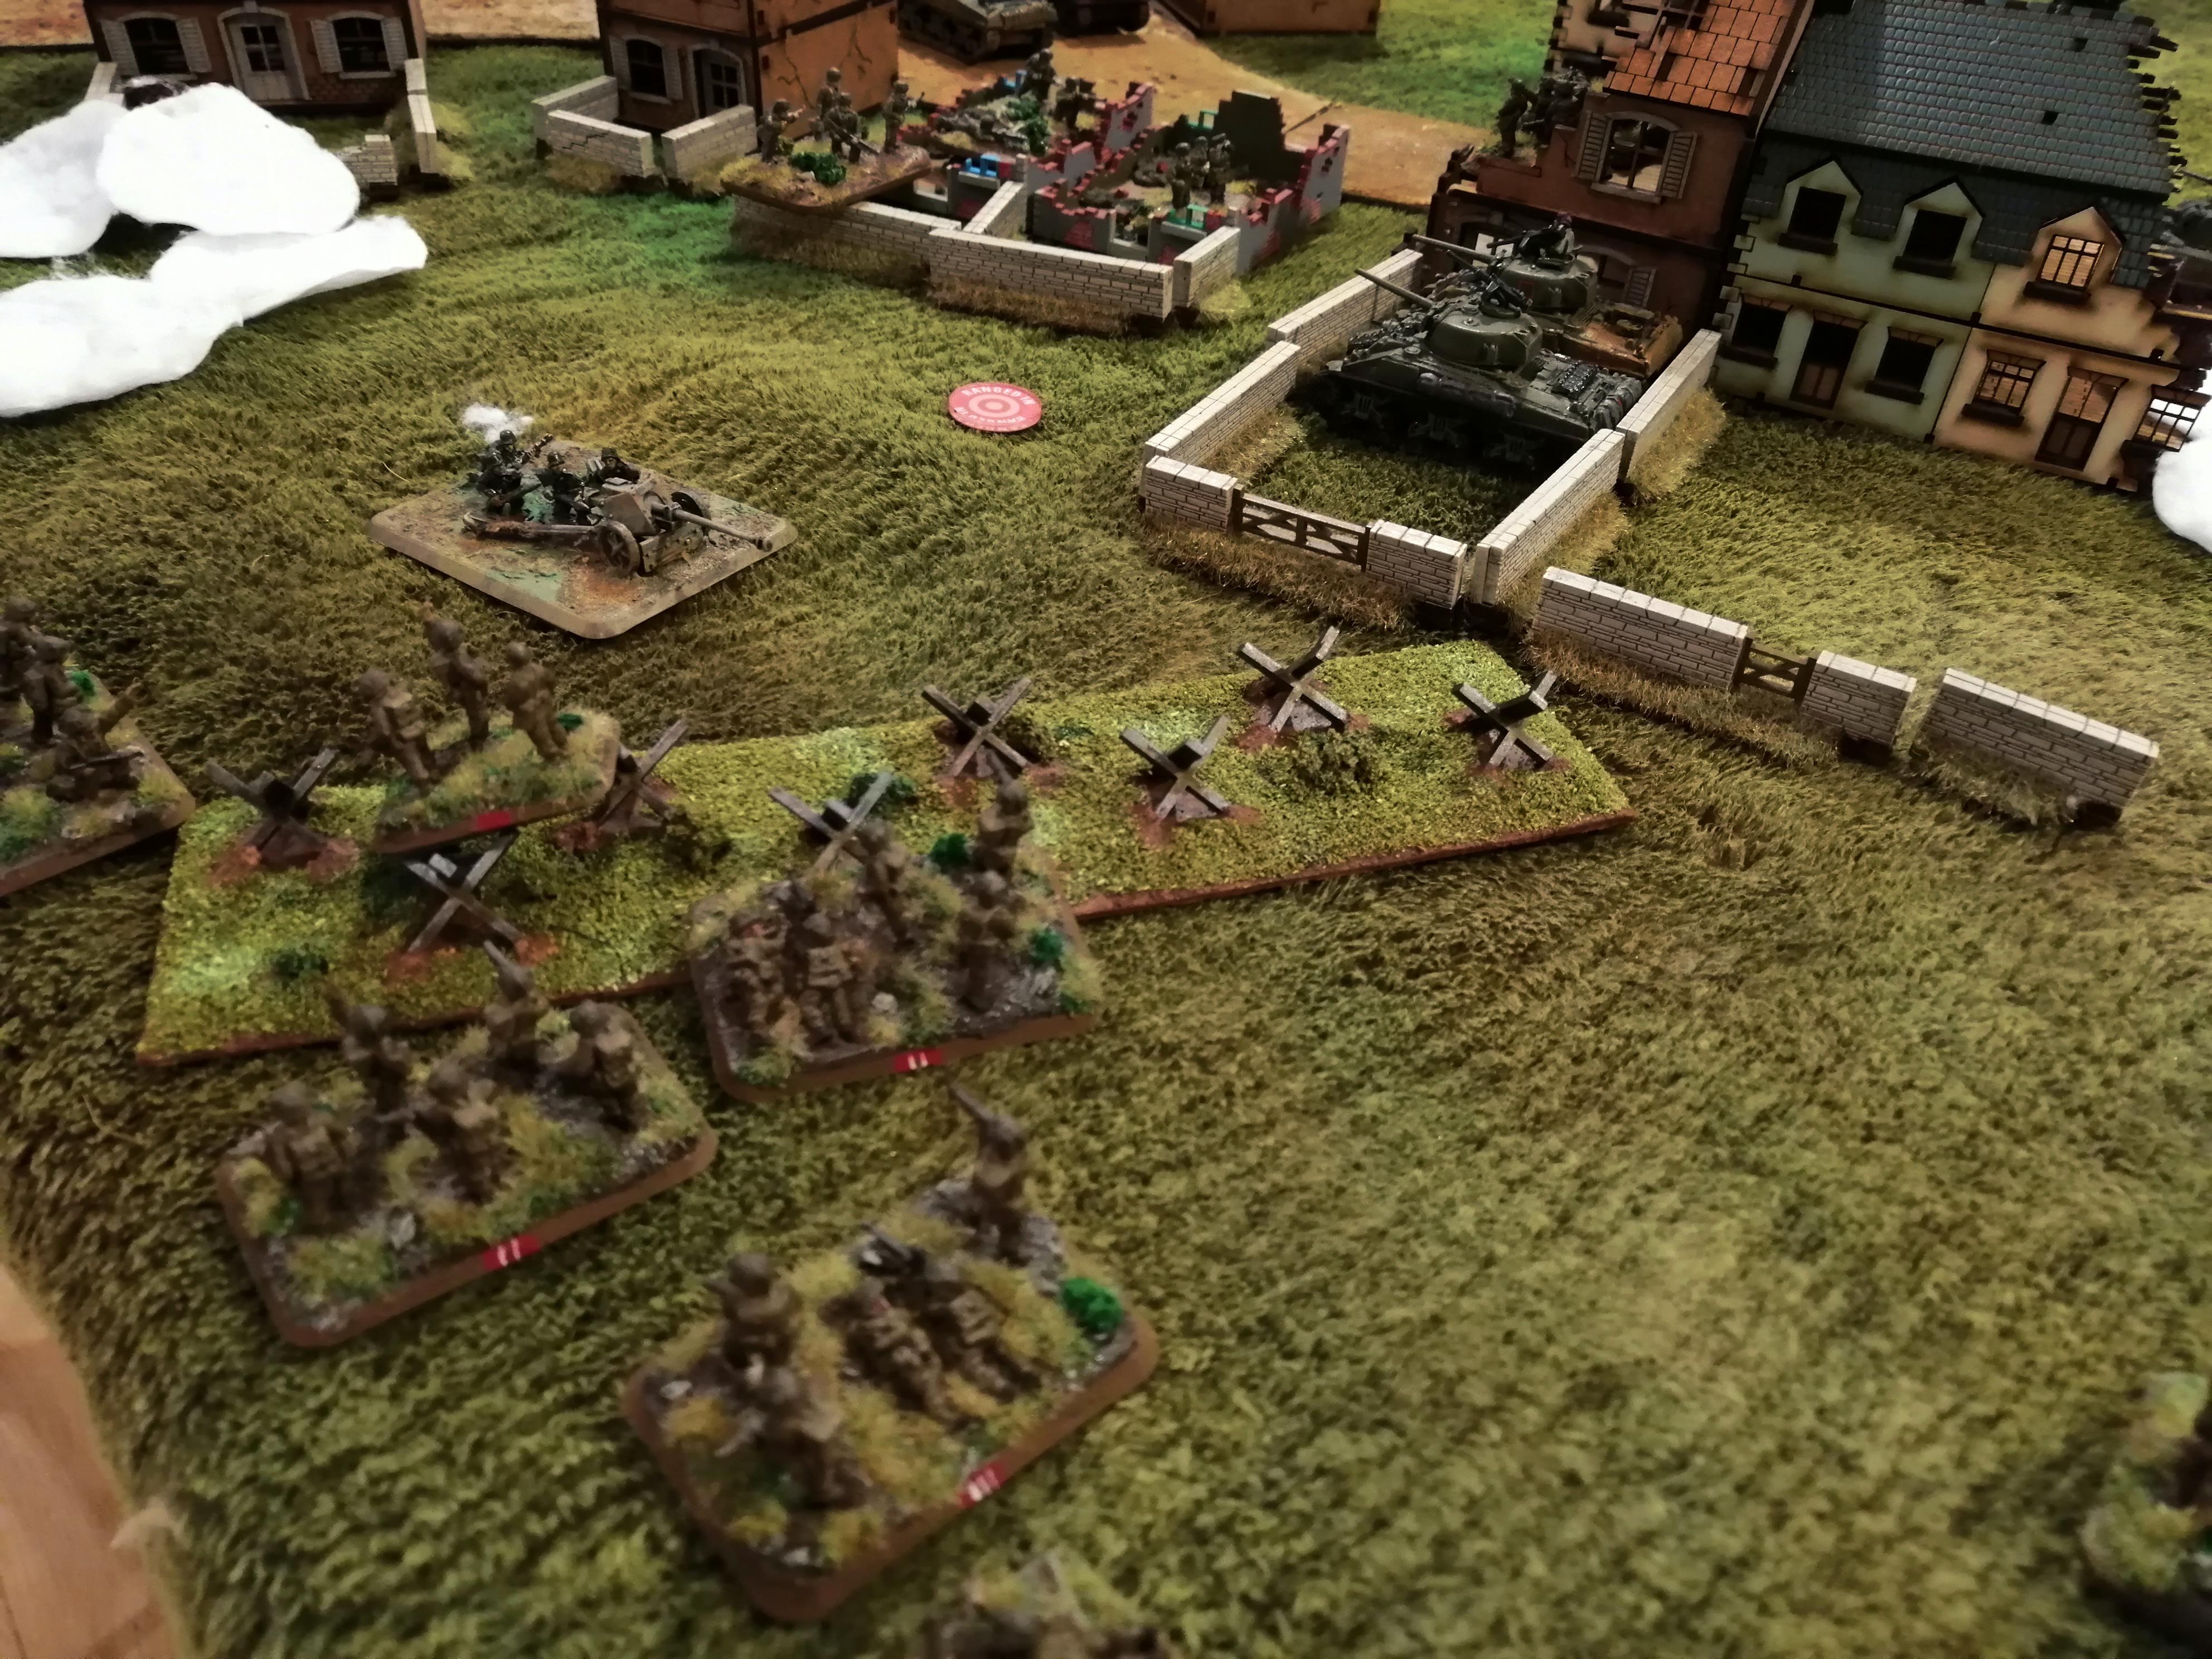 Red Platoon taking cover in the tank traps and preparing to assault the PaK40
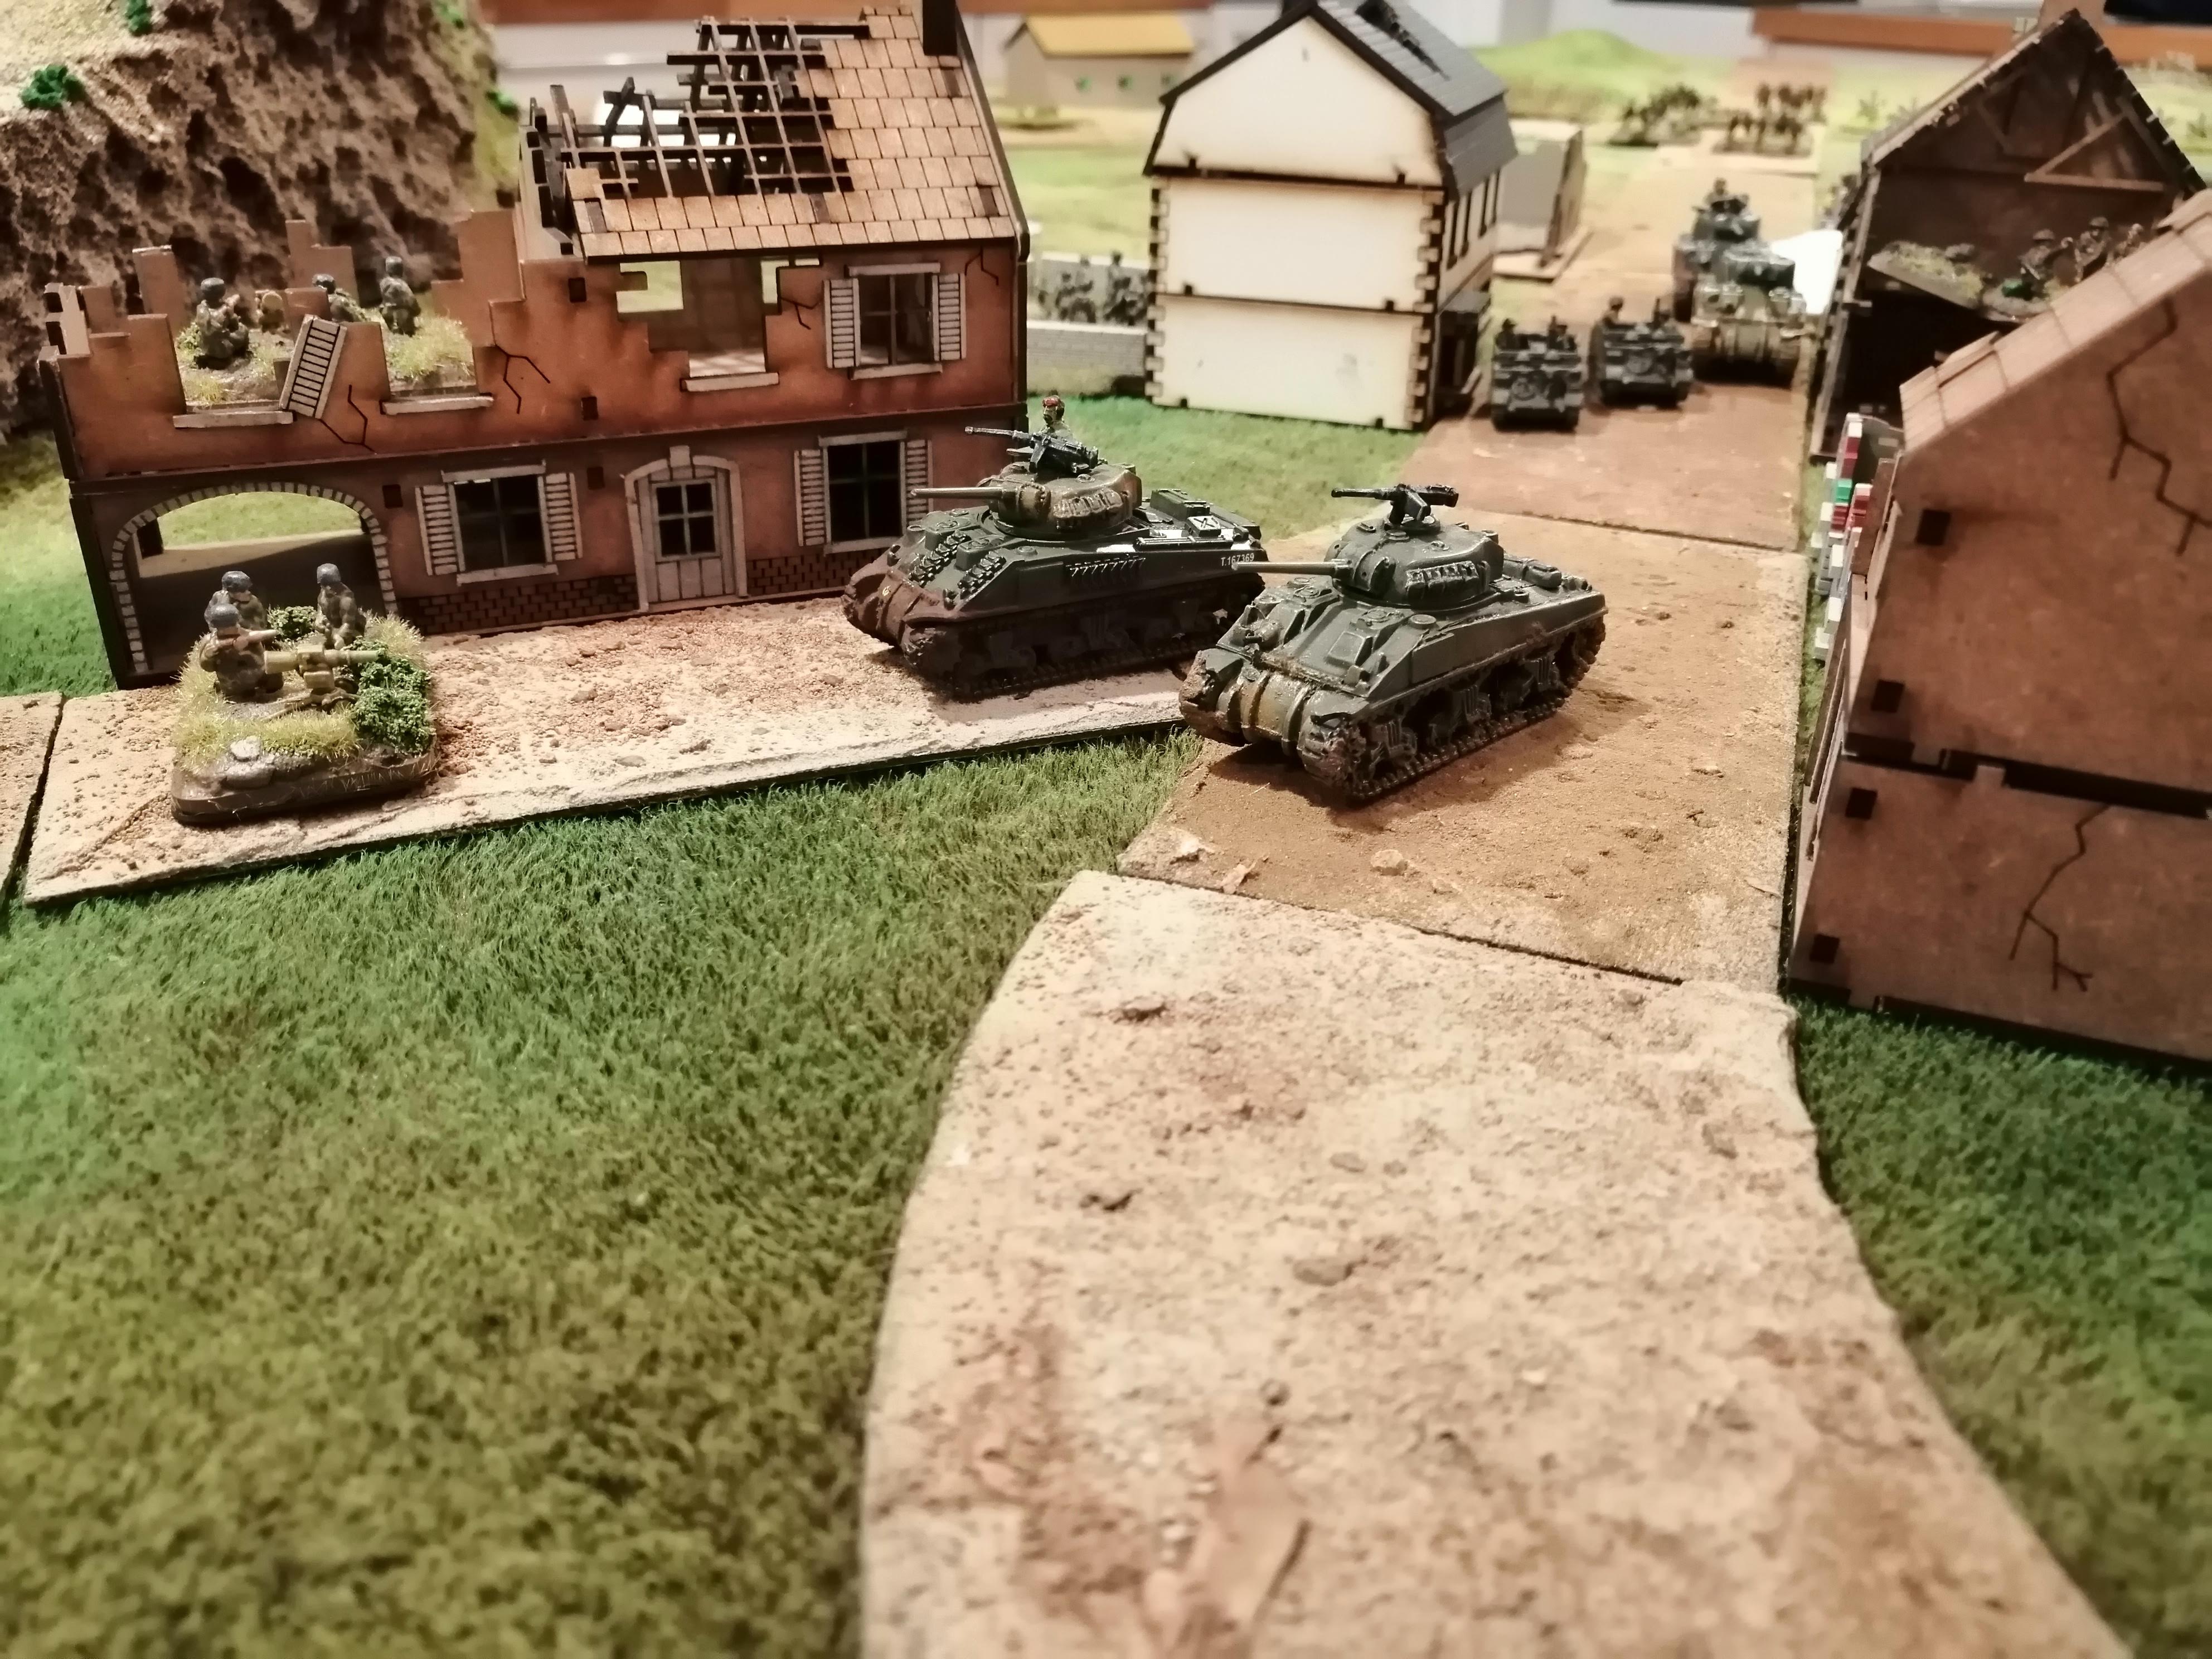 Tank Platoon 2 round the corner to deal with the 7.5cm Infantry Guns
Game Wrap Up
This was a close fought game and the random German Deployment made for some interesting decisions. With the increasing density of cover and the unknown locations of the German forces, it certainly caused the Kiwis to adopt a more cautious approach. Interestingly, many of the German forces got deployed into locations that were entirely suited to the unit.
I was hoping the smoke might have played a bigger and more interesting role in the battle. I wanted the location to be random each turn but perhaps there wasn’t enough of it to really cause an impact.
Overall, I think this is a format that I might repeat in the future with perhaps some tweeks on how and where the random deployment takes place from. Perhaps breaking the table up into zones and then allocating units to each zone might provide a little bit more control for the German player.
Otherwise, the battle went as per the history books. The 2nd NZ Division were able to fight their way into the town of Cassino and, like our game, troops often fought building to building to move forward. The Fallschirmjager put up a dogged defence and certainly gave a good account of themselves.
3rd Battle for Monte Cassino - Assault on the Town (Turns 6 and 7)
NZ Turn 6
The Kiwis need to start pushing on now as they’ve only progressed half the board and taken 5 turns to do it. They’re running out of time to complete their mission. The smoke bombardment lands around the MG teams in the hills providing some cover for the advancing 2nd Division. In addition, all of the Shermans remount and Green Platoon unpins.
Red Platoon advances and finds a minefield which kills 2 units. T1 pushes forward a little toward the Marder but wanting to stay beyond 16” of the PaK40 so as to be a little harder to hit. The Engineers follow T1 up using them as cover. Green platoon moves its remaining units into the ruins of the buildings.
The command tank from T2 advances toward the Scouts and the Universal Carriers advance up the road while T3 advances on the farmhouse to try and finally flush out the 3sqd of defending Fallschirmjager.
The Mortar team continue to rain down fire on the farmhouse and manage to kill a team and pin the defenders in place. T1 fire upon the Marder and this time manage to penetrate the armour and hit the ammunition, causing the vehicle to explode.
During the assault step, T2 command tank launches another assault against the Scouts. The initial assault kills one scout team but they hit back and cause the tank to bail out.
The rest of T2 assault 2sqd in the building across the road from the scouts. The defensive fire misses the tanks and they crash into the defenders, killing 2 teams. The Fallschirmjager are able to counterattack but fail to cause any damage leaving the tanks to kill the platoon command and push the rest of the squad out of the buildings.
Finally, T3 launch their assault against the 3sqd Fallschirmjager dug in at the farm house. A shot from a panzerfaust destroys a tank as they advance but it is not enough to stop T3 and they manage to kill 1 team and force the rest of the platoon to fallback, finally giving up their defensive position.
German Turn 6:
Only one location has been discovered and this is drawn as a blank.
3sqd fall back and 2 sqd consolidate into the next house along the road with the Company Command teams.
The PaK40 fires and punches straight through the armour of one of the tanks in T1, taking it out instantly and 2sqd are able to kill another team from Green platoon. The MG team in the hill is able to also fire on Green platoon but the bullet proof cover of the ruined buildings save them from further losses.
Finally the Scout platoon assaults the bailed out command tank of T2 and is able to destroy the tank!
 State of play in Turn 6
 The view that the MG Teams in the hills have of the battlefield
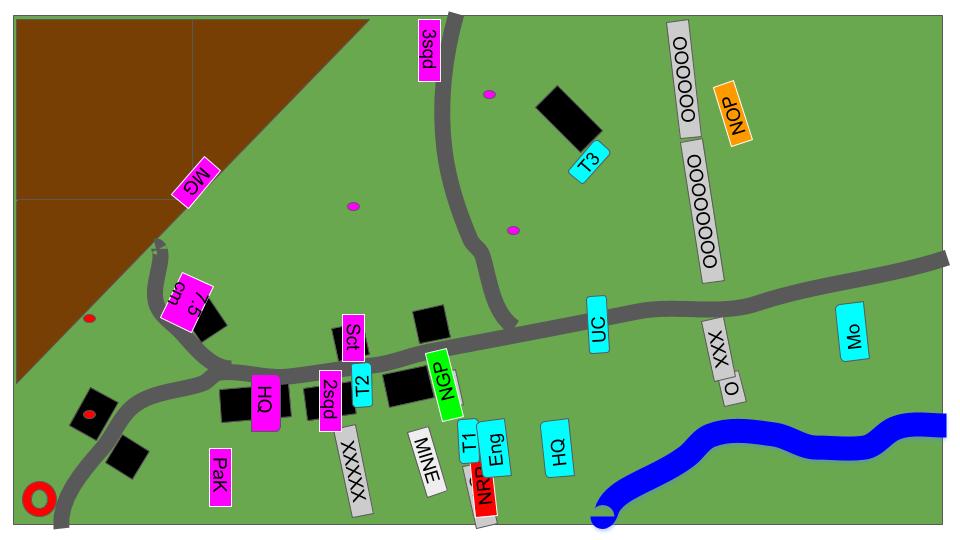

NZ Turn 7
The smoke lands around the PaK40 and the command teams offering some cover for the advancing Kiwis.
T3 heads back to the road and Orange platoon, with 3sqd removed, can finally carry on advancing. T2 make a blitz move down the road and Green Platoon dash out of their building and cross the road toward the Scout platoon, ready to assault them. T1 moves into the gardens of the buildings now vacated by 2sqd. The Engineers move into the minefield with a view to clearing it however they lose one team in the process. Red platoon continues to advance around the barbed wire.
The mortar team is able to range in on the PaK 40 and also include some of 2sqd in the bombardment. The PaK40 is pinned and 2 teams from 2sqd are killed as the mortar shells rain down.
T2 fire upon the Fallschirmjager company command teams and manage to kill the 2nd in Command. T2 then assaults into the building and while it does not cause any damage, it does cause 2sqd to fallback again.
Green platoon assault the scout squad but get pinned down by the defensive fire and lose one team in the process.
German turn 7:
Things are starting to look a little desperate for the Germans although if they can just hang on for a couple more turns, they might just hold the Kiwis up and win the game through delaying tactics. It’s going to be close.
The PaK40 unpins and 3sqd move along the edge of the hill, trying to get back into the fight but being hampered by the minefield tokens lying in their direct path.
The Pak 40, having rallied well, fail to score any hits on T1. The Company command fire their panzerfaust at T2 but miss. One of the 7.5cm recoilless guns manage to get a couple of shots off at T2 and hit but fail to penetrate while the other gun is able to destroy the lead Universal Carrier. The MG teams rain down fire upon Green platoon, pinning them and killing two more teams, leaving Green platoon with just one team remaining!
 Green Platoon about to assault the Scout Platoon hiding in the building
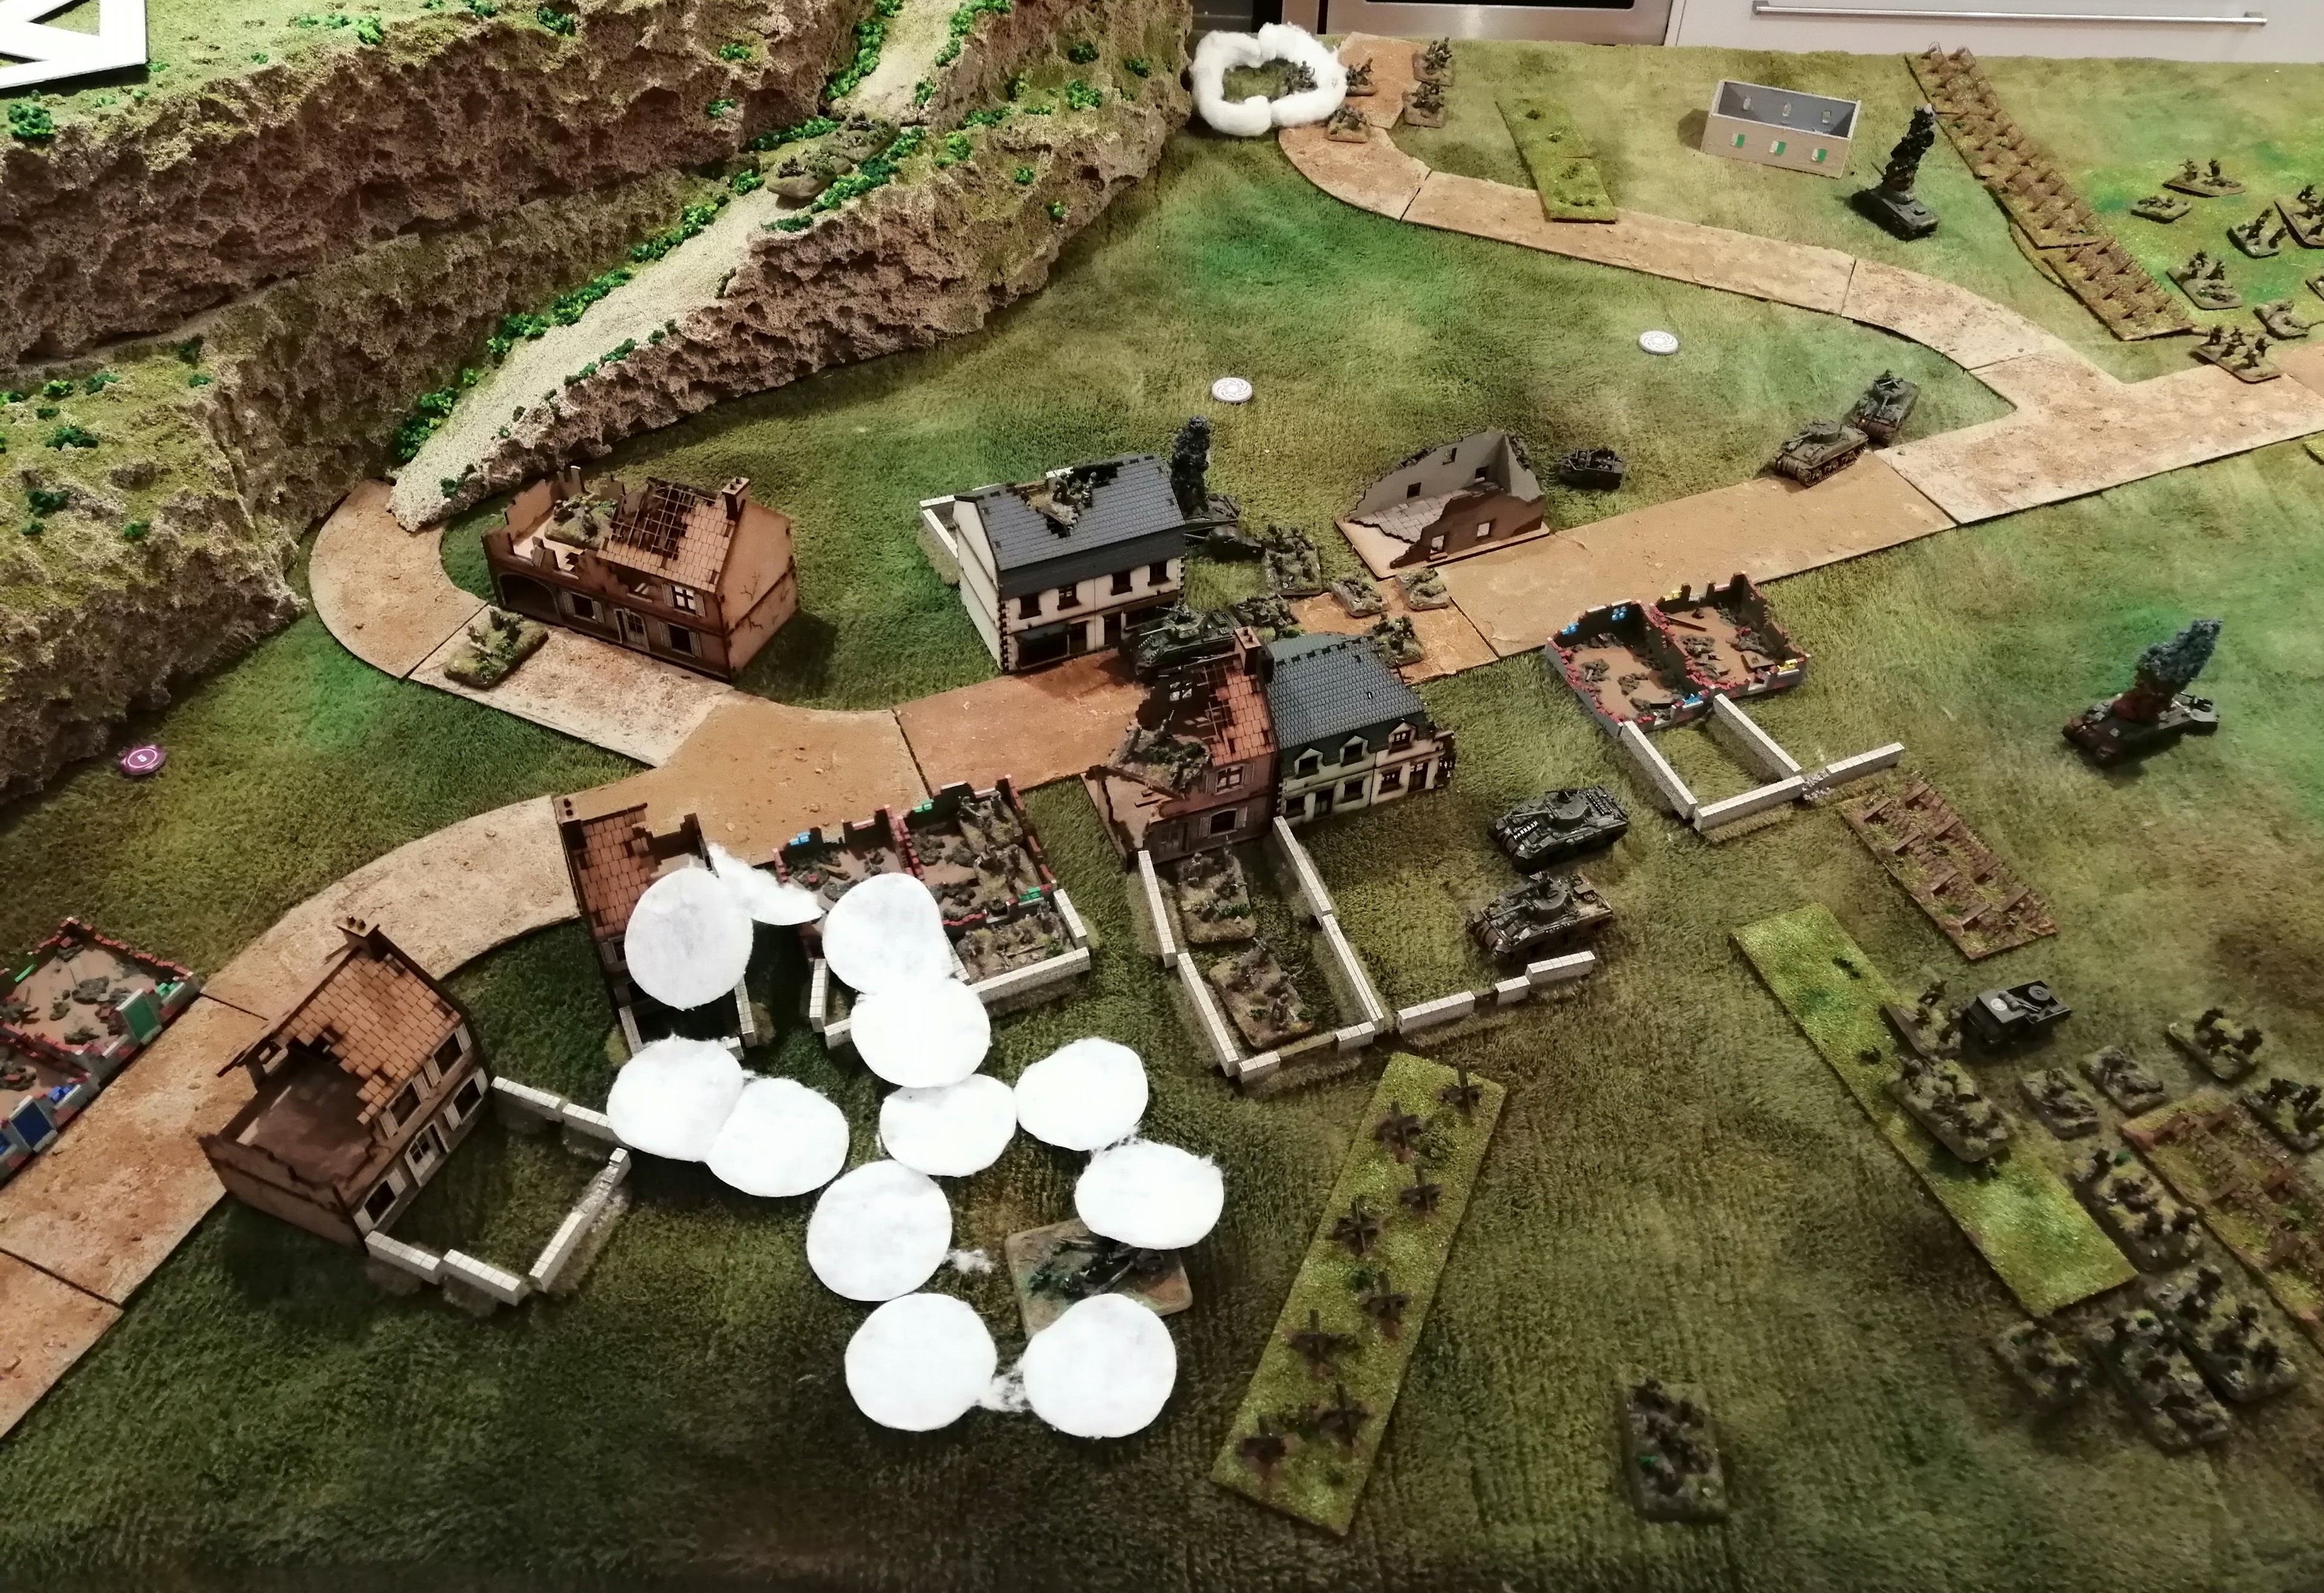 Turn 7
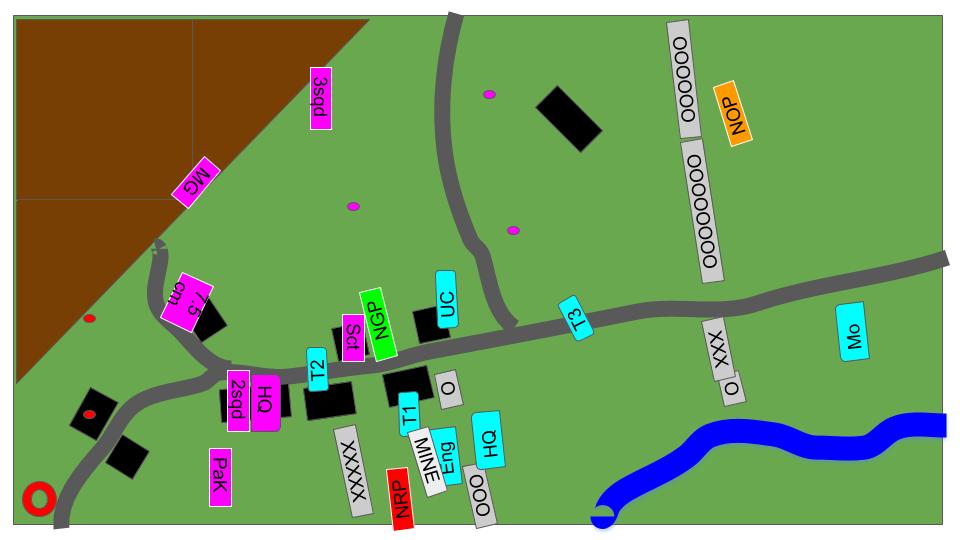 Tactical view
 Tanks ready to assault
3rd Battle for Monte Cassino - Assault on the Town (Turns 3, 4 and 5)
NZ Turn 3:
The smoke bombardments land further back and play no real impact on this turn.
Tank Platoon 1 attempts to cross the barbed wire, with all but one tank being unsuccessful. The remaining 2 tanks get close enough to a mine counter to trigger it, it turns up another blank. Red Platoon also gaps the barbed wire by the river. The Engineers, Green Platoon and Tank Platoon 2 all advance up the road, looking to leave the 3sqds of Fallschirmjager to Orange Platoon and the Tank Platoon 3.
During the shooting phase, the mortars yet again pin but fail to wound 3sqd. T3, Orange Platoon and the Carriers all pour their fire into 3sqd but fail to cause any damage. Just like the real battle, the Fallschirmjager are well dug in and will take some effort to shift.
German Turn 3:
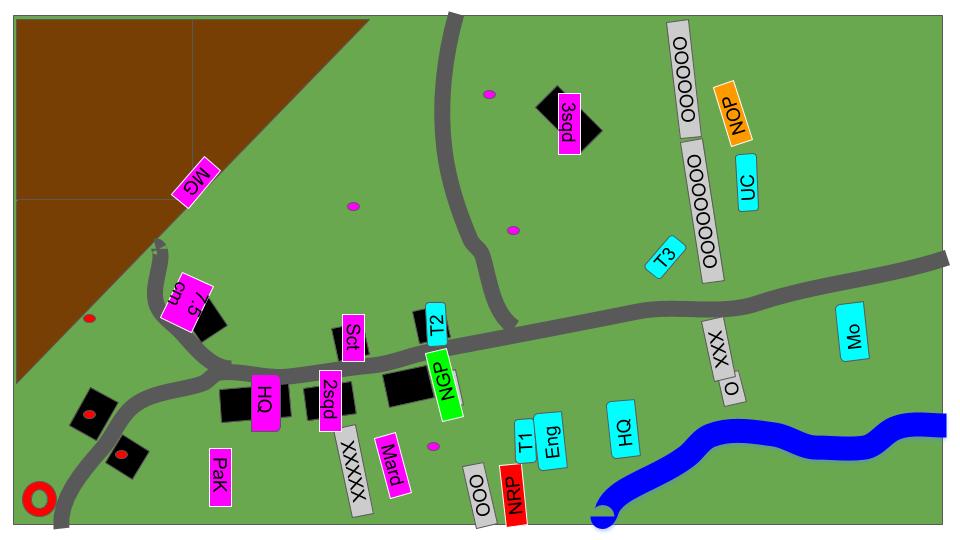
The NZ advance is enough to trigger 4 deployment locations. The German player draws a blank for the location behind 3sqd, the scout squad for the house above the road, the 2 squad Fallschirmjager for the house further back and the Marder for the location behind the barbed wire (see the tactical map).
3 sqd this turn fail to unpin and their reduced firepower results in no hits at all. The Marder is unable to find the mark on the advancing Tank Platoon 1. The Scout platoon has a little more success, inflicting one kill against Green Platoon in the middle of the table. The newly discovered 2 Squads of Fallschirmjager are out of range and so cannot fire this turn.
 The position of the Marder, the 2sqd Fallschirmjager Platoon in the building/garden to the left and you can just make out the Scout Platoon in the ruin on the other side of the road
NZ Turn 4:
The smoke this turn lands around the hill so has little impact on the game.
Red platoon now advance through the barbed wire they gapped last turn and Tank Platoon 1 moves up in advance of them, giving the infantry some cover and protection. The Engineers get forward to almost reach the first ruined building, while alongside Green Platoon advances up the road and Tank Platoon 2 move off the road to their right. Tank Platoon 3 decides that the 3sqd of Fallschirmjager at the farmhouse are too well dug in and begin to advance around the barbed wire.
With the discovery of the second Fallschirmjager platoon, the Kiwis use their one artillery strike on them. Yet again, the Fallschirmjager are too well dug in to cause any wounds however they will start the next turn pinned.
The Mortar platoon continue to land shots on the 3sqd Fallschirmjager at the farmhouse and manage to destroy another team this turn.
Tank Platoon 1, faced with a Marder, decide to open fire on it to remove the threat. Despite being on the move and at range, they manage to get a glancing hit that causes the Marder crew to bail out. In the centre, Tank Platoon 2 and Green Platoon fail to cause any hits against the Scout Platoon in the ruined building ahead of them.
German Turn 4:
The advance opens up two more deployment locations and the random draw is a blank and the Fallschirmjager HQ. The HQ are deployed in the ruins behind the 2sqd (see the tactical map)
All of the pinned units are able to unpin and the Marder team remounts their vehicle – exactly what you would expect from the Fallschirmjager!
The Scout platoon fire upon Green Platoon and kill a team meanwhile 2sqd is able to kill two teams from the Engineer Platoon.
The Marder crew waste no time having remounted and fire upon the advancing Sherman’s of Tank Platoon 1 but their haste is to their detriment as they can only manage to bail out one of the Shermans.
 End of Turn 4
NZ Turn 5:
Once again the smoke lands toward the back of the battlefield, not really impacting play this turn.
The Sherman of Tank Platoon 1 is able to remount but the platoon stops to better engage the Marder. Tank Platoon 3 is able to round the barbed wire and turns toward the farmhouse, looking to assault the dug in 3qsd Fallschirmjager there. Tank Platoon 2 moves up toward the scout troop in the ruined building.
Green platoon dives into the ruined building across the road from the scout platoon while battered engineer platoon moves in to take cover behind tank platoon 1. Red Platoon moves up alongside and reaches the second set of barbed wire. Orange platoon, still not willing to move due to the overwhelming firepower that the Fallschirmjager in the farmhouse can apply finally manage to dig in, providing themselves some useful bullet proof cover.
Tank platoon 2 and Green Platoon lay down some fire on the Scouts in the ruined building but fail to cause any damage. Tank Platoon 1 hits the marder, again forcing the crew to bail out but fail to destroy it.
The Mortars and Tank Platoon 3 manage to once again pin the 3 sqd Fallschirmjager platoon but fail to cause any damage.
Tank Platoon 2 is close enough to launch an assault on the scouts and does so. The Shermans crash into the ruined building, destroying one scout team and forcing the rest to fall back.
German Turn 5:
3 new deployment areas are discovered. The Germans randomly draw the 7.5cm infantry gun teams (placed into the ruined buildings at the road fork), the MG teams who are in position on the hill and the PaK 40 anti tank gun which is placed in the fields behind the buildings and further back from the Marder.
The Marder remounts and the scout platoon falls back to the building further down the road, recreating the ‘building to building’ fighting that made up much of the combat seen in Cassino.
The Marder fires upon Tank Platoon 1 and causes both tanks to bail out but fails to destroy either. The PaK 40 further back has a shot but the tank somehow bounces the powerful shot – this tank platoon is living a charmed life!
2 sqd Fallschirmjager fires upon Green platoon and manages to destroy another team while 3qsd’s shooting on Orange Platoon is ineffective. The MG team on the hill has nothing to shoot at but will certainly stop the infantry from advancing around the back of the houses.
In the images below, you can see the state of play at the end of turn 5 and two shots of the battlefield during the Kiwi’s turn.
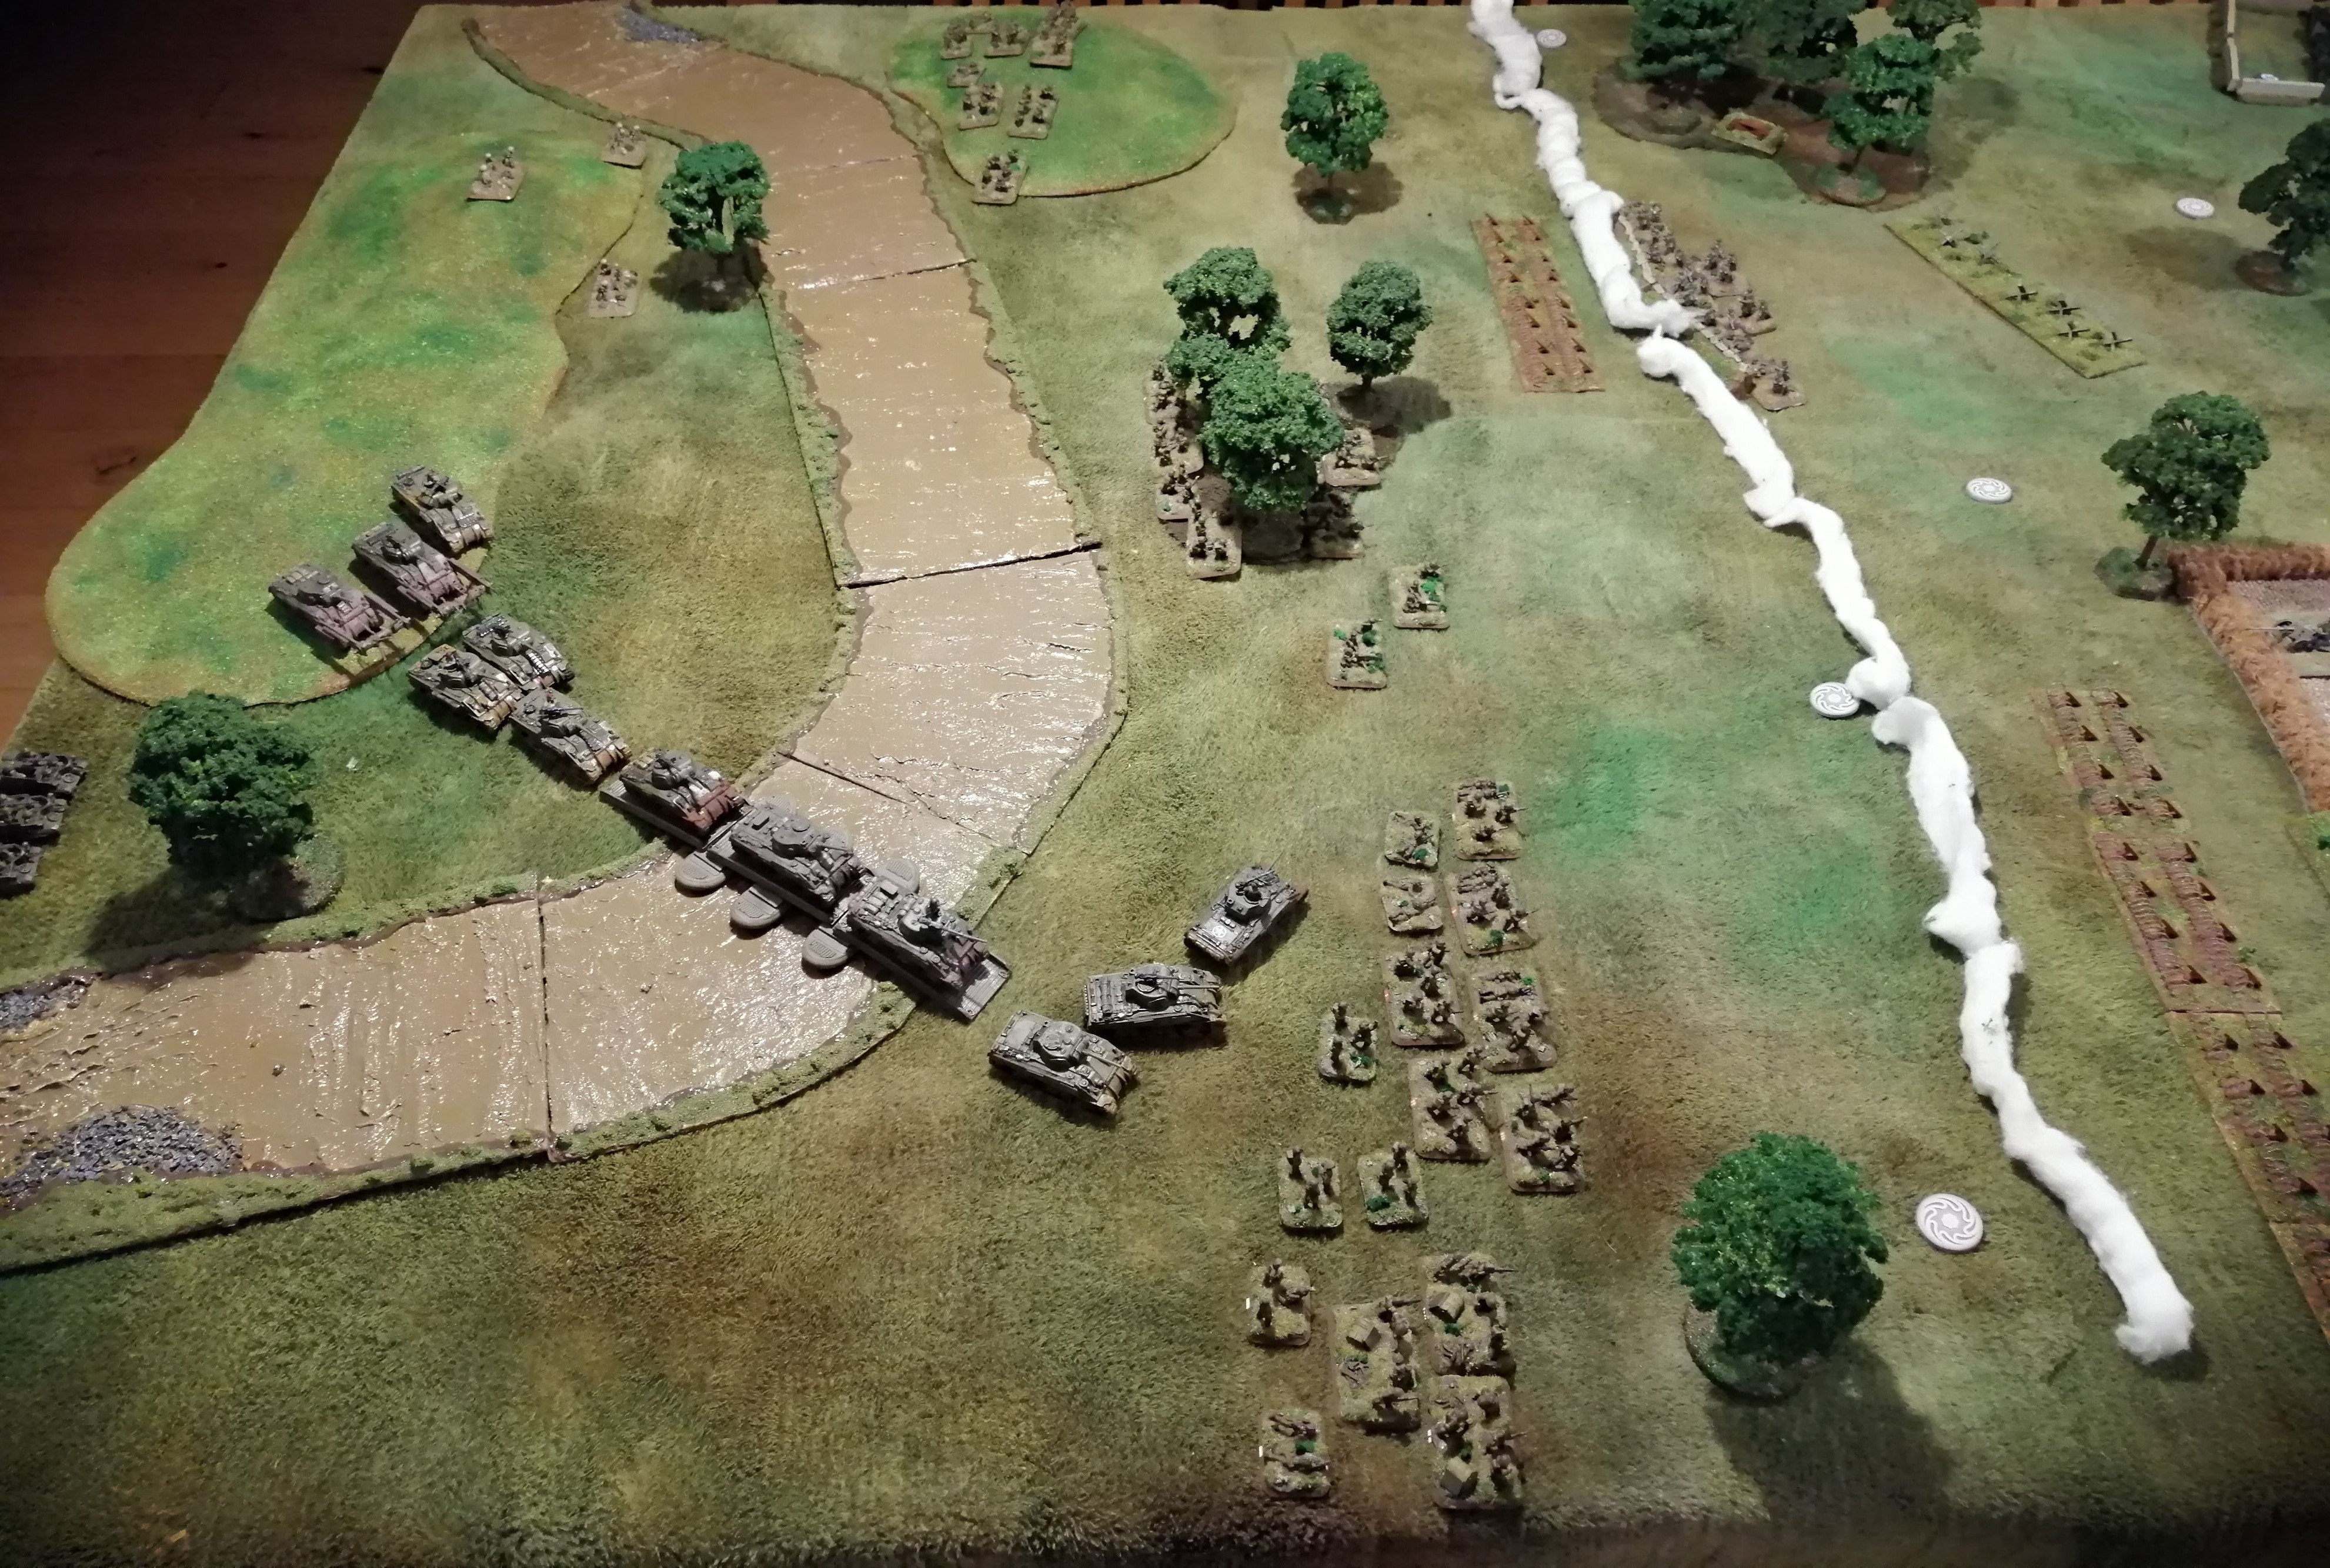
 The Marder's view of the battlefield and the advancing Tank Platoon 1 and Red Platoon
 Tank Platoon 2 and Green Platoon just before the assault on the Scout Platoon hiding in the ruined building
3rd Battle for Monte Cassino - Assault on the Town (Turns 1 and 2)
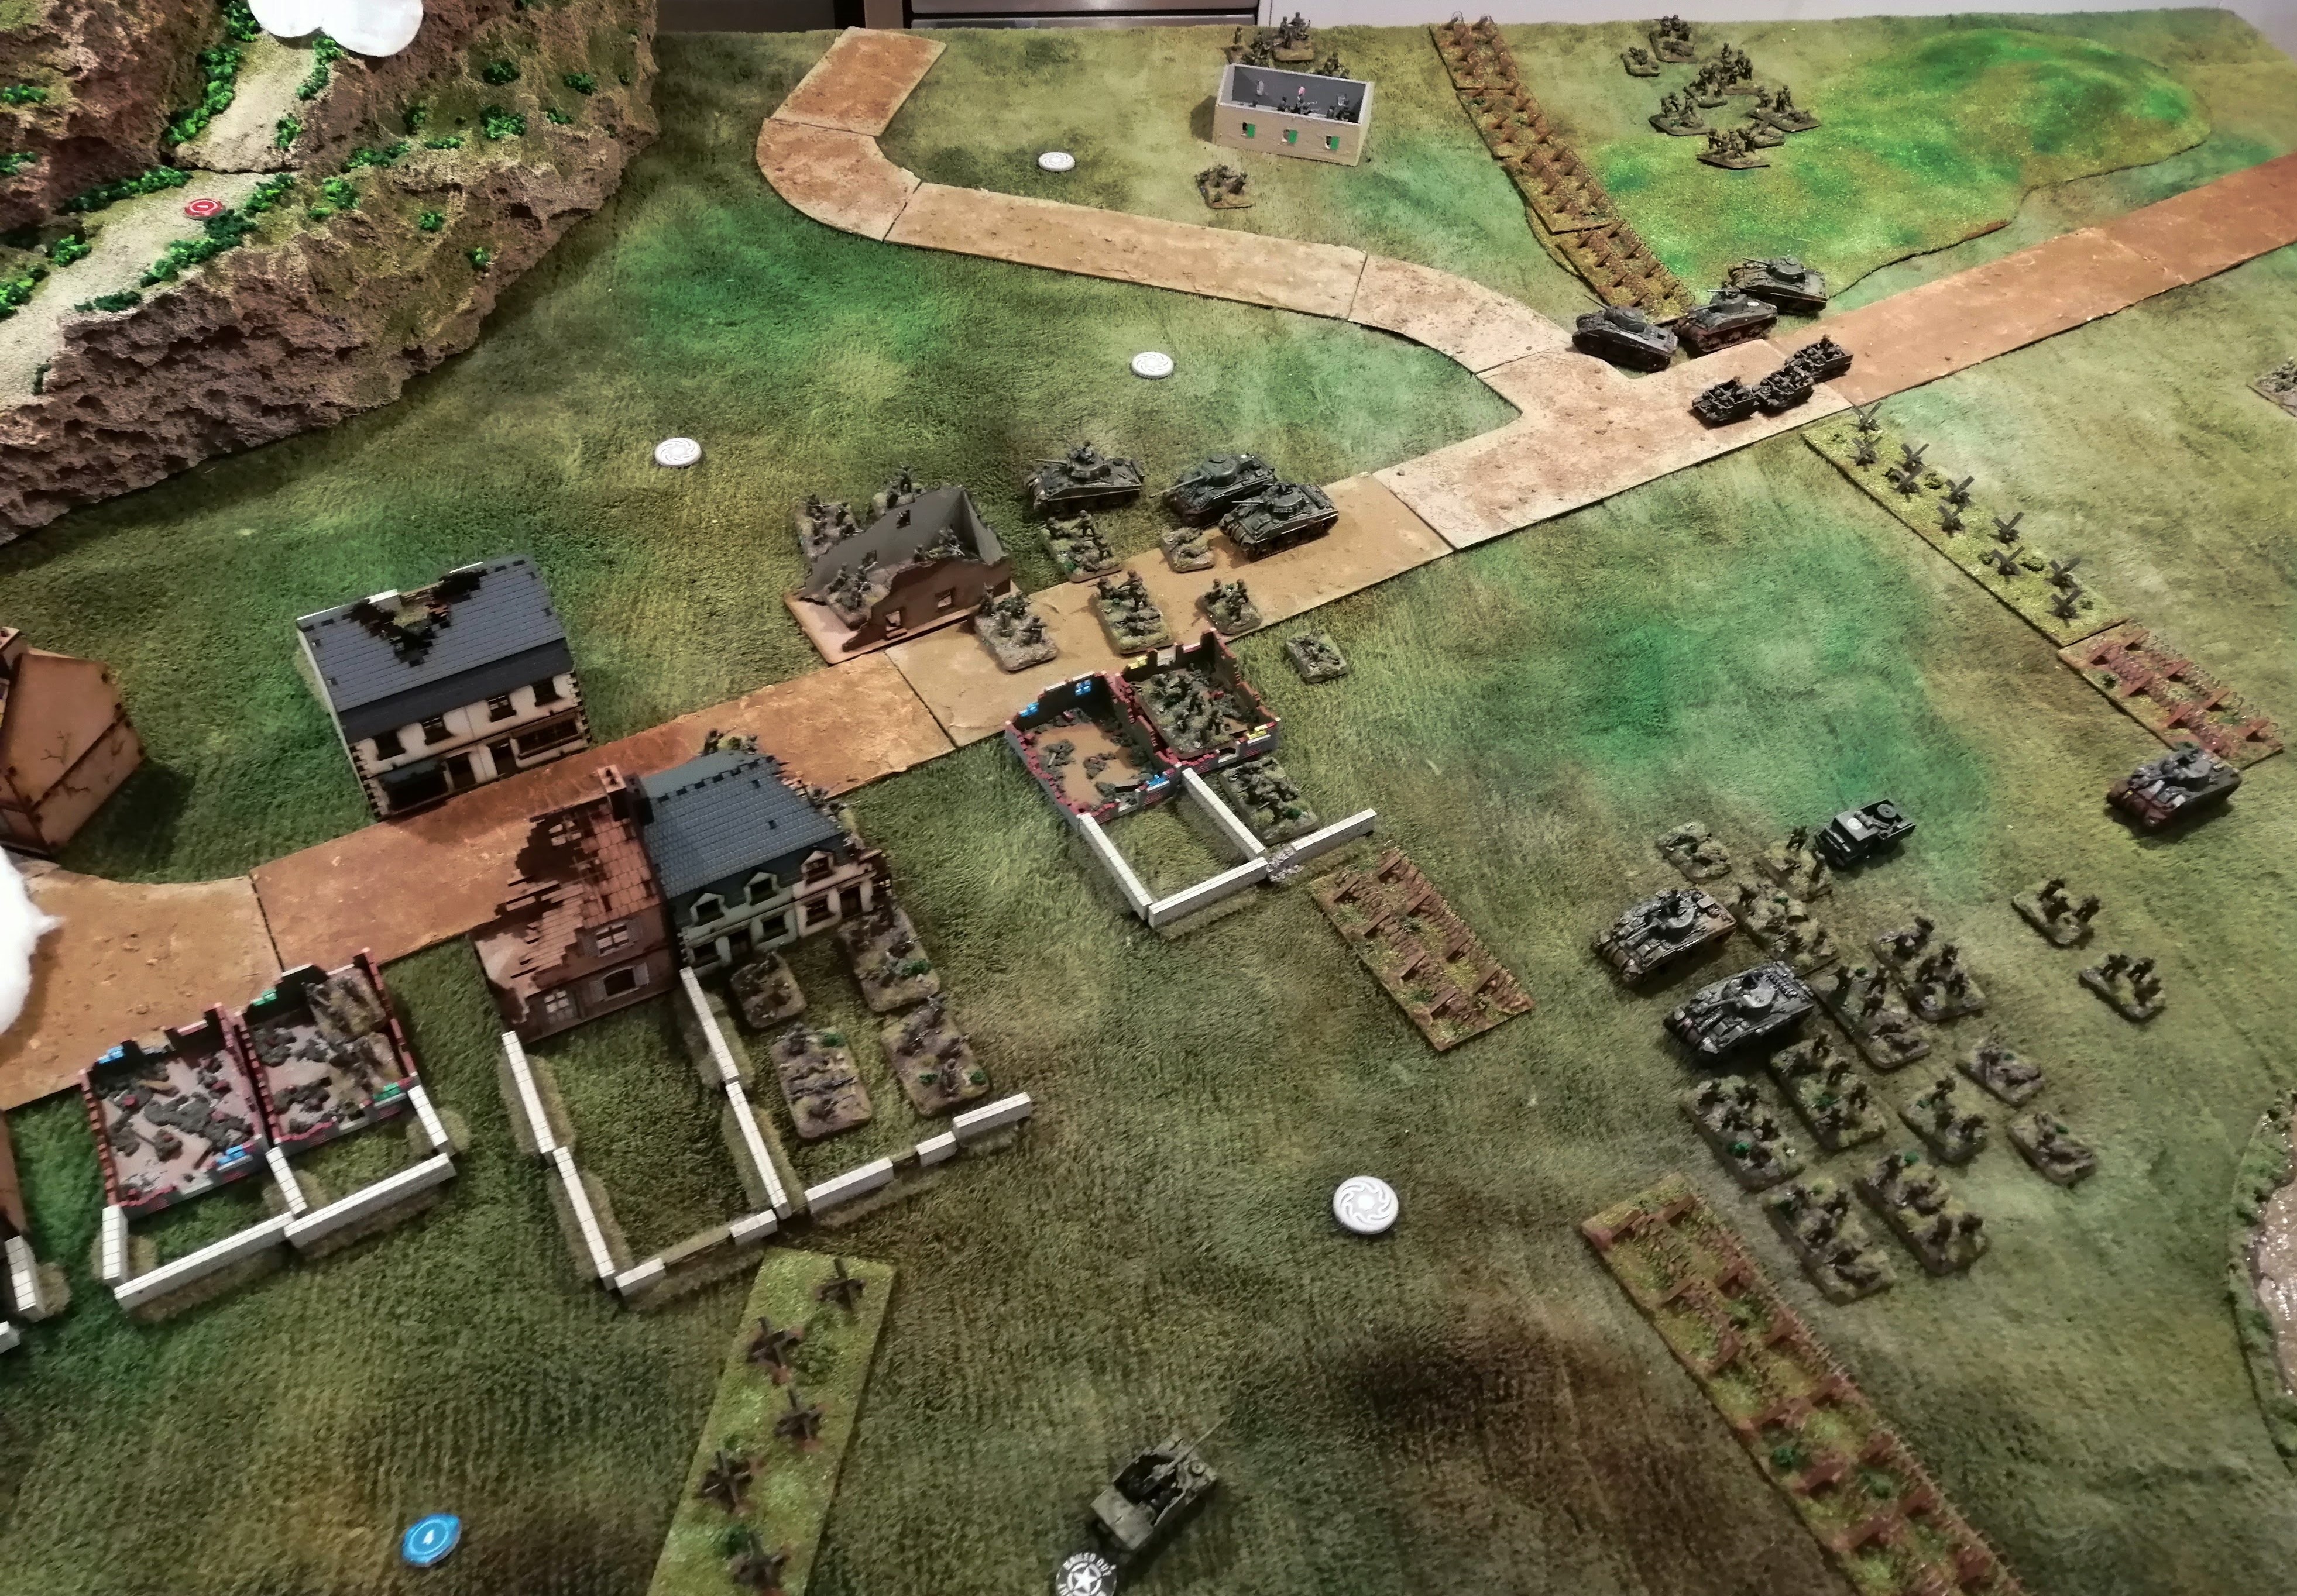
 The view from the NZ left flank
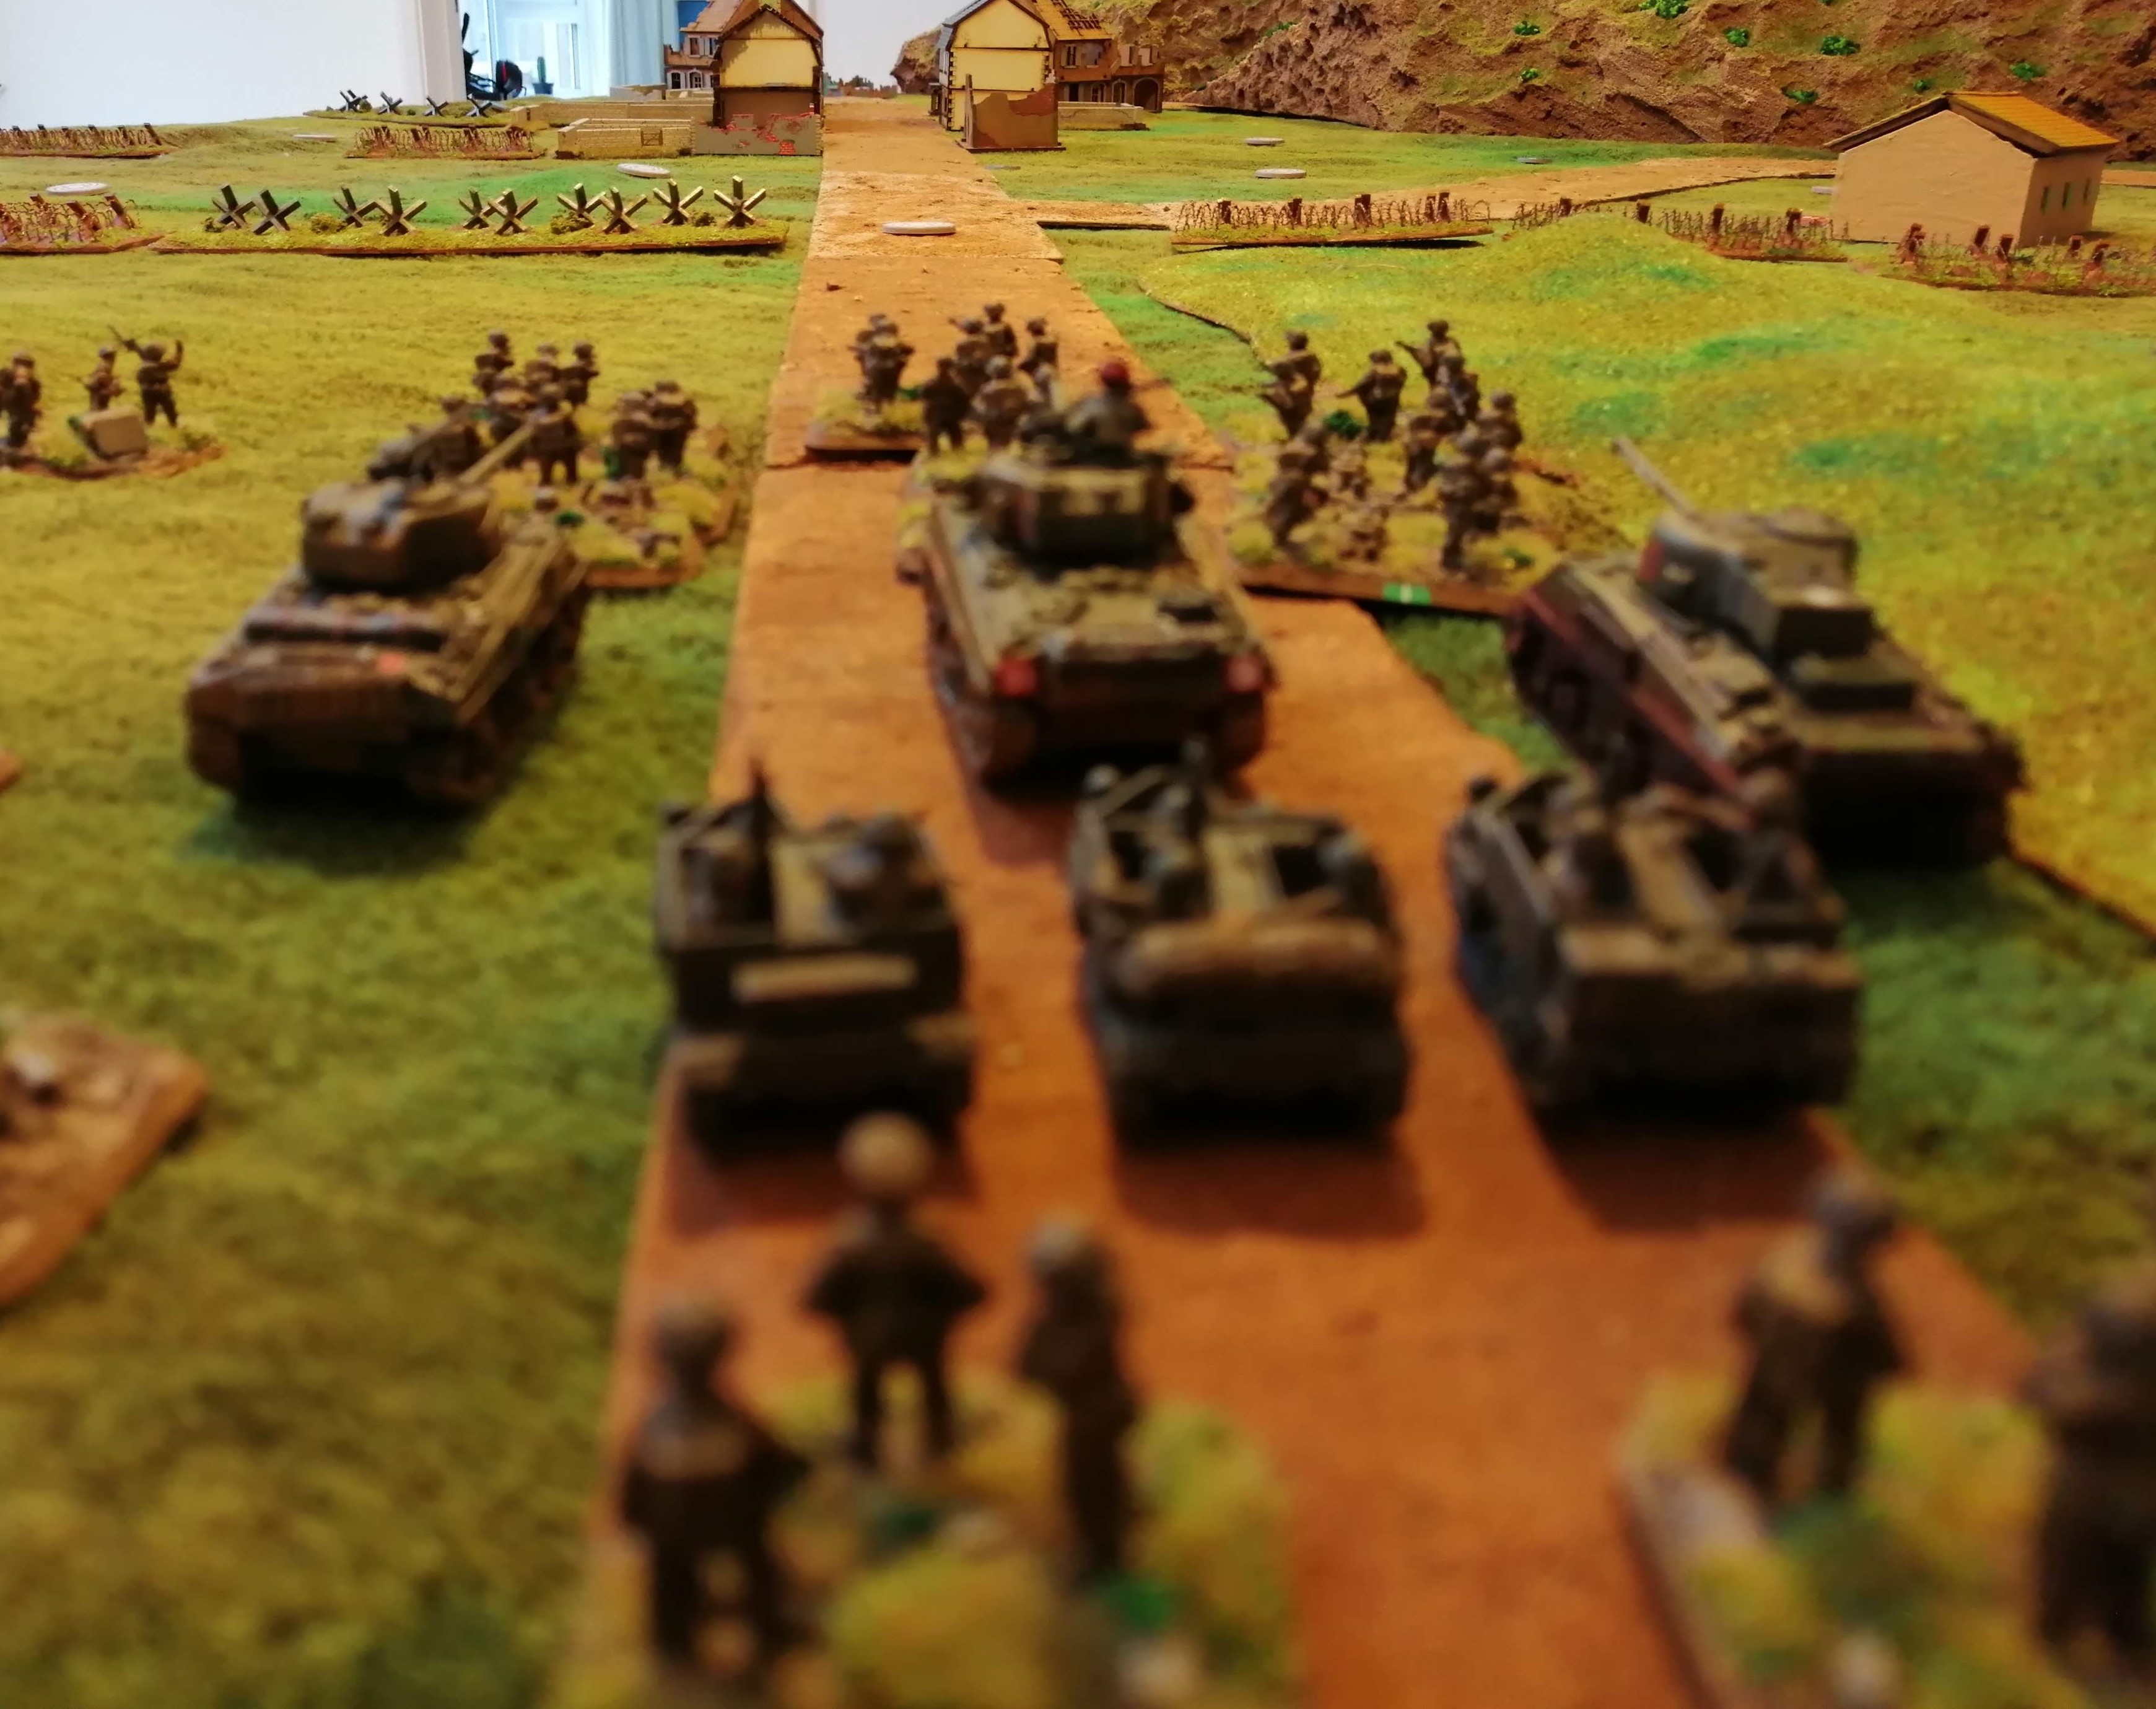 The middle (behind Green Platoon and Tank Platoon 2)
 And the NZ right flank, where Orange platoon face an abandoned farm house beyond the barbed wire
NZ Turn 1:
The three smoke bombardments arrive quite far up the German half of the battlefield so won’t impact play this turn. Otherwise, with no German units currently discovered by the NZ forces, all that can happen is an advanced. Red platoon is able to reach the barbed wire in front of them.
German Turn 1:
A quick measure shows that three deployment points are within 20” of NZ forces. A random draw puts the 3sqd Fallschirmjager platoon in the lone building, a blank for the deployment zone in the road and an MG Nest in the garden of the building just off the road (see the tactical map below). All of these units start this round pinned however the 3Sqd is able to lay down some serious fire on Orange Platoon and despite causing any casualties, is able to pin them in place.
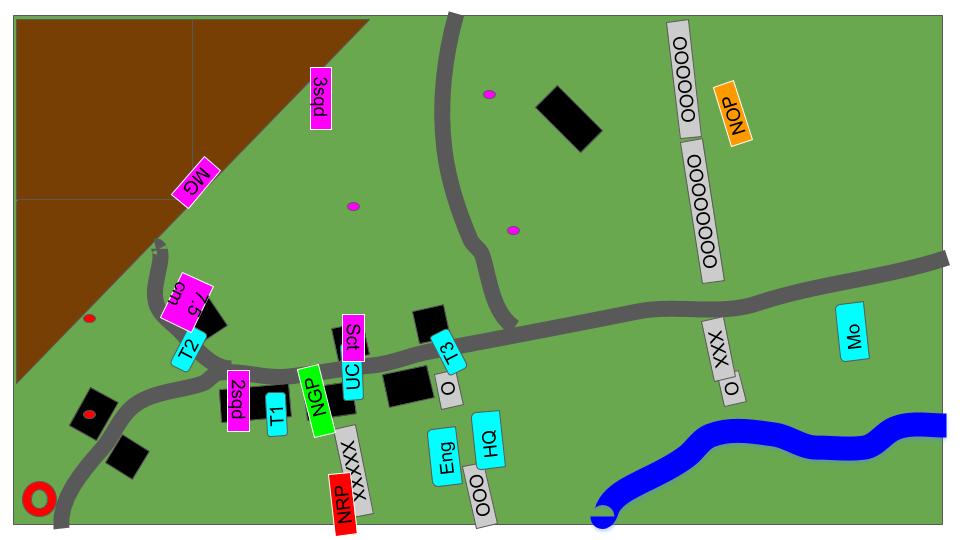
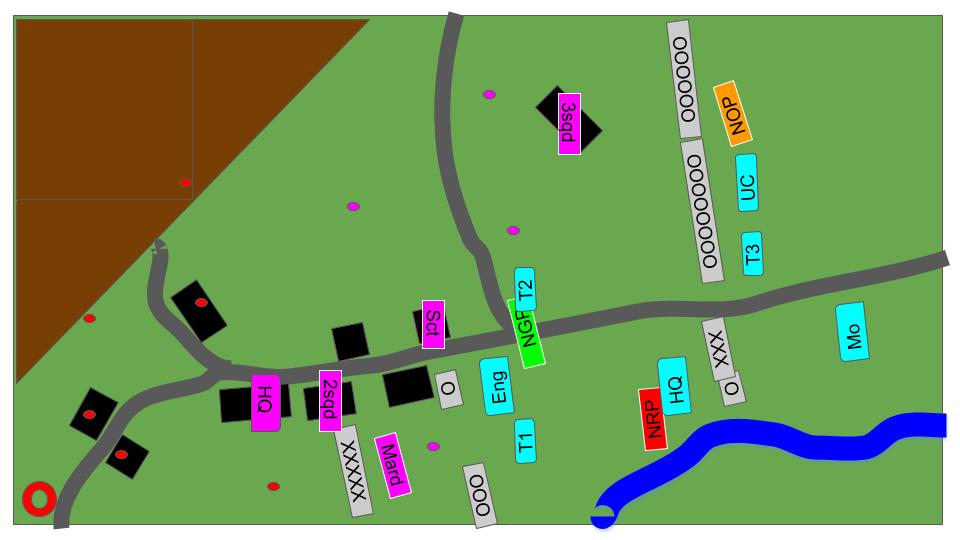
 Tactical Map at the end of Turn 1
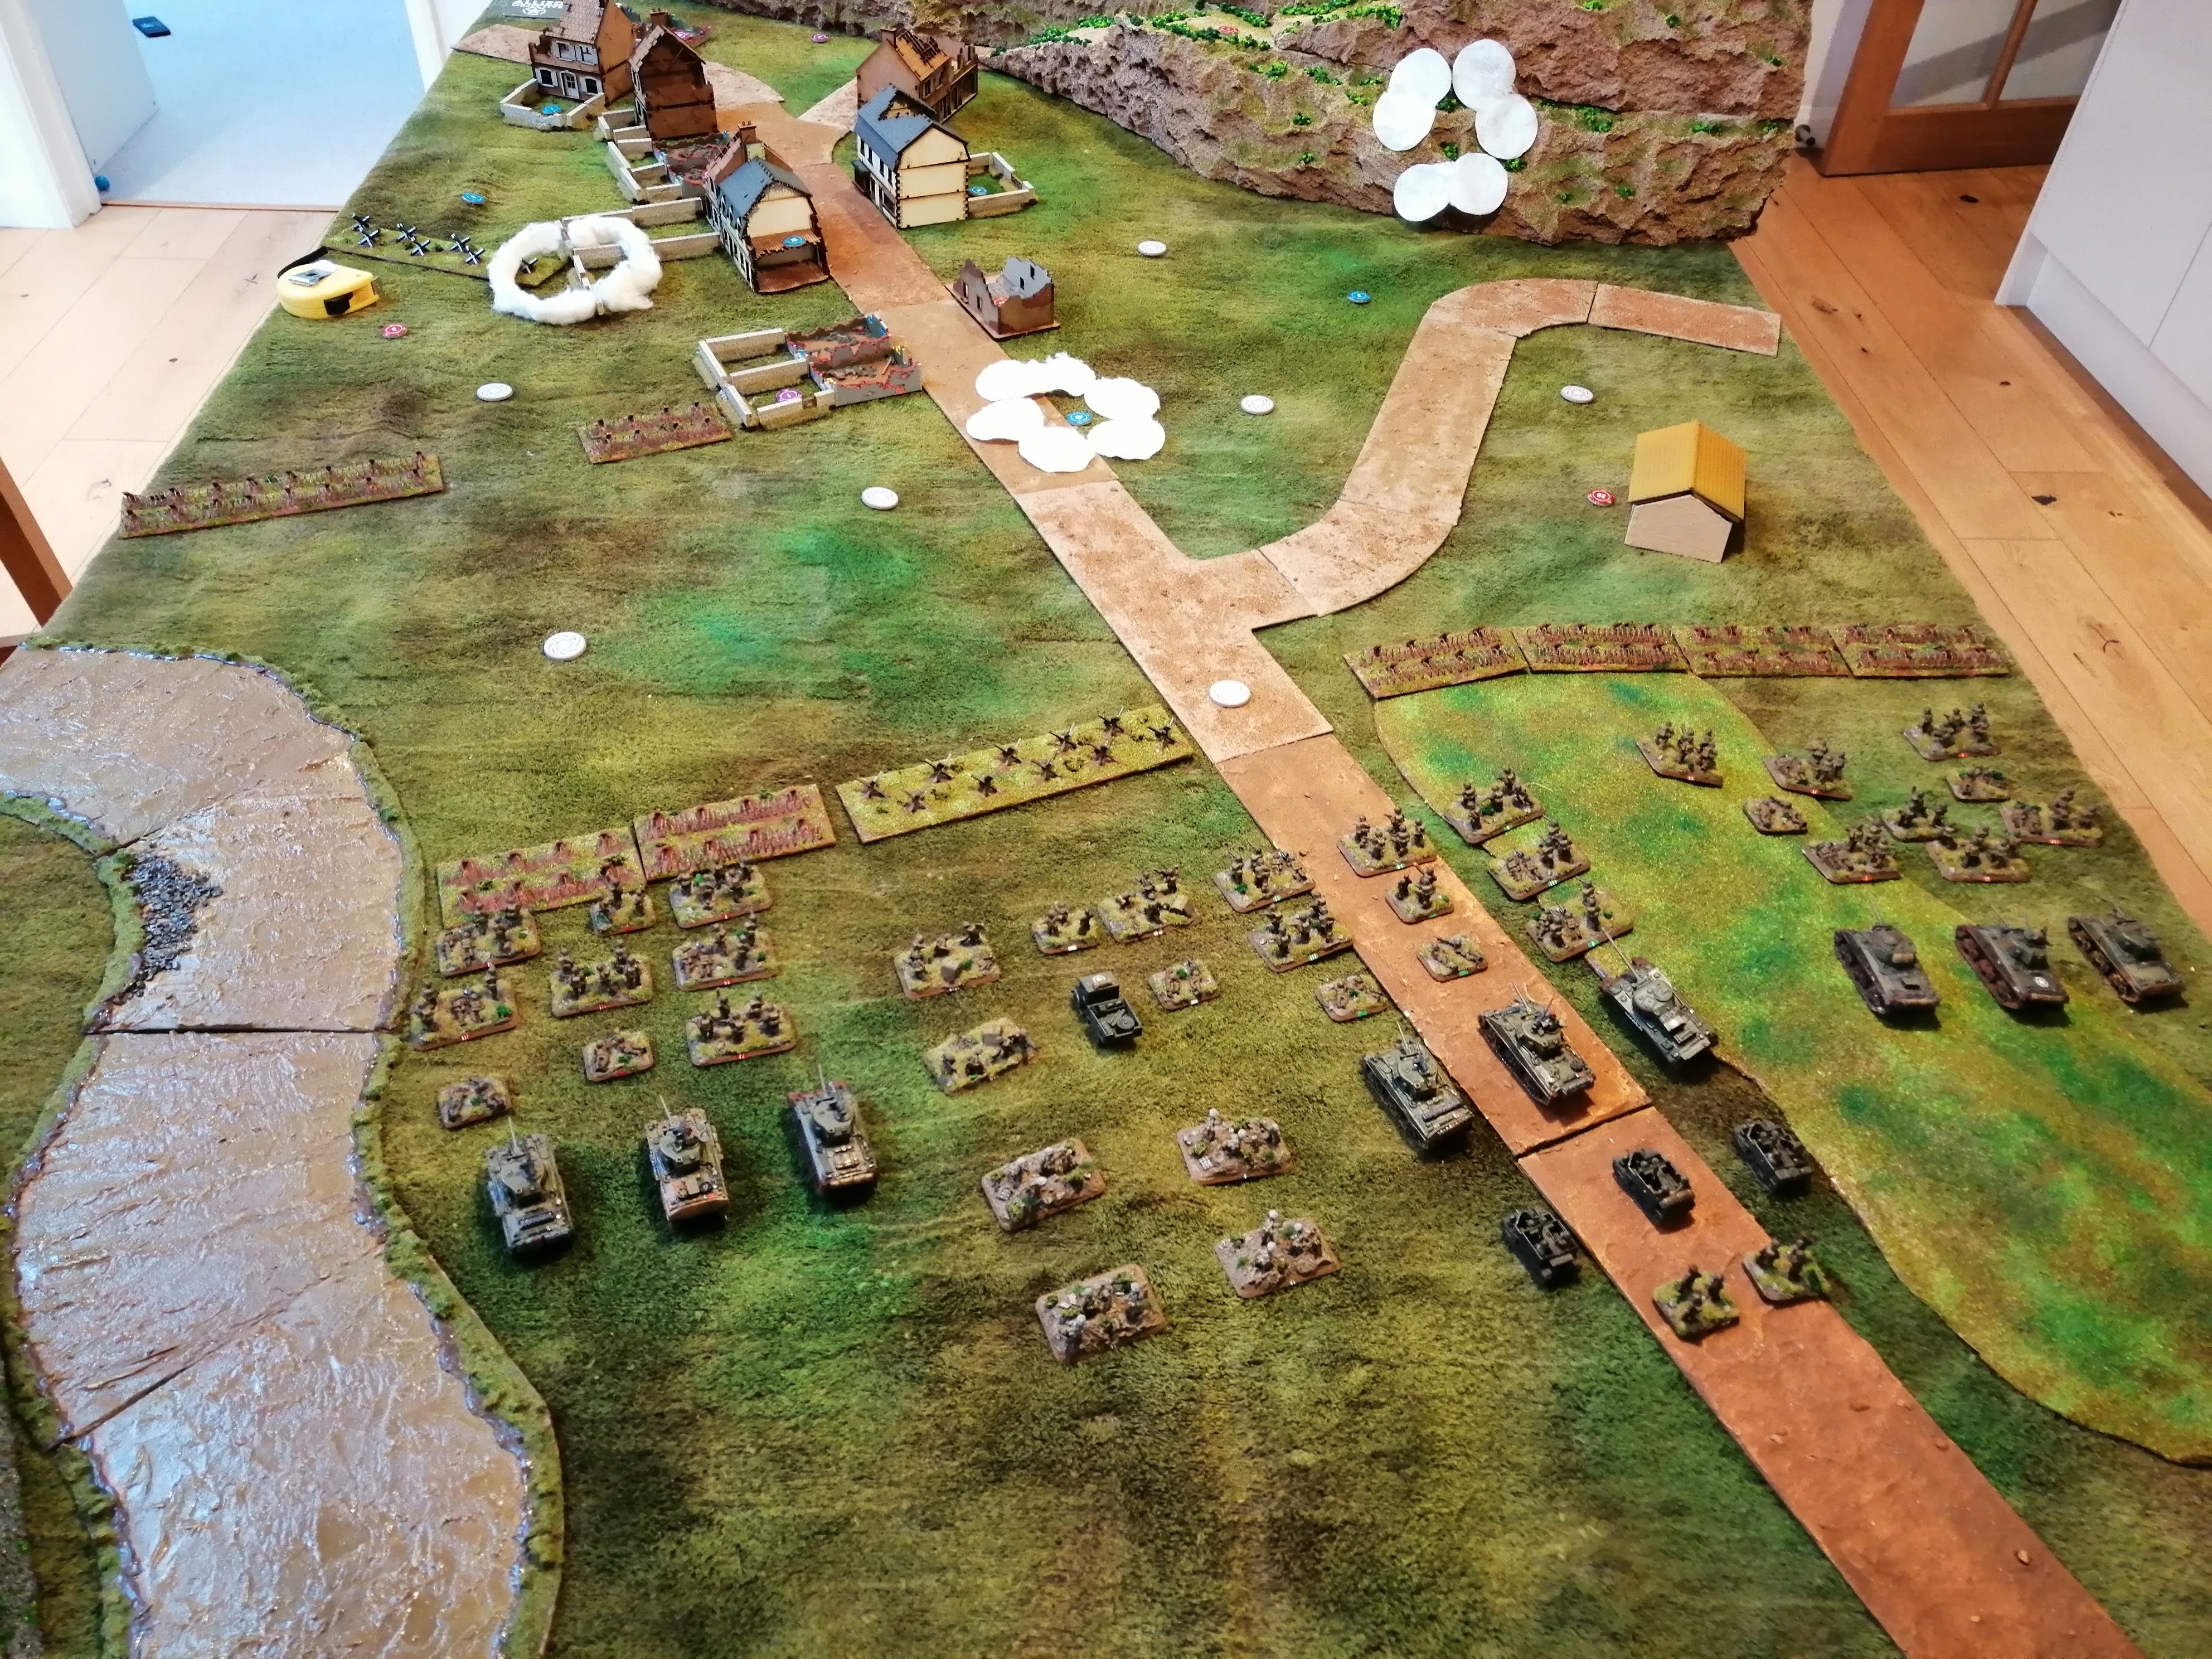 End of Turn 1
NZ Turn 2:
Only one smoke bombardment is in any place to worry the current combatants, landing in the road just further up field from the MG Nest, the other bombardments land further back.
Orange platoon rally but stay in place to avoid the huge volume of fire the 3 squads of Fallschirmjager are able to throw out. At least by staying put, they gain some additional cover bonus. The Universal Carriers move up alongside Orange to provide some additional firepower.
The Engineers advance up the road to trigger the possible minefield laying between the defences – it’s a blank, so nothing to worry about there. Otherwise, the remaining units advance apart from the Mortars that set up ready to fire – they range in on 3sqd and pin them in place but fail to cause any casualties. The Universal Carriers have more luck and their .50cals are able to dig two teams from 3qd out of their bullet proof cover and destroy them.
Meanwhile, in the middle of the advance, Tank Platoon 2 (T2) fire upon the MG Nest and get a lucky shot through, destroying the nest at the first attempt!
German Turn 2:
The NZ troops have not advanced far enough to trigger any more deployment markers so the German player cannot try to bring more troops into the battle.
The 3sqd Fallschirmjager unpin and continue to fire upon Orange Platoon, killing one team. With no other units on the table, this is the end of the German turn!
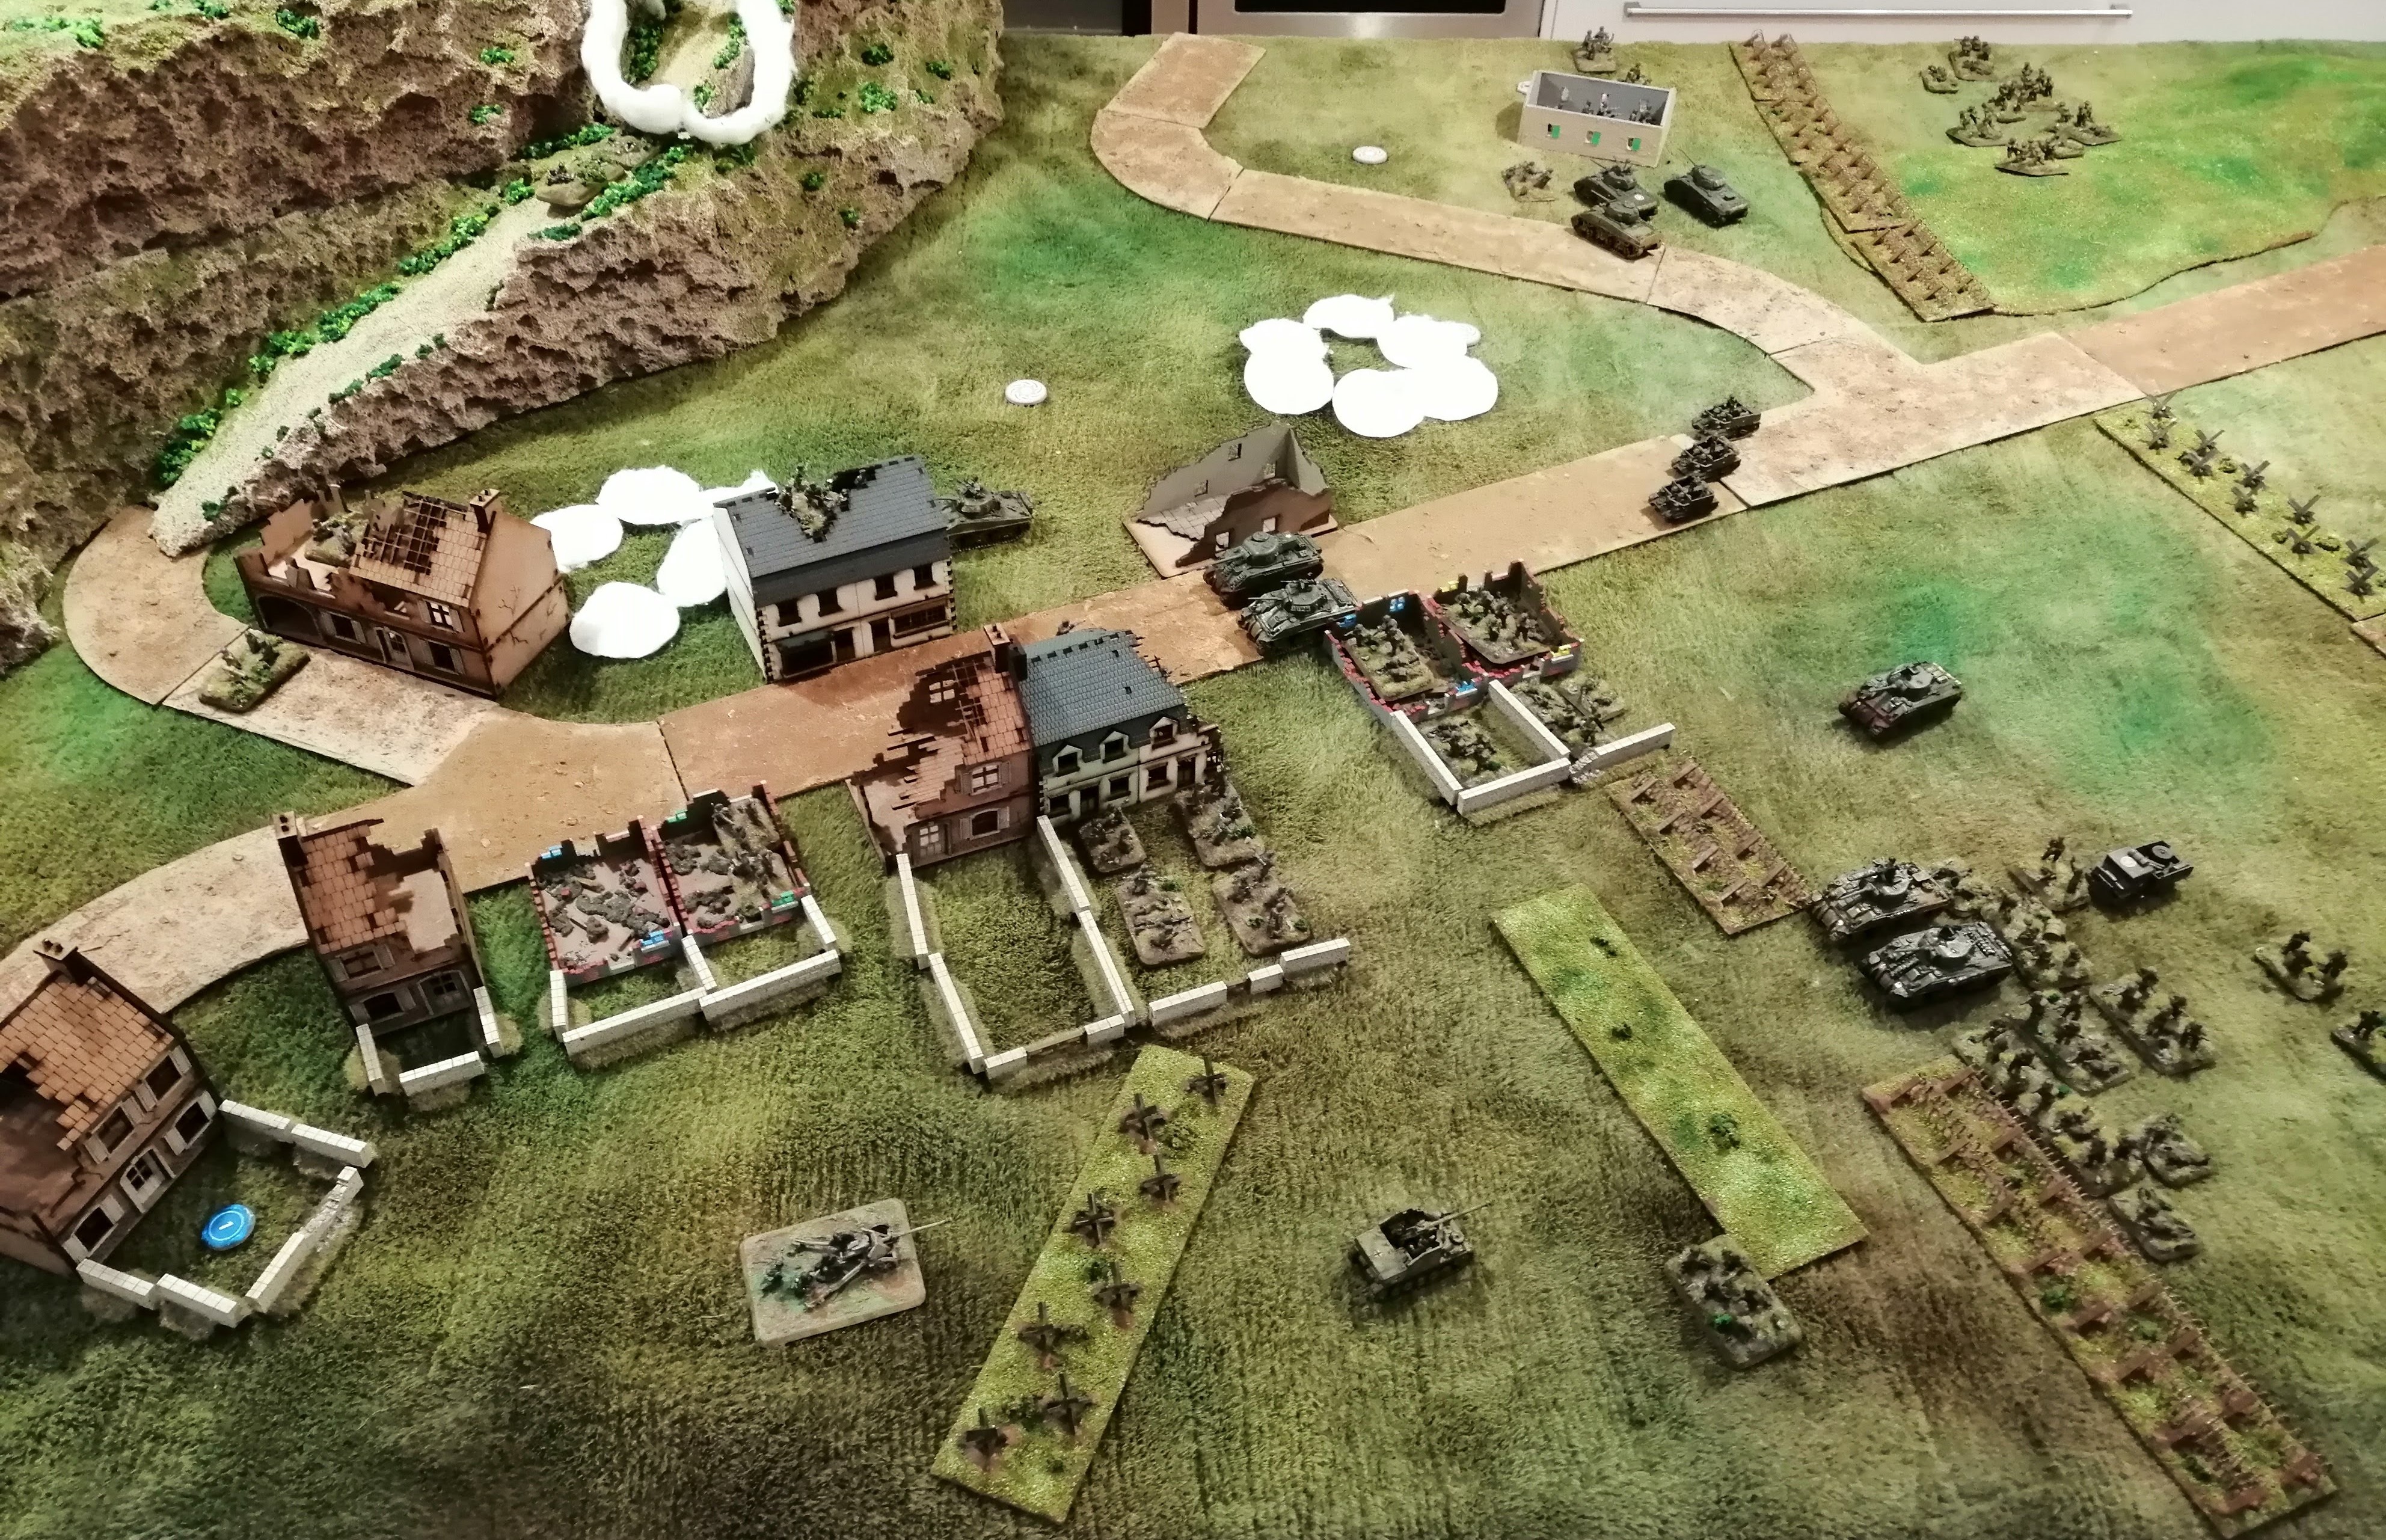
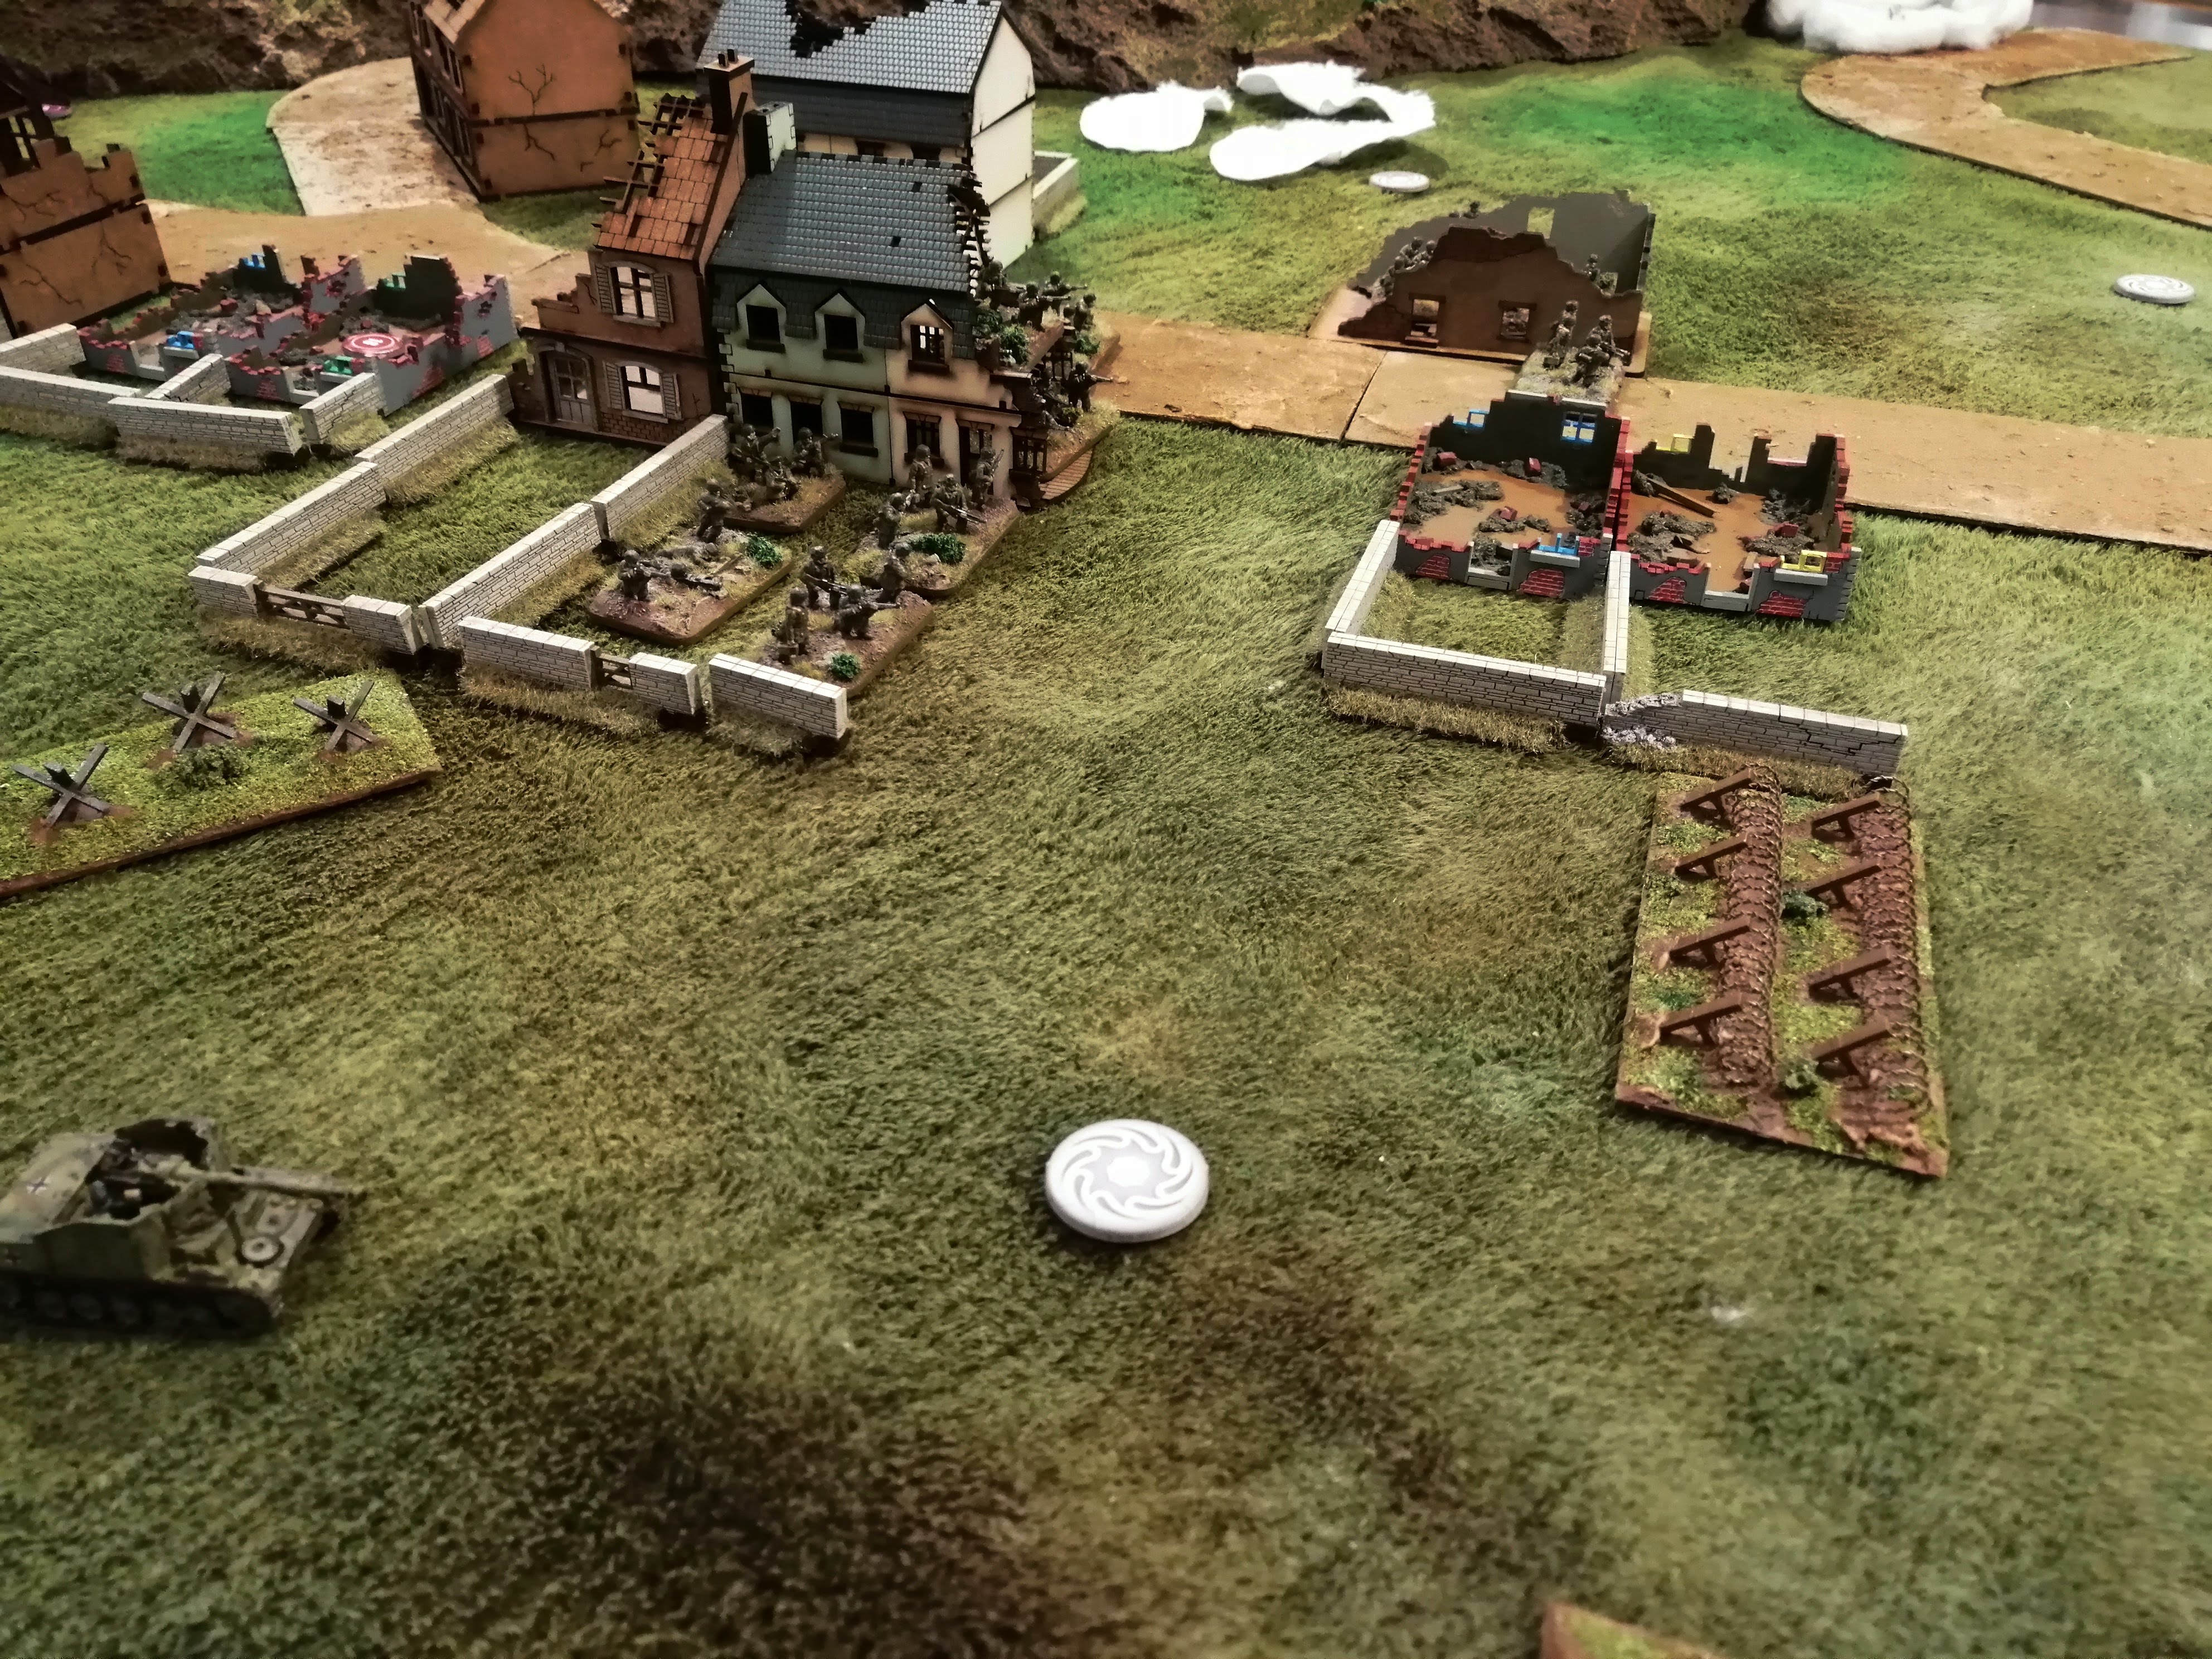
In the below pictures, you can see the MG Nest in the back garden of a small house, Red Platoon at the barbed wire and the view of the 3 squads of Fallschirmjager dug in at the farmhouse as Orange Platoon and Tank Platoon 3 advance on them.
 End of Turn 2
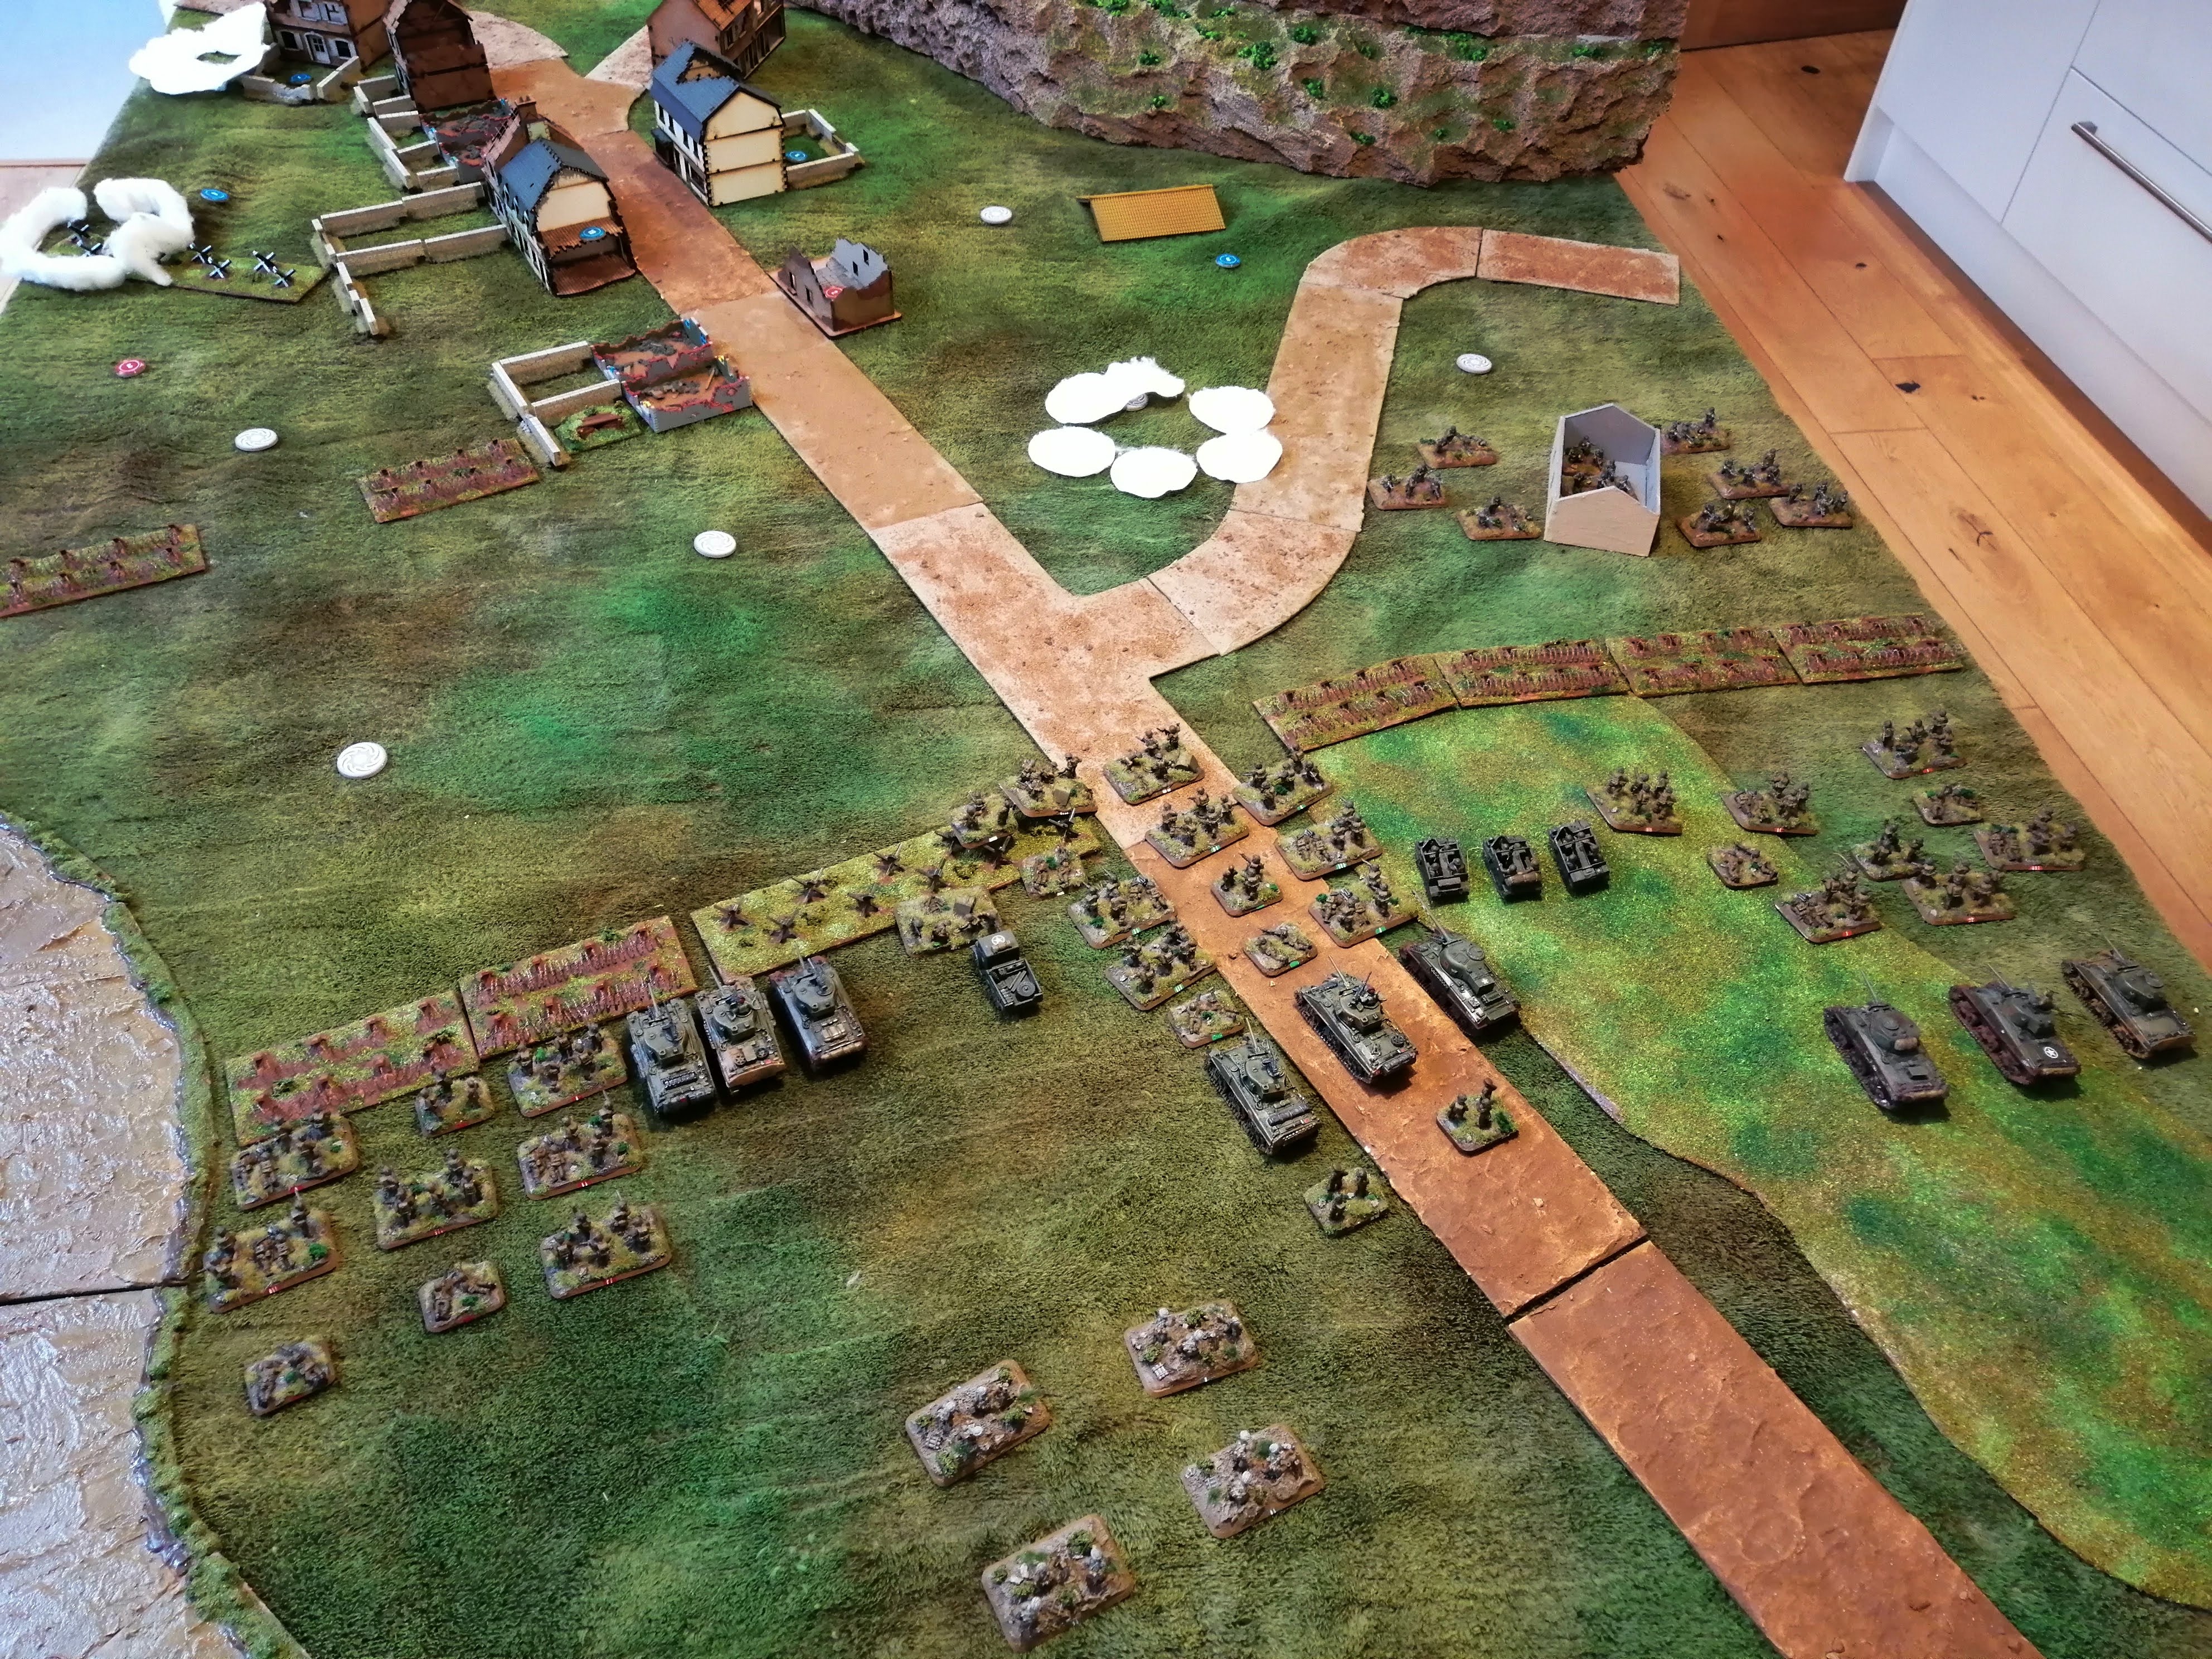 Real state of play


