


![NO Weekender Or Cult Of Games XLBS This Weekend [Updated]](https://images.beastsofwar.com/2026/03/No_Weekender_and_XLBS_this_Weekend-225-127.jpg)


Painting the KD:M Pinup Architect


Recommendations: 279
About the Project
A group of friends and I decided to paint the same KD:M Pinup together and I'm collecting all my WIP photos in the same place. Hope you enjoy!
Related Game: Kingdom Death: Monster
Related Company: Kingdom Death
Related Genre: Horror
This Project is Completed
Priming and Basecoating
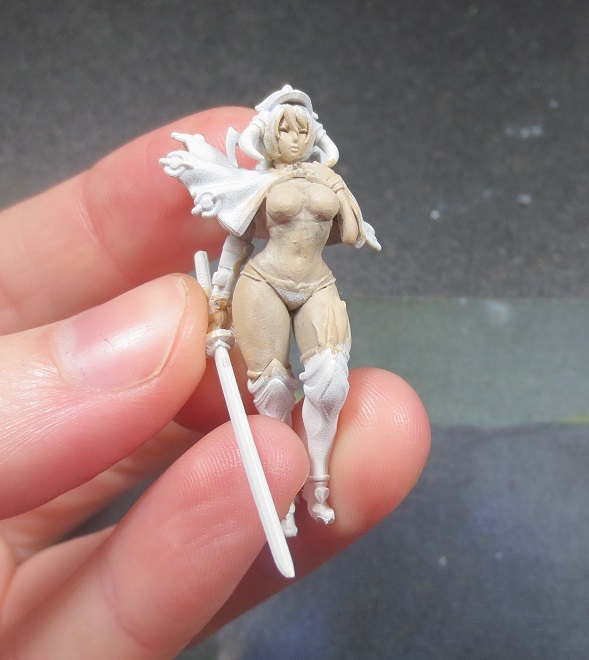
I abandoned this mini a while back, so when I dug her out she was half-started and kitbashed to hold a katana instead of the original scythe. Before anything else, I detached the arm, soaked the main body in Dettol for two days, then scrubbed off the old paint and primer.

Afterwards, I mounted the miniature on a cork, then re-primed her in grey.
Basecoating

When painting I prefer to basecoat the flesh areas first – although this miniature isn’t too complex in terms of sculpt, it can help when trying to figure out what’s happening.

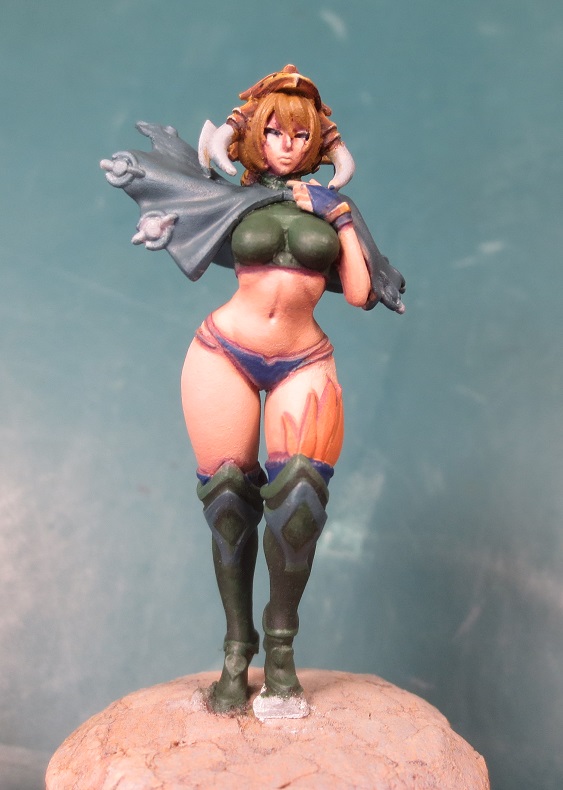
The next step (and the hardest!) was to figure out a colour scheme. One of the other painters said, ‘We’ve got a red Architect and a blue Architect, why not go green?’ After hunting around a bit, I found a picture of a samurai that used really interesting colours (link to the image and artist: https://www.deviantart.com/freshpaint/art/Paizo-Male-Samurai-282060941).
I decided to pull the jade, the dark blue-green, and the gold for the miniature and basecoated in darker versions of those colours.
Flesh – Reaper’s Tanned Highlight
Top and Boots – Citadel’s Waaagh! Flesh
Cape and Boot Details – a mix of Waaagh! Flesh and Citadel’s Kantor Blue
Helmet – Citadel’s XV-88
Glove, Panties, and Socks – Citadel’s Kantor Blue
Feathers – Citadel’s Jokaero Orange
I briefly basecoated the lowermost boots in Citadel’s Rhinox Hide but the dark colour pulled the eye down, away from the majority of the mini. In the end, I painted over using Waaagh! Flesh again, but left a slight tint of the brown showing through to help distinguish between the sections.
Flesh Tones

I usually paint flesh tones first, often because it lays in areas that would be harder to reach later (such as under the cape on this miniature). The above skin was achieved using the Reaper paints, basecoated with the midtone Tanned Highlight and blended up and down from there.
Again, just personal preference, but I blend down into the shadows, then up into highlights.
Step One: Lay down vague shadow areas using Tanned Flesh (the difference won’t be too visible yet)
Step Two: Over a smaller area within the Tanned Flesh, add some Tanned Shadow.
Step Three: The final shadows are created using a mix of Tanned Shadow and Royal Purple. You can see on the left leg, near the feathers, where the transition was a little too harsh (this gets blended out eventually).
The purple does a few things: First, it creates depth to the shadows that wouldn’t be there otherwise. Second, it helps strengthen the demarcation between flesh and clothes (which is how that line above the boot got there). Third, it’s a secondary colour, which will contrast and combine pleasingly with the other secondary colours on this mini (green, orange).
Highlights are created using a similar process, with Fair Skin, Fair Highlight, and finally a 70/30 mix of Fair Highlight and Polished Bone on the nose and cheeks.
To really make the skin pop, I went back over the shadow portions and added some Rosy Shadow and Rosy Skin. It’s difficult to describe the method I use to do this, as it’s neither a glaze nor a wetblend, but something in between.
Step One: Using a mix of Tanned Highlight (the basecoat colour) and Rosy Skin, glaze/wetblend between the basecoat and the previous Step One. In the end I needed to mix in a little Tanned Flesh to make the transition seamless.
Step Two: Using a mix of Tanned Flesh and Rosy Shadow, glaze/wetblend between the areas created during the previous Steps One and Two. Again, I needed to mix in a little Tanned Shadow.
It should be noted this can (and I think I usually do) be done before adding the highlights. Sometimes I decide to shift the shadow regions around, which is easier to do when not having to paint over highlights.
(The hand hasn’t been painted. I leave those until last, just because they’re so fiddly and in close proximity to weapon handles, rings, clothes, etc.)
Gold Non-Metallic Metal Helmet

After a lot of experimentation in the past, I landed on a recipe for Gold Non-Metallic Metal that I’m happy with. The picture above shows what it looks like in the first stages.
Base – Citadel’s XV-88
Shadows – Citadel’s Rhinox Hide
Highlights – Citadel’s Averland Sunset
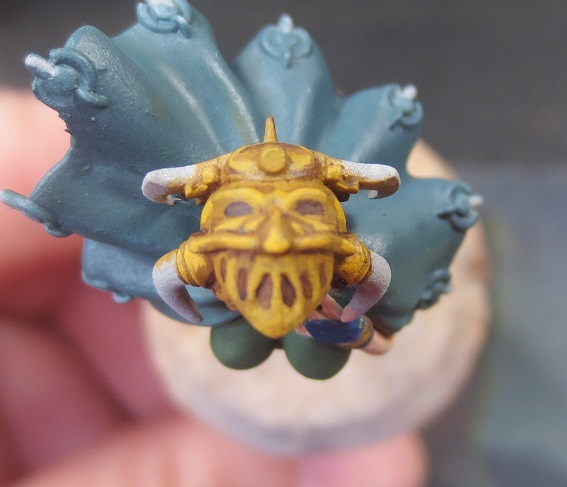
During the first pass, I just concentrate on blocking in the major shadows and brighter portions. The deepest recesses on the face grill will eventually be painted black – they didn’t come out well in the sculpt.
The blending process involves adding Reaper’s Chestnut Brown to the shadows, as a transition between the Rhinox Hide and the XV-88.
Highlights are pushed up even further by adding Reaper’s Polished Bone to the Averland Sunset; first a 50/50 mix, then up to pure Polished Bone.
The above photo is about halfway through the process; everything below the helmet’s nose has been highlighted while everything above is still only blocked in. It shows the depth that Chestnut Brown adds to the shadowed portions. Until I found the paint that added that hint of red, I really wasn’t happy with my gold NMM experiments.
I finished off the helmet by adding spot highlights of Windsor & Newton’s Titanium White.
Greens for the Green Man
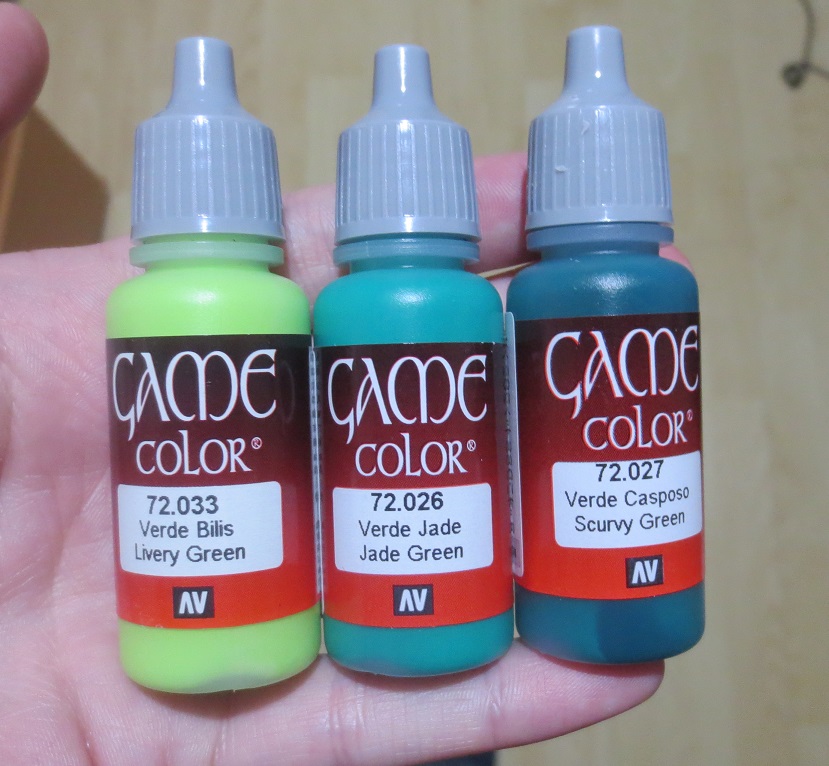
Painting the clothes required waiting for new paints to arrive! Lovely, delicious, new paints. I only owned three greens before this project (including the Reaper Black Green you might have noticed creeping onto the boots in previous pictures), but now it’s six.
The plan is: Livery Green for the portions basecoated in Waaagh! Flesh, Jade Green for the portions basecoated in the blue-green mix, and Scurvy Green just in case.
Cape, Top, and Boots
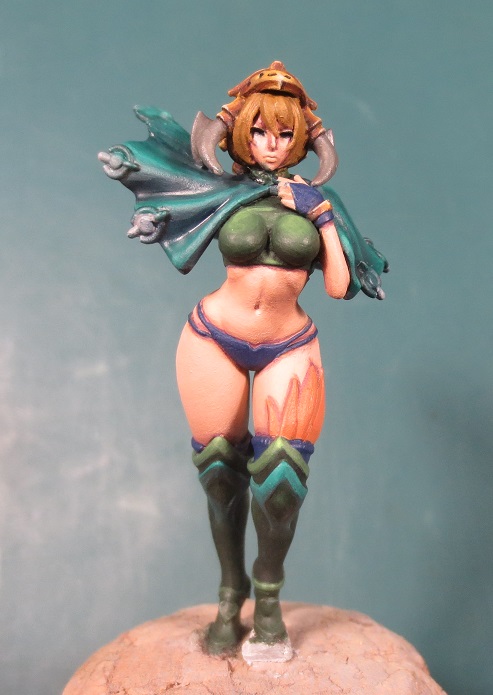
I applied two of my new Vallejo colours as planned, highlighting the cape with the Jade Green and the top/boots with Livery Green. Beforehand, I was feeling a bit meh about my choice of colour on the cape and boot details: something about the blue-green was reading very flat to to the eye. However, the Jade Green brought it right back up.
Additionally, I chose to shade the cloak using Citadel’s Drakenhof Nightshade blue wash rather than Reaper’s Black Green (my only dark green). I had already used the Black Green to shade the miniature’s boots and top, so I was worried that using it again would make the greens look too similar. Additionally, using the wash helped bring back some of the blue-green that was lost when highlighting up to jade.
As a note, I found the Livery Green incredibly hard to work with. I think the effect was worth it in the end, but it provided very poor coverage over the Waaagh! Flesh and, at the same time, didn’t like being glazed or blended. I might try strengthening the pigment with off-whites in future, then bringing it back down with other greens.
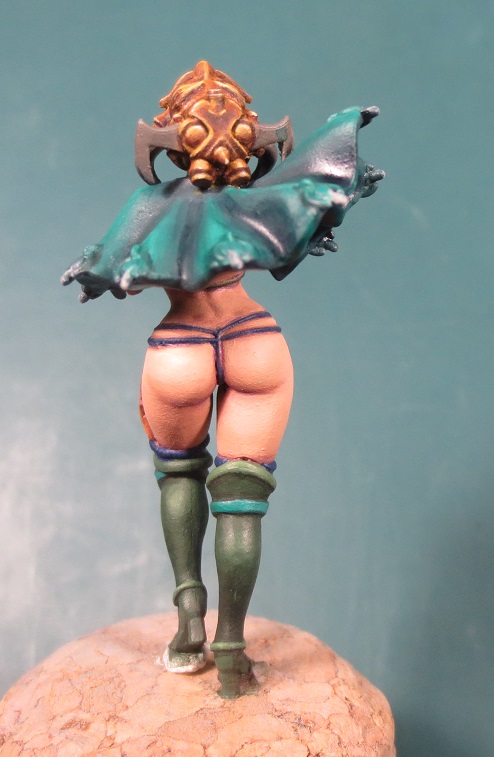
Detailing, Part One
The cloak clasps were painted using the same colours and techniques on the helmet, the only difference being that the highlights and shadows change depending on their orientation.
Also, in the end I glazed the lowermost boot portion using my new Scurvy Green. It was close enough to the colours used on the upper boot portions that it didn’t look out of place, while also being distinct enough to emphasize the difference between the two parts.
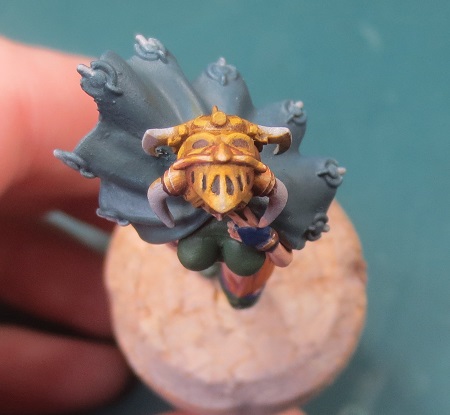
The panties, glove, and sock tops were highlighted using Citadel’s Altdorf Guard Blue and Lothern Blue. There’s also the tiniest bit of Drakenhof Nightshade on the lower portions of the socks and glove.
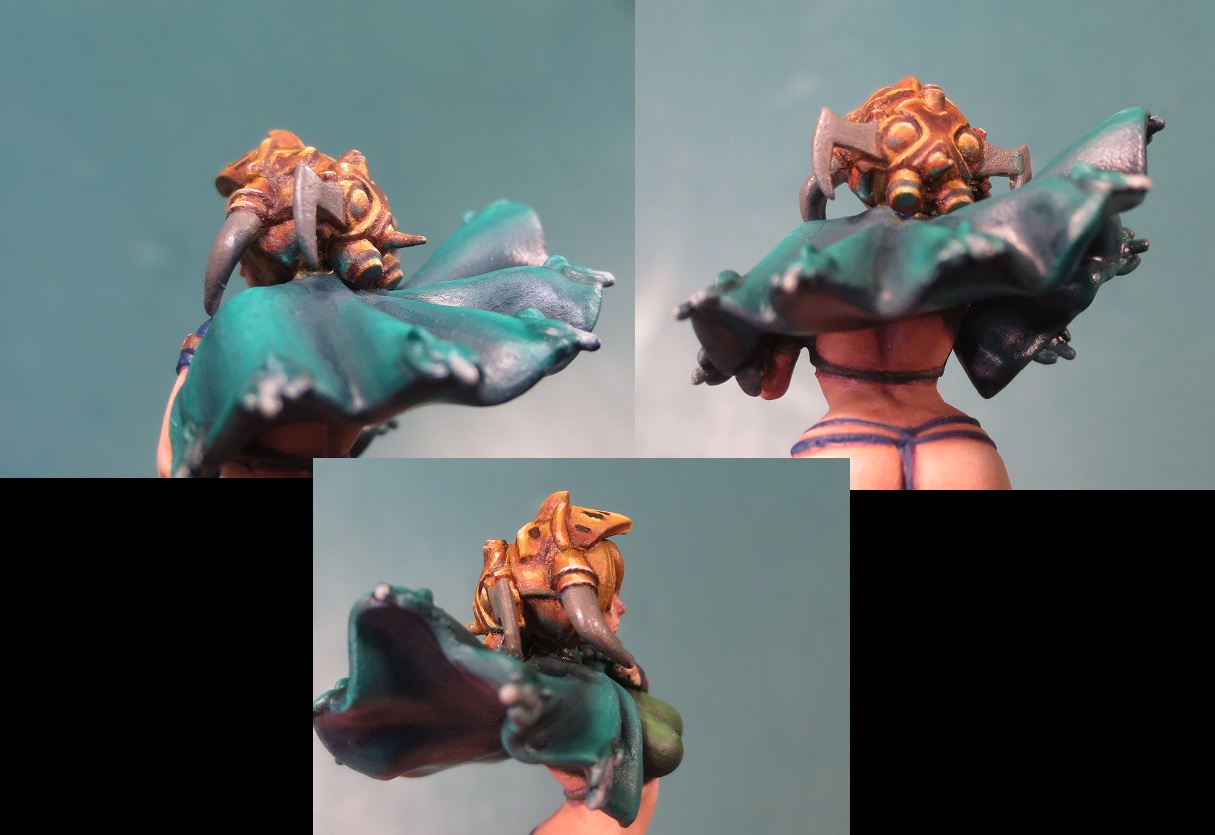
I also tried something completely new to me: making the metal helmet looks as though it were reflecting the green of the cloak. This was my first experiment – I gradually grew braver and increased the number and intensity of highlights.
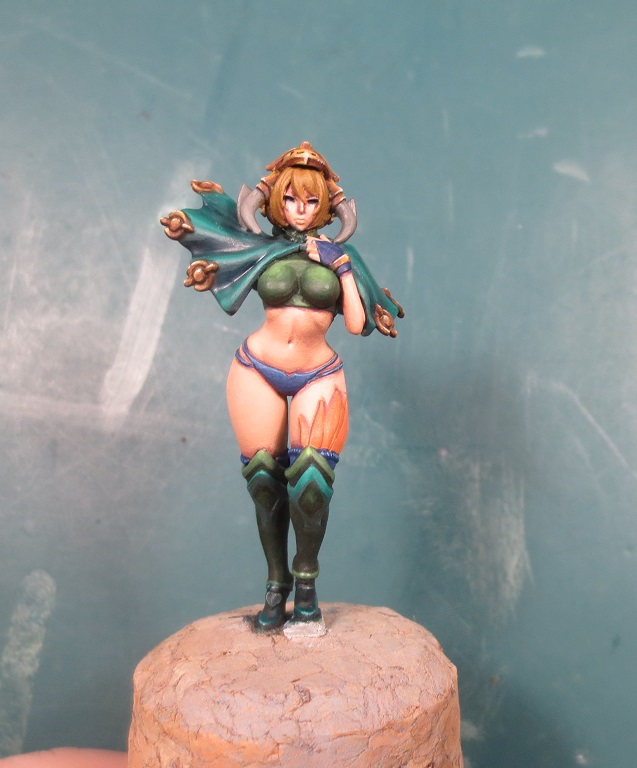
Detailing, Part Two

At this stage, the last details to address were the horns on the helmet, the hair, the feathers, and the fingers of the left hand. I remain undecided about painting the heart shapes on the shoes, because any other colour will draw the eye down, away from the miniature’s face and cape.
The feathers were detailed by outlining the edges and placing feather-lines with Reaper’s Carnage Red. Additionally, I put a small amount of Averland Sunset on the highest points just to increase interest a tiny bit.
The hair was basecoated with Citadel’s XV-88, the same colour used in the gold NMM. So as to visually distinguish between the two, I made sure not to shade down at all, especially not with Rhinox Hide. Instead, I restricted myself to highlighting up with a desaturated version of the XV-88, created by adding small amounts of Polished Bone. Finally, I added very small touches of Reaper’s Clotted Red (a colour which, incidentally, really lives up to its name) to the areas that would be in shadow.
I tried to paint whites on the eyes many times and failed each time. This miniature’s eyes are sculpted incredibly deeply, so I’ve decided to leave them as is. I can’t seem to get the white pigment into the recess without overpainting the edges, nor can I fix that overpainting without ruining the pupils inside.

The horns were basecoated in Citadel’s Stormvermin Fur and shaded using gradients mixed with Citadel’s Abaddon Black, and Reaper’s Polished Bone. Certain portions (mainly the undersides and darker portions) were also glazed in the Jade Green so as to make it look reflective.


![StarCraft Tabletop Miniatures Game Pre-Orders Live Now [Updated]](https://images.beastsofwar.com/2026/03/starcraft-tmg-news-cover-600-338.jpg)


