


Persei-Aries War – Oriskany v. Rasmus


Recommendations: 1418
About the Project
After racking up 127 entries, 3500+ recommendations, and 600+ comments, the original Darkstar project thread was getting a little unwieldy. So I'm starting a new one, featuring a new campaign for interested players in the OTT community and beyond. So far we have five players, but there's always room for more!
Ever wonder if you had what it took to command fleet of starships in tactical combat? Darkstar offers that challenge to the hard-core wargamer, with a "Newtonian Physics" movement system, rules for astrophysical objects and phenomena, gravity, and of course dizzying amounts of 26th-century firepower. There are no aliens, no "hyperspace," no planets that look suspiciously like movie studio back lots. Just the old empires of Earth doing what they do best, colonization and kicking the hell out of anyone who gets in their way (i.e., each other).
In addition to starship tactical combat, Darkstar includes rules for carriers and aerospace craft, atmospheric operations, orbital and surface installations, boarding actions, assault landings, and a complete campaign system.
The system is free to download for members of the OTT community, and of course we play almost every weekend with a on-line version with starship commanders around the world! So if you ever want in, you know where to find us!
Related Genre: Science Fiction
This Project is Active
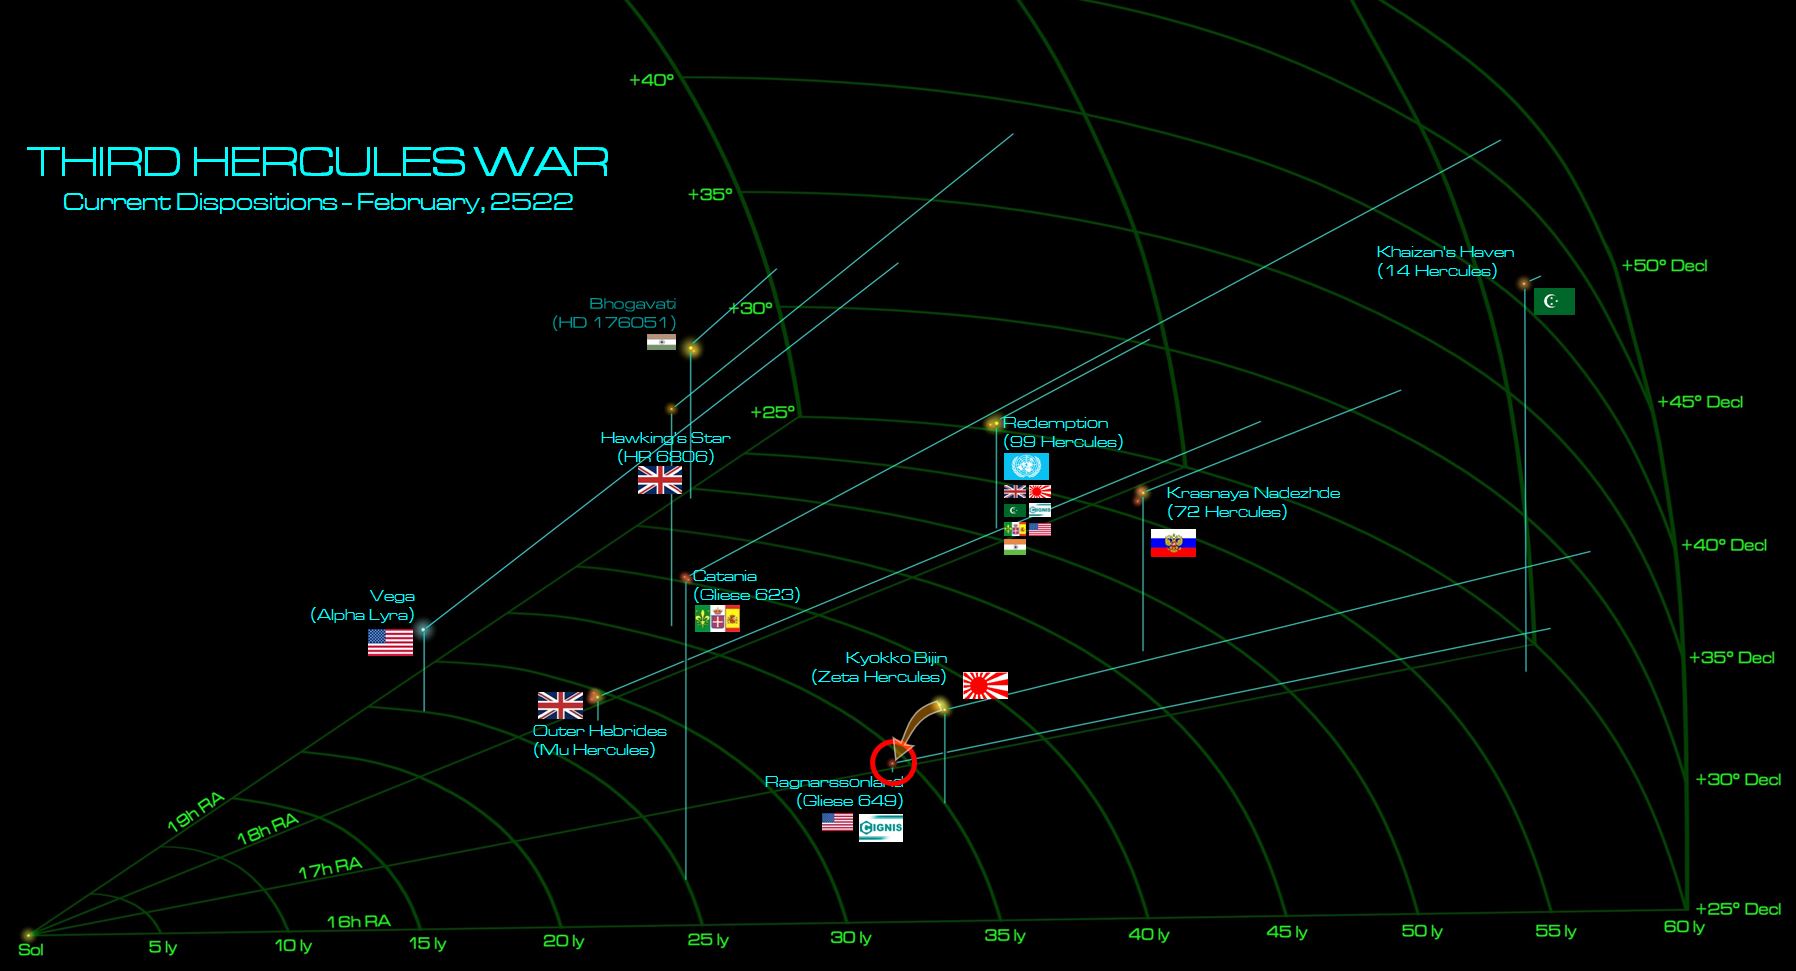
Second Battle of Nakir's Riddle (14 Hercules)
FROM: ADVISORY OFFICE, UN HERCULES SCS REGIONAL COLONIAL CENTER
20:20 SOL GMT, 12 MAY 2522
BREAKAUTH: 181072.18J
CLEARANCE: NATIONAL COMMAND AUTHORITY
SUBJ: SECOND BATTLE OF NAKIR’S RIDDLE (14 Hercules 5.22)
The situation in the Third Hercules War continues to build to a climax. In the latest engagement, naval forces of the Arab League have struck against the foothold recently established by the Holy Russian Empire in the “Khaizan’s Haven” caliphate in the 14 Hercules star system.
As noted in previous entries, the British are looking to end the Third Hercules War with a concerted strike at the regional “capital” of their greatest remaining enemy, the Holy Russian Empire. The obvious target is the Krasnaya Nadhezda (Red Hope) colony at 72 Hercules, but with expanded holdings and lucrative shipping leases already won in the UN “Redemption” Mandate in the 99 Hercules system, it’s unlike the British will be allowed by the UN to take full possession of 72 Hercules as well. Even in the 26th Century, overt imperialism only goes so far. So the British have been lining up allies for a concerted multi-national strike, most likely to include the Japanese Empire and the Arab League.
The Russians know these plans and have been working hard to upset them, creating distractions along British flanks by striking into neighboring star systems and disruptions among their allies. One of these initiatives has been an invasion of 14 Hercules system (Khaizan’s Haven caliphate), recently defeating an Arab cruiser task force these and planting a regiment of Russian Naval Infantry on the gas giant moon of Nakir’s Riddle.
The Arab League wants the moon back, and now. The Emir of Khaizan’s Haven knows full well that the British are about to invade 72 Hercules with the Japanese, and if the Arab League can’t take part in that invasion as well, they’ll be left out of the spoils when 72 Hercules is carved up by the victors. But the League can’t invade 72 Hercules if the Russians stall have a foothold on their own system, so the Mutamid battlegroup under Captain Rashid al-Maghrebi is given orders to retake the system post-haste. Failure is not an option. Eject the Russians, or don’t bother coming back.
However, it was al-Maghrebi’s Mutamid battlegroup that lost the earlier battle that gave Nakir’s Riddle to the Russians in the first place. That battle took place barely six weeks ago (24 March, 2522), and al-Maghrebi’s warships required extensive repairs in the aftermath. Even now, after a crash repair program, the ships are barely welded back together. In fact, the Almanzor-class hybrid cruiser-carrier Mutamid herself still has repair crews on board when she Darkstar waves out of Maalikmina shipyards to attack the Russian foe.
For their part, the Russians are also not in the best shape. Preparations to meet the expected Anglo-Japanese onslaught have demanded that their heaviest naval units in 14 Hercules be withdrawn to 72 Hercules. This has included, most importantly, the heavy cruiser Tatiana Mikhailovna, and half the “Night Witches” aerospace attack group aboard the strike carrier Novorossysk. But the heavily-upgraded light cruiser Admiral Lazarev has arrived as reinforcements, commanded by the redoubtable Captain Pyotr F. Myshaga, along with the American destroyer USS Cowpens, detached from Task Force Liberty.
In summary, this is an all-out, stand-and-die slugfest, with the real prize being operational time. The Arab League needs this win so they can push forward with participation in the Anglo-Japanese invasion of 72 Hercules, while the Russians need to retain their death-grip on Nakir’s Riddle to ensure that Arab reinforcements will not participate in that increasingly inevitable showdown.
ARAB LEAGUE: @muakhah
RUSSO-AMERICANS: @oriskany
ASSAULT VICTORY CONDITIONS (244 points)
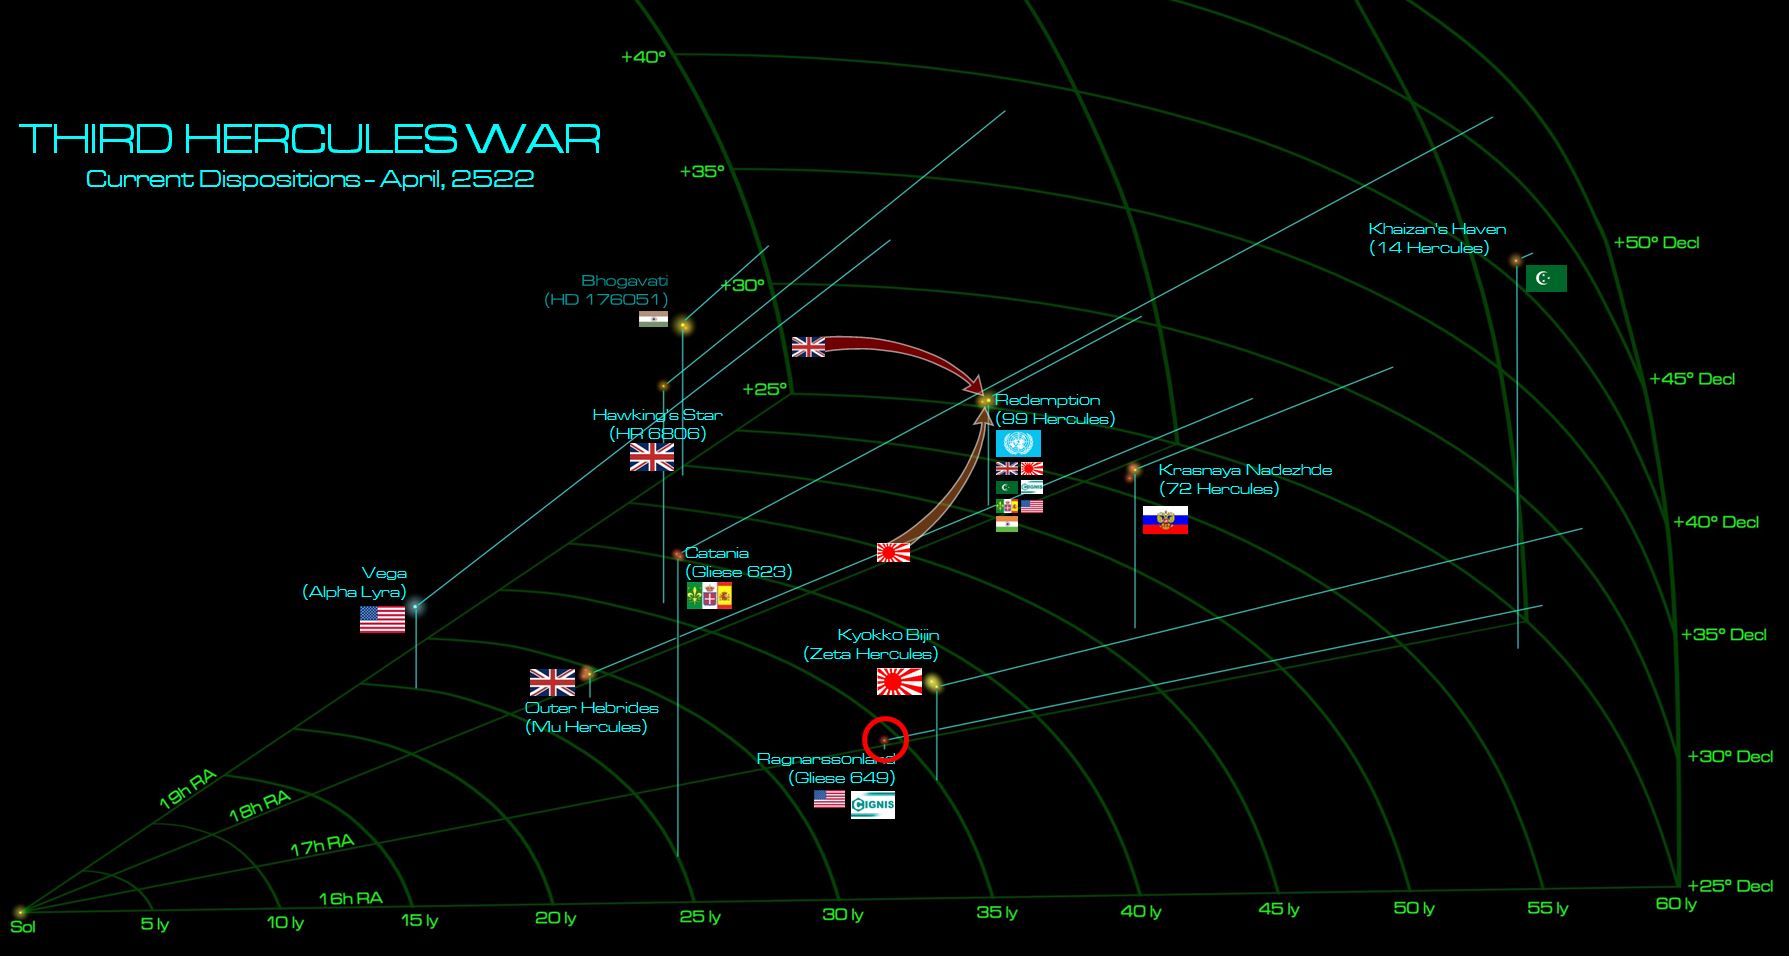
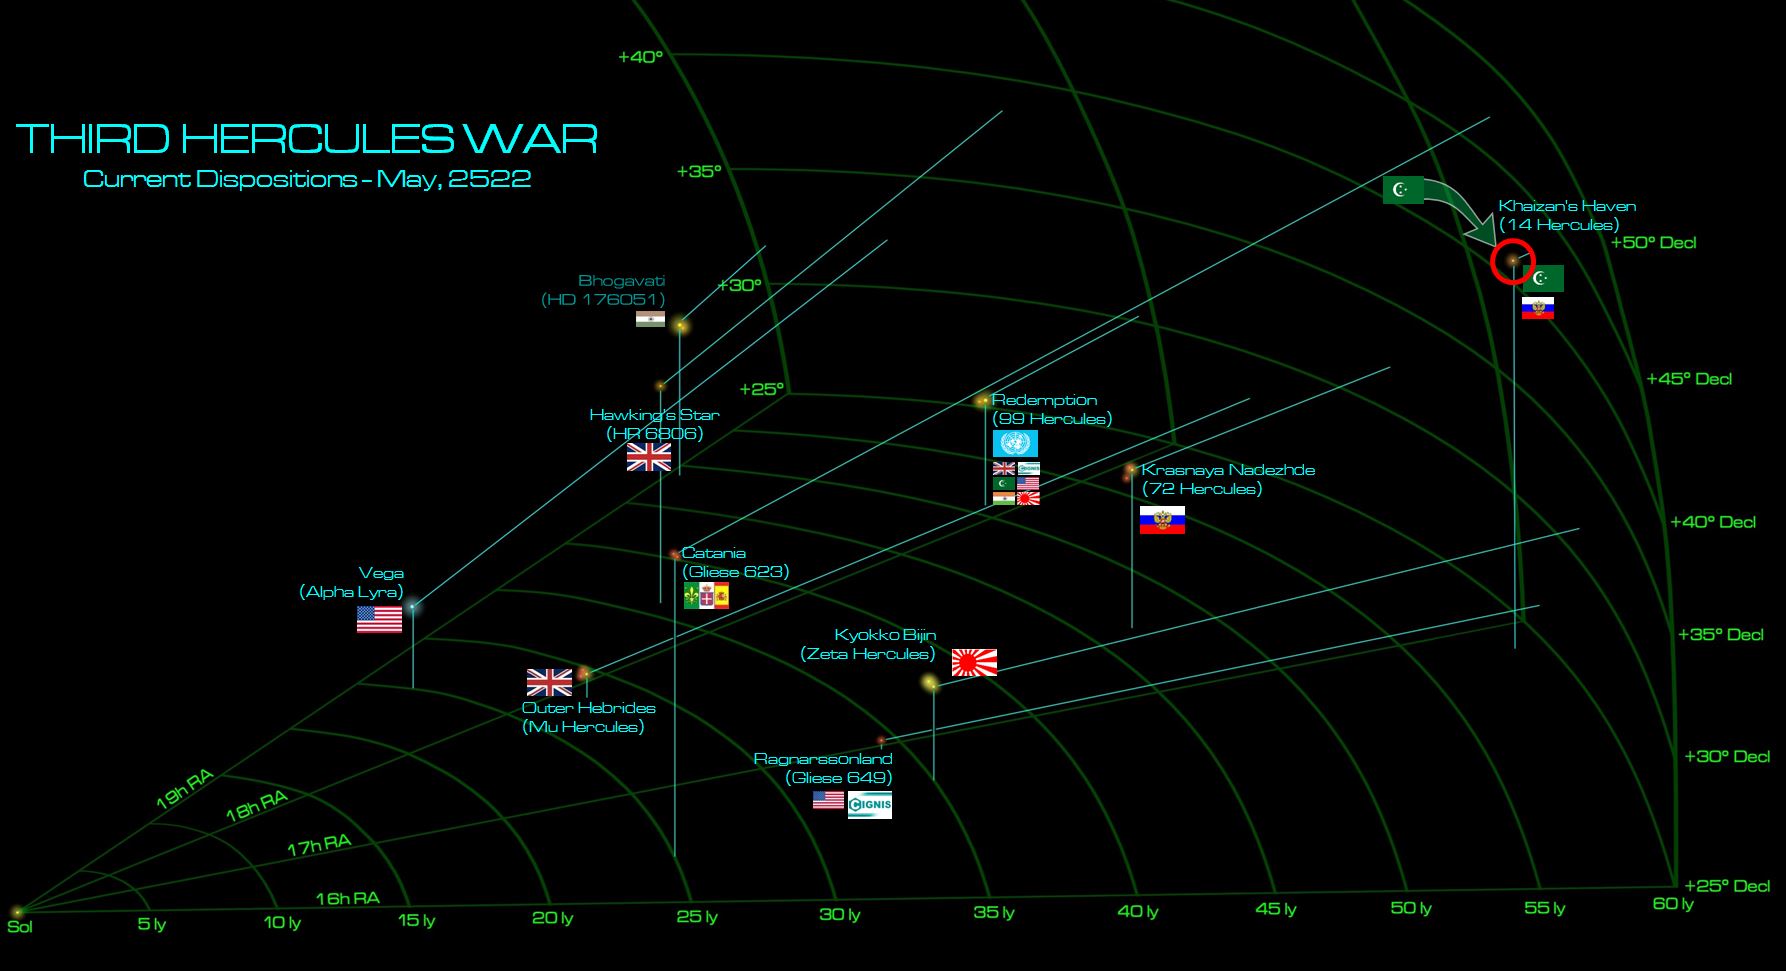 The general situation of the Third Hercules War in mid-May, 2522. At the moment, both the Japanese (Rasmus) and British (Damon) have recent victories over the Russians, giving them the campaign choice where and when to strike next. They’re lining up for a combined strike on 72 Hercules, the big Russian capital here on the Hercules Rim. The third ally in the Anglo-Japanese alliance is the Arab League (muakhah), but before they can even contemplate joining in the shove into 72 Hercules, they have to smash the Russians out of their OWN backyard at Khaizan’s Haven (14 Hercules). This clash will come at the moon of Nakir’s Riddle, 22 satellite of the largest gas giant in the 14 Hercules system.
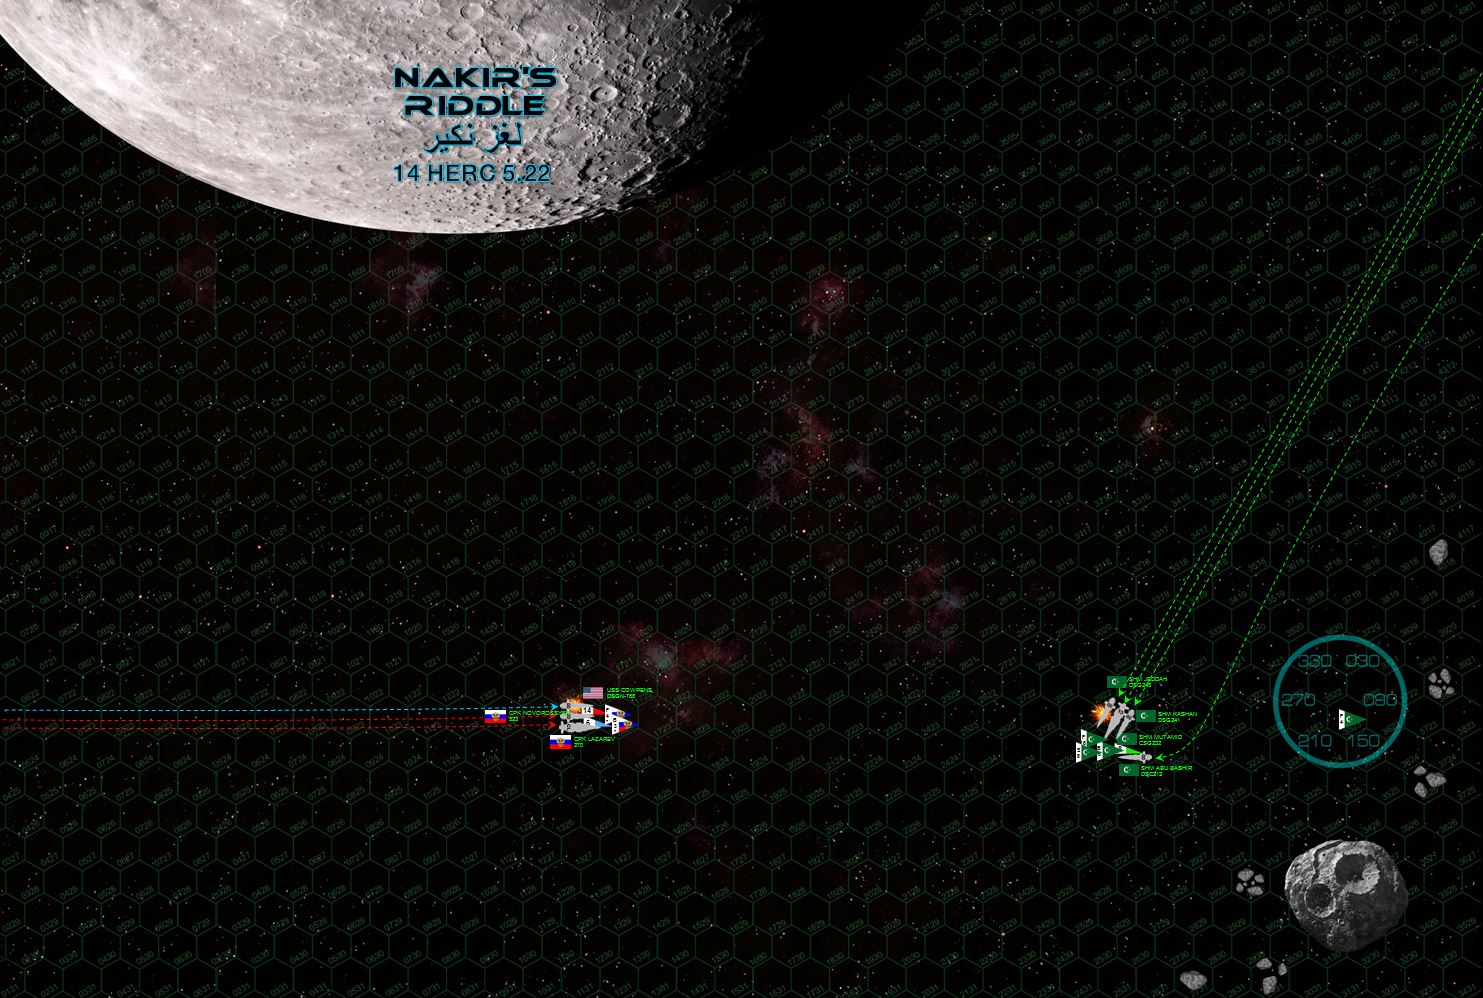 The Russians detect the Arabs making their approach via a high-speed vector through the eclipse shadow of Nakir’s Riddle. While Captain Myshaga sets Russians and American allies on his typical high-speed approach, al-Maghrebi’s approach is positively suicidal, rocketing into the battle area at nearly 60 kilometers per SECOND (speed 19 in game terms x3 = 57 kps). They thus instantly have the Coalition warships in a broadside, and in a withering fusillade at a range of 2500 kilometers (14 hexes), burn through the forward shielding and bow armor of the USS Cowpens. Sensors are hit, the ammo explodes in one of the forward 5-gigawatt rail gun turrets, and the forward magazines go up. A tough hit, but certainly survivable, until runaway chain-decompressions start tearing through the forward end of the destroyer. An investigation after the battle will reveal that these decompressions were the result of insufficient weld seams made the last time the Cowpens was repaired in pressure dock. Commander Rachel Collingsworth has to make the tough call, and deaf to the roars of Captain Myshaga over the comm, USS Cowpens has to break off from the engagement (game terms: one core box hit = 20% chance for a destroyer to break off, I roll a very unlucky 18).
 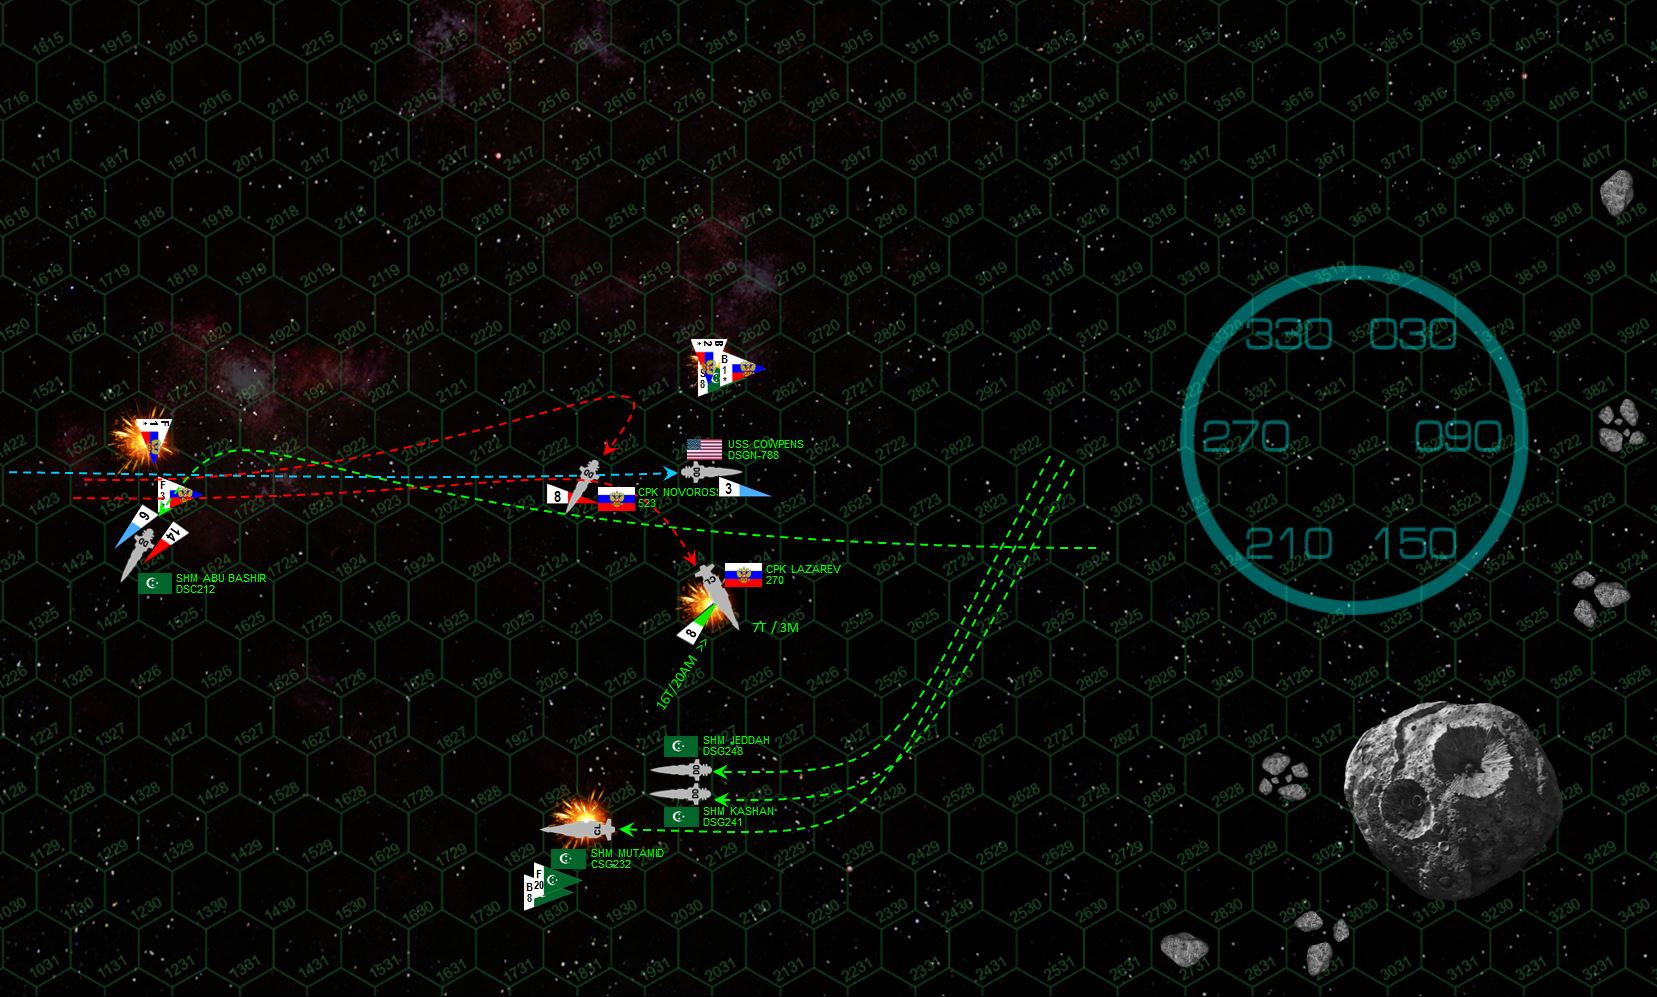 While the Cowpens continues to speed out of the battle, the Admiral Lazarev and the Mutamid almost race past each other, both cruisers screaming through high-speed turns and all engines howling in full reverse. The mass torpedo and missile strike launched from the carrier Abu Bashir and her aerospace group slams into the starboard bow of the Lazarev, doing heavy but survivable damage. What follows up, however, is an incredibly successful gunnery broadside from the Mutamid, Kashan, and Jeddah. All three ships score at least double their projected hit-rate (game terms, Maghrebi had 12 guns at a chance of 40% to hit, but scored ten hits), and while the upgraded accurate, upgraded hitting power barrage of the heavier Lazarev DOES INDEED leave the Mutamid a burning, powerless cripple, the Arab league ships in turn do the same to the Lazarev. Even as Russian and American torpedoes and the “Night Witch” fighters also cripple the carrier Abu Bashir (these warheads hitting, by contrast, less than 30% their projected hit rate, although I do admittedly get a lucky “cripple” check on Abu Bashir afterwards), the Russians have clearly lost this battle. Simply put, the League can lose the Mutamid and continue the fight. With the loss of the much more powerful Lazarev (and with the USS Cowpens already compelled to leave the battle area), this fight has suddenly become very one-sided.
 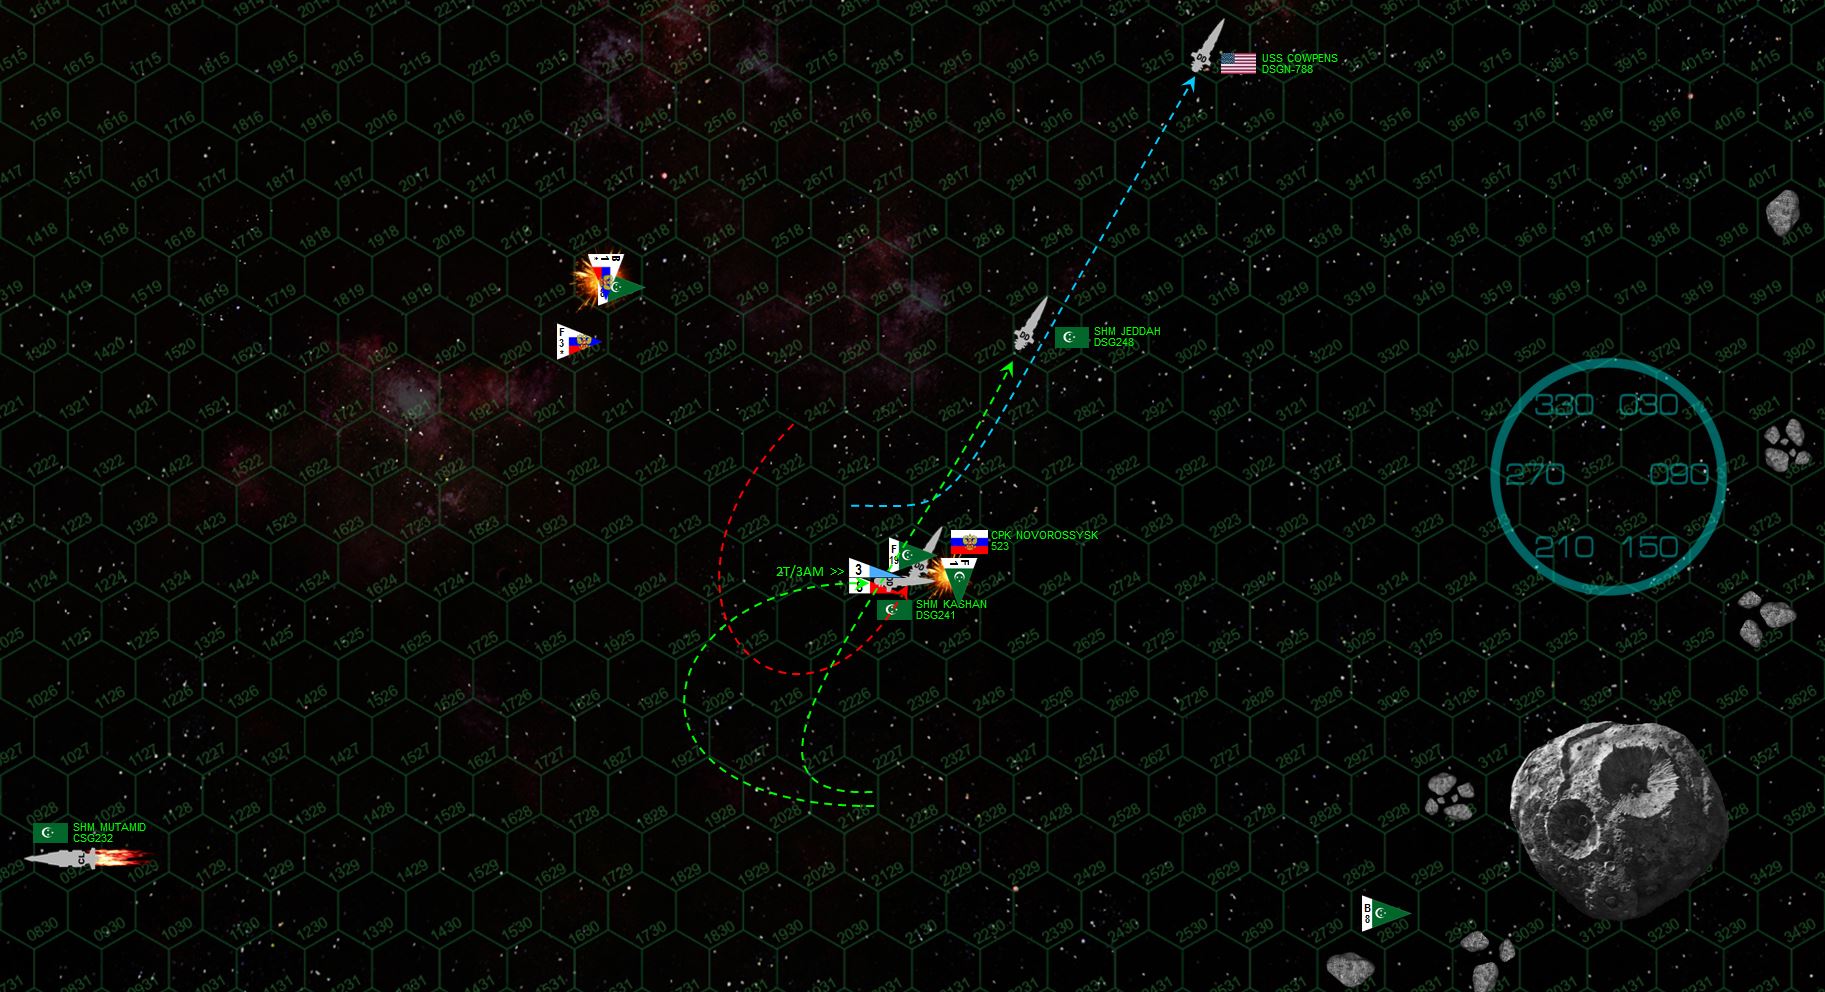 As the Cowpens breaks to port and raises steam to escape, the Arab League destroyer SHM Jeddah turns to pursue. The Novorossysk follows, if only to keep her forward torpedo array (the one real weapon the Russians have left) pointing toward an enemy target. But the destroyer Kashan turns behind Novorossysk in turn, and together with a strafing attack by some of Abu Bashir’s fighters (I throw another brick and only shoot down ONE of these fighters, I “should” have gotten at least 5-6), cripple Novorrossysk. Meanwhile, the rest of the League fighters and plenty of mass driver fire from the Kashan breaks up the last Russo-American torpedo strike on Kashan’s stern, our last despairing chance to at least cripple ONE of these destroyers and reduce this calamity to a “minor” defeat.
 What can I say, this just WASN’T the Russians’ day. Full credit to Muakhah for using an unconventional attack plan and making it work, but between the Cowpens breaking off on Turn 01, the disastrous torpedo attack on Abu Bashir, the loss of most of the Night Witches before they even had a chance to fire, the luckiest broadside I’ve seen in a while crippling the Admiral Lazarev, and then the complete failure to break up the League fighter attack on the Novorossysk, suffice it to say that Lady Luck was giving my friend Muakhah the lap dance of the century all night long on this one. But of course commanders also make their own luck, and he also made the most of all his opportunities, didn’t get carried away and leave me an opening, and made sure the Russians and Americans were all crippled or driven off the table (thus giving me no opportunities to “cheese” any victory points). Well done, sir! And congratulations on what I think is your first MAJOR VICTORY (determining margin 40%+) in Darkstar.
 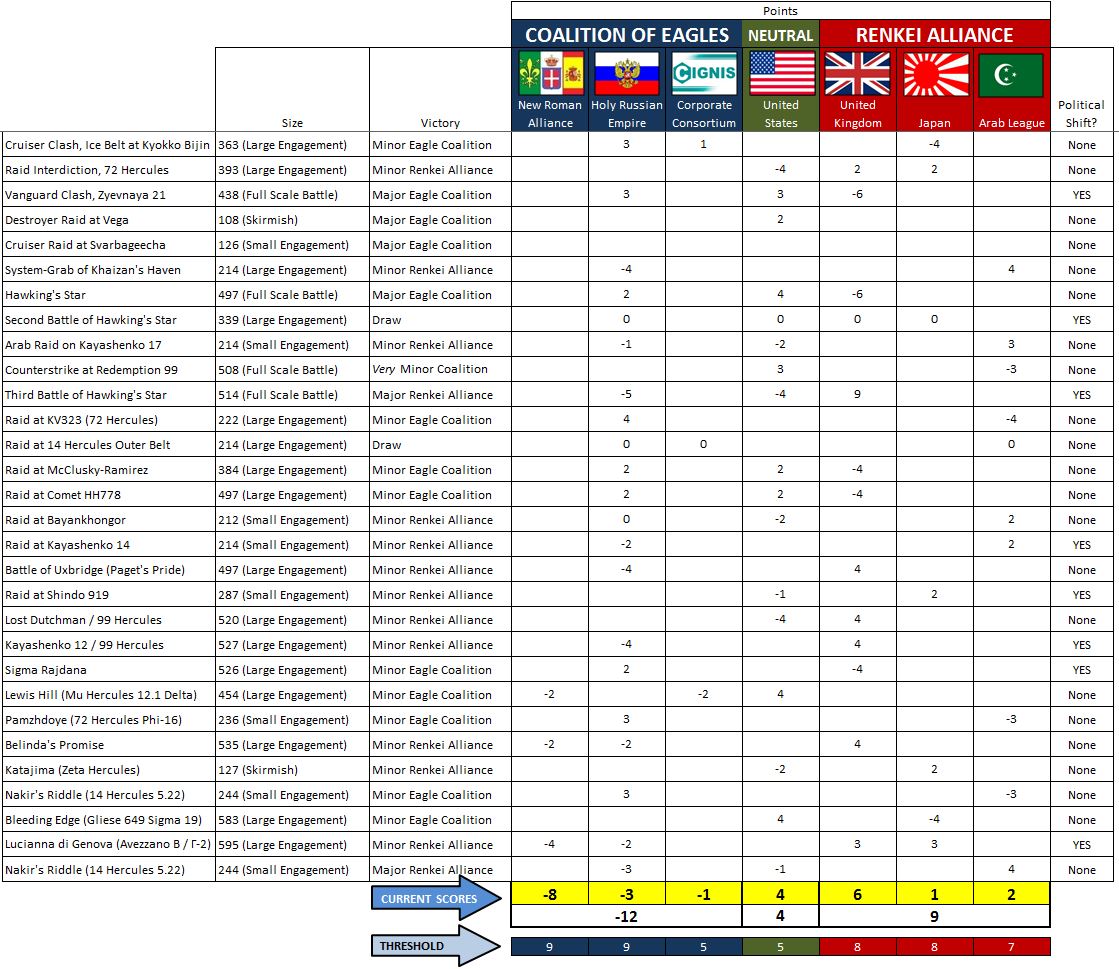 So that cinches it. The Arab League has decisively ejected the infidels from their Khaizan’s Haven caliphate, and the League is now set up to participate in the Anglo-Arab-Japanese invasion into 72 Hercules. With the extra campaign points afforded him by the MAJOR victory at the Second Battle of Nakir’s Riddle, Muakhah has upgraded two of his destroyer-class vessels to more Almanzor-class light hybrid cruisers (and paid for his command to get “Task Force” rating command, allowing him to field forces up to 500 points). So when the League goes into to claim their share of 72 Hercules, they’ll be a lot more powerful than they were here. THEN AGAIN, the Russian “spoiling attack” strategy they’ve been pursuing for the last several months has bought them a lot of time, and who knows what powerful new naval forces will be ready for the British, Japanese, and Russians when they finally launch the decisive, all-out invasion of “Red Hope.”
Battleship at Avezzano (99 Hercules Gamma), Anglo-Japanese vs. Russo-Romans
FROM: ADVISORY OFFICE, UN HERCULES SCS REGIONAL COLONIAL CENTER
20:20 SOL GMT, 29 APRIL 2522
BREAKAUTH: 181072.18J
CLEARANCE: NATIONAL COMMAND AUTHORITY
SUBJ: ANGLO-JAPANESE ASSAULT ON CATANIA (99 Hercules Gamma)
The situation in the Third Hercules War is reaching a breaking point.
The Americans, previously humbled and sidelined by the British, have regained their footing and are about to “cash out” of the conflict with new holdings both in 99 Hercules and Gliese 649. The latter may be particularly bad for the British, as an American shipping stronghold in Gliese 639 would allow them to bypass the 99 Hercules, thus deflating the tariff revenue the British hoped to squeeze from the Americans with their 50-year lease so graciously granted by the British in the Treaty of Zubrin.
The Americans have also thrashed the Japanese at the recent Battle of Bleeding Edge (Gliese 649 Gamma-19), thus weakening Britain’s staunchest and most powerful ally in the Third Hercules War.
Britain’s other ally, the Arab League, has also been bested by the Holy Russian Empire. The Russians now have an entrenched foothold in the Khaizan Caliphate, and any immediate Arab League naval action will have to be directed toward ejecting this Russian presence before they can help the British against the Russians directly.
Perhaps most ominously, the Russian Orthodox Patriarch of Krasnaya Nadhezda and New Roman Archbishop of Catania have reaffirmed their new alliance, with Russian warships now staged in the Catania colonies (Gliese 623). Russian destroyers and torpedo corvettes have also been detected in the UN “Redemption” Mandate at 99 Hercules, specifically at the Avezzano Colony (99 Hercules Gamma). This is obviously a move to threaten British possession of Kayashenko, the 99 Hercules gas giant the British took from the Russians after a protracted campaign earlier in 2521-22.
In short, the Russians continue their efforts to forestall the inevitable British hammerblow on their Krasnaya Nadhezda (Red Hope) colonies at 72 Hercules by creating as many distractions as possible among British allies and problems along British flanks.
Finally, the British have had enough. Pairing two of their most powerful warships in the Hercules Rim with two of the most powerful Japanese ships currently operational, an aggressive move is made directly for the heart of New Roman holdings in 99 Hercules. For the British this includes the heavy cruiser HMS Agamemnon and light cruiser Retribution. For the Japanese it is the heavy cruiser IJN Kama and light cruiser Sendai Byo. The mission is simple, smash into the heart of the New Roman holdings at 99 Hercules. Cripple, destroy, or drive off any naval presence there, thus clearing the way for two Fearless class planetary assault ships to drop in elements of 3rd Marine Commando Brigade and 5th Para Brigade, outright seizing the colonies and installation on the terrestrial planet of Avezzano (99 Hercules Gamma) and its two moons.
Clearly the British aim is to crush any threat posed by the Coalition of Eagles in 99 Hercules once and for all, while also dealing a heavy blow to the blossoming Russo-Roman alliance and shutting down any additional danger to the rear of a final attack on 72 Hercules.
Unfortunately the New Romans have been building up for a climactic entry to the Third Hercules War for some time. While the Americans, Russians, Japanese, British, and Arab League battered each other senseless, the Romans were quietly bringing in ships from the Core and other sectors of Known Space, only opening hostilities when they felt they had an overwhelming force. Most significantly this includes the gigantic 347,000-ton Constantine class battleship NRS Leo Magnus, arriving at Avezzano three weeks ago after a Darkstar voyage of 117 days. Now screened by aforementioned Russian destroyers and torpedo corvettes (CPK Syekyra, Rusalka, and K-98, all part of Task Force “Admiral Lazarev”), the Roman dreadnaught’s presence unmistakably underscores this renewed Russo-Roman cooperation in the Hercules Rim.
For now, however, this hideously-powerful Russo-Roman force is alerted to the rapid approach of British and Japanese Darkstar waves, and raises steam to meet the threat. The New Roman battleship and her screen will meet the Anglo-Japanese cruiser force at the second moon of Avezzano, joining what is the largest battle to date in the Third Hercules War.
BRITISH: @damon
JAPANESE: @rasmus
RUSSO-ROMANS: @oriskany
ASSAULT VICTORY CONDITIONS (595 points)
 The general situation of the Third Hercules War at the end of April, 2522. With a combined Anglo-Japanese smash into the New Roman holdings at the UN “Redemption” Mandate at 99 Hercules (specifically the planet Avezzano / 99 Hercules Gamma), the British hope to shut down the Coalition of Eagles for good in 99 Hercules, weaken the Russo-Roman wing of the Coalition of Eagles, and quell any flank or rear threats for the intended drive on Krasanaya Nadezda (“Red Hope”, 72 Hercules). There’s just one problem. After almost four months in a Darkstar wave, the Romans have managed to bring in a BATTLESHIP.
 The two fleets meet at the second moon of the Avezzano planet (99 Hercules Gamma-2), roughly the size of the planet Mercury, named Lucianna di Genoa for a duchess of terrestrial Italy. Although gigantic, the Leo Magnus is surprisingly fast for a ship her size, her guns pin-point accurate and heavily upgraded in hitting power and range. In short, a single hit from her 21-teravolt EPCs and 90 eHz syglex emitters can cleave clean through the armor of a light cruiser, even at a range of over 9500 kilometers (the distance between London and Capetown, a fact she quickly brings home to the hapless light cruiser Sendai Byo. Even here, at the comfortable “medium” range of 5000+ km, she carves open Sendai Byo’s port bow like a Christmas turkey, instantly hitting magazines, burning mass driver turrets out of the hull, smashing open torpedo bays, crippling sensor suites and incinerating maneuvering thrusters. It’s frankly pure luck that spares Sendai Byo’s bridge, otherwise the 83,000 ton cruiser would be smacked out of the battle in the opening salvo. The British and Japanese respond, aiming guns at the little K-98. At this range the 15,000-ton corvette is almost impossible to hit, but these British and Japanese crews are expert shots, and K-98 is crippled. It seems like a small victory, but the K-98 has twelve P-500 torpedo tubes, double-upgraded with the most advanced electronic warfare suites anywhere in the Holy Russian Empire. With that battleship to deal with, the last thing these cruisers need to worry about is swarms of Russian torpedoes, too.
  As the Leo Magnus continues to keep the intruders in her broadside, hammering the Sendai Byo again. The Japanese accelerate and dive right toward the Roman behemoth, somewhat leaving the British behind a bit. But the Japanese are trying to set up an eventual angle behind the Leo Magnus, and also present heavily-fortified bows to those terrifying guns. The Sendai reels again, yet still remains in the fight, although a fresh forward facing of shielding and armor is now reduced to a twisted, flaming ruin. The Russian destroyers hedge ahead of the Leo Magnus, pivoting to port to keep torpedo tubes facing the enemy. The British execute a shallow S-turn, keeping port broadsides to the enemy, now hammering on the destroyer Syekyra, still trying to chew down that enemy torpedo load. Again they and the Japanese are successful, and the Russian destroyer’s bow, forward torpedo tubes, magazine, and finally bridge are smashed open, leaving the ship a crippled wreck.
 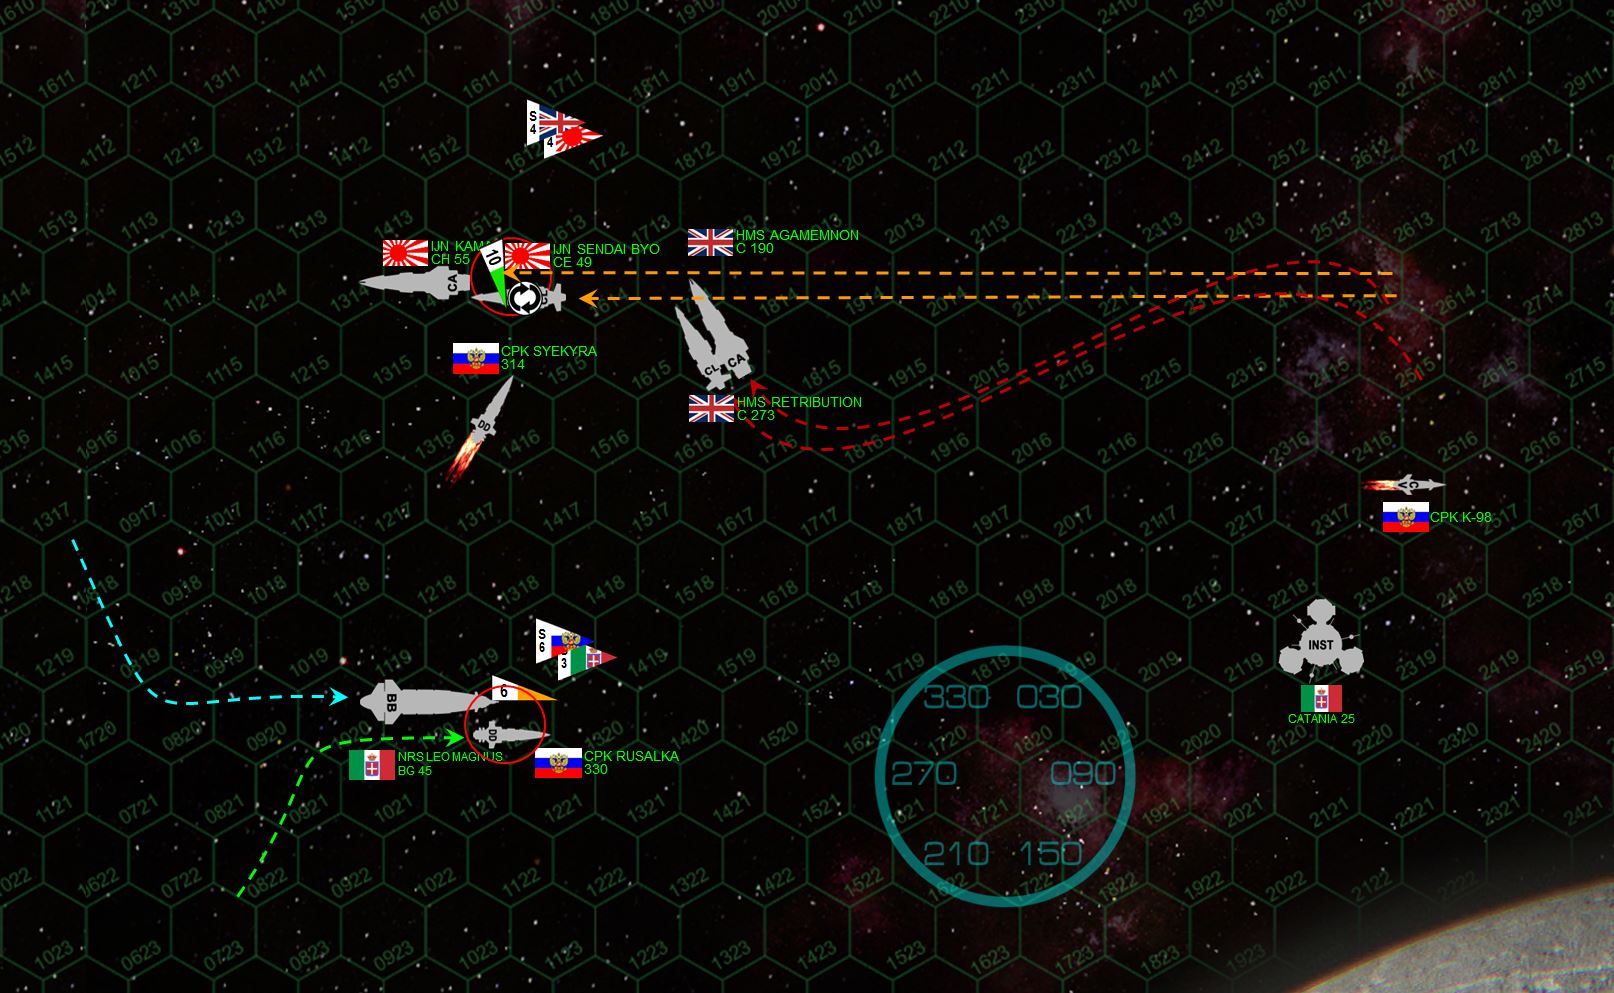 The Leo Magnus finally turns away from the moon, putting a THIRD broadside in to the long-suffering Sendai Byo, just as she and the Kama finally get into good broadside range on the Roman battleship. The Kama is particularly well-positioned, able to tear open Leo Magnus’ port quarter with 18-teravolt EPVs and 12-megakelvin lasers (the biggest caliber in Known Space). Although the Kama can get through Leo Magnus’ shields easily enough, her absurdly thick armor plating is another matter. But while the Agamemnon and Retribution hammer on the Leo Magnus’ port bow in a truly withering barrage of lasers, rail guns, and especially 15-teravolt EPCs, the Sendai Byo can finally take no more. Although she’s rolled over on her back to present her starboard side rather than her fatally-wounded port side, the cruel magnitude of the Leo Magnus’ broadside all but tears the sleek light cruiser in half. Although she will eventually return to service, she will need 119 days in towing and dry dock (66 internal boxes hit, +50% for being crippled, +20 days for towing) to again stand ready to fly the Rising Sun.
 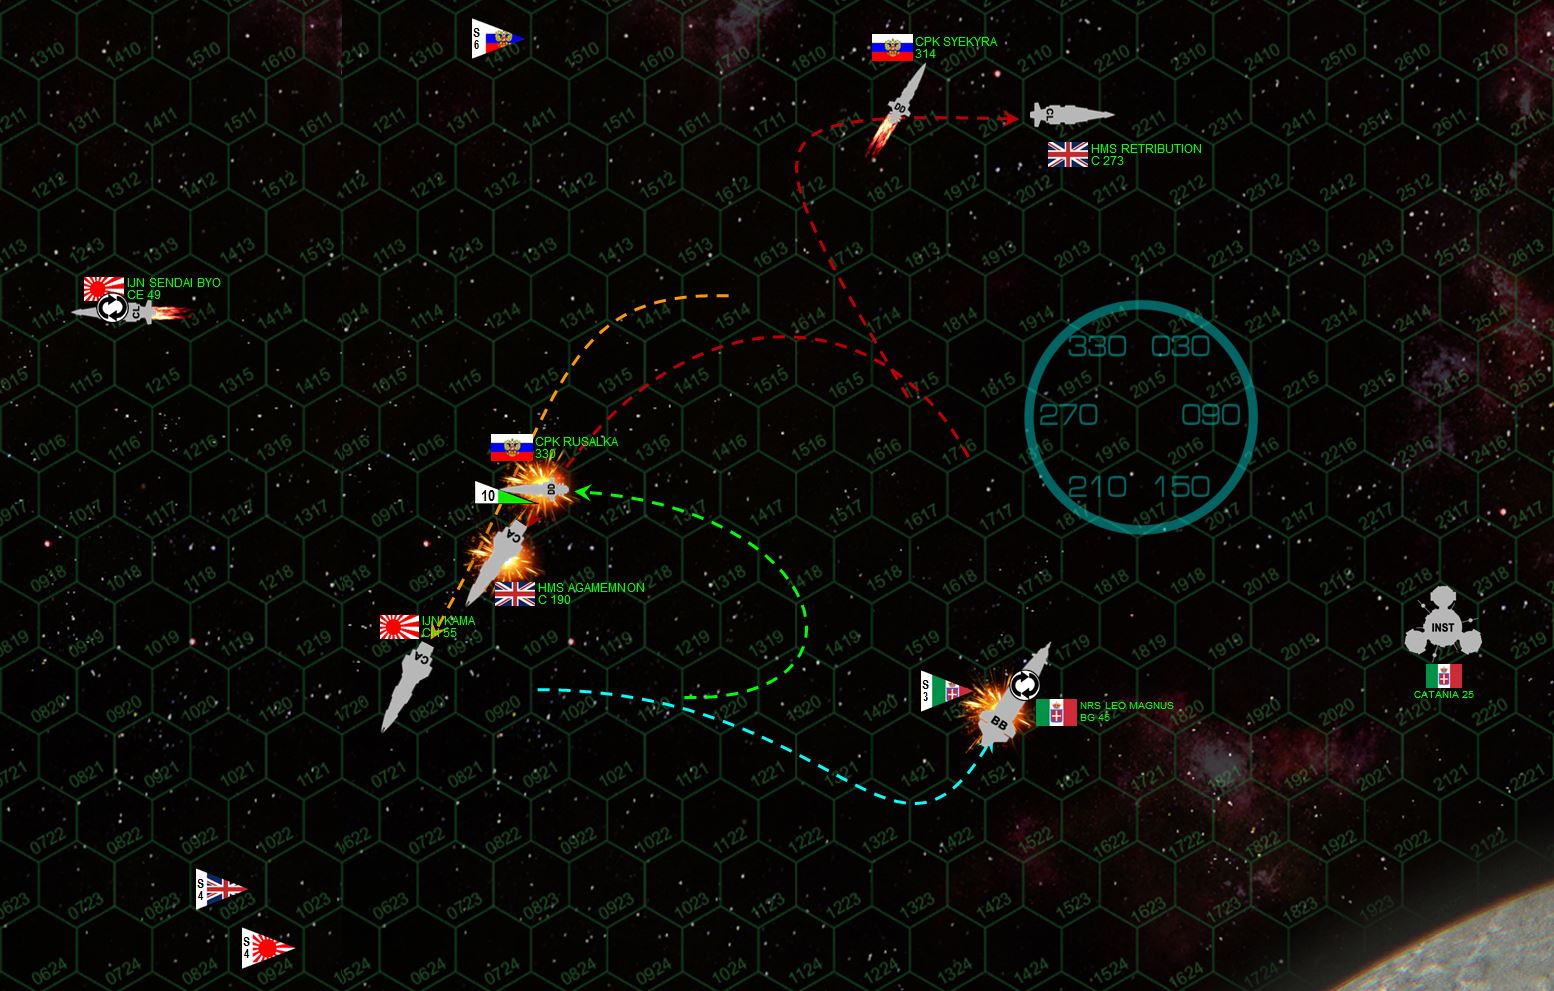 The Leo Magnus peels away from Lucianna di Genoa, her grav rudder and maneuvering thrusters pulling hard against the moon’s gravity, the battleship rolling on her back to present starboard armor and shielding to the three remaining cruisers (stop me when this starts reminding people of the 1939 Battle of the River Plate). But it can’t prevent the Kama and Agamemnon from edging behind her, their powerful combined broadsides how targeting Leo Magnus’ quarter. At last the dreadnaught begins to shudder from hard hits to her starboard engines and reactors, even as her broadside ... now delivered at the punishing range of just 1400 kilometers ... positively incinerates the Agamemnon’s port side. Making matters worse, the destroyer Rusalka has come hard about to cross Agamemnon’s stern, her rail guns and plasma projectors packing a startling punch at such close range.
 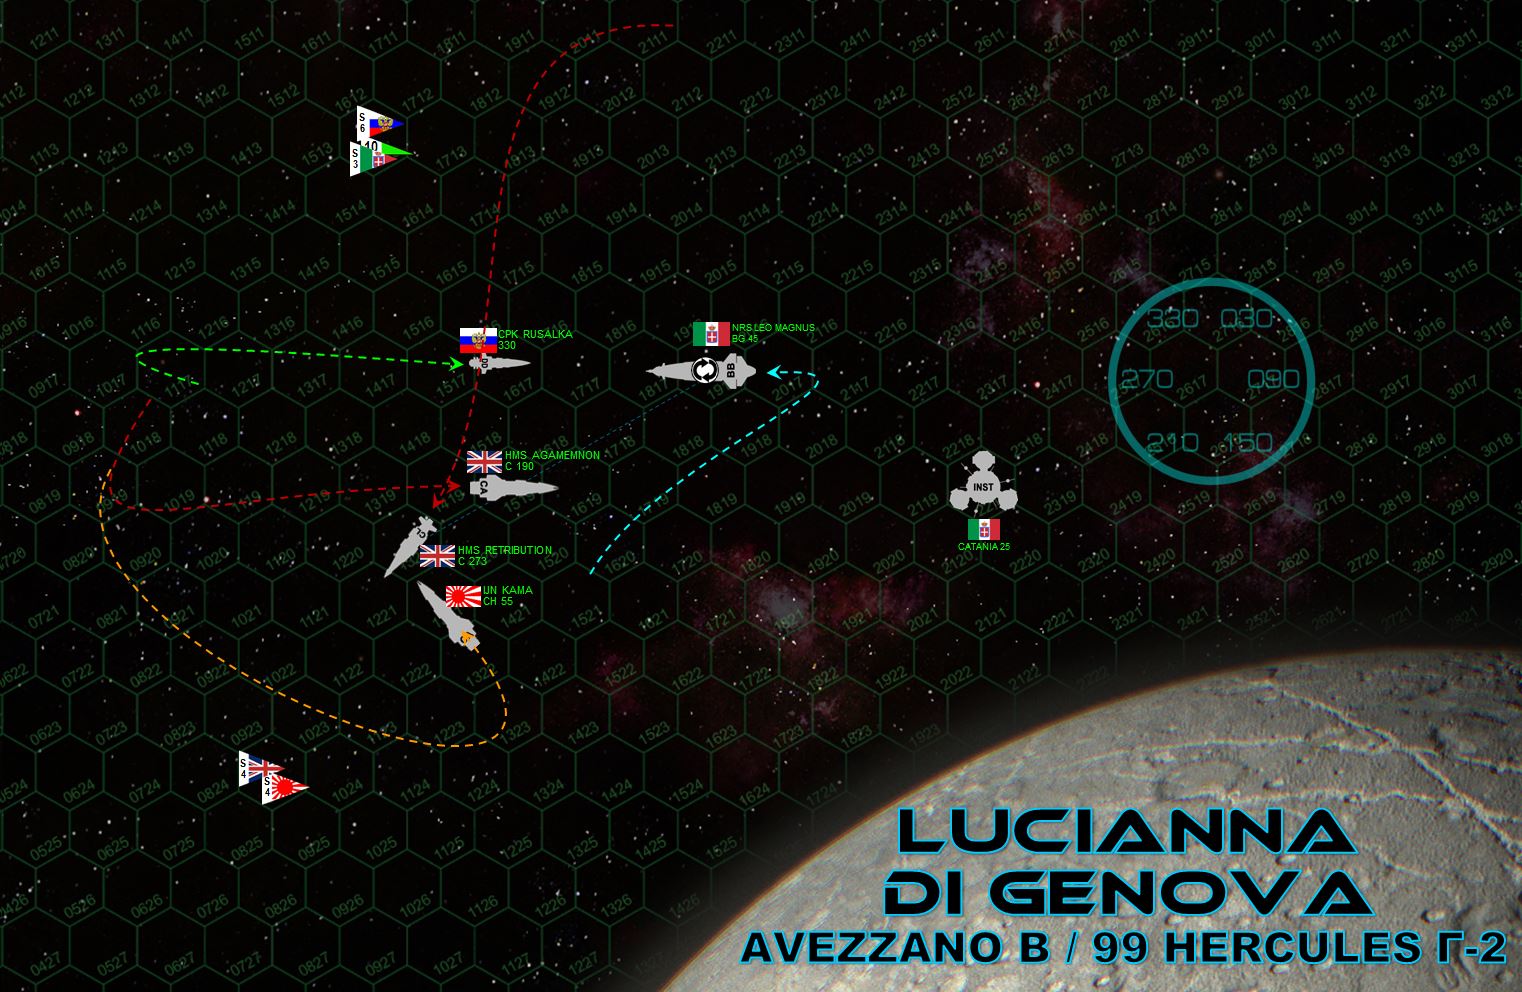 Still pulling against gravity, the Leo Magnus now makes a hard jackknife turn to starboard (turning “left,” remember she is inverted), determined to keep her engines and reactors clear of enemy guns for as long as possible. HMS Retribution dives down to rejoin the fray, combining with Agamemnon and Kama to all fire into Leo Magnus’ starboard bow. This is actually the first time all Allied ships have been lined up against the same facing of the dreadnaught, and even now they can’t fire full broadsides because of their own positioning. But aft batteries of the Agamemnon and Retribution open up on the Rusalka, inflicting enough damage to force her captain to break off the action. Forward batteries combine with the Kama to hit the Leo Magnus, hammering into sensors and mass drivers, trying to knock out some of her huge turrets or even better, her bridge. But the sheer size of the battleship is just too much to shoot through right away, even if both her broadsides are now masses of glowing, twisted metal and jets of burning escaping atmosphere.
 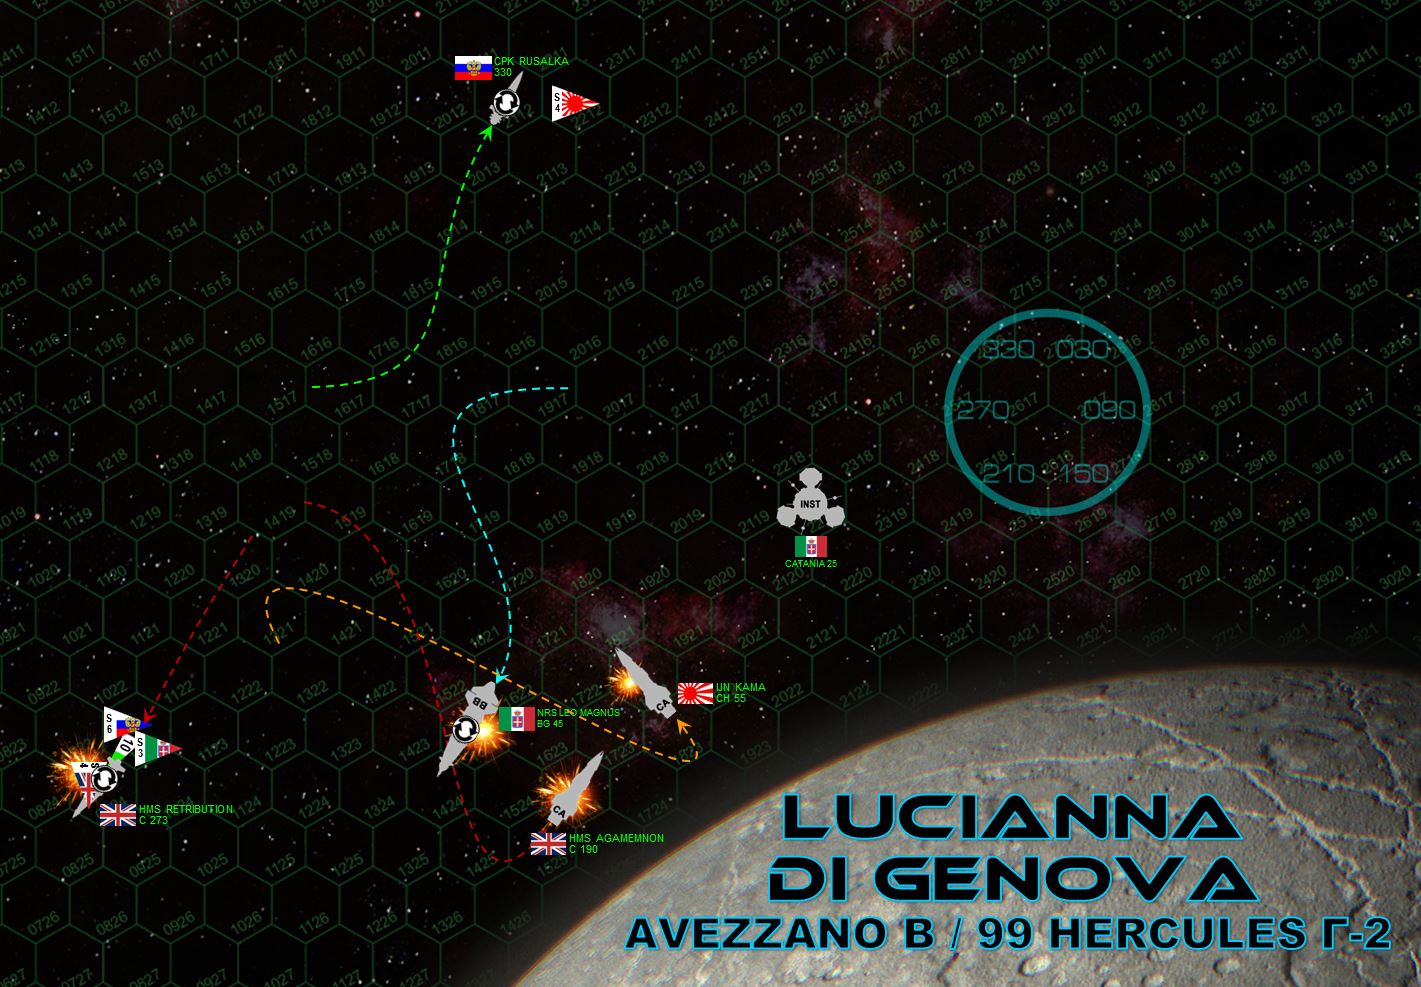 The Leo Magnus turns hard to starboard and again dives toward Lucianna de Genoa, hoping to keep her worst damage screened against the moon’s bulk. Her captain, Read Admiral Giuseppe Maccia, hopes to at least for the British and Japanese to dive dangerously close to the moon to get at his starboard side. It’s a dare that Lord Commodore Edward Cavendish and Captain Seizo Yamamoto are happy to accept, with perilous dives and jackknife turns that put broadsides right into Leo Magnus’ starboard broadside. However, the Agamemnon is also fatally close to the battleship, literally at POINT BLANK range directly abeam her full broadside. It’s a fire phase that Agamemnon does not survive, the mighty Trafalgar-class heavy cruiser finally blown wide open and left a burning, crippled, spiraling mass of flames. Her chief engineer has to eject her reactors before they detonate, setting off a blinding fusion explosion that puts a tiny, momentary new star in the 99 Hercules system. The Retribution can’t quite join the main broadside, her maneuvering thrusters largely crippled and harried by Russian scouts and torpedoes. All British scouts are shot down by the Leo Magnus as they try to fend off these Russian torpedoes, just one more indication of how desperate this battle is becoming. However, all is not in vain. Although she is STILL not crippled, the Leo Magnus now has holes blown deep through her midships superstructure, including medical bays, life support systems, troops bays, both starboard mass drivers, and forward hangar. Three of her sensor suites are also gone, leaving her half-blind as well. At last Rear-Admiral Maccia makes the call. It’s time to break off.
 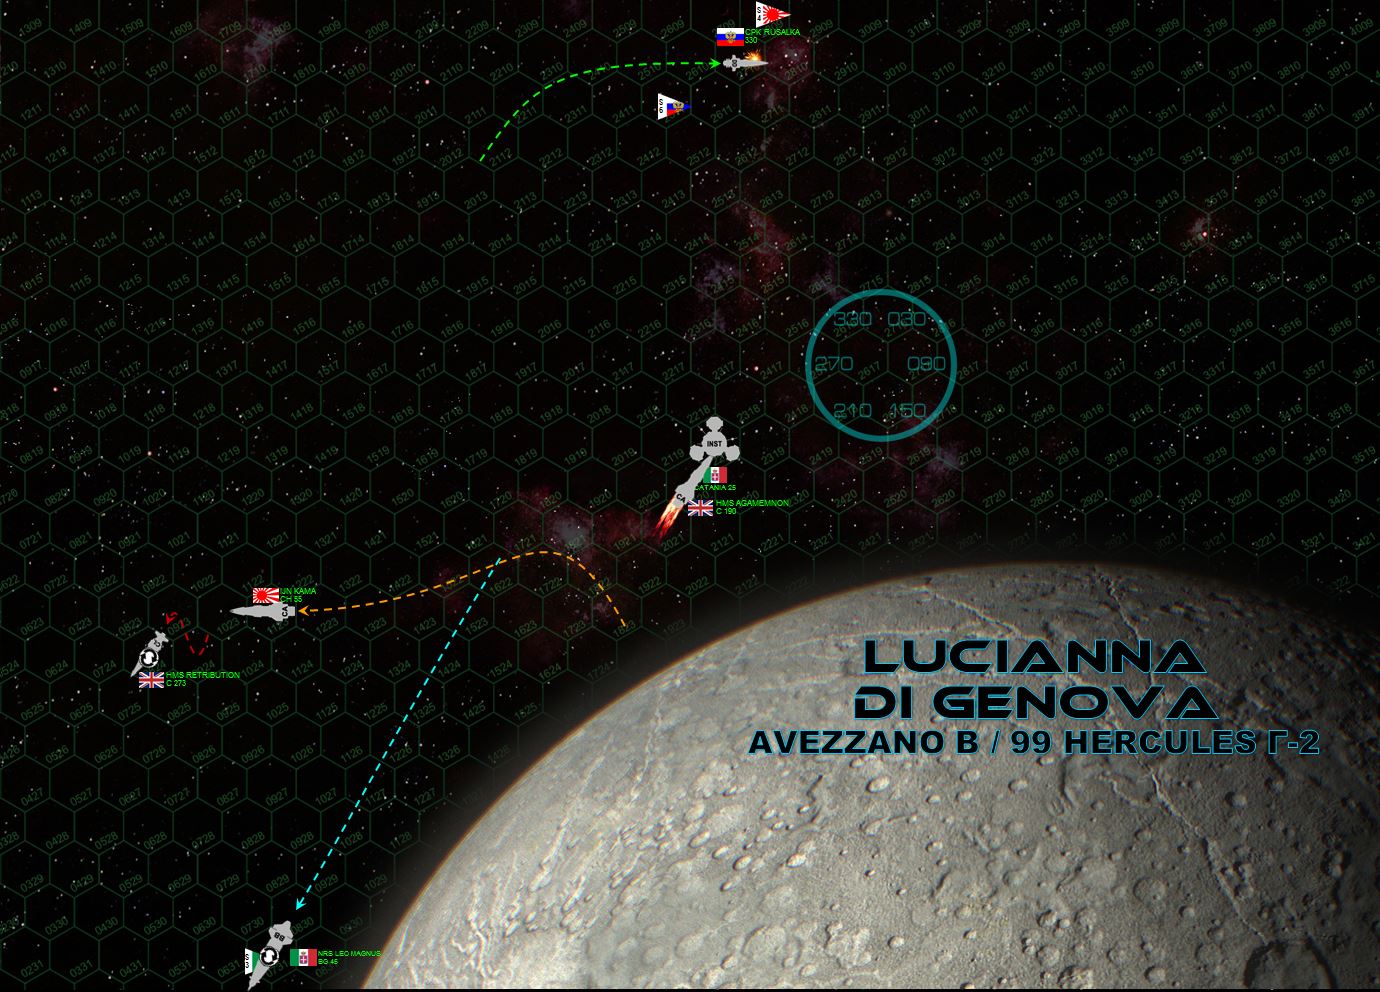 Here’s the thing. Darkstar “assault score” games end on Turn 8 at the latest. Ships that are forced to “break off” after taking a certain amount of “core damage” (internal, crew-heavy components and thus crew casualties) and then failing the corresponding percentile roll are must leave the table in good faith. Basically, the ship has failed a “morale check.” But such ships are still operational and can even use full weapons as they “cover their retreat.” The formal break-off rules are as follows: A ship that is breaking off must (a) not decelerate, and (b) MUST END their movement phase, if it is in any way legal or possible, at least one hex further from the closest enemy operational warship then they were when the ship starts its movement phase. Now here’s the onion ... IF Leo Magnus technically remains on the table at the end of Turn 8, she counts for half victory points – so if she can legally remain on the table for two more turns, the Romans can probably pull off a draw or even a narrow victory. For now, she was six hexes away from HMS Retribution at the start of her movement. She must end her turn at least seven hexes away from the closest operational enemy ship. The only way to pull this off is to accelerate by 2 to 7, which she reluctantly does (remember, she can’t decelerate). Guns keep firing, and yes, now the HMS Retribution must also break off. That makes three warships (Leo Magnus, Retribution, Rusalka) that are on the table and “running away.” But ships that “don’t make it” are still worth half points, and note I am BARELY ABLE to keep Leo Magnus on the very last hex on the table! So this game is still up in the air!
 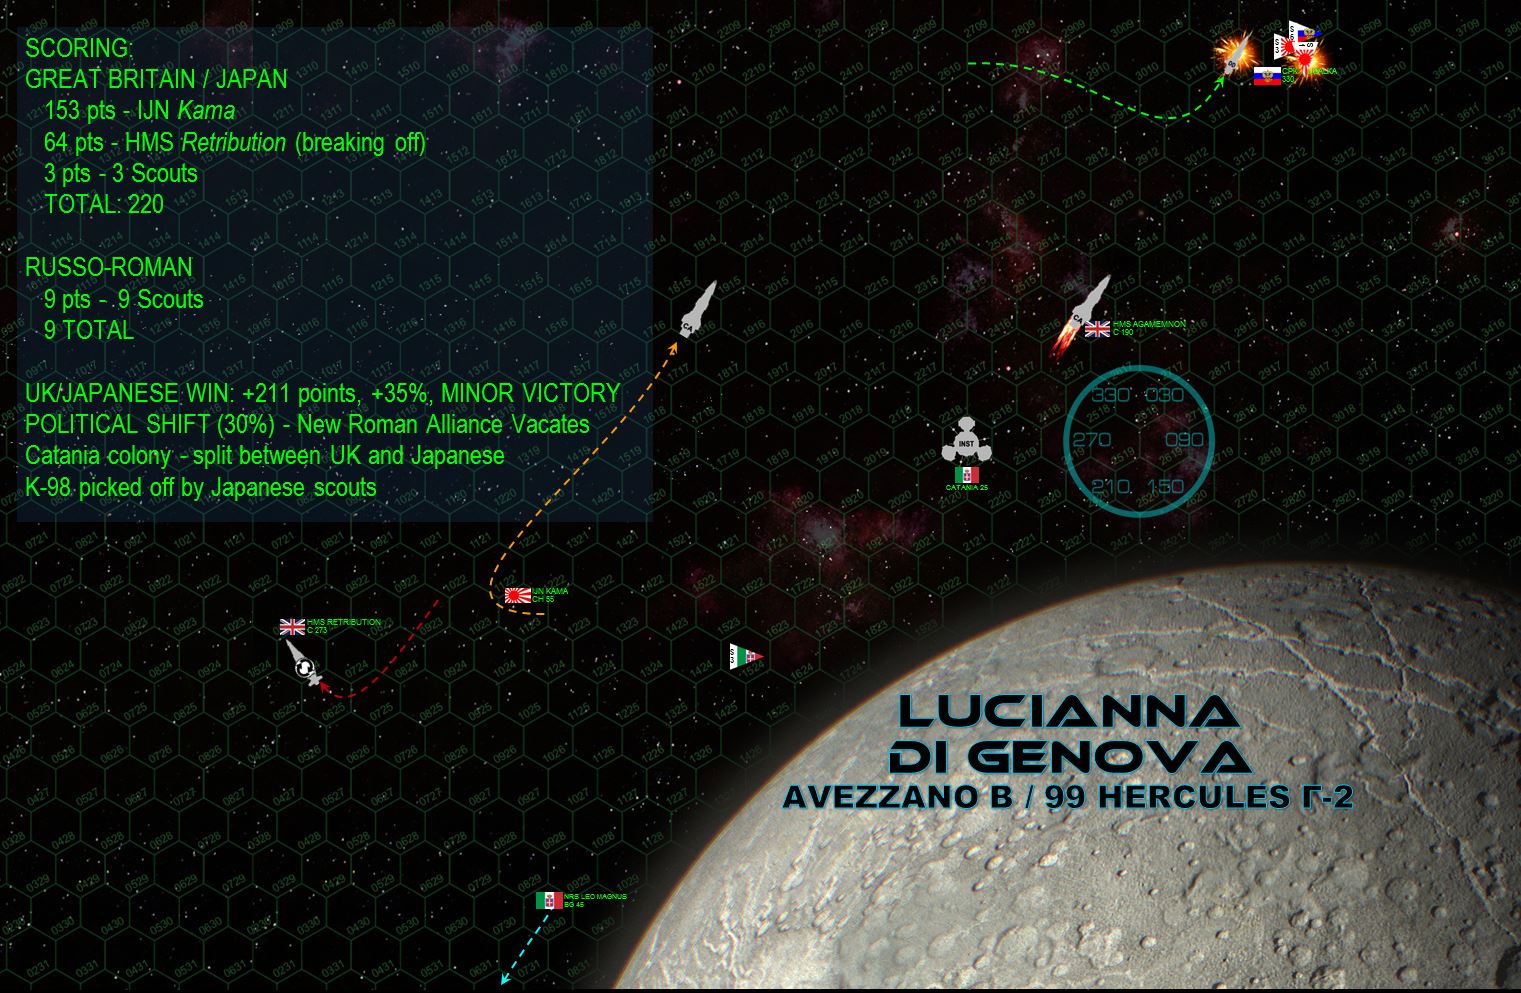 Finally, it comes to a close. The incessant attacks by Japanese scouts finally manage to CRIPPLE the Rusalka - they’ve been hounding the open wound on her unshielded port quarter for a while now, with -3 sensor boxes hit I haven’t been able to shoot them down and they finally landed the lucky hit. Rusalka is no longer breaking off, she is CRIPPLED, and thus worth no points. I earnestly try to keep Leo Magnus on the table. All I have to do is make a port turn (again, inverted) in hex 0731, come to heading 270, and skirt along the bottom of the board. This gives me one more turn to broadside the Retribution and probably cripple her, AND force Kama to come down and engage Leo in a desperate hope to knock her out for good. Yes this is the last turn of the game, if Leo Magnus can LEGALLY make this turn, she’s on the board at the end of Turn 8 and Damon and Rasmus HAVE to kill her or lose the game. I have two thrust points (damaged maneuvering thrusters) and a velocity of 7 (not allowed to hit the brakes). I am currently 8 hexes from the Retribution (Hex 0923, at the “beginning” of her red movement track). I make the turn, and wind up 9 hexes from the Retribution (Hex 0531). That’s it! I win! Except gravity takes its effect, pulling me one hex closer to the Lucianna de Genoa moon (Hex 0631). This would leave me at 8 hexes from Retribution, the same distance I started, which means ... that is NOT a legal move. Therefore, with no LEGAL way to meet the “breaking off” requirements, by strict interpretation of the Darkstar Rules 4.9.4.C and 5.2.1.A (and of course not turning to heading 150 and crashing into the moon) I have to leave the table. This means the Leo Magnus counts for NO points (she’s hugely expensive) and thus the game shakes out as a thick British-Japanese victory. But MAN, guys ... this one was CLOSER than the score suggests. But for the GRAVITY effects on ONE HEX, if Leo Magnus had just ONE MORE HEX to work with, she stays on the table for half points (209) and I get a score of 218 to Damon-Rasmus’ 220. That’s a margin of 3/10 of 1%, and per Darkstar Rule 5.2.1.C.i (p 98), a score has to margin out at least +/-5% or it’s a draw. So this game came down to the gravity effects of ONE HEX.
 The Battle of Avezzano is over. This was one for the record books, folks, and no mistake. The crippled K-98 will later be chased down and finished off by the same Japanese scouts that crippled the destroyer Rusalka, but her skipper survives and will be rescued. The damage control fight to save the Agamemnon will be epic (it will be forever one of those “miracles” in the Royal Navy that she survived), while the Sendai Byo will be in dry dock for almost four months. Retribution is limping out of the battle area, while even the Kama bears deep scars of the fight. Meanwhile, the Leo Magnus left the table under her own power, but will admittedly be in Catania shipyard for 147 days (Damon and Rasmus inflicted 147 boxes of internal damage on her) after the 89 days it will take her 9th-wave Darkstar drive to get her the 39 light-years to Catania. So in all we’re looking at 236 days, basically eight months . . . she’s realistically out of the war. Meanwhile the Marines and Paras land on Luciana di Genoa and seize the moon’s orbital and ground installations, and after the 30% “political shift” was rolled (% chance determined by the size of the battle and its outcome), it’s determined that Roman Alliance is forced to sign the Avezzano colony over to Great Britain and Japan entirely. With their new campaign score of -8, it’s clear the Romans are a hair’s breadth away from giving up on this war altogether, their involvement as disastrous as it has been brief. Now we’ll see if the Arab League can win a battle against he Russians this week, and if so, 72 Hercules is at last lined up for a three-way smash from the UK, the Japanese, and the Arab League, all at once!
 Japanese Assault on "Bleeding Edge" (Ragnarssonland - Gliese 649 Sigma-19)
FROM: ADVISORY OFFICE, UN HERCULES SCS REGIONAL COLONIAL CENTER
06:05 SOL GMT, 10 APRIL 2522
BREAKAUTH: 181072.18J
CLEARANCE: NATIONAL COMMAND AUTHORITY
SUBJ: JAPANESE ASSAULT ON “BLEEDING EDGE” (Ragnarssonland – Gliese 649 Sigma-19)
In response to the recent American raid at Katajima, the Imperial Japanese Navy has mounted a major counterstrike at the base from which the Americans launched the Katajima incursion. These are the corporate “Ragnarssonland” colonies (Gliese 649 star system) formerly held by Imperial Prussia until forfeited at the end of the Second Hercules War in 2513-14.
As is often their habit, the Corporate Consortium has to date played a quiet role in the Third Hercules War. Although technically part of the Coalition of Eagles, they have not taken significant action against their hostile “Renkei Alliance” Japanese neighbors in Zeta Hercules for some time. This didn’t stop them from allowing the US Navy’s “Battlegroup Collingsworth” access to their Ragnarssonland holdings for the Katajima raid, of course. Unfortunately, that raid was an abject failure, and now the Japanese are coming for payback.
But the Japanese aren’t coming for a simple punitive raid. This is a powerful assault spearheaded by Task Force Naginata under the flag of Commodore Hiromi Ozawa. With a combat record extending over ten years back to the 19 Draconis War of 2512, and commanding some of the most experienced, prestigious, and decorated crews in the Imperial Japanese Navy, this potent “Tenonoken” (Sword of the Emperor) formation includes the heavy cruiser Naginata (practically a pocket battleship), the bristling light fleet carrier Nagashima (carrying the double-elite “Kotukai Donryu” – Naval Air Group “Storm Dragon”), the prestigious and venerable “legacy ship” light cruiser Takakawa, and the sleek, swift, high-tech destroyer Kikasa.
Even more ominously, behind this task force are three Shimada class light carriers converted to troop ships, their aerospace fighters and bombers replaced with tanks, APCs, and elite Naval Landing Force infantry. This isn’t a raid, this is an invasion and assault. Not only are the Japanese looking for punitive retribution for the Katajima raid, but also to win a staging point for a possible joint Anglo-Japanese invasion of 72 Hercules (Krasnaya Nadhezda), Lord Commodore Edward Cavendish’s proposed war-winning assault and invasion of the Holy Russian Empire’s regional capital.
Arrayed against this assault is the bulk of Carrier Task Force Liberty under the flag of Captain Zachary Thomas Irons. Comprised of the Endeavor class light fleet carrier USS Liberty, the new light cruiser USS Northampton, the destroyer Cowpens and frigate John Young, it is supplemented by warships from Task Force Oriskany, including the veteran destroyer USS Valley Forge and the USMC light strike carrier USS Tarawa.
The two fleets meet at the nineteenth moon of the eighteenth planet of the Gleise 419 system, a sphere of economically-rich silicon about 80% the size of Venus. Playfully named “Bleeding Edge” by its Cignis Corporation owners, the world is orbited by two mining, shipping, and administrative installations named for the locally-famous “company TGIF” bars on them: The Nimble Toad and Space Chili’s. Such quirky names belie the gravity of the battle about to be waged over their possession.
Such gravity is not lost upon the two battlefleets, however. Many of the men and women on these converging warships have known each other for the better part of ten years, having fought against each other as blood-enemies in the 19 Draconis and Andromeda Arc Wars, then fighting as blood-brothers in the Xi Scorpio and Scorpion’s Tail Wars (where many of them became personal lifelong friends). Yet here they meet again as foes, subject to the cruel ironies of duty, fate, and 26th Century colonial politics.
Leaving such sentiments for poets and historians, we are left with the business of the day. Ozawa’s flagship has just dropped out of her Darkstar wave, and the Battle for Bleeding Edge is about to begin.
ASSAULT VICTORY CONDITIONS (583 points)
 The general situation of the Third Hercules War in April, 2522. As the British strive to assemble a “coalitional” invasion of 72 Hercules, Japanese involvement in such an invasion is perhaps dependent on subduing any American / Corporate threat from their “left flank” in Gliese 649. Given the abortive American “Katajima Raid” against Zeta Hercules last month, the Japanese have resolved to silence this nuisance once and for all.
 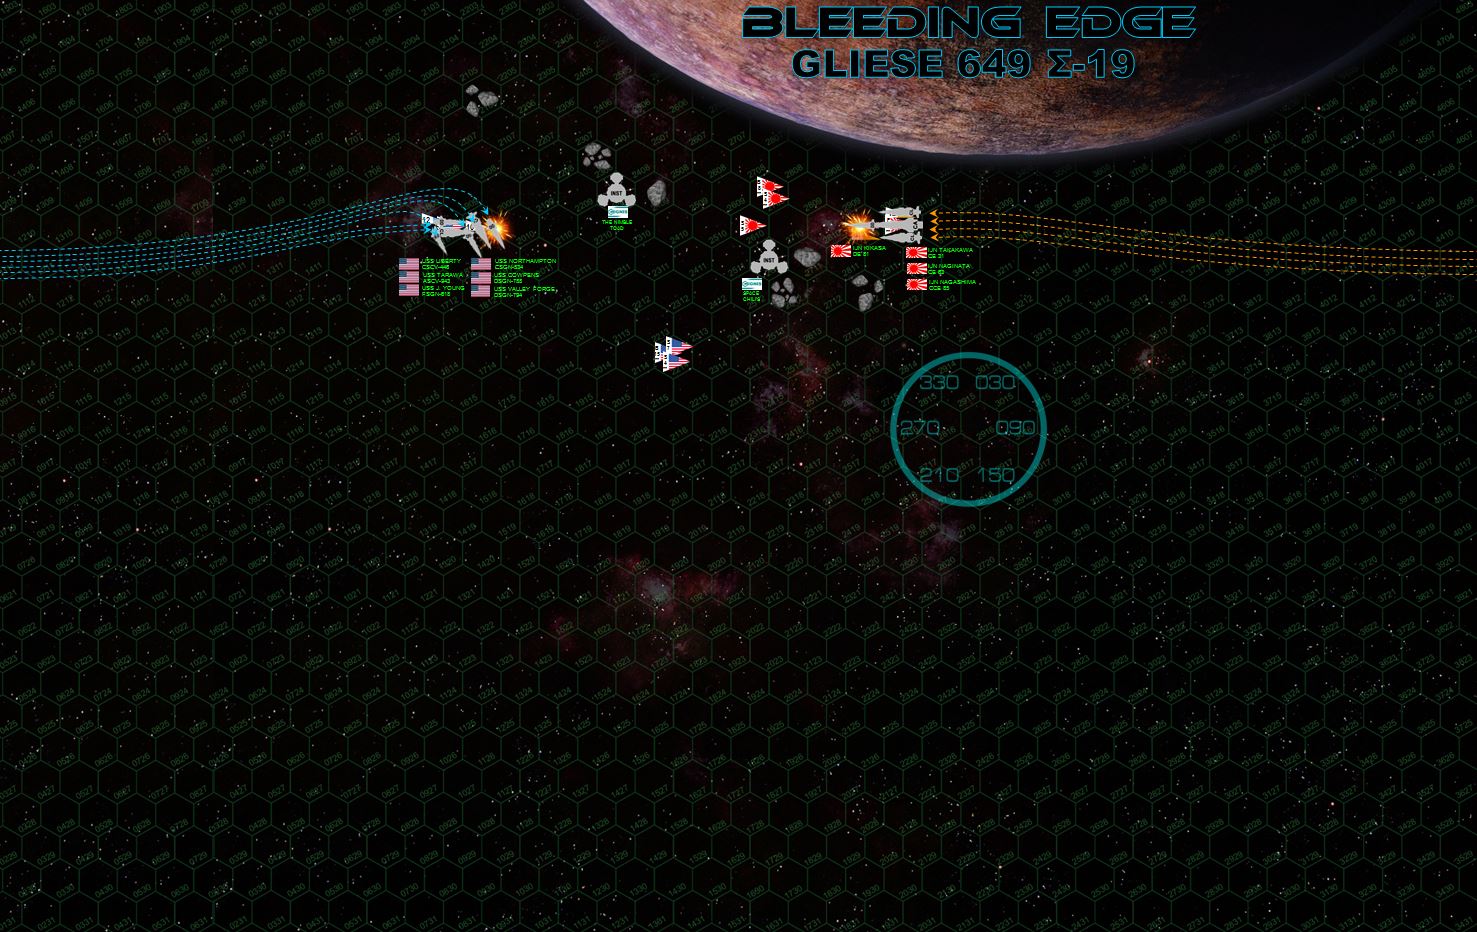 Both fleets detect each other on the daylight side of the Ragnarssonland Sigma gas giant and pivot towards its largest moon, Sigma 19 “Bleeding Edge.” Both sides set a relatively fast and “close shave” approach trajectory, skimming the moon’s atmosphere and threading toward gaps between industrial debris fields and the “Nimble Toad” and “Space Chili’s” orbital installations. Captains Irons and Jack Morrison (USS Northampton) see what Commodore Ozawa (IJN Naginata) is up to and tap the brakes just a little, allowing their cruiser, destroyers, and frigate to pivot to present a broadside. Full frontal Japanese guns, however cripple the destroyer USS Cowpens outright, the worst damage by far inflicted by the horrific forward 18-teravolt EPCs of the Naginata, scoring four out of six hits, plus a gigantic 12-magakelvin laser. These beam weapons slash through USS Cowpens’ bridge and forward magazines, torpedo racks, port and starboard bow mass drivers. Captain Rachel Collingsworth escapes serious injury, but the ship loses power and slews out of the battle. The rest of the American task force returns fire broadside, the Northampton tearing open the Kikasa’s bow at 1800 kilometers. The destroyer Valley Forge and frigate John Young follow up, their lasers, rail guns, and EPCs smashing through sensors, bow mass drivers, and collapsing the forward shields. Captain Hashida Kamanaga is forced to break off the action, his sleek destroyer suffering a chain reaction of decompressions. The carriers, cruisers, and destroyers of both sides also launch massive torpedo spreads and aerospace strike wings, including the elite US Navy VSF-221 (The Dead Rabbits) fighter squadron, VSA-193 (The Eight Ball Express) bomber squadron, US Marine Corps’ VMF/A-319 (The Tigersharks) squadron and the elite Japanese Kotukai Donryu (Naval Air Group “Storm Dragon”).
 American and Japanese aerospace wings immediately set into each other, with two American and four Japanese bombers shot down by each others’ scouts as they angle for torpedo runs on warship targets. Again, the Americans largely outguess the Japanese approach, setting up USS Liberty so her vulnerable engines and reactors are at least partially screened by debris fields. The Japanese are also coming on just a shade too fast, and can’t turn fast enough to make quite the maneuvers they want. The light cruiser Takakawa makes a port turn to present a broadside against the American approach, but the Valley Forge and John Young avoid this and cross Takakawa’s stern point-blank. The huge Naginata crosses both their sterns, only to be crossed in turn by Northampton. The carriers try to hide out of the way while also avoiding debris fields and keeping Bleeding Edge’s gravity field in mind. It’s an absolute nightmare of high-speed, hairpin turns in a deadly obstacle course, the moon’s gravity bending everyone’s course, huge point-blank broadsides threatening from around every corner. Nevertheless, the Americans have largely won the maneuver match here. But the sheer size, accuracy, and hitting power of the Japanese batteries (especially Naginata and Takakawa), especially at these ranges, may render this a moot point.
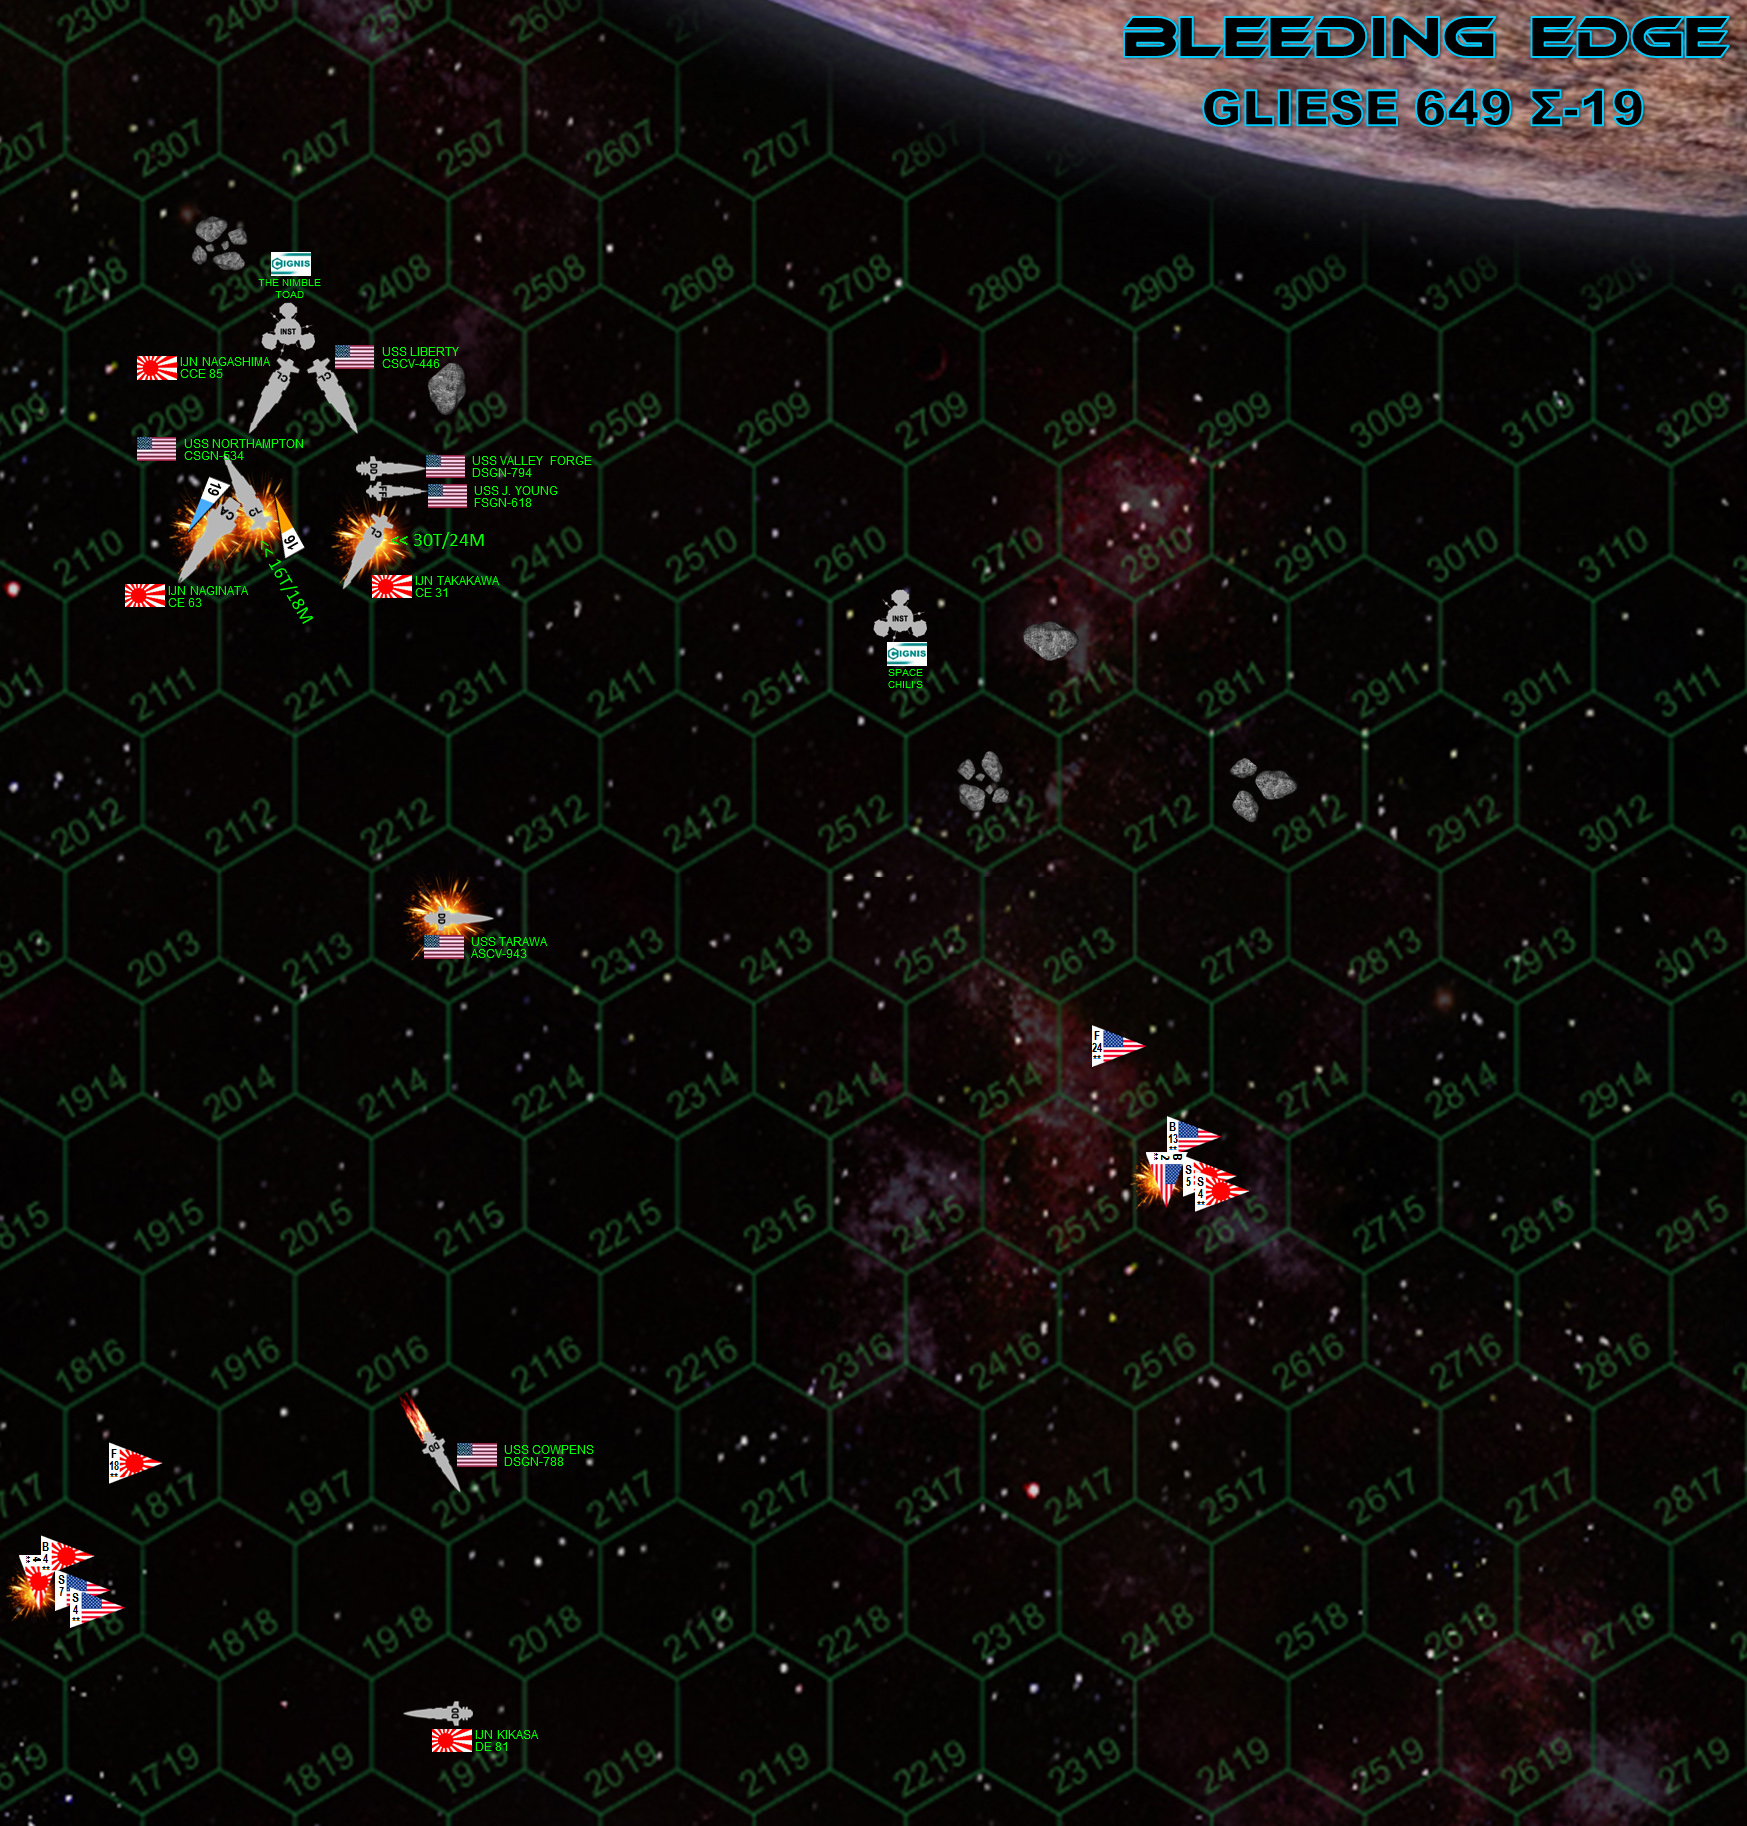 YOU MAY WANT TO EXPAND THIS IMAGE FOR BEST RESULTS - This image is the same as above, on an expanded hex grid so we can see just what the hell is going on in this prison riot of starships. First up, the Japanese flagship IJN Naginata is hit by four Mark 48 torpedoes astern. The hapless Takakawa, victor at Katajima, is hit by no less than FIFTEEN torpedoes from the Eight Ball Express and the Tigersharks, then six missiles from the Dead Rabbits. USS Northampton hit astern by two torpedoes and five missiles from Stormdragon Naval Air Group. Naginata fires her gigantic forward guns, all six of her huge 18-teravolt EPCs hitting the Tarawa on her port quarter, instantly leaving her spinning crippled through space. Naginata’s aft guns burn savage gashes through the USS Northampton that has just cut right behind her. The Northampton fires her full point-blank broadside into the stern of the Naginata, already weakened by aforementioned torpedoes, Northampton’s EPCs and 8-megakelvin lasers slashing into Naginata’s fantail, detonating reactors and engines. Naginata is more than crippled, her whole aft third tearing apart in a ripple of internal explosions. In fact, Captain Jack Morrison orders his last guns to switch to the Takakawa before Northampton EXPLODES the huge Japanese heavy cruiser. An instant later the Takakawa cuts lose with her forward 6-gigwatt rail guns and 15-teravolt EPCs into the Northampton, along with long-ranged EPCs of the fleeing Kikasa. At last the Northampton shudders and goes dark, spiraling through space in a hail of molten metal and twisted debris, just barely clearing the northern terminator of the Bleeding Edge moon before the gravity slingshot hurls her out into interplanetary space. Valley Forge and valiant little John Young fire broadsides point-blank into the stern of the Takakawa, devastating her powerplant and engineering sections, leaving Takakawa a derelict wreck as well, just before John Young takes two long-ranged hits on the starboard bow from Kikasa’s long-ranged syglex emitters. Four warships, 390,000 tons of shipping, have been left ravaged hulks inside of sixty seconds, in addition to the fifth ship crippled and sixth ship forced to retire just one minute before.
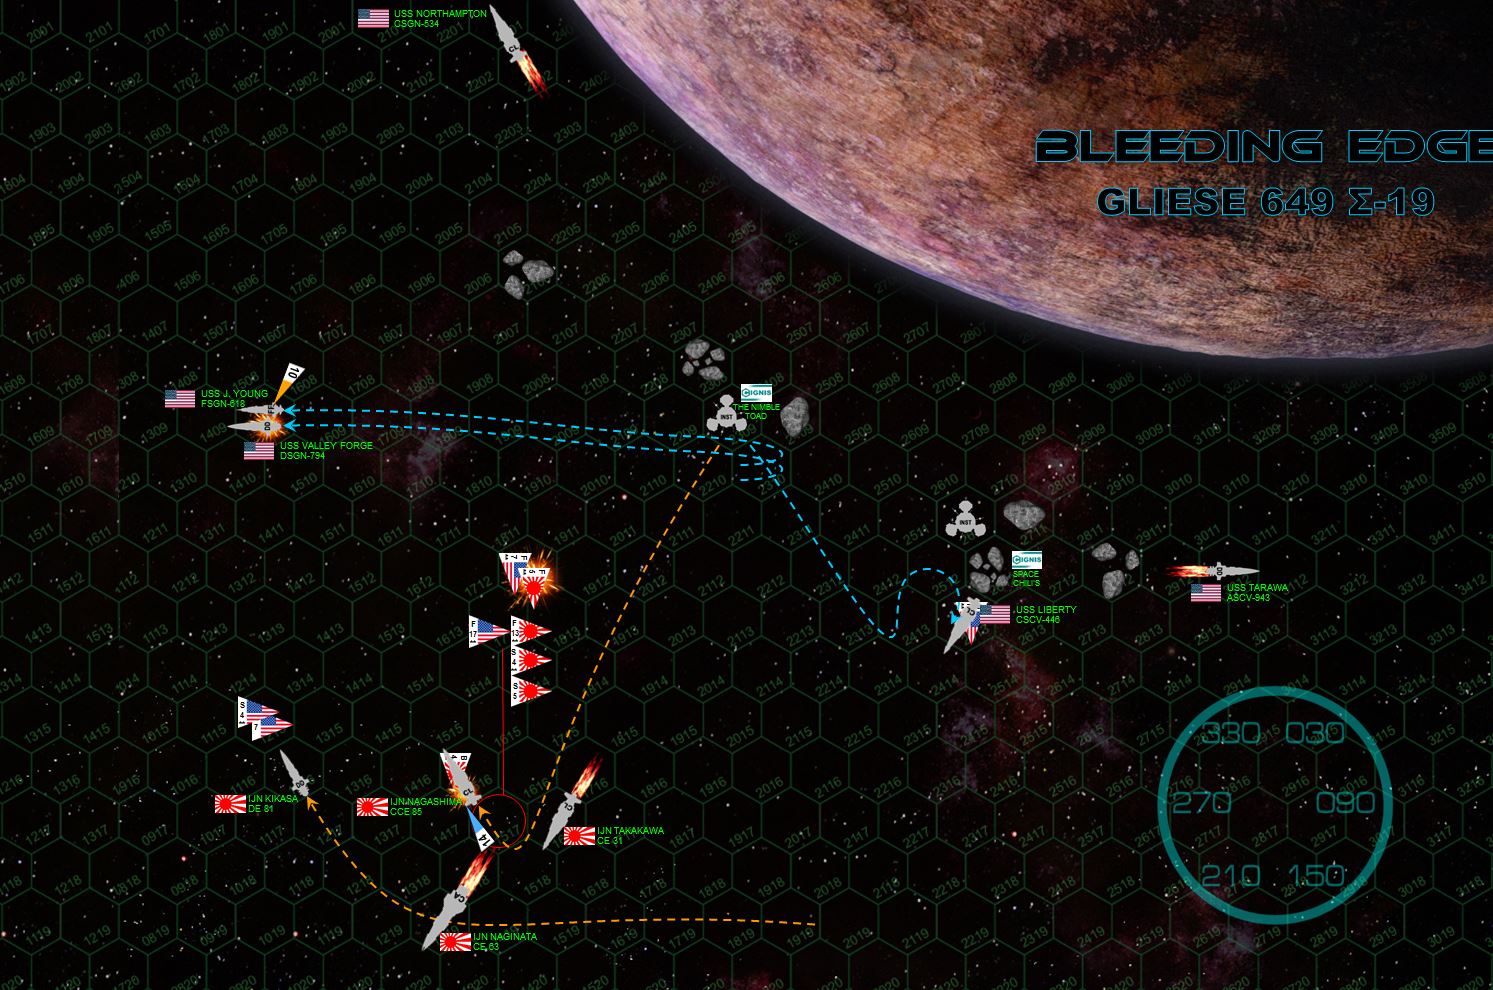 Wrecked ships careen out of the battle area, helplessly plunging at their last speed and trajectories, subject to the pull and slingshot of Bleeding Edge’s gravity. What few ships are left try to shake off the shock, recover and win the battle. The destroyer USS Valley Forge and frigate USS John Young come hard about and cross the bow of the badly-damaged destroyer IJN Kikasa, her fo’c’sle largely gutted in the opening American broadside. Remember that Kikasa has been forced to break off the engagement, she has to leave but still has power and long-ranged weapons, and so still poses a threat. Kikasa’s forward 60 eHz syglex emitter is blown out of the hull, and crew casualties continue to mount, but Kikasa’s forward guns slam into the Valley Forge in turn. Meanwhile, two Ki-45 torpedoes from IJN Nagashima slam into the damaged starboard quarter of the Valley Forge (from the opposite direction). The internal blast cavitates through the starboard engineering compartments, and the Valley Forge is left burning, adrift, and without power. American torpedoes and fighters swarm against the carrier Nagashima, but eighteen A9M “Kataka” (Fire Hawk) fighters of the Stormdragon aerospace group return to defend her. Two Mark 48s hit Nagashima’s heavily-shielded stern, combined with a strafing run by fourteen FS/A-44 “Star Corsair” fighters the Dead Rabbits while Marine “Tigershark” Corsairs turn to fight off the Japanese fighters defending the carrier. Five Fire Hawks and seven Corsairs go down in a furious dogfight (remember all three of these squadrons are double-elite), but the Nagashima does not falter, and neither does the Kikasa (despite a frantic attack by American scouts planes against her unshielded bow). Despite the dreadful damage they’ve taken in the opening minutes of the engagement, the remaining Japanese warships are not giving up Bleeding Edge without a fight.
  As the Valley Forge corkscrews helplessly off the table and Kikasa is force to reluctantly open the range, the frigate USS John Young comes hard about again and races to rejoin the Liberty, hoping the two remaining American ships can defend each other from swarms of Japanese Ki-45 “Toryu” (Dragon Slayer) torpedoes and vengeful fighters of the Storm Dragon strike group. It doesn’t work. Although one A9M is shot down by John Young’s squad 40mm mass drivers, the rest tear into her with a cannon strafe attack that collapses her starboard bow shields and sets off her forward magazine (remember her starboard bow was damaged earlier by Kikasa’s syglex emitters). The John Young is left burning and dead in space, but seven more Fire Hawks are shot down by Corsair fighters of the Dead Rabbits and Tigersharks. Spreads of Ki-45 and Mark 48 gravitic torpedoes both fail against the USS Liberty and IJN Nagashima, respectively (the last Japanese warhead BARELY misses against the Liberty’s double-enhanced shielded and electronic warfare suite), but it can’t be denied that the Japanese are still chipping away at the early American lead. With Valley Forge and John Young now down, the USS Liberty stands alone! Can the Japanese steal this one back?
 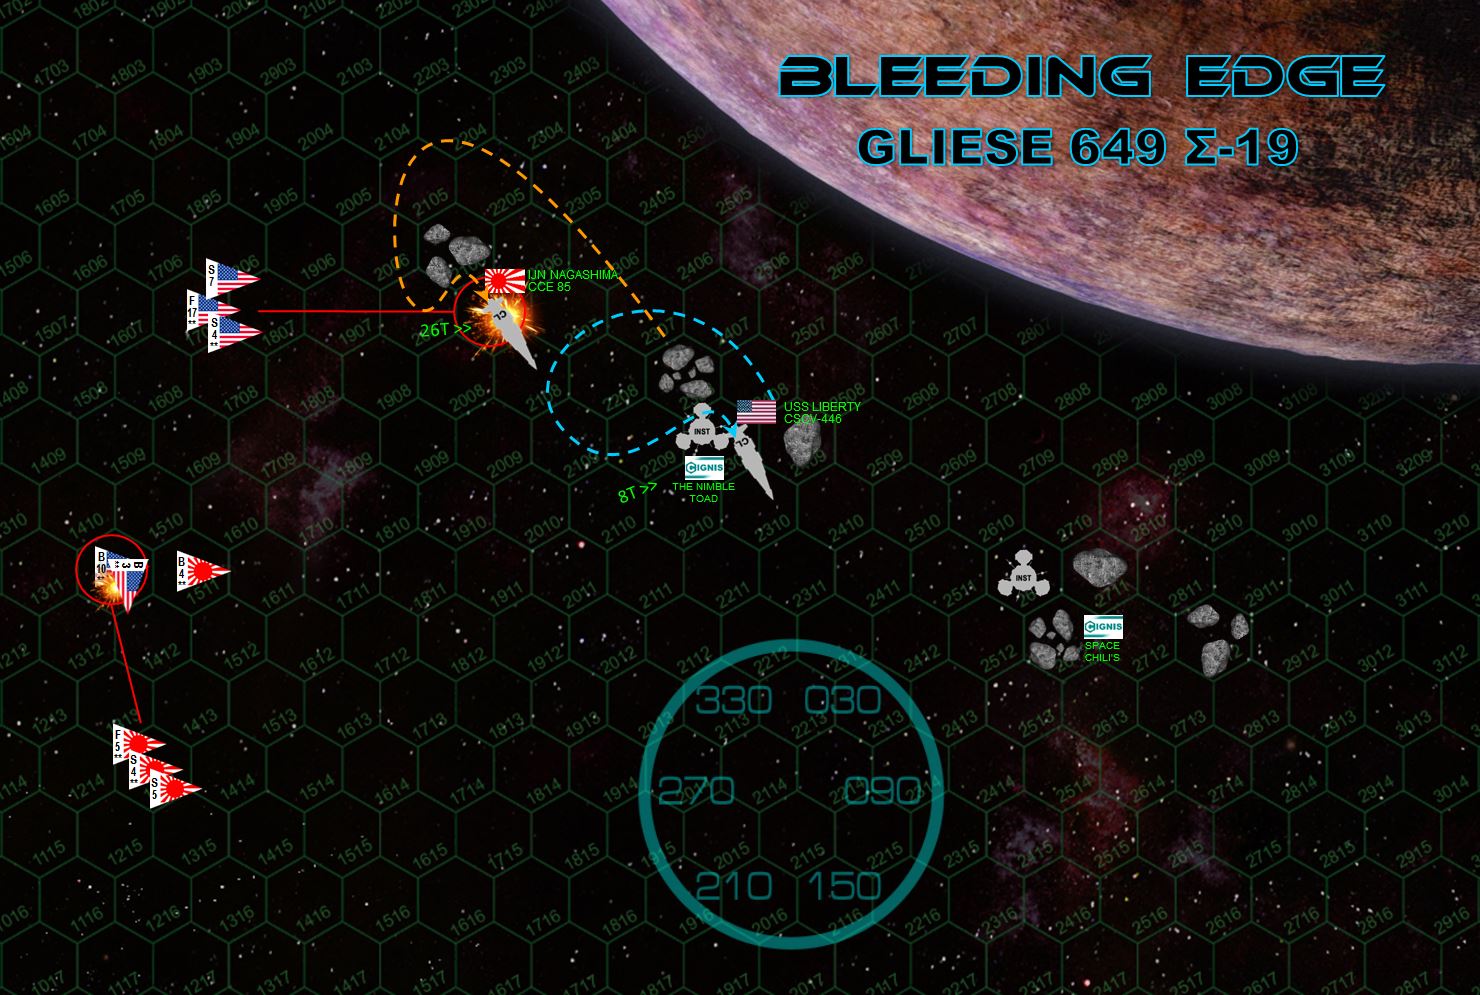 Her whole forward superstructure burning or open to space, the destroyer Kikasa must finally leave the battle, now leaving the carrier Nagashima to stand alone against the last American warship, the carrier USS Liberty. Nagashima and Liberty maneuver around the asteroids and Nimble Toad station, both carriers also re-launching bombers (B7N “Tenrai” Heavenly Thunders and FS/A-81 Avengers, respectively) that were previously recovered and rearmed for second torpedo strikes. Three of the American bombers go immediately to Japanese fighters and scouts, but the Nagashima is hit by a stunning FIFTEEN ASM-56 Harpoon torpedoes launched from these bombers. Nagashima’s starboard quarter is reduced to a twisted semi-molten mass, but she’s still operational . . . at least until seventeen Navy and Marine Corps Corsairs and eleven scouts begin a mass, point-blank gunnery attack on her previously damaged stern. It’s just enough, and the Nagashima is crippled. Meanwhile, the handful of eight Ki-86 “Ryusei” (Shooting Star) torpedoes launched by the Storm Dragon bombers were shot down by the Liberty’s mass drivers. The Battle of Bleeding Edge is over.
 As the wreck of the Nagashima careens out of the moon’s orbit, the surviving Japanese aerospace craft gather around her and begin sending distress calls. Captain Zachary Irons immediate stands down, recovering his bombers again preparing his fighters and scouts for orbital sweeps, charting drift trajectories of wrecked ships, ejected pilots, and escape boats. The Liberty also launches a full spread of URBs (universal rescue beacons), declaring the area a cease-fire zone and broadcasting telemetry on wrecks for rescue and recovery efforts. While such is common practice for most battles in Darkstar, here the efforts are even more earnest as again, these men and women all KNOW each other. Even the three invasion ships are allowed into the system to help tow wrecks, recover pilots, send damage control parties, and evacuate wounded. There some protest from the corporate vice-presidents at Ragnarssonland colony, but such squawks are cold ignored by Captain Morrison . . . while Captain Irons blatantly threatens them with a “visit from the Eight Ball Express.” When the corporations go over their head to Read-Admiral Virginia Saunders (CNO, US Navy Lyra/Hercules SCS), she offers a few platitudes while quietly promising her commanders that while US-Japanese hostilities will doubtlessly continue, she will do her level best not to put Task Force Liberty or Oriskany specifically against Task Force Naginata.
  The updated state of the Third Hercules War. As you can see, the Americans are about to leave this war for good, having won leases and concessions from both the UK in the Treaty of Zubrin and the Corporate Consortium after their defense of Ragnarssonland / Gliese 649. As for the Japanese and British, a powerful combined cruiser group of Task Forces Agamemnon and Kama have been prepared for a strike against the Russians or the New Roman Alliance (perhaps both). This will be another big one (live game with Rasmus and Damon), perhaps what the British and Japanese need to reverse recent fortunes and put 72 Hercules back in the crosshairs . . .
 Russian Assault on Nakir's Riddle (14 Hercules 5.22)
FROM: ADVISORY OFFICE, UN HERCULES SCS REGIONAL COLONIAL CENTER
023:40 SOL GMT, 24 MARCH 2522
BREAKAUTH: 181072.18J
CLEARANCE: NATIONAL COMMAND AUTHORITY
SUBJ: RUSSIAN ASSAULT ON NAKIR’S RIDDLE (14 Hercules 5.22)
By now the naval intelligence bureaus of the Holy Russian Empire have confirmed and re-confirmed reports of a building British effort against their regional capital at Krasnaya Nadhezda (Red Hope – 72 Hercules). After their latest victory at Belinda’s Promise (Mu Hercules C6-Beta), the Royal Navy is ready. However, the Admiralty wants to ensure an allied naval power shares in the glory (read: bloody cost) of assaulting the Russian stronghold. In a vein less mercenary, the British Foreign Office is also convinced that the United Nations and Jerusalem Council would never let the British Empire alone control such a vast swath of the Hercules Rim in perpetuity. At least on the surface, the British would have to share the spoils of such a victory lest they be seen as blatant neo-Victorian imperialists. And if they’ll have to share the spoils, all the more reason to share the cost.
This puts the Admiralty in a tough spot, as now they’ll have to wait until one of their allies in the region, either the Arab League or the Japanese, are similarly poised for a final strike on Krasnaya Nadhezda. The Japanese are winning, sure enough, having handily driven off a recent American raid at Katajima (Zeta Hercules A3). But they’re already deep into launching a counter-assault into Ragnarssonland, the Corporate Consortium system from which the Americans launched their Katajima raid. As for the Arab League . . .
. . . they’ve just been assaulted by the Holy Russian Empire at their Khaizan’s Haven caliphate (14 Hercules).
Indeed, Russian intelligence knows the British are waiting for either the Japanese or Arab League to join with them in a converging assault, and head-on attacks against the Royal Navy have been less than successful as of late. Therefore, the Russian Navy has resolved to strike British allies. Since the Americans are tying up the Japanese, the choice is predictably simple: a full-on smash and invasion directly into the Khaizan Caliphate at 14 Hercules.
The strike lands at the frozen outer ice giant of Nakir’s Riddle (named for the legendary Islamic angel who queries souls of the dead to learn their worth). Specifically, it lands at Nakir’s Riddle 5.22, twenty-second moon on this ice giant. Large enough to mask the approach of a Russian invasion fleet in its eclipse shadow, and close enough to the planet to threaten caliphate installations and infrastructure if the Russian naval infantry are able to establish a presence here.
The Russian fleet is blunt and deadly in its purpose. The flagship is the CPK (Holy Russian Ship) Tatiana Mikhailovnya, eldest daughter of the first Romanov czar. The Zhukov-class strike carrier Novorrosysk provides aerospace support (flying the elite all-female “Night Witches” naval strike squadron), the battlegroup screened by three deadly K-56 class torpedo corvettes.
The emir of the Khaizan caliphate has no choice but to send the Mutamid battlegroup to meet the threat, under the flag of Captain Rashid al-Maghrebi. At under 98,000 tons, his flagship Mutamid is outweighed by Tatiana Mikhailovnya almost two-to one. But both the Mutamid and the light carrier Abu Bashir can launch almost double the Night Witches’ number in aerospace strike craft, the Russians have no answer to the destroyers Kashan and Jeddah, and the Arab League fleet is much, much more maneuverable than their Russian opposites.
It’s another jaguar vs. grizzly matchup, speed and tactical agility stacked against weight, armor, and sheer firepower. The question of who will win is perhaps the latest riddle the angel Nakir will ask in this cold, lonely corner of the Hercules Rim.
Holy Russian Empire – @oriskany
Arab League – @muakhah
ASSAULT VICTORY CONDITIONS (244 points)
 The general situation of the Third Hercules War in March, 2522. In order to deny any British opportunity for a joint, multinational strike against the Russians at 72 Hercules, the Russians are striving to keep British allies off-balance. What better way than to seize and outer planet of the 14 Hercules system, and force the Khaizan Caliphate to mount a counter invasion to take it back?
  As we often see, the Russians are making a fast approach run out from behind the night terminator, hoping to close distance with the League as quickly as possible. At shorter engagement ranges, their heavy plasma and rail gun batteries will hit harder, and their slower P-500 torpedoes will have an easier time reaching their targets. Captain al-Maghrebi, for his part, pivots to present a long-range broadside, hoping his accurate long-range gunfire can pick off the tiny K-56 class corvettes. Learning the lessons of Pamzhdoye (72 Hercules Phi-16), al-Maghrebi means to pick off those corvettes in order to whittle down the huge torpedo waves they’ll send at him. The plan starts to work, the K-275 has her bow almost completely blown off just as she slings out her torpedo spread, kicking down her forward shields and blowing both torpedo arrays clean out of the hull.
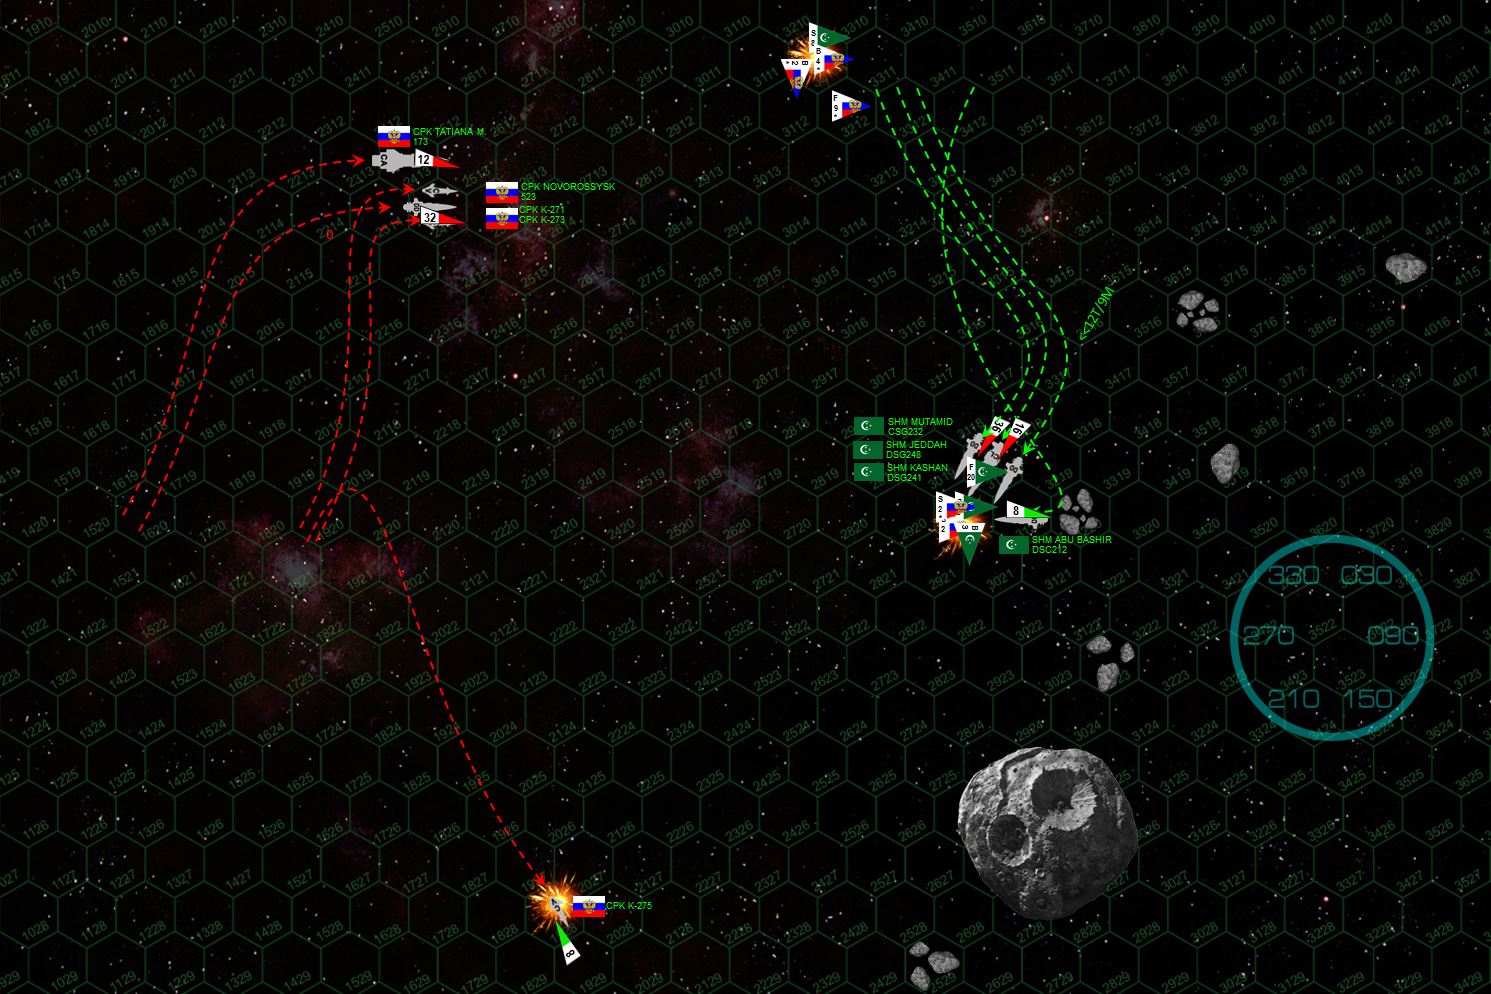 The K-275 veers away, hoping to hide her savaged bow amidst the asteroid debris orbiting alongside the ice giant moon. Captain al-Maghrebi sidesteps away from the Russians, keeping them in his broadside and hedging toward the asteroid debris while keeping a wary eye out for possible collisions. The Russians close formation and turn to starboard, setting up for a hard rake across Arab sterns in the next minute or so. The Russians also send in their full aerospace / torpedo strike, no less than 52 P-500 torpedoes and a hail of aerospace missiles and torpedoes from the MiG-103 “Tunguska” fighters and Tu-97 “Zvesburya” (Star Storm) bombers of the Night Witches. Yet here is where al-Maghrebi makes an unconventional move with his own larger aerospace wing. He forgoes an immediate strike on the Russians, holding back and using his fighters defensively to shoot down huge numbers of the Russian warheads. Yet the Mutamid is still crippled, instantly knocking out the League flagship. Also, Russian scouts are able to get at the League bombers, the Night Witches shooting down three of them, thus diminishing the delayed League torpedo strike. Yet the Russian “Sunday Punch” could have taken out the Mutamid and at least one of their destroyers as well, so al-Maghrebi may have saved his overall battlegroup even as he lost his task force. League torpedoes, meanwhile finish off the K-275 and maul the K-271, while they have absorbed the main firepower of the initial Russian strike.
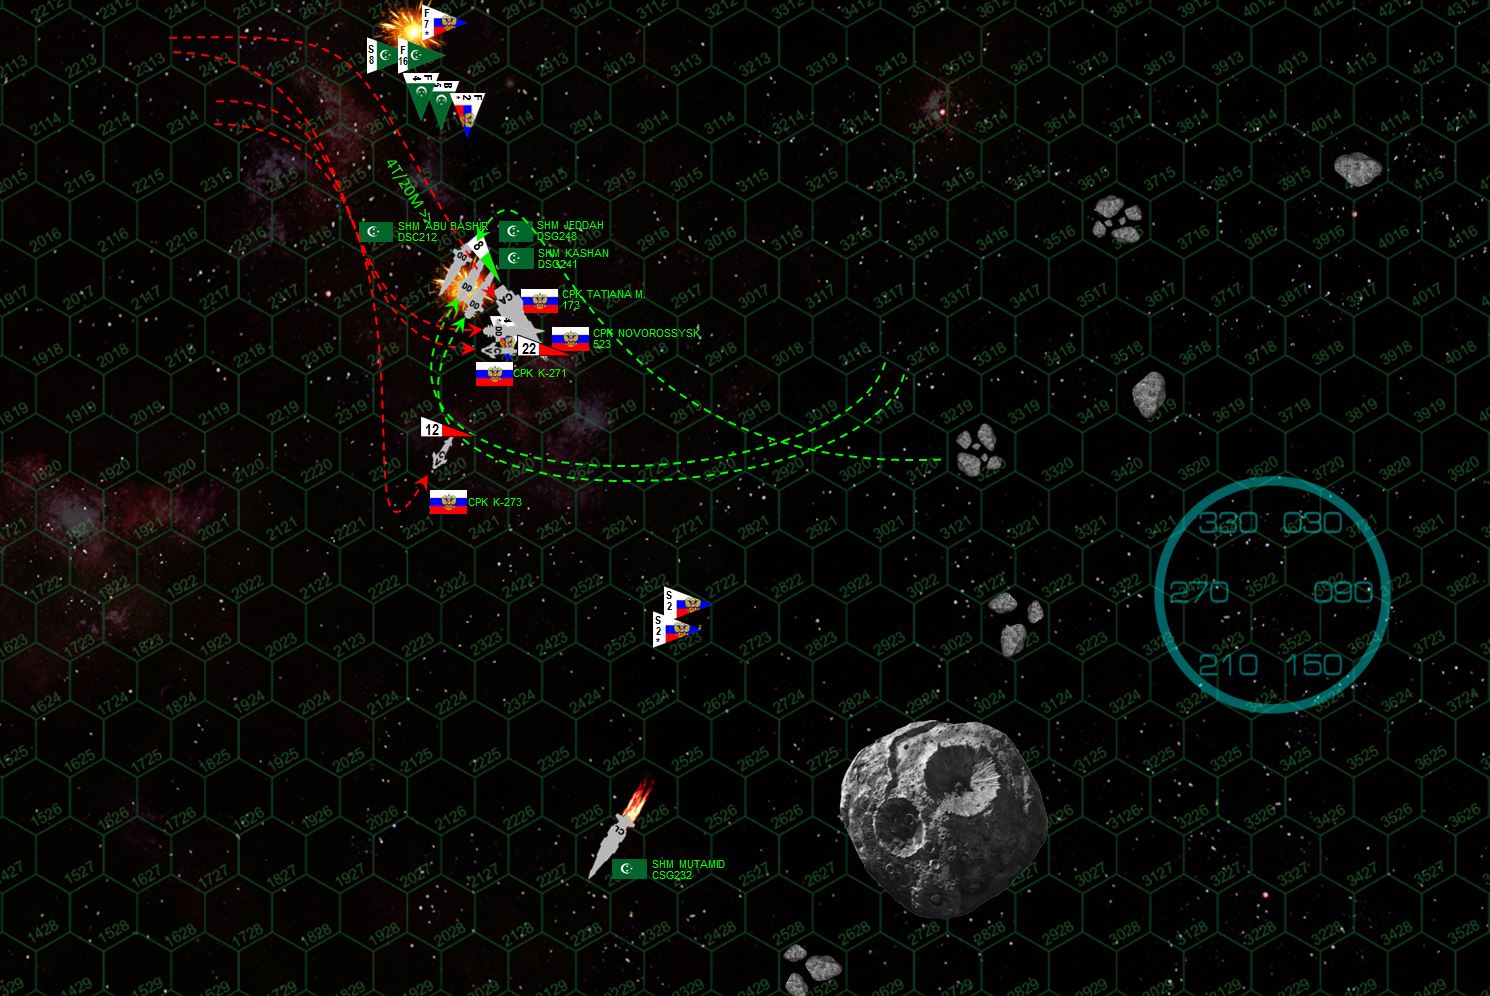 Confident in that the aerospace strike has done its job, crippling the Mutamid and thus leaving the League battlegroup with just two destroyers, the Tatiana Mikhailovnya thunders in for a point-blank dust-up with Arab survivors. But this just allows the two League destroyers, Kashan and Jeddah, to loop around behind the big Russian cruiser for a double broadside across her tail. Outmaneuvered, the Russian behemoth flails behind her, her aft guns managing to knock out the Jeddah even as both League destroyers maul Tatiana’s stern. In fact, the Russian cruiser gets off very light, only 25% of the Arab guns hit despite the point-blank range. Meanwhile, the fighters and surviving bombers line up for a strike on Tatiana’s stern but again, the big Russian lady survives. Her armor, her shielding, and her sheer size weather the storm (although she’s lost one sensor suite and her engines and reactors are badly damaged). More ominous news for the League comes when the Night Witch’s MiGs start carving down Arab “Mylekinir” (Fire Angel) fighters, and her bombers all land aboard the Novorrossysk to be rearmed for a second strike.
 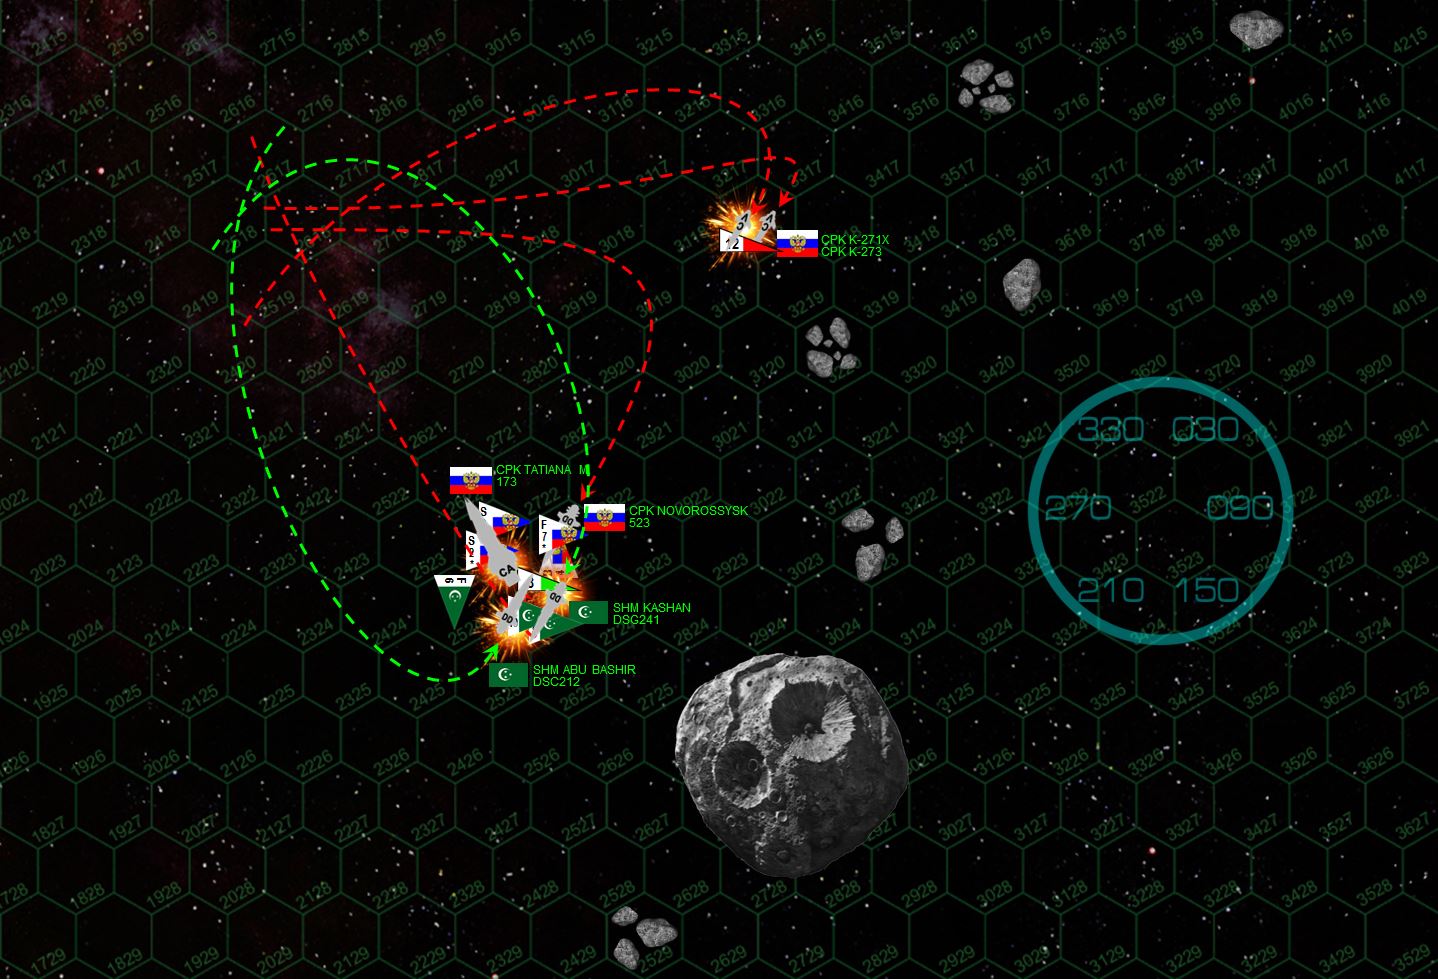 Desperation beings to spread through the officers and crew of both battlegroups, either can simply leave because this is an ASSAULT, the Russians mean to put TROOPS on Nakir’s Riddle and the League HAS to stop them. The Tatiana Mikhailovnya heads right for an asteroid and then comes hard about, hoping to screen her stern from further League attack. It doesn’t work, even as the Jeddah careens out of the battle area, burning and crippled, her sistership Kashan pivots around behind the Russian cruiser for a second try. League torpedoes slam into the K-271 so hard she actually explodes, killing about half her crew including her skipper, Lt. Commander Oleg K. Konstinokov. The last Russian corvette, K-273, is badly mauled astern by a League torpedo but stays in the fight long enough to loose her very last torpedoes (yes, this battle has lasted long enough where both sides are running out of ammo). The Kashan pays a brutal price for her point-blank attack across Tatiana’s stern, in fact she’s crippled by more Russian torpedoes, fighter strafing attacks, and hammering guns of the Tatiana’s aft batteries. But it’s worth it, Tatiana is crippled and set adrift, in fact she’s nearly lost after the battle (it’s another Russian ship that has to tow her clear of the moon’s gravity well).
  Exhausted and out of torpedoes, the two light carriers (they’re practically all either side has left) duck for cover as the last torpedoes launched last round race toward their targets. The Novorossysk is hit but weathers it well, the Abu Bashir isn’t so lucky. She survives and maintains power, but is forced to raise steam and break off the fight (crew casualties are very bad after a forward magazine explosion and a Night Witch fighter strafing attack ALMOST knocks out the damaged bridge).
 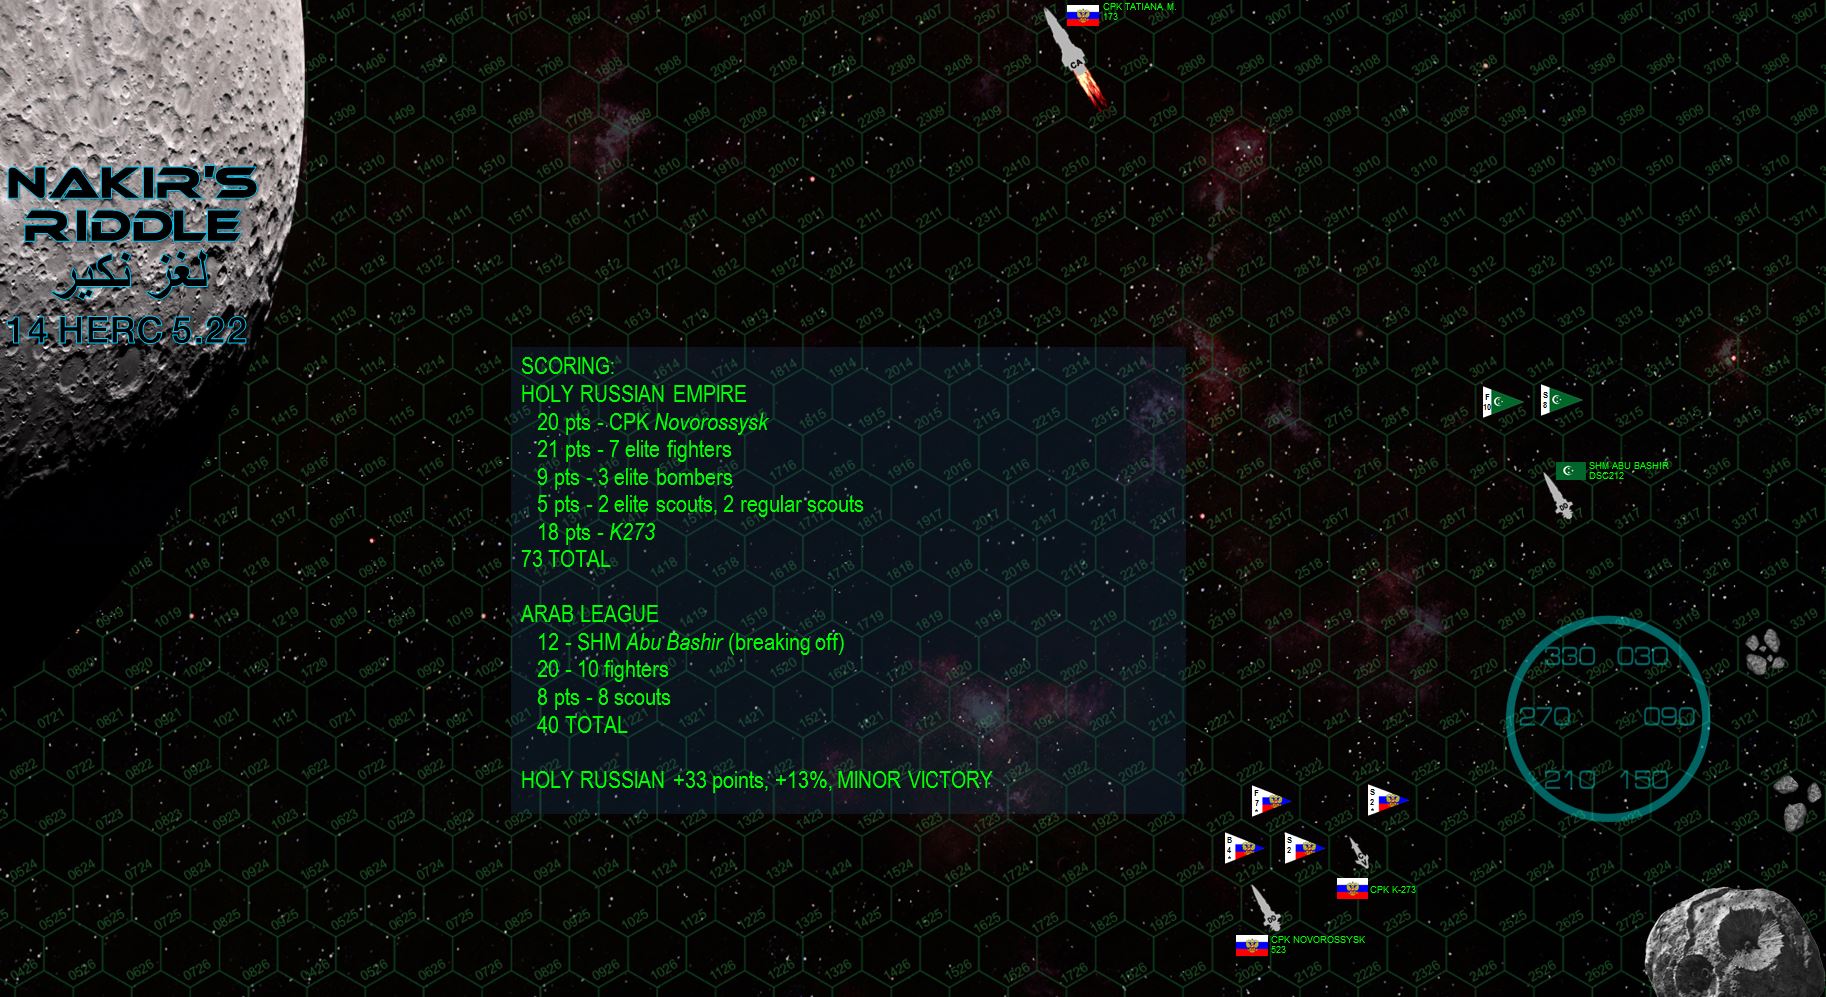 At last, the furious Battle of Nakir’s Riddle is over. As the Abu Bashir powers out of the area and the Russians begin rescue and recovery operations, its clear that the Russians hold a narrow, bloody, hard-fought yet unmistakable edge in remaining operational naval assets. The Nakir’s Riddle orbital zone is theirs. Another Zhukov-class assault destroyer, the trop ship CPK Katukov, comes in with four grav tanks, two APCs, and 96 troops, enough to take the orbital installation over Nakir’s Riddle and the small surface installation below. The moon has fallen, the Holy Russian Empire has a foothold in the Khaizan caliphate.
  Needless to say, the Russian plan to disrupt British-League cooperation against 72 Hercules seems to be working for the moment. To redress this setback, the League will have to launch another assault back into Nakir’s Riddle and WIN that battle, by which time the Americans may win against the Japanese in Ragnarssonland and the Russians may finally receive the long-awaited heavy reinforcements in the form of the Peter the Great class battleship CPK Kuznetsov. The Russians are still on the back foot, and their still playing for time, but for the moment it seems to be working. Stay tuned for further updates as the Third Hercules War continues to rage!
 American-Japanese skirmish at Katajima (Zeta Hercules)
FROM: ADVISORY OFFICE, UNITED NATIONS REGIONAL COLONIAL CENTER
013:05 SOL GMT, 15 MARCH 2522
BREAKAUTH: 181072.18J
CLEARANCE: NATIONAL COMMAND AUTHORITY
SUBJ: AMERICAN RAID ON KATAJIMA (Kyokko Bijin – Zeta Hercules A3)
The Americans may have signed a separate peace with the British in the Treaty of Zubrin, but the United States Navy has never completely sheathed the sword in the Hercules Rim. Open hostilities persist with the Arab League and especially the Japanese Empire, a fact brought to sharp relief when a small American raiding force emerges from an accelerated Darkstar Wave in the inner orbital zones of the Kyokko Bijjin colonies (Zeta Hercules), intent of destroying a small array of orbital refineries and surveillance outposts over the terrestrial world of Katajima (Zerta Hercules A3).
Latest American intelligence had reported the orbital zones of this particular planet to be empty. Accordingly, Captains Matthew Spencer and Zachary Irons (commander, Task Force Oriskany and Liberty respectively) thought this strike would be an ideal opportunity for some of their junior commanders to accrue some combat command experience. Accordingly, all the newer, less experienced warships and commanders of these two task forces were sent together to carry out what was supposed to be a routine “smash-and-dash” raid.
Of course, this intelligence turned out to be woefully out of date. Perhaps warned by the mysterious “Red Kitsune,” the enigmatic Japanese spy (or spy network) that allowed them to anticipate so many battles in the recent Duchess Annabel’s War, the Kyokko Bijin Prefecture command has a small force ready and waiting for the Americans in low orbit over Katajima.
This force turns out to be only two ships, the old Hokkaido class light cruiser IJN Tatakawa and the Kagoshima class aerospace strike carrier Nagashima, both from the elite and decorated Naginata cruiser strike squadron under the flag of Commodore Hiromi Ozawa. Now elite or not, two ships cannot protect or even watch the orbital approaches of an entire Earth-analog planet, so the Takakawa stays near the refineries while the Nagashima sets high-speed orbital course, her aerospace fighters, bombers, and scouts ranging all across Katajima hoping at least to provide some warning of an American approach.
The Japanese plan works … somewhat. These are destroyers, frigates, and corvettes of the Oriskany and Liberty task forces, remember, their Darkstar FTL drives extensively upgraded. As a result, they’re able to set a high-speed, high-accuracy jump directly into the heart of the Kyokko Bijin binary star system, rocketing straight into the low orbital zones of Katajima. But another way, despite the Japanese being forewarned, the sheer speed of American strike still gives them some degree of tactical surprise nonetheless.
The end result, the American strike meets only the Takakawa, supported only by the handful of Nagashima fighters and bombers that happen to be close enough to reach the Takakawa as the Americans make their final approach. It’s a small, high-speed skirmish, fought between “second-tier” support elements of some of the most elite and renowned naval formations operating in Known Space today.
[In other words, I am running a small game to “reawaken” the warships and commanders in my Japanese task force, and to give my American “noobs” a little experience and help them catch up to the superstars like USS Oriskany, Liberty, Tarawa, Valley Forge, and Northampton.]
RAID VICTORY CONDITIONS (127 points)
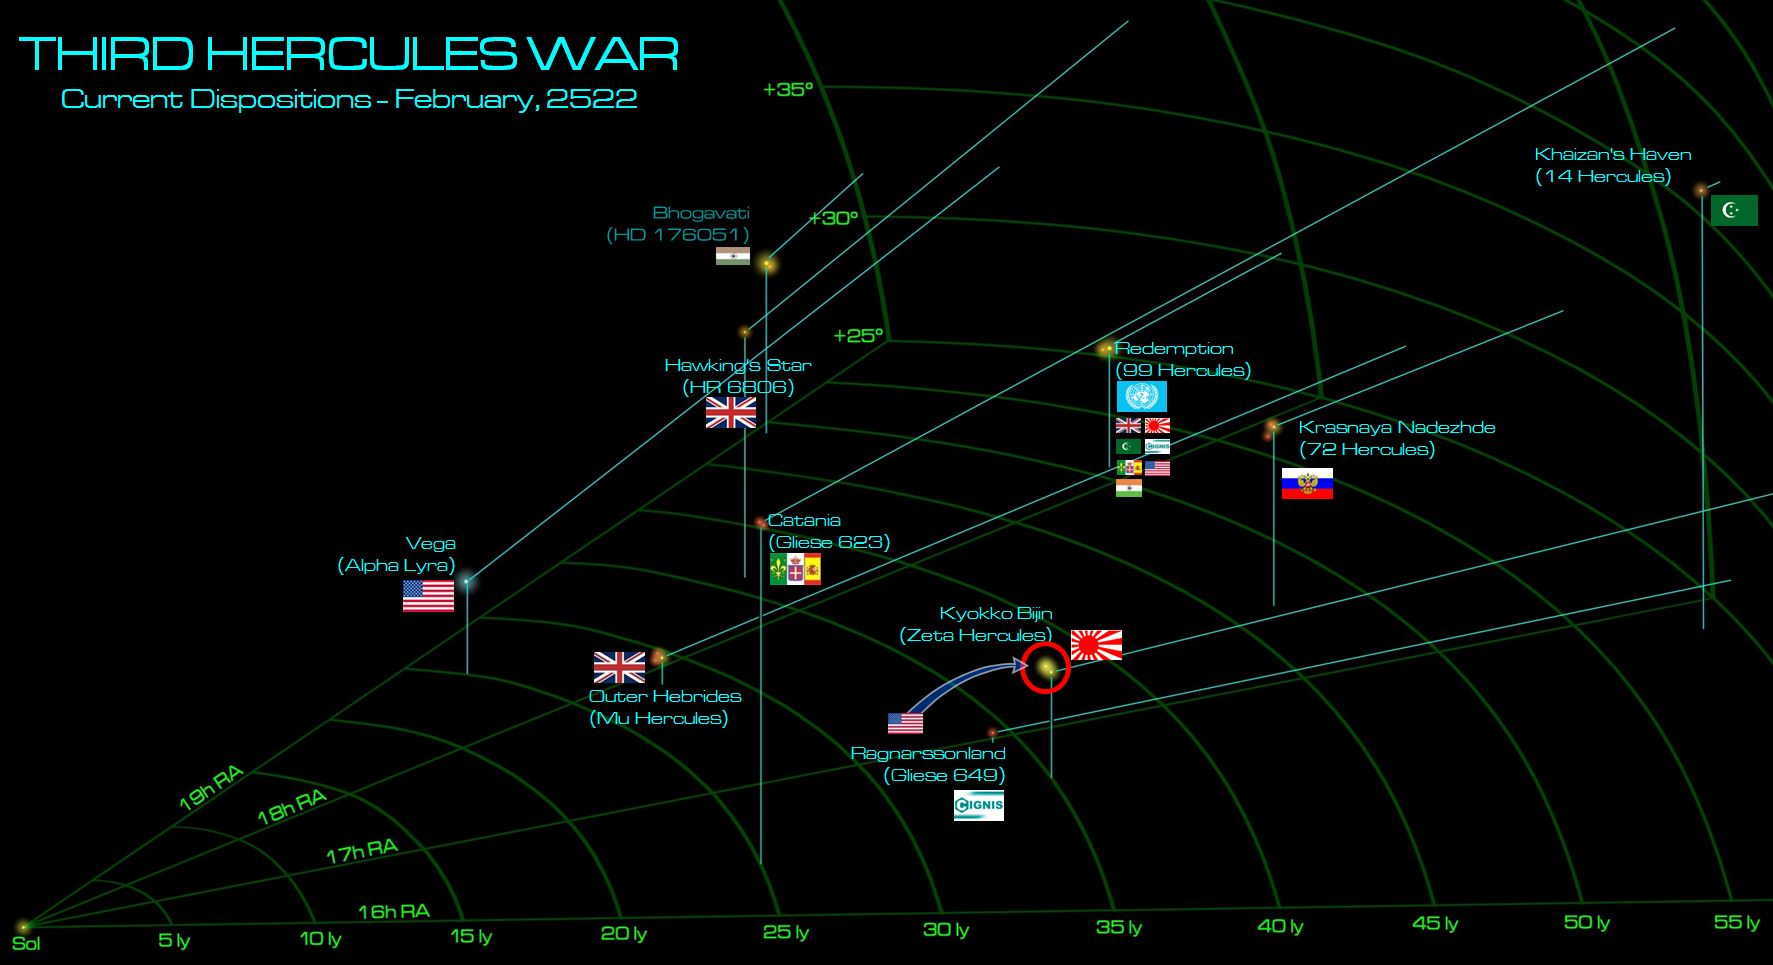 The general situation of the Third Hercules War in March, 2522. The Americans, perhaps eager to assure their former “Coalition of Eagles” allies that they are in fact not lap dogs of the British (despite the recent US Navy battle fought in service of the British at Mu Hercules, part of the mutual military assistance clauses in the Treaty of Zubrin), are eager to strike against the Renkei Alliance (so long as they don’t hit the British, again . . . per the Treaty of Zubrin). Accordingly, the Americans have staged this small task force with their allies in the Corporate Consortium holdings of Ragnarssonland (Gliese 629, formerly of Imperial Prussia), poised to strike amidst the third planet of the primary star of the Zeta Hercules binary system, Katajima (Zeta Hercules A3).
 The Americans cut low over Katajima’s upper atmosphere, setting a high-speed approach toward the one Japanese warship in the area, the aged (but elite and heavy-upgraded) light cruiser Takakawa (Captain Koji Ryoko). The Americans are led by Commander Rachel Collingsworth aboard the Valcour-class destroyer USS Cowpens, with the Shepard class frigates John Young and Ronald Evans. In the vanguard is the deadly little Mako-class torpedo corvette USS Daggerfish, now under the command of Lt. Commander Lewis Knight (Daggerfish’s former commander Priscilla Wolfe has been promoted to take command of the Valcour-class destroyer USS Hancock). The Americans have to peel up fro the planet a little in order to get torpedo locks on the Takakawa, which has cut even closer to the Katajima atmosphere and presented a broadside against the approaching foe. While the Americans launch a terrifying spread of deadly-accurate Mark 48 gravitic torpedoes, the Takakawa kicks off with a withering broadside that even at this range (3600 kilometers) hits the Daggerfish perfectly on her bow, caving in her foc’s’le, destroying both her torpedo arrays, exploding her magazines, and hitting the bridge. Just that fast, in the very first salvo of the skirmish, the Americans have lost their first warship.
 As the Daggerfish spirals burning across the Katajima sky, the rest “Battlegroup Cowpens” presses the attack. For a moment there is hope, the remaining American torpedoes streak toward the Takakawa, which only knocks a few of them down with her mass drivers. Japanese Ki-202 "Hien" Flying Swallow scouts fail to knock down any, and ten warheads hit the Takawaka’s starboard quarter shields. But these shields are upgraded, and only three Mark 48s scatter themselves across Takakawa’s hull. The USS Ronald Evans bravely sets herself up fro a broadside on the Takakawa (a ship four times her size), and manages to hit Takakawa’s sensors and maneuvering thrusters, but is smashed through the bridge by the Takakawa’s broadside of 6-gigawatt rail guns and powerful EPCs. The Americans have now lost a SECOND warship, but at the least the aerospace / ordinance strike of A9M "Kataka" (Fire Hawk) fighters, B7N "Tenrai" (Heavenly Thunder) bombers, and Ki-45 “Kiryu” (Dragon Slayer) torpedoes has been broken up before it could seriously damage the frigate John Young, while American “Hawkeye” manage to down one Japanese bomber.
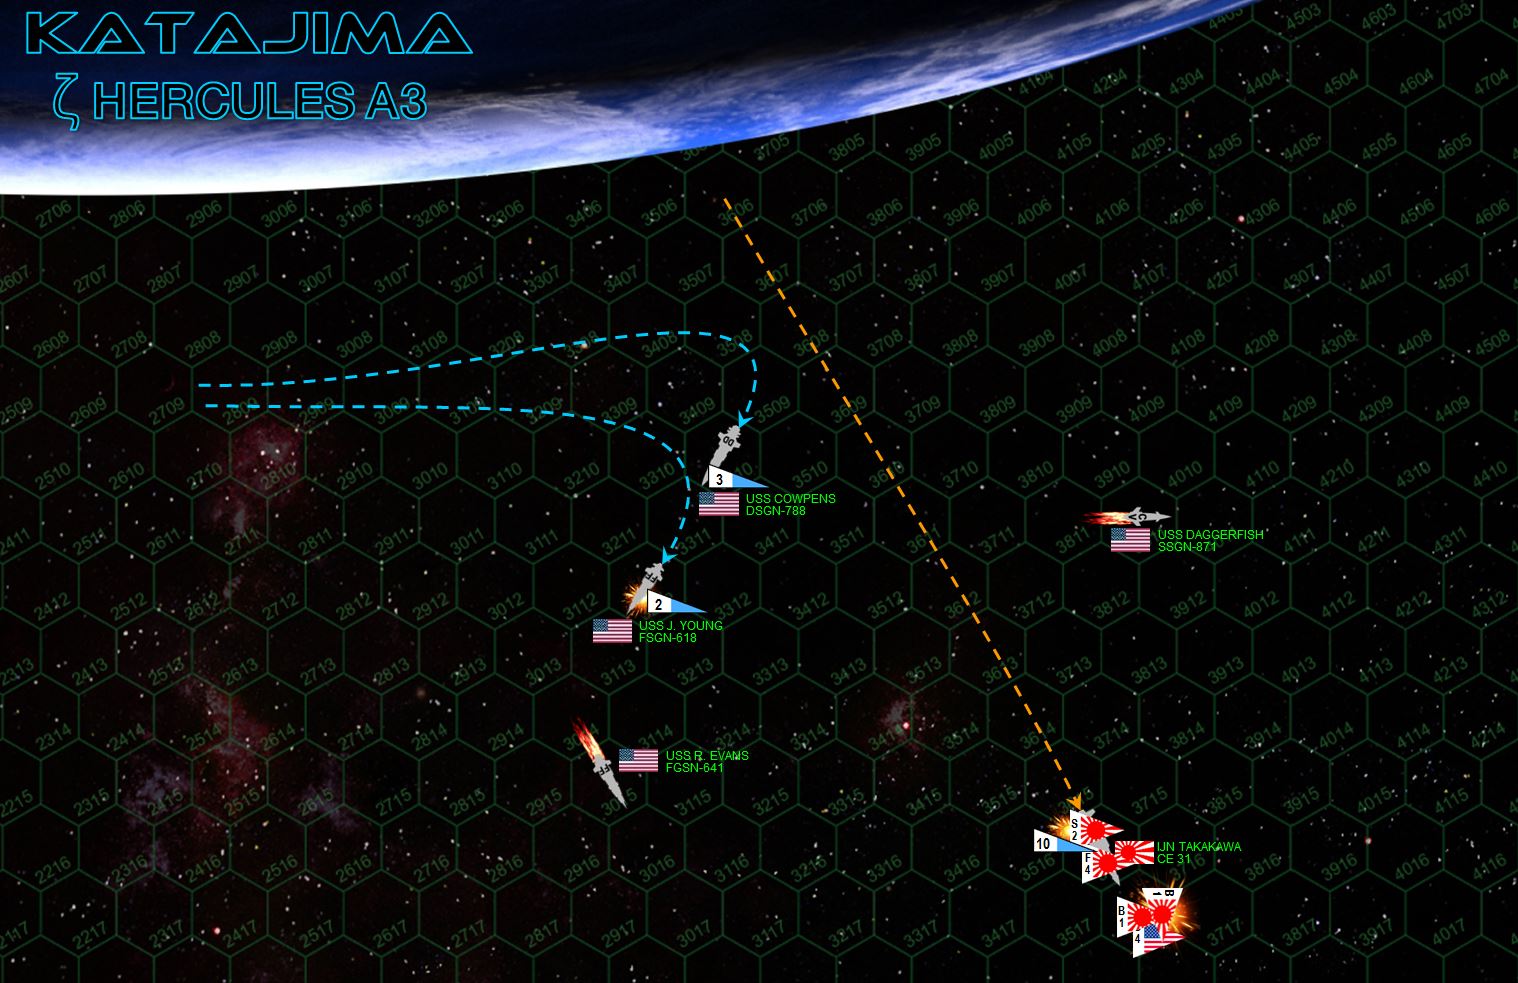 The Takakawa has been badly damaged along her starboard quarter, and now raises maximum steam to leave the battle area. If she can break off the immediate engagement yet remain operational in the Katajima area, the Americans (who have already lost two ships and will be spending the next hours or even days in rescue and recovery operations). The Americans fail crucial initiative checks, and the Takakawa’s move catches them largely flat-footed. There is a despairing attempt to hit the Takakawa with a second reduced spread of torpedoes, but Captain Ryoko has wisely recalled his fighters to help shoot down the incoming American warheads. Only one additional warhead gets through, along with a single EPC hit from the John Young. It hits Takakawa’s starboard reactors, but it won’t be enough to leave her crippled.
  The Takakawa makes it off the table, seriously damaged by definitely still operational. The combined threat of Takakawa’s return (once she patches some plate over her starboard quarter), plus the rapid approach of the Nagashima and the rest of the elite “Donryu Kotukai” (Storm Dragon Naval Air Group). The Americans have had a corvette and frigate crippled, and have shot down just two bombers to show for it. It’s a humbling loss to be sure. Obviously, this was a solitaire game, so neither player was “better” than the other, it came to raw luck. The Takakawa hammered the Daggerfish right out of the battle with the opening long-range salvo, which took her eight +2 torpedoes out of the American spread, which meant that only ten warheads hit the Takakawa on Turn 2 instead of 18 (against a shielding of 6, this would have been six torpedoes instead of three). Its damned possible that Takakawa would have been crippled right there, even if Daggerfish had been crippled but sixty seconds later. Then the Americans failed a crucial initiative check, the Takakawa rolled a “6” on her second mass driver check ... It simply wasn’t the Americans’ day.
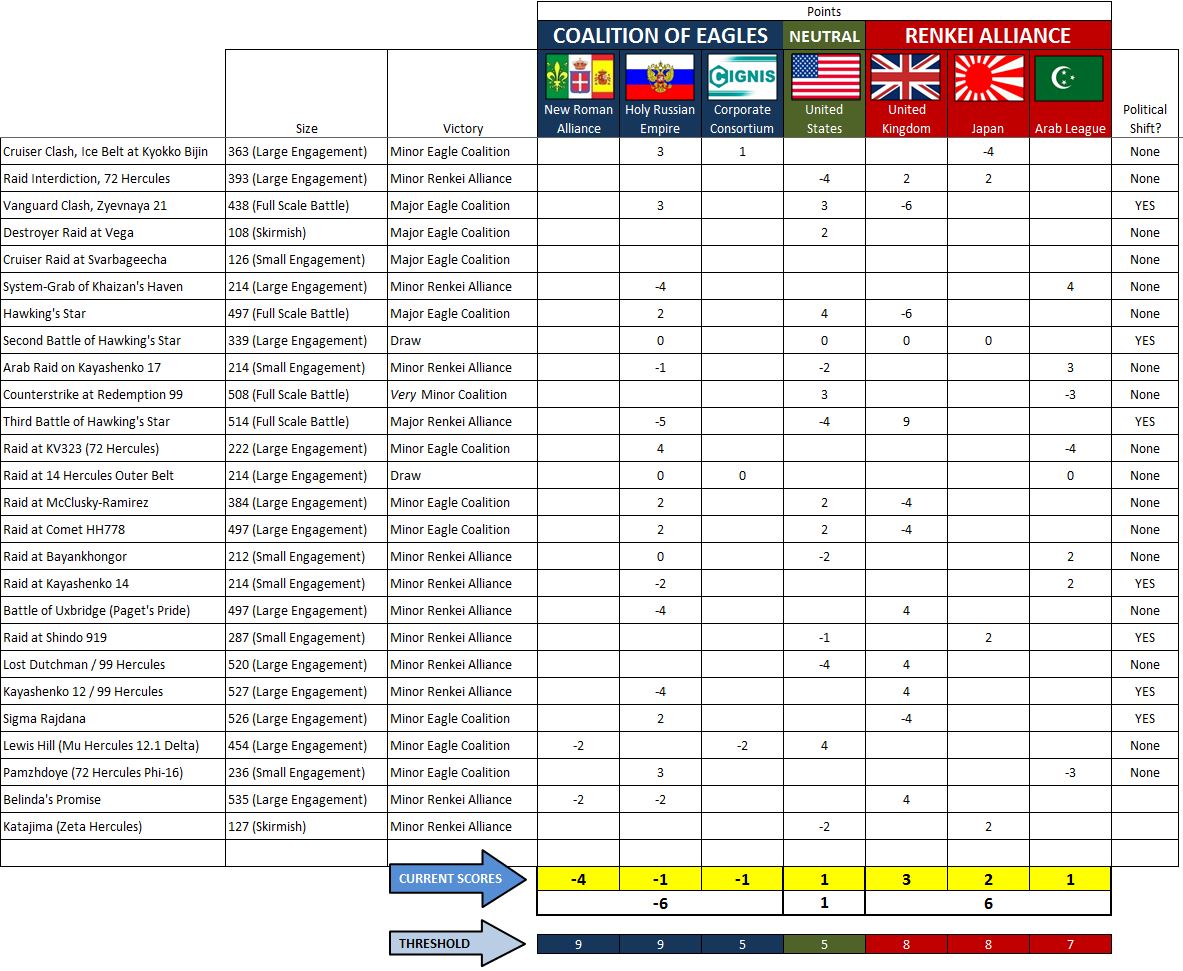 Here is the new campaign scoring sheet. Just keeping the Third Hercules War timeline moving forward through an “off” weekend. We might see some Arab League vs. Russian action later this week, depending on what I can work out with @muakhah.
Franco-Russian Raid on Belinda's Promise (Mu Hercules 3.6Beta)
FROM: ADVISORY OFFICE, UNITED NATIONS REGIONAL COLONIAL CENTER
04:10 SOL GMT, 28 FEBRUARY 2522
BREAKAUTH: 181072.18J
CLEARANCE: NATIONAL COMMAND AUTHORITY
SUBJ: FRANCO-RUSSIAN RAID ON BELINDA’S PROMISE (Outer Hebrides – Mu Hercules C.6Beta)
Another battle has broken out in the Hercules Rim warzone, the twenty-fifth recorded engagement in the ongoing Third Hercules War. Eager to follow up on their recent successes against the British at the Indian Boghavati colonies (HD176051 system) and against the Arab League at Krasnaya Nadhezda (“Red Hope”, 72 Hercules system), the Holy Russian Empire launched another strike against Royal Navy holdings in the Outer Hebrides colonies (Mu Hercules).
In an effort to maximize their chances for success, this Russian force (built around the Admiral Lazarev task force) was reinforced by warships of the Leclerc battlegroup of their new allies, the New Roman Alliance. Based out of the Catania colonies (Gliese 623 system), the light cruiser Leclerc and her escort, the sleek Milan-II class destroyer Corsica, rendezvoused with the Russian strike force in the interstellar space just outside the helioshock boundary of the Mu Hercules trinary star system. There they set a short, “stealth-wave” approach trajectory for Belinda’s Promise, second moon of the sixth planet of Mu Hercules-C, smallest red dwarf of the three-star system.
The Outer Hebrides colonies, however, have been a major battleground of the Third Hercules War for some time, however, and by now the British administrators of the system are well-prepared for unwelcome visitors. Although the Americans of the Liberty battlegroup defended the outer orbital bands of these stars last time the New Romans came calling, this time the British themselves are on hand to meet the threat. Recently repaired, refitted, and recovered from their sharp defeat at Bhogavati, the Agamemnon Task Force under the flag of Lord Commodore Edward Cavendish has been alerted to the enemy approach by several of the tens of thousands of automated “darkwave” gravimetric detection drones deployed along likely approach routes to vulnerable “blind side” sectors of this three-star system.
The American Liberty Task Force, still under repair from the Battle of Lewis Hill (29 January), is no match for this invading Franco-Russian force. It’s therefore up to Cavendish and his Agamemnon task force. Intercepting this strike force is no mean feat, given the FTL and sublight speed of the French and Russian ships. The light cruiser Leclerc is a Foch-Hispaniola class, renowned for their speed, while the destroyer Corsica is even faster. The larger, heavier, much more powerful Admiral Lazarev has also been upgraded, able to match sustained speed even with the Leclerc.
Fortunately for the British, however, the HMS Agamemnon is the fastest heavy cruiser in known space, at least in sublight. Able to keep pace with most destroyers, she raises best steam for Belinda’s Promise and reach high orbit above the day side of the small terrestrial planet just as the Russians and French emerge from behind the planet’s dusk terminator. With just minutes to spare, the battle is joined.
What is less clear, at least initially, are Franco-Russian intentions. This is a light, speedy force . . . able to inflict tremendous damage not really packing the “hit-and-stay” firepower of an invasion spearhead. Furthermore, no planetary assault ships loaded with Russian zero-g naval infantry are detected behind the strike force. Rather, this seems a simple “run and gun” raid. Only after the battle will British Naval Intelligence confirm that Russian spies have discovered Lord Commodore Cavendish’s plans for a converging British-Arab strike on Russian colonies in 72 Hercules. Accordingly, the Russians now seem determined to keep the British off-balance, on the defensive, and unable to coordinate this potential war-ending invasion of their “Krasnaya Nadhezda” colonies.
GREAT BRITAIN: @damon
RUSSIANS / FRENCH: @oriskany
RAID VICTORY CONDITIONS (535 points)
 The general situation of the Third Hercules War at the end of 2522. Having now uncovered Lord Commodore Cavendish’s plans for a coordinated invasion of the Russian “capital” at 72 Hercules (cooperating with the Arab League from the “Khaizan’s Haven” caliphate), the Russians seem determined to keep the British bottled up at Mu Hercules with fast, sharp strikes like this one, leveraging their alliance with the New Romans at Gliese 623 whenever possible.
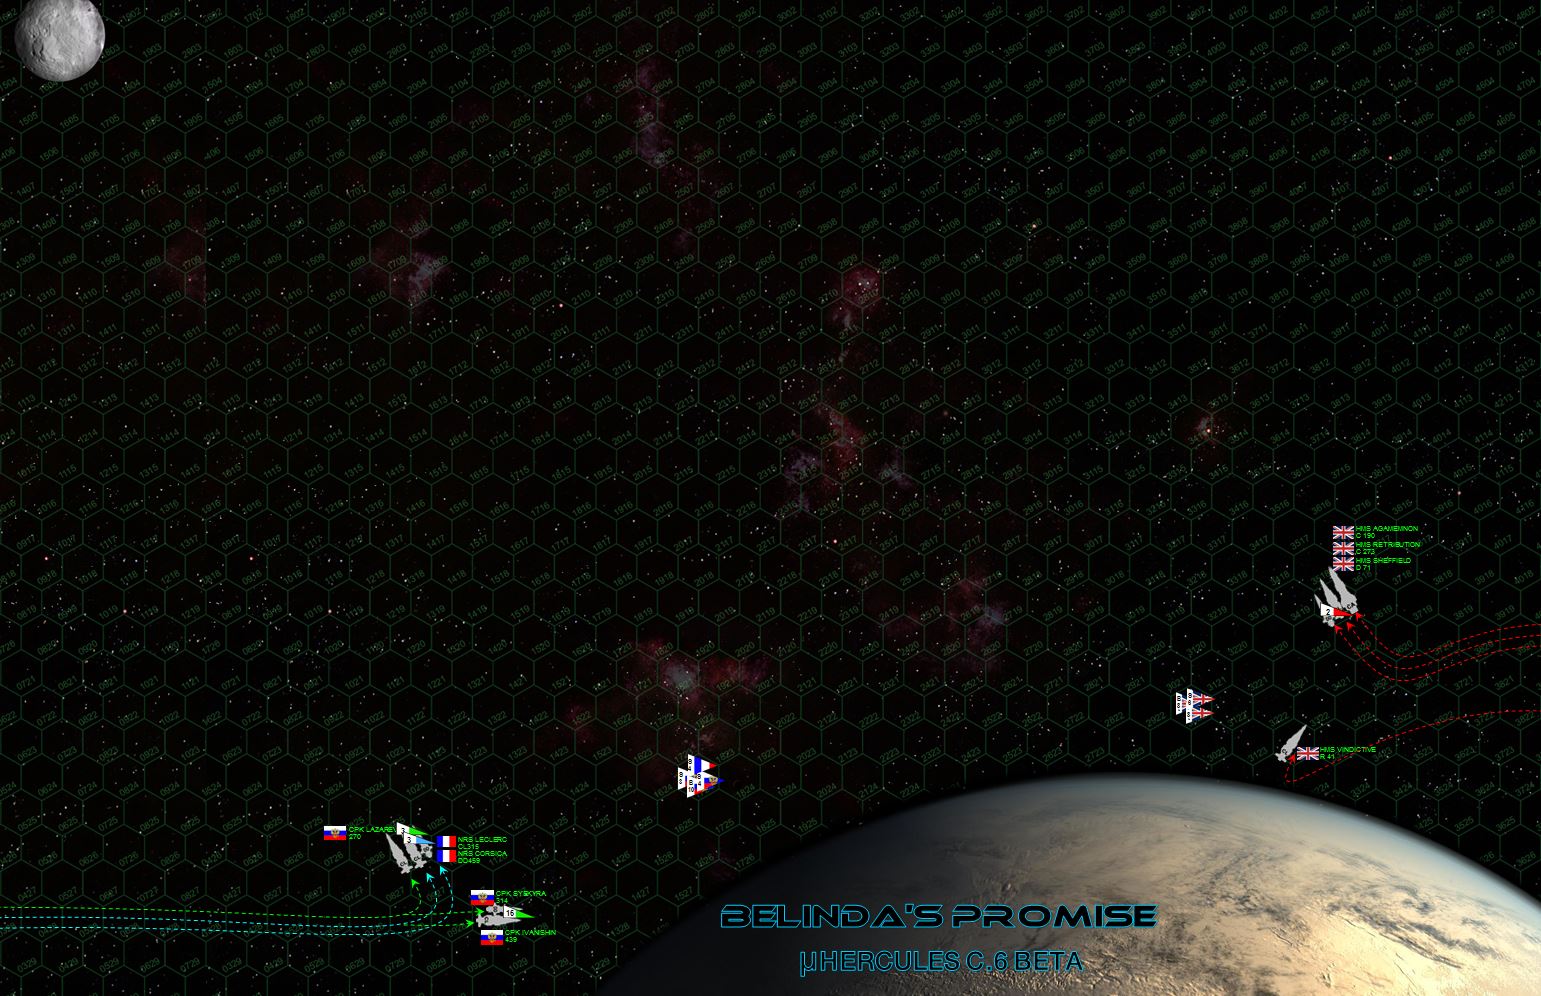 As noted earlier, the Franco-Russian invaders have snuck into the system via a short, slow, and stealthy Darkstar wave from the night side of the Belinda’s Promise. Emerging from beneath the planet’s eclipse shadow, the Franco-Russian commanders (Captains Pyotr F. Myshaga and Rafael deChalemonde) find Lord Commodore Cavendish’s counter-strike force bearing out of the sun (red dwarf Mu Hercules-C) right at them. Both fleets break away from the planet, presenting long-range opening broadsides delivered at 4700 kilometers (the distance from London to Tehran), while the respective aerospace strike carriers (HMS Vindictive under Commander Alfred Carpenter and CPK Ivanishin) begin launching bombers and escorting fighters. The Russians also deploy formidable spreads of their dreaded P-500 “Plamya” (Flame) gravitic torpedo, along with supporting “Lancea” torpedo fire from the destroyer Corsica (Captain Daphne St. Croix).
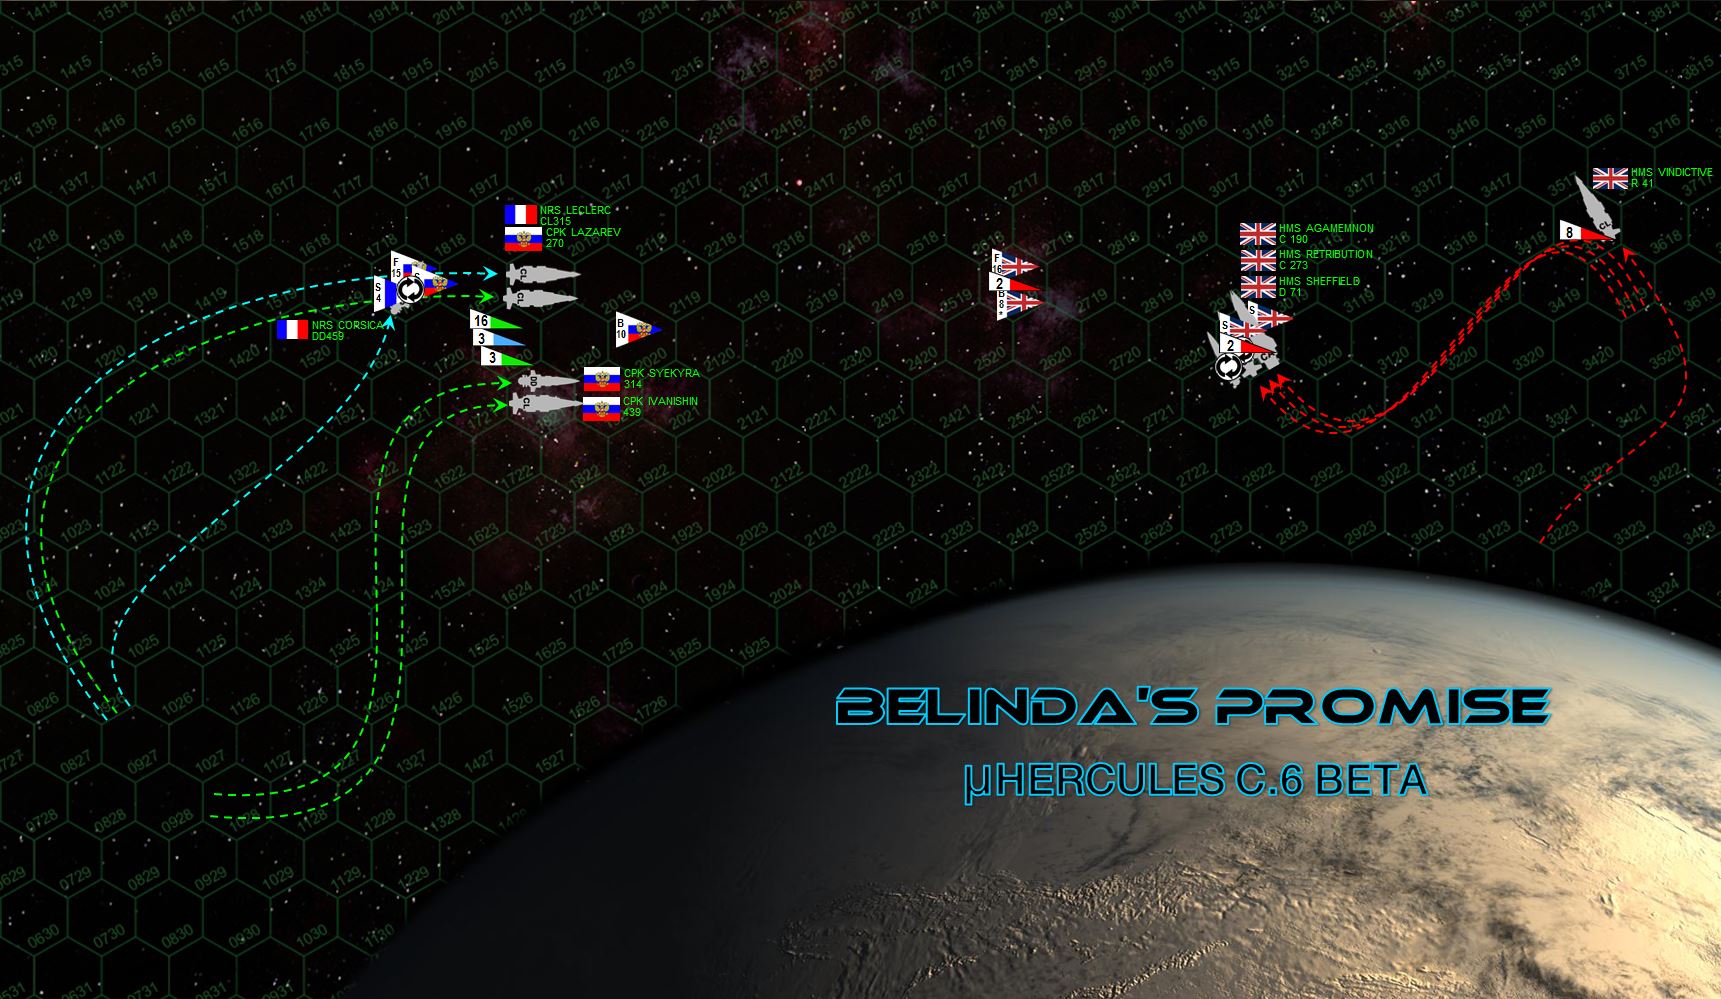 The French and Russians wait for the British to move toward them, then execute a nearly-perfect converging pincer to get MOST of their ships close together for mutually-supporting defensive fire against an anticipated British aerospace and torpedo attack. But the British forestall their attack for now, instead crossing the Franco-Russian “T” with port broadsides from heavy cruiser HMS Agamemnon, light cruiser HMS Retribution, and destroyer HMS Sheffield. Note the Franco-Prussian reform is *nearly* perfect, the destroyer NRS Corsica can’t quite complete the maneuver at her current speed due to maneuvering thrusters damaged in the opening British broadside. Slower Russian torpedoes, meanwhile, can’t quite reach the British this turn and besides, the Ivanishin is still launching the last of her Tu-97 “Zvesburya” (Star Storm) bombers.
 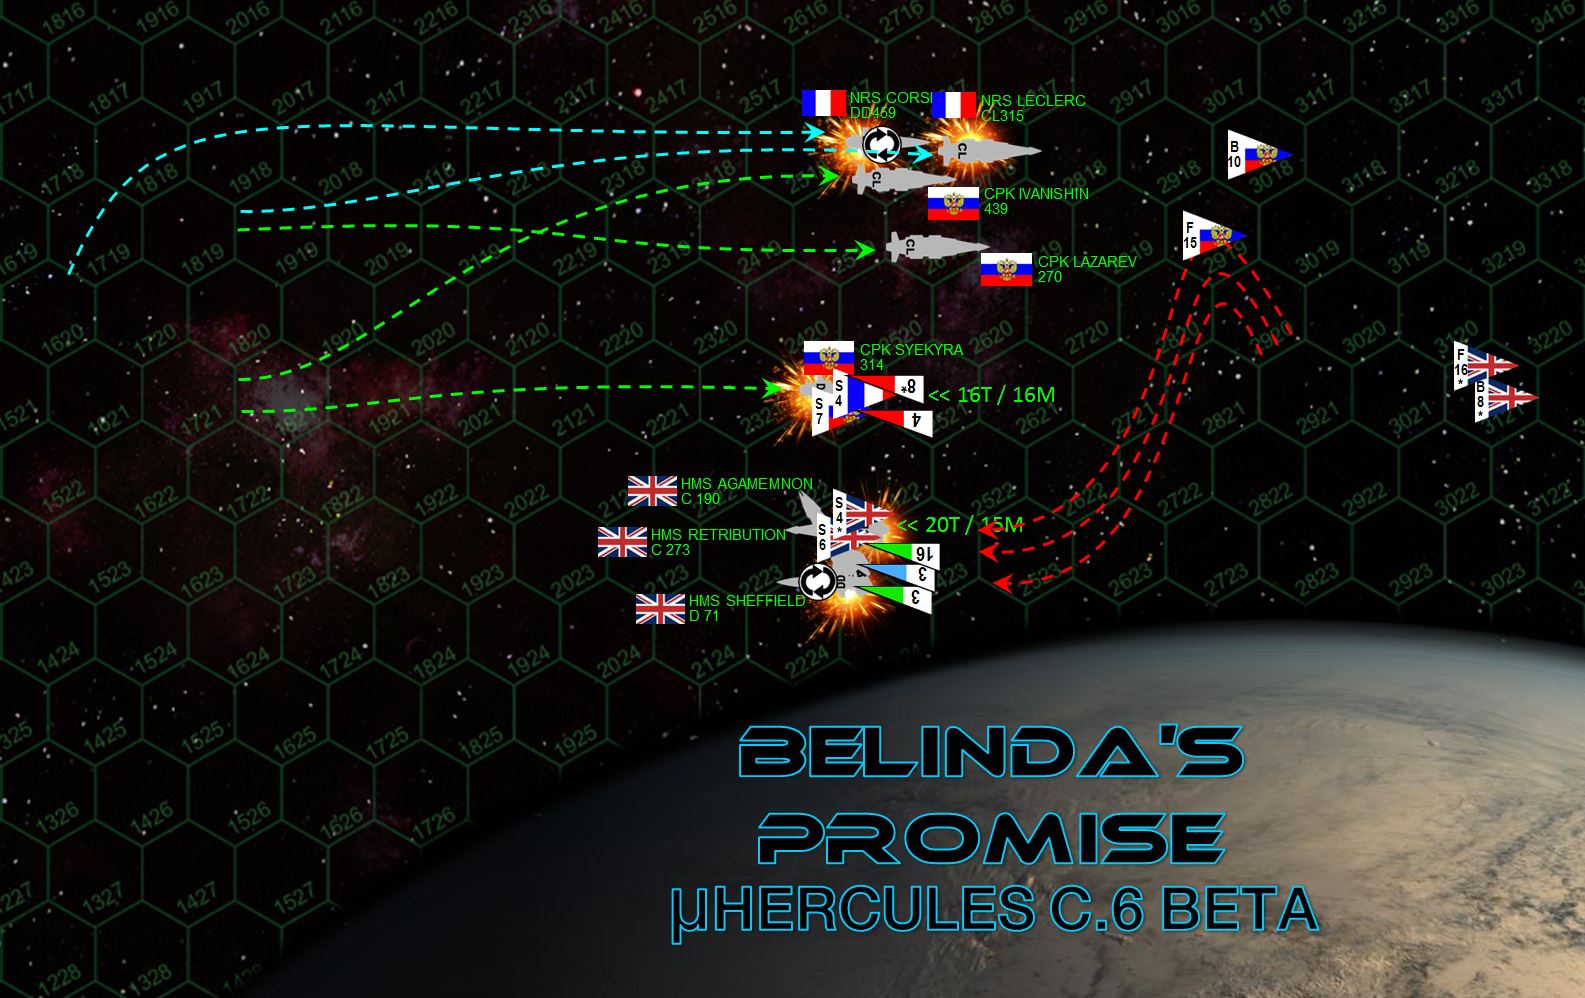 Until now this skirmish has been a slow, measured dance, a careful chess game of angled approaches, measured timing, and calculated strike ranges. Cavendish, deChalemonde, and Myshaga have all proven equals, however, and finally the storm breaks on both sides more or less evenly. The British make an abrupt break toward Belinda’s Promise, leaning hard on their thrusters and grav rudders to pull hard AWAY from the planet at the last moment, using the upper atmosphere to protect Agamemnon’s stern from the Russian torpedo-missile strike sure to hit any second. But the Retribution opts instead for a broadside her guns smashing into the destroyer Syekyra as she and the rest of the Franco-Russian force bolts ahead to broadside the British in turn. The Retribution is positively torn apart astern by the massed missile and torpedoes, the carrier Vindictive much too far away to help with any mass driver defense (she instead broke for high orbit, not even in this picture). Massed Franco-Russian gunnery hammers into the Sheffield, also knocking her out of the battle with her whole starboard engine array smashed clean out of her hull. The British return fire just as hard, however, smashing into the engines and reactors of the swift, sleek, but rather weakly-shielded Leclerc, almost instantly knocking deChalemonde’s flagship out of the fight. The luckless Syekyra is also struck by most of the British aerospace strike, having lost her forward shields she’s basically executed despite the absolute hurricane of mass driver fire that wipes most of the British warheads from the sky. The Agamemnon’s forward guns then cut loose, heavy EPCs tearing through the Corsica’s engines and leaving her crippled and adrift as well. In sixty furious seconds, five warships, totaling some 335,000 tons, have been reduced to charred, drifting wrecks.
 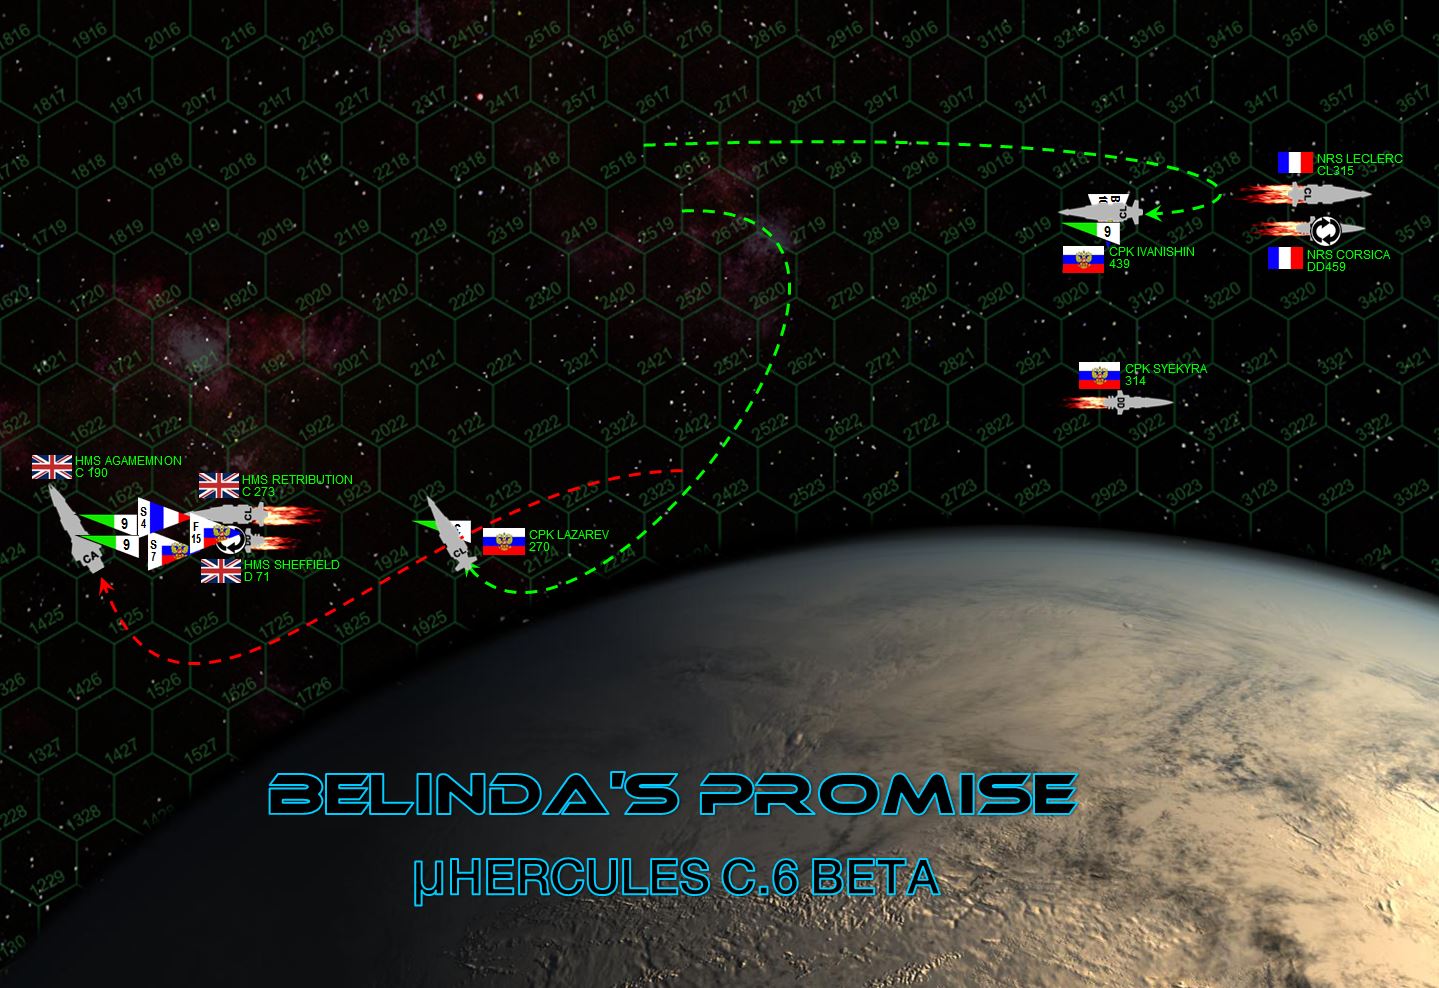 Although they came off slightly worse than the British in that exchange, the Russians under Captain Pyotr Myshaga are far from ready to give up the fight. The Russian bombers are all close enough to immediately land aboard the Ivanishin, where they can swiftly be turned around for another strike. The British carrier, meanwhile, is ordered to break out of orbit and leave the battle completely. A controversial move, perhaps, but Cavendish knows this Franco-Russian incursion is just a raid, NOT an invasion. By keeping his starships intact, he knows he can ensure LONG TERM superiority in the Mu Hercules system. The Admiral Lazarev, meanwhile, hauls around to engage the Agamemnon, who likewise begins a powerful acceleration away from Belinda’s Promise. The Lazarev and Agamemnon exchange withering broadsides, and both mighty cruisers inflict hideous damage on each other. But while the Agamemnon might have an advantage in size and firepower, the Lazarev has an advantage in position. Note her broadsides are hitting Agamemnon’s starboard QUARTER, while Agamemnon is hitting Lazarev on the port BOW. This Lazarev is digging into Agamemnon’s engines and reactors . . . Russian fighters and torpedoes also have their say . . .
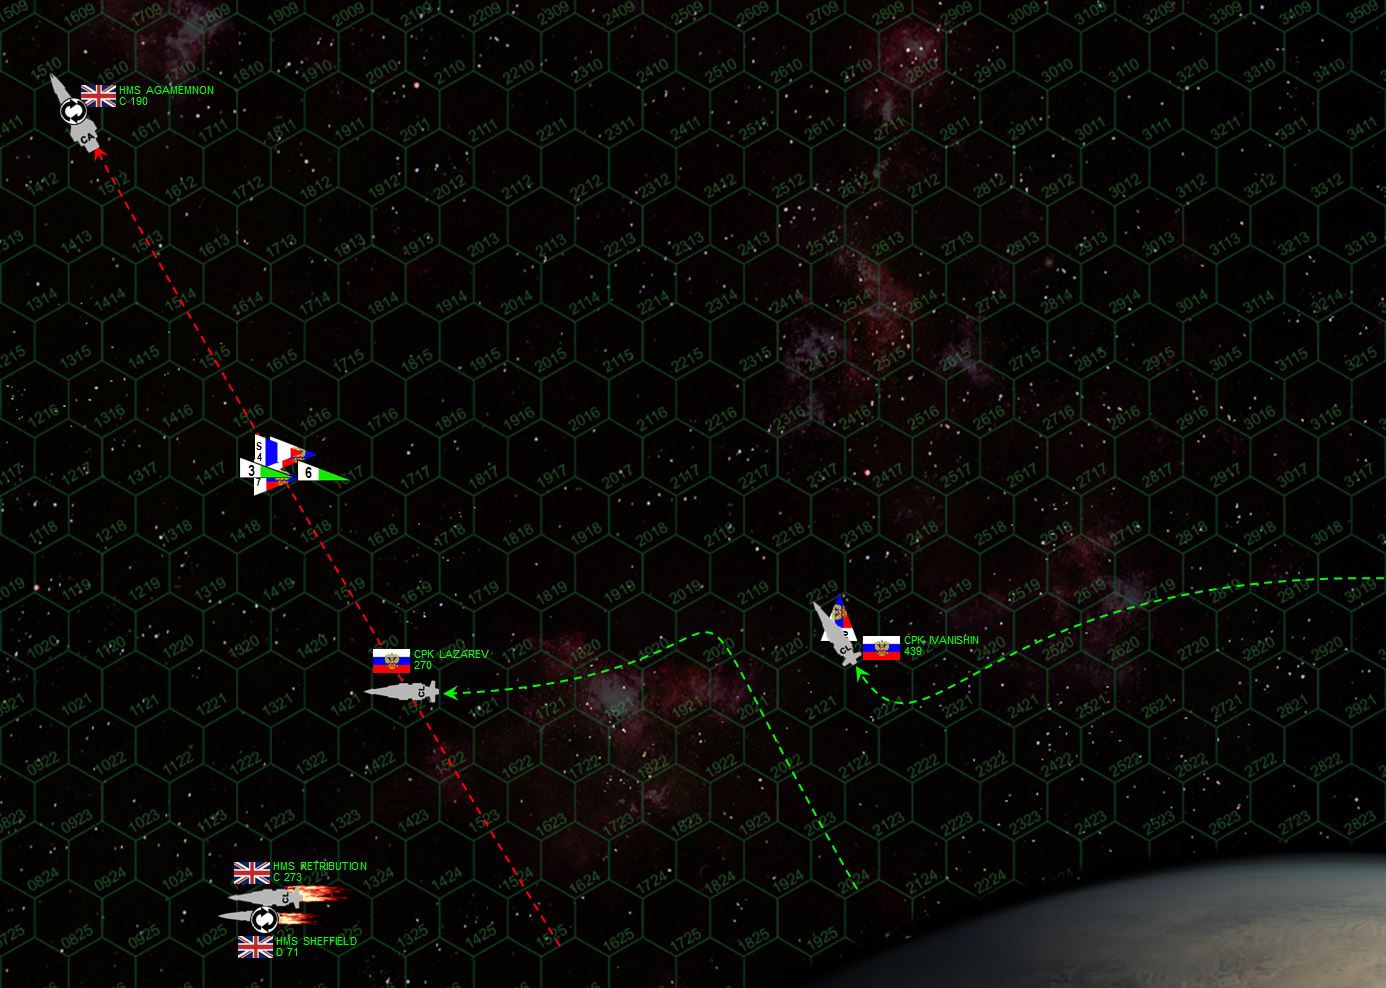 The Agamemnon continues her fiery escape. By now Myshaga knows he will never catch her, so instead cuts across her stern for a last-ditch frantic broadside across her stern. If he can cripple Cavendish, Myshaga’s road will be a success and he may even be able to establish a small foothold in the outer reaches of Mu Hercules, or at least compel the British to drive him out rather than mount their anticipated invasion of 72 Hercules. But by now Cavendish is doing almost forty kilometers a SECOND, literally outrunning the swarm of Russian torpedoes coming after him. He can’t fire much back at the Russians, having lost his aft laser array, but the Russians lose this last chance to cripple HMS Agamemnon and claim victory.
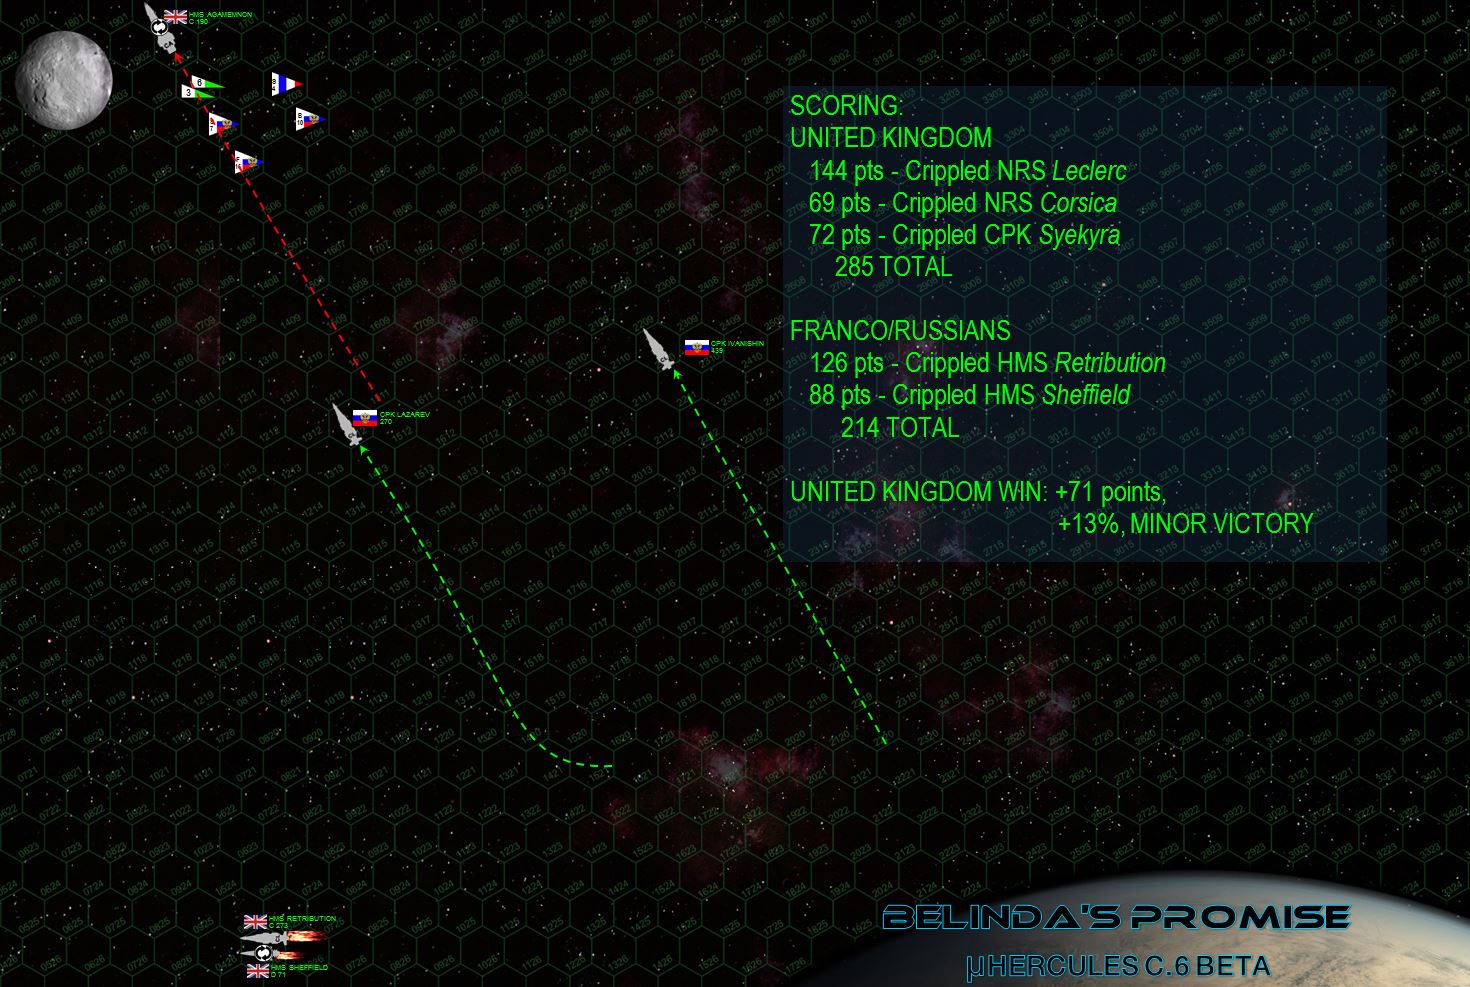 The final results, positions, and score. Remember this is a RAID, scored by how much enemy shipping you destroy or cripple (not what you have left standing). So even though the Russians “hold the field,” they’ve lost more than the British. In campaign terms, with HMS Agamemnon and Vindictive still operational out there (along with a full aerospace strike group), Captain Myshaga cannot linger to destroyer British facilities or even set up a small outpost of his own, he has to return to Krasnaya Nadhezda (once he completes what rescue and recovery efforts he can mount). Ironically, Myshaga’s first task is to rescue to French destroyer Corsica, who repeatedly fails post-battle recovery checks, it’s only Myshaga’s “Commander’s Luck” reroll (campaign upgrade) that saves her. Aboard the Russian destroyer Syekyra, Captain Ekaterina Duranov must also roll for personal wounds or survival since her bridge was hit by British aerospace missiles launched by Supermarine Starfire fighters. This was a nasty one, folks. Hard-fought and close-run. Congrats to Damon for a hard-knuckled win!
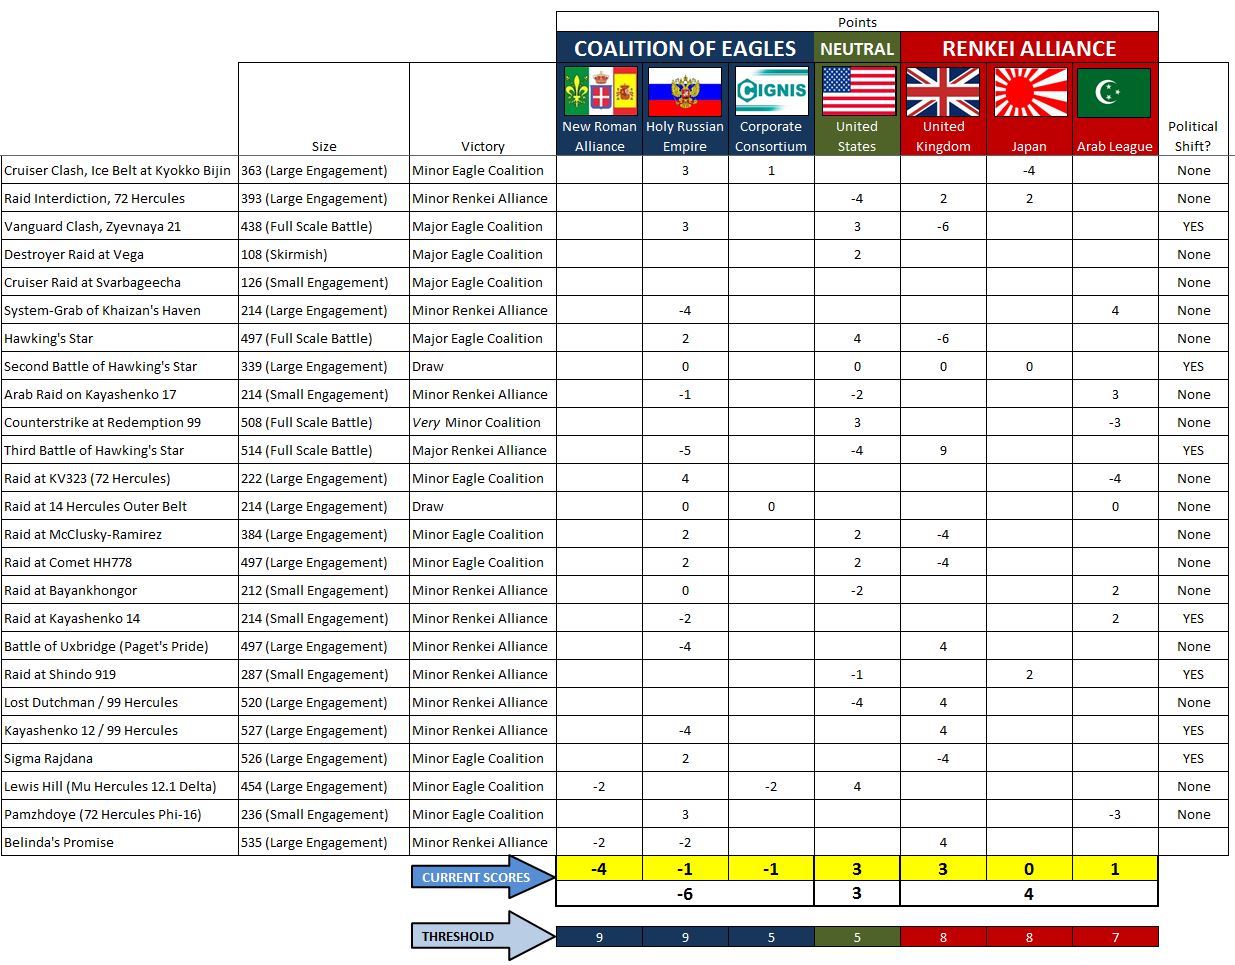 So after some recent defeats, the Royal Navy is again poised to launch an actual planetary invasion into the Russian colonies at Krasnaya Nadhezda, and perhaps end the bulk of this war. They need an ally to help them, but right now the Japanese or the Arab League need a “preliminary victory” to set them up (rough campaign rules, you need to win your PREVIOUS battle to choose the site of your NEXT battle). So if the Japanese or Arab League want to “choose” 72 Nadhezda as the site of their next big smash to support a full-scale British system invasion . . . they need a win somewhere against the Russians to “tee it up.” So stay tuned to see what happens!
 Arab League Raid on Pamzhdoye Phi-16
FROM: UNITED NATIONS REGIONAL COLONIAL CENTER
011:15 SOL GMT, 08 FEBRUARY 2522
BREAKAUTH: 181072.18J
CLEARANCE: SECRET (NATIONAL)
ARAB LEAGUE RAID ON PAMZHDOYE (Krasnaya Nadhezda / 72 Hercules Phi-16)
In the wake of the Americans largely dropping out of their leading role the Coalition of Eagles in the wake of the Treaty of Zubrin, and the New Roman Empire’s recent frustrations in their opening gambits in the Outer Hebrides (Mu Hercules system), the focus of the Third Hercules War has again shifted to the spinward shoulder Hercules Rim. Here, Lord Commodore Edward Cavendish has begun drawing plans for a war-ending offensive against the Russians, hoping to shove them out of the war as he did with the Americans (not only with military victories but no small amount of political maneuvering).
His partners in this effort will be the Arab League, spearheaded by the Mutamid high-speed cruiser-carrier battlegroup under Captain Rashid al-Maghrebi. With the navy of the Holy Russian Empire teetering somewhat after the string of defeats that largely threw them out of the UN “Redemption” Mandate at 99 Hercules, Cavendish hopes to take his Task Force Agamemnon into Krasnaya Nadhezda (“Red Hope” – 72 Hercules), reinforced by a pair of Fearless class planetary assault cruisers loaded with Royal Marines and Para Commandos. While they come in through the spinward “front” of 72 Hercules, the swift Mutamid battlegroup will sweep around behind and stab the Russians in the back from the coreward side of the Red Hope colonies. The Mutamid battlegroup seems ideal for this mission, given the enhanced Darkstar FTL systems usually installed on Arab League ships.
Successful completion of this operation will more or less throw the Holy Russian Empire out of the war and the Hercules Rim in general, a goal toward which Cavendish has promised the League primary ownership of the 72 Hercules trinary star system, allowing the British to take former Russian holdings in 99 Hercules (Redemption) and thus dominate the center of the Hercules Rim.
There are just two things wrong with this plan at the moment. First, the Russian Navy is no longer “teetering,” they were instrumental in a bloody British reversal at Sigma Rajdana in the Bhogavati (HD176051 star system), winning a victory that helped the Republic of India claim victory in their small part of the Third Hercules War. Second, Task Force Agamemnon itself was badly mauled in this battle, and at least a month of pressure dock and star port repair time before this force can realistically challenge the Holy Russian Empire in 72 Hercules.
So although Captain al-Maghrebi has agreed with this plan and is ready to get underway, the in early February 2522 the British are hardly in a position to undertake their part. Warily watching the Russians rebuild their strength and prodded by persistent rumors that a Peter the Great class battleship might be on its way from the Kuznetsov Shipyards of Gliese 725, the regional Caliphate soon issues orders to the Mutamid battlegroup. Hit the Russians . . . now, even if only to rattle their cages and slow their recovery and buildup in 72 Hercules.
With most of the Admiral Lazarev task force still in dock or returning from the far-off Indian Bhogavati colonies, defense of the Krasnaya Nadhezda colonies will have to fall to a scratch force of a Kutusov class light cruiser, a Gagarin class light fleet carrier, and three K-56 class torpedo corvettes. The Mutamid battlegroup greatly outguns this defense force, but the Russians hold a pretty solid edge in torpedoes and aerospace strike groups. It’s a lopsided match-up of guns vs. torpedoes, victory will undoubtedly go to the side that can make better use of its advantage.
ARAB LEAGUE: @Muakhah
HOLY RUSSIAN EMPIRE: @Oriskany
RAID VICTORY CONDITIONS (236 points)
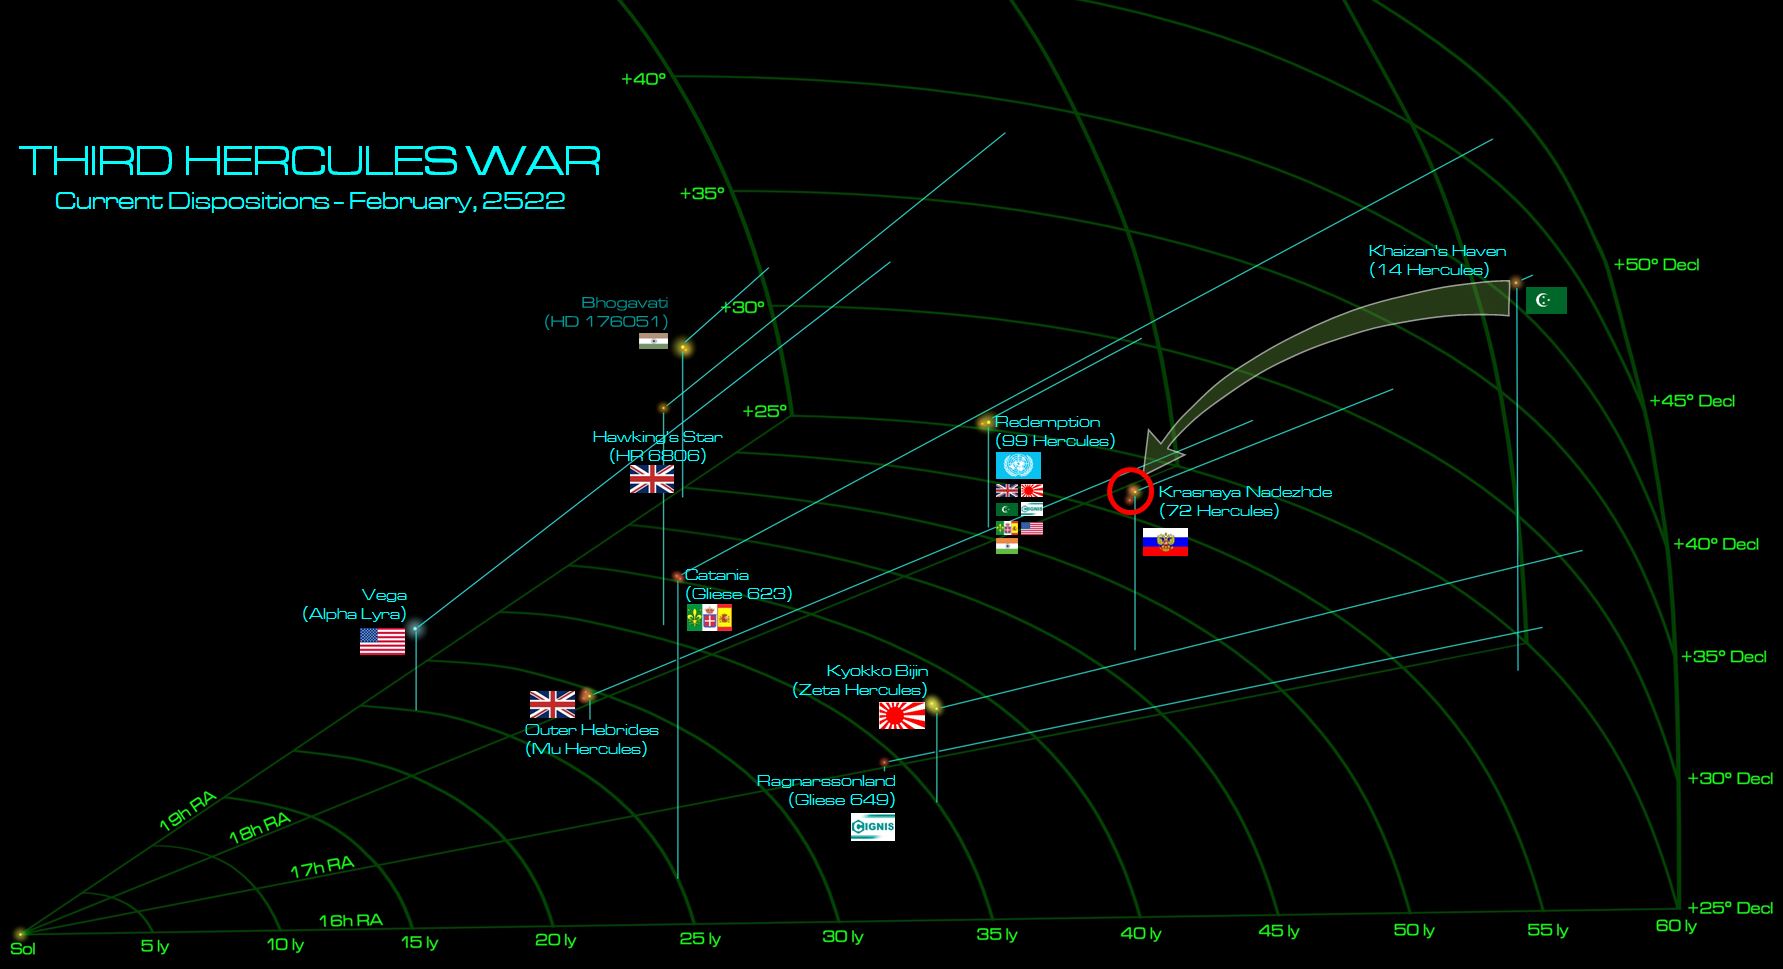 The situation at the beginning of February 2522. The Indian Republic has “cashed in its chips” and claimed a modest victory in this war. The Americans are technically still in the war, but largely called to heel at least as far as the British are concerned. The first New Roman shove at Mu Hercules has been defeated. Thus, the spinward (upper left) side the Hercules Rim lies largely quiet. Perhaps its only natural that fresh battles flare up along the coreward shoulder of the Rim (lower right) with an Arab League strike out of the Khaizan’s Haven Caliphate, against the Krasnaya Nadhezda colonies of 72 Hercules.
  The two fleets close rapidly along the daylight side of Pamzhdoye (72 Hercules Phi-16), one of the outer terrestrial planets of the smallest of the three 72 Hercules red dwarf stars. But while the Mutamid battlegroup maintains its high approach speed, the Russians are immediately kicking in powerful retros to decelerate. This is somewhat unusual for Russian naval formations, who tend to close as quickly as possible to make best use of heavy plasma and rail cannon gunnery. But if the Russians are going to win this fight, it will be with torpedoes and heavy aerospace strikes. Also, the overloaded strike carrier CPK Ivanishin is going to need three complete turns to launch her entire aerospace group, and remember how slow these Russian P-500 torpedoes are. So the Russians are content to take their time on a slow approach. The League, meanwhile, comes on much faster. Yet with a turn to starboard, they present a long-range broadside to the Russians ... yet also yield the “gravity gauge” to the Russians as well. Now the Russians can maneuver between the league and the planet, forcing the league to turn INTO planet gravity to engage the Russians in future turns. Secondly, the League doesn’t engage the corvettes at this early stage. Sure, their guns can’t do much damage at this distance, but it doesn’t take much to knock out a K-56 and even a single kill means 12 less torpedoes coming at you each turn.
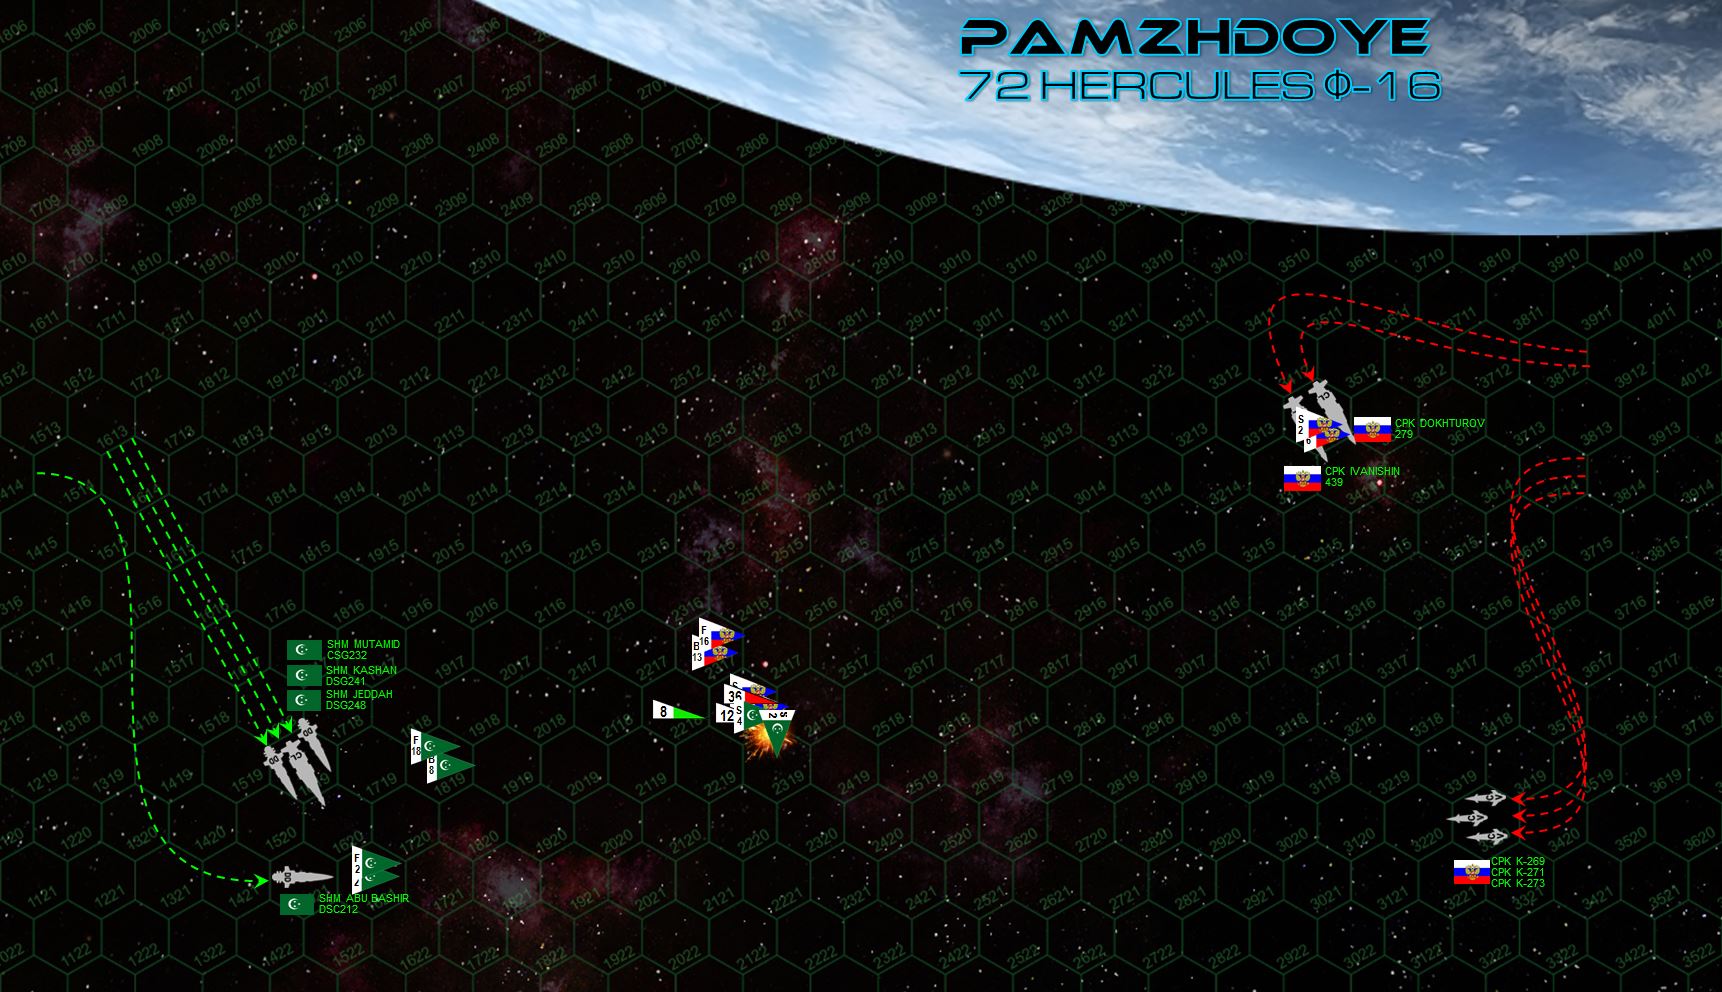 The Russians continue to slip-stream closer to the planet’s frigid nitrogen and methane atmosphere, banking away with a hard turn to port so the light cruiser Dokhturov (named for one of Kutuzov’s generals at the Battle of Borodino) can try to put at least some gunnery into the League warships. It doesn’t do much, while the League hammers away at the Russian Dokhturov. Yes, the Dokhturov is the biggest threat in a gunnery match, but the Russians are determined that this won’t BECOME a gunnery match. Note their torpedoes could have hit the League this turn, but they hold them back, STILL launching the last of their MiG-103 “Tunguska” fighters and Su- 107 “Molniya” (Lightning) scouts for a truly massive SINGLE united ordinance strike. A small scrap of action does take place in the void between the two battlegroups, where League scouts try to shoot down Russian torpedoes but are instead intercepted and they lose two scouts of their own.
 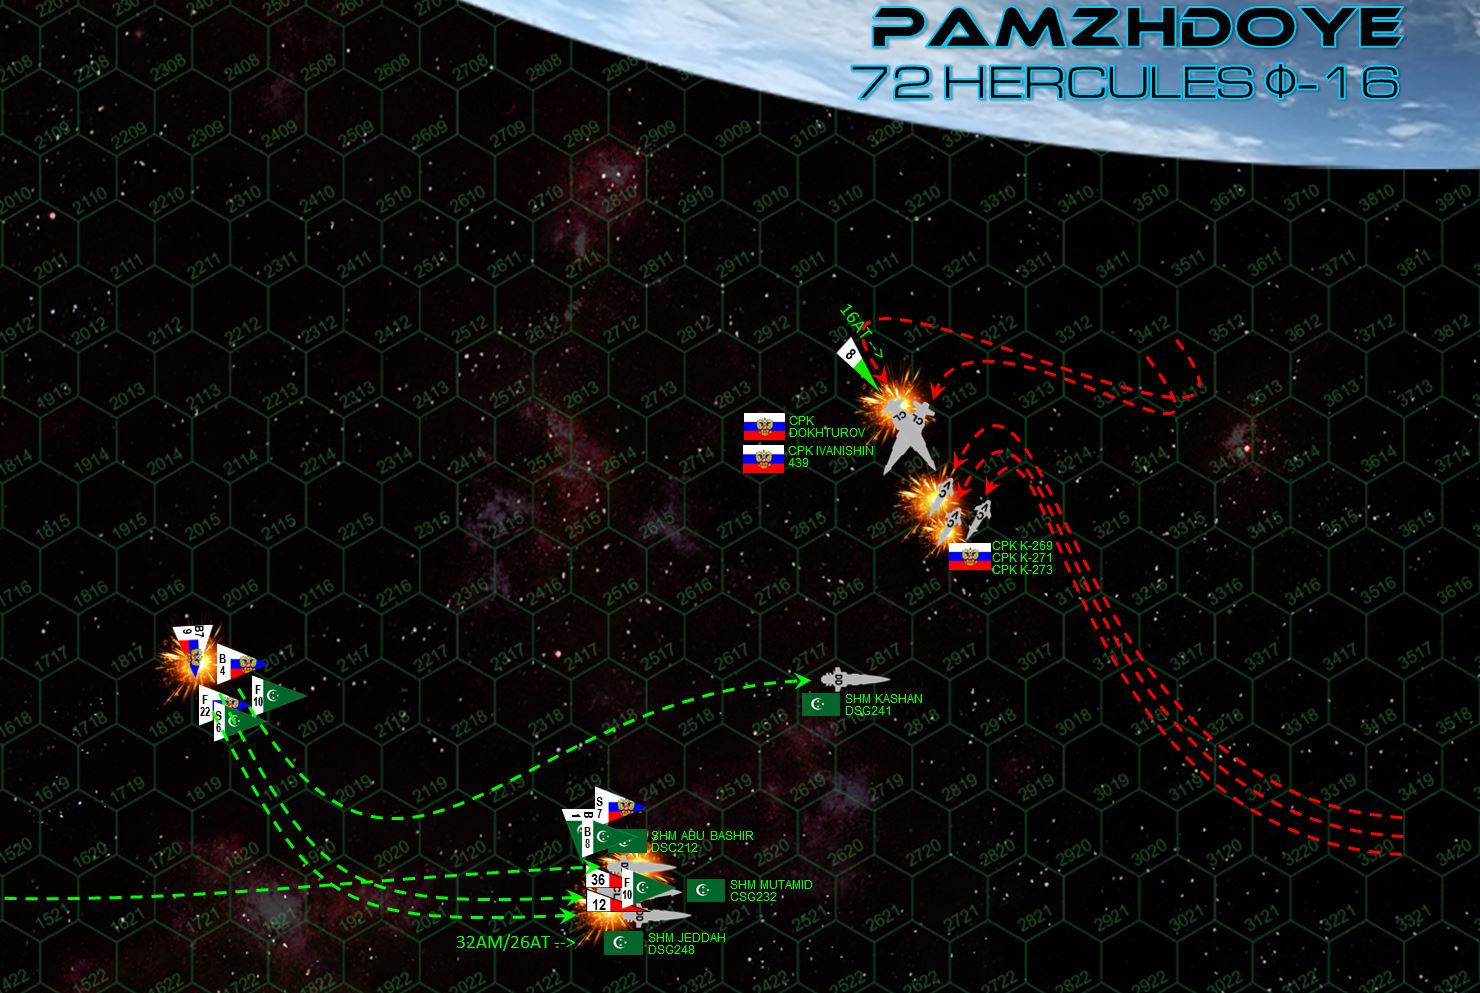 At last, the hammer falls. Just as the massive Russian missile and torpedo strike comes in, the League fleets splits up somewhat, the destroyer Kashan accelerating to port to engage the Russian attack wing of K-56 corvettes. This broadside does pretty well, immediately blowing the bow completely off the K-269, leaving her dead in space. The K-271 also loses all weapons, shields, magazines . . . it’s only blind luck that she’s not crippled as well and maintains power to accelerate out of the battlespace. Captain al-Maghrebi recognizes the threat posed by those Russian torpedoes and recalls his fighters to defend his ships from Russian warheads – and while this dilutes the League’s own aerospace strike, it probably saves his fleet from instantaneous destruction. As it is, his flagship Mutamid and light carrier Abu Bashir are hit astern by a hail of surviving torpedoes from Tu-97 “Zvesburya” (Star Storm) bombers, P-500s from the warships, and aerospace missiles. The Mutamid is crippled and set adrift, as is the Abu Bashir. It’s a devastating strike, but one the Russians have patiently set up for three complete turns (half the game). Betting in its success, the Russians have now finally decided to close the range, with the Ivanishin presenting a full spread of torpedoes and the Dokhturov a 1200-kilometer broadside on the destroyer Jeddah. In addition to the ravaging of the Russian corvette flotilla, the other bright spot for the League is the gutting of Ivanishin’s bomber force, nine of thirteen are blown out of the stars by vengeful “Mylekinir” (Fire Angel) fighters.
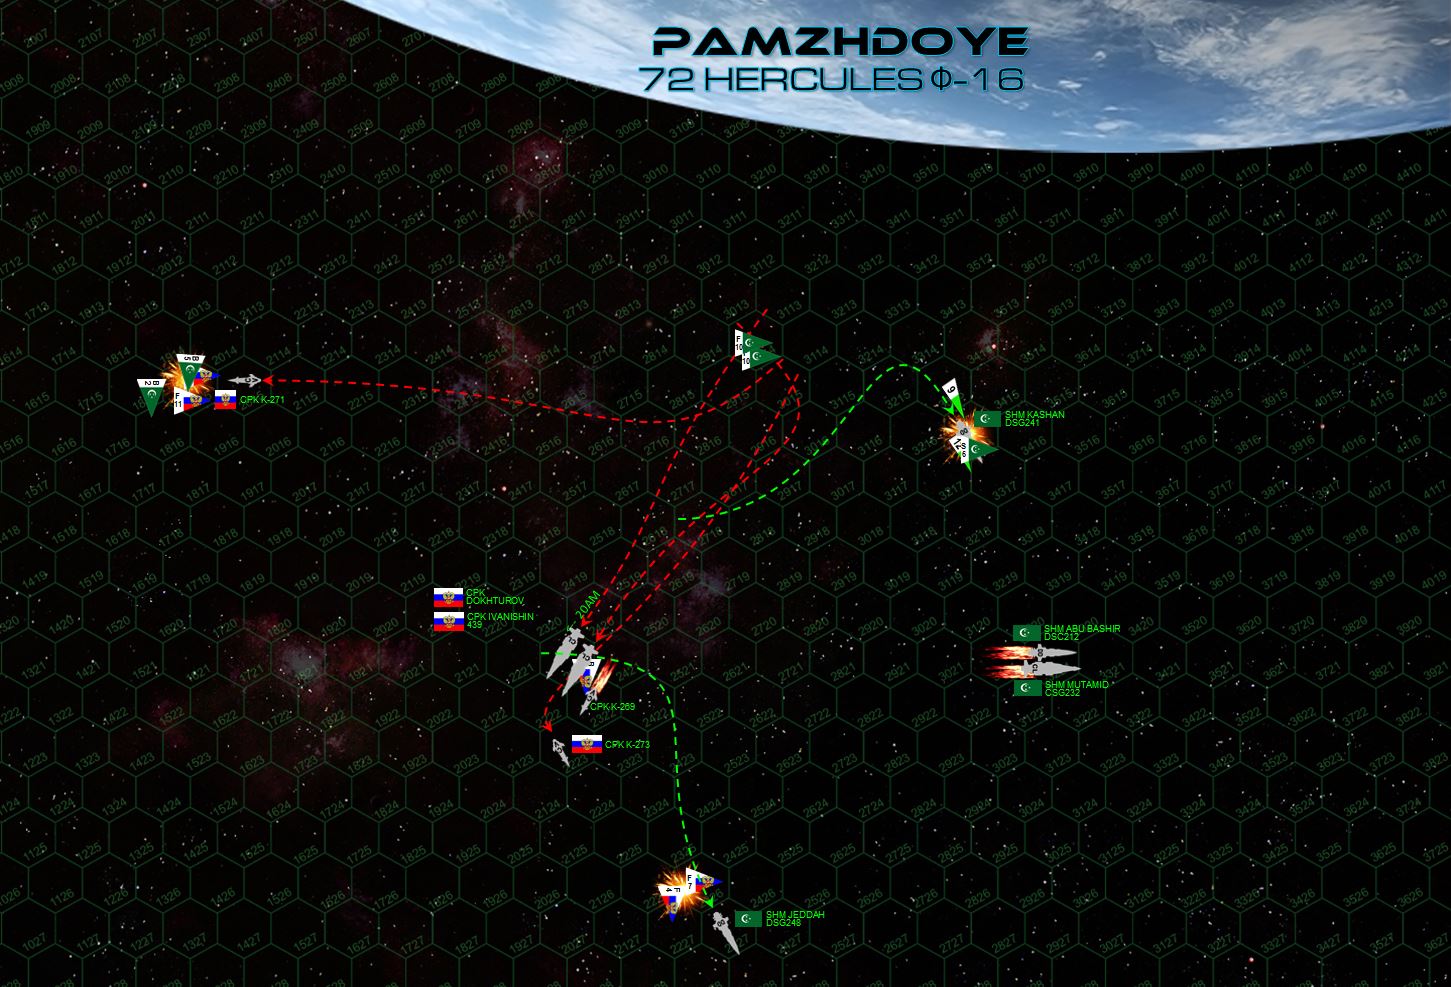 Heady with anticipated victory, the Russians dive toward the League, the two surviving destroyers Jeddah and Kashan scattering port and starboard. Empty League “Demkikham” (Vengeance) bombers, with no carrier on which to land, try to strafe the fleeting corvette K-271, but are instead beset by a pack of Russian MiG-103s and largely destroyed. A second (MUCH smaller) Russian torpedo strike goes for the Kashan, who somehow survives the onslaught, while half the Russian MiGs go to strafe the unshielded stern of the Jeddah. But the Jeddah survives as well, and for MiGs are shot down. League torpedoes, lasers. And EPCs continue to hammer the Dokhturov, which is now hobbled with lost maneuvering thrusters, two engines gone, and half-blind with multiple sensor suites knocked out.
  Dokhturov now raises maximum steam, making flank speed (as best she can) to break high orbit and get out of the battle area. The League is determined she won’t escape, however, and finally have crippled her with a broadside from the Jeddah after she has jackknifed to starboard, nearly colliding with the light fleet carrier Ivanishin in the process. The Dokhturov careens out to space, her bridge afire and commander badly wounded. The scrappy little K-273 has pivoted as well, slinging out a third hail of P-500 torpedoes which target the stern of the Jeddah along with most of the remaining Russian MiGs and scouts. The Jeddah is likewise crippled ... only by the LUCKIEST of hits (I needed a “6” on a d6 to cripple her and nailed it), and she will BARELY miss colliding with the tiny asteroid moon about 3000 kilometers ahead, JUST off her port bow. The Russians also launch a torpedo and fighter strafing attack against the Kashan. The MiG pilots hoped those torpedoes from the Ivanishin would occupy Arab point defense, allowing them a clear attack run. They were wrong, League fighters took care of the torpedoes which meant the MiGs took heavy losses on the way in. But the survivors pressed home the attack, savaging the wounded stern of the Kashan until they crippled her as well.
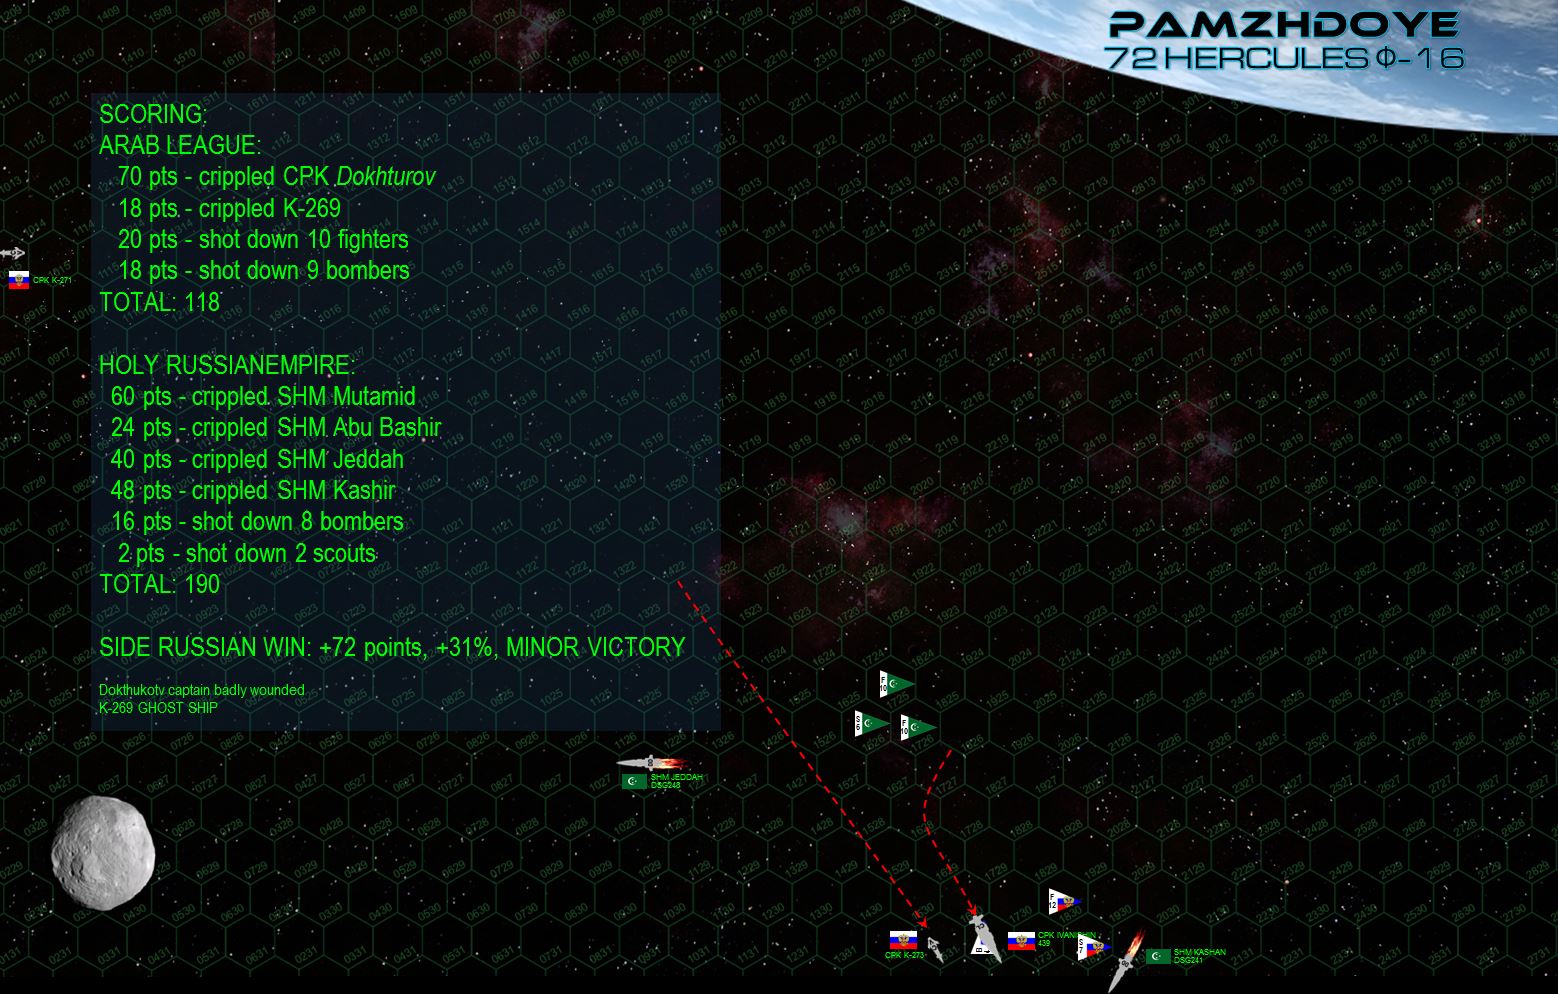 The entire League task force has been crippled, while the Russians still have the carrier Ivanishin and two corvettes to lay claim to the Pamzhdoye orbital zone of 72 Hercules. Yet the Russians have taken heavy damage to their aerospace wing, the captain of the Dokhturov is badly injured, and the wrecked K-269 is ... just never seen again. When rescue ships reach the coordinates indicated by her drifting speed and trajectory, she just isn’t there, forever “missing” as a “ghost ship” of the Hercules Rim. In all, this comes down to a solid yet minor win, as indicated by the RAID score shown.
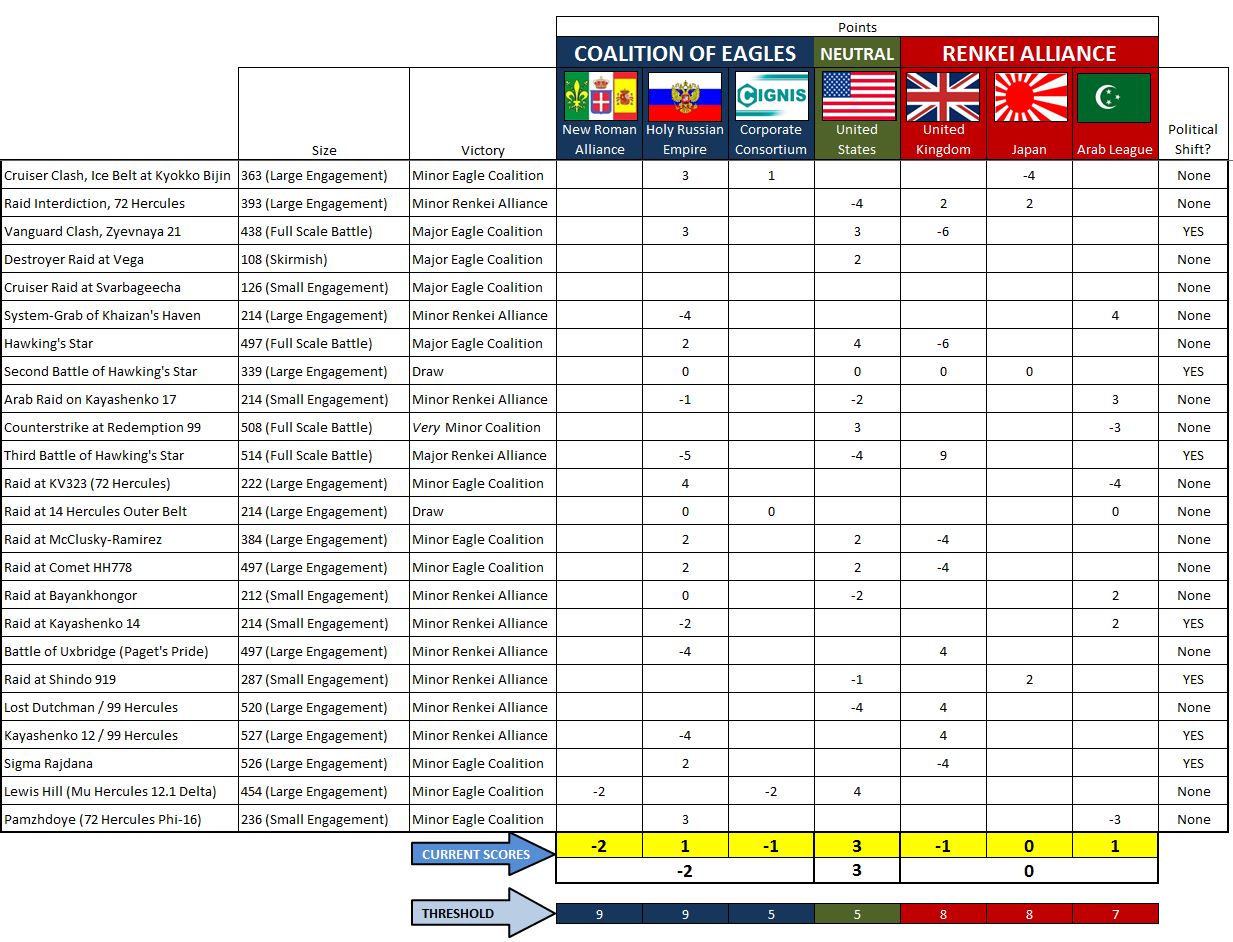 Here is the new campaign tracking chart in the wake of the skirmishes at Lewis Hill and Pamzhdoye. Suffice it to say the Russians are RESURGENT, having dealt bloody noses to both the British at Sigma Rajdana and the Arab League at Pamzhdoye. Although the New Roman threat has been contained for the time being at Lewis Hill, the plans of Lord Cavendish and Captain al-Maghrebi against 72 Hercules have certainly been stalled for now, both the British and League naval forces in the Hercules Rim will have to regain their balance before contemplating their conceived converging strike on Krasnaya Nadhezda.
New Romans fight their first engagement in Hercules Rim
FROM: UNITED NATIONS REGIONAL COLONIAL CENTER
14:40 SOL GMT, 29 JANUARY 2522
BREAKAUTH: 181072.18J
CLEARANCE: SECRET (NATIONAL)
NEW ROMAN RAID ON LEWIS HILL (Outer Hebrides – Mu Hercules 12.1 Delta)
The political upheaval seen across the Hercules Rim in recent months took another turn with yet another engagement. The setting for the skirmish was an old one, the long-embattled outer orbital zones of the Outer Hebrides colonies (Mu Hercules system) of the United Kingdom. What was decidedly less familiar were the combatants. Mounting the “fast strike” into the system was a task force of the newly-belligerent New Roman Alliance, having recently entered the war from their Catania colonies (Gleise 623 system). Yet it wasn’t a British force that sortied to fend off the Roman aggressors, but the Liberty task force of the United States Navy.
Former enemies in the Third Hercules War, the United States and Great Britain have more or less buried the hatchet (at least in some Hercules star systems) with the recent Treaty of Zubrin. Although overwhelmingly favorable to the British, the treaty granted the Americans shipping access through the Hercules Rim and a lease on a small base . . . allowing them to save face while backing out of the war with Great Britain. Also within that treaty, however, is a “mutual military assistance clause” requiring the two navies to come to each others’ aid if their holdings in the Hercules Rim are attacked. Clearly this clause also heavily favors the British, given that they administer two compete star systems and multiple colonies in the UN “Redemption” mandate, while the Americans only have the tiny “Lost Dutchman” planetoid awarded them in the Treaty of Zubrin.
In fact, this is the raid that first calls that mutual military assistance clause into effect. As the New Roman task force, under the flag of Commander Antonio Faccia aboard the Aurelius class heavy cruiser NRS Nicaea, enters the outer orbital zones of the Mu Hercules system, they are met by the US Navy’s Liberty carrier task force under the flag of Captain Zachary Irons. Sailing beside the American carrier is the new San Antonio class light cruiser USS Northampton, under the command of the newly-promoted captain Jack Morrison (formerly of Task Force Oriskany). Most the New Roman force is in fact French, made up of the Lerclerc Battle Group under the flag of Captain Raphael deChalemonde, supported by the Cignis Corporation frigate CMS Arauz.
Now the two fleets vector toward each other, the Americans warned of the Roman approach by a timely report of a Griffon-class gunboat. Dropping out of their short “approach waves” back into sublight speeds, they close to engagement range at the lonely outer rim planetoid of Lewis Hill (Mu Hercules 12.1 Delta). As bizarre as it seems, the Americans stand ready to defend the territory of their old enemies against a new foe, and the Battle of Lewis Hill is on.
RAID VICTORY CONDITIONS (454 points)
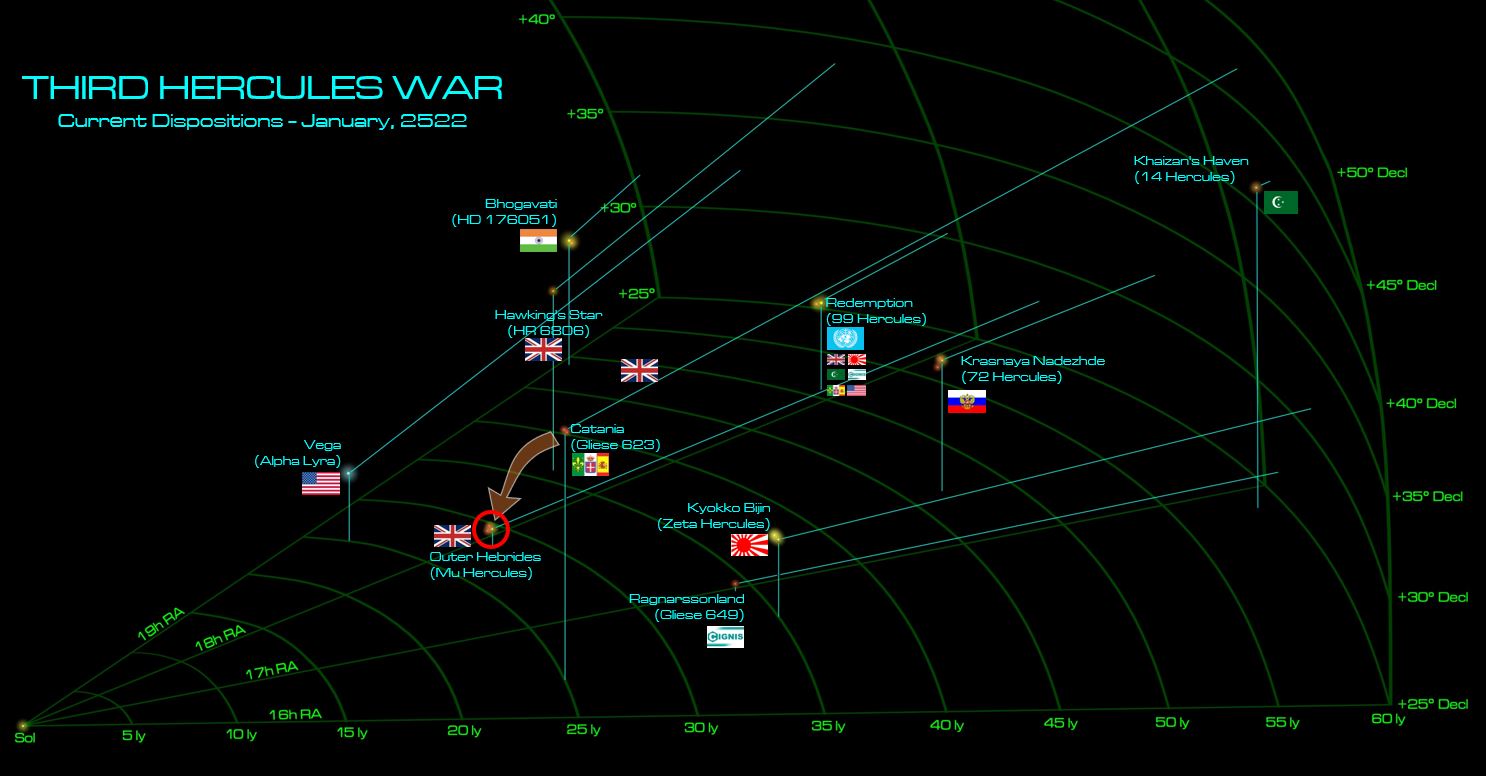 The general situation of the Third Hercules War in the opening months of 2522. Having recently joined the war after a long period of neutrality, the New Roman Alliance has launched this raid out of their Catania colonies in Gliese 623, aimed at British holdings at Mu Hercules. Ironically it’s an American task force that will meet this strike, defending British holdings per military assistance clauses in the recent Treaty of Zubrin.
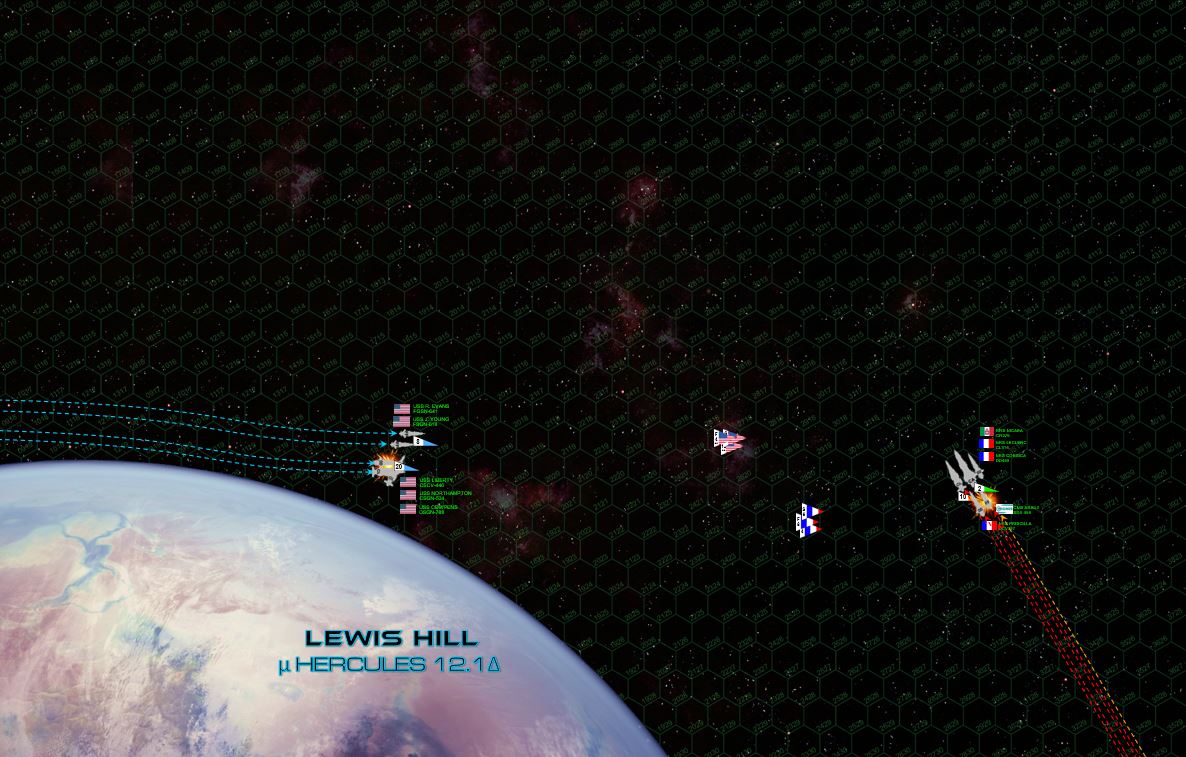 The Americans set a low-angle course, using the gravity if Lewis Hill to dip further behind the New Romans’ port beam, hoping for an angle around their stern. The Americans also seize the “gravity gauge,” the position between their enemies and the planetary body, thus forcing the enemy into the dangerous choice of turning INTO planetary gravity to engage. The Romans, for their part, seize the classic opening position of crossing the Americans “T”, presenting broadsides cross the enemy’s bow. Things start out pretty well for both sides as opening gunnery score major hits at 3300 kilometers, the American destroyer USS Cowpens and Cignis strike frigate CMS Arauz taking heavy damage.
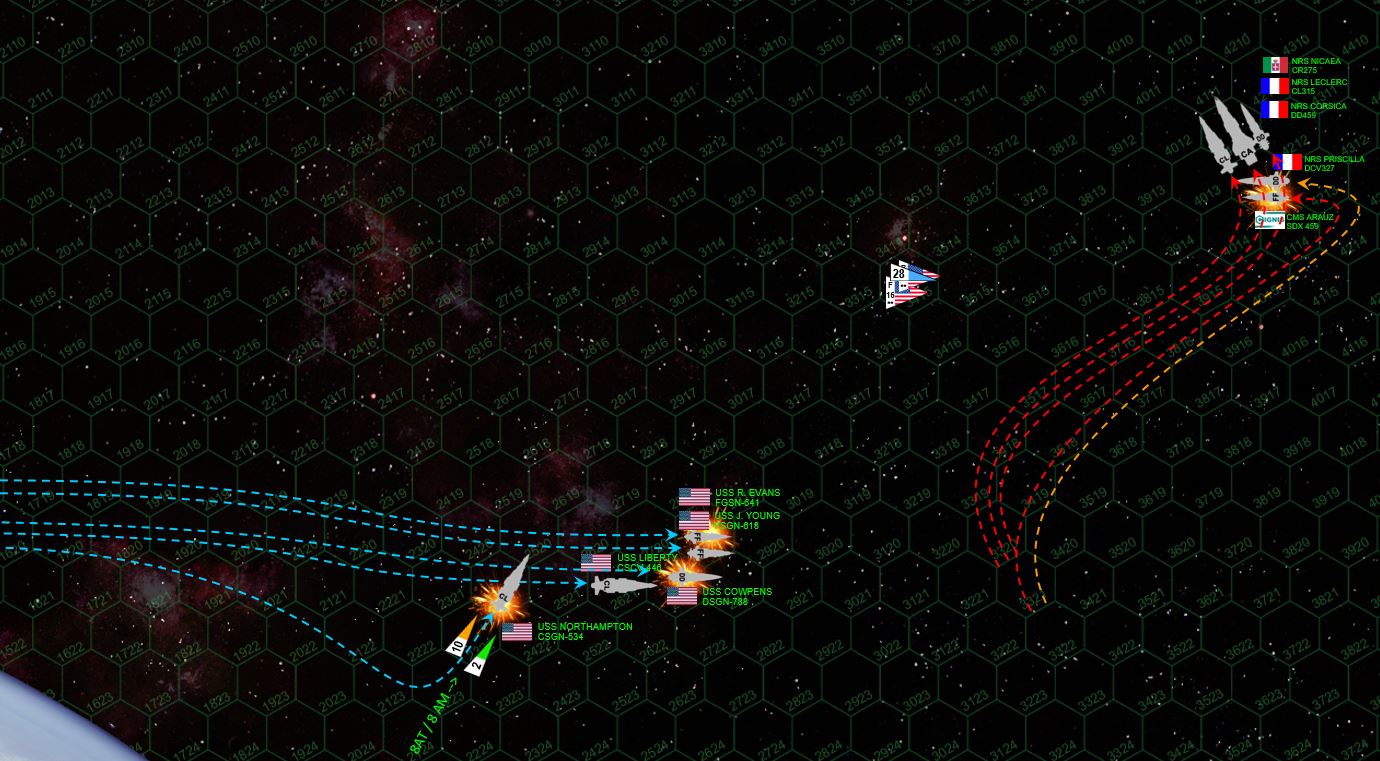 The Americans continue to close at high speed, anxious to get behind the New Roman warships for broadsides across the stern. The New Romans defeat the move, sidestepping at 24 kilometers per second AWAY from the Americans, keeping them within their broadside, refusing to turn into the American’s gravity well and relying on their more accurate guns and heavier firepower to continue to whittle down the American force. For the moment, the Roman plan seems to be working. While the Americans manage to knock the frigate Arauz with a second salvo, their destroyer Cowpens and the frigate USS Ronald Evans are both crippled by withering Franco-Italian lasers and EPCs, and the Americans are still thousands of kilometers away from the sterns of Roman ships. But one factor that the Roman warships can’t outmaneuver is the American aerospace strike group consisting of US Navy squadrons VSF-221 “The Dead Rabbits” and VSA-193 “The Eight Ball Express.” The full fighter and bomber group is finally launched, forming up with a phalanx of Mark 48 gravitic torpedoes for a combined ordinance strike the Americans hope will turn the tide.
 Seconds after the NRS Nicaea’s broadside tears open the port quarter of the light cruiser USS Northampton, the American aerospace and torpedo strike hits the stern of the Roman flagship in turn, not only detonating the ship’s engines and crippling her reactors, but almost blowing the ship up outright. American guns shift fire to the escorting destroyer NRS Corsica (Captain Daphne St. Croix), while the USS Liberty set up for another torpedo spread while also getting close enough to recover her bombers for a possible second strike. The Northampton pivots to present her first proper broadside of the engagement, but already she’s badly hammered by the Nicaea’s previous gunnery.
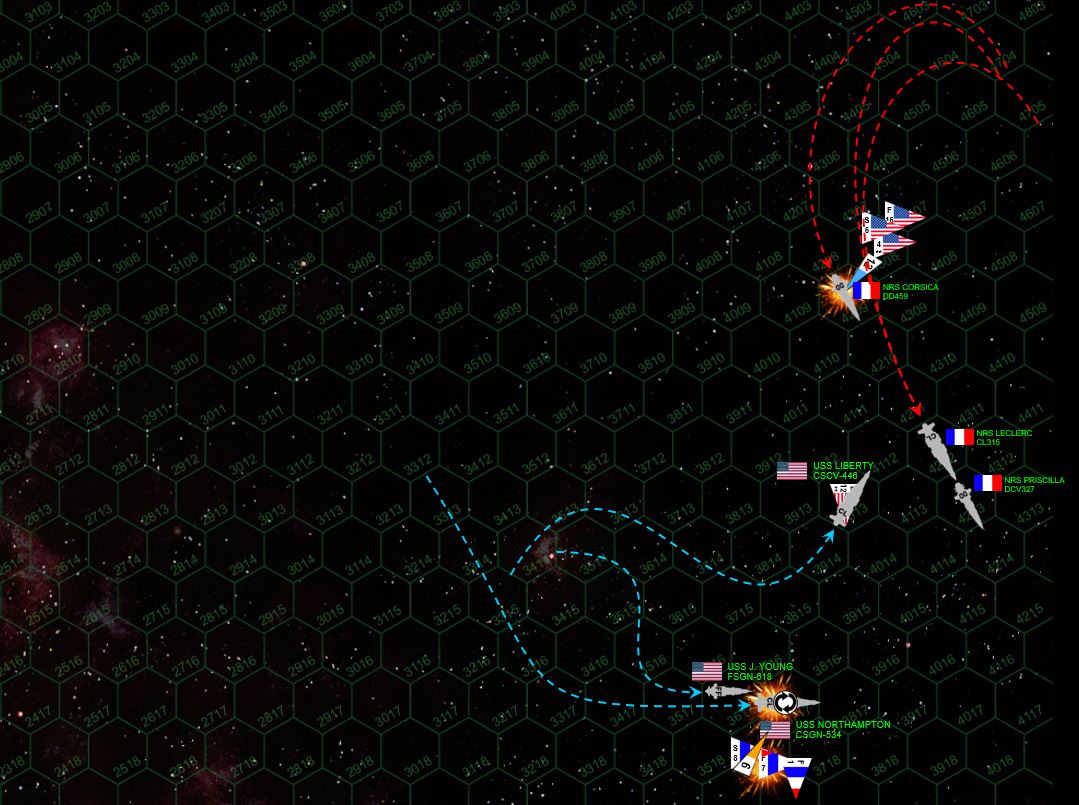 Captain deChalemonde (NRS Leclerc) comes hard about and dives toward the Americans, who are still trying to decelerate after their very fast approach runs. DeChalemonde is also determined to knock out the Northampton (note she is rolled to protect her damaged port side). Roman fighters and torpedoes try to spin around to hit the Northampton’s port quarter (where shields have gone down) but despite losing a fighter, the torpedoes are all shot down and the fighters’ gunnery run doesn’t quite known down the American cruiser. American bombers land to begin rearming for a second torpedo strike, while the Northampton takes another hammering (albeit on a new facing with fresh armor) from the Leclerc and Corsica. The Americans manage to cripple the Corsica, however, while the Liberty also takes tremendous damage along her starboard bow (the French perhaps trying to destroy those “Avenger” torpedo bombers while they’re still in the hangars).
 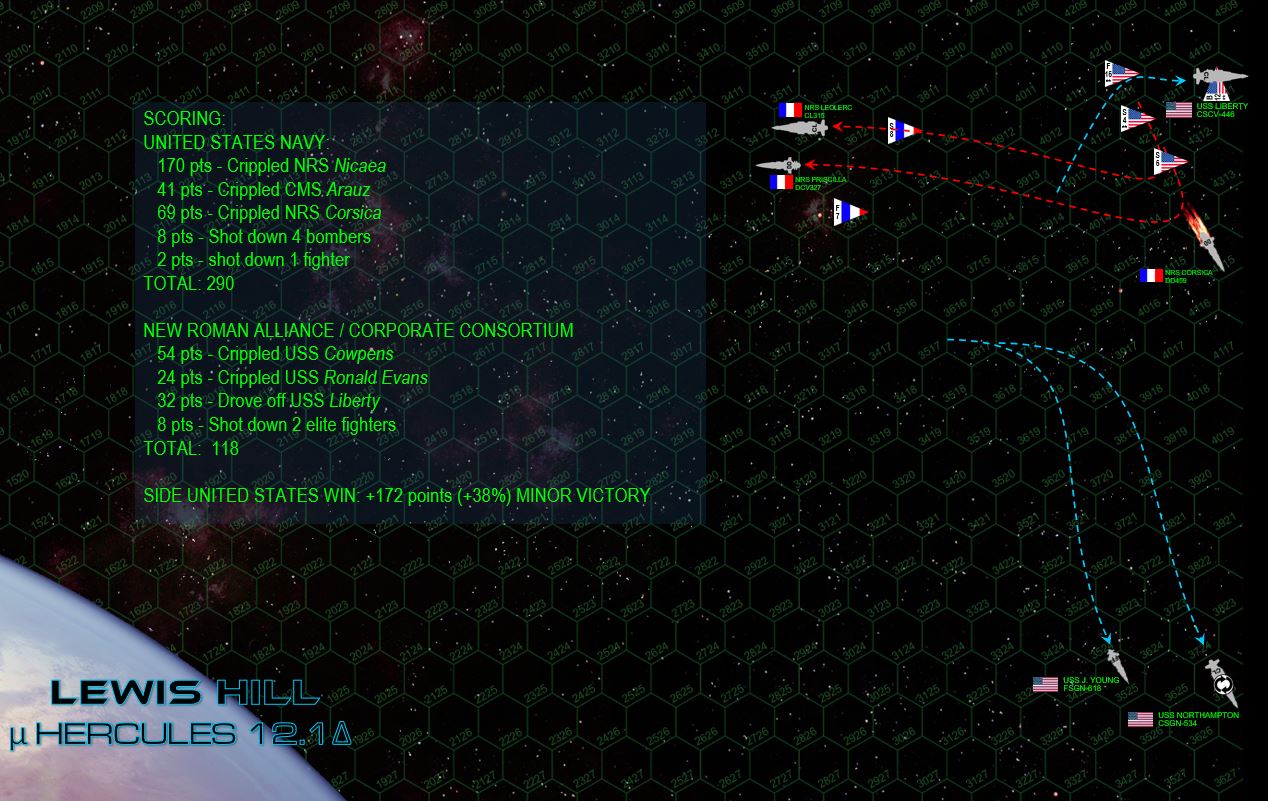 Although the deChalemonde aboard the Leclerc is ready to continue the fight (his light cruiser and the carrier Priscilla remain operational), Captains Zachary Irons aboard the Liberty and Jack Morrison aboard the Northampton accelerate to break off the engagement. That have done far more damage to the Romans than vice-versa, and both the Liberty and Northampton are now very heavily damaged with widespread systems damage. With the frigate USS John Young close abeam, they pull off the Lewis Hill orbital zone and break off the battle, leaving the French over the planetoid but in far, far too weakened a state to maintain a foothold in the Mu Hercules system. The score of the game is displayed in the graphic, shaking out as a VERY solid American minor victory (just two percentage points shy of a major victory). After the embarrassing outcome of Kayashenko 12 and the Treaty of Zubrin, this is a much needed boost to American naval prestige, even if it was won to the benefit of their former British foes. As for the New Romans, it is hardly an auspicious debut into the Third Hercules War, prompting some local archbishops to wonder if perhaps “sitting on the sidelines” was perhaps the best course of action after all.


