


![NO Weekender Or Cult Of Games XLBS This Weekend [Updated]](https://images.beastsofwar.com/2026/03/No_Weekender_and_XLBS_this_Weekend-225-127.jpg)


Manda’s (Amachan) Ἕλληνες (Hellēnes)


Recommendations: 202
About the Project
This project encompasses all of my forces for the Greeks or Ἕλληνες (Hellēnes) as they would call themselves.
Related Game: Midgard Heroic Battles
Related Company: Warlord Games
Related Genre: Historical
This Project is Active
Warlord Games
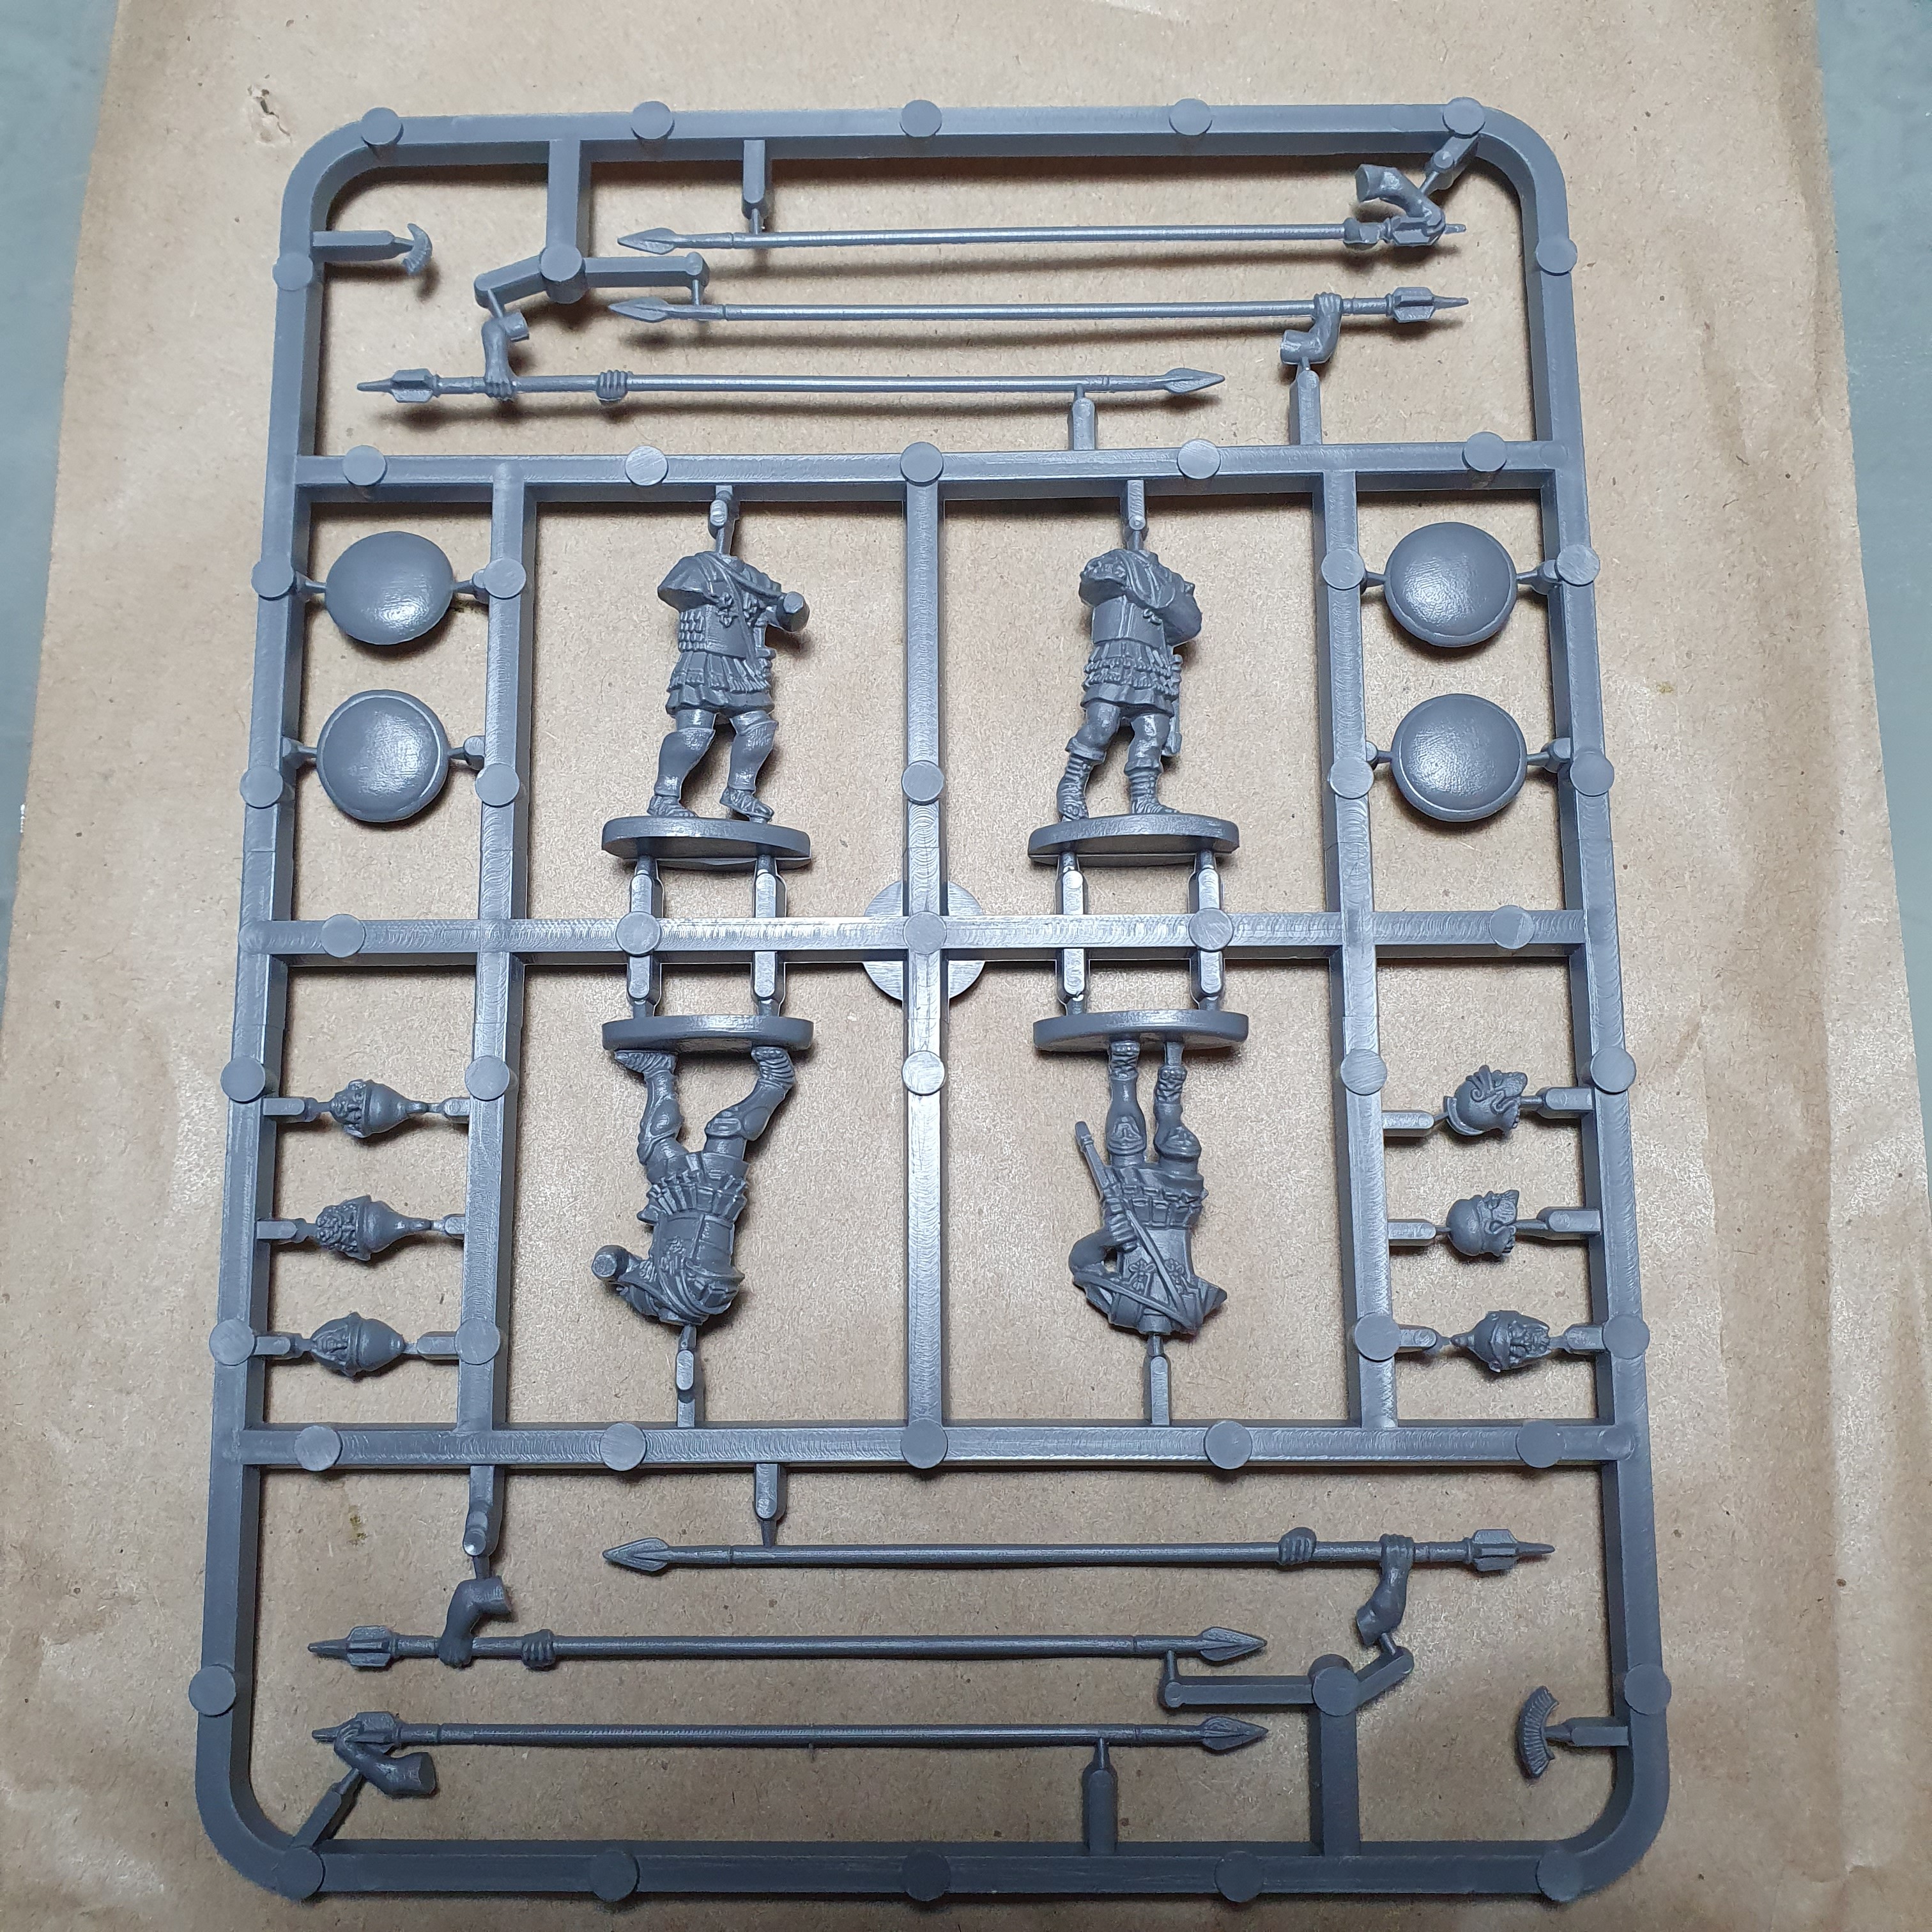
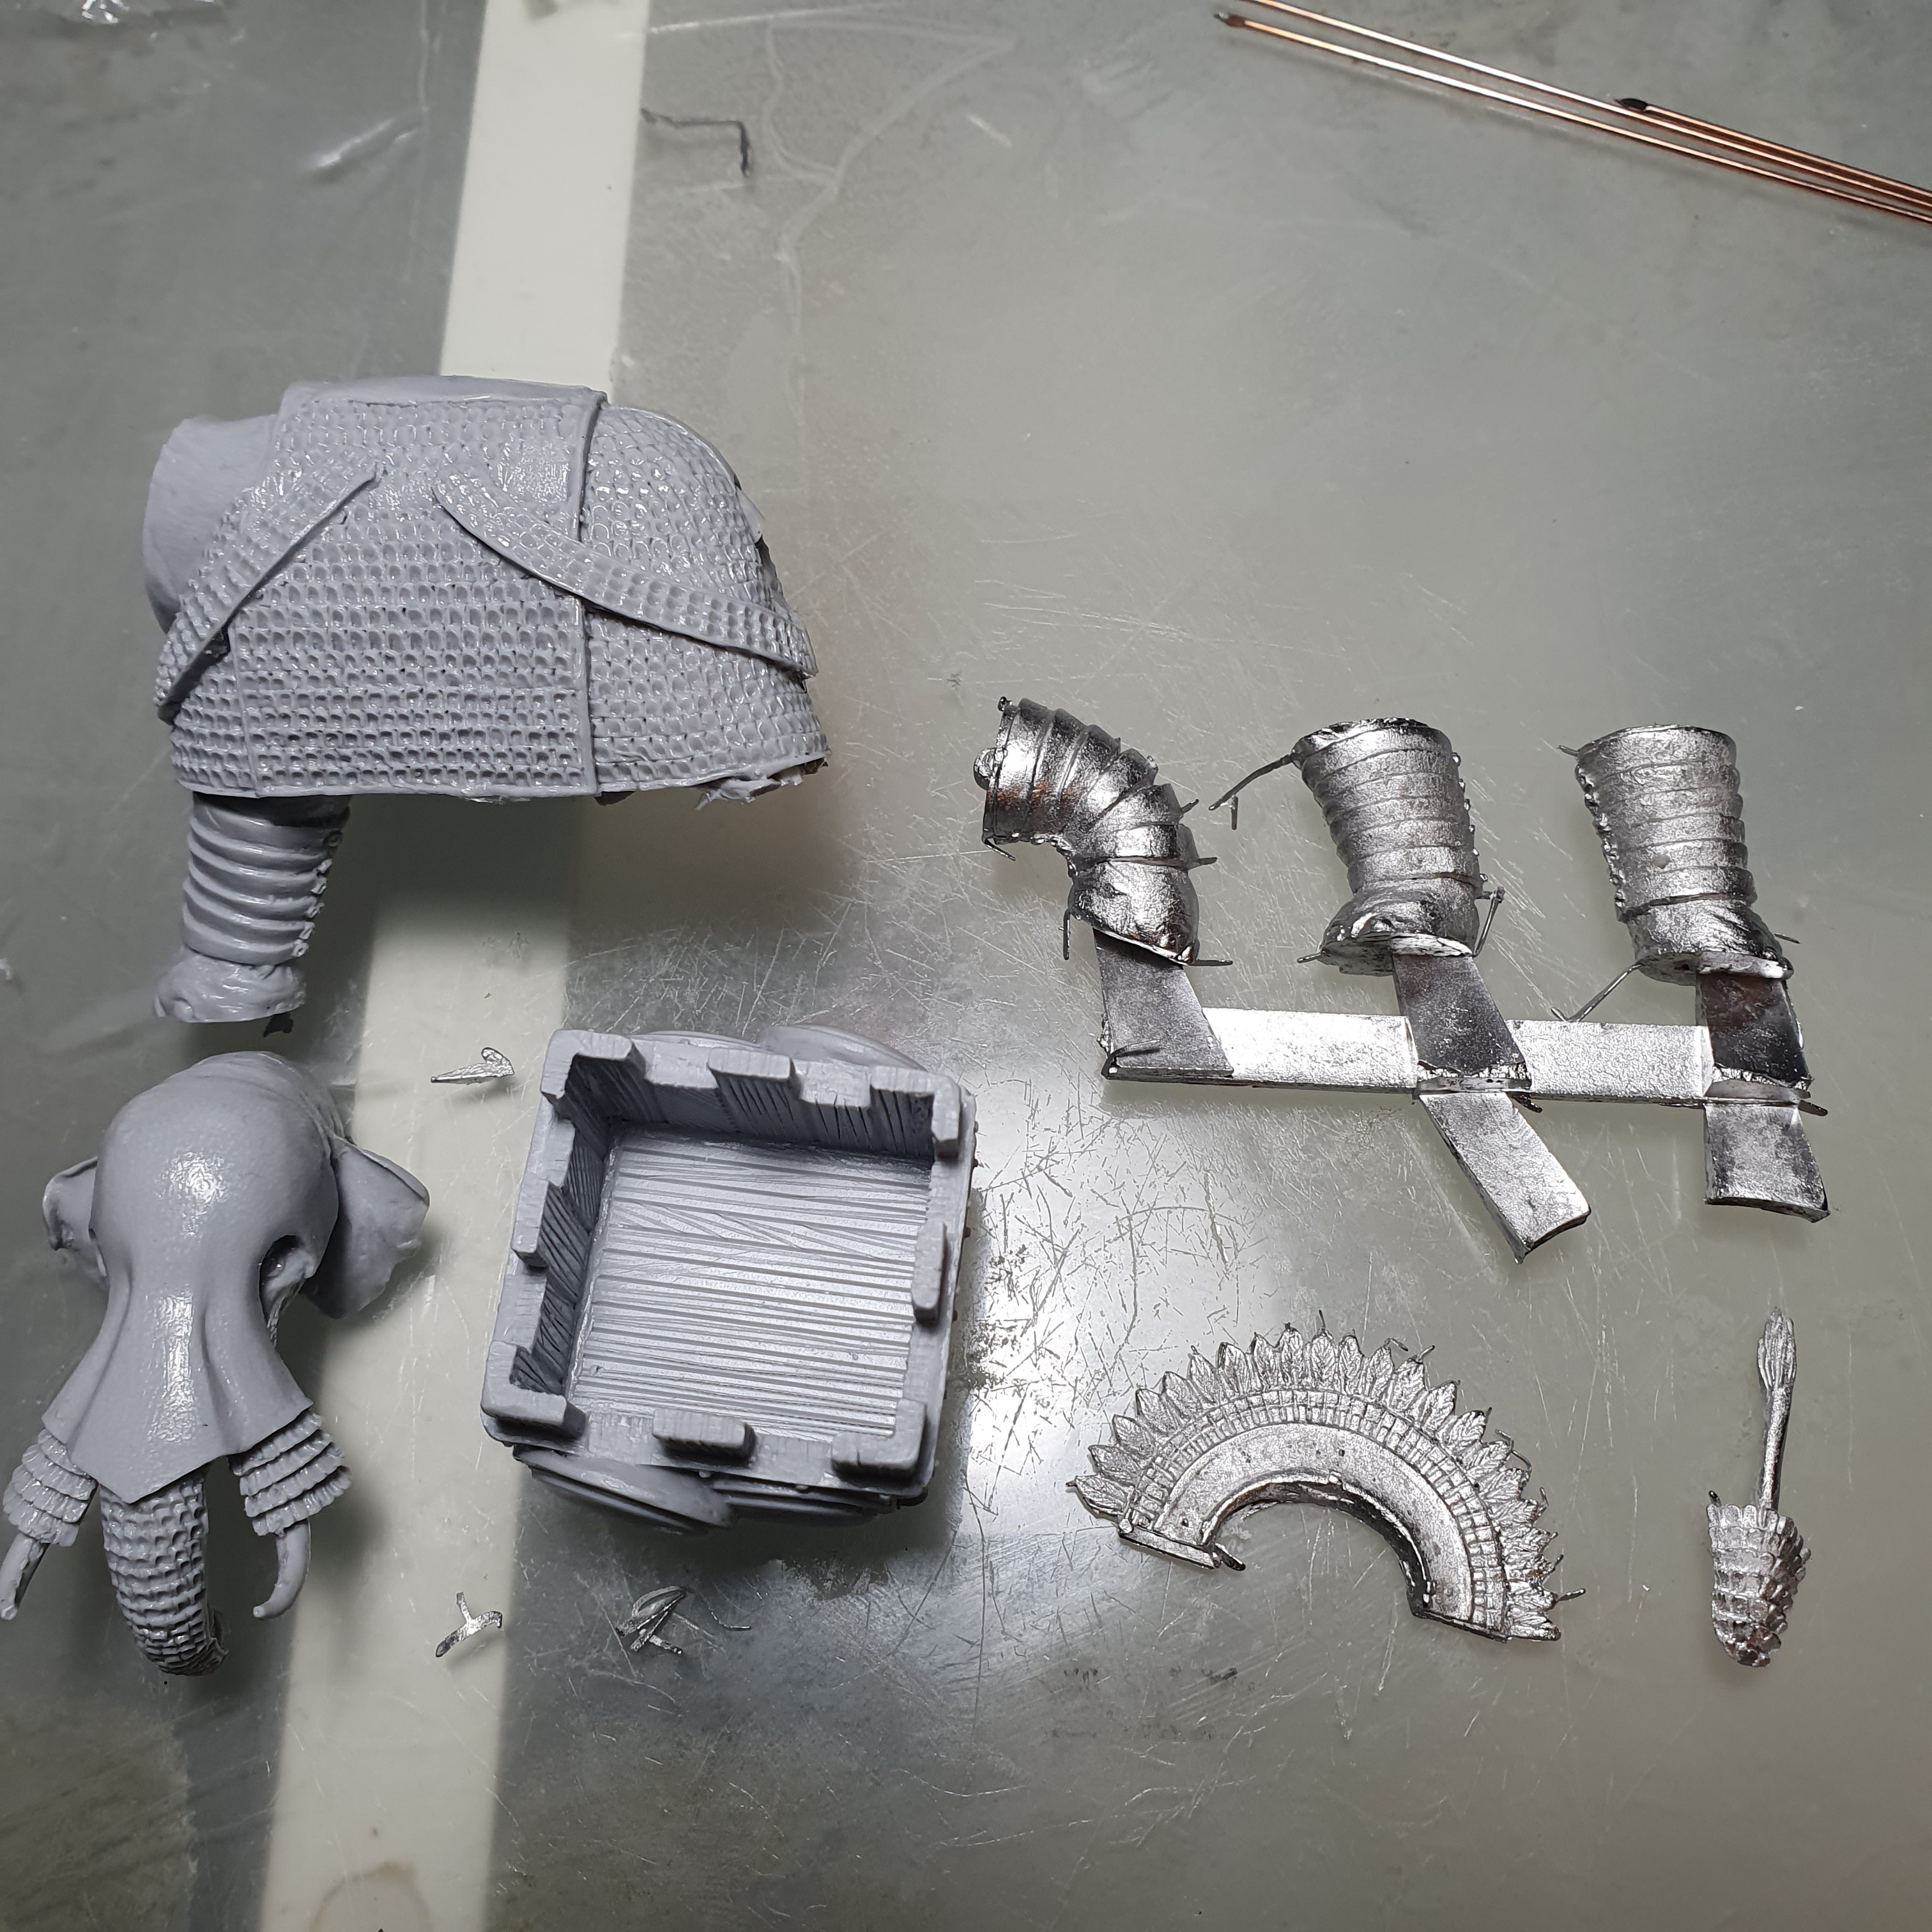
To start off the new Σελευκίς (Seleukis) part of my Ἕλληνες (Hellēnes) project, my order from Warlord Games came in today.
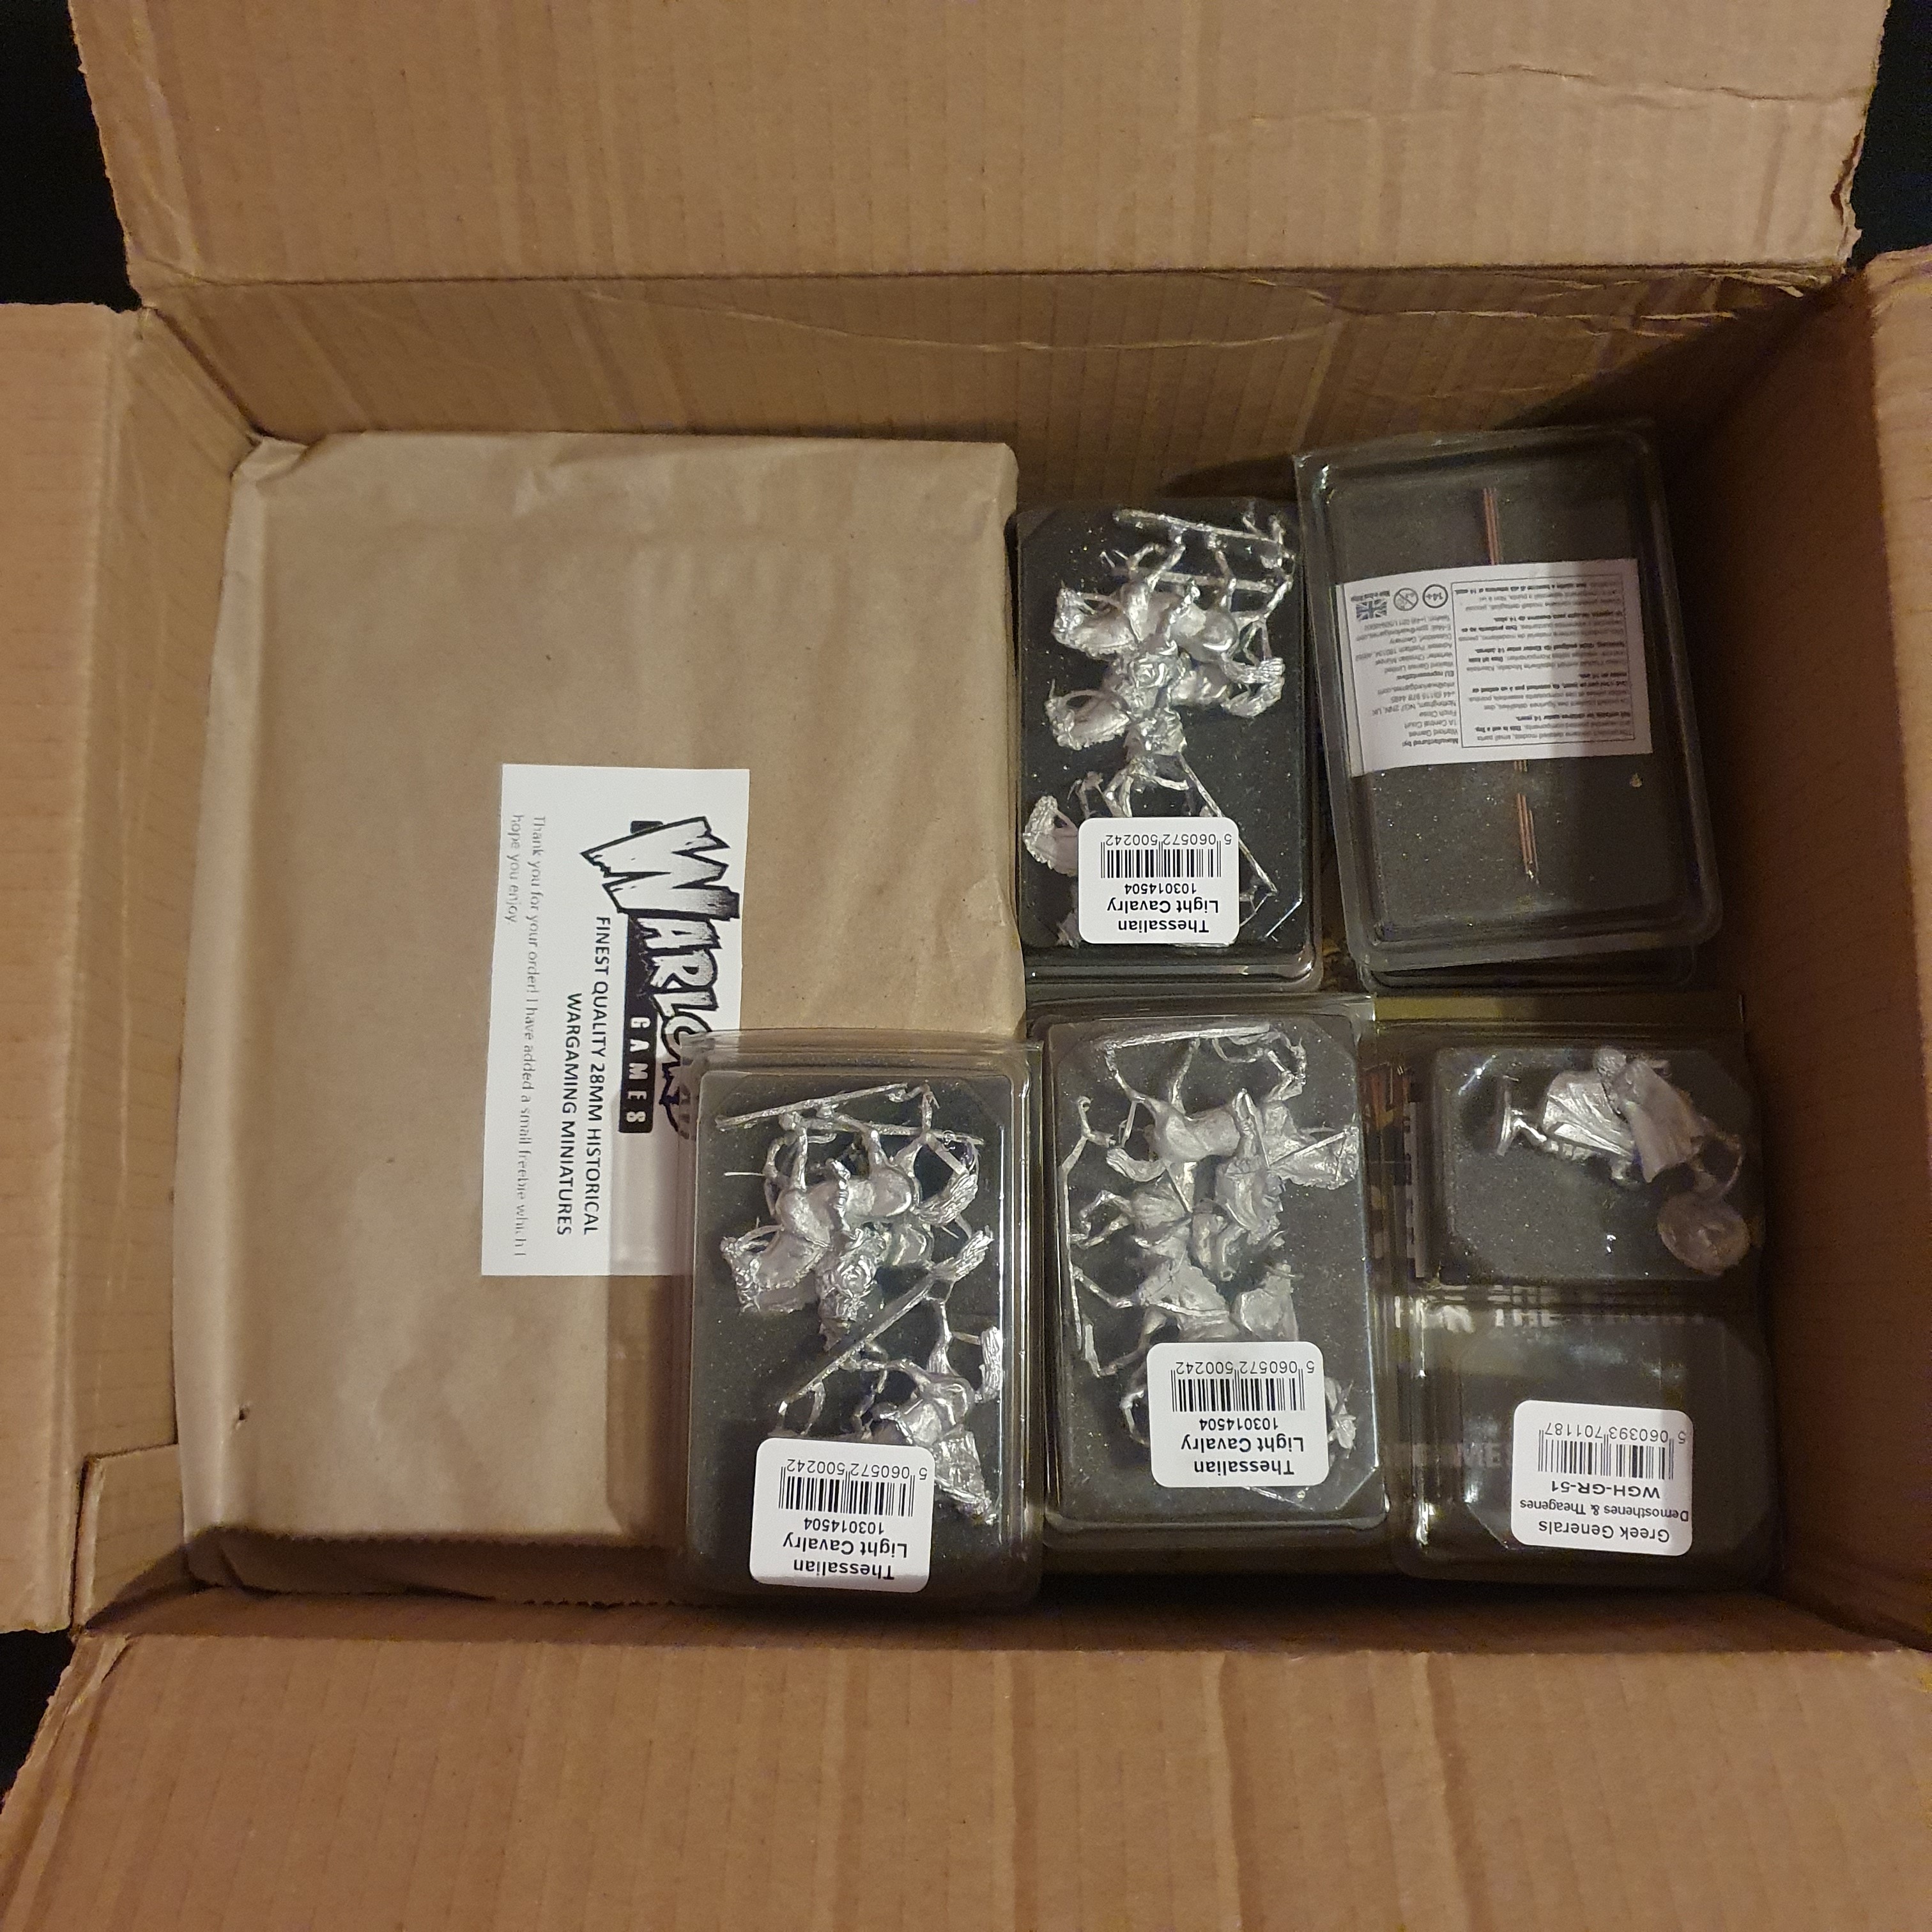
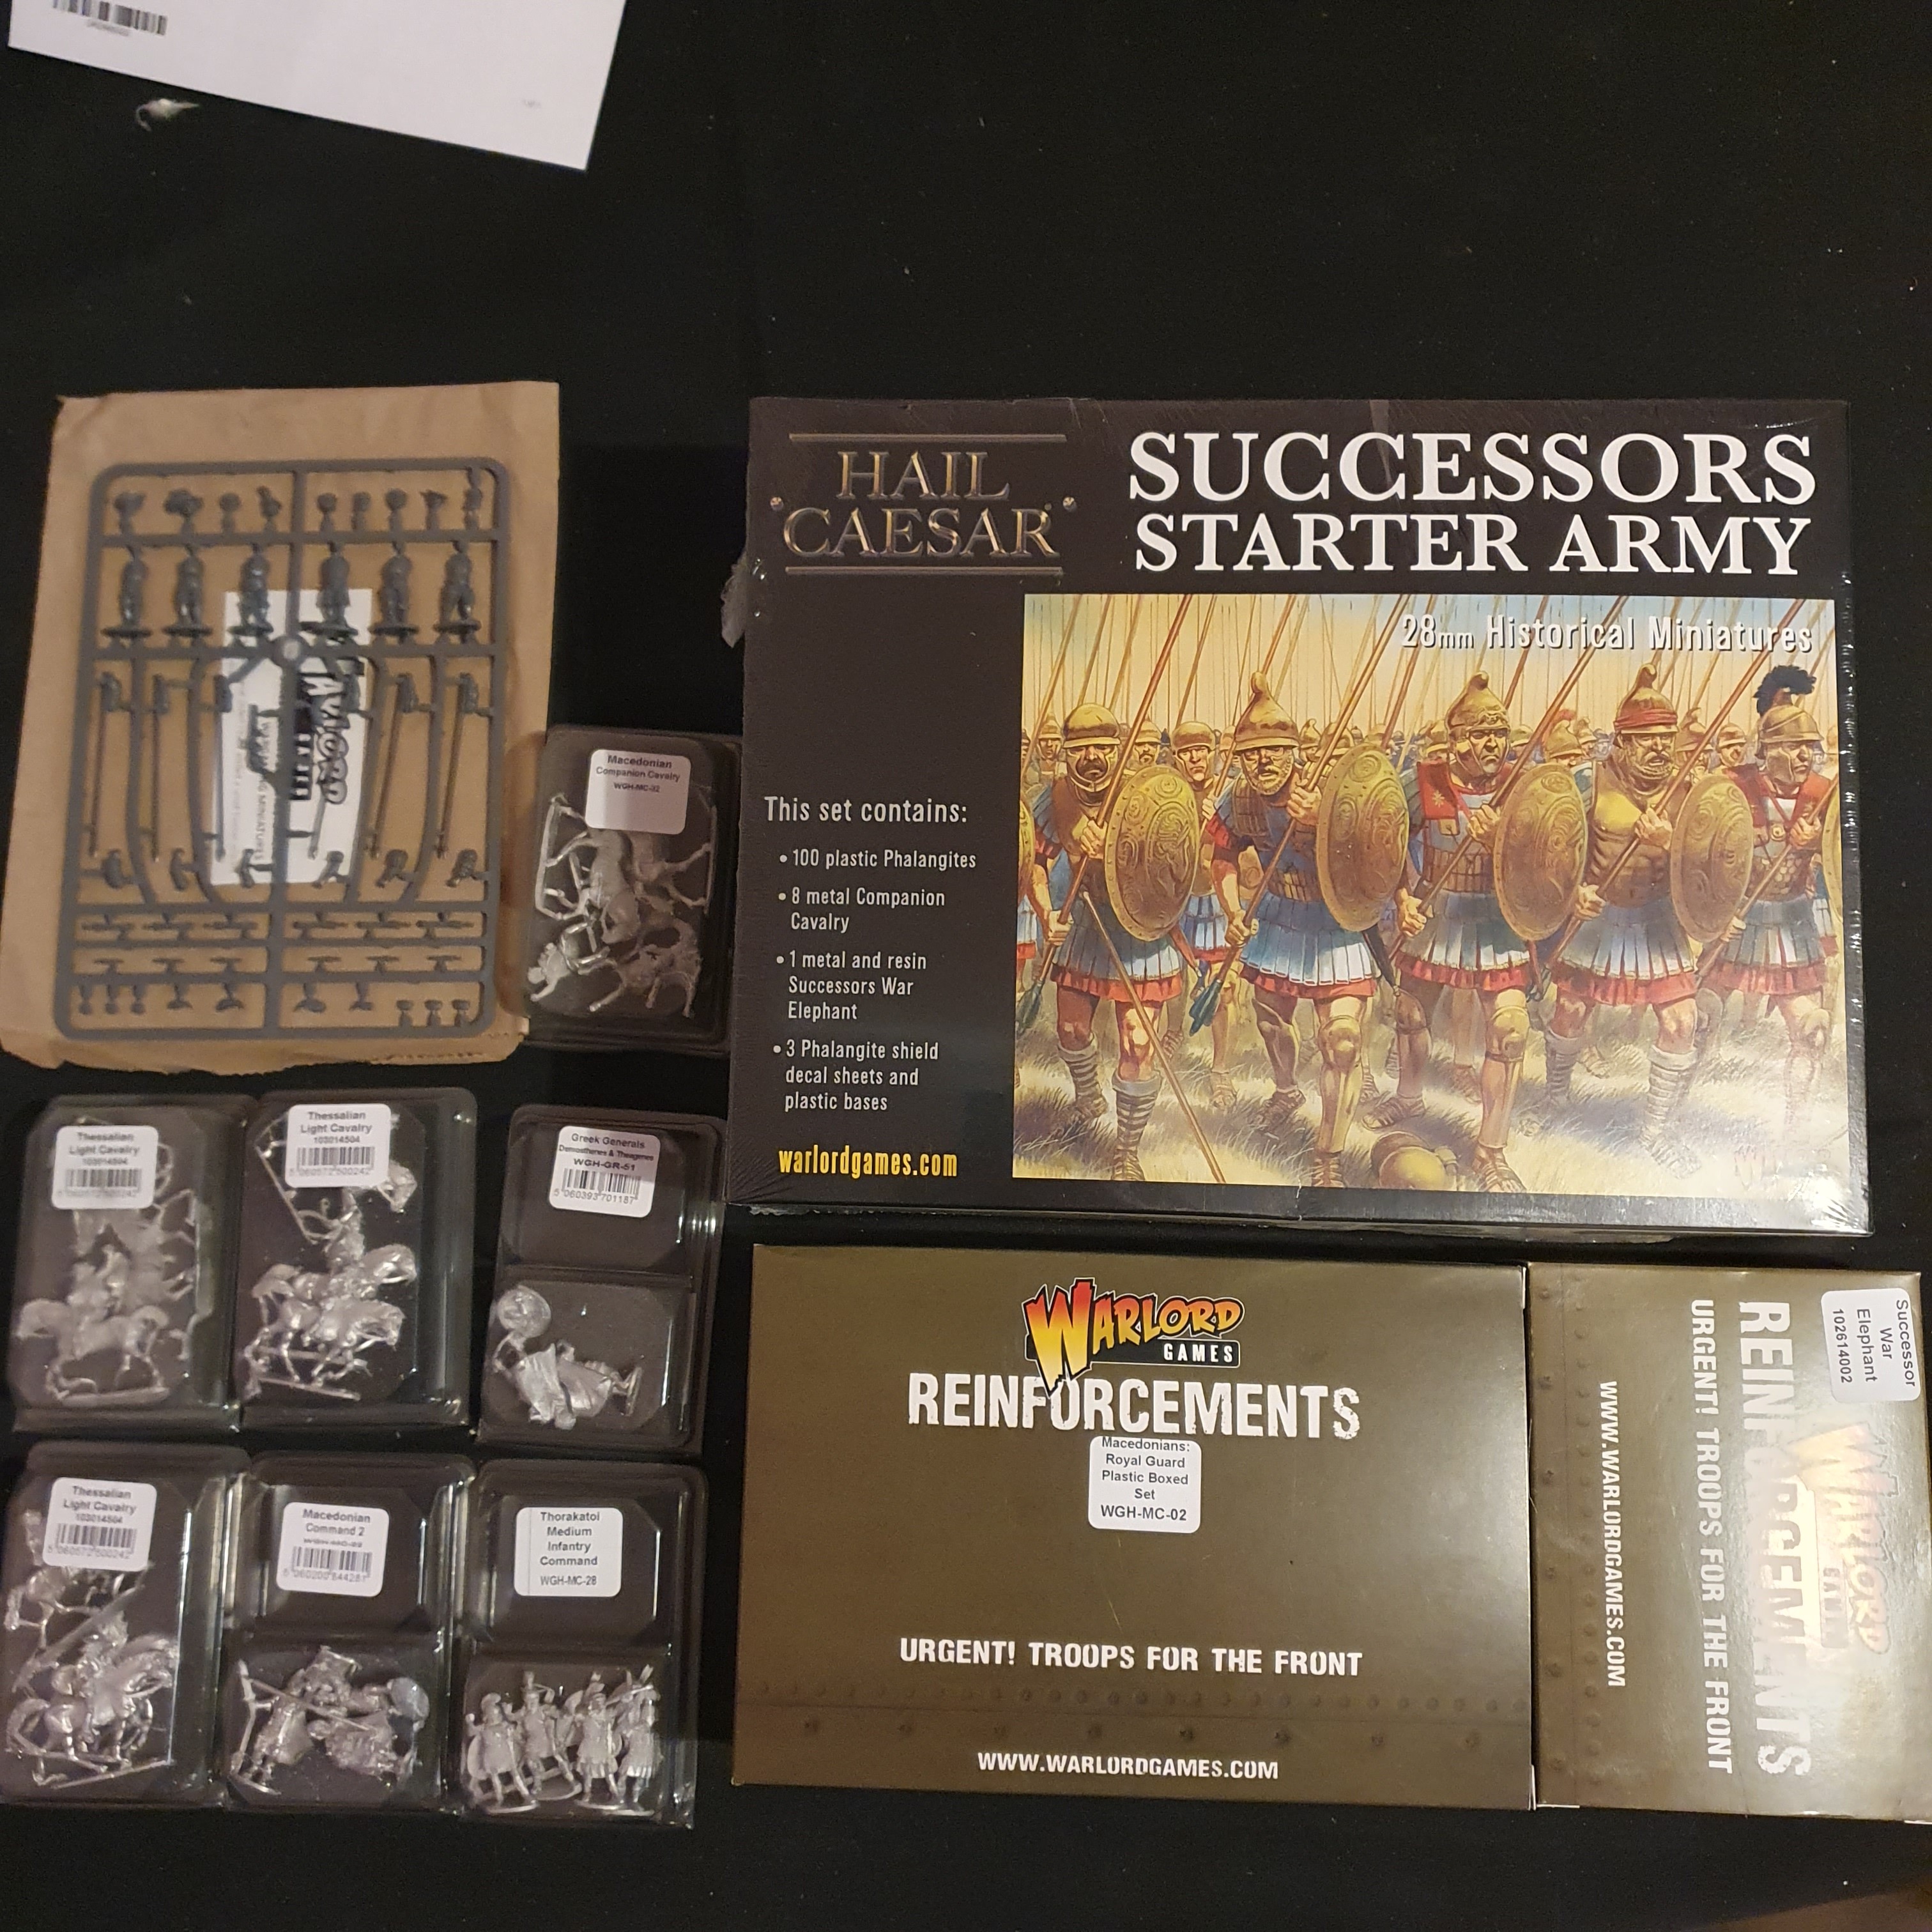
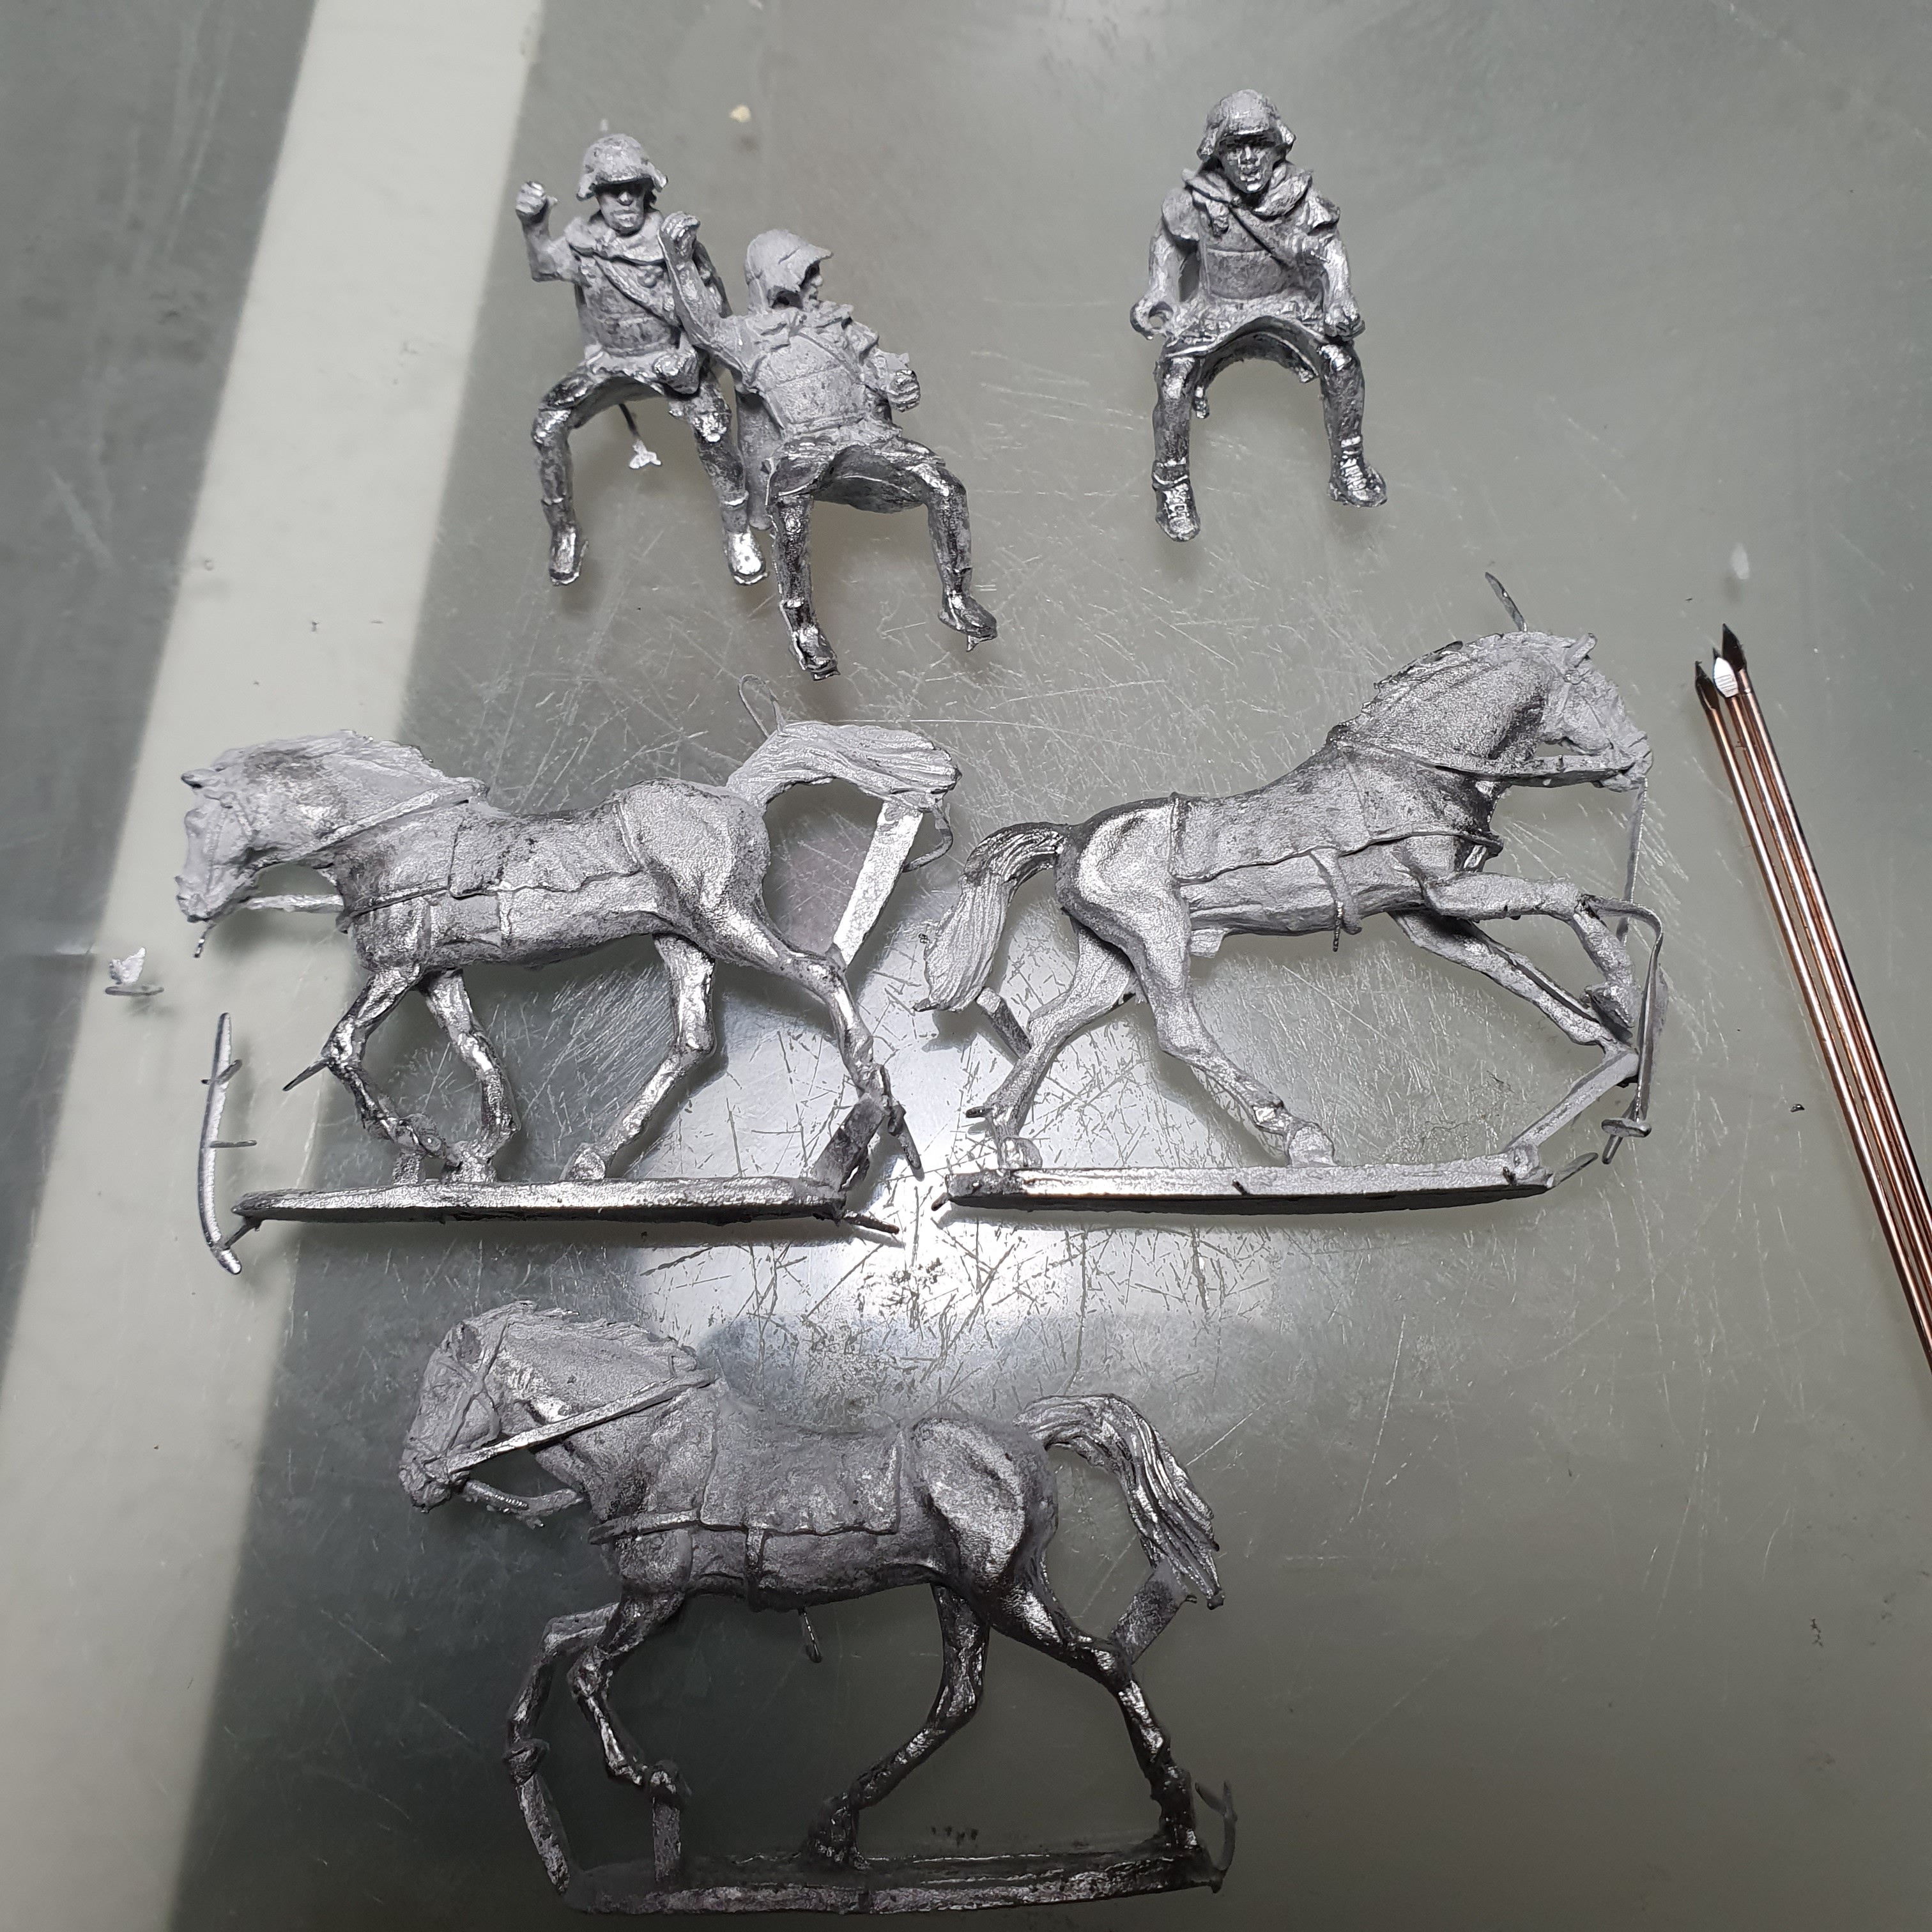
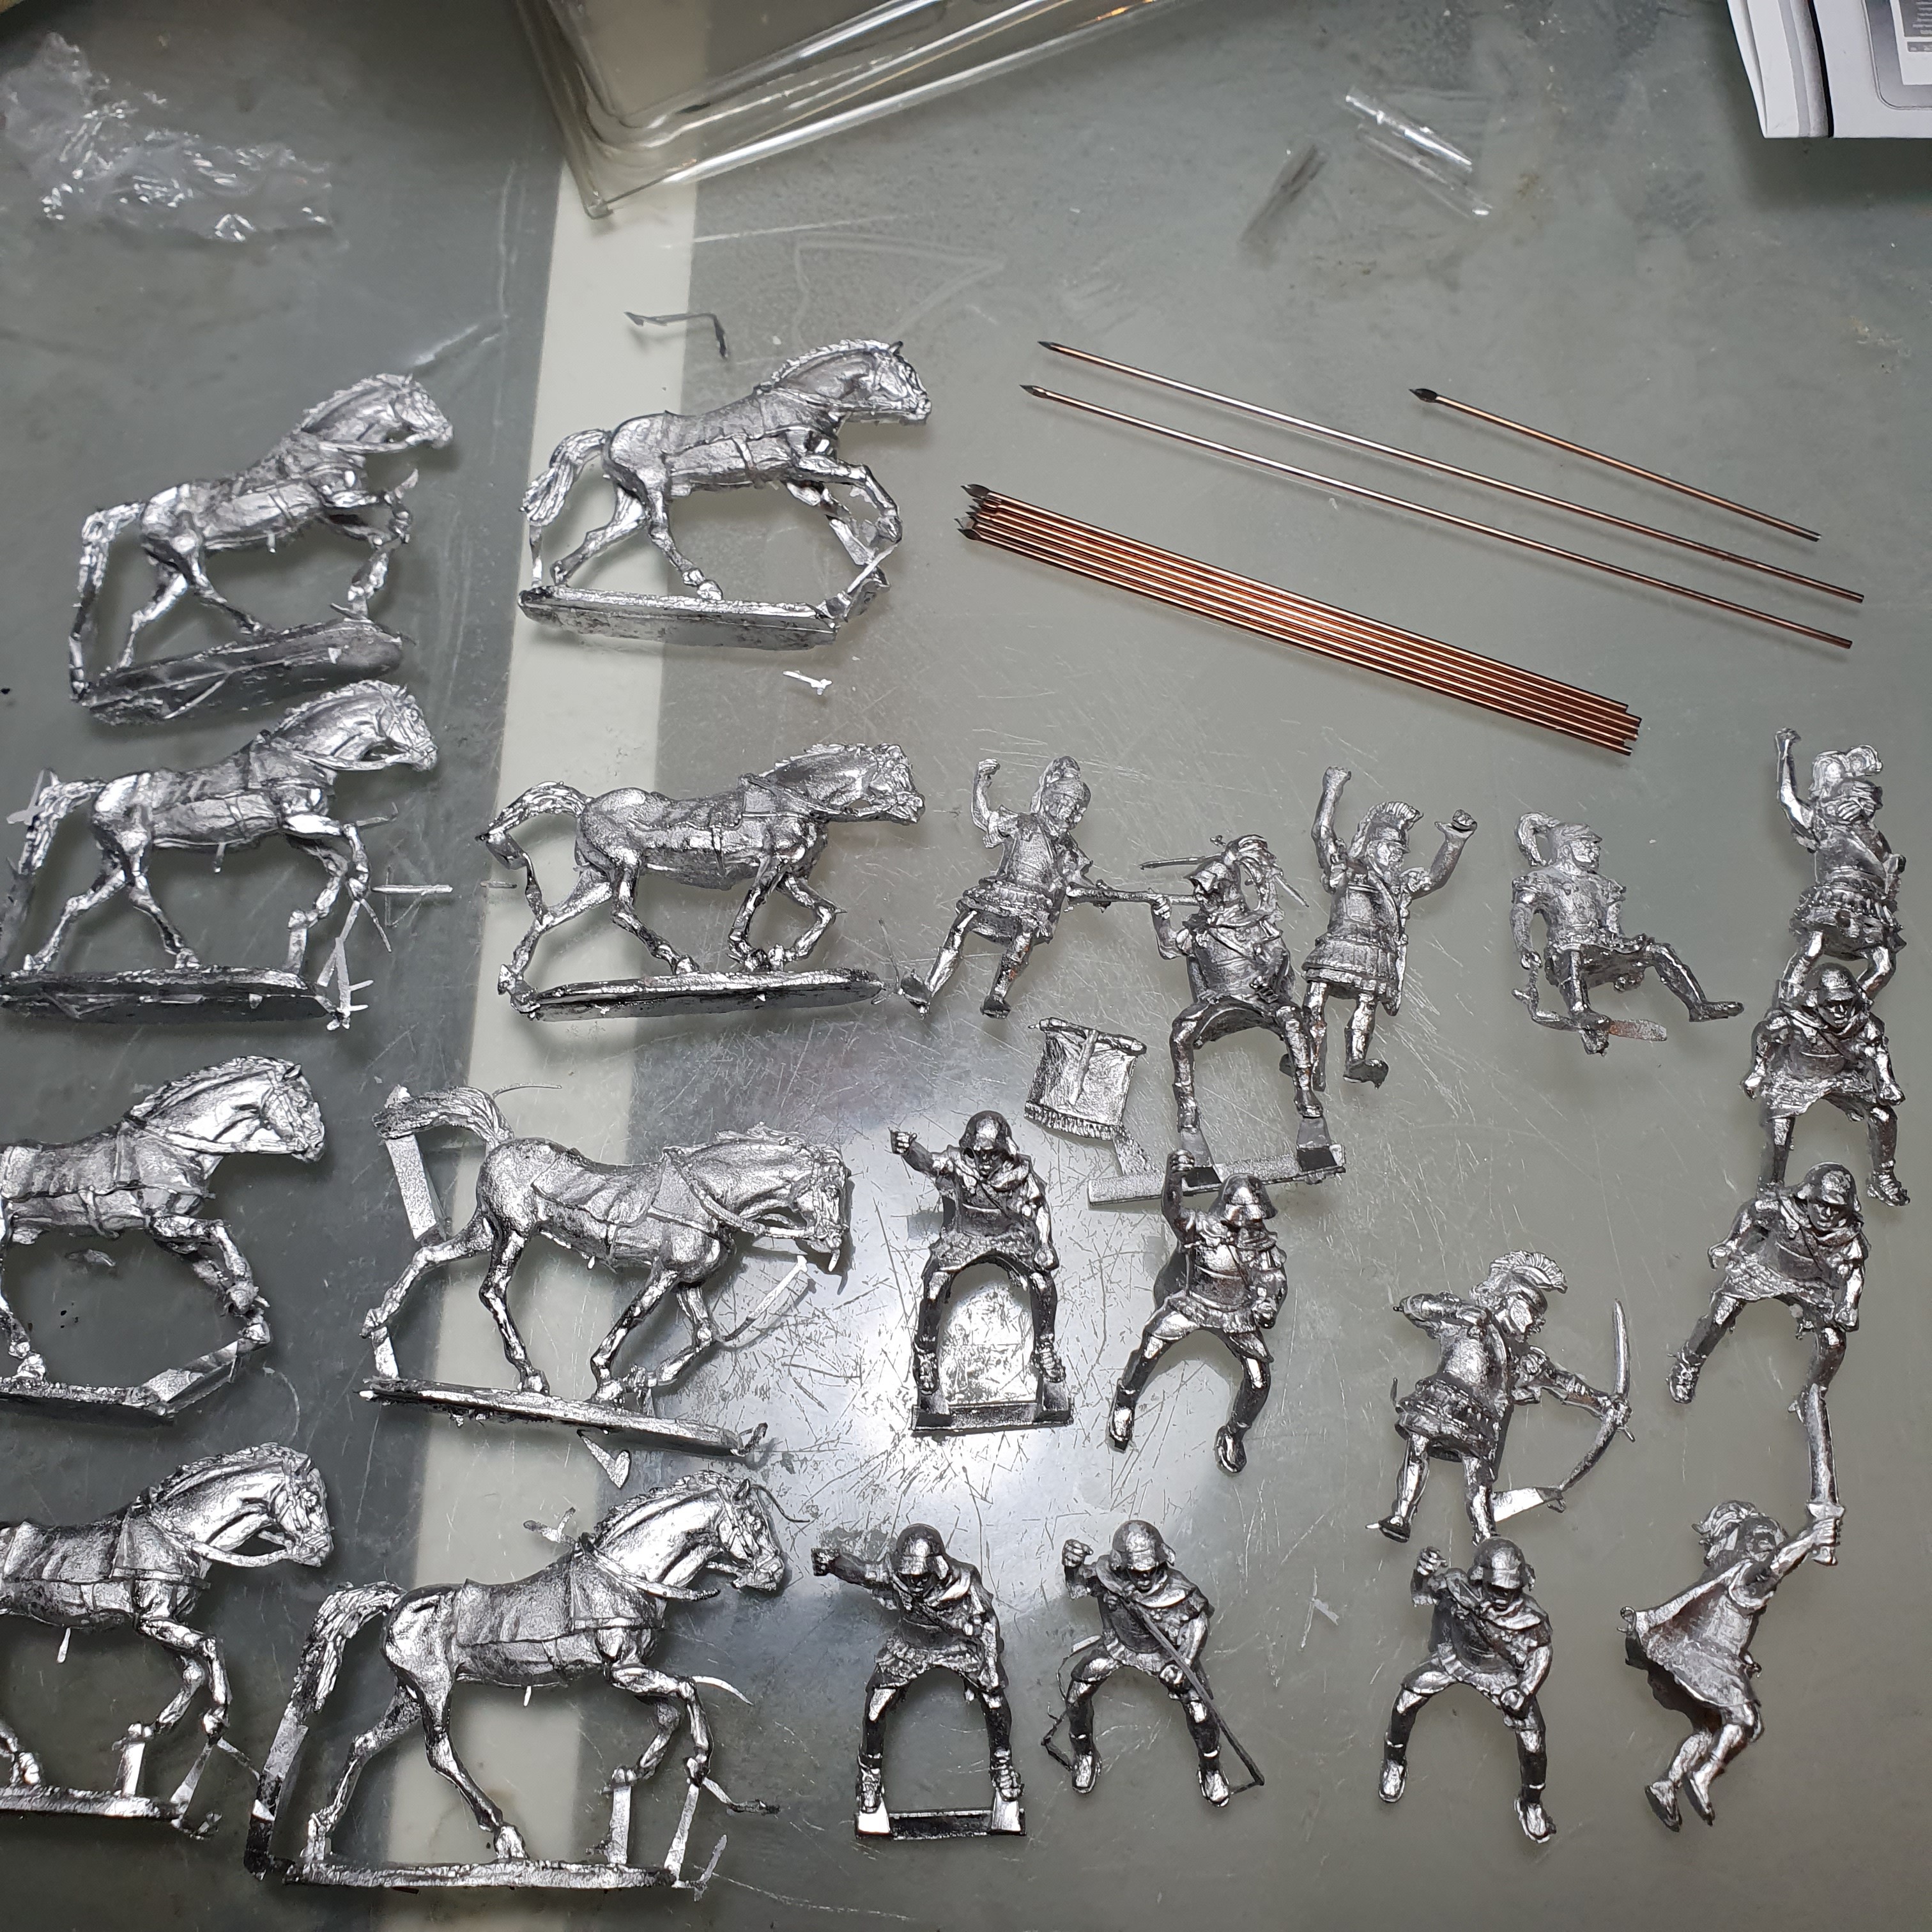
First up some Thessalian cavalry, a group of Macedonian command, a handful of Companion cavalry and 2 Greek generals.
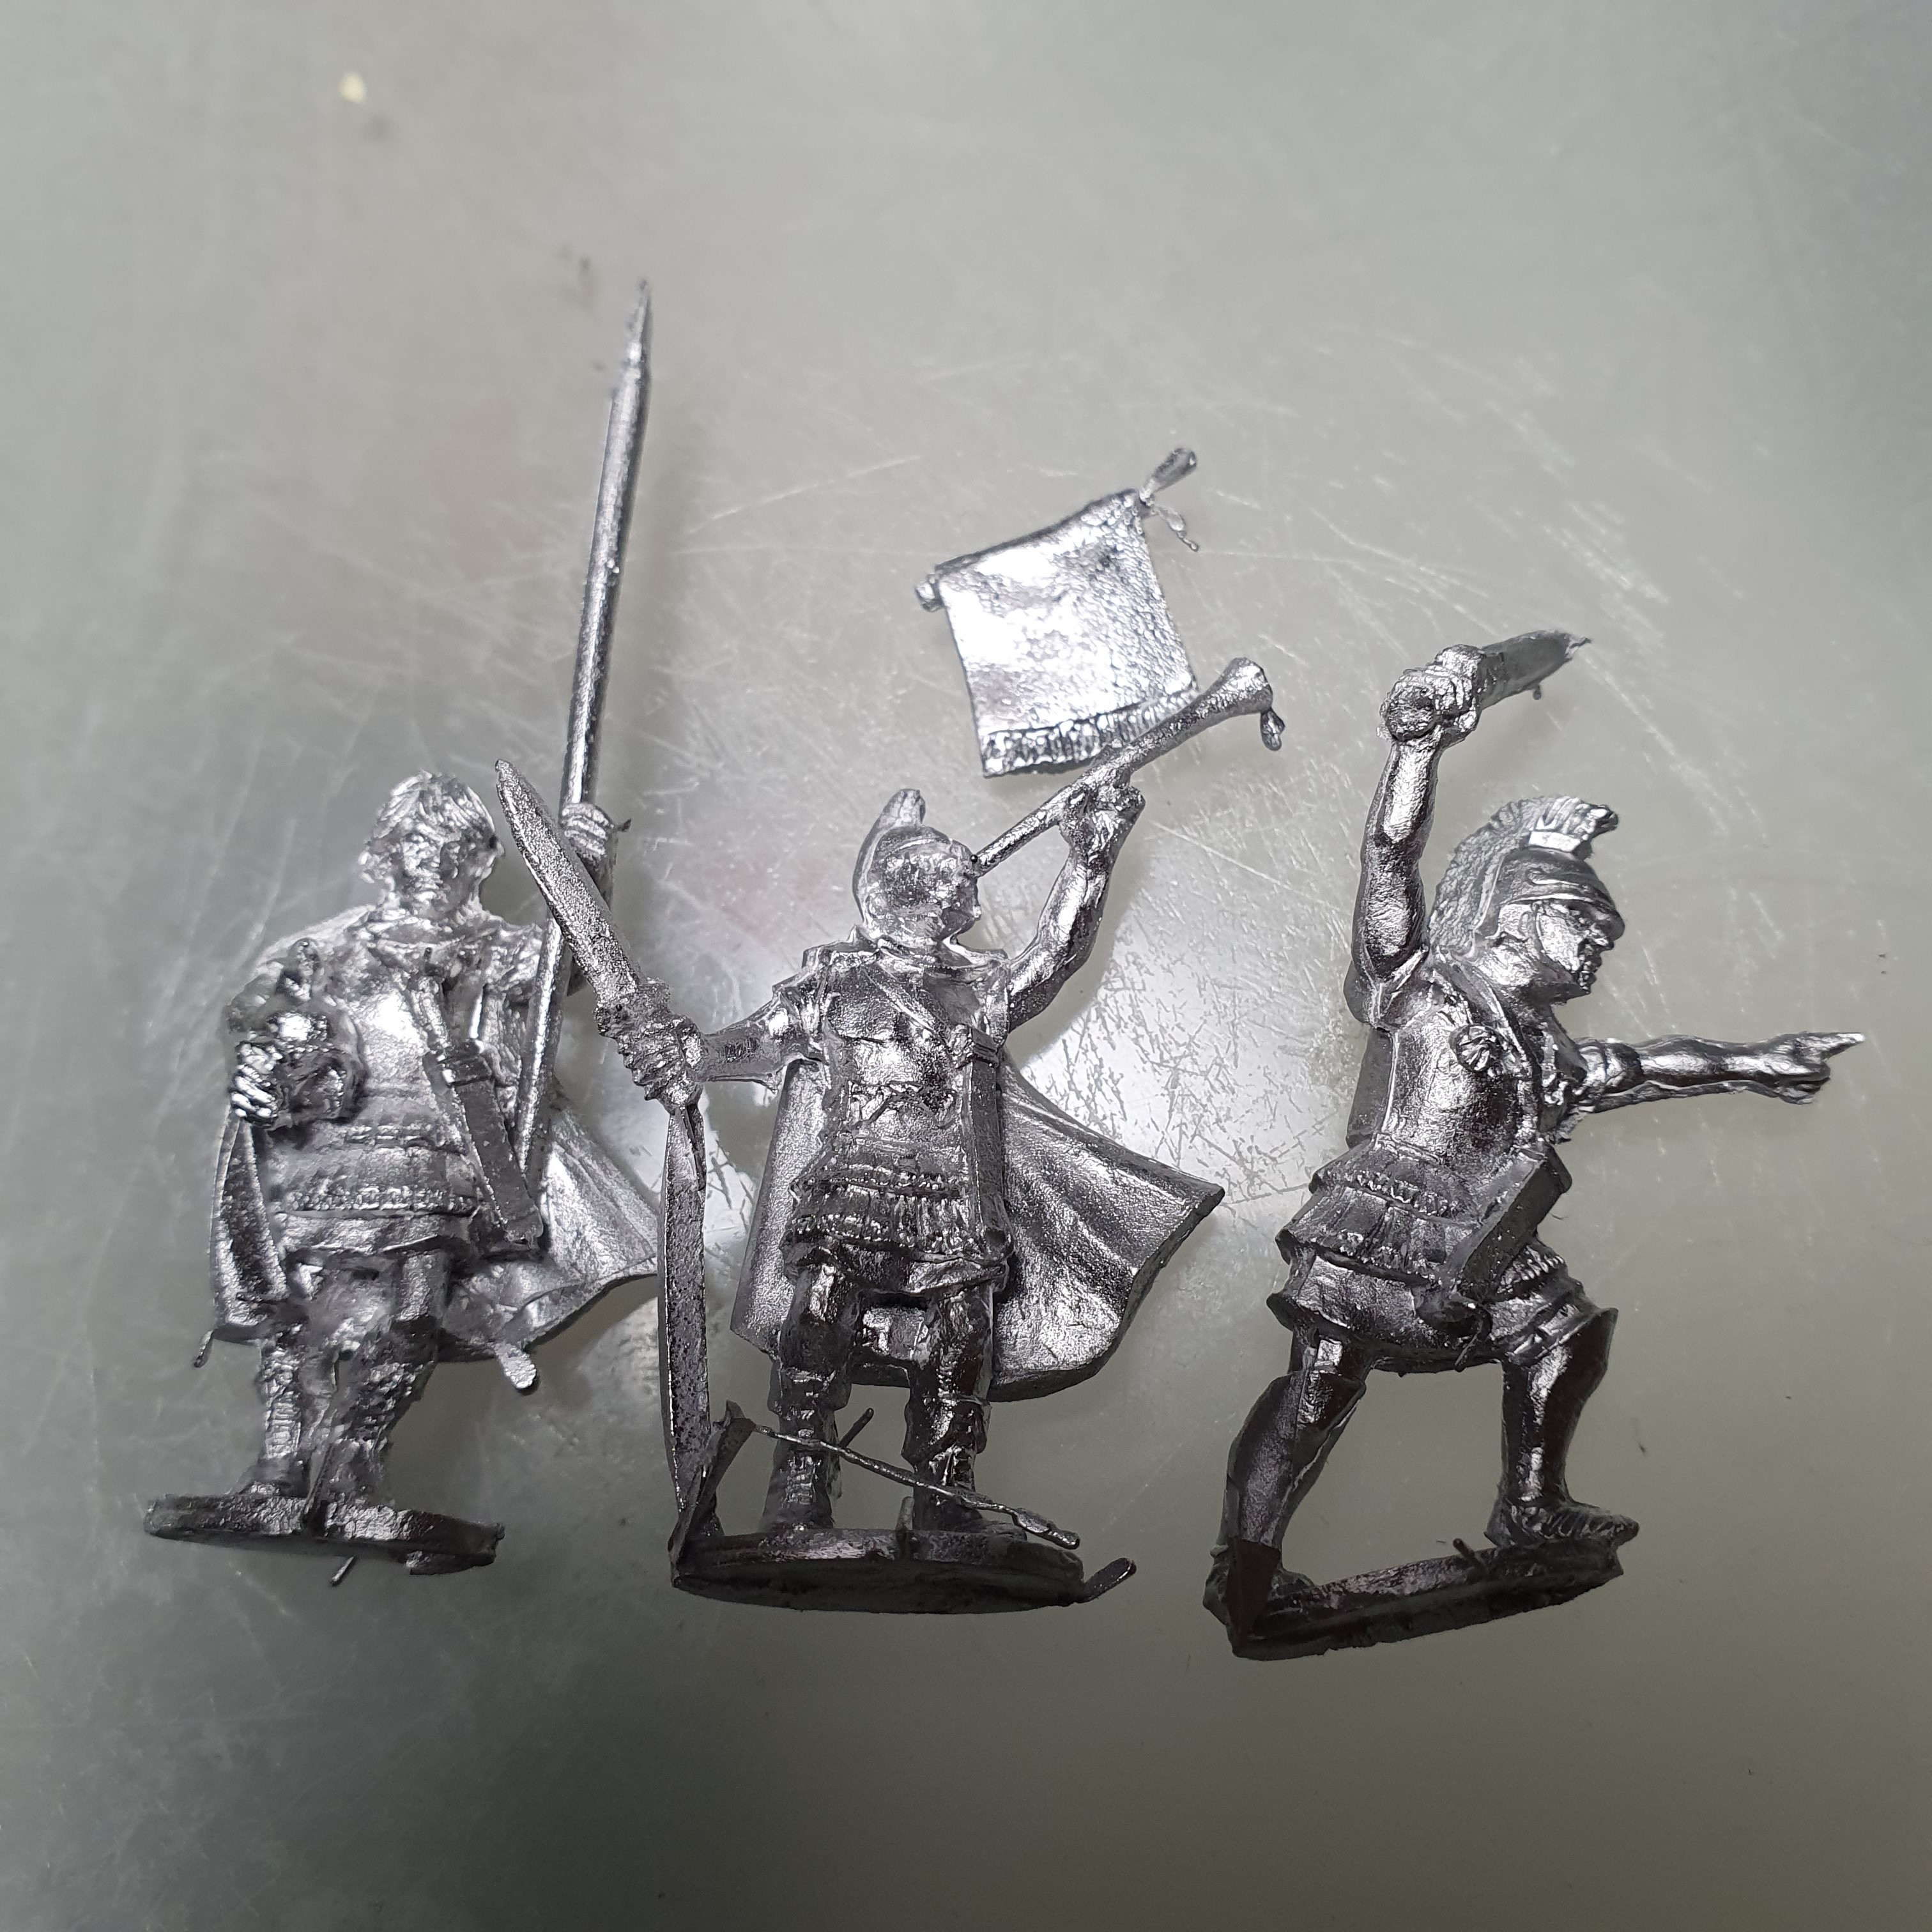

Then we have some θωρακίται (Thorakitai) command, an armoured war elephant and a set of Macedonian royal guard containing metal conversion bits and 6 sprues of Φαλανγίτεσ (Phalangites).

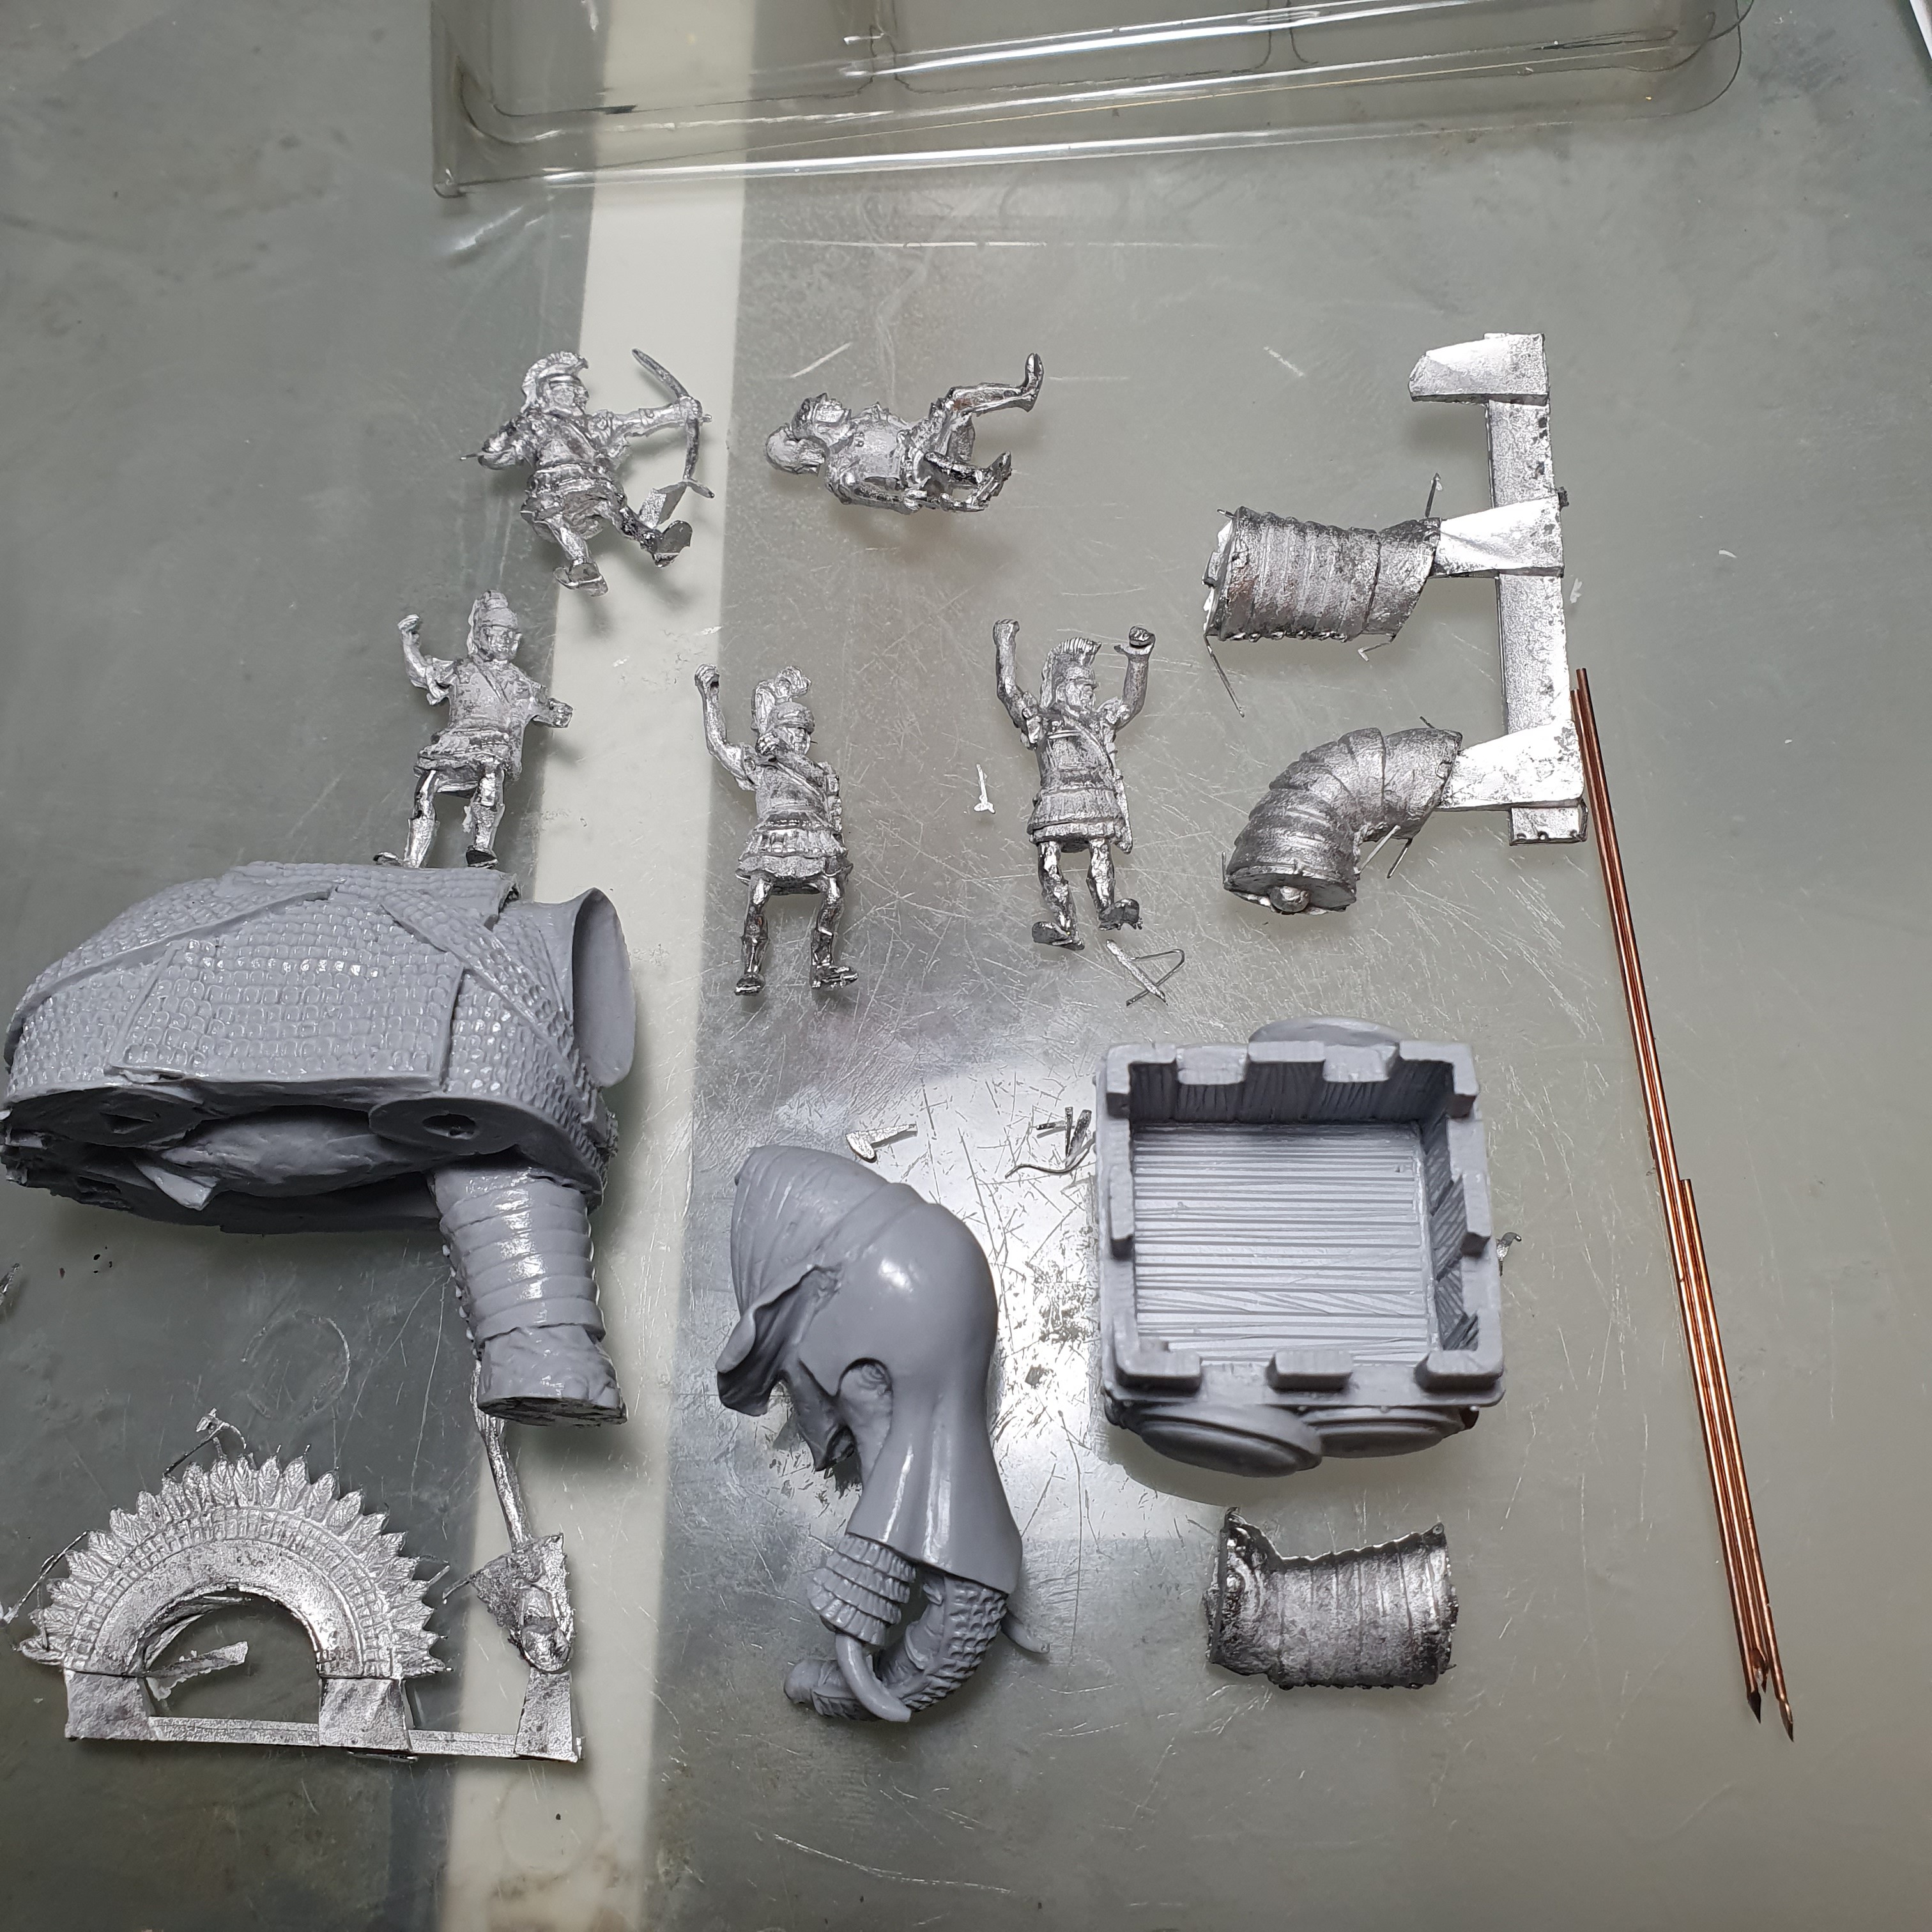
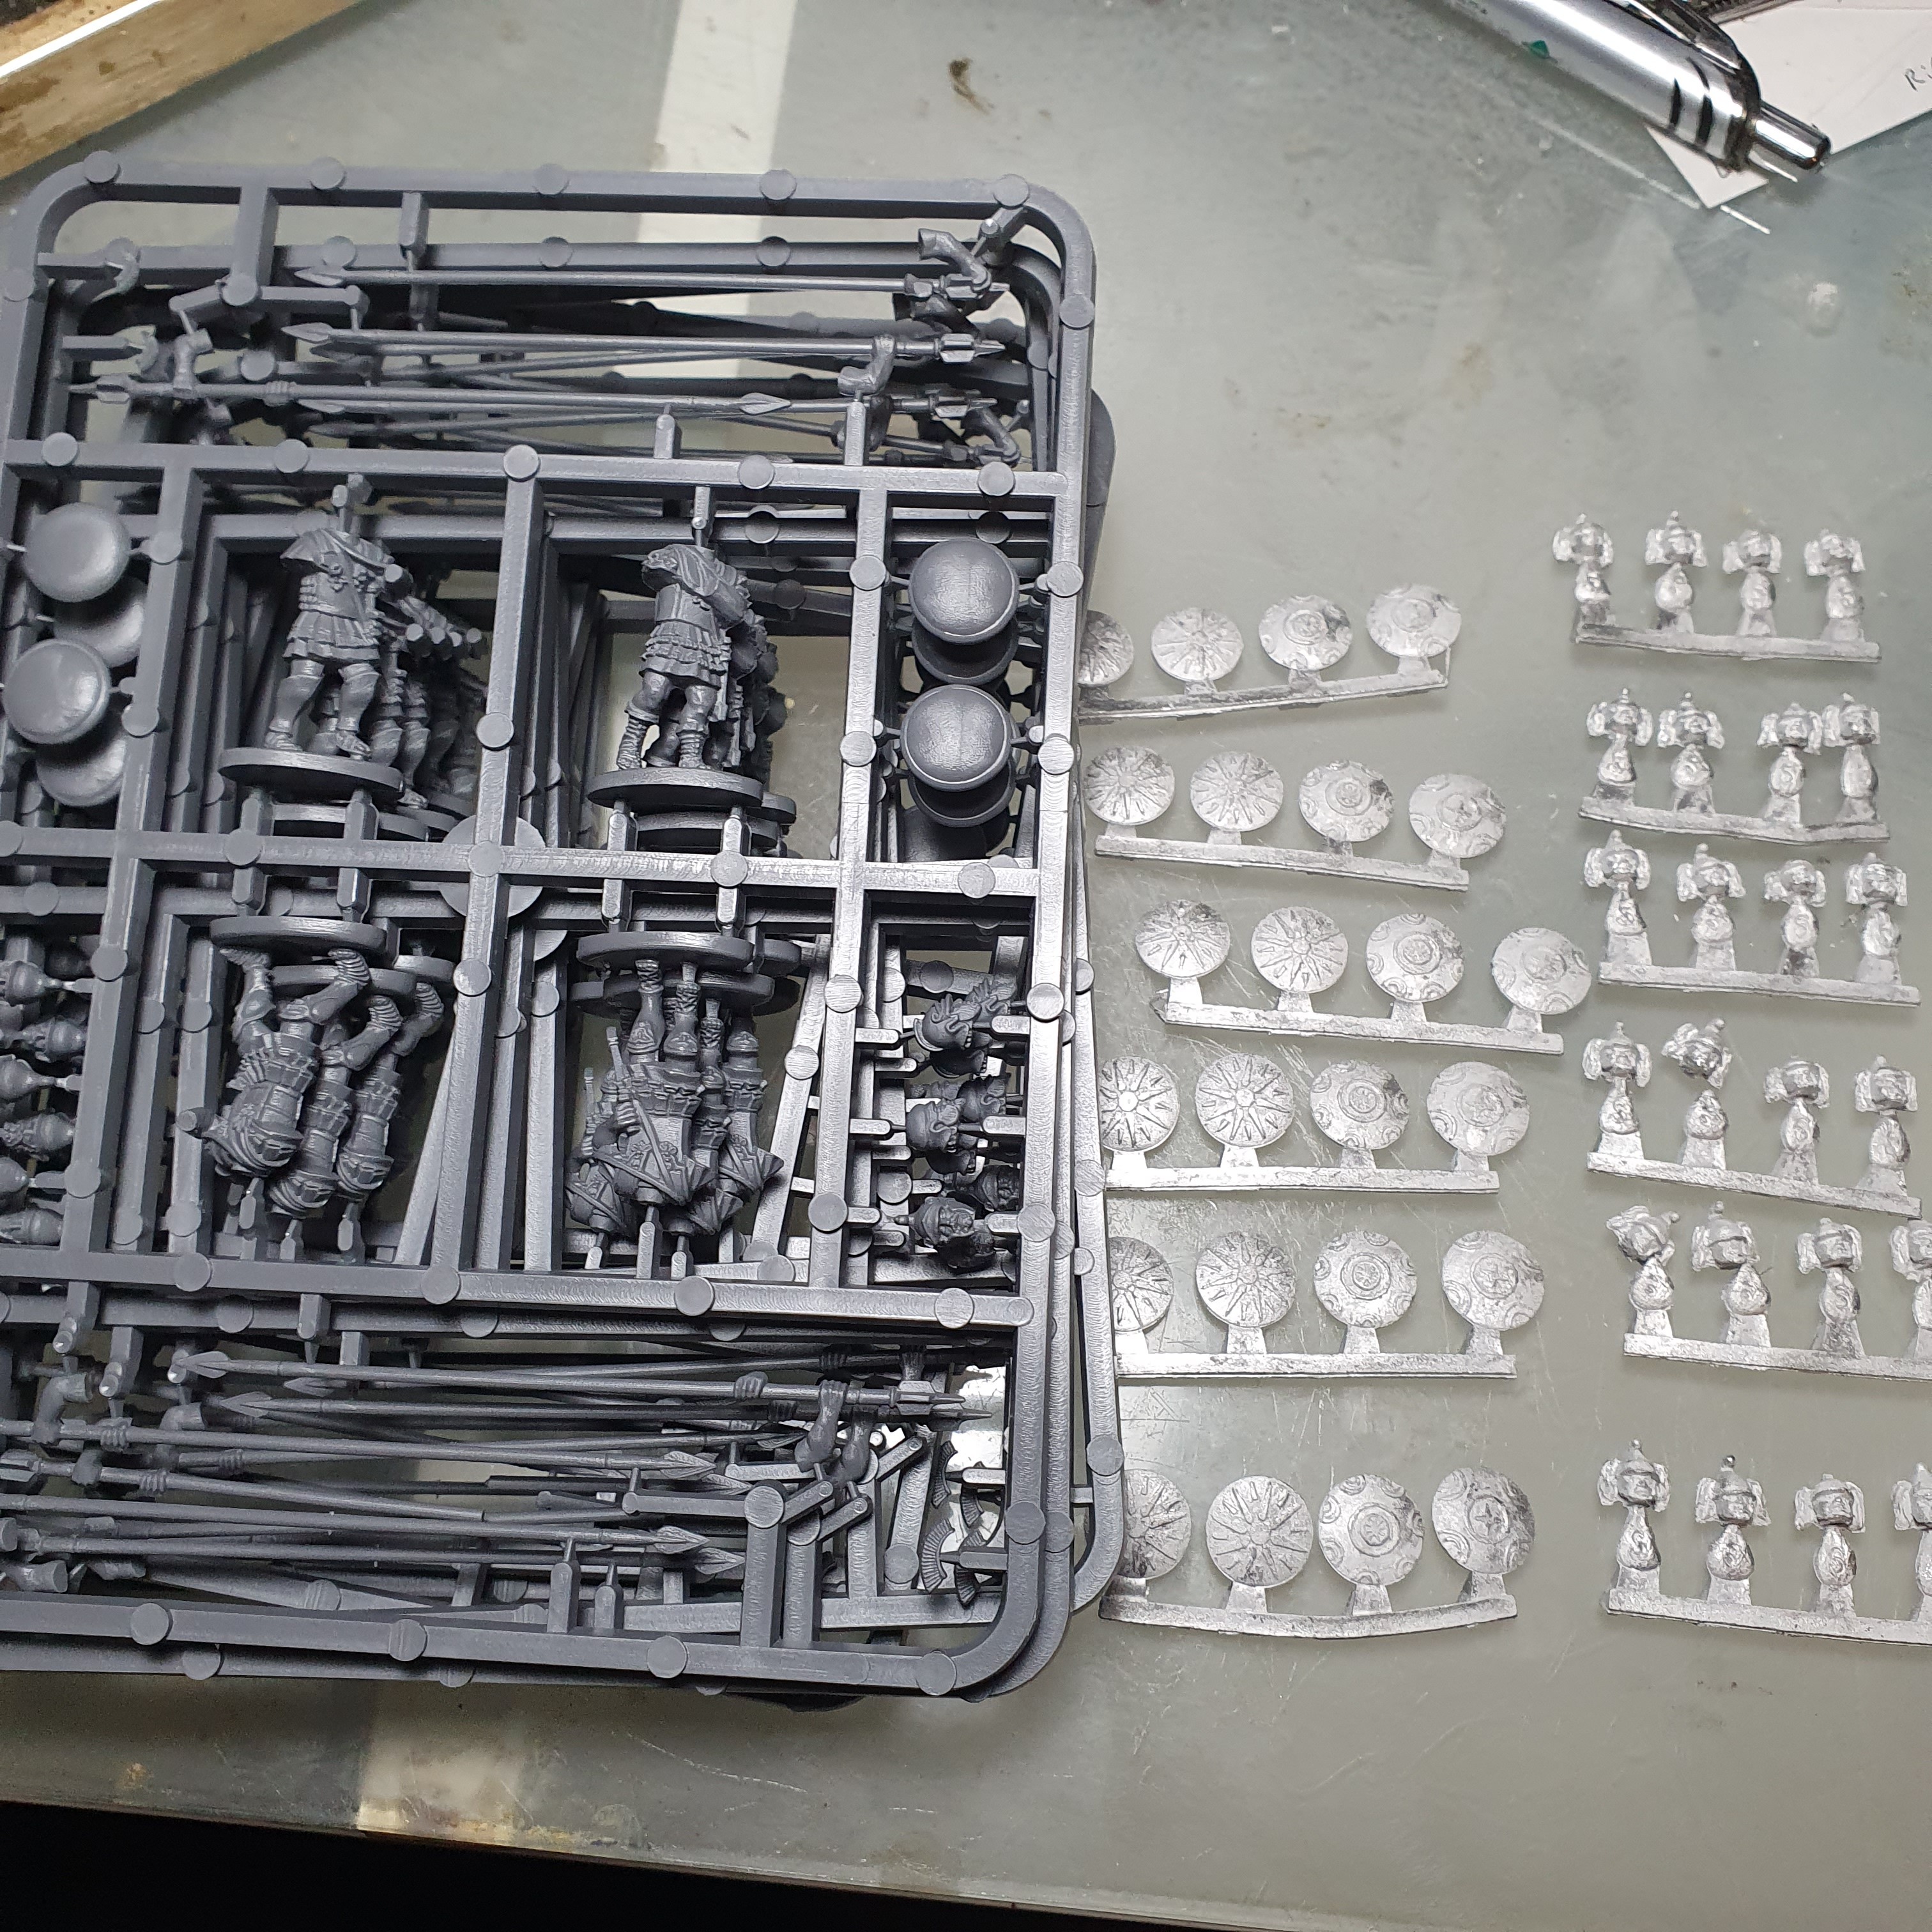
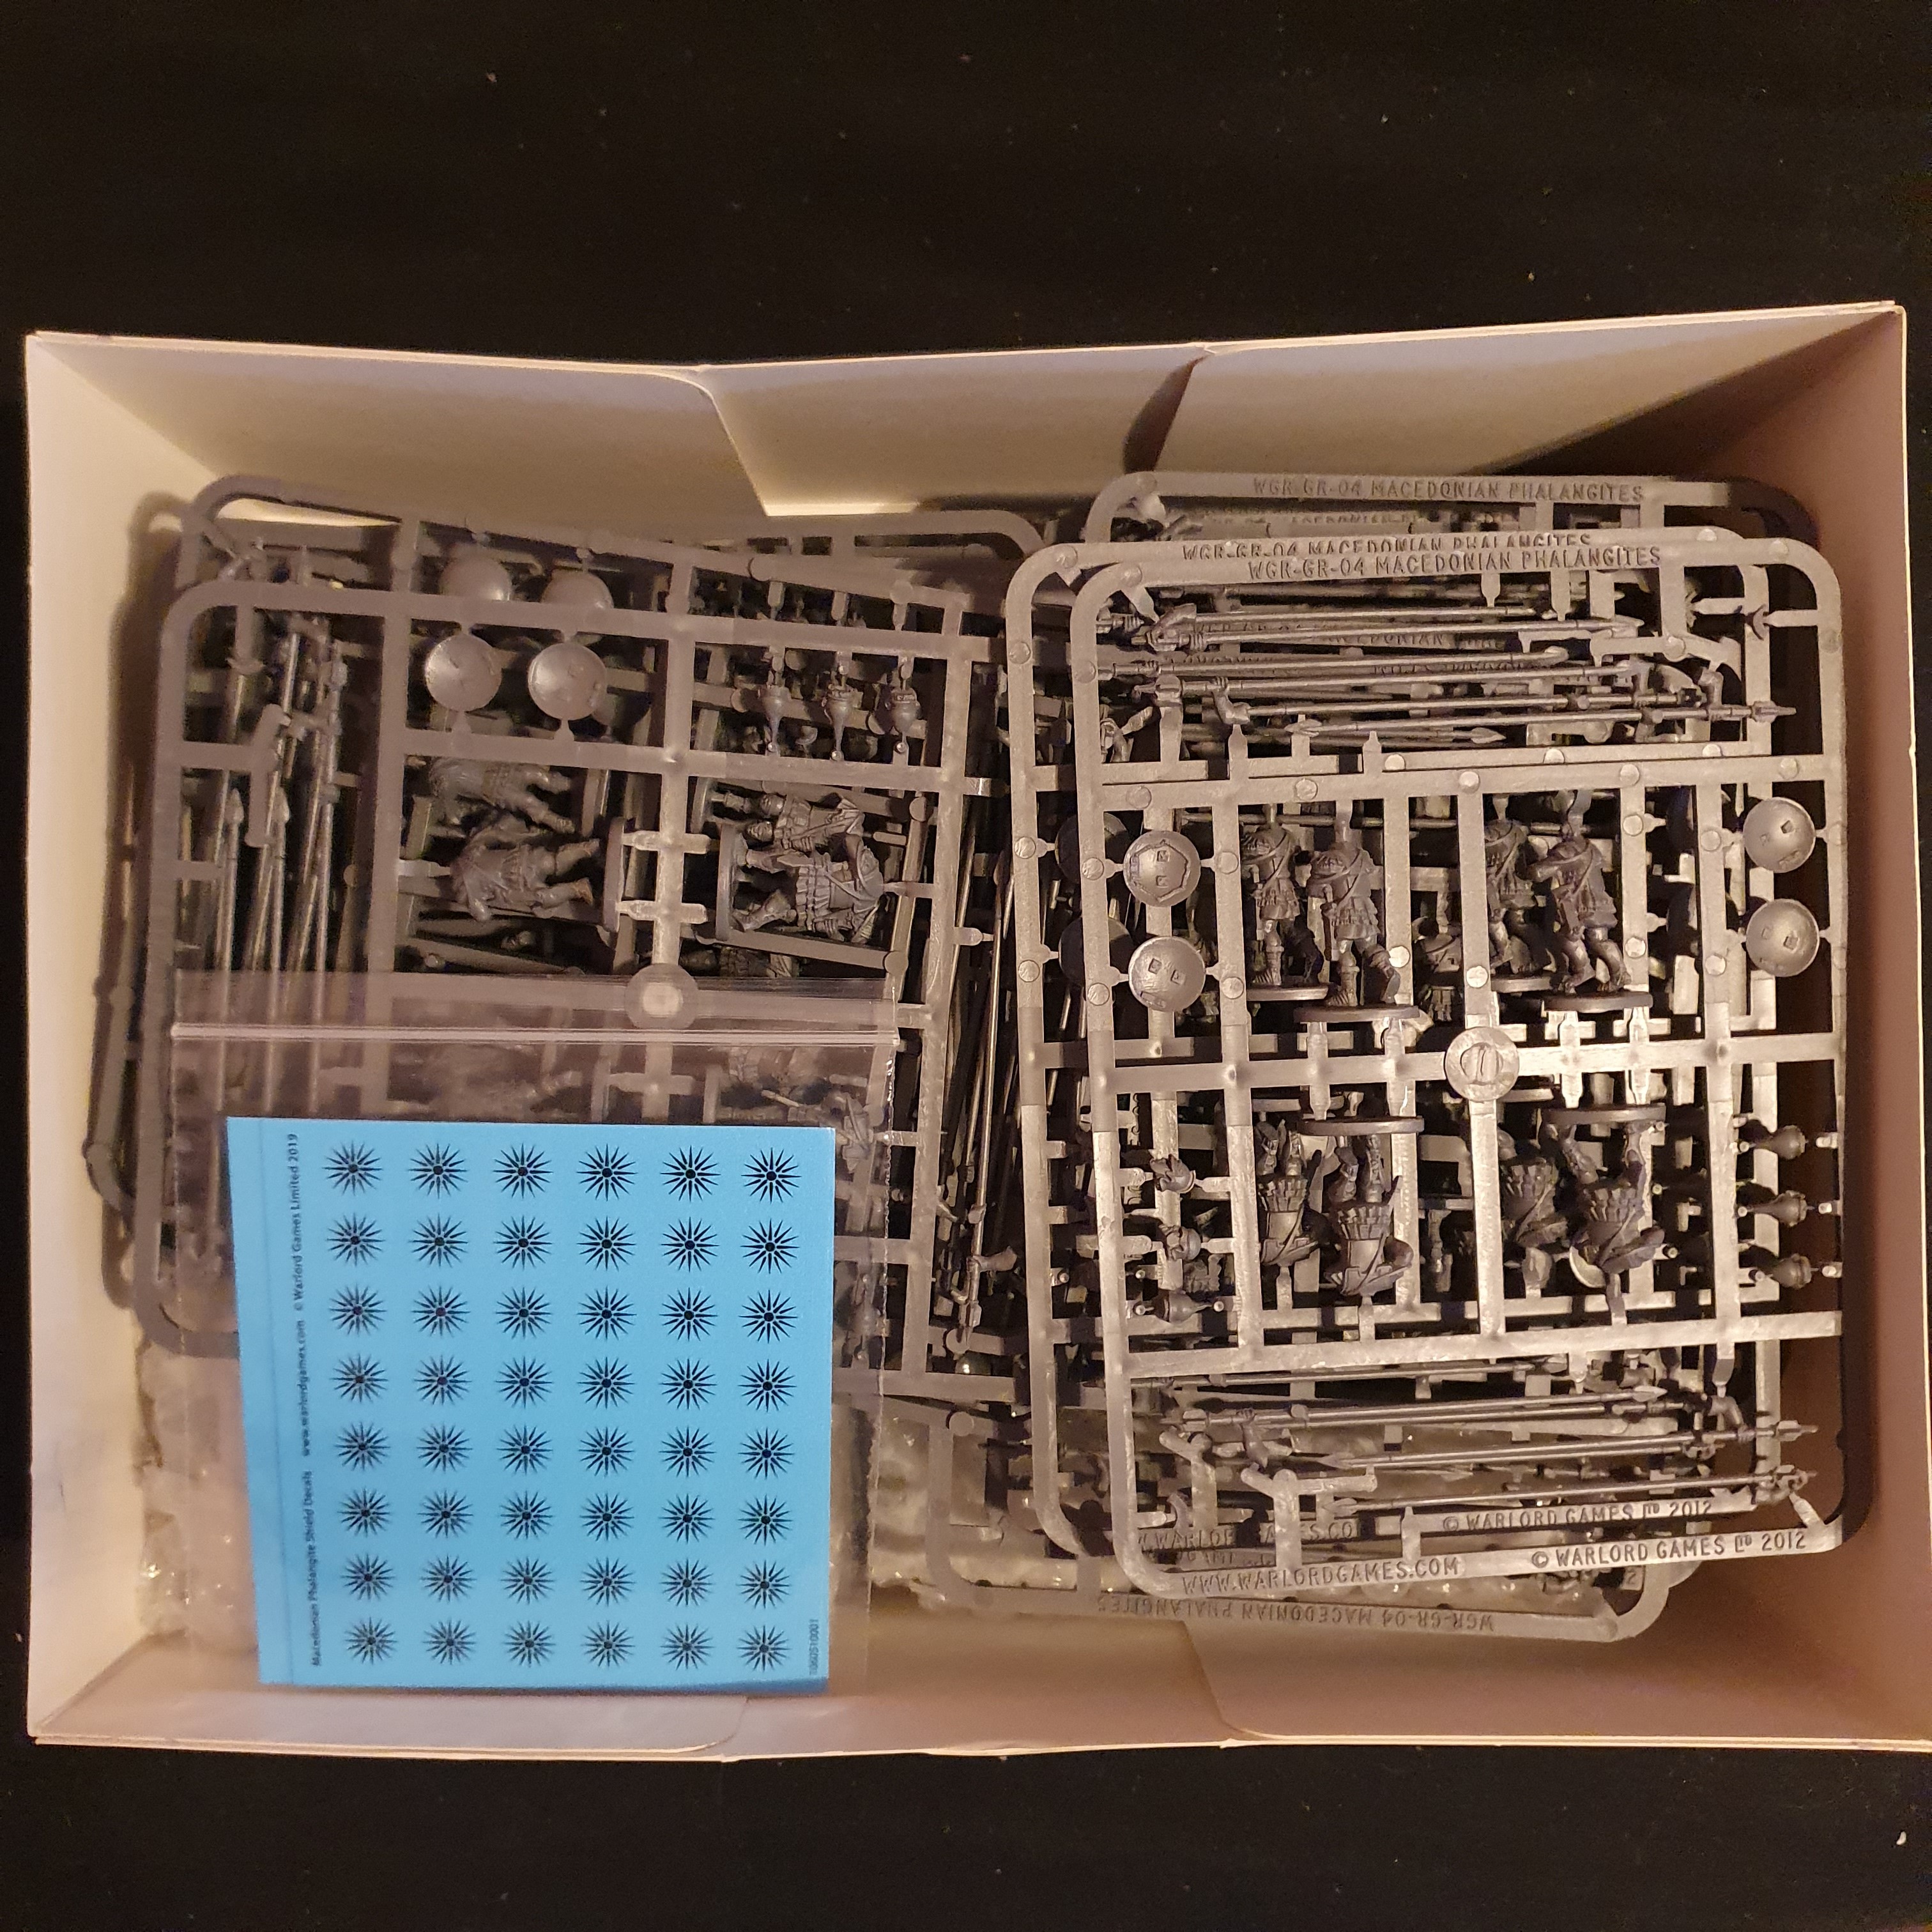
And then for the Successors Starter Army Box. We have bases I am not going to use, a set of waterslide decals, another armoured war elephant, 8 more Companion cavalry including command and 25 more sprues of Φαλανγίτεσ (Phalangites).
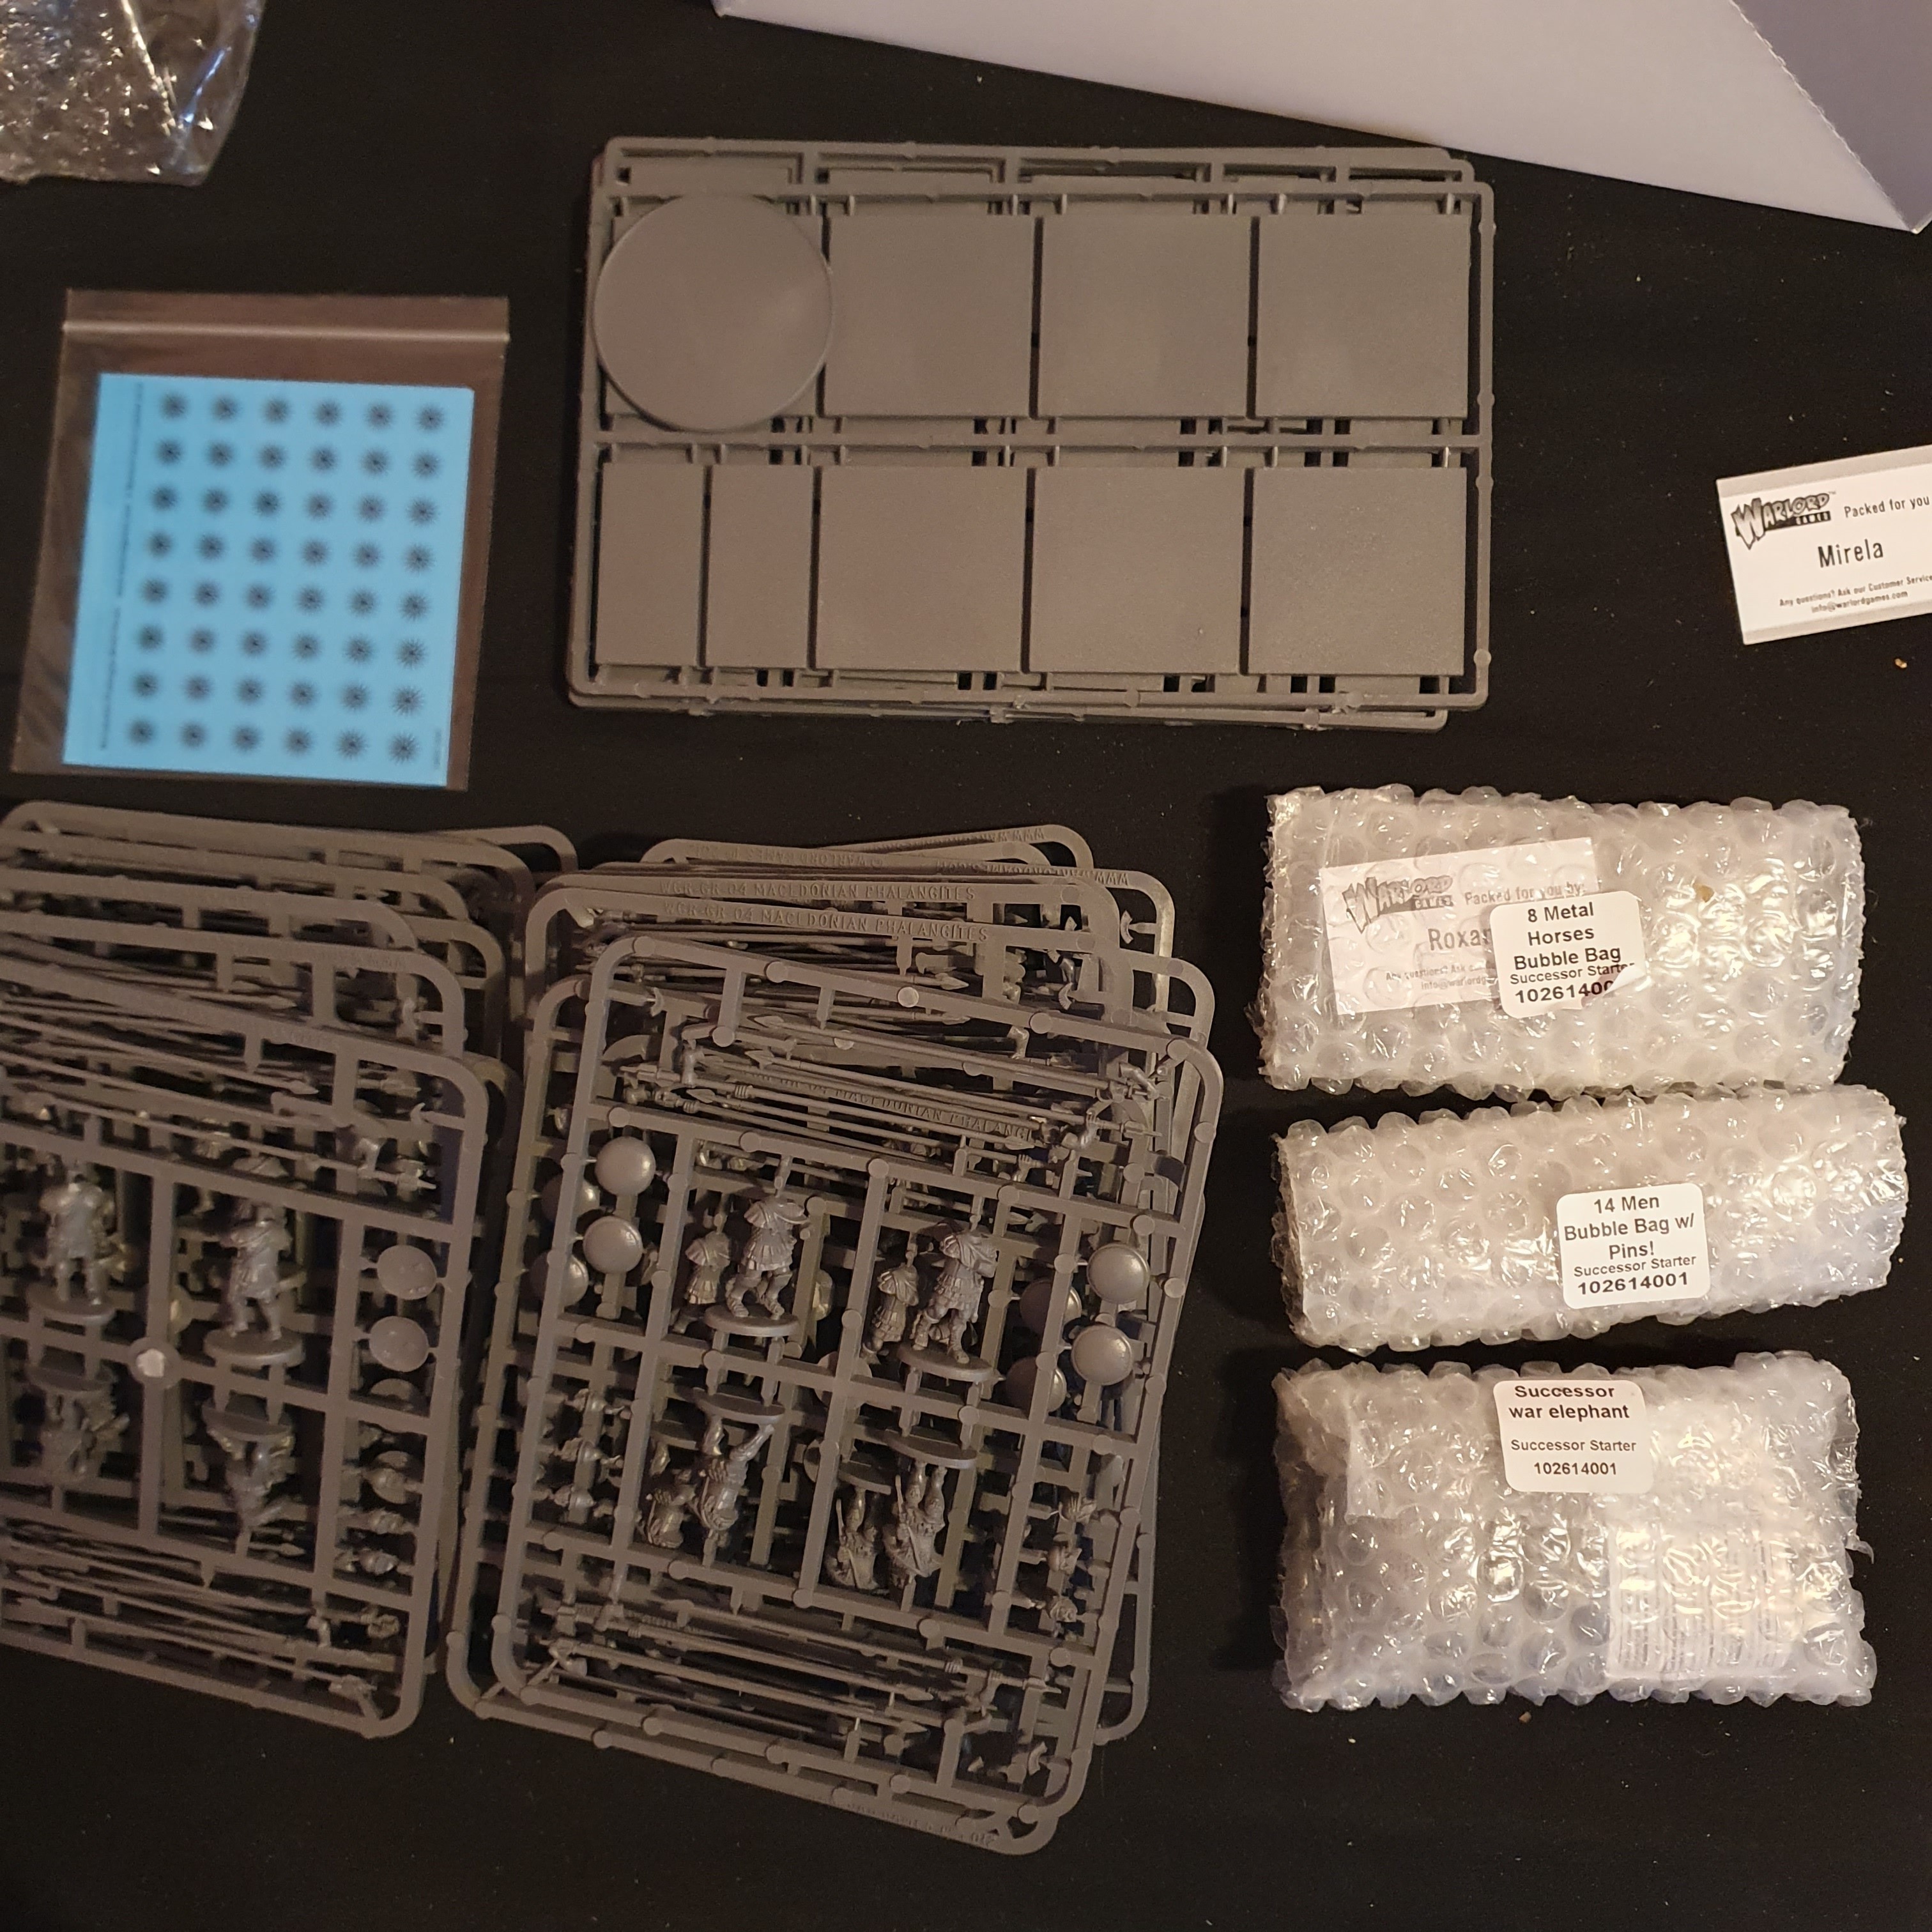
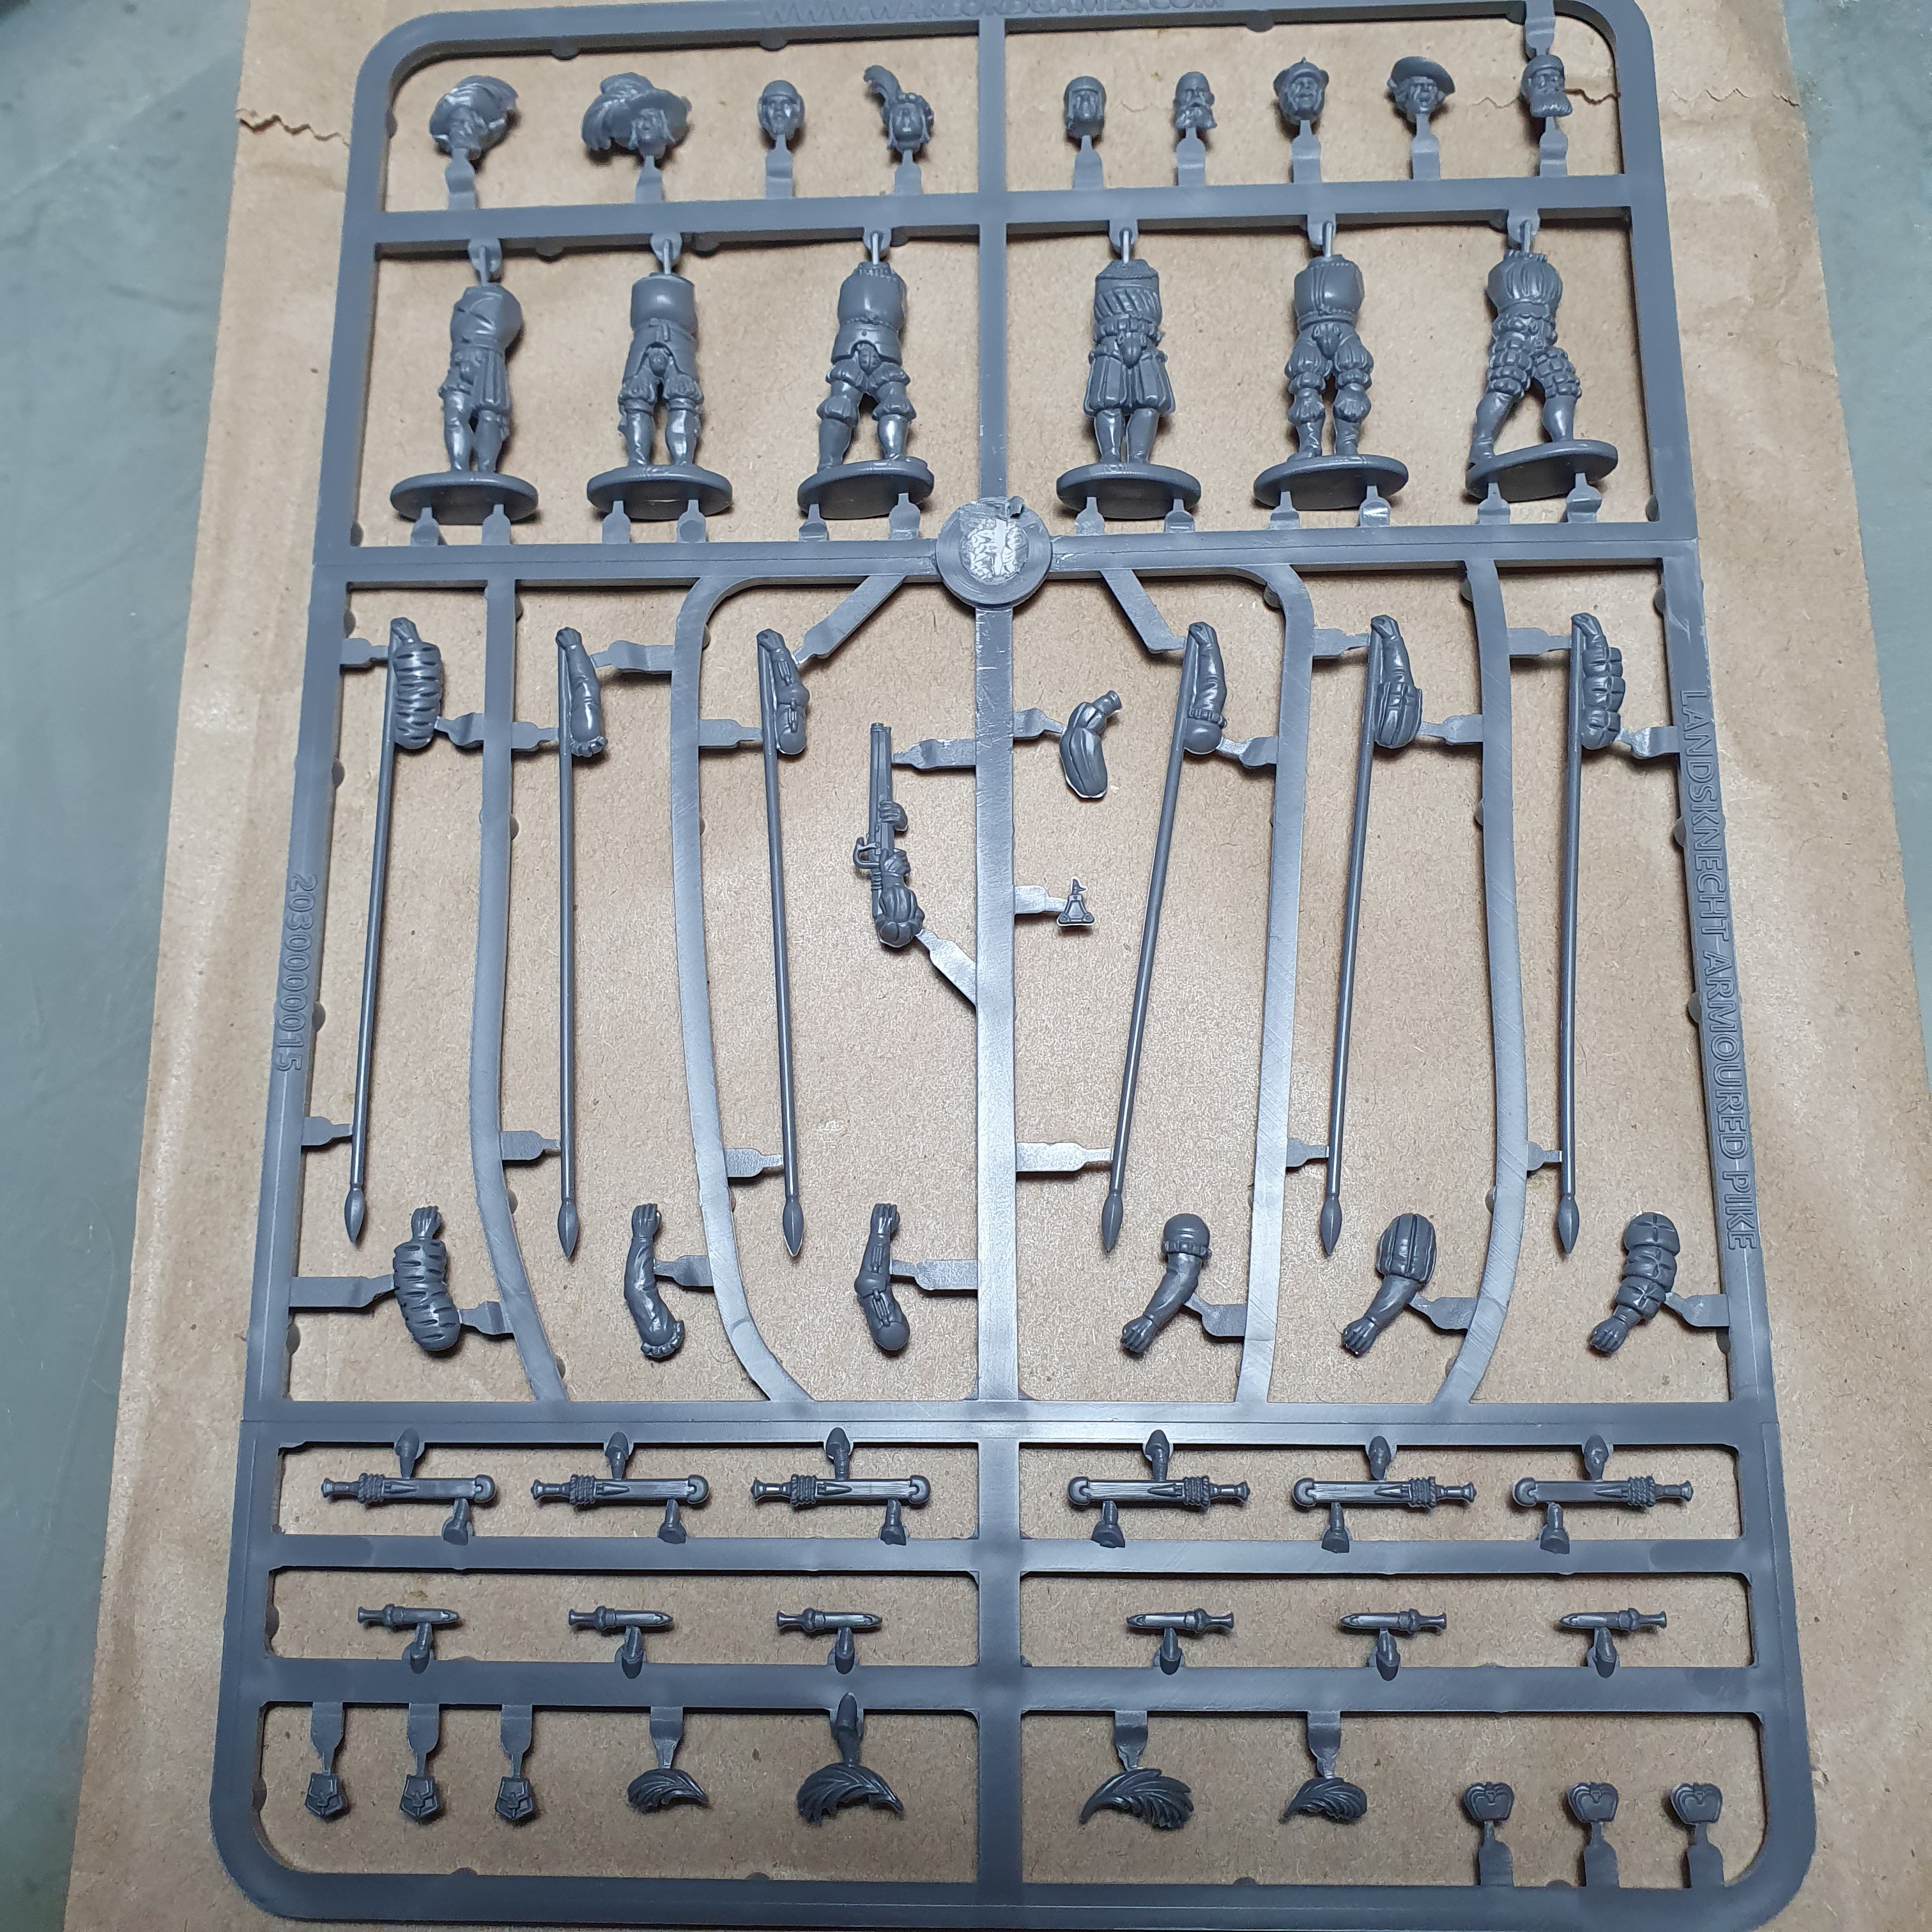
And of course the lovely freebie of Landsknecht pikemen or for people who can’t seem to pronounce that, Landssnack pikeman….. Different era pikemen, but I think they’ll be a lovely palette cleanser.
Paint Scheme
I have decided that the basing scheme I have recently developed is pretty good and shouldn’t feel the need to develop a new one just for the sake of doing something different. Plus I just made this basing scheme for this kind of project…… Anyway here is the paint scheme for this project.
Primer:
All miniatures will be primed with AK Interactive Primer and Microfiller Grey (AK758) unless stated otherwise. For the bronze and silver shields for their respective units will on the front be primed with Greenstuff World Gloss Primer Black (1743) and those that will be fitted with LBMS transfers will be primed with AK Interactive Primer and Microfiller White (AK759) on the front.
Shading:
The basic shading for all miniatures will be 2 coats of AK Interactive Streaking Grime (AK012) letting that dry to the touch and then removing the majority of it using mineral spirits and a woollen dauber and cotton buds.
Basing:
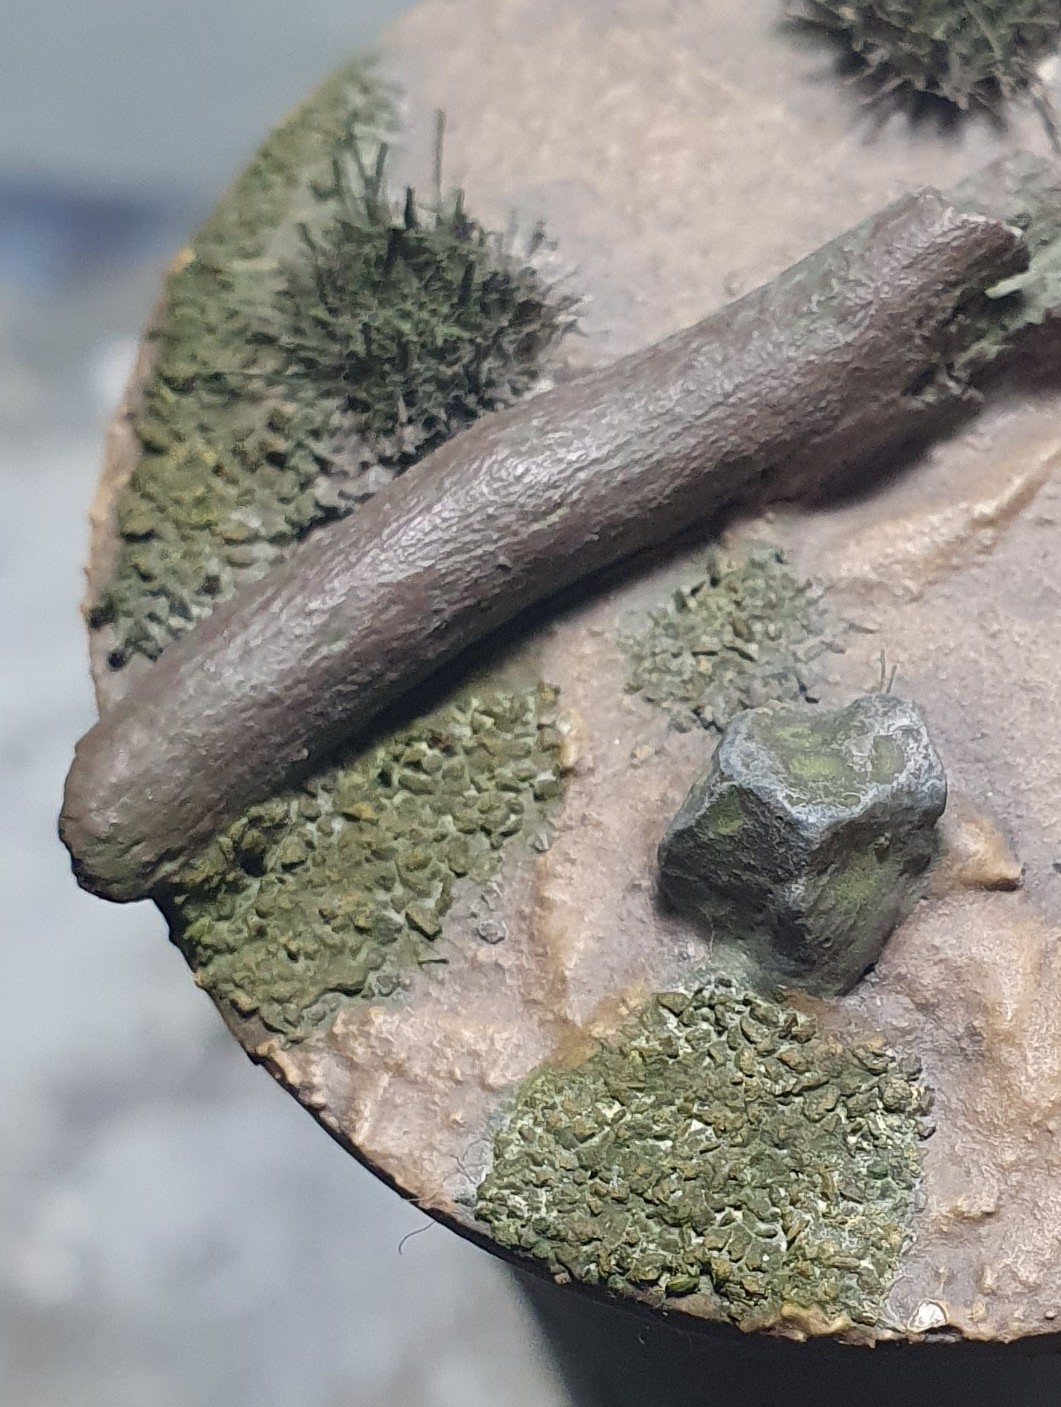
For the basing I will use a basic structure paste mixed with a bit of PVA glue and sand to form the structure. I will add logs, rocks and tufts in there and then prime the whole miniature with the base. I will then paint the tufts using my airbrush with AK Interactive Acrylic Colors Grass Green (AK11140). I will then paint the base and the rim with Vallejo Model Color Iraqui Sand (70.819).
Then for the rocks I will paint those with Vallejo Model Color Basalt Grey (70.869). Once dry I follow that up with a dry brush of Vallejo Model Color Medium Sea Grey (70.870) and then quickly without cleaning the brush with a drybrush of Vallejo Model Air White Grey (71.119).
The logs I will paint with Vallejo Model Color Mahogany Brown (70.846) and the broken off exposed bits with Vallejo Panzer Aces New Wood (70.311) and when dry I will drybrush them with Vallejo Panzer Aces Old Wood (70.310).
I will then add a bit of a flock mix with thinned out PVA with water on the base before varnishes. The varnishes will seal it to the base.
After the varnishes the second stage of weathering for the miniature will be a coat of AK Interactive Earth Effects (AK017) over the bottom of the miniature and the base with my airbrush. I will let that dry to the touch and then use cotton buds and no mineral spirits to remove the majority of it.
Once that is all set I will put a coat of AK Interactive Moss Deposits (AK676) on the rocks, logs, tufts and flock during the highlighting & detailing stage. I will let that dry to the touch and rub the majority off with cotton buds again.
And then as the final stage I will brush on a layer of Vallejo Pigments Desert Dust (73.121) on the bottom of the model and the base and then with a wet brush with just water remove the pigment that got on the flock and tufts. And I will also paint the rim with a fresh coat of Vallejo Model Color Iraqui Sand (70.819).
And this should be the result of that:
Standard Colours
Skin:
The skin will be done with Scale 75 Scalecolor Golden Skin (SC-19) either by airbrush or brush depending on how much skin there is on the model. The skin will then get a bit of a highlight with Abteilung 502 Modelling Oil Color Light Flesh Tone (ABT135) and a shade of Abteilung 502 Modelling Oil Color Flesh Shadow (ABT215) if needed in the highlighting stage.
Metals:
For the metals I will paint bronze using Vallejo Model Color Bronze (70.998), Gold with Scale 75 Metal N’ Alchemy Elven Gold (SC-74), iron with Vallejo Metal Color Burnt Iron (77.721) and iron/steel plate armour with Scale Metal n’ Alchemy Thrash Metal (SC-64). After the varnishes go on the model I will add a second coat of these metallics to make them metallic again. Doing this if any of it chips it will just show a dull version of the paint.
And then when it comes to the highlighting & detailing stage I will highlight the bronze with AK Interactive True Metal Brass (AK460), the gold with AK Interactive True Metal Gold (AK450), iron with AK Interactive True Metal Iron (AK459) and the iron/steel plate armour with AK Interactive True Metal Steel (AK457).
Wood:
For the wood for spears and pikes I will use Vallejo Panzer Aces Old Wood (70.310) as that is a good representation of ash wood which is what they would most likely be made of. For the rest of the wood I will either choose or roll a D6 to pick one from the following list:
1-2 Vallejo Panzer Aces Old Wood (70.310)
3-4 Vallejo Model Color Mahogany Brown (70.846)
5-6 Vallejo Panzer Aces New Wood (70.311)
During the highlighting & detailing stage larger surfaces of wood will receive a coat AK Interactive Wash for Wood (AK263) with the excess wiped off with cotton buds once dry to the touch.
Leather:
Most belts and straps will be painted with Vallejo Panzer Aces Leather Belt (70.312) with Vallejo Panzer Aces Dark Rubber (70.306) being a secondary colour if there are a lot of belts and straps and I need to differentiate it a bit.
Other leather surfaces will be painted using either Vallejo Model Color Cavalry Brown (70.982) or Vallejo Model Color Red Leather (70.818) with the possibility of Vallejo Model Color Ivory (70.918) being used instead to represent painted leather.
Cloth/Dyes:
For any cloth, painted surfaces or other things using dyes I will use this chart to pick a colour from or I will let a D20 decide for me:
1 Vallejo Panzer Aces Stencil (70.313)
2 Vallejo Model Color Black Grey (70.862)
3 Vallejo Model Color German Cam. Med. Brown (70.826)
4 Scale 75 Fantasy & Games Goblin Flesh (SFG-24)
5 Vallejo Model Air Duck Egg Green (71.009)
6 Vallejo Model Color Yellow Ochre (70.913)
7 Scale 75 Scalecolor Sol Yellow (SC-40)
8 Vallejo Model Color Amaranth Red (70.829)
9 Scale 75 Scalecolor Cantabric Blue (SC-53)
10 Vallejo Model Color Flat Red (70.957)
11 Scale 75 Scalecolor Mediterranean Blue (SC-51)
12 Scale 75 Scalecolor Adriatic Blue (SC-15)
13 Vallejo Model Color Old Rose (70.944)
14 Vallejo Model Color Pink (70.958)
15 Scale 75 Scalecolor Irati Green (SC-43)
16 Vallejo Model Color Deep Sky Blue (70.844)
17 Vallejo Game Color Jade Green (72.026)
18 Vallejo Model Color Medium Blue (70.963)
19 Vallejo Model Color Carmine Red (70.908)
20 Vallejo Model Color Medium Olive (70.850)
Any natural undyed linen, wool and linothorax armour will be painted using Vallejo Panzer Aces Stencil (70.313). Other colours may be used on special occasions like on characters, heroes or special units. Any cloth might get a highlight during the highlighting & detailing stage using an oil paint representing a similar and/or lighter colour.
Horses:
If I don’t have a specific colour in mind for the horse I will use the following chart to determine the colour of the horse:
1-2-3 Bay
4-5-6 Leopard
7 Tobiano (Brown)
8 Tobiano (Black)
9 Black
10 Chestnut
Horses will painted in the fur stage using oils according to the following schemes:
Bay
Fur: 3 Parts Abteilung 502 Modelling Oil Color Dark Brick Red (ABT220) + 1 Part AK Interactive ABT 502 Oils Ivory Black (AKABT110)
Manes/Legs/Snout: Abteilung 502 Modelling Oil Color Smoke (ABT005)
Leopard
Fur Black: Abteilung 502 Modelling Oil Color Smoke (ABT005)
Fur White: AK Interactive ABT 502 Oils Titanium White/Snow White (AKABT001)
Snout: Abteilung 502 Modelling Oil Color Light Flesh Tone (ABT135)
Tobiano (Brown)
Fur Brown: 1 Part Abteilung 502 Modelling Oil Color Dark Brick Red (ABT220) + 1 Part Abteilung 502 Modelling Oil Color Sand Brown (ABT245)
Fur White: AK Interactive ABT 502 Oils Titanium White/Snow White (AKABT001)
Snout: Abteilung 502 Modelling Oil Color Smoke (ABT005)
Tobiano (Black)
Fur Black: Abteilung 502 Modelling Oil Color Smoke (ABT005)
Fur White: AK Interactive ABT 502 Oils Titanium White/Snow White (AKABT001)
Snout: Abteilung 502 Modelling Oil Color Smoke (ABT005)
Black
Fur Black: Abteilung 502 Modelling Oil Color Smoke (ABT005)
Fur White: AK Interactive ABT 502 Oils Titanium White/Snow White (AKABT001)
Snout: Abteilung 502 Modelling Oil Color Light Flesh Tone (ABT135)
Chestnut
Fur Brown: Abteilung 502 Modelling Oil Color Sand Brown (ABT245)
Fur White: AK Interactive ABT 502 Oils Titanium White/Snow White (AKABT001)
Snout: Abteilung 502 Modelling Oil Color Smoke (ABT005)
Elephant:
Elephants don’t have fur any more so their skin will be basecoated in Vallejo Model Color Basalt Grey (70.869) with a drybrush of Vallejo Model Color Iraqui Sand (70.819).
Bone, Hooves & Tusks
Any bone, hooves and tusks will be painted using Vallejo Model Color Ivory (70.918) and receive a coat of Vallejo Game Color Sepia Shade (73.200) during the acrylic stage. During the highlighting & detailing stage they might get a highlight of Abteilung 502 Modelling Oil Buff (ABT035).
The Order of Things
This is my work order on how I get through all the miniatures. Things need to dry/cure between each stage and that is why they’re split up.
Stage 1: Assembly.
Prep the base, seal the bottom of the MDF, drill a hole and glue a magnet in. Assemble the miniature and attach it the base, in formation if need be. And finally add my basing paste and any scenic bits I want in there.
Multi based models will only be assembled in sub-assemblies as in animal, rider and shield or any other forms needed.
Stage 2: Primer.
Apply a coat of primer with my airbrush.
Stage 3: Furs.
Any furs that need to be done with oil paints.
Stage 4: Acrylics.
All the acrylic basecoats to bring colour to the miniature.
Stage 5a: Assembly 2
Glue any shields to the model and attach riders to their animals. And also apply a little bit of flock to the base.
Stage 5b: Multi Based Model Assembly
Glue the models to the base and then add my basing paste and details to the base. Prime the base by hand and then paint it like in the Acrylics stage.
Stage 6a: (Metal Miniatures Only) Gloss Coat.
Apply a coat of gloss varnish.
Stage 6b: Matte Coat.
Apply a coat of matte varnish.
Stage 7: Shading Part 1.
Apply the first coat of weathering and remove excess using mineral spirits when dry.
Stage 8: Shading Part 2.
Apply the second coat of weathering to the base and the bottom of the miniature and remove excess without mineral spirits when dry.
Stage 9: Highlighting & Detailing.
All the highlighting and detailing work with oils and enamels to enhance the miniature.
Stage 10: Final Touches
A coat of pigment over the base and the legs of the miniature and then any blood, water or other effects that need to be added.
Ἕλληνες (Hellēnes)
Going forward with this project it will not just be the army of Πύρρος (Pýrrhos), but will now include armies of all my forces for the Greeks or Ἕλληνες (Hellēnes) as they would call themselves. I feel that this is the best approach as a lot of models can be interchangable used between various Hellenistic factions. Mostly the light infantry and skirmishers, but some others too here and there. The focus will also not just be on SAGA Age of Hannibal, but on various other game systems. Mainly, Midgard: Heroic Battles, SAGA Age of Alexander, Kings of War Historical and maybe even Hail Caesar and others. I will be using the Kings of War single basing system, for most of the units and will be doing round bases for the characters to make them stand out. This seems to work best for most games as I can adjust the frontage of each unit with an appropriate movement tray and characters are generally less important in terms of formations. The faction I will be adding soon will be the army of Σελευκίς (Seleukis).
The paint scheme will be updated to fit my newer paint scheme using oils and enamels. The colour choices for the acrylics set out before for specific units will stay the same, but the drybrushes and shading will be removed for the newer system. Any other changes to the paint scheme will be listed once I finalize the paint scheme. I currently have a different idea of what I want to do with the basing that I want to test out, so that will have to wait until next month. I will post the paint scheme once it is done.
So there won’t be any painting on this project for at least a month, but there are many other things I can do to assemble stuff.
Project On Hold.
I have been struggling with massive disabilities causing me to not be able to paint or build miniatures. The major disabilities limiting my hobby are tremors in my right hand making it very unstable and lots of pain in my left which I was learning to paint with. I am getting physiotherapy to try and help me cope with the disabilities, but I am not sure it is going to solve anything. I do not know if I will be able to return to miniature painting and such and for now I am starting a new project involving LEGO, something I can do with my disabilities.
Painting Horses.
As I started painting the horses for the Roman Eques I quickly realized that my painting technique has changed somewhat since I did the Order of Heimdallr. Therefore I started experimenting with a new paint scheme based on the old one, but one that fits in with my newer techniques. So this is my renewed horse paint scheme.
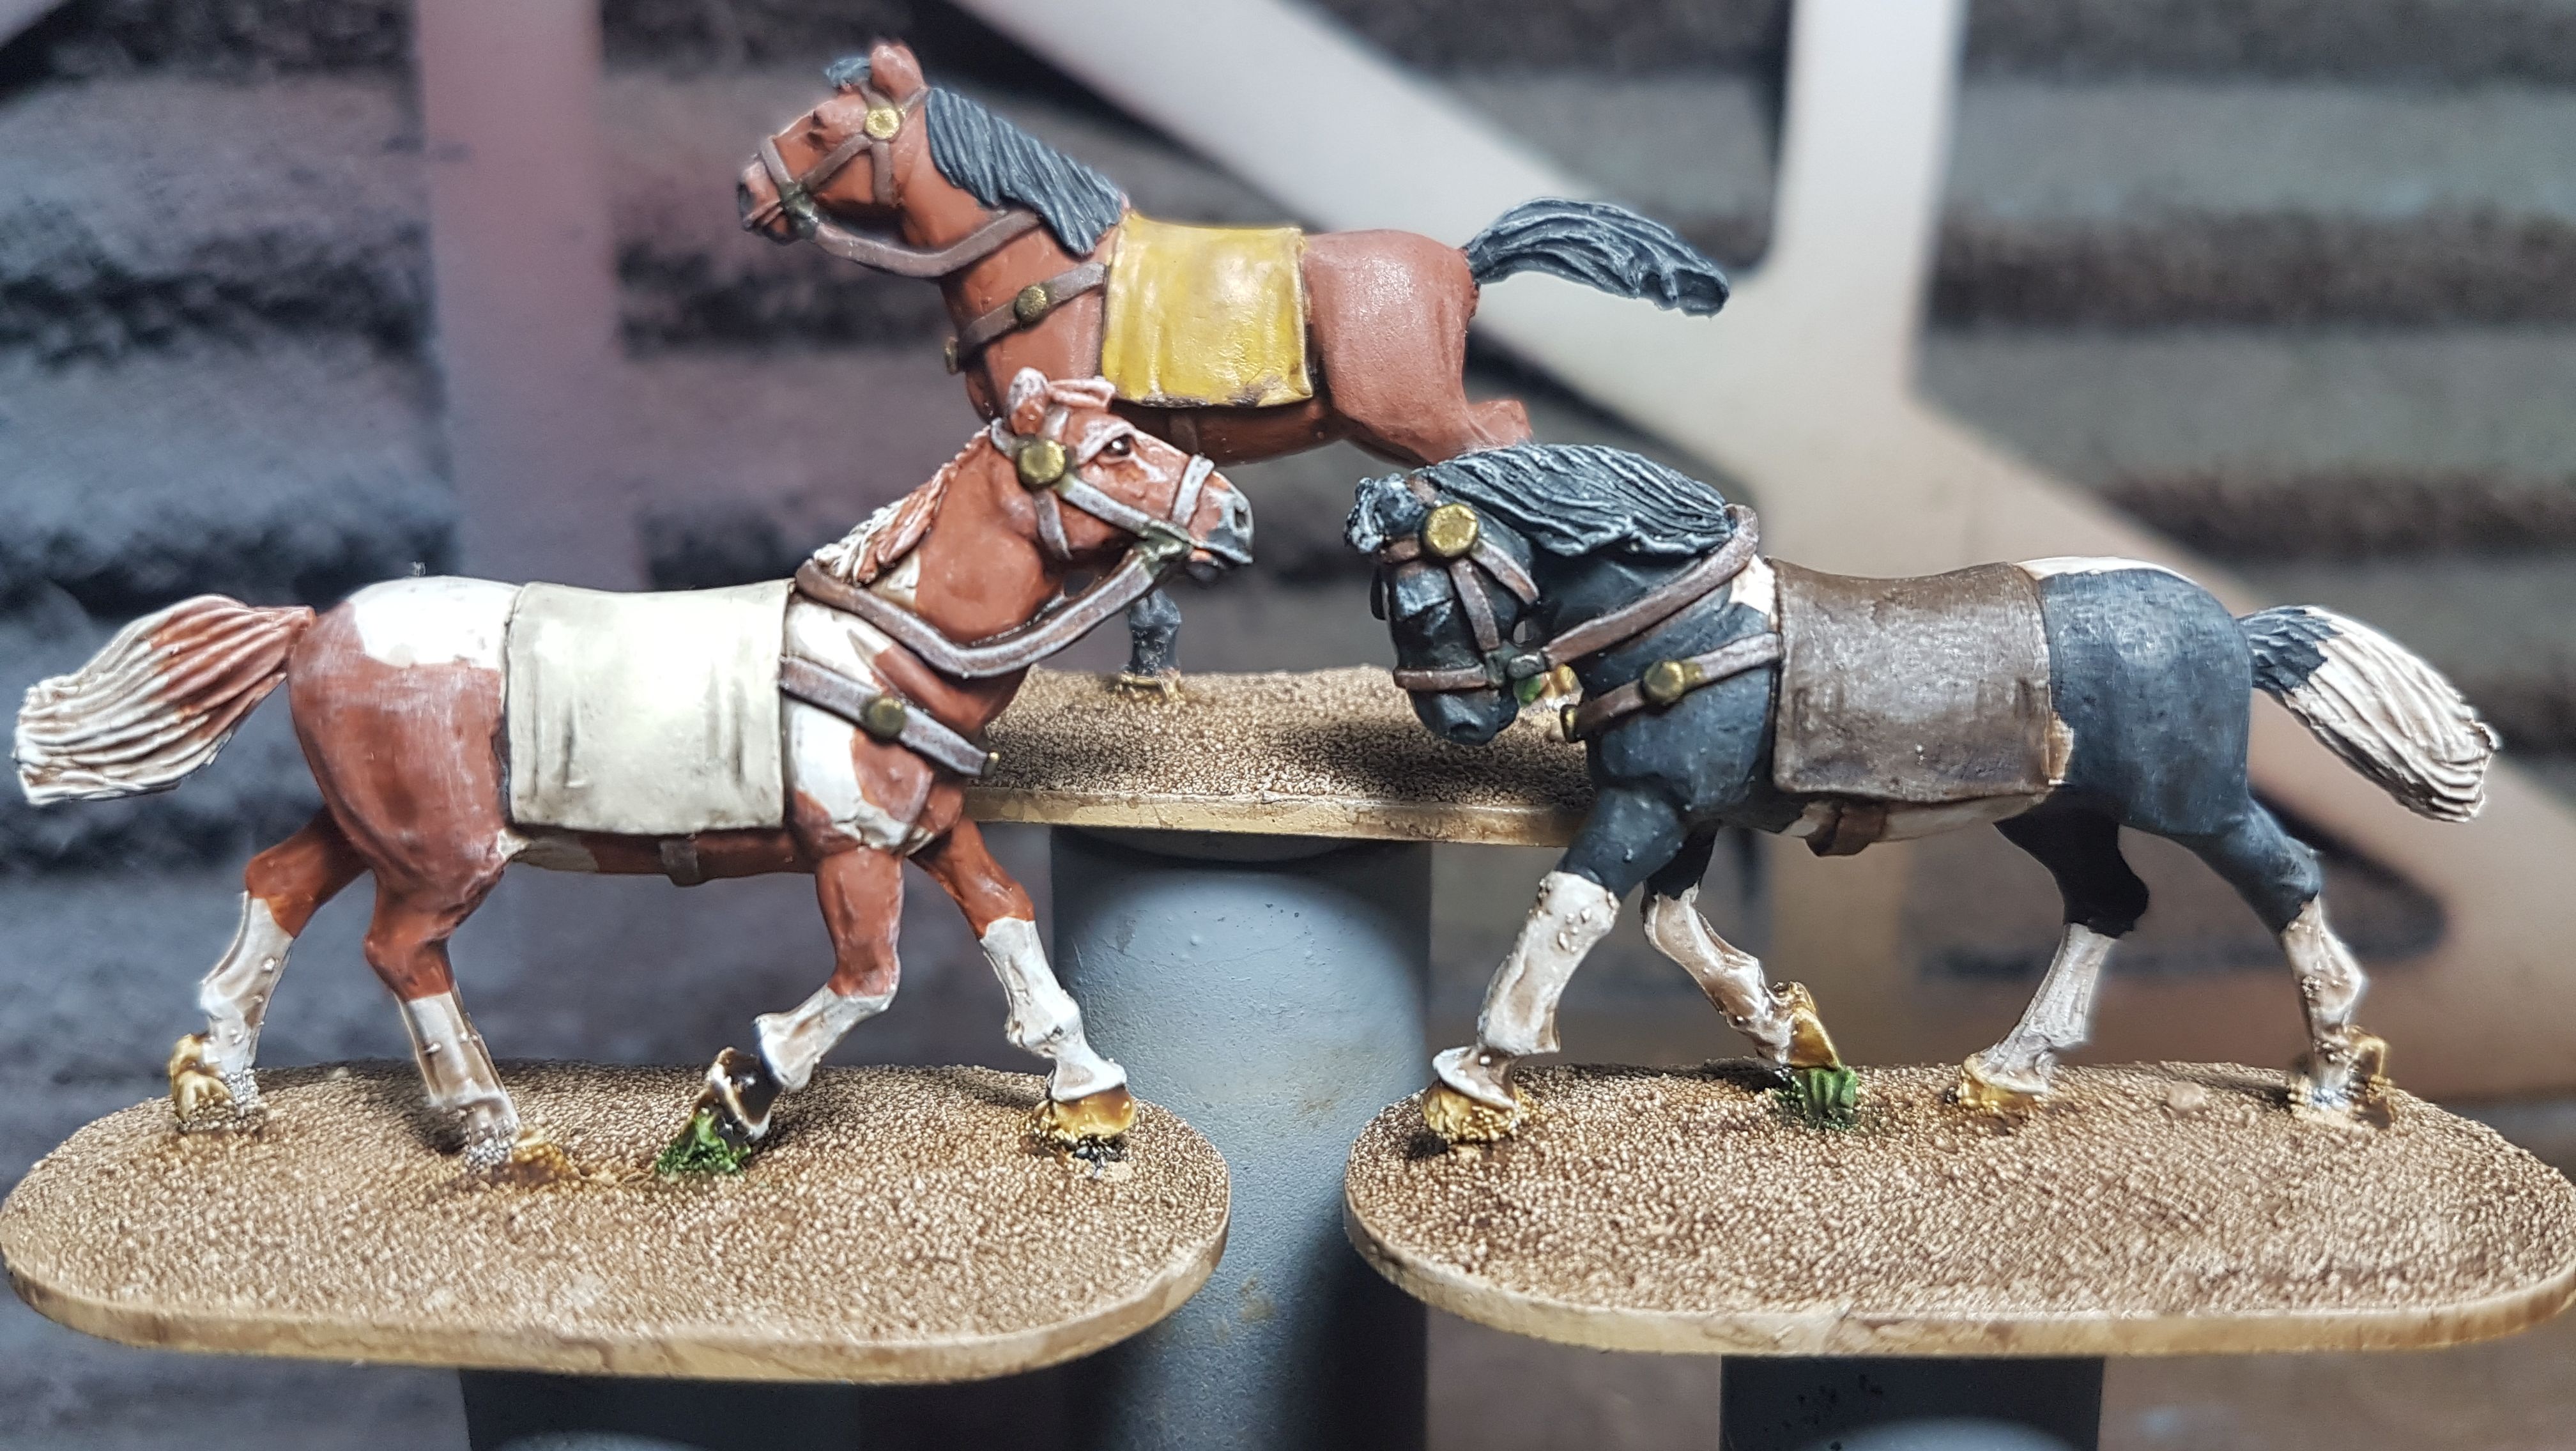 Roman Eques Horses.
Horses come in a variety of colours and during my Order of Heimdallr project I did some research as to what different kinds of horses where common in Scandinavia. It so happens that this research also includes data from around the 3rd century BC, so I am using the same data source as before. You can find it below.
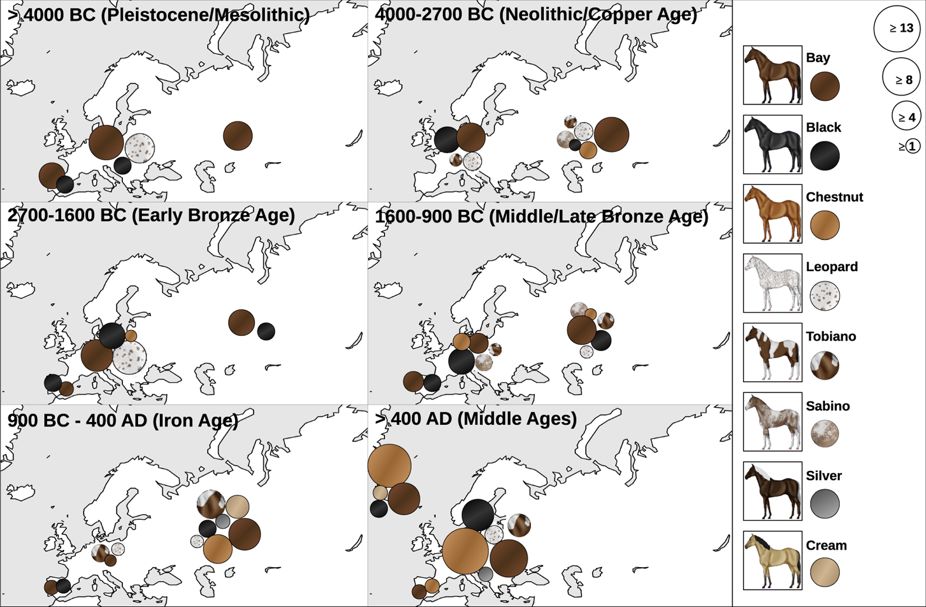
I will be using the same die chart as listed below in the Colour Scheme.
- 1-2-3 Bay
- 4-5-6 Leopard
- 7-8 Tobiano
- 9 Black
- 10 Chestnut
Some Basics.
Hooves
For the hooves on all horses I will use a base of Vallejo Game Color Bonewhite (72.034) shaded with Vallejo Game Color Sepia Shade (73.200).
Nose
Unless specified differently, I will use a 50/50 mix of Vallejo Glaze Medium (70.596) & Vallejo Model Color Black Grey (70.862) to do the noses of all horses.
The Horses
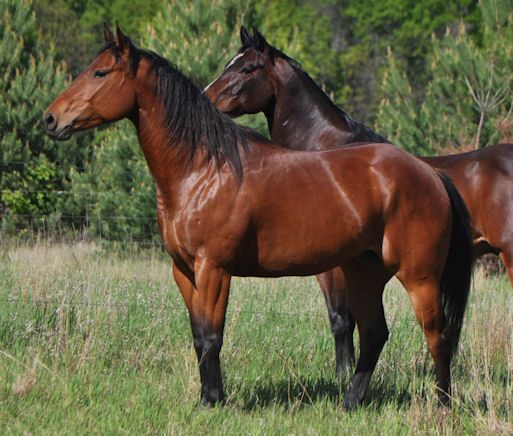
Bay
I will start with a basecoat Vallejo Model Color Red Leather (70.818) and I will then paint the manes, tail and bottom half of their legs with Vallejo Model Color Black Grey (70.862). I will paint a stripy bit on the front of their heads using Vallejo Model Air White Grey (71.119).
Leopard
I will start with a base coat of Vallejo Model Air White Grey (71.119) and then apply dots in various sizes and locations using Vallejo Model Color Black Grey (70.862). For the nose on these I will use a 50/50 mix of Vallejo Glaze Medium (70.596) & Vallejo Game Color Cadnium Skin (72.099) as opposed to the regular scheme. And for the manes and tail I will then use a coat of Vallejo Model Air Aged White (71.132).
Tobiano
The Tobiano will come into 2 variants, but remain mainly the same. I will list the difference when it comes to it. I will start with a base coat of Vallejo Model Air White Grey (71.119) and then I will paint on a pattern. For this I will roll a D6 and on a 1-2-3 it will be the brown variant for which I will use Vallejo Model Color Red Leather (70.818) for the pattern and if it rolls a 4-5-6 I will use Vallejo Model Color Black Grey (70.862) as the pattern for the black variant. I will paint the manes where it meets the body and the tail will be split between the base colour and the pattern colour. I will paint a stripy bit on the front of their heads using Vallejo Model Air White Grey (71.119).
Black
Probably the simplest of all. I will start with a basecoat of Vallejo Model Color Black Grey (70.862) and paint a stripy or spot on the front of their heads using Vallejo Model Air White Grey (71.119).
Chestnut
I will start with a base of Vallejo Game Color Bronze Fleshtone (72.036) and will then paint a stripy bit on the front of their heads using Vallejo Model Air White Grey (71.119). I will then use the same Vallejo Model Air White Grey (71.119) to paint the bottom 1/3 of their legs as well.
The Rest
I will then paint the tack and hooves in the appropriate colours, apart from the metal bits. I will put a drybrush of Vallejo Model Color Ivory (70.918) over the whole model. I will then paint the metal bits according to the Colour Scheme set before. The horse will then be shaded by a 50/50 mix of Vallejo Glaze Medium (70.596) & Citadel Shade Agrax Earthshade (99189953018) and the other bits will be shaded according to the Colour Scheme set before.
I will paint the eyes at the end with a simple coat of Vallejo Game Color Black (72.051) and then a coat of gloss varnish after the model has been finished.
The riders will be painted separately according to the Colour Scheme set before.
 Bay
Bay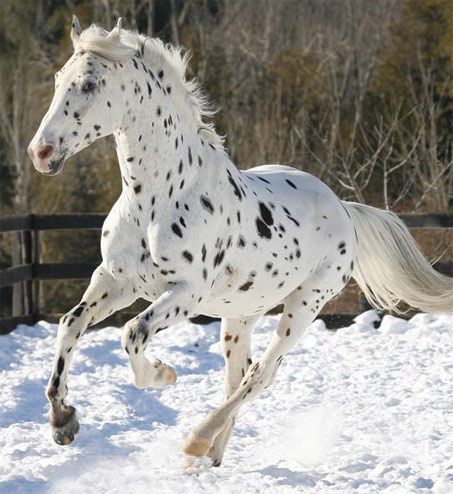 Leopard
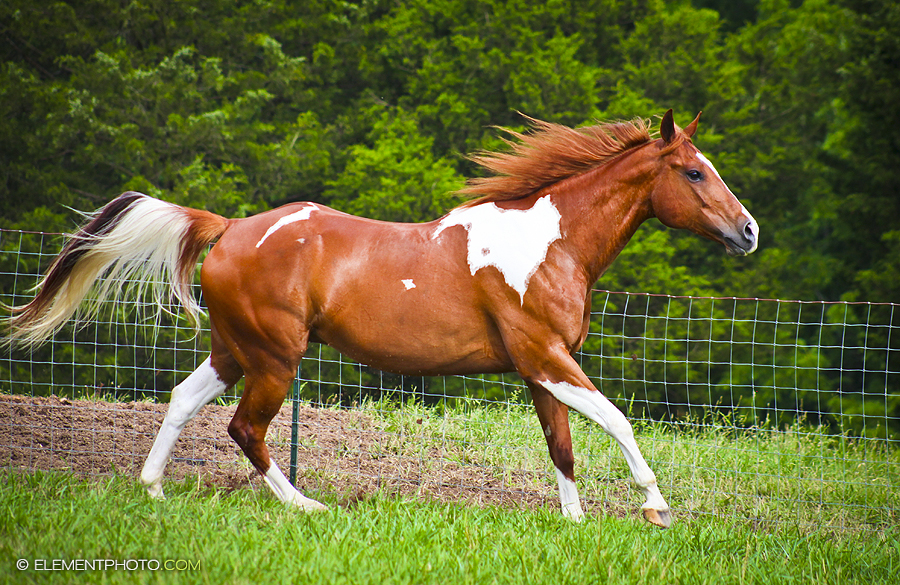 Tobiano (Brown)
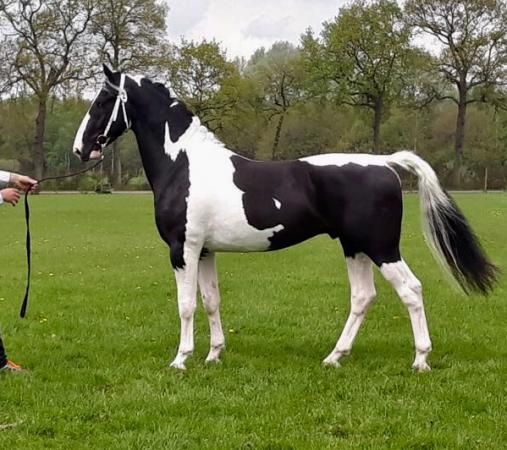 Tobiano (Black)
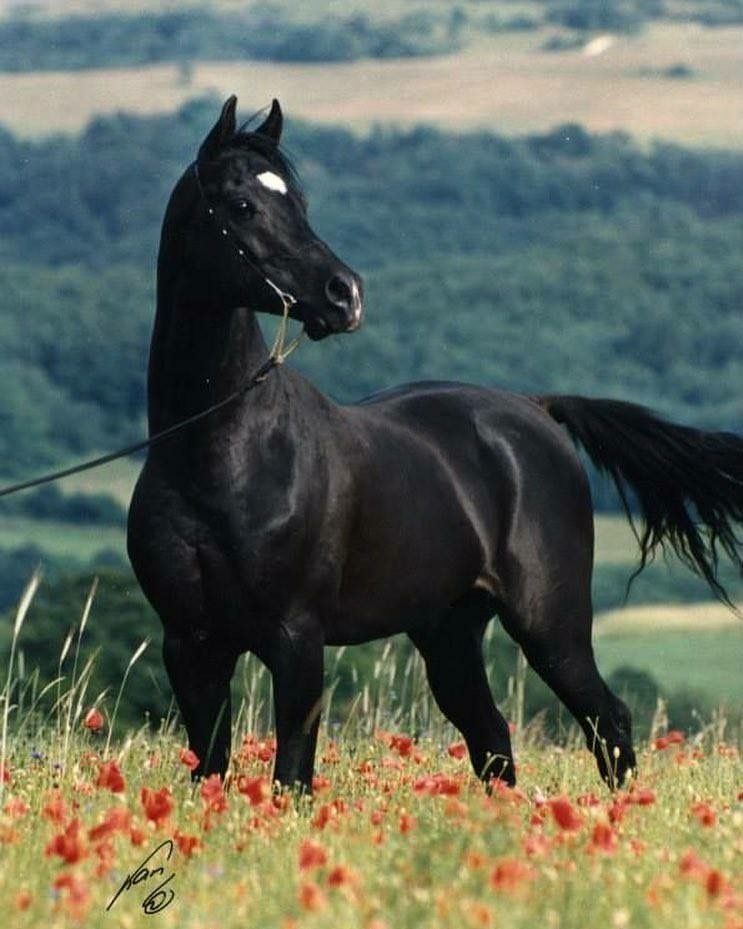 Black
Black 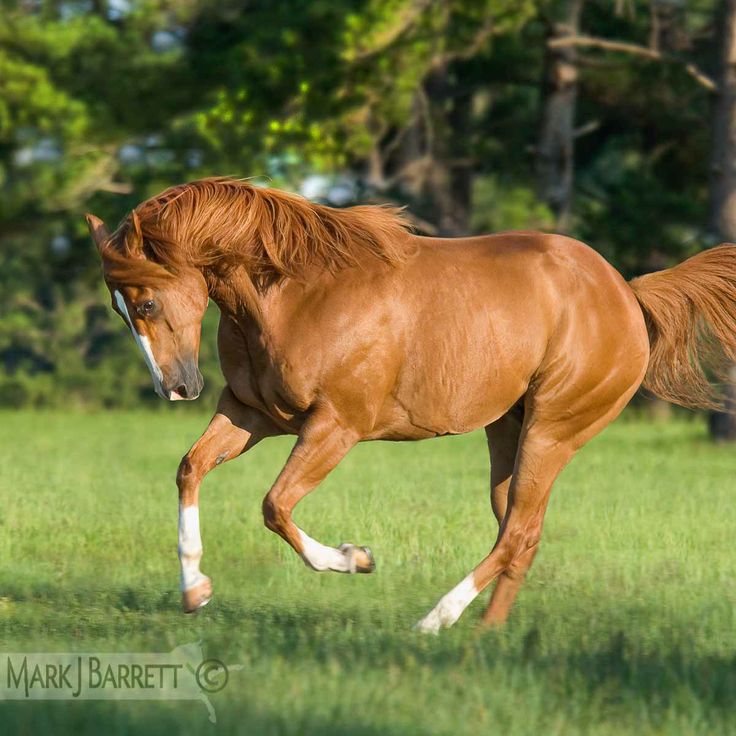 Chestnut
Basing
So after considering it for some time, this is what I am going to do with my basing.
- Attach the model to the base and blend in the moulded on base that the models come with. Without them I fear I am going to struggle with adhesion to the base. Pinning isn’t really an option as I use 1.5mm thick bases.
- I then add details on it that need to be painted, like resin tree stumps, weapons, skulls or whatever I feel is appropriate.
- I cover the base in PVA glue and cover it with a fine sand.
- Give the model and its base a coat of primer.
- I will paint the model as normal, but at the same time I paint the base and the rim with Vallejo Model Color Iraqui Sand (70.819).
- When this is sufficiently dry I will drybrush the base with Vallejo Model Color Pale Sand (70.837).
- After that I will add a coat of Citadel Shade Agrax Earthshade (99189953018) over the base.
- When the wash has dried I will add another drybrush of Vallejo Model Color Pale Sand (70.837).
- After that I will add a coat of Vallejo Model Wash Desert Dust (76.522).
- I will put a second coat of Vallejo Model Color Iraqui Sand (70.819) over the rim of the base.
- When this is dry I will add some PVA glue in various areas where I want to place a tuft, a rock or a log to the base. I will then cover a couple of more areas of the base and sprinkle some fine flock over it.
- Shake it off and when the glue is dry it is ready for the varnishes.
I think this will add a good Mediterranean feel to the base.
 This is what the bases will look like.
Shields
I am doing most of the shields for both my Epirote warband and my Republican Roman warband in one go. There will be some shields that I still have to do later since I don’t have all the models yet, just most of them.
I put the shields on my airbrush plate with some Blu-Tack, primed them, painted the backs and then sealed that in with a gloss varnish.

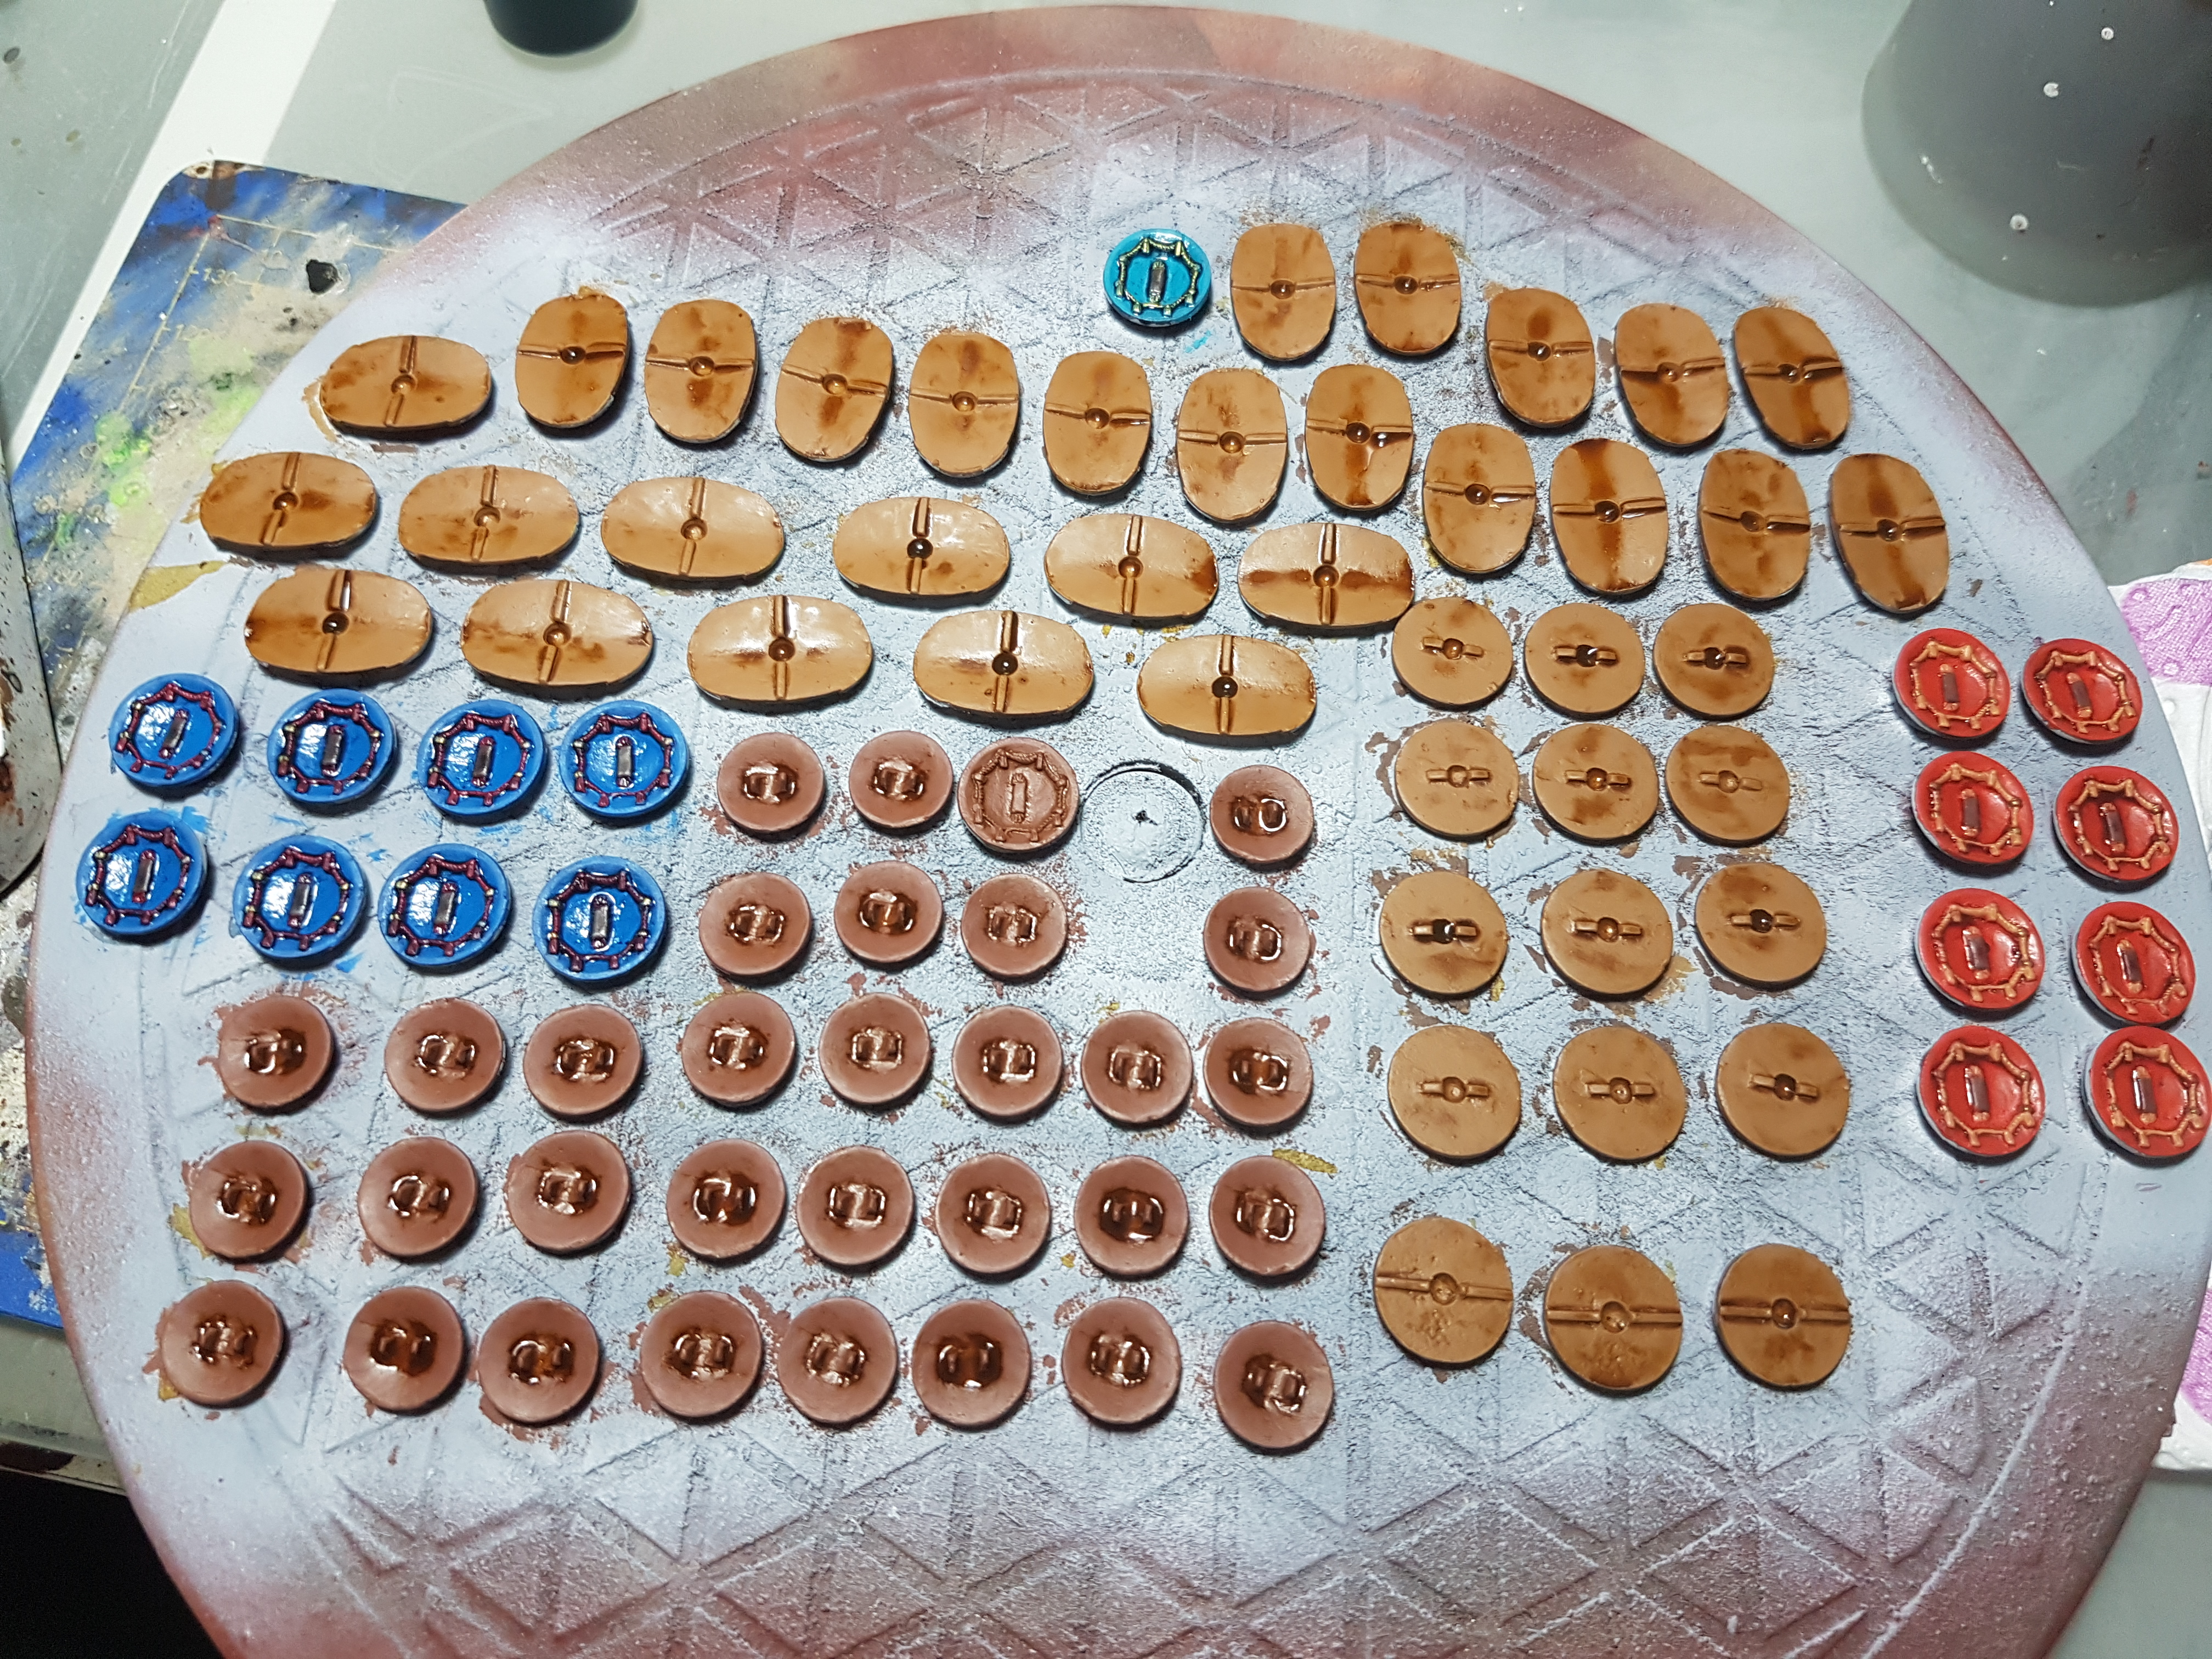
I turned them around and primed and painted this side and then put a gloss coat on there as well. I then proceeded to apply the Little Big Men Studios transfers that I had. They weren’t really an easy fit and I had to cut a lot of them to size, the scuta especially were a pain. Once they were on I added a bit of paint to blend them in and put another gloss coat over it to protect them.
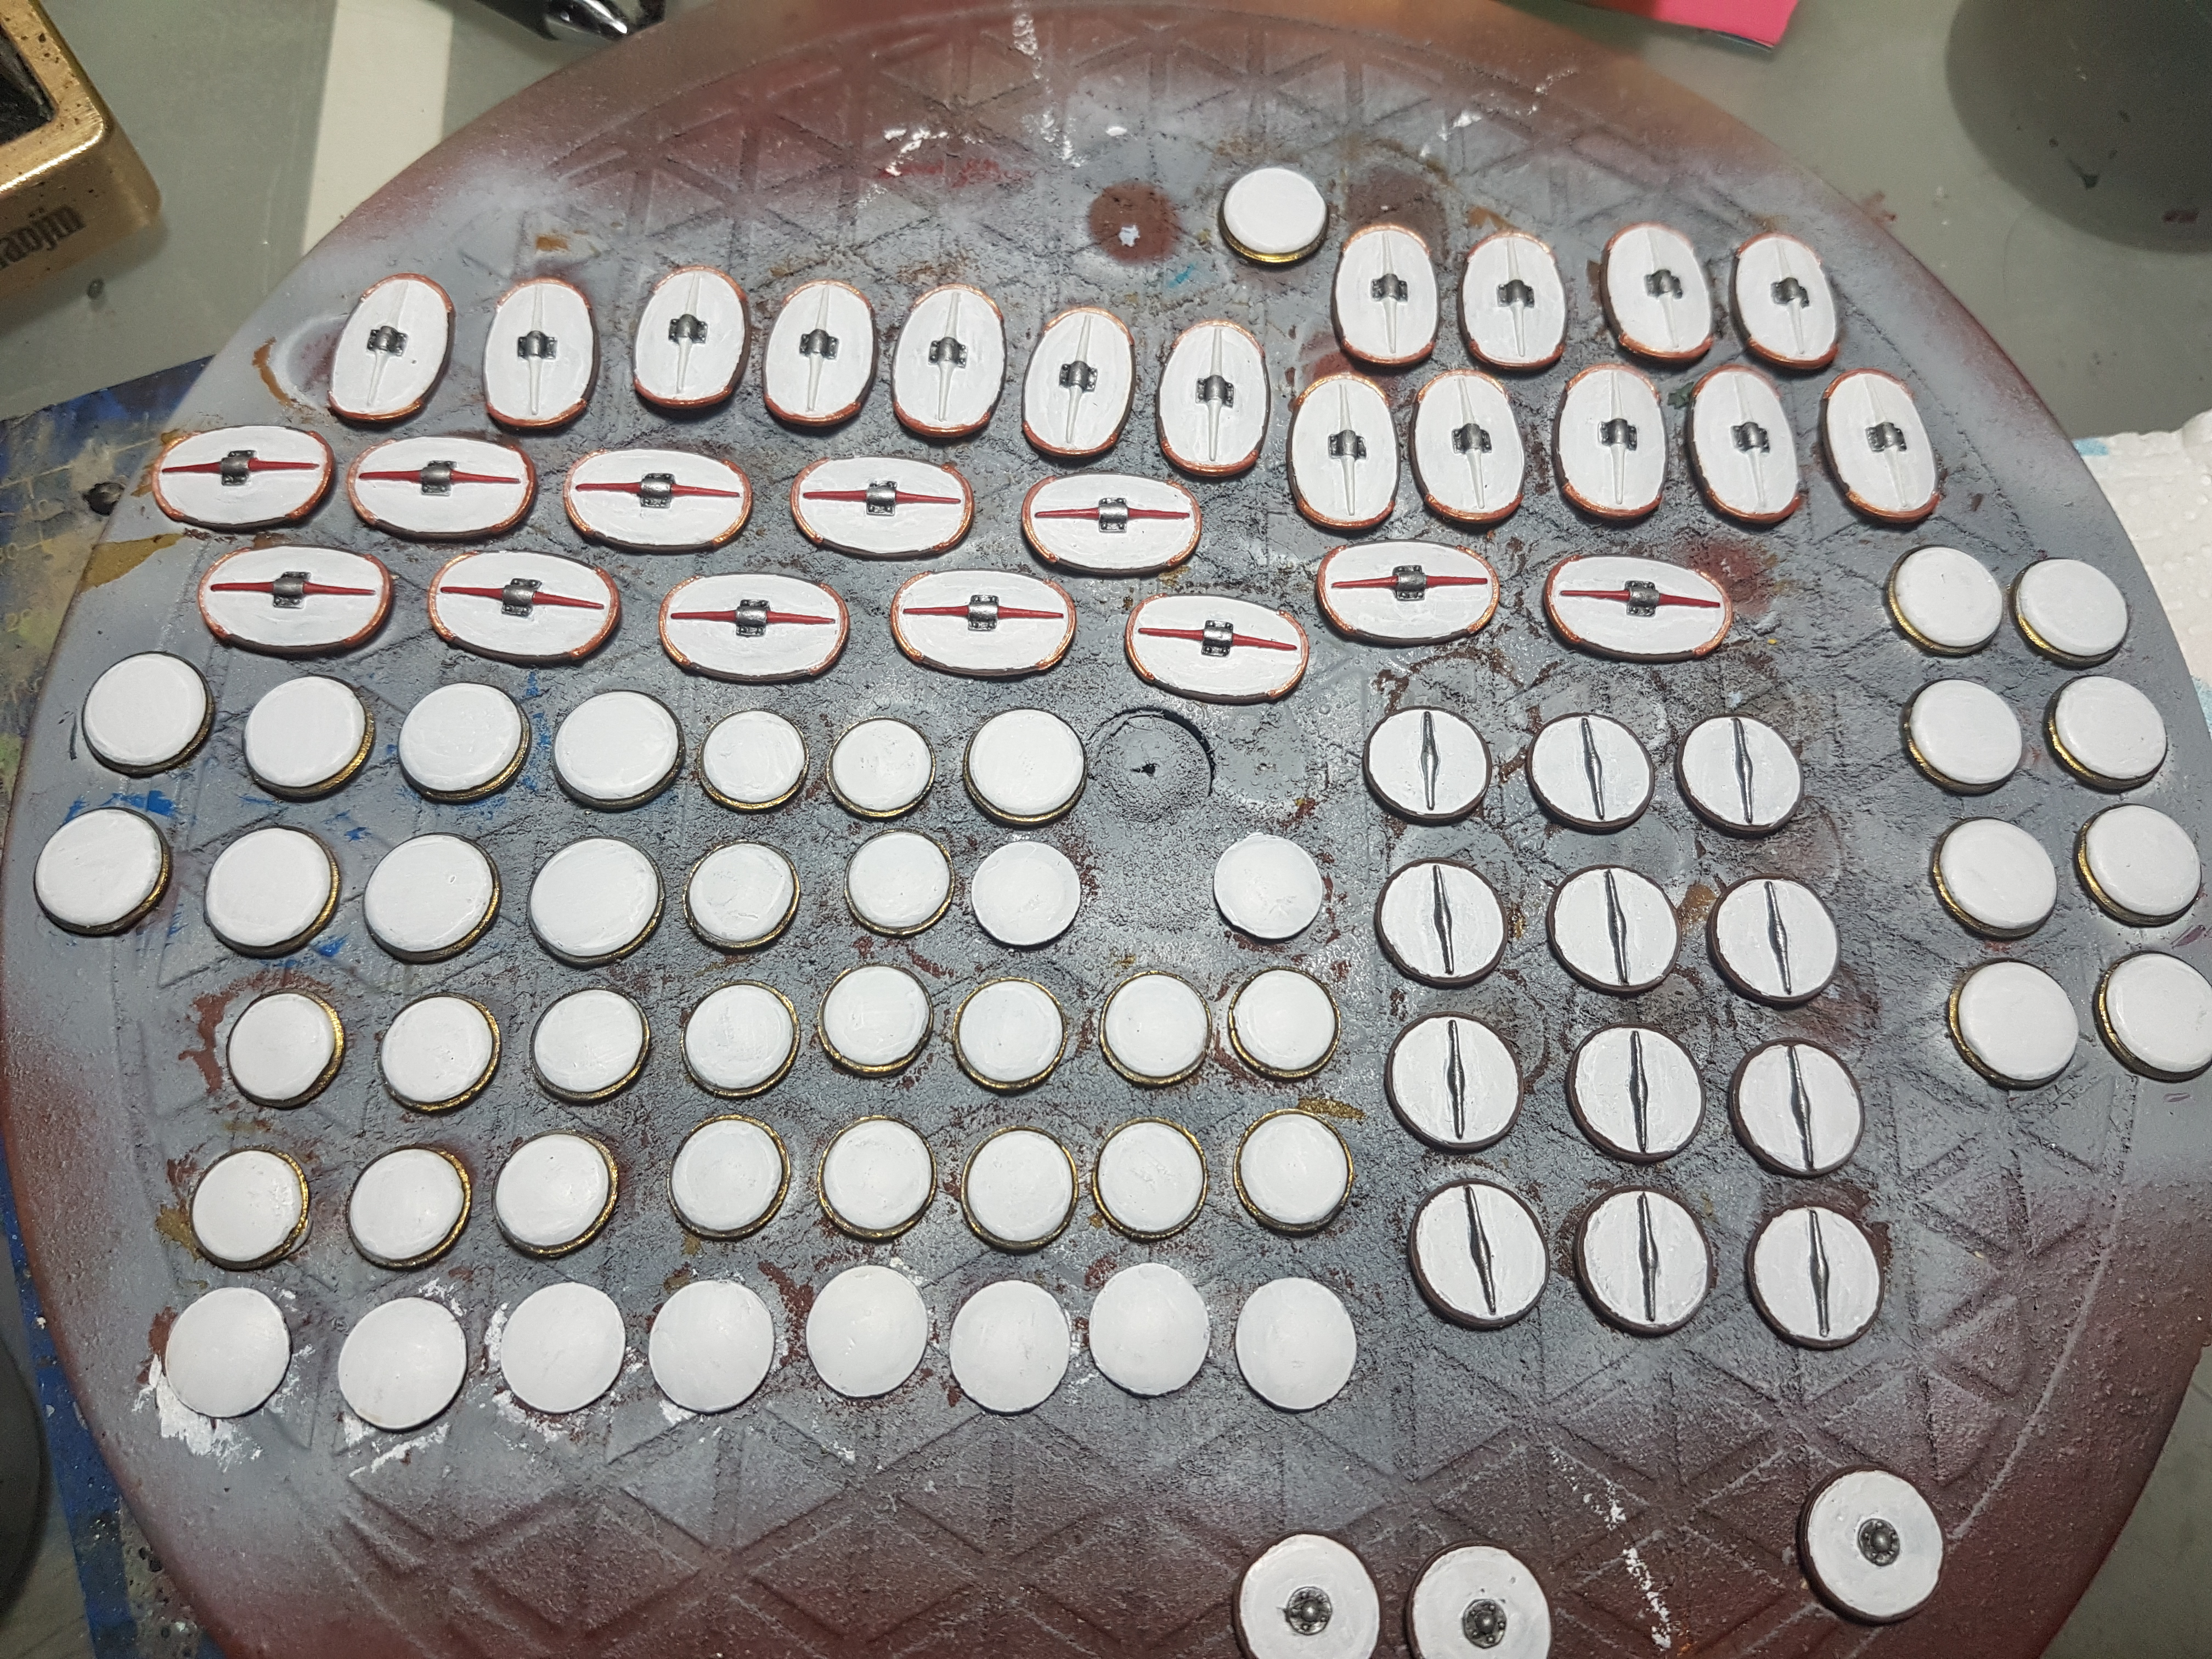
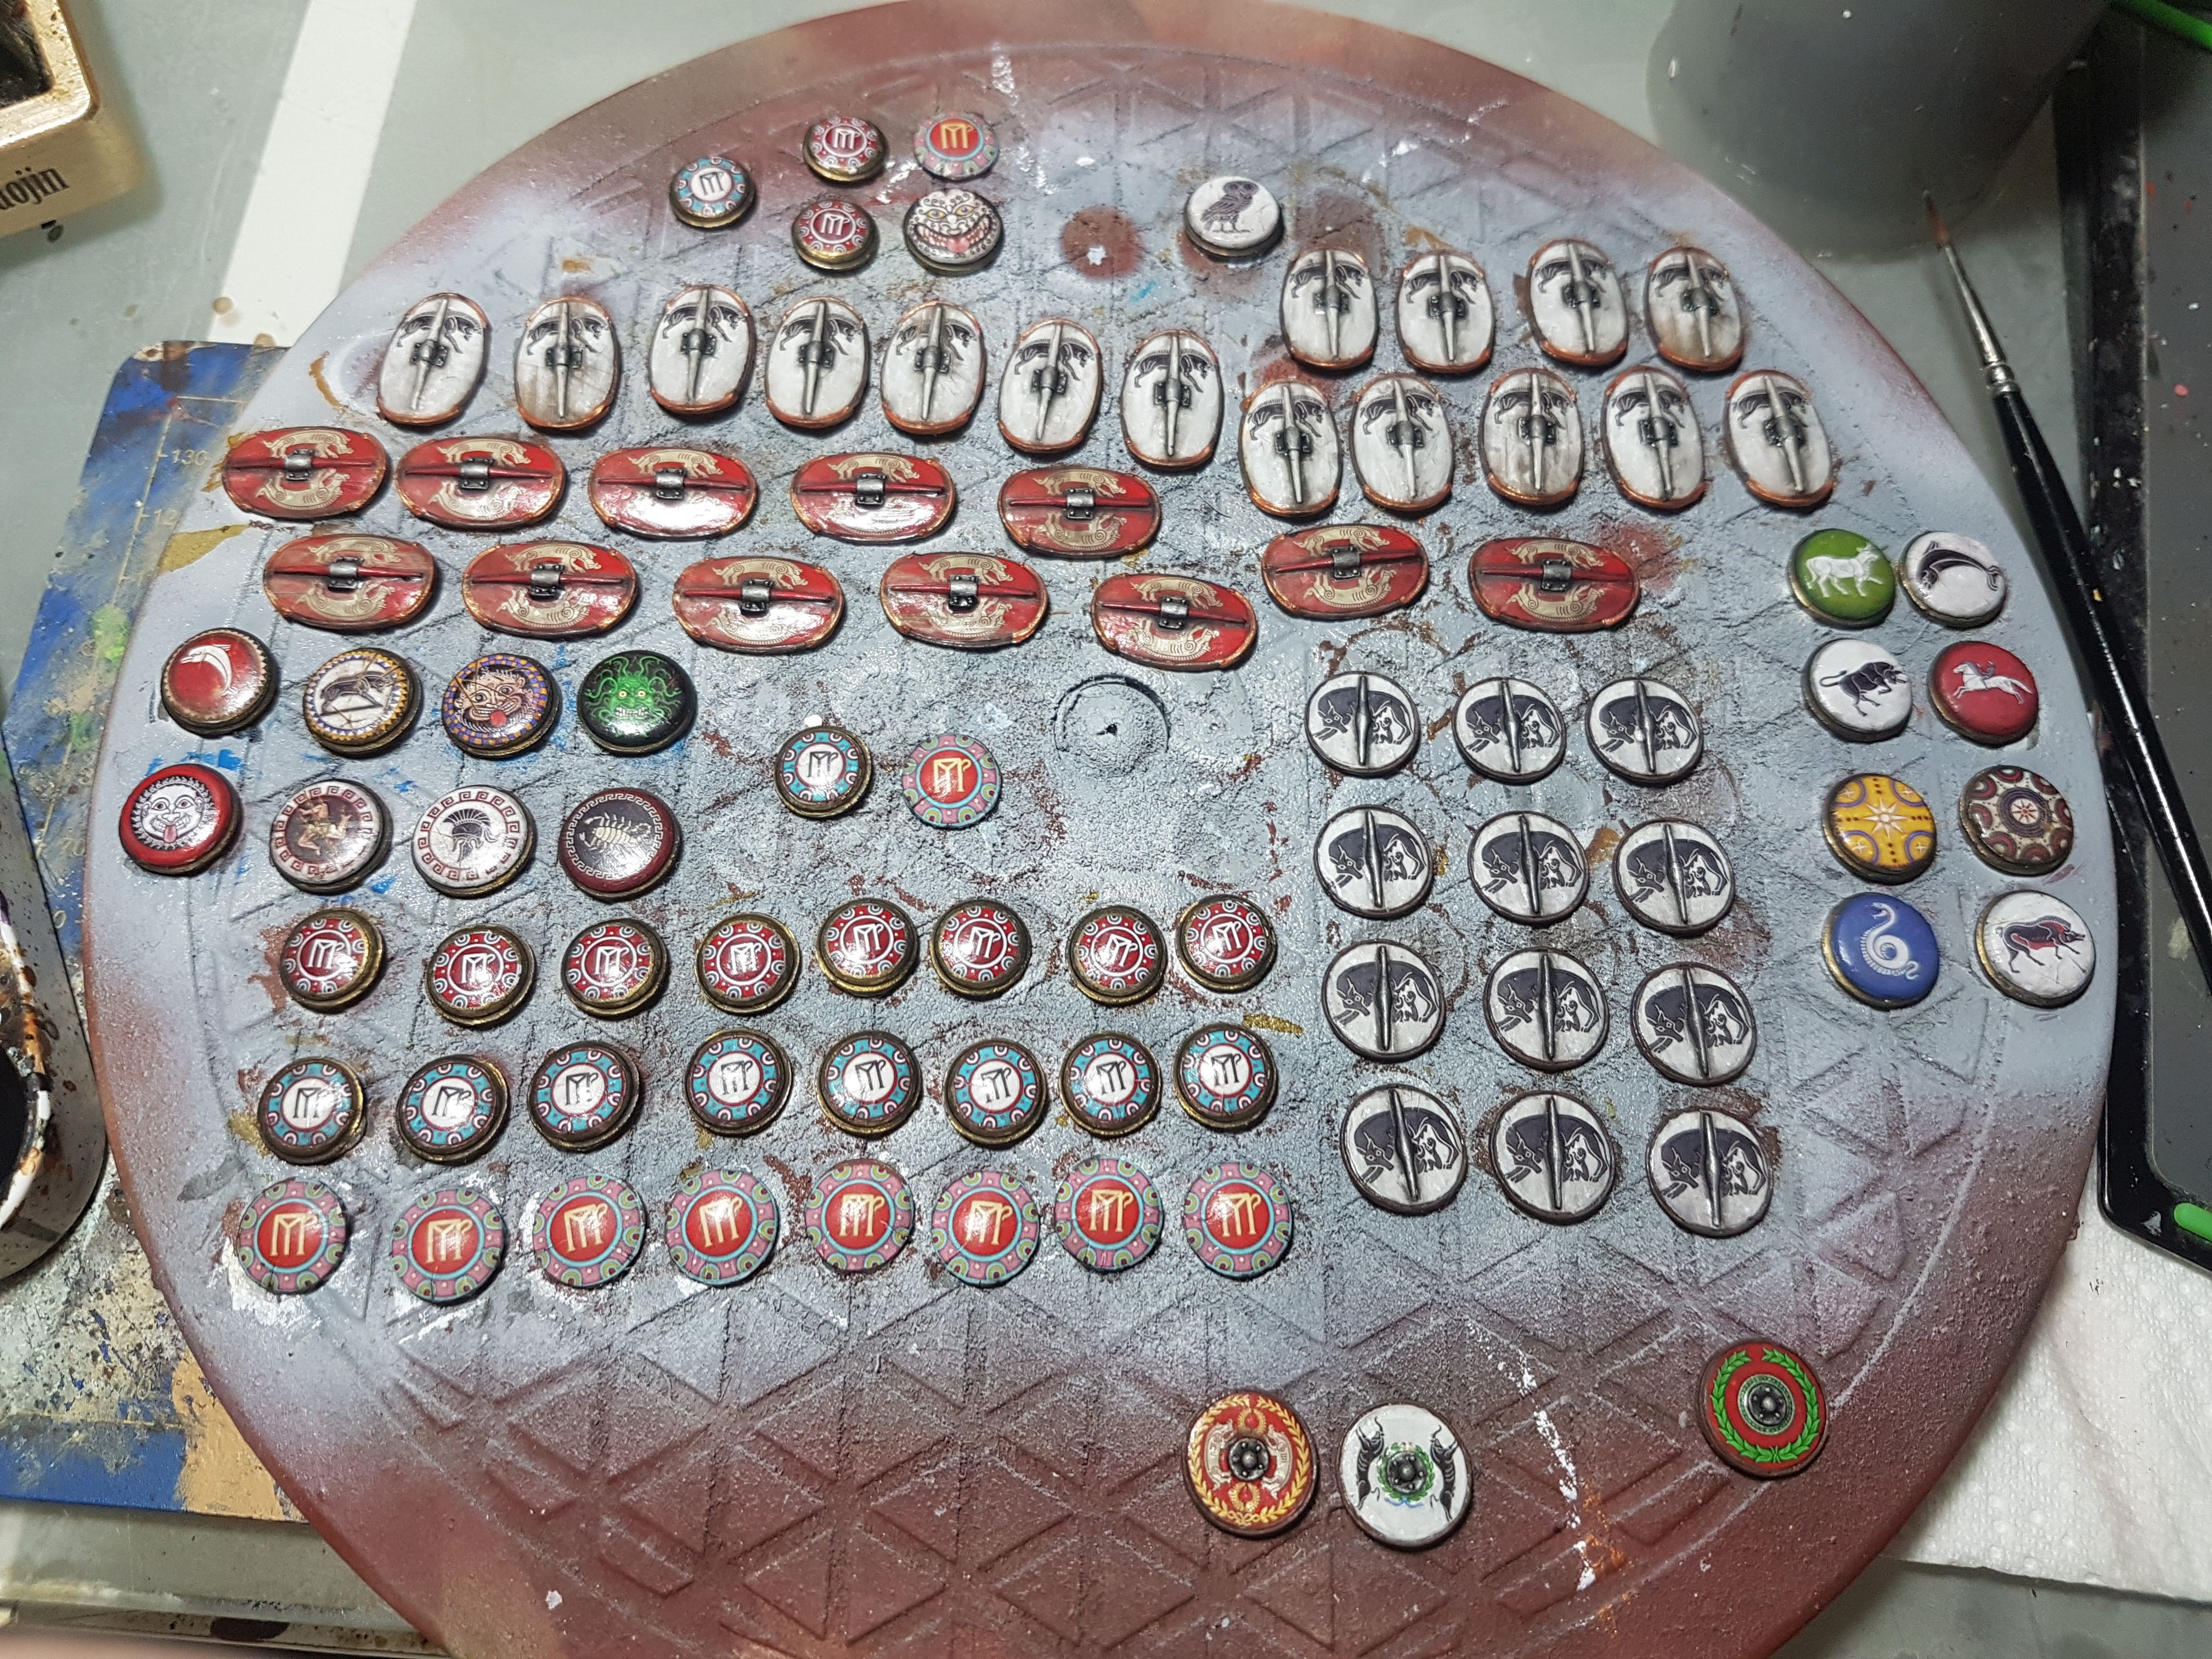
And that is most of the shields done for now. Now let’s wait for Shields 2: The Shielding…..


