Baptism By Fire: 1943 // Americans In Tunisia – Part Two
March 19, 2018 by oriskany
Welcome back to our continuing series on the American “baptism of fire” in Tunisia during World War II. Fought in February and March 1943, these were the first large-scale ground battles between German and US forces, where grizzled Wehrmacht veterans would show the newly-arriving GIs just how much they had to learn on the battlefield.
Follow The Americans In Tunisia Series
Using wargames like the upcoming Battlegroup Torch (IronFist Publishing) and classics like Avalon Hill’s Panzer Leader, we’ll look at where the novice Americans went wrong and how the Germans dealt them some very bloody noses. Most importantly, we’ll see how the Americans would apply these lessons throughout the rest of the war.
If you’re just joining us, please take a moment to check out Part One, where we introduce the project and fill in some background on these climactic closing months of the North African campaign. For now, though, it’s time to climb back in the tank turret. Dust clouds are rising from the enemy’s side of the ridge, it’s time to engage!
Tunisia: February 1943
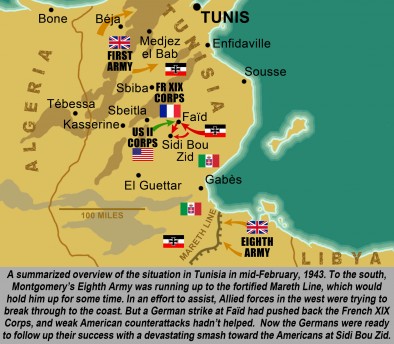
As we saw in Part One, November 1942 saw the Allies decisively turn the tide of World War II in North Africa with the near-simultaneous victory at El Alamein and the Operation Torch landings in Morocco and Algeria. By January of 1943, two allied armies were closing from the east and west on Tunisia, the last Axis stronghold in North Africa.
Determined to retain a foothold in Africa, the Germans massively reinforced Tunisia. They held many advantages, like short supply lines, mountainous terrain and a heavy fortification line in the south, a lack of harmony between the US, British, and Free French allies, and woeful inexperience among the newly-arrived American divisions.
A new campaign was about to begin. First, let’s set the stage. Running down the “spine” of Tunisia are two north-south mountain ranges, closer together in the north, almost forming a rough “A” shape. These are known as the Western and Eastern Dorsals, cut by several key passes vital to any army trying to move through (or defend) Tunisia.
As the British, Americans and French forces in Algeria pushed into Tunisia from the west, rival German commanders Erwin Rommel and the newly-arrived Hans-Jürgen von Arnim argued bitterly over how to counter the advance. Eventually, they agreed on a successful strike at the French XIX Corps at Faid Pass in the last days of January 1943.
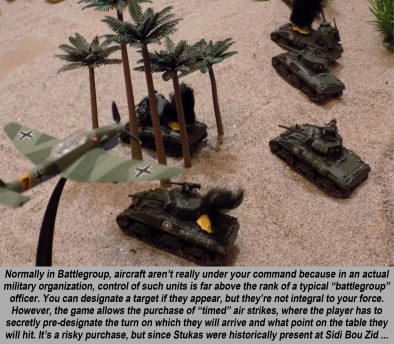
So far, the Germans were doing well. One reason was a surprisingly strong showing in the air. The Luftwaffe was using permanent, concrete runways, while Allied air forces had to use dirt runways that were vulnerable to adverse weather. Thus, Allied air forces were often grounded despite a distinct numerical edge over the Germans.
With the French temporarily out of the way, the Germans were able to occupy Faid Pass and thus secure a gateway through the Eastern Dorsal. This opened the way for an assault towards the Western Dorsal, the Algerian border, and perhaps a chance to oust the Allies from Tunisia. Only the “greenhorn” Americans stood in the Germans’ way.
Disaster At Sidi Bou Zid
Welcome to the War, Yank!
To be fair, “casual” historians do a slight disservice when they say this was the first real battle for the US Army in World War II. A detachment of Rangers was at the Dieppe Raid, there’d been hard fighting against the Vichy French, and there had been some sharp skirmishes against the Germans during the “Race for Tunis” the previous December.
The Americans had also launched some belated and half-hearted counterattacks against the Germans who’d just taken Faid Pass. But now with control of the Eastern Dorsal passes, and with at least partial control of the air, the Germans were now ready to strike hard against the Americans massing to the west.
This would be Operation Frühlingswind, or Spring Wind. The target was the American II Corps, holding the low, broken ground between the Eastern and Western Dorsals. To break the American position, the Germans would hit elements of the US 1st Armored Division at a tiny crossroads town named Sidi Bou Zid.
If the Germans could crack the Americans at Sidi Bou Zid fast enough, they might be able to make a run for Kasserine Pass beyond, a vital cut in the Western Dorsal. This, in turn, would open the road back into Algeria. The Allies in western Tunisia would be split and might have to withdraw, leaving Monty’s Eighth Army alone in southern Tunisia.
The American unit holding Sidi Bou Zid was the 1st Armored Division’s “Combat Command A” (CCA). American tank divisions typically had three such combat commands, semi-permanent and semi-independent formations roughly brigade in strength. This would allow the divisional commander to tackle several missions at once.
The 1st Armored Division (“Old Ironsides”) also had CCB and CCC in the area. But the commander of US II Corps, Major-General Lloyd Fredendall, had deployed his forces too thinly, and these units were too far apart to help each other when the Germans struck.
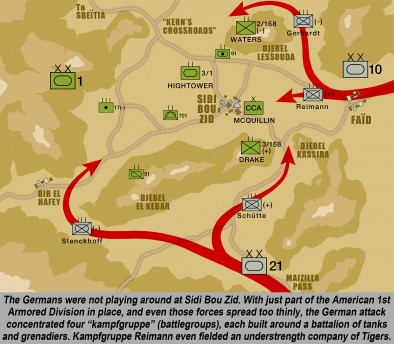
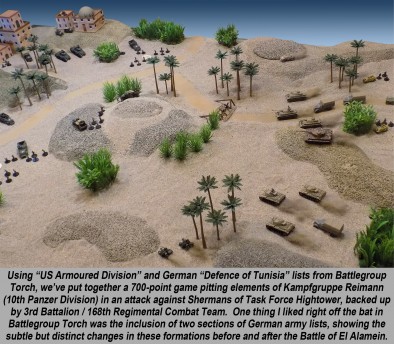
On Valentine’s Day 1943, Sidi Bou Zid was hit hard by two German axes of advance. Each was built around two “kampfgruppe” (battlegroups). Two of these “KGs” were formed from the newly-arrived 10th Panzer Division, the other two were from Rommel’s elite 21st Panzer Division, rebuilt after the long retreat from El Alamein.
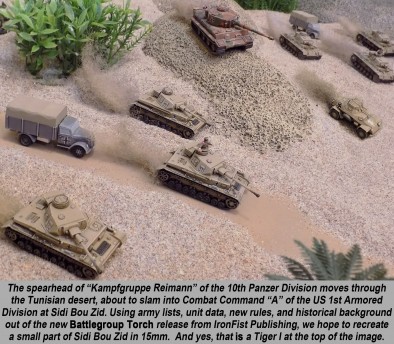
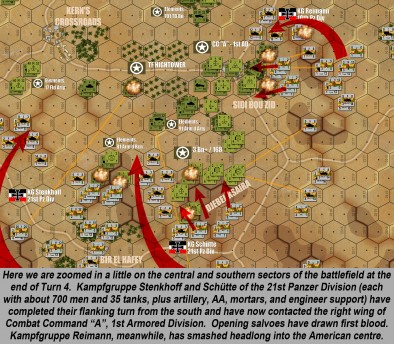
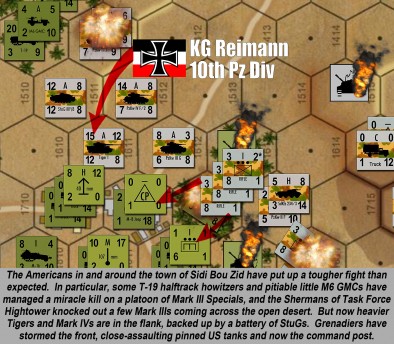
Out of the southeast came “KG Schütte” and “KG Stenckhoff” of 21st Panzer Division. They’d hooked far to the south through Maizila Pass and now approached Sidi Bou Zid from the right flank. Meanwhile, “KG Reimann” and “KG Gerhardt” from 10th Panzer Division come straight at Sidi Bou Zid from their newly-won positions at the Faid Pass.
In all the German force numbered about 140 panzers, plus artillery, “pioniere” assault engineers, panzer recon forces, and plenty of panzergrenadiers in trucks and half-tracks. KG Reimann even fielded a handful of the new PzKpfw-VI “Tiger” heavy tanks (on paper he had a company, but really he had about five).
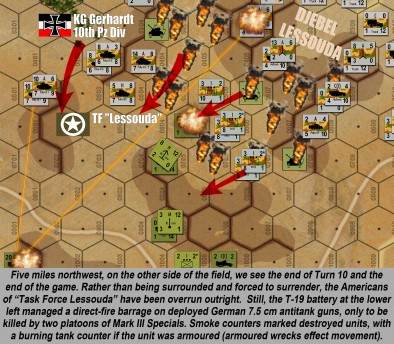
At 04:00 on February 14, KGs Reimann and Gerhardt advanced out of a sandstorm and smacked Sidi Bou Zid from the front, fixing the Americans in place by 06:00. They also encircled the high ground of Djebel Lessouda to the north (defended by a task force commanded by Lt. Colonel John K. Waters, George Patton’s son-in-law).
Cut off and surrounded, the Americans of “Force Lessouda” would eventually be overwhelmed. Lt. Colonel Waters wound up as one of the many American POWs from this debacle, leaving Patton with the nasty chore of writing his daughter to tell her that her husband was now an unwilling guest of the Third Reich.
Meanwhile, KG Schütte and KG Stenckhoff had completed their wide flanking drive through the Maizila Pass. KG Schütte struck from the south, collapsing the American right wing. KG Stenckhoff flanked much further, hooking through Bir el Hafey to hit Sidi Bou Zid practically from behind.
By 0920, American commanders on the scene (Brigadier-General Raymond E. McQuillan, Combat Command A and Colonel Thomas Drake, 168th Regimental Combat Team) had requested permission to retreat. This request was denied by Fredendall, who ordered to hold positions and wait for reinforcements to arrive. This never happened.
In any event, it was too late. KG Gerhardt had now hooked around Djebel Lessouda to the north, approaching Sidi Bou Zid from the northwest. Thus, Sidi Bou Zid was now under attack from four directions (KG Reimann from the east, KH Gerhardt from the northwest, KG Schütte from the south, and KG Stenckhoff from the southwest).
Enough reports were finally reaching Major-General Ward, commander of 1st Armored Division, to alert him of the gravity of the threat. Overriding his boss’ orders (Fredenhall), he ordered a reserve battalion forward to occupy a fallback position toward which the rest of CCA could hopefully retreat.
This position would be called “Kern’s Crossroads,” a desert road junction under the high ground of Djebel Hamra (Hill 672). The hope was that a reorganized stand could be made here long enough to pull in larger elements of 1st Armored Division, like CCC to the north and CCB to the southwest.
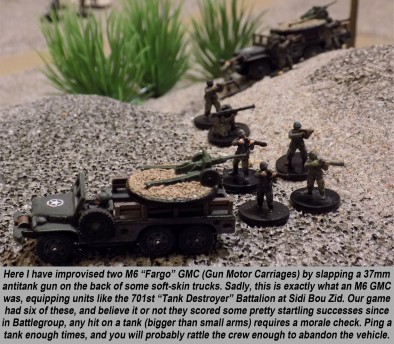
The retreat of CCA was not a pretty one. By now elements of KGs Gerhardt and Stenckhoff were completely behind CCA’s main position, overrunning whole batteries of American field artillery and pitifully inadequate 37mm antitank guns. Reports clearly indicate wholesale panic in many American units. Not many of them made it.
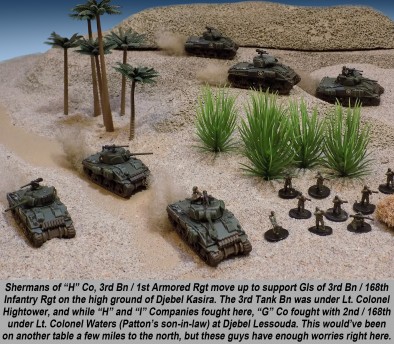
Other units fought well, especially in the south against KGs Schütte and Stenckhoff. One tank battalion commanded by Lt. Louis Colonel Hightower fought north and south simultaneously, holding open the road west from Sidi Bou Zid toward Kern’s Crossroads long enough for other CCA units to escape.
Of course, Hightower’s battalion was effectively annihilated in the process. In fact, CCA was more or less wrecked in one of the most humiliating episodes the US Army would face in World War II. Adding insult to injury, German Stuka dive-bombers hammered the retreating Americans, sowing still more panic and casualties.
By day’s end, Sidi Bou Zid had definitely fallen. Kern’s Crossroads had held, but only just … saved more by the fall of darkness than by the scratch force mostly of tiny M3 Stuart light tanks.
American counterattacks the next day, built mainly around Combat Command C of the 1st Armored Division, were thrown back with heavy losses. Wedges of Shermans simply drove straight at German Mark III Specials, Mark IV F/2s, Tigers, and entrenched 88s over open ground. Bad move, to say the least, and Stukas certainly didn’t help.
On February 16, it was the turn of Combat Command B. Once again with strong Luftwaffe support, the Germans cracked the disorganized, confused, and sometimes panicky American defence and took the town of Sbeitla. Now the road was wide open toward Kasserine Pass … and the Germans were just getting started.
In fact, the only thing that slowed the Germans down was the arrival of part of the British 6th Armoured Division, which ran into 21st Panzer at the nearby town of Sbiba. Reinforced by units of the US 1st Infantry Division and French rifle battalions, this truly Allied defence halted and eventually pushed back 21st Panzer on 20 February.
All the same, one hell of a battle was shaping up at Kasserine Pass. The US II Corps, badly mauled at Sidi Bou Zid and subsequent skirmishes, was far, far from ready. Clearly, the Americans needed help, and the British were sending in more units from both north and south. But would they get to Kasserine in time?
Please come back next week as this harsh “education” continues at Kasserine Pass, one of the darkest episodes in the history of the American Army. Assisted by their more experienced British comrades, can the Americans survive long enough, and learn fast enough, to eventually redeem themselves on these Tunisian battlefields?
For now, what battles have you played in the North African theatre? Are you thinking of picking up Battlegroup: Torch and giving this a go? Would you play the grizzled, weary, threadbare Germans … or the fresh, idealistic, and well-supplied Americans?
Keep the conversation going and post your comments, questions, and thoughts below!
"So far, the Germans were doing well. One reason was a surprisingly strong showing in the air..."
Supported by (Turn Off)
Supported by (Turn Off)
"Clearly, the Americans needed help, and the British were sending in more units from both north and south. But would they get to Kasserine in time?"
Supported by (Turn Off)


![NO Weekender Or Cult Of Games XLBS This Weekend [Updated]](https://images.beastsofwar.com/2026/03/No_Weekender_and_XLBS_this_Weekend-225-127.jpg)








Excellent article as always. Time to visit the bookcase and Amazon to brush up on the North African campaign. Is Desert Leader available to buy? it looks a good add on.
Thanks very much for kicking us off, @gremlin !
Unfortunately, the website from which I bought it seems to be no longer in operation:
https://boardgamegeek.com/thread/1503484/patrick-stortos-pbpl-variants-site-offline
Fortunately, Brian Train operates his own website, and is available to contact via e-mail:
https://brtrain.wordpress.com/
Of I can just send you the word docs if you want. It’s an old 2000 release and not even mentioned on B. Train’s site. 😀 It’s just something he published almost 20 years ago off his dining room table, it was given one hell of a face lift for this article series. 😀
Thanks again for the comment.
Thank you, I’d be grateful if you could send me the file – [email protected].
All right, sir – you should have some e-mail. 😀
UPDATE: @gremlin – I have actually heard from Brian Train. 🙂 and he’s provided a new address were more of his scenarios should be available.
https://brtrain.wordpress.com/scenarios-and-variants/
Check the link above and you should find more of his great material! 😀
Another happy lunch break spent reading one of your articles. looking forward to Kesserine Pass article,think I’m going to have to do some follow up reading on this.
BG Torch ordered to add to my collection.
Fantastic article!
Thanks very much, @dorthonion – I have it on order as well! 😀 (Okay, I have most of the book on .pdf already so I could prepare this article – but gotta have the physical copy as well!)
Very cool @oriskany again!
Hopefully the campaign pack we have to go with BG Torch will aid some to fight their own campaign…
An honest look at the rough start for the Americans in the desert. I dig it man, keep up the good work!
Thanks very much, @coachjose59 – Yeah, the Americans get hammered pretty bad here, and at the next day’s counterattacks at Sbeitla, and at Kasserine Pass a week later (next week’s article).
The good news is that there is a “happy” ending with a little redemption at the Battle of El Guettar (as anyone who’s seen the movie Patton knows). Of course it’s not quite as clean-cut or complete a victory as the movie portrays, and follow-up American counterattacks were badly frustrated along the Sened-Maknassy Road, but the Americans are learning … fast.
Tunisia was a bit of a crucible where the US Army really got “on the job training” re: fighting modern mechanized war (tanks are NOT the new cavalry … the British have already paid buckets of blood learning those lessons) … but more importantly, how US, UK, and French forces learned to fight together as a coalitional team (as painful as that process was at times).
Thanks for the comment!
Mmmmm… massed Panzerleader. *wipes drool from chin*. That’s a spectacular battle! Were you using the AIW morale rules for the American forces?
BG Tunisia: Can you play company sized games in the Battlegroup series? Or is it too unwieldy for forces that large?
Anyway, I may build an American BG later in Steel Panthers 2 and try my luck against the dreaded Hun. 🙂
Well done, Jim!
Thanks, @cpauls1 ! 😀
Were you using the AIW morale rules for the American forces?
Ohh … I’ve been hoping someone would ask about that. (evil chuckle)
The short answer is yes. In his original Sidi Bou Zid scenario presented in Desert Leader, Brian Train uses the map boards, most of the rules, the WEC, and the morale system from Arab-Israeli Wars, back-dating it to 1940-43 Desert WW2 games. He also inclueds a scenarios specifially for Sidi Bou Zid.
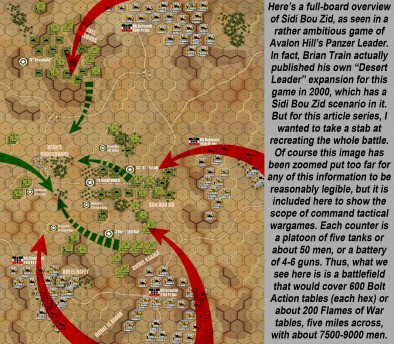
Now needless to say, I am not using original AIW mapboards or Panzer Leader counters here. Everything has been cranked up to the “Oriskany Special” standard, with the map approximating the actual layout of the battlefield.
We also expanded the game to include ALL of Sidi Bou Zid. If you look at the larger map, you see its basically a picture of four converging German attacks. Brian Train’s original published scenario I think includes just one, I’m assuming KG Reimann since it includes a platoon of Tigers (Kampfgruppe Reimann had the only Tigers on the field). But I wanted to try all four.
I kept Brian Train’s original morale listings, though. Germans, naturally, get an “A.” The Americans don’t get an A, B, C, or even the lowest, a D.
The Americans are so bad at Sidi Bou Zid that Brian Train gives them a new value: “E” 😐 I’m not kidding. They had to invent a new level of awful. Once “D” or “DD” dispersed through normal Panzer Leader CRT results, American units just never rally, period.
It’s tough. The Germans can literally spray fire everywhere, pin down hordes of Americans, and then mop them up at their leisure. This is basically what happens historically, CC “A” of 1st ArmDiv was virtually annihilated while the Germans took practically no losses at all.
I did manage a counterattack with “Task Force Hightower” – and also Task Force Kern with the reinforcements from 6th Armored Infantry that come on near the end of the battle (establishing the fallback position at Kerns Crossroads). With the asymmetric victory conditions, the Germans actually had a pretty challenging game (even losing one or two platoons of tanks is very bad news for them since the scenario assumes they have to push on through Sbleita, then Kasserine, and possibly even Tebessa Gap into Algeria).
But the battle itself was a historically-accurate slaughter. 🙁
Also, this game was freakishly huge. 12 hours over three days. Ugh.
YES to some Tunisia-based Steel Panthers! 😀 😀 😀
Bucket of Coffee – check
New entry in an @oriskany series to read – check
Enjoy lunch – check
Epic, @rasmus – thanks for the comment. My lunch break is actually
1) get coffee
2) catch up on comments!
😀 😀 😀
This, again, proves Monday can be a day to look forward to.
The desert tables look good. On one of them I saw dust clouds. Dust clouds both give your position or direction of advance away and blur your vision. Are there any rules in BG for this or how would you include this in your games?
Did the Americans allready have bazookas?
I would like to play the Germans and I want to put my opponent right if he/she is fielding those can-openers irregularly 🙂 .
So far I mainly tried to play small skirmishes as part of the German advance to Tobruk and further on to El Alamein. There is for instance one occasion, when British Forces almost accidently smashed into Rommel´s reconaissance centre (and destroyed it, thereby “blinding and deafening” the Desert Fox and hampering all German efforts on North Africa.) Germans defend a radar station, tents, material and vehicles, British launch a surprise attack.
There was one battle in this campaign when General Stumme suffered a deadly heart attack. I took this event as the initiative to make a random card for my games called “Commander´s Deadly Heart Attack” with the result of reduced command ability of the force.
So far I mainly play Bolt Action and FoW in Africa.
I like Mondays and I´m looking forward to the next one.
Yes… rules for dust storms are in Battlegroup.
The US did have the bazooka in Tunisia but many went unissued as local supply corps were unfamiliar with what it was or who it was due to go to, further compounded by a general lack of training in its use as it was so ‘new’. It was an issue that they remedied by Husky.
Thanks, @jemmy – I was thinking along the same lines as you re: the bazookas, I knew the Americans had them but wasn’t sure how common they really were. But they were in the Battlegroup Torch lists we were featuring, I had the minis, and most importantly, I felt my poor Americans needed all the help they could get.
Battlegroup does a great job with Bazookas, their application but also their drawbacks. You gotta be close, and you’d better be on the flank. They’re awesome for blowing up trucks, halftracks, armored cars, etc, other light targets, so your big tanks don’t have to spend ammo on them, and still forces your opponent to draw a battle rating counter. 😀
As @piers says below, the book does include rules for dust storms, etc. I did not use them here since Tunisia is largely a “different kind of desert” than the open “sand sea” of El Alamein, etc. Much more rocky, mountainous, and during December 42 – February 43 … surprisingly rainy.
Thanks very much, @piers – that helps clear things up re: the bazooka. That’s kind of what I thought, but it’s nice to be sure. Anything to get rid of those terrible 37mm … *ahem* … “antitank” guns. 😀
Great read for Part 2. Lessons to be learned for trying to hold a thin line. I’ve read some interesting stories about the poor relationship between Fredenhall and Ward, with Fredenhall bypassing Ward completely at times to dictate even individual company deployments to Ward’s subordinates.
Also a story that before the attack, intelligence was suggesting the Axis would strike against the French to the north. Waters had done reconnaissance in the days before and bumped his concerns up the chain, only to be rebuffed.
Contrasted with Rommel and von Arnim leading from near, if not at, the front, the Allied forces structure and communications led to much inflexibility… Surely they will get it together at Kasserine…
Oh absolutely, @donimator – I actually took it a little easy on Fredenhall in the actual article. But by all accounts this guy was a walking disaster, and even before these battles his peers did not like having him around.
“Aggressively informal” is one way I think we can describe him, the kind of guy who tries to crush your hand in a handshake while slapping you too hard on the back, practically yelling “HOW THE HELL ARE YA?”
Brusque, overhearing, and pompous, yet very little attention paid to the more scientific aspects of command like RTO procedures, map coordinates, etc.
There’s the one story I’m sure you’ve heard where he’s trying to direct battalions over the radio, telling them to deploy “you know … near that place that begins with a ‘C’.”
For these battles, Fredenhall has something like two whole battalions of combat engineers building his HQ, a freakin’ modern-day castle fortified under a mountain like he was expecting a nuclear bomb attack. Seventy miles back from the front, WAAAAY too far for a corps commander (the usual distance is roughly analogous to the frontage of your formation, so a corps commander should be no more than 5-10 miles back).
Now true, Fredenhall’s II Corps was spread out way too thin, and this was partly his boss’ fault, British General K. Anderson, who admittedly gave Fredenhall too much frontage, but we’ll get into that in Part 04. But still …
You can’t bury yourself under a mountain 70 miles away and then try to take micro-manager command of a fast-moving mobile battle like that. It was so bad that when Brigadier General McQuillin (CCA/1st Armored) asked for permission to withdrawal, he wasn’t denied by his boss, Maj General Ward (1st Arm Div), he was denied by HIS boss, Fredenhall, CO of II Corps. Ward was cut out the loop so badly he barely knew what was going on. Once he found out, he more or less overruled Fredenhall and ordered forward Task Force Kern (primarily 6th Armored Infantry) to establish that fallback position at the crossroads. Saving even a few scraps of CCA is probably a big reason Ward’s command reputation comes out of this mess pretty much intact, but Fredenhall not so much.
🙁
Omar Bradley (still only a brigadier at the time) called Fredenhall’s HQ “an embarrassment to any solider.” MajGen Harmon (2nd Armored) would call him “a physical and moral coward.” Monty’s boss, Alexander, would politely assure Eisenhower that “I am sure you must have better men than that.”
Yeah, no one was too sorry to see this guy go (spoilers!)
And you’re absolutely right about the intelligence. After Kasserine Pass, the only person fired faster than Fredenhall was Eisenhower’s chief of intelligence, who relied too heavily on Enigma / ULTRA sources. Great for strategic or operational information, not so much for real-time tactical data. We get into this much more in Part 04.
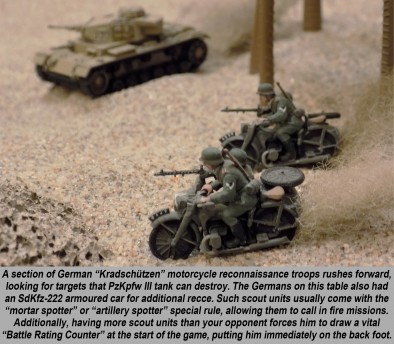
I really love the tone of this one. As Americans, we tend to think we are the most Bad**s guys out there and this article shows we had a lot to learn about fighting in the desert. Also, I know you Grognards are die hard hex and counter folk, but those tables look sweet! Especially the motorcycles with the dust clouds. I could just picture @warzan making vrooom vroom noises has they move around the board.
(Colonial Marines) ? @gladerunner you forgot the Daka daka daka if a plane attack’s
Yep, @gladesrunner – like Rommel would later write (I think to his wife, actually) – “I’ve never seen troops so badly prepared for battle – and I’ve never seen troops learn so quickly.”
And yes, German Kradschützen motorcycle troops are always a hit. 😀 With the “mortar spotter” rule, they’re also great for calling in barrages. Just not nearly as fast as you’d think, at least off-road.
Oh, @zorg – poor Colonial Marines. Thinking their the most badass troops in the universe, winding up being xenomorph food and wombs. 🙁 🙁 🙁
Yup.
😀
Another great article. I’m especially interested in the miniatures used in the photos, particularly the motorcycles. What scale/manufacturer are they? I’m waffling between 15mm and 28mm myself.
Thanks, @koraski – you actually caught me in a moment “cheat” there. Those BMW motorcycles are Zvezda, but 1:72 (20mm) whereas the rest of my table is all 15mm.
So think of them as really big dudes on motorcycles, sort of a German “Sons of Anarchy.” 😀 😀 😀
I just ordered the wrong size, I guess, but I’ve been using them for years and it’s always worked out well. In photos I put them in the foreground so their extra size actually helps create depth of field in the image. 😀 Battlegroup also plays equally well for 15mm or 20mm (so it’s never been a problem rules-wise), but also plays for 10mm and 28mm.
Obviously, I like 15mm, just because I like saller-scale games that allow larger armies and more realistic relationships between the size of the model and the ranges of their weapons. But that’s just me.
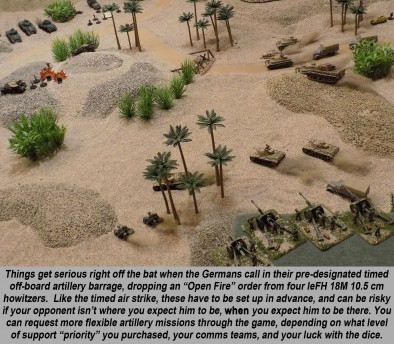
The German Pz IIIs are PSC. German Pz IVs are Zvezda. American Shermans are old “Open Fire” starter kit Shermans from Battlefront. The German trucks are Zvezda. Halftracks are Axis & Allies pre-paints. The artillery is Battlefront from the new 4th Edition DAK set (FoW boot camp last year). American trucks are battlefront, Stuka is Zvezda 1:100.
Nice one @oriskany do you think Patton had a dislike for the son in law.?
I honestly have no idea. 🙂 Patton wasn’t in command yet at US II Corps, he was still trying to put US I Armored Corps together back in Morocco and get it ready for combat.
But when these defeats took place, he was pulled up early and given command of II Corps, which he had to rebuild almost from scratch in the wake of Sidi Bou Zid, Sbleita, and Kasserine.
This is where Patton’s contribution is often UNDER-rated (I know I’m usually the guy squawking about how OVER-rated he is). Patton could build, train, organized, inspire, and prepare division, corps, and eventually armies for battle like nobody’s business. He was also pretty instrumental in the 1920s and 30s (as a major and lt. colonel) in getting the US Army to adopt tanks into their doctrine.
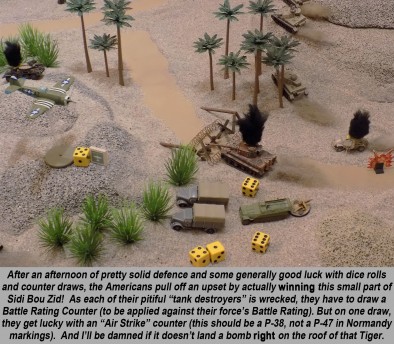
The tables do look great, but I think I spotted a few unpainted minis … (said by someone who has yet to paint the FoW panzers from bootcamp … ;-))
However given the overall quality and work that goes into this article series (and the inevitable answering of stupid questions by people like me) that’s a teensy tiny flaw in an otherwise perfectly byte sized piece of history.
(btw : my wallet is starting to dislike these articles ;-))
Anyways …
If the Americans had had a similar overview as that Panzer leader hexboard … would they even thought of fighting ?
It looks like the Germans have outnumbered them to such a degree that a loss appears to be inevitable.
Is there any situation (besides being lucky with weather & dust storms) that they could have survived at all ?
There are no unpainted minis on these tables. Now admittedly there are some Axis & Allies 15mm pre-paints among the infantry and German halftracks – but everything has at least three colors.
Totally agree on the Americans’ predicament on the Panzer Leader board – but this is a measured and scaled representation of what was actually there, where it was, and the quality of the units. It’s a straight-out butchery. The Americans are surrounded, outnumbered 4-1, being attacked from four sides, and outclassed by an enemy force vastly superior in experience, equipment, and training.
But in these strict historical scenarios, the historical result is the “win-line” that determines who won the actual game. So if you’re the German player, as bad as the Germans kicked the holy hell out of the Americans at Sidi Bou Zid historically, you have to do EVEN BETTER to win the table top game.
Conversely, as the Americans, you just have to do a LITTLE better than they did historically, last a little longer, kill a few more German units, suffer 98% losses instead of 99% … 😀 and you win the game, even as your army dies on the battlefield.
Asymmetrical, man. 😀 😀 😀
LOL … you’re right. I think I spotted a second colour on that ‘unpainted one’ 😀
I guess I don’t have the mind set required for such strict historical fights, because trying to survive such a butchery doesn’t rank too high on my list of things that are cool.
It must be real difficult to construct historical scenarios in a way that the ‘win line’ that is possible within the context of the game.
If the armies move/attack as they did historically then the game would be a draw, right ?
Because neither would have done better than the historic event itself.
@limburger –
“If the armies move/attack as they did historically then the game would be a draw, right?”
In short, yes.
“Because neither would have done better than the historic event itself.”
Yes, barring crazy results on dice, etc. 😀
This is actually how I playtest Panzer Leader scenarios I’m designing.
1) get as close as you can with research, the map, the forces, etc.
2) run the game exactly as the historical commanders did.
3) does the game more or less turn out the way the battle did historically? (taking into account wild results on dice, etc).
If the answer to #3 is “yes,” (and you run it a few times, and you keep getting “yes”), you know your scenario engine is pretty correct. Now play it yet AGAIN, but this time making new moves, etc. See how it turns out.
You’re less playing a game at that point, and more a historical “thought experiment.” 😀
Now in the interest of full disclosure, I didn’t put this Sidi Bou Zid scenario through the full wash described above. After 15 years I’ve gotten comfortable enough with Panzer Leader scenario design that I can “wing it” and at least come close. Also, it was just a game that we were running once for this article series.
But when scenarios are being officially written and presented to other wargaming communities (not really Beasts of War, where hex-and-counter isn’t that big, but more hex-and-counter communities like certain segments of BGG community and websites like CSW (ConSimWorld) – some of these scenarios have been taken to conventions by PanzerBlitz/Leader “bigwigs” – yeah … THOSE get put through the wash pretty heavily.
PanzerBlitz Barbarossa, for example, wound up at 150,000 words, took 14 months, and presents 21 pretty-seriously playtested and published scenarios with (new maps and counters) on CSW and BGG.
There are wargamers who take this stuff pretty seriously. 😀 I’m proud to be one of them.
Ive always found it easy to replay historical battles… you just assign objectives in a manner that reflects the historical precedent… even heavy defeats can be ‘won’.
Far more fun that line em up affairs.
@piers – Agree 110%. Admittedly I’m better at it in Panzer Leader, but I’ve just been doing it longer in systems like that..
Nice roll on next week with Sidi Bou Zid.
This week was Sidi Bou Zid. Next week is Kasserine Pass. 😀
Yes it was that’s was what I was ment to say, oops non lightbulb moment.
😀 No worries at all.
Interesting how this battle and Kasserine are so similar, in the same general place and time, but Kasserine is well known and Sidi Bou Zid is not.
That’s actually a really good point, @pslemon . 🙂 I can guess at a few reasons why almost everyone into WW2 has heard of Kasserine Pass but Sidi Bou Zid is more of a footnote …
1) Kasserine Pass was bigger.
2) Kasserine Pass got people fired (people like to talk about that).
3) Kasserine Pass involved the British, and the British wrote most of the “first generation” of histories after WW2 in the late 40s.
4) Kasserine Pass has a more memorable name, especially to an American mind. Sidi Bou Zid is very “Middle Eastern.” “Sidi” is a title, so apparently the town is named after someone? But Kasserine Pass – not only is it easier to remember, but your instantly know it’s a “Pass” – a rocky defile in a mountain chain. Just from the name you have the beginnings of a picture.
It also sounds like something out of a western movie. 😀 John Wayne and Clint Eastwood have a shootout in “High Noon at Kasserine Pass!”
You forgot James Coburn and Charles Bronson!
Oh, damn it … you’re right, I did. Especially unforgivable since James Coburn stared in Cross of Iron, one of my favorite WW2 movies ever.
The best movie ever… Steiner? Steiner!
Oh, absolutely. Whenever I come to a desperate moment in a game, especially if I’m playing the Germans, before I make my roll, I hold my six-siders aloft, stare at my opponent, and mutter …
“And I will show you … where the Iron Crosses grow.”
😀
And also Sidi Bou Zid was a prelude to Kasserine Pass – everyone recall the 2nd act.
And of cause Kasserine Pass was in Patton as well – when we are talking movies, even if they are Hollywood not history ; )
This is very true, @rasmus . 🙂 When the movie Patton starts out (after the opening motivational speech **), all the wreckage and bodies we see I think is supposed to be right after Kasserine Pass (Feb 19-22 1943). We get into this in Part 04 a little, where Fredenhall is sent home after Kasserine and Patton takes over II Corps on 6 March 1943.
** Opening speech – I think this is the one (slightly edited) he historically gave when Third Army was activated in July 1944 – even though the scene shows him as a 4-star general which he didn’t get until April 1945, wearing medals he wasn’t awarded until V-E Day or after, even later in 1945. Basically the scene shows him at the height of his career, but the speech is from a moment significantly before that.
For information for those without some one to play with, Steam are doing Tank Warfare Tunisia 1943 at 80% off. Haven’t played it yet, still downloading, but it does have generally favourable reviews.
That’s a great tip, @gremlin ! I’ll have to check that out. 😀
Thoroughly enjoyed the read @oriskany. I love your articles as they touch on other areas of Military history where I have a passing knowledge but they flesh it out and make it so I want to nip to the library and start further research.
As an aside I have some photos of the military tunnels in Gib from when I was there. They are still in military use by the Gibraltar Regiment and Royal Engineers, so are off limits to tourists but there is still quite a bit of stuff left over from the build up to Torch down there. In fact my Corps has a guy who is a sort of defacto curator/tunnel guide to visiting military units. I’ll see if I can find them and post them up on the threads. We can even have a guess the object competition on one of them. It is most intriguing??!!
@brucelea – Awesome, glad you like the series so far. 😀 Indeed, there is easily enough material to run a parallel series on the British Eighth Army at the Mareth Line, the LRDG finding a way around the Mareth Line, the crazy New Zealand tribesmen of 28th Maori battalion cracking open that position, the British 48th Royal Tank Regiment capturing Tiger 131 at Madjez al Bab, etc.
But never fear. although this series is about the Americans getting the hell beat out of them (until Part 04, anyway), the British contribution to Kasserine Pass is well represented in Part 03 next week.
Yes, the Central and Eastern Task Forces sailed straight through Gibraltar on their way to Algiers and Oran (we have a larger “Torch” map back on Part 01). That’s crazy that there is still gear from Torch in those tunnels. I should start the usual “support thread” sometime this week (usually halfway through a series), so if you’d like to post those photos, I’d love to see them. 😀
Intriguing object down in those tunnels from the build-up to Torch? One of Eisenhower’s jeeps? General K. Anderson’s portable latrine? Wouldn’t have been anything of Patton’s, he was landing in Morocco … Hmm … 😀
>>>>>>>>>>>>>>>>>>>>>>>>>>>>>>>>>>>
ERRATA
Oh, and before I forget again – Apologies, everyone for totally butchering Lieutenant-Colonel Louis Hightower’s name in the article. Somewhere up there it says “Lt. Louis Colonel Hightower … ” (?!?!) Not enough coffee that morning, that’s my defense. The guy and his battalion (3/1st Armored, CCA, 1st Armored Division) was one of the only bright spots for the Americans at Sidi Bou Zid, and his reports formed the basis of a lot of the SOP for US mechanized forces for the rest of Tunisia … he deserves to have name and rank arranged correctly.