


![1918 Spring Offensive Wargame | Full Rules Overview with John & Gerry (WW1 Tabletop Game) [7 Days Early Access]](https://images.beastsofwar.com/2026/03/unboxing-warfulcrum-games-1918-spring-offensive-review-coverimage1-225-127.jpeg)


Valor & Victory – 1918 (German v. French Megagame)


Recommendations: 227
About the Project
The Valor & Victory system was originally published by Barry S. Doyle, free to print & play. An unapologetic "love letter" to the 1980s Avalon Hill classic Advanced Squad Leader, Valor & Victory sought to present easy, fast, and yet realistic World War II squad-level combat - without the sometimes overwhelming complexities for which ASL was both loved ... and feared. Players of Valor & Victory have always been encouraged to create their own maps, scenarios and units, contributing to an ever-growing community of die-hard "substance over style" historical wargamers. In that vein, I've started creating a "1918 Edition" of the Valor & Victory system, featured recently on Beasts of War during the "Campaigns of 1918 - Centennial Gaming in the Great War" article series. Basically a "prequel" of the World War II scenarios, Valor & Victory 1918 seeks to put squad-based tactical wargaming in the Great War within easy reach of players like me, who may not have large armies of Great War miniatures available (or the time, resources, or inclination to build such an army and tabletop terrain).
Related Genre: Historical
This Project is Active
Creating British Units - Valor & Victory 1918 Edition (P 3)
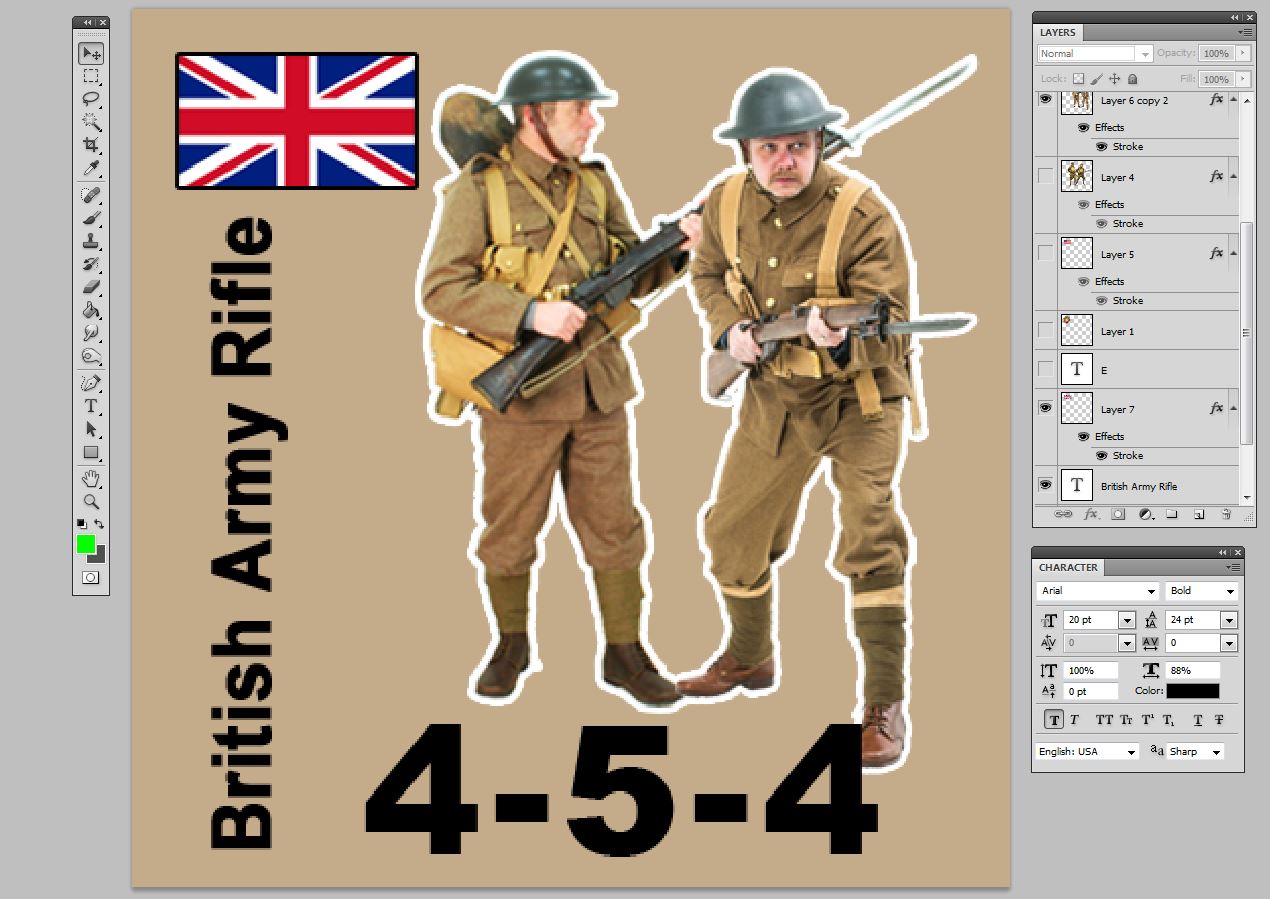
Okay, here is the completed print sheet for British units.
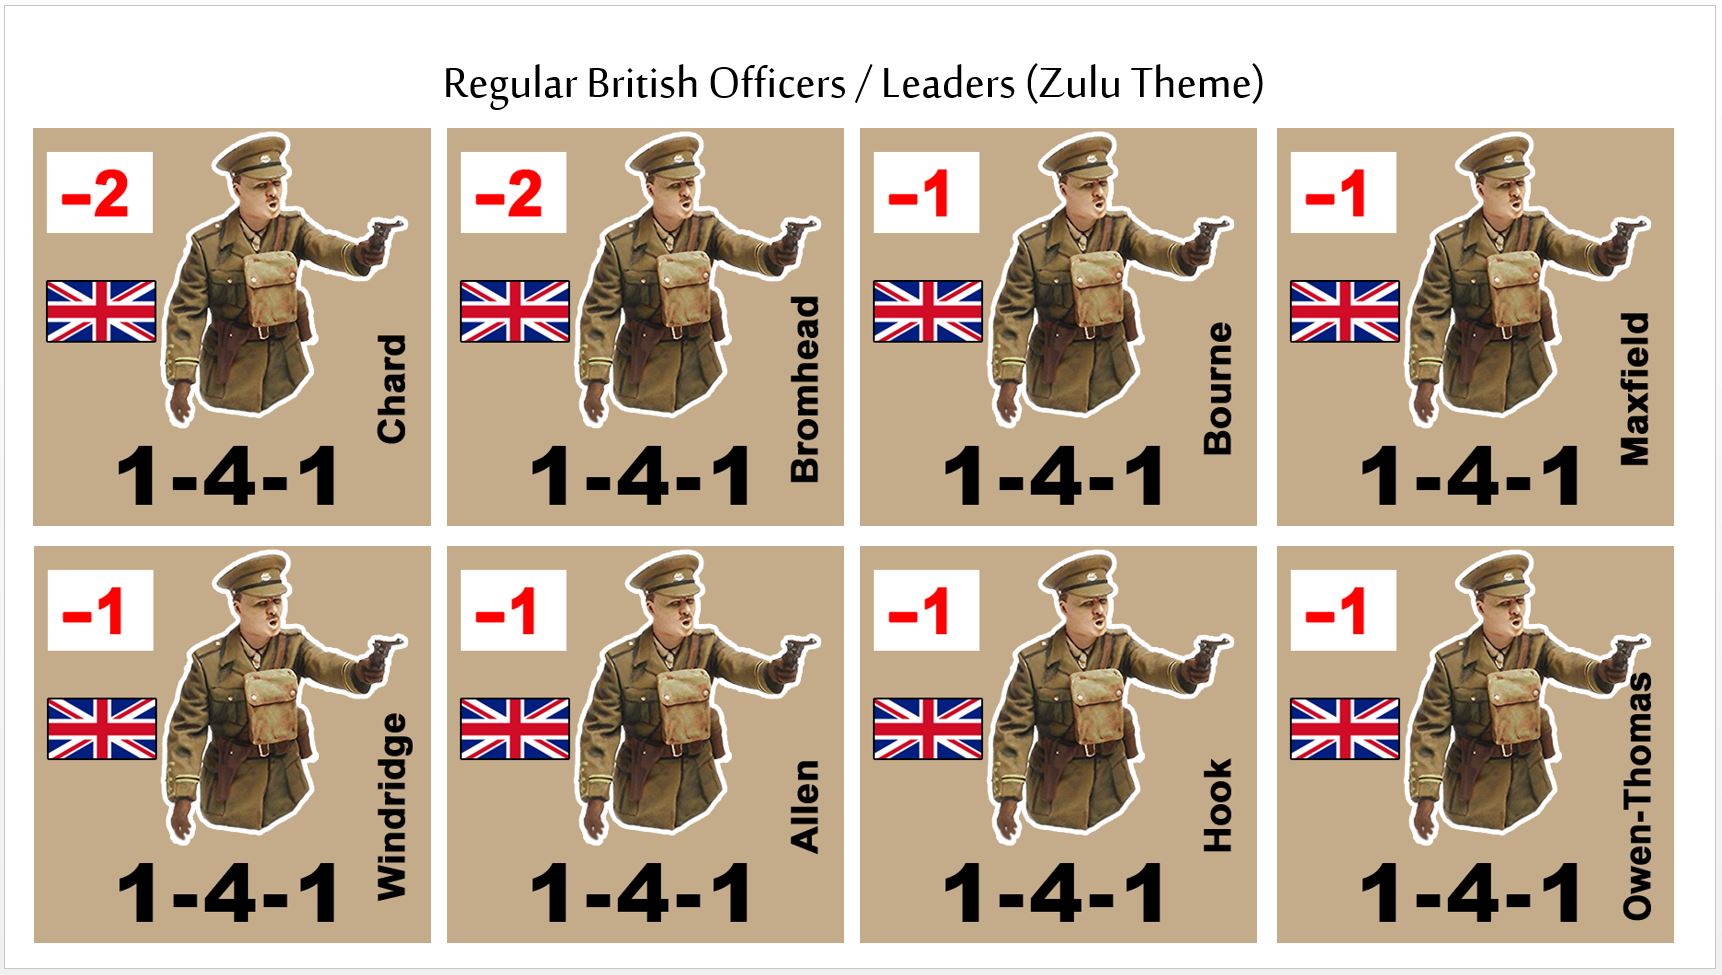
Upper left are the “regular units” – with regular 4-5-4 rifle squads and regular -2 and -1 officers and leaders. Note the names of these officers and leaders, all named for characters in “Zulu.”
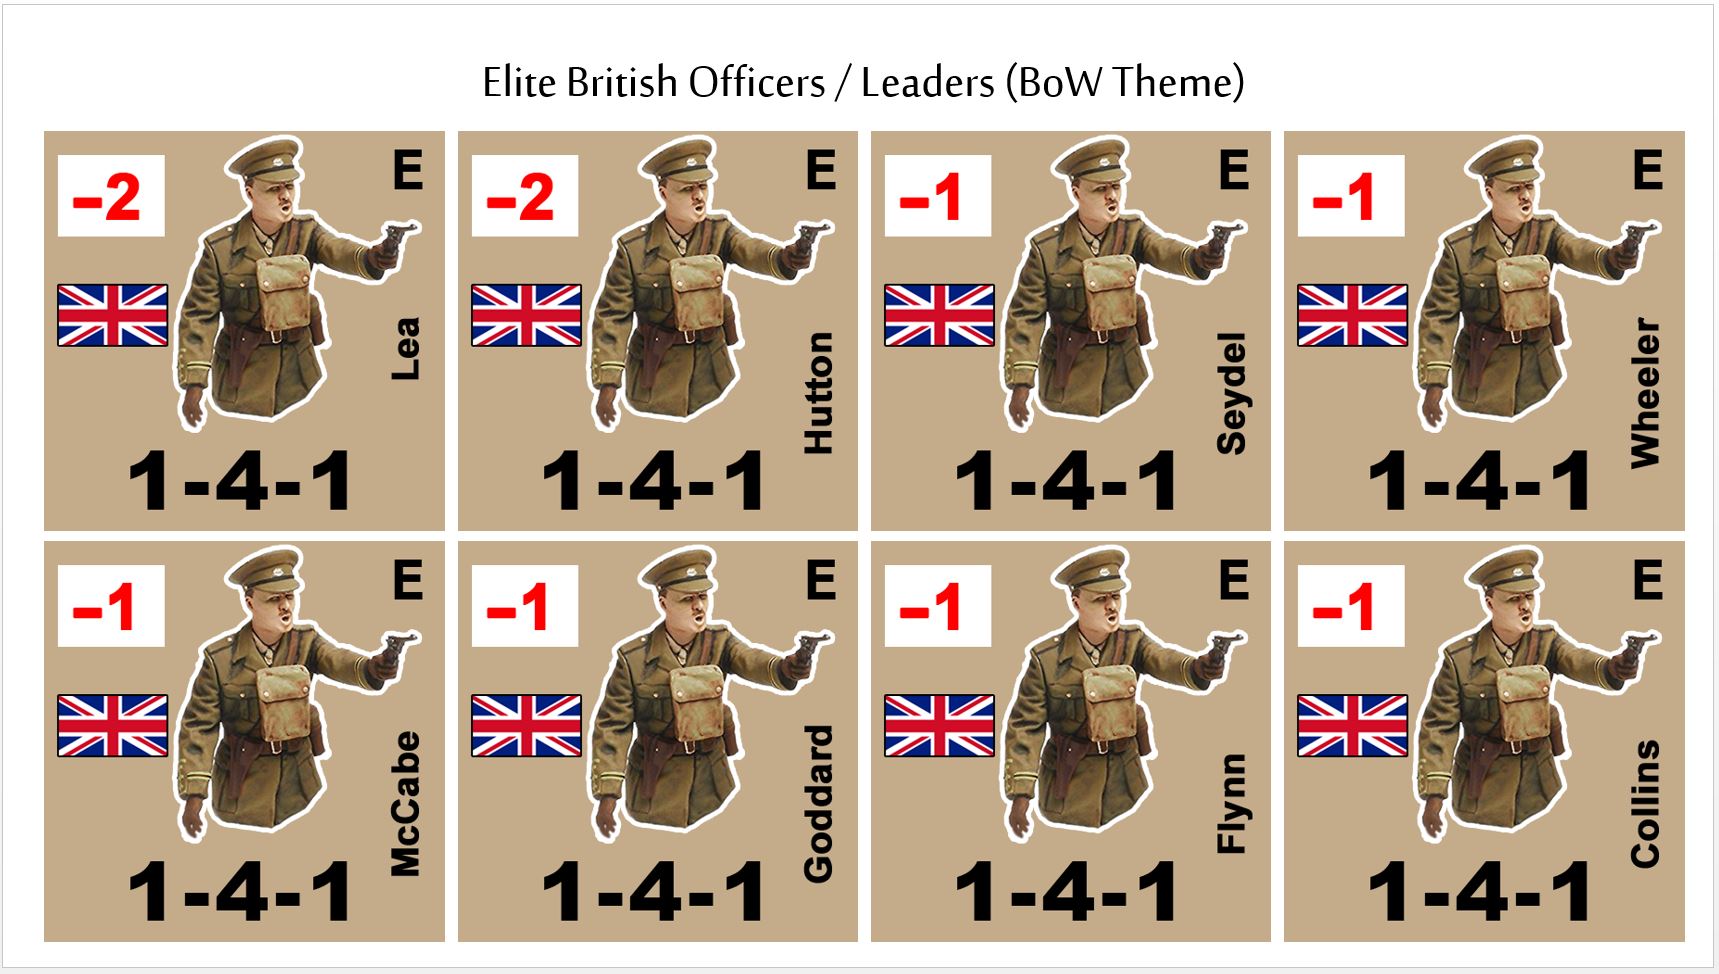
Upper right are the “elite” units, with additional 4-5-5 casualty points to make them just damned tougher. To my knowledge there are no real equipment or organizational differences between “hard as nails” regiments and more mundane regiments, they’re just tougher / braver / more likely to go “valorous” / more likely to rally from pins, better officers, etc. This is reflected in the “E” in the upper right of their counters and the extra point of casualty rating (these squads can absorb more punishment before they drop to a half-squad).
Also, note the leaders for these squads, names for British and Irish members of the BoW community – either veterans, guys I’ve met at the bootcamps, or both! 😀
**tip: Click on the image and then “open in new tab” for best resolution!


Creating British Units - Valor & Victory 1918 Edition (P 2)
Okay, continuing the project to add British infantry units, support weapons, and officers to further expand my Valor & Victory: 1918 Great War edition – to go with US Army, German Army, US Marines, and German Stormtroopers already created.
In the previous post, we looked at creating the unit templates in Photoshop, how they’ll be used in either virtual tabletops or printed out and cut into physical counters for traditional play, and how the base rifle squads and half-squads are created.
Now we’re starting officers and support weapons to round out the rest of this force.
So using the same Photoshop layer methodology as previously laid out, and sticking to the general design template as other counters familiar to Valor & Victory players, we start working up British officers.
Again, sourced an image. I found lots with the British officer standing passively, puffing on pipes with one hand resting passively on the hilt of a sword. But I wanted to use this one that was a little more dynamic with his Webley revolver. It was pointing the wrong way, but reversing the image was simple enough. The only side-effect is that now all my British officers will be left-handed. 😀
Also, some slight alterations to color temperature, contrast, and resolution so his uniform would more closely match those in the rifle squad and half-squad templates.
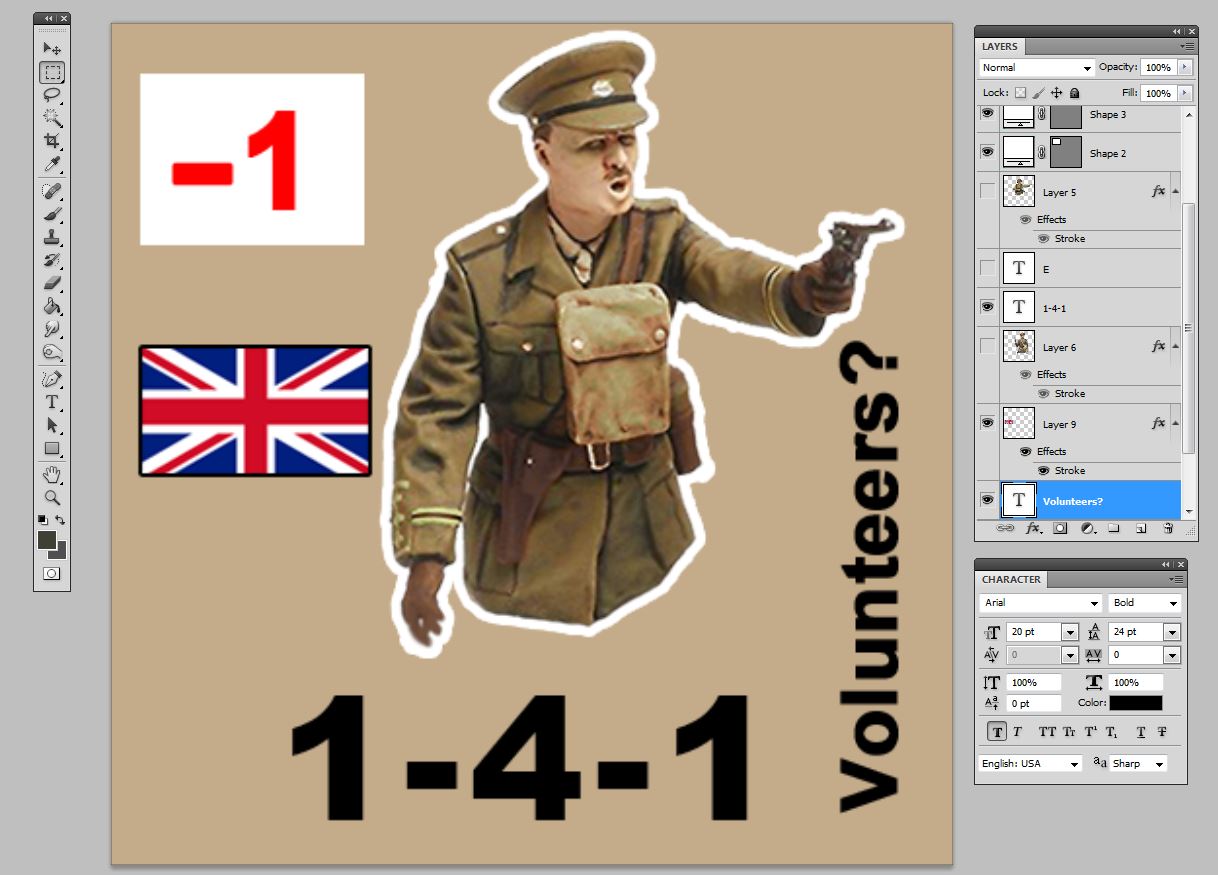
Lastly, leaders in Valor & Victory are named. Usually these are just slapped with generic names that “sound” like they come from the nation in question. But some people on BoW have gotten a kick out of having units named for them, a tradition I’m continuing here. For instance, this company commander is named for @commodorerob. 😀 I should note that the “-2” at upper left is not a penalty. Quite the opposite, this is the amount by which he reduces the difficulty of certain tasks attempted by squads, half-squads, and weapons crews with which he is stacked. So -2 is a pretty solid commander (the best, actually, in the base Valor & Victory sets).
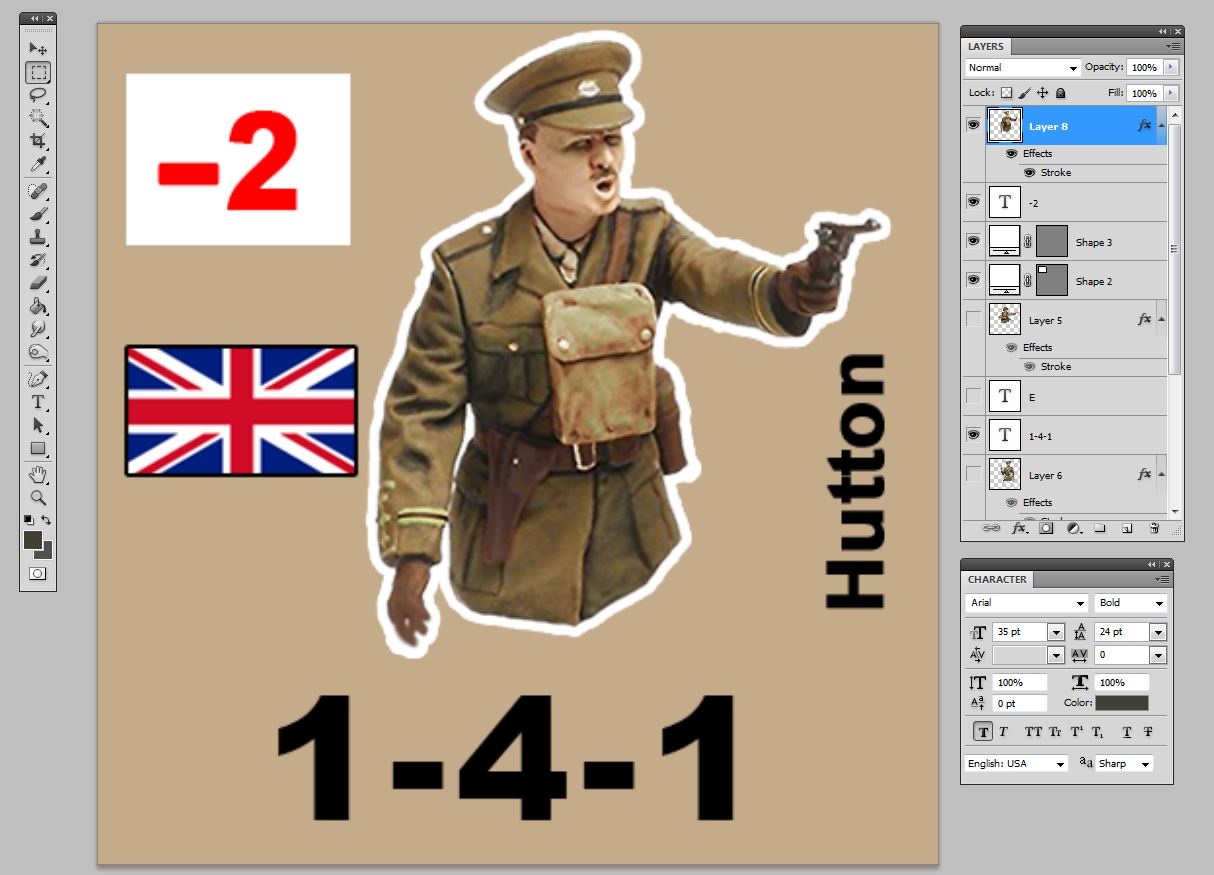
So on top of my -2 “captains,” I usually make up about x5 as many -1 “Lieutenants.” Any volunteers from among our British community members?
😀 It will mean “service in the trenches,” fair warning.
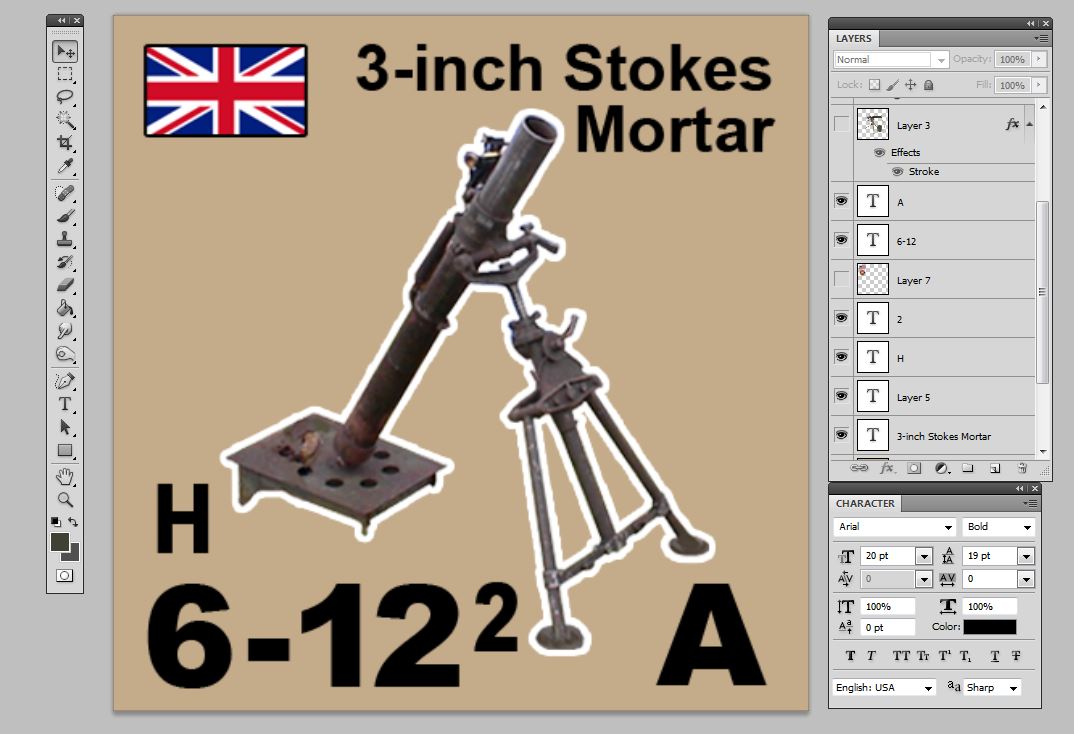
Keeping with the same methodology, we start chewing away at support weapons. First up we have the 3-inch Stokes mortar. The “H” is the weapon class for movement – these are mobile but half-squad crews cannot use their own firepower and firepower of their weapon in the same turn, and they slow down any unit that carries them by 1 movement point. The “6” is the firepower, the 12 is the max range, the small 2 is the minimum range. These are mortars, after all.
The A is their armor piercing class (“A” is the lowest possible, but it does register) – although I’m not sure how often these things will be used against German tanks or “armored” bunkers.
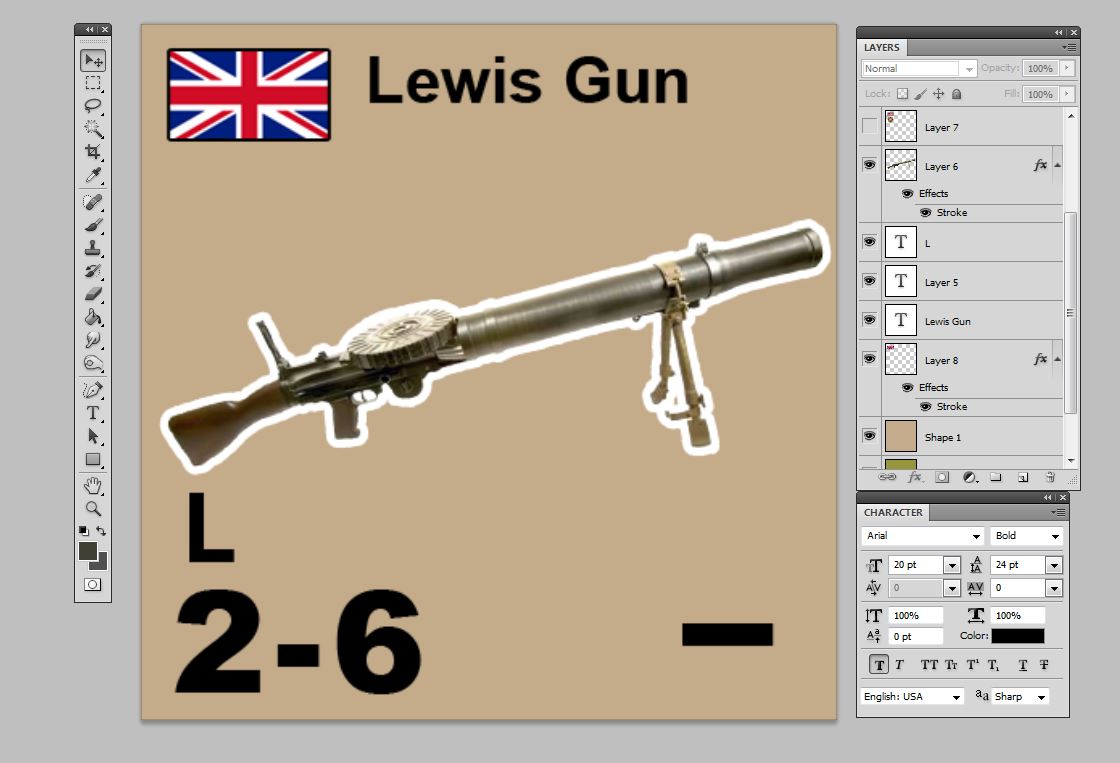
The Lewis Gun, light support weapon, able to be carried and used without penalty by squads or half squads (even leaders I think, although I think it replaces their “1” APFP value, I have to check that – you can’t fire that Lewis Gun and your Webley revolver at the same time. 😀
Vickers Mk1 heavy machine gun. Note it has the same “H” movement class as the mortar. However, they have no minimum range and no armor piercing value.
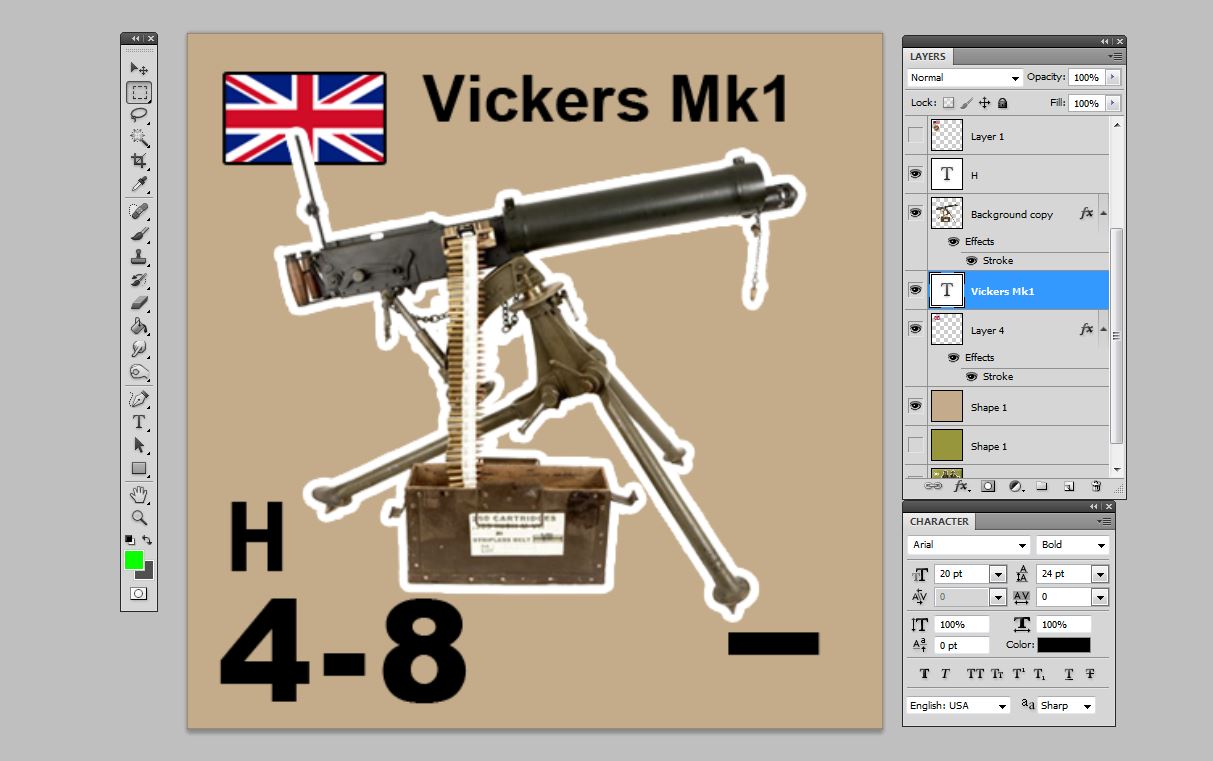
Last but not least, the British grenades. These don’t have an actual firepower value, but act as a -1 benefit modifier for assaults, point-blank antipersonnel fire, and opportunity fire against enemy infantry movement (again, point-blank only, hexes in these games are generally 30 yards). They are “expendably support weapons” – your list has a given amount (usually 6-12) and you use them as you go. Once your force has used all your grenades in the game, though, that’s it for them.
So this will wrap us up for British army units in Valor & Victory at the moment. Next steps will be to create print sheets for them, print a few, mount and cut them. Hopefully I should have them on the table as soon as this weekend! 😀

Creating British Army Units - Valor & Victory 1918 Edition
Okay, Beasts of War. To further expand my Valor & Victory: 1918 Great War edition, I’m adding British army units to go with my US Army, German Army, US Marines, and German stormtroopers.
Basically, this means creating a lot of .png files in Photoshop that can be either be used as “floating” image objects in a virtual game board or printed in a sheet, mounted on matte board, and cut into physical counters for traditional tabletop play.
So first, the design of the basic template. I set up the file in Photoshop as a transparent background .png. This is so I can design the image with a “drop shadow” effect that will make the counter look more “tangible” and interesting on a virtual game board. For physical printing, obviously, this will have no effect, but this way I only have to create one set of counter files.
The choice of background color is fairly obvious. However, it may be a little lighter and brighter than historical British WW1 uniforms for two reasons. (1) – these counters tend to print darker than they appear on a monitor (even on laser printers), and (b) – a major concern in counter design is high contrast for easy of play. Counter games have no stat lines, no cards, all the information for the unit has to be right on the counter, which of course is pretty small. Starting off with a light, bright color will make this easier in later stages of design.

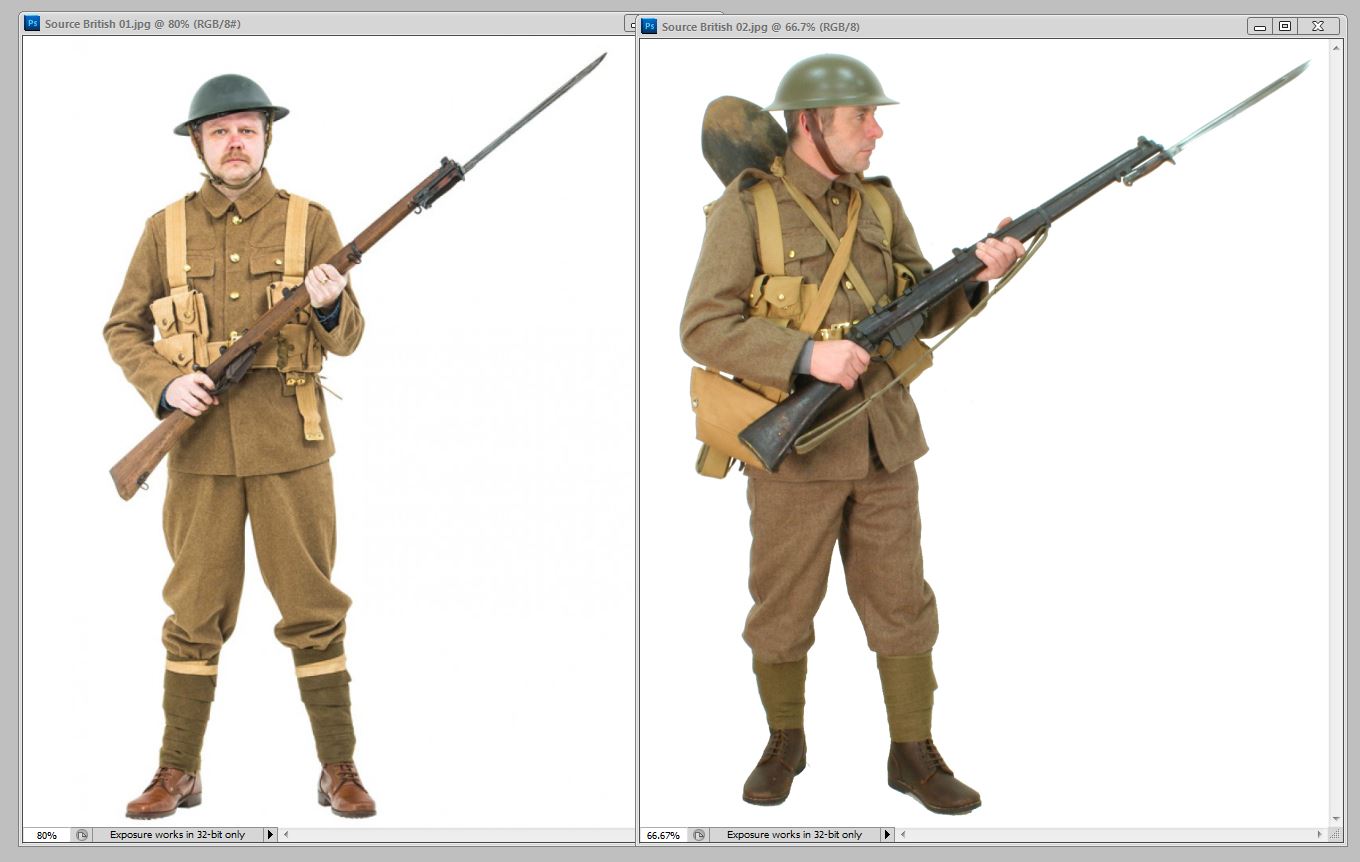
Since I certainly don’t intend to sell or formally publish these, I’ll skip the 20 hours of work to design and e-draw my own British infantry figures. I source these from Google images. In Valor & Victory, full squad counters always have two figures on them, so I make sure to grab two. There will be a little work in Photoshop here to ensure they both have generally the same color temperatures, resolution, sharpness, etc.
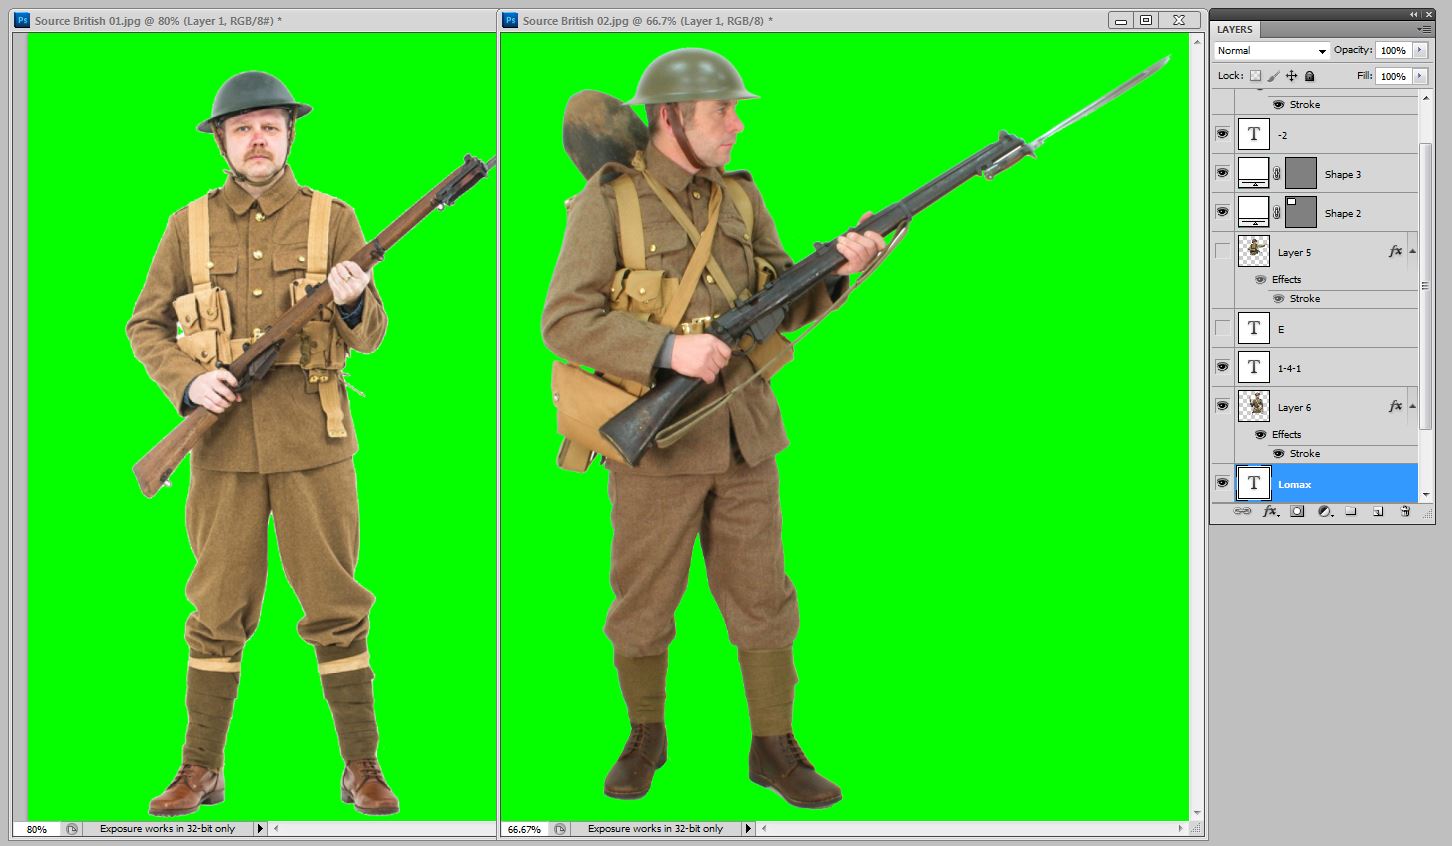
Next, a quick Wand Tool and a little careful work with the WACOM stylus and pad removes the background. For those not familiar with Photoshop, you just duplicate the layer with the soldier, insert an intervening layer between them (I choose bright green for ease of contrast), and then Wand / Lasso / Erase all the negative space around the top soldier layer, showing the bright green beneath. This creates a “floating” layer on top that is just the solider.
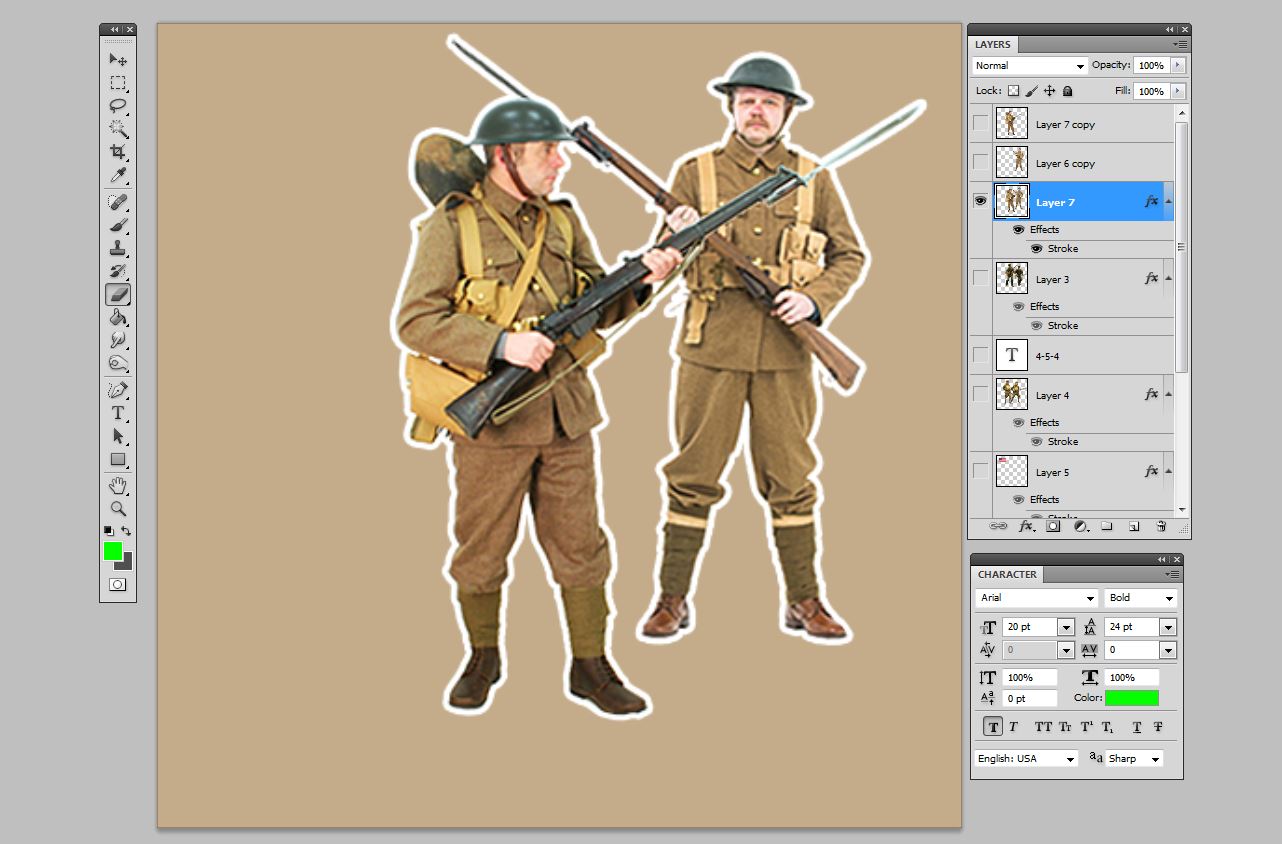
Resizing the two soldier layers, I then slide them onto the counter template. I choose one to go in front and one in back. The on in back is put a little “higher” on the image, and shrunk slightly to create a “forced perspective” that he’s actually standing behind the first figure.
Once I’m happy with their placement, I go ahead and merge the two soldier layers, only then applying the white “Stroke” layer around them. If I don’t merge them first, the white outline on the first figure’s rifle and bayonet will cut across the second figure’s chest, etc. I also make sure I duplicate and “hide” extra copies of these un-merged layers, for reasons I’ll show below.
Okay, here’s a finished counter for a British rifle squad. As you can see, I found a better pose for one of the figures, a little more dynamic than just standing there at “port arms.” The British Army Rifle text is standard, as are the Arial Black numbers along the bottom for game values. The UK flag is for embellishment and consistency with my American and German figures.
The 4-5-4 is the same as for German and American “regular” rifle squads. Squads were approximately the same size, armed with similar bolt action rifles, grenades, bayonets, shovels, etc. The differences come in special troops that come on different counters (stormtroopers, US Marines, support weapons, officers, etc).
Once I’m fully finished with this, I save the file, then merge all layers into one, and save again as a .png for storage and play.
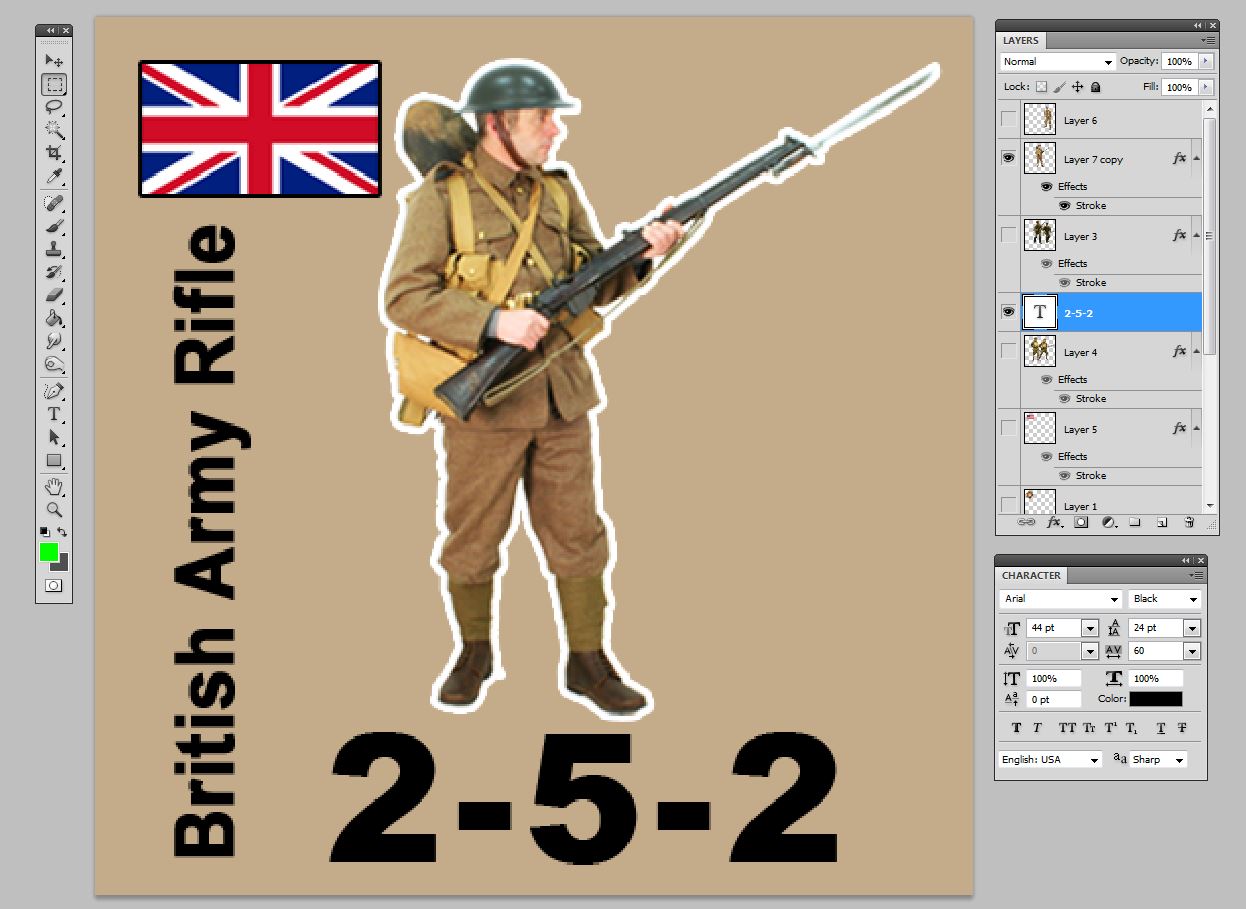
Next, I create another version of the file for a half-squad. Note the one figure and the 2-5-2 “half squad” values (antipersonnel firepower, range, casualty rating)
When units take fire in Valor & Victory, they suffer a certain number of “casualty points” depending on how much fire was thrown at them, the attacker’s roll, and terrain / cover / leadership modifiers. These casualty points must be “paid for,” either be eliminating squads, reducing them to half-strength, or allowing units to become pinned, or some combination thereof. Also, half-squads may be used in starting order of battles for scenarios with MG crews, mortars or other support weapons, or just an understrength forces. Finally, players who have full squads may, at their option in the command phase of the turn, elect to divide them into two half squads for various reasons (two different missions, enhanced casualty-causing properties against enemy assaults, etc).
Trench Assault! (Final Part) - Valor & Victory 1918 Edition
The epic battle in the German trench network … concludes!
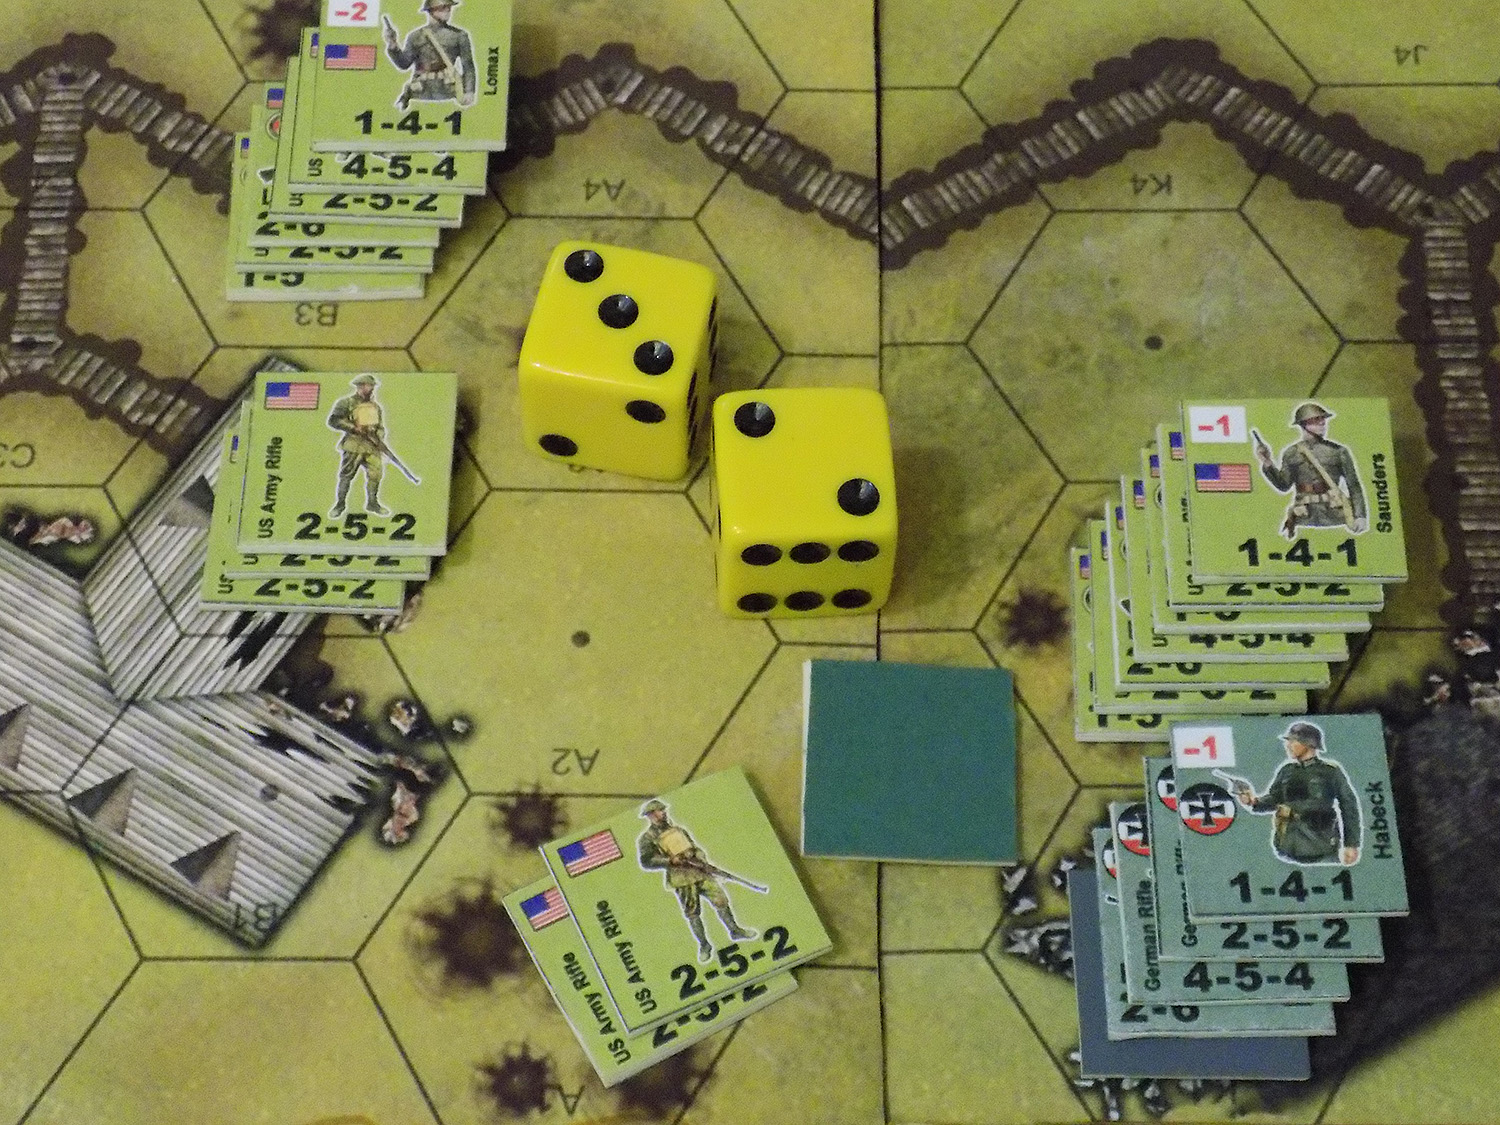
Captain Lomax has no choice but to lead another bloodbath assault on the Habeck House. A staggering five casualty points are inflicted by German opportunity fire (Schoeller applies a -2 leadership bonus) and then Lomax leads the assault in with the few men he has left. It’s another massacre, and by the time I figure out the math, yes … Lomax has succeeded in the assault, so Schoeller’s teams are eliminated and the Habeck House again changes hands … but the required casualty points for the assault (3 for Schoeller’s units in the hex + 3 for the building’s defense bonus) exceeds the number of casualty points Lomax still has.
Yes, the two platoons have wiped each other out.
Badly wounded, Captain Lomax is carried off the field by her shaken, dazed survivors, and sends an orderly with a message to Captain Pollock in the south. “German bunker cleared. It’s up to you now!”
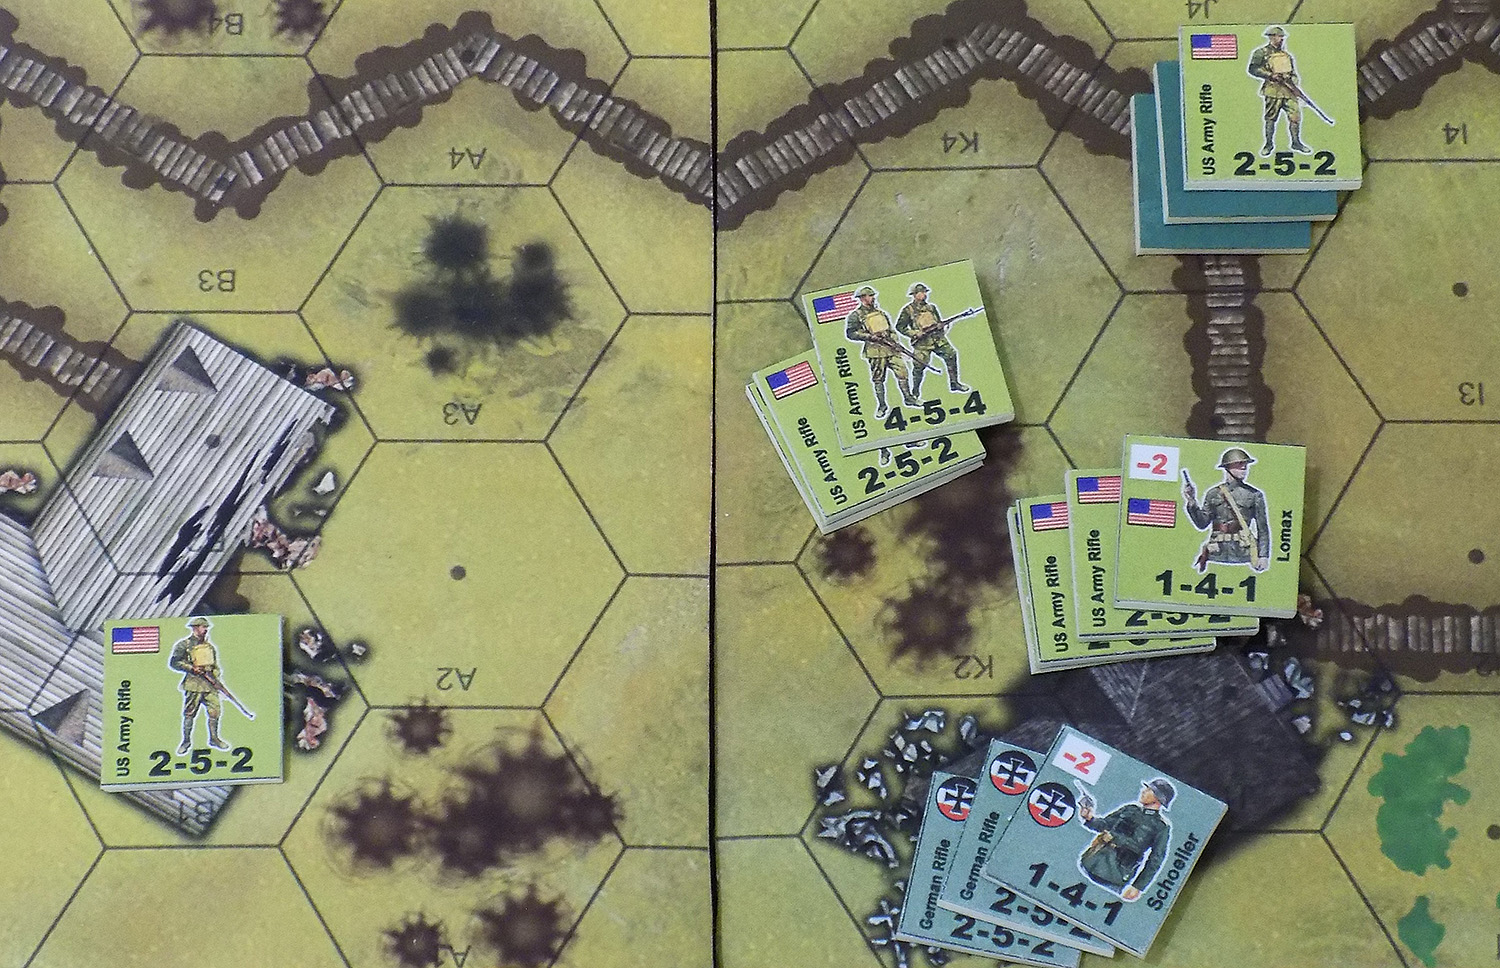
Fortunately for Captain Pollock, there isn’t much left in the way of German resistance. Lomax and Saunders, Schoeller and Habeck, they all really went “all in” on possession of that building (and the +3 defense bonus it confers to whoever occupies it). Consolidating with Lt. Ferber, Pollock prepares to push north, out of the German reserve trenches, through their communication trenches, and into his first immediate target, the remaining German mortar pit.
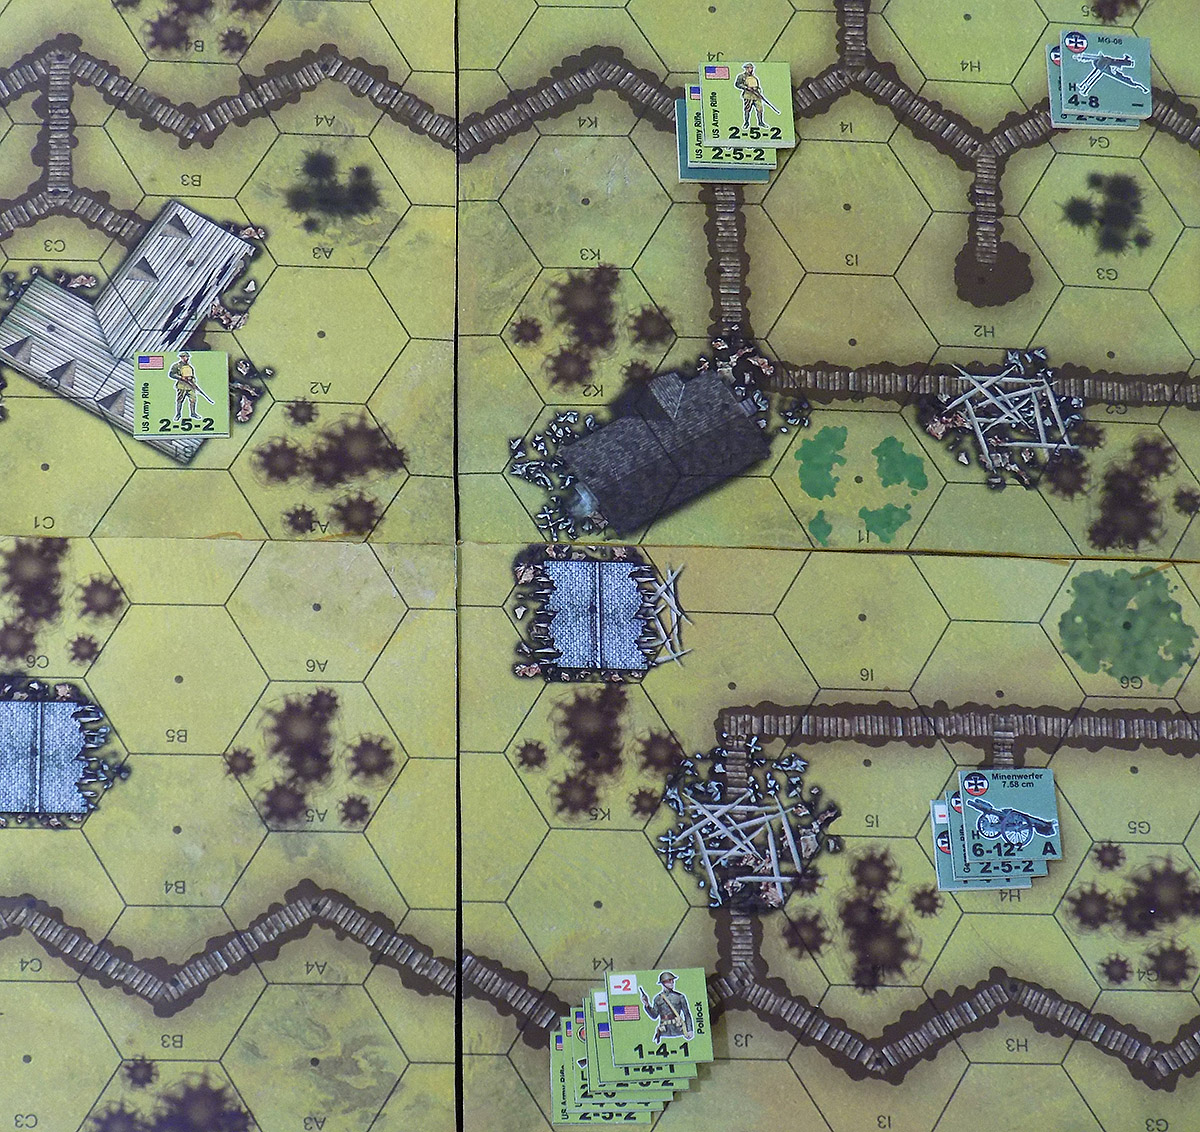
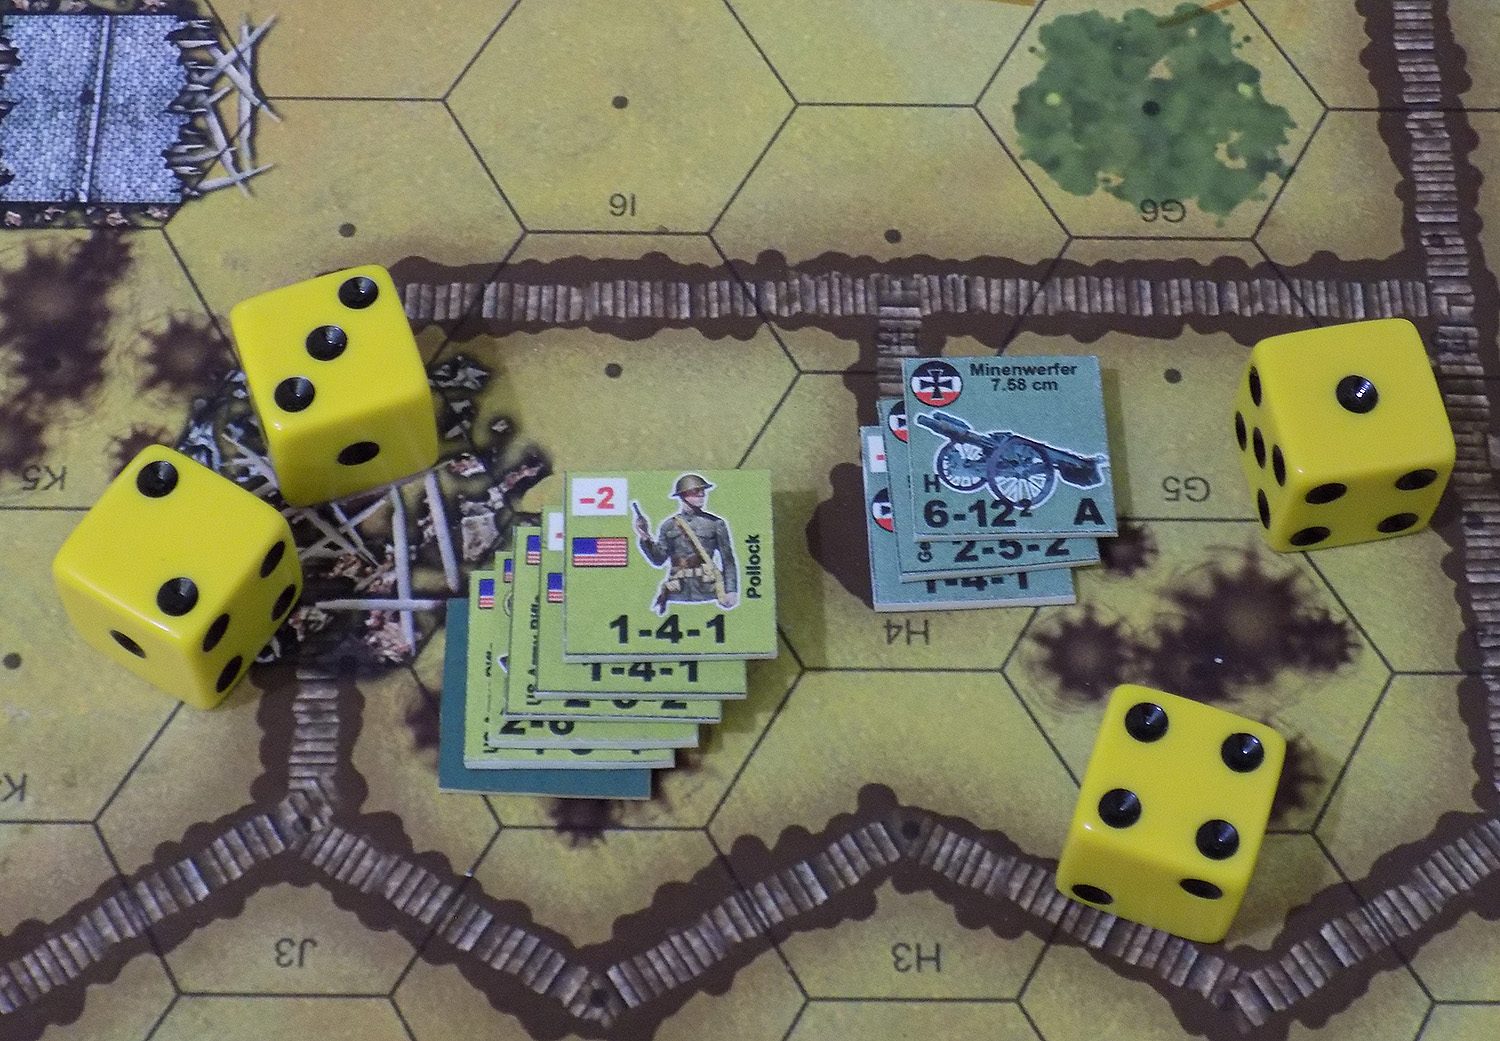
Pollock leads his assault in at the beginning of American Turn 5. Fortunately, heavy weapons like the mortar cannot help with opportunity fire, and Pollock and his men are within the weapon’s minimum range anyway (“6” is the firepower, “12” is the range, the small “2” after that is the minimum range. However, there is a mortar crew (half squad with rifles and pistols) and a German leutnant in there with a -1 leadership bonus. Pollock has chosen a route of assault that includes craters, slowing him down but he’s very close anyway and he wants the cover bonus. He only takes a casualty point to opportunity fire, which he resolved by pinning a fire team. Then the assault goes in and with a “5”, wipes out the mortar position.
Again, Pollock opts to pin units to account for his required casualty points (pretty much his whole stack). He feels safe doing this because (a) there are no German units nearby to counter-assault, (b) he occupies the German trench, which is a trench with a +2 cover bonus, and (c) he has a -2 leadership bonus, which will make it very likely he will rally these men at the end of his turn anyway.
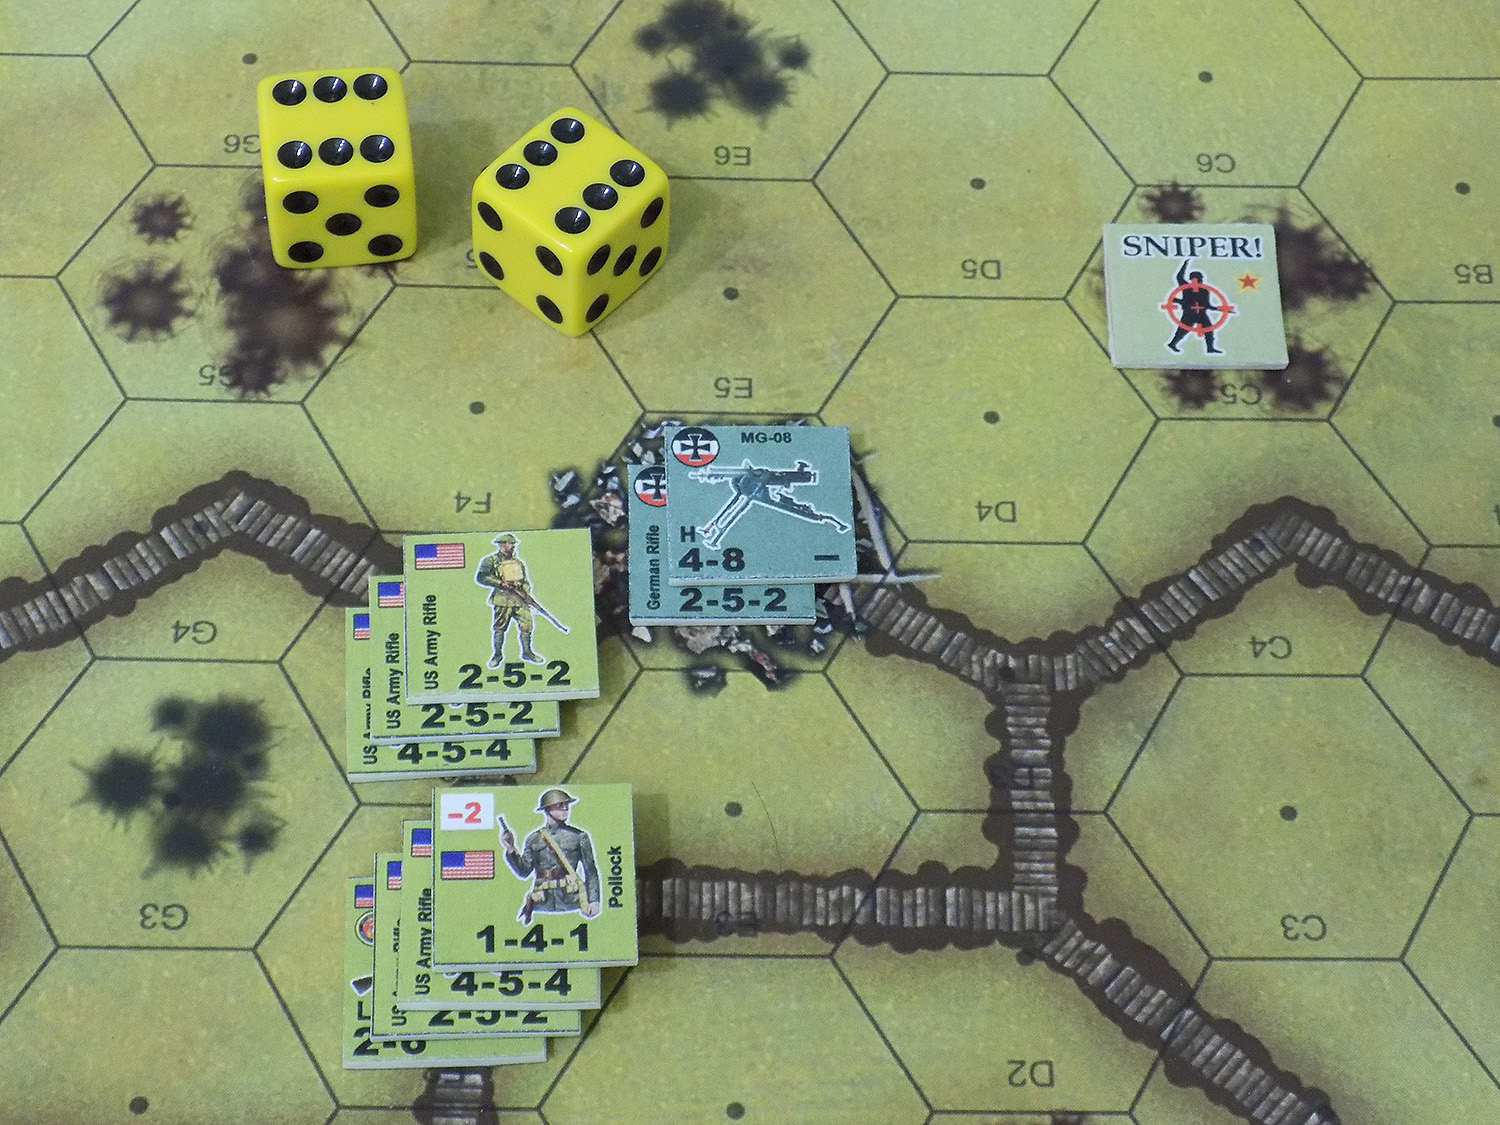
On the American Turn 6 (German MG fire has no lines of sight, so relocates to a rubble position for better defense), the Americans finally catch a bonafide stroke of excellent luck. No clever tactics here, they just get damned, damned lucky. German opportunity fire gets the worst possible roll, a 12. Not only doe sit do no damage to the approaching American infantry, but when an infantry unit rolls a 12 on an attack roll in this game, an enemy sniper suddenly appears. Snipers are handled in a rather abstract way in this game, they appear as if by magic anywhere within LOS of the enemy unit that rolled the boxcars. So the American sniper pops up in t hose craters (apparently he’s been belly-crawling through no-mans land all this time) and immediately attacks the German MG team. Sniper attacks are very simple, they roll a d6 minus the cover bonus of the target hex, and apply that many casualty points.
The sniper rolls a 4, -1 for the rubble, thus inflicting 3 casualty points. Only 2 German casualty points are in the hex, so they are wiped out. Pollock’s men assault t he hex only to find the Germans already dead or wounded by the sniper. It’s an anticlimactic ending, but by this point the Americans are just glad they aren’t taking any more casualties.
Thus ends the game. So did the Americans win?
Well, they cleared the German trenches in the allotted time … barely (Valor & Victory scenarios typically last six turns). So … yes. But did they take too many casualties? Possibly. This was a playtest game of the new trench boards, so I didn’t try to set up detailed victory conditions. But in a more formal, finalized scenario, the Americans would have had to take the trench in the allotted time, and have “x” number of intact squads left to meet German counterattack from off the south edge of the table.
So with only 27 officers and men out of an original assault force of 198 … I don’t know if I would call this an American victory. Those early assaults were very ham-fisted, not very tactical, and very bloody. Then again, many German diaries and battle reports of the actual period recount that this is just how American units tended to fight in 1918 – fresh to the war so still very brave to the point of recklessness, but tactically somewhat unskilled.
Again, just because 171 Americans and 174 Germans have been “eliminated” doesn’t mean they are all dead. Their units have been rendered combat ineffective. The usual estimations for early 20th Century combat usually runs about half the men in a “combat ineffective” unit being actual casualties, with about one third of the casualties being killed outright. So German and American losses each ran about 27 killed and 54 wounded (81 total casualties).
As for the trench boards, there are a few clarifications I want to draw up for lines of sight, but other than that I think they worked great. As for Valor & Victory, every time I play this game I’m reminded again how much I love it. It’s quick, easy, extremely tactical, pleasantly realistic (without mind-numbing levels of detail) and best of all, it’s free. It’s a little bit of work to print the boards and counters …
… but definitely worth it if hard-core tactical, historical wargaming is your thing.
Trench Assault! (Part Five) - Valor & Victory 1918 Edition
Good afternoon, Beasts of War history fans …
Okay, time to wrap up the trench battle in Valor & Victory: Great War 1918 Edition.
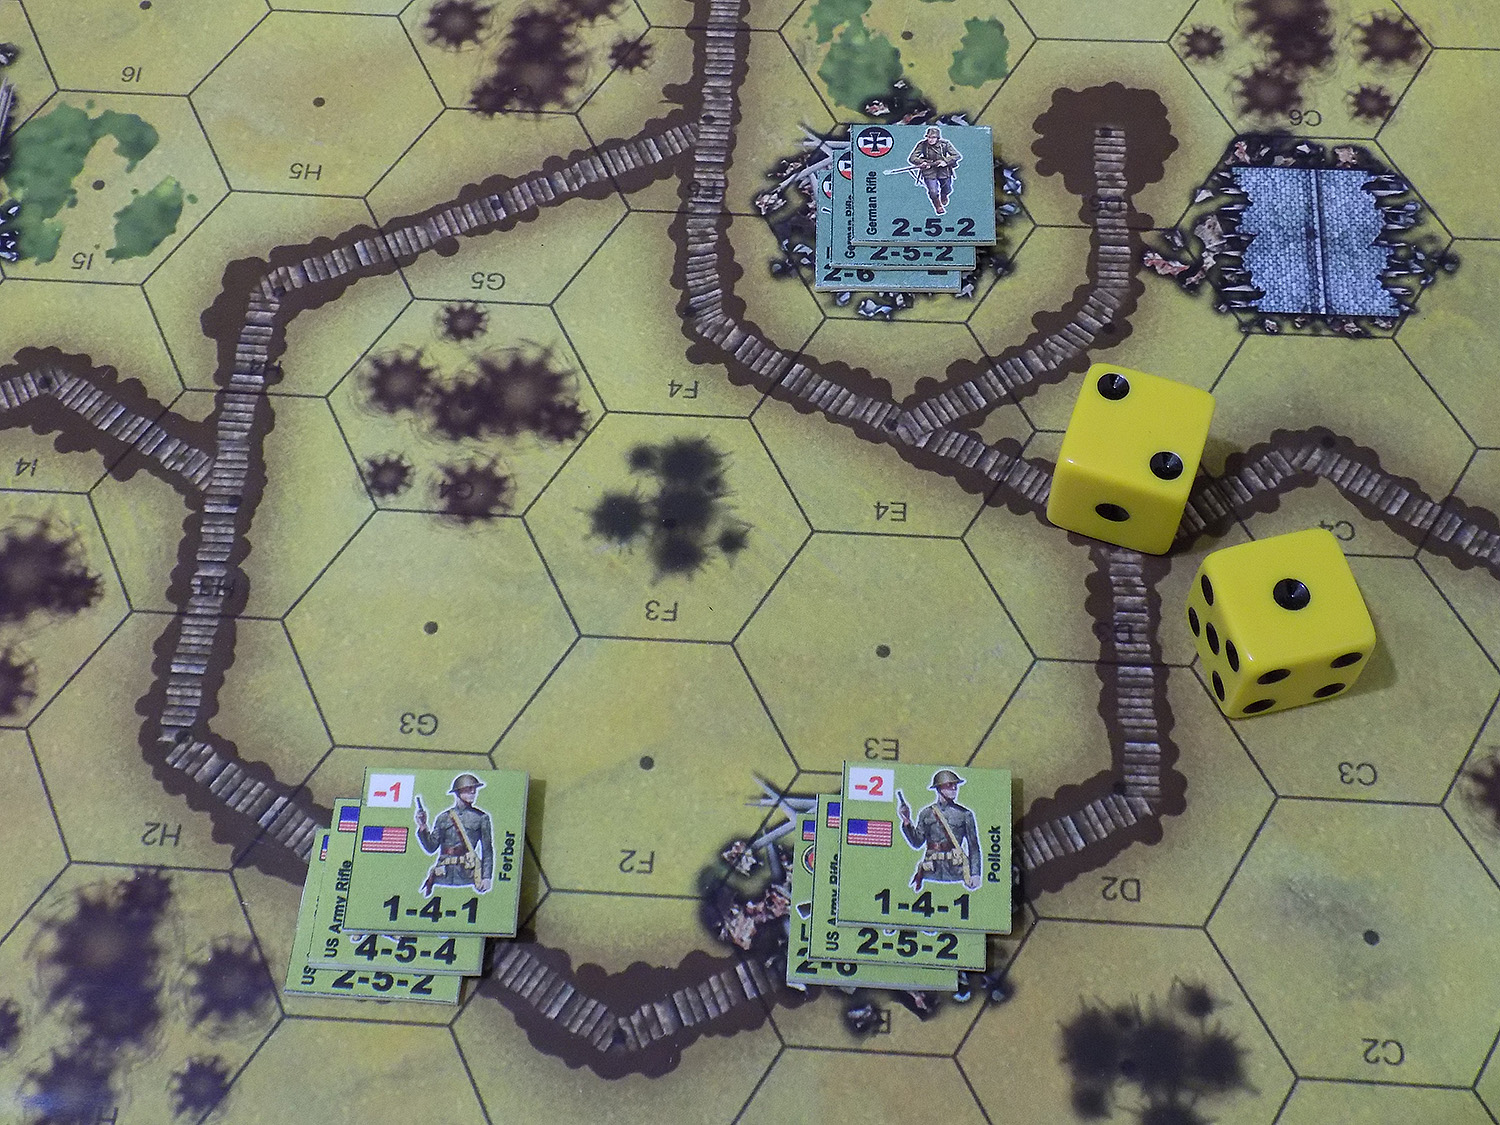
We start off in the southern part of the breached German trench system, where Captain Pollock wants to assault the next German strongpoint but cut down on his company’s losses. Casualties are becoming a real problem here, the Americans are in serious danger of running out of men before the Germans run out of trenches.
Normally in Valor & Victory, the proper methodology to these kinds of assaults is usually a rough representation of real-life military “fire and maneuver” tactics, where your “base of fire” element force pours down fire on the target and pins them down, while your “maneuver” element flanks to one side or the other and assaults.
We’ve been running into two problems on this trench table, though. One, once we’re down in the trenches, there is almost never a long enough line of sight for any kind of “base of fire” or “overwatch” element. Two, the weapons of 1918 just aren’t powerful enough to seriously weaken or even pin significant units, the Americans have felt compelled to simply launch the assault “cold” (and pay the predictably horrific cost in casualty points).
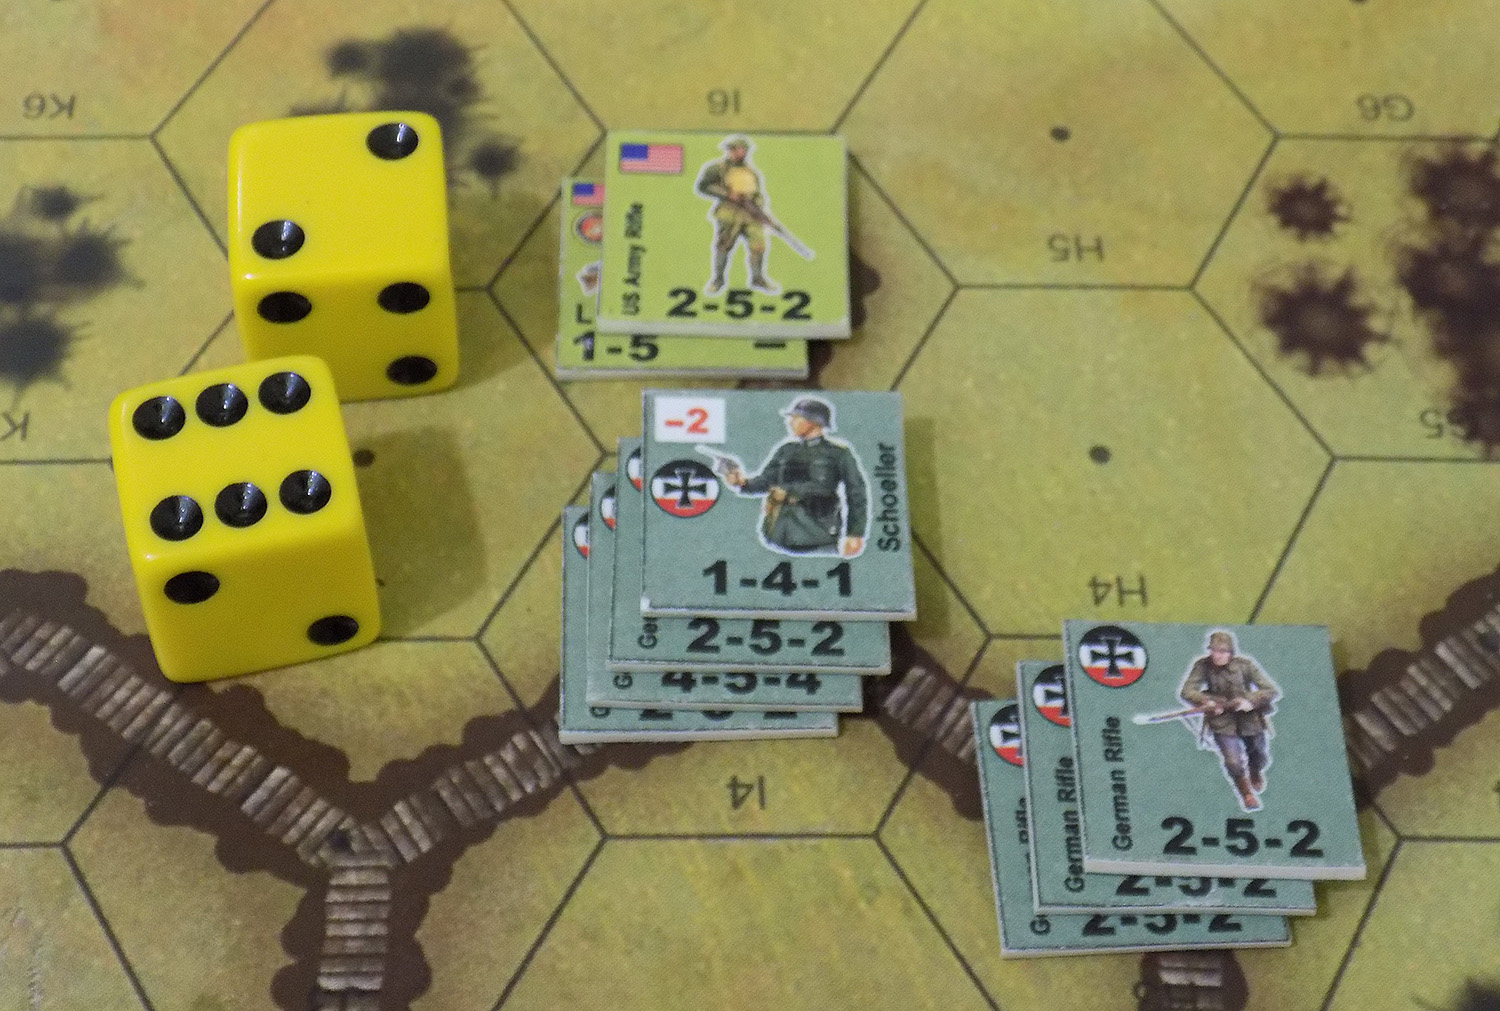
Here, though, the Americans at last have no choice. Pollock and his half-squad (carrying a Lewis Gun) elect to put down fire on the Germans in that rubble pile, while Lt. Ferber leads the assault. The math works out that Pollock’s stack is better as the overwatch, because his -2 leadership bonus actually yields more of a benefit than the additional 2 points of firepower in Ferber’s stack.
But Captain Pollock scores huge on the dice Check out that “3”! Remember that low rolls are better in this game! Not only does Pollock and his Lewis Gun team pin down the two German half-squads in that stack (one of them is carrying an MG 08 15 LMG), but actually kills them outright! No assault is even necessary!
Up north, Captain Lomax is up against more serious opposition. That ruined building the Germans occupy (Leutnant Habeck) gives a +3 defense bonus, and is manned by 16 men, including another LMG. Habeck himself also confers a -1 leadership bonus. That is going to be one tough nut to crack.
Lomax’s stack unloads on Habeck’s position, with a “6” pins one of the half squads. It’s not much, but as Lieutenant Saunders prepares his men for the grim assault, every little bit will help.
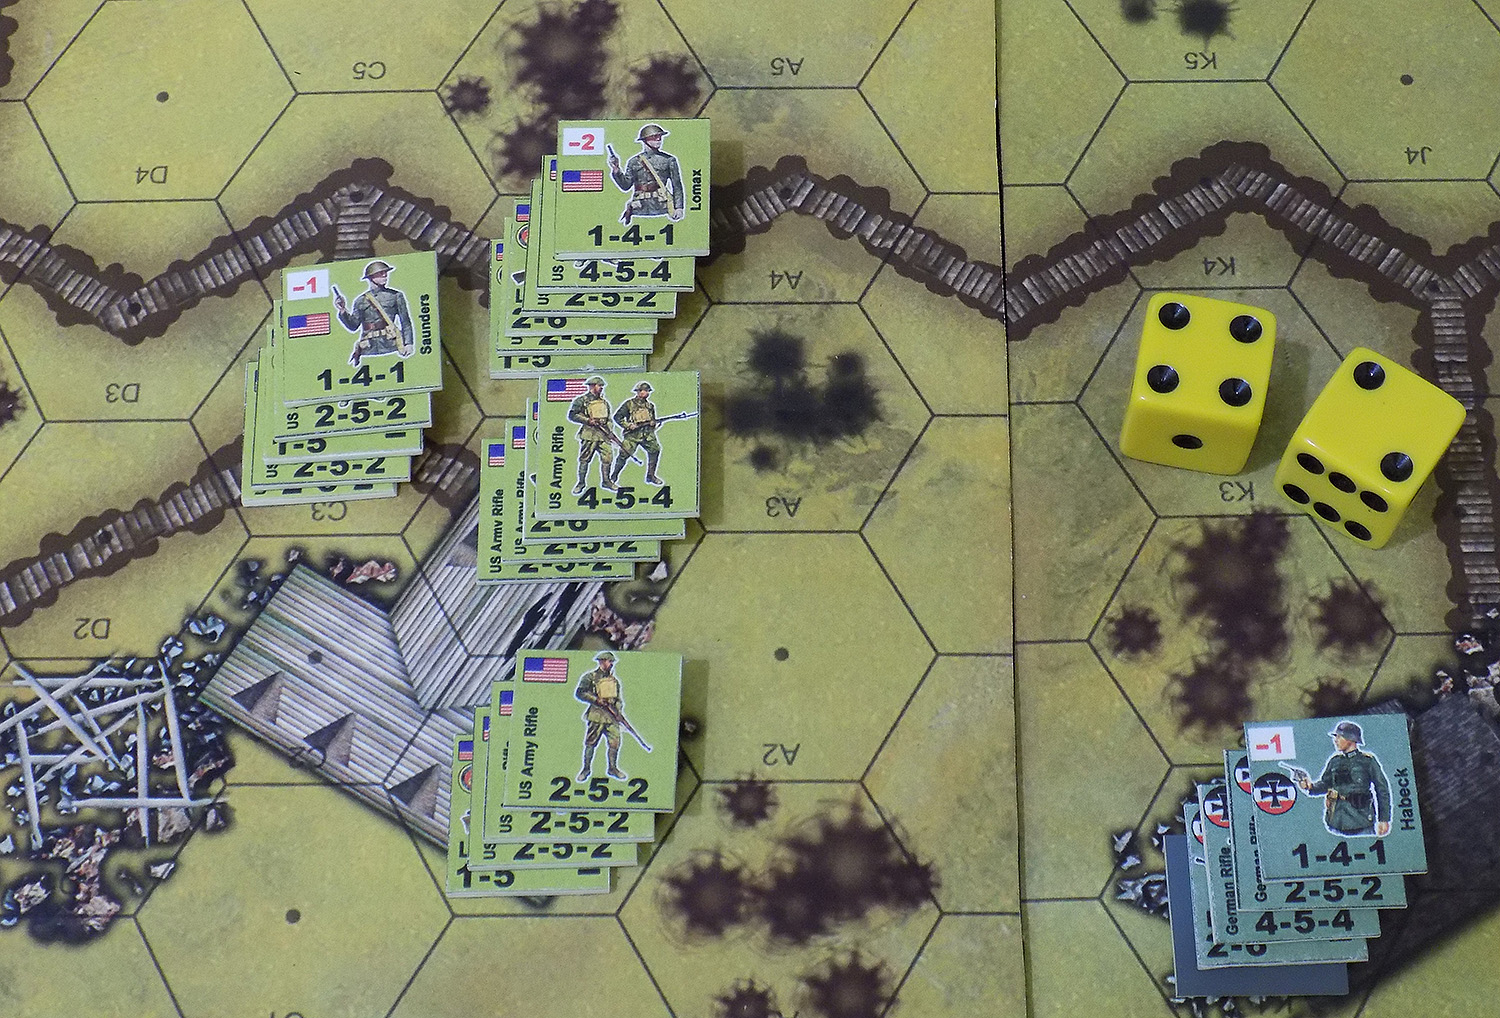
The assault goes in, and German opportunity fire is horrendous. Two half squads are eliminated outright, a third is pinned down. Saunders keeps feeding more men into the charge, not stopping until is stack is at maximum allowed for one hex. At least now they’re in a crater, when they launch the assault.
Saunders’ assault clears eliminates Habeck’s platoon and clears the position. In an effort to keep casualties down, Saunders elects to “pin” some of his units rather than let them be eliminated (owning player gets to choose how to account for required casualty points, as long as he accounts for all points inflicted by the enemy). The trade off is, when you’re pinning you must pin much MORE than if you’re taking eliminated casualties. Saunders is gambling that he can rally his units before the Germans can counter-assault (any assault that hits pinned units – pinned units are automatically eliminated at no cost to the attacker). He gets to apply a -1 bonus to his difficulty on this roll (leadership). However he doesn’t roll very well, and two of his fireteams remain pinned as sure enough, Hauptmann Schoeller leads his men in for a counter-assault.
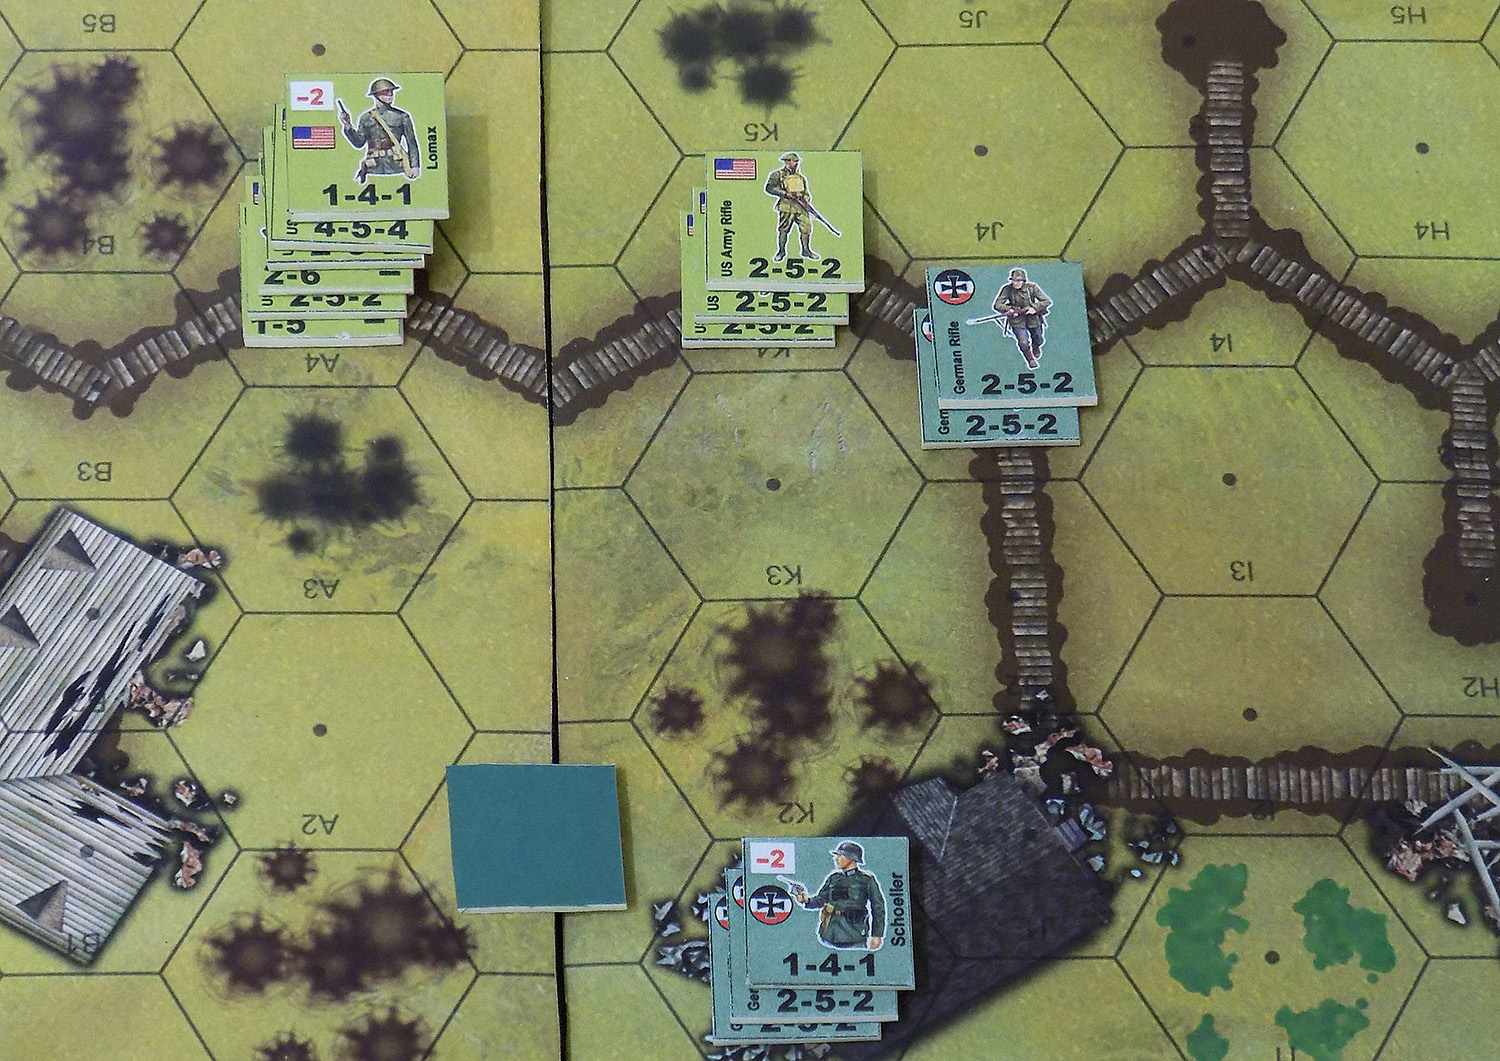
Now Lomax has foreseen this possibility. Note the three 2-5-2 fireteams deployed forward at the trench junction, ready to take opportunity fire on the Germans as they make that left turn down the trench to attack Saunders in the “Habeck House.” Sure enough, Schoeller sends units through this junction, and those three American rifle teams knock down one German fire team and pin two more. But then Schoeller himself leads more troops down that trench (and those 2-5-2s have already fired). They reach the building for their assault. Saunders’ men take opportunity fire, but have two major drawbacks here … they are badly weakened since two of their units are still pinned (and can’t contribute) and the German assault is already in the other half of the building, so gets the =3 building cover bonus (this is now an assault inside a ruined German bunker)!
Saunders’ opportunity fire does nothing (note the “10” – a rather bad roll). Schoeller’s assault goes in, and Saunders’ pinned units are immediately and automatically eliminated… even before the dice are rolled.
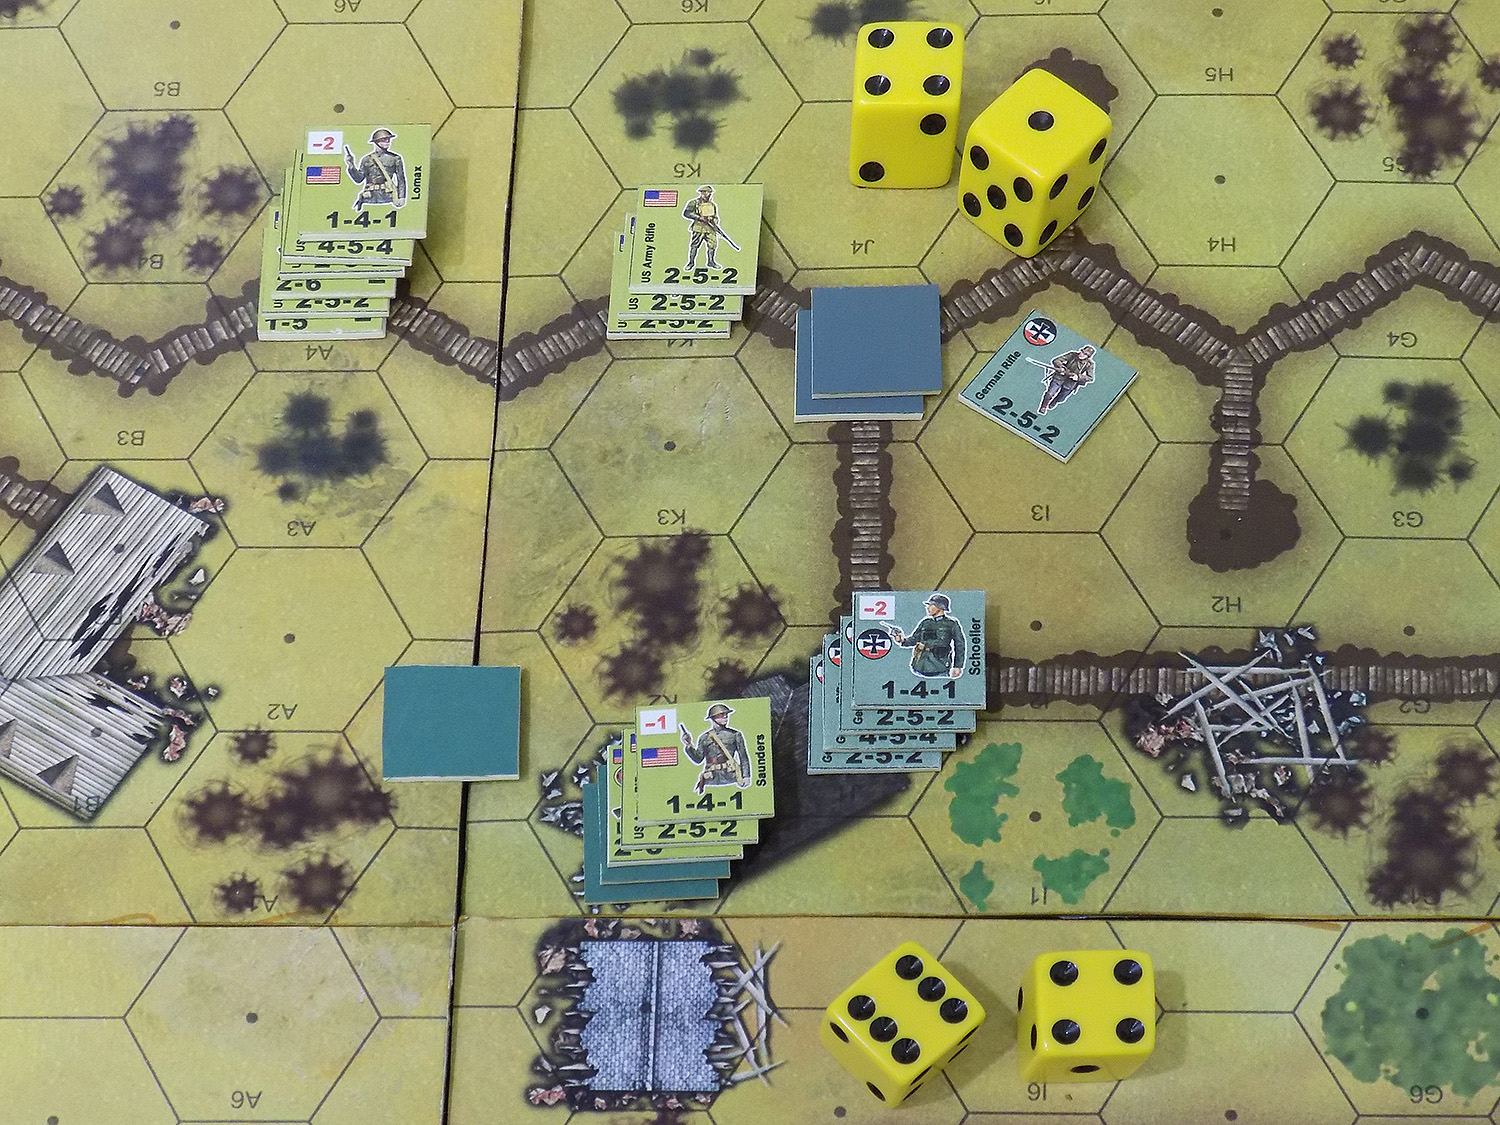
Saunder’s squads are eliminated (killed, wounded, captured, scattered, or otherwise rendered combat ineffective). Schoeller has paid a steep price for this assault, but again has re-taken “Habeck House!” The two half-squads up at the trench junction have rallied, and it looks like the Germans might still manage to repel this American assault!
This highlights the dangers of trying to pin too many of your units to account for casualty points, rather than “bite the bullet” and kill a smaller number of them. In the long run, Saunders wound up losing much more. Furthermore, setting up proper overwatch positions (like Lomax’s three fireteams at the trench junction) can help with preventing enemy counterassaults. Also, care must be taken to not assault units too deep into enemy positions, where you wind up being closer to enemy counterattack units than you are to friendly supporting units. And finally, the importance of leaders who can rally pinned units and prepare them to meet that enemy counter-assault.
In short, this game is fast, simple, and brutal, but also very tactical. The tactics are hidden in the turn sequence, the math, the bonus, the resolution tables. It’s not laid out on cards or stat lines. You have to practice the game, learn how squads and platoons work in overwatch, base of fire, and maneuver elements …
…and we’re not even using ALL the rules (MG fire lanes, assault movement, etc.).
Trench Assault! (Part Four) - Valor & Victory 1918 Edition
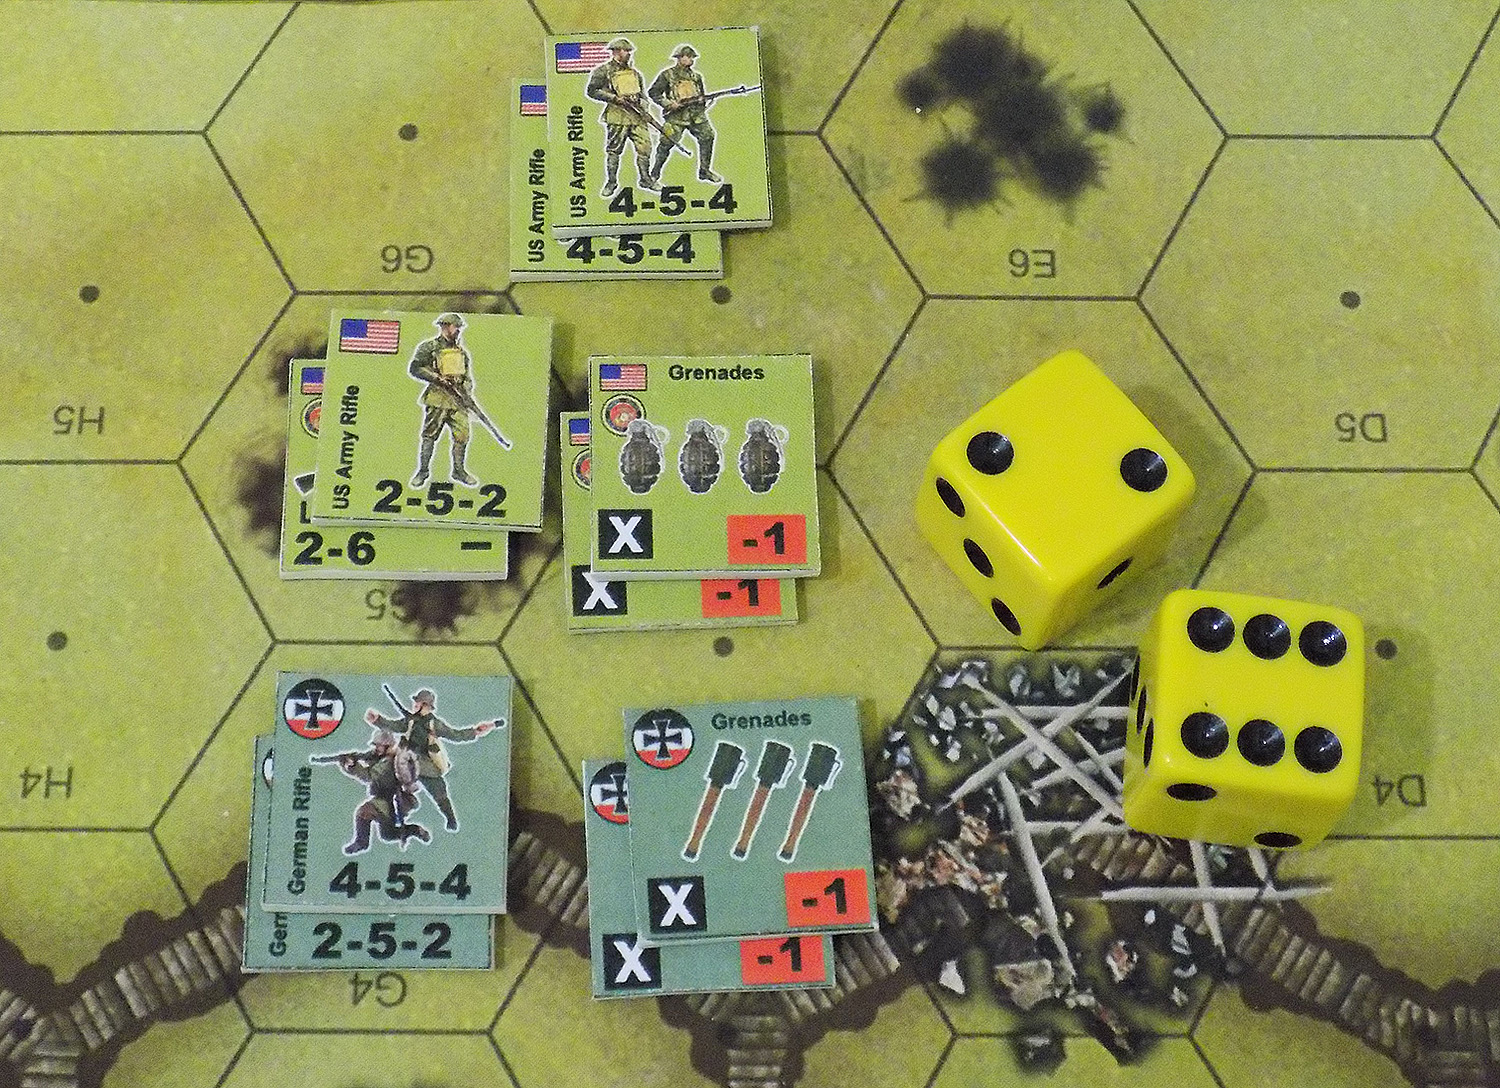
German Turn 02 begins with some ferocious counterattack. First, the remaining 7.58 cm mortar crew lands a lucky drop on Arauz’s position, basically taking him out. This opens up the way for this German platoon to assault against Mader’s platoon, badly weakened from their assault on Paulssen’s CP on the American turn. Mader’s survivors miss their opportunity fire, and the Germans roll amazingly well on their assault (note the “3”, remember low rolls are better in this system). Both Mader’s platoon and the rest of Arauz’s platoon are gone, opening a fearful gap straight through the American center and leaving a dangerous gap between Pollock’s and Lomax’s companies.

Sure enough, Lomax loses her left wing when Schoeller counter-assaults and retakes that former MG position.
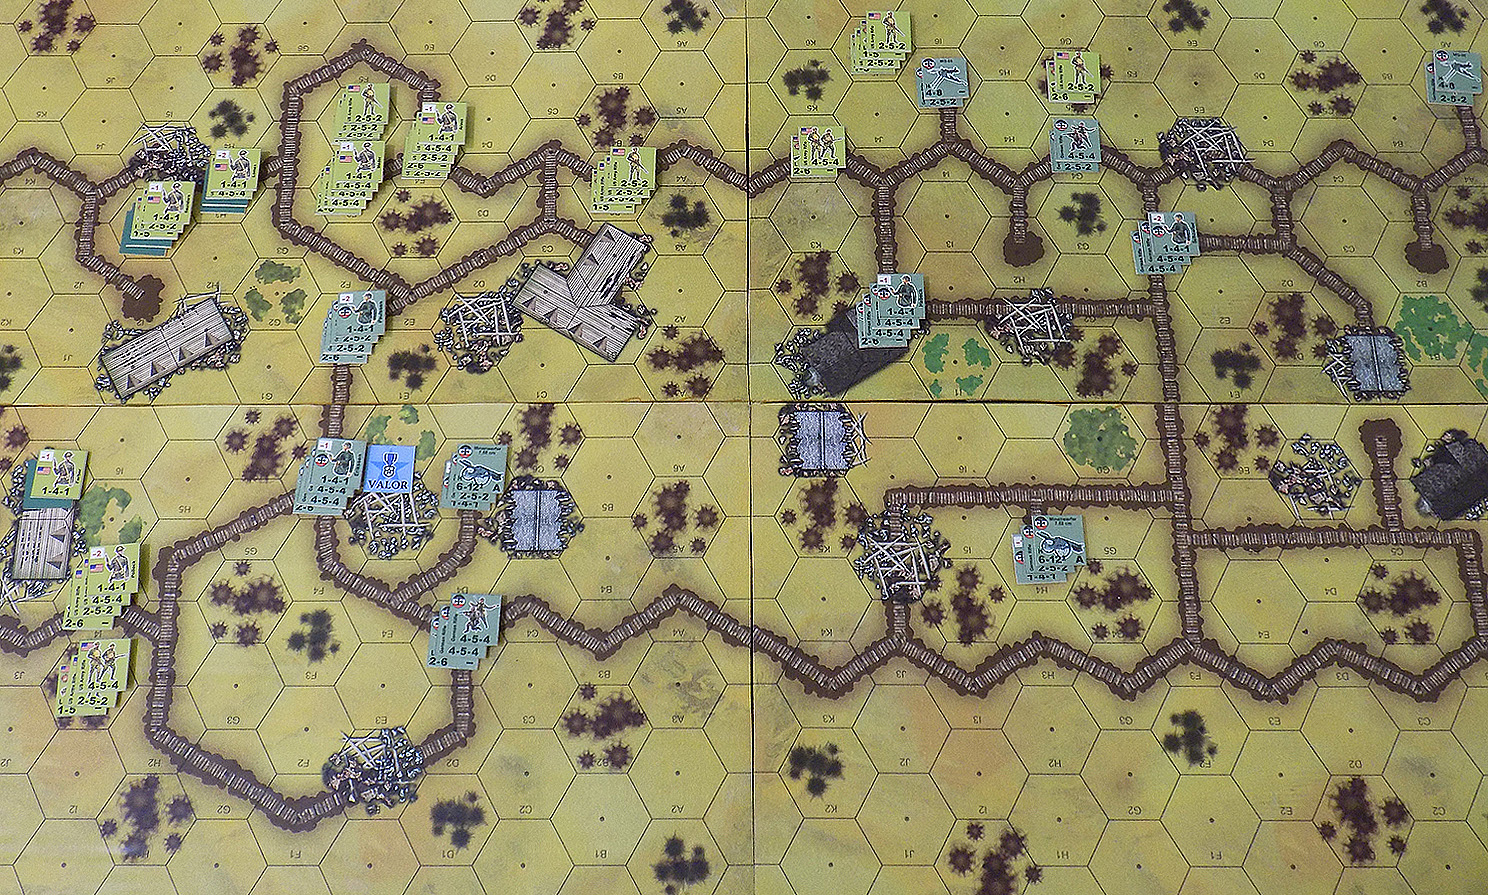
The situation at the end of German Turn 02. To the north, we have four remaining stacks of Lomax’s company, to the south we have two stacks left of Pollock’s company. But the Germans are also in very bad shape, and that one platoon to the west is now terribly understrength and about to get cut off by a converging assault from the two American companies.
This was a rough turn for the Americans, but the Germans took pretty steep damage as well, and of course started off with less men to lose. This one could still go either way!
Trench Assault! (Part Three) - Valor & Victory 1918 Edition
Okay, Beasts of War history fans … it’s time to see how things are getting along with the assault of Captains Lomax and Pollock (BoW @stvitusdancern and @silverfox8) in their American Army assault against trenches held by the Imperial German Army – somewhere in the Meuse-Argonne, September 1918 …
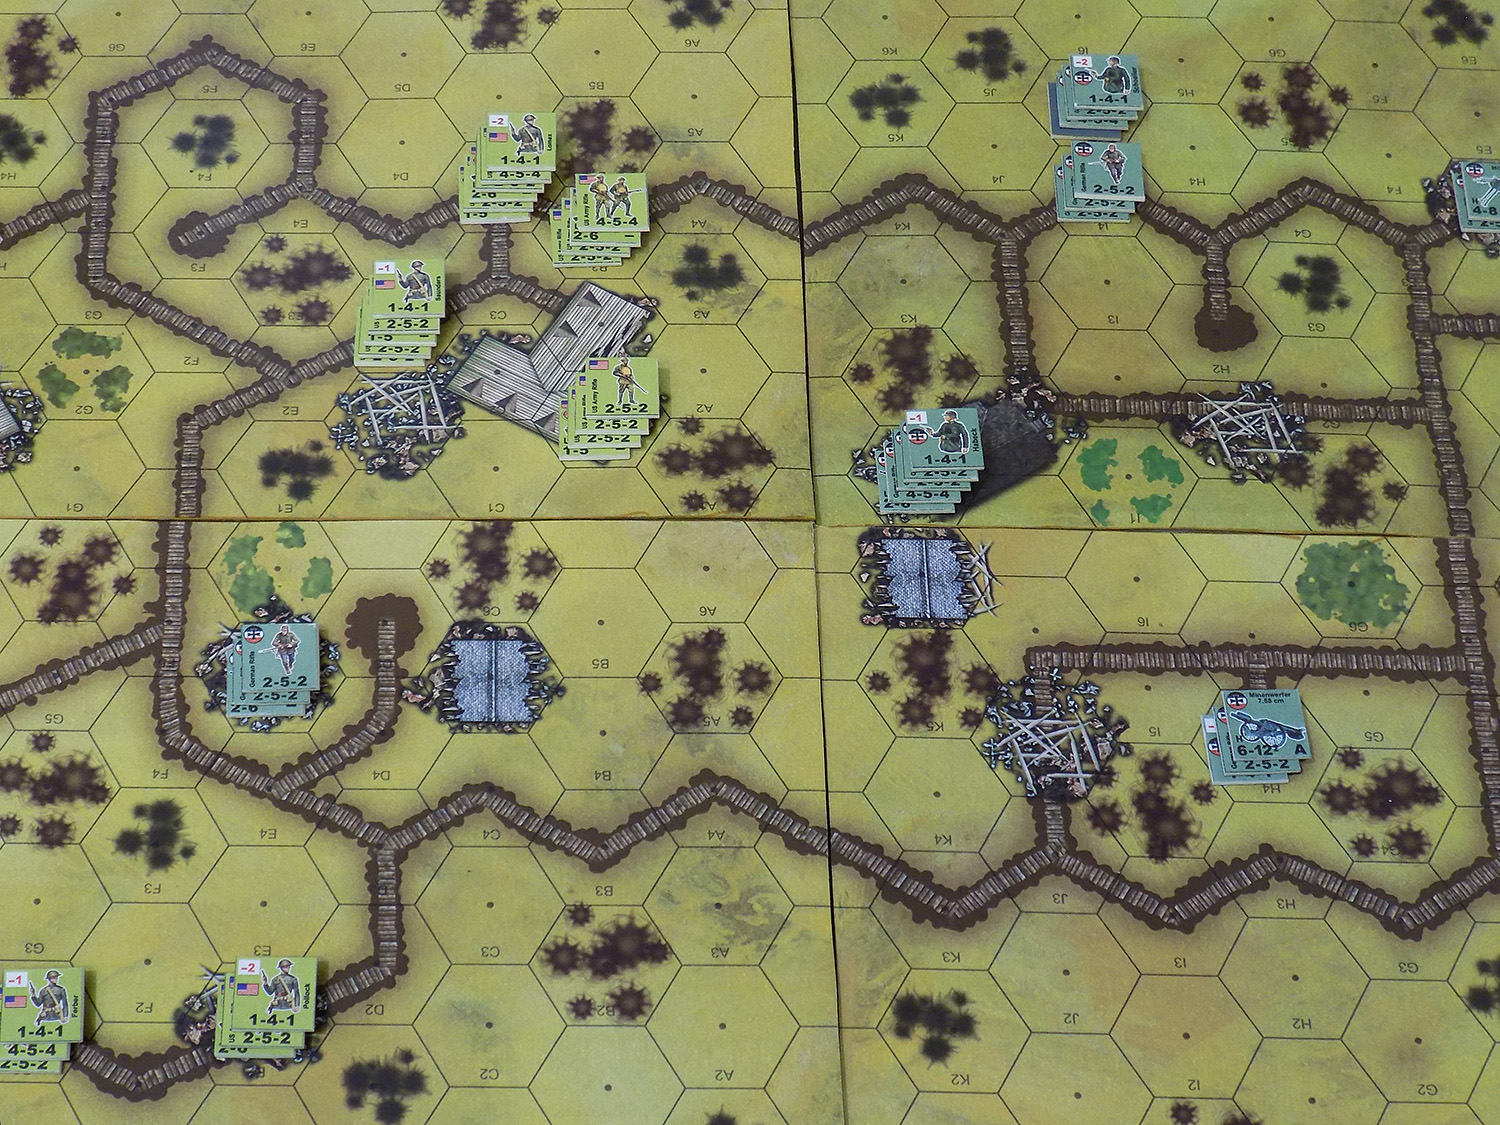
When we last left this battle, we’d completed a fiery turn one. American infantry has already cracked this band of German trenches, and how attack not only from directly in front of the trenches (to the right) but also from within the trenches from the left. At top and right we have Lomax’s company coming in, from the left we have Pollock’s company.
So after off-board artillery and mortars had plastered forward German positions (although almost half the barrages missed) , the assaults went in. While Lomax’s wing hitting the front of the German trenches at right ran into serious trouble and took heavy casualties, the main body split the weakened German position and pretty much cleared the upper left board. Pollock’s company, meanwhile, had further to travel from the left and so hadn’t actually engaged heavily yet, although took some grievous German opportunity fire despite sound tactical movement, long ranges, and even cove rin hardened buildings (just ridiculously good German rolls). On their turn the Germans fell back, consolidated their positions, launched some small counterattacks on that upper right hand board, and dropped some 7.58 cm “minenwerfer” mortar fire.
Now we begin Turn Two.
To the south, Pollock’s leading his strongest platoon directly against a rubble-filled stretch of trench that has been caved in by some long-ago artillery impact, held by the valorous Leutnant Erikssen and an understrength platoon. Lt. Ferber’s platoon is trying to catch up, picking up and consolidating stragglers along the way, while to the north, Mader’s platoon prepares to assault a German company command post held by Hauptman Paulssen.
Lomax’s company, meanwhile, is coming down from the northwest, although having wiped out most of the German positions they hit last turn, and the surviving Germans falling back in front of them, many of their squads won’t be in direct combat this turn. The exception is to the east, where Lomax’s wing is in serious trouble against German counterattacks led by Hauptmann Schoeller and Leutnant Habeck.

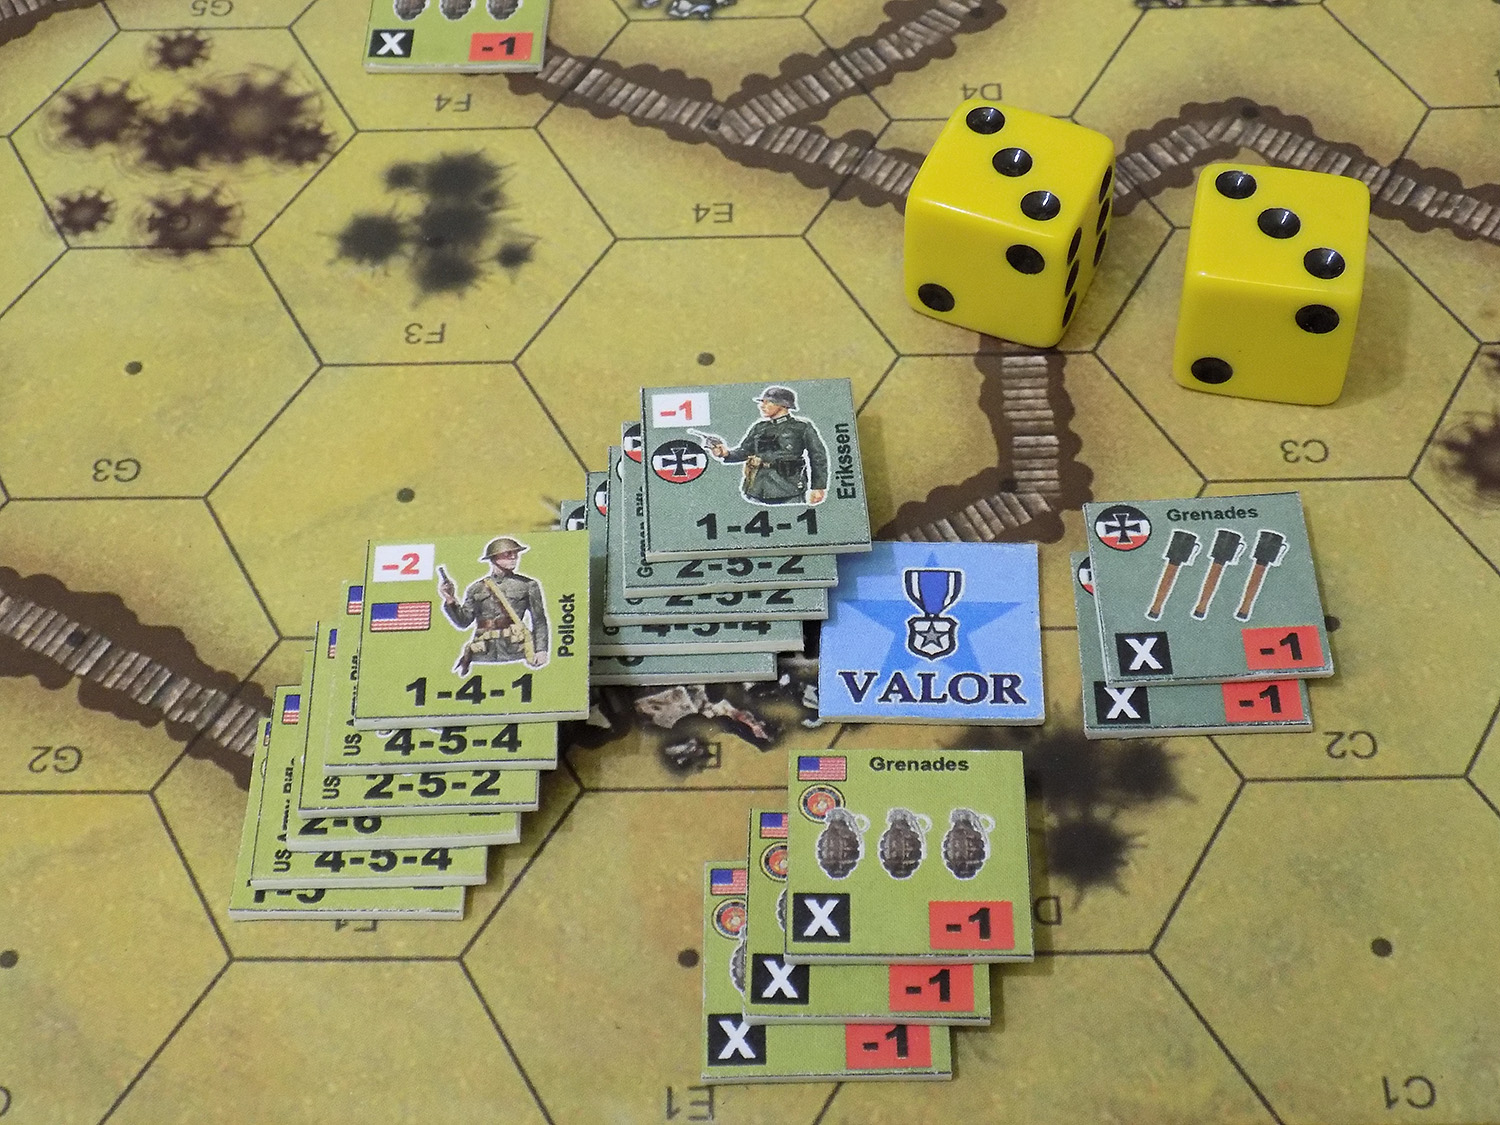
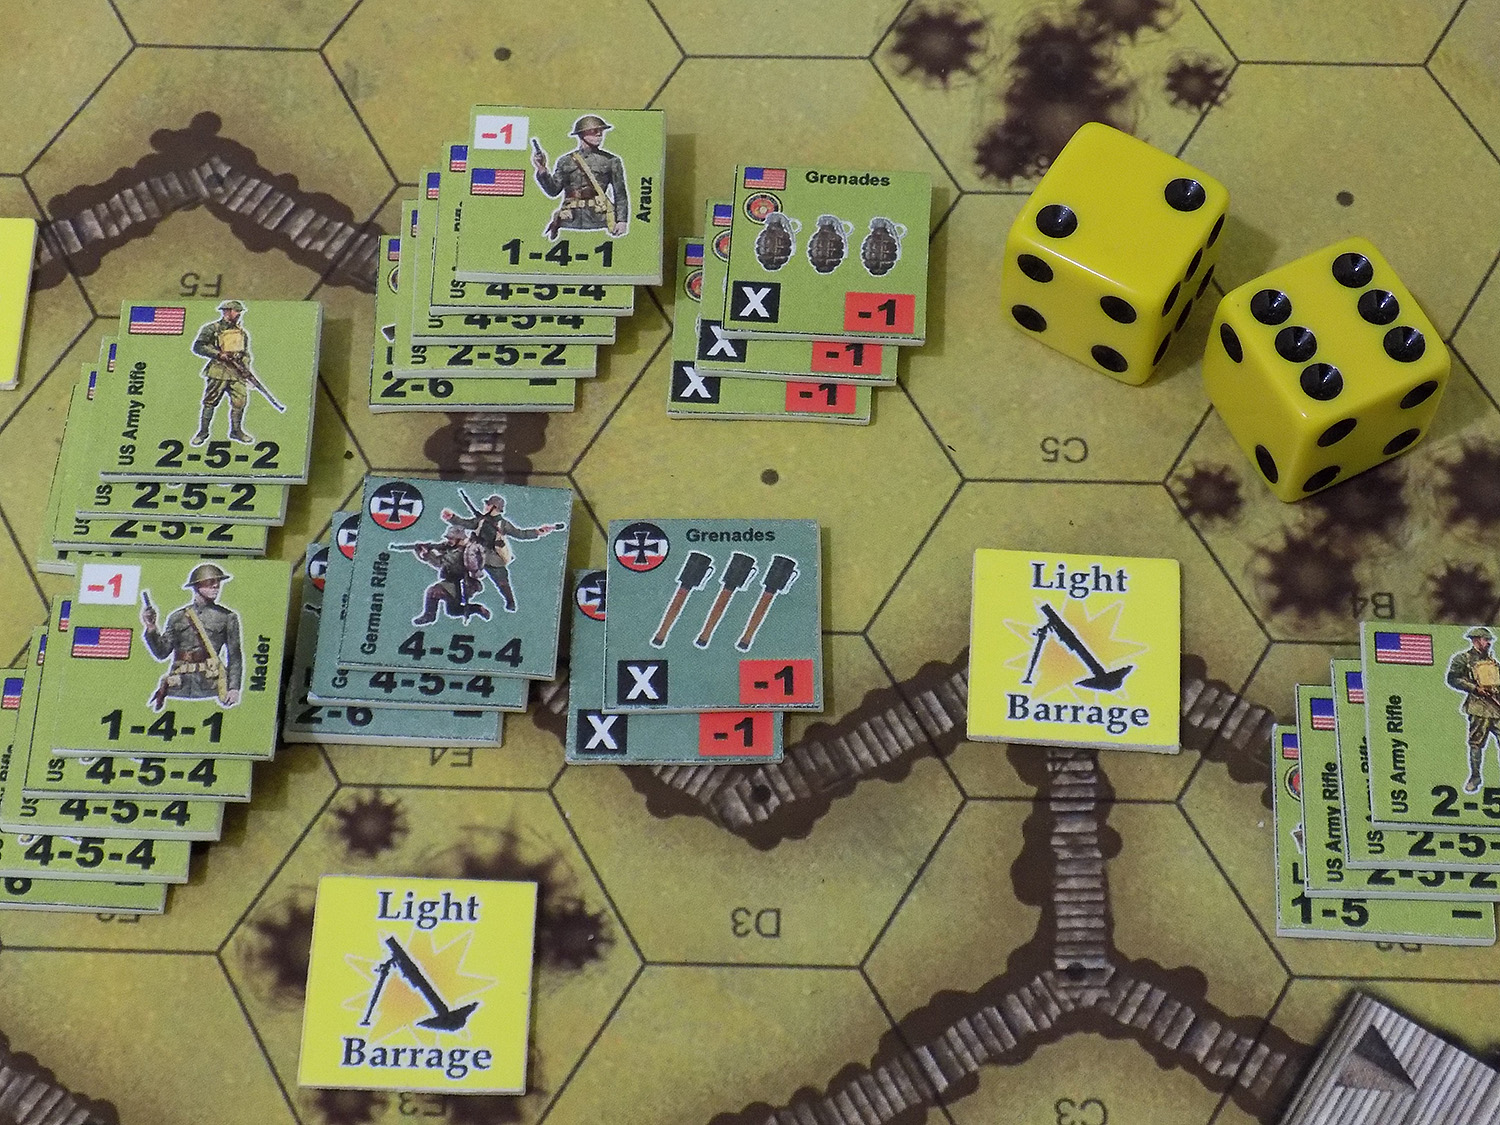
First we look at Pollock’s assault in the south. Note the hexes to the left and right of Erikssen’s platoon are wide open, leaving Pollock no real options to approach other than straight down that trench. Erikssen is also investing the last two German grenade counters, has the defensive bonus of that rubble, and gets a -1 difficulty (leadership bonus) point-blank opportunity fire shot as Pollock and his men come in. I won’t lie … this one is not going to be easy … or cheap. But the Americans roll a 6, which is a success.
*Math: outnumbering the Germans with a combined firepower of 1 + 4 + 2 + 2 + 4 + 1 = 14 vs. 12 (Erikssen’s “1” counts double because of his “Valor” counter), so Pollock needs a 7 or less on 2d6 … then gets a -2 bonus for leadership, then -3 for grenades, but has to add +2 for German grenades and +1 for Erikssen’s leadership, so a net bonus of -2, or a 9 or less needed on 2d6.
So Erikssen and his platoon are eliminated. However, with four units in the hex (Erikssen himself, a 2-5-2 half squad, another 2-5-2 half squad, and a 4-5-4 full squad), plus a +2 defensive bonus for that rubble (it “interrupts” the trench), means that Pollock has to pay six casualty points for this victory, in addition to what he already lost to opportunity fire.
This was a well-chosen spot for the Germans, well-fortified, supported with grenades, a valorous officer, and some solid dice on that opportunity fire check. The Americans win this assault, but the cost is friggin’ severe.
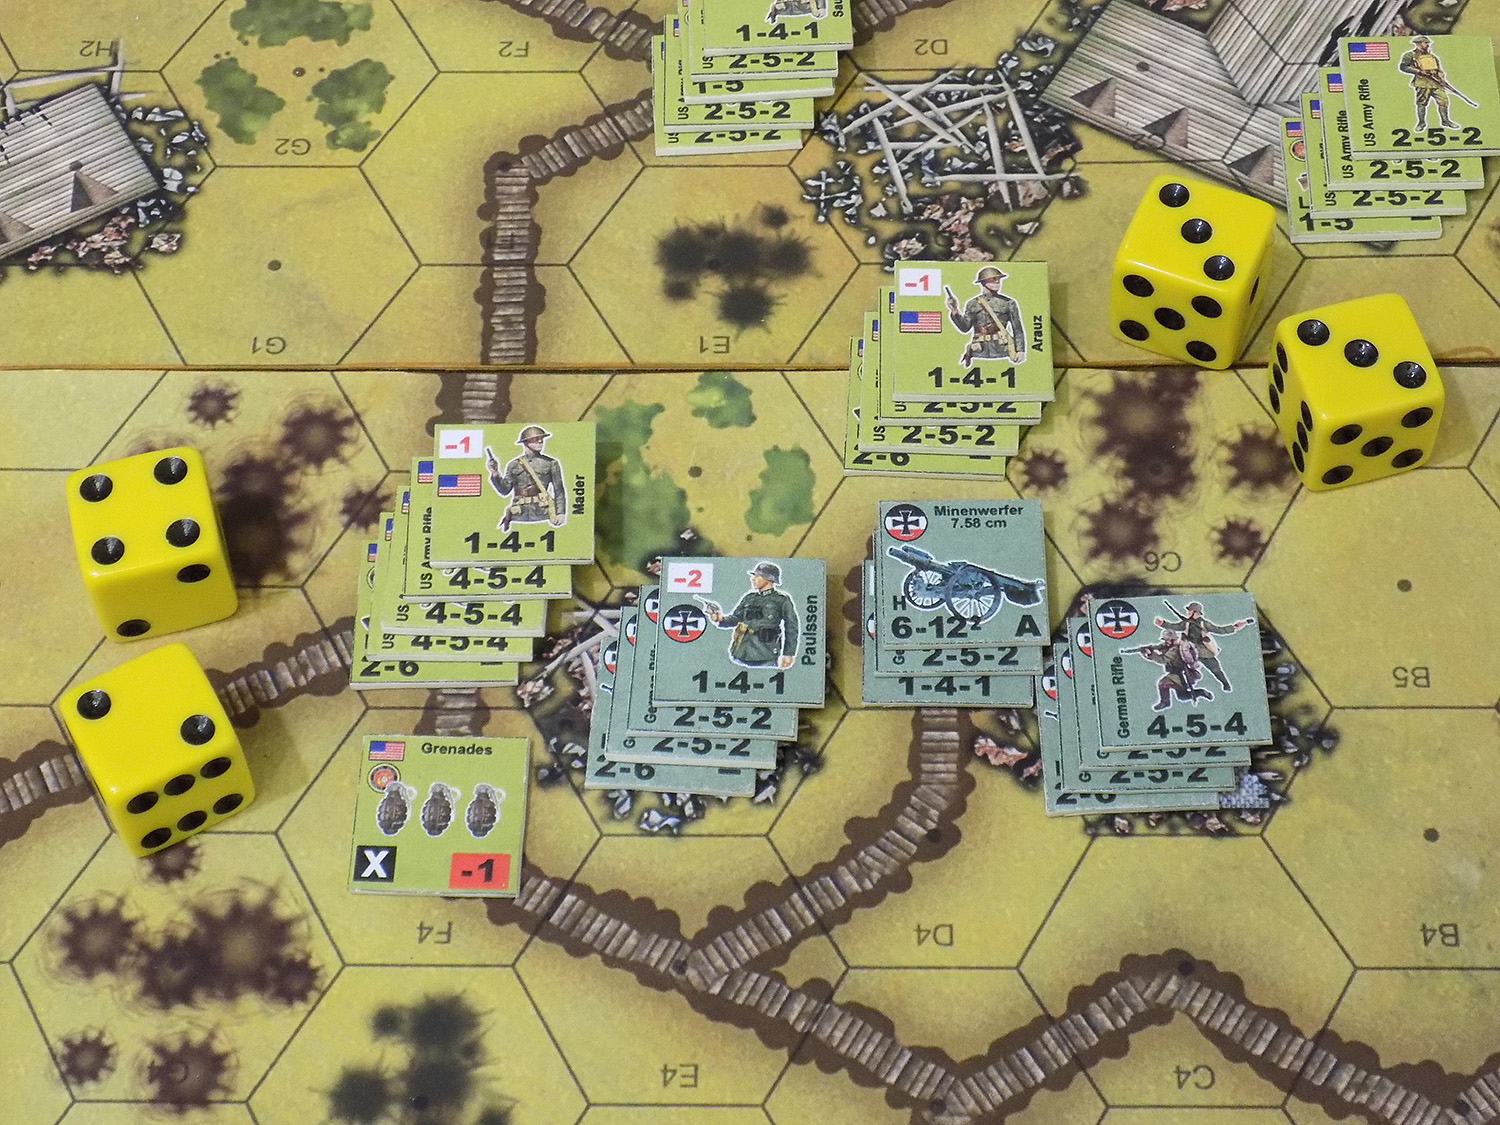
Further north, more American assaults go in. Again the Germans are fortified in rubble, trenches, and even a building, and have a solid officer (-2 Hauptmann Paulssen) leading them. The Americans have superior numbers, and get some pretty good dice rolls. They win both these assaults, wiping out Paulssen’s command post and that mortar pit, but again, losses are heavy.
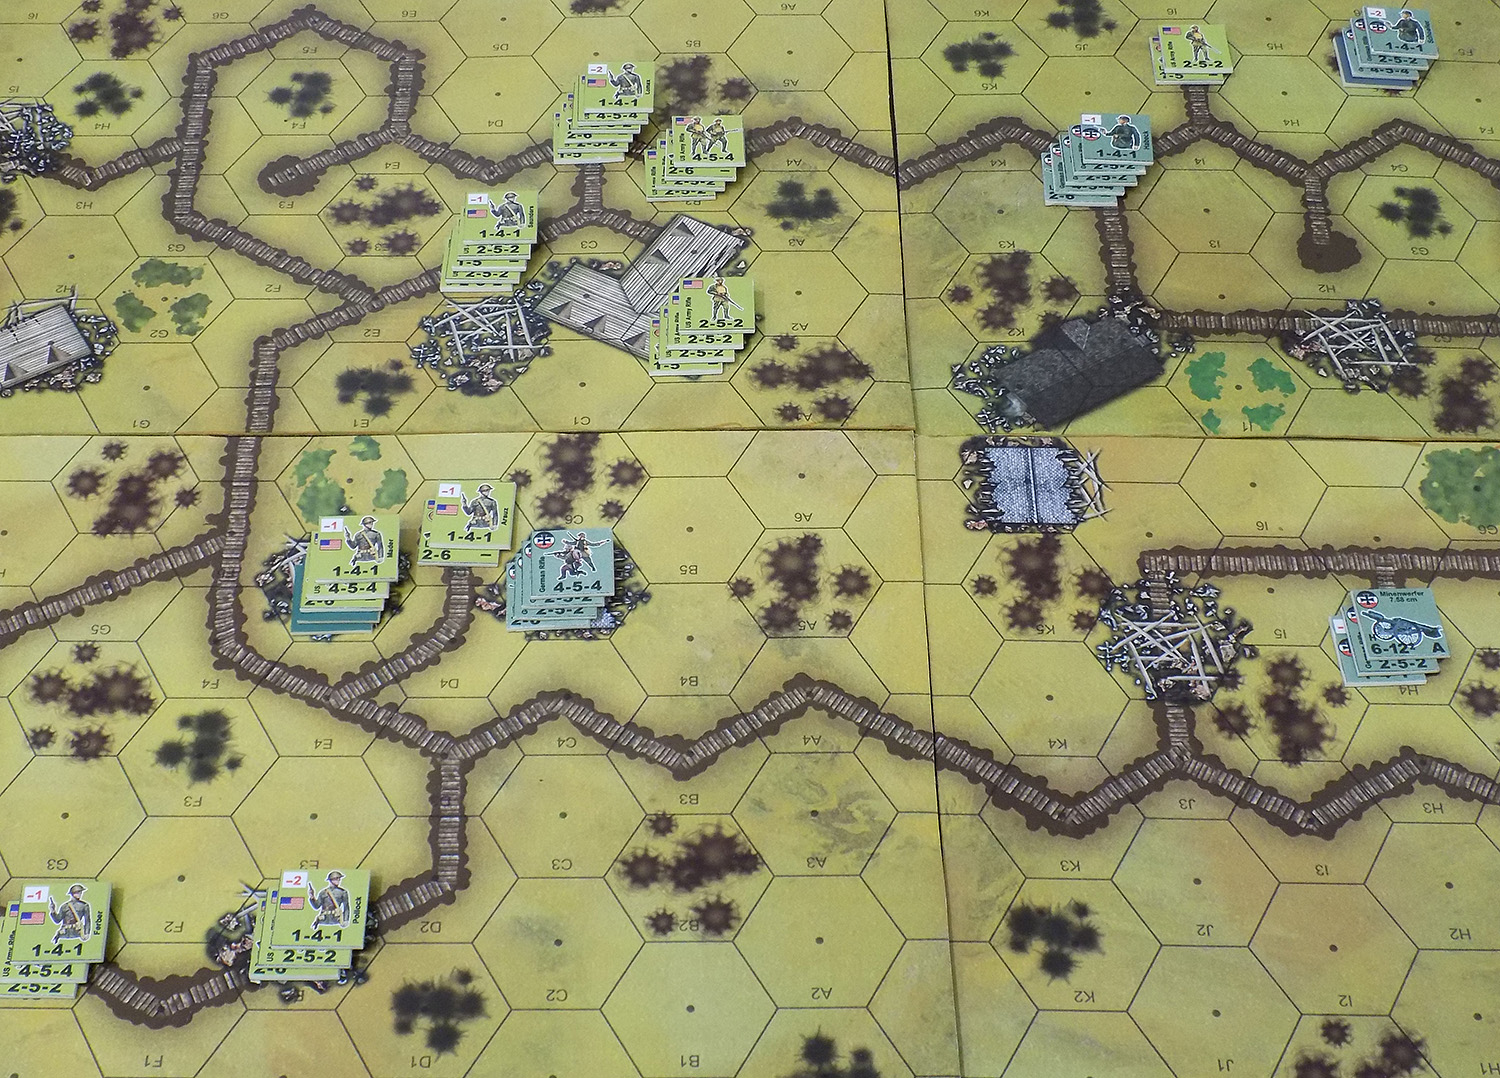
The Situation at the end of American Turn 02. In addition, the small squad at the far upper left (Lomax’s extreme left wing) has taken out another German MG 08 machine gun next, but is all but cut off by German advances of Schoeller’s kompanie and is now sadly likely to be wiped out by German assaults on their turn.
Trench Assault! (Part Two) - Valor & Victory 1918 Edition
A little further down the trench, another American assault, having already paid a steep price in opportunity fire, again barely makes the required roll for a successful assault. Note that this time the roll was an 8 or less on 2d6 instead of a 9 (slightly harder roll) because Lt. Arauz only applies a -1 bonus, not a -2. If this attack had failed (shudder – failed close assaults on fortified positions are nasty), the two American stacks at left would have gone in and finished the job.
Speaking of failed assaults, here’s one that does fail. Two full German squads (there were two 4-5-4 squads in that hex) repel the American assault on their trench. The Americans have to pay 2 casualty points (one for each German unit in the hex) + 2 for the trench bonus (note the attack was not coming in from within the German trench) + 2 for the margin by which they missed the roll (6 or below was needed, they rolled an 8). So they have to pay 6 casualty points, meaning that one whole squad is wiped out and the second squad reduced to a 2-5-2 half squad (still carrying the Lewis Gun beneath them). The Germans have to pay one casualty point for each unit that hit them, so one of their 4-5-4 squads is reduced to a 2-5-2. Basically, the Germans have lost 4 men here, the Americans lost 12.
The overall situation at the end of the American turn, after their rallies (some succeeded, some failed and so the units remained inverted). Note the Americans have largely failed to make a dent in the northeast board, but have all but smashed the German position on the northwest board. Battle has yet to really join on the southwest board, as the Americans didn’t have the movement points to get close enough on Turn 01.
On the German turn, they largely fall back and consolidate their position. Their one remaining platoon abandons the northwest board, their reorganize their squads (breaking into more half squads for better all-around defence in more directions), and their two 7.58 cm trench mortars drop a few fire missions on American platoons not in trenches (everyone’s at least in craters, but craters give a +1, while trenches give a +2.
Losses so far at the end of Turn 01. It’s pretty even, with steeper American losses thanks to bloody assaults and German opportunity fire almost perfectly equalized by that opening American artillery salvo on German positions. But now the Americans have used up their artillery. Yet their largely in the German trenches. Also, both sides have used up most of their grenades. It’s time for pistols and entrenchment tools, and time for the both sides to be much more careful in how they throw casualty points, close assaults, and opportunity fire around.


![StarCraft Tabletop Miniatures Game Pre-Orders Live Now [Updated]](https://images.beastsofwar.com/2026/03/starcraft-tmg-news-cover-600-338.jpg)


![Mounted US Cavalry On Kickstarter For Dead Man’s Hand! [Updated]](https://images.beastsofwar.com/2026/03/us-cavalry-main-600-338.jpg)


