Persei-Aries War – Oriskany v. Rasmus


Recommendations: 1418
About the Project
After racking up 127 entries, 3500+ recommendations, and 600+ comments, the original Darkstar project thread was getting a little unwieldy. So I'm starting a new one, featuring a new campaign for interested players in the OTT community and beyond. So far we have five players, but there's always room for more!
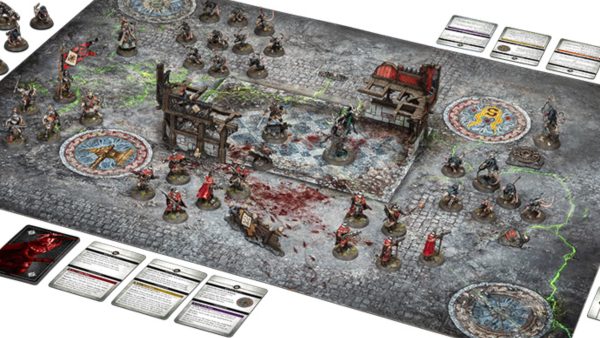
Ever wonder if you had what it took to command fleet of starships in tactical combat? Darkstar offers that challenge to the hard-core wargamer, with a "Newtonian Physics" movement system, rules for astrophysical objects and phenomena, gravity, and of course dizzying amounts of 26th-century firepower. There are no aliens, no "hyperspace," no planets that look suspiciously like movie studio back lots. Just the old empires of Earth doing what they do best, colonization and kicking the hell out of anyone who gets in their way (i.e., each other).
In addition to starship tactical combat, Darkstar includes rules for carriers and aerospace craft, atmospheric operations, orbital and surface installations, boarding actions, assault landings, and a complete campaign system.
The system is free to download for members of the OTT community, and of course we play almost every weekend with a on-line version with starship commanders around the world! So if you ever want in, you know where to find us!
Related Genre: Science Fiction
This Project is Active
British Raid on Sigma Rajdana (British vs. Indians and Russians)
FROM: UNITED NATIONS REGIONAL COLONIAL CENTER
02:00 SOL GMT, 02 JANUARY 2522
BREAKAUTH: 181072.18J
CLEARANCE: SECRET (NATIONAL)
BRITISH RAID ON SIGMA RAJDANA (Bhogavati / HD176051)
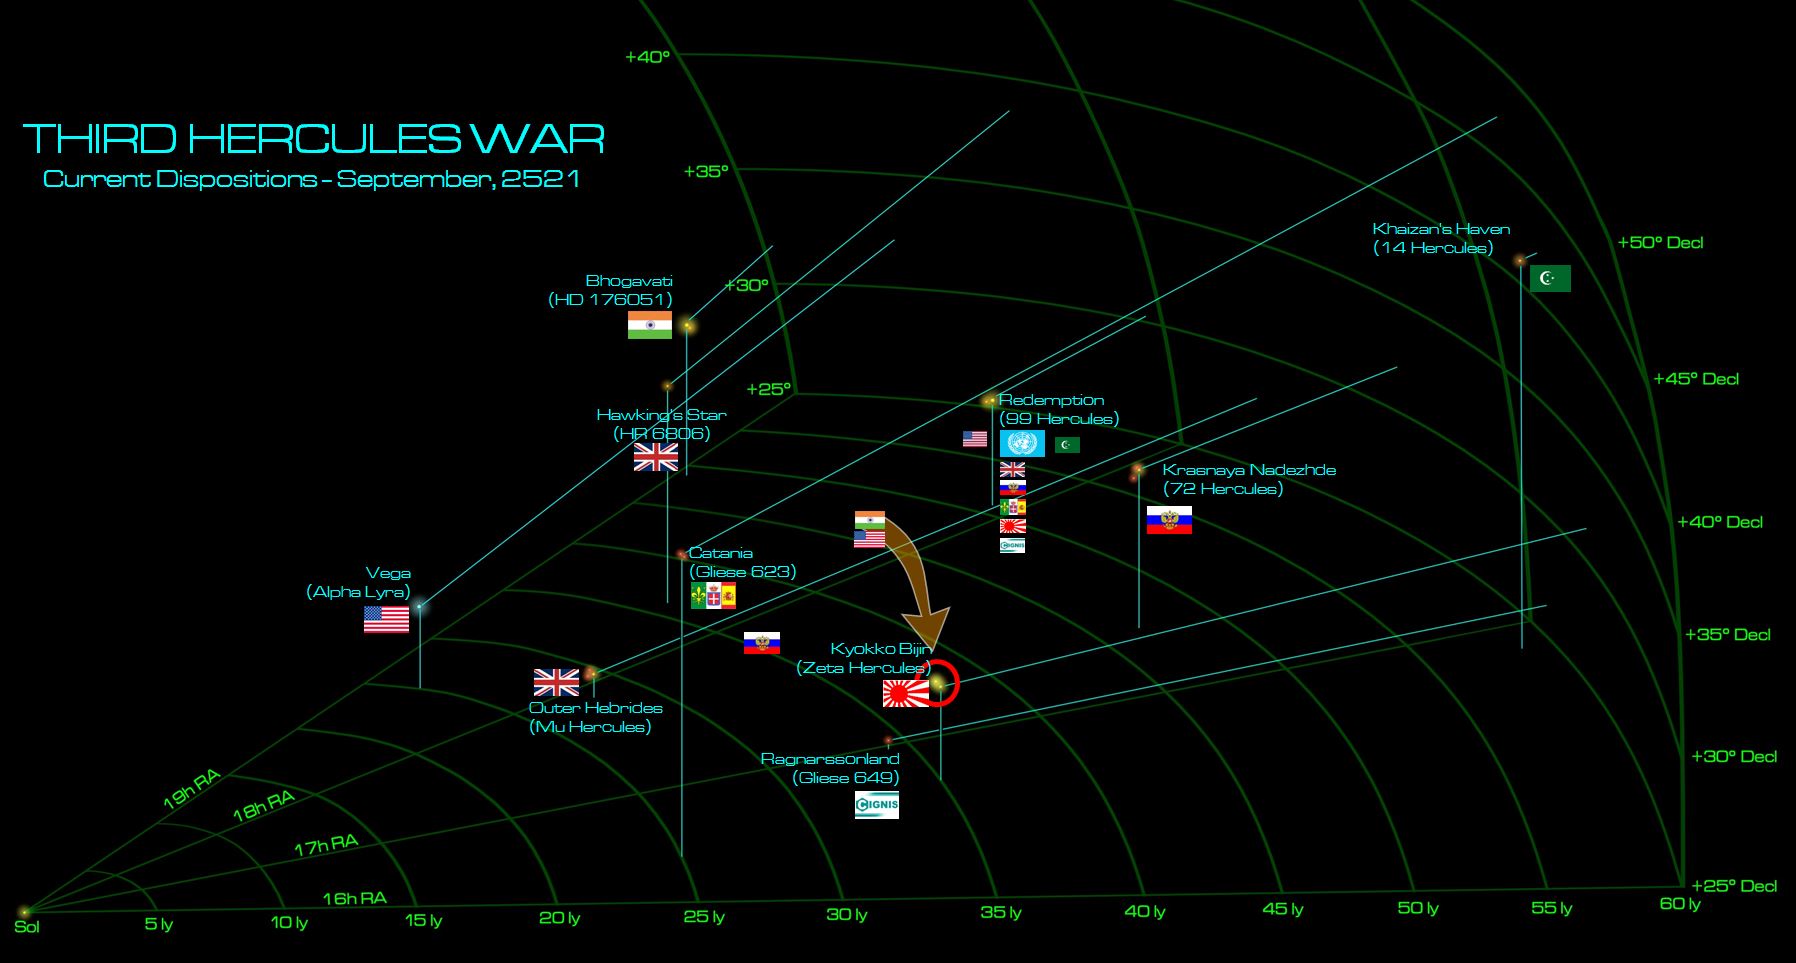
The situation is definitely heating up in the ongoing Third Hercules War community campaign. Recent weeks have seen the British Royal Navy continue their wining streak, resurgent in the United Nations “Redemption” Mandate (99 Hercules system). The Holy Russian Empire reels from successive defeats, the Americans all but tossed out of half of the war by a string bitter reversals. Now a threatening new faction has joined the fray in the form of the New Roman Alliance (the combined star navies primarily of Italy, France, and Spain). All across the Hercules Rim, a series of “tipping points” inch precariously closer to several factions, and more than one nation stands upon the cusp of victory, or stares into the abyss of defeat.
Flush with recent “Operation Rodney” victories in the 99 Hercules system, Lord Commodore Edward Cavendish receives orders from Hercules SCS Admiralty (Outer Hebrides / Mu Hercules). With the Americans pacified along the spinward shoulder of the Hercules Rim by the Treaty of Zubrin, the Admiralty has decided to focus attention on their other foe in this region, the Indian Republic.
Based out of the Bhogavati Colonies in the HD176051 system (yellow main sequence / orange dwarf binary), Indian commitment to the Third Hercules War has always been lukewarm at best, with regional governors hoping to provide peripheral support in a presumed American victory and claim a modest share in the spoils, namely a permanent basing and shipping lease in the UN “Redemption” Mandate. But now with the Americans largely called to heel, at least here in the spinward systems of the Hercules Rim . . .
Task Force Agamemnon is thus issued orders to sortie an immediate strike into the Bhogavati Colonies. No Royal Marines or Paras are sent along, it is hoped a sharp, punitive strike will convince the Indian Republic bow out of the war to choose its allies more carefully in the future. Then, with all opponents quelled along the spinward shoulder of the Hercules Rim, the Royal Navy can turn coreward and, together with the Japanese and Arab League, deal with the Russians and Romans once and for all.
The Russians, however, having just lost an ally in the United States (depending on the star system in question, of course), are determined not to lose another. So when Task Force Agamemnon erupts from its Darkstar wave HD176051 and decelerates toward the small outer terrestrial world of Sigma Rajdana, they find not only a pair of Maharani class heavy cruisers waiting for them, but part of the Admiral Lazarev Battlegroup (Captain Pyotr Fedorovich Myshaga) as well.
UNITED KINGDOM: @Damon
RUSSIA / INDIA: @Oriskany
RAID VICTORY CONDITIONS (526 points)
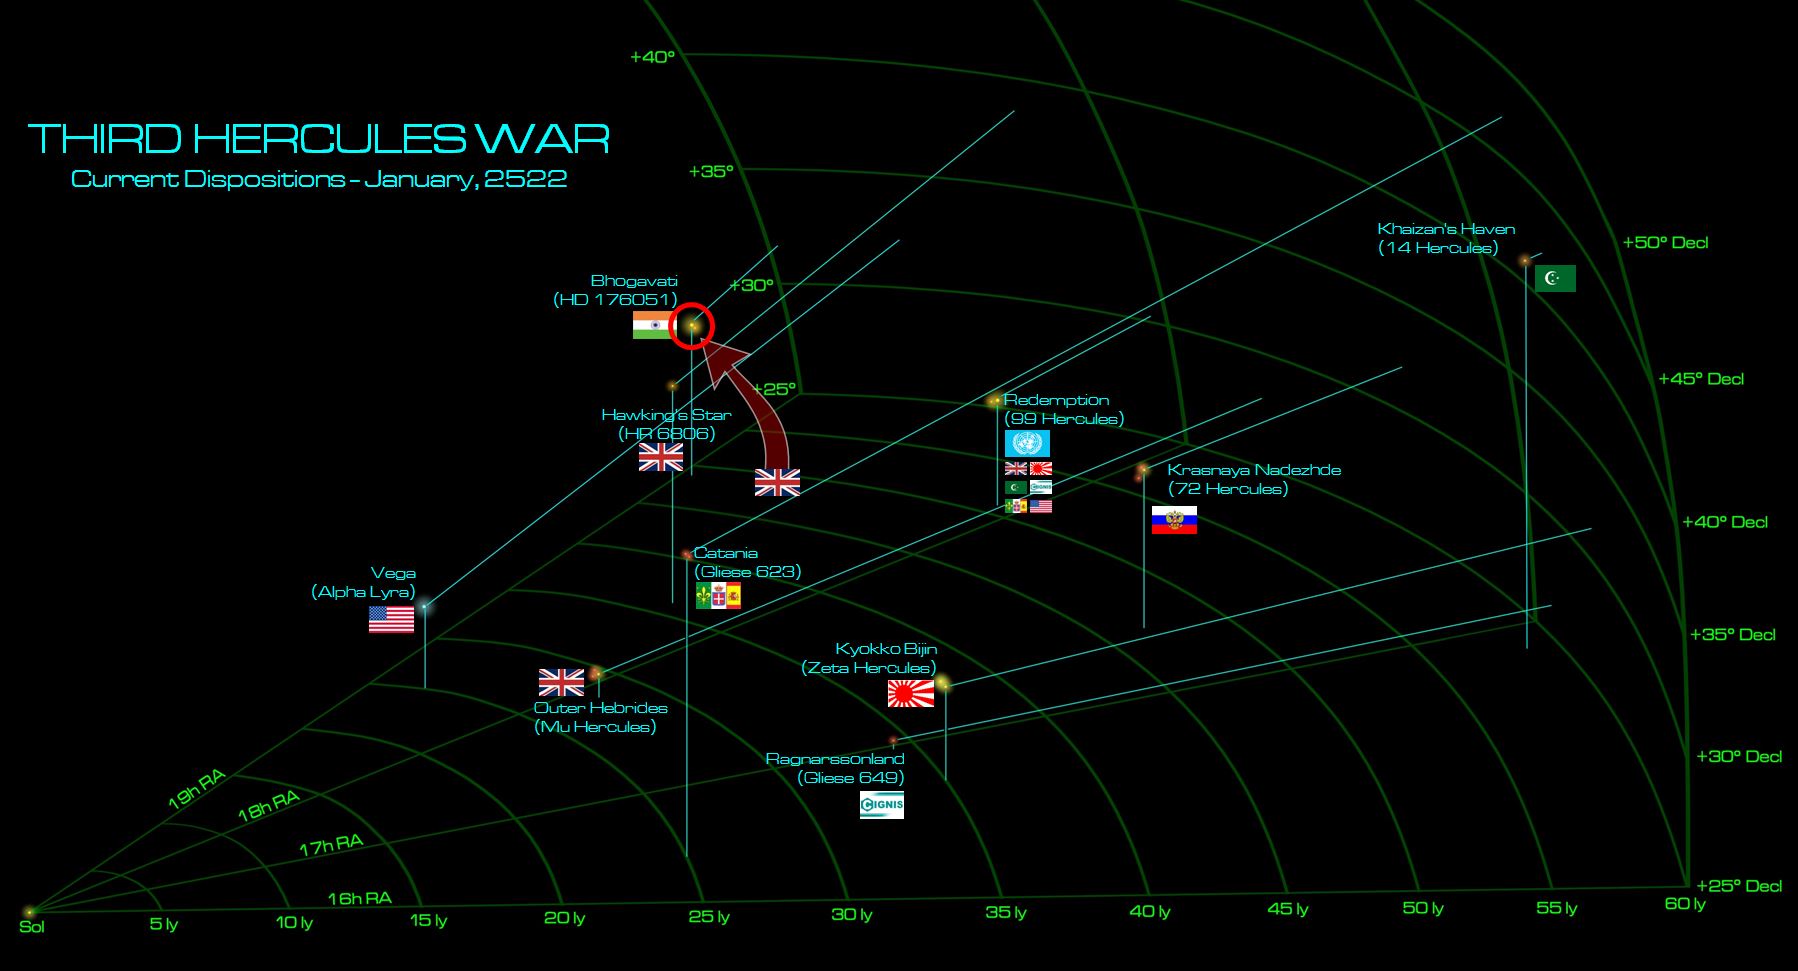 A new year, a new phase of the Third Hercules War. As 2522 dawns, the British are well on their way to turning the spinward shoulder of the Hercules Rim into their backyard. Forbidden by treaty to act against British interests, the Americans at Alpha Lyra are in fact obligated to help defend British holdings in 99 Hercules, HR 6806, and Mu Hercules in a “mutual assistance” clause. This leaves only the Indian Republic in HD176051, a matter that Task Force Agamemnon aims to settle directly. With this spinward flank secured, the Royal Navy hope to turn coreward, linking up with their Japanese allies in Kyokko Bijin and Arab League allies at Khiazan’s Haven against the stubborn Russians at Krasnaya Nadhezda and the newly-belligerent Roman Alliance at Catania. The Indians, for their part, are keen to defend themselves and their early gains in this war, while their allies in the Holy Russian Empire are determined to keep their British opponents in a “two front war.” Either way, Bhogavati must stand.
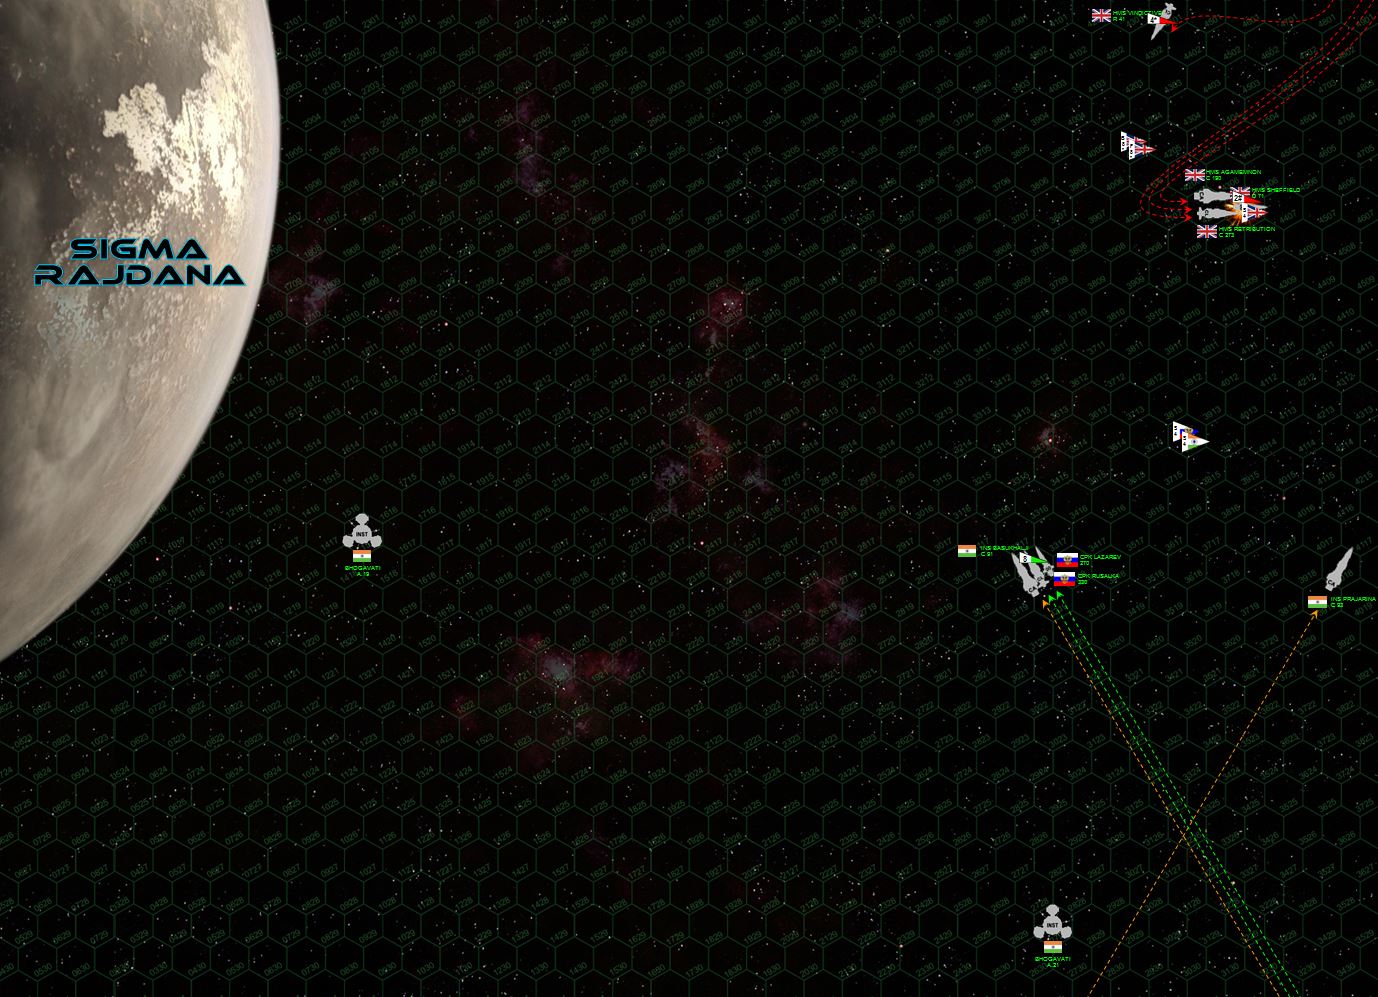 Both fleets make their approach along the daylight side of Sigma Rajdana. The Indian heavy cruiser Prajarina streaks in first at very high speed, engines full reverse in as hard a deceleration as her 126,000 tons will allow. Task Force Agamemnon comes in a moment later, Cavendish setting up a skillful standoff starboard broadside that doesn’t expose his ships to Prajarina’s broadside in turn. But he doesn’t entirely pull it off, the heavy cruiser Basukhalji thunders in next with Russians running close abeam, the veteran destroyer Rusalka and the notorious light cruiser Admiral Lazarev. This combined force just manages to get the angle for a broadside on the lead British destroyer, HMS Sheffield, at just under 2000 kilometers. This combined Russo-Indian task force opens fire, leading off with the massed syglex emitters of the Basukhalji and following up with the EPCs of the Admiral Lazarev and rail guns of the Rusalka. The Sheffield is hammered, scorched, and lacerated along her starboard quarter, her engine rooms vented to space, her starboard reactors ejected to prevent catastrophic explosion. Just that fast, the Sheffield has been smacked out of the battle. The British return fire on the Prajarina, slashing open her port bow, damaging (among other systems) her maneuvering thrusters, a CRITICAL system to lose for a heavy cruiser still moving at just over 30 kilometers per second.
 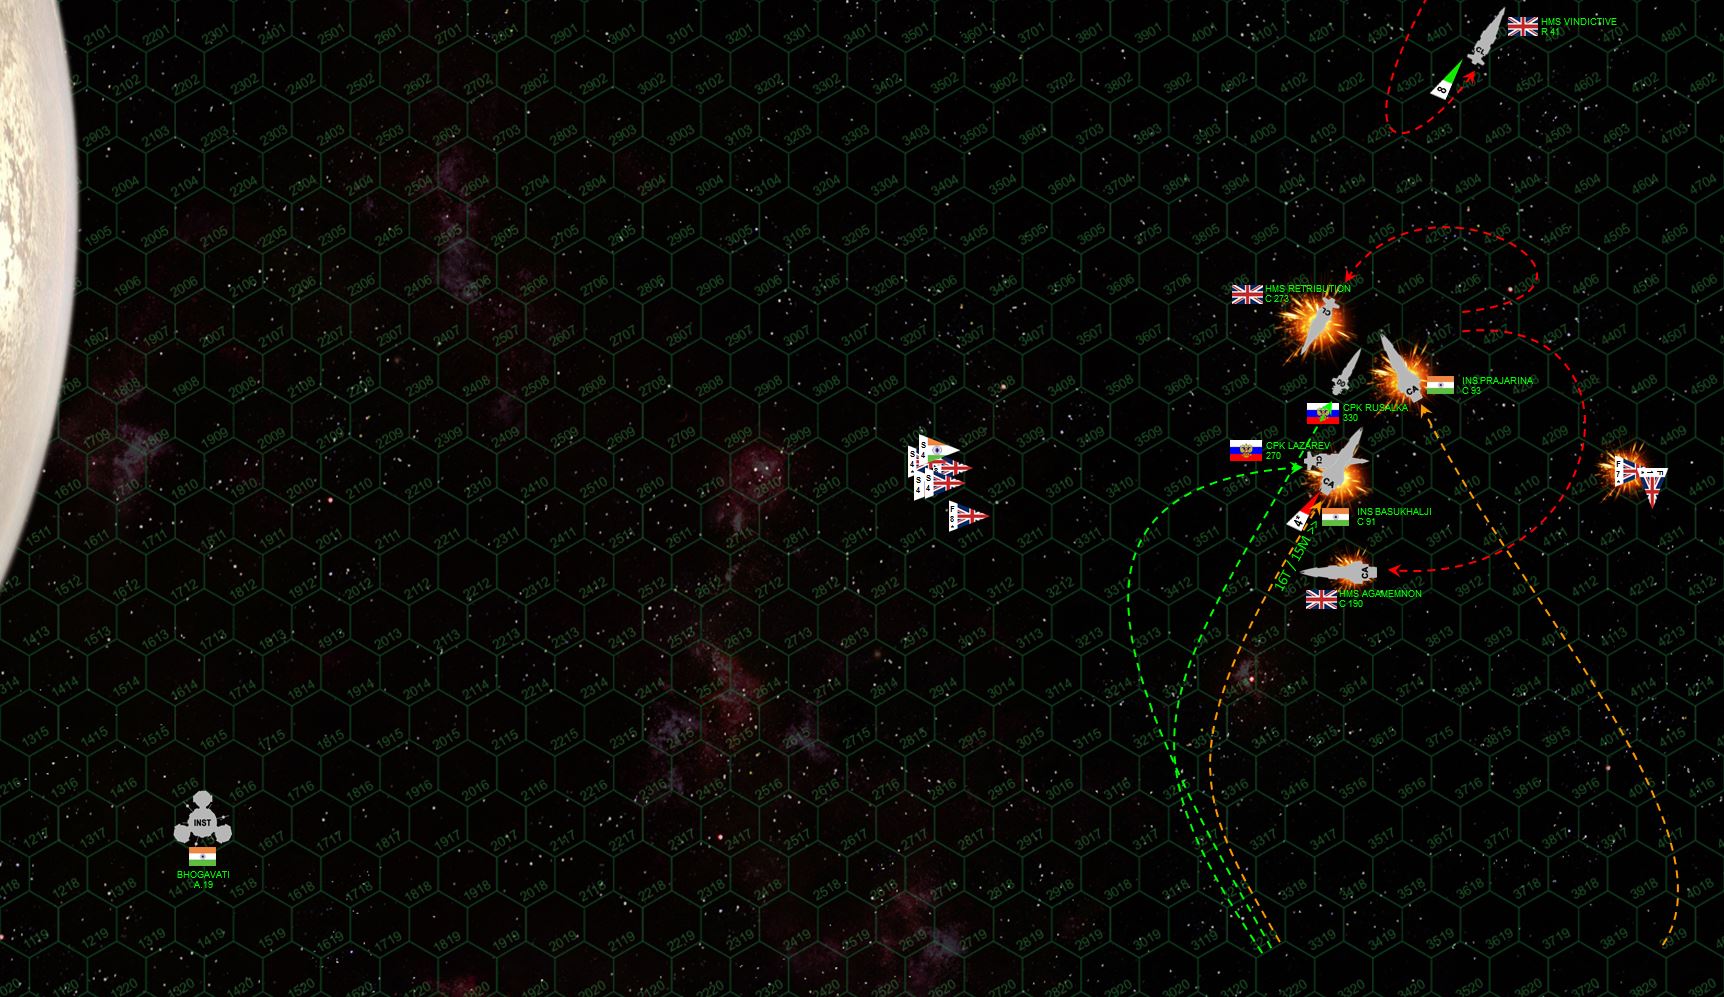 The Indians had a beautiful maneuver planned here, with the mighty Basukhalji and Prajarina scissor-turning into each other to present mutually-supporting broadsides in Hexes 3810 and 3910. But with the Prajarina trailing a sheet of burning atmosphere from the gash where her portside thrusters used to be, she can’t make this turn and continue to decelerate at the same time. The maneuver is thus flawed, the jaws don’t close, and the British seek to exploit the gap between the two behemoths. The Agamemnon, still the fastest heavy cruiser in Known Space, pivots around to rake Basukhalji’s stern. The light cruiser HMS Retribution (sleek, modern, but somewhat vulnerable Relentless-class) hooks the other way to put a broadside into Prajarina’s badly-damaged port bow. Cavendish’s plan here is to try to knock out both Indian heavyweights in one salvo, securing victory before close-range Russian EPCs, rail guns, plasma accelerators, and massed P-500 torpedo strikes can tip the balance.
 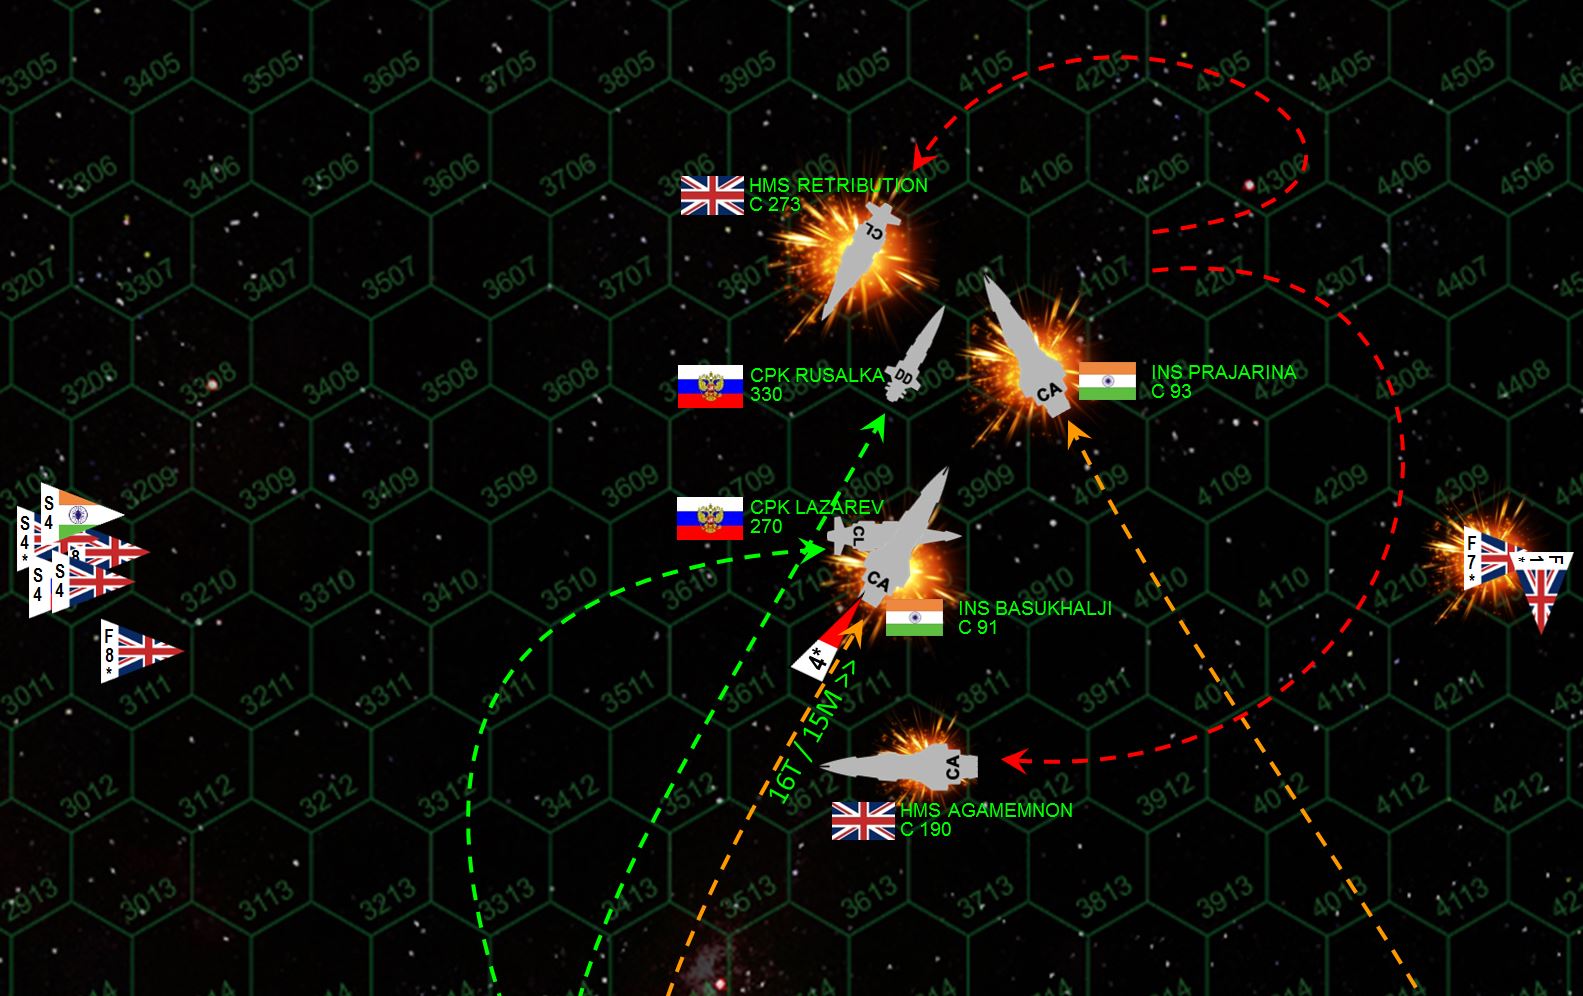 Okay, a lot happens here. With the Basukhalji and Prajarina both “helpless” but to hit the Retribution along her port bow with their forward batteries, the Admiral Lazarev and Rusalka cut in to offer close-range broadsides in support. If this combined Russo-Indian barrage can hit the Retribution’s forward magazines or bridge, they’ll knock out the ship and keep the odds even (they’re already assuming the Prajarina will be crippled). Both sides, however, are going to score a lot more damage than they expected. Although the aerospace strike of the carrier HMS Vindictive is largely broken up against the stern of the Basukhlaji (one Supermarine Starfire fighter is shot down), the broadside of HMS Agamemnon positively savages the stern of the Basukhalji. Just as she slings her forward guns at the Retribution and aft guns at the Agamemnon, the Basukhalji has to eject her reactors and she’s left dead in space. The Prajarina cuts loose into the Relentless as well, her syglex emitters and heavy lasers carving horrific wounds down Retribution’s port bow, after guns slicing open Agamemnon’s starboard quarter. Retribution fires her full broadside, smashing into Prajarina’s fatally-damaged port bow, hitting both the magazine and the bridge, wounding her captain and knocking the shop out of the battle. The Admiral Lazarev fires next, her EPCs and plasma emitters burning into the gaping wound already left by the two Indian cruisers, exploding Retribution’s forward magazine, hitting the bridge, crippling the ship, and exacting some measure of revenge for the humiliating loss Myshaga suffered at Kayashenko 12. Suddenly without a target, Rusalka instead turns her turrets against Agamemnon, which has suffered terrible damage to her starboard quarter from the aft guns of Basukhalji and Prajarina. For a razored, terrified, heart-attack moment, Agamemnon’s fate hangs in the balance. If damage control and engineering crews can’t keep her reactors up and engines powered, Agamemnon will plunge into the gravity well of Sigma Rajdana. The lights flicker, the engines stagger, the reactors shudder ... but Agamemnon maintains power and for the moment remains in the fight.
 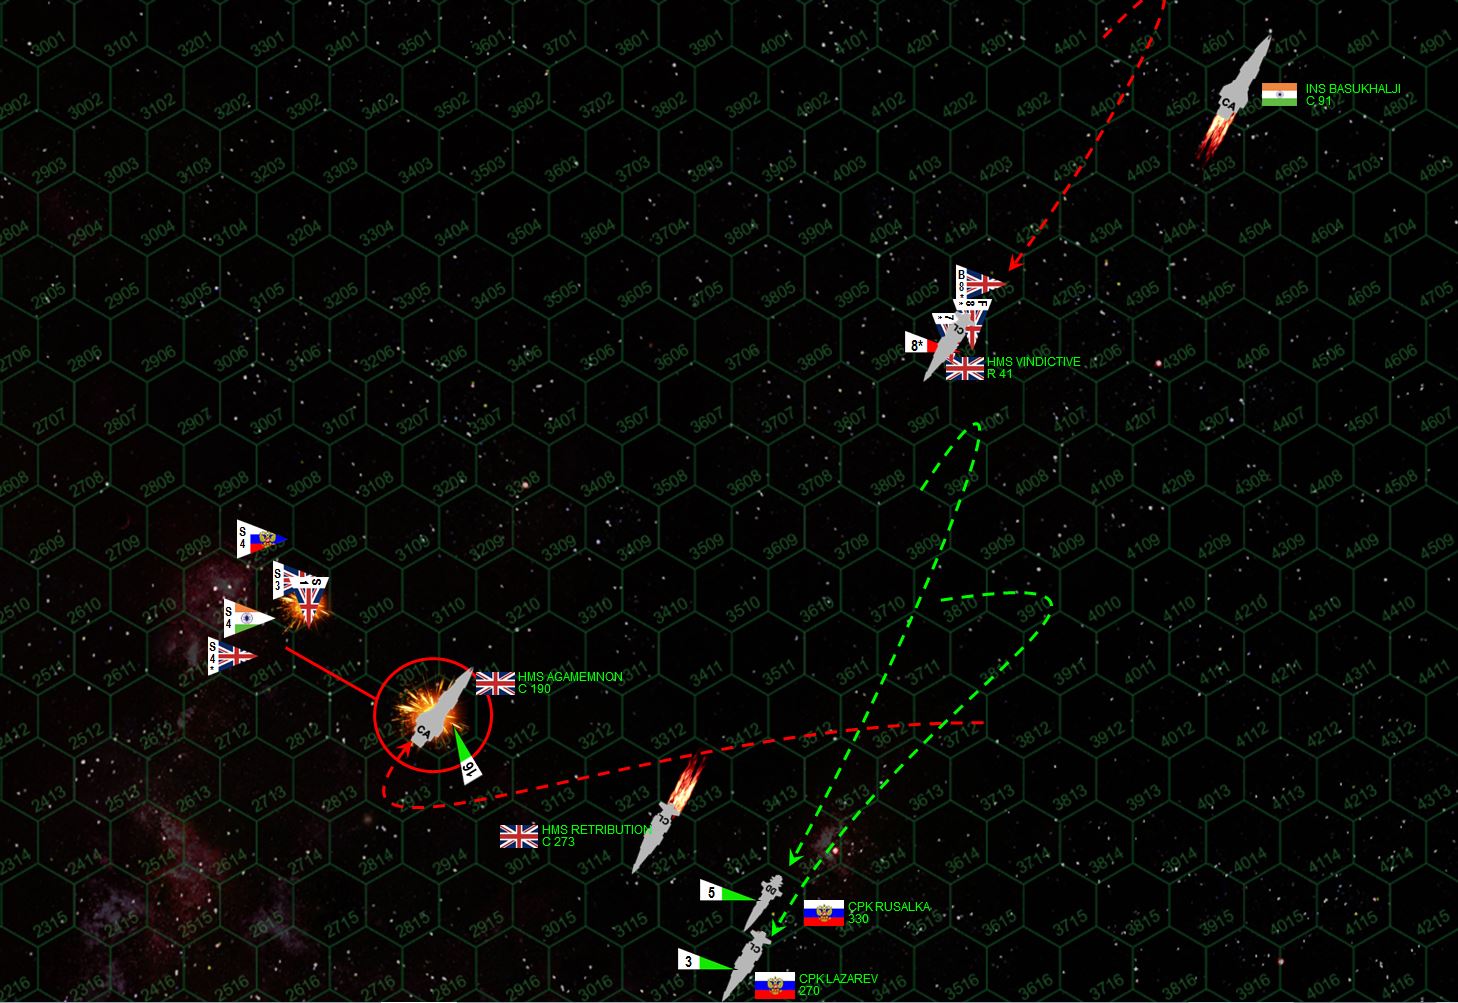 The raid on Sigma Rajdana has been brutally reduced to just four ships, and the largest of them, HMS Agamemnon, is in real trouble. Although she manages to pull a flaming starboard turn away from the planet and present a broadside to the Russians, she frankly doesn’t have a broadside left. ALL aft guns have been blown clean out of their mounts, leaving only forward EPCs and lasers to fend off these Russian wolves hounding the wounded British bear. It’s not nearly enough, the destroyer Rusalka taking moderate damage as the Rusalka and especially Admiral Lazarev hit the Agamemnon again. This time, the engineers and damage control teams have no miracles left, the Agamemnon is left crippled and adrift . . . but at least she’s in a safe orbital trajectory. Meanwhile, the HMS Vindictive lands her fighters to rearm for another missile strike, her bombers close behind.
 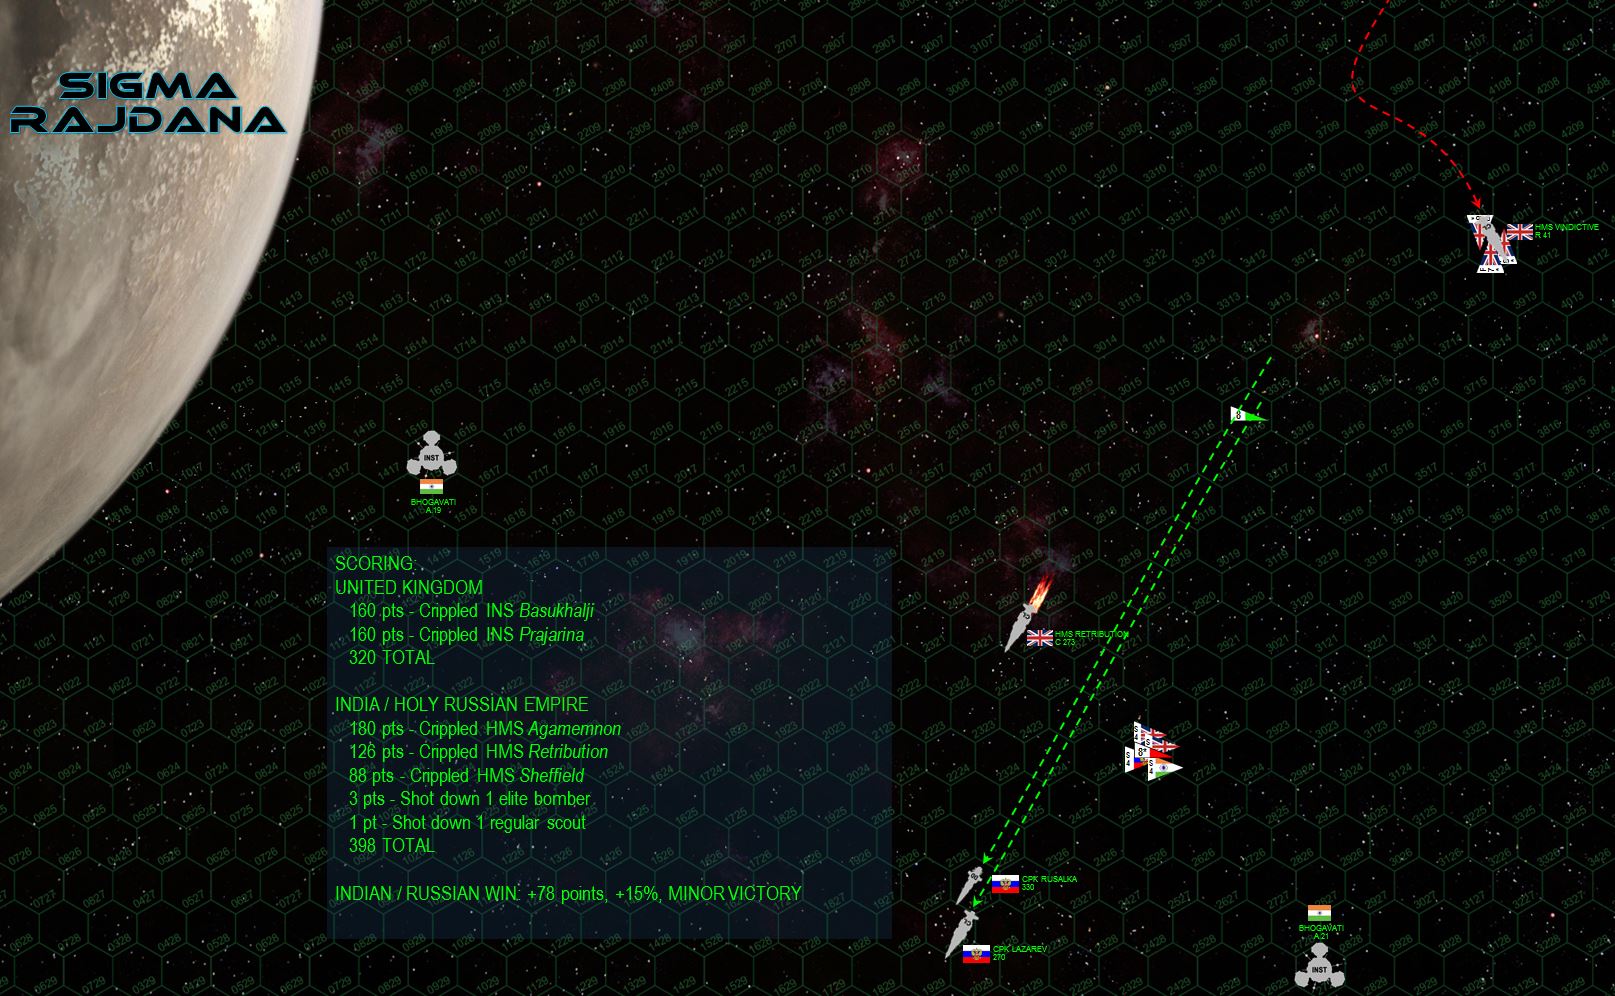 But honestly, this raid is already over. The Russians accelerate to break off the engagement (RAID victory conditions, remember), content in the knowledge that this British task force is NOT the vanguard to an invasion fleet. Vindictive is receiving orders to begin rescue and recovery operations, while the Lazarev task force retains more than enough firepower to ensure continued Indian control of the Sigma Rajdama orbital zone and the Bhogavati colonies in general. The score is displayed, it’s a bitterly-fought but clear Indo-Russian victory.
  The effect of the raid on Sigma Rajdana is immediate and far-reaching. Splitting the victory campaign award for a minor victory in large engagement (4 points) equally between the Russians and the Indians, we see the Indians are now unmistakably ABOVE their campaign victory threshold. In summary, they’re OUT OF THE WAR, as VICTORS. The UN is prepared to mediate negotiations that will guarantee them a world in the 99 Hercules system (UN “Redemption” Mandate) they will PERMANENTLY annex as sovereign territory of the Indian Republic. It’s not a terribly huge win, but note the “4” threshold for the Indian Republic . . . their government never had ambitious or grandiose goals in this war. Remember that HD176051 isn’t even in the Hercules constellation, they’re heading in from the neighboring Lyra strategic command sector (SCS). Their participation in this conflict was understood to be strictly limited from the start, and now that they’ve achieved their modest aims, their naval commanders have cease-fire orders from New Dehli. For the Indian Republic, the Third Hercules War is over. Thus, from a certain point of view, the British loss at Sigma Rajdana has ironically ACHIEVED their strategic goal. The Indians are out of the war, and the Royal Navy now has a free hand to turn against coreward threats like the Holy Russian Empire and the New Roman Alliance. Of course, that’s AFTER they weld Task Force Agamemnon back together, that is.
 Updates Complete - MAJOR CHANGES in Third Hercules War
Okay, everyone. This post should complete the updates on the Third Hercules War Community Campaign up to date.
It covers Darkstar Web Games 45 and 46 (The Lost Dutchman and Kayashenko 12), and brings the timeline up to the end of November, 2521.
The end of the post shows the current state, what factions have dropped out (sort of), and what new faction has joined.
>>>>>>>>>>>>>>>>>>>>>>>>>>>>>
FROM: UNITED NATIONS REGIONAL COLONIAL CENTER
02:00 SOL GMT, 25 OCTOBER 2521
BREAKAUTH: 181072.18J
CLEARANCE: SECRET (NATIONAL)
BRITISH ASSAULT ON THE LOST DUTCHMAN (Redemption / 99 Hercules)
With the Japanese having defeated the Indo-American incursion at Shindo 919, the “Khaizhan Caliphate” of the Arab League defeating the Russian counterstrike at Kayashenko 14, and especially the Royal Navy’s solid win at the Battle of Uxbridge in the Outer Hebrides (Mu Hercules system), Royal Navy high command senses an opportunity to decisively turn the tide of the Third Hercules War once and for all.
Thus is born Operation “Rodney,” named for one of the battleships that helped sink the Bismarck in 1941. Originally conceived by Lord Commodore Edward Cavendish, the plan met with eager approval at Hercules SCS (strategic command sector) Naval Command at Uxbridge, who immediately assigned the plan tier-one priority in Royal Navy support facilities, supplies, and repair / refit scheduling. Having ensured the plan’s adoption, Cavendish also made sure his force (Task Force Agamemnon) would get the orders to spearhead the effort.
The orders are to launch consecutive assaults against the Royal Navy’s two primary enemies in this Third Hercules War, the United States and the Holy Russian Empire. Rather than strike far-flung targets at Port Halsey or Krasnaya Nadhezda, the British will hit much closer to home, at American and Russian holdings in the UN’s “Redemption” Mandate (99 Hercules system).
First, the Americans will be struck at their newly-secured holding, the outer terrestrial planet of The Lost Dutchman (99 Hercules-12.A). With a mass roughly that of Mars, but an orbit more like Pluto or Eris, the Lost Dutchman was a British possession until early defeats in HR6806 and Mu Hercules forced the British to reinforce these threatened sectors at the expense at less-vital areas like the Lost Dutchman. In a word, the Americans “stole” it, practically without a fight, after the British suffered yet another defeat in 99 Hercules, trying to shove the Russians out of the moons of the Kayashenko gas giant.
The “Stars and Stripes” flying over a British colony simply won’t do, and on 25 October 2521, Task Force Agamemnon mounts a short, slow, and very precise intrasystem Darkstar jump out of Zubrin (the main British holding in 99 Hercules) to the night side of The Lost Dutchman. They find themselves confronted by one of the major American flagships in the Hercules Rim, the Gettysburg class heavy cruiser USS Shiloh under the flag of Rear-Admiral Virginia Saunders. Raising steam for a parabolic orbit around to the day side of The Lost Dutchman, Saunders denies battle just long enough for help to arrive in the form of the bulk of Task Force Oriskany (Captain Matthew Spencer).
The Battle of the Lost Dutchman is on.
UNITED STATES: @Oriskany
UNITED KINGDOM: @Damon
ASSAULT VICTORY CONDITIONS (520 points)
 Make no mistake. This will be no “raid,” but a knock-down, drag-out, last man standing assault to determine possession of The Lost Dutchman (outermost terrestrial planet of the “Redemption” / 99 Hercules star system).
 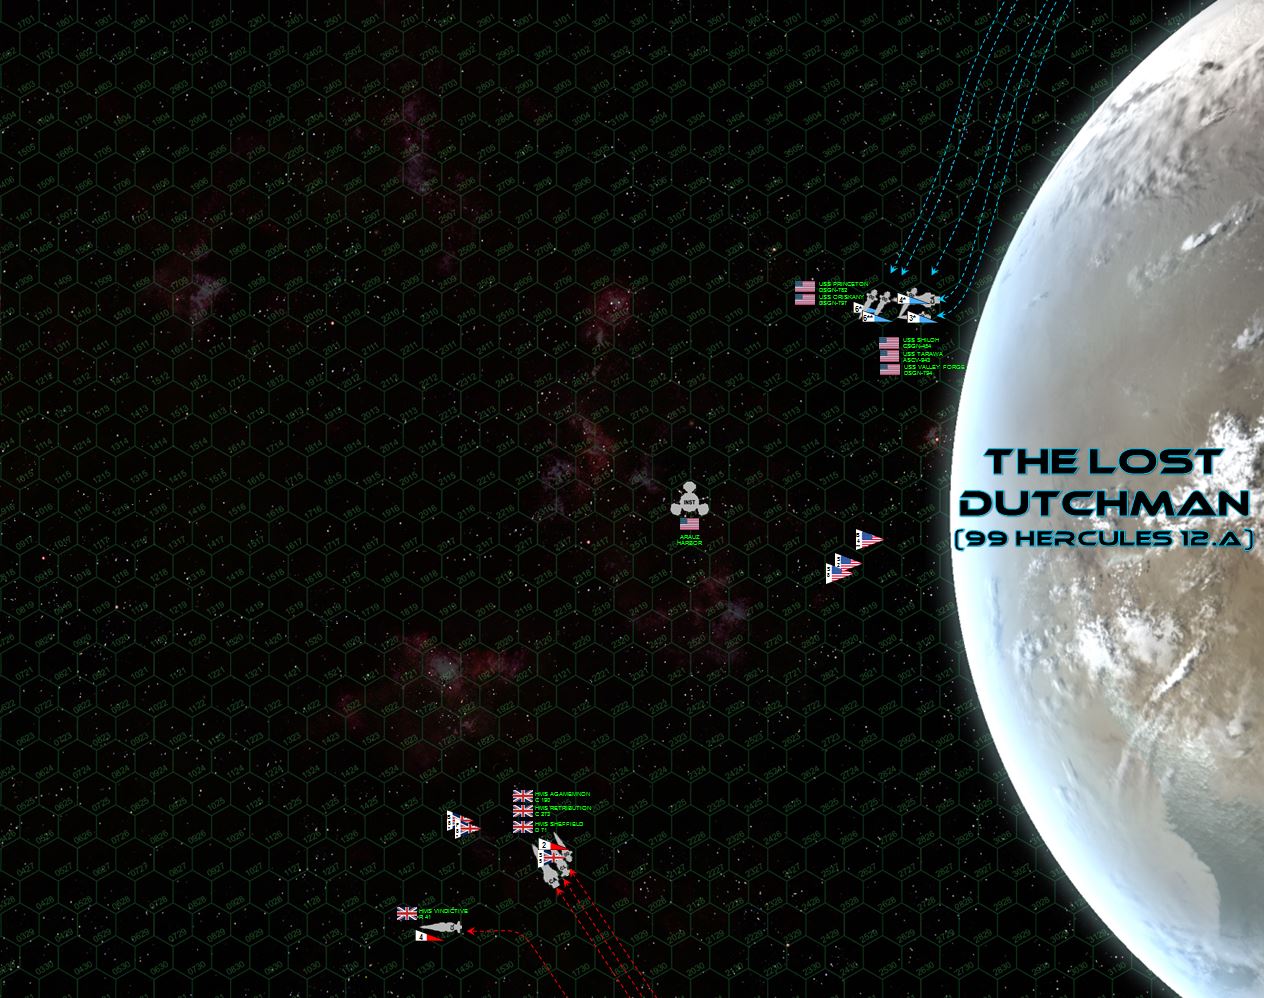 The Americans come on very fast, eager to close the distance with the bigger guns of USS Shiloh. Also, most of these British ship have more accurate guns than the Americans, at accuracy advantages tend to count less at shorter ranges. The Americans thus thunder toward “Arauz Harbor,” the Shiloh just missing lining up a broadside on the approaching British while the destroyers of Task Force Oriskany line up torpedo spreads and the USS Tarawa starts launching her aerospace group (Marine Corps strike squadron VMF/A-319 - the “Tigersharks”). The British, meanwhile, sets a slower speed, content to keep the range open for the time being, the light fleet carrier HMS Vindictive angling away from the Americans so she can launch her strike group in relative safety.
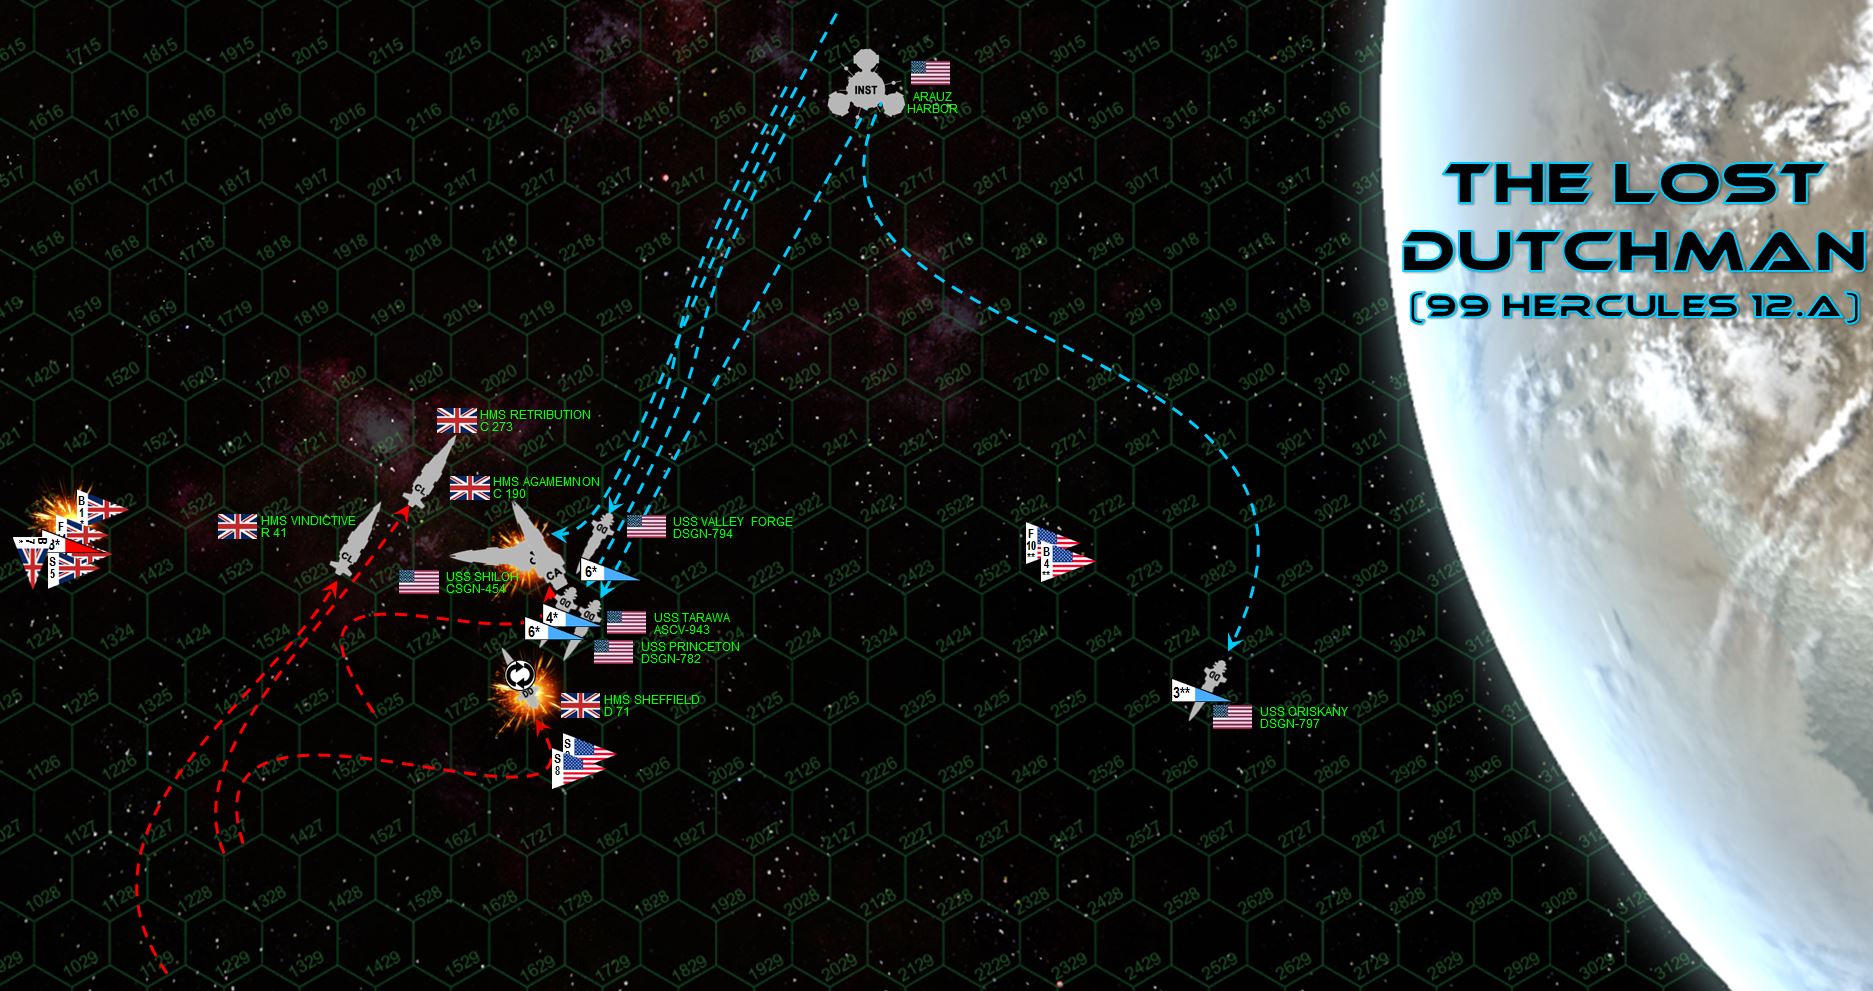 By Turn 3, things are already going pretty badly for the Americans. Out of her first three fire phases, the biggest American guns (10 gigawatt rail guns aboard USS Shiloh) have hit exactly ONCE out of 18 shots, and now she’s being broadsided point-blank in the engines by the faster, more maneuverable HMS Agamemnon. She ... doesn’t last long. USS Oriskany has also been hammered, forced to break off yet trying to sling additional torpedoes into the fray. She gets lucky when one of her Mark 48s, along with strafing scouts, manages to hit the HMS Sheffield astern, crippling the ship with a detonation right in her engines and reactors. The main Marine Corps aerospace strike, meanwhile, along with point-blank broadsides of the USS Princeton and Valley Forge, manage to cripple the HMS Agamemnon. British fighters and bombers, meanwhile (Supermarine Starfires and Nebula Star Typhoons) try to set up a launch against the Americans, venture a shade too close and before she is crippled, the USS Shiloh’s long-ranged 40mm mass drivers knock down most of the British bombers. Although diluted, the British torpedo and missile strike still manages to cripple the USS Princeton with hits astern in her reactors and engineering sections.
 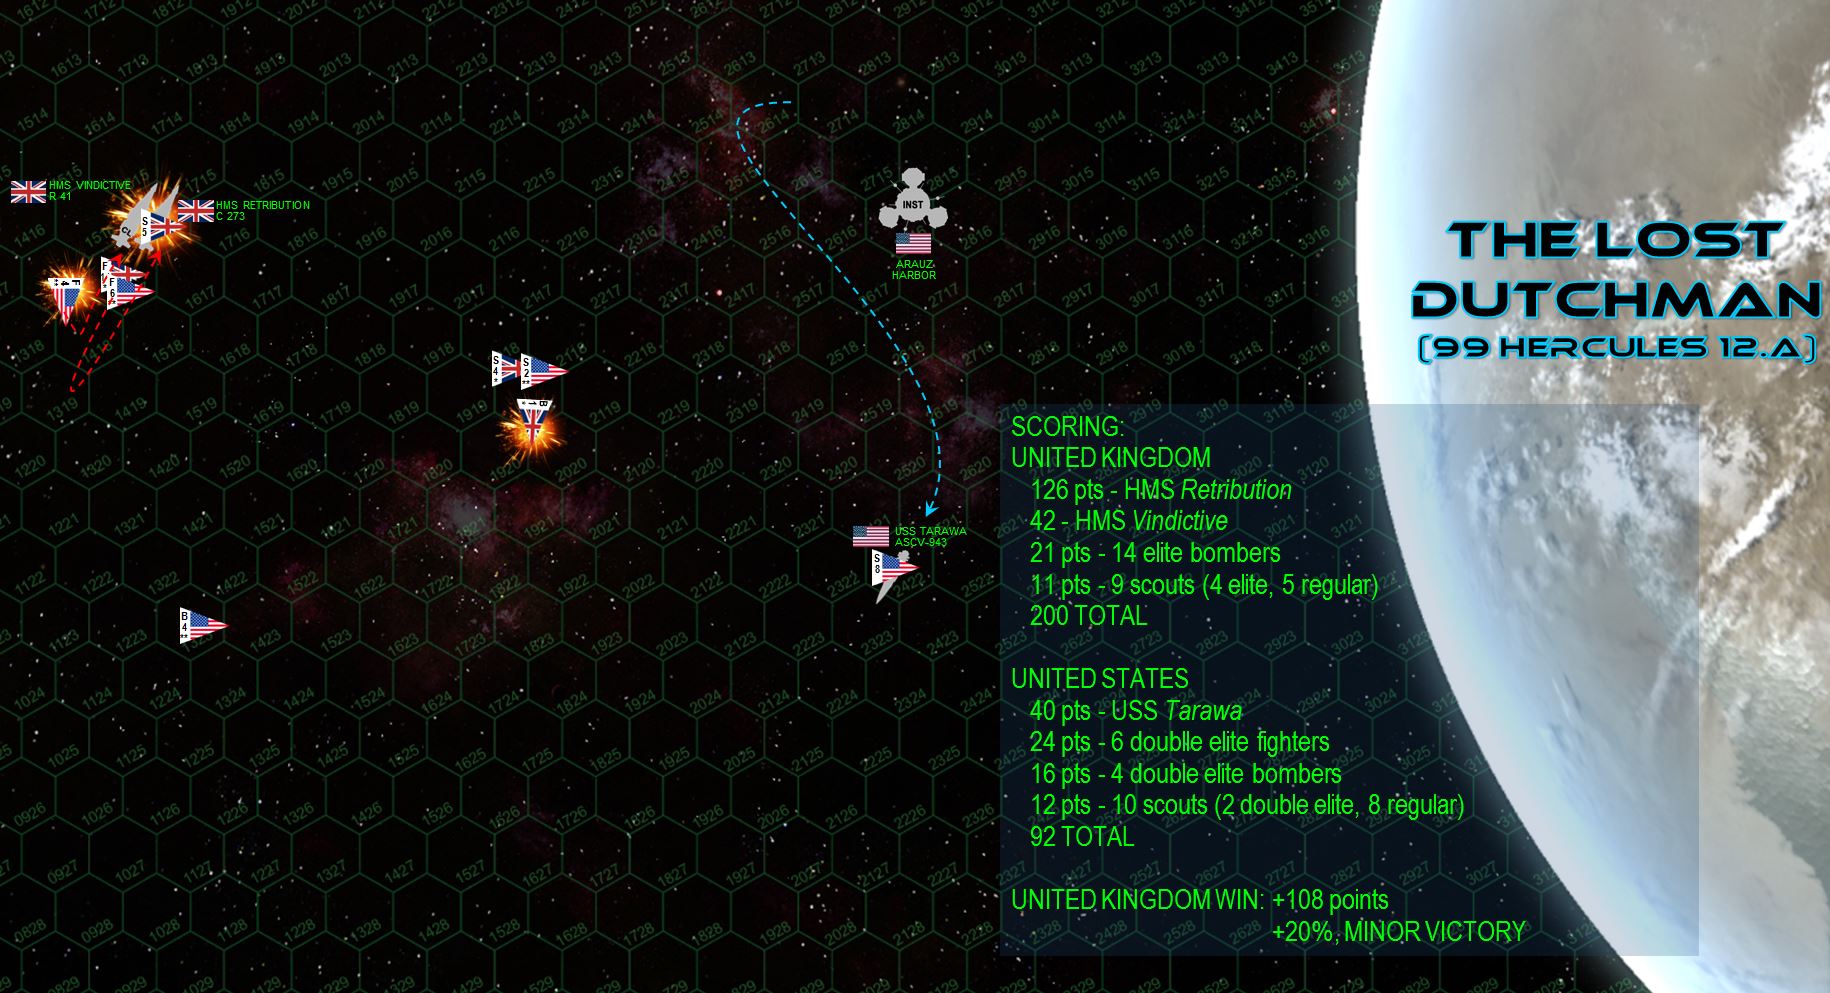 Turn 7, and like we saw against the Japanese at Shindo 919, by the end of the game the Americans are desperate to steal back a draw, and like we saw at Shindo 919, they come up short. Successive Marine Corps strafing attacks have been chewing away at the stern of the HMS Retribution. The Valley Forge has also put a broadside into her stern, but Retribution’s deadly-accurate guns have crippled her. The USS Oriskany has been forced to break off. USS Tarawa, unarmed except point-defense mass drivers and torpedoes, keeps slinging in Mark 48s until she actually runs out. The bombers land, are re-armed, and re-launch for a second strike which, combined with the suicidal courage of the Marine Tigersharks (flying F/S-44 Star Corsairs) and the Tarawa’s very last torpedoes JUST MISS crippling the HMS Retribution (I rolled a 3, I needed 1 4) – even as the last British bombers are shot down by American “Hawkeye” scouts. But it doesn’t matter. The British still have too much firepower in orbit over The Lost Dutchman, including HMS Retribution a larger carrier than HMS Tarawa, and MANY more surviving fighters. It’s a narrow, bloody win, but a clear outcome nonetheless. The British have re-taken The Lost Dutchman, and the Americans have lost their foothold in the UN “Redemption” Mandate (99 Hercules).
 FROM: UNITED NATIONS REGIONAL COLONIAL CENTER
23:40 SOL GMT, 18 NOVEMBER 2521
BREAKAUTH: 181072.18J
CLEARANCE: SECRET (NATIONAL)
ROYAL NAVY ASSAULT ON KAYASHENKO 12 (Redemption / 99 Hercules)
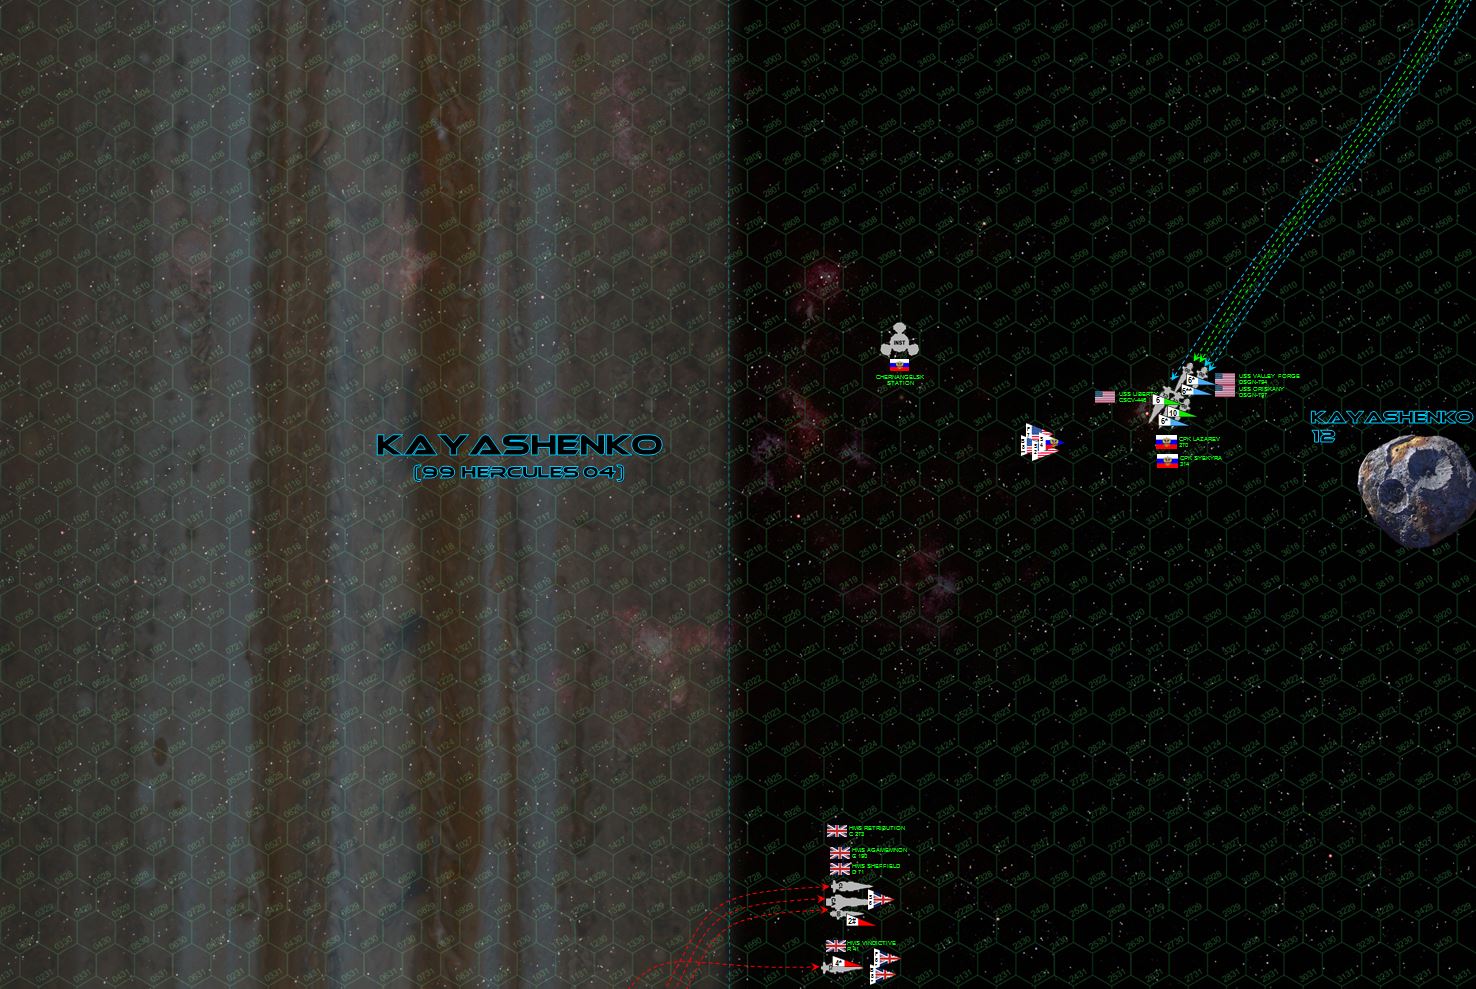
With the Americans for the most part limping back to Port Halsey, the Russians stand more or less alone in the UN “Redemption” Mandate (99 Hercules). Accordingly, Lord Commodore Edward Cavendish (commander, Task Force Agamemnon) is determined to maintain the momentum of Operation “Rodney.” His warships are thus patched together at the nearby Zubrin gas giant in record time (in the same 99 Hercules star system) and within three weeks, he’s sortied against his next target, the Russian Kayashenko gas giant.
If Cavendish can repeat his last win, he’ll have knocked the Royal Navy’s two biggest enemies clean out of the UN Redemption Mandate, marking the first clear territorial win for Great Britain in the Third Hercules War.
Yet however brief his pause has been to repair ships like HMS Agamemnon, Retribution, and Sheffield, that same time has allowed the Americans to repair some of their smaller ships as well. While there’s no way they can repair USS Shiloh in time, the USS Oriskany and Valley Forge have been repaired (the Princeton is also unable to make it in time). The Americans also send in their FTL-enhanced light fleet carrier, the legendary USS Liberty (Captain Zachary Irons). The Coalition of Eagles can only hope that these slender reinforcements, combined with the Russian Light cruiser CPK Lazarev and destroyer Syekyra might be just enough to stop Cavendish’s follow-through to his “Rodney” offensive.
The two fleets meet at Kayashenko 12, a captured asteroid in a freakishly close, rapidly-decaying orbit around the gigantic bulk of the Kayashenko gas giant. As fate would have it, this battle is not only the largest yet seen in the Third Hercules War, but even beyond its tremendous battlespace impact, will also prove to have fateful and controversial political impact across over fifty light-years of space, changing the shape of the conflict going forward.
UNITED KINGDOM: @Damon
RUSSIA / UNITED STATES: @Oriskany
ASSAULT VICTORY CONDITIONS (527 points)
 No need for a “theater map” on this one, it is taking place in the same 99 Hercules system as the battle immediately prior. We see the British task force moving up slowly from actually WITHIN the gas giant’s upper most cloud layers, keeping as slow a speed as Lord Cavendish dares (he can’t go too slow of if any of his ships are crippled, they won’t have escape velocity to leave the table - gravity rules are MUCH more harsh on gas giant tables). The Americans and especially Russians, meanwhile, are setting a VERY high speed well over 40 kilometers a second, more or less dive-bombing straight into the planet’s gravity well. This seems insane, but the Coalition ships are actually much more agile and maneuverable than the British task force. The American commander (Irons) wants to launch that decisive aerospace strike as soon as possible and he’ll need the help of slow Russian torpedoes to do it, while the Russian commander (Captain Pyotr Fedorovich Myshaga) wants to put his plasma accelerators, EPCs, and rail guns across a British stern five minutes ago. Note the how the Russo-American trajectory is affected by the planet’s gravity
  And here it is, the movement phase that doomed the Americans in the Third Hercules War and damned near KILLED two of the game’s most famous ships. The British have moved first (lost initiative), jack-knifing back and ducking back into the clouds of Kayashenko. The decision is a chancy one, braving the gravity and lightning to keep the range open on the Coalition warships and hit them with a broadside as they race forward. Although previously decelerating, the Russians and Americans now RE-accelerate, hoping to close the range with the British as soon as humanly possible. Their speed, however, combined with Kayashenko’s merciless gravity, leave them only one option for a starboard turn if they want to stay in the battle. The destroyer Sykerya doesn’t have to worry about that choice. Already damaged by the British forward batteries last turn, she is smashed open so hard by the second volley (now a complete broadside) that she loses power and careens off the table anyway, crippled and out of control. The Lazarev, Oriskany, and Valley Forge, meanwhile, are in desperate trouble already ... even if they don’t already know it. At least the British aerospace strike largely fails, a single Supermarine Starfire’s missile hits USS Oriskany astern ... but that’s a hit that will be telling later. Meanwhile, all forward Russian and American guns tear into the carrier HMS Valiant, inflicting such damage that Cavendish elects to order her out of the battle area. Note where USS Liberty is, near the top of the pic. THAT’S where the Russians and Americans should have ALL gone, weathering one more British broadside at longer range against their enhanced shielding, all while hammering the British with their far stronger aerospace strike coming up ...
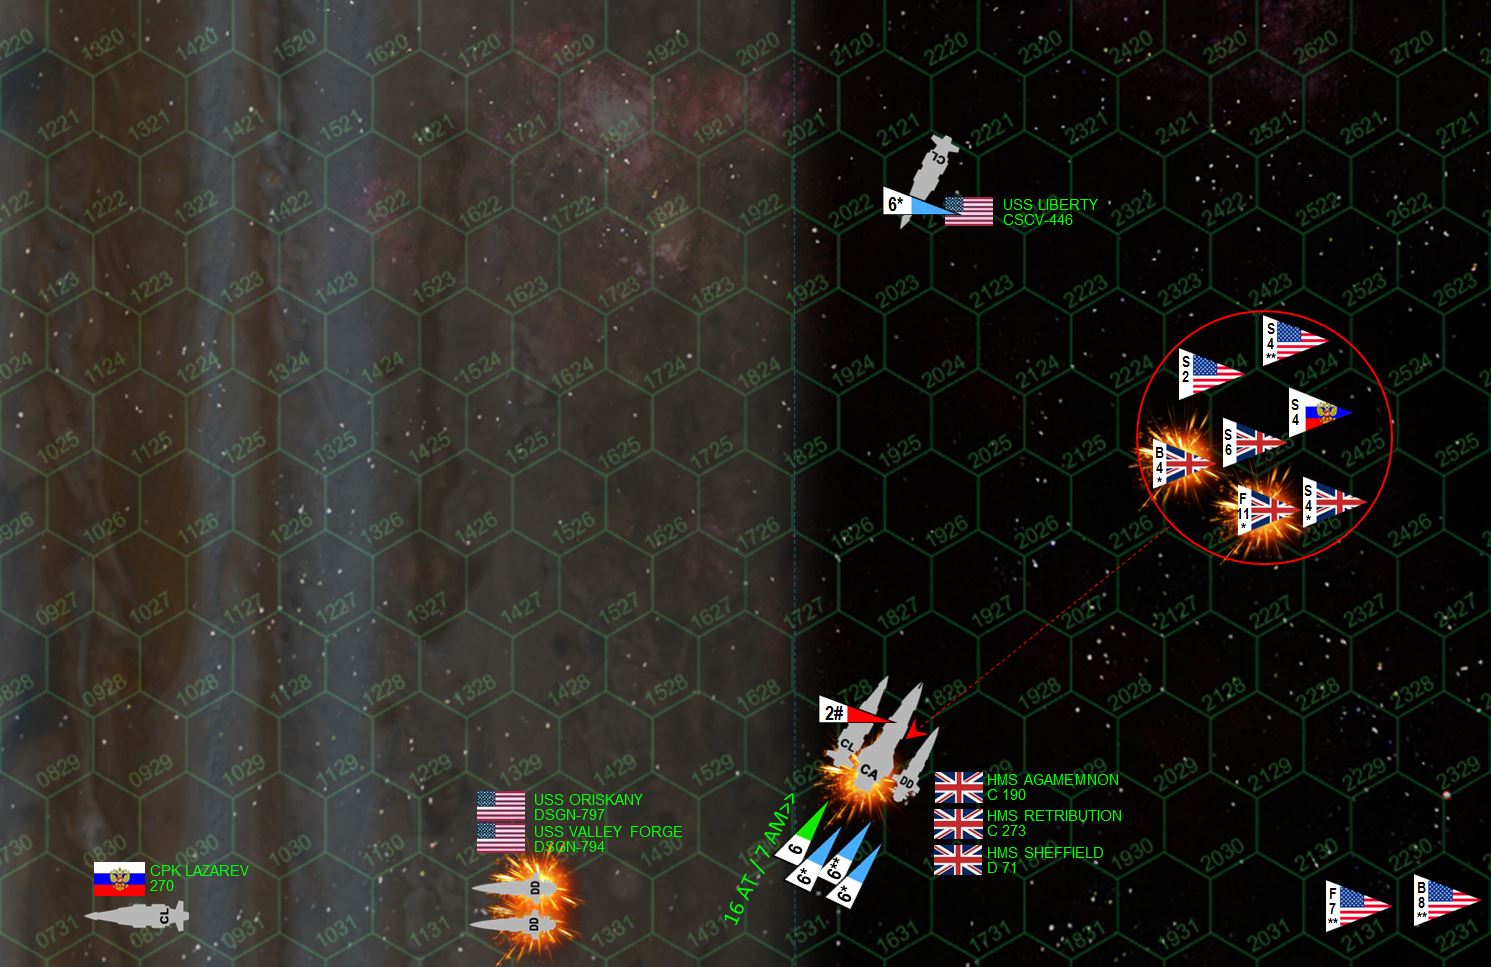 Turn three, and it’s all over but the crying. Even decelerating as much as they can, the Lazarev, Oriskany, and Valley Forge BARELY manage to make a starboard turn and dive head-first into the gas giant’s gravity well, literally at flank speed into the jaws of death. Even much of the speed they managed to shed was regained due to the enhanced gravity rules within a gas giant atmosphere. Meanwhile, the British have powered back OUT of the atmosphere and looped behind the Coalition with a full-scale broadside directly astern ... as the Coalition dives headlong into Kayashenko. THIS ... IS NOT HOW YOU PLAY DARKSTAR. I of all people should know not to do this. By losing patience and setting too high a speed, I have made my position nakedly predictable, so all the points I spent in speed and initiative bonuses are for naught, Damon lost initiative and was still able to easily put himself in perfect position. The Agamemnon fires into the stern of the Oriskany and Valley Forge, doing tremendous damage against both ships’ engines and reactors. Note: if they lose power HERE, they are DEAD. Commander’s Luck, nothing saves you from being pulled down to the crushing incineration thousands of kilometers deep in a gas giant’s blistering ocean of hyper-pressurized liquid hydrogen. The American aerospace strike slams into the stern of the Agamemnon, crippling her, but her far wiser commander has her on a trajectory and velocity where she will drift off the table and be rescued after the battle. The Retribution and Sheffield now fire as well . . . The Oriskany winds up taking 5 boxes of “critical” damage. Destroyers are crippled on a d6 roll of 7+, from which you subtract the number of crits. She’s now at a 2+ to die. At the end of the turn, I get to roll 2d6 to repair internal damage (Resolute Crew upgrade). I get lucky and score two successes, so I repair two critical engine boxes and now Oriskany is at 7-3=4+ to die. I ask Damon of he’s willing to let me out of this roll if I break off the Oriskany and Valley Forge (in an assault game, this gives him the same number of victory points, I just get to keep my favorite ship for future games). Damon agrees, but only if the Americans break off ENTIRELY and also sign a peace treaty with the British. Desperate not to lose the “Lady O” forever, I reluctantly agree. Unfortunately for me, we roll the dice anyway just to see what would happen and Damon rolls a “1” – Oriskany would have survived anyway.
 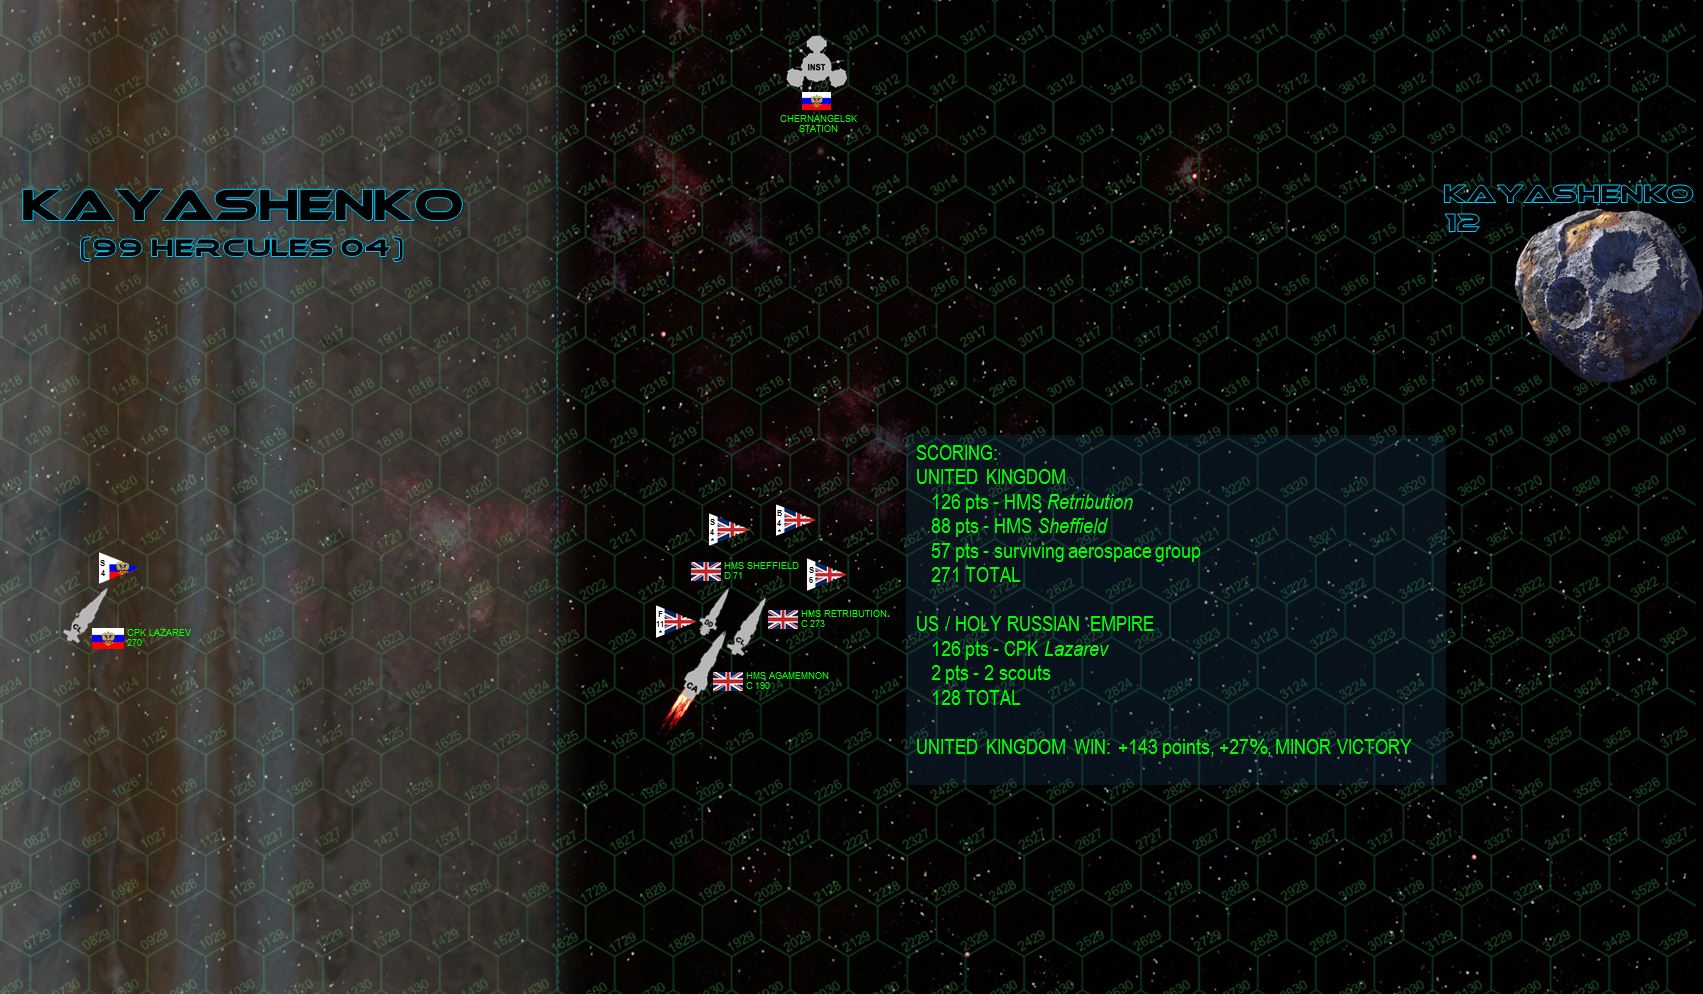 Well, that was a f***ed game, mostly through my own stupidity. The Americans honor their word, pulling out of the battle entirely. Leaving CPK Lazarev on her own. With Retribution and Sheffield still operational, the British thus score a minor victory. The Russians have lost their holdings in Kayashenko and the UN Redemption Mandate. Interestingly, the crippled CPK Syekyra misses her post-battle recovery check, her Commander’s Luck point, and Lazarev’s commander’s luck point as well. It takes one of Oriskany’s luck points to save her from the decaying orbit, meaning the “Lady O,” as bad off as she was, took the Russian destroyer under tow and saved her from oblivion. At least she managed to do SOMETHING right.
So where does this leave the Americans, the British, and the Third Hercules War in general? Well, it’s complicated.
First up, the US and UK sign the Treaty of Zubrin, with the stipulations below:
- The Americans agree to cease any and all combat operations against the United Kingdom throughout the Hercules Rim.
- The Americans agree to a “mutual assistance” clause if British holdings in Hawking’s Star, Outer Hebrides, or Redemption (99 Hercules) are attacked.
- Yes, this includes if the Holy Russian Empire, Republic of India, or Corporate Consortium attacks these holdings. The Americans will be obligated by treaty to help defend British possessions against their former “allies.”
- The British agree to grant the Americans a 50-year lease on the Lost Dutchman, a British outer ring planet in 99 Hercules. This allows the Americans to save no small degree of face, “winning” the shipping route through the Hercules Rim which was their casus belli in the first place.
- The price of this lease is very high, the “overcharge” is quietly recognized as war reparations for damage done to British facilities in Outer Hebrides and Hawking’s Star.
- The Americans agree to pay tariffs (very, very steep tariffs) for shipping through Lost Dutchman / 99 Hercules.
- At the end of that 50-year lease, the British retain the right to reclaim operation of the Lost Dutchman, complete with improvements / facilities the Americans made in that time.
- American war conditions with the Japanese and Arab League remain in effect, neither Japan or the Arab League were a party to these concessions and they are not happy with the outcome of this “separate peace.”
- Americans are not allowed to cooperate with the Russians, Indians, or Consortium against the British in any way.
- In fact, Americans may well wind up fighting AGAINST the Russians, Indians, or Consortium if they attack a British star system.
In game terms, the Americans are AT PEACE with the British and their “campaign threshold” is reduced from a 10 to a 5. In a weird way, they are almost neutral, fighting on both sides of this war although only in a limited fashion. Along the coreward shoulder of the Hercules Rim, they remain at war with the Japanese and Arab League. Along the spinward shoulder, they will probably wind up fighting on the side of the British if anyone attacks a recognized British possession.
Those five American missing campaign commitment points will be taken up by a new faction joining the Coalition of Eagles (although only at a campaign commitment level of “5”).
This new faction is … from their Catania colonies in the Gliese 623 binary red dwarf star system … the NEW ROMAN ALLIANCE (primarily Italians, Spanish, and French).
This is all pretty confusing, but the chart below has been updated to show the complete updated geopolitical situation along the Hercules Rim going forward into 2522. Let me know in the comments if you have any questions.
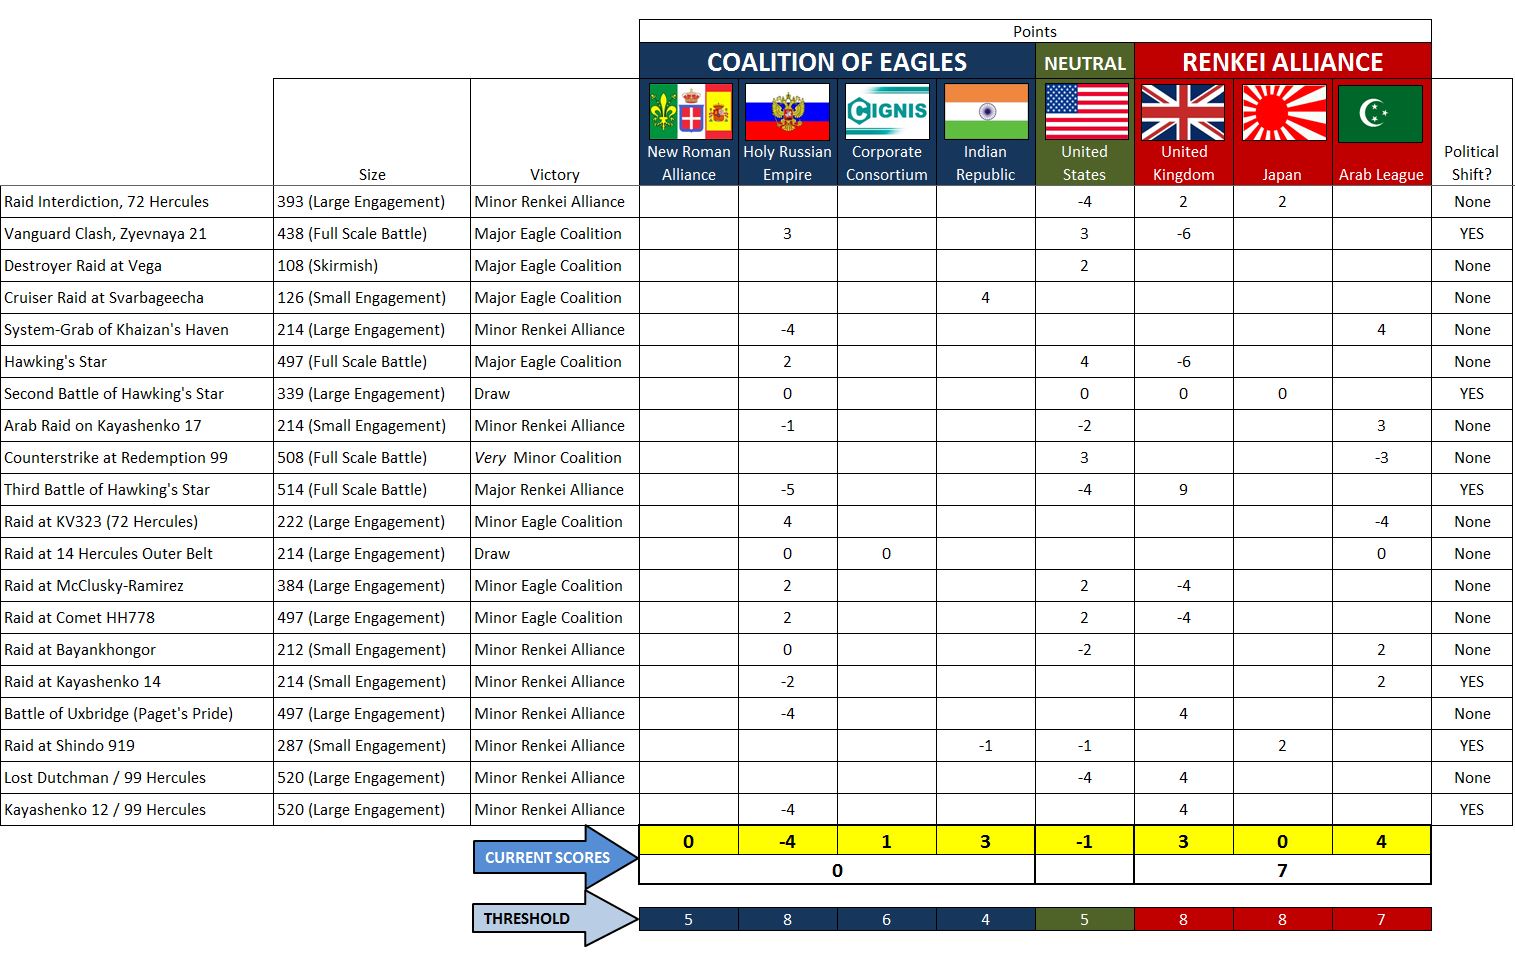 Note some other nations’ “Commitment Threshold” numbers have been slightly tweaked so both coalitions remain at 23. This is the number, positive or negative, that a nation reaches before leaving the war either as winners or losers. The YELLOW number is their actual score at present, and shows how close to their political commitment threshold that faction actually is. So the New Roman Alliance is brand new to the war (score 0), but their archbishops aren’t THAT keen on a bloodbath, they will leave the war when their score hits +/-5. The Russians are more committed with an 8, but they’re already at -4 with a string of recent defeats. So one more solid loss and they might cut a deal as well. The British, having won against the Americans, have reduced their “hawkish” war commitment from an 10 to an 8, but they’re at +3 after recent victories, so five more points of victory gives them a complete win for Hercules Rim. The Japanese are also “cooled down” from a 10 to an 8, probably because they no longer 100% trust their British allies. Closest to an outright win are the Arab League, just three points shy.
 Two Catch-up Battle Reports - Kayashenko 14 and Shindo 919
Okay, everyone. I have a lot of catching up to do here to bring the Third Hercules War Community Campaign up to date.
A lot has happened since the last battle report, and these battle reports frankly take too long to do, so I’ll be quickly buzzing through four missing games / battles here to complete the recent campaign timeline.
I’m only doing this now because, as you’ll see, the combined effects of these battles have triggered some major shifts in the Third Hercules War, shifts which directly impact the national strategic standing of several player factions. These players need to know exactly what’s happening in the Third Hercules War.
So first I have a battle between the Russians and the Arab League in August, 2521 (Darkstar Web Game 42). This actually took place BEFORE the most recently posted battle report (Darkstar Web Game 43 – Holy Russian Empire v. Royal Navy at Uxbridge, Outer Hebrides / Mu Hercules system). Once that is presented, we’ll skip past Uxbridge and move to Game 44, US Navy and India against the Japanese at Shindo 919.
There will be more to come after this. When I am fully caught up we’ll see where we stand, what factions are still in, what factions are out, what separate peace treaties have been signed, and whether Third Hercules War is in fact continuing.
But for now . . .
>>>>>>>>>>>>>>>>>>>>>>>>>>>>>
FROM: UNITED NATIONS REGIONAL COLONIAL CENTER
21:55 SOL GMT, 21 AUGUST 2521
BREAKAUTH: 181072.18J
CLEARANCE: SECRET (NATIONAL)
RUSSIAN COUNTER-RAID ON KAYASHENKO 14 (99 Hercules)
Yet again, the Americans and Russians seem to be checked against the British in the Outer Hebrides (Mu Hercules) system. Despite recent American victories at the McClusky-Ramirez gas giant (Alpha Lyra system) and the HH779 comet in the Outer Hebrides, a bloody British victory against the “Three Princesses” cruiser squadron has frustrated Russian plans to cash in on American momentum in the spinward shoulder of the Hercules Rim. Not only has this allowed the British to yet again step back from the brink of defeat in the Third Hercules War, but also further strained relations between the American and Russian “allies” of the Coalition of Eagles.
Perhaps to show the Americans something of a cold shoulder, the Russians have resolved to “redress their own problems” rather than “help win the Yankees’ war” against the British in the Outer Hebrides. Withdrawing from the spinward sector of the Hercules Rim, they instead launch a strike against the Arab League foothold recently gained among the moons of the Russians’ own Kayashenko gas giant. The largest planet in the “Redemption” UN Mandate in the 99 Hercules system, Kayashenko has at least 60 charted moons, and an Arab League battlegroup lurking among them simply won’t do.
Indeed, several Russian admirals have already contacted friends, both in Krasnaya Nadhezda (Red Hope, 72 Hercules) and Imperial Naval Command in St. Petersburg, demanding to know why Russian cruisers are hammering themselves to ruin to gain an American victory at the Outer Hebrides when an enemy power in fact after has a foothold in Russian space among the moons of Kayashenko.
As for the Arab League, the al-Mutamid battlegroup has hardly paid for their foothold at Kayashenko 14 to give it up to a Russian cruiser raid. While their fleet lacks the strength to mount a “stand or die” defense of the frozen little moon, Captain Rashid al-Magrebi’s orders are to damage the incoming Russian force as badly as possible, mounting a counterstrike to ensure their sortie against Kayashenko 14 does not become a permanent reoccupation.
HOLY RUSSIAN EMPIRE: @Oriskany
ARAB LEAGUE: @Muakhah
RAID VICTORY CONDITIONS (214 points)
 The Russians are tired of being bogged down in the grinding (and ultimately fruitless) battles against the British in spinward systems like Mu Hercules and HR6806. With Arab League battlegroups roving in their own coreward backyard, and having outright taken a moon of their Kayashenko gas giant in the 99 Hercules system, the Russians have resolved to get their own affairs sorted, and eject the League from Kayashenko 14.
 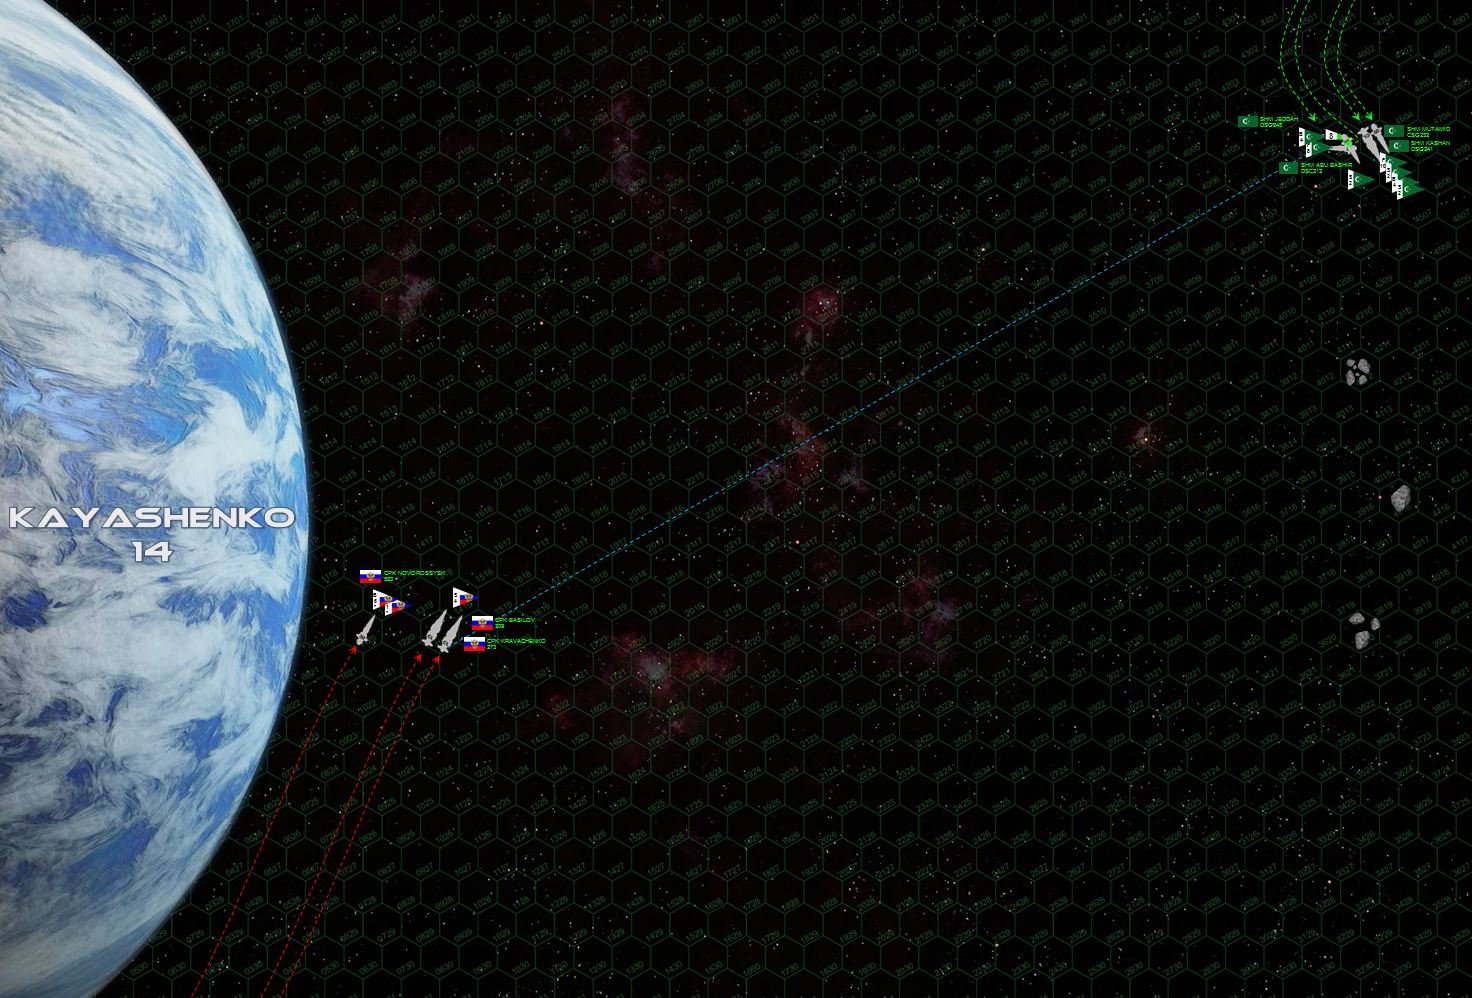 Right off the bat, the Russians set a very high approach speed, trying to set up a mass salvo of their P-500 torpedoes, combined with an aerospace strike of Mikoyan-Guyevich MiG-103 “Tunguska” fighters and Tupolev Tu-97 “Zvesburya” (Star Storm) bombers. The League, for their part, keeps their distance, hoping to make the best of their more accurate gunnery, faster and longer-ranged torpedoes, and cover of that planetary rubble field beneath them for protection from Russian massed torpedoes, rail guns, and plasma projectors.
  The range closes to just over 3200 kilometers. The League battlegroup has launched its combined aerospace wing (Mutamid is a “hybrid” carrier / light cruiser and Abu Bashir is a full-on light carrier). The Russians have also launched, their smaller wing having an edge in experience, and forming up with a phalanx of P-500 “Plamya” (Flame) torpedoes.
 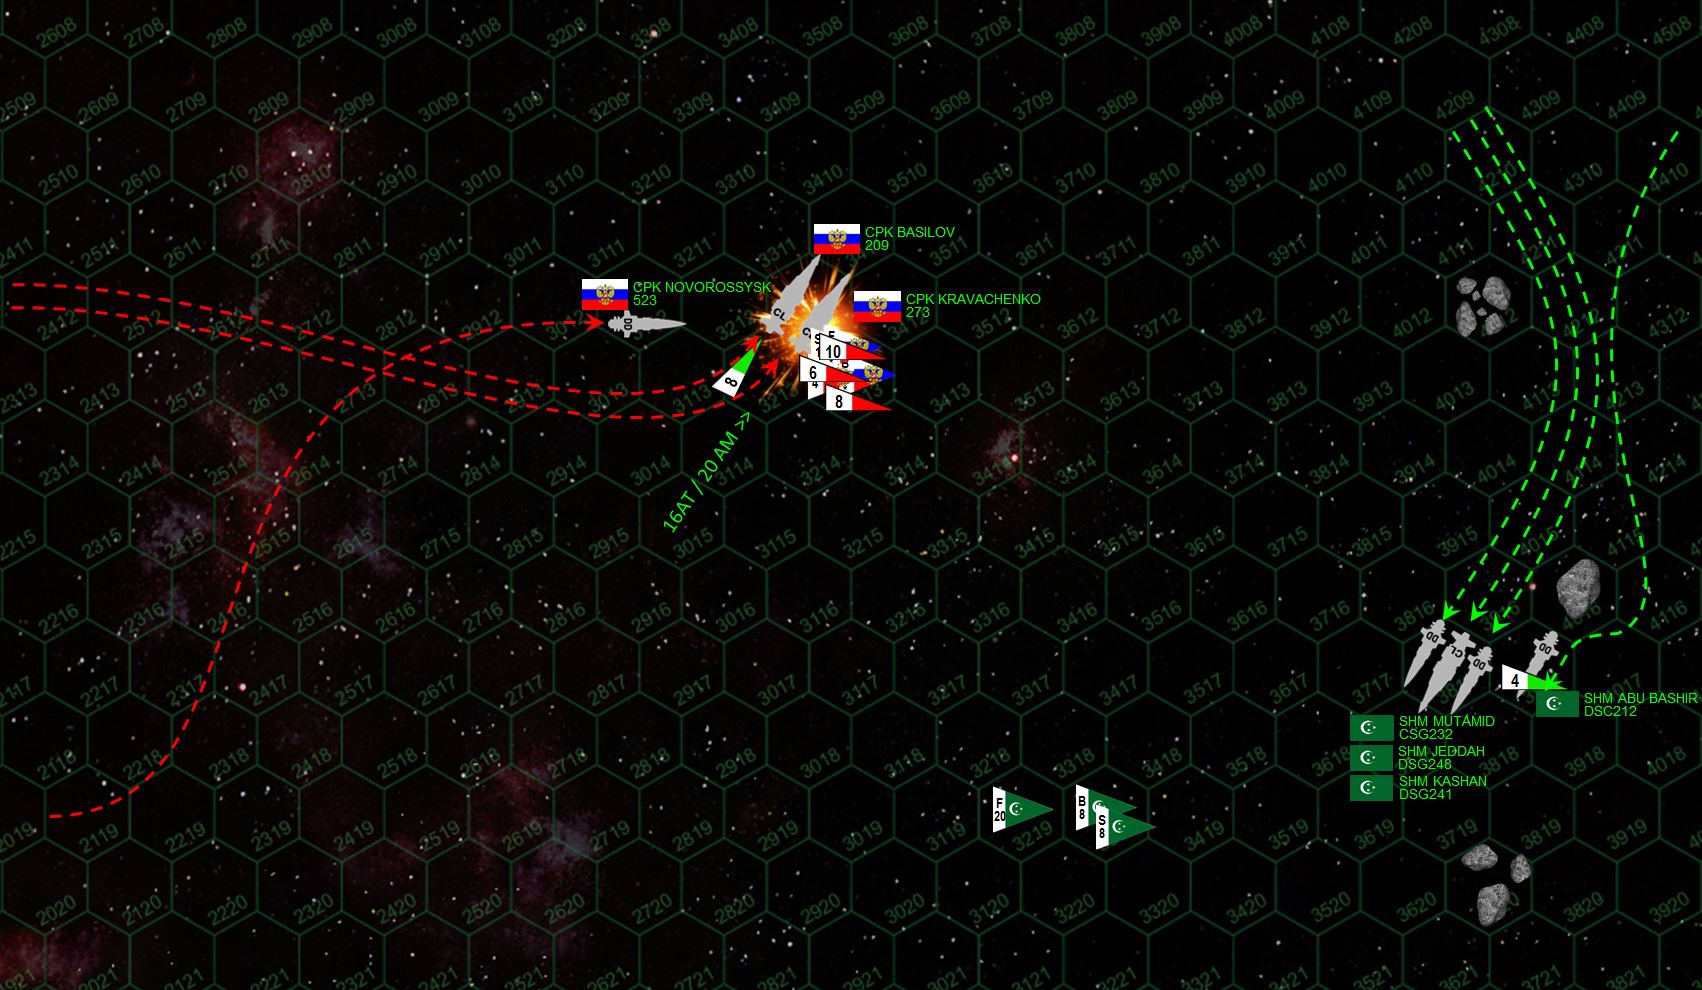 Caution starts to pay off for Captain al-Magrebi. His ships are now snaking dangerous courses amongst the asteroids and planetary mining rubble, using them as partial cover against Russian EPCs and rail guns off the light cruisers Kravachenko and St. Basilov (an old Konstantin class). Their own return fire, meanwhile, inflicts heavy damage against the Kravachenko. Al-Magrebi’s aerospace strategy also pays off when his aerospace strike lands first, the slower Russian strike outranged ... at least for now. But any Russian whip that loses power here will also have its torpedoes “go dark,” thus thinning out that wave of P-500s before it can hit next turn. This is what happens to the Kravachenko, the Kutusov-class light cruiser losing power as Arab League “Demkikham” (Vengeance) bombers and “Mylekinir” (Fire Angel) fighters put enough torpedoes and missiles into her stern to explode her portside engine and power down her starboard engines. The CPK Kravechenko is blown out of the battle, but al-Magrebi is still in real danger of a collision if he’s not deathly careful.
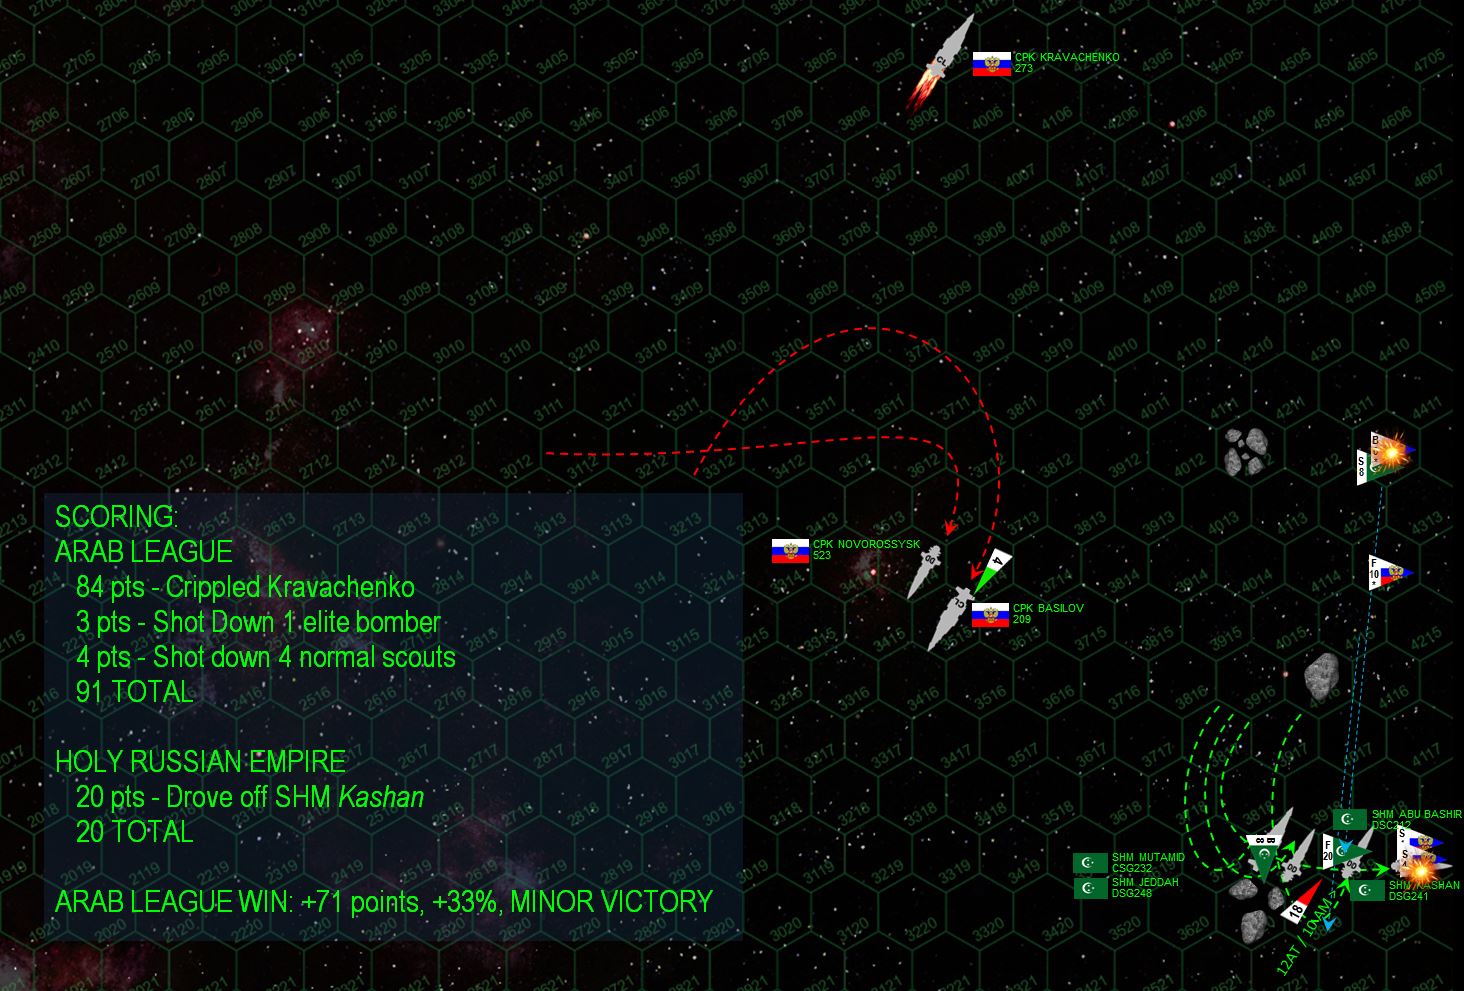 The final result. With the Kravachenko crippled, the Russian aerospace and torpedo strike is badly weakened. Al-Magrebi has also made expert use of those asteroids to shield the engines of some of his ships from Russian ordinance, forcing them to attack port and starboard quarters instead. As it stands, only one of the League Basra-class destroyers is forced to break off (not even crippled) – leaving the League with a clear win here at Kayashenko 14. The League’s foothold around this Russian gas giant is thus secure ... for now. IN fact this was damned near a MAJOR League victory (double campaign points if a battle is won by a margin of 40% or more, Muakhah scored +33%. Needless to say, the Russians have suffered another bloody nose in the Third Hercules War. For his part, Captain Rashid al-Magrebi has fought a careful, measured, and patient battle, and comes damned close to a MAJOR victory for his caliphate. “Major” victories are actually quite rare in Darkstar, I wouldn’t be surprised if al-Magrebi is decorated for this success, or at least vindicated for earlier frustrations.
FROM: UNITED NATIONS REGIONAL COLONIAL CENTER
16:30 SOL GMT, 05 OCTOBER 2521
BREAKAUTH: 181072.18J
CLEARANCE: SECRET (NATIONAL)
US / INDIA RAID ON SHINDO 919 (Kyokko Bijin / Zeta Hercules)
Frustration among the American commanders at Port Halsey (Virgo / Alpha Lyra system) is running high. Aboard her flagship, the Gettysburg class heavy cruiser USS Shiloh, Rear-Admiral Virginia Saunders knows that the Russian defeat at Uxbridge (Mu Hercules system) has allowed the Royal Navy to regain its balance . . . yet again. “I would say these Brits are cats with nine lives,” she snarks in a rare wardroom press conference. “Except they used more than nine lives some time ago.”
While resources are gathered for a renewed strike against the re-fortified British, the Americans are determined not to let the Renkei Alliance completely regain their footing (or for morale to drop too low among their own crews). While a direct strike against Mu Hercules is off the table for at least 45 days, a smaller raid can be launched against their Japanese allies in the Zeta Hercules system. This is especially true once American admirals and State Department diplomats exert sufficient pressure on their Indian Republic allies to step up their involvement in the war.
First to arrive is the Maharina class heavy cruiser INS Basukhalji. Once Rear-Admiral Saunders has this ship at her disposal, orders for the Zeta Hercules strike are immediate. Escorted by the USS Princeton and the Marine Corps strike carrier USS Tarawa, this combined battlegroup will smash into the Japanese Kyokko Bijin (Sunrise Beauty) colony at Zeta Hercules. If nothing else, renewed Indian participation in this war will demonstrate fortified unity among the faltering Coalition of Eagles, keep the Japanese from reinforcing the British at Outer Hebrides, and warn the Russians to step back in line with the “Stars and Stripes” winning a victory along the coreward sector of the Hercules Rim.
As for the Japanese, Captain Seizo Yamamoto’s Kama task force detects the incoming strike with plenty of time to deploy against it. The Basukhalji is hardly a petite lady, and the magnitude of the Darkstar wave required for a “fast” 20-light-year jump is hard to miss. Also note that the trajectory of this jump between Port Halsey and Kyokko Bijin takes the Indo-American force right past the British holdings at Mu Hercules. A Griffon-class patrol boat is dispatched in a 12th-magnitutde wave to arrive at Zeta Hercules a full 39 hours ahead of the Indo-American force, providing Yamamoto with still more warning.
Accordingly, the Japanese are able to meet the enemy far out along Kyokko Bijin’s outer debris (Kuiper) belt, the two forces colliding near a desolate proto-comet known only as Shindo 919.
JAPAN: @Rasmus
INDIA / UNITED STATES: @Oriskany
RAID VICTORY CONDITIONS (287 points)
 This map is actually a little off, what SHOULD be portrayed is an Indo-American strike zooming out of Port Halsey in the Alpha Lyra (Vega) system. Note how it has to pass RIGHT BY the British at Outer Hebrides (Mu Hercules). Yes, “right by” is a relative term here, remember the SCALE of this map. But superluminal gravimetric (Darkstar) waves of a passing heavy cruiser are enough to set off sensors, and the British can get a fast courier ship to Zeta Hercules with the warning BEFORE the Indians and Americans arrive.
 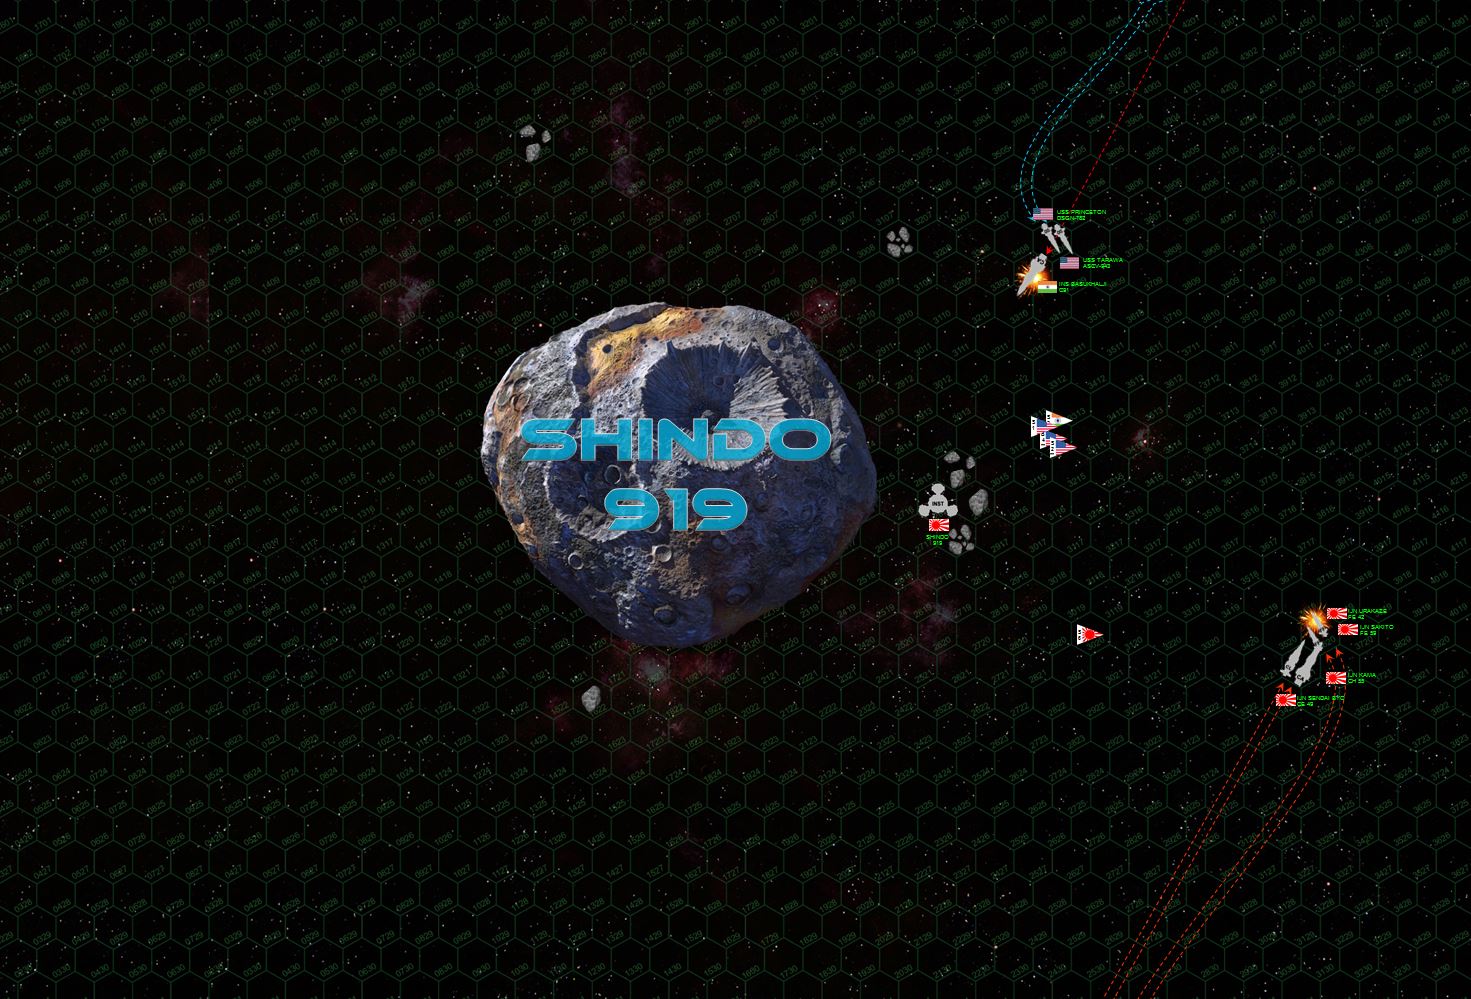 Here are in the frigid abyss of the Zeta Hercules outer debris (“Kuiper”) belt. The Japanese are mounting a fast but oblique approach. The Americans are happy to oblige, the Tarawa and Princeton easily winning initiative and pointing their bows at the Japanese ships at an angle to allow ALL their torpedoes to come to bear and staying out of the Kama’s withering broadside (nine enormous 18-teravolt electron particle cannons, or EPCs). The Basukhalji threads a dangerous course between the primary bulk of Shindo 919 and some of its orbiting asteroids, hoping to work around to a broadside on the Kama’s stern or port quarter in future turns. For now the Basukhalji takes the worst of Kama’s wrath, while the Indo-Americans try to take the strike frigate IJN Sakito out of the battle for an early advantage.
 The Japanese abruptly break formation, their two strike frigates (Sakito and Urakaze) charging straight at the Americans and Indians while Sendai Byo and Kama sidestep to starboard to keep an open broadside range. The Basukhalji trades broadsides with the Kama, actually mauling her port bow very badly, while the Princeton again hammers the hapless Sakito. Perhaps one mistake the Americans make here is concentrating their torpedo and aerospace strike (Marine Corps strike squadron VMF/A-319 - the “Tigersharks”) against the Sendai Byo.
 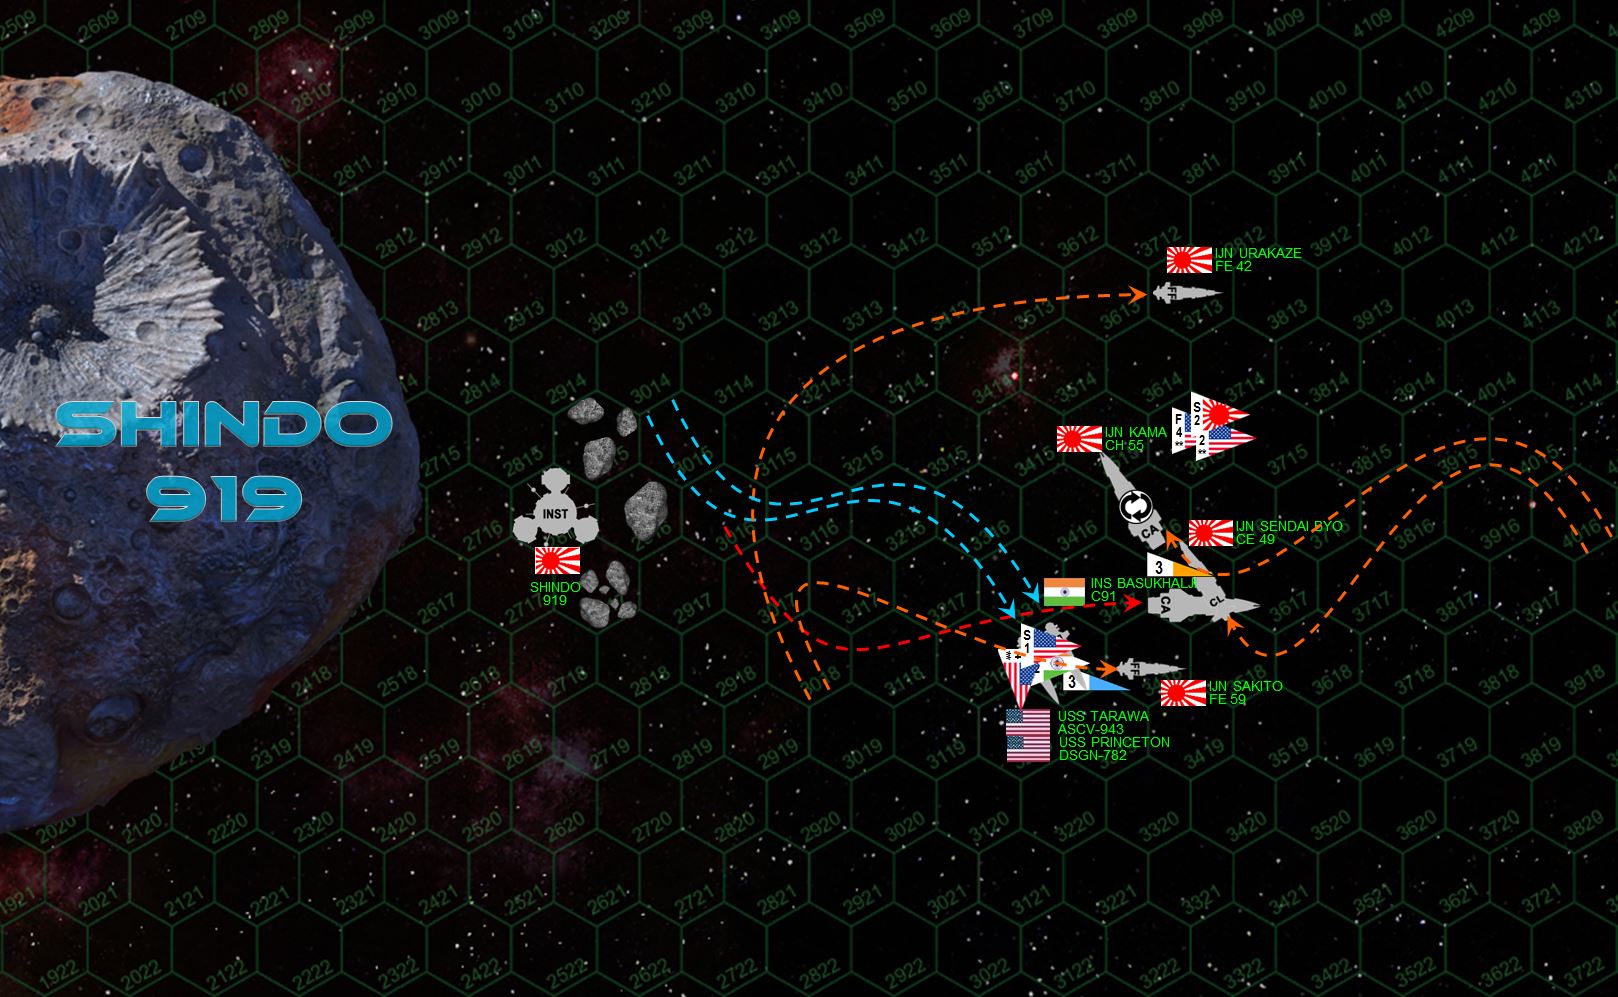 Turn three, and the Skirmish at Shindo 919 turns into a brawling dogfight. Kama rumbles up, rolling on her back to protect her ravaged port bow. The Basukhalji sees the move coming, and cuts point-blank for a broadside across her stern. Unfortunately, the swift Sendai Byo likewise cuts for a broadside right into the Basukhalji’s damaged port bow (in the same hex, less than 100 kilometers away). Kama’s forward guns hammer the USS Tarawa, which has just landed Marine bombers to rearm for a second strike. Kama’s aft guns tear into Basukhalji’s port quarter. Basukhalji’s broadside erupts into Kama’s stern, detonating at least one engine and forcing the engineer to power down portside reactors, but with starboard reactors she manages to maintain power. Unfortunately for the Basukhalji, the Sendai Byo puts her own broadside into Basukhalji’s port bow, previously mauled from broadside exchanges with the Kama. A slash of x-ray laser carves through the bridge, crippling this ship as well. The Princeton finally manages to cripple the Sakito, while the Marines of VMF/A-319 mount a gunnery strafing attack that soon has the strike frigate Urakaze in trouble as well.
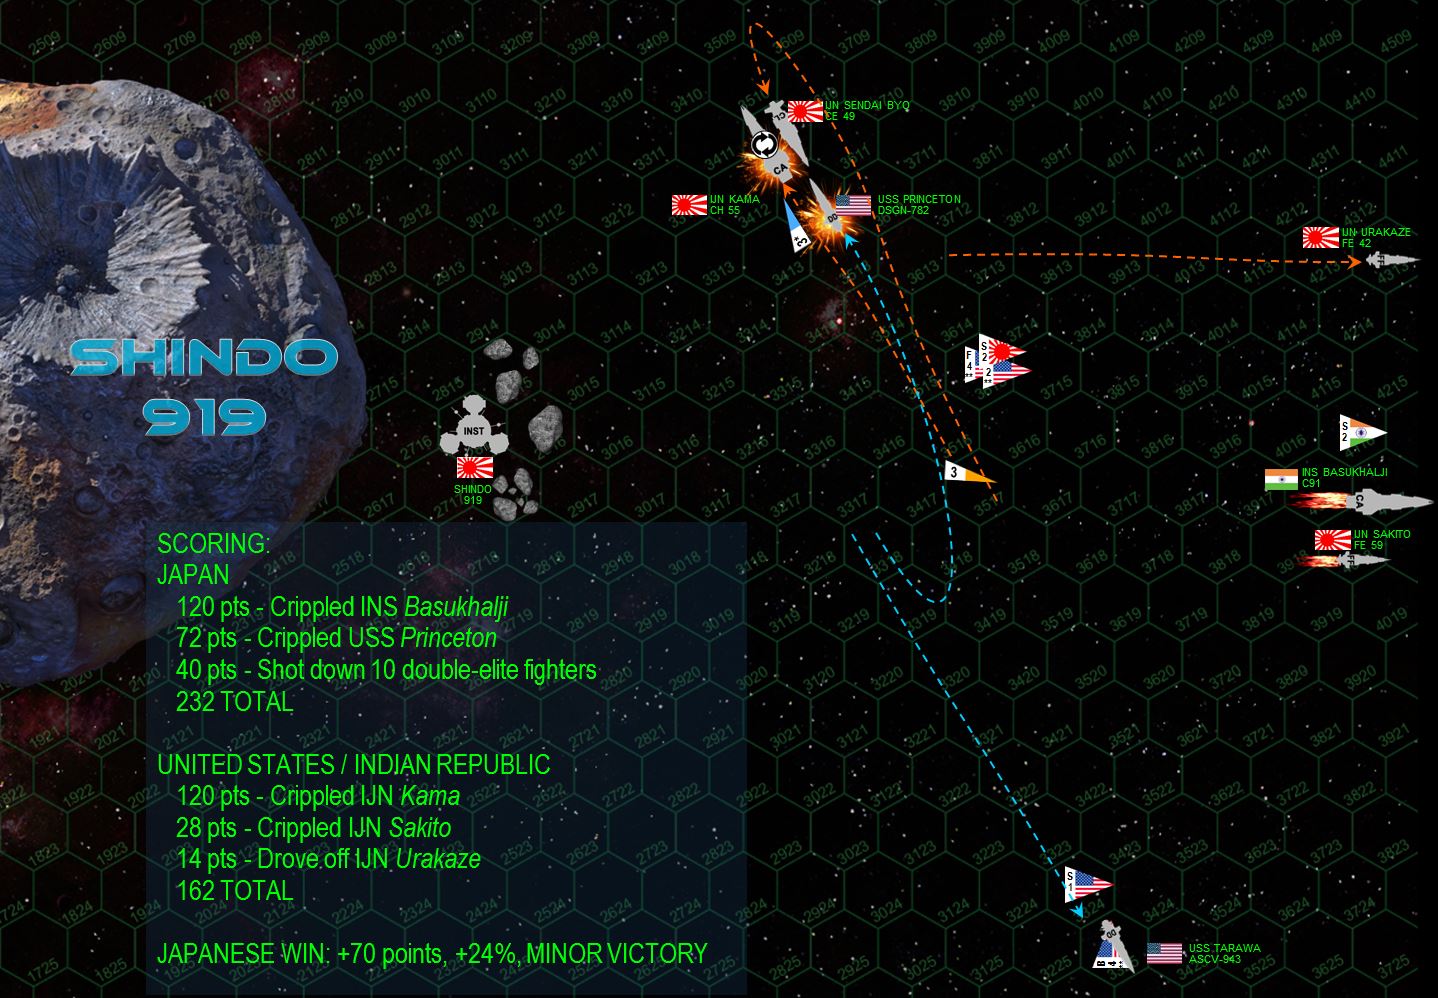 Okay, at the moment, the Americans are losing ... hard. But there is a ray of hope that the USS Princeton can steal back a draw. If she and those Marine fighters can CRIPPLE the Kama (already brutally mauled astern, she’s trailing three kilometers of molten metal and a flaming sheet of escaping atmosphere), AND the Princeton can survive Kama’s return fire, the Americans actually WIN by 2 points (you have to win a Darkstar game by 5%, so this margin is too narrow, it would be called a draw). The Kama maneuvers, the Princeton cuts in behind her. I don’t have the thrust to put a broadside across Kama’s stern at this speed, so I’ll have to do this with forward guns only. American torpedoes are shot down, the fighters go in and do damage, Princeton’s forward guns GET THE JOB DONE, Kama is crippled. Kama’s aft batteries and Sendai’s forward batteries (God, that ship is fast for her size) pound on the Princeton, tearing one laser mount clean out of the hull, setting the forward magazine afire, even damaging the bridge. But the Princeton should still be okay, Rasmus has only hit one critical box of internal structure, so as long as he doesn’t roll a 6 on a d6, Princeton survives and I squeak out a draw. But Rasmus rolls a 6. Now Princeton is crippled as well as the Japanese maintain a minor victory at Shindo 919.
 New Indian Heavy Cruiser, Battleship, Upgraded US Destroyer
There have been some major updates to the Third Hercules War … in fact some parts of it may be over. So I have some serious updates to make here. I’ll be catching up over the next day or so, but for now …
Here are new Indian Republic Navy warships – heavy duty classes they’ve never had before – a battleship and a heavy cruiser. It’s time for them to step up and really start carrying more of their share in this war, and they’ll need the ships to do it.
Valcour Class Destroyer (FRAM-I Upgrade) United States Navy
The Valcour class destroyers of the United States Navy (covered earlier in this reference) entered service in 2498 and were named for small engagements of the American Revolution. Although never remarkable, the class was considered by many naval experts as some of most solid and reliable all-around destroyers in Known Space. The class was also made famous by the exploits of some of its more veteran ships (notably, USS Oriskany), and by the design’s modular construction – making it easy to repair and upgrade – even at modest orbital facilities far from major naval support infrastructure.
In the early 2520s, the US Navy decided to initiate the “FRAM-I” program (Fleet Refit and Modernization, Phase One), starting with the workhorse units of the Valcour class. Again, the design was well-known for its ease of modular replacement, repair, and upgrade, so these ships seemed a natural choice for a stem-to-stern rebuild. If FRAM-I worked with these select warships, the Navy could then decide whether to expand the program to the rest of the fleet.
Four Valcour class destroyers were chosen for this experiment. The first was USS Oriskany, most famous of the class. Veteran of the 19 Draconis, IK Pegasi, Andromeda Arc, Xi Scorpio, Scorpion’s Tail, and Third Hercules Wars, she stood as arguably one of the most celebrated warships in the 26th Century Navy. These upgrades were undertaken from 2521-2522 at Port Halsey in the Vega (Alpha Lyra) system, starting with a complete rebuild of the power plant. New General Electric “StarCore 5600-A” reactors and Todd Shipbuilding “Quasar Mk 21.1” ion drives produce at least 10% more power than the old Mk 16s at the same weight and crew complement. While this might not sound like much of an improvement, because most ship’s systems remain the same (maneuvering, SLD, transluminal drive, life support), it almost doubles the amount of power available to tactical systems.
While hardly a “quantum leap,” the Valcour FRAM-I refit shows undeniable expansion of protection, fire control, and weapons. Electronic countermeasures and gravitic shielding are increased along all aft quarters, providing up to 25% additional protection over engines and reactors at typical engagement ranges. For point-defense, the old 40mm and 20mm chain mass drivers have been replaced with newer, faster-firing 25mm rotary “Bushmaster” mounts. These provide a slight increase in mass driver protection, while actually as a significant savings in mass and power draw.
While the main battery of 5-gigawatt rail guns (three double turrets) remain in place, along with the two triple-tube arrays of the Mark 48 gravitic torpedo, all weapons are guided by the new Hughes / General Dynamics SPQ-1010 sensor suite, providing significant improvement in accuracy of fire control and suppression of enemy electronic warfare.
Perhaps the most noticeable external change is the removal of the 6-megakelvin laser emitters foreward and aft. These have been replaced by new McDonnell-Douglas X-Star 221 gravitic-lensed x-ray emitters. Burning well in to the 75-exohertz frequency range at over 10 gw of power, they can hit like some cruiser-sized guns under the right conditions.
The Oriskany had something of a difficult refit, as she was the first ship to undergo the process and the ship had already been heavily modified and upgraded by her crew. When she finally emerged from pressure dock in early 2522, however, she was probably one of the most formidable single destroyers in Known Space. Quick to follow were her sisterships USS Valcour, Ranger, and Kaskaskia.
Only time will tell whether the FRAM-I experiment is considered a success. Just undertaking the refit has shown to cost the US Navy almost the equivalent of new Shepard class frigate, and combined with the original expense of the ship, a FRAM-I Valcour represents a cost equal to some light cruisers. But after twenty years of service, at least the US Navy is getting twenty more years of service out of these celebrated “tin cans.” If the next twenty years prove as successful as the last, the investment will prove worth every penny.
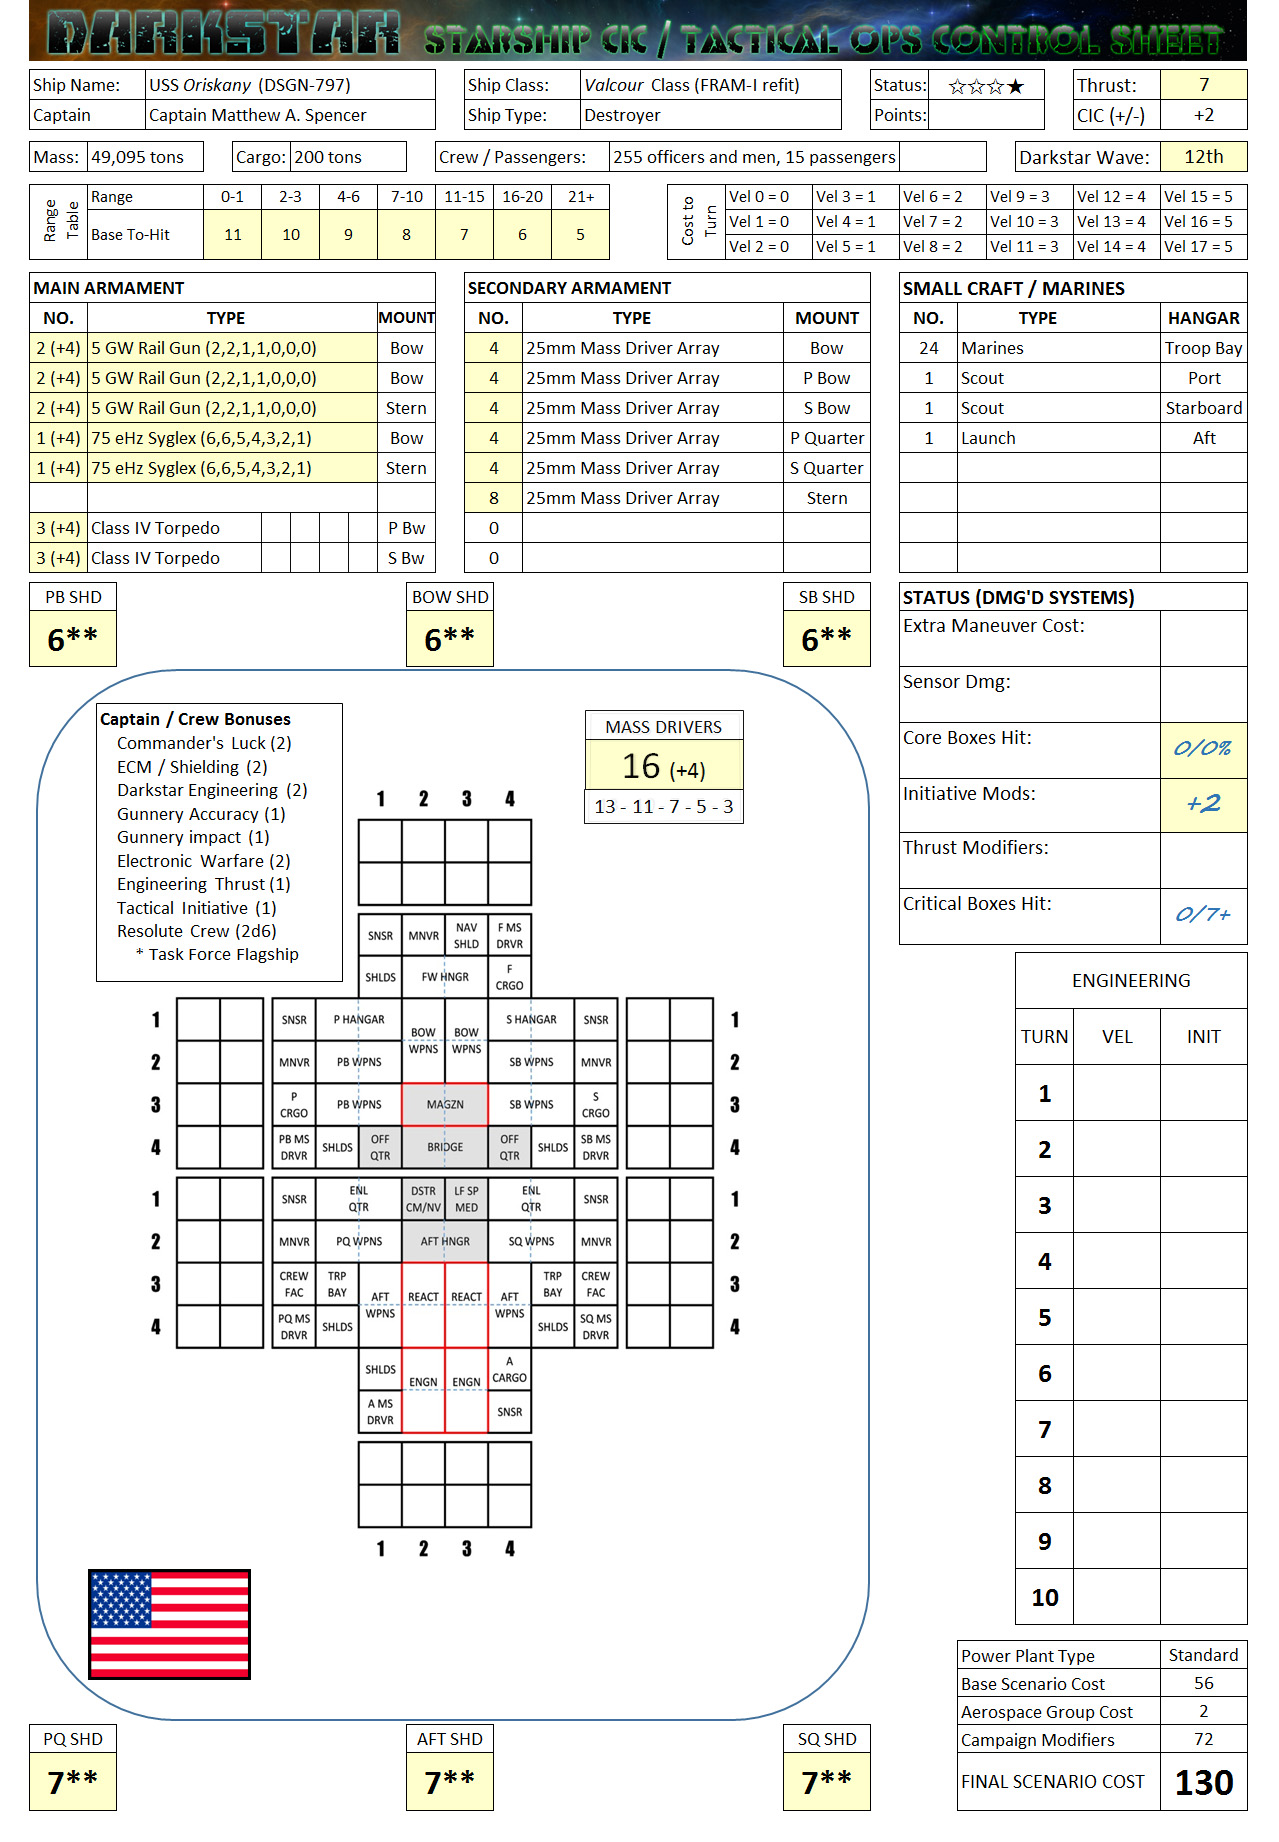 Here's the USS Oriskany, with her FRAM-I upgrades combined with her campaign upgrades. In game / campaign terms, I simply promoted Captain Matthew Spencer into a FRAM-I destroyer instead of a light cruiser, and paid the appropriate campaign points.
Maharani Class Heavy Cruiser - Indian Republic Navy
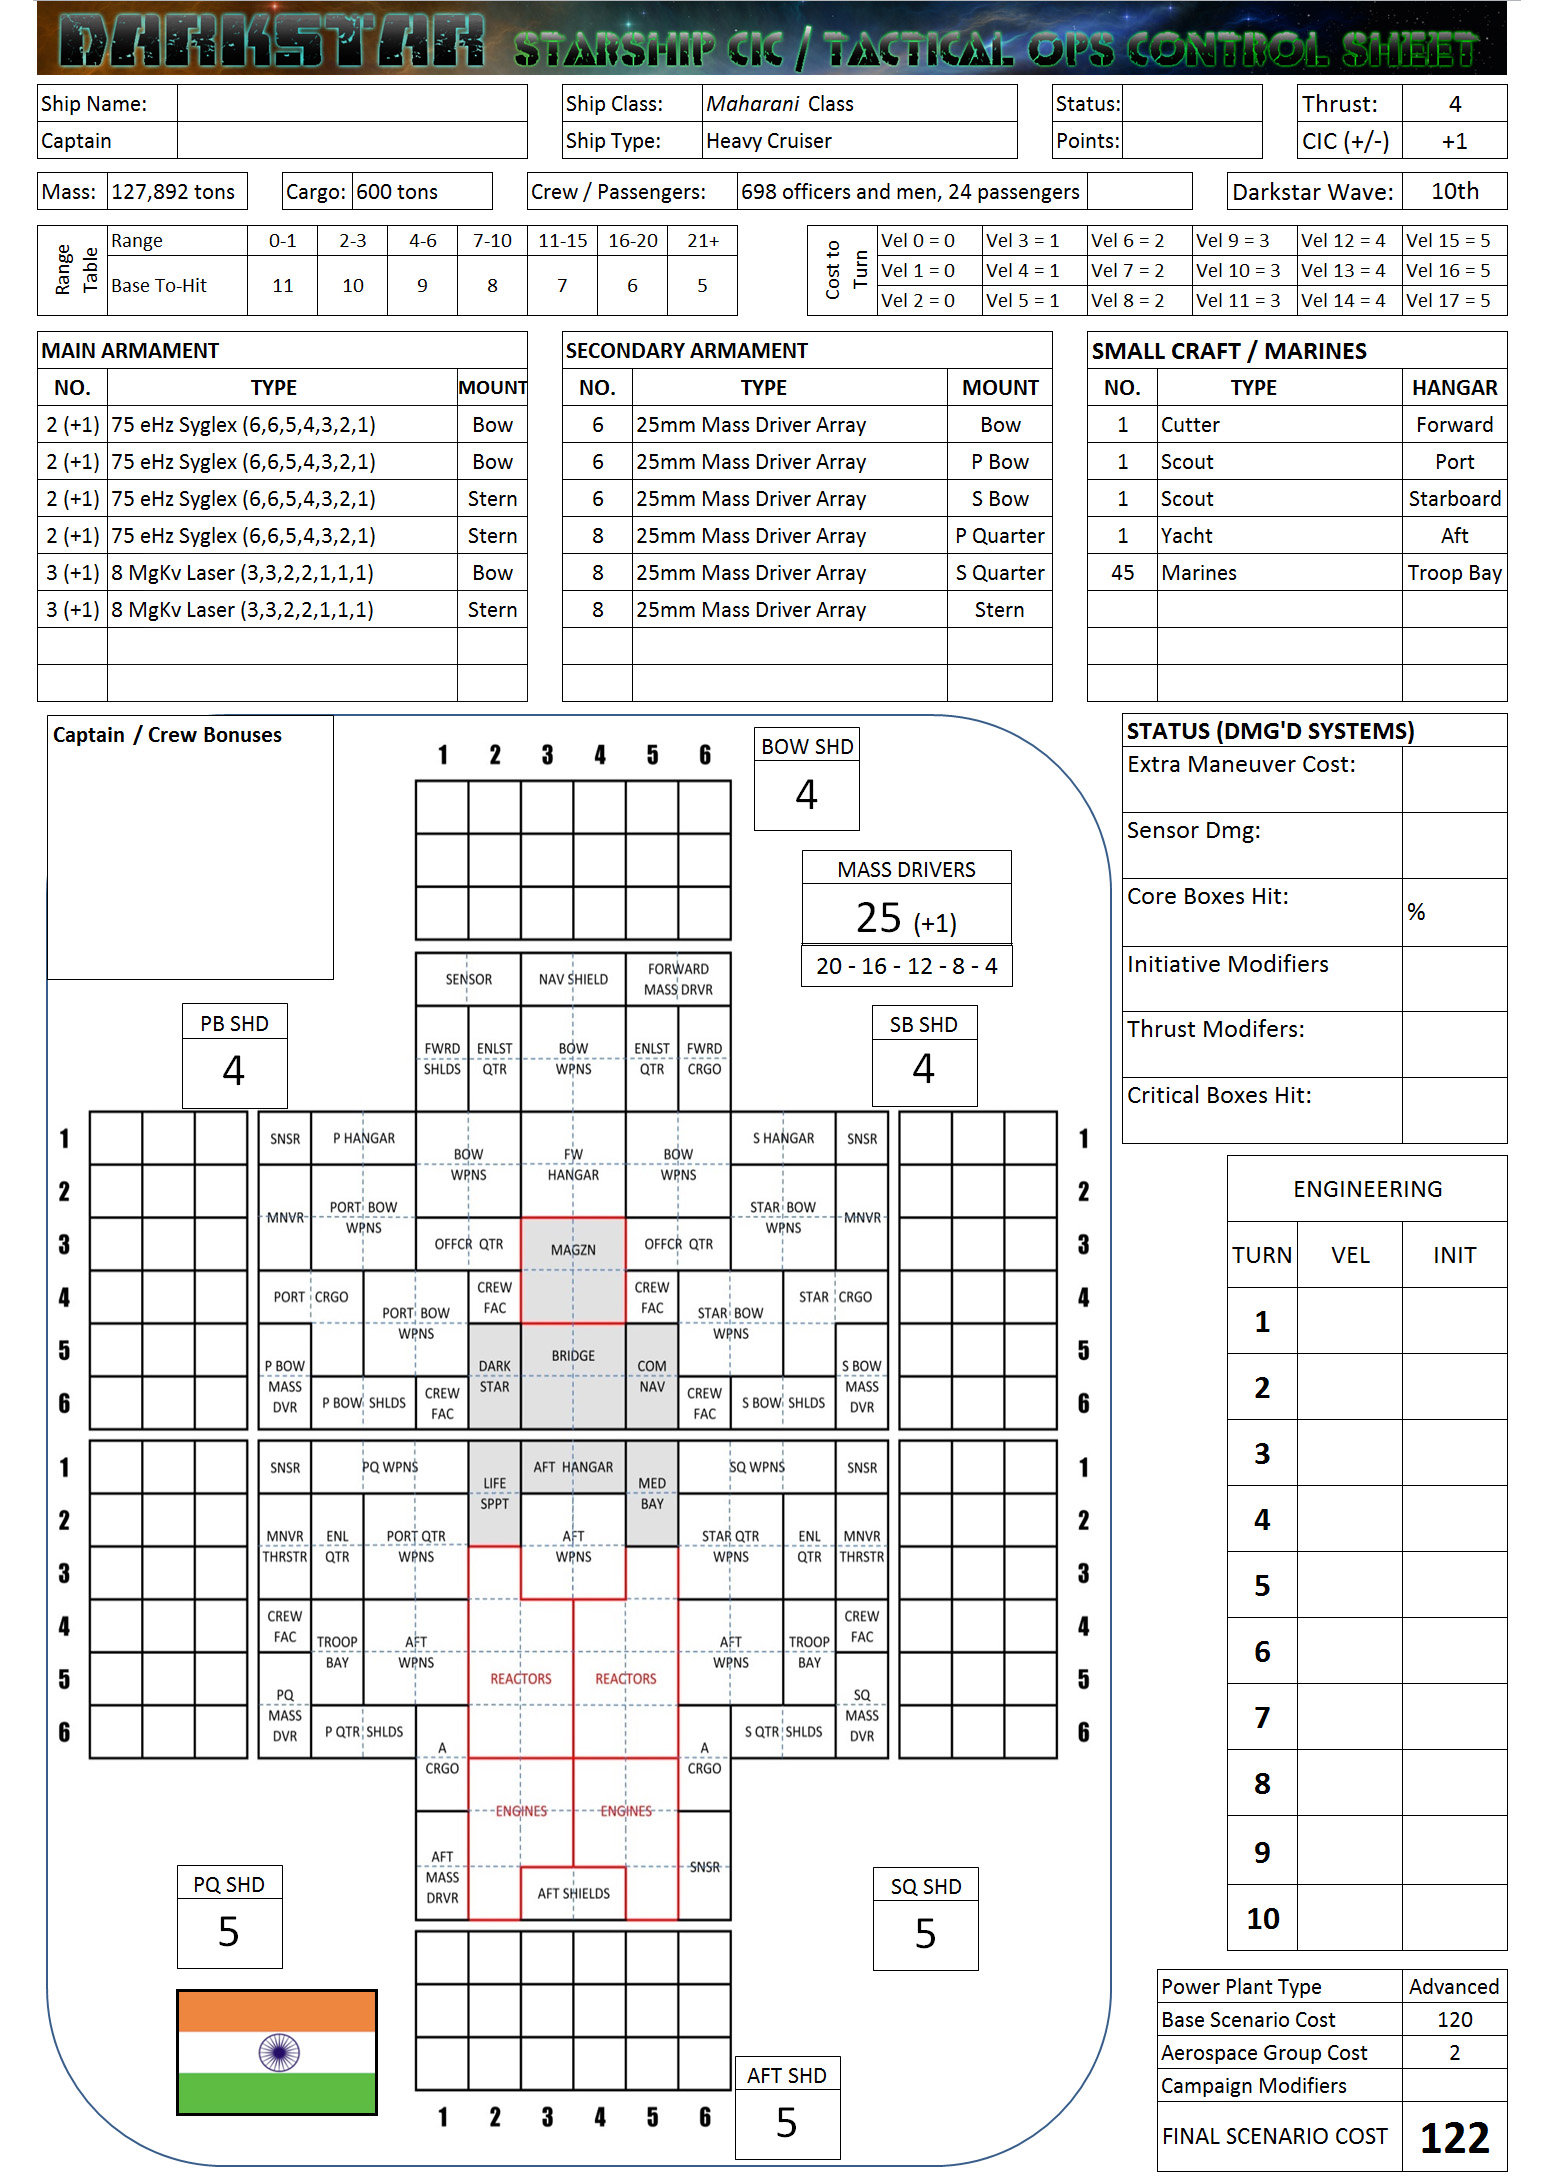
The Maharani class heavy cruiser continues the Indian Republic Navy’s traditions of advanced design, startling beauty, and a long-ranged, highly-accurate focused beam weapons suite. Originally slated for construction in 2505, the class had something of a troubled inception, as designs were altered repeatedly to incorporate the new “Bhala Saat” GX-7 x-ray emitters. These were meant to replace the traditional heavy laser batteries at the core of the original design, which were proving troublesome with the Maharani’s powerplant. Also, there were doubts about the original laser armament’s ability to cope with larger enemy warships like battleships or other heavy cruisers. Unfortunately, switching to the new “syglex” (synchronized, gravitic-lensed x-ray) technology mid-design forced significant delays with the commissioning of the first ships of the class, during which time older Magadha and smaller Sharada class cruisers had to carry the Indian Republic Navy.
Once the Maharanis finally started coming on-line, however, they made an immediate impact against Russian, Japanese, Arab League, and Panasian opponents in a series of incidents, skirmishes, and small wars across Known Space. They are light for heavy cruisers, less than 127,000 tons, but the immense power draws of their beam-based weapons suite mean their acceleration curves and maneuver envelope remain comparable to other classes of heavy cruiser. The weapons are long ranged and deadly-accurate, but some analysts feel that the lack of particle weapons, rail guns, or torpedoes make the Maharani class something of a lightweight against cruisers like the Slava, Leopold, Iron Duke, or Gettysburg class. Critics also point to the mixed batteries of 75-exohertz x-ray emitters and 8-megakelvin lasers, an indecisive design choice and proof that the Indian Navy still can’t fully break with its traditional laser-based weapons arrays. As one American analyst said: “She’s pretty, precise, and accurate … but wants to fight with scalpels against opponents arms with chainsaws.”
Yet early combat experience shows that what the Maharani class lacks in “chainsaws,” she makes up for with blowtorches. Those syglex emitters out-punch the heavier rail guns of many rival classes of heavy cruiser, even if they come at the cost of a smaller secondary battery and a complete lack of torpedoes. Typically, a Maharani commander will try to engage larger targets with the syglex emitters, reserving the secondary lasers for smaller warships or to drill into enemy armor already damaged by the syglex emitters, all while staying at range to avoid close-range threats like rail guns or plasma accelerators.
The Maharani class heavy cruisers are named for queens and princesses of Indian nobility during the colonial Raj, terrestrial republic, and interstellar periods.
Kali Class Battleship - Indian Republic Navy
 Like many battleships, the Kali class is as much a national statement as a naval warship. Named for some of the greatest Hindu deities, these dreadnaughts are huge, sleek, deadly, and as is typical for ships of the Indian Republic, peculiarly beautiful. Yet beyond their role as “simple” naval assets, the Kali class battleship also proclaims a simple immutable truth. India is no longer anyone’s “raj”, no longer a vassal state, no longer a jewel in anyone’s imperial crown. Her navy stands as an equal not only to any of the new “black water” navies like the Arab League, Imperial Prussia, the Holy Russian Empire, or the New Roman Alliance, but also the traditional maritime powerhouses like the United States, Japan, or the United Kingdom. Tipping the scales at just under 340,000 tons, the Kali class is actually quite light for a battleship. This is typical for the Indian Navy, given their exclusive preference for focus-beam weapons suites rather than “crude” weapons like rail guns, plasma accelerators, or particle weapons. These weapons draw tremendous power, however, leaving the Kali with average sublight maneuverability and transluminal speeds. Protection is also somewhat standard, with enhanced shielding only directly over the huge Mazagon Dock Shipbuilders MDT-19 “Taaron-Ka” (Starlight) engines and reactors. Point-defense systems are also solid, if average for a warships of this size.
Like many battleships, the Kali class is as much a national statement as a naval warship. Named for some of the greatest Hindu deities, these dreadnaughts are huge, sleek, deadly, and as is typical for ships of the Indian Republic, peculiarly beautiful. Yet beyond their role as “simple” naval assets, the Kali class battleship also proclaims a simple immutable truth. India is no longer anyone’s “raj”, no longer a vassal state, no longer a jewel in anyone’s imperial crown. Her navy stands as an equal not only to any of the new “black water” navies like the Arab League, Imperial Prussia, the Holy Russian Empire, or the New Roman Alliance, but also the traditional maritime powerhouses like the United States, Japan, or the United Kingdom.
Tipping the scales at just under 340,000 tons, the Kali class is actually quite light for a battleship. This is typical for the Indian Navy, given their exclusive preference for focus-beam weapons suites rather than “crude” weapons like rail guns, plasma accelerators, or particle weapons. These weapons draw tremendous power, however, leaving the Kali with average sublight maneuverability and transluminal speeds. Protection is also somewhat standard, with enhanced shielding only directly over the huge Mazagon Dock Shipbuilders MDT-19 “Taaron-Ka” (Starlight) engines and reactors. Point-defense systems are also solid, if average for a warships of this size.
Where the Kali excels, however, is in her lethality. One of the more dangerous battleship designs in Known Space, she pack a horrific, three-tiered array of long-ranged beam weapons. First, three massive triple turrets of gravitically-lensed coherent x-ray (“syglex” or “xaser”) emitters can strip the armor off an entire enemy battleship or installation at ranges out to 3000 kilometers with single broadside, at closer ranges with one or two hits. Yet these weapons are actually unwieldy against smaller targets, where the massive secondary battery 12-megakelvin lasers (some of the largest such weapons in Known Space) and the tertiary batteries of 6-megakelvin lasers come in, packing enough firepower to core a light cruiser. At twelve guns each, these secondary and tertiary batteries alone match the firepower of most heavy cruisers at medium ranges. As if these sheer firepower were not enough, this whole weapons suite is slaved to the Bharat Electronics “Tryambakam” (Third Eye) targeting acquisition and fire control suite, making these weapons deadly accurate.
Engagements with a Kali class should be undertaken with extreme care. Most enemy battleships and heavy cruisers would be advised to close as quickly as possible since the Kali will enjoy a range advantage against most comparable weapons batteries. Once close in, many of the Kali’s superior attributes begin to fade against the class’ shortfalls, namely their somewhat underwhelming defense systems.
Russian Heavy Cruiser Strike v. British Defense, Uxbridge Colony / Mu Hercules
FROM: UNITED NATIONS REGIONAL COLONIAL CENTER
04:10 SOL GMT, 19 SEPTEMBER 2521
BREAKAUTH: 181072.18J
CLEARANCE: SECRET (NATIONAL)
**UNITED NATIONS COMMUNIQUE**
With recent defeats at the McClusky-Ramirez gas giant (Alpha Lyra system) and the HH779 comet in the Outer Hebrides (Mu Hercules), the British Empire has again been brought to the brink of defeat in the Third Hercules War. American planetary assault ships are now lurking in the Oort Cloud and outer debris discs of the Mu Hercules system, ready to land battalions of US Marines on British colonies and run up the stars and stripes, while bristling cruiser squadrons of the Holy Russian Empire are making fast Darkstar approaches from the coreward system of Krasnaya Nadhezda (72 Hercules). This is effectively putting the Outer Hebrides colonies in a pincer, with British resources … and time … rapidly running out.
All is not well in the “winning camp,” however. Relations between the Russian and American “allies” of the so-called Coalition of Eagles have reached an ominous chill. Russian naval units seem to always be present for coalition victories, while the burden of defeats are left for the Americans alone to bear. This has resulted in the Holy Russian Empire stacking up as much political capital at the UN negotiating table as the United States, while the Americans are left paying the vast majority of the cost, in naval assets, money, and of course blood. Making matters worse, the naval battlegroups of their Indian Republic allies haven’t shown up much at all.
This has resulted in something of a breakdown of communication and liaison between the American naval command at Port Halsey (Alpha Lyra system) and the Russian Admiralty at Krasnaya Nadhezda (Red Hope, 72 Hercules). Neither of these “allies” much trusts each other, each convinced that the other is trying to “steal” the victor’s spoils from Britain’s inevitable defeat.
Perhaps it was inevitable, therefore, that one side or the other would launch a quick strike at the British first, without consultation or coordination with their allies, in the hopes of scoring the “knockout blow” against the British and claiming final victory entirely for their own flag.
The Russians win this race, lashing into Mu Hercules with a newly-arrived squadron of heavy cruisers, built around three of the new “Wave Two” Slava (Glory) class heavy cruisers. Nicknamed the “Three Sisters,” these cruisers bear the names of the three daughters of Czar Michael I, founder of the Romanov Dynasty. Supported by a Gagargin-class light fleet carrier, this powerful task force sorties into Mu Hercules with orders to smash whatever remains of the weakened Royal Navy, and claim the system (along with final victory) for the Holy Mother Russia.
The British, however, aren’t as powerless as the Russians estimate. Although outnumbered and outgunned, a crash repair and refit program has brought Task Force Agamemnon (Commodore Edward Cavendish) back on line. Alerted by Peregrine¬-class gunboats, Cavendish vectors to the colonized terrestrial planet Uxbridge (about 80% the mass of Earth) to intercept the Russian invader.
HOLY RUSSIAN EMPIRE: @Oriskany
UNITED KINGDOM: @Damon
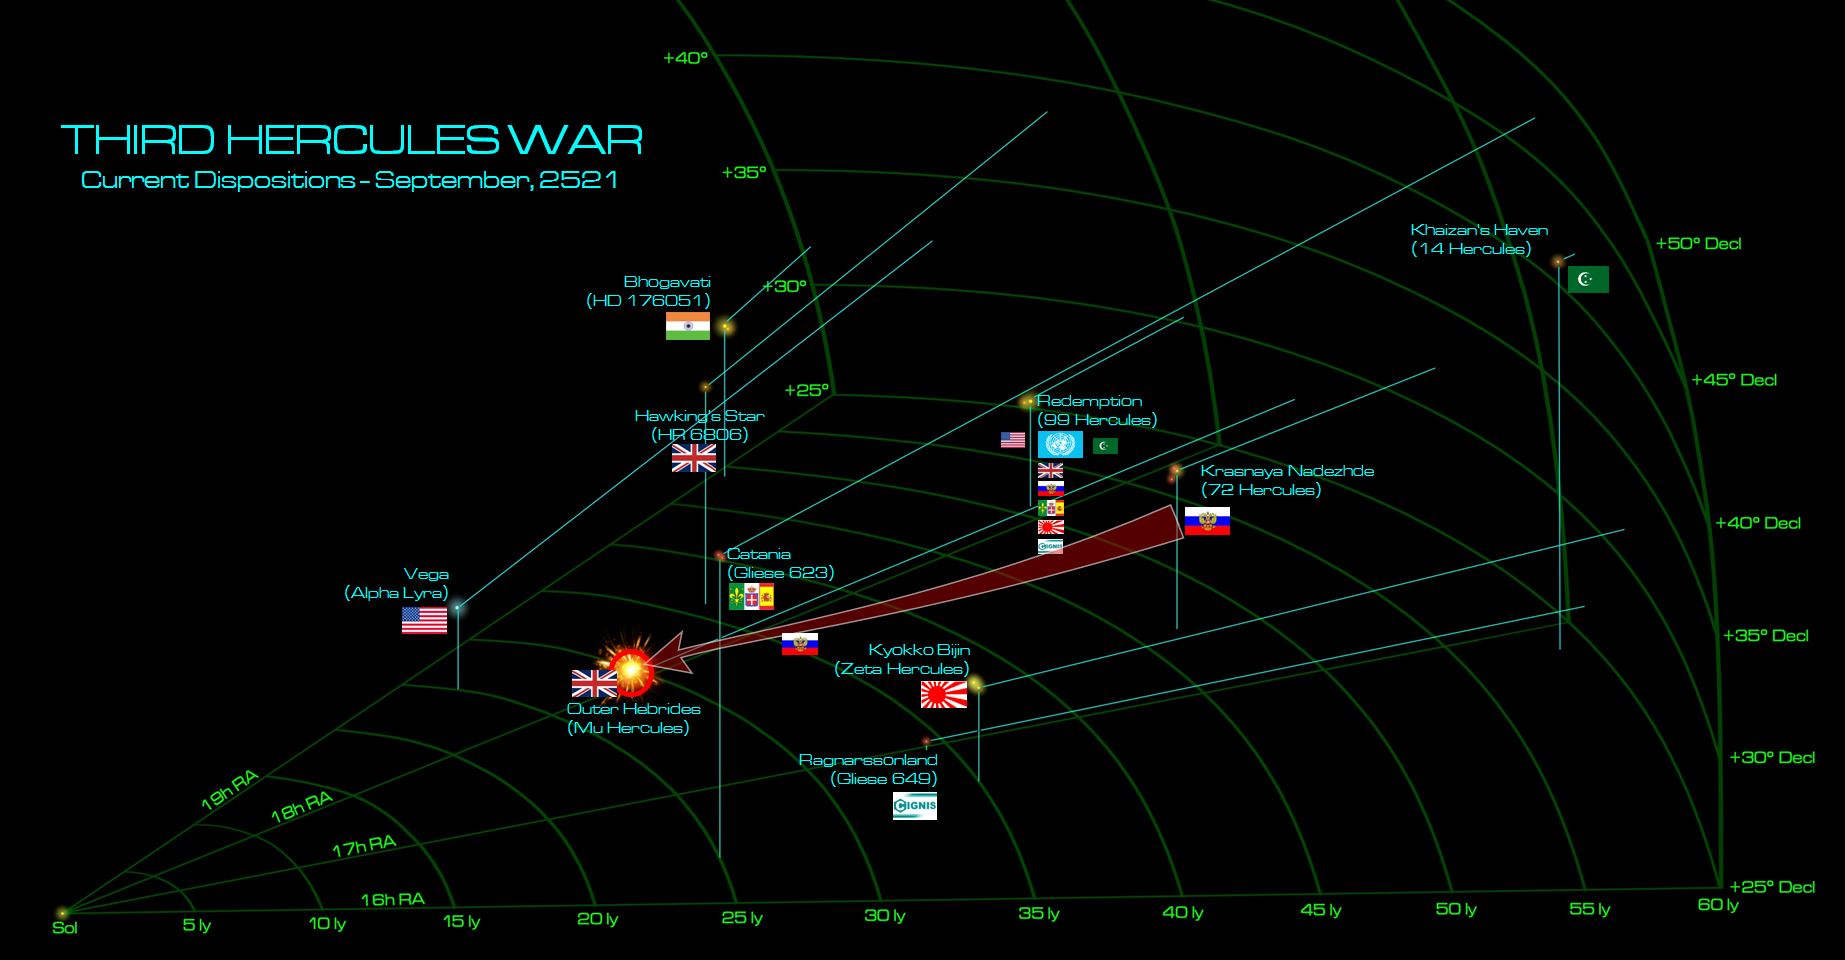 The Russian strike out of 72 Hercules into Mu Hercules. Note the 24 light-year distance. This means that the Russian cruiser squadron had to set a very high-speed Darkstar Wave to cross this distance in anything shorter than a month. Subsequently, this means their wave wasn’t very accurate and they could drop very close to major astrophysical bodies like planets or colonies. Therefore, a second more accurate “assault wave” was required, by which time Task Force Agamemnon had been mobilized and vectored to intercept.
 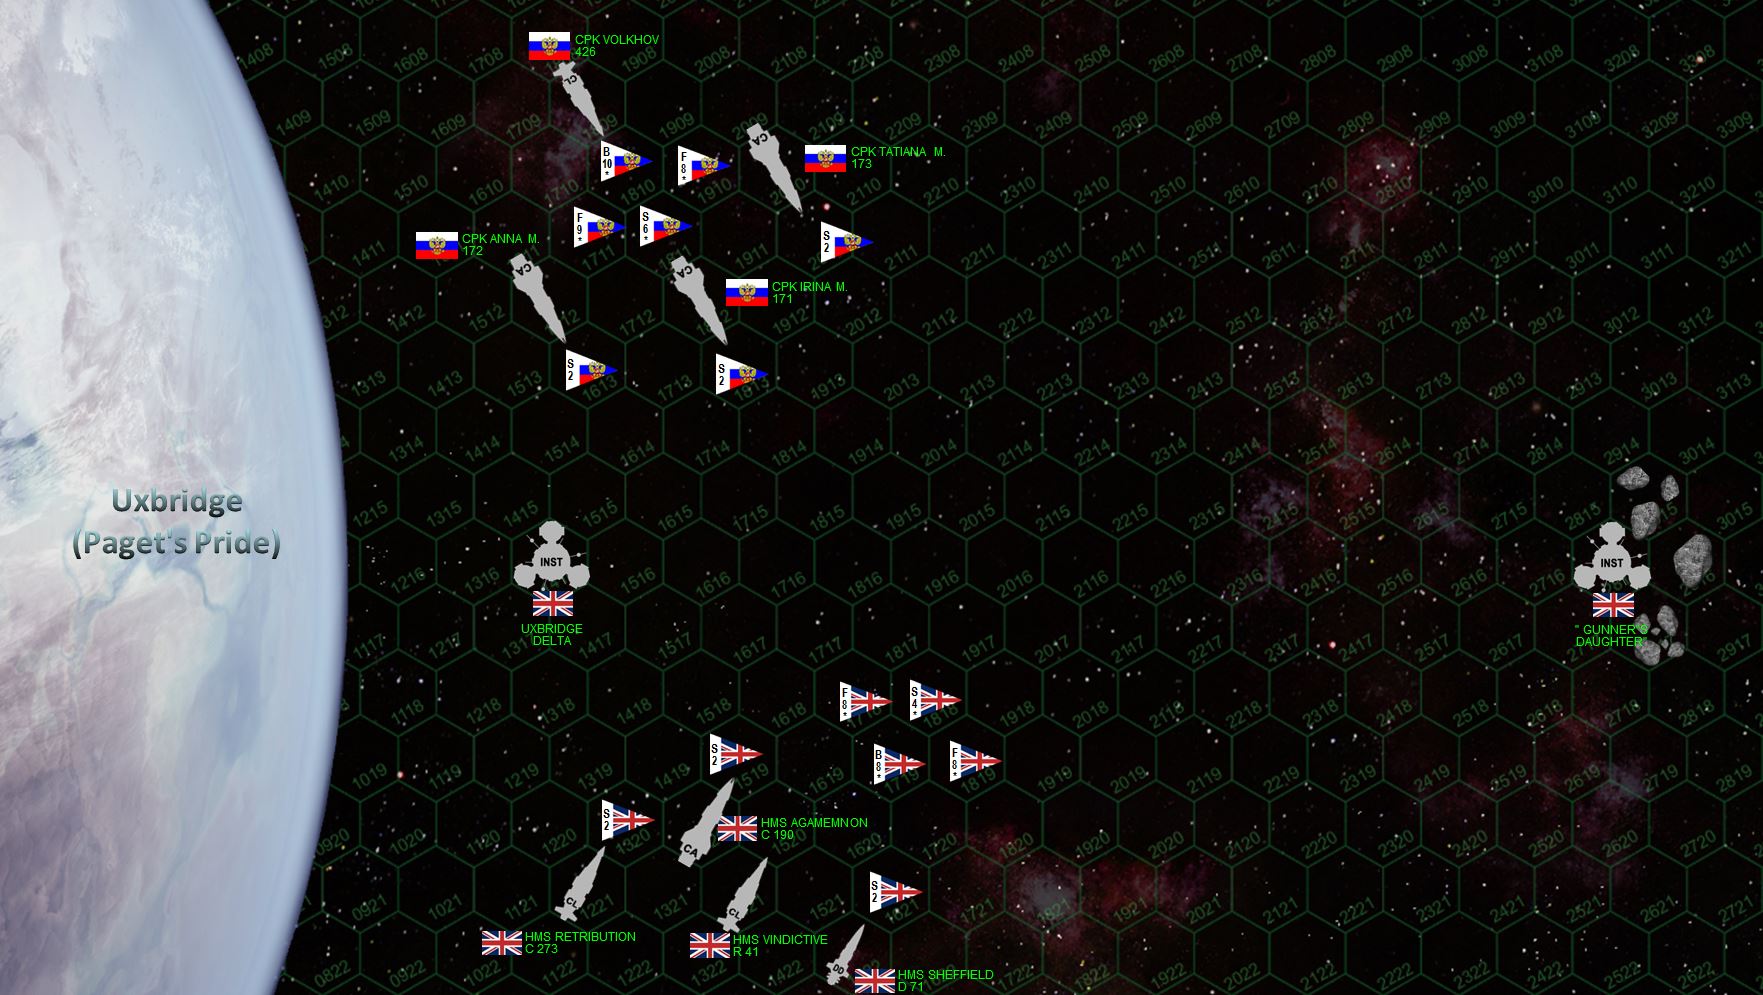 Here’s the matchup. Each side has a light fleet carrier (light cruiser) loaded with elite aerospace, with the Russians enjoyed a slight numerical superiority. The real weight advantage, however, is in guns, with three upgraded Slava-class heavy cruisers against just one British heavy cruiser, supported by a light cruiser and a destroyer. The British force is of course much more high-tech, nimble, flexible, and fast ... not to mention upgraded with more accurate and harder-hitting guns. Damon’s been working on this fleet for the better part of a year and a half, after all. But can they really take on a fleet that outweighs them almost two-to-one?
 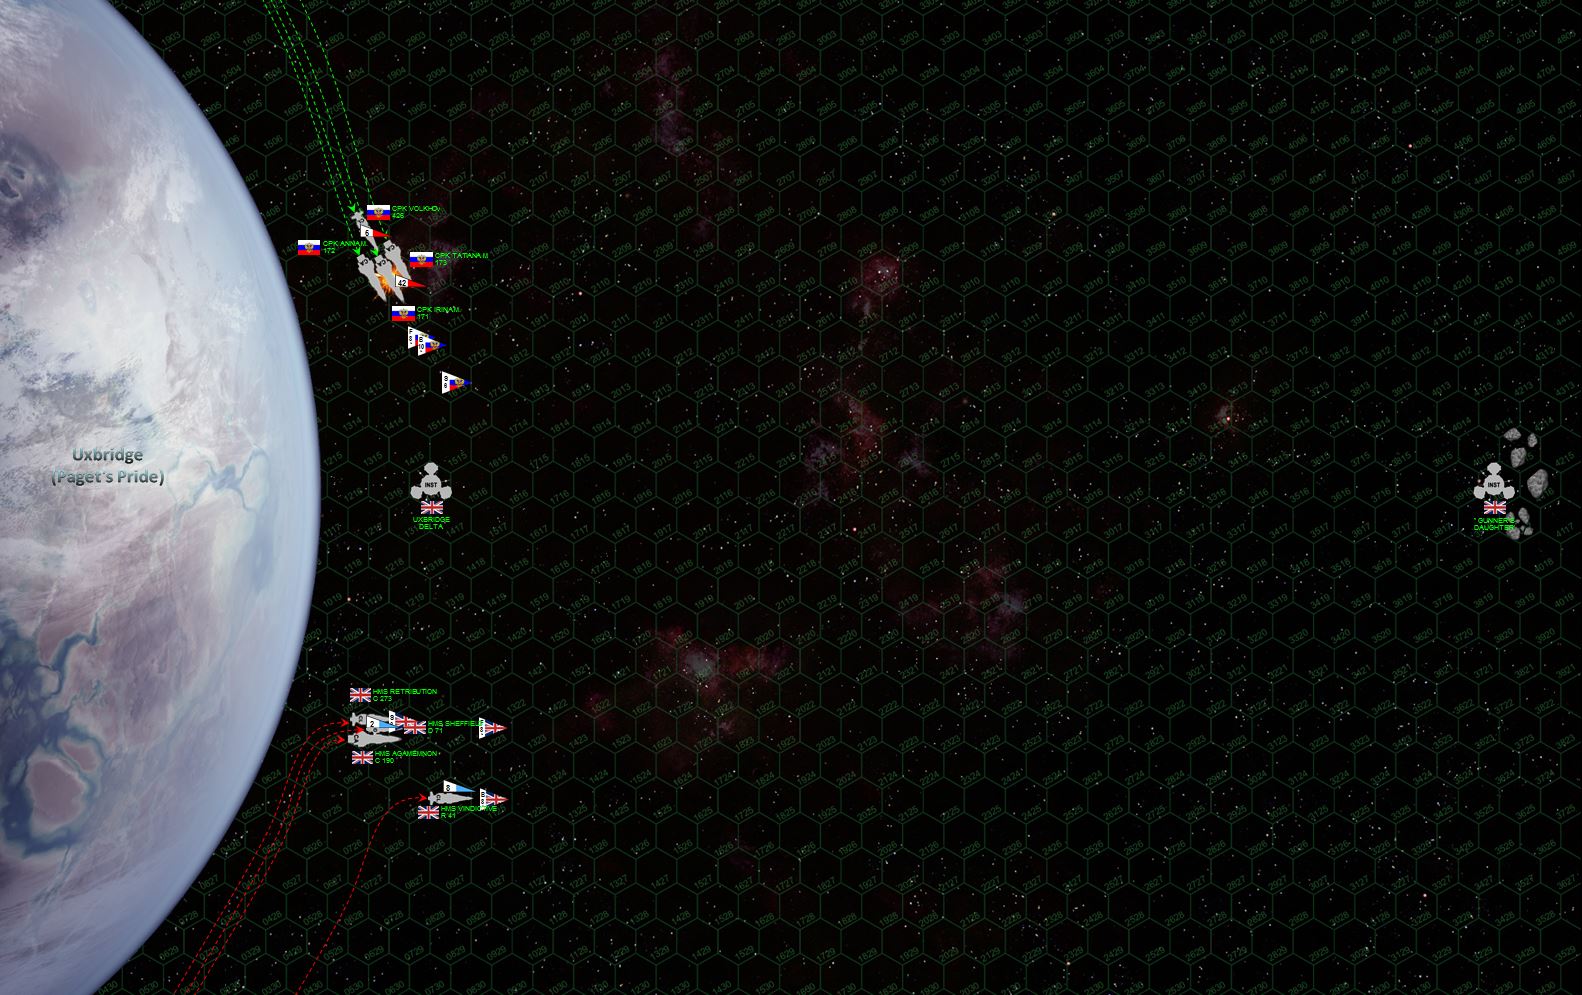 The two sides make their initial approach. Both sides hug the planet, adjusting course for gravity which effects the final positions of ships within 10 hexes. They are hoping to get the “gravity gauge,” forcing the put themselves between the planet and the enemy, so the enemy has to turn dangerously TOWARD the planet to engage them. The carriers also launch their aerospace strike groups. The British start out doing well, their faster speeds giving them better initiative results, and allowing them to broadside the larger, slower Russian ships. The flagship Irina Mikhailovnya is heavily battered on her starboard bow, while the Agamemnon is barely scratched. ADVANTAGE: BRITISH
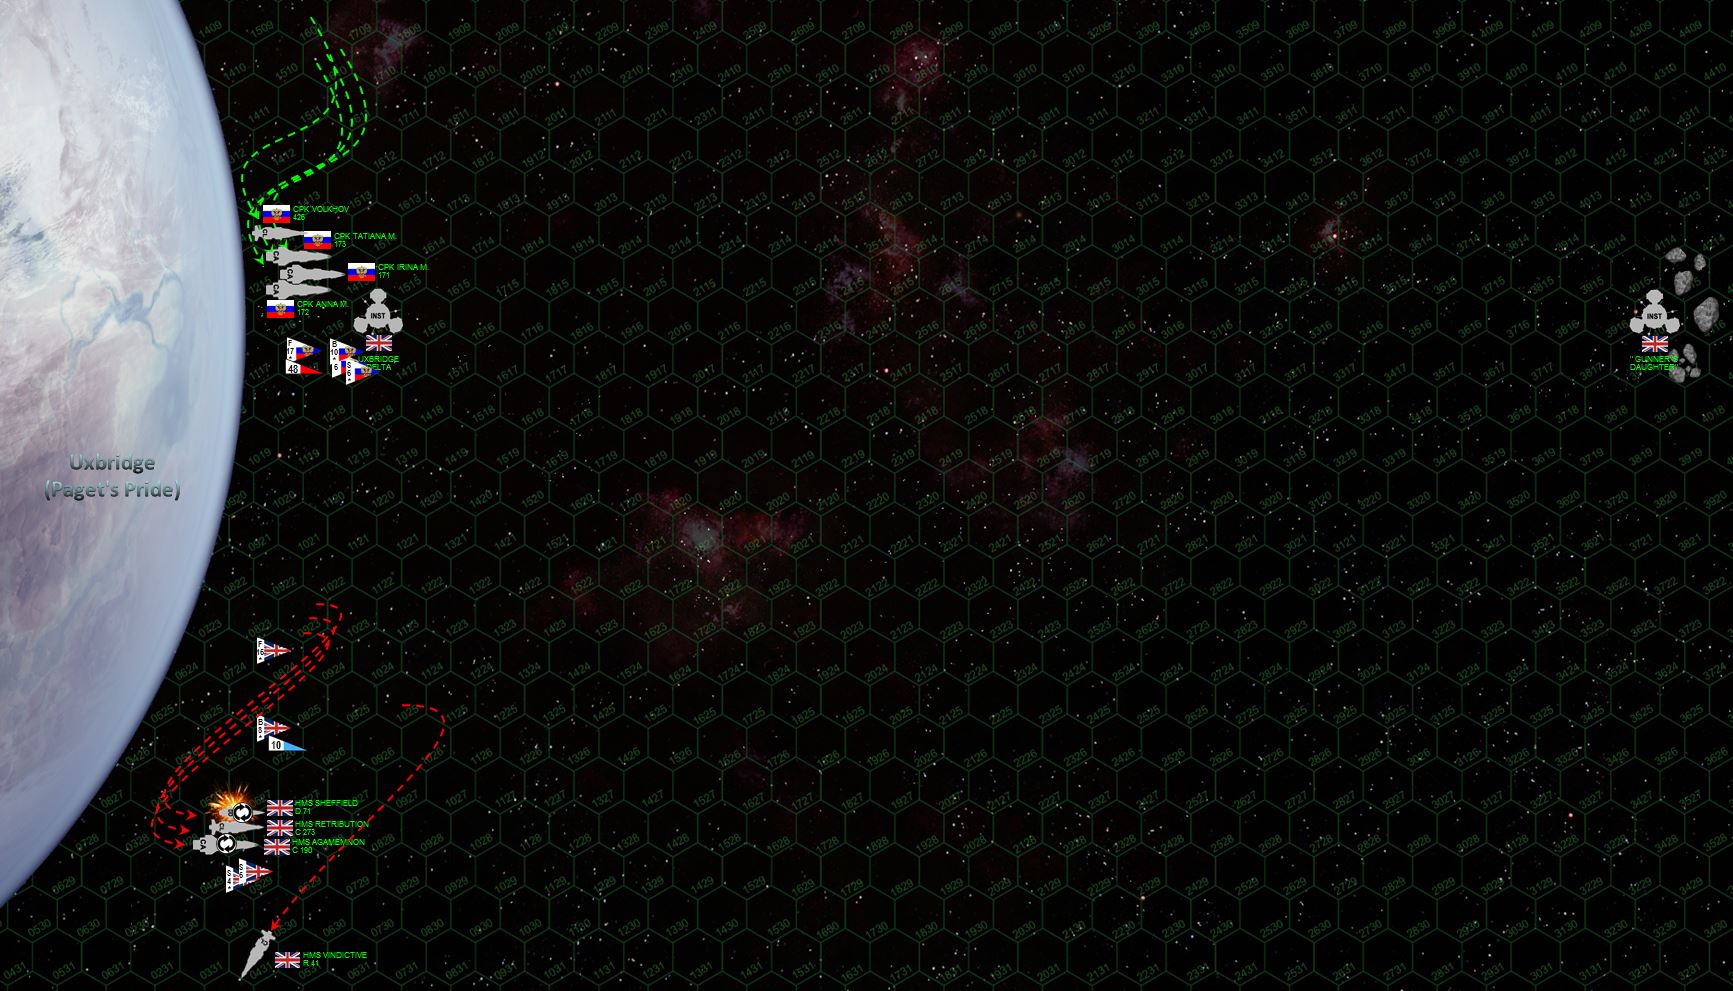 The British abruptly kick their grav-rudders and maneuvering thrusters to starboard, jackknifing AWAY from the oncoming Russians. The reasons are this are two-fold. One, it keeps the range open where less-accurate but heavier Russian guns are at a disadvantage (especially the dreaded Russian plasma projectors) and also perfectly outranges the huge wave of P-500 “Plamya” (Flame) Class III torpedoes they’ve launched (48 warheads in all). A viable tactic, but it doesn’t offer sufficient argument against the sheer weight of the Russian broadside. THREE heavy cruisers are now positioned to fire every gun they have, and even at 2300 kilometers their blistering broadside caves in the port bow of the destroyer HMS Sheffield, including a 10-gw rail gun and 20-kg plasma pulse-spray through the bridge. Commander Bowen survives without serious injury, but Sheffield is crippled and out of the battle. ADVANTAGE: RUSSIANS
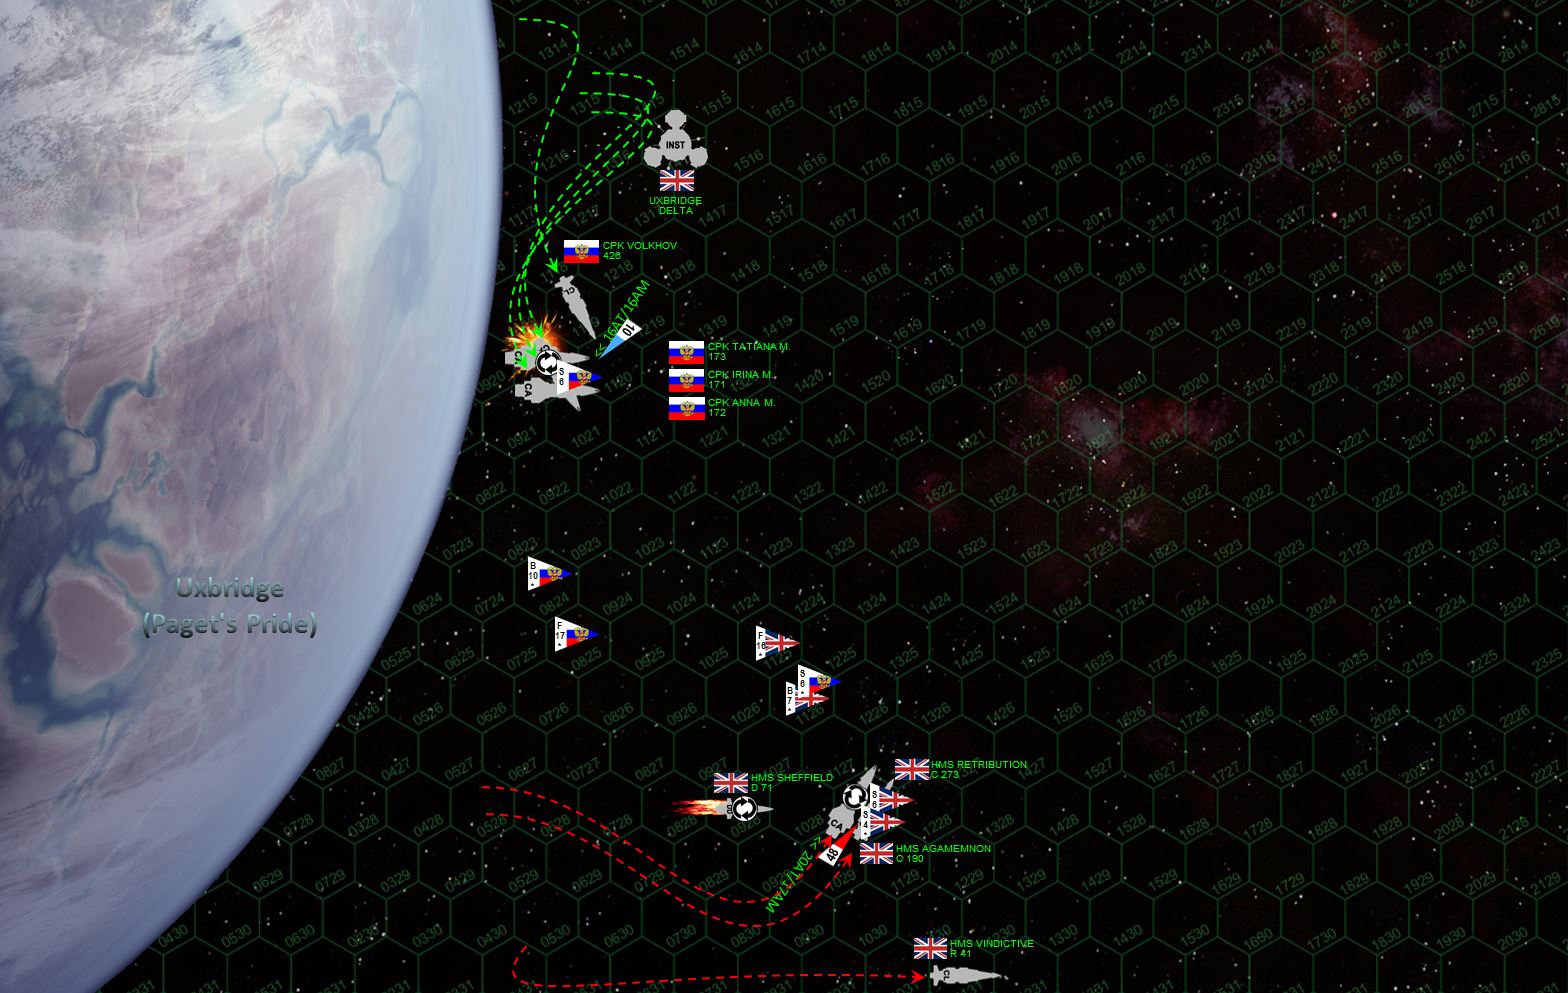 The British are finally forced to break away from the planet, giving up the gravity gauge in exchange for crossing the Russian “T” as they start to power up out of Uxbridge’s gravity well. The Russian flagship, Irina Mikhailovnya, rolls on her back to protect her ravaged starboard quarter, but the aerospace strike group of HMS Vindictive has formed up for a powerful strike or aerospace missiles and torpedoes to target this unshielded vulnerability anyway. This strike, combined with the Model 41 gravitic torpedoes launched from the HMS Vindictive (the Sheffield’s warheads have gone dark when the ship lost power), slams into the unshielded port quarter, blowing apart the whole aft third of the ships and leaving her a 160,000 ton derelict careening through space. The Russian aerospace strike, meanwhile, is much less impressive against the more accurate British point-defense systems and tougher ECM / gravitic shielding. The British flagship Agamemnon loses her aft shielding, but remains operational ... for now. ADVANTAGE: BRITISH
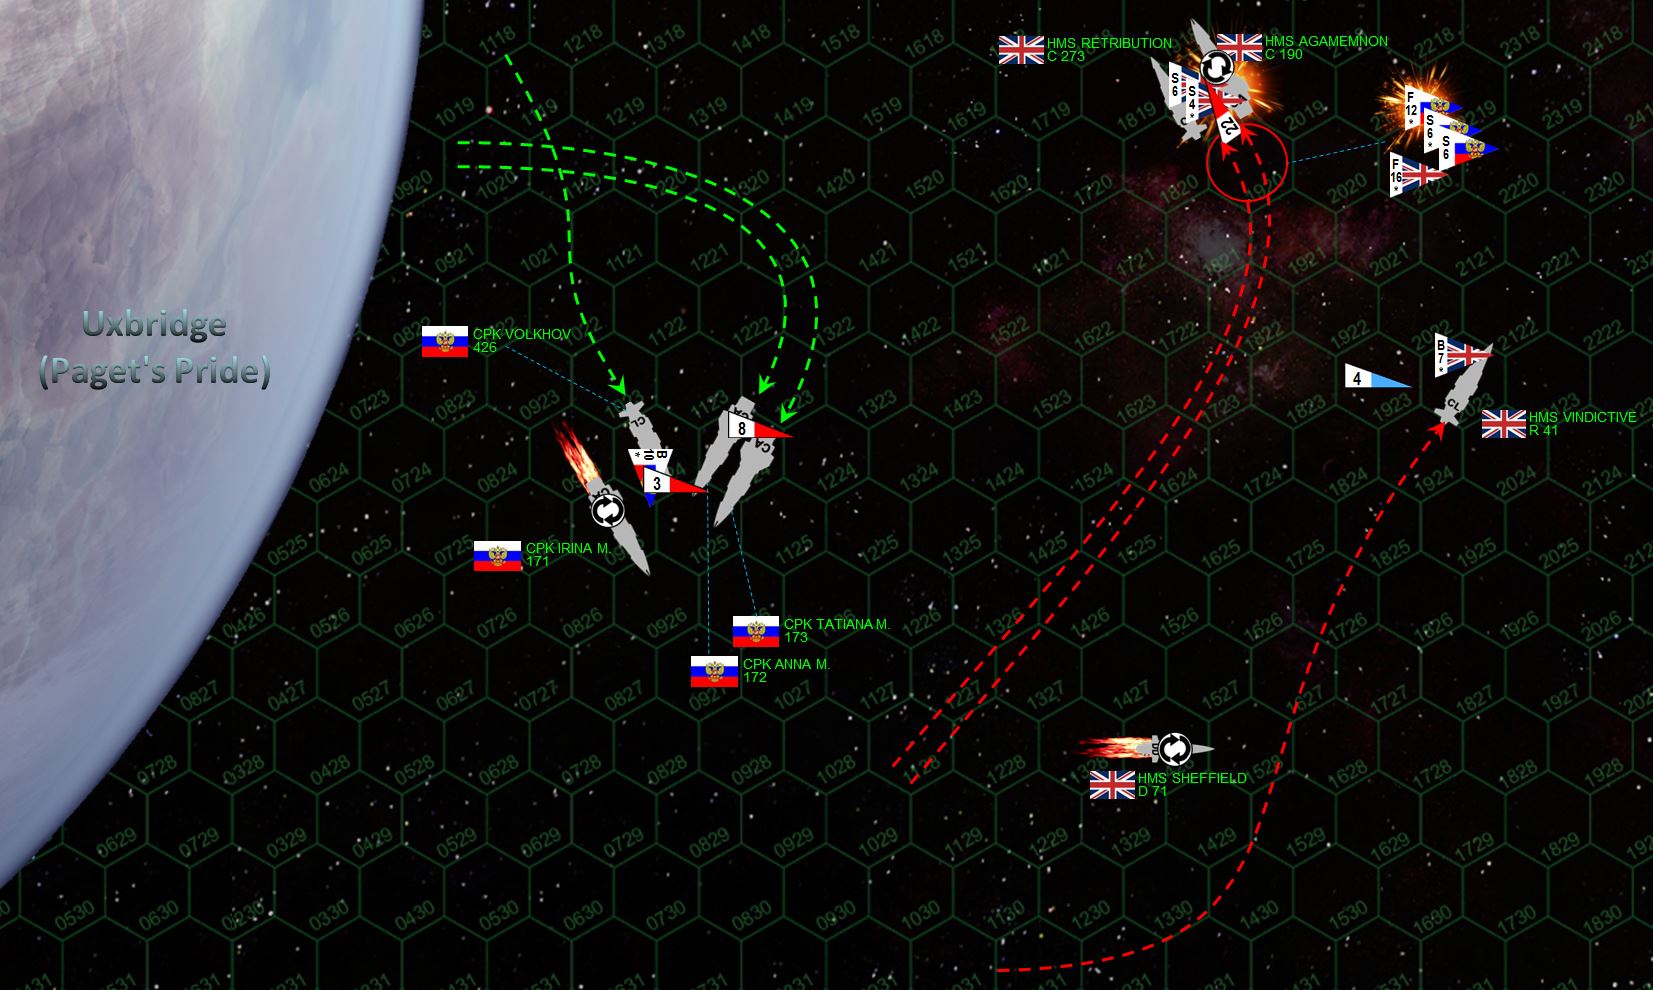 The Russians turn hard toward the British, but the Agamemnon (the fastest heavy cruiser in currently in the Darkstar ‘verse) accelerates to 27 kilometers per second and pivots out of the way, along with her escort ship (light cruiser HMS Retribution). The Vindictive powers away from the planet, perhaps hoping to recover her surviving bombers (one has been lost) in peace. But she actually moves too fast, trying to get herself clear of the Russian broadsides. While she succeeds at this, she’s actually moving faster than the hapless bombers trying to land. Meanwhile, the Russian carrier Volkhov recovers her ten Tupolev Tu-97 “Zvesburya” (Star Storm) bombers, the hanger crews feverishly beginning preparations for a second launch and strike. The Russian Mikoyan-Guyevich MiG-103 “Tunguska” fighters, meanwhile, make a nigh-suicidal strafing run on the badly-damaged and unshielded stern of the Agamemnon. Five are shot down, but their gunnery, combined with another smaller wave of P-500s, is enough to knock down the Agamemnon’s engines and leave the British flagship dead in space. ADVANTAGE: RUSSIANS
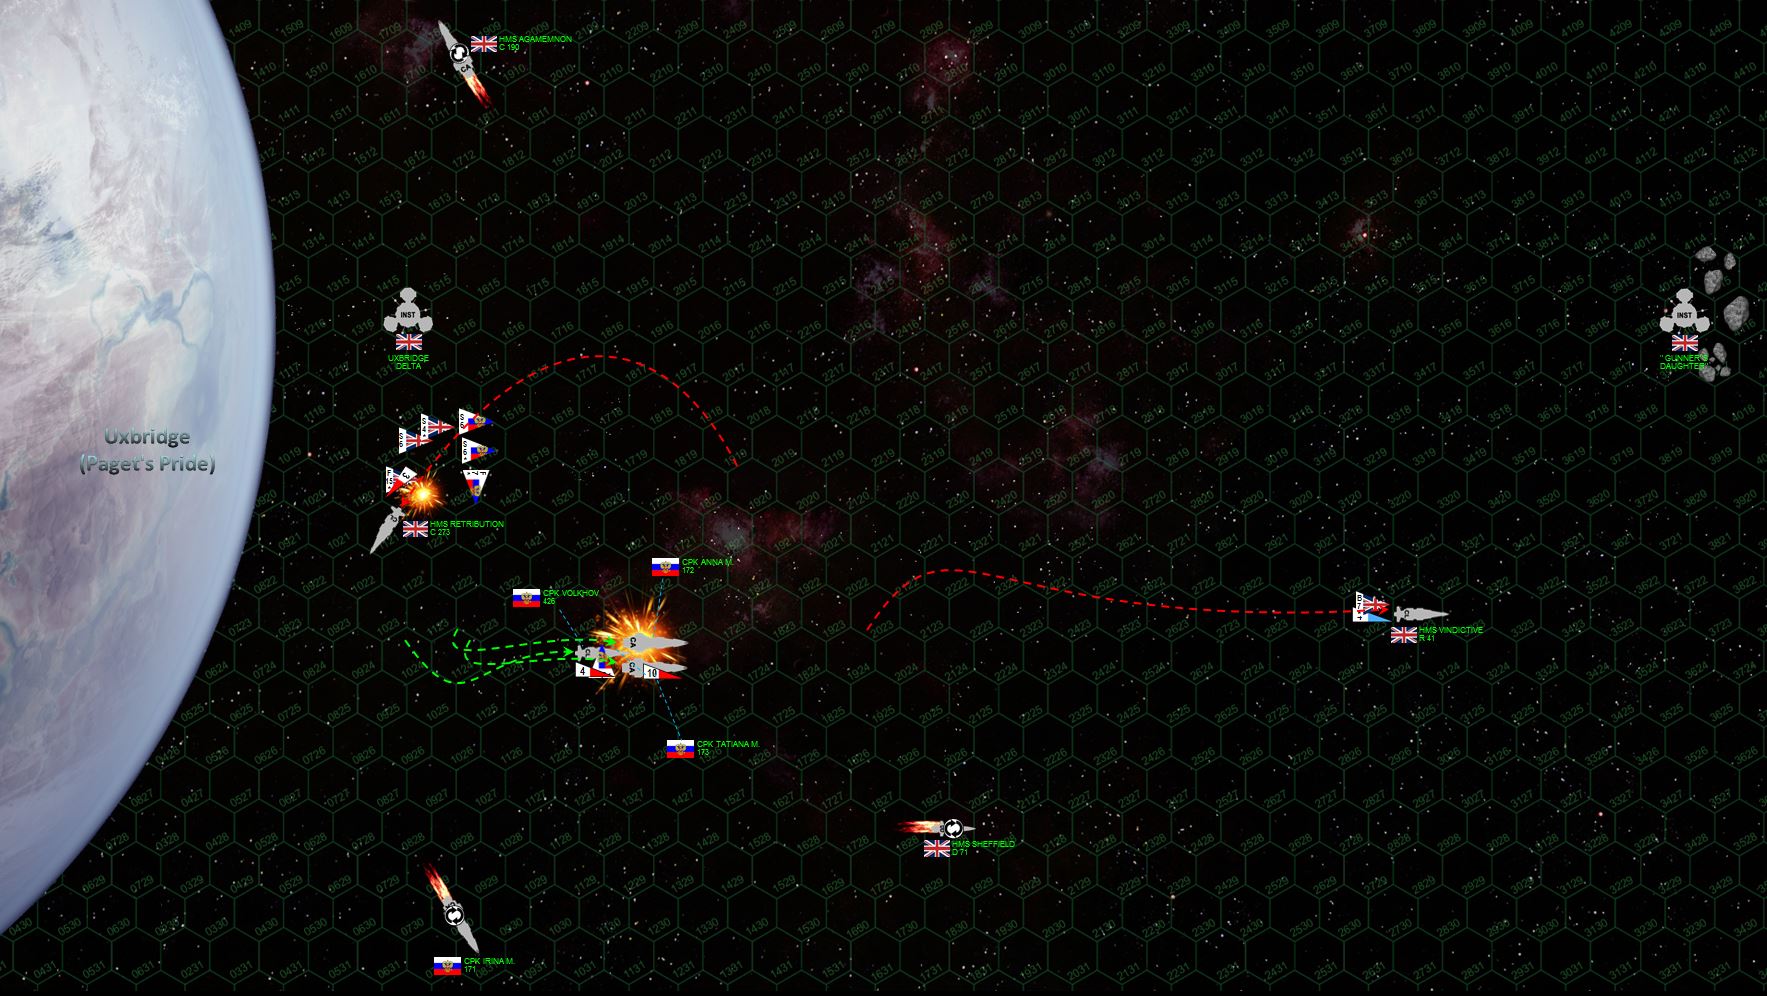 With the Agamemnon crippled and the Vindictive approaching high-orbit, the light cruiser Retribution is more or less alone in a knife-fight with the TWO Russian heavy cruisers (a 90,000 ton warship against two 160,000 ton warships). However, she’s must faster than her opponents, and able to pivot behind them for a broadside into the damaged fantail of the Anna Mikhailovnya, inflicting such critical damage that the heavy cruiser EXPLODES, instantly killing 447 officers and men (60% of her crew), including her commander, Captain Dmitri K. Krimilov. The blastwave also does serious damage to the Tatiana Mikhailovnya (less than 50 km abeam) and the carrier Volkhov (180km behind). ADVANTAGE: BRITISH.
 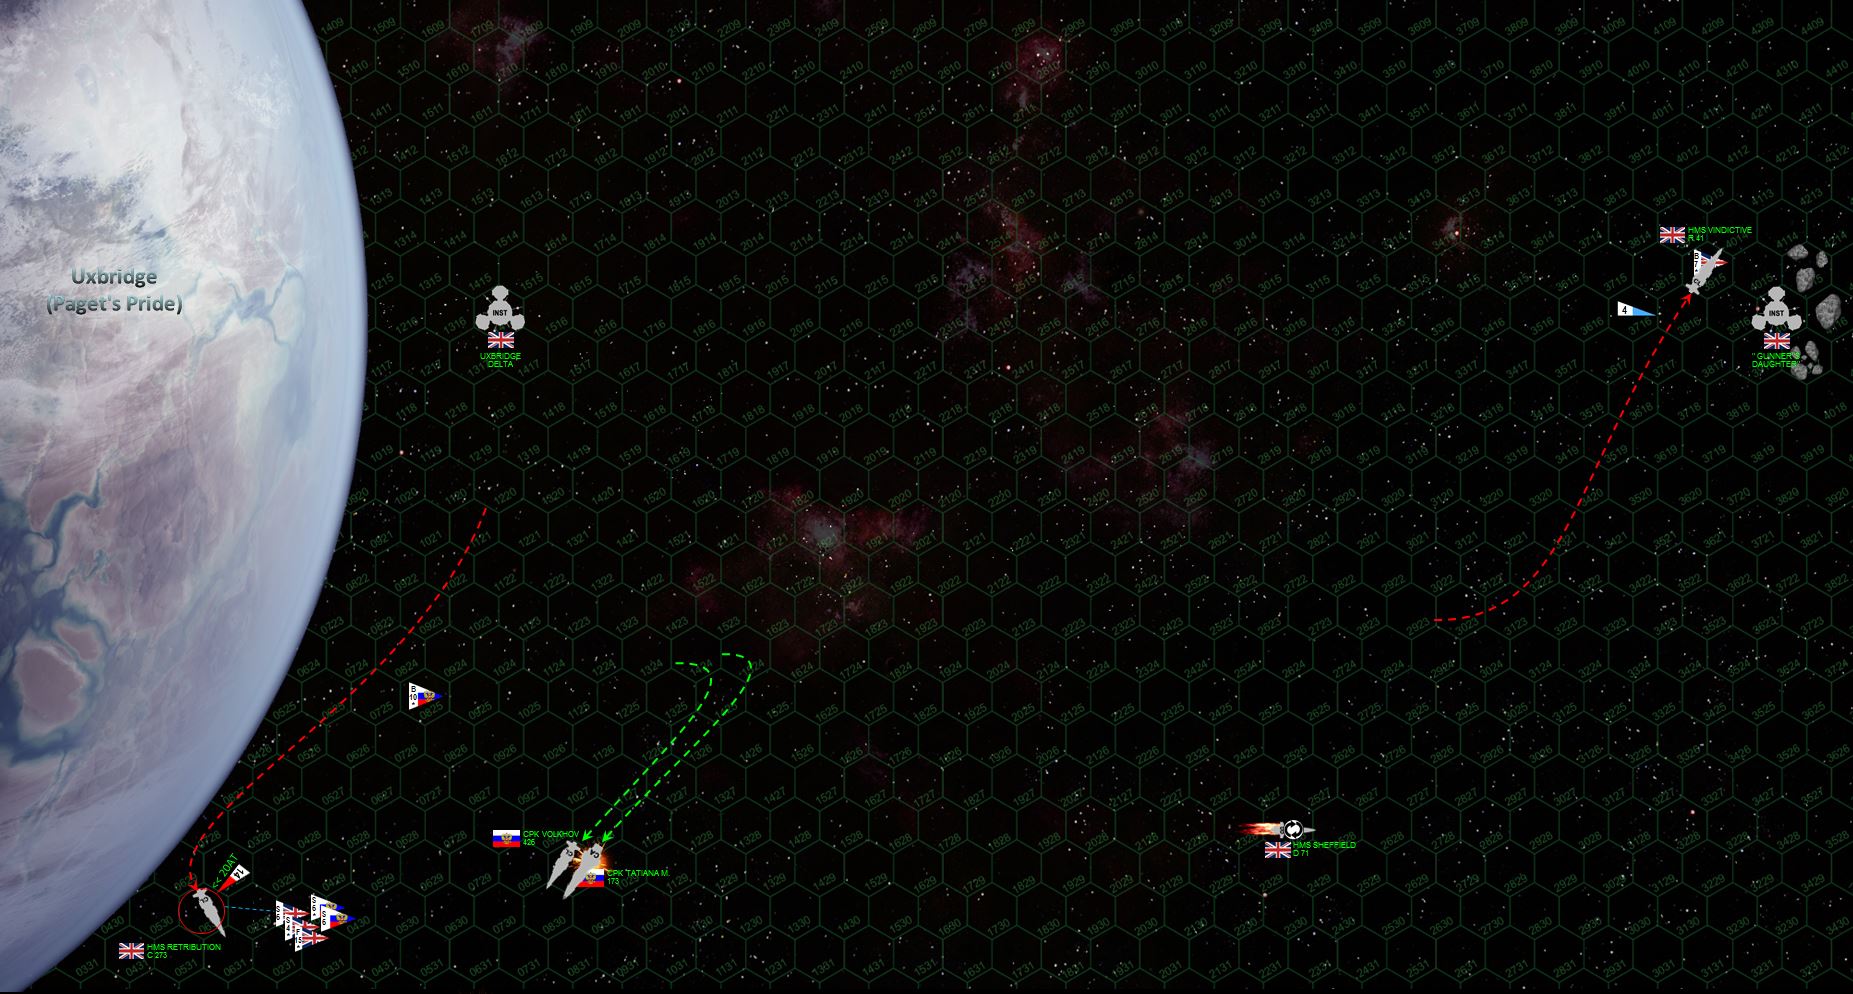 Missing her portside engines, with maneuvering thruster damage, and half-blinded by sensor damage, the Tatiana Mikhailovnya cannot hope to outmaneuver the Retribution (although she’s heavily damaged herself by this point). A last despairing aerospace strike, including re-launched bombers from the Volkhov, fails to cripple the Retribution, even as all seven remaining Russian MiGs are shot down. The Tatiana’s forward guns maul the port bow of the Retribution, but it’s not enough, especially as the Retribution’s return broadside hammers into the Tatiana. The last Russian heavy cruiser remains operational, but with fires on the bridge, the forward magazine hit, the starboard torpedo array and the forward plasma pulse turret destroyed, she’s at last forced to break off the action. She doesn’t have the thrust to turn around, she can’t turn to starboard toward the Retribution, and she can’t turn to port toward the Vindictive. She therefore must leave (by the rules of the game) and is thus out of the fight as well. VICTORY: BRITISH
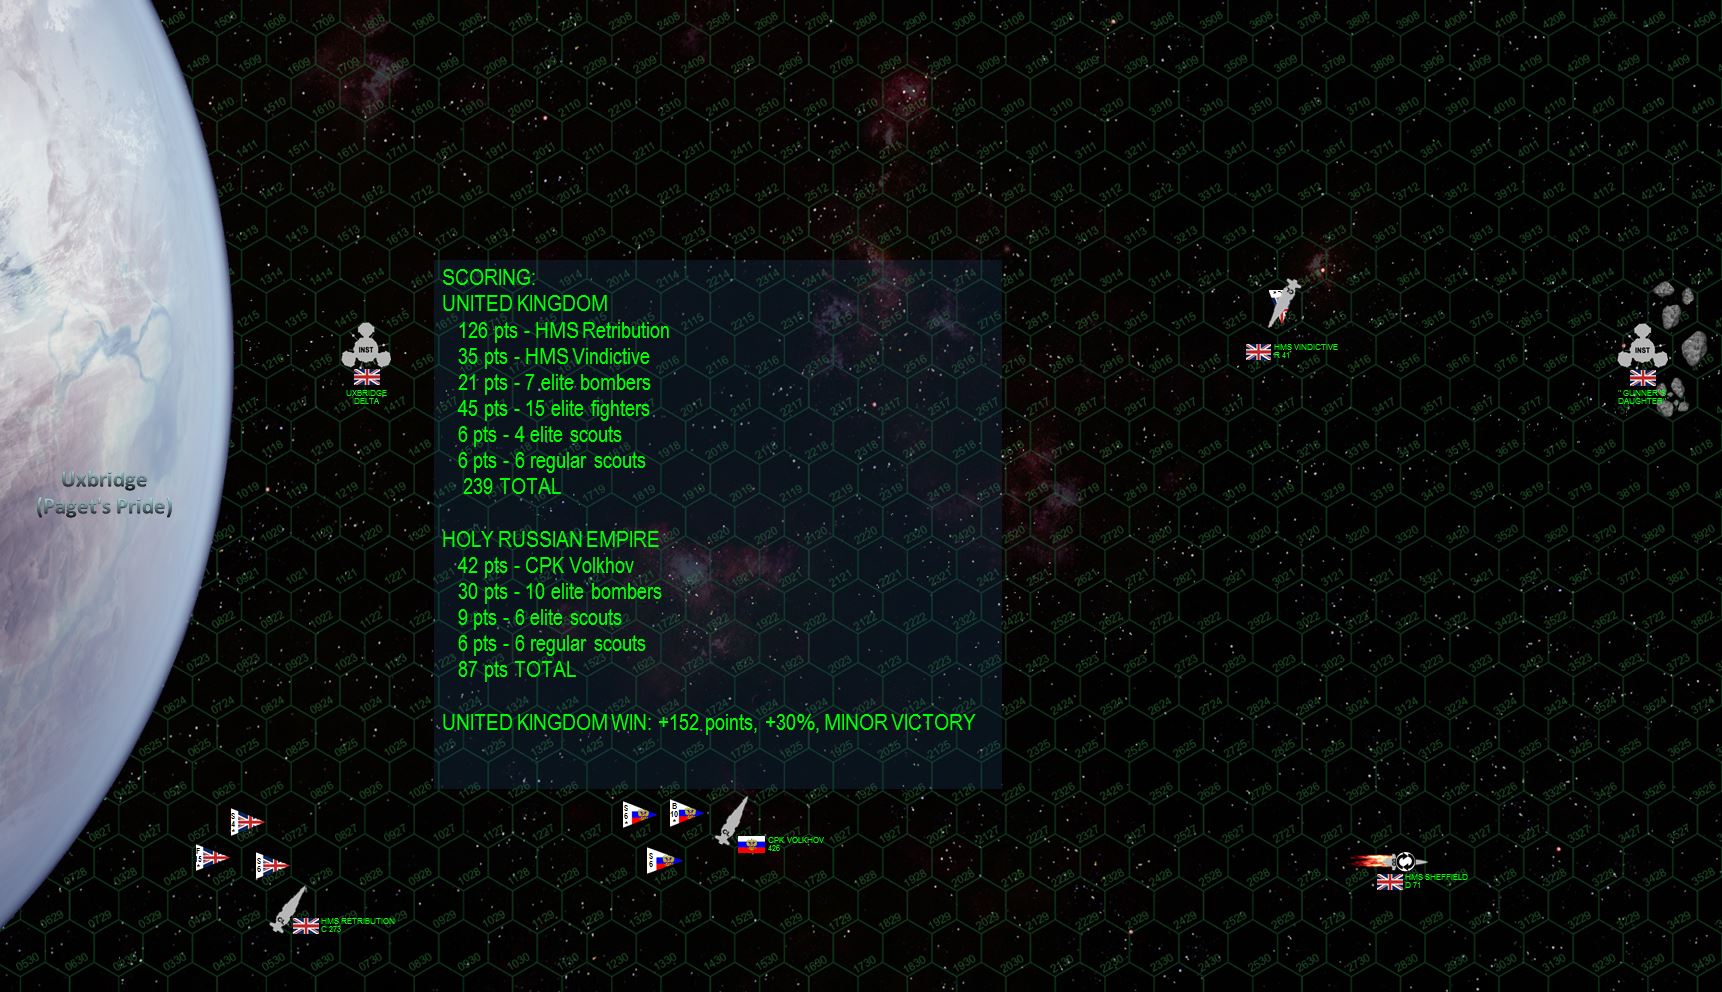 The game is called at this point. This has been a brutal, seven-turn “assault rules” game (victory points assessed by what REMAINS on the table, not what is destroyed). The score is displayed. Suffice it to say the British have resolutely defended the planet Uxbridge and its colony (Mu Hercules) system from the Russian “Three Sisters Squadron.”
 In winning this battle, the British have stepped away somewhat from their perilous brink of defeat. In the chart below, they had a campaign score of -9, with a defeat threshold of -10. With a +4 win (based on victory margin and scale of the battle) they are at -5 ... still on the back foot, but no longer staring into the abyss. The question is, will they strike first against the enemies threatening either Mu Hercules of Hawking’s Star ... or fortify defense against the next inevitable assault (this time probably from the Americans)?
Long-Range American Raid at 14 Hercules (Khaizan's Haven)
FROM: UNITED NATIONS REGIONAL COLONIAL CENTER
09:10 SOL GMT, 23 AUGUST 2521
BREAKAUTH: 181072.18J
CLEARANCE: SECRET (NATIONAL)
**UNITED NATIONS COMMUNIQUE**
The general American offensive continues to unfold across the Hercules Rim, a clear indication of their desire to bring their participation in the Third Hercules War to a decisive and successful conclusion. Almost simultaneously with the successful raid they and their Russian allies have carried off at the HH779 comet in the Outer Hebrides (Mu Hercules A/B), other elements of Task Force Oriskany have sortied from Port Halsey and made the incredible 60 light-years to Khaizan’s Haven in just two over weeks.* Their mission is to hit the Arab League’s surveillance outpost and naval staging platform orbiting Bayankhongor,
*[In game terms, all the ships in Task Force Oriskany have purchased sufficient FTL upgrades until they can generate 12-magnitude Darkstar waves, giving them approximately x1000 c superluminal speeds.]
Bayankhongor is something of an oddity, a terrestrial planet in an irregular orbit, highly eccentric to the solar plane and much further from the 14 Hercules parent star than is found in most standard solar system models. Some speculate it is actually an escaped moon from one of the systems outer ice giants, others guess Bayankhongor was tossed out of its original orbit by migrating gas giants in the system’s early history. Bayankhongor is also a Mongol name, a vestige of 14 Hercules’ previous Black Dragon occupants (the League hasn’t yet given the rogue planet a new Arabic name).
The purpose of the American raid may seem unclear until one reviews the over situation in the Third Hercules War. Obviously the American effort is focused against the British along the spinward shoulder of the Hercules Rim. But while the Americans have their hands full in places like the Outer Hebrides, the last thing they want are Japanese or Arab League allies showing up to help the British. So the Bayankhongor Raid is meant to pin down other Renkei Alliance forces on the coreward shoulder of the Hercules Rim, demonstrating that Japanese and League holdings out here remain under threat, and discourage redeployments to help the British at the Outer Hebrides.
As for the League, their mission is much less circumspect. With these repeated incursions by the Russians and now the Americans, the League remains determined to defend these new holdings at 14 Hercules. “Stay out of Khaizan’s Haven,” one League commenter was heard to say. “This is our system, we stole it from the Black Dragons fair and square!”
United States: Oriskany
Arab League: Muakhah
212 points per side
RAID victory rules
 The current disposition of the Third Hercules War. With successful American and Russian raids putting the British on the back foot in the Outer Hebrides (Mu Hercules A/B), the Americans hope this raid way out at 14 Hercules will give pause to British allies in the Renkei Alliance (Japanese and Arab League). The Americans hope that raiding operations along the coreward shoulder of the Hercules Rim will discourage Japanese or Arab redeployments of naval reinforcements to help the British at the Outer Hebrides, thereby putting Japanese and League possessions at greater risk.
 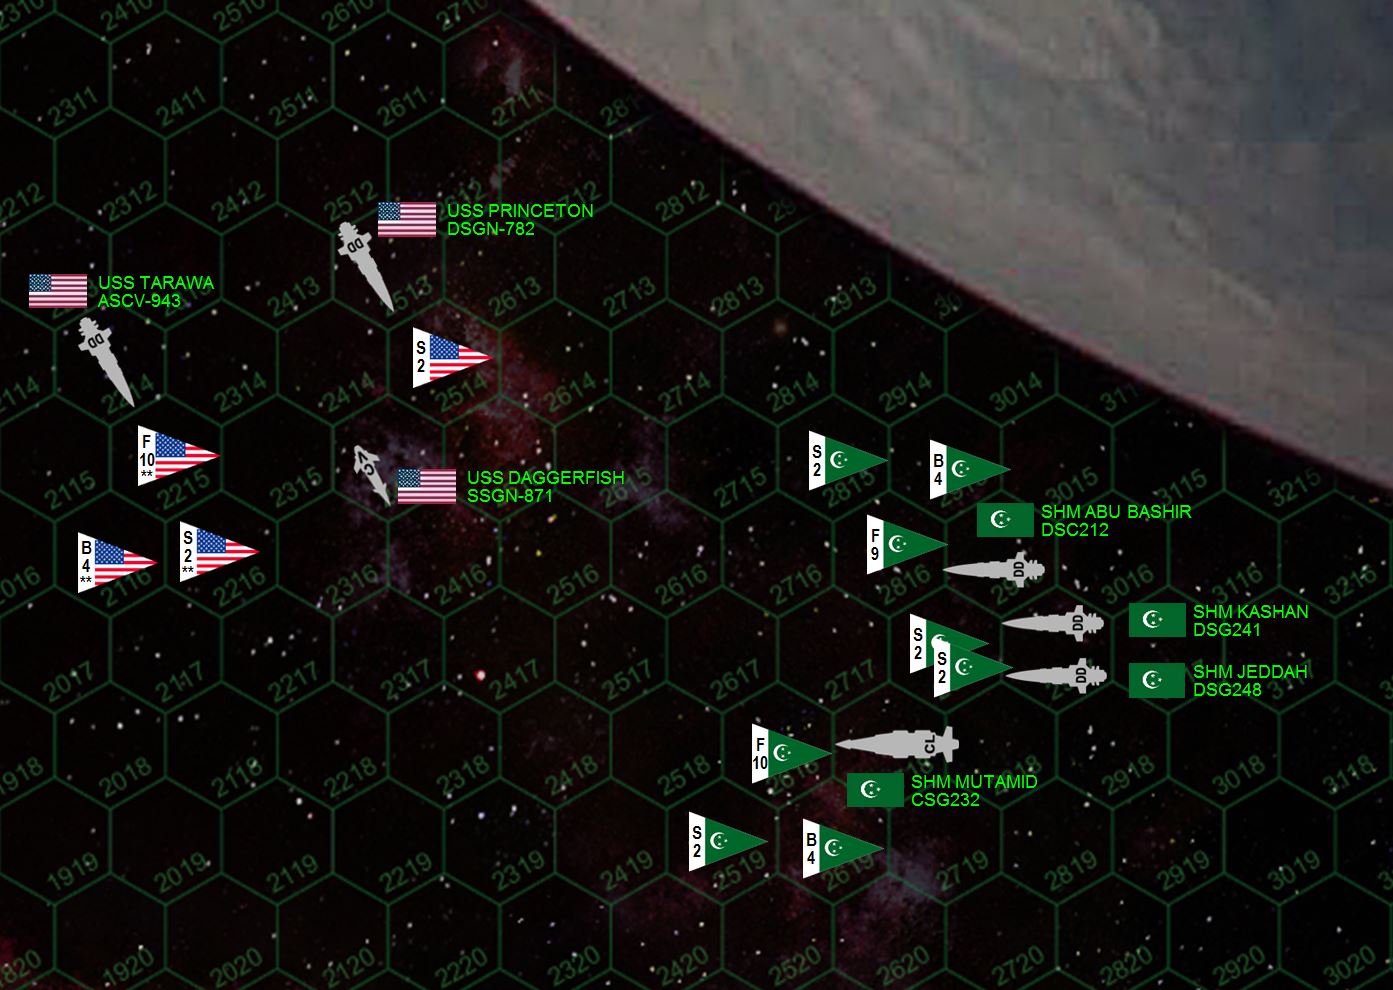 Here is the matchup. This is a small one, and the second Darkstar game played that day. American forces include the destroyer USS Princeton (sister ship to Oriskany but with fewer upgrades), light carrier USS Tarawa (a converted USMC planetary assault ship), and the hunter-killer torpedo corvette USS Daggerfish. These ships all generate 12-mag Darkstar waves (have earned and purchased the required upgrades) which explains how they crossed the Hercules Rim to hit such a remote target so quickly. The Tarawa carries the fighters and bombers of USMC aerospace strike squadron VMF/A-319 (the “Tigersharks”), double-elite badasses who are nevertheless badly outnumbered by the aerospace strike wings of both the SHM Matamid (Almanzor class light hybrid cruiser) and SHM Abu Bashir (Khalifa class light carrier). Escorting the League carrier and hybrid cruiser are the sisterships SHM Jeddah and Kashan (Basra class destroyers). In all, the Americans are heavily outnumbered. In terms of gunnery we’re looking at a light cruiser and two destroyers against just a destroyer … in terms of aerospace we’re looking at a 2:1 superiority. But these American ships are elite, and the USS Daggerfish carries insanely dangerous torpedoes guided by a +2 CiC/targeting bonus and +2 (double upgraded) electronic warfare. In total this gives her forward spread (8 tubes) +4 to hit, and League mass drivers a -2 to shoot them down. Ouch.
 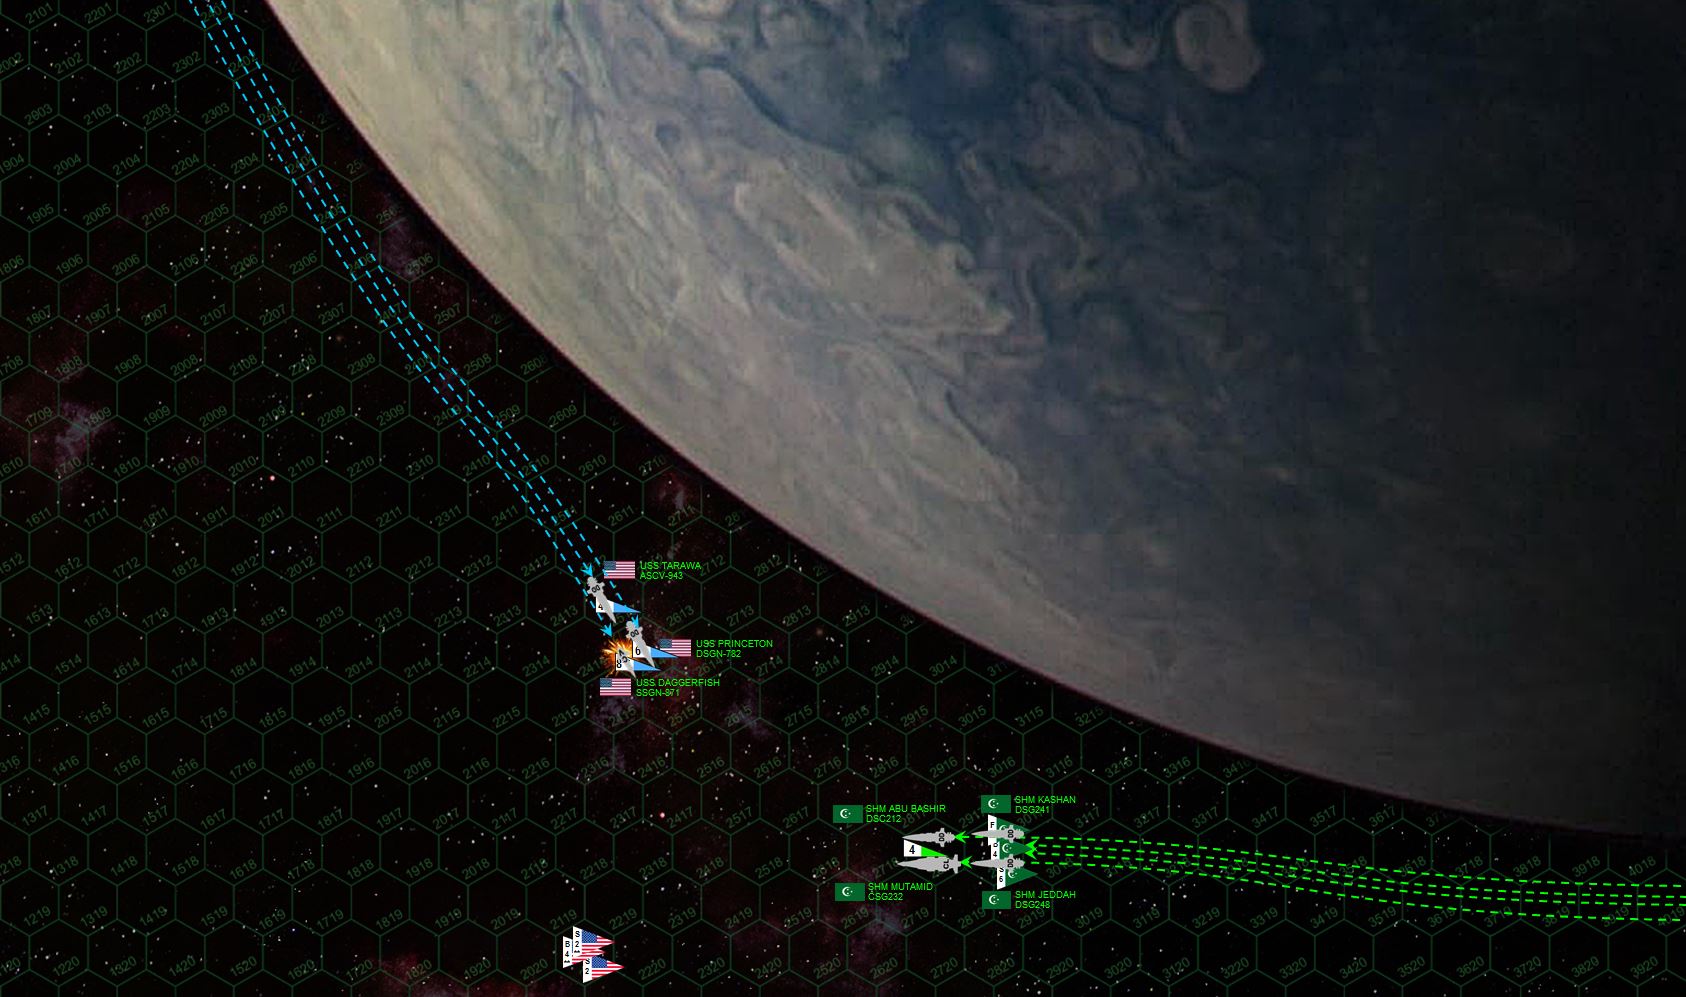 The Americans and League make their initial approach. Almost immediately I see the mistake by sleep deprived mid may have made here … eager to show off how fast this small battlegroup was, I closed with the Arab League WAY too fast, thus throwing away much of my advantage in electronics, elite aerospace, and ranged accuracy. Closing this quickly gives my opponent Muakhah the chance to make this about GUNNERY, a prospect in which his battlegroup will win ten times out of ten. As if to prove the point, he focuses his forward lasers and EPCs on the USS Daggerfish. While her shielding and electronic warfare make her about as hard to hit as a cloaked Romulan Bird of Prey, the League ships have a fair amount of electronics as well, and when it comes to gunnery salvoes at this range … numbers matter. The Daggerfish is soon crippled with hits to both her bridge and starboard reactor. While losing the ship is bad enough, losing the eight Mark 48 torpedoes (quadruple upgraded, by the way) really takes the killing edge off the ONE BIG AEROSPACE STRIKE I’m going to be launching … my only real chance at victory. This was a dumb move on my part, but my opponent saw it and took advantage, smart enough to NOT waste his first big salvo on the more obvious targets like USS Princeton.
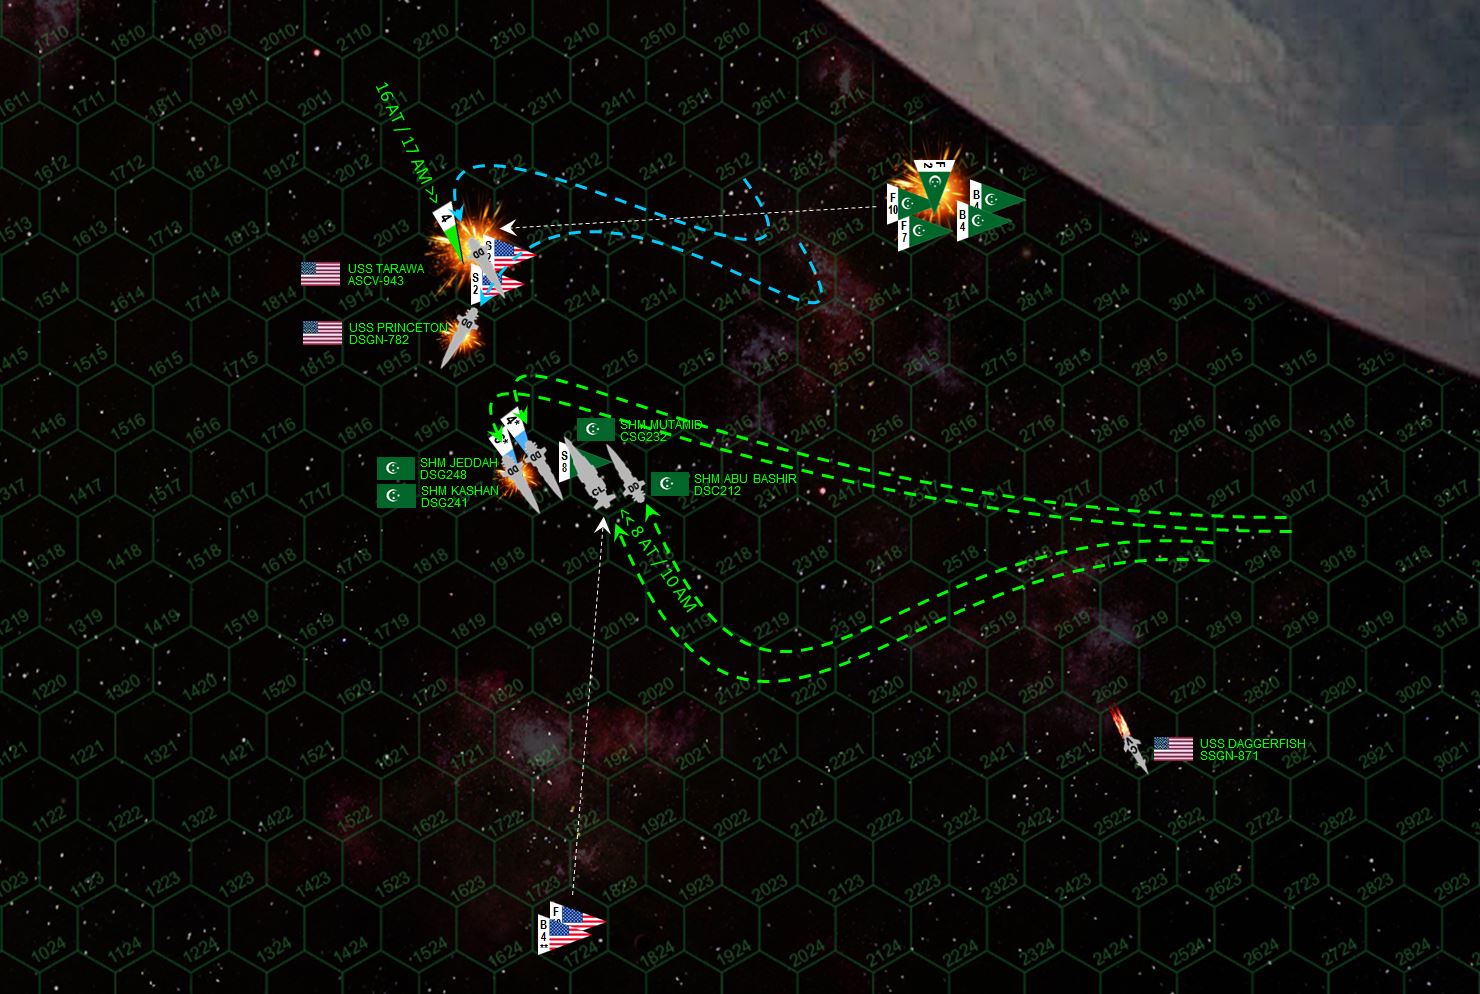 Things continue to go badly for the Americans as … sure enough … their aerospace and torpedo strike doesn’t come to very much. Sure, the League is helped by some good dice rolls on point defense (a 6 and two 5s, if memory serves) but in a game like Darkstar, players make their own luck, which Muakhah did LAST turn by knocking out the Daggerfish. If I’d still had those EIGHT Class 4 torpedoes, with +4 to hit and -2 to shoot down, good mass driver rolls wouldn’t have mattered, this torpedo and aerospace strike would’ve still blown Abu Bashir out of the stars. Also, I divided by aerospace strike here (perhaps not realizing just how bad it had been weakened), so while I damage Abu Bashir and Kashan, I don’t cripple either ship. Meanwhile, while I’m able to shoot down some of the “Mylekinir” (Fire Angel) fighters slinging missiles at USS Tarawa, I don’t shoot down enough of the torpedoes released by his “Demkikham” (Vengeance) bombers, and the Tarawa takes enough hits in her engines and reactors to leave her adrift, burning, and without power.
 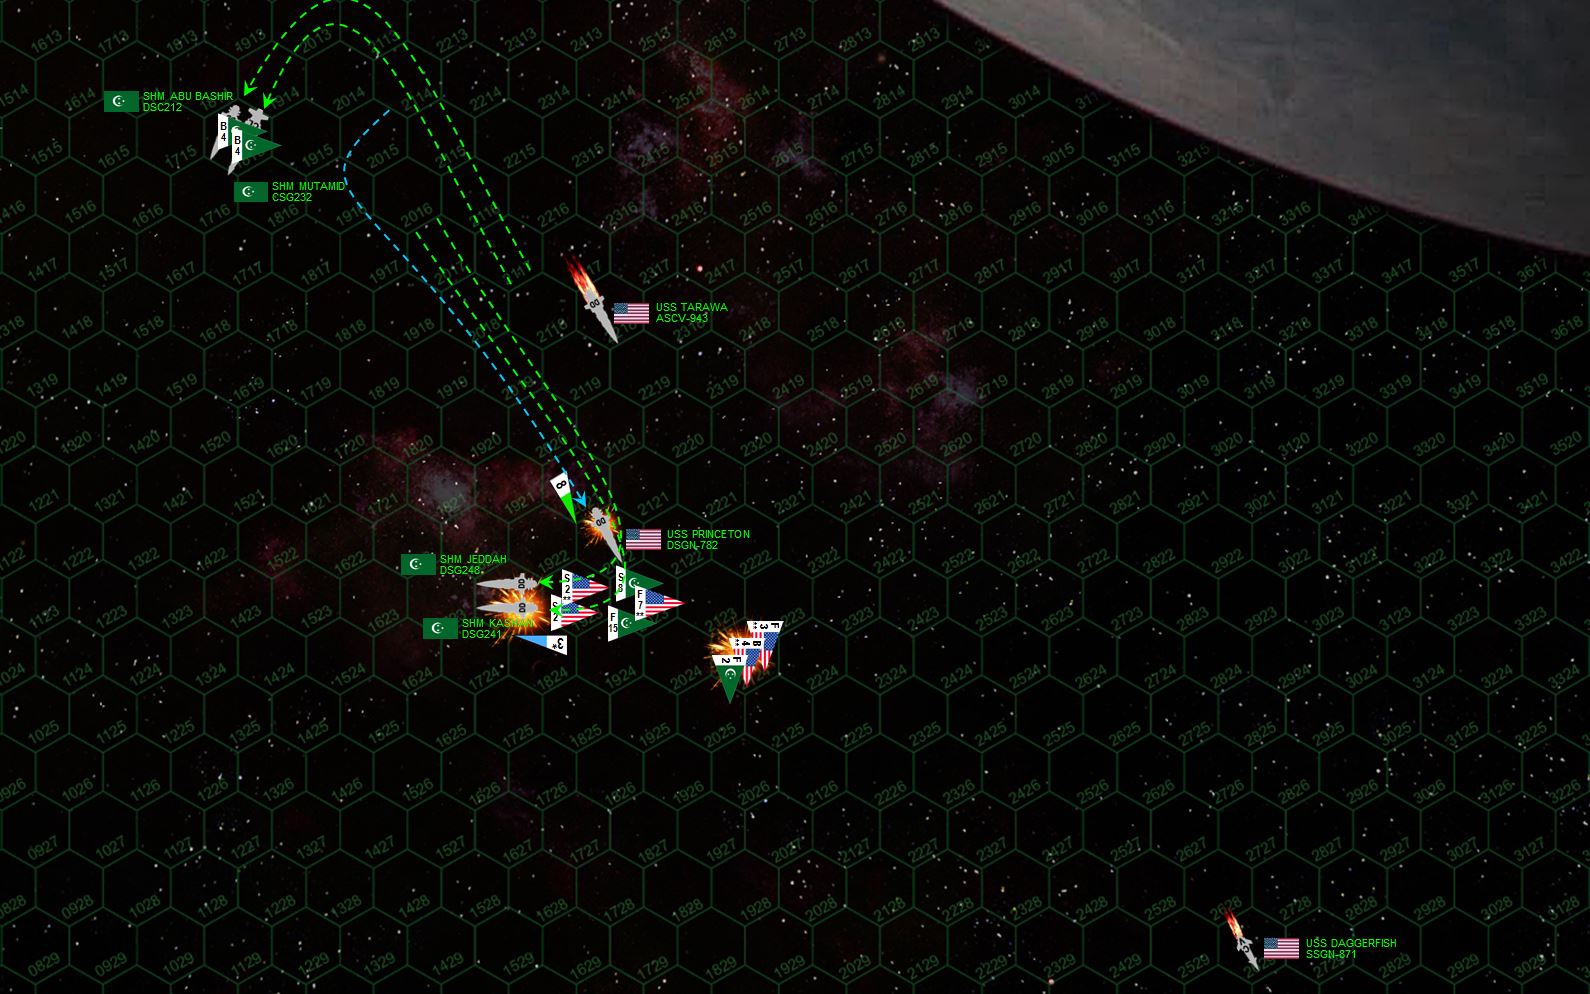 While the Americans have clearly lost this game, it’s up to the USS Princeton and Marine pilots of VMF/A-319 to at least mitigate this disaster down to a “minor” defeat. Note the League has somewhat divided their battlegroup here, a result of basically always losing initiative to these much faster American ships and so trying to cover multiple angles in their movement phase. While this isn’t a bad move (again, it’s all but impossible for Muakhah’s ships to beat Princeton on initiative) it does leave the damaged destroyer Kashan in somewhat isolated and vulnerable to a second strike. The Marines of “Tigershark” squadron dive for her damaged stern, taking heavily losses to League mass driver defenses. But the FS/A-81 Avenger bombers, E/S-101 Hawkeye scouts, and especially F/S-44 Star Corsair fighters put enough chain guns into the stern of the Kashan to detonate her starboard engines and reactors, sending her hulk spinning through space. The Princeton has matched this move, meanwhile, and comes THAT CLOSE to crippling the SHM Jeddah as well with a point-blank broadside across her stern (literally I needed a 5+ to cripple, I rolled a 4).
 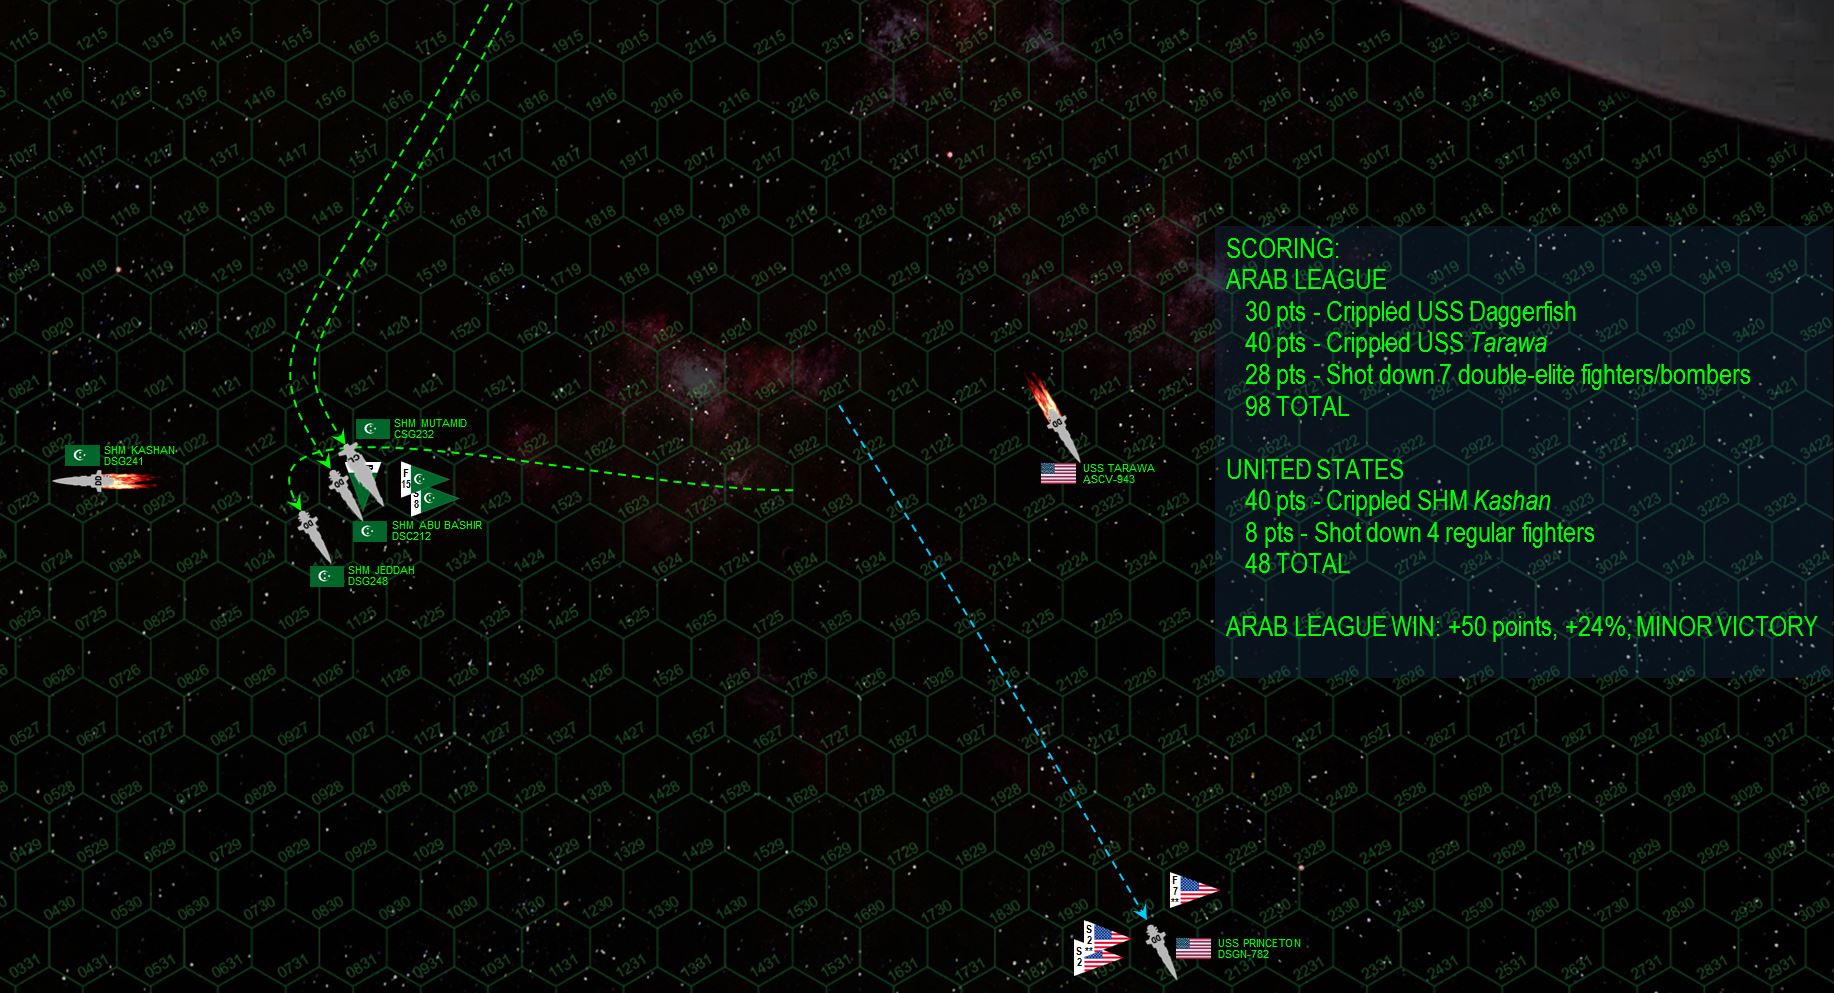 USS Princeton takes her damage as well, but manages to maintain power and leave the table on her own power. The American aerospace withdraws as well, and both side begin recovery and rescue operations. In particular, the fires aboard SHM Kashan continue to rage out of control despite controlled venting … it’s up to the flagship SHM Mutamid and her commander, Captain Rashid al-Maghrebi, to transfer additional damage control parties and take the Kashan in tow. It bears noting that IF the Americans had managed to cripple both the Kashan and Jeddah, and take less aerospace losses in that last-ditch strafing run, MAYBE they could have forced a draw out of this debacle. But as it stands, with only the Kashan left inoperable, the result is a solid League “minor” victory.
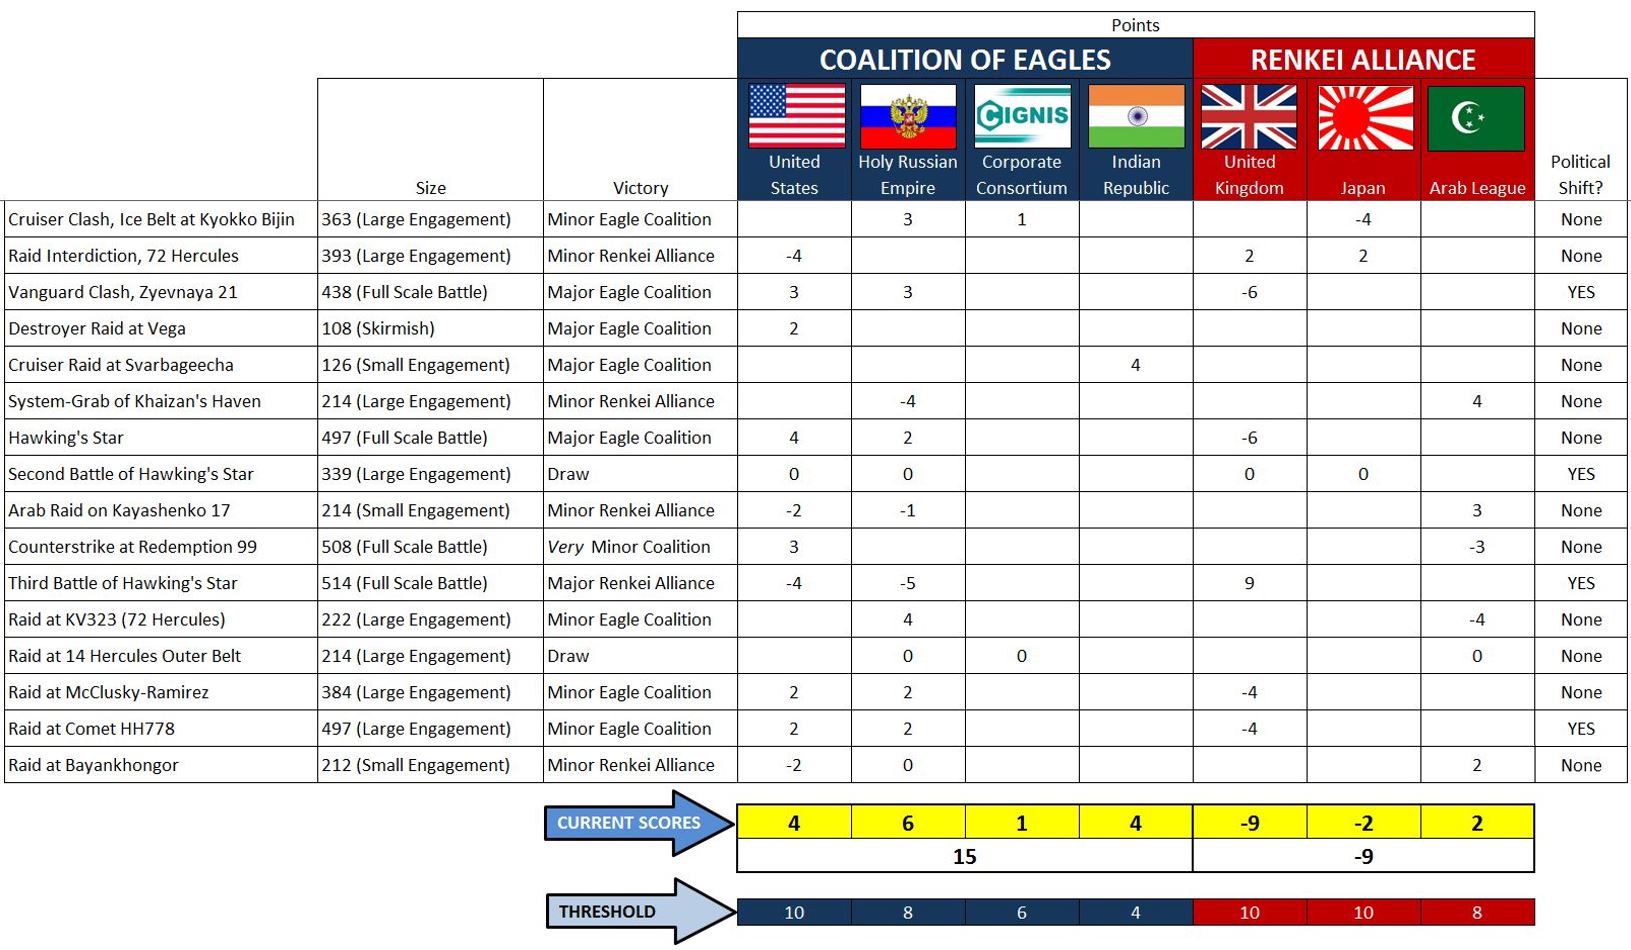 Needless to say, the result at Bayankhongor has taken some of the sting out of the American sector-wide offensive. While the operational result of this raid has little bearing on the situation at Outer Hebrides, the fact that American wolfpacks WON’T be prowling around the coreward systems of the Hercules Rim means that Japanese and Arab League reinforcements might be free to help the British after all. Furthermore, half of Task Force Oriskany is now limping back across the Hercules Rim, with ships facing long drydock repair times once they return. These are ships that will be sorely missed when the Americans open the next phase of their operations in the Outer Hebrides.
Skirmish at Comet HH779 (Outer Hebrides - Mu Hercules A/B)
FROM: UNITED NATIONS REGIONAL COLONIAL CENTER
22:45 SOL GMT, 19 AUGUST 2521
BREAKAUTH: 181072.18J
CLEARANCE: SECRET (NATIONAL)
**UNITED NATIONS COMMUNIQUE**
The current war raging across the Hercules Rim continues to escalate as the United States Navy has embarked on what seems to be a campaign aimed at winning at least their part of this conflict once and for all. After taking a pause to recover from their losses and setbacks in their failed Hawking’s Star campaign earlier in the spring, then breaking a British raid into the outskirts of the Port Halsey colonies (Vega / Lyra Alpha), they have now embarked on a general offensive on both the coreward and spinward shoulders of the Hercules Rim.
The first of these blows has landed against the British, fairly predictable given the proximity of Port Halsey to two of Britain’s largest colonial systems in this region, Hawking’s Star (HR 6806) and the Outer Hebrides (Mu Hercules A/B). Wanting no part of Hawking’s Star after their earlier frustrations, the Americans have instead shifted focus to the Outer Hebrides, joining with allies in the Holy Russian Empire for a strike against the Outer Hebrides colonies in Mu Hercules A/B. This is a binary star system with a large main sequence star just beginning to enter its red giant phase, and a much smaller red dwarf. British population and industrial settlements orbit the larger star, toward which the Americans have their approach by masking their task force behind the tail of a comet.
This is Holmsberg-Hebrides 779 (Comet HH779), which is now close enough to Mu Hercules A to begin streaming tails of ionized gas, sublimated frozen nitrogen, and crystallized water ice. As these materials shed off the comet’s core, outgassing and geysers have also cracked off large slabs of dust-mixed ice and porous rock, calving off the comet like slabs off a melting glacier.
This is the material the Americans and Russians (the so-called “Coalition of Eagles”) have been using to hide their low-speed, high-stealth Darkstar approach into Mu Hercules A, followed by their final sublight approach toward the first Royal Navy installations in the inner orbital zones of the system. The cover has screened their approach to a surprising degree, but a British Griffin-class gunboat has finally spotted them, and Task Force Agamemnon (Lord Commodore Edward Cavendish) has been sortied to intercept.
The battle promises to be a dramatic one. Not only is Task Force Agamemnon one of the more powerful and prestigious British formations in the Third Hercules War, but the approaching Americans and Russians represent some of the most battle-hardened ships in Known Space. These include the light cruiser CPK Admiral Lazarev and destroyer Syekyra, and the American light fleet carrier USS Liberty, carrying squadrons VSF-221 “The Dead Rabbits” and VSA-193 “The Eight Ball Express.” Rounding out the American force is none other than the Valcour-class destroyer USS Oriskany. One way or another, the Battle of Comet HH779 promises to be memorable.
United States / Holy Russian Empire: Oriskany
United Kingdom: Damon
497 points per side
RAID victory rules
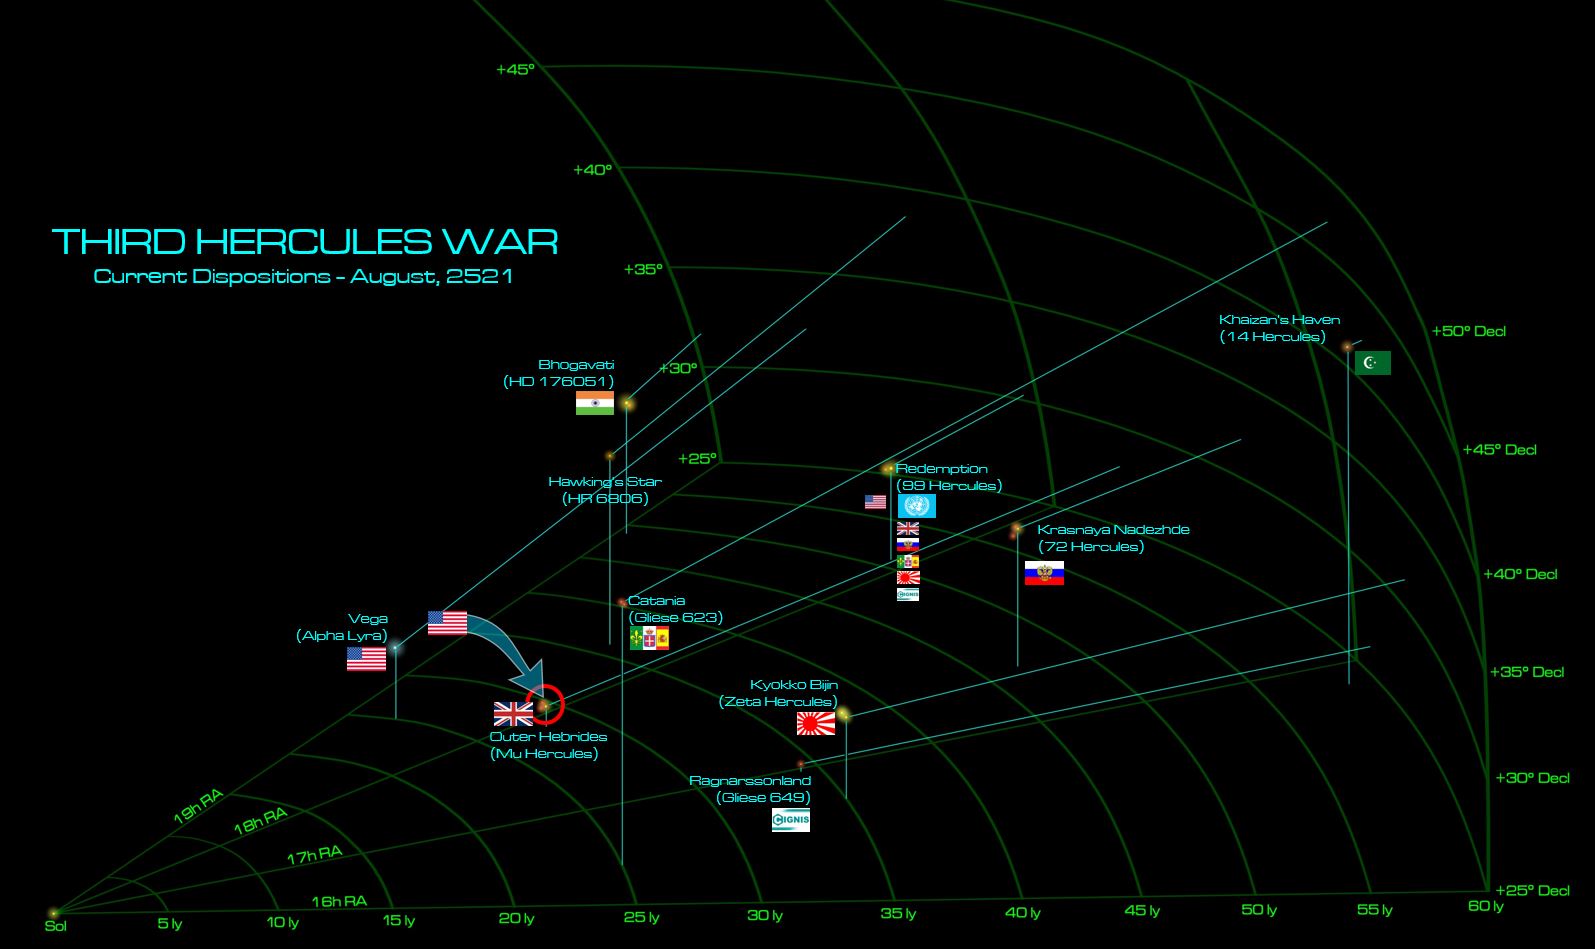 Current disposition on the Third Hercules War, showing in particular the Russo-American raid into the Mu Hercules. For an approach like this, the standard practice is to set a high-speed, high-magnitude Darkstar wave toward the target, dropping back into normal space anywhere from 200 AU to 2 light-years out from the stars or planets where the enemy may be waiting. Given the absurdly-high speeds of these waves (anywhere from 300-500 times the speed of light), even 25th Century clocks and instruments can’t always guarantee a precise exit point. Also, stronger Darkstar waves project a much larger curvature shadow into normal space, making them much easier to detect and at longer distances, and will also run afoul of stellar or planetary gravity fields from a much greater distance (thus causing catastrophic gravity shear). Accordingly, the approaching naval force usually sets a second “approach wave” - much slower, harder to detect, and more accurate - for the final approach into the target. Also, because this second wave casts a much smaller curvature shadow into normal space, they can get much closer to actual targets (i.e., enemy-held planets) before exiting into normal space. Here the Russians and Americans have added a third stage, a high-speed sublight “ghost approach” into the heart of Mu Hercules using the tail of the HH779 comet for additional cover.
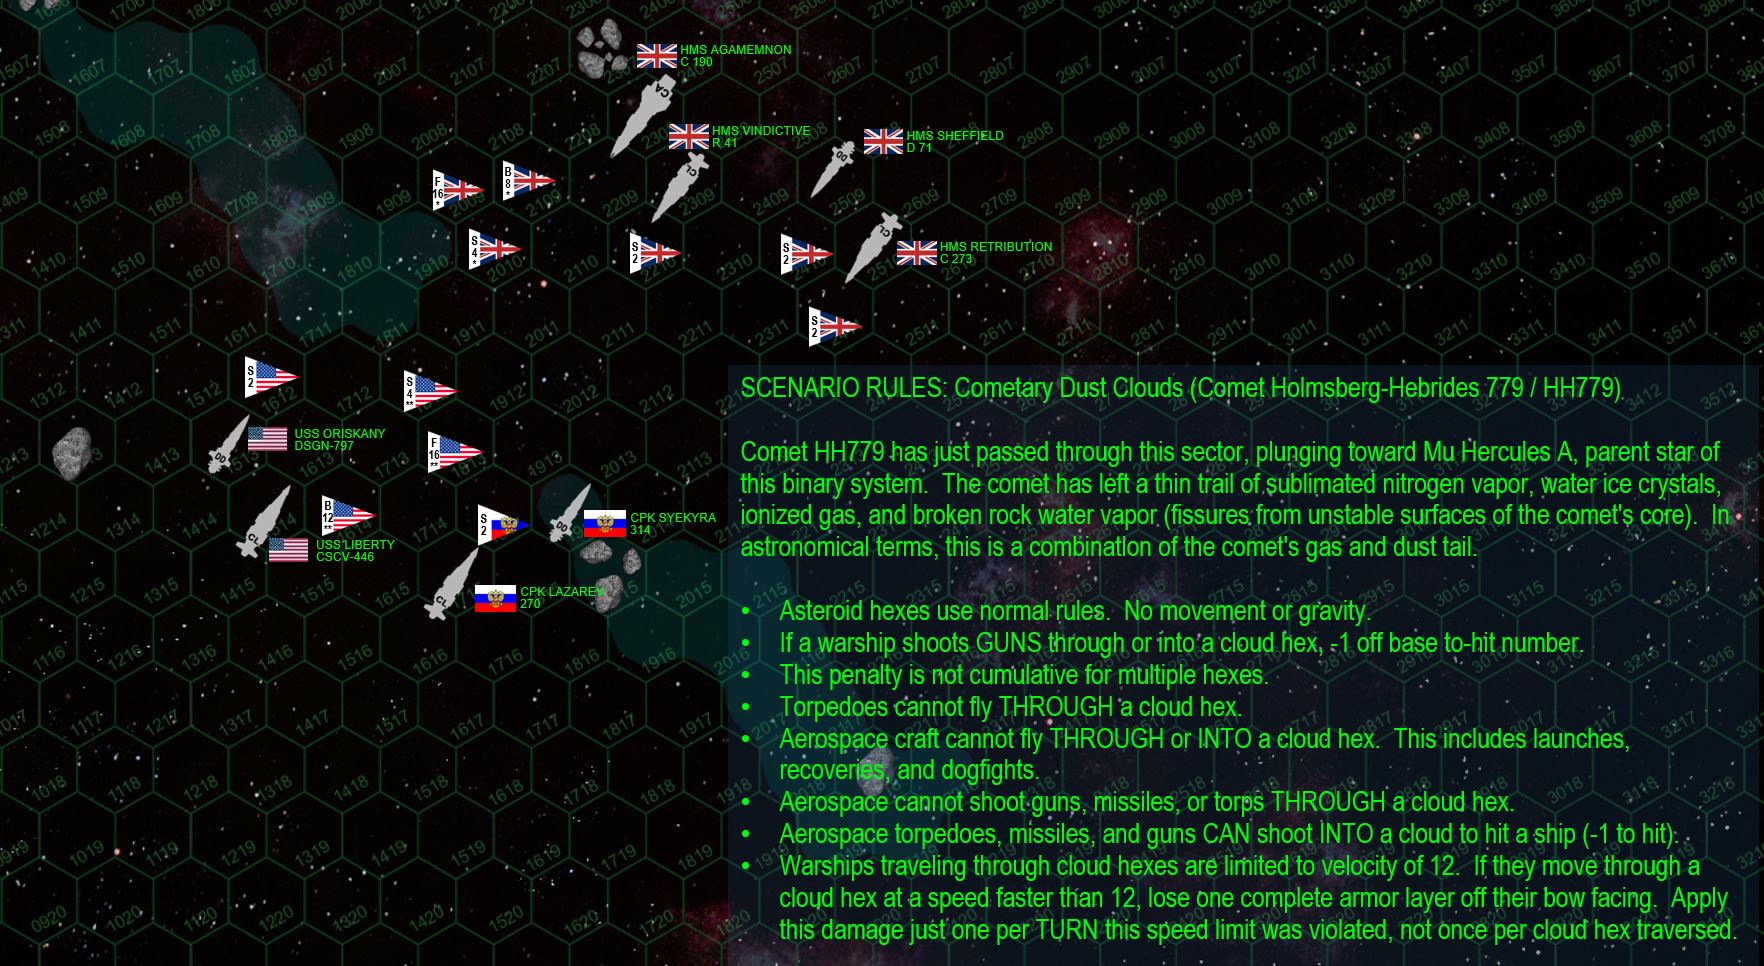 Here is the matchup, and the special rules for the starship duels in the tail of a comet. The torpedo and aerospace rules are written in there so the game won’t be “terrain balanced” against the British, who have a much more “gun-heavy” force than the Russians and especially Americans.
 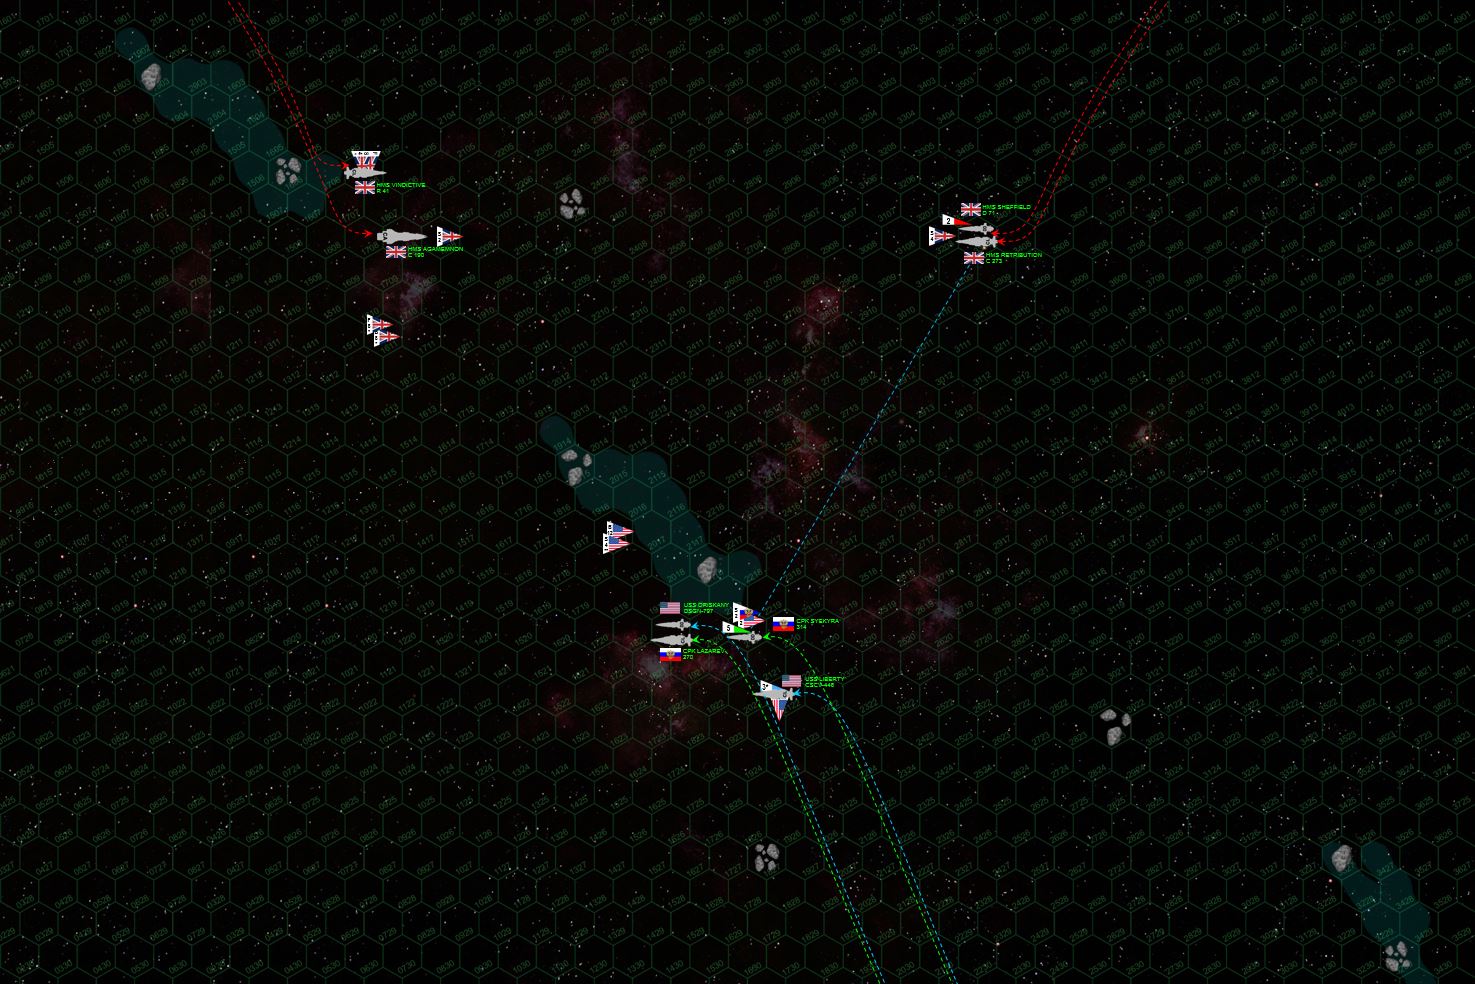 The two sides make their initial approach. The British start off with a novel attack, closing from two sides of the board to cover both main “gaps” in the comet gas/debris tail through which the Coalition may strike. As it turns out, the Coalition doesn’t push through either of these gaps, instead using the “spaceberg” ice fields and trails of ionized gas to hide most of their ships from the big guns of HMS Agamemnon and Retribution. This works for all the Coalition ships except the carrier USS Liberty, which is positively drilled by pinpoint, long-ranged laser, syglex, and rail gun fire from the light cruiser Retribution and destroyer Sheffield. In fact, the aft hangars of the Liberty are hit, just moments after the last of her bombers launch. Reactors, maneuvering thrusters, troop bays, and without guns of her own, the Liberty cannot respond at the moment, protected only by the smaller guns aboard the Russian destroyer Syekyra. After all, while the Lazarev and Oriskany are screened from British fire, this also means they can’t fire in return.
 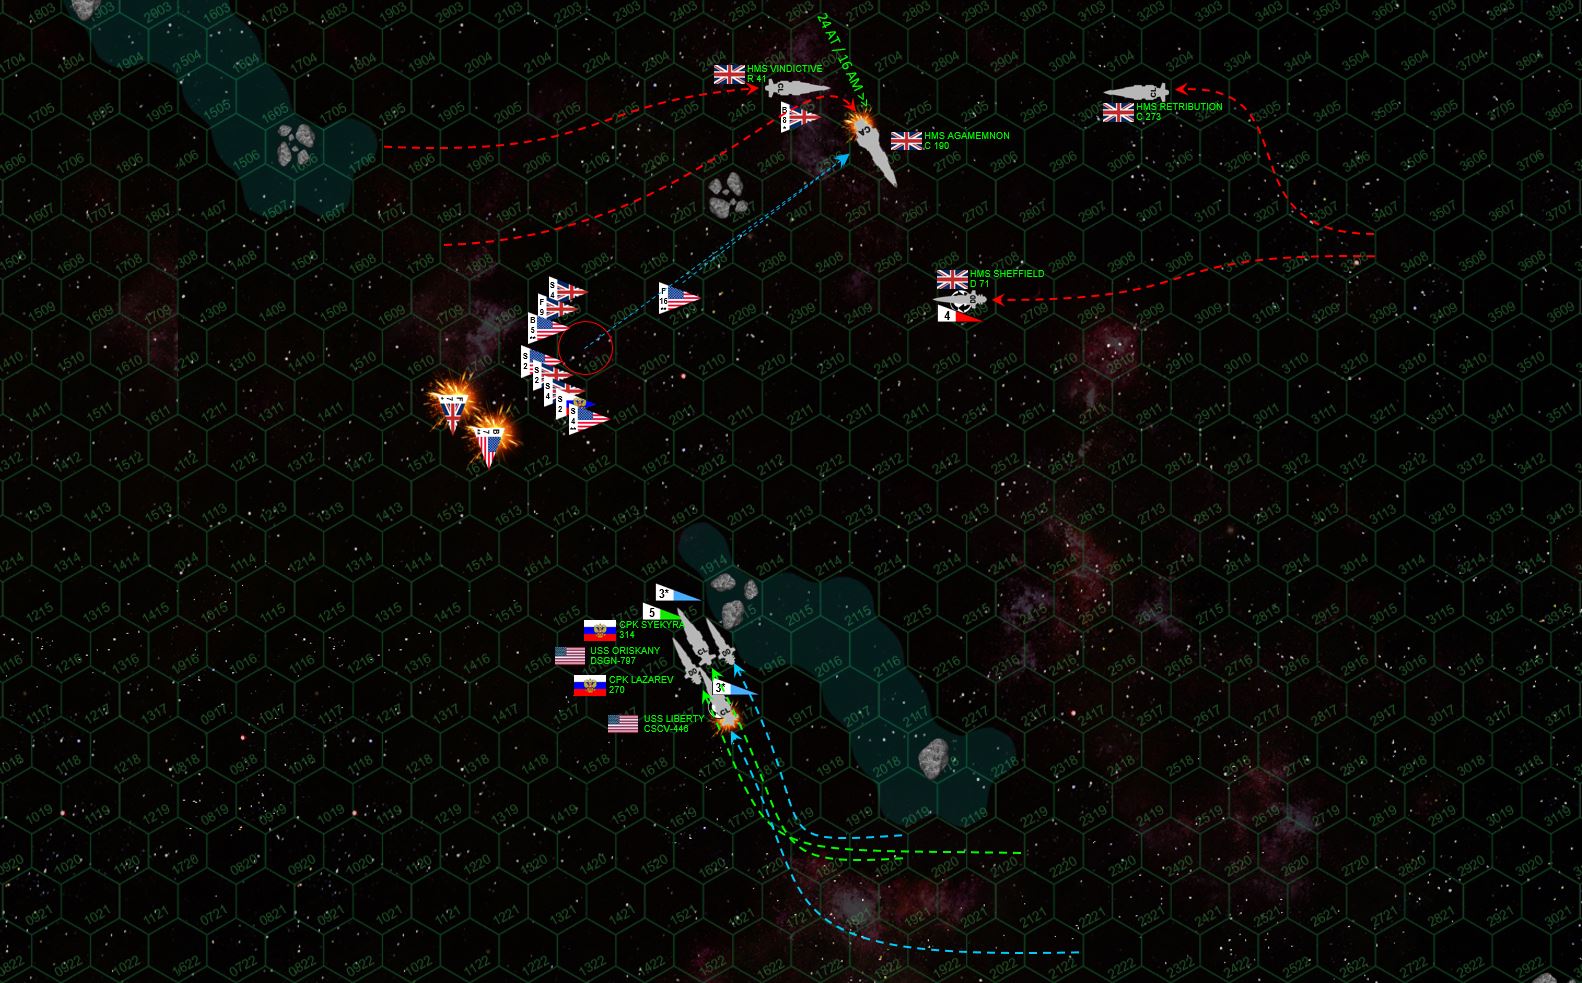 The Coalition again endeavors to make best use of “space terrain,” refusing to emerge from behind the comet debris tail until a hopeful torpedo and aerospace strike knocks out at least one of the heavier British “gun ships.” As HMS Agamemnon and Retribution converge, hiding from both ships becomes easier, although USS Liberty is hammered again (albeit on a different facing). Things SEEMS to go better for the Americans, with fighters of VSF-221 “The Dead Rabbits” closing to launch aerospace missiles and VSA-193 “The Eight Ball Express” to launch torpedoes at the Agamemnon, carefully positioning themselves so only the Agamemnon (and not the rest of the British task force) can offer defensive fire against the American aerospace craft. The American bombers are attacked by British fighters, but even this is something of a trap as the American bombers are still within the range of friendly mass driver point-defense guns, and the British Supermarine Starfires suffer heavy losses. As precise, cagey, and well-planned as the American aerospace strike is, however, it isn’t perfect. Warship torpedoes are still too far away, and British mass driver defenses can concentrate on shooting down American aerospace ordinance. The Agamemnon is struck twice astern, but her armor and upgraded shielding absorbs almost all the damage.
 Things get ... VERY sticky here. Agamemnon loses initiative and moves first, pivoting as shown to set up a broadside as the Coalition at last slips from behind that cometary debris. Aboard the Lazarev, Captain Piotr F. Myshaga orders flank speed, cursing the failed American aerospace strike and resolving to knock out the Agamemnon on his own with a broadside across Commodore Cavendish’s fantail. Appalled, the Americans are more or less forced to follow suit, they HAVE to stick close together in the face of an imminent British aerospace strike. The Liberty slides in alongside the Lazarev, ready to break off the action, but her mass divers and electronic warfare will be needed when those Royal Navy “Star Typhoon” bombers start slinging out torpedoes. The Retribution closes for a point-blank broadside on the Lazarev, the Oriskany cuts into Agamemnon’s hex to support Lazarev’s do-or-die broadside. The Vindictive swoops in so American fighters can’t help shoot down British torpedoes, the Syekyra supports the Liberty, the Sheffield cuts in for a point blank broadside against Liberty and Syekyra!
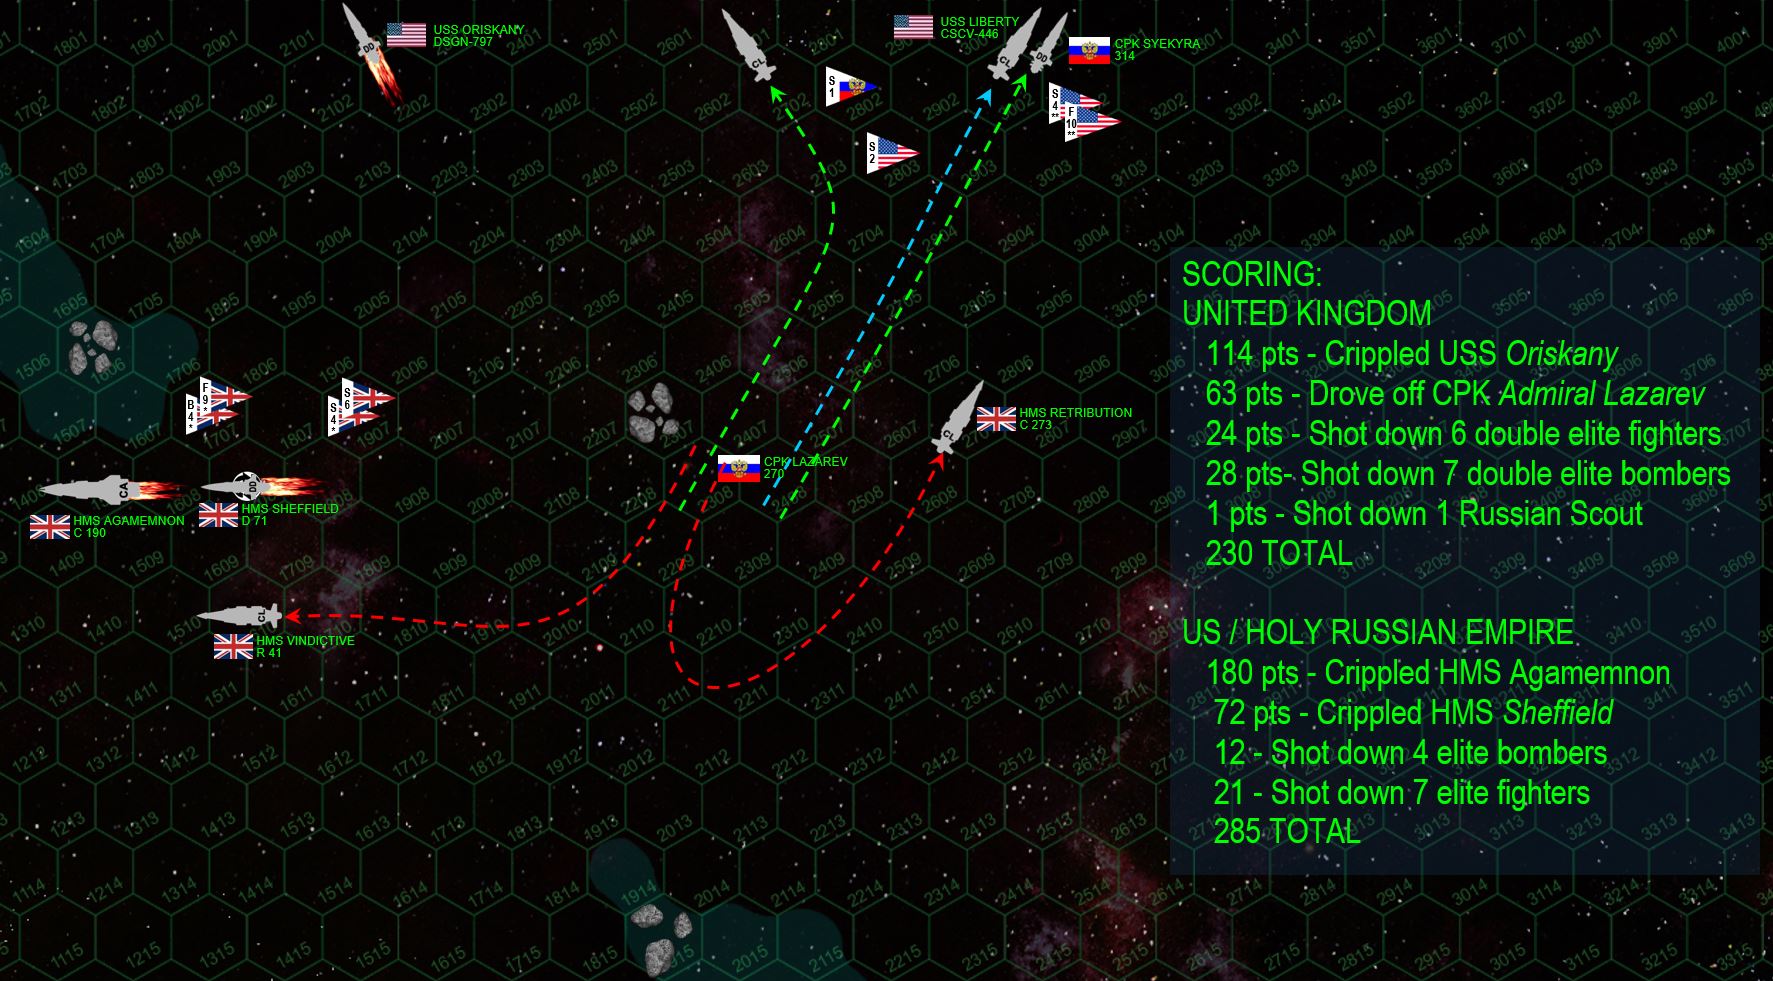 The fiery exchange that follows instantly decides the battle. The Oriskany and Lazarev cripple the Agamemnon, the Agamemnon and Retribution cripple the Oriskany. While trading a heavy cruiser for a destroyer is normally very bad business, note the Oriskany is worth 112 points, the Agamemnon is worth 180 ... so it’s not a DISASTROUS trade, especially given all the losses taken so far to American aerospace. The British aerospace strike pummels the Lazarev, and while she isn’t destroyed or crippled, she’s forced to break off. The Liberty was already running for her life, and the Syekyra takes horrific damage astern but somehow her skipper, Captain Ekaterina Duranov, manages to keep her reactors on line. The actual decisive blow comes from Syekyra, who manages to cripple the Sheffield with some point-blank 40-kg plasma projectors, 7 gw rail guns, and hot dice on the “Crippled Ship Check.” The score is shown in the slide, with the Russians and Americans claiming a hard-fought 11% minor victory.
 The successful Coalition raid on Mu Hercules A puts the British in a precarious position, not unlike the “brink of defeat” on which they found themselves in Hawking’s Star earlier in the year. In game terms, they now stand at -9 campaign score, with a threshold of +/-10. In other words, two more defeat points (one more battle) and they exceed the -10 campaign score their government and Admiralty is prepared to accept. In campaign terms, the successful battle at HH779 means the Americans are now sending in Saipan-class planetary assault ships, each leaded with a battalion of US Marines, hoping that one more “Assault” victory (as opposed to “Raid”) in Mu Hercules will allow them to put boots on Mu Hercules colonies and end America’s involvement in this war once and for all.
 British Raid on McClusky-Ramirez
FROM: UNITED NATIONS REGIONAL COLONIAL CENTER
01:20 SOL GMT, 25 JULY 2521
BREAKAUTH: 181072.18J
CLEARANCE: SECRET (NATIONAL)
**UNITED NATIONS COMMUNIQUE**
War has returned to the spinward shoulder of the Hercules Rim. After a period of relative calm following the bloody Battles of Hawking’s Star (HR6806), heavy naval action is again reported along the far “western” edge of the Third Hercules War.
Not content to await renewed American aggression against the Hawking’s Star colonies or perhaps the Outer Hebrides (Mu Hercules), this time the British have resolved to strike first. The Royal Navy has launched powerful elements of the Agamemnon Task Force (Commodore Edward Cavendish) out of the Outer Hebrides’ Woodward Yards in a raid against a remote American outpost along the edge of their Vega colonies (Alpha Lyra).
Although their force includes the heavy cruiser HMS Agamemnon, the light fleet carrier HMS Vindictive, and the destroyer HMS Sheffield, the powerful light cruiser HMS Retribution is still undergoing an engine overhaul and repairs, and will not take part in the raid. Cavendish respectfully warns that his battlegroup is understrength and the Port Halsey base at Vega houses very powerful American naval formations. The Admiralty has overruled him, however, citing that he’s not been ordered to attack Port Halsey itself, only a small outpost at the outer ice giant McClusky-Ramirez. In any event, the Americans must be struck, and now, before they regain their balance and lash out against British colonies in the Hercules Rim.
Indeed, the Americans are building up a powerful invasion force for a renewed effort. Eager to reinforce this operation (and thus secure a share of the spoils), the Holy Russian Empire has also deployed light and medium battlegroups to Vega. Thus, when the Agamemnon and her escorts drop out of their Darkstar waves and vector toward McClusky-Ramirez, they find not only the American heavy cruiser USS Shiloh (Rear-Admiral Virginia Saunders) maneuvering to intercept, but she’s escorted by light carriers, destroyers, and frigates of the Holy Russian Empire’s Krikalev carrier battlegroup.
The American outpost is an automated listening post, refueling point, and navigation beacon that’s actually nestled in the clouds of the McClusky-Ramirez (Neptune analog) ice giant. Control of the station isn’t exactly vital (in game terms, this is still a RAID and not an ASSAULT), what really matters is destruction of enemy warships. Whichever side deals out the bloodier nose here will have a marked advantage in the outer orbital zones of the Alpha Lyra system, and thus this sector of the Hercules warzone.
Holy Russian Empire: Rasmus
United States: Oriskany
United Kingdom: Damon
384 points per side (optional, +100 points for control of the station)
RAID victory rules
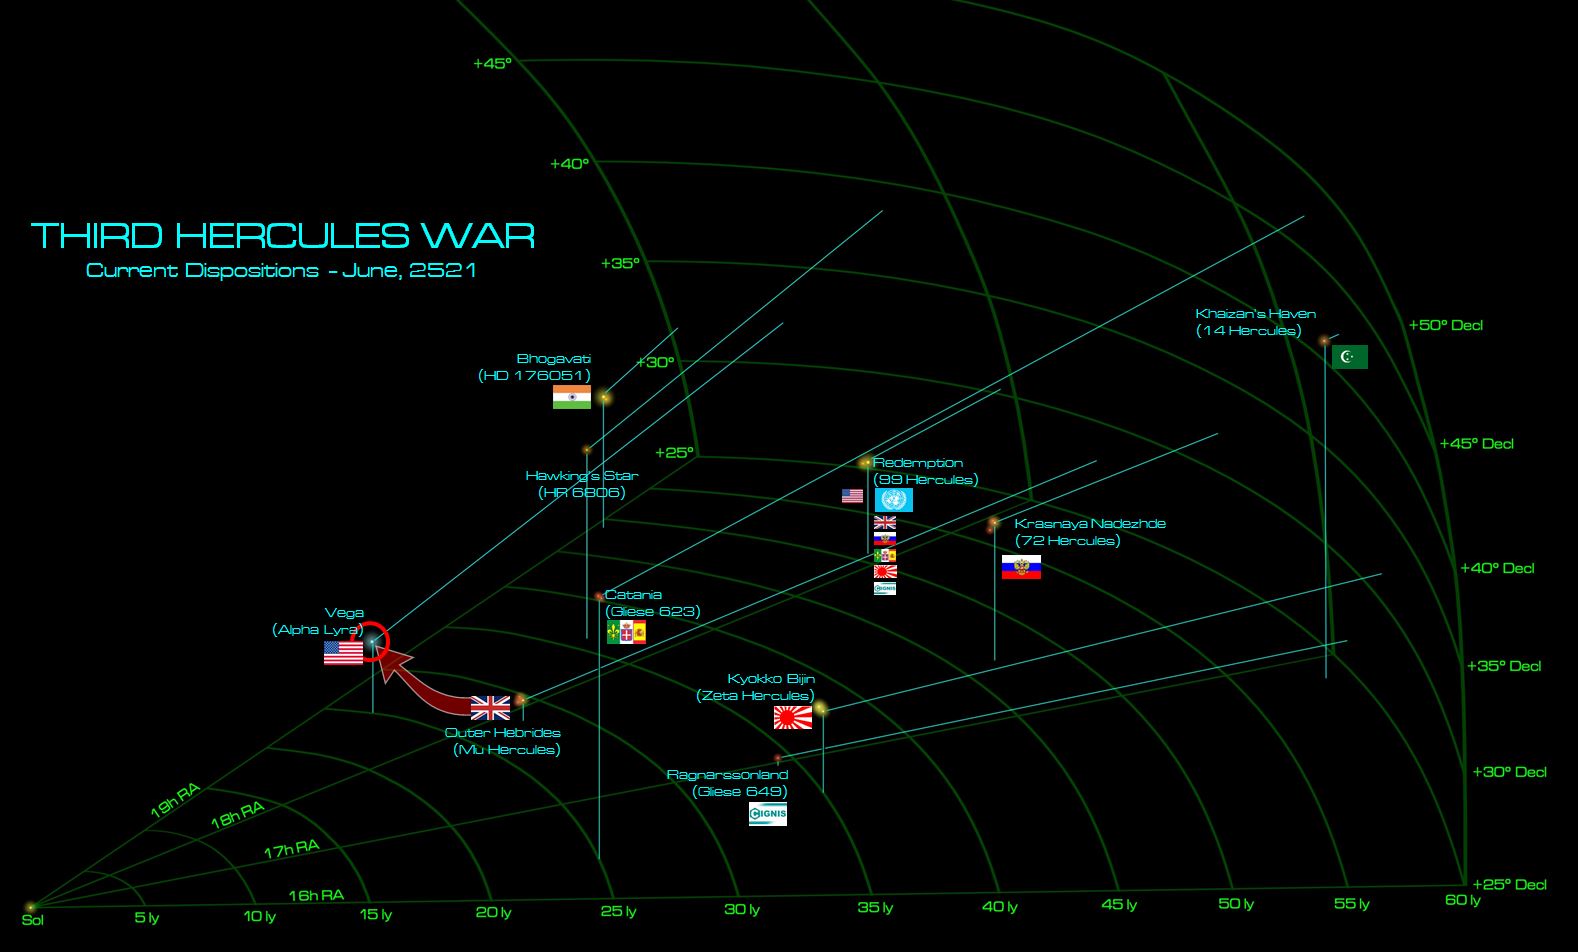 Current disposition on the Third Hercules War. Despite a series of bone-splintering battles, nothing much has actually changed in what the media is starting to call “The Iron Triangle” of Vega, Hawking’s Star, and the Outer Hebrides. So far all the big wins here have been defensive ones, where enemy invasions one way or another have been defeated. The Americans and Russians are still winning the war of attrition, however, and the British are slowly being ground down out here. Some say a marked lack of support from their Japanese allies is to blame.
 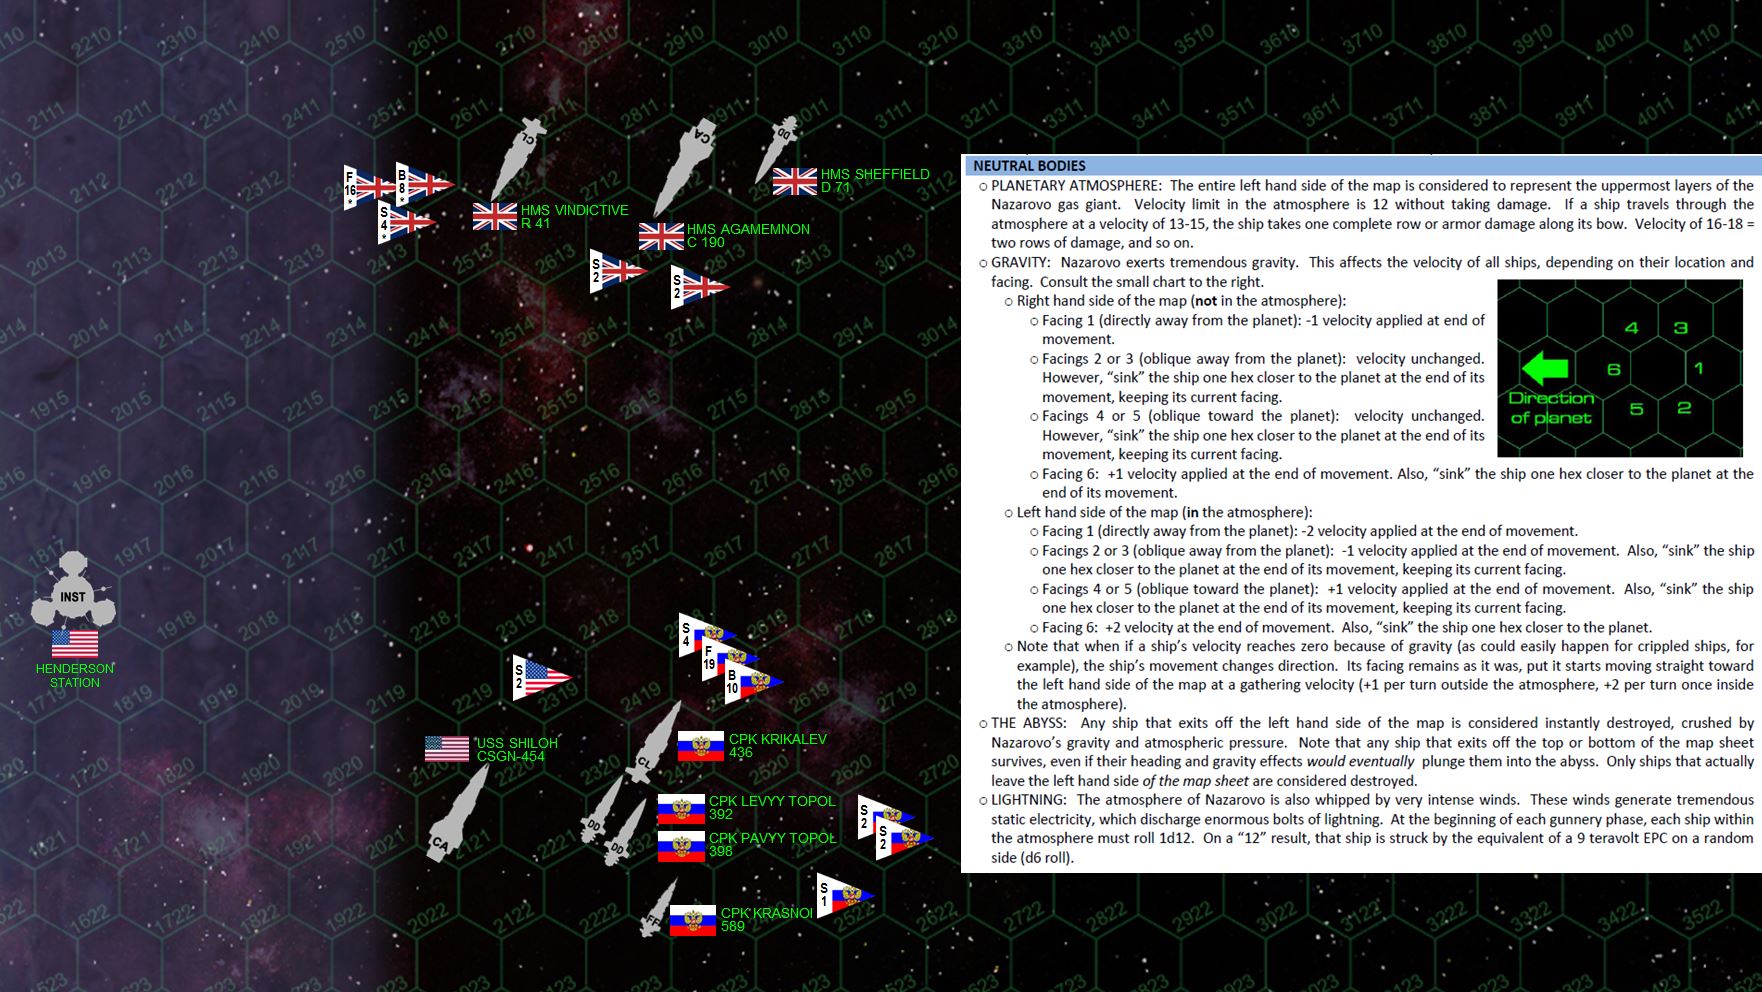 Here’s the matchup. Yes, the British are heavily outnumbered, but their ships are all very heavily upgraded with elite crews. Rasmus’ Russian force is more or less brand new, and contains much lighter ships. The gravity special rules are to the right. Yes, this is a GAS GIANT battle, where gravity rules are f***ing brutal and can kill a ship without even being fired on. “Outside” the gas giant atmosphere (right side of the board), the rules are less severe. “Inside” the atmosphere, however, the gravity rules get crazy, plus there are atmospheric friction rules and enormous sheets of lightning. Why even mess with that side of the table? To hide from your enemies, to drag them down with you, or to be the closest ship to the station (bonus 100 victory points). But it’s dangerous, make no mistake. (SPOILERS - there IS a math mistake here, I address this later).
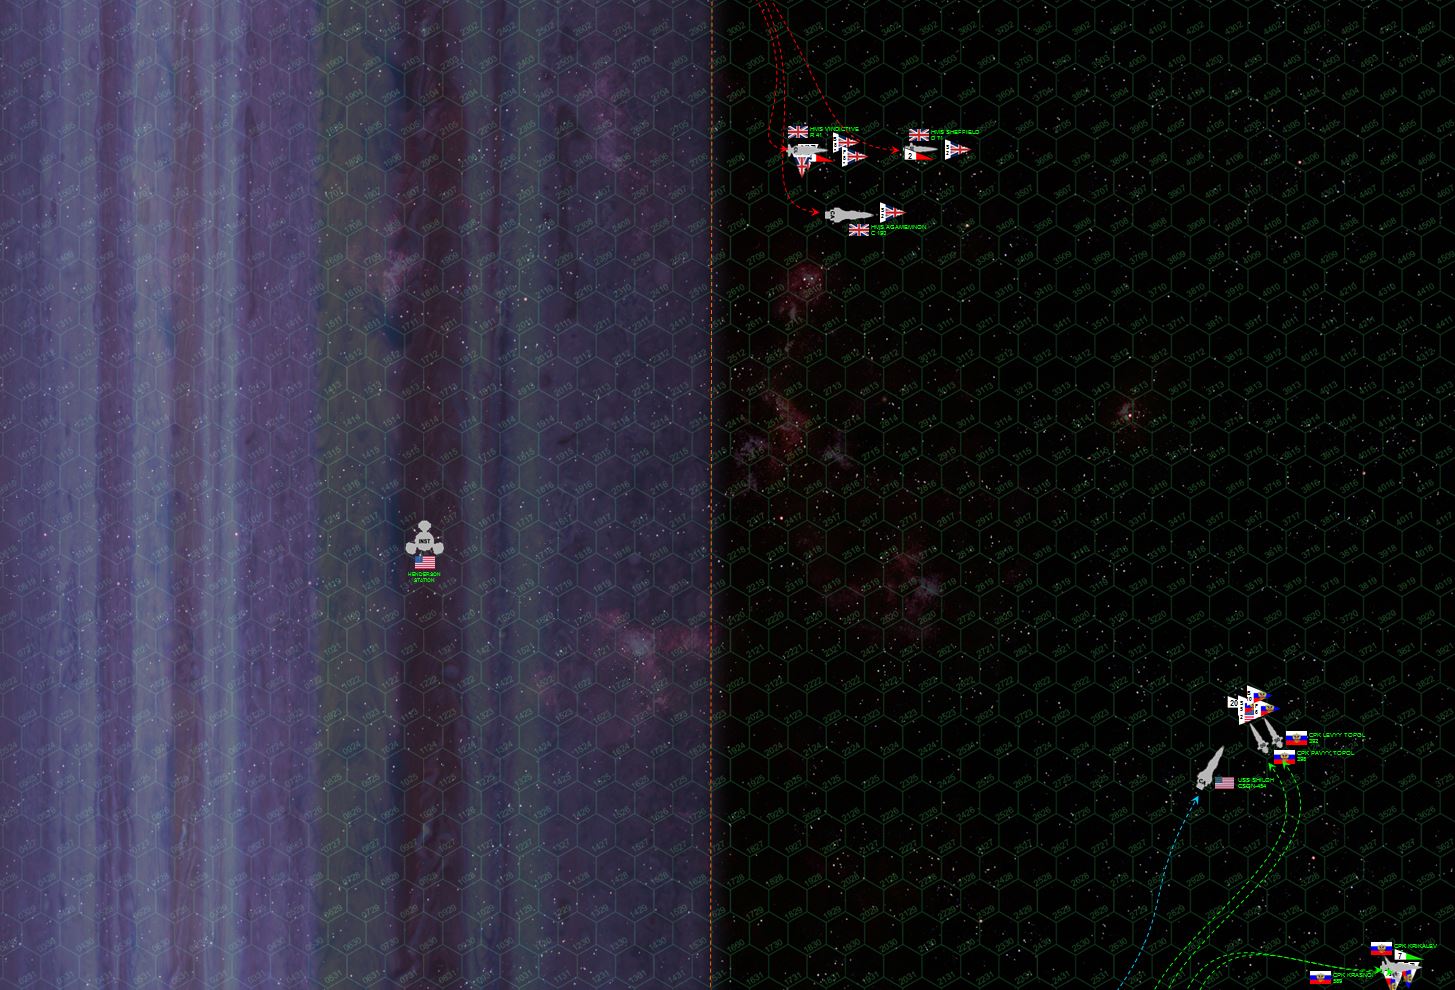 The opposing formations make their approach, start launching fighters and torpedoes. Looks like the British are trying to keep the “gravity gauge” (keeping themselves between the enemy and the planet, forcing the enemy to turn INTO gravity to engage them) or maybe they’re just keeping their options open to move toward the American station later. The Russians, meanwhile, are already having communication problems with their American allies, the USS Shiloh and the two Sovnya class destroyers aren’t exactly in close formation. Meanwhile, the Russian carrier CPK Krikalev remains well back, escorted by the frigate CPK Krasnoi.
 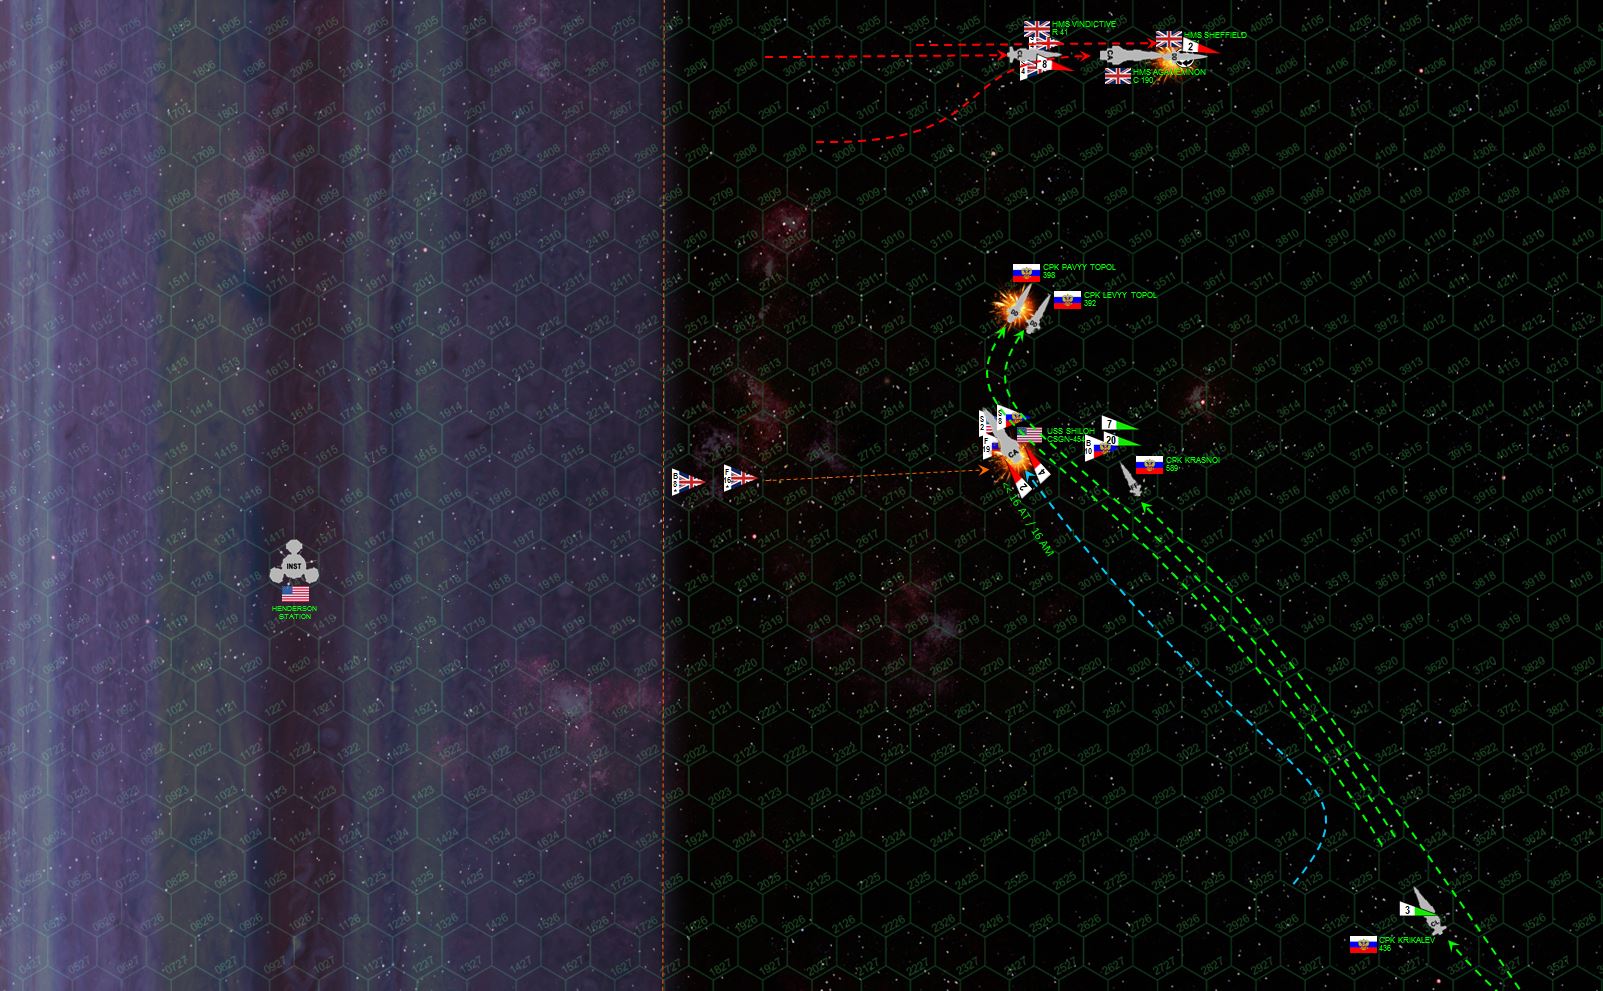 The Russians abruptly bolt toward the British, HARD. The USS Shiloh, even with her upgraded thrust and tactical initiative bonuses, cannot completely keep up (she’s over triple the weight of those Russian destroyers). This is bad news for the Americans, as the whole British aerospace group is now launched and the Americans are perilously on their own when it comes to aerospace defense. The Russian battlegroup commander realizes this, and rather than escort his bombers, sends his fighters to protect the Shiloh from the massed British torpedo and missile strike. It saves the Shiloh, although she still takes three Model 41 gravitic torpedoes in her port engines and reactors. The Russian aerospace bombers can’t quite reach the British meanwhile, and the Agamemnon puts a broadside into the destroyer Pavyy Topol that all but blows her bow off, while the HMS Sheffield damages the Levyy Topol so badly that she’s being forced to break off. Although the Sheffield takes withering damage in return, she remains operational. This is not going well for the “Coalition of Eagles” so far.
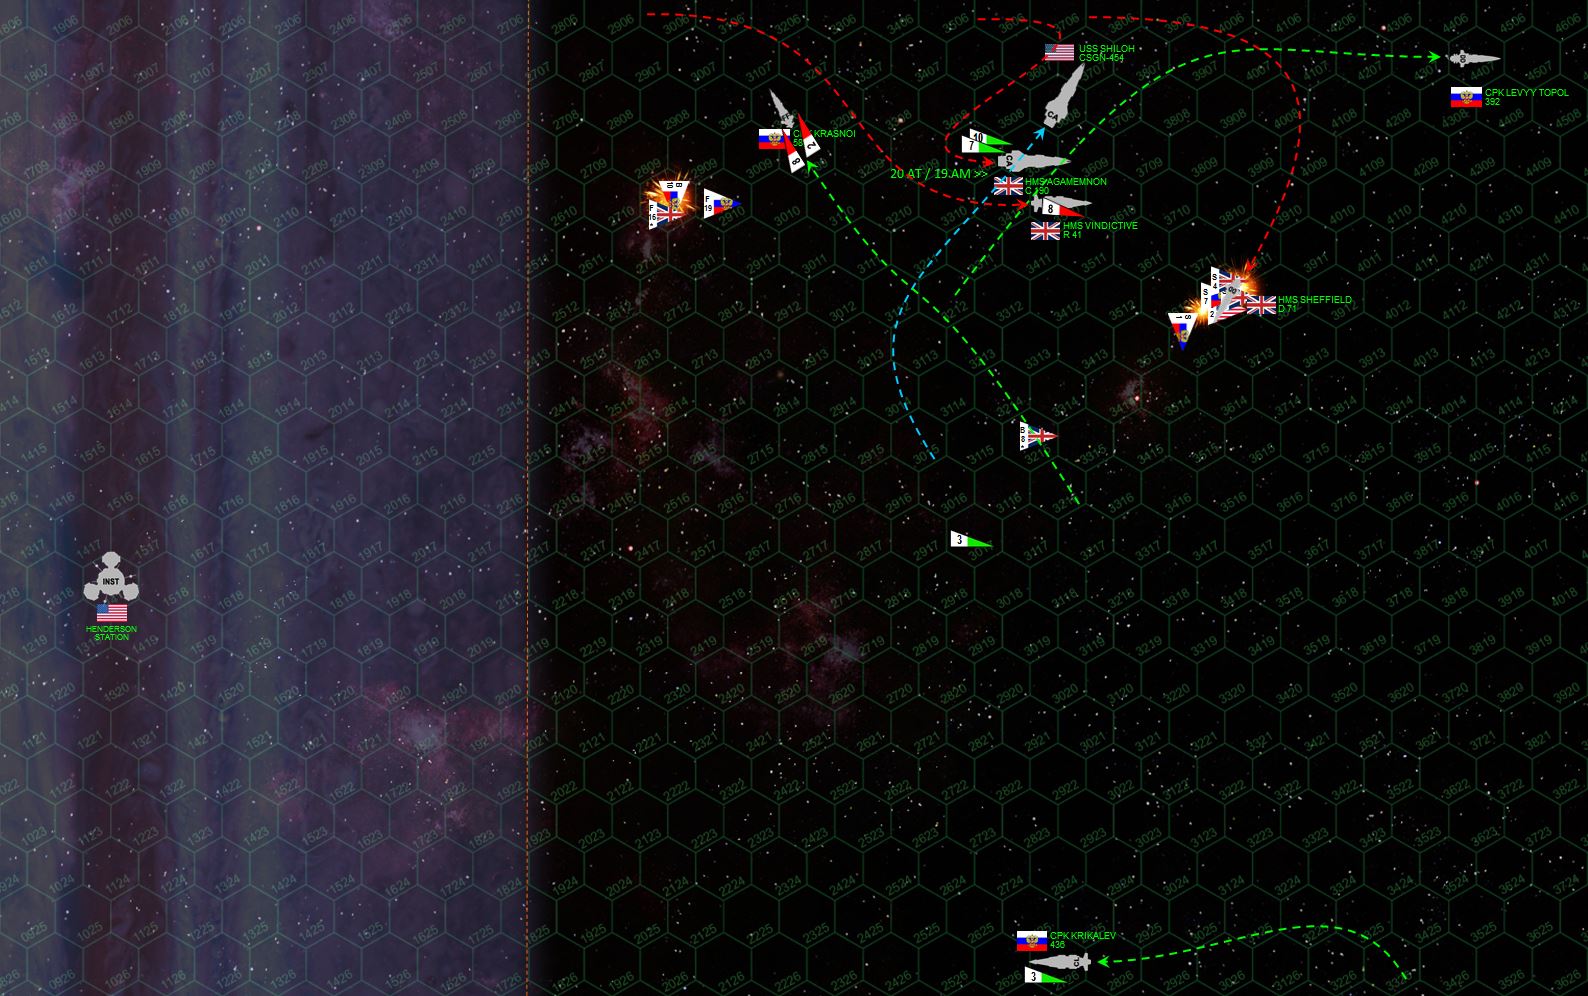 Things continue to go badly for the Americans. The USS Shiloh is by far the heaviest warship on their side, but it is deftly outmaneuvered by the Agamemnon (the fastest heavy cruiser in Known Space), who puts a broadside right into her stern at point-blank range. The damage is horrific, but it is misplaced. Vital engines and reactors are largely missed, and the Shiloh, by the grace of God, survives what should have killed her outright. Meanwhile, the Shiloh tries to shoot back as best she can, her forward guns taking grim vengeance on the HMS Sheffield, who is crippled by Shiloh’s massive 10-gigawatt rail guns. The Russian aerospace and torpedo strike hits the stern of the Agamemnon, but again not enough hits ... and what does hit ... hits in the wrong place. The Agamemnon survives as well.
 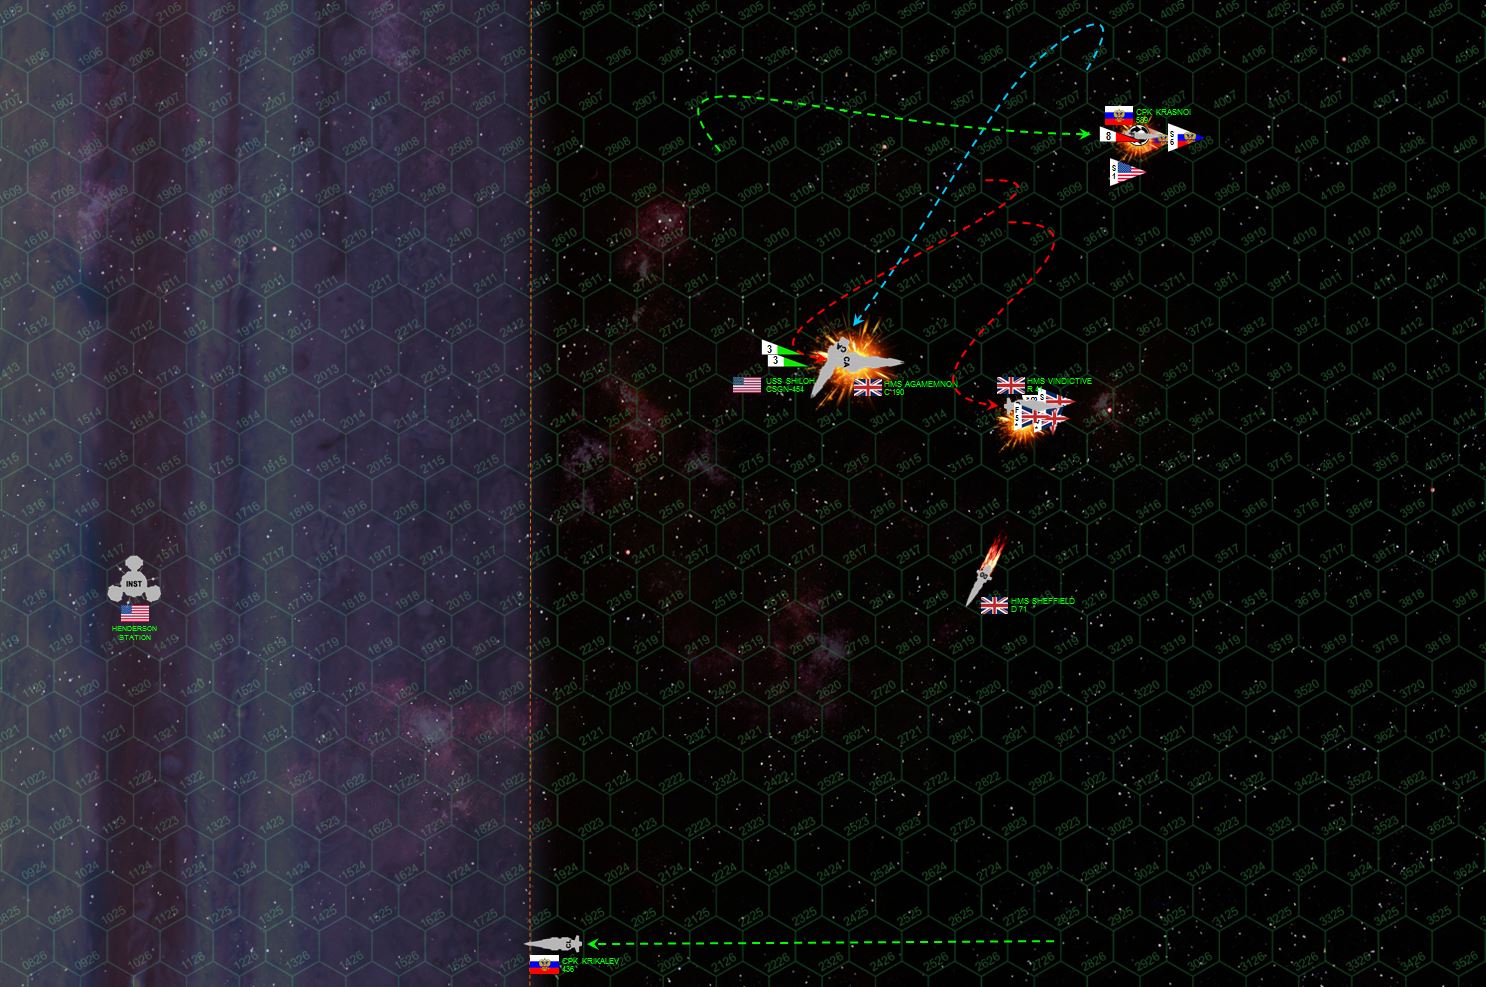 The tide turns with ... with thunderclap speed. USS Shiloh beats HMS Agamemnon on initiative, despite Agamemnon’s slightly faster speed. As Agamemnon maneuvers away from the planet and accelerates to escape velocity, the Shiloh comes hard about in a fishhook turn and powers down after her, using the planet’s gravity to pull her down sideways, thus slip-stepping INTO Agamemnon’s hex and putting a broadside across Agamemnon’s stern at less than 100 kilometers. It’s beyond point-blank, and the Agamemnon is beyond doomed. Rear-Admiral Saunders fires her turrets in turn, intent on CRIPPLING Agamemnon but careful not to MURDER the ship by exploding her engines. This isn’t just “star chivalry” – it’s also so Shiloh can put the extra guns into the stern of the carrier HMS Vindictive, which has already started landing her bombers for a second strike.
  The battle is over. Note the Agamemnon’s speed after she lost power, with the gravity rules she BARELY has escape velocity. Two more hexes back ... or with one less point of velocity, her drift speed would have reached zero BEFORE she reached the end of the board, which means she then starts drifting back, first at speed 1, then 2, then 3 ... She would be pulled forever into the crushing incineration of the McClusky-Ramirez gas giant. The carrier Krikalev and the cruiser Shiloh move a little closer to the station just to ensure they claim those 100 bonus points, while the Sheffield drifts off the table safely. Yes, she’s pointing obliquely toward the planet, but will in fact be saved by a gravity slingshot that will fling her hulk out into open space where she’ll eventually be recovered (game terms, she exits off the bottom of the map before the left side of the map, meaning she escapes).
 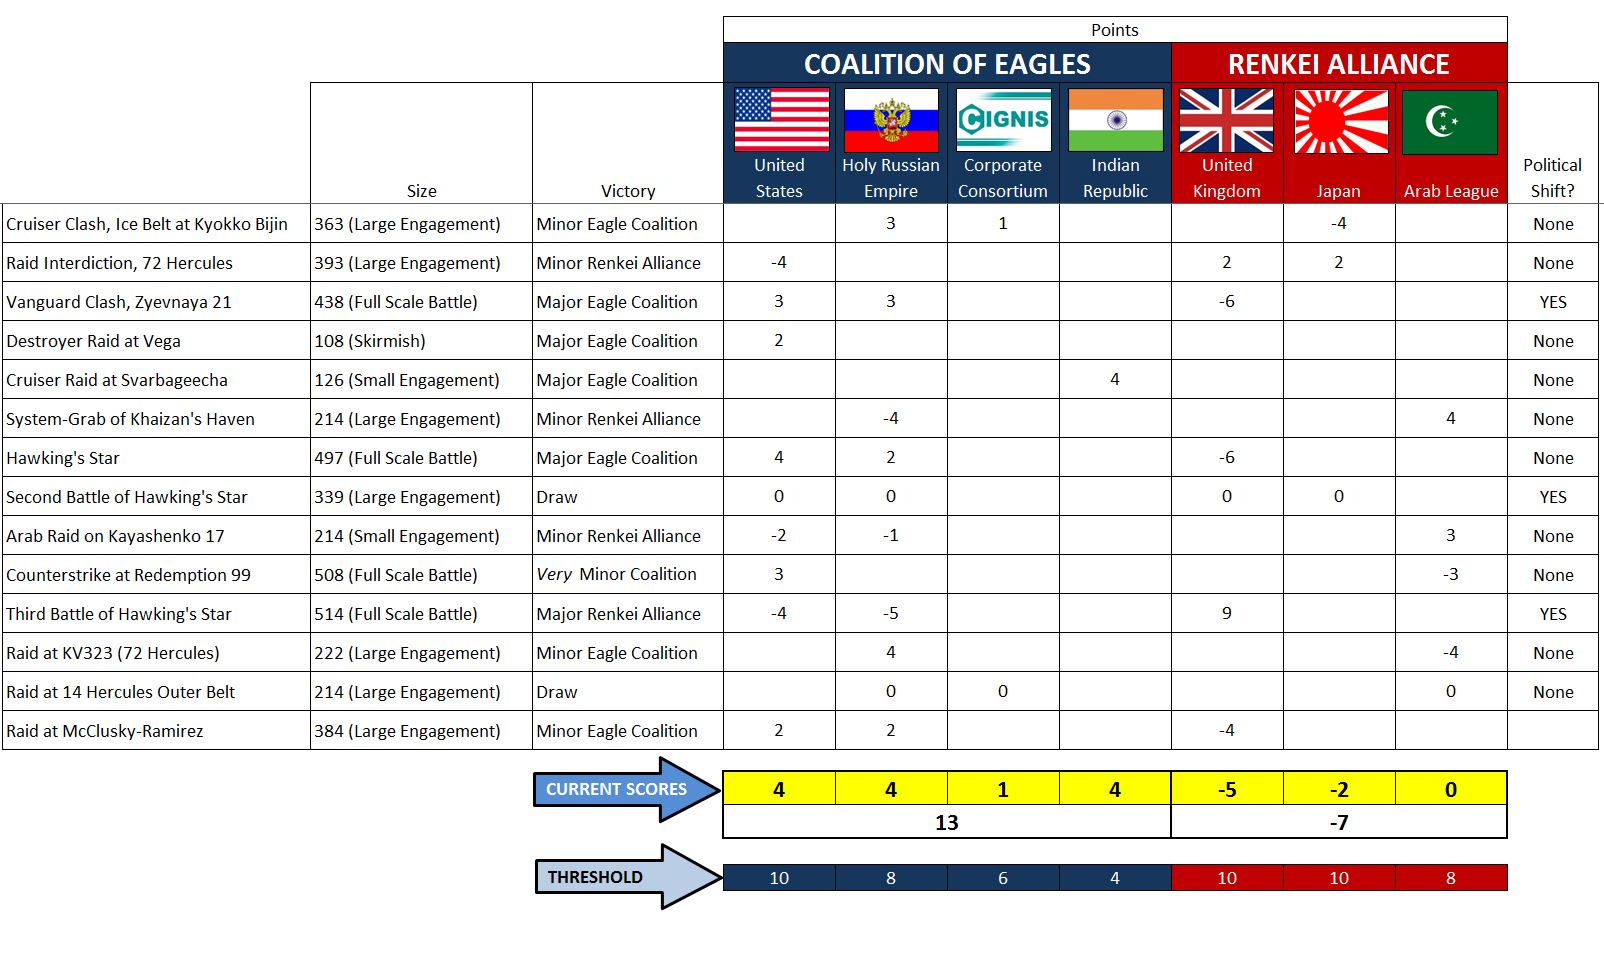 Now HERE is where I made a pretty bad mistake, and realized it only when I was writing up this AAR. When I was building this scenario, I assessed the British point cost for the cruiser Retribution, not the less expensive carrier Vindictive. This meant the British were shortchanged 15 points. That’s five more elite bombers they should have had, or ten more torpedoes, easily enough to cripple the Shiloh or Krikalev. So I’m counting the Shiloh as “crippled” – which makes this a Russo-American MINOR victory instead of a MAJOR victory. Note: even if the Shiloh had been crippled, the biggest possible difference those bombers could have made, the Russo-Americans win by 78 because the Shiloh’s position dictates they still own that station. Thus, the campaign points here are assessed as a MINOR VICTORY, despite the MAJOR VICTOY that was recorded on the table.