


![How To Paint Moonstone’s Nanny | Goblin King Games [7 Days Early Access]](https://images.beastsofwar.com/2024/12/3CU-Gobin-King-Games-Moonstone-Shades-Nanny-coverimage-225-127.jpg)


Persei-Aries War Resumes


Skirmish at Comet HH779 (Outer Hebrides - Mu Hercules A/B)
FROM: UNITED NATIONS REGIONAL COLONIAL CENTER
22:45 SOL GMT, 19 AUGUST 2521
BREAKAUTH: 181072.18J
CLEARANCE: SECRET (NATIONAL)
**UNITED NATIONS COMMUNIQUE**
The current war raging across the Hercules Rim continues to escalate as the United States Navy has embarked on what seems to be a campaign aimed at winning at least their part of this conflict once and for all. After taking a pause to recover from their losses and setbacks in their failed Hawking’s Star campaign earlier in the spring, then breaking a British raid into the outskirts of the Port Halsey colonies (Vega / Lyra Alpha), they have now embarked on a general offensive on both the coreward and spinward shoulders of the Hercules Rim.
The first of these blows has landed against the British, fairly predictable given the proximity of Port Halsey to two of Britain’s largest colonial systems in this region, Hawking’s Star (HR 6806) and the Outer Hebrides (Mu Hercules A/B). Wanting no part of Hawking’s Star after their earlier frustrations, the Americans have instead shifted focus to the Outer Hebrides, joining with allies in the Holy Russian Empire for a strike against the Outer Hebrides colonies in Mu Hercules A/B. This is a binary star system with a large main sequence star just beginning to enter its red giant phase, and a much smaller red dwarf. British population and industrial settlements orbit the larger star, toward which the Americans have their approach by masking their task force behind the tail of a comet.
This is Holmsberg-Hebrides 779 (Comet HH779), which is now close enough to Mu Hercules A to begin streaming tails of ionized gas, sublimated frozen nitrogen, and crystallized water ice. As these materials shed off the comet’s core, outgassing and geysers have also cracked off large slabs of dust-mixed ice and porous rock, calving off the comet like slabs off a melting glacier.
This is the material the Americans and Russians (the so-called “Coalition of Eagles”) have been using to hide their low-speed, high-stealth Darkstar approach into Mu Hercules A, followed by their final sublight approach toward the first Royal Navy installations in the inner orbital zones of the system. The cover has screened their approach to a surprising degree, but a British Griffin-class gunboat has finally spotted them, and Task Force Agamemnon (Lord Commodore Edward Cavendish) has been sortied to intercept.
The battle promises to be a dramatic one. Not only is Task Force Agamemnon one of the more powerful and prestigious British formations in the Third Hercules War, but the approaching Americans and Russians represent some of the most battle-hardened ships in Known Space. These include the light cruiser CPK Admiral Lazarev and destroyer Syekyra, and the American light fleet carrier USS Liberty, carrying squadrons VSF-221 “The Dead Rabbits” and VSA-193 “The Eight Ball Express.” Rounding out the American force is none other than the Valcour-class destroyer USS Oriskany. One way or another, the Battle of Comet HH779 promises to be memorable.
United States / Holy Russian Empire: Oriskany
United Kingdom: Damon
497 points per side
RAID victory rules
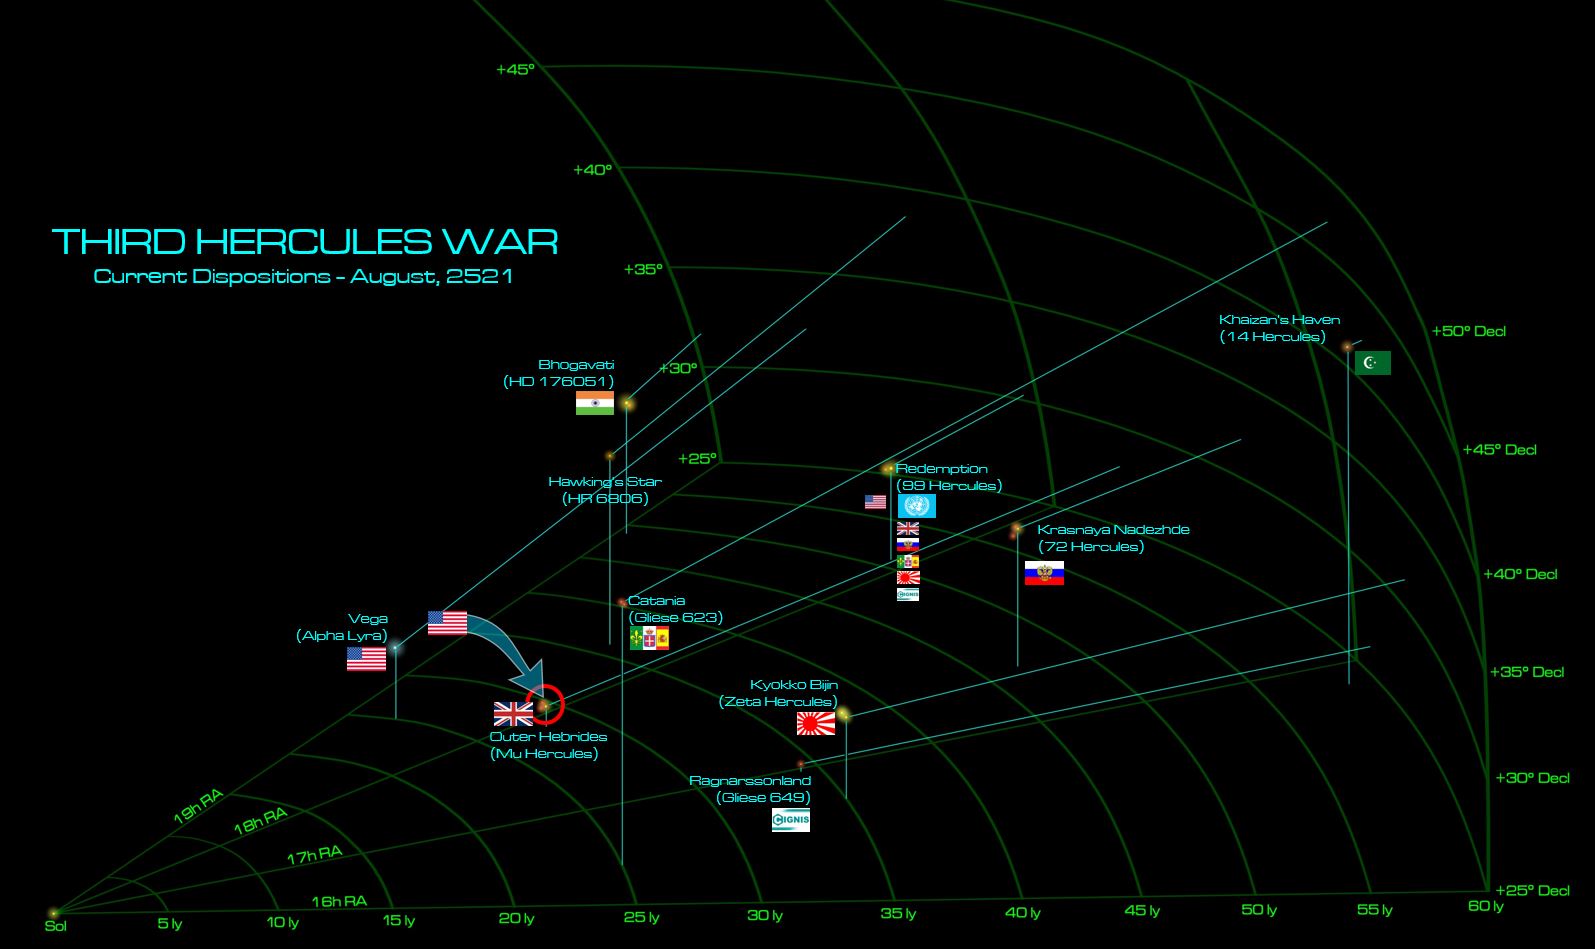 Current disposition on the Third Hercules War, showing in particular the Russo-American raid into the Mu Hercules. For an approach like this, the standard practice is to set a high-speed, high-magnitude Darkstar wave toward the target, dropping back into normal space anywhere from 200 AU to 2 light-years out from the stars or planets where the enemy may be waiting. Given the absurdly-high speeds of these waves (anywhere from 300-500 times the speed of light), even 25th Century clocks and instruments can’t always guarantee a precise exit point. Also, stronger Darkstar waves project a much larger curvature shadow into normal space, making them much easier to detect and at longer distances, and will also run afoul of stellar or planetary gravity fields from a much greater distance (thus causing catastrophic gravity shear). Accordingly, the approaching naval force usually sets a second “approach wave” - much slower, harder to detect, and more accurate - for the final approach into the target. Also, because this second wave casts a much smaller curvature shadow into normal space, they can get much closer to actual targets (i.e., enemy-held planets) before exiting into normal space. Here the Russians and Americans have added a third stage, a high-speed sublight “ghost approach” into the heart of Mu Hercules using the tail of the HH779 comet for additional cover.
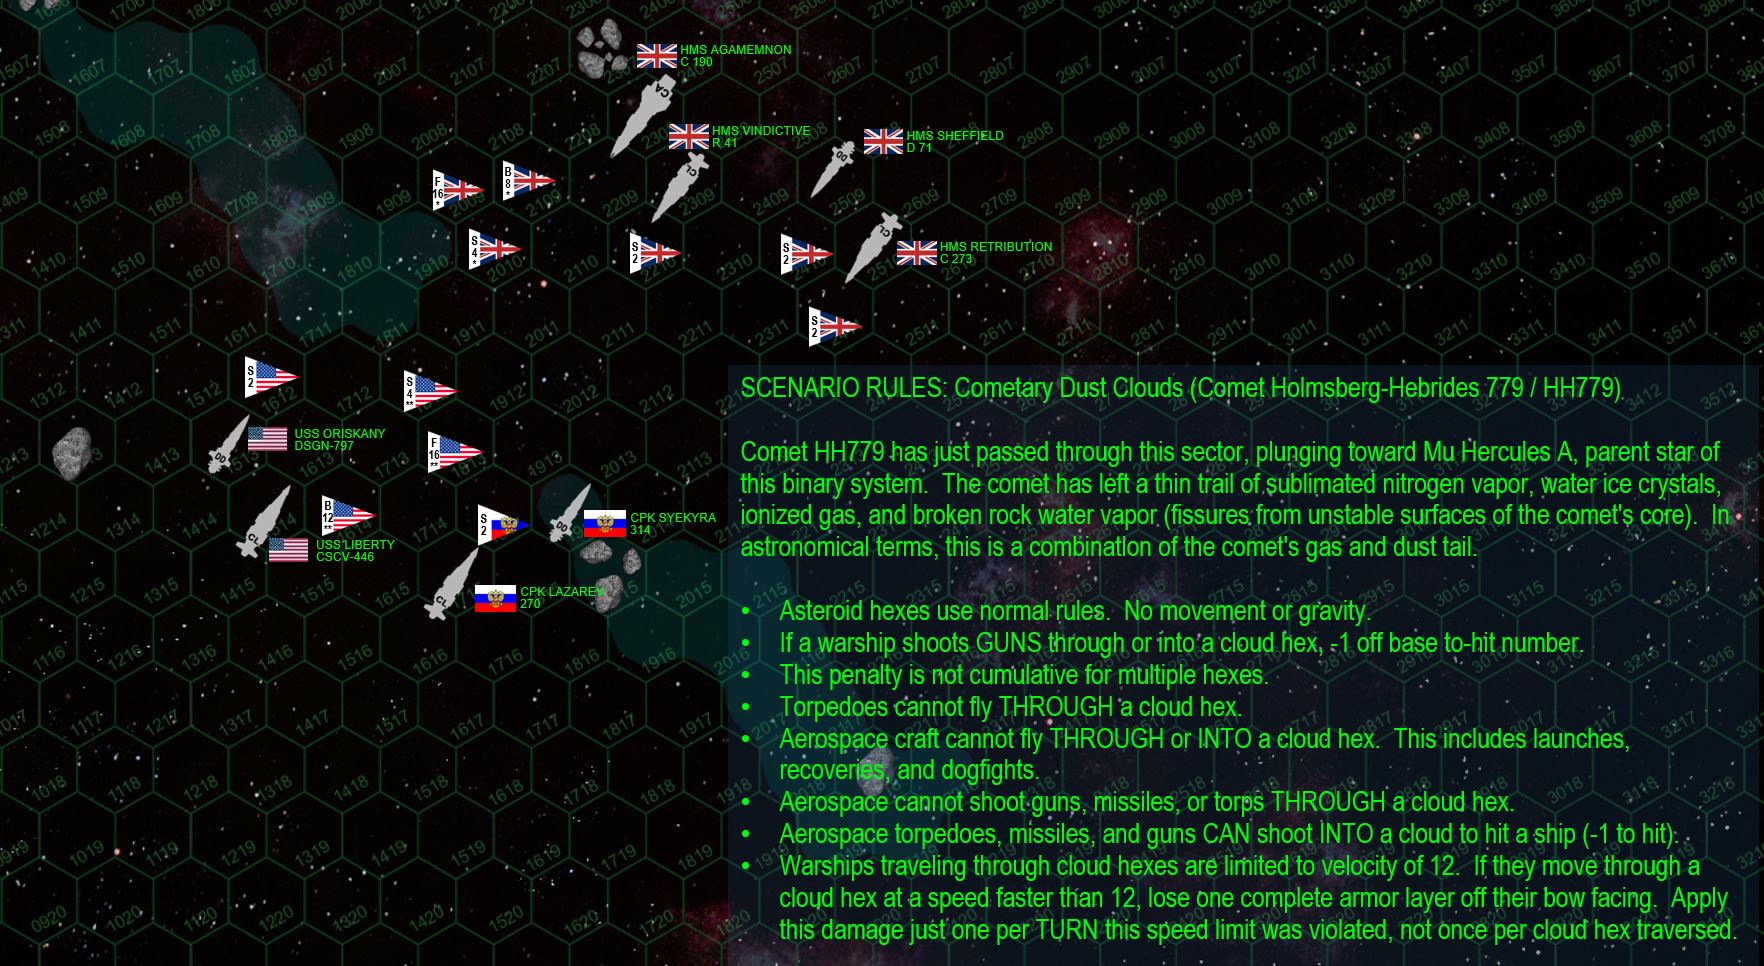 Here is the matchup, and the special rules for the starship duels in the tail of a comet. The torpedo and aerospace rules are written in there so the game won’t be “terrain balanced” against the British, who have a much more “gun-heavy” force than the Russians and especially Americans.
 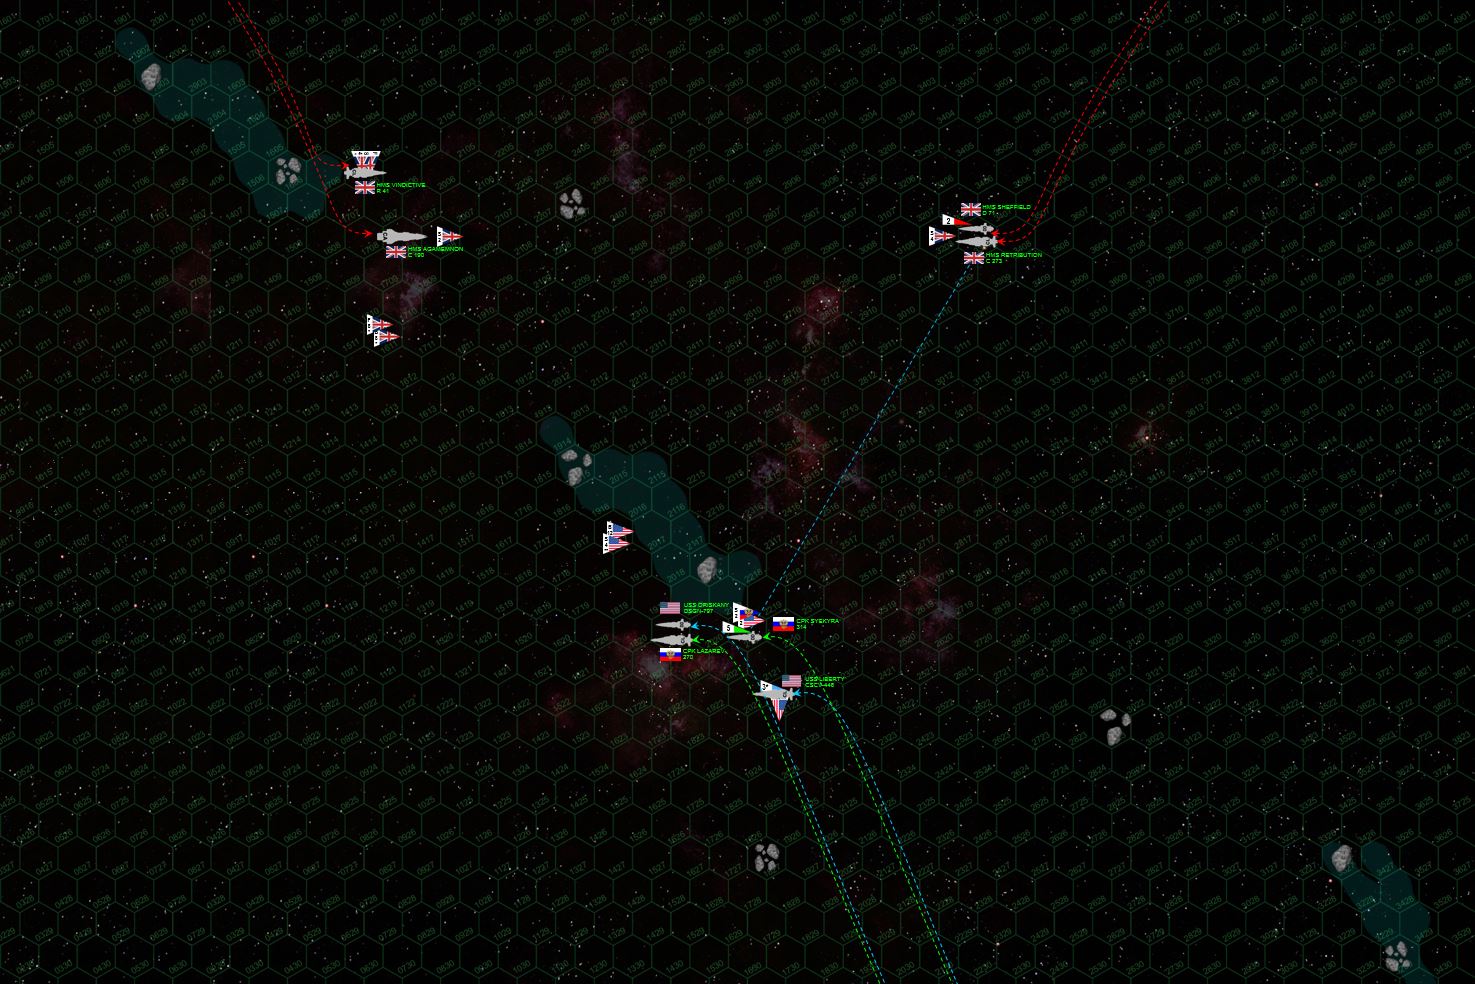 The two sides make their initial approach. The British start off with a novel attack, closing from two sides of the board to cover both main “gaps” in the comet gas/debris tail through which the Coalition may strike. As it turns out, the Coalition doesn’t push through either of these gaps, instead using the “spaceberg” ice fields and trails of ionized gas to hide most of their ships from the big guns of HMS Agamemnon and Retribution. This works for all the Coalition ships except the carrier USS Liberty, which is positively drilled by pinpoint, long-ranged laser, syglex, and rail gun fire from the light cruiser Retribution and destroyer Sheffield. In fact, the aft hangars of the Liberty are hit, just moments after the last of her bombers launch. Reactors, maneuvering thrusters, troop bays, and without guns of her own, the Liberty cannot respond at the moment, protected only by the smaller guns aboard the Russian destroyer Syekyra. After all, while the Lazarev and Oriskany are screened from British fire, this also means they can’t fire in return.
 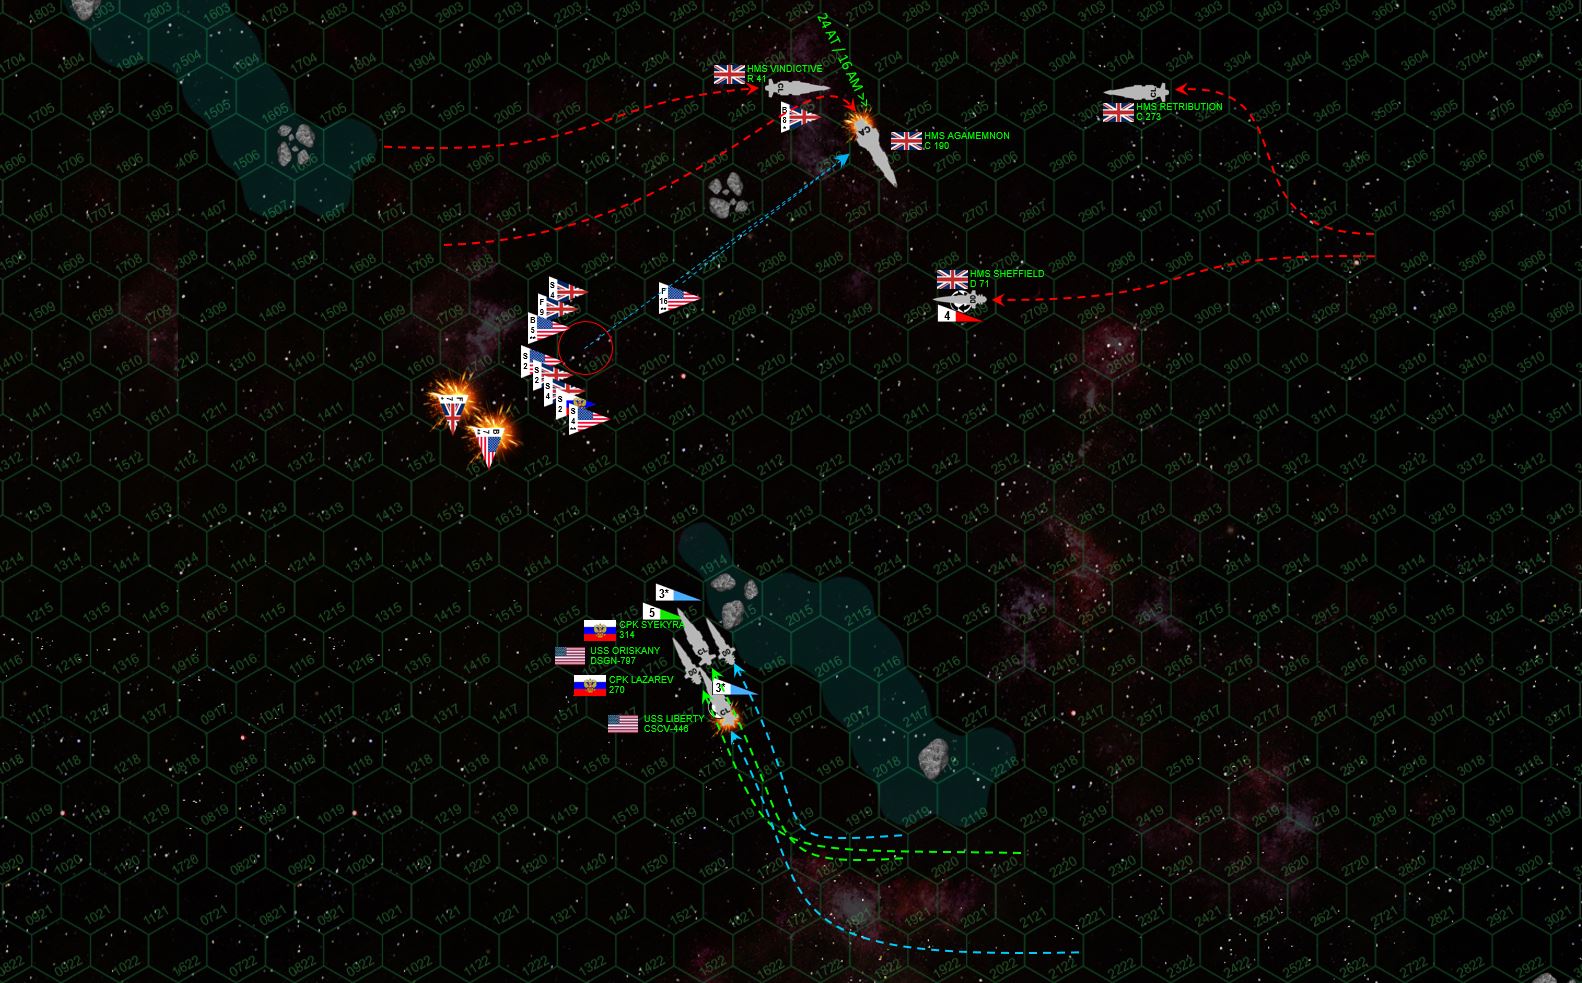 The Coalition again endeavors to make best use of “space terrain,” refusing to emerge from behind the comet debris tail until a hopeful torpedo and aerospace strike knocks out at least one of the heavier British “gun ships.” As HMS Agamemnon and Retribution converge, hiding from both ships becomes easier, although USS Liberty is hammered again (albeit on a different facing). Things SEEMS to go better for the Americans, with fighters of VSF-221 “The Dead Rabbits” closing to launch aerospace missiles and VSA-193 “The Eight Ball Express” to launch torpedoes at the Agamemnon, carefully positioning themselves so only the Agamemnon (and not the rest of the British task force) can offer defensive fire against the American aerospace craft. The American bombers are attacked by British fighters, but even this is something of a trap as the American bombers are still within the range of friendly mass driver point-defense guns, and the British Supermarine Starfires suffer heavy losses. As precise, cagey, and well-planned as the American aerospace strike is, however, it isn’t perfect. Warship torpedoes are still too far away, and British mass driver defenses can concentrate on shooting down American aerospace ordinance. The Agamemnon is struck twice astern, but her armor and upgraded shielding absorbs almost all the damage.
 Things get ... VERY sticky here. Agamemnon loses initiative and moves first, pivoting as shown to set up a broadside as the Coalition at last slips from behind that cometary debris. Aboard the Lazarev, Captain Piotr F. Myshaga orders flank speed, cursing the failed American aerospace strike and resolving to knock out the Agamemnon on his own with a broadside across Commodore Cavendish’s fantail. Appalled, the Americans are more or less forced to follow suit, they HAVE to stick close together in the face of an imminent British aerospace strike. The Liberty slides in alongside the Lazarev, ready to break off the action, but her mass divers and electronic warfare will be needed when those Royal Navy “Star Typhoon” bombers start slinging out torpedoes. The Retribution closes for a point-blank broadside on the Lazarev, the Oriskany cuts into Agamemnon’s hex to support Lazarev’s do-or-die broadside. The Vindictive swoops in so American fighters can’t help shoot down British torpedoes, the Syekyra supports the Liberty, the Sheffield cuts in for a point blank broadside against Liberty and Syekyra!
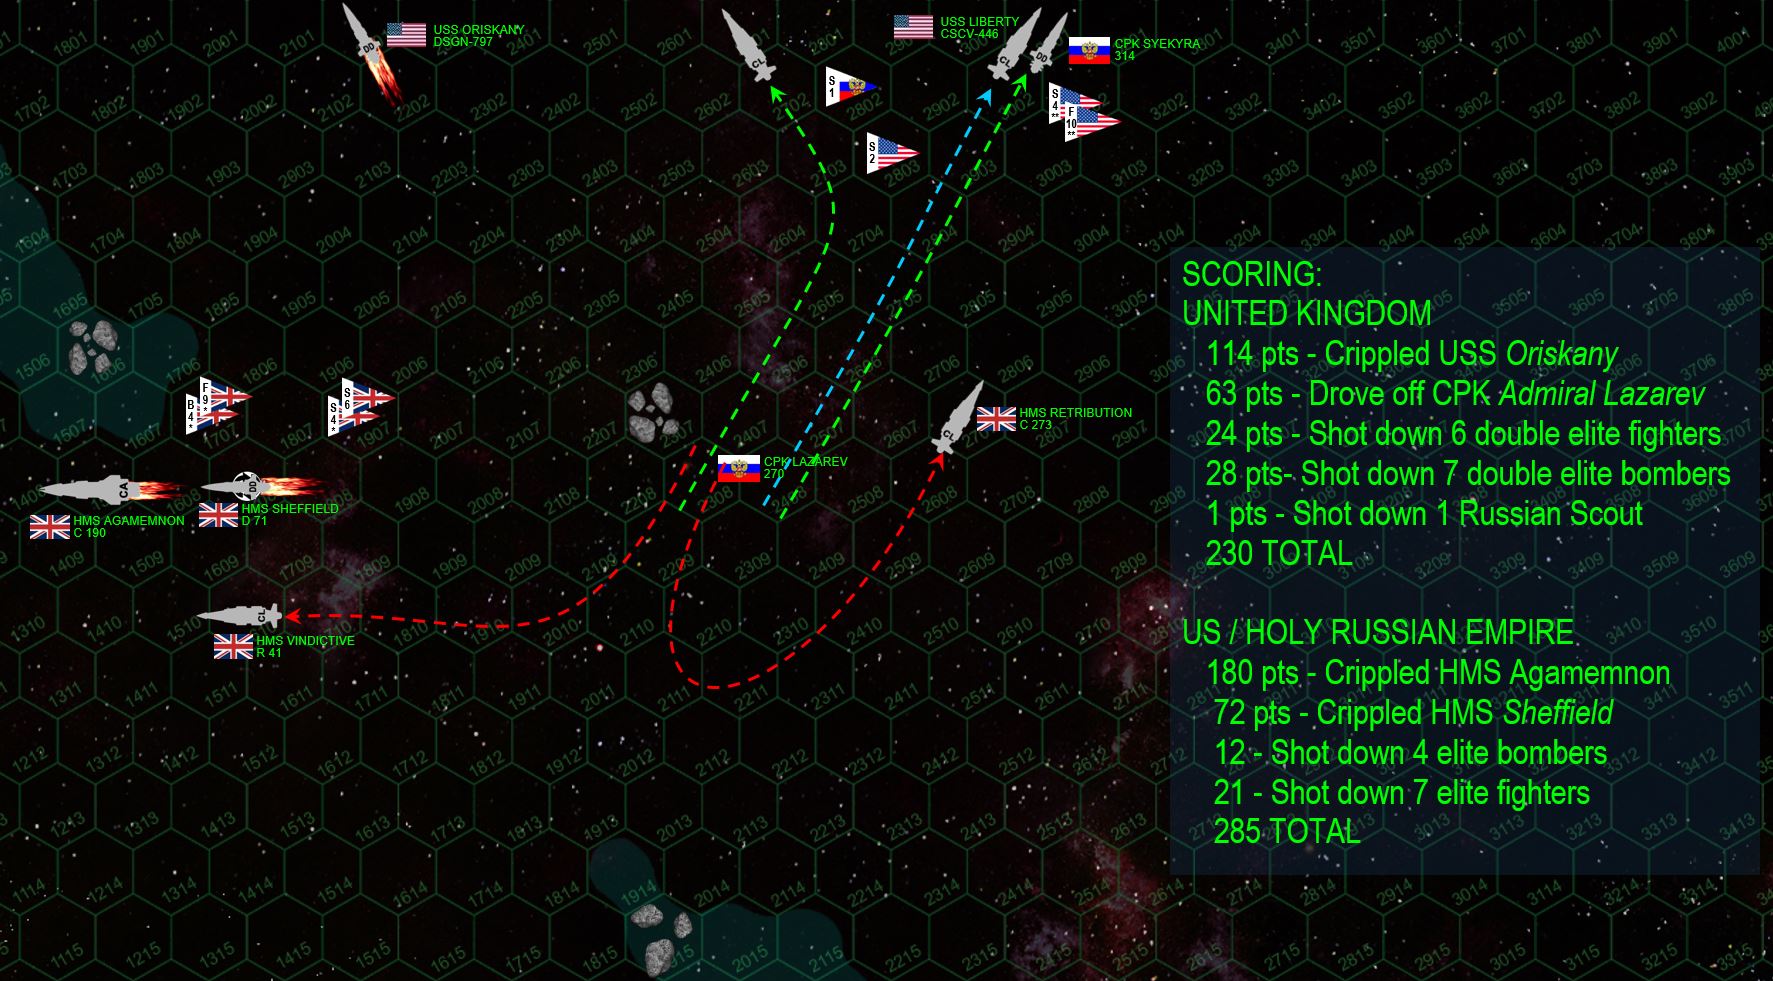 The fiery exchange that follows instantly decides the battle. The Oriskany and Lazarev cripple the Agamemnon, the Agamemnon and Retribution cripple the Oriskany. While trading a heavy cruiser for a destroyer is normally very bad business, note the Oriskany is worth 112 points, the Agamemnon is worth 180 ... so it’s not a DISASTROUS trade, especially given all the losses taken so far to American aerospace. The British aerospace strike pummels the Lazarev, and while she isn’t destroyed or crippled, she’s forced to break off. The Liberty was already running for her life, and the Syekyra takes horrific damage astern but somehow her skipper, Captain Ekaterina Duranov, manages to keep her reactors on line. The actual decisive blow comes from Syekyra, who manages to cripple the Sheffield with some point-blank 40-kg plasma projectors, 7 gw rail guns, and hot dice on the “Crippled Ship Check.” The score is shown in the slide, with the Russians and Americans claiming a hard-fought 11% minor victory.
 The successful Coalition raid on Mu Hercules A puts the British in a precarious position, not unlike the “brink of defeat” on which they found themselves in Hawking’s Star earlier in the year. In game terms, they now stand at -9 campaign score, with a threshold of +/-10. In other words, two more defeat points (one more battle) and they exceed the -10 campaign score their government and Admiralty is prepared to accept. In campaign terms, the successful battle at HH779 means the Americans are now sending in Saipan-class planetary assault ships, each leaded with a battalion of US Marines, hoping that one more “Assault” victory (as opposed to “Raid”) in Mu Hercules will allow them to put boots on Mu Hercules colonies and end America’s involvement in this war once and for all.


Some times a video say more than mere words
https://youtu.be/GFxkkI9Z-ac?t=19
And sometimes videos won’t embed
But it is Tackleberry who missed a gun fight
No worries, @rasmus – the video link works fine. 😀
And hey, I’m sure you had tons of pirates to paint for Adepticon! 😀