


It takes a village to….


Recommendations: 445
About the Project
...raise a village. No, that doesn't sound right. The goal is to make a set of fantasy village houses. Later more buildings will be added as no project is ever finished but for now: simple houses. The rules: -It's fantasy and I want them to look nice. They might end up a bit on the fancy side for a peasants abode, but that's okay. - Playable, inside and out, Preferably multiple exits and not to big so models can run around. - Detailed. I want these to kinda like they're lived in, so the will be furnished and some more detail, but they're not doll-houses.
Related Game: Lasting Tales
Related Company: Blacklist Games
Related Genre: Fantasy
This Project is Active
Wait, what?
It is done!?
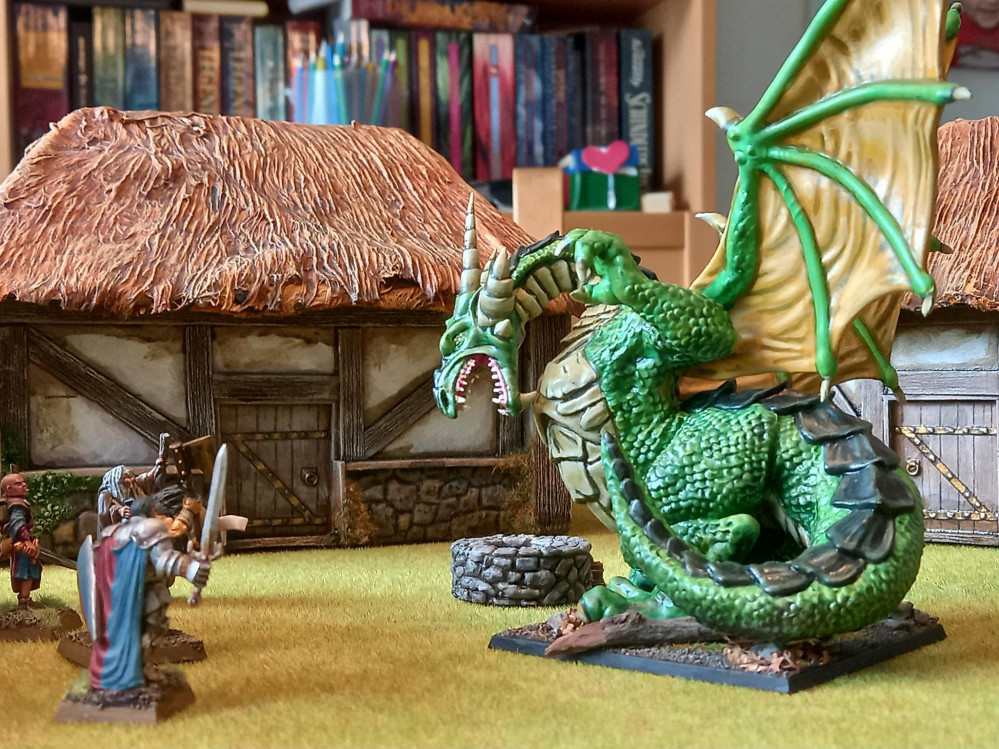
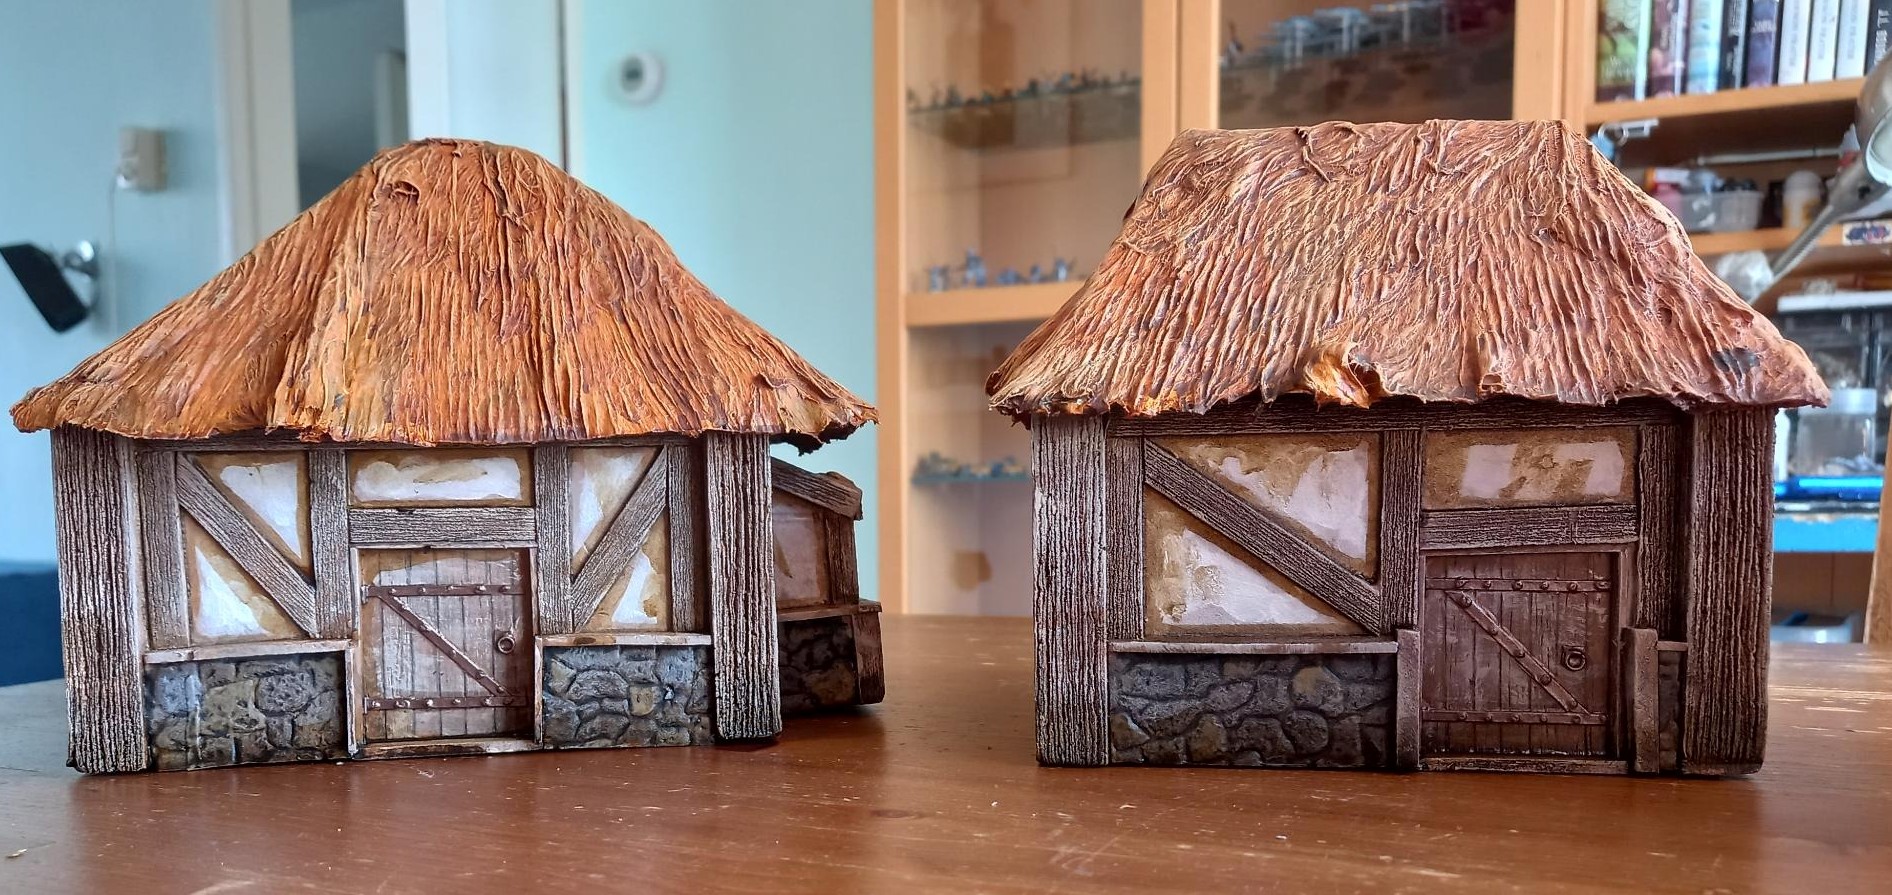
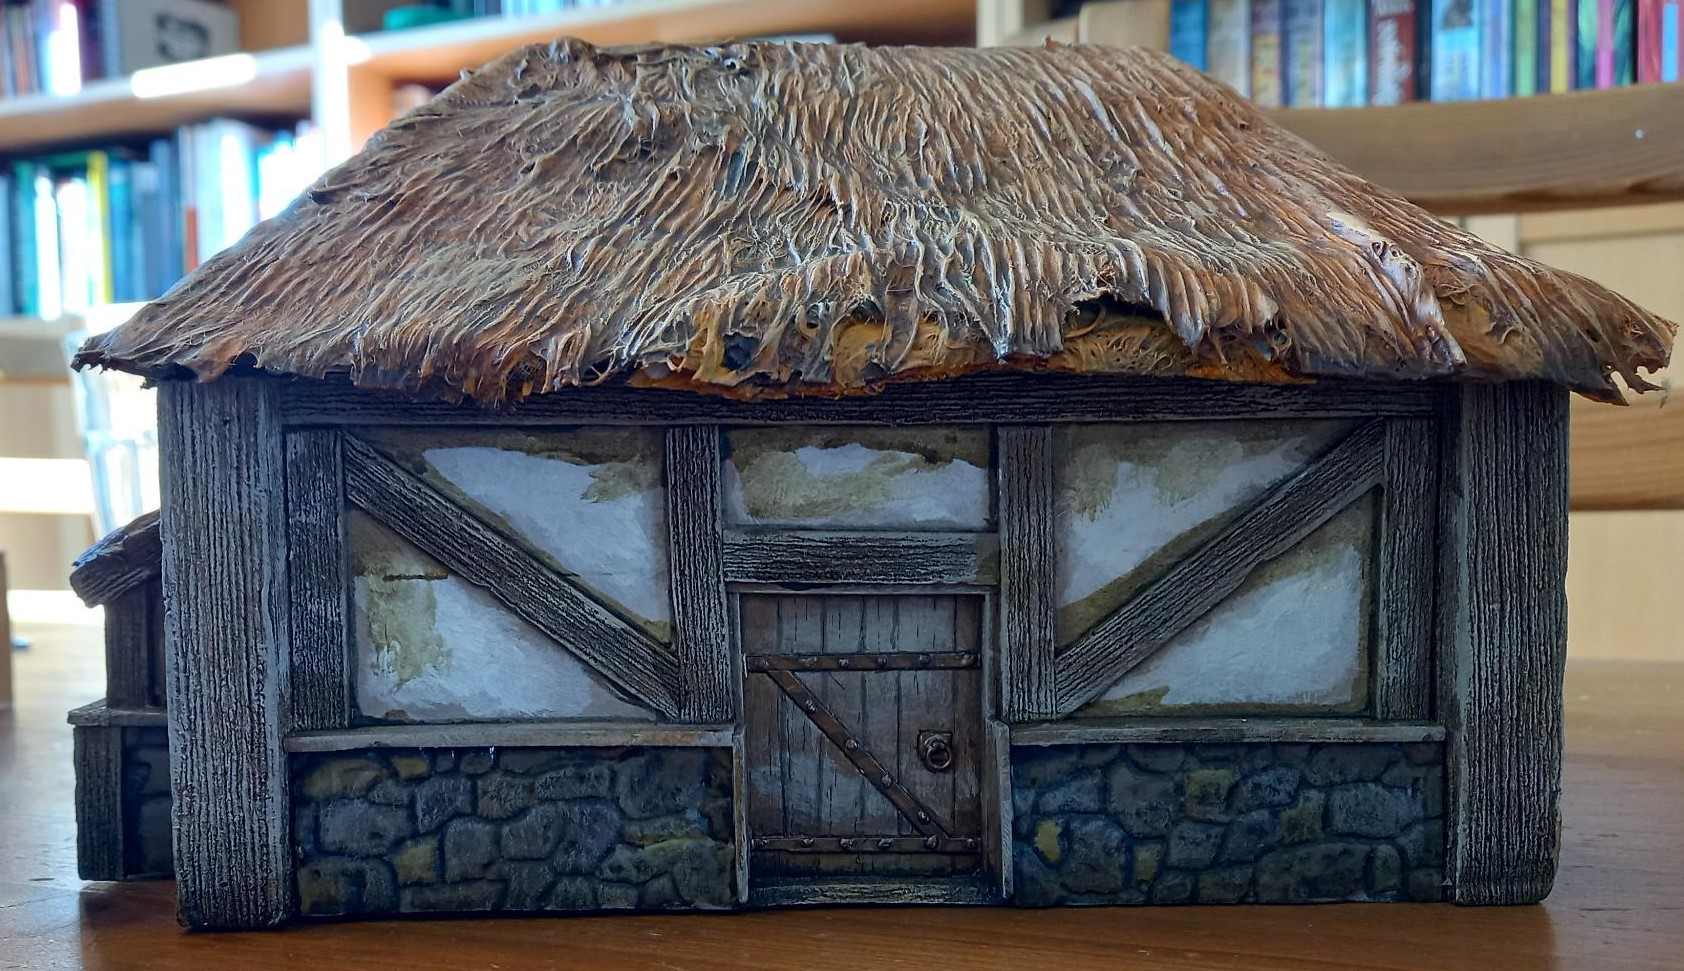
Unbelievable, but I plowed through it and I now have 4, highly detailed, completely furnished fantasy buildings.
It was somewhat frustrating at times, but I’m allready itching to build a hag’s hut for the outskirts of the village, so I must have enjoyed myself. I am very pleased by the results and there’s plenty of plans to add to the set. The smithy, Inn, a windmill and plenty of greenery, both woodlands and farmland. So much more to add to this..
I got a comment I’m crossing over into dollhouse territory and I’m sure there’s some truth to that statement. This is certainly much more detailed than I’d ever dreamed I’d make something when I started all thos years ago. It might not be to realistic, but this is the ammount of detail I am dreaming of now. Playing on a table that looks like it’s lived in.
Not to surprising as I’ve spend some evenings talking to the mom of one of my wife’s friend, who did make dollhouses, and we had plenty of tips and tricks to learn one another. I though it was pretty cool how such different interests still had such a huge overlap.
There wasn’t a whole lot of exciting things to add, since last update.
I added some green and moss on the outside. For this I made a mix of watered down PVA and static grass. I made sure to fill amy cracks where the wall pieces didn’t properly fit as much and then scattered one of 2 materials over it. Some static grass on the lower parts and some bright flock to the green that would go higher on the buildings.
I made the pva/grass mix, so I could both fill the gaps, but also have an already green base for the greenery, making sure I would get a good, visible coverage.
Then it was just painting all that I had printed. I basecoated everything in one of two browns. After this I gave it all a wash (I started brushing, but ended up just dunking it all in the pot of the home-made wash I used for the entire project. So much faster and a definite plus on making such a huge batch)
A quick drybrush with the origional brown mixed with some bone and light grey and most of the wood was done. I picked the metal on the simpler pieces and gave this a black wash. The goal was to set aside as many finished pieces in every step to make each next step less daunting. Seeing the pieces that remained required more and more colours.
I then tried and paint as many small details in one go as possible. All the cheeses, all the botltles and so on. Making sure as to not overdo it. Some pieces only got one highlight, but It’s more an overall look I am going for here. If I paint this all up as if I am painting for a competition I’ll never be done and I doubt it’ll be scrutinized that hard.
So, now I just have to post the glamour shots.
And with that….
I’m done.
I’m done?
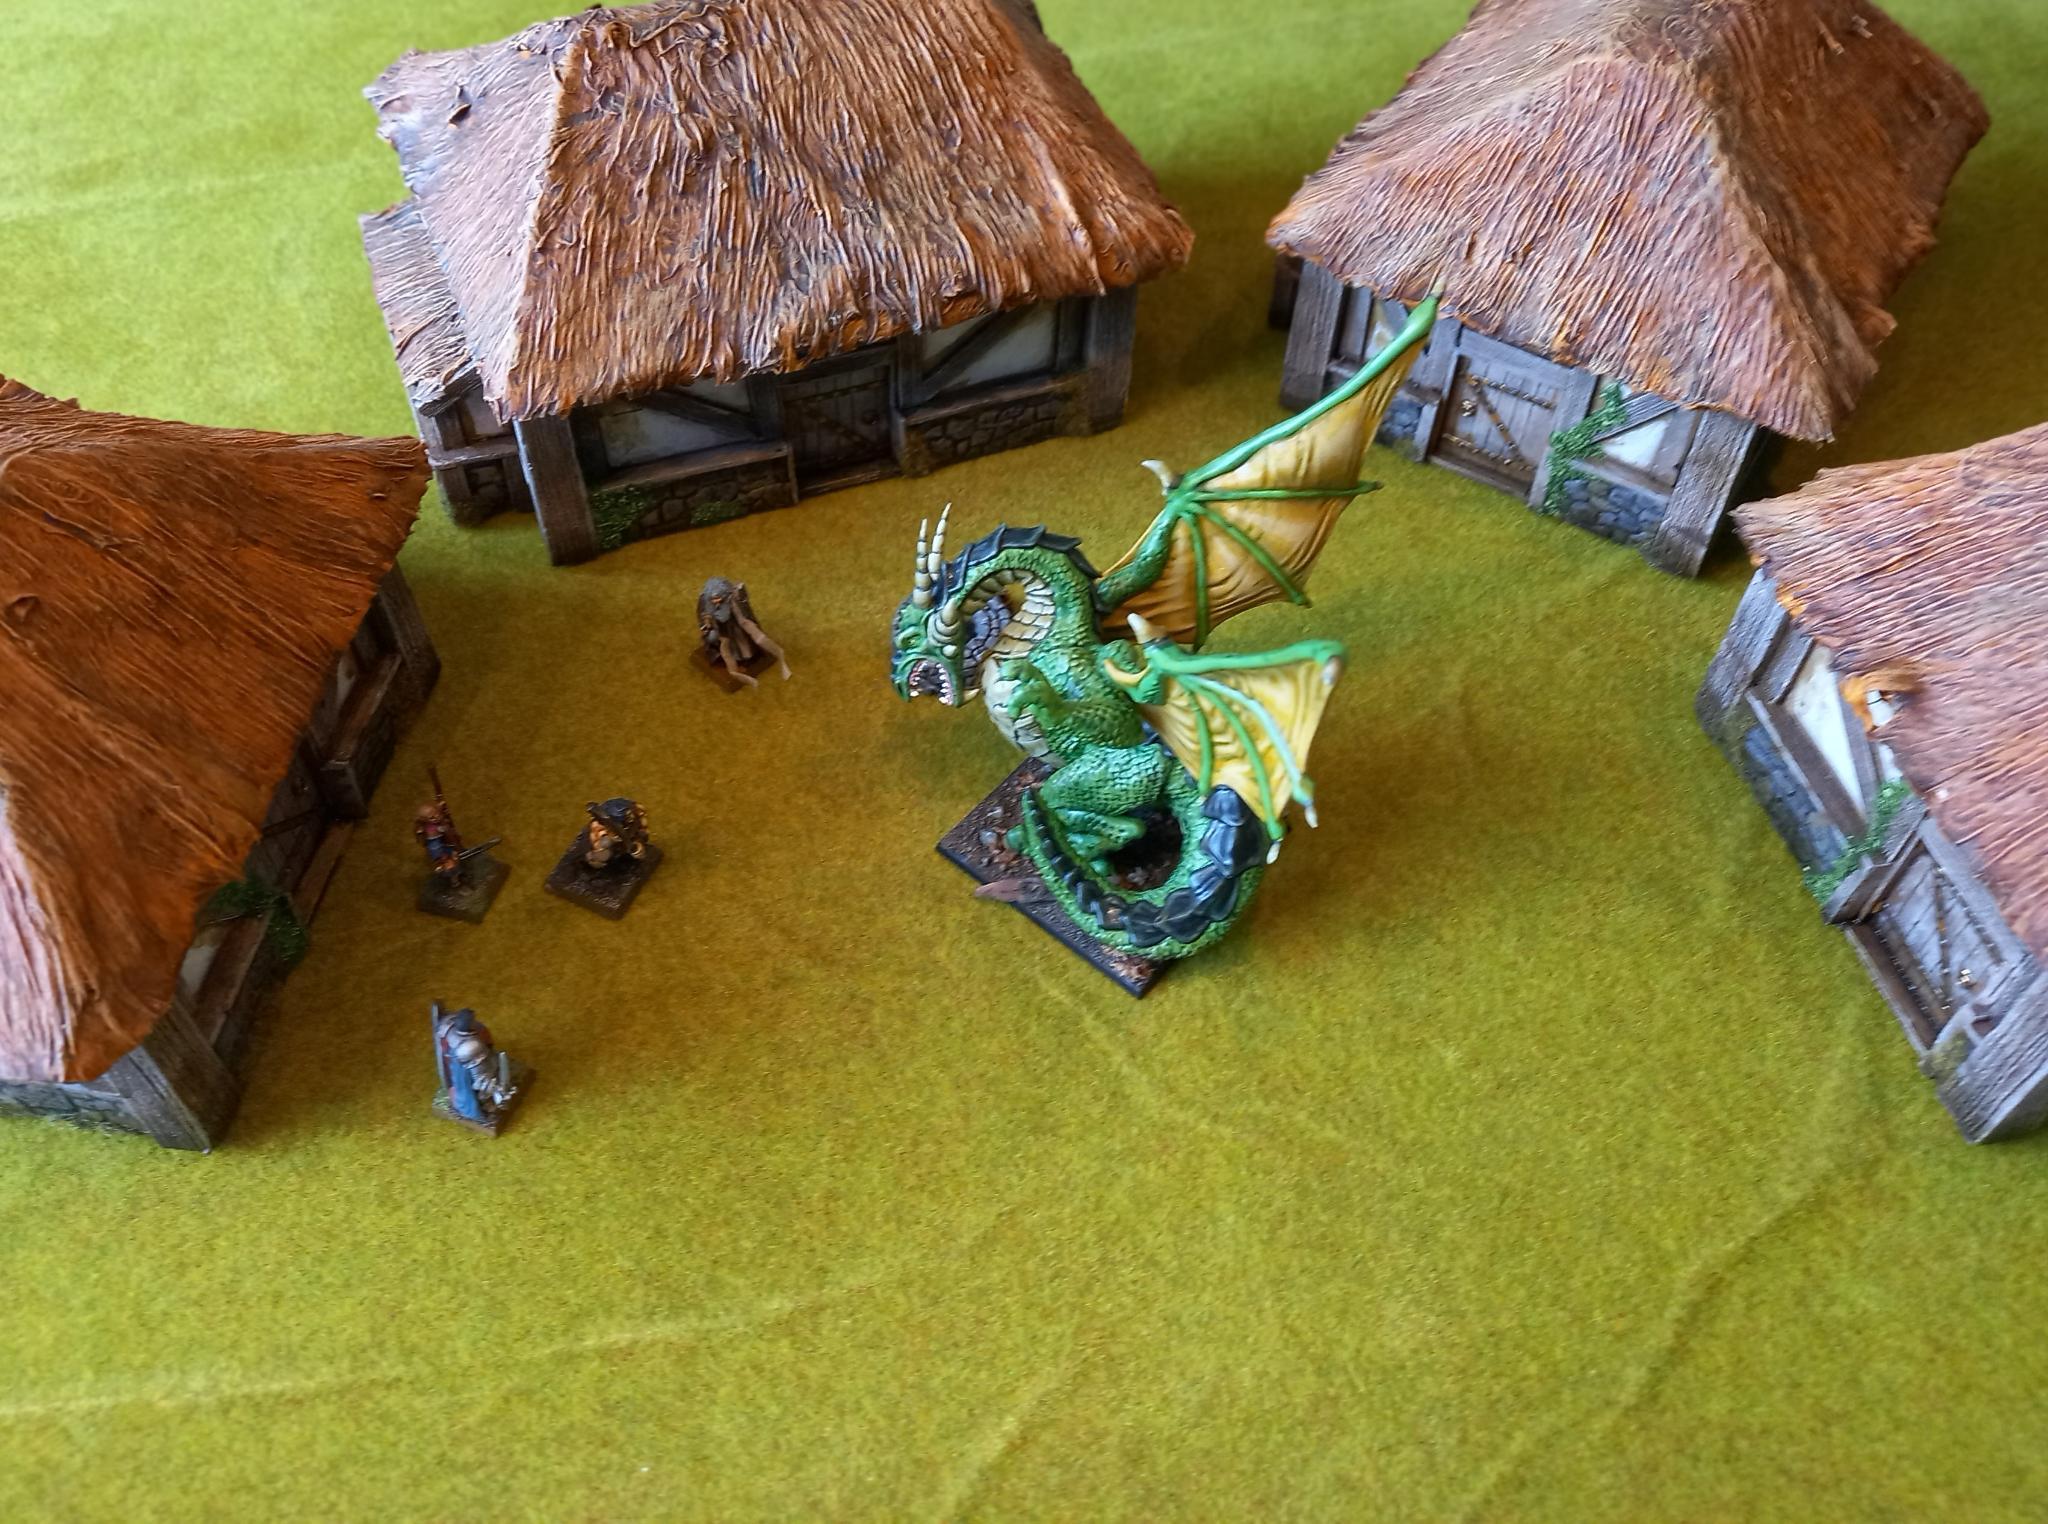
Now, if just the heroes can get rid of that pesky dragon before it torches the place, that’d be great.


Adventures in interior decorating 3D
Long Hiatus, but I am back on it. I was a bit demotivated by some mishaps with my 3d printer, but I got it sorted out. Got my money back from the shop and bought a new one at another shop. Due to a sale I was even able to upgrade from a mars2 pro to a mars 3. Higher resolution and bigger buildplate: nice.
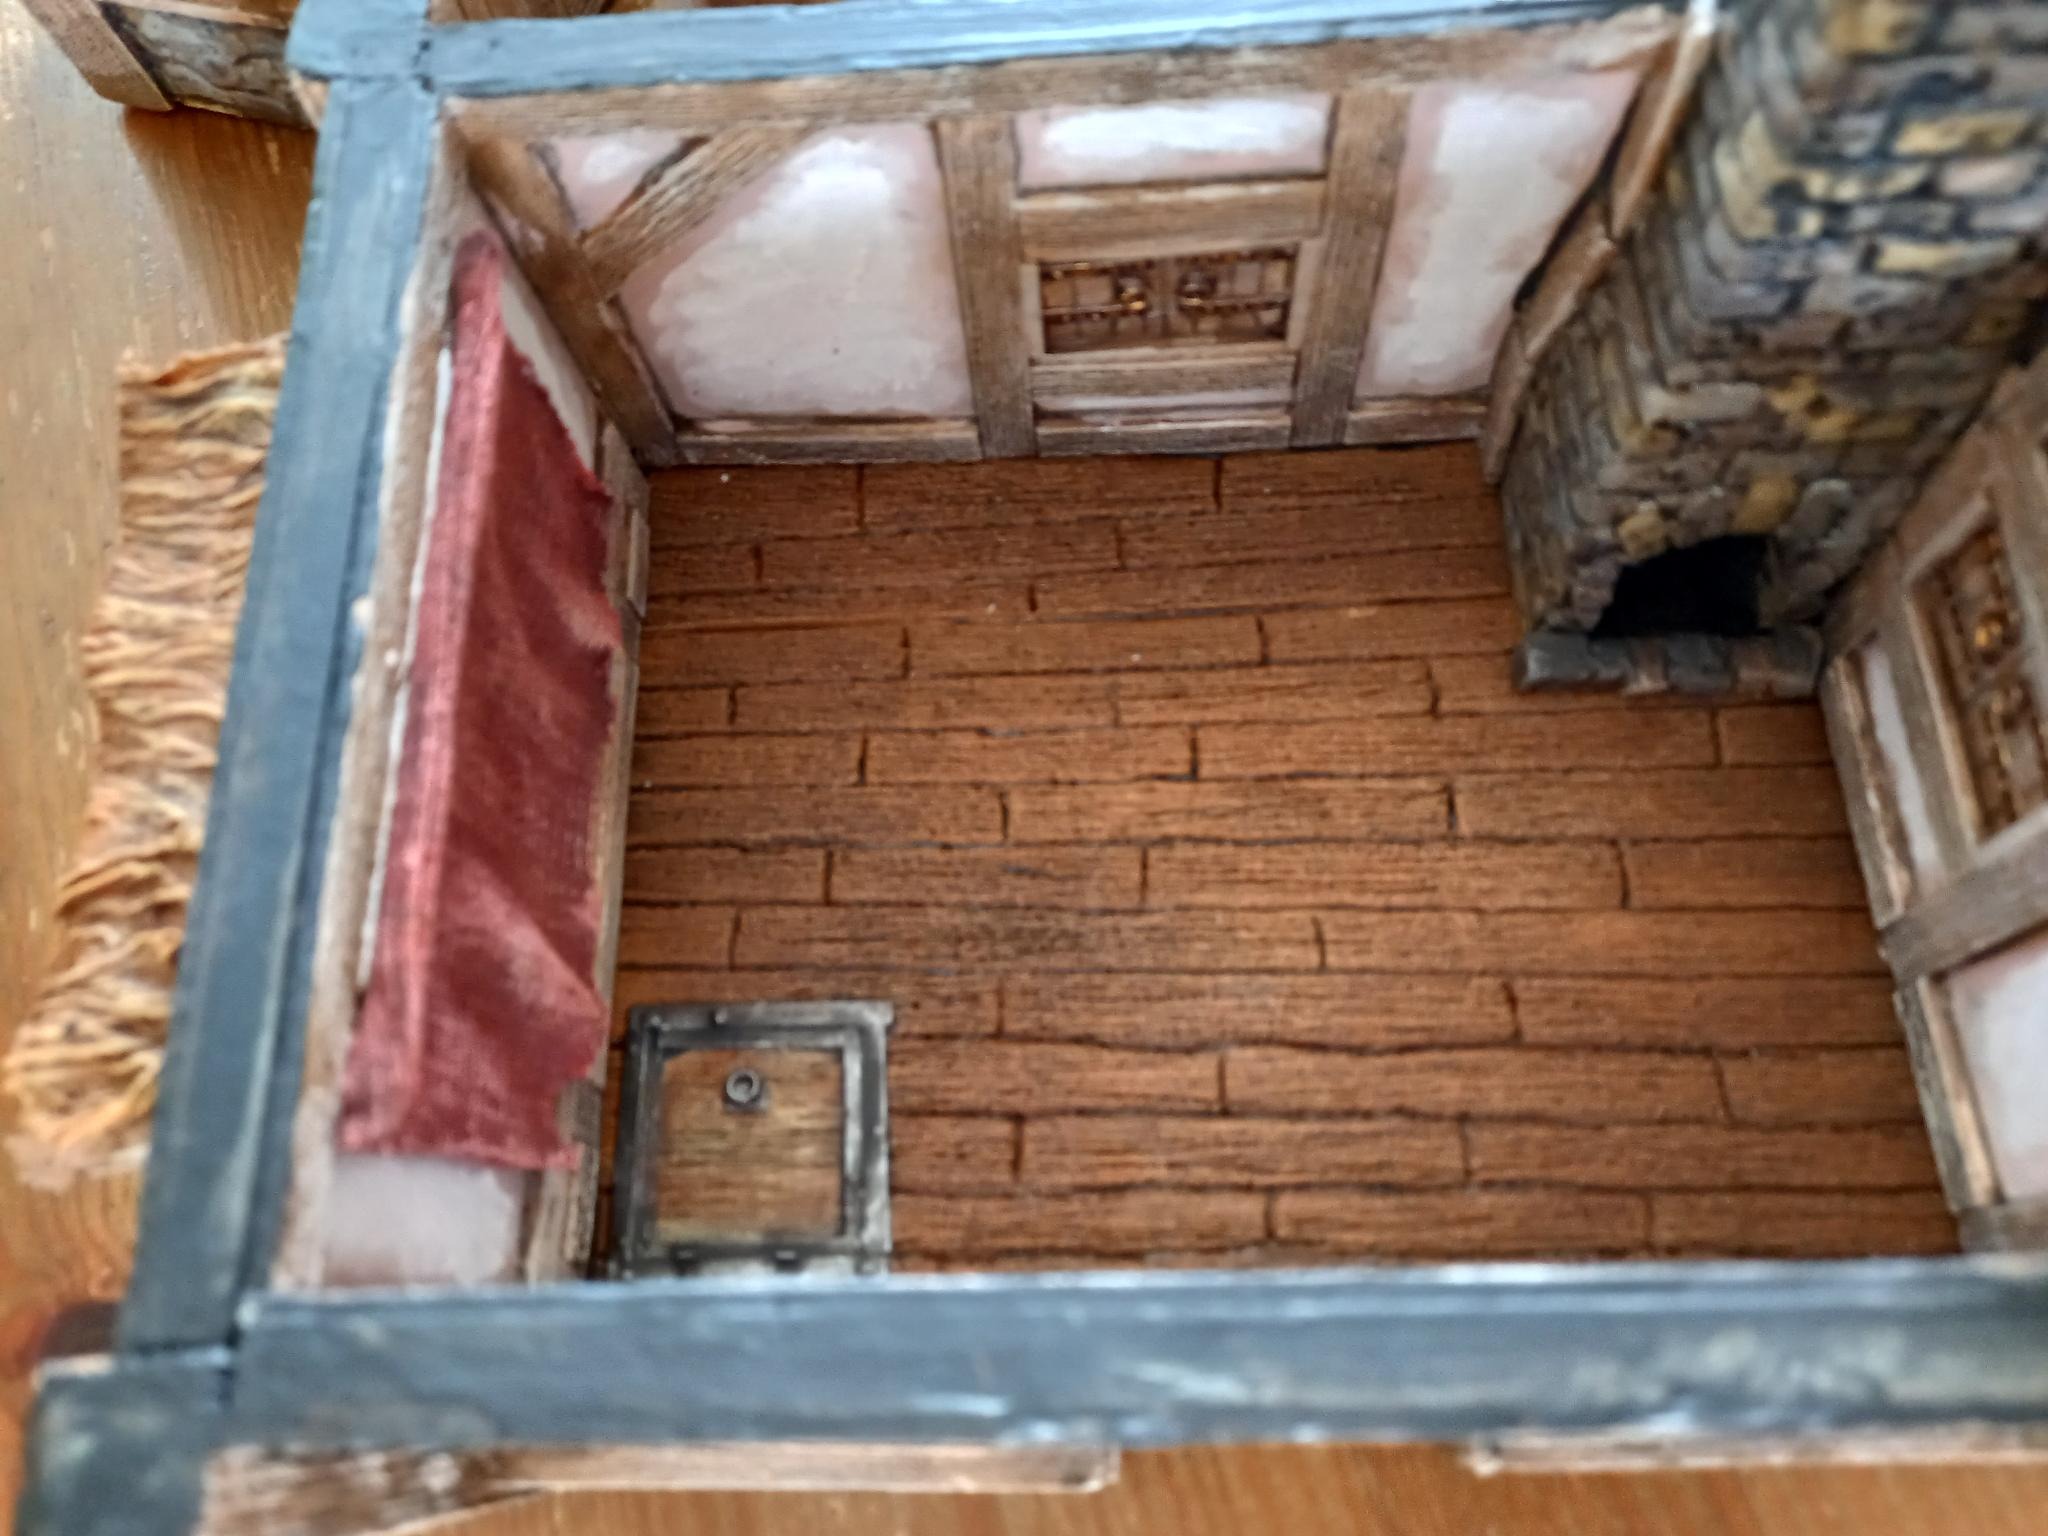
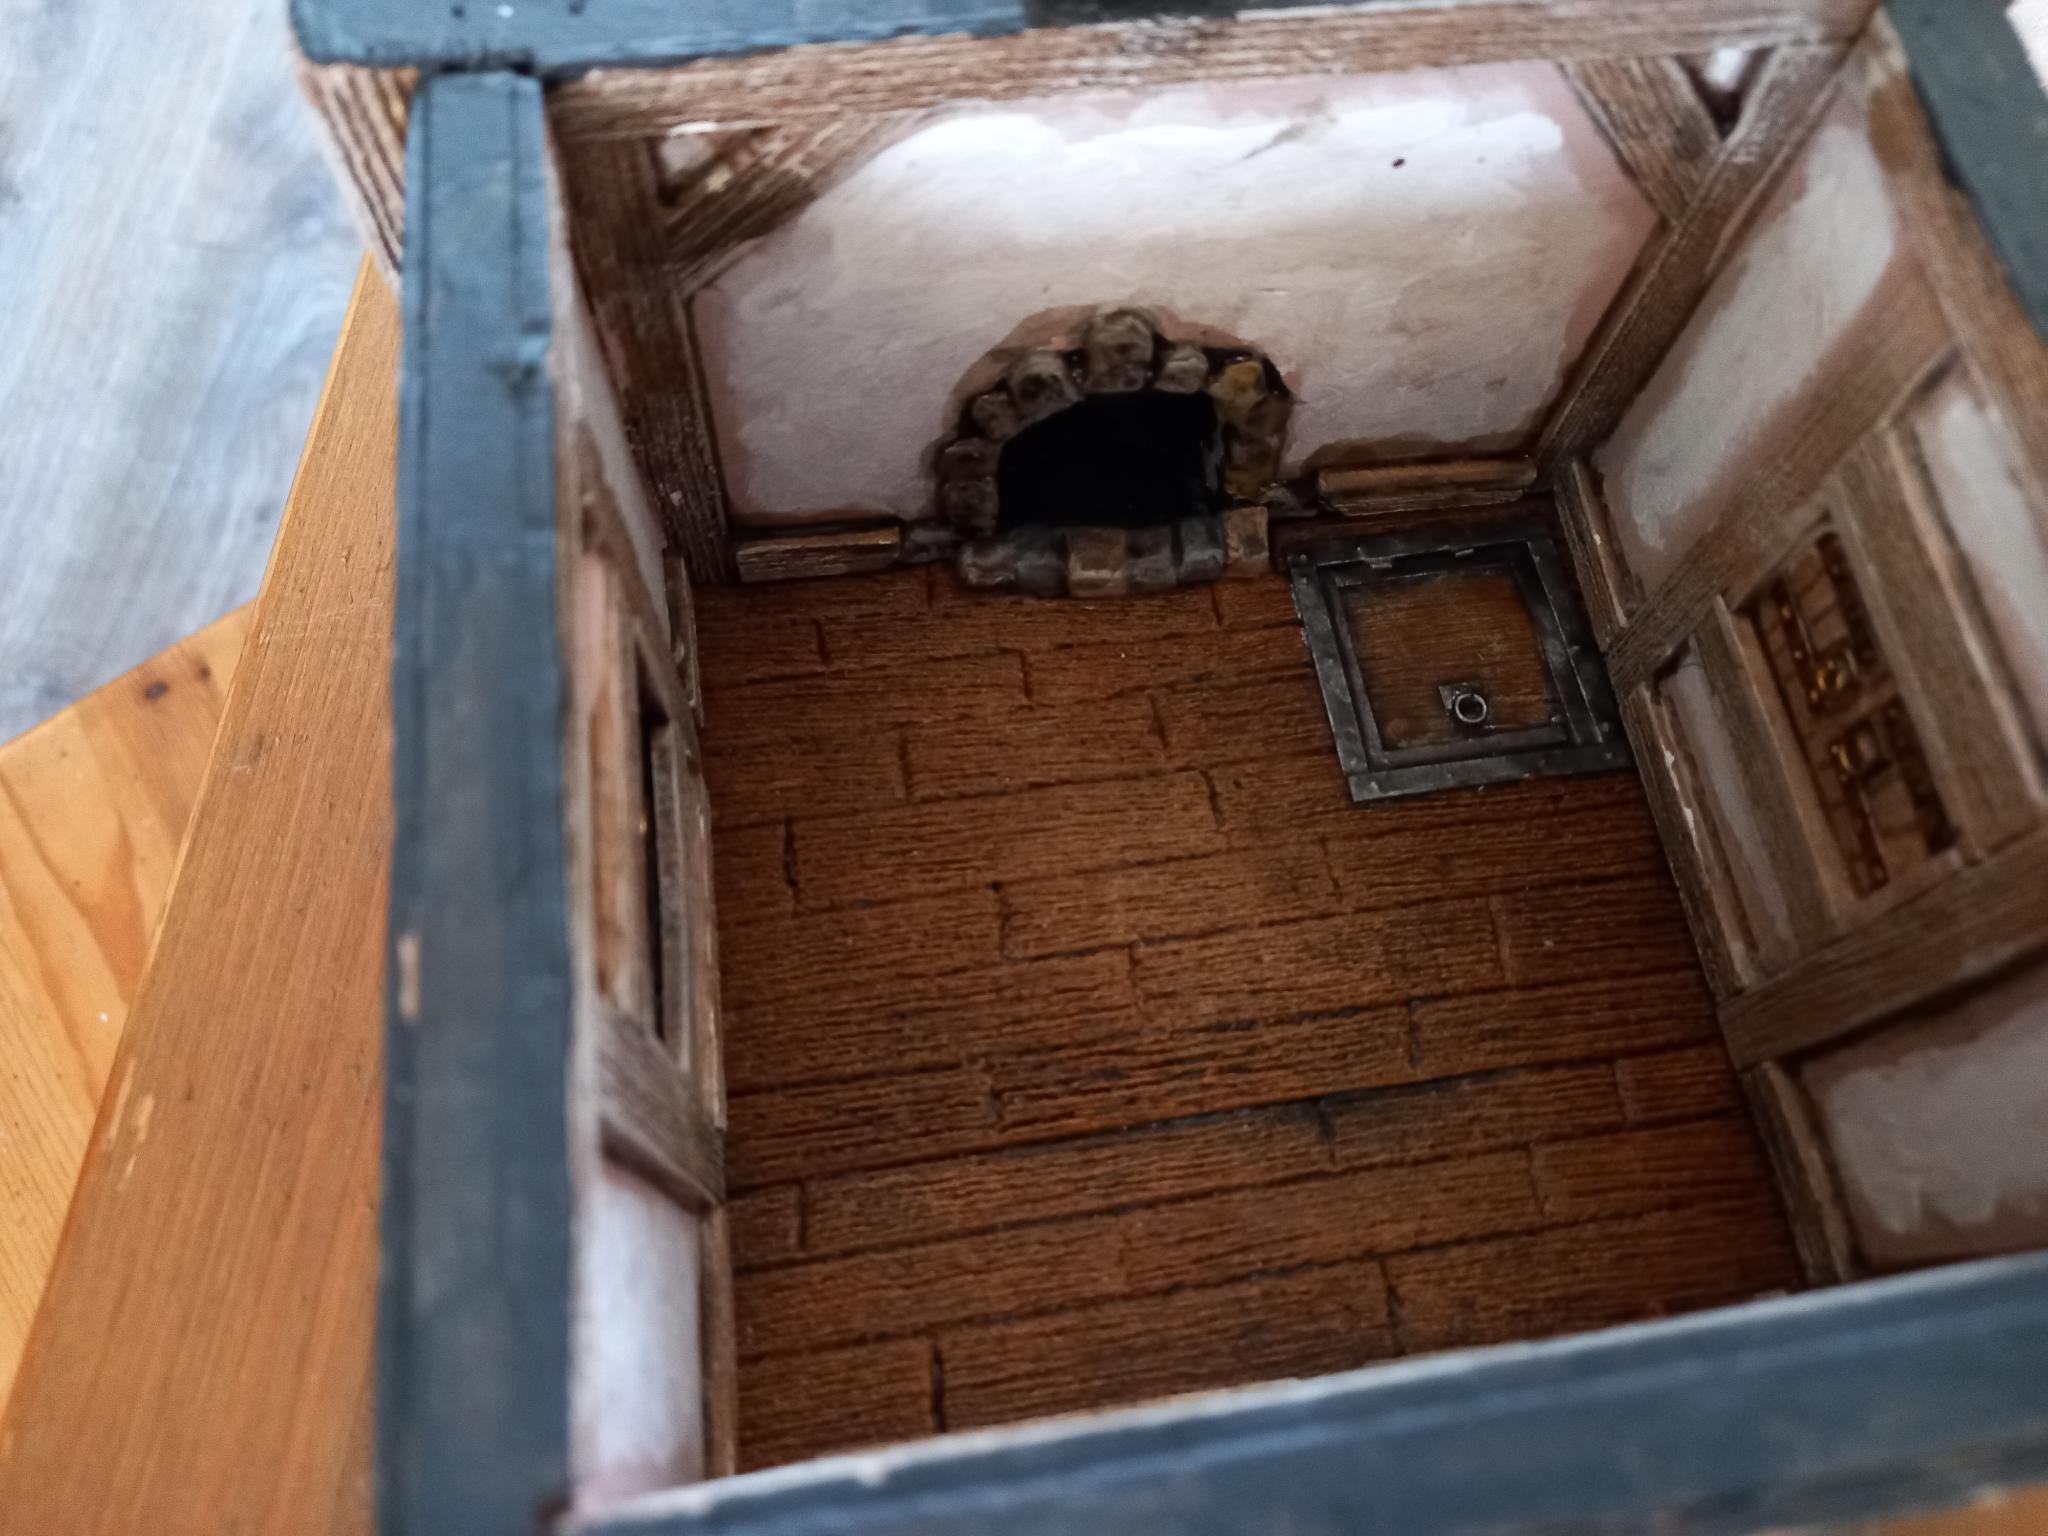
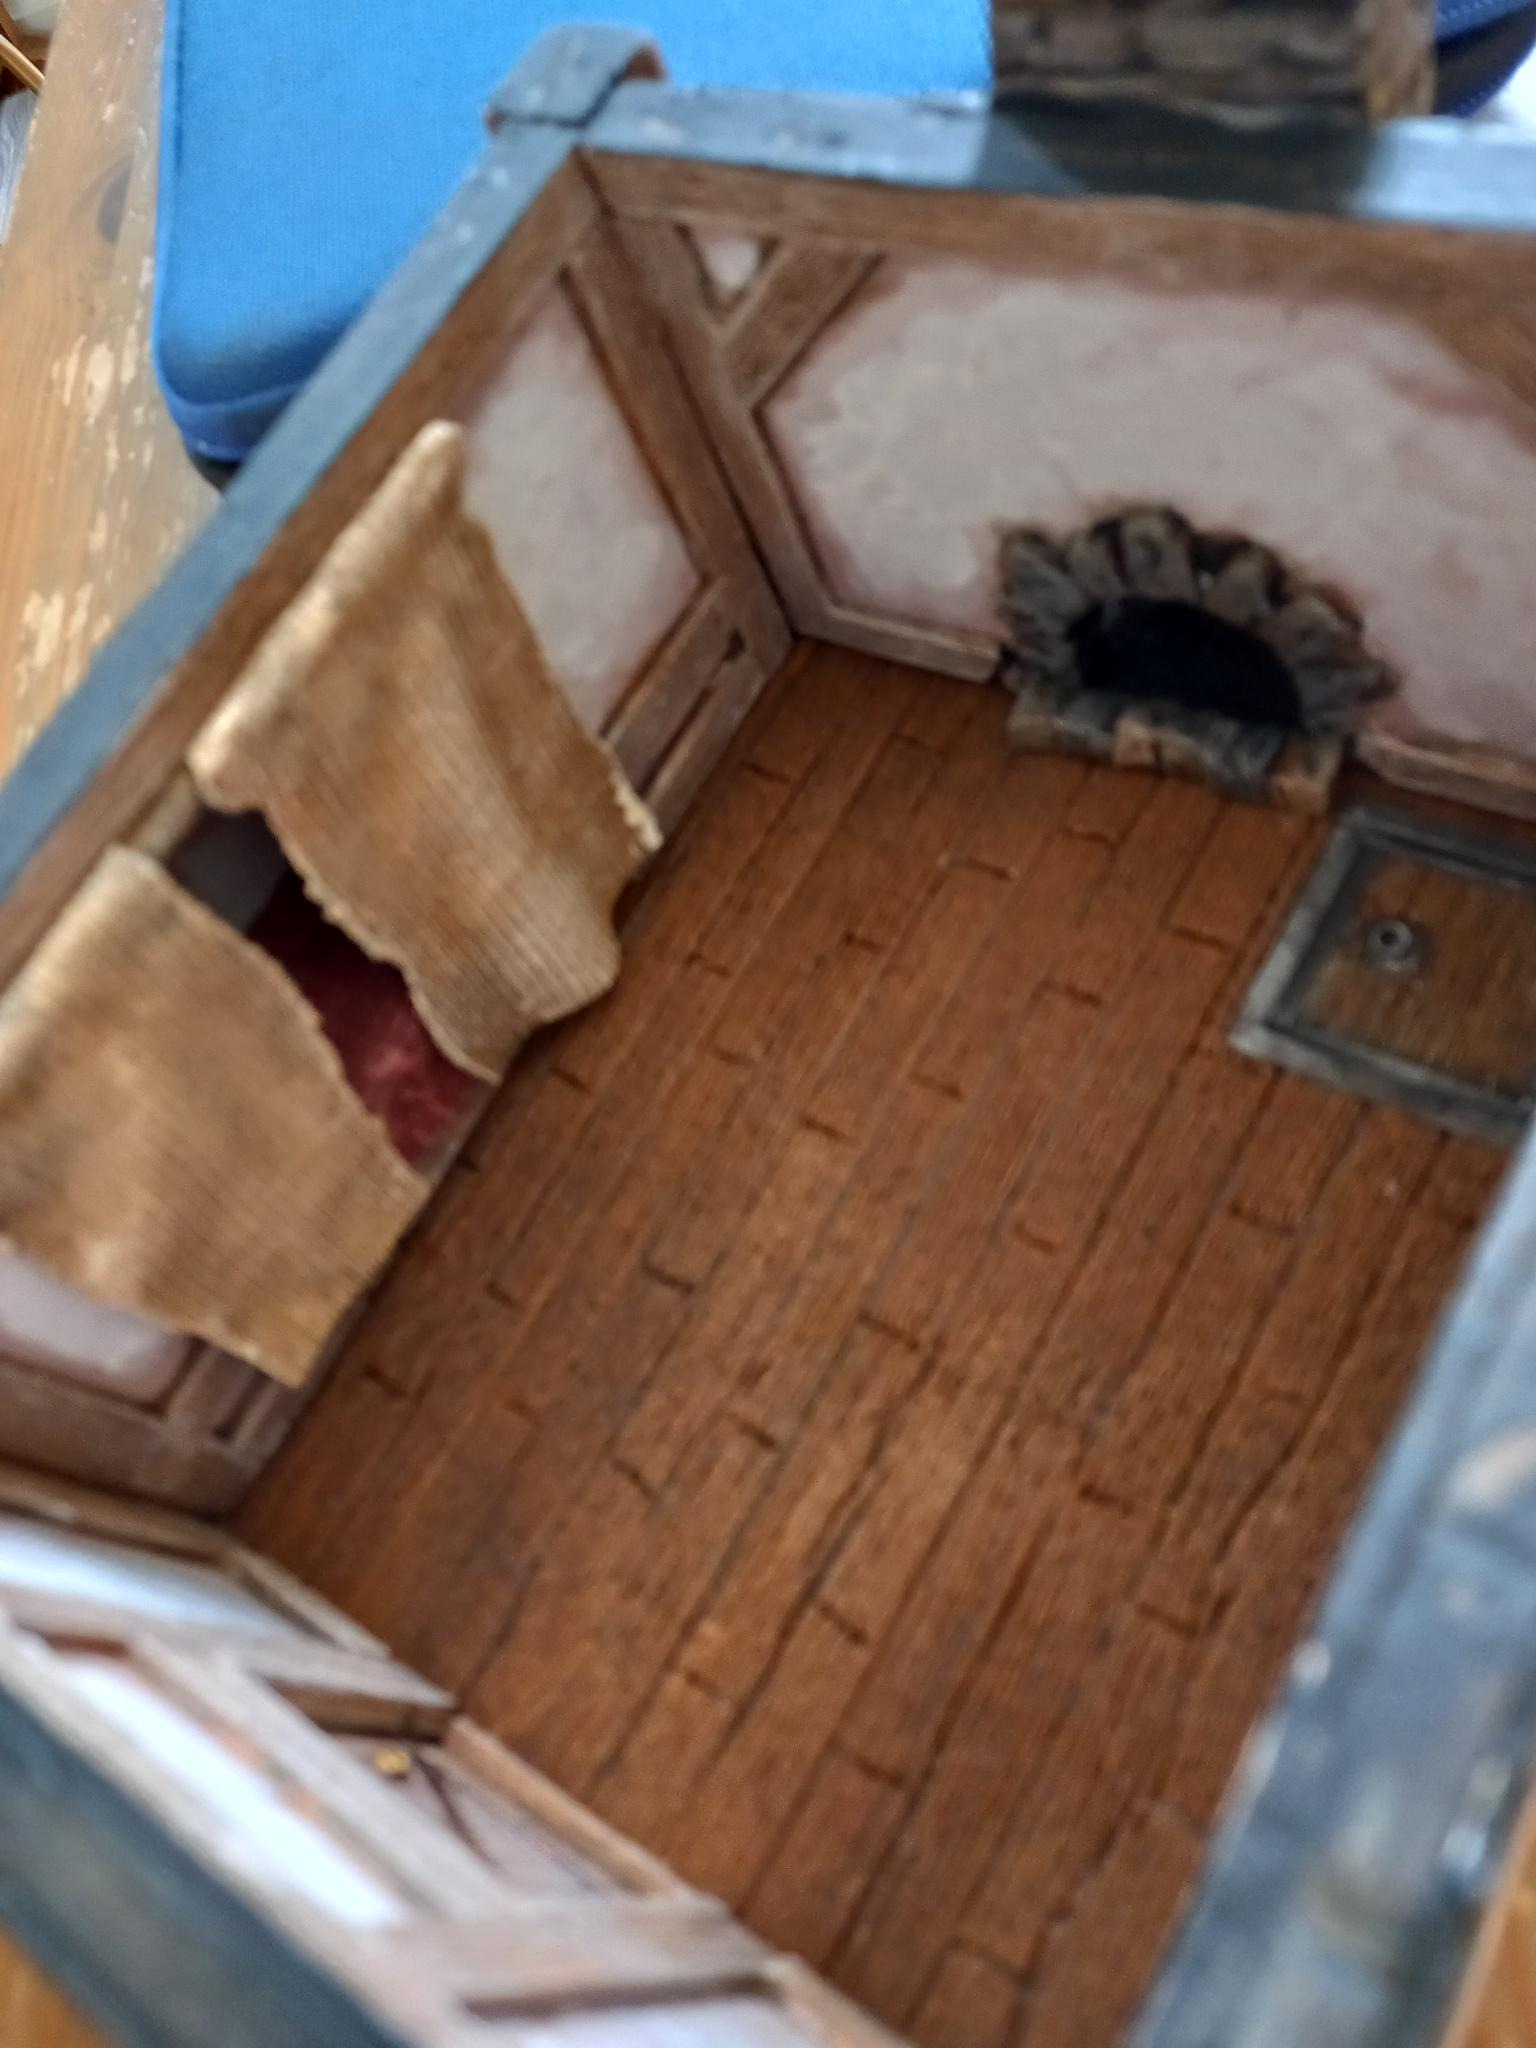
I did do some crafting in the meantime, but I haven’t made a lot of pictures. You’ve already seen the floors, but I now added some colours to it. I used craft paint to mix a nice brown and a lighter tone. The lighter tone I painted on the pieces of the wood that would be most worn: the paths from the door to fireplace, bed, windows and tables. This was all wetblended and I painted metal on the trapdoor. Everything was given my standard darkbrown wash, with some added black. I was planning on drybrushing it, but decided against it. I liked the look. The worn effect was lost a bit, but the way it combined with how the wash had dried I though it gave it a look that had enough variety in colour and I like the dark warm look and didn’t feel like brightening it.
I made some small strips of stone. Simply by cutting some irregular shapes and glueing them on a clothing pin untill they dried. Used some alluminum foil to rough it up and painted it in grey/browns with a wash and drybrush. These where glued in forn of the fire places. I was planning on some logs in them as well, but honestly, I just want this done now. Maybe at some later point.
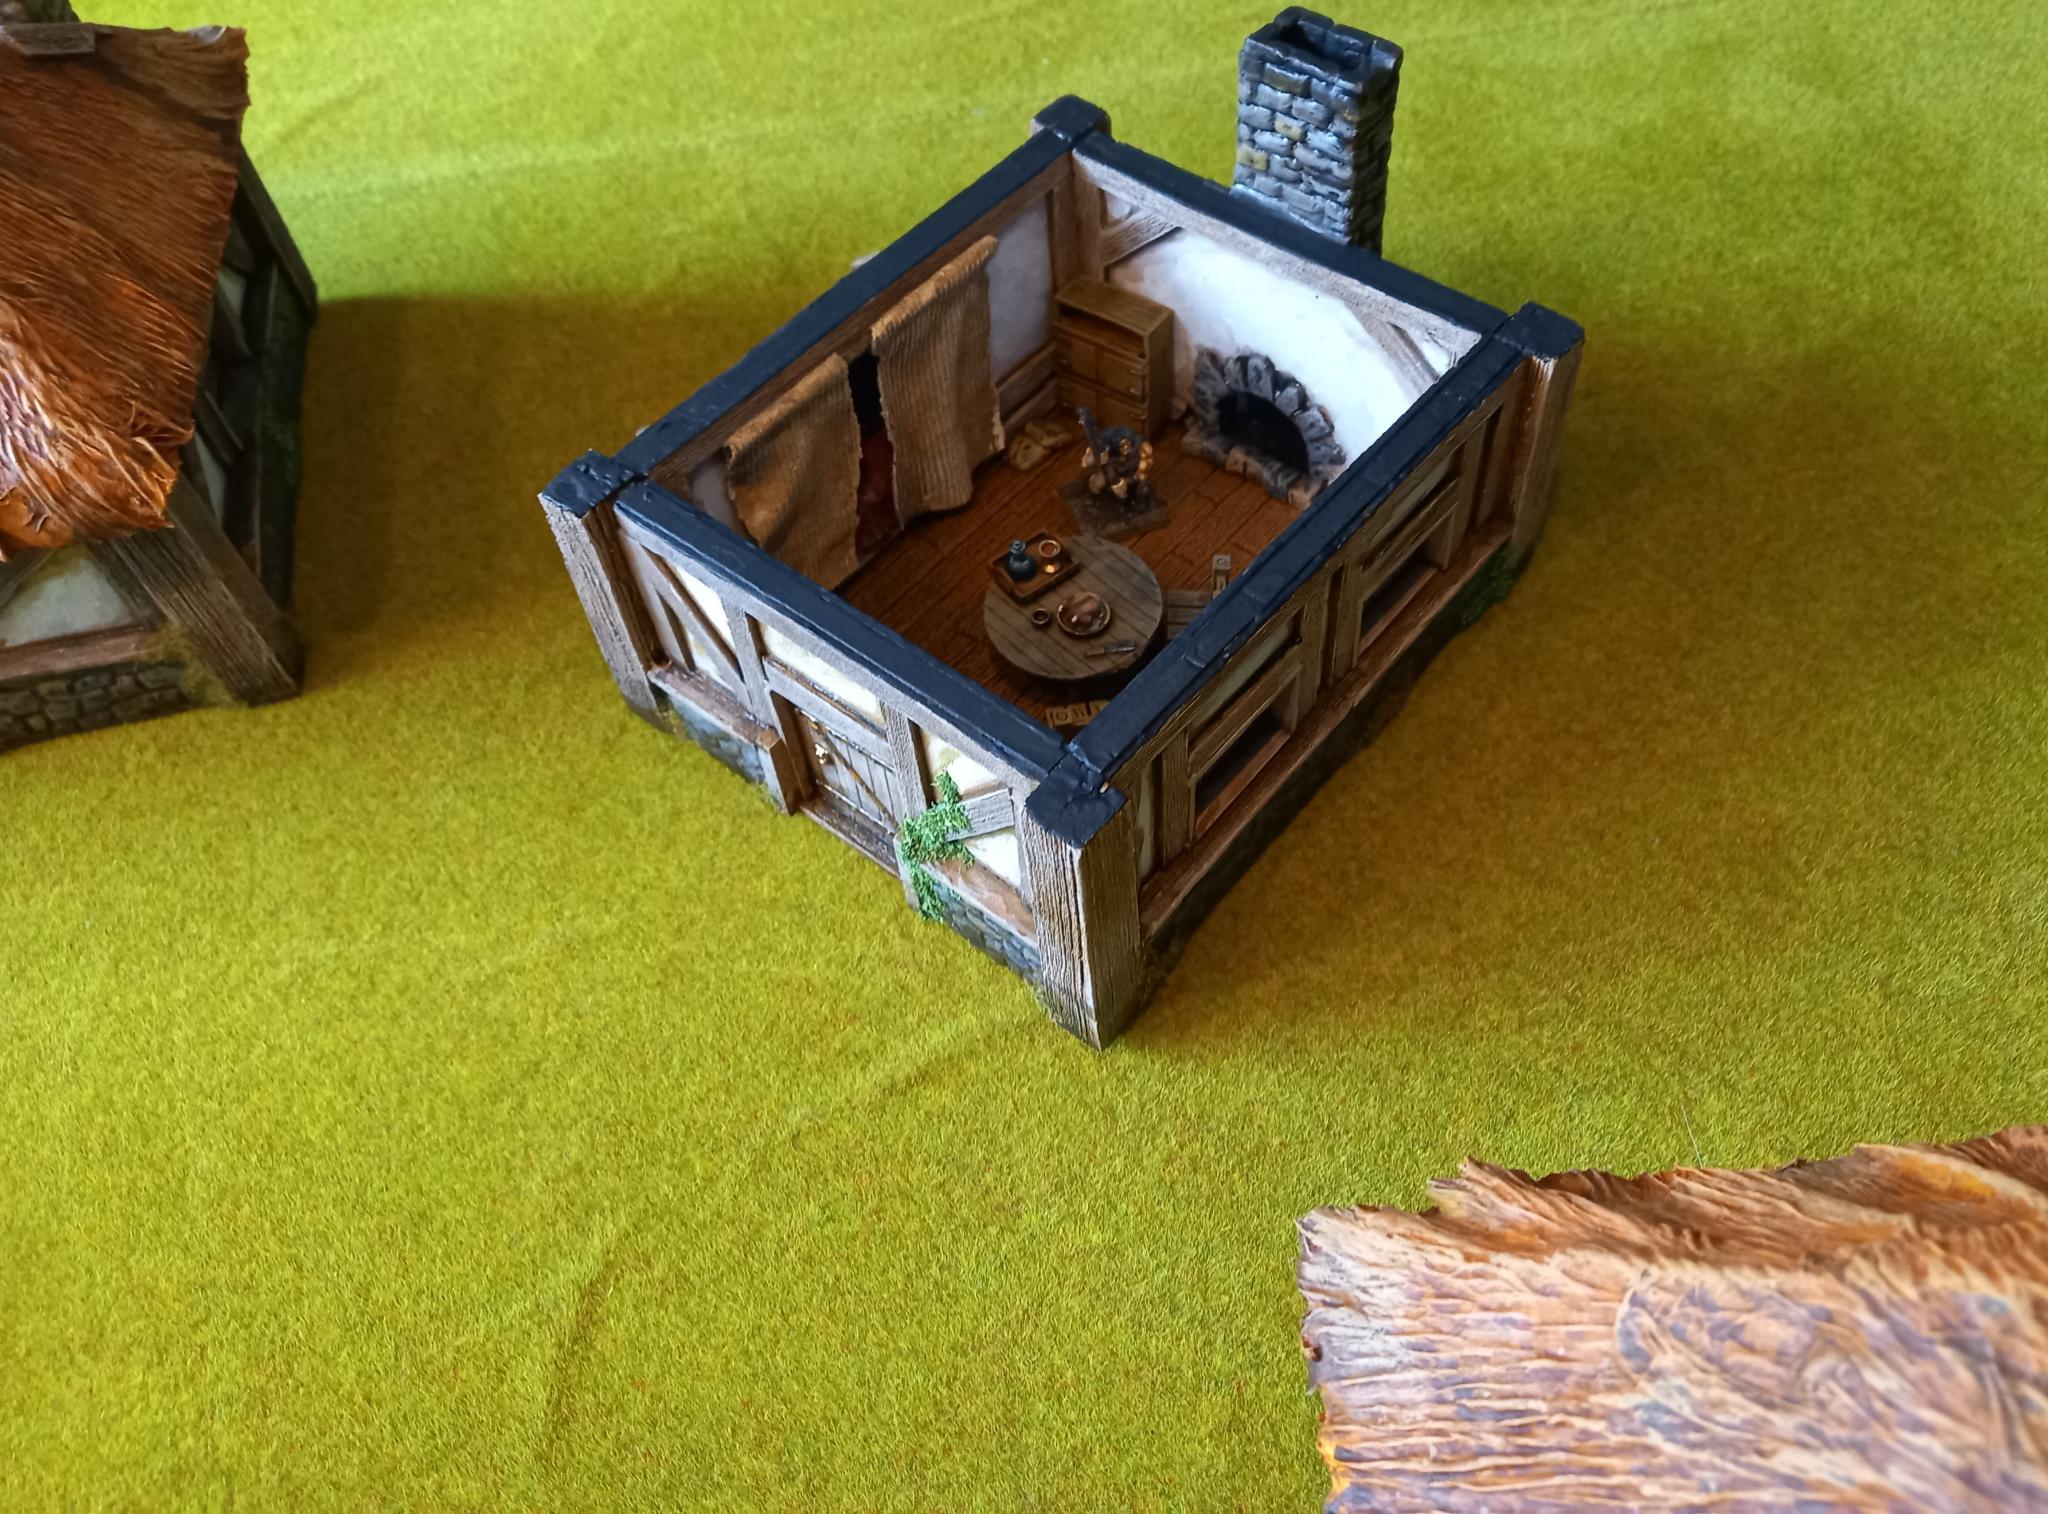
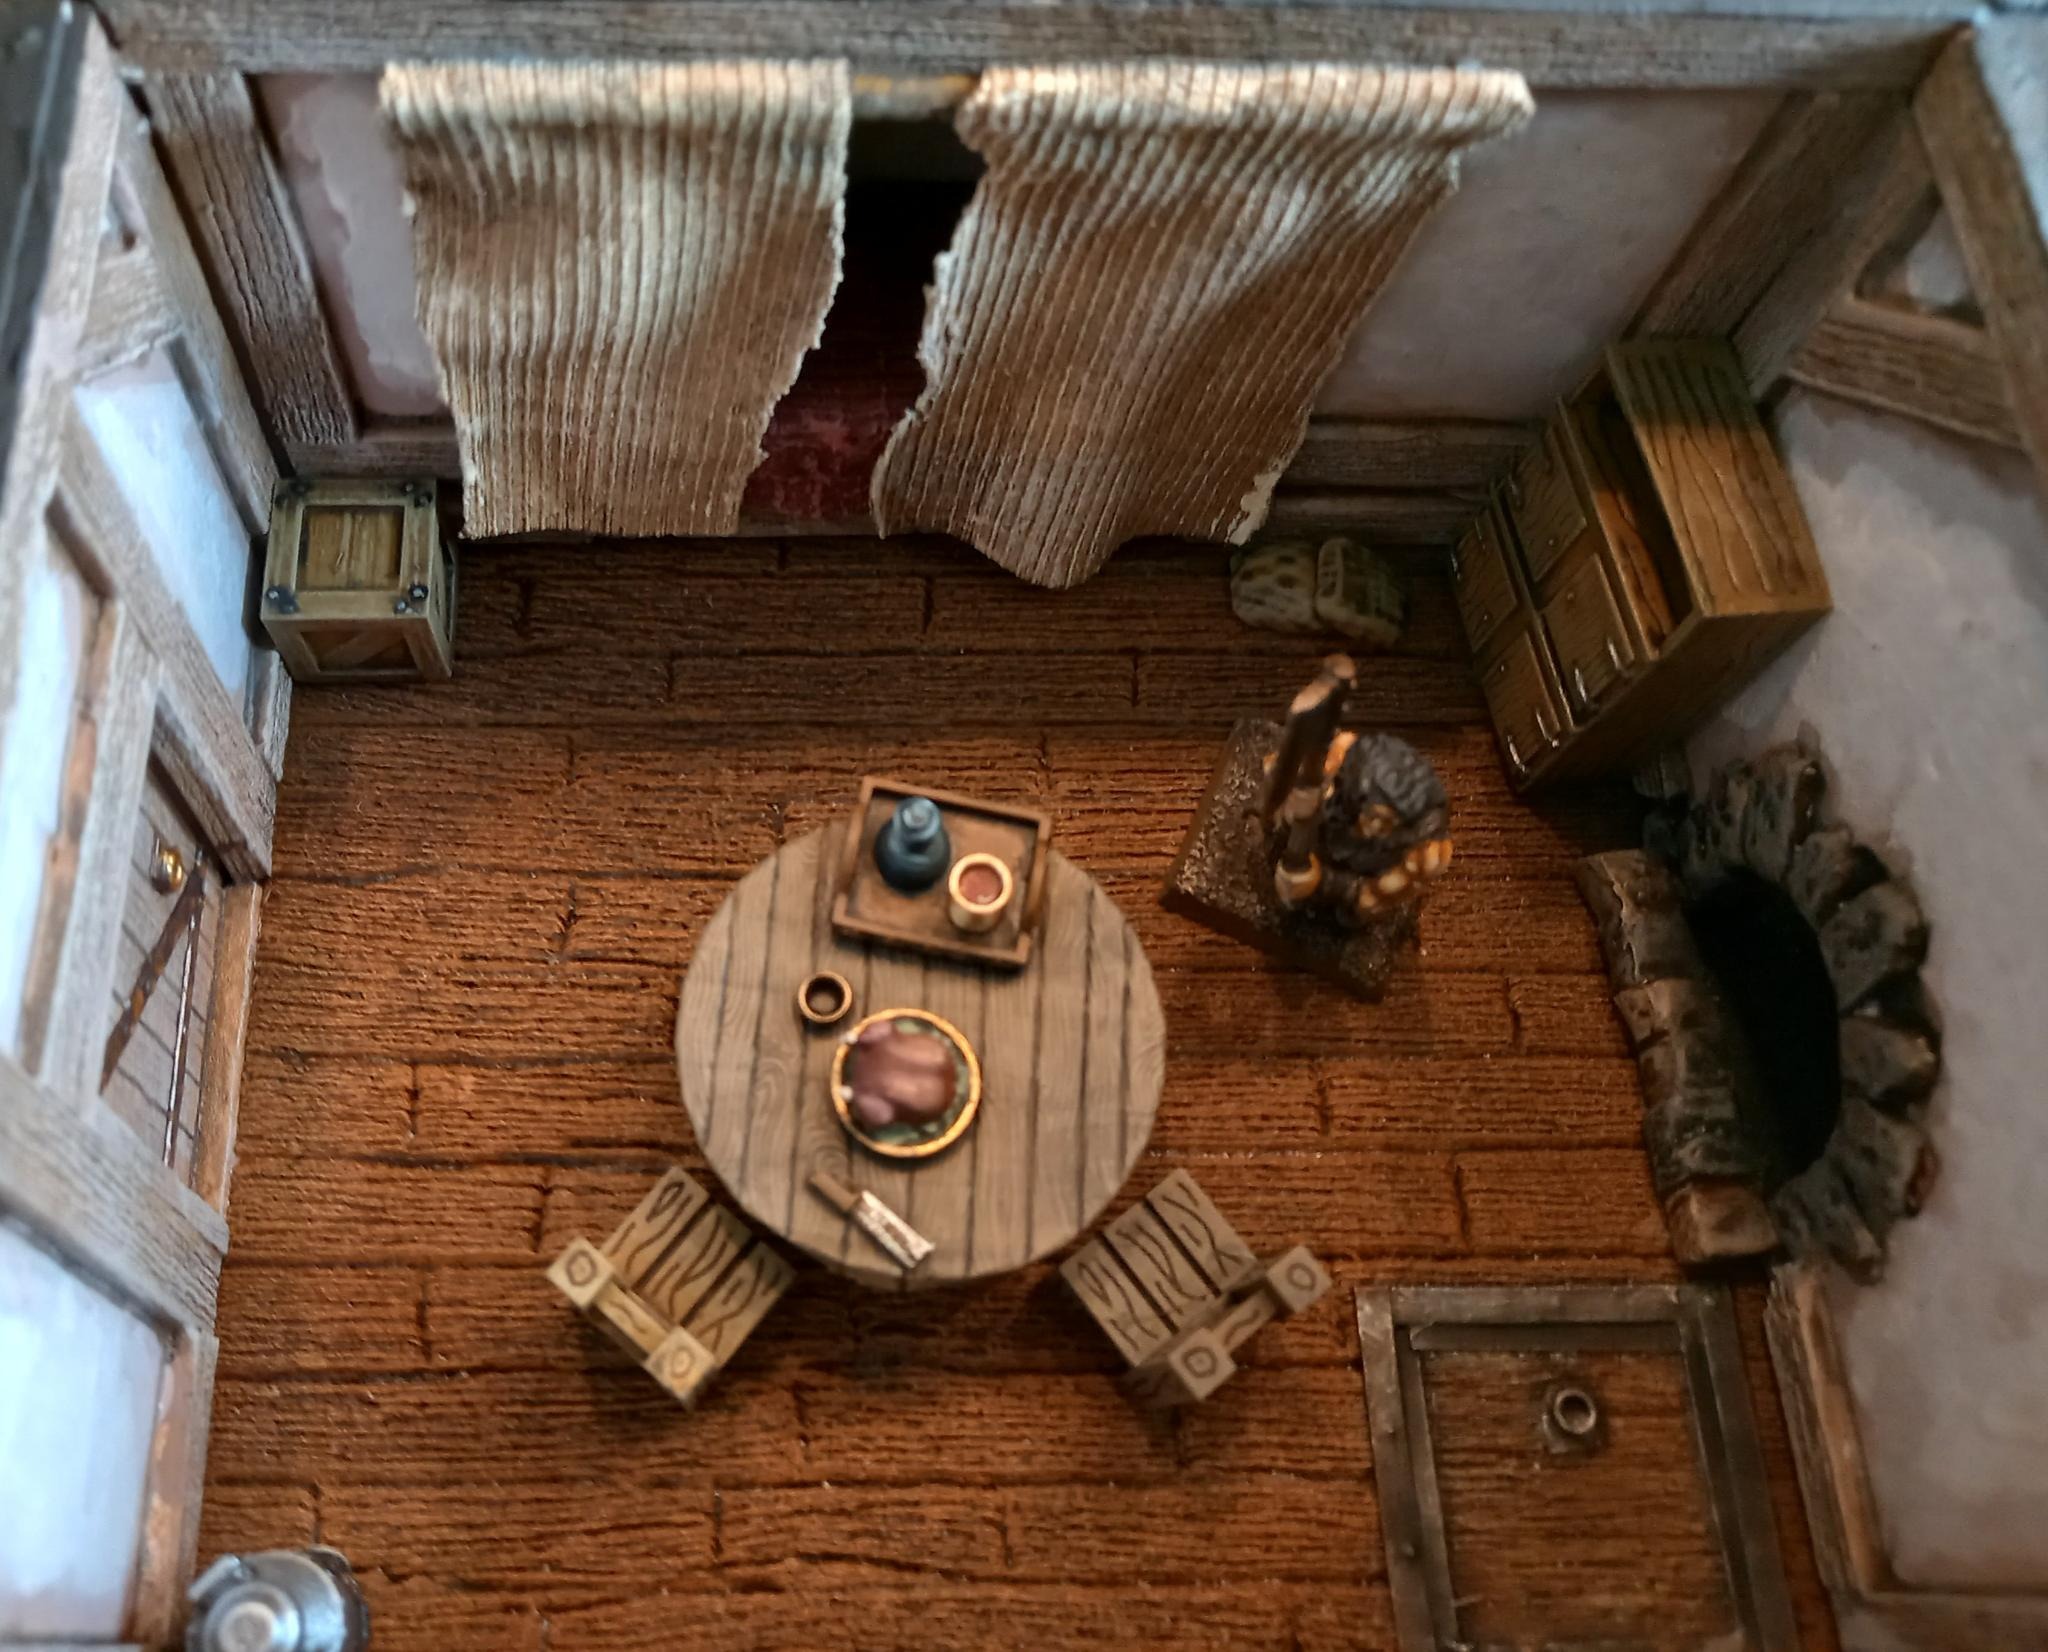
Cutting some cloth in pieces to hang in front of the sleeping area, I super-glued them to some skewers and soaked them in PVA Glue/water/primer mix. I placed this on a surface the glue wouldn’t adhere to and let it dry over night, after carefully creating some folds. I also used some of this method to put some fabric on some balsa wood cut to shape to fill the beds. Making sure it looked a bit lumpy. When dry I painted them up in several brownish colours and glued the into place with pva, simply sticking some cloth pins to keep them in place untill they dried. That’s the enterior done, but for the furniture and the exterior just needs some green.


I bought some files for tavern props, which had some lovely detailing: including cutlery, buckets, food items, bowls, tankards and stuff. Really nice stuff that would allow me to make different shelves and tables.
There was also a wealth of free stuff to be found on thingyverse and the like.
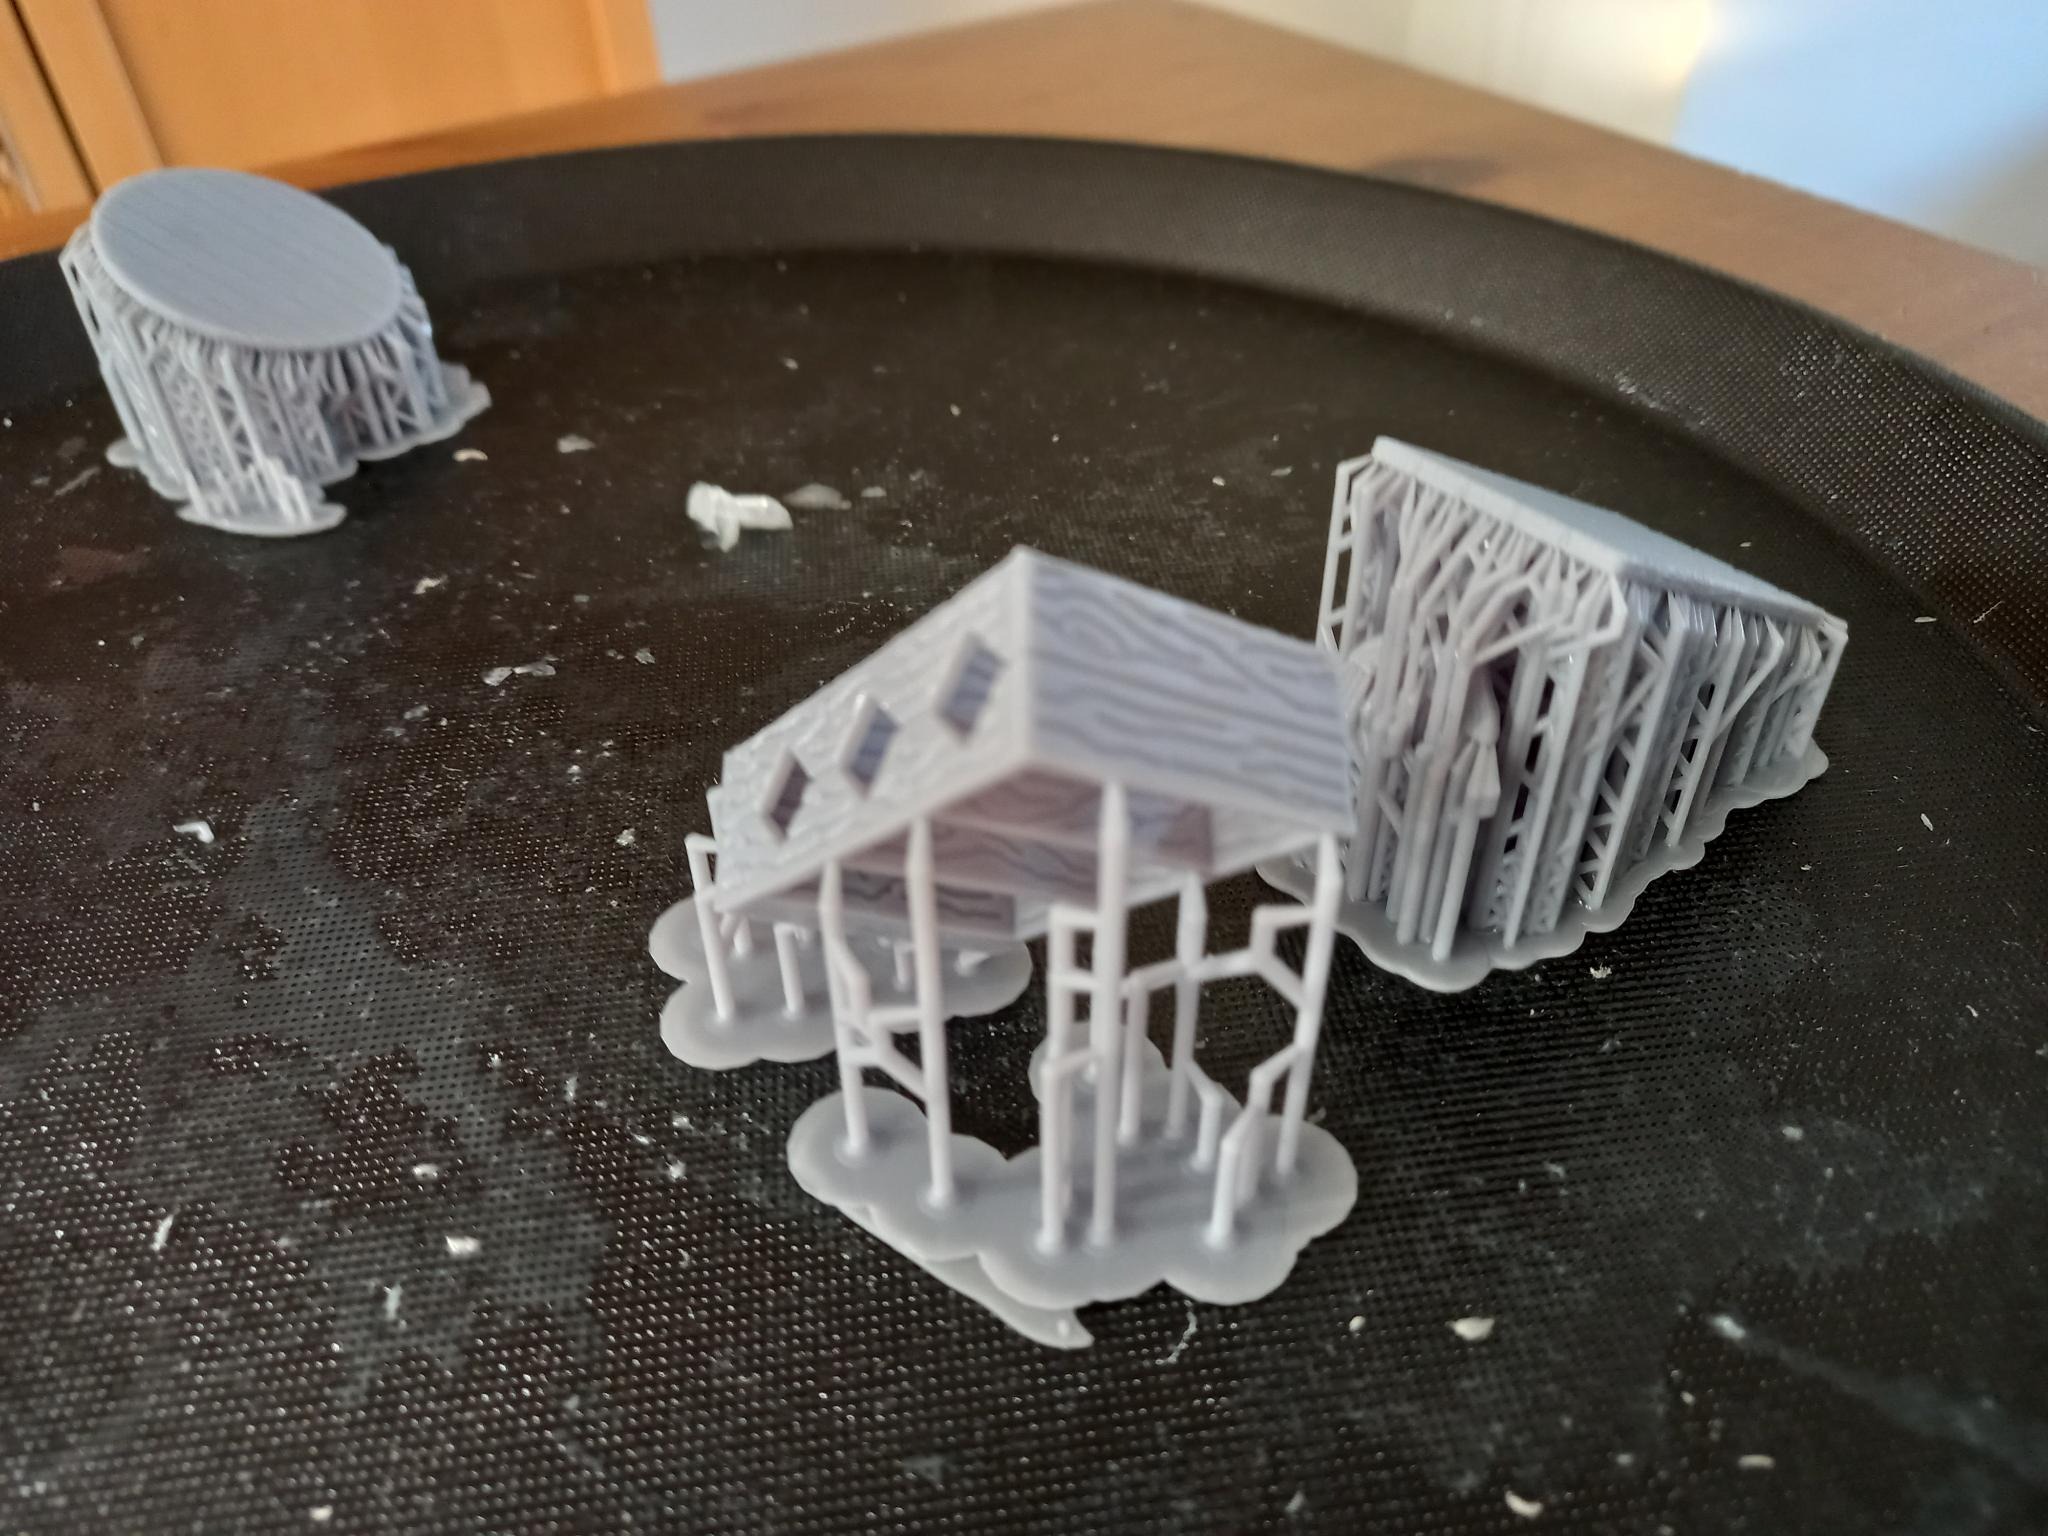
One set of files came pre-supported (and luckily also unsupported, it seeemed).
As a complete newby I started with these, but I ended up as quite a journey. The pre-supported stuff came out fine, but some of the other model only printed half.
After googling what the problem was and asking advise on several platforms, including this one, I understood the problem.
A big flat area creates a lot of suction and will pull the model from the buildplate if not properly supported, so it will only start printing when there’s enough space from another support to start builing on. The sollution is angling the model in such a way that the slicer shows a little red as possible before placing the supports.
This also means you need way less supports, in the final picture you see 3 models I printed at the same time. The one in front was supported by me and required little clean up. The one in the back came pre-supported but did not survive clean up.
It was a bit frustrating and all, but in the end it was a very usefull experience. I have a way bigger understanding about supports and becoming less anxious about using my printer. This did cost me a FEP sheet amd I needed to replace it, which was also a bit daunting. Not as daunting as having resin on my screen, but I was lucky I could remove it with a plastic scraper. Still best to not have this happen to often. I bought a screen protector sheet, which had some good reviews and some plastic razorblades that seemed to be able to clean a screen if disaster strike.
The final picture is what I now need to paint, which is actually quite a lot for but 4 houses.


Forcing myself to do something
I’ve been pre-occupied with my new 3d printer, then with it stopping doing what it should and communicating with the supplier.
I figured I’d just put some work on the outside so I have something to show for all my work.
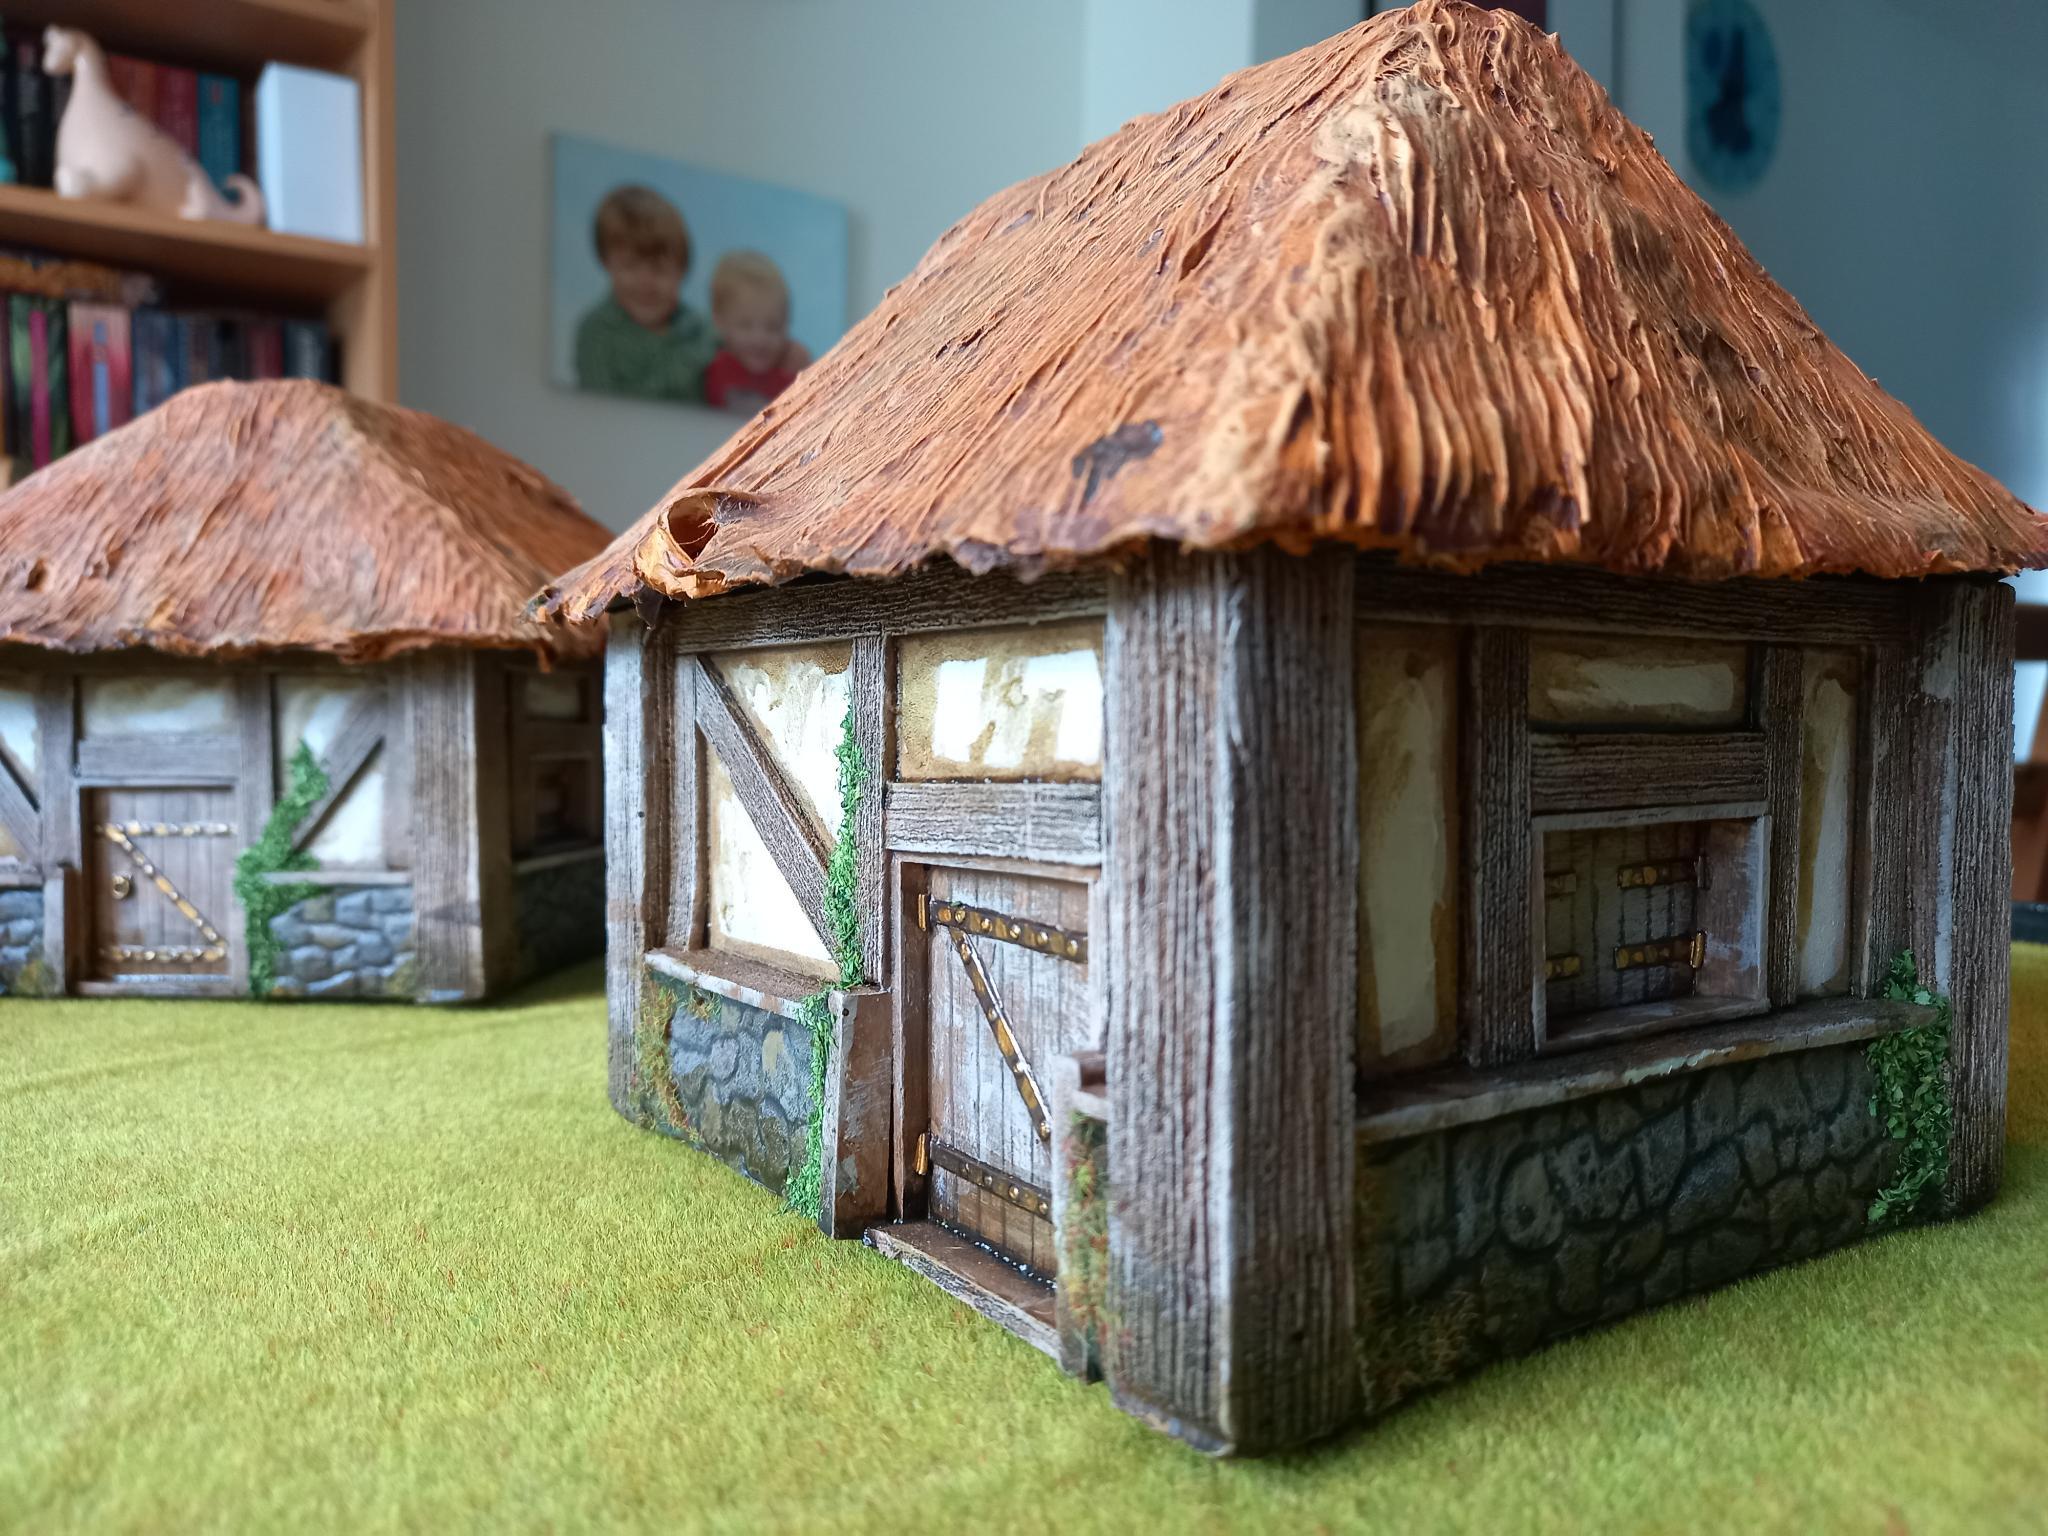
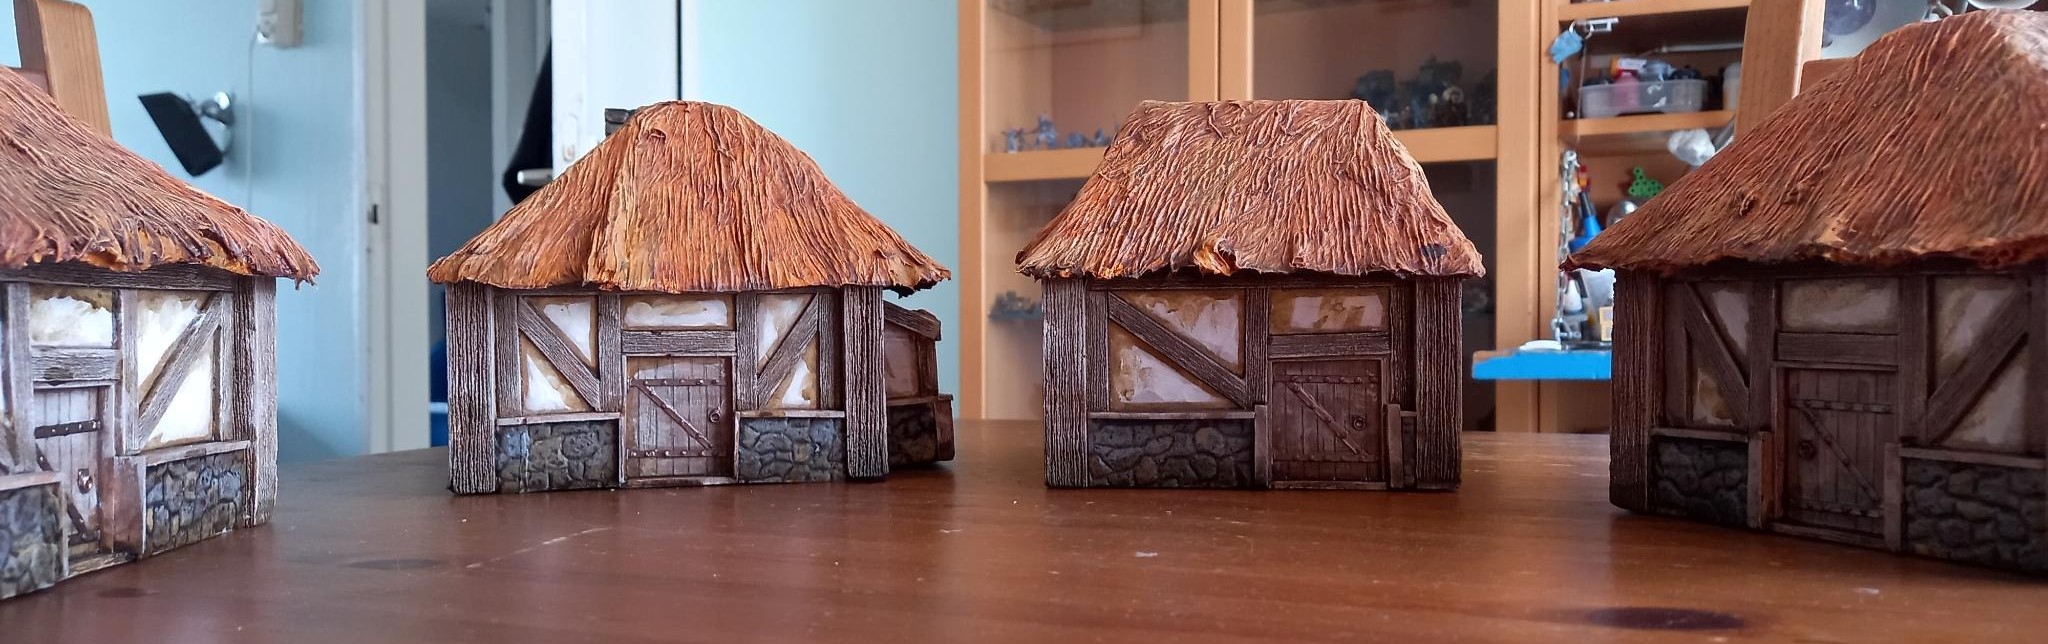
I washed the woodwork with a brown wash and drybrushed with a brown/grey mix. After this all the plaster got a coat of very light brown, stippled to off white in the center of each panel.
I painted the stone with a grey, mixed with a brown tone. After this I picked out individual stones with a grey mixed in with either a yellowish or reddish brown. I used model paints for this as it’s a bit more precise work and doesn’t require that much paint even on 4 houses.
After this I made a wash. Water, matt medium, some flow aid and a good quality ink. This costs me about 4 euro’s worth of matt medium and some drops of ink for what would be about 25-30 euro of pre-made wash.
I have plenty left in the container, but this stuff works fine on mini’s as well, even if I don’t need it for future scenery projects.
I washed the entire stonework, but it dripped off way too much. Happy I had put the models on pins so they didn’t spend the night soaking in pools of brown. I cleaned my work area and washed each side in turn. letting it dry in each in turn as well. This did the trick and I gave the stone a drybrush of grey/bone.
I then made a wash of green/brown ink and weathered the outside. Painting it on the inside of each panel, letting it flow a bit and rubbing it away with my thumb if it got too much.
The last stage was painting the metal working. This still needs highlighting and shading.
I also used a grey brush/pen thing I got at the art store to increase the contrast between the planks of the doors and windows.
Apart from the metal, the outside is mostly done. I’m going to add some moss/greenery and maybe a bit more targeted weathering.
Now to get that printer sorted out. Might need to do another project in the meantime. It’s already februari and I didn’t finish one model yet.
Getting something done
I’m working on the interior detailing and I am not having a good time.
Not sure yet how it will turn out. Some looks pretty good, some might look good put together and painted, but at this stage I might wait for my 3d printer to arrive and just print it out. Not sure yet.
In the meantime I decided I might as well slap some paint on the buildings themselves as I can finish the rest of the detailing later, but still have some joy in my work. Hoping that seeing it all come together motivates me to finish the job. I bit of a bit more than was wise: making a set instead of just a building creates something great when you get there, but man, does it take a while and is it hard to stay motivated.
I covered all the models in a mix of white primer, pva and water. Make the mixute nice and watery and don’t overdo it on the pva. We just need a thin coat of the pva to protect the foam from spray can gas and a little bit of strength. The model is bigger, but as always: 2 thin coats.
To protect the models as they dried I put some pint in the bottom. This allows the excess fluid to drip of, without creating pools sticking it to the surface it’s drying on. This will not end up looking good when drie so it’s best to avoid.
After this I used some cheap craft paints and mixed the colour I wanted in a empty pickle jar. Make enough of this, so you won’t run out and end up with two different badges on the same model. Thin the paint as it is pretty gloopy and again. Thin coats. I added some grean to the mixture and spread this on random places. Don’t over do this. I then created a wash of a darker mixture and applied this liberally. Again with the models resting on pins. I also added a small glob of black on some random places before washing. The wash would spread this around, creating some colour variation and weathering.
After this I made a new mixture looking like a lighter version of the base coat and used this as dry brush. I use a new batch because I don’t want my drybrusch paint to runny.
I also managed to put 2 coats on the wood after this. This still need washes and drybrushes and then I can get to the stonework. Making sure I get some colour variation in the model.
While painting the wood, I paid special attention on not getting any paint gattering in corners and details. Don’t want that ruiined.

Mostly glamourshots.
I can’t find my groove at the moment, so made very little progress.
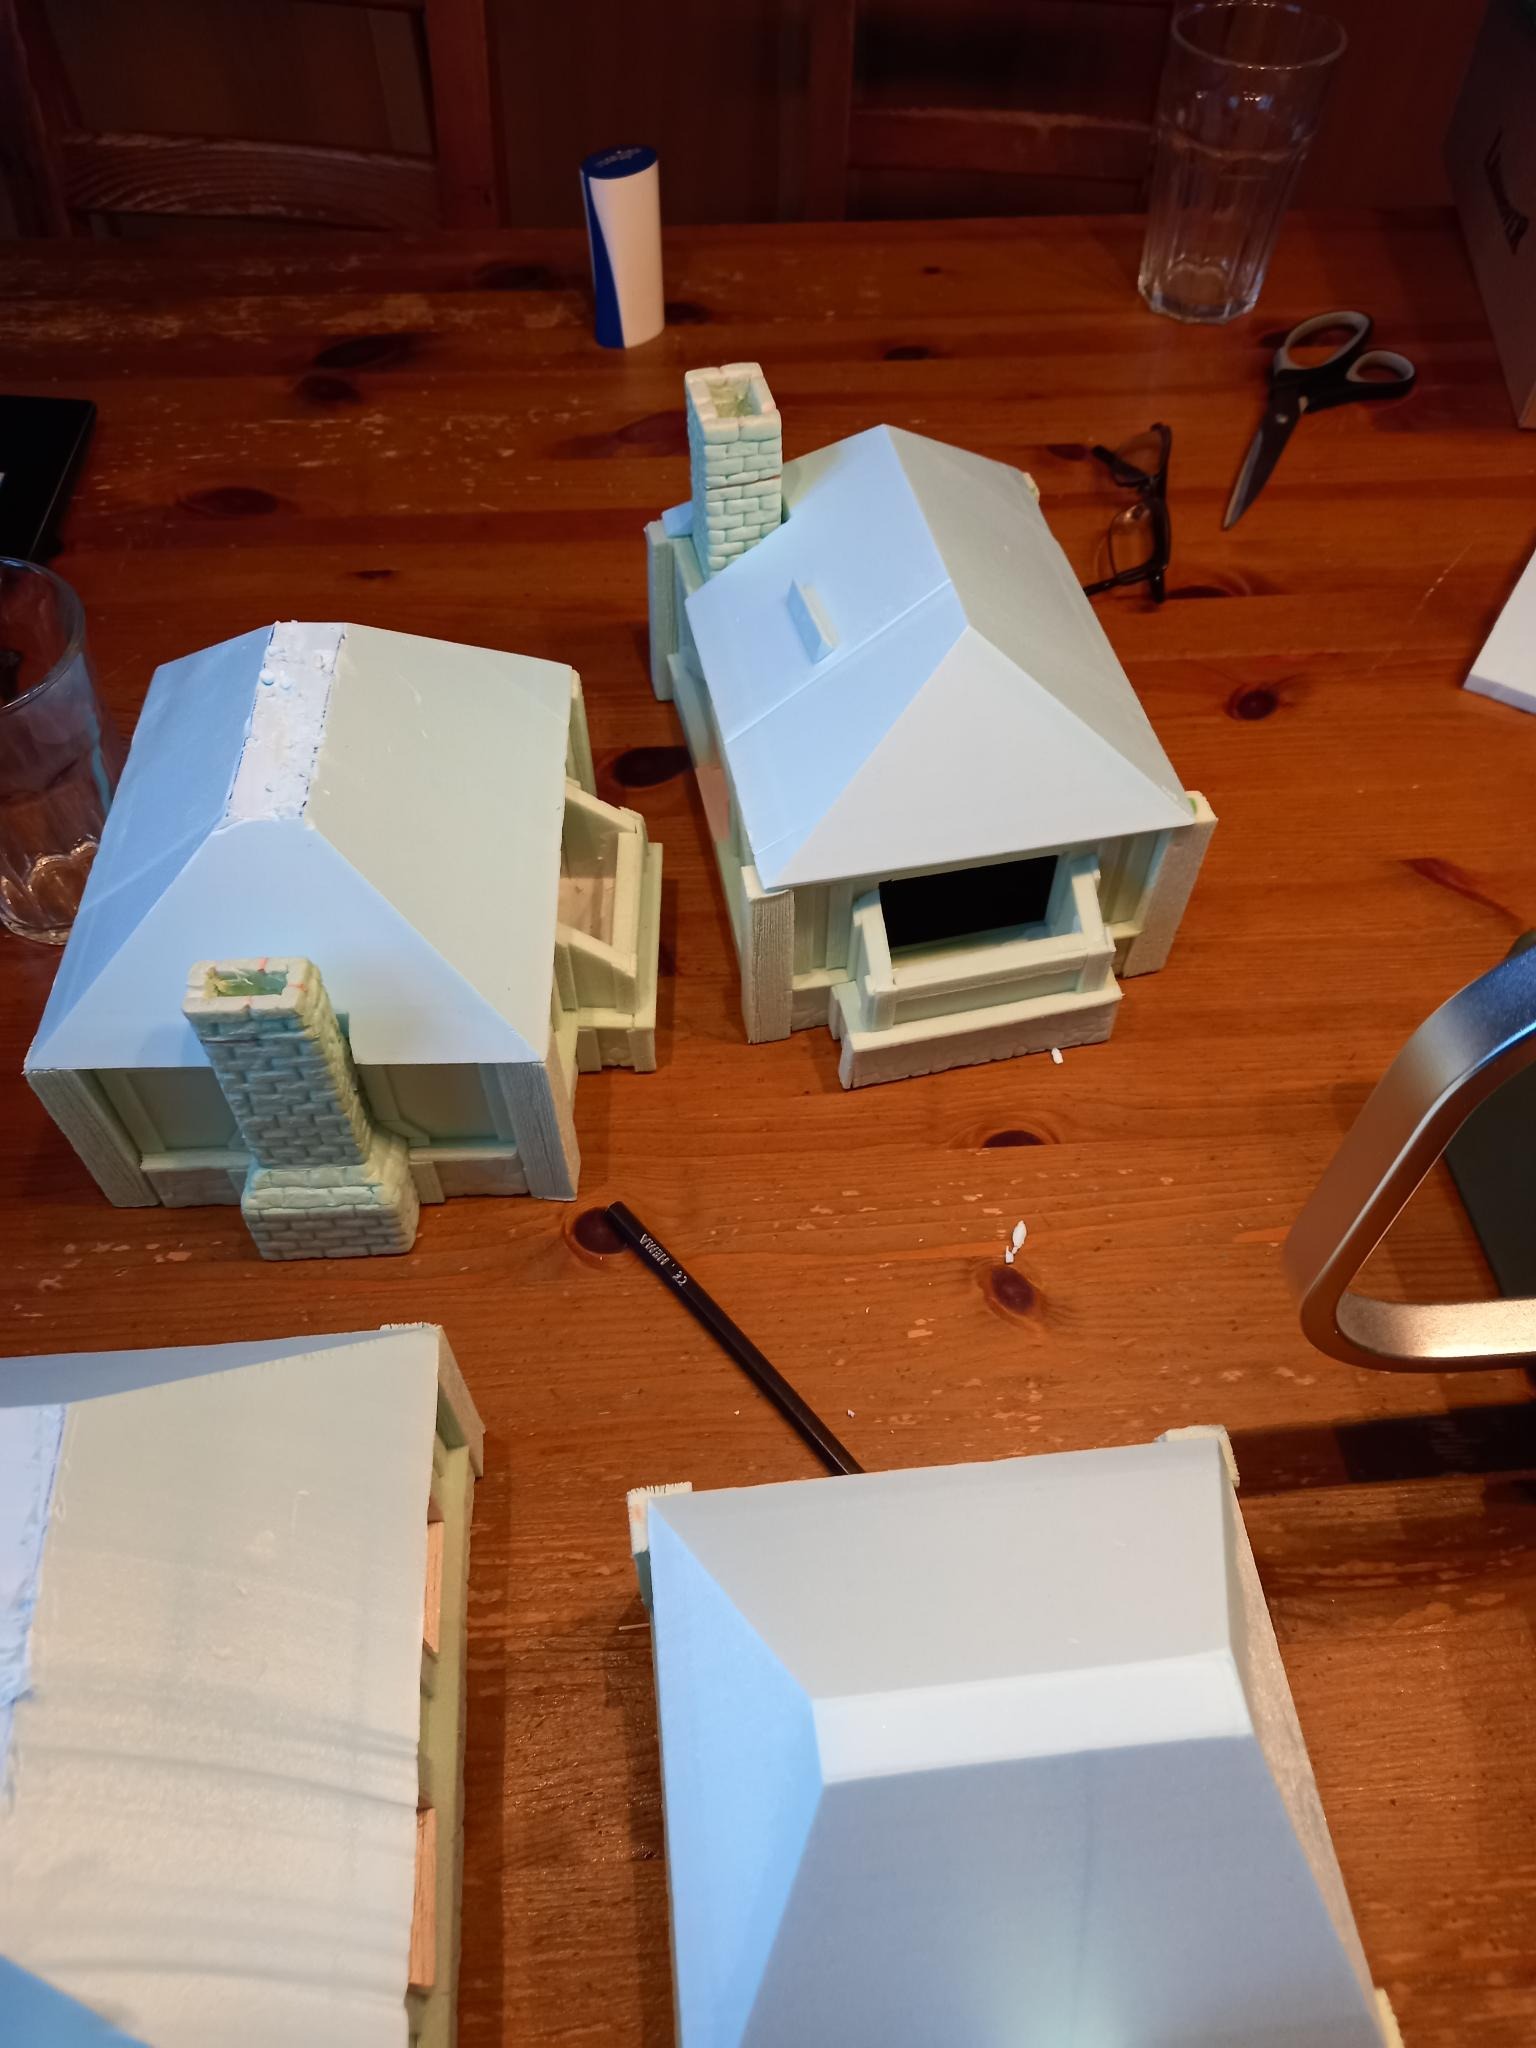
I was finally ready to put the roofs on the models so I thought I made some nice shots of them.
There’s some detailing to be done and openings to hide.
I also made some promissing first steps on the furniture, but that’s for another update when I actually have something to show.
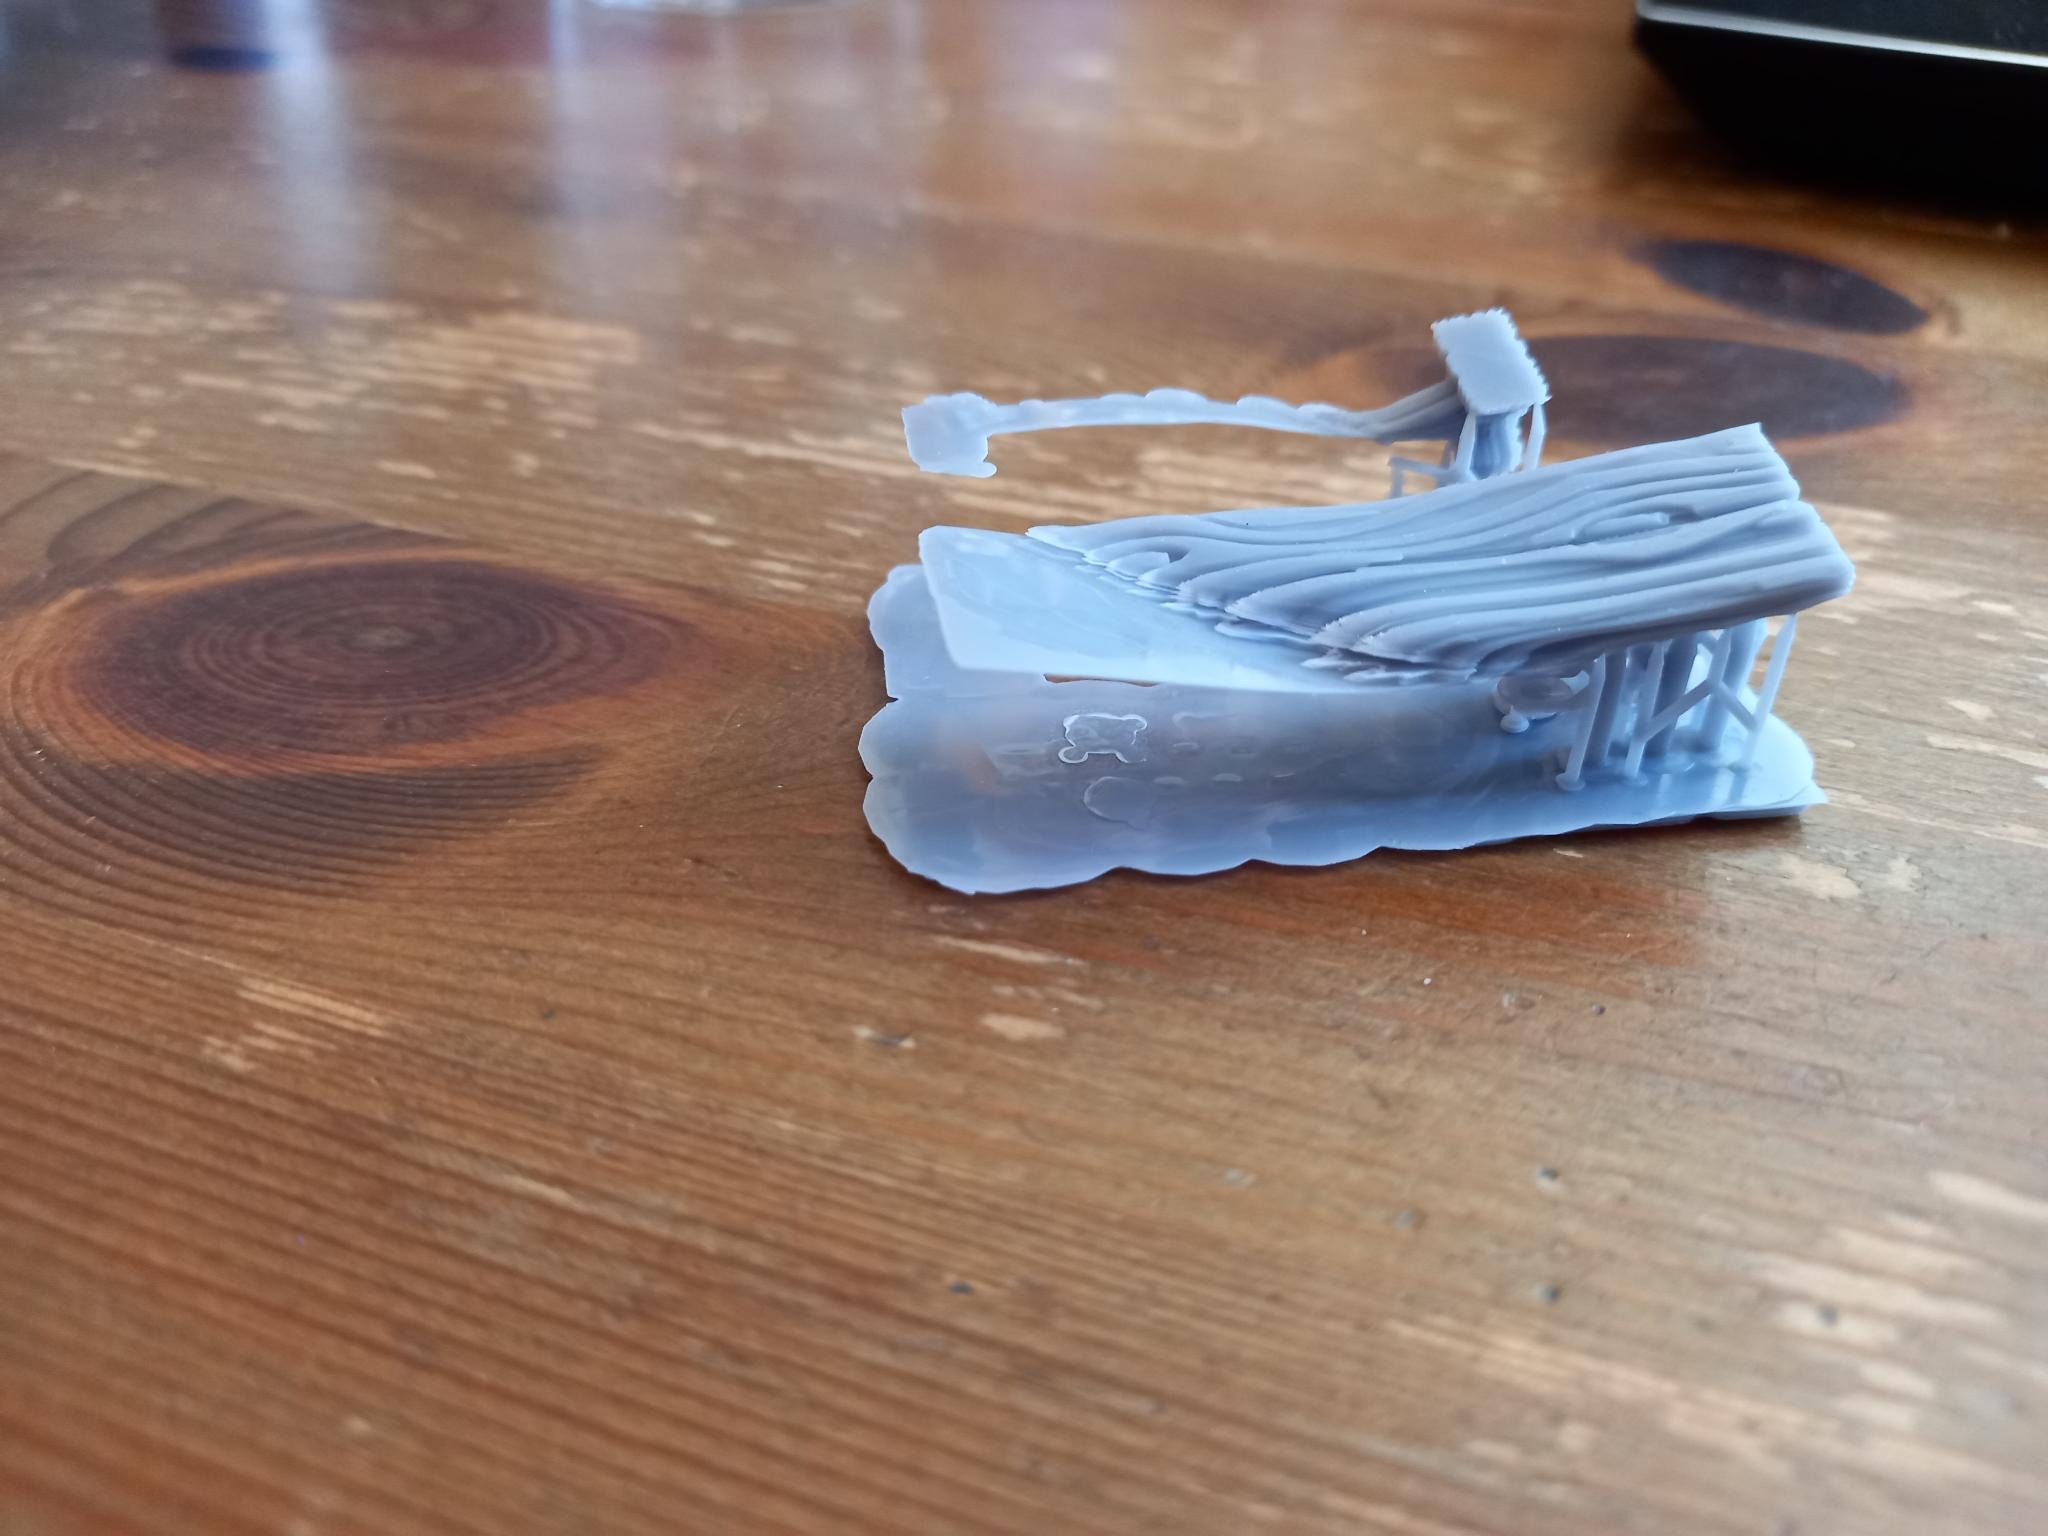
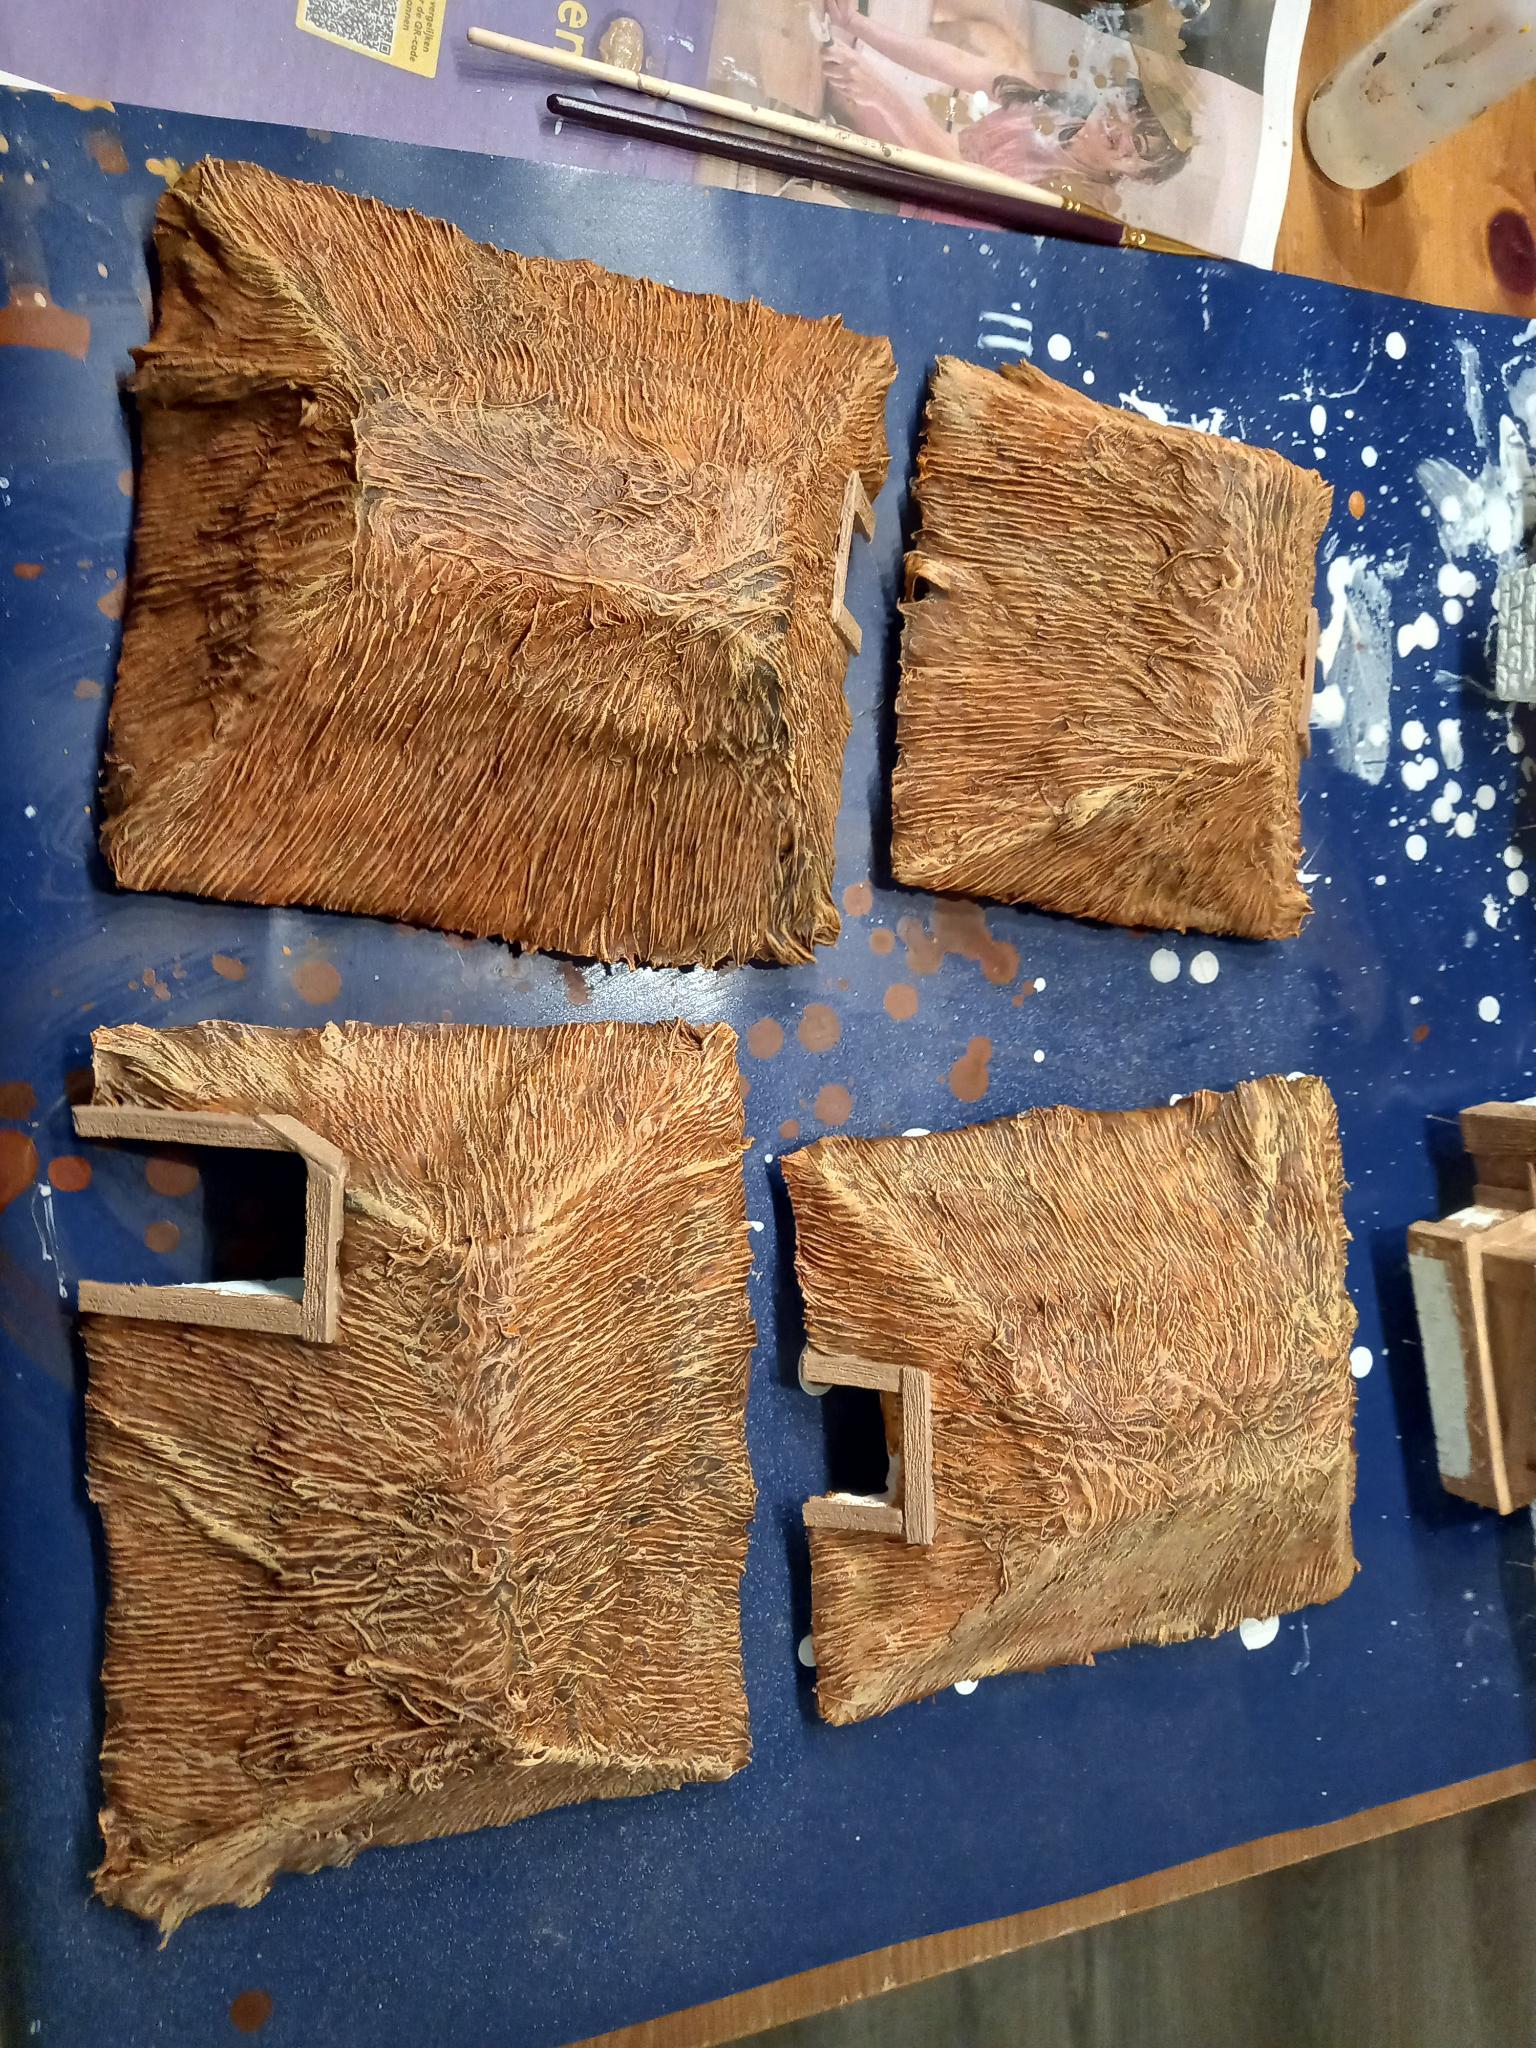
I cut some card into the correct sizes for the last of the roofing and added the thatch over it as already shown.
I made the fur covering this way to big and cut it into shape when dry.
Should’ve made a final piece as one of the roofs has a piece cut out, for the interior fire place.
Glued these into place and cut the holes into the thatch of the roofs.
Then made some pretty pictures.


Woops, forgot the pictures
First up: Happy new year to everyone.
I made some pictures but only now, saw I neglected to post them.
Better late then never.
The process is allready posted in the previous entry, but I’ll copy and paste to have everything together.
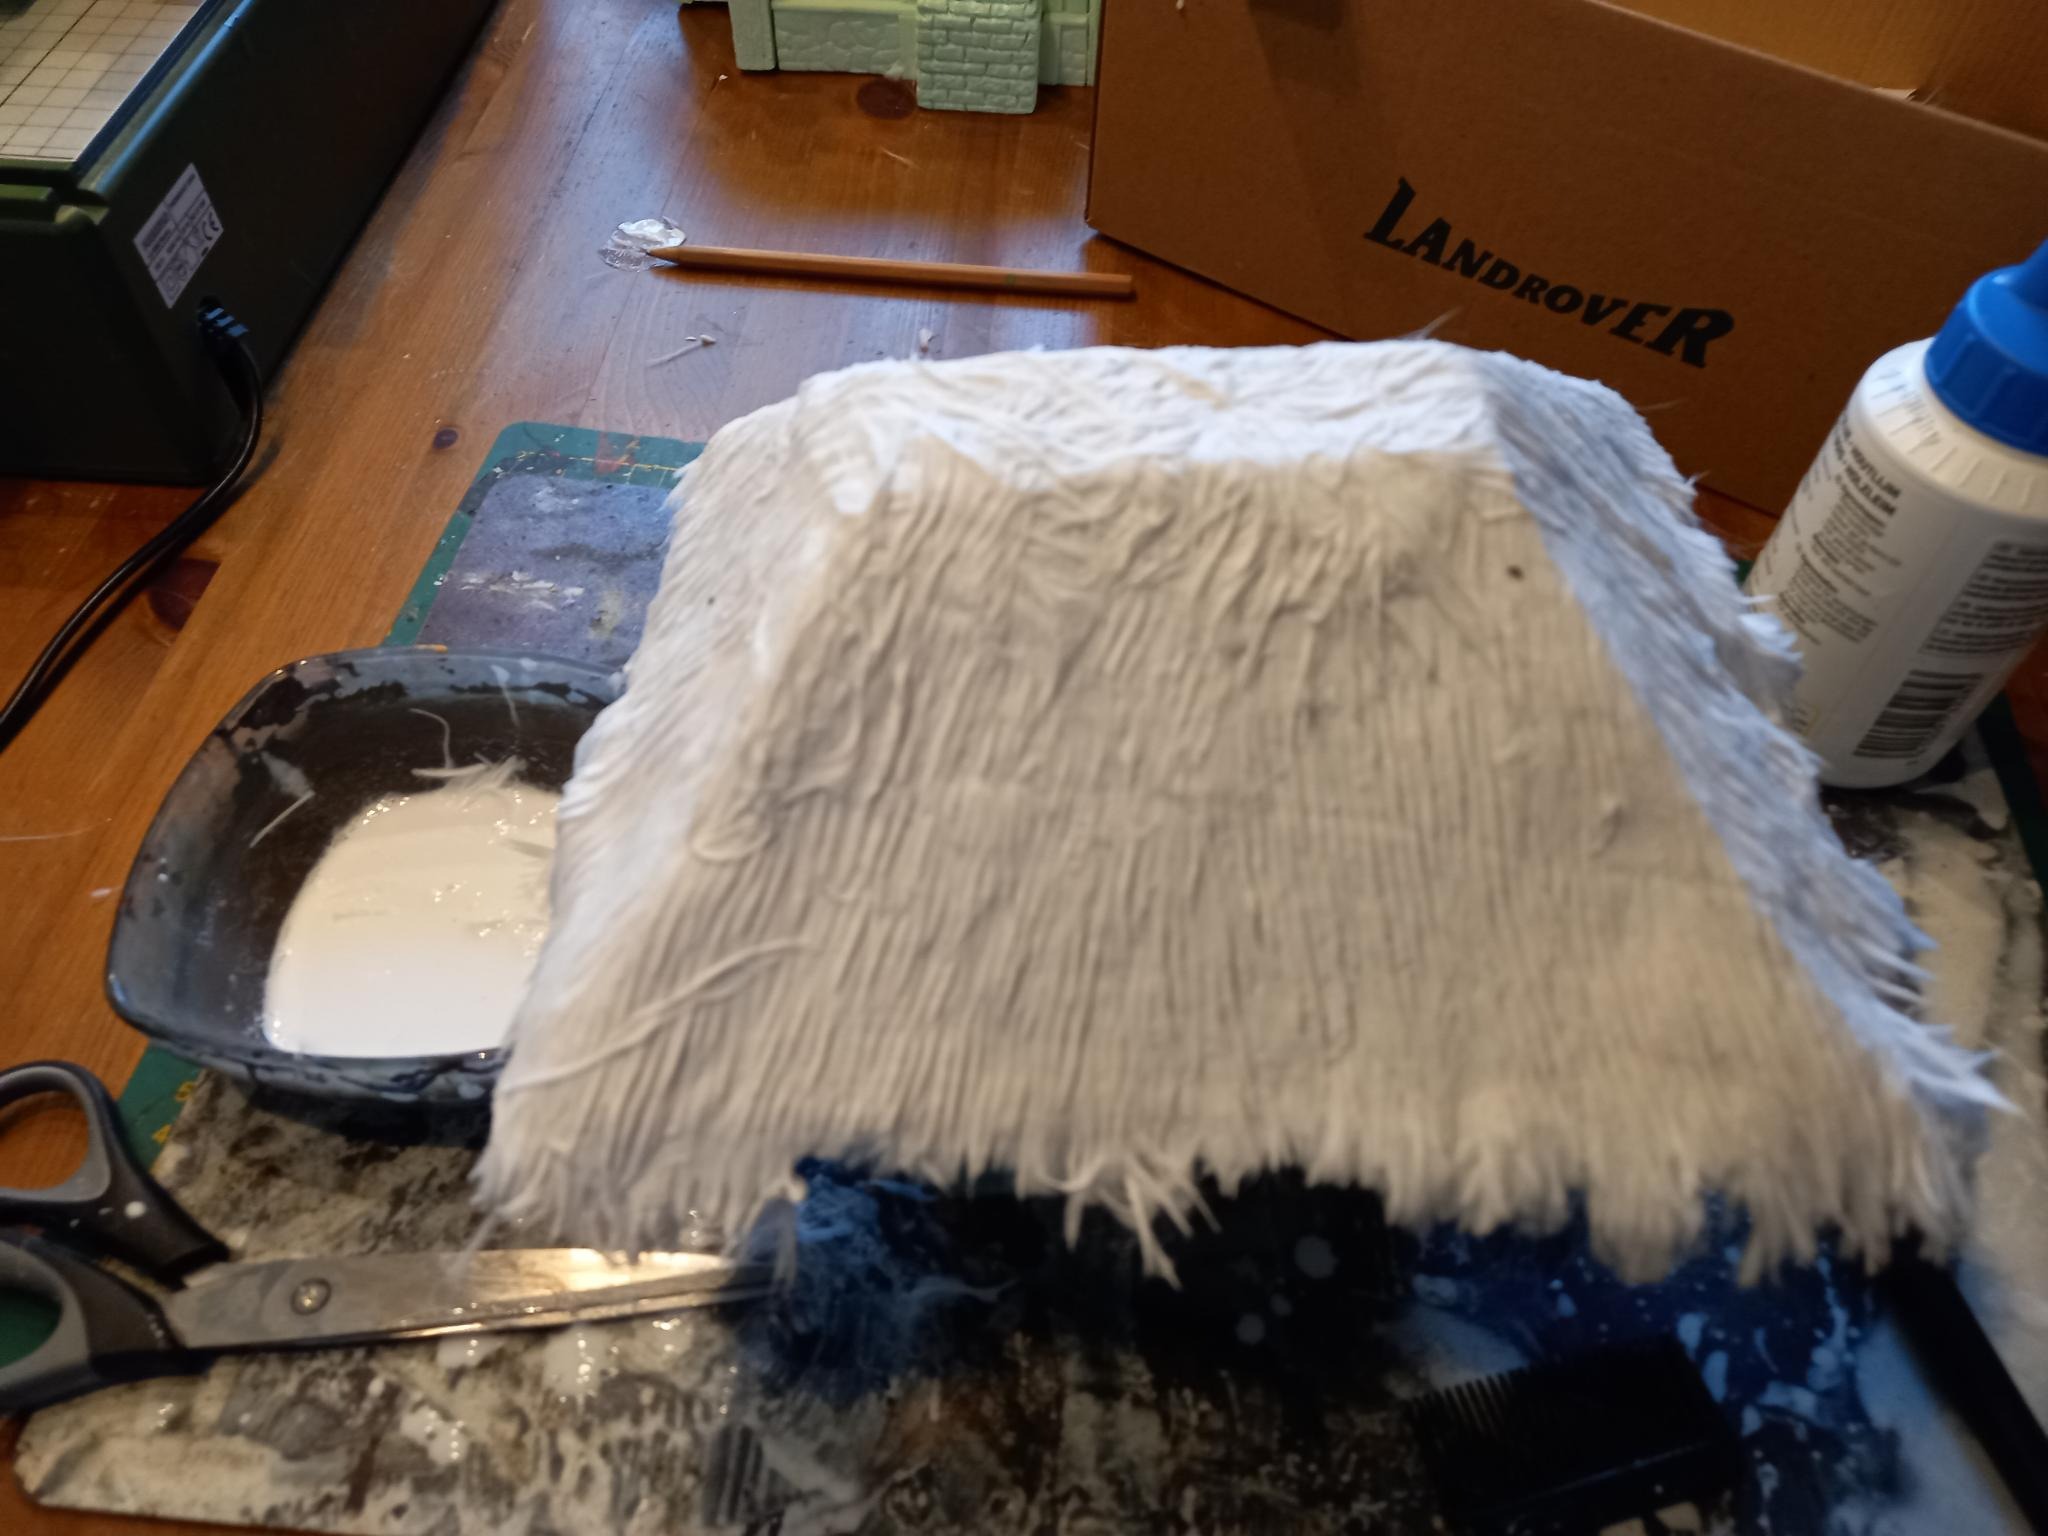
I got some teddy-fur from the net, instead of hunting my own.
Unfortunatly all stores, bar the essentials, are currently closed in the low lands.
I’d’ve prefered to go and see what I was getting as when I opened the packaged the fabric felled a bit light on the hairs. It sufficed, but there are some bald splotches I can see now it’s drying. I’ll see if I can fix this.
I cut an approximate piece, covered the roof in glue and draped the clothe over it.
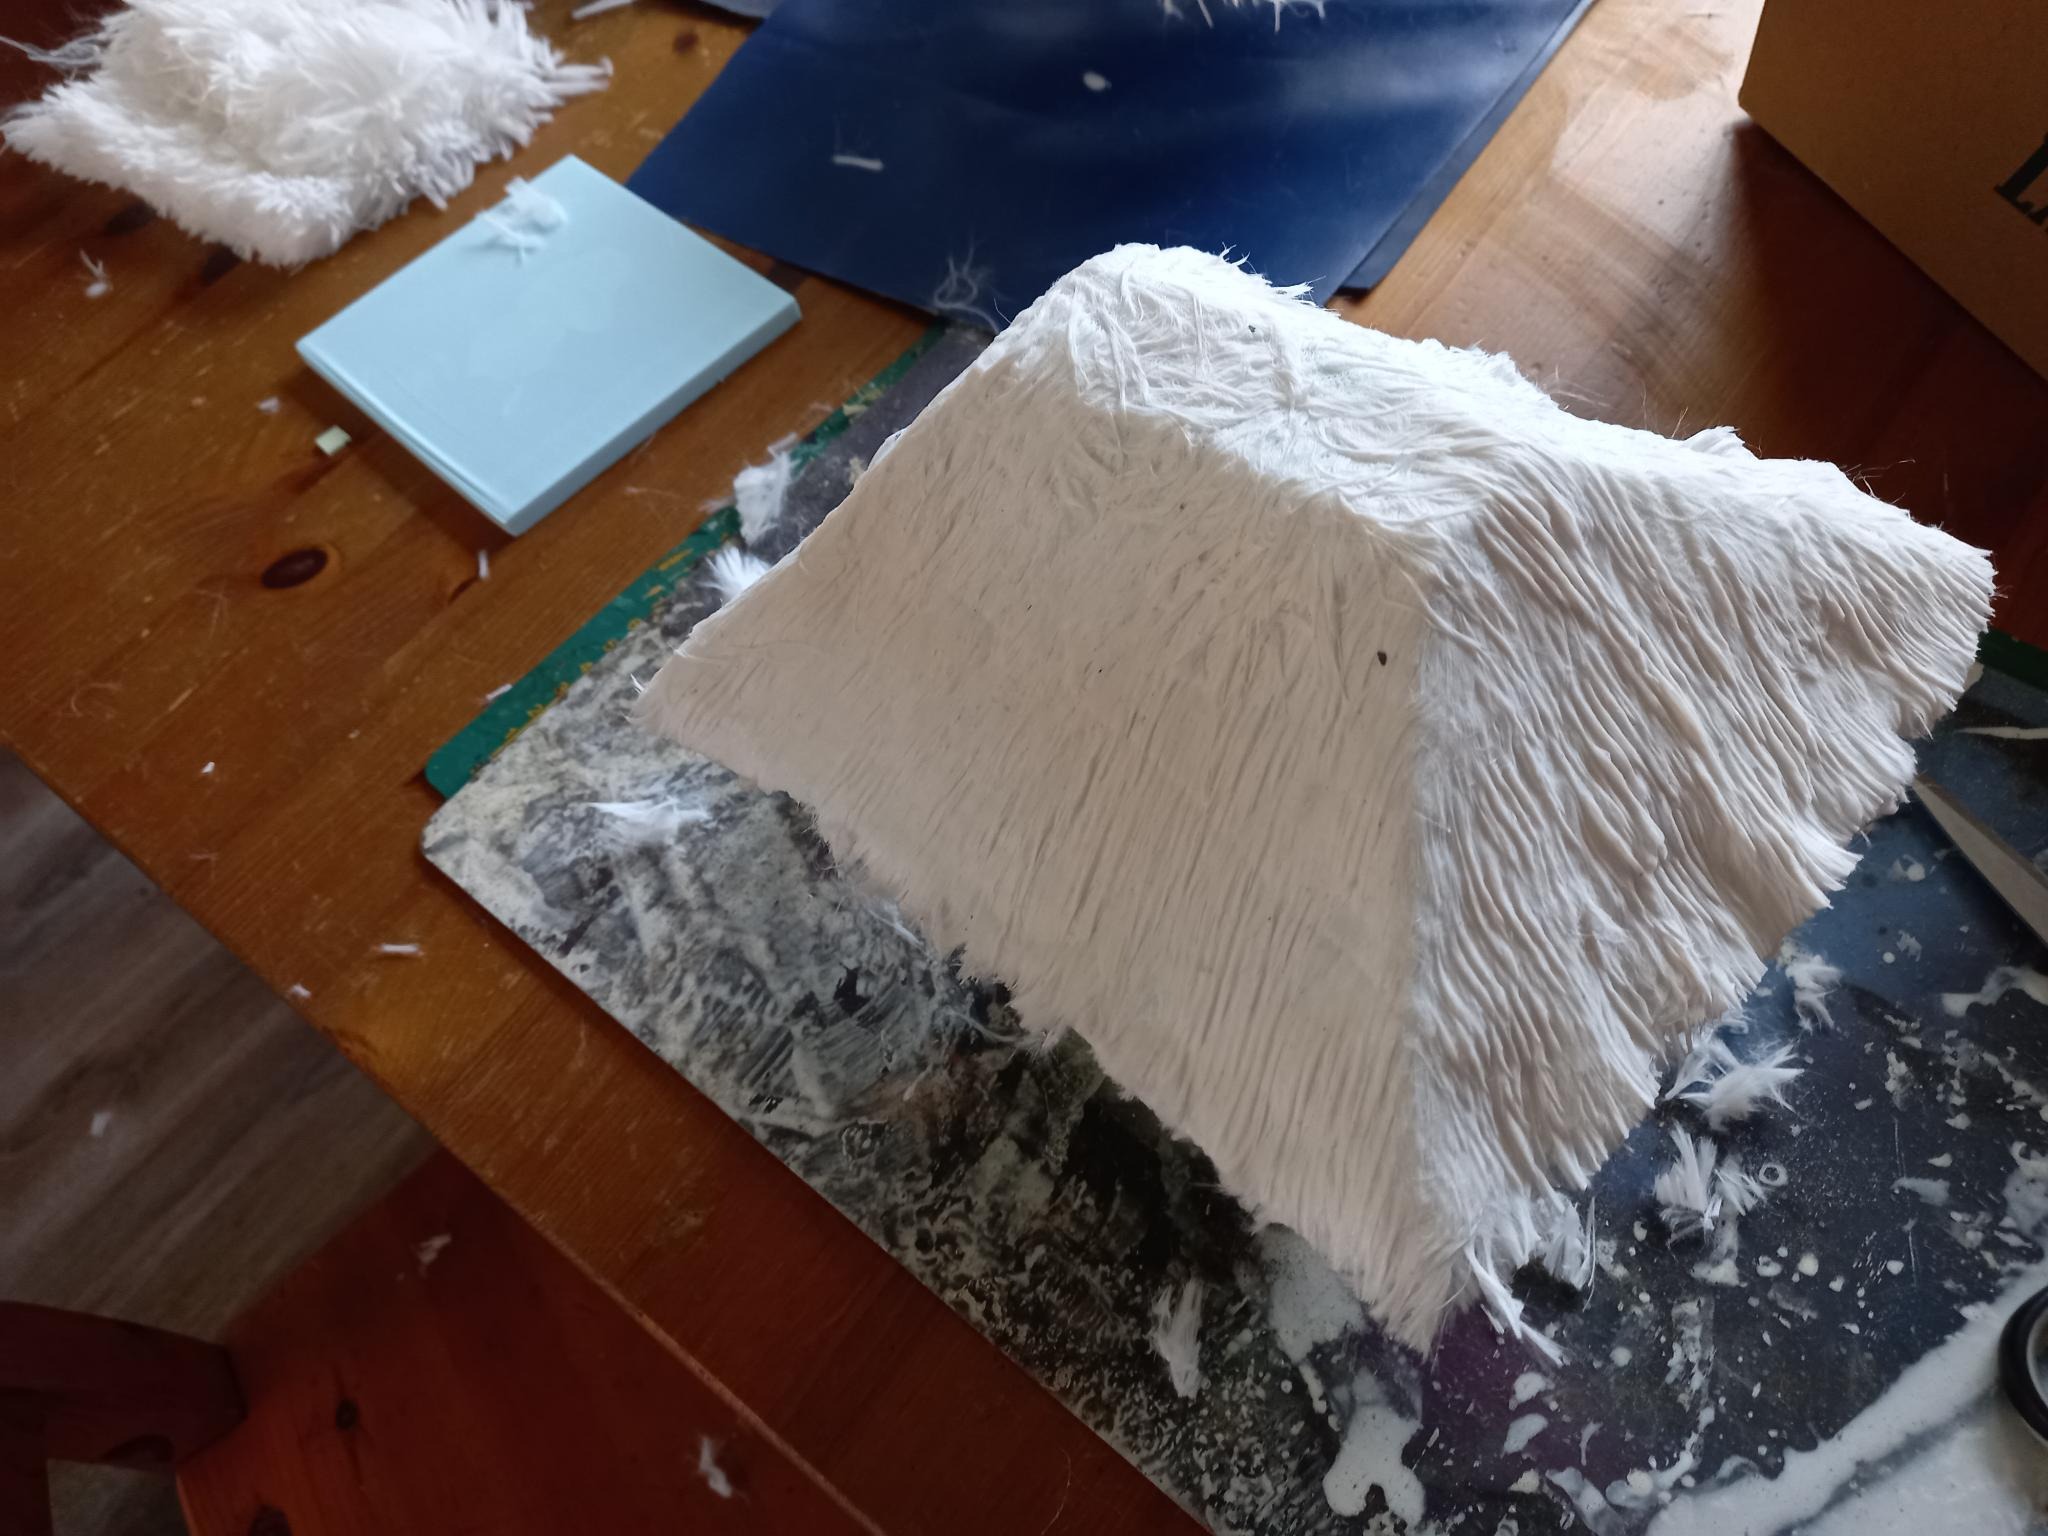
When this was dry and solid, I watered down some PVA (1:1) and, using a cheap, big brush soaked the cloth.
Using half a cheap comb, I then combed the fibres into shape and now it’s drying.
Messy, messy stuff. My clothes, shoes, beard and living room are covered in stray fibers and my fingers looked like I was turning into an albino werewolf.
Best done in a dedicated hobby space, if you have such luxury
And then the roof
Yeah, christmas and life got in the way of my hobbytime.
I got a bit of stuff done in between all the seasonal humbug, but not much.
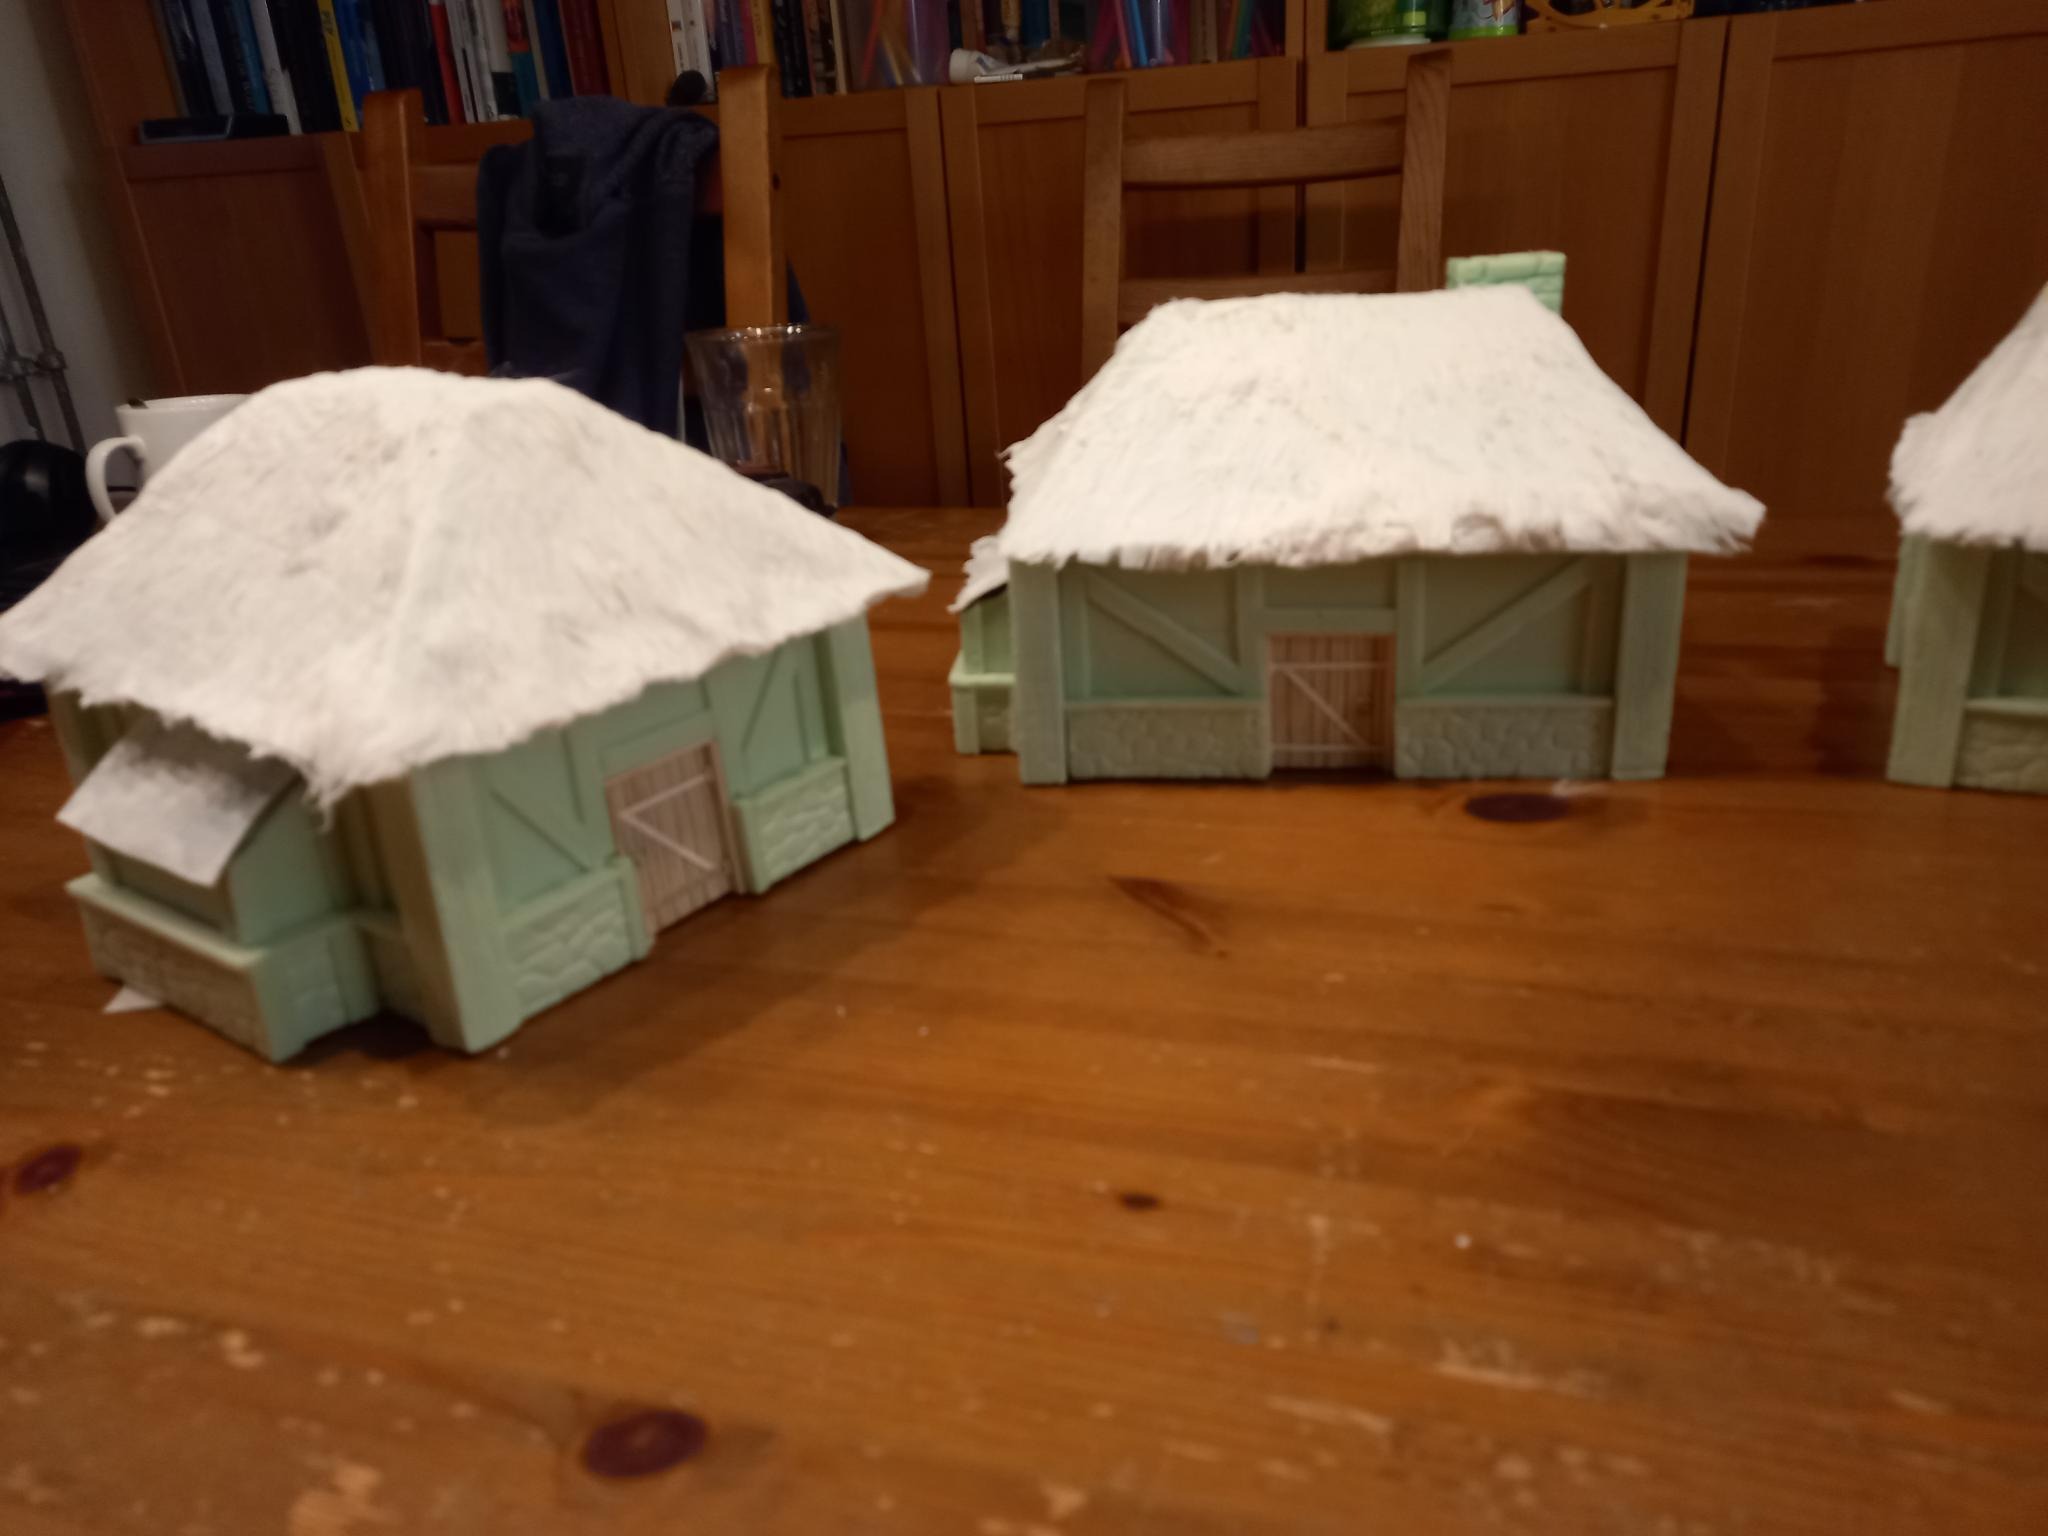
I finally did some measuring and cut some blocks of new foam for the roofs.
You can make these by building just the sides, which saves material.
But this is faster, more sturdy and the material is rather cheap.
It did ask everything I could get out of the proxxon for size, though and in the end, I made them a bit to small.
After cutting the blocks, I put the wire at and angle and created the roof form as I desired. I used different angles on different roofs for some variation.
After fitting I noted they where a bit to small, and stuck some thin slices on the sides and some strips to put them a bit higher on the buildings. No pics of this step, unfortunatly as I was kinda miffed about the delay and wanted it done.
Not the most elegant of solutions, but you won’t see it when the jobs done.
I got some teddy-fur from the net, instead of hunting my own.
Unfortunatly all stores, bar the essentials, are currently closed in the low lands.
I’d’ve prefered to go and see what I was getting as when I opened the packaged the fabric felled a bit light on the hairs. It sufficed, but there are some bald splotches I can see now it’s drying. I’ll see if I can fix this.
I cut an approximate piece, covered the roof in glue and draped the clothe over it.
When this was dry and solid, I watered down some PVA (1:1) and, using a cheap, big brush soaked the cloth.
Using half a cheap comb, I then combed the fibres into shape and now it’s drying.
Messy, messy stuff. My clothes, shoes, beard and living room are covered in stray fibers and my fingers looked like I was turning into an albino werewolf.
Best done in a dedicated hobby space, if you have such luxury
Floorplans
Not a lot of work done this week.
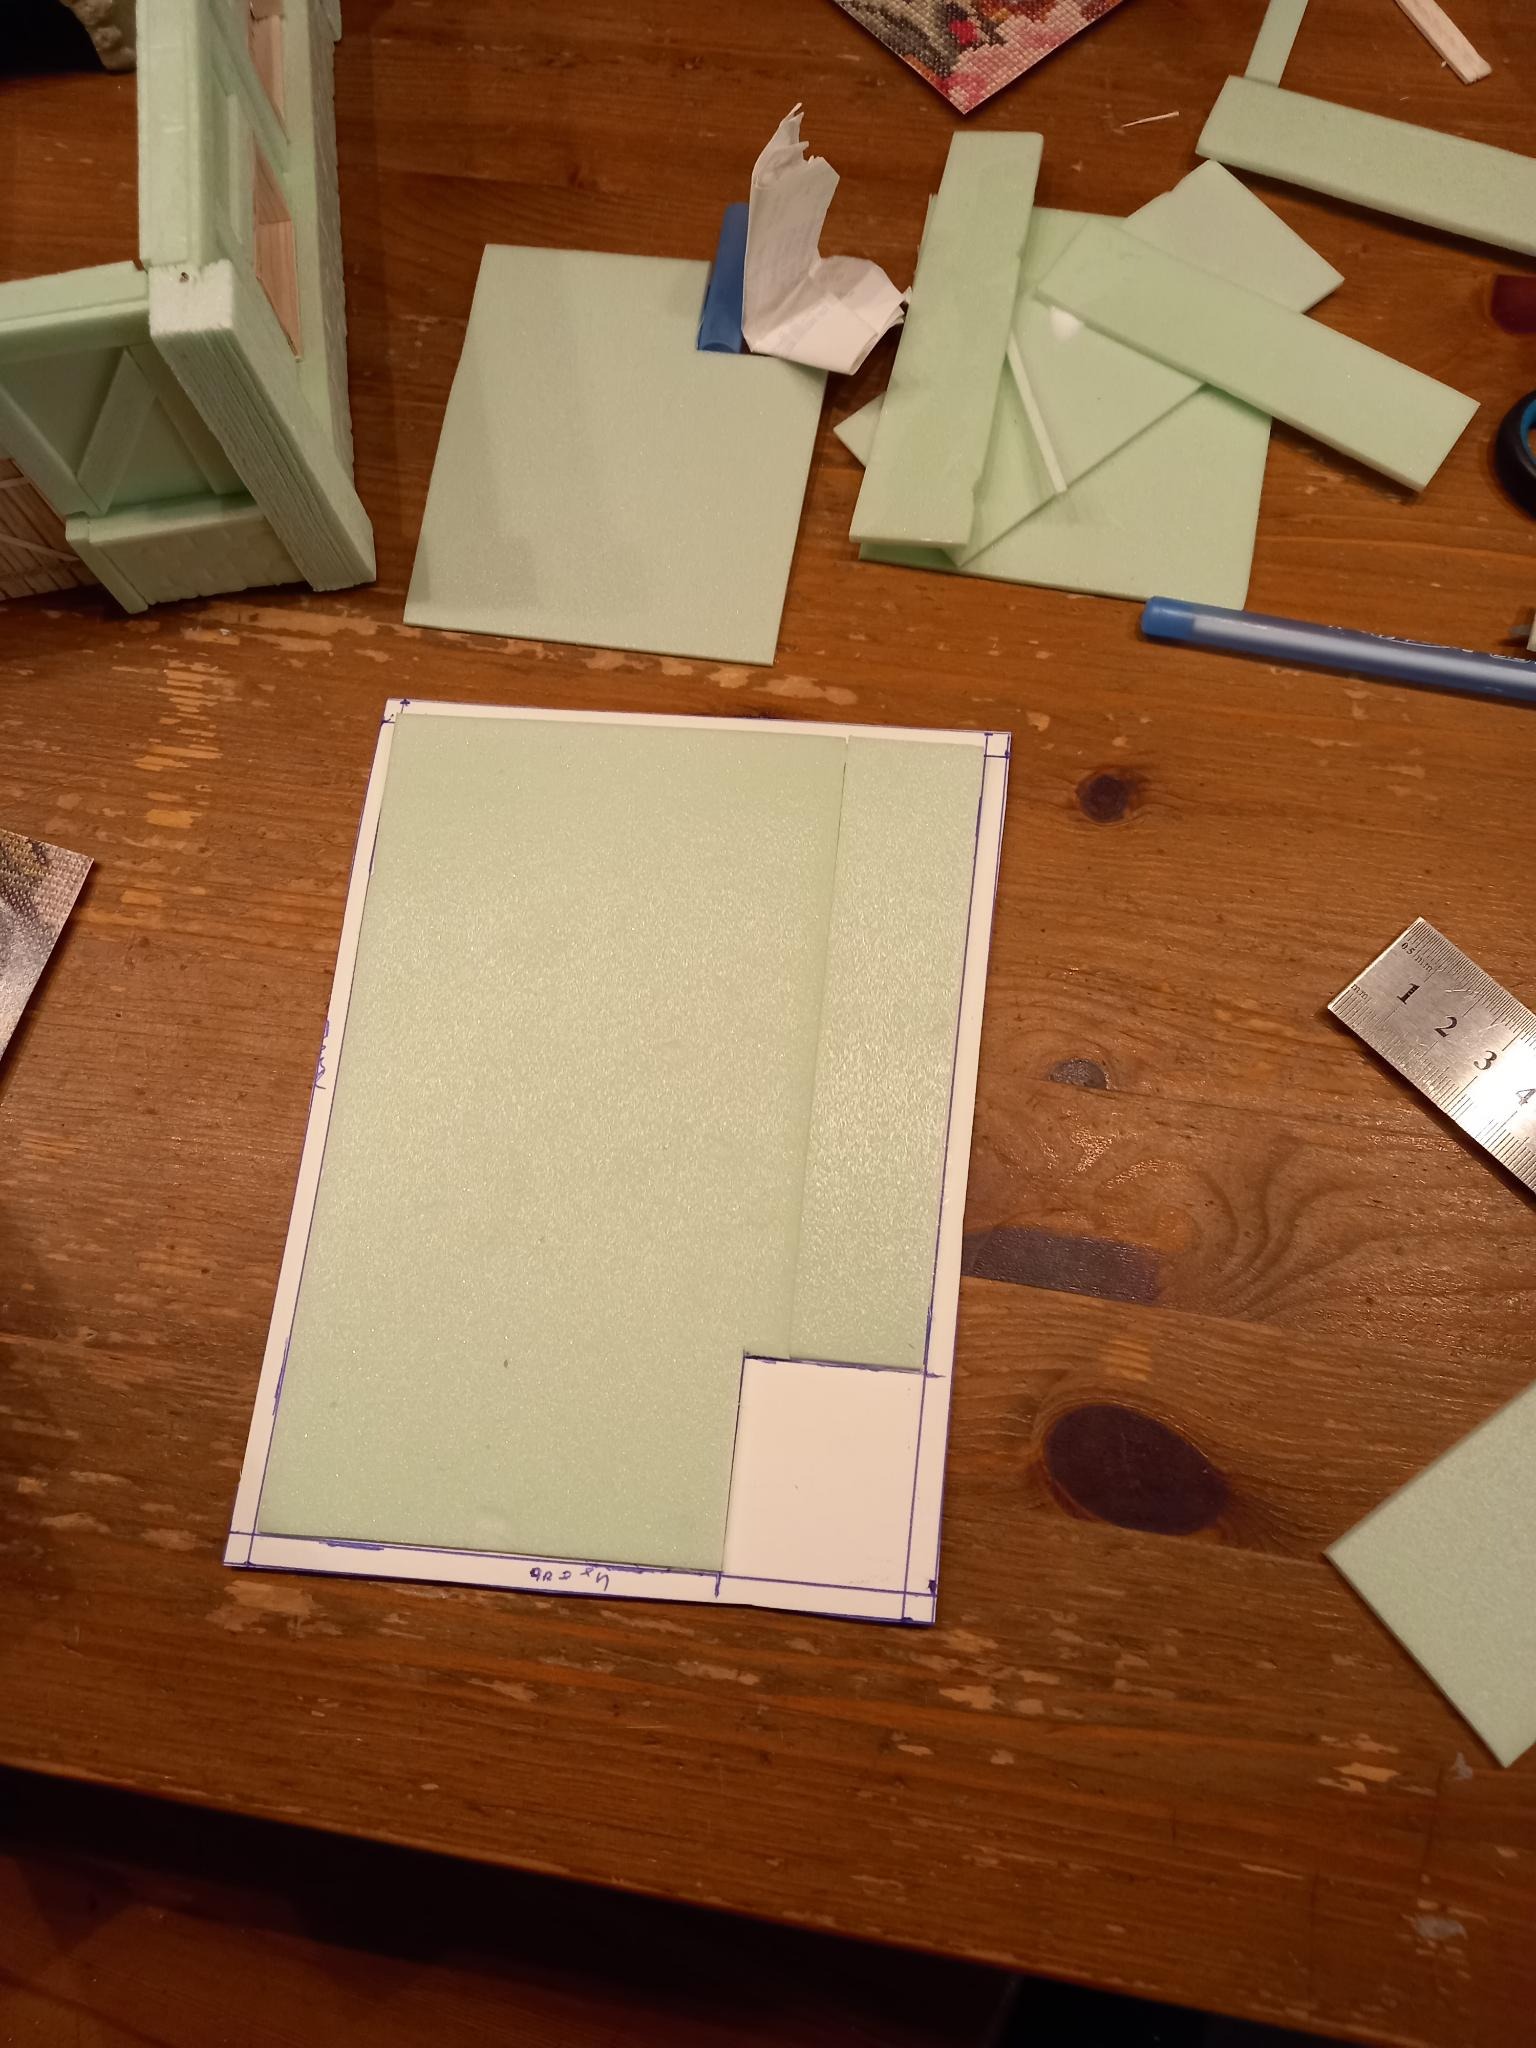
I made some templates, on which I drew the size of the actual floor.
This was then covered in a this sheet of foam.
Using a ruler I drew the planking. I didn’t bother measuring them, as I don’t really care they are the exact same size.
I also cut a small square in the corners, in which I build a trapdoor in the same way as the doors and windows.
The trapdoor was an important gameplay detail for me. What’s down there?
Just a farmers winter supplies?
Secret tunnels connecting the buildigs to move from one to the other?
The lair of an evil dragoncult?
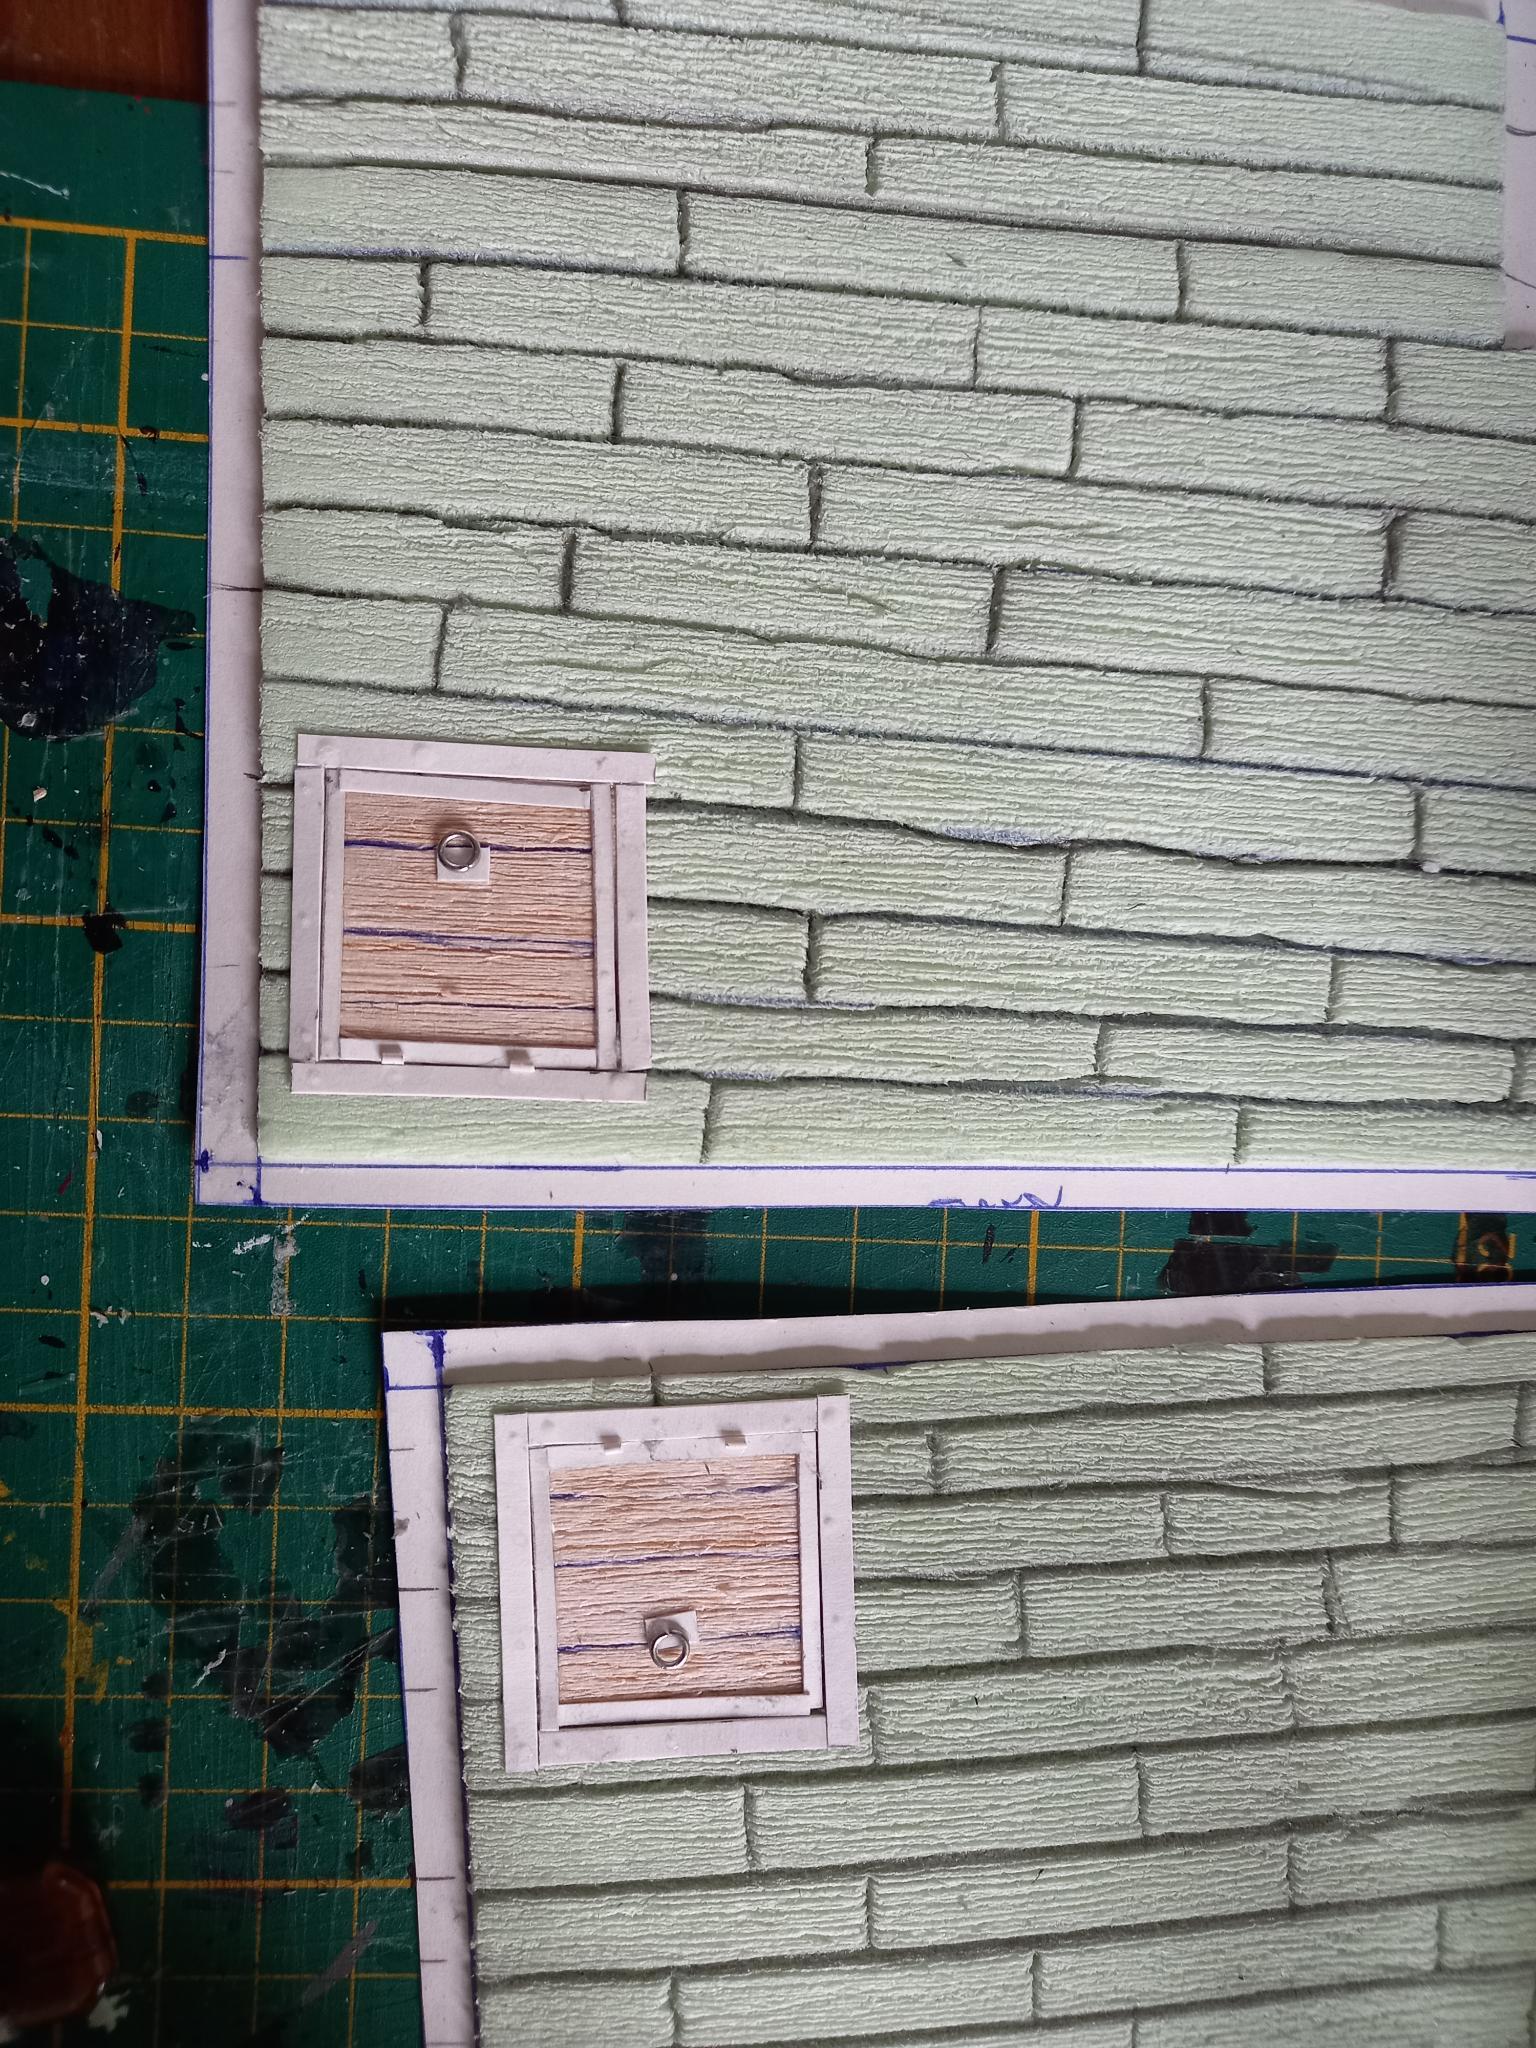
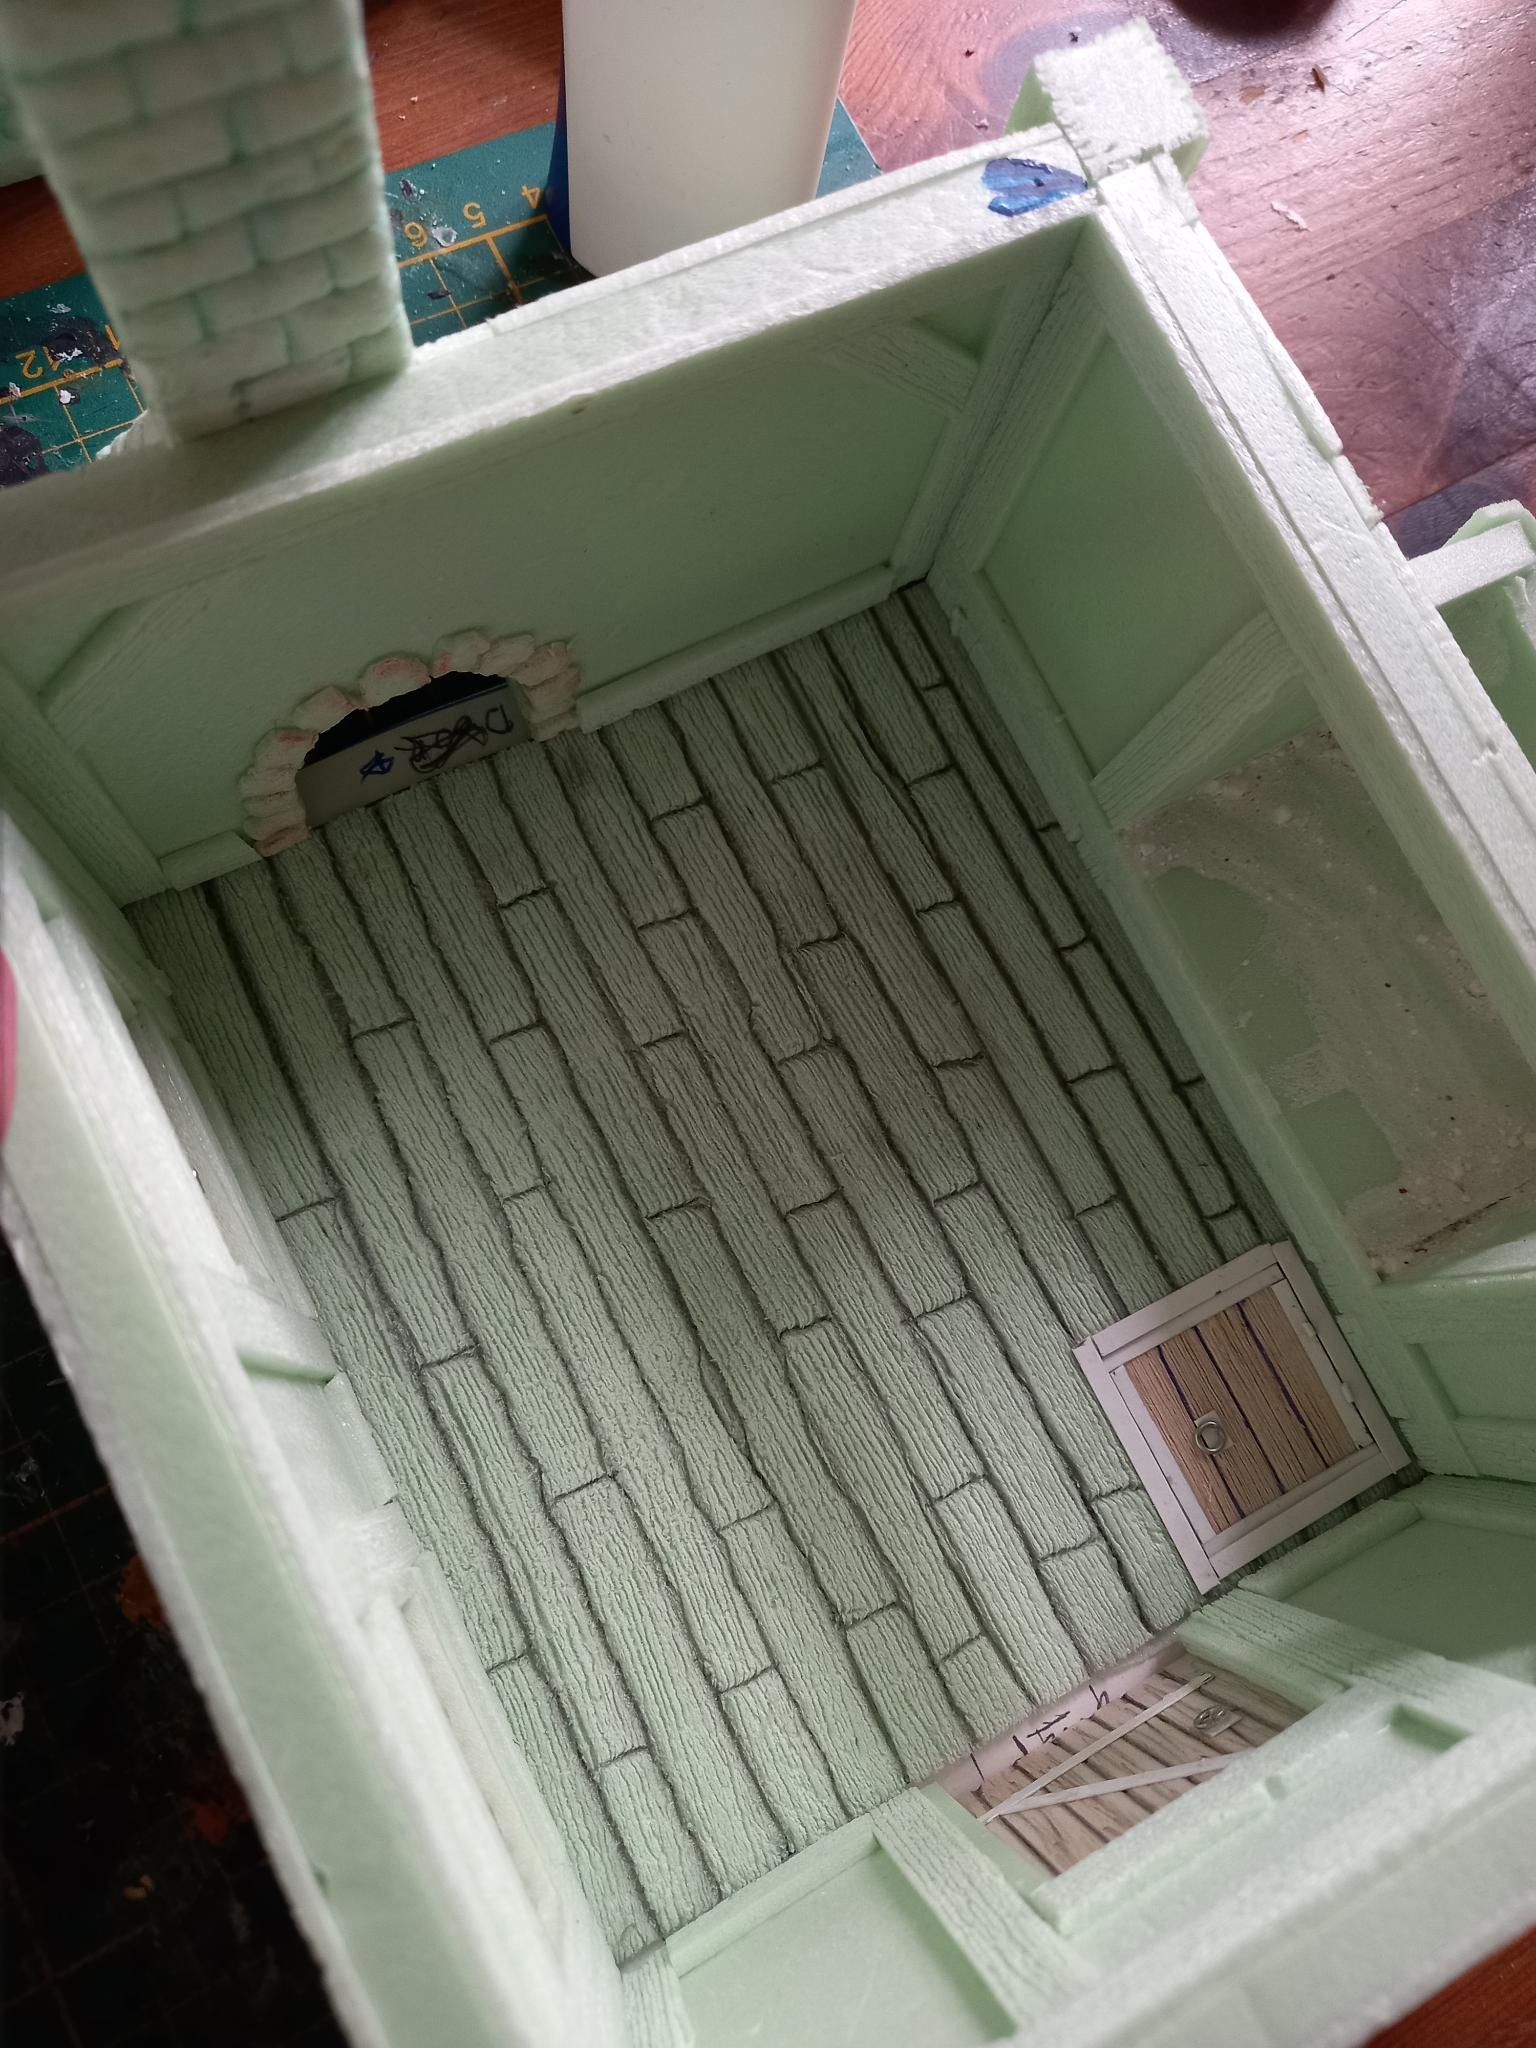
The inserts will not be glued into place for now. This’ll make it easier to paint the interior.


