


Hürtgen Forest - Game Video


Battle Report - Rasmus v. Oriskany at Midway
This past weekend, my friend Rasmus and I sat down to try an 80th Anniversary Commemorative Wargame of the Battle of Midway. Widely considered one of the most pivotal battles in naval history, Midway was fought between the navies of Imperial Japan and the United States roughly from 3-7 June 1942 (June 4 is widely considered the pivotal moment).
An earlier version of this home brew system was presented as part of the 75th Anniversary Midway presented in 2017 for the 75th Anniversary. For the 80th anniversary, I knuckled down to re-invent that system, this time with a sharper eye for historical detail, adaptability for remote play, and possible expansion and implementation to other Pacific War campaigns (Solomons, here we come).
Some thirty hours were invested in this past Sunday’s rollout, where the game was live-tested for the first time, against a live opponent, on a live stream, in front of a live audience. Suffice it to say I was slightly nervous, but in truth for a first try I couldn’t be more pleased. True, it isn’t perfect, there are still some significant wrinkles to work out. But so far I feel the game design is delivering on all its objectives.
Better still, even after Sunday’s stream, the issue between Rasmus and I isn’t quite settled. After four complete turns, the Battle of Midway remains in doubt on our table. Had the game turned out along historical lines, it would be. So the game isn’t really taking too long. It’s just elevated to a chess match against a great opponent, where even after 16 hours of battle time (not game time), both sides stand a real chance of victory.
The game is “Level Three” – full “Operational” – although as a naval game some tactical-level decisions and mechanics remain. The map covers 910,000 square nautical miles (1300 x 700 miles across). Each turn is four hours. Each “task force marker” is either a task force of up to 30 warships (some of them over 300,000 total tons displacement) … or a “ghost” counter of empty ocean. In all we have 137 warships and 732 aircraft on the table.
Which task forces are real are only known to the owning player, until encountered by enemy warships or spotted by enemy scout planes. Clearly, factors like detection, intelligence, bluff, and deception are going to play a key role, especially in the battle’s early phases.
Rasmus is playing the Japanese, I am playing the Americans.
Below is the battle report so far … I hope you enjoy!
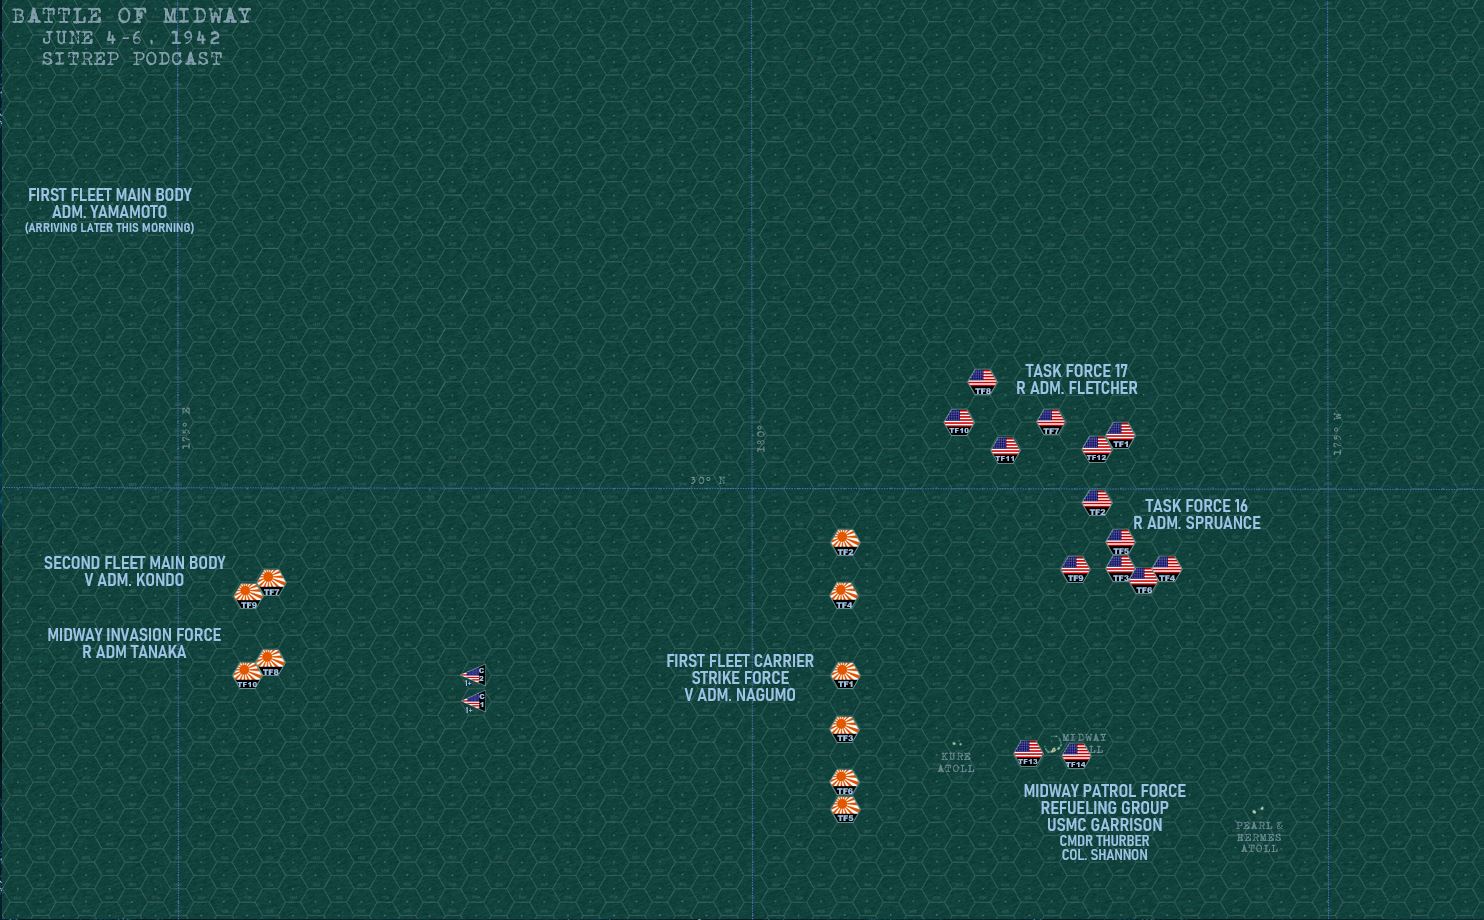 Here is the overall battle map and the dispositions of sortied fleets and launched aircraft at the end of Turn 1. The game begins at 0001 hours (just after midnight) on the morning of 4 June, 1942. For the historical purists out there, some very light combat DID take place on 3 June, some ineffectual USAAF bombing raids that missed elements of the Kondo’s Second Fleet, and a torpedo-armed Catalina that hit a Japanese oiler supporting the invasion force. But since we’re not tracking auxiliary ships, and historically the B-17s missed the warships, no actual effect was taken that would affect the game’s start conditions. Also, the game “resets” identified task forces during night turns, so the Americans would have lost contact with these fleet elements anyway. However, notice that Kondo’s Second Fleet Main Body and Tanaka’s Invasion Force have only one “dummy” counter to help hide the location of their real ships. Since they bombed these fleets yesterday, and know their objective, the Americans have a pretty good idea where Kondo and Tanaka’s task forces are. The real threat is Nagumo’s First Fleet Carrier Strike Force, which is much closer and hadn’t been spotted yet. I have night-launched two long-range PBY Catalina scout planes … they can’t spot targets in the dark but they will take longer than four hours to reach their suspected targets anyway, if I want to find anything when the sun comes up on Turn 2 (0400) I had to launch them now. Meanwhile, Rasmus has to set up a strike on Midway Island, while keeping a wary eye on my suspected locations of Task Force 17 (USS Yorktown) and Task Force 17 (USS Enterprise and Hornet).
 Dawn rises on 4 June 1942. A prowling US submarine, USS Nautilus, has by chance come across Yamamoto’s main body as it enters the west edge of the map, yes this is the same USS Nautilus that tried to torpedo the Japanese battleships Kirishima on the historical June 4 – I even rolled USS Nautilus randomly out of the twelve American submarines in the area! This game gives a submarine two choices, “Surface to Report” or “Dive to Attack.” Because this task force is still 800 miles due west and won’t come in contact before dusk (when I lose contact anyway), Nautilus goes to attack, but is fended off by the eight destroyers of First Fleet Main Body. Meanwhile, one of my Catalinas (now airborne for at least six hours) verifies that “TF8” was a dummy counter, while my other Catalina misses what will turn out to be Kondo’s Second Fleet!
 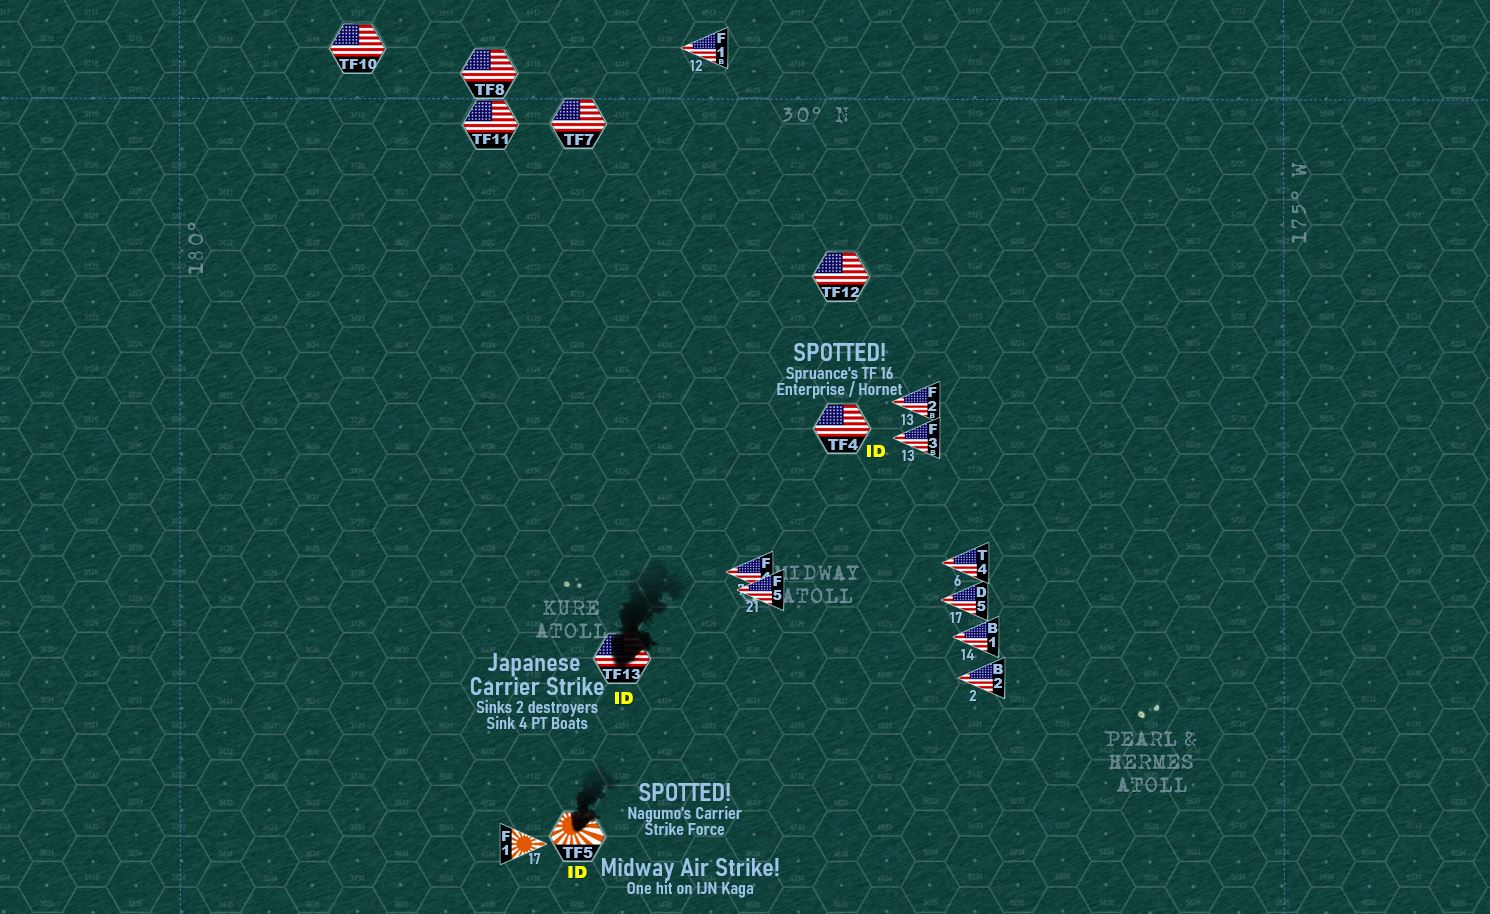 A few hours later (later in Turn 02), Nagumo’s Sirt Fleet Carrier Strike Force moves to within 140 miles of Midway Island. Nagumo is compelled by orders to hit Midway with at least 100 planes by 1200 hours UNLESS he spots an American carrier or is hit by American carrier aircraft. I’m not sure was counter was “real” so I launched as many search assets as possible, up to an including the Midway Refueling and Patrol force (two destroyers, 10 PT boats). The eliminated some very suspicious dummy counters, while float planes launched from cruiser Pensacola, New Orleans, Minneapolis, and Vincennes scouted other possible locations. Rasmus, meanwhile, also gets a scout plane over my Task Force 16. A few spotting checks fail, a few reporting checks fail, but finally the scout plane from cruiser IJN Chikuma gets the message through. Sadly for both of us, our carriers are two far apart for full strikes. So Rasmus has to settle for launching a full carrier strike on the hapless Midway Patrol and Refueling force, which loses both destroyers USS Blue and Talbot, along with four PT boats. I can only hit Nagumo with my aircraft on Midway (longer ranged aircraft and 80 miles closer to boot). It’s a costly gamble, which only manages to put a single bomb hit in the largest Japanese carrier, IJN Kaga. I was hoping to damage her enough where she couldn’t launch aircraft, and thus give me momentary superiority for 0800-1000 hours or so … (Enterprise, Hornet, and Yorktown vs. Akagi, Soryu, and Hiryu). But it doesn’t work.
  The beginning of Turn 3 (so, 0800-1000 hours, June 4). Incredibly, the Nautilus has found Yamamoto’s main body again! The roll required was an 11+, so about 8.5%! Again she attacks, and this time Rasmus fails the destroyer screen roll. Nautilus dives, penetrates the destroyer screen and launches a full torpedo spread at the Japanese battleship Nagato (I know I can’t even appreciably damage the superbattleship Yamato, not with these 1942 Mark 13 torpedoes). Nagato takes three torpedo hits, not crippling her, but definitely slowing her for the rest of the game which means Rasmus will either have to detach her with a partial destroyer screen or slow the whole main body. He chooses the former. Meanwhile, my second pair of Catalinas has spotted both Kondo’s Second Fleet and Tanaka’s Midway Invasion force, although both Catalinas are shot down for their trouble.
  1000-1200 Hours, 4 June: The end of Turn 3. The shattered remnants of Midway Patrol and Refueling force limp back to the Midway Atoll. Rasmus makes the decidedly “un-Japanese” move of ordering Nagumo’s First Carrier Strike Force to raise flank speed and steam course 270, straight WEST … AWAY from the Americans. While I’m sure there was a screaming match on the flag bridge of IJN Akagi, Rasmus’ move here straight out saves the Japanese fleet. Had he persisted east or even stayed where he was, he’d be in range of a full strike by all three of my carriers (including USS Yorktown and Task Force 17, which he hasn’t even found yet), plus the full Navy, USAAF, and USMC force on Midway. Now American strikes in this period of the war have a worse roll for “Strike Coordination” (we all remember Hornet’s infamous “Flight to Nowhere”). So a lot of my planes don’t find the Japanese, but enough do. USS Enterprise Wildcat fighters escort my strike in, but Hornet’s get lost. Thus, my torpedo bombers suffer heavily, while half the Enterprise’s fighters are wiped out by Rasmus’ Combat Air Patrol (CAP) of the dreaded A62M “Zeke” (Zero) Fighter. Still, my Americans press in. Carrier Kaga (Increased Joy) blows up right away, and I manage to sink Akagi as well. My third target is the Soryu, determined to get at least three of these things in this all-important (is somewhat mismanaged and incomplete strike). I damage Soryu heavily, not enough to sink her … BUT ENOUGH TO PREVENT HER FROM LANDING AND RECOVERING AIRCRAFT. Honestly, just as good, as dozens of Japanese aircraft will now have to ditch (the last Japanese carrier HIryu can only carry so many). It’s cold comfort, though, as Rasmus’ FOUR-CARRIER strike (you know, the one that was never launched at the historical Battle of Midway) positively ravages Task Force 17. USS Enterprise blows up and sinks (shudder), followed quickly by USS Hornet while the antiaircraft cruiser USS Atlanta takes heavy damage. This is a COSTLY strike, though, as the whole Japanese air group has now been reduced to just 70 planes aboard IJN Hiryu.
 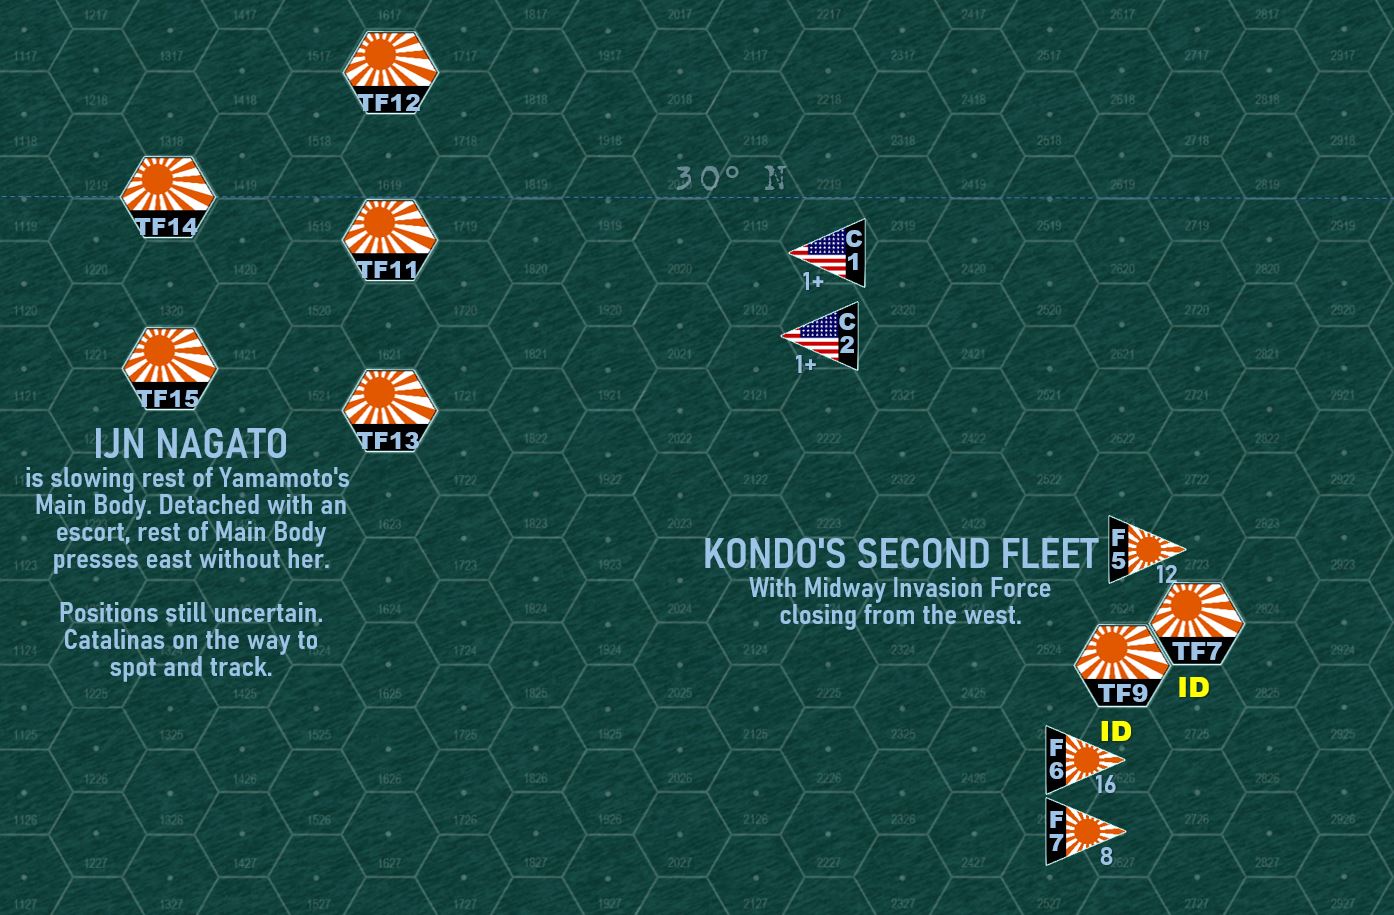 1200-1400 Hours, 4 June: Beginning of Turn 4. Limping and listing with torpedoes in her side, the battleship Nagato falls out of formation from Yamamoto’s main body, escorted by two destroyers. I don’t really know where, so new task force and dummy counters are placed. Kondo’s second fleet plows resolutely eastward, now close enough to start launching scout planes from battleships and cruisers, as well as launching improvised CAP with their light carrier Zuiho and seaplane tenders Chitose and Kamikawa Maru.
  1400-1600 Hours, 4 June: Kondo’s scout planes sweep the western reaches of the immediate battle area (300 miles west of Midway), confirming no American warships in or west of 179 W. Even with this greatly narrowed search area, Nagumo’s remaining scout planes STILL fail to find USS Yorktown (just bad dice). Rasmus has also failed Damage Control checks on carrier Soryu (these rolls are very difficult, Japanese damage control was very poor in 1942), so Soryu cannot recover aircraft for the rest of the game. She therefore heads north, straight at the Americans, if only to cover Hiryu’s escape. This is somewhat mismeasured, as my only remaining task force can’t reach Hiryu anyway (still heading 270, due west AWAY from Midway). In Rasmus’ defense, his scouts haven’t located Yorktown anyway, and some of my land-based air on Midway can reach much further (they just can’t anything). One battleship, one two heavy cruisers, and a screen of destroyers are sent as well, which make contact with the remains of US Task Force 17 (both their carriers sunk) for the long-awaited Japanese surface gunnery engagement. Problem is, USS Yorktown and Midway Island launch a strike against this “Kamikaze Force” first (aircraft are faster than battleships) and sink the smoldering hulk of the Soryu, the battleship IJN Haruna, and the heavy cruiser Chikuma. Hiryu responds, launching a strike on the remains of Task Force 17 as well, crippling the heavy cruiser USS Pensacola. The surface engagement finally happens, although with fewer ships per side. The American cruisers actually do well here, although again … the Japanese force has been heavily mauled by the preceding American airstrike. The heavy cruiser USS Northampton is very badly damaged, but the Americans claim the heavy cruiser Tone and destroyer Yugumo in return. But just to add insult to injury, a Japanese submarine creeps within torpedo range of Midway itself and sinks two more PT boats out of the hapless Midway Patrol and Refueling Force.
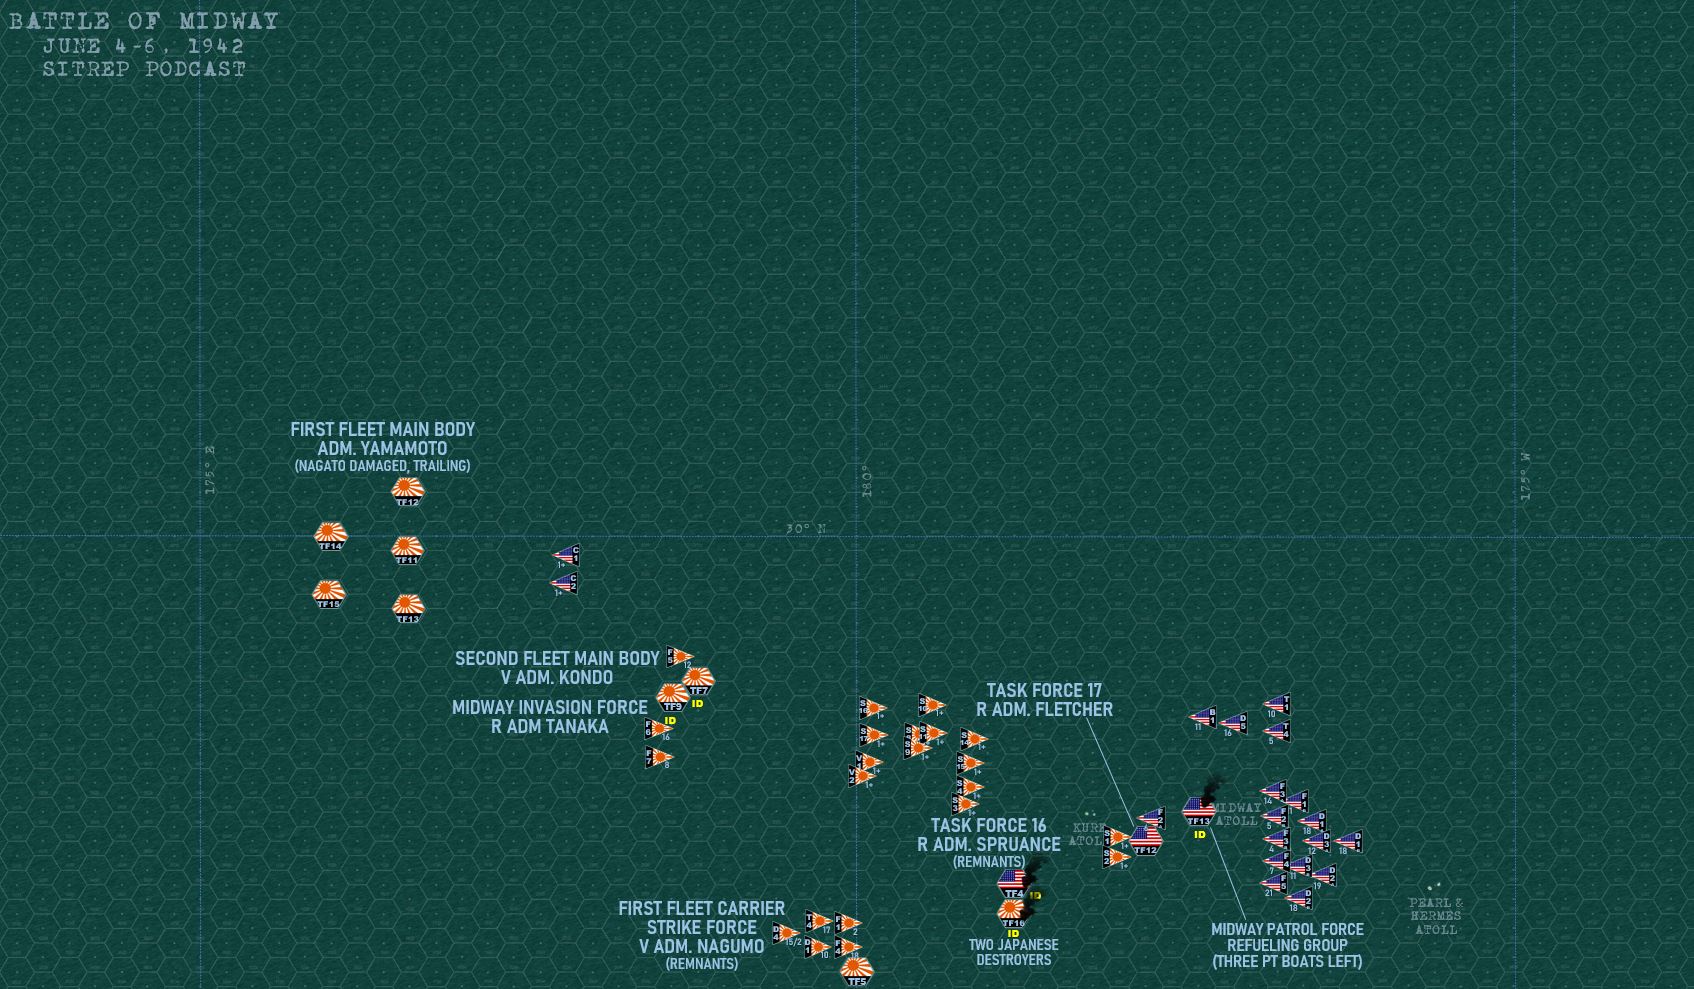 Thus here we are, a little after 1600 hours on 4 June, 1942. We’re running out of daylight here, at the start of next turn the sun goes down and outside of long range PBY scout missions, nothing is flying. That’s eight full hours where Japanese battleships can rush Midway (200 nautical miles, assuming 25 knots, or ten hexes). By dawn (Turn 8) Kondo’s Second Fleet and Tanaka’s Invasion Force could be in the immediate battle area, with Yamamoto’s Main Body there by midday. With just one carrier, now with a damaged air group, can Rasmus provide enough air cover to these battleships, being resolutely proven to be vulnerable to American air power … including from a carrier the Japanese STILL haven’t pinpointed. For their part, the Americans are also down two carriers, USS Hornet and Enterprise are gone forever. True, I can base aircraft on Midway, but my air groups have also taken terrible damage. Aircraft losses so far have been roughly equal, 183 Japanese lost to 163 American lost, although again, please remember much of the remaining airpower is older or less useful types like B-17s, F2F Buffalo, and SB2U-3 "Vindicator" dive bombers. We hope to finish this game up, LIVE on Sunday June 12 on the Sitrep Podcast channel!


Leave a Reply