Skip to toolbar
Gorram’s Grand Terrain Project

Gorram’s Grand Terrain Project

Supported by (Turn Off)

Project Blog by gorram Cult of Games Member

Recommendations: 103

About the Project

One dog's mission to get all their terrain "table ready".

This Project is Active

Vehicles Part 1

Tutoring 4
Skill 4
Idea 4
No Comments

I picked up an airbrush recently and was looking around for some things to practice on before I start into an army. I hate painting vehicles largely because I’ve had to rely on brushes and spray cans up until now. I have a load of the Mantic crashed cars so I grabbed two of each design and got to painting.

They were already primed black so the main thing here was to play around with different types of paint through the airbrush and play around with control.

I picked out:

Army Painter Fanatic Wolf Grey – to see how much the Fanatics need thinned. This was the easiest to get the consistency but I did splatter on the roof a lot. It is also a terrible colour for a car!

Vallejo Cavalry Brown – An old bottle I’ve had for a while. This was the hardest to use. The paint is thicker being an older bottle and I struggled to get the right consistency. In the end I added in water then thinner but it is certainly the dodgiest of the paint jobs.

Vallejo German Grey – One of my most recently bought bottles. Not too much work to get through without hassle

Vallejo Oily Steel – putting metals through the airbrush is going to be important for my first major project with it. This one was fun and it is quite marked difference in the look of the paint to touching up with the brush.

Details were all done with a brush and then I used it as a chance to practice pin washing. I forgot that the thing to do to get a good pin wash is to gloss varnish first but it was good practice for my brush control.

They are definitely table ready but not great however, it is four more cars than I had at the start of the afternoon.

Vehicles Part 1
Vehicles Part 1

Jungle Boogie

Tutoring 4
Skill 4
Idea 4
6 Comments

I need some jungle terrain for a project I’ve been working on in the background. Technically it is a real world jungle but I’m not going to kill myself for realism. It’ll be the typical aquarium plants that you see on most wargames tables.

It is also a project that I can complete entirely from things in my stash…. perfect.

Step One:

I like using the Warbases pond bases; they are great for people who don’t/shouldn’t have access to power tools to cut up MDF. I took some of the Geek Gaming Scenics Modelling Compound that has been sitting unopened for four years according to my invoice. It isn’t the texture I was expecting; it is very chunky but it’ll do for the ground texture.

Step Two:

Cover with filler that had brown paint mixed into it. This is mostly just to cover the surface and make things a bit tougher.

Step Three:

Add the plants. These are just cheap crap from Amazon. I couldn’t find my glue gun so I used superglue. Some were glued on as they are, others were cut up smashed together. All of them are pretty big next to 28mm minis but this is meant to be dense terrain somewhere like the Amazon. I was going for a mix of heights and species on every base so it looked interesting but tied together.

Step Four:

I have a tub marked Jungle Basing that I made up two years ago… Here’s what I said about it then:

I’m a sucker for a new jar of herbs for a recipe I cook once and then leave them to spend eternity in the herb and spice drawer; only being touched to move them out of the way when looking for something else. Sure enough, I found three jars in ten seconds all of which have been open far too long to be of any use imparting flavour.

Mixing them together doesn’t give a huge amount to work with so I may need to be a little inventive in building layers of texture under them to fake it. Then I remembered that I have a bunch of teabags from a “I’ll try drinking herbal teas to be better for my health than the builder’s brew I usually drink” phase. Perfect. 

A layer of PVA and good coating of the mix was left to dry overnight… one of the best smelling projects I’ve ever done. 

Step Five:

After drying overnight, I added some extra textures to the plant life by adding tufts, moss, GSW Ivy Foliage and some of the GSW Tall Shrubs. The goal here is to bulk out and diversify the species. 

Step Six:

The base texture gets some isopropyl alcohol and some watered down pva to seal them in. It darkens down the colour of the basing material and I’m very happy with the end product.

I had enough plants to get eight bases done which should be more than enough the games I’m about to play with them.

Upgrades

Tutoring 4
Skill 5
Idea 5
1 Comment

I’ve played a couple of campaigns of Four Against Darkness, a solo/co-op pen and paper dungeon crawler. There are some excellent fan made sheets for tracking your dungeon and adventuring party as they progress – I use the ones found on BoardGameGeek.

However, after the fun of playing Pulp Alley recently, I thought it might be time to try it a little upgrade. I’ve a lot of fantasy minis that were painted up for Frostgrave and the binders filled with cardboard standees from Paizo so minis are taken care of.

Terrain-wise though, I don’t have a lot of buildings with interiors and nothing suitable for a dungeon setting.

There’s a million and one videos online about making dungeon tiles but I can’t be arsed with that. I don’t need enough for a huge table, just a couple of rooms at a time so went looking for the plastic options.

Upgrades

Archon are an obvious choice so looking at their options I narrowed it down to two. The original fantasy set and the Pathfinder Abomination Vaults. I went with the Pathfinder box partly because the sculpts are newer but mostly it was because it was the set that came with doors.

The box gives you a sprue of clips and six sprues of the same terrain sprue. It took a few hours to clip everything off and clear up the mold lines. It was tedious and I hated it buuuuuut I now have a box of pieces. A spray can prime of Colour Forge’s Raven Black and it was time to hit the dry brushes.

Fanatic Deep Grey first. It took 90 minutes to do all the walls, floors and debris. Then Fanatic Ash Grey, this was a more sparing pass so only took an hour. I had thought of doing three tones but I’ll be honest, after the Deep Grey I couldn’t be bothered. I’m working six days this week but I’m aiming to have them done so I can play through a new campaign of Four Against Darkness over this coming week’s evenings.

I‘d tried through the dry brushing step to keep the recesses as dark as possible to avoid having to do an all over wash. The colours in the dungeon come from the torches which fit into the nice little wall decorations and the doors. At some point in the future I might go back and do some more washes on the stone (perhaps some heavily watered down Agrax and perhaps a green wash of some sort). For now though, I’m bored of terrain and I received an exciting bag in the post this week…

Until then, the tiles all fit away nicely in the box. There’s enough space for a second set in the future.

Upgrades

Walls, tents and fences

Tutoring 8
Skill 9
Idea 8
1 Comment

I only have one day off this week and haven’t had any hobby time during the week so Sunday was painting day. I cleared the grown up jobs out the way, stuck on an audiobook and away I went…

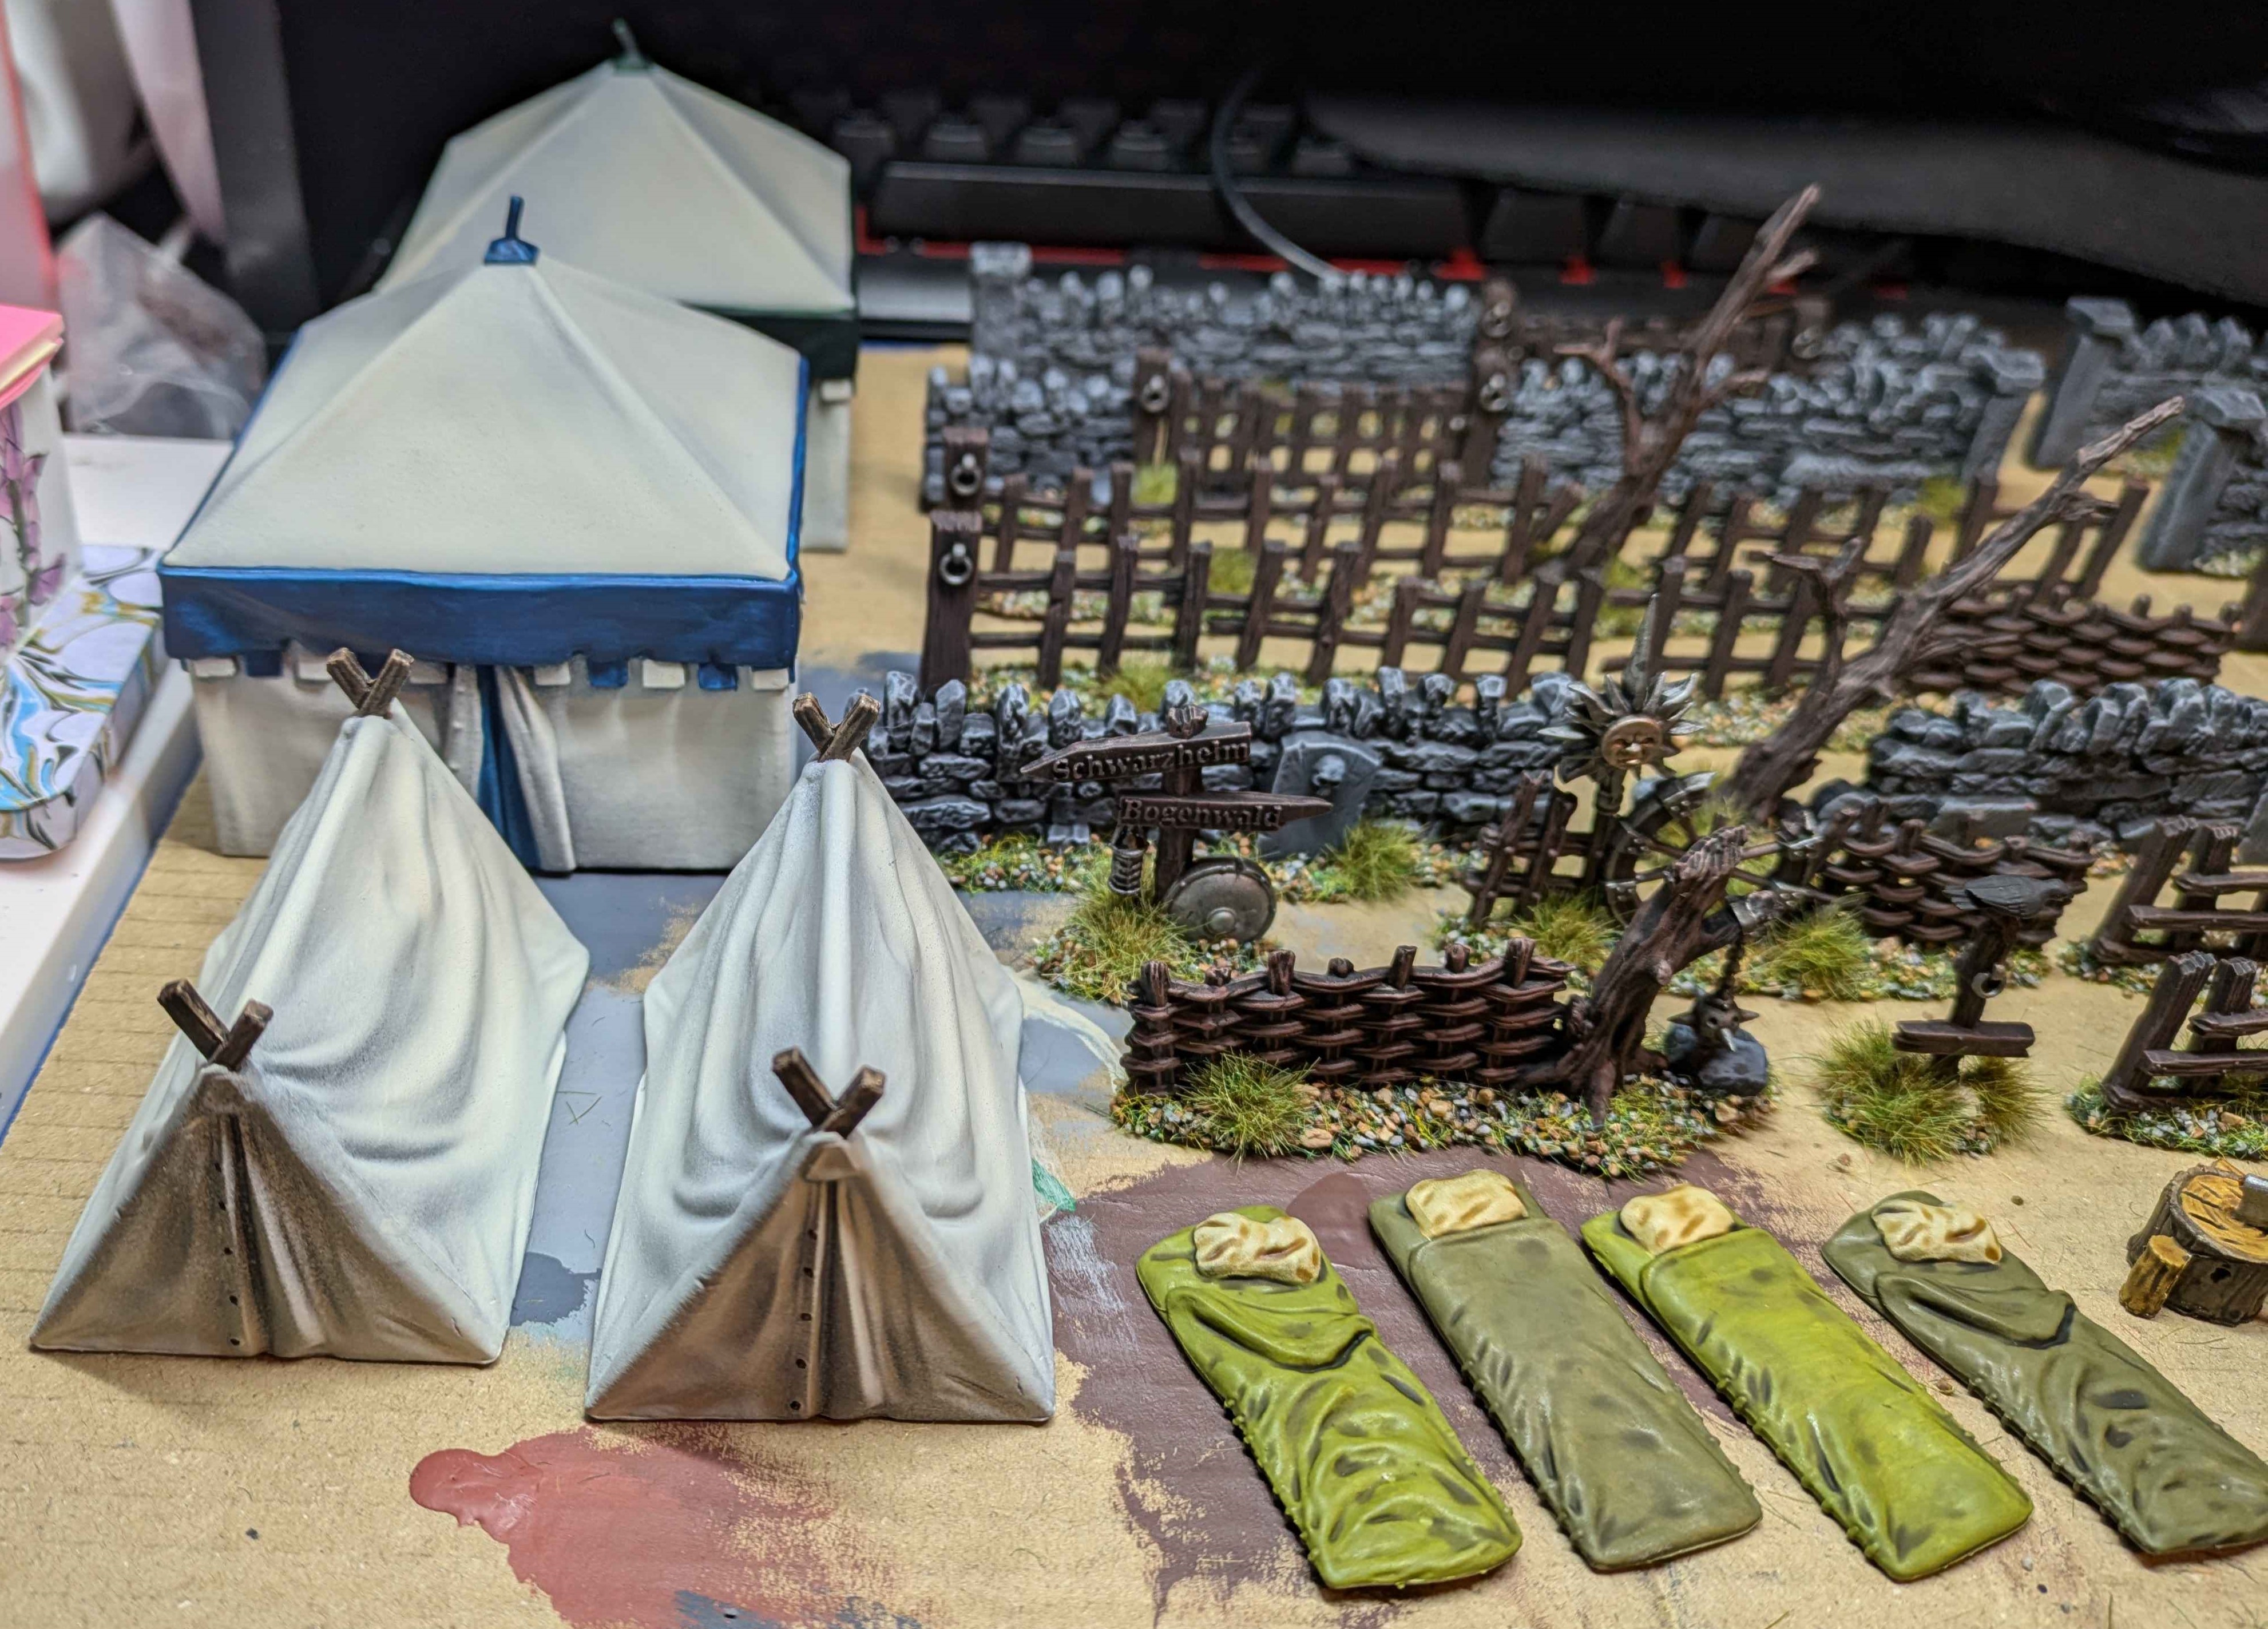
In anticipation of a game next weekend, I needed some tents for a camp. Mantic’s Terrain Crate range has a Military Camp box. Oh the synergy! Thankfully the Terrain Crate stuff is largely one piece so, with minimal clean up and blatantly ignoring some mould lines (sorry Gerry!), I got to priming.

I’m sure that there is a way to paint up large, mostly flat, pieces like tents that they don’t look crap but I wanted to focus on done, not perfect so I primed black and then did a heavy zenithal with an off-white. It doesn’t really show up in the photos but in person it gives a slight shadow that breaks up the surfaces. Speed paints and normal acrylics were used on the rest of the items. If I can find them before next week, I’ll use some pigment powders to dirty up the lower halves of the tents a bit but they’ll do as they are for game day.

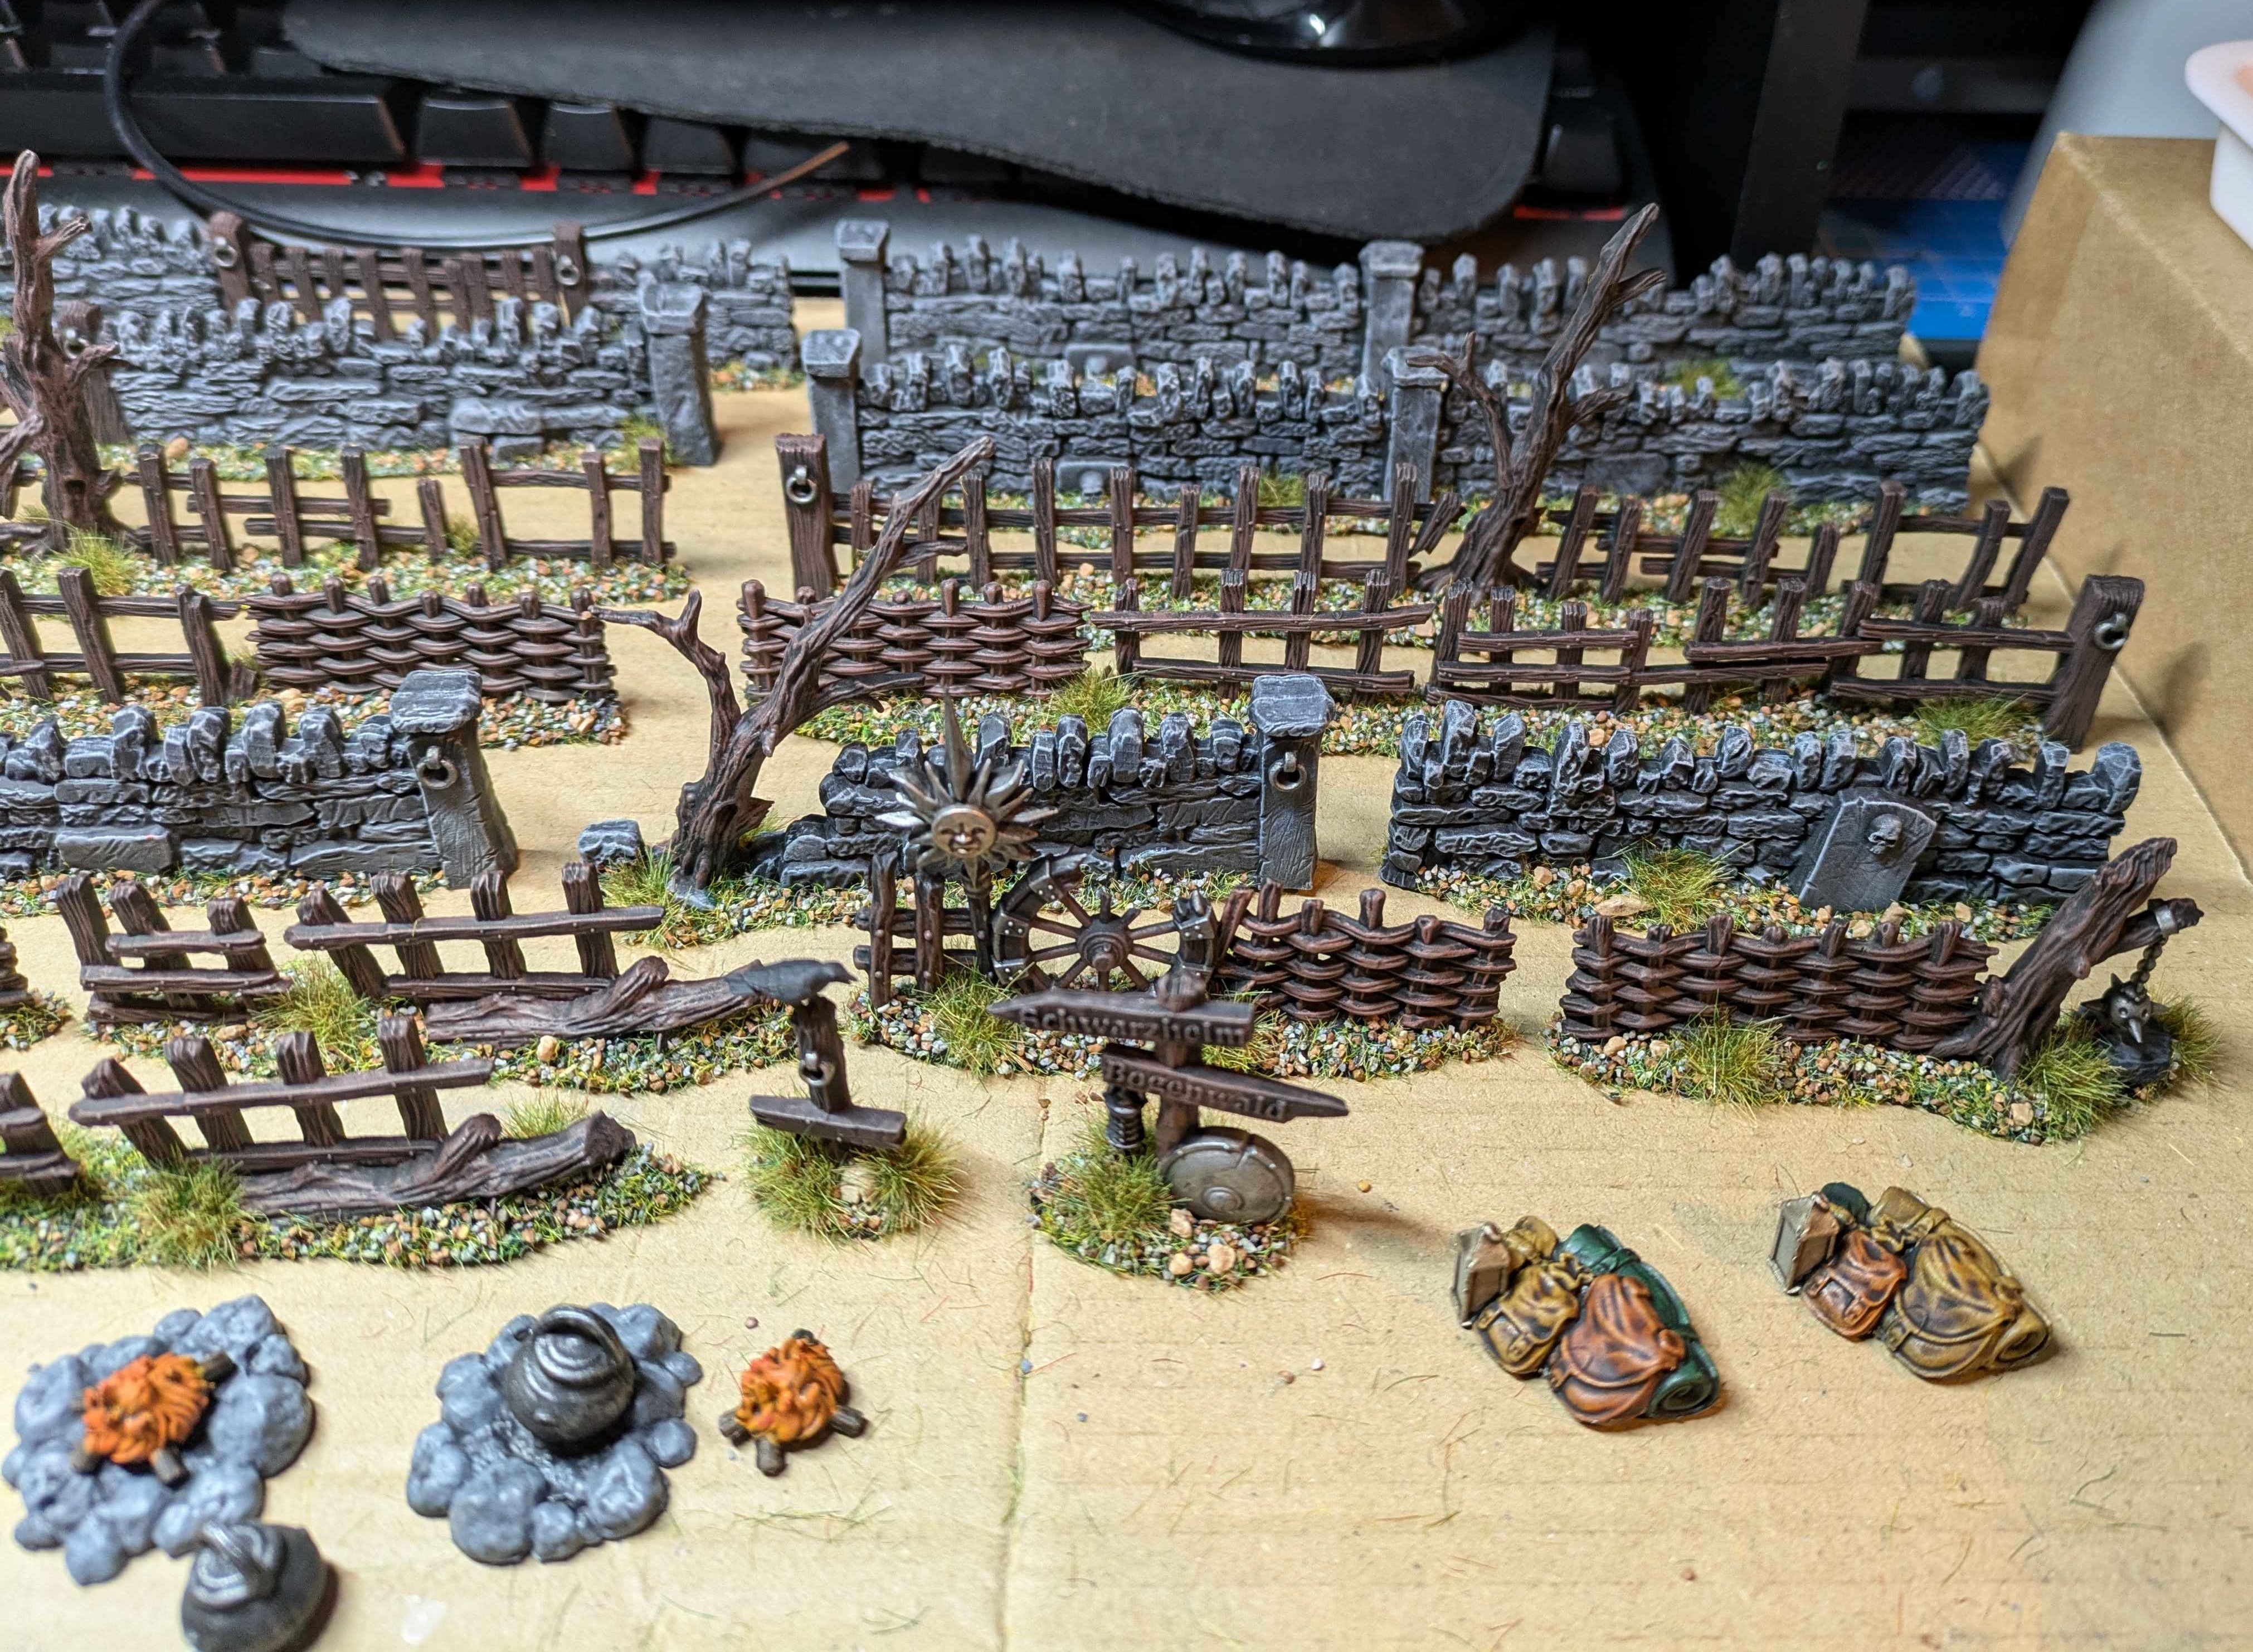
Now to more walls and fences. I painted up some Terrain Crate stuff a couple of months back but I recently saw these for Games Workshop. At £18, I figured they were worth a punt as there is more variety than the Mantic box had. 

I’m assuming this is an older GW kit that has been retooled for Old World cos they aren’t overly fussy with detail – just enough that with some drybrushing and two or three other colours for details, they look great. 

I primed them all black and then:

  • Walls were given a heavy dry brush with Army Painter Deep Grey and then a light dry brush with Army Painter Ash Grey.
  • Fences and trees were dry brushed with Army Painter Oak Brown.
  • Any metal details were given a coat of Citadel Leadbelcher and a Nuln Oil wash.
  • The few plants were painted with a green but I decided that because I was going to flock the bases, it would look better to cover the plastic plants with some tufts
  • All the pieces then got some pva and my fantasy terrain basing mix which is a Javis Scenics mix that I bought several bags of so I don’t need to worry about forgetting the recipe in the future

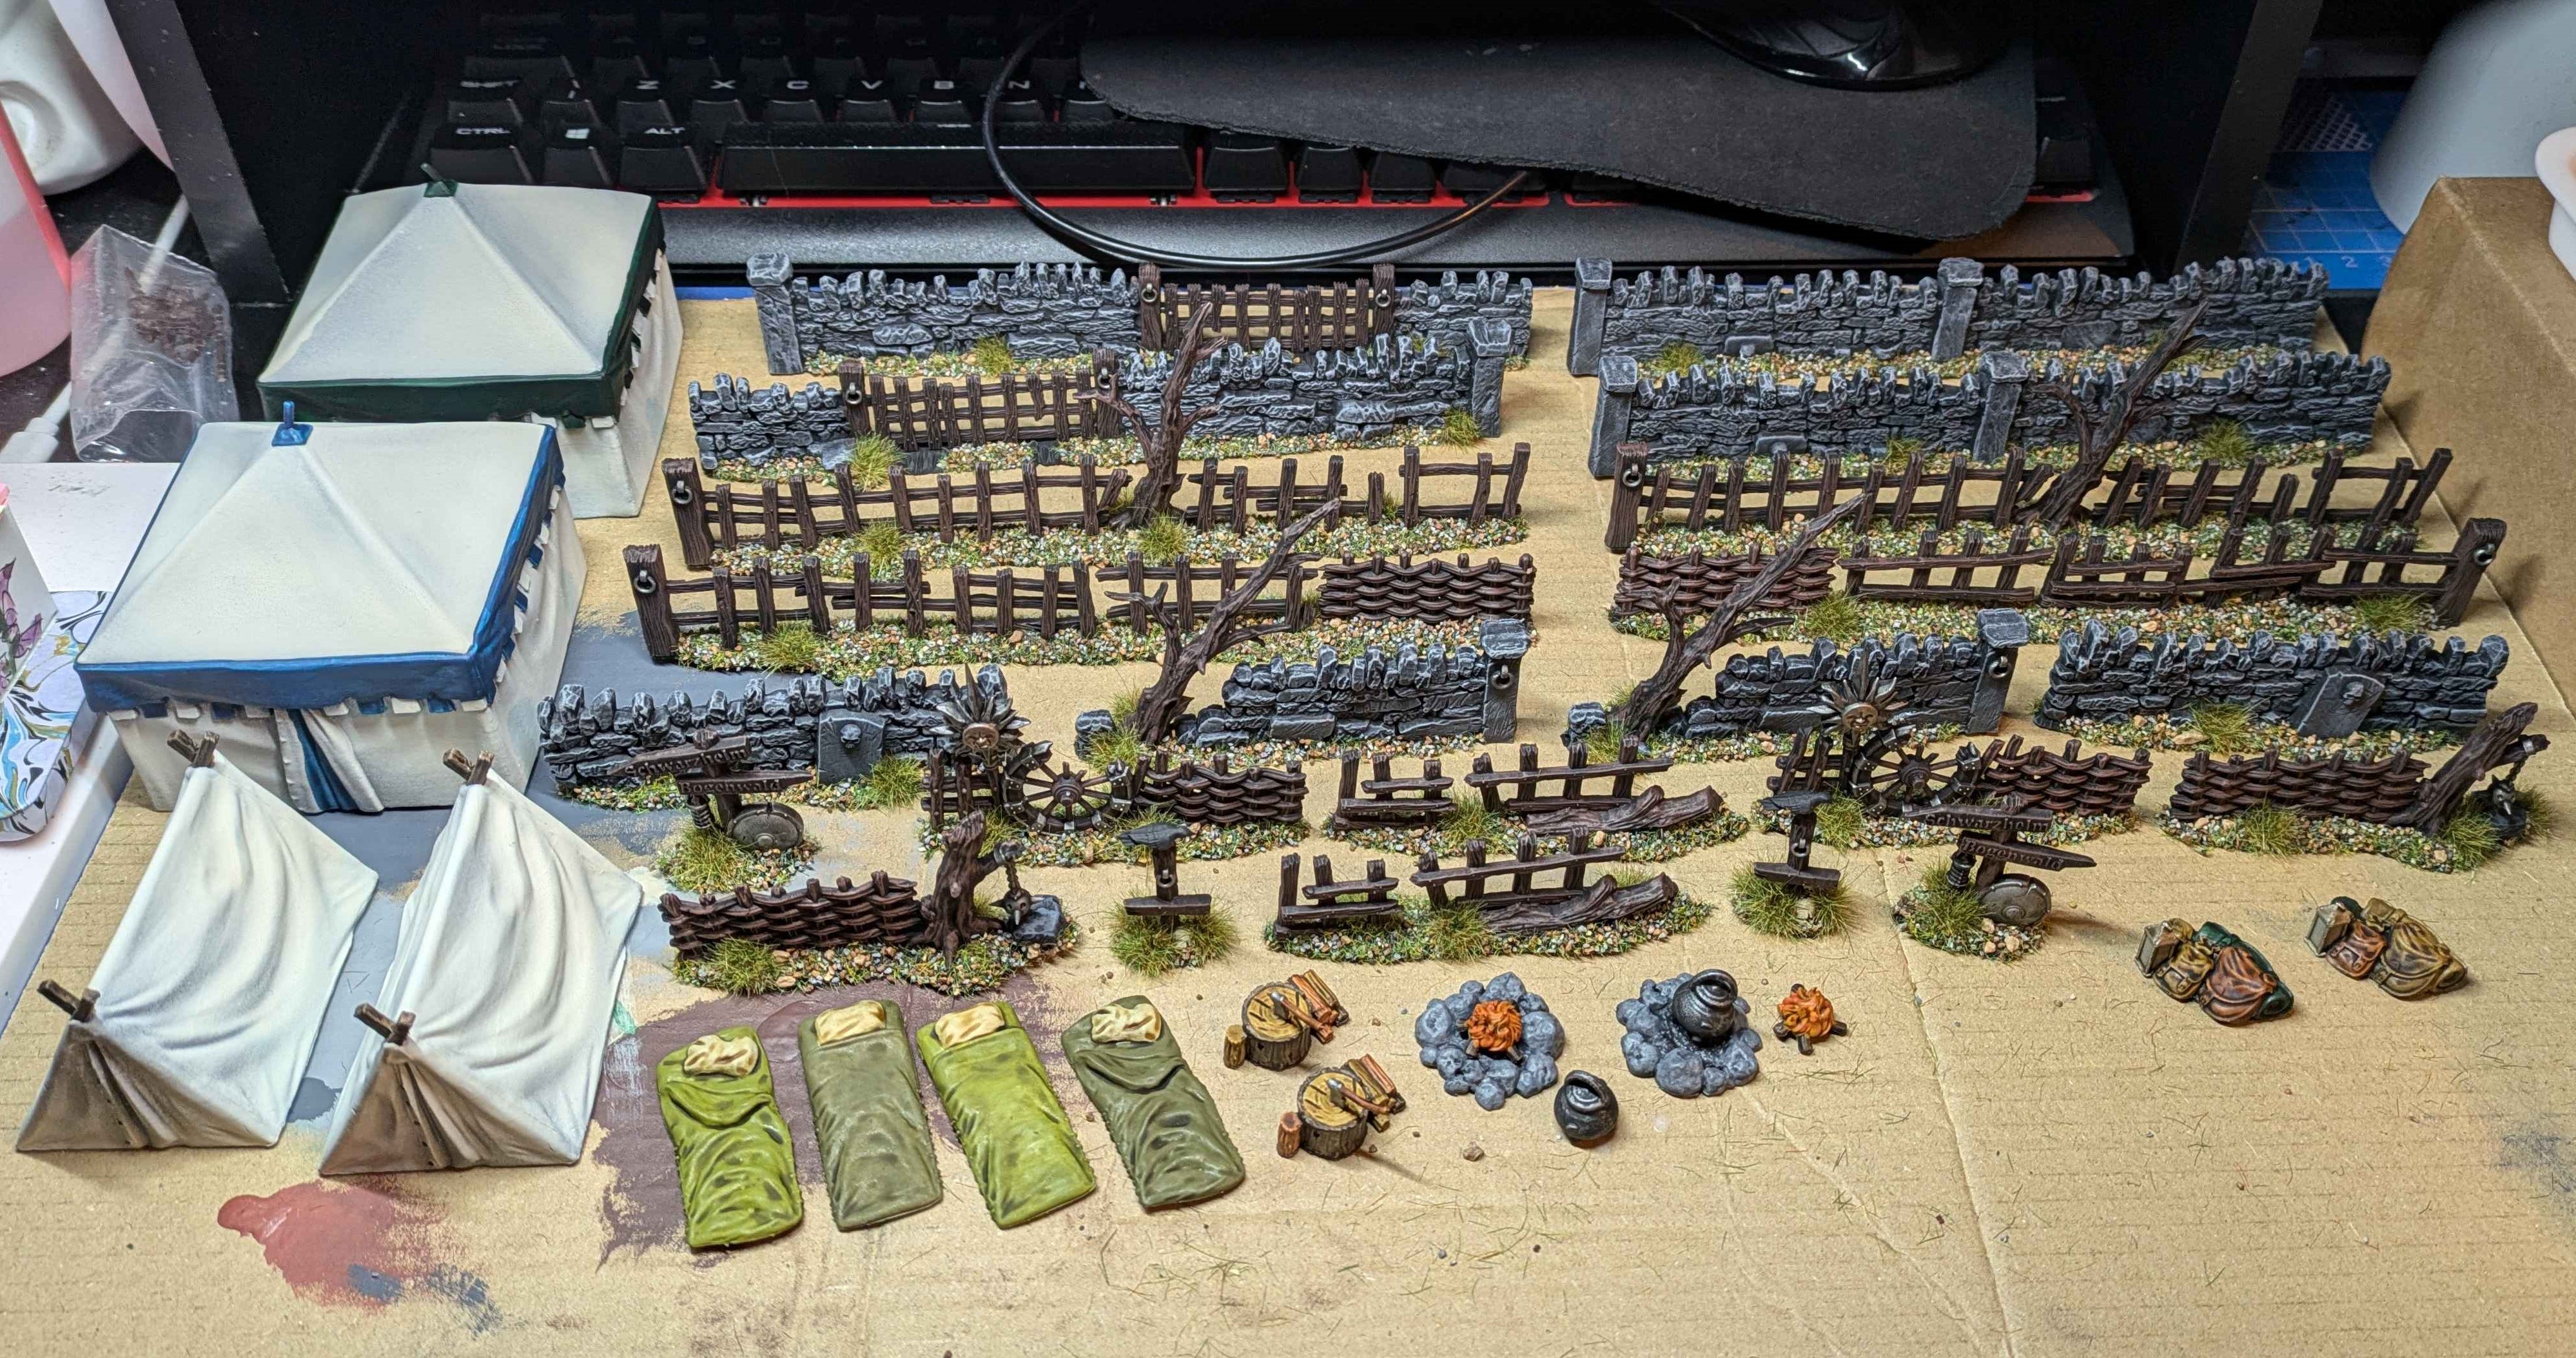
I caught myself a couple of times at the end of the day feeling like I hadn’t achieved much but seeing it laid out together, that is clearly bollocks. Two boxes of terrain painted and ready to hit the table (varnishing will have to wait as we are being battered by a storm right now so spray varnish is not in my immediate future). 

And I finished my audiobook before it had to get returned to the library. 

What a time to be alive!

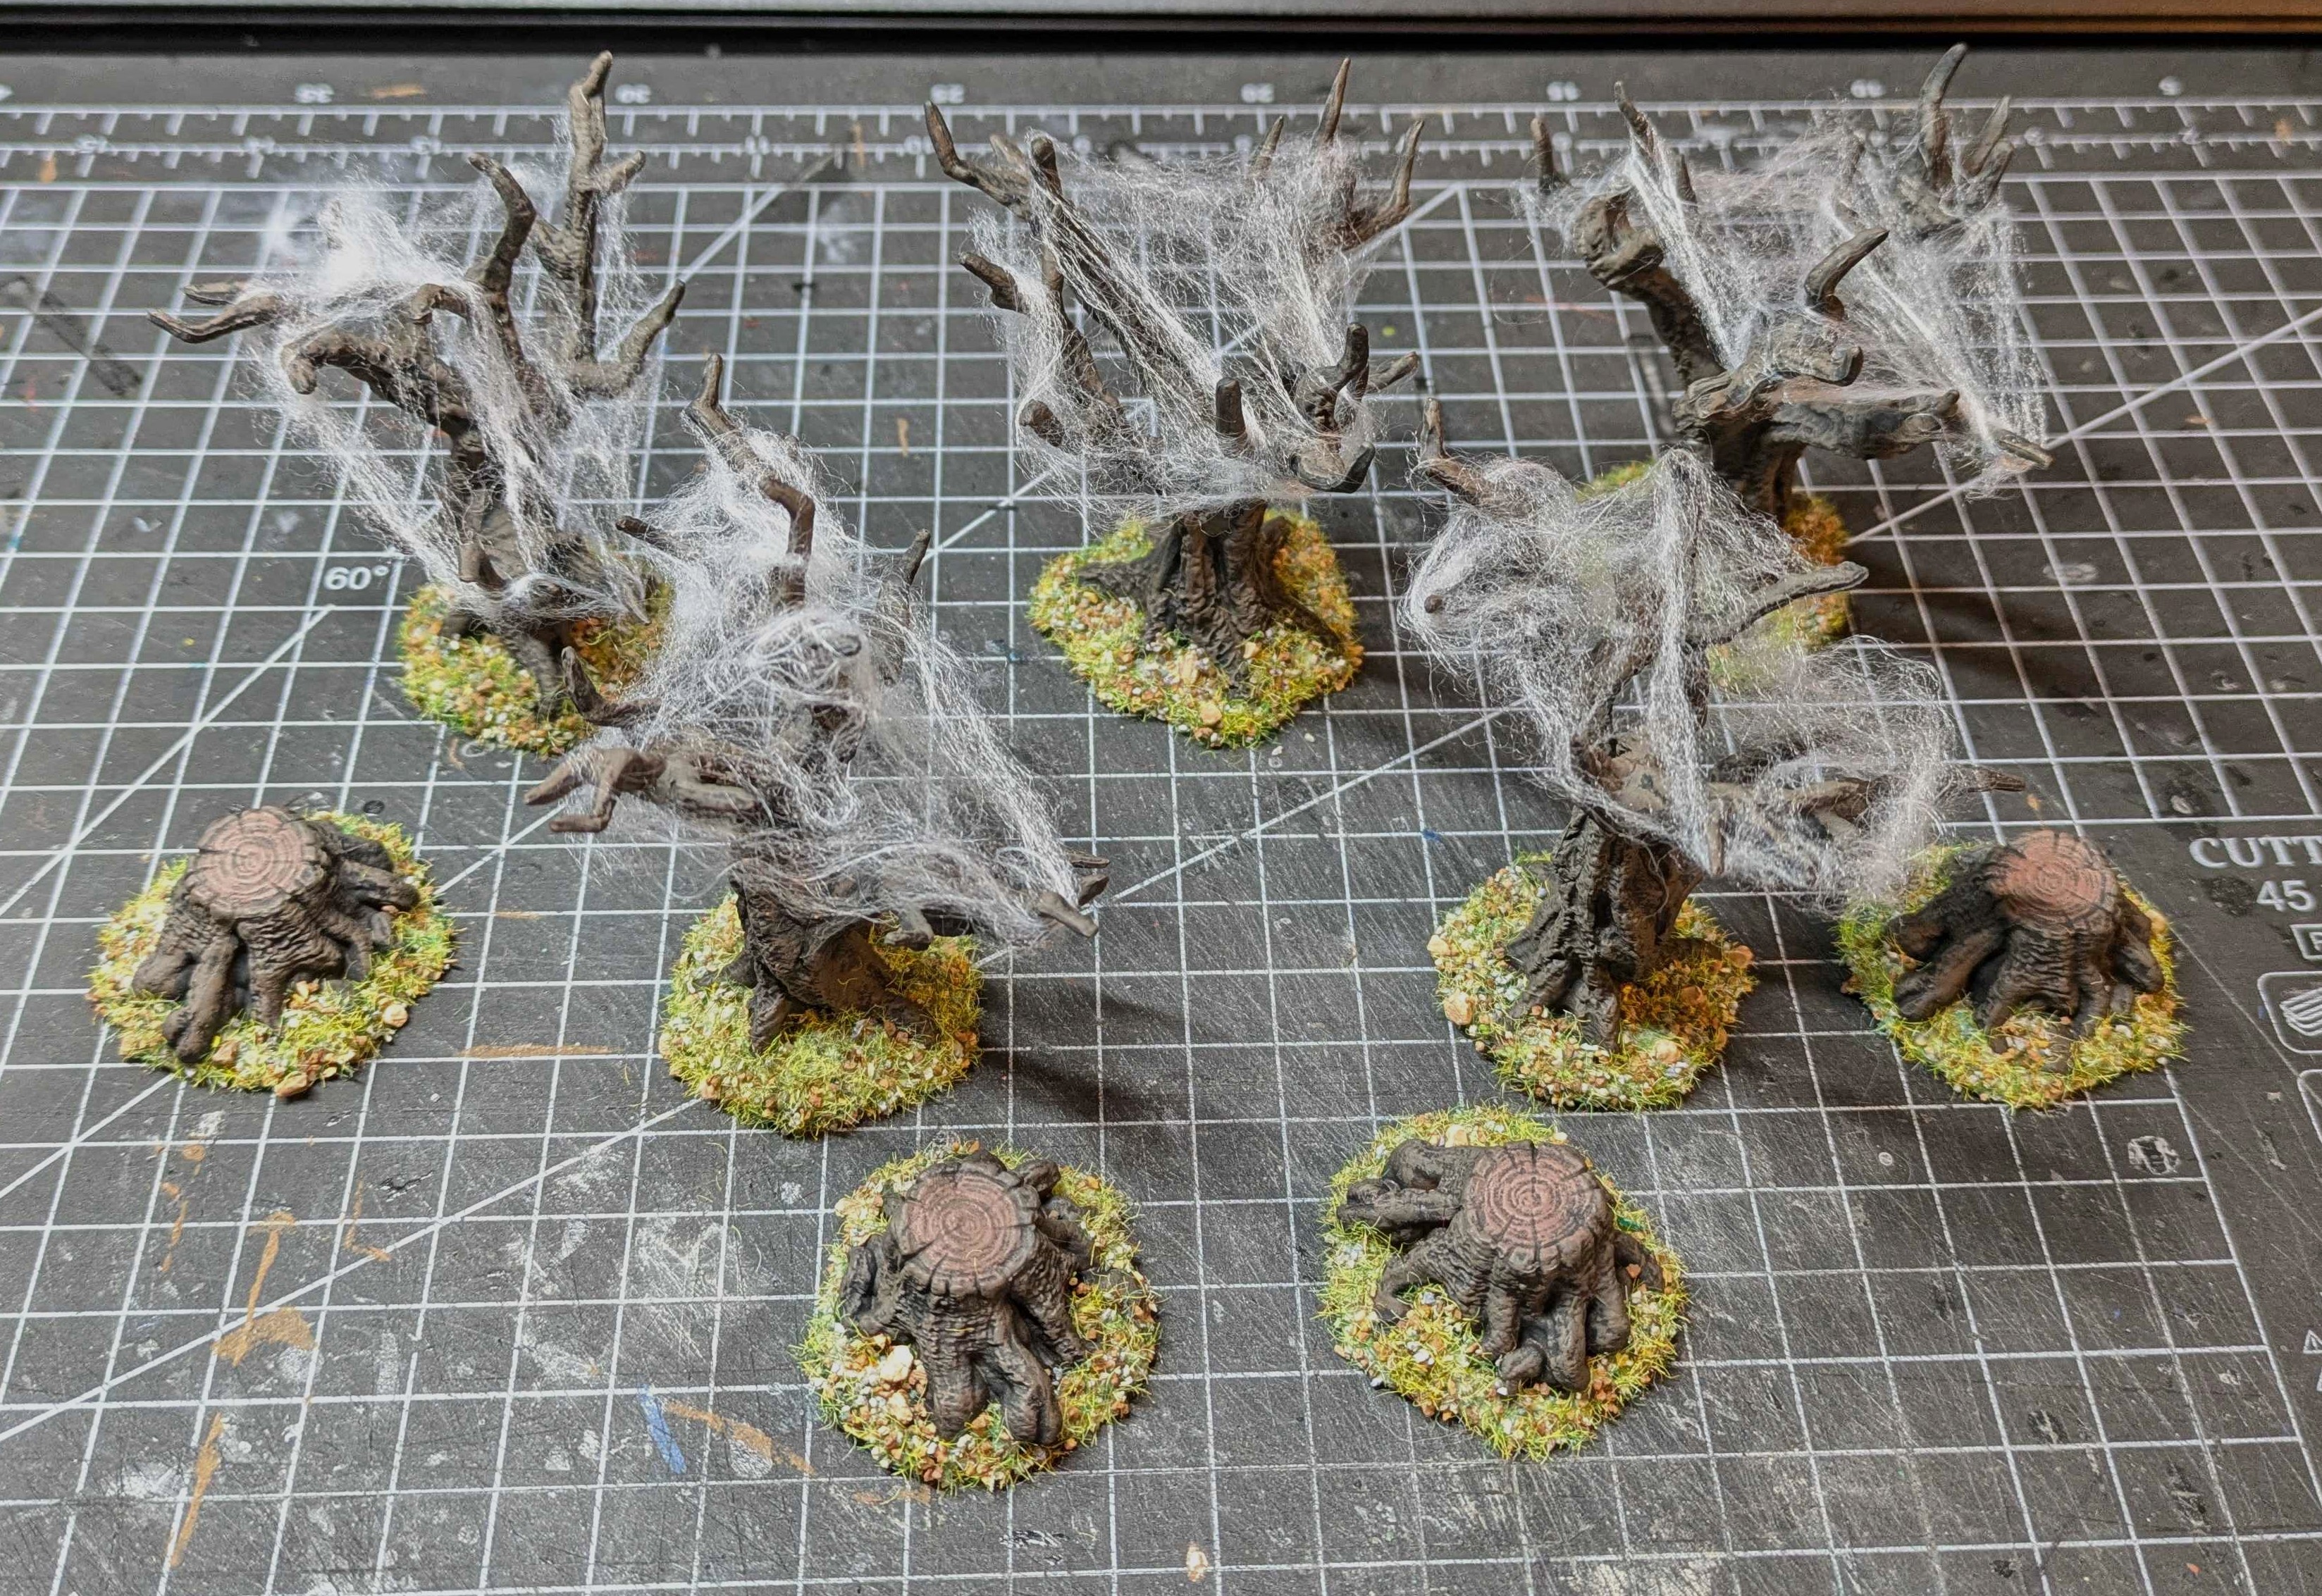
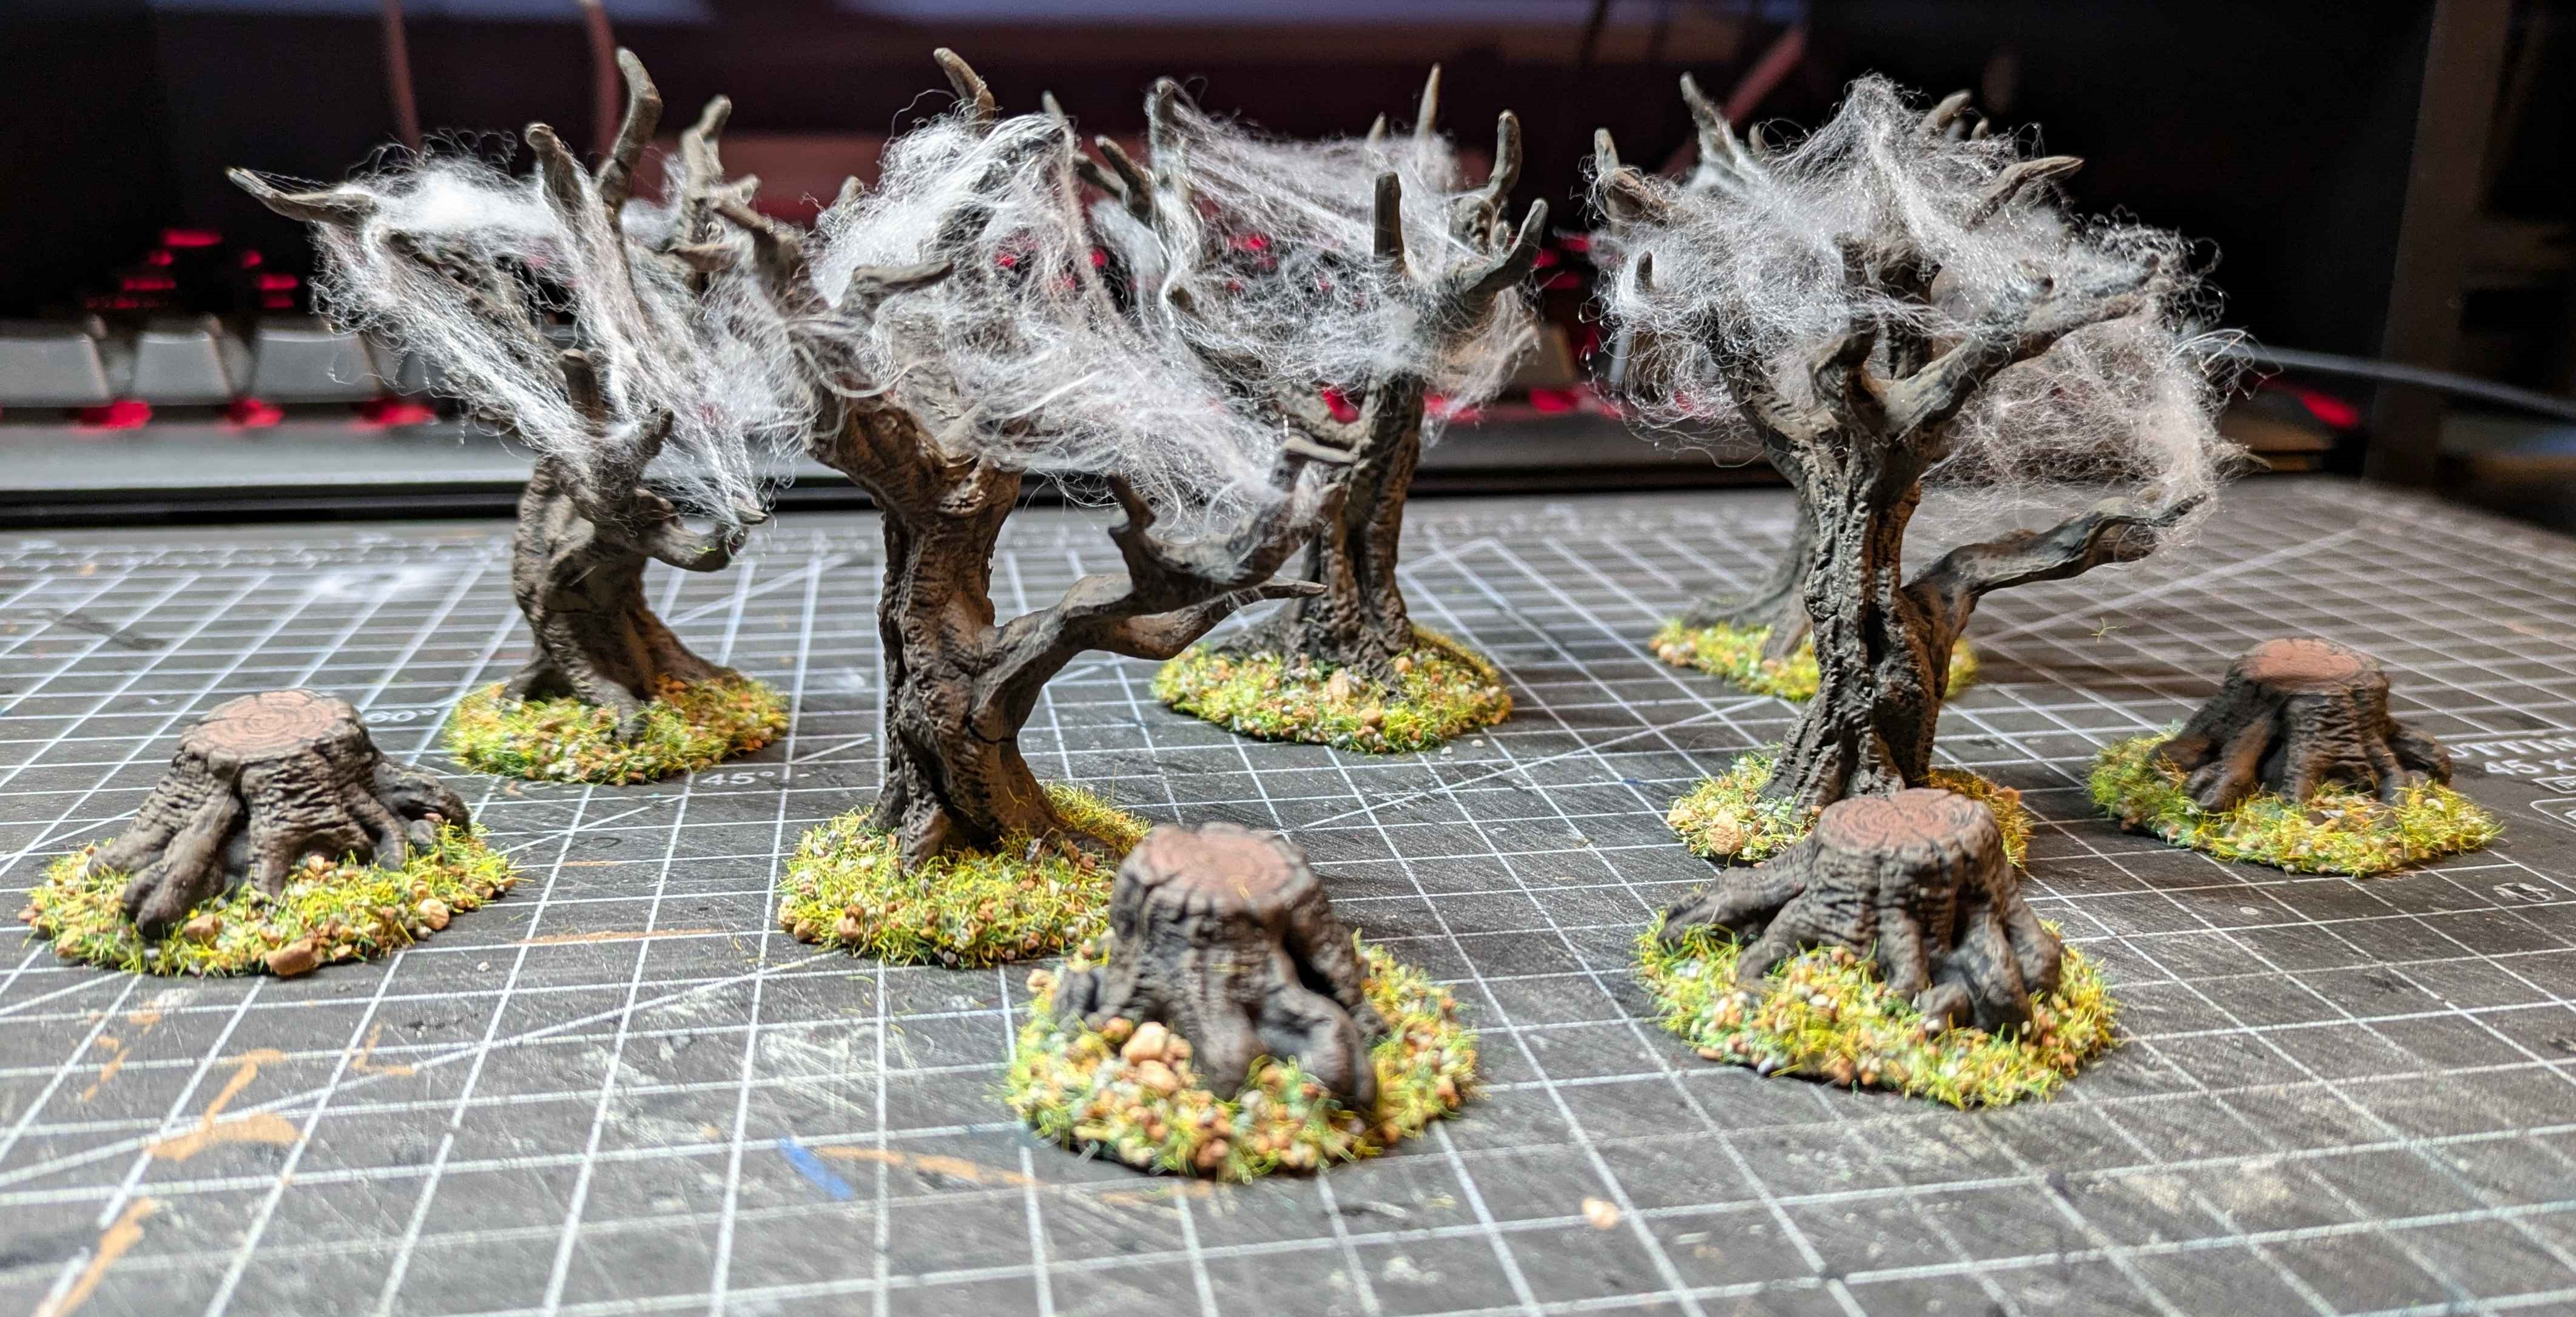
Spider Trees – Mantic Terraincrate

Tutoring 7
Skill 8
Idea 9
No Comments

Let’s start small shall we?

I have two of the Mantic Terrain Crazy boxes (one from 2022 and 2023) and they are filled with a hodge-podge of terrain bits that may or may not see a coat of paint. Amongst them were four of the trees from the Gothic Grounds (https://www.manticgames.com/terrain-crate/fantasy/small-box/terraincrate-gothic-grounds/) box. I like the look of them and when I saw that I had a £10 off voucher for Mantic, I ordered a full box to go with them.

The trees are nice and sturdy – they don’t feel like they will tip over the way most others do. The are all the same height so these eight will be okay but a whole table of them would look dull. The stumps are nice and the wee mushrooms will be added to the pile of basing bits. It feels weird to describe the box as a ten pieces of scenery when the mushrooms are smaller than a fingernail but even with eight pieces in the box, the price is good.

The kit comes with faces you can add into the trees but I only used one for this set – they are being painted up with a specific use in mind but I can easily see me buying more in the future and having more face trees.

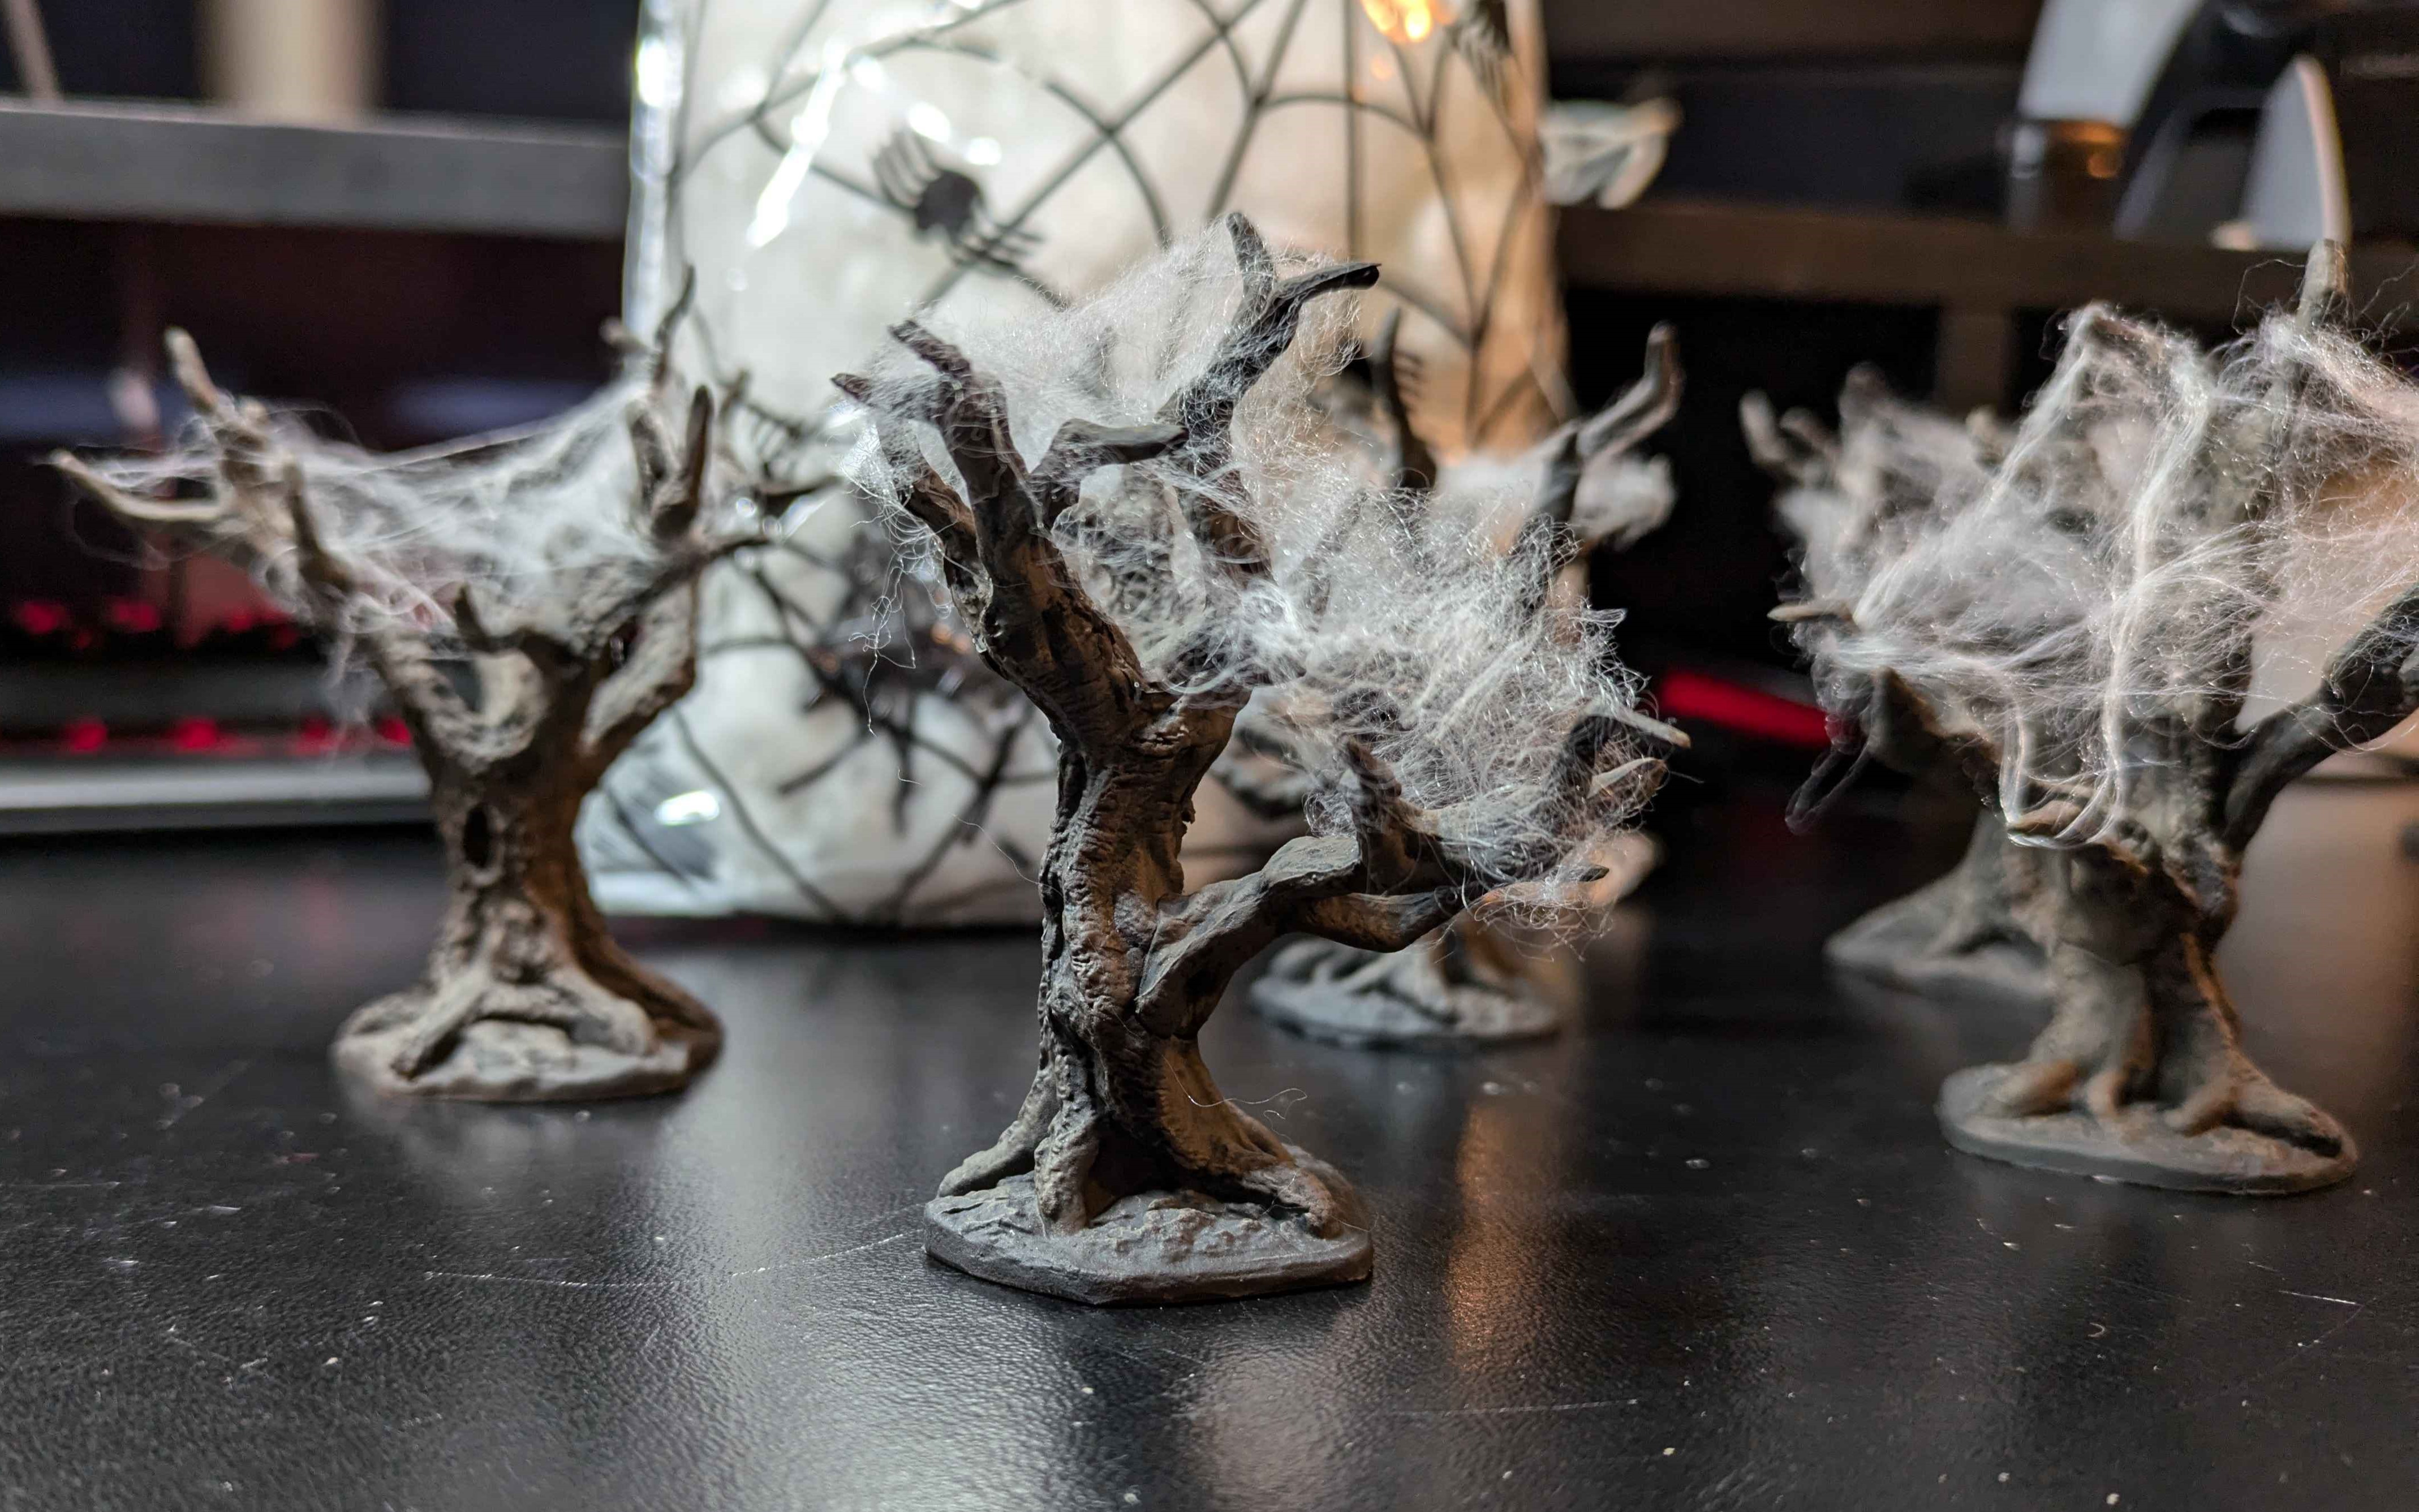
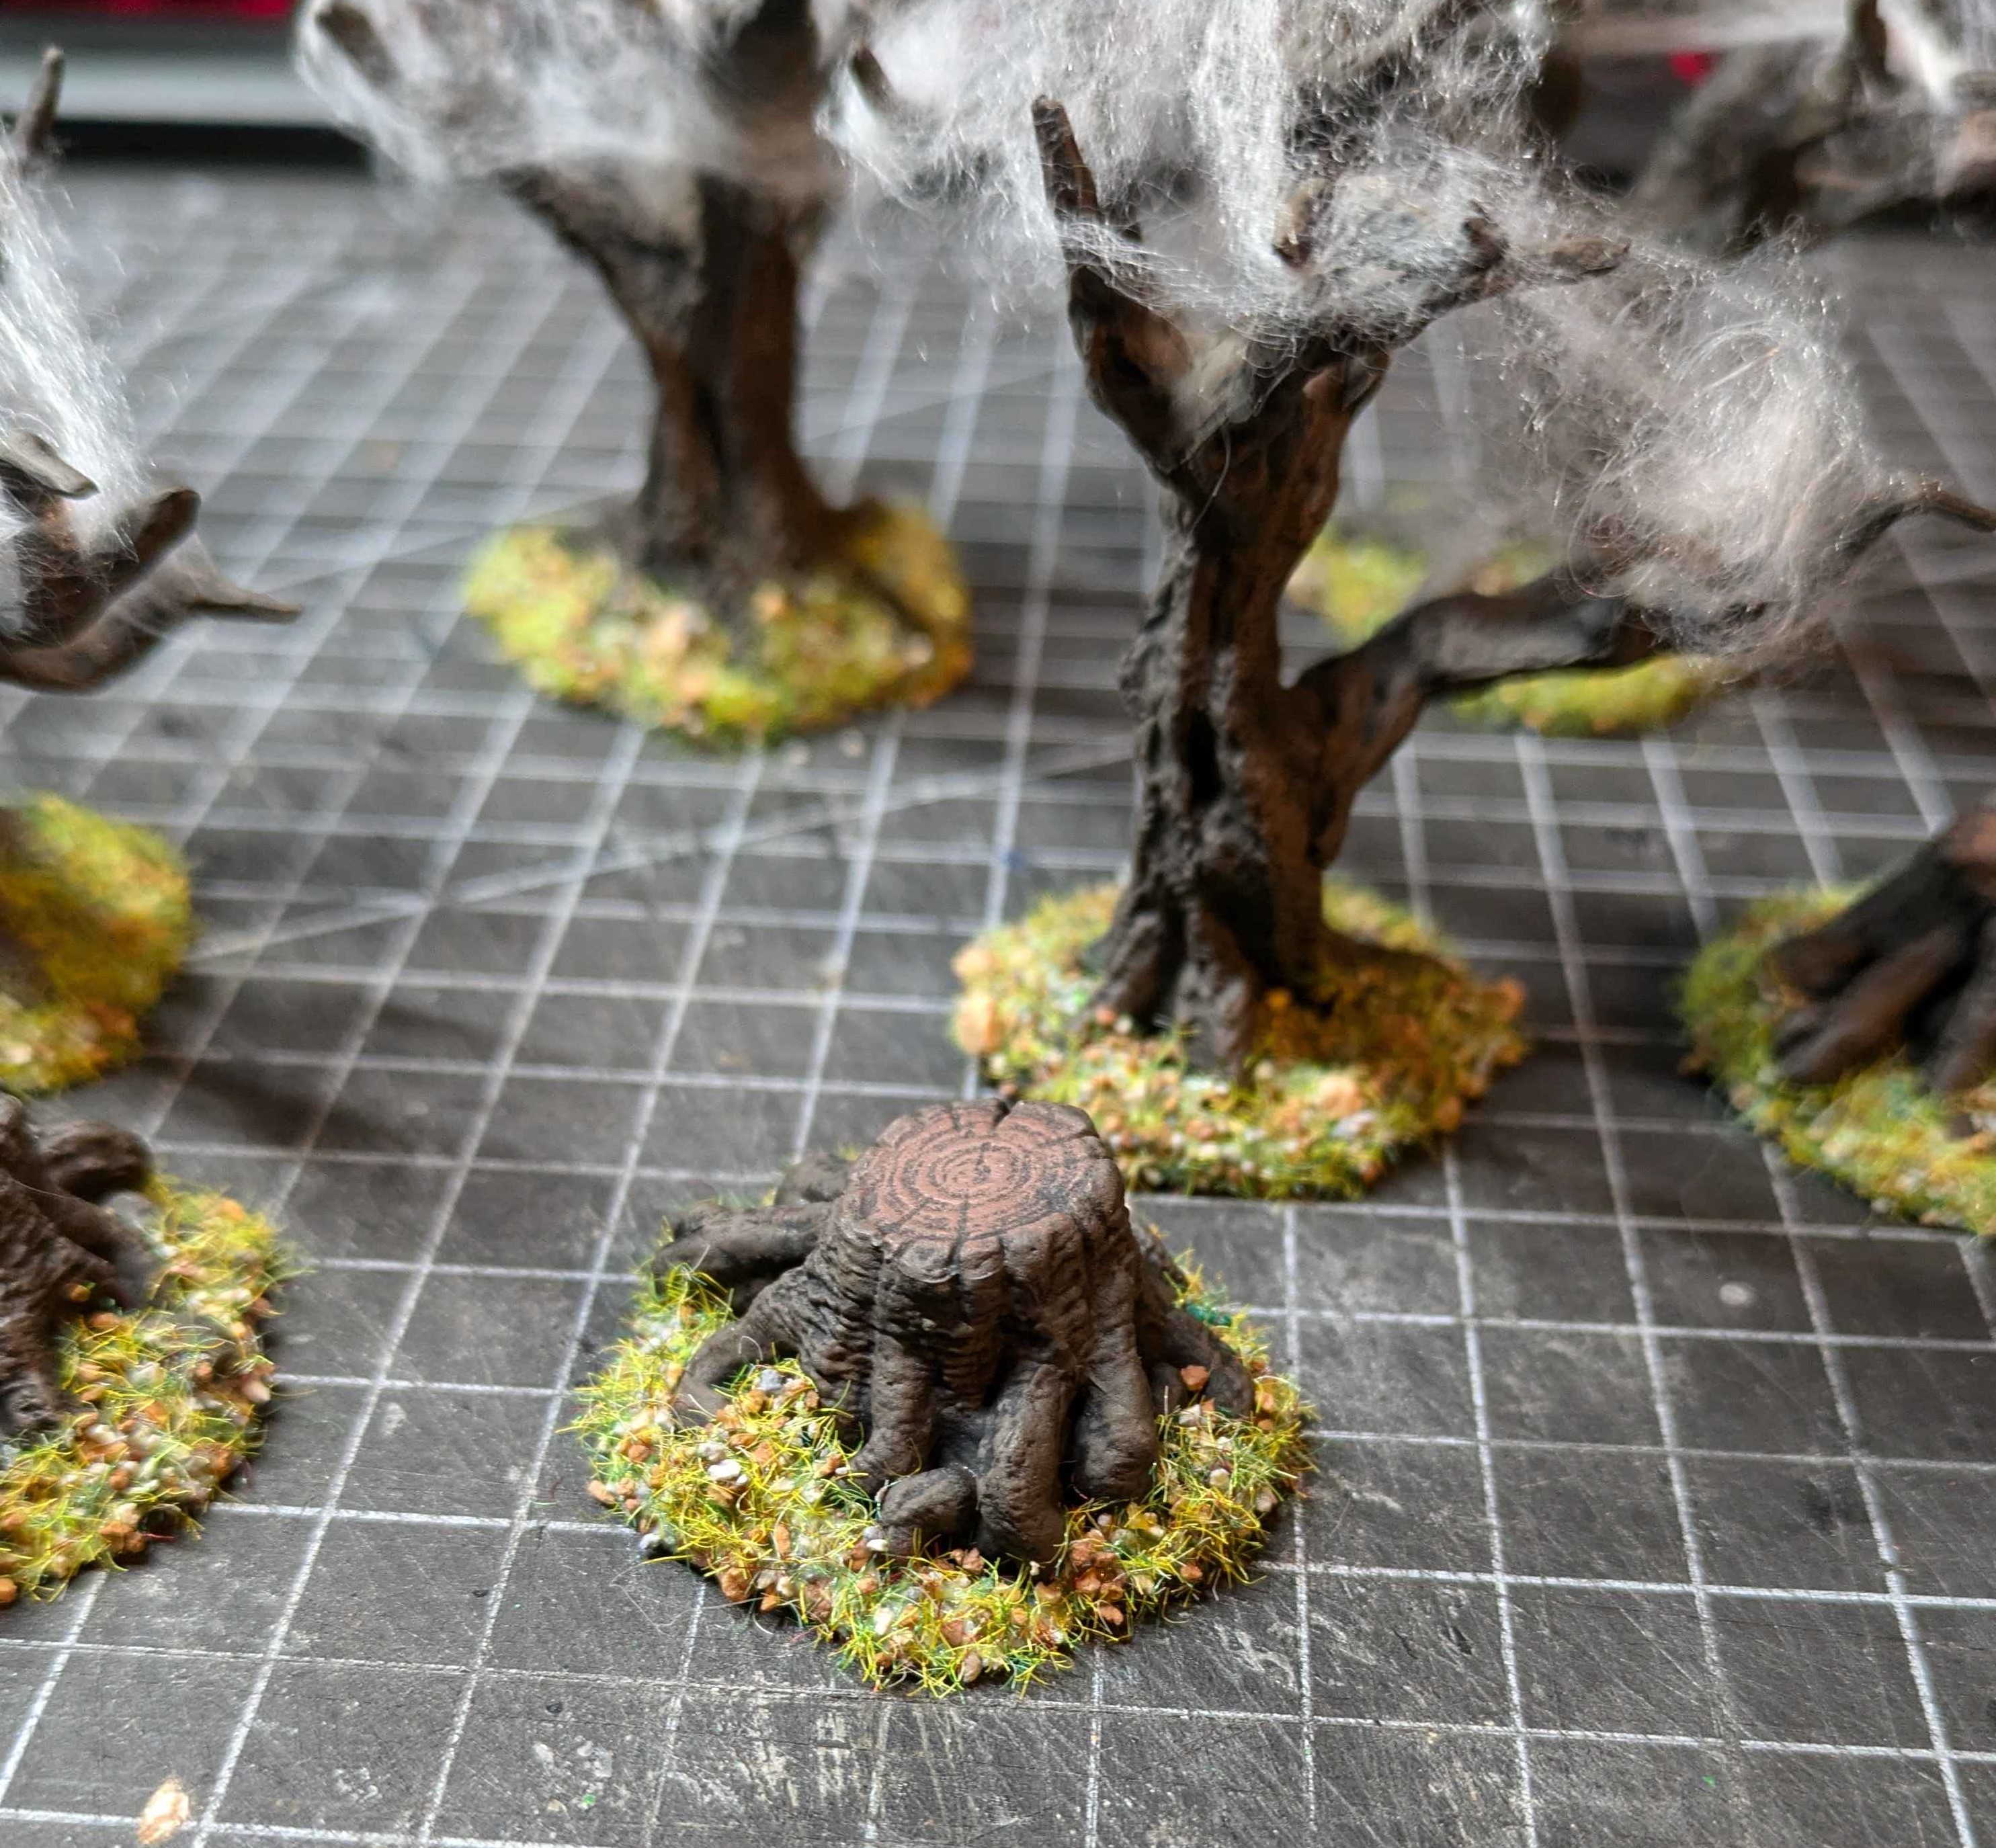
  • Black prime and a brown (Vallejo Chocolate Brown) drybrush did the bulk of the work. For the stumps I drybrushed a lighter brown (Vallejo Mahogany Brown).
  • I need some cursed spider trees for a Rangers of Shadow Deep, five in total. Thankfully we’re getting close to spooky season so getting decorative spider web.
  • I used a little Javis Battlefield Field Scatter around the trunks to add a little more interest.
  • The remaining trees will be back in another post

Introduction

Tutoring 4
Skill 4
Idea 8
4 Comments

I have a terrain problem. I dislike painting it, I find it tedious. That by itself isn’t a problem – when it is paired with the fact that I love a lot of terrain on my tables however, we see the problem. This has come into particular focus recently as I’ve been working on gutting my flat after several years without a decent clear out.

Turns out I actually own quite a bit of terrain, some of it painted and good to go, much of it not. I have buildings, ruins, furniture and scatter galore. Very little of it is well organised. With the Grand Army Project I have been working on getting through my model backlog, now it is time to do the same for my terrain backlog. It would be nice to be able to put together a good looking table for most game genres/periods without too much effort.

There will be different aspects to this project as you can imagine – MDF kits, plastic kits, pre-painted, different scales, different genres/periods and how the hell am I going to store it all. It is also another multi-year project but at least it is focused chaos!?!?

Goal: get my terrain collection to a table ready state and find easy storage options.

Supported by (Turn Off)