Wargaming The Battle Of The Bulge Part Four
January 5, 2015 by crew
At last we come to the end of our Battle of the Bulge series, where I team up with Beast of War community members Gladesrunner and Amphibiousmonster to take a “gamer’s view” at some of the closing engagements of this historic campaign. If you need to catch up on what’s happened so far, the series begins HERE, but for now let’s close the book on this titanic battle that ended 70 years ago this month.
ENGAGEMENT TEN: LIFTING THE SIEGE OF BASTOGNE - DEC 26, 1944
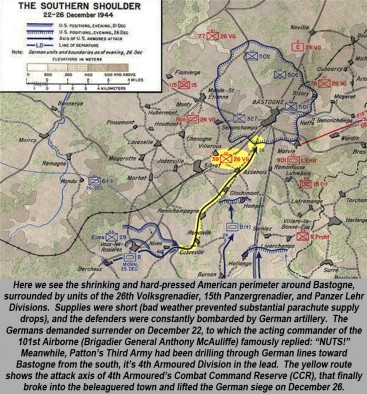
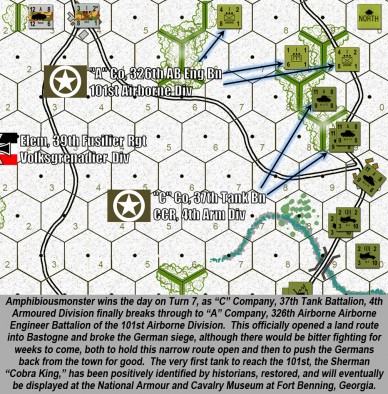
As we’ve seen previously, the Belgian town of Bastogne was critical to both sides during the Battle of the Bulge as one of the largest road junctions in the area. When the German XLVII Panzer Corps (Fifth Panzer Army) failed to storm the town on December 19, they instead surrounded and bypassed Bastogne, leaving the 26th Volksgrenadier Division and part of the Panzer Lehr Division to strangle it into submission. Yet despite nearly a week of constant attacks and shelling, the US forces in Bastogne (101st Airborne, reinforced by elements of 9th and 10th Armoured Divisions) refused to give in. As Christmas approached, however, the Germans surrounding Bastogne had been significantly reinforced. It was clear that the “Battered Bastards of Bastogne” needed relief, and soon.
One of the most famous episodes of the Battle of the Bulge is Lieutenant-General Patton’s counterattack to relieve Bastogne. Patton’s Third Army was huge, about twelve divisions strong (upwards of 200,000 men), but they were all engaged along the German border far to the south when the Ardennes offensive struck. Yet Patton had foreseen the possibility of a German attack through the Ardennes, so even when the offensive first opened, Third Army already had contingency plans, timetables, routes, and operational orders drawn up and distributed through all levels of command. Thus, when Eisenhower and Bradley (12th Army Group, Patton’s immediate superior) asked when Third Army might be able to apply pressure against the southern German wing, Patton famously stunned them with his reply, “I can attack with two divisions in forty-eight hours.”
Normally this was an impossible feat, and would have been if Patton hadn’t put the administrative wheels in motion well in advance. I usually hold the view that Patton is somewhat “over-remembered” in American military history, but this is one of the moments for which he truly deserves recognition. With his foresight and operational planning, he proved that a general’s most formidable weapon is not the tank or the artillery shell, but the typewriter and the radio, combined with an all-star staff of army, corps, and divisional officers in the field.
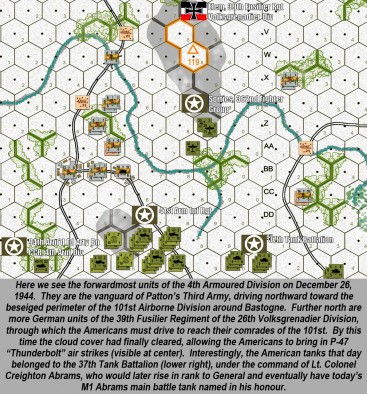
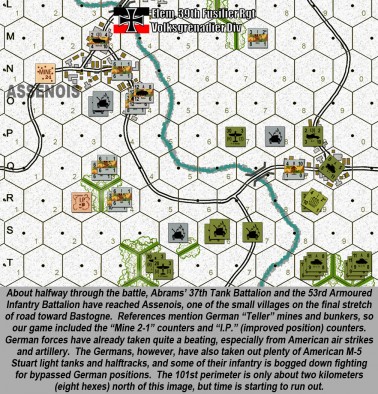
The lead division in Patton’s attack toward Bastogne was the famous 4th Armoured, which had spearheaded the Third Army’s drive across France the previous summer. Pulling 15,000 men and thousands of vehicles out of a winter battle, pivoting ninety degrees on narrow country roads, and driving north through one of the worst European winters on record, the 4th Armoured covered 150 miles, fighting through the German Seventh Army and the south wing of the Fifth Army. On December 26, they finally broke through to Bastogne, leading off with the 37th Tank Battalion under Lt. Colonel Creighton Abrams. Lt. Colonel Abrams, of course, would later become a general and have the American M1 “Abrams” main battle tank named after him.
ENGAGEMENT ELEVEN: CLOSING THE TRAP - LA ROCHE - JAN 5, 1945
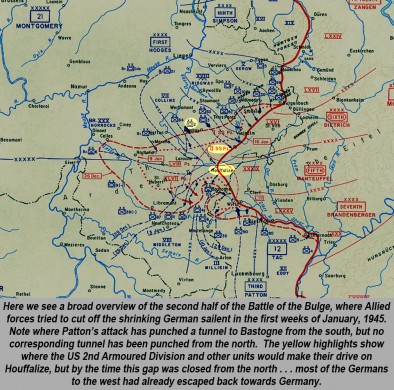
Once the German “bulge” penetration was finally contained, the Allied plan was for the bulge to be “sliced off” with converging attacks from the north and south. As we’ve just seen, Patton and his Third Army certainly did their part from the south. But in the north, things were different. For one, the German forces were much tougher on the northern side of the bulge since that was where they’d been trying to effect a breakthrough. And Field Marshal Montgomery, temporarily in command of the northern part of US First Army, was somewhat hesitant in launching his northern part of this converging attack.
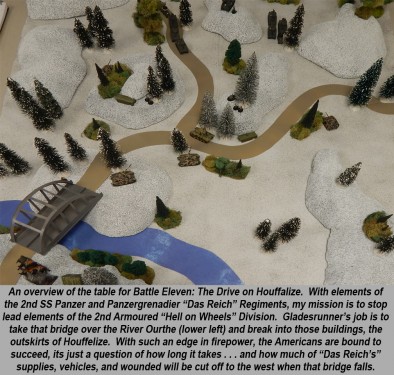
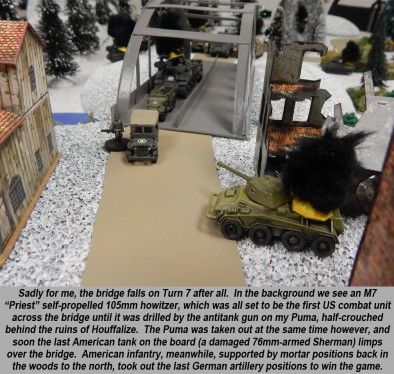
For our eleventh Bulge game, we tried to recreate part of the US 2nd Armoured Division’s drive south toward Houffalize in 15mm Axis & Allies “hexless” miniatures. Their opponents are the elite 2nd SS “Das Reich” Panzer Division, hardened veterans of almost every campaign since Poland in 1939. The Americans would eventually reach Houffalize, but thanks to a late start, most of the Germans to the west managed to escape back toward Germany. This meant that reducing the rest of the Bulge would be a bloody, frontal grind rather than a flanking blitz, and would cost many more Allied lives than the initial German assault in December.
Montgomery often catches a lot of blame for taking too long to get this northern arm of the Allied counteroffensive in gear. But this northern sector of the battlefield had been hit much harder by the initial German offensive, and many of these American units temporarily under his command were in very bad shape. Accordingly, Monty wanted to bring in additional British divisions from his 21st Army Group to help stabilize the Allied position before going over to the offensive.
Still, Monty’s trademark caution, in addition to his patronizing attitude afterwards about how “he” won the Battle of the Bulge, earned a furious backlash from the American public, soldiers, and officer corps. Finally, none other than Winston Churchill had to step in and smooth things over. As with so many things in life, its less about what you did and whether you were right or wrong...than it is about your attitude.
Generals aside, it should be remembered that although the dark days of December get all the ink in Bulge history books, the battle in fact lasted until January 16 and it was in these latter weeks that most of the Allied casualties were sustained. Admittedly, this article series is just one more example of this general trend, but in our efforts to build historically-accurate games, we have to work with what we have.
ENGAGEMENT TWELVE: OPERATION NORDWIND - JADGTIGERS AT RIMLING - JAN 9, 1945
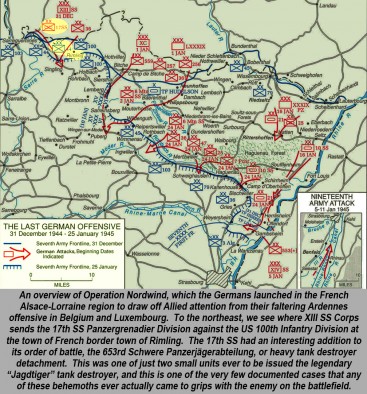
It bears noting that the whole “Wacht am Rhein” offensive was just the largest part of a broader series of German offensives along the Western Front in the winter of 1944-45. On December 31, as their Ardennes offensive really started to come apart, the Germans launched “Operation Nordwind” (North Wind), an attempt to draw Allied reserves away from the battlefields in Belgium and Luxembourg. Nordwind struck much further south, against the US Seventh Army in the Alsace-Lorraine region of north-eastern France, near Strasbourg. Not only does including Nordwind help give a complete picture of that terrible winter 70 years ago, but it also gives us a chance to use one of the rarest units of the German army...the dreaded “Jagdtiger” tank destroyer.
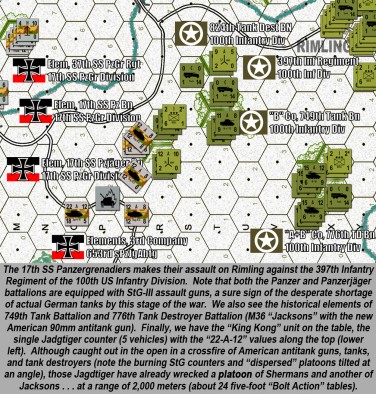
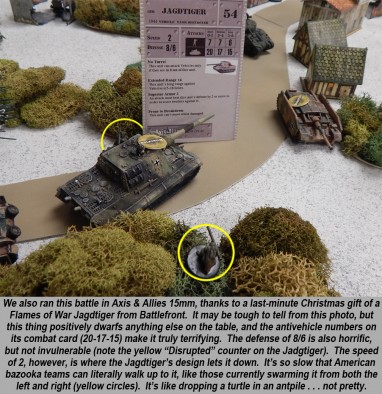
The Jagdtiger was the heaviest armoured fighting vehicle ever actually committed to combat, combat-loaded at 79 tons. Built on the chassis of a Porsche-variant Tiger II chassis, it carried not an 88mm... but a 128mm main gun in a turretless casemate. Ridiculously slow, the Jadgtiger proved terribly vulnerable despite its 250mm of armour. It was also slow-firing, since the ammunition was so huge that each shot had to be loaded in two pieces. It was also a nightmare to maintain and supply, with a fuel efficiency of eight GALLONS to the MILE (no, I didn’t type that backwards). Yet despite all these weaknesses, we wanted to use this beast on the table at least once.
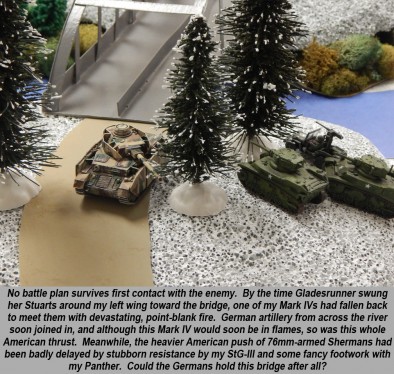
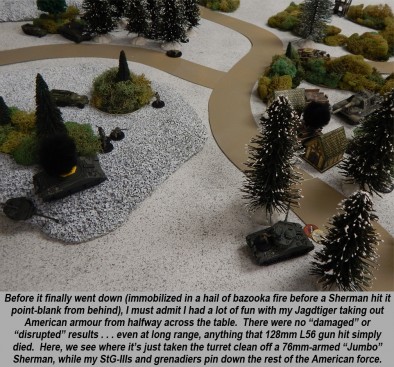
The Jagdtiger’s strengths and weaknesses reflected well in both Panzer Leader and Axis & Allies 15mm. In our Panzer Leader game, the Jagdtiger was too slow to cross the open terrain with any kind of speed, and its lack of a turret precluded it from taking advantage of “split move and fire” rules afforded to turreted AFVs. Thus, they were caught in the open by superior numbers and hammered into junk. In our smaller Axis & Allies game, my Jadgtiger literally moved at the pace of running infantry, and was soon swarmed by American bazooka teams and outflanked by Shermans.
Jadgtigers or no Jagdtigers, in the end Operation Nordwind accomplished almost none of its intended aims. Although the US Seventh Army was thrown into momentary disarray (many of its reserves and supplies had been diverted north to help secure the Ardennes), the situation was soon stabilized and the Germans eventually pushed back to their starting positions in the Siegfried Line. Between the Ardennes offensive and Nordwind, Germany had lost well over 100,000 of its last men and thousands of vehicles, including over 600 tanks and assault guns. Never again could the Third Reich mount a major offensive in the West, and Nazi Germany would be crushed utterly in a little over 100 days.
This concludes our 70th Anniversary commemorative Battle of the Bulge article series on Beasts of War. Keep the discussion going with questions, comments, or debate in the comments below! I’d also like to take the opportunity to thank my worthy gaming opponents Gladesrunner and Amphibiousmonster for taking their share of lumps while dishing out plenty of their own. I’d also like to thank Ben, my Beasts of War editor, for publishing all my ramblings on this site. Lastly, I’d like to thank the folks at our local gaming store here in Fort Lauderdale, Florida, GXE Games, for hosting all our Axis & Allies Miniatures battles.
If you would like to write an article for Beasts of War then please contact me at [email protected].
"Patton famously stunned them with his reply, “I can attack with two divisions in forty-eight hours.”..."
Supported by (Turn Off)
Supported by (Turn Off)
"The Jagdtiger was the heaviest armoured fighting vehicle ever actually committed to combat..."
Supported by (Turn Off)










I would like to thank everyone who reads and enjoys this, but especially thank Oriskany for all the research and writing he put into this. I picked up a lot of new stuff about the Bulge during this anniversary. I got to cross the Jadg Tiger off my “bucket list” of vehicles to play historically. I got to replay units I’ve researched in the past like 17thSS PZGD. many many cool things. I hope you all enjoy. And if I ever need to sum up the speed of a JadgTiger to a layperson…. “eight GALLONS to the MILE”
Oh and I must add: Even without the benefit of cover. I was fun to park my JadgTigers in an open field, screened on both sides by relatively tiny StuG III’s, and trade shots with those M-36 Jacksons. So fun!
Ever since my first set of PanzerBlitz I’ve wanted to play a Jagdtiger at least once. Sadly for that game (representing mechanized combat on the EASTERN Front), it included a Jagdtiger counter even though no Jagdtigers were ever used on the Eastern Front. Then Panzer Leader came out (for the Western Front) . . . yet didn’t include a Jagdtiger. (??) No game is perfect, I suppose. Lots of people have probably used Jagdtigers in their games, but I would wager that far fewer have actually used Jagdtigers in battles where Jagdtigers actually took part. These things were (fortunately) more… Read more »
Heck yeah, once in awhile you just have to play a tournament style – all star – death match with all the top-line late war stuff!!!
That’s what Germany’s true “Last Gamble” is for . . . Lake Balaton, March of 45. Although there are no Jagdtigers there and almost certainly no Sturmtigers, you do get to use all the great late-war Soviet stuff including JS-2s, ISU-152s, and SU-100s. A true clash of the titans! Just for fun we should try some “Patton’s War 1946” silliness one of these days. All the kicka$$ stuff, including “rehabilitated” and remobilized German equipment. American Pershings and Chaffees teaming up with Jagdpanthers and King Tigers, along with British Comets, up against Soviet JS-2s and JS-3s. As you say, just drop… Read more »
Joking aside, I would love to see you do a series of ‘what if?’ articles in the style of this one. Pick a scenario – or perhaps several – and play some of the opening battles…
I’ve wondered for ages why Battlefront aren’t exploring this for Flames of War. I know they haven’t yet published army lists for every single battle that took place, or models for every single unit type, but I’d have thought a counterfactual expansion would be pretty popular. More so than some of the other expansion games they’ve done.
Funny you should mention that, @angelicdespot . In a historical forum thread I’ve been poking around at some M26 Pershings I’ve picked up from Battlefront. So @amphibiousmonster suggested I put them with some M24 Chaffees against some of my late war Soviet armor in a “46 Game.” I was going to do something in Korea (T-34/85s and tons of Chinese infantry against UN tanks, infantry, artillery). But there wasn’t a WHOLE lot of tank vs. tank action in Korea . . . and a “46 WW2.5” scenario might be a little more interesting? At least it would let me lighten… Read more »
Not to knock historical gaming, but there sometimes comes a point where if there’s something you really want to do, and you’re struggling to find a moment in history that ‘allows’ you to do it, I think you need to face up to it… And do it anyway!
Every once in a while you need a break from “hard-core facts.” And after this Bulge project, and a parallel Arab-Israeli Wars themed project, I could certainly use one. 🙂
Another great series of articles thank you for taking the time to write them.
Thanks, and thanks to the Beast of War team for putting them up. 🙂
Outstanding, the whole series was great!
Thanks very much, @vitalis . If I can part with a nasty secret, a very small (and very tired) part of me is about 1% glad it’s over. 😀 Now I can finally get back to building / painting some of my miniatures backlog.
A nice end to the series was that your Xmass prezzie cutting its teeth @oriskany you mention that StuGs were used a lot at the end with armoured units but they were always being used with armour they were designed to go with troops after the Pz IV went to the armour units then they started getting the StuGs instead of the infantry to beef up mangled armour units.
Indeed that was the Jagdtiger from Christmas. I’m not 100% happy with the way the paint came out . . . I might take another swing at it later. Time for a little “Miniatures ER.” 😀 Regarding my example of StGs being pressed into service with 17th SS Panzer Battalion . . . What’s in the caption of the 11th image mentions that the 17th SS Panzer Battalion was, according to my research, made up of StG-III Gs assault guns for the Nordwind operation. This is pretty unusual and would have been unheard of earlier in the war. The original… Read more »
the paint job didn’t look to shabby to me.
Careful photography, my friend. Careful photography. 😀
as is true for most things Lol
There are no such thing as a fair battle in history – they forgot to meet up and point up the battle to be nice and fair 😉
Well said, @rasmus . The trick is building a game that’s still fun for both players, even if the forces are nowhere close to “fair.” I think where I slightly screwed up with Bulge #12 (Nordwind – Rimling) was the source material said: “ELEMENTS” of B Co/749th Tank Battalion and ELEMENTS, A + B Co, 776th Tank Destroyer Battalion . . . then went ahead and included ALL of these units instead of the “elements.”
Of maybe I was just tired of losing all these games. BwahahaHAA!
From a mini’s playing perspective, attacking was WAY more difficult than delaying action defending. Getting sniped by sneaky, tree-hugging Mark IV’s was NOT fun. Also, I thought I was so tricky with my super fast Stuart right hook, but Noooooo, another $%^&* Mark IV in the tree line ruined my day 😉
Thanks for making me look good, again, and increasing my knowledge of history with both the game prep and the articles. Oh, and thank you for giving me the chance to blow up your Jadgtiger!
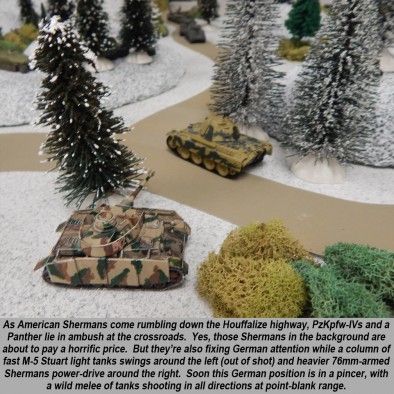
Sometimes I think that’s the real secret of playing defense . . . simply the art of p***ing people off. 😀 Oh, you thought you had an open road to that objective bridge/town/hill whatever? **ZOINK** !! Sorry . . . Allow me a petulant moment to cry about how I SOOOO should have won that game. In Image 07 above we see a column a Shermans rolling down a road in single file in the open . . . into a crossfire of Mark IVs and a Panther . . . My die roll was so bad on that fire… Read more »
O how the dice gods can be so cruel @oriskany is your middle name (Indy) with all of the snake eyes you were getting?
I hate snakes! 😀 Gimme a bullwhip and a few torches!
— Or —
“Why . . . does the floor move?”
“The floor isn’t moving, Sullah. That’s just the crappiest die roll in the history of gaming.”
— Or —
“Wow. That dice roll is uglier than Indy’s girlfriend.”
“Awwww! Booooo! Bad joke, son! Bad joke!”
Lol
I said zero bad die rolls, that’s five bad die rolls! Can’t you count!?!
Awesome series, thank you very much for the time and effort you put into this, I thoroughly enjoyed reading it..;)
Thanks very much!
Another great series of articles, @oriskany – you really are Bow’s resident five star general of historical wargaming. There are all kinds of fascinating historical facts and pieces of tactical analysis in these articles that I found highly enjoyable, and I look forward to more such articles in the future.
Thanks, @vetruviangeek . Although to be fair, this is mostly a 20th Century thing. I’m conversant in other periods of military history, but once you start winding the clock back a little further you enter the area of expertise of guys like @redben, @huscarle, and others (panzerkaput, brennon, etc.)
I don’t mean to take anything away from the other officionados of historical wargaming on the site. I once had a great conversation with @redben and others including Romain about just how egregiously Hollywood tends to mangle history, with movies like 300 and Braveheart coming under entirely justified fire;l the depiction of Xercese and the Persion Empire was, to put it very mildy indeed, problematic in both 300 movies, and as for Braveheart – that title was never held by William Wallace at all, but was actually applied postumously to Robert the Bruce when what was literally believed to be… Read more »
Oh dear God in heaven . . . let me not get started on this topic, we should open a forum thread for it. Suffice it to say that I 100% agree, if anything I’m even more of a ******* when it comes to bad history in movies. That’s just the surface of what’s wrong with all these movies, and hundreds more . . . Some friends of mine won’t even watch these kinds of movies with me because they’re tired of me yelling and throwing things at the screen. 🙂
I definitely know the feeling. Sometimes you watch a ‘historical’ movie and it is an almost physically painful experience due to the gross liberties taken and the hatchet job done on the chronology. Mel Gibson is a serial offender too, adding the ahistorical abomination that was The Patriot and the anti-semetic right wing propoganda exercise of the Passion of the Christ to the crime against Scots and broader UK history that was Braveheart. Objects may not have been thrown at screens, but I certainly felt like it at times.
I guess movies just aren’t the right “medium” for real history, for much the same reason as “the book is always better than the movie.” Movies are just too short, too simplistic, and have to cater to too large of a demographic (to make them commercially viable) in order to really do that kind of thing justice. Then again, there are movies like the Randall Wallace disasters you mention (Braveheart, Patriot, I will add Pearl Harbor) where they don’t even try . . . especially Braveheart and Patriot where the lies (yes, LIES, not omissions or mistakes or oversimplifications, but… Read more »
I do it with (politicians on the news) and quiz shows as well, glad to see I,am not the only one. Lol
Oh man, @zorg . I can’t even watch the news or politicians anymore. I have to get all my news from comedy shows like the Daily Show or Bill Maher. If I watch it straight I will choke, I need “comedy sweets” to make it go down easier. 😀 But no, you’re not the only one.
Now, on defence, I’d take StuG IIIs, Hetzers, PzJgIV/70s, etc all day long. But attacking with those things? Those poor Germans.
Right, StG-IIIs, Hetzers, and PzJg IV/70s were designed and built for defense. The split-move-and-fire rule in Panzer Leader (and excluding it from turretless AFVs like these) is one of the great things about that game. One simple little rule like that, and presto, the game naturally “behaves” in such a way that reflects tactical realities of the day. Another great thing about that game (and historical gaming in general) is that you often have the wrong tools for the job at hand. The commanders on the scene had a mission, and had those forces on hand. “Make it work .… Read more »
That is something that all types of wargame can benefit from, if handled properly. The odds are against having exactly the troops and equipment you need to do the task at hand during the chaos of any ongoing campaign, so you have to make do with what is on hand and think around the problem. It certainly throws a spanner into the works of min/maxers and other types of power-gamer. As someone who is not particulalry a historical wargamer, but more a generalist, I will now of course do what all of us non-historical wargamers do – shamelessly steal good… Read more »
@vetruviangeek – “. . . As someone who is not particularly a historical wargamer . . .” Yeah, I’ll admit seeing you on this thread was a pleasant surprise. 🙂 Welcome to the Dark Side. And I’ll admit that “asymetrical game balance” can be tough in games. In historical games, we have the one great crutch that . . . HEY, this stuff really HAS happened before, we have loads of empirical data to draw on – against which we can measure the validity of our game systems and tabletop results. 🙂 Sci-fi, however, doesn’t have usually this for obvious… Read more »
I definitely feel the allure of historical wargaming. The scope and complexity of the engagements, the potential for incredible levels of geekery facilitated by research into the appropriate historical periods, the chance to re-enact actual historical tactics and gambits and see if they work as well in the rules system, even the opportunity to see how well you fair when faced by historical tactical and strategic challenges. One must be careful, though – go too far down that path and you will wind up part of historical re-enactment group, sacrificing your weekends to done period garb (Confederates and Yankees for… Read more »
Since this is the Dark Side, when do I get my cookie? And my red lightsabre… 😉
Be careful of becoming a historical gamer, @vetruviangeek . It’s a dark, lonely road. People always yawn at you, call you “rivet counter” or “button counter,” and preface every question with “please don’t put me to sleep . . .” 😀 Many historical gamers are gamers first, who found some history in the course of gaming. I’m sort of the opposite. I found gaming through history. Even when I do sci-fi (fantasy or PHW aren’t usually my cup of tea), it’s “pseudo-historical” . . . i.e., the history of the movie or books being recreated in the game. Absolutely nothing… Read more »
On the side, Oriskany and I are currently playtesting a future “hypertech” war game, with rule “subsections” cobbled from a few different systems.
And, as mentioned, the only thing to do is test test test. We’ve got a few different Army “styles” and have pitted smaller elite forces against large lumbering ones a few times. Soon will be trying two larger but lower grade units against eachother. And we may put two small elite units against each other. It’s really the only way to work the kinks out.
I ramble
Sound very interesting, @amphibiousmonster. Can you or @oriskany elaborate any further, or is everything still entirely under wraps?
If there is anything I can do to help, please let me know. I would be more than happy to contribute in any way I can.
Definitely under wraps, although I can say it draws heavily from FASA’s old “Renegade Legion” game: Centurion (far-future ground combat, think Battletech with grav tanks instead of mechs).
Anyway, definitely a “home dining room” project, not the next “Infinity.” 😀
If you made the next Infinity, I would buy it in a New York minute. Seriously, after what you demonstrated you could do with the Star Wars PocketModels tactical system, I have absolute confidence that if you wanted to write your own commercial wargaming system you definitely could, and people like me would be lining up to throw money in your general direction to get their hands on it in short order. Yor profile on BoW would even conveniently afford you your initial core market. I am sure that Warren & Co could be persuaded to offer a little help… Read more »
Wow, that’s a helluva vote of confidence, @vetruviangeek . In all seriousness, though, I’ve sent a complete rules set to BoW for that Star Wars tactical game (artwork and everything), and they say they want to publish it – mentioned prominently on an old Weekender . . . http://www.beastsofwar.com/the-weekender/weekender-win-wild-west-exodus-starter-set/ (time code 53:10) . . . but so far they haven’t published. To be fair, there COULD be copyright issues, not only with Lucasfilm / LucasArts / Disney . . . but also WizKids / Topps from the PocketModels perspective and maybe even Bolt Action for some of the rules I… Read more »
That is good to hear @oriskany, I look forward to seeing how things progress on that front.
And I have so much confidence in you because I firmly believe you deserve it.
**** Health warning – the absolute confidence of one’s peers has been known to result in ego driven spontaneous cranuim enlargement syndrome (EDSCES). Specially modified doorways may be required by sufferers***
😉
Thanks for the support as always, @vetruviangeek , and also the EDSES warning. 🙂 Fortunately, I get kicked around enough in “real life” where this danger is alleviated. There’s also the 75% of Beasts of War content about which I know very little or nothing at all to hopefully keep the progression of this admittedly deadly disease in check.
If symptoms start to present themselves, however, I hope the BoW community will provide a little friendly diagnosis before the condition becomes irreversible. 😀
Yeah, nothing ever to be exported. I just like playing around with the idea of mechs vs “conventional” vehicles.
I was into Rifts WAAAY back and they put up some cool wheeled, tracked and hovering vehicles to compliment all their great mech artwork.
Fair enough. Enjoy. 🙂
Someone tried to “commission” me to make a Rifts command-tactical wargame . . . (in the vein of Panzer Leader) but there were so many supernatural elements to it (and the guy was a little flighty), so nothing much ever came of it.
A pity – I would have liked to have seen that. Still, that is often the way things go. Lots of people have all kinds of nebulous ideas, but baulk at the realisation that the old truism is correct; and success in almost any walk of life is 1% inspiration, 99% perspiration.
Test Comment Good
Test Comment Bad
Test Comment King
Test Comment Really Bad
???
Website revision testing, @zorg , evidently. 🙂
O.K.
What a grand end to a great series – thanks so much for doing this and taking the time to write it all up! I’d be interested to know what was happening on the Eastern Front at the time, and whether or not the two fronts were impacting upon each other. Did ‘Watch on the Rhine’ enable the Soviets to smash through? Or were the Germans launching an offensive in the east at the same time as the west? That sort of thing. I suppose despite the horror of the fighting, there was never any serious chance of these battles… Read more »
In very broad terms, the Eastern Front was more or less “at rest” in December 1944. On June 22, 1944, the Soviets had opened their gigantic “Bagration” Offensive which eventually carried through into Romania, Galacia, most of Poland, into East Prussia, and more or less re-conquered the Baltic States (exception – the Courland Pocket). This (and the rest of their “Year of Ten Blows” offensives) took the rest of the summer. The Soviets paused here momentarily, long enough for the Polish Resistance which rose in Warsaw to be crushed by the Germans (July-August 44). Stalin didn’t want this faction of… Read more »
Interesting that after waiting years for the Western allies to fullfill their promise to open up a second front in Western Europe, Stalin was able and willing to help out when the Western allies asked for it rather than leaving them to stew!
That’s true, @angelicdespot . Granted, STAVKA only pulled up their January attack by like two weeks, and we can rest assured that the Soviets were also keen on hitting the Germans while many of their best divisions were embroiled to the west . . . and getting the rest of Poland and their slice of Germany while the getting was good. So it wasn’t JUST “Allied cooperation.” But overall, yes. It’s also interesting that Bagration (largest single offensive of the war) was also timed roughly to coincide with and lend support to the much smaller Overlord offensive in Normandy. Both… Read more »
Interesting… It’s funny what an impact something as simple as an anniversary can have. There’s no military difference between one day and the next, but a propaganda impact it mush have had!