Home › Forums › 3D Printing for Tabletop Gaming › Help please!
This topic contains 16 replies, has 6 voices, and was last updated by ![]() redvers 4 years, 7 months ago.
redvers 4 years, 7 months ago.
-
AuthorPosts
-
April 24, 2020 at 8:55 pm #1517439
I need some basic help on 3D printing, so hopefully some experienced soul here can give me some guidance – please?
This is a completely new area for me and I don’t have a 3d printer. I’ve been tinkering with a terrain project and need some buildings but I’ve not found anything available to buy that really meets my needs. So I’m thinking of designing the buildings I need in FreeCad and then getting them printed somewhere….
I think I can use FreeCad to create what I want but I need some help on the printing side. Firstly, I’m looking at creating 15mm scale buildings for Flames of War, so I’m thinking of making the walls 2mm thick. The buildings need to be able to take the models inside but I won’t be bothering with internal detail.
Is 2mm too thin for 3D printing? Can all types of printer handle this or just certain types (resin, PLA etc?)??
Is there a practical limit to how thin you can print? I have started a design where the door is 0.7mm thick – will this work on all printers?
Once I’ve designed my building(s), can anyone recommend an online printer service that’s cheap and reasonable so that I can test out the design?
Thanks in advance!
April 24, 2020 at 9:52 pm #1517483firstly there are two main types of printer with different ‘rules’
FDM for big terrain projects, generally cheaper to run with PLA etc but the detail is harder to achieve
SLA (resin) is great for small detail, for example minis or small scale terrain, but is generally more expensive to run due to faff and material costs.
The ‘standard’ (average) nozzle size on FDM is 0.4mm and its normal to want to have double thickness walls so really you’ll want to have 0.8mm thick walls as a minimum on your model (note, I’ve used walls to describe 2 types of wall*). FDM can work perfectly well for 15mm terrain but you’ll have telltale ‘lines’ on your prints from the process of extruding plastic layer by layer. makes it cheaper to make loads but SLA will always be much more detailed.
let me know if you need something testing, Im sure I can run one out for you. I have both FDM and SLA.
*first wall = thickness of the outer layers of a print before getting to the hidden infill area.
*second wall = wall on a building in real life, aka the wall of the building on your model
April 24, 2020 at 11:54 pm #1517580surely those ‘lines’ can be fixed with greenstuff or something similar ?
I also wonder how ‘visible’ those lines are on a 15mm scale building when you’re at standard ‘table distance’.
//
@redvers I think you’ll need to design using multiples of whatever nozzle-thickness your target printer has.
If it has a 0.4 mm nozzle then you either have to do a 0.4 mm wall or a 0.8 mm wall, because you can’t do 0.5mm (unless you add that extra 0.1 mm or find a way to remove excess material (either method means more work … ).You could also start by modifying an existing design or use that as a template for your own.
April 25, 2020 at 7:55 am #1517655The layer lines are a pain in FDM, especially on large, plain surfaces.
I’ve found the best way to deal with them is to prime the model with a car filler primer, as this helps smooth the surface. But then you usually need to give up your afternoon to sanding, to knock it back so it only remains in gaps between layers.
If you print with ABS (which is more difficult and less forgiving than PLA) you can use acetone vapour (literally stand the model over a bath of acetone) and it will ever-so-slightly melt the surface, creating a smoother appearance and hiding a lot of the layer lines.
Both techniques do result in a loss of “crispness” of detail though. I’ve found cleaning up FDM prints to be a lot of work, if you want a nice, clean finish. If you’re happy to live with layer lines (or your model is super-busy so they get lost on the surface) then FDM printing terrain is great fun!
Even at arms length, layer lines are usually visible because drybrushing picks them out and makes them pop!
April 25, 2020 at 10:32 am #1517700Not sure about the design aspect but I am planning to use these guys to print stuff to play FoW
April 25, 2020 at 10:44 am #1517707@noyjatat they’re great models I bought loads of them about 10 years ago, you’ll be very happy with them, check out his pegasus bridge
April 25, 2020 at 1:34 pm #1517883Thanks everyone for taking time to answer my questions, really appreciated. 🙂
@collins and @limburger just to make sure I’m understanding you, if the printer is an FDM printer and a using a 0.4mm nozzle, the thicknesses have to be a multiple of 0.4mm? So I assume a thickness of 0.8mm is manageable but would a 1mm thick wall be possible? Or would you need to go to 1.2mm? Is there a size where this doesn’t become an issue and you don’t have to worry about multiples of the nozzle size?
And thanks for offering to print the file once I’ve completed, I’ll try and post it up here if I can once it is ready.
Is there a standard x,y,z size that I can’t design beyond as it won’t fit on the ‘standard’ 3d printer? One of the buildings I’m thinking of designing is a church, which is going to be fairly large. Knowing this will allow me to break the model down into smaller parts.
@blinky465 I’ve heard about this ‘layering’ but having not had a 3d print before, I’ve not seen it myself. I’m hoping that at 15mm, it won’t be too noticeable and if need be, I can apply a thin, watered down layer of polyfilla and gently sand it down once dry.
@noyjatat I did stumble across those files, but thanks for reminding me. They do look lovely. I’m looking for Italian buildings as most of my FoW stuff is based around the Italian campaign. I’ve yet to see anyone make Italian buildings at 15mm. I’ve found some Mediterranean style, but it just doesn’t quite fit. I’m thinking Tuscany hill village. I started off by designing files for a laser cutter to make MDF buildings but to get them made is going to be very expensive. So I thought I’d try 3d printing as another option that might allow more detail than MDF…. I’ll fire up a project at some point on the terrain build
April 25, 2020 at 1:53 pm #1517893@redvers yep, multiples of the nozzle width/material thickness.
I think some printers have optional nozzles of a different size, but I am not sure what ‘standards’ are used.There doesn’t appear to be such a thing as a ‘standard’ 3D printer size, because unlike 2D printers (where most use A4 or Letter size) there isn’t a standard volume.
You can probably estimate a maximum size by looking at the top 10 popular 3D printers and using the smallest print volume of those.
https://rigid.ink/blogs/news/what-3d-printer-nozzle-size-should-i-use-the-pros-and-cons
April 25, 2020 at 2:53 pm #1517929After I first assembled my Tronxy and set it printing, using some cheapo- left-over filament I had lying around, the result was a little like this:
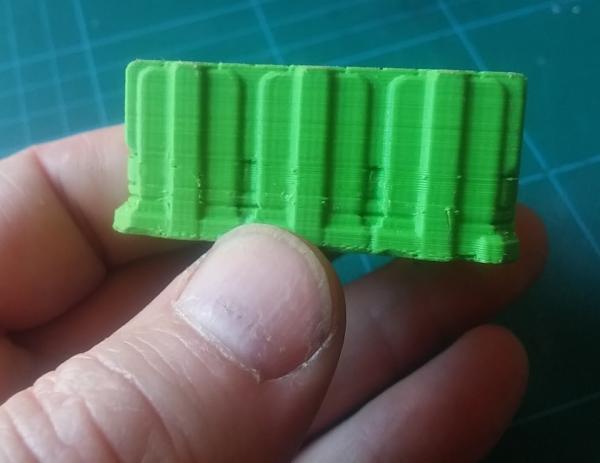
Note the banding and “zits” on the print. This is because a) the filament was old (and probably not perfectly dry) and b) the printer hadn’t been perfectly set up, I just went with the default settings and hit print.
After spending some time with the guys at rigid.ink (sadly no longer trading in filament) I got my machine “dialled in” for their filament – it ran slightly hotter (230 degC I think instead of 190-220) and I had to change my extrusion settings (109% for perfect adhesion) and the results were like this:
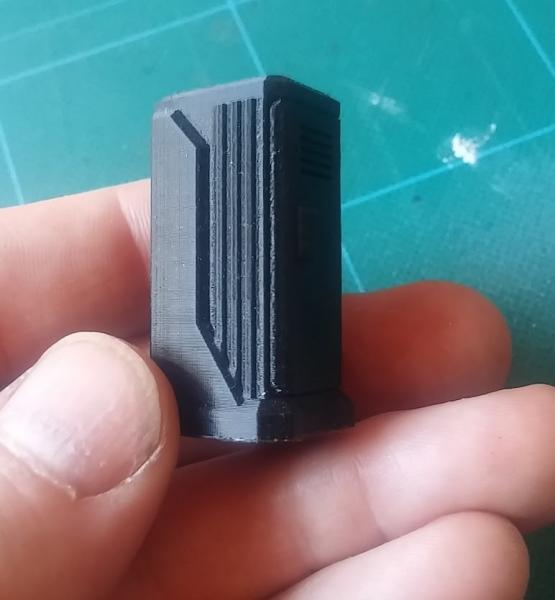
(yes I know it’s a different colour, but you should get the idea!)
The horizontal layer lines are far less pronounced and there’s none of that nasty “zitting” (the corner edge only looks rough in the photo because of the poor light I took it in – in real life, it actually very smooth). But you can still see visible layer lines, even on a highly tuned machine, using (relatively) expensive filament.
That said, it worked for me; I printed about five of these. Two I just painted and drybrushed – the layer lines were definitely visible (but not too distracting). On the other three, I used a car filler-primer, then sanded the flat sides down; layer lines were gone completely, but I also lost a little bit of the sharpness on the details.
In short, getting your machine “dialled in” for your filament is crucial to get the best results. But you may be happy with not-the-absolute-best-but-good-enough. Quality of filament is massively variable and makes a massive difference to the final print finish. Don’t skimp – cheap filament is almost always a pain in the arse to work with and often creates “zits” (where moisture in the filament expands and pops as it goes through the nozzle) or dimples (where the filament isn’t a perfectly constant thickness along its length, so thinner and thicker sections print differently).
April 25, 2020 at 2:58 pm #1517931That said, I still got a perfectly serviceable corner sofa and locker to use as scatter terrain at 28mm, even when my printer was far from perfectly tuned.
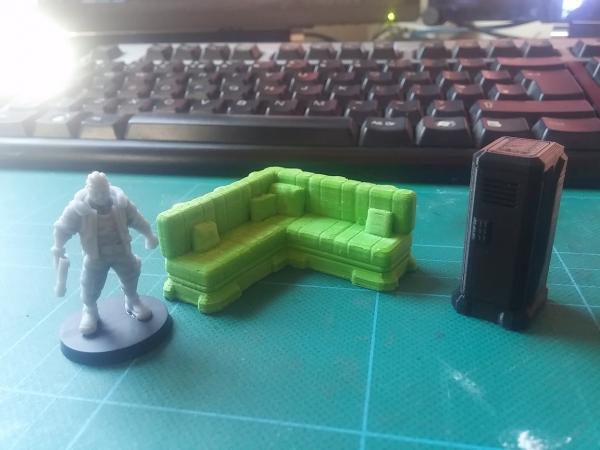
(I’ve since re-printed these pieces as hollow resin and the finish is much nicer though!)
April 26, 2020 at 10:58 pm #1518591Thanks @limburger and @blinky465. I’m using your guidance to create a basic design for a house. I’ve just about finished the design for the ground floor 🙂
April 29, 2020 at 7:14 pm #1520312Hello again.
I’ve been messing around in FreeCad and have now come up with a fairly rudimentary building that I think should work, just to test some of my design thinking. The building is a ground floor, first floor and roof currently in separate files. It should be possible to print all three sections in one print, as each section’s footprint is 60mm by 40mm. Would this mean that all three files would need to be combined into a single STL file for this? Or is it possible to combine STL files in the Slicing(?) software prior to printing?
And would any kind soul like to cast their eye over the STL files to see if I’ve gone horribly wrong anywhere?
As I don’t have a 3d printer and I’m not likely to get one soon, are there any online printing services that anyone could recommend?
April 29, 2020 at 9:55 pm #1520394Maybe ask around at a local hackspace? They usually have 3d printers you can use for a reasonable price/free.
You *can* print multiple sections on top of each other, but you need to be careful that residual heat doesn’t cause them all to fuse together during printing! (like those chainmail models, in theory they print as a single piece and “just work” but very often you find supposedly free pieces fuse together).
If you’re not sure about the quality of your .stl files, there’s the online service from Autocad called netfabb (I think it’s integrated into the prusa slicer but I’m not sure). Just create an autodesk account, sign in to netfabb and upload your design – it’ll find any “non-manifold” sections and try to correct any non-joining sections or pieces with tiny gaps in them.
I try to run my models through netfabb before printing, it solves a lot of slicing problems!
April 30, 2020 at 5:34 pm #1520732Thanks for the advice – the netfabb solution was easy! 🙂
Now to get it printed out to see if it works.
May 14, 2020 at 4:48 pm #1526345Just wanted to come back and say thanks for everyone’s input here. With your help, I was able to design and get printed a couple of test pieces to see if my thinking was along the right lines. I also stumbled across Treatstock, an online market place where you can upload designs and get prices for them to be printed. I didn’t think that the prices were too bad and much cheaper than buying my own printer 🙂
My first effort was a ‘flat pack’ building with floor and walls designed separately and then glued together. This seemed to work if albeit a little rough and ready looking
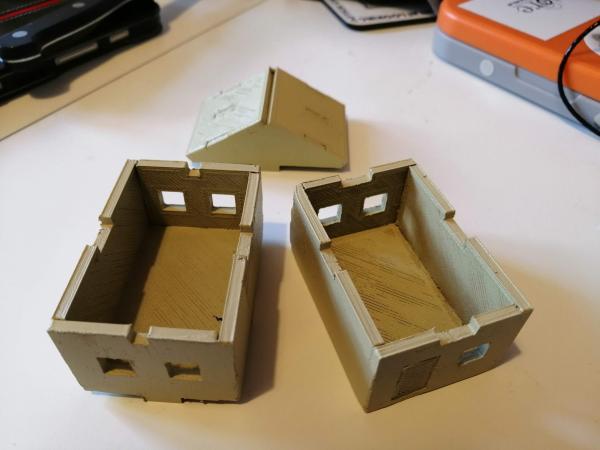
Thinking that taking this approach meant that I was not really utilising the benefits of 3d printing, I downloaded FreeCad and taught myself the basics and went for something a little more complex, again to test out how I could make this modular and how small I could realistically get detail to print. I ended up with this:
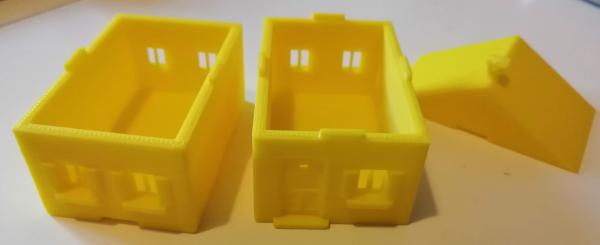
It has a couple of small issues. The linking slots are a little tight and need a file. The door detail didn’t quite work out and I need to leave some more space so that the detail is visible. And the chimney is probably a fraction too small to print correctly. But otherwise, I think this is going to be the solution to create a unique village from Tuscany for my Flames of War.
Here’s the two attempts and I’ll definitely be ditching the flat pack option.
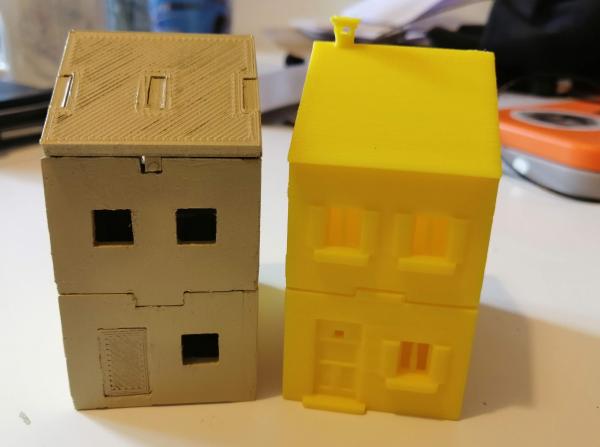
I appreciate that you all work on far more detailed prints than this but to say thanks for your help, if you do want to print your own Italian buildings, I’m more than happy to share the STL files for this and the more detailed designs that I have planned. I’ll fire up a project to cover the progress!
-
AuthorPosts
You must be logged in to reply to this topic.


