


![How To Paint Moonstone’s Nanny | Goblin King Games [7 Days Early Access]](https://images.beastsofwar.com/2024/12/3CU-Gobin-King-Games-Moonstone-Shades-Nanny-coverimage-225-127.jpg)


Oriskany's Final Days of the Great War - Australians + British tanks vs. Germans at Hamel


Australians vs. Germans at Hamel, 1918 (Part 03)
Okay, I was finally able to finish this game of Valor & Victory “1918 Edition” – depicting part of the Australian assault on Hamel (4 July 1918).
As discussed in Part One of our recent article series, this battle was especially important because it field-tested new combinations of diversion, close coordination between tanks and assault infantry, shorter and sharper “surprise” artillery barrages meant to suppress and stun rather than destroy, and more flexible utilization of support assets allowing better tactical exploitation of initial breakthroughs into operational depth.
In short, the Australians under General Sir John Monash decided to ditch long artillery barrages that really only served to warn the Germans of where the Allies intended to attack, rely instead of misdirection shock, and surprise, and keep the tanks and infantry much closer together in order to ptovide mutual support.
We’ve already gone over the scenario set up in previous posts on this project, as well as some of the special rules we’ll be using to attempt to recreate this “Monash Doctrine” – as well as retrofitting Valor & Victory AFV rules into new Mark V “male” and “female” tanks for use in 1918 Great War games.
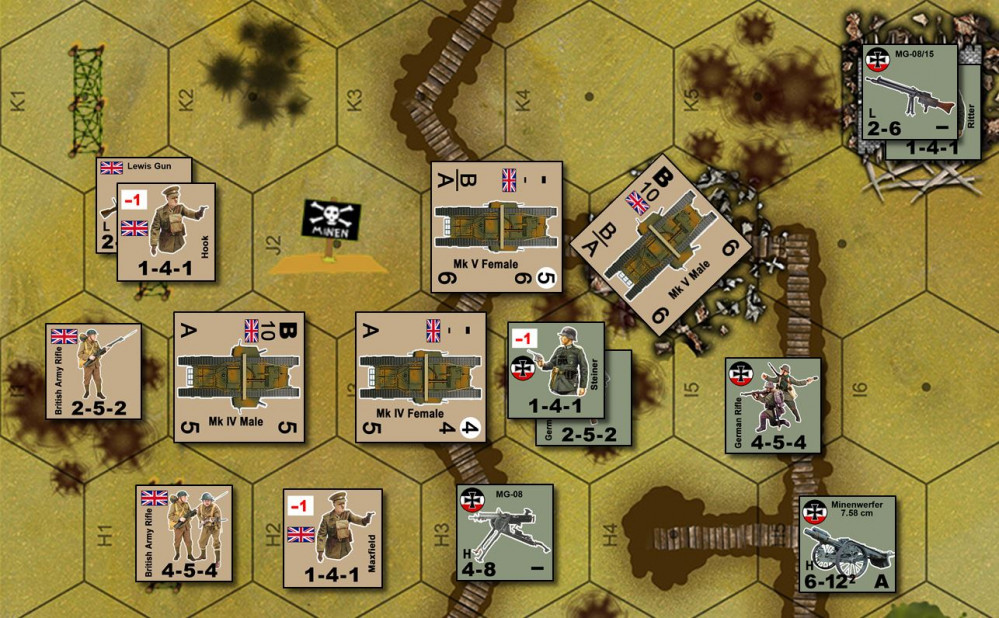
So far we’ve seen the Australians make their initial assault across no man’s land toward the primary line of German trenches – making the best use of tanks as mobile cover, as well as craters. They took a little extra time in avoiding minefields, and used the advance and assault phase of their turn to pick their way through German barbed wire.
Of course this gave the Germans additional time to hit them with MG fire, but so far this has been surprisingly light. What hasn’t been light, however, is German mortar fire, which has been murderous. But now the British tanks are close enough to start laying down suppressive fire, and the massive wave of off-board artillery is about to hit the German line just before the Australians reach the trench line.
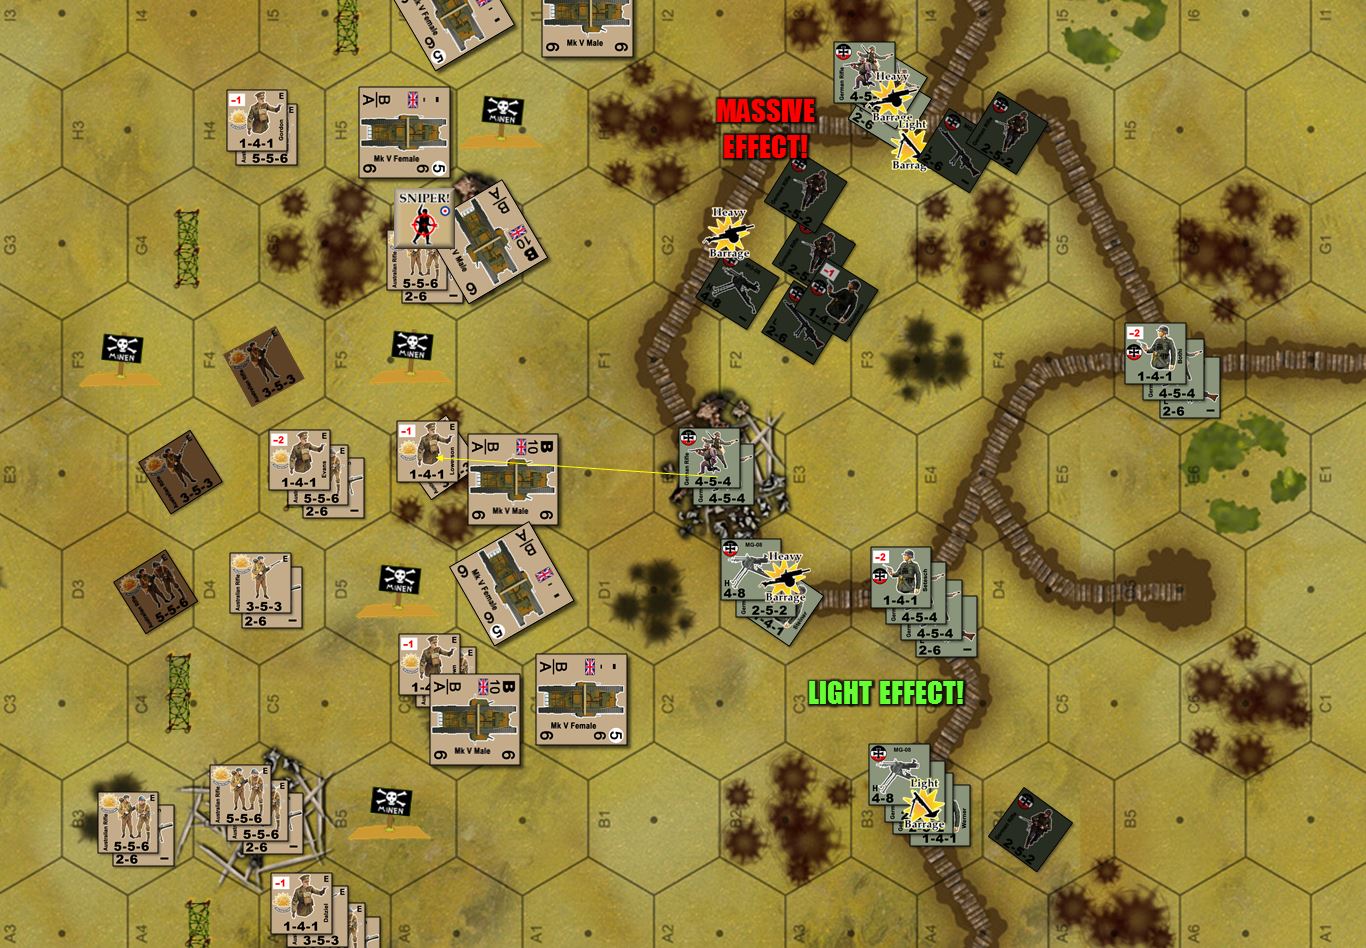
So this image shows the Australians’ 10 light and 5 heavy artillery barrages, scheduled to hit in the Command Phase of their Turn 2. They’re using 1918 “drift” rules, however, and so they’re not terribly accurate by World War II standards. The final locations of the artillery barrages are shown, you can see where only a few of them have actually landed on their targets.
In fact, two mortar barrages have almost hit British tanks!

Even those barrages that hit their targets haven’t always done the best damage, especially in the southern part of the line. However, one barrage in the center has really hit home. Note the darkened German units set off on an angle, these represent units eliminated by the artillery.
Units that are set at an angle but still “illuminated” are not eliminated, but pinned, and thus unable to use opportunity or defensive fire against Australian infantry sections as they continue their advance toward the German trench line.
With off-board artillery resolved (and somewhat disappointing except that one really powerful smash in the German center), we move on to Australian / British direct fire phase. In general, the rule in Valor & Victory is that you can move or fire, not both in a single turn. So these British Royal Tank Corps Mark Vs along the southern part of the line all fire at German targets.
But they roll very badly, the Germans making the best of their +2 cover bonus afforded them by their trenches. Only a few additional German units are pinned or eliminated.
After firing, all units then get to move one hex in the “Assault and Advance” phase, the tanks crawling forward just a little.
A quick word about these tanks … the “male” tanks are armed with two 6-pound guns in side-mounted sponsons, along with a handful of machine guns. The “female” tanks have no cannon, but are armed instead with many more machine guns.
Historically, the general idea was to send these tanks into assaults mixed in pairs (hence the “male” and “female” metaphor). The MG-armed female tanks would suppress enemy infantry and gun crews while the cannon-armed males would shell enemy bunkers, gun positions, strongpoints, and buildings.
This actually works out great in Valor & Victory – since, when tanks are close assaulted by enemy infantry, they can fight back only with MGs, cannons cannot be used against enemy infantry crawling right up on your tank’s hull. This makes “males” very vulnerable to enemy close assault, unless they have females alongside to cover for them. Females are also better at engaging targets in multiple directions, as these MGs are mounted all over the tank’s hull (none of these tanks have a turret).
Conversely, armed only with MGs, the females cannot engage enemy targets past a certain range (cannons in Valor & Victory have unlimited range at least on the relatively small battle areas depicted on the map boards), and only males can engage fortified or armored targets.
Male or female, though, at least so far these tanks aren’t doing very well at all.

Further north, however, one MArk V male does much better, landing 6-pounder shells and Hotchkiss .303 machine gun ammo right into the German trench to devastating effect.

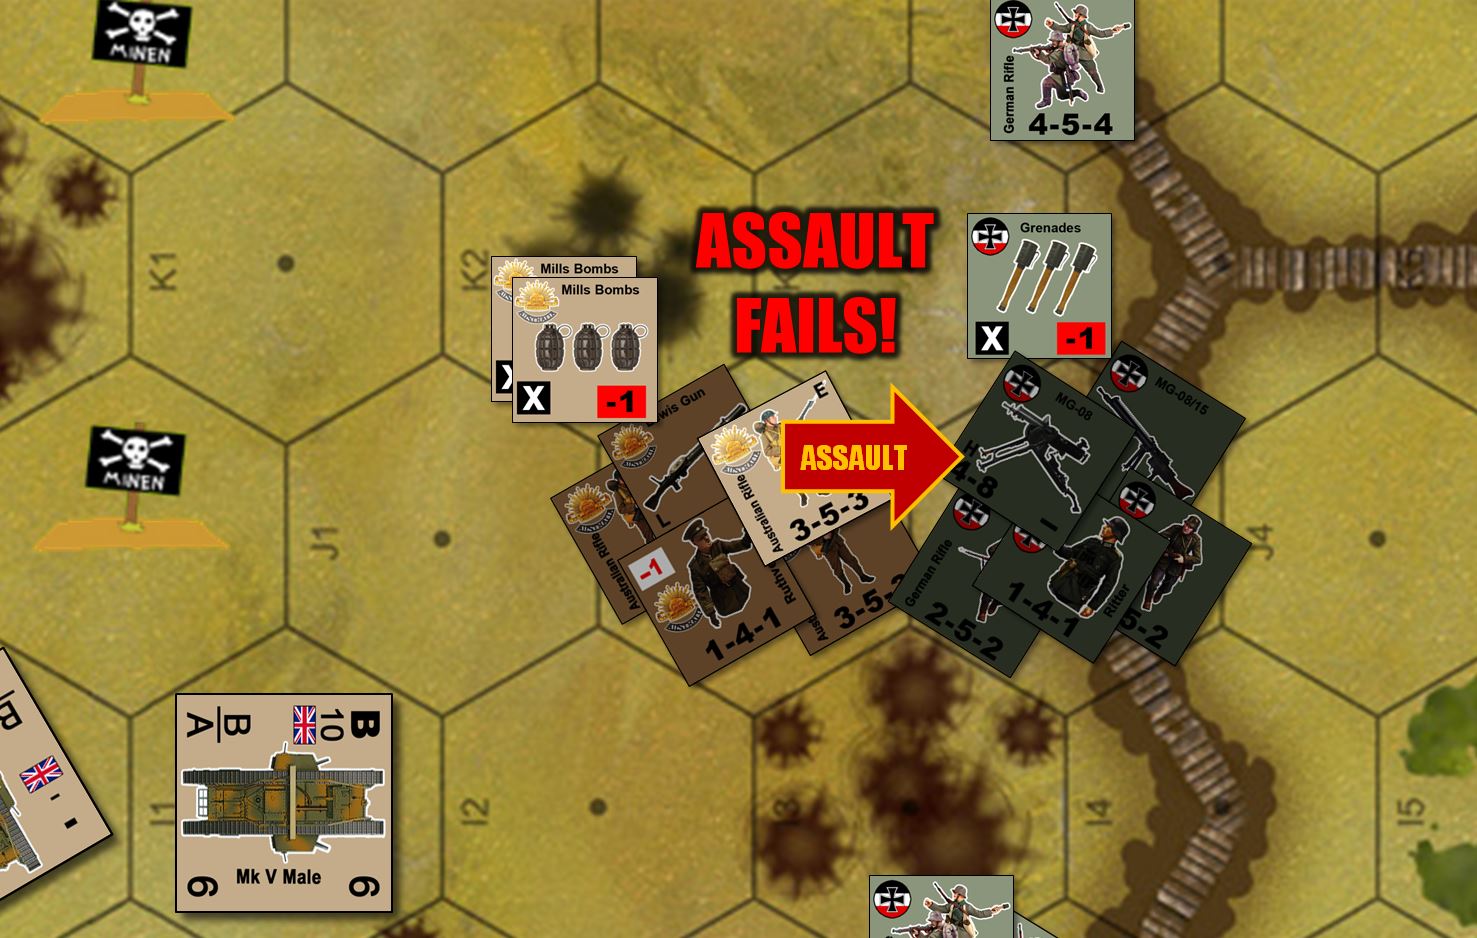
With the artillery and tanks doing all they can, we’re finally onto Australian movement phase. Eager to get out of no-man’s land, they have decided not to fire, instead retaining their movement phase for fast advance the rest of the way to the German trenches for a series of close assaults.
The first Australian assault however, actually fails. Even against this gravely weakened German platoon position (an MG 08 and crew, a half squad that includes an MG 08 15 LMG, and an officer -Leutnant Ritter), the Australians take serious casualties to point-blank German opportunity fire, which weakens their assault to the point that very bad dice rolls actually causes the assault to fail.
Failed assaults in Valor & Victory is something you never want to see. The casualty points you have to pay = the number of non-pinned enemy units in the target hex + terrain bonus (2 for trench) + the margin by which you failed the roll. The Germans, however, must also sustain casualty points = the number of enemy units that just assaulted them, and this was the hex already badly blooded by that Mark V tank fire.
So by way of grim default, the Germans have basically run out of men in this hex anyway. But because the Australian assault technically failed, those few survivors do not get to occupy the German hex, thus leaving the survivors pinned down in the open just in front of the German trench.
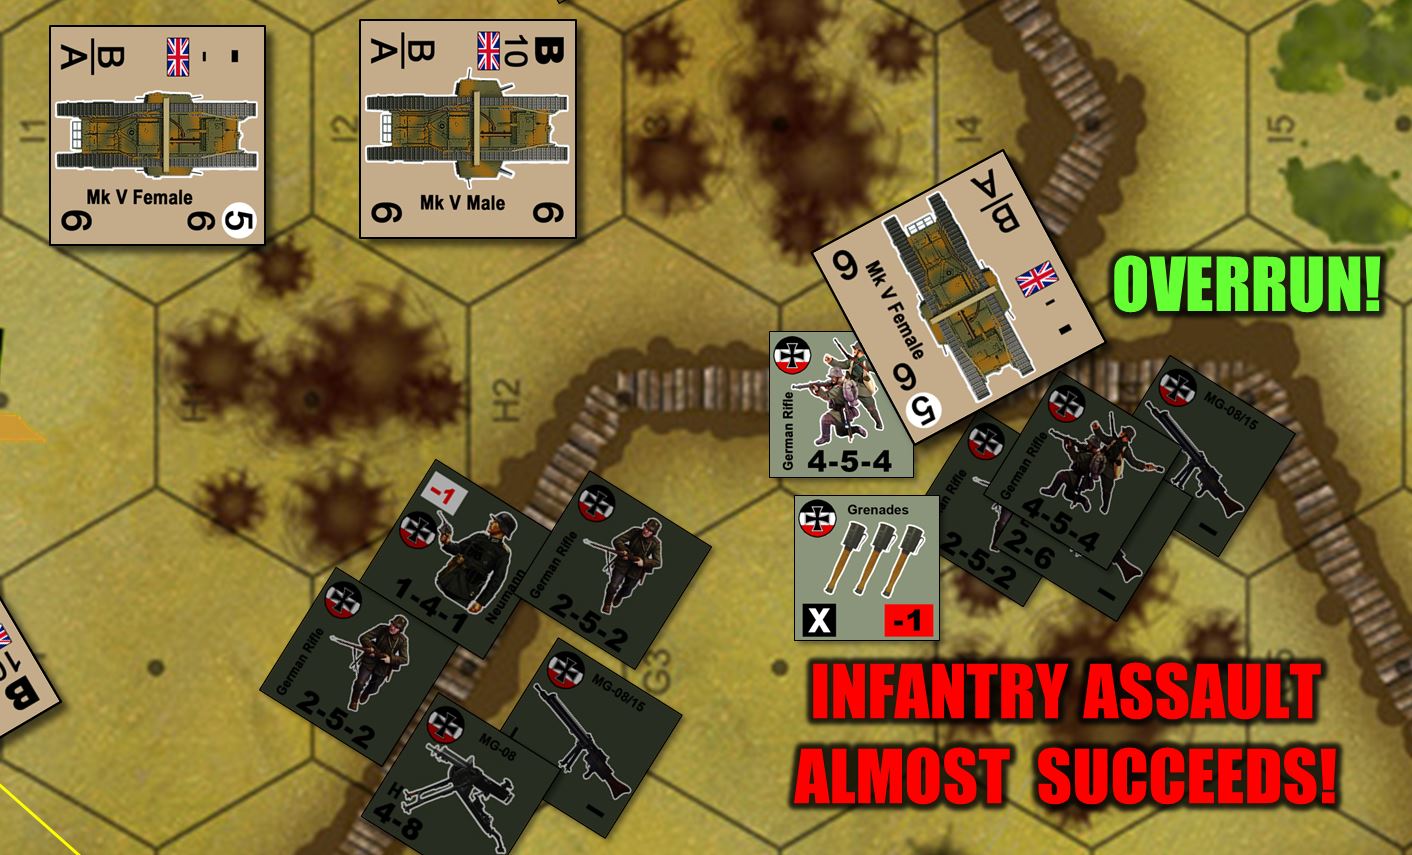
Things go a little better for the Australians in the center, where one Mark V “female” tank that did not have a target earlier (and so did not fire, thus leaving her eligible to move) instead overruns the German trench. Tank overruns are terribly nasty, although again they can’t use their cannons point-blank against enemy infantry in the same hex.
Good thing “females” don’t have cannons, those weapons mounts instead taken by more machine guns, which are doubled in overrun attacks.
In short, this makes “female” tanks absolute monsters in overrun attacks, as these Germans learn to their dismay. They do get the opportunity for a close assault on the tank as it comes in, and it almost succeeds (which would have blown up our first tank of the game). But the British catch a break and the Germans just miss their roll. The overrun goes in and wipes out this German position, finally putting the first real crack in the German trench line.


Leave a Reply