


![How To Paint Moonstone’s Nanny | Goblin King Games [7 Days Early Access]](https://images.beastsofwar.com/2024/12/3CU-Gobin-King-Games-Moonstone-Shades-Nanny-coverimage-225-127.jpg)


Hürtgen Forest - Game Video


Battle Report - Australians v. VC
Apologies to everyone – I’ve way behind in battle reports. Real fast, here is the recap for the Valor & Victory: Vietnam game played between myself and Elessar2590 last weekend, with Elessar playing Australians on defense (2 companies, “A”CO, 7th RAR, ATF) vs. attacking guerrillas of my 274th Main Force Regiment, National Liberation Front (Viet Cong).
Phuoc Tuy Province, South Vietnam, January 1968)
Obviously, the Australians have a ridiculous advantage in firepower, but my victory conditions are much easier. For instance, I get 10 points for each objective hex I take (he gets none or anything he holds). Also, he gets only 1 victory point for each casulaty inflicted on me, while I get 3 points for each casualty I inflict (knocked out officer, medic, or fireteam), make that 6 points if Elessar doesn’t manage to evacuate that casualty. He also can’t fire into civilian hexes, and if any casualties are killed by his incidental fire, that’s 6 more victory points for me.
So let’s see how this goes …
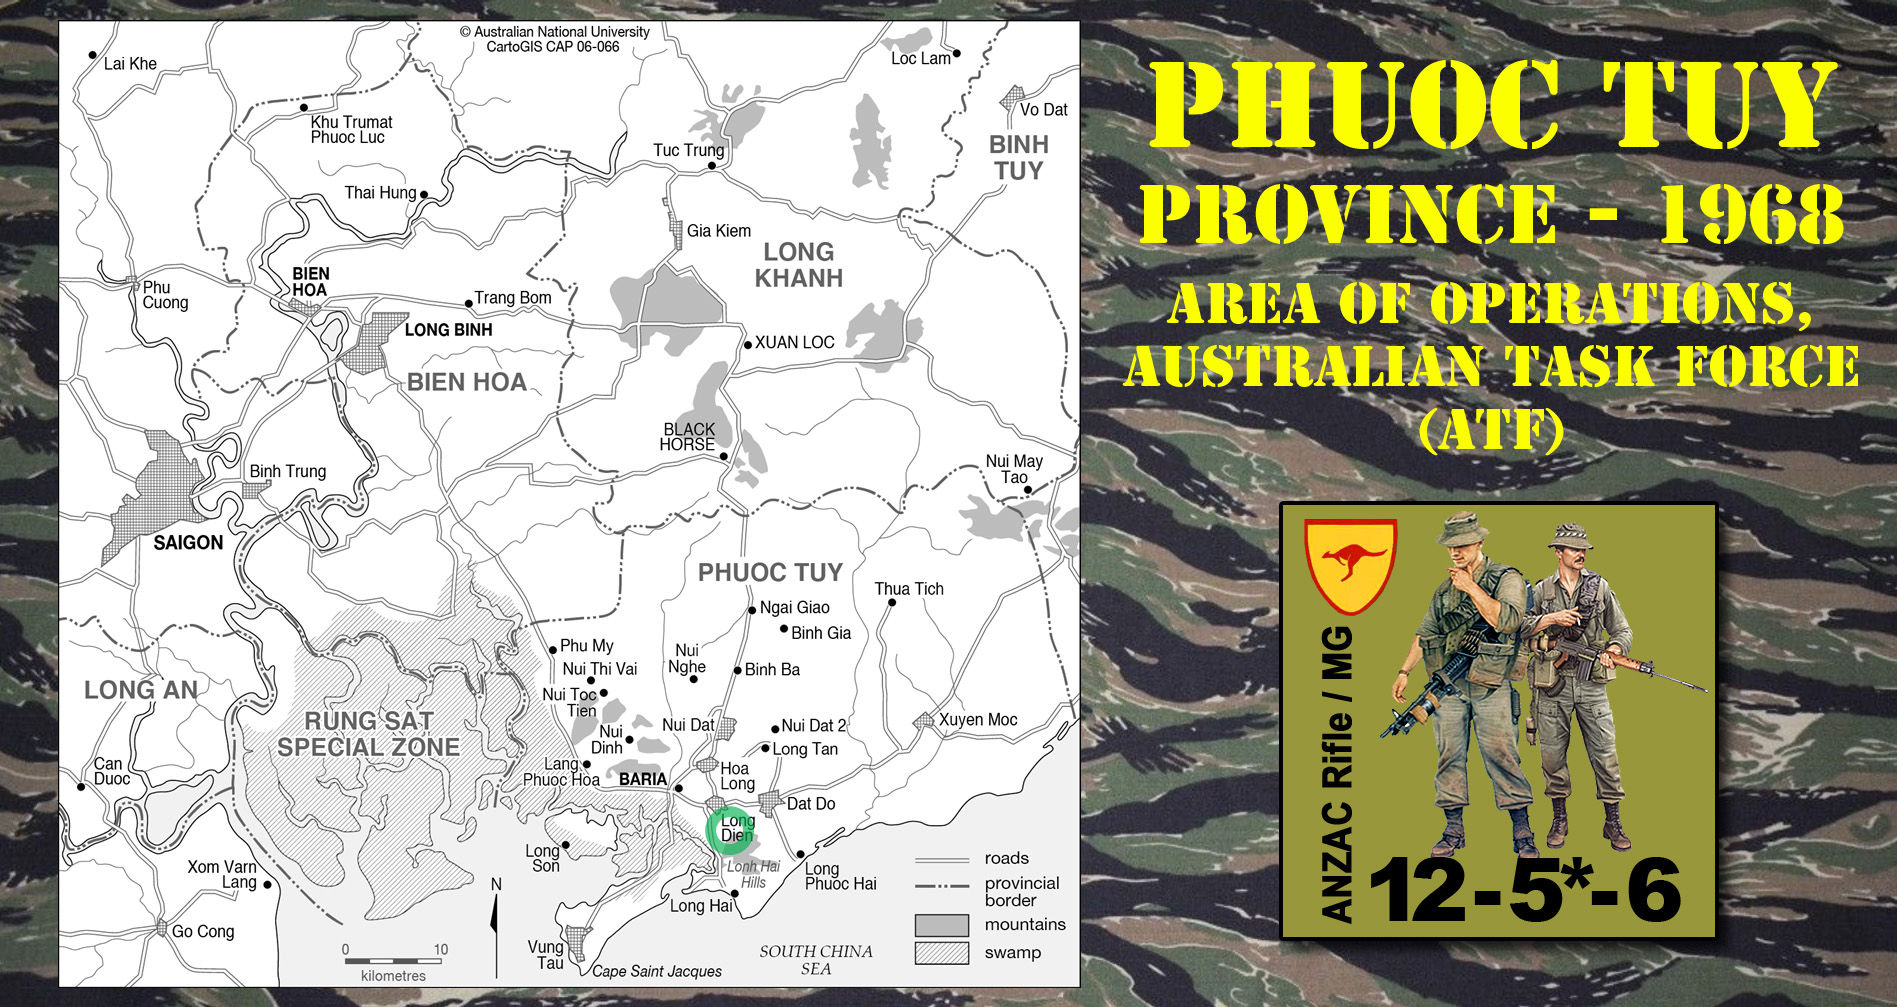 Some quick context. The Australian Task Force (ATF) spent most of the Vietnam War in this Phuoc Tuy Province, with particularly savage battles around Long Dien and the Lonh Hai Hills. This is one of the few areas where the Viet Cong attacked the ATF instead of vice versa, so I picked this area since I usually like to let new players to a system take defense (attack or assault missions are actually much harder in most systems).
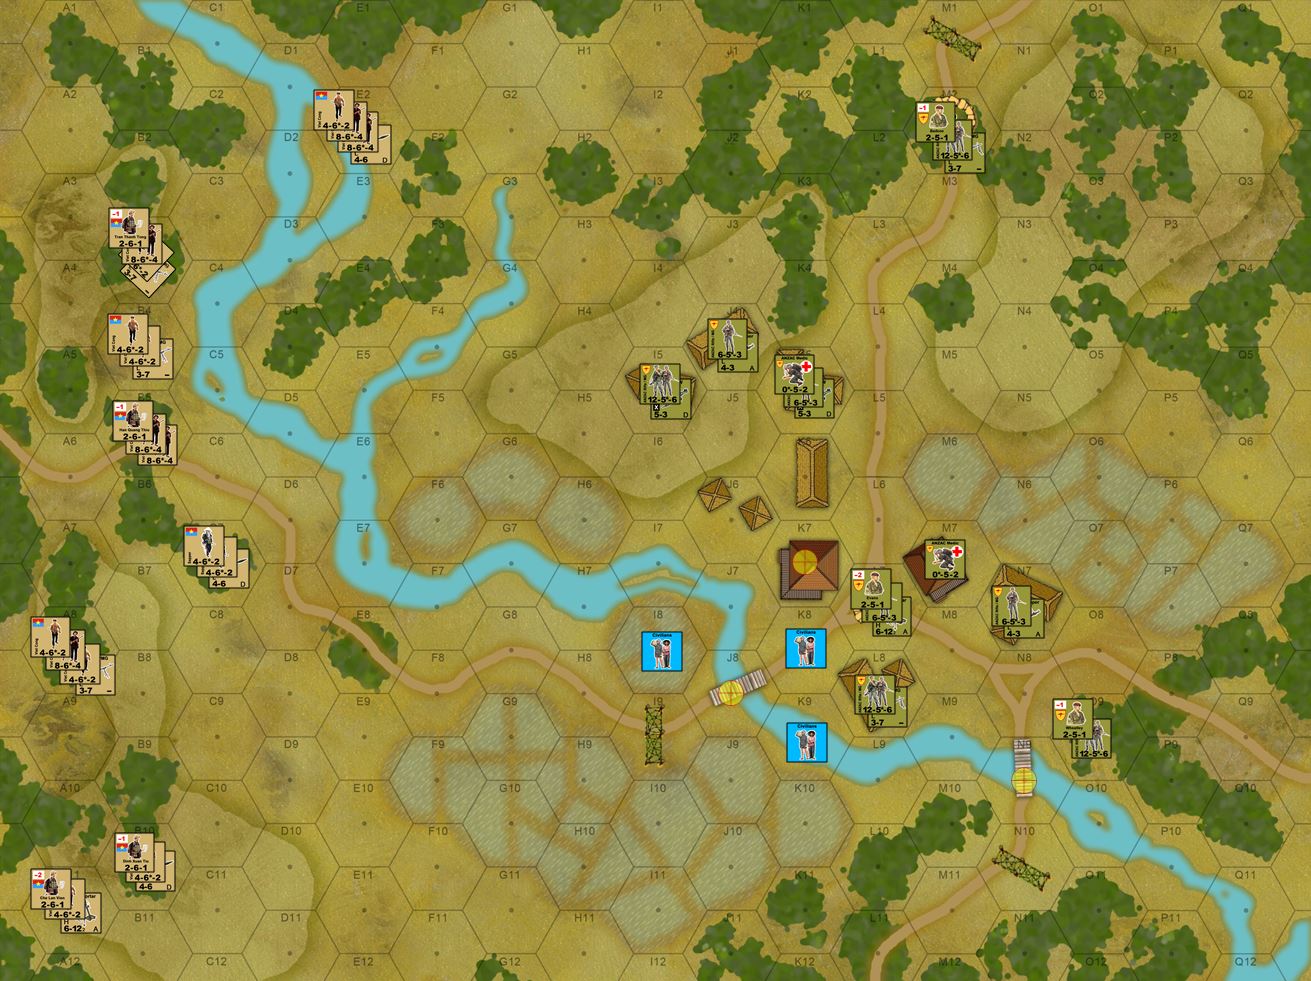 Here is a zoom out of the overall map. NLF forces can attack from anywhere along the western, southern, or northern edges of the map. I quickly take the western two objective hexes (wooded high ground overlooking the village, vital for future artillery or rocket attacks). Civilian groups move randomly at the beginning of each movement phase.
 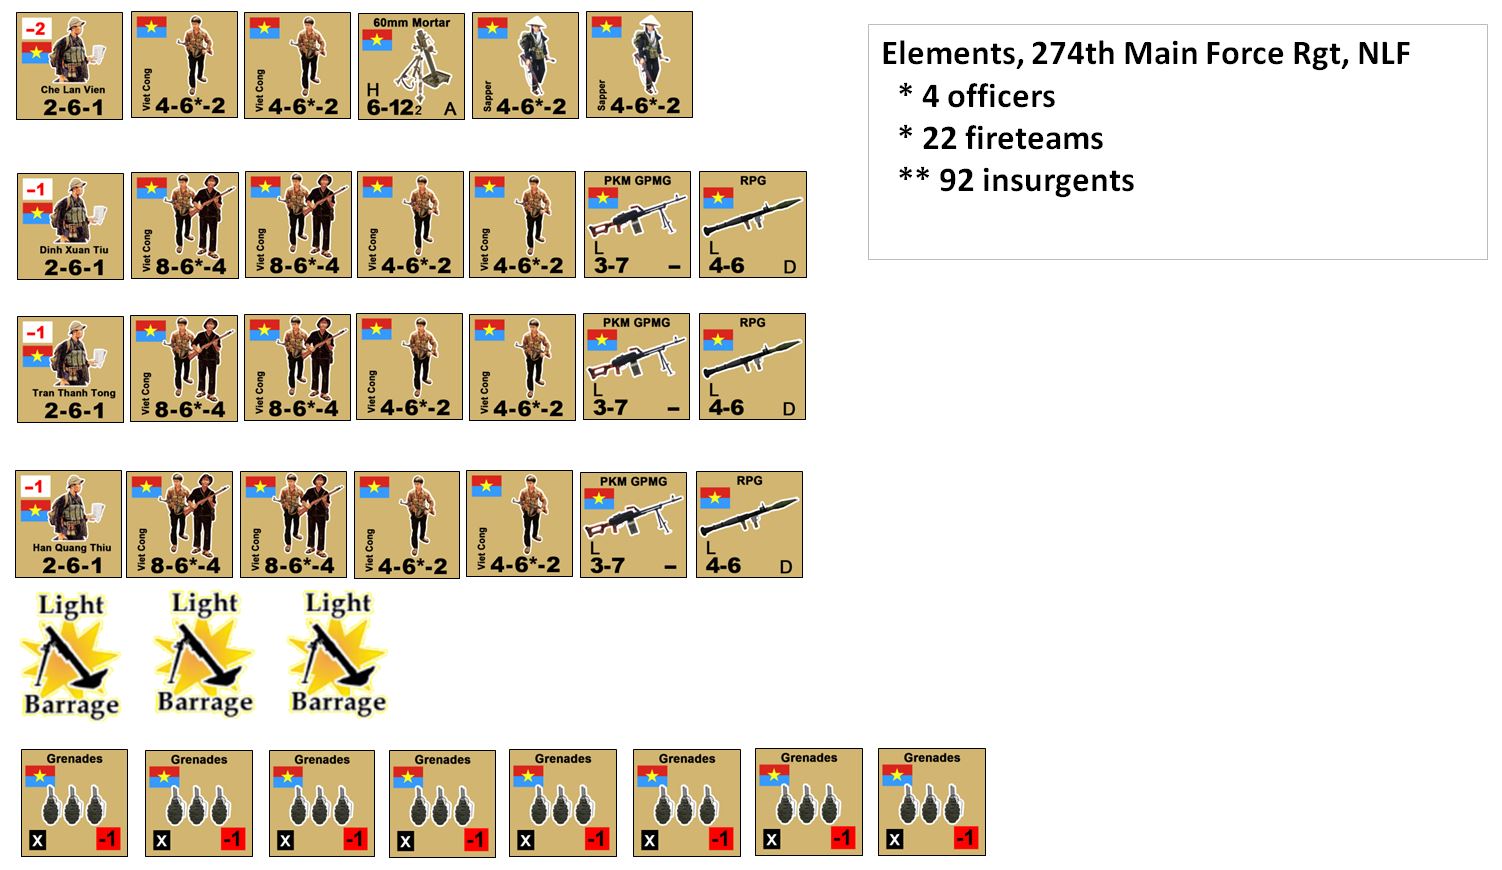 My NLF/VC company. I have a -2 captain and three -1 lieutenants, plus squads of VC insurgents, sappers, three off-board Chinese 82mm mortar attacks, an onboard section of 60mm mortars (captured American), and two teams of sappers. Some of my men are carrying PKM GPMGs and RPG / B-40 rockets. I also have eight grenade counters I can use in close-quarters combat. In all, I'm coming on the table with 92 insurgents.
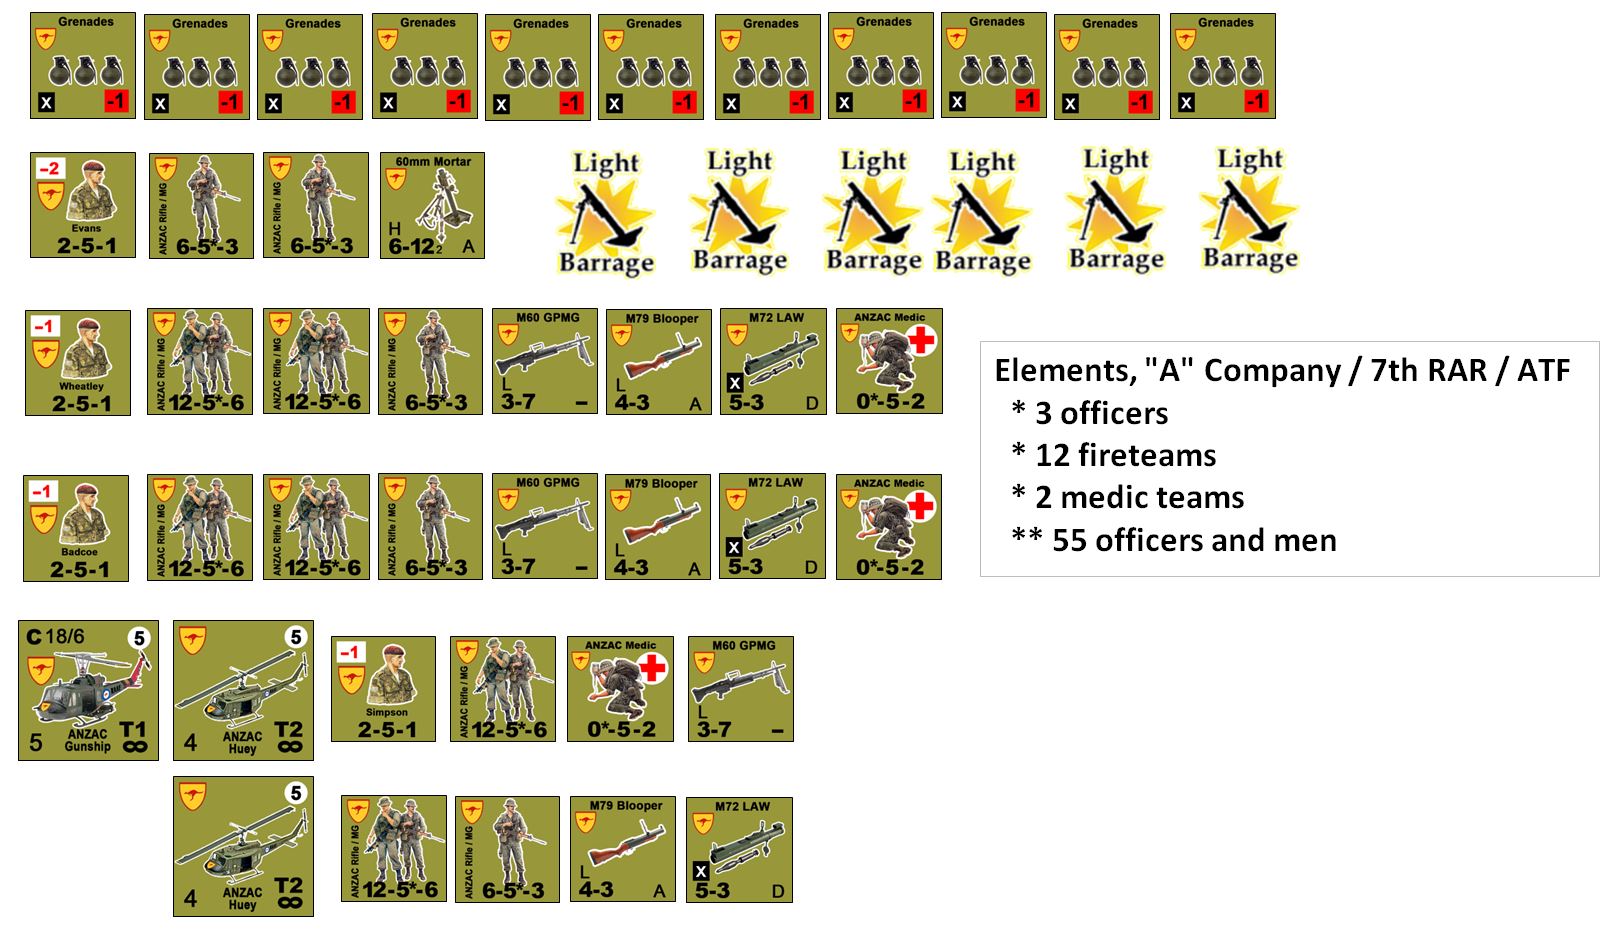 The Australian force is much smaller, with only a -2 captain, two -1 lieutenants, two platoons rifles, medics, and one section of 60mm mortars. However, he has six fire missions of off-board 81mm mortars, extra M60 GPMGs, M79 Blooper (40mm grenade launchers), and M72 LAW rockets (one-shot Light Antitank Weapon). Notice he also has more grenade counters than me. In all, he's got 55 officers and men, albeit with much more firepower. Beneath that, you'll also see three helos, one gunship and two transport birds, carrying another understrength platoon. I'm not sure if he'll need these, but this scenario is not playtested and if it turns out he needs "emergency reinforcements" - I'll bring them on during Turn 4.
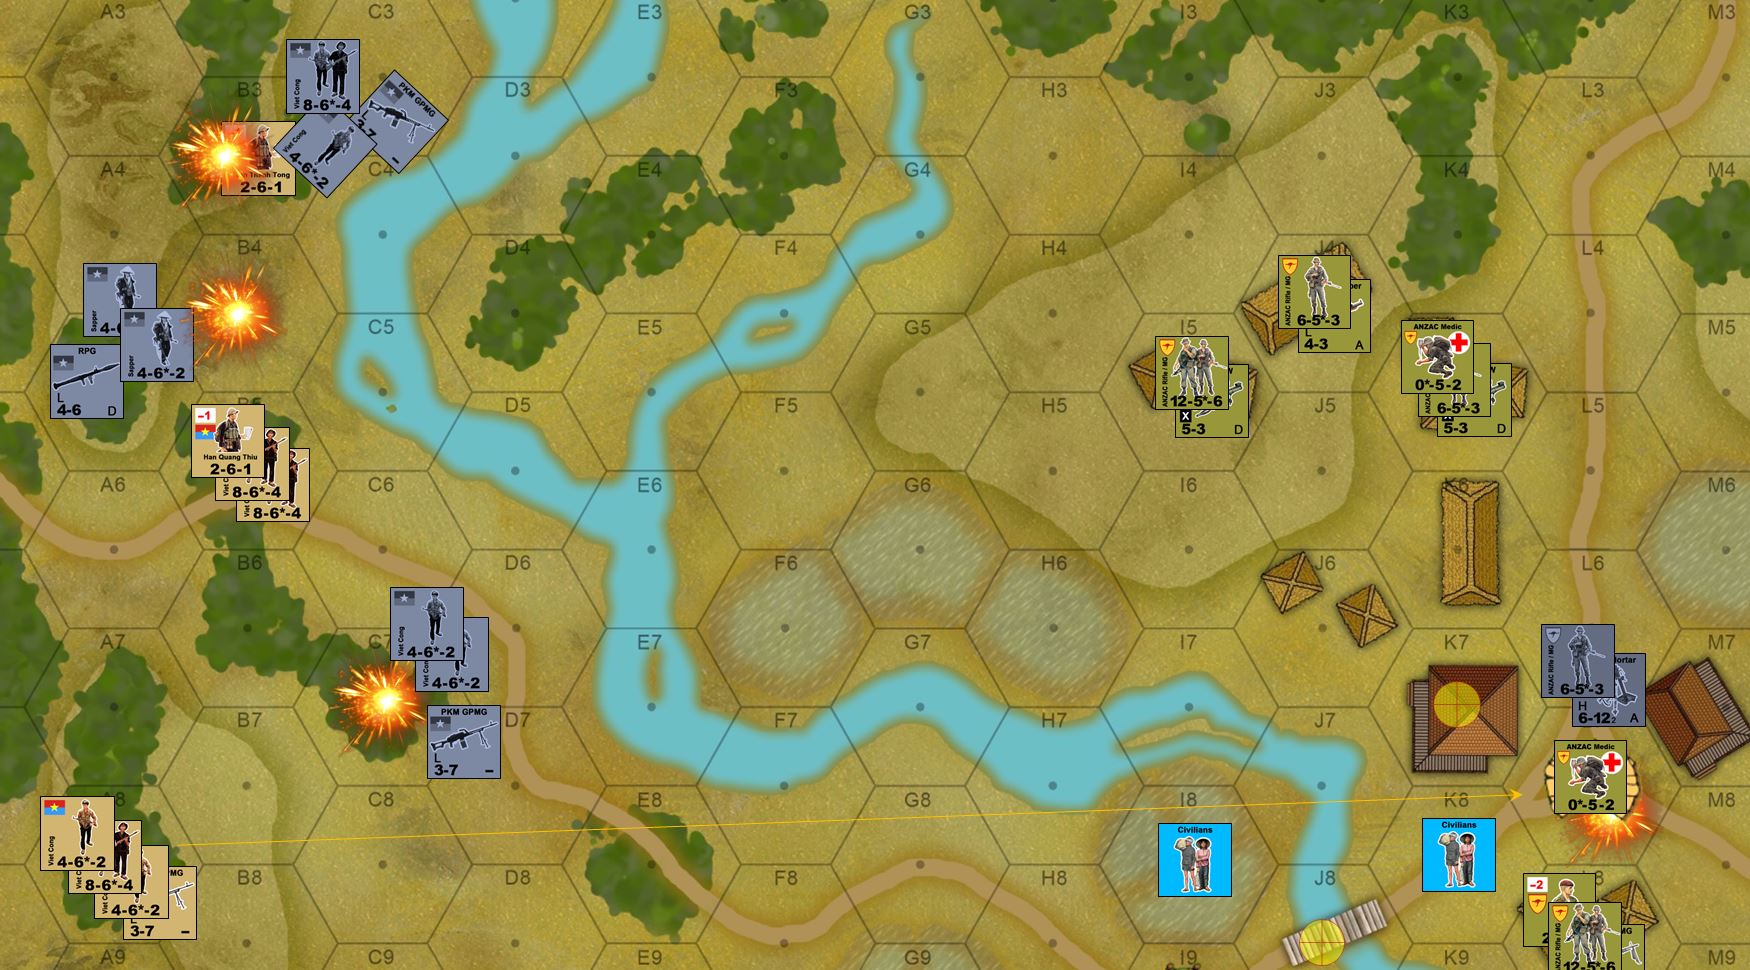 The game starts off pretty bloody. If you've seen our little video you seen where even the Australian off-board mortar missions that miss ... actually drift onto OTHER VC squads instead of the intended targets. It's not all bad news, however, my VC Captain Che Lan Vien directs my 60mm mortars and takes out his mortar team in the sand bag bunker dug into the middle of that village. This creates a casualty marker, which Elessar has to evacuate by bringing in a medic, then CASEVAC the casualty marker during his after-action phase. The original Valor & Victory rule set does not include civilians or CASEVAC mechanics (originally presented fro WW2 squad wargaming) - I have drawn up these rules myself to more accurately depict the asymmetrical aspects of post-1945 conflicts.
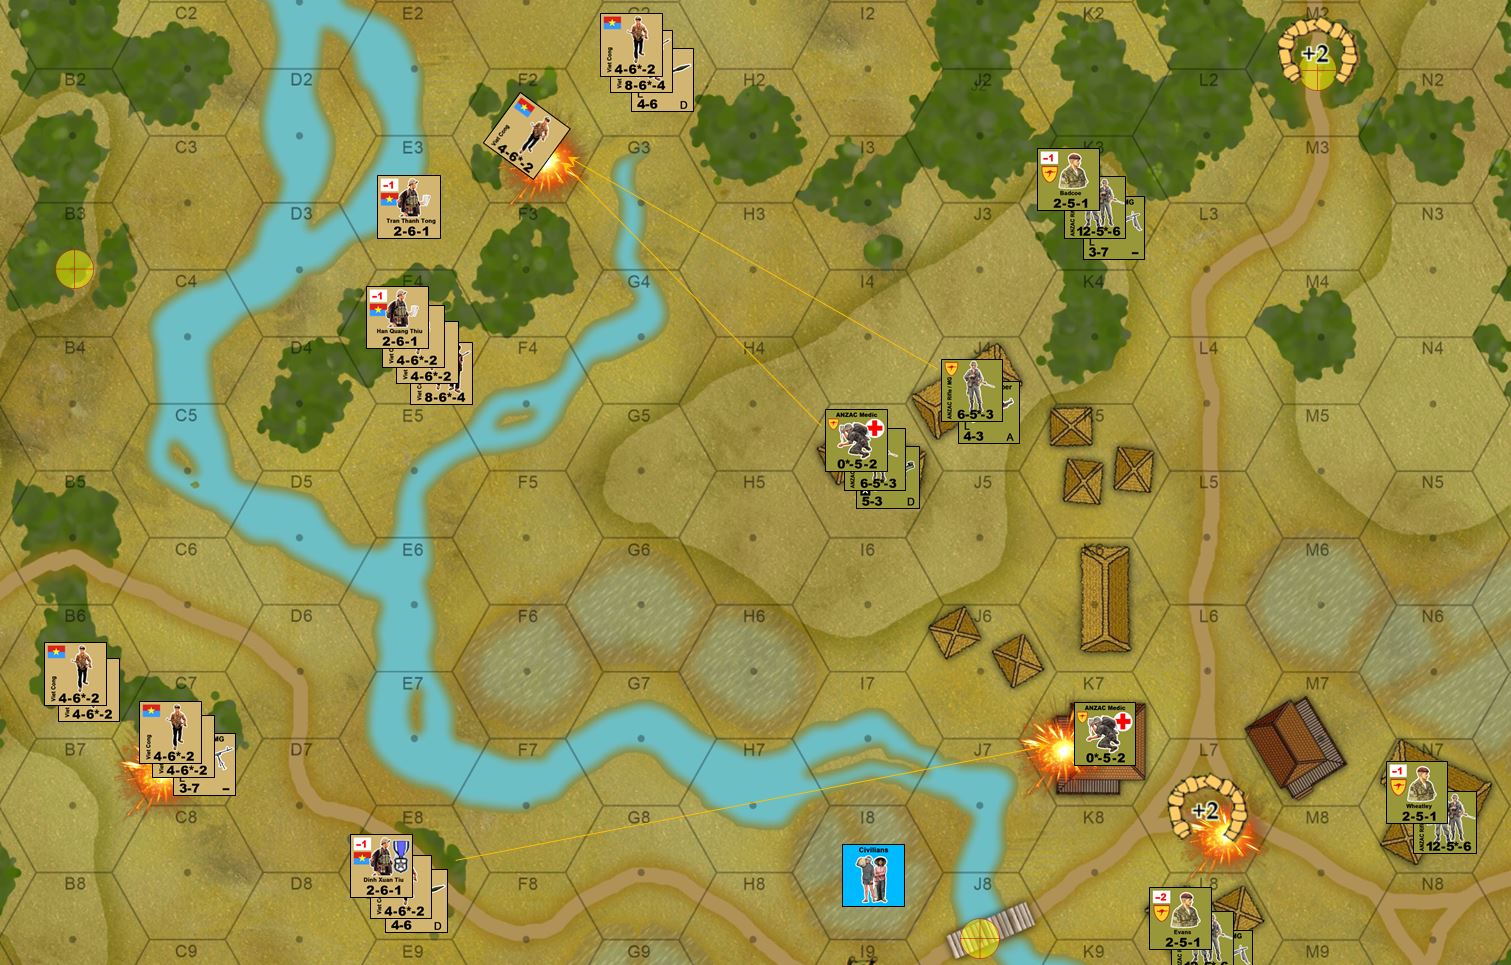 My NLF / VC squads keep moving forward, taking distressing casualties as they go once they come within range of Australian FN-FAL rifles and M60 GPMGs. My squads are also a little slow because I don't has as many officers as I would like (movement in this game is typically 4, unless an officer is stacked with the squads, in which case the movement is increased to 6). I call in all my offboard Chinese-built mortars, however, and blow anther couple squads out of those Vietnamese hooches in the village.
  VC / NLF assualts are pretty much dying out in the south and center, but Lt. Tran Thanh Tong has a pretty serious platoon hooking around the north to assault that Australian squad holding a third objective hex, the roadblock / checkpoint to the north. Not only does the presence of a -1 officer make this platoon more dangerous, but one of the fireteams is also carrying RPGs.
 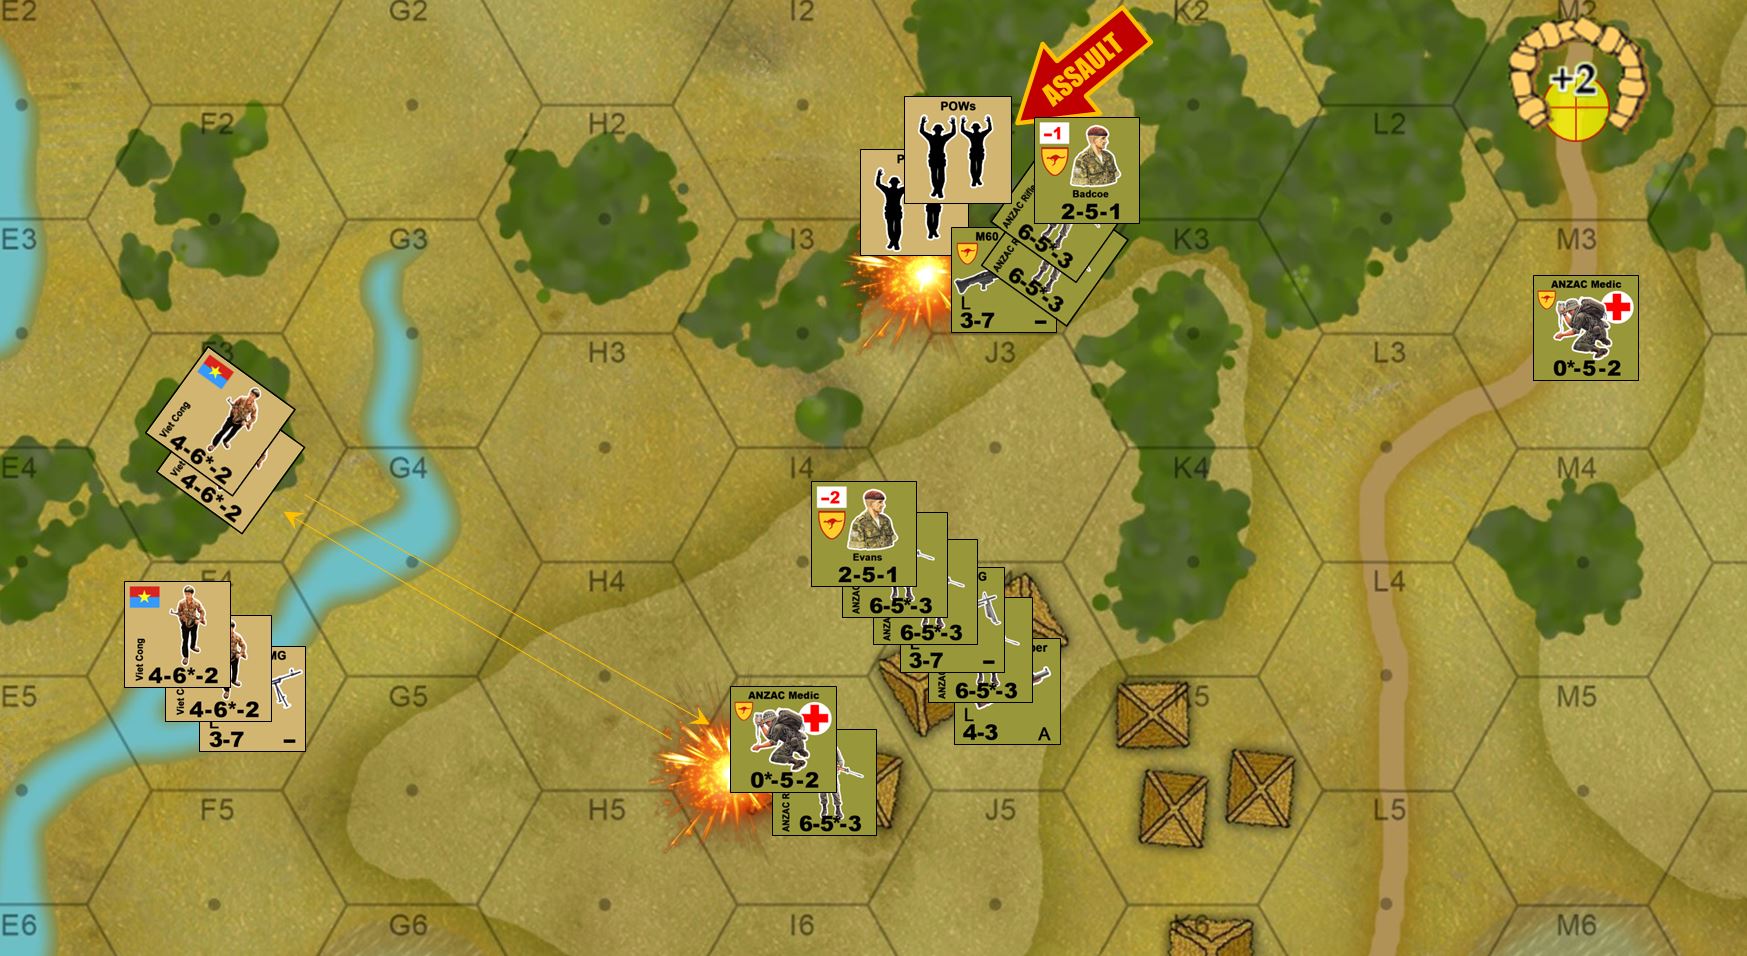 My gambit to the north has decisively failed. Not only did Australian opportunity fire largely shatter Tong's platoon (due in part to timely use of Australian grenades) but Lt. Badcoe is now leading a counter-assault southwest against the survivors. When a successful assault is carried out against NVA / VC units, each fireteam or officer is converted into a POW counter. If Elessar can evacuate these POWs safely, they are worth 3 VP for him instead of the usual 1 for eliminated insurgents. For narrative purposes, this would be especially true since one of those POWs was Lt. Tong. VC officers are particularly prized by intelligence officers back at battalion or regiment HQ.
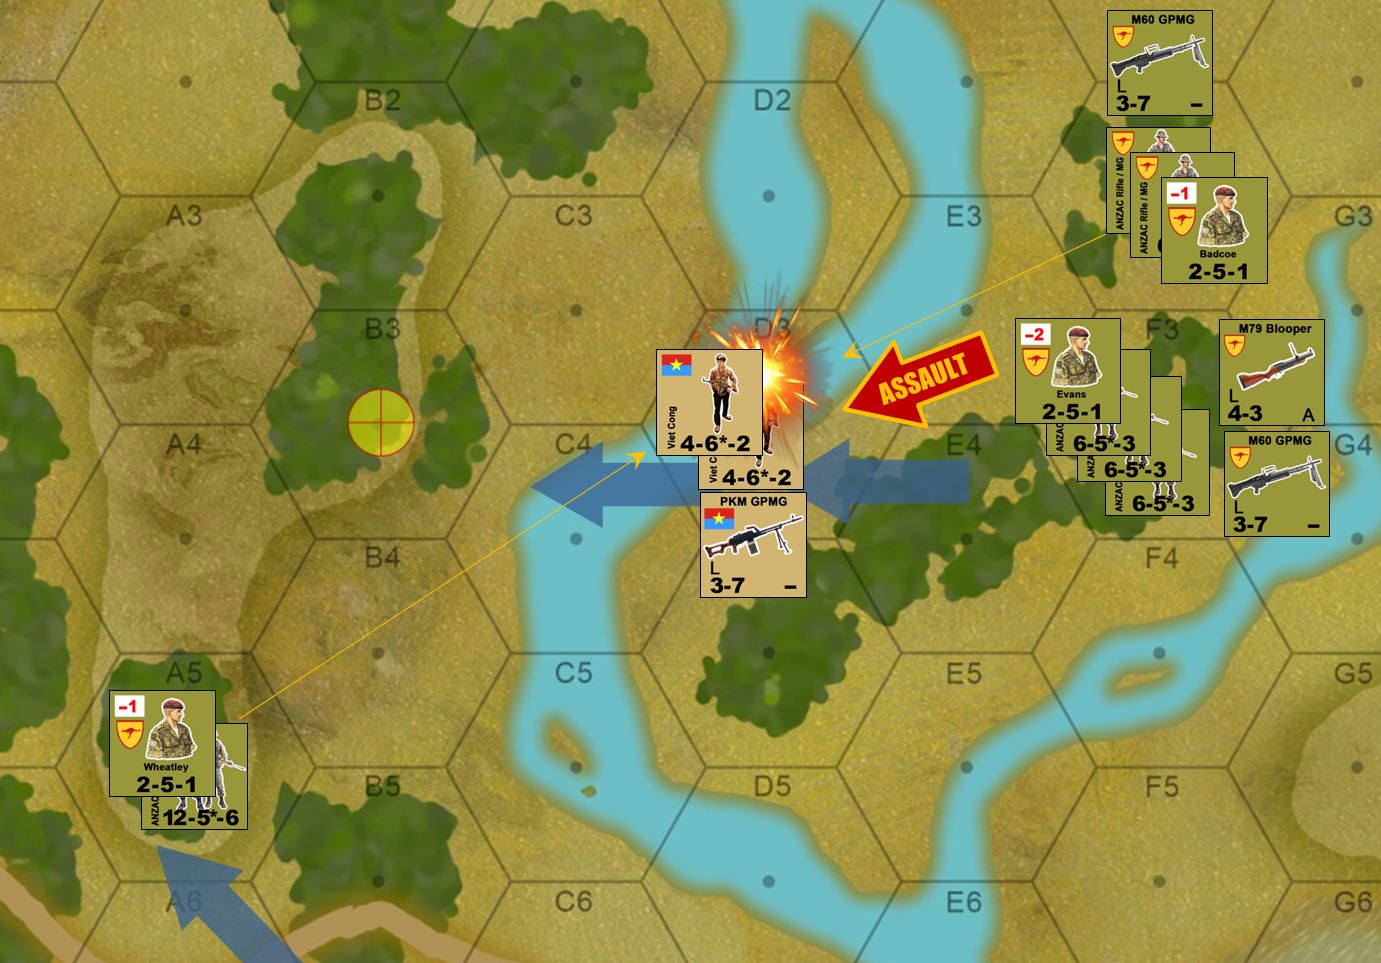 When things start going badly for the VC, they go badly fast. No worries, I still hold one objective hex, and if I can hold two, I'll probably win the game even in the face of nearly total casualties. Unfortunately for me, Elessar sees this coming and ensure these last two VC fireteams don't get a chance to fall back to that objective in Hex B3. Lt. Wheatley and his squad in A5 and Badcoe in F2 have a crossfire set up that kills one fireteam and pins the other as they try to withdraw across that stream. Then, Captain Evans launches an assault on that pinned fireteam, claiming it as a last POW counter for extra VP.
 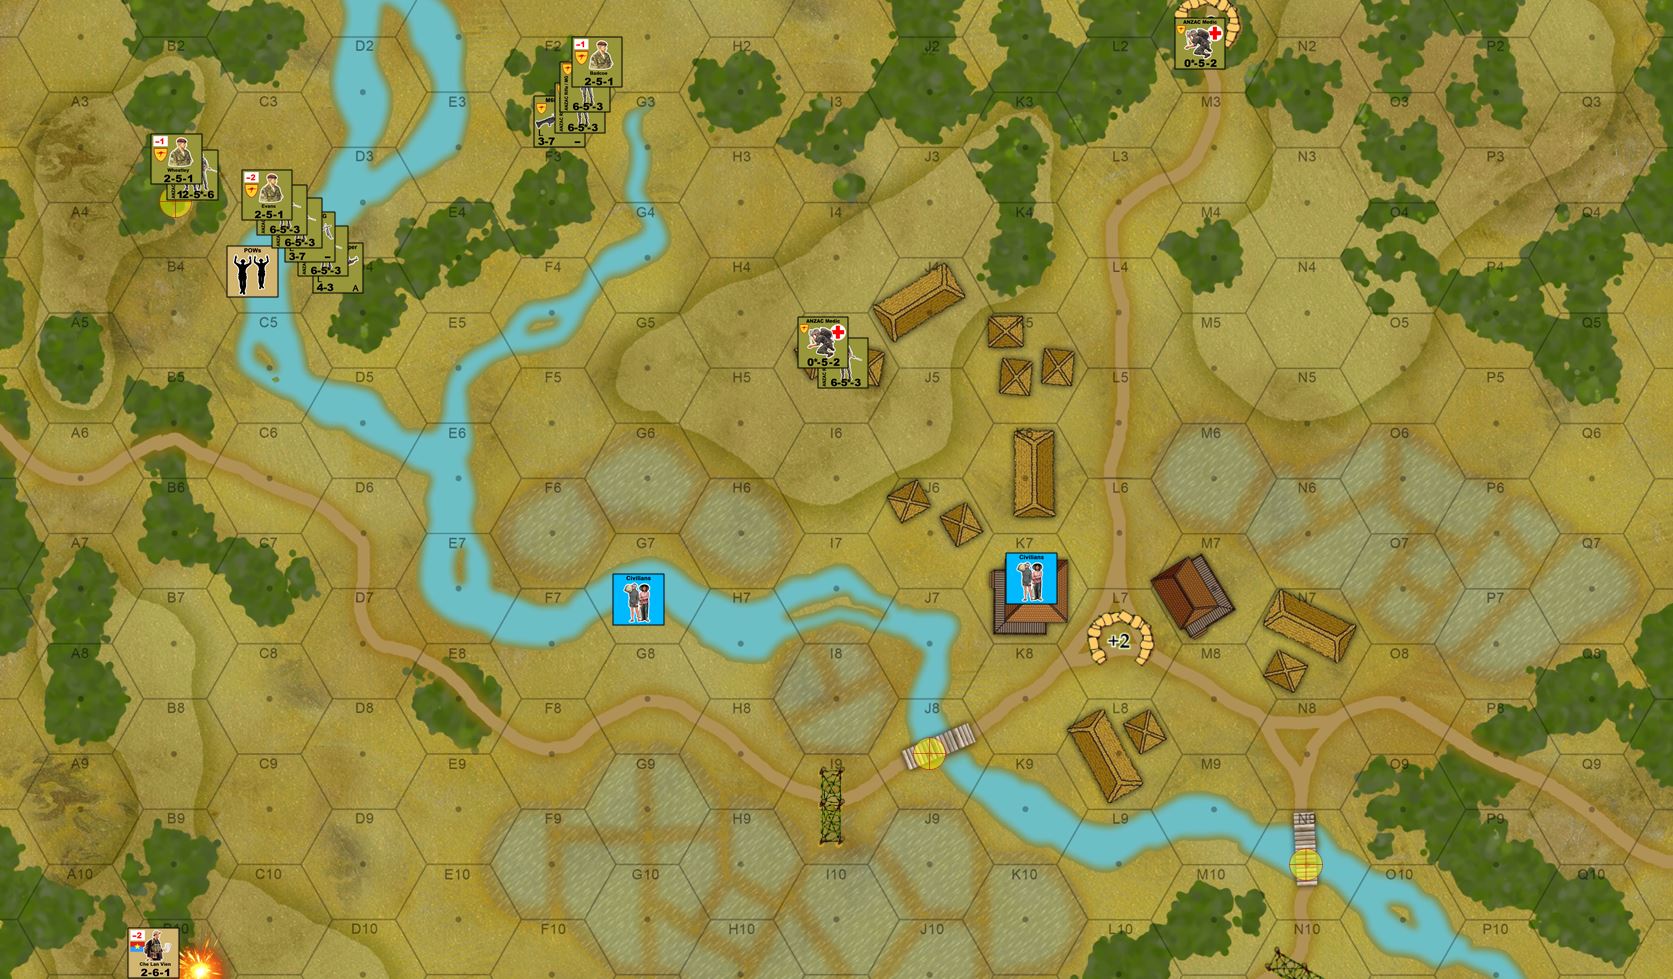 So that's the game. I have one officer left, literally my "last man standing." That's my captain, and he's still occupying one objective hex down int he southwest. That means I'll end the game with 10 extra VP, in addition to whatever I get from Australian casualties inflicted.
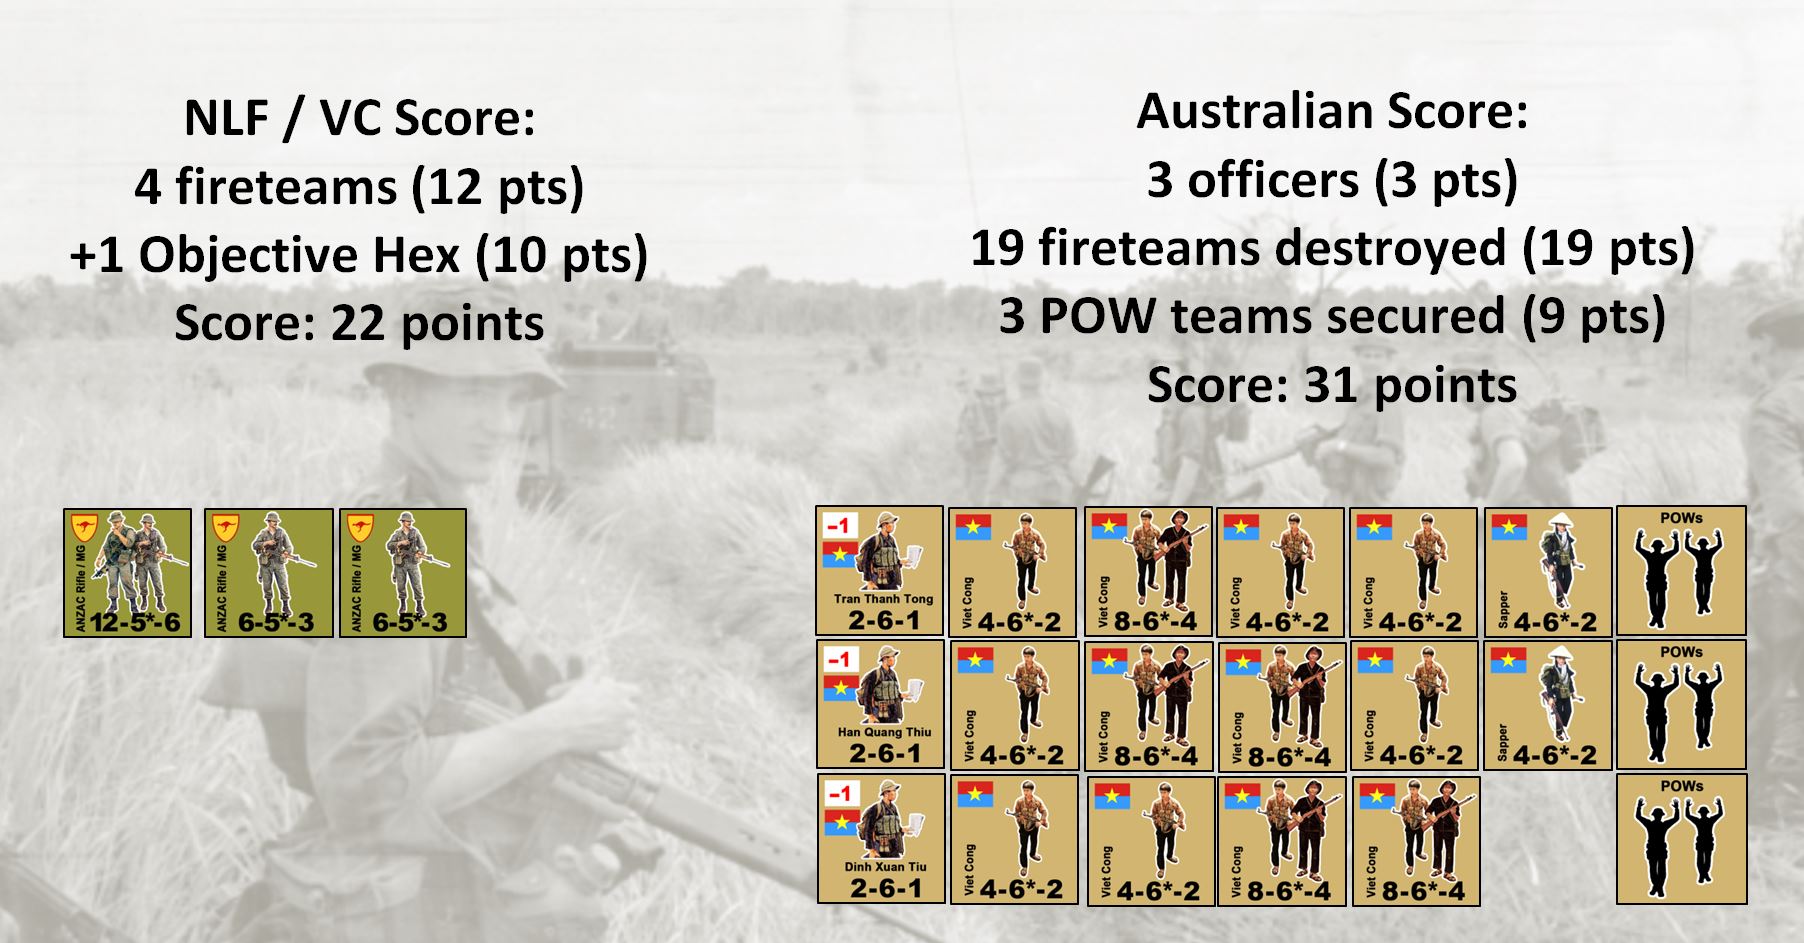 Final score. Congrats to Elessar2590 on his win and first Valor & Victory game! As you can see, even with a horrific imbalance in casualties, the insurgent player can still win (or at least come close) in these games if they can inflict respectable casualties and / or hold an objective hex. If I was able to hold that second objective hex, even with a 5-1 kill ratio, I would have won. Basically these objective hexes are high ground from which my last remaining officer can call in Katyusha rockets or D30 howitzers down on that village, at least inflicting one hellish night on the Australians and civilians therein. But it'snot enough to win me the game, with a final score of 22 to 31.


Leave a Reply