


![How To Paint Moonstone’s Nanny | Goblin King Games [7 Days Early Access]](https://images.beastsofwar.com/2024/12/3CU-Gobin-King-Games-Moonstone-Shades-Nanny-coverimage-225-127.jpg)


Tea. Earl Grey. Hot.


Recommendations: 163
About the Project
Here I will collect a bunch of my finished (speedpainted) 3D-printed miniatures and terrain. I include som old posts from my blog themountainsofminis.com as I have printed a lot of stuff, but not really built nor painted much of it yet, and this means I can collate my 3D-output here in the projects.
I have recently thrown out my old cheapo Flashforge Finder FDM printer for an Ender 3, and also bought an Elegoo Mars Pro resin printer.
What gets me every time I 3D-print something, is that where there was nothing, suddenly there is a miniature! Just like that!
Tea. Earl Grey. Hot.
Related Genre: Fantasy
This Project is Active
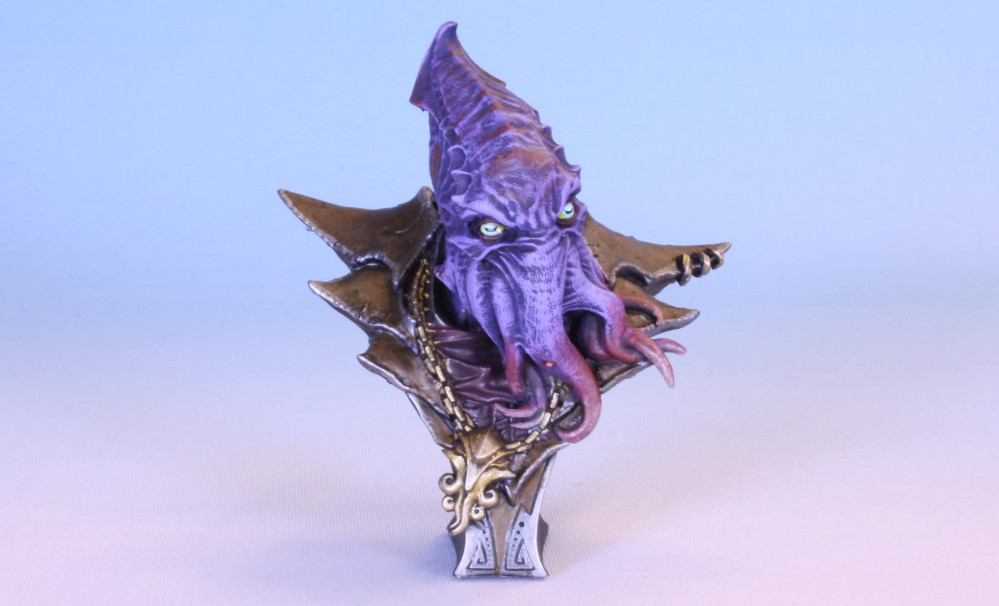
Going Bust
And now for something slightly different:
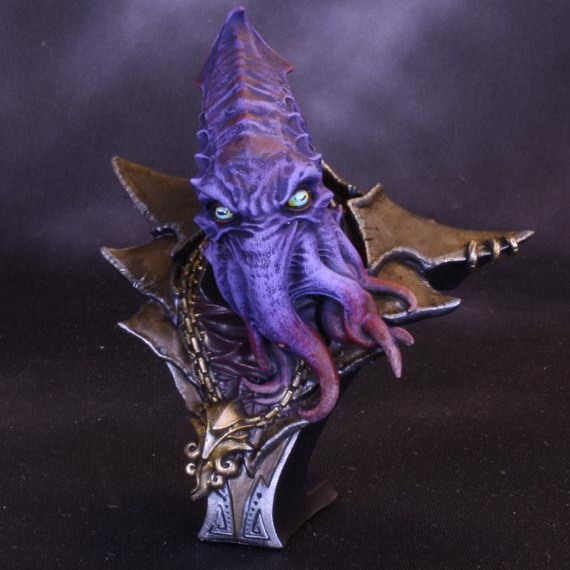
This is the “Soul Stealer” bust from Artisan Guild’s welcome pack on patreon. I printed it on my Elegoo Mars Pro resin printer.
This might be the first bust I have ever painted, not counting an Orc bust from the very early days of Forge World that I started but never finished and sold off at some point in the distant past (oh, the Folly of Youth).
I do not usually buy busts as they are generally outside my scope of interest. However, I do own one or two busts as .stl-files that have been parts of patreon bundles.
And with such an extensive library of files at hand, once I decide to do one, it does not take long to make supports and print one off.
But what to choose? Tentacle-face or a human face?
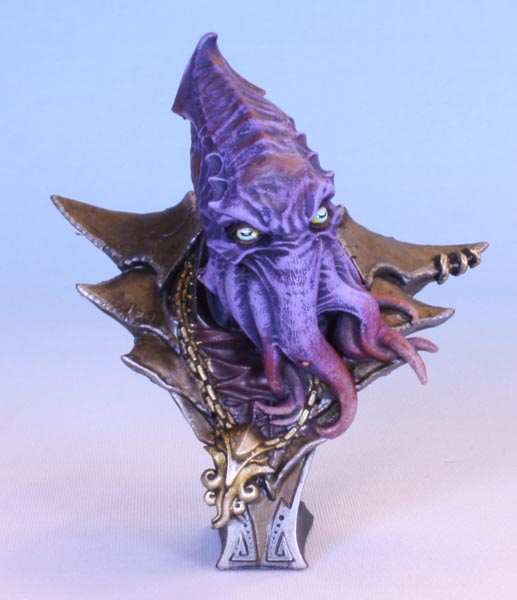
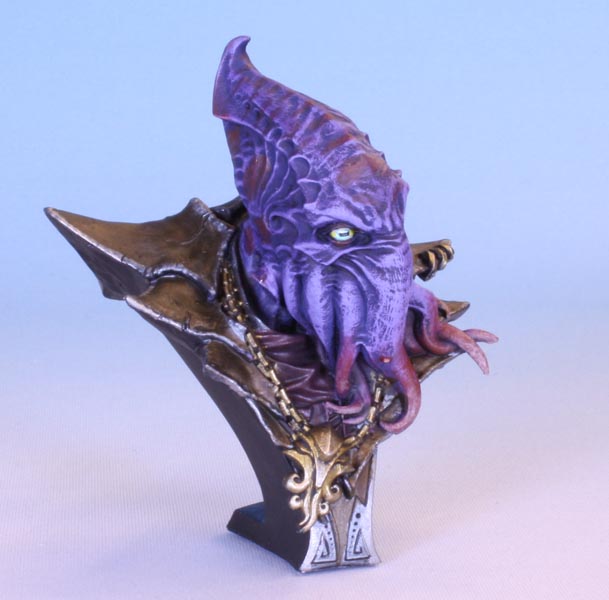
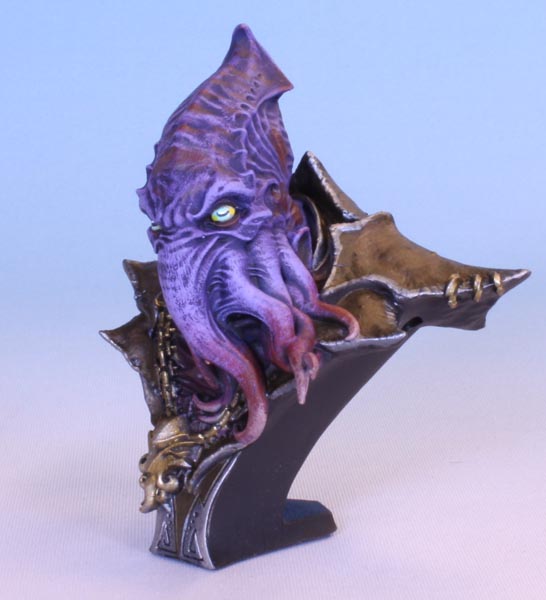
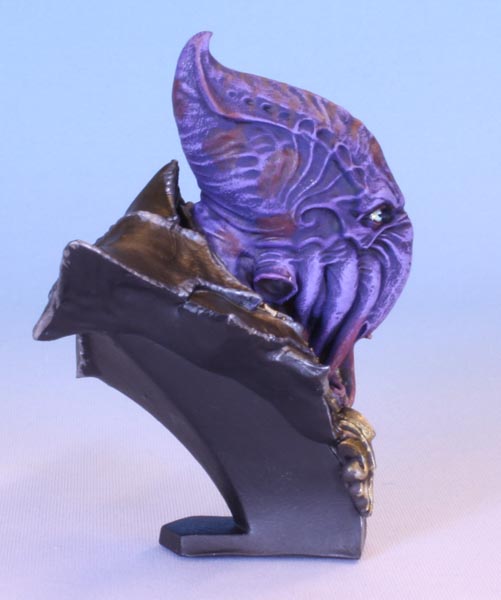

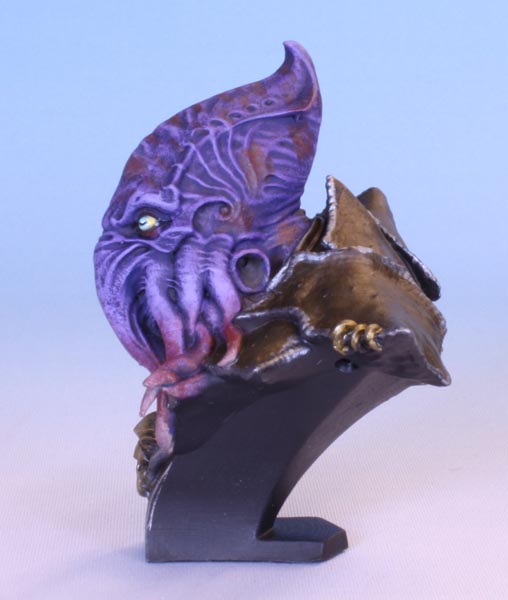
Suckers for the win every time!
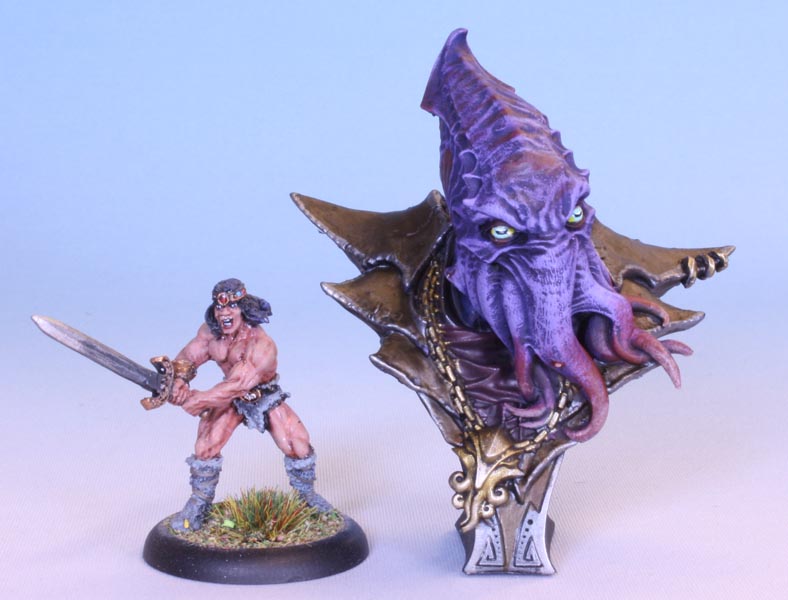
I hollowed it out before printing, and I think I maybe should have filled the bottom with something to weigh it down as it is a bit unstable and tips easily.
—
This bust was completed February 24th, 2021
Elliot Gone Bad
A 3D printed miniature from Lost Adventures, printed in a single piece on my Elegoo Mars Pro resin printer.
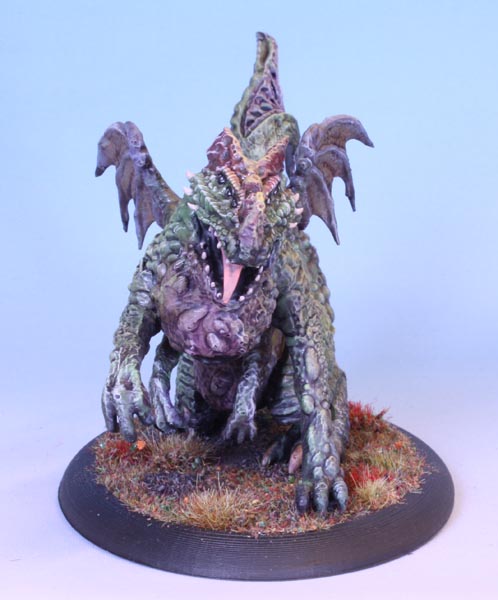
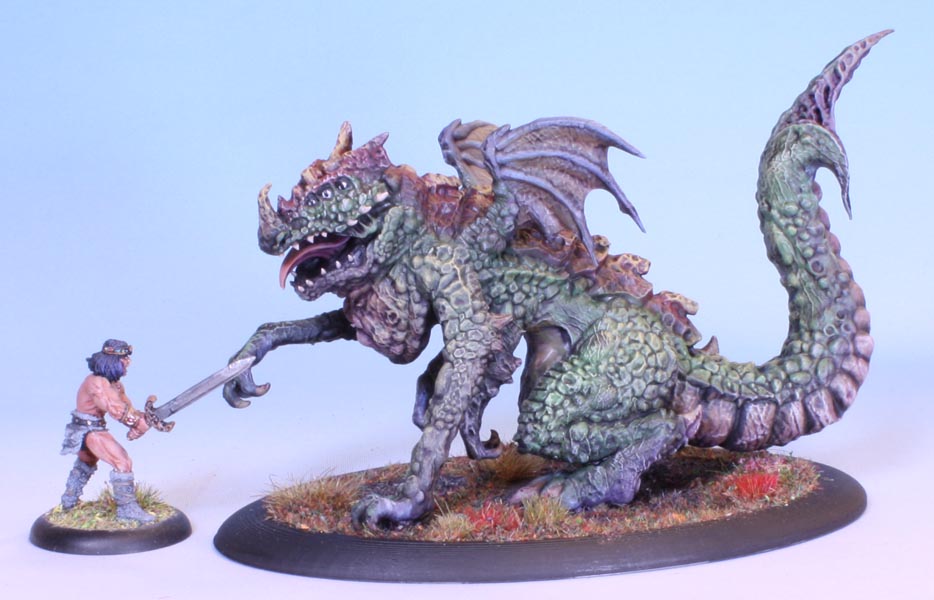
This is the Blight Dragon, or The Blighter as I like to call it. (Would “Old Blightey” be taking it too far?).
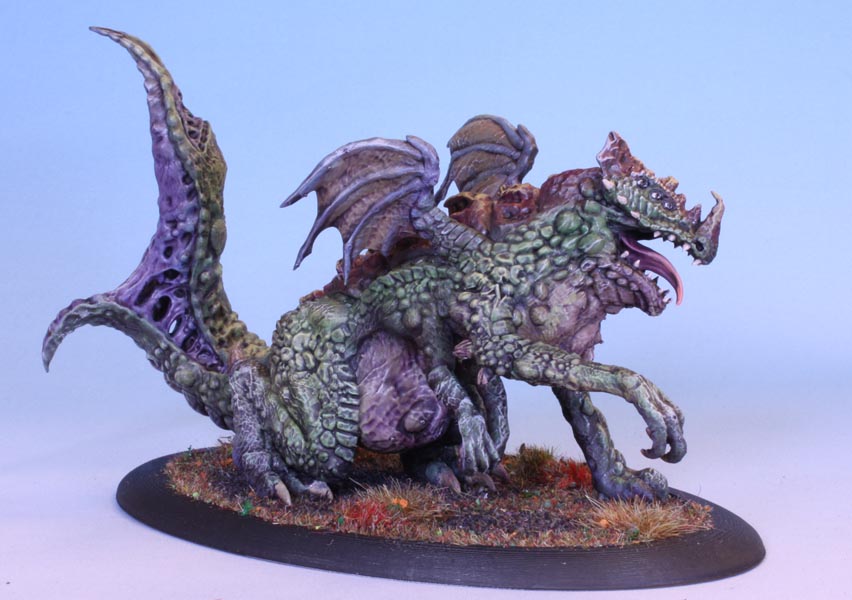
I do not know if the name “Blight Dragon” is something “official” and specific in D&D or if it is something Lost Adventures have come up with on their own.
For me with a background in Warhammer, this would be a Chaos Dragon of Nurgle, or maybe a giant Spawn of Chaos, or even a Great Unclean One, or a stand in for a Maggoth or something similar.
It also reminds me of the imaginary dragon Elliot in the old 1977 Disney live-action/ animation hybid movie Pete’s Dragon. I think it is the vestigial wings and the distended belly that do it.

So is this what Elliot becomes when he goes bad? (Yes, that is what would be a Dad Joke, right there. In ancient times, this was known as a “pun”.)

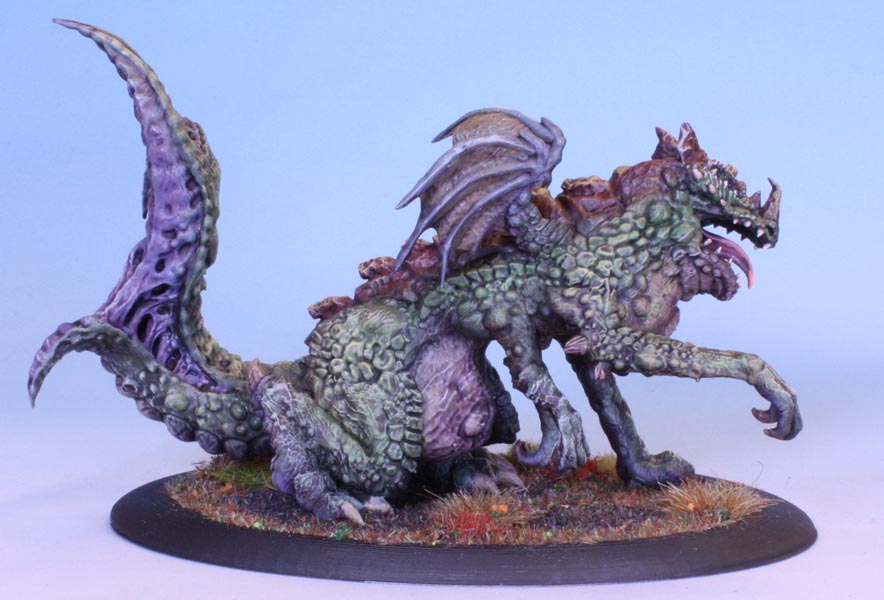

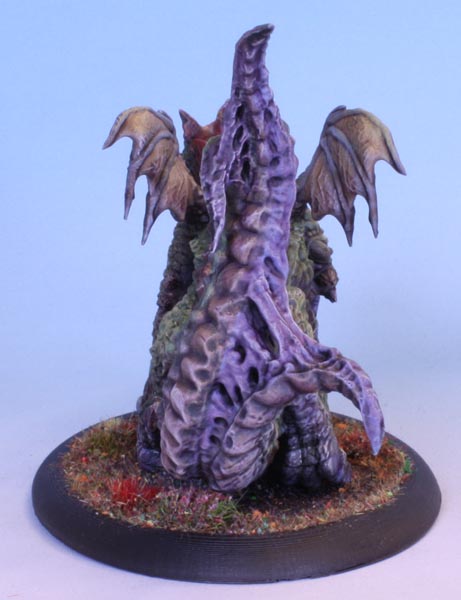
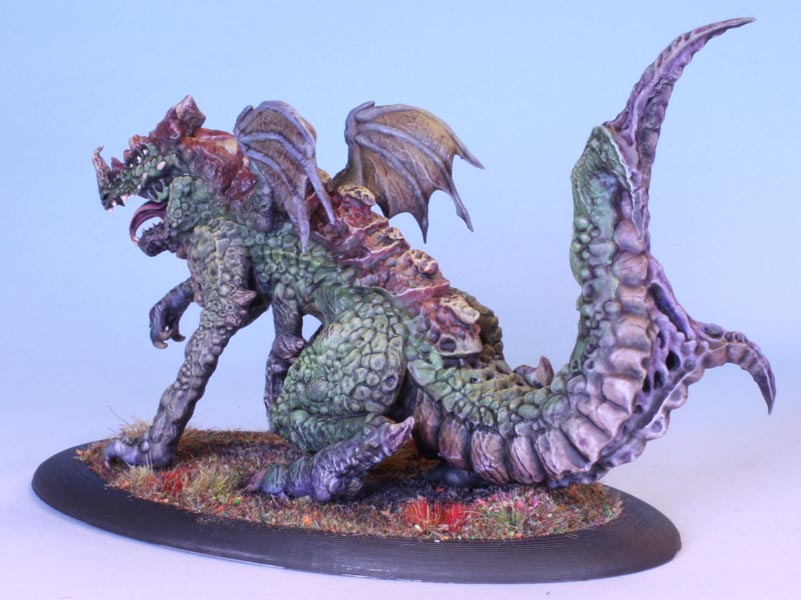
I made an 80 x 130mm base for it, printed in PLA on my Creality Ender 3 Pro printer. You can see the print lines clearly along the rim, which illustrates the difference in achieved detail between resin and PLA printers. I cannot see any print lines on the dragon. Can you?

I was given the .stl-file as an out-of-the-blue freebie at the very tail-end of delivery of the very last rewards from the first Lost Adventures kickstarter campaign. It was originally from the Lost Dragons KS. It is currently available to buy from the Lost Adventures website.
This mini was finished on December 4th, 2020.
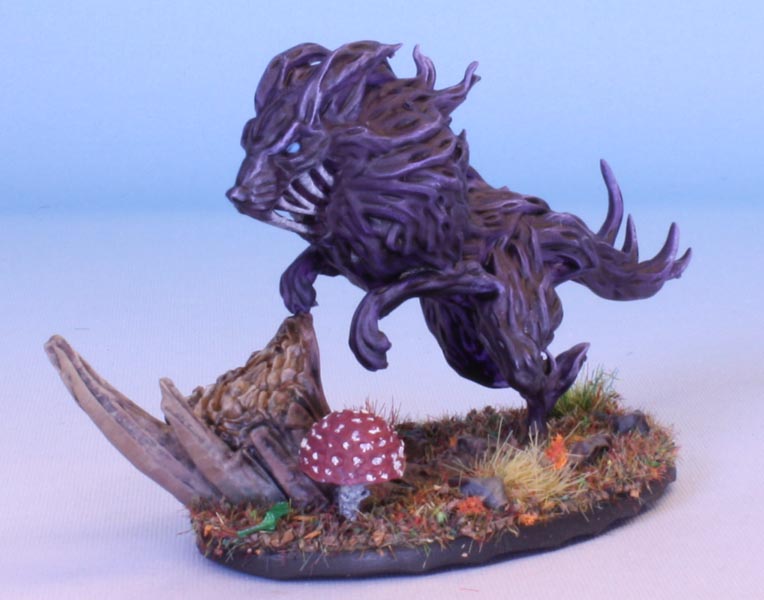
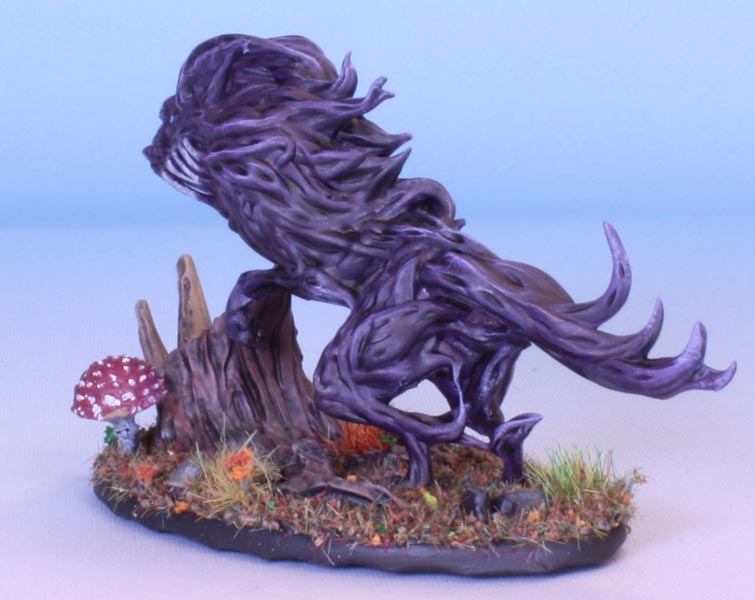
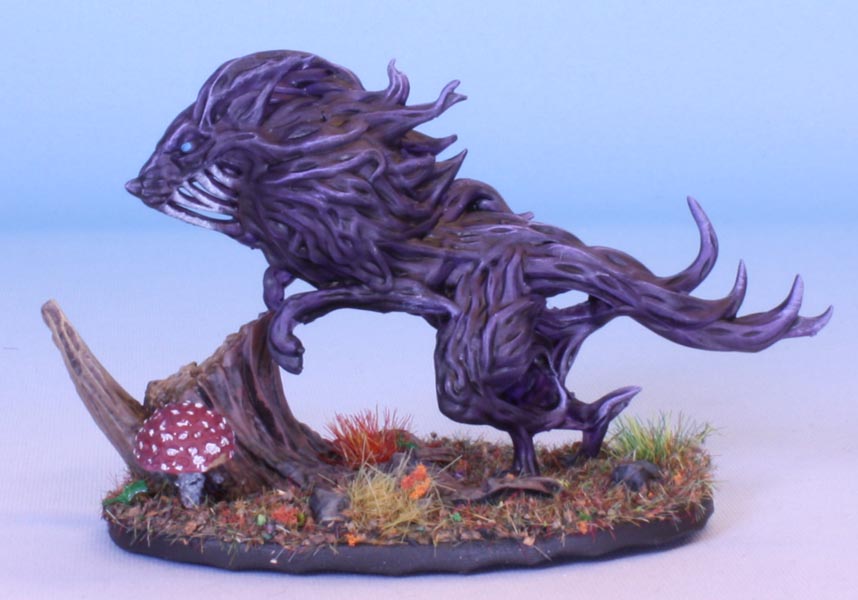
The Ancient Treeman
A design by Cast N Play, 3D printed by me. I put it on a 95mm base.
This is one of the designs that drew me towards Cast N Play in the first place. They are generally a bit on the cartoony side for my tastes though, but I am happy to patreonize them for the ones that I like in between all the others I am not too fond of. The patreon rewards are great value even though I might only want to print two or three from a given month.
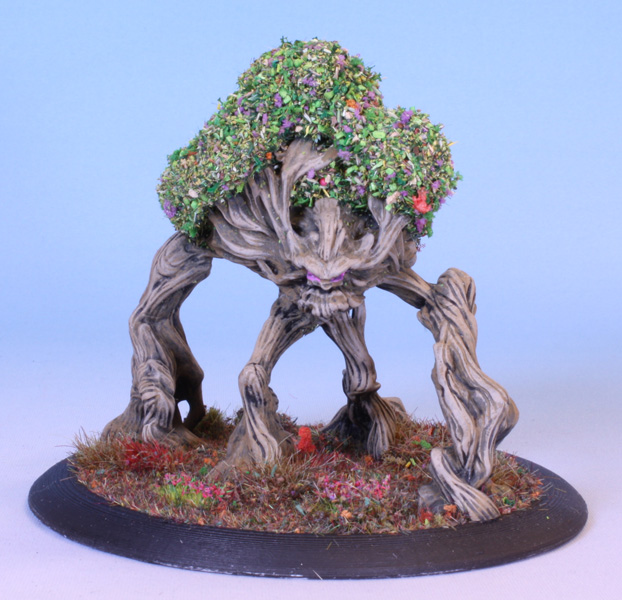
I have always been a fan of treemen, although I have not painted all that many. However, I have printed out a few different ones lately, so there will probably be some varied styles of treeman appearing on this site in the forseeable future.


I think we can safely call this mode of locomotion “Lumbering”

I hollowed it and printed it in one piece, and made it a 95mm base on my other printer.
This treeman is a bit mangrovy. The wood is painted a few different shades of brown and yellowbrown on a black base. I painted the foliage green and used my spring/summer flockmix for that, and used tufts and my autumnal flockmix on the base for contrast.
I got it as part of their September 2020 throwback pack on Patreon. Each month, they relase a new set of themes minis, and in addition they release a “throwback pack” that contains a goodly selection of older models. It’s like two rewards for the price of one!
This mini was finished on Dec 9th, 2020.
Lord of the Print Myconid
This one is for @warzan

This myconid is from their April or May 2020 patreon. I printed it on my Elegoo Mars Pro resin printer.
I painted it as follows:
Black undercoat with zenithal grey/white on top. I tried Apothecary White contrast over this, but that was not really effective at all, so I immediately while wet put on a coat of Skeleton Horde constrast. When dry, I drybrushed it carefully with Reaper MSP 09315 Ancient Bark and did a bit of shadows with Reaper MSP 09313 Rotting Wood. Dark purply reds on the cap. Base and done.


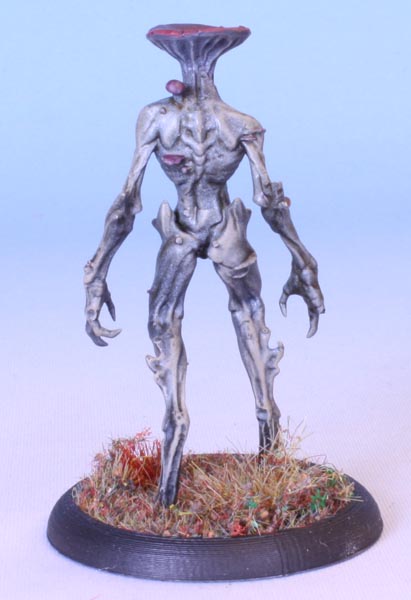


For some reason, this model makes me think of the movie Annihilation. Not sure why.
–
This mini was finished October 23th 2020
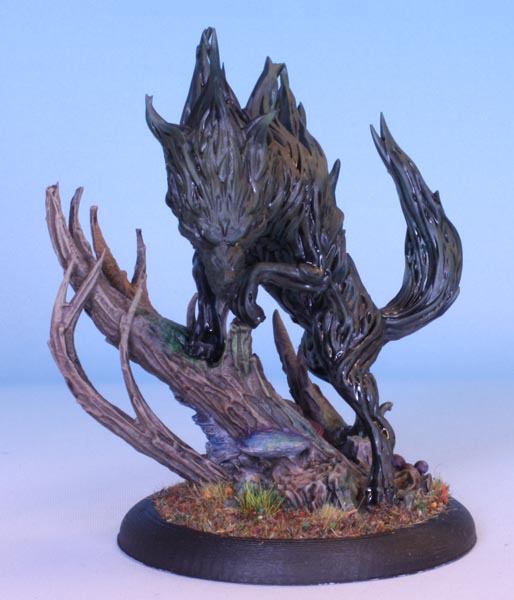
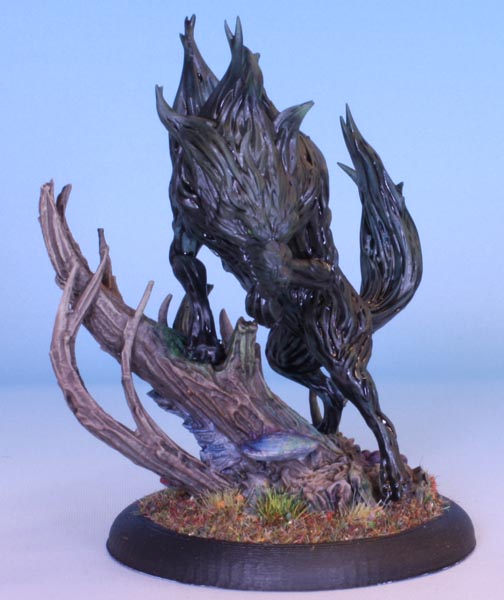
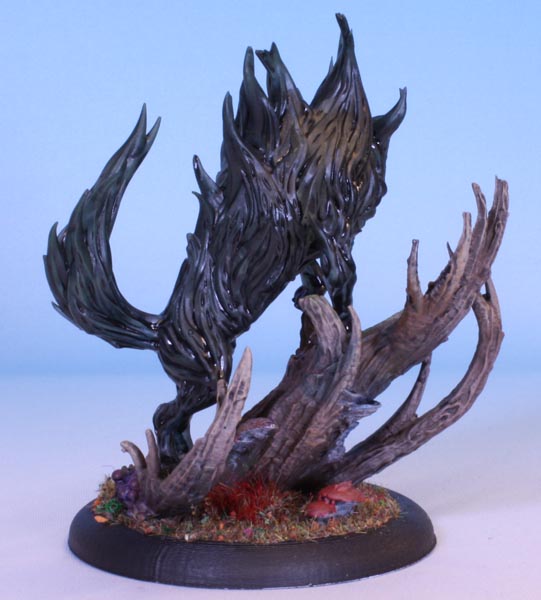
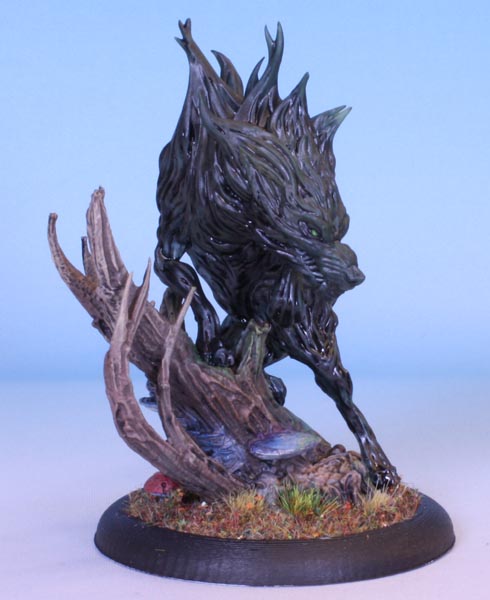
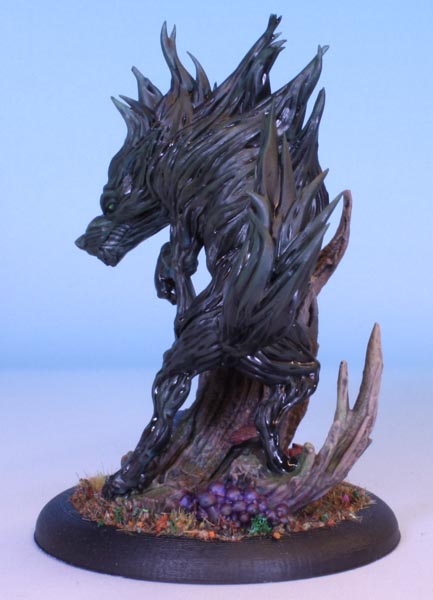
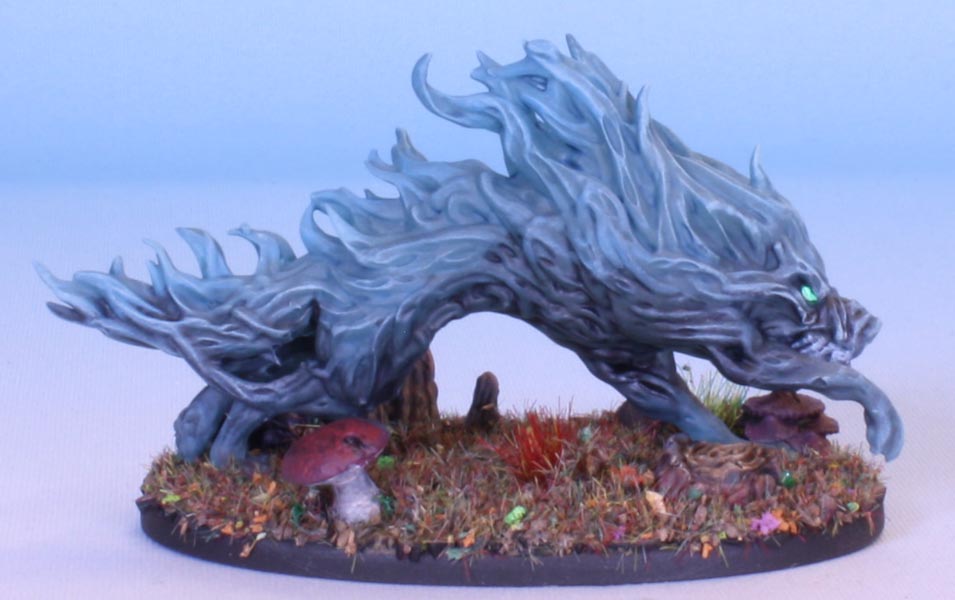
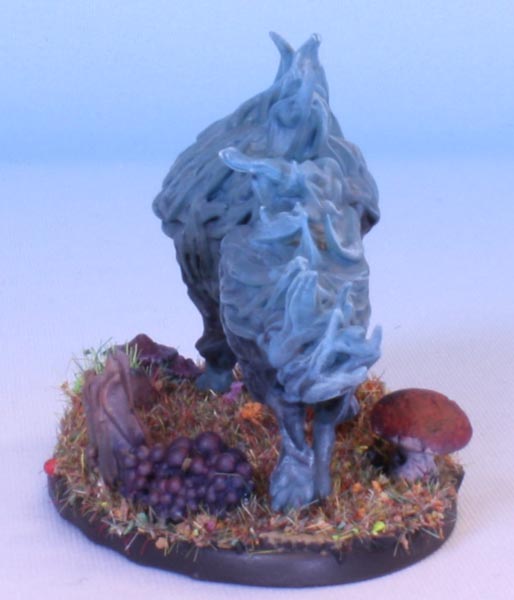
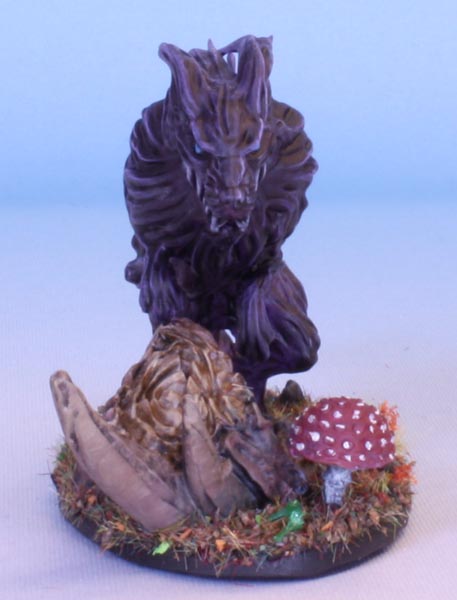
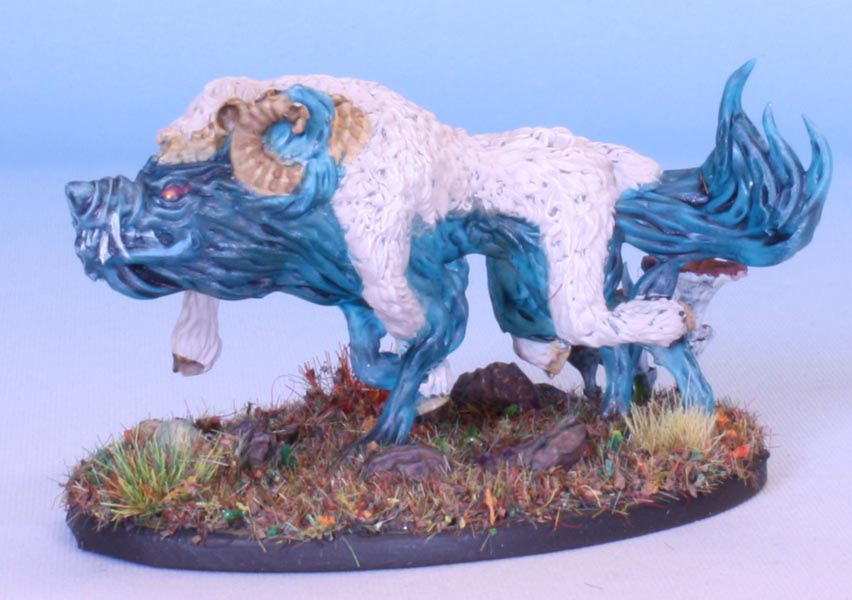
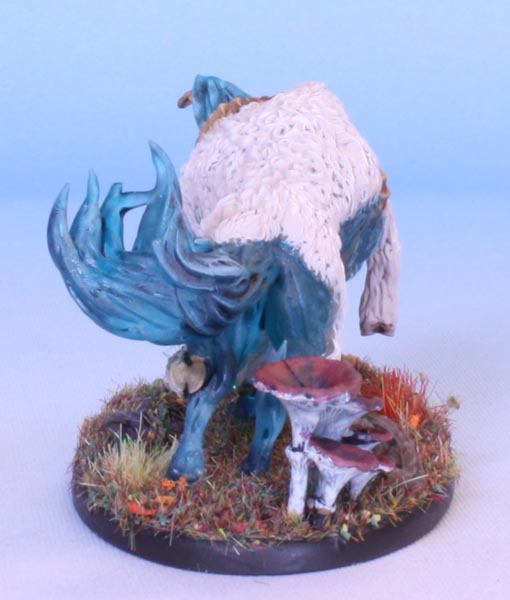
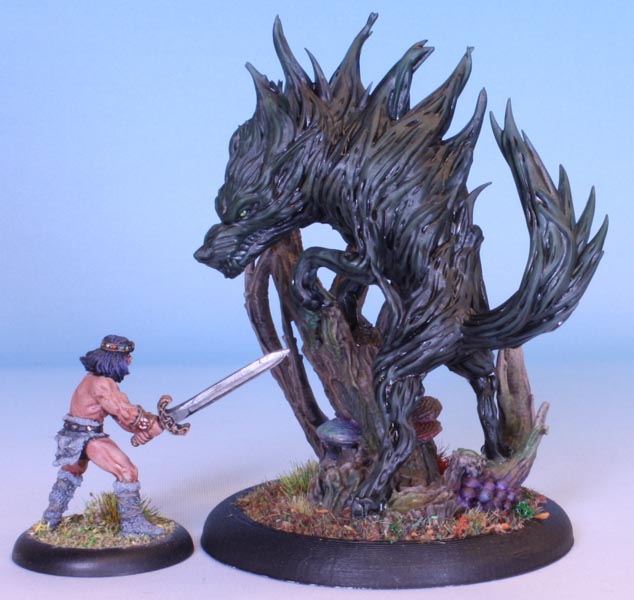
Wraith Wolves
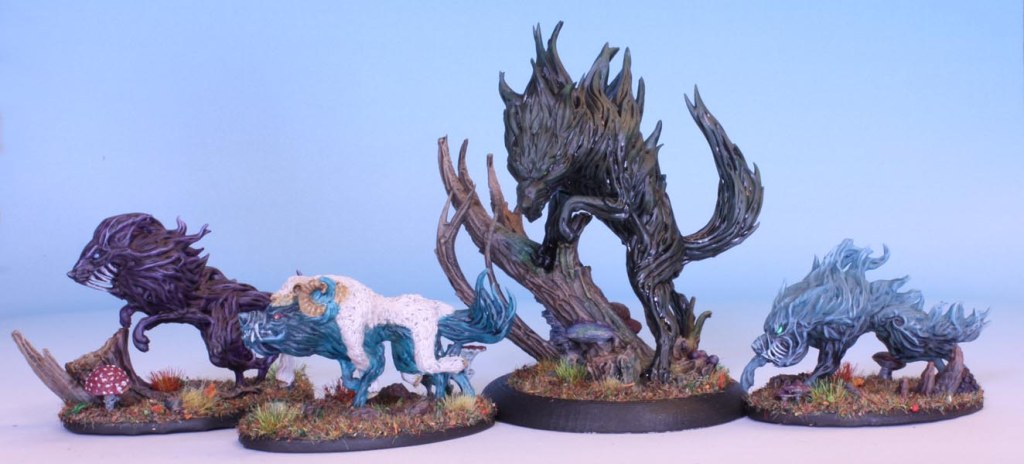
The full moon casts a pale blue light across the rugged white landscape. Tall pine trees cling to the rocky ground, branches stirring, shedding their cold white burden as the wolves breathe past. The pack is on the move, and the land is trembling beneath their step. They move with purpose, something is not as it was before. There! An affront; a boat pulled ashore, a small group of fur-clad prey around a campfire, round shields and axes in sight. From the treeline the windwolves move, silent, swift, cold gusts of dark shadow, spirits of malice descending upon the men with claws of ice and fangs of doom.


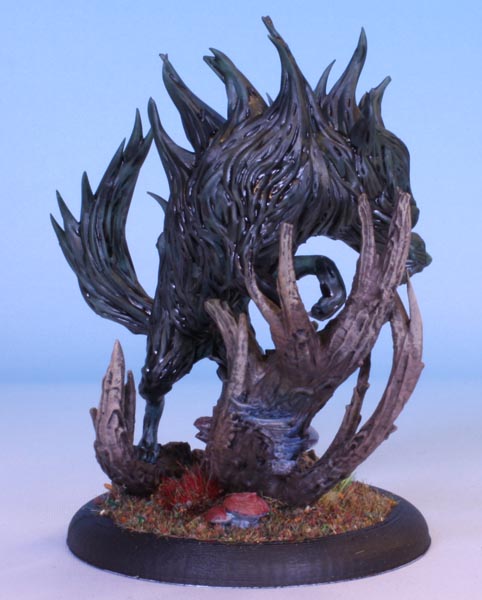
The Wraith Wolf Alpha. I made it an extra base rim to go around the original 50mm base. It is now 65mm. It was mainly painted with Citadel Black Templar Contrast and Reaper 09411 Wilderness Green and a slight bit of Vallejo Model Color 70.967 Olive Green. All the Wraith Wolves are printed in clear water-washable resin that turned distinctly yellowy after curing in the UV-chamber. I sprayed them with matte varnish before painting.
These are further early fruits of the Elegoo Mars resin printer. The Wraith Wolves by Asgard Rising. They run a patreon centered around fantasy viking / norse type .stl files for both minis and terrain pieces, and they are simply gorgeous.


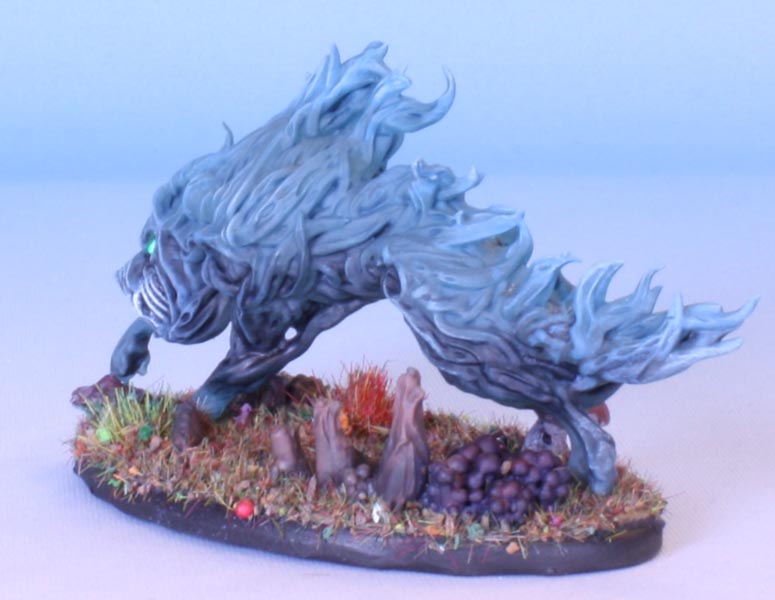

This one was painted with Citadel Nighthaunt Gloom and Army Painter Dark Tone quickshade ink. Then drybrushed with light bluegrey for the most part.
These are some of the earliest ones I made supports for and printed without the prints failing in some way or other. I view them as test subjects both for the printing and also the painting.


This one is painted in Citadel Shyish Purple Contrast with Vallejo Nocturna 74.026 Purple Hex and 74.032 Orchid Light for the most part. Shyish purple is really strong and overpowering. It does not behave much like most of the other contrast paints, but more like the nighthaunt gloom technical paint, that also is very strong and overpowering.
If you look closely, there are some bad support marks, divots etc in inopportune places (such as smack in the middle of the face / mouth) which ruined the details there, broken wisp-ends and such all over these. You can also see where the bases have deformed slightly where the supports were. I know I should have sanded these but did not.
I have since refined both the angle of the mini and the placement of supports to avoid the worst of this. I will probably be printing out new ones at some point.


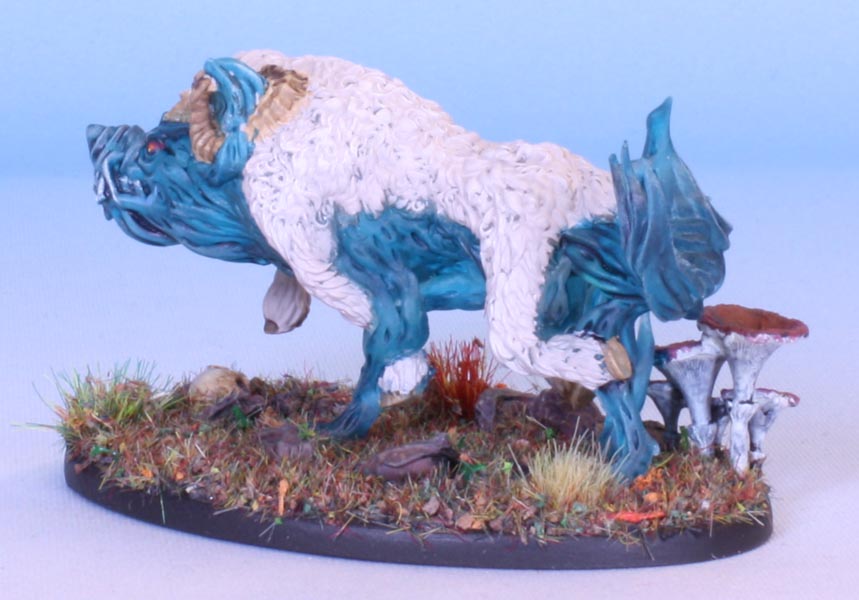

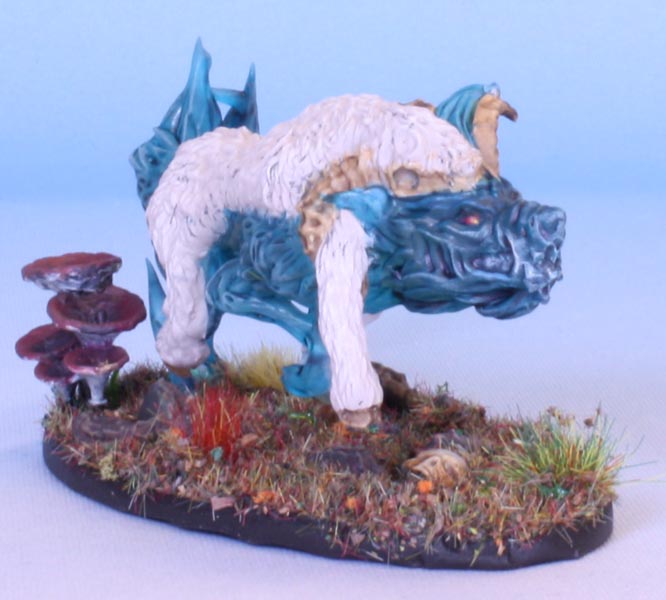
The Wolf in Sheep’s Clothing was painted with Citadel Akhelian Green Contrast and some Reaper MSP 09323 Glacial Mist for the spiritwolf and Vallejo Nocturna 74.015 Pale Flesh and Reaper MSP 09272 Graveyard Bone for the sheepskin, with Flames of War Sicily Yellow and Vallejo Model Color 70.976 Buff with Army Painter Strong Tone quickshade ink for the horns, hooves and bone details of the sheepskin.
All the bases were very finely detailed with leaves and such. I painted up some of the larger details like mushrooms and branches, and covered the rest with my usual autumnal flockmix like I do most of my minis these days.
The three little wolves have 60x35mm bases.
Some musings:
There are many things about 3D printing my own minis that make this a paradigm shift in my approach to minis in general. One is that I no longer need to be too intimidated by or apprehensive of ruining a very expensive mini with a bad paint job. I can experiment freely as I can always make another print! Even if I never get around to printing off another of a given mini, it still represents a sort of epiphany or free-your-mind-situation for me. I had a similar epiphany when I first got into the Bones minis. The “cheapness” of them takes away some of the pressure to do my best, and a serviceable result is perfectly acceptable.
For my part, I do all this as a hobby to unwind. I do not feel the need to chase excellence with every mini I paint. But I do like to try new paints and effects to see what happens.
Enter these minis I print myself. So what if I mess up? I can print out another and try again!

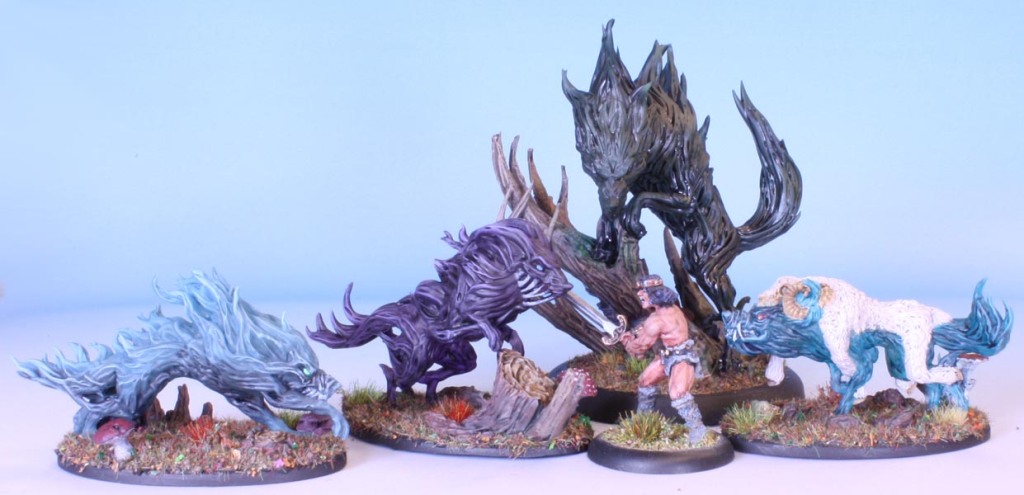
The Wraith Wolves are from the Asgard Rising Patreon in May 2020. The files can currently be bought from their MyMiniFactory store
The Next Generation
I have at long last taken the plunge and bought a resin 3D printer. I have been waiting for water washable resin to become available in my country. When I found a supplier a few weeks ago I ordered an Elegoo Mars Pro.
After this arrived, I have been spending far too much time trying to print a selection of minis, most of which have failed in one way or another.
It turns out that most “pre-supported” minis are not really supported enough for me. Many of the minis have ended up being sucked off the supports or with flat bits here and there, such as arms and or legs. These kinds of failures are typically due to insufficient supports, and I am too much of a noob to be able to tweak the settings properly to make them work.
So instead I make my own supports, or beef up what is already there in some cases. I think I have gotten the hang of it, and most of my current prints are not failures. But now I might have too much supports. I spend ages snipping them off, often creating divots and marks here and there.
I would much rather have a few marks than failed prints!
As I learn how all this works, I hope to be able to tweak the settings and rely less on thick support structures.
But anyway, here is one of my first successful prints, all painted up:


This is the Demiliche by Cult Miniatures. Actually a freebie with their now closed Patreon.
I printed it in clear resin which promptly turned distinctly yellow after a spin in the UV-chamber.
A simple paint job, I used Citadel Tesseract Glow on the top and Vallejo Black Green ink on the bottom half, avoiding too much pooling. I tried using different contrast paints on the skull, but they did not work at all over the clear parts. I painted over with several bone colours, some blue and red for the eyes and jewel, and added a light wash of strong quickshade around the edges.
I put it on a 40mm base which itself was 3D printed but on my old FlashForge Finder. This has since been taken out of service due to my purchase of an Ender 3 pro to replace it. The FlashForge Finder was good as long as it lasted, but in the end the too-small print bed and mounting leveling problems spelled it’s doom.

Methinks there will be an influx of 3D printed minis in the near future…
This mini was finished October 4th 2020.
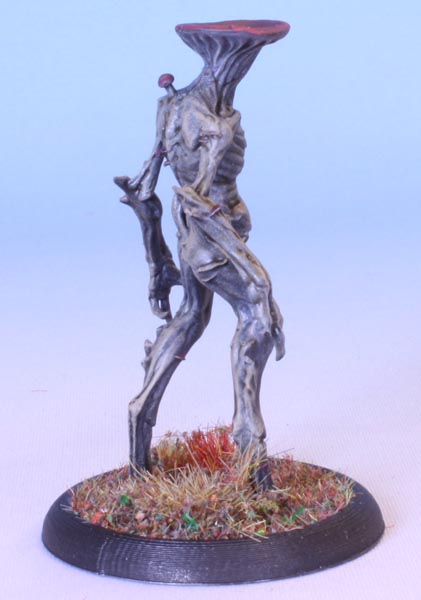
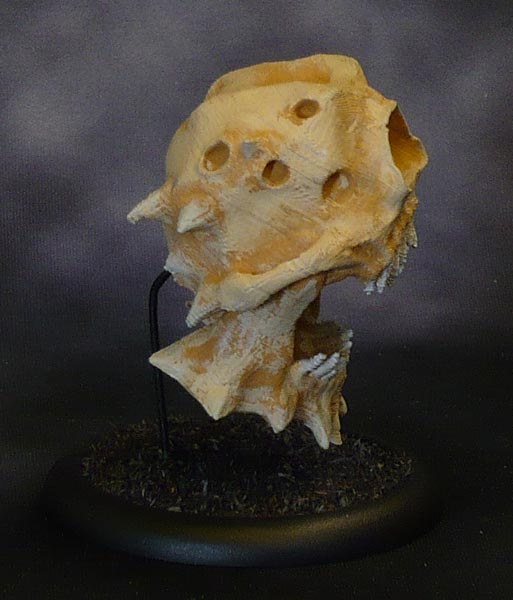
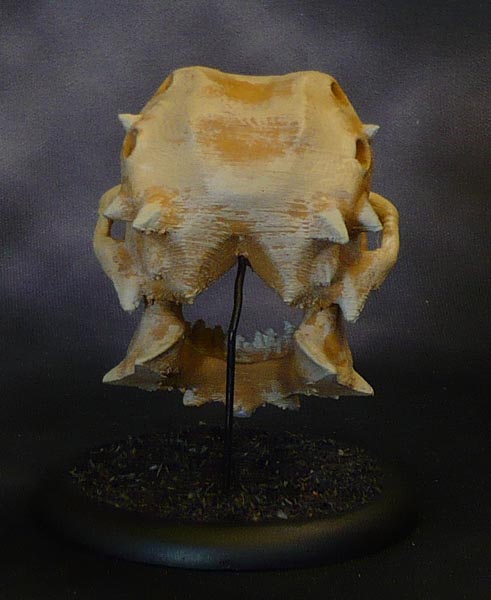
Skyless Realms Rock Beast
The Skyless Realms was a kickstarter for some .stl-files that funded recently and delivered just a couple months ago. The theme was buildings, scatter terrain and miniatures of several kinds that would typically found in the Underdark setting for D&D. Centered around spider-worshipping Dark Elves, there are a bunch of classic cave and dungeon monsters, Deep Gnomes, Gray Dwarves, lizardfolk and the obligatory tentacle-faced horrors that want to suck out your brains. A whole lot of stuff!
Here is a Rock Beast, which is meant to be a Xorn Earth Elemental monster from D&D,


It did not print perfectly….the lower part of the arms were spaghetti as the PLA had not settled properly, even with supports. I just cut off the excess and carved the rest into shape. You can see in the pictures where it went wrong.
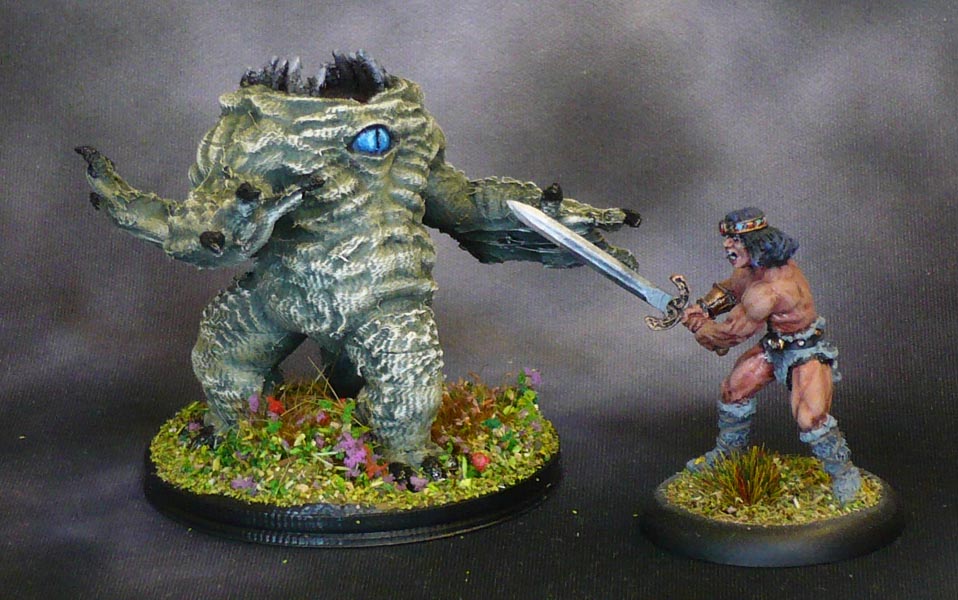
48mm integral base. Printed in one piece with supports.
I have used the default settings from the Flashprint slicer program I got with the printer. The setting I used on this is “Standard”, with 0.18mm layer height and 0.27mm first layer. Shell: perimeter 2mm, top and bottom layers 3mm
infill 15%, hexagon pattern, combine every second layer
print speed 60mm/s, travel 80mm/s
temperature 220 degrees C
enable supports, auto made treelike supports,
no brim or raft (the minis have bases, so they do not need this)
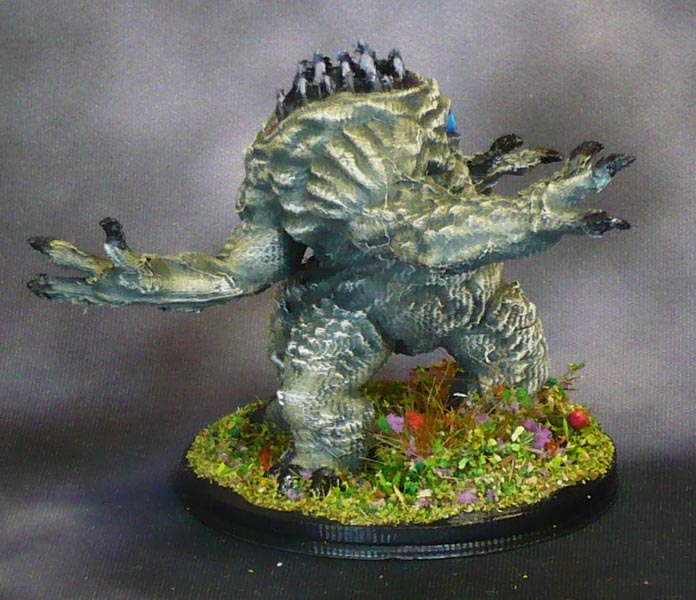
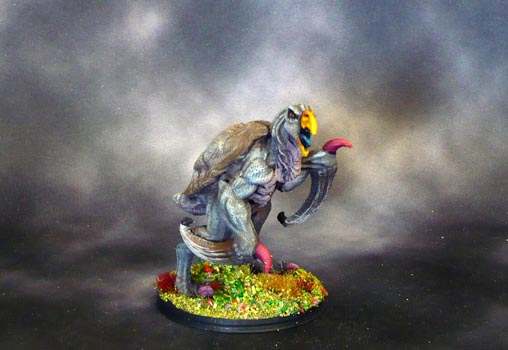
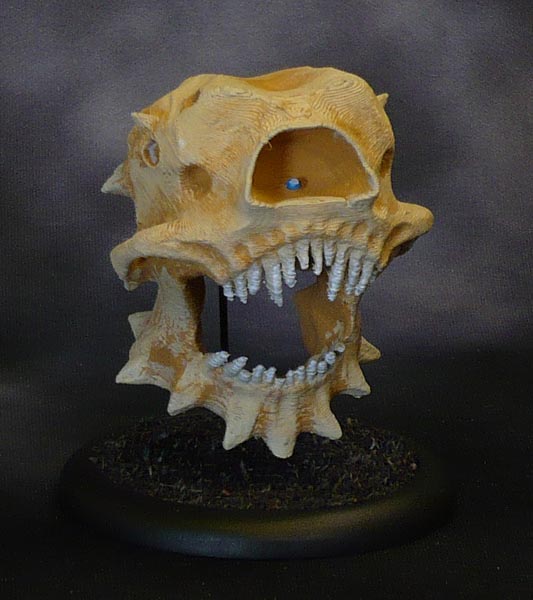
Myconids and Hook Clacker from Skyless Realms by EC3D
The Skyless Realms was a kickstarter for some .stl-files that funded recently and delivered just a couple weeks ago. The theme was buildings, scatter terrain and miniatures of several kinds that would typically found in the Underdark setting for D&D. Centered around spider-worshipping Dark Elves, there are a bunch of classic cave and dungeon monsters, Deep Gnomes, Gray Dwarves, lizardfolk and the obligatory tentacle-faced horrors that want to suck out your brains. A whole lot of stuff!
Now, I have a two year old cheapo flashforge finder FDM-printer that only uses PLA material. It is great for terrain and buildings, but not so great for miniatures because of the unsightly print lines and such.
However… the print lines are really not all that bad, especially when seen on the table and not in extreme close-up as in the photos.
And I even printed these at the “normal” settings which have a .18mm layer height and not the “hyper” settings which has a .08mm layer height.
Each of the smaller myconids took less than an hour to print, and the Behemoth about four hours in a single piece.


The “Hook Clacker”, which would be the D&D Hook Horror. 48mm integral base, printed in a single piece, with supports.
I drybrushed this a lot, which really brings out all the printlines!
I find that my printer leaves a “fur” of fine, hair-like strings when printing rounded details. Trying to take this fur off the old fashioned way with knives, files or scrapers is contraindicated as it is a really annoying chore to do and the results are less than optimal.
But then a blast of inspiration hit me: KILL IT WITH FIRE!
Now I burn the fur off by rapidly flicking a lighter’s flame over the model in short, controlled bursts.
Outdoors, as the resulting fumes and smell are not welcome indoors.
PLA has a relatively low melting point, so this needs to be done quickly and carefully so the other details are not affected. It literally takes less than a second to clear off the offending fur-material.
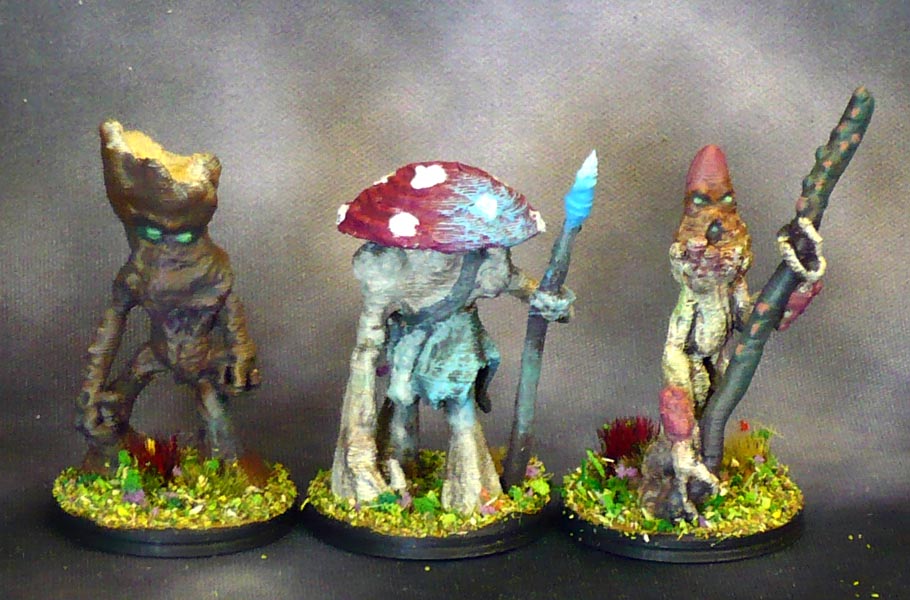
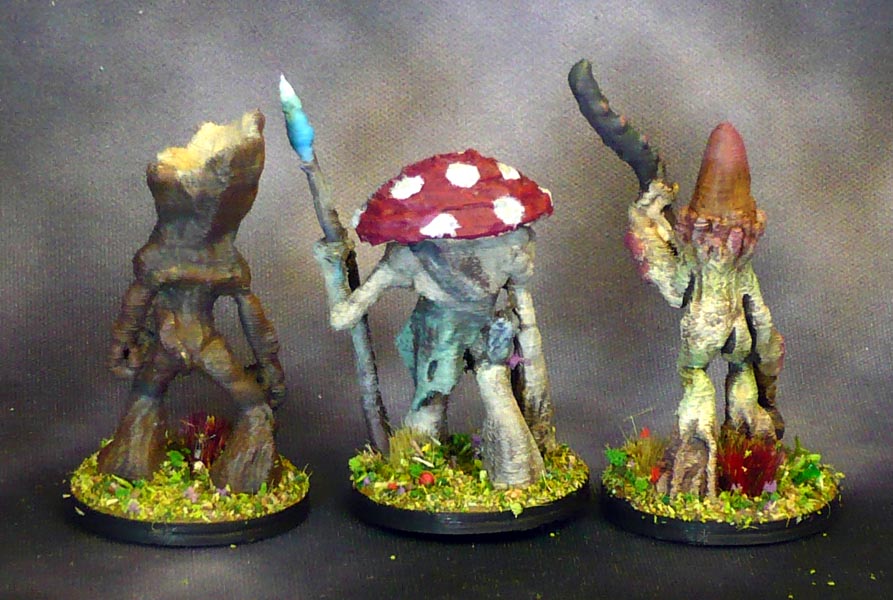
The three Myconids. 25mm integral bases. The one in the middle is in two pieces (the toadstool cap), the others are single piece prints.

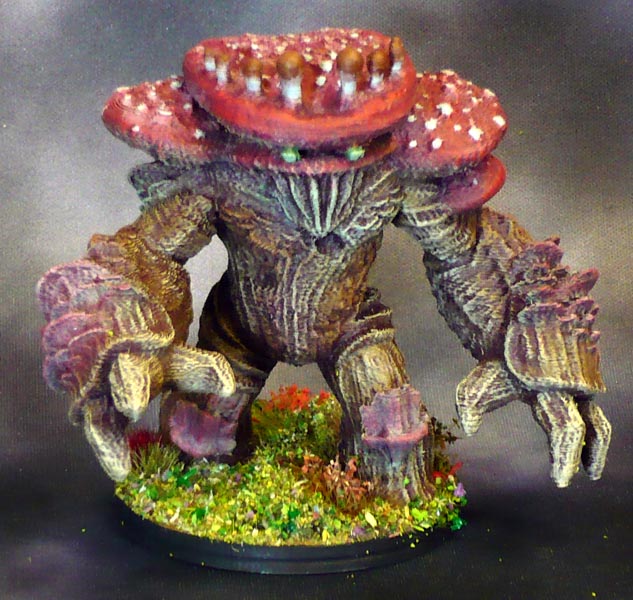
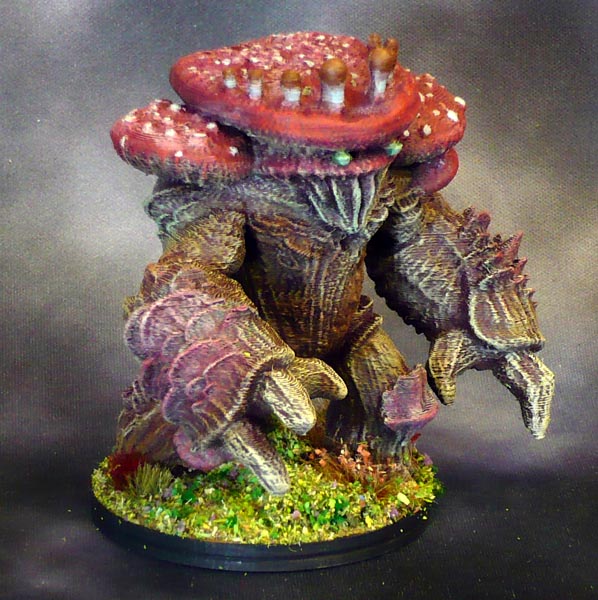
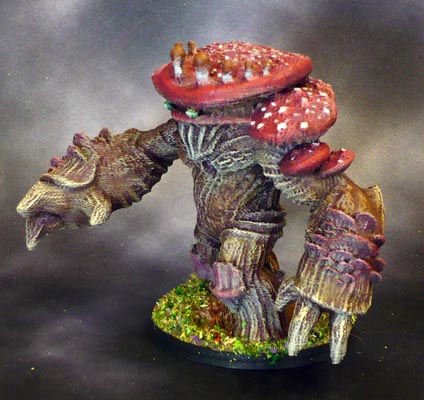
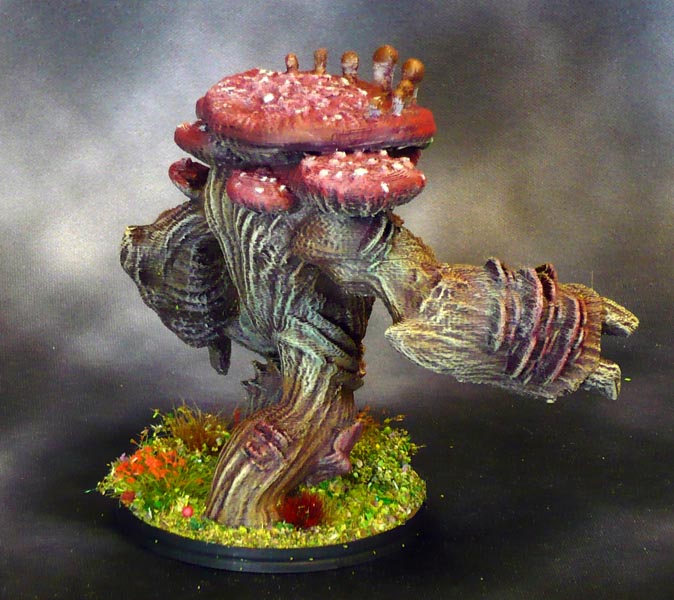

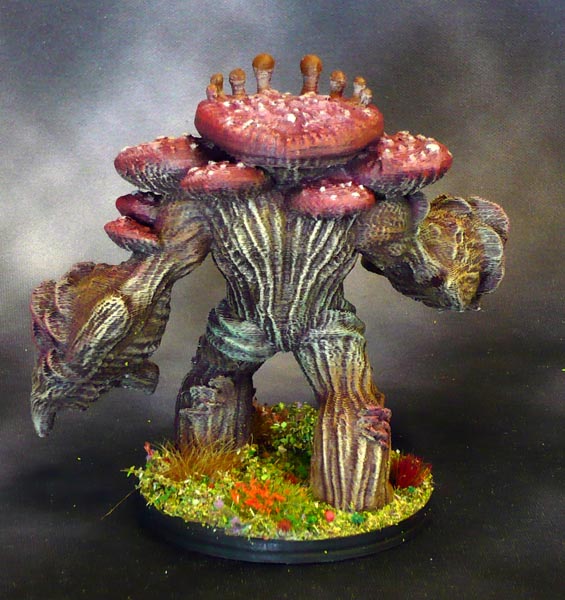

The Myconid Behemoth. Also a single piece print. The “eyes” are actually bits of the supports that I chose to leave on, as they gave it an interesting face. I expect the crown of toadstools might be meant to be eyes on stalks.
48mm integral base.
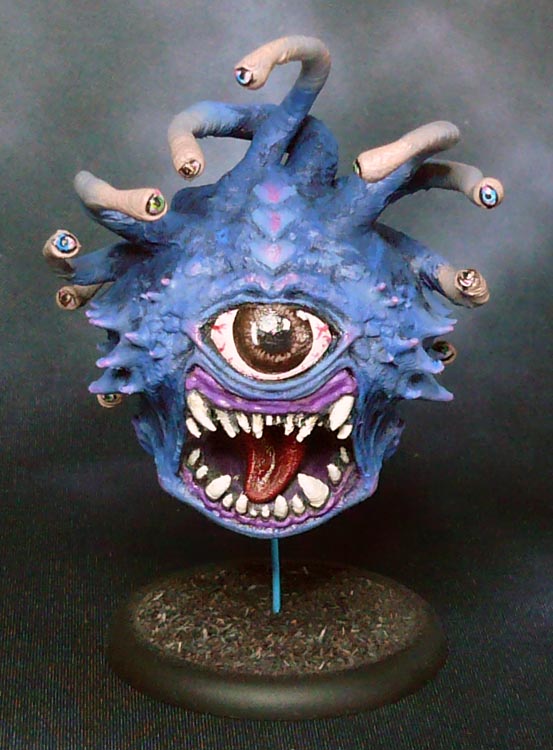
Death Tyrant by Axolote
Warming up the 3D printer again, I have revisited a few of the beasts from one of the Axolote Gaming kickstarters.
Here is a Death Tyrant, which is an undead Beholder. It should have a smattering of floating, ghostly eyes surrounding it. Not sure how I want to do that though. Maybe bend some pins with round heads and stick them in?


It is printed in PLA on my Flashforge Finder with standard options, 0.18 layer height. It took about a hour and a half to print out. I gave it a 50mm base and used a paperclip to make the stand.
As I printed it on standard the stepping is a bit more pronounced than if I had printed it on extra fine. Which does not matter much as it is not really visible on the tabletop anyway.
This is a really rough and ready five minute paint job, started out painting the whole thing skeleton bone, and then globbing some leather brown in all the recesses, and then going over with some more skeleton bone. Fangs in grey and lighter grey. Some dark blue, light blue and a dot of white on the central eye dot. (I am thinking of revisiting this and adding some OSL inside the eye socket.
I did the base in black scatter as I think that fit the model better than the green meadow I ususally do.
Death Tyrant
design by Axolote Gaming
printed in PLA at .18 layer height
50mm base
Originally posted @themountainsofminis.com Jan 13th 2019
Gorilla by mx4250
Just a few years ago, someone* wrote in their results statements thingy** that 3D-printing miniatures is not in any way a threat to the miniatures industry:
“We know quite a lot about 3-D printers, having been at the forefront of the technology for many years. We know of what we speak. One day 3-D printers will be affordable (agreed), they are now, they will be able to produce fantastic detail (the affordable ones won’t) and they will do it faster than one miniature per day (no, they won’t, look it up). So we may get to the time when someone can make a poorly detailed miniature at home and have enough for an army in less than a year. That pre-supposes that 3-D scanning technology will be affordable and good enough (don’t bet the mortgage on that one) and that everyone will be happy to have nothing but copies of old miniatures. (…).”
So, just three years later, in 2017, I printed this minature, which I downloaded for free from drivethrurpg.com as it was part of one of many totally free packs of critters, beasts and monsters that are downloadable from that site (and they also have many packs that are pay what you want or have a fixed cost of a few dollars.)


The only alteration I did was to cut away the integral base and print it on a raft instead so I could base it in the same style as my other minis.
This ape took about an hour to print on my cheap as chips Flashforge Finder-printer, on “hyper” 0.08mm layer height. This needed supports when printing, and cost just a few pennies worth of PLA.
Yes, the details are not fantastic (but that has more to do with the tru-scale nature of this model than with the printer) and there are slight print lines visible. (not really all that visible unless it is zoomed in on as in the pictures.)
But still. We are getting there, and much faster than someone* would have thought.
*that someone being the then Chairman of Games Workshop, Tom Kirby,
**2014 GW Chairman’s Preamble to the Games Workshop CEO annual report .
3D printed Gorilla
by mx4250,
downloaded from drivethrurpg.com
PLA, 0.08 mm layer height
30mm base
Originally posted @themountainsofminis.com April 16th, 2017
Beholder by Axolote
And they* said 3D printing poses no threat to traditional miniatures…
well maybe not yet, but still:
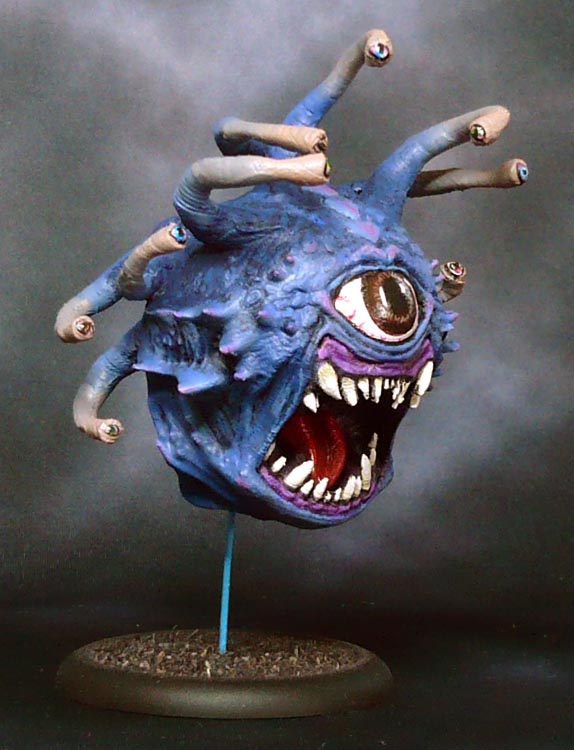
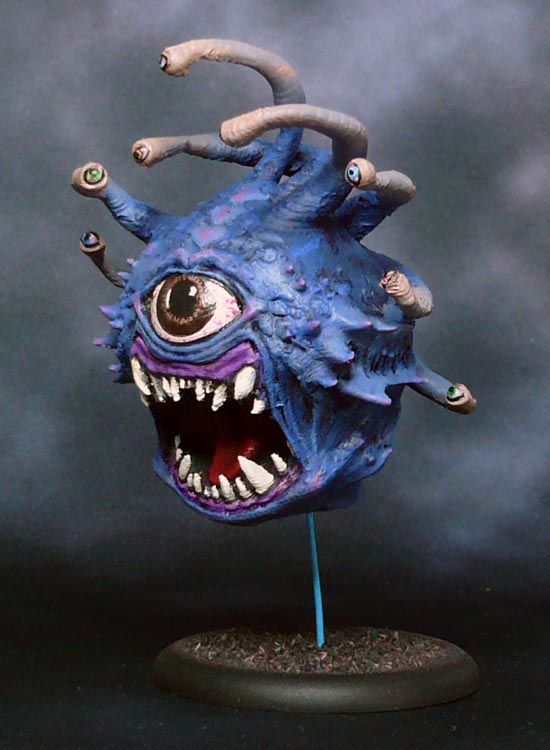
This is a 3Dprint I printed out myself on my cheapo Flashforge Finder. Printed in PLA with .08mm layer height. I scaled it a bit randomly to make a large one.
The original model is by Axolote Gaming, an unexpected bonus item from their second Kickstarter, and also one of the better models of a Beholder I have seen yet.
You can see the stepping from the printing process if you look closely. This is particularily obvious in the teeth and the eyeball as.the gloss varnish I used on the eye really made the stepping apparent. It was not half as bad before.
At any rate, the stepping is really only apparent when looked at closely, or when magnified such as in the pictures. The fangs are a bit misshapen here and there, mostly from my printer not being all that great. I have not used a file when prepping, just clippers and a sharp hobby knife. Maybe a file would have straightened those teeth out properly. Something to try next time.
The tentacles are hollow as their cross sections are to small to include any infill. This means they are quite brittle and prone to snappin off. Luckily only one of them broke during the removal of the supports though.
My printer also left a lot of extremely fine hair-like strings attached to the finished print, so together with removing the print-supports there was quite a lot of prepwork.
At least I did not have to wash it to get rid of the mould’s release agents, as I have realized the truth: there is no mould.


A note about painting 3D models: Neither drybrushing nor washes are good techniques for them, as the stepping will get accented and more pronounced. (and here I am with drybrushing and washes as my favorite techniques… argh!)
and to make the size apparent:

I used a 50mm lipped base with a paperclip to make the stand.
Beholder
model by Axolote Gaming
3D printed at 0.08 mm layer height
PLA
50mm base
*They still being Tom Kirby CEO of Games Workshop in the 2014 GW Chairman’s Preamble to the Games Workshop CEO annual report.
originally posted @themountainsofminis.com May 21, 2017


