


Quick and dirty stepper-motor driver tripod turret


Recommendations: 103
About the Project
After spending a small fortune on Patreon .stl creators during lockdown this month, I thought it only right to print a few out and have something to show for it!
Related Genre: Science Fiction
This Project is Active
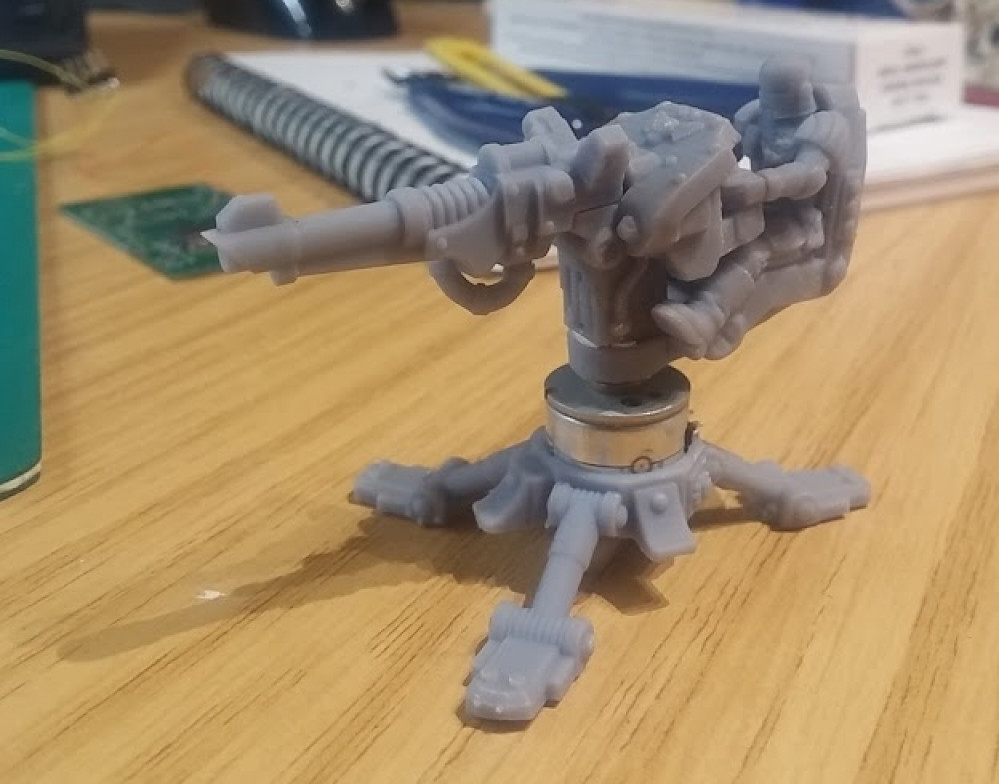
Quickl base and drybrush
I’ve not really had much time to work on the gun since I started my cyberpunk billboard project (https://www.beastsofwar.com/project/1521382) but it’s still on my painting table, for when I get an hour or two to work on it.
To date it’s had a base prime of Halfords matt black and a drybrush of Army Painter shining silver – though it probably only needs a few details picking out and the pilot painting; I’m not looking to spend too long on the paintjob on this one and I think the silver drybrush brings out much of the detail anyway!

Adding more guns to the... erm, gun.
I thought I’d knock this project out quite quickly and get another quick win under my belt, but the end result has proven to be a little disappointing. (hey, @avernos did say the other day he’d be interested to see a few failures as well as the crowning successes on my project blog!).
So to jazz things up a bit, I took the gun off and printed a number of replacements.
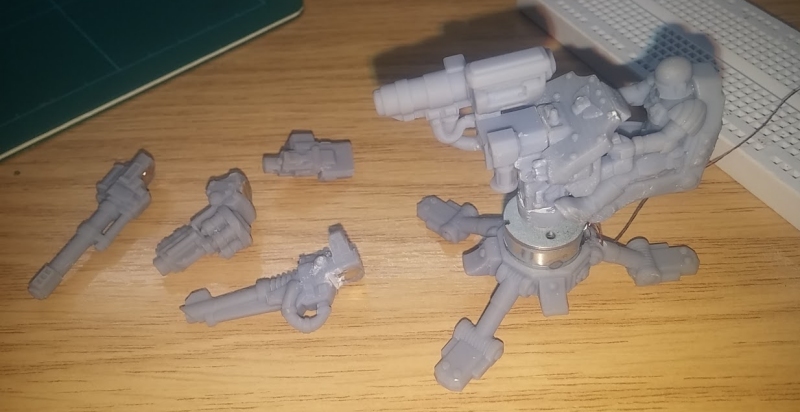
A 5mm neodymium 1mm magnet is glued to both the turret and the weaponry. So you can easily change between an auto-cannon, bolt-gun, laser cannon, missile launcher and mortar.
Even if the electronics wizardry isn’t as impressive as hoped, there’s no reason not to have a cool model anyway, is there?
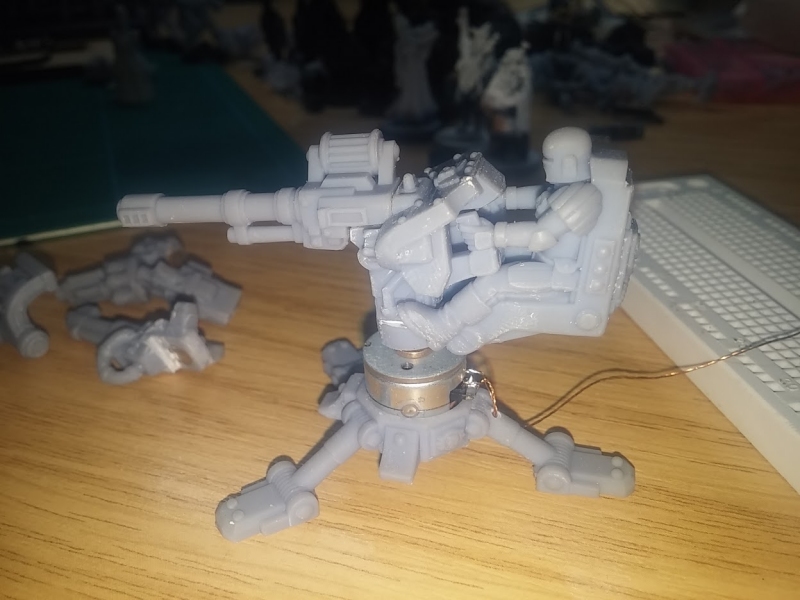 (gun turret showing alternative weaponry in place)
Motorised gun turret
I’ll be honest, the overall effect isn’t as exciting as I’d hoped. Mainly because the stepper motor I chose only had a small number of steps per complete revolution.
I think I counted 20. Which means that each single step is 18 degrees.
Even with micro-stepping, it means that the turret jumps almost ten degrees with every step. The main problem this causes is that the movement becomes very “jerky” if played back at a relatively slow speed (since the gaps between steps become pronounced.
So I had to speed up the time between steps.
The delay between steps is currently set to 25 milliseconds.
That means to complete a full rotation would take 20 x 25ms = 1/2 a second. That puts our gun turret at two revolutions per second, or a whopping 120rpm!
That’s really too fast to be of any use.
But until I can find either a geared stepper in a similar size, or a stepper with many more steps per revolution, it’ll have to do (the circuitry can remain the same for almost any stepper motor, so changing the actual motor should be relatively easy).
I think I’ll add some trickery to this, so that it’s compatible with my app-enabled hardware, used for the Titan Forge Cyber Punk diorama a few weeks back – it may look a bit rubbish, but being able to rotate a gun turret through a phone app has got to be pretty cool, hasn’t it?
Stepper motor truth table
I found an old L239D twin h-bridge chip lying around (from an old CNC project most likely) and had a quick play with it this evening. This chip allows two separate motors to be controlled, and you can change the direction of the current flowing through each, independently – effectively making each one spin clockwise or anti-clockwise as required.

The L239D is often used as a stepper motor driver: if we consider our stepper as two independent motors (since it does actually have two separate coils inside the casing) and by activating the coils in a specific sequence, we can get the motor to turn.

I knocked up a quick “truth table” for the L239D stepper motor. If you imagine the coils to be laid out as in the drawing, the power sequence is as follows:
When current flows through the first coil (at the top) the fixed magnet inside the motor is attracted to the coil (thanks to the magic of electro-magnetism). This is the first “step”.
If we then turn off the first coil and activate the second (at the side) the fixed magnet is attracted towards the second coil – the motor shaft makes a one-quarter turn.
Now let’s activate the first coil again, but this time in reverse polarity. Instead of attracting the fixed magnet, it is repelled, causing the magnet to move as far away as possible from the top coil (another quarter turn). Lastly, we activate the second coil in reverse and this repels the fixed magnet opposite the coil on the right (another quarter turn).
(In truth, a stepper motor doesn’t have a single fixed magnet, it has a number of “teeth” in which magnets of north and south “poles” are arranged so each step is much less than a quarter turn, but the principle remains the same).
So we can make our magnet flick between the 12 o’clock, 3 o’clock, 6 o’clock and 9 o’clock positions. We can also use “micro-stepping” – whereby two coils are activated at once, pulling the magnet to the half-way point between then; this can be used to smooth the rotation, where the steps would otherwise be quite large.
So looking at the truth table, we can see that step one is to activate the top coil by turning on pin 1 of the L239D stepper motor chip – this causes current to flow from pin 1 (on the motor) and pulls pin 2 to ground. In step two, we leave the top coil energised, and turn on the right-hand coil, by setting pin 3 of the L239D chip high (this causes current to flow from pin 3 on the motor to pin 4 which is pulled to ground).
In step three, only the right-hand coil is left energised.
At step four, we activate pin 2 of the L239D chip; this causes current to flow through the top coil again, but this time in the opposite direction as before – from pin 2 (on the motor) to pin 1.
The rest of the steps complete a full rotation of the motor.
Making things spin
Of course, the first thing that came to mind, having committed to this model, was to put a plasma gun on the turrent and have a fancy, LED-driven, glowing plasma coil.
But this is a gun that swings around, pointing at multiple different targets. So it made sense to turn it into a gun that swings around, pointing at multiple different targets…
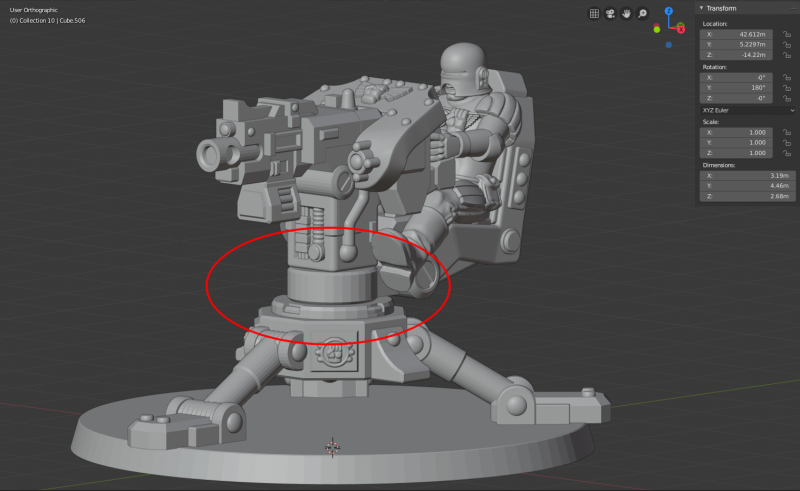
There’s a middle section in this piece which is mounted on top of a peg on the legs – it allows the top part to swivel around the z-axis.
If the peg could only be mounted on top of a motor, we could make it spin around using the magic of electricity. Except cheap hobby motors spin at something like 21,000 rpm (which might be a little bit too fast for our purposes!)
Somewhere deep in a drawer of salvaged parts, I came across a small stepper motor. It looks like it’s come out of an inkjet printer or a flatbed scanner or something. At just 16mm across, it was a perfect fit.

A quick bit of hacking in Blender and the legs had a hole just the right size to take the motor. The stepper motor already had a tiny cog fixed onto the shaft so by adding a blob of milliput inside the gun turret and smooshing the two together, I had a good, solid bond.
Having salvaged the motor from something else (quite possibly many years ago) there are no instructions readily available on how to use it – the part number has long ago worn off, and I’ve no idea what device I came from to try to look it up online!
A bit of poking about with a multimeter and looking up combined stepper motor driver datasheets and we should have this thing spinning…..
Printing Patreon
During this month’s lockdown, I’ve been hitting Patreon. Hard.
Since owning a 3d resin printer, I’ve been supporting various creators for a few months at a time (though some, like Titan Forge, have had unbroken support since the day I discovered them).
With money tight (because of the lockdown – did anyone mention, there’s a lockdown going on out there?) I’ve been spreading my monthly “allowance” around a bit, and recently I stumbled upon Monstrous Encounters (https://www.patreon.com/monstrousencounters/posts)
Their “arbiters” range look like brilliant Judge Dredd proxies (a quick headswap in Mesh Mixer and you could get away with some “modern style” Judges”. So when, this month, the Devastation Team included a guy sat on a tripod gun, I knew I just had to eke out the last of my resin to print one out!


