


Skin
• Base: AK Cork + AK Tan Yellow (50/50)
• Wash: GW Guilliman Flesh + water (50/50)
• Layer 1: AK Tan Yellow
• Wash: GW Guilliman Flesh + water (1/5) x 2-3
Aeon Trespass: Odyssey (base game, expansion and godform miniatures)
Recommendations: 359
About the Project
ATO is my first paint project where I am primarily using acrylic paints and it took me a long time to do research on paint recipes and techniques to get the results I wanted (or close to wanting). I can imagine many other people being in the same situation I was in, namely wanting to paint good looking minis but not knowing where to begin or which colors to use. So, I decided to make a paint guide for ATO (cycles 1-5 + godform miniatures) in the hopes of helping people out. This guide is heavily inspired by the paint guide made by Lawnor here on this website. His miniatures are awesome and I recommend you check him out as well!
Related Game: Aeon Trespass: Odyssey
Related Company: Into The Unknown
Related Genre: Fantasy
Related Contest: Spring Clean Hobby Challenge 2025
This Project is Active
Labyrinthauros
I really liked how Skold Painting did his Labyrinthauros (first image) so I took heavy inspiration from that to paint my own. Now I wasnt able to mimic Skold as much as I wanted, but I did get a result that I am really pleased with. The armor I wanted to do differently, because just slapping one color on and drybrushing it wasnt good enough for me. I layered on three different colors and it came out great. I could have washed it with some Seraphim Sepia to blend it together, but I liked the result as is.
Stone
• Base: GW Mechanicus Standard Grey
• Heavy drybrush: GW Dawnstone
• Light drybrush: GW Grey Seer
Marble
• Base: GW Screaming Skull
• Wash: AP Pallid Bone + AP Speedpaint Medium (50/50)
• Drybrush: GW Wraithbone
Armor
• Base: GW Warlock Bronze
• Layer 1: GW Castellax Bronze
• Layer 2: GW Skullcrusher + GW Castellax Bronze (50/50)
• Layer 3: GW Skullcrusher + GW Castellax Bronze (75/25)
Mouth
• Flesh: GW Screamer Pink
• Tongue: AK Purple + AK Pastel Violet (25/75)
• Teeth: GW Screaming Skull
White cloth
• Base: white
• Wash: GW Soulblight Grey
Tentacles
• Base: AK Magenta + AK Pastel Violet (25/75)
• Pinpoint wash: AK Magenta + water (recesses)
• Highlight: GW Pallid Wych Flesh
• Wash: AK Magenta + AK Pastel Violet (25/75) + water
Black flesh
• Base: GW Abaddon Black
• Drybrush: GW Mechanicus Standard Grey
Mutated flesh
• Base: AK Magenta + AK Pastel Violet (25/75)
• Layer: GW Ungor Flesh
• Highlight: GW Flayed One Flesh (dots)
• Pinpoint wash 1: AK Magenta + water (recesses)
• Pinpoint wash 2: AK Purple + water (recesses)
Horns
• Base: GW Rhinox Hide
• Layer 1: GW Steel Legion Drab
• Layer 2: GW Zandri Dust
• Layer 3: GW Morghast Bone
 Painted by Skold Painting
 Painted by yours truly
The Burden
This is one of the easier primordials to paint, because it doesnt have a lot of different elements to paint and the elements that are there make up a lot of the miniature.
Marble
• Base: GW Screaming Skull
• Wash: AP Pallid Bone + medium (50/50)
• Drybrush: GW Wraithbone
Stone
• Stipple GW XV-88 over the surface
• Stipple GW Jokaero Orange over 80% the surface
• Stipple GW Tao Light Ochre on the edges
• Dust drybrush: GW Screaming Skull (highlight the edges and lightly everything else)
Thin all paints with water to stipple and blend it while its wet. Move fast with this. Make sure the colors are blended properly.
Legs
• Base: VAL Brass
• Wash: GW Nuln Oil
Water
• Base: AK Ducat Blue
• Highlight: AK Snow Blue
• Gloss varnish: GW Ardcoat
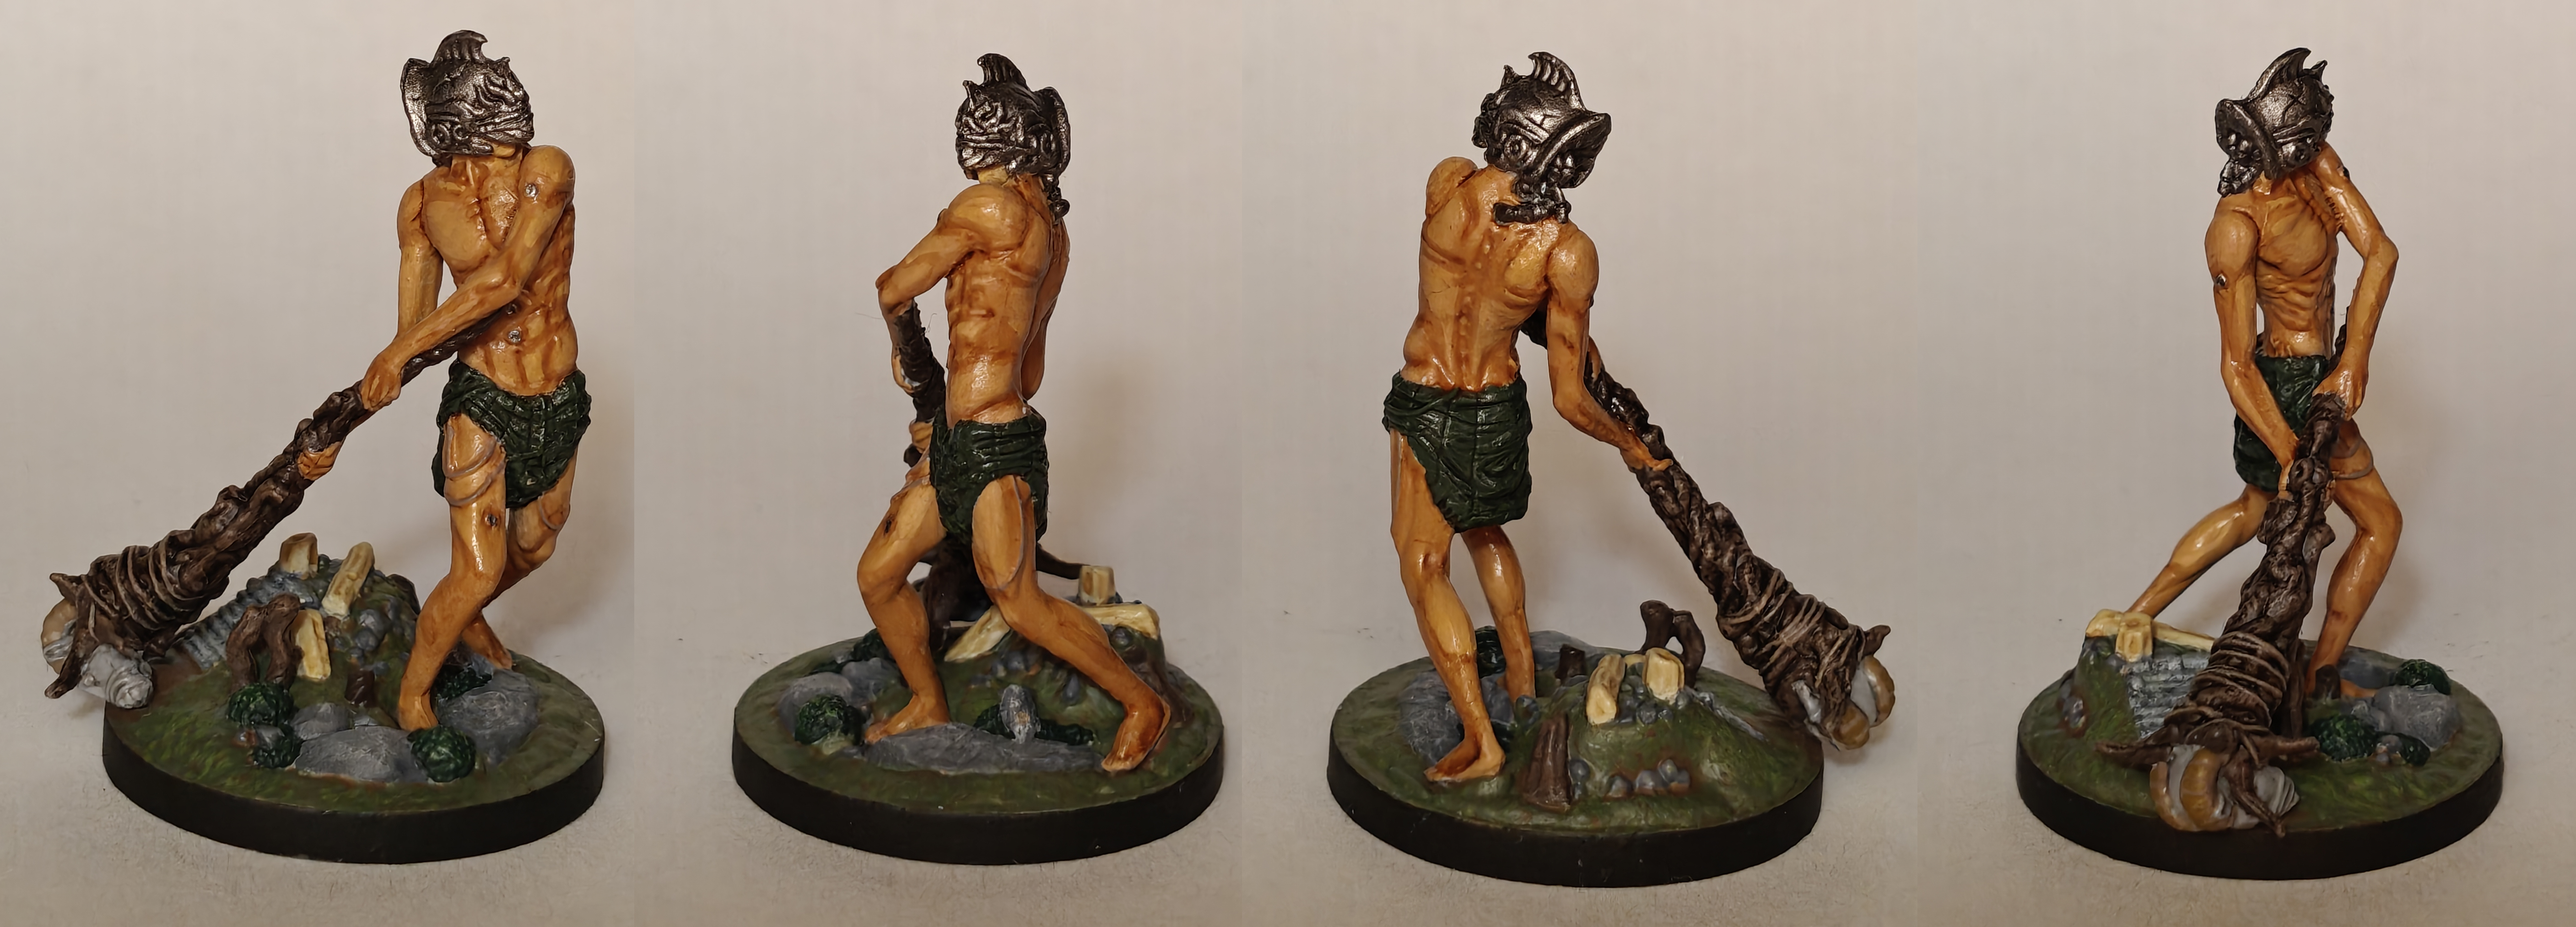
Person
• Base: GW Cadian Fleshtone
• Wash: GW Guilliman Flesh
Herodotus – Philoctera – Solon - Ulyssea
The first Titans I have painted. It took me a while to figure out how to paint the skin and I figured out that blending on small miniatures like this is not really effective nor efficient. So I used contrast paints as washes to blend the different layers together. Looking back I should have used less layers of contrast paint to have a higher contrast between the darker and lighter layers on the skin. Lesson learned! These miniatures came out better than I ever expected so I am pleased with them.
Wooden weapons + shield
• Base: GW Dryad Bark
• Drybrush: AK Dark Brown
• Wash: GW Agrax Earthshade
• Drybrush: AK Dark Brown
• Drybrush: GW Baneblade BrownMetal (helmets)
• Base: GW Iron Warriors + black (50/50)
• Drybrush: GW Ironbreaker
• Wash: GW Nuln Oil
• Base: GW Dryad Bark
• Drybrush: AK Dark Brown
• Wash: GW Agrax Earthshade
• Drybrush: AK Dark Brown
• Drybrush: GW Baneblade BrownMetal (helmets)
• Base: GW Iron Warriors + black (50/50)
• Drybrush: GW Ironbreaker
• Wash: GW Nuln Oil
Metal (weapons)
• Base: GW Leadbelcher
• Drybrush: GW Runefang Steel
• Wash: GW Nuln Oil
Brown cloth
• Base: GW Baneblade Brown
• Wash: GW Agrax Earthshade
Light green cloth (all)
• Base: GW Loren Forest
• Wash: GW Athonian Xamoshade
Dark green cloth (all)
• Base: AK Dark Green + GW Loren Forest (50/50)
• Wash: GW Athonian Camoshade
Purple cloth
• Base: AK Violet Red
• Wash: GW Carroburg Crimson
Brunette hair
• Base: AK Grim Brown
• Layer 1: VAL Charred Brown
• Layer 2: AK Dark Rust
Weapon (stone + stone base)
• Base: GW Mechanicus Standard Grey
• Drybrush: GW Dawnstone
• Light drybrush: GW Grey Seer
Marble
• Base: GW Screaming skull
• Wash: AP Pallid Bone + AP Speedpaint Medium (50/50)
• Drybrush: GW Wraithbone
Ground (base)
• Base: AK Dark Brown
• Stipple 1: GW Loren Forest
• Stipple 2: AK Golden Olive (alternative GW Moot Green)
Bushes (base)
• Base: AK Black Green
• Drybrush: GW Warpstone Glow
• Lighter drybrush: AK Golden Olive
Trees (base)
• Base: GW Dryad Bark
• Drybrush: AK Dark Brown
• Wash: GW Agrax Earthshade
• Drybrush: AK Dark Brown

Before we get into the paint recipes and painted miniatures ....
To start of I will be using a few acronyms which are:
– Games Workshop (GW)
– Army Painter (AP)
– AK Interactive (AK)
– Vallejo (VAL)
(Un)necessary tools
Before I share pictures and paint recipes it is important to talk about the necessary tools aside from paints that you need. Here is a short list of the things I used and if they are necessary or not:
Primer (necessary)
Primer is what helps creating a basecoat to which paint can stick to. If you Go for a grey color primer. I recommend AP primers like Ash Grey. You can go for other brands, but make sure it is a light grey color or white, because it will make your life easier as some lighter paints are a bit transparent (like yellow paints) which means that you need to use more coats for a good coverage when your basecoat is of a darker color. You can use black as well, but like I said you will have to use more paint sometimes to get better coverage.
Brushes (necessary)
Very obvious that you need brushes, but there are many different kinds so I want to talk a little about what brushes I think are good (enough) and which are necessary:
– GW base brush – medium
– GW and VAL drybrushes – small and medium (you can use any brand)
– VAL precision – 0 and 1
– GW shade brush (old) – small (not really necessary but I like to apply contrast paints and shades with these)
– GW layer brush (old) – small and/or medium (not really necessary but I like to apply contrast paints and shades with these)
– AP precision brushes
– A set of old brushes (necessary so I recommend a cheap set from a craft store)
Now, I also have a lot of old brushes that I use for blending the bases of miniatures, to apply a basecoat or to apply varnish. I also use old brushes to apply contrast paints as contrast paints are notorious to damage your brushes. That’s why I think it is necessary to have a set of old or cheap brushes.
Paper towels (necessary)
For some this might sound strange but you need paper towels when painting. It is necessary for some techniques like drybrushing, but in general when rinsing your brush, you will need to dry it and paper towels work great for that. Some people dry their brushes with their mouth. Yes, you read that correctly but don’t be one of those people haha XD. Use a paper towel.
Surgical latex gloves or painting handle (necessary)
Your fingers excrete sweat and/or grease which will erode paint over time. That’s the reason you need latex gloves or a painting handle to avoid that.
Wet pallet (not necessary)
A wet pallet is useful when painting with acrylic paints, but definitely not necessary. That said it will make your life easier as the pallet is designed to keep your acrylic paints moisturized when painting. You can even keep your mixed paints in the pallet and they will still be wet the next day when you want to continue painting. I found it useful when painting skin, but again it isn’t necessary to have one. You can, if you don’t want to spend money on it, make your own. Just search for instructions on a search engine or Youtube.
Mouldline remover and viles (not necessary)
I got the GW ones, but these tools aren’t necessary. However, it does make your miniature look better. It can be annoying sometimes to remove them and you need to be careful to not damage your miniature, but to me it is worth it.
Plastic Putty (not necessary)
Some miniatures have gaps where different parts were glued together. These gaps can be filled with putty. There are different brands but the one that I found the most convenient was the plastic putty from Vallejo that comes in a tube. Just fill the gaps with the putty and wipe or sand it until you have the desired look. Putty isn’t necessary to have but it will make your miniatures look better.
Painting techniques
Now lets quickly talk about some techniques that I have used:
Drybrushing
This is a technique where you put a tiny (and I mean TINY) amount of paint on your drybrush, wipe most of it on a paper towel and use it on a miniature to highlight elements on your miniature. It is a beginner friendly technique that creates nice effects without much effort. Drybrushing can be used for more that only highlighting. Look up Artis Opus on youtube to learn more about drybrushing and get a better understanding of how versatile it can be.
Layering
This is also a beginner friendly technique where you put one layer of paint over another to create a (sometimes rough) transition between colors. Layering can be used for painting skin where you will have a dark tone (shadows and recesses), a midtone (which will comprise most of the miniature) and a light tone (for highlights). By layering you can create a gradient from dark to light, but the transition can be quite harsh or rough if not combined with other techniques like blending or glazing which will be explained below. If you want to learn more about layering look up Zumikito on Youtube.
Glazing
This is a technique where you thin your paints, sometimes in a 1 to 10 ratio of paint to water/medium to create a transparent paint. This technique isn’t always beginner friendly as some paints are thinner than others and knowing how thin you need to make it to get a certain effect can be difficult if you have no experience. However, this technique is often used with layering to create a smooth(er) transition between colors. This is done by apply a few layers of thinned down paint (glazes) over the layers you have painted. Bit by bit the layers get a uniform color as the glaze you use is of a single darker tone. If you want to learn more about layering look up Zumikito on Youtube.
Blending
This is a technique in which you blend two paints that are still wet together to create a smooth transition between colors. This technique is also not beginner friendly, because acrylic paints are not the most suited for blending. However, if you work fast enough and have some experience you can make pretty smooth looking transition between colors. If you want to learn more about layering look up Zumikito on Youtube.
Important tips
Important tips you should always follow:
– Paint should never be in your entire brush. Fill the brush up to half or ¾ of your brush.
– Rinse your brush often in water, because of the reason explained above.
– Clean out your paint pot fairly often. Also because of the reason explained above.
– Don’t use your ‘main’ brushes that you paint with for contrast paints, applying basecoats or to varnish, because it will degrade your brushes at an alarming rate. Use old or cheap brushes.
– Always thin down your paints with some water! Most acrylic paints are quite thick and dry pretty fast when painting. This will result in streaks on your miniature. To get a smooth finish just thin down your paints with some water.
– Always look at how much paint has been loaded into your brush. You don’t want to see a drop forming when you pull away your brush from your pallet, because that means you got too much paint loaded up. This can result in too much paint being released from your brush onto the miniature.
– When you are done painting your miniature make sure to rim it. Yeah, you heard that right. Rim your miniature because it will look that much better. Aside from the fact that it is enjoyable to do.
So the torment begins ....
ATO is my first paint project where I am primarily using acrylic paints and it took me a long time to do research on paint recipes and techniques to get the results I wanted (or close to wanting). I can imagine many other people being in the same situation I was in, namely wanting to paint good looking minis but not knowing where to begin or which colors to use. So, I decided to make a paint guide for ATO (cycles 1-5 + godform miniatures) in the hopes of helping people out.
This guide is heavily inspired by the paint guide made by Lawnor here on this website. His miniatures are awesome and I recommend you check him out as well! His guide helped me begin painting this beast of a game. However, he uses quite a lot of paints I couldnt get my hands on so I wanted to make a guide with paints that are more accessible (no offence to Lawnor!).


