


![Very Cool! Make Your Own Star Wars: Legion Imperial Agent & Officer | Review [7 Days Early Access]](https://images.beastsofwar.com/2025/12/Star-Wars-Imperial-Agent-_-Officer-coverimage-V3-225-127.jpg)


Persei-Aries War - Oriskany v. Rasmus


Battle of Nygoshima Lambda - 5 December 2522 (Alpha Aries System)
Had a great game of Darkstar against @rasmus the other day. I won’t post the whole battle report here, that’s on our Discord if anyone’s interested. Suffice it to say that we broke out the battleships for the first time in several years.
The game took seven hours, and I swear it felt like two.
Rasmus is a methodical, detail-driven, analytical player, who puts thought behind every turn, maneuver, volley, and torpedo launch. When you can genuinely put the game designer through his paces, and hand him defeats as often as not … in game as detail-focused as Darkstar …
Anyway, here are a few virtual table shots and some of the highlights.
 The initial approaches. I've got the British, coming in from the top. Rasmus has the Japanese, coming from the bottom. The basic scenario is both the Japanese and British hold possessions in the Alpha Aries (Hamal) system, and ... long story short ... they're in a bit of a fued. Initially on the back foot, the British have won a few battles and now hope to capitalize on recent success here at Nygoshima Lambda - 11th moon of the Nygoshima gas giant. This is a big Japanese colony and naval base, and the British must break Japanese naval presence here to clear the way for two Fearless-class planetary assualt ships carrying 1st Battalion, Royal Scots Dragoons and Queens Irish Hussars. Of course, the 400,000 ton Japanese Sengoku-class battlecruiser and her escorts might have something to say about that ... Hexes are 180 kilometers across (the moon at left is measured at slightly smaller than Earth). Turns are 1 minute, so one hex of movement = 3 kilometers per second. So yeah, the British are hauling the proverbial ass here, intent on closing the range with the Japanese as quickly as possible. This is because their guns have better accuracy at longer ranges, and they carry the dreaded Ki-45 "Toryu" (Dragon Slayer) gravitic torpedo. Best to get in close as quickly as possible, where your guns hit just as hard, just as accurate, and Japanese advantages are nullified.
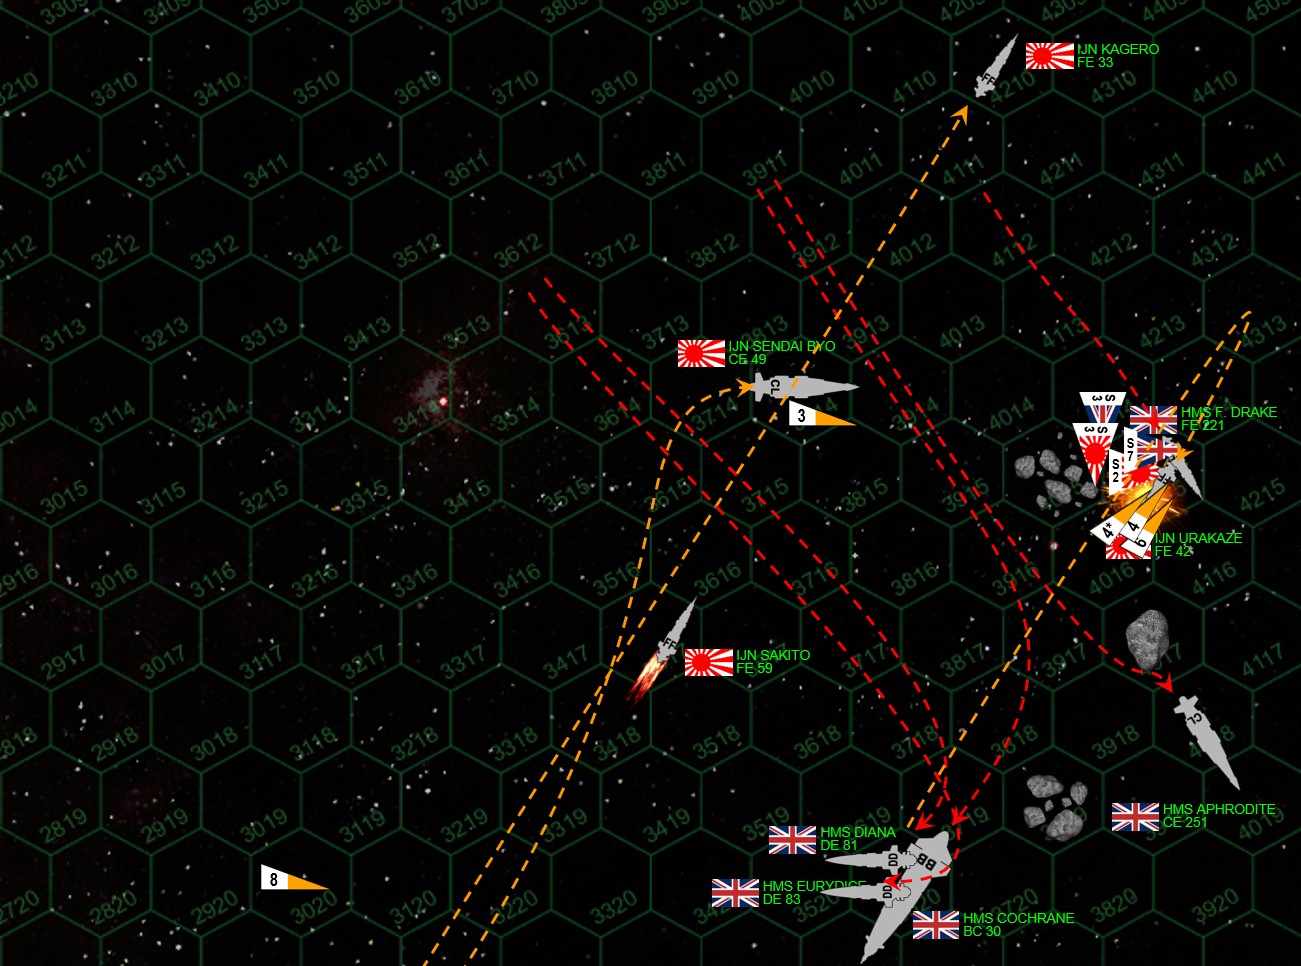 Things get VERY hairy in here, where the tight gaps between these drifting fields of orbital debris (basically, man-made asteroid fields) pose severe navigation hazards, through which both the British and Japanese are maneuvering at absurdly high speeds. This isn't a game where you can just count the hexes and move your piece that many spaces. Heading, velicity, available thrust, all combine in a semi-Newtonian movement system where you have to manage your speed, thrust, and even planetary gravity fields very carefully. And if you take a hit in your maneuvering thrusters here ... God save you. Of particular note is Hex 4115 (you probably can;t see the number), where frigates IJN Urkaze and HMS Francis Drake are engaged in a point-blank dogfight, while Japanese torpedoes scream in (orange wedges), while Japanese Ki-202 "Hien" (Flying Swallow) scout planes also howl in, intercepted by British DeHavilland "Buccaneer" scout planes, all amdist tumbling mountains of rock and iron - some of them big enough to be small moons themselves. Touch one of those rock hexes, by the way ... and die.
  The British come out of the asteroid fields in pretty good order. Two Japanese ships are already crippled, a third is looking for the door. The destroyer HMS Diana is in very bad shape, and the Francis Drake has had much of her bow all but blown off. Meanwhile, the two battlecruisers (basically, lighter, faster battleships - a kilometer long and weighing up to 400,000 tons - and yes, these are the small ones that trade some firepower and protection for speed) finally come to blows at broadsides at 1,800 kilometers. That's very close for guns of this caliber. At least part of the British plan has worked, the Japanese have been denied the longer-range gunnery duel they would probably prefer.
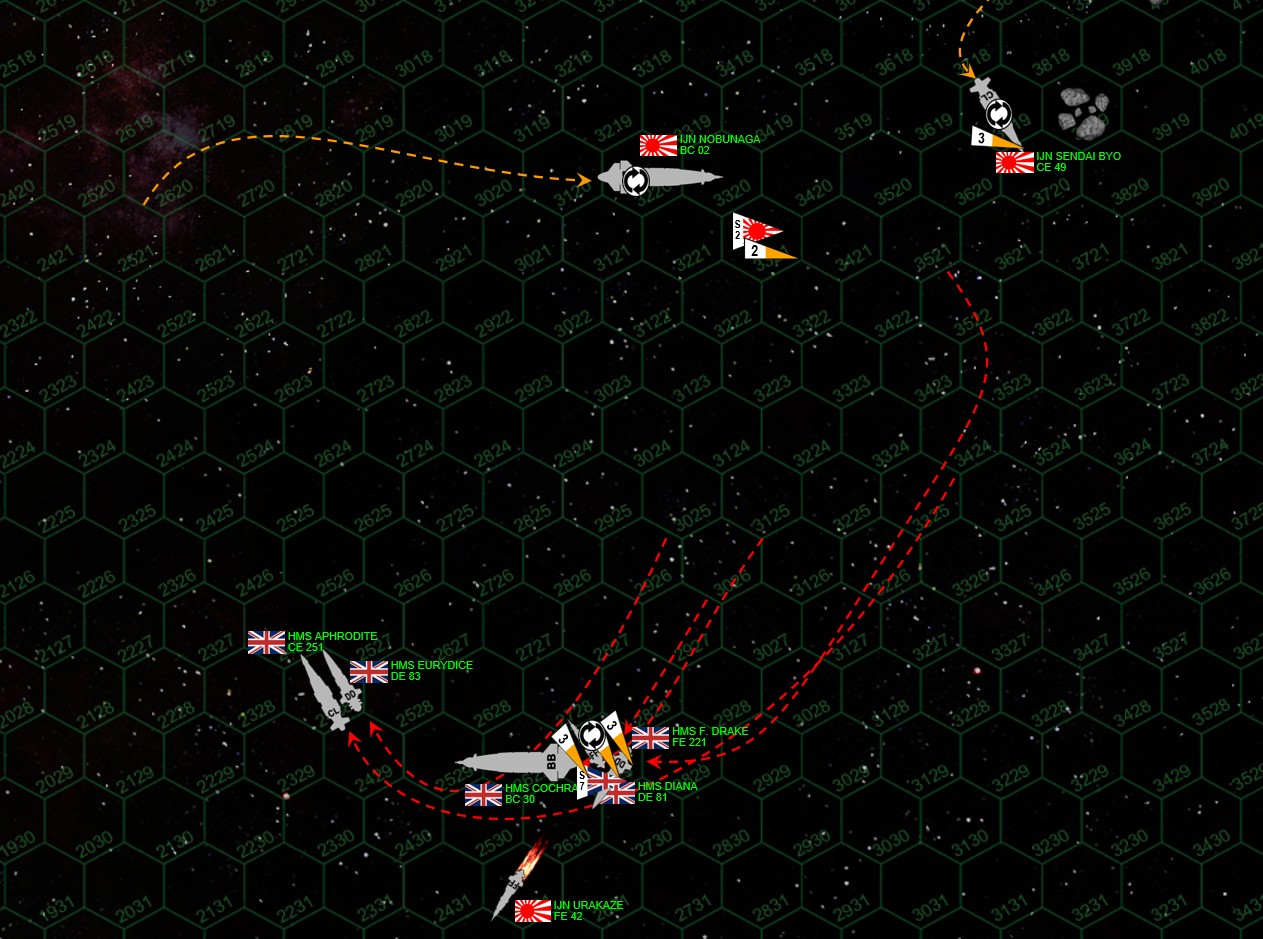 The advantage returns to the Japanese here. As the battlecruisers HMS Cochrane and IJN Nobunaga start to wheel around each other, still pounding away with starboard broadsides, the British have a problem. I'm still carrying too much speed. In summary, I can can slow down, turn, or roll my ship over. It's space, after all, I can roll my ship to present fresh armor and shielding if my starboard side gets beaten up too badly. The problem is ... I'm going at such a speed I can afford to two TWO of these things. So I turn and slow down. But I can't roll over. Rasmus rolls IJN Nobunaga, thus presenting fresh shielding and armor on his port quarter instead of his badly-damaged starboard quarter. I can;t do that quite yet, I'm still moving too fast ... so I have to eat another withering Japanese broadside in my burning, wounded side. Balanced against this, I still have my escort fleet in pretty good order, so they're adding lots of smaller guns to the argument.
 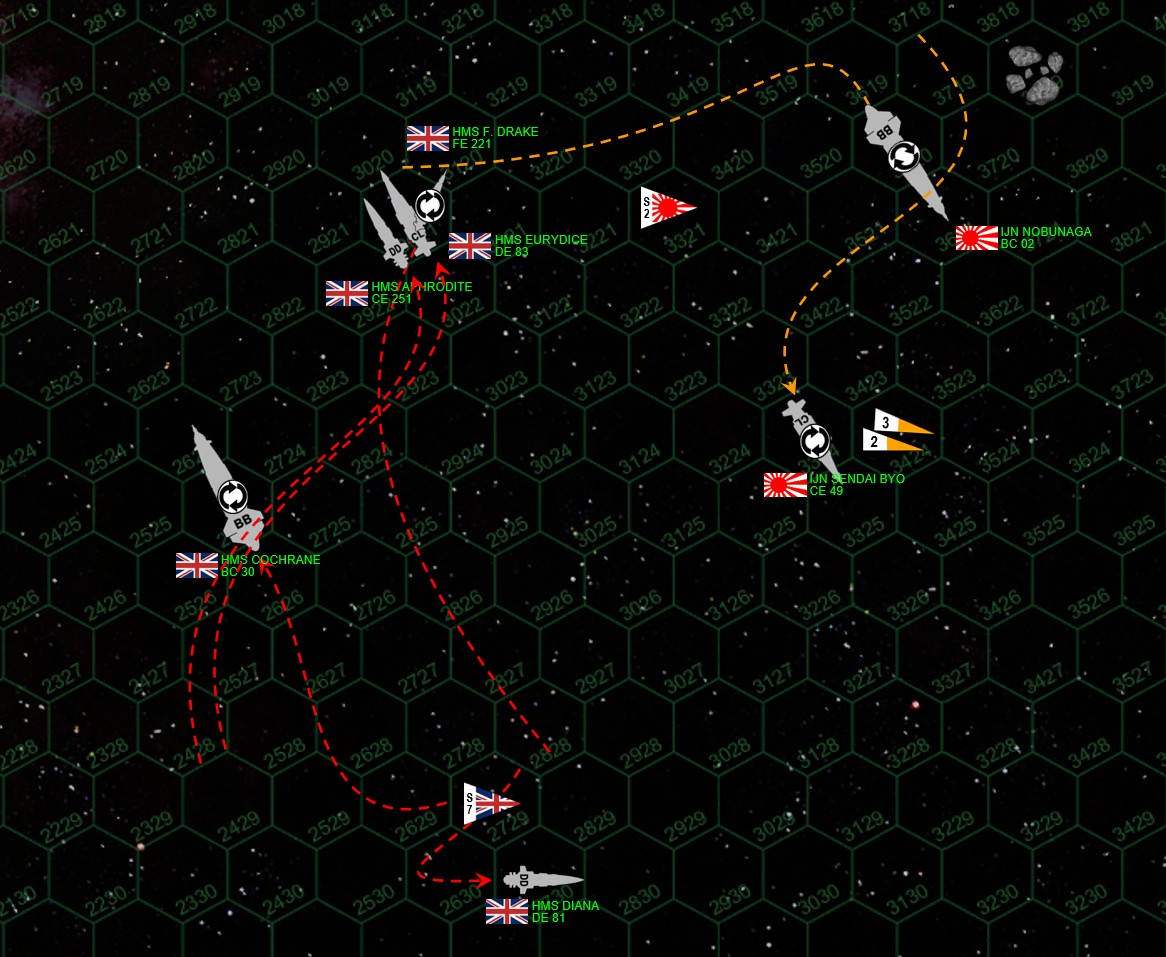 Good news, I've finally managed to roll my ship. Bad news, I've now taken sensor damage as well, giving me a penalty to hit - making it all but impossible to get through Japanese shielding. My escort ships sidestep closer, closing the range to make their to-hit rolls a little easier. But of course my big battlecruiser can't execute the required S-turn just yet - she's actually very fast for a battleship but no battleship turns on a dime. I have to hope I get lucky, and I actually do. One of the few hits I score takes out some of Nobunaga's maneuvering thrusters. Rasmus is going to have a much tougher time making turns and rolls now, making it easier to predict where he will be next turn. Meanwhile we continue to fend off waves of Japanese scout planes and torpedoes.
 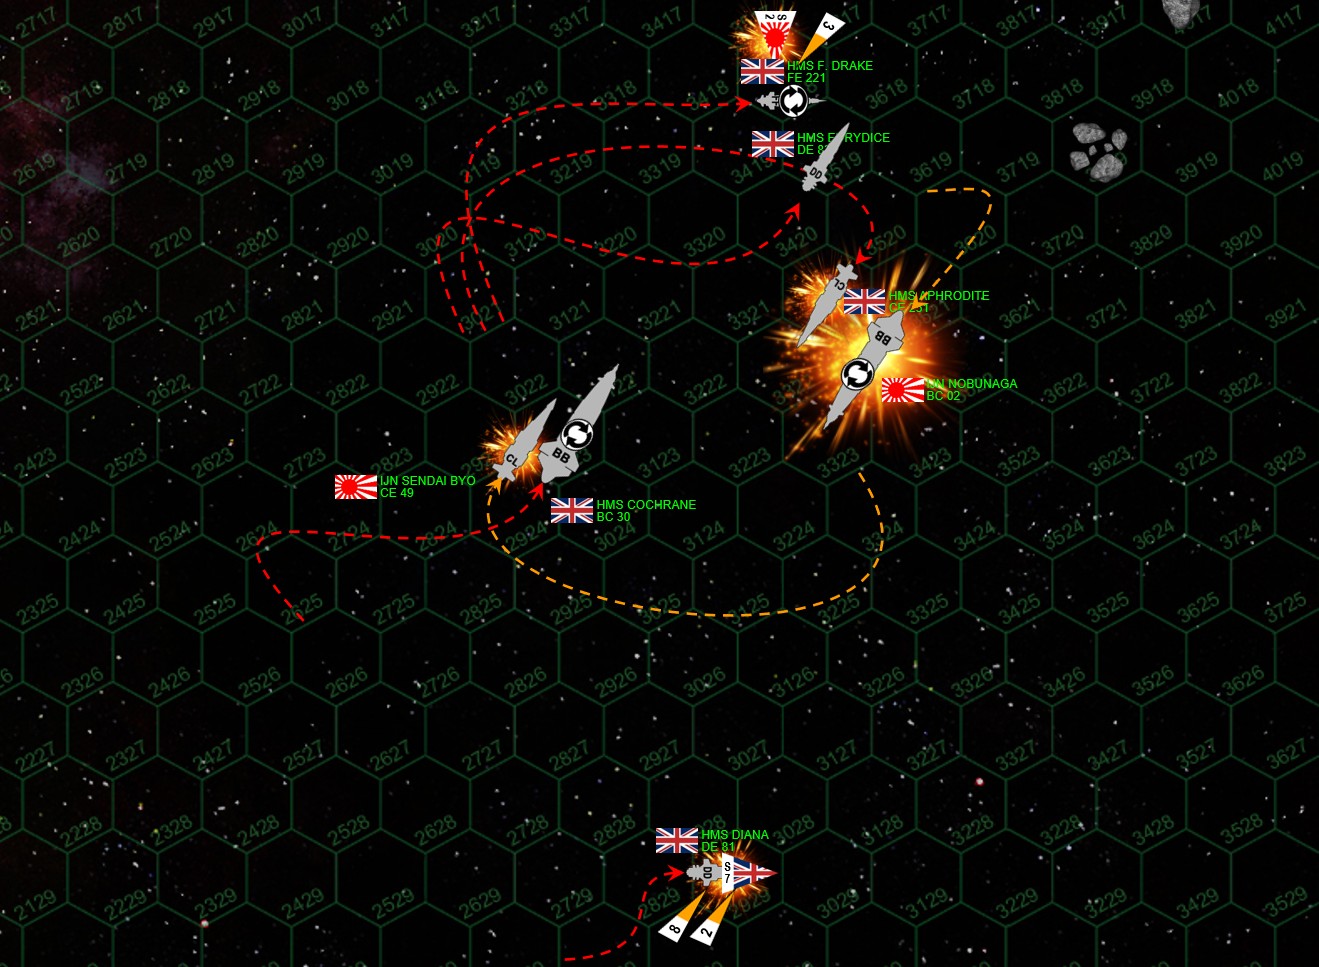 The end comes swiftly. Ramus pivots Nobunaga inside our wheeling waltz, thus presenting my guns with his undamaged port BOW rather than his port quarter (remember he's inverted, so what looks like his right side is actually his left side, etc). Ironically, our battlecruisers can barely hurt each other immediately, both of us facing (yet again) fresh armor and shielding. But our light cruisers, the IJN Sendai Byo and HMS Aphrodite, can cut in against each other's damaged quarters, even if that means instant, point-blank destruction at the hands of battleship-grade guns at 0 hexes and 1 hex range. Needless to say, we both sacrifice our light cruisers here. But for a chance to take out a battle cruiser and thus win the game? The difference here is that the Nobunaga has lost her port quarter shields, HMS Cochrane's quarter shields are still up. Cochrane takes horrific damage, but manages to stay operational. Nobunaga loses power as Aphrodite's y-gigawatt rail guns tear through exposed reactors and armor. She's left burning and adrift in space, and the British limp away with a smoking, blood-splattered, exhausted victory in the Battle of Nygoshima Lambda. As badly damaged as she may be, an operational BATTLECRUISER in low orbit over the Japanese csurface colony makes the imminent British troop landings a foregone success, marking a big step forward in the ongoing Persei-Aries War.

Subscribe
Login
Please login to comment
0 Comments
oldest


