Anatomy Of An Air Compressor Part Three – Accessories & Maintenance
February 24, 2016 by crew
Welcome back, folks, for the final article in our “Anatomy of an Air Compressor” series. In Part One we discussed the sorts of compressor available to the hobbyist and a took a high level overview of the operation of a compressor. In Part Two we looked at why a receiver is such a desirable feature, and how it improves the stability of your compressor’s pressure.
Today we shall conclude this series with a look at the various accessories you need to work with a compressor, and a take a brief overview of some routine maintenance.
Connectors
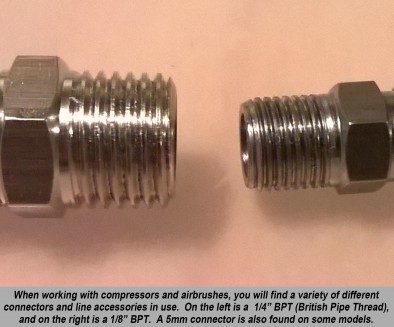
When working with compressors and airbrushes, you’ll find a variety of connectors and line accessories available for most models. Many times these are classified by the thread type they use. For hobbyists there are three main thread types in use.
On most compressors you will find 1/4” BPT (British Pipe Thread) used for connections, as this is the standard size used for most air tools. However, airbrushes tend to use a smaller pitch thread 1/8” BPT, so it is common for a compressor to come with a 1/4" to 1/8” BPT adaptor.
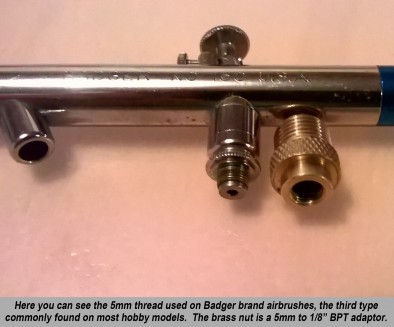
The third commonly found thread size is 5mm, often used by Badger brand airbrushes. Unless you use Badger airbrushes exclusively it makes sense to use a 1/8” BPT airline and use a 5mm to 1/8” adaptor to connect the airbrush.
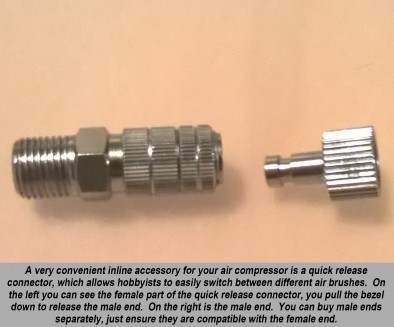
As mentioned, there are various inline (i.e. they are mounted on the air line) accessories. Perhaps the most useful is a quick release connector, which allows you to quickly swap airbrushes and swill out the paint cup between colour changes. These are a two-part connector, featuring a male and female end, where you pull on the female bezel to release the male end.
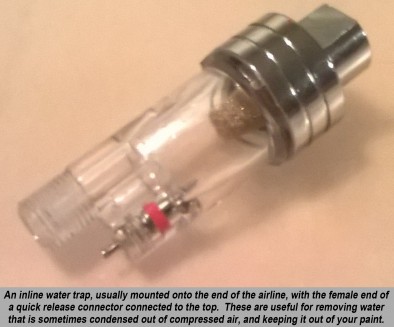
The next most common accessory is a second moisture trap mounted on the airline (in addition to one mounted on the receiver). Not only does this give you additional protection from condensed water, it also extends the handle of the airbrush which can make it more comfortable to use for prolonged amounts of time.
Inline pressure regulators are also available, but in my experience they are quite fiddly and do not give as good a performance as the one mounted on the compressor.
Airline
The airline is the hose that connects the compressor to your airbrush. Like most things with a lead, buy as long an airline as you need. Two to three meters is generally the right length, as it gives you greater freedom where you position your compressor (but not too long, you don’t want to be tripping over it).
A word of warning though … avoid buying a very long airline (greater than five meters), especially if you don’t have a receiver on your compressor or you have a very small compressor. This is because an overly-long airline can lead to pressure drops and force your compressor to work harder to keep everything at the pre-set static pressure.
Airlines come with a variety of different connector sizes at either end, but the most common are 1/8” BPT at both ends, ranging to 1/4” BPT. Airlines tend to come with a braided protective sheath, which not only helps brace the hose so excess pressure doesn’t deform it, but also helps prevent snagging and knotting.
Moisture Trap
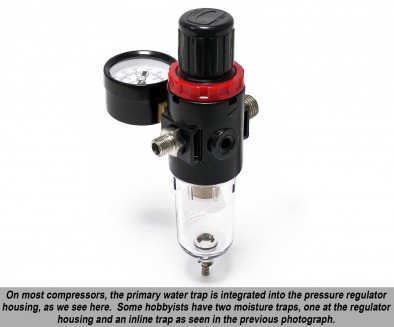
The moisture trap is often incorporated into the pressure regulator’s body, and is used to trap any moisture “squeezed out” of the compressed air. Water can also be present due to atmospheric humidity and from being condensed out during the compression process due to the heating caused by the compression of a gas.
It is vital to remove any moisture present in the compressed air before it gets to your airbrush. Otherwise the moisture will be blown at what you are painting and ruin the surface finish. For this reason, it is not uncommon to see a secondary moisture trap mounted on the handle of the airbrush, or just behind the female end of a quick release valve.
Check Valve
The check valve or one-way valve is used between the compressor and receiver to isolate the stored air in the receiver from the compressor. This part is sometimes internal and sometimes external, and not every compressor with a receiver has one. As mentioned in Part One, this is the sort of component which makes the difference between a “budget” compressor and a premium model.
The check valve prevents damage to the compressor by having the receiver’s stored pressure forced back through the compressor. This stops the pressure being too great for the motor to overcome when the pressure switch turns it on. If you have a cut-out pressure of 60 psi, then the motor has to generate over 60lbs of force to turn the piston.
By isolating the receiver’s pressure from the piston, you won’t stress the motor so much when it starts up, and the less you stress the motor the cooler it remains, and the longer it will last. Again, by reducing the heat generated by the motor, the greater the increase in the duty cycle.
Check valves also often incorporate a dump valve as well, this is used to release any pressure between the compressor and check valve when the compressor stops either by a pressure switch being engaged or by being turned off, this prevents any resistance to starting the compressor motor when its turned back on.
Maintenance
Maintenance required for most hobby compressors is minimal. Most are oil-less so you don’t have to top oil or anything like that. Most of what you have to do to ensure reliable operation consists of cleaning or replacing air filters and emptying moisture traps, as well as following any maintenance instructions in the manual.
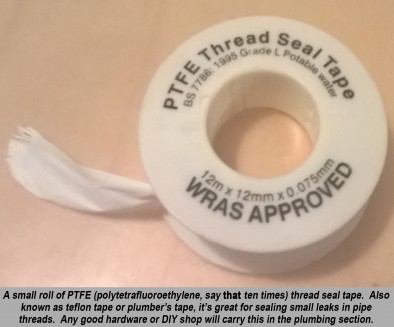
The most common fault you may find in your compressor is an air leak. These can often be cured by tightening the connection and resealing the threads with PTFE tape. There are several methods of detecting a leak but the one I use most often is as follows.
Get some washing up liquid and an old large paint brush, put some washing up liquid in a suitable pot, then paint liberally around the connection you suspect is leaking. Now turn the compressor on and if its leaking you will see the washing up liquid you have applied starting to bubble.
To fix it, simply unscrew the connection, pick out any sealant of the threads with a tooth pick, then wrap the threads with PTFE tape in an anti-clockwise direction, ensuring the tape doesn’t cover the internal bore. By wrapping the tape anti-clockwise it tightens it up when you screw it in.
Now tighten the connection back down firmly, being careful to not cross-thread the connection. You don’t want to over-tighten the connection as airline fixtures tend to be made of brass so will sheer if you over tighten, and the thread will strip if its crossed. If the spanner has left a mark on my palm from tightening, then that’s about right.
Finally, reapply some washing up liquid and check for no bubbles. If you are still getting bubbles try more tape and cinching the connector down harder. If it still leaks following that, then you either need to buy a spare part as the old one is no longer air tight, or you need to get a specialist to look at it.
Wrap Up
This concludes our series on the anatomy of an air compressor. Hopefully you now know what features are worth looking out for, what some of the key differences are between budget and high end models, and have a fair idea on what if any maintenance you need to conduct on your compressor.
If you would like to write an article for Beasts of War then please contact us on [email protected] for more information!
"For hobbyists there are three main thread types in use..."
Supported by (Turn Off)
Supported by (Turn Off)
"Hopefully you now know what features are worth looking out for, what some of the key differences are between budget and high end models..."
Supported by (Turn Off)


![How To Paint Moonstone’s Nanny | Goblin King Games [7 Days Early Access]](https://images.beastsofwar.com/2024/12/3CU-Gobin-King-Games-Moonstone-Shades-Nanny-coverimage-225-127.jpg)




Well that was fun, cheers to @warzan and crew for giving this series a chance, and doing a cracking job on the layout and banner graphics. And again a massive thanks to @oriskany for his advice and guidance on getting my ramblings up to BoW standard :), to any one else in the community is thinking they have an article in them; give it a go and get your thoughts written down, it has been a very enjoyable and rewarding experience which i can thoroughly recommend people try at least once!
So are you doing a post about the air gun? @nakchak
@zorg maybe…
This is SO useful… were it only because that way you can choose a compressor requiring as little skill as possible ! Thankfully, most compressors in ouf hobby do not require more than a basic grasp of how pressure and valves work. I prefer to concentrate on artistry and technique towards (that is the goal after all) rather than tinkering. But I have to admit this has been extremely interesting in and of itself !
@elromanozo thank you very much, glad i’ve been able to reciprocate in the knowledge sharing 🙂 Much like colour theory i think if people have an understanding of the underlying principles of how things work, and a knowledge of the terms used then it can only help when it comes to learning techniques, perhaps less so when it comes to compressors but at least people now should know that they have to double check the thread pitch before ordering accessories as there is nothing more annoying than finding its the wrong sodding size 😉
Your articles are also very good for identifying the cause of problems… A lot of people have flow problems that could be avoided by having a compressor with an air tank, or simply don’t understand how certain pressures are adapted to different tasks. Understanding how the compressor (and all airbrush parts) really work can only help. It’s like knowing how brushes are made and how they work : it helps to control the paint flow if you use them properly, and take advantage of their construction.
Well done once again @nakchak . Thank you for taking the time to write such an informative article for all us wannabe airbrush types! 🙂
@cpauls1 thank you, glad you have enjoyed the series hopefully it will help you get started
Great job once again, @nakchak , and a great close to the series! 😀 The hobby-related articles have really helped broaden the range of contributor-based content. A great precedent that is hopefully soon followed!
@oriskany i have a few more ideas up my sleeves… As for other community created content like i said at the top of the comments, this has been great fun to do, and VERY rewarding seriously if anyone has an idea for other hobby articles, or features give @oriskany a PM and lets see what the BoW community comes up with next 😀
What I find so crazy, and why this series is so essential, is how few airbrush supply websites explain what’s involved when considering which compressors and airbrushes to get. Knowing the underlying science and more importantly explaining it in layman’s terms is so important and I’m sure I’m not alone in being grateful that the ‘Beasts’ and community (‘the Herd?’) have tackled the problem so well!
@grumpyzhukov – still one of the nest UserIDs ever. 😀
Thanks @grumpyzhukov it is surprising how hard it is to find all this info in a high level guide, that was one of my main motivations when it came to writing this series was to create a resource which could be used as a one stop shop by people looking to get into airbrushing and to explain to people just what is what on there starter set, as much of what i learnt was through trial and error and buying the wrong thing and learning the hard/expensive way lol
great finish @nakchak I would recommend the quick release connections.
and as you say for most people its a matter of trudging through sites for each and every part to get the info for them.
Thanks @zorg, QR connectors are just too useful not to have, especially when it comes to cleaning.
Great article! This takes what many would consider a …shhhhh…boring….topic and gives just enough info to be helpful without so many details you get lost. Thanks!
@gladesrunner cheers!, i will admit its a bit left field when it comes to hobby articles but given the number of compressor questions that appear in the painting forum that it was a topic worth exploring. The hardest thing when writing this series was trying to find the balance between detail and brevity when covering a given topic. Glad you enjoyed it though 🙂
Really good set of articles much more about the compressor than I would have thought real eye opener. Great enjoyed every word on such a dry topic.
Cheers @chrisg glad you enjoyed it, truth be told ive only scratched the surface when it comes to pneumatics however more detail and exploration of concepts would probably redundant in this context as it would have next to nothing to do with general hobbying unless you are like me and build compressors for fun as well as painting mini’s ;). Building compressors is actually pretty straight forward once you have assembled all the parts, if you have ever changed a tap or its washers then you are qualified for the mechanical aspects, and the wiring is no harder than adding… Read more »
Thanks @nakchak for the advice on the compressor. Is there any chance for one about the setup of the airbrush because no one will tell me what I need to run the pressure at to get the best flow of paint through the airbrush?
At the moment I have an Iwata Smart Jet Pro Auto Compressor with a •Iwata Revolution CR Gravity Airbrush.
Any advice will be help will be appreciative 🙂
@naff101 There is no magic pressure as it very much depends on the qualities of the individual paint you are using. For airbrushing i tend to use the various vallejo “air” ranges, thinned with their thinner and flow improver, for those i find spraying at between 15-25psi to be about right. But its VERY subjective, i know some people who never go below 40psi! Best advice i can give is to experiment, eventually you find a pressure and consistency of paint that just feels right. Stuff in the bitz box is great for this sort of experience building, as is… Read more »
@nakchak, Thanks for the info about the air pressure as that seems a good place to start as I’m using Vallejo game air to try this out .
I will let you know on the progress and I’ll send some pics of what has been achieved
Thanks again 🙂