


![How To Paint Moonstone’s Nanny | Goblin King Games [7 Days Early Access]](https://images.beastsofwar.com/2024/12/3CU-Gobin-King-Games-Moonstone-Shades-Nanny-coverimage-225-127.jpg)


Home › Forums › 3D Printing for Tabletop Gaming › Success Printing out gaming figures.


Related Games:
Tagged: 3dprinting
This topic contains 4 replies, has 3 voices, and was last updated by ![]() blinky465 5 years, 5 months ago.
blinky465 5 years, 5 months ago.
-
AuthorPosts
-
June 28, 2019 at 1:18 pm #1409430
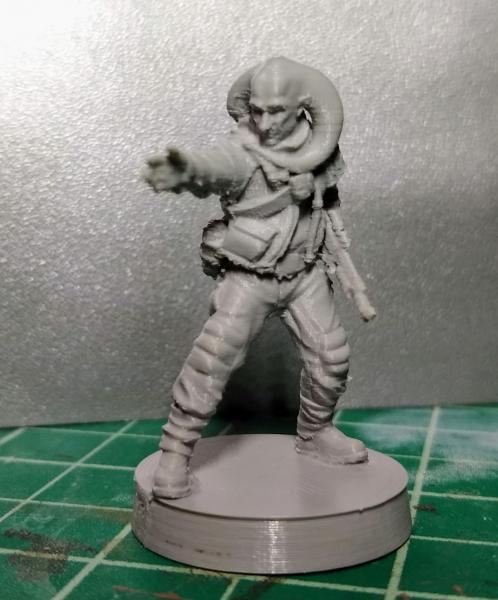
This is an alternative Rebel Unit Leader from Skull Forge Studios. Took about 3.5 hours on my Prusa i3mk3s. I am exceedingly pleased with the results.
There’s still a little cleanup to do, but it’s no worse than if you were getting a figure that you bought ready for painting.
 June 29, 2019 at 1:15 am #1409595June 29, 2019 at 5:45 am #1409627June 29, 2019 at 10:56 am #1409753
This is the profile I used. I’ve gotten a handful of figures that look really good out of it, but about 1/3 of the attempts have slipped free of the print bed and become blobs. I probably need to play around with bed temps to get them to stick more securely.
# generated by PrusaSlicer 2.0.0+win64 on 2019-06-25 at 16:20:29
avoid_crossing_perimeters = 0
bottom_fill_pattern = rectilinear
bottom_solid_layers = 7
bridge_acceleration = 1000
bridge_angle = 0
bridge_flow_ratio = 0.7
bridge_speed = 30
brim_width = 3
clip_multipart_objects = 1
compatible_printers =
compatible_printers_condition = printer_notes=~/.*PRINTER_VENDOR_PRUSA3D.*/ and printer_notes=~/.*PRINTER_MODEL_MK3.*/ and nozzle_diameter[0]==0.4
complete_objects = 0
default_acceleration = 1000
dont_support_bridges = 1
elefant_foot_compensation = 0
ensure_vertical_shell_thickness = 1
external_perimeter_extrusion_width = 0.45
external_perimeter_speed = 25
external_perimeters_first = 0
extra_perimeters = 0
extruder_clearance_height = 20
extruder_clearance_radius = 20
extrusion_width = 0.45
fill_angle = 45
fill_density = 100%
fill_pattern = rectilinear
first_layer_acceleration = 1000
first_layer_extrusion_width = 0.45
first_layer_height = 0.2
first_layer_speed = 20
gap_fill_speed = 40
gcode_comments = 0
gcode_label_objects = 0
infill_acceleration = 1500
infill_every_layers = 1
infill_extruder = 1
infill_extrusion_width = 0.45
infill_first = 0
infill_only_where_needed = 0
infill_overlap = 25%
infill_speed = 50
inherits = 0.15mm QUALITY MK3
interface_shells = 0
layer_height = 0.05
max_print_speed = 200
max_volumetric_speed = 0
min_skirt_length = 4
notes =
only_retract_when_crossing_perimeters = 0
ooze_prevention = 0
output_filename_format = {input_filename_base}_{layer_height}mm_{filament_type[0]}_{printer_model}.gcode
overhangs = 1
perimeter_acceleration = 800
perimeter_extruder = 1
perimeter_extrusion_width = 0.45
perimeter_speed = 45
perimeters = 3
post_process =
print_settings_id =
raft_layers = 0
resolution = 0
seam_position = nearest
single_extruder_multi_material_priming = 0
skirt_distance = 2
skirt_height = 3
skirts = 1
slice_closing_radius = 0.049
small_perimeter_speed = 25
solid_infill_below_area = 0
solid_infill_every_layers = 0
solid_infill_extruder = 1
solid_infill_extrusion_width = 0.45
solid_infill_speed = 50
spiral_vase = 0
standby_temperature_delta = -5
support_material = 1
support_material_angle = 0
support_material_auto = 1
support_material_buildplate_only = 1
support_material_contact_distance = 0.05
support_material_enforce_layers = 0
support_material_extruder = 0
support_material_extrusion_width = 0.4
support_material_interface_contact_loops = 0
support_material_interface_extruder = 0
support_material_interface_layers = 2
support_material_interface_spacing = 0.2
support_material_interface_speed = 100%
support_material_pattern = rectilinear
support_material_spacing = 2
support_material_speed = 50
support_material_synchronize_layers = 1
support_material_threshold = 45
support_material_with_sheath = 0
support_material_xy_spacing = 60%
thin_walls = 0
threads = 4
top_fill_pattern = rectilinear
top_infill_extrusion_width = 0.4
top_solid_infill_speed = 50
top_solid_layers = 9
travel_speed = 250
wipe_tower = 1
wipe_tower_bridging = 10
wipe_tower_rotation_angle = 0
wipe_tower_width = 60
wipe_tower_x = 170
wipe_tower_y = 125
xy_size_compensation = 0June 29, 2019 at 10:30 pm #1410010I recently changed to rigid.ink and had a bit of a nightmare “dialling in” the settings to get a decent print from their pla – but once I did, the results were very impressive. The only thing I ever had trouble with (and it may be because of my auto-levelling sensor) was the first layer/skirt sticking – I either had to set the z-offset such that when it stuck on one side of the bed, it over-extruded (and went translucent) on the other, or when I had good adhesion on that side, the filament didn’t stick properly on the other.
In short, some white spirit or isopropyl alcohol to clean the bed (I used both separately and both worked as well) then a film of Tesco’s own brand glue stick on the (heated) bed and I didn’t have a problem ever again!
-
AuthorPosts
You must be logged in to reply to this topic.


