


![How To Paint Moonstone’s Nanny | Goblin King Games [7 Days Early Access]](https://images.beastsofwar.com/2024/12/3CU-Gobin-King-Games-Moonstone-Shades-Nanny-coverimage-225-127.jpg)


Spring Cleaning - with an AT-AT!


My process of and thoughts on painting OSL-effects, exemplified by my finished Anakin Skywalker
On the subject of OSL:
The following paragraphs explain my approach and thoughts on the subject of OSL effects for miniatures that are otherwise painted in a typical lighting situation – usually with an imaginary light source above the mini.
Basically, I always paint on OSL effects at the very end, when the figure is completely finished. The emphasis here is on ‘paint’ – OSL effects benefit from very precise, targeted work with the brush, and I advise against dry brushing or airbrushing OSL effects altogether.
There are three factors to consider with OSL effects: brightness, light colour and the reflective properties of the illuminated elements, and the placement of the effect:
Brightness:
OSL effects always work better on darker figures than on lighter ones. This is because we simulate light with colour pigments and there is no lighter colour than white available to us. An OSL effect must never be darker than the colour of the surface it is painted on. The brighter the surface, the less strong and effective the OSL will be, and with very bright to pure white surfaces OSL is basically impossible to pull off effectively.
The intensity of the light source is also a factor – the stronger the light source, the more intense the OSL effect must be. Since we’re talking about figures we’re depicting in normal daylight, most light sources would be too dim to really justify an OSL effect. Flames, candles, torches – they all only really come into their own in darkness and their light intensity is basically completely lost in sunlight. Many artificial light sources are also much weaker than many believe. Even a glowing LED is virtually unrecognisable as glowing when in direct sunlight. But since we exaggerate a little when it comes to figures, we also exaggerate the luminosity of light sources for our OSL effects a little.
An OSL effect must never be brighter than the light source that causes it.
Light colour and reflection properties:
For OSL effects, it is always advisable to use a coloured light source, i.e. not a pure white one, because with such a light source the OSL effect can look more like misplaced standard highlighting. The more intense the light colour, the more colour-intensive the OSL effect. Surfaces should be lightened and coloured less than edges, and the sharper the edge, the more intense and sharp the colouring. For surfaces, it is often best to glaze with the light colour. How much the light colour dominates depends on the strength of the light source and the saturation of the illuminated surface. The stronger the light colour and the weaker the saturation of the illuminated surface, the more the light colour dominates. In any case, the colour of the light mixes with the colour of the illuminated surface.
Highly reflective material can be perfectly represented with very saturated and brighter OSL effects along edges and on peaks or sharper elevations. Here you can go as far as the colour and brightness of the light source.
Placement:
This is where targeted and precise work with the brush comes into play. OSL effects decrease in intensity the further away you are from the light source. OSL effects must never be placed on surfaces or edges that face away from the light source.
OSL effect from the lightsaber blade on Anakin Skywalker:
Finished miniature without OSL effect (and without matt finish):

Finished (and matt varnished) miniature with OSL effect:
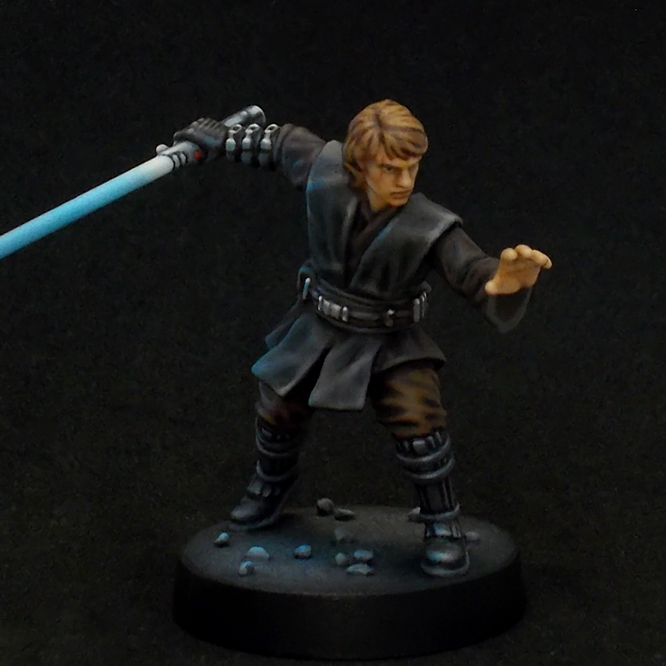
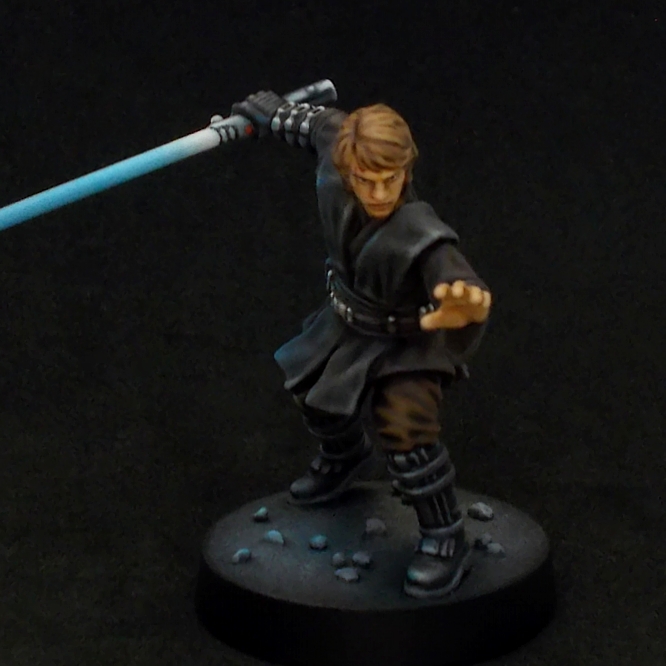
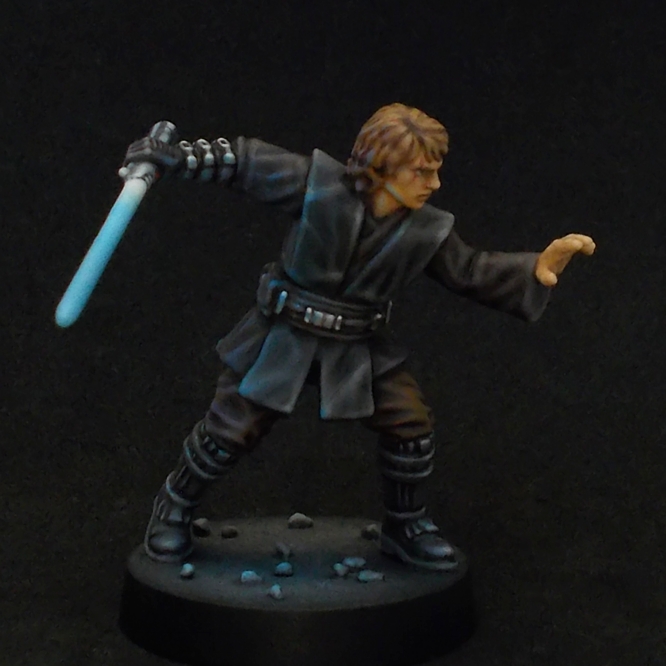
Anakin Skywalker wears dark, and this makes him very suitable for OSL effects. A lightsaber blade is also a very bright light source with a strong light colour, which is very conducive to an OSL effect.
I first glazed all the dark, shaded areas at the front right side of the mini with a very saturated blue (Vallejo Game Colour Magic Blue). Especially on the arm, torso and the area of the black leather tunic below the belt. In the next step, I mixed the colour of each of the original highlights on the sleeve, tunic, leather tunic, belt, hair, trousers and boots with some Magic Blue and a little white, transparently painting over the original highlights where the OSL effect should be, and reduced the transparency the closer I got to the light source – the lightsaber blade. I also painted a very bright effect on the back edge of the jaw and on the neck. Finally, I mixed Magic Blue with some white, and used it to transparently paint a more intense reflection of the light on the more reflective elements – leather tunic, boots, and areas of the belt as well as the right forearm and saber hand, as well as slightly colouring the base at the front.
So, that’s my approach to OSL, exemplified by Anakin’s mini. I hope it helps a bit. I’ll be happy to answer any questions – also about concrete experiments with OSL – here.


Leave a Reply