


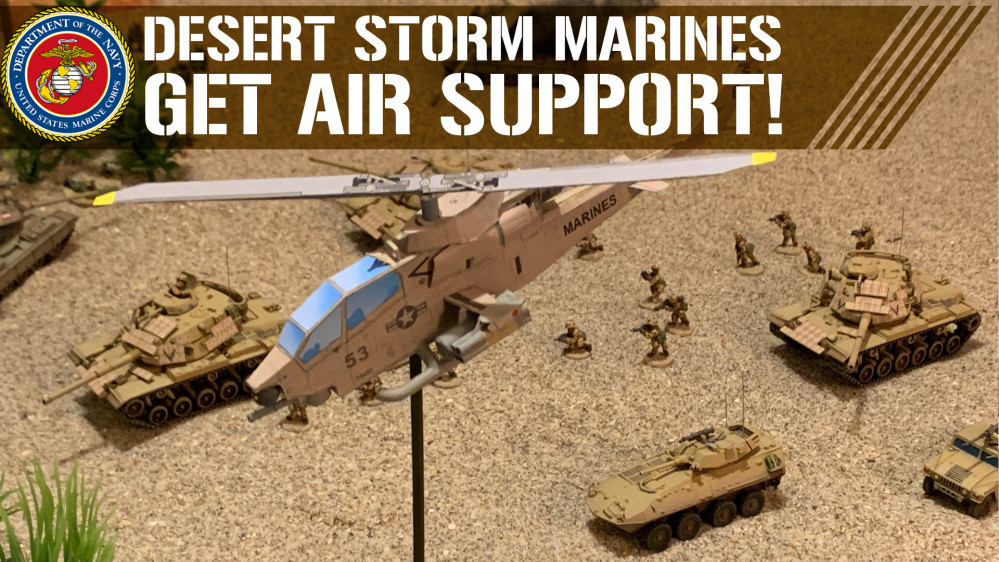
Emergency Miniature Work – 15mm USMC Super Cobra


Recommendations: 1804
About the Project
It's the return of Oriskany's Web Wargames, where we connect with YOU, members of the community, over the web to stage live wargames. This thread will go over the ideas, concept development, design, LIVE PLAYS, and after-action reports for these games, covering all periods and ranges of the historical genre.
For anyone who's ever interested in participating in one of these games, all you need is an internet connection (so software downloads required). Reach out me (Oriskany) on a PM and so we can agree on a time and a system.
Systems so far include multiple iterations of Panzer Leader (1939-2020), Valor & Victory (1918-1993), Naval Command, AirWar C21, Contact Front, and others!
So feel free to toss in ideas, reach out to play, just spectate, or just comment and +1 on the design and after action reports!
Related Genre: Historical
This Project is Active
Assault on Claudine 5 - Live Stream
Good morning, everyone.
Later this afternoon we’ll be hosting a live game featuring “Oriskany” and “Yavasa.”
We’ll be using Barry Doyle’s Valor & Victory to recreate one of the final assaults (May 6-7, 1954) of the Viet Minh against the French Foreign Legionnaires and Paratroopers holding the doomed airfield of Dien Bien Phu.
Culminating a months-long siege, this climax to the First Indochina War would end the conflict and spell the end of the French Empire in Southeast Asia. Shortly afterwards, the Americans would find themselves embroiled in this troubled region, leading to what we remember as the Vietnam War.
Join us today at 5PM UK time for what we hope will be an epic night-assault game of desperate, point-blank infantry combat!
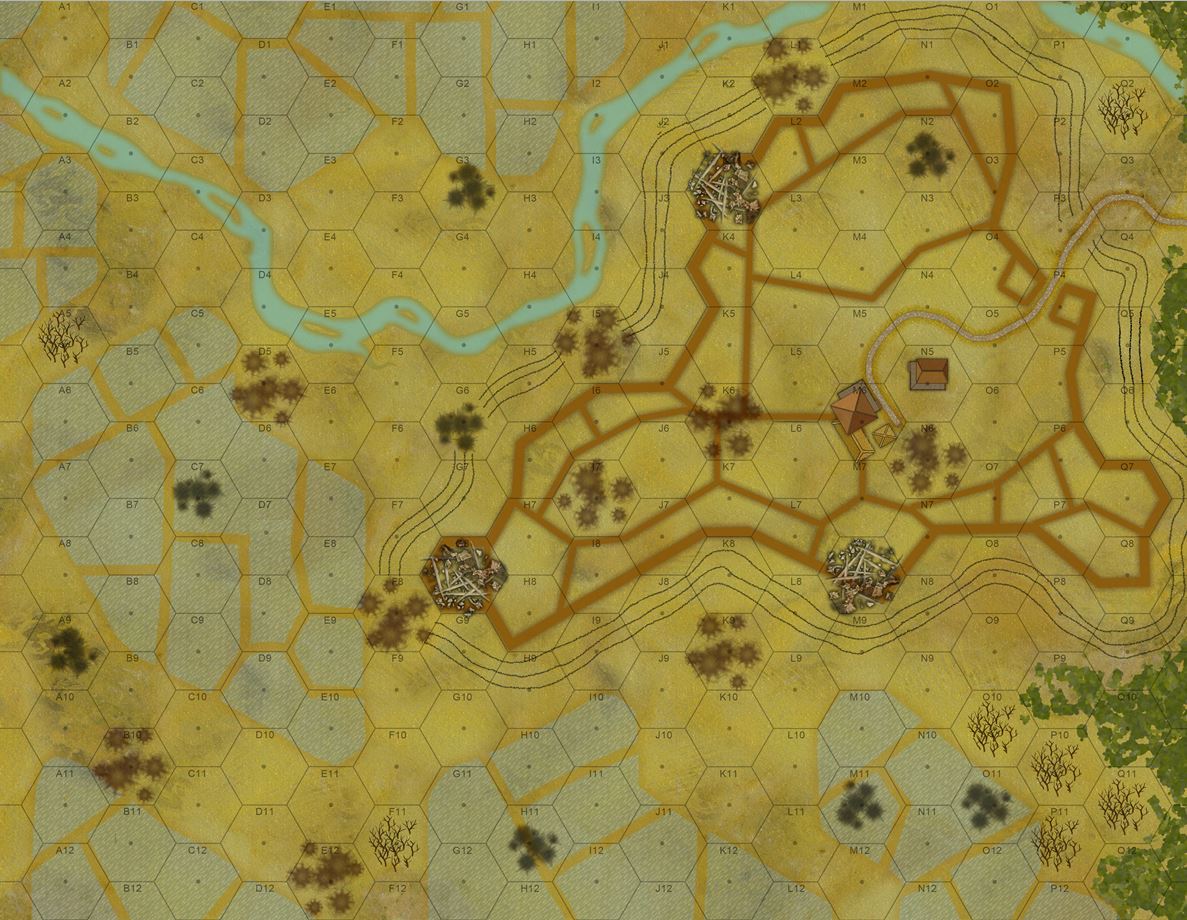 The map for our game today. Hexes are 15 meters (6 inches at 15mm, a little under one foot at 28mm). Trenches, wrecked bunkers, ride paddies, barbed wire, and some woods to the east.
 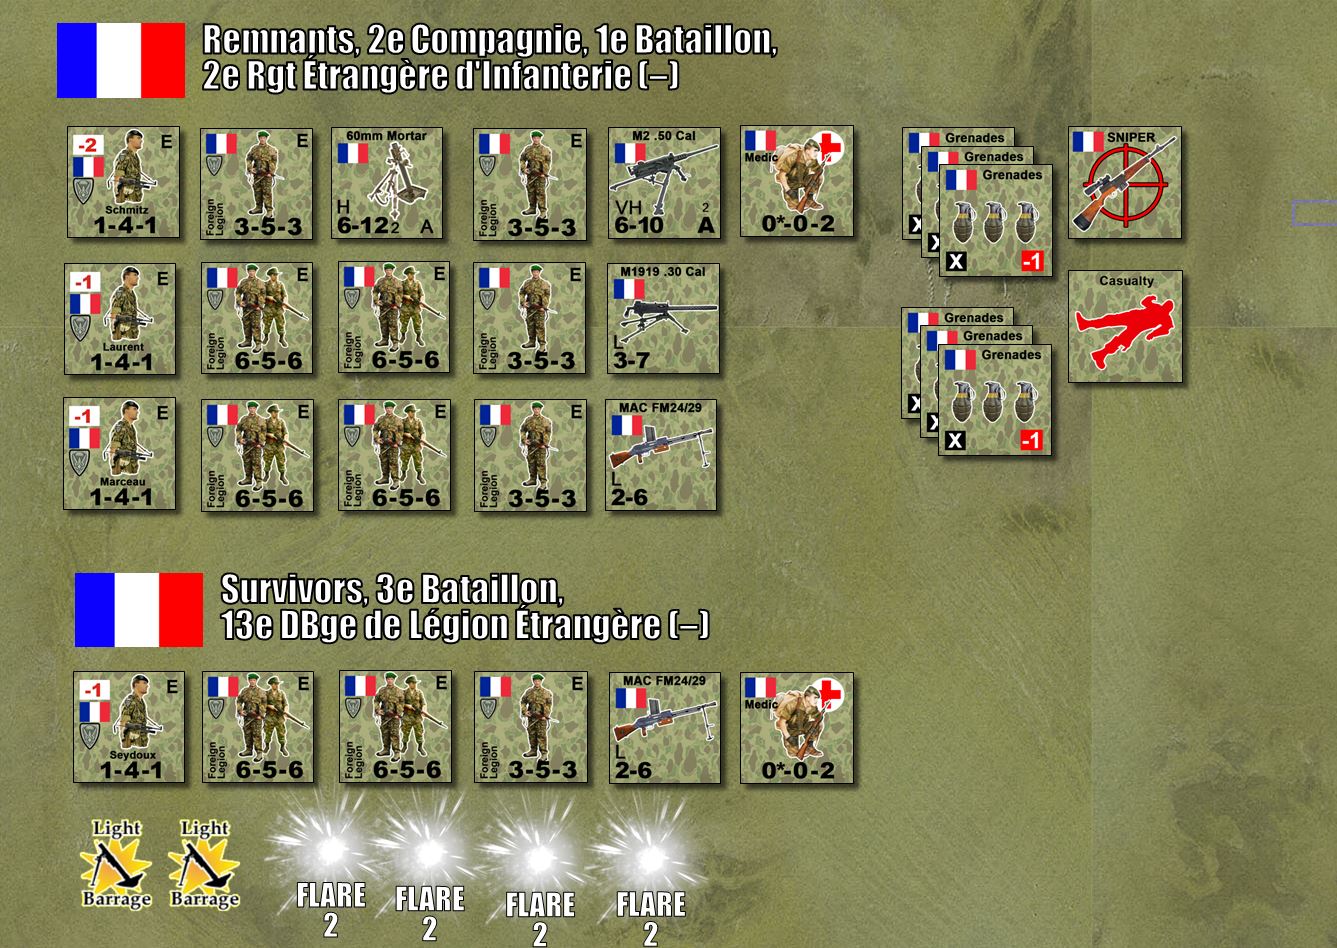 French force, including French Foreign Legion. Looking at the 13th Demi-Brigade, it's pretty bad when four counters plus a light machine gun (23 men) represents the survivors from an entire BATTALION. Welcome to Dien Bien Phu.
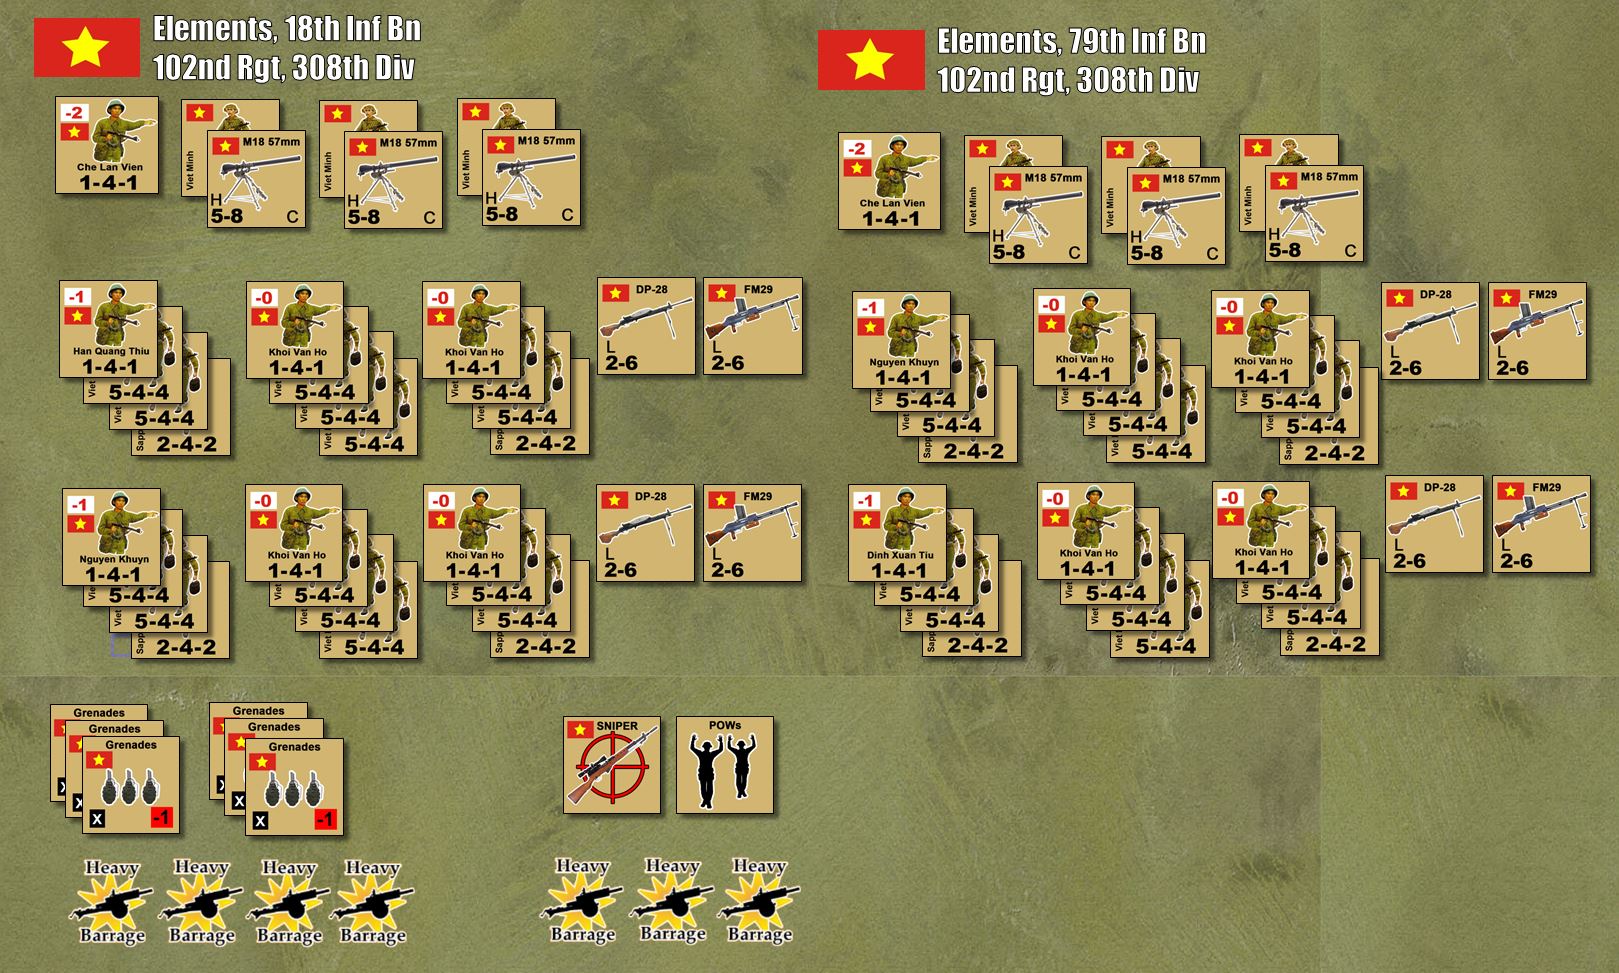 Two BATTALIONS of Viet Minh (18th and 79th, of the 102nd Regiment / 308th Division). Presented at 2/3 strength since a previous assault by these units was already repulsed earlier that night.
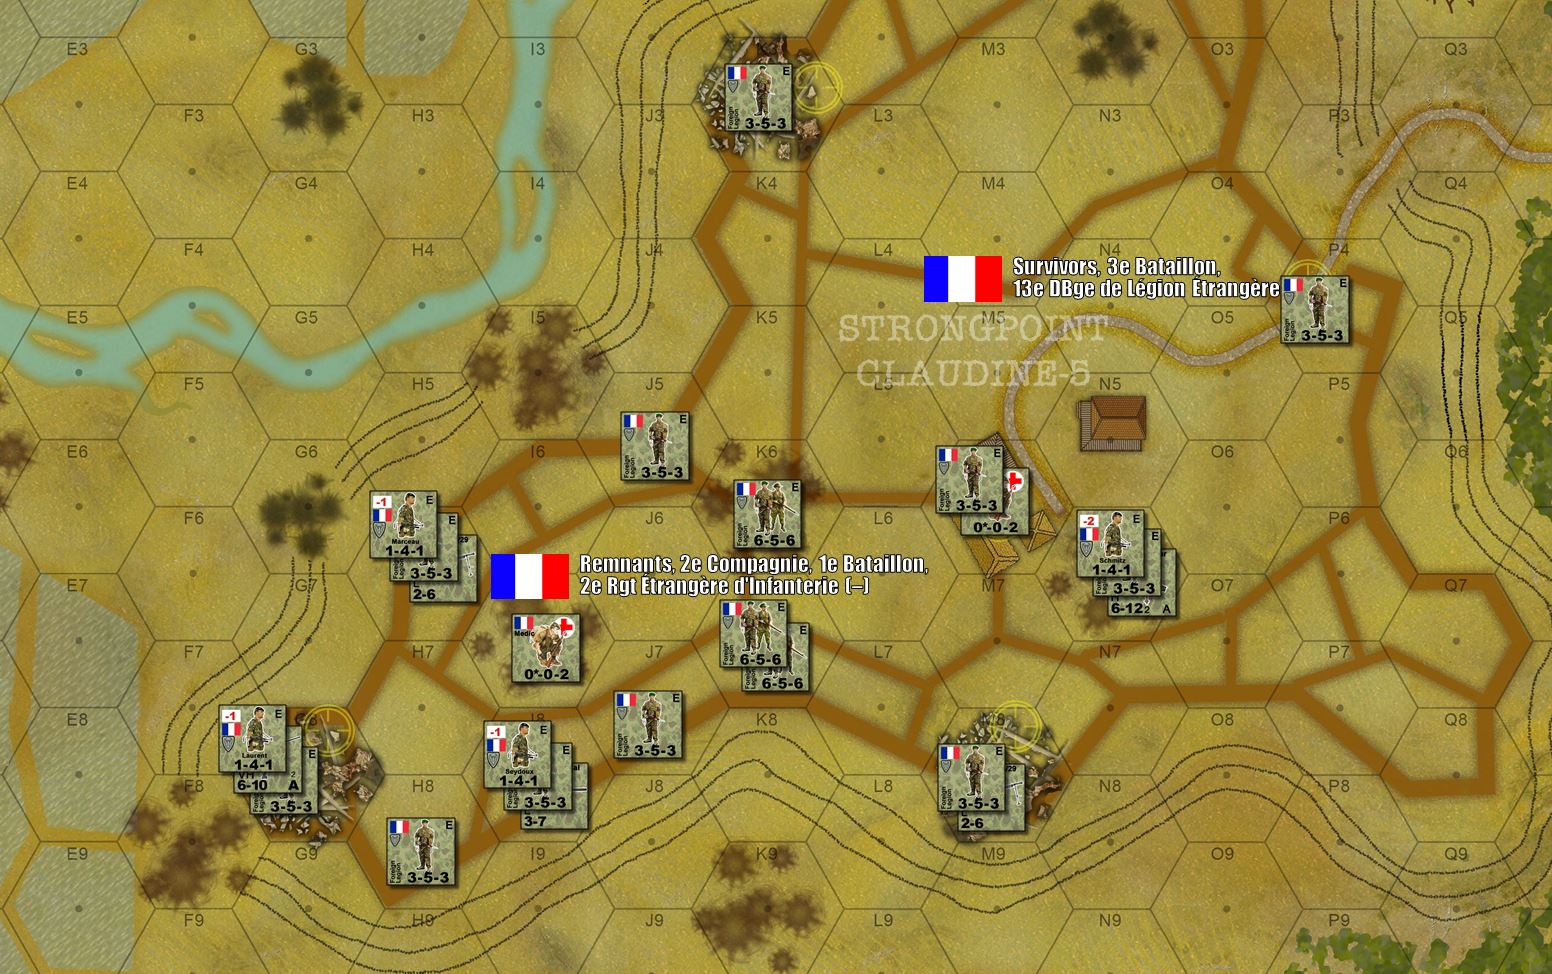 French set up.
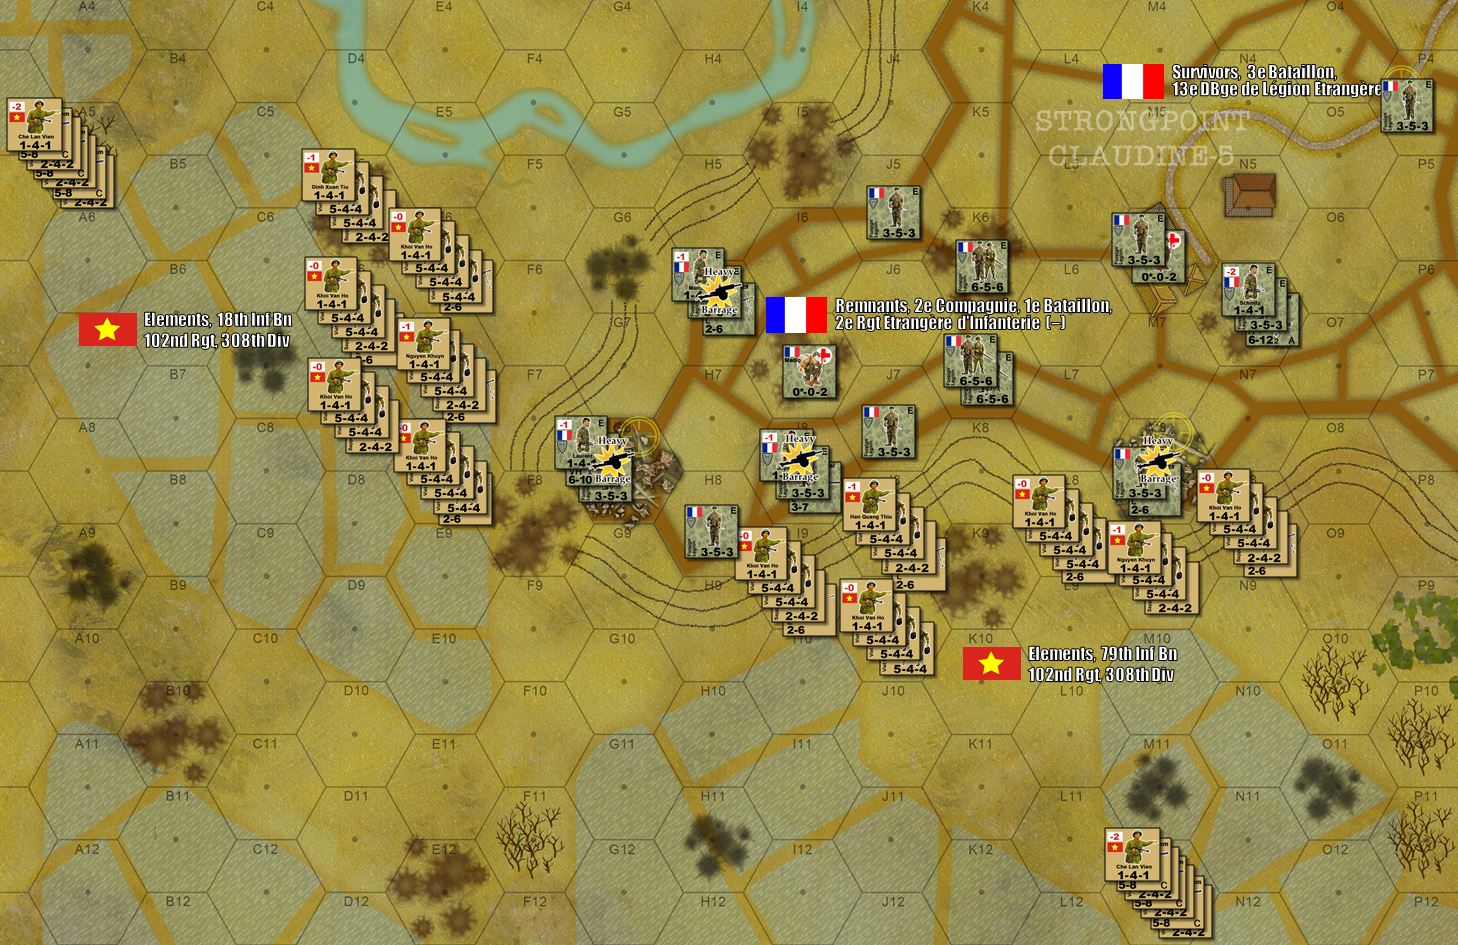 The Viet Minh first movement and opening artillery barrages onto the southern and western table edges. CHECK OUT OUR LIVE STREAM AND SEE HOW THIS GAME SHAKES OUT!
 Live Stream - 5PM UK Time - Panzer Leader (Battle of Hannut)
Good morning, everyone.
Yesterday we featured a live stream recreating part of history’s first “true” tank battle. This was the Battle of Hannut, starting on May 12, 1940, part of the shattering German Blitzkrieg of the West.
As General Hoepner’s XVI Motorized Corps spearheaded German 6th Army’s drive into northern Belgium, Belgian resistance was hopelessly outmatched and crumbled before them. Following mobilization and response plans, French mechanized units entered western Belgium, intending to meet up with the retreating Belgians and combine to form a unified line of resistance against the Germans.
But the Belgians in this sector weren’t falling back. They’d been overrun. So the French, having not met the Belgians falling back, had no idea their Cavalry Corps (2nd and 3rd Division Légère Mécanique) was about to collide with Hopener’s XVI Motorized Corps, namely 3rd and 4th Panzer Divisions.
In a wild melee that largely surprised both sides, Prioux’s French Cavalry Corps and Hoepner’s XVI Motorized Corps rammed full speed into each other in what would become the Battle of Hannut, running from May 12-13, 1940. In all, almost 1,000 AFVs (tanks, armored cars, halftracks) would be engaged between the four opposing divisions, making this the first time actual tank formations would square off in open combat.
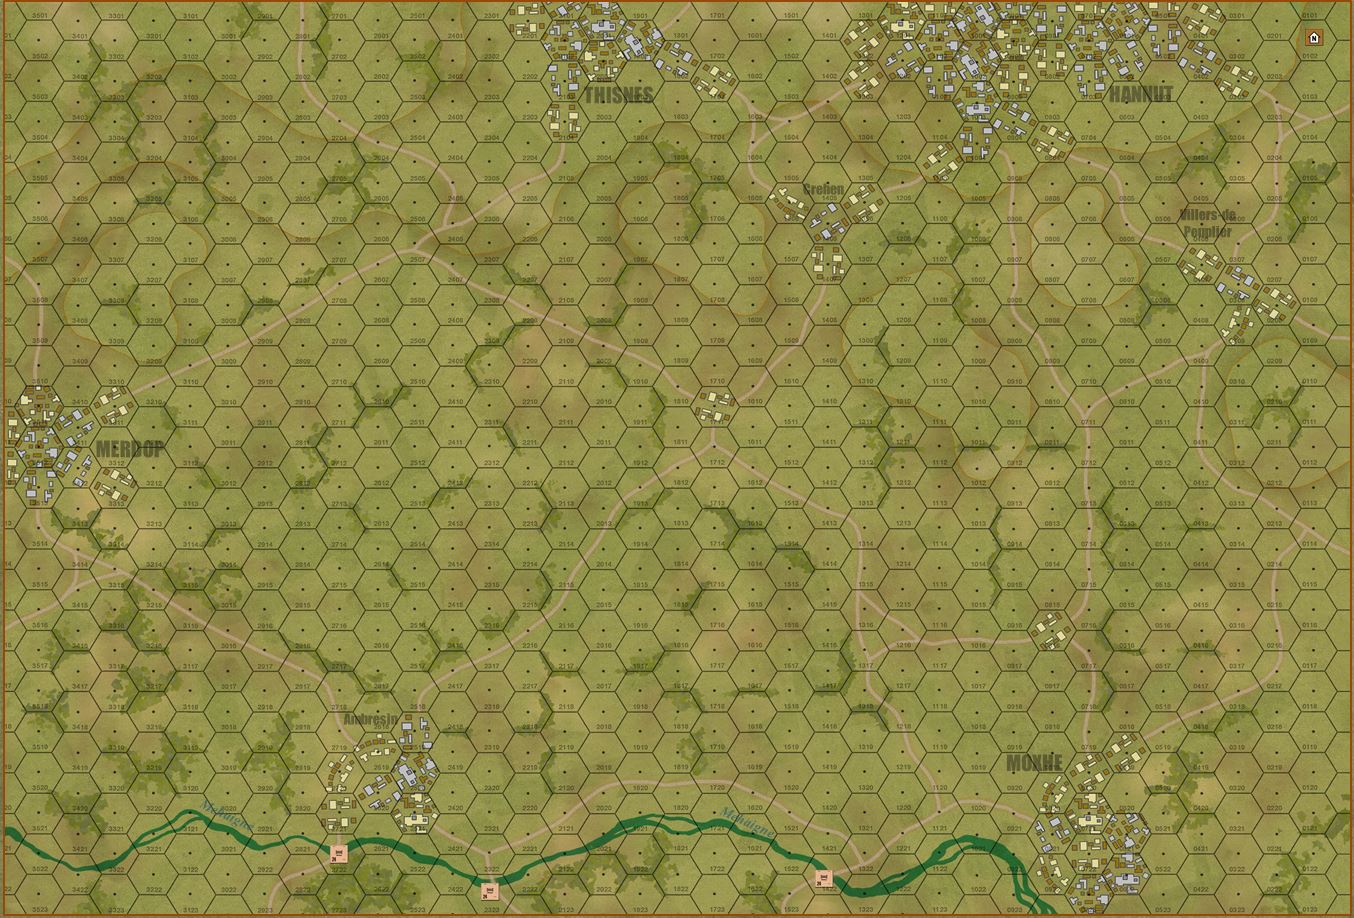 The overall map, showing the corridor running east to west between the southern outskirts of Hannut and the Mehaigne river. Hexes are 200 meters.
  French and German forces. Yes, the Germans seem to have a lot of tanks. The Germans DO have a lot of tanks. This nearly full OOB for two German Panzer Regiments, back in the days when Panzer Divisions were still built around a full brigade.
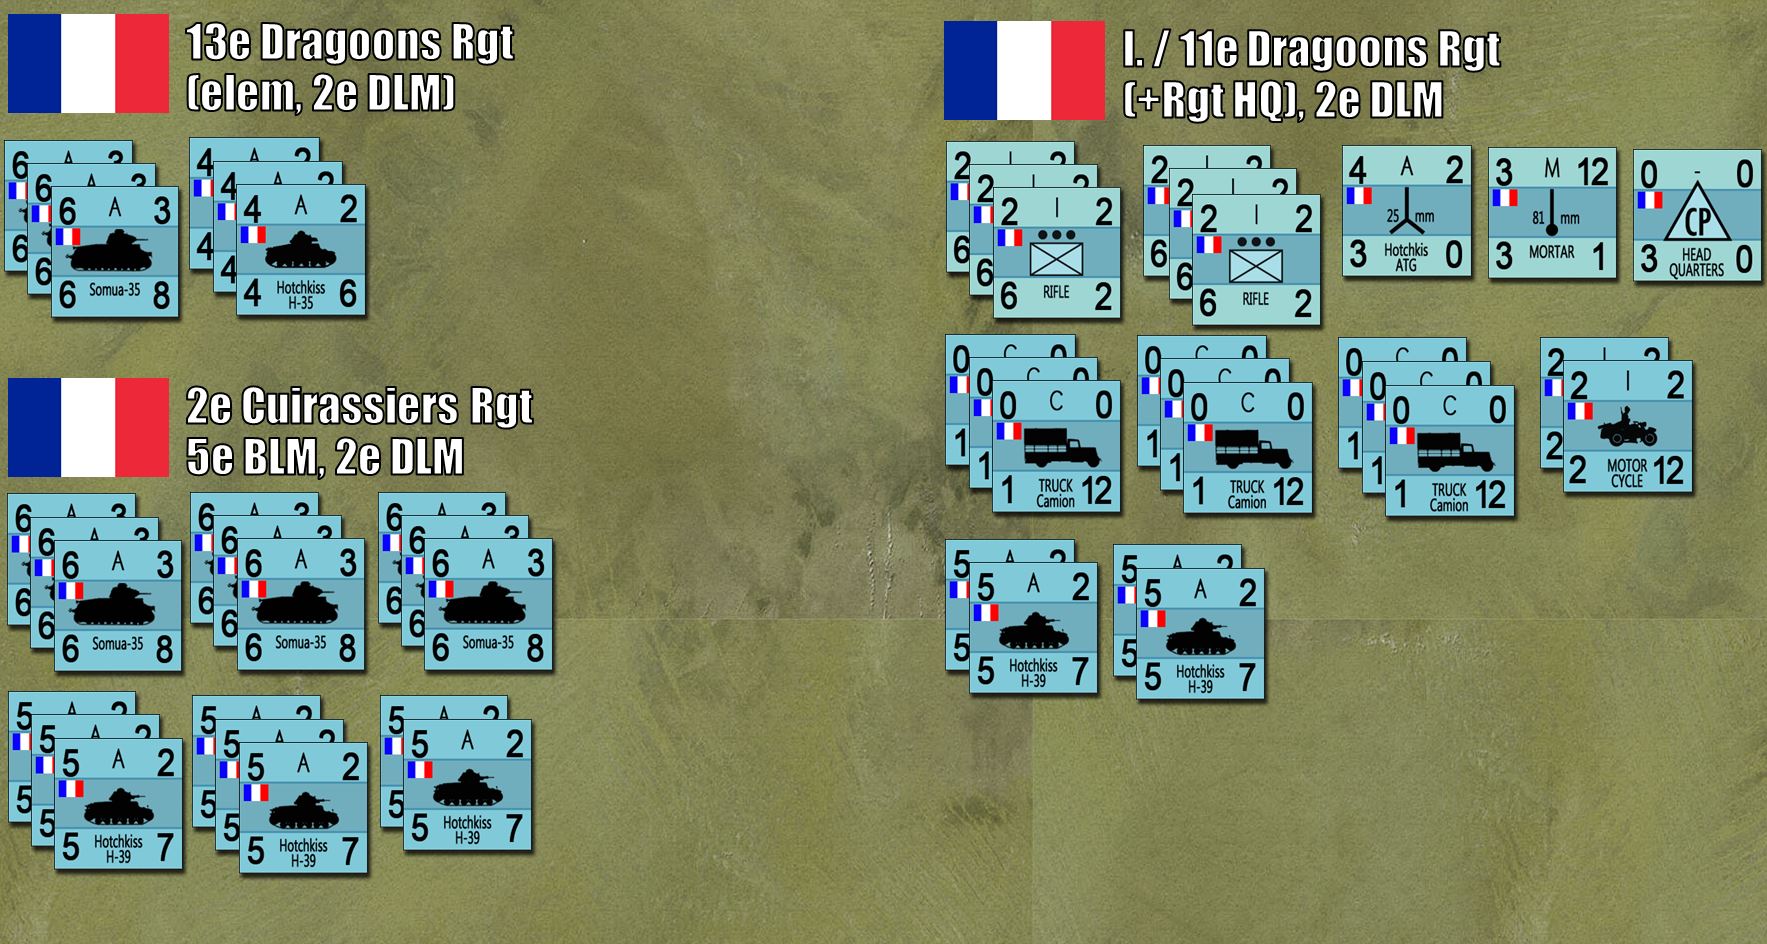 Close look at some of the French Armor. In short, we have two-three companies of the 13th Dragoons (here is where I was a little generous with the French). Then the 2nd Cuirassiers Regiment (four battalions, two of Somua-35s and two of Hotchkiss-39s). First Battalion of the 11th Motorized Dragoons will be deployed forward in holding positions in Thisnes and Crehen, while the armor and motorized artillery (76th Rgt) comes in from the west.
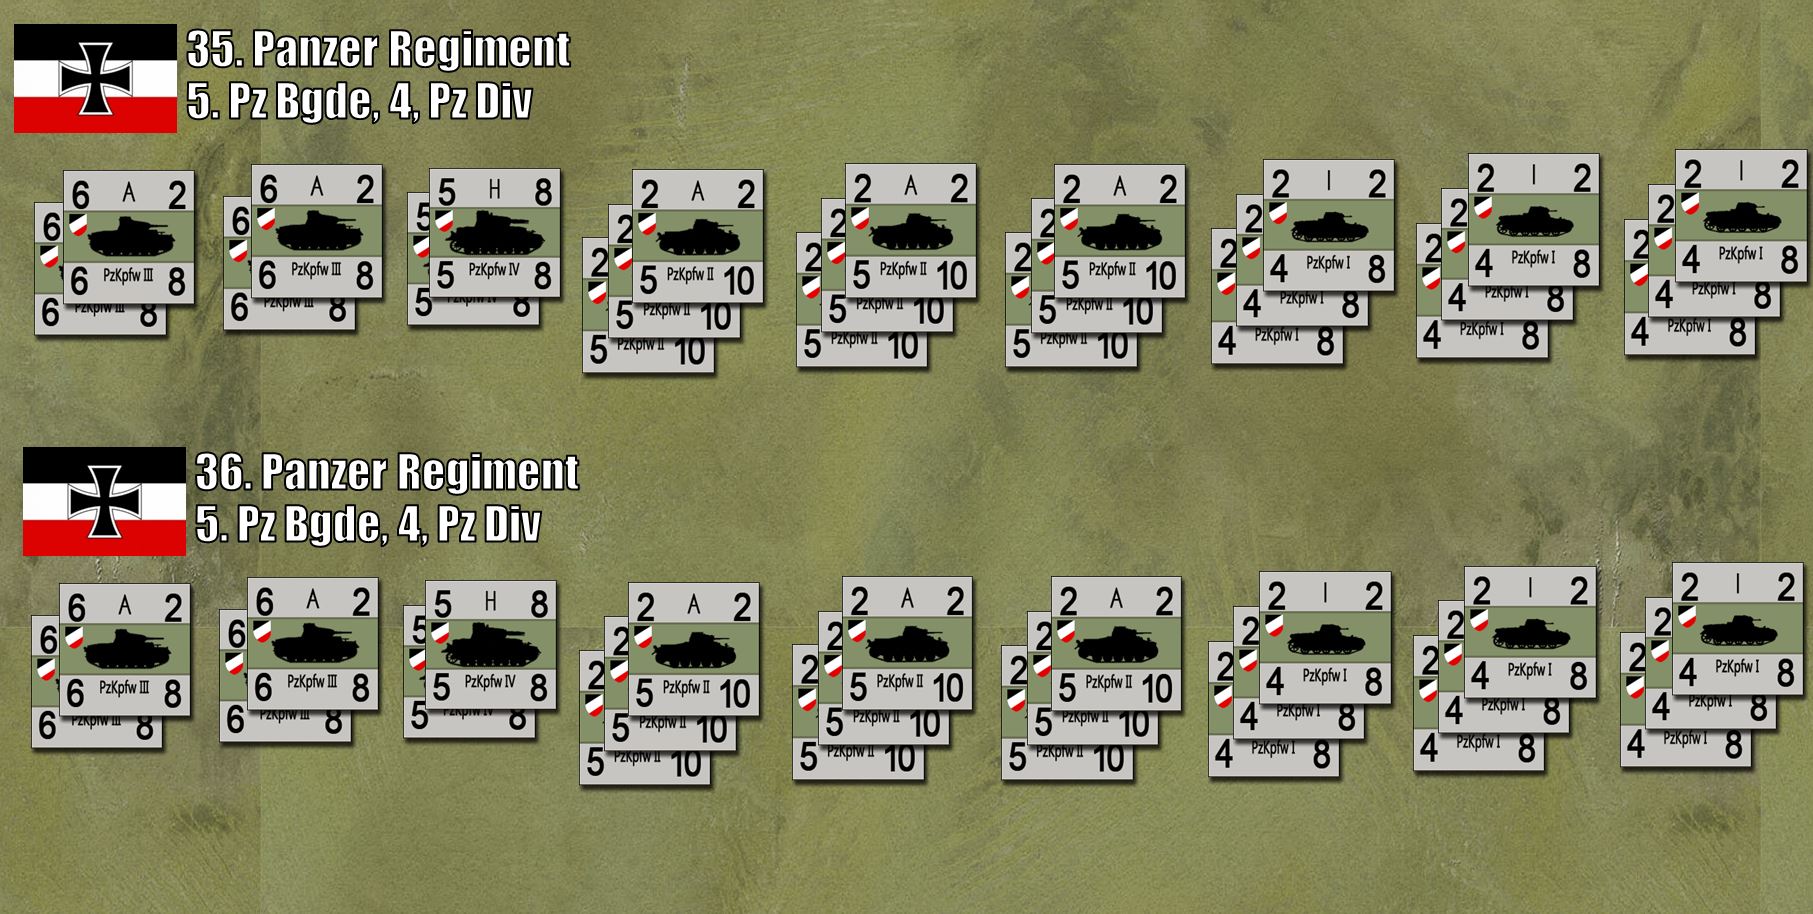 Here is a closeup of the German armor. While it may look formidable, notice that 18 out of the 48 (over a THIRD) of the German panzer platoons are the practically useless PzKpfw I. ANOTHER 18 platoons are the PzKpfw II, which was fast and decently armored for the time but again, largely useless against heavier French armor. Again, that's the history.
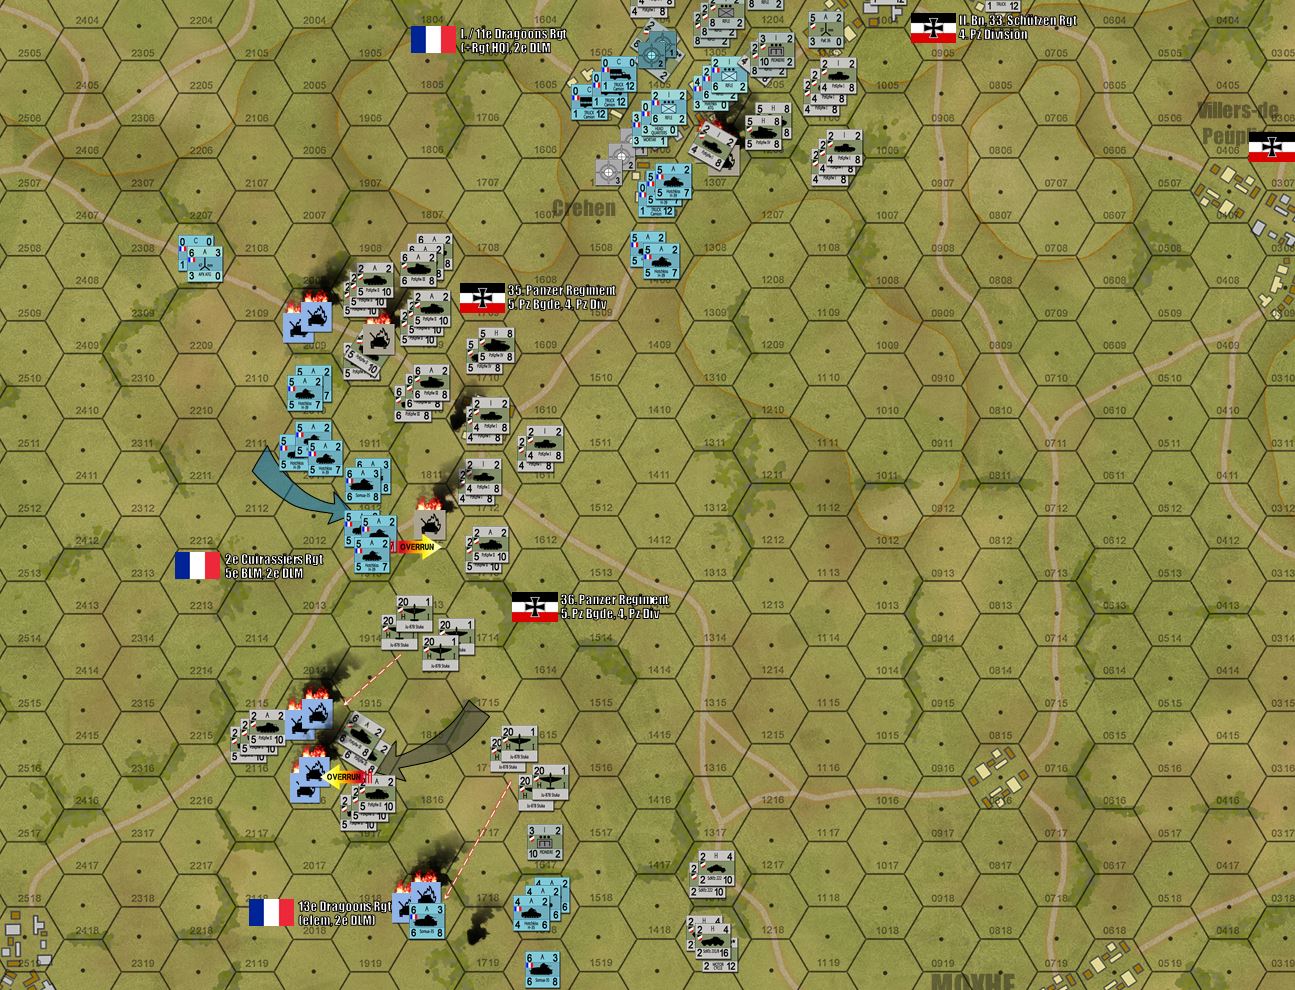 Part of the situation at the end of Turn 3. Air strikes! Overruns! COUNTER-overruns! God, how I love early-war Panzer Leader! You could never get away with these kinds of maneuvers in 1944 ...
 Now granted, this was supposed to be a live game and with some internet issues with my player, we weren’t able to have an opponent-vs-opponent live game, but as long as the Excel file is saved, the board is always set up and we can always take another swing at this later!
Panzer Leader Video Battle Report, P1
Playtesting some slight updates to the scenario played live with Dylan on last Sunday’s stream. Now the spearhead of 1st Panzer Division (XIX Panzer Corps, Panzer Group Kleist) has a little off-board artillery from the division’s integral 73rd PzArtillerie Rgt.
Just two batteries of 10.5 cm howitzers.
How much difference could that POSSIBLY make?
Highlights from Sunday's Game
Here are just a few snapshots from Sunday’s game between @elessar2590 and I.
Again, the whole “report” was recorded on video HERE.
But just a few spots are highlighted below.
 Here are the Germans entering from the Luxembourg border on the east side of the map, representing the leading elements of 1st Panzer Division (XIX Motorized Corps, Army Group “A”). These represent ELEMENTS of 1st Panzer Regiment, 1st Schützen Regiment, 4th Aufklärungsabteilung (reconnaissance detachment / battalion), 37th Panzerjäger Abteilung (antitank detachment / battalion). This is the situation at the end of German Turn 1, when they have contacted the main line resistance for the Belgian 1st Chasseurs Ardennais Division.
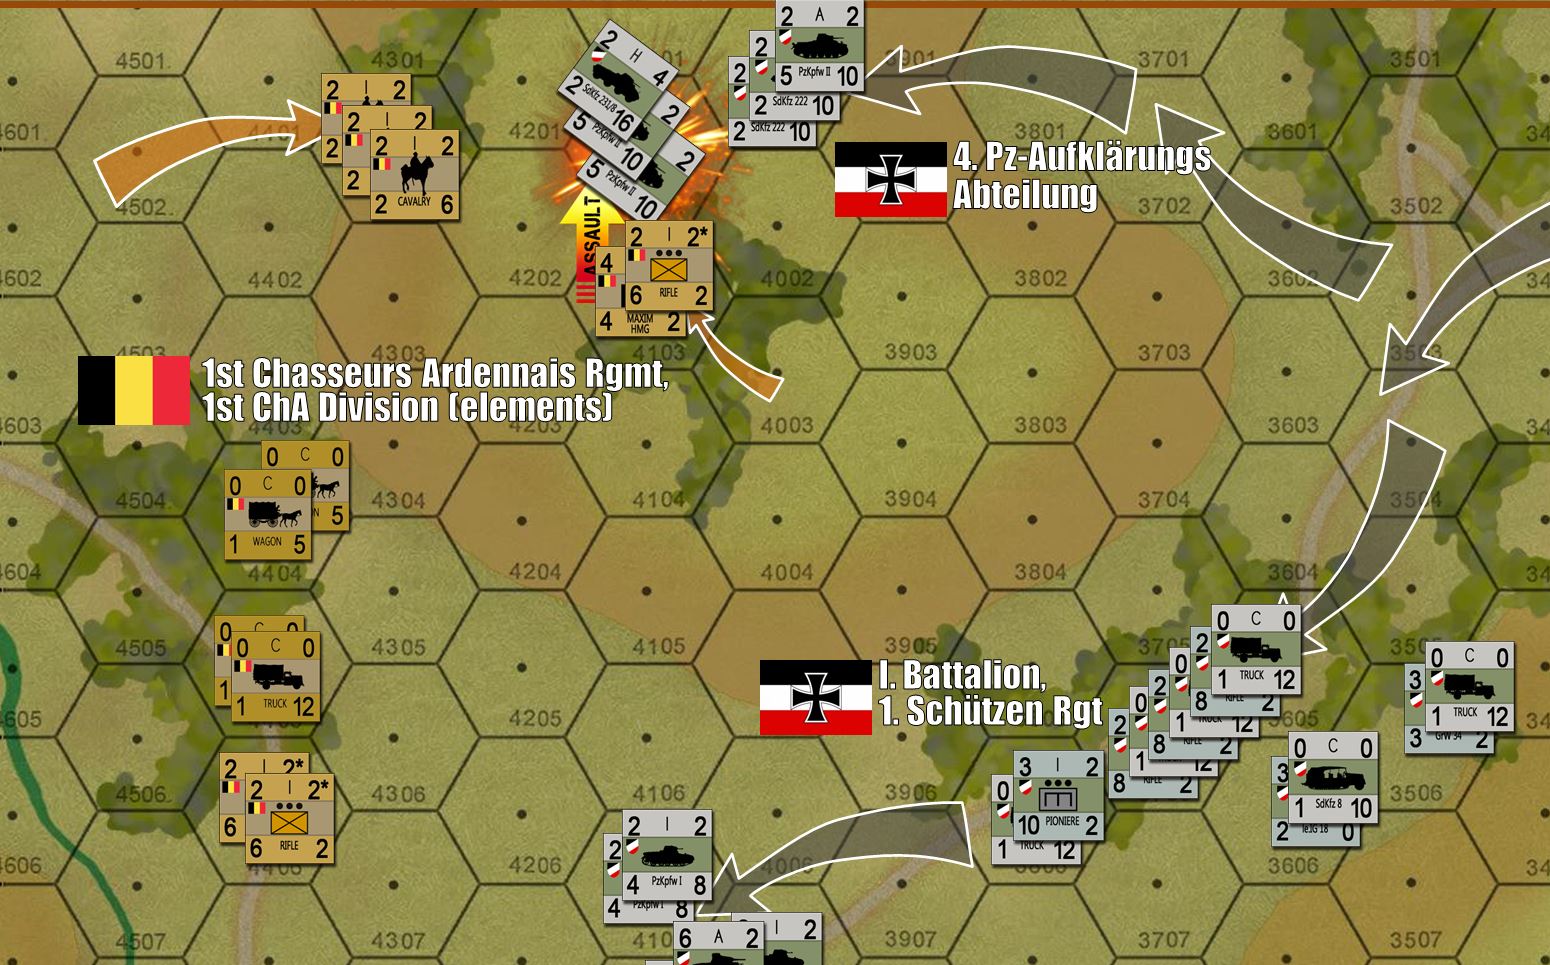 Action starts off right away as @elessar2590 hooks a platoon of Belgian rifles and a section of Maxim HMGs back through the woods in the north and “close assaults” some of my light armor trying to squeeze around the extreme Belgian left. Please remember this is the Ardennes and these cuts through dense treelines are very narrow. Normally in Panzer Leader all you have to do to avoid this is maintain a distance from treelines of at least 1 hex (150 meters). But that wasn’t possible here. Also, those German light tanks and armored cars were able to fire as the Belgians charged, I just whiffed the roll with a “6” on opportunity fire. So I guess these German panzer recon troops were still half asleep from their drive through Luxembourg. Also, note how Elessar2590 hooked back in such away so his advanced was screened from the follow-up stack of German light armor, so they couldn’t provide additional fire support against the charge.
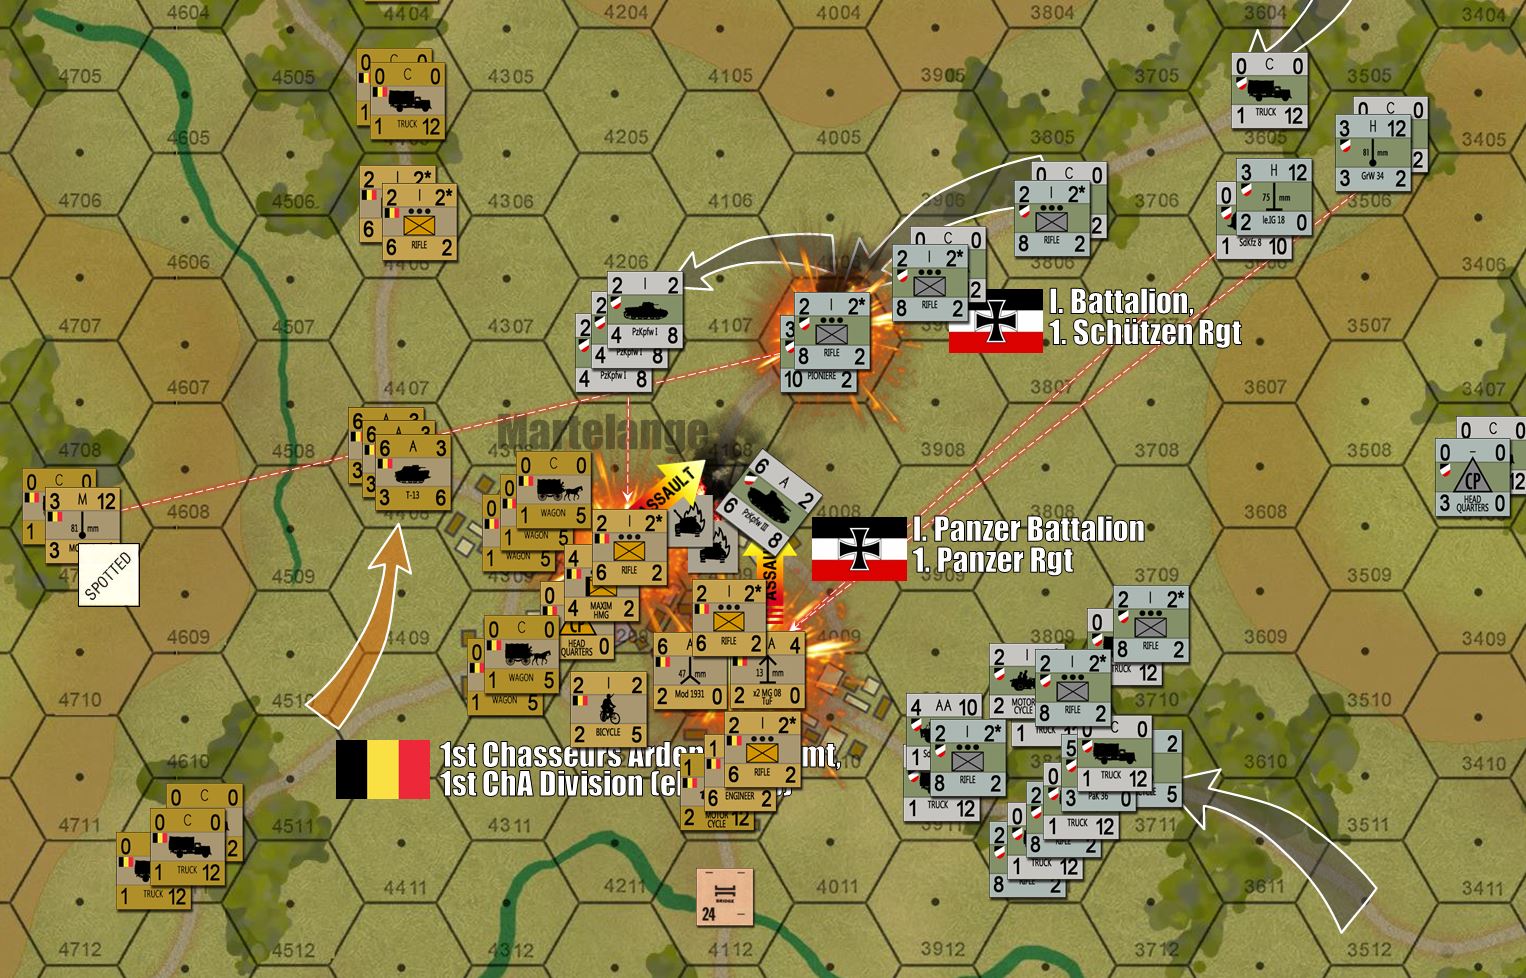 More bad news for the Germans comes when I hit the Belgian center proper on Turn 2. As I approach the town of Martelange (Belgian / Luxembourg border), Elessar pulls back from the first hex of the town on Turn 1. This gives me a foot hold in the town for free, but also compels me to advance into the town and engage the Belgians at close range in a street fight on Turn 2. Long-range fire support isn’t nearly as easy all of a sudden. In a rush and not really paying attention, I send in the PzKpfw- IVDs and PzKpfw-IIIs to bulk up the “assault hex’s” defense against anticipated Belgian infantry attack (those Mark IVs will do great with point-blank HE fire, but the Mark IIIs are practically useless in this fight). What I SHOULD have done is call in off-board artillery fire, but those batteries were left out of this game for purposes of the stream. This aside, what I also should have done was backed off with the tanks and sent in infantry, allowing the tanks to employ fire support from a different angle. But again, I was in a rush and not paying attention. Elessar’s 47mm ATGs and 13mm Maxim TuF HMGs pinned down by Mark IVs, and then he followed up with a great roll on a converging “CAT” (close assault tactics) battle. Basically, it was the “Belgian Prequel” for Saving Private Ryan, infantry mass-assaulting German tanks driving blithely through close city streets. There go two platoons of Mark IVs ... ten tanks in all. Ooof. Boss-man Guderian will NOT be happy. =(
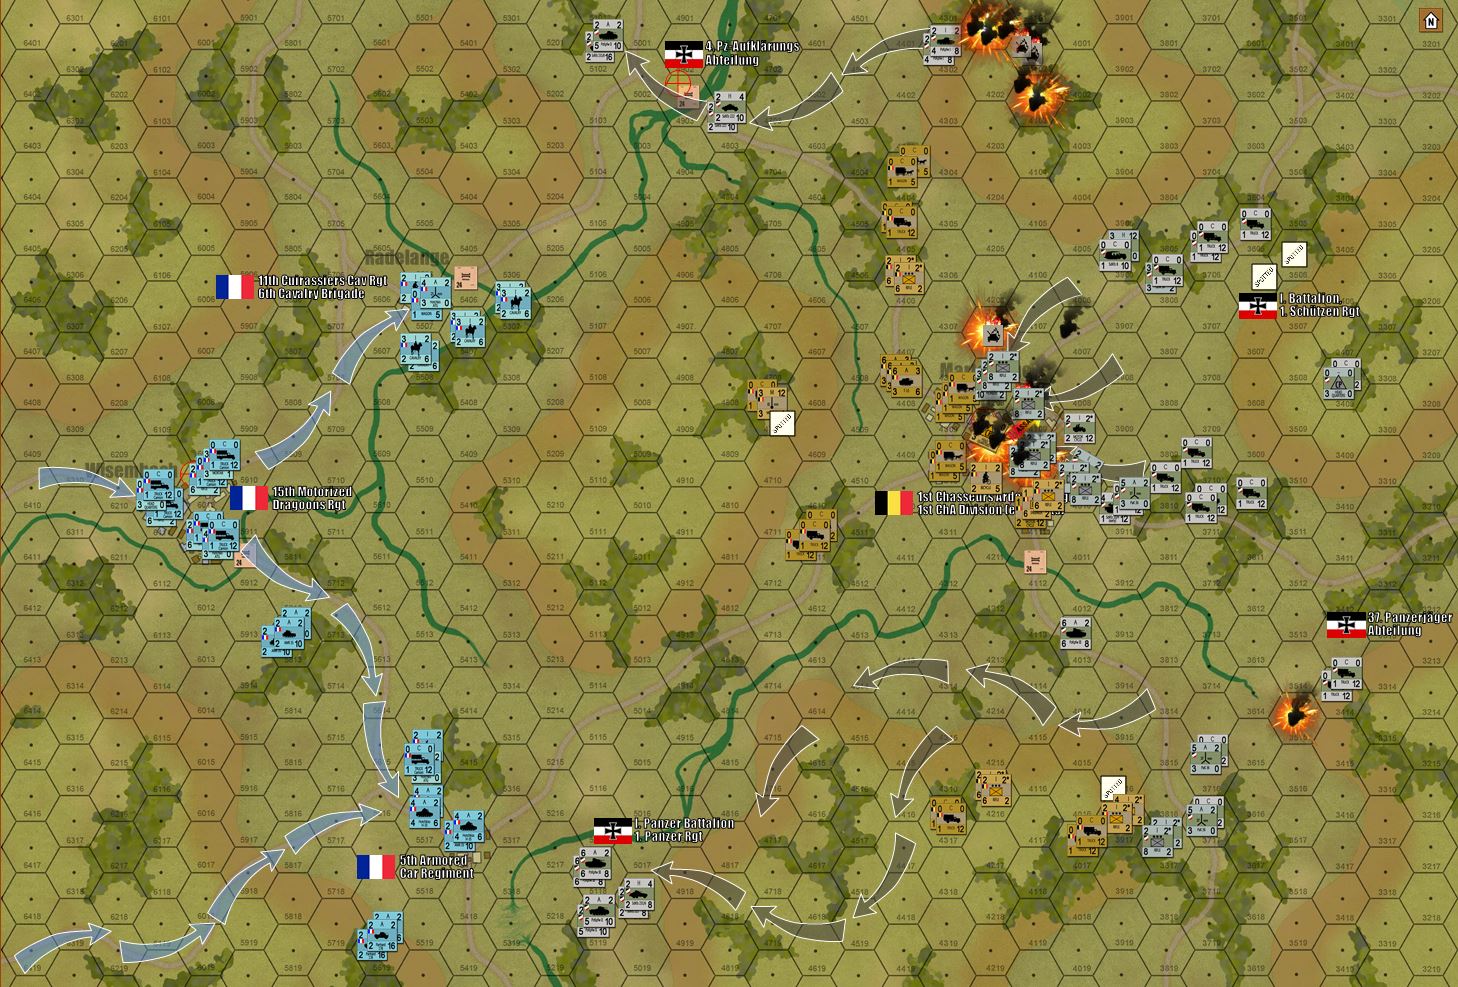 Turn 3, and here come the French (lead elements, 5e Division Légère de Cavalerie - 5th Light Cavalry Division). Now historically these guys didn’t arrive until Day 3, long after these forward Belgian units had been virtually annihilated. But for a fun stream we included them here anyway. Just in time to, because the Germans have shaken off their bloody noses of Turn 1 and 2. The Belgian left wing is gone, the Belgian center is cracked (but not quite collapsed YET), and the Belgian right is fatally outflanked. But they’ve delayed and blooded the Germans far more than should have been possible.
 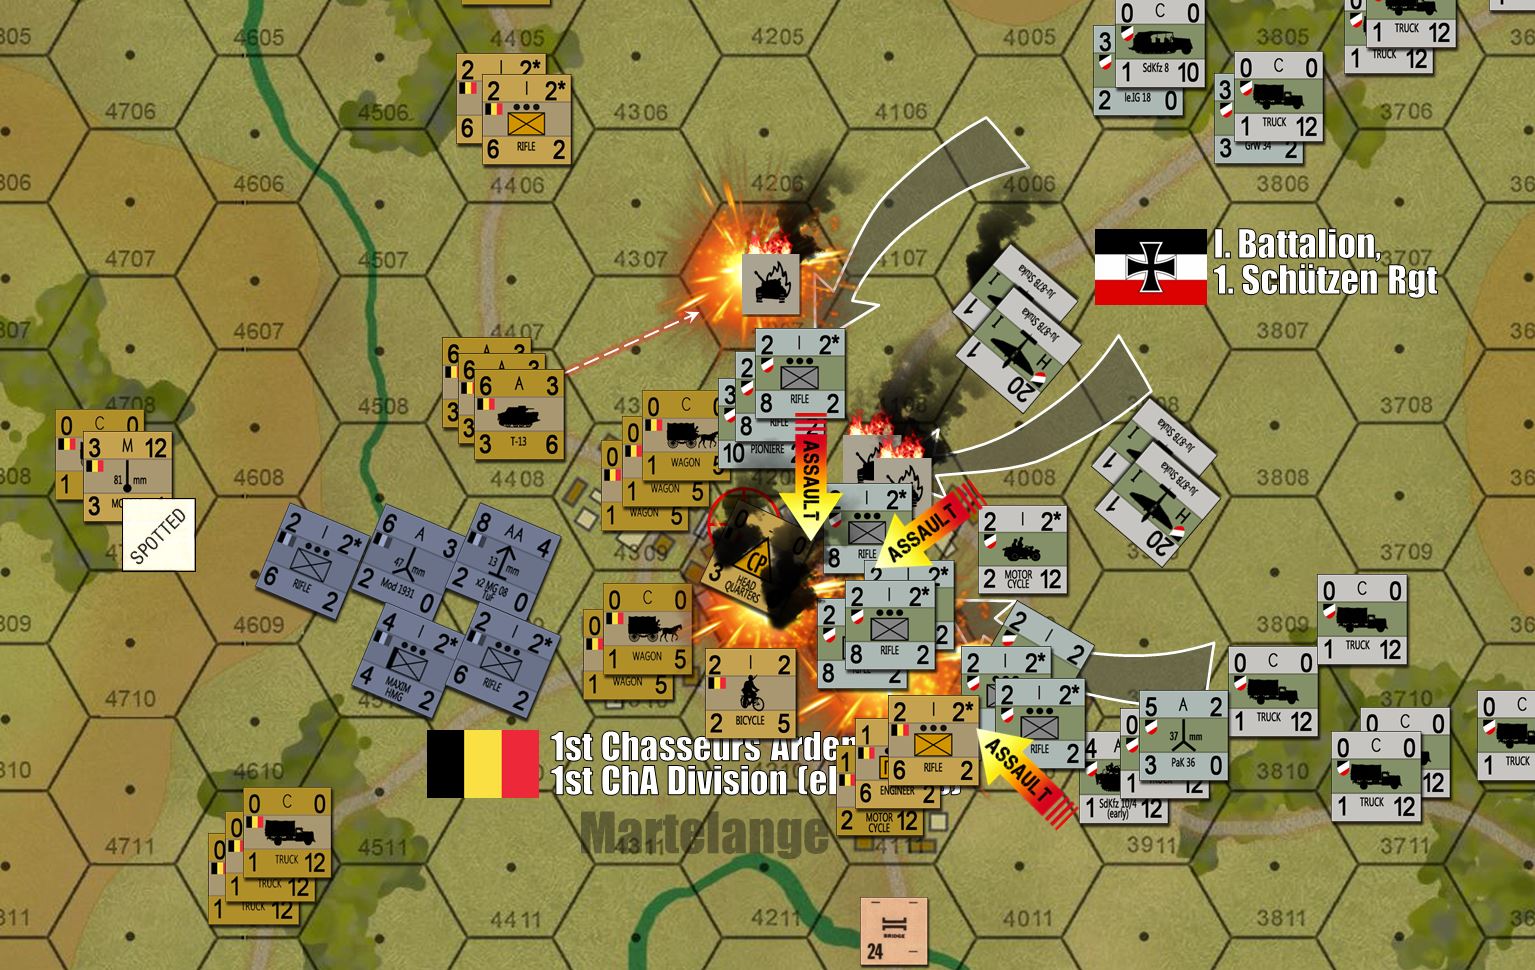 First, the butchery in the center. Where German panzers have failed, Stukas and infantry (converging from two directions and bolstered by “pionier” engineers) have smashed the Belgian antitank battery, antiaircraft battery, HMGs, and two platoons of infantry. Fire from German 8.0 cm “grenatenwerfer” mortars and 7.5cm infantry guns have also helped. Some 200 troops are killed, wounded, or captured here, along with 12 guns. But still the Belgians cling to the center of town, pinning down one platoon of German infantry, their T-13 tank destroyers wrecking a handful of PzKpfw Is, and their Headquarters “CP” stubbornly refusing to die.
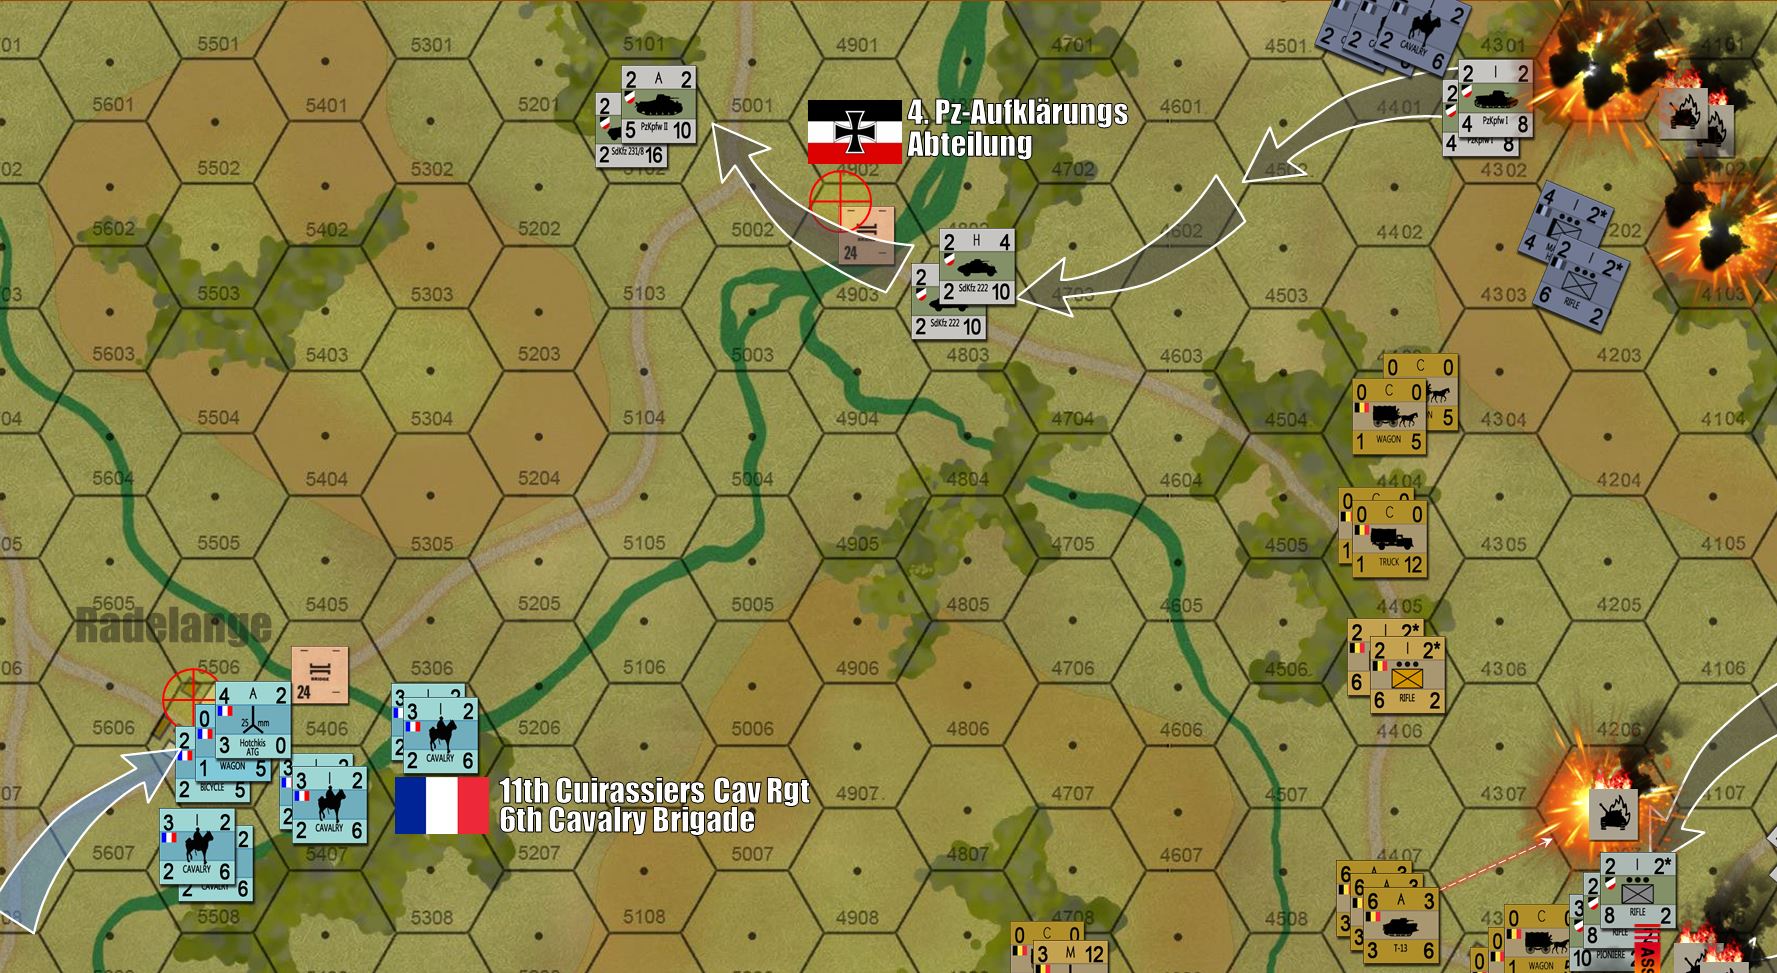 In the north, the Belgian left wing is gone. Although two platoons of my light armor failed to rally from earlier Belgian close assaults and were then blown up by continued assaults on Turn two, follow-on German light armor pinned down a full squadron (company) of Belgian cavalry (150 mounts) that tried to counterattack. None of these rallied and were then butchered by sustained German 2.0cm autocannon fire. The same fate was share by Belgian infantry and Maxim HMG sections, already mauled by Stuka air strikes. The way is thus open for a route around the north, across that Ardennes stream and seizing the first German objective hex. But is it too late? Already the French cavalry of 5th DLC has arrived.
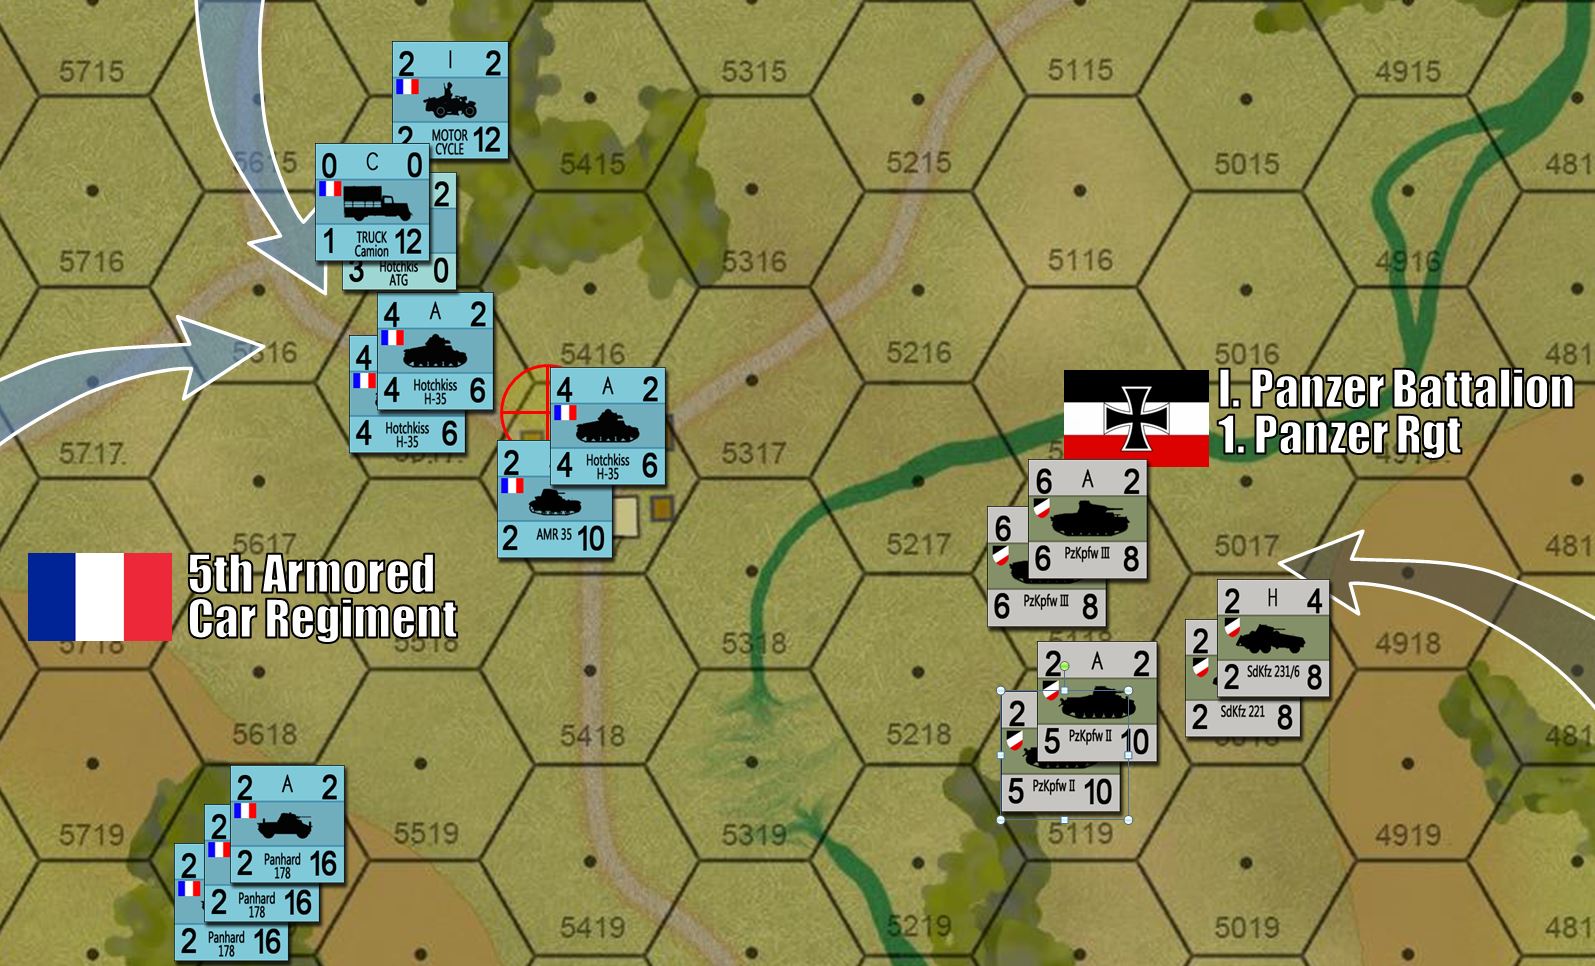 In the far south, my panzer element that outflanked the Belgian right has also run into some terrain problems, delaying them just enough to where they French have narrowly won the race to this village crossroads objective hex. Looks like a little tank skirmish is in the making here?
 Sadly, this was as far as we got. Although the Belgians are mauled and on the brink of collapse, they lasted longer and cost the Germans more than they ever should have. Thus, the Germans are really NOT in a position to engage the French for the last two or three objectives hexes. Crazy as it sounds, this is an Allied victory as Guderian’s larger-scale timetable for 1st Panzer Division and XIX Motorized Corps in general is now totally thrown off. They’ll be fighting here for the rest of the day and into tomorrow, by which time Guderian had expected to be halfway to Verdun.
Great game from @elessar2590!
Panzer Leader 1940 Oriskany vs. Elessar2590 REPLAY!
1,000 thanks to Elessar2590 for joining me in this playthough / Demo of Panzer Leader 1940 (Avalon Hill). We got through about the first half of the game in this session (four turns), and definitely had some killer moments with Stukas, panzers, some kickass German “pioniere” assault engineers and hella-heroic Belgians of the Chasseurs Ardennais Division.
Also, thanks to the awesome audience who turned out in numbers I never expected, given the awkward hour of the game.
Check out the replay! Hope you like it.
Live Stream tonight at 5PM US EST, 10PM UK
May 10, 1940 marked the beginning of what was undoubtedly the most successful German operation of World War II. Viewed in this light, it can in some ways be regarded as the war’s darkest day.
Eighty years ago today, an invasion began that would see no less than four nations crushed beneath the tyranny of the Third Reich. A fifth allied army would be routed and virtually destroyed, in some ways never to fully recover. This offensive would conquer most of Western Europe with stunning speed, establish the Wehrmacht’s aura of battlefield invincibility, and put Britain on the strategic back foot until almost the end of the war. Lessons learned in Poland and Norway would be applied in a new, improved version of “Blitzkrieg,” delivering for the Germans a victory in just six weeks what they couldn’t do in four bloody years of World War I.
If one considers the damage this offensive would also do to the global empires of Britain and France, we are still dealing with the fallout of this attack to this very day.
Victory in World War II never seemed more impossible as it did eighty years ago today … May 10, 1940.
“Fall Gelb” the Germans called it. “Case Yellow.” The Blitzkrieg in the West.
~ ~ ~ ~
Join us today as we live stream a Panzer Leader recreation of one of the campaign’s very first engagements.
 Belgian screening forces in this battle - forward elements of 1st Chasseurs Ardennais Division, deployed along the Bastogne-Neufacheteau-Martelange triangle.
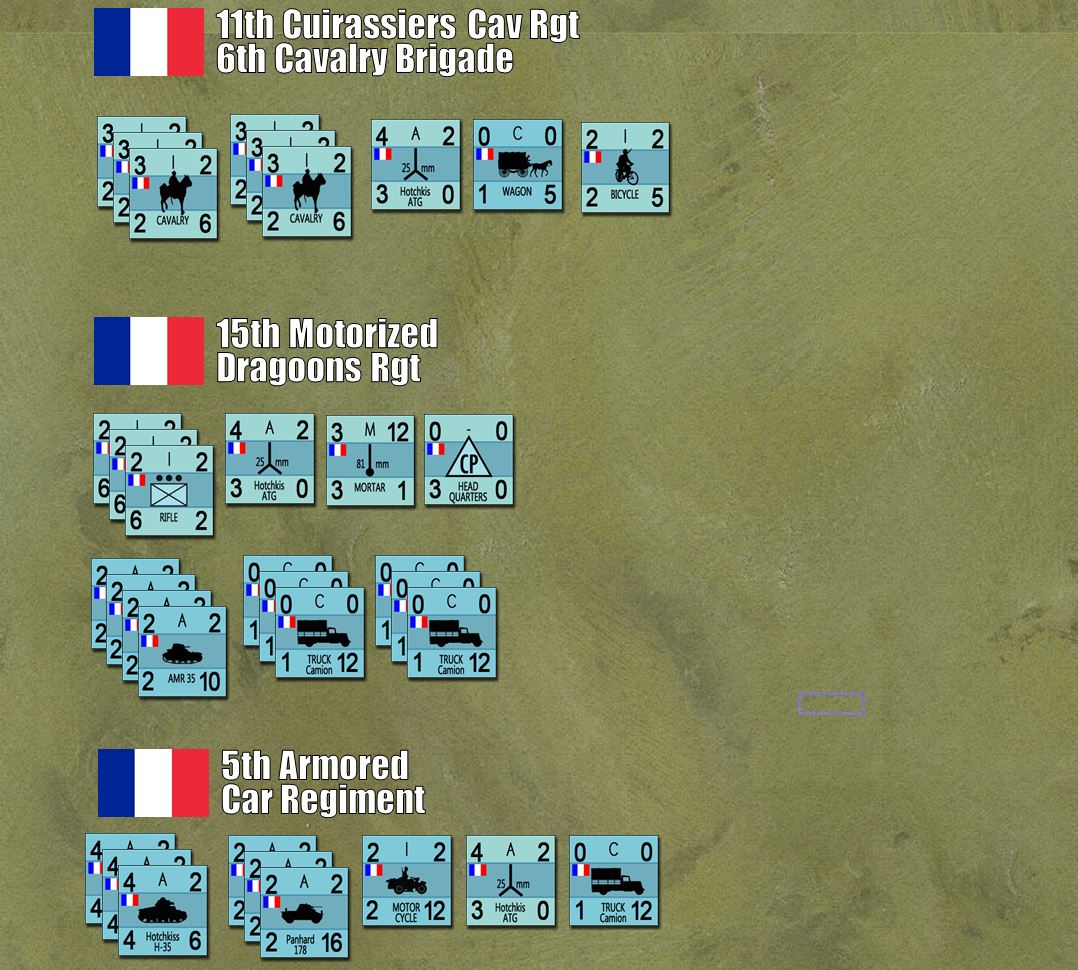 French reinforcements, drawn from 5e Division Légère de Cavalerie, or DLC (light cavalry division). Again, historically these forces didn't close with the Germans until day 2 or 3 of the offensive. We're taking a little historical liberty to get a third faction on the table and give the Allied player SOME maneuver force for a tank battle.
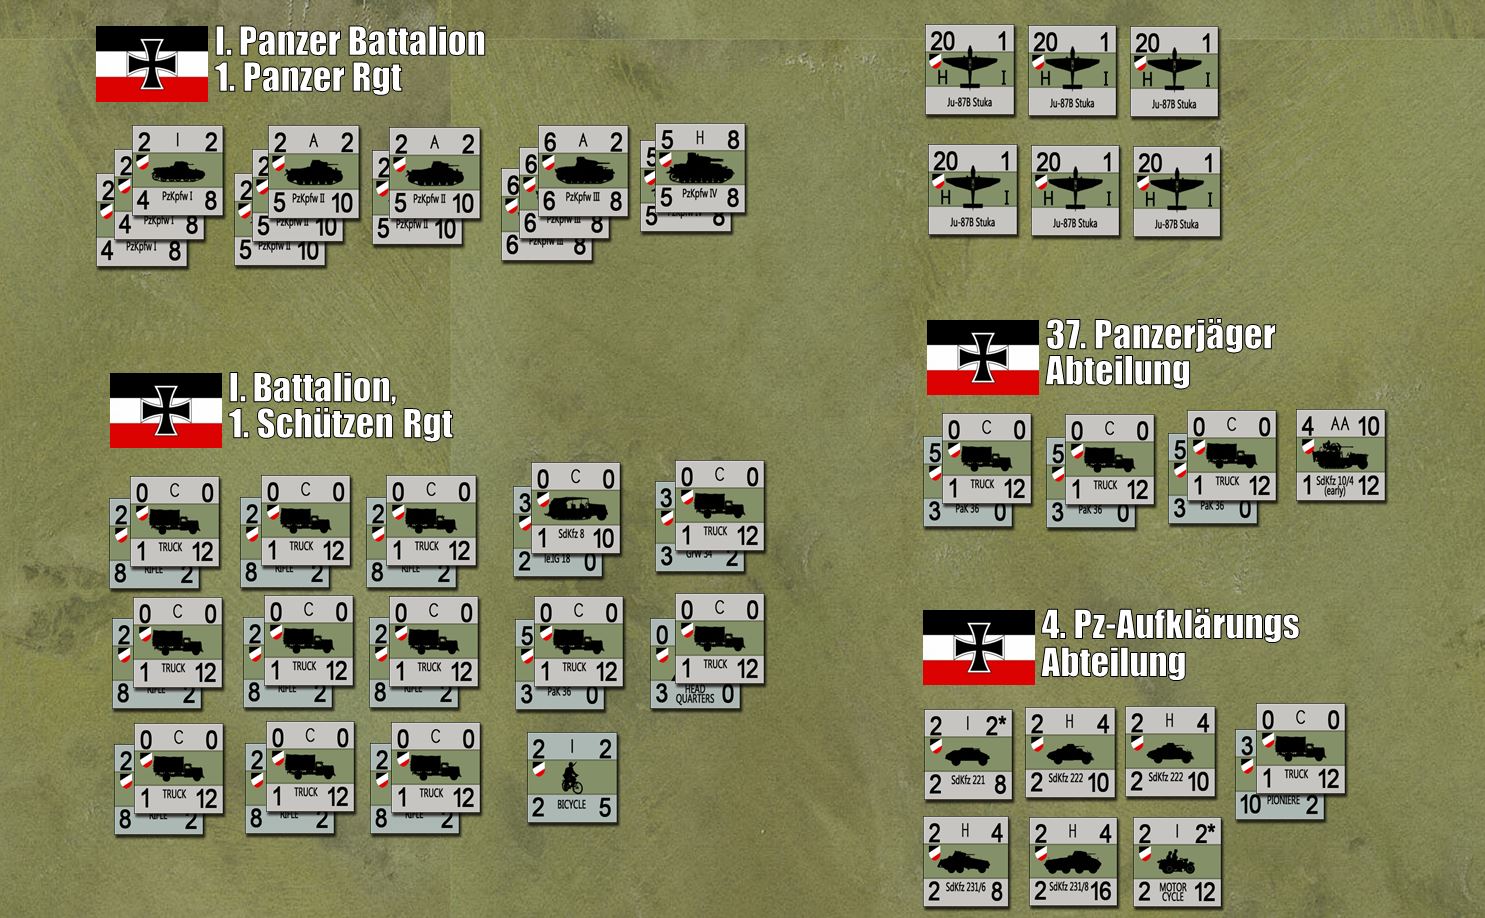 Leading elements of 1st Panzer Division, Guderian's XIX Motorized Corps (the didn't call them Panzer Corps until late summer 1941), Panzer Group Kleist, Army Group A.
 The game has technically started. Set up and initial German movement is complete, so when the stream starts, we're ready with immediate action.
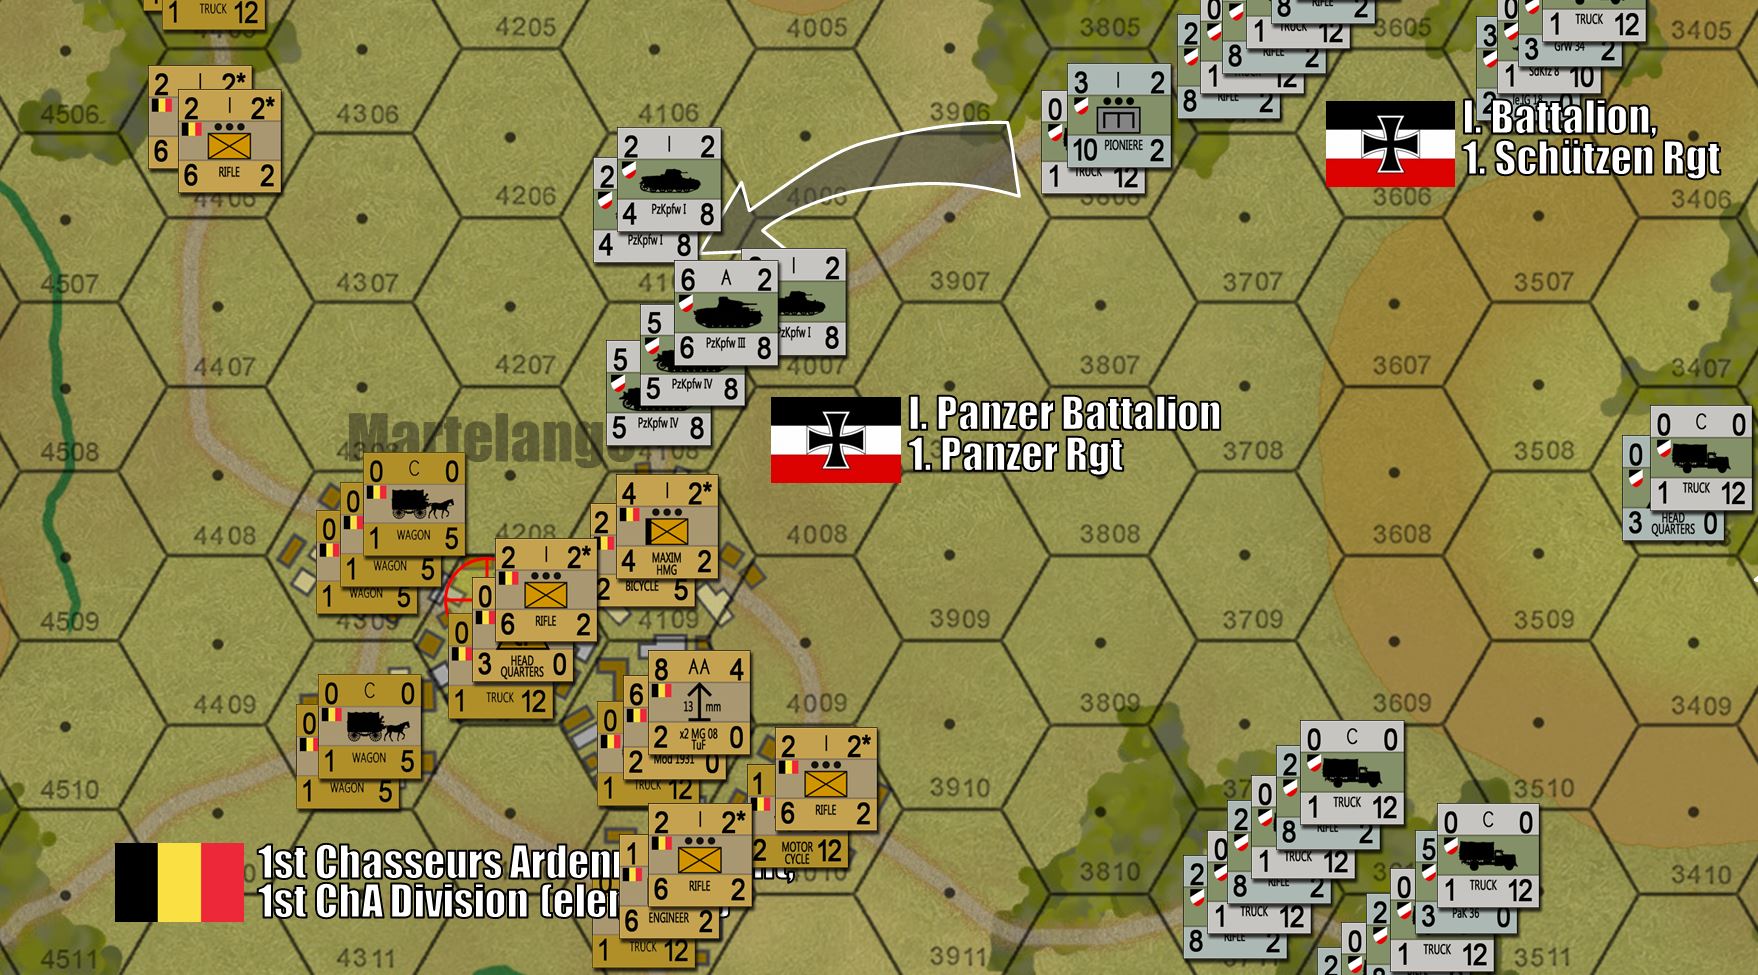 Leading off with German PzKpfw IVs with the old short-barrel 7.5 cm assault howitzer. Unlike the long, "sexy" tank-killing guns we see so often, these short stubby "ugly ducklings" are INVALUABLE against a far more common threat, enemy infantry and light artillery entrenched in woods, fieldworks, or (as we see here) in a town.
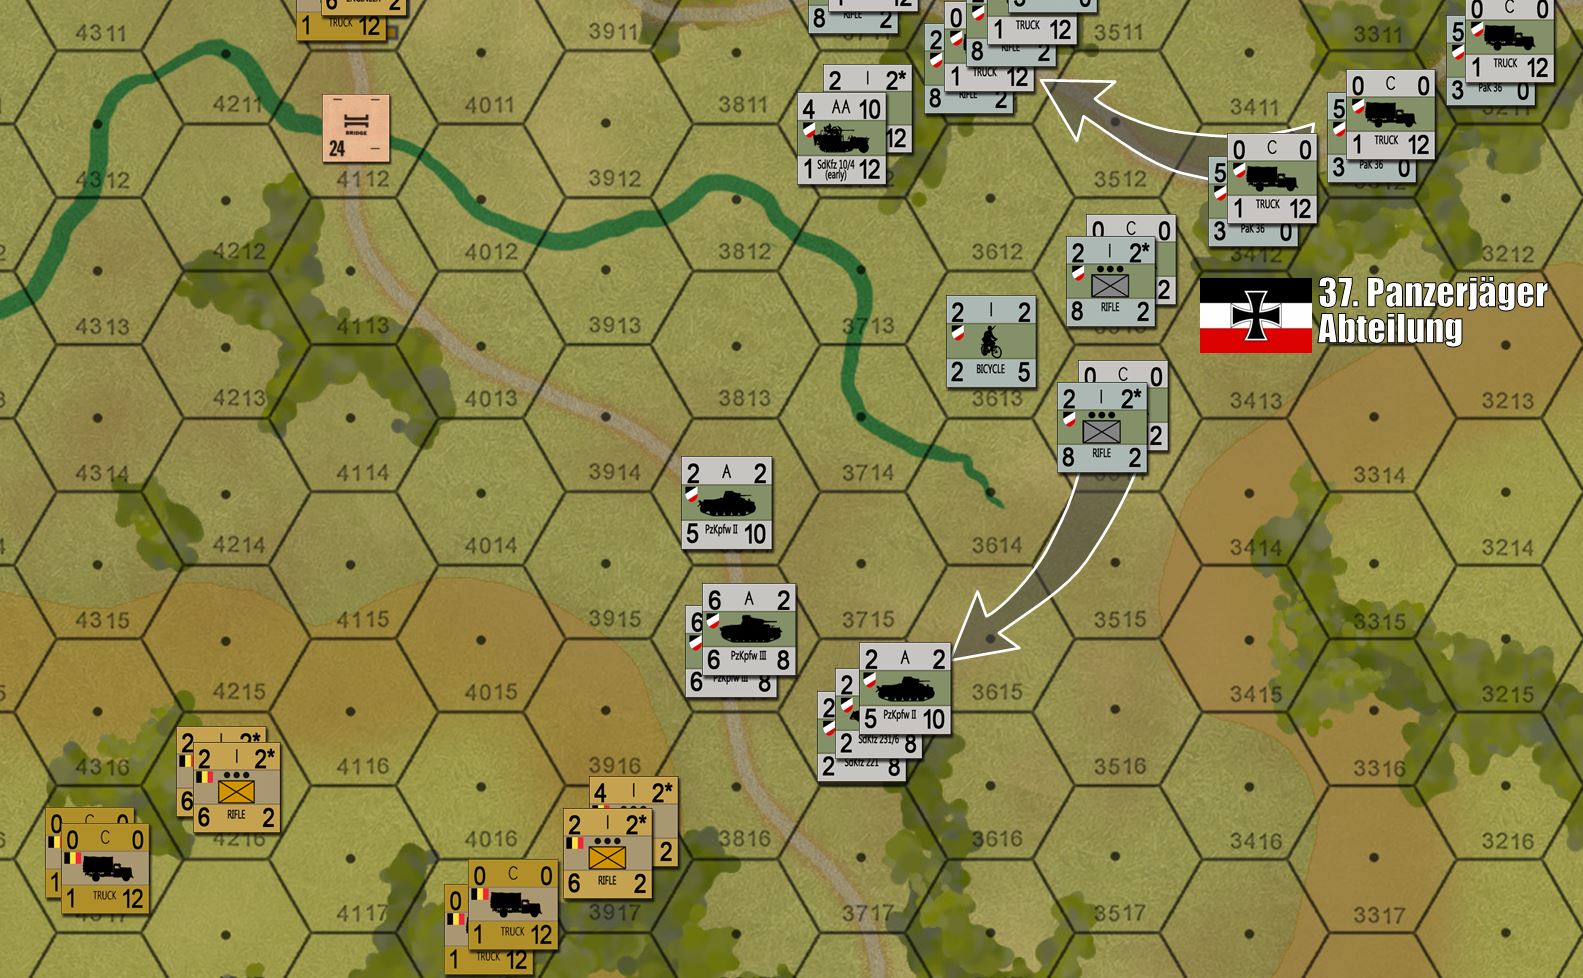 Here's another thrust the Germans have going to the south, hoping to flank the main Belgian position and get at some of the objective hexes along the Allied backfield before the French arrive in too much strength. Panzers are stacked with armored cars on purpose, for extra defensive strength and fire support JUST in case the Belgians decide to get bold and charge off that hill in a close assault against thin-skinned German recon units.
80th Anniversary Games and Shows
We’re working on a new mini-project, commemorating the 80th Anniversary of the the opening of “Fall Gelb” (Case Yellow) – the great German blitzkrieg that smashed into France, Belgium, the Netherlands, and Luxembourg on May 10, 1940.
So far we’re working up some Panzer Leader armies for use in a May 10 game, to be streamed live by the Sitrep Podcast Channel.
Initially we’re looking at Belgian and French forces that fought many of the key initial engagements through May 10 – 15 against German Army Group “A”. Later we’ll be looking B.E.F. units that fought at places like Aras and the approaches to Dunkirk.
We hope you’ll join us as we follow the 80th Anniversary course of this earth-shaking campaign (some of the effects linger with us to this very day) through May and into June … charting, gaming, and remembering the course of this world-altering WW2 campaign.
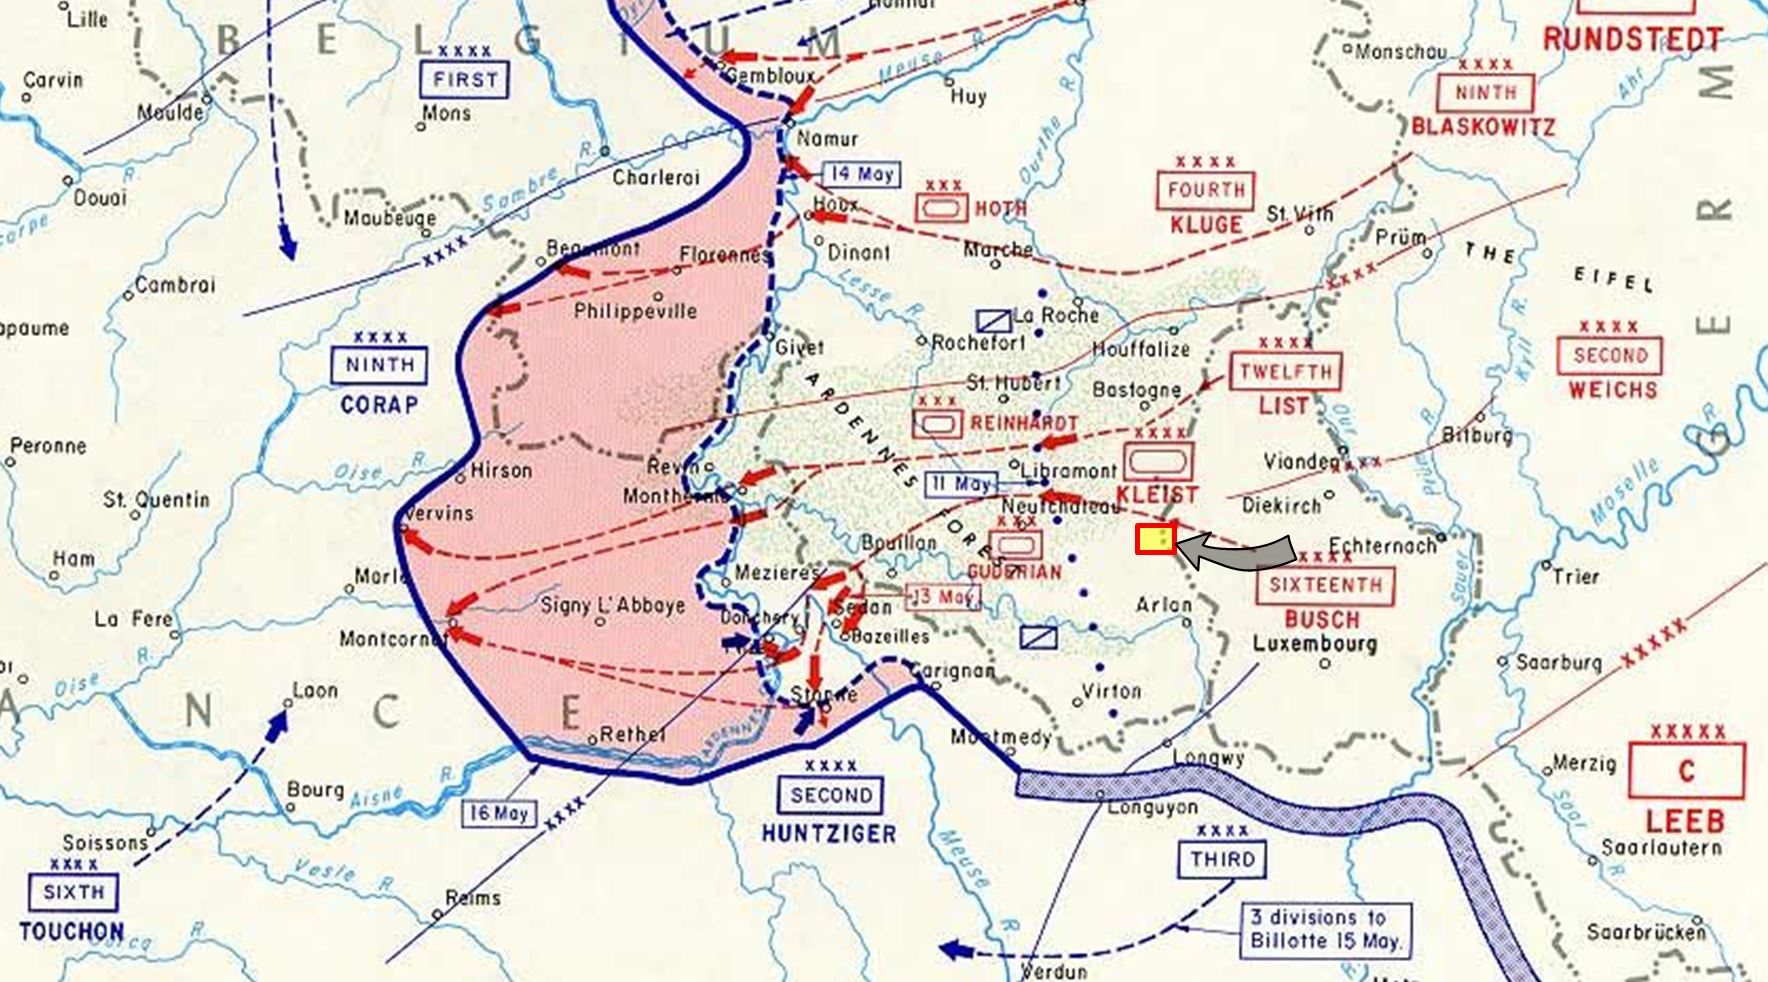 Our first game is scheduled for Sunday (live stream at 5 PM US EST). The map shows where it takes place at, the yellow rectangle is scaled for the actual size of our gaming table. So leading elements of Panzergruppe Kleist, spearheading Army Group A, have smashed completely through Luxembourg in about half an hour and are now entering southern Belgium. They will be met by Belgian forces along the border, who KNOW that can't stop the Germans, but hopefully will delay them until French allies arrive from behind them. For reference, note the far upper left, the city of Lillie (where some of the last delaying actions for the Dunkirk evacuation will be held in about three weeks), and the lower right we see Verdun. Closer to the imminent battlefield, we see Belgian towns like Neufacheteau and Bastogne ... this fight will take place on nearly the exact battlefields as the Battle of the Bulge 4 1/2 years later ...
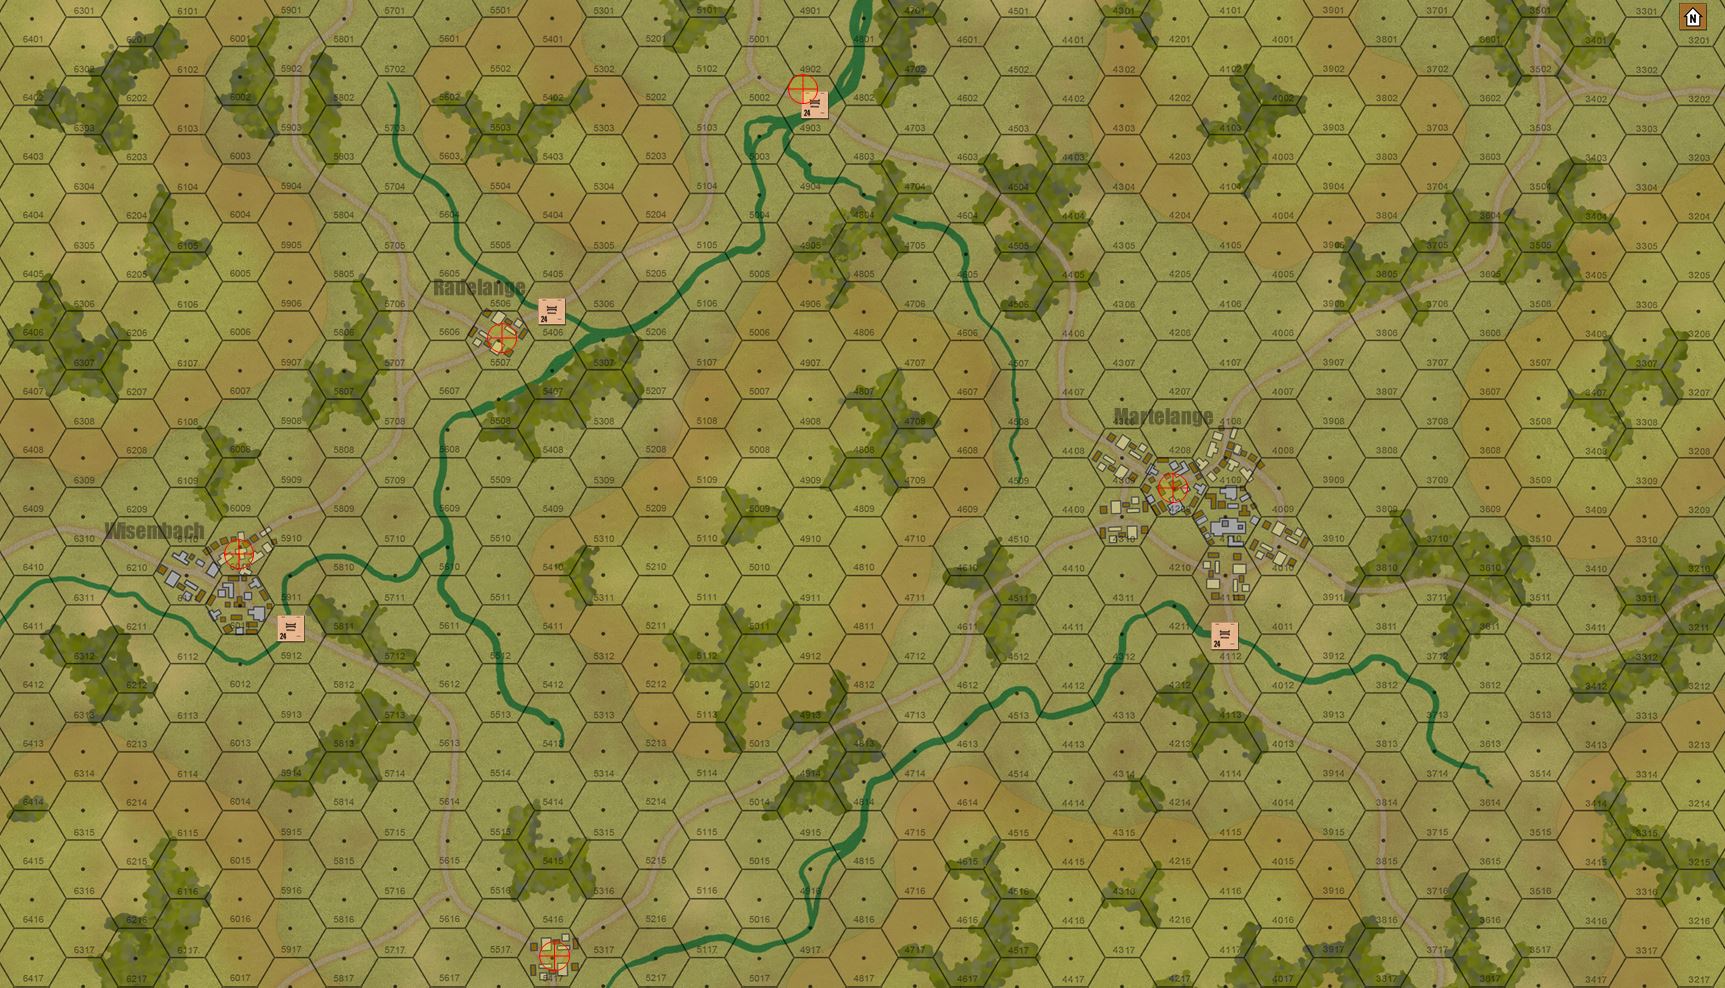 Here is the Panzer Leader map I have drawn up for our first game. We're looking at 150 meter hexes. The town of Martelange marks the border between Luxembourg (east) and Belgium (west). Belgian forces will be allowed up, then the Germans will enter from the east end of the table. Objective hexes (marked in yellow) must all be taken by the Germans.
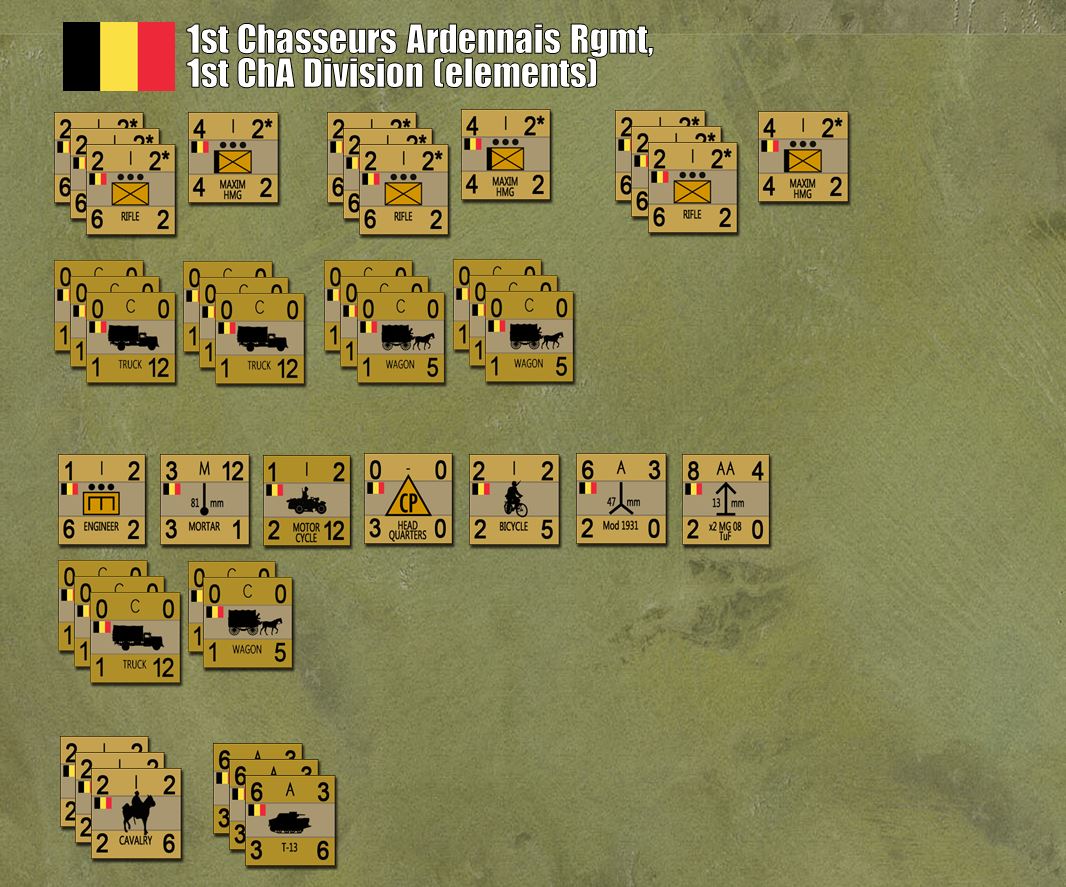
 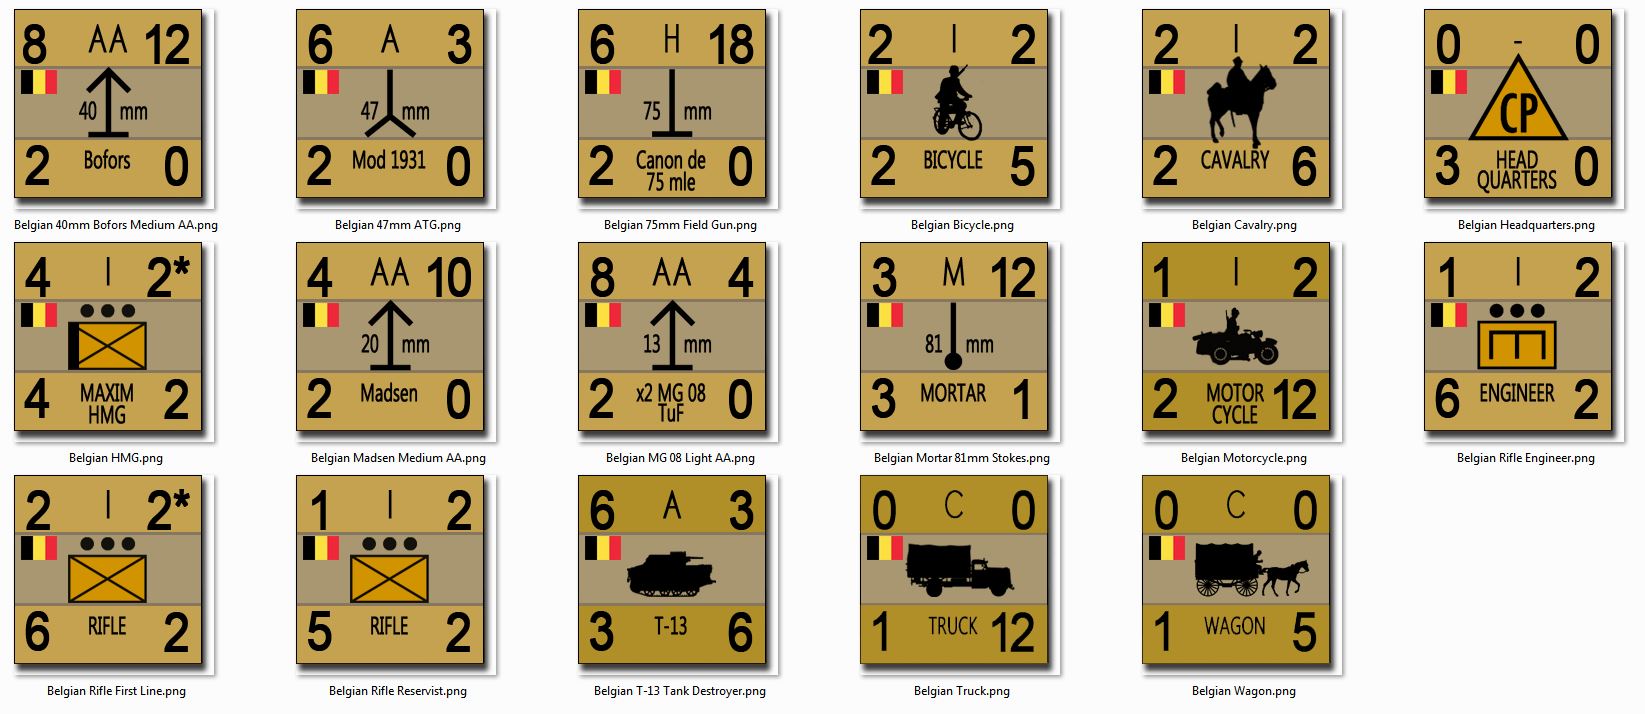 The Belgian counters made up for this game. Obviously some counters will be duplicated many times for multiple units on the actual table. The overall unit will be a battalion of the 1st Chasseurs Ardennais Regiment, 1st Chasseurs Ardennais Division, "Group Keyaerts."
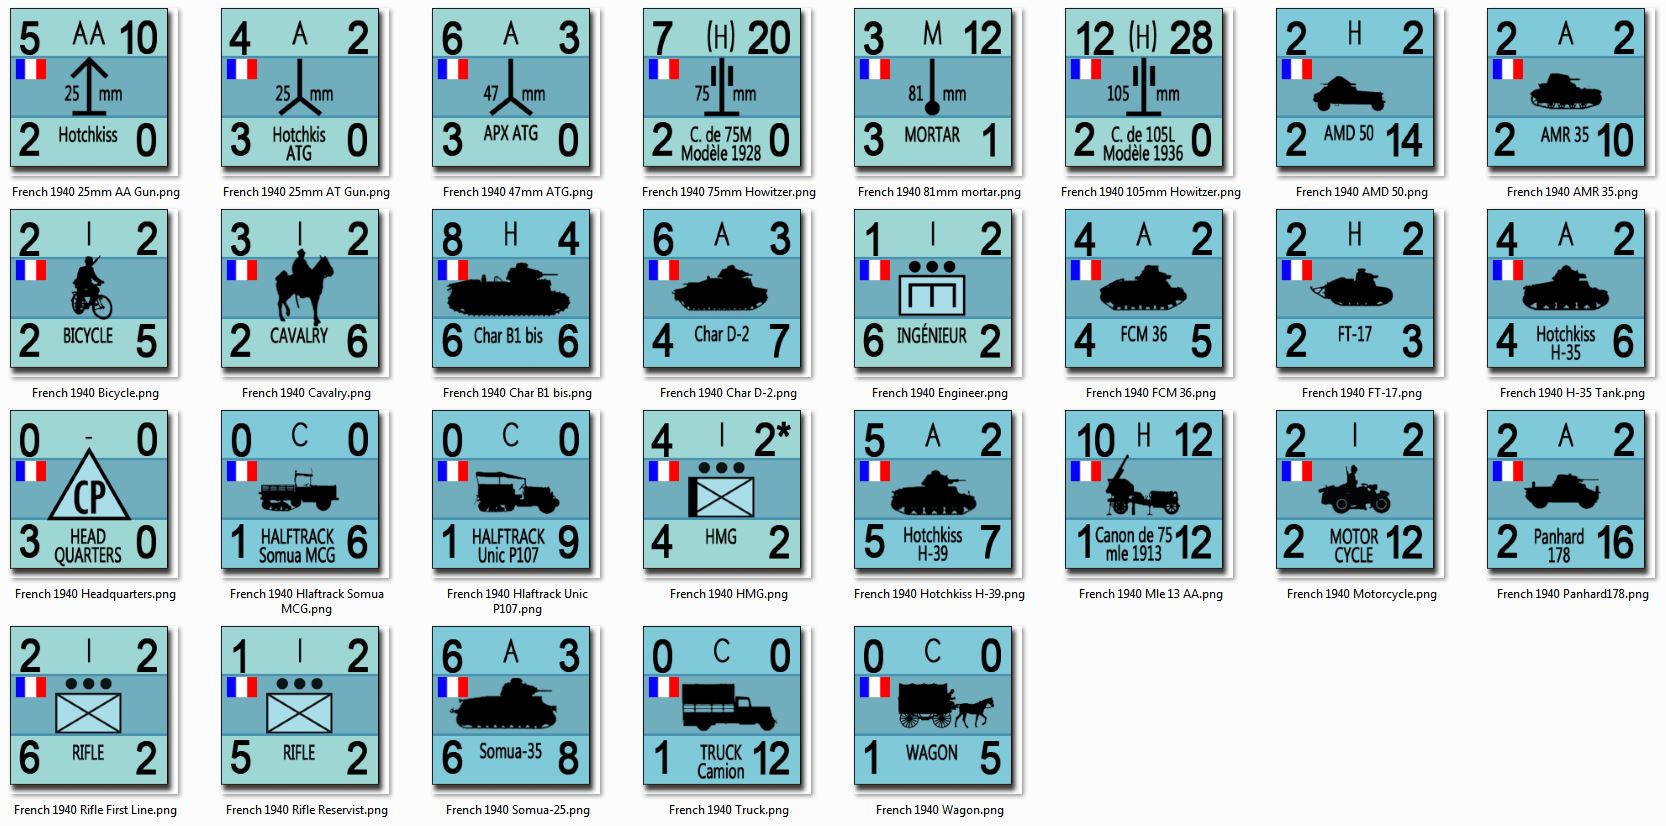 Now the overall Allied plan for defense was for the Belgians to delay as long as they could, then withdraw to a line generally described by the River Dyle, where French and BEF units would be coming up INTO Belgium from the west and join them in a united defense. Of course it didn't work out this way, especially in the Ardennes region of southern Belgium. Light, fast French units like the 5th DLC (Light Cavalry Division), part of the Second Army, were supposed to rush up and support the Belgians. But historically they didn't arrive until May 12-13. Here, we bringing in limited forward elements of 5th DLC (NOT all these tanks, this is a list of ALL the French counters we'll be using in the CAMPAIGN) in something of a "what if" scenario ... what if the French mobilization and reinforcement, and coordination with the Belgians, had been but a little better.
 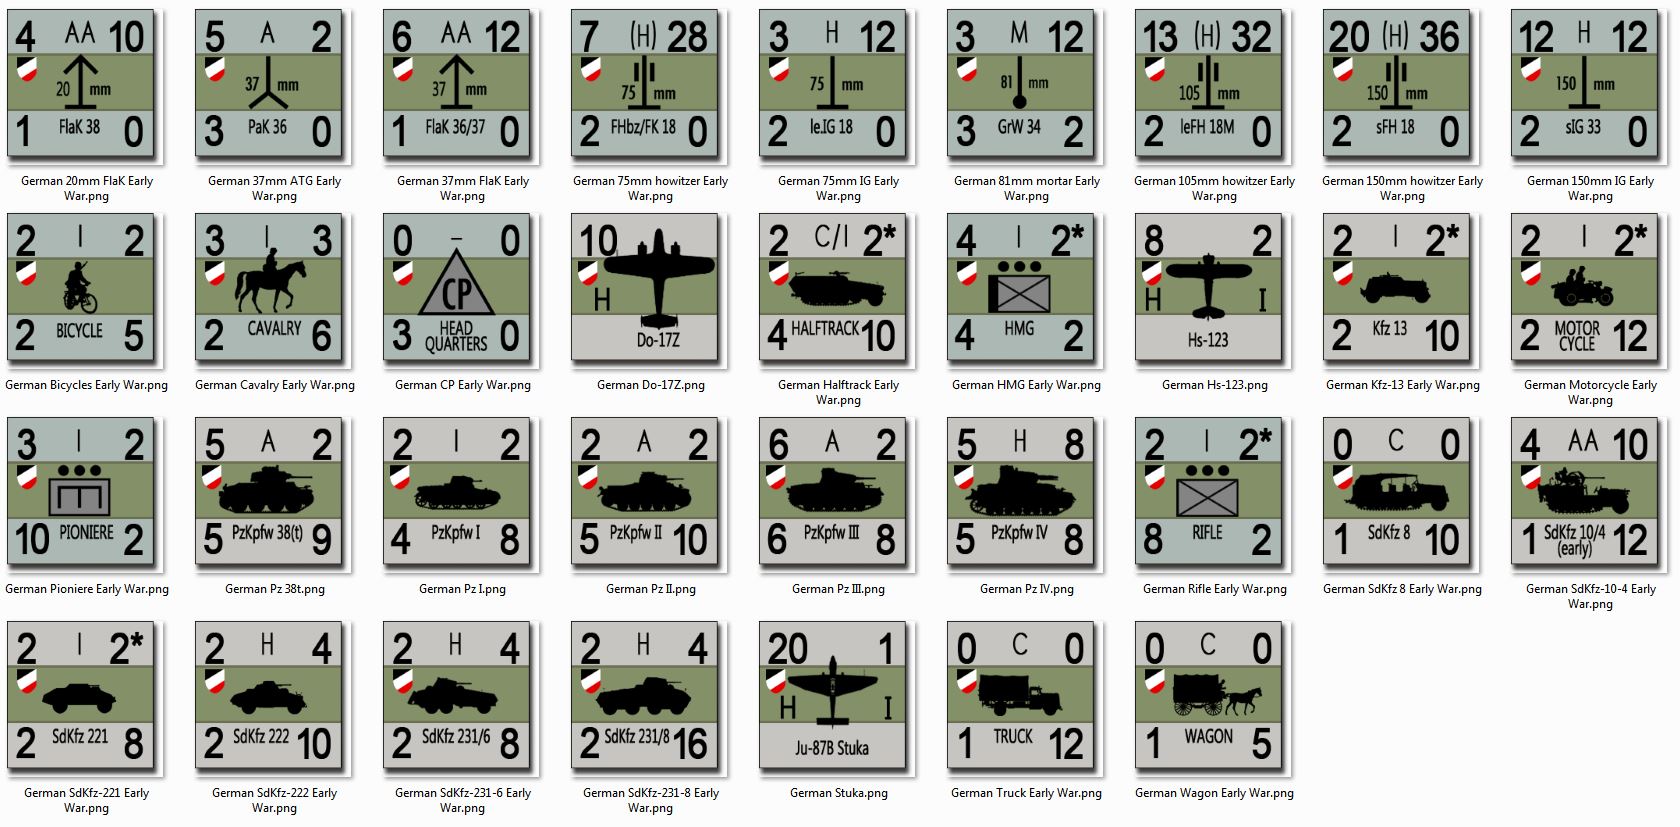 Again, this is a "warehouse" of ALL German units we'll be toying around with during this project, they certainly won't all be in this first game. But for now we'll be looking at the 1st Panzer Battalion, 1st Panzer Regiment, 1st Panzer Division, leading the way for Guderian's XIX Motorized Corps, Panzer Group Kleist, Army Group A. They be backed up by motorized infantry, panzerjaegers, reconnaissance armored cars, and course Stukas.
Elessar 2590 v. Oriskany, Battle Highlights
As community members are asking how this battle went between @elessar2590 and myself, let me offer a quick “cliff notes” outline of some of the highlights.
- We’re still playtesting the system. In this game we wanted to try out some new factions, namely Crown Germans (“Hessians”) and Native Americans of the Iroquois Confederacy.
- Since we’re still playtesting, the games are kept “impossibly equal,” and so are not historical battles.
- That said, these kinds of battles happen all the time in the 1777 New York Campaign, with elements of Germans and Native Americans detached from the main Crown Army (Burgoyne) to fight in the frontier wilderness of upstate New York. They were often checked by columns of American Continentals or (more commonly) militia.
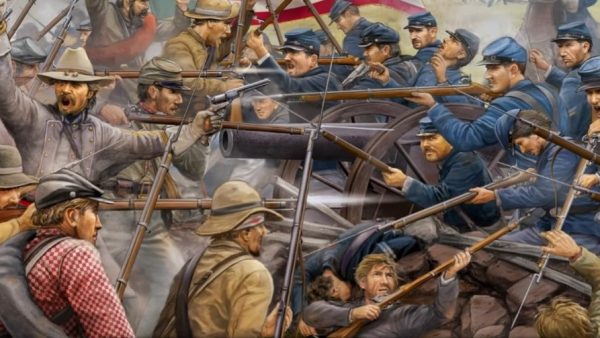
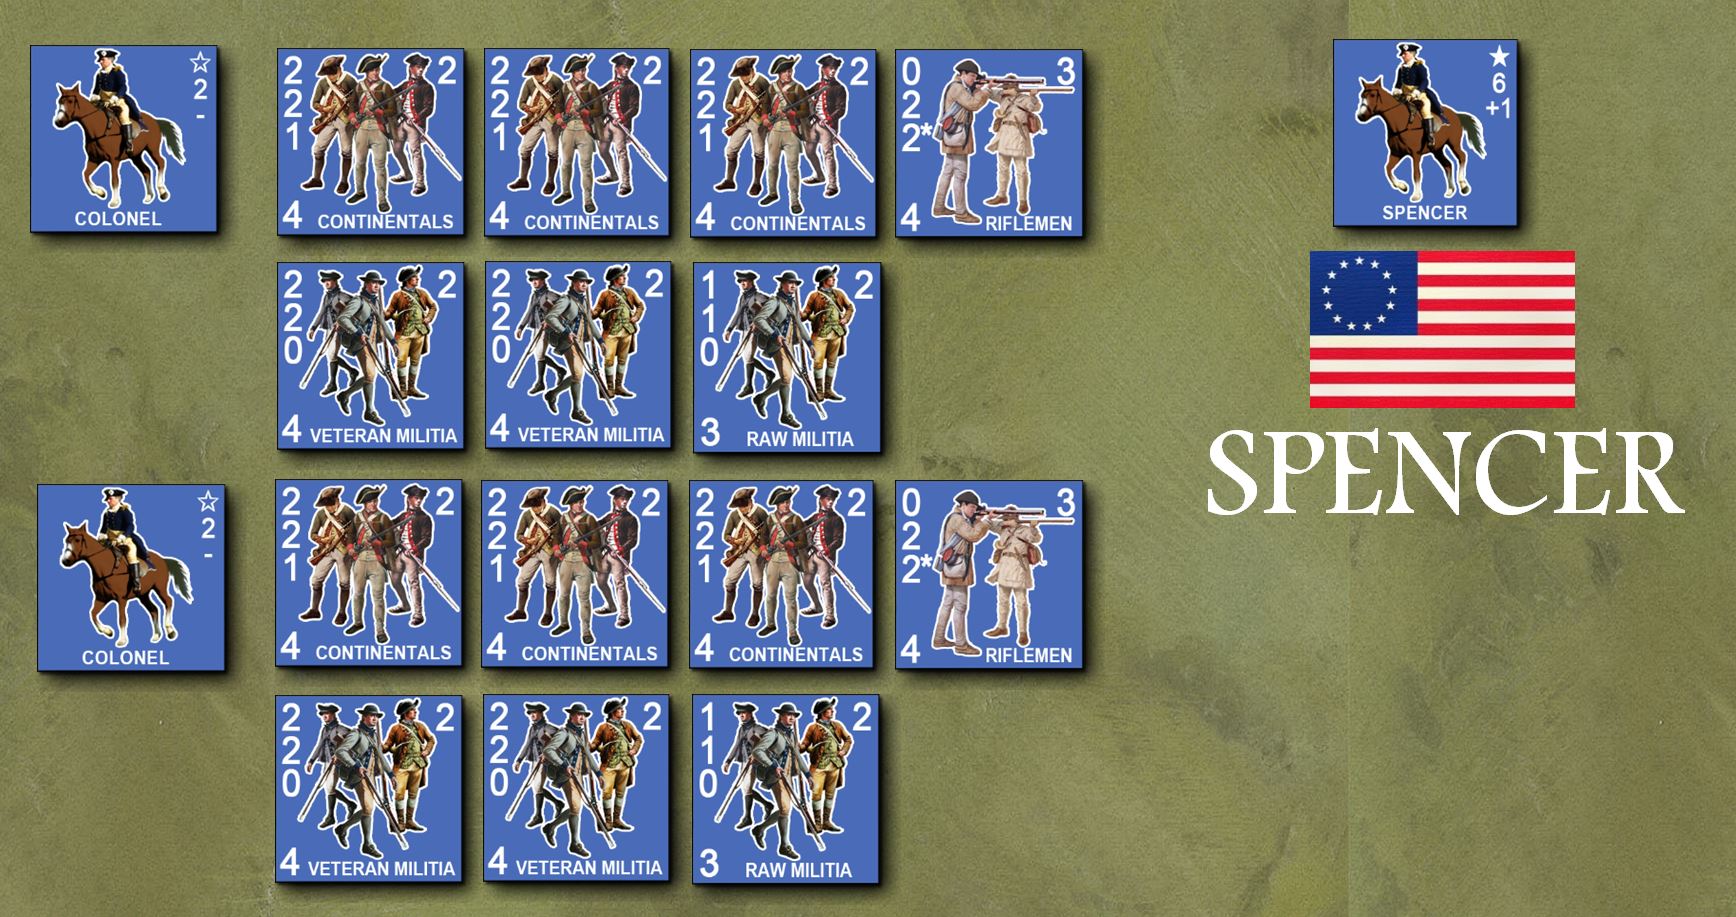 Here’s the American force. We have the fictional Brigadier General Spencer in command of two mixed regiments of Continental regulars, trained and raw militia, and riflemen. Two colonels command the regiments. We’re looking at 14 units (very roughly, 60-100 men, call it two companies each) so just over 1100 men.
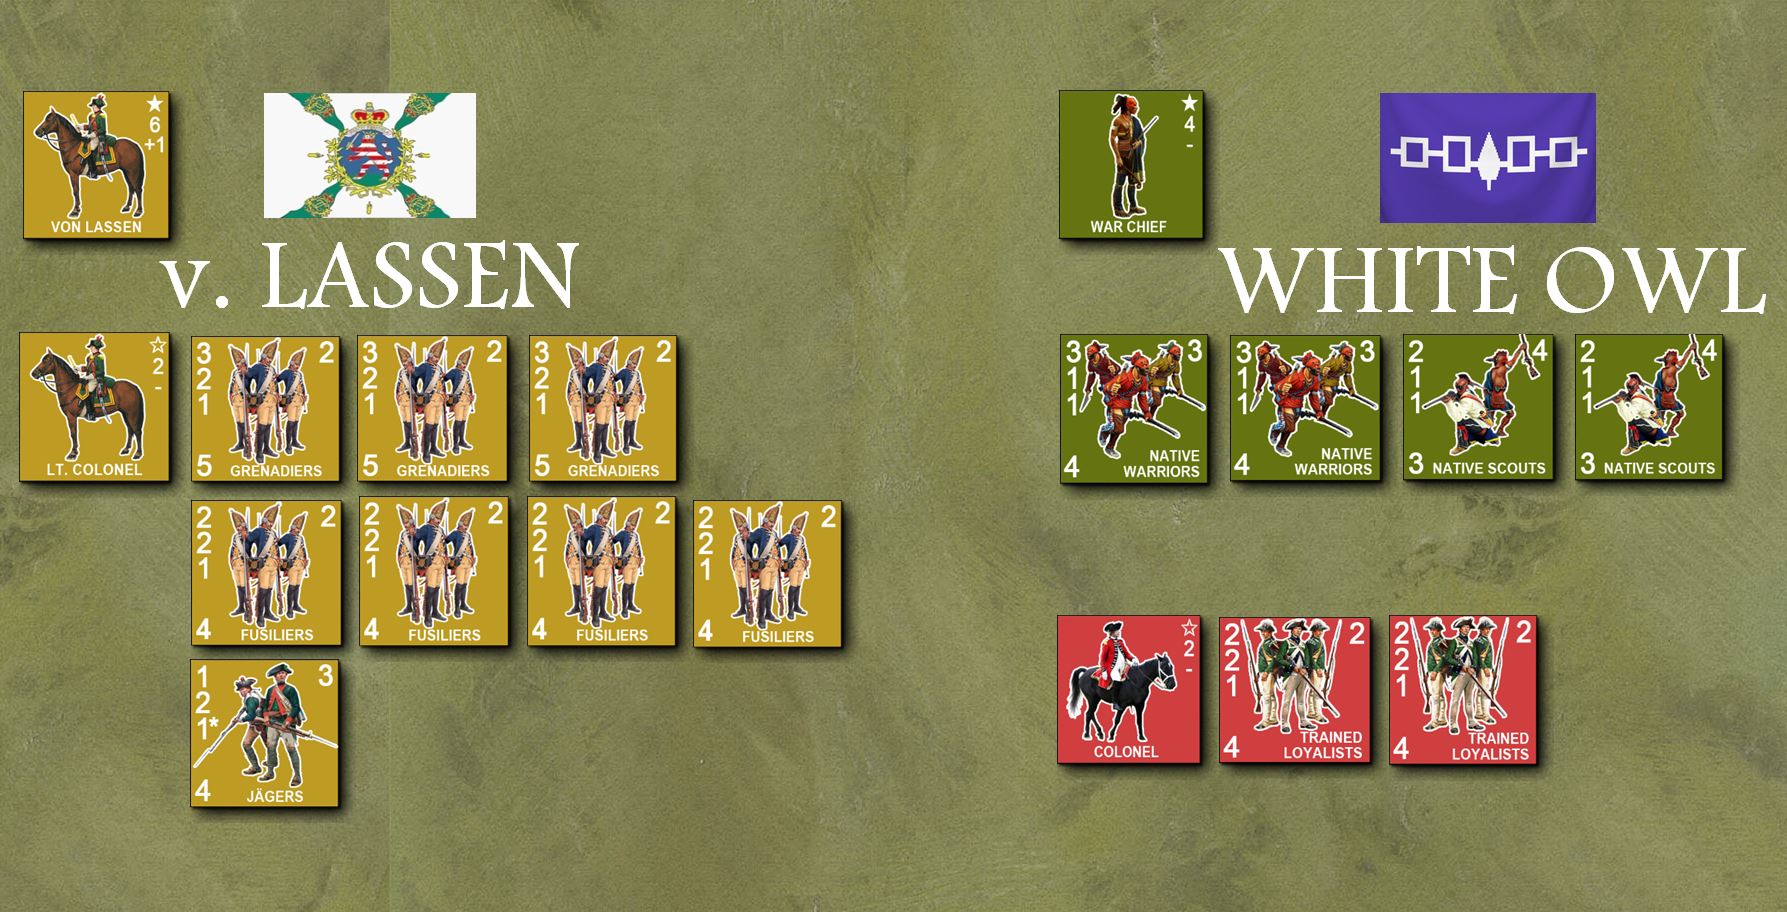 Here’s the Crown force. It’s a little different, but about the same in power. We have an understrength regiment of Hessian grenadiers (only 240 strong), along with fusilier “line infantry” and a detachment of jaegers. The fictional Colonel von Lassen is in command. Unlike British regiments of the day, most Crown German states of the day (Hesse, Brunswick, Saxony) organized their grenadiers into their own regiments, although these were few and understrength, as we see here. There is also a contingent of Mohawk Iroquois under the leadership of fictional war chief “White Owl,” and a detachment of local “Tory” loyalist militia.
 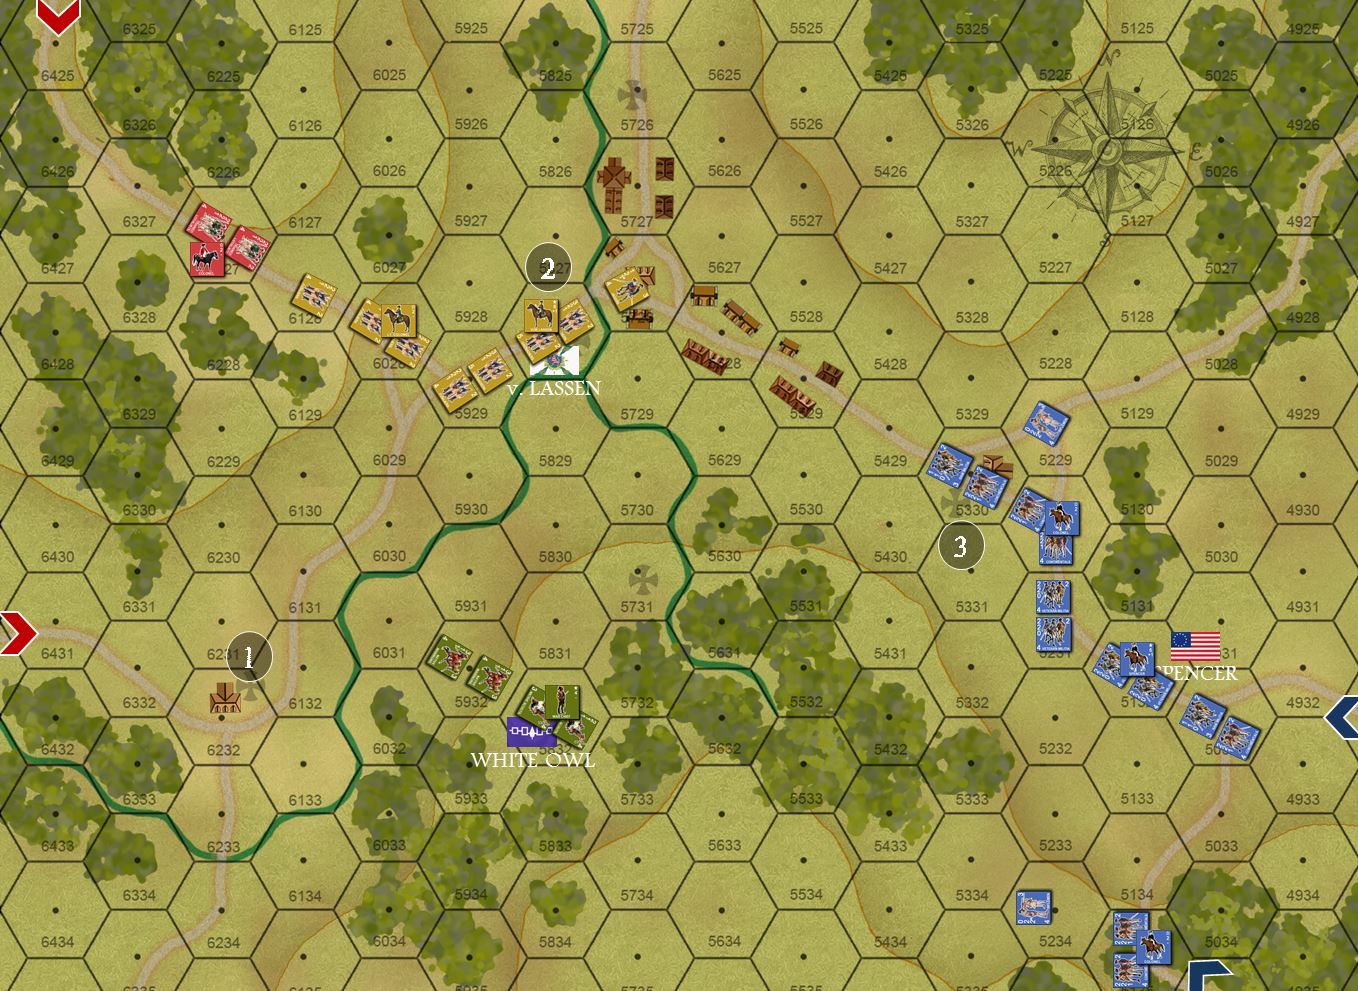 We rolled dice to determine that I would play the crown, and Dylan would play the Patriots. Dice also determine that I am the “attacker” and so move on to the table first. I approach along the west and northwest roads (entry hexes indicated). My Iroquois (VERY fast warriors) seize the West Tavern (1) and my light Hessian Jaegers move fast and seize the objective bridge leading into the town from the west (2). Meanwhile, the patriots also come in from the east and southeast, seizing an objective at the East Tavern (3). The Patriots detach a three-company battalion to the south under command of one of their colonels, wary of the Mohawk Iroquois I might try to work around their left wing.
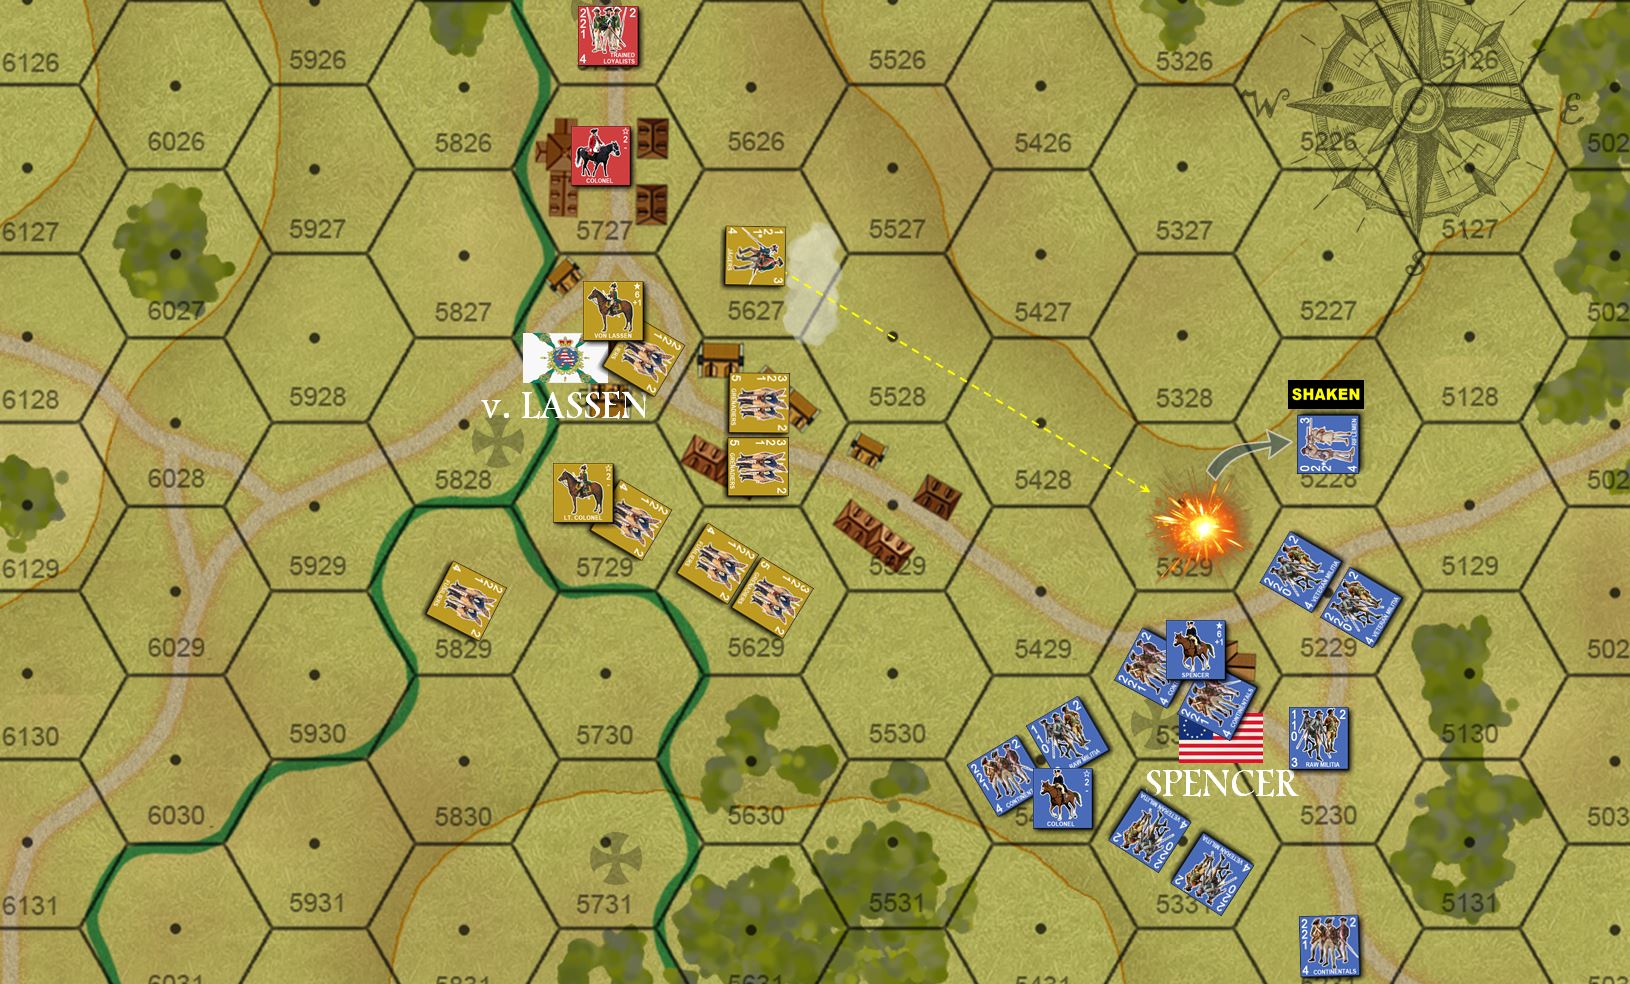 Shots fired! As the brigades close, my jaegers get the drop on an approaching column of Pennsylvania rifles. At long range (only riflemen and jaegers can engage at this distance), I manage to scare them off a little.
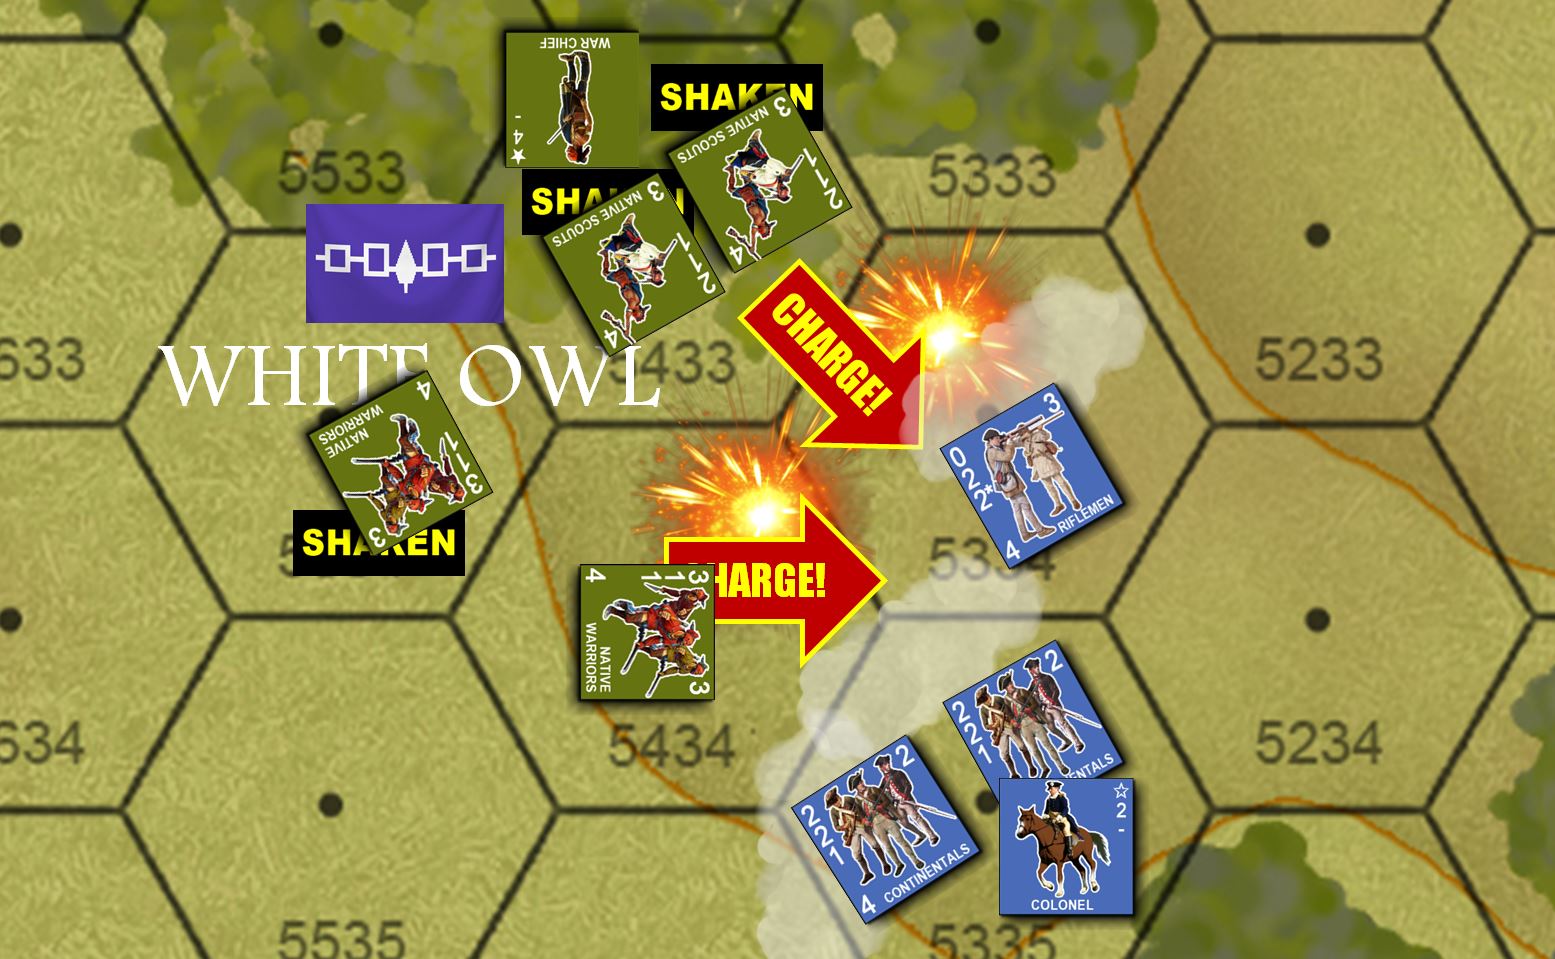 The battle starts in earnest not between the opposing main bodies, but in the south. Here I launch a screaming charge out of the woods with nearly all my Mohawk Iroquois (not all of them can quite reach the Patriots). However, Elessar2590 carefully portions out his interruption fire as I charge in, foregoing the possibly of KILLING any units for simply breaking up the charge and saving his extremely vulnerable riflemen. It’s a smart but risky decision that pays off. None of my war bands are KILLED or even seriously damaged, but the charge never really happens. Luck turns against me, though, as White Owl himself catches a stray bullet and is wounded.
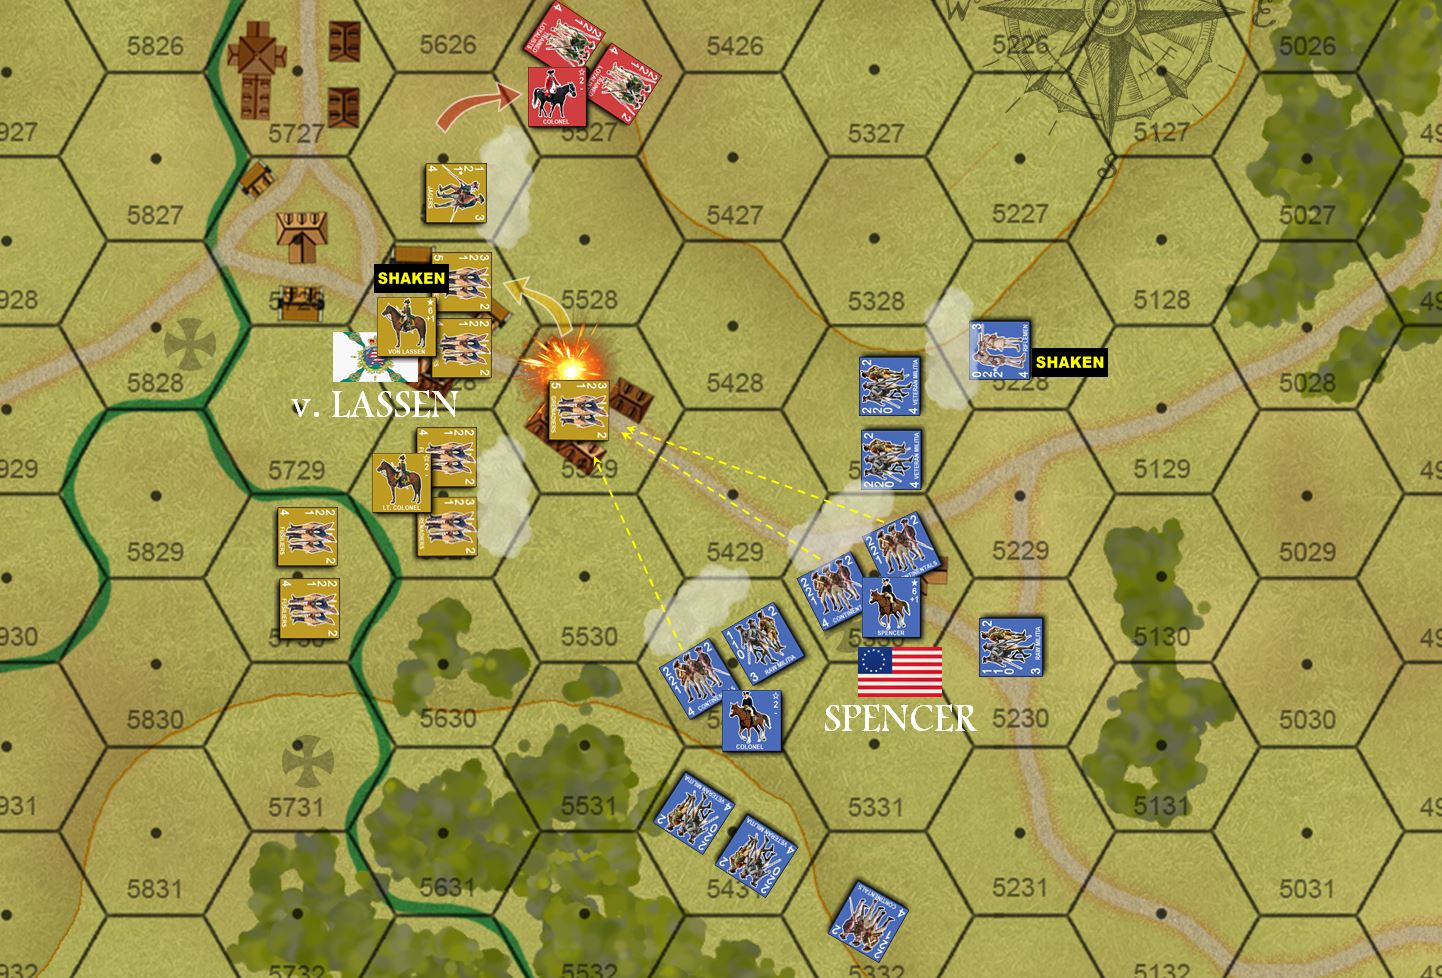 The main battle in the north finally gets underway. By opening volleys have missed, but return Patriot volleys are more effective. However, despite the firepower, these opening volleys are made at VERY long range for smoothbore muskets, the target are my very tough Hessian grenadiers, deployed between wooden buildings for cover, and with Colonel von Lassen’s +1 leadership bonus. Nevertheless, one company is actually shoved back a little. Meanwhile, my Tory Loyalists have taken ANOTHER objective along the north road (out of shot) and are now poised to take the high ground north of the developing battle.
 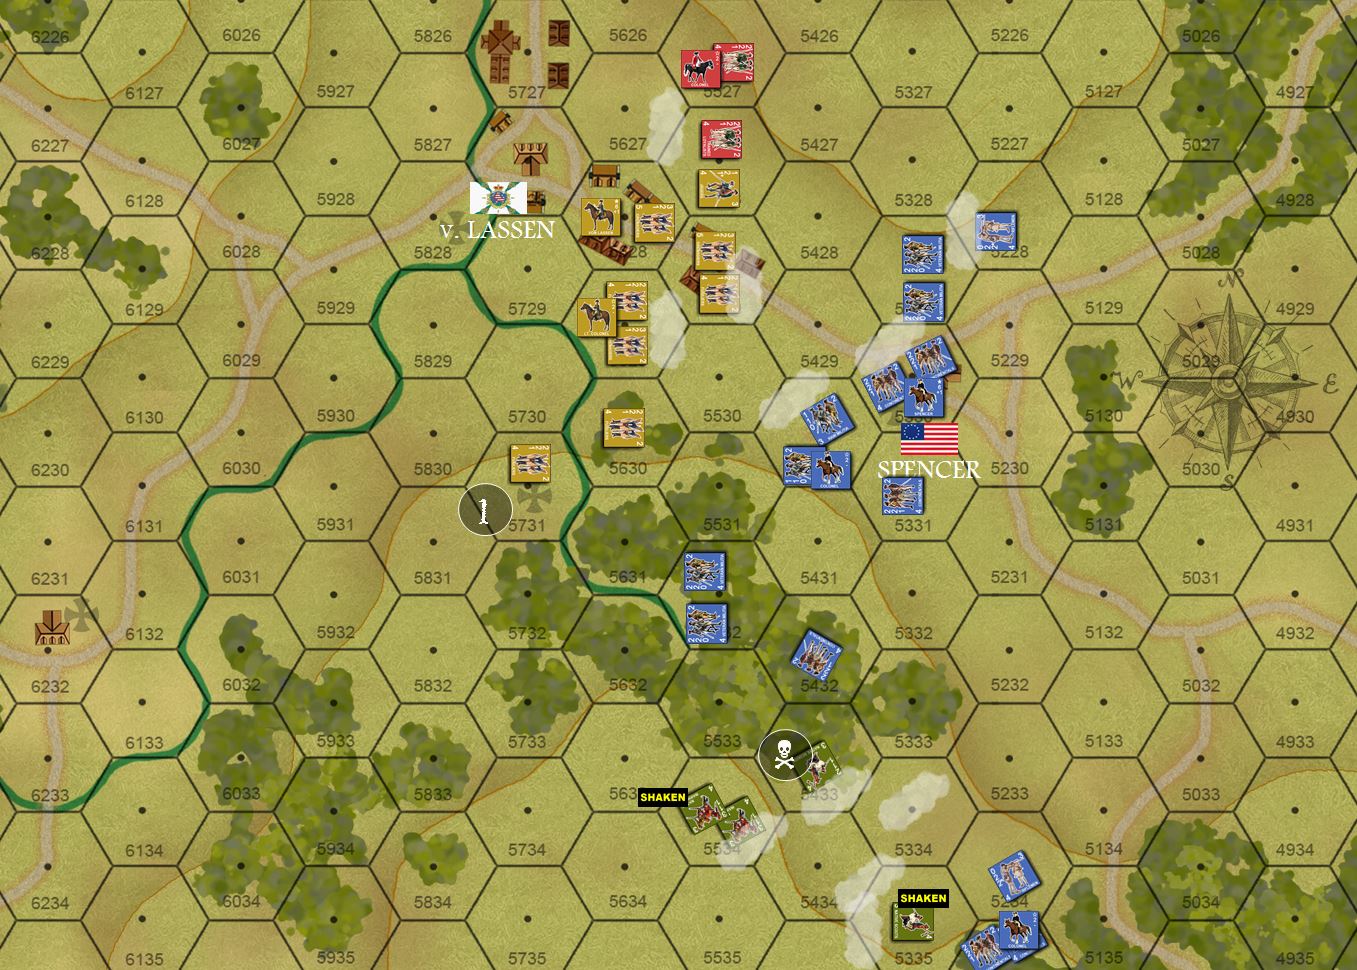 The situation at the end of Turn 4. I’m totally winning on objectives (note I’ve taken the “+” objective marker marked by the “1”). However, my south wing is in danger of completely falling apart. Here, Elessar2590 has chosen to use his Patriot riflemen not to attack my Mowhawk warbands, but try to SNIPE my wounded leader, White Owl (a special ability for Patriot riflemen, renowned and infamous for deliberately targeting Crown commanders). It’s a tough roll, and it means basically not getting a normal attack that turn, but Elessar2590 makes the shot and White Owl is killed (skull and crossbones marker). This means that these Iroquois are no longer under command (the game has strict rules for command radius, etc.), and what few survive in good order are basically helpless unless DIRECTLY attacked or if I can get another commander down there.
 More to come! Stay tuned!
Again, the whole game is available on video: