Into Infinity & Beyond: Don’t Fear The Metal!
November 20, 2013 by crew
For our UK friends:
I was planning to jump straight into a battle report, but after some discussion in the comments I think it makes more sense to start closer to the beginning: with the miniatures. I promise to get to the batreps but I think this deserves some more discussion. It’s an easy argument to make that Infinity has arguably the best looking miniatures on the market right now. But they are in metal and for some that’s a problem.
Now there are a lot of very reasonable economic explanations why Corvus Belli has opted for metal miniatures, but that doesn’t matter much to me. What does matter to me is that before this the only metal miniature I had worked on was a single piece Super Dungeon Explore mini. I was raised on Games Workshop’s plastic Tau and metal seemed like a big painful hassle. But now that I’ve been working with them I’m here to say: It’s not a big deal.
So let’s take a look at some reason why you, and others you’re trying to get into Infinity, shouldn’t let metal miniatures get in your way…
Clip it, Clip it Good
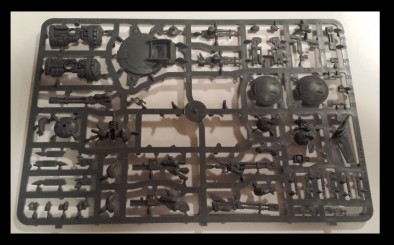
Let’s start where anyone buying a new box of minis starts: The sprue. Like the Force, that tangled mess of material that binds our beloved mini’s pieces together. Here’s what a current Games Workshop sprue looks like:
It’s an engineering marvel (no really I know a few casting engineers and they tell me this isn’t easy) that they can fit so much in such a small space… But yikes! I can barely get my clippers in there, and that means I’m going to have to do a lot of cutting with my hobby knife. That’s a lot of effort just to get the pieces out.
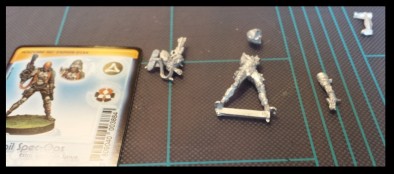
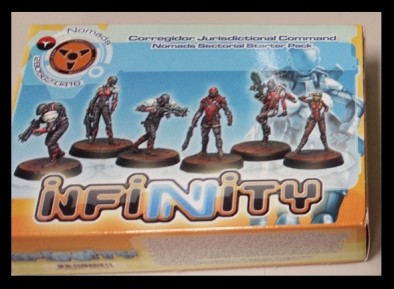
Now let’s take a look at what an Infinity miniatures looks like on the fresh out of the box:
Oh wait, hmmm, no sprue. All of the miniatures from Corvus Belli come pre-clipped out. Now I grant you, there is a bit of flash that needs trimming, but the metal is soft enough that my hobby knife can make short work of it. While I’m talking about it; the mold lines on these models are amazing because they barely exist. A lot of work has gone into hiding these lines so well that the majority of my models didn’t need any lines removed at all! The few places that did need some love, the lines were so faint that some quick sanding or a couple scrapes with my knife were more than enough to remove them.
Back to BASEics
Getting a model to stick to its base inevitably goes one of two ways:
1. It takes 30 seconds and perfectly sticks forever.
2. You spend two days gluing your fingers together only to find out that the model is on crooked. But it doesn’t really matter because you just breathed on it and it fell off.
I was terrified of trying to get a heavy metal miniature to adhere to its base. On top of that Infinity minis are renowned for being dynamic (aka running or jumping off one foot!) this meant I was going to have to pin them. I know nothing about pinning models, but it sounds tough, complicated, and scary.
Obviously since I still haven’t learned how to pin a model means I haven’t had to pin anything. Now I’m not saying I won’t ever have to pin something, and there are a couple of models that are known for the pinning required, but Corvus Belli has done us some favours.
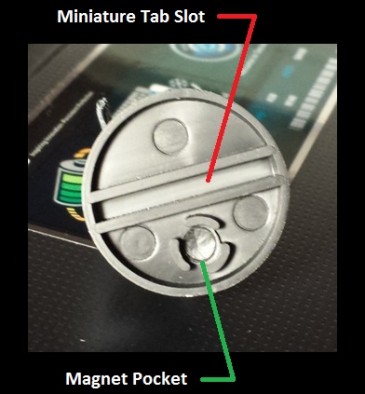
1. Slotted bases. All the minis come with a tab on the bottom, yes even the dynamic ones, which allow them to slot into their bases and easily stay in place. The bases even have little pockets to fit magnets into if you want to magnetize your mini’s base!
2. Double ball and socket joints. Now some of the older minis don’t quit have this, but most of them have a ball and socket joint for limbs to fit into. Inside the ball half of the joint is a little indent that corresponds with a small nub. This means you don’t have to guess where and how pieces fit together. It also provides extra surface area for glue to adhere to. Some quick scoring with your knife on both sides will give a piece even more grip.
3. Thin limbs: most of the pieces that are glued together are so thin and light that they don’t need the extra support a pin provides unlike older, chunky models.
Now I’m not saying you won’t ever have to learn to pin a model or a piece might come off if you don’t pin something, but I haven’t had either of those problems yet. Speaking of glue, regular old super glue that you use on your plastic miniatures will do just fine here too. Some people will debate glue viscosities, applicators, and adhesive properties but I’ve found good old Krazy Glue with a brush tip to be more than sufficient.
TIP: If you haven’t ever used green stuff or some other epoxy based putty, now is the time to learn. If a joint is giving you trouble and wont glue together properly just roll a little ball of the stuff, place it in the socket, put a little super glue on it and squish the pieces together. After that you just need to trim the excess green stuff away with a wet knife. It will almost make you mad how easy it is after struggling with the glue.
Tools of the Trade
Here are the tools that I use for working on plastic miniatures:
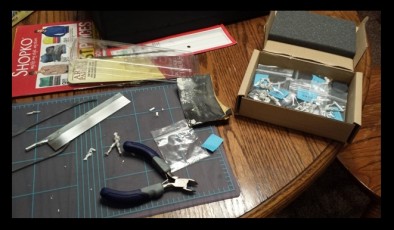
Here are the tools that I used on my metal miniatures:
Yup, no special tools were required for the building of these miniatures! So if you’ve put together any plastic miniatures you won’t need to shell out for anything new when you get your Infinity ones. For the record here’s a list of what you’re probably going to need to assemble your minis:
1. Hobby knife – Really this is your most useful and versatile tool. How many times have I mentioned using it already?
2. Clippers, good for removing larger bits of flash, but not required.
3. Files, for stuff to big for sand paper and too small for clippers.
4. Sand paper, I prefer a nice fine grit of 300 or above.
5. Super glue.
6. Razor saw- it’s nice for cutting the tabs off the feet if you don’t want to use the slotted bases.
And that’s it! Chances are if you’ve built any models in the past you already have these tools.
Conclusion
Is plastic easier to work with? Yes. Is metal a big painful hassle? No!
I hear hobby veterans tell horror stories about the dark early days (aka the 80’s) of metal miniatures but a lot has changed since then! Corvus Belli has put a ton of work into making these miniatures as easy to assemble as possible. Are they all perfect and will you never have any problems? Of course not (I’m looking at you Clipsos) but on the whole they are very, very good.
Now you can make building these models as easy or as difficult as you would like based on your skill level and desired finished quality, but I’m here to say that it doesn’t take much to make the models very nice. With sprues already removed, slotted bases, ball joints, and no extra tools required it’s pretty easy to see that working with Infinity’s metal minis is nothing to hold you, or anyone else back.
In summary here is couple of simple things I picked up to help you get started if you’re new to metal miniatures:
1. Leave the tabs on unless you’re doing special basing, it makes prepping much faster and easier.
2. A quality hobby knife can cut through small spots of metal if needs be.
3. Green stuff is easy to use… just use lots of water on your hands and tools so it doesn’t stick to them.
4. Before gluing put on a little hand lotion, it can keep you from gluing yourself to your piece.
5. Files are useful, but sand paper is often easier to use and more precise especially when removing lines on curved surfaces.
6. A ball of blue tack is perfect for propping up models or keeping a limb in place while glue is drying .
Those are my tips and tricks; I know we have some metal mini veterans and would love to hear their tips! Or, if you have any questions, post them below and we’ll do our best to get them answered.
If you'd like to submit an article for Beasts of War then please contact me at [email protected].




Thanks, great article. I don’t know if its cause I like punishment but I enjoy working with metal, ya plastic is easier but I think its a nostalgia thing. Reminds of when I first started gaming. The Infinity models can be a little tough sometimes but they are just such nice minis the little bit extra you got to put into them is worth it IMO.
What would you say is the toughest part of working with these minis?
Choosing the parts on minis that come with optional heads or arms 🙂
For real – maybe smoothing out small imperfection and tough-to-reach mould lines in places that no-one will ever see.
And the fact that some parts are almost microscopically small.
I think the material a range of miniatures comes in should never be a reason to not take it up if you love the models and background. Working with different materials is all part of the development of a hobbyist. Using different tools will expand your skill set to the point where there is no model you wont be afraid to buy and build. I buy the models I think are cool regardless of what material they are. Its the chance to paint something awesome that inspires me. I don’t even think about the material or prepping. I just get… Read more »
That’s a great point. I Don’t buy into a game still I can prep a mini. I get into a game to paint something I think looks cool and is fun to play. The time it takes to prep a mini is insignificant when compared to the time I will spend playing and painting it.
It’s kind of like saying you don’t like cars because turning the ignition key is bothersome.
CB has some amazing sculpts. I do like how they place their molds just right so the mold lines follow hard edges and dont go in odd places, like across the face.
Haha my Tau who have moldings running across their perfectly smooth helmets in very visible locations agree!
If you sprinkle a small amount of baking soda on a liquid super glue, it will cause the glue to harden almost instantly. Baking soda acts as an accelerant on the glue.
+1 for that. Where the mould lines are is so much more a factor than the material used. E.g. PP’s resin/plastic is (IMO) a fine material, but the mould lines on those Khador jack legs are a nightmare to clean up all nice.
Some of the points on here are great…. A lot of plastic and resin models? Mass produced so tricky and excessive mould lines all over the casts. Infinity metal minis? mould lines are minimal and follow the edges so clearly cast with real care and attention.
Materials don’t matter. Buy the mini’s you want to buy and embrace the challenge working with different materials bring. It’s all part of the love, man!
I agree with this article – I grew up with metal minis and HATED them, moved to plastics and have been in love ever since. But… Infinity… I mean, INFINITY!!!! Such an elegant system and such great looking models – when I turned off 40k, I wanted to go to infinity but I actually went to warmachine first, JUST to avoid metal minis – of course, infinity is just too good and I eventually broke down and got some. Everything in this article is true, they are light, easy to assemble and don’t break into their parts when knocked over… Read more »
Great article, I quite enjoyed it.
The fact that there even exists an article whose title can be paraphrased to “OH NO!!! METAL?!?!?!” just makes me feel old. You youngins need to tackle the old metal Eldar Warwalker if you want a nice hair pulling maddening challenge.
Now back to my beardy old gamer cave.
Metal!!!!Why are minis made of Metal??????? It is a very expensive material and the models look awful compared to Finecast!!!!!Yes, it is true, because my local red shirt told me……;-)
Nice article, I’m looking forward to the battle reports!
There are some Infinity miniatures that drive me nuts….. I recently bought the CA Shasvasti Sphinx…. Incredible sculpt, but it looks that it will be a challenge, spindly legs to hold up the rest. Two fingers comprise a part, that in this kit other components are larger portions… I’ve bought an accelerator to speed up the drying process. I’ll try it soon… I’ve just assembled the Yaogats boxed set….. I really had a great time putting them together, they went together quite well, I fielded them from the box in less than a week; they looked great, and kicked butt…..… Read more »
I’m a painter first and a gamer second. The reason I don’t want to buy metal minis is that after spending many hours on each miniature to paint each and every one to the absolute best standard I can the paint chips off and thin parts get accidentally bend by careless handlers. If someone can assure me that that cannot happen with Infinity minis, then I’ll consider buying some, but I spent many hours in my youth trying to patch up paint jobs ruined by someone carelessly banging two minis together.
I love metal models. I’ve been painting them for 25 years or so. But I hate multipart metal models. Especially spindly ones with sub-millimeter connecting surfaces. I also hate handling small parts. And I hate superglue. The only thing it consistently glues is my fingers. Even if it initially seems to work, I’ve seen the glue joints disintegrate 5 or 10 years down the road. I’m in this for the long haul. If I put something together, I want it to outlive me. Without constanly reglueing parts or whatever. You know why I really like metal models, apart from the… Read more »
Great article. I have always worked with metals and I actually prefer them over plastics.
Just wanted to add, you don’t need other tools, but I would advice a second pair of clippers. Use 1 for plastics and 1 for metals, as the metal ones will wear down very fast and if you use them on plastics they will leave a jagged cut.
Pinning infinity models is very easy. I do all the arms, legs, heads etc on mine. It’s just a paper clip into one of the two holes you’ve drilled, clip it so that enough is vissible to fit in the other hole and glue. I’ve also found with infinity if you have any gaps in joins that vallejo plastic putty is better than green stuff. Just put a little blob on your palette, use a sculpting tool to scoop a tiny amount on to the seem, then rub your finger over it. It fills the join yet rubs off all… Read more »
I went through that exact process with my Clips oz having to greens tuff a lot of her. Thanks for the tip on a better way to gap fill!
@ maxxon That really depends on the super glue in question. One of the best pieces of advice I received when starting in the gaming hobby 20 plus years ago was to use Loctite super glue. I have very few pins in my vast collection of metal minis and my metal minis from 2nd ed 40k and 5th ed WHFB are still holding together fine. The really good thing about it is it usually starts to bond after 30 seconds or so, you’re rarely left holding a part in place for very long. There are no special tools required for… Read more »
Loctite do a super glue with elastic in it. It’s brilliant as it’s not as brittle
Hi, i just received my very first infinity minature…. And i’m terrorized by it!! XD It’s a nomad wildcat with spitfire and it has a really thin frame, very unlike wh40k and its bulky minis. When i look at its arms, i keep questioning me about just using glue or clipping them on and i can’t decide. I’m used to old oblits, daemon princes etc falling apart if not clipped with “tree chunk size metal bars” and i hate watching paint being broken apart in the process. What do you think? I’m worrying too much? I was also looking at… Read more »
I went through the very same fear the first time I glued one of these together. The limbs are thin and light enough you should be ok. I have a friend who has been gluing wild cats and he hasn’t had any problems.
Edit: about the bases. .. I’m putting to clip the bottom tabs is time consuming but it looks good. You could also use the slot base and then spread a thin layer of greenstuff over it to hide the slot. You could then press a clothe intro the green stuff to give it texture then put some paint, flock, static grass or whatever you think looks nice.
about bases i’ll first experiment with old minis trying to not cut the tab… before making big mistakes 😛 thank you 🙂
The little aerials that go into the bagh-Mari heads were the hardest bit for me, but I hear CB are moving away from putting annoying bits like that on everything (at least I hope they make them part of the head next time). Also making sure I was not cutting a small part thinking it was flash.
I used to always want everything in plastic. Most of the models I have actually built and painted have been metal though. Lately I don’t understand why people want plastic anymore! The plastic sets are a bit more of a bargain price wise, but for single miniatures and smaller sets metal is usually about the same pricing. Building the models, the only time a metal model has ever been an inconvenience, at least to me, was the few times an extended long appendage is meant to adhere to a single spot. The weight comes into play. Other than that I… Read more »
Brilliant article. Keep them coming!
Great article, completely agree! You have nothing to fear with CBs minis, I love working with them.
Bring on the battreps!