The Saratoga Campaign Of The American Revolution – Part Four: First Battle of Freeman’s Farm
October 12, 2017 by oriskany
Welcome again, Beasts of War, to our continuing series commemorating the 240th anniversary of the Saratoga Campaign in 1777, turning point of the American Revolution. Through a series of 20mm wargames, we’ve been tracking the movements and clashes of armies slowly drawing toward an inevitable crossroads of destiny.
At last, we are here.
If you’re just joining us, here’s the basic situation. In the third year of the Revolution, British General John Burgoyne has launched an invasion out of Canada down into New York State. By seizing the lines of Lake Champlain and the Hudson River, he hopes to split off New England from the rest of the colonies and win the war for the Crown.
So far we’ve covered the British invasion plan in Part One, including the desperate delaying action at the Battle of Hubbardton. Part Two saw the British try to bring in an additional invasion, largely halted at the Battle of Oriskany. In Part Three we saw the Battle of Bennington, where British fortunes truly started to falter.
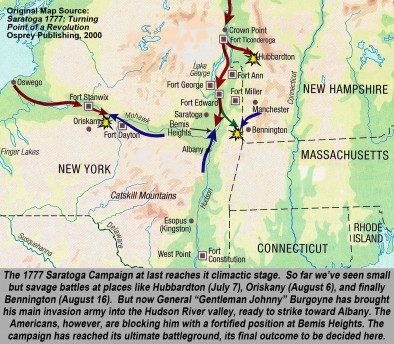
Now at last, after two months of skirmishes, preliminary battles, and brutally difficult wilderness marches, General “Gentleman Johnny” Burgoyne’s main army finally emerges into the Hudson Valley. Marching south, they are soon drawing near Albany, the capital of New York State, their ultimate objective.
This is also where the Burgoyne’s army will finally meet the main body of the northern American Army, well entrenched under the command of Horatio Gates. Gates and Burgoyne are actually old friends, comrades in British service during the Seven Years War. Now they’ve met again, both leaders of armies, but friends no more.
The Battles Of Saratoga
Setting Up The Chessboard
As August bleeds into September, “Gentleman Johnny” finds himself, his army, and his grand invasion plan in ever more dire straits. Yes, he’s made it to the Hudson. But he’s also been informed that the two other British armies scheduled to meet him in Albany are in fact not coming.
First, the expected British support from occupied New York City has been cancelled. General Howe has instead launched an invasion toward Philadelphia, Pennsylvania…leaving Burgoyne on his own in upstate New York. And we’ve already discussed where Colonel St. Leger’s army was defeated at Fort Stanwix and the Battle of Oriskany.
Many of Burgoyne’s generals are recommending that the campaign is given up for the year. Better to fall back to the fortified position of Fort Ticonderoga and try for Albany in the spring. Besides, the Americans facing them have been heavily reinforced and deeply fortified on commanding high ground. The situation doesn’t look good.
Indeed, the Americans are pretty comfortable with their situation. The Polish-born military engineer Tadeusz Kościuszko has selected Bemis Heights for their position and expertly fortified it with plenty of well-supplied artillery. This position commands the Hudson and blocks the route south toward Albany.
The American commander, General Horatio “Granny” Gates, is content to sit still and leave the first move to Burgoyne. His subordinates are far more aggressive, especially the dynamic and ambitious Benedict Arnold, who repeatedly insists on hitting the outnumbered and badly-positioned Burgoyne at first opportunity.
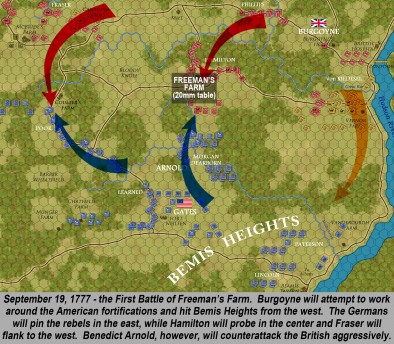
Burgoyne knows he can’t go through the American position, so he sketches up a plan to go around it. He divides his army roughly into thirds, with Major-General Baron von Riedesel and his German troops advancing south down the river (on the Crown left) to hit the Americans in the front and pin them in place.
Meanwhile, two more elements (a central division under Major-General Phillips, led by Hamilton’s brigade – and a right-wing division under Brigadier General Simon Fraser to the west) will angle out to the west and then south, hoping to work himself around the powerful American fortifications at Bemis Heights and perhaps hit them in the flank.
On the morning of September 19th, 1777 Burgoyne’s army begins to move. Sources differ about how many men he has. Some say 6,000+775423, others put the number as high as 8,000. Two things are certain. He has far less than the 10,000 he started with in June, and the Americans definitely outnumber him.
Such a movement is impossible to hide from the Americans. The people here are sympathetic to the rebel cause, every farmhouse houses potential spies. Burgoyne has also lost most of his Iroquois allies, so American scouts are able to get much closer to Burgoyne’s formations and report his every move.
So with greater numbers, the better intelligence of enemy intentions, and a strongly-fortified base of operations, why aren’t the Americans doing anything? That’s exactly what Benedict Arnold (American second-in-command) wants to know. He argues furiously with his boss, but the timid “Granny Gates” still won’t budge.
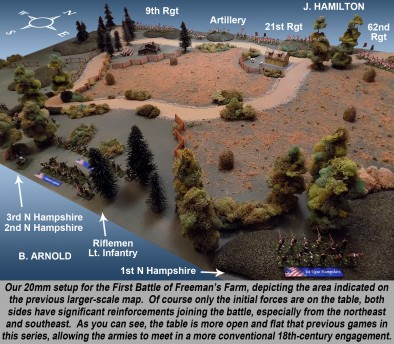
Finally, Arnold takes matters into his own hands. Assuming personal command of whatever units he can, he heads out to engage the foremost element of Burgoyne’s army, Brigadier Hamilton’s column advancing down the centre. They will meet at a fateful clearing in the thick New York woods called Freeman’s Farm.
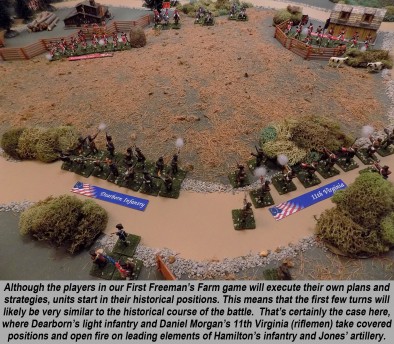
Arnold has chosen his men well. He has the 11th Virginia Regiment, expert marksmen under the command of Daniel Morgan. Widely regarded as the father of US Army special forces, Morgan has fought with Arnold as far back as Canada in late 1775. Morgan is beyond tough, and his riflemen are the deadliest “widow makers” in America.
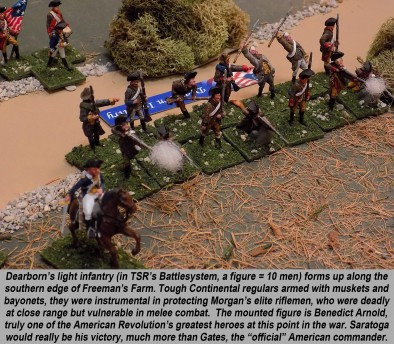
Supporting Morgan is Henry Dearborn’s battalion of light infantry. Armed with muskets and bayonets, they are an important part of this unit since Morgan’s riflemen (for all their range and accuracy) are slow-firing, and useless in melee combat since they have no bayonets and are not trained to fight when in formation.
As the British pickets emerge from the woods on the north side of Freeman’s Farm, they are immediately engaged by Morgan’s sharpshooters. Down go the officers first. Major Forbes commands a screening force of the 9th Regiment of foot, he loses every officer but one in the opening minute of fire.
The British react. Brigadier Hamilton, coordinating with Brigadier Fraser to the west, commit Canadian Rangers on Morgan’s west flank, driving back the riflemen. Here’s where Dearborn’s light infantry earn their pay, setting up a line of muskets and bayonets behind which the vulnerable riflemen can withdraw.
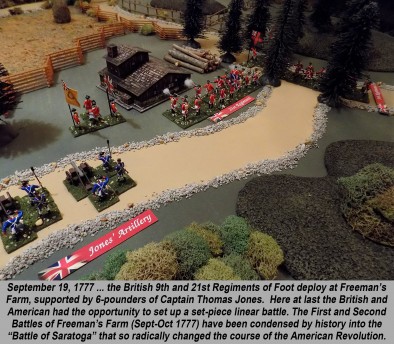
British firepower begins to pile on. Captain Jones brings up his four six-pounder artillery pieces. After putting a shell through Freeman’s farmhouse to make sure it is unoccupied, they then open fire on the Americans. But more American infantry is arriving, the bulk of Enoch Poor’s brigade pushing up to support Arnold’s battle.
The battle is also spreading westwards. As Simon Fraser (the victorious Scot commander at the Battle of Hubbardton) pushes down through McBride’s Farm, he is engaged by more American infantry under Ebenezer Learned. Soon the McBride Farm battle and Freeman’s Farm battle bleed together into one continuous brawl.
British discipline and firepower continue to tell, with American infantry regiments being torn up by artillery. Morgan’s sharpshooters then start picking off British artillery crews, their rifles are so accurate they actually outrange British artillery. Jones’ guns are bloodily removed from the equation.
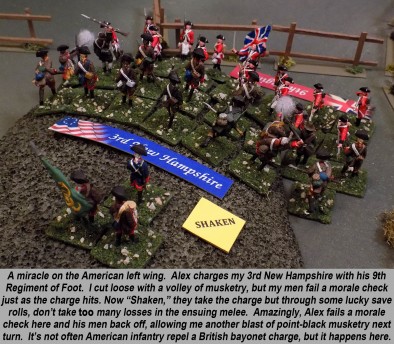
The British mount a number of bayonet charges, which are usually their battle-winning “coup de grace” manoeuvre. But here British regiments are taking such losses to American gunfire, and American numbers are just large enough, where the unprecedented starts to happen: American infantry are actually REPELLING the British bayonet.
Another big reason American regiments are doing better here is the incomparable leadership of some of their commanders. Benedict Arnold, Daniel Morgan, Henry Dearborn, these are some of the best battlefield commanders the Americans will ever have in the Revolution. Galvanized and inspired, the men stand and fight.
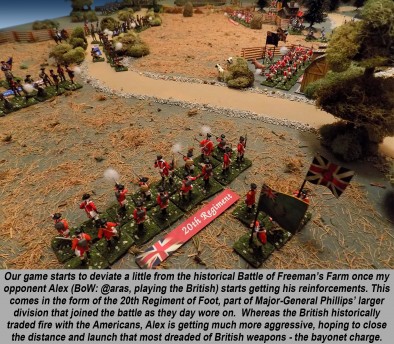
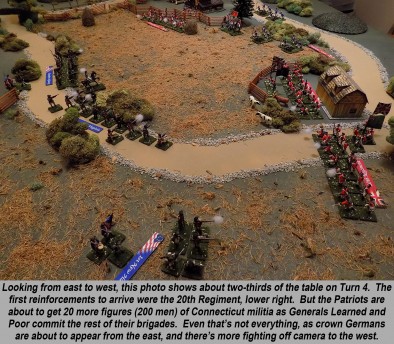
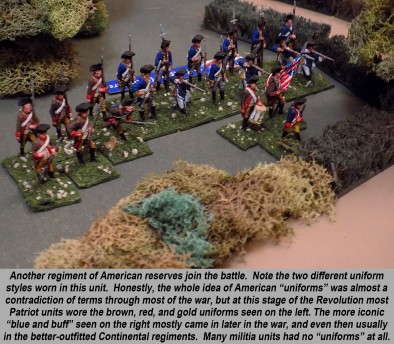
But so do the British. At Freeman’s Farm, the 9th, 62nd, and 21st Regiments of Foot are soon joined by the 20th as Major-General Phillips commits more of his division to support Hamilton. They push into the firestorm from the northeast. The Americans are then reinforced by Connecticut militia, entering the field from the southeast.
Fighting also rages perhaps half a mile to the west, where Learned’s New Yorkers and General Fraser’s British slug it out on McBride’s Farm. They also try to work around each other’s exposed west wing. Captain Fraser’s British marksmen, the few remaining Iroquois, and German jäger light infantry fight it out with American militia.
On Freeman’s Farm, however, things are getting desperate for the British. Their line is starting to buckle in places, forcing some regiments (especially the 62nd) to “refuse” their fronts, setting up at an angle to fight in two directions at once. American muskets and riflemen take cruel advantage, putting these angles in murderous crossfires.
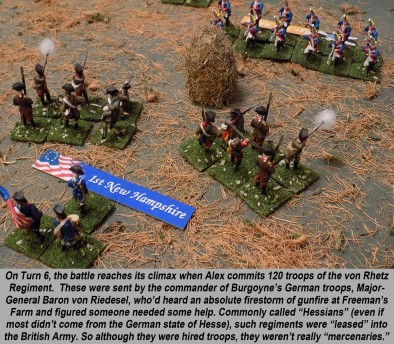
For the British, the day is saved by Baron von Riedesel and his Germans. As per his orders, he’s pushed down along the Hudson River to the east, ready to fix the main American position from the front with a “masking” attack. But when he hears the intensity of the gunfire to the west, he knows the situation is serious.
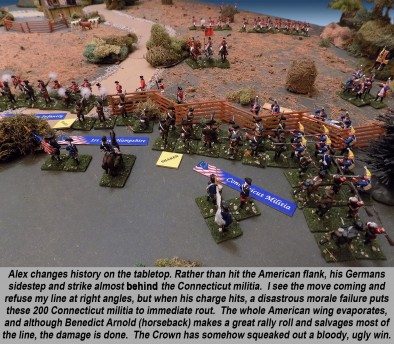
Acting fast and without orders, von Reidesel detaches some of his men and sends them west to help Hamilton and Phillips at Freeman’s Farm. They emerge squarely on the flank of Arnold’s force fighting Hamilton, practically behind the Connecticut Militia.
With a whole new enemy force on their right flank (and partially behind them as well), the Americans are forced to finally withdraw from the field. The sun is going down, and frankly, both sides are more than happy to call it a day.
Technically, First Freeman’s Farm is sometimes called a British “pyrrhic victory” as they retained possession of the field. But in no realistic sense can Burgoyne call this battle a success. He’s lost 600 men. The Americans have barely lost 300. And if the day has proven anything, there is just no way Burgoyne is breaking through to Albany.
Through the days following the First Battle of Freeman’s Farm, Burgoyne’s position continues to deteriorate. Through disease and desertion, his army shrinks every day. Conversely, the Americans continue to gather militia from practically every county of New York, New Hampshire, and western Massachusetts.
Even so, not all is well in the American camp. “Granny Gates” is positively furious with Benedict Arnold for engaging Burgoyne without permission. Despite the battle’s success (or perhaps because of it), Gates sees Arnold as an insubordinate hothead, trying to steal the glory of command for himself.
Big trouble is brewing between these two men, trouble that will boil over with potentially disastrous results just in time for the Second Battle of Freeman’s Farm. Indeed, history isn’t quite done with this tiny corner of New York state.
We hope you’ll come back next week for our grand finale of the Saratoga Campaign. On October 7th, 1777, Burgoyne makes one last attempt to salvage victory from his ruined campaign. As for the Americans, Washington has just lost huge battles in Brandywine and Germantown, Pennsylvania…costing them Philadelphia, their capital city.
If the Americans have ever, EVER needed a victory…they need it now. Will the Second Battle of Freeman’s Farm, the climax of the Saratoga Campaign, give them the win they so desperately need? Come back next week and find out as we conclude this commemorative series on this epic campaign.
If you would like to write an article for Beasts of War then please contact us at [email protected] for more information!
"Marching south, they are soon drawing near Albany, the capital of New York State, their ultimate objective..."
Supported by (Turn Off)
Supported by (Turn Off)
"Morgan is beyond tough, and his riflemen are the deadliest “widow makers” in America..."
Supported by (Turn Off)


![How To Paint Moonstone’s Nanny | Goblin King Games [7 Days Early Access]](https://images.beastsofwar.com/2024/12/3CU-Gobin-King-Games-Moonstone-Shades-Nanny-coverimage-225-127.jpg)








Great article. I was afraid this series had stopped before getting to the end of the campaign.
No worries, @pslemon – I think they just wanted to take a break for WWX week (a themed week for one of the games featured on the site). 😀
Great table! I like all the hay, and of course the cows. 🙂 Also, the timber logs stacked by the farmhouse. Great little touches! Glad to see this article series back on track.
Thanks, @gladesrunner – those “logs” were cut from branches blown down by the hurricane. You know what they say, when life gives you lemons … make lemonade … and by “lemonade” I mean 15mm scatter terrain! 😀 😀 😀
And great bases on the minis as well
Hey, thanks very much, @ramus ! Jim had me chained to the hobby table and wouldn’t let me go until I finished almost 400 bases … Oh wait, he’s glaring at me as I type this …
🙂
Hey hey now . . . 😐
Excellent as always. Seeing these really makes me want to get some more of my AWI stuff painted and try out the system.
Those riflemen sure are effective at taking out officers. What’s the in game effect of losing your unit’s officer? Is it just when it comes to taking tests or is it a passive effect?
Great questions, @elessar2590 – The question of officer vulnerability is always a tough one for AWI wargames. The Americans do it constantly, and have the men and weapons to do it. The British don’t have many men or weapons for this task, and even when they do, they don’t usually do it because it’s “not gentlemanly.” I think everyone’s heard the story of Major Ferguson at Brandywine (Sept 11, 1777), designer of the Ferguson Rifle. He had a senior American officer dead-bang in his sights and despite the EASY kill, didn’t take it because it just didn’t seem fair. When… Read more »
Ok, now that I’ve commented on the important stuff
Amazing how those cows survive even when two full regiments are blasting away at each other with the cows right in the middle. “Matrix” cows? 🙂
Great read again, definitely more open to the historical side since the last four series. Looking forward to more. Looks like on the table at least @oriskany and his patriots are getting a more severe spanking!
I’ll totally admit I got the hell beat out of me at the very end. So as my 200 Connecticut Militia come up behind my right wing, Alex brings on his Brunswick infantry (von Rhetz Regiment). Now historically what happens here, these new Germans bring some pressure on the American right and rear oblique, the sun is going down, Americans figure they’ve already inflicted 2-1 casualties on the British, so they fall back in good order and leave the field to the British. Here, those Connecticut militia catastrophically fail their morale check. Alex changed history not in where he brought… Read more »
The best games are hard fault, the crown taking the field truly this time
Absolutely. Congrats to @aras !
Ah ha Part 4 . I thought it might have disappeared. Interesting read as always Jim
Thanks, @torros – just a slight interruption in Historical Awesomeness Service 😀 for WWX week. 😀
Another nice article. I’ve never really explored early American history and these articles have motivated me to broaden my horizons beyond European wars. My copy of Patriot Battles arrived a couple of hours ago, it’s joined my bedside pile along with Red Army and Memoirs.
Oh, and spent some time on the Front Rank Miniatures webstore checking out the AWI 28mm and 40mm ranges. One of the lads at my local club is big into AWI/FIW, going to see if he will organise a couple of games to try my hand.
Another great read. Thanks for this. I first came across Freemans farm in the Blackpowder rulebook so good to see how it sat in the wider campaign.
Awesome, @denzien – Just please note there are two battles of Freeman’s Farm – we cover the second one next week. 😀
a great very bloody read @oriskany and a cliff-hanger as well, very tune in next week to see if the hero? survives stuff.
Thanks, @zorg – Yep, just one more to go. 😀 For Second Freeman’s Farm, we see whether Granny Gates finally gets off his ass and does something, Burgoyne takes his shrinking army (and fortunes) and makes one last attempt, or if Arnold just usurps the army from Gates and fights the battle himself.
(Hint – out of the three things listed above, two of them wind up happening, one does not). 😀
Great read Jim, I thought I’d missed an episode as I wasn’t really interested in Wild West exodus week and then we get inundated with John’s tank and terrain vlogs and your historical articles. Great week on BoW!
I knew very little about this bit of history and I find it and the scale of the engagements fascinating. Another list of books to add to my must reads once I get to retire and become a full time military historian/ man of mystery. 🙂
Thanks, @brucelea – “Full Time Military Historian / Man of Mystery!” Damn, you beat me to the title. Now I have to come up with a new one. “Military Historian and Designated Heir of Hugh Hefner.” No? I’ll keep working on it. 😀 I agree the scale is one of the best things about this war. Bigger than skirmish (why does everything have to be skirmish-based these days?) but smaller than the huge Napoleonic battles that are literally ten times the size or more. At least for me, it’s a perfect fit, nice big battle-scale gaming, but still manageable on… Read more »
Great stuff – some of that part of New York State still seem desolated as it was back then.
Seem like @ares played to the Crowns advantages – get up close
When I’ve visited the battlefield @rasmus , I fly into Albany and drive up the Hudson. And yeah, Saratoga Springs and Schuylerville areas are nice small towns, but some of those back roads . . . yeah. It’s pretty sparely populated back there.
@oriskany You’re going to have me painting a thousand AWI models before the winter is out! Well done, and nice basing @gladesrunner 🙂
Amazed by the versatility of Battlesystem. I know my rulebook shelf has only that and AD&D books… and it’s always been enough. I see the rules governing individuals are more abstract, and now that I’ve seen the system in action, I’m sure it wouldn’t appeal to roleplayers, but is outstanding for simulating one-off battles and non-roleplaying scrimmages!
Oops. I’m talking about 1st Edition Battlesytem vs. 2nd of course.
“You’re going to have me painting a thousand AWI models before the winter is out! ” Oh no! Hey, it’s your fault, really. You’re the one that got me hooked back into Battlesystem. Yes, commanders are basically units like all others, with a few exceptions to show they are acting as individuals instead of formations. We’ve abstracted it a little more,and to be honestin a “native D&D” setting the leaders / commanders / characters have a lot more flavor because they can be more than one hit dice, have enhanced movement, armor, weapons, spells. Here everyone is a normal human,… Read more »
Oh, and one more thing to @cpauls1 and everyone who commented on this thread today . . .
THANK YOU so much! We’re at 39 comments, so we beat Part 03’s entire run in just the first day, and damned near reached Part 02’s total as well.
Seriously, everyone, it means a lot. 😀 😀 😀
A good mate of mine is a keen AWI gamer and has over the years ended up with a rather large 28mm collection. We use British Grenadier for our wargame rules (gives a good, fast paced game with an awesome feature of “order” where units gain disorder before loosing casualties…which rewards the player who uses his troops in “bursts” and quickly re-enforces or falls back if they start to get in trouble. Anyway LOTS of eye candy at http://yarkshiregamer.blogspot.co.uk/search/label/28mm%20AWI
Thanks for the great post, @phaidknott – and awesome photos in the link. I was particularly interested in those entries on Second battle of Freeman’s Farm (Bemis Heights) – October 7, 1777. This is the exact battle we’re zooming into for next week’s grand finale. I also liked the order of battle information in the Yarkshire site. Totally agree with the “ranking” of commanders (“Excellent” / “Average,” etc). I also like the OOB information. And of course, incredible miniatures. I always have crazy respect for people who paint large armies this detailed and colorful in 28mm. Hope you’ll check in… Read more »
I have to say that as always this is yet another reason why Jim is held in the regard he is. This series has brought out what I consider to be the best spot on read for a while for me. I am very much an American revolution follower. As if it needs to be said, but I have re-read this series as it gives the, in my humble opinion, a light on some of the lesser known facts of both armies make ups unless you look at these details one is always doomed to imagine a war of sides… Read more »
Wow, thanks very much, @chrisg – definitely appreciate all the kind words. Indeed, you and I plowed through all the material early last year in our American Revolution series (still one of the more successful historical series we’ve done, measured by content count). Basically this whole series is everything we did in Part 04 of the original series (War in the North) and zoomed in to much greater detail. I’ve also had a lot more time to build much more extensive armies. 😀 I hear what you’re saying about being “doomed to imagines a war of sides lining up, British… Read more »
The snow is coming do let’s make that last minute dash for glory. Hitler should have read the about Saratoga before he decided to make that last snatch for Moscow at seasons end. Another fine installment sir. While it has not motivated me to start doing the AWI, it has served to increase my efforts for the ACW. According to the Rifles episode of the old series Takes Of The Gun, Saratoga was the first battle in history where one side had mostly smooth bore muskets, the British, and the other side had mostly rifled bore muskets. Known as the… Read more »
Thanks, @jamesevans140 – I hope when you guys get that ACW project up and running we see some photos and commentary here in the forums on Beasts of War. I’m not sure if I would agree 100% with that episode of Tales of the Gun re: the proportion of American rifles at Saratoga (First and Second Freeman’s Farm). Mind you, I’m not doubting your knowledge, it’s just these shows sometimes feel the need to say oversimplified and dramatic statements – a sin I fully admit I have been guilty in with some of my BoW interviews. (Saratoga leads directly to… Read more »
It was named after the chap who invented the bullet. Which strangely preferred the minie rifle by 2 years
Preceded sorry
I tend to agree with your over simplification statement. But if you squint your eyes really tight and only look at that one rifle unit it would be safe to say the other unit it engaged then it would be safe to say the other side only smooth bores. The other thing that concerned me about their statement is that in my army lists for the opening stages of the ACW most of the units are equipped with smooth bore muskets. Even in the final stages even some militia units still have smooth bore muskets. In the opening battles of… Read more »
Absolutely, @jamesevans140 – almost anything can be construed as “true” depending on manipulations of context. I’m on much less solid ground when it comes to the ACW as opposed to the AWI. But even I know that at, say First Bull Run (First Manasass), both sides had all kinds of weapons. Some with smooth bore muskets (more advanced than the Brown Bess of 80 years previous, but still) – some still carrying “buck n’ ball” ammunition for cryin’ out loud. But rifles firearms were in much larger supply, minié ball ammunition (why they call it that I have no idea,… Read more »
Might reply in the right place this time
It was named after the chap who invented the bullet. Which strangely preferred the minie rifle by 2 years
Awesome, @torros – I just don’t know why they call them “balls.” They have a more ballistic shape.
Then again, I guess they call all ammunition to this day . . . “rounds” ???
Standard rounds, like NATO 5.56 and 7.62 are still referred to as ‘ball’, to differentiate them from specialized ammo like tracer. Thus the term ‘4B1T’ or ‘4-bit’ linked ammo, which stands for ‘four ball, one trace’.
That’s actually a really good point, @cpauls1 . You were really “on the ball” for that one.
gro-o-o-o-o-o-o-o-o-an
😀
I think one part that’s usually not seen in most games are the “loyalist troops”. Most games have lines of British and Hessians vs the Continentals. Yet many of the battles the Loyalist troops outnumber the British part of the OOB. Also get around the problem I’ve seen of British “elite” rgts vs American “militia” (as the loyalist rgts were about the same as the continentals when it came to arms, training and equipment). I think these days we need a little more focus on these rgts rather than the standard “American vs British/Hesse” you usually see on the games… Read more »
@oriskany as @torros said the minié round was named after the guy. Yes it is still a ball round. It is molded as a ball with at thin flange or skirt attached. When the power charge goes off this skirt is deformed and as it has nowhere to go so it is forced hard against the barrel and into the rifling. By using the expanding skirt allows the round to be smaller than the rifle bore. The round free falls down the barrel while standard balls had to be hammered down the barrel making it bite into the rifling. The… Read more »
I would disagree with the drill etc bring abandoned in Europe . Take a look at the FPW or the early tactics the French and to some extent the Germans in the early phases of WW1
@jamesevan140 – great post as always! Please don’t misunderstand, I know what a minié ball is and how it works. I actually have a few in a display case recovered from a North Carolina battlefield (Chattanooga). I’ll post a picture of them on the Saratoga thread (where we can post pics). I’ve also seen how they’re cast and made. They’re just not remotely ball-shaped. But as @cpauls1 pointed out above, they’re still calling rounds like 5.56mm NATO / .223 Remington as “NATO Ball.” 😀 (And calling all ammunition “rounds” for that matter). ACW tech is indeed fascinating and the reason… Read more »
@torros – FPW and the 1860s Wars of Prussian Unification are definitely conflicts I need to do some more reading on.
In a number of ways too true @torros. But I really do mean by the book 1812 for everything here. Expected reload times on drills, exact distance to fire and the whole show from Napoleon’s day. While the system had evolved in Europe to take into account technological improvements, such as the needle rifle, and change on the tactical use of those units of men on the battlefield. Of particular interest here are the ideas of Clausewitz and in particular for the times those of Jomini and his oblique line of battle. Yet back at West Point we are stuck… Read more »
Oh, the good ole’ Brown Bess. AK-47 of the 1700s. 😀
American foot balls are not round either.;-) You touch on my attraction to the ACW from a wargaming point. One afternoon I can play a WW1’ish game and the following afternoon play a Napoleonic’ish game with the very same armies and rules. I just can’t get that same sea change from the WW2 or modern period unless I use a multitude of armies and a couple of different rule sets. Imagine fighting a WW1 tank battle then doing 73 Easting with the same armies. That is what excites me as a Wargamer about the ACW. I will have to admit… Read more »
So true, @jamesevans140 – as history progresses, the technology changes (not just in the obvious ways like gun-boomie-‘splosion-thingies, but more impactful technology like the railroad and telegraph in the ACW / Wars of Prussian Unification, the wireless radio in WW2, and the Internet in Gulf War 1. Obviously, as the technology changes, the tactics have to change to keep up. When the tactics lag too far behind the technology, we see bloodbaths like World War I and the end of the ACW. So from a gaming perspective, trying to game “out of period” is often a disaster. Found those ACW… Read more »
Thanks for posting the picture @oriskany, I left a little comment. I am not sure it would be a disaster as such but just look wrong. Like my U.S.soldiers storming Omaha Beach all dressed as Romans and mounted on bases to form part of a cohort. You could do it but it would feel so wrong and you would get a reputation for being overly tight with your money. Mind you I am using figures made by a Spanish company, Totentanz. Nice detail for 15mm metals that have a slight edge on the details to catch ink washes. More importantly… Read more »
Apologies, I meant “disaster” from a rules perspective. Like the WW1 tank battle rules for 73-Easting example you gave. 😀
Totentanz seem nice. They bought the moulds for the the old Corvus Belli historicals. Have you thought about 10mm at all?. The Old Glory stuff is cheap and not bad and there are lot of other companies doing 10mm ACW
Quite honestly, I have no interest in starting ACW at the moment … but if I did, or if I ever get bit by that bug, 10mm might be the way for me. These 20mm AWI figures took ALL summer, and still I don’t have quite 400 of them, and still there’s one faction I don’t have (Loyalists) and still most of the figures i have aren’t quite finished (washes on British, Germans, and Iroquois). Since my ACW wouldn’t have to “mix” with anything else, I wouldn’t have to worry about compatibility with preexisting armies, so I could start with… Read more »
Actually @torros 6mm or 10mm were among my first conversations. I could not find anything at all for 6mm and I could not find anyone out here stocking 10mm. So the guy I normally buy from put me on to these 15mm models. I am not keen to order from overseas myself when it comes to metals as the postage costs could buy you half an army. Where the guy I buy from bus in bulk and slow boats them here. It took almost 3 months for my first order to arrive where I could have got them in under… Read more »
Both Baccus and Adler do huge ranges in 6mm
@torros your knowledge of figurines in both scale of maker among with rule sets continually amazes me sir.
6mm would have been my preferred way to go. Across a Deadly Field covers 10mm so I only needed to reduce measurements by 40% and I would be there.
I know I’ve said this before, but would it be possible to play a 10mm game with 6mm figures? “underclocking” a game’s scale by one level sometimes works well for me.