


The Battle Of Kursk: 75th Anniversary // Part Two: Assault From The North
July 9, 2018 by oriskany


Last week, we rolled out this article series marking the 75th Anniversary of the Battle of Kursk. Fought during World War II between German and Soviet armies in July-August of 1943, it’s usually regarded as the largest single battle in human history. Needless to say, we couldn’t let the anniversary of an event like this get by us.

Catch The Entire Series Here
If you’re just joining us, here’s a summary of what we covered in Part One. After their shattering defeat in the Battle of Stalingrad, German armies in Russia reeled back through the opening months of 1943, desperate to contain a vast, vengeful Soviet counterattack across southern and central Russia.
When this “Stalingrad fallout” finally settled, a huge bulge (or “salient”) in the Soviet line was left reaching deep into German-occupied territory. Centred on the Russian city of Kursk, this salient posed both an opportunity and a threat to the Germans, who sorely needed a chance to redress the situation along the Eastern Front.
The Germans resolved to hit the Kursk Salient (about the size of Northern Ireland) in the flanks, striking from north and south. These two spearheads would meet at Kursk, and slice off perhaps half a million Soviets in a vast pocket. Such a success just might win the Germans enough time to make a full recovery in the wake of Stalingrad.
The Kursk Salient was an obvious target, however, and the Soviets had plenty of warning. Both sides took months in preparation, investing everything they could for the impending showdown. With a German “unstoppable force” hitting a Soviet “immovable object,” the stage was set for a gargantuan battle like none other in human history.
Assault From The North
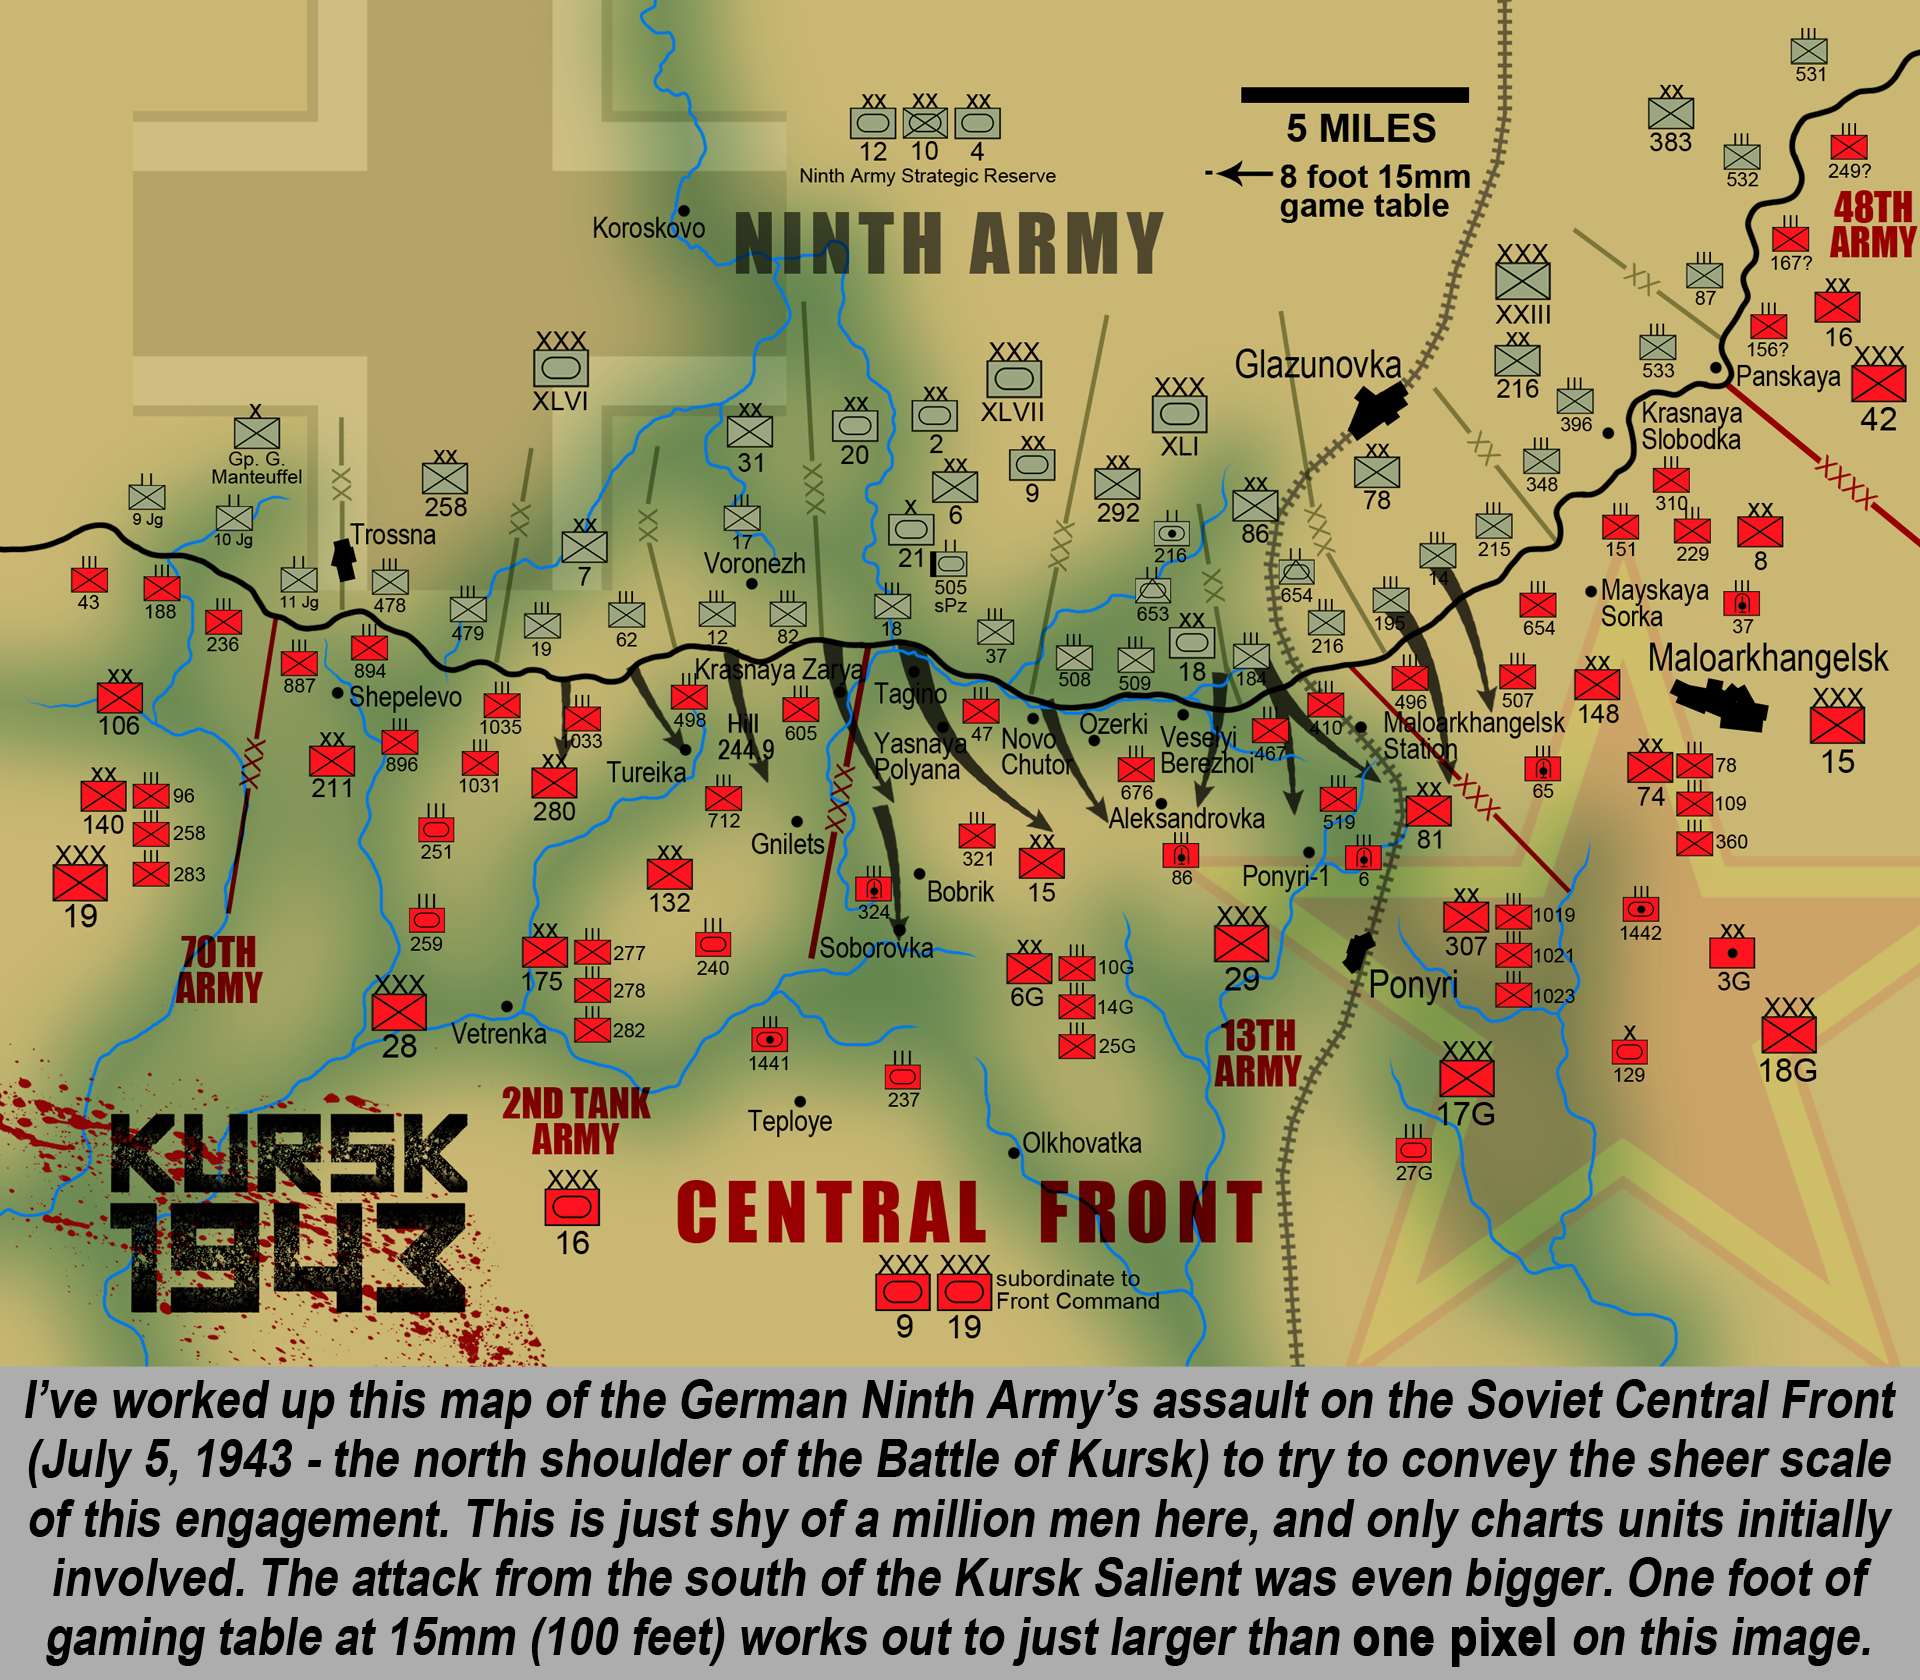
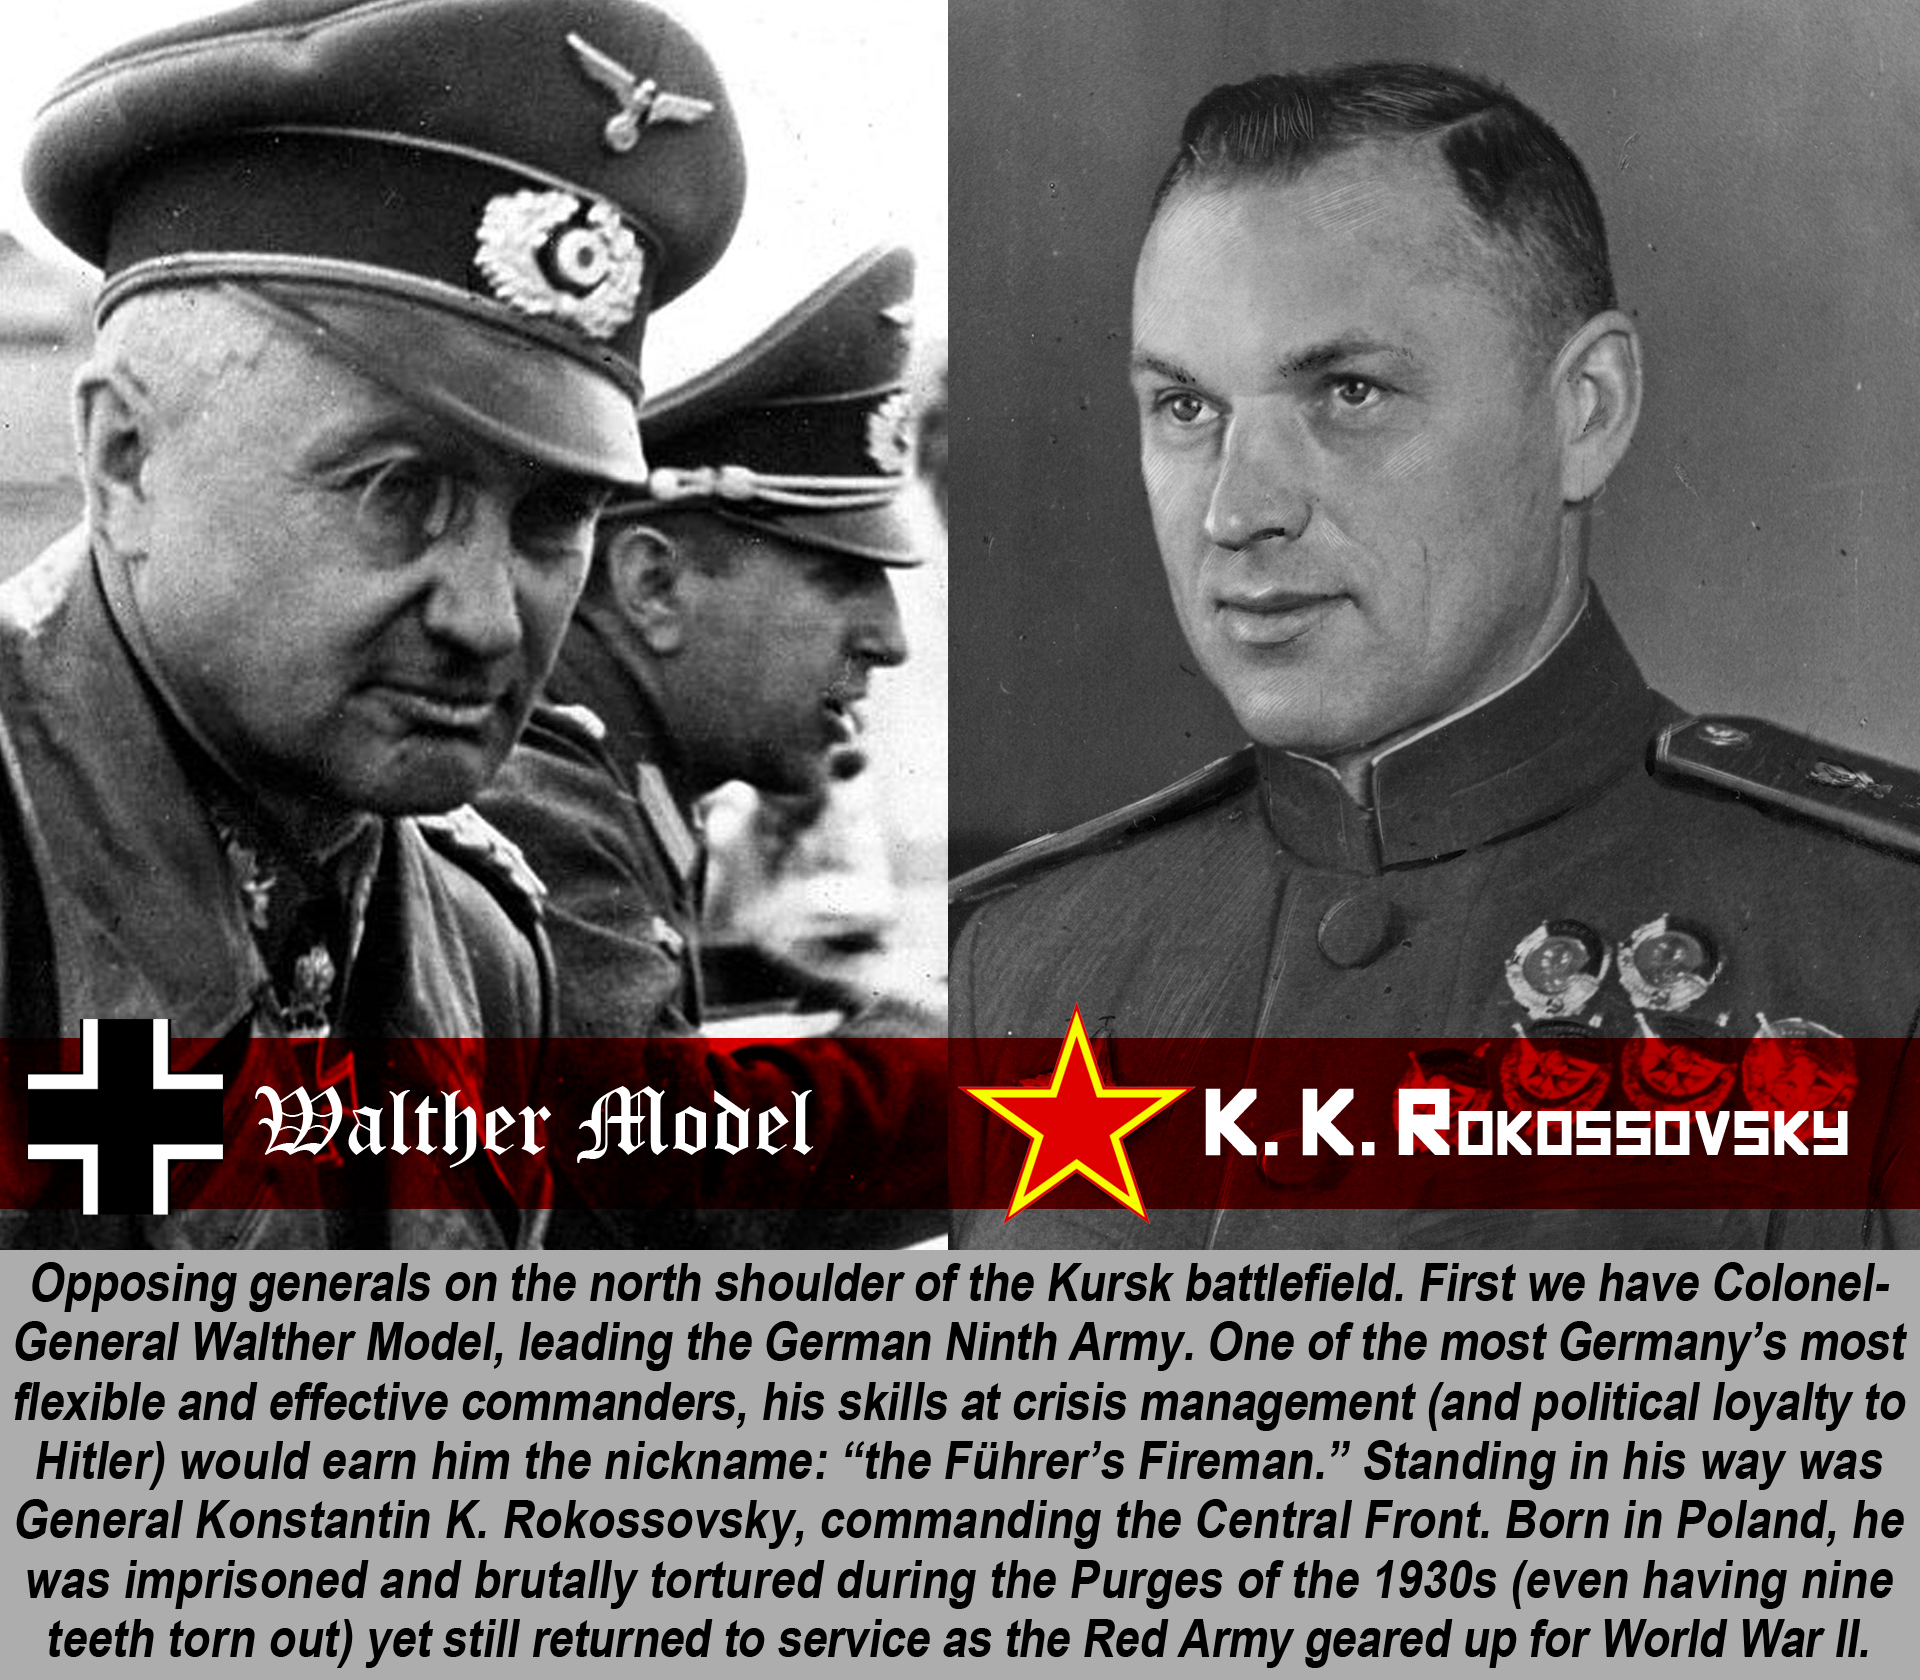
The northern wing of the German assault was launched by Ninth Army, under the command of Colonel-General Walther Model. Three panzer corps would spearhead the attack (almost 1,000 tanks, including reserves), supported by powerful formations of assault guns, tank destroyers, grenadier infantry, and ground attack aircraft.
Holding the northern shoulder of the Kursk Salient was General Konstantin Rokossovsky’s Central Front (in the Soviet military, “front” is roughly analogous to a western “army group” - about a million men). These forces were deployed in thick belts of fortified infantry, concealed antitank guns, and hundreds of thousands of mines.
The overall German objective was to break through these defences and meet the southern German spearhead at Kursk. The Soviets wanted to absorb the shock of the German assault amidst these thick defences, bleed them dry, and then counterstrike with powerful tank armies held back in reserve…but only when the time was right.
Thousands of books have been written on this battle, and there’s no way I can squeeze even a summary of the history into this article. So instead let’s get straight into the wargaming, and see what kind of results we can get when we try to recreate select parts of this northern assault on the table top.
Advance Of XLI Panzer Corps
Elephants & Grizzlies!
What makes Kursk so great for wargaming is the scale. So much is going on, with so many different unit types, that with just a little research (or asking your friendly Beasts of War Historical Editor) you can find the engagements that feature the units that interest you and easily set up reasonably historically accurate games.
For me, these include the German Sturmpanzer IV Brummbär (“grouch” or “grump” but usually translated as “Grizzly”) assault guns and the Ferdinand Elefant (Elephant) tank destroyers. These are rare and somewhat bizarre units that historically-conscious gamers don’t often get to use. So when a chance comes along, you take it.
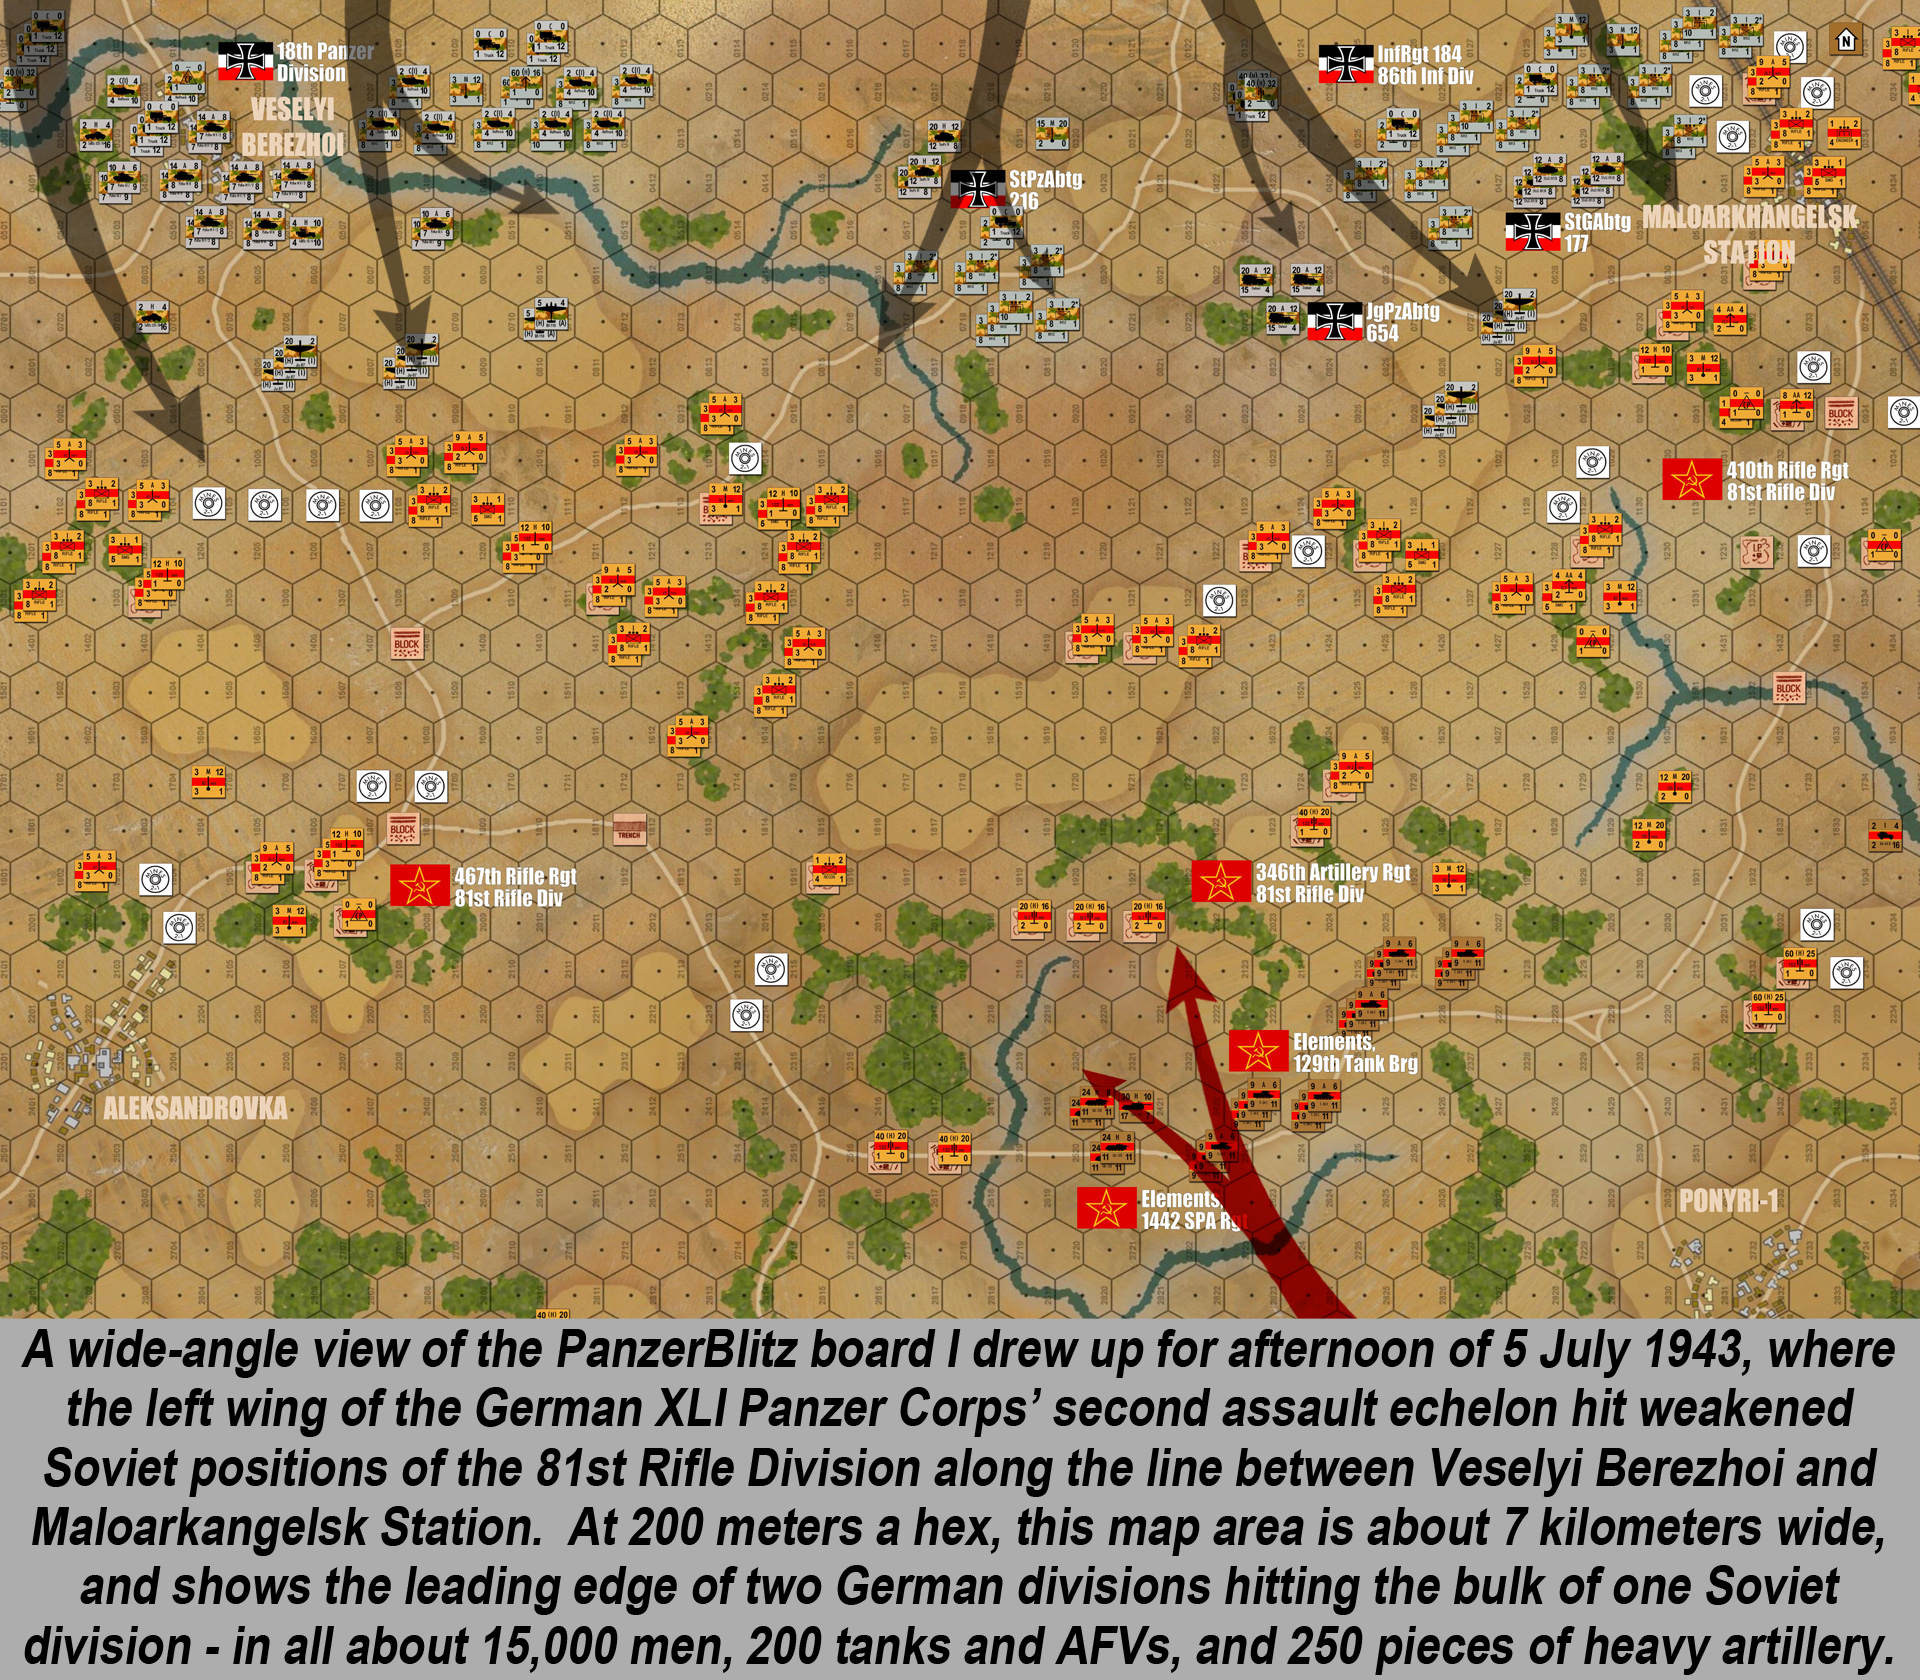
For this game of PanzerBlitz, I selected the assault corridor of German XLI (41st) Panzer Corps between Veselyi Berezhoi and the Maloarkhangelsk Station along the Kursk-Orel rail line. This is where some of these interesting units got stuck into some serious combat, and we can get a “wargamer’s look” at how they performed.
When the Battle of Kursk opened on 5th July 1943, the Germans in this sector of the line had little choice but to mount a frontal, headlong smash into prepared Soviet defences. Fortunately, they had incredible amounts of artillery, air, and rocket launcher (nebelwerfer) fire support to force these initial cracks in the Soviet defensive belts.
We’re actually skipping this initial “brute force” part of the battle, and picking up with XLI Panzer Corps in the mid-afternoon. By then, the initial breaches have been opened, and the Germans are trying to pry these cracks apart and exploit them into full-scale breakthroughs.
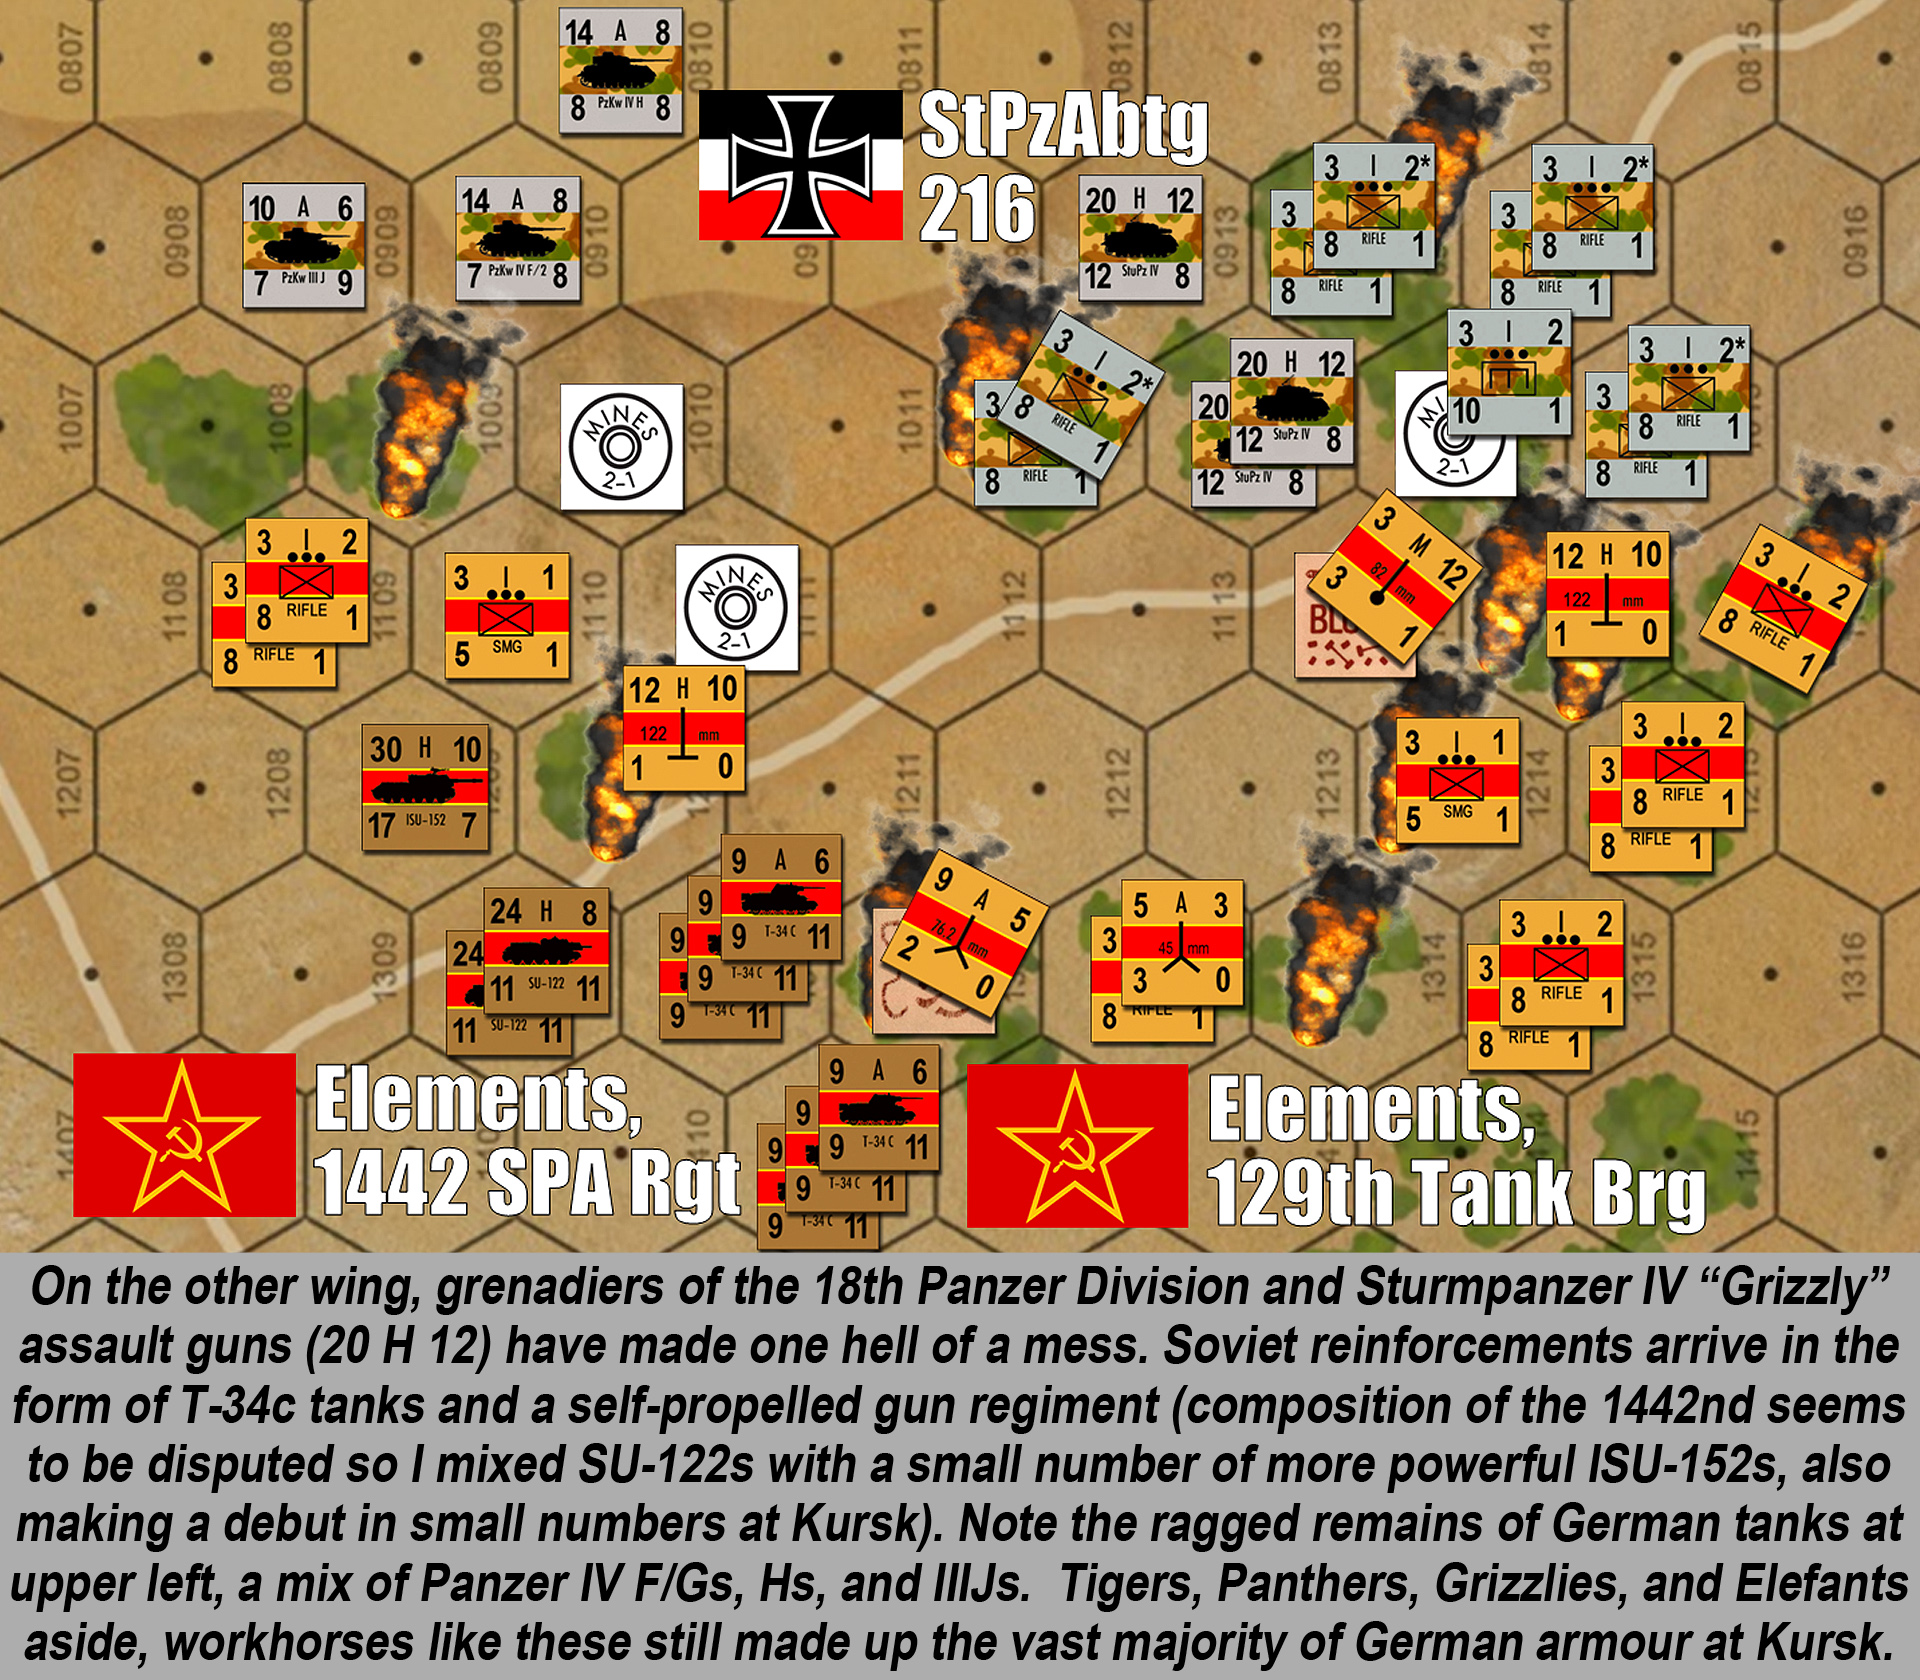
To the west near Veselyi Berezhoi, we have the leading elements of 18th Panzer Division hitting 467h Rifle Regiment of the Soviet 81st Rifle Division (29th Corps, 13th Army). Note that 292nd Infantry Division conducted the initial assault, but now the town’s been taken and 18th Panzer is trying to push through into the Russian backfield.

One change I’ve tried is to have the “Grizzlies” of Sturmpanzer Abteilung 216 provide close fire support to this wing of the attack. With a 15.0 cm infantry howitzer mounted in a thickly-armoured casemate, this “super StuG” is the perfect tool against dug in Soviet infantry and antitank guns, opening breaches for tanks of 18th Panzer Division.
To the east, the Germans of Infantry Regiment 184 (86th Infantry Division) continue their morning’s assault against 410th Rifle Regiment holding the Maloarkhangelsk Station. Heavy minefields have been set up here, but the Germans also have serious “pionier” assault engineers to clear lanes through these obstacles.
The Germans also have the Ferdinand assault guns. Although armed with the long L71 variant of the dreaded German “88” and armoured like a mobile steel castle, they’re also incredibly slow. Historically, the Germans also failed to mount a basic machine gun, making these things helpless against swarms of Soviet infantry.
To correct this mistake, I keep my Ferdinands just behind my grenadiers (historically they did the opposite). They last much longer this way and every turn those long 88s keep firing means more gutted Soviet strongpoints, not to mention counterattacking armour.
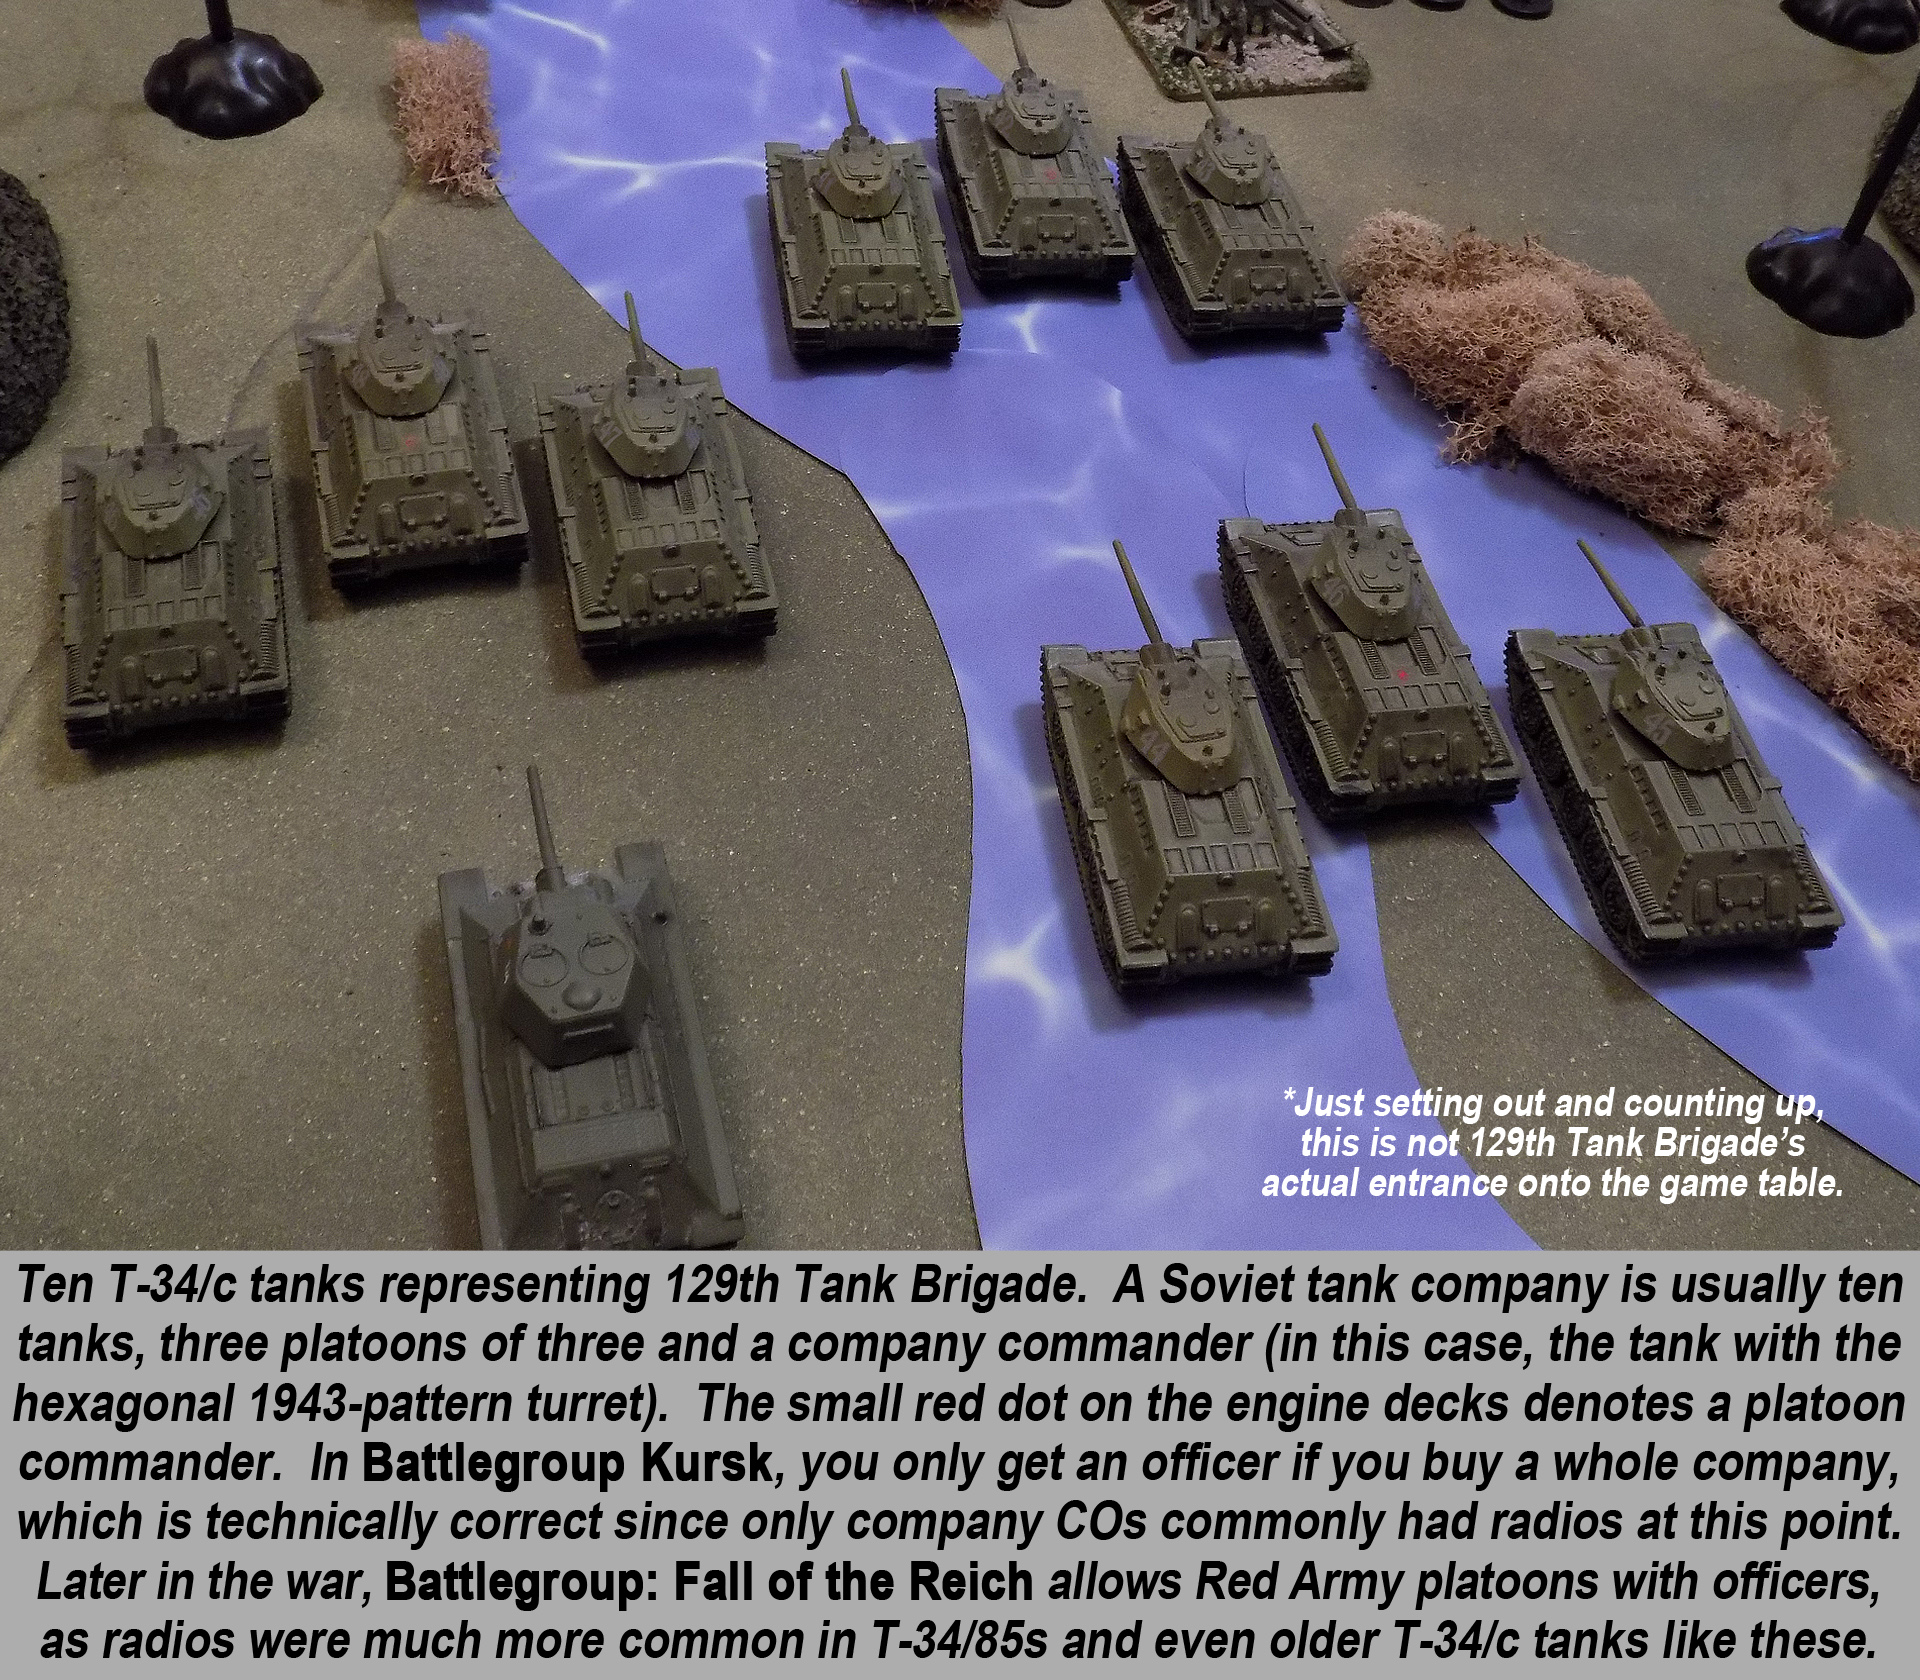
In the end, the assault is still a bloody mess. Soviet minefields, layered artillery defences, and antitank guns is a tough nut to crack when done right in PanzerBlitz. Counterattacking T-34s of the 129th Tank Brigade and SU-122s / ISU-152s of the 1,442nd SP Artillery Regiment doesn’t help. But nevertheless, the Germans crush out a narrow win.
Northern Assault In 15mm
Battlegroup Kursk
For miniature wargaming in the Battle of Kursk, what better option is there than Battlegroup: Kursk by IronFirst Publishing. As covered in Part One, this was the first campaign supplement produced for the Battlegroup system, which still holds the “Oriskany’s Choice” Award for World War II miniature wargaming.
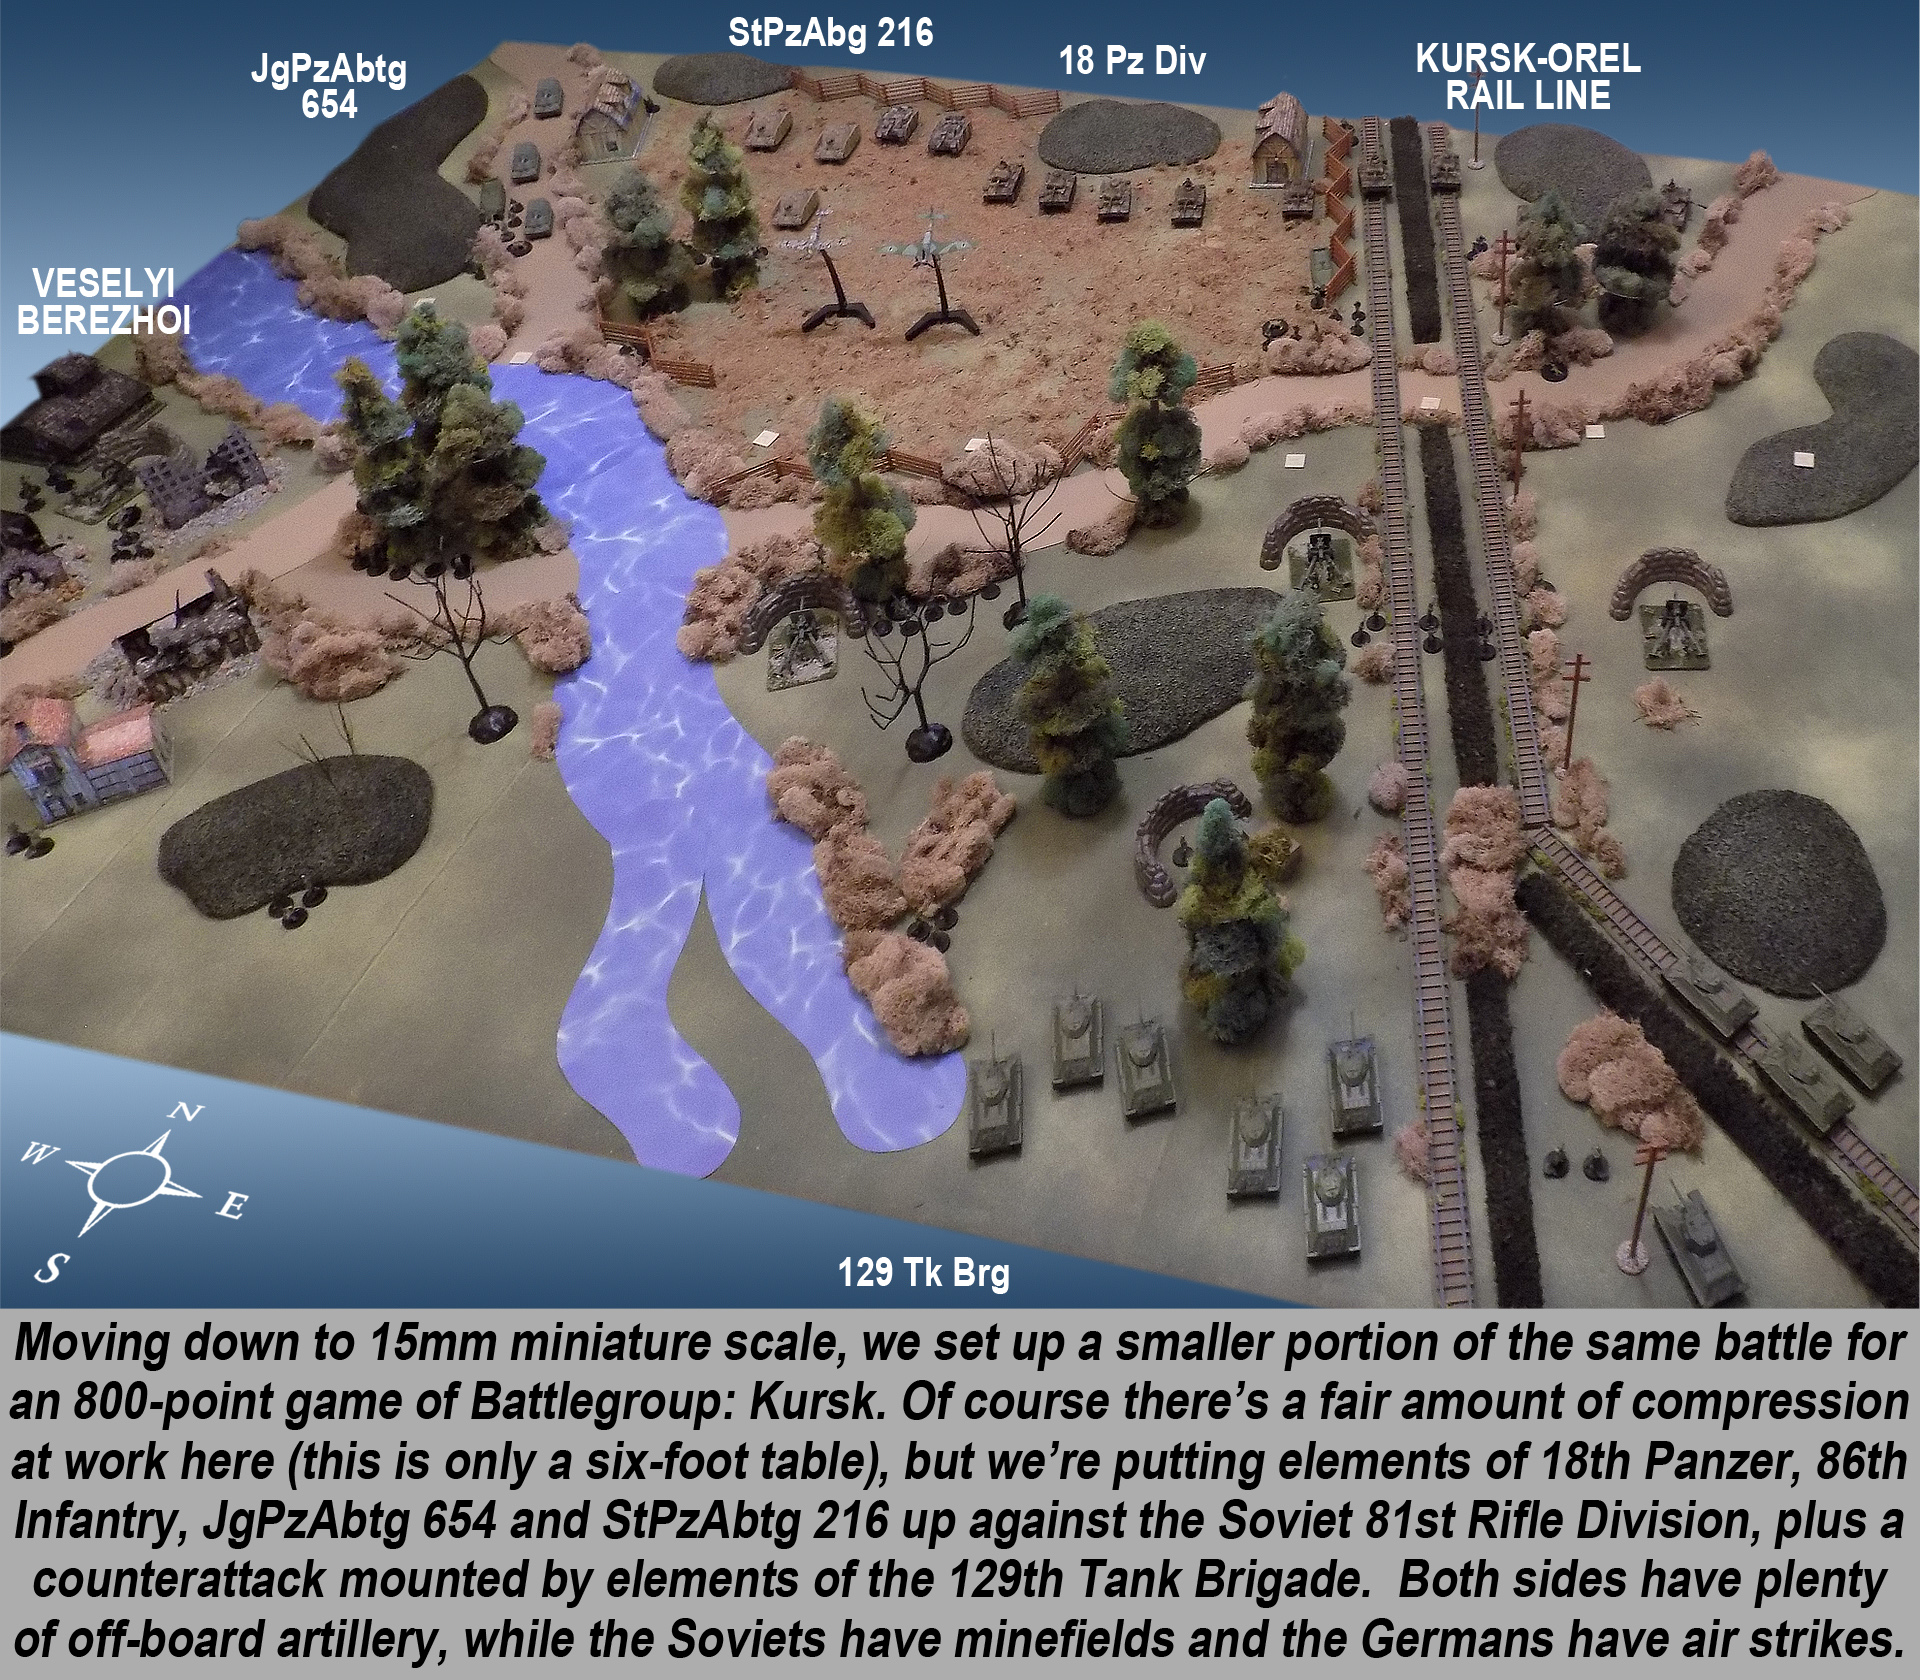
To keep things straightforward, we set up essentially a smaller version of the same battle (XLI Panzer Corps, the afternoon of 5th July) as the one executed in PanzerBlitz. The Soviets had two infantry platoons, 76.2mm guns, 82mm mortars, even sniper teams, all fortified in hardcover emplacements behind no less than eight minefield markers.
The Germans, for their part, had an immensely powerful attack force. Three Ferdinands and three Grizzlies represented elements of JgPzAbtg 654 and StPzAbtg 216, plus a mixed force of Panzer IIIJ and Panzer IVG tanks. This was all supported by Stukas, off-board artillery, StuG IIIs, and a platoon of panzergrenadiers in halftracks.
Such a force would smash a hole even in these heavily-fortified Soviet defences. But the Soviets also had access to off-board artillery (four “first priority” fire support calls, plus a communication team to make these rolls easier), and no less than ten T-34/c tanks entering the board on Turn four (elements, 129th Tank Brigade).
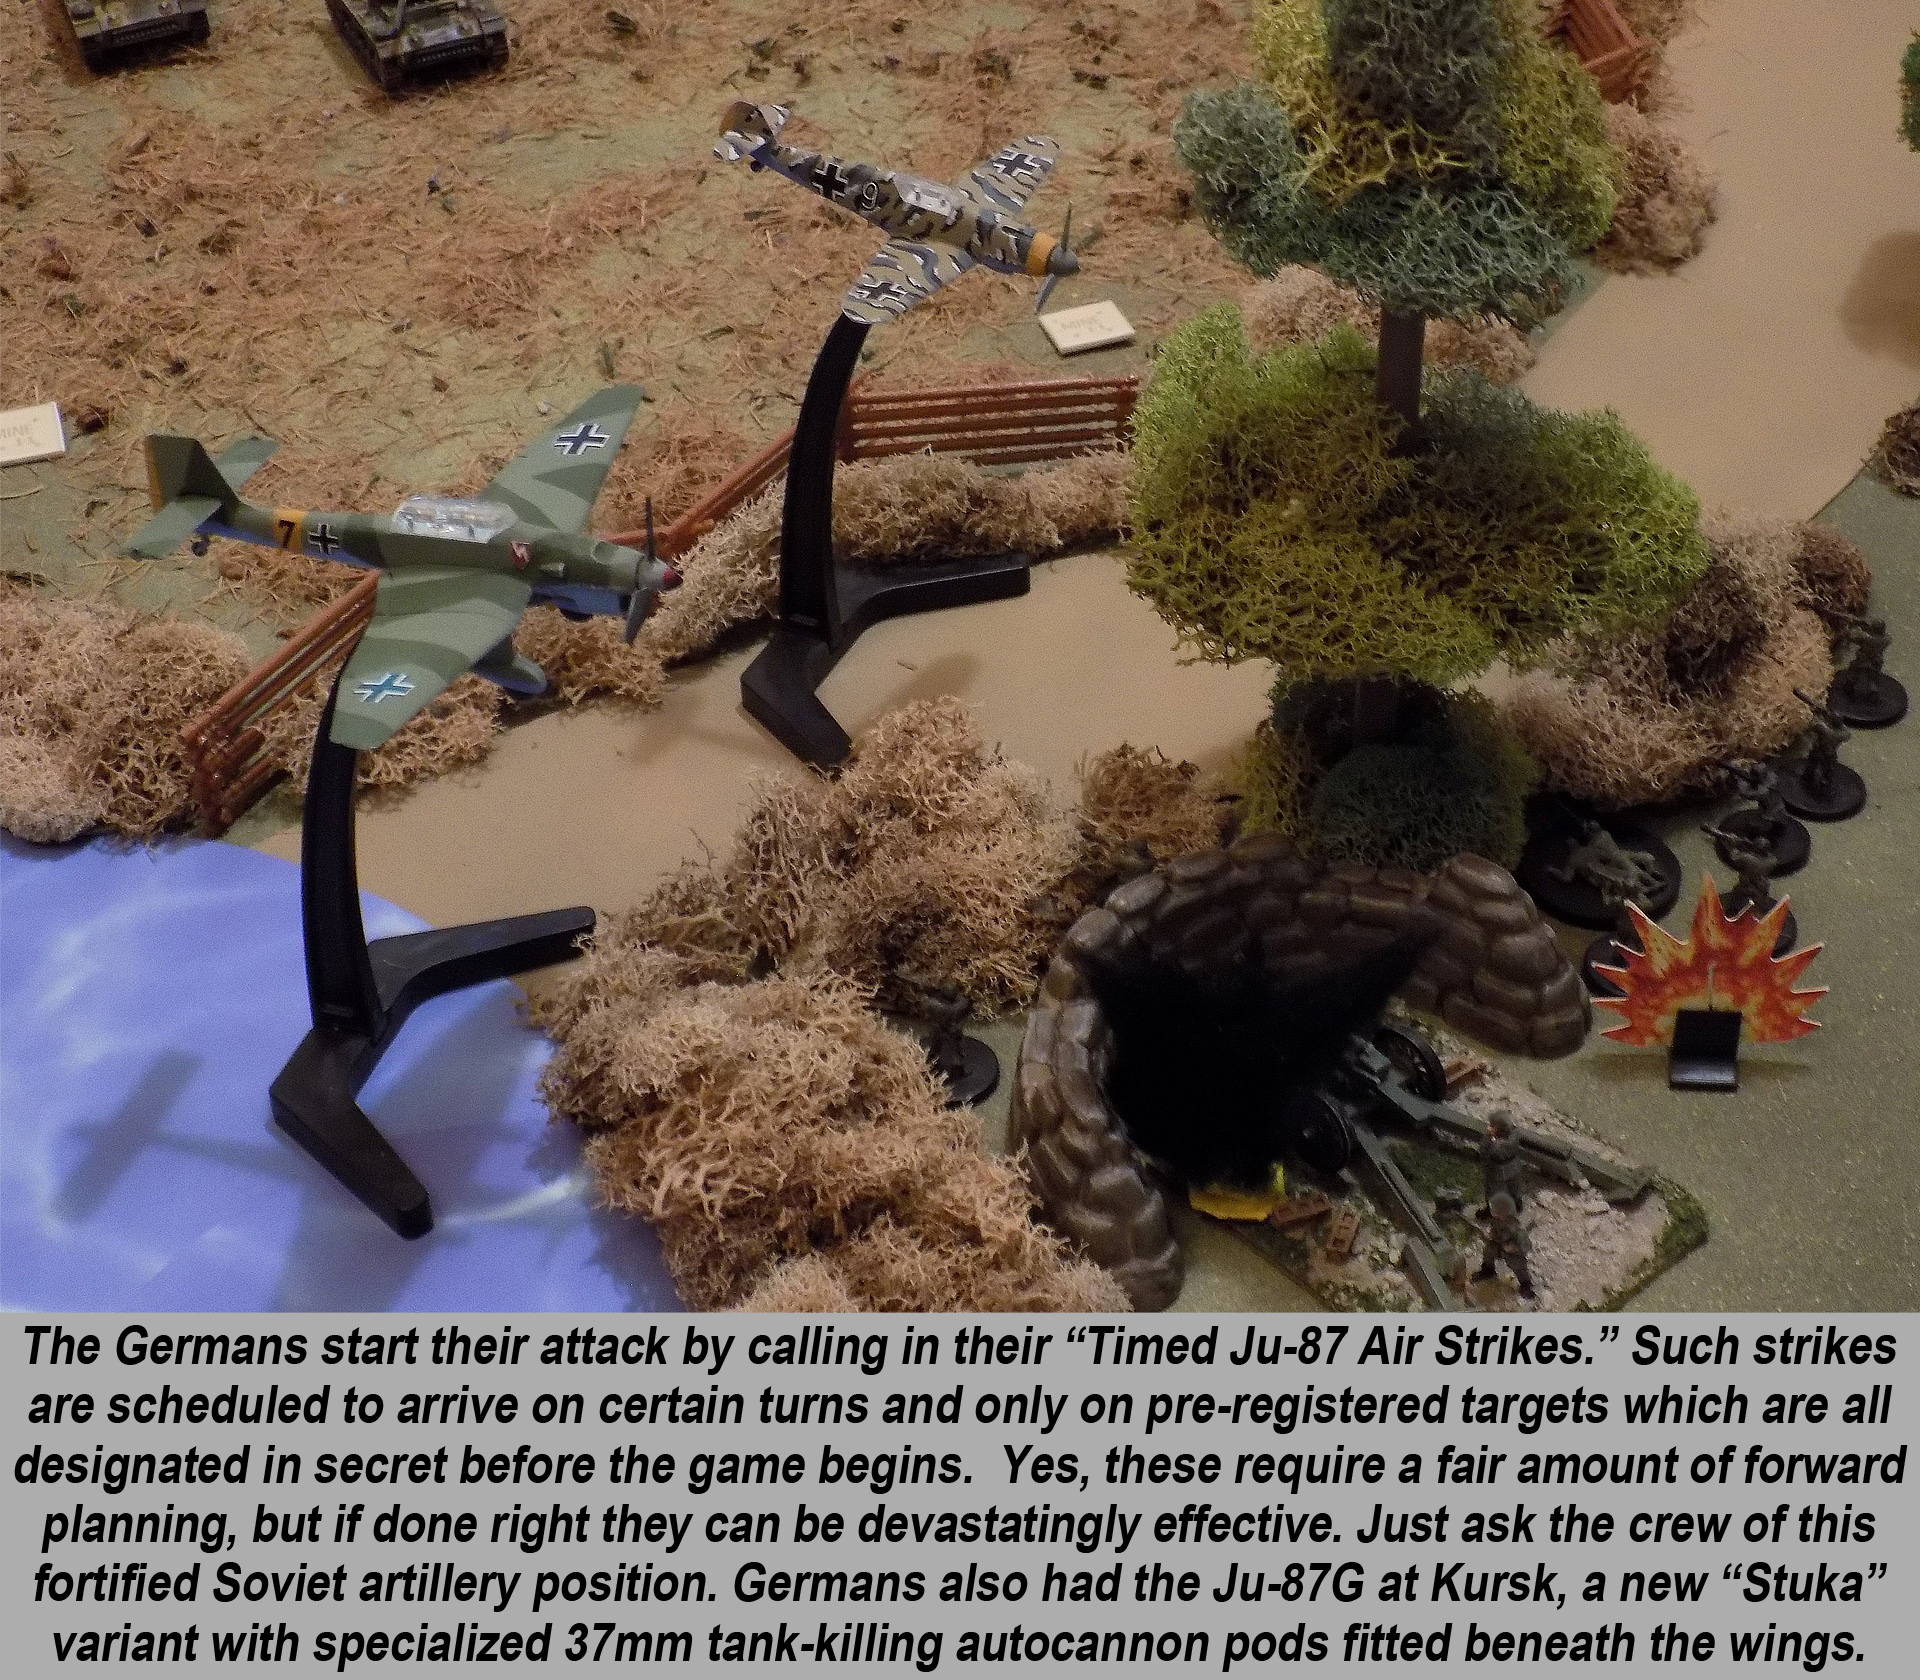
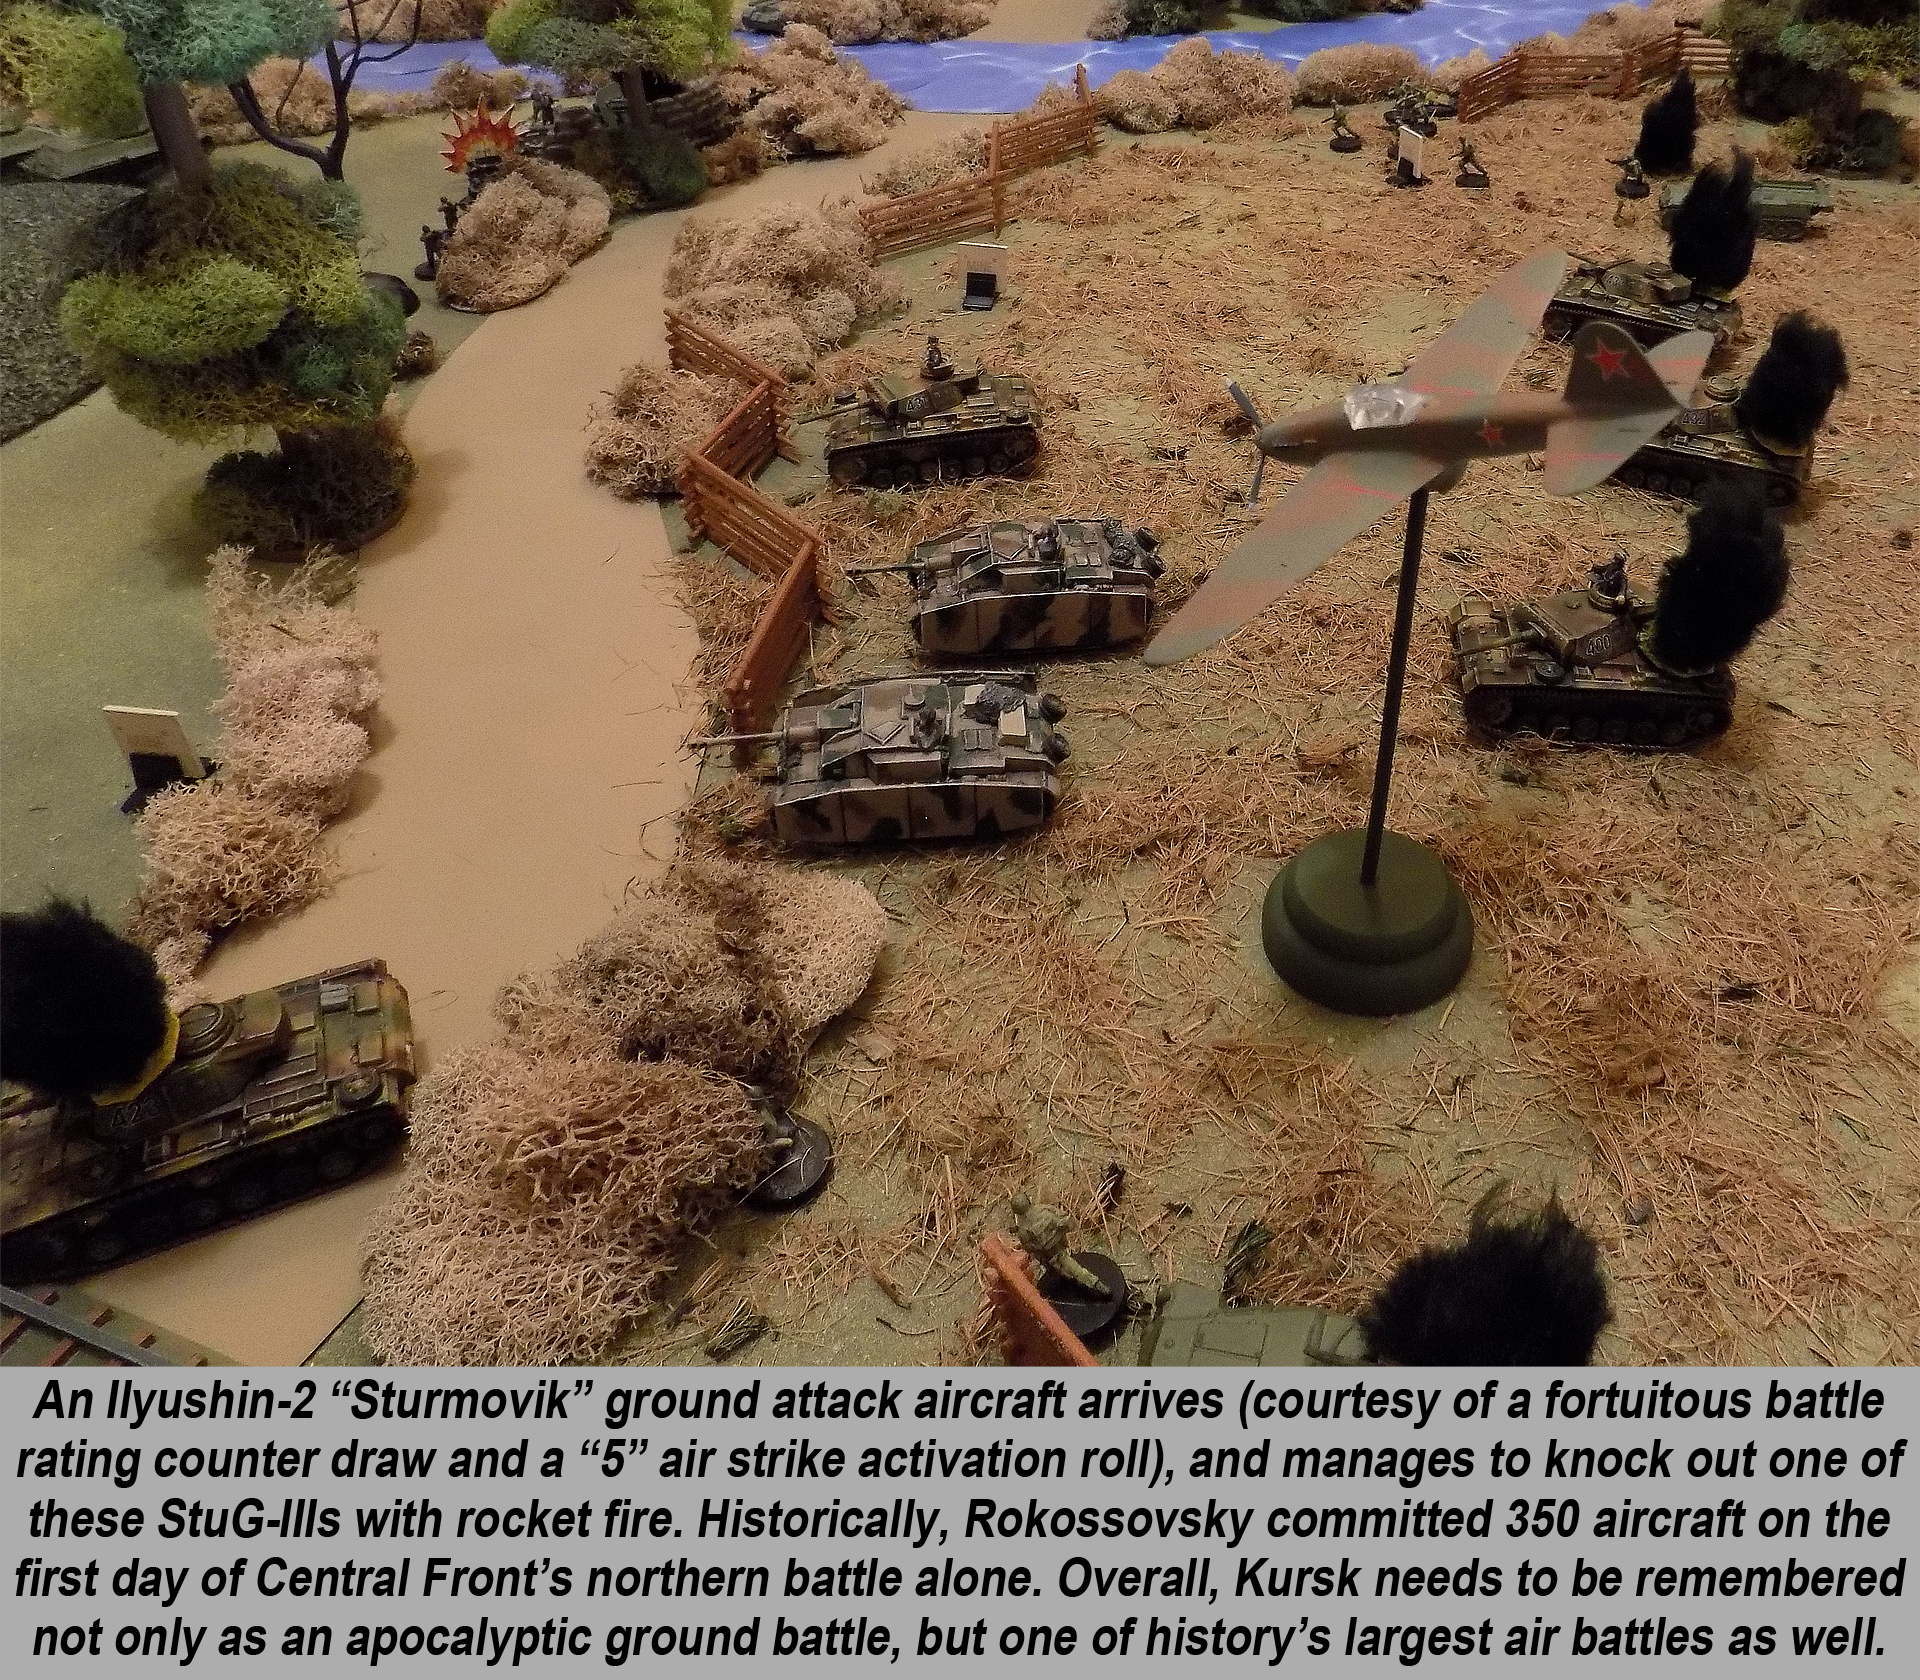
German air strikes went in first. The Stukas did great (the Soviets really should have invested some points in 37mm AA guns), knocking out Soviet artillery from the centre of their line and inflicting enough damage to two Soviet infantry squads that the survivors fled the field.

This was fortunate for the Germans, as their first round of off-board 105mm artillery strikes drifted wide off their targets and barely even scored any pins. I had traded off pre-registered fire missions for the flexibility of artillery missions I could target during the game, but even with a special observer team, the dice had other ideas.
The tanks went in. Straightaway the Battlegroup system did a great job of showing the vast difference in German armour. Panzer IIIs and even IVs quickly took losses from Soviet anti-tank guns, while shells just pinged away from the Grizzlies and especially the Ferdinand tank destroyers.
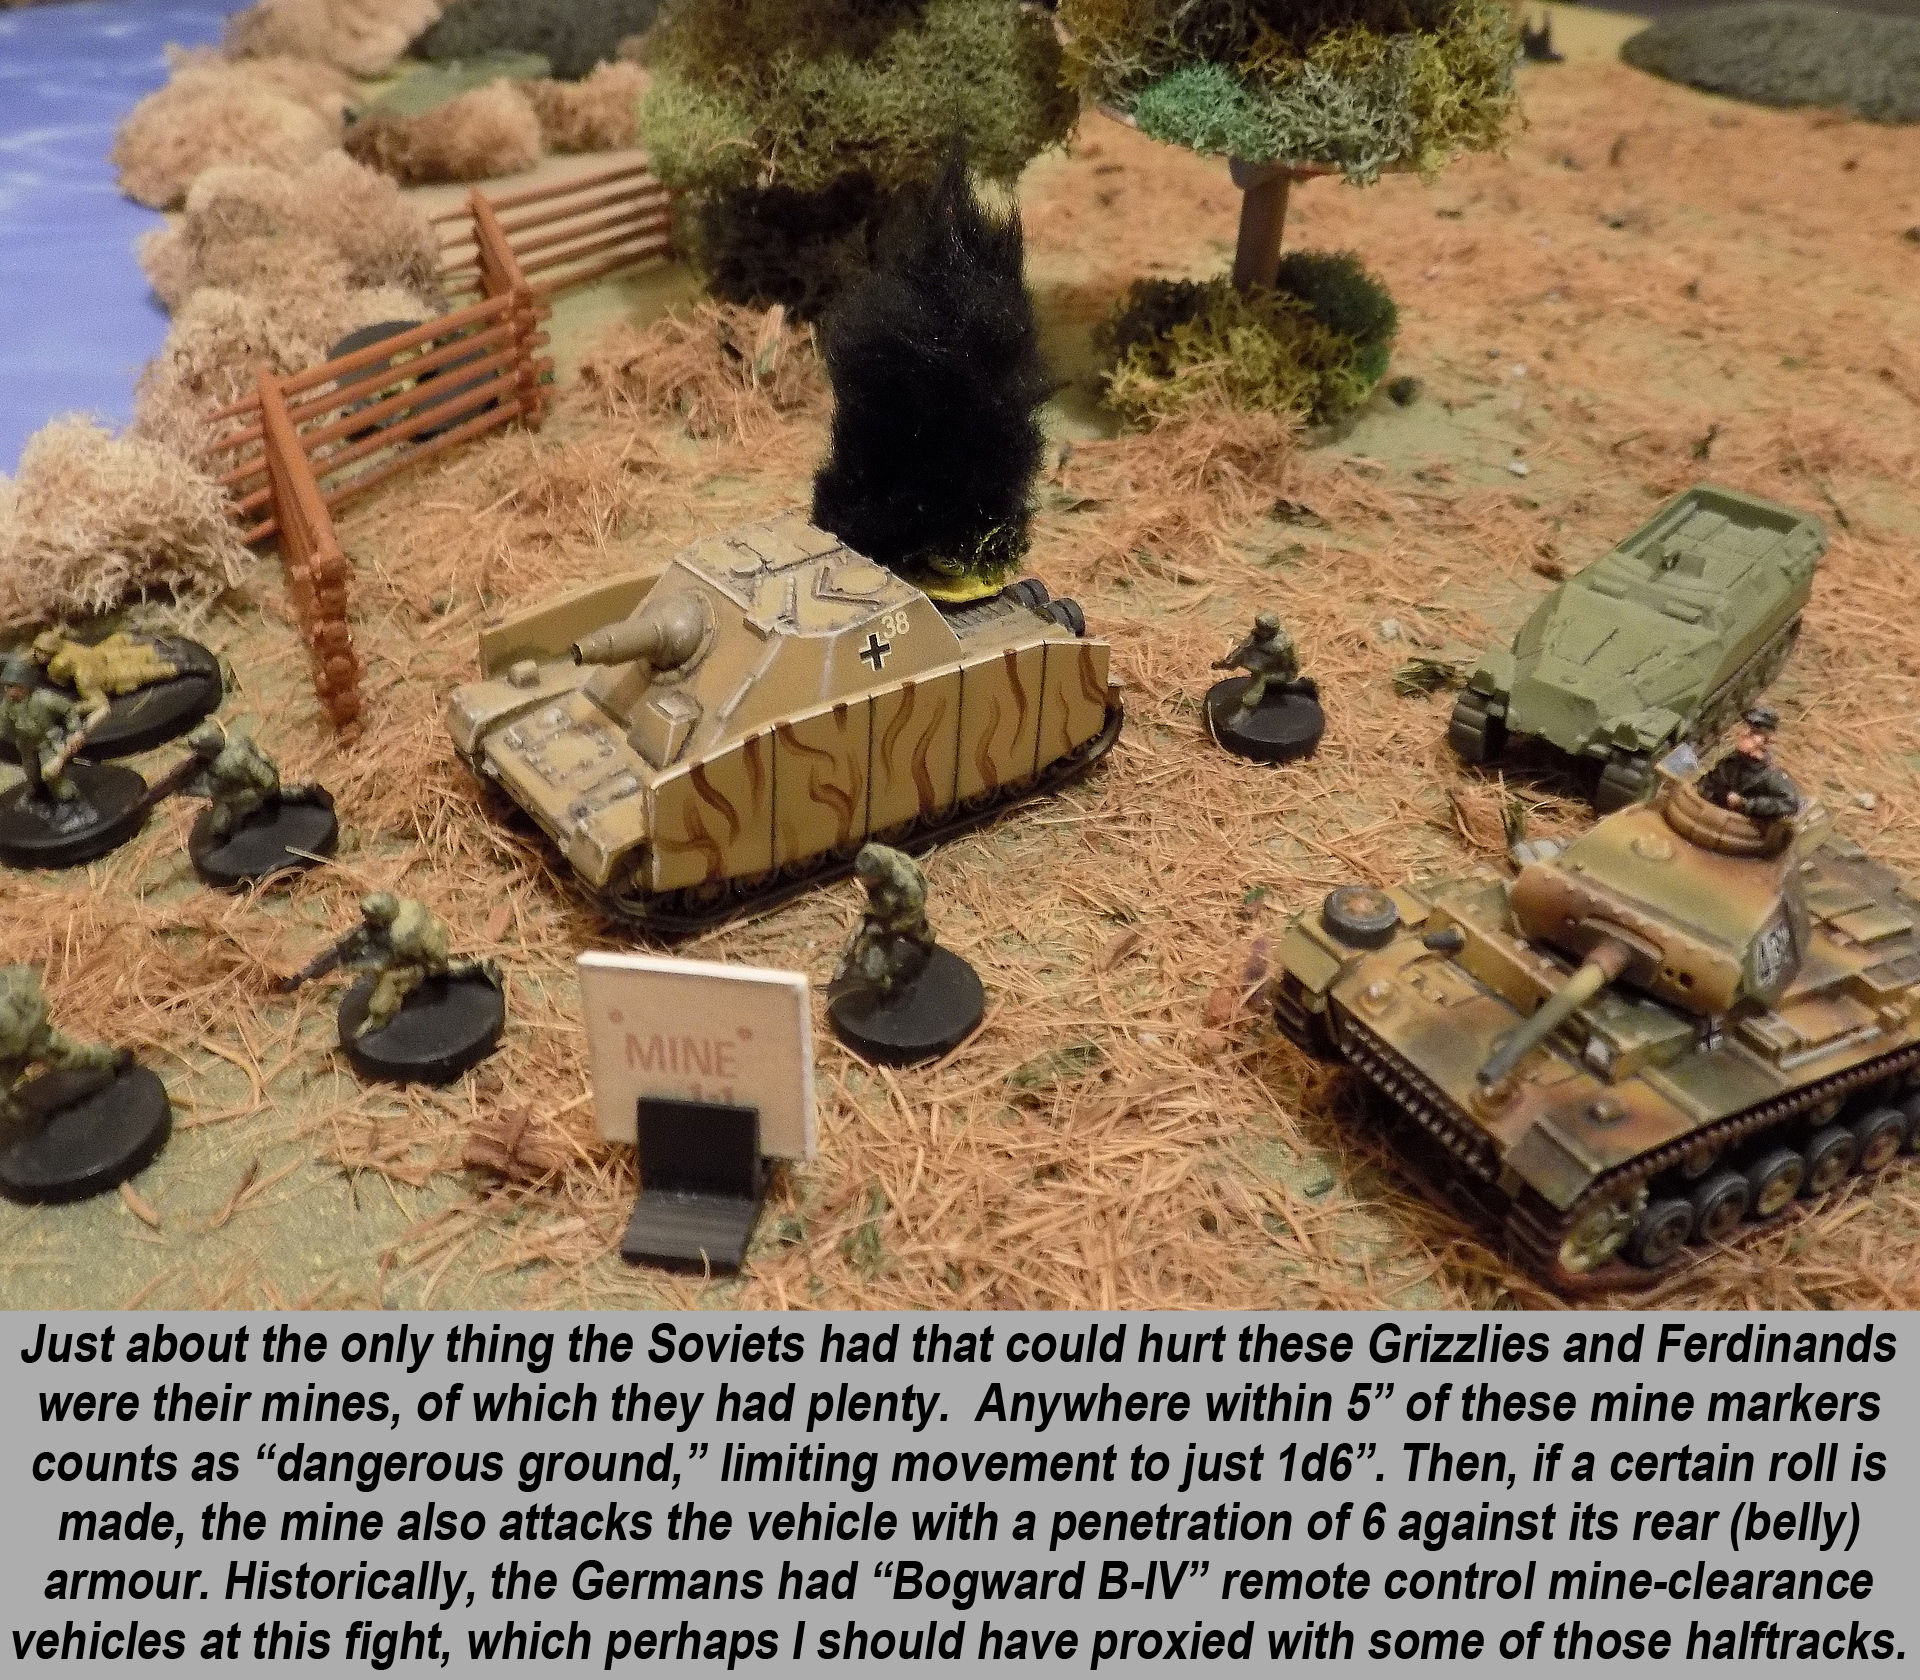
Not until the Ferdinands hit the Soviet minefields did any of them take real damage. As the Soviets should have taken AA guns, my Germans should have bought some engineers to open a gap in those mines (historically, they did have them).
This brings up an important point and highlights one reason I really appreciate Battlegroup. This is a system that really demands you take a balanced, holistic list. It’s not just about the “big booms” and “sexy tanks” and “heroic infantry” - but also the support assets like comms teams, engineers, rearmament vehicles, liaison officers, etc.
On the German right, only one Grizzly and one Ferdinand managed to make it through all those mines and into the village of Veselyi Berezhoi. Once they did, though, they were damned near unstoppable…but only because I made sure to send in a grenadier squad as close infantry support.
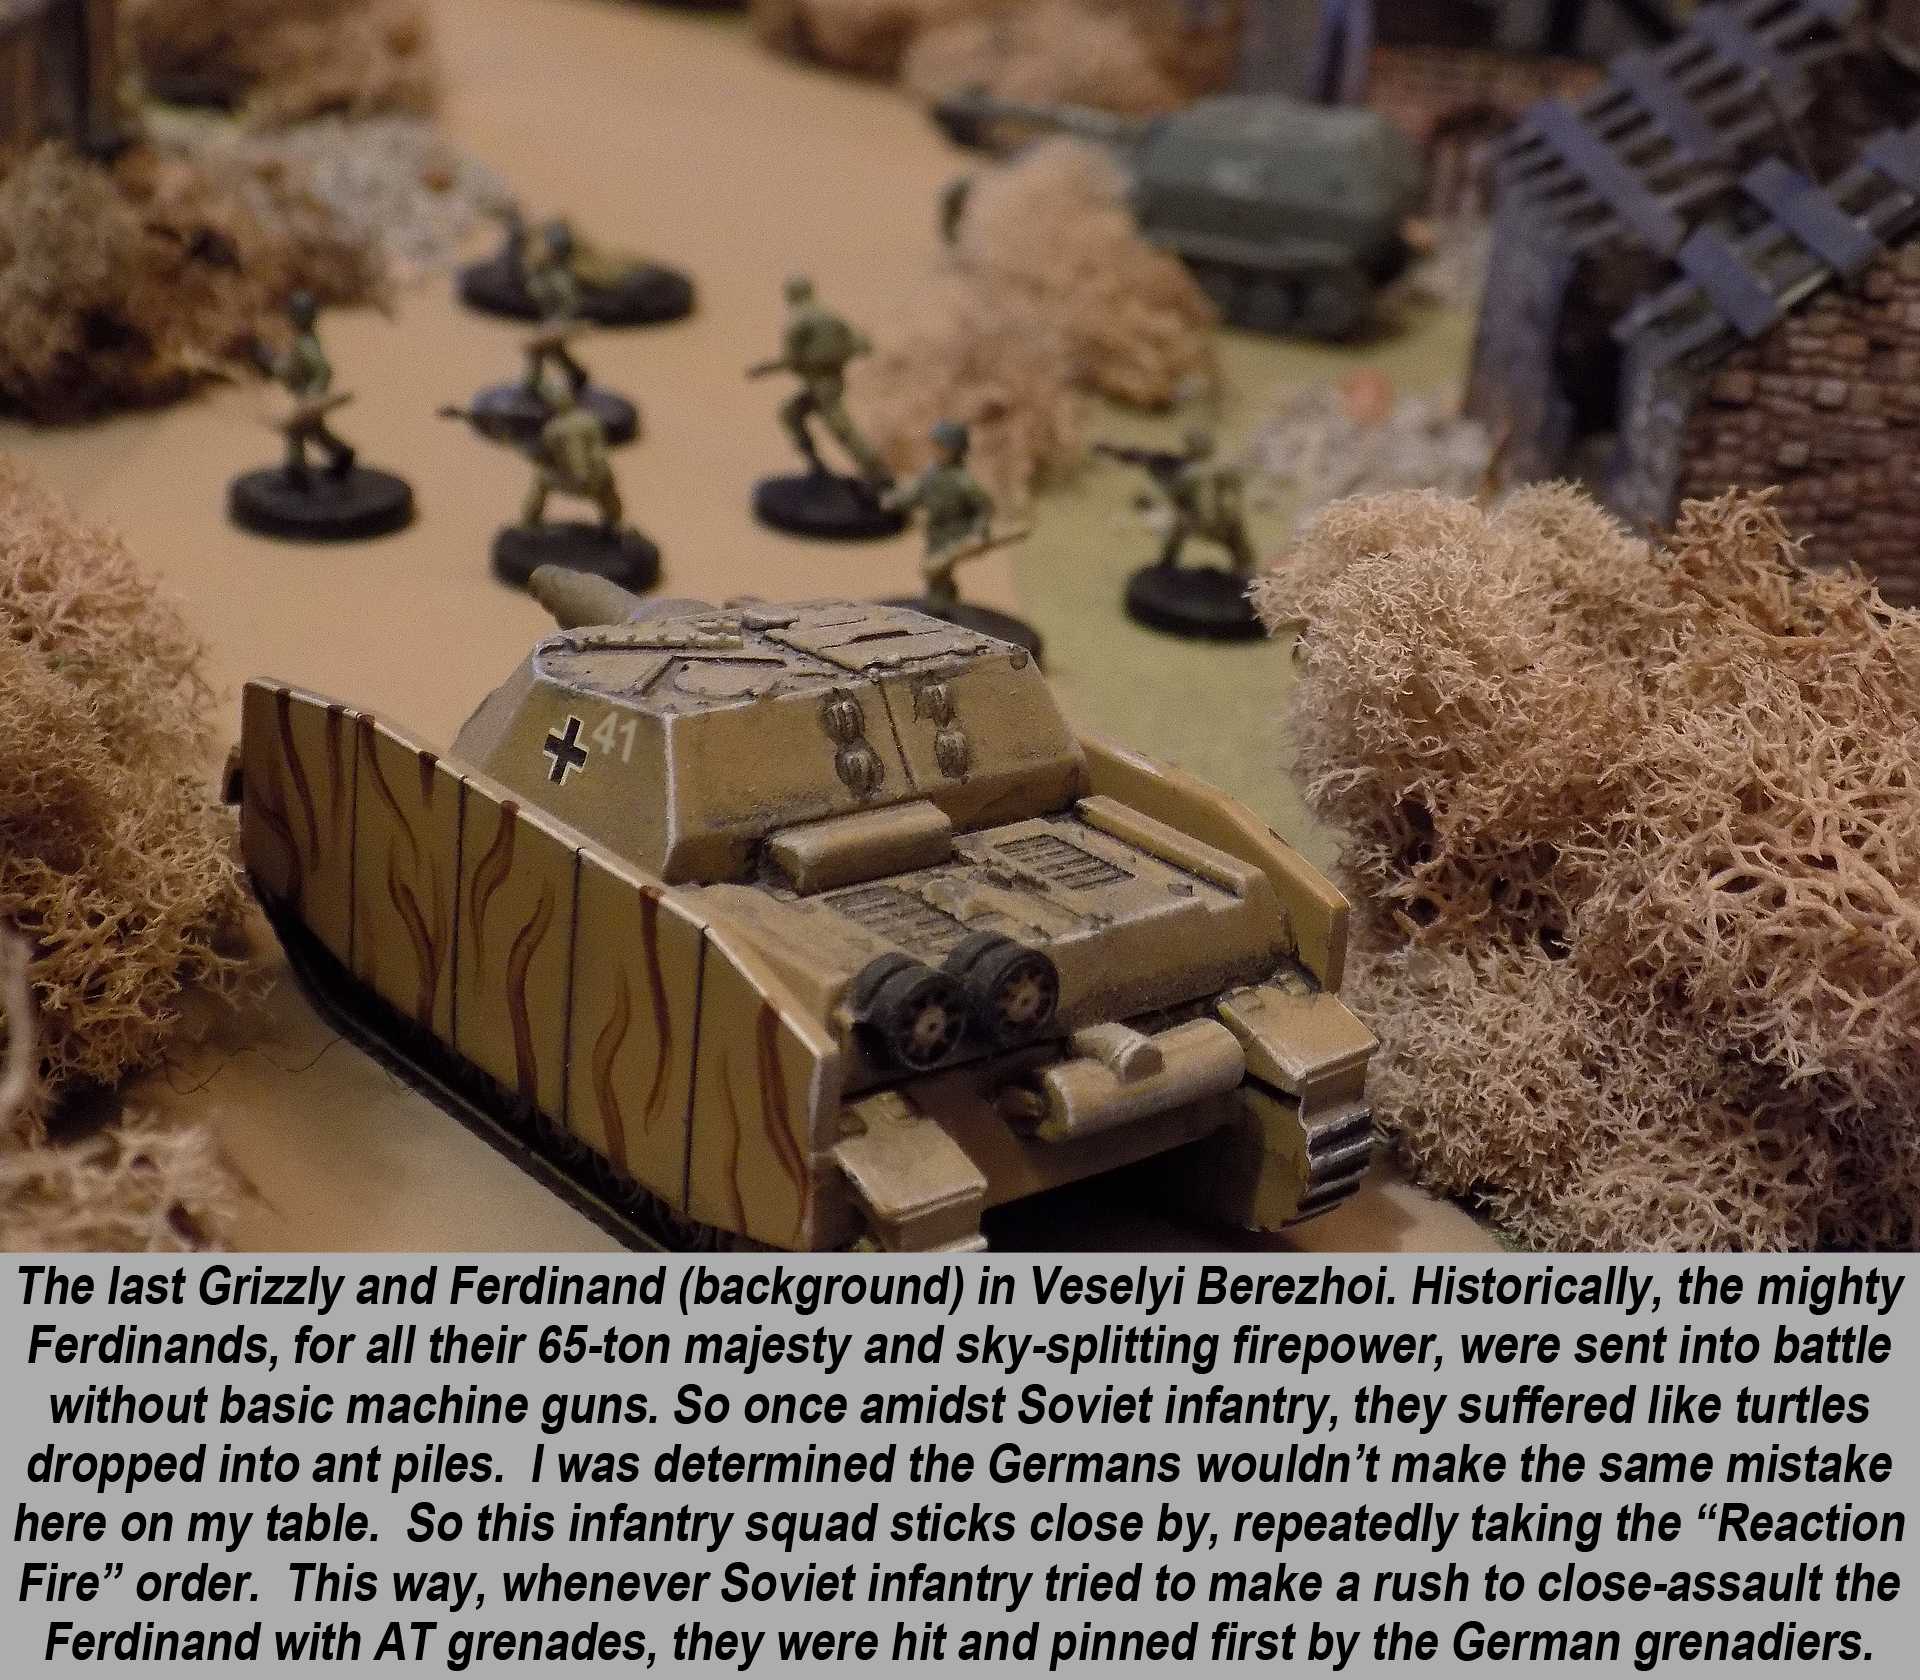
Over and again, Soviet infantry tried to launch close assaults with antitank grenades on these two behemoths. But unlike historically, the Grizzly and Ferdinand had close infantry support that kept the Soviet riflemen back. Soviet mortars kept trying to pin these grenadiers, to no avail.
Meanwhile, the Grizzly’s big howitzer clobbered soft targets like Soviet infantry squads, antitank guns, and howitzer positions, while the Ferdinand’s armour-piercing 88 took care of hardened bunkers and T-34s when they arrived. In no time at all the whole Soviet wing began to come apart.
When the Soviet T-34 company of the 129th Tank Brigade showed up, they actually did very well against the Panzer IIIs and IVs. Outnumbering the Germans 2-1 didn’t hurt. Yet the Soviets soon faced a tough choice…should they split off one platoon against that Grizzly and Ferdinand collapsing the west wing?
With the Ferdinand’s agonizingly slow speed and the creek barring its advance, the Soviets decided to focus everything on smashing the German panzers in the east and centre. A surprise Soviet airstrike arrived, which was able to put some rockets into the last German StuGs…while the Ferdinand suffered a breakdown anyway.
Despite these reversals, the Germans walked away with the win, 52 to 43. The Soviets just drew heavier penalties on the battle rating counters and ran out of points first. As they did historically, the Soviets gave up these positions, falling back to the second line of defence braced on positions of the 519th Rifle Regiment.
I hope you’ve enjoyed this quick look at the northern German strike on the Kursk Salient, with a little more focus put on the wargaming rather than the detailed history. Come back next week when we shift down to the southern sector of the Kursk Salient, which was (unbelievably) an even bigger clash than we see here in the north.
Meanwhile, leave your comments, questions, and feedback below! How do you protect your heavy units from enemy infantry? What “combined arms” mutual support tactics have you tried in your games? How might you have kept the German momentum going at Kursk, or better slowed this “mother of all blitzkriegs?”
"For miniature wargaming in the Battle of Kursk, what better option is there than Battlegroup: Kursk by IronFirst Publishing?"
Supported by (Turn Off)

Supported by (Turn Off)
"What “combined arms” mutual support tactics have you tried in your games?"
Supported by (Turn Off)


Mind-melting trees on the weekend on BoW, and now a mind-melting part two of the article series. How lucky we are indeed. One comment: The vulnerability against infantry assaults of the Ferdinand led to the developement of MPs or StG with curved barrels so that the crew could fire through the slits at assaulting infantry. I watched a documentary recently where this point was made. The curve was about 30 degrees, later they had one with even 90 degrees, furthermore equipped with a mirror so that one could see around corners. There don´t seem to exist many opportunities to fight… Read more »
Thanks for kicking us off, @jemmy ! I have heard about these curved barrel attachments for German small arms used later in the war, but did not know about their attachment to the Ferdinand. Quite typical I suppose … for the WW2 Germans to overengineer the wrong solution to what should have been a very simple problem. Just put two MGs on the vehicle, bow and pintle, the way you’re “supposed” to. 😀 From what I understand those curved barrels didn’t work very well anyway, they wore out and broke exceedingly quickly. Yes, next week when we visit 10th Brigade… Read more »
A rule of thumb I’ve seen is every 15 Degrees of curve halves the barrel life.
Although with a curved barrel you might as well ditch the rifling since the Bullets tumble pretty early on anyway.
@jemmy you can play smaller games with almost anything. Pick any Battle/Invasion and I guarantee you there was at least one case of a Platoon/Company having to do something that would work for BA/CoC.
Thanks, @elessar2590 – and I agree 100% about small platoon battles in BA / CoC. I wanted to cover this in Part 01 and in the interview: Don’t believe the idea that Kursk was some kind of epic “tank battle.” For the historian, this just isn’t true, or at least presents a tragically incomplete picture. For the tactician / theorist, it’s a gross oversimplification that ignores the vital role that infantry, engineers, antitank guns, and mines played in this battle. For the wargamer, this clips off the possibility of great close-quarters infantry battles between crack German infantry / grenadiers /… Read more »
Good to see plenty of terrain on the Battlegroup Kursk tables. I do think getting the right feel of the battlefield terrain is just as important as focusing on troops and equipment. I well designed hex and counter game will build this in to the board and the rules. Building in sufficient features into a minitatures game table is always a challenge. Unlike some of the Western European battlefields, such as those in Normandy and Italy ( e.g. Omaha and Monte Cassino) which are well documented in photos and accessible to visitors, I do struggle to visualise the Kursk terrain.… Read more »
Thanks, @mark28 – our hex and counter boards for these games were actually custom-designed for this series, based on RKKA and German Army topographical maps, maps from three Osprey books, and maps from the writings of David Glantz. This data is then scaled to fit the scale of the PanzerBlitz game tables (normally this is 250 meters a hex – for some games we scale to 150 meters a hex with different stacking rules). I agree about the terrain for miniature tables. The scale of the battlefields, however, make this much more of a question of “flavor” rather than “this… Read more »
Great article Oriskany. Battlegroup is my WW2 game of choice too, we’ve not done Kursk though, playing either 1941 or post Bagration Eastern Front so far. Would very much like to try it though, especially the campaign.
Thanks, @volleyfireandy – So I assume you’re playing with lists from Battlegroup: Barbarossa and Battlegroup: Fall of the Reich? Both great books with tons of great information, along with Battlegroup: Kursk.
Yup! We’ve played quite a bit of FotR, and it’s one of the best gaming experiences I’ve had, and that’s playing as the Germans too! It really does feel like an AAR come to life on the tabletop, without being difficult either.
We played a game of Barbie the other day, Stuka’s broke up the Russians at the start, then the Russians were largely locked in place whilst the Germans maneuvered to their objectives. Brilliant stuff.
Not surprised to hear you had a great time playing the Germans in FotR – you get all the most amazing toys (just not enough of them) and who doesn’t love playing as the underdog and scoring the huge upset win!
Barbarossa’s another of my favorites, as the Germans you have such massive advantages, but your mission objectives are often so high. In most Barabarossa themed games (Battlegroup, PanzerBlitz, etc) – Yes, you’ll probably win, but you have to win very quickly, with practically no losses, and leave no Soviets behind you to form into pockets or partisans.
Great stuff, I will need a little longer to read the 2nd part – but my lunch is only so long
Thanks very much, @rasmus ! 😀 Hope you enjoy the whole article when you get a chance.
Yes, enjoyed the battlegroup part as well, the engineer in my say a MG on the Ferdi, would add a weaker point in the armour. So the correct way would be to do it as you did – maybe even tank riders
Thanks, @rasmus. Yeah, coordinating these engineers / grenadiers to actually cover and protect the Ferdinand Elefants (without being slaughtered by Russian MGs / artillery) was actually kinda tough to do live in a real game. The infantry had to be basically RIGHT with the Elefants, then under cover, then take a reaction order (which means they basically aren’t allowed to fire or move). Tougher than it sounds, so it’s a great example of how a good wargame can almost teach the difficulties and pitfalls (and potentials) of real battlefield tactics. Put another way, it’s easy to say “historically the Ferdinands… Read more »
I see what you say about the mounting of a MG at the hatch as that does not leave a weak point in the metal monster.
With Tankriders I did more think of the logistics of getting them to the hot zone rather than once under fire, getting them around the battlefield would be hard and take coordinating that you would have to be the Germans to do, if anyone could do it.
@rasmus – you write: “I see what you say about the mounting of a MG at the hatch as that does not leave a weak point in the metal monster.” Germans were bad at that, with ammo loading hatches and pistol ports in the sides of so many of their tank turret designs, weakening overall structural integrity We come across this kind of question again in Part 03, where my Panthers of 10th Brigade / 39th PzRgt take the field at Cherkasskoye. Technically they should be the initial “Panther D” variant, with some differences in the driver / bow machine… Read more »
Excellent part II! And great looking battles, especially the Battlegroup one. I really would love to get a demo of that game some day. I don’t think I have the time or the dedication to do the research to really appreciate a game like this, but if someone else did the work for me, I’d love to give it a try! Did the Germans ever consider redirecting away from Kursk to avoid the pre-prepared defences? I mean, I get that salients are vulnerable targets as well as being a danger to your own lines – and so doubly tempting to… Read more »
That’s honestly and seriously the great thing about Battlegroup, @angelicdespot – the campaign sourcebooks have done all the “heavy lifting” historical research for you. 😀 Alternate high-level plans for Kursk can be explored in higher-level operational level wargames, like those we touched on (admittedly briefly) in Part 01. I don’t think the Germans could have counterattacked into the Caucasus in 1943, they had hit the Caucasus with much more powerful forces, against much weaker Soviet forces in 1942, and still lost so bad that it set up the defeat at Stalingrad. There were other potential targets to strike, however, or… Read more »
Okay, thanks.
As for the heavy lifting being done… I’m lazy. I need someone to do the medium lifting for me to and actually set up a game for me to take part in. If I like it, I’ll then be happy to pick up some of the slack!
Well @angelicdespot , I would consider giving at least one of the Battlegroup books a go. You’d need the base book (very small), and at least one of the campaign books. Battlegroup: Kursk is a good one, as it covers a lot of the mid-war materials (artillery, vehicles, etc). you need for combat on the Eastern Front. 😀 And it handles not only the individual weapons and vehicles, but also guidelines for the OOBs of actual units of the period.
ooh sneaky sneaky keeping troops to stop the elephant culls but to be honest I think that’s what the Germans would have planned in the perfect world a great read.@oriskany
Tricky to do on the actual tabletop @zorg – , but if it works, MAN does it work. Soviet infantry can’t get close enough to the Ferdinands for a close assault without taking reaction fire from the German squads already under cover in an “overwatch.” Soviet tanks can’t really duel with the Ferdinands because, well … they’re Ferdinands. Just have to make sure the rest of your army presses forward as well so nothing gets flanked. There IS a counter to this tactic: Soviet artillery or mortars. Destroy or pin the German infantry, THEN send in your infantry to close… Read more »
The Ferdinand makes a good super StuG I don’t know if that was their main plan more than just a heavy support gun could the gun still fire AA ?
Thanks, @zorg , and great question. Technically, the Ferdinand / Elefant is classifiable as a jagdpanzer – “tank destroyer” – hence they are organized to units like JgPzAbtg 653 and 654, the only two small units to have them. Their job is to engage and destroy enemy tanks. They can do this better than normal tanks (so the theory goes) because by dispensing with the turret, they can mount a larger gun with a longer recoil path. Thus, in the Ferdinand / Elefant we see the L70 88 instead of the weaker L56 88 in the Tiger I. The tradeoff… Read more »
Yes the StuGs trusty old tank’s given a second chance of life as a infantry support only to be that good at their job that about 75% of them ended up back on the front supporting armoured assault’sassault’s while the troop slugging it out with what they do get.
Couldn’t agree more @zorg , StuGs are probably the most useful single German vehicle of the war, both in history and most good games. This is why I liked that Flames of War Open Fire started kit so much, they didn’t give you Tigers or Panthers or King Tigers or some such – but StuGs. 😀
Lol a very famous war saying it just panther’s n tiger’s or some such.
🙂
Another great article @oriskany. I have one small question – is it usual for both sides to have airpower in a battle like this? Usually one side controls the air, right, I would guess typically the attacker? Or were the Germans and Soviets on a parity here with air support?
Great question. Actually, the Germans started off heavy in the air on day one of the offensive, and the Soviets shoved back later in the battle and eventually fought the Luftwaffe here to a relative standstill. As you say, a parity. Now in the game, we only allowed the Germans to start with aircraft in their list (this is the opening day of the offensive), that Sturmovik shows up later because of a very lucky battle rating counter draw (and subsequent 5+ activation) for the Soviets.
1. Very clear, easy to follow, and interesting, even for a totally non-grognard like me.
2. WOW those table look GREAT!
3. I am so glad you decided to do the wide angle map on panzerblitz scale because I don’t think they make enough t-34’s to do it in 15mm
Absolutely, @gladesrunner – you’d need a couple hundred T-34s to put that whole force on the table, and a table 240 feet wide (7 kilometers at 1:100) but you gotta admit it would look pretty badass. 😀
Is this what that paperwork was about I found on the dining room table? Something about renting a warehouse? 🙂
Oh man, if only. 😀 😀 😀 😀
So that is the US bootcamp project?! … 😉
We keep joking about that. One of these days we need to stop joking and start “talking.” 😀
Another fantastic article @oriskany
I’ve got to say out of all the Generals Rokossovsky has got to have the coolest name.
Got to say he did pretty well for a guy Stalin wanted put up against the wall only 5 years earlier. I’d probably be a little more bitter but that’s just me I guess.
I’m a bit surprised that the Soviets had such reasonably sized Tank Companies but I guess without radios they didn’t have much of a choice.
Thanks, @elessar2590 – indeed Rokossovsky is one of my favorites, at least among the the “front-level” command guys. My all-time favorite Soviet WW2 general is still M. E. Katukov, commanding 1st Tank (later 1st Guards Tank) Army. At the beginning of the war, when Katukov commanded 20th Tank Division (when the Soviets still had tank divisions) – his immediate superior was Rokossovsky, who’d just been given 9th Mechanized Corps, I believe. Rokossovsky is a cagey character, politically wise enough to always be just out of the scythe’s way when “purge” time comes around. Later in the war he becomes the… Read more »
Whilst it’s interesting seeing the close-up battles I do really enjoy the reach and scope you get with something like PanzerBlitz as seen here in the article – I think it gives you more of a sense of what’s going on in the wider context (once you understand the iconography).
I might have to start looking at more of these types of games for playing out battles. Is there something like this which works for Ancient/Fantasy battles @oriskany ?
Thanks very much, @brennon ~ actually yes, there are piles of these types of games for command-tactical or operational-level wargaming in other genres. These PanzerBlitz Kursk battles are “command-tactical” (all one battle, one field, one-two hours of real-time combat, etc … just based on 1 playing piece = a UNIT of men, so the math is much more “trend-and-average” focused) – so sticking with that … I’m not 100% sure about fantasy, but there are tons of them for sci fi. Also, there are tons for ancients as well. One title is “The Great Battles of Alexander:- https://boardgamegeek.com/boardgame/11057/great-battles-alexander-deluxe-edition Historical set… Read more »
@brennon Many years ago SPI released some fantasy hex and counter games though they might be expensive now and I think Chaosium were meant to be bringing Dragon Pass back to Kickstarter. For Ancients there are quite a few You could have a look at Peloponnesian War by GMT which is very suitable for solitaire play https://www.gmtgames.com/p-710-peloponnesian-war.aspx
Couldn’t agree more, @torros – GMT, along with affiliates like ConSimWorld, Hexasim, and companies like Decision Games, are really keeping the H&C gaming world alive with hundreds of titles. Which reminds me, I STILL have to break out my Twilight Struggle and win the Cold War. 🙂
Hi Jim, Just a few questions & points I’ve been wondering about: 1. One thing I’ve noticed from the maps, that I’ve seen, is that in the north there seems to be a smaller bulge, would it have been worth the Germans using this as a staging area for a southern sweep to cut off the soviet side? 2. I’m also wondering how bad the organisation of the German forces had to be to allow such a build up of soviet forces? 3. For the Ferdinand assault guns, I wonder why they didn’t have infantry support to protect them from… Read more »
Thanks @ dignity, and great questions! 😀 1) The smaller salient you’ve noticed to the north of the Kursk Salient is the Orel Salient. Indeed, Col. General Model would use this terrain as a staging point for the Ninth Army’s drive south into the shoulder of the Kursk Salient. However, it would prove incredible vulnerable (as salients often do) to the Soviet counterattack of Operation Kutusoz, as we’ll see in Part 05. Good eye, by the way! Zehr gut, Herr Justin! We shall make a general of you yet! 2) Bad German organization allowing Soviet build-up: Two things. One, this… Read more »
On improvised scenario generation, Perhaps from your game using the Battlegroup rules it could generate a skirmish level game in the Village. Just have a damaged/broken down Ferdinand (it’s now just an objective rather than a gaming piece), now add angry Russian infantry trying to destroy it and some Panzer Grenadiers trying to save it. Was thinking back to our discussion on Renegade Legion, and perhaps how games at different levels/scales could prompt scenarios further down the operational level. Could be played using Bolt Action or any other skirmish set of rules (only problem is you’d need a Ferdinand in… Read more »
That’s actually a really great idea, @phaidknott . Use a tactical game like Flames of War or Battlegroup for the “base” game, zooming in occasionally for really small-scale tactical like Bolt Action. The results of these actions could feed up into PanzerBlitz or even actual operational-level games like Drive on Kursk: July 1943 (Ty Bomba) or Kursk: History’s Greatest Tank Battle (Eric Goldberg).
Although, damn, a Ferdinand in 28mm would look pretty scary. 😀
It would look exactly like this https://store.warlordgames.com/products/sd-kfz-184-ferdinand-heavy-tank-destroyer yours for only 26 Great Britsh Pounds (on the exchange rate that’s about 5-6 pints of good beer tokens) 😀
Good grief, @phaidknott – I just looked up the real Elefant’s dimensions and converted to 1:56 … that thing would be almost six inches long (including the gun). And with that superstructure swept to the back and the gun mounted fixed forward, why am I reminded of a TOG Trajan? 😮 😮 😮
Now as a total newbie to historical WWII gaming, I tend to look for those points where I think a good individual story could be found. The one that immediately stood out for me was the mention of Pioneer engineers clearing paths through the mines.
How do you find such things play out across the table?
Most games I know of, would handle it in as follows (with out much in the way of story):
1. Pioneers get to edge of mine field
2. Pioneers roll dices and remove some, non, or all of the mine field
3. Pioneers take any casualties
4. Rinse and repeat
I guess a sub game could be created but I am not aware of any
Great comment, @rasmus – and I would agree with the overall engineer mechanic. In Battlegroup, any unit with the “engineer” special rule moves within 5″ of a minefield marker (as you say, pretty much to the edge). If they are issued an “Engineering” order next turn, they roll a simple dice. 4+ the minefield is cleared. If not, there are more mines remaining, and they can try again next turn. PanzerLeader / Arab-Israeli Wars (the actual rules engine behind the PanzerBlitz games in this series) is very similar. The engineers can’t take casualties directly from the mines, unless they try… Read more »
Thanks for the comment, @dracs ! 😀 I’ll answer the question on “battlefield narrative” here and then on battlefield engineering / minefield clearance to @rasmus below. I find the best stories in more military, historical, “fact-based” wargaming can be evoked through the use of victory conditions. I’ll say up front this isn’t for everyone. Tournament-focused players who enjoy crisp, objective, point-driven games may not appreciate the “foggy” subjectivity inherent with narrative driven-victory conditions or game balance. But at least for me, narrative is the preferred way. Even leaving off the larger context of a campaign game (I need this village… Read more »
Another great read. As for Narrative or as we used to call it playing a scenario there are so many real life examples to choose from you don’t need to make it up
Yeah but a lot of players nowadays are obsessed with points, game balance, and tournament-style play. I’m with you, I always prefer scenario-driven games (as I hoped I’d shown above) – the tradeoff is they are difficult to objectively balance, require a lot of trust in the person running the game, and yeah … sometimes they may not feel perfectly balanced (especially when you’re losing … bwaaah-wah-wah!) 🙁 This isn’t a problem in our group, but I understand that’s not universal. Also some people just like tournaments. 😀
Great article, thanks Jim 🙂
Thanks very much, @buggeroff ! We’re trying to a live stream on this on Friday … 2PM. We’ll see how it goes! 😀
excellent, will log on for that, who’s in the hotseat in BoW with Warren off annoying the Welsh? 😉
And I can state for the record ‘the Welsh are truly f******g annoyed!’ Lol 😉
A man after my own heart, antagonizing other cultures wherever I go. 😀 😀 😀
LMAO have a great time
Crap, I should have said 2PM my time (EST US) – 7PM GMT (so people in Europe / UK will have some time to get home after day jobs and the like). I do not know who will be at the table. I guess we’ll see!
I’ve finally found time to read the first and now the second article – great stuff, really enjoying it. Personally, I’ve been trying to studiously ignore the Eastern Front as there’s a large risk I will get a itch for some Russian tanks. I don’t need to start another project right at the moment. Given the size of this battle, 15 and 28mm almost (only almost!) just doesn’t seem right – it almost trivialises the whole thing. But then I do love a 15mm WW2 game, so I’d be gaming it as well, if I had any Russians! At large… Read more »
Thanks very much, @redvers ! Yeah, I will freely confess you have a point there. Miniature gaming on the Eastern Front is not cheap. The battles out here are so big that in to usually do them justice, just set up a new bank account and start buying 100 of everything. 😀 I also know what you mean a little about certain scales “not doing it justice.” This is why I sometimes go to hex-and-counters, it frees you from all constraints on scale, and you can really get your hands around just how massive some of these fights really where.… Read more »
Now, this is what I call a proper battle of Kursk onslaught. It seems that the Soviets almost won 🙂
Thanks, @yavasa ! Indeed, we’re ju-u-u-ust getting started! 😀 😀 😀 As I’m sure you know the southern arm of the German assault was even bigger, and then we go to Prokhorovka, and THEN we go to the Soviet counterattacks of Kutusov and Rumyantsev! It only gets bigger and badder from here!
We like them big battles 🙂
Couldn’t agree more. 😀